

Stiletto nails are a bold statement. There’s something about that sharp, elongated shape that instantly elevates your entire hand game — whether you’re going for sleek sophistication, artistic flair, or pure confidence. The beauty of stiletto nails lies in their dramatic canvas: they draw the eye, demand attention, and transform even the simplest nail art into something memorable.
But here’s the real question: what design actually makes stiletto nails shine? Not every look translates well to this shape. Some designs that work beautifully on shorter or rounder nails actually get lost on the length and edge of a stiletto. The proportions matter. The depth of color matters. The way light catches the surface matters. Get it right, and your stilettos become a piece of wearable art that people genuinely want to replicate. Get it wrong, and you’ve wasted a solid two-week manicure.
This is where the looks that follow come in. These aren’t random nail designs pulled from scattered inspiration pins — they’re specifically chosen, tested looks that genuinely complement stiletto length and shape. Some are bold and graphic. Some are elegant and refined. Some are intricate enough to make people ask who did your nails, and some are simple enough that you can recreate them at home. Each one works because it respects the geometry of the stiletto form while delivering visual impact that makes the shape work harder.
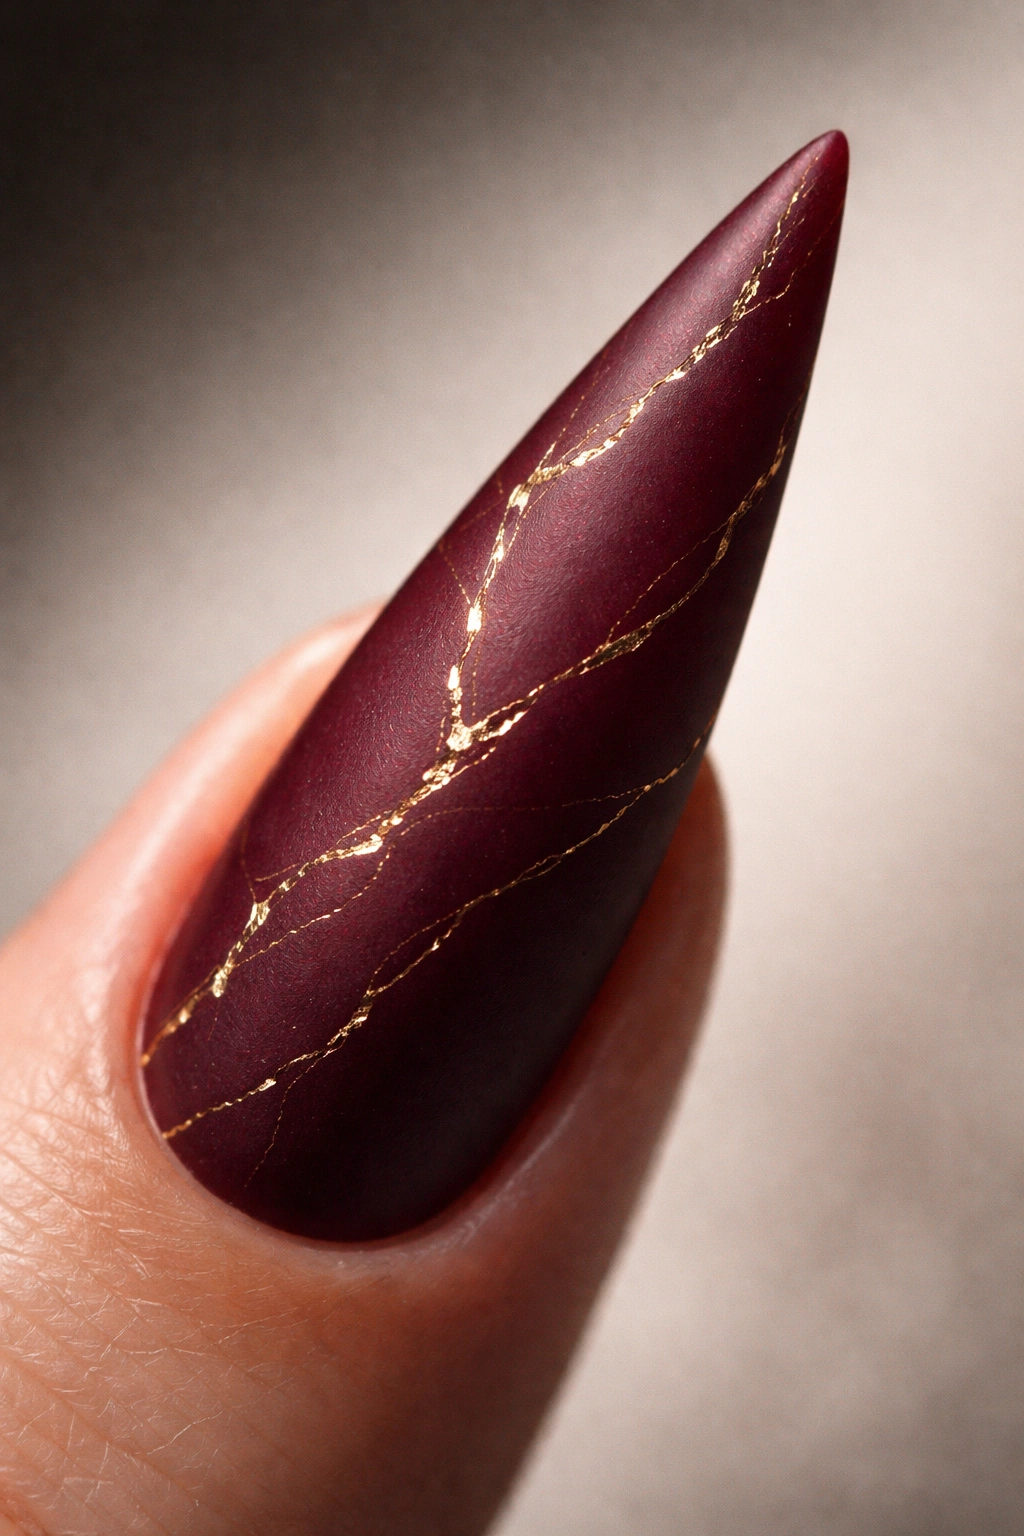
1. Deep Burgundy with Gold Veining
Burgundy nails have a timeless luxury that never goes out of style, and when you add delicate gold veining throughout the surface, it elevates from classic to editorial. The deep wine tone provides a rich base that makes the gold lines pop without overwhelming the nail, and the contrast between the matte or satin burgundy and the reflective gold creates genuine depth.
Why This Look Commands Attention
The burgundy-and-gold combination hits that perfect sweet spot between elegance and drama. Gold veining on burgundy reads as intentional artistry rather than accident, and the color pairing has been associated with luxury for decades—think wine cellars, velvet, and refined evening wear. On stilettos specifically, the length allows the gold lines to travel the full span of the nail, creating continuous visual interest from cuticle to point. The sharp shape of the stiletto actually makes the delicate gold lines appear more striking because they have a clean, well-defined backdrop.
How to Execute It at Home
- Start with two coats of a deep burgundy base (something like a wine or oxblood shade, not candy red—that’s a different energy entirely). Wait fully between coats. A quality burgundy will give you rich color that doesn’t look patchy.
- Use a very thin gold striping brush or a 00 detail brush with gold gel or metallic polish. Thin is key—you want delicate veining, not thick stripes.
- Draw irregular, organic lines across the nail as if gold is running through the surface like marble veining. Don’t make them perfectly straight; let them curve and branch naturally.
- If you’re using regular polish, seal with a glossy top coat. If using gel, cure and apply gel top coat. The shine amplifies the gold.
Pro tip: If your hand-painting feels shaky, try using gold leaf instead. Press tiny pieces of adhesive gold leaf randomly across the burgundy surface after the base color dries. It creates a similar vein-like effect with less precision required, and honestly, it often looks more organic.
2. Ombré Gradient from Black to Nude
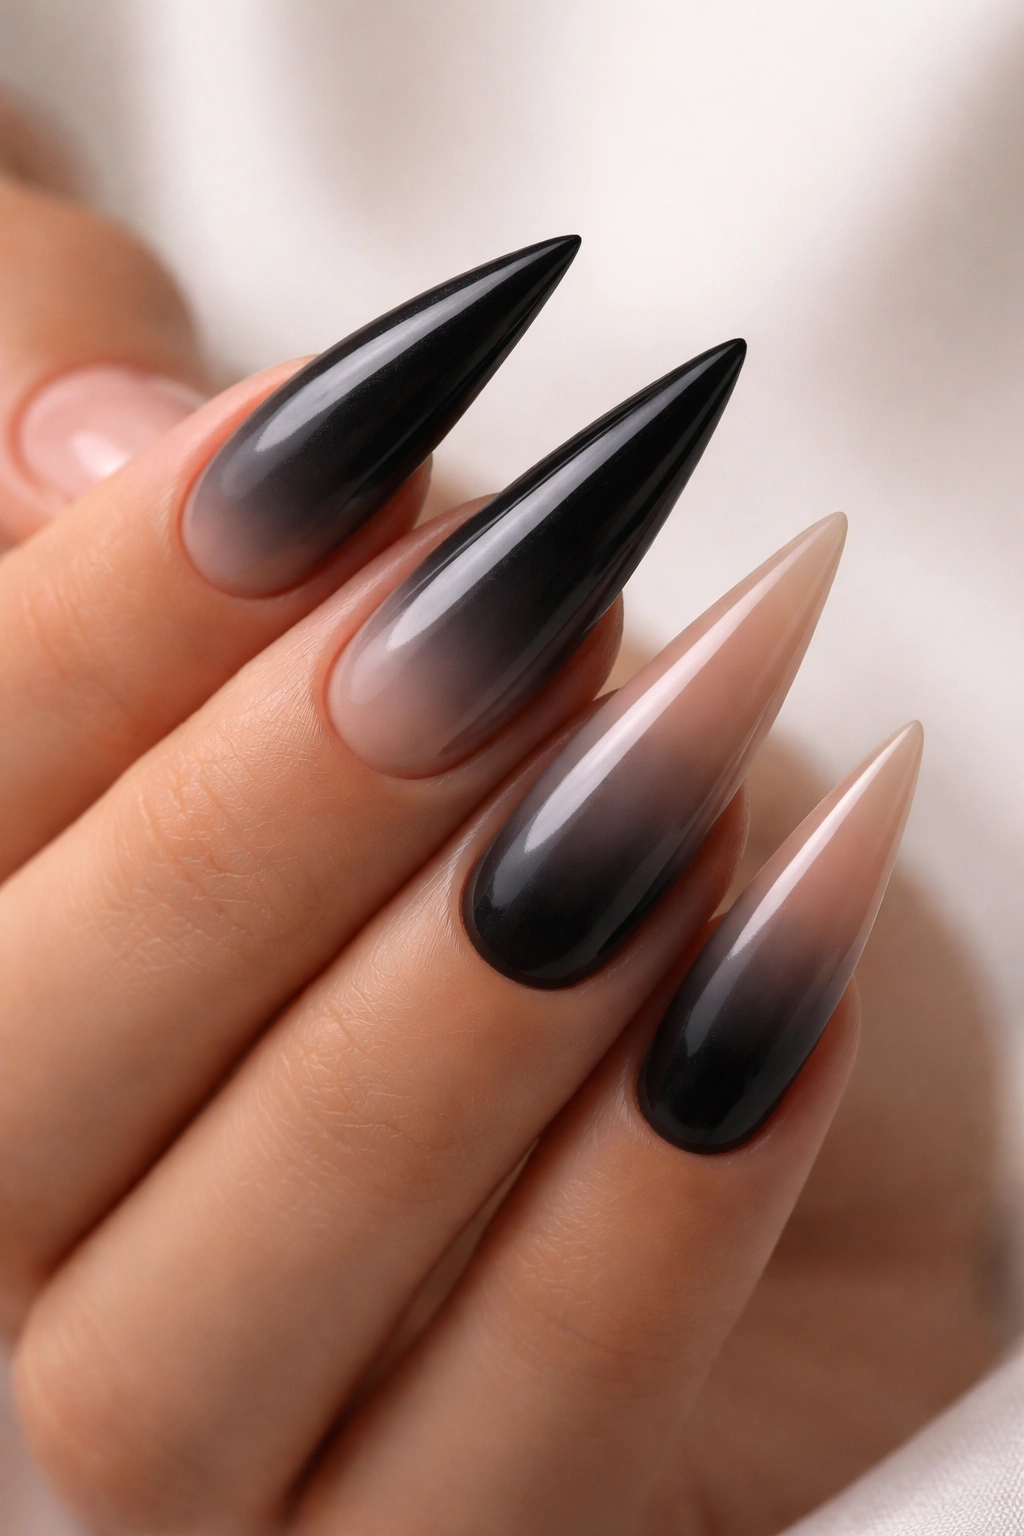
An ombré gradient from deep black through charcoal and gray to pale nude is sophisticated, modern, and incredibly flattering on stilettos. The long nail length gives the gradient room to breathe, and the gradual tonal shift creates visual movement without being loud about it.
Why Gradient Works Brilliantly on Stilettos
Ombré is essentially a technique that uses the full length of the nail to tell a color story. On a short nail, the gradient can feel cramped or unclear. On a stiletto, it becomes a deliberate artistic journey from one color family to another. The pointed tip naturally frames the lightest shade in the gradient, so your eye travels from dark at the base through the middle tones and finishes on the pale nude point—it’s inherently flattering. Black-to-nude specifically works because it’s dramatic enough to feel intentional while remaining wearable for professional settings.
Application Technique for Flawless Blending
- Paint the base coat nude or pale beige all over the nail, curing or drying fully.
- Create thin stripes of color progressing from black near the cuticle through dark gray, medium gray, light gray, and back to the nude tip. You’re essentially layering stripes that overlap slightly.
- Using a clean makeup sponge or a special ombré blending sponge, gently stipple where the colors meet to blur the lines. Work in small sections—don’t drag the sponge; press and lift, press and lift.
- For gel polish, cure between color applications. For regular polish, work quickly because it dries fast and makes blending harder.
- Seal with a glossy top coat (gel or polish) to make the gradient glow.
Worth knowing: A makeup sponge works just as well as expensive ombré sponges—the technique matters more than the tool. Dampen it slightly with rubbing alcohol if you’re using regular polish; this helps it blend without removing color.
3. Chrome Mirror Finish with Color Shift
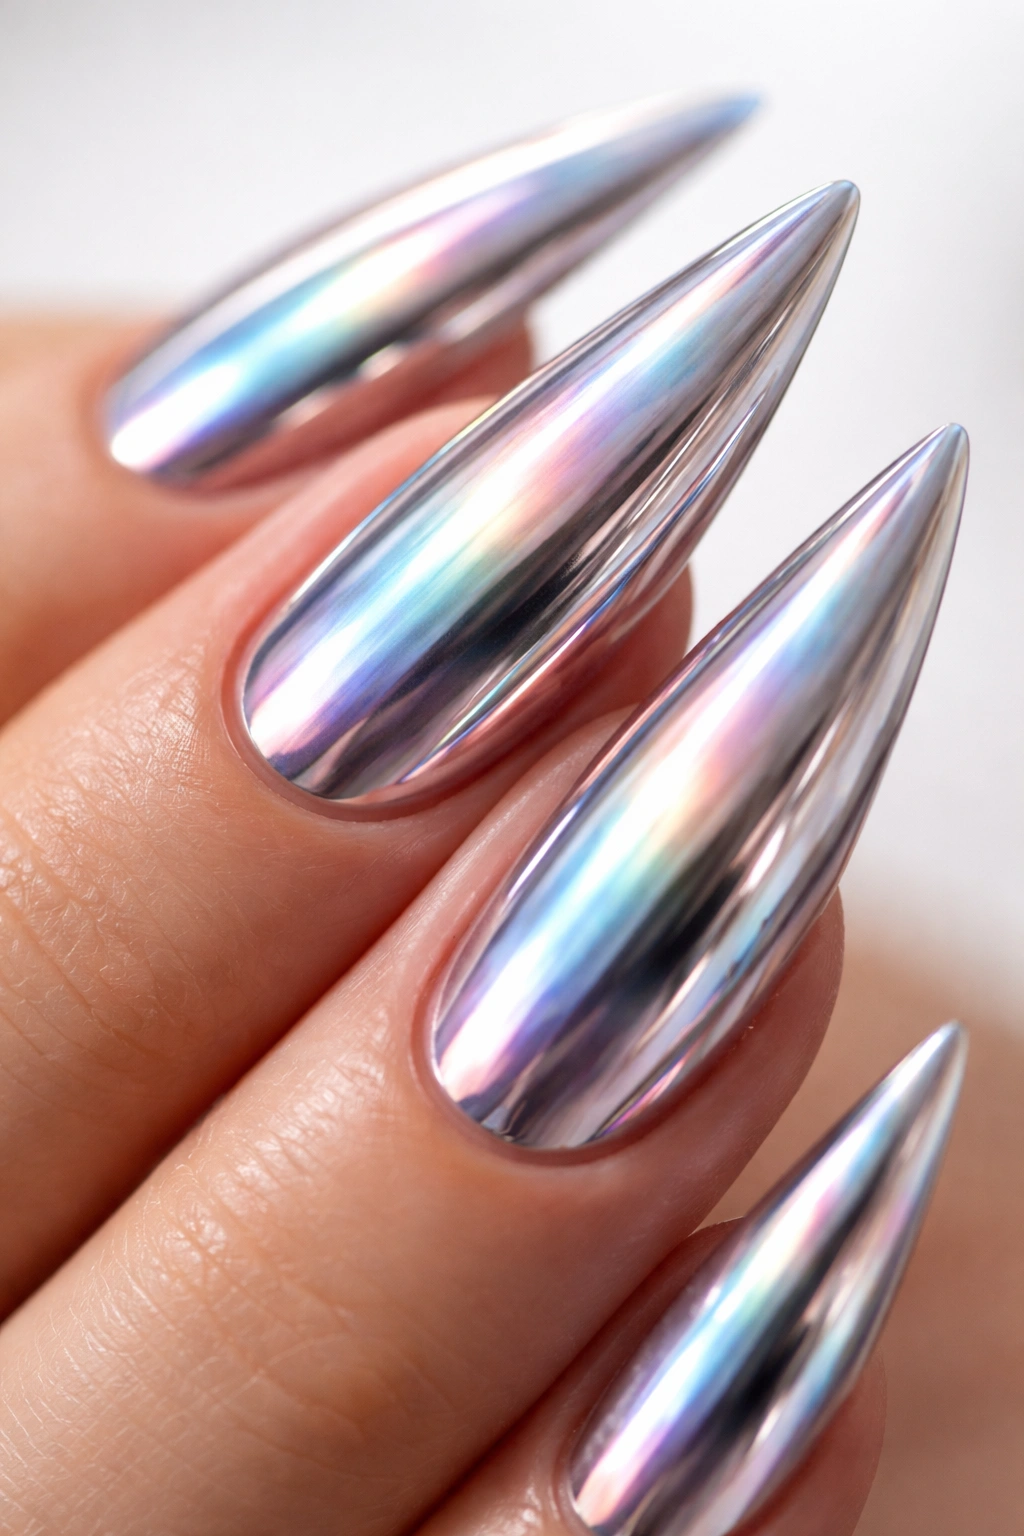
A true chrome mirror finish on stilettos is pure visual drama. The reflective, almost liquid-looking surface catches light from every angle, and when you add a subtle color-shifting iridescent effect (where the reflection changes depending on the viewing angle), it becomes genuinely mesmerizing.
What Makes Chrome Look Extraordinary on This Shape
Chrome mirror finishes have a sculptural quality—they make the nail look almost three-dimensional, as though light is moving across the surface itself. On stilettos, this effect is enhanced because the curved tip catches light differently than the flatter base, creating zones of reflection. The sharp point acts as a natural light collector. Add iridescence on top, and you’ve got a nail that looks like it belongs on a sci-fi character or a high-fashion runway. It’s the kind of manicure people photograph and ask about immediately.
Getting Chrome Right (It’s Easier Than You Think)
- Chrome effect requires a specific chrome powder (available from any nail supplier) and a sticky base coat or gel base.
- Apply two thin coats of a nude, pink, or even black gel base depending on what undertone you want the chrome to have. Cure fully.
- While the final base coat is still sticky (don’t cure it yet if using gel), use a velvety-tipped applicator or a silicone brush to rub the chrome powder onto the nail in circular motions. Build density gradually.
- Cure fully, then apply a clear glossy gel top coat. Cure again.
- For color shift, look for iridescent chrome powders that shift between two tones (like blue-to-purple or gold-to-green). The shift becomes visible when you move your hand in different directions.
Insider note: The stickiness of your base is everything. If it’s not tacky enough, the powder won’t adhere. If it cures completely before you apply powder, you’re starting over. Practice your timing on a practice nail first.
4. Leopard Print in Neutral Tones
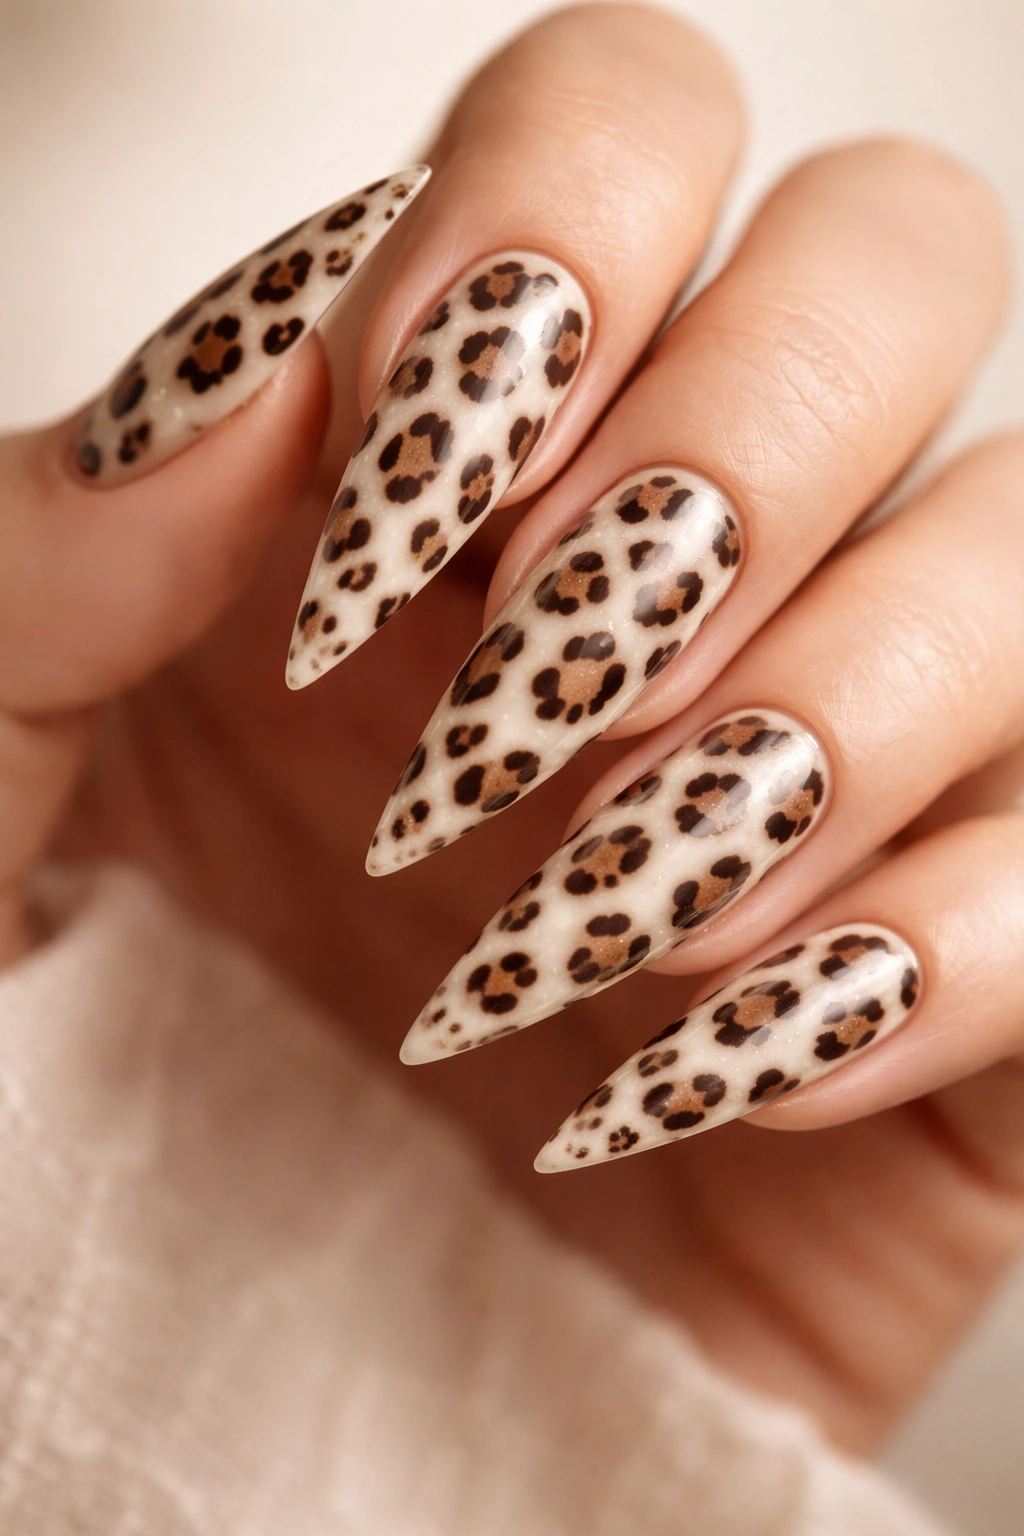
Leopard print is timeless, and when rendered in neutral tones—cream or camel base with chocolate brown and gold spots—it’s simultaneously bold and wearable. The animal print pattern creates intricate visual interest while the neutral palette keeps it from feeling costume-y.
Why Animal Print Works With Stilettos
Stilettos are inherently fierce, and leopard print taps into that same wild, confident energy. The irregular, organic nature of the spots and rosettes complements the smooth, clean lines of the stiletto shape beautifully. It’s controlled wildness—a design that feels bold but refined. On the extended surface of a stiletto, you have room to execute proper rosettes (those incomplete ring shapes that make authentic leopard print) instead of just random dots, which elevates the entire look.
Creating Leopard Print Like a Pro
- Start with a cream or camel base coat. Two thin coats, fully dried or cured.
- Using a thin detail brush and chocolate brown polish or gel, paint small “C” shapes and incomplete rings across the nail, spacing them roughly evenly but not perfectly—natural leopard isn’t uniform.
- While the brown is still slightly wet or between applications, add tiny gold or bronze dots in the center or near some of the rings. This adds dimension and authenticity to the pattern.
- Some spots can be solid brown, some can be just the ring shape, and some can have the gold detail—variation is what makes it look genuine.
- Seal with a glossy top coat that enhances the pattern’s definition.
Pro tip: Look at actual leopard print reference images while you’re painting. Real leopard spots have an organic, almost chaotic placement. If your dots look too perfect or evenly spaced, erase one or two with rubbing alcohol and repaint them in slightly different positions.
5. Geometric Color Blocking in Jewel Tones
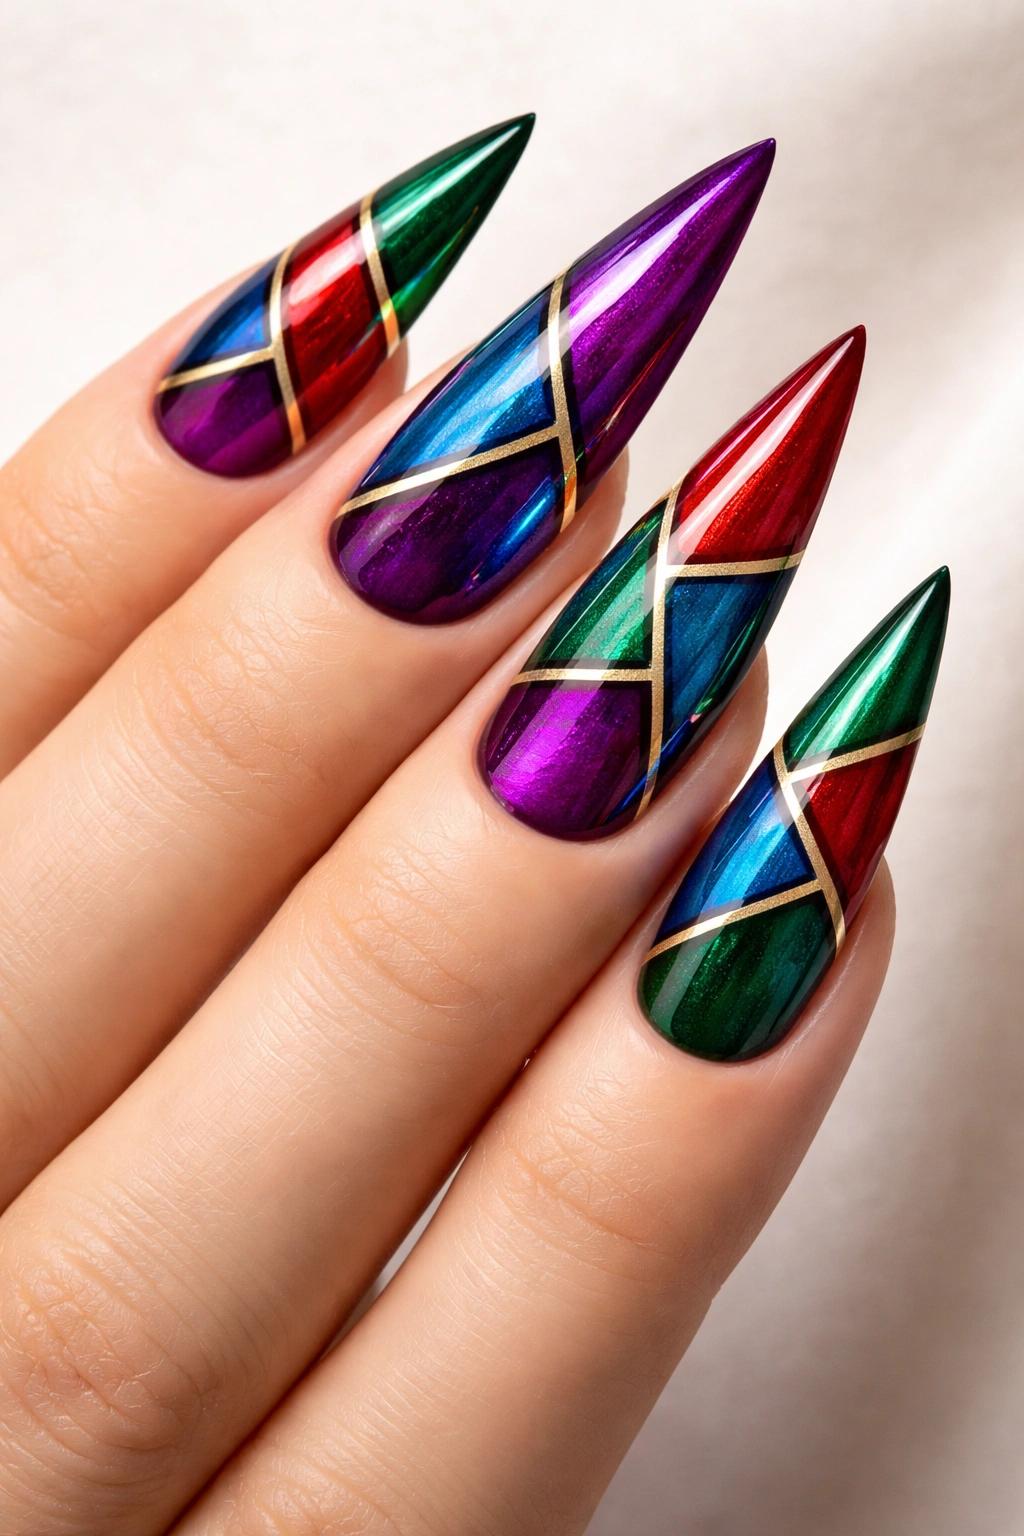
Color blocking using sharp geometric shapes—triangles, rectangles, and angular sections—in jewel tones (emerald, sapphire, amethyst, and ruby) creates a bold, modern look that feels high-fashion and intentional. The clean lines of geometric shapes pair beautifully with the sharp geometry of the stiletto point.
Why Geometry Complements the Stiletto Shape
A stiletto is already a geometric form—clean lines, dramatic angles, a precise point. When you add more geometry through color blocking, you’re creating visual harmony through repetition and emphasis. The angular sections of color actually make the stiletto shape appear even more defined and intentional. Jewel tones add luxury and depth; they’re not flat or juvenile colors. On stilettos, this look reads as intentional design, not random coloring.
Step-by-Step Geometric Application
- Choose your base color (often white, black, or nude works best as a clean background for color blocking).
- Plan your design lightly with a thin pencil or light tracing tool. You might do diagonal sections, or create a “stained glass” effect with multiple angular shapes per nail.
- Using painter’s tape or thin nail guides, create clean boundaries between colors.
- Apply your first jewel tone carefully along the taped edge. Remove tape before the polish fully dries for the cleanest line.
- Move to the next color section and repeat. Building gradually prevents mistakes.
- If lines aren’t perfectly clean, use a thin detailing brush with your base color to clean up edges.
- Seal with a glossy top coat for definition and shine.
Worth knowing: Jewel-toned polishes can be sheer, so you might need two or even three coats per color for full opacity. Patience here prevents you from having to start over.
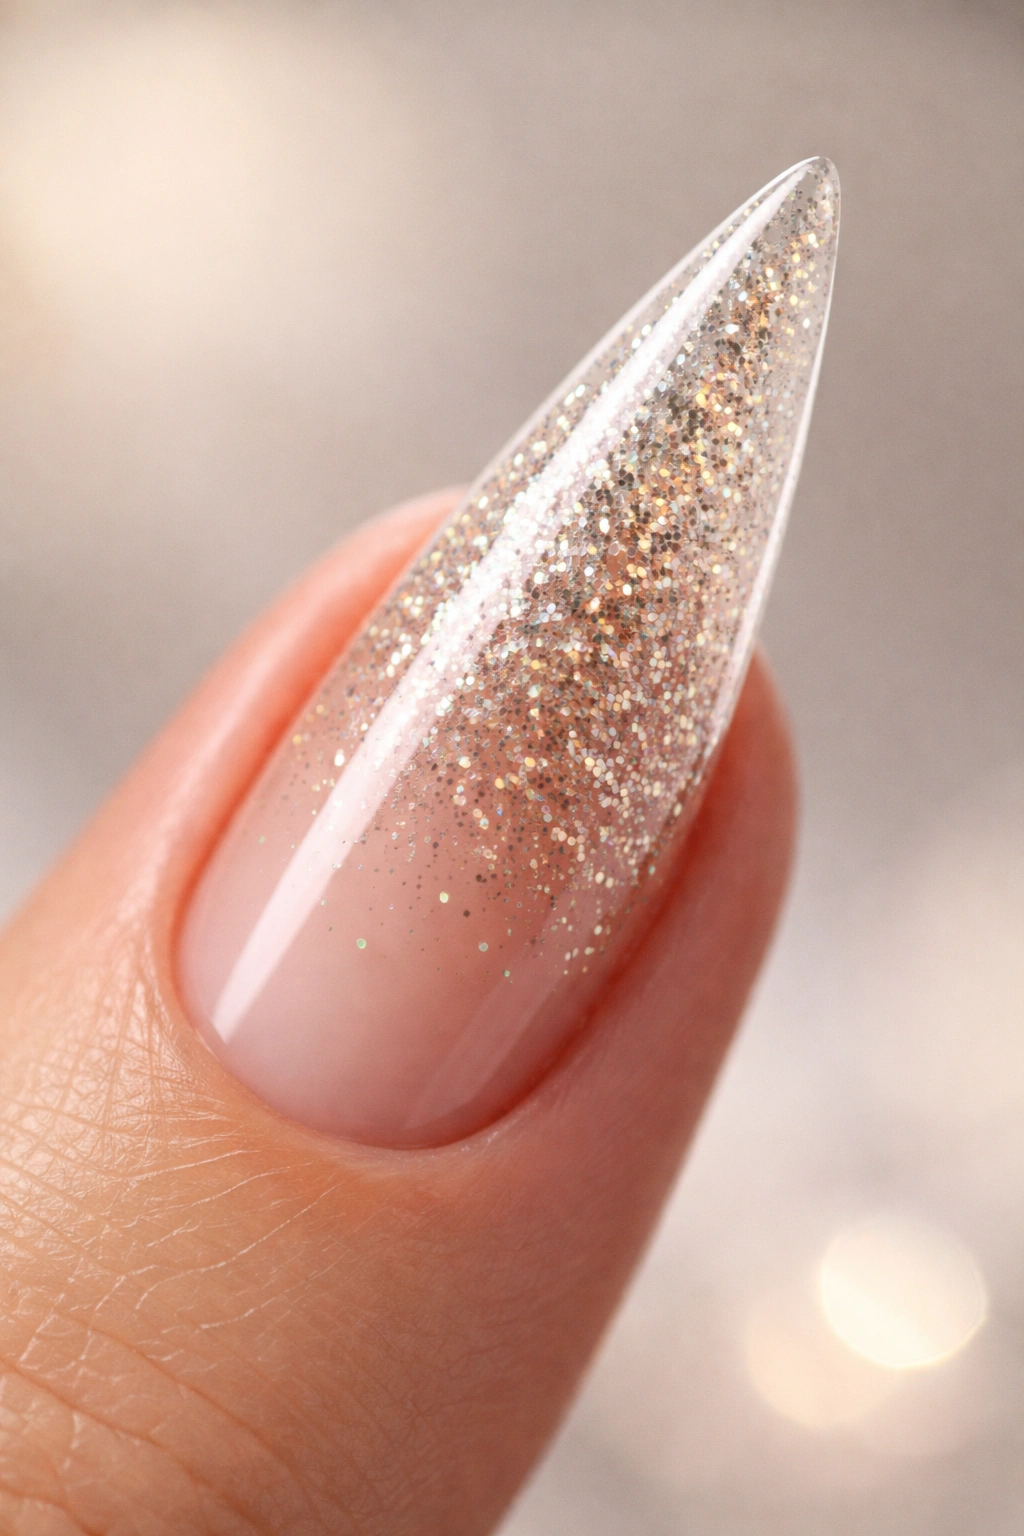
6. Glitter Gradient and Fade Effect
A gradient that starts with dense glitter at the base and gradually fades to bare or neutral-polish at the tip creates visual movement and catches light beautifully. This look is sparkly without being costume-y, refined without being boring.
The Magic of Glitter Fade on Stilettos
Glitter gradient on stilettos is particularly stunning because the gradient can be lengthy—you have real estate to work with. The eye naturally travels from the glitter-dense base up through the gradually-thinning glitter particles to the clean, bare tip. It’s elegant and playful simultaneously. The pointed shape means the lightest part of the gradient (the tip) is already the most visually prominent, so nothing competes with that sharp, clean finish.
Creating the Perfect Glitter Fade
- Apply a base coat of gel or regular polish (nude, pink, or clear all work beautifully). Cure if using gel.
- Mix loose glitter or pre-made glitter gel with your chosen color in a small dish. Start with a glitter-to-polish ratio of about 1:1 for maximum sparkle.
- Using a brush, apply the glitter mixture densely at the base of the nail (near the cuticle), covering about 1/3 to 1/2 of the nail.
- Rinse your brush and load it with less glitter (fewer particles) and apply the next 1/3 of the nail more lightly. Blend the transition area gently.
- Apply the final third with almost no glitter—just the base color or clear—so the tip has minimal sparkle.
- If using gel, cure after each layer. Top coat (gel or polish) seals and protects the glitter from snagging.
Pro tip: The transition looks most natural if you create it in stages rather than trying to blend one thick application. Multiple thin applications of decreasing glitter density always look better than trying to thin out a single thick coat.
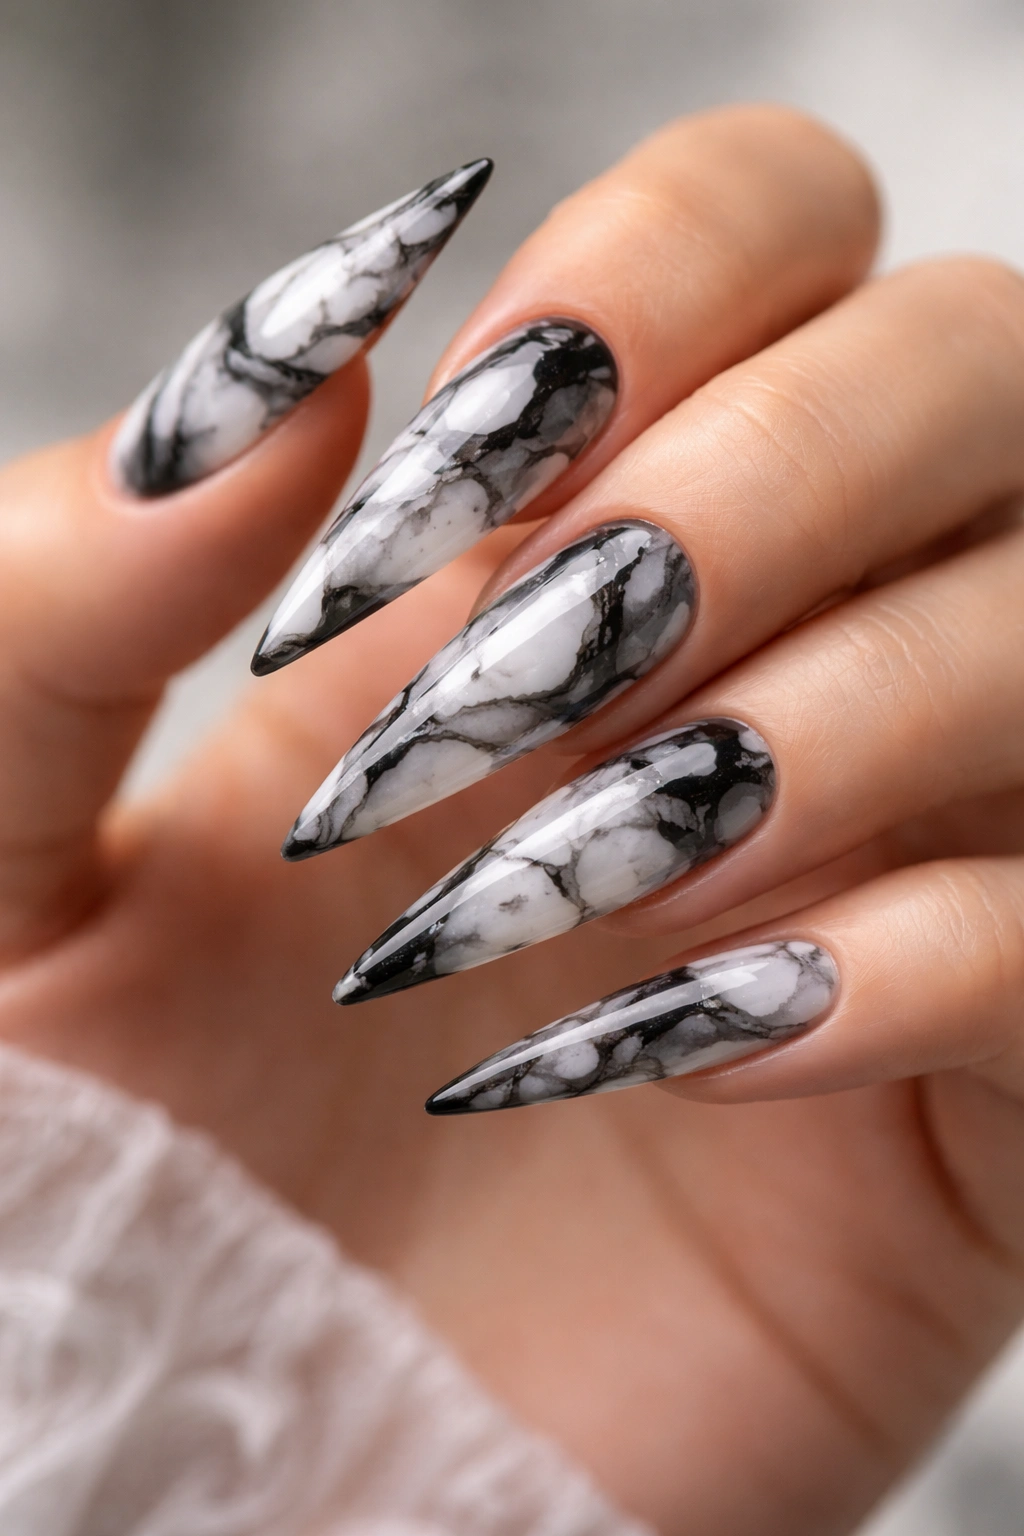
7. Marble Effect in Black and White
A black-and-white marble pattern mimics the organic, swirled veining of actual marble stone and creates a timeless, sophisticated look. The high contrast between black and white is visually striking without being loud, and the unpredictability of the veining pattern means no two nails look exactly alike.
Why Marble Pairs Perfectly With Stilettos
Marble suggests luxury, permanence, and high-end refinement. The organic, unpredictable swirls of a marble pattern are beautiful precisely because they’re not symmetrical or perfect—they’re natural. On stilettos, a marble effect feels like a deliberate nod to elegant design rather than trying too hard. The pattern is intricate enough to draw the eye but not so busy that it’s overwhelming. The neutral palette means it works with literally any outfit or occasion.
Creating Convincing Marble Veining
- Paint a white or off-white base coat, fully dried or cured.
- Using a thin detail brush and black gel or polish, create thin, irregular lines across the nail. Don’t aim for perfection; let the lines curve, branch, and overlap naturally.
- While the black is still wet or slightly tacky, use a thin dry brush or even a toothpick to drag through some of the black lines, creating movement and feathering effect. This mimics the way real marble has soft, blended edges where colors meet.
- Some areas will have denser black veining, and others will be mostly white with just a few black lines—that variation is what makes it look authentic.
- Optionally add very thin gray lines in a few places for additional depth and subtlety.
- Seal with a glossy top coat that enhances the depth of the veining.
Worth knowing: Patience is your friend here. Take your time with the veining, and don’t overthink it. Real marble isn’t perfectly planned; neither should your design be.
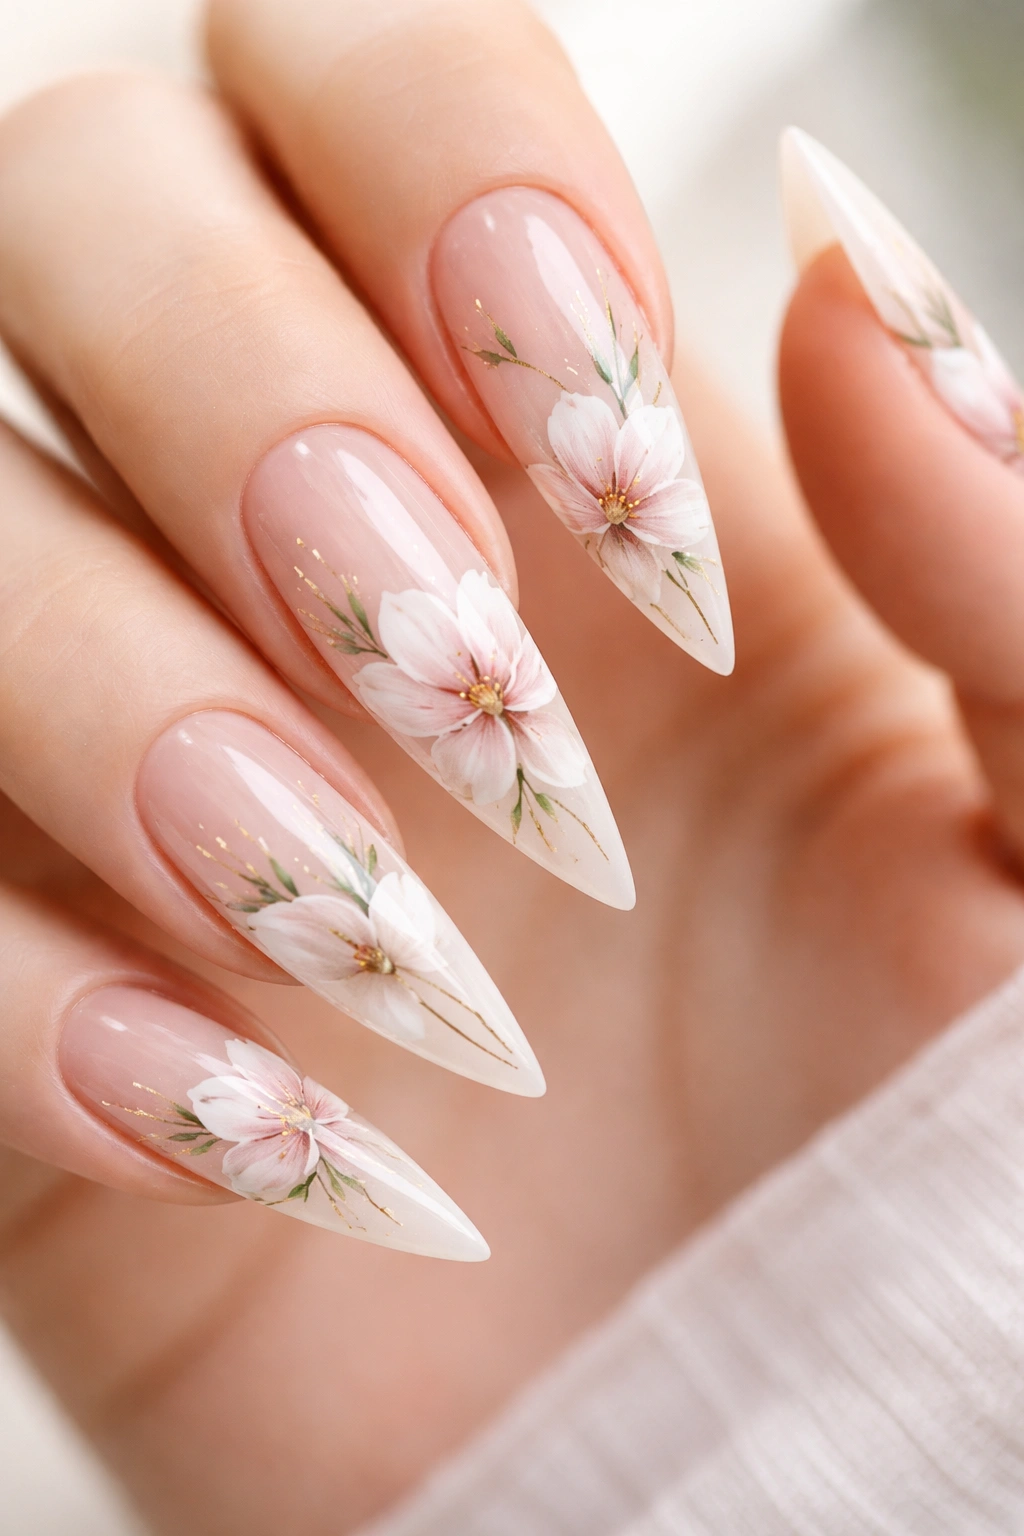
8. Floral Artwork with Negative Space
Hand-painted florals on stilettos are genuinely artistic, especially when some of the design incorporates the bare nail (negative space) rather than covering the entire surface. A single focal flower, delicate stems, and strategically-placed negative space create an elegantly balanced composition.
The Sophistication of Floral Design on This Shape
Florals could feel dainty or overly feminine, but on stilettos, they gain an unexpected edge. The pointed shape and dramatic length mean florals can be rendered at actual size (as you might paint them on a larger canvas) rather than miniaturized. A single, properly-painted rose or peony taking up the center third of the nail reads as genuine artwork, not decoration. Using negative space—leaving the nail color unpainted in certain areas—adds depth and prevents the design from feeling flat.
Painting Florals That Look Professional
- Choose a base color that will be your canvas. White, nude, and pale pink all provide excellent backgrounds for vibrant florals.
- Lightly sketch your flower placement with a pencil or light tracing tool.
- Use a thin detail brush (00 or 000 size) and quality acrylic paints or gel polish to paint the flower. Start with larger petals, then layer smaller, inner petals on top.
- Add realistic details: shading within petals (darker on the base, lighter at the edges), a detailed center, and fine stamens or pollen if appropriate.
- Paint thin stems and leaves, varying the green shades for depth.
- Leave some areas of the base color visible as negative space—don’t fill every inch.
- For longevity, seal everything with a clear gel top coat, cured fully.
Insider note: The difference between “nail art” and “artwork on nails” is usually blending and shading. Take time to blend colors within the petals so they look three-dimensional rather than flat.
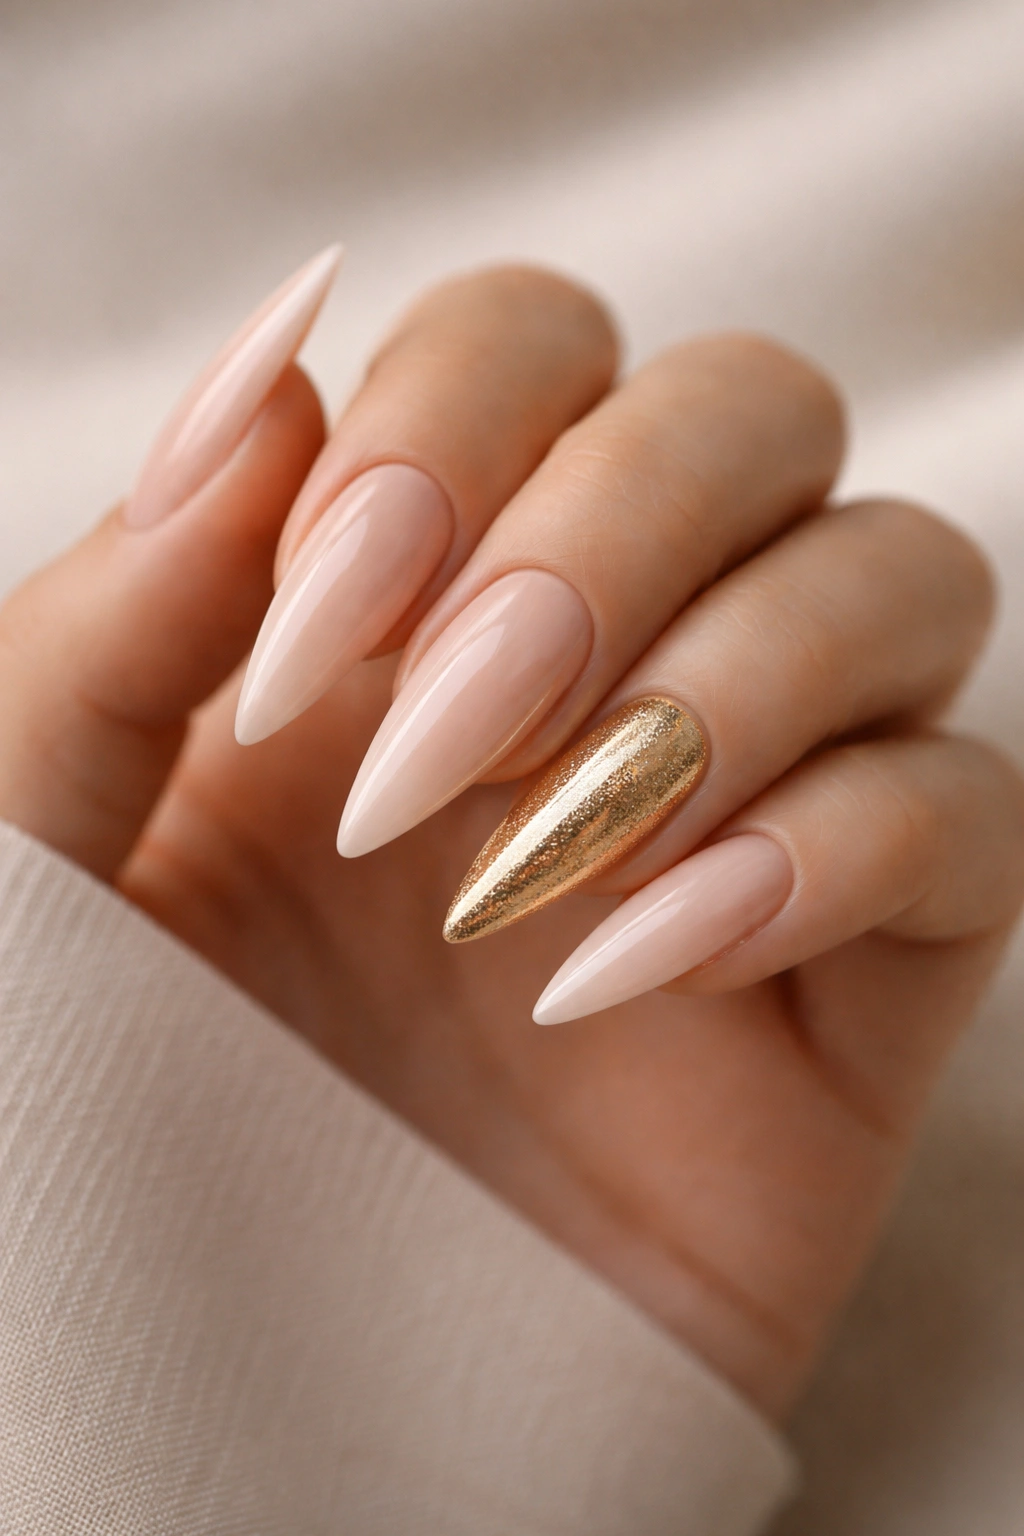
9. Nude Base with Accent Gold Nail
A monochromatic nude manicure is inherently elegant, but when you make one single nail entirely gold (either the entire surface or just portions of it), it creates a luxury-look that feels intentional and modern. The contrast between the minimal nude majority and the single statement gold nail is visually powerful.
Why Contrast Makes This Look Work
This look leverages the principle of emphasis through restraint. By keeping nine nails neutral and minimal, you’re training the eye to land directly on the one gold nail when you move your hand. It’s subtle but impossible to ignore. This works beautifully on stilettos because the pointed shape already draws attention; the gold nail becomes even more noticeable as a result. It’s a look that works for both everyday wear and special occasions.
Executing the Two-Tone Manicure
- Apply a high-quality nude polish to eight nails. Choose a shade that complements your skin tone—not one-size-fits-all beige, but actually flattering to you. Two coats, fully dried.
- On the accent nail (typically the ring finger or index finger), apply a base of nude, then layer with a premium gold polish or gel. Two coats for opacity.
- Alternatively, apply nude to all nails, then add gold leaf, chrome powder, or a gold glitter effect to just one nail.
- Seal all nails with a glossy top coat for a polished, finished appearance.
- Keep the nail edges clean and precise—sloppy lines undermine the minimalist elegance of this design.
Pro tip: The accent nail looks more intentional if it’s placed strategically. Your dominant hand’s ring finger or index finger tends to be most visible when you move your hands, so placing the gold there ensures it gets noticed.
10. Deep Jewel Tone with Subtle Shimmer
A rich jewel tone—emerald, sapphire, or deep purple—with an integrated subtle shimmer creates depth and dimension without being glittery or over-the-top. The color carries sophistication while the shimmer adds refinement and catches light beautifully.
Why Shimmer Elevates Solid Color
A flat, single-color nail can read as either minimalist-intentional or just boring, depending on execution and context. Adding a barely-there shimmer (not glitter, just subtle light-reflecting pigment built into the polish) transforms a solid color into something more interesting and luxe. On stilettos, the shimmer catches light differently depending on angle and hand movement, creating visual interest without the look changing based on viewing angle (like with chrome).
Choosing and Applying the Perfect Shimmer Polish
- Look for “shimmer” or “duochrome” polishes rather than glitter polishes. These contain finely-milled light-reflecting particles rather than visible glitter chunks.
- A quality shimmer polish from a reputable brand will apply smoothly and provide opacity in two coats.
- Apply two coats of the shimmer polish, waiting between coats for a smooth finish.
- The shimmer will be visible in sunlight and under certain lighting but won’t make the nail look textured or chunky.
- Seal with a glossy gel or regular top coat to enhance the shimmer and protect it.
- Keep the surface pristine and scratch-free; any irregularity will break up the shimmer effect.
Worth knowing: Premium shimmer polishes are worth the investment here because cheap versions often look muddy or patchy. The shimmer should be clearly visible but still allow the underlying color to be the star.
Final Thoughts
Each of these stiletto nail looks works because it respects the unique geometry and drama of the stiletto shape while delivering a specific aesthetic or mood. Some are bold enough to command attention in a room. Some are subtle enough to elevate an everyday look without feeling overdone. The real power lies in choosing a look that genuinely fits your lifestyle, your confidence level, and what you actually enjoy seeing on your hands.
The beauty of stiletto nails is their versatility. You can go from ultra-minimal (the nude with gold accent) to fully artistic (hand-painted florals) without the shape working against you. The length and pointed tip are features that make even simple designs more impactful. This is why these particular looks translate so well to this shape—they lean into what stilettos do best, which is create drama through form.
The best nail look is the one you’ll actually wear, enjoy maintaining, and feel confident about. If you’re trying a new design for the first time, consider starting with something achievable at home (the burgundy and gold veining, the marble effect, or the glitter fade) before moving on to techniques that require more precision or specialized tools. Your stiletto nails are literally extensions of how you present yourself to the world—make sure they feel authentically like you.
