

Dark green stiletto nails are having a major moment, and honestly, it’s easy to see why. There’s something undeniably sophisticated about this color choice—it’s elegant without being safe, bold without screaming for attention, and weirdly flattering on almost every skin tone. Whether you’re drawn to forest hues, emerald depths, or olive undertones, dark green offers a canvas for nail art that feels both elevated and endlessly creative. The stiletto shape amplifies this effect, adding drama and edge that transforms even a simple solid color into a statement piece.
The beauty of dark green lies in its versatility. It works for boardroom meetings, date nights, beach vacations, and everything in between. Unlike trendy neon brights that feel dated within weeks, dark green has staying power—it’s been chic for years and will continue to be. When you combine it with the elongated, architectural perfection of stiletto nails, you’re creating something that photographs beautifully and catches light in fascinating ways. The narrower nail bed of a stiletto actually makes the green appear more saturated and jewel-like, especially when you’re working with gloss, chrome, or metallic finishes.
What makes dark green stiletto nails particularly exciting right now is the sheer range of designs you can execute. From minimalist solid colors to intricate nail art featuring everything from glitter gradients to hand-painted florals, dark green serves as the perfect foundation. The color plays beautifully with gold accents, silver details, nude undertones, and even contrasting brights. If you’re ready to explore the possibilities, here are eighteen stunning dark green stiletto nail ideas that will completely reimagine how you approach your nail game.
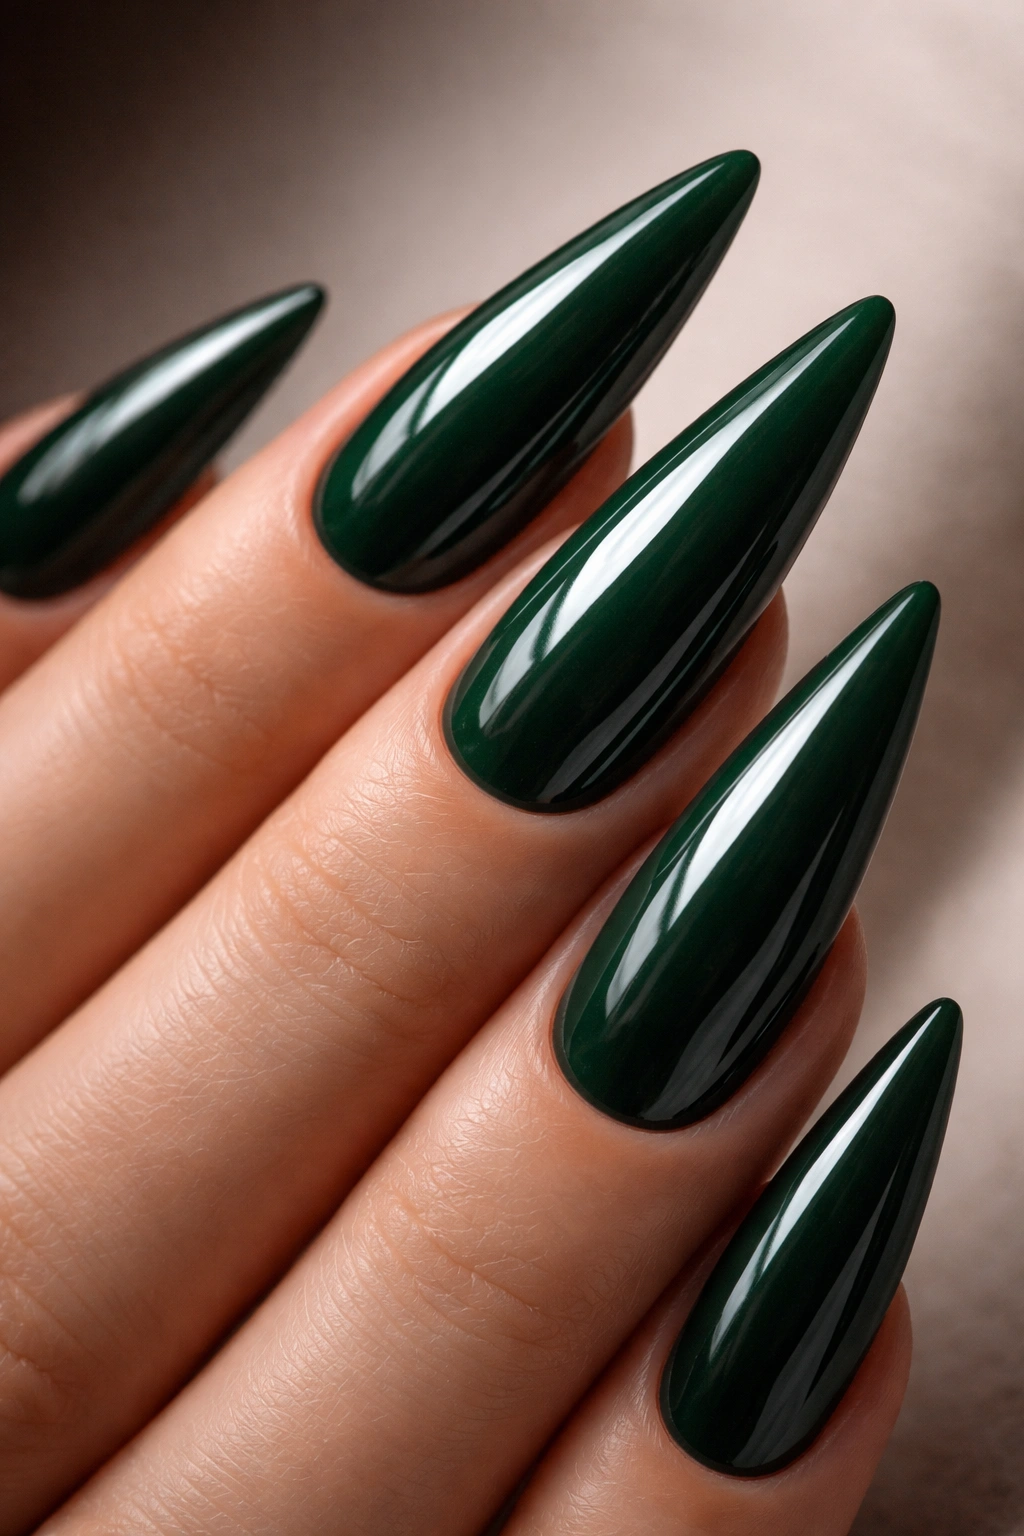
1. Classic High-Gloss Forest Green
A flawless high-gloss forest green is the foundation of great stiletto nail styling. This is the design you reach for when you want something that feels expensive, polished, and completely timeless—no embellishments, no overthinking, just pure color.
Why This Design Works
High-gloss forest green on stilettos hits that perfect sweet spot between subtle and show-stopping. The reflection of light off the gloss finish makes the color appear deeper and more luxurious, and the elongated nail shape amplifies this effect. Forest green (as opposed to darker, almost-black greens) reads as sophisticated rather than gothic, making it wearable for professional settings while still feeling undeniably chic.
The Execution Details
- Use a premium gel polish or traditional lacquer with at least two coats for true opacity
- Seal with a high-shine top coat applied generously—this is where the luxury-looking finish comes from
- Keep the finish perfectly smooth; any streaks will be visible on stilettos
- Maintain the nail shape with regular filing every 7-10 days to keep edges sharp
- The color appears even richer when your cuticles are pushed back and the nail bed is clean and prepped
Styling tip: This design pairs effortlessly with gold jewelry, bronze eyeshadow, or a cognac-toned lip. It’s the type of nail that feels equally at home at a formal dinner or during your everyday routine.
2. Emerald Ombre to Nude
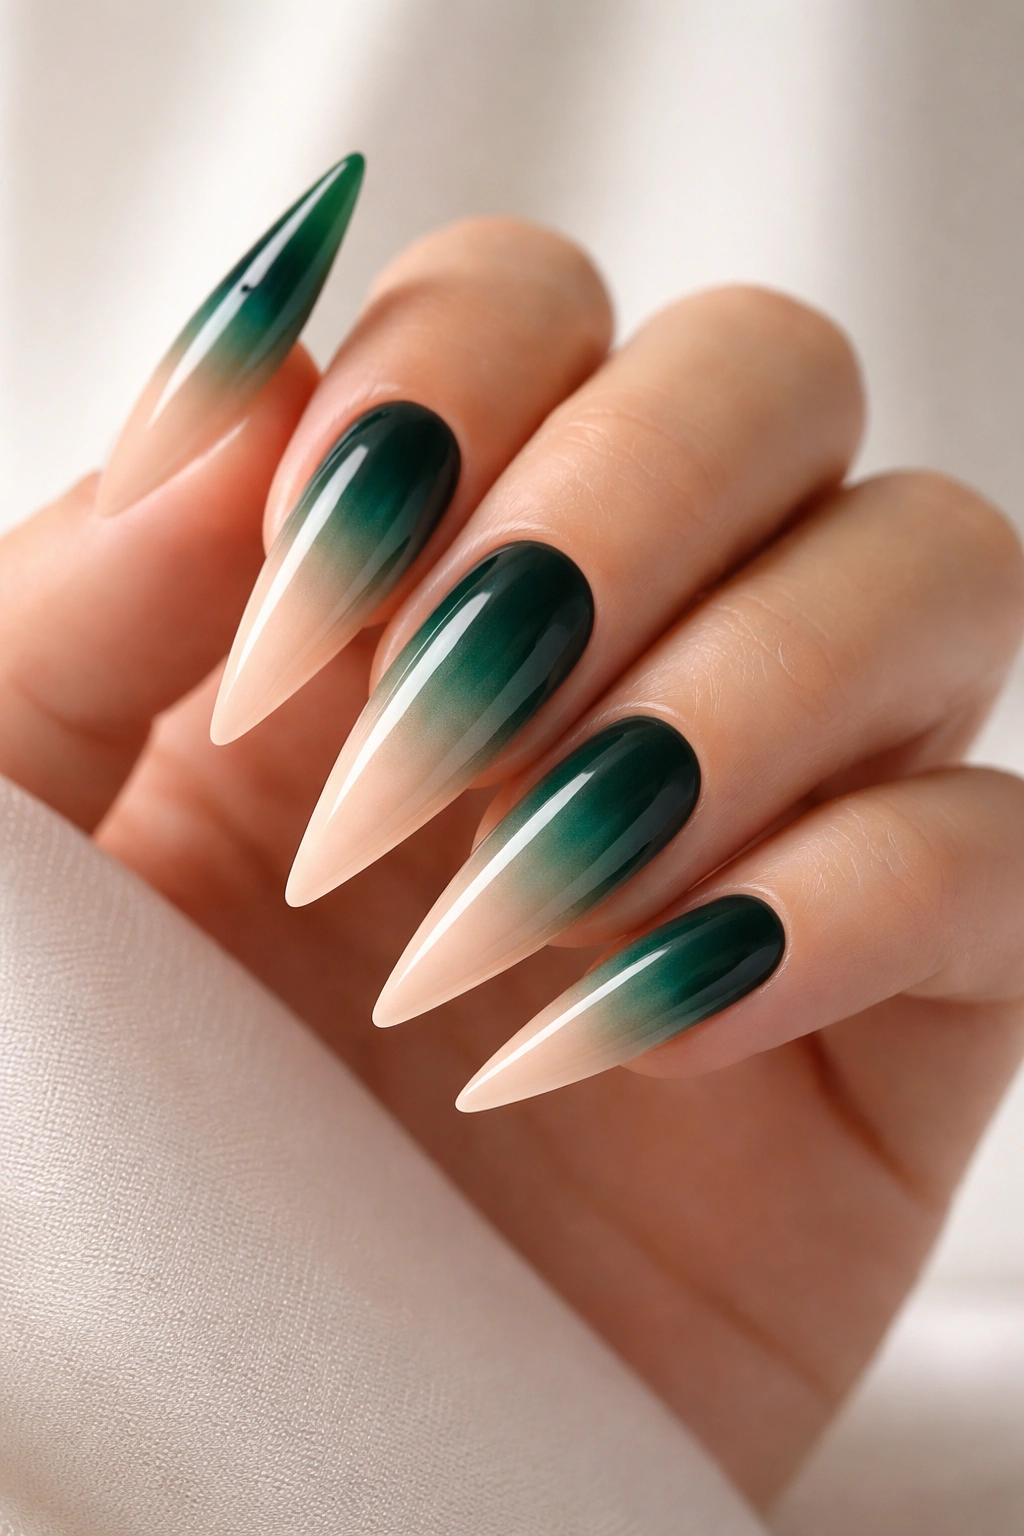
This gradient design transitions from a deep emerald at the base to a pale nude or champagne at the tip, creating an effect that’s both dramatic and surprisingly wearable.
Why This Design Works
Ombre gradients on stilettos create an illusion of even greater length and elegance. The emerald-to-nude direction (dark to light from base to tip) is particularly flattering because it naturally draws the eye down the nail, emphasizing the length. The nude tip also softens the intensity of a fully dark green, making this design more office-appropriate than a solid dark shade while maintaining that high-impact look.
How to Achieve This Look
- Start with a nude base coat as your foundation
- Use a makeup sponge to dab and blend emerald gel polish from the base, progressively lightening toward the tip
- You can use a white gel to lighten the emerald as you transition, or simply apply less product as you move upward
- Seal with a glossy top coat, or try a matte finish to make the gradient more pronounced
- Alternatively, nail technicians can hand-blend acrylics to create a seamless transition
Pro tip: Practice your ombre technique on a practice nail wheel first. The sponging method takes a light touch and patience—rushing it will create harsh lines rather than a dreamy gradient.
3. Dark Green with Gold Leaf Accents

Scattered gold leaf flakes embedded in a dark green base create an organic, luxurious effect that catches light beautifully.
Why This Design Works
Gold and green are classically complementary—think emerald jewelry with gold settings. On stiletto nails, gold leaf adds visual interest without overwhelming the base color. The metallic flakes create dimension while the dark green keeps the overall aesthetic sophisticated rather than glittery or juvenile. This design reads as intentional and high-end, not like you grabbed whatever was available at the nail shop.
Design Elements to Include
- Begin with two coats of your dark green base in either gel or acrylic
- Apply gold leaf or flakes while the base is still slightly tacky (if using gel, cure first, then apply a sticky base coat before adding leaf)
- You can do full coverage flaking or sparse, strategic placement—sparse tends to look more refined
- Layer the leaf before applying your top coat so it integrates seamlessly into the finish
- Use a high-quality leaf; cheaper versions will tarnish and look dull quickly
Styling consideration: This design pairs beautifully with minimalist gold jewelry and creates a cohesive, intentional look. The nail becomes an accent piece rather than a competing element.
4. Stiletto Nails with Chrome Dark Green Base and Rose Gold Tips
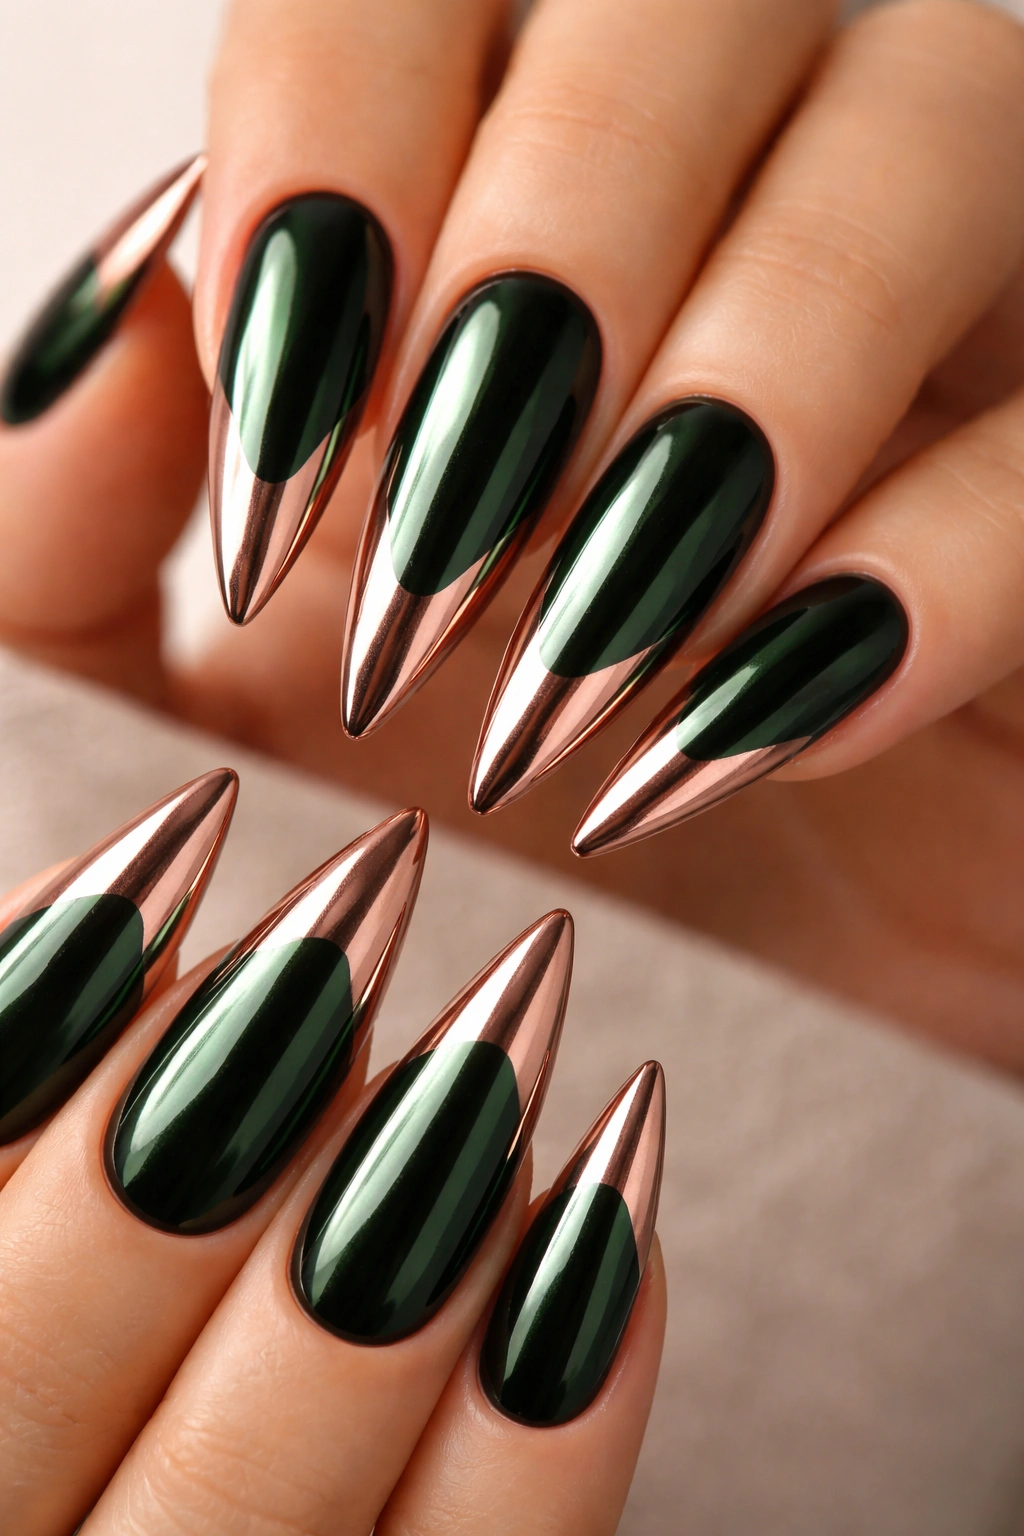
A dark green chrome finish forms the base, while the tips are capped in warm rose gold chrome for a two-tone effect.
Why This Design Works
Chrome finishes on stilettos are inherently glamorous—they catch and reflect light in ways that regular polish simply cannot. Combining dark green chrome with rose gold tips creates a color blocking effect that feels modern and editorial. The warm rose gold softens the coolness of the green while adding another dimension of shine. This design definitely makes a statement without requiring any nail art skills.
Execution Steps
- Apply a base coat, then thin layers of dark green chrome powder or gel-chrome system
- Once you’ve built up sufficient coverage and the green has that metallic, mirror-like finish, apply a protective matte or glossy layer
- Use nail tape to create a clean line at the tip area (approximately the final 1/4 to 1/3 of the nail)
- Apply rose gold chrome powder or chrome gel system to the tip section using the same technique
- Remove tape carefully and seal everything with a final top coat
- The transition between colors should be clean and defined
Worth knowing: Chrome finishes require a special powder and application technique. If you’re doing this at home, invest in a quality chrome powder system; budget options will look cheap and uneven.
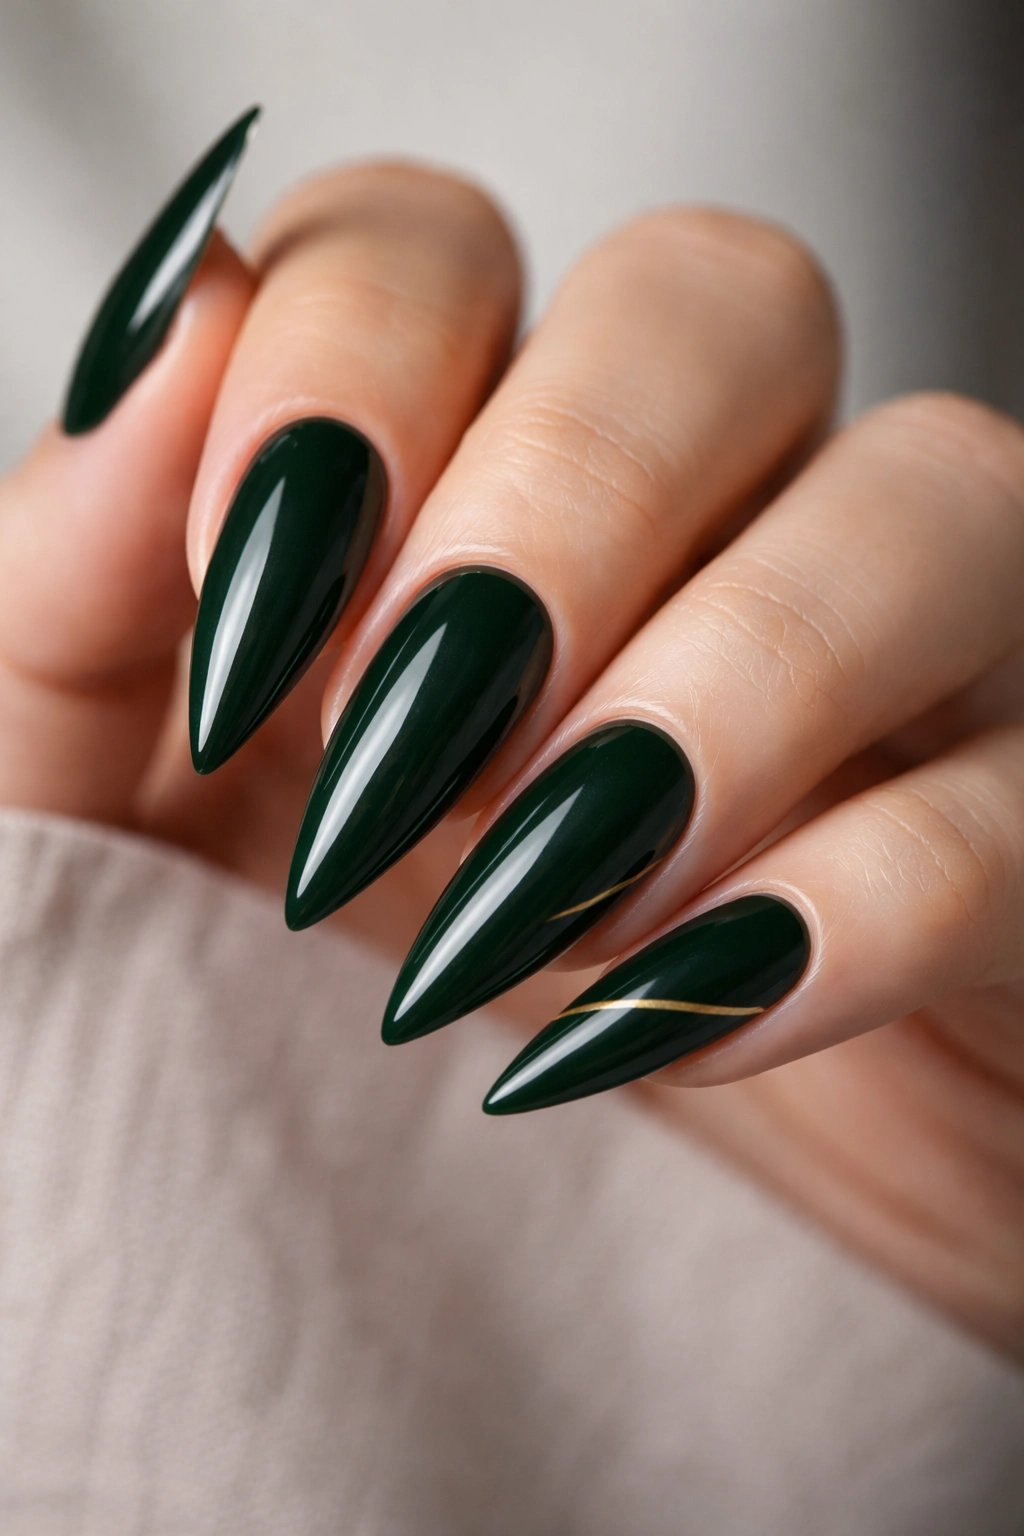
5. Deep Emerald with Minimalist White Line Art
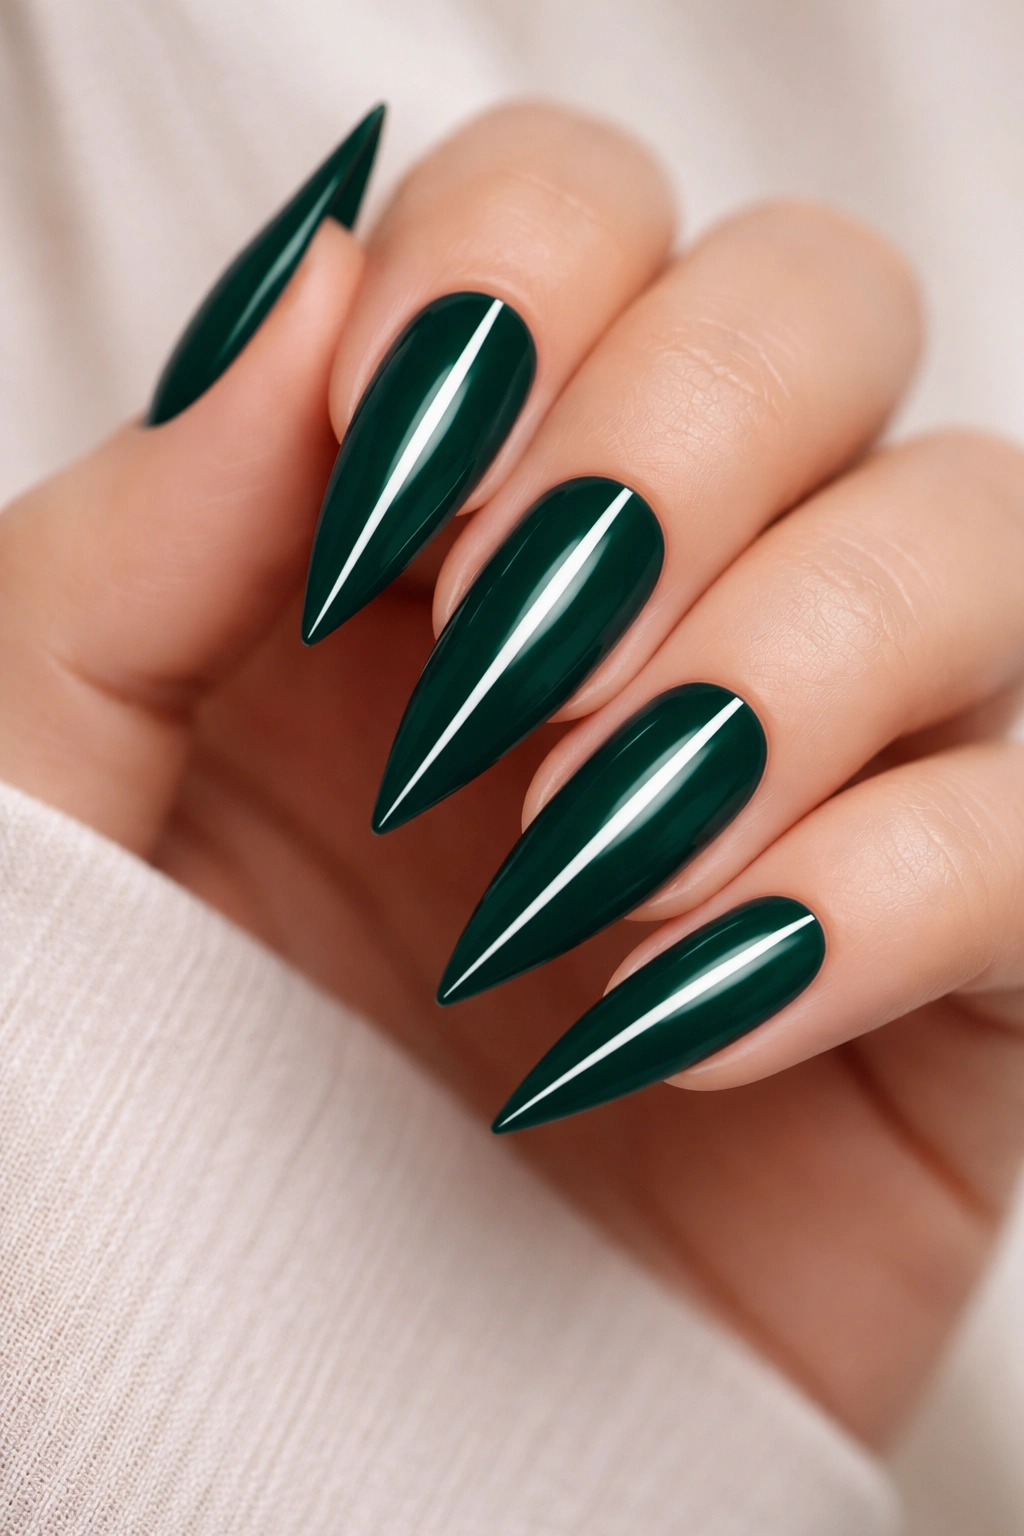
A single crisp white line runs down the center of each nail from cuticle to tip, creating striking linear geometry against the dark emerald background.
Why This Design Works
Minimalist line art feels incredibly sophisticated and modern. The white line creates instant contrast against dark emerald, making the nail design pop without being fussy. On stilettos, this linear element emphasizes the nail’s length and creates an optical effect of making fingers appear even longer and more elegant. This is the nail design equivalent of a perfectly tailored blazer.
How to Create This Design
- Start with two coats of dark emerald gel or polish for full opacity
- Use a very thin nail art brush or a striping pen to paint a white line precisely down the center
- The line should be thin enough to feel delicate, not thick enough to dominate the nail
- Seal with your chosen top coat (glossy or matte both work beautifully)
- If hand-painting feels shaky, use a thin striping tape as a guide, or ask your technician to use a striping tool
Pro tip: The impact of this design hinges entirely on line precision. A slightly wobbly line feels hand-drawn and intentional; a sloppy line looks accidental. Take your time or let a professional handle it.
6. Dark Green Marble Effect
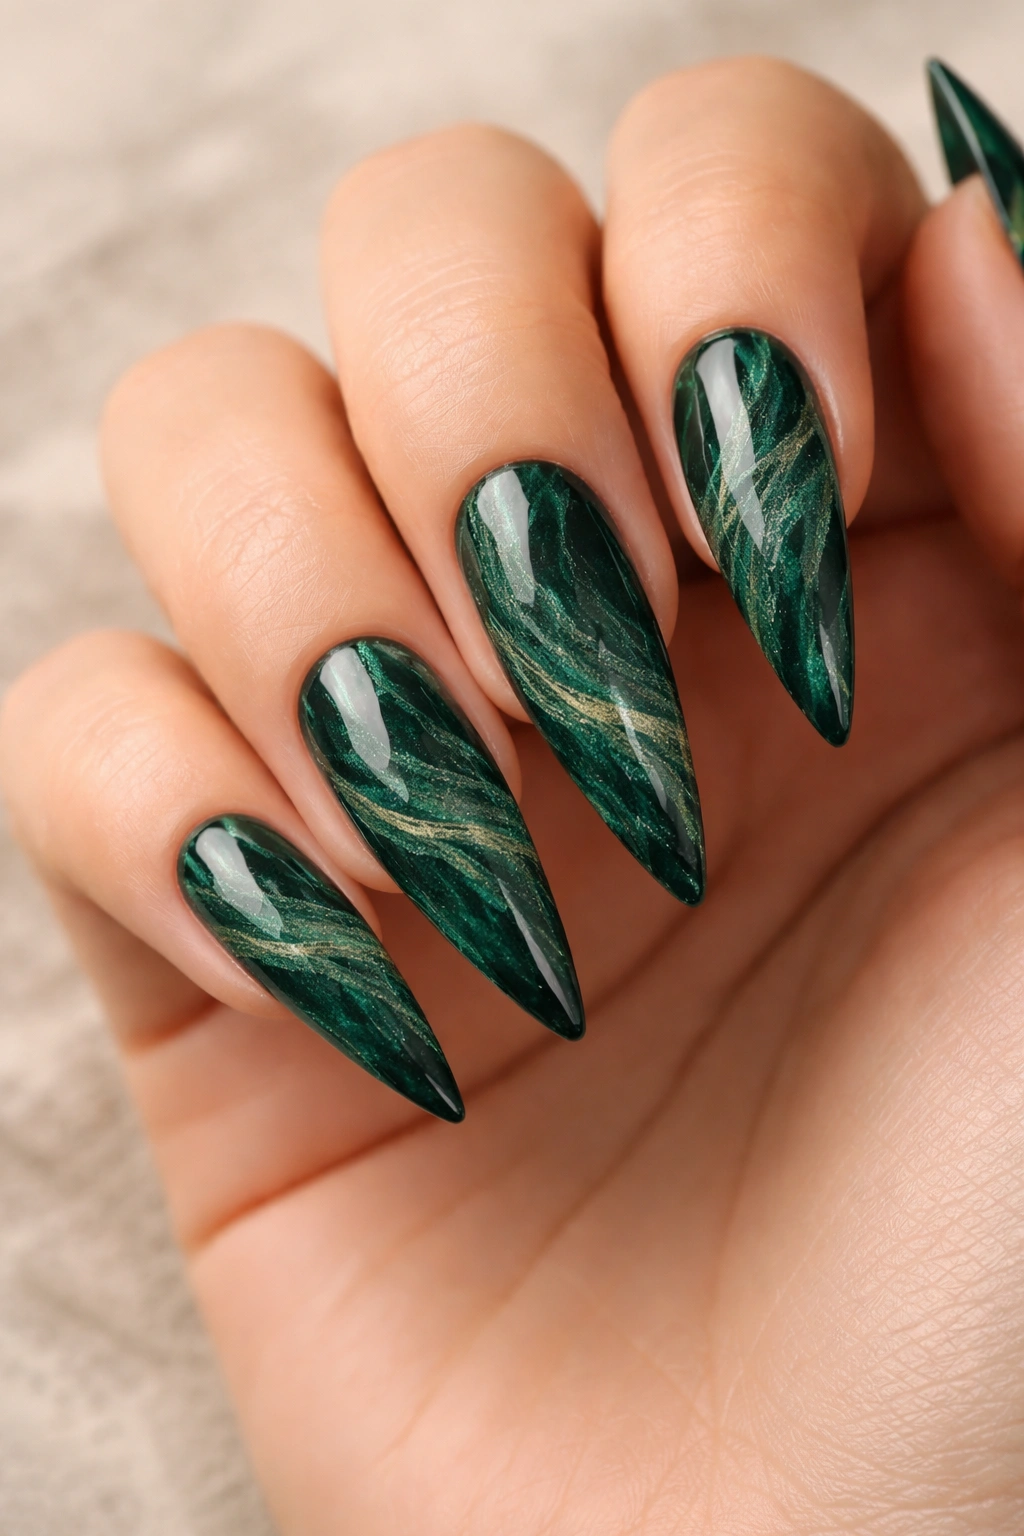
An organic, flowing marble pattern in shades of dark green, emerald, and deep teal creates the illusion of natural stone on each nail.
Why This Design Works
Marble effects make nails look expensive and carefully curated, even though the technique is actually quite forgiving. On stilettos, the marble pattern creates movement and visual interest without the geometry of structured nail art. The multiple green tones keep the design cohesive while adding depth. This is sophisticated enough for any occasion but artistic enough to spark conversation.
Technique Breakdown
- Start with a pale cream or white base coat as your foundation
- Drop dark green, emerald, and teal gel or polish onto the nail in random patterns
- Use a toothpick, thin brush, or specialized marble tool to drag and swirl the colors together, creating organic veining
- Work quickly before the polish dries, and don’t overwork it—the best marble effects have some unpredictability
- Seal with a glossy top coat to enhance the stone-like appearance
- Each nail’s pattern will be unique, which is part of the charm
Expert note: If you’re new to marble, practice on a few fake nails first. The technique takes getting a feel for how the polish moves and when to stop manipulating it.
7. Dark Green Stilettos with Negative Space Geometric Cutouts
The nail maintains a dark green color on the majority of the surface, but geometric shapes—triangles, hexagons, or strips—are left bare to show the natural nail or a contrasting color beneath.
Why This Design Works
Negative space designs feel architectural and intentional. On stilettos, geometric cutouts create visual rhythm and highlight the nail’s perfect shape. The contrast between the dark green and whatever lies beneath (natural nail, nude polish, or a pop of another color) adds sophistication without looking busy. This design appeals to people who love modern art and graphic design.
Design Possibilities
- Paint the entire stiletto dark green first, ensuring it’s completely cured
- Use nail stencils or carefully apply thin striping tape to create your geometric shapes
- Gently remove the polish from inside your taped areas using a thin brush dipped in acetone or pure gel remover
- You can expose the natural nail beneath, or fill the cutouts with another color like nude, gold, or a brighter green
- Seal the final design with a clear or nude-tinted top coat
- Clean up any rough edges for a polished final look
Design tip: Keep geometric shapes relatively simple and symmetrical. Overly complicated cutouts can look chaotic on a curved nail surface.
8. Forest Green with Delicate Hand-Painted Florals
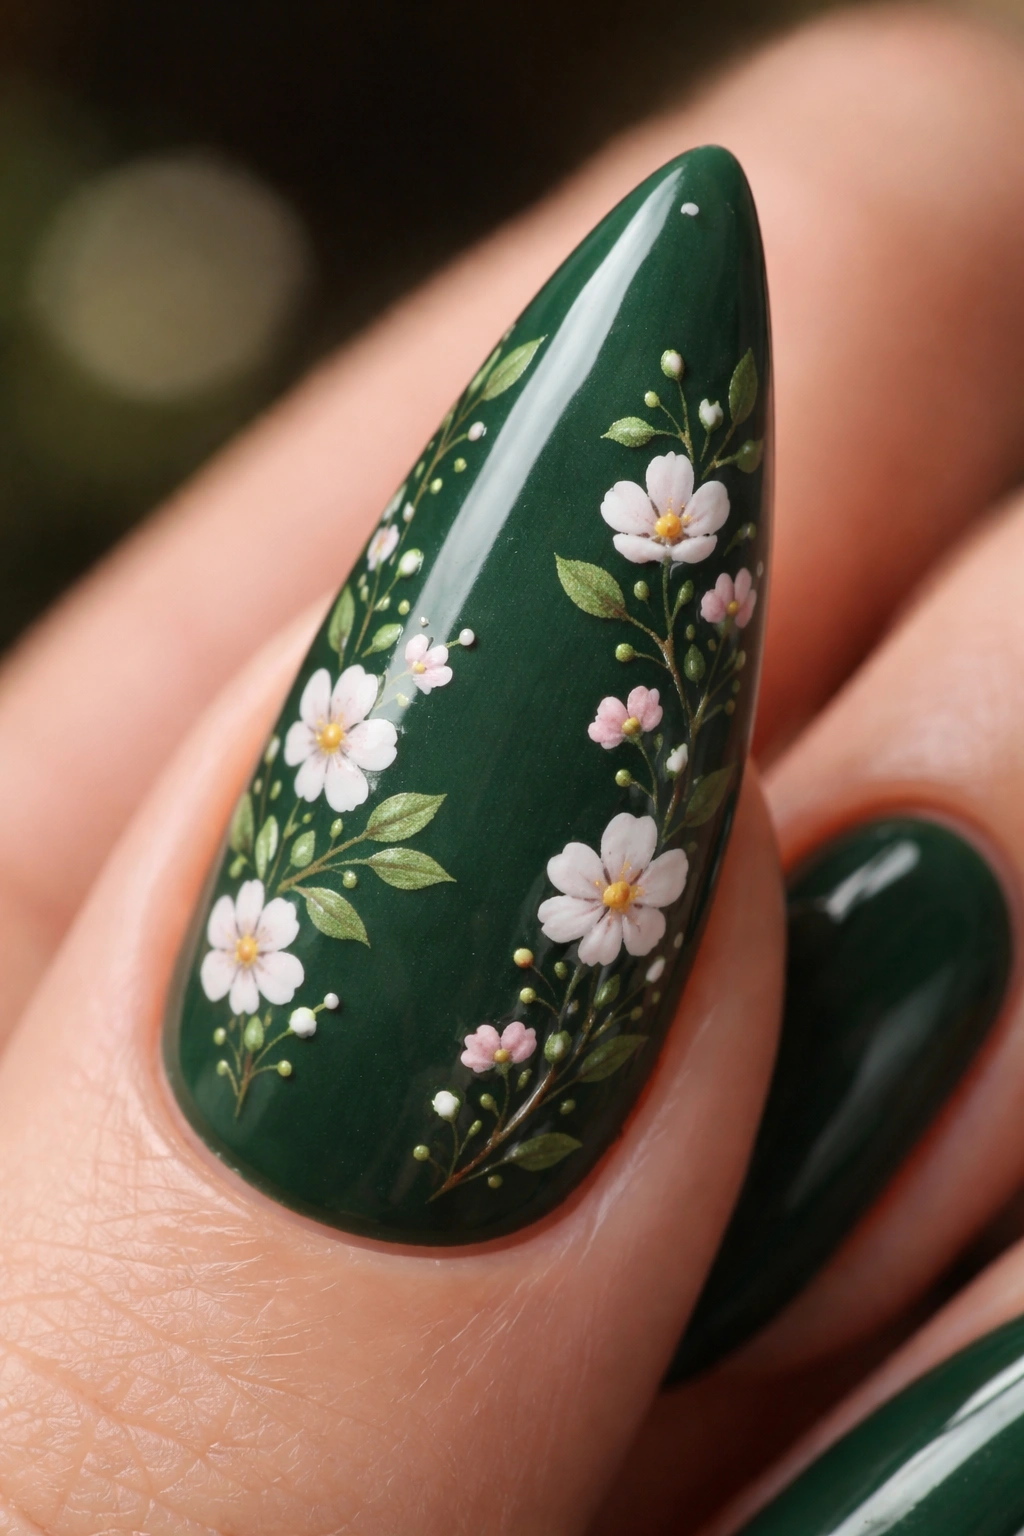
Tiny hand-painted flowers in white, pale pink, or nude create a garden-inspired design against a dark green base.
Why This Design Works
Florals on dark green backgrounds immediately evoke natural, botanical beauty—think pressed flowers in a vintage book. The small scale of the florals keeps the design delicate and wearable rather than costume-y. On stilettos, careful floral placement can actually enhance the nail’s elegant shape without competing for attention. This design feels feminine and thoughtful without being overly fussy.
Executing the Floral Design
- Start with two coats of forest green base for complete opacity
- Use a thin nail art brush to hand-paint flowers (small roses, daisies, or simple abstract blooms work well)
- Pale pink, cream, or white petals contrast beautifully against forest green
- Paint leaves in a slightly lighter shade of green or pale sage
- Add tiny details like flower centers using a dotting tool
- Seal with a matte or glossy top coat depending on your preference
- The florals don’t need to cover the entire nail; strategic placement on one or two nails per hand can be equally impactful
Styling note: This design pairs beautifully with botanical-inspired outfits, romantic occasions, or spring and summer styling. It’s a nice counterbalance to the architectural elegance of the stiletto shape.
9. Dark Green Velvet or Matte Finish Nails

A velvety, completely matte dark green finish creates a soft, almost fabric-like texture that’s unexpected on nails.
Why This Design Works
Matte finishes are having a major resurgence, and for good reason—they feel modern and tactile. The velvety quality is particularly striking on dark green because it almost looks like suede or soft leather. The matte finish also makes the color appear slightly softer and less intense than a glossy version, which paradoxically makes it feel more luxurious. On stilettos, this finish creates a sophisticated, understated elegance.
Achieving the Matte Look
- Use either a dedicated matte gel polish system or a traditional matte top coat over your dark green base
- Matte gel systems typically require specific primers and are best applied by professionals
- Traditional approach: apply dark green gel or regular polish, then seal with a matte topcoat
- The key is avoiding any glossy shine—any shine spots will ruin the effect
- Matte finishes can chip more readily than glossy, so maintenance is important
- Consider a matte top coat that’s specifically formulated for durability
Care note: Matte finishes show fingerprints and oil more readily than glossy finishes. You may need to wipe your nails more frequently to maintain that pristine appearance.
10. Emerald Green with Gold Glitter Gradient
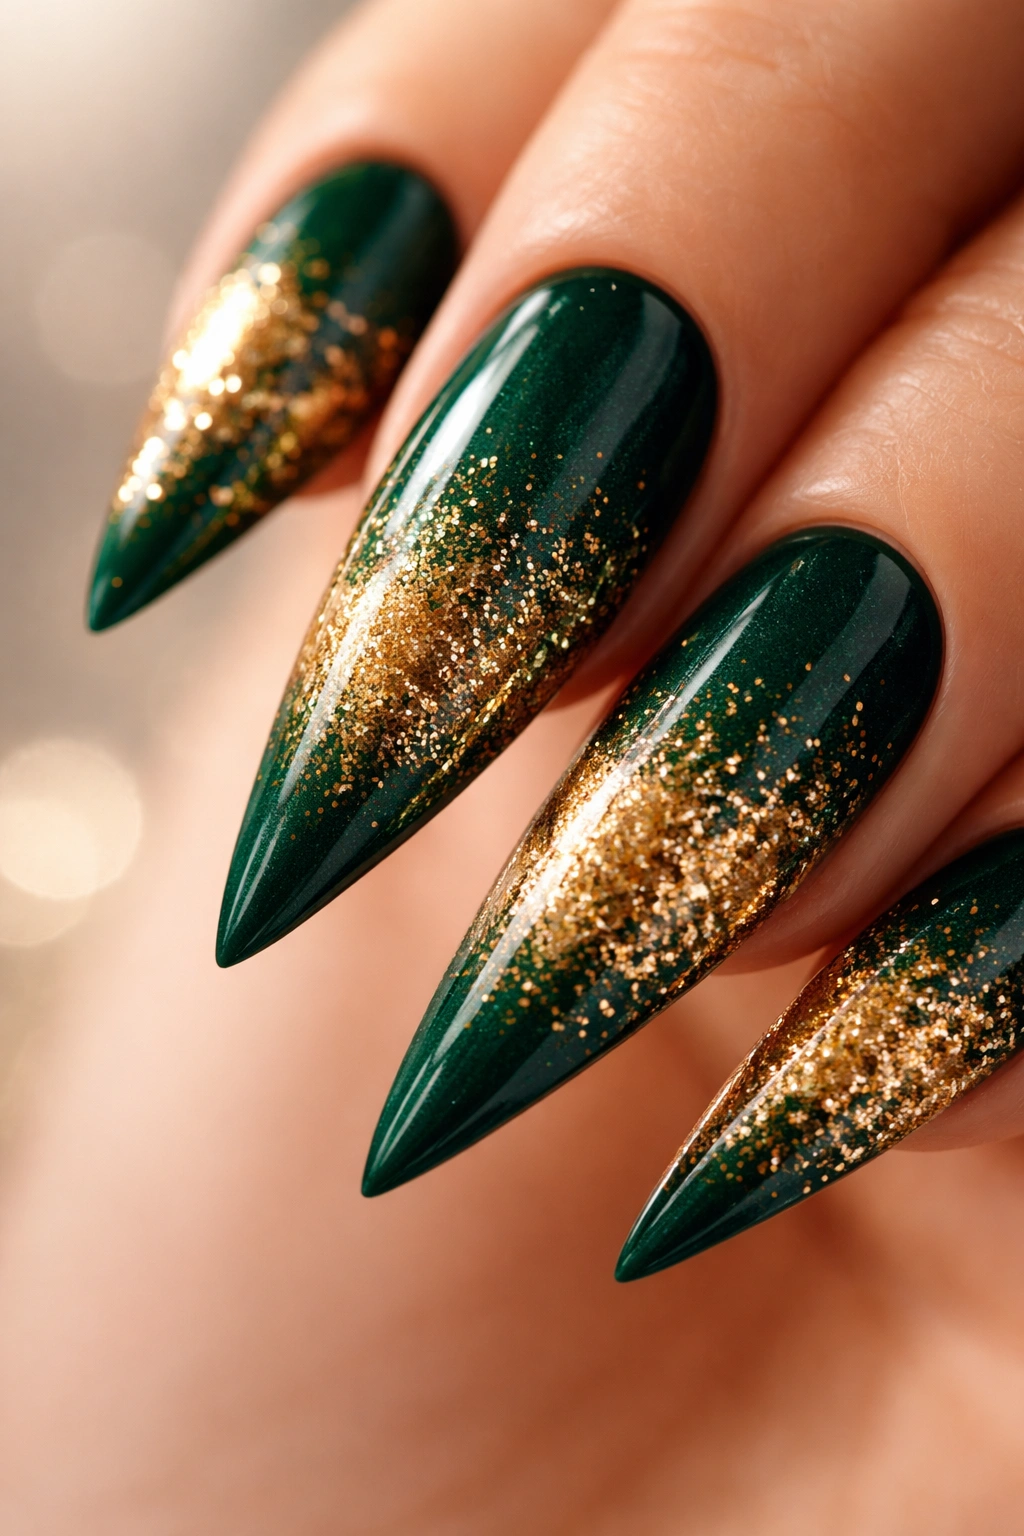
The nail starts as solid emerald green at the base and transitions into increasing density of gold glitter toward the tip.
Why This Design Works
Glitter gradients create that magical “starburst” effect that catches light from every angle. Transitioning from solid color to glitter adds visual interest and elegance without being over-the-top. The emerald-to-gold combination is inherently luxurious and works year-round. On stilettos, this design photographs beautifully and creates stunning detail in natural and artificial lighting.
Technique for Glitter Gradient
- Apply two coats of emerald green base color as your foundation
- Using a makeup sponge or stippling motion with a brush, apply a thin layer of clear gel mixed with gold glitter to the top half of the nail
- Add another layer of the glitter mixture to the top third, concentrating the density near the tip
- You want the effect to be gradual—more glitter toward the tip, progressively less as you move toward the base
- Seal with a shiny top coat to make everything blend and sparkle
- Some technicians create this effect by layering glitter directly in the gel before application; both methods work
Pro tip: Using fine or extra-fine glitter creates a more elegant effect than chunky glitter, which can look costume-y on nails.
11. Dark Forest Green with Black Spider Web Design
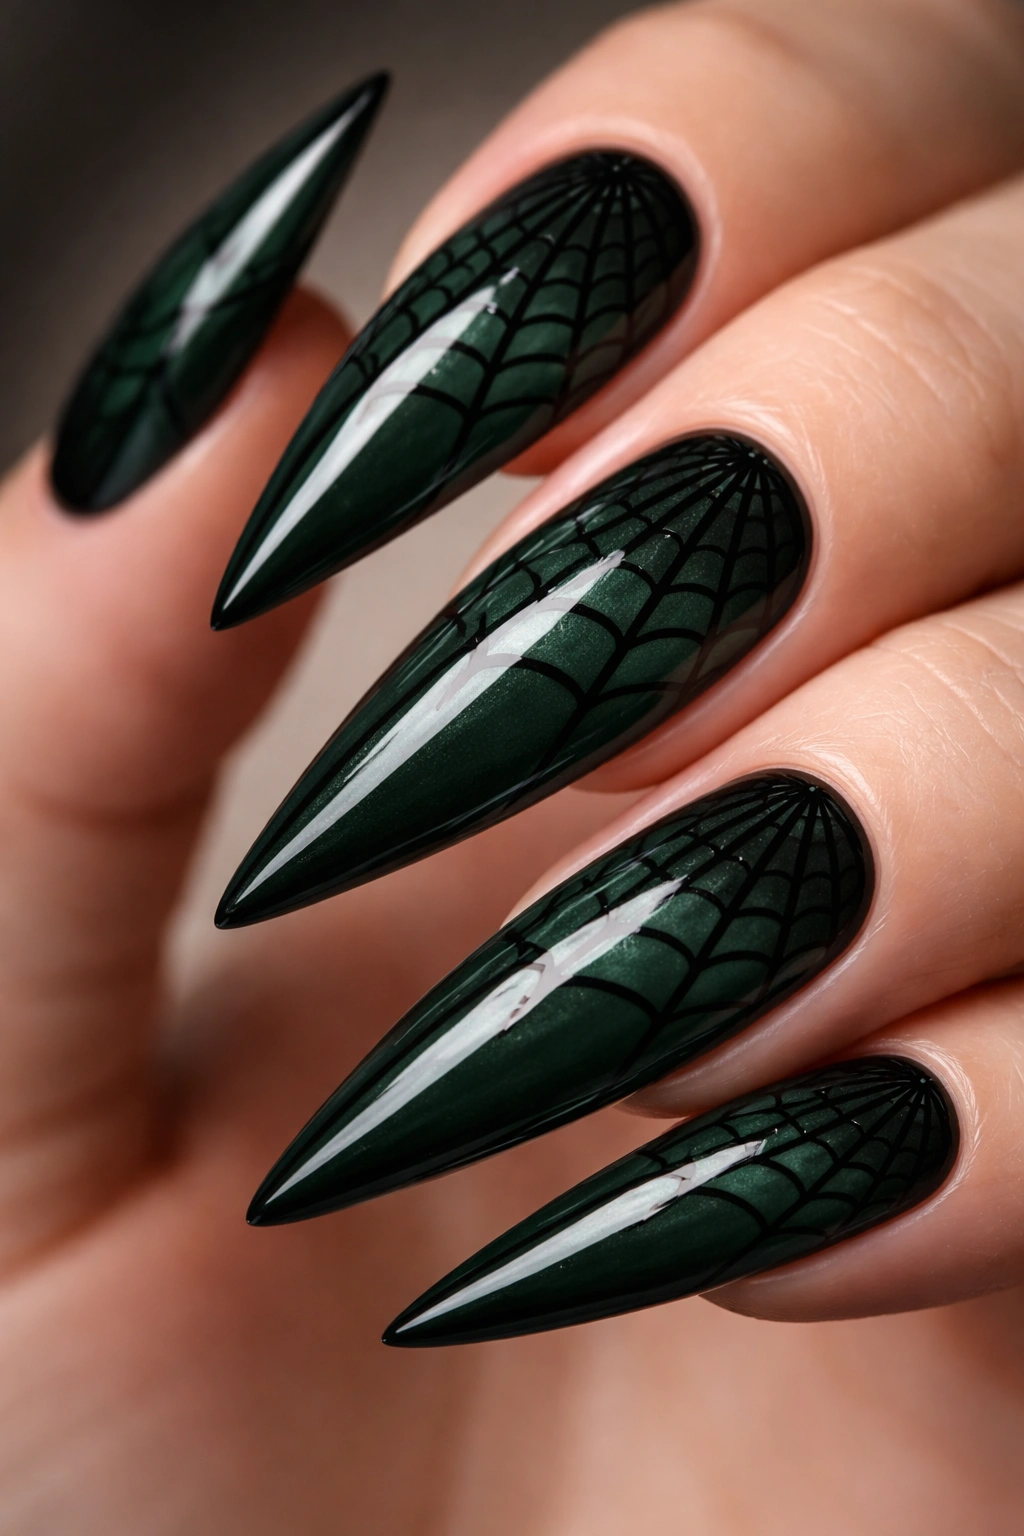
Delicate black lines create a spider web pattern across the dark green nail, perfect for adding an edgy, gothic-chic element.
Why This Design Works
Spider web designs add an unexpected edge to dark green nails while maintaining elegance. The contrast between the deep green and pure black creates drama without looking costumey (unlike some Halloween-specific nail designs). On stilettos, the web pattern follows the nail’s natural curves, creating an organic flow. This design walks the line between feminine and edgy perfectly.
Creating the Spider Web
- Start with a solid dark forest green base, fully cured
- Using a thin brush or striping tool, paint thin black lines from the outer edges of the nail toward a central point
- Create crossing lines to form the web pattern—think of a spiderweb’s geometric structure
- You can cover the entire nail or create web sections, leaving some areas solid green
- Add a tiny black spider if you’re feeling artistic, or keep it purely web-based
- Seal with a glossy or matte top coat depending on your preference
- The web doesn’t need to be perfectly symmetrical; slight irregularities look more natural
Design variation: You can also create this effect using thin nail stickers or decals if hand-painting feels overwhelming.
12. Olive Green Stilettos with Rose Gold Foil and Geometric Shapes
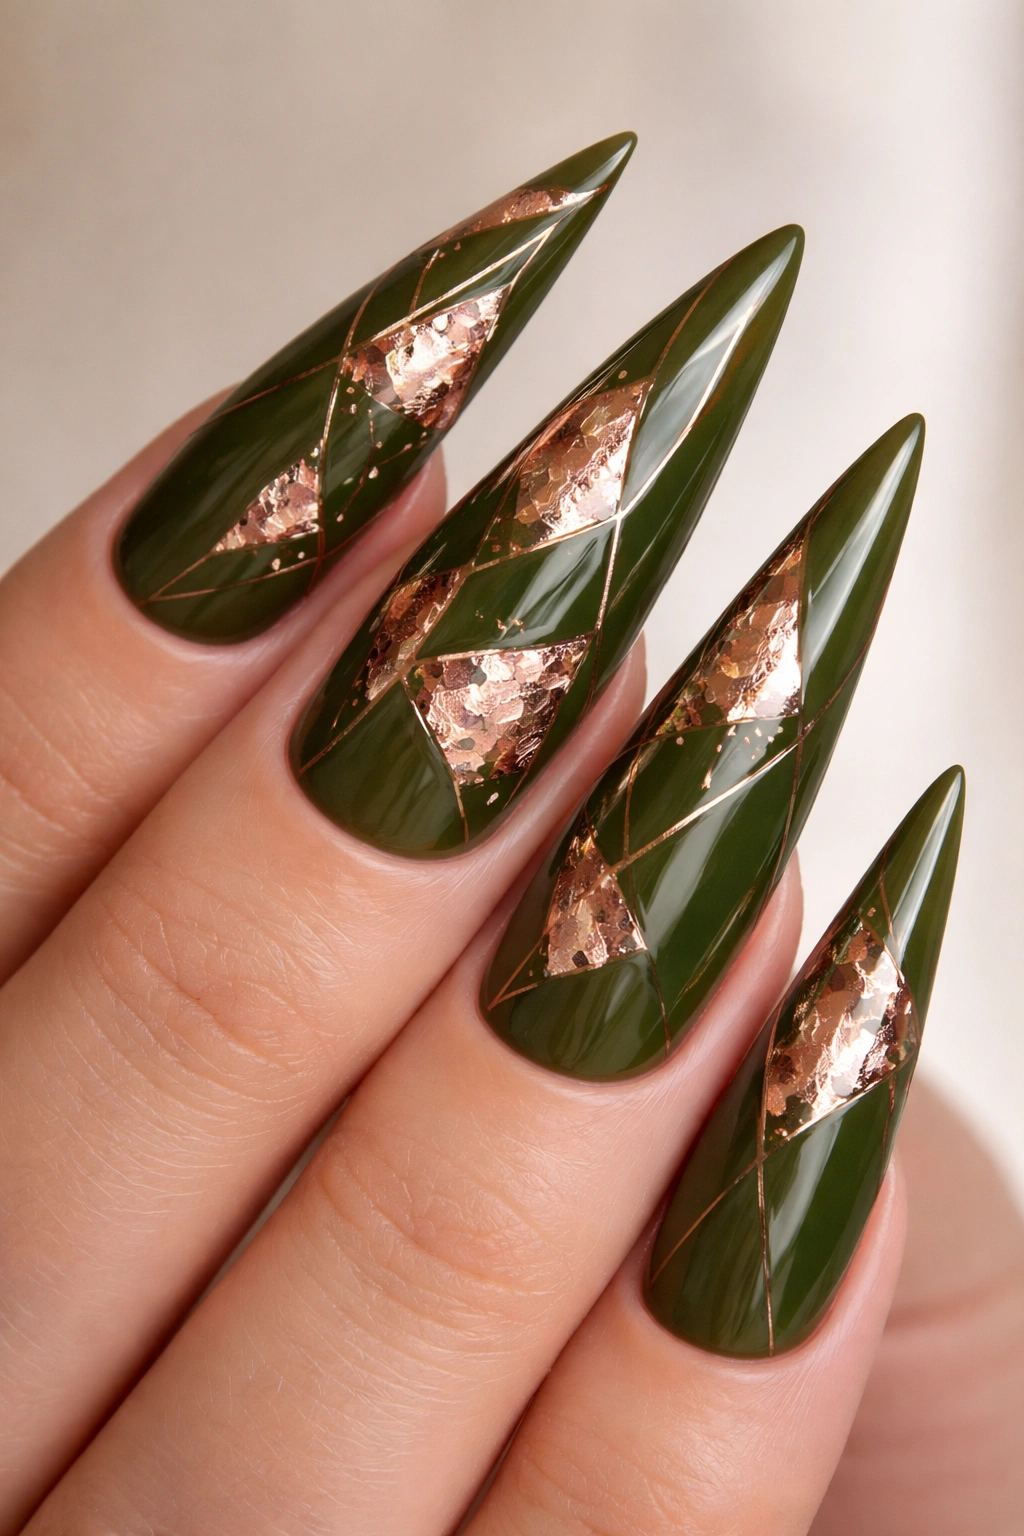
An earthy olive green base is accented with metallic rose gold foil applied in triangular or hexagonal shapes for a modern, editorial look.
Why This Design Works
Olive green is a more understated shade than emerald, making it feel wearable and slightly more unconventional. The warmer undertones of olive pair beautifully with rose gold, creating a cohesive color story. Foil (as opposed to paint) creates a reflective, three-dimensional effect that’s more eye-catching than flat metallic polish. On stilettos, geometric foil placements create visual interest without overwhelming the nail.
Foil Application Process
- Apply your olive green base in two coats, ensuring full coverage
- While the final coat is still slightly tacky (or apply a designated foil adhesive base), carefully press metallic foil onto the nail
- You can cover specific areas with geometric shapes using stencils, or randomly scatter foil pieces
- Apply gentle pressure to ensure the foil adheres completely
- Seal with a glossy top coat to protect the foil and create a seamless finish
- Professional nail technicians often use specialized foil systems; at-home applications work but require a gentle touch
Quality note: High-quality foil adheres better and looks more luxurious than budget options. Cheap foil can wrinkle, crease, or peel.
13. Deep Teal-Green with Pearlescent Shimmer and White Accents
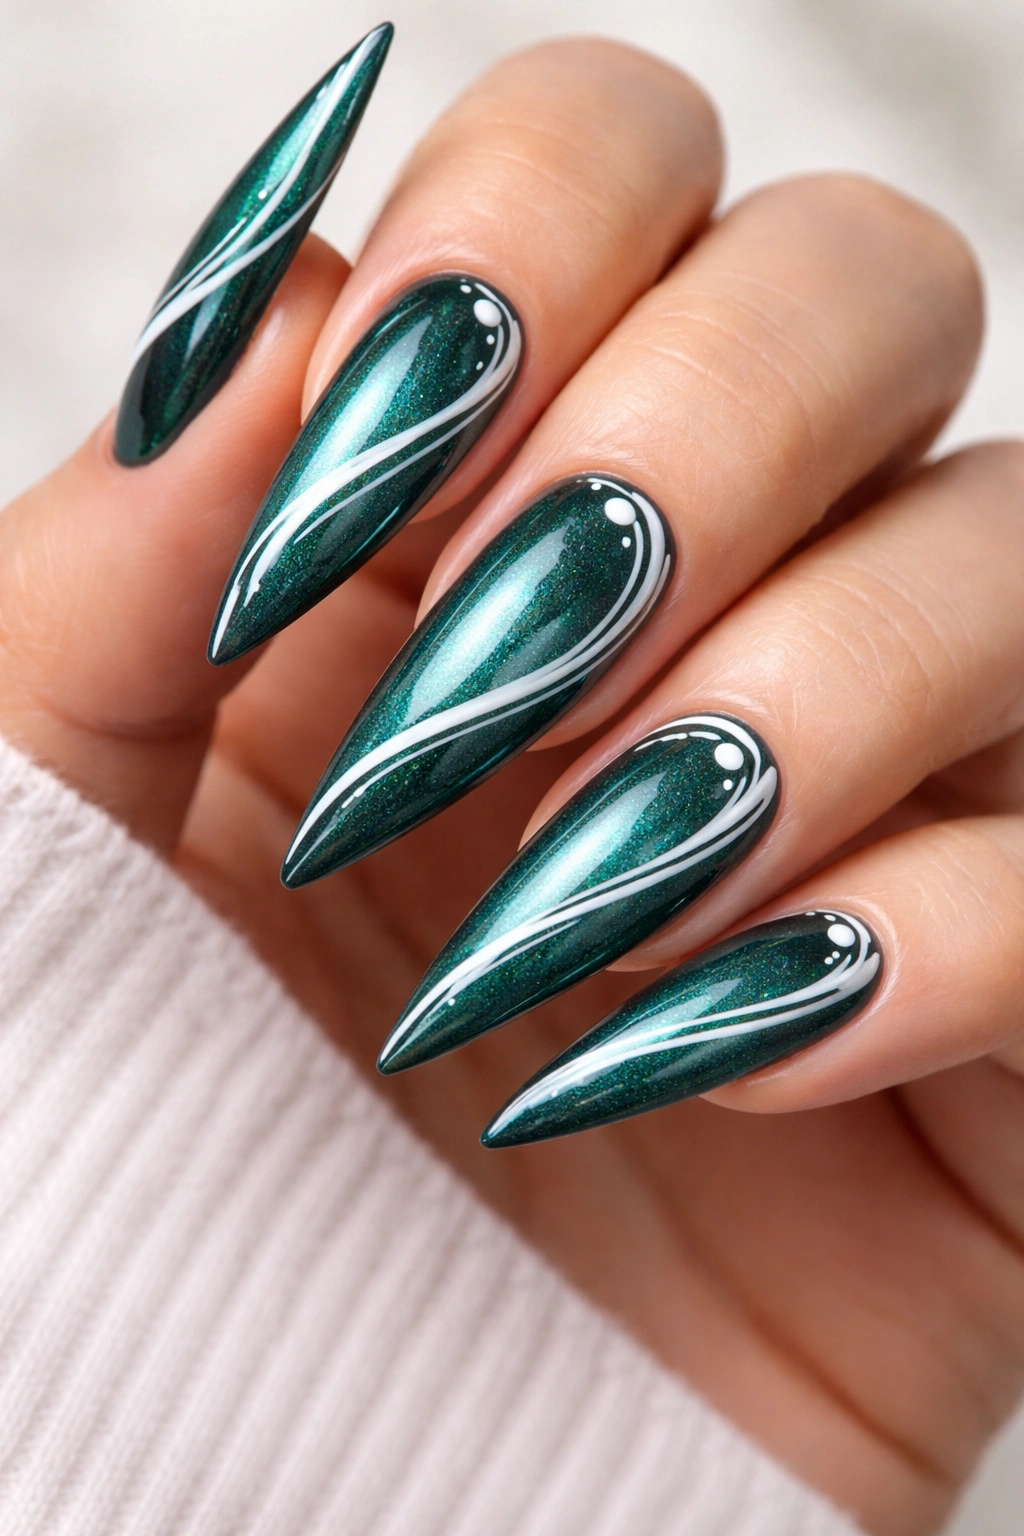
A deep teal-green base with built-in pearlescent shimmer is accented with crisp white lines or dots creating contrast and clarity.
Why This Design Works
Pearlescent finishes add dimension without being glittery. They shift and change as light hits them, creating an almost iridescent effect that’s captivating. Adding white accents amplifies the shimmer and creates visual focal points. On stilettos, the combination of shimmer, color depth, and white contrast creates a multidimensional look that feels expensive and carefully considered.
Execution Details
- Look for pearlescent gel polishes or traditional lacquers specifically formulated with pearl pigments
- Apply two coats of your pearlescent teal-green base, ensuring even coverage
- Once cured, apply white accents using thin lines, dots, or small geometric shapes
- You can create a sparse accent design (white lines on a few nails) or a more coordinated pattern
- Seal with a shiny top coat to enhance the pearlescent quality
- Avoid matte finishes with this design—the shimmer won’t show through effectively
Visual impact: The shimmer becomes even more noticeable in sunlight or under bright lighting, so this design photographs beautifully and looks stunning in person.
14. Dark Green Ombre with Glitter Tips and Rhinestone Accents
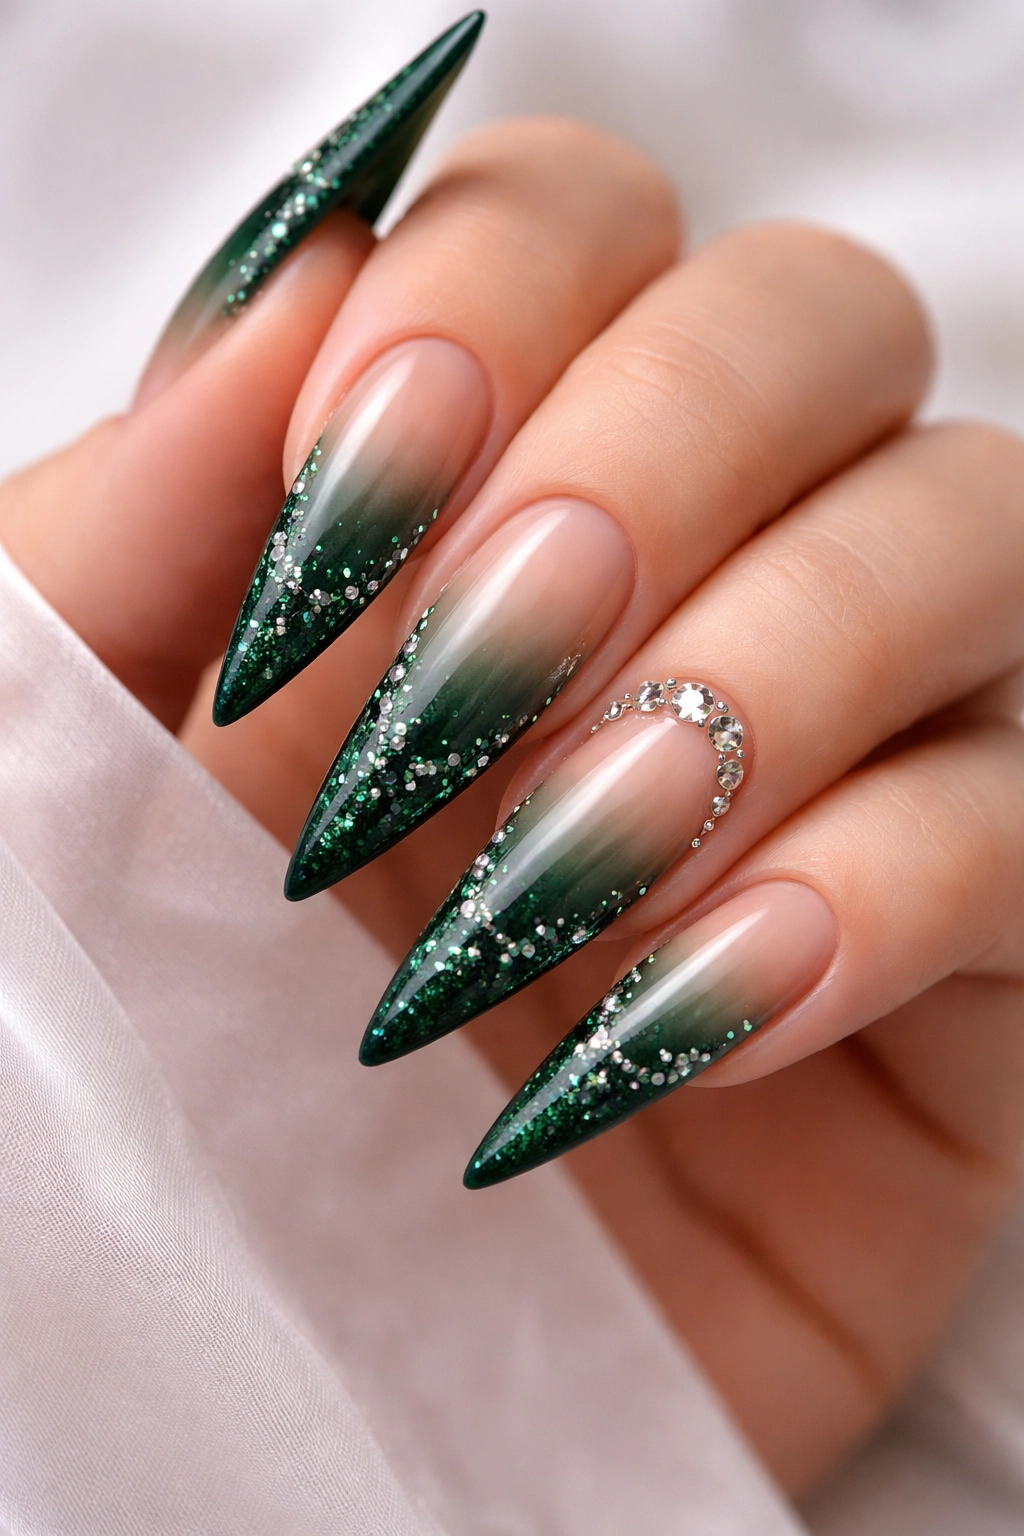
The nail transitions from solid dark green at the base to a glitter-laden nude tip, with small rhinestones scattered across the design for sparkle and dimension.
Why This Design Works
This design checks multiple boxes: it’s elegant, sparkly, and visually interesting. The ombre creates length and sophistication, the glitter tip adds glam, and the rhinestones provide high-end finishing touches. On stilettos, this design is particularly striking because each element has room to shine without feeling cramped or chaotic. It’s dressy enough for special occasions but can work for everyday glam if you dial down the rhinestone density.
Building This Multi-Element Design
- Create your dark green-to-nude ombre base using the sponging technique described earlier
- Once fully cured, apply clear gel to the tip area (the glitter section)
- Press fine gold or champagne glitter into the wet gel, creating a gradient density effect
- Cure the gel, then apply tiny high-quality rhinestones using nail glue or a specialized rhinestone applicator tool
- Place rhinestones strategically—perhaps scattered across the transition zone or clustered at the cuticle area
- Seal everything with a final clear top coat, ensuring rhinestones are secure
- This design is labor-intensive but stunning when executed well
Professional tip: High-quality rhinestones (like Swarovski crystals) create a much more luxe appearance than flat-back rhinestones found in bulk packs.
15. Dark Forest Green with Fine Gold Striping and Minimalist Dots
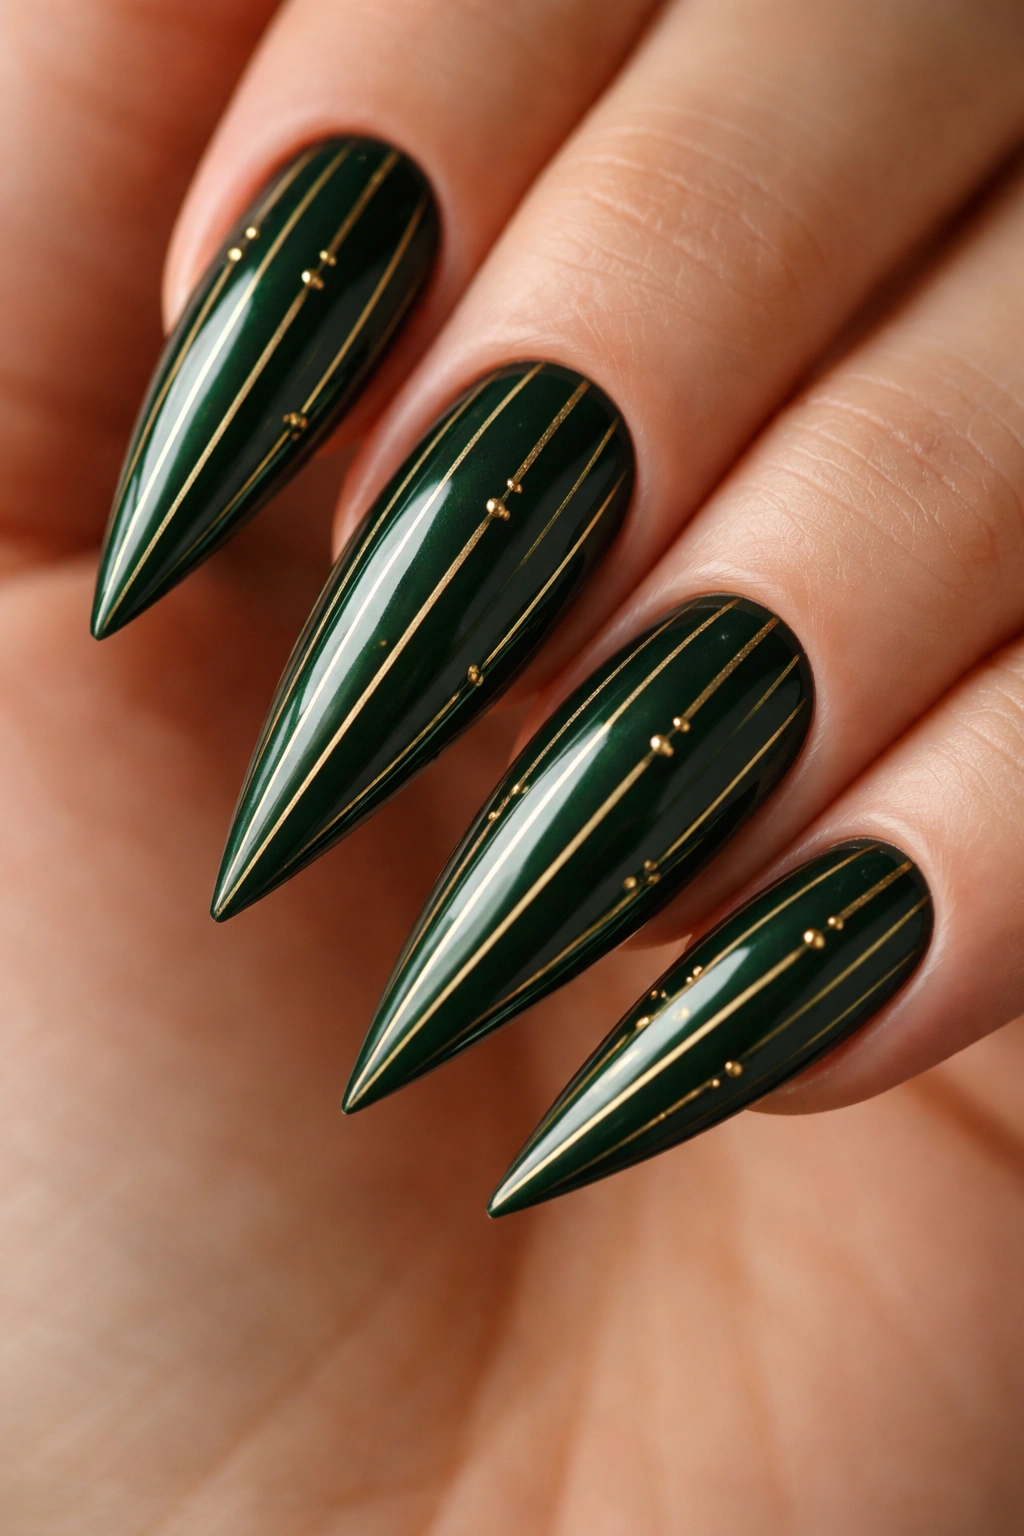
Thin gold lines create vertical striping with small gold dots scattered between them, creating an Art Deco-inspired geometric pattern.
Why This Design Works
Art Deco design is inherently elegant and timeless. The geometric precision of gold stripes and dots against dark forest green feels very sophisticated and editorial. The design is modern yet has vintage vibes, making it versatile for many occasions. On stilettos, the vertical striping emphasizes the nail’s length while the dots add visual rhythm. This is a design that feels intentional and carefully designed.
Creating the Art Deco Pattern
- Start with your dark forest green base, fully cured
- Using a thin striping brush and gold gel or polish, paint thin vertical lines spaced evenly across the nail
- Using a dotting tool, apply small gold dots between the lines in a regular, repeating pattern
- Keep the lines and dots consistent in size and spacing for a polished look
- You can cover the entire nail or create the pattern on just one or two nails per hand
- Seal with a glossy top coat to make the gold really pop against the green
- If hand-painting feels shaky, stencils and striping tape can help guide your lines
Design note: The key to pulling off this look is precision. Wobbly lines or irregular spacing will ruin the Art Deco feel. Perfection is the entire point.
16. Emerald Green Stilettos with Subtle Rainbow Holographic Effect
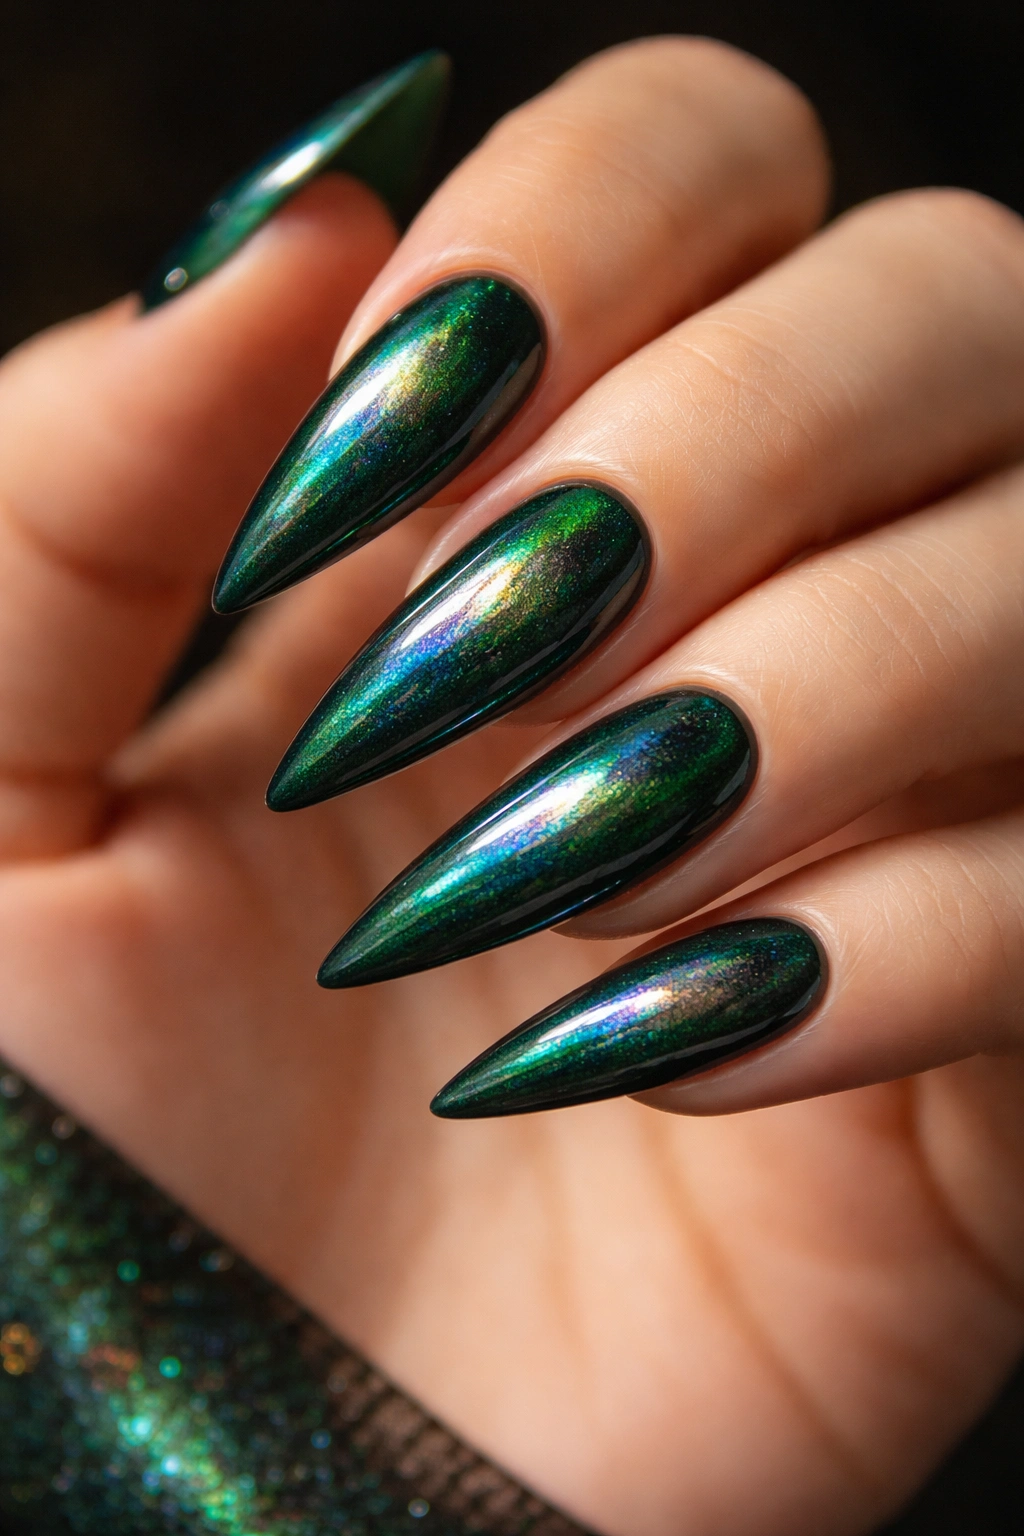
A dark emerald base with an integrated holographic pigment that creates rainbow light effects without looking overtly multicolored or glittery.
Why This Design Works
Holographic effects are understated compared to glitter or chrome finishes, but they’re incredibly eye-catching when the light hits just right. The effect is most visible in bright sunlight or under certain lighting conditions, which makes it feel like a secret detail. The emerald base keeps the design sophisticated while the rainbow flashes add modern intrigue. On stilettos, this subtle shimmer creates a jewelry-like quality.
Achieving Holographic Effects
- Use gel polishes or traditional polishes specifically formulated with holographic pigments
- Apply two to three thin coats, as holographic effects require adequate pigment density to show properly
- Holographic powders can also be mixed into clear gels for a custom effect
- The effect shows best in natural sunlight—indoors under regular lights, it may be subtle or invisible
- Seal with a clear, glossy top coat to enhance the effect
- Some holographic systems work better with specific base colors; emerald and dark teal are ideal
Wearability note: The holographic effect means your nails will look different in different lighting conditions. That’s actually part of the appeal—a design that reveals different facets depending on the light source.
17. Dark Green with Vintage Gold Filigree Stamped Design
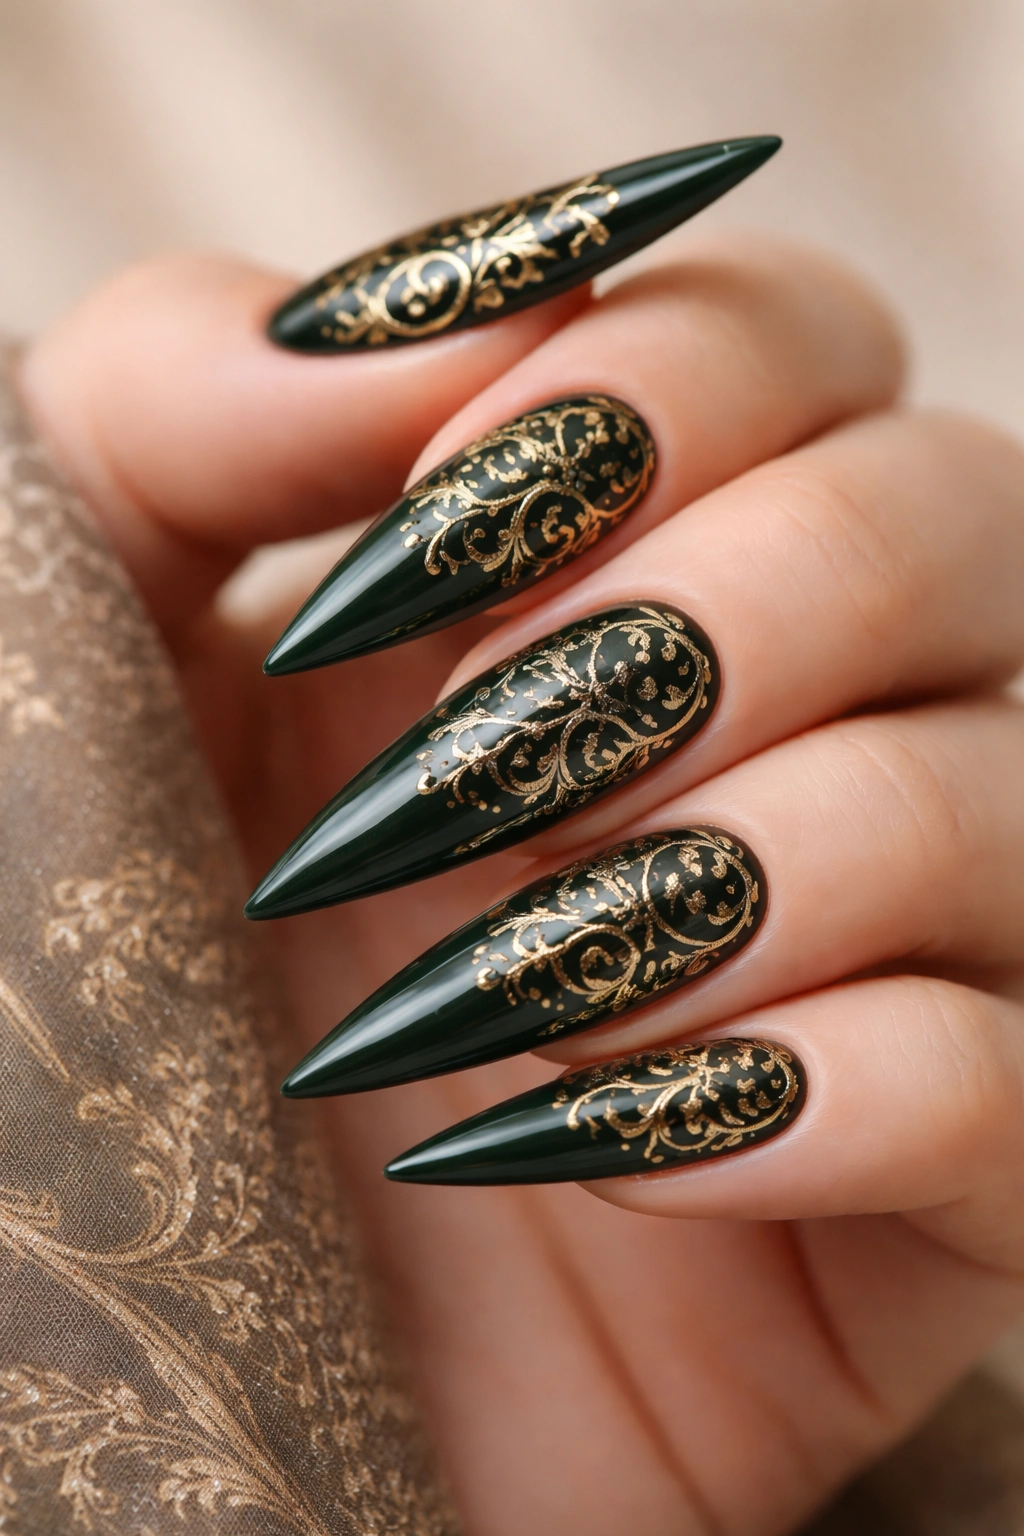
Ornate gold filigree patterns stamped onto the dark green nail create a vintage, heirloom jewelry-inspired aesthetic.
Why This Design Works
Stamped designs allow for intricate patterns that would be nearly impossible to hand-paint. Filigree is the epitome of elegance—it evokes antique jewelry and fine art. Against dark green, gold filigree looks almost like ornamental metalwork. On stilettos, this design creates instant sophistication and feels very luxe. The vintage inspiration appeals to people who love classic beauty and detailed craftsmanship.
Nail Stamping Process
- Apply your dark green base in two coats, ensuring complete opacity
- Use a nail stamping kit with a filigree pattern (many brands sell these)
- Apply stamping polish to the stamped plate and use a scraper to remove excess at a 45-degree angle
- Quickly press the stamper onto the nail and hold firmly for 2-3 seconds
- Carefully roll the stamper away from you to transfer the design
- Seal the entire nail with a glossy top coat
- Practice on a few test nails first; stamping takes a light touch and precise technique
Note: Not every dark green polish works equally well with stamping plates. Test your specific polish first, or use one of the traditional opaque stamping polishes designed specifically for this technique.
18. High-Shine Dark Green with Minimalist Gold Accent Nail
Fifteen nails are polished in a pristine high-shine dark green, while one accent nail features a thin gold line or small geometric shape, drawing focus through contrast and intentionality.
Why This Design Works
The accent nail approach is the height of sophisticated minimalism. By keeping most nails solid while featuring one statement nail, you create a focal point without overwhelming the viewer. The single gold accent nail provides just enough visual interest to elevate the entire look. On stilettos, this design maximizes the impact of both the color and the shape while maintaining a refined aesthetic. This is the nail equivalent of a perfectly tailored outfit with one standout accessory.
Executing the Accent Nail Design
- Paint fourteen nails with two coats of high-shine dark green base
- On your accent nail (typically the thumb or ring finger), create your focal point: a thin vertical gold line, a small gold triangle, or a geometric shape
- Keep the accent subtle—this is about drawing the eye, not overwhelming it
- Seal all nails with the same glossy top coat for a cohesive finish
- The impact comes from the contrast and intentionality, not elaborate detail
Placement strategy: The accent nail works best on your thumb, ring finger, or pinky—wherever it will naturally draw attention without looking random. Consider which hand is more visible and place your accent accordingly.
Final Thoughts
Dark green stiletto nails are endlessly versatile, and these eighteen designs only scratch the surface of what’s possible. Whether you’re drawn to minimalist elegance, sparkly glamour, artistic details, or editorial simplicity, there’s a dark green stiletto design that speaks to your aesthetic. The beauty of this color is that it works across seasons, occasions, and personal styles—you can rock it in the boardroom, at a wedding, on vacation, or just because you want to feel fabulous on a Tuesday.
The key to nailing any of these designs (pun intended) is patience and quality materials. Invest in good base coats, top coats, and polishes—the difference between a drugstore polish and a salon-quality one is genuinely noticeable. If any of these designs feel too intricate for your skill level, don’t hesitate to book an appointment with a skilled nail technician. The investment in professional application pays off in longevity, precision, and that satisfaction of having nails that look expertly done.
Dark green will always be chic, and on the architectural perfection of stilettos, it’s absolutely stunning. Pick your favorite design and make it happen—your nails will thank you.
