

There’s something undeniably elegant about light pink duck nails. The soft, sophisticated color paired with the distinctive curved silhouette creates a manicure that feels both playful and polished—the kind of nail art that works for a casual weekend brunch and a professional office setting alike. Light pink has become the go-to neutral for people who want their duck nails to feel less dramatic and more wearable while still commanding attention with that architectural shape.
If you’ve been scrolling through nail art inspiration and keep coming back to light pink duck nails, you’re definitely onto something. This color and shape combination gives you incredible versatility: you can keep it minimal and clean, layer in subtle textures, add sparkle and dimension, or incorporate intricate designs without the whole manicure feeling overwhelming. The beauty of light pink is that it’s forgiving—it works with nearly every skin tone, coordinates with almost any outfit, and somehow makes even simple nail designs look intentional and curated.
The challenge, of course, is figuring out which direction to take your light pink duck nails when the possibilities feel endless. Do you want something that whispers elegance, or are you ready to make a statement? Should you lean into minimalism or embrace embellishment? The good news is that light pink as your base color can handle whatever direction you choose. Whether you’re a nail art veteran or someone who’s nervous about trying something new beyond a standard polish, there’s a light pink duck nail design here that’s going to feel exactly right for where you’re at.
1. Soft Ballet Blush with Chrome Accents
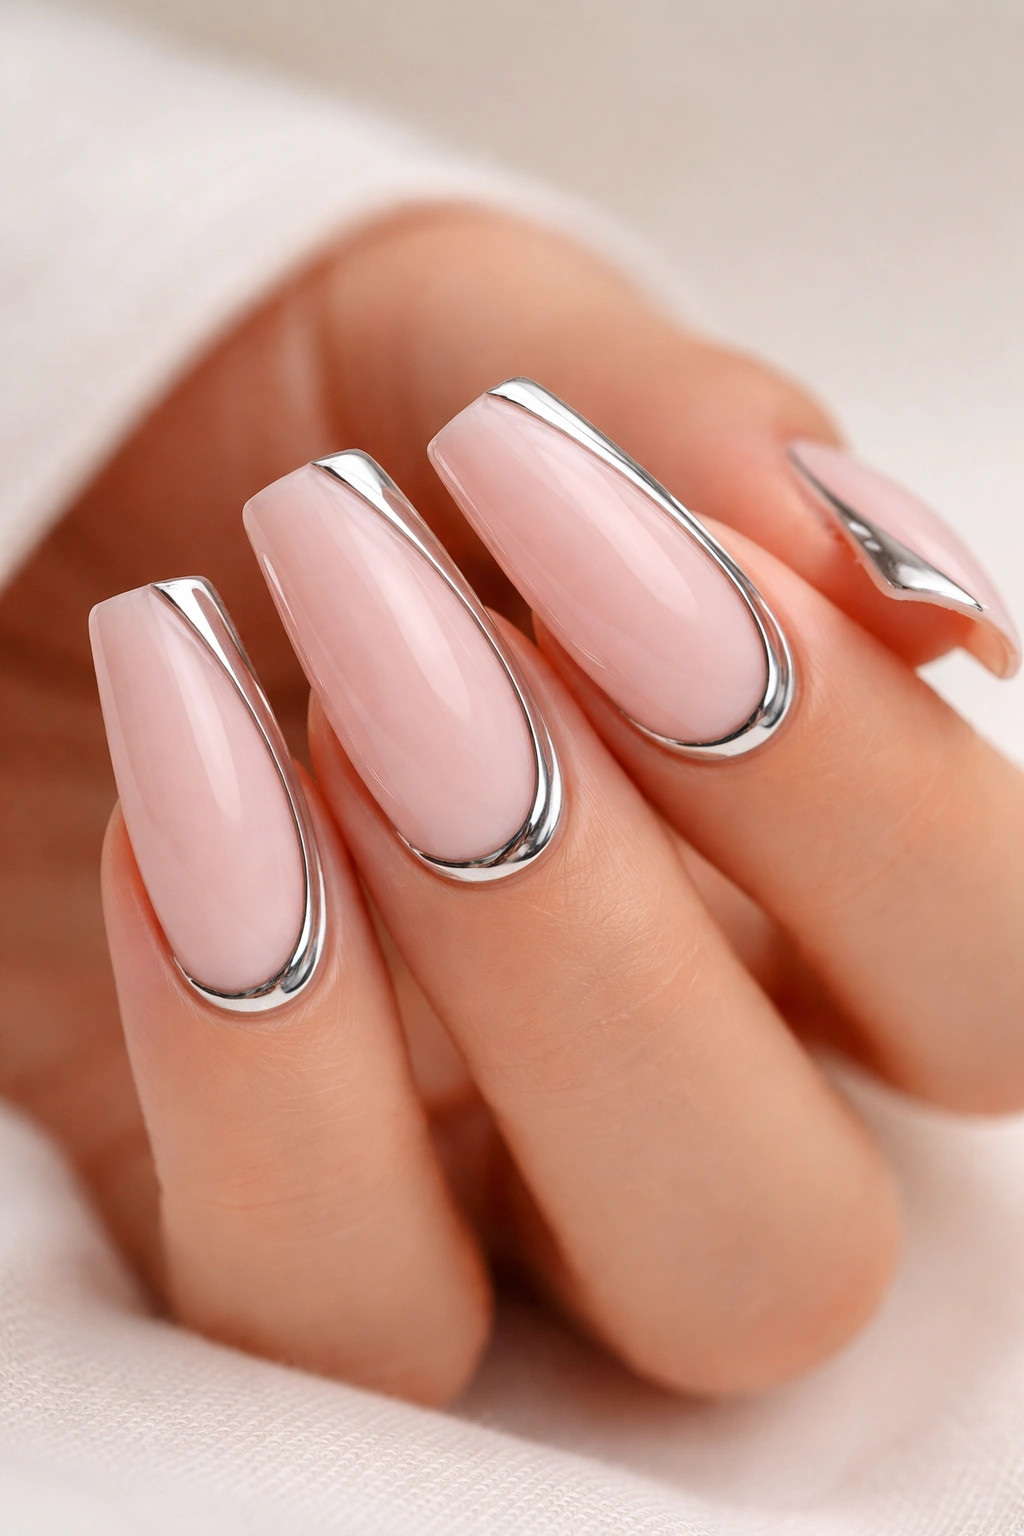
This design captures pure elegance with a creamy light pink base and touches of chrome that catch the light with subtle sophistication. The chrome sits along the cuticle area and down one side of the nail, creating asymmetrical movement that complements the duck nail curve beautifully. It’s refined without screaming for attention—the kind of manicure that makes you feel confident and put-together.
Why This Design Works So Well
Light pink and chrome might sound like an unconventional pairing, but they actually complement each other perfectly. The warmth of the blush tone keeps the reflective chrome from feeling too cold or metallic, while the chrome adds just enough dimension to prevent the manicure from feeling flat. The asymmetrical placement also respects the duck nail shape rather than competing with it—the curved edge remains the focal point while the chrome adds visual interest.
How to Achieve This Look
- Start with a milky light pink base coat—something like Ballet Blush or a true soft pink without any shimmer
- Use chrome powder applied with a velvet applicator pad to create an ombré effect from the cuticle downward
- Focus the densest chrome concentration at the cuticle and fade it out toward the tip for a gradient effect
- Seal everything with a thick top coat to protect the chrome and keep it from dulling
- Pro tip: Chrome powder shows every fingerprint and dust particle, so use a lint-free wipe between applications to keep your work clean
What Makes It Special
The beauty here is restraint. You’re not covering the entire nail with chrome—you’re using it as an accent that enhances rather than dominates. This makes the design feel premium and intentional, like something a professional nail artist created for a high-end salon. It’s perfect for anyone who wants subtle luxury.
2. Gradient Ombré From White to Light Pink
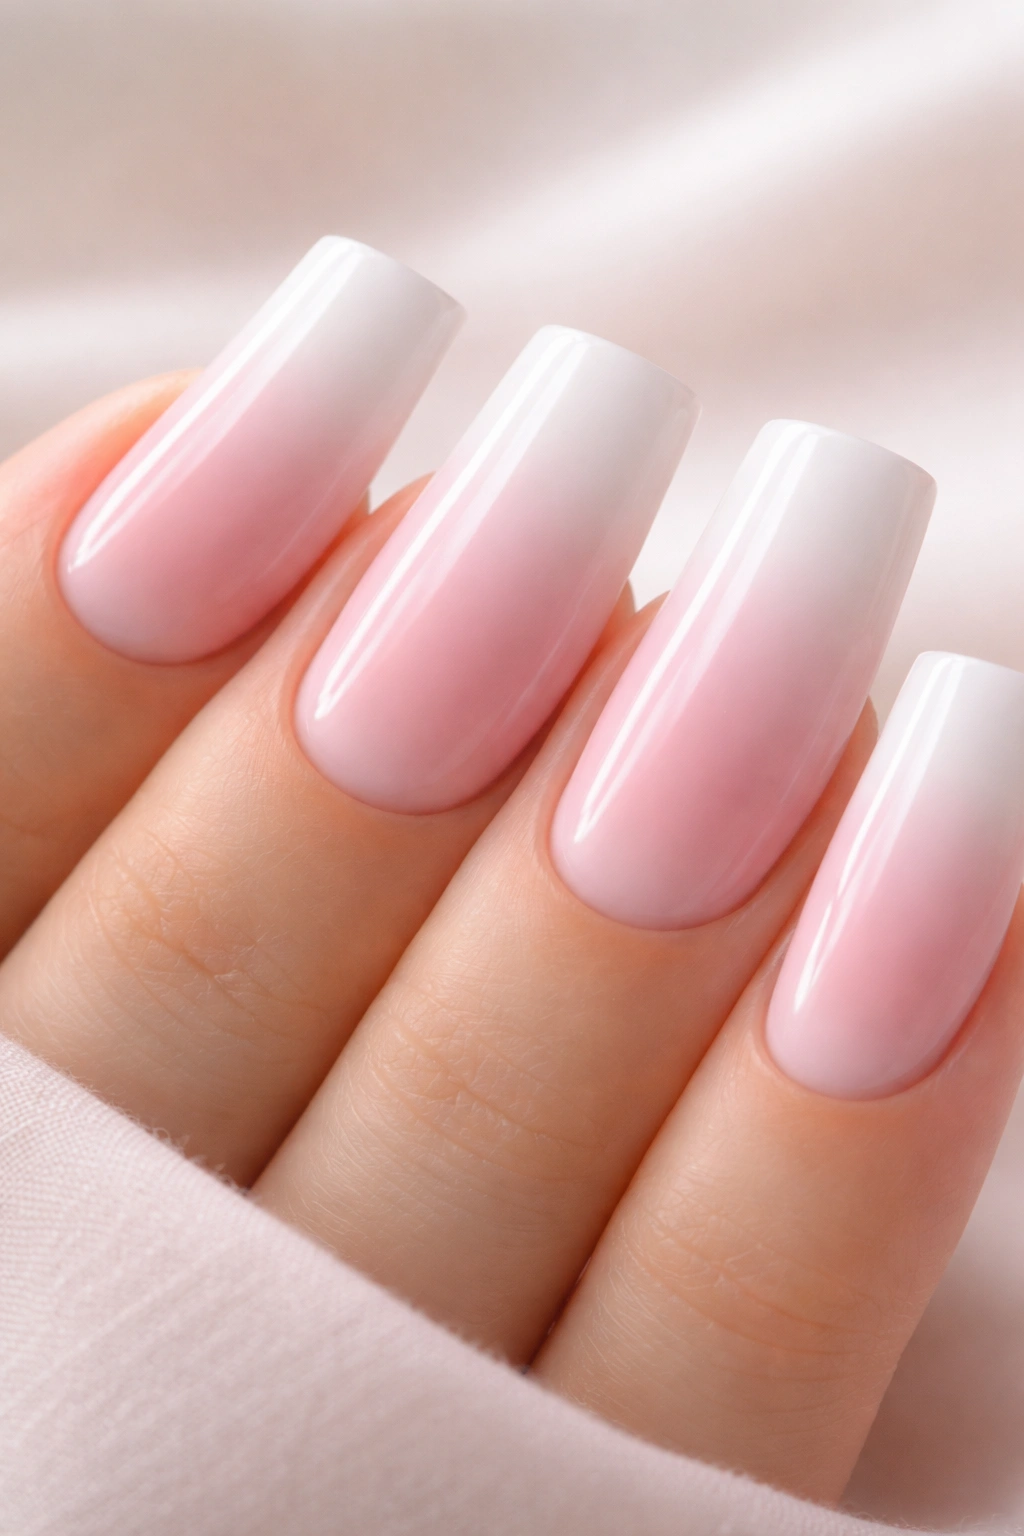
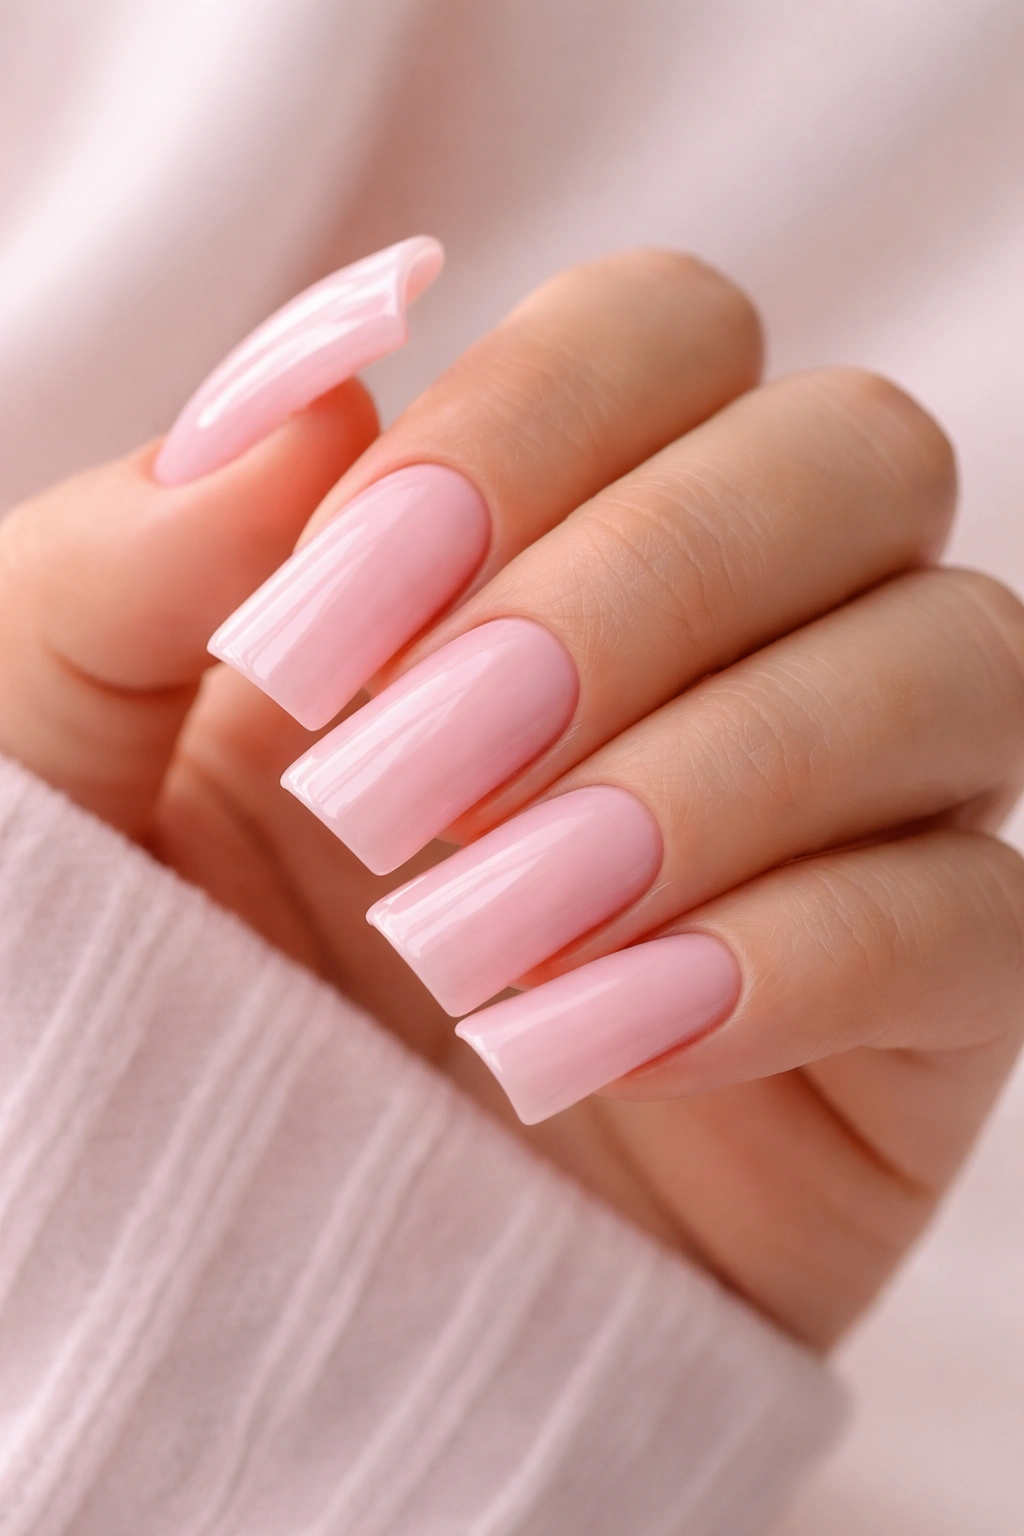
This design transitions smoothly from pure white at the tips to soft light pink at the base, creating an ombré effect that makes the duck nail shape pop with dimensional movement. The gradient is soft and seamless, not harsh or striped—it gives the illusion of depth and light that makes your nails look longer and more sculpted. It’s a technique that looks complicated but is actually quite forgiving once you get the hang of the blending.
Why This Gradient Is So Effective
The white-to-pink ombré mimics the effect of light hitting a curved surface, which works beautifully with the duck nail’s pronounced curve. Your eye naturally follows the gradient from the base to the tip, emphasizing the architectural shape you’ve chosen. The color transition is subtle enough to feel sophisticated but distinct enough that it’s clearly intentional and artistic.
How to Achieve This Look
- Paint the entire nail with light pink base polish—this will be your darker color
- Load a makeup sponge with white polish on one edge and light pink on the other
- Dab the sponge onto the tip area where the colors meet, blending back and forth in a bouncing motion rather than a dragging one
- Layer multiple applications, building gradually rather than trying to get perfect coverage in one sponge application
- Once you’re happy with the gradient, seal with a thick top coat to smooth out the sponge texture and create a glass-like finish
- Worth knowing: This technique works best with polish that has good opacity—sheer or translucent formulas will require too many layers
The Real Advantage
Once you master this technique, you can adapt it endlessly. Different color combinations, different directions of the gradient, different intensities—the skills transfer to every design variation. It’s one of the most versatile nail art techniques in your toolkit.
3. Delicate Floral Line Art in Muted Tones
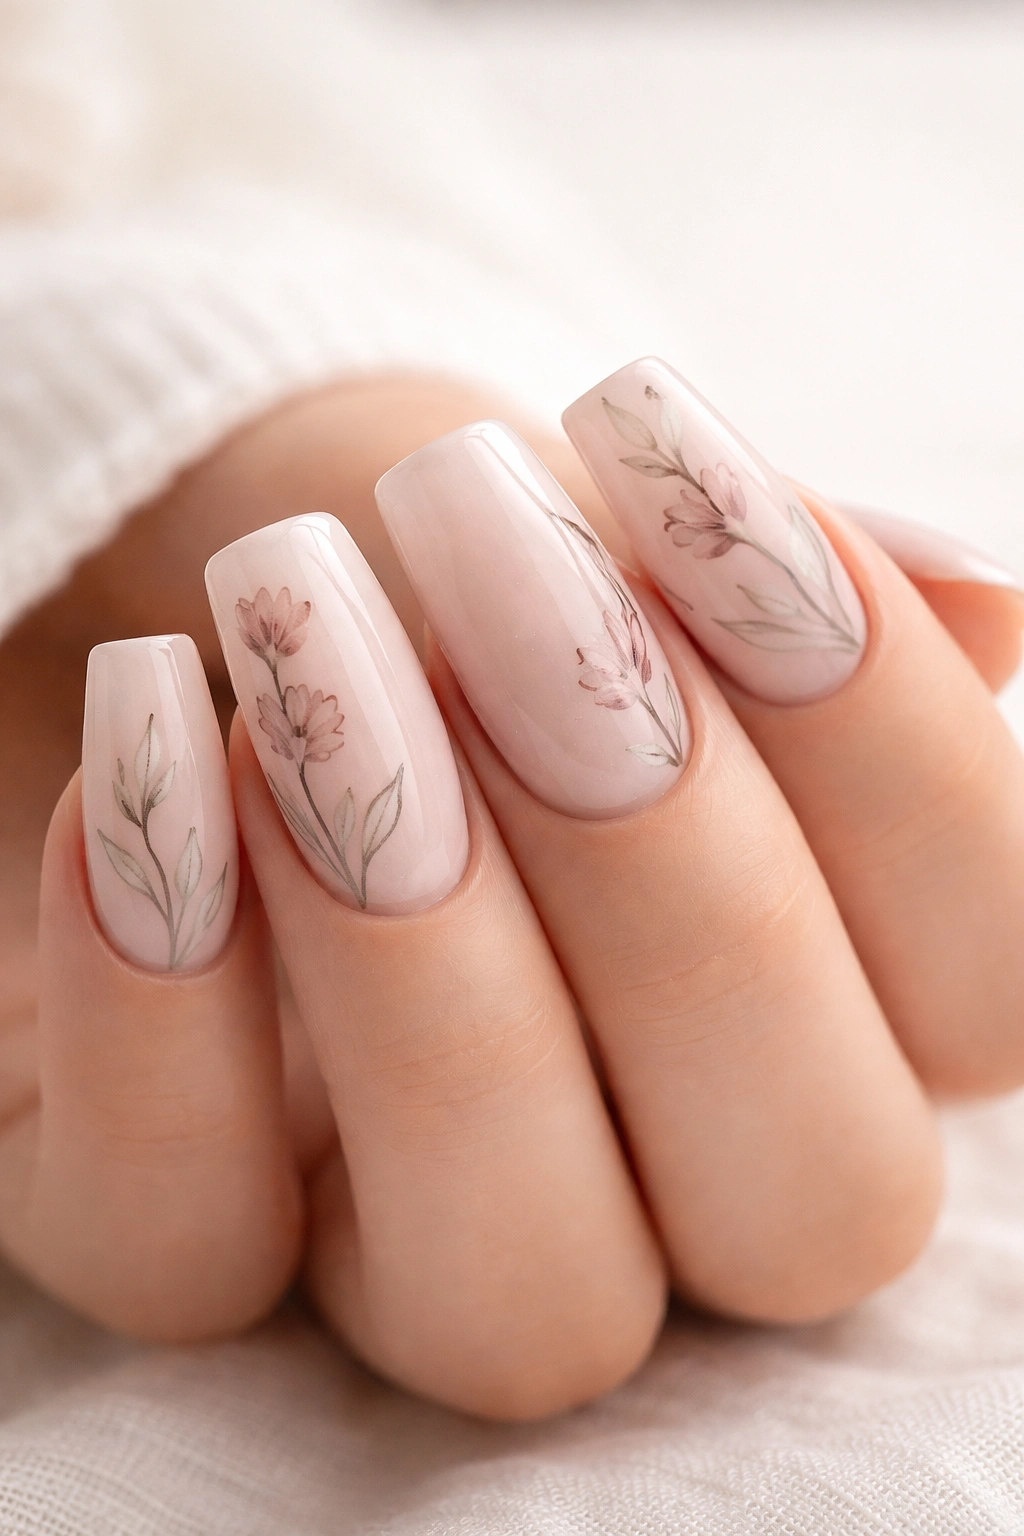
Hand-drawn florals in thin, clean lines create an understated botanical feel against your light pink base. Think tiny stems, minimalist blooms, and leaves scattered across the nail surface in dusty rose, sage green, or soft cream. The line work is detailed enough to feel artistic but simple enough that it doesn’t overwhelm the elegant duck nail shape. Each flower is rendered in just a few strokes, emphasizing the beauty of simplicity.
Why Minimalist Florals Work Here
Florals paired with light pink is a classic combination—the colors already evoke a natural, botanical aesthetic. By keeping the line work thin and the design sparse rather than full-coverage, you’re respecting that natural sensibility. The duck nail’s curved tip becomes part of the visual composition, with line art that flows naturally along the shape rather than fighting against it.
How to Achieve This Look
- Use your light pink base as the foundation—one thin coat is usually sufficient
- Use an ultra-fine liner brush or a thin art brush to apply designs in a contrasting color (dusty rose, deep green, or warm taupe work beautifully)
- Start with faint pencil marks or lightly sketch designs with a thin brush loaded with very diluted polish to plan your layout
- Draw stems first as guidelines, then add small blooms and leaves along those stems
- Keep individual elements small—one tiny flower per nail or scattered across two or three nails is more sophisticated than covering all five
- Seal with a glossy or matte top coat depending on your preference—both look beautiful with line art
- Insider note: If you’re not confident in your freehand drawing skills, create simple designs (three-line flowers, curved stems) rather than attempting photorealistic florals
What Makes This Special
Hand-drawn florals feel personal and artistic in a way that stamps or decals can’t quite replicate. You’re essentially creating wearable miniature art, and light pink is the perfect canvas for that kind of personal expression.
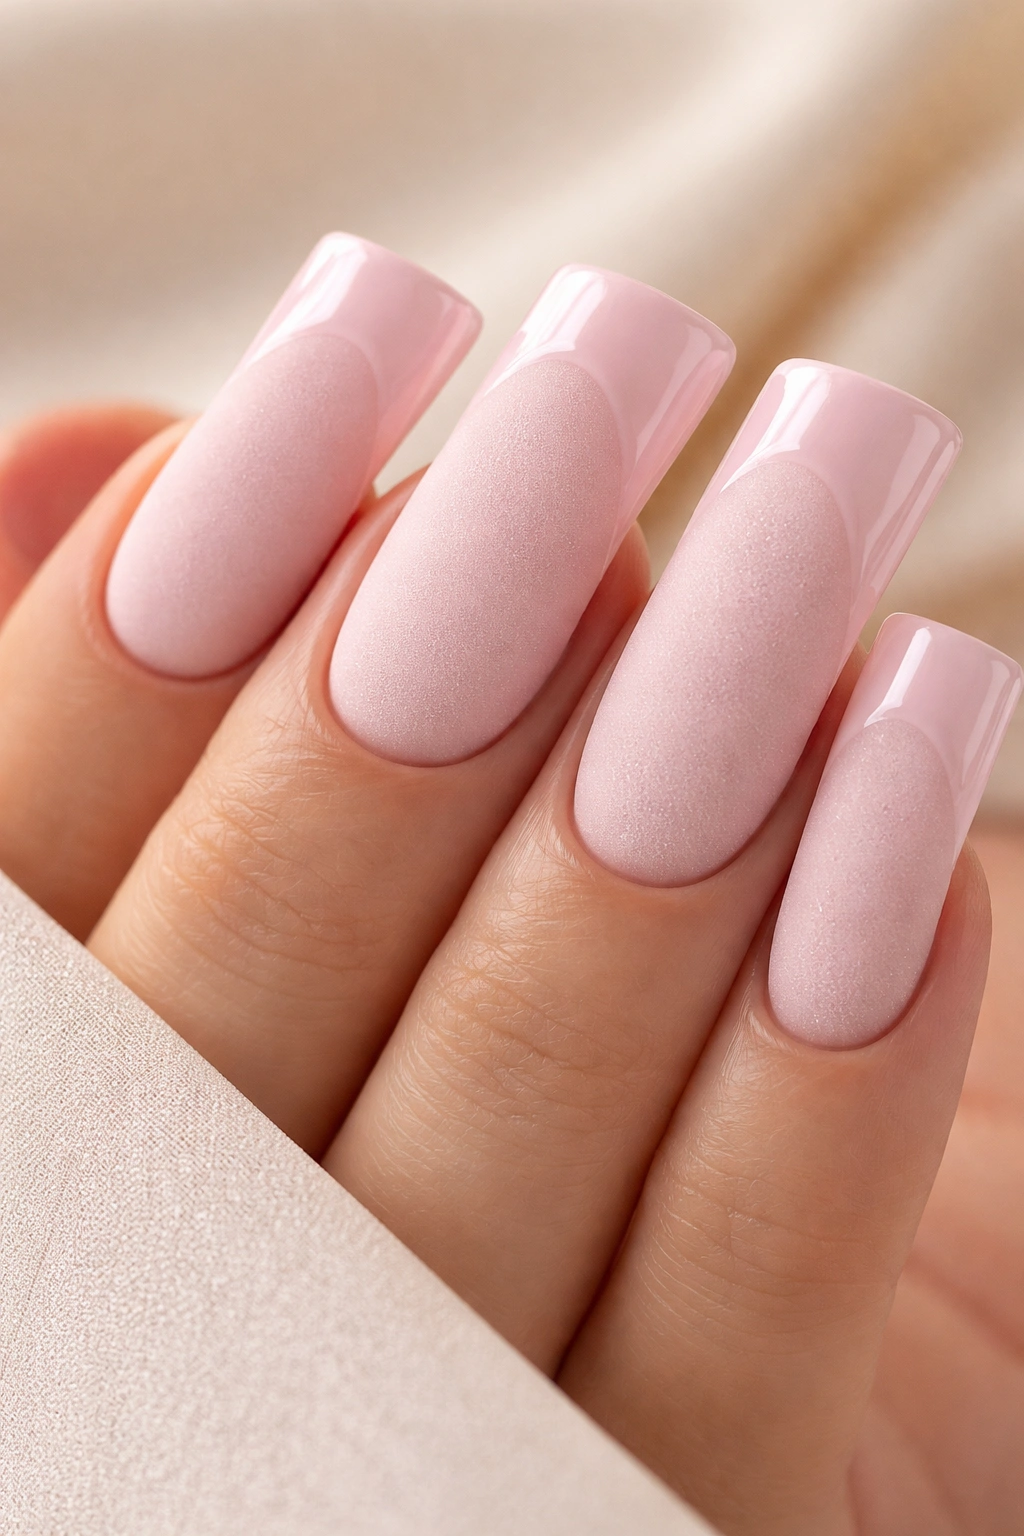
4. Shimmery Light Pink with Metallic Cuticle Definition
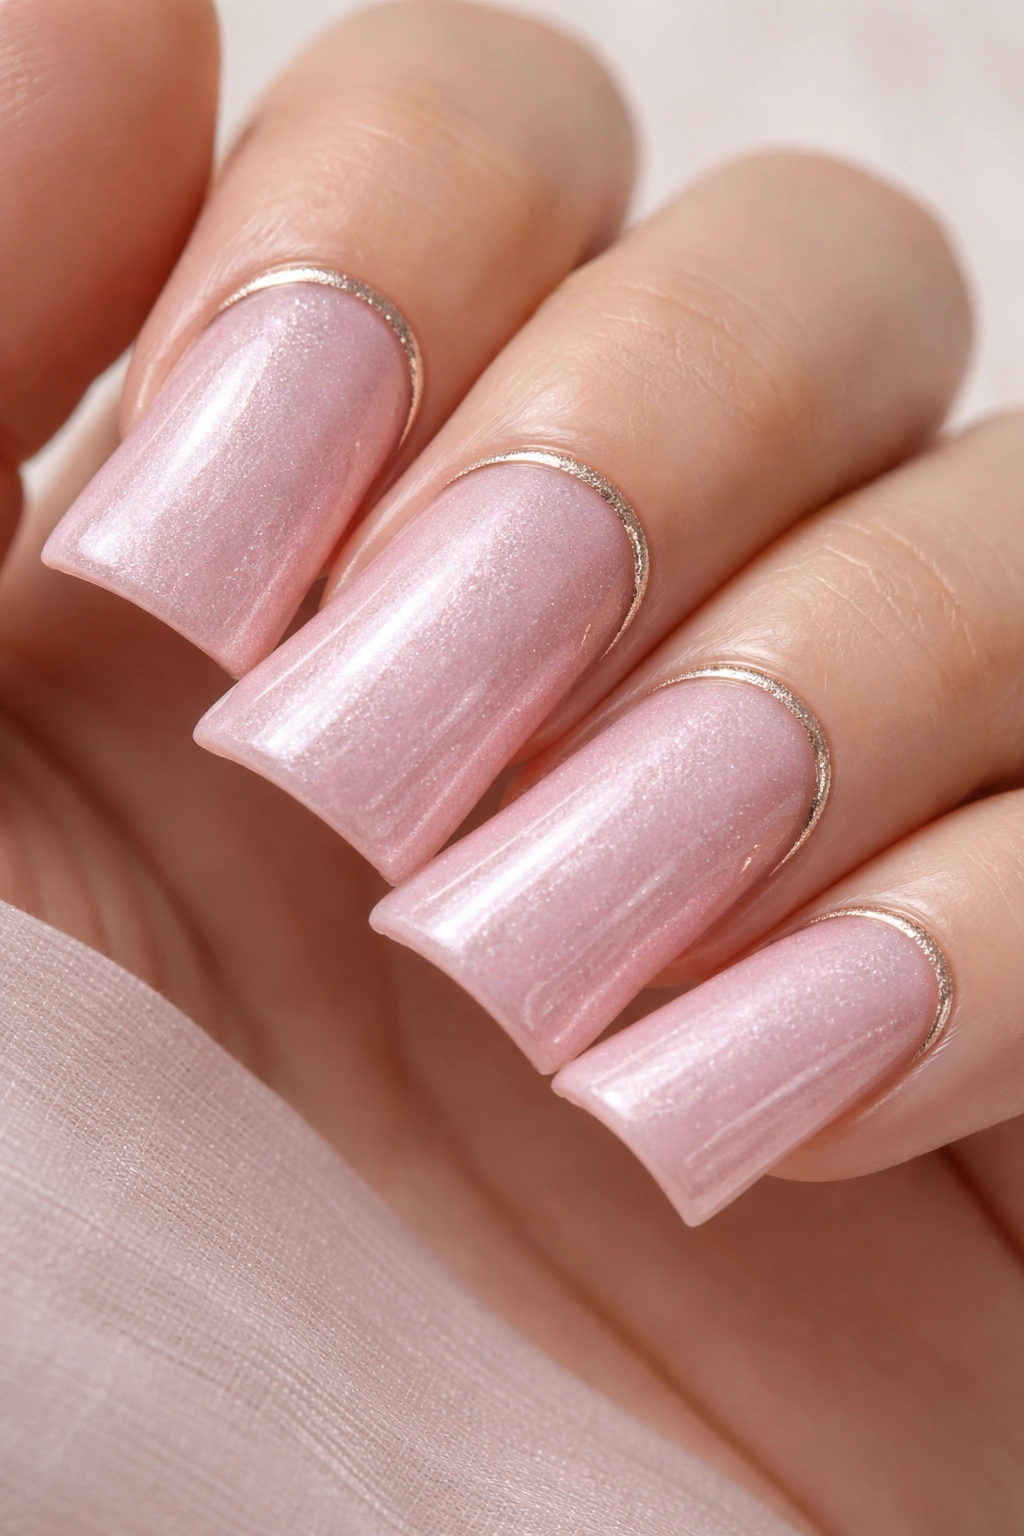
This design keeps things simple with a creamy shimmery light pink across the entire nail, but adds definition through a thin metallic line that frames the cuticle area. The metallic could be gold, rose gold, or silver, depending on your undertones and personal preference. The line is thin and precise, almost like a negative space design that makes your nail base appear slightly lifted from the nail bed. It’s understated elegance with just enough visual interest to feel intentional.
Why This Approach Works
The shimmer in the base polish catches light and adds movement, preventing the manicure from feeling flat or one-dimensional. The metallic cuticle line grounds the design and adds polish without complicating the overall aesthetic. This design works because it respects the duck nail shape—nothing competes with the curve of the tip, but the metal line adds sophistication to the quieter base area.
How to Achieve This Look
- Apply two coats of a shimmery light pink polish—make sure it’s a true shimmer (not a full-coverage sparkle)
- Use a thin metallic striping brush or a fine art liner with metallic polish (gold, rose gold, or silver)
- Draw a thin curved line just above the cuticle area, following the natural contour of your nail base
- Keep the line clean and even—this is where precision matters because the minimalism makes any imperfections visible
- Apply a glossy top coat that enhances the metallic shine without dulling the shimmer in the base color
- Pro tip: Metallic polish is tricky to work with because it dries quickly and can show brush strokes. Use slow, deliberate strokes and clean your brush frequently
What Makes It Special
This is the kind of design that looks effortlessly refined. It’s minimal enough to work in professional settings but polished enough to elevate your everyday look. The metallic detail signals that you put thought into your nails without overwhelming them.
5. Negative Space Design with Geometric Cutouts
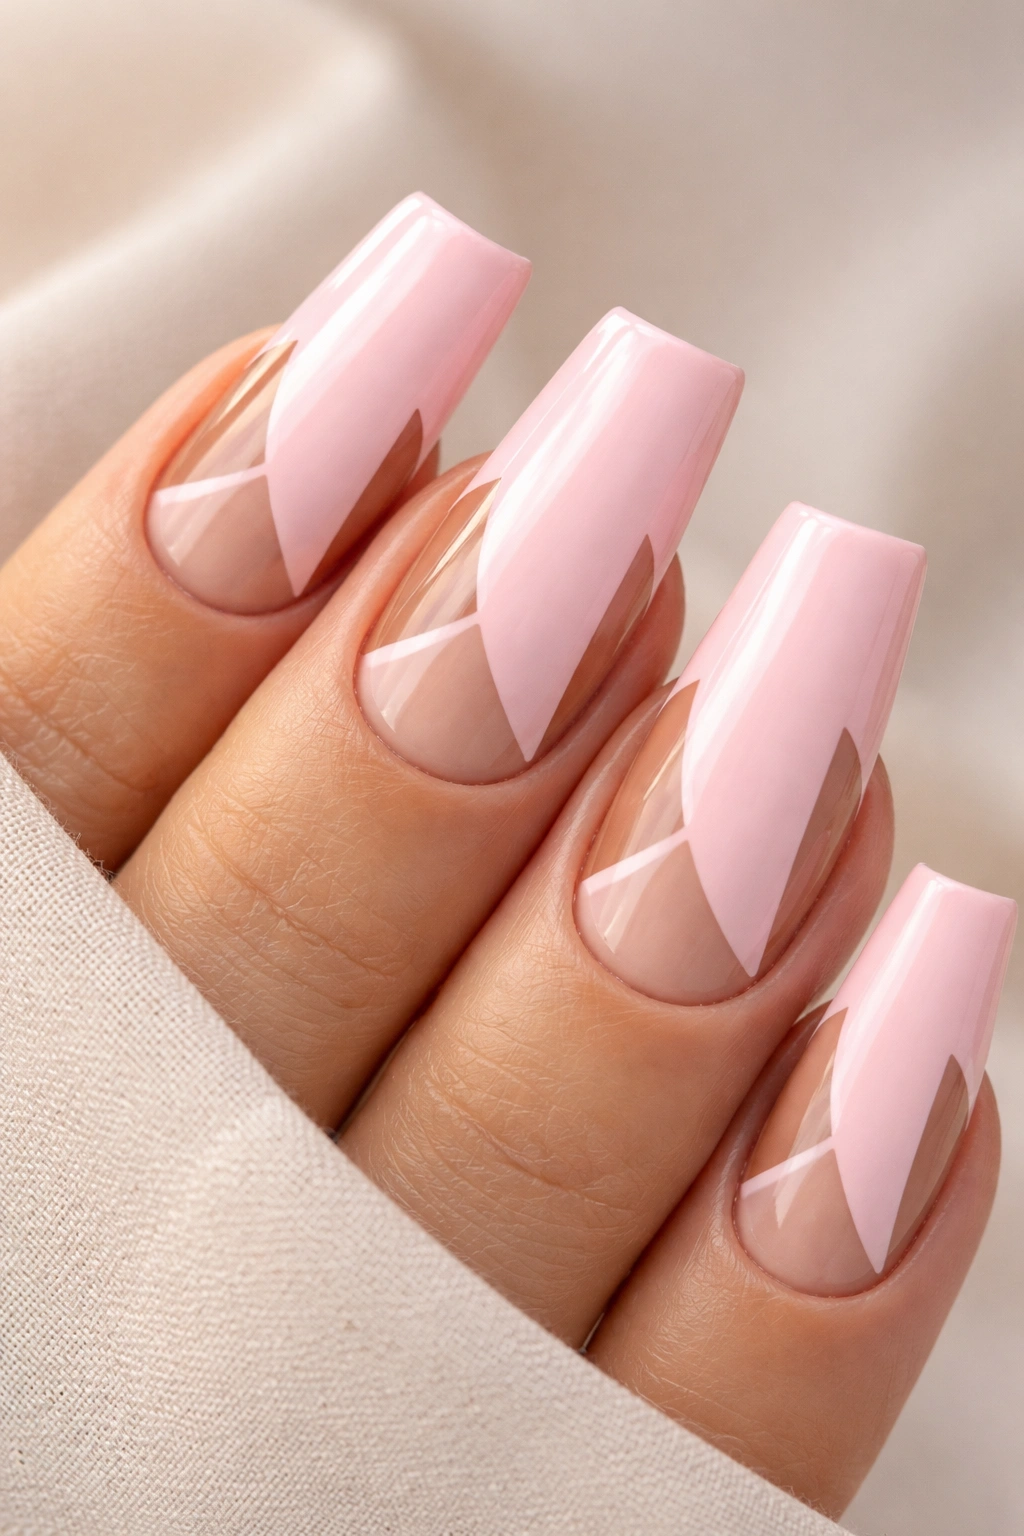
This bold design features your light pink base with geometric shapes (triangles, lines, or abstract shapes) cut out through the polish to reveal the natural nail or a contrasting nude base underneath. The negative space creates visual interest through what’s not there rather than what is, which is a sophisticated design principle. Common patterns include triangular sections removed from the side of the nail, horizontal lines of negative space, or scattered geometric shapes that feel almost like a pattern.
Why Negative Space Works So Well
Negative space design takes advantage of the duck nail’s prominent shape by creating visual contrast without adding pigment. The curved tip of the duck nail becomes even more pronounced when you’ve removed polish from the side edges or base, and that architectural quality becomes the star of the manicure. It’s a design technique that feels modern and intentional.
How to Achieve This Look
- Plan your design on paper before committing to the nail
- Paint your entire nail with light pink polish—two coats for full coverage
- Use rubbing alcohol and a thin brush or toothpick to remove polish in your chosen pattern while the top coat is still wet, OR use a striping brush with acetone to dissolve existing polish
- For a cleaner approach, paint your design in light pink, then use painter’s tape to create geometric shapes before applying a contrasting nude or neutral base coat, removing the tape to reveal the light pink underneath
- Seal with a thick top coat to prevent the negative space edges from catching on things
- Worth knowing: This technique is easier with a base layer of contrasting color, so light pink polish over a nude base reads more clearly than light pink directly on the natural nail
The Real Advantage
Negative space design is surprisingly versatile. You can make it match your mood—bold and graphic for someone who wants to make a statement, or subtle with minimal removed space for someone who wants understated interest. The technique works with any color combination.
6. Soft Pink Base with Tiny Pearl Embellishments

Imagine a creamy light pink base studded with microscopically small pearls or pearl-like rhinestones positioned along the cuticle line and scattered down one side of the nail in an intentional but not-quite-symmetrical pattern. The pearls add three-dimensional texture and catch light in a soft, lustrous way. It’s delicate embellishment that feels refined rather than over-the-top, with each pearl carefully placed rather than scattered carelessly across the entire nail.
Why Pearl Accents Elevate the Design
Pearls carry natural associations with elegance and sophistication, and tiny pearls in particular feel special without being flashy. Against light pink, they read as almost ethereal—there’s a luminous quality to pearls on a soft background. The scattered placement along the cuticle and down one side creates movement and asymmetry that keeps the design from feeling too stiff or formal.
How to Achieve This Look
- Apply two coats of light pink base polish in a creamy or slightly shimmery formula
- Use a sticky top coat or an adhesive designed for nail embellishments
- Using a fine-tipped brush or an adhesive applicator, create dots of sticky substance where you want pearls placed—along the cuticle line and descending along one side
- Place tiny pearls (1-2mm pearls work beautifully here) into the sticky dots using a rhinestone picker or a slightly dampened toothpick
- Once all pearls are placed and positioned, seal everything with a thick, protective top coat
- Pro tip: Apply the top coat in thin layers to avoid shifting the pearls—wait a few seconds between coats so pearls have time to set in position
What Makes It Special
The delicate restraint here is what makes this design feel luxury. You’re using embellishments, but thoughtfully and minimally. It’s the kind of detail that catches light when you move your hands—people notice it without you having to explain it, and that’s when embellished nail art feels most successful.
7. Soft Pink with Wavy Marble Effect
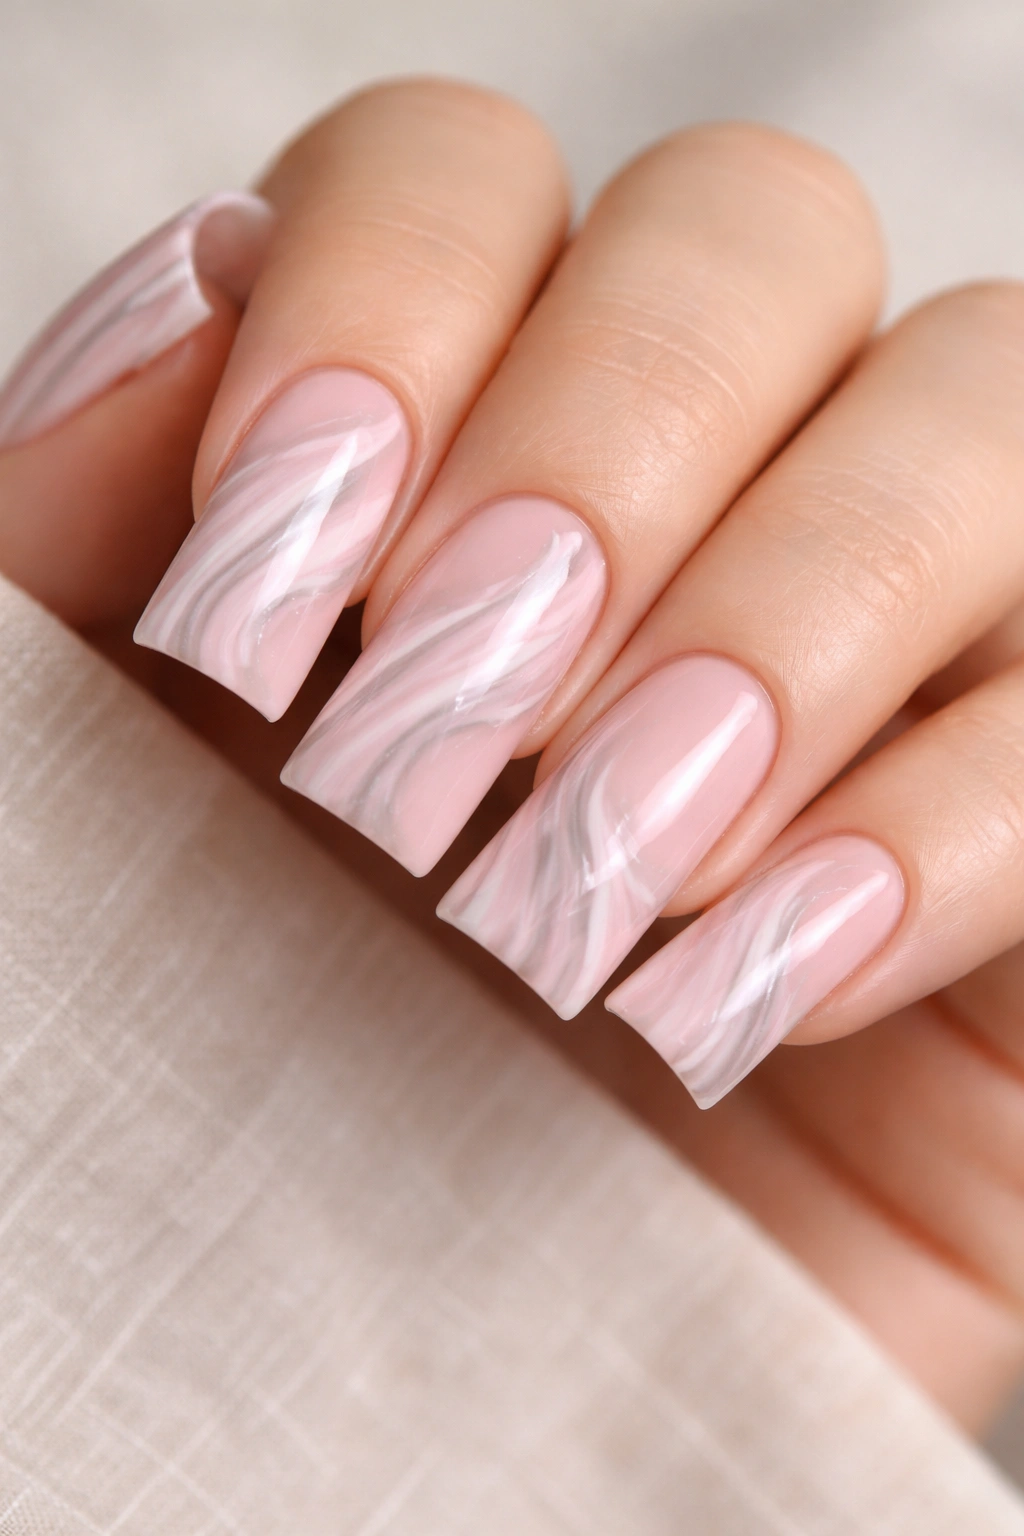
This design blends light pink with white and soft gray in a flowing, organic pattern that resembles marble or liquid movement. The effect is achieved through wet-on-wet blending, creating soft, diffuse lines rather than sharp boundaries. The colors swirl together in an unpredictable but harmonious way, with the light pink as the dominant color and white and gray flowing through it. Each nail ends up unique, even if you’re attempting the same pattern, which adds to the organic, natural appeal.
Why Marble Works with Light Pink
Marble patterns inherently look sophisticated and high-end because marble itself is associated with luxury and elegance. Light pink marble specifically feels fresh and contemporary—it’s a twist on traditional black or gray marble that feels modern without being trendy. The soft blending also complements the duck nail curve by creating visual movement that flows naturally along the shape.
How to Achieve This Look
- Start with a white or very light nude base coat
- Apply a generous amount of light pink polish to the majority of the nail
- While wet, add small touches of white and soft gray polish in random areas
- Use a dry brush, a toothpick, or a marble tool to gently swirl the colors together, creating flowing, organic lines
- Work quickly before polish starts to set—the wet environment is what creates that soft, blended effect
- Seal immediately with a glossy top coat
- Worth knowing: This technique requires practice because timing is everything. If you wait too long, the polish dries and won’t blend smoothly. If you work too fast, you’ll create muddy colors instead of defined swirls
The Real Advantage
Every marble manicure is one-of-a-kind because the blending is unpredictable. This uniqueness makes the design feel more personal and special than something perfectly replicated. Plus, marble patterns are forgiving of minor imperfections because the organic nature of the design is actually enhanced by slight irregularities.
8. Ombré Glitter Fade from Dense to Sparse
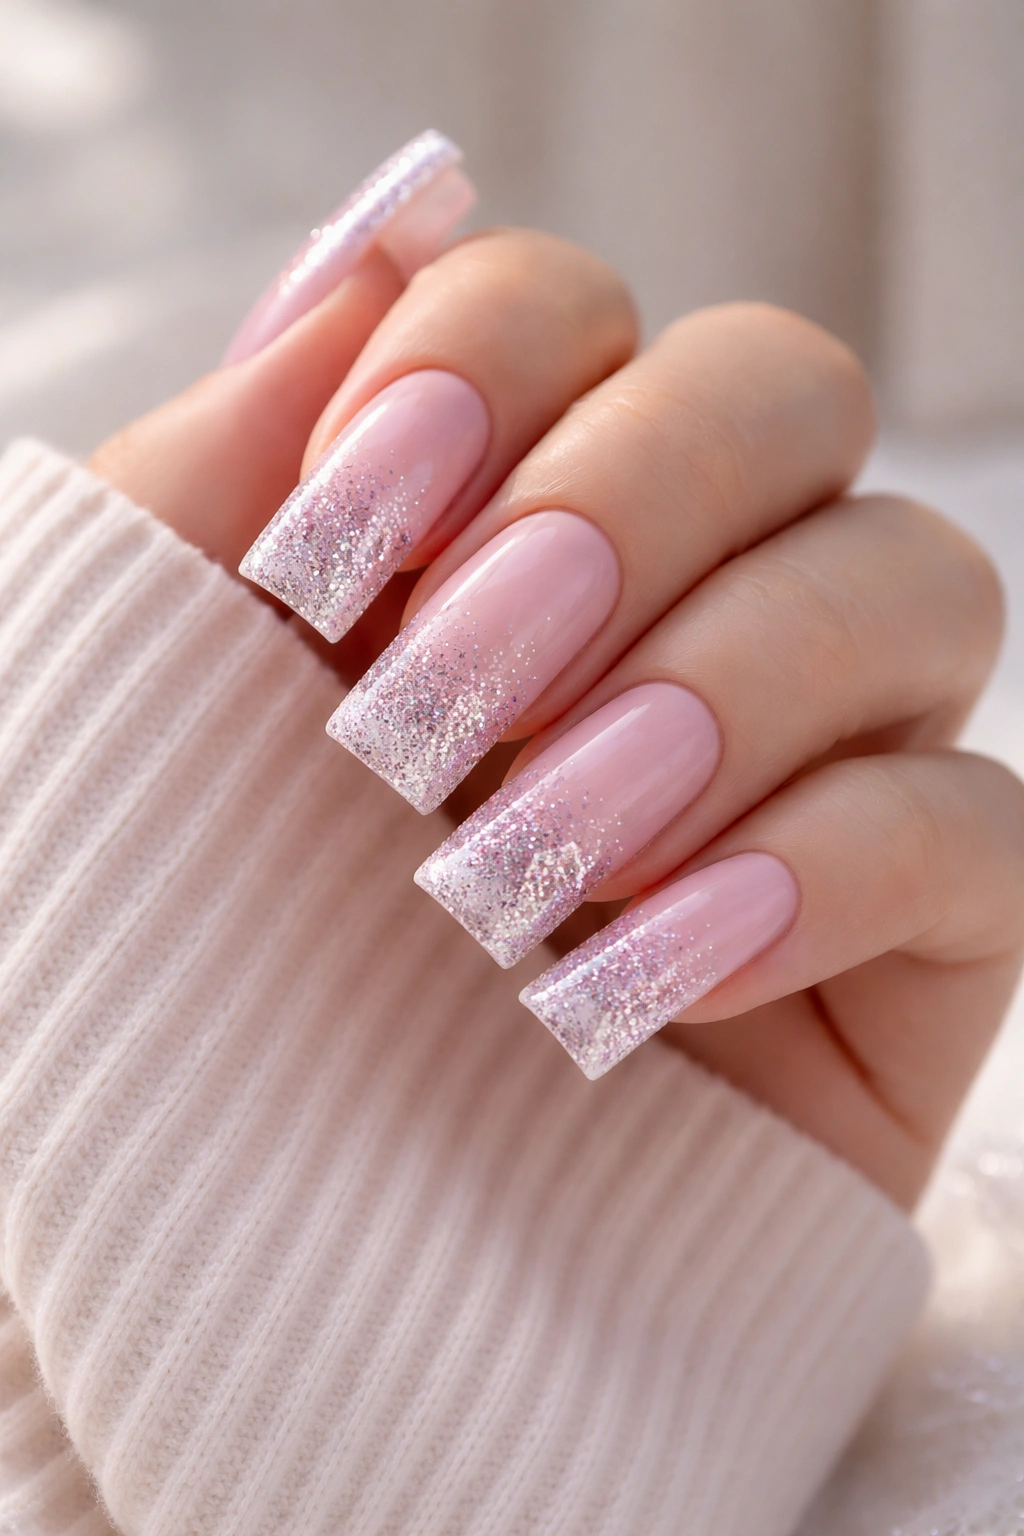
This design features your light pink base with a strategic glitter placement that transitions from dense glitter coverage at the tip to sparse or absent glitter near the cuticle. The glitter itself could be rose gold, silver, champagne, or even holographic microglitter—the key is the gradient from “lots of sparkle” at the tip to “barely any sparkle” at the base. This creates a visual flow that emphasizes the duck nail shape while adding celebratory sparkle without the heaviness of full glitter coverage.
Why the Fade Effect Works
A glitter fade respects the architecture of the duck nail by adding visual weight to the tip, which naturally draws the eye to that curved, extended area. The gradual transition also feels more intentional and artistic than all-over glitter, which can sometimes read as a quick, simple manicure. The fade creates a sense of movement and dimension.
How to Achieve This Look
- Paint your entire nail with light pink base polish—two coats
- Apply a sticky top coat or adhesive solution
- Using a dense brush loaded with fine glitter, paint the tip area (roughly the top third) completely
- Reload your brush and apply glitter to the middle section with less density—perhaps 60% coverage with visible streaks of pink showing through
- Apply glitter to the lower third very sparsely—maybe just 20% coverage scattered across the nail
- Once glitter placement is done, seal everything with a thick, protective top coat
- Pro tip: Use a slightly dampened brush to create more controlled glitter placement—dry brushes create less defined edges for the gradient
What Makes This Special
The glitter fade gives you the best of both worlds: sparkle and shine where it visually matters (at the tip, where it’s most noticed), combined with the elegance of a mostly clean base. It’s a design that feels celebratory without being costume-like.
9. Light Pink with Hand-Painted Gold Geometric Lines
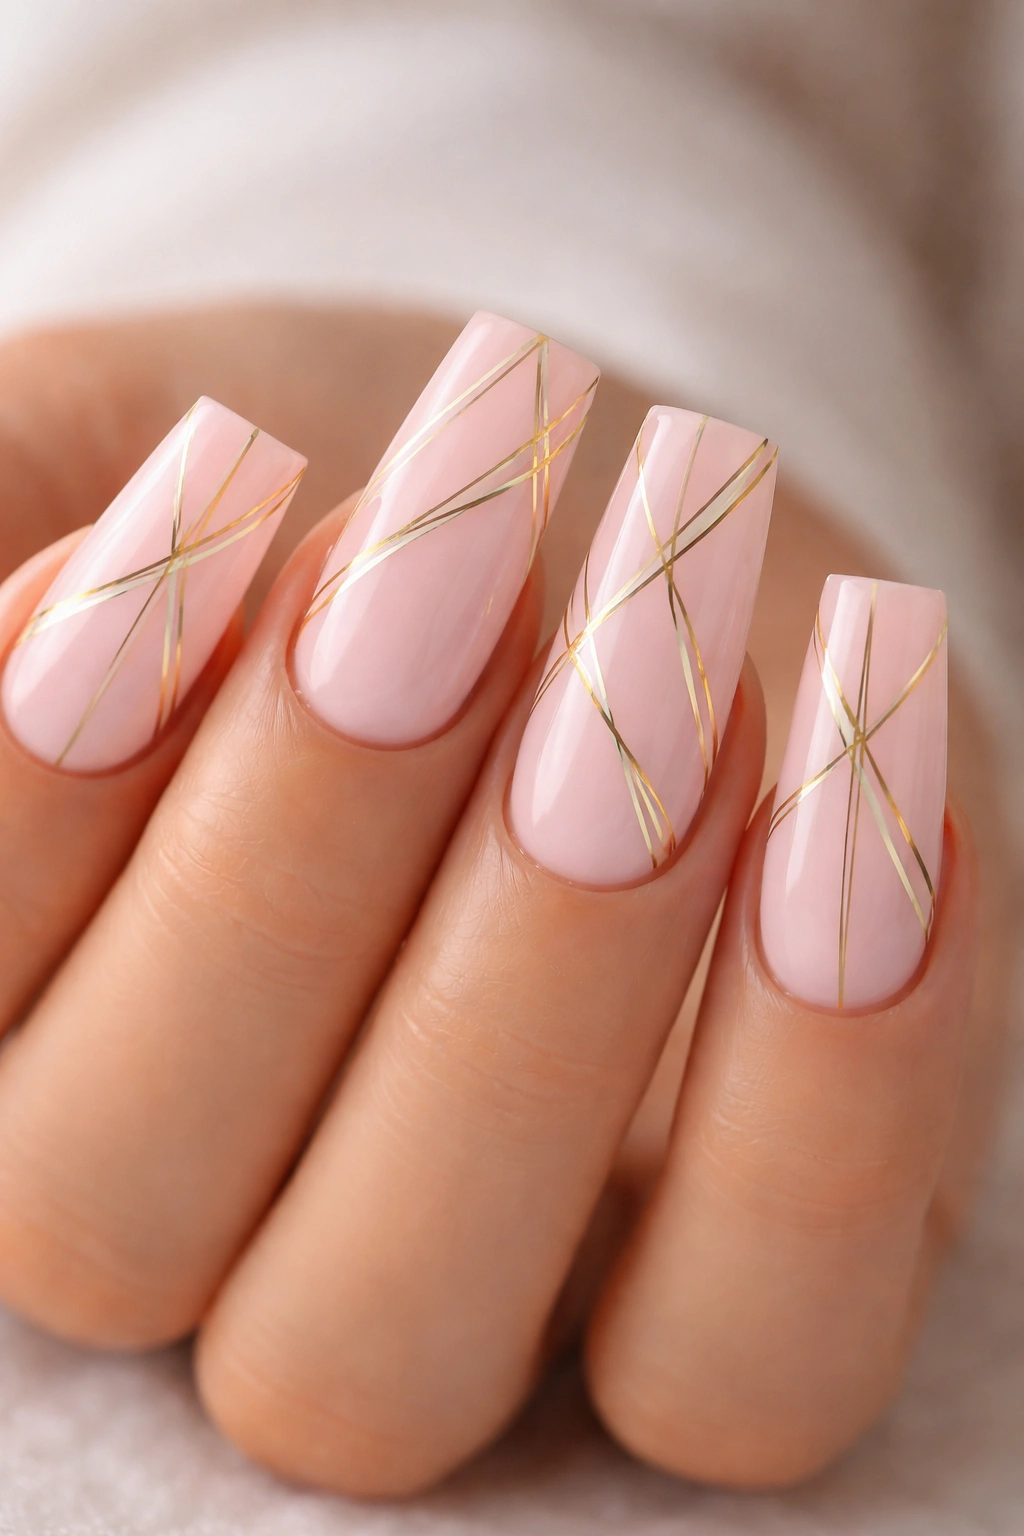
This design uses a clean light pink base as the foundation for thin, precise gold lines that create geometric patterns across the nail. The lines might form triangles, abstract shapes, or simple linear patterns—think modern art museum chic. Each line is clean and intentional, creating visual structure against the soft color. The gold contrasts sharply with the pink, making the lines pop as a distinct design element rather than blending into the base.
Why Geometric Line Art Feels So Contemporary
Geometric patterns inherently feel modern and artistic. When you pair them with a soft background color like light pink, the geometry reads as intentional design rather than chaotic decoration. Gold lines against pink also feel upscale—it’s a color combination you see in luxury goods and high-end design.
How to Achieve This Look
- Apply two coats of light pink base polish in a creamy, opaque formula
- Use a thin striping brush or art liner with metallic gold polish
- Lightly plan your pattern with a pencil or a very light hand—geometric patterns require planning more than freehand florals
- Draw clean, even lines creating your chosen geometric pattern (parallel lines, triangles, abstract shapes)
- Keep lines thin for maximum impact—thin gold lines against pink read as sophisticated, while thick lines can feel heavy
- Seal with a glossy top coat that enhances the metallic shine
- Worth knowing: Metallic polish (especially gold) shows every imperfection, so take your time with each line and clean your brush between strokes
The Real Advantage
This is a design that looks like you spent significant time on your nails, even if you can complete it relatively quickly once you’ve planned your pattern. The intentionality of geometric design always reads as more impressive than random embellishment.
10. Sheer Light Pink with French Tips in Rose Gold
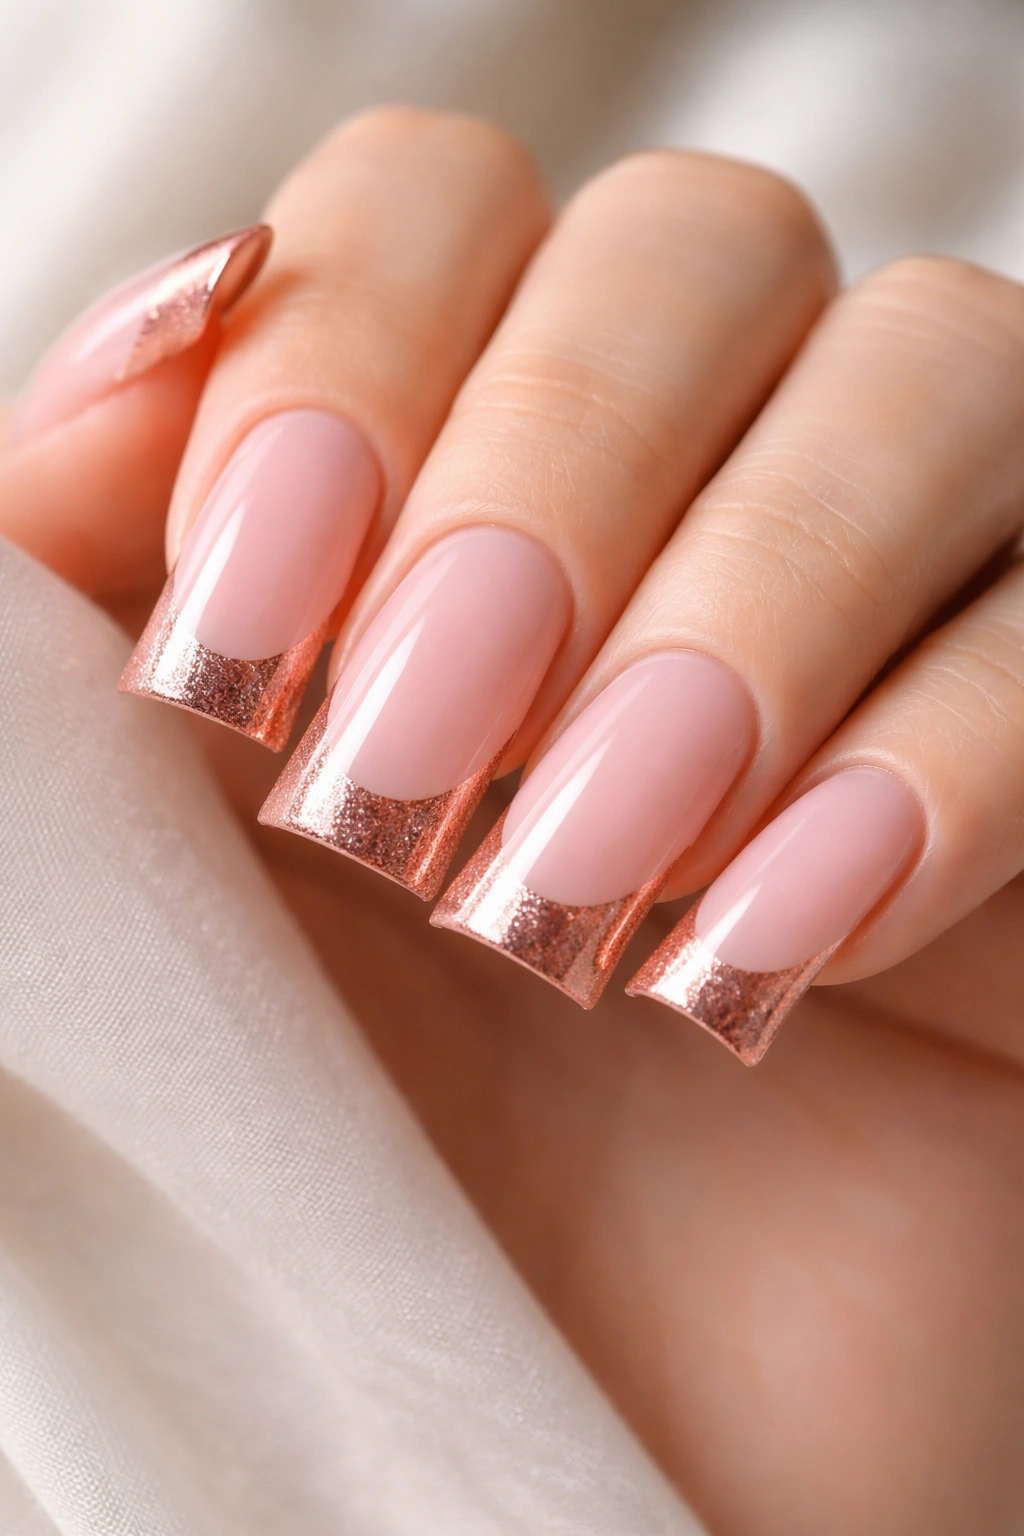
This design inverts the traditional French manicure concept: instead of a white tip and colored base, you have a sheer or very pale light pink that creates a milky base, topped with a defined rose gold tip. The rose gold adds warmth and luxury while the sheer base keeps everything feeling light and elegant. The rose gold tip can be a crisp line (classic French style) or a slightly softer gradient (modern French ombré style).
Why This Takes the French Manicure Forward
Traditional French manicures can feel dated or boring, but replacing white with rose gold instantly modernizes the concept. Rose gold brings warmth and femininity while gold itself signals luxury. The sheer base also feels more contemporary than an opaque colored base, giving the manicure an ethereal quality that complements the duck nail shape beautifully.
How to Achieve This Look
- Apply one coat of a sheer or very pale light pink polish—you should see the natural nail color showing through underneath
- Use a thin, curved striping brush to apply rose gold or champagne metallic polish along the tip, creating a defined French tip line
- For a softer look, apply the rose gold and then blend the bottom edge slightly with a clean, barely damp brush while it’s still wet
- Keep the tip line clean and even—this is where technique matters because the simplicity makes imperfections obvious
- Seal with a glossy top coat that enhances the metallic rose gold without dulling it
- Pro tip: Rose gold and warm undertones work together to create a universally flattering look that enhances most skin tones
What Makes It Special
This feels like a deliberate modern update to a classic technique. You’re honoring the timelessness of French tips while making them feel fresh and current. It’s sophisticated without being boring, and it works beautifully with the elongated duck nail shape.
11. Textured Light Pink with Matte Finish and Glossy Tips
This design creates textural contrast by using a matte light pink base across most of the nail, with a glossy finish applied only to the tip and cuticle area, creating a shine-and-matte gradient. The textural difference creates visual dimension and interest without requiring additional colors or embellishments. The glossy areas catch light and draw the eye while the matte portions create a sophisticated, velvety appearance. It’s a design based entirely on finish, which feels innovative and artistic.
Why Texture Can Be As Important As Color
People often focus on color when designing nails, but finish—matte versus glossy—is equally important for visual impact. Mixing finishes on the same nail creates depth and sophistication. Matte finishes feel modern and edgy, while glossy finishes feel classic and polished. Using both together gives you the best of both worlds and creates a more interesting manicure than a single finish throughout.
How to Achieve This Look
- Apply two coats of light pink base polish in a regular glossy formula
- Apply a matte top coat to the entire nail
- Once the matte top coat is fully dry, use a thin brush or applicator to apply glossy top coat only to the tip area and a thin band at the cuticle
- Be deliberate about the application—this is where the design element lives, so clean lines matter
- Allow glossy and matte areas to fully set before touching anything
- Worth knowing: Matte finishes can feel chalky or dull if you apply too many layers, so stick to one or two coats of matte product
The Real Advantage
This is a design that looks like you visited a professional salon because most people don’t think to mix finishes. It’s a technique that’s relatively easy to execute but reads as exceptionally creative and intentional. Once you try this, you’ll realize how many finish combinations you can explore.
12. Soft Pink with Delicate Lace Pattern in White
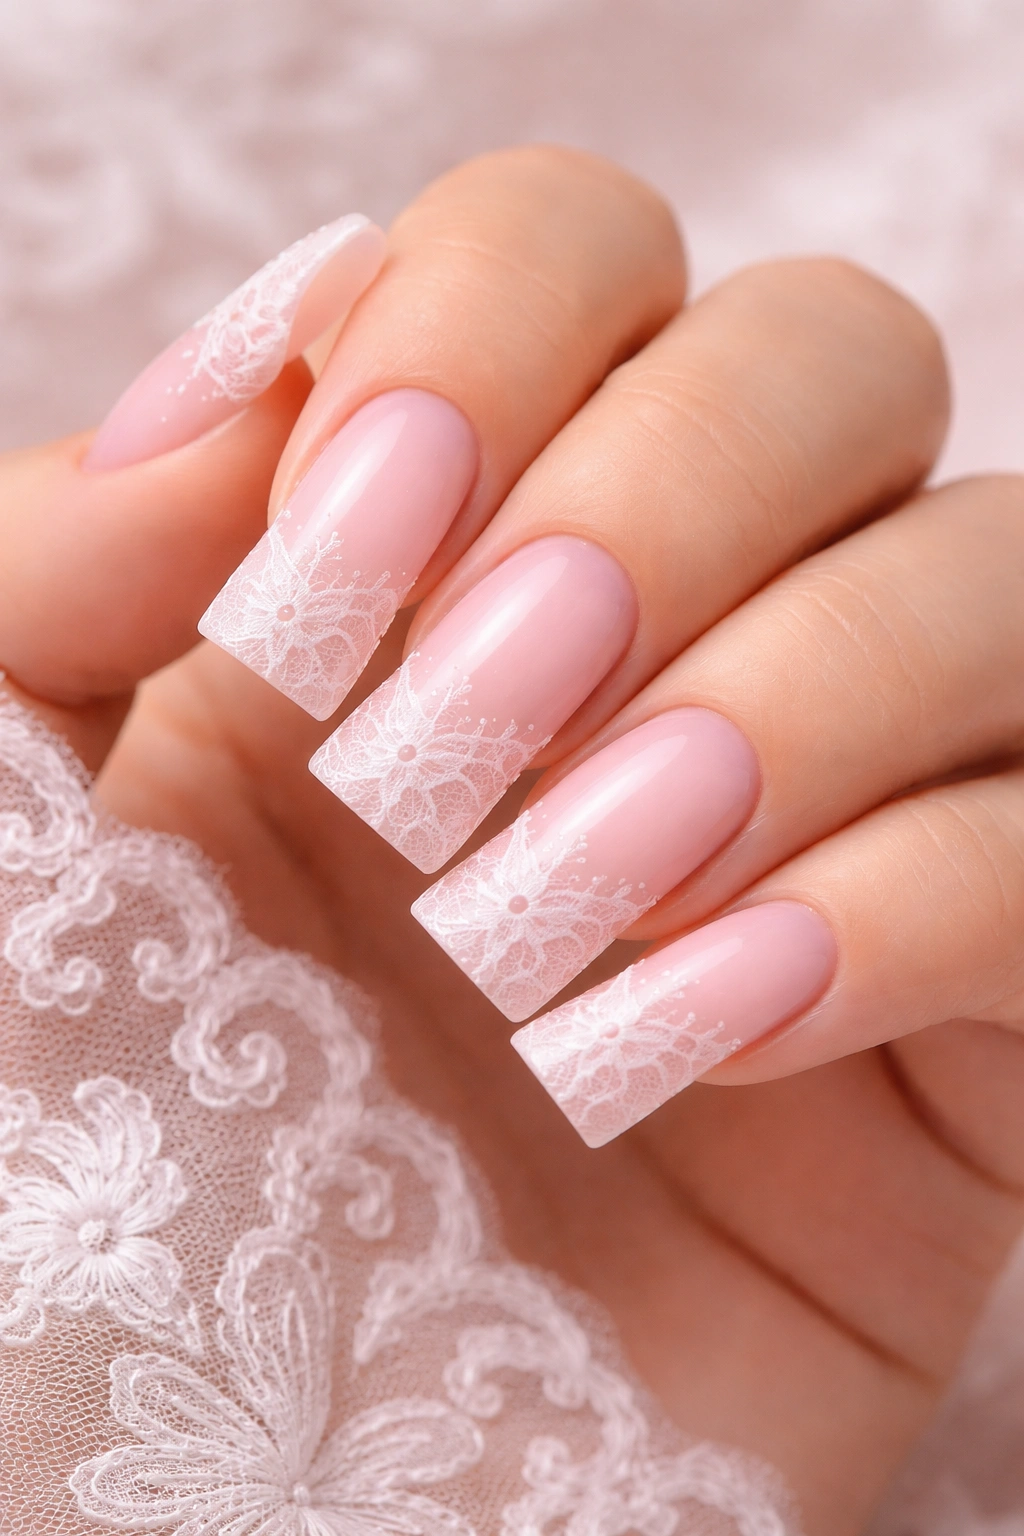
This final design features a light pink base with an intricate but delicate lace pattern hand-painted or stamped in white across the nail. The lace is detailed enough to feel special but applied sparsely enough that it doesn’t overwhelm the light pink background. Think doily-inspired patterns, fine filigree details, or vintage lace motifs rendered in white. The pattern could be concentrated at the tip, scattered across the entire nail, or placed only along the cuticle area—the key is that it feels delicate and refined rather than heavy or ornate.
Why Lace Patterns Feel Timeless
Lace carries associations with elegance, femininity, and romance. Lace patterns on nails are inherently romantic without being overly girly or saccharine. The fine detail of lace also complements the refined nature of light pink beautifully. When executed in white against the pink base, lace patterns create strong visual contrast that reads as intentional design rather than accidental decoration.
How to Achieve This Look
- Apply two coats of light pink base polish in a creamy, opaque formula
- Use a fine art brush or a thin detail brush with white polish to hand-paint lace details, OR use a lace-pattern nail stamp with white polish
- Hand-painting allows more control and customization—draw fine lines, loops, and curved patterns that evoke lace. Use a toothpick or very thin brush to create dots and details
- Stamping is faster if you have a lace-patterned stamp plate—roll the stamper gently for clean pattern transfer without dragging
- Keep the overall pattern light and airy—negative space is part of the design. Covering the entire nail with detail defeats the delicate purpose
- Seal with a glossy top coat that makes the white details pop against the pink background
- Pro tip: If hand-painting feels intimidating, start with a single vertical stripe of lace detail down the center of the nail rather than attempting an all-over pattern
What Makes It Special
Lace patterns instantly elevate a manicure because they signal attention to detail and artistic intention. Light pink lace feels romantic and sophisticated—it’s a design you’d be proud to show off at any occasion. The juxtaposition of delicate lace against the bold duck nail shape also creates interesting visual contrast.
Final Thoughts
Light pink duck nails prove that you don’t need dramatic colors or complicated designs to create a manicure that feels elevated and intentional. Whether you choose something minimal like the metallic cuticle line design, something artistic like floral line work or lace patterns, or something textural like the marble effect or mixed matte-glossy finish, your base color provides a sophisticated foundation that works with virtually any technique you want to add on top of it.
The real beauty of light pink as your duck nail color is its versatility across situations and moods. Paint delicate florals when you’re feeling artistic and romantic. Go for the ombré glitter fade when you want some sparkle but nothing too bold. Choose the geometric lines if you’re craving something contemporary and a little edgy. Every single one of these designs looks beautiful, feels intentional, and respects the elegant duck nail shape that makes this manicure style so special.
Your nail artist might have their own techniques and interpretations for these designs, which is actually a good thing—their expertise will probably improve on these concepts and make them even more wearable for your specific nail shape and style. Bring inspiration photos, describe what speaks to you about these designs, and collaborate with them on the final version. That’s how you end up with a manicure that feels uniquely yours while still being technically beautiful and intentionally designed. Whatever light pink duck nail design you choose, you’re picking a manicure that announces you know what you’re doing with style.
