

White French tip duck nails combine two of the most coveted nail trends: the timeless elegance of French manicures and the bold, sculptural appeal of duck nails. If you haven’t encountered them yet, duck nails are essentially nails shaped like a duck’s bill — wider at the nail bed and gradually narrowing toward a split or pointed tip. When you add the classic white French tip aesthetic to this modern shape, you get a manicure that’s instantly recognizable, incredibly versatile, and surprisingly wearable for everything from everyday life to special occasions.
The beauty of white French tip duck nails lies in their ability to feel both polished and playful at the same time. The crisp white tip adds a refined, professional edge that keeps the bold duck shape from feeling too theatrical, while the unique silhouette makes even a simple French manicure feel fresh and current. Whether you’re into minimalist nail art or you love intricate details and embellishments, there’s a white French duck nail design that’ll speak to you. The white tip also provides a perfect blank canvas for additional nail art — you can add metallic accents, gemstones, gradient effects, or leave it clean and classic depending on your mood and lifestyle.
What makes this trend so special is how customizable it is. You can adjust the length and width of the duck shape to suit your hands, change the thickness of the white tip line, add textures like matte or glitter finishes, or layer on additional design elements that transform the same basic style into something entirely unique. The following 18 ideas showcase the incredible range of possibilities when you combine white French tips with duck nails — from the purest minimalist versions to elaborate designs that turn your nails into wearable art.
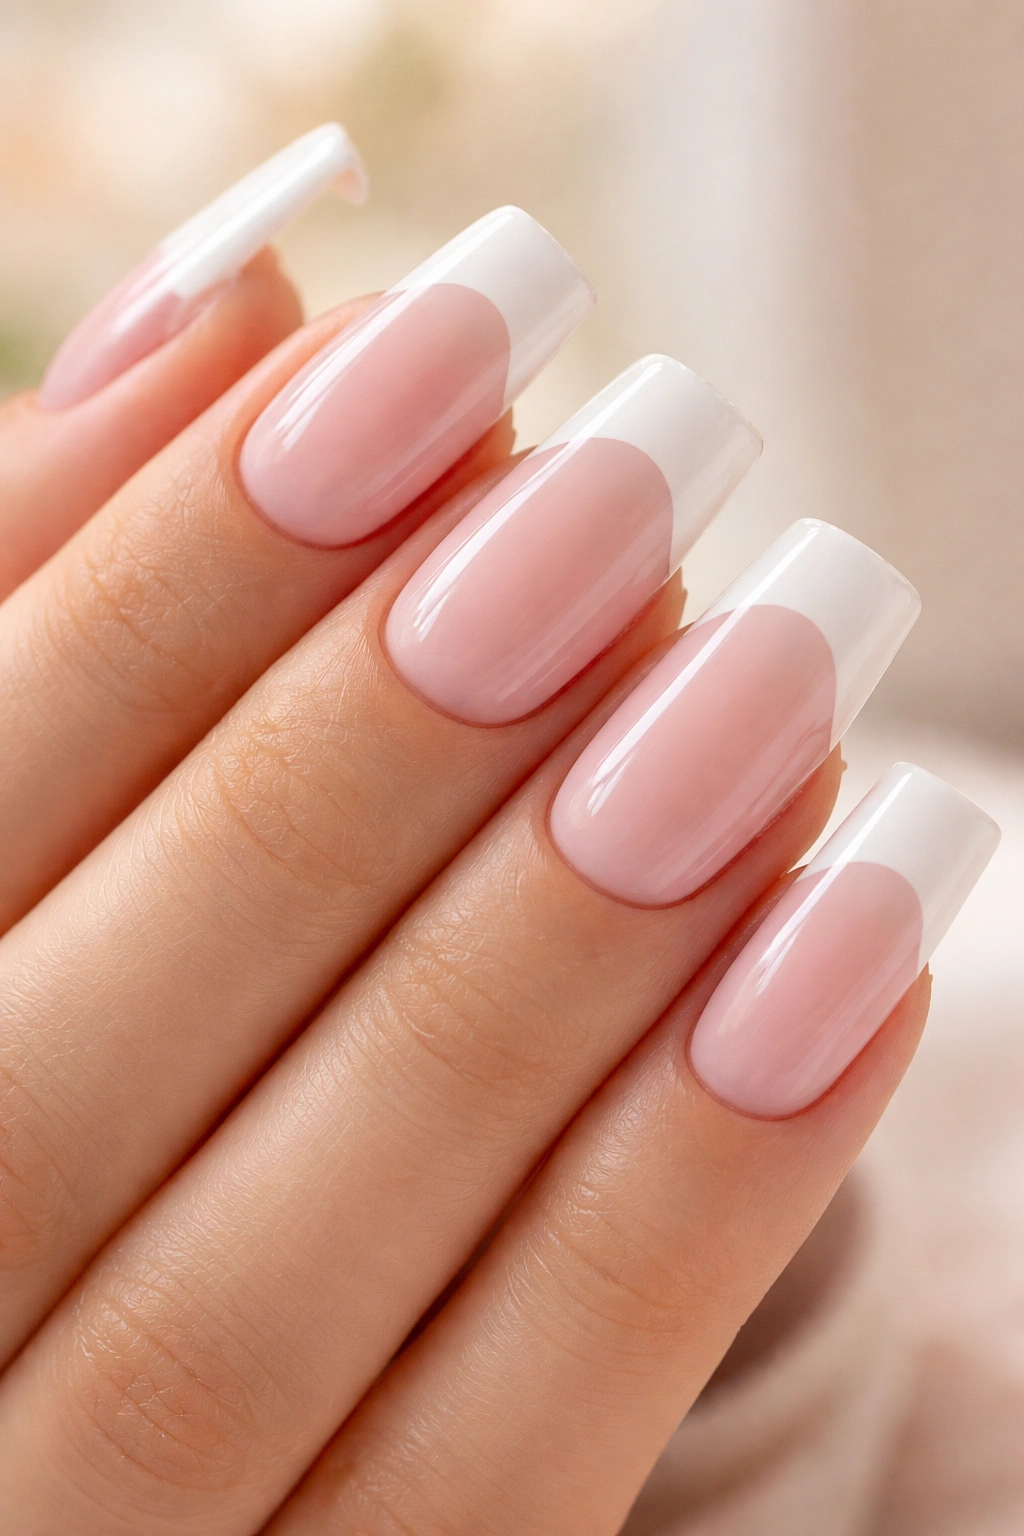
1. Classic Glossy French Duck Nails
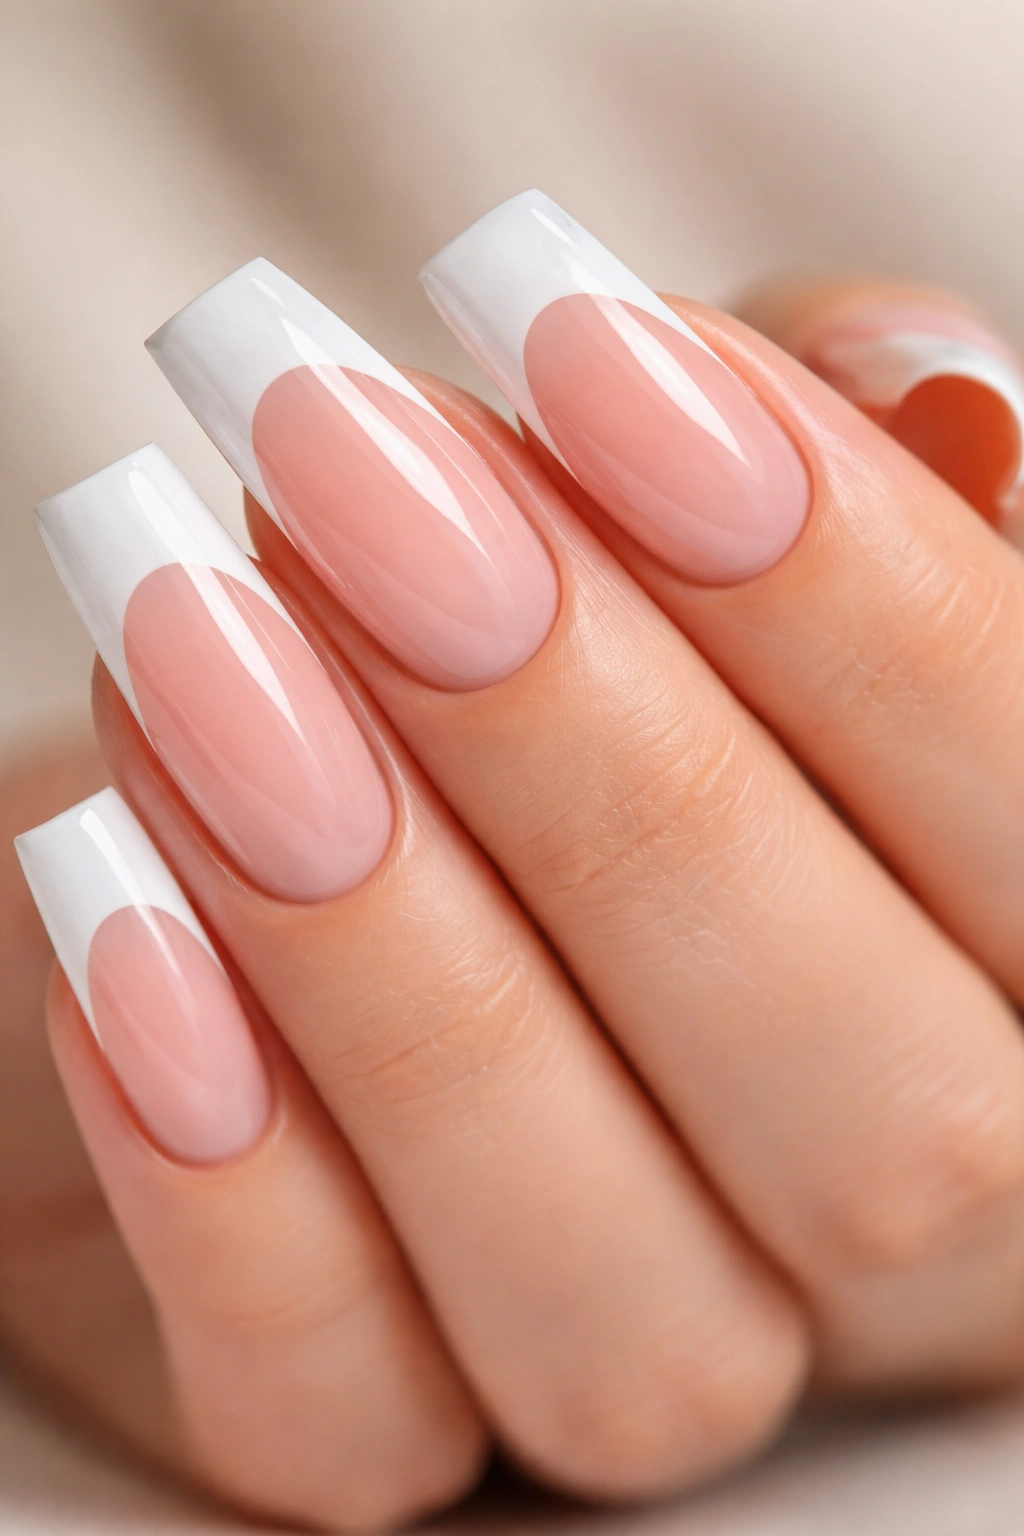
The foundation of all white French tip duck nail designs starts here: glossy, pristine, and timelessly elegant. This version keeps things utterly simple with a smooth, shiny nude or natural base color and a crisp, sharply defined white tip that follows the duck shape’s signature silhouette. The glossy finish catches light beautifully and gives your nails that polished, just-left-the-salon appearance that never goes out of style.
Why This Style Never Gets Old
The classic glossy version works because it’s the nail equivalent of a white button-up shirt — it’s endlessly wearable, instantly elevates your appearance, and pairs with literally anything you wear. The high-shine finish makes the white tip pop without any extra effort, and there’s something deeply satisfying about perfectly executed, uncomplicated beauty. This design works for professional settings, casual outings, and formal events alike.
Application and Maintenance Tips
- Use a good-quality base coat to protect your nail beds from staining, especially important if you’re going for a truly white tip
- Apply thin, even coats of your nude base color — usually two coats provides full coverage without looking thick or plasticky
- Use a steady hand or nail guide tape to create that perfectly sharp white tip line; take your time here because this is what makes the design sing
- Seal everything with a glossy top coat and apply it generously for that wet, glass-like appearance
- Keep these nails pristine: The glossy finish shows every smudge and fingerprint, so regular cleaning and quick touch-ups of top coat keep them looking fresh
Pro tip: If you’re not confident drawing a perfectly straight white line freehand, invest in a thin liner brush or use striping tape — there’s zero shame in using tools that help you achieve the look you want.
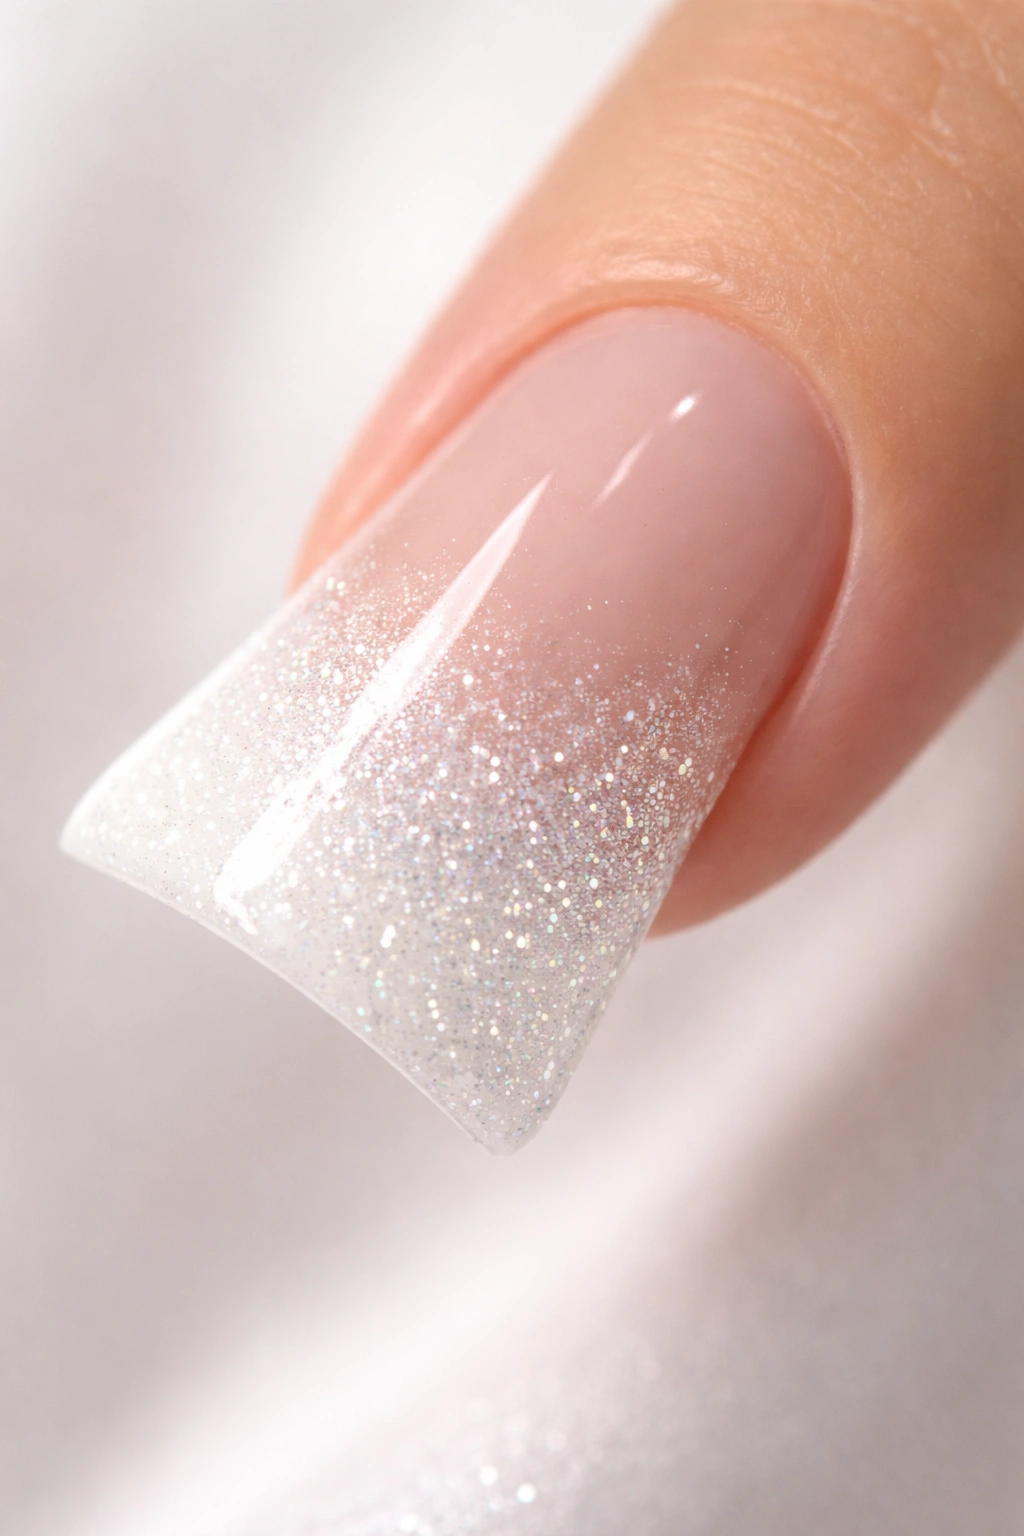
2. Sparkly Diamond-Dusted French Tips
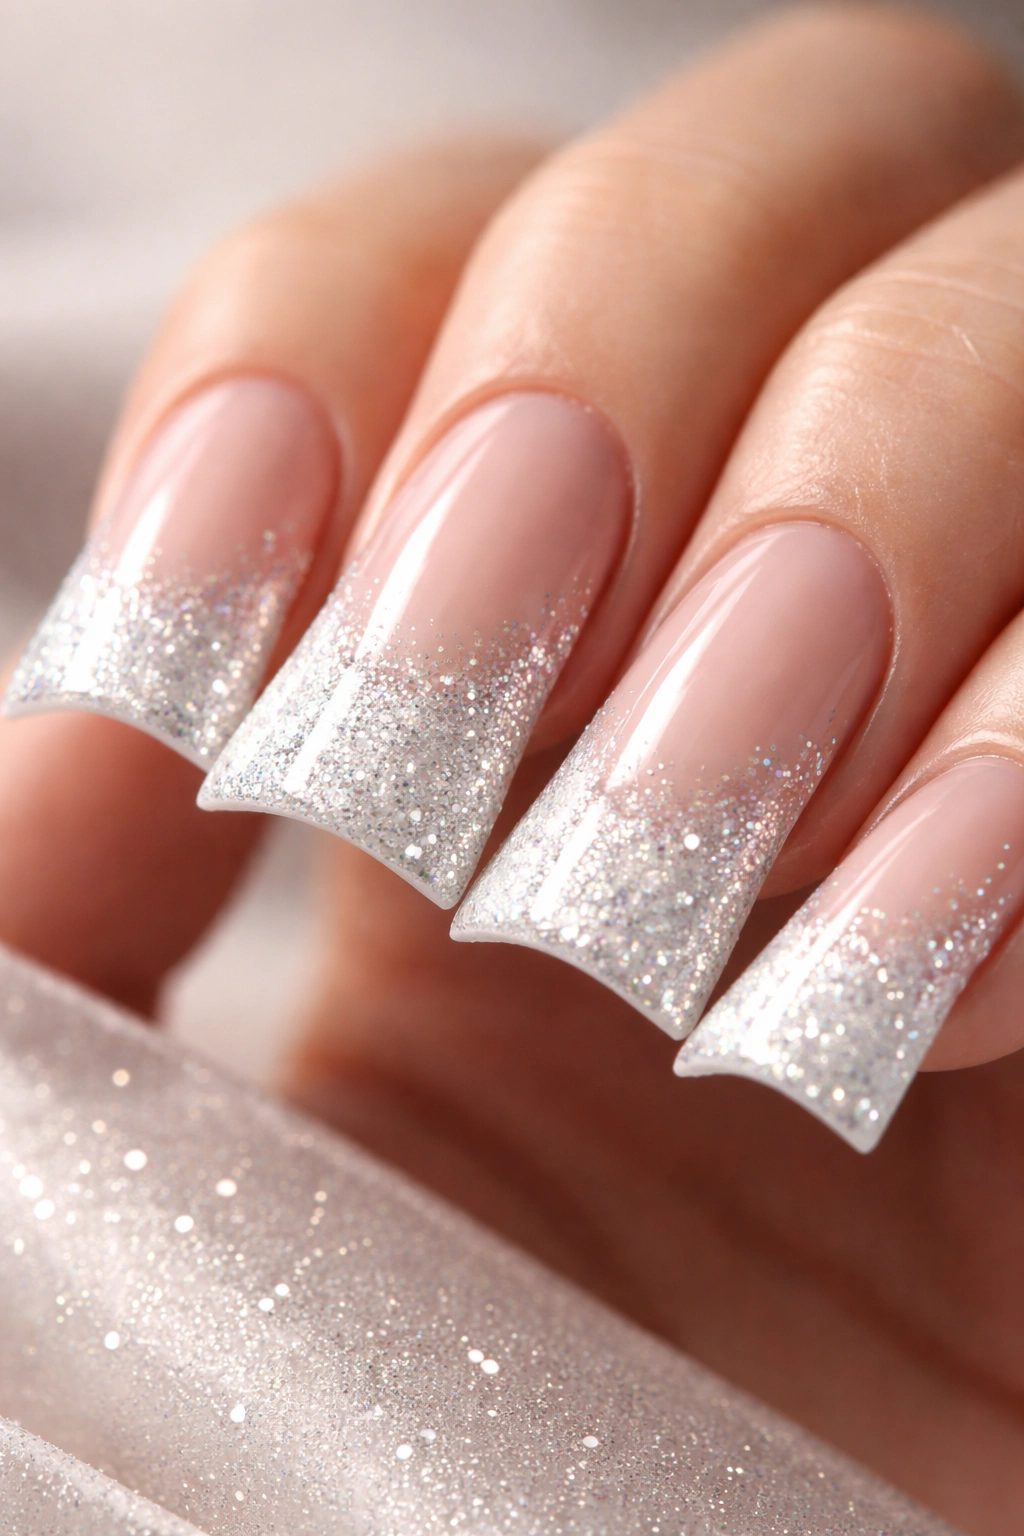
This design elevates the classic white French duck nail by adding glitter or diamond dust specifically to the white tip area, creating a shimmering, eye-catching accent. The white tip becomes a jeweled edge that catches light with every movement, while the nude base remains smooth and understated. You can use fine cosmetic glitter, diamond dust (which has a more sophisticated sparkle than regular glitter), or even finely crushed rhinestones for varying levels of shine and visual impact.
Creating That Perfect Sparkly Tip
The key to making this work is restraint — you want the sparkle concentrated in the tip area, not scattered across the entire nail. Apply your white tip line first, then while it’s still slightly tacky, carefully apply your chosen sparkly element to just the white portion. You can use a small, firm brush to distribute diamond dust evenly, or sprinkle fine glitter and tap away the excess. Seal it all in with a clear top coat to lock everything in place and prevent the sparkle from migrating.
Design Variations Worth Trying
- Gradient sparkle: Use more glitter at the very edge of the white tip and gradually reduce it as you move toward the nail bed for an ombré effect
- Dual-color sparkle: Layer two complementary glitter colors (like silver and rose gold) in the white tip for depth
- Confetti style: Use mixed metallic glitter in multiple colors for a celebratory, festive vibe
- Micro sparkle: Use the finest diamond dust available for an elegant, subtle twinkle rather than obvious glitter
3. Minimalist Black Line Detail
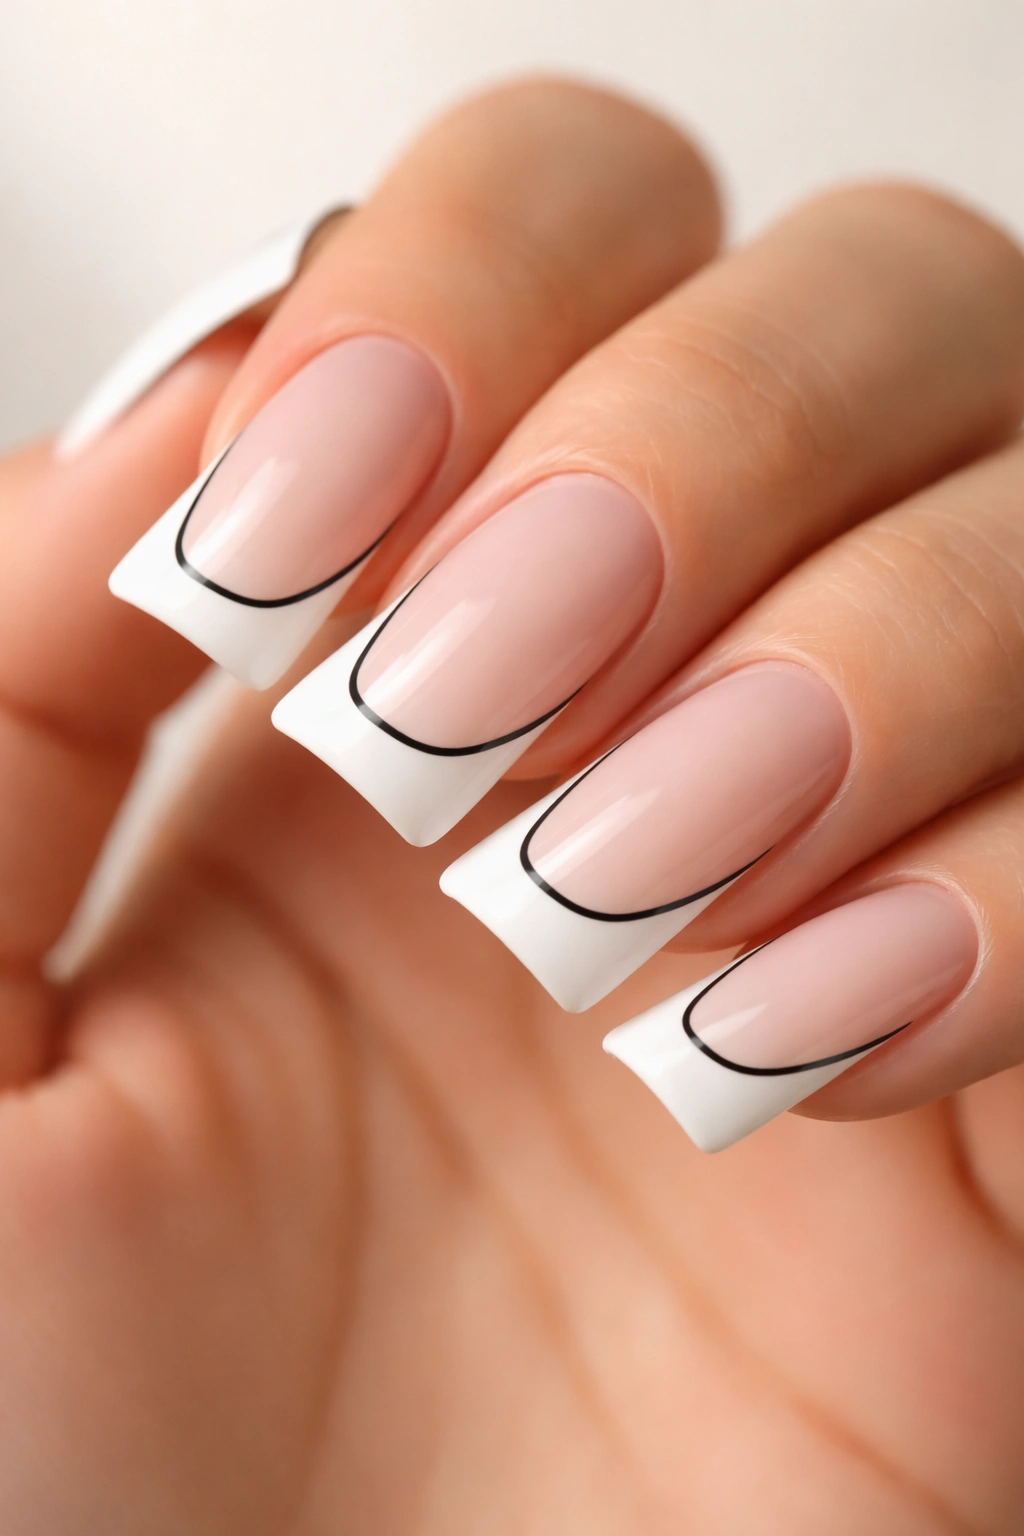
Sometimes less is genuinely more, and this design proves it. The minimalist black line version takes the white French tip duck nail and adds a single thin, precise black line that either outlines the edge of the white tip or runs down the center of each nail. The result feels architectural, modern, and unexpectedly sophisticated — it’s the kind of design that makes people ask, “Who does your nails?”
Why the Black Line Works
A thin black line creates contrast and definition without being overwhelming. It gives the eye something to focus on and adds visual structure to the design. The black also provides a subtle masculine edge that balances the classic elegance of the French tip, making this style work beautifully for anyone, regardless of personal aesthetic. The minimalist approach also means you can wear this design anywhere — it reads as professional, intentional, and refined rather than decorative or statement-making.
Perfect Execution Techniques
- Use a thin liner brush or nail art pen with precise black gel or polish
- Steady your hand by resting your pinky on the table and keeping your brush hand stable
- Apply the line in one smooth motion rather than trying to draw it in sections; this creates a more confident, even line
- If you’re doing an outline, start at one corner of the white tip and follow the edge around; practice on a nail wheel first
- Seal with a glossy or matte top coat depending on the overall vibe you’re going for
4. Gold Foil French Duck Nails
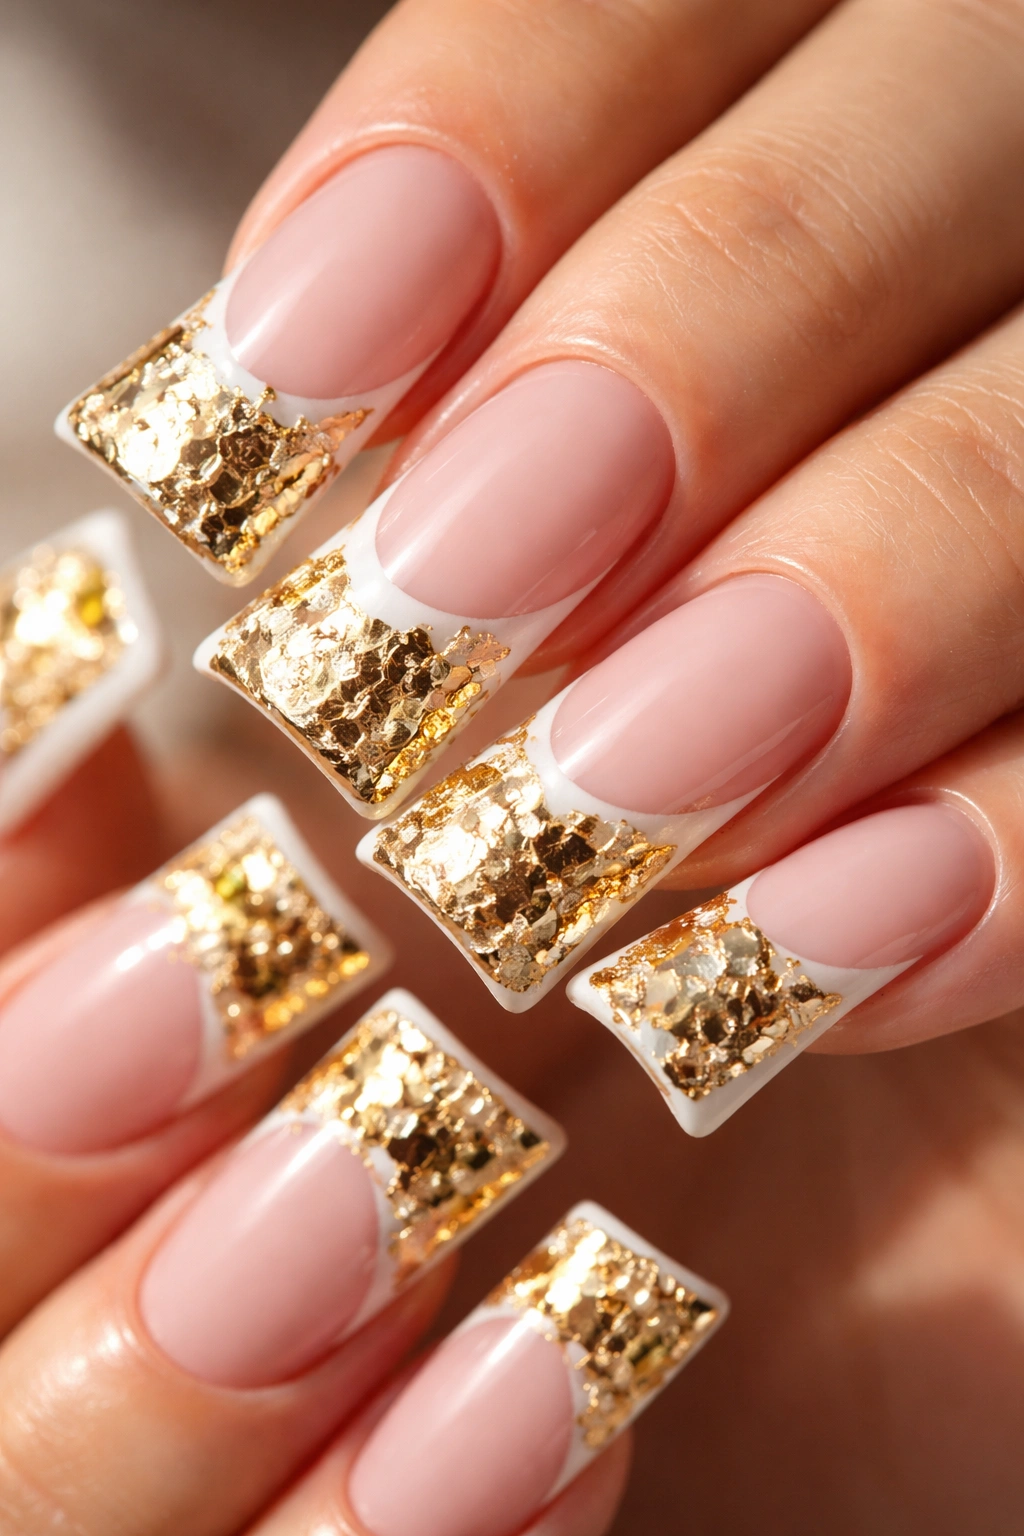
Gold foil brings glamour and warmth to the white French duck nail design. Rather than a traditional white tip, this version uses actual gold foil pressed into the tip area, creating a lustrous, dimensional finish that’s far more luxurious-looking than regular gold polish. The foil catches light in a way that flat color simply cannot, giving your nails that high-fashion, editorial quality.
Applying Gold Foil to Your Nails
Gold foil application requires a slightly different process than standard nail polish. You’ll paint the nude base as usual, then apply a thin layer of either a special foil adhesive or a slightly tacky gel base to the area where you want the foil to stick. Cut your gold foil into appropriately sized pieces, press them firmly onto the adhesive side, and seal everything with a top coat. The foil should stick smoothly without wrinkles or air bubbles.
Why Gold Foil Feels Luxe
The three-dimensionality of foil creates visual interest that polish alone cannot match. It photographs beautifully, catches natural and artificial light in flattering ways, and instantly elevates even a simple nail design into something that feels expensive and intentional. Gold foil also works year-round — it’s warm enough to feel cozy in cooler months but sophisticated enough to complement summer styles too.
- Foil placement options: Just the very tip, or slightly deeper for a bolder statement
- Combine it: Layer gold foil with a thin white line for added interest
- Mix metals: Use rose gold or silver foil for variety while keeping the same elegant vibe
5. Pastel Ombré French Tips
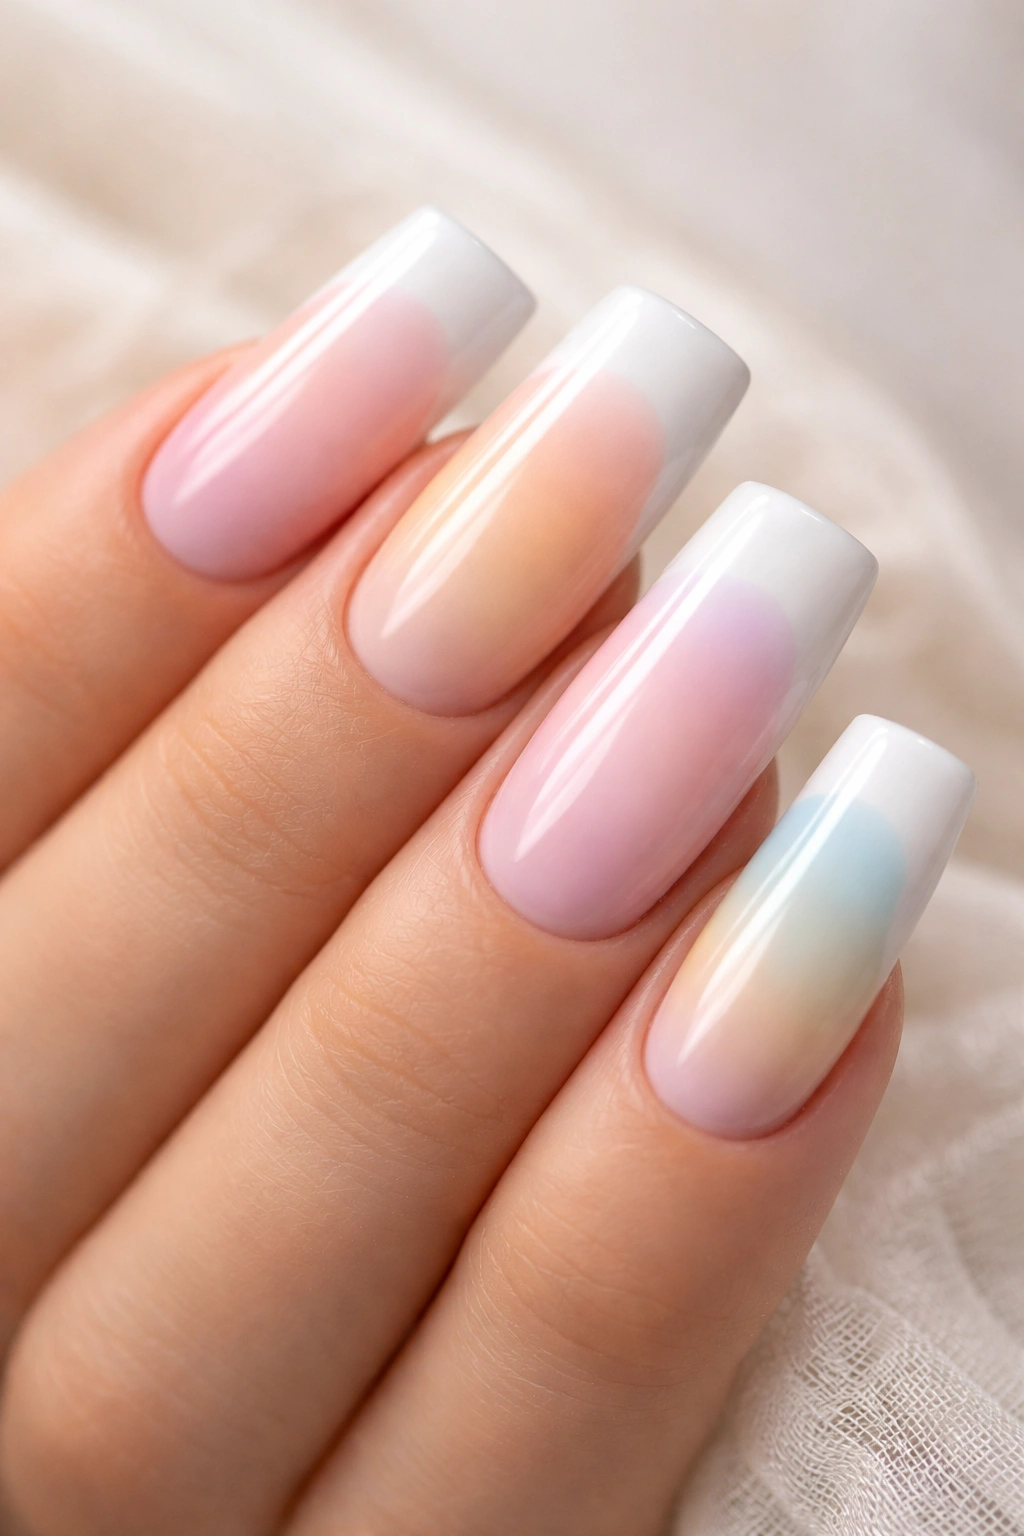
This design replaces the solid nude base with a soft pastel ombré that gradually transitions from a pale pink, blue, or peach at the nail bed to the crisp white tip. The effect is dreamy, romantic, and far more visually interesting than a single-color base while maintaining the refined aesthetic of the French tip design. The ombré effect creates the illusion of depth and makes the duck nail shape feel even more sculptural.
Creating a Smooth Ombré Transition
The ombré effect requires either a sponge or a soft brush and some blending technique. Apply your pastel base color to the nail bed, then load a damp makeup sponge with a slightly lighter shade and blend it upward toward where the white tip will begin. Work slowly, allowing the colors to merge gradually rather than appearing as distinct stripes. Once you’re happy with the transition, apply your crisp white tip line on top. Seal everything with a glossy top coat.
Color Combinations That Work Beautifully
- Blush to white: A romantic, soft pink ombré paired with white tips — perfect for weddings or everyday elegance
- Powder blue to white: Calming and serene, this combination feels fresh and modern
- Peach to white: Warm and inviting, a peachy ombré has a summery, optimistic vibe
- Lavender to white: Ethereal and dreamy, this pairing skews romantic and artistic
- Pale yellow to white: Subtle and sunny, this cheerful combination feels approachable and warm
6. Nude-to-White Gradient Duck Nails
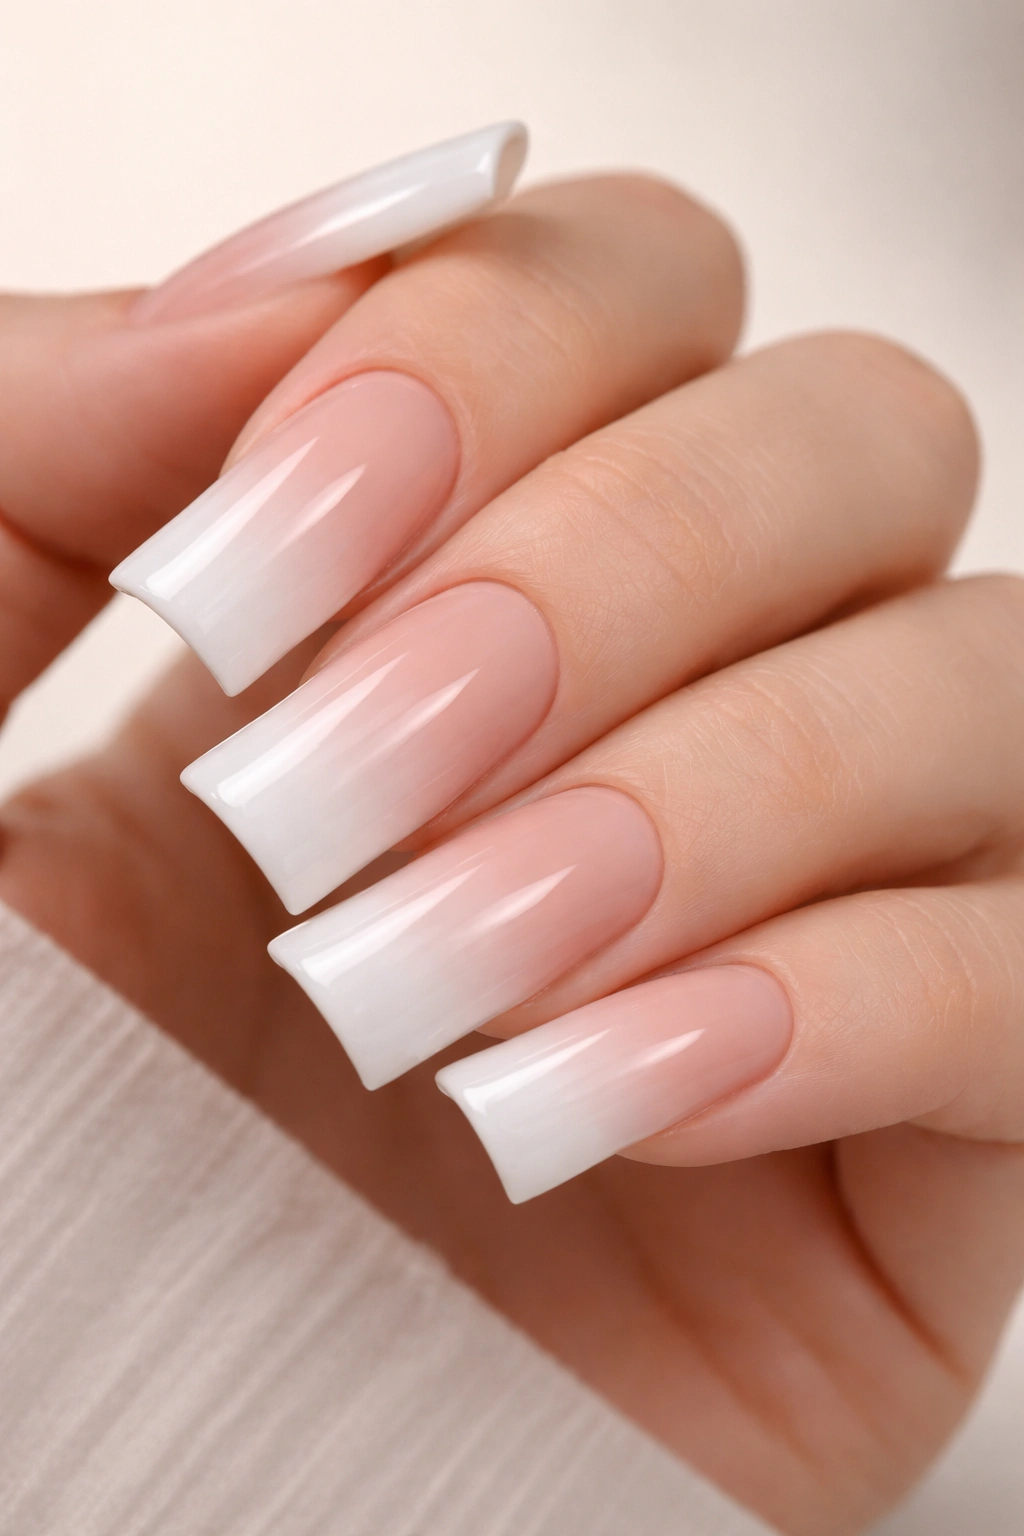
The nude-to-white gradient is a sophisticated play on the traditional French manicure concept. Instead of a sharp line of demarcation between the base and tip, the color gradually fades from your natural or warm nude shade directly into the white, creating a seamless, elegant transition. This design feels less defined than a classic French tip but equally refined, with a softer, more blended aesthetic.
Achieving That Perfect Gradient
Use a dry brush technique or a makeup sponge to blend nude and white polish together on your nail. Start with your nude base color covering the entire nail, then apply white to just the tip area and use a clean, slightly dampened brush to blend the border where they meet. Work in small sections and build the gradient gradually — it’s easier to add more blending than to fix a harsh line. The key is patience; a beautiful gradient takes time but creates a truly custom, professional-looking result.
The Psychology of the Gradient
Gradient designs feel modern and intentional without being as bold as a stark French tip. They’re perfect if you love the French manicure concept but want something that feels uniquely yours. The soft transition also tends to be flattering on all skin tones and hand shapes, making this a universally wearable design that works for any occasion.
- Warm gradients: Nude to white creates a sophisticated, neutral look
- Cool gradients: Soft gray to white for a more contemporary feel
- Tinted gradients: Barely-there pink or blue in the gradient for subtle color
7. Pearl Finish French Tips
Pearl finish polish creates a subtle, luminous quality that’s different from both glossy and matte finishes. When applied to white French duck nails, it gives the tips an almost iridescent glow — they seem to shift and shimmer as you move your hands. The pearl finish transforms a simple design into something that feels soft, sophisticated, and slightly mysterious. The nude base typically stays glossy or satin while the pearl finish is reserved for the white tip area, creating a subtle contrast in finish texture.
Understanding Pearl Polish Finishes
Pearl finishes contain mica and other light-reflecting particles that create that signature soft shimmer. They’re different from glitter because the shimmer is built into the polish formula rather than suspended as separate particles. This makes pearl finishes smoother to apply and more durable than glitter-heavy designs, while still providing visual interest and dimension. Pearl-finished nails look particularly stunning in soft lighting — they have an almost ethereal quality that photographs beautifully.
Application Tips for Pearl Finishes
- Pearl polish usually needs two coats to show its full shimmer effect
- Apply it more carefully than regular polish since the finish makes imperfections slightly more visible
- Use a good top coat to seal the pearlescence and protect it from chipping
- The pearl finish works best when the rest of the design stays simple — let the finish itself be the statement rather than layering additional embellishments
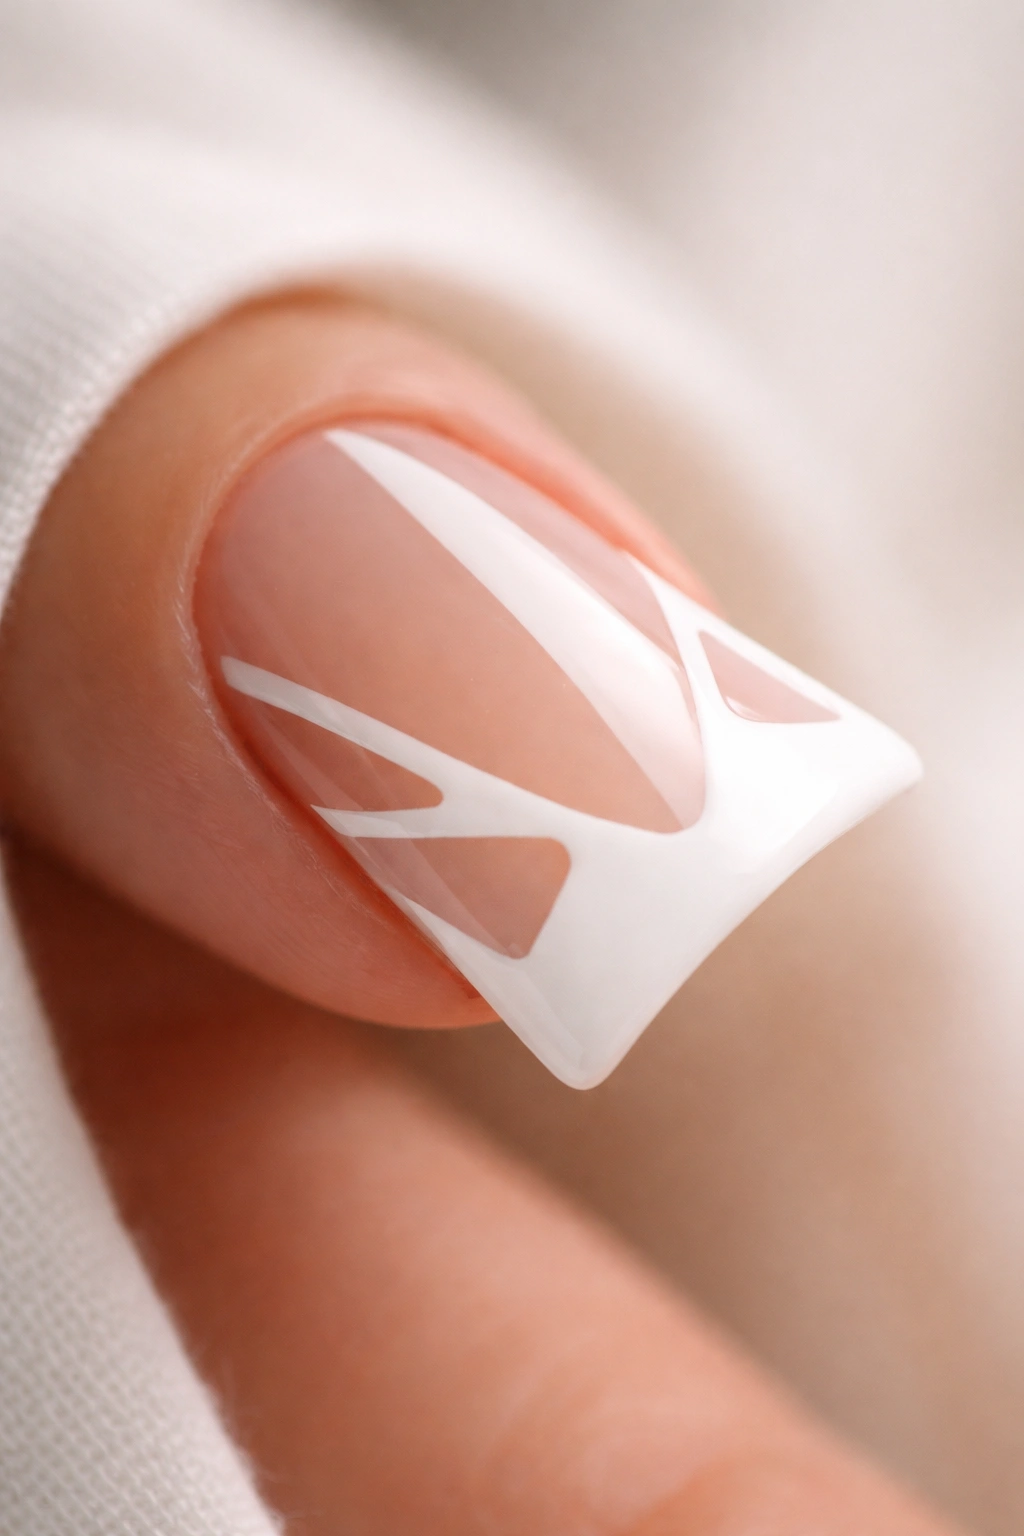
8. Geometric White Line Design
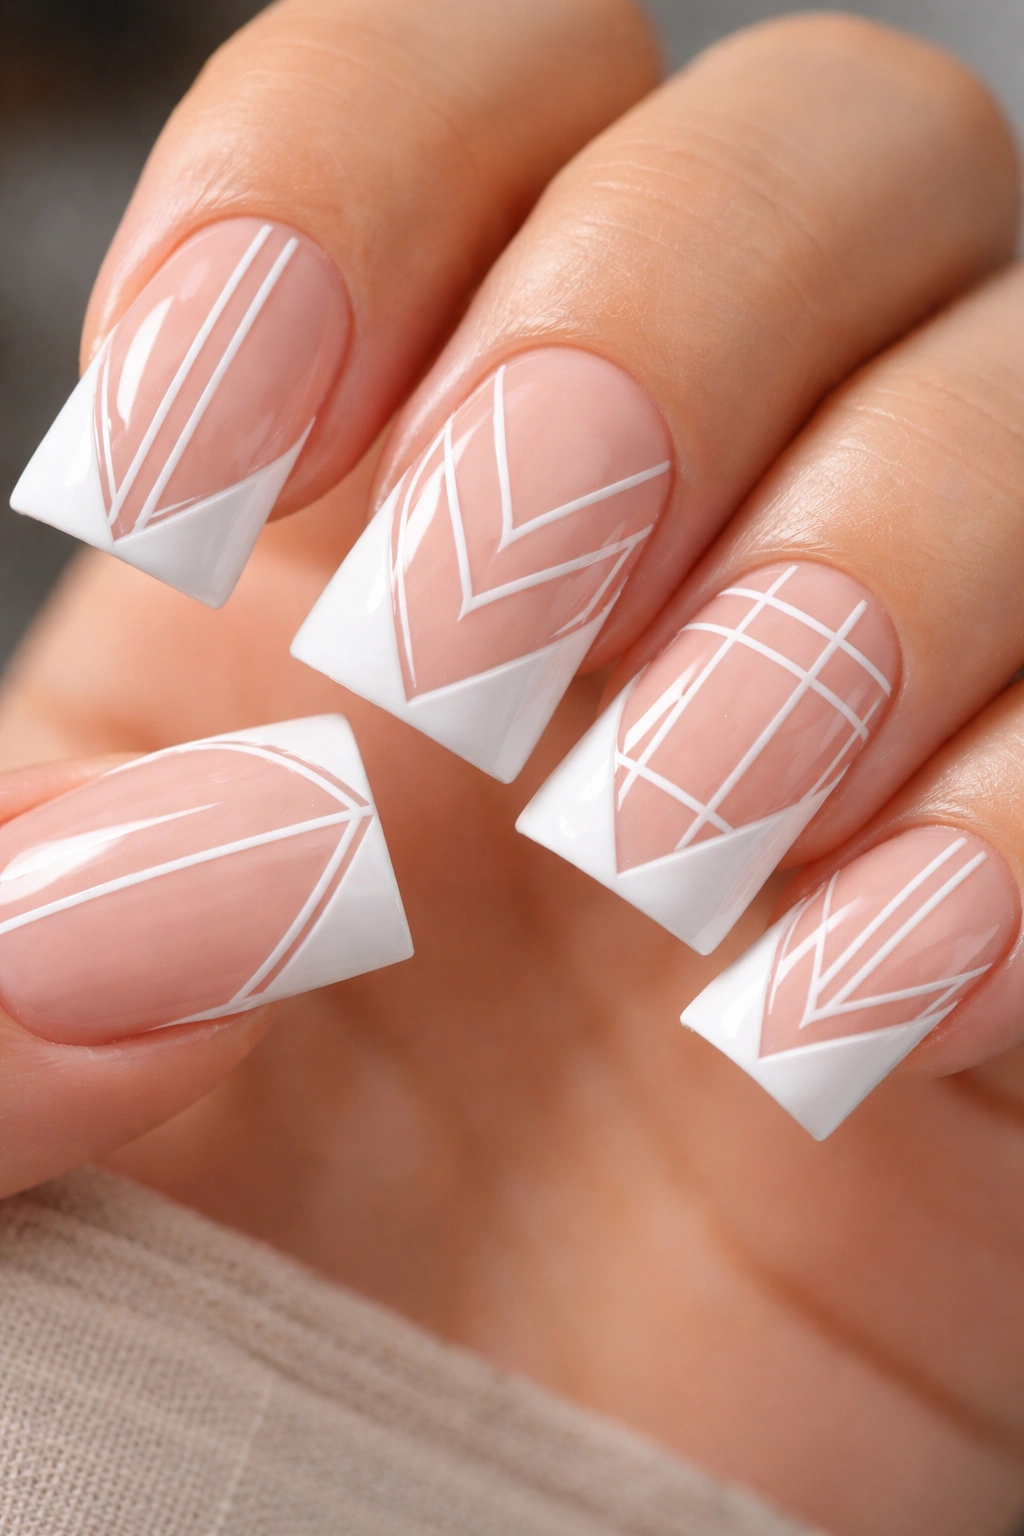
Move beyond a simple white tip and explore geometric patterns within the white space. This design incorporates clean lines, triangles, or minimalist graphic elements directly into the white tip area of the duck nail. You might create a thin vertical line down the center of each white tip, parallel horizontal stripes, or angular chevrons — the possibilities are endless. The geometric approach adds visual complexity and modern edge while remaining clean and organized rather than cluttered.
Creating Geometric Patterns
Use a thin liner brush, a striping tool, or nail art pens to create your geometric design. The key is working with a steady hand and using nail guides or tape to keep lines crisp and even. Many nail artists use contrasting colors like black, metallic gold, or nude tones to draw geometric elements within the white tip. The geometric design transforms the white space from a simple solid area into an intentional visual statement.
Geometric Designs Worth Exploring
- Negative space lines: Very thin lines that outline certain areas, creating a minimalist architectural feel
- Chevron patterns: Angled lines creating a pointed or zigzag effect
- Minimalist grid: Thin intersecting lines creating a subtle grid pattern
- Marble effect: Thin veining patterns that mimic marble stone
- Abstract shapes: Small triangles, circles, or organic shapes scattered within the white tip
9. Matte French Tip Duck Nails
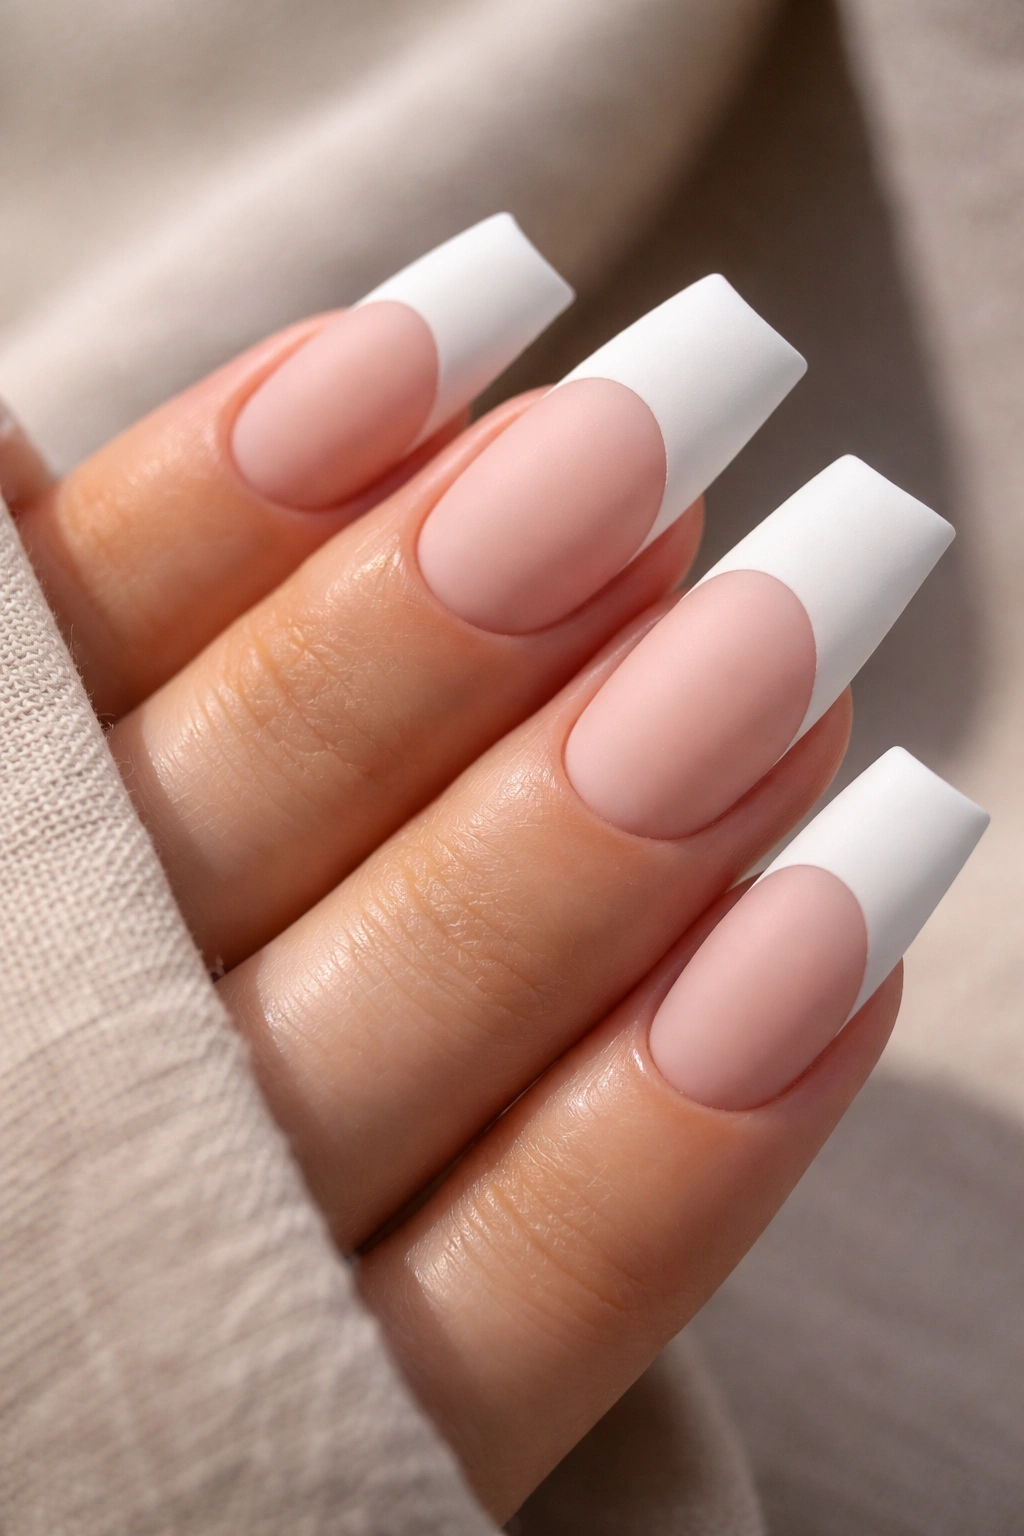
While glossy finishes get most of the attention, matte finishes on white French duck nails create an entirely different vibe — one that’s modern, edgy, and surprisingly versatile. A matte white tip paired with either a glossy or matte nude base feels current and cool, like you’re intentionally playing with texture and finish. The matte finish also makes the white tip feel less traditional and more avant-garde, even though the French tip concept itself is decades old. The lack of shine creates a softer, more sophisticated appearance that photographs beautifully in natural light.
Achieving a Flawless Matte Finish
The easiest approach is to use a matte top coat over your white tip, which can be applied over regular white polish. Alternatively, you can use matte white polish directly if your preferred brand offers it. The matte finish requires meticulous application because imperfections, streaks, and uneven coverage show more prominently without the light-reflecting properties of shine. Apply thin, even coats and be patient — it’s better to do three thin coats than two heavy ones.
Matte Texture Combinations
- Matte white tip with glossy nude base: This creates interesting contrast — the matte focuses attention on the white while the glossy base keeps hands looking polished
- All-matte design: Everything matte creates a cohesive, modern look that feels intentional and editorial
- Matte with subtle sparkle: Add just a hint of shimmer to the matte white tip for dimension without losing the cool matte aesthetic
10. Chrome Silver French Duck Tips
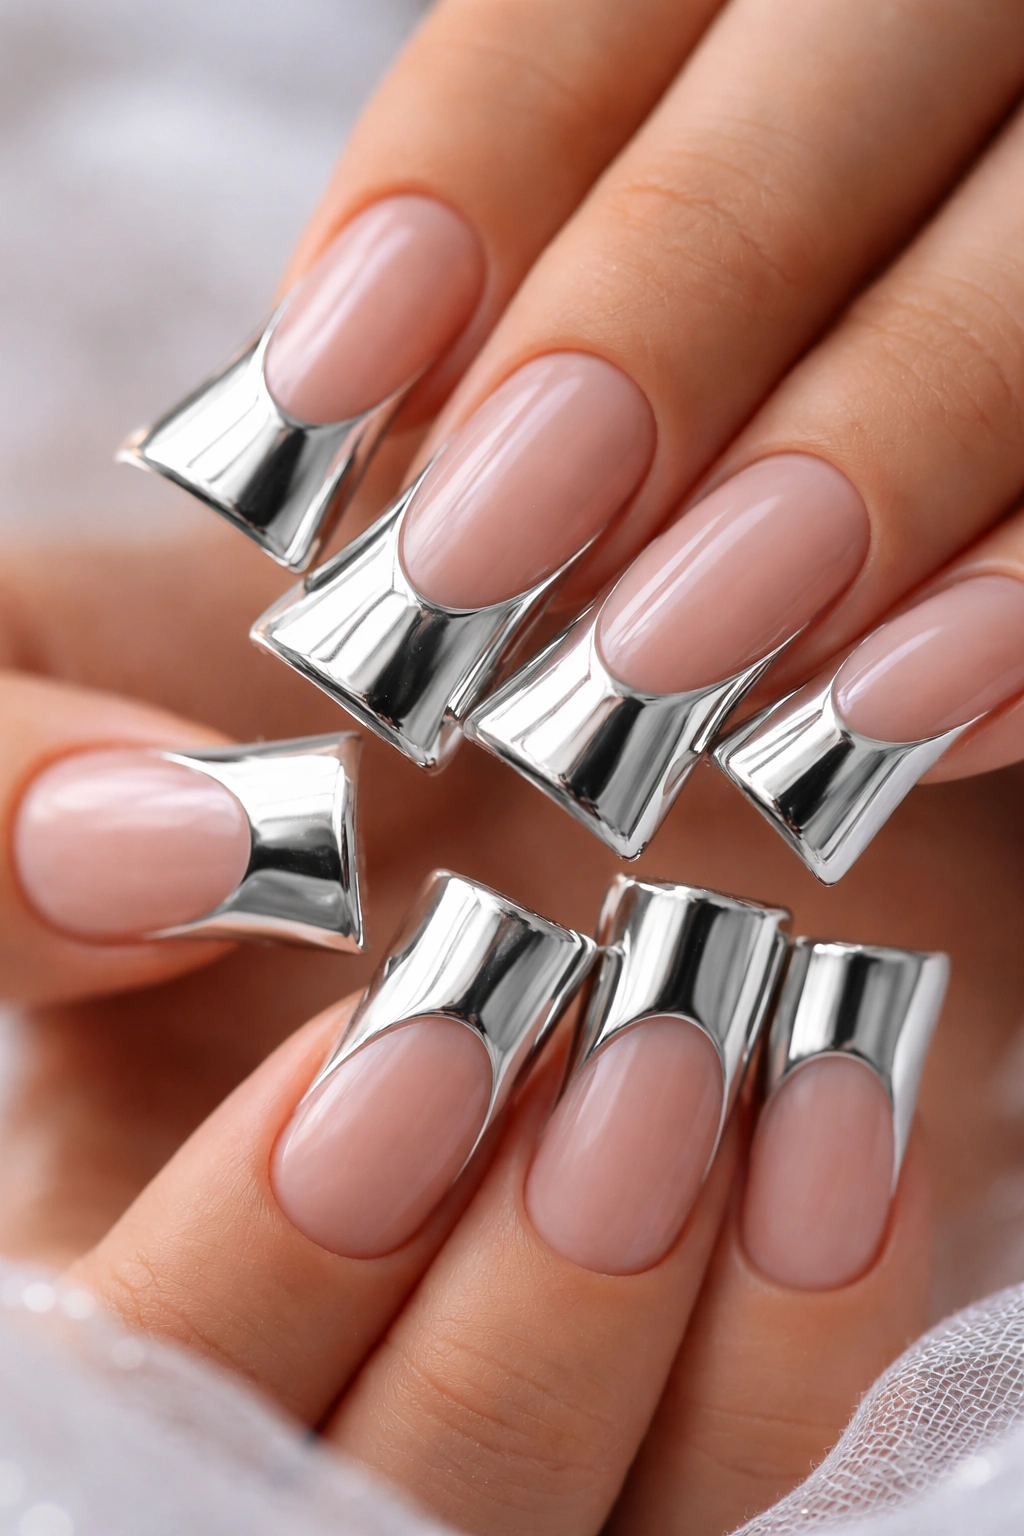
Chrome and metallic finishes bring an almost futuristic quality to white French duck nails. Rather than using traditional white for the tip, this design substitutes a brilliant chrome silver or holographic silver finish that catches and reflects light in dramatic ways. The result feels high-fashion, slightly futuristic, and undeniably eye-catching. Chrome finishes typically require a special chrome powder and a sticky base coat, making them slightly more involved to apply than standard polish, but the results are absolutely worth the effort.
Applying Chrome and Metallic Finishes
Chrome powder application requires a tacky gel base coat, a chrome powder (which you apply by rubbing the powder directly onto the sticky base), and a sealed top coat. The process is straightforward but does require some practice to get the powder distributed evenly. Metallic chrome finishes are also sometimes available as ready-made polishes, which simplifies the application process significantly. The key is working in a well-ventilated area and using proper technique to prevent the chrome powder from creating a dull or patchy finish.
Why Chrome Feels Luxe
Chrome finishes have an inherently sophisticated, expensive quality. They’re eye-catching without feeling over-the-top, and they work beautifully for special occasions, nights out, or whenever you want your nails to be a bold statement piece. The reflective quality makes your hands look interesting and polished from every angle, which is why chrome is so popular for editorial photography and red-carpet looks.
- Mirror chrome: The most reflective, almost mirror-like finish
- Holographic chrome: Adds rainbow tones alongside the silver for extra dimension
- Chrome with accents: Add thin gold or rose gold lines alongside the chrome silver for mixed-metal elegance
11. Rhinestone-Studded French Ducks
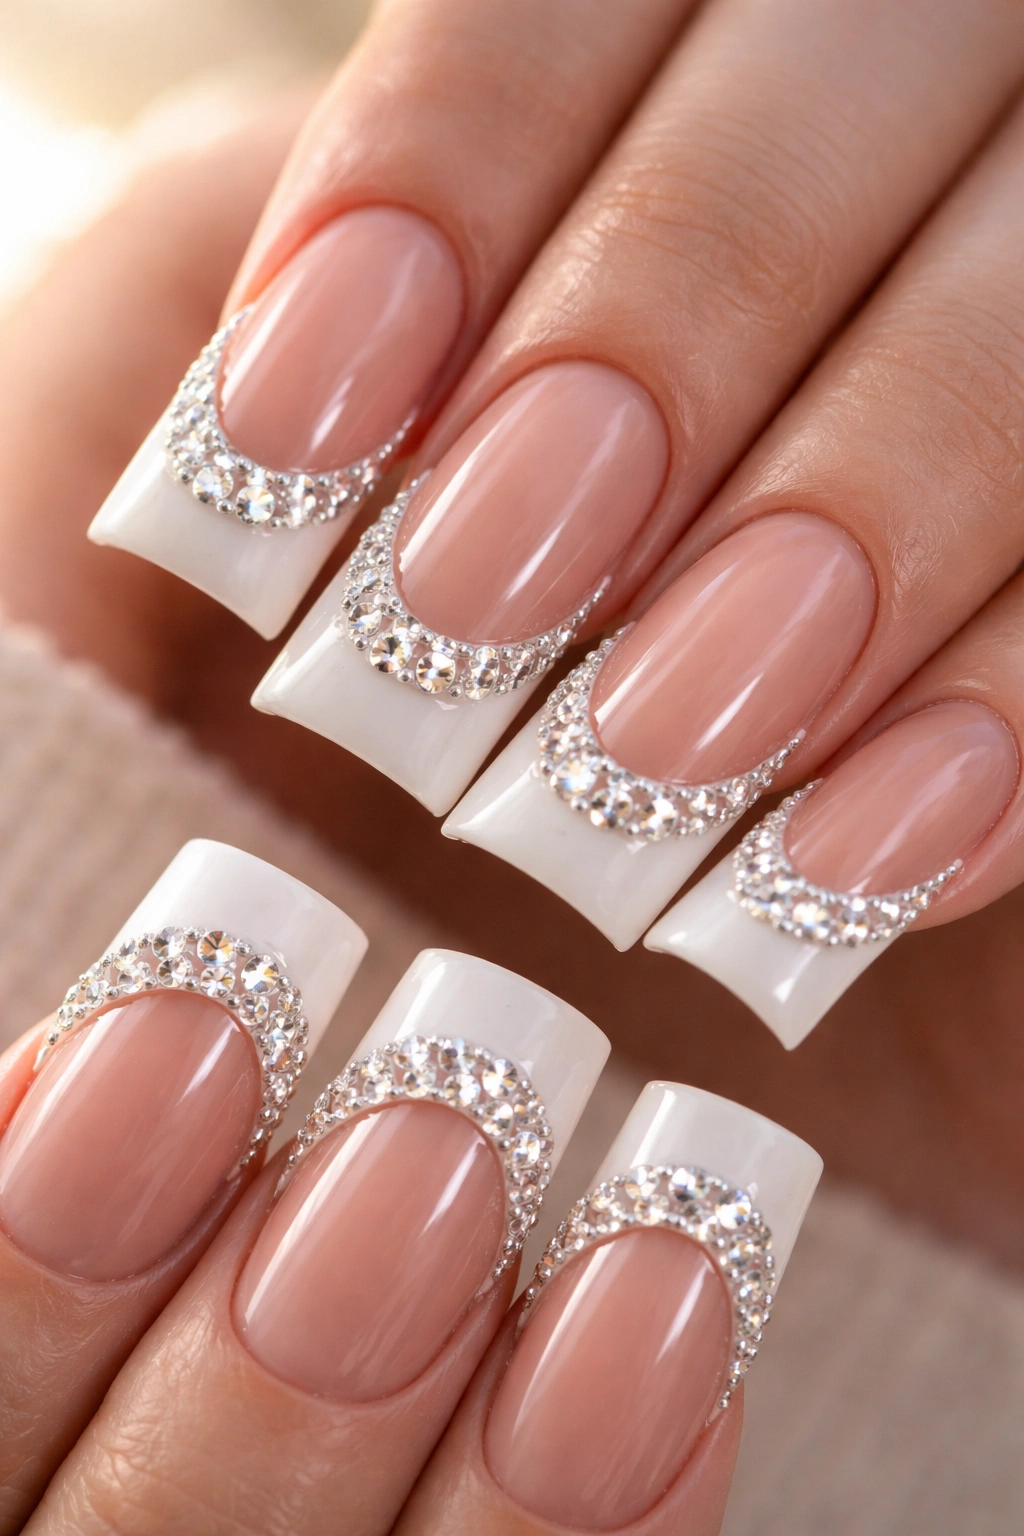
For occasions when you want true glamour and sparkle, rhinestone-studded French duck nails deliver maximum impact. This design places individual rhinestones or crystal studs along the white tip edge or scattered throughout the white area, creating a luxurious, jewelry-like aesthetic. The crystalline sparkle of genuine rhinestones (as opposed to glitter) creates a more sophisticated, upscale appearance that reads as intentional luxury rather than costume jewelry.
Strategic Rhinestone Placement
The most flattering placement typically involves a line of rhinestones along the edge where the white tip meets the nude base, creating a shimmering border that defines the duck nail shape. Alternatively, you can scatter rhinestones throughout the white tip area for a more playful, celebratory vibe. The key is choosing rhinestones in colors that complement your design — crystal clear, champagne, rose gold, or silver typically work beautifully with white tips.
Securing Rhinestones Properly
Use a rhinestone adhesive or a small amount of gel polish to secure each stone firmly in place. Press each rhinestone down gently but decisively, ensuring it sits flush against the nail surface. Seal everything with a glossy top coat, being careful not to apply so much that it clouds the rhinestone sparkle. Well-applied rhinestones should feel secure and not shift or come loose with normal daily activities.
Rhinestone Design Ideas
- Single line of stones: A delicate row along the white tip border
- Scattered clusters: Groups of rhinestones at different densities across the white area
- Gradient intensity: Fewer stones at the base transitioning to more density at the tip
- Mixed sizes: Using rhinestones in varying sizes for visual interest and movement
12. Soft Pink and White French Ducks
This design introduces subtle color by using a soft, barely-there pink as the base color instead of nude, then pairing it with the crisp white tip. The effect is romantic, feminine, and slightly more colorful than a traditional French manicure while remaining completely appropriate for professional and formal settings. The pale pink base provides warmth and softness while the white tip maintains that polished, refined aesthetic. This combination is particularly flattering on a wide range of skin tones and feels especially beautiful during warmer months.
Choosing the Right Shade of Pink
The pink should be pale enough that it reads more as a skin-tone enhancement than as actual color. Think ballet slipper pink, dusty rose, or pale blush rather than bright hot pink. The softer the pink, the more elegant and timeless the overall design. If you’re unsure whether your chosen pink is the right shade, test it on a single nail first before committing to all ten.
Why Soft Pink Works Year-Round
Pink doesn’t have to feel seasonal or overly feminine — soft, muted pinks have a sophisticated, romantic quality that works beautifully in any context. The combination of soft pink and white is classic and elegant, yet still feels current and intentional. This design works for everyday wear, professional settings, date nights, and special occasions alike.
- Ballet pink to white: Delicate and graceful, perfect for anyone
- Dusty rose to white: Slightly warmer and richer while maintaining softness
- Mauve-pink to white: Introduces a hint of purple for added sophistication
13. Negative Space French Duck Design
Negative space designs embrace the nail bed itself as a design element, leaving portions of the nail bare (or showing only the base coat) to create visual interest and pattern. In this version, the white tip remains, but portions of the nude base are cut away or left bare, creating geometric shapes, lines, or patterns that showcase the actual nail beneath. The effect is modern, artistic, and incredibly distinctive — a design that tells people you’re not just following trends but creating something uniquely yours.
Creating Negative Space Safely
Negative space requires careful planning and usually involves using guides or stencils to ensure your bare areas are intentional and not accidental bald spots. You can create negative space by painting around existing tape guides, or by carefully removing polish in specific areas after application. The key is that the bare area should look intentionally designed, not like a mistake or chipped polish. Some designs incorporate small windows of negative space, while others make it the dominant visual element.
Negative Space Ideas Worth Trying
- Geometric cutouts: Small triangles, circles, or squares of exposed nail scattered across the design
- Linear negative space: Thin lines where no polish exists, creating an almost architectural effect
- Organic shapes: Irregular, flowing bare areas that feel artistic and experimental
- Half-moon design: A curved section of bare nail at the nail bed (the opposite of the traditional half-moon manicure)
14. Soft Glitter Fade French Tips
A glitter fade takes the diamond dust concept and expands it, creating an ombré effect where glitter density gradually increases as you move toward the tip. This design feels celebratory without being over-the-top, glamorous without requiring the commitment of full glitter nails. The glitter concentration at the tip draws attention to the French tip shape while the lighter glitter at the base keeps the design feeling wearable and sophisticated. You can use a single glitter color or layer multiple colors for added depth and complexity.
Building a Beautiful Glitter Fade
Start by applying your nude base color to the entire nail. Then, load a makeup sponge or glitter brush with fine glitter and apply it to just the white tip area in a concentrated way. Using a clean, slightly dampened brush, blend and diffuse the glitter upward toward the nail bed, creating a gradient where glitter density decreases. You can build multiple layers if you want a more dramatic fade. Seal with a glossy top coat to lock the glitter in place and create a smooth, finished appearance.
Color Combinations for Glitter Fades
- Silver glitter fade: Classic and versatile, works with any outfit or occasion
- Rose gold glitter fade: Warm and romantic, particularly beautiful on medium to deep skin tones
- Champagne glitter fade: Sophisticated and subtle, perfect for professional settings
- Multi-color glitter: Layer different glitter colors for a celebratory, festive vibe
- Holographic glitter: Rainbow sparkle that shifts colors as you move your hands
15. 3D French Tip Duck Nails
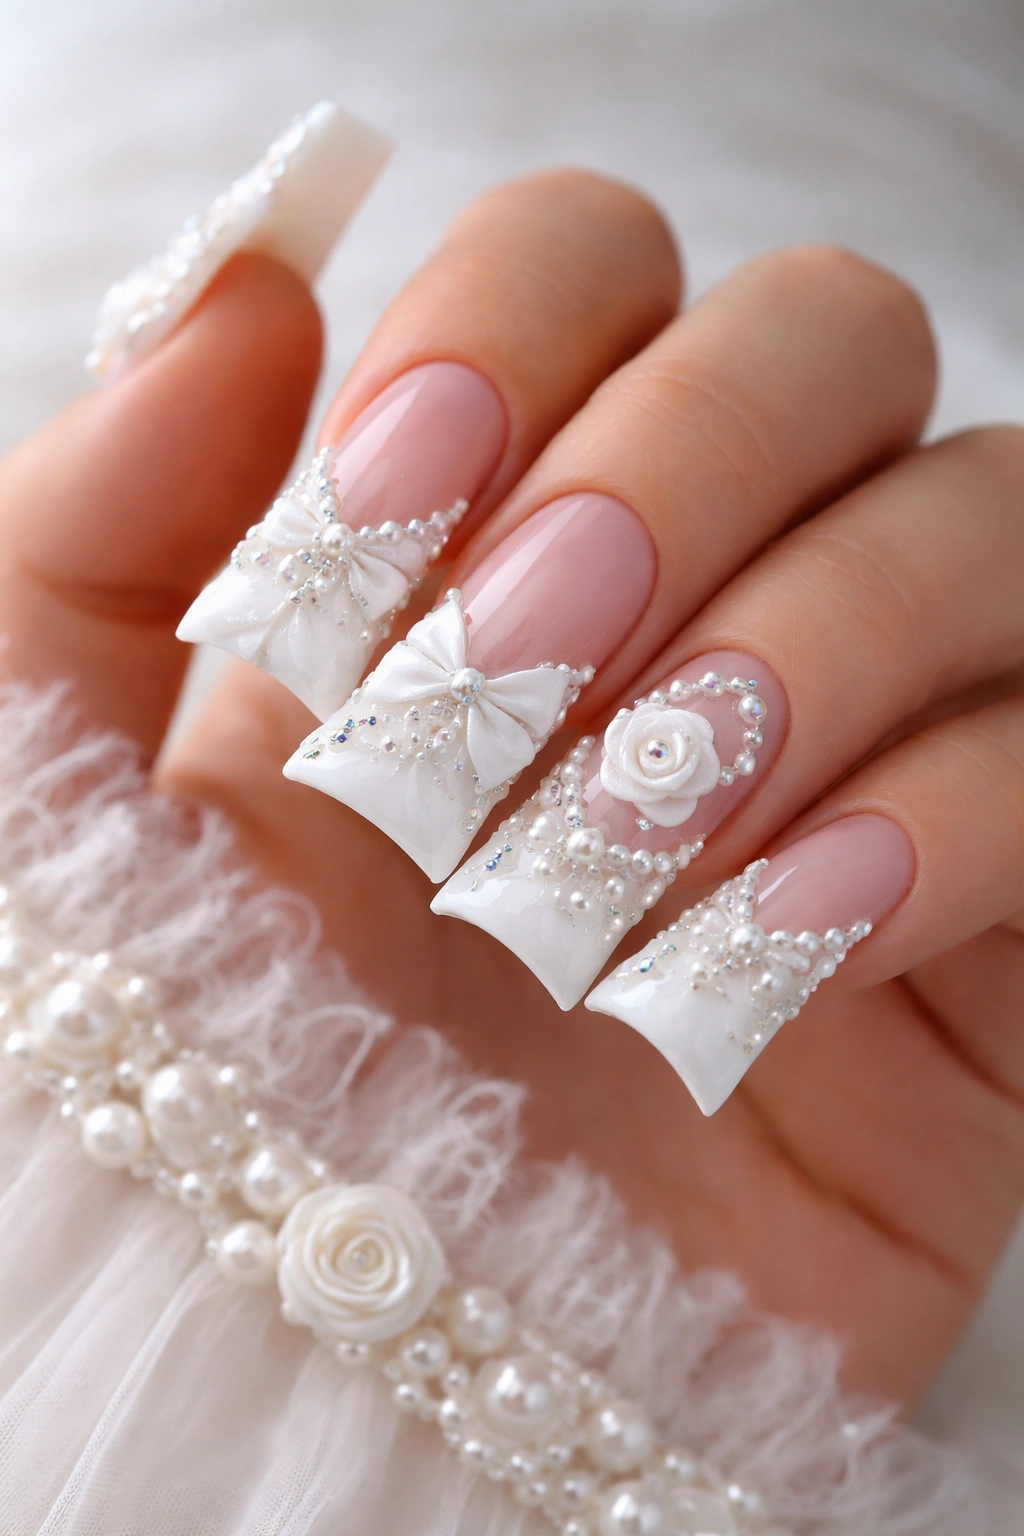
Three-dimensional nail art takes the white French duck nail into decorative territory by adding texture and dimension directly to the white tip. This might involve using 3D gel, sculptural elements, or textured nail art materials to create raised designs — perhaps a pattern of tiny pearls, a sculpted line, or dimensional shapes that extend above the nail surface. The result is incredibly eye-catching and tactile, transforming the nail into true wearable art. Three-dimensional designs require more skill and often need professional application, but they create statement nails that are absolutely unforgettable.
3D Materials and Techniques
Three-dimensional designs can be created using clear gel sculpted into shapes, acrylic elements, or specialized textured pastes designed for nail art. Each material requires different application techniques and drying times. Gel-based 3D work needs to be cured under a UV or LED lamp, while some acrylic products air-dry. The key to successful 3D design is structural integrity — the raised elements need to be securely attached and shaped in a way that won’t catch on clothing or cause breakage.
3D Design Ideas for French Ducks
- Dimensional line: A raised, sculptural white line running along the edge of the white tip
- Pearl clusters: Three-dimensional pearl elements scattered across the white area
- Geometric shapes: Small sculptural triangles, dots, or abstract shapes in relief
- Lace texture: A raised lace-like pattern that creates visual and tactile interest
- Ombre 3D: Combining 3D elements with an ombré base for a fully dimensional design
16. Baby Blue and White French Ducks
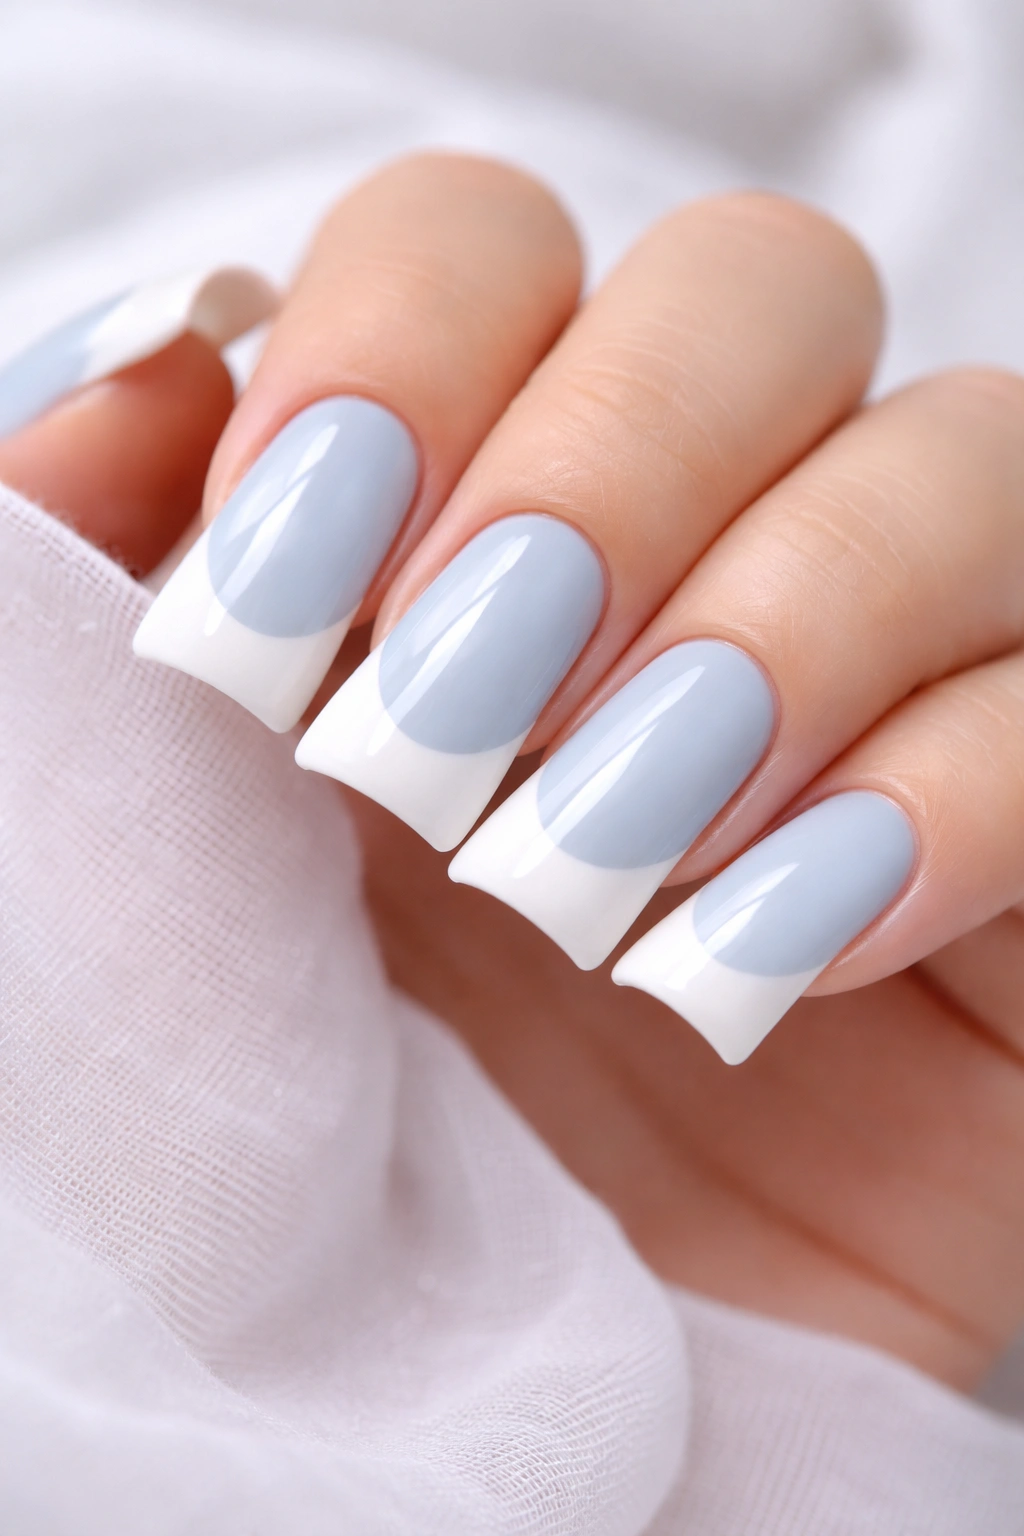
Introduce a soft, cool-toned color by pairing white French tips with a baby blue base. This combination feels fresh, modern, and slightly unexpected — it moves beyond the typical neutrals while maintaining complete wearability and sophistication. Baby blue works beautifully on all skin tones, feels calming and serene, and pairs beautifully with cool-toned clothing, jewelry, and makeup. The combination of pale blue and crisp white has a clean, almost nautical quality that feels fresh and seasonless.
Selecting the Perfect Baby Blue
Baby blue should be pale and cool-toned rather than saturated or greenish. Think sky blue, powder blue, or a barely-there tinted blue rather than ocean blue or royal blue. The lighter and more muted your chosen blue, the more sophisticated and wearable the overall design. If you’re uncertain about the shade, comparing it to actual reference photos of baby blue helps ensure you’re in the right color family.
Styling with Baby Blue and White
This color combination works beautifully with both warm and cool jewelry, clothing, and makeup, making it incredibly versatile. The pale blue feels sophisticated in professional settings, cheerful and fresh for casual wear, and elegant enough for special occasions. The combination also photographs beautifully, which is why it’s popular for engagement photos and formal portraits.
- Ombré version: Gradient from pale blue to white for added sophistication
- Solid base: Consistent baby blue throughout for a clean, classic look
- Glitter accent: Add subtle silver or clear glitter to the white tip for extra sparkle
17. Rose Gold Accent French Duck Nails
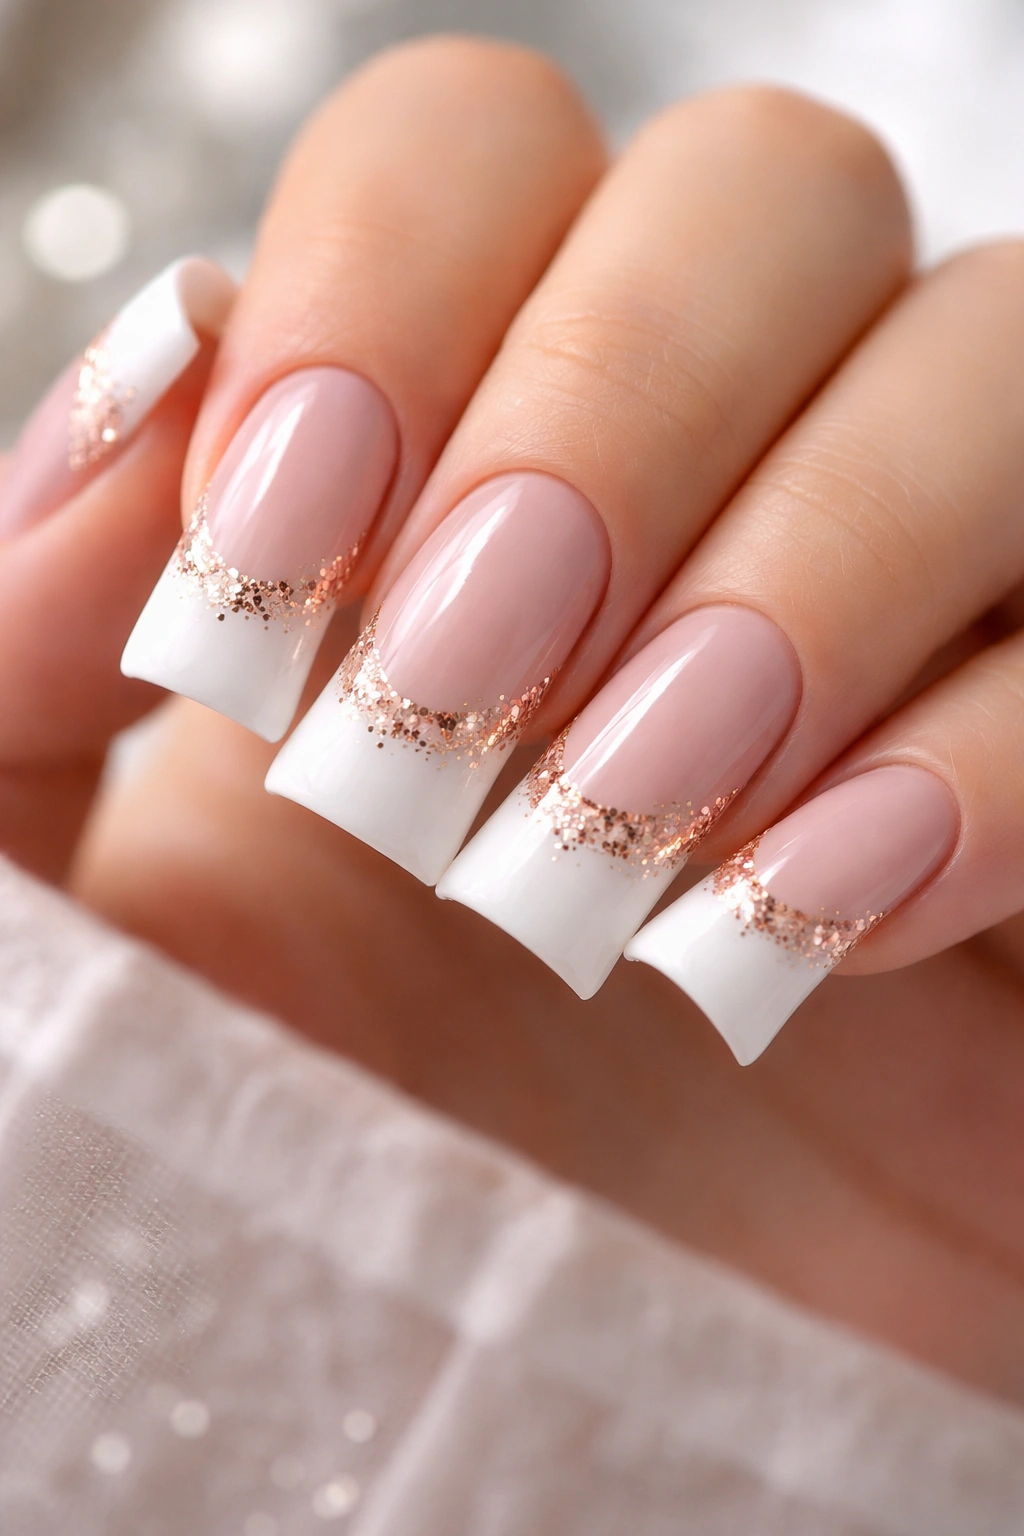
Rose gold brings warmth and romanticism to the white French duck nail design. This approach uses rose gold foil, rose gold leaf, or rose gold accents placed strategically alongside the white tip — perhaps as thin lines bordering the white, small leaf elements, or delicate geometric accents. The combination of cool white and warm rose gold creates a beautiful contrast that feels both modern and timeless. Rose gold also has a distinctly luxurious, Instagram-worthy quality that elevates even a simple design into something that photographs beautifully.
Incorporating Rose Gold Elements
Rose gold can be applied as foil (similar to the gold foil technique), as thin lines using rose gold gel or polish, or as actual rose gold leaf applied with an adhesive. The most durable approach is typically rose gold foil sealed under a top coat, as this prevents the gold from scratching or peeling. Thin rose gold accent lines can be applied with a precision brush, creating delicate geometric or floral designs within the white tip area.
Rose Gold Design Combinations
- Rose gold outline: Delicate rose gold lines defining the edge of the white tip
- Geometric rose gold: Small triangles, chevrons, or angular shapes in rose gold within the white area
- Mixed metals: Combining rose gold with silver or gold for a dynamic, multi-metal look
- Rose gold veining: Fine rose gold lines creating a marble or stone-like appearance
- Scattered rose gold leaf: Small pieces of rose gold leaf scattered across the white tip for a luxe, artistic feel
18. Ombré Nude-to-White French Ducks
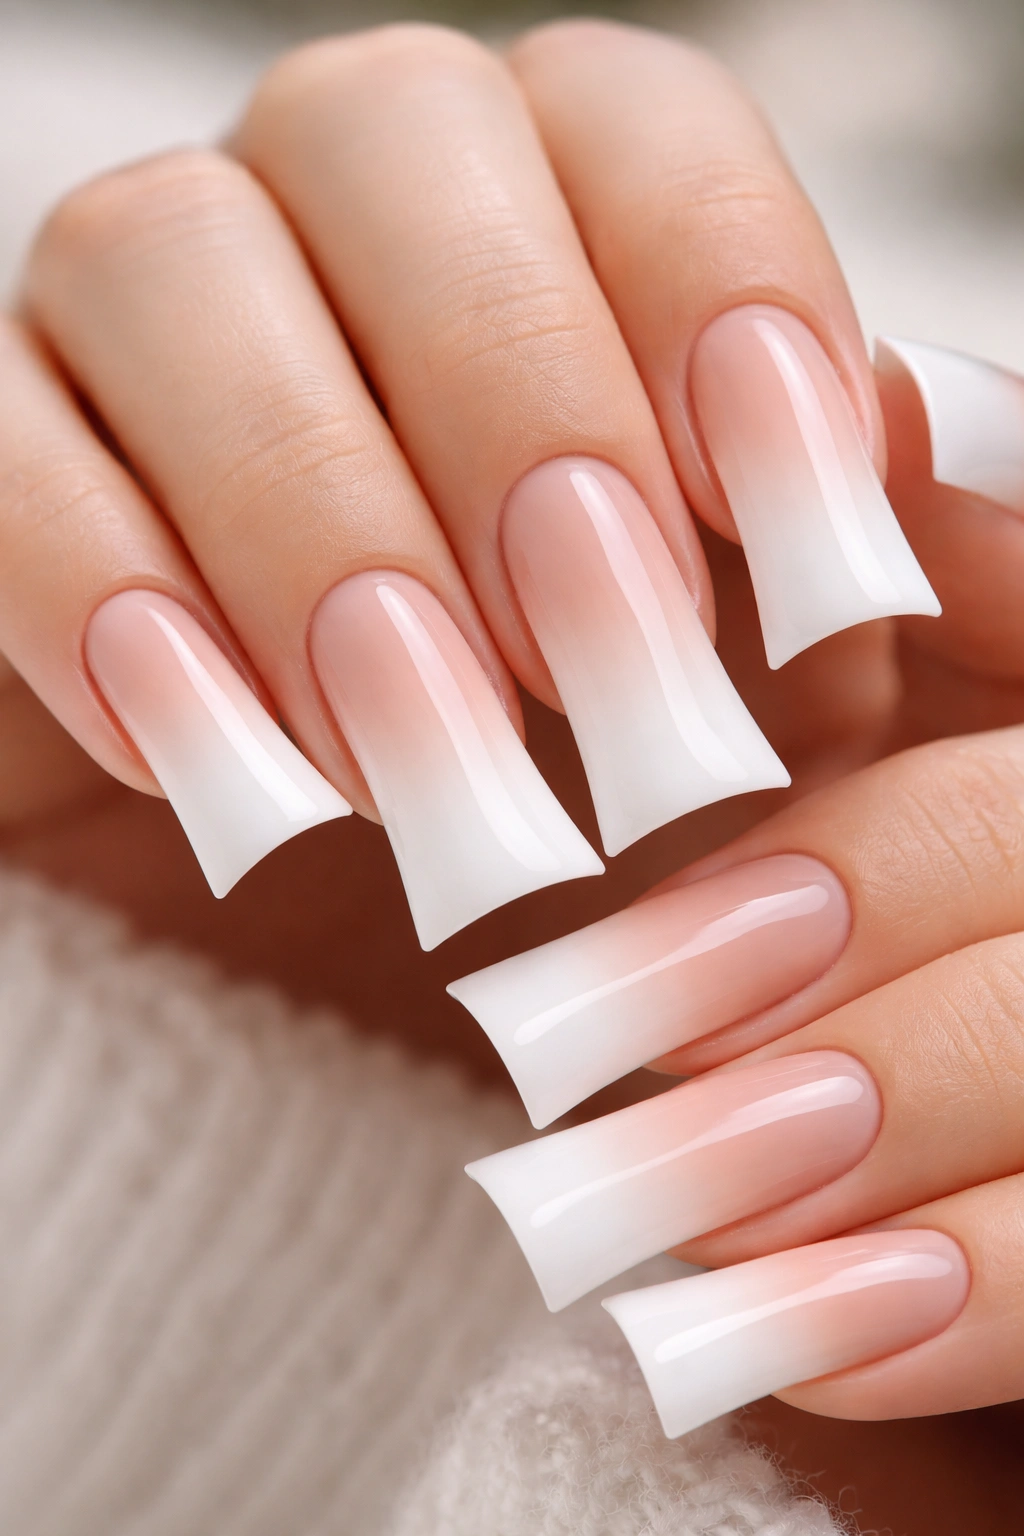
This final design takes the gradient concept to its ultimate expression, creating a seamless ombré that flows from your natural nail color or a warm nude at the base, through increasingly lighter shades, and finally into the crisp white tip. The effect is a sophisticated, graduated color transition that’s far more visually interesting than a single-color base while maintaining complete elegance and wearability. The ombré approach honors the French manicure concept while modernizing it with a contemporary gradient technique.
Mastering the Multi-Shade Ombré
Creating a convincing ombré requires multiple shades — typically three to five different nude and white tones that transition smoothly from one to the next. Apply your darkest shade first, covering the entire nail. Then, using either a makeup sponge or a soft brush, apply each progressively lighter shade to smaller and smaller areas, blending the boundaries between colors with a slightly dampened brush. Take your time and build the gradient in layers; rushing this process results in visible color blocks rather than a smooth transition.
Why the Ombré Gradient Feels Elevated
Ombré designs automatically read as more intentional, skilled, and sophisticated than single-color designs. They showcase technical nail art ability while remaining completely appropriate for professional and formal contexts. The gradient also creates the illusion of length and makes the duck nail shape even more visually striking. Once you’ve mastered the ombré technique, you can apply it to any color combination, making this a foundational skill that opens up endless design possibilities.
- Warm ombré: Peachy, taupe, and beige tones transitioning to white for a warm, inviting feel
- Cool ombré: Gray, cool taupe, and pale blue tones for a contemporary, sophisticated look
- Rosy ombré: Pink-toned progression from dusty rose to pale pink to white for romantic elegance
- Monochromatic ombré: Staying within the nude-to-white family for the most cohesive, subtle appearance
Final Thoughts

White French tip duck nails represent the perfect intersection of classic elegance and modern edge. Whether you gravitate toward the purest, most minimalist versions or you love layering on textures, embellishments, and artistic details, there’s a design here that speaks to your personal style. The beauty of this trend is its adaptability — you can wear it to a corporate boardroom, a casual weekend brunch, a wedding, or a night out dancing, and it will feel appropriate and intentional in every context.
The key to pulling off white French duck nails is precision and intentionality. Because the design itself is relatively bold and sculptural, every detail matters more than it might in a traditional manicure. Take time during application to create crisp lines, smooth gradients, and even coverage. If you’re not confident doing these nails yourself, investing in professional application ensures that you get a flawless result that showcases the design at its best.
Start with one of the simpler designs if you’re new to French duck nails, and work your way up to the more complex gradient and embellished versions as you gain confidence and skill. You might find yourself returning to a favorite design again and again, or you might enjoy switching between different styles depending on your mood, season, and upcoming activities. Either way, white French duck nails are a versatile, sophisticated, and undeniably stunning choice that will keep your hands looking polished and intentional.
