

Stiletto nails are the ultimate canvas for intricate nail art, and when you combine their dramatic length and sharp point with delicate flower designs, you get something truly striking. Floral patterns have moved far beyond simple painted daisies — modern flower stiletto nail designs range from photorealistic botanical illustrations to abstract watercolor blooms to minimalist line work that proves sophistication doesn’t require complexity. The elongated silhouette of stiletto nails actually amplifies floral designs, giving you more real estate to work with and making every petal and leaf visible from across a room.
What makes flower stiletto nail ideas so versatile is that they work across every aesthetic imaginable. Whether you’re drawn to romantic, delicate styles or bold, vibrant tropical designs, there’s a floral stiletto nail concept that matches your vibe. Some designs leverage the natural nail bed as negative space, while others layer multiple florals across the entire nail surface. The key to pulling off any flower nail art on stilettos is understanding how the length and shape affect the visual impact of your design — what looks good on a round nail might need adjustment on a sharp point.
Let’s explore fifteen stunning flower stiletto nail designs that range from beginner-friendly to advanced, giving you plenty of inspiration whether you’re booking a nail appointment or attempting these at home.
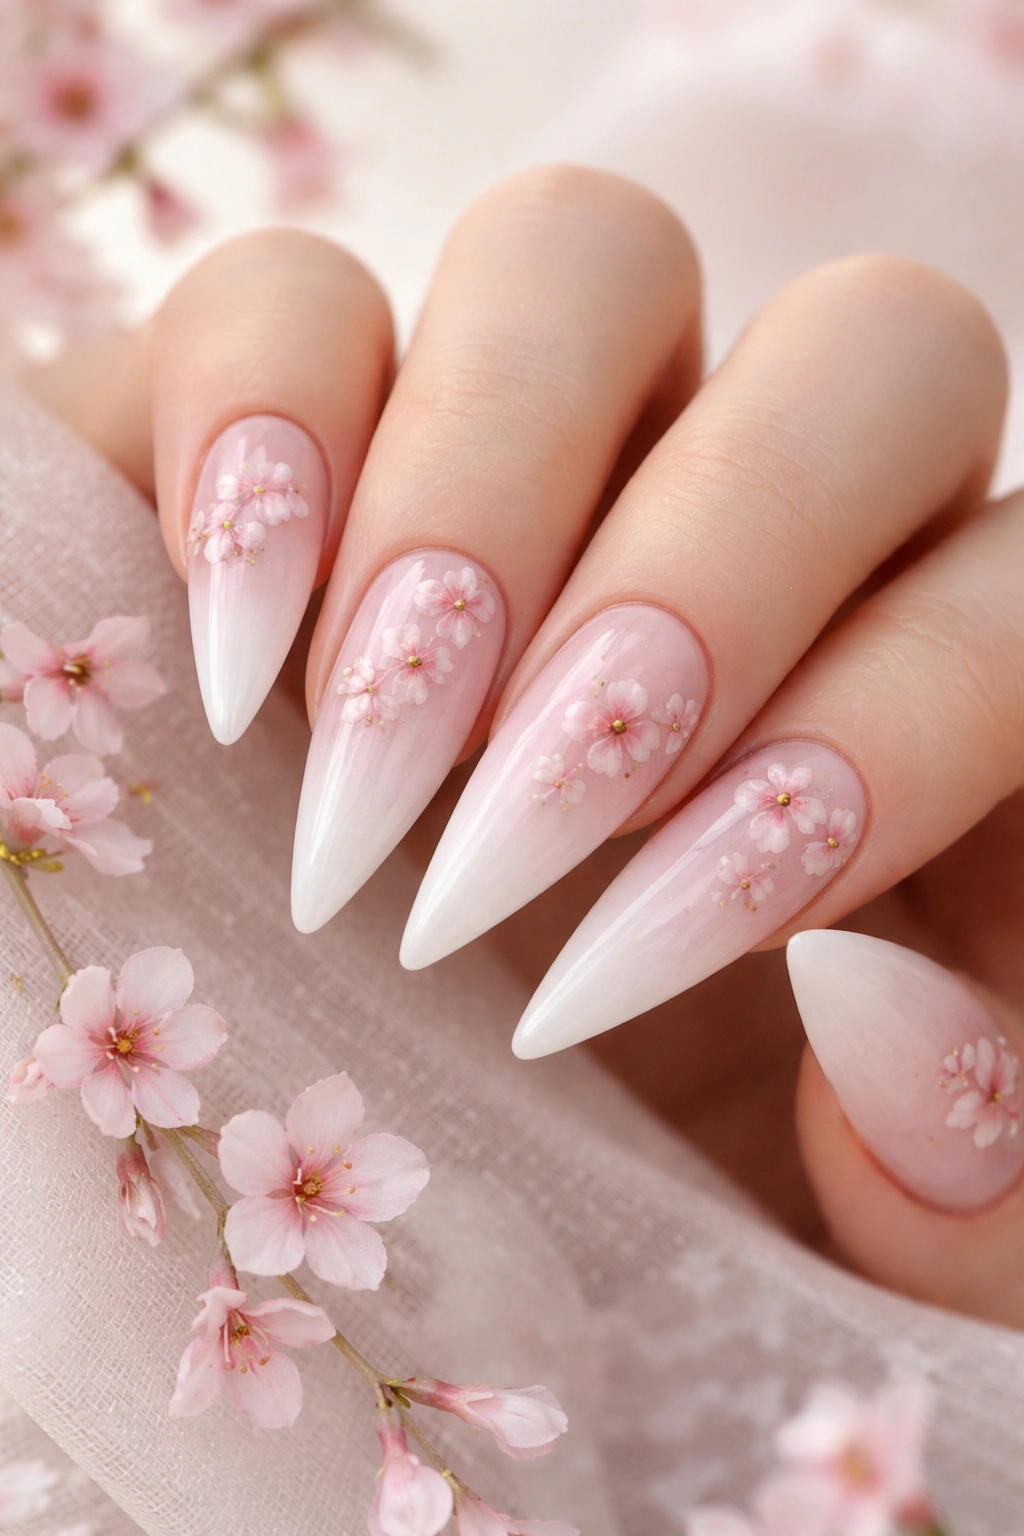
1. Delicate Cherry Blossom Whisper
Cherry blossom nails capture the essence of spring with their soft, romantic aesthetic, and they look absolutely ethereal on stiletto shapes. This design features pale pink or white stiletto nails with minimalist cherry blossoms scattered across the nail bed — think 2-3 small five-petaled flowers per nail, rendered in dusty rose or mauve with a tiny yellow dot center. The beauty of this design is its restraint; you’re not covering every millimeter of the nail, but rather creating a sense of delicate flowers drifting across the surface.
Why It’s Timeless and Romantic
Cherry blossoms symbolize beauty and the fleeting nature of life, which translates into nails that feel sophisticated rather than cutesy. The sparse placement means this design works equally well in professional settings and casual moments — it reads as understated elegance on stilettos rather than over-the-top nail art. The soft color palette feels gentle against the dramatic silhouette of the stiletto shape, creating a beautiful contrast between delicate and bold.
How to Execute This Look
- Use a thin nail art brush or a dotting tool to paint five-petaled flowers with one-stroke technique if possible
- Keep petals feather-light and slightly translucent for an authentic cherry blossom appearance
- Add tiny dark stamen in the center using the finest brush tip you have
- Space flowers asymmetrically across different nails rather than lining them up in rows
- Seal with a glossy topcoat to make the flowers appear to float on the nail surface
Pro tip: If freehand painting intimidates you, use nail decals as your base and layer hand-painted details on top for a hybrid approach that gives you more control.
2. Wild Sunflower Accent Statement
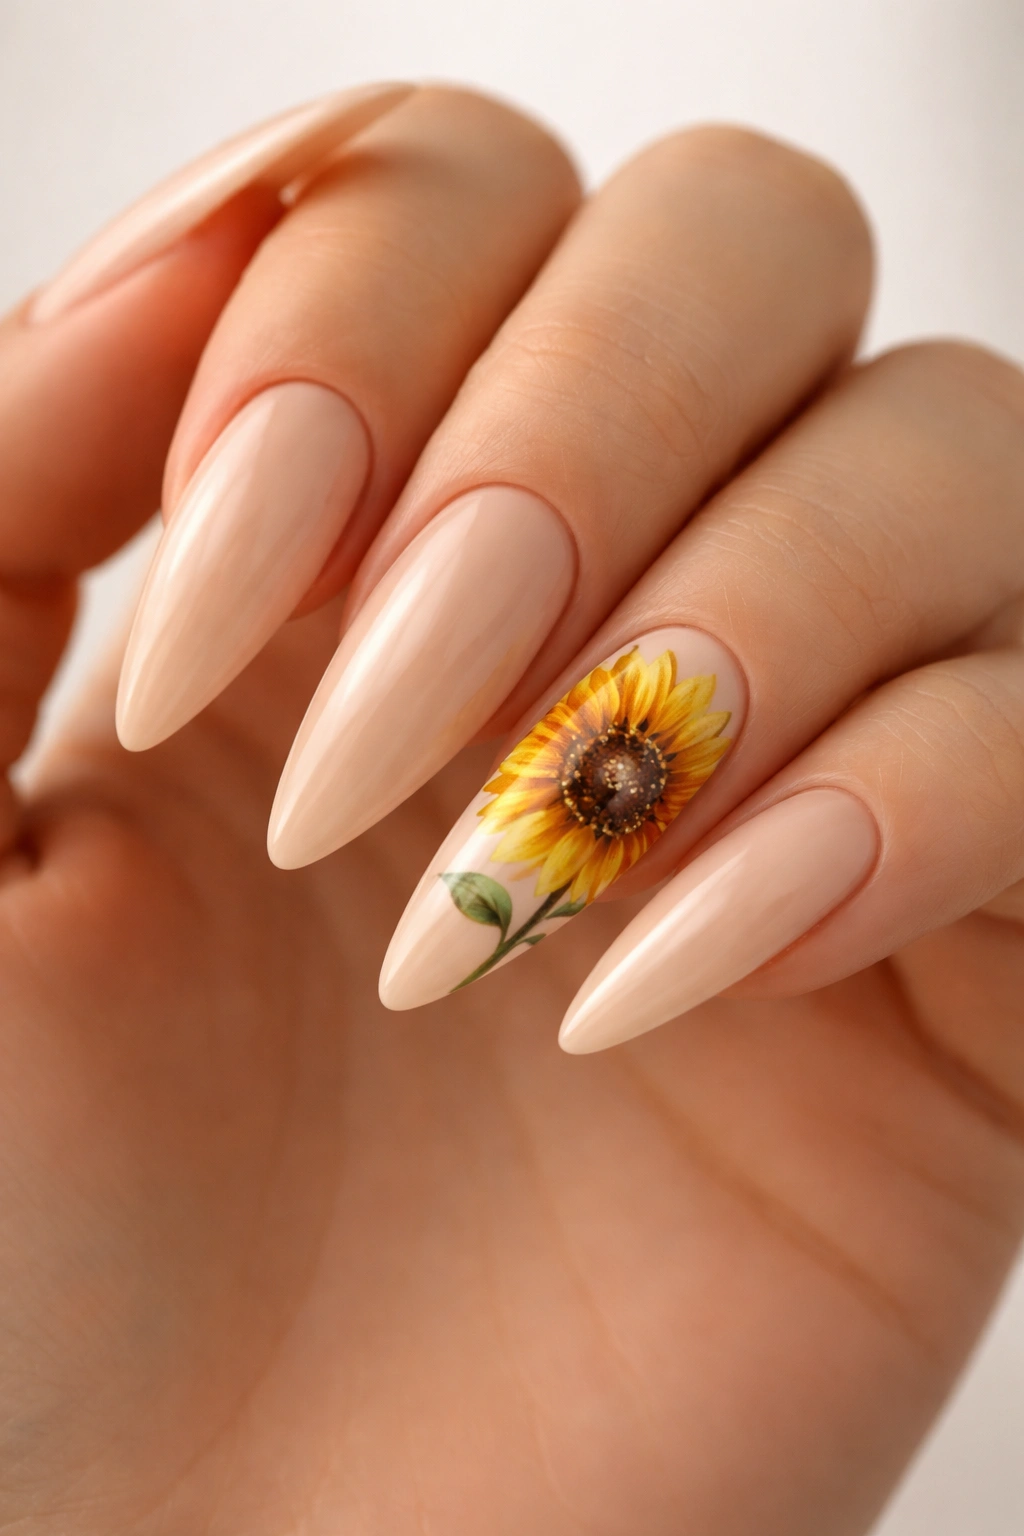
For those who love bold, cheerful energy, sunflower stiletto nails deliver instant happiness with their sunny disposition and graphic impact. Paint four nails in a neutral nude or soft beige, then dedicate one accent nail (typically the ring finger) to a large, detailed sunflower design that spans most of the nail. The sunflower features golden-yellow petals radiating from a rich chocolate brown center, with thin green stem and leaves trailing down the side of the nail.
What Makes This Design Pop
Sunflowers are instantly recognizable and inherently eye-catching, so even a single well-executed sunflower creates major visual impact on a stiletto nail. The scale works beautifully with the elongated shape — a large flower head with a long stem takes full advantage of the nail’s length without looking cramped. This design bridges casual and special-occasion wear; it’s cheerful enough for everyday but polished enough for events.
Application Techniques and Tips
- Start with a detailed sketch in light pencil on the nail to map out petal placement
- Use a medium round brush to paint golden petals in overlapping strokes, letting them radiate outward
- Create depth in the brown center by adding slightly darker brown shading around the edges
- Paint a thin green stem using the side of a fine liner brush, then add 2-3 small leaves along the stem
- Consider adding tiny highlights or a glossy topcoat just on the flower to make it dimensional
Worth knowing: Sunflower nails look even more striking when paired with complementary colors on other nails — try a burnt orange or deep green on the remaining three nails for a coordinated look.
3. Rose Garden Ombre Elegance
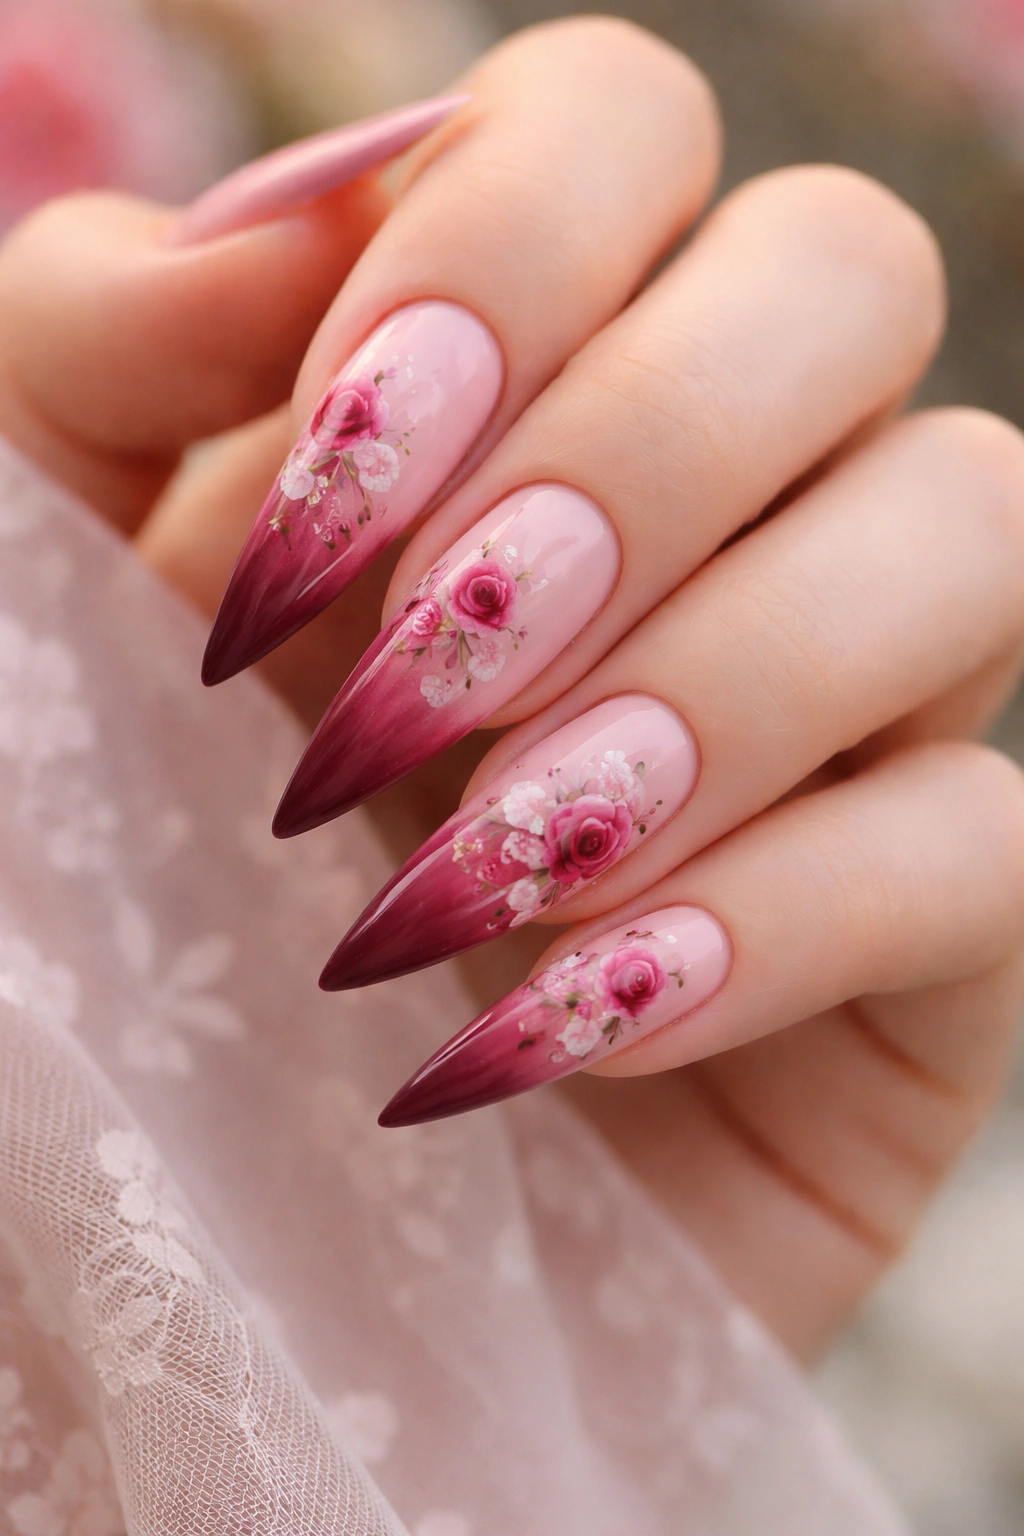
Rose garden ombre stiletto nails create a luxurious, sophisticated aesthetic by blending multiple shades of rose tones across the nail bed. This design features a gradient that transitions from pale blush at the cuticle to deep burgundy at the tip, with tiny rose blooms painted in various stages throughout the gradient. The result is a nail that reads as both elegant and artistic without being overly complicated.
Why Ombre Rose Works on Stilettos
The gradient elongates the visual line of the nail, making the length feel even more dramatic. Roses in multiple sizes add botanical interest to what could otherwise be a simple ombre — the flowers anchor the gradient and give it purpose. This design works beautifully for weddings, date nights, or anytime you want nails that feel intentionally luxurious.
Building the Ombre Rose Design
- Create an ombre base using a makeup sponge dabbed with two to three coordinating rose shades
- Blend the colors on the sponge first, then press gently onto the nail in a dabbing (not dragging) motion
- Once the ombre base is set, use a thin brush to paint small roses at varying sizes throughout the gradient
- Paint some roses as full blooms (showing the spiral center) and others as simple three-petal profiles
- Add tiny green leaves between roses to create a cohesive garden effect
Insider note: Set your ombre with a matte topcoat before adding the roses — this prevents your sponge from dragging the base color and keeps the flowers looking crisp and intentional.
4. Lavender Botanical Precision
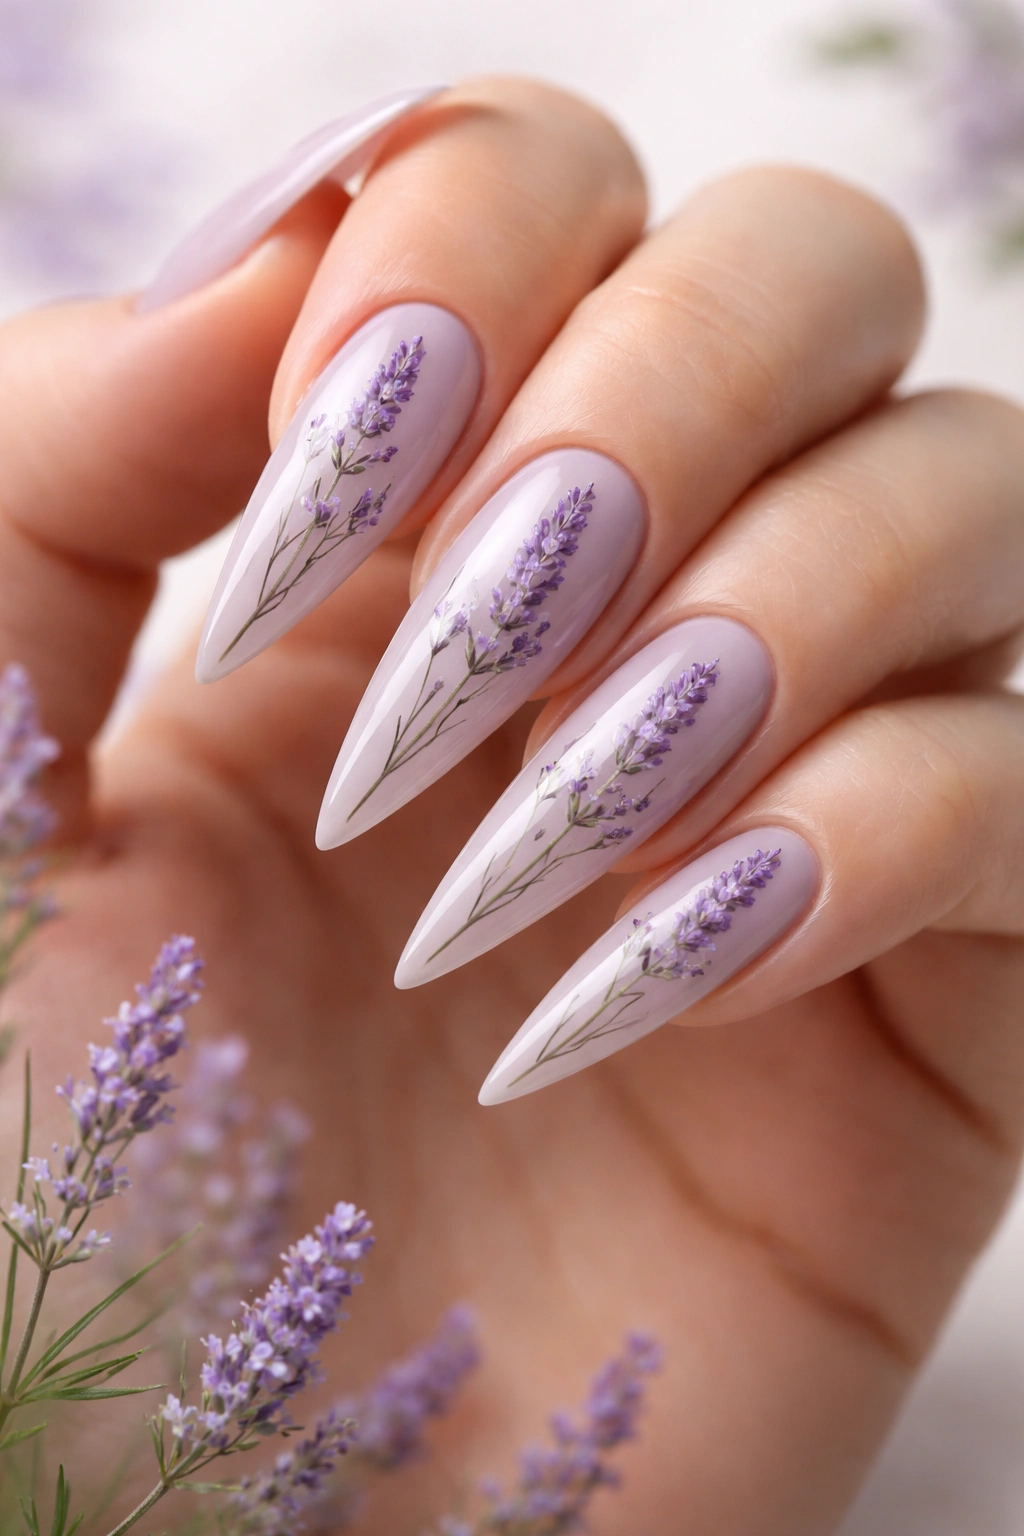
Lavender flower stiletto nails tap into the current popularity of botanical nail art while maintaining an air of calm sophistication. This design features pale lavender or off-white stiletto nails with delicate, hand-painted lavender stems scattered across the surface. Each stem shows tiny individual florets arranged vertically, creating an almost pressed-flower quality that feels very current and design-forward.
The Appeal of Lavender Nail Art
Lavender has become synonymous with wellness and mindfulness, so nails featuring lavender florals carry psychological associations with calm and beauty. The color palette is inherently soothing — soft purples and muted greens against pale backgrounds don’t create visual jarring. On stilettos, multiple lavender stems create an artistic, almost botanical-illustration feel that elevates the manicure beyond typical nail art.
Painting Detailed Lavender Stems
- Use a very thin liner brush and purple or mauve shade to paint vertical lines (the stems)
- Along each stem, add tiny dots or small oval shapes clustered closely together to represent florets
- Space your stems asymmetrically across different nails, varying their heights and directions
- Add very fine green leaves at the base of stems using a delicate brushstroke
- Consider adding one or two stems in a slightly darker purple for depth variation
Pro tip: Lavender flowers are incredibly detailed, so consider using a magnifier or macro lens while painting to ensure each floret is visible and intentional rather than blurry.
5. Peony Watercolor Romance
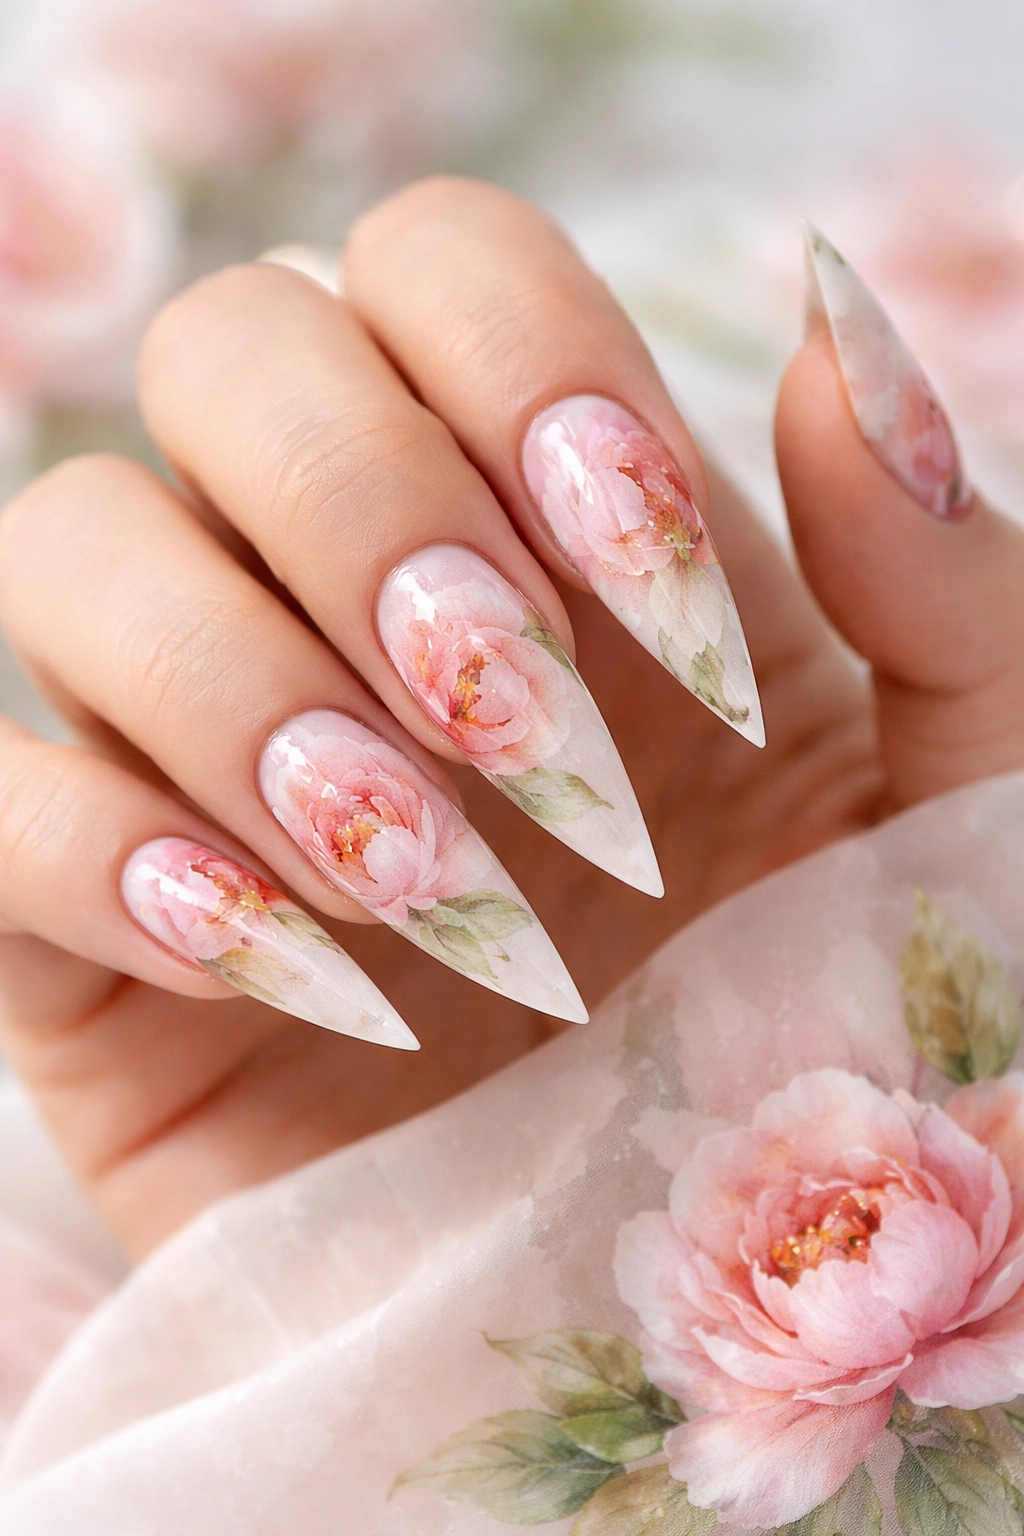
Peony watercolor stiletto nails capture the dreamy, layered beauty of full peonies using soft watercolor techniques. This design features large, loose florals that look like they’ve been painted with a watercolor brush — soft edges, blended colors, and an almost ethereal quality. Each peony spans most of a nail, rendered in pale pink, coral, or even white with green leaves peeking through the layers.
Why Watercolor Peonies Feel Special
Watercolor techniques on nails feel significantly more artistic and less “nail art commercial” than other approaches — they read as miniature fine art rather than decorated nails. Peonies’ naturally full, layered petals translate beautifully into watercolor style, which thrives on soft color transitions. On elongated stilettos, a watercolor peony creates an almost painterly statement that genuinely catches attention.
Watercolor Technique for Nails
- Use alcohol inks or watered-down acrylic paints for authentic watercolor effect on the nail
- Start with very light, wet color and build layers rather than trying to apply full pigment at once
- Use a wet brush and gentle dabbing motions to create soft petal shapes with undefined edges
- Allow colors to blend slightly where they meet — no harsh lines or precise boundaries
- Add darker green leaves after the peonies are dry, using slightly more defined brushwork for contrast
Worth knowing: Watercolor nails are more delicate than other designs, so prioritize sealing with a strong topcoat to protect the soft finished look.
6. Daisy Chain Cheerful Design
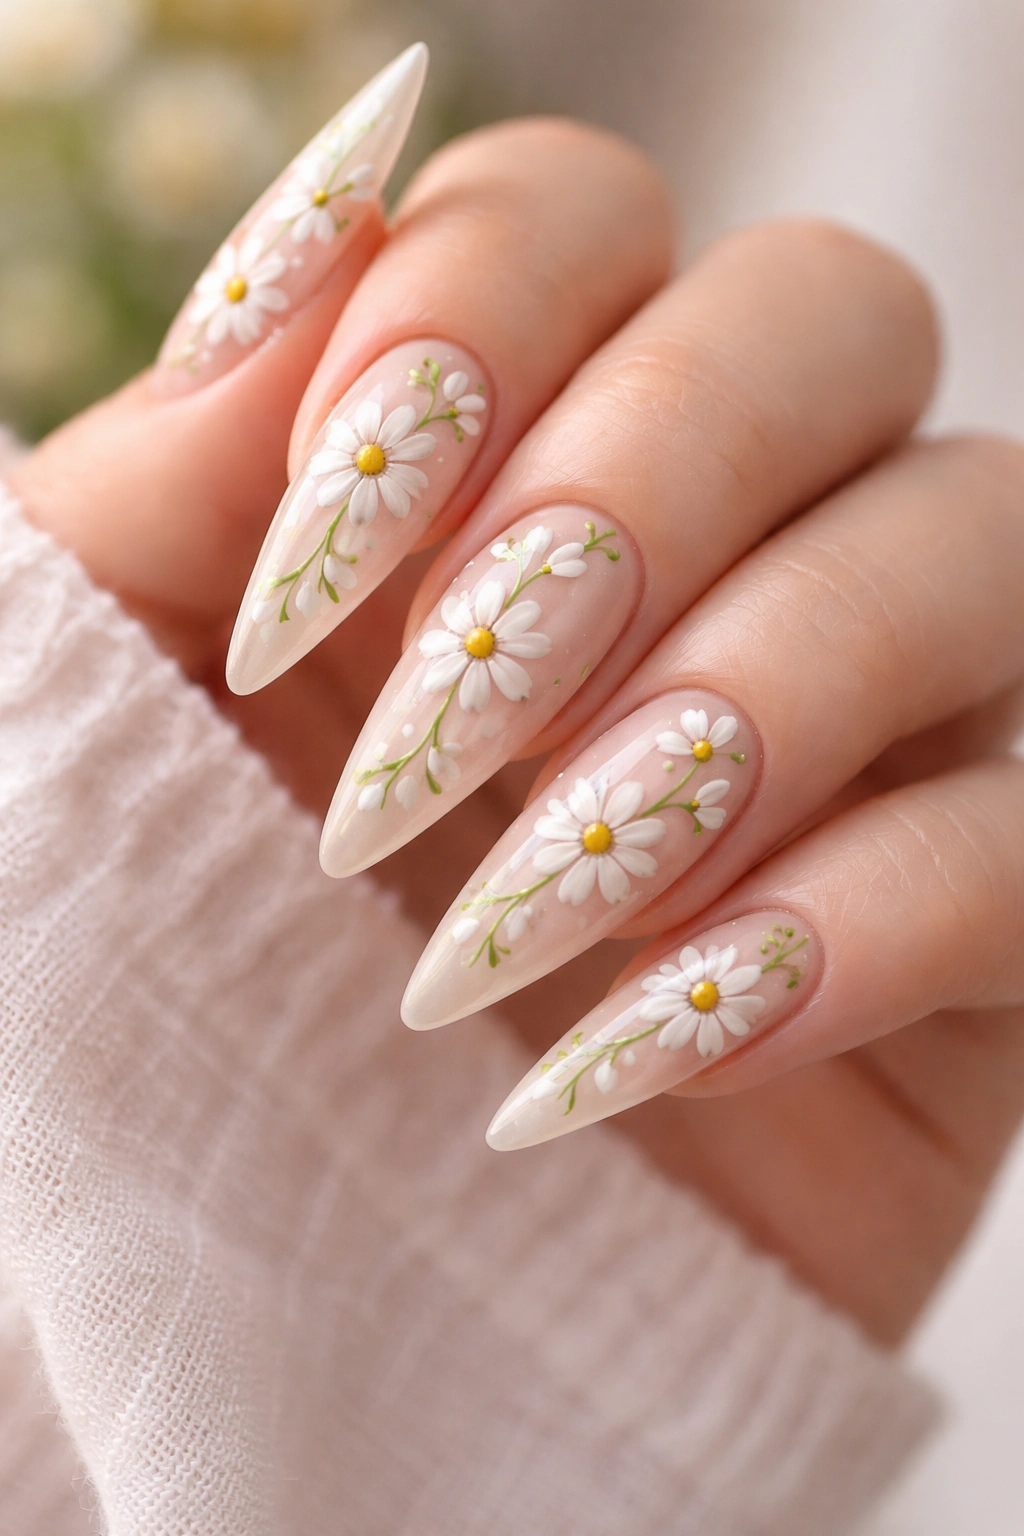
Daisy chain stiletto nails create a playful, garden-inspired aesthetic by painting multiple connected daisies flowing across the nail surface. This design features simple white or pale yellow petals with golden-yellow or brown centers, connected by thin green vines or stems that link each flower together. The result is less formal than a single statement flower and more joyful and movement-oriented.
The Joy of Daisy Chains
Daisy chains feel inherently youthful and happy without being childish when executed with precision on stilettos. The connected design creates a sense of motion and flow that complements the pointed shape of stiletto nails. This design works particularly well for spring and summer wear, but the cheerfulness of daisies transcends seasons.
Painting Connected Daisies
- Lightly sketch your vine pattern first so you know where flowers will land
- Use a thin brush to paint thin, slightly curved green stems connecting multiple points across the nail
- At each connection point, paint simple five or six-petaled daisies with white or pale yellow petals
- Fill centers with a warmer yellow or golden shade, then add tiny detail lines radiating from the center
- Space daisies so the vine naturally guides the eye across the entire nail surface
Insider note: Keep your vine slightly irregular and organic-looking rather than perfectly symmetrical — real plants aren’t perfect, and this imperfection adds charm to the design.
7. Tulip Gradient Spring Palette
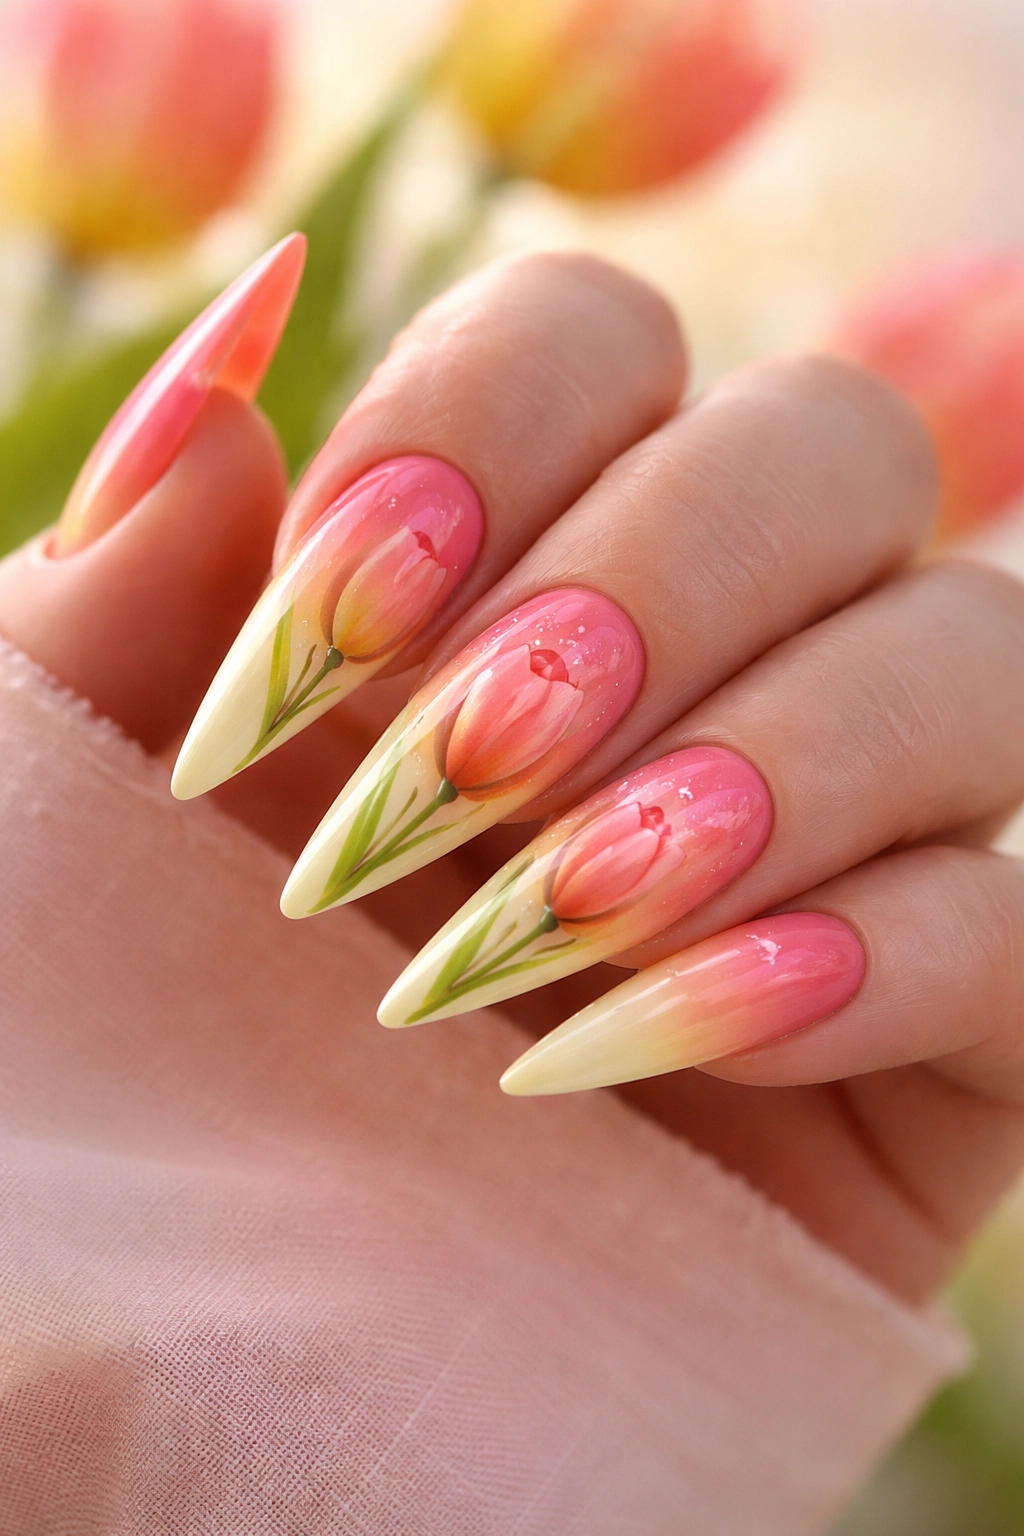
Tulip stiletto nails celebrate spring with a gradient design that transitions from coral-pink to yellow across the nail surface, with detailed tulip blooms anchoring the composition. Each nail features one or two tulips with characteristic cup-shaped petals, painted to look dimensional and three-dimensional. The gradient background complements the tulips while making them the clear focal point.
Why Tulips Work in Gradient Style
Tulips have a very specific, recognizable shape that reads as spring and renewal. Their cup-like form is easier to render realistically than some other flowers, making this a good choice if you’re not extremely confident in your floral painting. The gradient background adds sophistication and visual interest without competing with the tulips themselves.
Creating the Tulip Gradient Effect
- Create a gradient using coral, pink, yellow, and possibly orange shades blended on a sponge
- Dab the gradient onto the nail, concentrating more intense color at the tips
- Once dry, paint tulips with three curved petals forming a cup shape
- Use deeper shades of your gradient colors (darker coral, deeper pink, richer yellow) to paint the flowers
- Add thin green stems and leaves in a contrasting shade of green to ground the flowers
Pro tip: Paint one or two tulips per nail rather than filling the entire nail with flowers — this lets your gradient shine while keeping the tulips as featured elements.
8. Orchid Glitter Blend Luxury

Orchid glitter stiletto nails combine delicate, hand-painted orchids with strategically placed glitter for a design that feels both elegant and slightly glamorous. Paint pale pink or white stiletto nails with orchid blooms in deeper pink or purple, then add fine glitter or mica shimmer to the orchid centers and scattered along one side of the nail. This approach elevates orchids from simply pretty to genuinely luxe.
The Sophistication of Orchid Designs
Orchids have an inherent luxury about them — they’re associated with sophistication and rarity in floral design. When combined with subtle glitter, orchid nails feel elevated without becoming costume-y or over-decorated. The glitter catches light beautifully on the stiletto shape, especially the tip, making the hand look even more refined.
Painting Orchids with Glitter Accents
- Paint orchid blooms with recognizable characteristics: a larger bottom petal and smaller petals clustered above
- Use deep pink, purple, or magenta to create dimension in the petals with shading
- Once flowers dry, apply a thin line of glitter gel or glitter-infused topcoat around orchid centers
- Add a few scattered glitter specks down one side of the nail for movement and sophistication
- Seal everything with a glossy, high-shine topcoat to make the glitter sparkle
Worth knowing: Less glitter is more in this design — you’re adding luxury accents, not creating a glitter bomb. Restraint makes the glitter feel intentional and elegant.
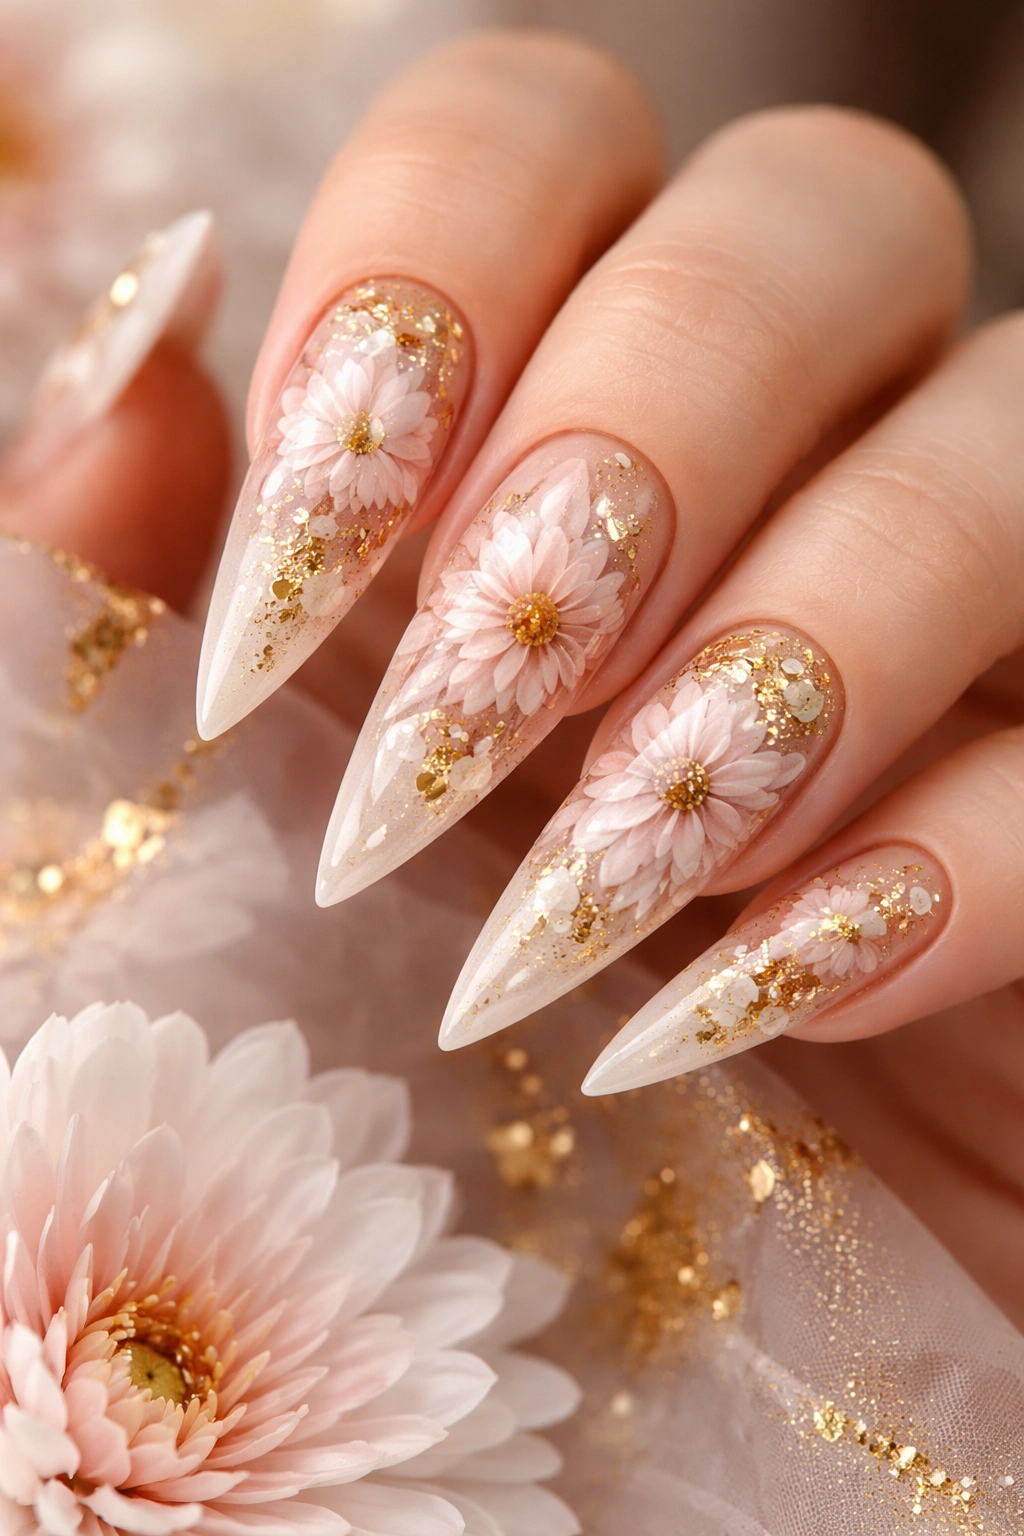
9. Pressed Flower Resin Art
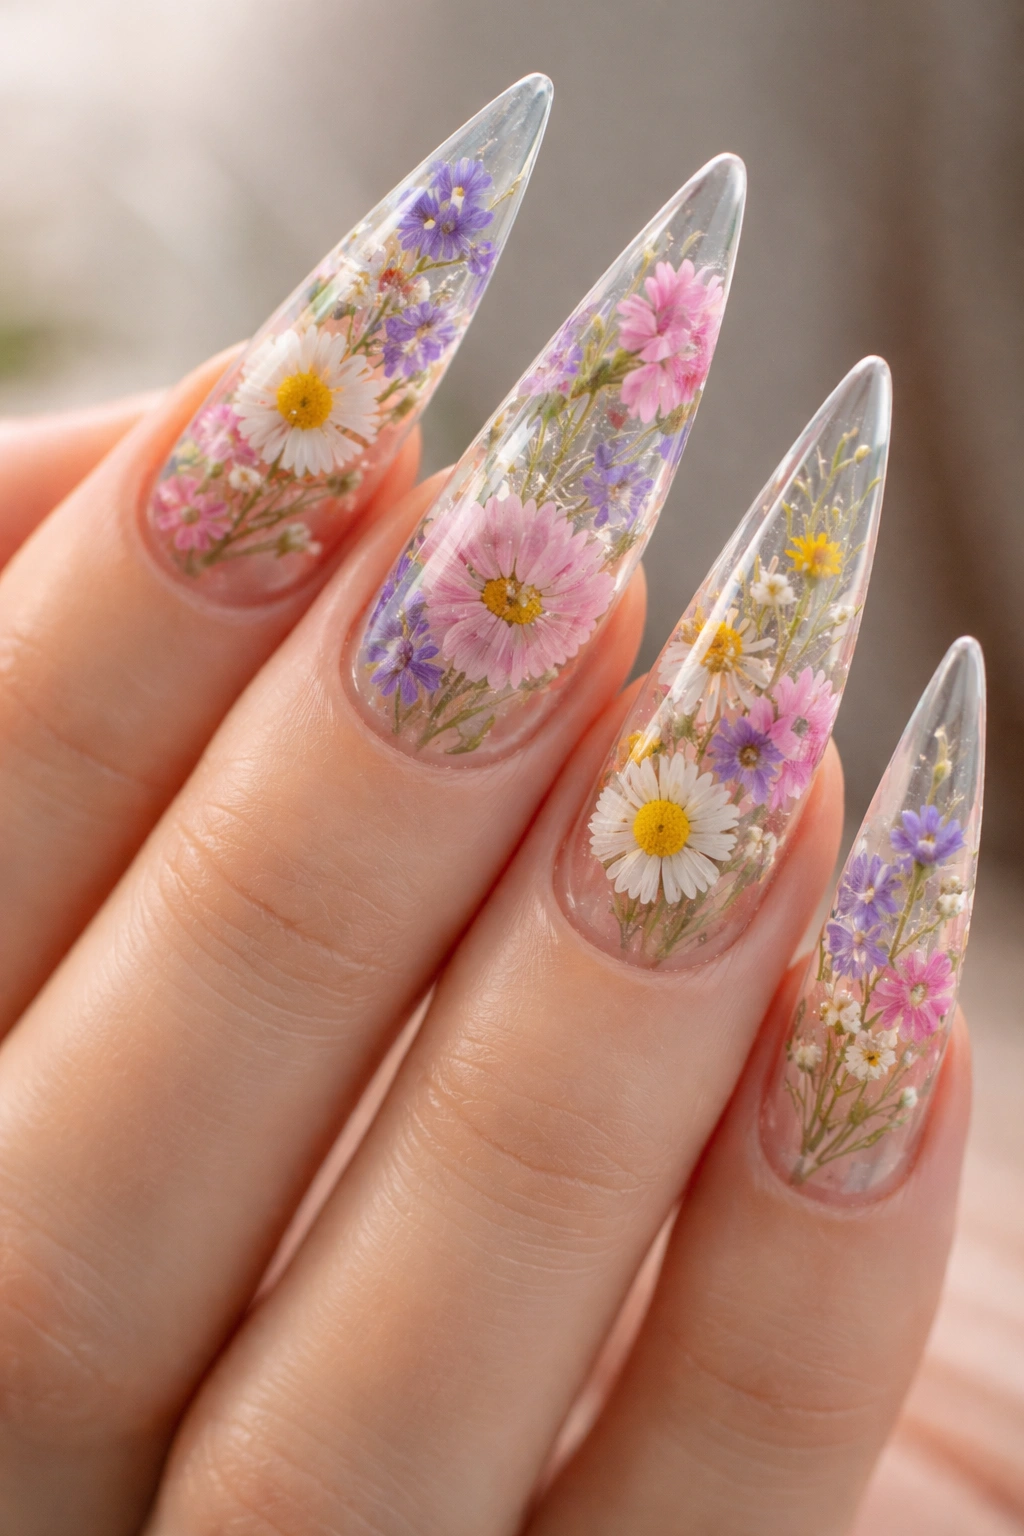
Pressed flower resin stiletto nails create a completely unique, dimensional aesthetic by embedding real or faux pressed flowers inside clear resin or builder gel. This technique involves painting a translucent nude or clear base, carefully placing tiny dried flowers or flower pieces at specific angles, then sealing everything with thick builder gel or clear resin. The result is a nail design that’s literally three-dimensional and catches light in unexpected ways.
Why Resin Flowers Feel Special
Resin flowers create an almost jewelry-like quality — these nails genuinely look like tiny pieces of wearable art. The dimensional quality means light plays differently across the nail, creating a moving, changing appearance throughout the day. Pressed flower resin nails are inherently conversation-starting because they’re unexpected and technically impressive.
Working with Resin and Pressed Flowers
- Use a clear or translucent builder gel as your base layer
- Carefully position tiny pressed flowers (available from craft suppliers or DIY-pressed) on the gel base
- Use a thin tool to adjust flower placement until satisfied
- Apply a thick clear builder gel or LED resin over the flowers, ensuring they’re completely encased
- Cure thoroughly under UV or LED light, depending on your product
- Finish with a glossy topcoat for a seamless, smooth surface
Insider note: This technique requires patience and a steady hand, but once you nail the placement, you’ll have nails that look professionally designed and completely unique.
10. Minimalist Lily Line Work
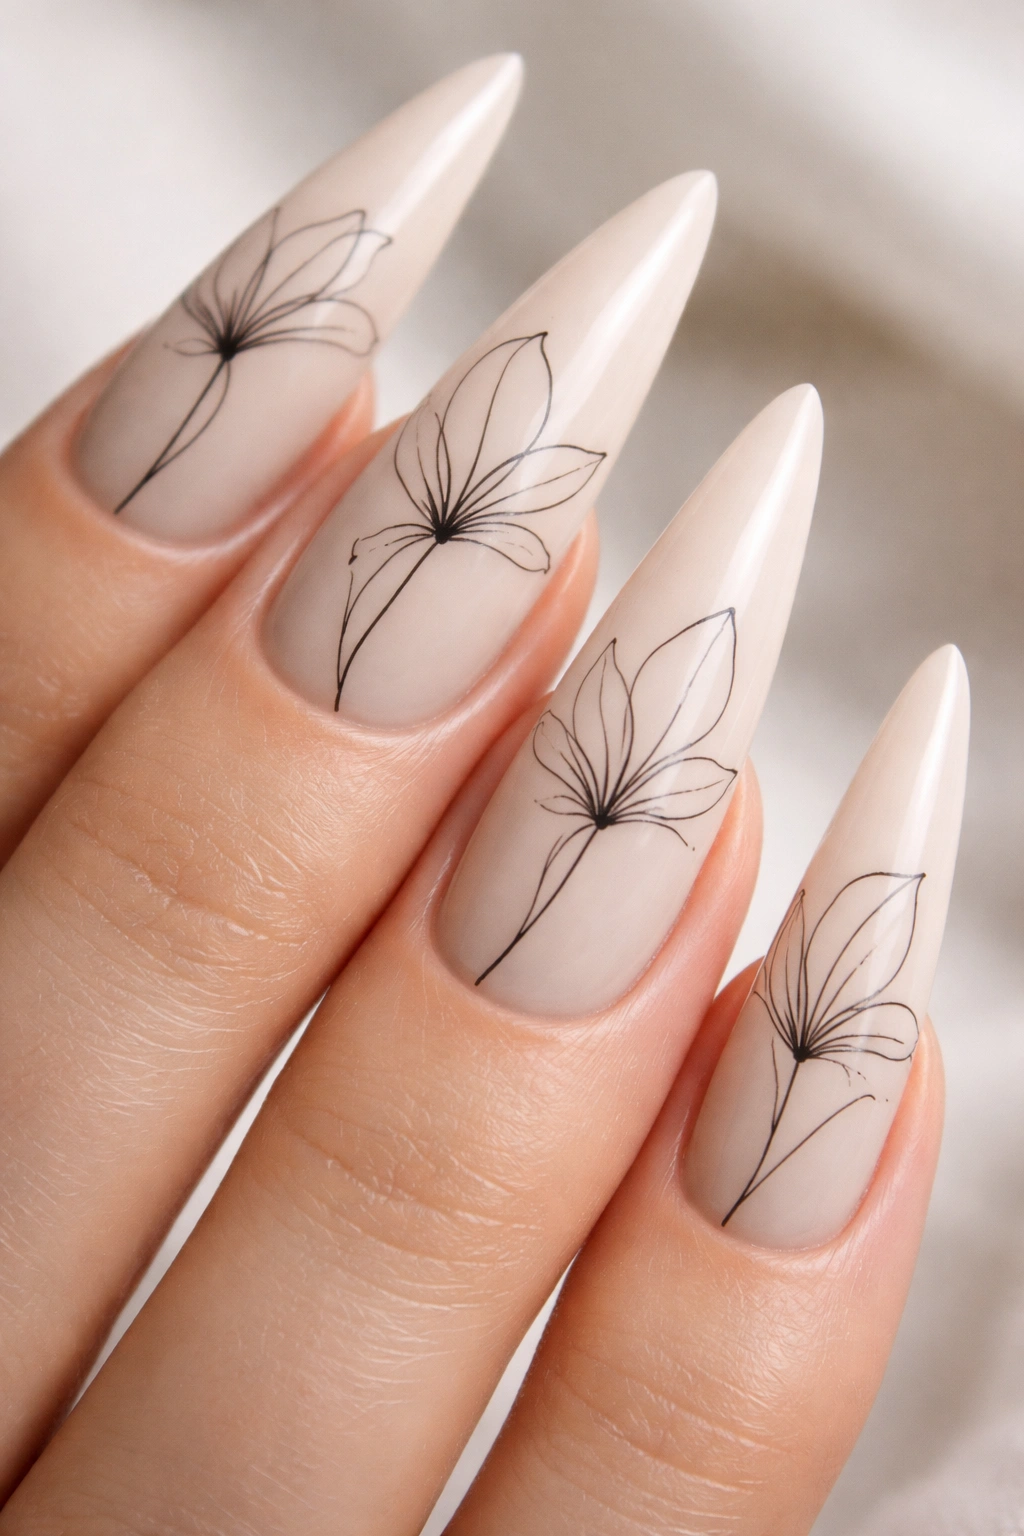
Minimalist lily stiletto nails embrace the less-is-more philosophy with simple, elegant line work that creates recognizable lilies using just a few brushstrokes. Paint pale neutral nails and use a thin black, deep brown, or dark green liner to draw abstract lily silhouettes — sometimes just the outline of petals, sometimes with minimal interior detail. This design feels very current and appeals to those who prefer sophisticated simplicity.
The Power of Minimalist Florals
Minimalist lily designs prove that nail art doesn’t need to be photorealistic or densely packed to be beautiful. A few well-placed lines can suggest an entire flower, letting the viewer’s imagination complete the picture. On stilettos, minimalist line work feels intentionally artistic rather than underdone.
Executing Minimalist Line Work
- Use the thinnest liner brush you have or a nail art pen for maximum control
- Sketch very lightly with pencil first to plan your lily placement
- Use confident, deliberate brush strokes to outline lily petals — typically 3-5 curved lines forming a bloom
- Add a minimal stamen or center detail if desired, but don’t overwork it
- Space lilies asymmetrically across nails, varying their angles and sizes
- Consider adding one nail in a slightly bolder version for accent interest
Pro tip: Minimalist designs actually require steady hands and confidence because every line is visible — practice on nail wheels or artificial tips before committing to real nails.
11. Chrysanthemum Gold Leaf Botanical
Chrysanthemum gold leaf stiletto nails layer floral and metallic elements for a design that feels both natural and luxe. Paint pale pink or soft beige nails with detailed chrysanthemum blooms, then apply delicate gold leaf accents around the flowers’ edges or to fill spaces between petals. The gold catches light and adds richness without overwhelming the botanical elements.
Why Gold Leaf Elevates Chrysanthemums
Chrysanthemums are full, layered flowers with lots of visual texture, which pairs perfectly with geometric gold leaf accents. The metallic element prevents the design from reading as simply “garden nails” and pushes it into more intentional design territory. This approach feels modern and editorial rather than traditionally floral.
Applying Gold Leaf and Chrysanthemums
- Paint detailed chrysanthemums using layered petals in burgundy, pink, or bronze shades
- Create depth by varying petal colors slightly — darker shades at the base, lighter toward the tips
- Once flowers are dry, apply a thin layer of clear gel or glue where you want gold leaf
- Carefully place gold leaf in deliberate patterns around the flowers — along petal edges, between bloom clusters, or creating geometric frames around each flower
- Seal everything with topcoat, being gentle to preserve the delicate gold leaf placement
Worth knowing: Gold leaf requires a very light hand — pressing too hard will crumple the fragile material, so use tweezers to place and a soft brush or sponge to gently secure it.
12. Hibiscus Tropical Vacation Vibes
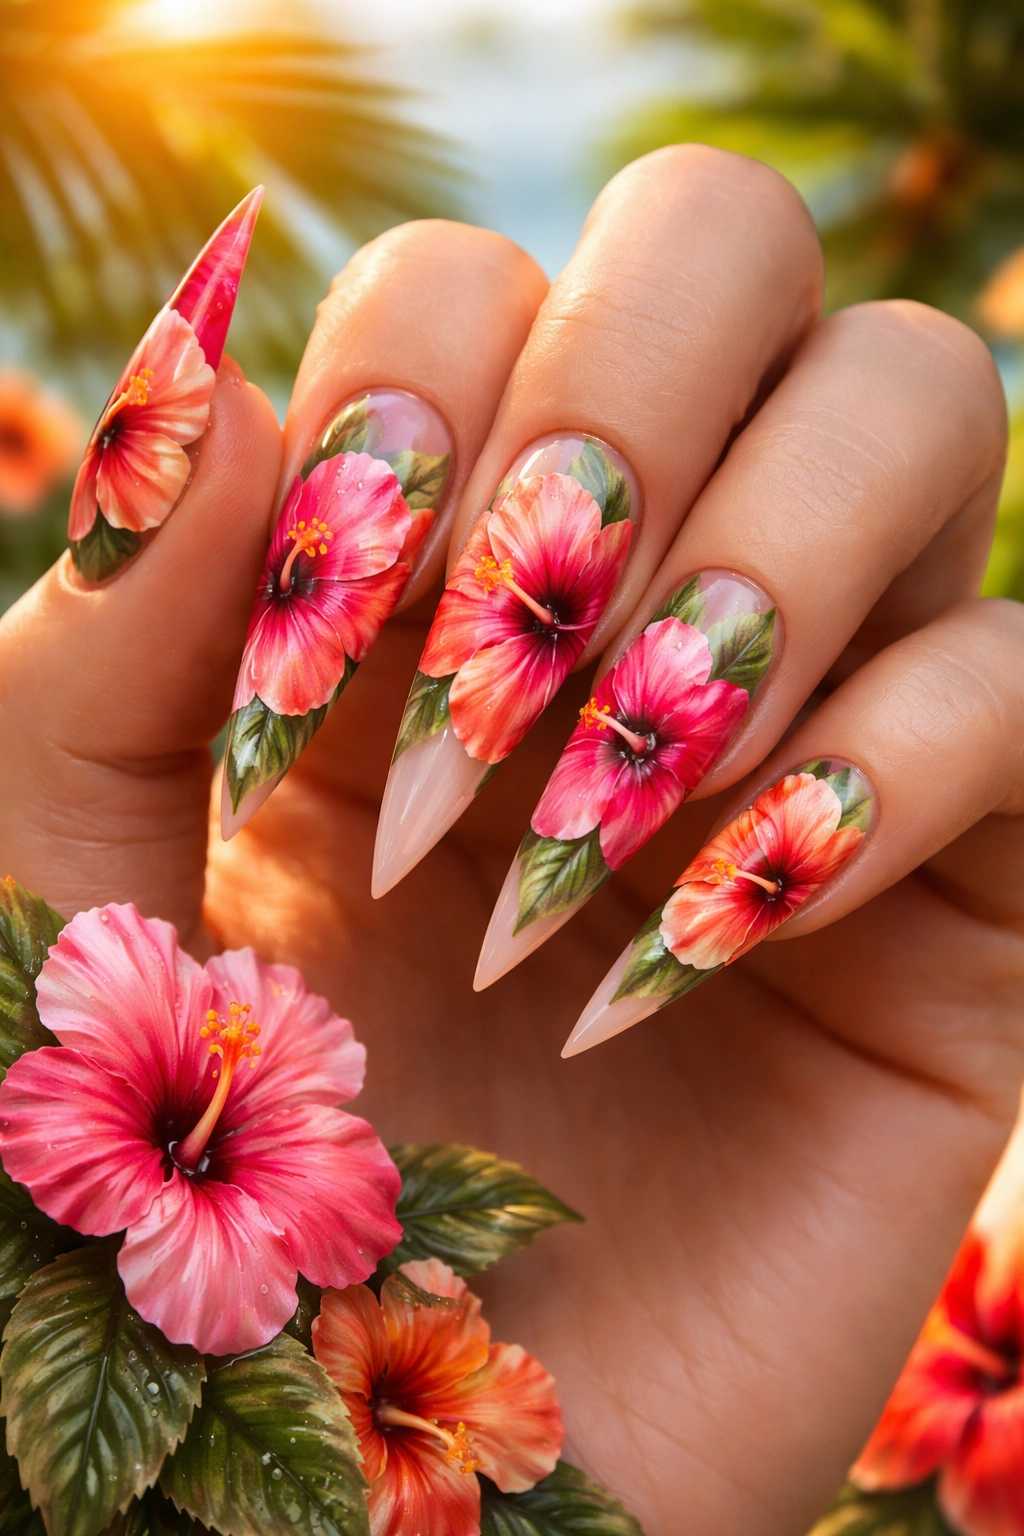
Hibiscus tropical stiletto nails bring island-inspired energy with large, bold hibiscus flowers that cover significant nail real estate. Paint stiletto nails with one or two large hibiscus blooms per nail, typically in hot pink, coral, red, or orange with dark burgundy or black stamens. Add green leaves and possibly secondary smaller flowers to create a lush, vacation-worthy composition.
The Boldness of Hibiscus Design
Hibiscus flowers are inherently large and dramatic, which suits the statement-making nature of stiletto nails perfectly. These designs have zero apology — they’re bold, colorful, and unapologetically decorative. Tropical hibiscus nails work beautifully for summer, vacations, or anytime you want to inject energy into your aesthetic.
Painting Bold Hibiscus Flowers
- Start with a light pencil sketch to map out flower placement and size
- Use a medium round brush to paint large, overlapping petals in your chosen hibiscus color
- Create depth by shading petal edges with a slightly darker shade, especially around the crease where petals overlap
- Paint a prominent stamen in the center — typically long, thin, and intricate with small detail lines
- Add several dark green leaves throughout the design, varying their size and angle
- Consider adding secondary tiny flowers or buds to fill empty space
Insider note: Hibiscus flowers have prominent, almost theatrical stamens, so don’t skip this detail — it’s what makes the flower read as “hibiscus” rather than a generic tropical flower.
13. Wildflower Meadow Scattered Mix
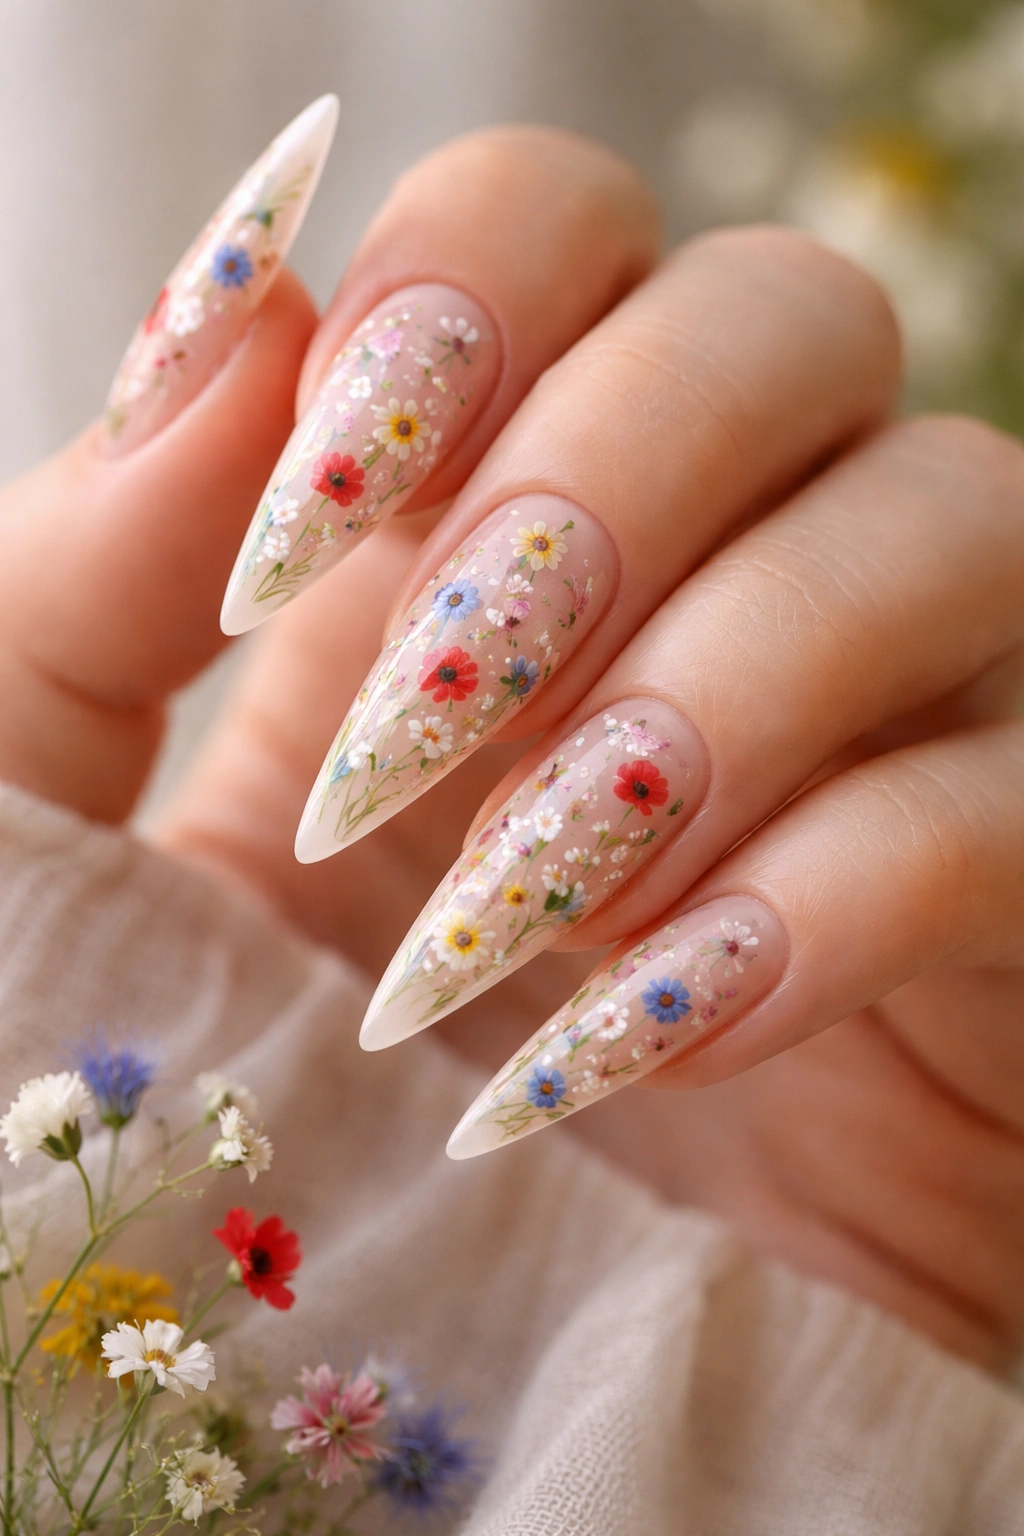
Wildflower meadow stiletto nails celebrate variety and organic chaos by scattering multiple different flower types across the entire nail surface. Paint a nude or soft beige base, then add a mix of tiny flowers — poppies, cornflowers, daisies, small roses, baby’s breath — scattered across the nail in a seemingly random arrangement. The result feels garden-inspired, artistic, and slightly whimsical.
The Beauty of Flower Variety
Rather than committing to one flower type, wildflower designs let you paint multiple flowers in different styles and colors, making the design feel more artistic and less commercial. No two nails need to have exactly the same flower combination, creating true one-of-a-kind art. This approach is also more forgiving because imperfections read as intentional variety rather than mistakes.
Creating a Wildflower Composition
- Plan your nail as a garden bed with flowers at different heights and angles
- Use a very thin brush and paint 6-10 tiny flowers per nail in varied styles and colors
- Include flowers in different color families — pinks, purples, yellows, reds — for visual richness
- Paint tiny green stems connecting some flowers, leaving others standalone
- Add delicate green leaves scattered throughout to tie the composition together
- Vary flower sizes from very small (just a dot center with three tiny petals) to medium (recognizable but still small)
Pro tip: Before painting on real nails, sketch your wildflower composition on a nail wheel or practice tip — this lets you refine the arrangement without pressure.
14. Magnolia Marble Effect Luxe
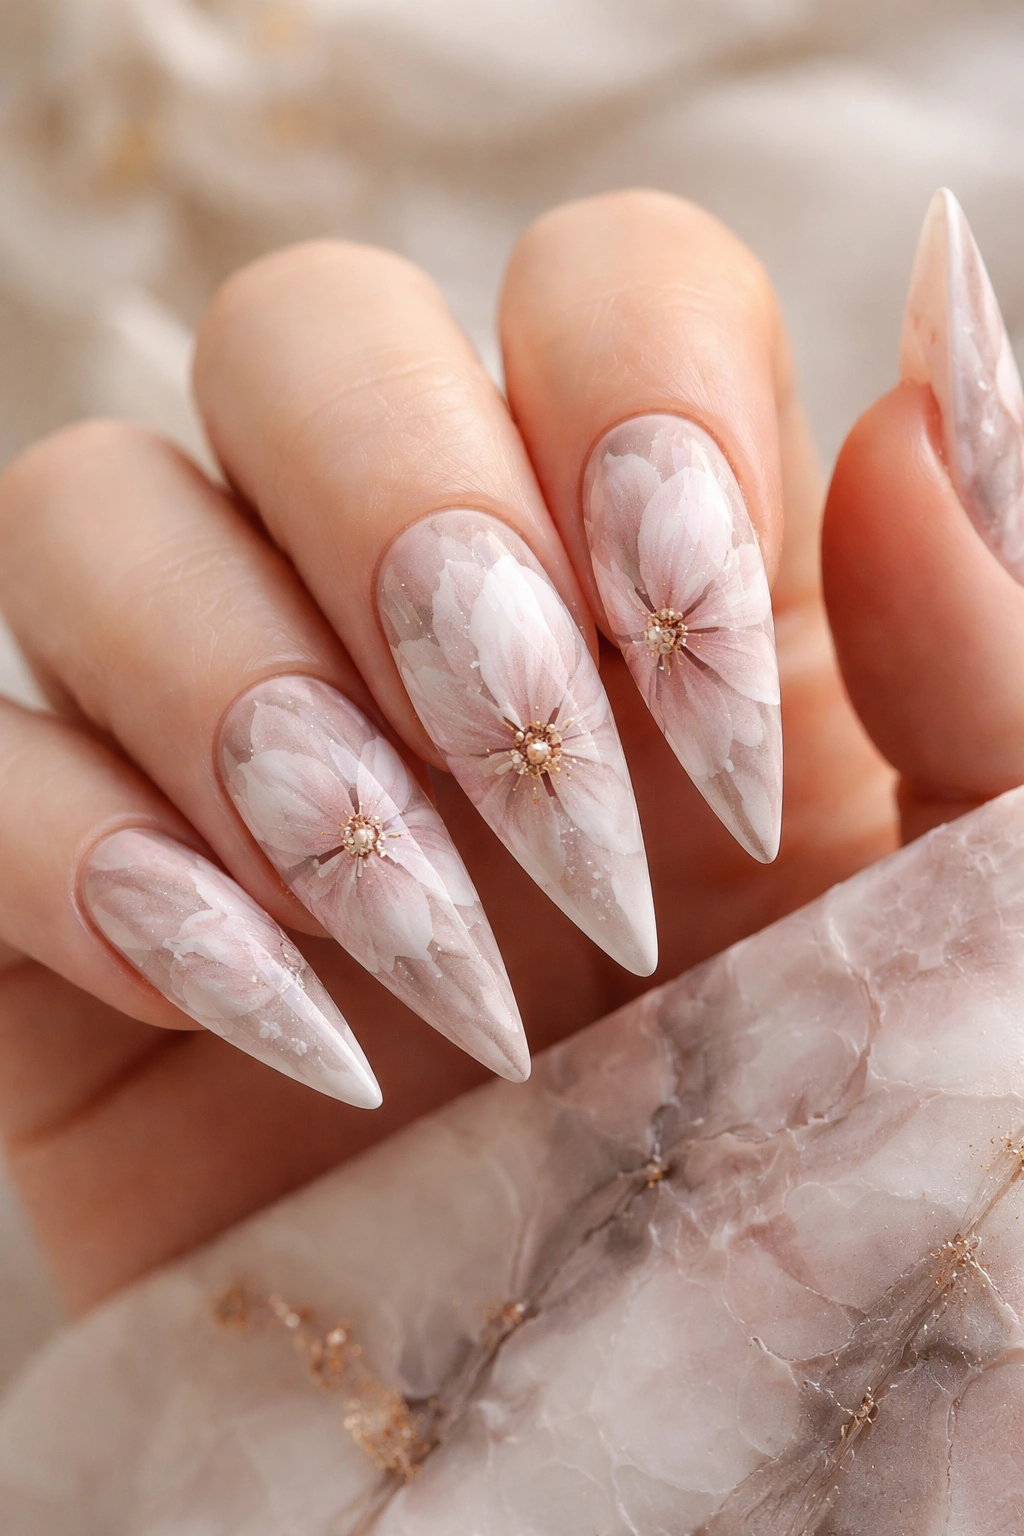
Magnolia marble stiletto nails combine the elegance of magnolia flowers with marbled nail technique for a design that’s simultaneously organic and sophisticated. Create a marbled base using soft pink, white, and possibly gray or taupe, then paint magnolia blooms with large, soft petals over the marbled background. The marble underneath acts as visual texture while the magnolias remain the clear focal point.
Why Magnolias Suit Marble
Magnolia petals are large, soft, and organic — characteristics that pair beautifully with the flowing, unstructured nature of marble technique. The marble background adds complexity without creating a busy composition because marble itself feels elegant and contained. This approach creates nails that are technically interesting but not overwhelming.
Creating Marble and Magnolia Combination
- Create your marble base first using a water-marble or dry-marble technique with coordinating colors
- Once the marble is fully dry and sealed, use a fine brush to paint magnolia blooms
- Paint magnolias with 6-8 large, soft petals in pink, white, or cream
- Use a darker or more saturated shade of pink for petal edges and inside petal details
- Add a simple green leaf or two, keeping the flower as the dominant element
- Seal the entire design with glossy topcoat for a polished finish
Worth knowing: Let your marble technique be visible — don’t cover the entire nail with flowers, or the marble will disappear and you’ll lose the sophisticated effect you worked to create.
15. Lotus Flower Negative Space

Lotus flower negative space stiletto nails use the natural nail bed as negative space, creating an outline illustration effect that feels contemporary and artistic. Paint stiletto nails in a neutral base color (or leave natural), then create a lotus flower outline using just the nail surface, often with fine black lines or metallic accents. The unpainted nail showing through becomes part of the design rather than an absence of design.
The Modern Appeal of Negative Space
Negative space nails feel intentional and editorial rather than underdone — they showcase current design trends while proving that bare space can be just as important as decorated space. Lotus flowers, with their distinctive spiral center and layered petals, work beautifully with negative space because their shape is so recognizable that an outline is sufficient.
Executing Negative Space Lotus Design
- Decide whether you’ll paint an outline on bare nail or create the outline on a colored base
- Use a thin black liner or metallic (gold or silver) liner to create the lotus outline
- Draw the characteristic spiral center of a lotus, then layer curved petal shapes around it
- Keep lines clean and intentional — this isn’t delicate and ethereal, it’s graphic and bold
- Consider adding one thin line of metallic accent within the flower for subtle luxury
- Seal with matte or glossy topcoat depending on whether you want the outline to glow or sit flat
Insider note: Negative space designs actually look more striking with impeccable application — any wobbles or inconsistencies become glaringly obvious, so practice your line work before committing.
Final Thoughts
Flower stiletto nail designs prove that when you combine botanical beauty with the drama of elongated nails, you create something genuinely striking and wearable. Whether you’re drawn to delicate cherry blossoms or bold tropical hibiscus, minimalist line work or lush wildflower meadows, there’s a floral stiletto design that matches your aesthetic and skill level. The key is choosing designs that feel authentic to you — wear what makes you feel confident and beautiful, rather than forcing yourself into designs that don’t resonate.
Remember that many of these designs benefit enormously from taking your time and investing in quality brushes and products. Dollar-store nail art brushes and thick, clumpy polish make every design harder to execute beautifully, while good tools genuinely make the difference between a design that looks amateur and one that looks professionally done. If you’re attempting these at home, consider starting with designs that use fewer details or larger flower sizes, building your skill and confidence before tackling intricately detailed work.
Consider your nail care routine as part of your nail art commitment — stiletto nails require regular maintenance to stay looking their best, and neglected nails with grown-out roots or visible damage will undermine even the most beautiful flower design. Whether you’re visiting a skilled nail technician or creating these designs yourself, the effort you invest in keeping your nails pristine will make your flower art shine even brighter.
