

Duck nails have become one of the most eye-catching nail trends, and for good reason. Their distinctive elongated shape—wider at the base and tapered dramatically toward the sides—creates a bold, confident look that photographs beautifully and commands attention. When you combine this trendy shape with the timeless elegance of pink and gold, you get a combination that works for everything from everyday glamour to special occasion looks. The interplay between soft, romantic pink tones and luxe gold accents creates a sophisticated aesthetic that feels both modern and eternally chic.
What makes pink and gold such a powerful pairing for duck nails is how the contrasting elements balance each other. Pink brings warmth, femininity, and approachability, while gold adds luxury, richness, and visual dimension. Together, they create a nail design that’s memorable without feeling overwhelming. Whether you prefer a subtle, minimalist approach or full-on glam with glitter and embellishments, this color combination adapts beautifully to your style and skill level. The extended surface area of duck nails gives you plenty of room to play with intricate details, geometric patterns, gradient effects, and layered designs.
If you’ve been searching for inspiration to transform your next manicure into something truly special, you’re in the right place. The following ideas range from delicate and wearable to dramatic and show-stopping. Each design showcases how versatile pink and gold can be when applied to duck nails, and they’re all achievable at a salon or with some practice at home.
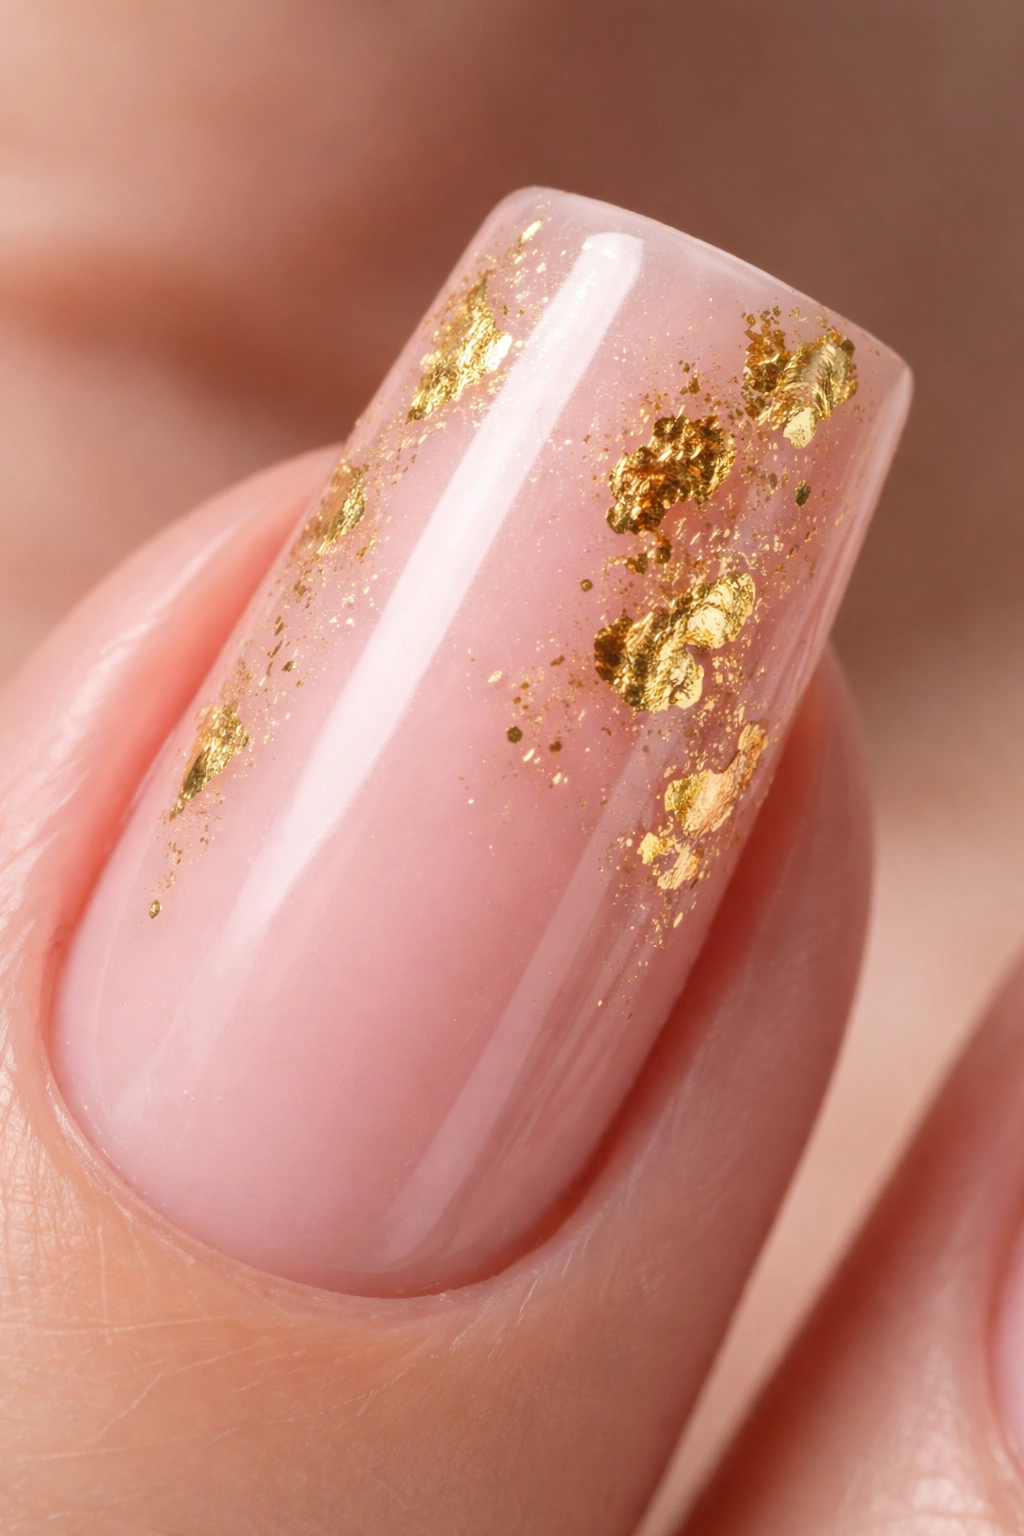
1. Soft Pink Base With Gold Foil Accents
This design is your foundation for elegance—a smooth, creamy pink base that covers the entire nail, paired with irregular pieces of gold leaf or foil scattered strategically across the surface. The beauty of this approach lies in its simplicity and the sophisticated texture it creates. Start with two thin coats of your favorite pale or medium pink polish, making sure each coat dries completely for a flawless finish on the wider base of the duck nail.
How to Apply the Gold Foil
Once your pink base is dry, apply a layer of clear gel or nail glue to the areas where you want the foil to adhere. Gold leaf foil comes in various sizes—you can use larger pieces for a bold statement or tear off smaller fragments for a more delicate, scattered effect. Press the foil gently onto the tacky surface, then brush away any excess pieces with a soft brush. Seal everything with a top coat to ensure the foil stays put for weeks.
Why This Design Works
- Creates dimension and light-catching shimmer without overwhelming the nail
- Works beautifully on both short and long duck nails
- Takes just 15-20 minutes to complete, even as a beginner
- Looks professional and intentional rather than accidental
- Pairs perfectly with both casual outfits and formal attire
Pro tip: Don’t worry about creating a perfectly symmetrical pattern with your gold foil. Random placement often looks more sophisticated and artistic than anything too structured.
2. Ombré Gradient From Rose Gold to Blush Pink

An ombré effect on duck nails creates a stunning visual flow that draws the eye across the nail’s unique shape. For this design, you’ll need at least two shades—a deeper rose gold (think warm, metallized pink) and a lighter blush pink. The gradient transitions seamlessly from the darker shade at the tip to the lighter shade toward the base. This creates the illusion of depth and dimension that’s absolutely captivating in person and photographs like a dream.
Achieving the Perfect Gradient
Use a makeup sponge or a special gradient brush to blend your two polish shades together. Dab the darker rose gold polish onto one end of the sponge and the lighter blush pink onto the other, then gently tap the sponge onto your nail, rotating and repositioning until you’ve created a smooth transition. You may need two or three applications to build the gradient to the intensity you want. Seal with a glossy top coat for extra shine and longevity.
What Makes This Technique Special
- The elongated shape of duck nails is perfectly suited to gradients—they showcase the color transition beautifully
- Works on any skin tone and complements gold jewelry naturally
- Can be customized by choosing different pink and rose gold shades based on your preference
- Timeless rather than trendy, so it’ll remain beautiful for years
- Surprisingly low-maintenance once applied correctly
Worth knowing: If you mess up your first gradient attempt, don’t stress. Simply paint over it with a solid color and try again—there’s no permanent damage.
3. Matte Pink With Gold Geometric Lines
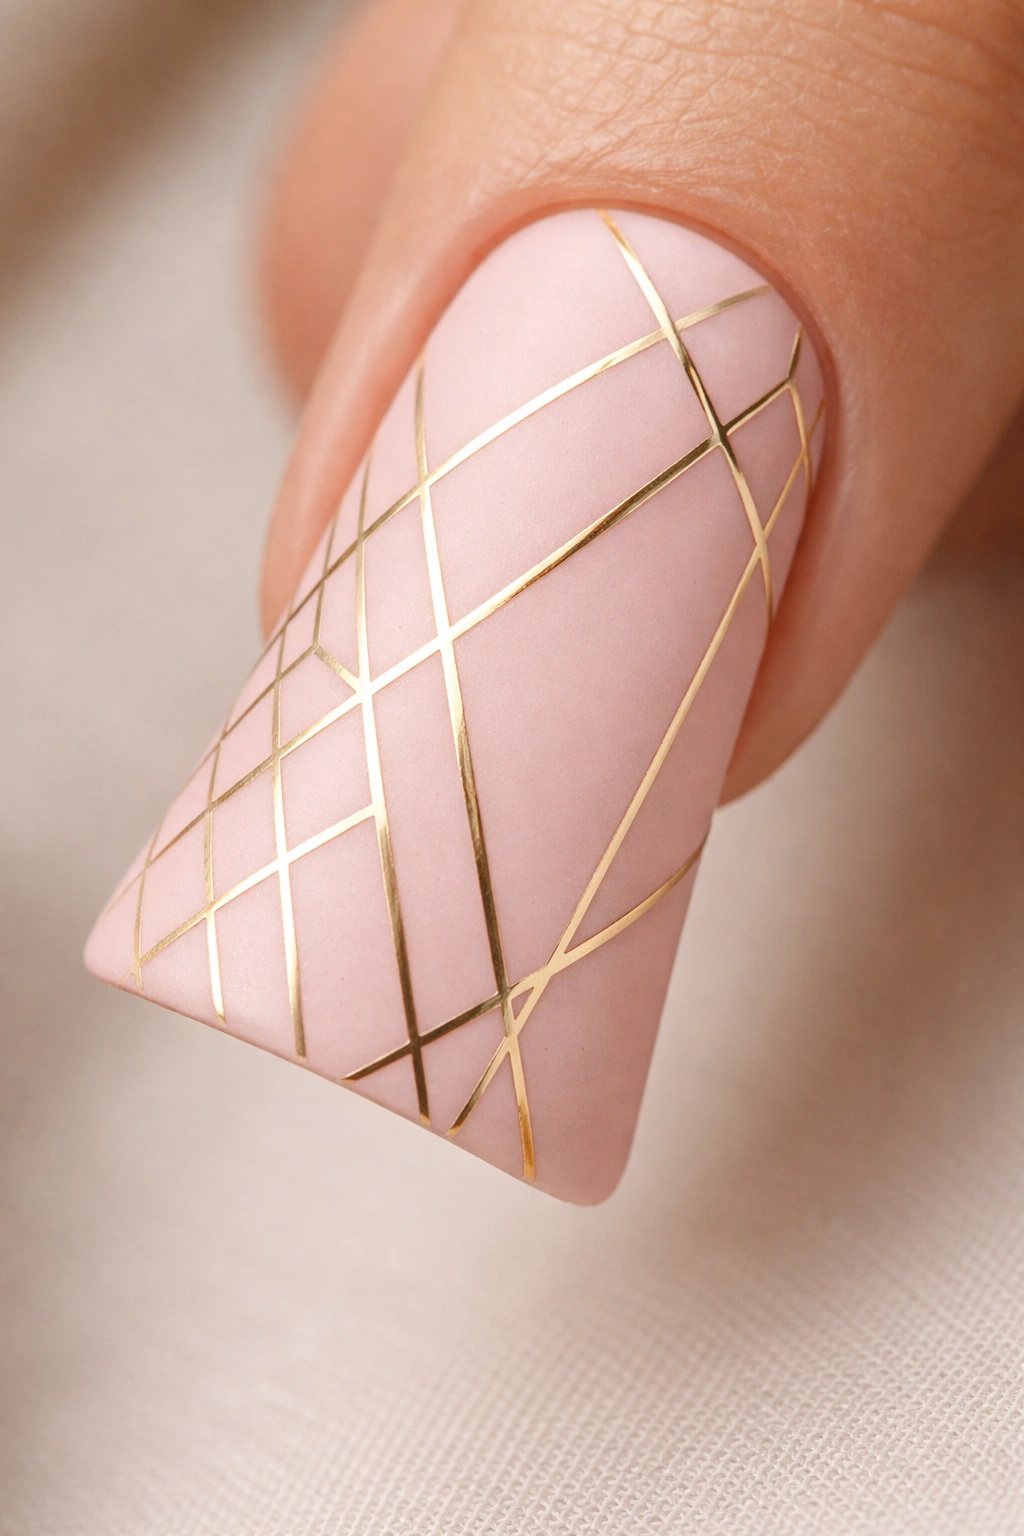
Matte finishes on duck nails create an ultra-modern, almost architectural vibe that’s particularly striking. Start with a matte pink base (use a matte top coat over your pink polish), then use a thin gold-striping brush or gold gel pen to create geometric lines across the nail. Think clean angles, minimalist patterns, and intentional spacing. Triangles pointing toward the tip, parallel lines, or a grid pattern all work brilliantly on the wider surface area that duck nails provide.
Creating Precise Geometric Patterns
If you’re worried about shaky hands, nail guides or striping tape can help you keep your lines straight and your patterns symmetrical. Measure where you want your lines to fall, apply the tape, then brush your gold polish over it. Once dry, remove the tape to reveal perfectly clean lines. For even more precision, gold gel pen polish pens allow for finer detail work than a traditional striping brush.
Why Geometric Designs Shine on Duck Nails
- The flat surface area of duck nails is ideal for geometric patterns
- Matte and gold contrast creates visual interest and sophistication
- Can be as minimal (just one or two lines) or as detailed as you want
- Looks intentional and curated, like you planned it carefully
- Complements both minimalist and maximalist personal styles
Quick facts about this design:
- Best applied with gel polish for longevity and chip resistance
- Works beautifully with both warm and cool-toned pinks
- Can be modified for different occasions by adjusting pattern density
- Takes 20-30 minutes if using tape guides, longer if hand-painting
4. Pink With Gold French Tips and Glitter Gradient
This design takes the classic French tip concept and gives it a luxe pink and gold twist. The tips feature shimmering gold glitter that gradually fades into the pink base, creating a glamorous gradient effect. Instead of a stark white line across the tip like traditional French tips, you’re creating an ethereal, blended transition that captures light beautifully. This works particularly well on longer duck nails where you have plenty of space for the gradient to unfold gradually.
Building the Glitter Gradient
Apply your pink base to the entire nail, then mix gold glitter polish with clear gel at the tips. Apply this mixture more densely at the very tip and blend it toward the base with less and less product as you move down the nail. The translucency of the blended mixture allows the pink to show through while the glitter catches the light. A second coat of clear top coat seals everything and adds extra shine.
The Appeal of This Particular Design
- Offers glamour without being overly complicated to execute
- The gradient makes even short glitter application look intentional and artistic
- Gold glitter naturally complements pink, so there’s no color-clashing risk
- Holds up well over time with a quality gel top coat
- Feels special enough for events but wearable enough for daily life
Pro tip: Use finer glitter particles for a more refined look, or chunky glitter for something bolder and more dramatic—the choice completely changes the vibe while keeping the same basic design.
5. Baby Pink With Hand-Painted Gold Florals
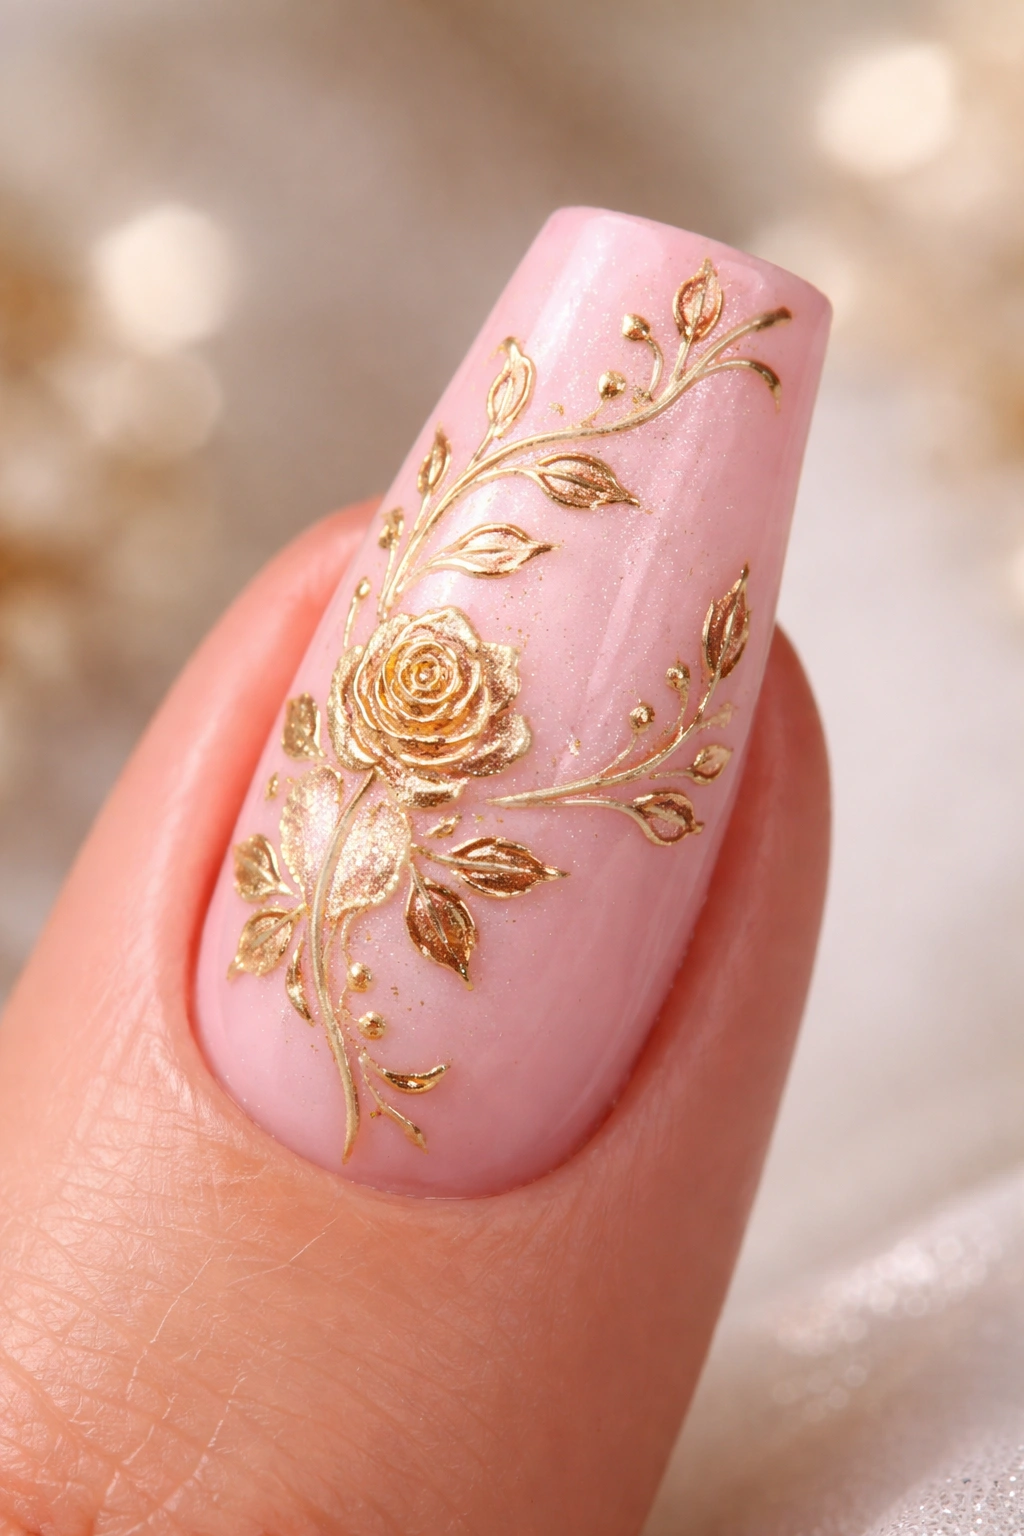
Hand-painted florals on duck nails represent the intersection of art and nail design. Using a fine-tipped brush and gold polish or gel, you can paint delicate flowers, leaves, and vines across a soft baby pink base. Roses, peonies, cherry blossoms, and wildflower designs all translate beautifully to the elongated surface. The wider base of duck nails gives you plenty of room to include intricate details that smaller nail shapes simply can’t accommodate.
Hand-Painting Florals: Skills and Tools
If you’re new to hand-painted design, start with simple flowers—loose circles with dots in the center become roses or peonies instantly. Gold polish is more forgiving than you might expect; slight imperfections often look like intentional artistic variation. Use a very fine brush (size 00 or 000), thin your polish slightly with a bit of gel base if needed, and steady your hand by resting your pinky on the nail table. Practice on a piece of paper first if you’re nervous.
Why Florals Work on Duck Nails
- The extended surface accommodates elaborate botanical designs
- Gold and pink naturally evoke floral aesthetics
- Hand-painted elements feel unique and personalized
- Works for any season or occasion
- Can be as simple or as detailed as your skill level allows
What to know:
- Thin coats of polish are essential—thick applications tend to obscure detail
- Seal everything with a glossy top coat to protect your artwork
- This design is time-intensive but yields impressive results
- Works beautifully on both matte and glossy bases
6. Marbled Pink and Gold Design
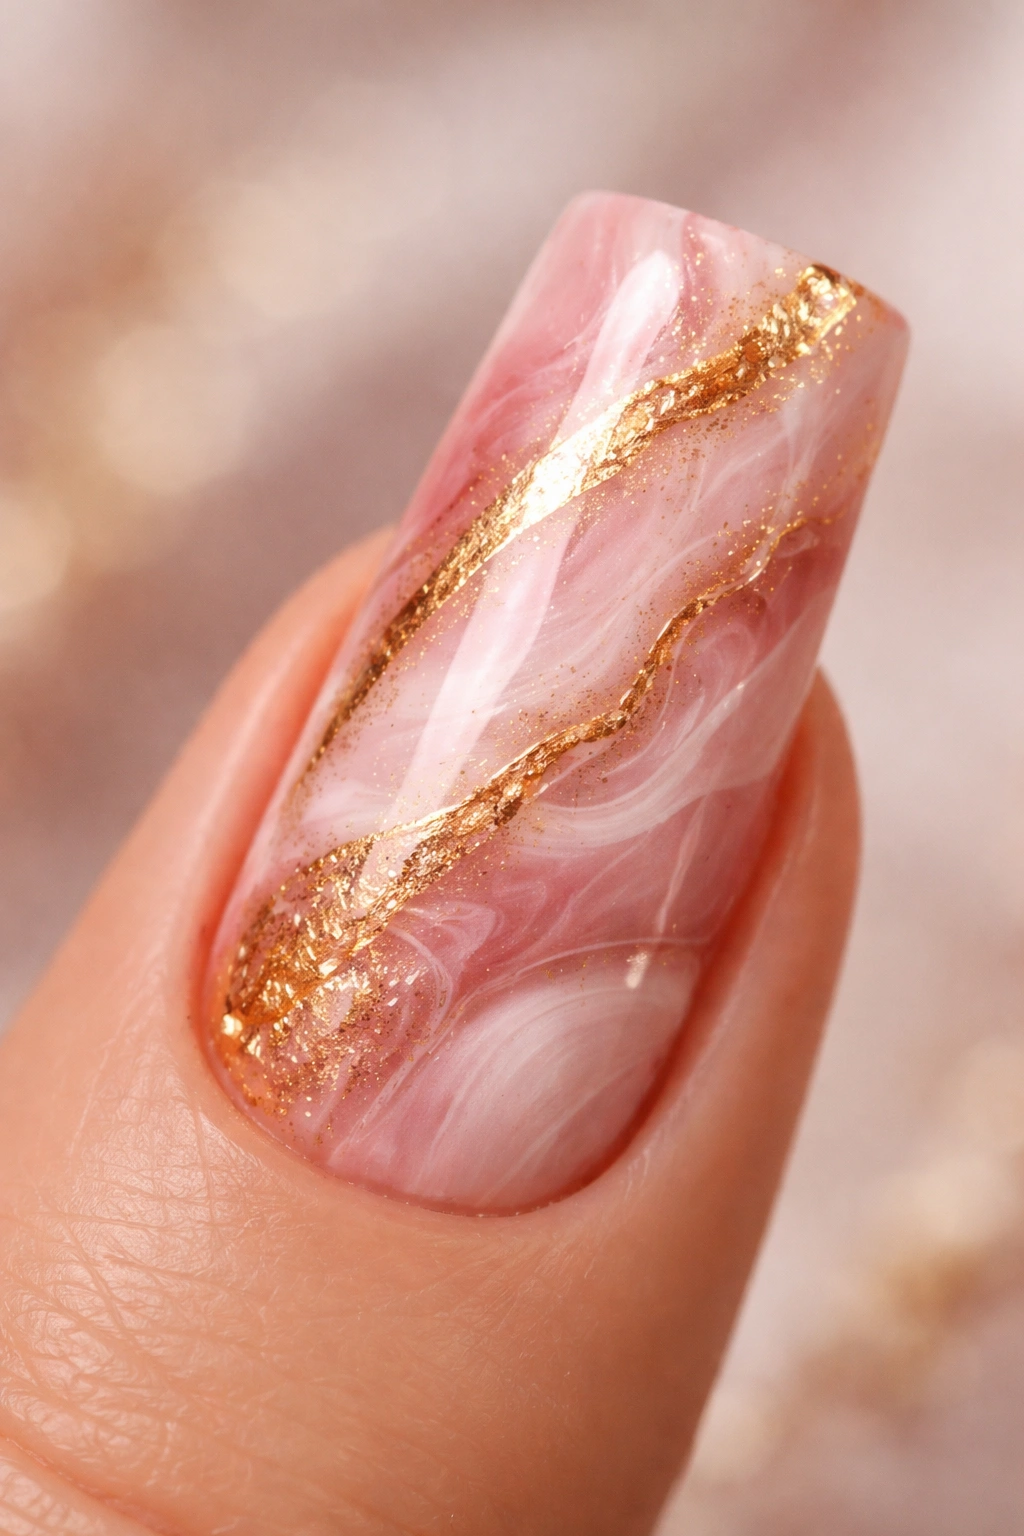
Marbling creates an organic, swirled pattern that looks like natural stone or precious minerals when executed with pink and gold. Create this effect by dropping small amounts of pink and gold polish onto a water surface (or using specialized marbling tools), stirring them with a toothpick to create a pattern you like, then dipping your nail into the design. The result is a completely unique pattern on each nail—no two marbles are ever identical. This unpredictability is part of what makes marbling so visually compelling.
The Marbling Process Step by Step
Pour a small amount of room-temperature water into a container, then drop your pink and gold polishes onto the surface. Swirl them together lightly with a toothpick, creating a pattern that appeals to you. Dip your nail into the water at a slight angle, holding it in the pattern for 2-3 seconds, then pull it straight out. Wash away any excess polish from the skin around your nail. Each marble design is gloriously random, which is exactly why people love this technique.
The Unexpected Appeal of Marbled Nails
- Each nail is literally one-of-a-kind, making your manicure truly personalized
- The blend of pink and gold creates a sophisticated palette
- Imperfection is actually the point—perfect symmetry would look wrong
- Takes practice to master but looks professional once you nail the technique
- Works beautifully whether you prefer more pink or more gold dominating
Worth knowing: Marbling works better with regular polish than gel, so plan for slightly shorter wear time than you might with gel alternatives. That said, you can seal marbled designs with gel top coat for extended longevity.
7. Champagne Pink With Delicate Gold Striping and Rhinestones
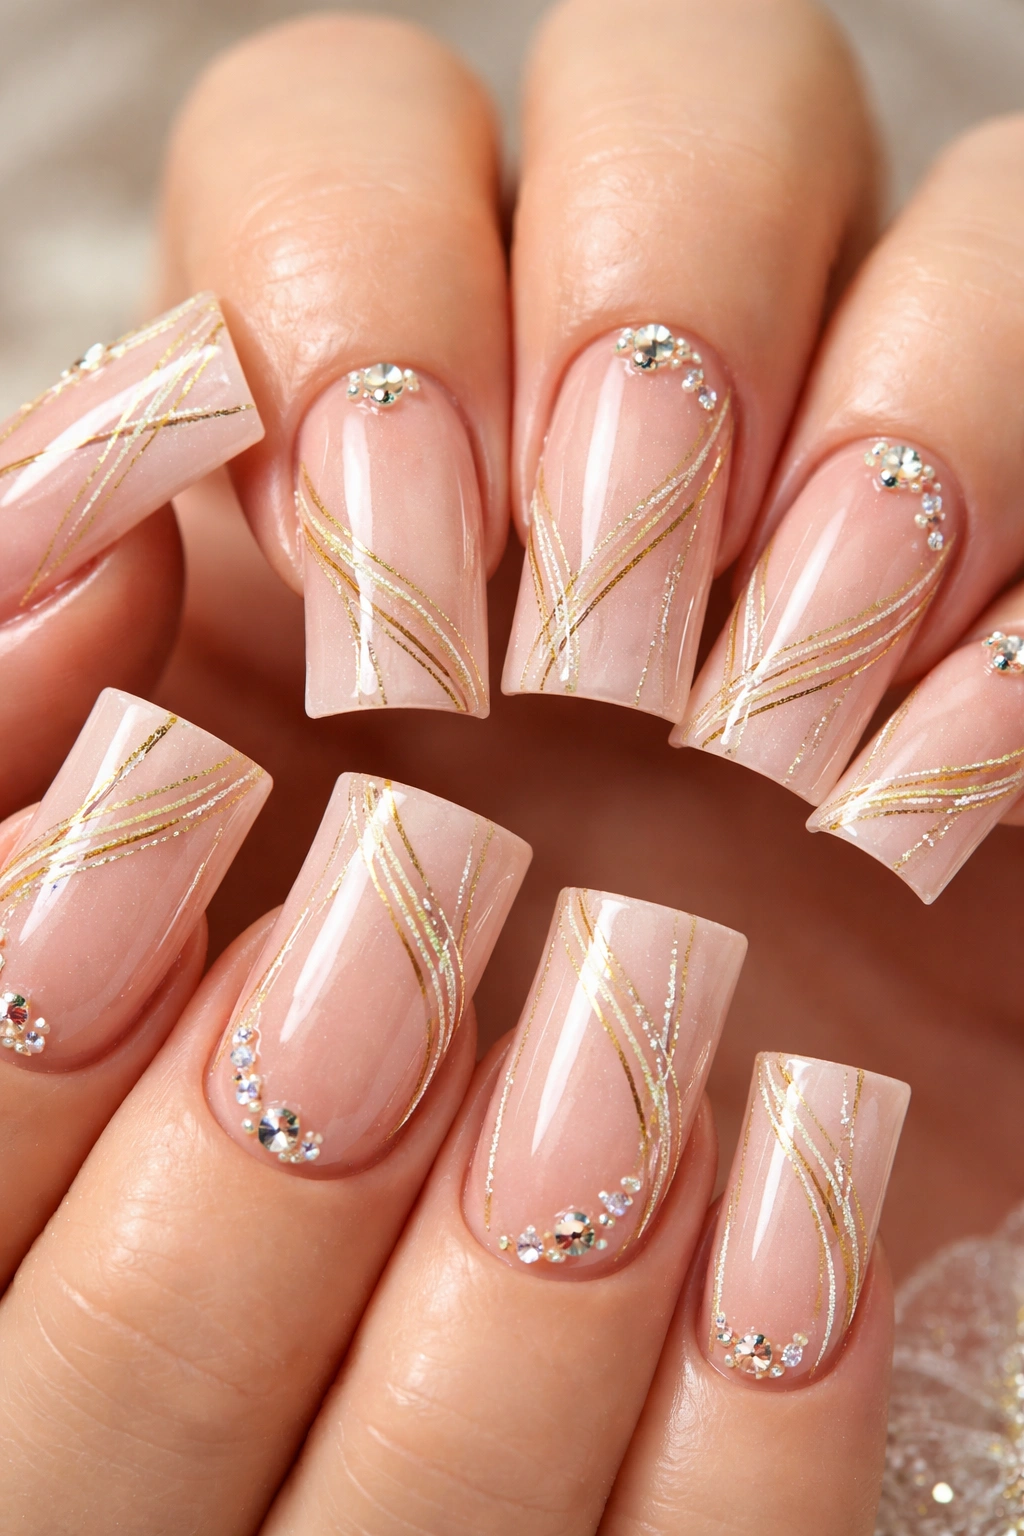
If you want to dial the glamour up to maximum, combine multiple elements: a sophisticated champagne pink base, elegant thin gold stripes, and carefully placed rhinestones that catch the light dramatically. This design is particularly stunning for special occasions, but honestly, it’s so beautiful that you might find yourself wearing it just because you can. The contrast between the subtle striped pattern and the sparkling rhinestones creates visual depth that’s absolutely mesmerizing.
Applying Rhinestones With Precision
Use a rhinestone picker tool (a tiny applicator with a sticky tip) to grab individual rhinestones and place them exactly where you want them. Apply rhinestones to a thin layer of clear gel, positioning them along your gold stripes or in a scattered pattern across the nail. Once you’ve placed all your stones, seal them with one or two coats of gel top coat, being careful not to dislodge them. This secure encapsulation ensures they’ll stay put for weeks.
Why This Design Feels Expensive
- Multiple elements work together to create visual interest and dimension
- Rhinestones catch light and create sparkle that changes as you move your hands
- Champagne pink is inherently sophisticated and flattering
- The gold striping adds structure and prevents the design from feeling chaotic
- Feels like a luxury salon design even if you create it at home
Quick facts:
- Best executed with gel polish for maximum durability
- Works on any skin tone and any nail length
- Takes 30-45 minutes to complete due to rhinestone placement
- Looks stunning even in photographs and video calls
8. Nude Pink Base With Gold Confetti Placement
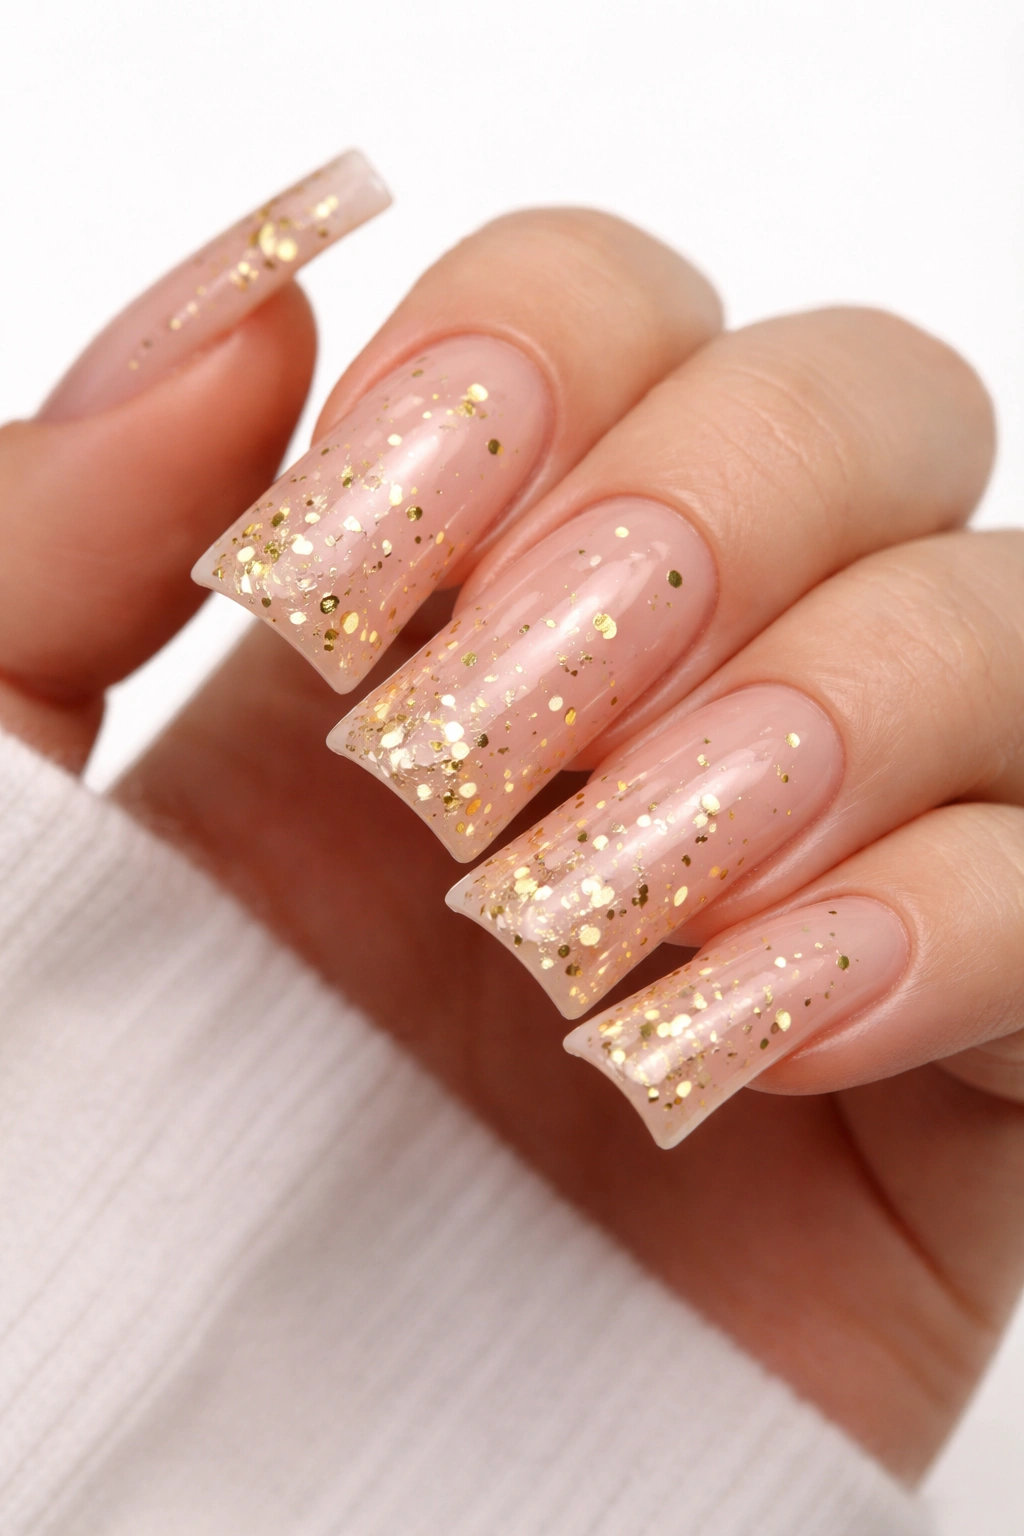
A nude pink or “barely pink” base is an elegant canvas for bold gold confetti elements scattered across the surface. This design strikes the perfect balance between understated and eye-catching. The neutral tone of nude pink is sophisticated and wearable, while the gold confetti adds just enough personality and shimmer to make your nails feel special without being overwhelming. It’s the manicure equivalent of a little black dress with statement jewelry.
Creating Confetti-Style Gold Elements
Use small pieces of gold confetti foil, thin metallic tape cut into tiny shapes, or even tiny gold sequins adhered with clear gel. Arrange them in an artistic scatter—clusters on some nails and singles on others creates more visual interest than uniform spacing. Seal everything with a top coat. The key to this design looking intentional is the careful placement; random doesn’t mean thoughtless.
The Versatility of This Approach
- Nude pink works with every skin tone imaginable
- Gold confetti adds just enough sparkle for any setting
- Easy to customize—add more or fewer confetti elements based on your preference
- Looks equally at home in a boardroom or at a wedding
- Extremely quick to execute once you’ve selected your confetti pieces
Pro tip: If you can’t find the exact confetti size you want, you can tear larger gold foil into the shapes you need. Imperfect edges often look more artistic than perfectly uniform pieces.
9. Deep Rose With Gold Leaf and Gloss Finish
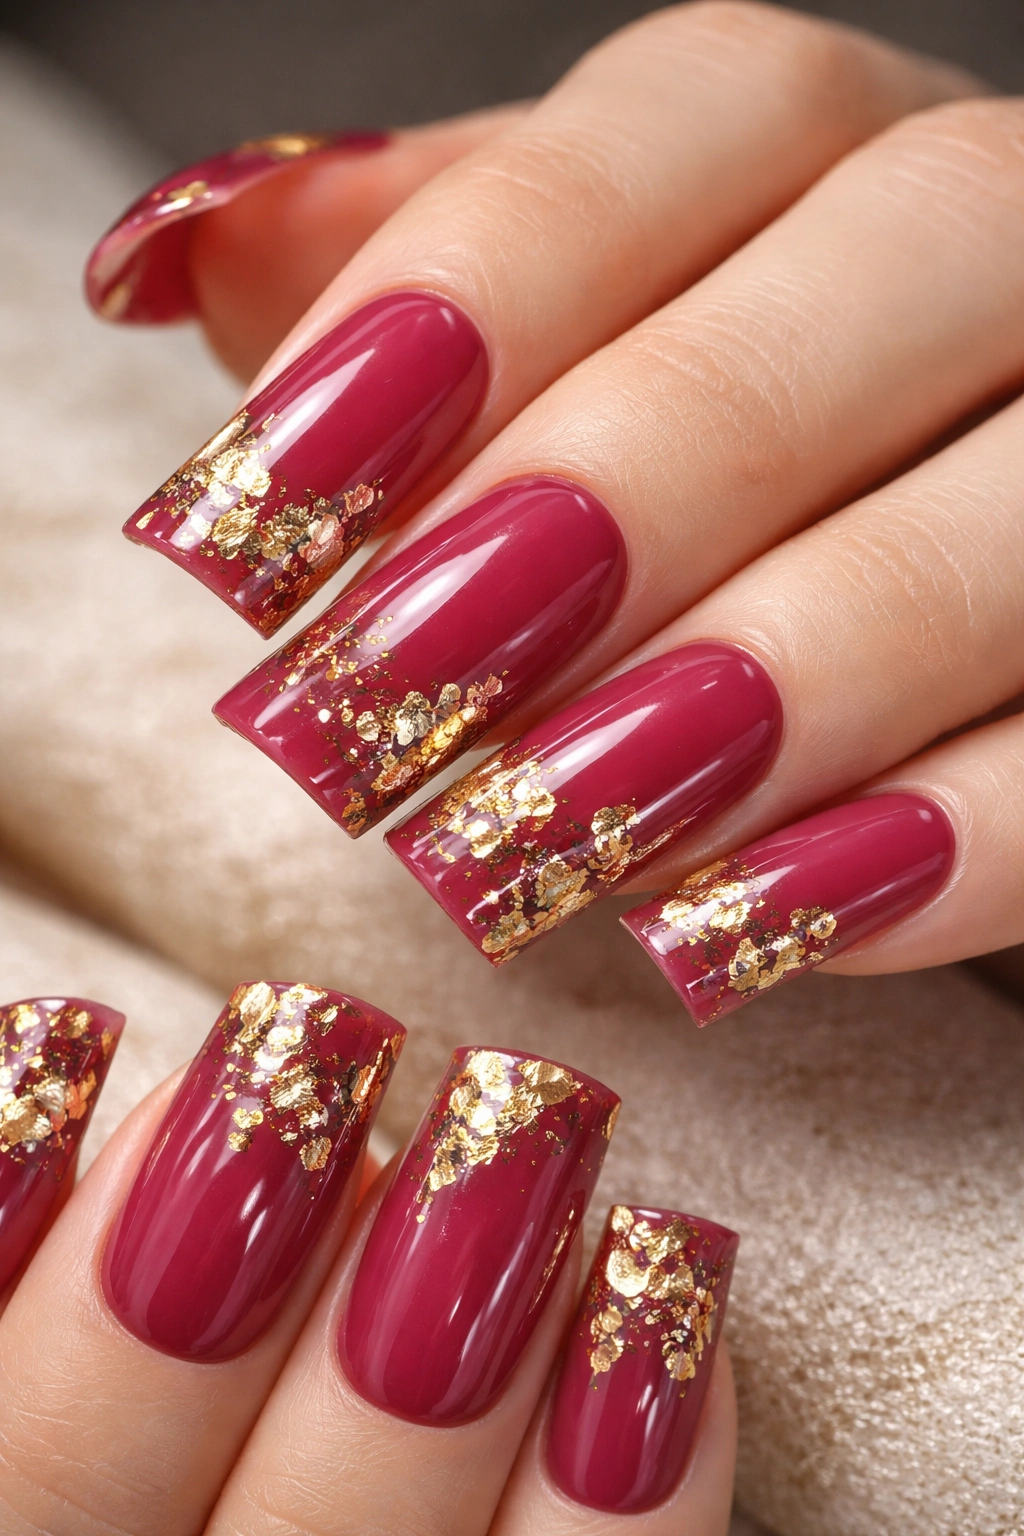
This design embraces a deeper, more dramatic pink tone paired with organic gold leaf application. Rather than small scattered pieces, generous applications of gold leaf create bold, confident accents that look like precious inlay work. The glossy finish over everything creates a stunning shine that makes the gold absolutely glow. This is duck nails for people who prefer to make a statement and aren’t interested in minimalism.
Applying Bold Gold Leaf Designs
Paint your deep rose base completely and allow it to dry. Apply a layer of clear gel or nail glue where you want your gold leaf. Tear off generous pieces of gold leaf—don’t worry about creating perfect shapes; irregular organic shapes often look more luxurious than precise rectangles. Press the leaf firmly onto the sticky surface, then seal with a glossy top coat. The contrast between the deep pink and bright gold is absolutely stunning.
Why Deep Tones Elevate the Design
- Rich, deep pink feels more luxurious and sophisticated than pale alternatives
- Bold gold leaf application complements the deeper tone without being overwhelming
- Glossy finish reflects light and creates movement as you move your hands
- Feels appropriate for evening wear and special events
- Deep pink works beautifully with cool skin tones particularly
What you should know:
- This design makes a statement, so wear it confidently
- The deeper pink actually masks imperfections better than lighter shades
- Requires a good top coat to protect the gold leaf from peeling
- Looks stunning with both warm and cool-toned jewelry
10. Pink Ombre With Brushed Gold Accents
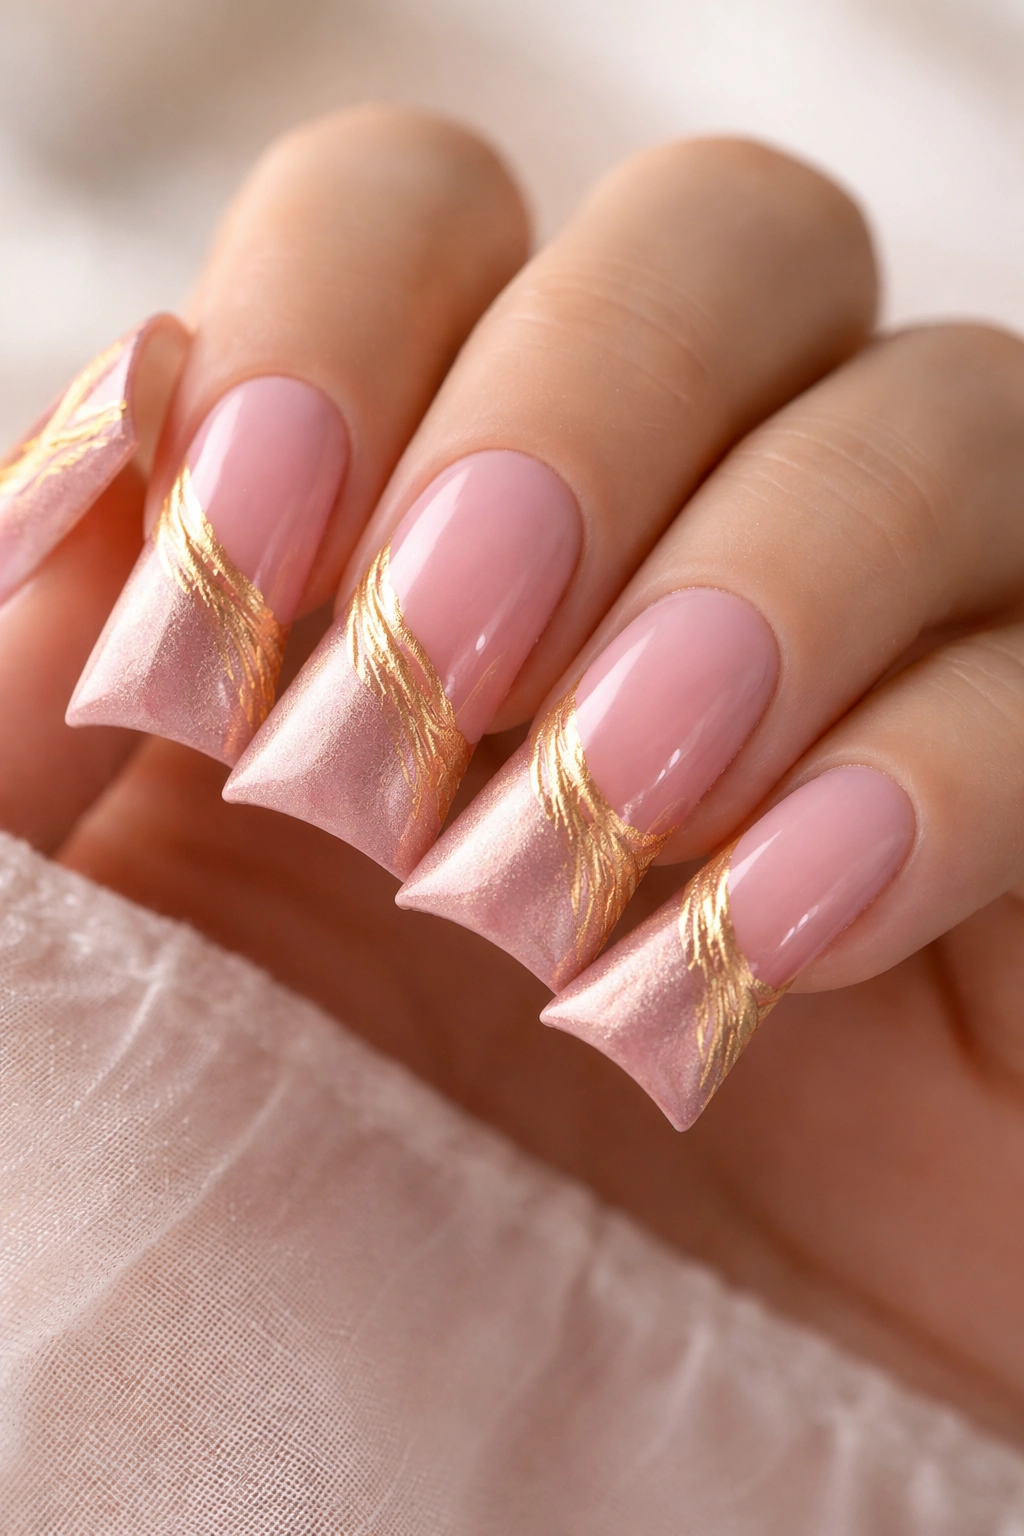
This final design combines an ombré gradient (from pale blush to deeper mauve-pink) with brushed, metallic gold accents that create texture and visual interest. The brushed effect is achieved by using a gold gel polish with a matte or satin finish, creating thin striped patterns that sit on top of the gradient base. The result is multidimensional and deeply sophisticated—a design that looks professional-quality but is surprisingly achievable at home with a little practice.
Creating the Brushed Gold Texture
After applying your pink ombré, use a thin striping brush and brushed gold gel polish to paint thin, parallel lines across the nail surface. The key is keeping your hand steady and maintaining consistent line width. You can create patterns that run horizontally, vertically, or even diagonally across the nail. The brushed finish of the gold polish creates a subtle texture that’s visible up close but reads as sophisticated refinement from a distance.
The Final Touch in This Collection
- Combines multiple techniques to create something uniquely yours
- Ombré and brushed elements work together without competing
- Takes time to master but yields salon-quality results
- Works beautifully on longer duck nails where the texture has space to shine
- Offers the perfect blend of elegance and personality
Quick facts about this design:
- Best executed with gel polish for the longest wear
- Requires steady hands or a lot of practice with nail guides
- Looks stunning under natural light and in indoor settings
- Pairs beautifully with simple jewelry that won’t compete with your nails
Final Thoughts
Pink and gold on duck nails is a combination that never goes out of style because it hits exactly the right balance between elegance and personality. Whether you choose a minimalist approach with scattered gold foil or go all-in with rhinestones, hand-painted florals, and brushed accents, you’re creating something that’s distinctly yours. The extended surface area of duck nails gives you room to play with designs that simply wouldn’t work on shorter nail shapes—take full advantage of that space.
The best design is ultimately the one that makes you feel confident and excited when you look at your hands. All of these ideas can be customized in terms of shade intensity, glitter size, foil texture, and additional embellishments based on your personal preferences and skill level. Start with the designs that feel most achievable to you, practice with the techniques that excite you, and don’t hesitate to combine elements from different designs to create something entirely your own. Your duck nails are a canvas for creativity, and pink and gold provide an absolutely stunning palette to work with.
