

Duck nails have become one of the most fun and flattering nail shapes trending in the beauty world, and purple is the perfect color to elevate this already eye-catching look. If you’re drawn to deep, moody purples or soft, dreamy lavenders, there are countless ways to style duck nails that make the most of this distinctive curved shape. The way purple plays with light on the wider, fan-like nail bed creates depth and sophistication that’s hard to achieve with other colors — plus, purple works beautifully for both subtle elegance and bold statement manicures.
The real magic of purple duck nails lies in how this shade transforms depending on the finish, design, and accompanying nail art. A shimmering plum creates a completely different vibe than a soft pastel lavender or a rich, jewel-toned violet. Whether you’re looking for something you can wear to the office or a show-stopping design for a special night out, purple duck nails offer flexibility that many other nail shapes don’t quite capture. The curved shape itself draws attention to your hands and makes nail art details feel more dramatic and intentional.
What makes duck nails particularly satisfying is how they balance boldness with wearability — they’re definitely a statement, but they’re also practical and don’t snag or break nearly as easily as extremely pointed nails. When you combine this functional elegance with rich purple tones and creative designs, you end up with a manicure that feels both artistic and genuinely versatile. Let’s explore fourteen stunning purple duck nail ideas that range from minimalist and chic to ornate and glamorous.
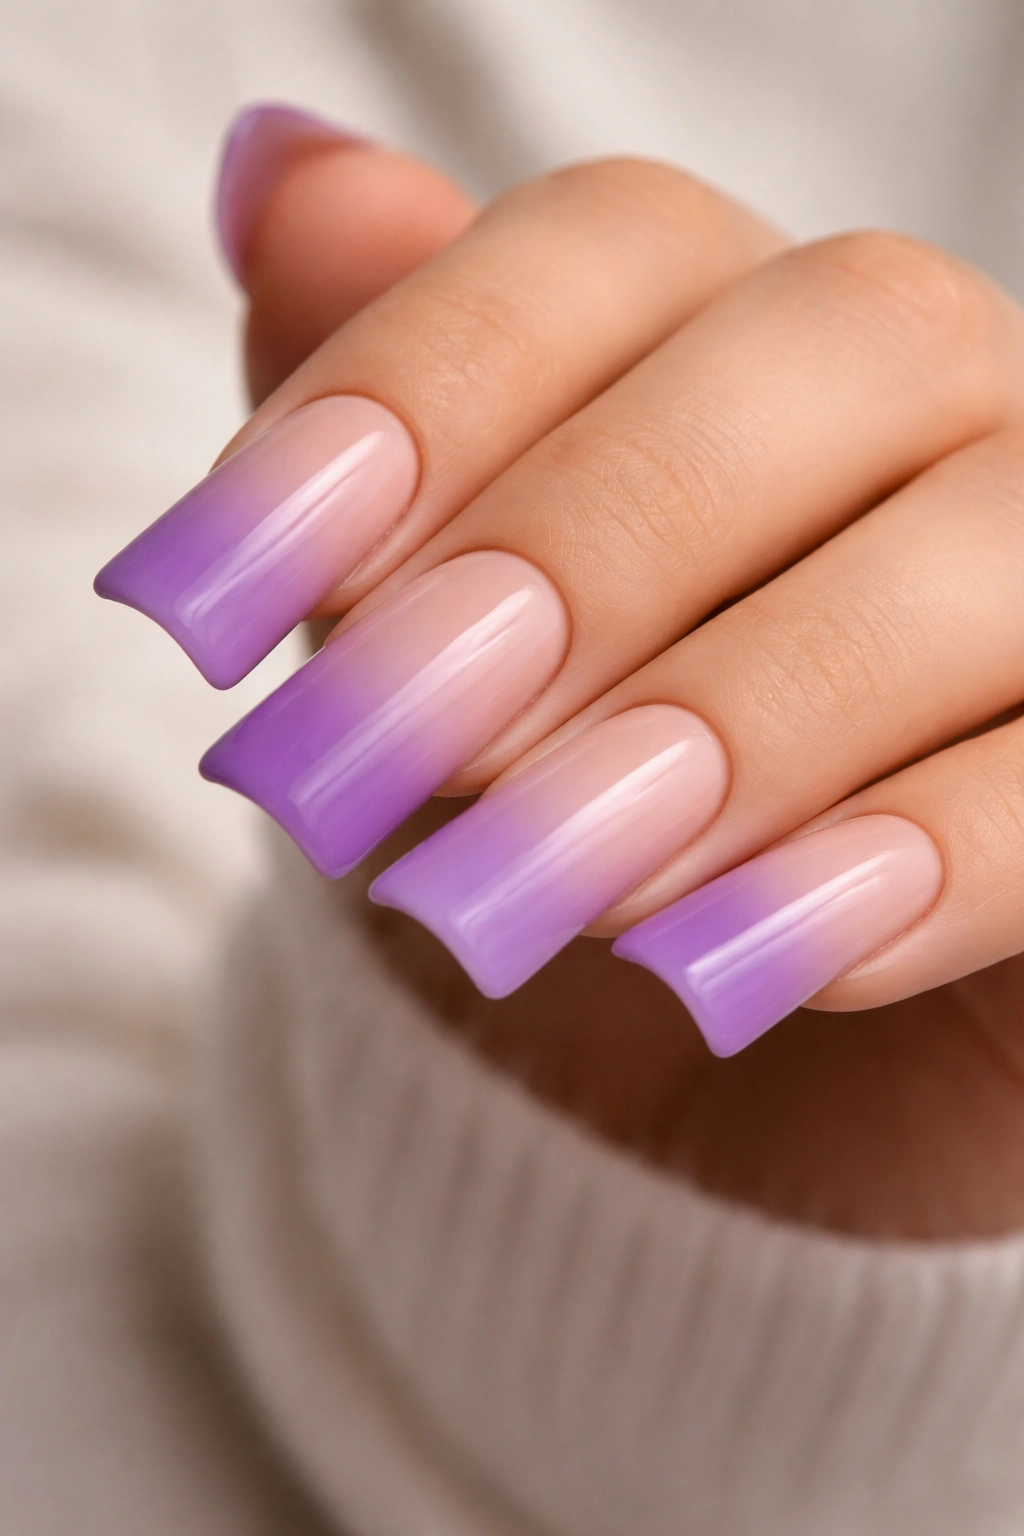
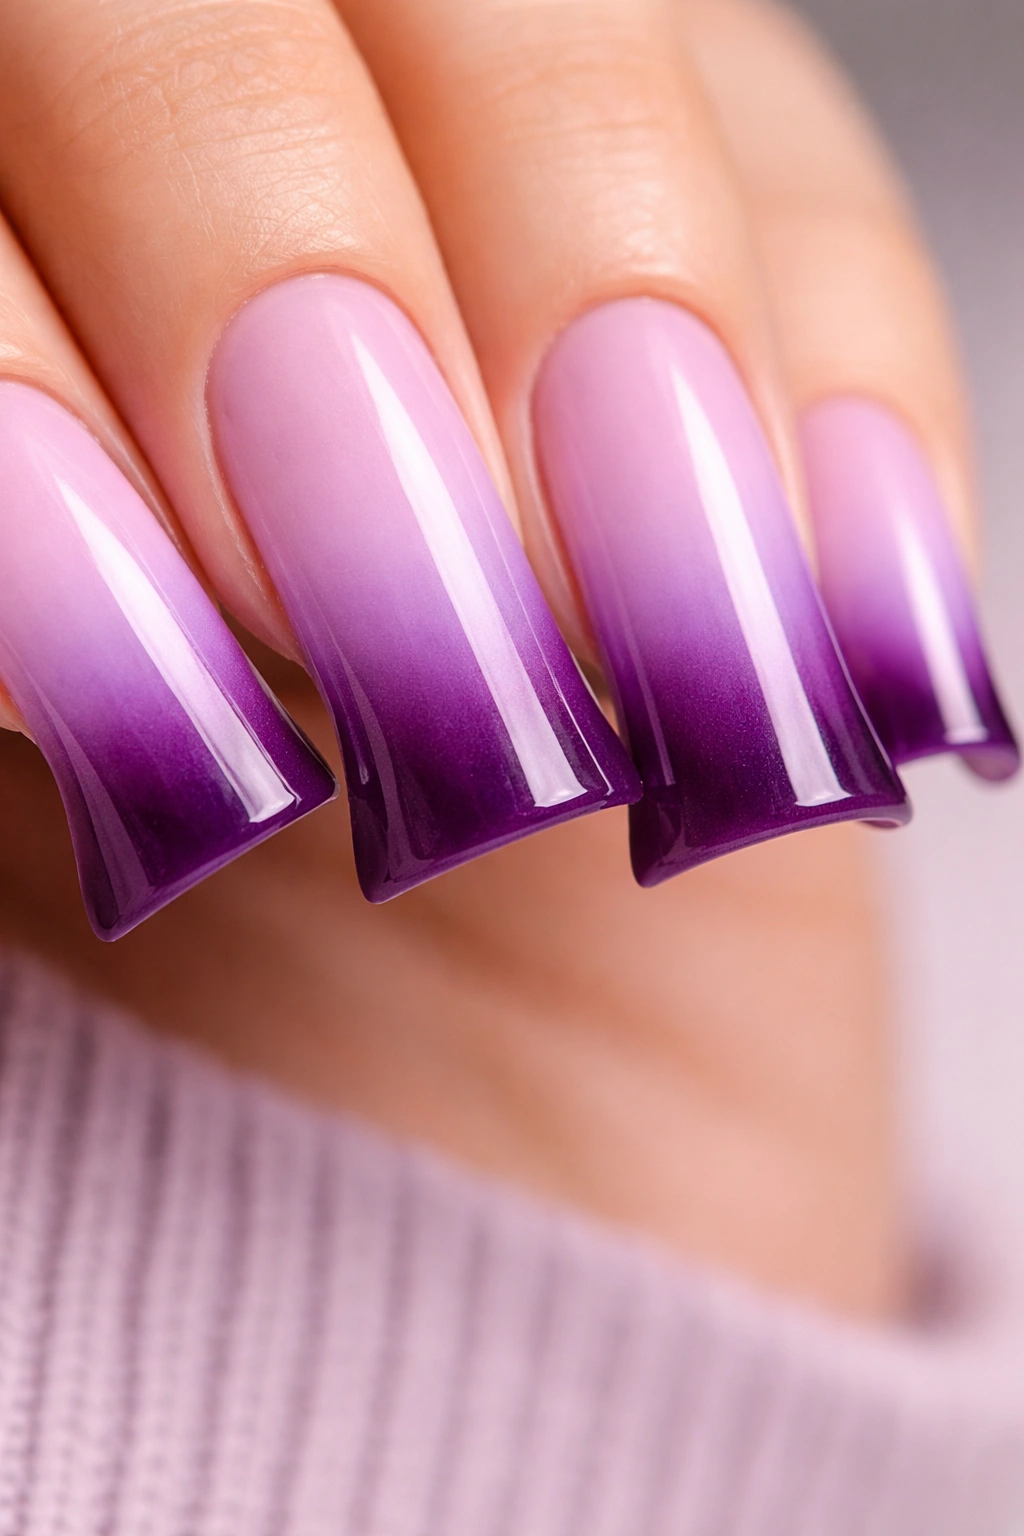
1. Classic Purple Ombré Duck Nails
A smooth gradient from deep plum at the tips to soft lavender at the base is an elegant approach that works for virtually any occasion and any skin tone. This ombré effect creates the illusion of even more length on the curved nail bed and gives the manicure a sophisticated, almost watercolor-painted quality. The key to pulling off this look is investing in quality ombre sponges and practicing your blending technique so the color transition feels seamless rather than striped or blotchy.
Why This Design Works
Ombre duck nails are flattering because the gradual color transition mirrors the natural curve of the nail shape, making the design feel organic and intentional. The depth created by layering two or more shades of purple gives your hands a polished, high-end appearance even with just a straightforward color gradient. This design also photographs beautifully because the color gradient catches light at different angles, creating visual interest without requiring intricate nail art.
How to Get This Look
- Use a base coat, then apply your lightest purple shade to the entire nail
- Dip a nail art sponge into your medium and dark purple shades, blending them on a palette first
- Sponge the darker shades onto the tip area, working inward toward the middle of the nail
- Blend and soften the lines by sponging back and forth until the transition is smooth
- Seal everything with a glossy top coat for a seamless finish
Pro tip: If your first blend doesn’t look perfect, simply apply another layer of sponging — each layer builds on the last and creates a more refined gradient.
2. Purple Glitter Duck Nails with Gradient Base
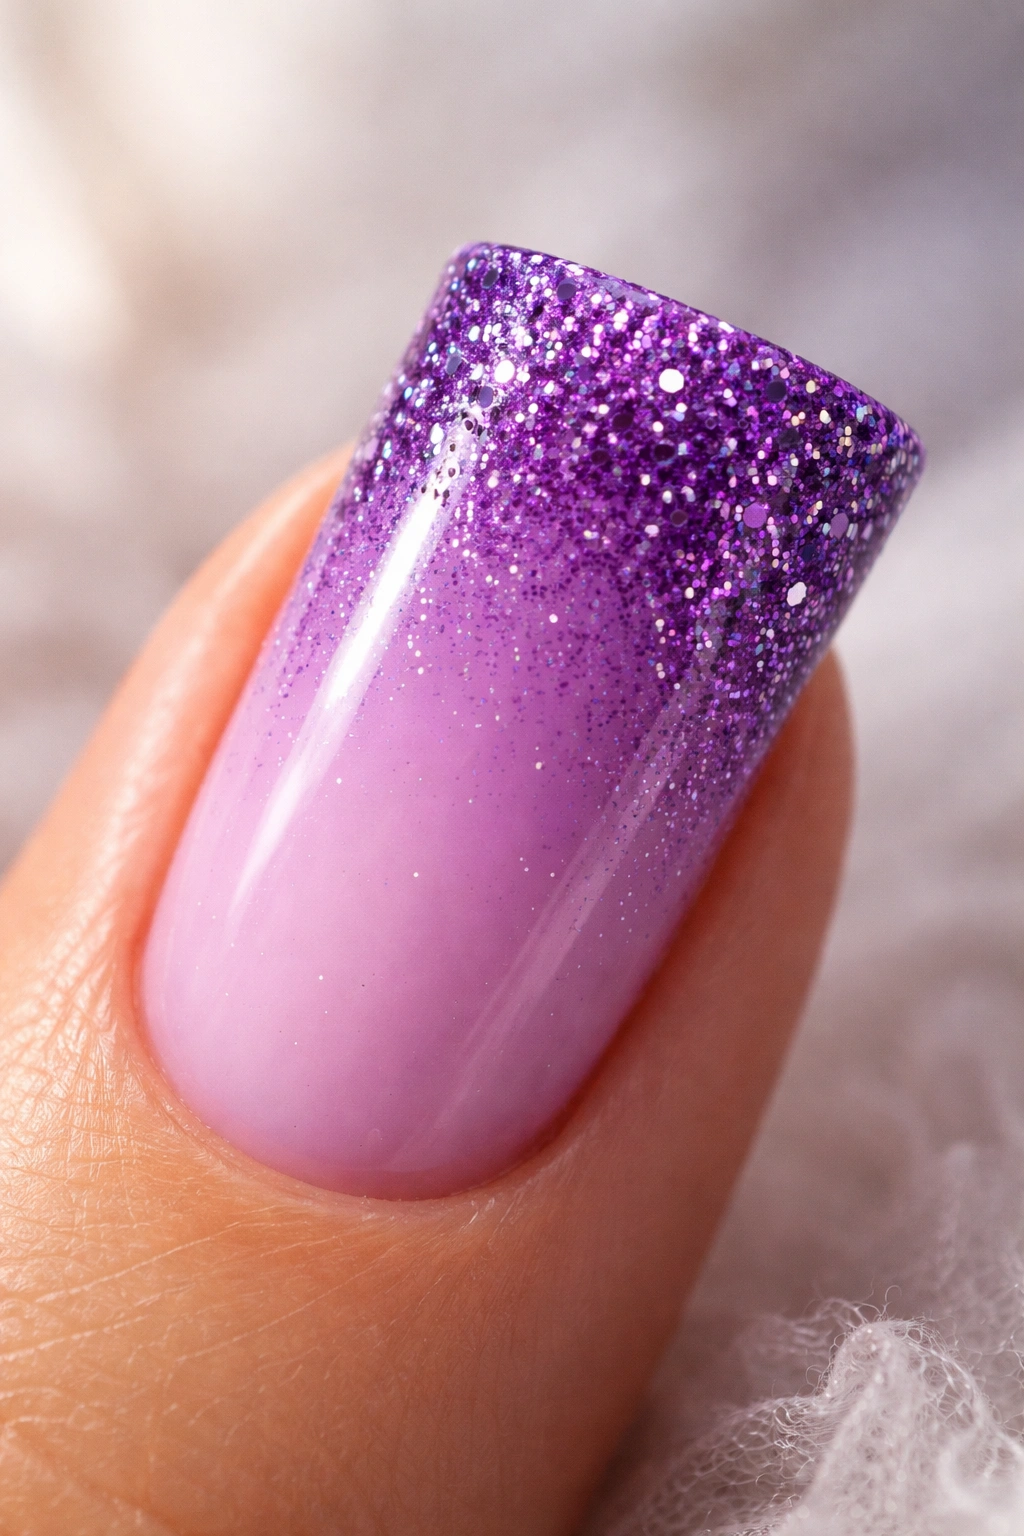
Combining glitter with a solid or gradient purple base brings sparkle and movement to the classic duck shape without overwhelming it. A popular approach is to use a purple jelly or semi-sheer base with glitter concentrated toward the tip, creating a “glitter gradient” that feels both festive and wearable. This design works whether you opt for fine, subtle micro-glitter or larger, more dramatic multi-colored sparkles mixed into the purple base.
The Glitter Placement Strategy
Glitter concentration matters enormously with duck nails — if you apply glitter evenly across the entire nail, the shape can feel heavy and less refined. Instead, focus glitter density on the tip and outer edges of the fan, leaving the base cleaner so the nail shape remains the star. This creates a subtle spotlight effect that draws the eye to the widest, most dramatic part of the duck nail’s curved silhouette.
Application Tips for Pristine Results
- Apply two coats of your purple base and let each dry completely
- While your second base coat is still slightly tacky, sprinkle or press glitter into the tip area
- Use a clean, flat brush to distribute glitter evenly and press it firmly into the polish
- Once dry, apply a generous thick top coat to seal and smooth the glitter surface
- If glitter pieces feel rough, gently file over them with an ultra-fine nail file
Worth knowing: Soaking glittery nails in warm soapy water for a few minutes before removal makes the cleanup process dramatically easier and less damaging to your nail beds.
3. Marble Purple and White Duck Nails
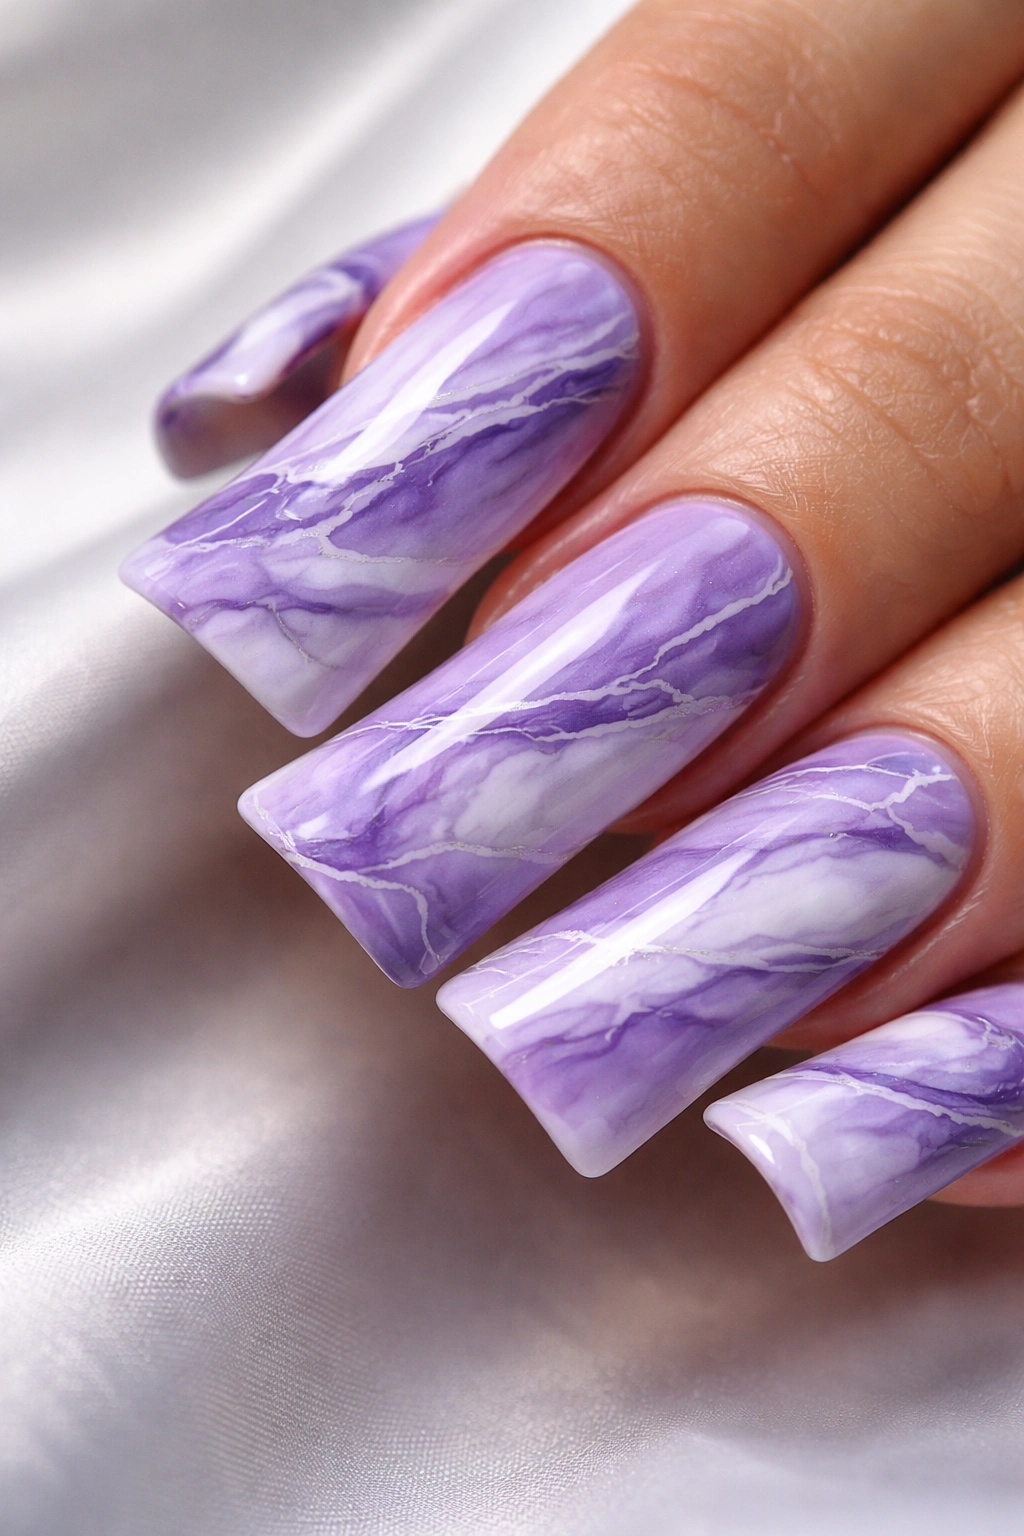
A marbled effect combining purple and white across the duck nail shape creates a sophisticated, artistic look that feels luxe without being overly complicated. True marble nail art uses a water marbling technique or a dry brush method to create organic, veined patterns that mimic natural stone. The white veining against purple creates high contrast that makes the nail shape even more striking and can actually make your nails appear longer.
Creating Convincing Marble Patterns
Authentic-looking marble requires either a steady hand with a thin brush or access to marble nail stickers and wraps — both methods yield stunning results. The key is creating irregular, branching veins that don’t follow a perfect pattern. Study actual marble photos to understand how veins split, branch, and flow rather than running in straight lines. On duck nails specifically, let veins follow the natural curves of the shape for a design that feels intentional rather than randomly placed.
Best Color Combinations
- Deep plum purple with bright white creates the most dramatic contrast
- Soft lavender with soft white works beautifully for a more subtle, minimalist aesthetic
- Marbled designs are even more striking when you add a thin gold or silver line along the edge where the white and purple meet
Insider note: If hand-painting marble intimidates you, high-quality marble press-on nails in duck shape are readily available and look genuinely professional when applied with a proper base coat.
4. Matte Purple Duck Nails
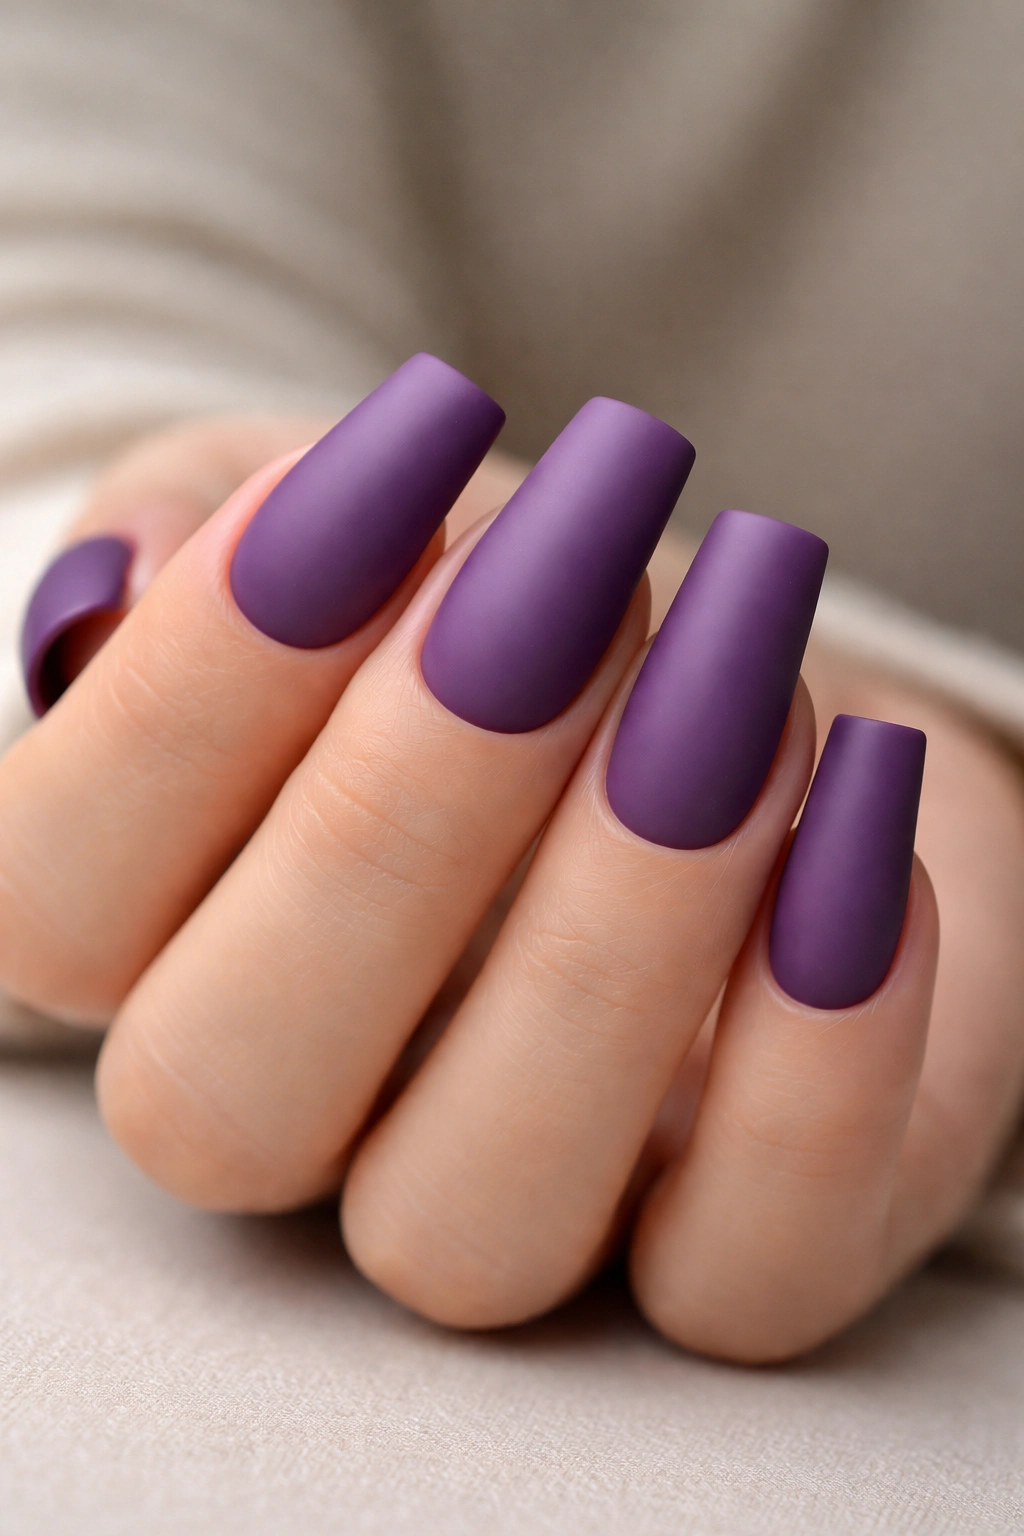
A silky matte finish completely transforms the look of purple duck nails, creating an almost velvety appearance that feels modern and understated in the best way. Matte purple actually looks more sophisticated on duck nails than glossy because it emphasizes the shape without the reflectivity that can sometimes make very shiny nails feel slightly costume-like. You can achieve matte with a matte top coat over any purple shade, or you can use matte purple nail polish directly from the bottle.
The Psychology of Matte on Duck Nails
The flat, light-absorbing finish of matte polish actually makes the three-dimensional duck shape more visually apparent — there’s no shine to flatten the depth perception. This means a matte duck nail appears more sculptural and intentional than the same nail in glossy finish. The softer appearance also makes matte purple nails slightly more office-appropriate and versatile across different settings and dress codes.
Styling Matte Purple
- Deep plum matte looks luxurious and moody, pairing beautifully with jewelry and darker clothing
- Soft lavender matte has a calming, almost minimalist quality that works for everyday wear
- Add a single shiny accent nail or a matte design with glossy details for dimensional contrast
- Pair matte purple with metallic accents — gold or copper stands out beautifully against the flat finish
Pro tip: A matte top coat can sometimes make nails feel slightly drier or more prone to chipping. Reapply every 5-7 days as needed for a flawless matte finish.
5. Purple Chrome Duck Nails

Chrome or metallic mirror finish on purple creates an absolutely show-stopping effect that catches light dramatically and makes your nails look almost futuristic and three-dimensional. Purple chrome can range from shimmery and reflective to deeply holographic depending on the specific product and how you apply it. The chrome effect on the curved surface of a duck nail creates unexpected light play that makes the manicure genuinely mesmerizing.
How Chrome Polish Works on Duck Nails
Chrome powders require a specific application method — you apply the base color (in this case, purple), then while it’s still wet or on a slightly sticky gel, you rub the chrome powder onto the nail using a soft brush or applicator. The curved surface of duck nails actually showcases chrome effects even more dramatically than flat nails because light hits the curved surface at multiple angles simultaneously. The result is a nail that seems to shift and shimmer as you move your hand.
Application Process
- Apply your purple base coat and let it dry or remain on a sticky gel layer
- Use a soft velvet brush or applicator to gently rub the chrome powder onto the nail surface
- Work in circular motions and pay special attention to covering the entire curved area
- Once the chrome effect is complete, seal everything with a shiny top coat
- The chrome effect improves after 24-48 hours as the polish fully cures
Worth knowing: Chrome nails require genuine chrome powder products (not just sparkly glitter), which are available from professional nail suppliers and quality beauty retailers.
6. Geometric Purple Duck Nails with Metallic Lines
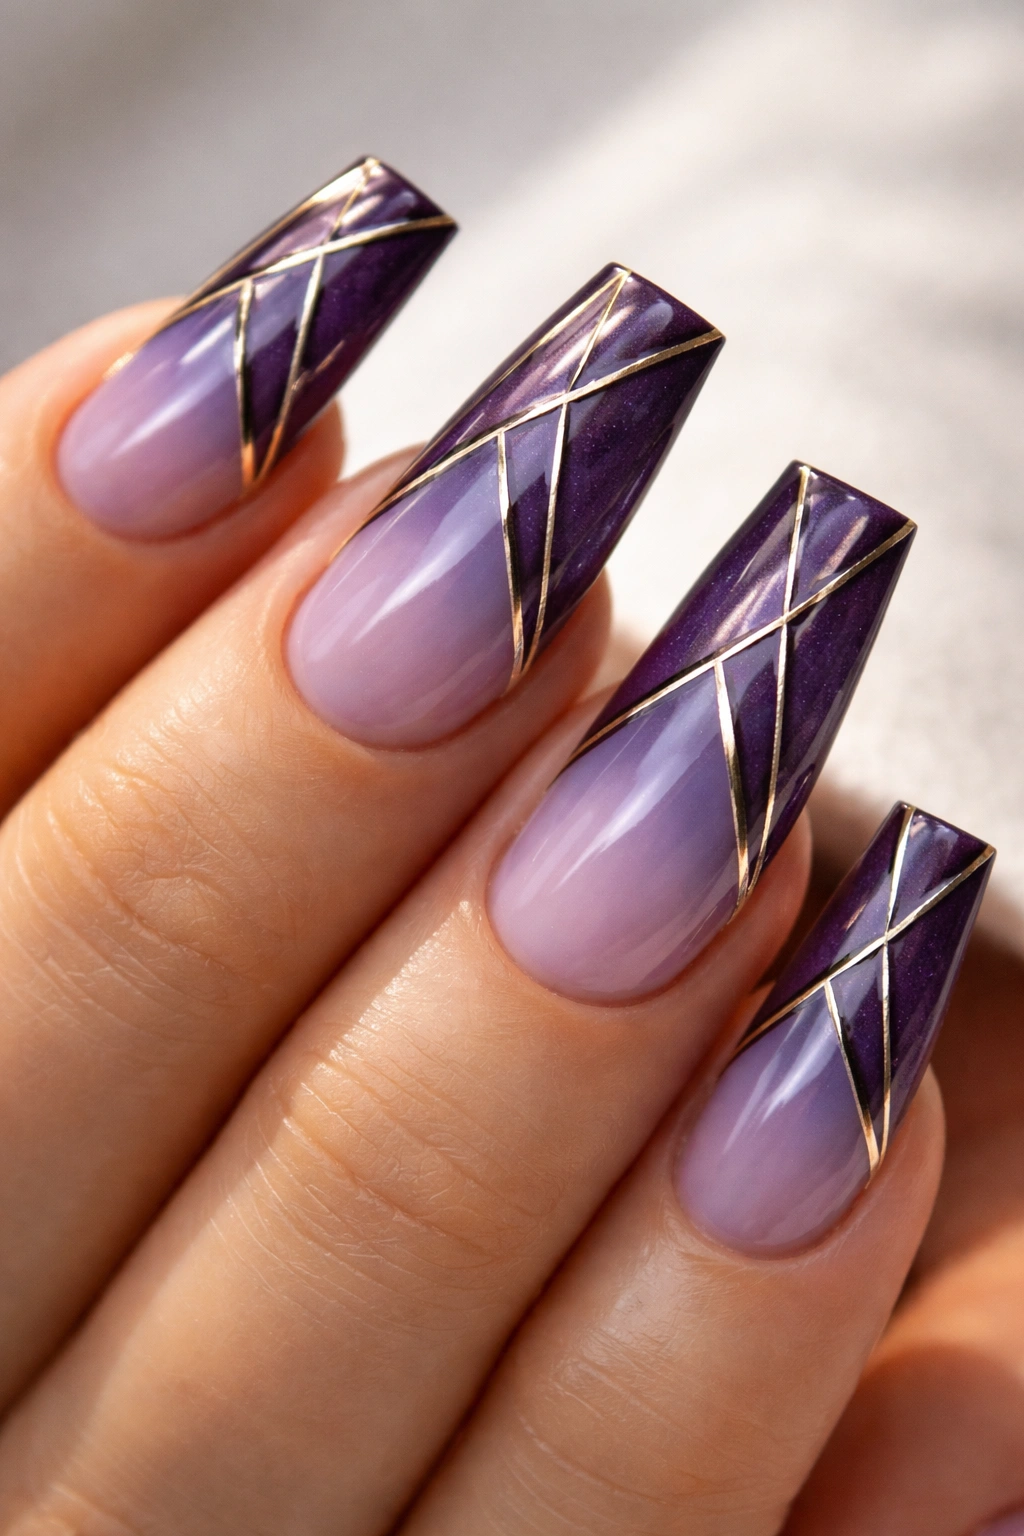
Clean, sharp geometric patterns — triangles, lines, hexagons, or angular shapes — in metallic gold or silver over a purple base create a modern, architectural look that’s artistic without being overly feminine. Geometric designs work particularly well on duck nails because the curved shape provides an interesting canvas for linear elements. The contrast between the soft curves of the nail and sharp geometric lines creates visual tension that feels intentional and sophisticated.
Geometric Design Ideas That Shine on Duck Nails
- Thin vertical or diagonal gold lines that follow the natural curve of the nail
- Small triangular shapes clustered around the tip area
- Hexagon or honeycomb patterns that create texture and dimension
- Half-moon designs where the upper portion is patterned and the lower base is solid purple
- Minimalist thin lines that frame the outer edge of the duck shape
Tools and Techniques
- Use thin striping brushes or nail art pens for precise metallic lines
- Nail art tape can help create perfectly straight geometric shapes if hand-painting feels risky
- A steady hand and good lighting are essential — take your time and don’t rush geometric designs
- Gold and silver metallic finishes both work beautifully; rose gold adds a softer touch
Pro tip: If you make a mistake with metallic lines, you can often gently wipe them away with a small brush dipped in rubbing alcohol before the polish dries.
7. Floral Purple Duck Nails
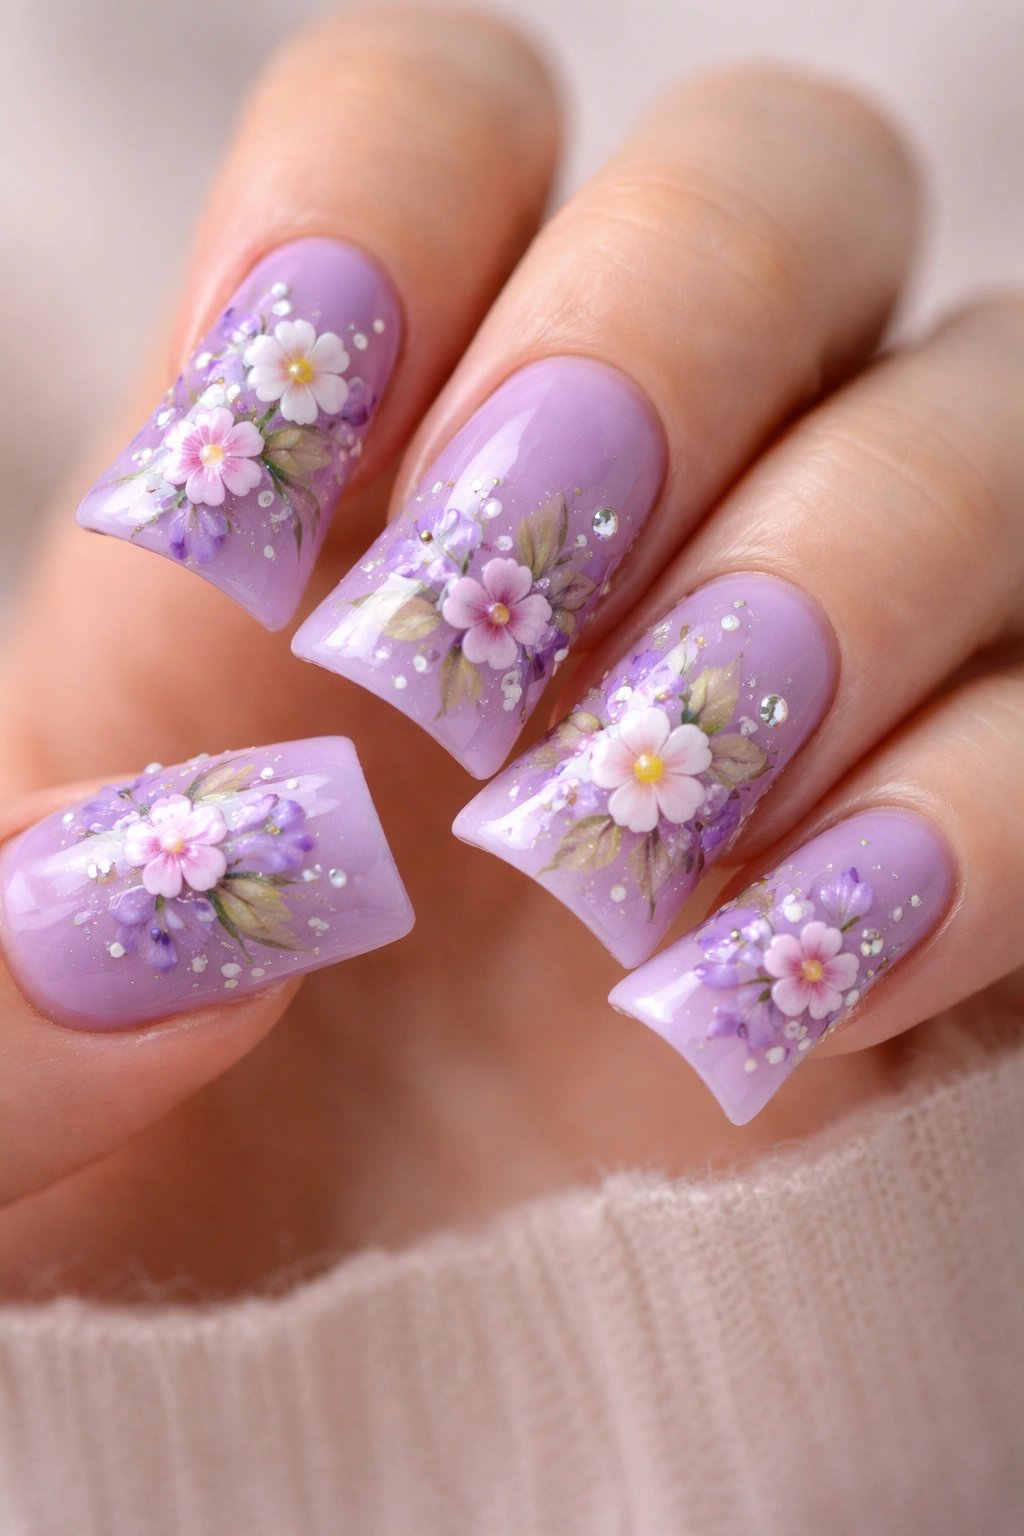
Hand-painted or stamped tiny floral designs — imagine small roses, wildflowers, or delicate botanical elements — scattered across a purple base or concentrated on the tip create a romantic, garden-inspired manicure. The wider surface of duck nails gives you more room to include recognizable floral details without making the design feel cramped or overwhelming. Purple is a particularly beautiful base for florals since it already has romantic, garden-like associations.
Floral Design Options
- Tiny purple ombre roses with green leaves create a classic, timeless look
- Wildflower designs with multiple small flowers and stems feel cottage-core and whimsical
- Cherry blossoms or delicate petal designs scattered across a light lavender base look ethereal
- Sunflowers or daisies with dark centers provide graphic contrast against lighter purple shades
- Pressed flower designs or detailed botanical illustrations for a more artistic, illustrative approach
Creating Recognizable Florals
Hand-painting florals requires practice, but starting with simple shapes — a small circle for the flower center, curved petals around it, a thin line for the stem — makes the process manageable. Alternatively, nail art stamping plates featuring floral designs eliminate the hand-painting requirement while still delivering beautiful, detailed results. You can also find gorgeous floral nail decals and stickers that offer professional-looking florals without any artistic skill required.
Insider note: Layering florals so some flowers are slightly opaque and others are semi-transparent through a jelly base creates beautiful dimensional depth that looks far more intricate than it actually is.
8. Holographic Purple Duck Nails
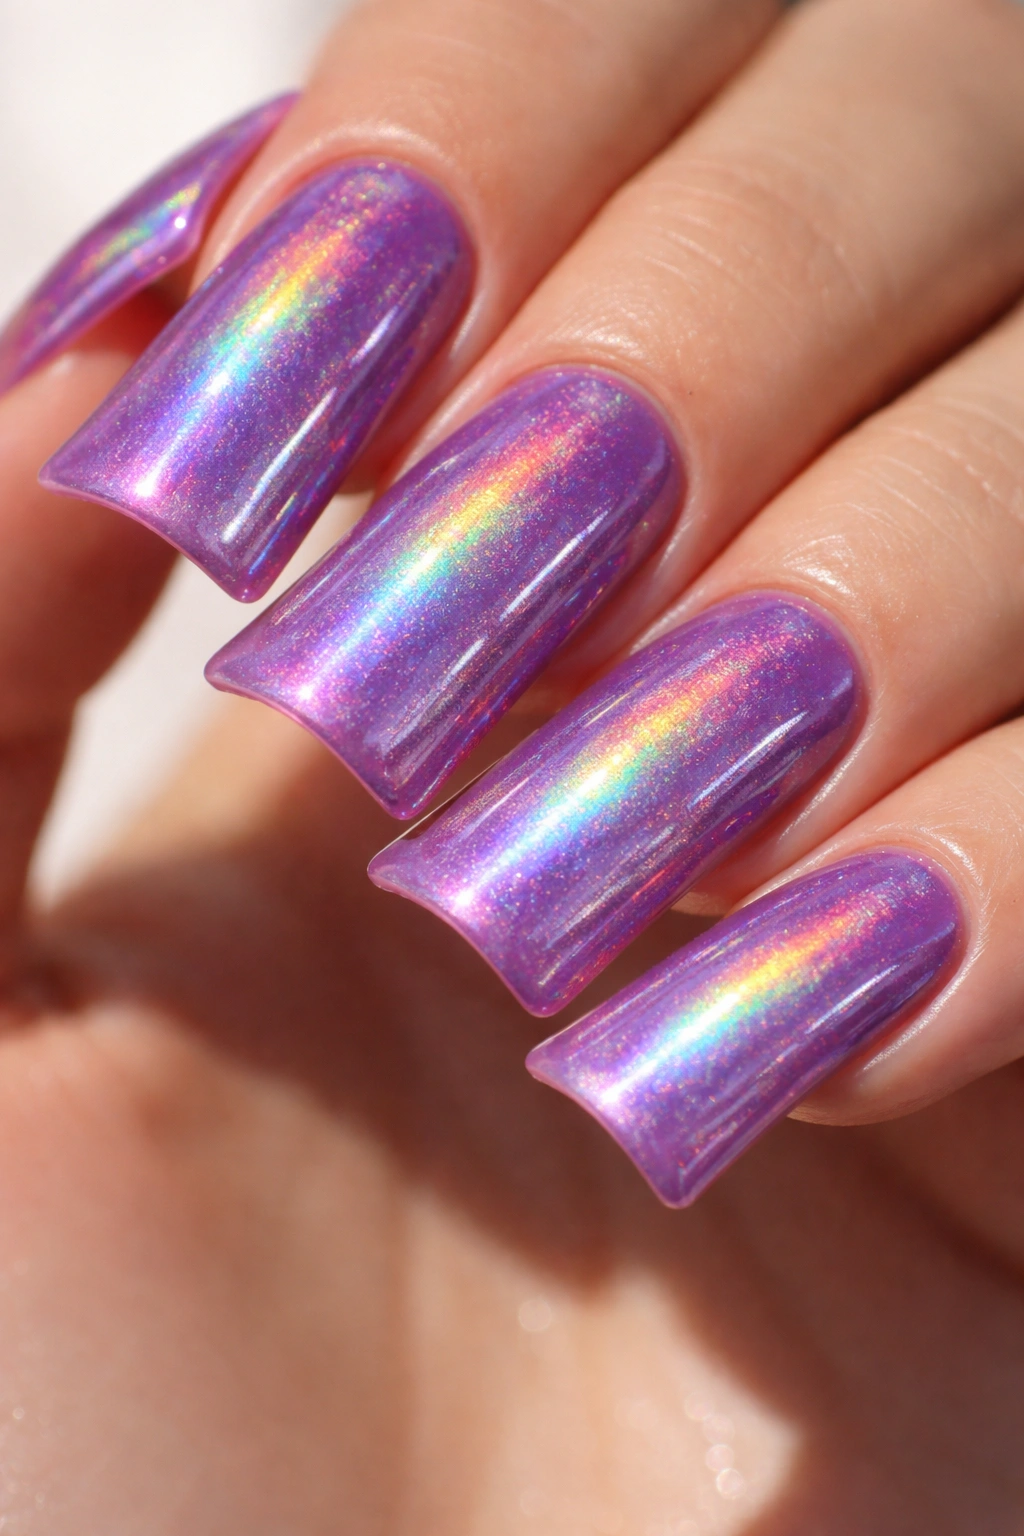
A shifting, rainbow holographic effect across purple duck nails creates a magical, almost otherworldly appearance that’s impossible not to stare at. Holographic polishes contain tiny light-refracting particles that create a prism effect, so the nails display different colors (often gold, pink, green, and blue) as they catch light at different angles. Applied to duck nails, this effect becomes even more dramatic because the curved surface hits light from multiple angles simultaneously.
How Holographic Polish Performs on Duck Nails
Holographic nails work best in natural light or bright indoor lighting where the light-refracting effect is visible — in dim settings or under certain artificial lights, the holographic shimmer might be less apparent. The curved surface of duck nails actually showcases the holographic effect beautifully because the shape naturally catches light at varied angles. You’ll get the best results with a base layer of a bright or saturated purple underneath the holographic polish, which makes the rainbow effect even more striking.
Application for Best Results
- Apply a solid purple base coat in a shade that complements the holographic colors
- Apply holographic polish in thin, even layers (thick application can look muddy)
- Two coats typically provide the most vivid holographic effect
- Seal with a shiny, clear top coat that won’t interfere with the holographic shimmer
- Wear your nails in different lighting conditions to fully appreciate the color-shifting effect
Worth knowing: Holographic polishes can be slightly harder to apply smoothly than regular polishes because the particle-heavy formula requires a lighter touch and careful brush control.
9. Lavender Ombré Duck Nails with Sparkle Fade
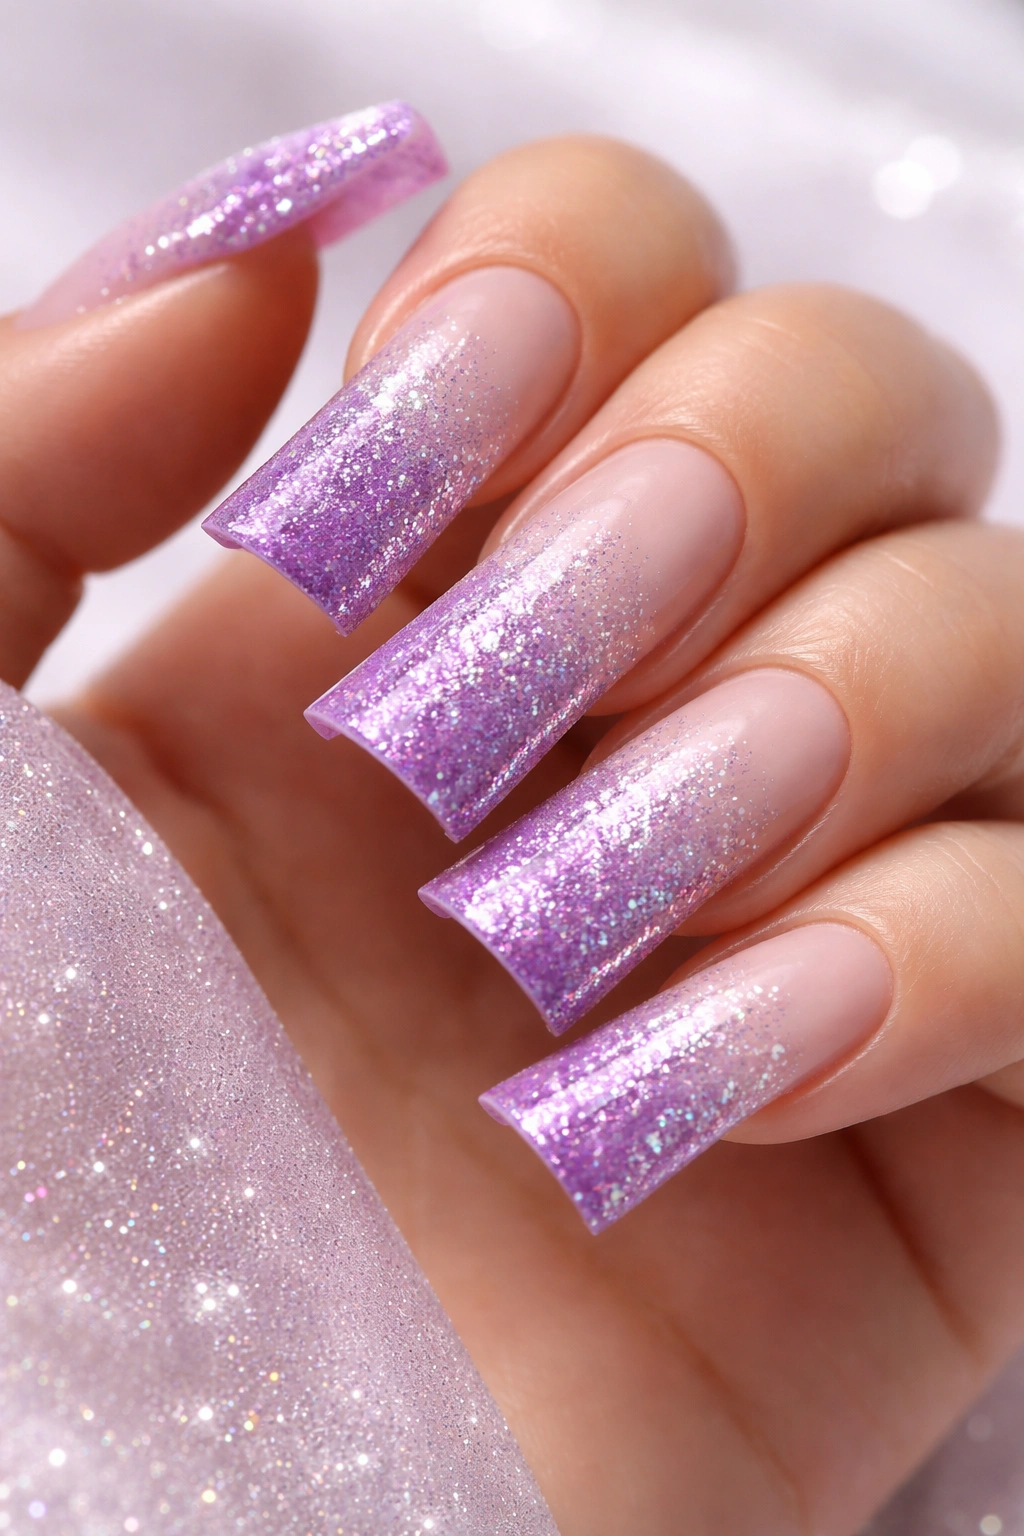
A delicate gradient from soft, pale lavender at the base to deeper purple at the tips, with fine glitter that gradually increases in intensity toward the nail edges, creates a dreamy, romantic look. This variation on the glitter ombré combines color gradient with sparkle gradient for a more layered, dimensional effect. The overall impression is ethereal and whimsical while remaining wearable and appropriate for multiple settings.
Layering for the Sparkle Fade Effect
The key to this look is applying the sparkle gradually rather than all at once. Start with a clean glitter-free area near the base, introduce fine microglitter in the middle section, and concentrate more substantial sparkle toward the tips. Each layer builds on the last, creating a subtle transition that feels intentional rather than random. This gradual approach prevents the manicure from feeling heavy or overly flashy.
Color and Sparkle Combinations
- Pale lavender base fading to grape purple with gold or rose gold glitter
- Almost white lavender base fading to medium purple with silver or iridescent glitter
- Soft lilac base fading to plum with champagne or pearl-toned sparkle
- Each combination creates a slightly different mood — choose based on your personal preference and skin tone
Pro tip: Use a jelly or semi-transparent purple base rather than opaque polish — this allows the glitter to sit atop the nail rather than getting buried, making the sparkle more visible and dramatic.
10. Purple Duck Nails with Gold Leaf Accents
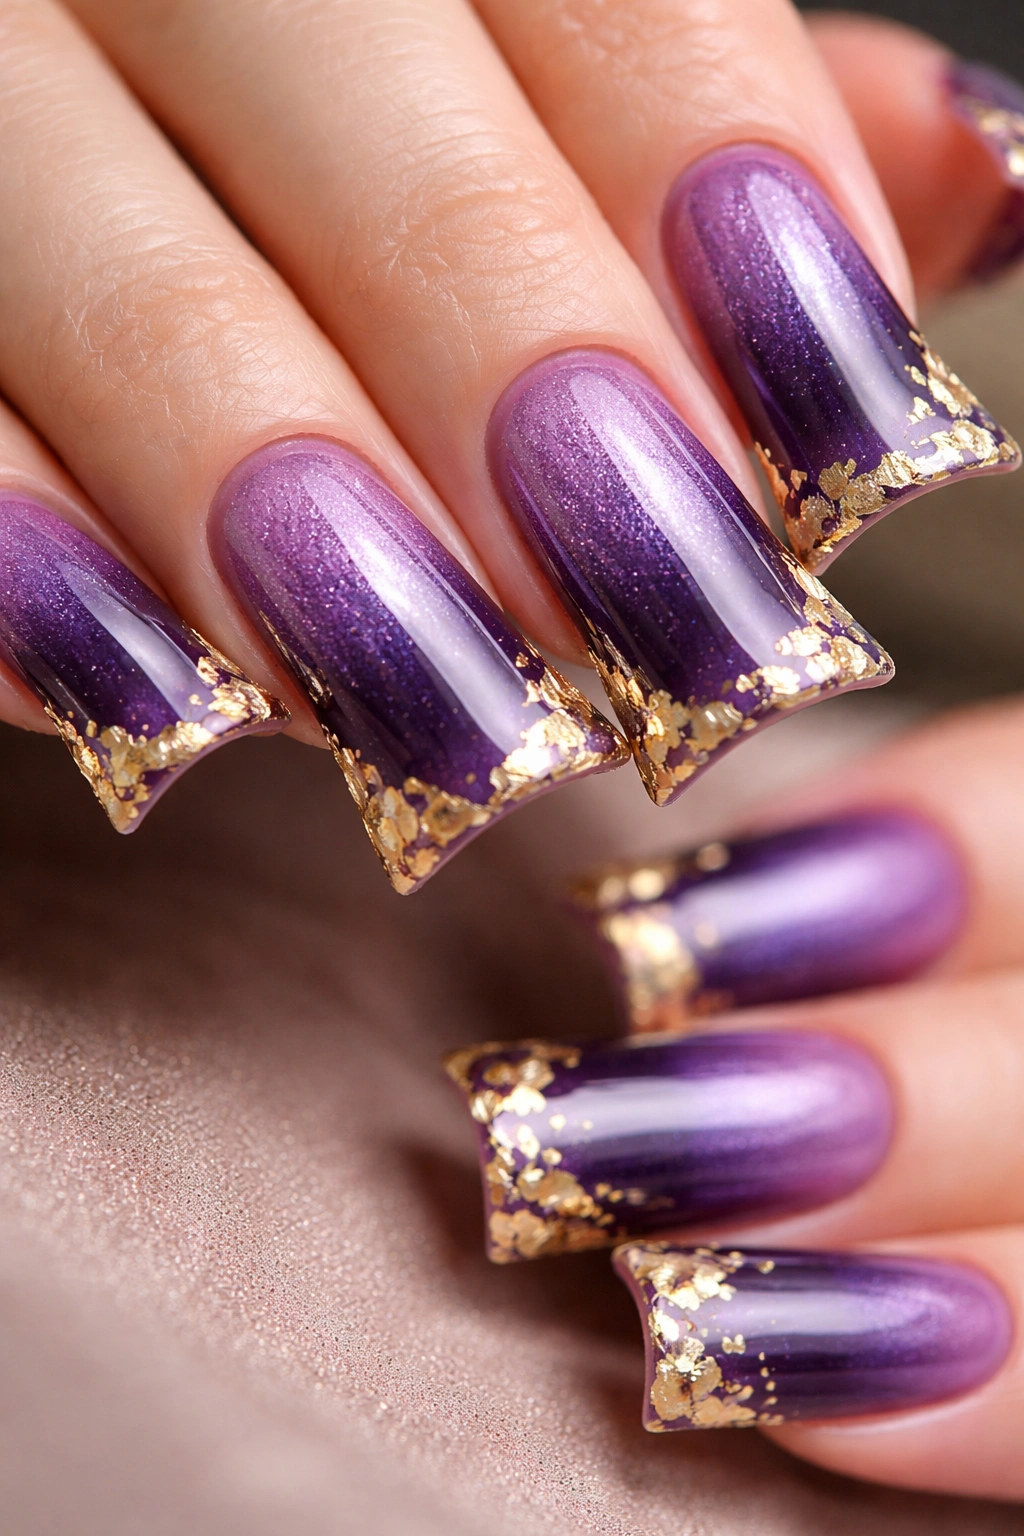
Incorporating actual gold leaf or faux gold leaf details into a purple manicure brings luxury and artistic flair without requiring complicated nail art skills. Gold leaf can be applied to accent nails, scattered across all nails, or concentrated along one edge of each duck nail to frame and emphasize the shape. The richness of gold against purple is a classic, sophisticated color pairing that immediately elevates the entire manicure.
Methods for Applying Gold Leaf
- Real 22k or 24k gold leaf provides the most authentic, lasting result but requires a special adhesive
- Faux gold leaf (also called composition leaf) is more affordable and easier to apply — simply press it onto a sticky top coat layer
- Gold leaf flakes scattered and adhered create a more organic, artistic appearance than perfectly placed sheets
- Combine gold leaf with other elements like matte finish or glitter for added dimension
Gold Leaf Design Ideas
- A single dramatic strip of gold leaf down the center of each nail
- Small gold leaf accents clustered around the tip area
- Gold leaf details framing the curved edge of the duck shape
- A full coat of very thinly applied gold leaf for an almost-solid metallic appearance
Worth knowing: Gold leaf requires careful top coat sealing to prevent it from catching and tearing during daily activities. Use a thick, protective top coat and reapply as needed.
11. Jelly Purple Duck Nails
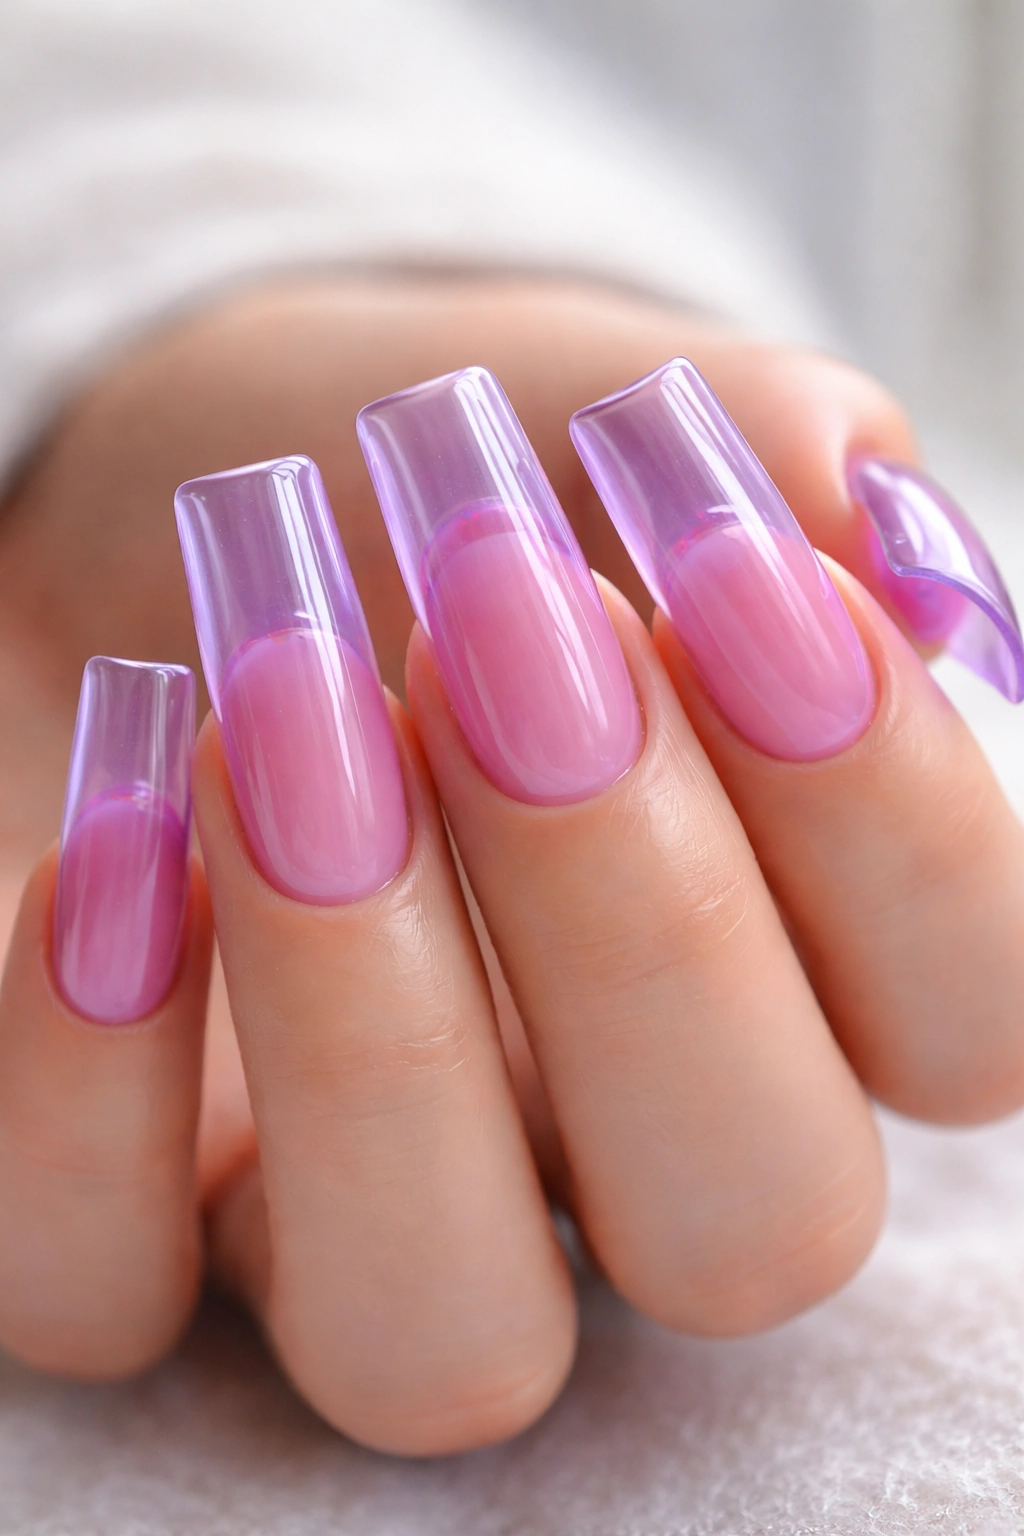
Semi-transparent purple jelly polish creates a glass-like, luminous appearance that feels modern and surprisingly versatile. Jelly polish allows light to pass through the color, creating a glowing effect that solid polish can’t replicate. On duck nails, this translucent quality makes the shape feel even more pronounced and adds an almost edible quality to the manicure — these nails genuinely look good enough to bite.
What Makes Jelly Polish Special on Duck Nails
The transparency of jelly polish means you see your actual nail bed beneath the color, creating a multidimensional appearance that feels alive and luminous. The curved surface of duck nails shows off this transparency even better than flat nails because different parts of the nail catch light at different angles, creating subtle variations in shade and intensity across the surface. A jelly manicure feels elegant and refined without requiring any nail art or embellishment.
Wearing Jelly Purple Duck Nails
- Solid jelly purple looks clean and modern with a minimalist aesthetic
- Layer a jelly purple over a chrome or metallic base for unexpected shimmer visible through the transparency
- Add scattered glitter through the jelly for a subtly sparkly appearance that feels organic
- Combine jelly purple on some nails with solid or accent nails of a complementary shade for variety
Pro tip: Jelly polishes often require three coats to achieve full opacity and color saturation. Be patient with application and allow each layer to dry thoroughly.
12. Nude and Purple Duck Nails with Ombré Blend
A striking combination of nude on one half and purple on the other, blended in the middle for a seamless transition, creates a chic, editorial look that feels fashion-forward. This two-tone approach works beautifully on duck nails because the wider nail bed provides adequate space for both colors while maintaining visual balance. The contrast between nude (which shows off skin tone beautifully) and purple (which adds drama and interest) creates an unexpectedly sophisticated combination.
Executing the Blend Perfectly
- Paint one side of the nail with nude and the other with purple
- Use a damp sponge to blend the colors in the middle section where they meet
- The blend should be gradual enough that you can’t identify a hard line between the colors
- This technique is easier to control than a full ombré because you’re working with distinct color zones
Nude Shade Selection
The nude shade you pair with purple matters — it should complement your skin tone without being too warm or too cool. If your purple is cool-toned, a slightly cooler nude (with pink or mauve undertones) creates harmony. If you choose a warmer purple, a slightly warmer nude (with peach or golden undertones) balances the overall look. The goal is for the nude section to enhance your hand’s natural coloring rather than clash with it.
Insider note: This design looks particularly striking with a matte finish on the purple side and a glossy finish on the nude side, creating textural contrast that adds visual interest.
13. Purple Velvet Duck Nails
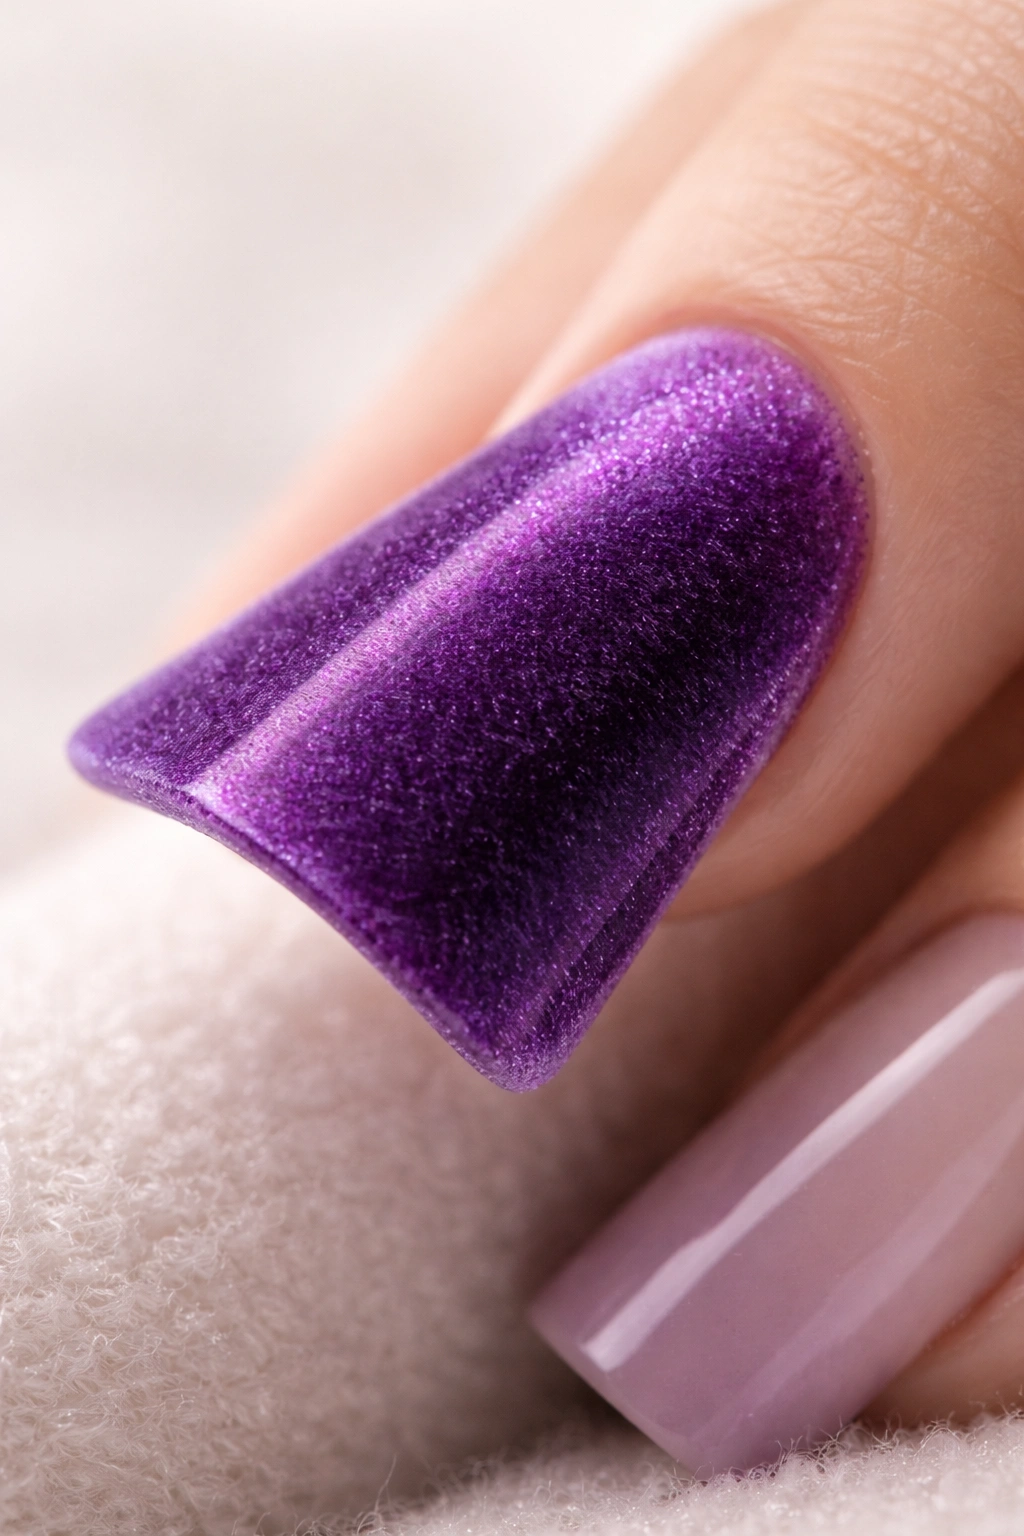
A plush velvet finish created with velvet powder over a purple base creates a textured, tactile appearance that’s completely different from any traditional nail finish. Velvet nails have a soft, fuzzy appearance that genuinely looks like you could touch them and feel velvet fabric. This ultra-luxe finish is surprisingly durable and actually quite wearable despite its delicate appearance.
Creating the Velvet Texture
- Apply your purple base coat and allow it to dry completely
- While a thin layer of clear, tacky gel or a sticky top coat is still wet, press velvet powder onto the nail surface
- Use a soft brush or applicator to ensure even coverage
- Seal with a flexible top coat that won’t crack the velvet texture
- The velvet will feel slightly bumpy rather than smooth — this is correct and intentional
Why Velvet Works on Duck Nails
The unusual texture of velvet creates an almost sculptural quality on duck nails that makes the shape even more three-dimensional and striking. The powder particles catch light differently than traditional polish, creating subtle variations in shade across the nail surface. A velvet manicure is unforgettable and starts conversations — it’s a genuinely artistic nail choice that goes beyond standard polish applications.
Pro tip: Velvet nails are more delicate than traditional polish and may require more frequent touch-ups. Be gentle when working with your hands, and reseal with clear top coat as needed.
14. Galaxy Purple Duck Nails
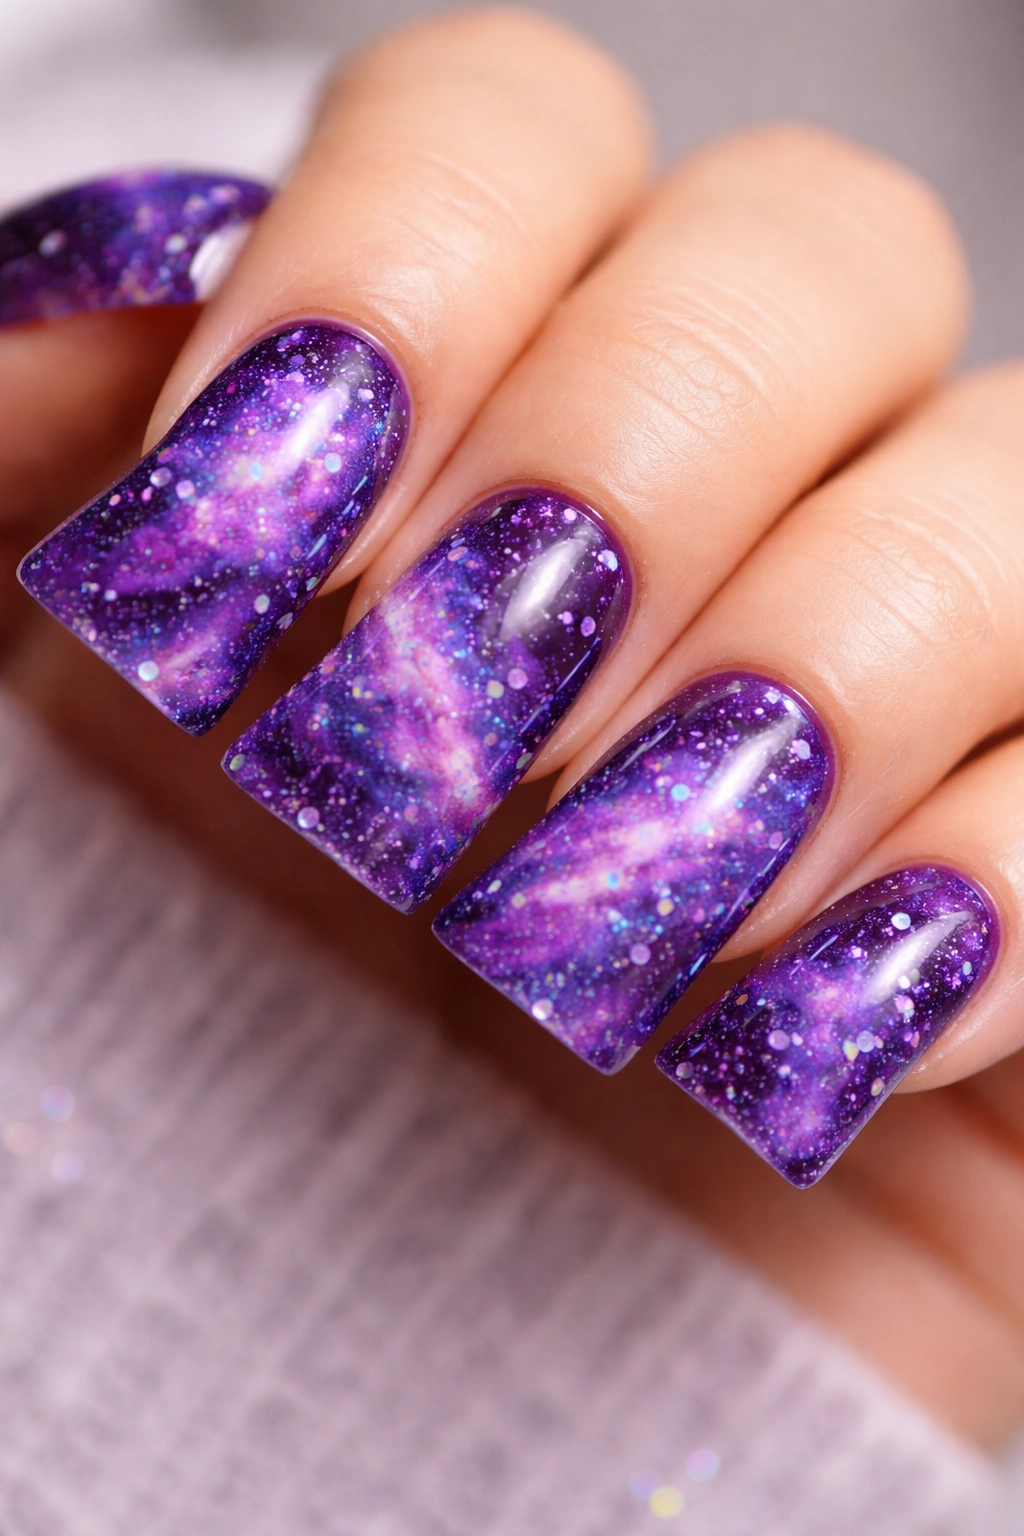
A cosmic-inspired design featuring deep purple as the base with swirls of lighter purple, pink, and blue, scattered with white and iridescent sparkles to mimic stars and nebula clouds, creates a magical, otherworldly manicure. Galaxy nails on a duck-shaped canvas become particularly dramatic because the curved surface naturally mimics the spherical quality of planets and celestial bodies. This design is artistic and playful while remaining visually balanced and wearable.
Creating Convincing Galaxy Effects
Galaxy nail art typically involves sponging multiple colors together for a blended, cloudy effect that resembles nebulae and cosmic dust. Start with your deep purple base, then use a sponge to dab on lighter purples, teals, and pinks, blending them together so the colors flow and merge naturally. Add white and iridescent sparkles last, scattering them to represent stars against the cosmic background.
Galaxy Palette Ideas
- Deep purple, lavender, hot pink, and turquoise for a vibrant, energetic look
- Deep purple, soft pink, and pale blue for a more subtle, dreamy galaxy aesthetic
- Purple, magenta, and black with white sparkle for high contrast and drama
- Add metallic accents in silver or rose gold for extra shimmer against the cosmic background
Sponging Technique for Galaxy Nails
- Tear off a small piece of makeup sponge and dampen it slightly
- Dab the sponge onto your polish shades in sequence, blending them on a palette first
- Sponge the colors onto the nail in dabbing motions, overlapping and blending as you go
- Allow each layer to dry slightly before adding more colors to avoid muddy blending
- Seal with a glossy top coat and add star accents with a thin brush or nail art pen
Worth knowing: Galaxy nails often look better with a slight sparkle or glitter addition — even subtle iridescent sparkle makes the cosmic effect more convincing and visually compelling.
Final Thoughts
Purple duck nails represent the perfect intersection of bold shape and versatile color, offering endless possibilities depending on which finish, design elements, and accent details you choose. Whether you gravitate toward minimalist matte elegance or show-stopping chrome and galaxy effects, purple provides a rich, sophisticated base that works across multiple skin tones and personal styles. The beauty of duck nails lies in how the curved shape makes even simple designs feel intentional and artistic, and purple enhances that effect with its inherent association with creativity, luxury, and individuality.
The key to choosing your purple duck nail design is considering what aspect of your personal style you want to highlight — do you want understated sophistication, artistic flair, glamorous sparkle, or something entirely unexpected like velvet or geometric patterns? Once you identify that, the purple shade and finish naturally follow. Start with a design that excites you, invest in quality polish and proper application tools, and remember that your nails are a form of self-expression that deserves the same thoughtfulness you’d give to any other aspect of your personal presentation.
