

Duck nails—those gorgeous, slightly curved tips that fan out at the edge—have become one of the most flattering and versatile nail shapes out there. The upward angle catches light beautifully, elongates your fingertips, and creates the perfect canvas for bold, creative designs. Whether you’re a glam enthusiast, a minimalist who appreciates elegance, or someone who likes to switch up their look frequently, duck nails offer endless styling possibilities that go way beyond basic polish.
What makes duck nails truly special is how they work with different design elements. The wider tip area gives you more real estate to play with embellishments, while the curved, blade-like shape naturally draws attention to intricate details. You can go ultra-feminine with delicate florals, bring serious glamour with metallics and jewels, or create bold, modern statements with geometric patterns and chrome finishes. The shape itself adds sophistication, so even simpler designs feel elevated and intentional.
The designs below showcase the range of what’s possible with duck nails—from understated elegance to full-on showstopper looks. Each one translates beautifully to this shape and works for different occasions, seasons, and personal styles. Whether you’re heading to an event, want to refresh your everyday look, or need inspiration for your next nail appointment, you’ll find plenty of ideas here to make your duck nails absolutely unforgettable.
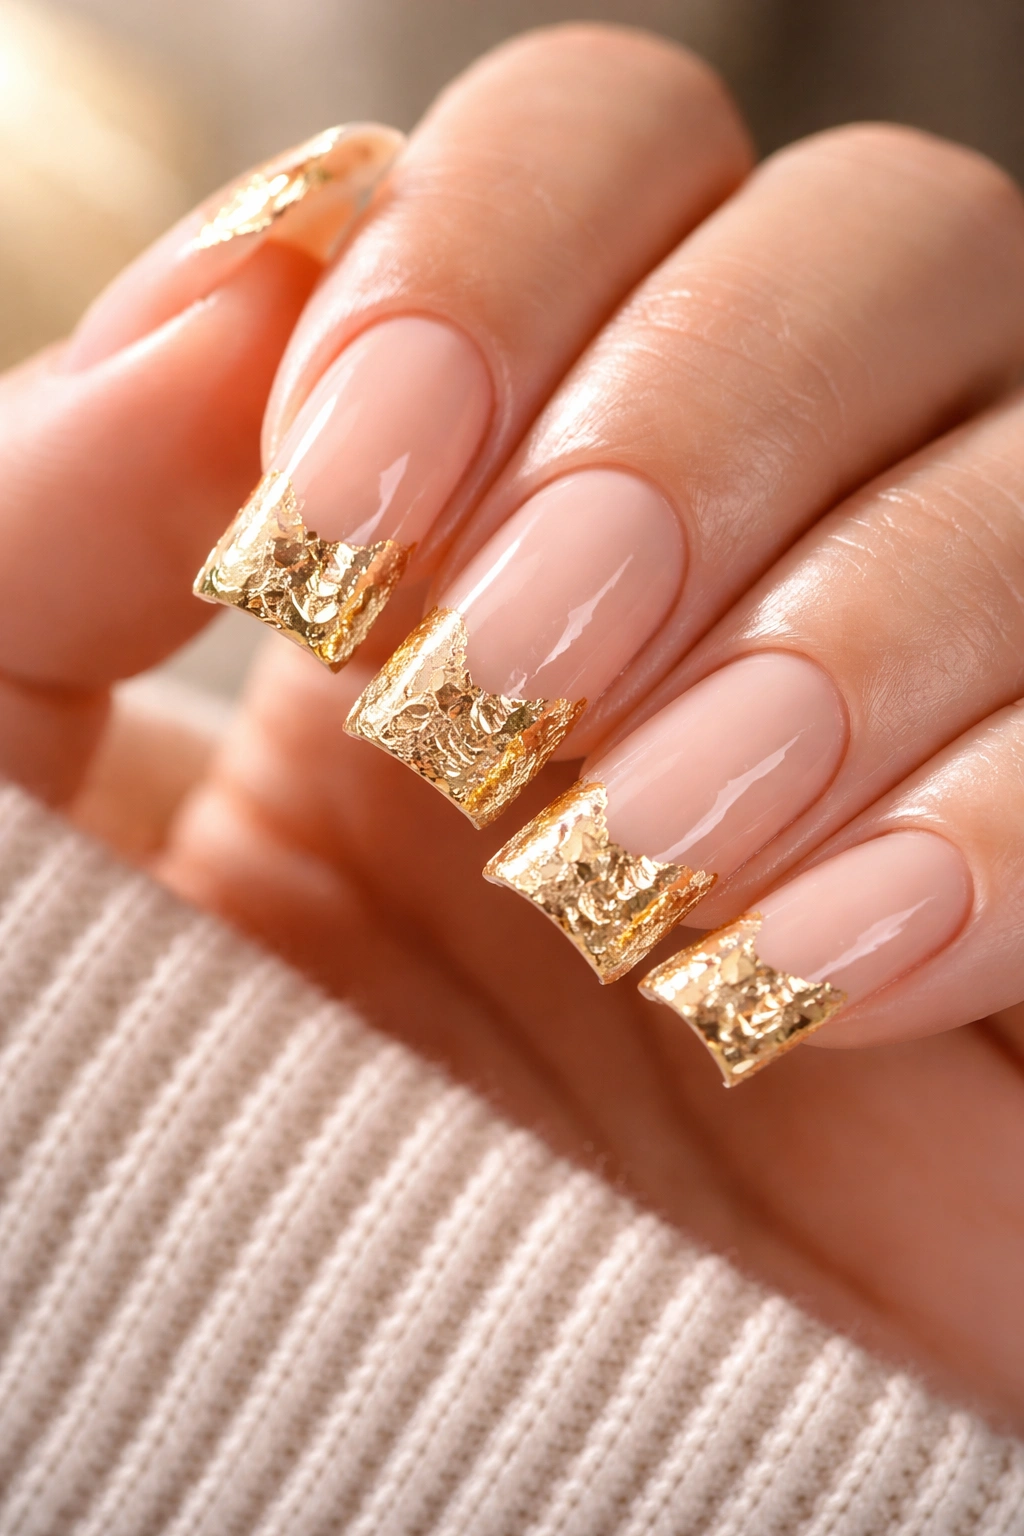
1. Gold Foil Accents
Gold foil elevates duck nails instantly, creating a luxe effect that catches the light from every angle. This design works beautifully with a soft nude, cream, or soft pink base that lets the foil become the star. The metallic shimmer feels sophisticated without being over-the-top, and it photographs amazingly well.
Why This Design Works for Duck Nails
Gold foil looks particularly striking on duck nails because the wider, flared tip gives you more surface area to showcase the shimmering effect. The curved shape of the tip naturally reflects light, making the foil appear even more luminous and dimensional. This creates an almost jewelry-like quality that feels special and polished without requiring complicated application skills.
How to Achieve the Look
- Apply a neutral base coat in cream, nude, or soft pink and let it cure completely
- Tear small, irregular pieces of gold foil (don’t try to make them perfectly uniform—organic shapes look better)
- Use a tacky base or a thin layer of gel adhesive to secure foil pieces across the tip, letting some overlap and angle in different directions
- Seal everything with a glossy or semi-matte top coat to protect the foil and create depth
- For extra dimension, consider adding just one small gold piece on accent nails rather than all ten
Pro tip: Gold foil pairs beautifully with a milky, translucent base that lets the foil glow from underneath—this creates more dimension than a solid, opaque base.
2. Ombre Gradient
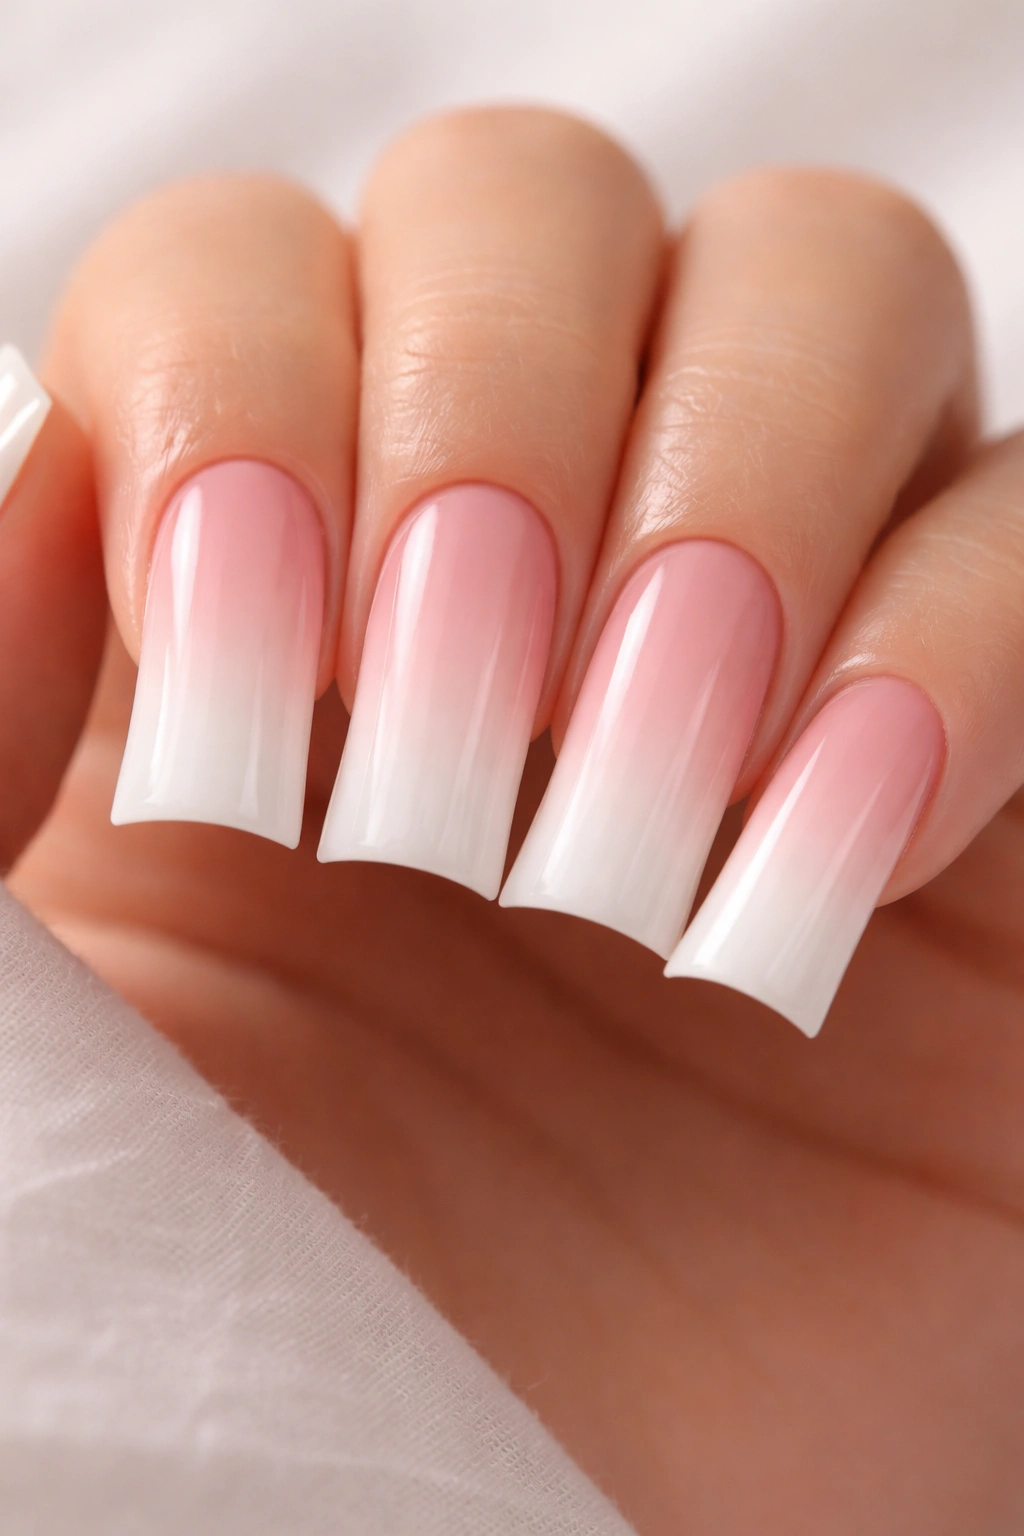
An ombre gradient on duck nails creates a dreamy, directional flow that’s incredibly flattering. You can work with two complementary colors or create a full color spectrum that transitions smoothly from nail base to tip. This design feels modern and artistic while remaining wearable for everyday situations.
The Technique Behind the Effect
The ombre works especially well on duck nails because the shape naturally guides the eye through the gradient—the curve of the tip creates a focal point where colors can blend and transition. A vertical gradient (moving from dark to light from cuticle to tip) makes nails appear longer, while a horizontal blend (moving across the nail from one side to the other) adds visual interest and width.
Design Variations to Try
- Soft blush to white for a delicate, romantic feel
- Deep teal to turquoise to seafoam for an ombré that feels calming and serene
- Purple to pink to white for a sunset-inspired look that shifts throughout the day
- Navy to royal blue to silver for a glamorous, cool-toned aesthetic
- Warm coral to peachy to cream for an energetic, sun-kissed vibe
Worth knowing: Using a makeup sponge to blend the colors together creates the smoothest gradient, but you can also hand-blend with a thin brush and some finesse.
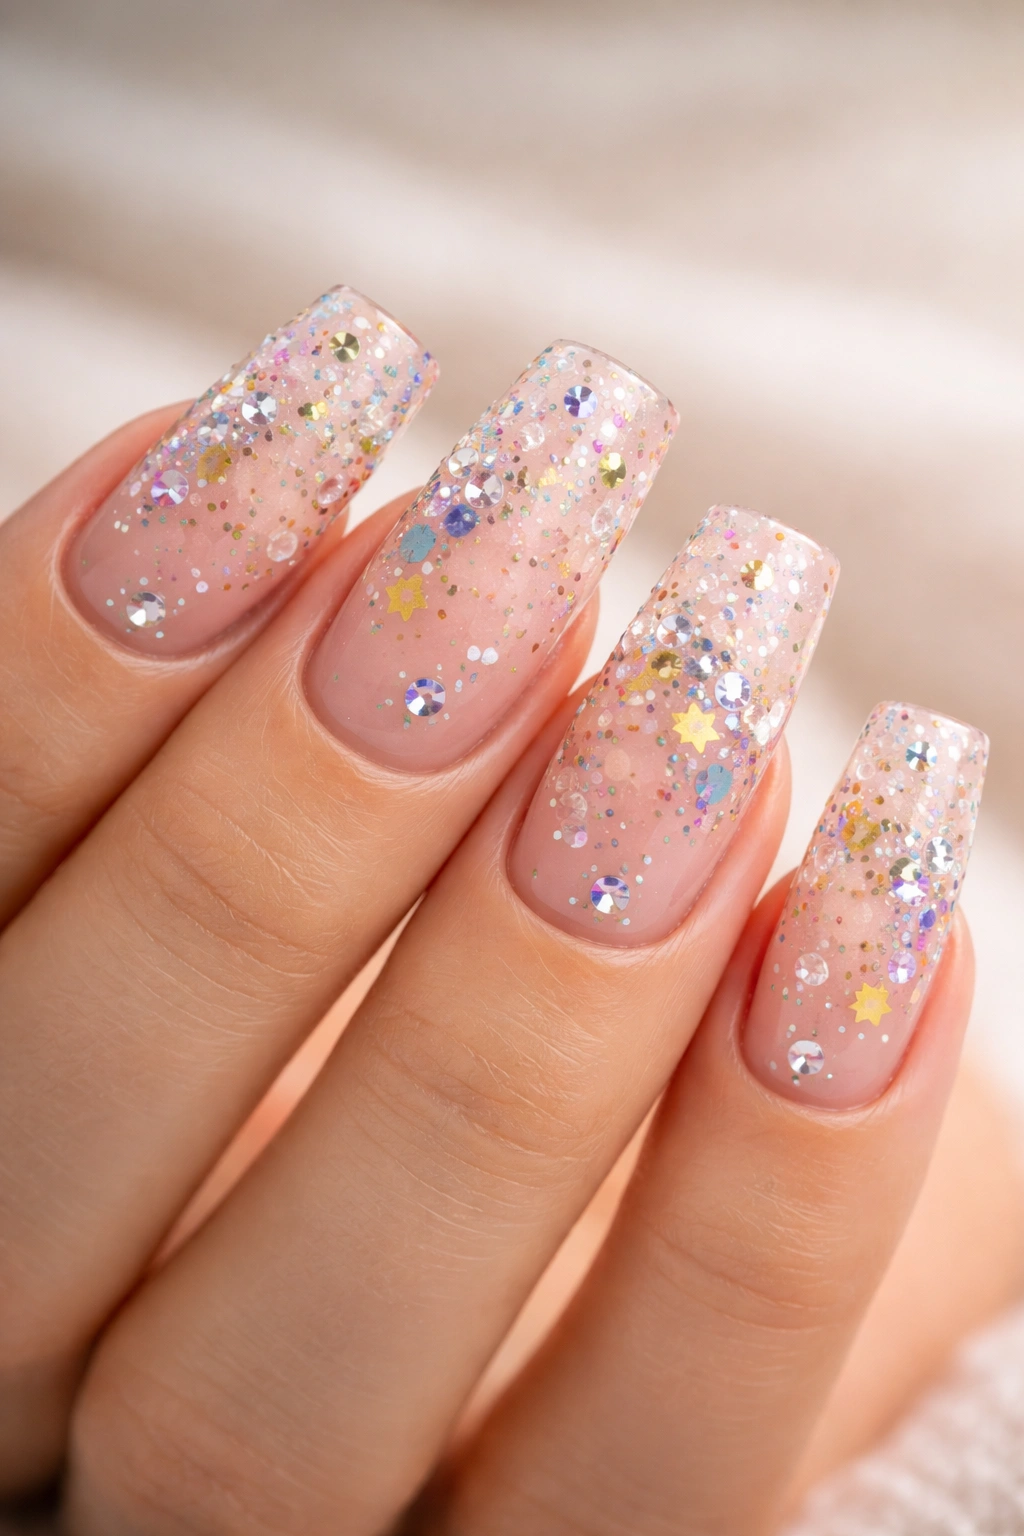
3. Rhinestone Clusters
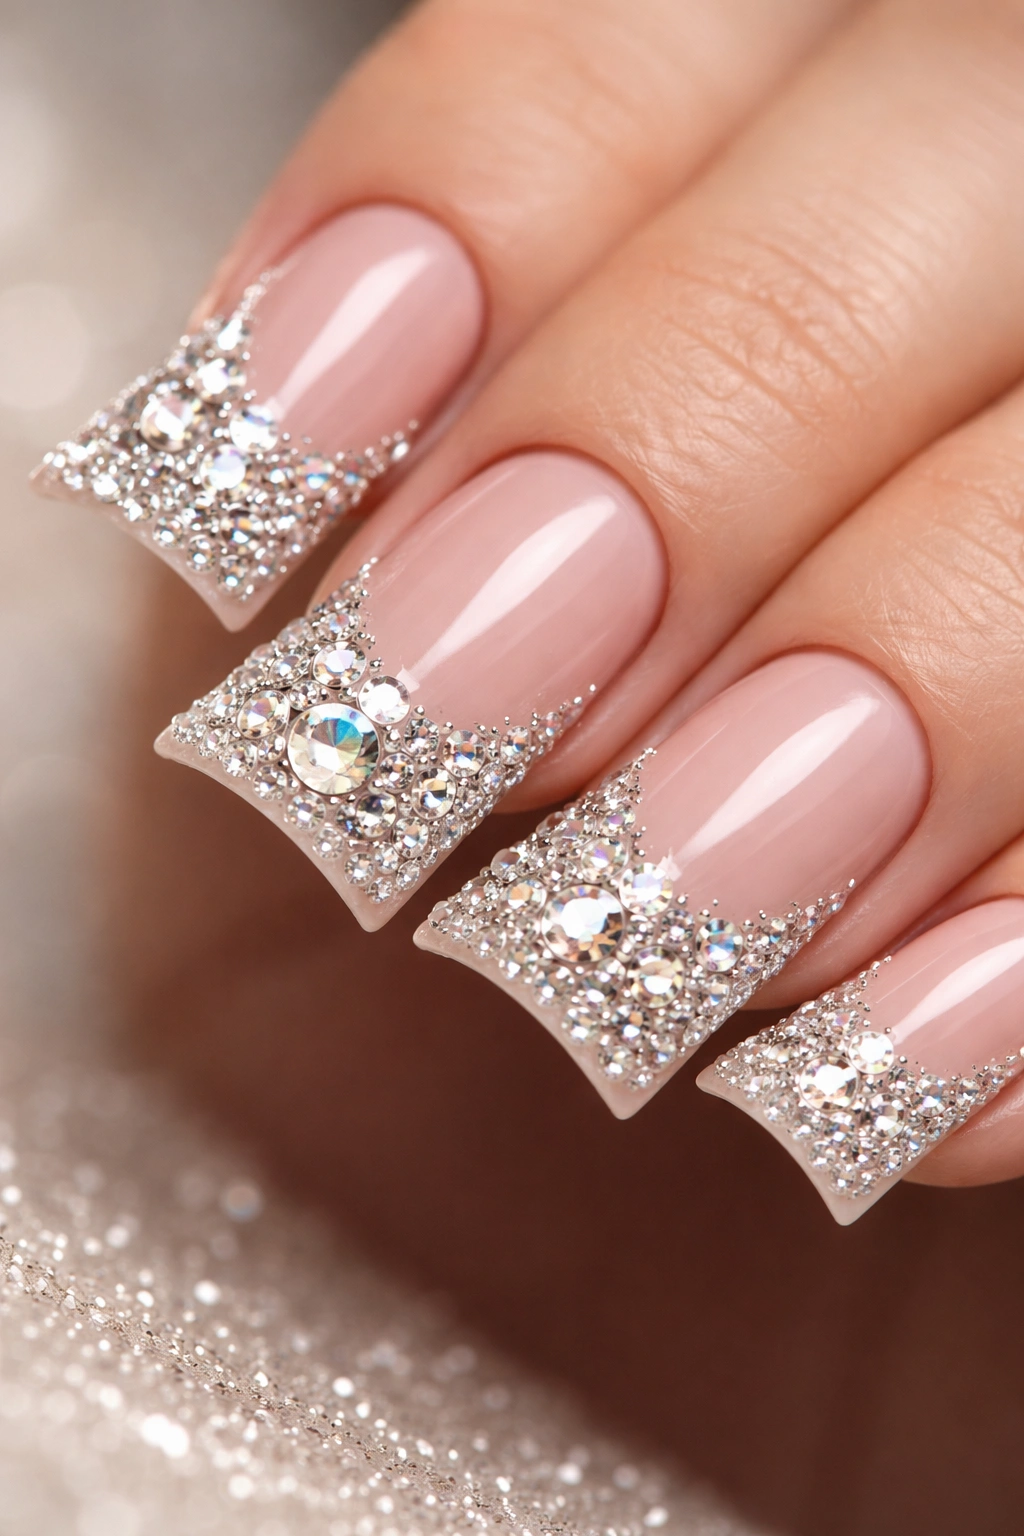
Rhinestones scattered across duck nails in artistic clusters create maximum sparkle with sophisticated placement. Rather than covering the entire nail, strategic clustering—perhaps focusing on the outer third or creating a constellation-like pattern—looks more refined and intentional. This is the design when you want serious glam without looking heavy.
Placement Strategies That Maximize Impact
Rhinestone clusters work beautifully on duck nails because you can create a natural flow that follows the shape’s curve. Placing larger stones at the tip and graduating to smaller ones toward the base creates dimension and draws focus to the nail’s most striking feature. You can also group stones along one side, creating an asymmetrical design that feels modern and artistic.
Stone Combinations That Elevate the Look
- Mix crystal clear with iridescent stones for a rainbow sparkle effect
- Layer large rhinestones with tiny micro-beads for textural interest
- Use rose gold-toned stones on a champagne base for warmth and unity
- Combine chrome and crystal stones for a design that shifts between reflective and refractive effects
- Stick with a single stone size and color for minimalist elegance
Insider note: Rhinestones stay put longest when you set them in adhesive nail polish or builder gel rather than regular top coat—the thicker formula grips the stone better and prevents shifting.
4. Holographic Finish
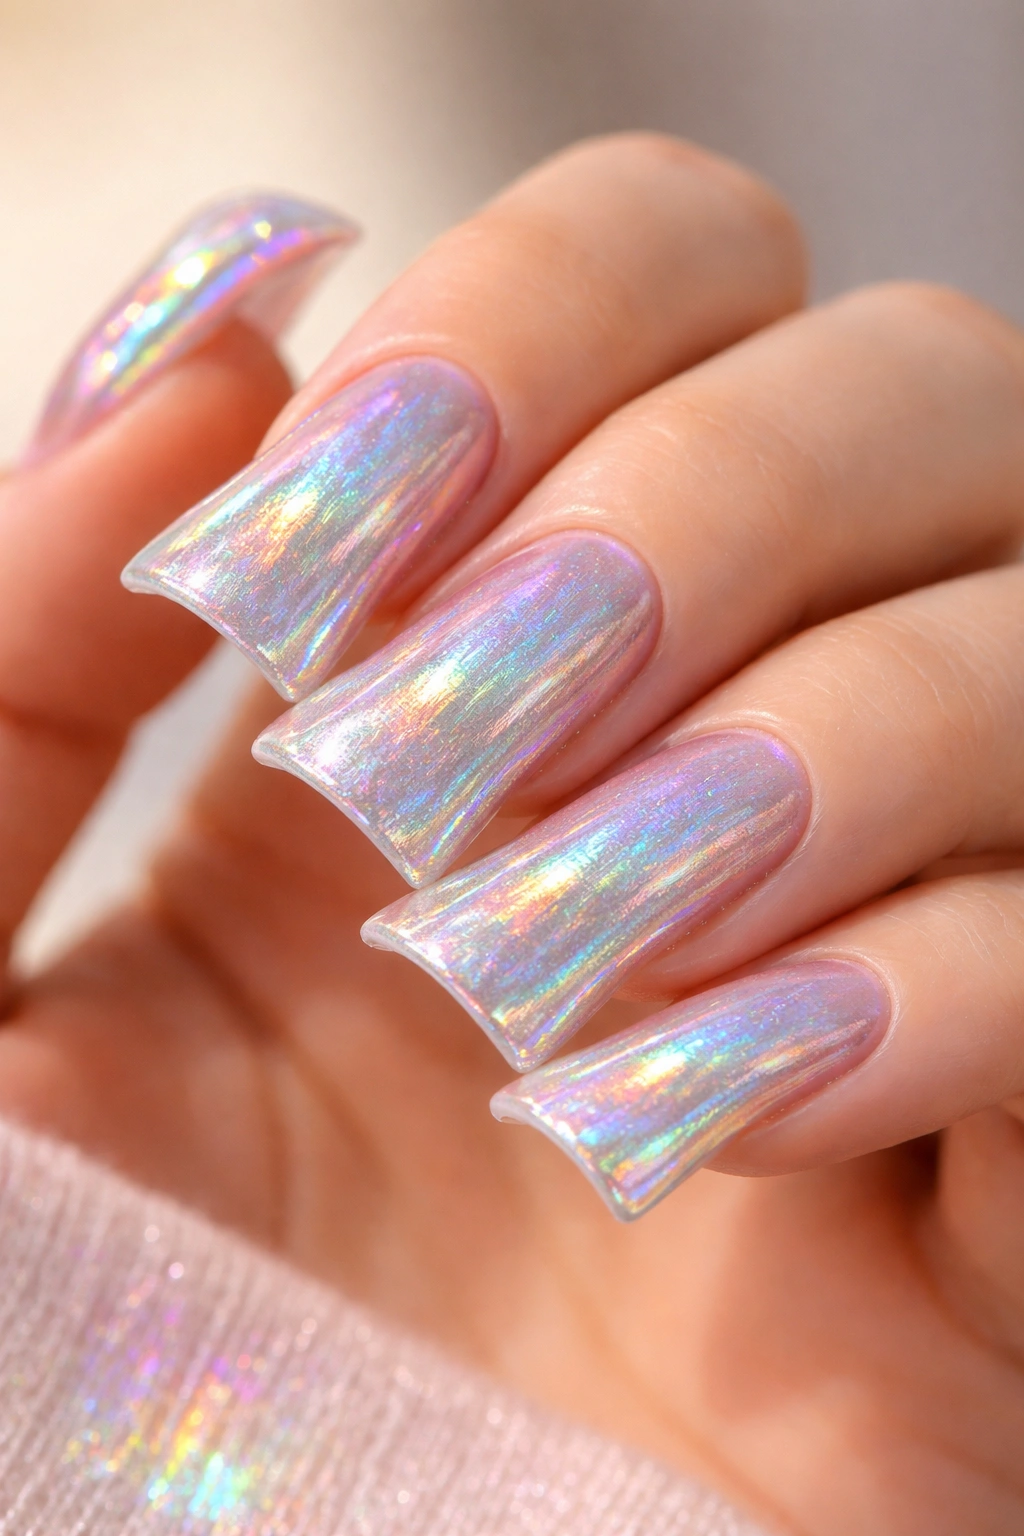
Holographic polish transforms duck nails into prism-like surfaces that display different colors depending on the light and angle. A full holographic manicure is pure statement-making energy—the nails literally change color as you move your hands, creating a mesmerizing, nearly magical effect. This design appeals to anyone who loves color play and movement.
How Holographic Polish Performs on Duck Nails
The larger tip surface of duck nails means more room for the holographic effect to display itself. As light hits the curved surface, the colors shift and dance across the nail—making every movement dynamic and eye-catching. The shape’s natural luminosity amplifies the holographic qualities, creating an almost liquid-metal appearance.
Application Tips for Best Results
- Use a holographic polish specifically formulated for intensity (cheaper versions can look muddy or dull)
- Apply thin, even coats rather than one thick coat—holographic works best with 2-3 thin layers
- Use a matte top coat to really intensify the holographic effect (counterintuitively, matte makes the prism effect more visible than glossy)
- For a subtler look, apply holographic polish to accent nails only while keeping others neutral
- Layer holographic over nude for a softer, less intense rainbow effect
Pro tip: Holographic polish shows up most dramatically in natural daylight and under UV light—if you’re going out at night, you might want a more visible glitter or foil option instead.
5. Matte and Glossy Mix
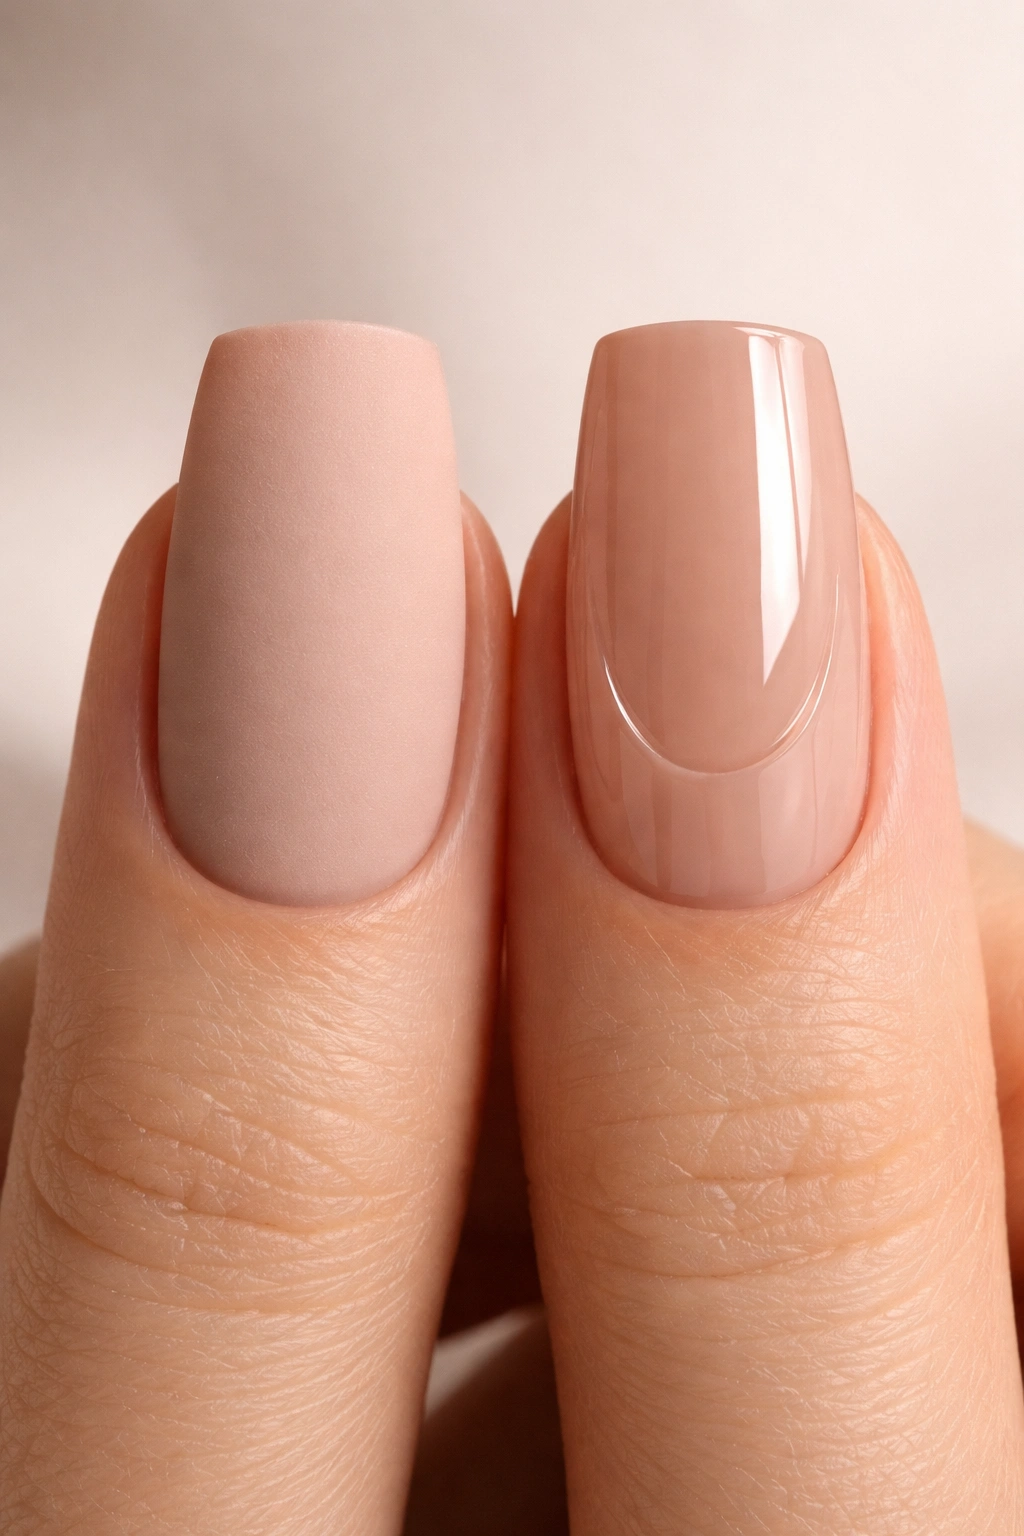
Mixing matte and glossy finishes on duck nails creates visual interest and modern contrast. One nail could be entirely matte while another is high-shine, or you could alternate finishes across your manicure. You can also mix finishes on the same nail—perhaps a matte base with glossy tips—for a more sophisticated approach.
Design Concepts Using Finish Contrast
- Alternate matte and glossy nails for a checkerboard rhythm that feels contemporary
- Create a matte gradient base with glossy embellishments on top for texture and depth
- Paint geometric shapes in matte over a glossy base for bold, graphic effect
- Use matte on the nail bed and glossy only on the duck tip for an ombré finish effect
- Reverse it: glossy base with matte tips for unexpected contrast
Why This Works Beautifully on Duck Nails
The curved duck shape amplifies the contrast between matte and glossy finishes—the glossy areas appear to glow while matte areas recede, creating visual dimension. The play of light across different textures makes the overall design more interesting and keeps the eye moving across the manicure.
Worth knowing: Matte finishes can show dust, fingerprints, and skin oils more readily than glossy—you’ll need to refresh with matte top coat or polish slightly more often to keep the look crisp.
6. French Tips with Flair
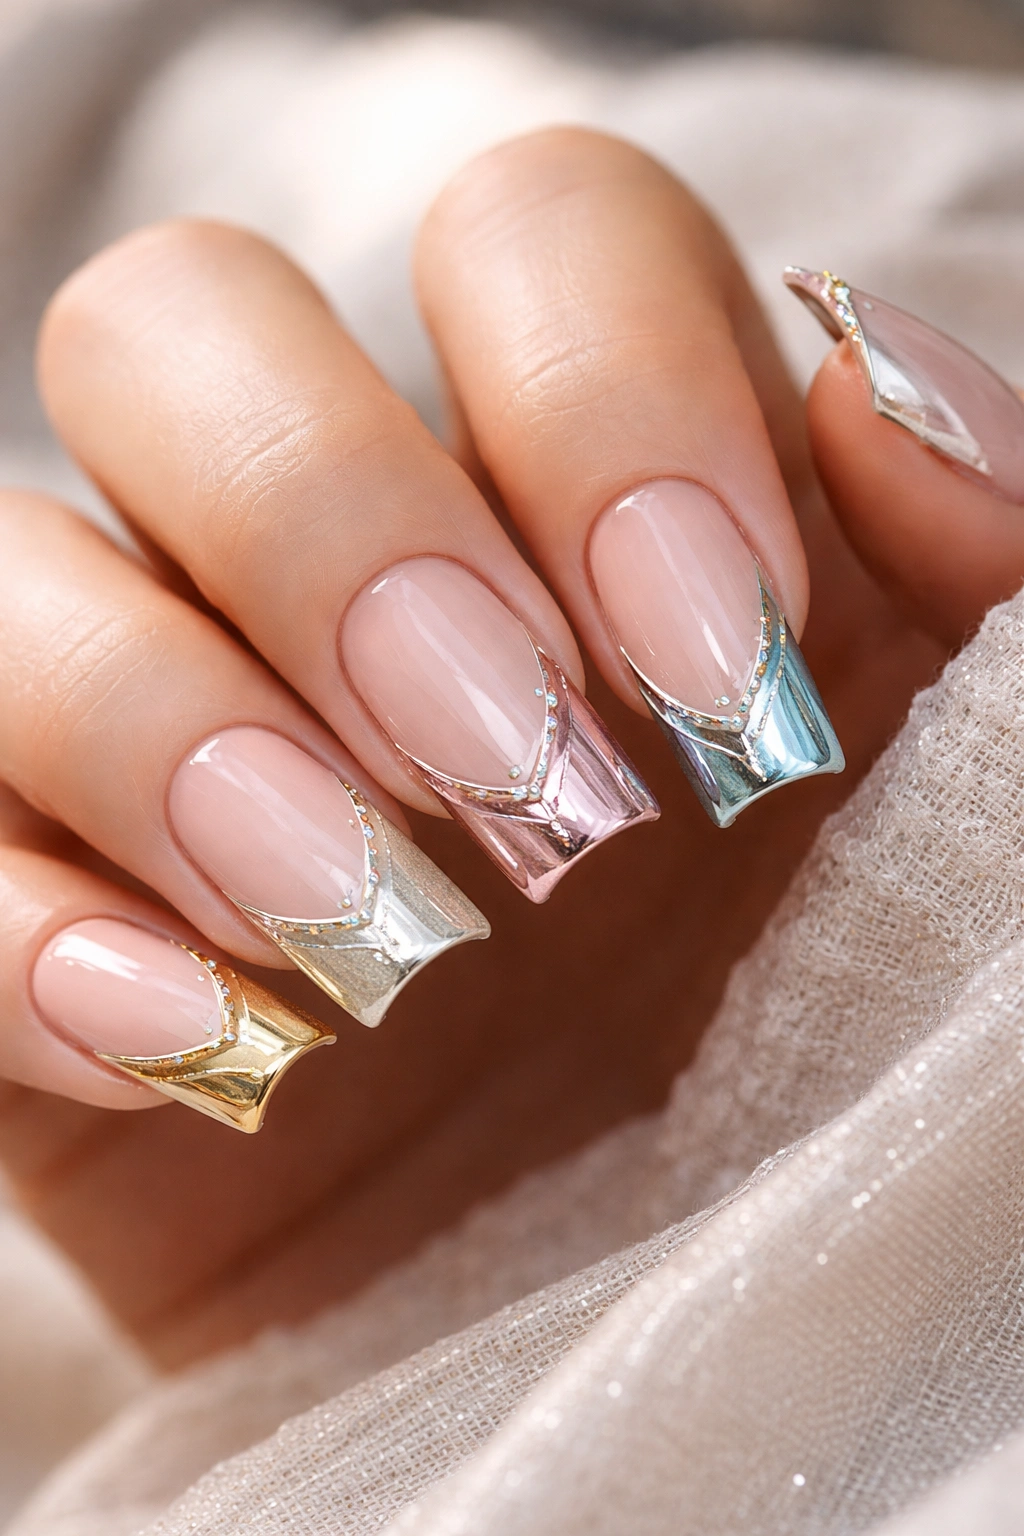
The classic french tip gets elevated on duck nails with creative color combinations, decorative lines, or embellished tips. Instead of the traditional white-on-nude, you might try metallic tips, colored tips, or tips adorned with fine lines, glitter gradients, or subtle patterns. The duck shape makes the tip extra prominent, so any embellishment shines.
Modern French Tip Variations
- Gold or rose gold tips on a neutral base for luxury and warmth
- Colored tips in jewel tones, pastels, or even neons paired with a complementary or contrasting base
- Glitter gradient tips that blend from the tip’s edge backward into the base color
- Thin metallic lines outlining the tip edge for definition without heavy color
- Two-tone tips that layer different finishes—like chrome on top of metallic, or glitter over shimmer
The Duck Nail Advantage for French Tips
Because duck nails are wider and more angular at the tip, the classic “white line” of a traditional french tip becomes a more dramatic architectural line. You can make the tip line thicker or thinner, straighter or slightly curved, and any variation looks intentional and stylish. The shape naturally emphasizes the tip, so any design there automatically becomes a focal point.
Pro tip: Keep the tip color or design slightly less saturated than you might think—the wideness of duck tips can make heavy color feel overwhelming, while strategic, slightly lighter shades read as sophisticated restraint.
7. Floral Patterns
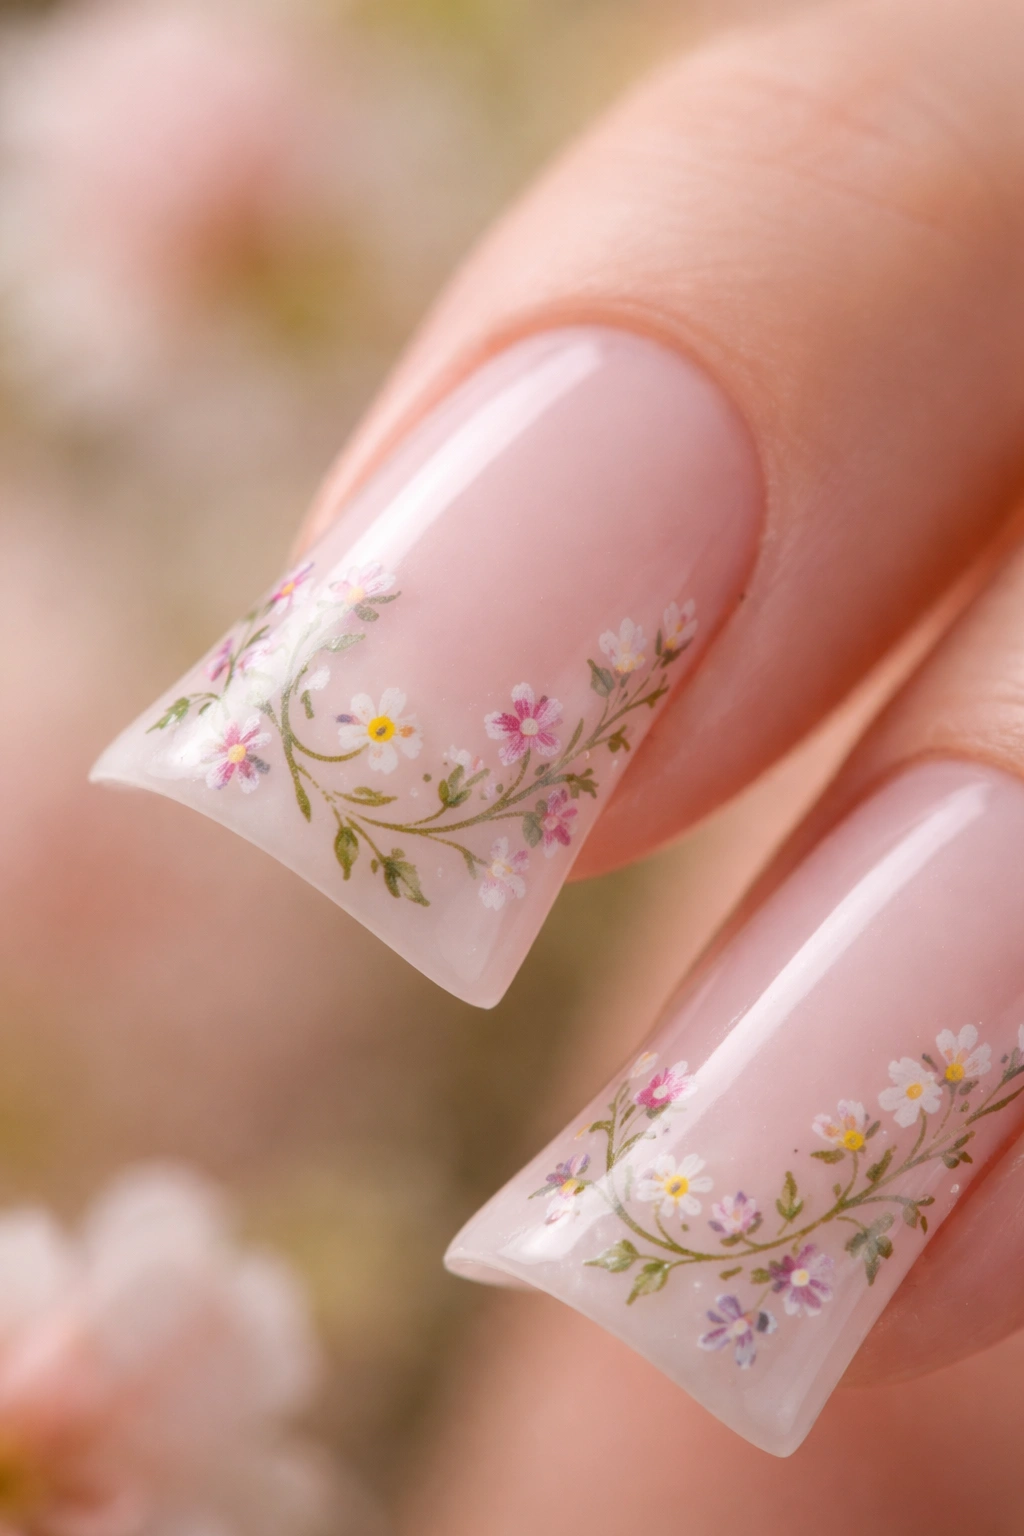
Delicate hand-painted florals or stamped floral patterns create a romantic, artistic vibe on duck nails. From tiny wildflower-inspired designs to larger, more detailed botanical illustrations, flowers feel elegant and timeless. You can go full manicure or place flowers strategically on just a few nails for emphasis.
Floral Design Approaches
- Delicate wildflowers scattered across neutral bases for a meadow-inspired look
- Large botanical blooms on one accent nail with coordinating solid color on the rest
- Trailing vine designs that flow across the nail from base to tip, following the duck’s curve
- 3D dimensional flowers with layered petals that add actual texture to the nail
- Negative space florals where the flower design is negative space against a solid background
Why Florals Thrive on Duck Nails
The curved tip of a duck nail provides a beautiful canvas for floral details—flower petals can follow the natural line of the shape, and the wider surface area accommodates more detailed botanical work. A single strategically placed bloom on a duck tip looks like intentional art rather than accident.
Insider note: If you don’t have steady hand-painting skills, look for floral nail stampers or water slide decals—they give you the floral artistry without requiring precision brushwork.
8. Metallic Chrome
Chrome polish creates a mirror-like, reflective finish that looks futuristic and hyper-luxe. On duck nails, chrome makes the entire nail appear metallic and dimensional, shifting between different reflective tones depending on how light hits it. This is the design when you want serious, head-turning glamour.
Chrome Variations and Applications
- Silver chrome for a mirror-like metallic neutral that works with any outfit
- Rose gold chrome for warmth and femininity with serious shimmer
- Multichromatic chrome that displays different colors based on the angle (these are sometimes called “shift” chromes)
- Holochrome that combines chromatic and holographic effects for next-level sparkle
- Duochrome chrome that appears to be two different colors depending on viewing angle
Maximizing Chrome’s Impact on Duck Nails
Chrome works particularly well on duck nails because the curved surface naturally reflects light in multiple directions. As you move your hands, the chrome finish appears to move and shimmer, creating a hypnotic effect. The wider tip catches more light than traditional shapes, making chrome appear even more luminous and striking.
Worth knowing: Chrome polish requires specific application—you typically need a very smooth, almost polished-glass-like base. Apply base coats carefully with minimal texture, and use ultra-thin coats of chrome for the best reflective effect.
9. Glitter Gradient
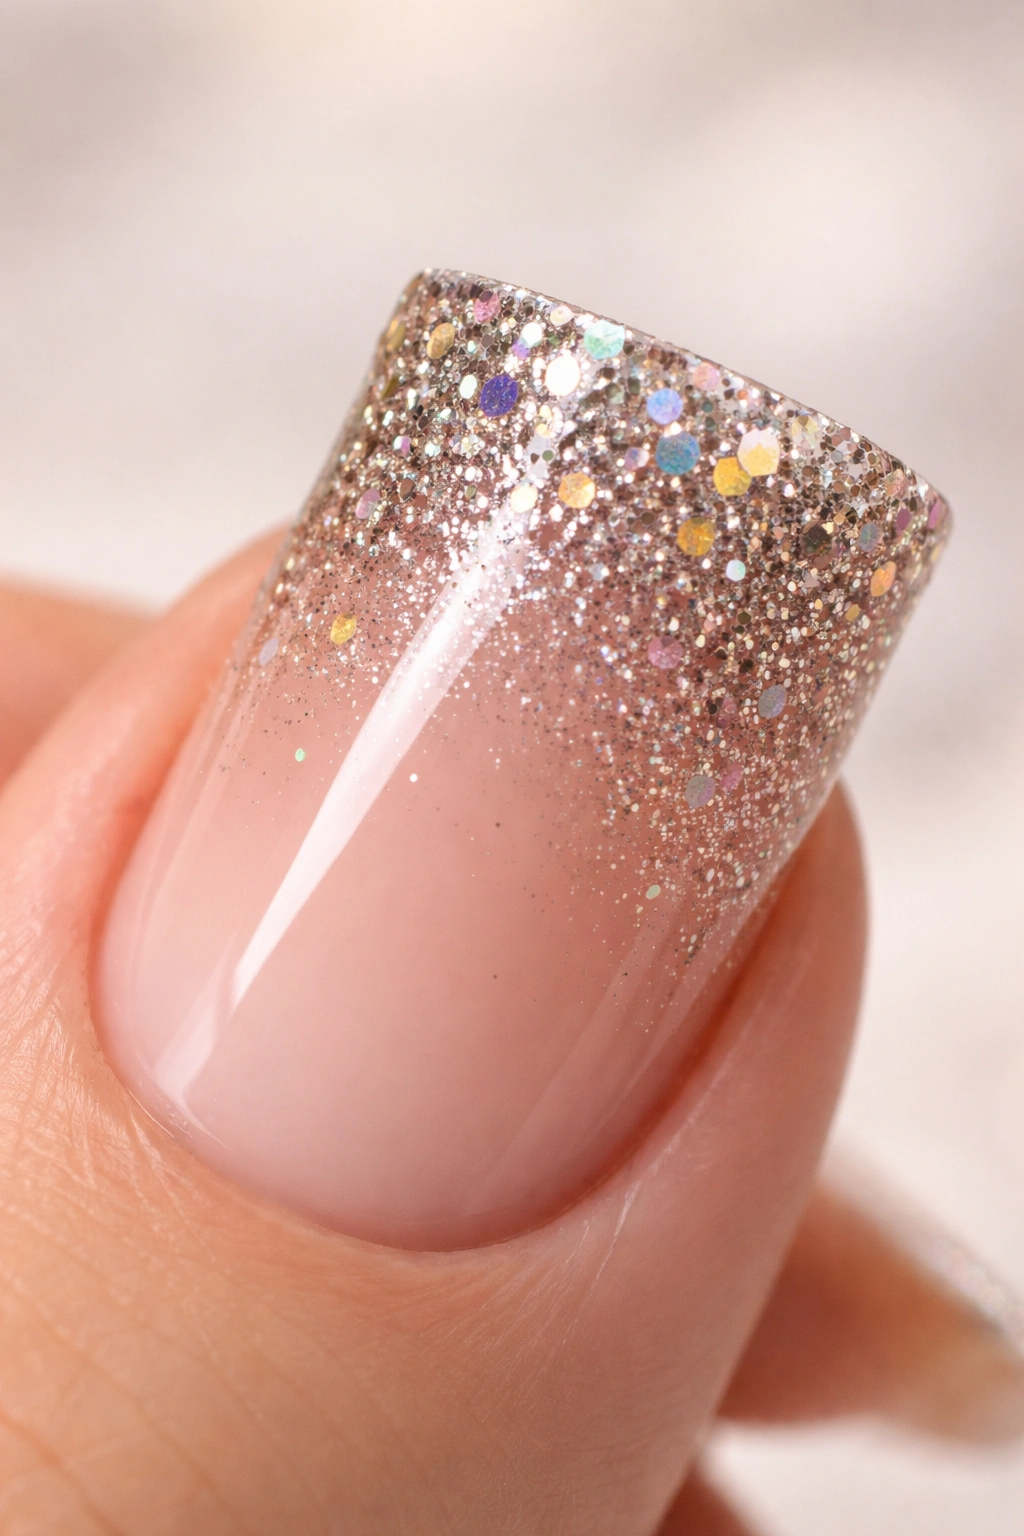
A glitter gradient fades from dense sparkle at the tip to clear or solid color at the base, creating a dissolving-into-light effect. This design feels glamorous but wearable because the base keeps things refined while the tips deliver all the drama. Glitter gradients photograph beautifully and work for everything from casual to formal occasions.
Creating Stunning Glitter Gradients
- Dense glitter to clear: Start with heavy glitter placement at the tip and thin it out toward the cuticle for a fade effect
- Large glitter to fine glitter: Use larger sparkles at the tip graduating to microglitter as you move toward the base
- Colored glitter gradient: Start with bold color glitter at the tip and fade to a nude or white base for a softer look
- Rainbow glitter gradient: Layer different colored glitters that transition from warm to cool tones
- Ombré glitter: Use glitters in similar color families that shift from light to dark
Application Secrets for Seamless Glitter
Use a tacky base (a thin layer of builder gel or specially formulated glitter base) and place glitter with a fine brush or nail art pen, densely at the tip and sparser as you move toward the base. The transition should feel natural and graduated, not abrupt. A glossy top coat seals everything and adds dimension.
Pro tip: For a more refined gradient, skip the glitter entirely on one side of the nail (creating asymmetry) rather than applying glitter all the way across—this looks more intentional and editorial.
10. Pearl Embellishments
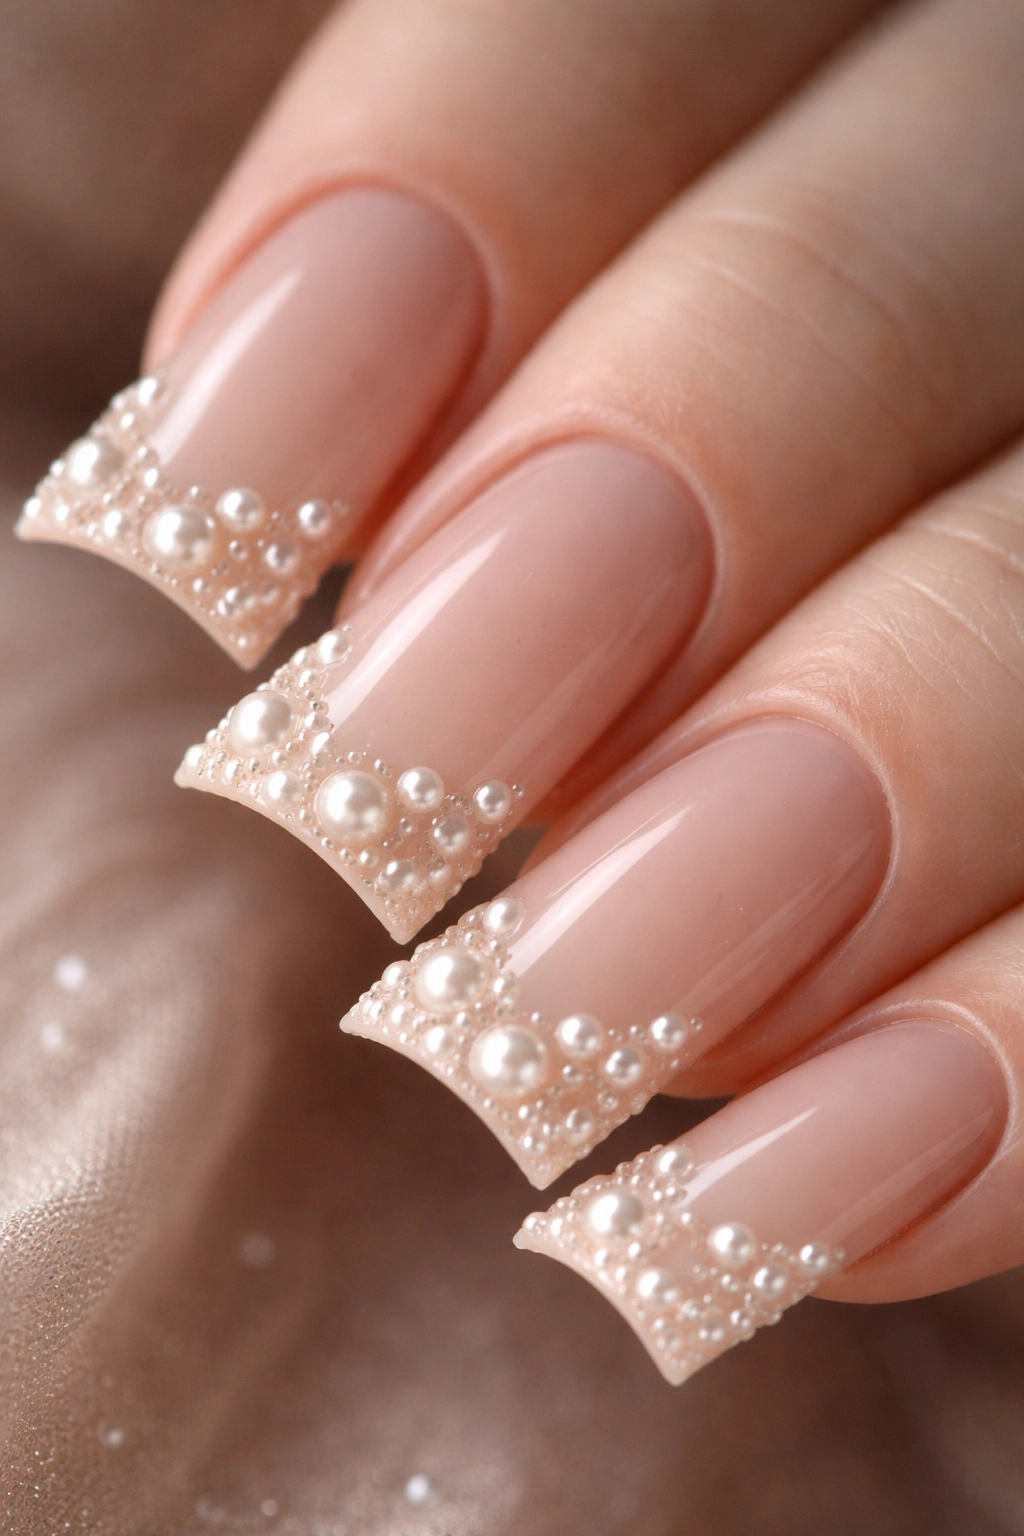
Tiny pearl beads or larger pearl-finish rhinestones scattered across duck nails create an understated luxury look. Pearls feel sophisticated and elegant, particularly when used sparingly on a neutral or soft base. This design has a quiet confidence—beautiful without demanding attention.
Pearl Design Variations
- Scattered micro-pearls across the entire nail for subtle, all-over sparkle
- Single statement pearls placed at the tip for minimal, modern elegance
- Pearl clusters grouping pearls at the outer third of the nail for dimension
- Pearl strands or chains running horizontally or diagonally across the nail
- Half-pearl embellishments (pearls are actually studs, sitting slightly above the nail surface) for texture you can feel
Why Pearls Work on Duck Nails
Pearls have a matte, lustrous quality that contrasts beautifully with the shiny surface of polished nails. On duck nails, pearls catch light differently than the surrounding polish, creating visual interest. The cooler undertones of pearls feel fresh and modern, working with almost any base color from nude to deep jewel tones.
Worth knowing: Pearls can sometimes roll off if they’re not completely secure—use builder gel or a thick adhesive polish to set them deeply into the base, and consider a matte top coat that grips the pearl without making it shiny.
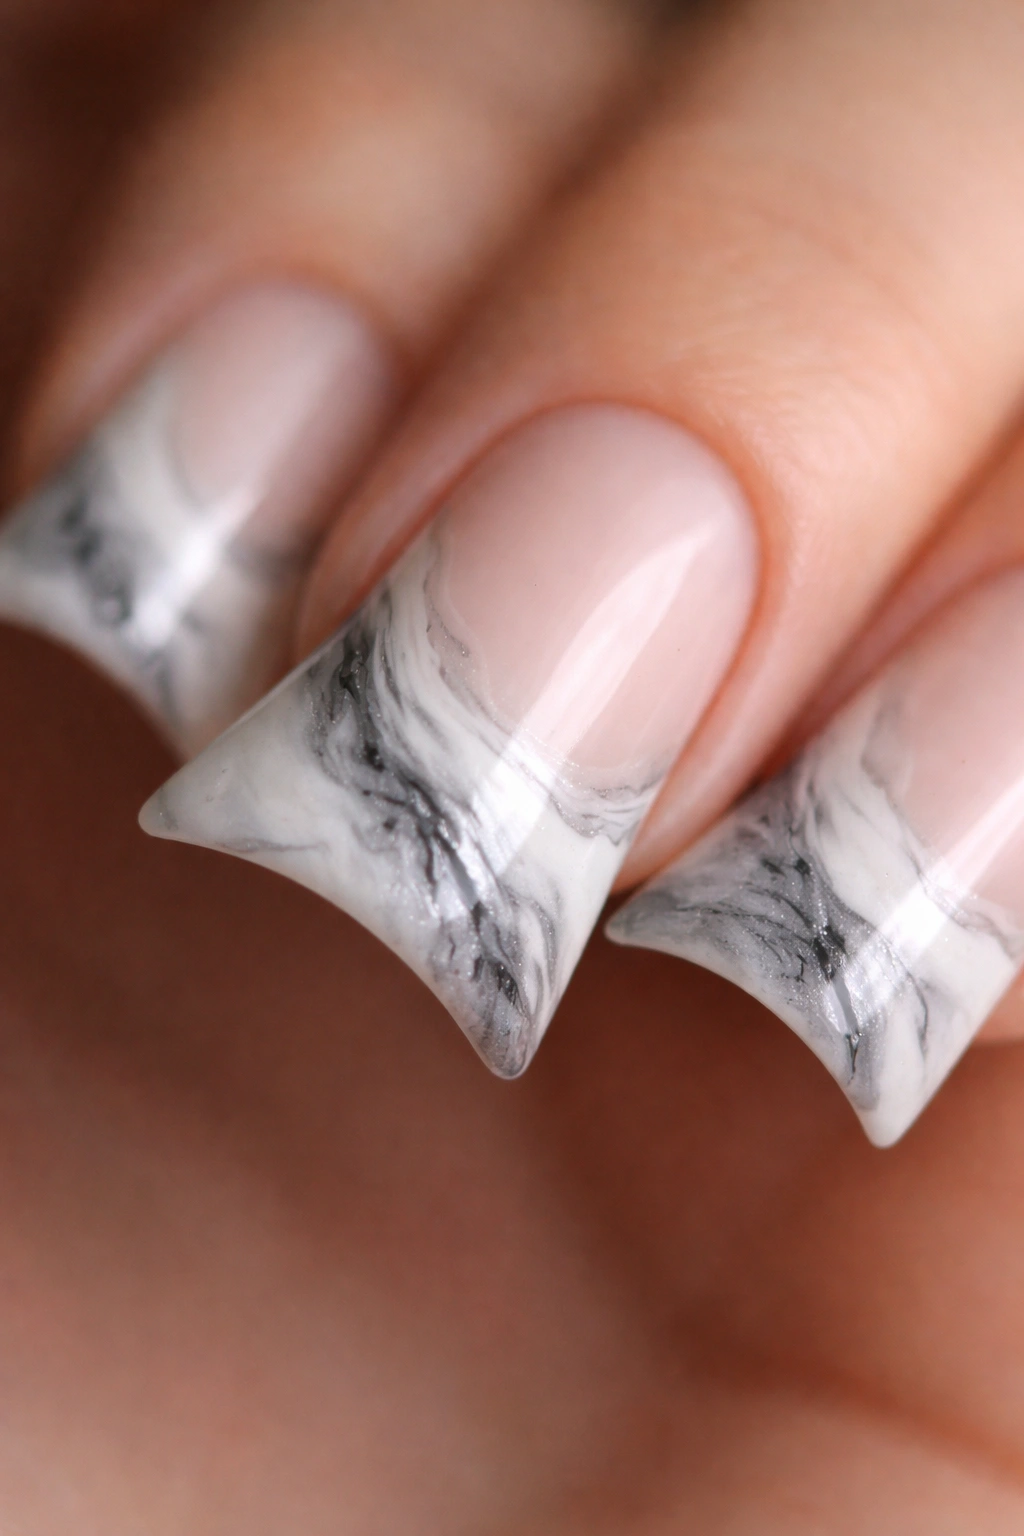
11. Marbled Design
Marbled nail art creates organic, flowing patterns that look expensive and artisanal. You can achieve marble through water marbling techniques, using a marbling gel, or hand-blending colors together for a faux-marble effect. The randomness of marbling means every manicure is truly one-of-a-kind.
Marble Effect Variations
- Classic white and gray marble: The iconic marble look that reads as sophisticated and neutral
- Jewel-tone marble: Deep emerald, sapphire, or amethyst tones create a luxe, precious-stone effect
- Rose gold and champagne marble: Warm, romantic tones that feel feminine and celebratory
- Black and white marble: High contrast creates a bold, modern aesthetic
- Watercolor marble: Softer blending with pastels or translucent colors for a dreamy, artistic feel
Execution Tips for Marbled Duck Nails
Marbling works particularly well on duck nails because the wider surface area gives you more room for the pattern to develop naturally. Create your marble effect first, then shape it to the duck nail form—this gives you flexibility in how the pattern lands. The curved tip can be part of the marble design or a focal point where colors converge.
Insider note: If water marbling intimidates you, look into marbling gels designed specifically for nail art—they’re more forgiving than traditional water marble and often produce more consistent, beautiful results.
12. Neon Accents
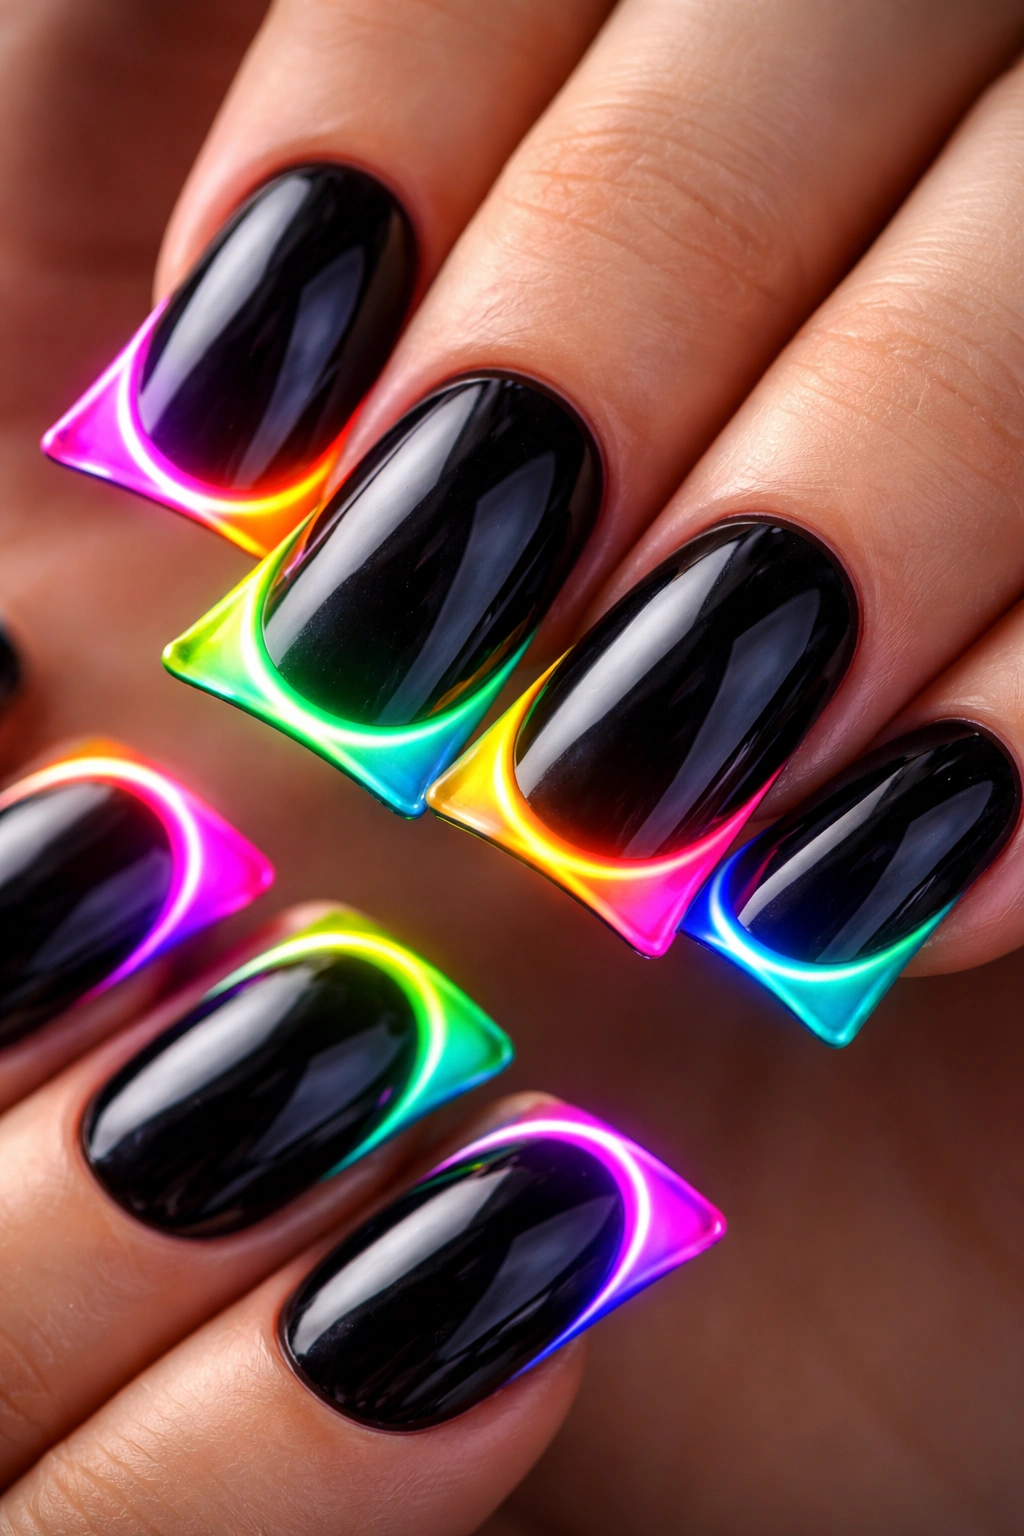
Neon colors pop dramatically against darker bases or neutral backgrounds. Whether you use a full neon tip, thin neon lines, or neon accents on an otherwise muted nail, the high-visibility color creates energy and modernity. Neon works for statement-making occasions or when you want to shake up your everyday look.
Neon Application Ideas
- Neon tips: A bold neon cap on the duck tip creates maximum drama
- Neon lines: Fine lines in neon against a dark base create graphic interest without overwhelming the nail
- Neon geometric shapes: Triangles, stripes, or blocks in neon on a solid background feel contemporary
- Neon and metallic combo: Neon plus chrome or metallic foil create futuristic, high-impact designs
- Gradient to neon: Start with a neutral base and gradient into neon at the tip for directional drama
Making Neon Work Without Looking Costume-y
The key is proportion and placement—using neon sparingly, perhaps only on a few nails or in strategic accents, feels intentional. Pair neon with neutral or earth-tone bases rather than other bright colors. High-quality neon polish is more sophisticated than cheap, chalky versions; invest in pigment-rich formulas.
Pro tip: Neon colors require a white base underneath to achieve full brightness and saturation—apply white polish first, then layer the neon color over it for maximum impact.
13. 3D Nail Art

Three-dimensional nail embellishments—whether carved designs, miniature sculptures, or layered elements that actually protrude from the nail surface—create genuine conversation-starting manicures. 3D designs range from subtle texture to full miniature art installations. Duck nails’ ample surface area is perfect for this approach.
3D Embellishment Ideas
- Carved gel designs: Use builder gel to create raised patterns, then carve details into the surface
- Tiny charms and objects: Small pearls, crystals, or custom resin pieces attached to the nail
- Textured surfaces: Bumpy, ridged, or studded finishes that add tactile dimension
- Layered gel designs: Multiple layers of gel built up and shaped to create realistic or abstract forms
- Miniature sculptures: Tiny flowers, hearts, stars, or abstract shapes sitting atop the nail
Technical Considerations for 3D Work
3D elements need to be securely attached and smoothly finished to work well. Any rough edges will snag clothing or hair. Duck nails’ width and strength actually make them ideal for supporting heavier 3D designs—the broader surface and longer length mean better stability than on shorter or narrower nails.
Worth knowing: 3D designs require professional application or serious skill—if you’re attempting this at home, start with smaller, simpler layered effects before attempting full sculptural work.
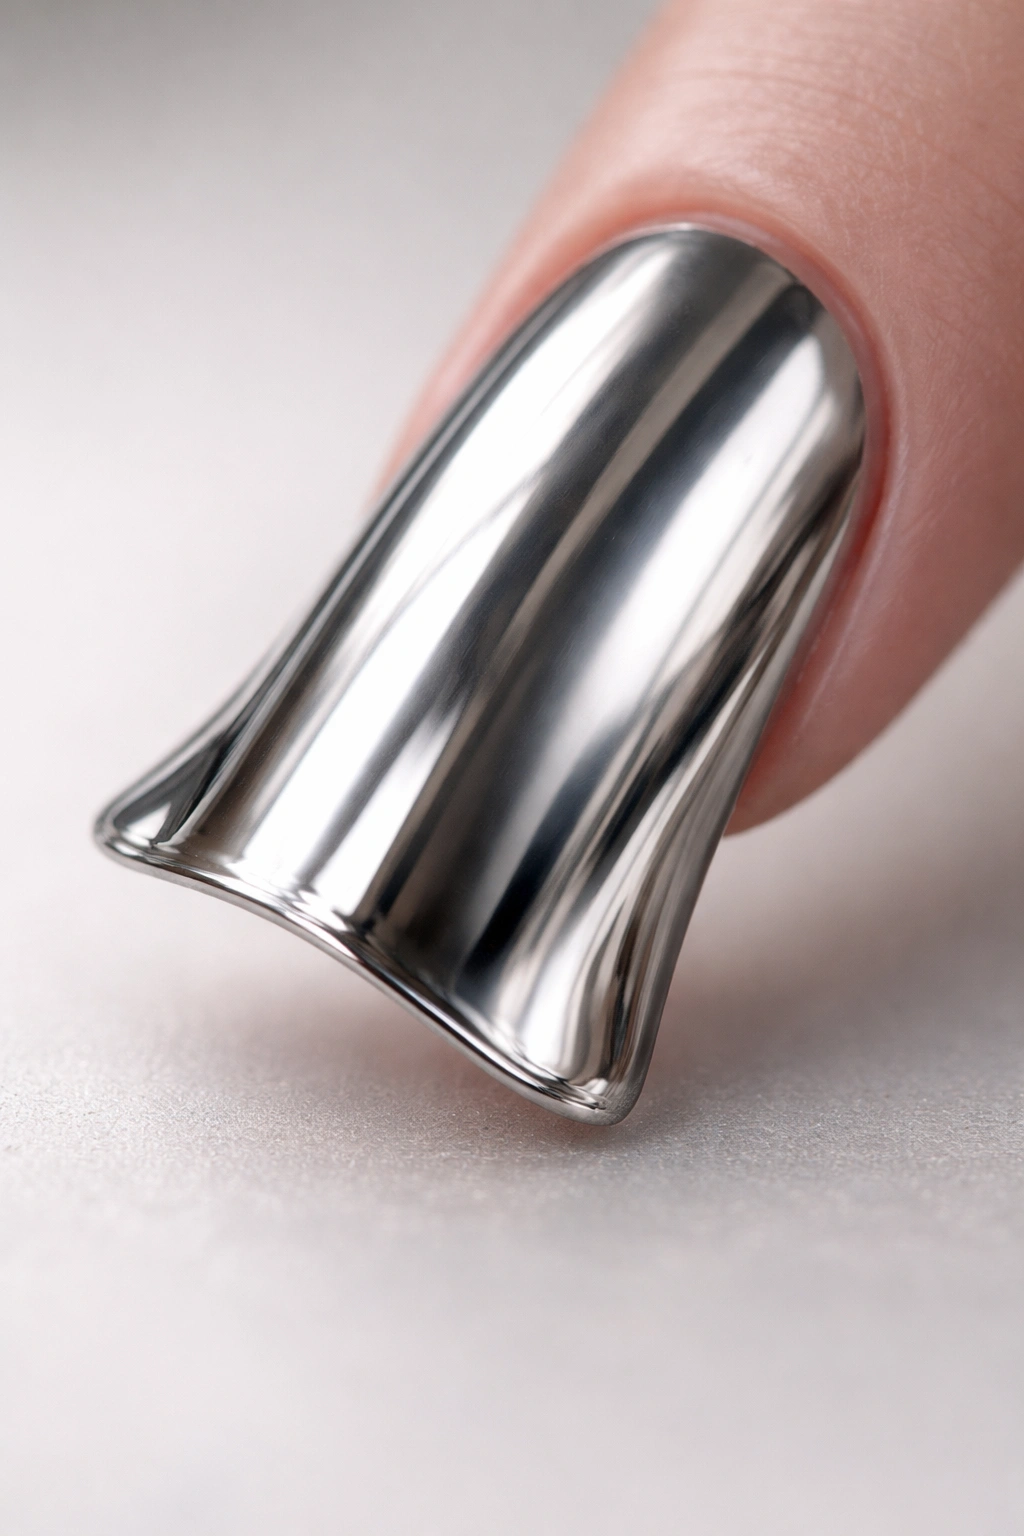
14. Mirror Finish

Mirror polish (also called chrome or metallic foil finish) creates a perfect reflection on the nail surface, essentially turning your nails into mirrors. This ultra-modern, futuristic effect is trending heavily. The liquid metal appearance is striking and works with almost any base color.
Mirror Finish Variations
- Full mirror chrome: Every nail is reflective and mirrorlike
- Ombre mirror: Transition from solid color to mirror finish for gradual drama
- Mirror tips only: Keep bases neutral and apply mirror effect to tips
- Broken mirror effect: Shattered or fractured mirror design for an edgier look
- Dual-finish mirror: Combine high-shine mirror with matte sections for contrast
Applying Mirror Finish to Duck Nails
Mirror finish requires an incredibly smooth base and proper technique. The wider tip of duck nails shows off the reflection beautifully—and any imperfections in the base will be reflected too, so preparation is key. Multiple thin layers of the mirror powder or foil, applied with a careful hand, create the best results.
Pro tip: Use a chamois cloth or special applicator rather than your fingers to apply mirror powder—oils from your skin can interfere with the reflective coating.
15. Jewel Tone Palette
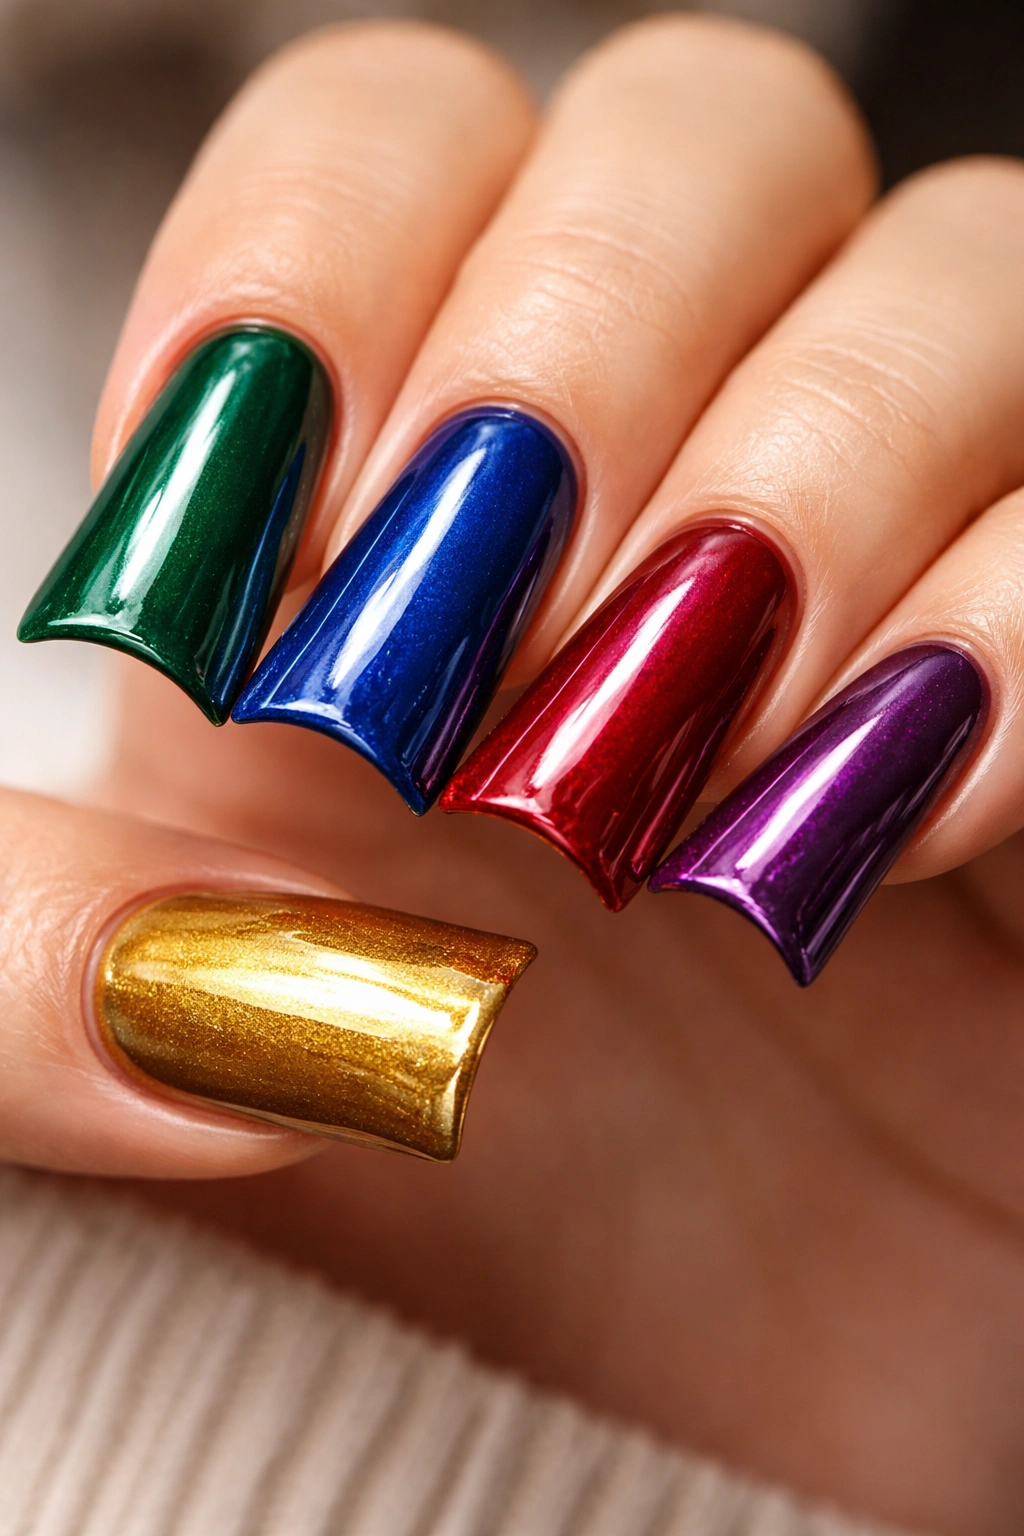
Deep, rich jewel tones—emerald, sapphire, ruby, amethyst, topaz—create sophisticated, luxurious manicures. Whether you’re using a single jewel tone or combining multiple jewel tones in creative ways, the color family has an inherently elegant quality. This palette works for professionals, special occasions, or anyone who loves color with depth.
Jewel Tone Design Combinations
- Solid jewel tone: A single deep color that feels rich and intentional
- Jewel tone ombré: Start dark at the tip, fading to lighter as you move toward the base
- Mixed jewel tones: Different jewel tones on different nails, creating a coordinated but colorful effect
- Jewel tone plus metallic: Deep jewel base with gold or copper accents
- Jewel tone with glitter: Add sparkle to jewel tones for extra glamour
Why Jewel Tones Work on Duck Nails
The depth of jewel tones is enhanced by the width and curve of duck nails—the color appears richer and more dimensional on the larger surface. These colors photograph beautifully and work across seasons and occasions. Jewel tones feel inherently sophisticated, so even a simple solid manicure in jewel tone looks polished and intentional.
Insider note: Jewel tones photograph differently under various lighting—test your chosen shade in natural daylight, indoor lighting, and artificial light to see how the color shifts before committing to a full manicure.
16. Confetti Mix
A celebratory mix of colors, patterns, and embellishments scattered across each nail creates joyful, playful energy. Each nail can be completely different, or you can maintain a loose color theme while varying the design. Confetti mix is perfect for anyone who loves maximalism, celebration, or can’t decide between designs.
Building a Cohesive Confetti Manicure
- Maintain a color thread: Choose 3-4 colors that coordinate, then use those colors in different combinations across your nails
- Repeat design elements: Use the same type of embellishment (like rhinestones) differently on each nail—clustered on one, scattered on another, creating borders on a third
- Vary the base: Each nail could have a different base color, creating variety while the repeated embellishments tie it together
- Mix finish types: Combine matte, glossy, sparkle, and metallic across different nails
- Balance maximalism: Pair super-detailed nails with simpler solid-color nails to prevent the look from feeling chaotic
Making Confetti Work Without Chaos
The key is intentionality—choose specific colors and themes you want to repeat across the manicure so it feels coordinated rather than random. Too many completely different designs can look cluttered, while repeating specific elements (colors, embellishments, finish types) creates coherence even amid variety.
Pro tip: Start with a neutral color (like nude or white) on a few nails, then make those the “breaks” between your more decorated nails—this gives the eye places to rest and prevents design overload.
Final Thoughts
Duck nails are such a versatile shape that they work beautifully with virtually any design philosophy—whether you’re drawn to minimalist elegance, maximum sparkle, or anything in between. The key to making duck nails look intentional is understanding how the shape’s width, curve, and length interact with different finishes, colors, and embellishments.
The designs above represent just the beginning of what’s possible. Once you find the style that resonates with you, you can adapt it endlessly—changing colors seasonally, swapping embellishments, mixing finishes, or combining elements from multiple designs. Duck nails deserve design that matches their sophisticated shape, and these ideas should inspire you to get creative with your next manicure.
Whether you’re heading to a professional salon or attempting designs at home, remember that the foundation matters most—a smooth, even base makes every design look more polished. Start there, choose an idea that speaks to you, and don’t be afraid to make it your own.
