

Duck nails are having a serious moment, and when you pair them with the bold, fun energy of cow print, you get something that stops people mid-conversation. There’s something undeniably satisfying about the contrast—those dramatically curved, elongated tips with the classic black-and-white (or black-and-cream) spotted pattern that instantly reads as confident and playful. Whether you’re obsessed with maximalist nail art or you’re ready to make a statement that can be spotted from across the room, cow print duck nails offer endless creative possibilities that go way beyond the basic spotted look.
The beauty of this combination is that cow print is incredibly versatile. You can make it edgy or cute, minimalist or totally over-the-top, monochromatic or splashed with unexpected color accents. Duck nails give you the canvas to really lean into the drama, and cow print gives you a pattern that’s immediately recognizable and seriously cool. The elongated shape actually makes the spots look even bolder and more dynamic—the curves follow the nail line in ways that smaller, squarer nails simply can’t match.
If you’ve been scrolling through nail inspo and wondering how to make cow print feel fresh on the longer nail shape, or if you’re just looking for ideas that go beyond the standard brown-and-white cow look, you’re in the right place. Here are twelve distinct takes on the cow print duck nail aesthetic, each one designed to help you find the version that matches your vibe and skill level.
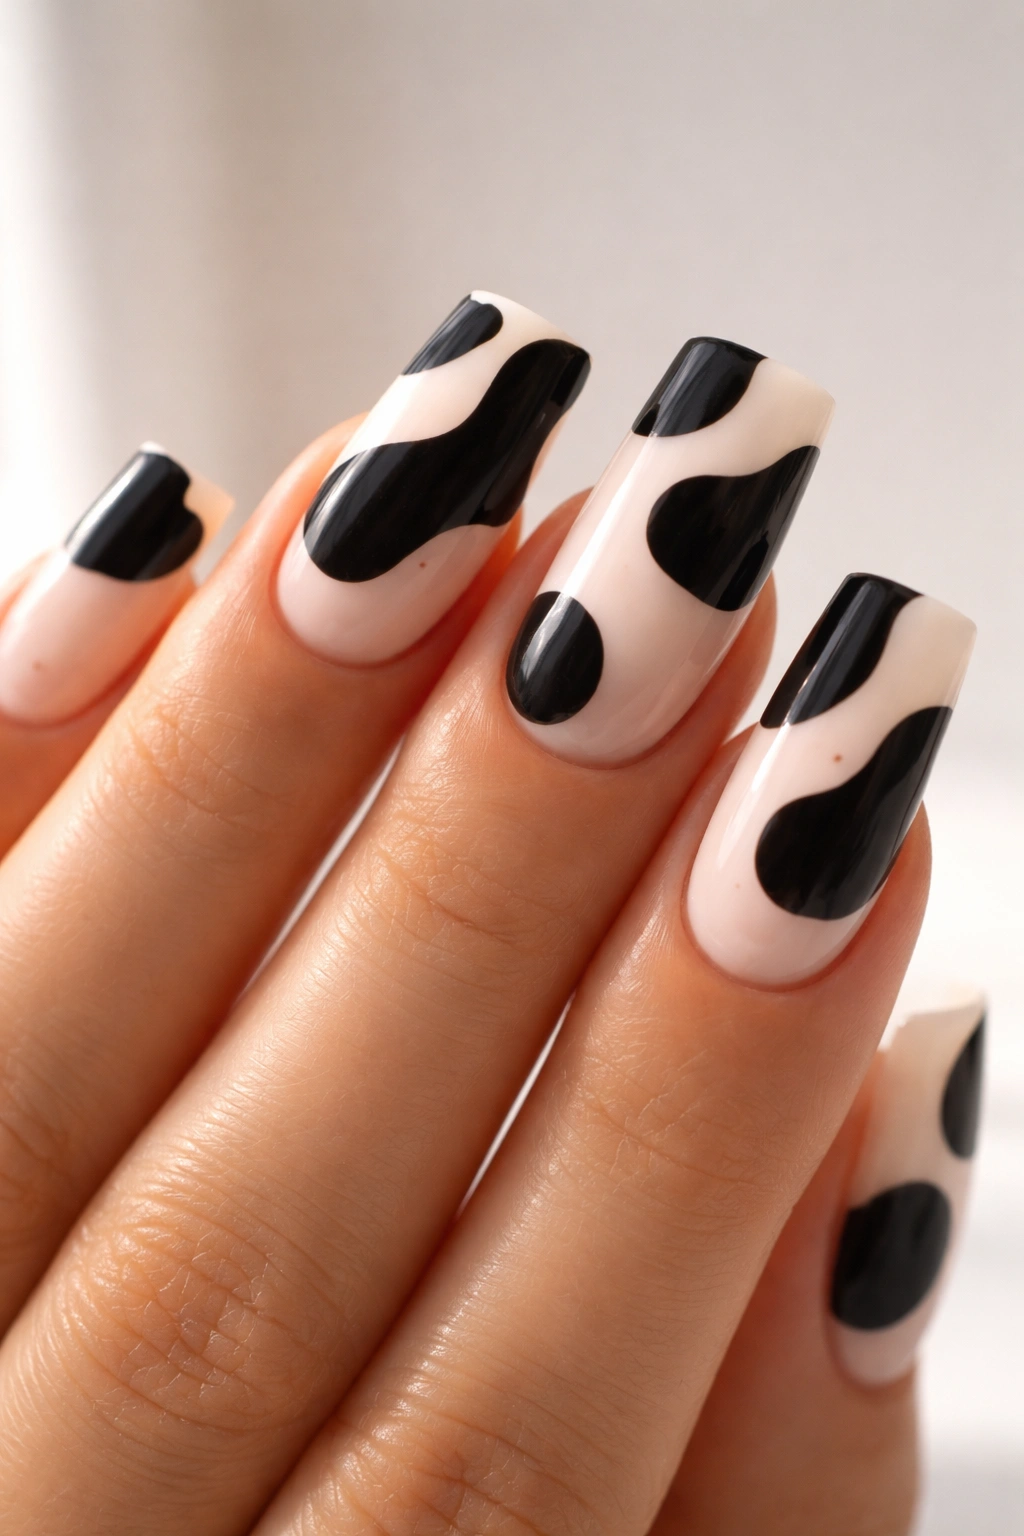
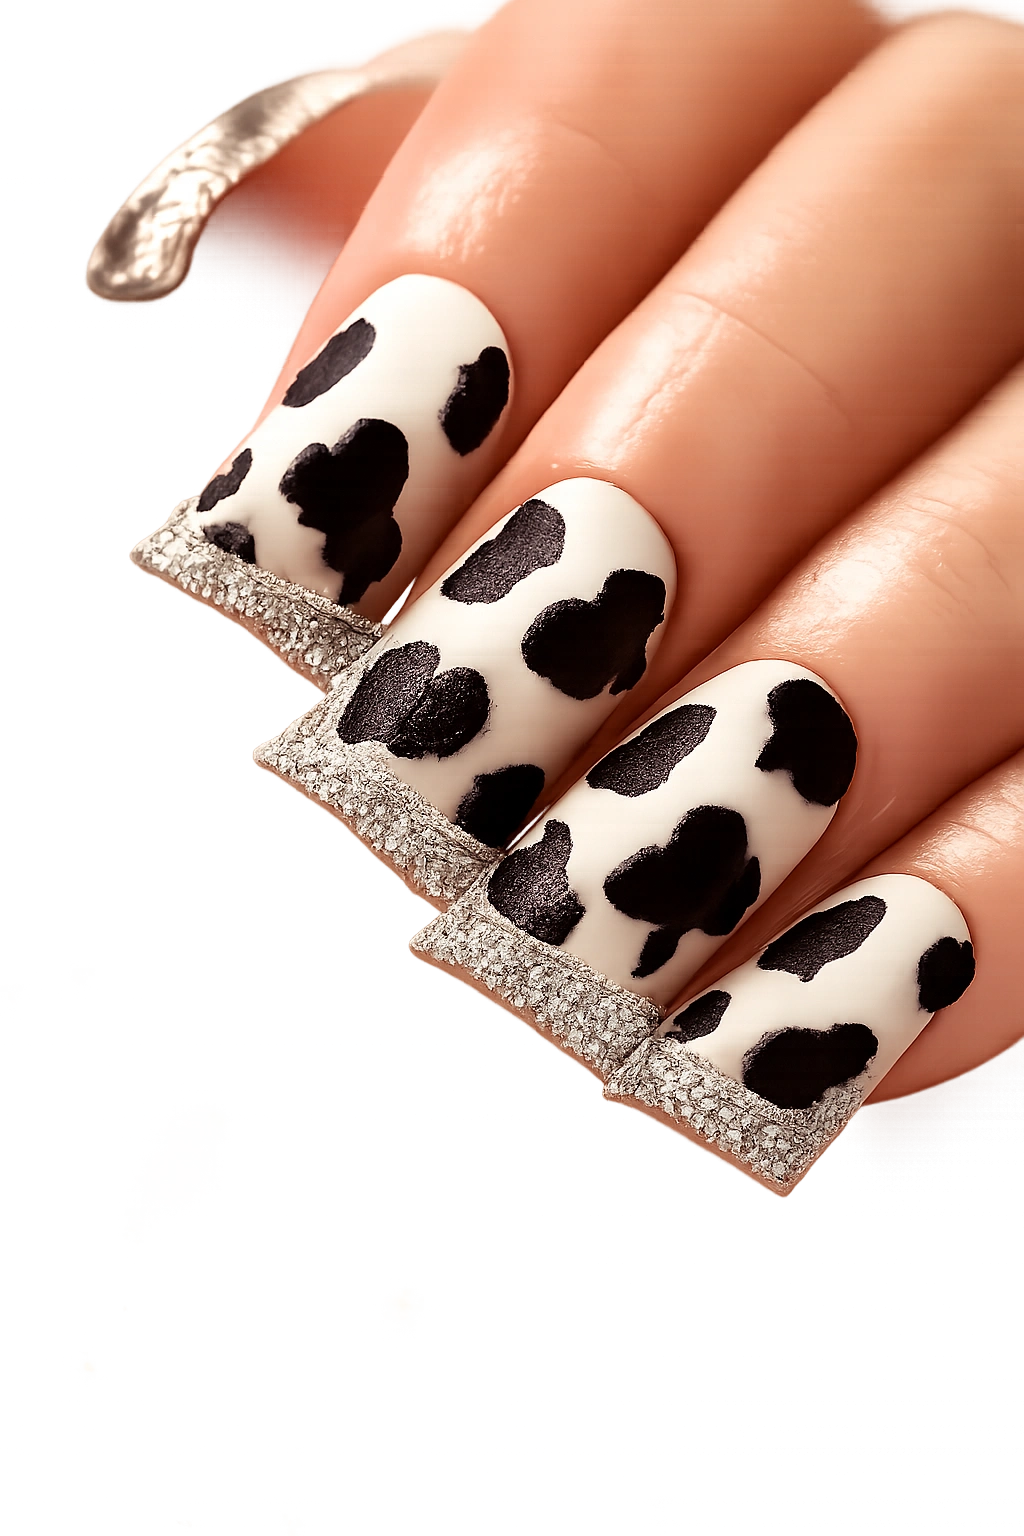
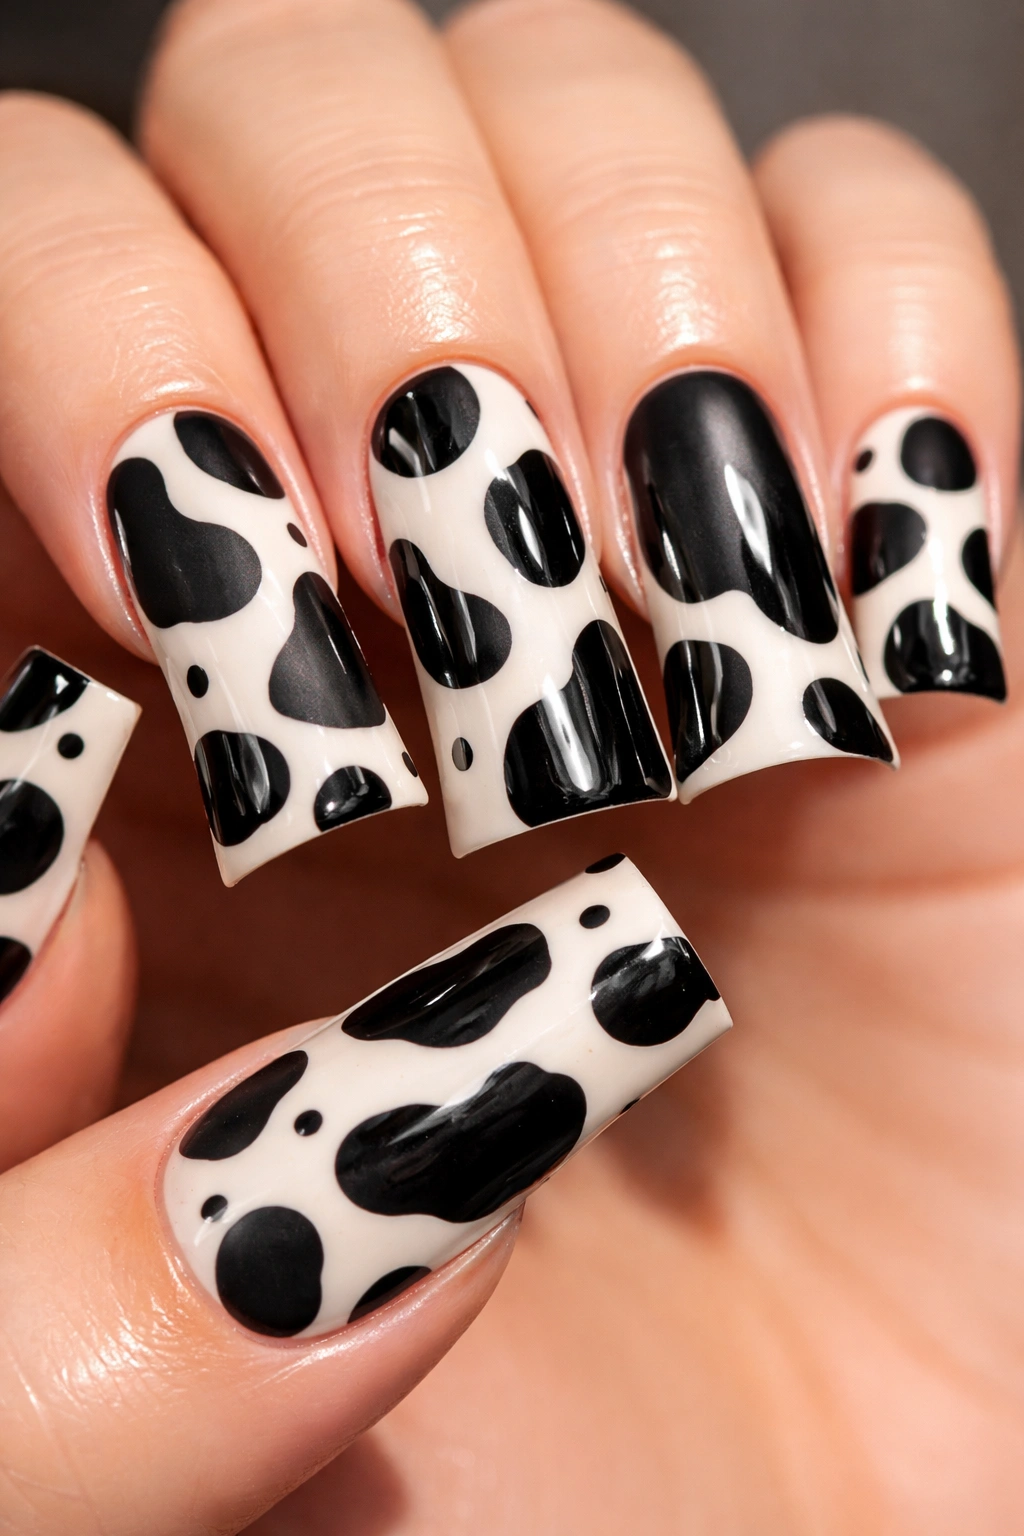
1. Classic Black and White Cow Print on Nude Base
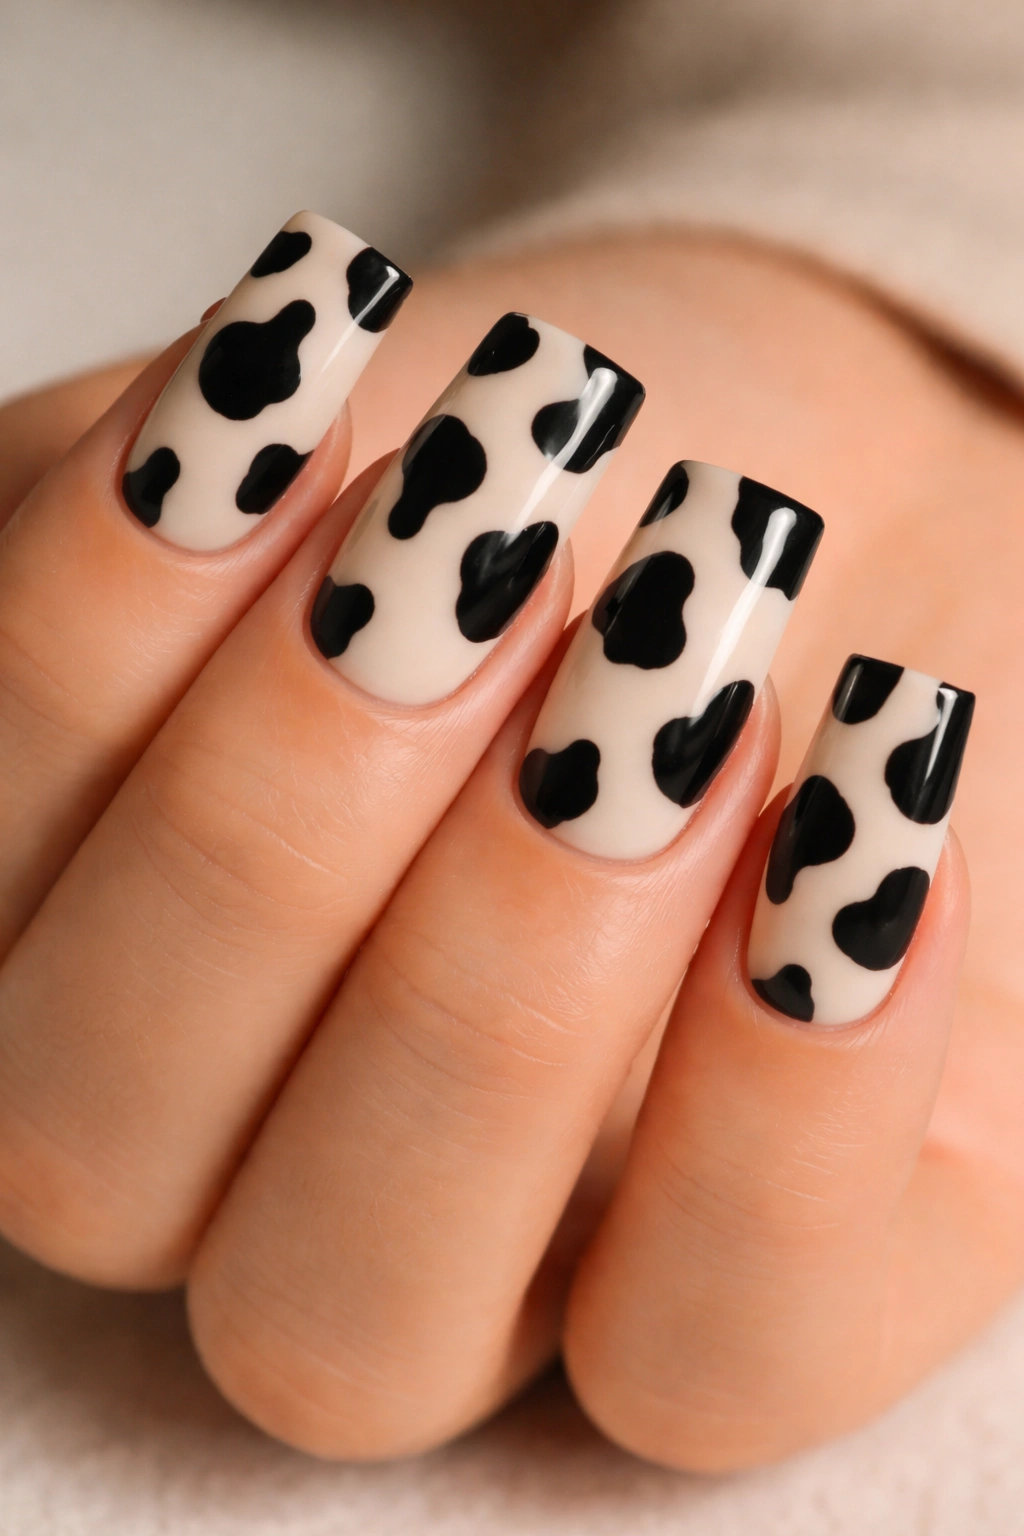
This is the foundation that every cow print duck nail concept builds from, and it’s timeless for a reason. Start with a soft, creamy nude base that lets the black spots become the real show-stopper, then layer irregular black patches and dots across each nail to create that authentic cow pattern. The key to making this work is keeping the white space (your nude base) just as important as the black pattern—the contrast is what makes it read as “cow print” rather than just random spots.
Why This Design Works So Well
The nude base creates visual balance and sophistication that pure white backgrounds sometimes lack. Because duck nails are already dramatic from their sheer length and curve, a softer base color keeps the overall look from feeling overwhelming. The black pattern pops beautifully against the warmth of the nude, and this combination reads as intentional rather than accidental.
How to Apply It Perfectly
- Use a thin detailing brush or a dotting tool loaded with pure black gel to hand-paint organic spots and patches
- Create some larger irregular shapes and some smaller dots for natural variation
- Let some edges blur slightly instead of making everything perfectly crisp—real cows don’t have perfectly clean print borders
- Seal everything with a glossy top coat to make the black pattern appear even more defined
Pro tip: If hand-painting feels intimidating, cow print nail decals in black and white come in every possible format, and applying them to nude duck nails looks just as impactful as hand-painted versions.
2. Reverse Cow Print with Black Base and White Spots
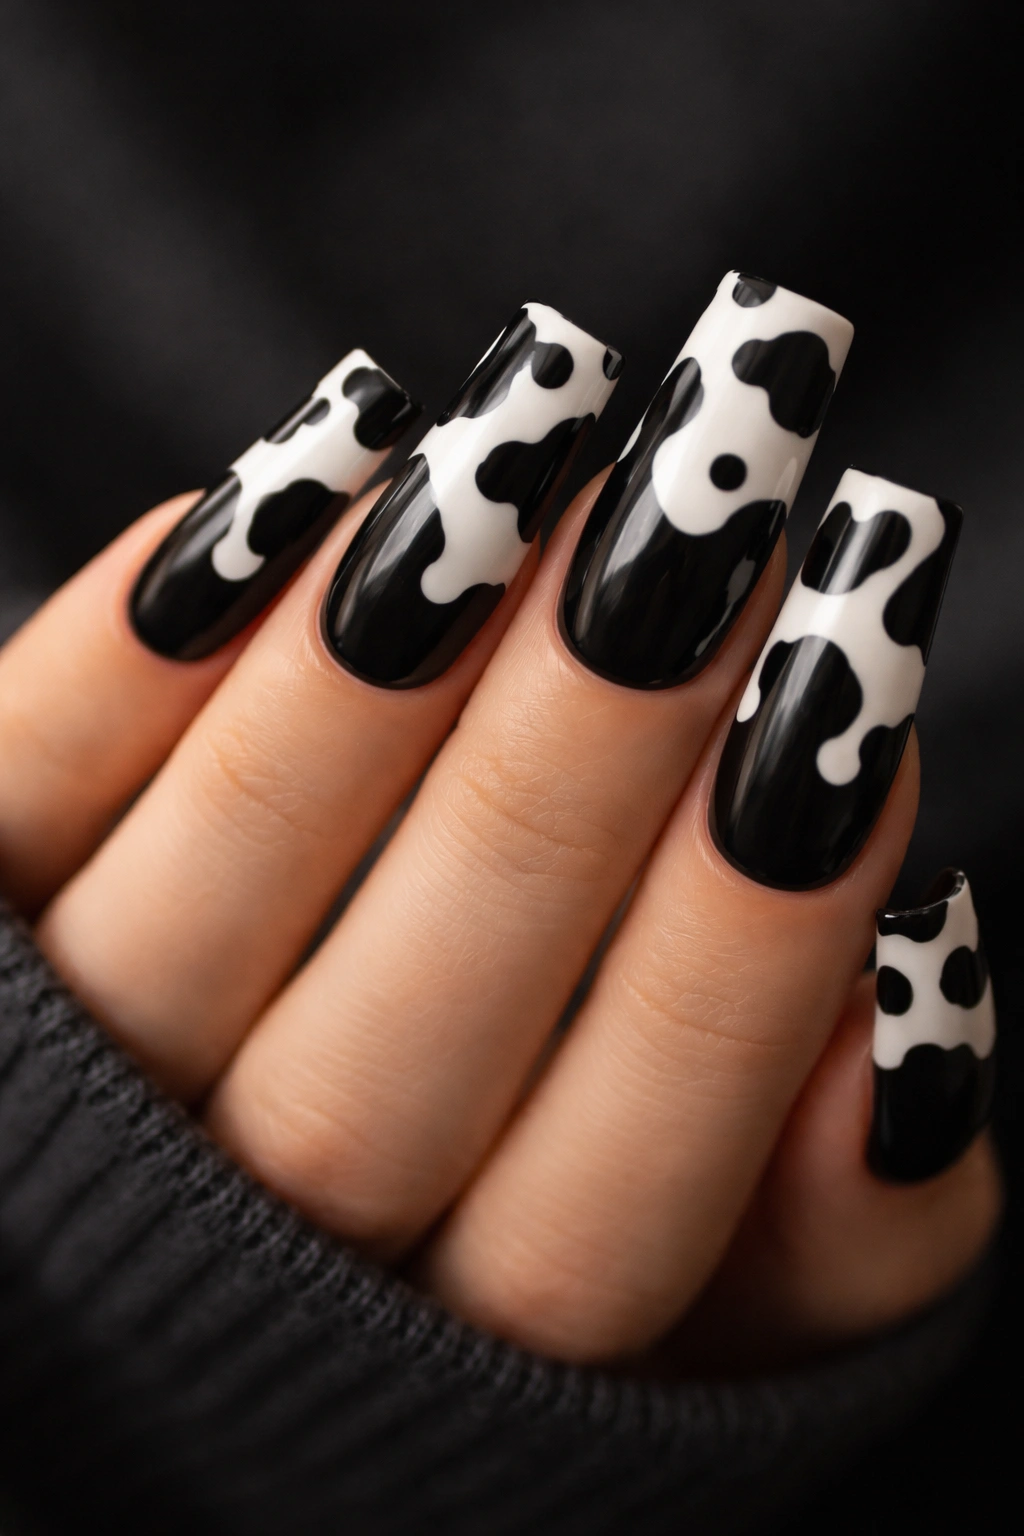
Flip the traditional cow print concept completely by starting with a rich black base and layering white spots and patches instead. This version feels edgier and more modern than the classic approach—it almost looks like a negative space design. The white pops dramatically against the black, and on duck nails, it creates an unexpectedly chic look that still reads instantly as cow print while feeling fresher and more unexpected.
What Makes Reverse Cow Print Stand Out
Reversing the colors completely changes the mood of the design. Instead of playful and classic, it becomes bold and contemporary. The darkness of the base makes the white pattern appear to float on top, and this visual effect is amplified by the curved shape of duck nails. It works especially well if you love a darker nail aesthetic but still want the fun of cow print pattern.
Application Tips for Clean White Spots
- Apply white gel carefully using a fine brush or dotting tools in varying sizes
- The white shows every tiny imperfection, so take your time and allow each layer to set completely before layering more details
- Use pure white (not off-white or cream) for maximum contrast and impact
- A matte top coat with white spots creates a sophisticated vibe; a glossy top coat makes the white appear more prominent and three-dimensional
Worth knowing: If your white gel is too transparent on the first coat, apply a second thin layer to deepen opacity without creating thick, uneven spots.
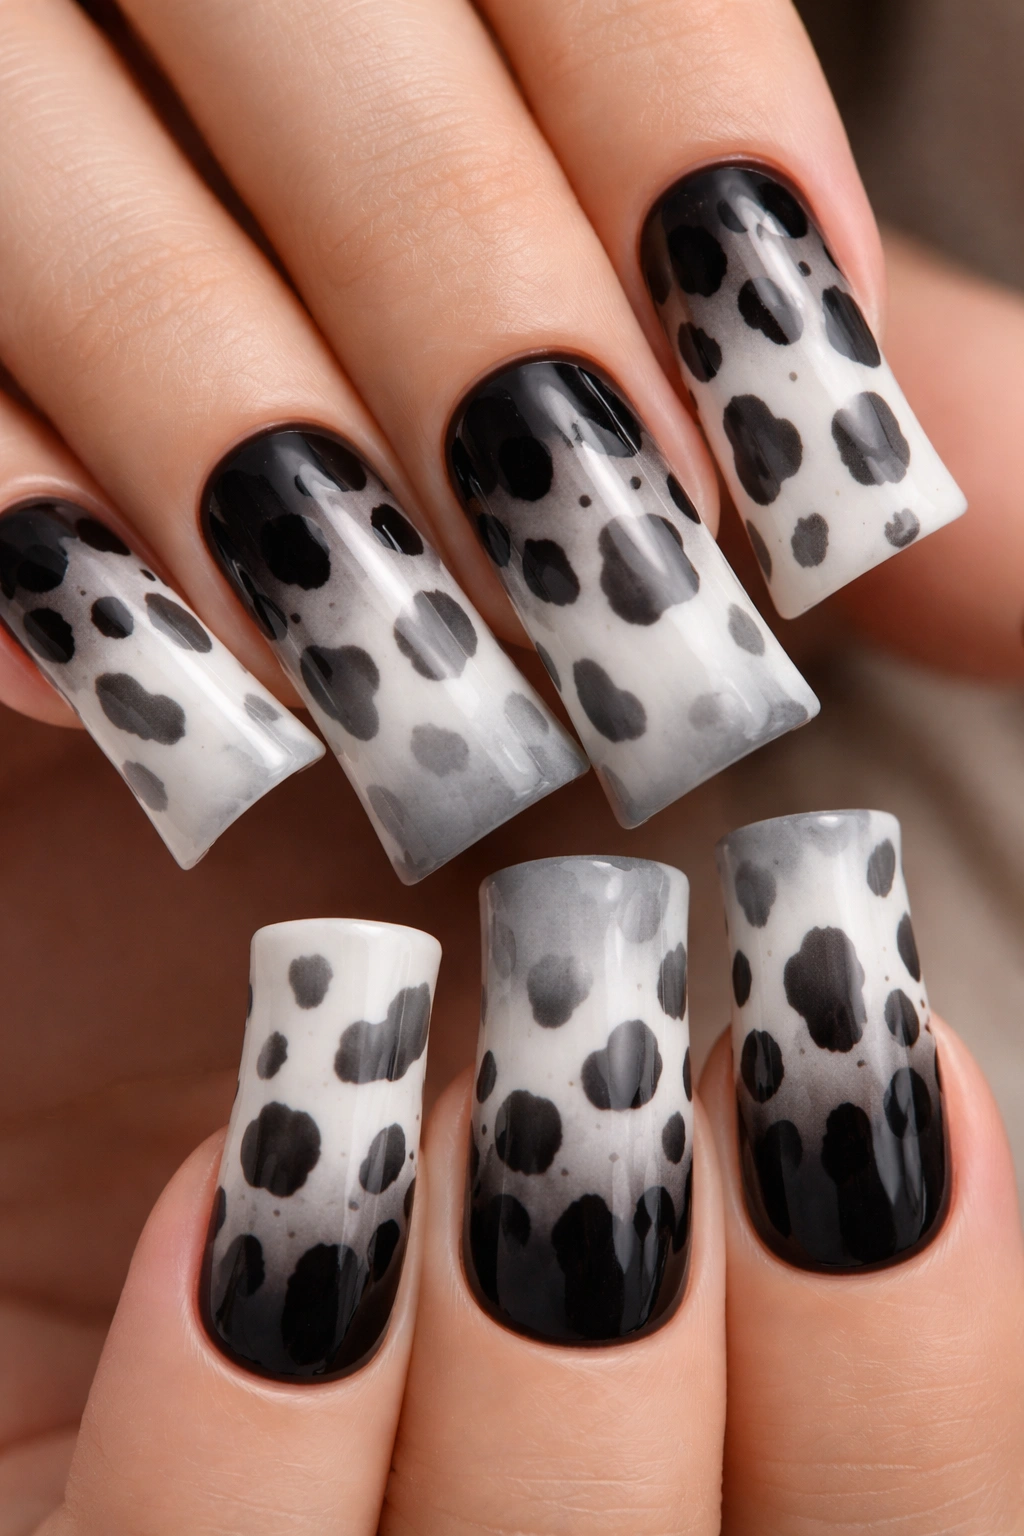
3. Ombre Cow Print Fading From Black to White
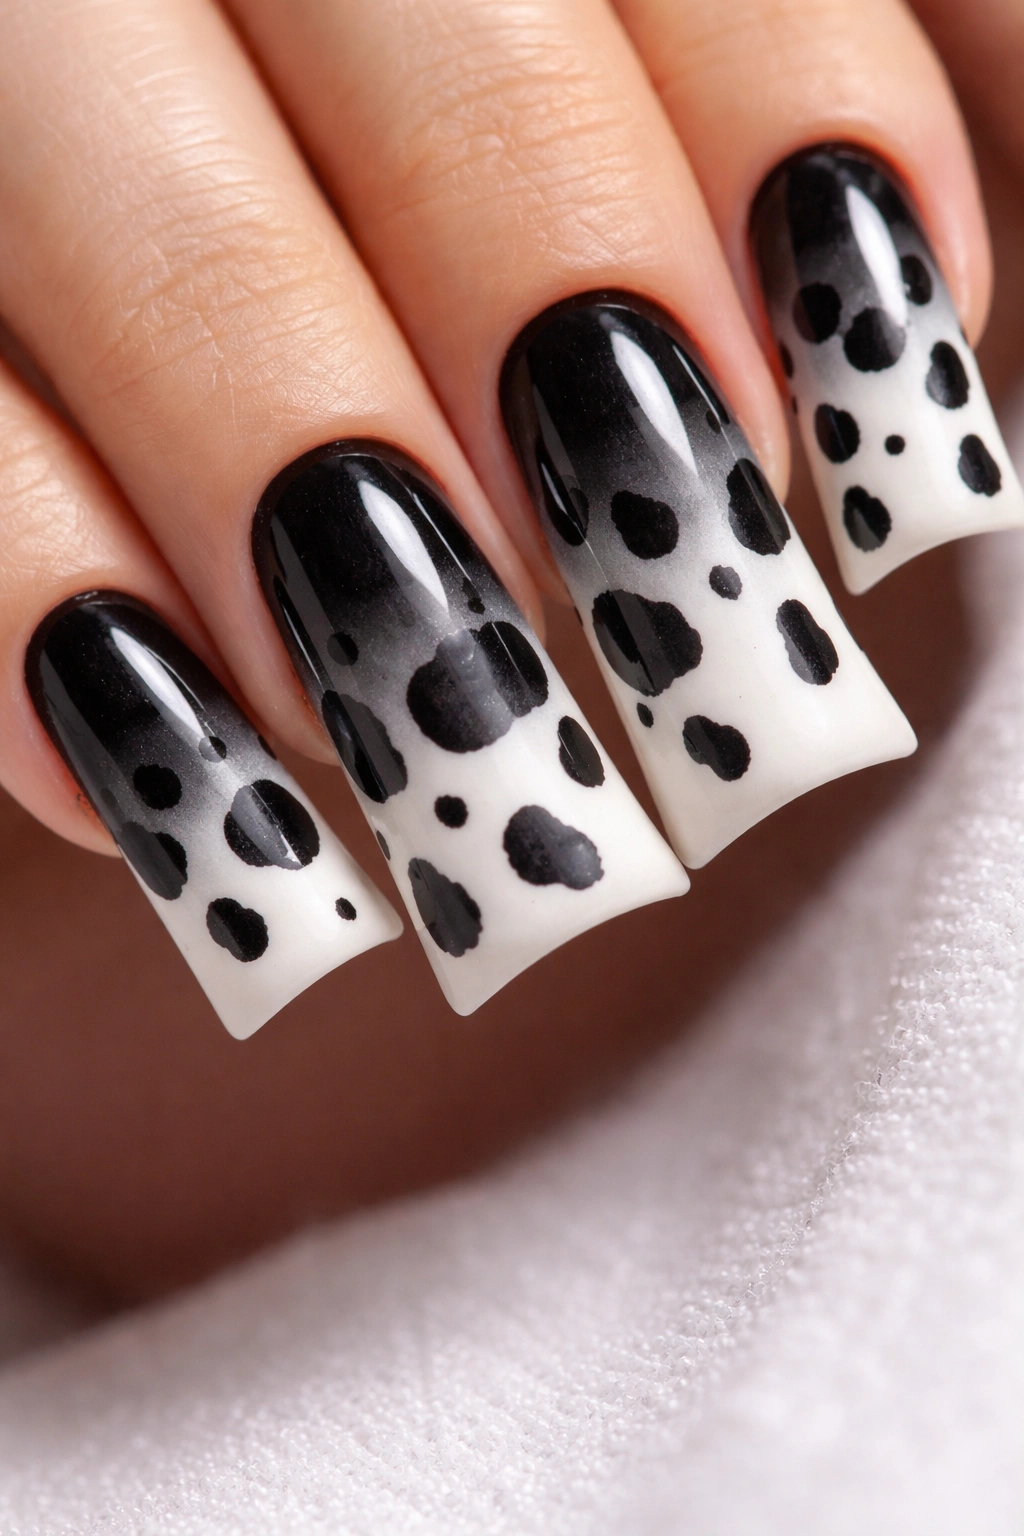
Create a gradient effect where the cow print transitions from a deep black base at the nail bed to a soft white at the tips, with the spotted pattern adapting throughout the transition. This technique requires some skill with an ombre sponge or blending, but the result is absolutely stunning—it looks like the cow print itself is melting or fading across the nail. The dimensional quality makes duck nails appear even more elongated and dramatic.
The Visual Impact of Gradient Cow Print
An ombre approach to cow print takes what could be a flat pattern and transforms it into something three-dimensional and artistic. The spots appear to shift and change across the nail, following the color gradient. Because duck nails already have visual movement from their curve, adding a color gradient that follows the same direction (base to tip) creates incredible cohesion. It’s sophisticated enough for work environments that allow nail expression and bold enough to feel genuinely fashion-forward.
How to Achieve the Ombre Effect
- Apply black gel to the entire nail and cure, then wipe the surface
- Use a makeup sponge to dab white gel from the tip downward, creating a gradual blend
- Add cow print spots once the ombre base is complete, adjusting their darkness to match the underlying color (darker spots on dark areas, lighter spots on light areas)
- Finish with a glossy top coat for seamless blending and shine
Insider note: Practice the ombre technique on nail wheels or practice tips before applying it to actual nails—the sponge-blending method takes a couple of tries to control.
4. Cow Print with Glitter Accent Nail
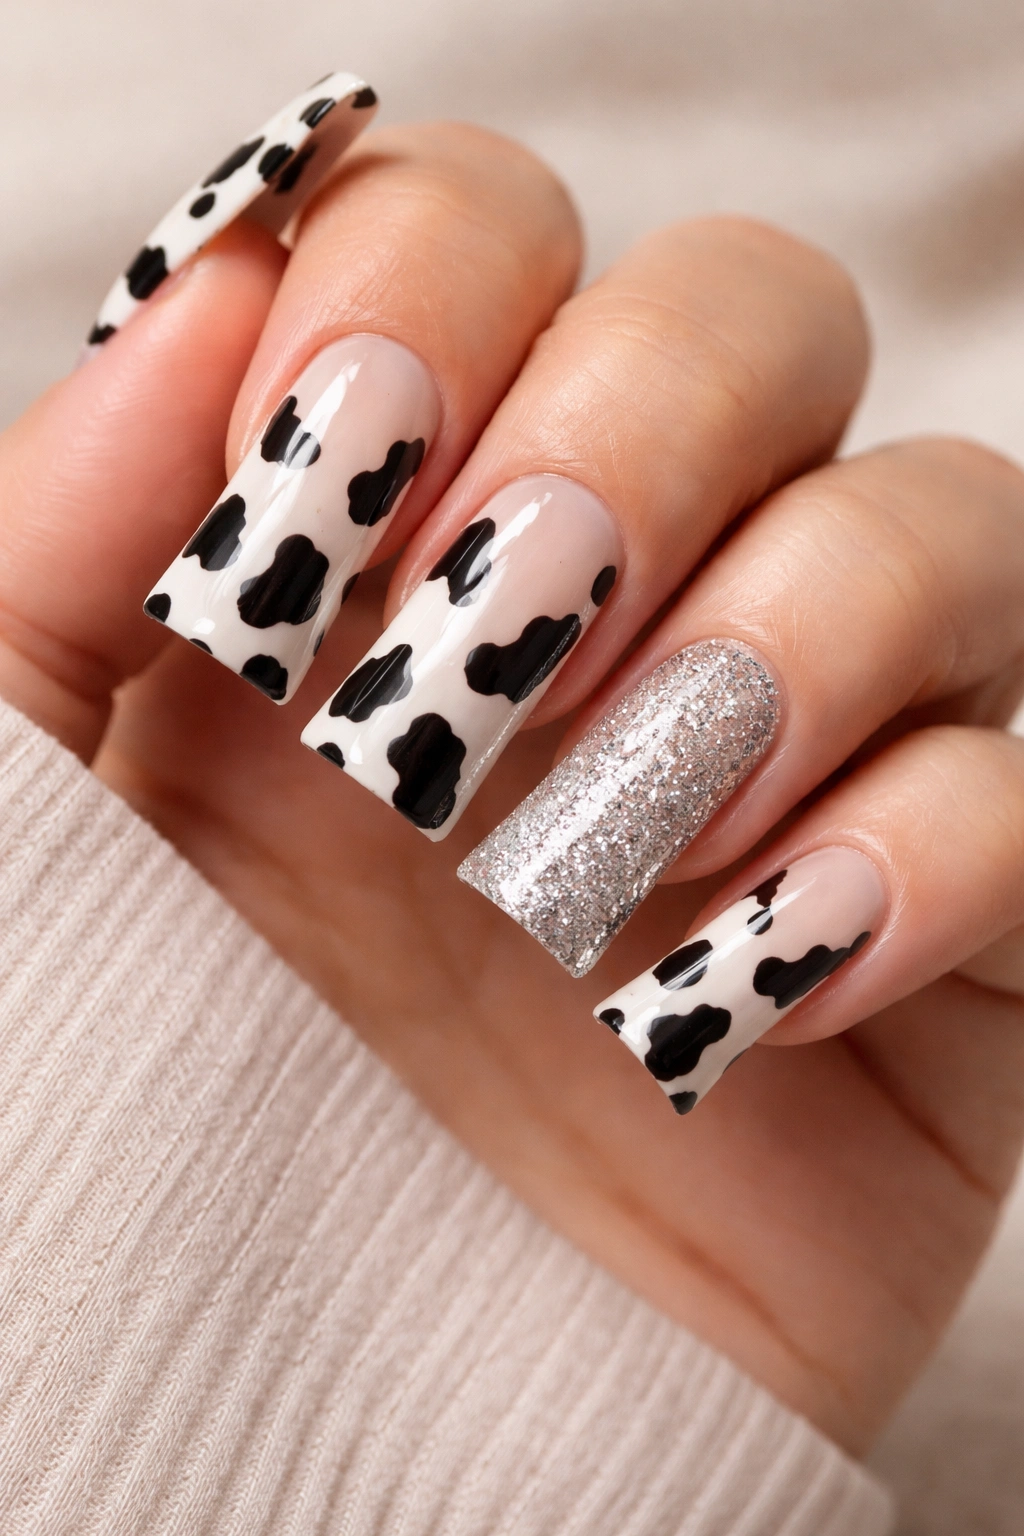
Keep most of your duck nails in classic cow print, but designate one accent nail (usually the ring finger) for a twist that brings sparkle and dimension. This could be all-over holographic glitter, chunky gold flakes, chrome powder, or even crystal embellishments scattered across a cow print base. The contrast between the matte or satin printed nails and the glittery highlight nail creates visual interest without feeling chaotic.
Why Accent Nails Transform the Whole Design
A single sparkly nail breaks up the repetition of a matching manicure and gives your look a bit of elevated glam. On duck nails specifically, accent nails become even more prominent because of the extended surface area. One glittery duck nail catches light from multiple angles, so even subtle sparkle makes a serious impact. This technique works whether you’re going for understated elegance or full maximalist energy.
Accent Nail Glitter Application Methods
- Press loose glitter or chrome powder onto a sticky, uncured top coat and seal with another layer
- Mix chunky glitter into a gel base and apply to just one nail for a pre-mixed effect
- Layer holographic or aurora borealis glitter over the entire cow print base for a subtle shimmer
- Apply metallic leaf or thin adhesive crystals in a strategic pattern (like corners or tips) rather than all over
Pro tip: Use a glossy top coat over glitter for maximum shine, and use gel that’s meant for loose pigments rather than standard top coat—it has stronger adhesive properties.
5. Minimalist Cow Print with Fewer, Larger Spots
Instead of covering the entire nail with a busy spotted pattern, create a minimalist version using just three or four large, intentional black patches on your nude or white base. This approach feels modern and less “literal cow” while still being unmistakably cow print. The restraint actually makes the design read as more sophisticated, and on the length of duck nails, fewer elements can be more striking than a pattern-covered surface.
The Power of Negative Space in Cow Print Design
Minimalism is huge right now across nail art, and applying that principle to cow print keeps it feeling contemporary rather than novelty. Large patches of solid black against open negative space naturally draw the eye, and the duck nail length gives those patches room to really breathe. This version appeals to people who love the concept of cow print but prefer subtlety over saturation.
Creating Impactful Large Patches
- Map out where you want three or four main black shapes using a light pencil or chalk marker first
- Use a medium-sized flat brush to fill in each shape with solid black gel, keeping edges relatively clean
- Allow the placement to be asymmetrical—this looks intentional rather than accidental
- The rest of the nail stays bare or nude, creating maximum visual contrast
Worth knowing: Larger shapes with cleaner edges require a steadier hand than busy spotted designs, so don’t rush the application or try this when your hands are tired.
6. Cow Print with Gold Foil Accents Between Spots
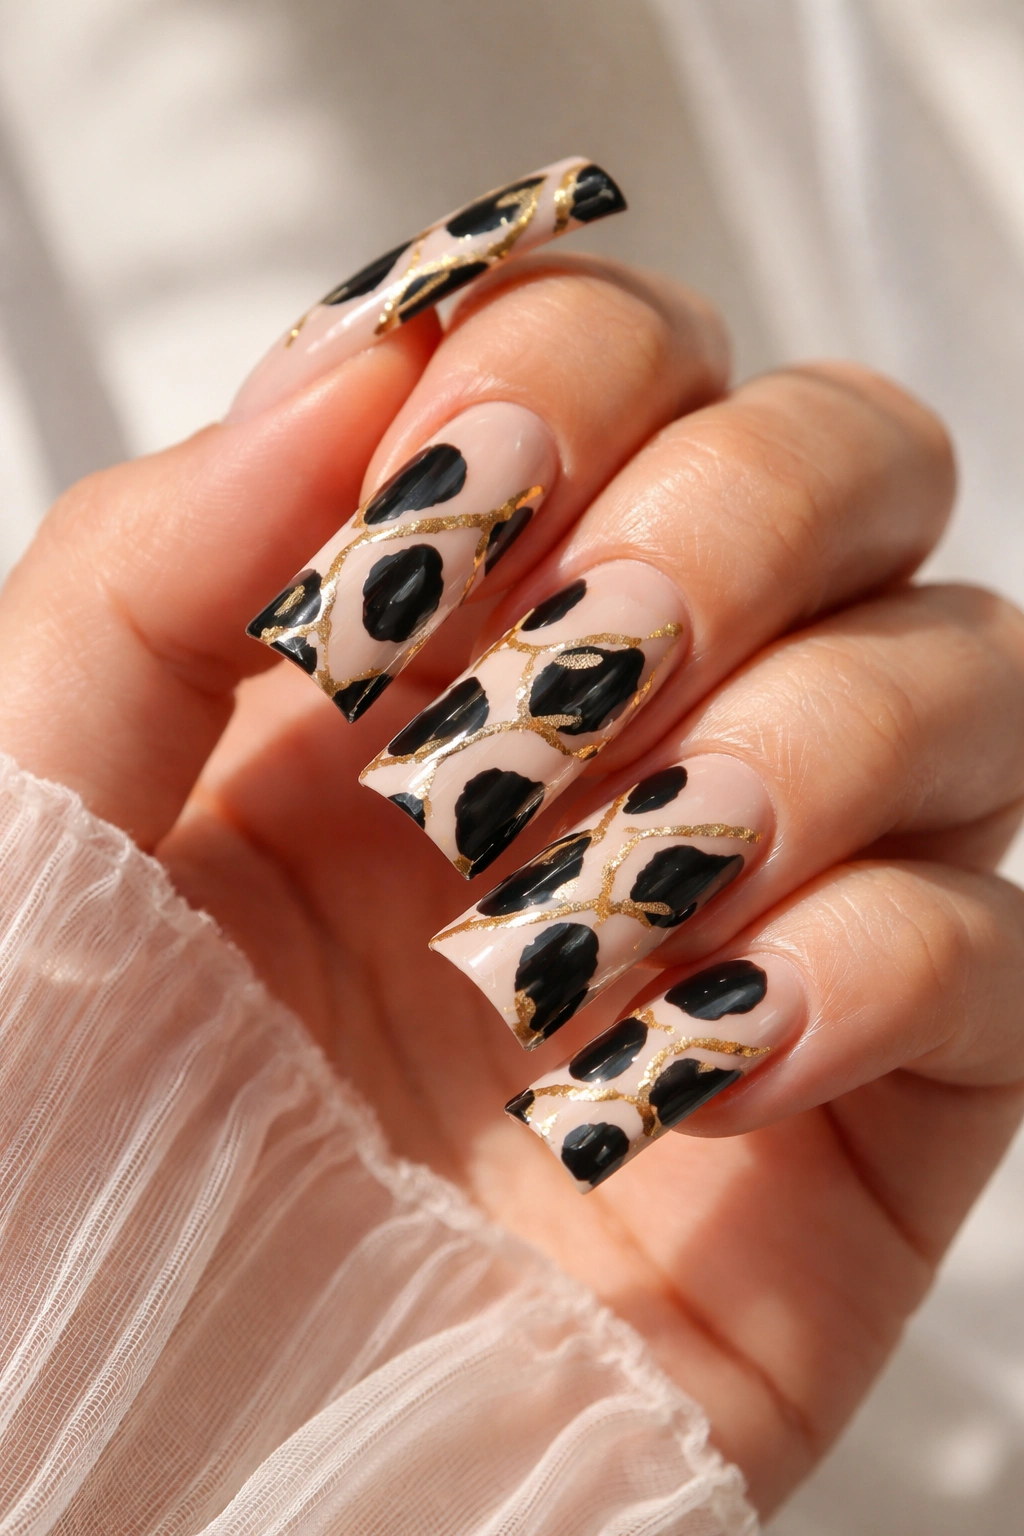
Layer gold or silver foil details between your black cow print spots on a neutral base. This could mean applying thin metallic lines, small gold leaf fragments, or geometric foil shapes interspersed throughout the spotted pattern. The metallic elements don’t compete with the cow print—instead, they catch light and add luxury to the overall aesthetic. It’s cow print with a sophisticated, jewelry-box sensibility.
How Metallic Accents Elevate Cow Print
Metal details automatically make nail art feel more elevated and intentional. On duck nails, thin foil accents create delicate visual interest without overwhelming the pattern. The contrast between the matte black spots, neutral base, and shiny metallic elements creates a refined three-part aesthetic that feels carefully curated. This approach works beautifully for special occasions or everyday wear if you love maximalist elegance.
Applying Foil Details Cleanly
- Apply your base and cow print spots first, then cure and wipe
- Cut small pieces of foil into geometric shapes or organic lines
- Use a foil gel or sticky top coat to transfer foil onto the nail exactly where you want it
- Small tweezers help position pieces precisely before sealing with top coat
- Alternatively, paint thin metallic lines with a chrome gel pen between your existing spots
Pro tip: Practice foil application on practice nails because repositioning foil on an actual manicure is nearly impossible once it adheres.
7. Pastel Cow Print in Soft Pink and Cream
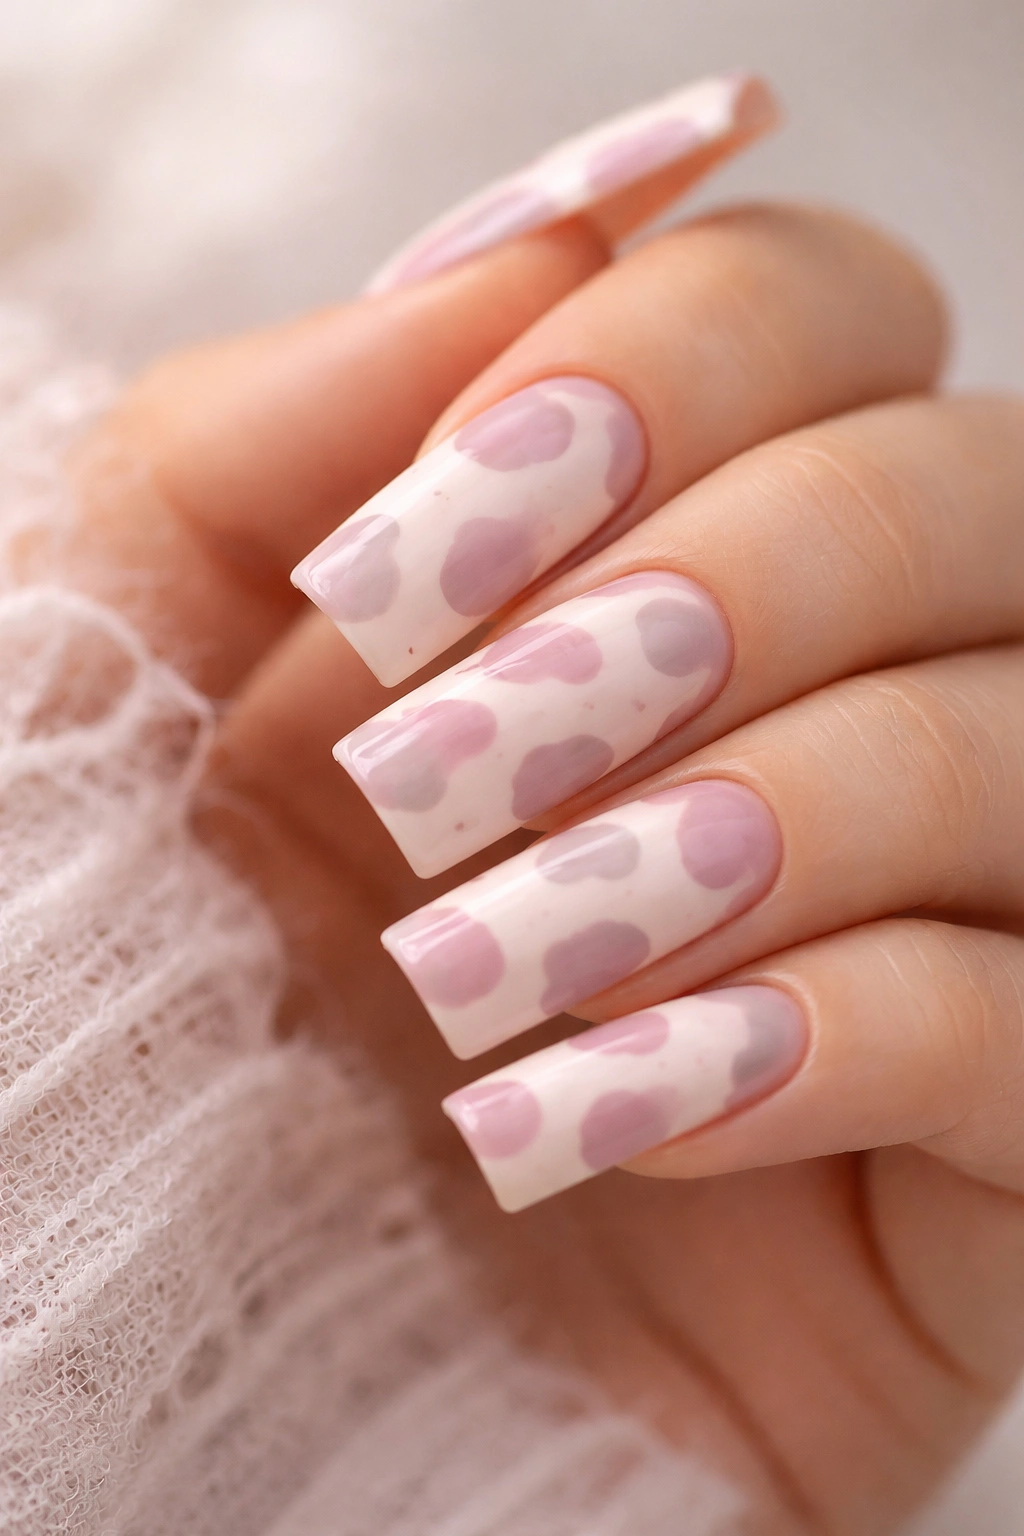
Reimagine the cow print pattern using soft pastel colors instead of stark black and white. Use a creamy pale pink base with dusty mauve or soft gray spots to create a gentle, romantic version of the classic pattern. This approach feels playful rather than dramatic, and it’s absolutely perfect if you want cow print vibes but prefer a softer color palette. The pastels work especially well in spring and summer, though they’re timeless enough to wear any season.
Why Pastel Colors Soften the Cow Print Aesthetic
Black and white cow print reads as bold and graphic, but swap those colors for soft pastels and the entire energy shifts. Pastel cow print feels whimsical rather than edgy, making it perfect for people who love fun nail art but prefer gentle colors. The cow print pattern still reads clearly because of the color contrast, but it’s a whisper instead of a shout. On duck nails, pastels create an unexpectedly delicate look that balances the drama of the elongated shape.
Executing Pastel Cow Print Perfectly
- Choose a pale, creamy base (soft pink, lavender, peach, or pale yellow work beautifully)
- Mix a dusty, muted version of the base color for your spots—slightly more gray or slightly deeper in tone
- The contrast still needs to be visible, but it should feel harmonious rather than stark
- Apply spots using the same techniques as black-and-white cow print, just with softer colors
- Finish with a glossy top coat to make the pastels appear more luminous
Insider note: Pastel gels sometimes appear more opaque and muddy than expected—test your color on a practice nail first to ensure it reads the way you envision.
8. Cow Print with Rhinestone Border Along the Nail Tips
Keep your duck nails in traditional or minimalist cow print, then add a line of small rhinestones or crystals right along the curved edge of the nail tip. This creates a glittery border that follows the duck nail silhouette and frames the entire design. The rhinestones catch light beautifully when your hands move, and they add a touch of glamour without competing with the cow print pattern itself. It’s an elegant, intentional finishing touch.
The Strategic Placement of Rhinestones on Duck Nails
Because duck nails curve dramatically at the tips, a rhinestone border becomes a beautiful frame for the shape. The curve is literally highlighted by the sparkly line, which actually emphasizes the nail design as a whole. This technique feels dressed-up without appearing costume-like, making it suitable for special events or everyday wear depending on the crystal size and density.
Installing Rhinestone Borders Securely
- Apply your complete cow print design and allow it to fully cure
- Use a sticky gel or rhinestone adhesive on your top coat (don’t wipe it)
- Place individual crystals along the tip edge using a dotting tool or crystal picker, spacing them evenly
- Seal everything with a thick layer of top coat to lock the rhinestones in place
- Allow extra cure time to ensure rhinestones are fully set
Worth knowing: Small rhinestones are more secure and comfortable to wear than larger ones—they’re less likely to catch on hair or fabric, and they’re easier to position evenly.
9. Cow Print Ombre from White to Gray to Black
Create an ultra-sophisticated gradient that moves from pure white at the tips through soft gray in the middle to deep black at the nail bed. The cow print pattern adapts throughout, so the spots become almost invisible where they fade into similar gray tones, then reappear prominently against the white. This creates a subtle, artistic effect that reveals itself differently depending on the angle and lighting. It’s cow print for people with refined taste and patience for detailed work.
The Artistic Potential of Three-Color Ombre Cow Print
This gradient approach transforms cow print from a novelty pattern into legitimate nail art. The spots essentially disappear and reappear as they transition across colors, creating visual movement and depth. On duck nails, this technique makes the elongated shape appear to have intentional dimensionality—the curve of the nail becomes a gradient canvas. It’s complex enough to feel like genuine artistic work, but still reads immediately as cow print.
Creating a Three-Tone Gradient with Integrated Spots
- Apply white gel at the tips, black gel at the base, and blend gray gel in the middle using an ombre sponge
- Allow the base colors to cure completely before adding the cow print pattern
- Add spots throughout, paying attention to how they appear against each underlying color
- Spots on white should be dark; spots on gray can be either darker gray or near-invisible; spots on black should be light or invisible
- Finish with glossy top coat to create seamless color blending
Pro tip: Work with one nail at a time on this design—trying to sponge-blend multiple nails simultaneously usually results in uneven gradients.
10. Cow Print Nail Art with 3D Embellishments
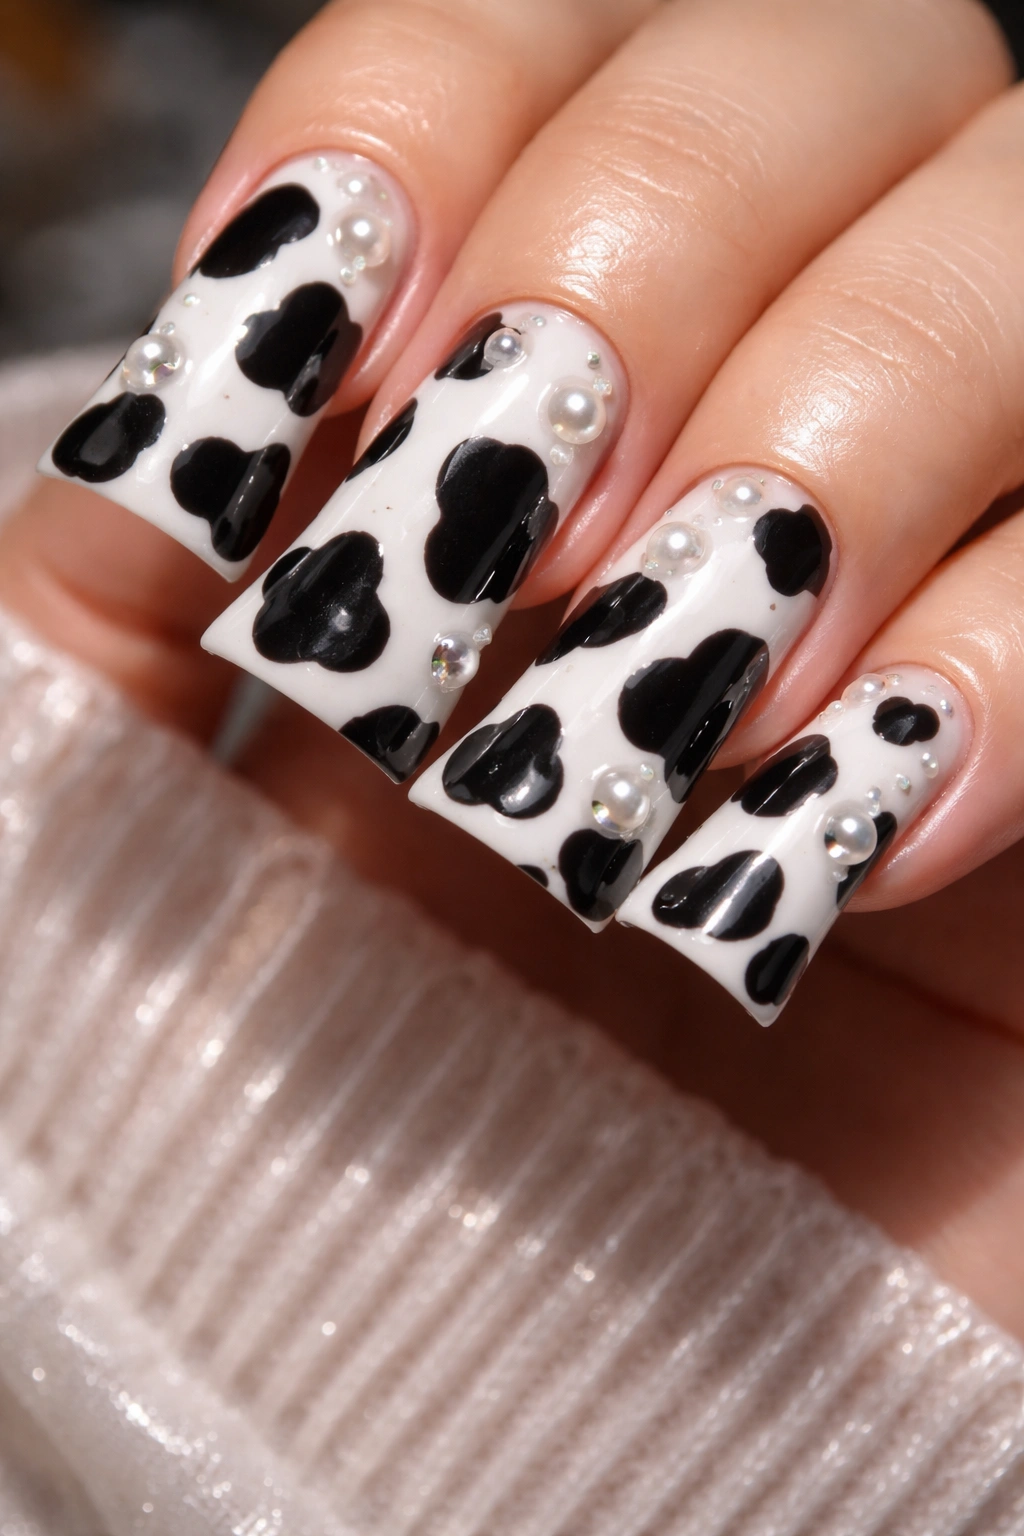
Use cow print as your base pattern, then add three-dimensional elements like tiny studs, pearls, or even small sculptural forms created from gel. These dimensional elements sit on top of the design, creating texture you can actually feel. A line of raised pearls down the center of each nail, or tiny gold studs scattered throughout the cow print pattern, transforms the design from two-dimensional to tactile and luxe. It’s maximalism with intentional purpose.
When 3D Elements Enhance Rather Than Overwhelm
Adding dimensionality to cow print is risky—do it wrong and it looks cluttered. The key is restraint and placement. Use 3D elements sparingly and strategically, allowing the cow print to remain the clear star while the dimensional pieces add luxury. On duck nails, dimensional accents actually benefit from the extra surface area—they have room to shine without making the overall design feel cramped.
Securing 3D Elements Permanently
- Apply your complete cow print base and cure thoroughly
- Create small raised gel dots where you want studs or embellishments
- Press studs, pearls, or other elements into the uncured gel and allow it to set completely
- Apply a seal layer of clear gel or top coat over everything, making sure not to submerge smaller elements completely
- Test durability before considering the manicure complete—elements should not budge when you press on them
Worth knowing: Smaller embellishments are more durable than large ones on nails that experience regular wear, and they’re less likely to catch on fabric or hair.
11. Cow Print with White Negative Space Design

Create a cow print pattern that incorporates intentional negative space shapes—like creating white spots or lines that form a secondary pattern within the cow print itself. For example, paint black cow spots as usual, but leave white stripes through them, or create white geometric lines that run through the pattern. It’s pattern layered on pattern, but because one layer is intentionally minimal, it creates visual interest without feeling chaotic. The dual-pattern effect makes the design feel sophisticated and contemporary.
Layering Patterns for Subtle Complexity
Combining two patterns on the same nail is tricky—most attempts look messy. But when one pattern is the main focus (cow print) and the other is an intentional secondary layer with specific placement (white lines or stripes), it works beautifully. The secondary pattern guides the eye and adds visual richness without competing. On duck nails, this layered approach creates a design that rewards close inspection—it looks simple from across a room but reveals complexity up close.
Creating Secondary Patterns Within Cow Print
- Apply your complete cow print base design first
- Once cured, use a thin white gel pen or brush to add secondary pattern elements (straight lines, small geometric shapes, or intentional white dots)
- Keep the secondary pattern to specific areas—perhaps only on certain nails or only in the middle section of each nail
- The secondary pattern should feel like it belongs, not like an afterthought
- Seal with glossy top coat
Pro tip: Sketch your secondary pattern idea on a practice nail first—seeing how it interacts with the cow print helps you visualize whether it will enhance or overwhelm.
12. Cow Print with Matte and Glossy Texture Contrast
Create visual and tactile contrast by applying your cow print design with both matte and glossy finishes. Perhaps the black spots receive a matte top coat while the base stays glossy, or vice versa. The textural difference makes the pattern appear to pop off the nail with incredible dimension, and the varied finishes reflect light differently, creating an almost three-dimensional illusion. Run your hand across the nail and you’ll feel the difference—it’s art you can experience through touch as well as sight.
How Finish Variations Create Optical Illusion
Matte and glossy surfaces reflect light completely differently, so a design that uses both reads as having actual depth even though it’s completely flat. On cow print specifically, the contrast can make black spots appear to float above a glossy base, or make the base appear recessed behind matte pattern elements. This is incredibly modern and sophisticated—it’s a technique borrowed from high-end fashion and luxury goods design. On duck nails, the already-dramatic length is amplified by this textural play.
Achieving Precise Matte and Glossy Sections
- Apply your complete cow print design with standard glossy top coat
- Allow it to cure fully and wipe the sticky layer
- Use a matte top coat selectively—either apply it carefully to just the black spots using a small brush, or apply it to the entire nail and then remove it from specific areas with a cotton pad and bit of acetone
- Alternatively, use a matte base coat on one section and glossy elsewhere
- The transition between matte and glossy should be intentional but can have slightly soft edges for a blended effect
Worth knowing: Matte top coats show fingerprints and oils more visibly than glossy finishes, so this design requires slightly more frequent cleaning to maintain pristine appearance.
Final Thoughts

Cow print duck nails are endlessly adaptable, and these twelve approaches barely scratch the surface of what’s possible. The beauty of the duck nail shape combined with cow print’s iconic pattern creates something that’s immediately recognizable yet entirely open to creative interpretation. Whether you’re drawn to classic black and white, soft pastels, glittery accents, or textural contrasts, there’s a cow print duck nail concept that matches your aesthetic perfectly.
The real magic happens when you choose the approach that feels most authentically you. Are you someone who loves maximalist nail art, or do you prefer sophisticated minimalism? Do you want your nails to be conversation starters, or do you prefer designs that reveal themselves on closer inspection? Do you have the patience for hand-painted details, or would you rather use decals and finishes to create impact? There’s no wrong answer—cow print works in every iteration, from the simplest spotted base to the most elaborate multi-layered, multi-textured design.
Start with whichever concept speaks to you first, practice the application technique on practice nails, and don’t hesitate to adapt these ideas to suit your preferences. Nail art is inherently personal, and the most beautiful manicures are the ones that make you feel genuinely confident and happy every time you look at your hands.
