

Pink stiletto nails have become a timeless staple in nail design, offering endless possibilities for expressing personal style while maintaining an elegant, elongated aesthetic. Whether you’re drawn to soft, romantic blush tones or bold, statement-making hot pinks, this nail shape paired with pink shades creates a look that works for everything from everyday sophistication to special occasion glamour. The beauty of pink stilettos lies in their versatility — the color palette is so broad and the design potential so vast that you can reinvent the look entirely while keeping the same basic elements. What makes stiletto nails particularly striking is how they elongate the fingers and create a dramatic canvas for color, nail art, and embellishments. This shape demands attention, and pink ensures that attention feels refined rather than harsh.
The challenge many people face is moving beyond basic solid pink and discovering the depth of creativity possible within this single color family. There’s so much more to explore than a simple manicure — you can layer textures, incorporate accent details, experiment with finishes, and play with undertones to create looks ranging from delicate and feminine to bold and edgy. Each pink stiletto style offers its own personality and serves different occasions and moods. Let’s dive into ten distinct pink stiletto nail ideas that showcase the full spectrum of what’s possible with this timeless combination.
1. Classic Baby Pink Stiletto
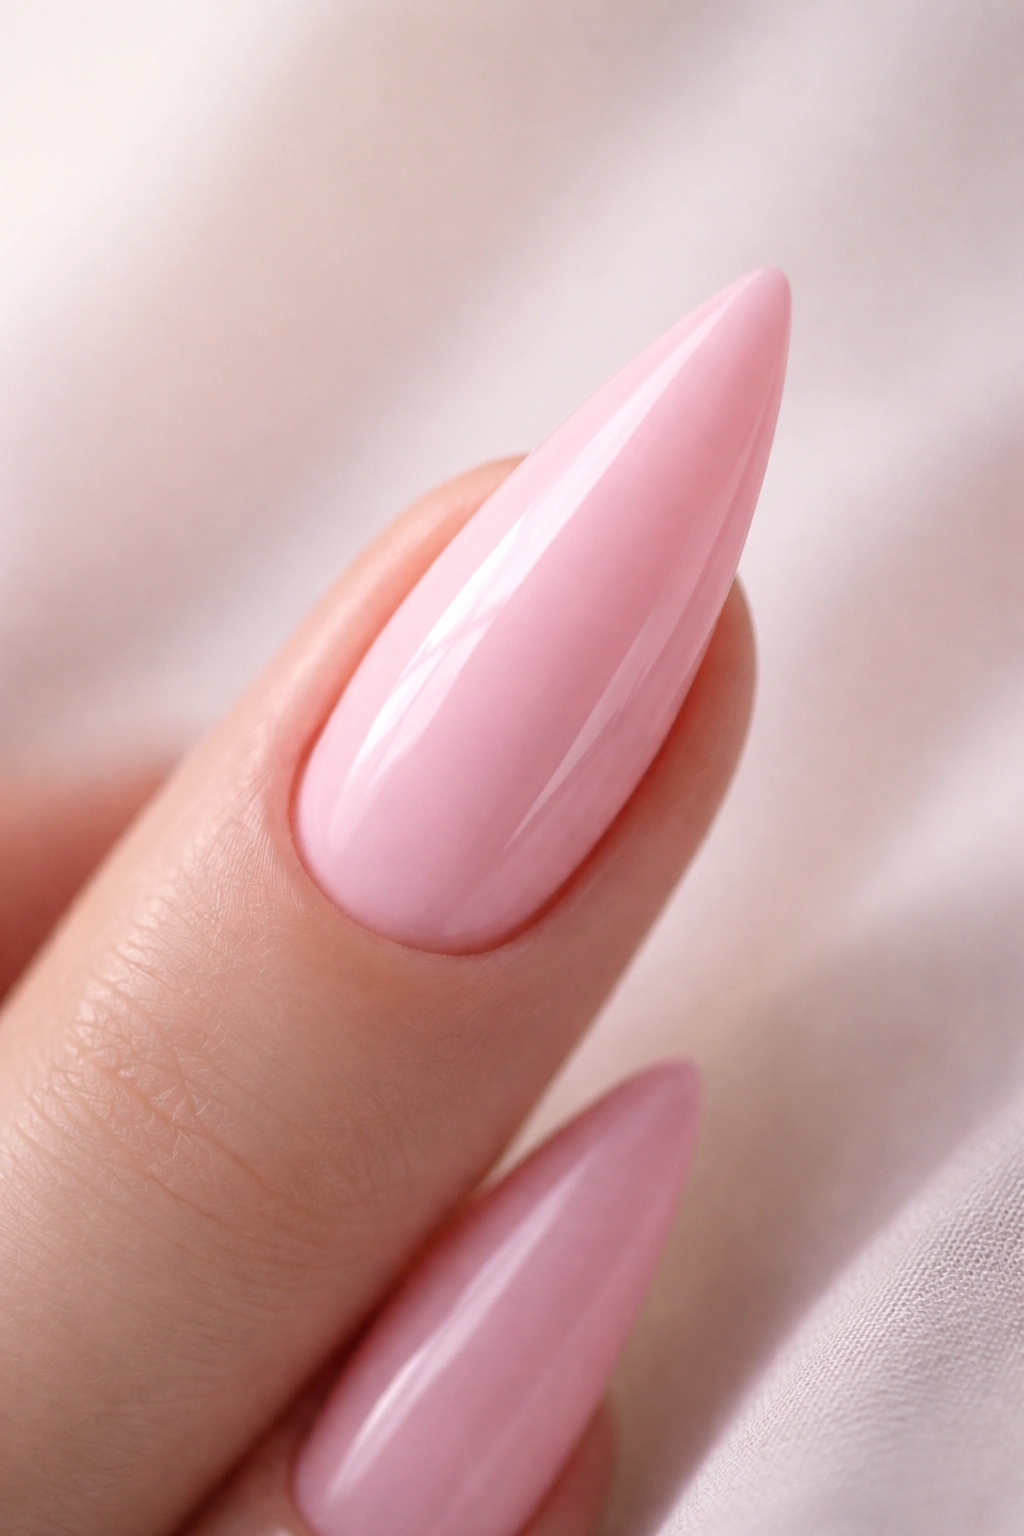
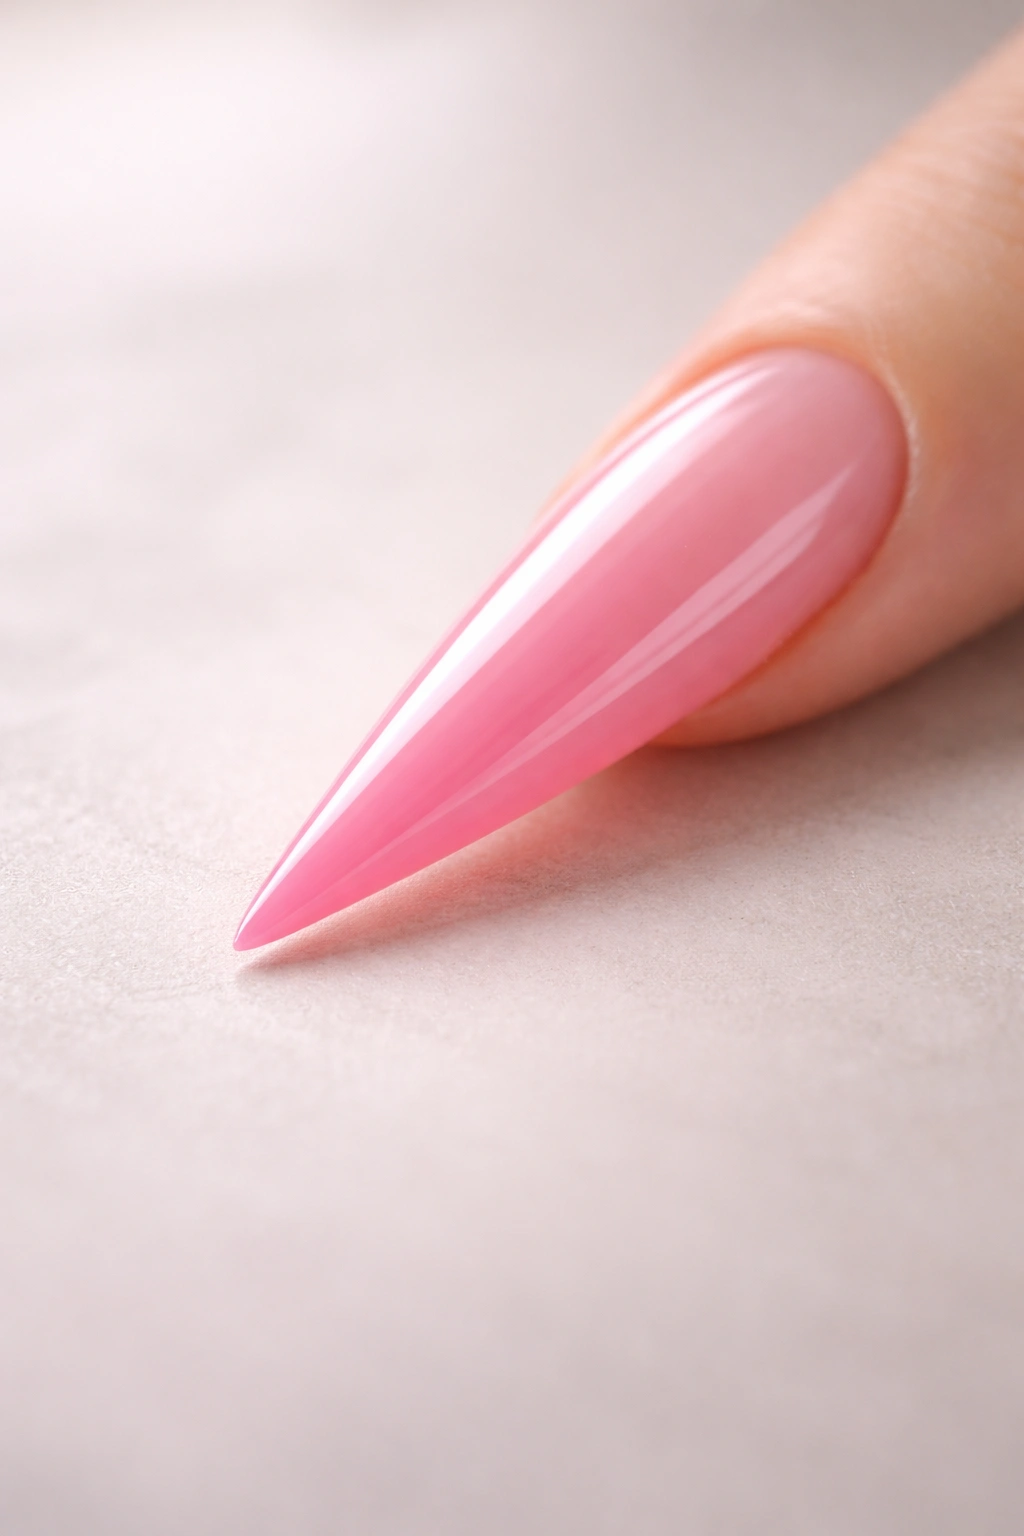
Baby pink is the quintessential foundation for stiletto nails, delivering timeless elegance that never feels out of place. This soft, neutral-leaning pink sits beautifully against all skin tones and works seamlessly whether you’re in a professional setting or attending a formal event. The simplicity of this look is actually its greatest strength — when executed with precision, a classic baby pink stiletto is pure sophistication.
Why This Look Works for Everyone
Baby pink’s versatility comes from its inherent neutrality combined with its unmistakable femininity. Unlike stark whites or bold colors that can feel one-dimensional, baby pink carries warmth and softness while still looking intentional and polished. The color flatters hands by creating visual balance — it doesn’t overpower your fingers or draw critical attention to any imperfections. Many nail technicians consider this the perfect “starter” stiletto shade because it teaches you what proper stiletto proportions should look like without any distraction from design elements.
How to Achieve the Perfect Finish
- Apply a strengthening base coat to prevent the stiletto tips from breaking during growth
- Use a high-quality pink nail polish (not too sheer, not overly opaque) — you want 2-3 thin coats rather than one thick coat that can bubble or crack
- Finish with a thick, high-shine top coat and cap the free edge (the white tip area) to seal the polish and extend longevity
- Choose a gel polish system if you want this mani to last 3-4 weeks without chipping
- File the stiletto point gently to avoid micro-tears in the nail plate that can lead to breakage
Pro tip: Baby pink looks even more luxurious when you keep the surrounding skin completely clean and moisturized — this high-contrast minimalist look puts the focus entirely on nail care, so cuticle care and hand skin texture become part of the overall polish.
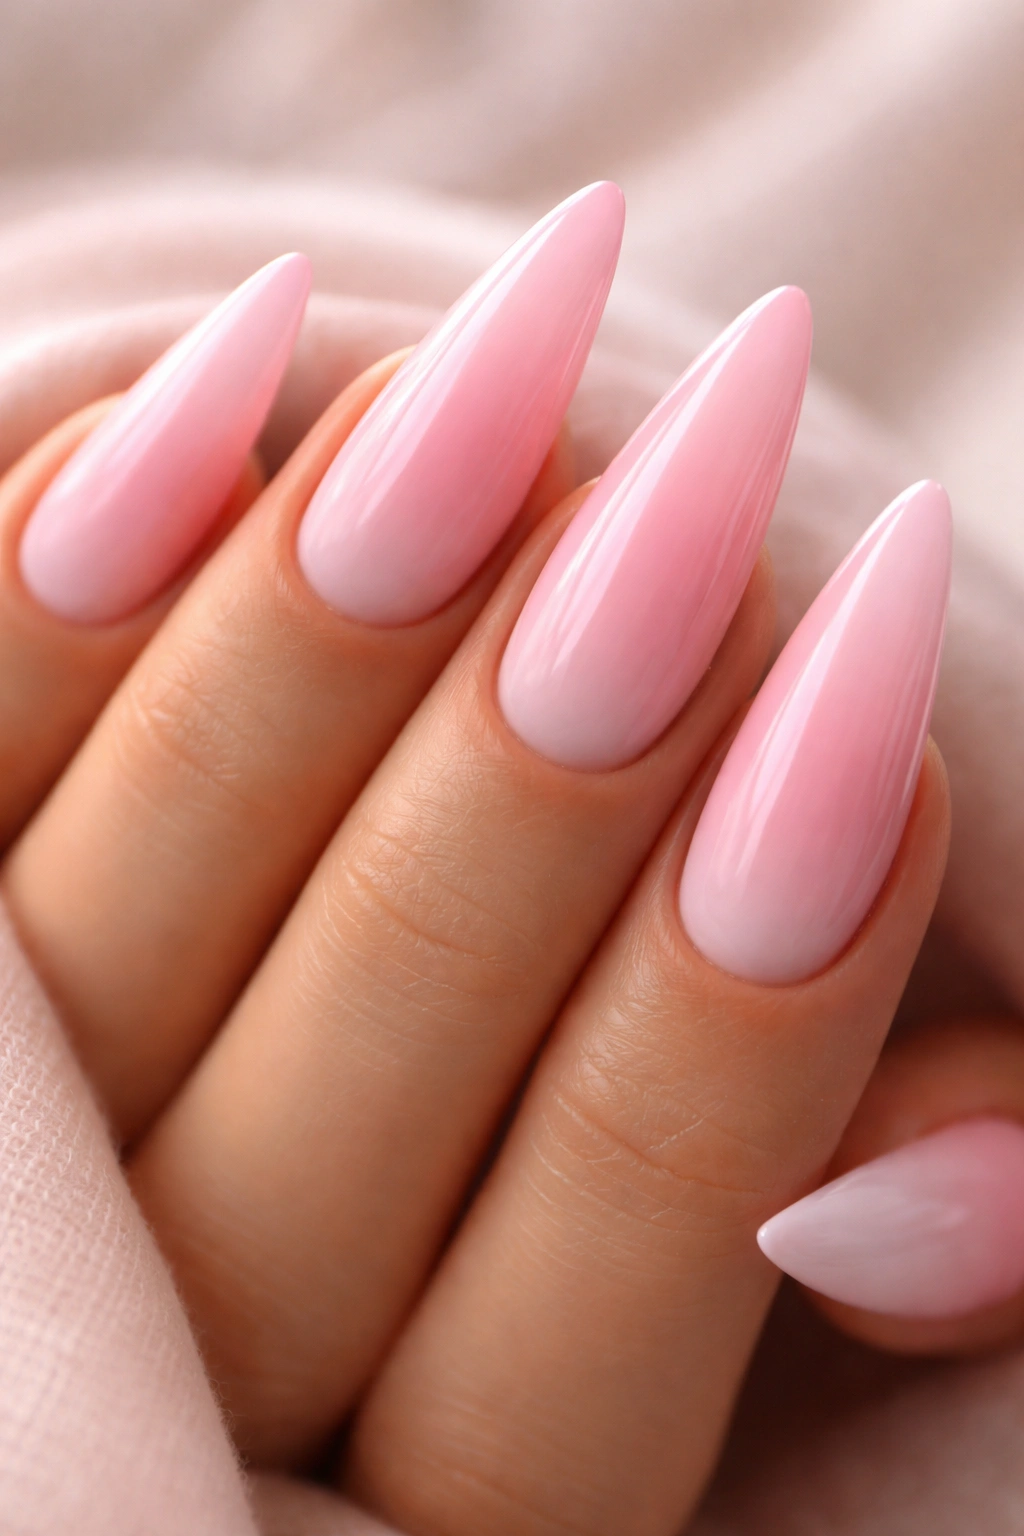
2. Ombre Pink to White Gradient Stiletto
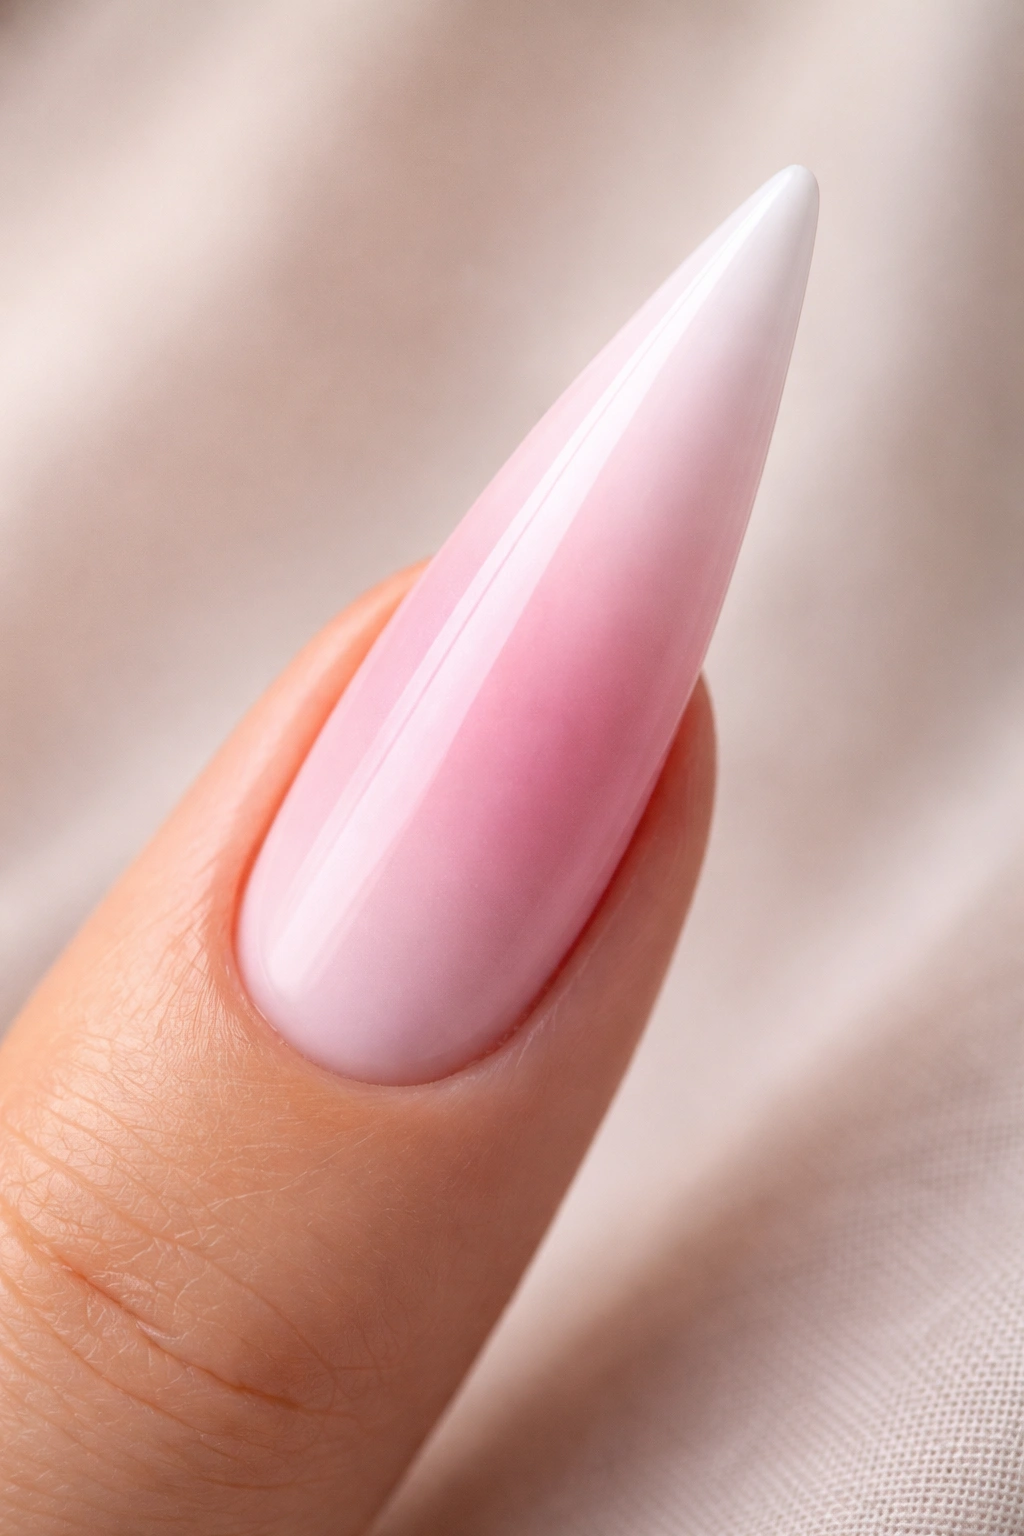
An ombre gradient moving from soft pink at the base through white at the tip creates a visually stunning effect that feels both modern and romantic. This technique adds dimension and movement without relying on intricate nail art, making it a smart choice if you want impact without complexity. The gradient draws the eye along the length of the nail, emphasizing the elongated stiletto shape even more dramatically than a solid color ever could.
The Art Behind the Gradient
Creating a smooth ombre requires either a sponging technique with multiple shades of pink and white polish, or a gradient powder system if you’re using a gel base. The key to a seamless blend is ensuring you have at least 3-4 transitional shades between your starting pink and ending white — trying to jump directly from hot pink to white will create harsh banding rather than a smooth fade. Each layer should be slightly lighter than the one before, allowing colors to blend naturally rather than sitting in distinct stripes. The gradient works best when it follows the natural slope of the nail from base to tip, so your sponging angle matters tremendously.
Application Tips for Success
- Use a triangle sponge or wedge to apply the gradient, dabbing rather than swiping — this creates texture that blends colors more smoothly than a sliding motion would
- Start at the deepest pink at the very nail base and gradually transition toward white, working in small incremental steps
- Seal with a glossy top coat for a high-shine finish that makes the gradient shimmer, or use matte top coat for a softer, more diffused effect
- The white tip should be fully opaque, creating a subtle pseudo-French manicure effect at the very point
- This look photographs beautifully and catches natural light in a way that solid colors simply cannot
Worth knowing: Ombre gradients can make even imperfect stiletto shapes look more intentional — the visual interest of the gradient actually camouflages any slight asymmetry in your nail line.
3. Pink Stiletto with Gold Leaf Accents
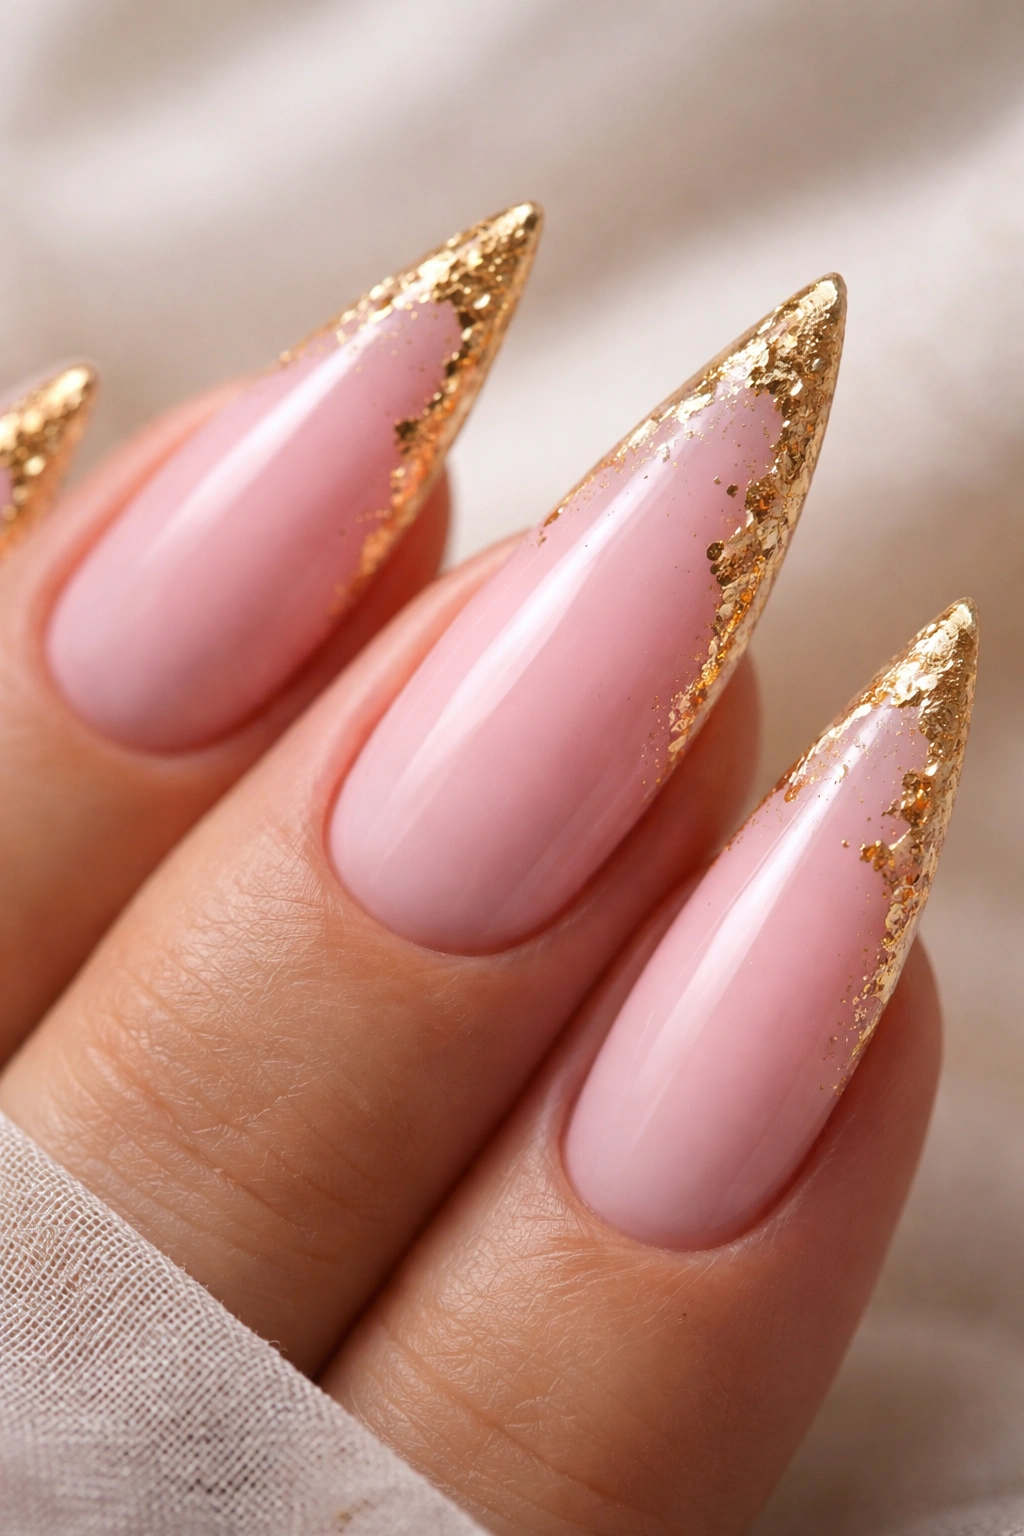
Introducing metallic elements transforms a simple pink stiletto into jewelry for your hands. Gold leaf accents create a luxurious, high-end aesthetic that reads expensive and intentional without requiring advanced nail art skills. This combination works because pink and gold are a naturally harmonious pairing — warm gold complements pink’s warm undertones perfectly, creating visual cohesion rather than contrast.
Where to Place Gold for Maximum Impact
The most effective placements for gold leaf are along the side edges of the stiletto point, creating a delicate frame effect, or scattered across the nail surface in organic, irregular patterns that feel artistic rather than messy. You can also apply gold leaf in geometric designs — thin vertical lines, horizontal stripes, or angular shapes that play with the nail’s negative space. Some people prefer concentrating all the gold at the tip to create a gradient effect from solid pink into gold-flecked white. The key is intentionality — every piece of gold leaf should feel like it was placed with purpose, not randomly sprinkled.
Technique for Pristine Gold Application
- Apply your base pink polish and allow it to dry completely
- Use either a sticky base coat or a thin layer of wet top coat to provide the adhesive surface for gold leaf
- Carefully press small pieces of gold leaf onto the adhesive using a fine brush or your fingertip
- Once all leaf pieces are in place and fully adhered, seal everything with a thick layer of clear top coat
- Gold leaf can shed if not properly sealed, so this top coat layer is absolutely critical
- If using gel polish, cure between the pink polish and the adhesive layer, then cure again after sealing
Insider note: Real gold leaf is pricier than imitation gold leaf, but the color stays true and vibrant indefinitely. Imitation gold can sometimes oxidize over time, turning slightly dull or greenish — this is purely aesthetic, but if longevity of that perfect gold tone matters to you, real gold leaf is worth the splurge.
4. French Tip Stiletto in Pink and White
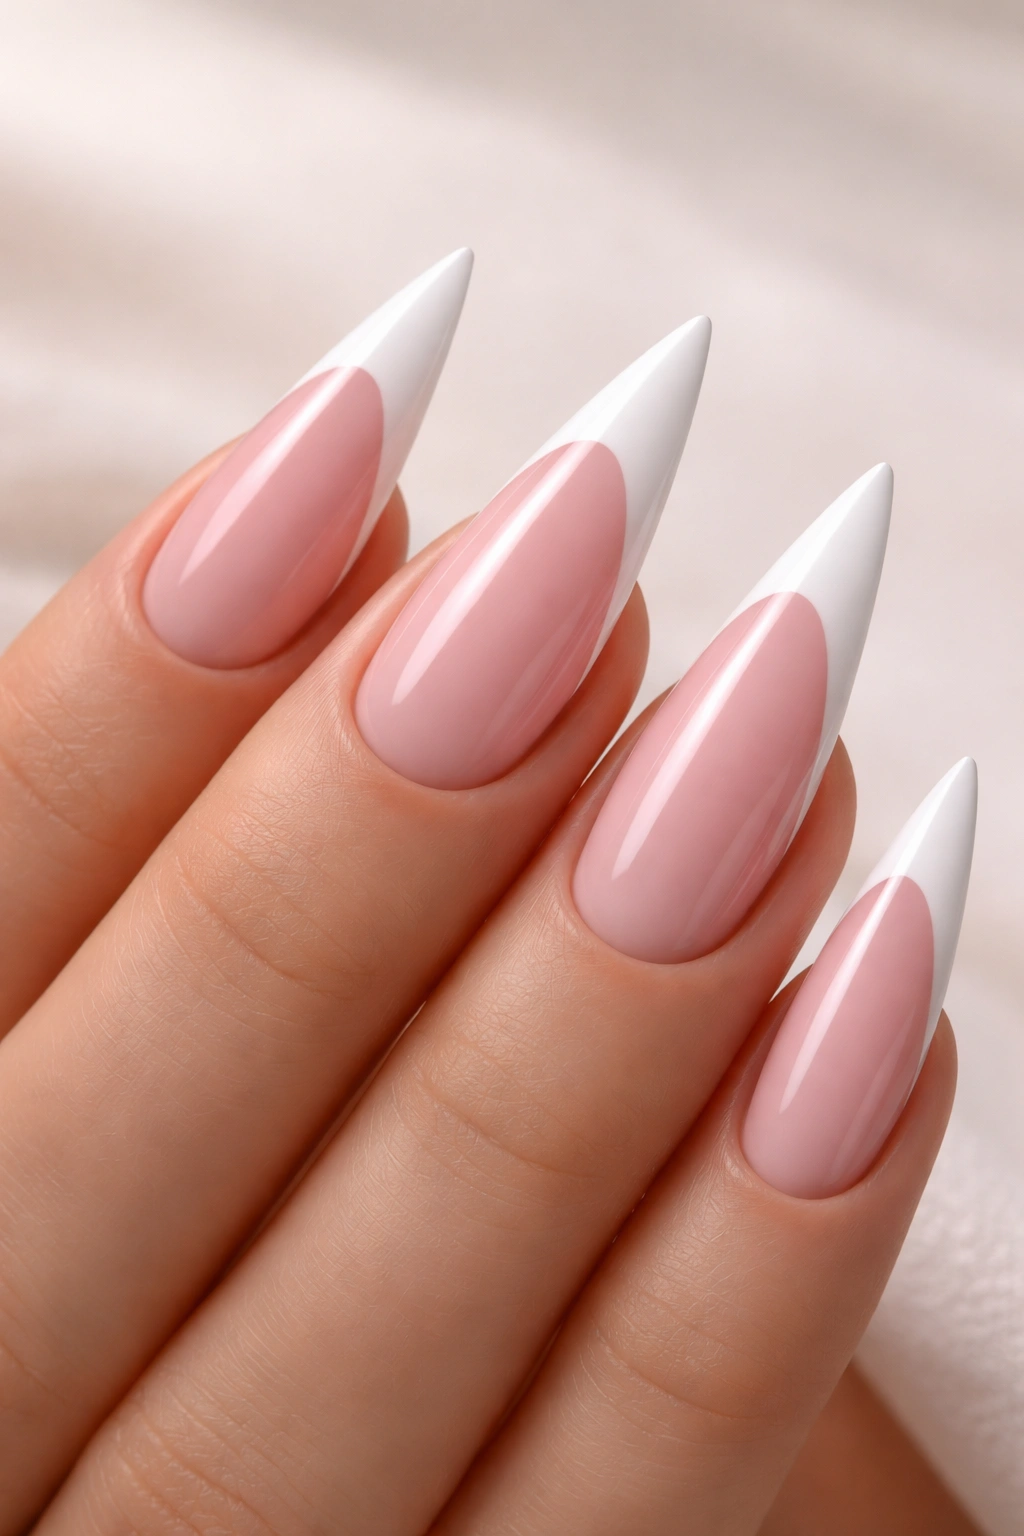
The French manicure never truly goes out of style, and reimagining it with pink undertones creates a fresh take on a classic. Rather than the traditional white tip against a nude base, a pink French uses soft pink as the base color with white (or cream, or pale pink) forming the tip line. This version feels more contemporary and intentional than the standard French while maintaining the timeless sophistication that makes French manicures eternally wearable.
Variations on the Traditional Pink French
The traditional French tip is the most subtle version — a clean white line forms a clear demarcation at the tip, with the base color being your chosen pink. A reverse French flips this concept, using white as the base with pink creating the “tip” color, though this reads as less classic and more fashion-forward. A soft French minimizes the white tip line significantly, creating a barely-there gradient where pink melts into white rather than presenting a dramatic color block. A thick French exaggerates the tip area, with the white extending much further than the traditional one-eighth of the nail length — this creates more visual drama and suits bolder personalities.
Achieving a Precise Tip Line
- Use either nail guides (adhesive stencils that stick to your nail) or freehand the line with a thin striping brush if you’re comfortable
- Nail guides are genuinely your friend here — even professionals use them because they guarantee precision
- Apply your base pink first and allow full drying
- Position your nail guide along where you want the white line to sit
- Paint white polish carefully along the edge of the guide, using thin coats to avoid flooding into surrounding areas
- Remove the guide immediately after painting while the polish is still wet
- Seal with top coat, making sure to cap the white tip edge to extend longevity
Pro tip: The French tip reads more elegant and less thick when you leave a hairline of pink showing between the white tip line and the very edge of your nail — this creates subtle visual separation rather than white going all the way to the extreme point.
5. Glitter Pink Stiletto Nails
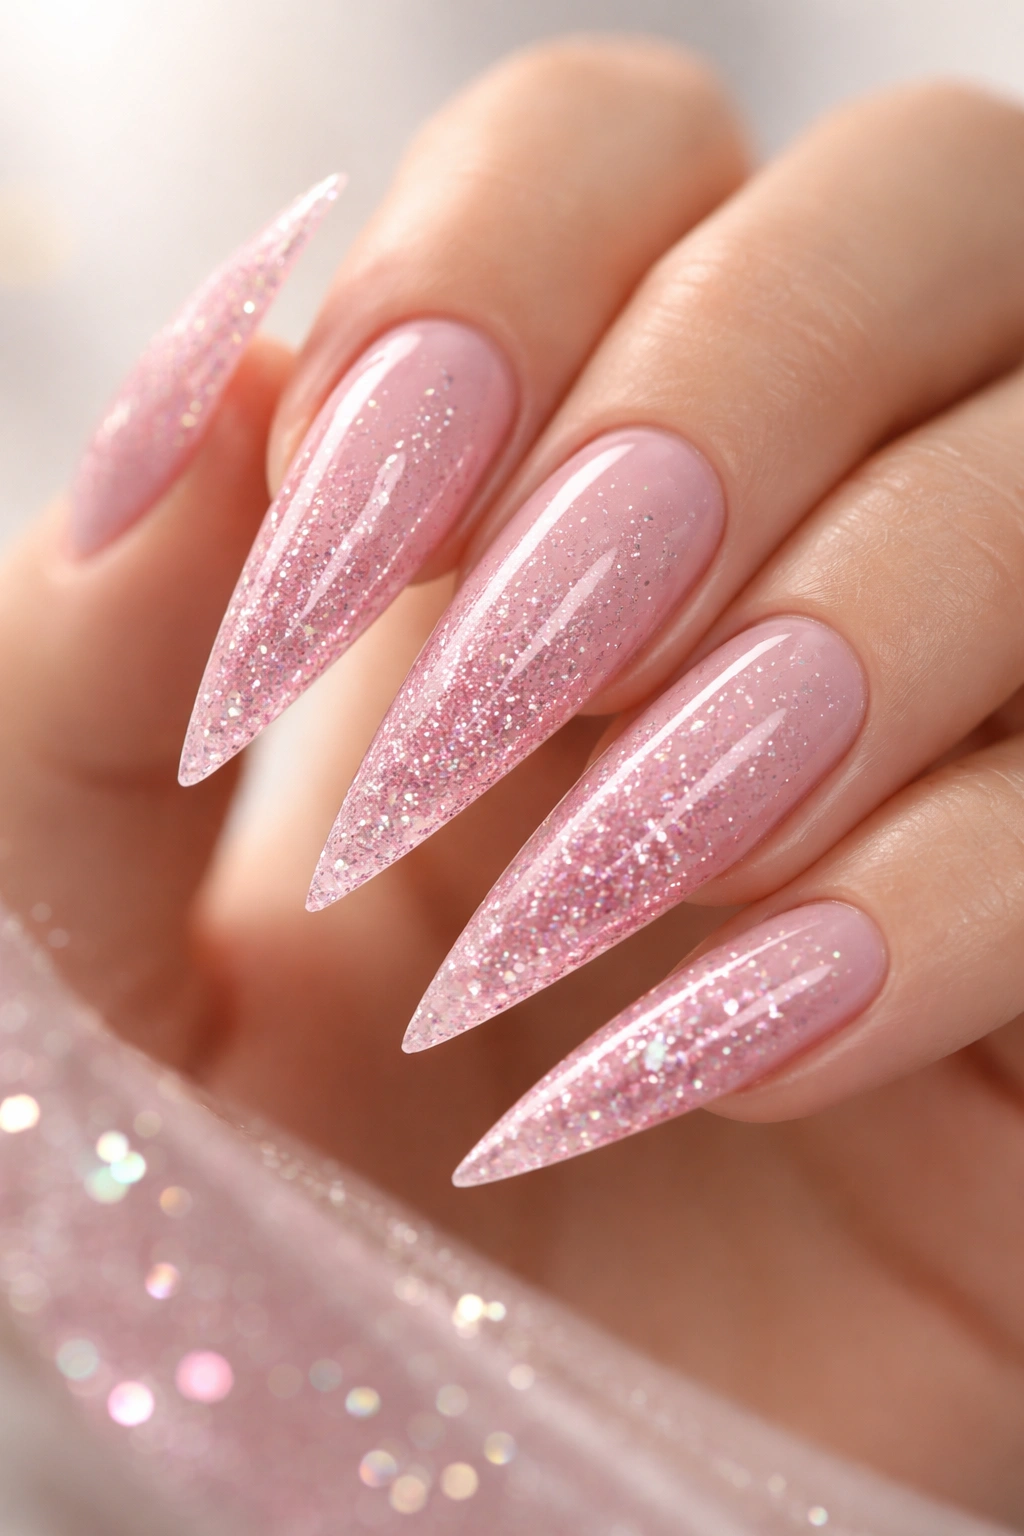
Glitter adds sparkle and festive energy while remaining sophisticated when executed thoughtfully. Pink glitter stilettos work best when you choose quality glitter in appropriate size ranges — fine glitter for subtle shimmer, larger chunky glitter for statement-making sparkle, or a mix of both for layered dimension. The key to glitter feeling elevated rather than juvenile is using restraint in placement and ensuring the base pink color remains the primary visual focus.
Strategic Glitter Placement Options
Full glitter coverage across the entire nail creates maximum drama and suits party settings, themed events, or anyone who loves bold, attention-grabbing nails. A glitter gradient applies glitter densely at the tip and fades to less coverage toward the base, creating visual movement down the nail. Accent glitter concentrates shimmer on just one or two nails per hand, creating a sophisticated asymmetrical look. A glitter ombre blends pink glitter into white glitter, creating a cohesive gradient effect where both colors contain sparkle. Geometric glitter placement uses guides or thin striping brushes to apply glitter in specific patterns — vertical lines, diagonal stripes, or triangular shapes that feel intentional and modern.
Application Process for Long-Lasting Glitter
- Apply your base pink polish in 2-3 thin coats for even, opaque coverage
- While the final coat is still slightly tacky (not fully dry, not wet), apply glitter using a small brush or by pressing individual glitter pieces onto the nail
- Alternatively, mix loose glitter with clear polish or a gel base to create a glitter “paint” that you apply where desired
- Once glitter is in place, allow the base to dry completely before sealing
- Use a thick, generous layer of top coat to seal all glitter pieces — this is critical for preventing glitter from shedding during wear
- Some people apply multiple layers of top coat over glitter for extra security
Worth knowing: Gel glitter polish (where the glitter is suspended in a gel base rather than loose) requires UV curing but produces significantly longer-lasting results than traditional glitter polish mixed with regular lacquer.
6. Marble Pink Stiletto Design
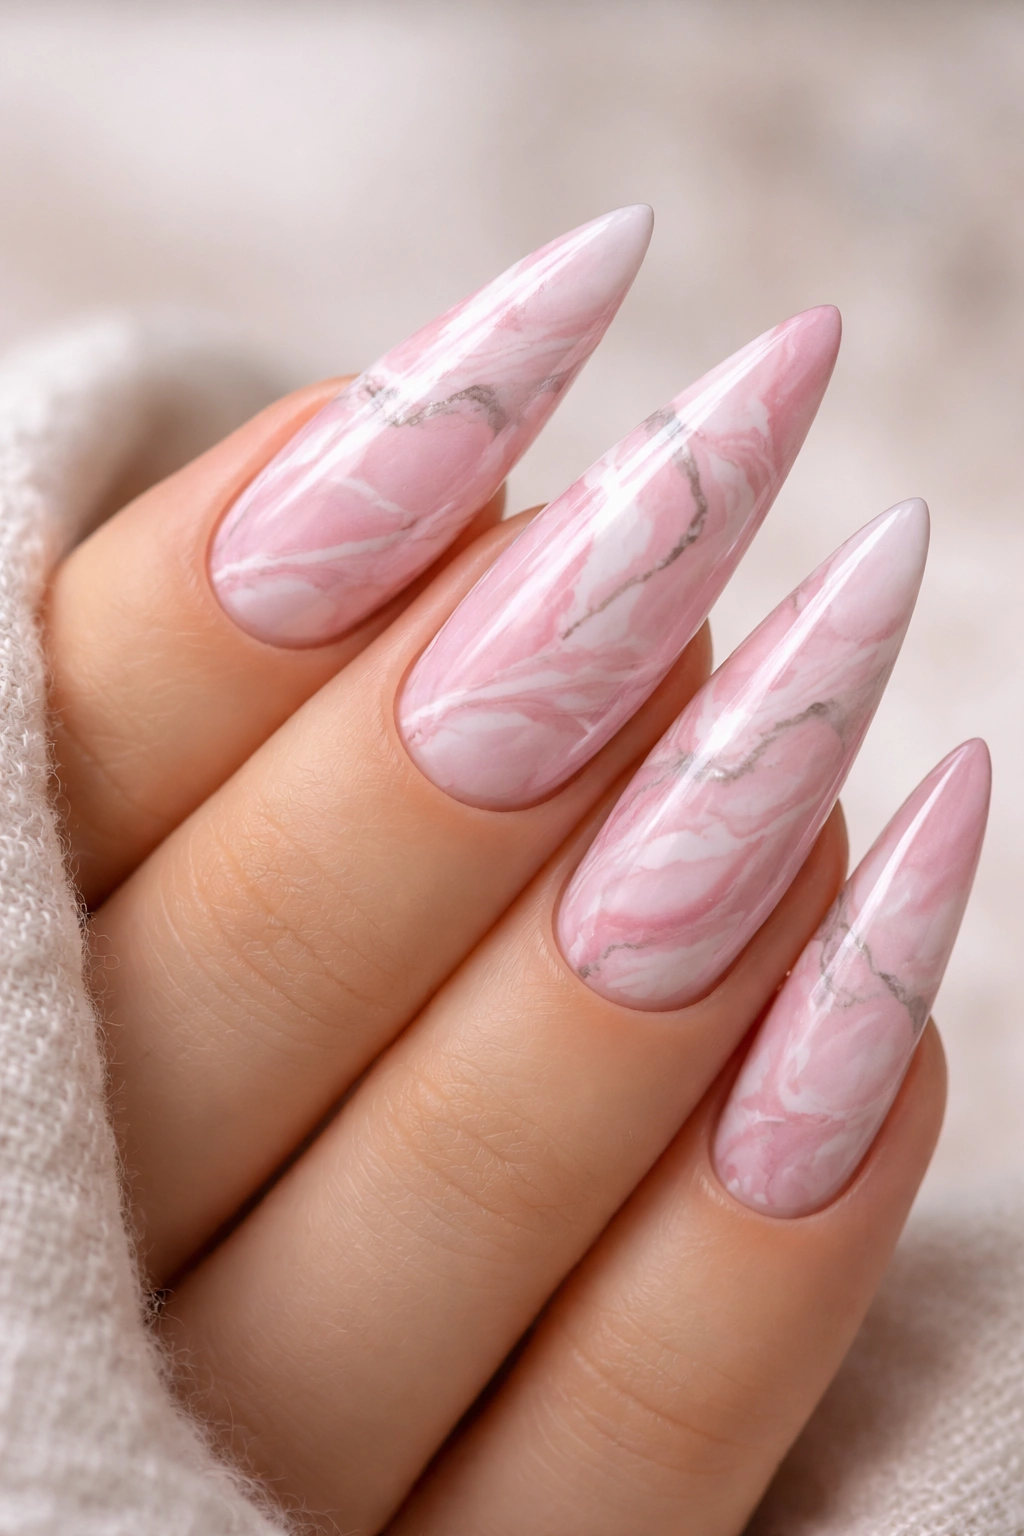
Marble nails create sophisticated, organic pattern that looks like natural stone when executed well. Pink marble combines soft pink with white, gray, and occasionally deeper rose tones in flowing, interconnected lines that mimic real marble veining. This design approach feels upscale and artistic without requiring steady-handed nail art skills — the organic nature of marble means imperfection actually enhances the authentic appearance.
Creating Realistic Marble Veining
The traditional technique uses a water-marble method where you drop various shades of polish into water, swirl them with a tool to create pattern, then dip your nail into the design. This creates organic, unpredictable veining every single time. A more controlled approach uses thin brushes to hand-paint veining directly onto the base color — this requires more precision but gives you more control over where lines appear. Some people use marbling tools (specialized sticks or dotting tools) to create patterns by dragging polish across the wet surface. The key to realistic marble is using varied shades of your base pink (darker and lighter variations) plus complementary neutrals, rather than multiple distinct colors that would read as “busy” rather than “marbled.”
Best Color Combinations for Pink Marble
- Pale pink with white and soft gray veining
- Peachy pink with cream and rose gold accents
- Dusty rose with white and charcoal gray veining
- Ballet pink with champagne and taupe tones
- Blush pink with ivory and very pale lavender
Pro tip: The most elegant marble nails keep the veining sparse and delicate rather than densely patterned — viewers should have to look closely to appreciate the detail, which reads as more intentional and high-end than obvious, heavy veining.
7. Nude Pink with Chrome Powder Stiletto
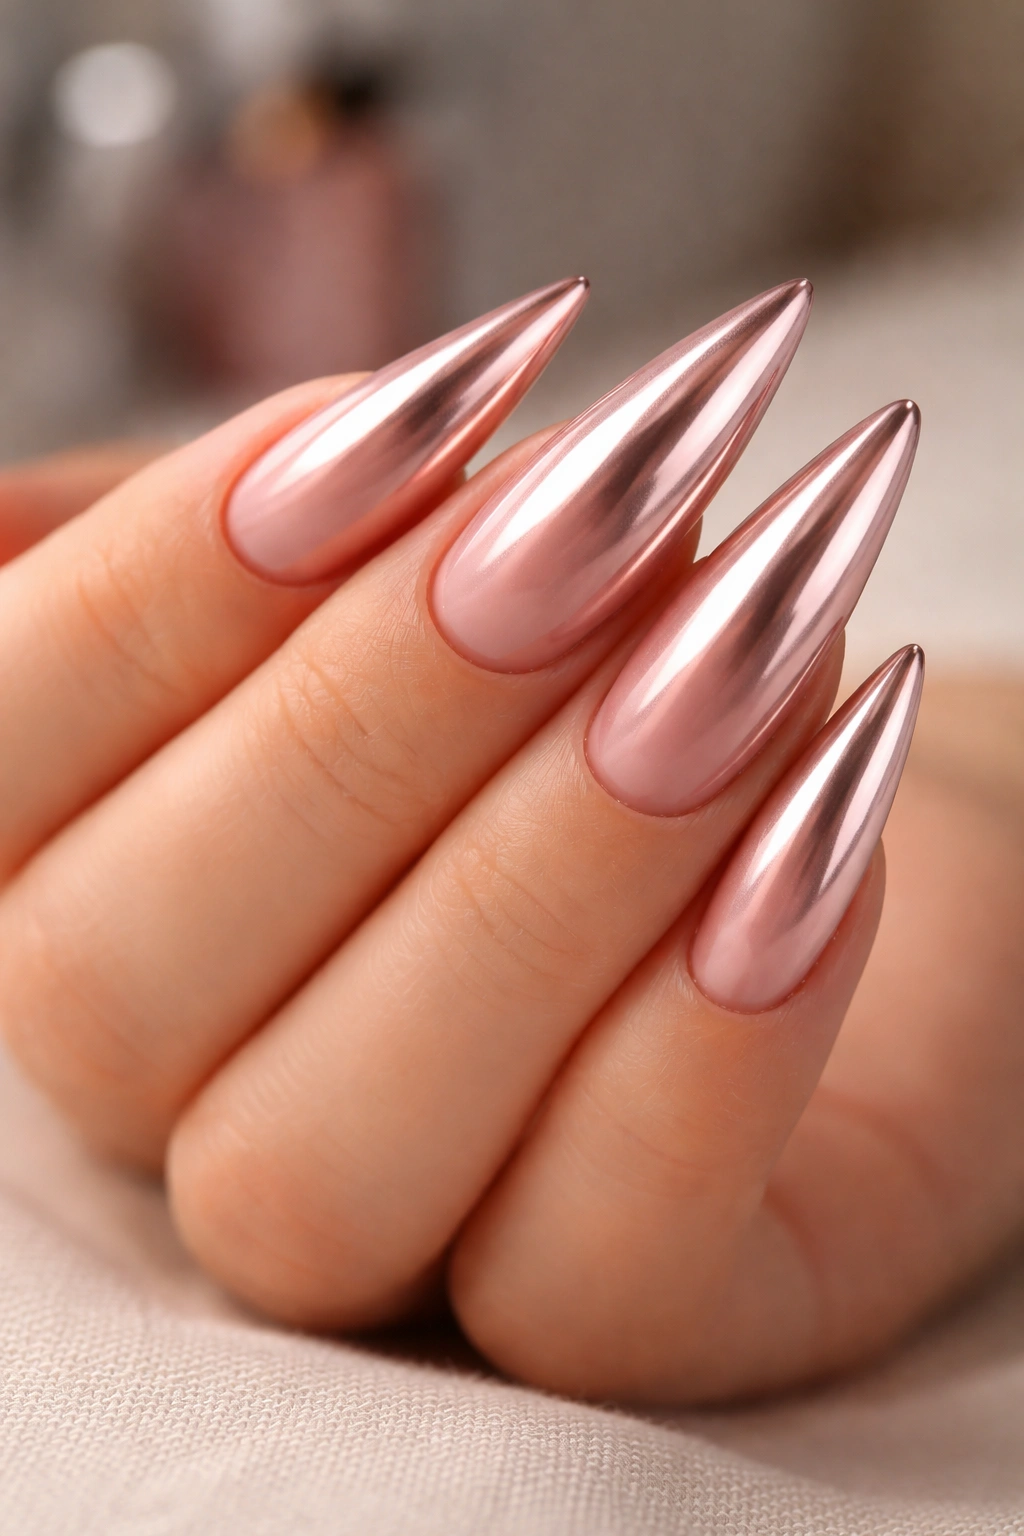
Chrome powder creates a mirror-like metallic finish that’s absolutely show-stopping when applied over the right base color. A nude pink serves as the perfect foundation because it’s neutral enough not to compete with the chrome shine while still adding warmth and elegance. This combination bridges the gap between subtle and glamorous, making it appropriate for both professional settings and special occasions depending on how boldly you apply the chrome.
Understanding Chrome Powder Finishes
Chrome comes in various colors — silver chrome creates a cool, icy reflection, rose gold chrome adds warmth and femininity, gold chrome delivers warmth and luxury, and holographic or rainbow chrome creates prismatic color-shifting effects. The application process requires a sticky gel base (most commonly a builder gel or hard gel), then the chrome powder is rubbed or brushed onto the tacky surface where it adheres instantly. The level of shine and reflectiveness depends on the quality of both the powder and the gel base — cheap chrome powder looks flat and dull, while quality chrome powder catches light so dramatically it’s almost disorienting.
Application Steps for Flawless Chrome
- Apply your nude pink gel base and cure it completely
- Apply a thin, even layer of sticky gel or chrome base coat over the pink
- Using a velvet applicator pad or soft brush, rub the chrome powder firmly and evenly across the sticky surface in circular motions
- The powder adheres instantly as you apply it — continue until you achieve the desired level of coverage and shine
- Seal with a thick layer of clear gel top coat and cure
- The chrome effect will be instantly visible and intensely reflective
Insider note: Chrome powder application is genuinely easier on gel nails than on regular polish because the tackiness of the gel base provides reliable adhesion. On regular polish, chrome pigments tend to shift and look uneven.
8. Matte Finish vs Glossy Finish Pink Stilettos
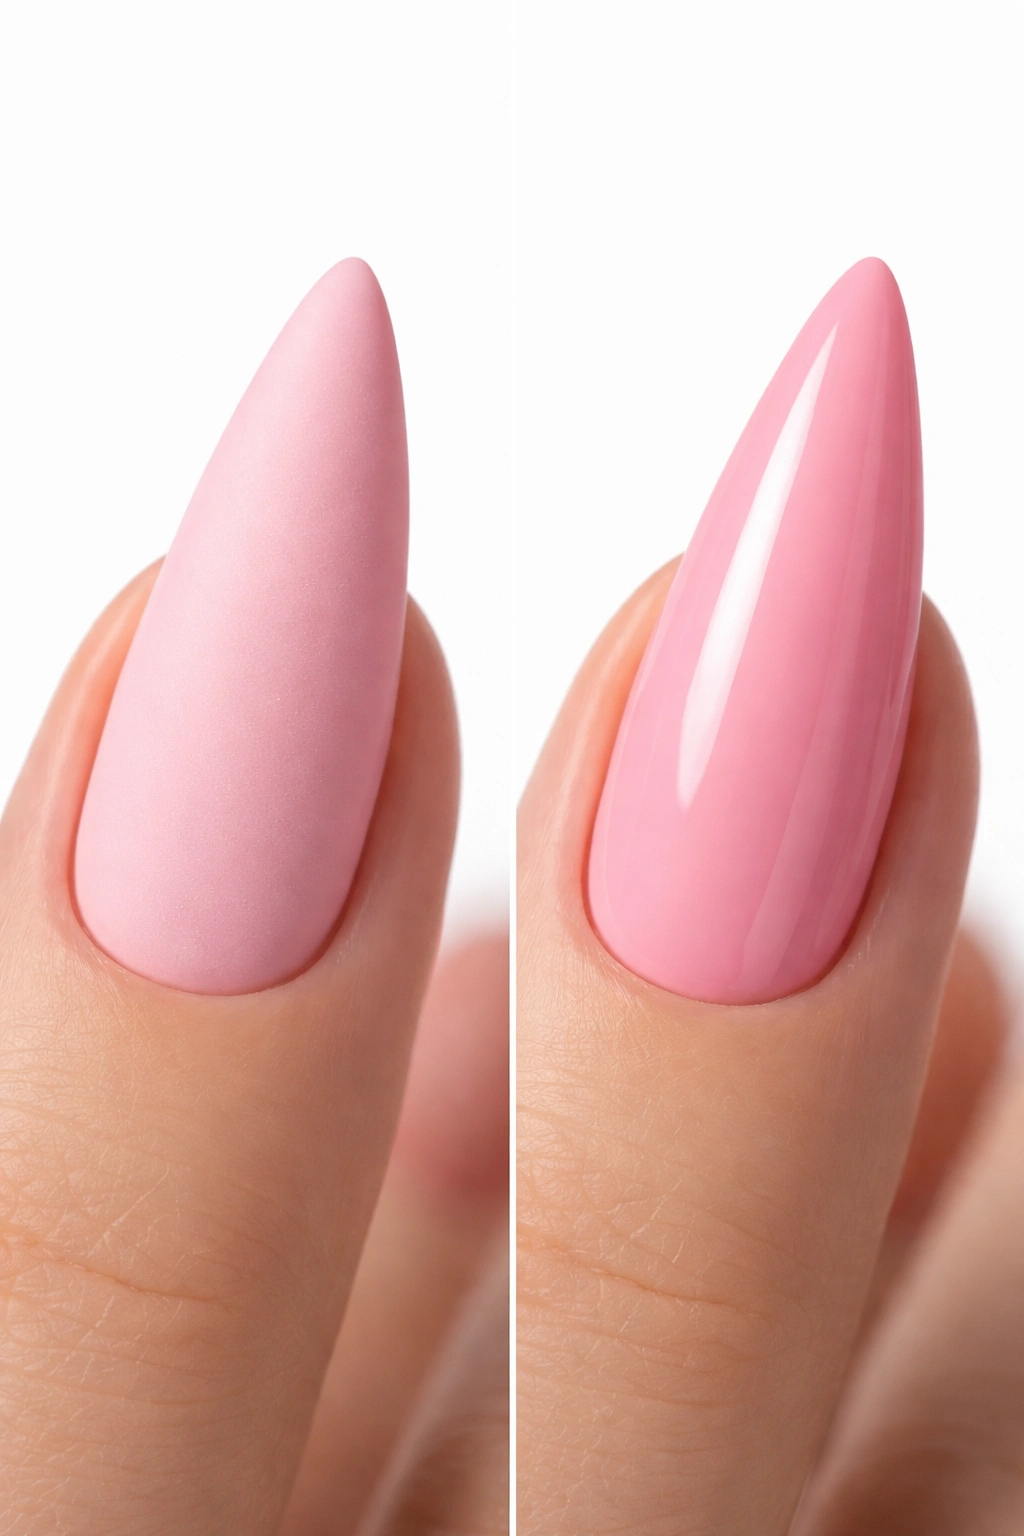
The finish you choose transforms the entire mood and perception of your pink stilettos. A high-gloss finish reflects light dramatically, creates maximum visual shine, and reads as more formal and polished. A matte finish diffuses light, creates a velvety appearance, and feels more modern and understated. Neither is objectively better — they simply create different aesthetics that suit different occasions and personal preferences.
The Psychology of Different Finishes
Glossy pink nails feel classic, elegant, and traditionally feminine — they photograph beautifully and catch light in a way that makes nails appear shinier and healthier. Matte pink nails feel contemporary, artistic, and intentional — the absence of shine focuses attention entirely on color and shape rather than light reflection. A hybrid approach called “satin finish” splits the difference, creating a soft sheen that’s neither fully matte nor fully glossy. Some people create intentional texture contrast by making the tips glossy while keeping the base matte, or vice versa, creating visual interest through finish variation.
Finish Options at the Application Stage
- Glossy: Use a standard high-shine top coat — the thicker the coat, the shinier the finish
- Matte: Use a matte top coat specifically formulated for that finish — don’t apply matte over a glossy base, as this looks patchy
- Satin: Many brands offer satin-finish top coats that fall between matte and glossy
- Hybrid: You can apply glossy top coat to some areas and matte to others using different applicators and careful application
- Texture: Add micro-beads, crushed shells, or textured powders to the wet top coat for intentional texture rather than pure matte finish
Pro tip: Matte finishes show fingerprints and water spots much more visibly than glossy finishes, so matte nails require more frequent cleaning if you want them to look pristine throughout the day.
9. Pink Stiletto with 3D Embellishments
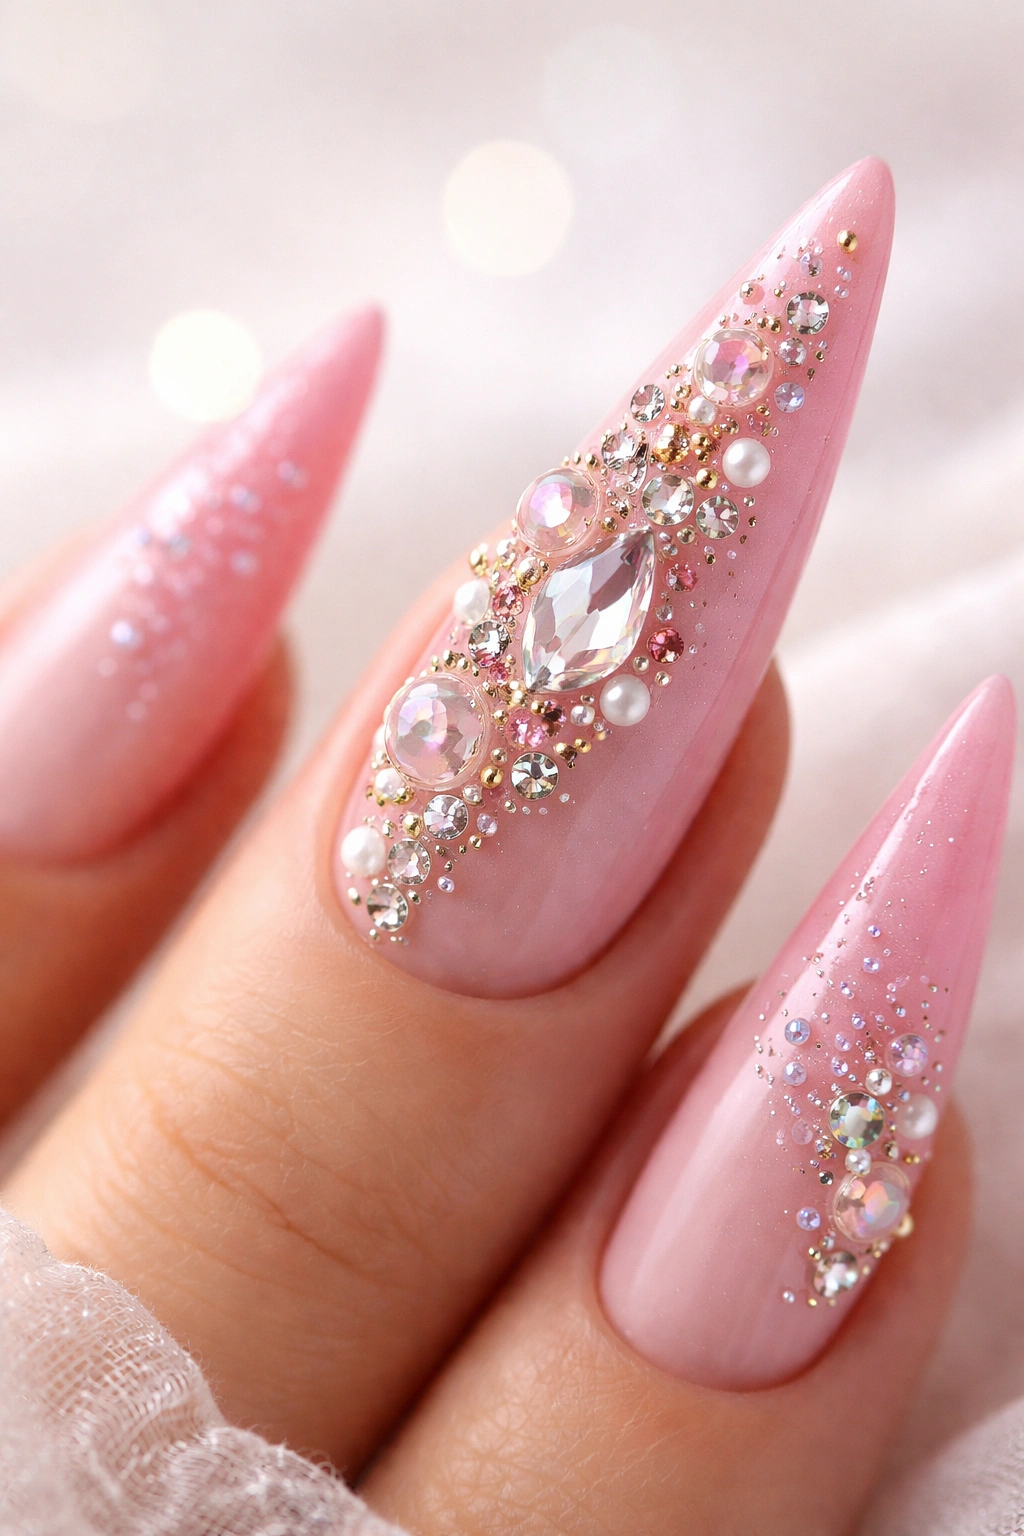
Three-dimensional nail art takes your manicure from decorative to genuinely sculptural. Small rhinestones, pearls, metal studs, tiny charms, or hand-sculpted elements attached to the surface of pink stilettos create a “wow” factor that flat nail art simply cannot achieve. This approach works best for special occasions where you’re specifically going for drama and impact — wearing heavily embellished nails in professional environments or daily life can feel overwhelming.
Types of 3D Elements to Consider
Rhinestones are the classic choice — they’re affordable, come in countless sizes and colors, and catch light beautifully. Pearls add elegance and sophistication, especially in white or cream tones contrasting against pink bases. Metal elements like small studs, spikes, or geometric charms add edge and modernity. Silk flowers, faux pearls, or tiny realistic elements create detailed, artistic looks. Hand-sculpted elements using acrylic or gel allow completely custom designs — tiny bows, flowers, or abstract shapes built directly onto the nail surface. Chrome balls, mirror pieces, or other reflective elements add shine and movement.
Securing 3D Elements Permanently
- All embellishments must be adhered with a strong nail-specific glue or gel-based adhesive
- Standard nail polish alone will not hold 3D elements — you need either gel polish with a sticky layer, or a dedicated nail glue
- Rhestones and pearls are typically glued directly to the nail surface
- For more complex designs, build a slight gel platform first, then adhere elements to that platform for better structural support
- Seal everything with a thick layer of clear top coat, being careful not to dislodge elements while applying it
- Elements should feel completely secure and not move or shift when you apply pressure
Worth knowing: Heavily embellished nails can catch on fabric, hair, and other surfaces more easily than smooth nails, so durability and practical wear are worth considering before committing to extremely elaborate designs.
10. Pastel Pink Ombre Effect with Gradient Base
A pastel pink ombre transitions from pale, barely-there pink at the base through progressively deeper pink tones toward the tip, creating subtle dimension and a romantic, soft aesthetic. This differs from the pink-to-white ombre because it stays entirely within the pink family, creating visual interest through depth of shade rather than dramatic color contrast. The effect is ethereal and dreamy, perfect for people who love pink but want something more sophisticated than a solid shade.
Creating the Pastel Pink Gradient
You’ll need at least 4-5 varying shades of pink, ranging from nearly translucent pale pink to a more saturated, deeper pink. Paint these in layers on the nail, starting with the lightest shade as your base, then applying increasingly darker shades toward the tip. The sponging technique works well here — use a small wedge sponge to dab each successive shade onto the nail, slightly overlapping previous layers to create smooth transitions. Alternatively, you can apply thin coats of progressively darker polish directly to the nail, with the darkest shade concentrated at the tip and feathering back toward the base.
Color Progression That Works
- Start with a base of pale, nearly-white pink
- Apply a soft blush pink in the middle section of the nail
- Deepen to a classic medium pink in the upper-middle area
- Finish with a more saturated rose or dusty mauve-pink at the tip
- Each shade should be visible and distinct, but transitions should feel smooth rather than striped
Pro tip: Matte top coat actually enhances pastel pink ombres because it diffuses the light in a way that makes the subtle color transitions more visible — a high-shine glossy top coat can sometimes make pale pastels look washed out and flat.
Final Thoughts
Pink stiletto nails offer remarkable versatility within a seemingly simple concept. From minimalist baby pink perfection to elaborate 3D embellishments, the color pink paired with the dramatic stiletto shape creates a look that’s simultaneously timeless and endlessly customizable. The key to choosing your perfect pink stiletto style is considering both your lifestyle and the occasions you’re dressing for — what works for a music festival differs from what works in a law office, though some styles (like classic baby pink or elegant French tips) transition seamlessly across settings.
The most satisfying part of this nail journey is discovering that your personal style can shine through even when working within a single color family. You might start with simple solid pink and gradually explore gradients, then textures, then embellishments. Or you might jump straight to the most elaborate designs. Either way, pink stilettos provide a framework that’s sophisticated enough to earn respect while creative enough never to feel boring. Invest in good base products, take care of your nail health by keeping them hydrated and strong, and don’t be afraid to experiment — some of the most beautiful pink stiletto styles come from happy accidents and creative combinations that no one thought to try before.
