

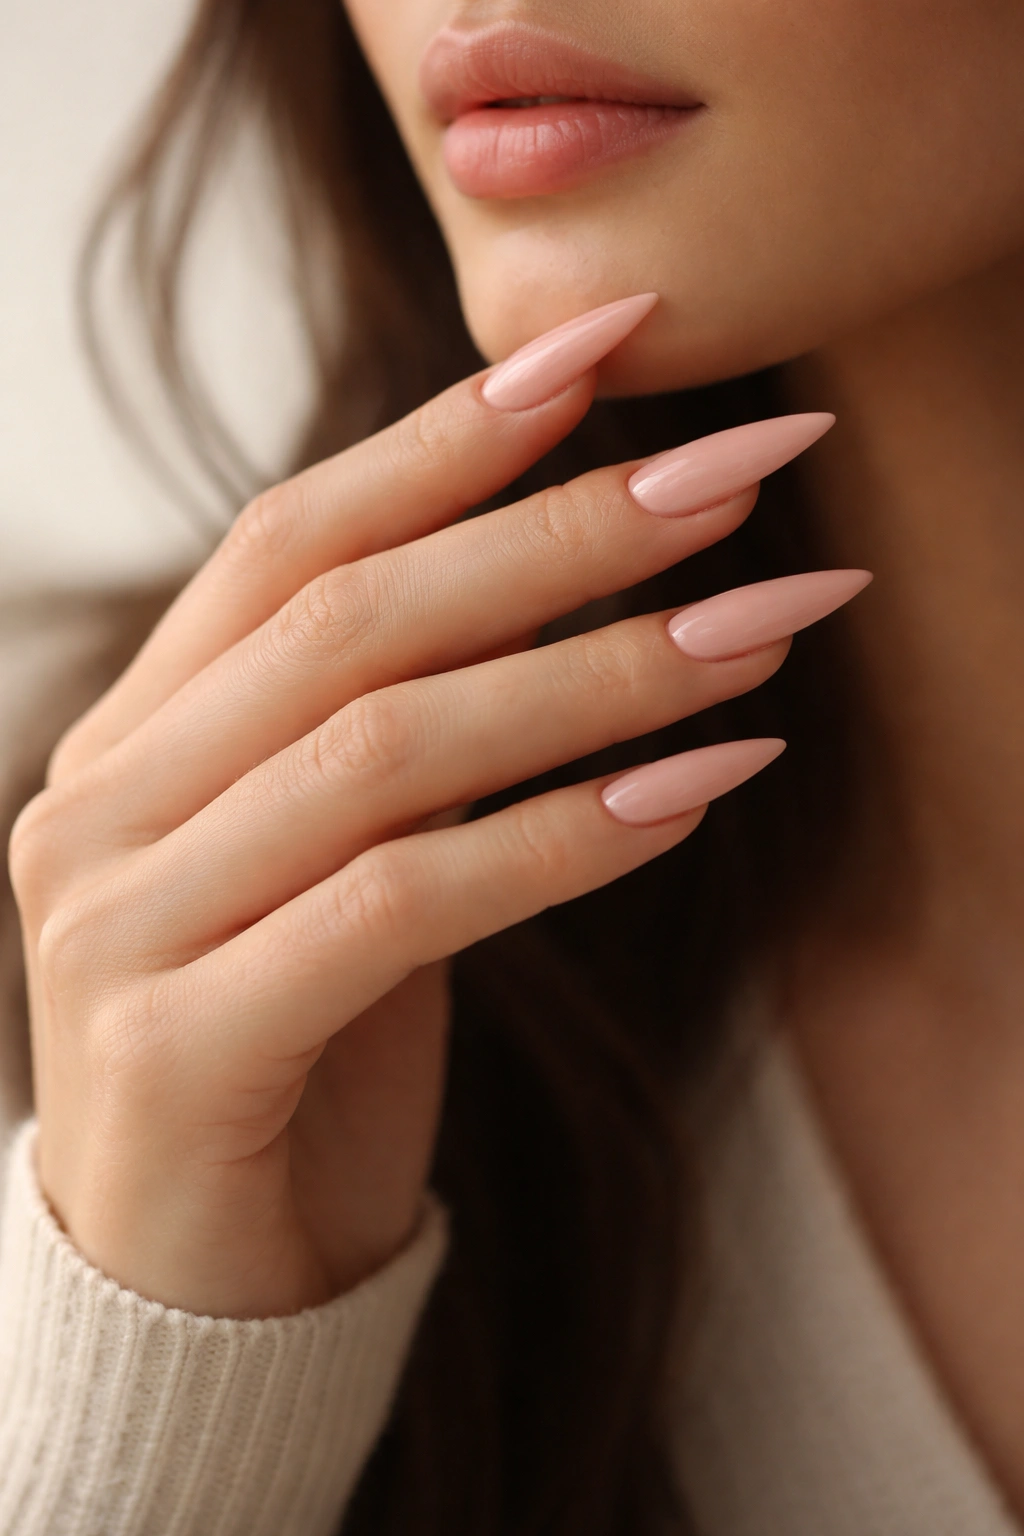
Press-on stiletto nails have completely changed the game for anyone who wants a high-impact manicure without the salon chair time. These elongated beauties give you that fierce, polished look—but here’s the thing: not every design works for every person or occasion. The key is finding press-on stiletto styles that actually feel right for your lifestyle, skin tone, and the level of boldness you’re comfortable rocking.
What makes press-on stilettos so game-changing is that you get salon-quality results in your bathroom, on your own schedule. You’re not waiting weeks for an appointment or paying $50-80 every three weeks. A good set costs $8-20 and lasts 2-4 weeks with proper care. Plus, if you’re tired of a design, you can take them off and try something completely different the next day. That’s freedom.
The best part? You don’t need fancy tools or artistic skills to make press-on stilettos work beautifully. Sizing, prep, and application are the real secrets—nail art comes second. Once you nail those fundamentals (pun intended), you can wear any of these 18 designs with genuine confidence. Whether you’re drawn to timeless elegance, bold statement looks, or something playful and unexpected, there’s a press-on stiletto style here that’ll make you feel absolutely unstoppable.
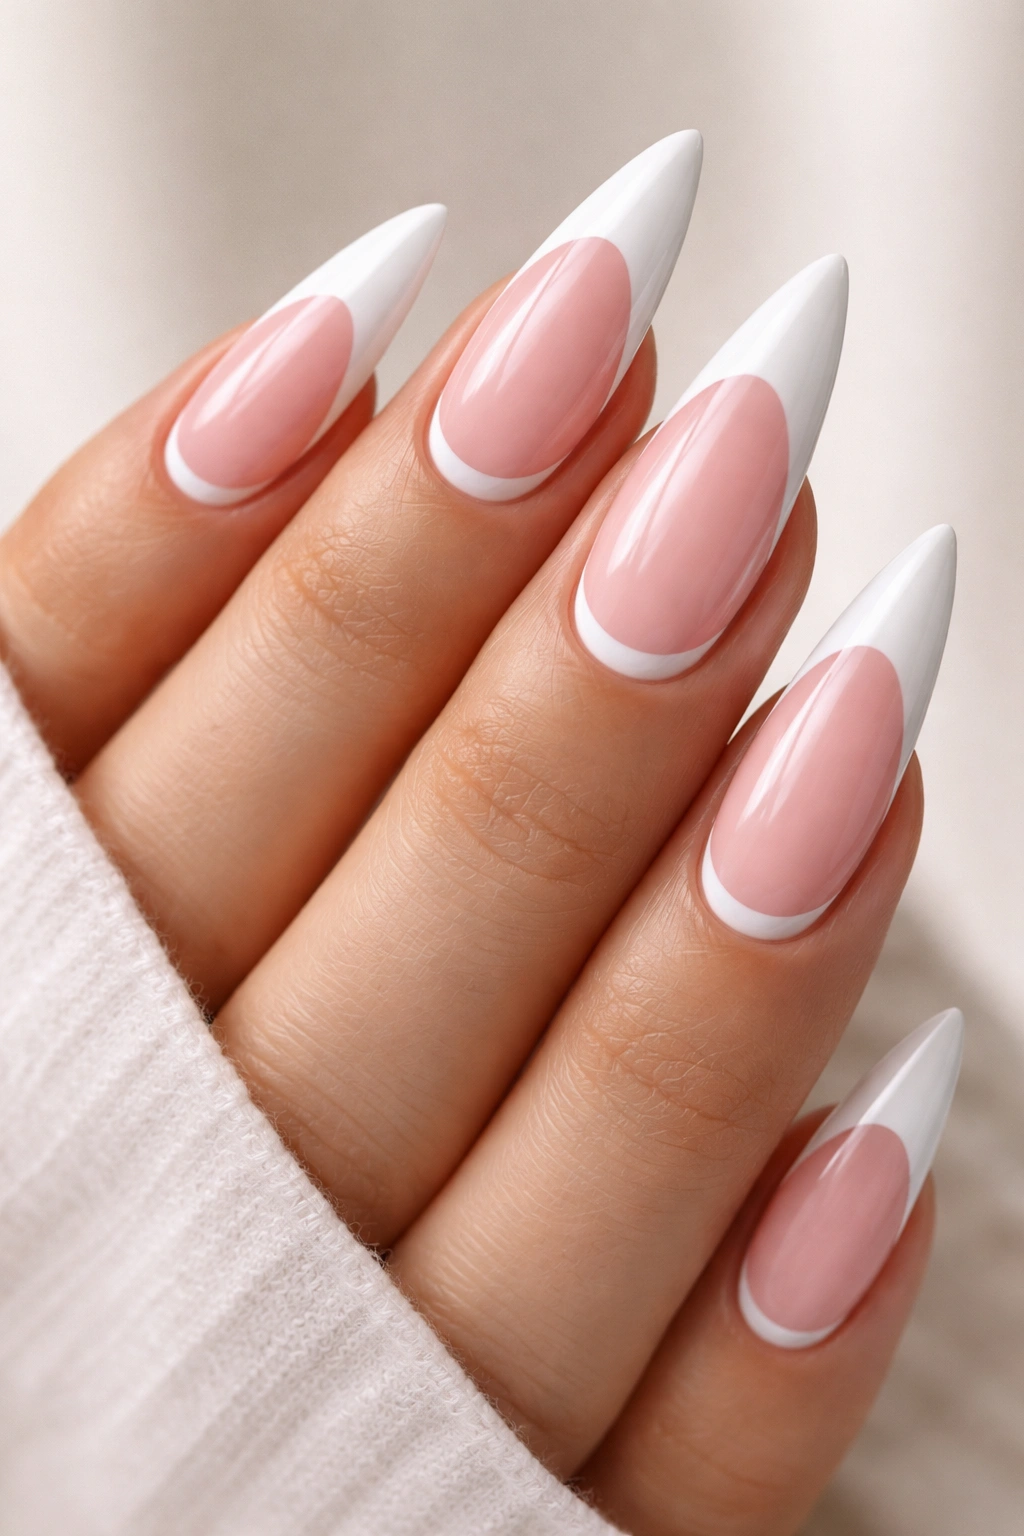
1. Classic Nude with Gold Accent Line
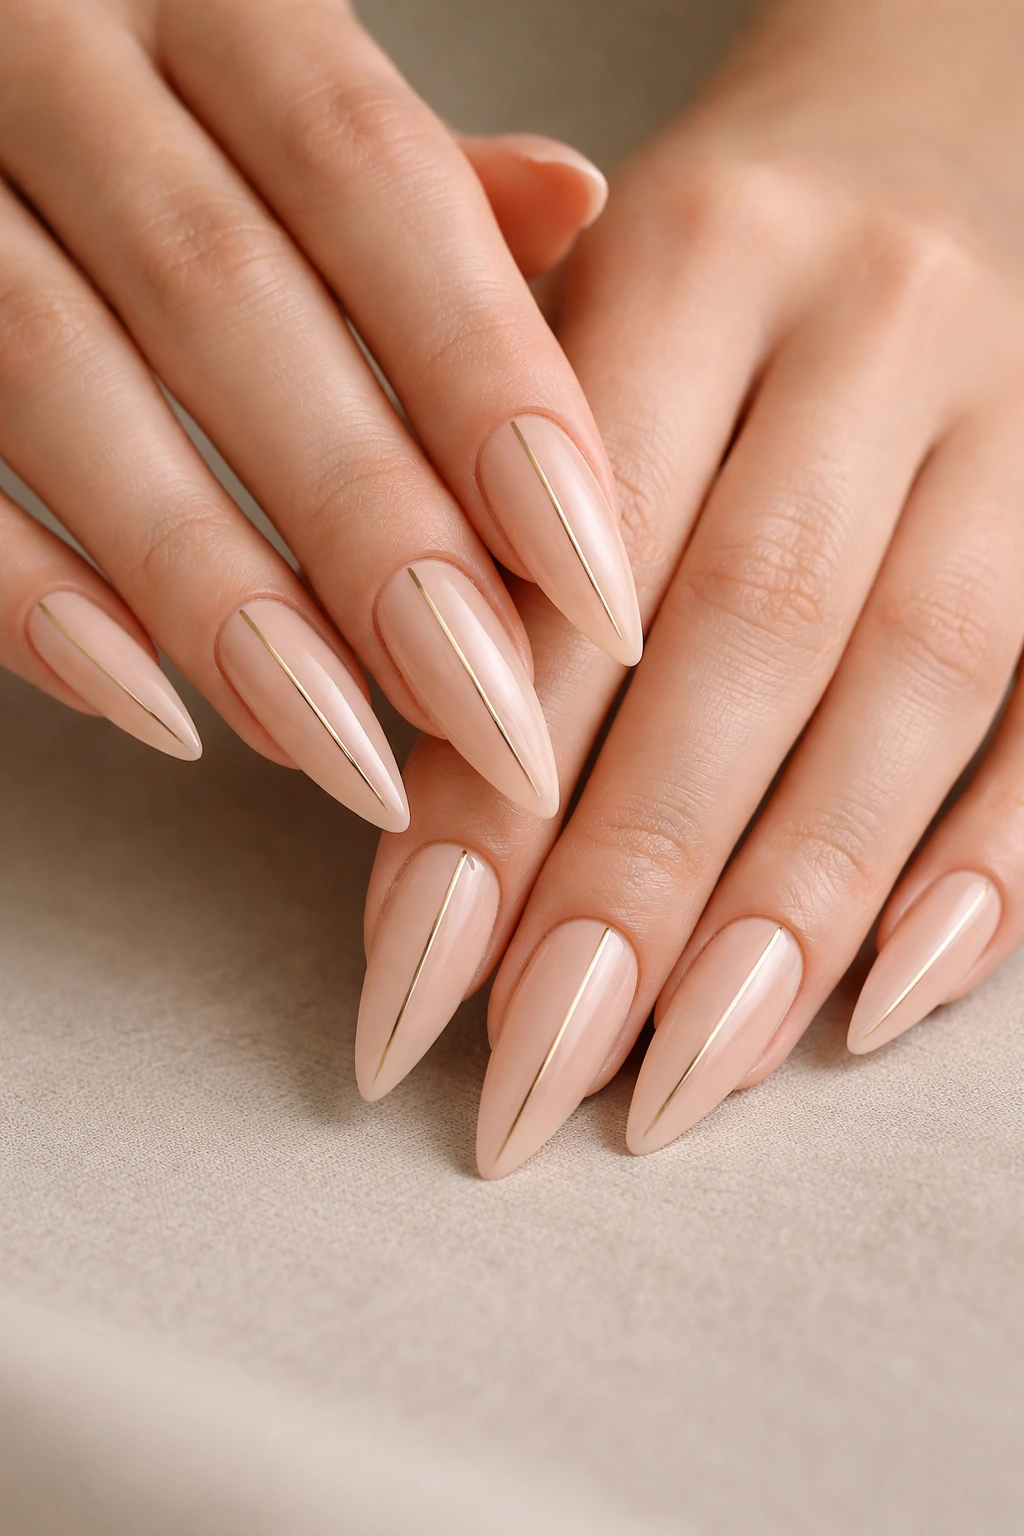
Nude stilettos are the foundation of any press-on collection, and there’s nothing boring about them when executed with intention. This design keeps things sophisticated and work-appropriate while that thin vertical gold line down the center of each nail adds just enough personality to keep it interesting. The nude tone extends the appearance of your fingertips, making your hands look naturally longer.
Why This Design Works for Everyone
Nude press-ons read as “intentionally polished” rather than trying too hard, which is why they’re the go-to move for professional settings, important events, or when you want people looking at your face instead of your nails. The gold accent line catches light without screaming for attention. This design also hides slight imperfections and nail gaps better than busier patterns, making it forgiving for first-time press-on users.
Application Tips and Longevity
- Choose a nude that matches your skin tone exactly—too pink and it looks costume-y, too yellow and it looks aged. Swatch against your palm, not your nail bed.
- Apply the gold line with a thin detail brush or nail art pen after the base sets completely. Seal with a glossy top coat.
- This design can easily last 3-4 weeks because there’s minimal complexity to chip or lift at the edges.
Worth knowing: If you don’t trust your hand-steadiness with the gold line, pre-made versions with built-in designs are available from brands like Kiss and Olive & June—same effect, zero DIY pressure.
2. Deep Burgundy with Rhinestone Studding
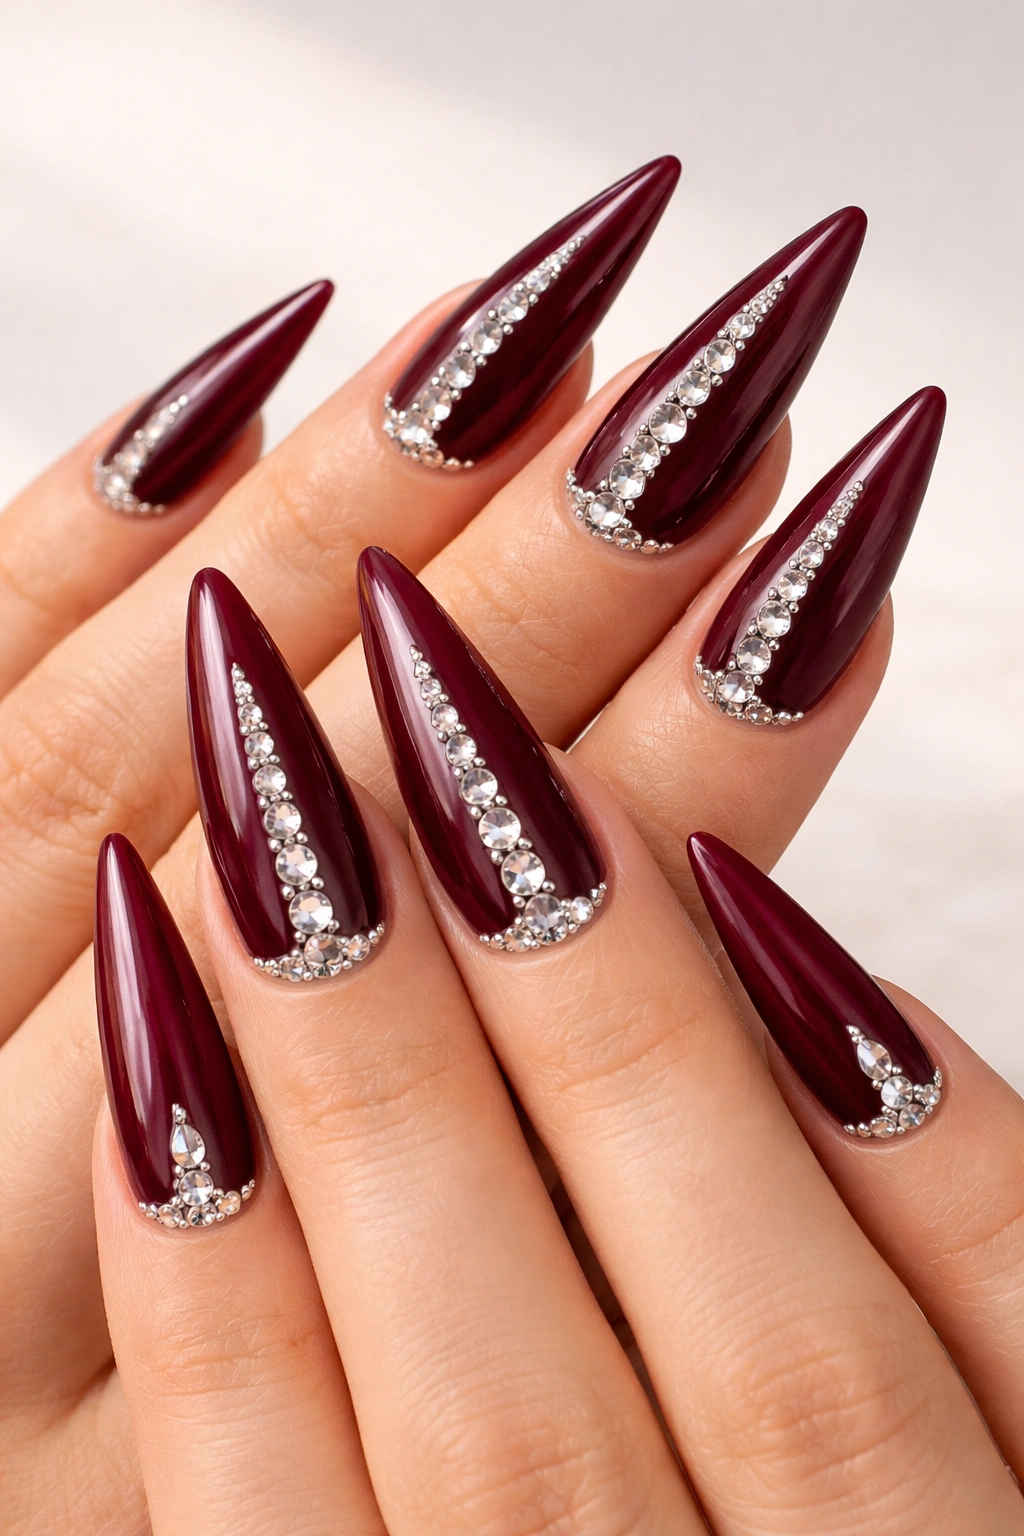
Burgundy stilettos hit different when the weather turns cooler, and adding rhinestones transforms them from “everyday professional” into “I have important plans and I’m dressed for them.” This color reads as sophisticated and moody without being as harsh as pure black. The strategically placed rhinestones—typically along the cuticle area and down the center—add texture and light-catching detail.
The Psychology Behind This Color Choice
Burgundy is wine-dark, slightly mysterious, and flatters nearly every skin tone. It suggests maturity and intention without the formality of full black. The rhinestones elevate it further, signaling that you’ve put thought into your appearance. People notice detailed nails like these, and most comments lean toward admiration rather than judgment.
Setting Rhinestones That Actually Stay Put
- Apply rhinestones over gel base coat or acrylics, not directly to the polish—adhesive holds better on a sticky surface.
- Use quality rhinestone glue (never just polish) and press each stone straight down for 3-5 seconds.
- Once the glue dries completely, apply a glossy top coat that encapsulates the stones. This locks everything in place.
- Expect 2-3 weeks of wear before occasional stones begin to loosen—a quick dab of glue keeps them secure.
3. Ombré Purple to Black Gradient
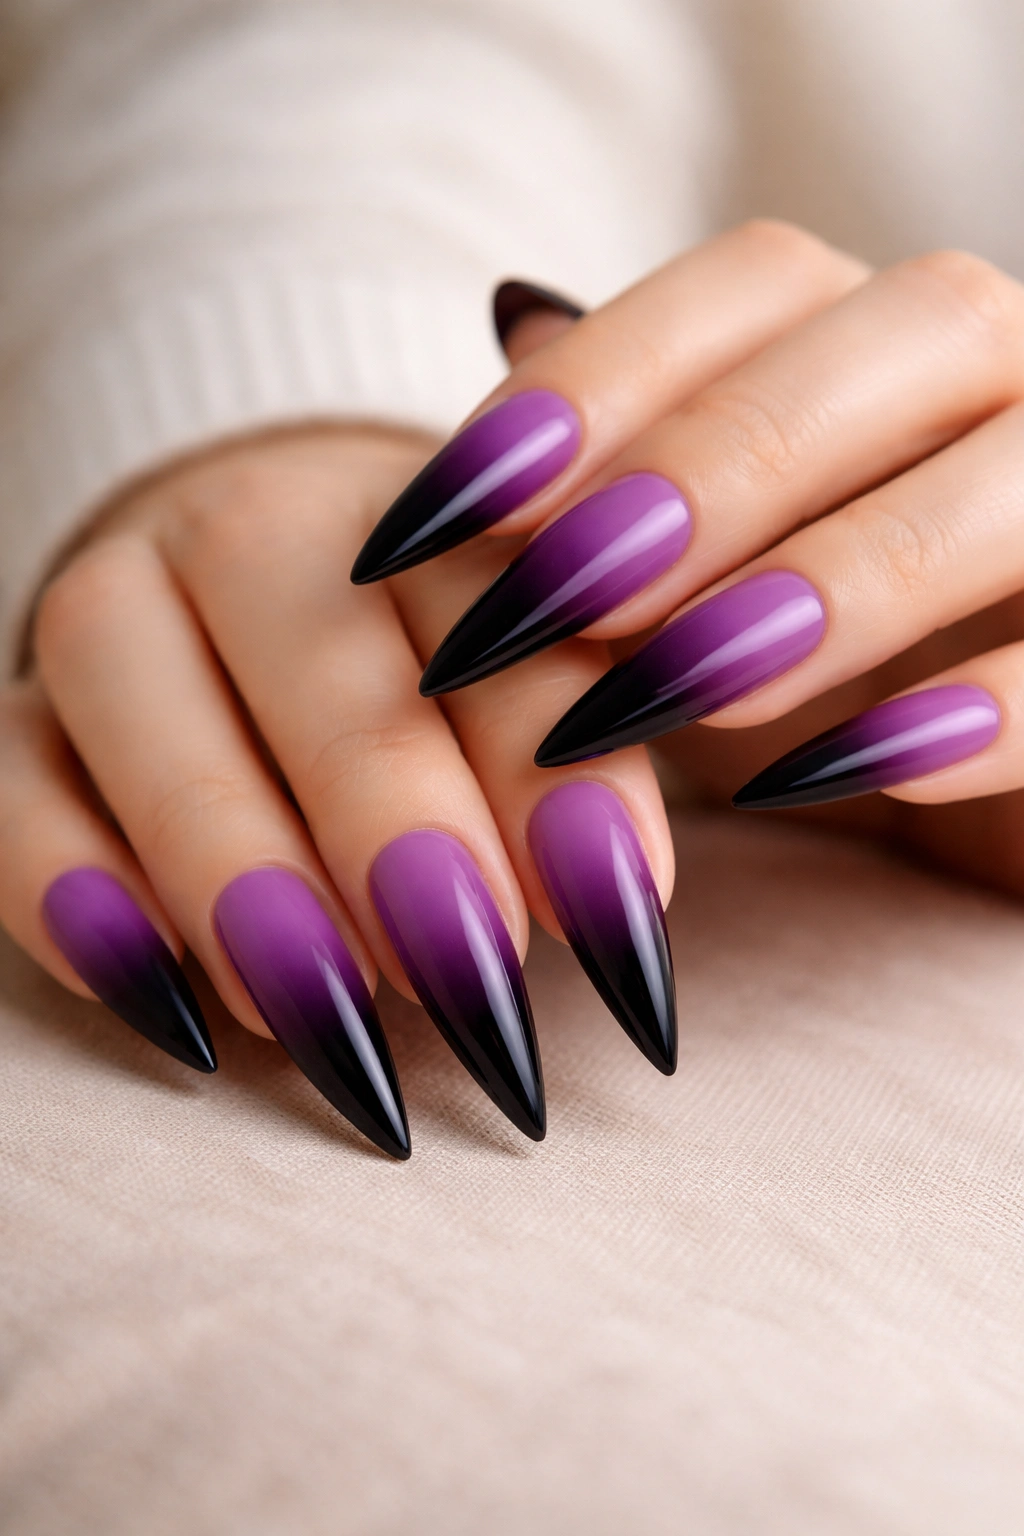
Ombré stilettos create visual movement and depth that solid colors simply can’t match. A purple-to-black gradient reads as artistic without being chaotic, and the color journey from lighter to darker as your nail extends is genuinely striking. This design looks especially dramatic on longer stiletto shapes because the gradient has more space to develop.
Creating or Purchasing Ombré Press-Ons
If you’re buying pre-made, verify that the gradient isn’t printed (which chips quickly) but actually blended into the nail surface. If you’re creating this at home, the sponge-and-polish technique works well: dab purple and black polish onto a makeup sponge, press your nail onto the sponge in a rolling motion, and seal with gel or top coat.
Color Combinations That Work Best
- Purple to black is the most versatile (works year-round, all skin tones)
- Blush pink to burgundy (romantic, professional)
- Navy blue to gold (unexpected but sophisticated)
- Emerald to forest green (nature-inspired, elegant)
The rule: choose colors that are at least 3-4 shades apart so the gradient is visible—too-similar colors look muddy rather than intentional.
4. Matte Black with White Geometric Shapes
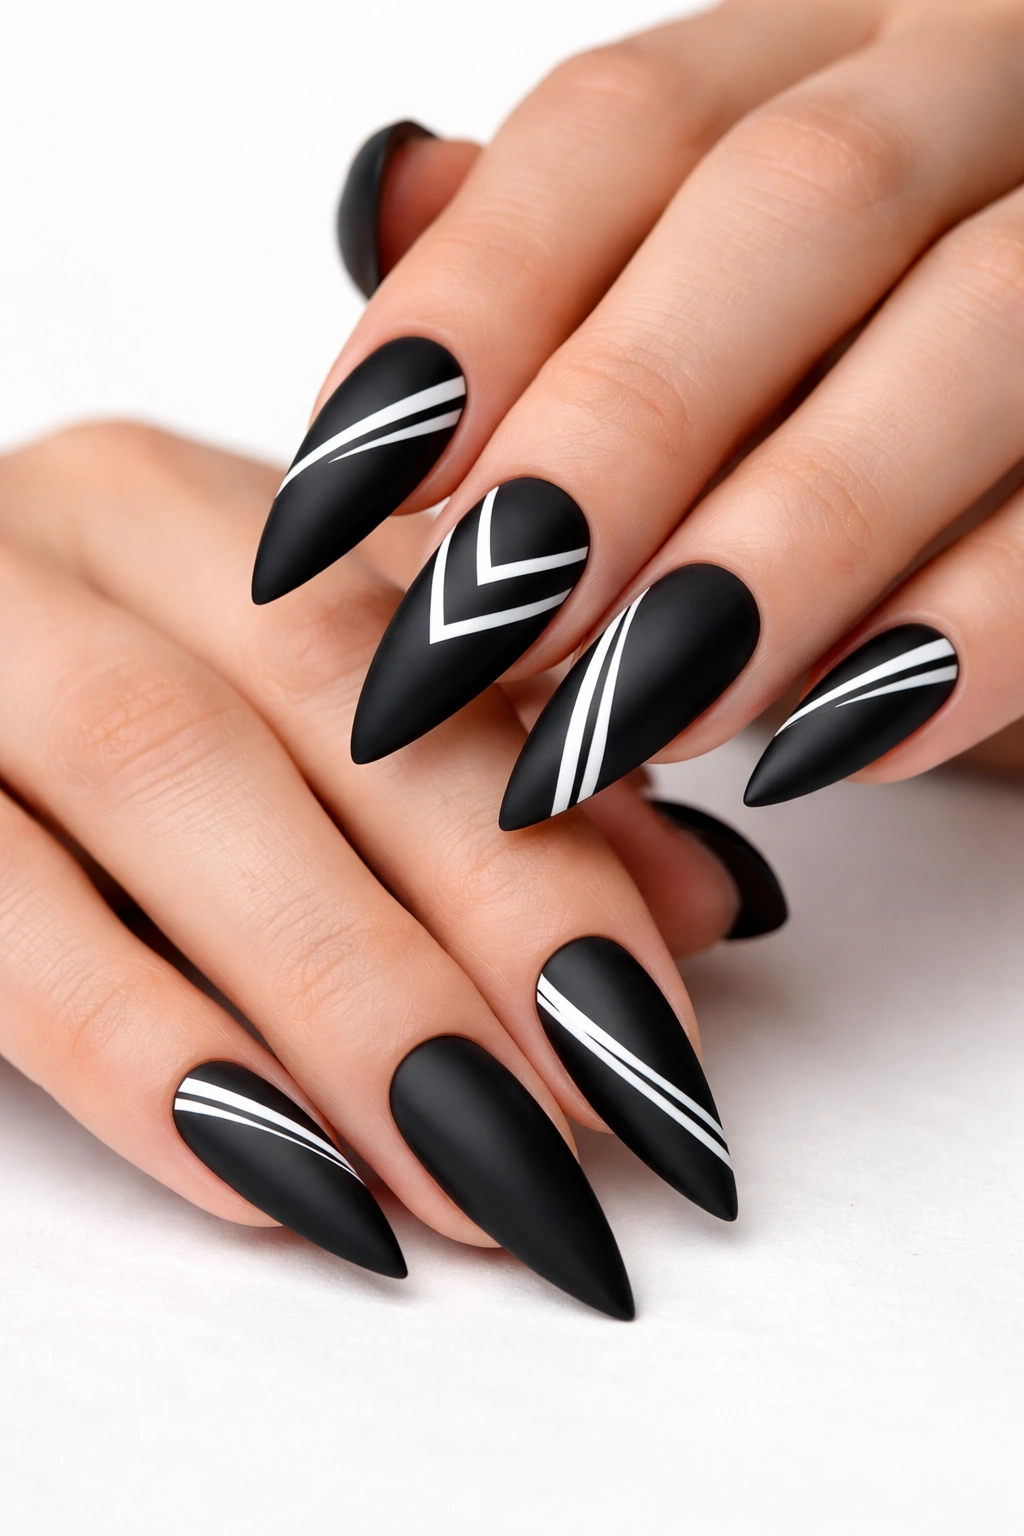
Matte black is sleek and architectural, and geometric white shapes—triangles, lines, half-moons, or abstract forms—create a visual contrast that feels modern and sharp. This design is particularly effective because the high contrast between matte black and crisp white makes each shape read clearly and intentionally. It’s minimalist but definitely not boring.
Matte Finish Application and Durability
Matte nails require a matte top coat applied over dried polish—standard glossy finishes will ruin the effect. The matte top coat is the weak point in this design; it’s more fragile than glossy finishes and chips more easily. Expect 2-3 weeks of wear before visible wear appears around the tips and edges.
Geometric Pattern Ideas
- Negative space designs (shapes are removed polish, showing the nail underneath)
- Thin white lines creating grids or angular patterns
- White half-moons at the cuticle creating a reverse French manicure
- Abstract splatters or drips that feel intentionally artistic
- Thick geometric blocks that cover roughly 30-50% of each nail
The best approach: use a nail art pen or thin brush for precise lines. If your hands shake, tape off sections with thin striping tape before applying color for cleaner edges.
5. Clear with Embedded Flowers or Leaves
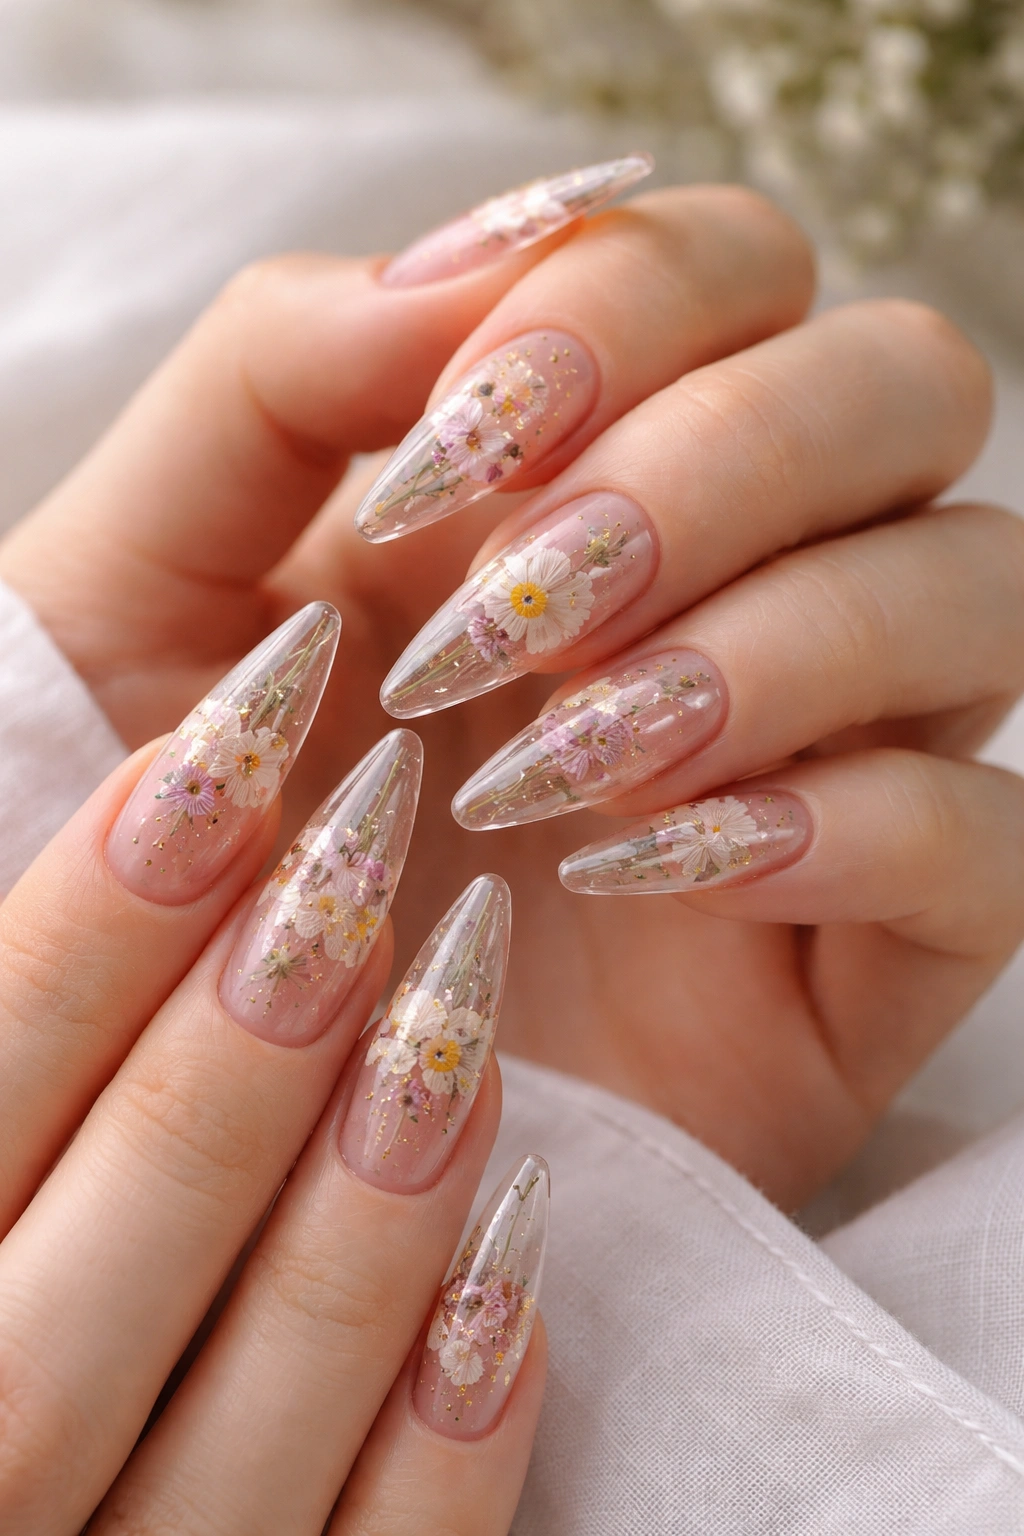
Embedding dried flowers or real pressed botanicals between two layers of clear or barely-tinted product creates an ethereal, garden-inspired look that feels genuinely special. This design photographs beautifully and catches people’s attention because there’s actual dimension and real elements under the nail surface—not a printed pattern. It’s become increasingly popular and for good reason.
Sourcing and Applying Botanical Elements
- Use pre-pressed flowers from craft stores (usually $3-5 per pack) or press fresh flowers at home between book pages for 1-2 weeks.
- Apply a base layer of clear builder gel or acrylics, then place the flower or leaf exactly where you want it before it fully sets.
- Cover completely with another clear layer, sealing the botanical inside. This protects it and keeps it looking fresh for weeks.
- The final sealed nails last 3-4 weeks because the botanical is fully protected inside the nail structure.
Floral Choices and Aesthetic
- Tiny dried baby’s breath is the most delicate and romantic option
- Real pressed ferns create a botanical garden vibe
- Tiny pressed flowers like pansies or violets add color
- Green leaves with white or nude base is calming and organic-feeling
- Combine multiple botanicals in different nails for a cohesive garden theme
Pro tip: Flowers and leaves darken slightly as they age inside the nail product—this actually enhances the vintage, pressed-nature aesthetic rather than ruining it.
6. Chrome Metallic Silver with Dark Underlayer

Chrome or mirror-finish nails create an otherworldly, futuristic effect that’s essentially impossible to ignore. The reflective powder sits on top of a dark base (typically black or dark gray), which adds depth and prevents the chrome from looking washed out. This design is bold, editorial, and genuinely high-impact. Metallic chrome catches every light source and changes appearance depending on your angle and lighting.
Achieving True Chrome Without Professional Equipment
- Chrome powder (available on Amazon, Sally’s, or pro beauty suppliers) requires a gel base coat, chrome application, and a clear top coat for durability.
- Apply the chrome powder with a dry brush immediately after the gel sets but before it fully hardens—the stickiness of the gel helps the powder adhere.
- The dark underlayer is crucial. Without it, chrome looks silvery and flat. With it, the chrome pops with depth and dimension.
- These nails can last 3-4 weeks, but the chrome surface can appear scratched or dull after 2-3 weeks of regular handling.
Chrome Variations Worth Trying
- Silver chrome on black (the classic futuristic look)
- Rose gold chrome on champagne (romantic and warm)
- Holographic chrome on nude (catches rainbow tones in different lights)
- Copper chrome on bronze (warm and autumn-appropriate)
Chrome is a commitment—it’s high-maintenance and gets noticed. Wear this design when you want to be seen.
7. Soft Blush Pink with Delicate Pearl Accents
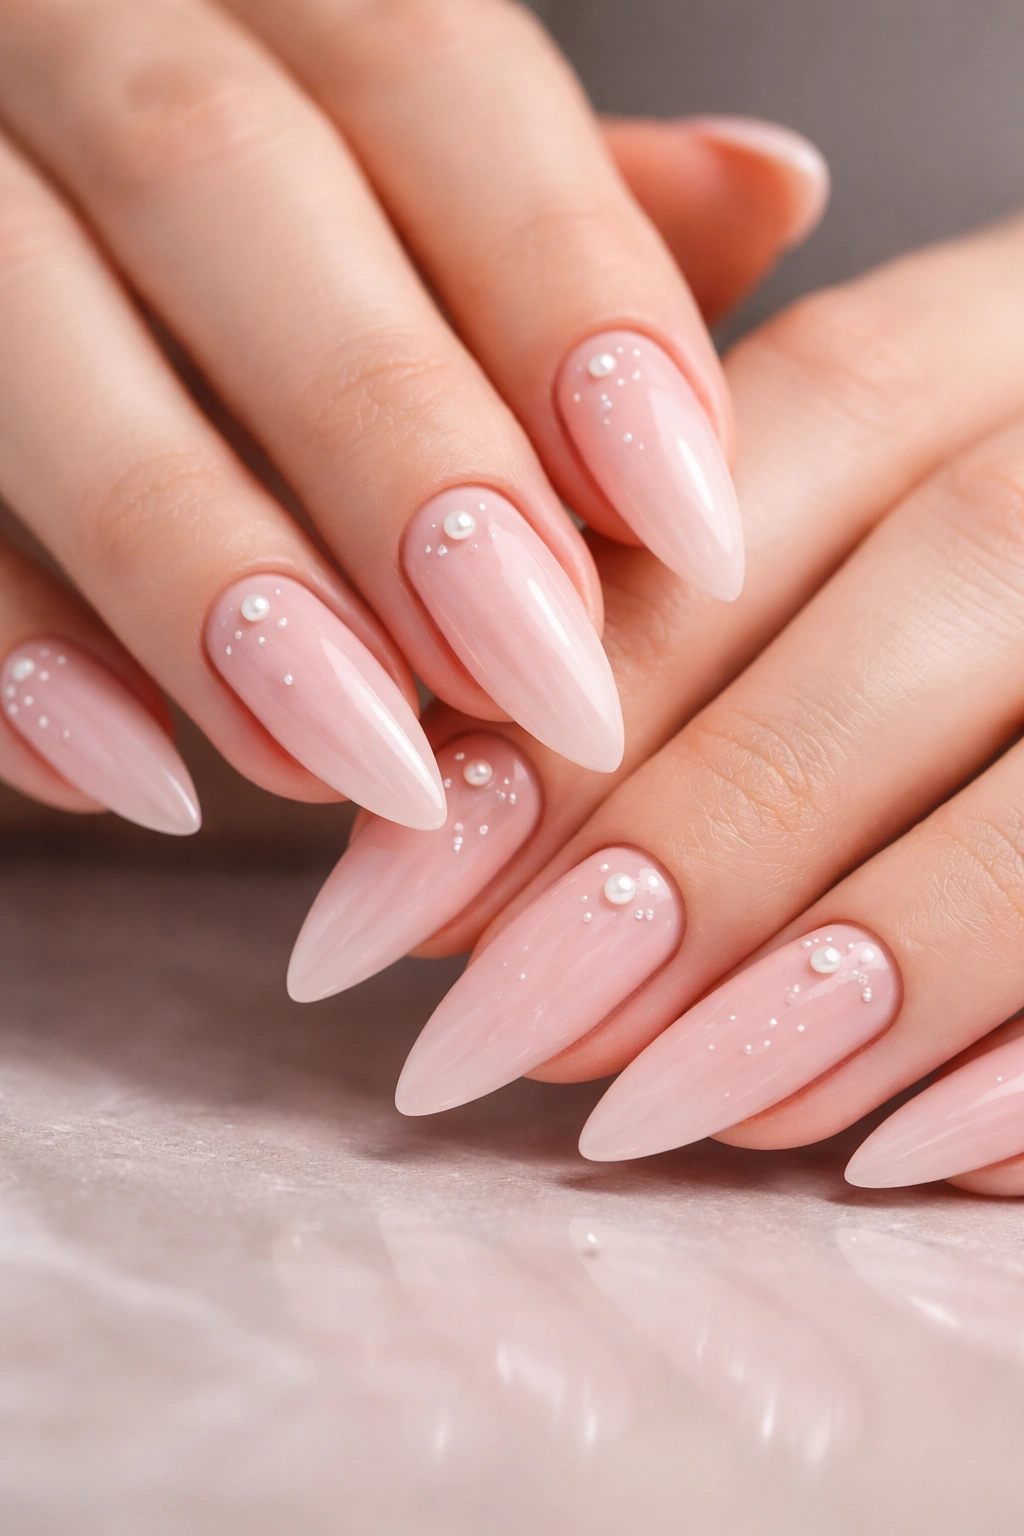
Soft blush is the nail color that works with literally everything you own, and adding pearl accents creates texture and refinement without any risk of looking childish or overdone. This design reads as elegant, feminine, and thoughtful. Pearls catch light subtly, creating a sophisticated shimmer that glossy or matte finishes alone cannot achieve. This is the perfect everyday-but-elevated design.
Choosing Pearl Accents That Feel Intentional
- Tiny seed pearls scattered across the nail surface (bohemian, romantic)
- A single pearl at the center of each nail (minimalist, striking)
- Pearls arranged in a line down the center (traditional, balanced)
- Pearls concentrated at the cuticle area (French-inspired, classic)
- Pearl dust mixed into the polish for an all-over shimmery effect (elegant, understated)
Application Strategy
- Apply the blush pink base first and let it cure or dry completely.
- Apply a thin layer of clear gel or glossy top coat (this becomes your adhesive).
- Place pearls individually with a toothpick or pearl picker, pressing straight down until embedded.
- Top coat with one more clear layer to seal and protect the pearls.
- Expected wear time: 3-4 weeks, though individual pearls may loosen slightly after 2 weeks.
8. Bold Red with Glossy Finish
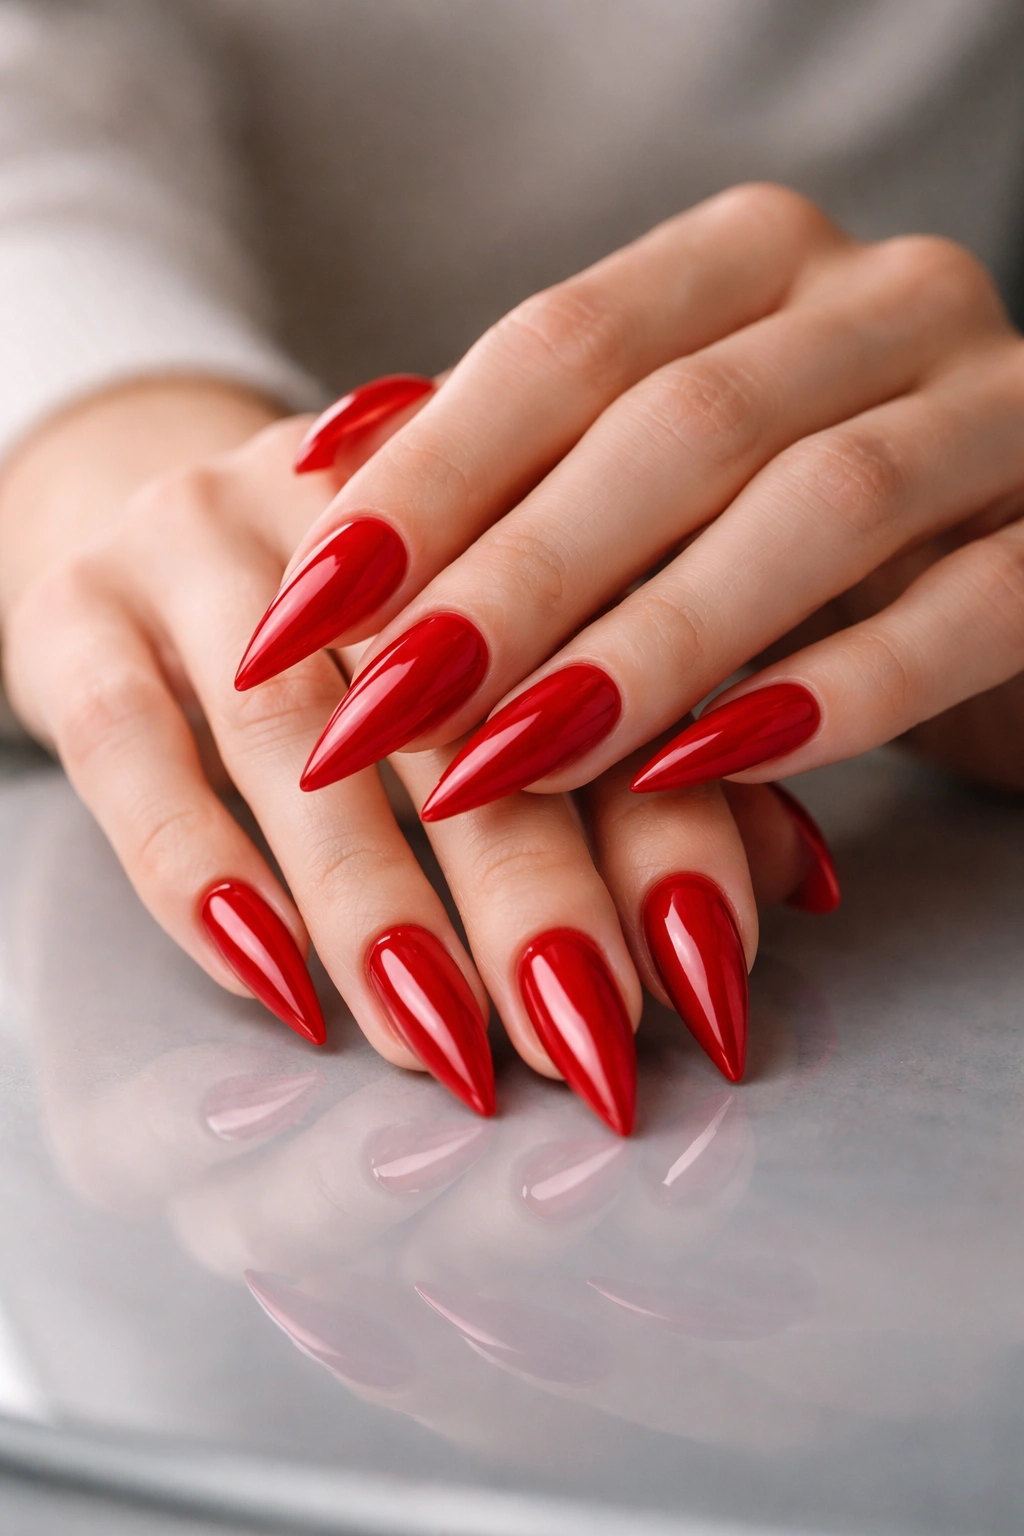
Red stilettos are a statement, period. There’s no color that commands attention quite like a true, glossy red—it’s confident, classic, and works for literally any occasion from professional meetings to nights out. The shine of the glossy finish is essential here; it amplifies the boldness and keeps the red from looking flat or dated. A good red should have slightly cool undertones (avoiding orange-reds that look costume-y) without leaning so blue that it appears burgundy.
Why Red Matters and When to Wear It
Red nails say “I’m intentional and I’m not apologizing for being noticeable.” They work at weddings, board meetings, dates, or just regular Tuesdays when you need confidence. The psychological effect is real—studies show that red clothing and accessories enhance confidence and perceived attractiveness. Wear these when you need to feel powerful.
Maintaining That Perfect Glossy Finish
- Reapply glossy top coat every 5-7 days to maintain shine and prevent dullness.
- Be careful with oils and lotions around your nails—excess products dull the finish.
- Red polish can stain skin and cuticles if allowed to chip and contact skin. Trim or file away chipped sections immediately.
- Wear these 3-4 weeks maximum; after that, the red can look faded or worn at the tips.
Insider note: When choosing a red polish, test it against your skin tone first. Some reds drain certain complexions, while others make skin look luminous.
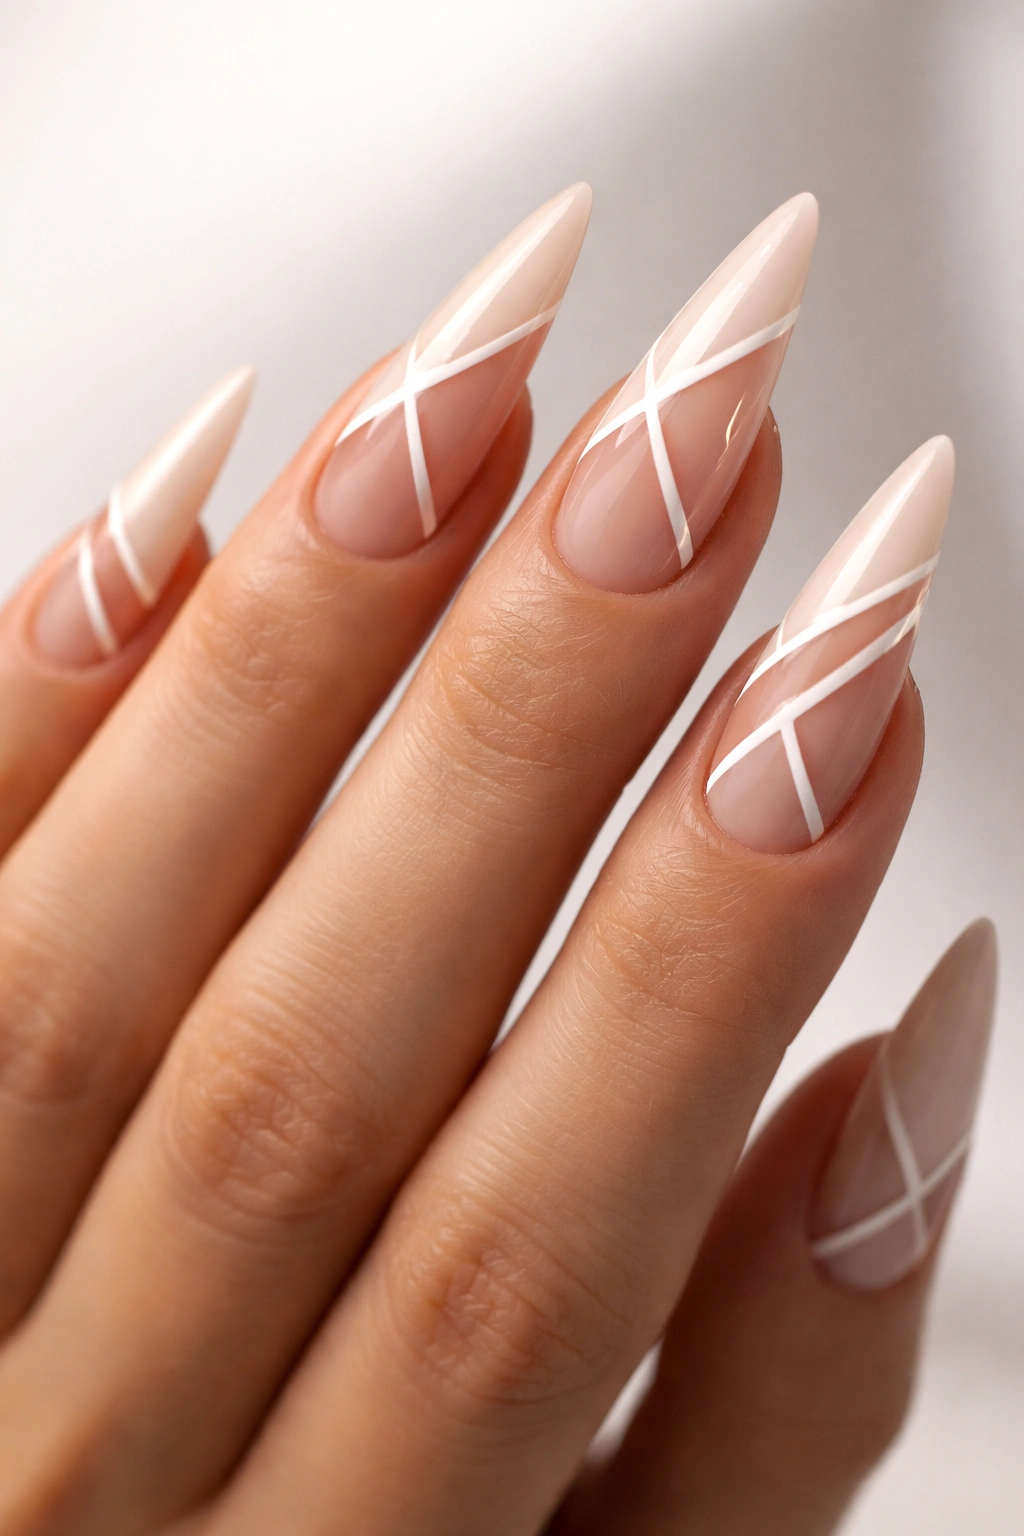
9. Nude with Thin Black Striping Tape Design
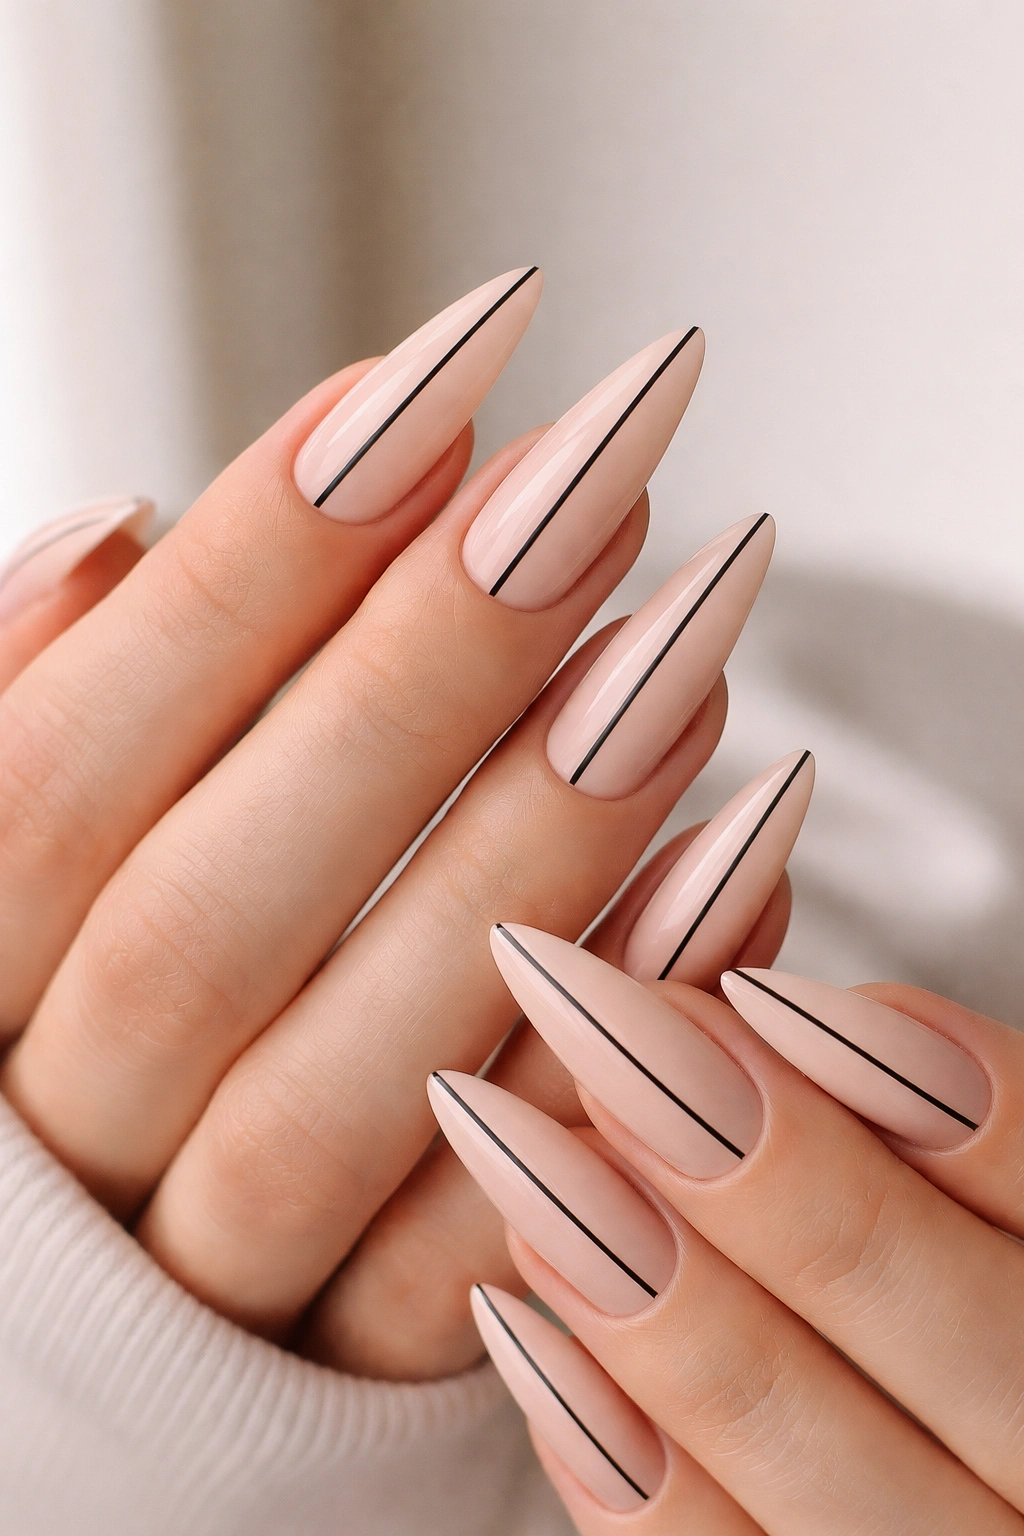
This design splits the difference between minimalist and slightly-designed-looking, using striping tape to create thin black lines that create visual interest without overwhelming the nail. The tape method means zero freehand skill required—if you can apply tape straight, you can create this look. The result is clean, architectural, and surprisingly chic.
The Striping Tape Technique Explained
- Apply your nude base and allow it to dry completely.
- Apply thin striping tape (1/16 inch width is the sweet spot) in vertical lines, diagonal lines, or geometric patterns—whatever appeals to you.
- Carefully paint black polish over the tape and the exposed nail areas. The tape creates clean edges.
- Remove the tape immediately while the polish is still wet for the sharpest lines. If you wait too long, paint can stick to the tape edges and tear your design.
- Apply glossy top coat once the black polish is fully dry.
Line Placement Ideas That Maximize Impact
- Three vertical lines down the center of each nail (simple, balanced)
- Alternating diagonal lines creating an X pattern (dynamic, modern)
- Two thin lines framing a wide center stripe (graphic, architectural)
- Scattered short lines that don’t connect (artistic, less rigid)
- Horizontal lines across the lower third of each nail (contemporary, bold)
10. Translucent White with Gold Flakes
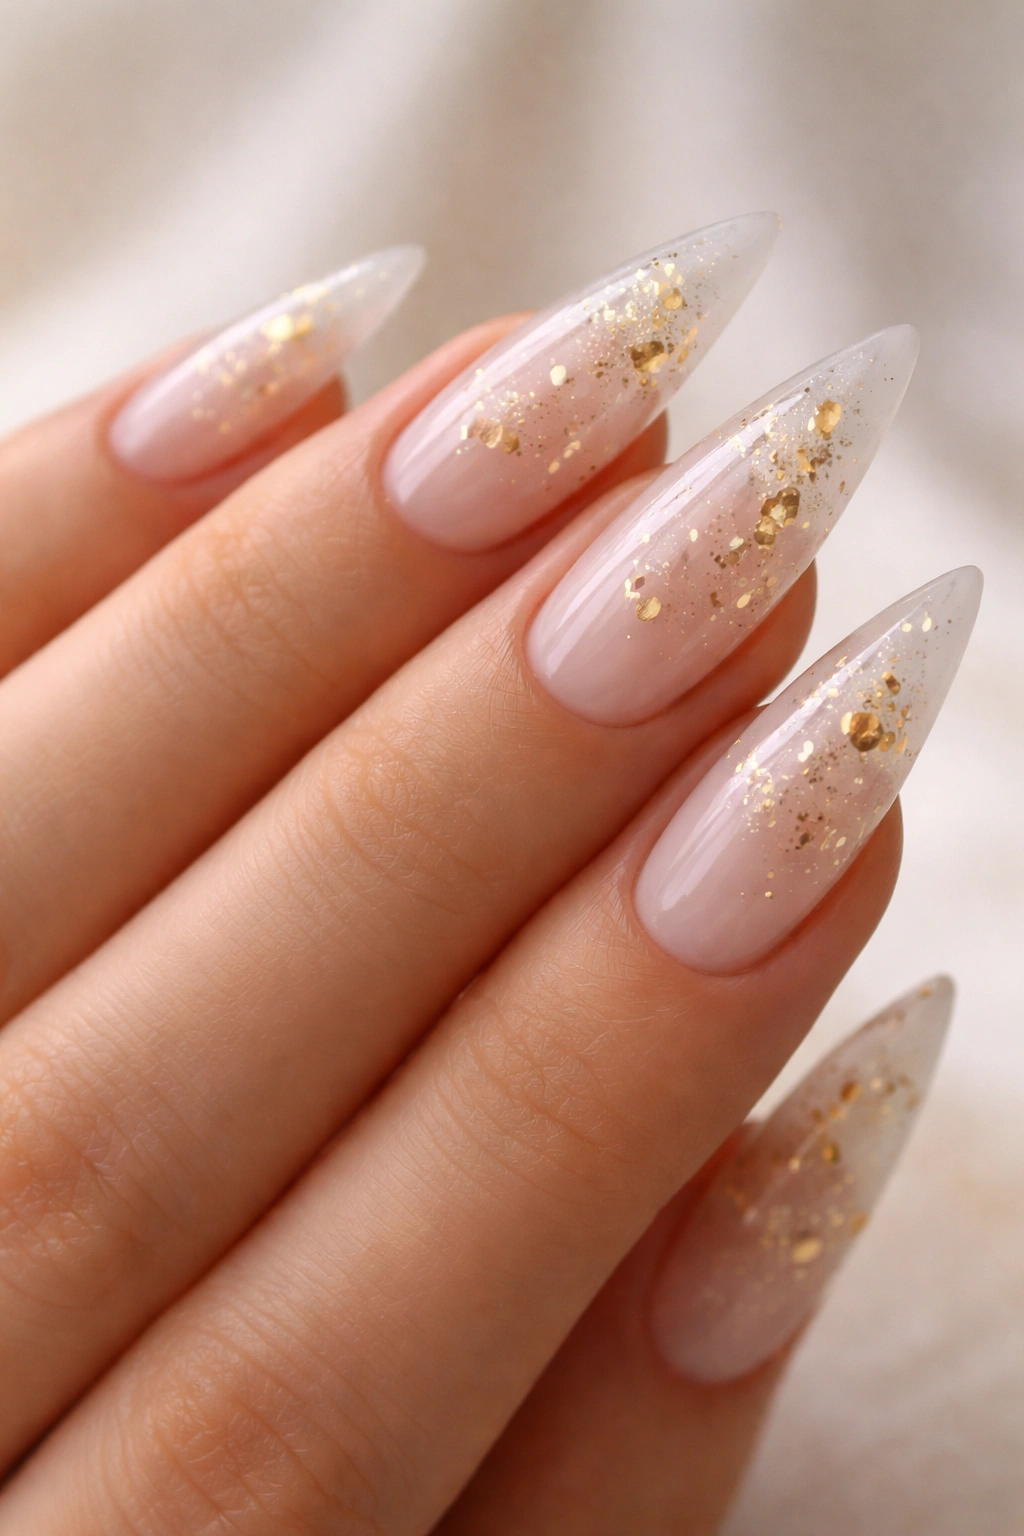
Translucent white stilettos create an interesting effect because you can see a hint of your actual nail underneath, which adds dimension to the design. Adding gold flakes creates shimmer and luxury while keeping the overall appearance clean and minimal. This design is particularly striking on darker skin tones because the contrast between your skin and the translucent white creates a sophisticated pop.
Achieving the Translucent White Base
- Use a translucent white polish (not opaque white, which is completely solid)—brands like Essie, OPI, and Zoya make excellent versions.
- Apply two coats for visible translucency without complete opaqueness.
- Add gold flakes while the second coat is still tacky, pressing them in gently.
- Seal with a glossy top coat that encapsulates the flakes and creates a smooth surface.
Flake Options and Finishes
- Solid gold leaf pieces (luxe, large, eye-catching)
- Tiny gold foil flakes scattered throughout (subtle, elegant)
- Gold dust mixed into the translucent base (shimmer throughout)
- Holographic or iridescent flakes instead of solid gold (modern, unexpected)
This design is relatively fragile around the tips and edges—expect 2-3 weeks of wear before visible wear appears on high-impact areas.
11. Deep Emerald Green with Metallic Gold Details
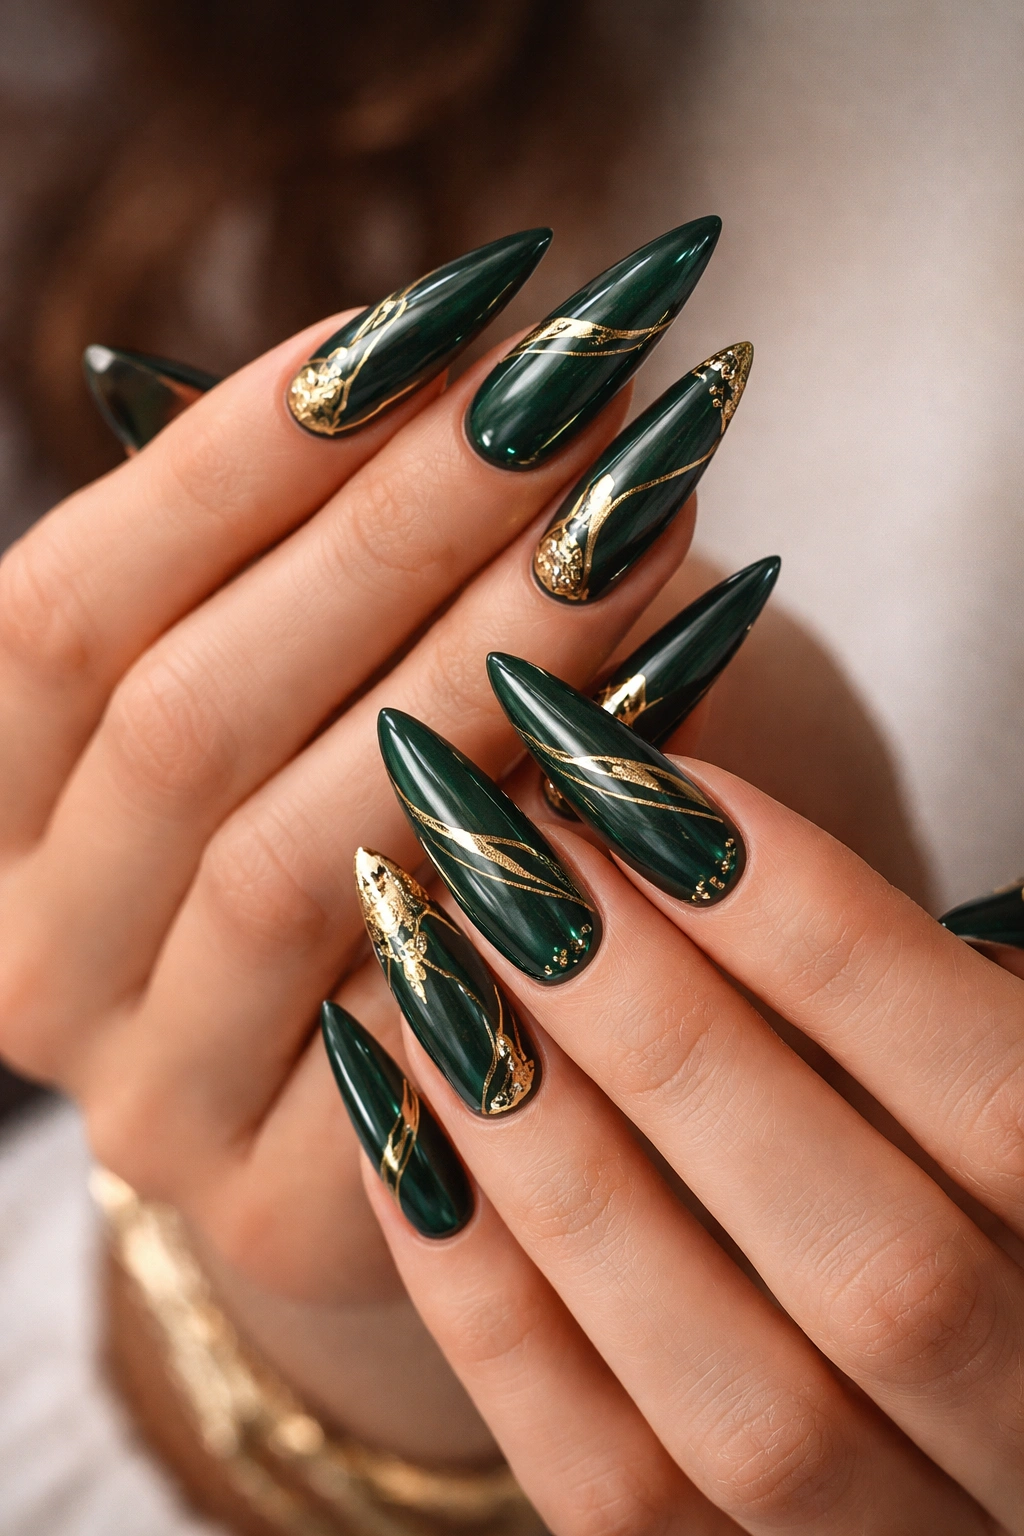
Emerald is sophisticated, rich, and surprisingly wearable year-round despite its jewel-tone depth. Adding gold details—whether that’s a thin gold line, gold leaf, or a gold glitter gradient—elevates it from “nice green” to “actually luxurious.” This combination feels expensive and intentional, working beautifully for evening events, holiday occasions, or whenever you want to feel genuinely glamorous.
Why Emerald Works Better Than You Think
Deep jewel tones can look costume-y on nails if the undertones aren’t right, but emerald that leans slightly warm (not too blue, not too yellow) flatters a huge range of skin tones. The gold accents warm up the design further and prevent it from feeling harsh or cold. Emerald especially suits deeper complexions and reads as regal rather than trendy.
Gold Detailing Techniques
- Thin gold striping tape down the center of each nail (clean, modern)
- 24K gold foil applied to a glossy clear layer (dramatic, textured)
- Gold glitter gradient fading from emerald at the base to gold at the tip (warm, dimensional)
- Gold leaf flakes scattered across the emerald surface (organic, artisanal)
- Gold beading or rhinestones placed strategically at the cuticle (formal, evening-appropriate)
Expected wear time: 3-4 weeks, though metallic elements may dull slightly after 2-3 weeks.
12. Nude with Tiny Hand-Drawn Minimalist Designs
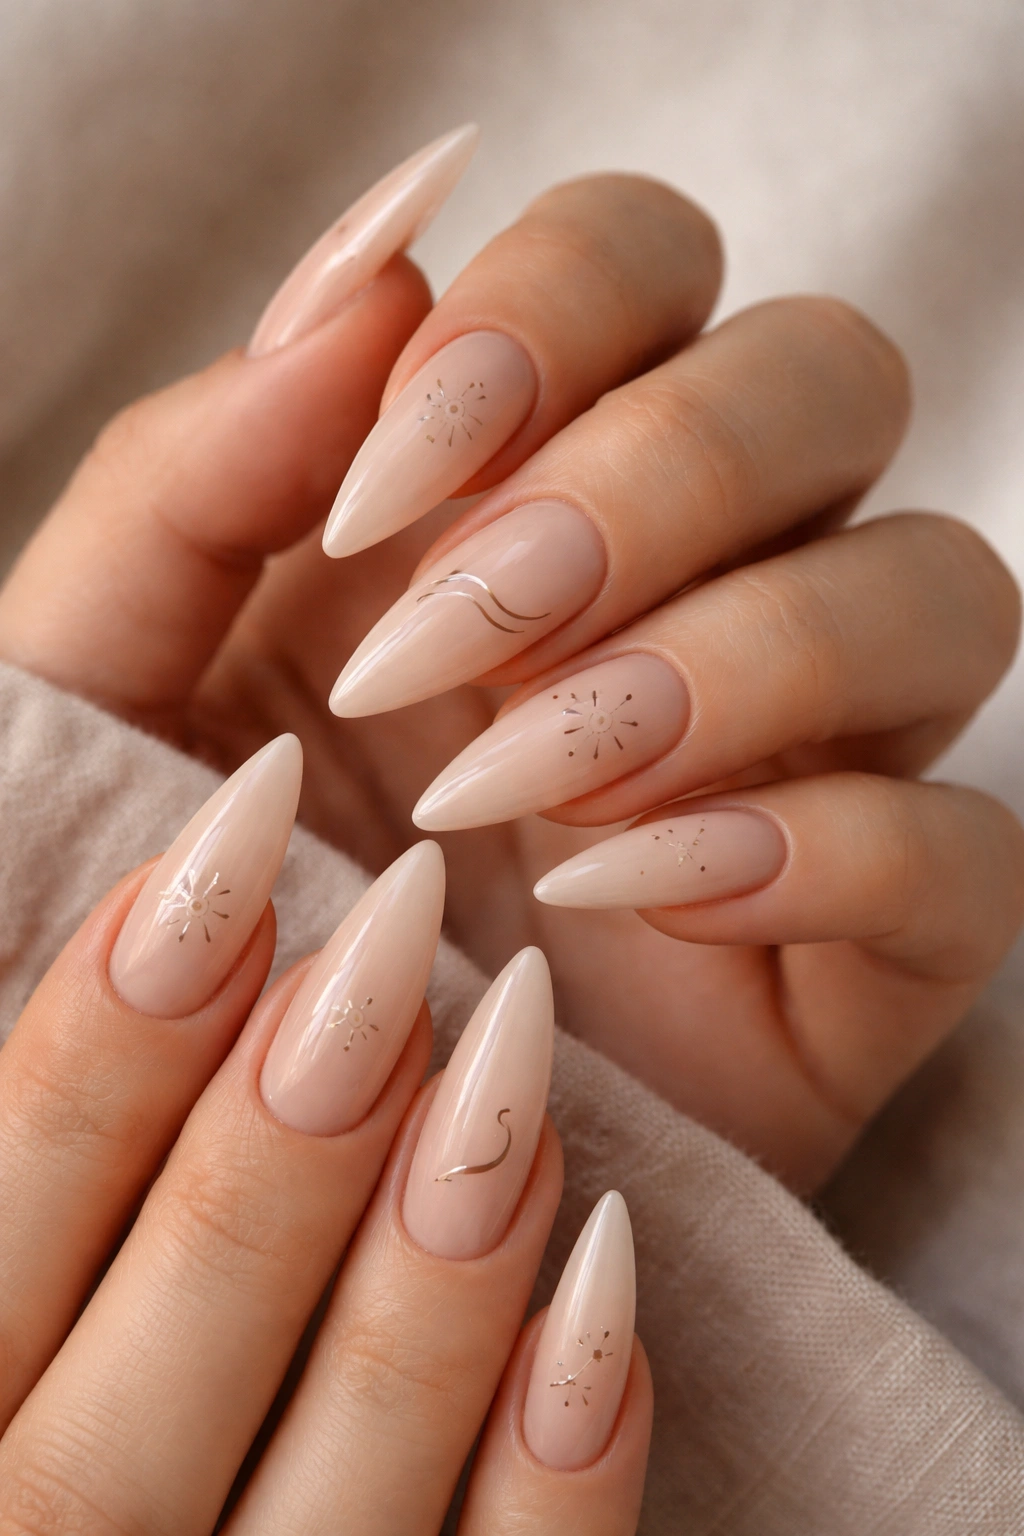
Hand-drawn designs feel personal and artistic in a way that pre-made nails cannot replicate. Simple line drawings—a tiny sun, a small wavy line, a delicate star, a minimal leaf—on a neutral nude base create a custom, thoughtful look. The minimalist approach keeps it wearable for any setting while the tiny designs signal that you’ve put intentional effort into your appearance.
Simple Hand-Drawn Designs That Actually Work
- Tiny suns at the tip of each nail (cheerful, sunny energy)
- Single wavy line down the center (calming, minimalist)
- Small stars scattered across the nail (playful but sophisticated)
- Tiny leaves or botanical marks (natural, grounded)
- Minimal faces or abstract symbols (artistic, personal)
Making Hand-Drawn Designs Look Intentional
- Use a thin detail brush or nail art pen—not a regular paintbrush, which is too thick and unwieldy.
- Practice the design on paper first to build muscle memory.
- Start each design lightly, then go over it again to ensure visibility.
- Seal with clear top coat to protect the design and add shine.
- These designs are delicate and may show wear after 2-3 weeks, but the simplicity makes touch-ups easy.
Worth knowing: If hand-drawing feels scary, tiny nail decals (available for $2-5) give the same custom-design effect with zero artistic skill required.
13. Black with Tiny White Dots (Polka Dot Pattern)
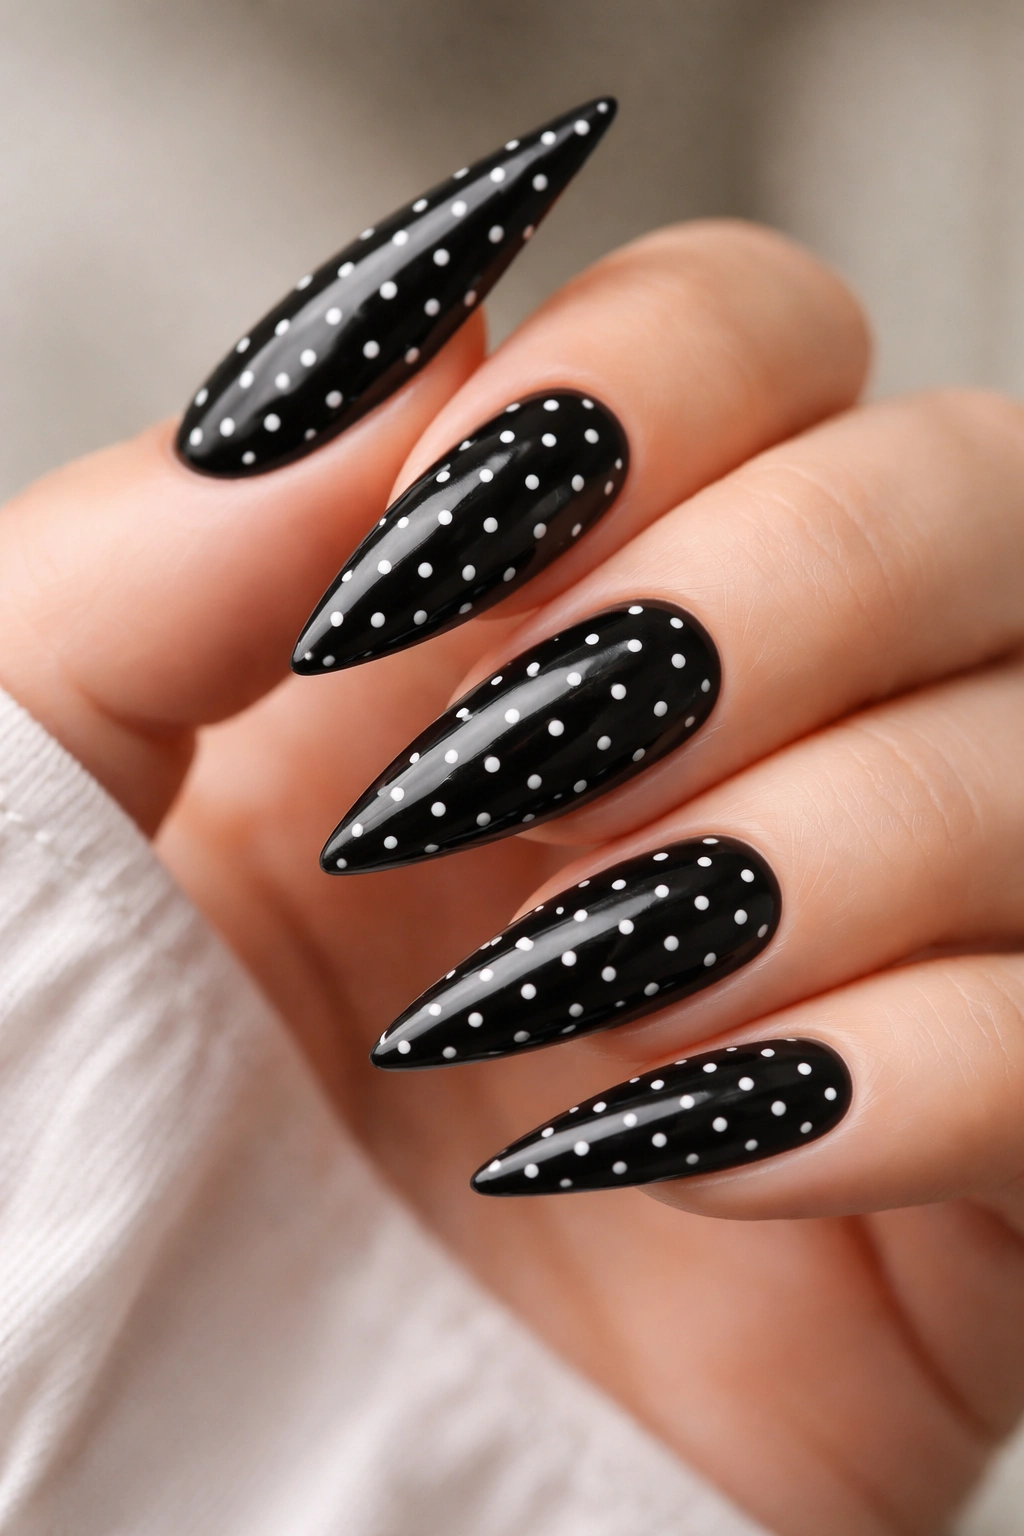
Polka dots on black create a retro-inspired, playful aesthetic that feels fun without being costume-y. The dots create visual rhythm and movement, and the high contrast between black and white makes each dot read crisply. This design works across decades and styles—it’s simultaneously vintage and timeless. Small dots (not large ones) keep it sophisticated rather than whimsical.
Creating Perfect Polka Dots Without Frustration
- Apply black base and let it cure or dry completely.
- Use a dotting tool (basically a small stick with a tiny ball on the end—costs $2-5) or the rounded end of a bobby pin dipped in white polish.
- Dip the dotting tool in white polish and press straight down on the nail for consistent dots.
- Space dots roughly ¼ inch apart for balanced coverage—too many dots looks busy, too few looks sparse.
- Apply glossy top coat once the white dots are fully dry.
Dot Placement Strategies
- Cover the entire nail surface evenly (classic, balanced)
- Concentrate dots at the tip area with fewer dots near the cuticle (gradient effect)
- Create a specific pattern like dots arranged in lines or clusters (intentional, artistic)
- Large single dot at the center of each nail (minimalist, striking)
Expected wear time: 3-4 weeks, though the white dots may show chips more obviously than a solid design.
14. Rose Gold Shimmer with Blush Pink Base
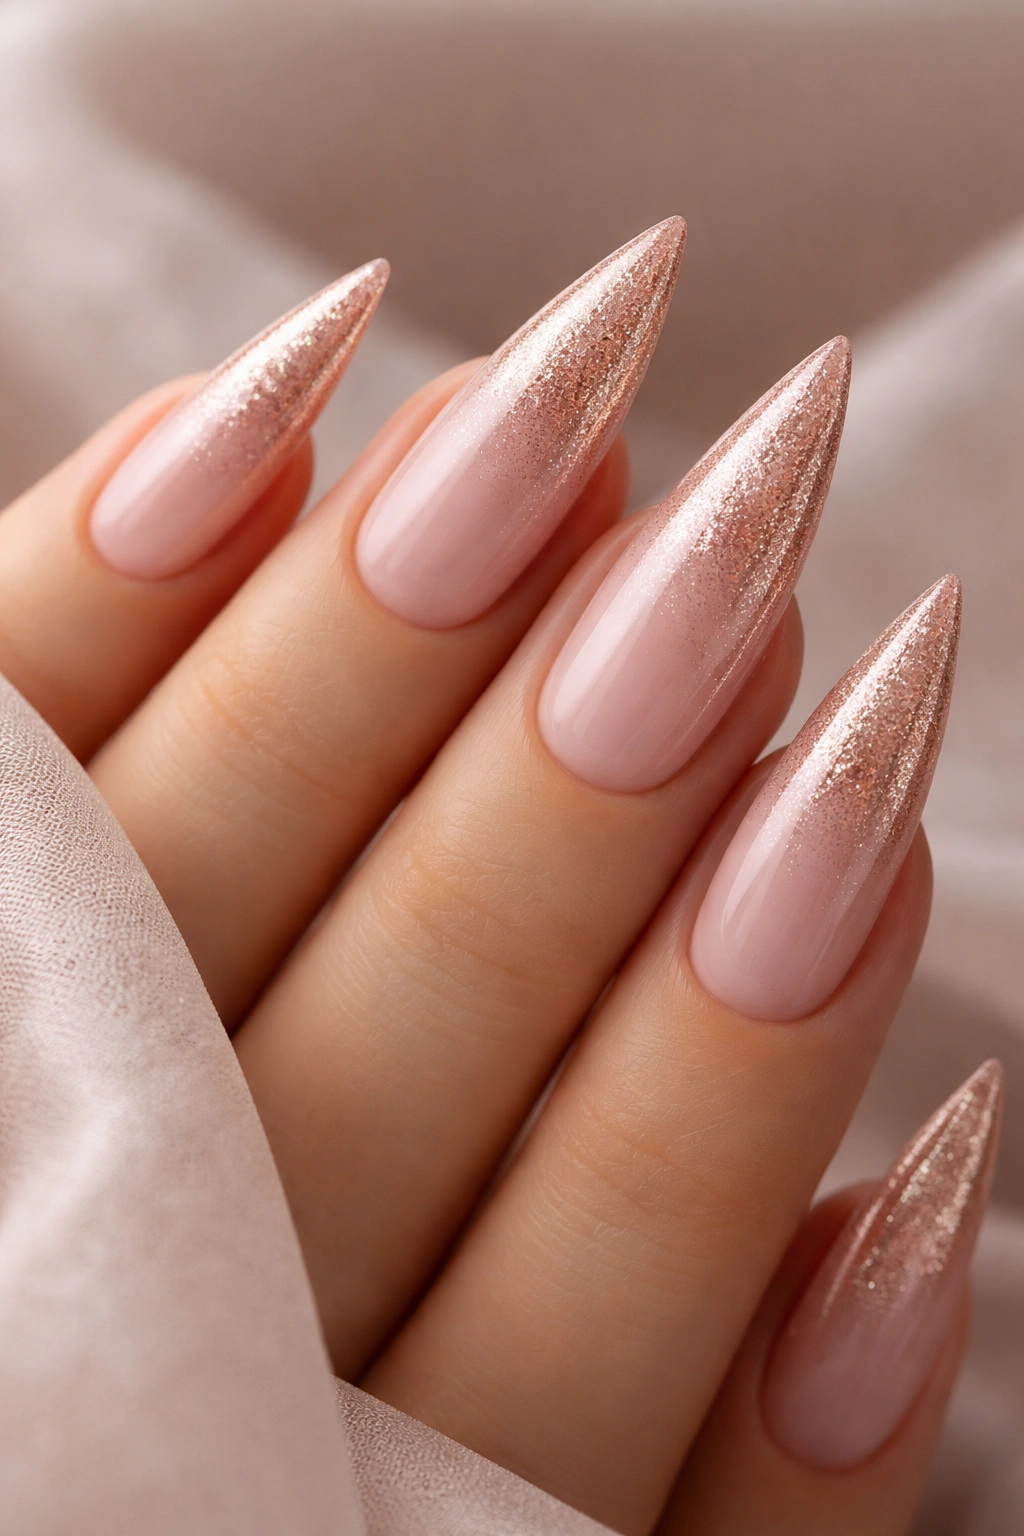
This design combines two on-trend colors in a way that feels elevated rather than overdone. The blush pink base provides a soft, wearable foundation, while the rose gold shimmer adds warmth and luxury. Together they create a look that feels expensive, carefully thought-out, and deeply wearable for professional and social settings. The shimmer catches light without looking glittery or costume-y.
Creating Shimmer Without Looking Glittery
- Apply blush pink base as your foundation.
- Apply a thin layer of rose gold shimmer polish over the entire blush pink surface.
- The shimmer should be sheer enough that you see the blush pink underneath rather than fully covering it—this creates the blended, sophisticated effect.
- Seal with glossy top coat to enhance shine and lock the shimmer in place.
Choosing Shimmer Finishes
- Metallic rose gold (warm, luminous)
- Holographic rose gold (catches rainbow tones)
- Pearl rose gold (subtle, elegant, less visible in certain lighting)
- Duochrome rose gold (changes color depending on light and angle)
The less glitter visible, the more expensive and sophisticated the overall effect reads. Aim for smooth shimmer, not grainy glitter.
15. White Base with Colorful Abstract Watercolor Effect
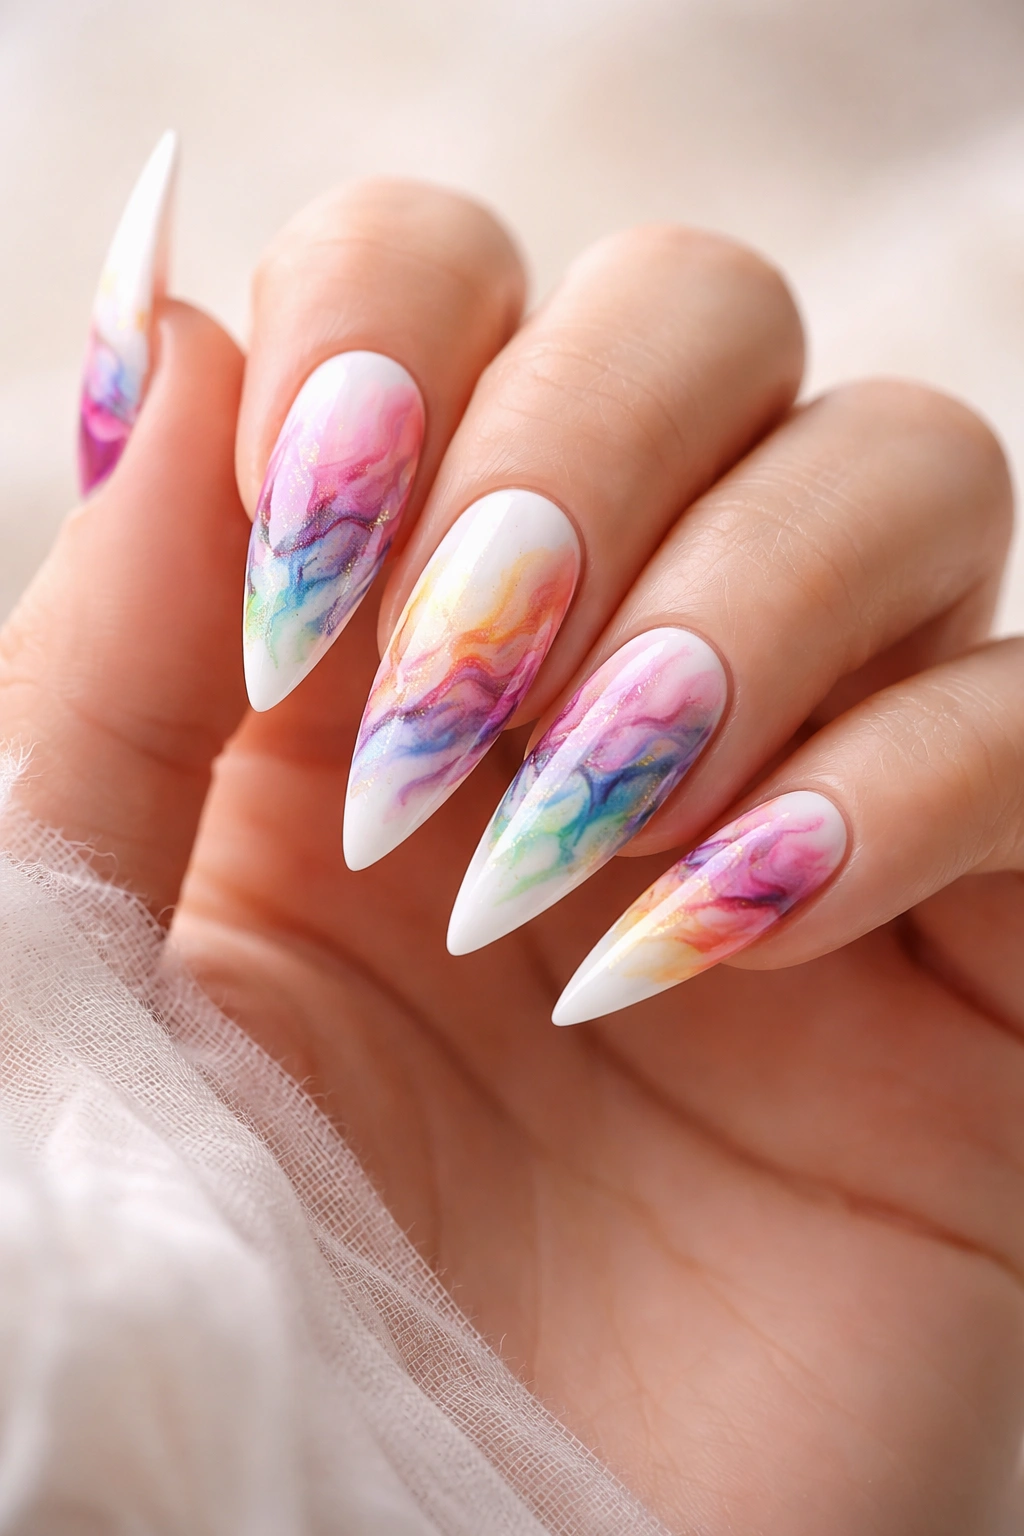
Watercolor effects on nails create organic, one-of-a-kind designs that feel artistic and intentional. This technique uses multiple polish colors applied to a wet base, allowing them to blend and flow naturally. The result is that no two nails are exactly alike, and the overall effect is flowing, feminine, and genuinely artistic. White base nails with colorful watercolor look gallery-worthy.
Creating the Watercolor Technique at Home
- Apply white base and keep it wet (either freshly wet polish or a tacky gel base).
- Drop tiny dots of various colors (pastels, metallics, brights—choose a cohesive color story) onto the wet white base.
- Use a dry brush or the edge of a paper towel to gently swipe and blend the colors across the nail surface.
- The longer you allow it to set before sealing, the more blended the effect becomes. Work quickly for more visible distinct colors, or let it sit briefly for more blending.
- Seal with glossy top coat once you’re satisfied with the result.
Color Combinations That Create Cohesion
- Pastels: blush, lavender, pale yellow, mint (soft, romantic)
- Jewel tones: emerald, sapphire, ruby, amethyst (luxe, rich)
- Brights: coral, turquoise, hot pink, sunny yellow (playful, vibrant)
- Metallics: gold, rose gold, silver, copper (sophisticated, glam)
These designs are relatively delicate and show wear after 2-3 weeks due to the varied colors, but the imperfect aging actually enhances the artistic aesthetic.
16. Nude with Negative Space Geometric Cutout Design
Negative space designs create visual interest by intentionally leaving areas of your actual nail visible (or using a nude base that matches your skin tone) within the design itself. Geometric cutouts—triangles, squares, hexagons, or abstract shapes—create a modern, architectural look that feels current and intentionally artistic. The negative space prevents the design from feeling too busy while maintaining visual impact.
Creating Negative Space Without Tape
- Use nail striping tape to mask off areas you want to remain unpainted.
- Paint your design around the masked areas.
- Remove tape immediately while paint is still wet.
- The exposed nail or nude base underneath becomes part of the actual design.
Geometric Negative Space Ideas
- Triangle negative space in the top corner of each nail
- Hexagon cutout at the center
- Half-moon shape at the cuticle
- Abstract angular shapes scattered across the nail
- Geometric grid pattern with alternating negative space
This design looks sharper and more intentional with matte finishes, though glossy finishes also work beautifully. Expect 3-4 weeks of wear.
17. Glossy Black with Thin Gold Line Accent and Rhinestone Tip
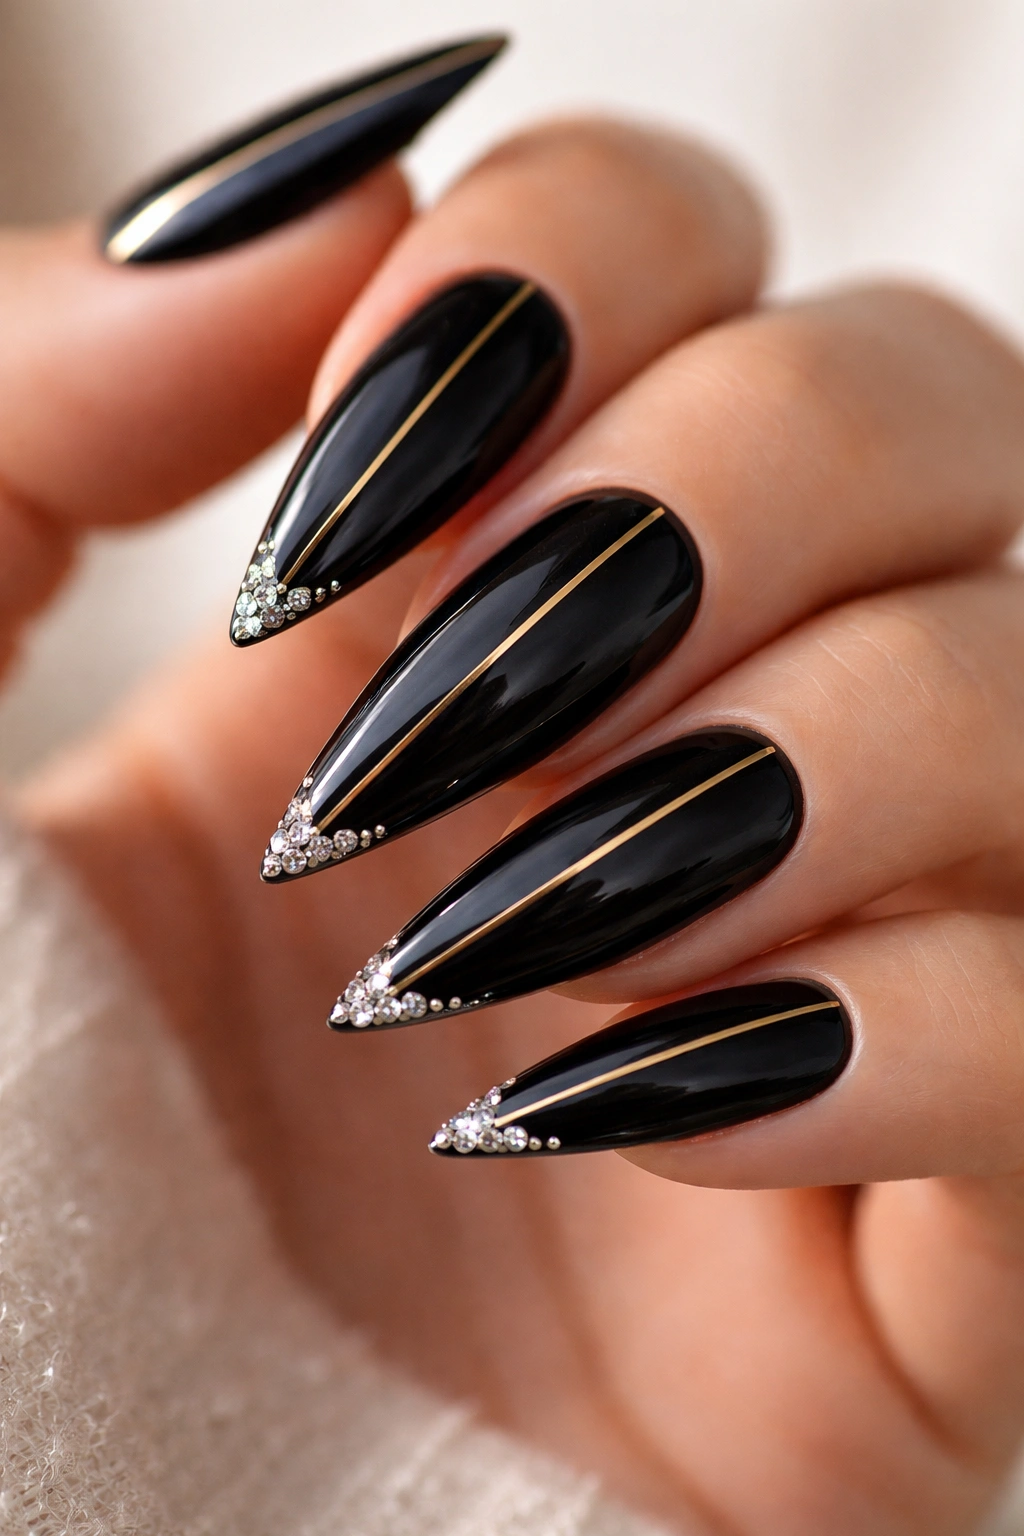
This design layers sophistication by combining matte black, a thin accent line, and rhinestone embellishment—each element serves a specific purpose, and together they create high-impact elegance. The thin gold line adds visual interest without overwhelming the black base, and the rhinestones at the tip create a point of focus that draws the eye. This design works for evening events, dates, formal occasions, or whenever you need to feel absolutely glamorous.
Layering Elements for Maximum Impact
- Black base provides the foundation and sets the sophisticated tone.
- Thin gold line down the center (or near the edge) adds warmth and prevents the design from feeling too stark.
- Rhinestones applied at the very tip create a focal point and enhance the luxury factor.
- The combination creates visual movement from tip to cuticle—nothing static or boring.
Placement Strategies for Rhinestones
- Single large rhinestone at the center tip of each nail (bold, striking)
- Three smaller rhinestones in a vertical line down the tip (graduated, balanced)
- Scattered small rhinestones across the tip area (scattered glam, less formal)
- Rhinestones only on your accent nails (ring finger and thumb) to tone it down slightly
Expected wear time: 3-4 weeks, though rhinestones may loosen individually before then.
18. Soft Pink with Reverse French Manicure in White
The reverse French manicure flips the traditional design—instead of a white tip, you create a white half-moon at the cuticle area. On soft pink stilettos, this creates a fresh, modern, and incredibly chic aesthetic. The reverse French reads as sophisticated and current rather than retro, especially in this soft color combination. This design is surprisingly easy to execute and always looks polished and intentional.
Executing the Reverse French at Home
- Apply soft pink as your base color and allow it to dry completely.
- Use thick striping tape or create a template by drawing a curved line at the cuticle area with a white pencil.
- Paint white polish carefully along the cuticle area, staying inside your marked boundary.
- Remove tape or wash away pencil marks while the white polish is still wet.
- Allow white to dry, then seal with glossy top coat.
Why Reverse French Never Goes Out of Style
The design feels modern because it breaks the traditional French manicure rule, yet it retains that timeless elegance. The white at the cuticle creates a clean, fresh appearance that reads as sophisticated. This is the perfect design when you want to look polished but not trendy or experimental.
Expect 3-4 weeks of wear, though the white area may chip more visibly than the pink base—touching up white every 2-3 weeks keeps this design looking fresh.
Final Thoughts
The beauty of press-on stiletto nails is that you’re never locked into one design—in fact, the ability to change your look whenever you feel like it is half the appeal. Each of these 18 designs works because it starts with a solid foundation: proper sizing, clean nail prep, and careful application. The design itself just adds personality to that base.
Your skin tone, lifestyle, and current mood should guide your choice. If you’re drawn to bold statement looks, emerald greens and chrome finishes deliver confidence. If you prefer something subtle that works everywhere, nude with delicate accents hits perfectly. If you want to experiment without commitment, watercolor effects let you play artist without pressure.
The real win with press-on stilettos is that you control the outcome—no waiting for appointments, no explaining complicated designs to someone who might not execute your vision, and zero regret because you can remove them anytime. That power to reinvent your nails whenever you want? That’s genuinely worth celebrating.
