

Black stiletto nails represent one of the most versatile and empowering nail designs you can wear. Whether you’re drawn to the bold elegance of a solid jet-black finish, the edgy appeal of metallic accents, or the sophistication of intricate art over a dark base, stilettos in black offer endless possibilities for self-expression. The sharp, pointed shape combined with deep black polish creates an instantly striking look that works equally well for a night out, professional settings, and everything in between. What makes black stilettos so compelling is their ability to feel both timeless and trend-forward at the exact same time.
The beauty of exploring different black stiletto nail ideas lies in discovering how the same base color can transform completely depending on what you add to it. A simple glossy black stiletto reads as classic and minimalist. Add some chrome powder, and suddenly you’ve got a futuristic edge. Layer in some nail art, and you’re creating a statement piece that reflects your personality. The versatility means you can update your look frequently without getting tired of the shape or color. Below are twenty distinct black stiletto nail designs, each with specific techniques, styling notes, and practical tips to help you recreate or customize them for your own nails.
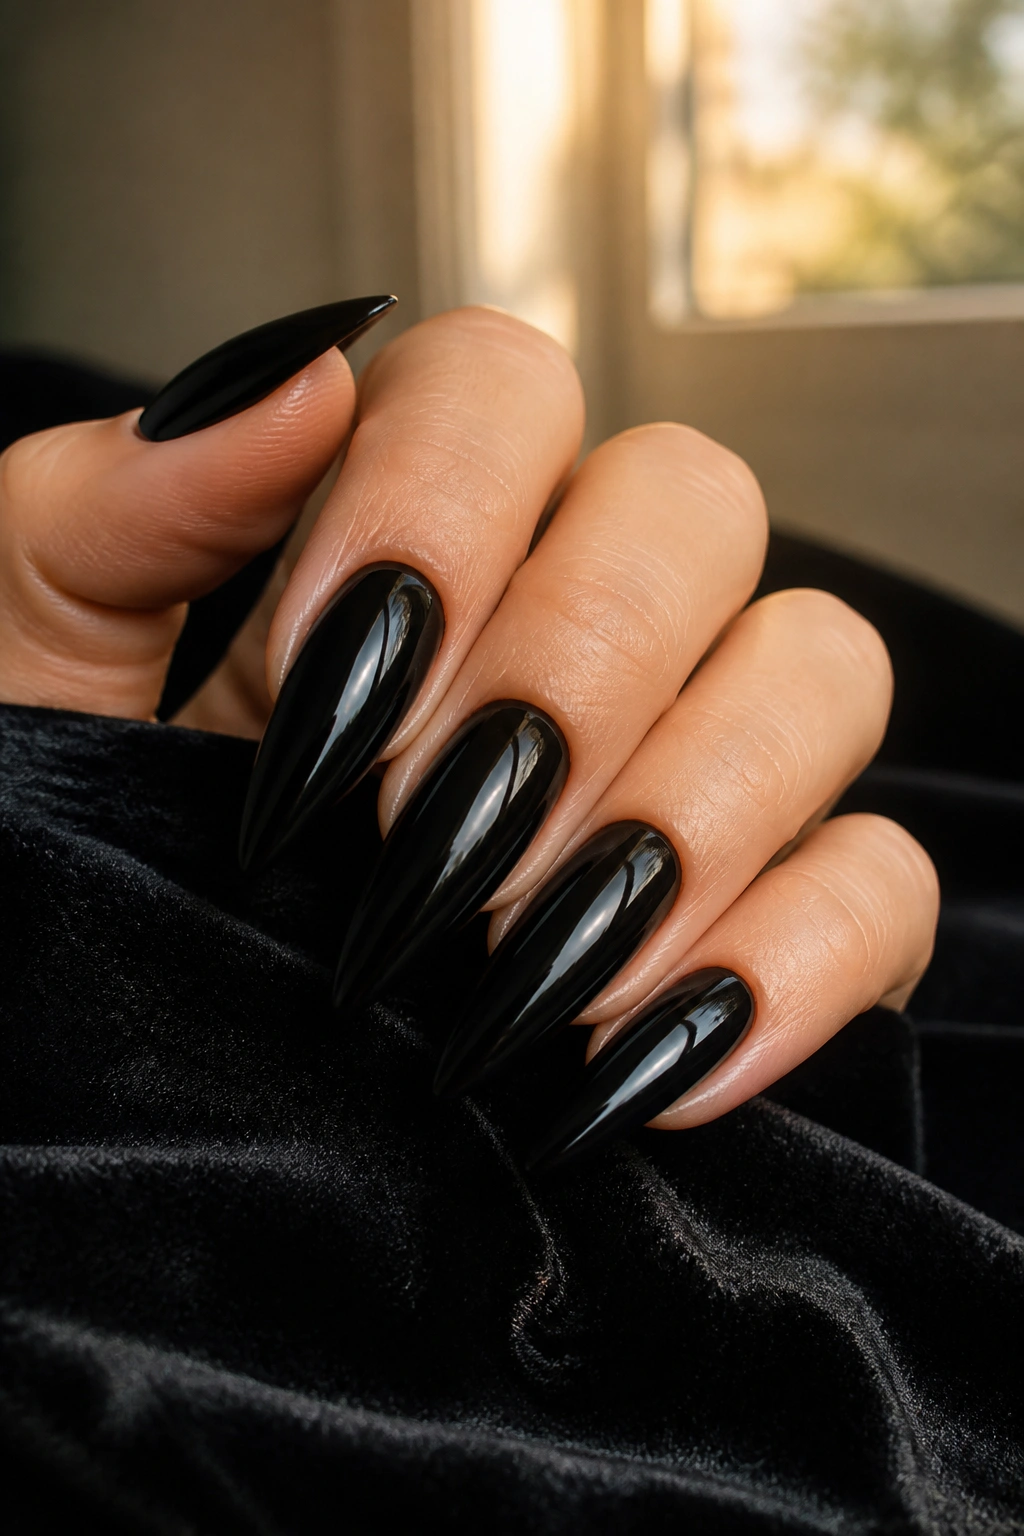
1. Classic Glossy Black Stiletto
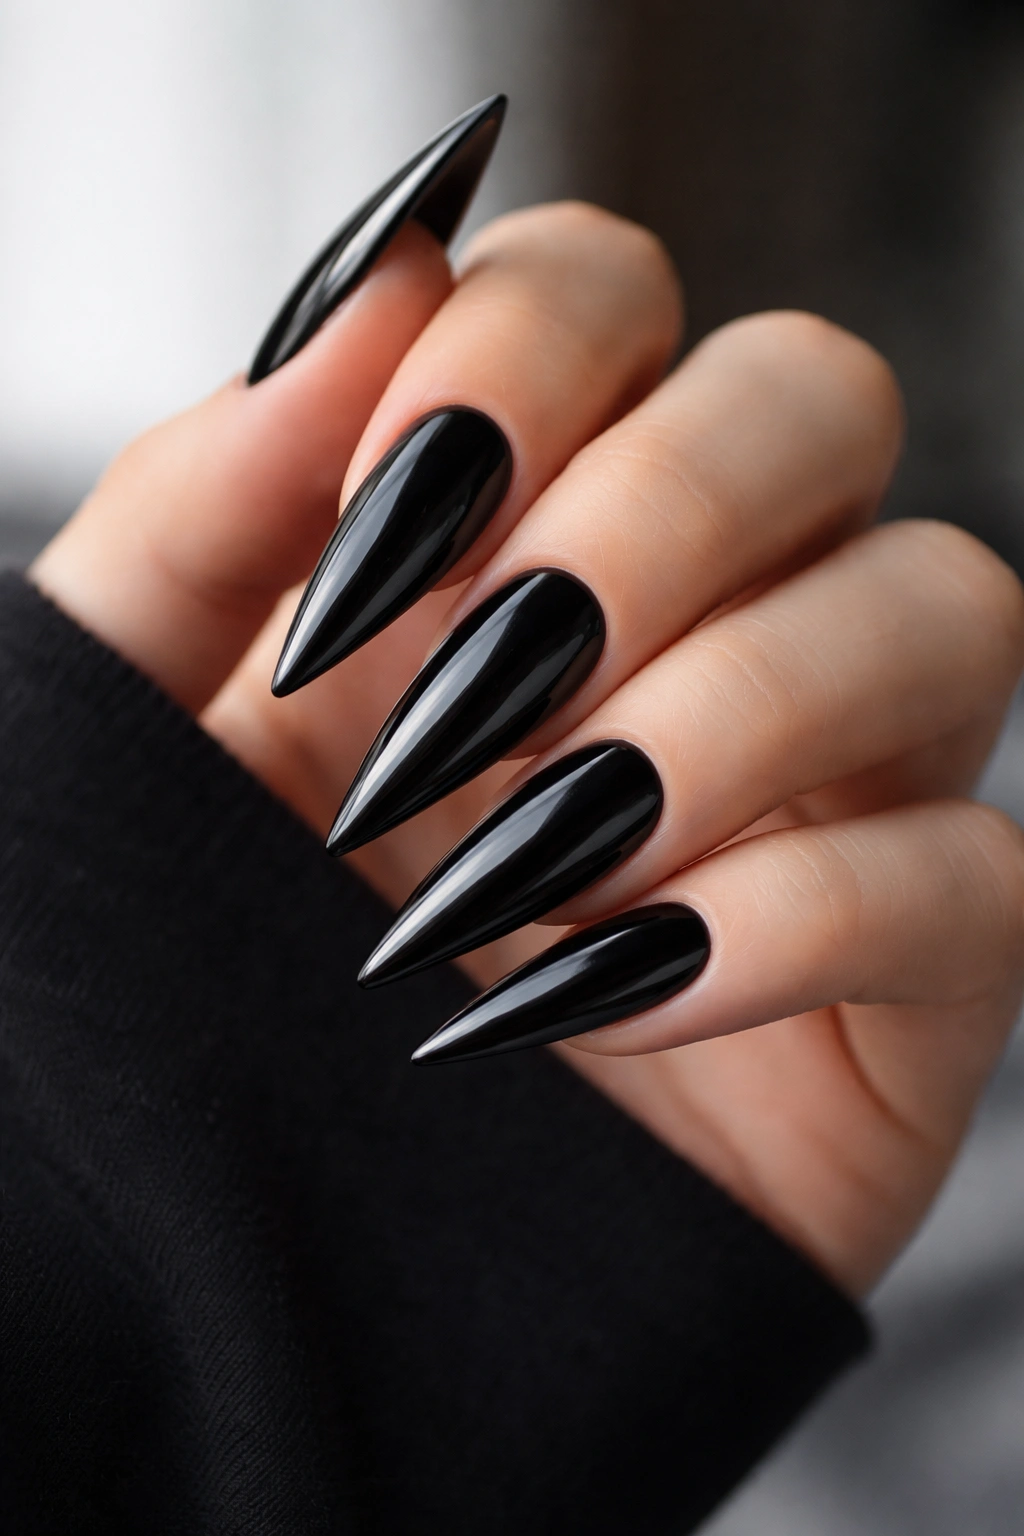
The foundation of all black stiletto designs, a high-gloss finish in pure black delivers maximum impact with zero effort. This is the look you wear when you want sophistication without distraction—clean, sharp, and undeniably elegant. A glossy black stiletto works for literally any occasion, from boardroom meetings to evening events, and that’s exactly why it remains a timeless choice.
Why This Style Never Goes Out of Style
A classic glossy black stiletto reads as intentional and refined because the shape itself does all the talking. You don’t need embellishments when your nails are sharp enough to command attention. The mirror-like finish catches light beautifully, highlighting the perfect geometry of the stiletto point. This simplicity is what makes it feel both effortlessly cool and undeniably professional.
How to Achieve the Perfect Glossy Finish
- Use a quality black gel or polish in a shade that’s true black rather than dark grey
- Apply thin, even coats rather than one thick coat—two thin coats provide better opacity and faster drying
- Finish with a high-shine top coat that actually magnifies the glossiness; cheaper top coats can look dull
- Seal the edges of each nail by running the brush along the tip to prevent chipping
Pro tip: If you’re using regular polish, a super-shiny gel top coat over it will give you that mirror finish even if your base polish is slightly less glossy. Many people don’t realize the top coat quality makes a massive difference in how professional your nails look.
2. Matte Black Stiletto with Chrome Tips

Swap the gloss for a velvety matte finish and add a metallic chrome gradient at the tips, and suddenly your classic black stiletto feels modern and editorial. The contrast between the flat black and the reflective chrome creates visual depth and catches light in completely different ways than a fully glossy nail.
The Visual Drama of Mixed Finishes
Matte creates a sophisticated, almost velvet-like appearance that feels more refined than shiny in many contexts. When you add chrome to just the tips, you create a gradient effect that makes the nail look longer and more tapered. The metallic gradient also adds a futuristic edge without being over-the-top. This combination walks the perfect line between minimal and statement-making.
Technique for Applying Matte and Chrome Together
- Paint your entire nail with black matte polish and let it dry completely
- Apply a clear gel base to the tip area (about ¼ inch from the point)
- While the gel is still tacky, apply chrome powder using a velvet applicator in circular motions
- Seal with a glossy top coat over the chrome area only, leaving the matte section matte
- The top coat sets the chrome and creates that reflective mirror effect
Worth knowing: Chrome powder shows up best over clear or light bases rather than dark polish. That’s why the gel base layer is essential—it gives the chrome something reflective to show off against.
3. Black Stiletto with Thin Gold Striping
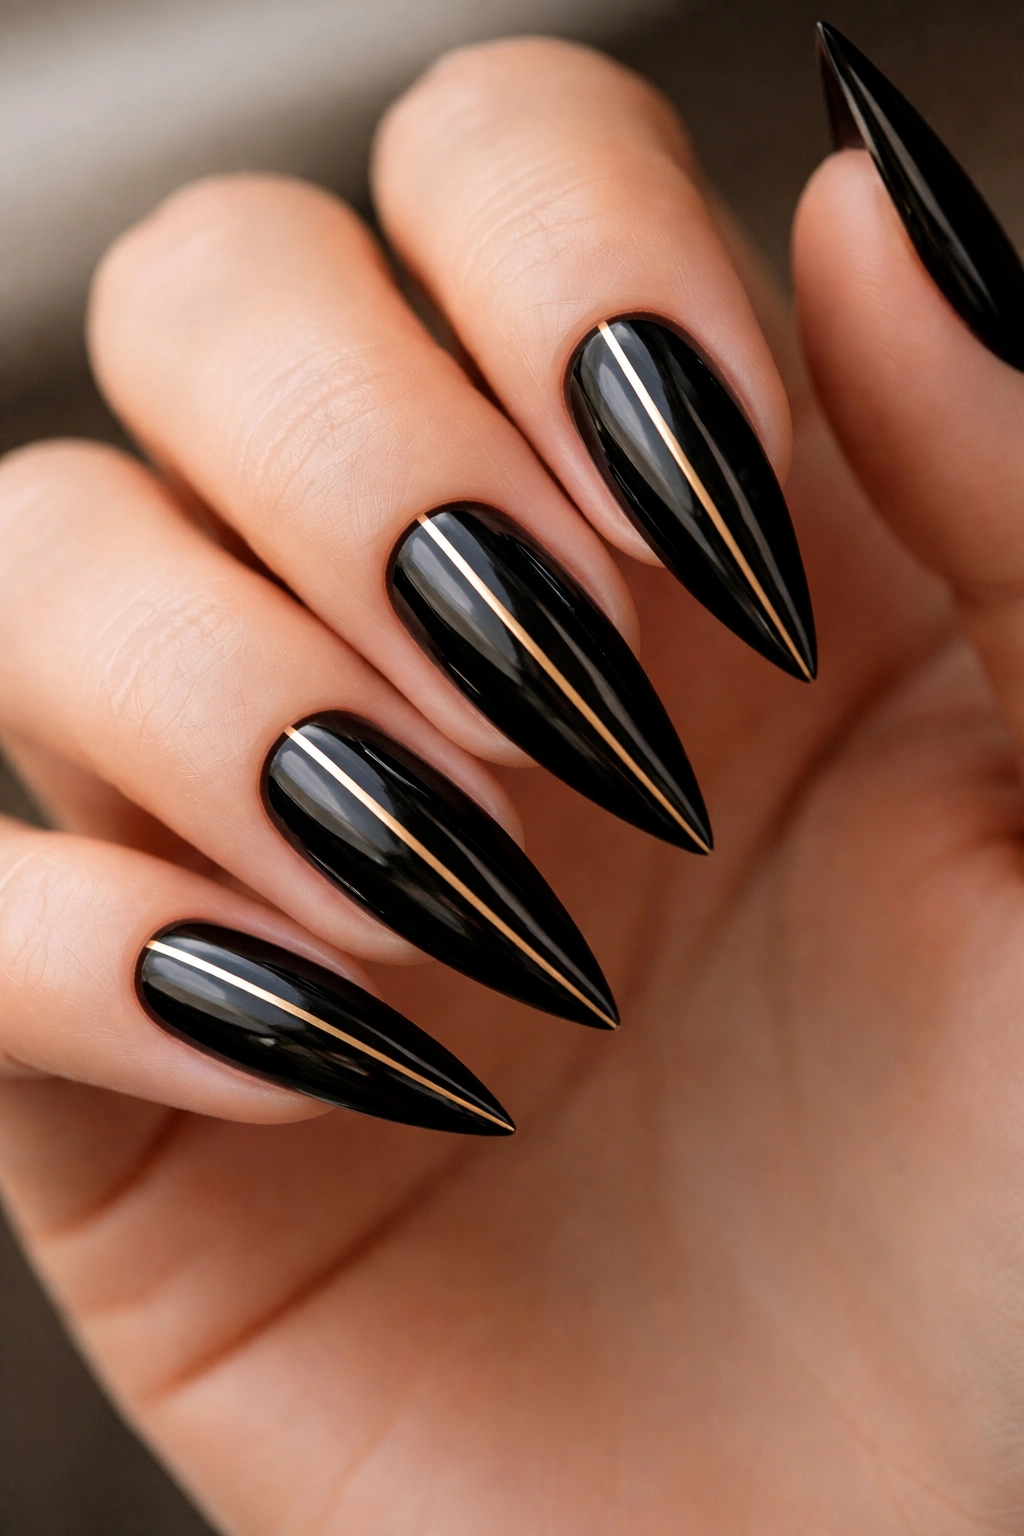
Elegant simplicity with a touch of luxury defines this design: a glossy black stiletto with ultra-thin gold lines running vertically down the center of the nail. The gold lines create visual interest without creating a busy aesthetic, and the technique is actually easier to execute than you might think.
Creating Delicate Line Work
Gold striping over black creates high contrast that makes even thin lines appear crisp and defined. The key is using an ultra-thin nail art brush and steady hand movement. A single straight line down the center is the most elegant approach, though some people add a second line on either side for a three-stripe pattern. Either way, the lines should be hair-thin rather than thick bands.
Application Steps for Gold Striping
- Start with two coats of glossy black and let dry completely
- Use a thin nail art brush or liner brush with gold gel or metallic polish
- Steady your hand by resting your pinky on the table for support
- Paint in one smooth, continuous motion from the base to the tip
- If you prefer a perfectly straight line, you can use a thin stripe of nail tape as a guide
- Seal with a glossy top coat
Pro tip: If your first attempt at a hand-painted line isn’t perfectly straight, don’t panic—embrace it as a “artistic interpretation” and most people will assume it was intentional. Perfectly imperfect details often read as more artisanal and intentional than computer-perfect lines.
4. Black Stiletto with Rhinestone Accents
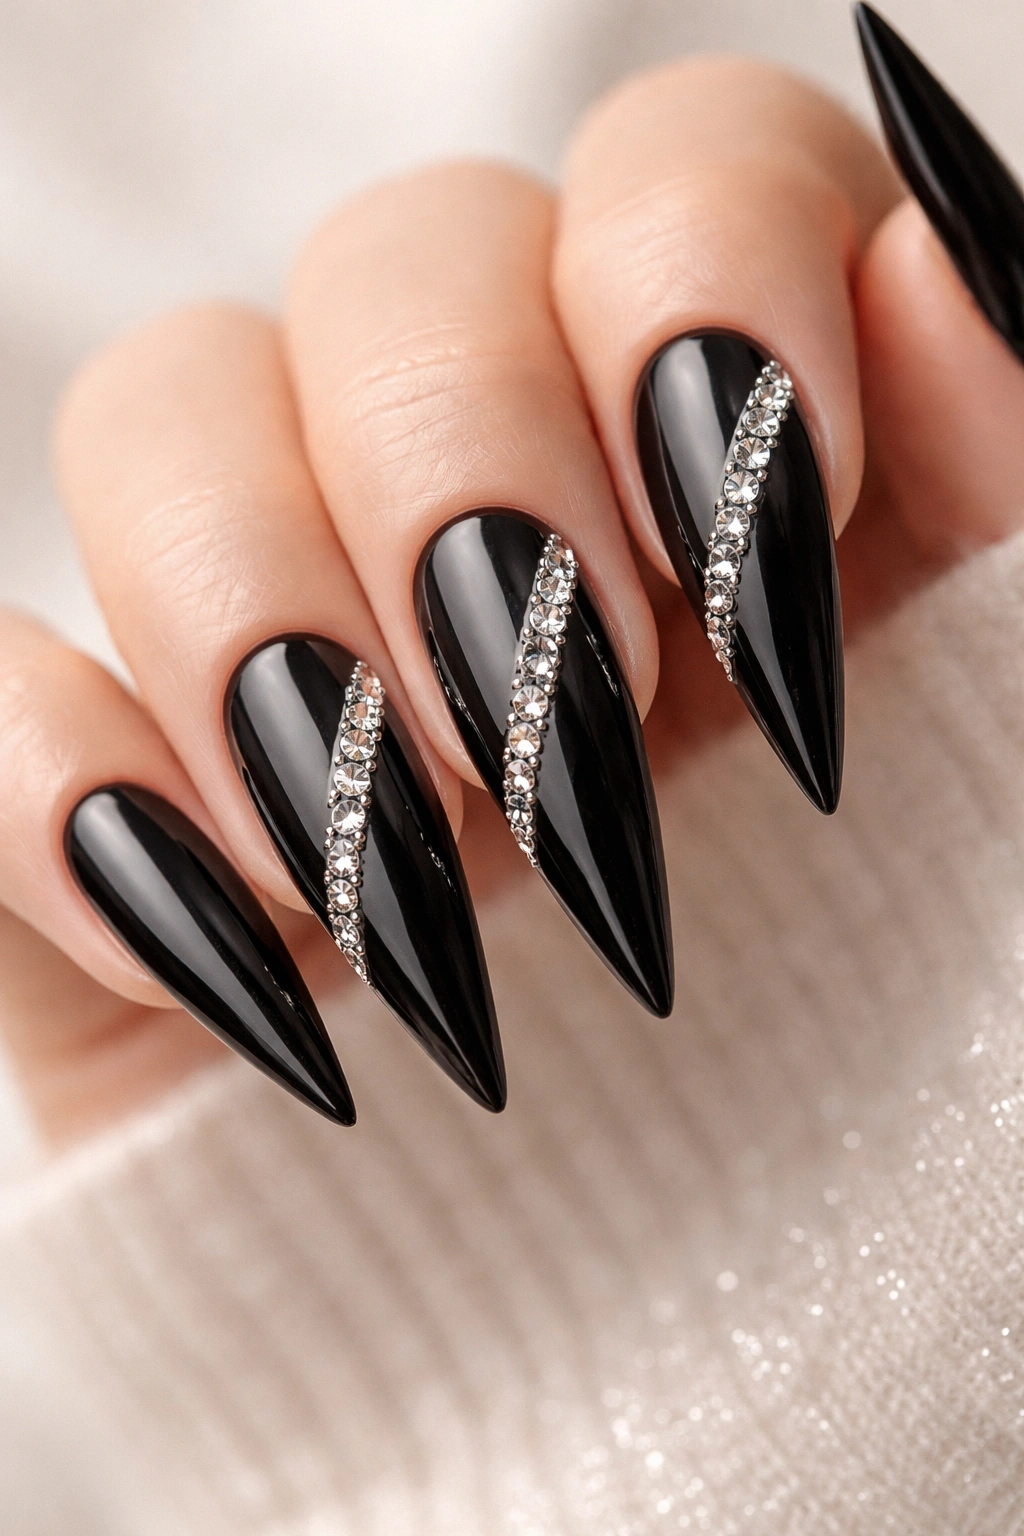
Drama and shine come together when you add rhinestones to your black stiletto nails. This works especially well for special occasions, nights out, or any time you want your nails to be a focal point of your look. The key is placement—strategic rhinestone placement creates elegance; random coverage reads as costume-y.
Where to Place Rhinestones for Maximum Impact
The most sophisticated rhinestone placements follow patterns rather than random scattering. A diagonal line of rhinestones from the inner corner of the nail to the tip creates a sharp, directional look that complements the stiletto shape. Alternatively, a cluster of rhinestones at the cuticle area with just a few accent stones trailing toward the tip reads as intentional and curated.
How to Apply Rhinestones That Actually Stay Put
- Apply rhinestones to a wet gel base or using a gel dot as adhesive
- Use rhinestones that are actually designed for nails (not craft rhinestones)—nail-specific stones have flat backs and hold better
- Press each stone firmly for 2-3 seconds to ensure strong adhesion
- Seal with a clear gel on top to lock them in place permanently
- Avoid over-filling your water cup when you wash hands for the first 48 hours
Insider note: If you use too many rhinestones, they catch on everything and feel uncomfortable when typing or handling objects. The sweet spot is usually 2-5 stones per nail, strategically placed where they’ll catch light when your hands are resting naturally.
5. Black Stiletto with White Negative Space Design
Negative space—creating designs by leaving parts of the nail unpainted—can look ultra-modern on black stilettos. White negative space against black creates stark, graphic contrast that reads as intentional and artistic. A geometric white stripe or angular negative space pattern makes the stiletto point feel even sharper.
Creating Graphic Negative Space
Negative space designs work best with geometric patterns: a diagonal white stripe from the base to the tip, a triangular white area at the cuticle, or parallel white lines. The beauty of negative space is that you’re not drawing—you’re simply protecting sections of the nail with tape while you paint. This makes it one of the easiest graphic techniques to execute.
How to Execute Negative Space Nail Art
- Paint your nails with a clear base coat
- Use thin nail tape or painter’s tape to mask off the areas where you want white negative space
- Paint the exposed areas with black polish, applying thin, even coats
- Remove the tape while the polish is slightly tacky (not fully dry, not wet)
- Seal with a glossy top coat
Real talk: The tape removal moment is when most people mess up. If you pull too early, the polish can smudge. If you wait too long, it becomes harder to remove cleanly. Aim for 90 seconds after your final coat—the polish should feel dry to the touch but slightly soft underneath.
6. Black Stiletto with Silver Foil Accents
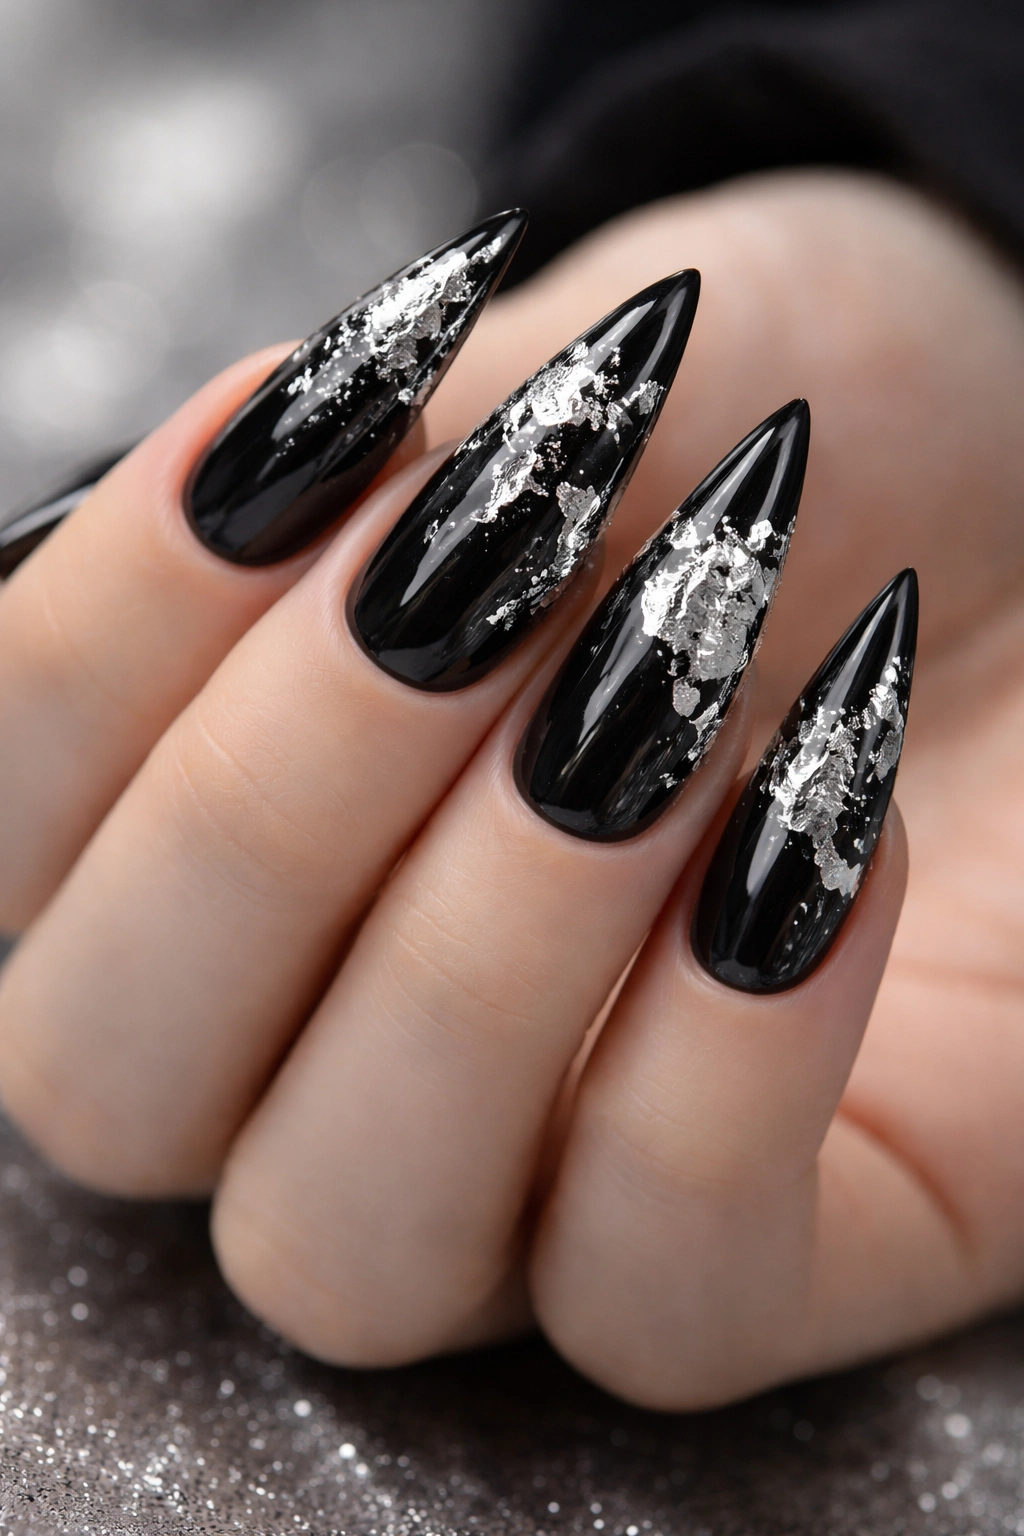
Silver foil creates a shattered-glass or crinkled-metal effect that’s absolutely eye-catching on black. The foil sits on top of your polish and catches light dramatically, creating a dimensional look that photographs beautifully. This design reads as artistic without requiring actual artistic skill.
Understanding How Foil Creates Visual Impact
Foil isn’t painted—it’s adhered to a sticky base and reflects light in scattered, organic ways. This creates movement and dimension that flat polish can’t achieve. The silver foil against black creates high contrast, so even small foil accents read as significant. Many people use foil just on the tips or in a specific focal area rather than covering the entire nail.
Applying Foil for a High-End Look
- Paint your nails with glossy black and let dry completely
- Apply a thin layer of gel top coat or a sticky base over the area where you want foil
- Tear small pieces of silver foil and press them gently onto the sticky surface
- Use a cuticle pusher or wooden stick to smooth down the foil
- Apply another layer of clear gel on top to seal the foil permanently
- The sealed foil won’t come off and remains brilliantly shiny
Worth knowing: Not all foil is created equal. Foil specifically designed for nails works better than craft foil, which can look cheap and separates easily. Buying quality foil is worth the small price difference because it actually stays put.
7. Black Stiletto with Nude Gradient Tips
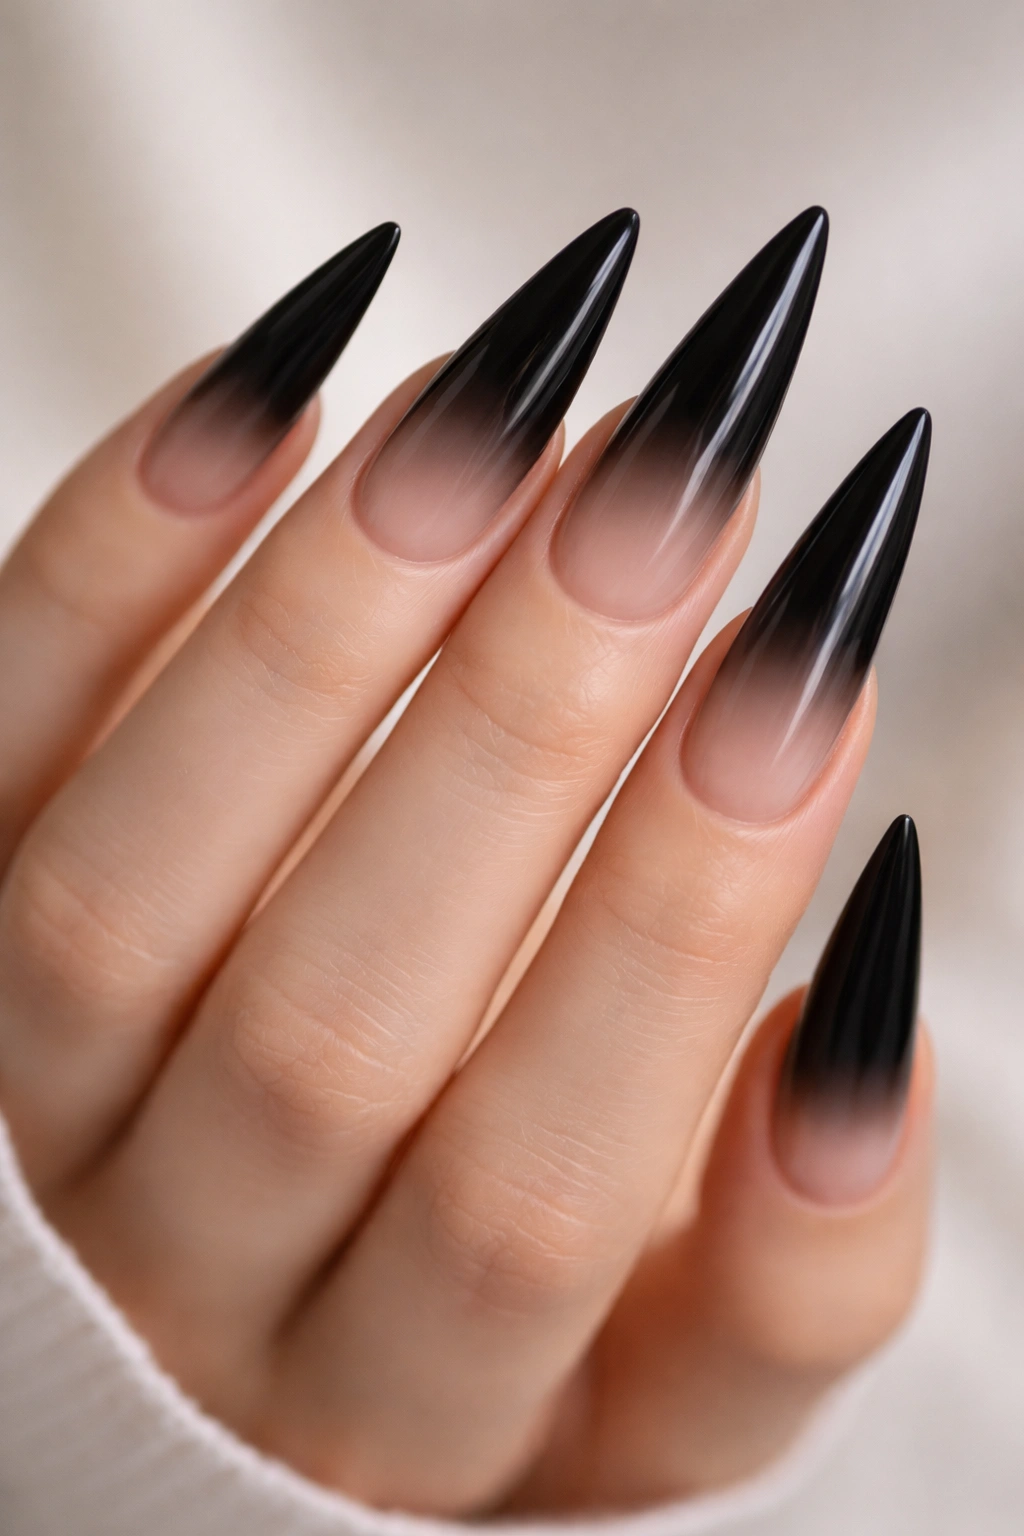
The ombré effect, where black fades gradually into nude at the tips, creates a long, tapered appearance that makes your nails look even more elegant and elongated. This design works beautifully if you have longer nail beds or if you want to create the illusion of extra length.
Why Gradients Enhance the Stiletto Shape
The gradient naturally draws the eye toward the tip of the nail, emphasizing the point. Nude against black is sophisticated rather than stark, so it reads as refined rather than bold. The soft transition between colors also makes the gradient easier to execute than you’d expect—perfect doesn’t matter because the blend is supposed to be gradual anyway.
Technique for Creating a Flawless Gradient
- Apply a base of glossy black to the entire nail and let dry
- Apply a layer of clear gel to the tips (about ¼ to ⅓ of the nail length)
- While the gel is tacky, apply nude gel and use a clean sponge to blend the line between black and nude
- Pat the sponge (don’t swipe) along the gradient line to create a seamless transition
- Apply another coat of nude on the very tips to strengthen the color
- Seal with a glossy top coat
Pro tip: The sponge blending method works way better than brush blending because the sponge doesn’t create harsh lines. Even if your gradient looks rough while wet, it softens considerably under the top coat.
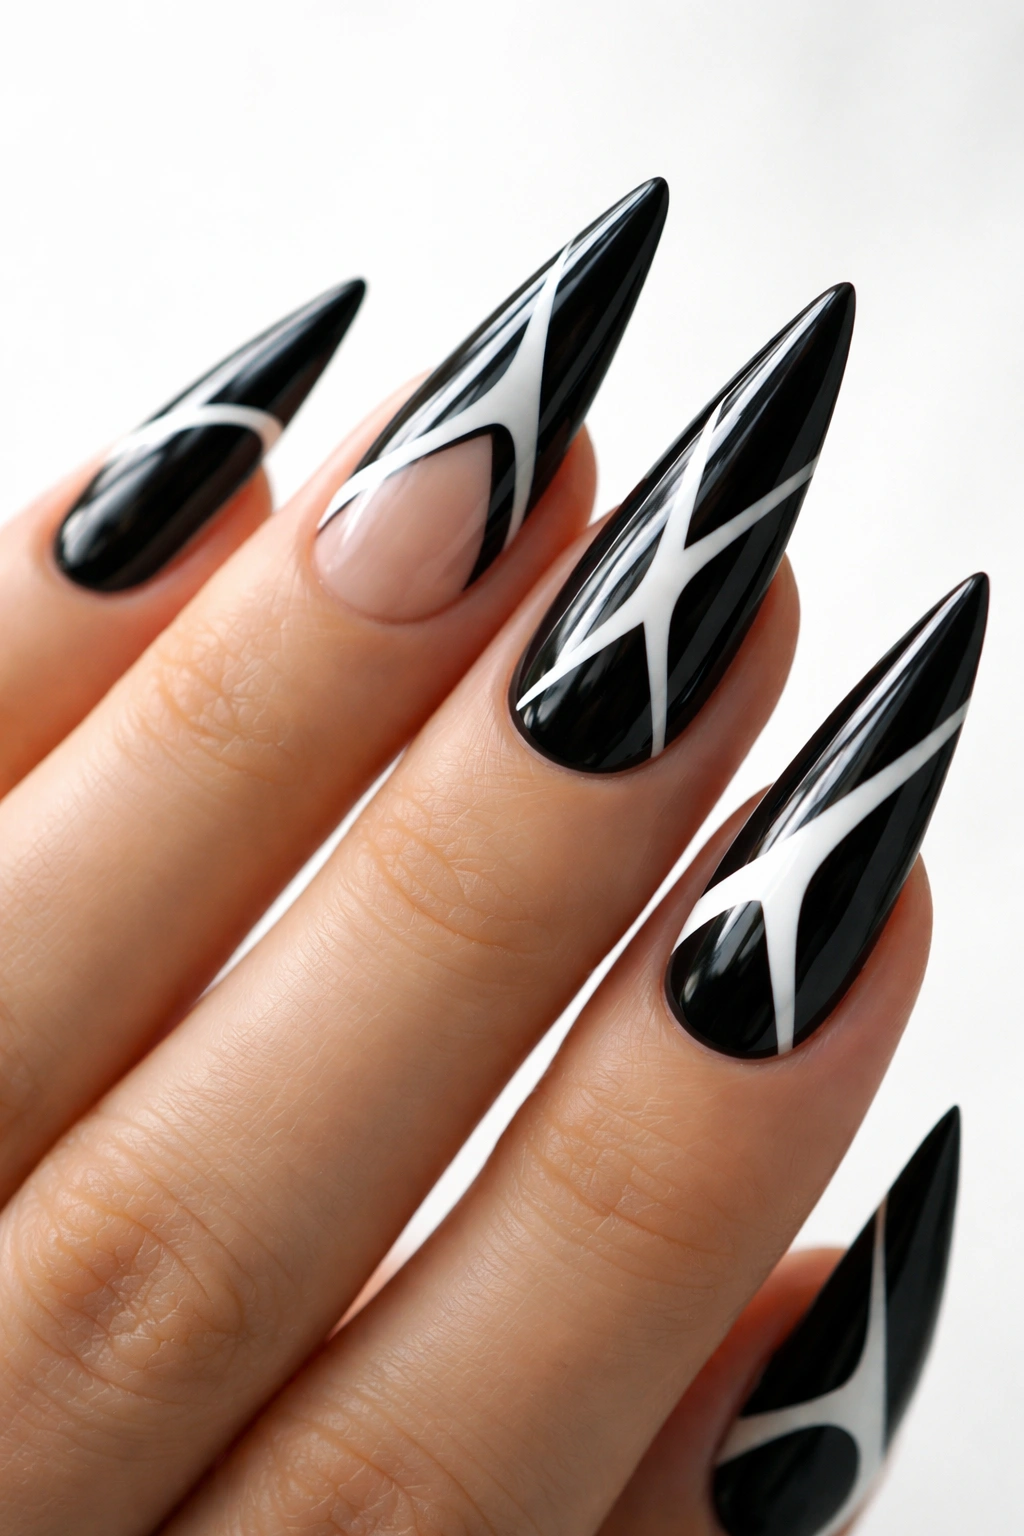
8. Black Stiletto with Geometric Line Art
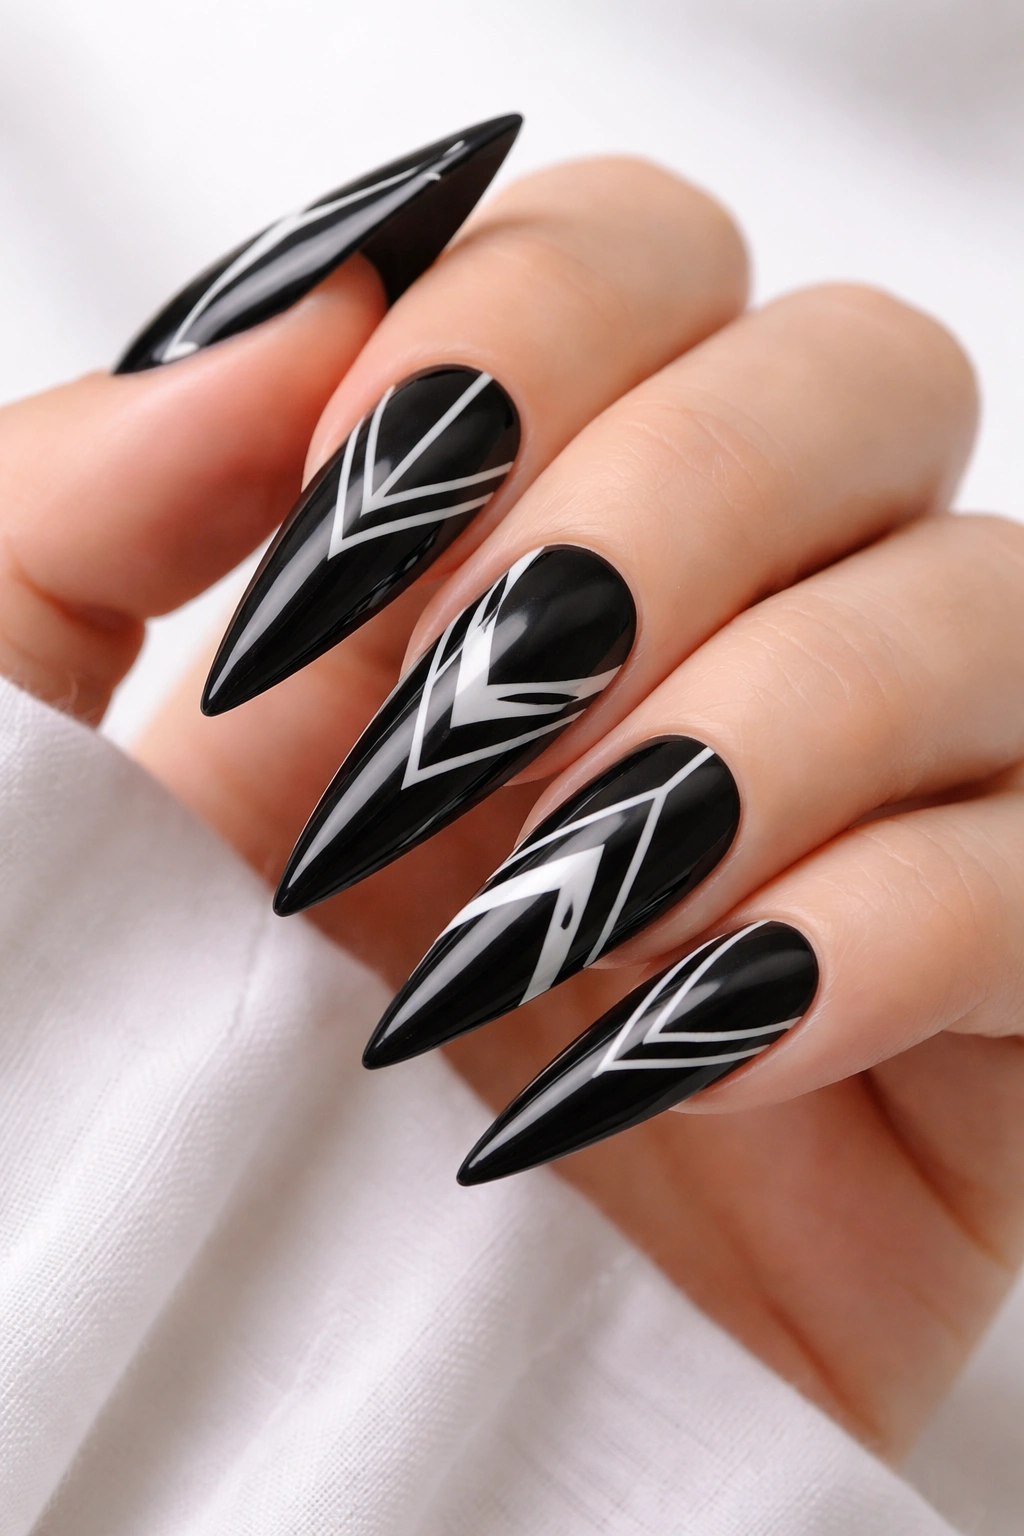
Clean, precise geometric lines—triangles, chevrons, or angular patterns—transform a black stiletto into a wearable piece of modern art. This design appeals to people who love minimalism with an edge. The geometry complements the sharp point of the stiletto perfectly.
Designing Geometric Patterns That Work
The most successful geometric designs use negative space (unpainted areas) or contrasting lines rather than solid shapes. A single chevron pointing toward the nail tip, parallel diagonal lines, or a simple triangle at the cuticle all read as intentional and sophisticated. Thick lines work better than thin ones for geometric art because they’re easier to paint and read more clearly.
Painting Geometric Designs Accurately
- Start with a glossy black base and let dry
- Use nail tape to create straight edges for your geometric shapes
- Paint your contrasting color (white, gold, or nude) in the taped-off areas
- Remove tape while the paint is slightly tacky
- Add additional details by hand if desired, using a thin brush
- Seal with a glossy top coat
Insider note: If you’re using bright white for geometric lines, two coats of white gives better opacity and prevents the black from showing through. Thick, opaque lines always read as more intentional and polished than thin, translucent ones.
9. Black Stiletto with Holographic Dust
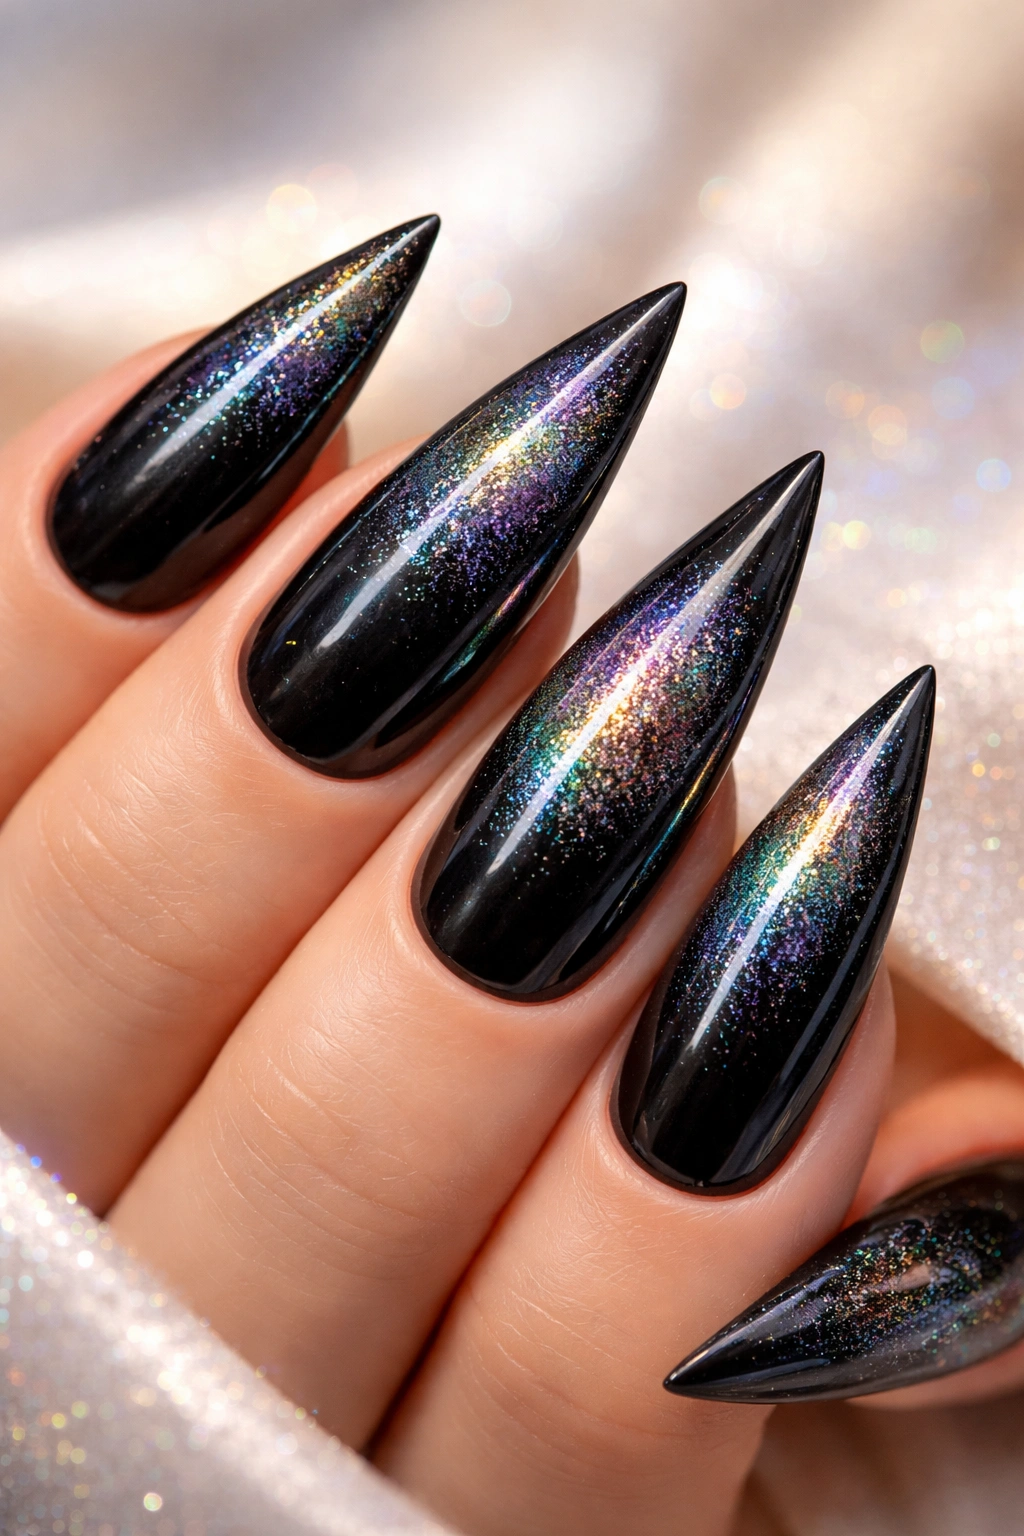
Holographic powder creates a rainbow-reflective shimmer that’s subtle in indoor light but absolutely spectacular under sunlight or bright party lighting. It’s the nail equivalent of having a prism on your fingertips—it catches light in magical ways.
The Appeal of Holographic Effects
Unlike solid sparkle, holographic dust shifts through multiple colors as light and angle change. This creates a magical, dimensional quality that’s impossible to capture in still photos but obvious in person. The effect is strong enough to notice but not so strong that it reads as costume-y—it’s refined sparkle.
Applying Holographic Powder Correctly
- Paint your nails with glossy black and let dry completely
- Apply a sticky gel base or clear gel to your entire nail
- Use a velvet applicator or brush to apply holographic powder in circular motions
- Be generous with the powder—a thin application looks patchy; you want visible sparkle
- Tap off excess powder into a paper towel
- Seal with a clear gel top coat, which intensifies the holographic effect
Real talk: Holographic powder shows up better in natural light than indoor artificial light. If you’re someone who spends most time indoors, you might not see the full effect as often as you’d like. But when you go outside or attend an event with good lighting, the payoff is absolutely worth it.
10. Black Stiletto with Marble Effect
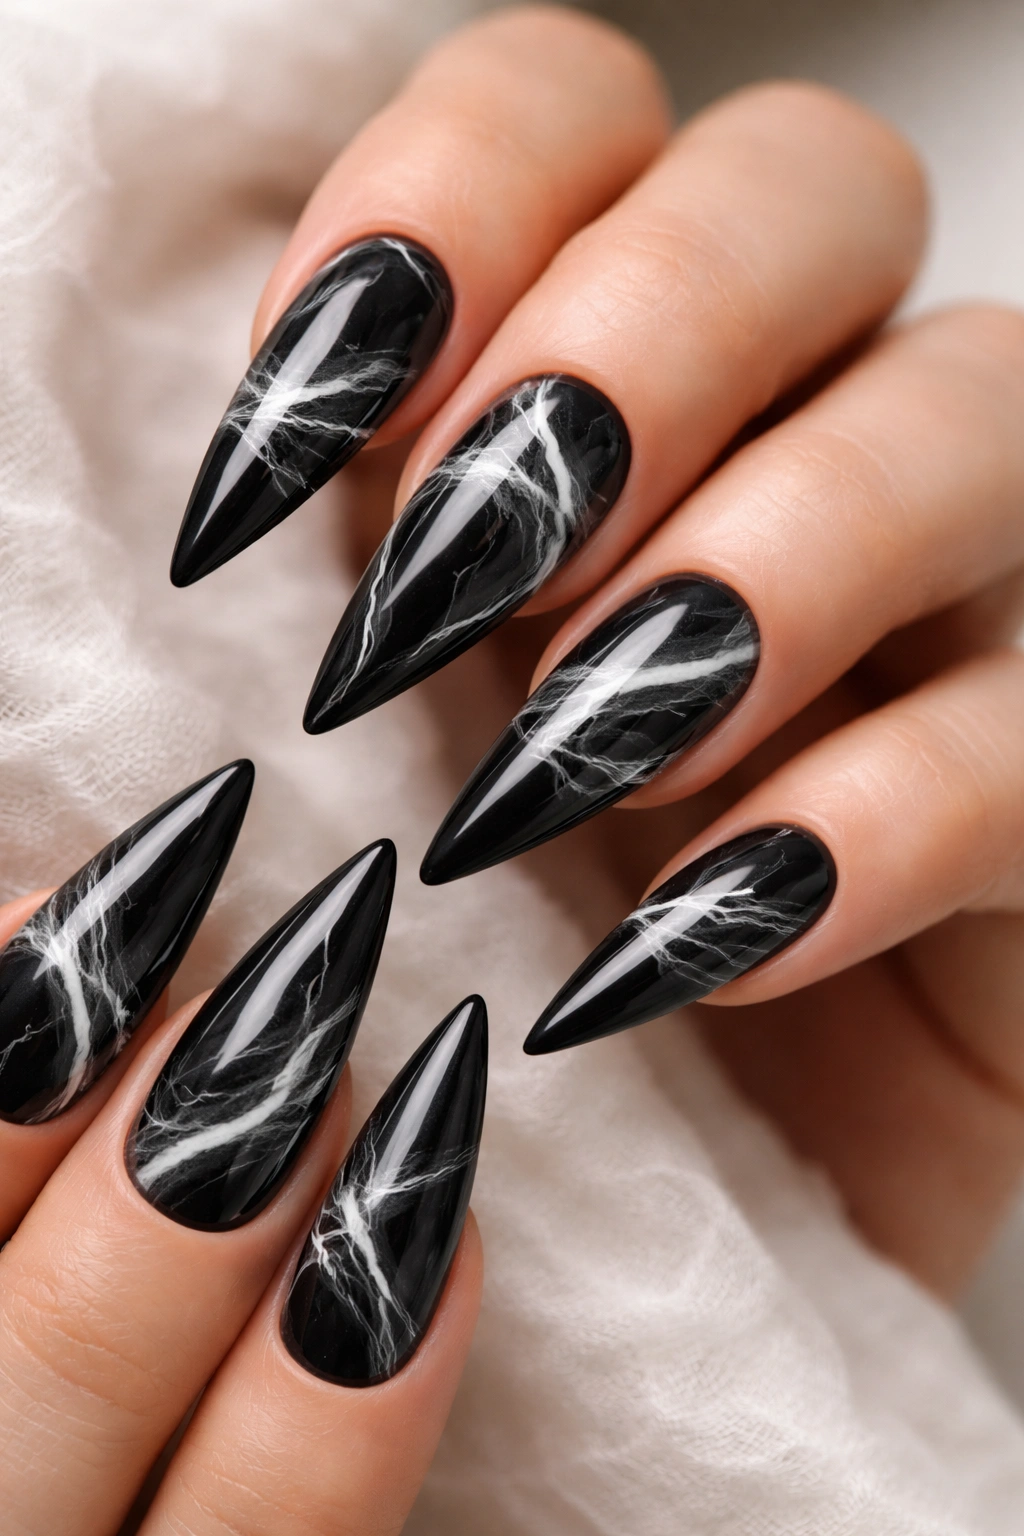
A marbled black and white design creates organic, cloud-like swirls that feel artistic and sophisticated. Unlike solid designs, the marble technique embraces imperfection—each nail looks slightly different, which is part of its charm.
Creating Marble on Black
The marble technique involves dropping different polish colors onto a surface, swirling them together, and transferring the pattern to your nail. For black nails, using white swirls creates stunning contrast. The organic nature of the effect means there’s no “wrong” way to do it—imperfection is the point.
How to Marble Your Nails
- Create a marble pattern using the water droplet method: drop black and white polish into water, swirl with a toothpick, then dip your nail in the pattern
- Alternatively, paint your black base and use a thin brush to swirl white polish across the surface
- Work quickly because polish dries fast; use quick, organic brushstrokes
- Apply a glossy top coat to seal the design
- Each nail will have a unique pattern, which reads as artistic and intentional
Pro tip: If your marble swirls look too uniform or planned, they read as less artistic. Embrace the chaos—the most beautiful marble designs are the ones where you didn’t overthink it.
11. Black Stiletto with Glitter Gradient
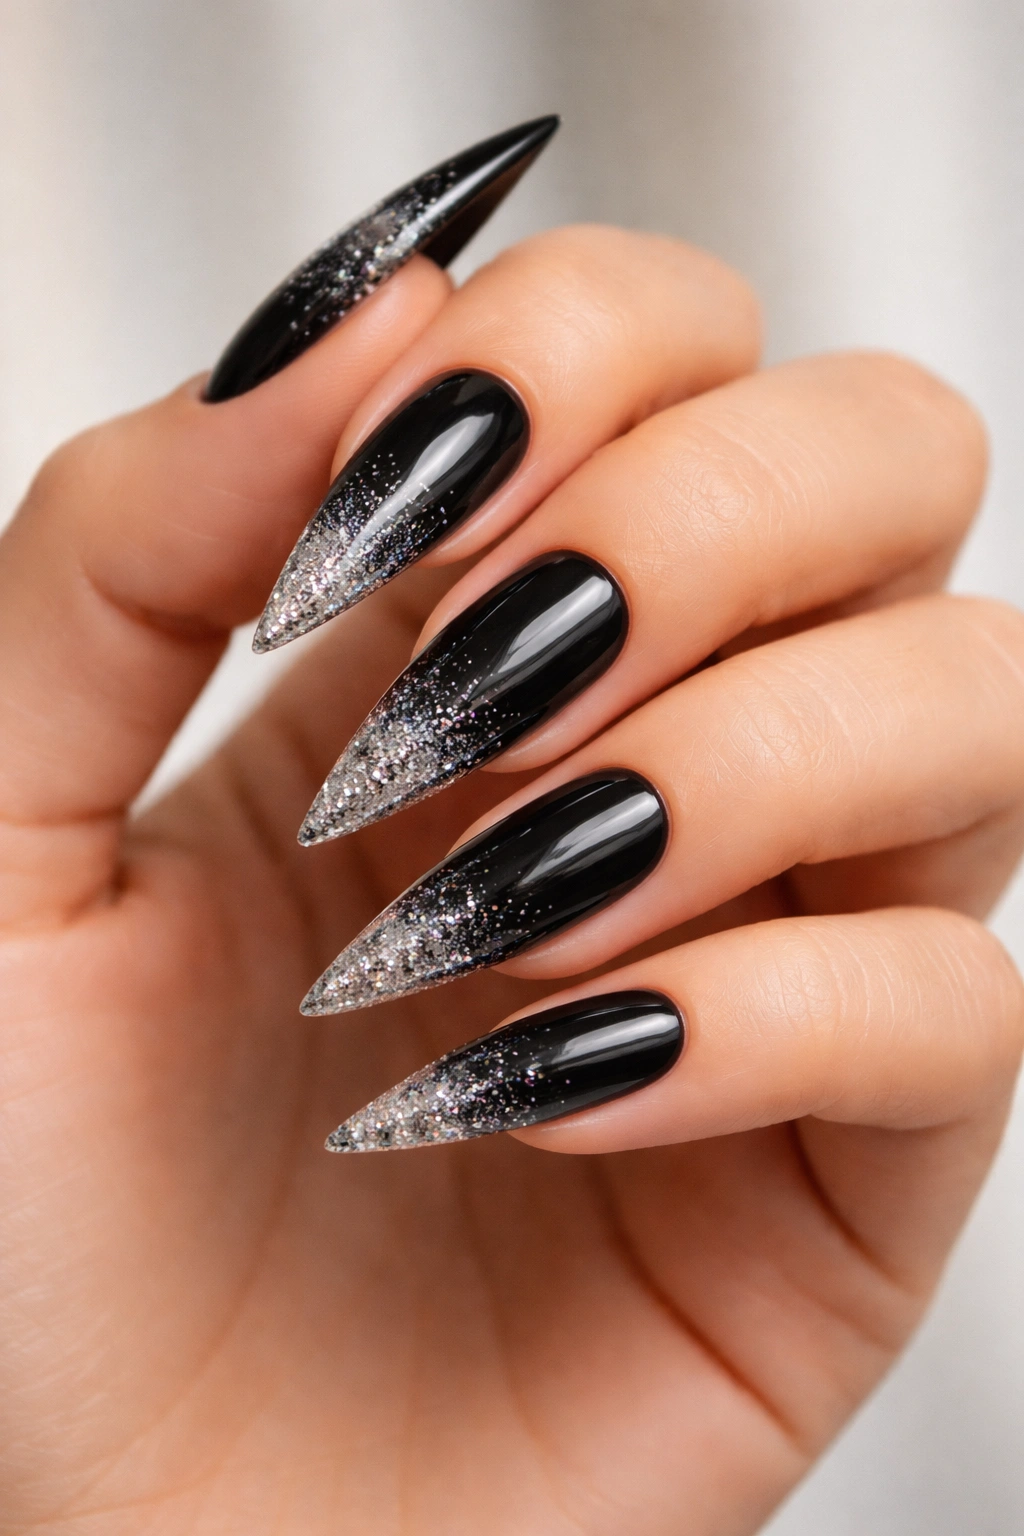
A gradient that transitions from black at the base to concentrated glitter at the tips creates sparkle exactly where it shows most. This works brilliantly for evening occasions or anytime you want nails that catch light and draw attention.
The Strategic Placement of Glitter
Putting glitter only at the tips means you get maximum sparkle without too much visual weight. The gradient from solid black to sparkle creates a natural-looking transition that makes the nails appear longer. This design is easier to maintain than full-glitter nails because the solid black portions are chip-resistant.
Building a Glitter Gradient
- Apply glossy black to your entire nail and let dry
- Mix clear gel with fine glitter in a separate container
- Apply the glitter mixture to the tips, making it more concentrated at the very point
- Blend the edges of the glitter into the black using a clean sponge
- Seal with a glossy top coat, which locks the glitter in place
Worth knowing: Fine glitter stays in place better than chunky glitter and creates a more refined look. Chunky glitter can catch on things and feel uncomfortable. Save the chunky stuff for special occasions where comfort isn’t the priority.
12. Black Stiletto with Red Accent Nail
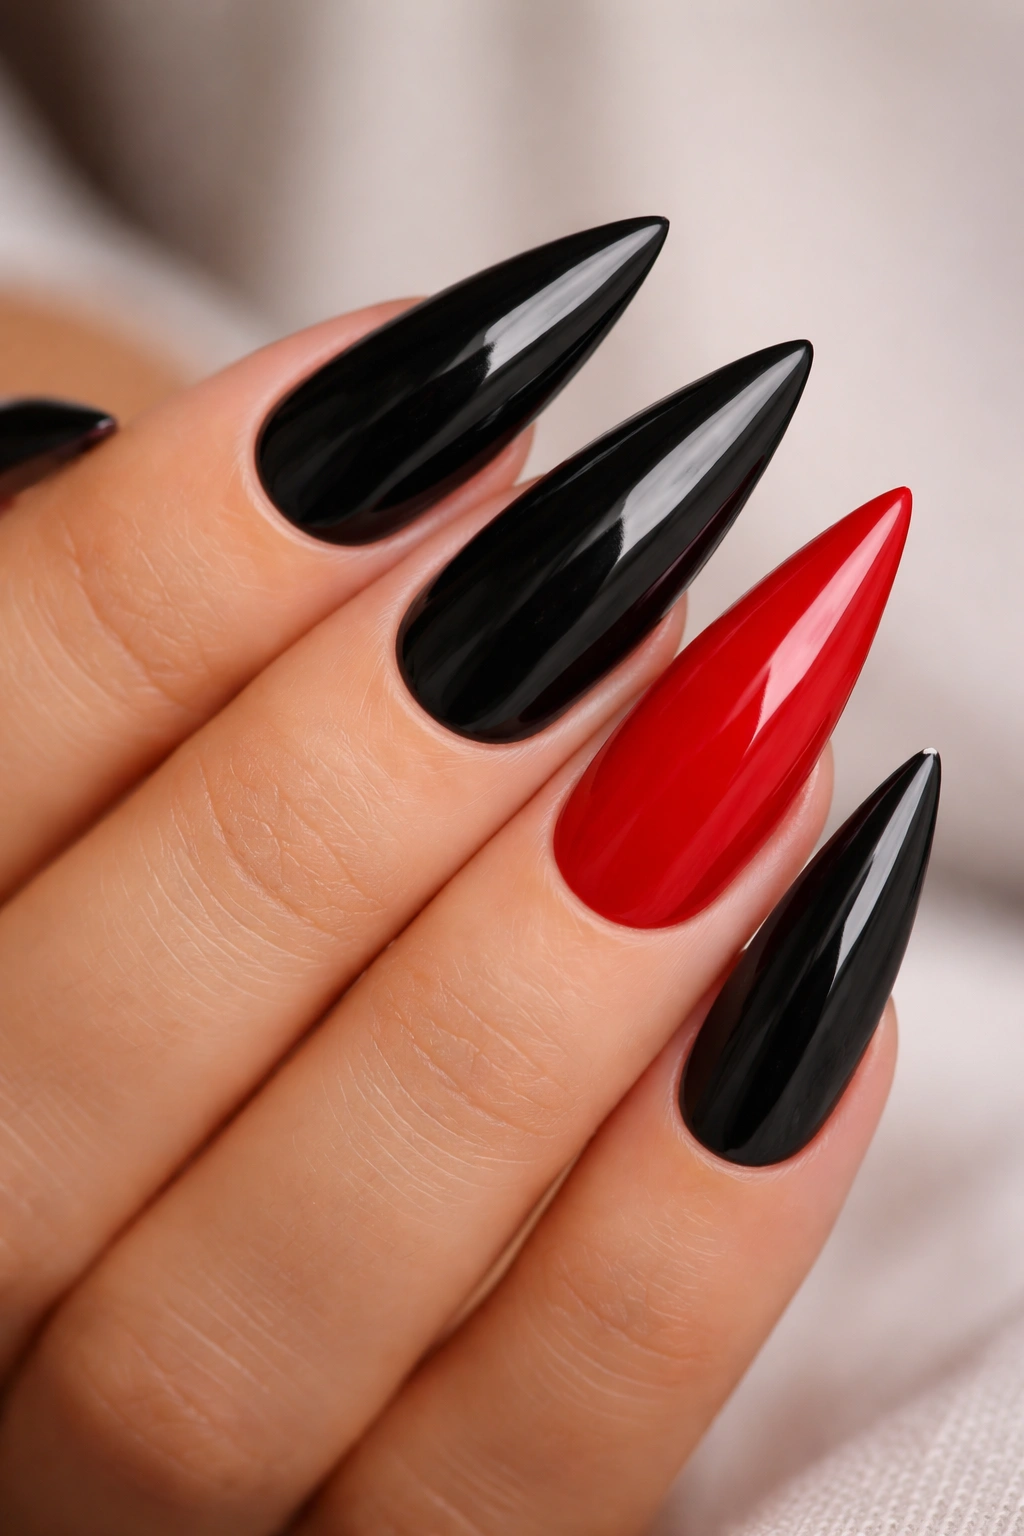
Break up a set of black stilettos by painting one nail a bold red, creating a striking contrast that draws attention. This design works for anyone who loves color but wants to keep their overall look sophisticated and wearable.
Why the Red Accent Works
A single red nail creates a focal point without being overwhelming. The contrast between red and black is naturally high-impact and reads as intentional rather than random. This approach works beautifully on a ring finger or middle finger—whichever nail gets the most visibility.
Making the Red Pop Against Black
- Paint your main nails with glossy black in the stiletto shape
- Paint your accent nail with a true red (not burgundy, not coral—true red)
- Use two coats of red to ensure rich, opaque color
- Seal all nails with the same glossy top coat for cohesion
- The contrast will be immediately striking
Insider note: The specific red you choose matters tremendously. A blue-toned red reads as cool and elegant; an orange-toned red feels warmer and more playful. Choose based on your skin tone and the vibe you’re going for.
13. Black Stiletto with Gold Leaf Accents
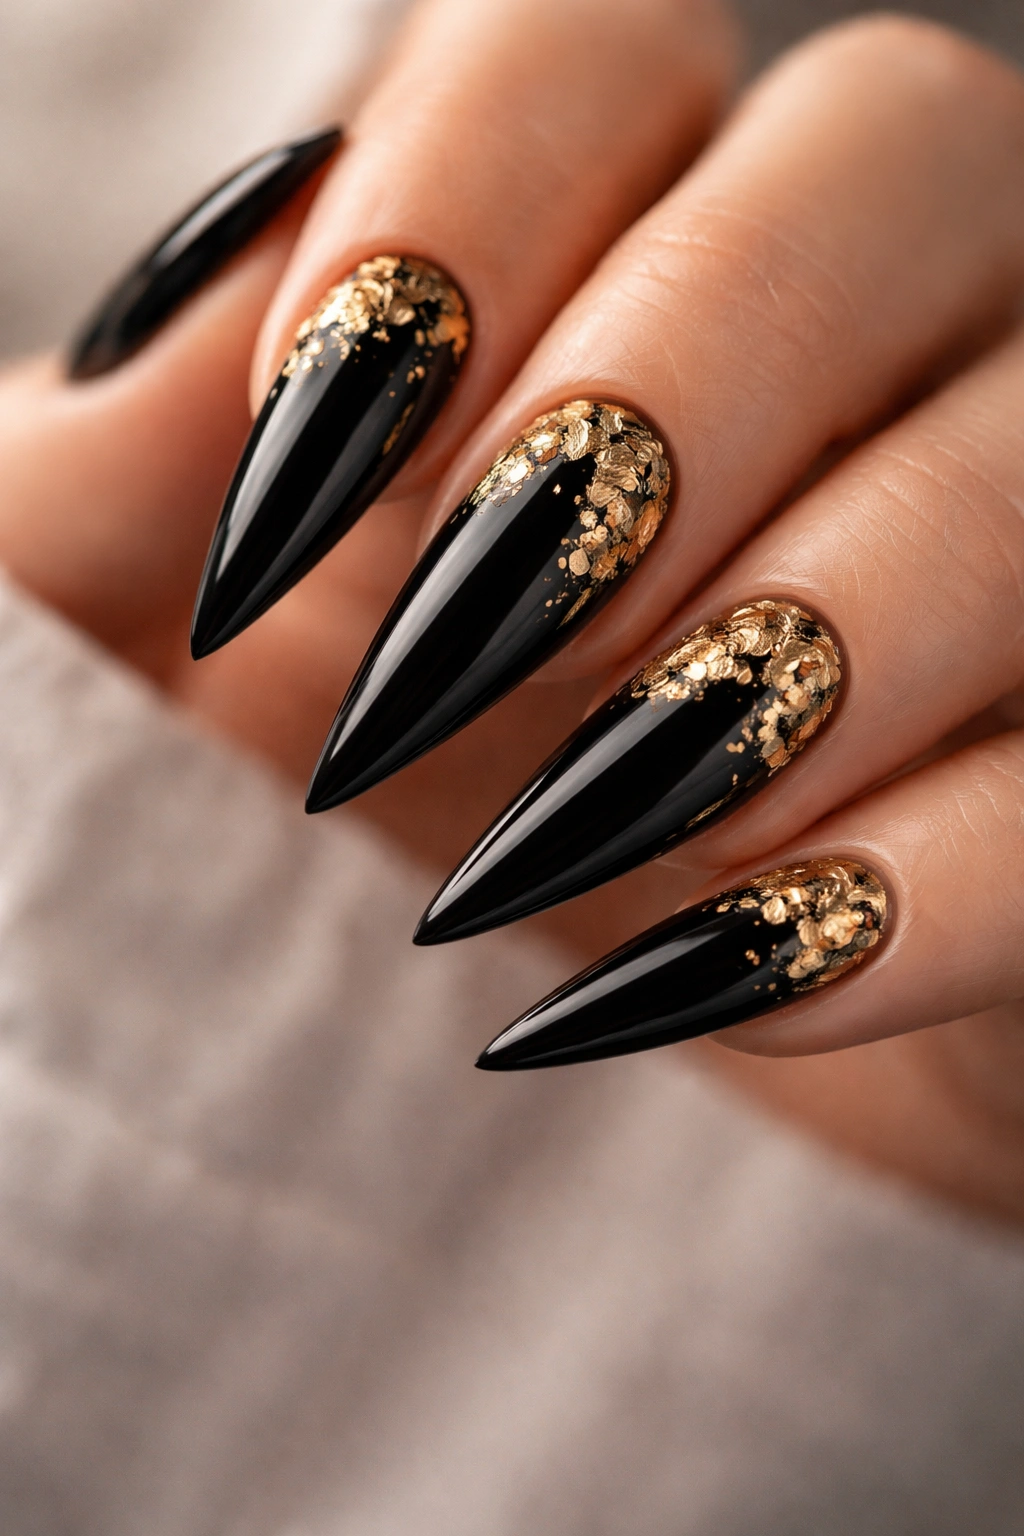
Real gold leaf (or nail-safe metallic leaf) creates a luxurious, high-end appearance that looks like it cost you way more than it actually did. The leaf sits on top of the polish and creates dimensional, organic patterns that can’t be replicated with paint.
Why Leaf Accents Feel Expensive
Leaf catches light like actual metal, creating depth and dimension. The organic, slightly irregular edges of the leaf create a more refined aesthetic than painted designs. Even a small amount of gold leaf reads as intentional luxury on black nails.
Applying Leaf for a Polished Finish
- Paint your nails with glossy black and let dry completely
- Apply a sticky gel base to the area where you want your leaf accents
- Tear small pieces of gold leaf and press them gently onto the sticky surface
- Use a soft brush to gently press the leaf into place
- Seal with a clear gel top coat, which locks the leaf permanently
- The sealed leaf becomes incredibly durable and won’t flake off
Pro tip: You don’t need much leaf—a small amount strategically placed reads as more sophisticated than covering the entire nail. Try just the tips, a small cluster at the cuticle, or a diagonal accent.
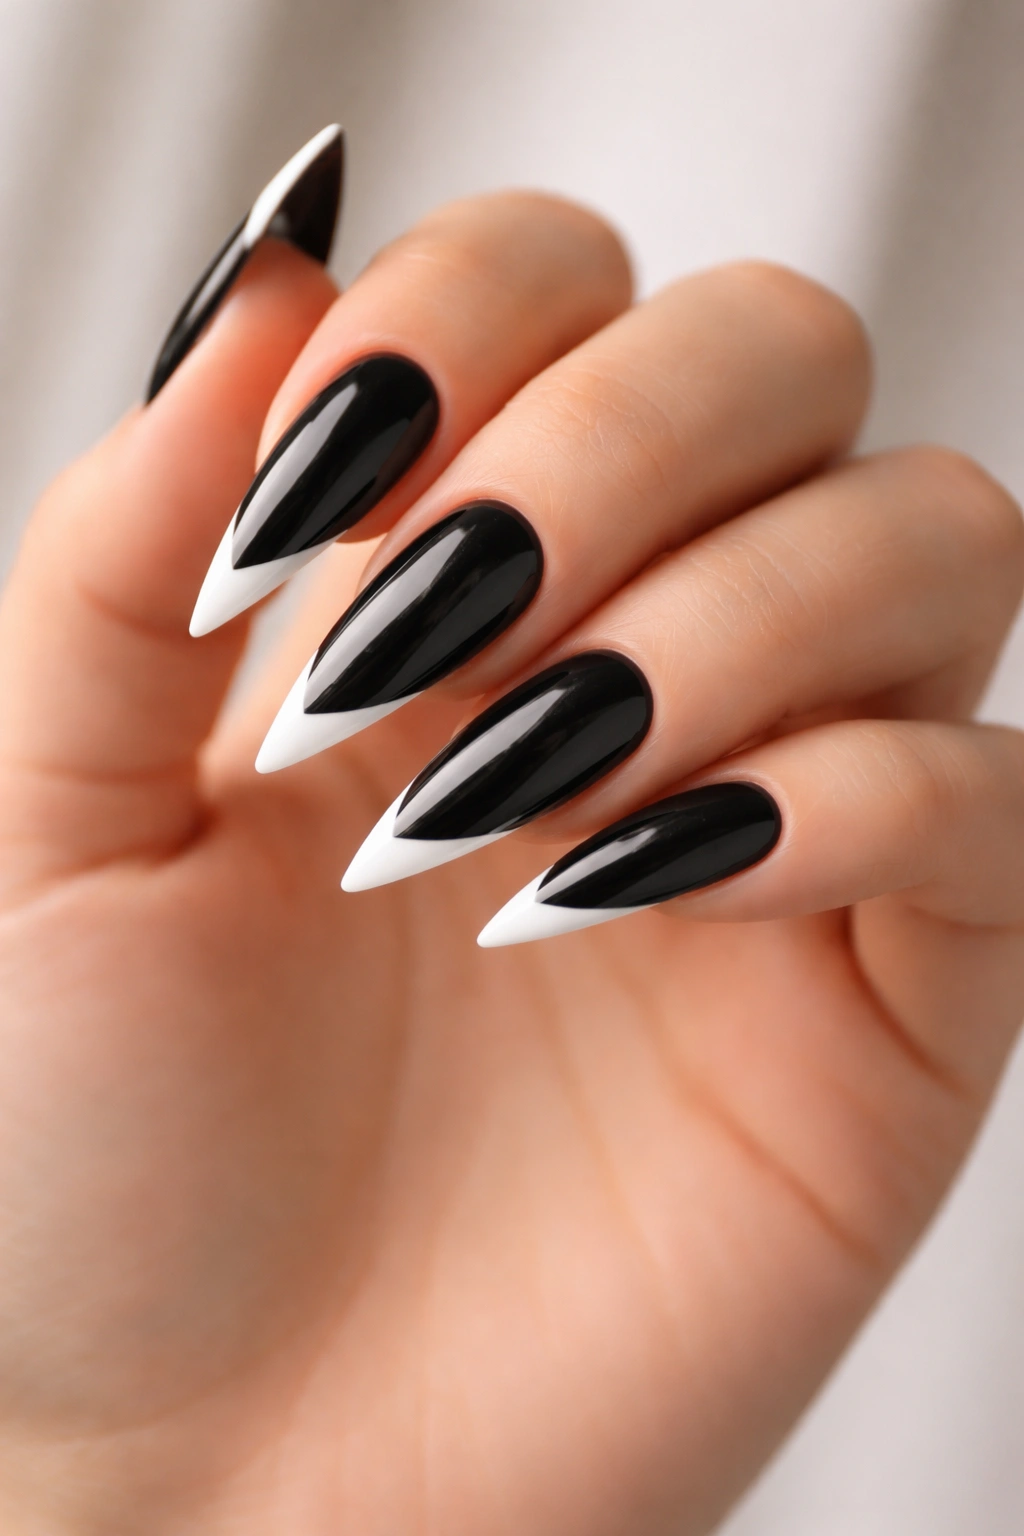
14. Black Stiletto with White French Tip
The timeless French manicure gets an edgy update on black stilettos: reverse the colors so your tips are crisp white instead of nude, creating a sharp, graphic look. The contrast reads as bold and modern while maintaining classic elegance.
Modernizing the French Manicure
A white tip against black creates stark contrast that emphasizes the stiletto point even more dramatically. The clean white line makes the shape feel crisper and more defined. This design works for any occasion—it’s both professional and fashion-forward.
Creating a Perfect White Tip Line
- Paint your entire nail with glossy black and let dry
- Use thin nail guides or painter’s tape to create a straight line across the tips where your white will go
- Apply white polish or gel to the exposed tip area using two coats for opacity
- Remove tape while the polish is slightly tacky
- Seal with a glossy top coat
Real talk: The tape method creates straighter lines, but freehand painting looks more artistic if you can keep a steady hand. Either approach works—choose based on your comfort level.
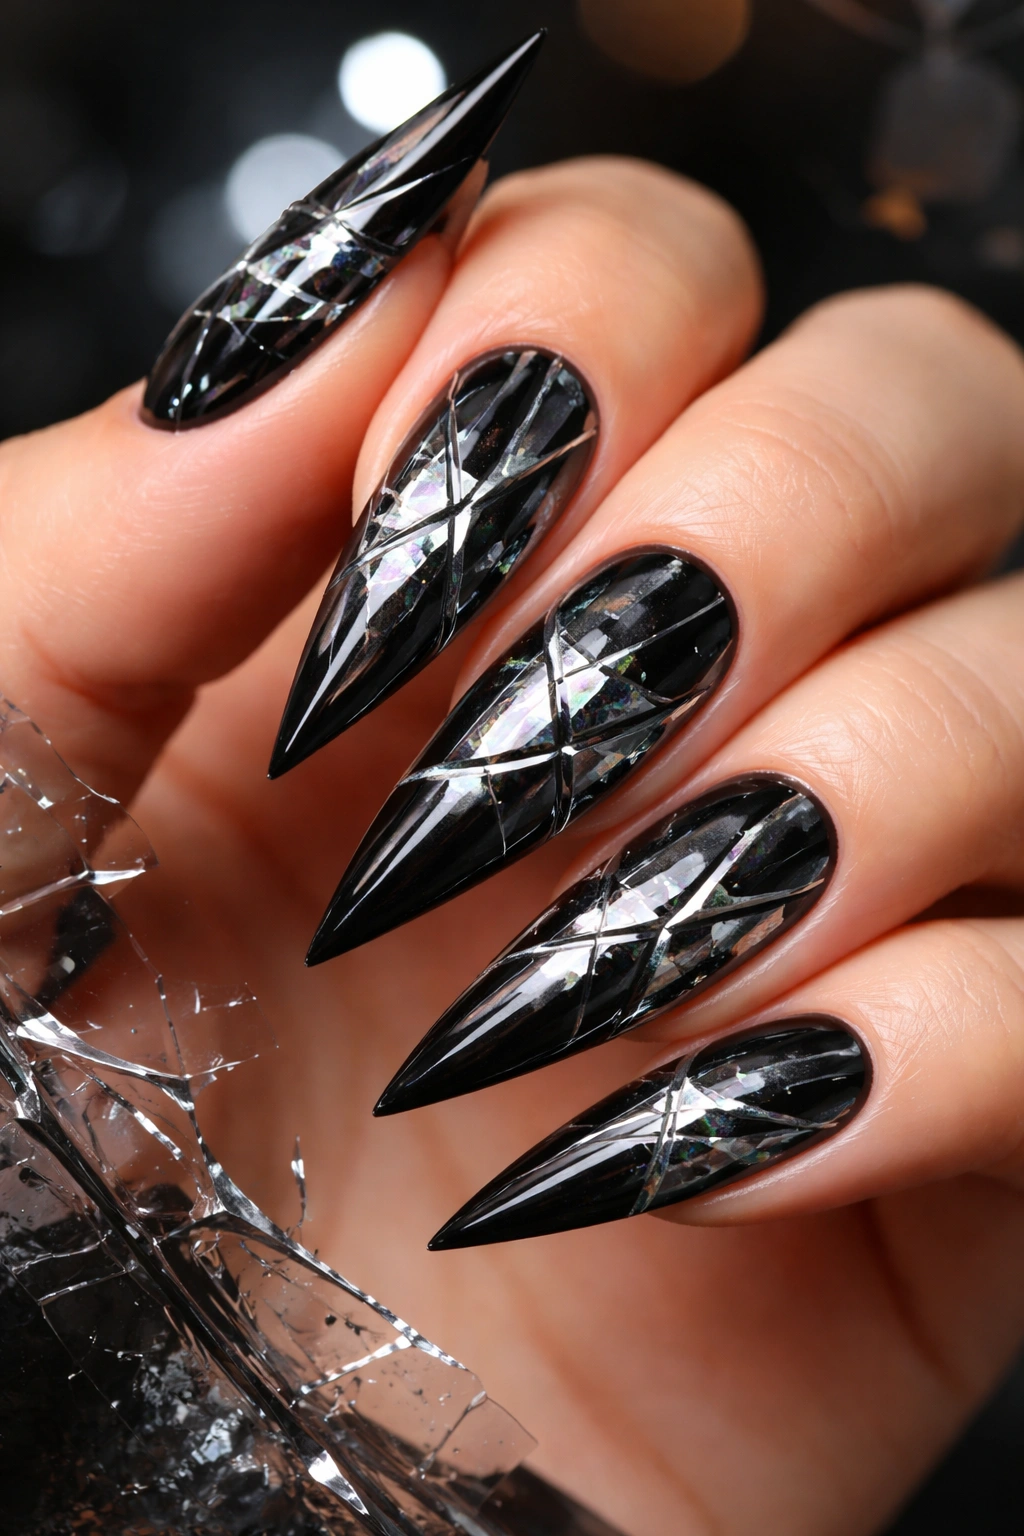
15. Black Stiletto with Shattered Glass Effect
The shattered glass effect uses a combination of broken lines, splinter patterns, and metallic accents to create the illusion of glass breaking across the nail surface. It’s visually striking and perfect for anyone who loves edgy, artistic designs.
Creating the Illusion of Shattering
The shattered effect uses black and white (or black and metallic) to create angular, line-based patterns that radiate from a central point or scatter across the surface. The effect is easier to achieve than it looks because precision doesn’t matter—controlled chaos is the goal.
How to Paint a Shattered Glass Effect
- Start with a glossy black base and let dry
- Using a thin brush and white polish or gel, paint angular lines that cross over each other
- Leave some areas solid black, some areas white, creating fragmented-looking sections
- Add metallic accents in silver or gold to enhance the glass effect
- The lines should look broken, not smooth or organized
- Seal with a glossy top coat
Worth knowing: The shattered effect works best with thick, opaque lines because thin lines get lost against the dark background. Don’t be conservative with your paint—bold, chunky lines read as intentional artistry.
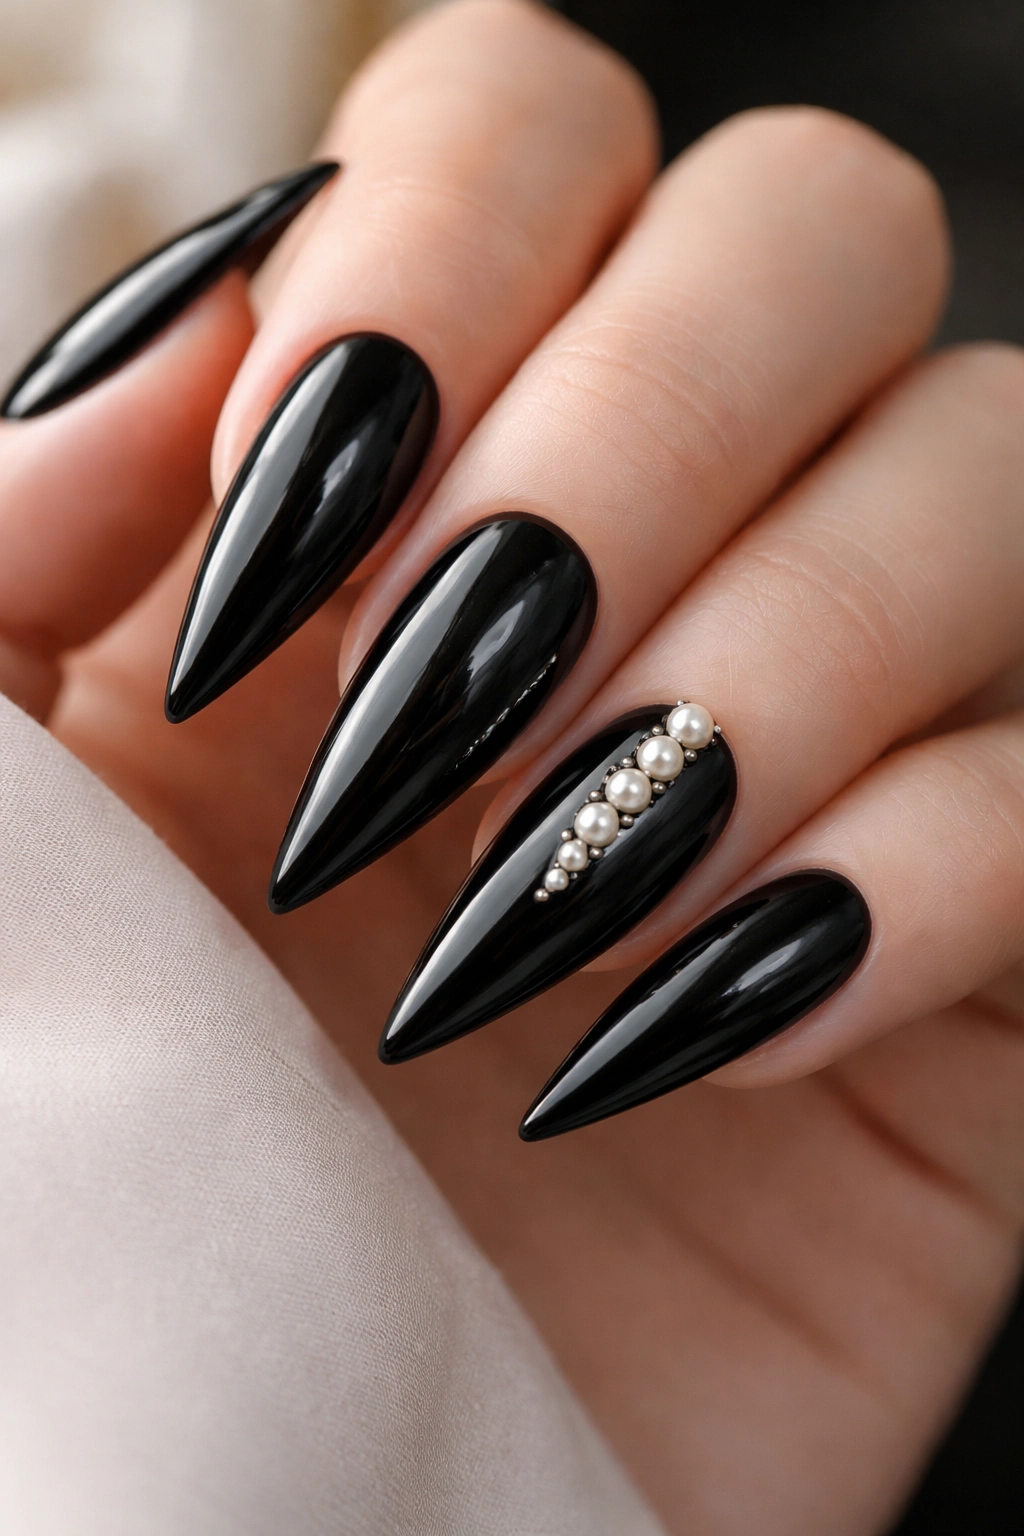
16. Black Stiletto with Pearl Accents
Delicate pearl or pearlescent elements create a soft, luxurious quality on black stilettos. This works particularly well for people who love elegance with a hint of femininity, or for special occasions where you want understated luxury.
The Elegant Simplicity of Pearls
Pearl accents against black create visual interest without being loud. The pearlescent quality makes pearls catch light in understated ways, creating shimmer rather than sparkle. A few pearl beads or a small pearl-effect cluster reads as refined and intentional.
Adding Pearls to Your Black Stilettos
- Paint your nails with glossy black and let dry
- Apply pearls using a clear adhesive specifically designed for nails or a small dot of gel
- Use tweezers to place each pearl precisely
- You can create a vertical line, a curved accent, or a small cluster
- Seal with clear gel to ensure the pearls don’t accidentally come off
- The sealed nails remain fully waterproof and durable
Pro tip: Pearls look most elegant when they’re small to medium-sized. Oversized pearls read as costume-y rather than sophisticated. Smaller pearls create a more refined aesthetic.
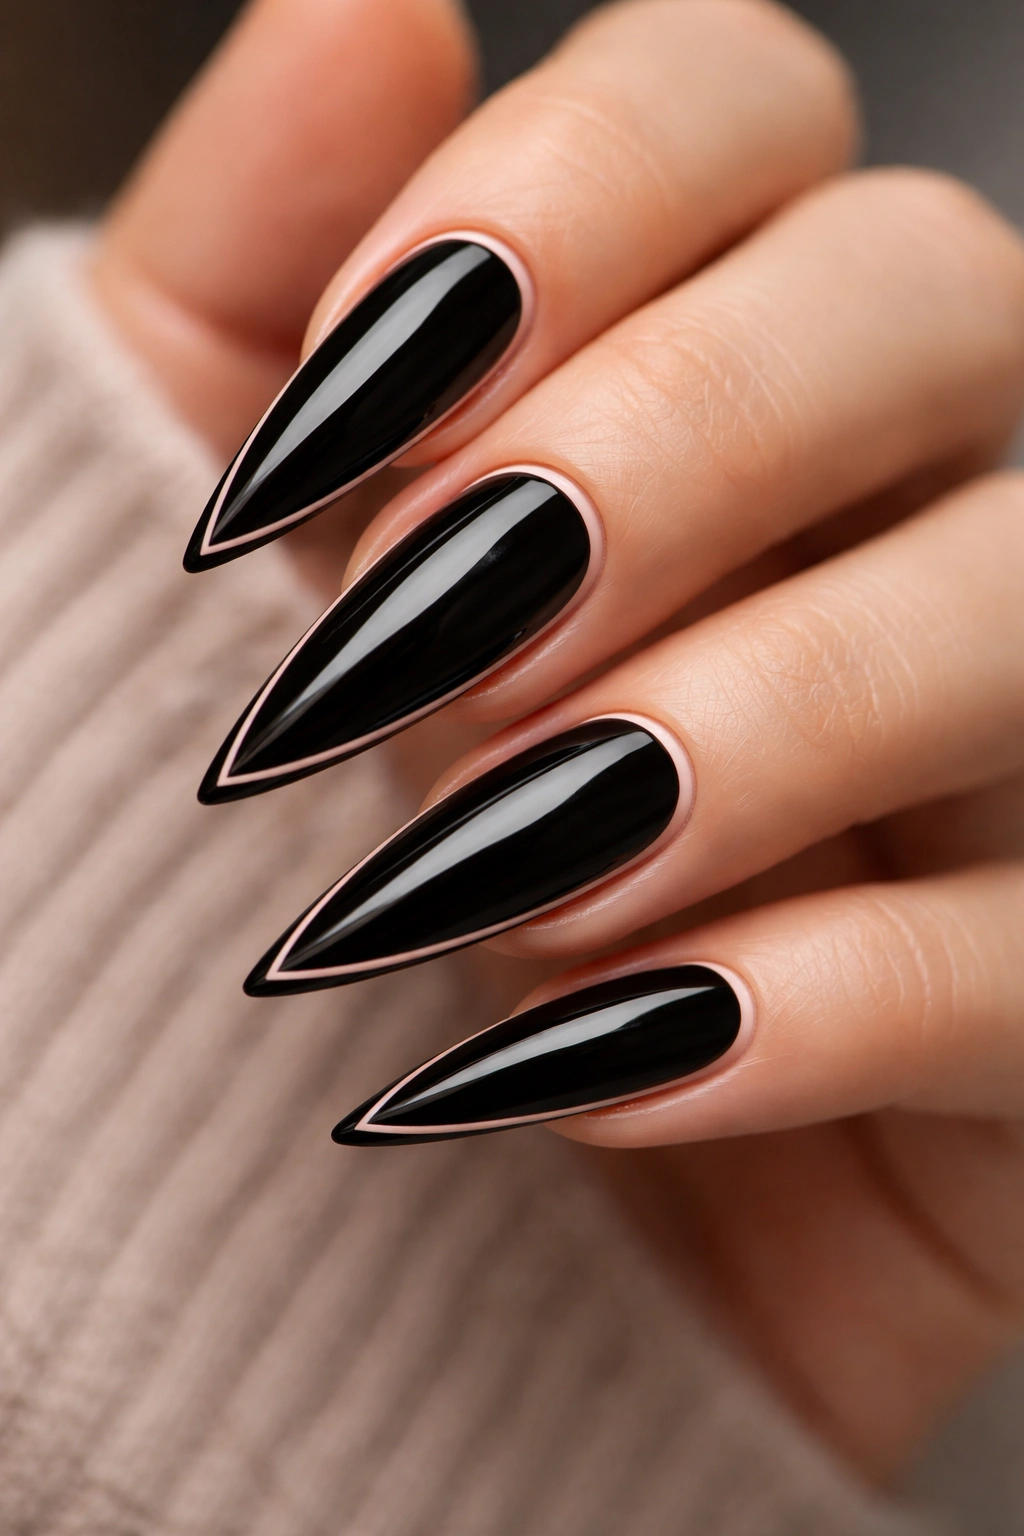
17. Black Stiletto with Nude Outline
Create depth and dimension by outlining each black stiletto nail with a thin nude or tan line around the perimeter. This subtle design creates a lifted, more defined appearance and reads as incredibly polished without being obvious.
Why Outlines Enhance the Silhouette
An outline creates the illusion of separation and definition, making the stiletto shape appear sharper and more dimensional. The nude outline against black reads as subtle sophistication—it’s refined enough that not everyone notices it immediately, but once they do, they realize how intentional and elevated the look is.
Painting a Precise Outline
- Paint your nails with glossy black and let dry completely
- Use a very thin brush and nude or tan polish
- Paint a thin line along the perimeter of each nail, following the edge closely
- Steady your hand by supporting your painting hand with your opposite hand
- The line should be thin enough to be subtle but thick enough to be visible
- Seal with a glossy top coat
Insider note: A nail outline looks best if you also outline the side edges of the nail, not just the tip and base. This creates a complete, framed effect that reads as incredibly polished.
18. Black Stiletto with Ombré Purple Tips
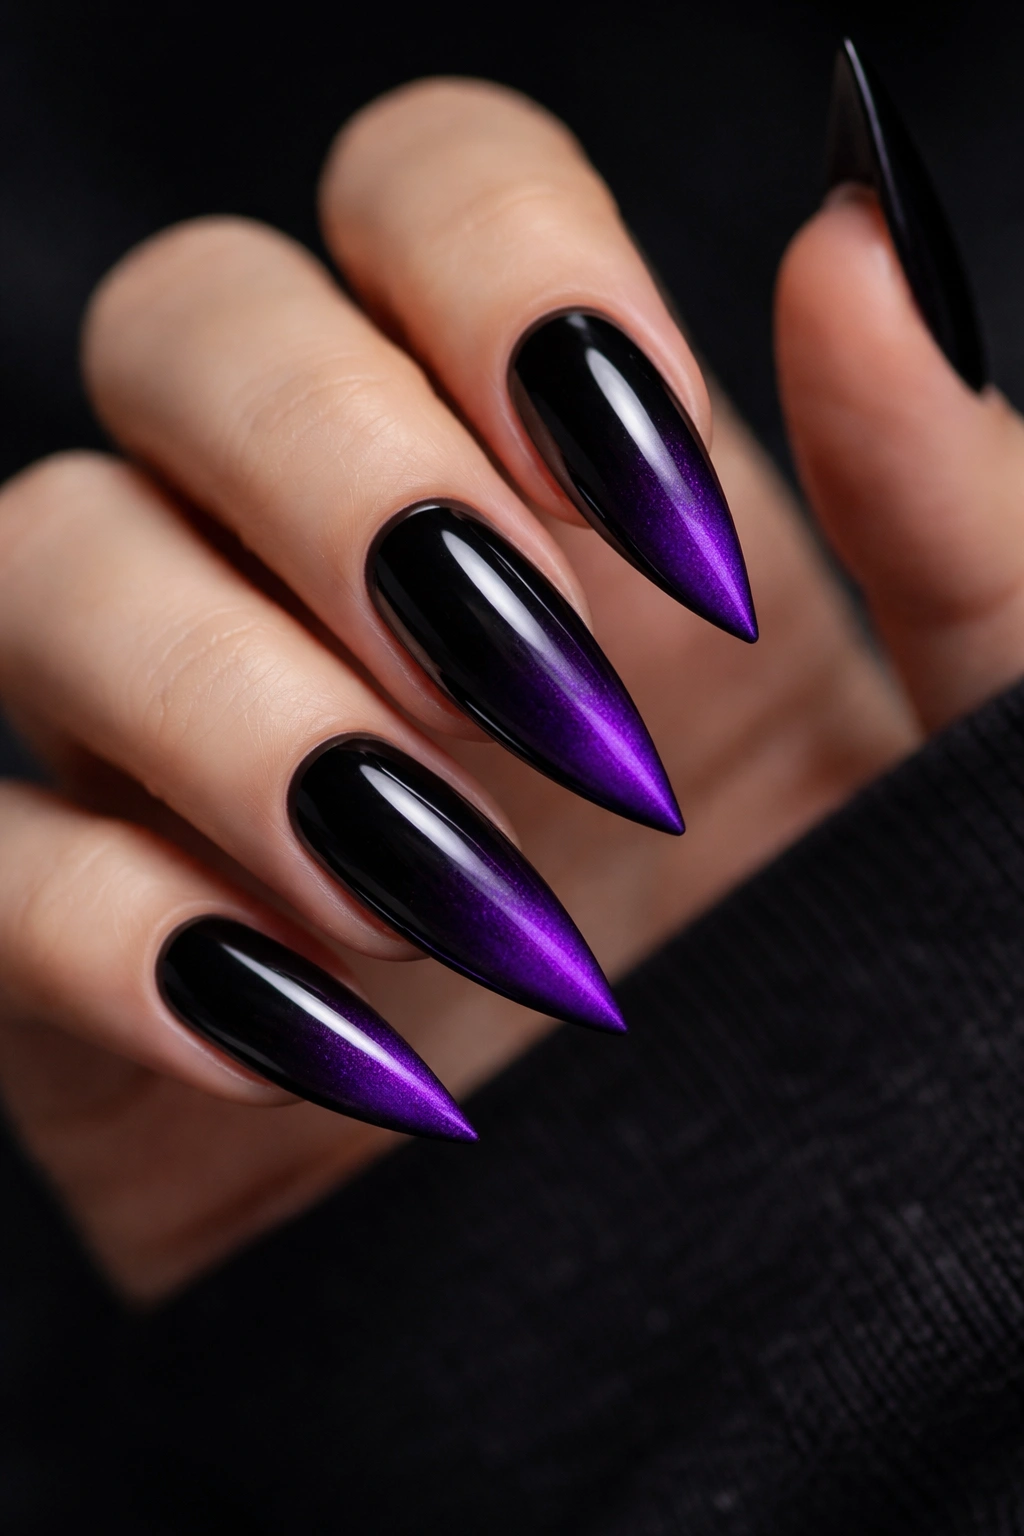
Create a moody, mystical aesthetic by blending black into deep purple at the tips, creating a gradient that reads as luxurious and editorial. This design appeals to people who love jewel tones and want something slightly different from the classic nude gradient.
Why Purple Elevates the Black Stiletto
Purple against black creates a rich, sophisticated palette that feels more upscale than black alone. Deep, dark purple reads as refined and luxurious rather than playful or casual. The gradient creates the illusion of extra length and tapered elegance.
Creating a Perfect Black-to-Purple Gradient
- Paint your entire nail with glossy black and let dry
- Apply a deep purple gel to the tips (about ¼ of the nail length)
- Use a clean sponge to gently blend the line between black and purple
- Pat the sponge along the gradient line to create a seamless transition—don’t swipe
- Apply another layer of purple to the very tips to strengthen the color
- Seal with a glossy top coat
Real talk: Purple fades faster than other colors under UV light or sunlight. If you wear this design regularly, you might notice the purple becoming more muted over time. Reapply the purple or refresh your entire manicure every 2-3 weeks for the richest color.
19. Black Stiletto with Negative Space French Tip
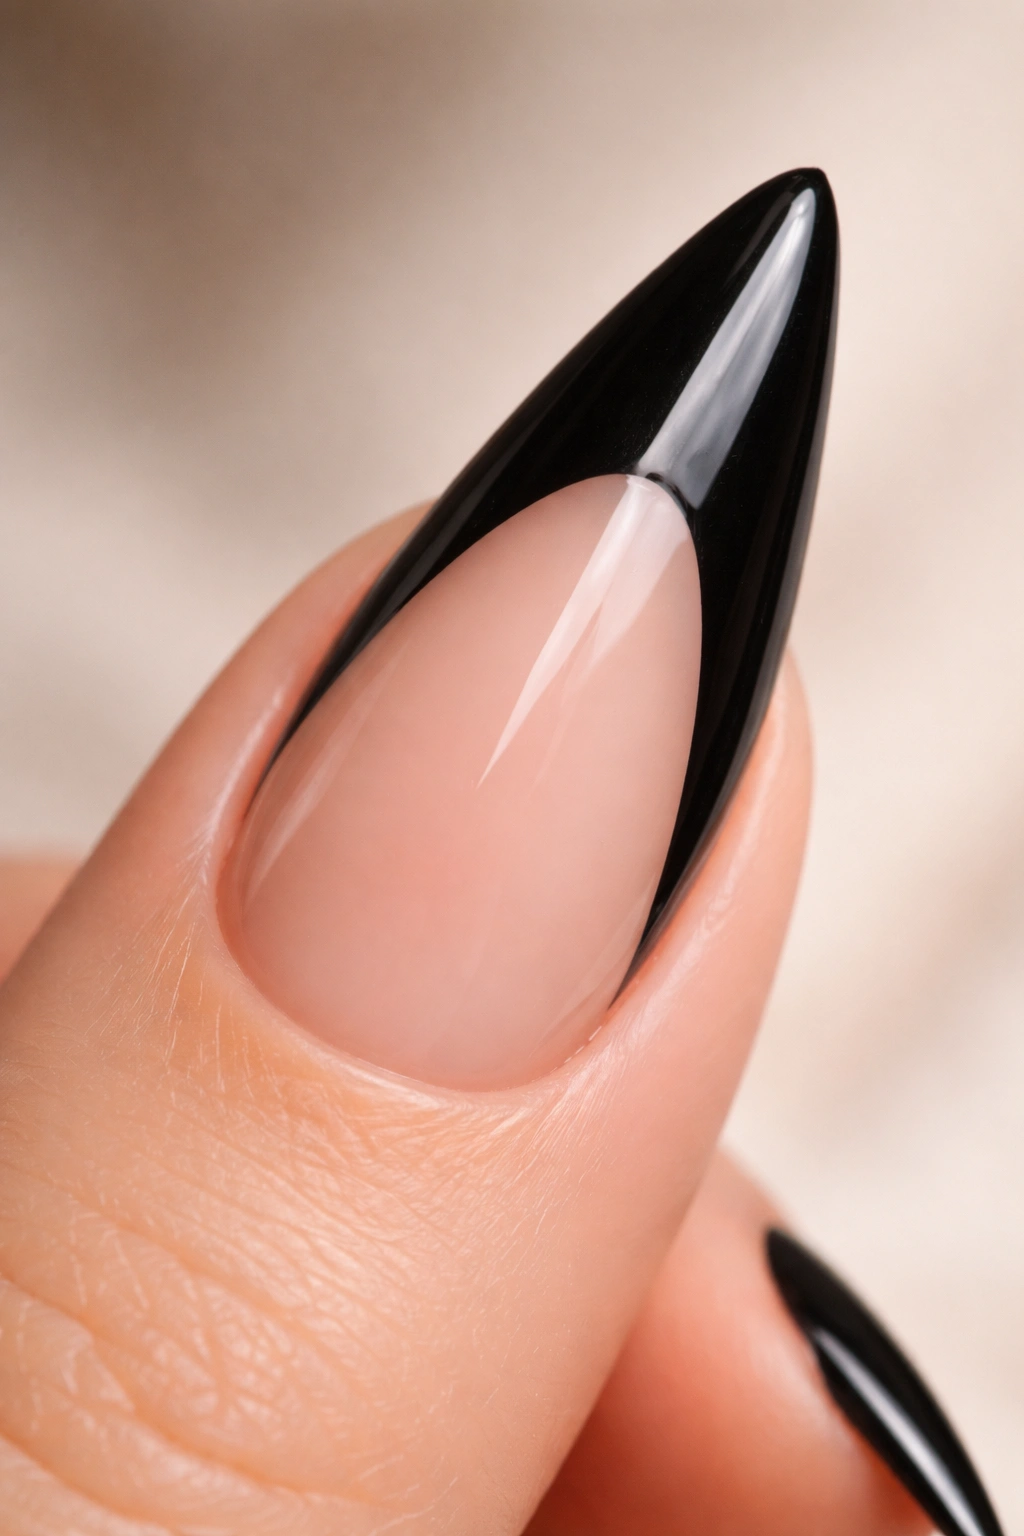
Combine two trending techniques by using negative space to create a French tip effect: leave the tips unpainted (natural nail showing through), creating a stark, minimalist design that reads as incredibly modern.
The Ultra-Modern Appeal of Negative Space
Negative space nails flip the traditional manicure on its head—instead of painting, you’re strategically leaving areas bare. Against black, this creates striking contrast. The natural nail showing through the tips creates an understated, minimalist aesthetic that feels fresh and design-forward.
How to Execute Negative Space French Tips
- Apply a clear base coat to your nails
- Use thin painter’s tape to create a straight line across where you want your negative space to begin
- Paint the base and sides with glossy black, leaving the tips unpainted
- Remove tape while the polish is slightly tacky
- The unpainted tips will show your natural nail color, creating the contrast
- Seal all painted areas with a glossy top coat
Worth knowing: This design shows off your actual nail color at the tips, so healthy-looking natural nails are important. If your nails are stained or discolored, this design won’t work as well. Build up your nail health before attempting this look.
20. Black Stiletto with Mirror Chrome Powder Full Coverage
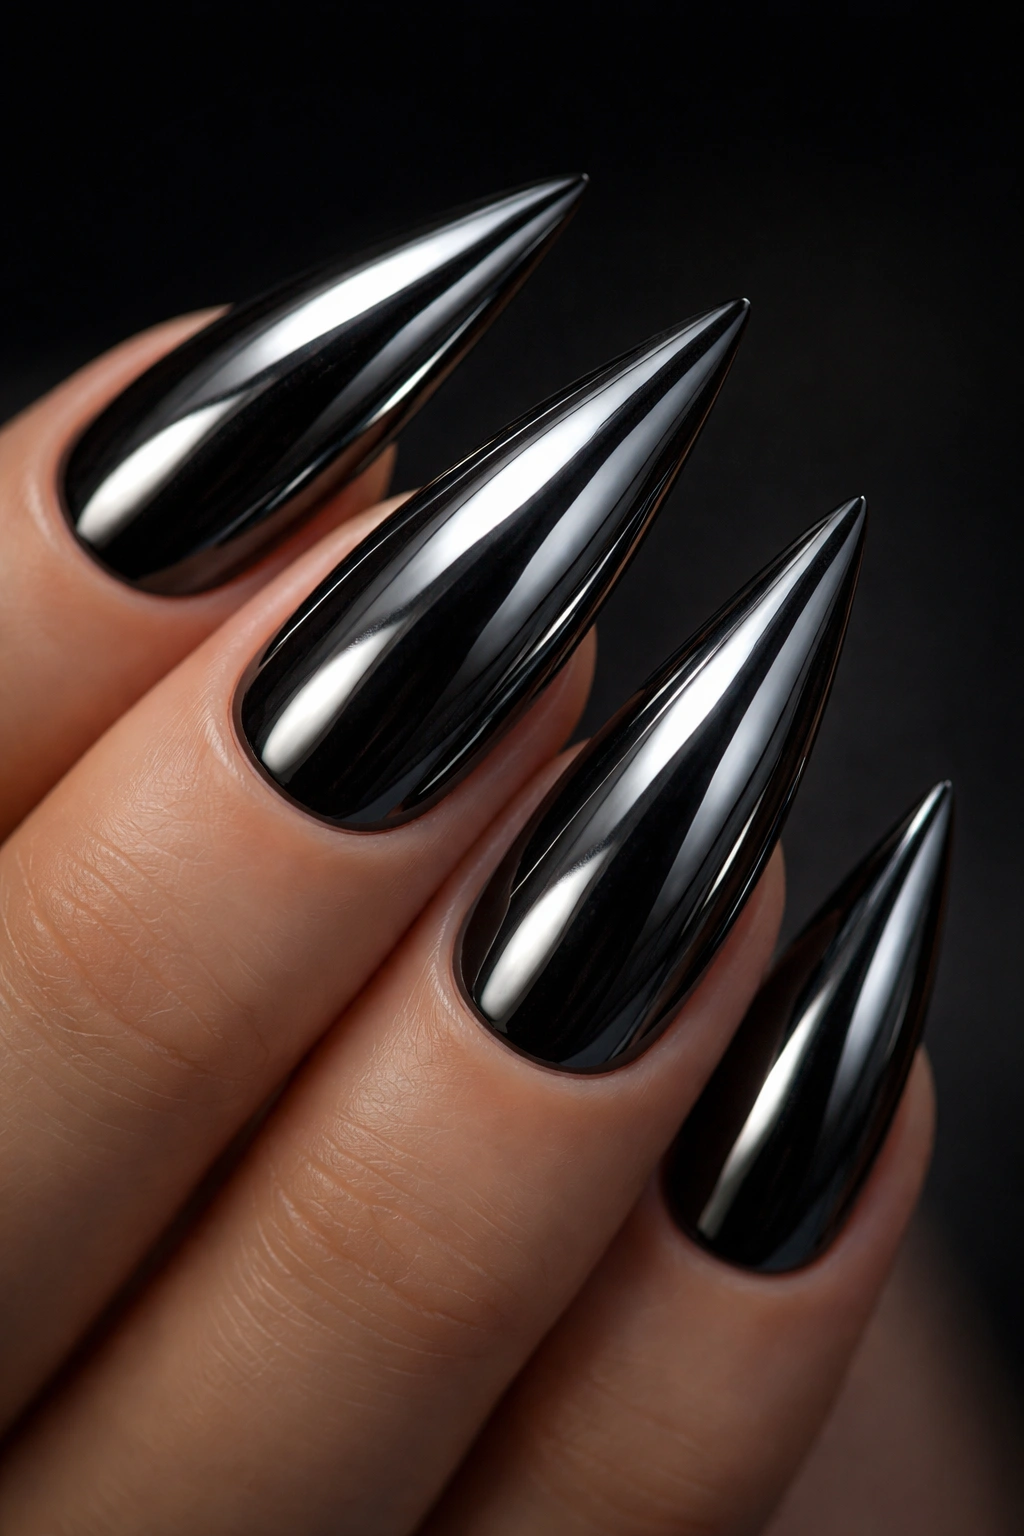
Go all-out with a full mirror chrome finish over the entire black stiletto nail—the result is absolutely show-stopping and futuristic. This design requires chrome powder but creates an effect that’s impossible to ignore.
The Sci-Fi Elegance of Full Chrome
A completely chromed nail reflects light like polished metal, creating a futuristic, high-tech aesthetic that reads as incredibly bold and fashion-forward. The chrome transforms the black stiletto into something almost alien and otherworldly. This works best for events, special occasions, or anyone who wants their nails to be a complete statement.
Applying Chrome Powder for Full Coverage
- Paint your entire nail with glossy black and let dry completely
- Apply a clear gel base to your entire nail
- While the gel is still tacky, generously apply chrome powder using a velvet applicator
- Use circular motions to work the powder into the gel
- Make multiple passes to achieve rich, full coverage
- Tap off excess powder and apply another layer of clear gel to seal permanently
- The chrome becomes incredibly durable and maintains its shine indefinitely
Pro tip: Chrome powder is messy to apply, so do this over a paper towel or designated work surface. The powder shows up best in natural light and under bright lighting. Indoors with artificial light, the effect is subtle—but it absolutely shines in sunlight or party lighting.
Final Thoughts
Black stiletto nails offer infinite possibilities for self-expression, from minimalist elegance to bold artistic statement. Whether you choose a simple glossy finish or add intricate details like foil, rhinestones, or chrome, the sharp stiletto shape commands attention and projects confidence. The key to finding your perfect black stiletto style is considering where you’ll wear your nails most often and what level of maintenance fits your lifestyle—a glossy black stiletto is genuinely timeless and effortless, while embellished designs create more visual impact but may require more careful handling.
Start with a design that excites you and feel free to modify it based on what you have available or what matches your aesthetic. Many of these ideas layer beautifully together—you could combine a gradient with rhinestones, or pair gold stripes with a chrome tip. The best nail design is the one that makes you feel confident and beautiful. Once you’ve perfected your favorite black stiletto style, you’ll find yourself reaching for it again and again because it simply works for everything.
