

Stiletto nails have become the ultimate canvas for subtle, sophisticated nail art — and nude ombre designs sit at the absolute pinnacle of that trend. There’s something undeniably elegant about the way color gradually transitions from one tone to another along that elongated, pointed shape, creating depth and dimension without screaming for attention.
The beauty of nude ombre stilettos is that they work everywhere. These designs bridge the gap between understated refinement and visual interest — they’ll pass a professional workplace dress code, photograph beautifully, and make your hands look impossibly graceful. Whether you’re drawn to warm peachy tones, cool beige gradations, or champagne-tinged transitions, there’s a nude ombre combination that matches your skin tone and personal style.
What makes these designs so versatile is the infinite color palette within the “nude” spectrum. Nude isn’t one flat shade — it’s a range that includes peachy undertones, warm taupes, cool beiges, rosy blushes, and creamy ivories. Layer ombre techniques across that spectrum on a stiletto base, add subtle embellishments like gold accents or rhinestones, and you’re creating something that feels custom and completely unique to you.
Let’s explore fifteen stunning nude ombre stiletto designs that showcase different color combinations, finishes, and decorative approaches. Each one is achievable with the right technique and materials, and each one will elevate your manicure game significantly.
1. Peachy Nude Ombre with Soft Gradation
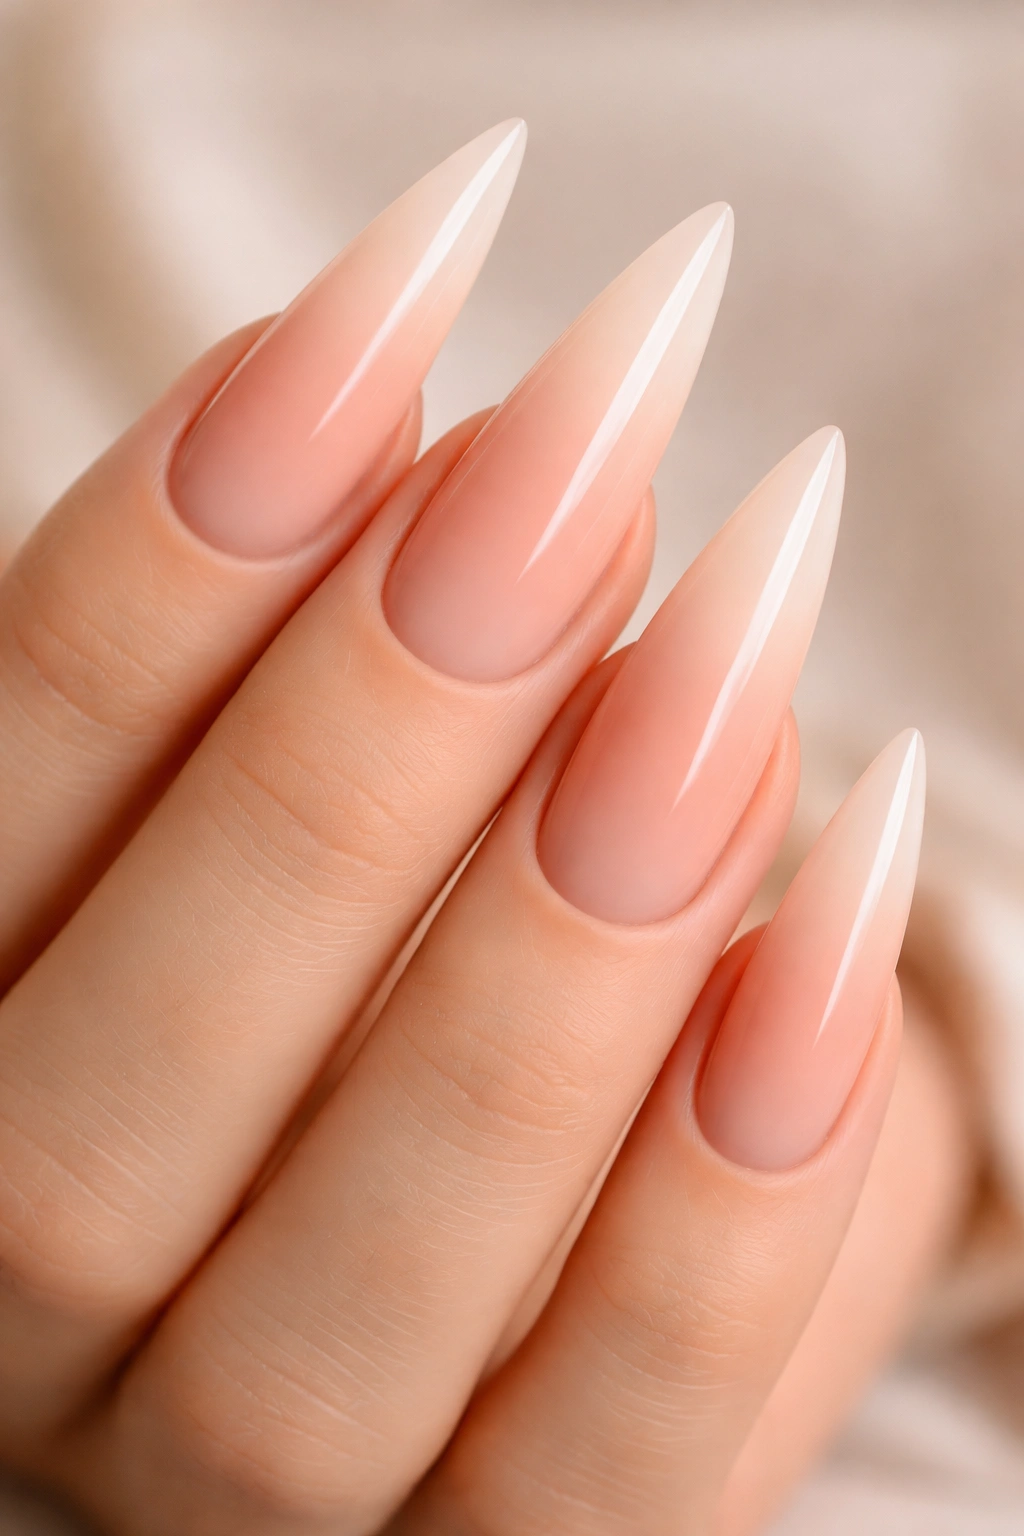
This design moves seamlessly from a warm peach tone at the cuticle to a pale, barely-there nude at the tips — creating a gradient that feels both natural and intentional. The peach base gives warm skin tones a flattering warmth while the pale finish at the tips keeps everything refined and elongated.
How to Create This Ombre Effect
Start with a creamy peach base coat (think the color of actual peach skin, not hot coral). Using a makeup sponge, dab the peach shade onto the sponge, then dab a soft nude or champagne shade directly next to it. Gently press and bounce the sponge onto your nail, blending where the two colors meet. Build the opacity gradually with 2-3 applications rather than pressing hard once — this creates a softer, more natural-looking gradient.
Essential Elements for This Look
- Peach base: A warm, muted peach rather than a bright or orange-leaning tone
- Nude transition shade: Soft champagne or pale nude cream
- Sponging technique: Use a damp beauty sponge with a bouncing motion for smooth blending
- Sealing coat: Clear topcoat to smooth the texture and add shine
Pro tip: If your gradient looks too harsh after the first sponge application, don’t panic — apply a semi-transparent nude shade across the entire nail with a regular brush, which softens harsh lines instantly and creates a cohesive finish.
2. Taupe-to-Cream Ombre with Gold Leaf Accents
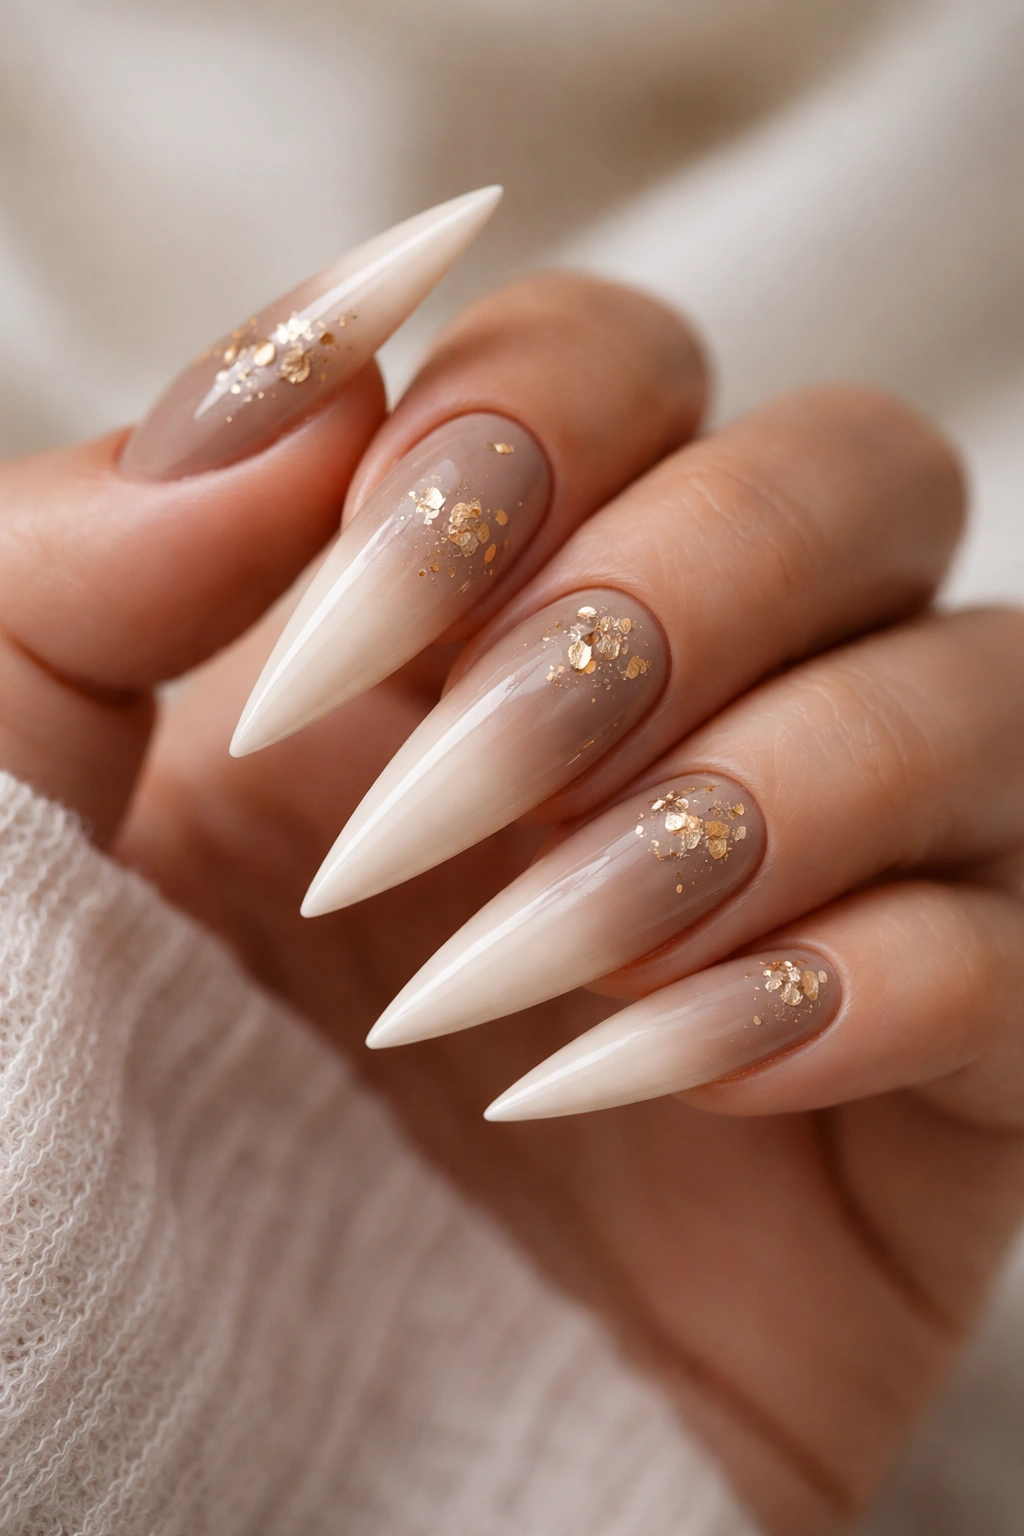
Taupe is the sophisticated older sibling of basic nude — it has gray undertones that feel cool and contemporary while remaining neutral. Pair a warm taupe base with a soft cream fade, then add delicate gold leaf fragments scattered across the upper portion for a touch of luxury without overwhelming the design.
Building Sophisticated Depth
The key here is choosing a taupe that complements your undertones. Cooler skin benefits from grayer taupes, while warmer skin tones can wear taupes with slight brown undertones. Sponge your gradient from the taupe base up to cream, then while the topcoat is still slightly tacky, apply small, irregular pieces of gold leaf using a thin brush or tweezers. The gold catches light differently than glitter and feels more intentional.
Components You’ll Need
- Taupe base polish: A muted, sophisticated gray-brown shade
- Cream polish: Almost white with a slight warm undertone
- Gold leaf sheets: Real or faux gold leaf works equally well
- Thin brush or tweezers: For precise placement
- Clear, glossy topcoat: Creates a glass-like finish over the leaf
Worth knowing: Gold leaf is delicate — seal it under a thick layer of topcoat and be gentle with your nails for the first 24 hours until everything fully hardens.
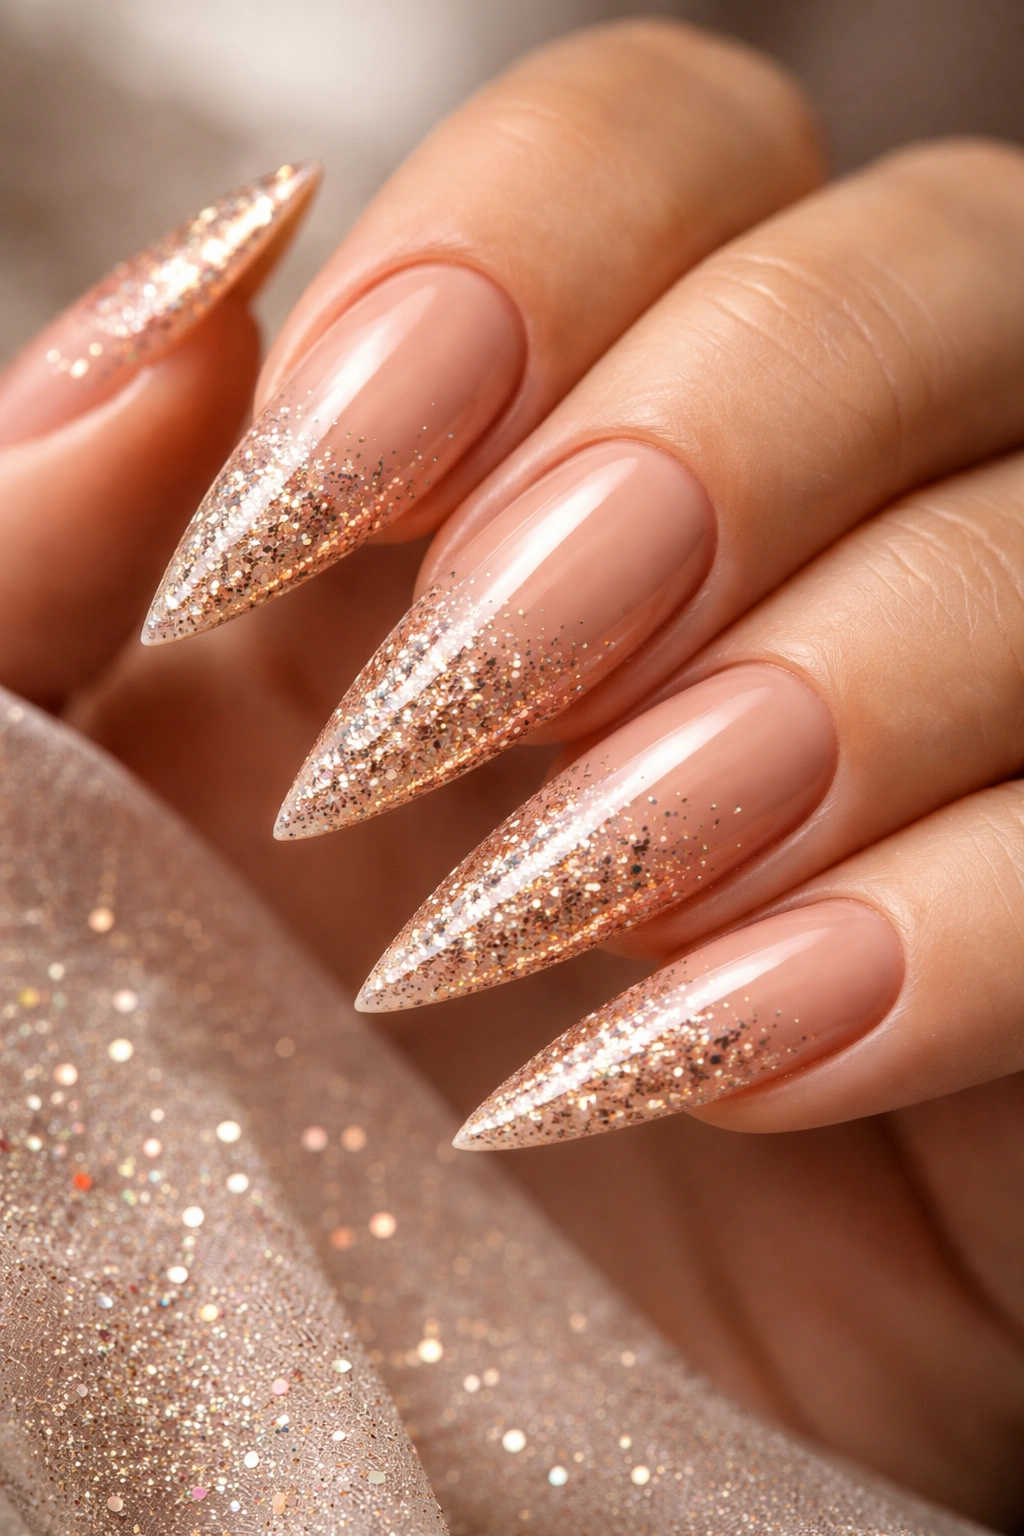
3. Warm Beige Ombre with Subtle Glitter Fade
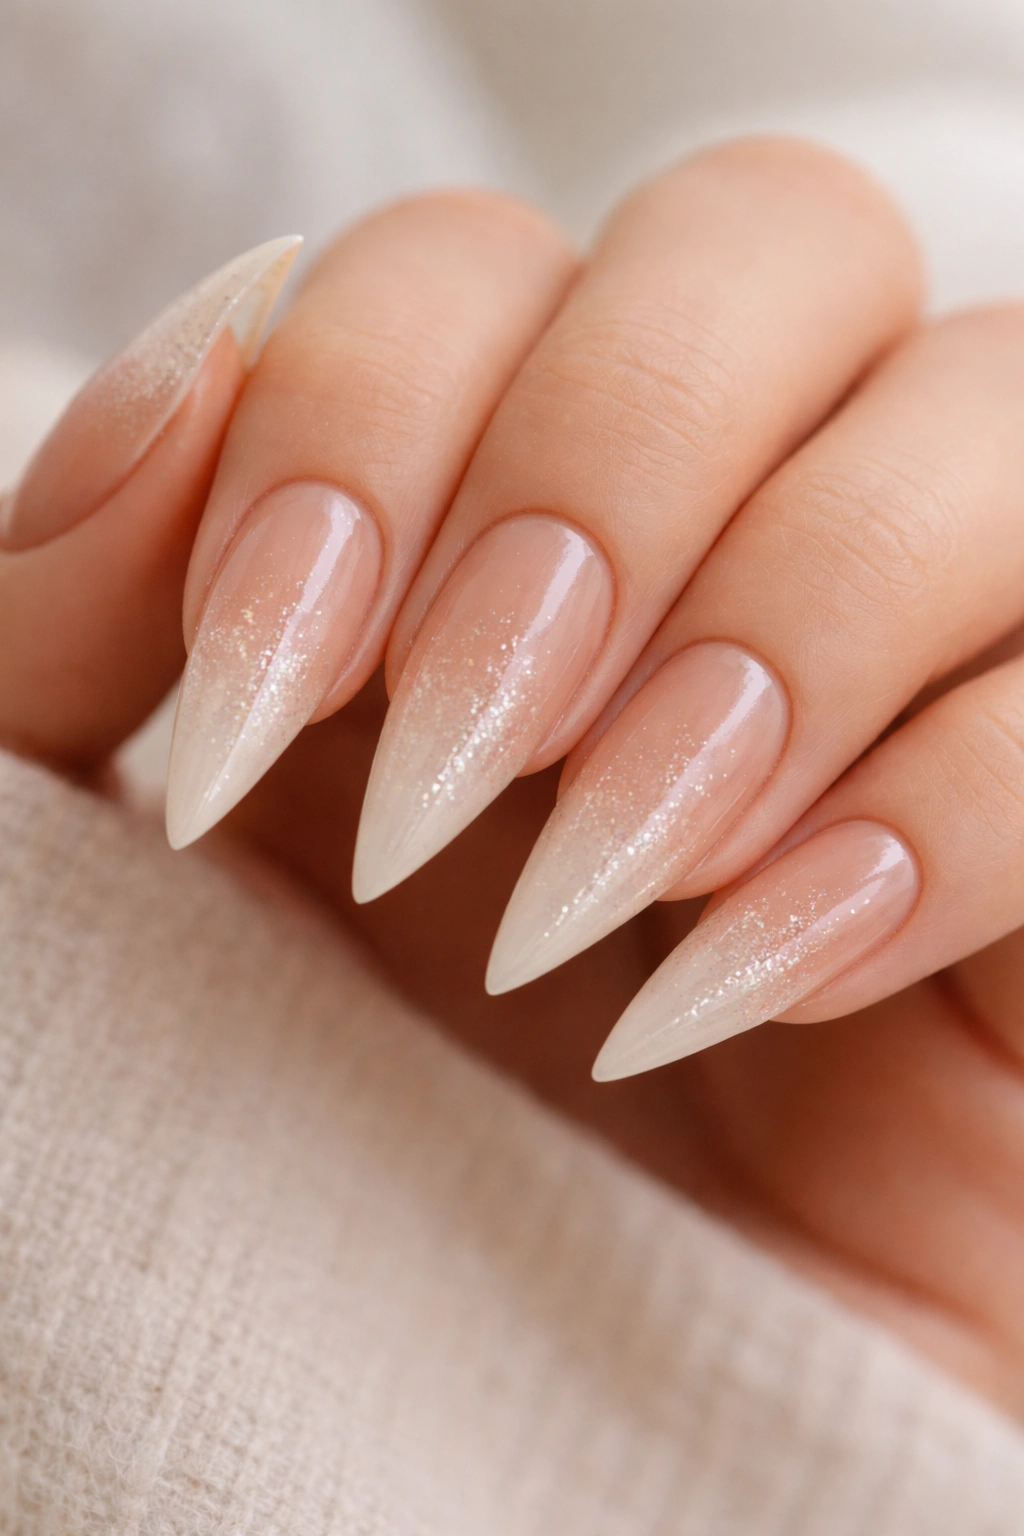
This design keeps everything soft and neutral with a warm beige foundation that transitions to ivory, then introduces ultra-fine glitter that gradually fades toward the tips. The glitter catch creates a sophisticated sparkle that reads as special occasion without being costume-like.
Layering for the Perfect Glitter Gradient
Apply your warm beige base and let it fully dry. Sponge on the ivory transition shade. While the topcoat is slightly tacky, use a thin brush to apply fine glitter (think micro-glitter, not chunky) concentrated near the middle of the nail, then feather it upward with a lighter hand as you approach the tip. The gradient of glitter density creates movement and visual interest.
Materials That Make This Work
- Warm beige base: A sand-like neutral with golden undertones
- Ivory or cream: The lightest shade in your ombre progression
- Micro-glitter: Ultra-fine, barely-there sparkle in champagne, gold, or clear
- Matte topcoat option: For contrast, use matte on the beige section and glossy on the glitter area
Insider note: Apply glitter over a slightly sticky topcoat layer (don’t fully cure if using a UV lamp) — this helps the particles adhere better and stay exactly where you place them.
4. Champagne-to-Blush Ombre with Dimensional Finish

Champagne and blush together create a romantic, date-night vibe that’s still entirely wearable daily. The champagne anchors the design with subtle sparkle, while the soft blush fade adds warmth and femininity. The dimensional finish comes from mixing finishes — glossy champagne transitioning to a slightly satin blush.
Creating the Champagne-to-Blush Transition
Champagne (that warm, shimmery pale gold tone) is best applied as a shimmery base coat to maximize its light-catching properties. Sponge a soft blush tone (pale pink with muted undertones, not hot pink) over the top two-thirds of the nail. The shimmer in the champagne shows through the translucent blush, creating depth without looking muddy.
Finishing Techniques for Dimension
- Champagne base: Choose a shade with actual sparkle or shimmer built in
- Blush transitional shade: Muted dusty rose or pale mauve-pink
- Glossy topcoat: Emphasizes the champagne shimmer
- Optional matte elements: A matte topcoat on just the blush area creates textural contrast
The combination of these finishes adds visual complexity — it’s the difference between a flat ombre and one with real dimension.
5. Soft Brown-to-Nude Ombre with Matte Finish
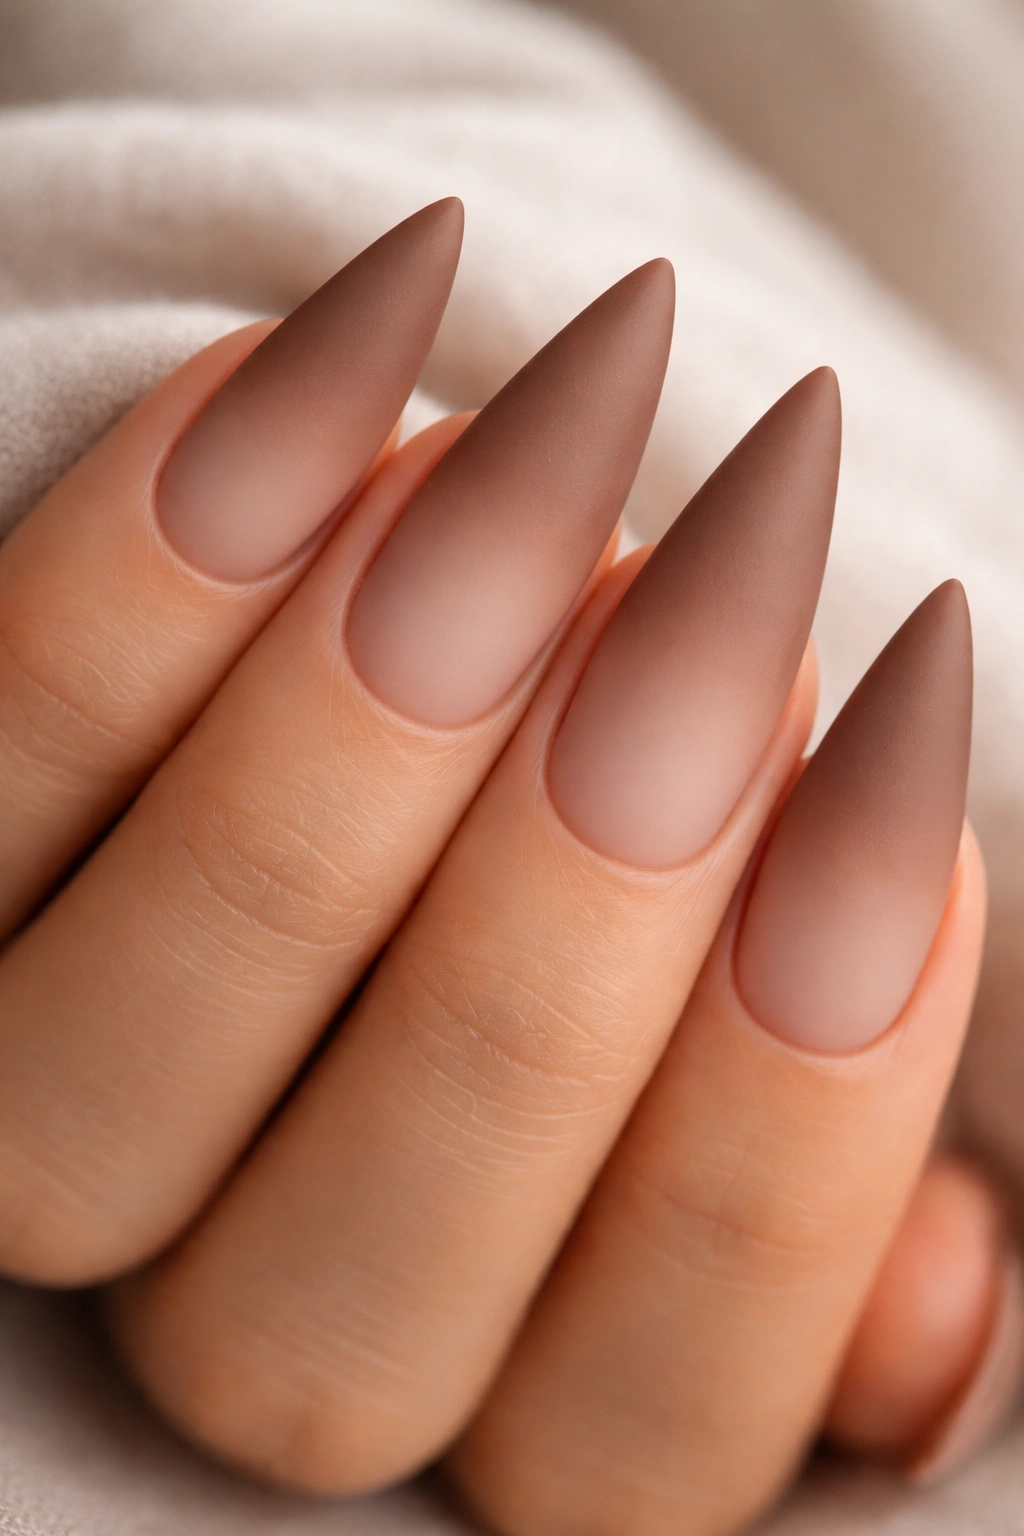
For a completely different vibe, matte finishes transform ombre designs into something more artistic and less wedding-traditional. A warm, soft brown base (like a diluted chocolate or caramel) fading to warm nude under matte topcoat feels modern, touchable, and surprisingly chic.
Why Matte Changes Everything
Matte topcoat dulls the inherent shine of polish, which makes subtle color gradations more visible — the colors read clearer without light reflection competing for attention. Brown-to-nude ombre under matte feels almost velvety and has an elevated, editorial quality that glossy can’t quite match.
Application for Flawless Matte Results
- Soft brown base: Warm, diluted brown (not pure chocolate)
- Warm nude shade: Slightly lighter than the brown, with similar undertones
- Sponge blending: Create your standard ombre gradient
- Matte topcoat: Apply in thin, even layers to avoid streaking
The matte finish requires more careful topcoat application because streaks are more visible, so take your time with even strokes and multiple thin coats rather than one thick one.
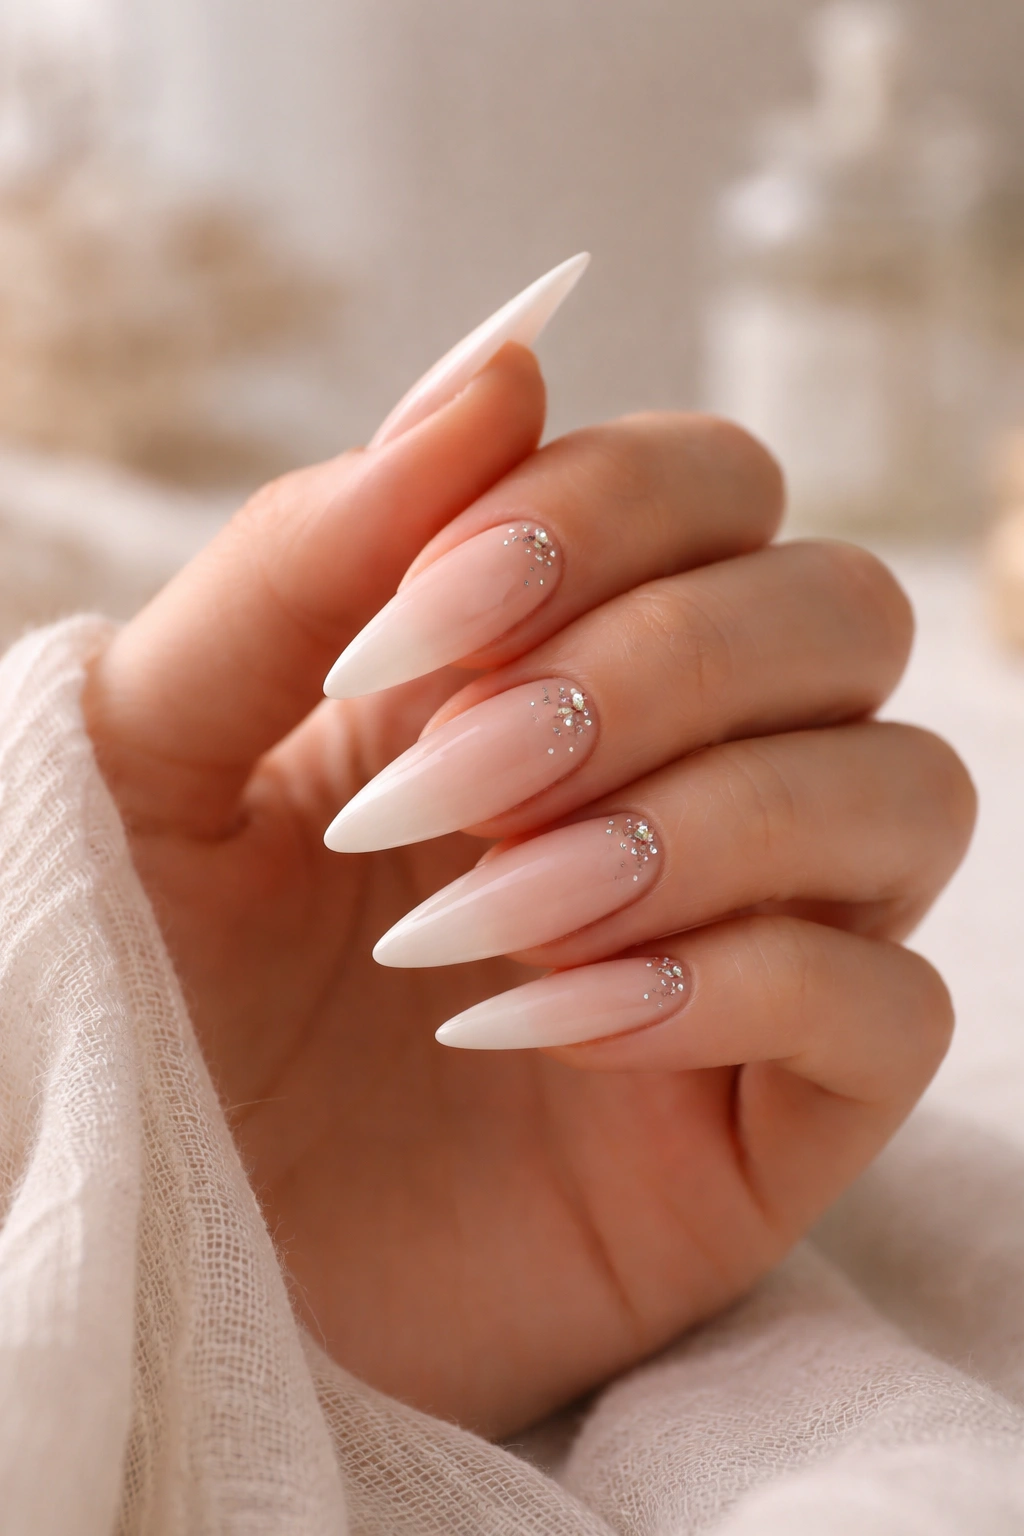
6. Nude-to-White Ombre with Rhinestone Tips
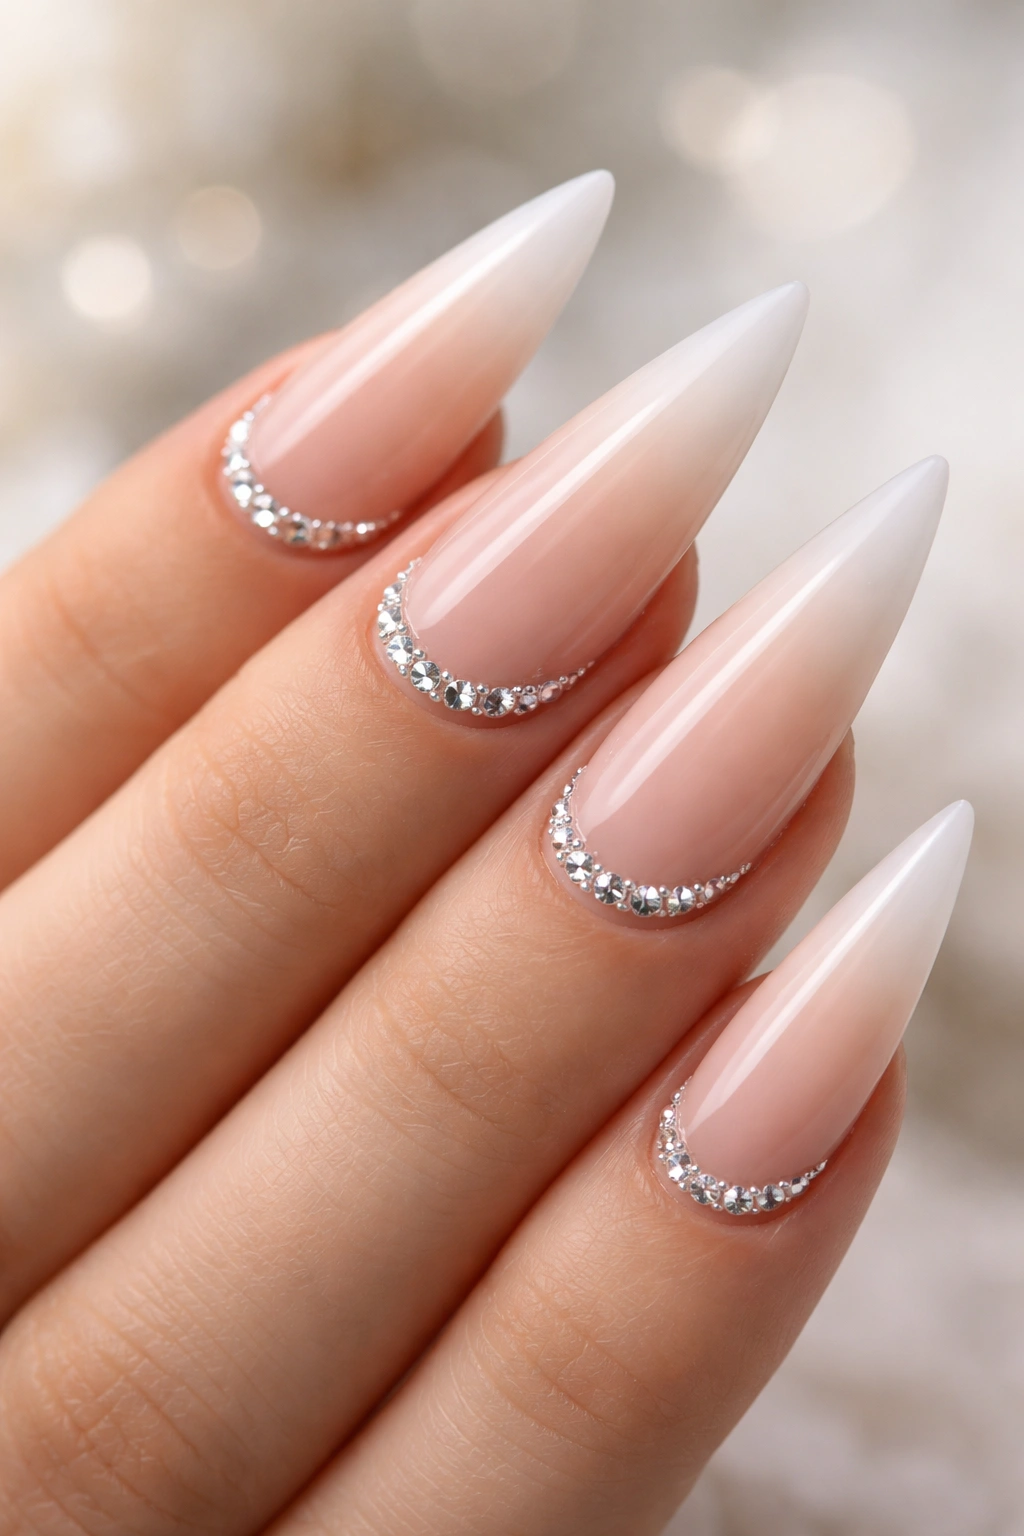
This is the design that walks the line between bridal elegance and everyday wearability. A soft nude base gradually fades to pure white at the tip, then a delicate line of small rhinestones traces along where the white begins — creating definition and sparkle in exactly the right spot.
Placing Rhinestones for Maximum Impact
The key is restraint. Rather than covering the entire tip with stones, place a single line of small (1-2mm) rhinestones horizontally where your nude transitions to white. This creates a visual “demarcation line” that makes the ombre transition pop while adding just enough sparkle to feel special without being over-the-top.
Executing This Design Flawlessly
- Soft nude base: A warm, skin-tone-matching nude
- White shade: Pure white or ivory depending on your preference
- Small rhinestones: 1-2mm size in clear, champagne, or rose gold
- Rhinestone glue or sticky topcoat: Ensure stones adhere and don’t shift
- Glossy sealer: Lock everything in place
Pro tip: Apply rhinestones while your topcoat is still slightly tacky — they’ll grip better and won’t shift as you seal with additional coats.
7. Caramel-to-Nude Ombre with Chrome Powder Accents
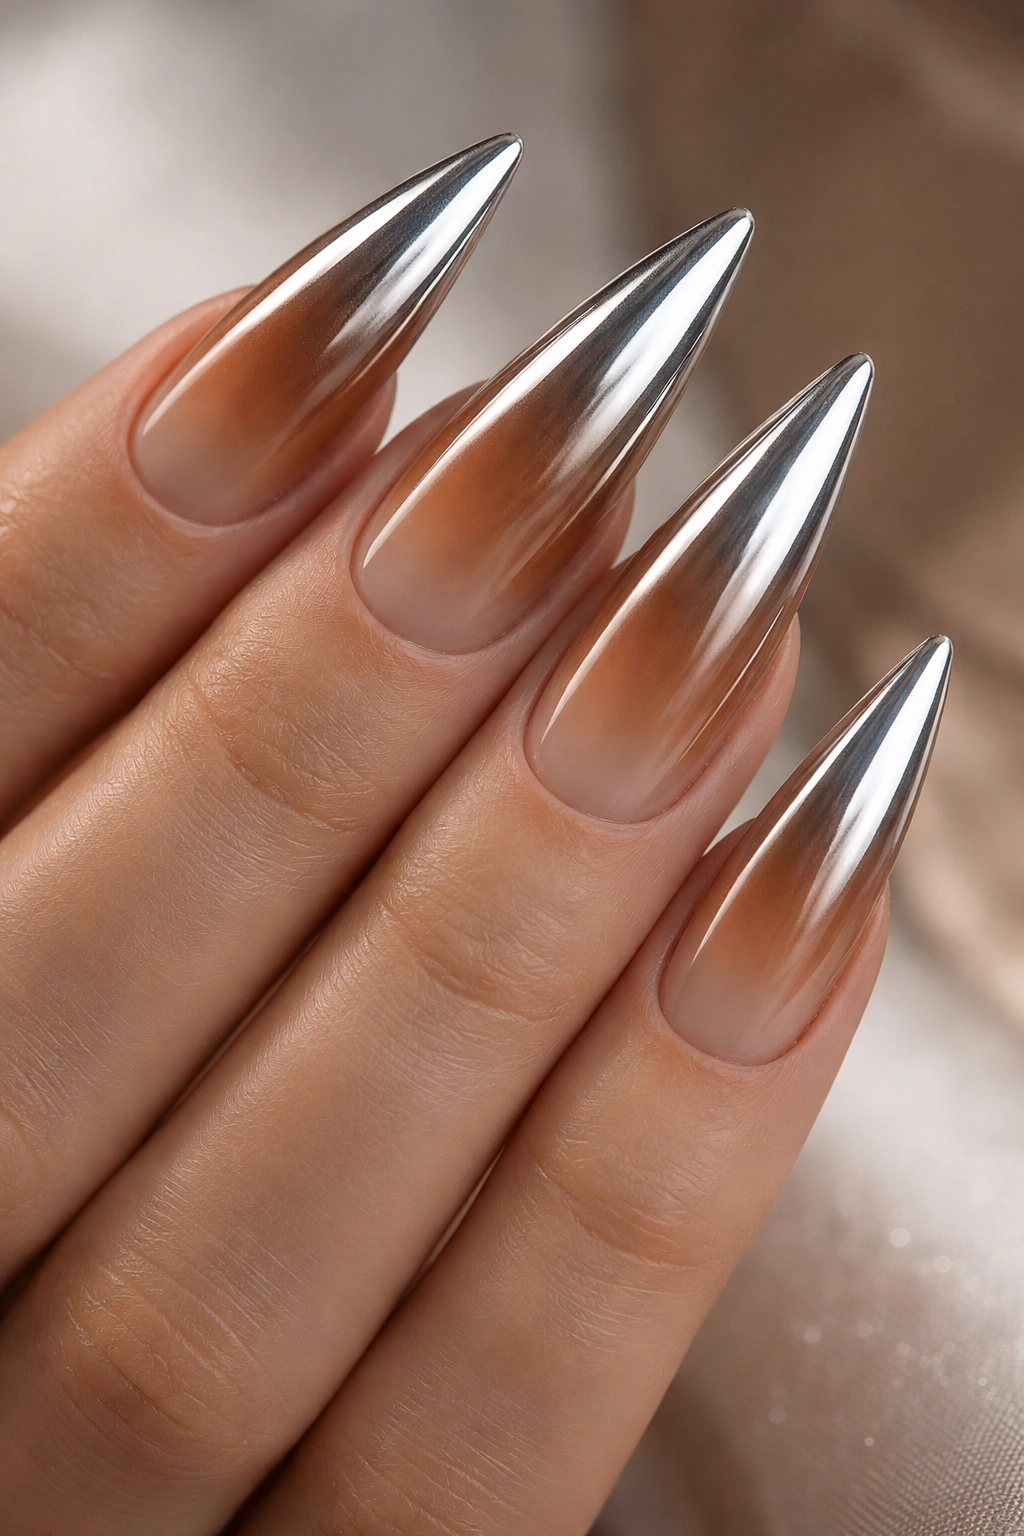
Chrome powder transforms regular polish into a mirror-like, high-shine finish that catches light dramatically. A caramel ombre that shifts to nude, then finished with subtle chrome powder on the tips, creates an almost liquid-metal effect that’s utterly modern and eye-catching.
Understanding Chrome Powder Application
Chrome powder must be applied over a tacky base (either sticky topcoat or a special chrome base). It’s not mixed into polish — instead, you use a small brush or applicator to rub the powder onto the nail where you want that metallic mirror effect. The powder only adheres to sticky surfaces, so the technique is crucial.
Layering for Chrome Success
- Caramel base: A warm, medium-depth brown tone with golden undertones
- Nude middle section: Pale cream or soft beige
- Clear or nude sticky base: Where you’ll apply the chrome
- Chrome powder: In rose gold, champagne, or silver
- Matte topcoat option: Chrome under matte topcoat feels more editorial than glossy
Chrome powder can feel high-impact, so start with a light application and build intensity if you want more shine — you can always add more, but you can’t take it off without starting over.
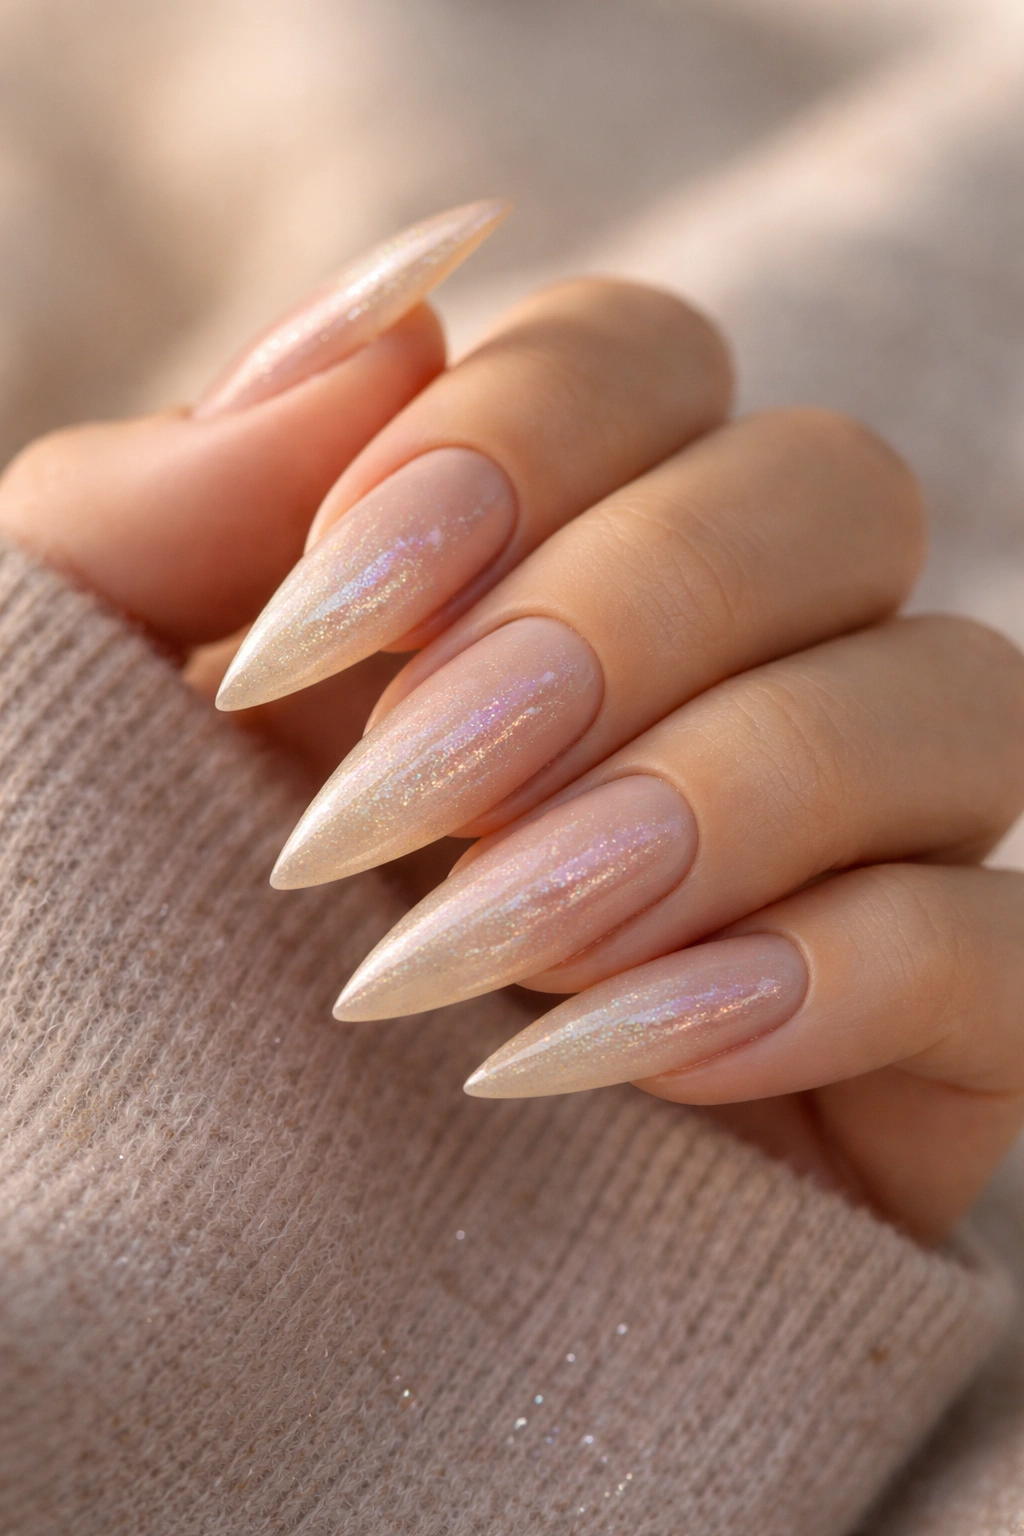
8. Barely-There-to-Nude with Pearl Accents
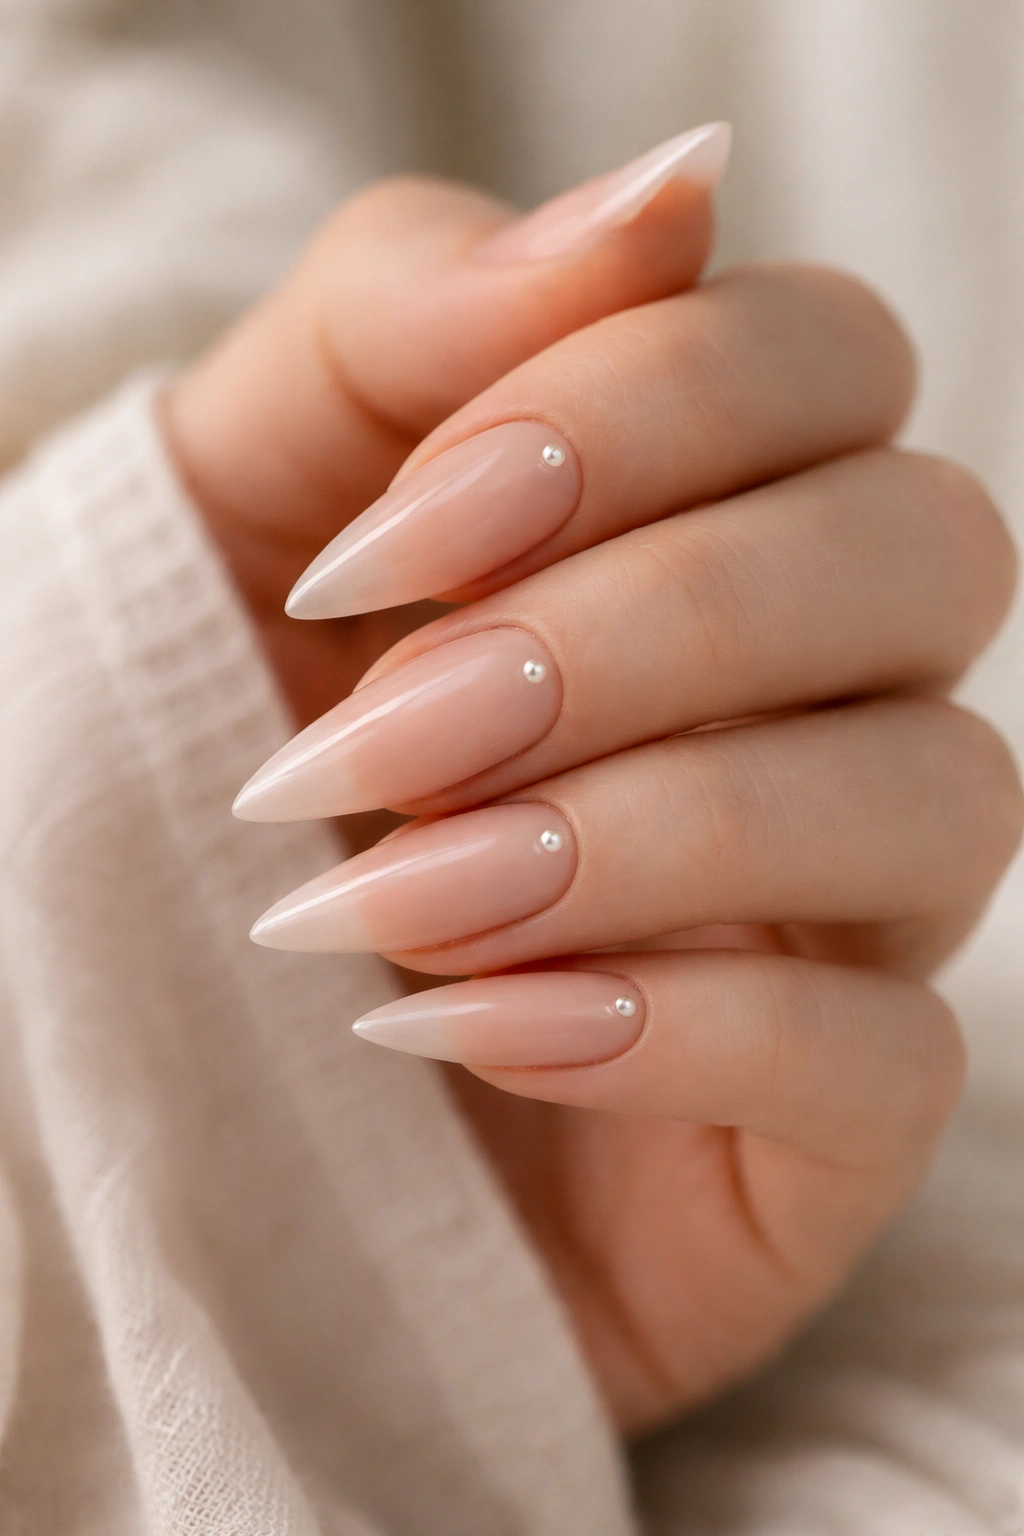
This ultra-subtle design works beautifully for minimalist aesthetics and professional settings. It’s almost nude-on-nude, with such a gentle color progression that it reads more as “pearlescent nude” than as a dramatic ombre. Tiny pearl accents dot the nail strategically, adding sophistication without flash.
Working with Barely-There Tones
When colors are this close in value, application becomes even more important. A barely-there nude (nearly translucent) at the base with a slightly warmer or peachy nude at the tips creates dimension without looking like a gradient — it’s more of a subtle warmth shift. Pearl accents (in a shade matching your complexion or slightly cooler) add interest without glitter’s sparkle.
Achieving This Refined Minimalism
- Barely-there base: Translucent nude or ultra-pale cream
- Soft nude shade: Slightly warmer or deeper than the base
- Pearl beads: Tiny (1mm) pearls in white, champagne, or your skin tone
- Placement: Sparse, intentional placement — perhaps 3-5 pearls per nail
- Matte topcoat: Complements the minimalist, understated vibe
This design asks people to look twice — it doesn’t announce itself, which is precisely why it works so well for those who prefer subtle elegance.
9. Warm Ivory-to-Nude with Geometric Line Details
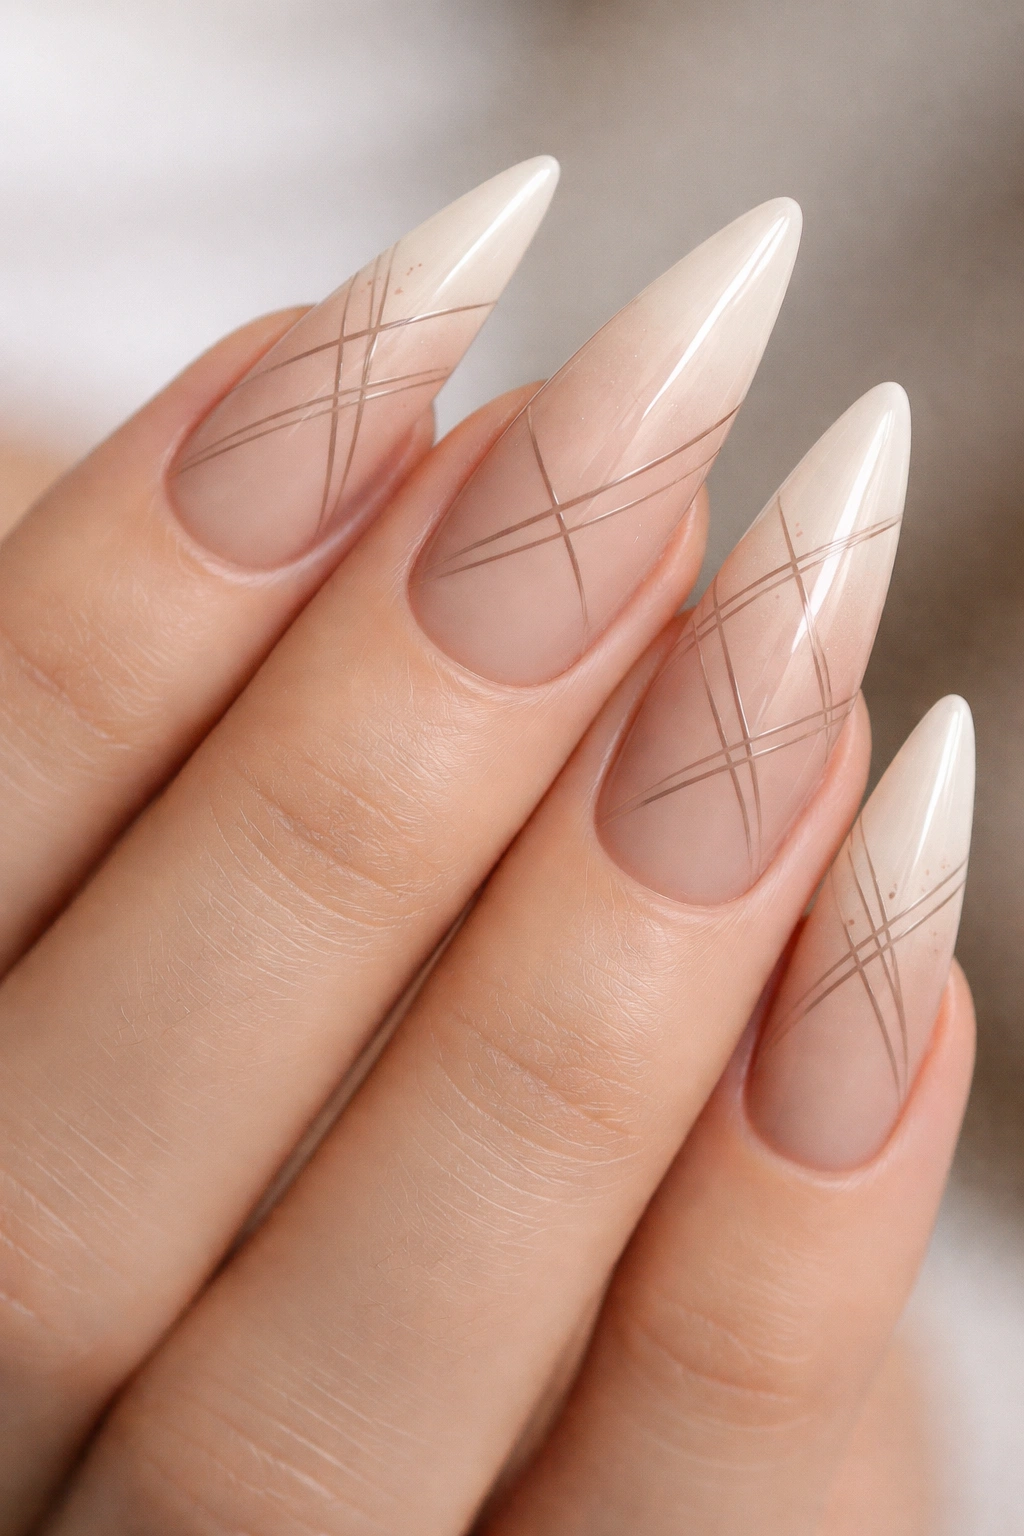
Geometry adds a contemporary edge to ombre designs. Pair a soft warm ivory base with a pale nude fade, then add thin, angular lines in a neutral tone (warm gray, taupe, or even the nude shade itself) creating abstract geometric patterns across the nail. This bridges the gap between “completely neutral” and “artistic statement.”
Incorporating Geometric Elements
The lines should feel intentional but not rigid. Think negative space, angular shapes, or asymmetrical patterns rather than perfectly straight borders. A thin brush and steady hand create these lines best — or use striping tape if you prefer perfectly straight edges. The key is that geometry should enhance the ombre, not compete with it.
Balancing Geometry with Gradient
- Warm ivory base: A creamy off-white with golden warmth
- Pale nude gradient: Sponged in your standard ombre fashion
- Thin striping lines: In taupe, warm gray, or a darker nude
- Fine-tipped brush: For precise, controlled line placement
- Clear glossy topcoat: Seals the design and adds dimension
Worth knowing: If your lines aren’t perfect on the first try, they actually blend slightly into the ombre underneath, which often looks more artistic than perfectly executed lines would anyway.
10. Sandy-to-Nude with Confetti Glitter Gradient
Confetti glitter (larger, mixed-shape sparkles) creates a playful, celebratory vibe that nude tones keep grounded and sophisticated. Start with a sandy beige base, transition to warm nude, then layer confetti glitter concentrated near the tips and fading toward the cuticle for a literal gradient of sparkle.
Building Glitter Density Gradients
Rather than scattering glitter randomly, apply it in a purposeful gradient — heavy concentration at the tips, medium concentration in the middle, and sparse toward the base. This creates the illusion that sparkle is part of the color transition rather than just decoration on top. Use a thin brush to place individual pieces rather than sprinkling, giving you more control.
Creating Playful Sophistication
- Sandy beige base: Warm, earthy, approachable
- Warm nude middle: Slightly lighter and creamier than the base
- Confetti glitter: Mixed shapes and sizes in clear, champagne, or rose gold
- Gradient application: Dense at tips, fading toward cuticle
- Glossy topcoat: Emphasizes the sparkle and adds shine
This design feels celebratory without being costume-y — it’s perfect for occasions where you want to feel special but still look polished.
11. Khaki-to-Cream Ombre with Subtle Shimmer
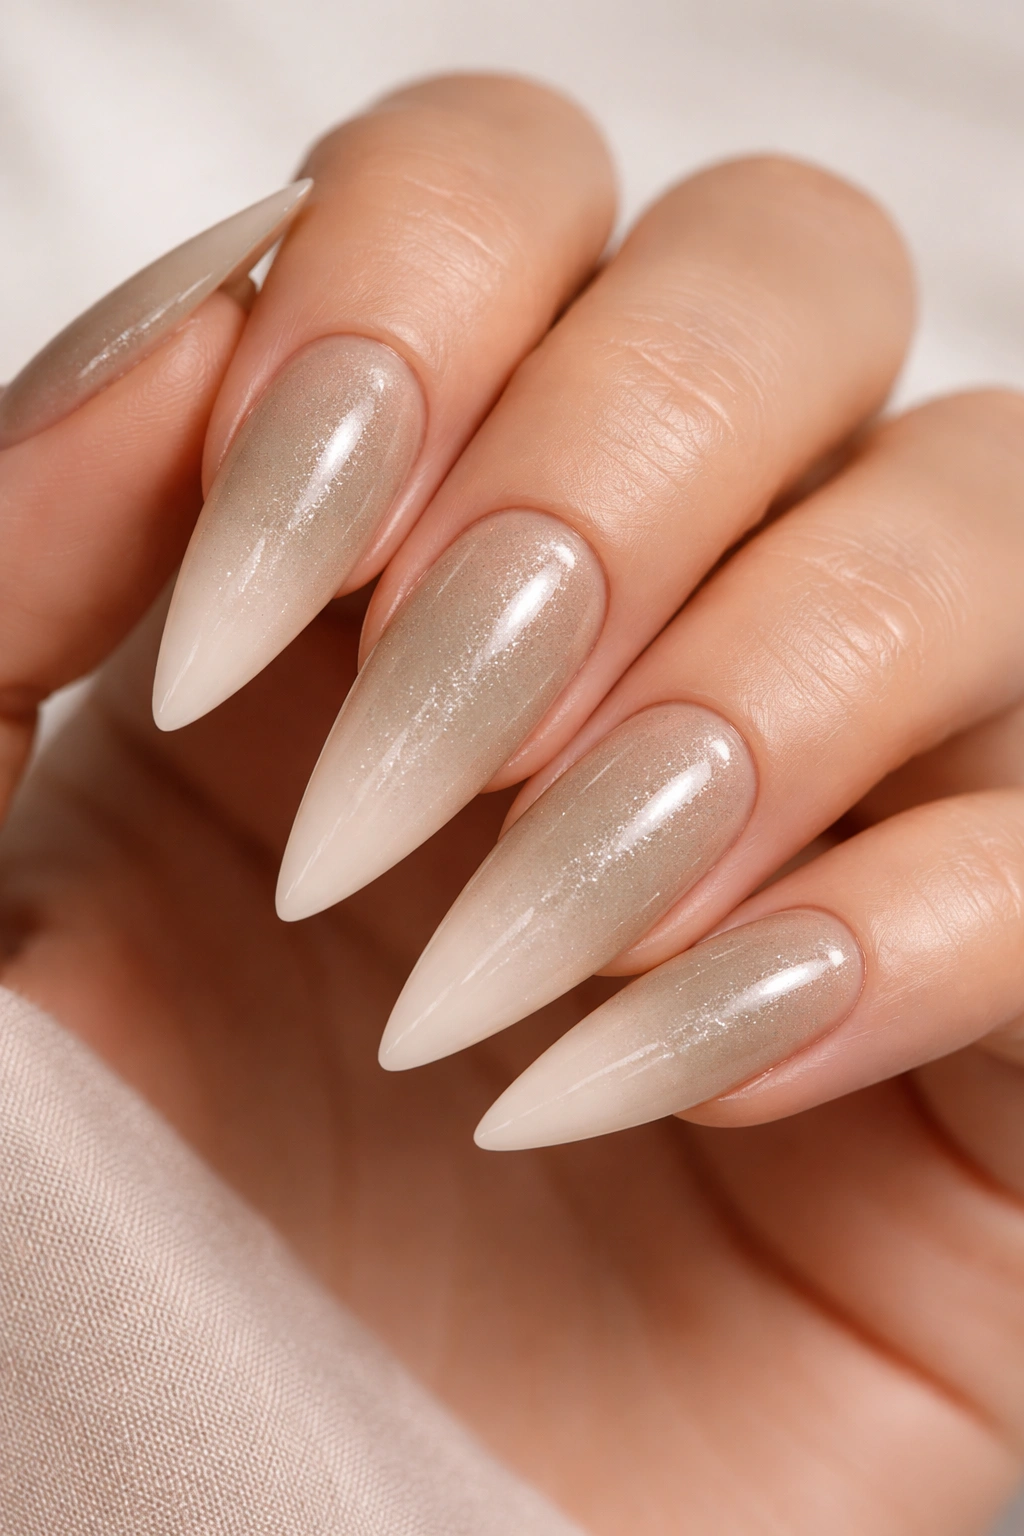
Khaki (that warm, dusty, slightly olive-toned neutral) is underrated in nail design. It’s sophisticated, unexpected, and flatters a wide range of skin tones. Pair khaki with cream using a subtle all-over shimmer finish that catches light without glitter — think finely milled pearl dust mixed into a clear topcoat rather than glitter particles.
Choosing Khaki for Deeper Neutrals
If you have deeper skin tones, khaki reads as more sophisticated and special than basic beige. The olive undertones add richness without warmth or coolness. It’s a color that says you paid attention to undertone matching — people subconsciously notice when a nude actually matches their complexion.
Building Shimmer Without Glitter
- Khaki base: Dusty, warm, slightly muted
- Cream shade: Light and warm for the gradient
- Shimmer topcoat: Pearl dust or mica mixed into clear topcoat for subtle light-catch
- Application: Sponge your ombre normally, then seal with shimmer topcoat
- Finish: Glossy for maximum light reflection
The shimmer here is understated — it’s not glitter you can see from across the room, but rather a quality that makes your nails luminous and dimensional up close.
12. Mocha-to-Nude with Negative Space Design
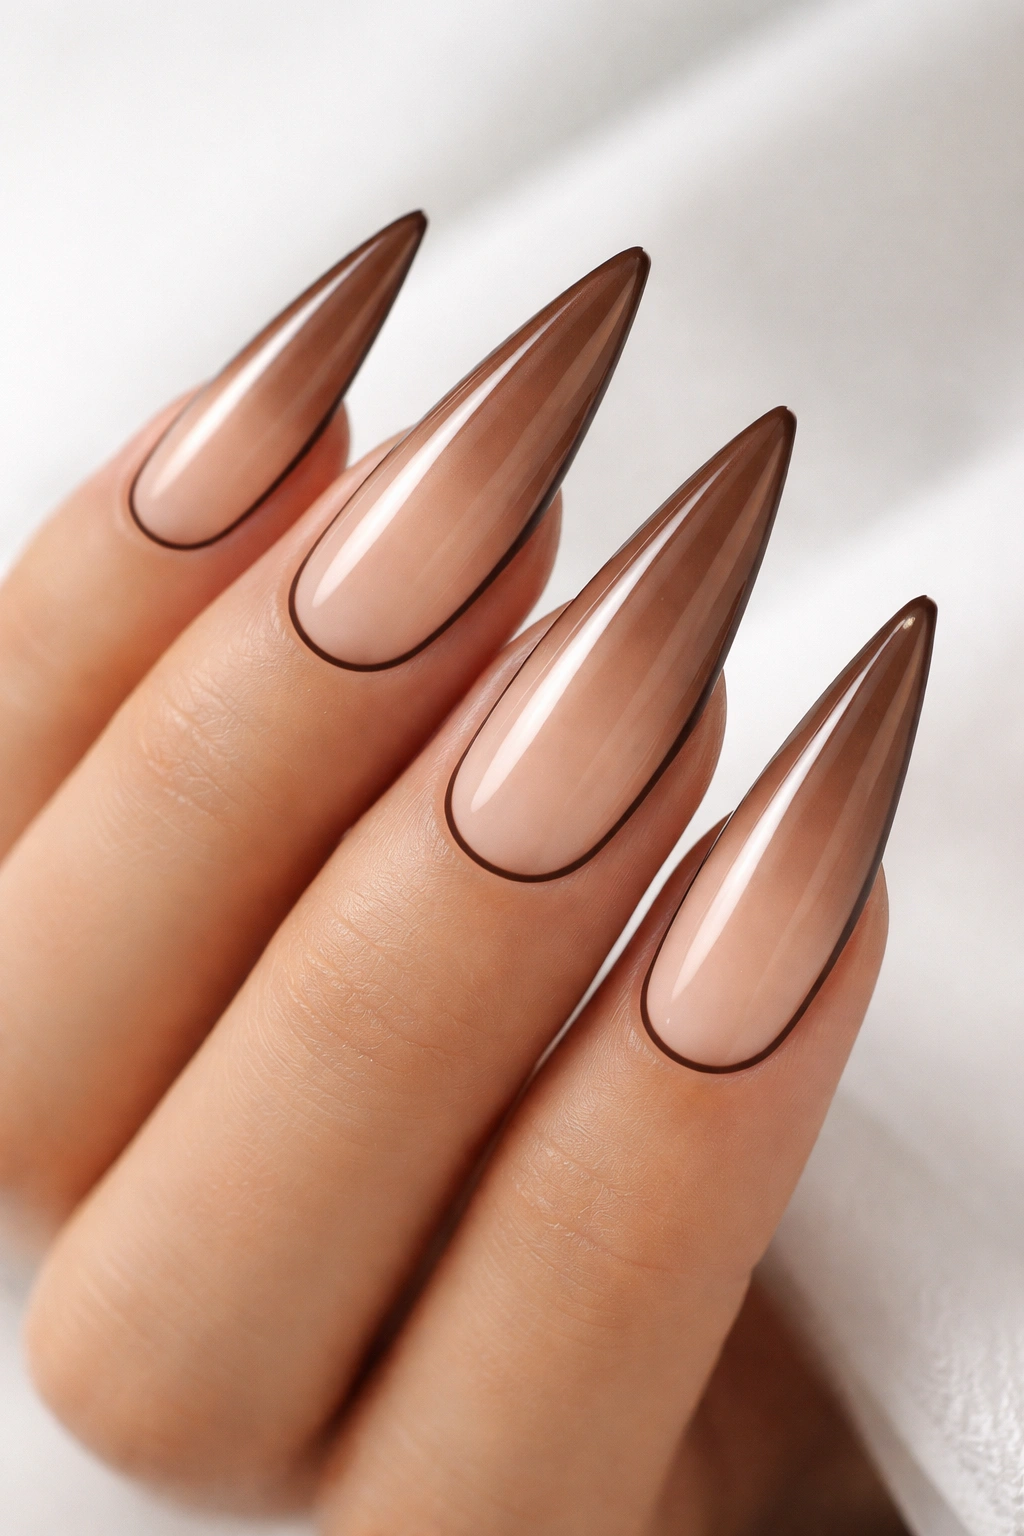
Negative space (intentionally unpainted areas of the nail) adds architectural interest to ombre. Create a mocha-to-nude ombre on the upper two-thirds of the nail, leaving the lower third or a specific shape unpainted (natural nail showing through), then outline the edge where color meets bare nail with a thin, dark line for definition.
Strategic Use of Negative Space
Negative space works best on stilettos because the elongated shape can accommodate the design without feeling cramped. A horizontal band of bare nail in the lower third, or a triangular shape at the base, or even an off-center stripe — each creates different visual effects. The dark outline line (in brown, taupe, or even black) prevents the design from looking unfinished.
Executing Negative Space with Precision
- Mocha base: Rich, warm brown in the upper area
- Nude gradient: Transitioning toward the negative space area
- Bare nail area: The natural nail showing through creates contrast
- Defining outline: Thin line in dark taupe or brown where color meets bare nail
- Glossy topcoat: Only on the painted area to preserve the bare nail look
This design feels modern and intentional in a way that full-coverage polish can’t achieve — it’s architectural rather than decorative.
13. Rose-Nude Ombre with Minimalist Line Details
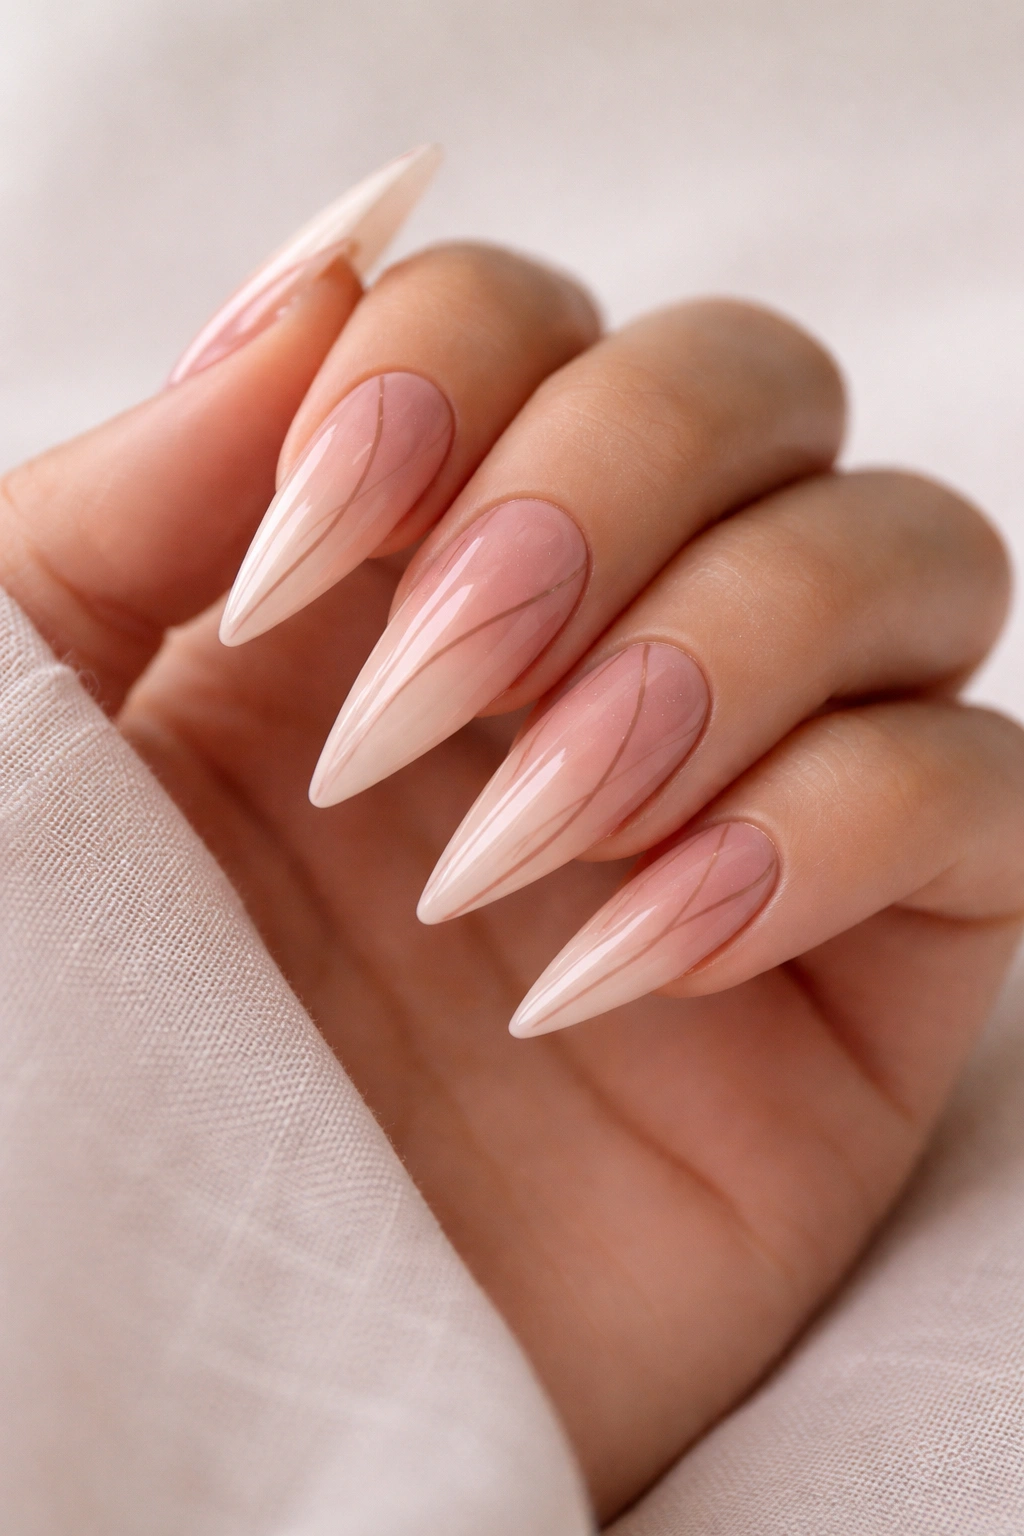
Rose-tinted nudes (those with subtle pink undertones) are incredibly flattering and inherently romantic. Layer a soft rose-nude base with a paler, more peachy nude, then add one or two thin, minimalist lines in a rose-brown shade running vertically or asymmetrically across the nail for sophisticated simplicity.
Finding Your Rose-Nude Match
Rose-nudes work best when they actually complement your skin’s undertones. If you have cool undertones, look for rose-nudes with mauve notes. If you’re warm-toned, rose-nudes with peach undertones will be more flattering. The goal is nude, not pink — it’s a whisper of rose, not a statement of it.
Minimalist Line Placement
- Soft rose-nude base: The primary color of your ombre
- Pale peachy-nude: The fade shade
- Rose-brown line shade: Slightly deeper and more saturated for definition
- Thin brush or striping tape: For clean, precise lines
- One or two lines only: Restraint is the key to minimalism
Minimalist designs ask more of the viewer’s attention than busy ones — every element must earn its place, which is why each line should be intentional.
14. Beige-to-Champagne Ombre with Holographic Shimmer
Holographic finishes create rainbow light reflections that shift as the nail moves — it’s different from glitter or chrome but equally eye-catching when done subtly. A warm beige-to-champagne ombre finished with a light hand of holographic shimmer creates depth that looks almost iridescent.
Understanding Holographic Effects
Holographic products come as topcoats, polishes, or powders. The topcoat option gives you the most control — apply your ombre, seal it, then apply holographic topcoat in thin layers. You only need a light coat to create the effect; too much can look costume-like. The holo shift should be barely visible in indoor light but absolutely stunning in natural light.
Creating Iridescent Dimension
- Warm beige base: A neutral, earthy foundation
- Champagne gradient: Light, shimmery, pale gold
- Holographic topcoat: Applied sparingly in one or two thin layers
- Natural lighting: This design is best appreciated in daylight or outdoor light
- Glossy finish: Allows the holographic properties to be fully visible
This design is perfect for people who want sparkle that feels sophisticated and contemporary rather than traditional or bridal.
15. Nude Ombre with Marble Effect
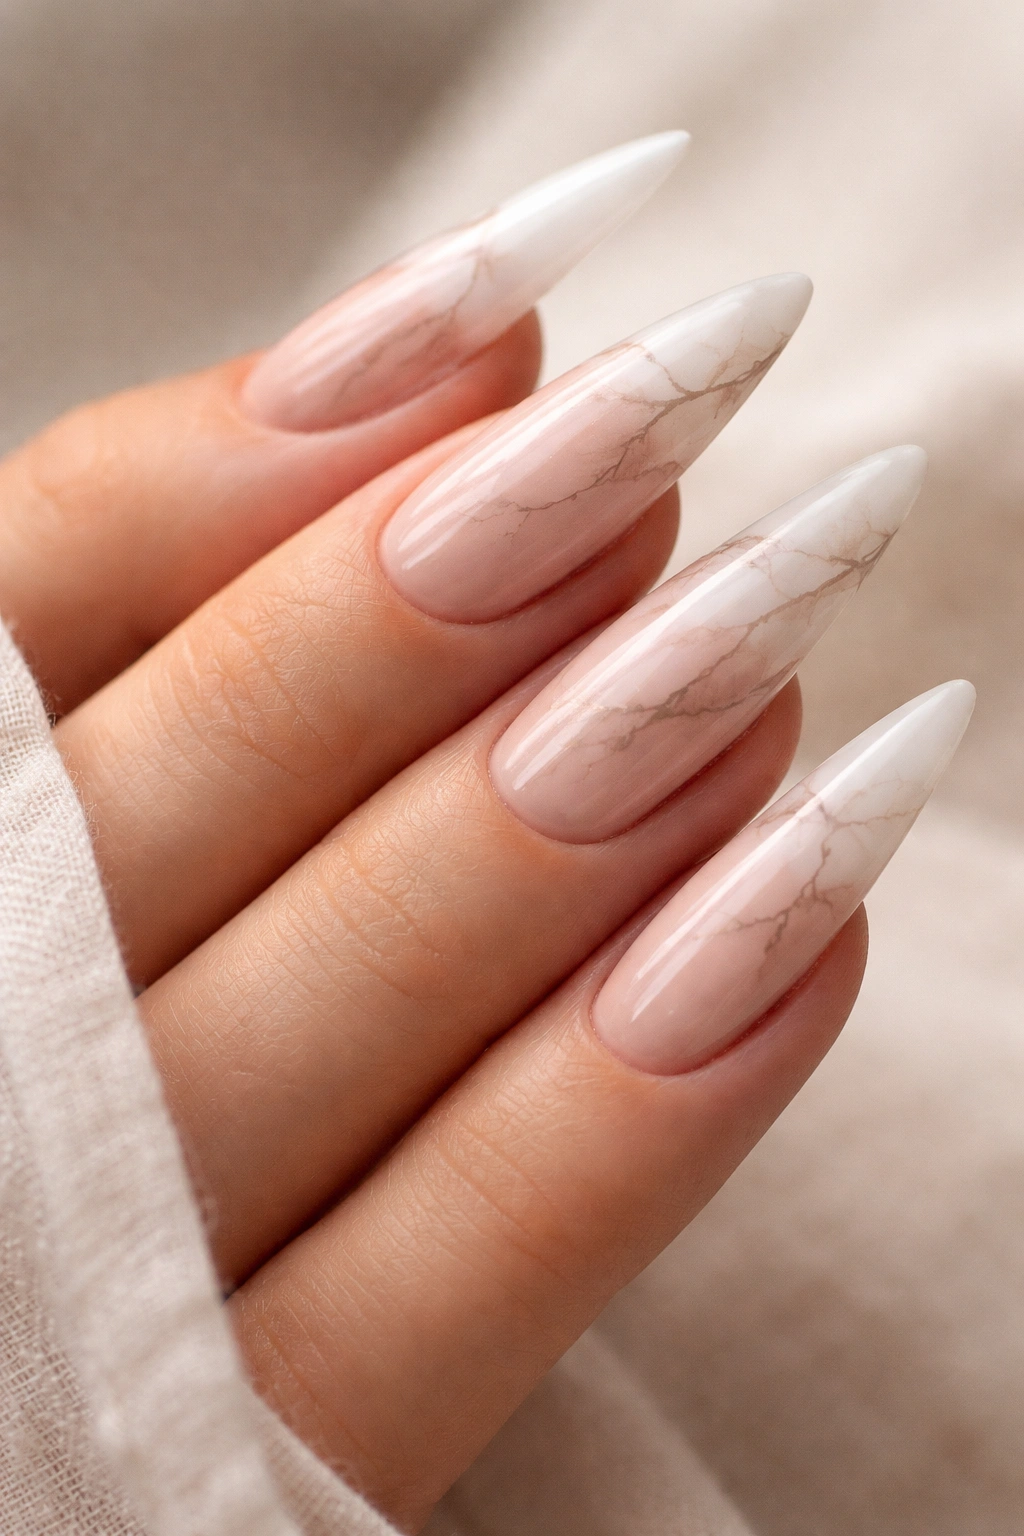
Marble effects create an organic, naturally patterned look that feels intentional rather than random. Combine a basic nude-to-pale ombre with thin veins of a contrasting shade (taupe, warm gray, or soft brown) creating marble-like patterns across the nail. This merges ombre and pattern seamlessly.
Creating Marble Veining
Marble requires a steady hand or a marble dipping technique (there are specific products designed for this). Using a thin brush, draw thin, irregular lines in your contrast color across the dried ombre, creating veins that look natural rather than geometric. The lines should cross unpredictably and vary in thickness, mimicking actual marble.
Technique for Realistic Marble
- Nude-to-pale ombre: Your base gradient
- Taupe or gray vein shade: In a thin brush
- Irregular line pattern: Crossing asymmetrically, varying thickness
- Semi-matte finish: Slightly dulls the polish and makes marble read more convincingly
- Glossy sealer: One topcoat on top for protection and slight shine contrast
Worth knowing: Marble looks better slightly imperfect — if your veins are too even or too controlled, they read as artificial. Embrace the irregularity and let the lines vary naturally.
Final Thoughts
Nude ombre stiletto nails work because they’re simultaneously refined and interesting, wearable and special. Whether you gravitate toward warm peachy tones, cool taupes, or romantic rose shades, the ombre technique adds sophistication and dimension to any color combination. The real magic happens when you add intentional accents — gold leaf, geometric lines, rhinestones, or negative space — that elevate the design from basic gradient to something uniquely yours.
The versatility of nude tones means you can refresh your design weekly without stepping outside a color family that works with everything in your closet. You’ll find that nude ombre stilettos photograph beautifully, feel professional in any setting, and somehow make your hands look more graceful than solid colors ever could. Start with a combination that resonates with you, then experiment — mix tones, try different finishes, add unexpected accents. Your nails are a small canvas, but they’re one you get to paint as often as you like.
