

Duck nails have become a major nail trend for anyone who loves bold, dimensional nail art. If you haven’t encountered them yet, duck nails are characterized by their squared-off shape combined with a dramatically curved, upward-facing tip that creates an almost webbed or curved appearance — kind of like, well, a duck’s bill. The style is playful and maximalist, and it’s become the perfect canvas for creative colors and finishes.
Blue is one of the most versatile and universally flattering shades for duck nails. Whether you lean toward deep sapphire, soft pastels, or icy electric blues, this color family works for virtually every skin tone and occasion. Blue duck nails can feel sophisticated enough for professional settings or fun and whimsical for everyday wear, depending on how you style them. The color alone helps showcase the unique shape — blue catches light differently than neutral shades, making the dimensional curved tip even more striking.
If you’ve been looking for duck nail inspiration beyond basic designs, here’s a collection of blue options that range from minimalist to ultra-glamorous. Each of these ideas is achievable at home with the right tools and products, and most can also be recreated by a skilled nail technician. Whether you prefer gel manicures, acrylics, or polish, these designs adapt beautifully to whatever your preferred nail medium is.
1. Classic Navy Duck Nails
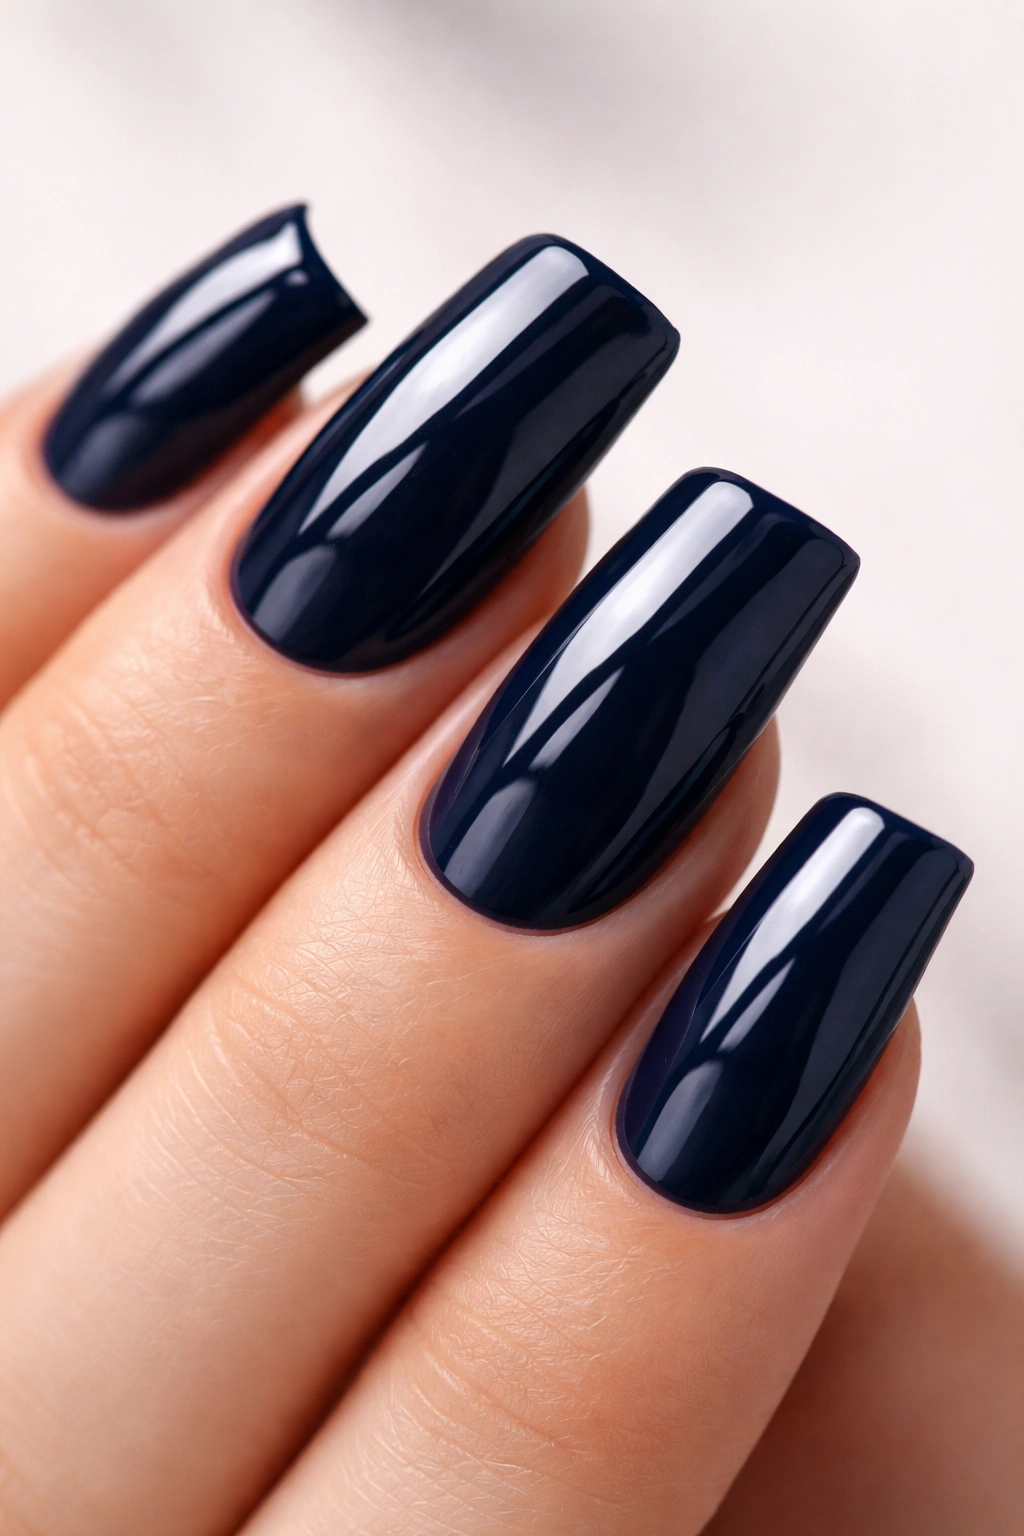
Navy is the backbone of any strong nail art collection, and on duck nails it absolutely shines. This design strips away any complexity and focuses entirely on the shape and the rich color depth. A genuine navy — not black, but a true deep blue — creates an elegant look that works year-round and pairs with almost any wardrobe.
Why It Works for Duck Nails
Navy duck nails photograph beautifully because the depth of the color emphasizes the dimensional curve of the tip. The color sits somewhere between professional and playful, so you can wear them to the office, a dinner date, or a casual weekend. Navy also provides the perfect base for a manicure that lasts — darker colors hide chips and regrowth better than lighter shades, which means your manicure stays looking fresh longer.
How to Achieve the Look
- Use a high-quality gel or acrylic base in true navy (avoid navy-blacks that read too dark)
- Apply two thin coats rather than one thick coat for smoother, more even coverage
- Seal with a glossy top coat to maximize color depth and dimension
- If using traditional polish, a quick-dry formula prevents smudging on those curved tips
- Finish with a shine enhancer or UV-cured topcoat for longevity
Pro tip: Pair navy duck nails with a nude or rose-gold nail bed to create contrast and make the blue pop even more visually.
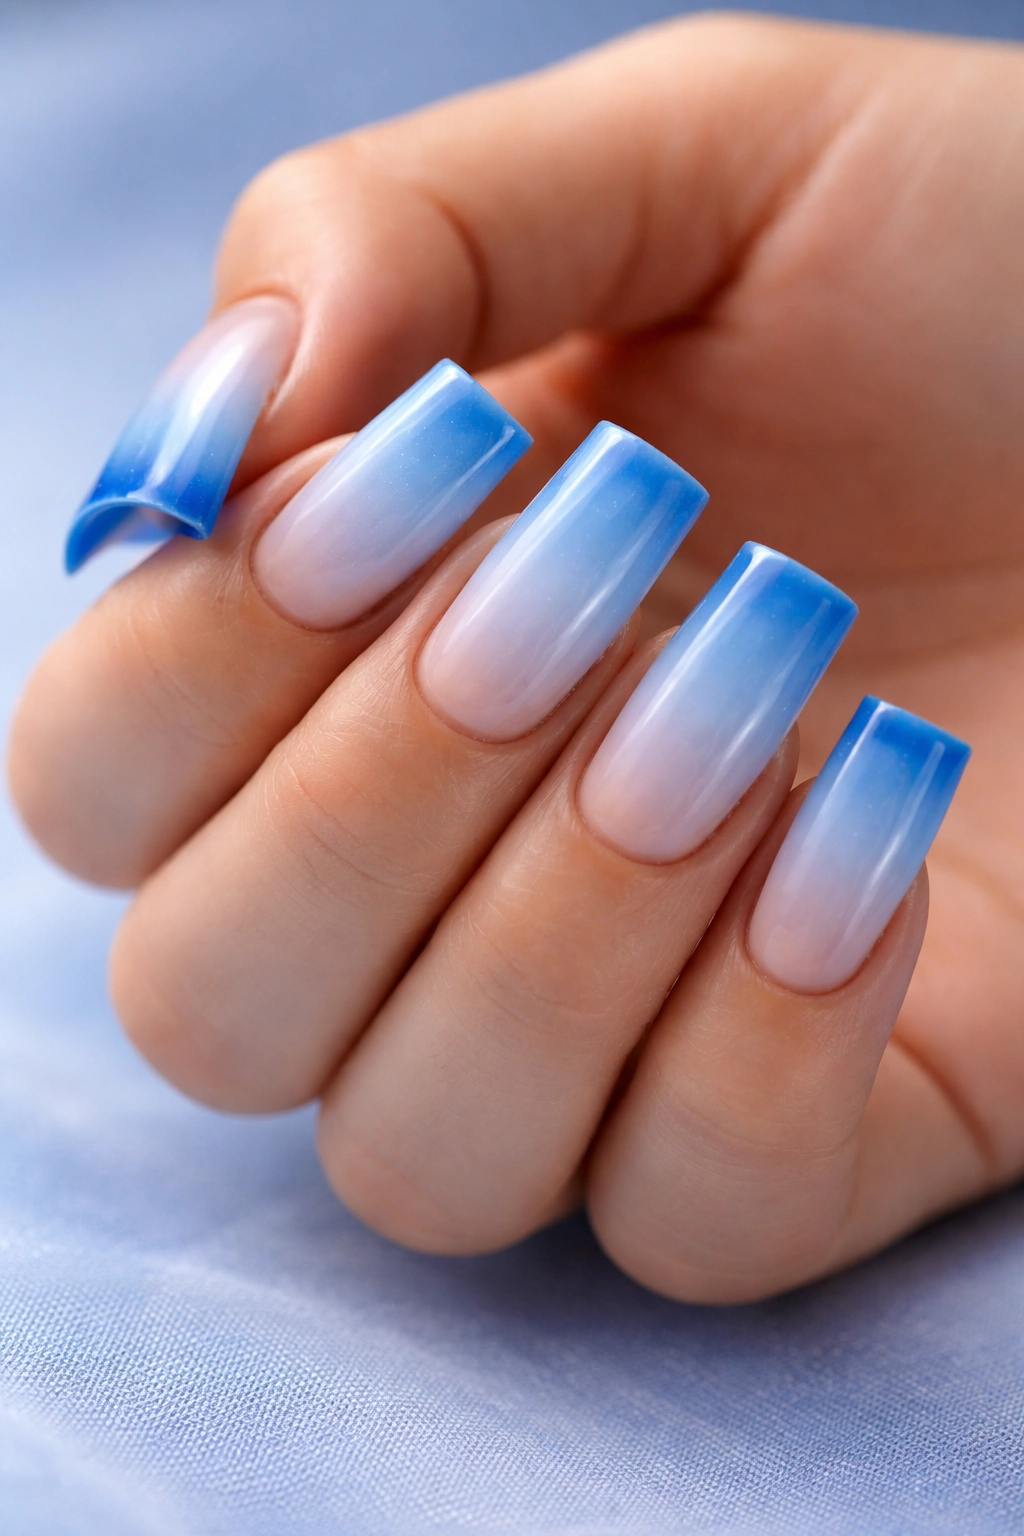
2. Ombré Blue to White Duck Nails
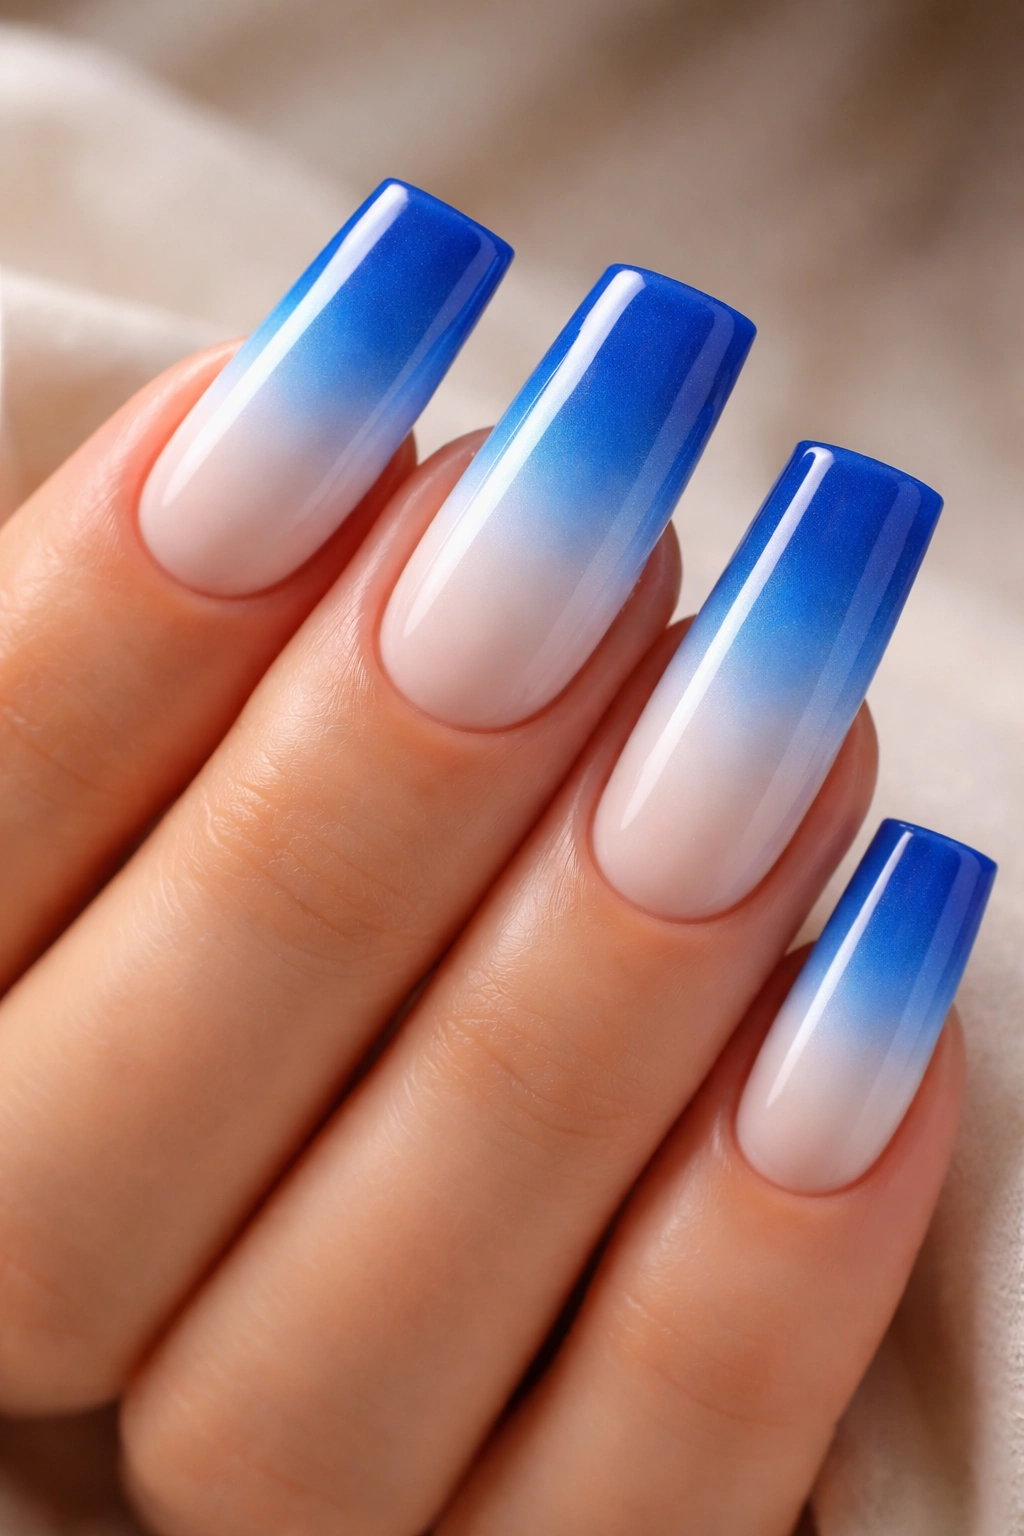
This design takes the duck nail shape and uses it to create a dramatic color gradient that flows from a rich blue at the base to a crisp white at the curved tip. The effect is striking without being overly busy, and it’s surprisingly easier to execute than it looks — especially if you use the sponging technique.
The Visual Impact of Gradient Design
Ombré designs on duck nails create the illusion of movement and depth. The gradient naturally guides the eye from the nail bed upward and out along the curved tip, which actually emphasizes the distinctive duck nail silhouette. This creates a kind of optical flow that makes the shape feel even more intentional and designed.
Step-by-Step Application
- Start with a white base coat on the entire nail, including the tip area
- Apply your blue shade (a medium to bright blue works best) to the nail bed area
- Use a makeup sponge to gently blend where the blue and white meet, creating a soft gradient
- Build the transition gradually — multiple light sponge applications create a smoother effect than trying to blend it all at once
- Seal with a glossy topcoat and cure (or air-dry if using polish)
- For added dimension, apply one coat of translucent blue gel or polish over the white tip area
Worth knowing: This design shows every imperfection in application, so take your time with the blending stage and don’t rush the gradient.
3. Blue Marble Duck Nails
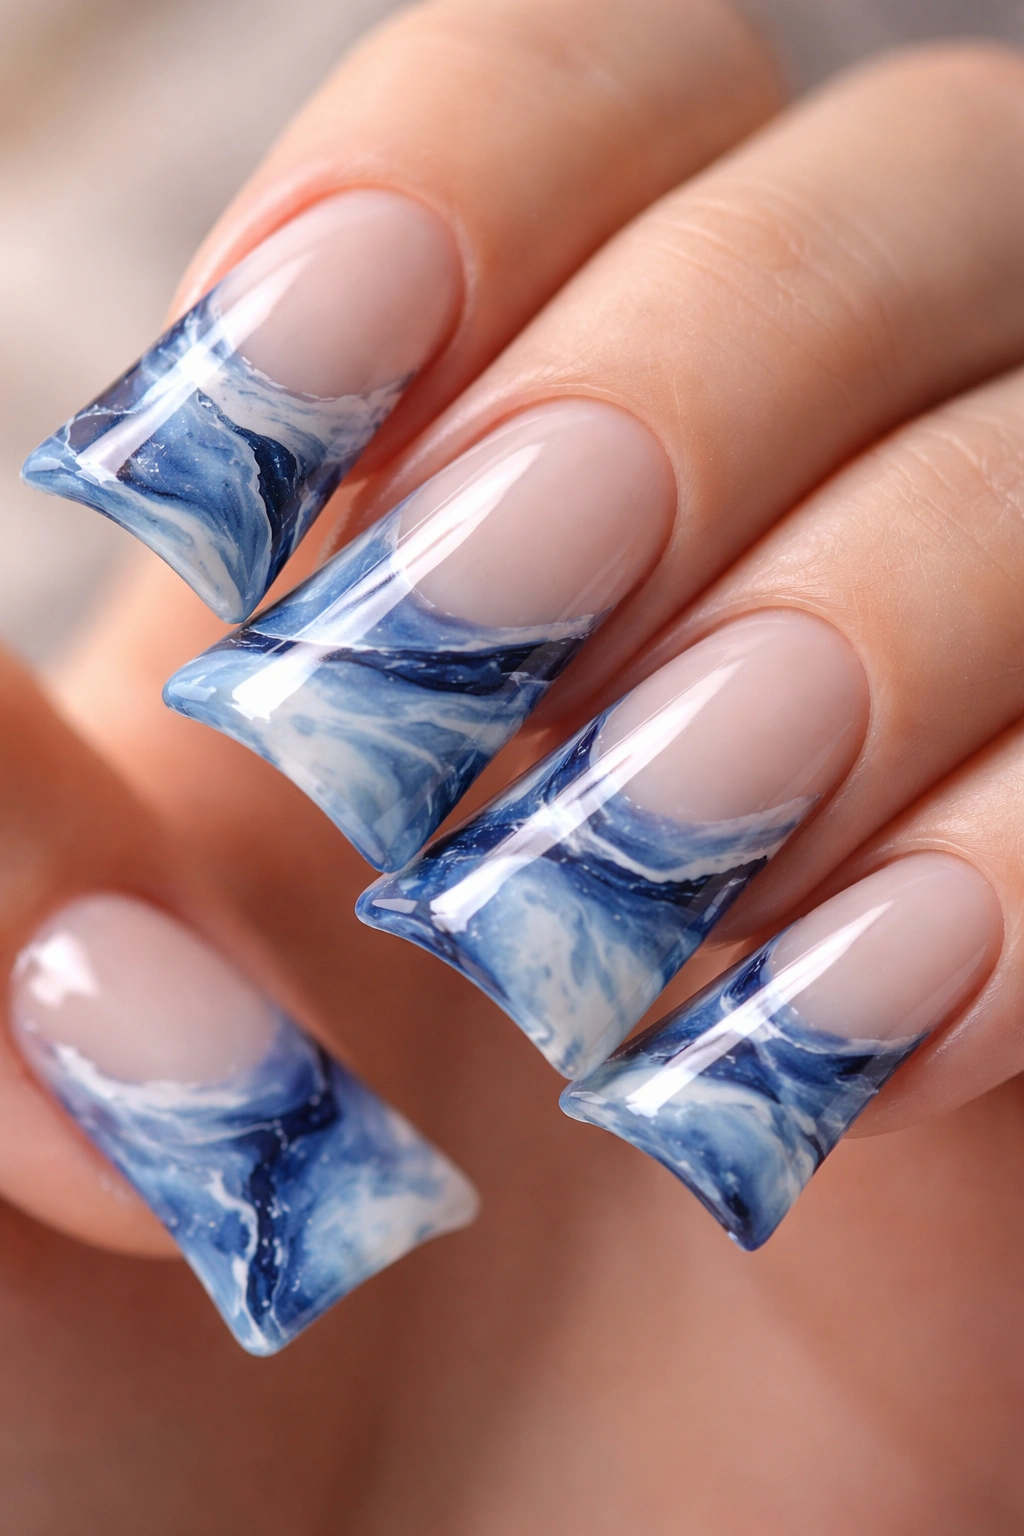
Marble patterns on duck nails feel incredibly sophisticated because the organic swirls and veining naturally complement the curved, organic shape of the nail tip. Blue marble designs can range from delicate and minimal to bold and dark, depending on whether you choose a light base with thin veining or a darker base with thick, dramatic lines.
Creating Marble Pattern Effects
Marble nail art works best when you embrace the randomness — there’s no “wrong” way to make veining look. The technique involves creating thin, organic lines across the nail surface that mimic the natural patterns found in marble stone. On duck nails, these patterns feel especially luxurious because they wrap around the dimensional tip.
Technique and Materials Needed
- Apply a light blue, white, or cream base coat as your foundation
- Use a thin striping brush or fine-tipped gel pen to hand-paint veining in a darker blue or navy
- Create irregular, branching patterns rather than perfectly straight lines — natural marble is never perfectly symmetrical
- Use a toothpick or dotting tool to soften and blend some of the lines if you want a more watercolor effect
- Seal with a matte or glossy topcoat depending on your preference
- Matte topcoat emphasizes the stone-like quality; glossy creates more visual depth
Insider note: Keep a paper towel handy while you’re painting the veining — you can wipe your brush between strokes to prevent color from muddying.
4. Metallic Blue Duck Nails
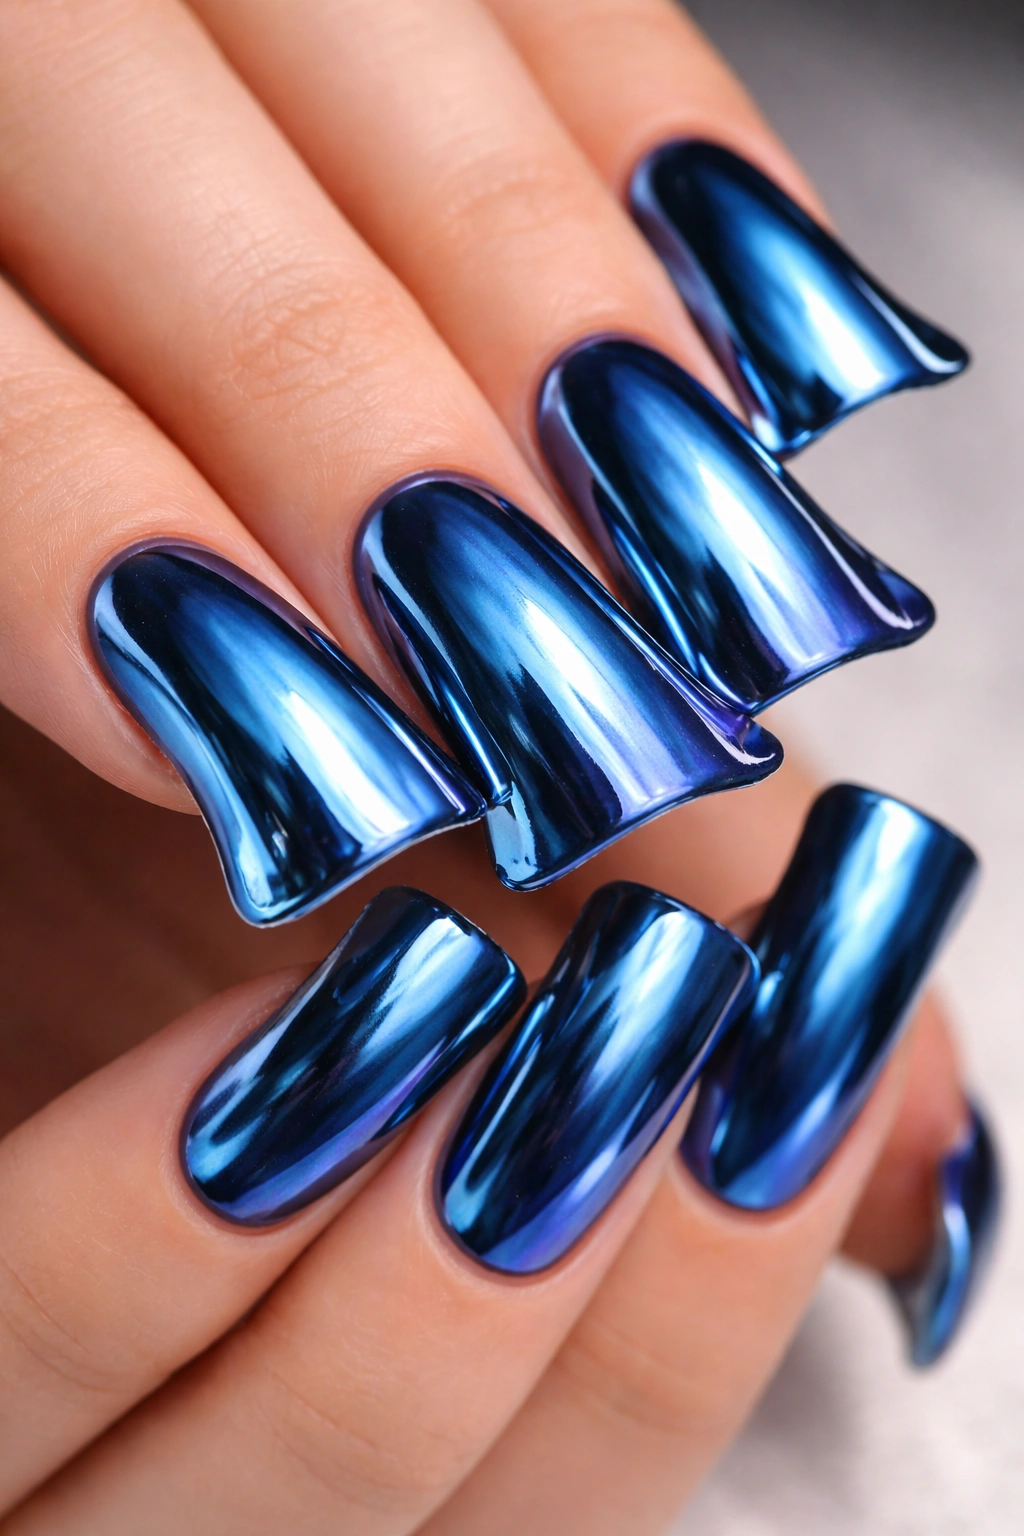
Metallic finishes catch light in extraordinary ways, and on a duck nail shape they’re absolutely dazzling. A true metallic blue — not just shimmer, but genuine chrome-like finish — creates a futuristic, almost sci-fi aesthetic that’s eye-catching without feeling childish.
Why Metallic Works on Duck Shapes
The curved tip of the duck nail is naturally reflective, so when you add a metallic finish, that tip becomes a focal point that catches light from every angle. When someone looks at your hands, their eye immediately goes to the glowing tip. This creates drama and visual interest that solid colors alone can’t achieve.
Application for Maximum Shine
- Use a true metallic gel or specialized metallic acrylic powder — regular shimmer polishes don’t deliver the same effect
- Apply in thin, even coats and cure properly between layers
- Chrome powders or foil finishes provide the most intense metallic effect
- If your metallic finish feels slightly patchy after curing, a glossy topcoat helps blend minor imperfections and amplifies the shine
- For gel, make sure you’re using LED or UV light specifically formulated for metallic finishes
- Polish or matte finishes will dull a metallic effect, so stick with high-shine topcoats
Key insight: Metallic blue duck nails photograph amazingly, so if you’re considering this look, get ready for people asking for photos of your nails.
5. Pastel Blue Duck Nails
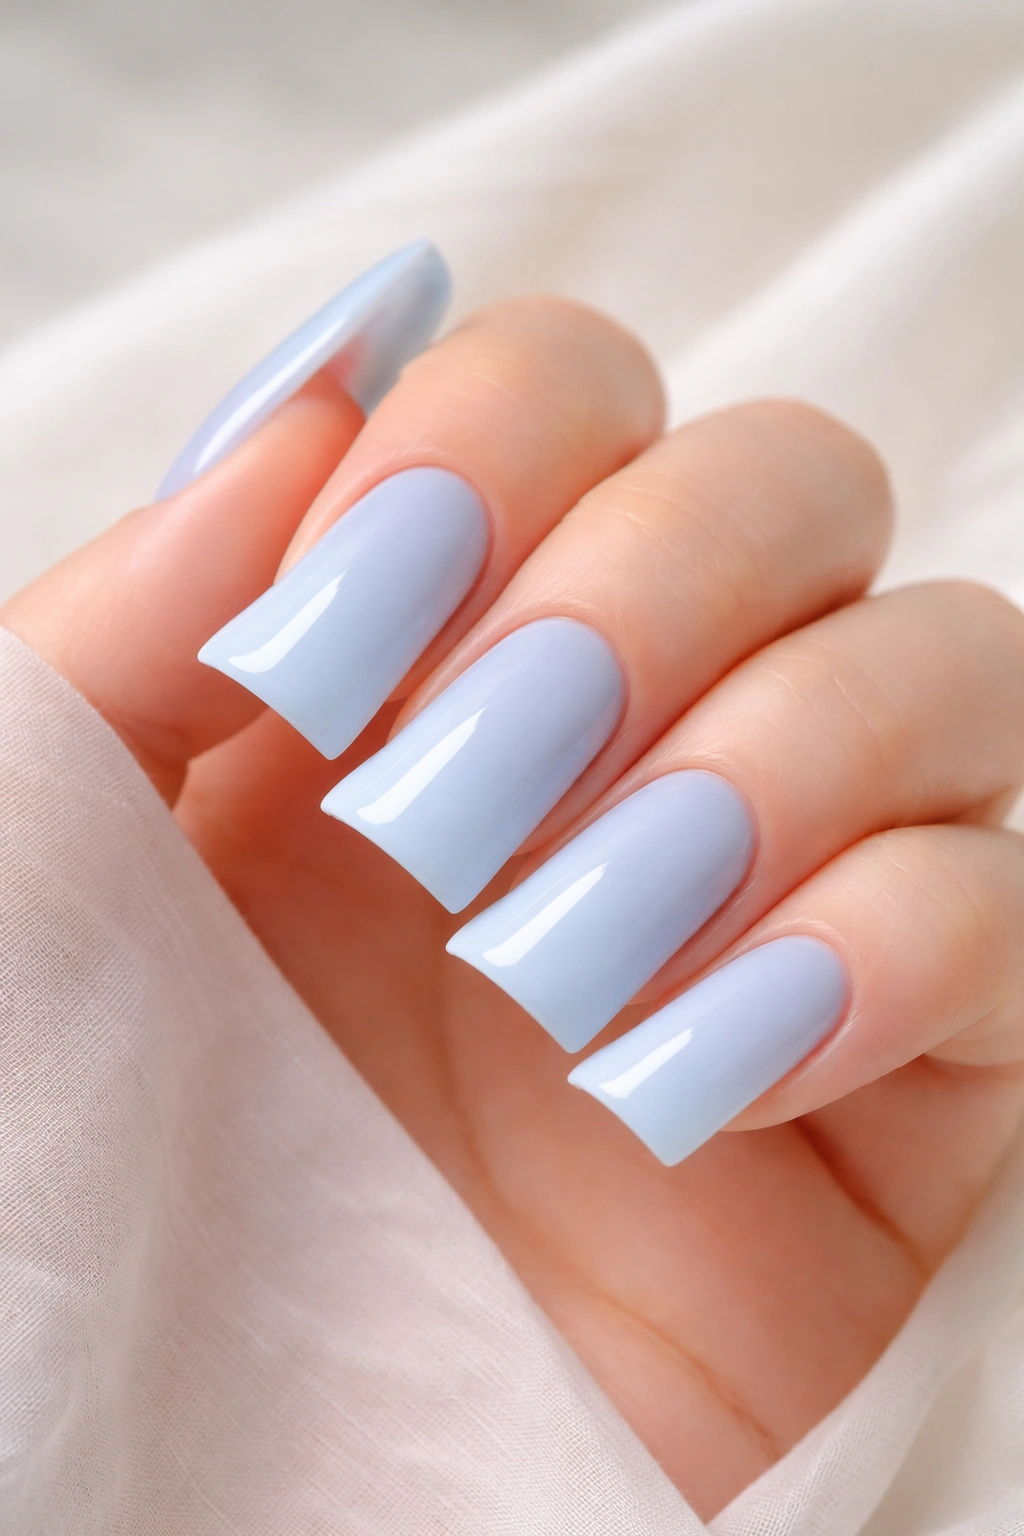
For a softer take on the duck nail trend, pastel blue brings all the shape drama without the boldness. Pastel blue — think powder blue, baby blue, or soft periwinkle — feels whimsical and dreamy, perfect for anyone who likes color but prefers subtlety in their nail art.
The Charm of Soft, Dusty Tones
Pastel blue duck nails work beautifully for spring and summer wear, but because the color is so gentle, they actually work year-round without feeling seasonal. The shape is still attention-grabbing, but the soft color makes the overall look feel approachable and friendly rather than bold or dramatic.
Achieving True Pastel Color
- Choose a pastel blue with a slightly milky or dusty undertone — pure bright blues desaturated can look washed out
- A sheer pastel often requires 3-4 coats of color to achieve full coverage, which is normal and fine
- Apply thin coats rather than thick ones to maintain the delicate color
- A pink or nude-toned topcoat can warm up pastel blue if you want it to feel softer
- For durability, make sure each coat is fully set before applying the next
- Matte topcoat can enhance the powder-like quality of pastels; glossy topcoat will make them feel more candy-like
Real talk: Pastel blue duck nails show fingerprints and dust more easily than darker shades, so if you love a clean look you’ll need to wipe them frequently.
6. Blue and Gold Duck Nails
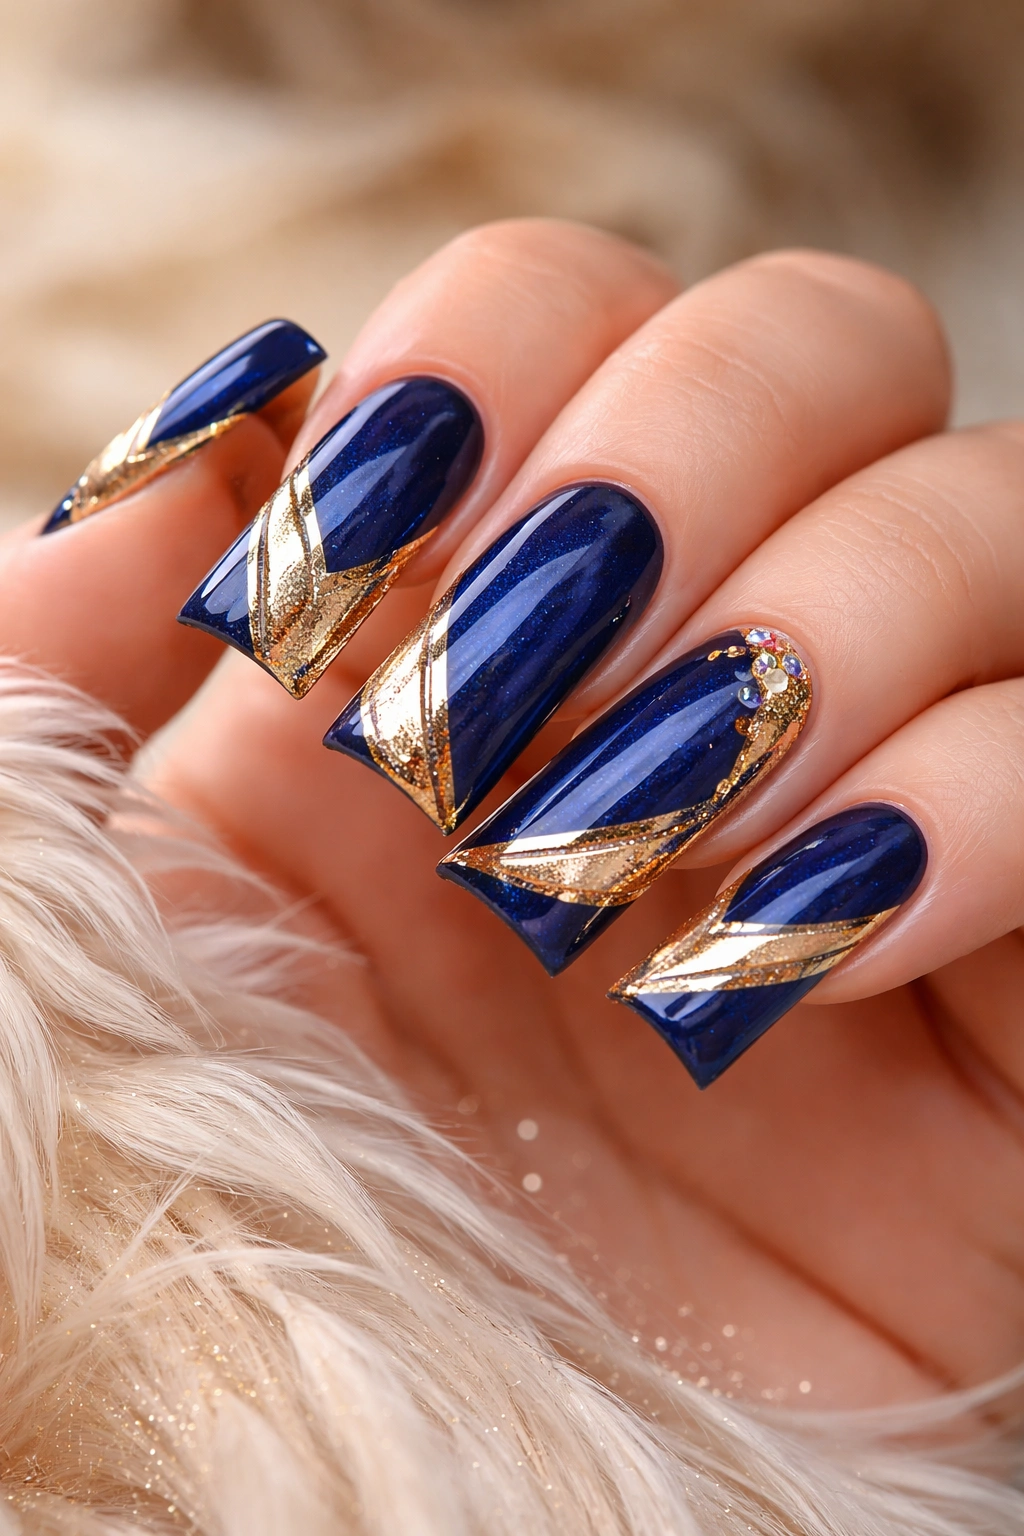
Combining blue and gold creates instant luxury — this color pairing is used in high-end fashion and jewelry for a reason. On duck nails, the contrast between cool blue and warm gold is visually striking and feels almost regal.
Design Layout Options for Two Colors
You can approach blue and gold duck nails several ways: paint half the nail blue and half gold, create stripes alternating the colors, use gold accent lines on a blue base, or do a gradient where blue transitions into gold. Each approach feels different — some feel bold and geometric, others feel more fluid and painterly.
Color Blocking and Accents
- For a half-and-half design, paint the nail bed blue and the curved tip gold (or reverse it)
- Use a thin line of gold to create a stripe or separating line between colors
- Gold detailing on the tip creates a crown-like effect that emphasizes the duck nail shape
- Mirror the gold and blue across multiple nails in a pattern for a more intentional design
- Metallic gold shows off better than matte, so use a true metallic or chrome finish if possible
- Seal both colors under a single glossy topcoat to blend them visually
Pro tip: Paint the gold element last so it sits on top of the blue — this prevents the colors from muddying together.
7. Matte Blue Duck Nails

A matte finish completely transforms how a color reads and feels. Matte blue duck nails have a velvety, almost fabric-like quality that’s totally different from glossy versions of the same shade.
The Visual Effect of Matte Finishes
Matte finishes are less reflective and more absorptive, which means they create a softer, more subtle appearance. Paradoxically, this often makes the shape itself feel MORE pronounced because there’s no gloss bounce to distract the eye. You’re seeing pure color and pure shape.
Achieving Flawless Matte
- Some gel systems include matte topcoats in their standard offerings — use these for the most reliable matte finish
- If using acrylic, a matte powder finish or matte topcoat applied over polish creates the effect
- For traditional polish, several brands now make matte polish specifically designed for that velvety finish
- Matte finishes can sometimes feel slightly chalky if over-applied, so use even coats and don’t exceed 2-3 layers
- If your matte finish looks uneven, a very light buffing with a file can even out any patches
- Matte finishes require more frequent touch-ups because they show growth and chips slightly more than glossy versions
Worth knowing: Matte finishes can photograph as less vibrant than glossy — if you’re posting photos, glossy versions will look more dramatic online.
8. Blue Gradient Duck Nails
A gradient is different from an ombré in that it typically moves through a more defined color progression. A blue gradient might flow from light to dark blue, or cycle through different shades of blue (sky blue to navy to teal), creating a rainbow effect within a single color family.
Multi-Shade Gradient Techniques
Gradients on duck nails feel dimensional because you’re using multiple shades that are all in the same color family. Your eye sees depth and movement even though you’re technically working with variations of a single color. This is sophisticated without being chaotic.
Building the Gradient
- Choose 2-3 shades of blue that have clear contrast but still read as the same color family
- Apply your lightest shade to the entire nail as a base
- Use a sponge to apply the medium shade across the middle section of the nail
- Apply the darkest shade to the base of the nail and blend upward
- Each blending step should be gentle to create smooth transitions
- The curved tip can feature your lightest shade for maximum contrast with the darkest base
- Seal with topcoat to lock in the gradient and prevent blending
Insider note: The sponge technique works best when you dampen it slightly and press rather than rub — pressing deposits color, while rubbing moves it around.
9. Blue Glitter Duck Nails
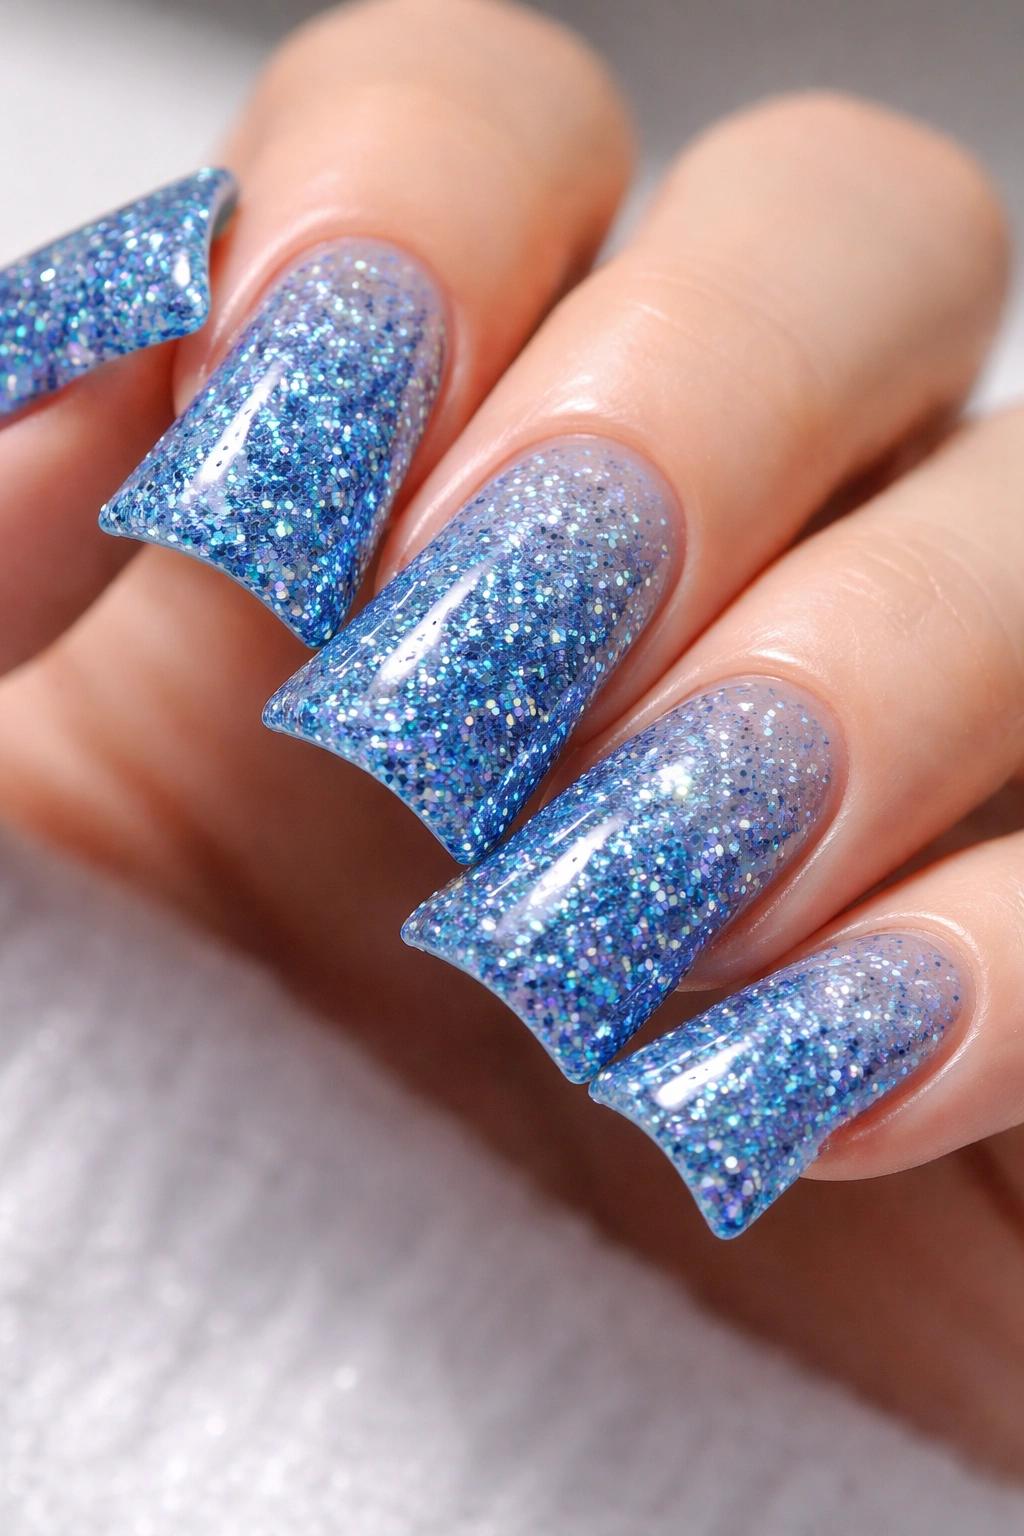
Glitter transforms any base color into something sparkly and celebratory. Blue glitter duck nails capture light beautifully, especially on that curved tip where light hits at different angles as you move your hands.
Glitter Placement and Density
You can do full coverage glitter across the entire nail, concentrate glitter on the tip to emphasize the duck nail shape, or create an ombré effect where glitter density increases as you move toward the tip. Full coverage glitter tends to be bolder and more dramatic, while graduated glitter feels more refined and intentional.
Application Methods
- Use a sticky gel base (many gel systems have a “color-in” gel designed to hold glitter)
- Sprinkle loose glitter onto the sticky base before curing, or use a glitter-in-gel formula
- For traditional polish, glitter polish applied over a colored base works well
- Cure or air-dry completely before sealing with topcoat
- Multiple layers of topcoat (2-3 coats) help lock glitter in place and prevent fallout
- An extremely shiny topcoat actually makes glitter show up more dramatically than matte
- For the curved tip, you can use larger glitter particles that catch light more visibly
Key fact: Glitter nails require extra care during removal because glitter particles can catch on acetone, so don’t rush the soaking stage.
10. Blue Holographic Duck Nails
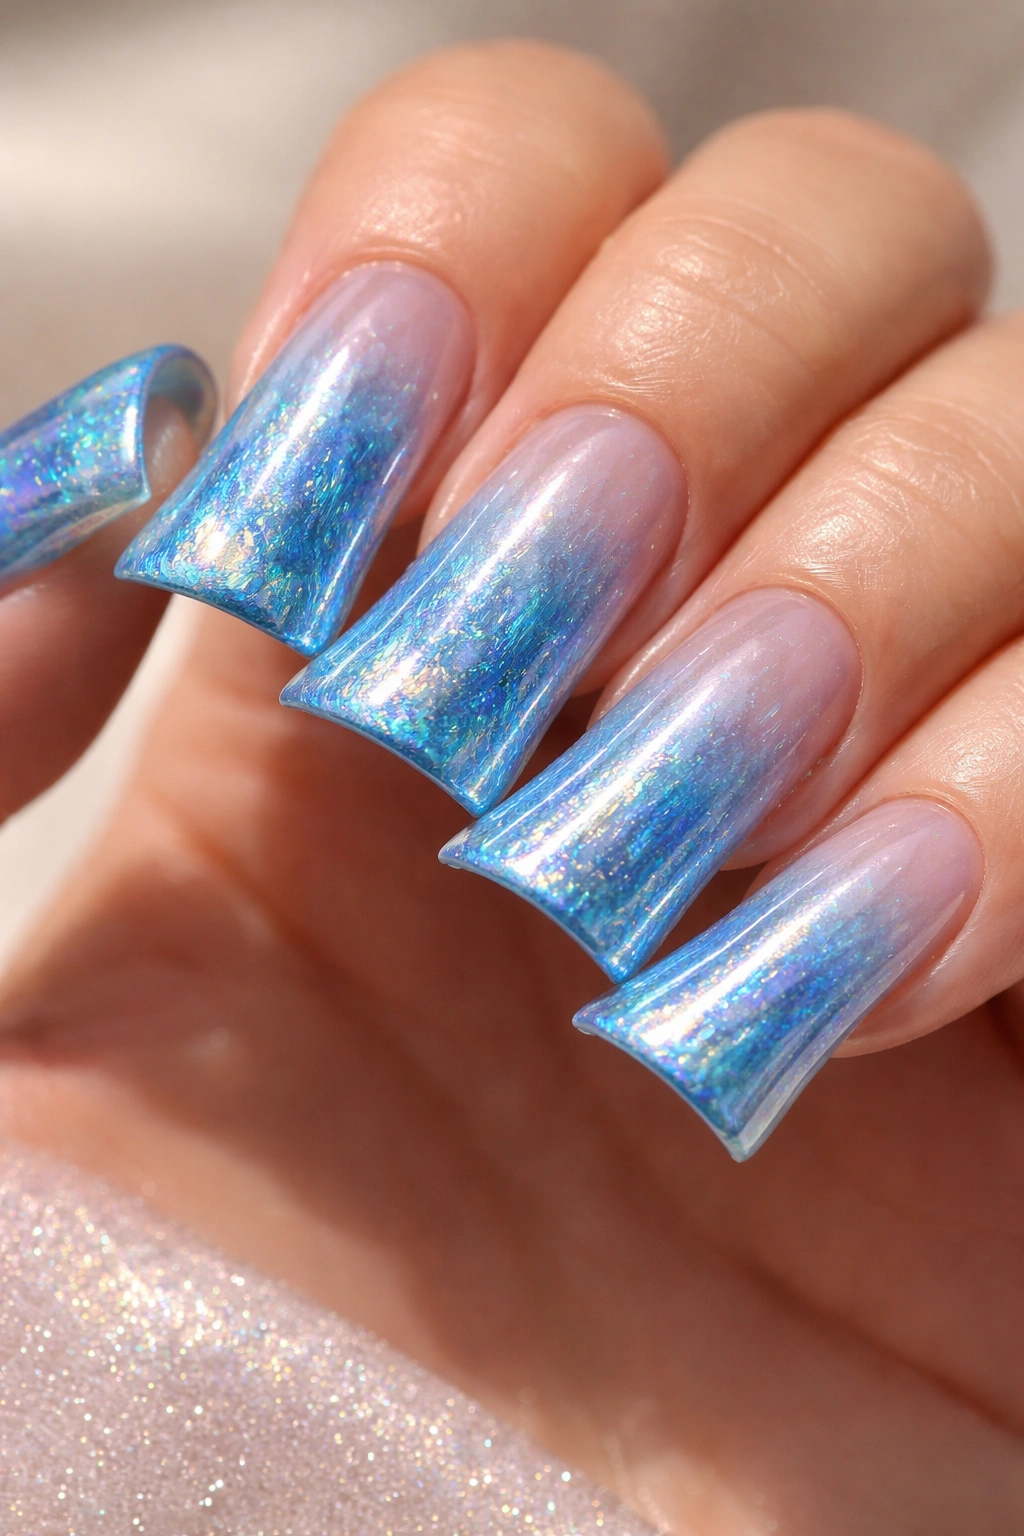
Holographic finishes are more advanced than metallic but absolutely stunning. A true holographic effect creates rainbow light refractions across the nail surface, and on a duck nail the effect is almost magical because the curved tip bounces light in constantly changing ways.
Understanding Holographic Effects
Holographic isn’t just about blue — it’s about how that blue refracts light into a spectrum. As you move your hands, the color appears to shift and change, which is what makes holographic so captivating. On duck nails, this effect is amplified because the shape itself creates multiple reflective surfaces.
Achieving Holographic Finish
- Use a specialized holographic powder or holographic gel — regular shimmer won’t create the same effect
- Apply a sticky base layer and press holographic powder onto it, or use a holographic gel directly
- The key to strong holographic effect is even distribution of the powder
- A glossy topcoat enhances holographic by creating an ultra-smooth, reflective surface
- Some holographic formulations require specific lighting to cure properly, so check your product instructions
- In natural light vs. artificial light, holographic nails will look completely different — that’s the appeal
- The curved tip of the duck nail is where holographic shine is most visible
Real talk: True holographic nails are a commitment because they require specific products and careful application, but the effect is worth it if you love something totally unique.
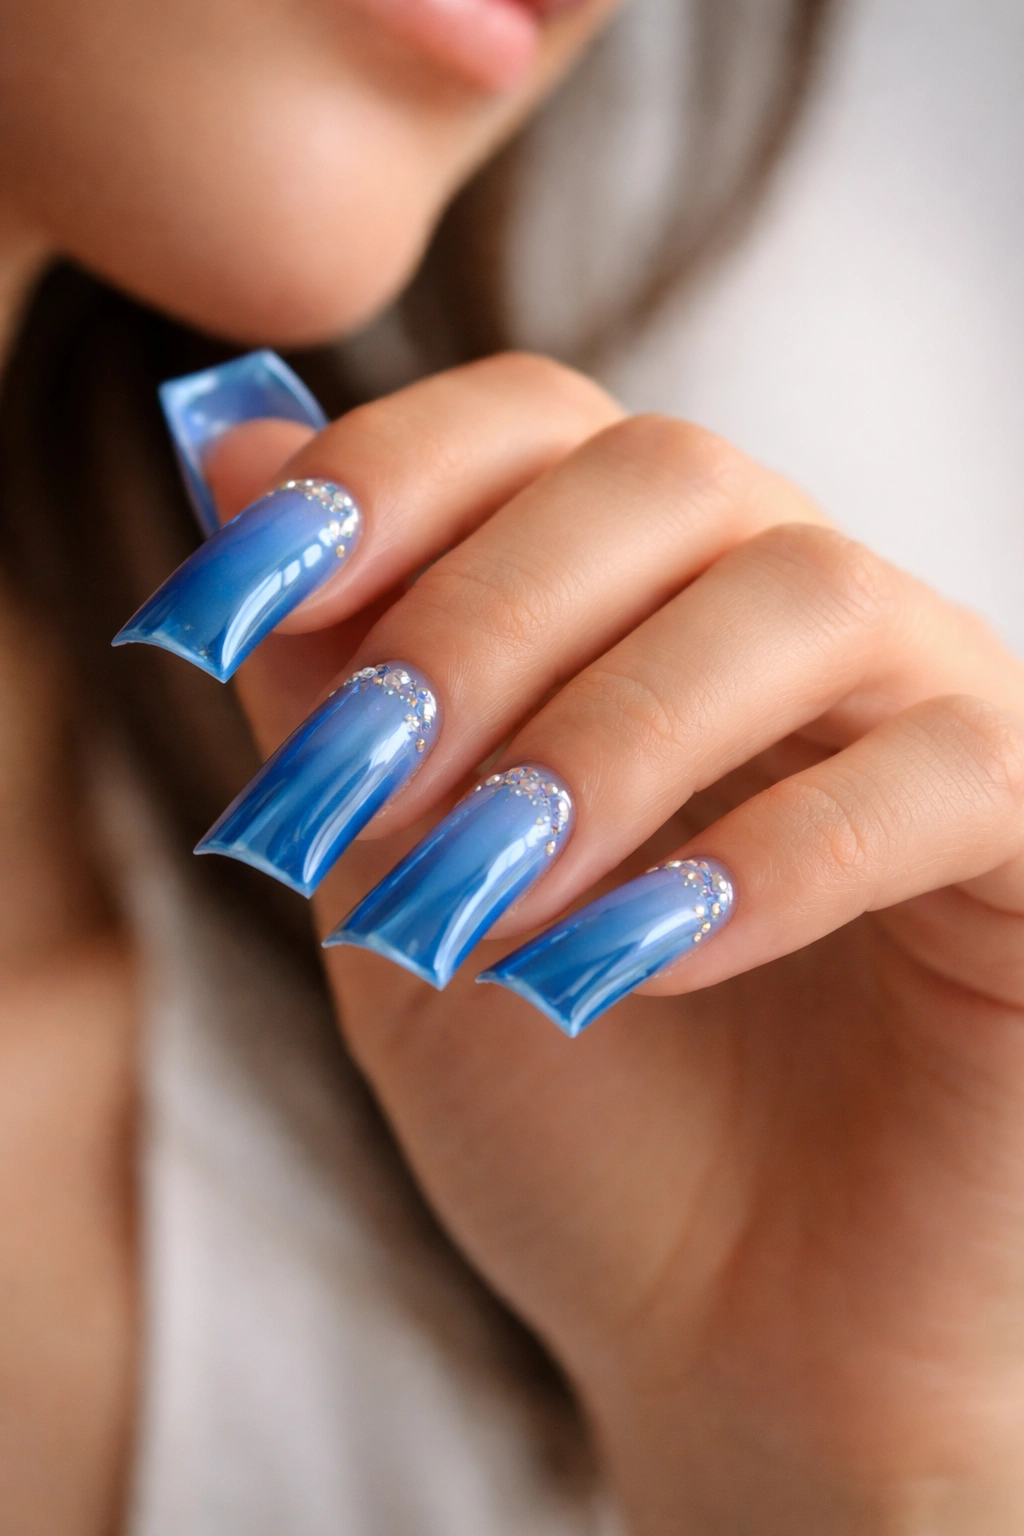
11. Blue French Tip Duck Nails
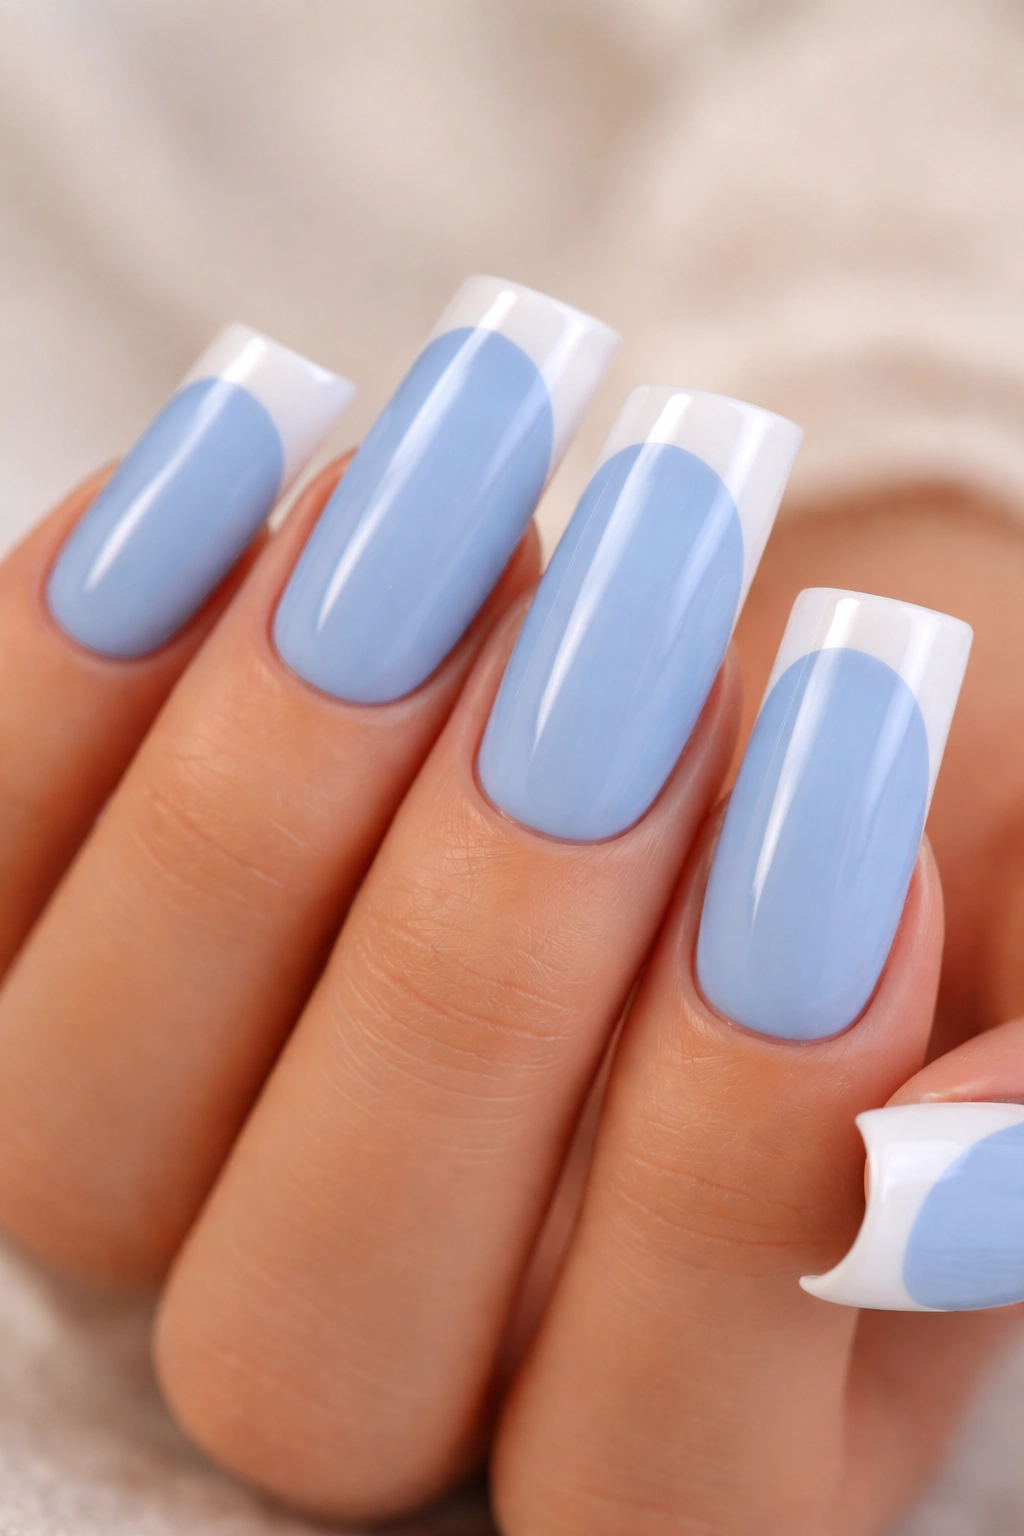
A French tip typically refers to a contrast between the nail bed and the tip, but on duck nails it takes on new meaning. The curved, extended tip becomes the perfect place to create a bold color block or gradient that draws attention to the shape itself.
Reimagining French Tips on Duck Nails
Traditional French tips use white, but on duck nails you can use any contrasting color. Pair a soft blue base with a white curved tip for a clean, modern look. Or use navy base with a bright blue tip for more drama. The contrast emphasizes the dimensional shape while keeping the overall design clean and wearable.
Clean French Tip Application
- Use painter’s tape or a nail stencil to create a clean line separating the nail bed color from the tip color
- Apply your base color (light blue) to the entire nail first and let it cure completely
- Carefully apply painter’s tape so the edge sits exactly where you want the color change to occur
- Apply your contrast color to the exposed tip area
- Remove the tape carefully while the color is still tacky (before full cure for gel, while still wet for polish)
- A thin line of shimmer or glitter along the dividing line adds extra polish
- Seal everything under one unified topcoat
Pro tip: If your French tip line isn’t perfectly clean, a fine-tipped brush dipped in the base color can clean it up before final topcoat.
12. Blue Tie-Dye Duck Nails
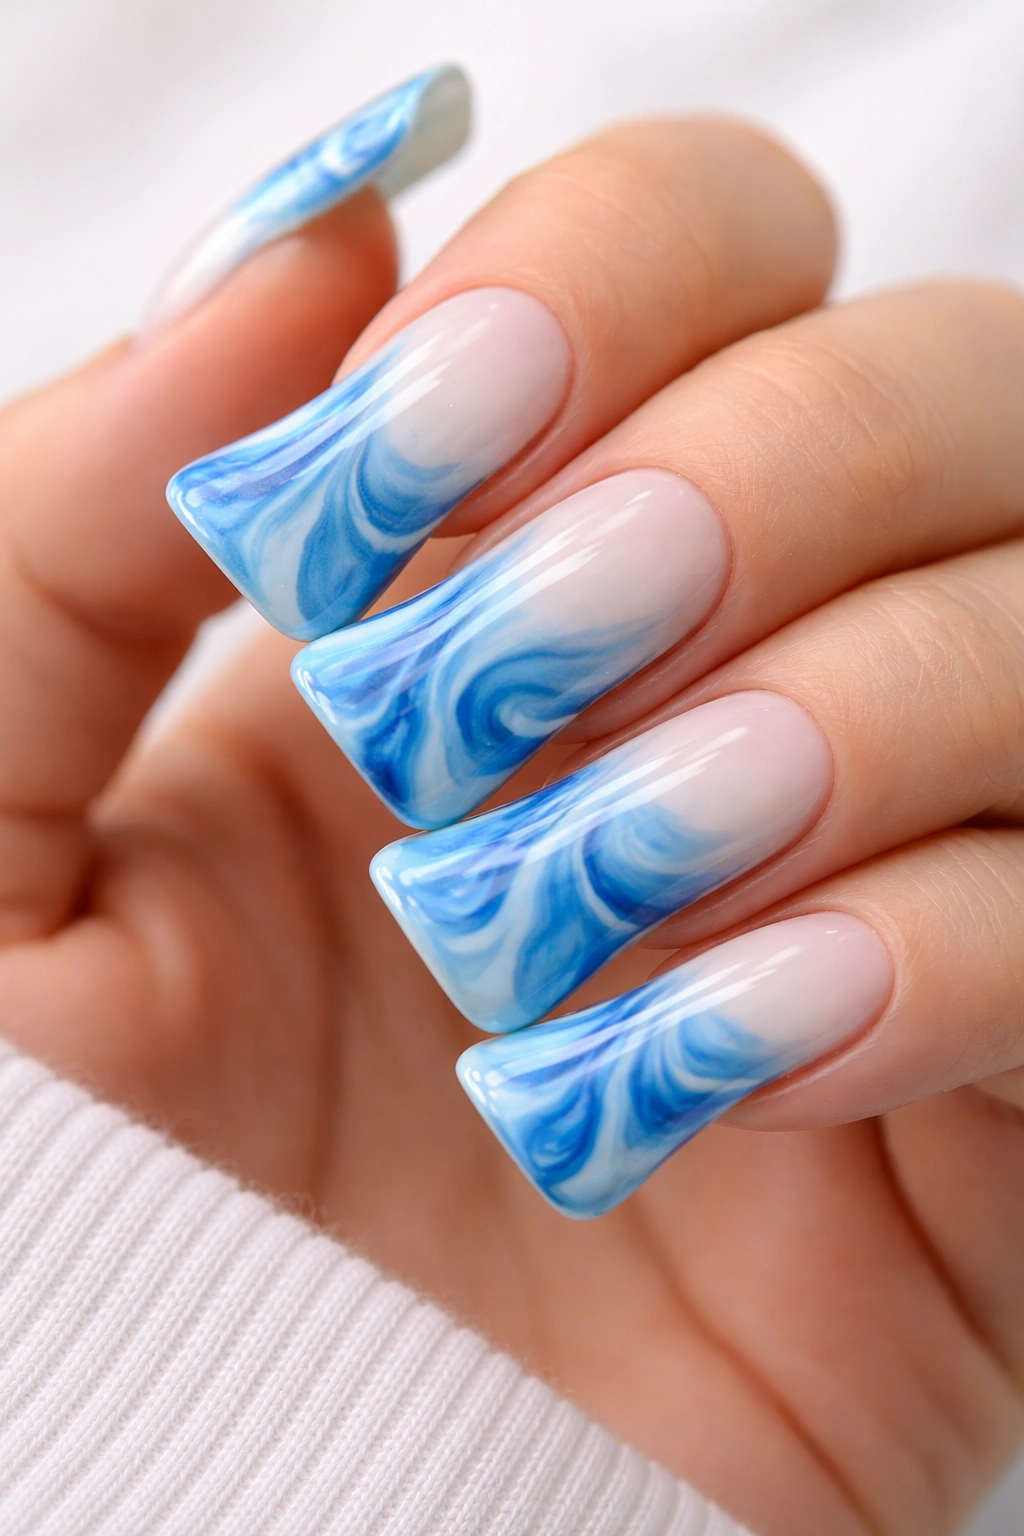
Tie-dye is inherently random and organic, which makes it perfect for duck nails where the curved shape already feels fluid and free-form. Blue tie-dye duck nails can use different shades of blue, or mix blue with complementary colors like purple, teal, or white for a retro feel.
Creating Tie-Dye Effects
Tie-dye works by letting multiple colors blend naturally rather than creating precise patterns. You’re swirling and letting them meet organically, which creates a playful, unique look on every nail. Because everyone’s swirls are different, no two sets of tie-dye nails are identical.
Technique for Nail Tie-Dye
- Use a white or cream base as your foundation
- Choose 2-3 blue shades or a combination of complementary colors
- Apply colors to different areas of the nail using a brush or dropper
- Use a clean brush or sponge to swirl and blend the colors together
- Keep the movement loose and organic — perfectionism kills the tie-dye vibe
- Let colors overlap and mix naturally on the nail surface
- Some areas will blend into purple-blue or teal-blue, and that’s exactly the point
- Seal with a glossy topcoat to blend all the colors visually
Worth knowing: Tie-dye looks best when the base colors are fairly similar in saturation — mixing a pastel blue with a neon blue can look muddy rather than purposeful.
13. Blue Acrylic 3D Duck Nails
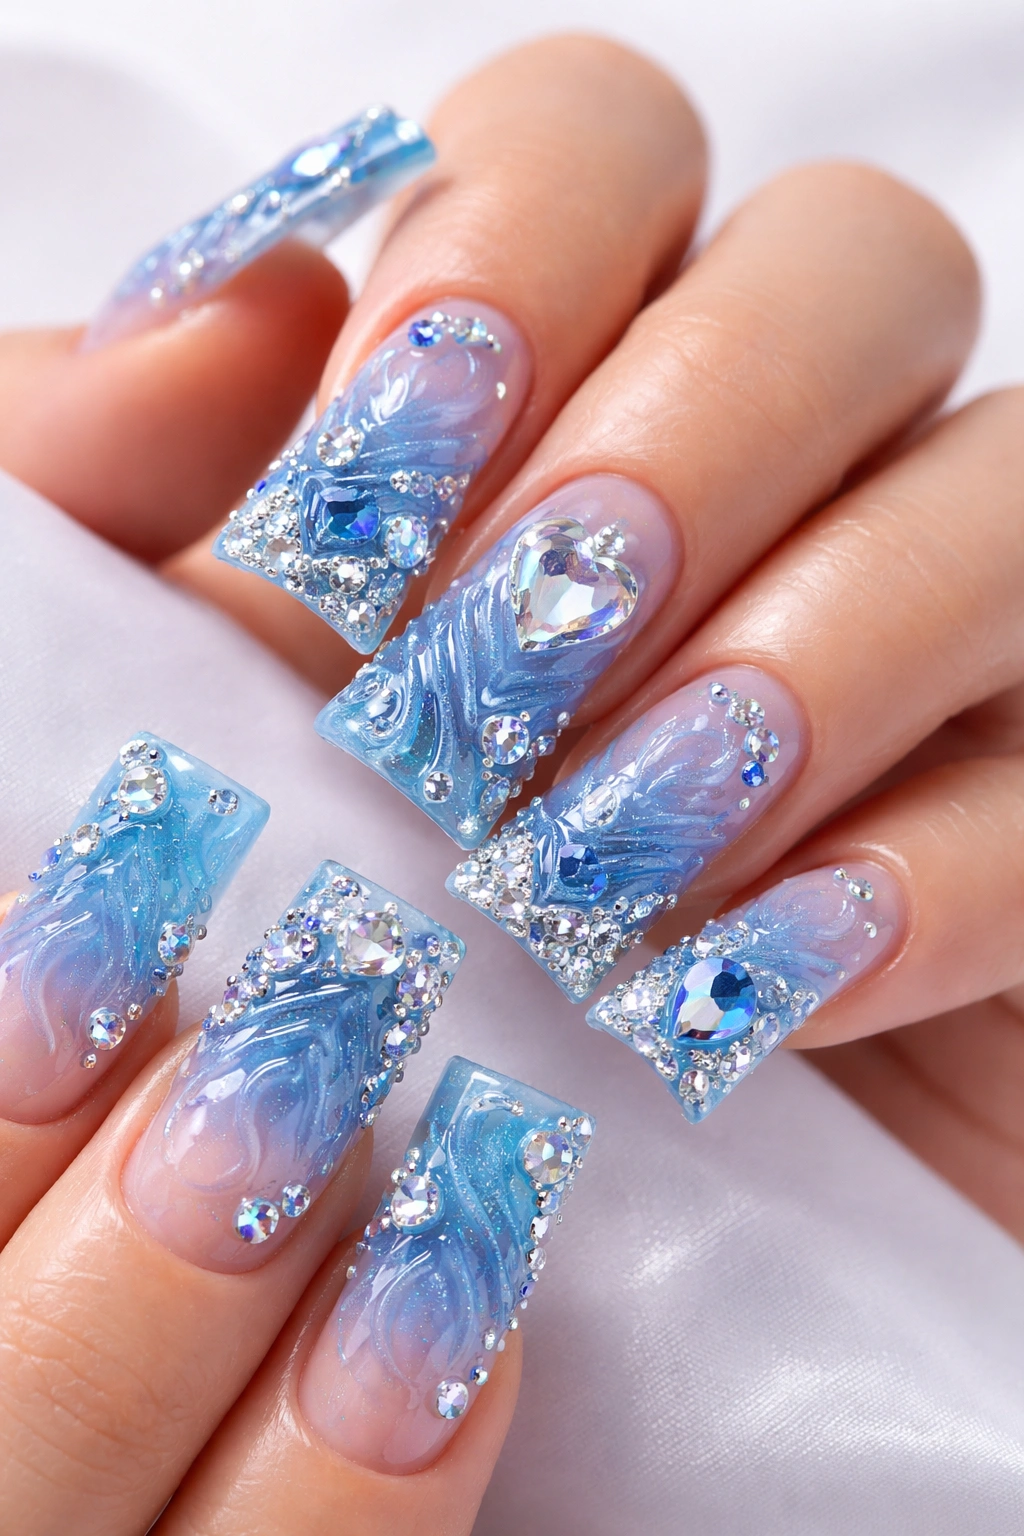
Taking duck nails into full 3D territory means adding sculpted elements, gems, or textured details that create actual depth beyond the shape itself. Blue acrylic 3D nails can feature raised designs, rhinestone accents, or 3D sculpted elements that turn the nail into an art piece.
What Qualifies as 3D Nail Art
3D elements on duck nails might include: sculpted acrylic shapes on top of the base color, strategically placed rhinestones or gems, embossed or textured surfaces, or even hand-sculpted flowers or objects. The goal is to create visual and tactile depth that goes beyond the 2D surface of the nail.
Building 3D Elements
- Create your blue base color first and let it cure completely
- Use clear or tinted acrylic to sculpt 3D shapes (roses are very popular, as are abstract shapes)
- Place larger gems or rhinestones on the curved tip where they’re most visible
- Smaller stones or details across the nail bed create balance
- Each element should be secured in place before sealing the entire design
- Multiple topcoat layers lock everything in place and prevent stones from shifting
- Weight matters — too many 3D elements can become uncomfortable to wear, so balance drama with wearability
Key insight: 3D nails require more care during daily life — avoid rough surfaces, tight gloves, or activities where you might snag the embellishments.
14. Blue and Silver Duck Nails
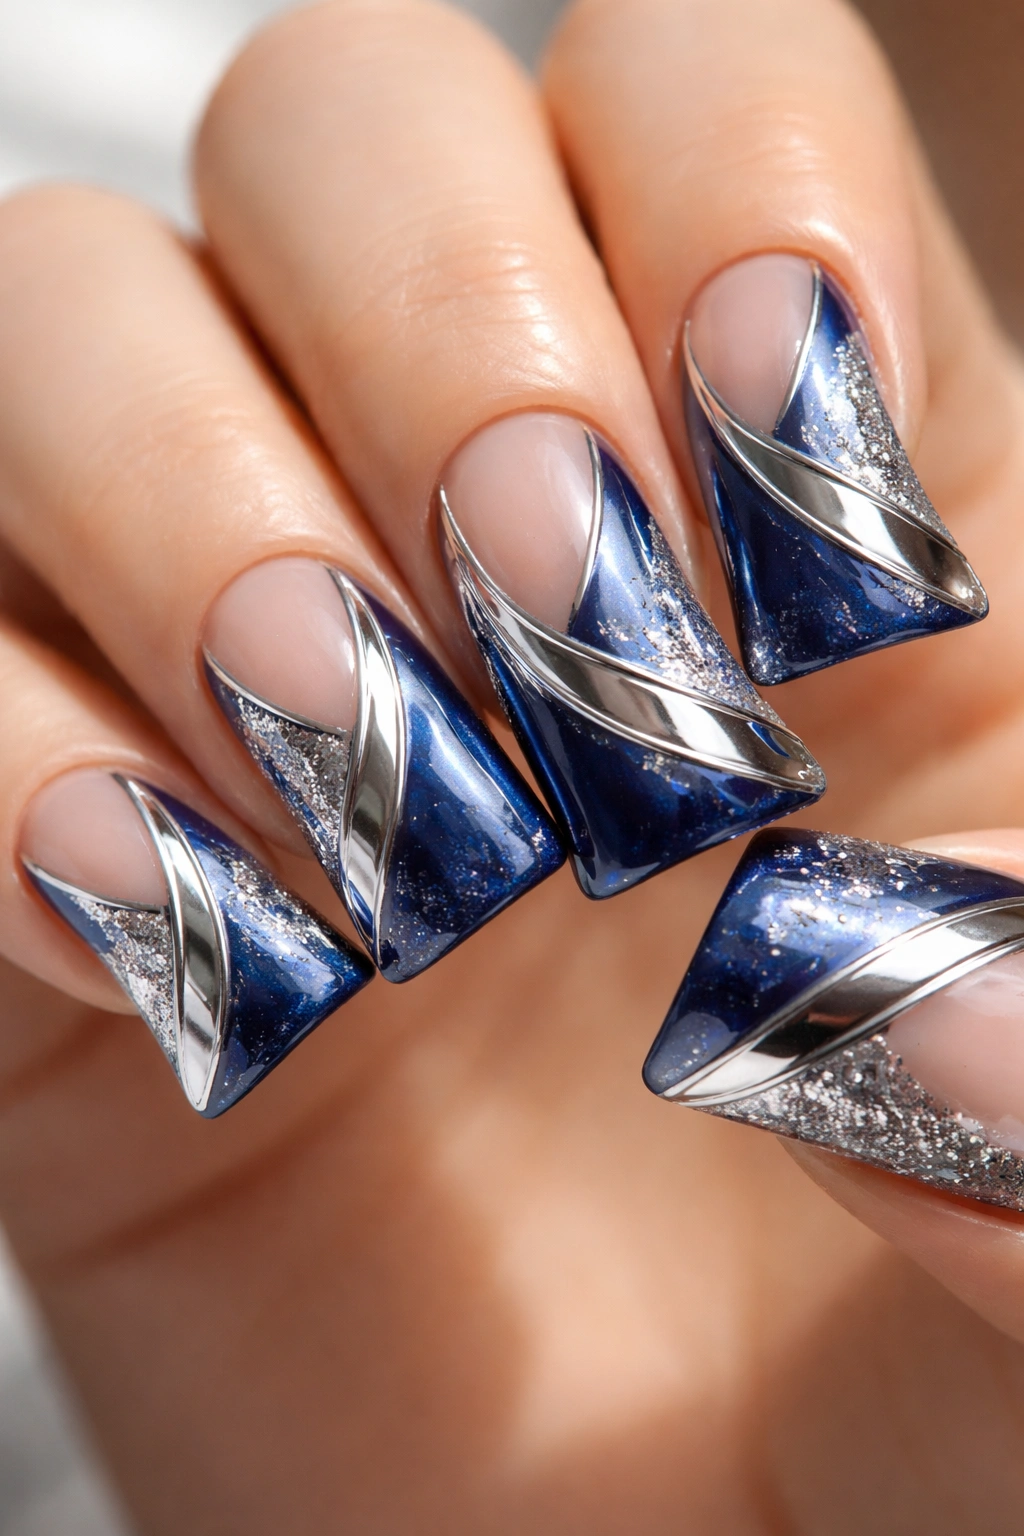
Silver is cooler and more futuristic than gold, and when paired with blue it creates a sleek, modern aesthetic. Blue and silver duck nails feel architectural and intentional — like you’ve designed them very deliberately.
Silver Accent Techniques
You can use silver as a full secondary color, as thin accent lines, as a glittery component, or as a metallic gradient. Each approach feels different. Full silver creates maximum contrast, while silver accents feel more sophisticated and subtle. Metallic silver works best — a dull silver or matte silver can feel flat.
Design Approaches for Blue and Silver
- Paint half the nail blue and half silver for a bold geometric split
- Use thin silver stripes to create a modern pattern on blue base
- Apply silver glitter as a gradient from blue to sparkly tip
- Create a silver gradient that moves across a blue base
- Use metallic silver for delicate nail art details on blue background
- Combine matte blue with high-shine silver for maximum contrast
- A thin silver line can separate different sections and create visual interest
Pro tip: Metallic silver shows every fingerprint and dust particle, so pair it with glossy topcoat and accept that you’ll be wiping these frequently.
15. Deep Sapphire Duck Nails

Sapphire is blue at its most luxurious — rich, deep, and inherently elegant. A true sapphire shade sits between navy and royal blue, with slightly more warmth and jewel-tone quality. Deep sapphire duck nails feel expensive and intentional, perfect for someone who wants serious color impact.
Why Sapphire Feels Premium
Sapphire is a gemstone, and the color carries that association. It feels precious and valuable in a way that lighter blues sometimes don’t. Wearing sapphire duck nails is a confidence statement — you’re not apologizing for the color, you’re celebrating it.
Perfecting Sapphire Color
- Look for a blue that has slight jewel-tone quality — not pure blue but something with depth
- Test sapphire shades in natural light because they can read very differently under artificial light
- A single coat of sapphire usually isn’t enough — plan for 2-3 coats to achieve full, rich color
- A high-shine topcoat amplifies the depth of sapphire — don’t use matte on this one
- Consider a subtle sparkle or shimmer underneath the sapphire to add dimension without overwhelming the color
- Pair sapphire duck nails with warm-toned skin by adding gold accents
- With cool-toned skin, silver or white accents complement sapphire beautifully
Insider note: Sapphire blue photographs beautifully because the depth of color shows up even in phone cameras, creating nail art that looks expensive in pictures.
Final Thoughts
Blue duck nails are endlessly customizable, which is exactly what makes them so appealing. Whether you choose a single solid shade or layer multiple techniques together, the distinctive curved shape naturally elevates any design you create. The key is understanding that the shape itself is already dramatic, so your color and finish choices should either complement that drama or provide intentional contrast.
Start with a design that speaks to you — if you’re drawn to metallics, go for the holographic or metallic versions. If you prefer subtlety, the pastels and French tips might be your entry point. Remember that manicure removals are easier on duck nails than on some shapes because the tips are less likely to snag or catch, so don’t be intimidated to experiment.
The most important part of achieving any of these designs is patience during application and confidence wearing them. Duck nails are bold by definition — own that. Your hands deserve to be noticed, and blue duck nails deliver that every single time.
