

Black stiletto nails with rhinestones represent one of the most elegant and versatile nail designs available—they work for formal occasions, night outs, professional settings with a bold edge, and everyday wear for anyone who wants to make a statement. The combination of black’s timeless sophistication with the sparkle and dimension of rhinestones creates an instantly luxurious look that catches light beautifully and draws genuine compliments. Unlike temporary designs that fade or chip within days, a well-executed black stiletto with rhinestones can last 3-4 weeks with proper application and maintenance, making it a smart investment in your appearance.
What makes this design category so compelling is the sheer range of possibilities—you’re not limited to one “black stiletto with rhinestones” look. The rhinestones themselves can be positioned, sized, and arranged in dozens of distinct ways, each creating a completely different visual impact and suiting different moods, outfits, and occasions. A full-coverage rhinestone design reads as glamorous and celebratory, while a single accent stone per nail feels sophisticated and restrained. The base finish matters too: glossy black emphasizes sparkle, while matte black creates contrast and depth. This article walks through 16 specific, achievable design approaches you can request from a skilled nail technician, recreate yourself, or use as inspiration for your own custom variations.
Whether you’re preparing for a special event, wanting to upgrade your everyday nail game, or simply exploring what’s possible with this timeless color combination, these designs prove that black stiletto nails with rhinestones go far beyond basic sparkle. Each design here comes with specific application tips, styling suggestions, and longevity advice so you get the look you want and keep it flawless for weeks.
1. Single Center Stone Classic
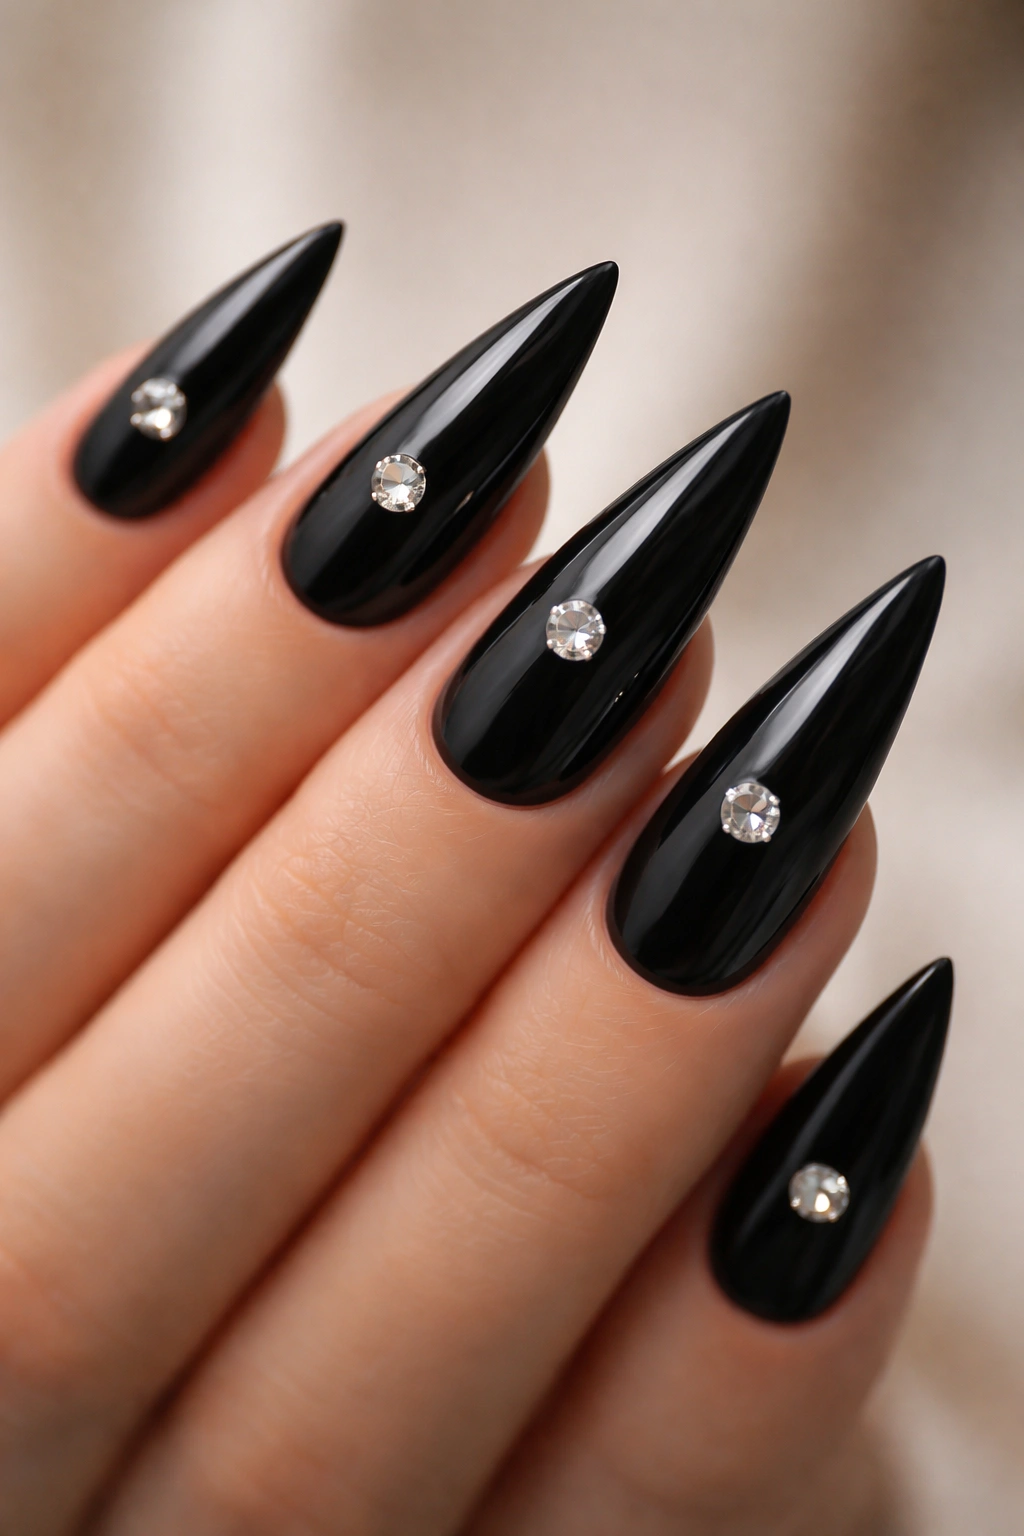
This design places one substantial rhinestone—typically a 3-4mm diamond-cut crystal in clear or champagne—directly in the center of each nail, creating an understated but unmistakably elegant look. The black stiletto nail becomes the backdrop for the rhinestone, which sits like a tiny jewel and catches light whenever you move your hands. The simplicity of this design makes it work across every context: it’s professional enough for office settings, elegant enough for evening wear, and subtle enough that it never feels over-the-top.
Why This Design Works So Well
The single-stone approach relies on proportion and placement—the rhinestone needs to be positioned precisely at the nail’s apex for visual balance. Your nail technician should apply the stone while the top coat is still slightly tacky, ensuring perfect adhesion without drowning the stone in excessive polish. This design works beautifully on all nail lengths, though it’s particularly striking on longer stilettos where the extra surface area emphasizes the stone’s isolation and importance.
Styling and Longevity Tips
- Best paired with minimalist jewelry—let the nails be the statement piece rather than competing with rings or bracelets
- This design actually gets more striking as you wear it; the rhinestone catches overhead lighting differently depending on your hand position
- The single stone is your most durable application point since you’re not spreading adhesive across multiple stones; properly applied, the rhinestone typically outlasts the polish itself
- Avoid aggressive hand movements for the first 24 hours after application to ensure the stone’s adhesive fully cures
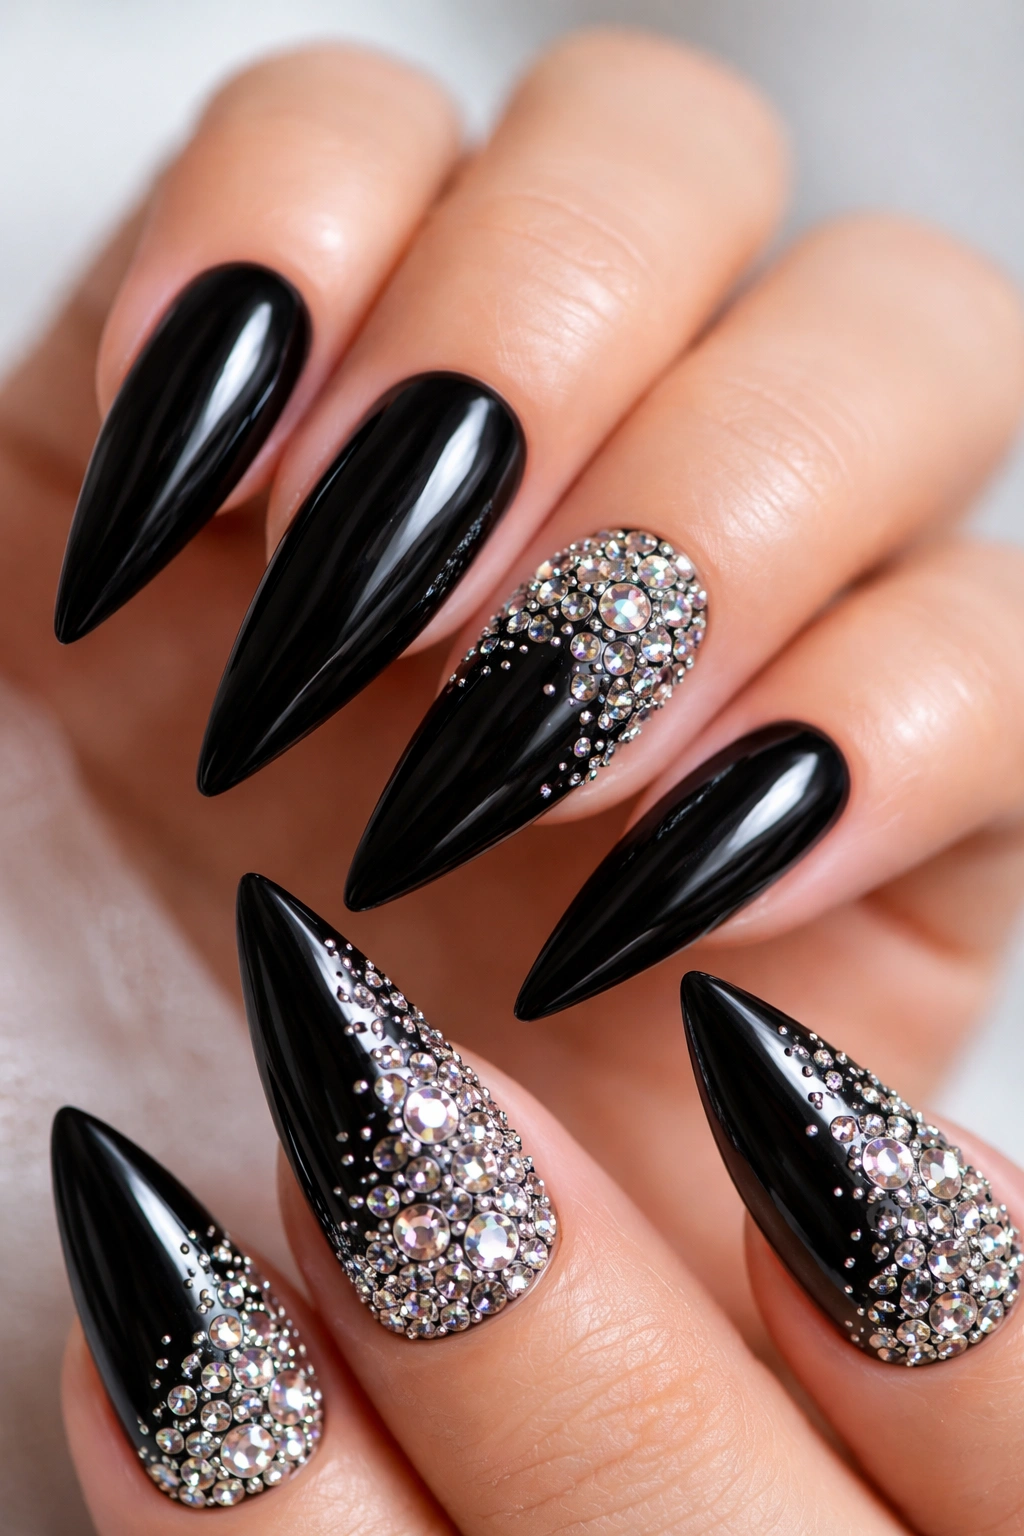
2. Full Accent Nail with Dense Rhinestone Coverage
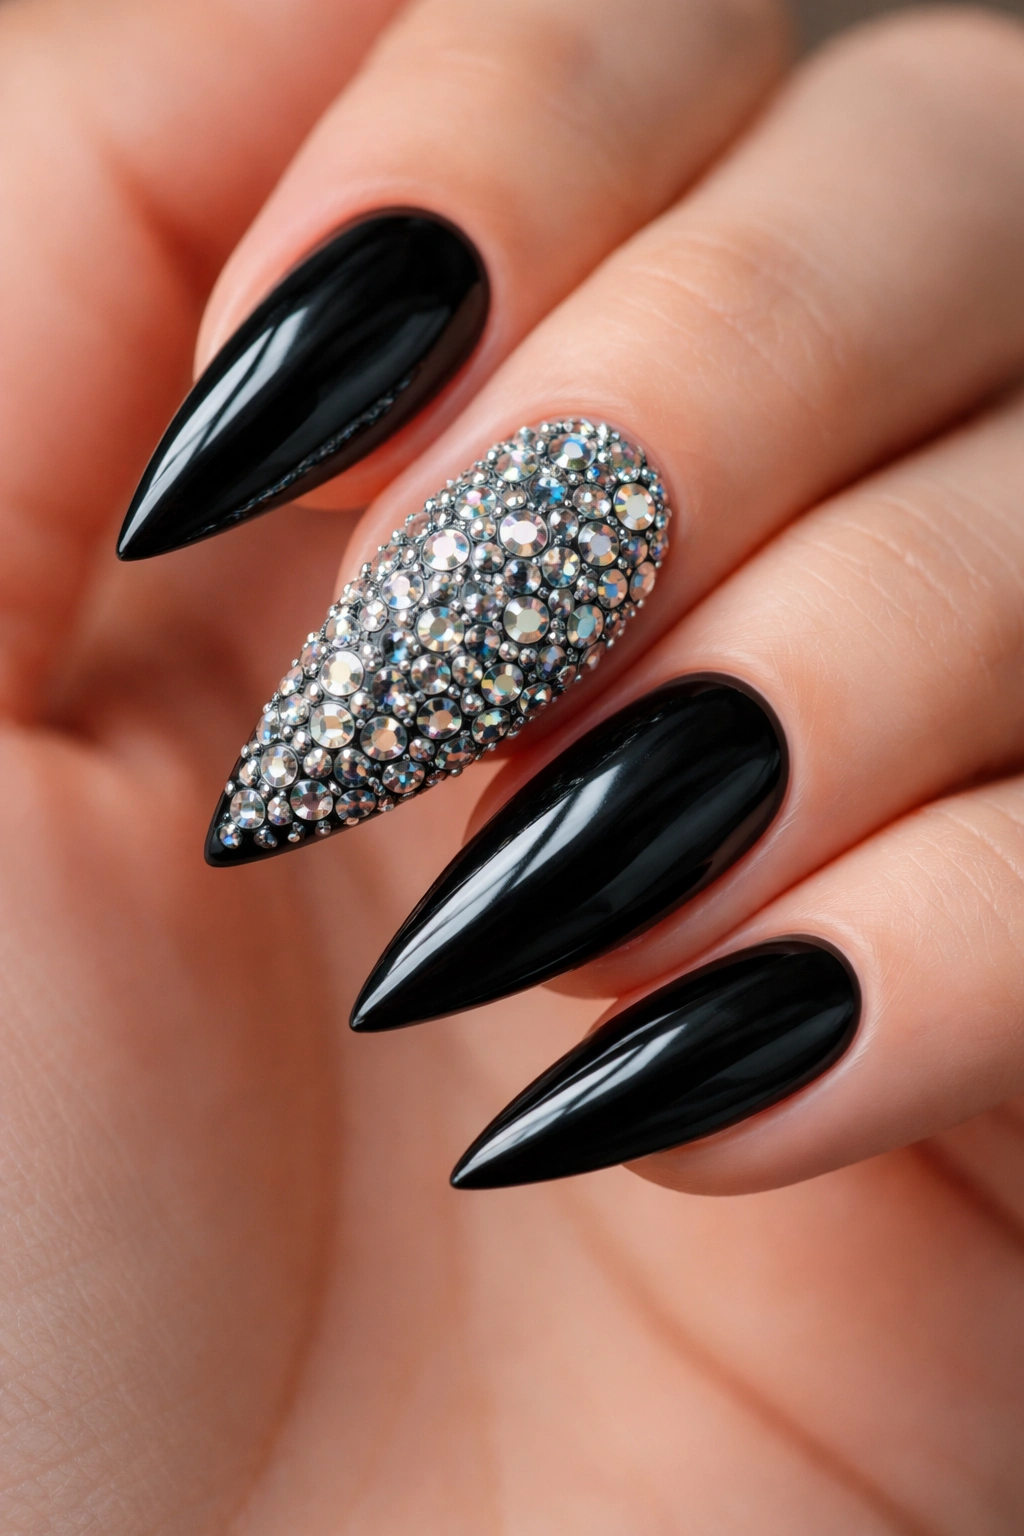
This design takes one full nail—typically the ring finger or middle finger on one hand—and covers most or all of it with a dense arrangement of rhinestones in graduating sizes, creating a spectacular focal point. While the other nails remain solid black, the accent nail becomes a jeweled showcase that commands attention immediately. The density of rhinestones creates texture and dimension that reads differently depending on the angle and lighting, making this design constantly engaging.
The Application Technique That Makes It Work
The key to a successful full accent nail is using a slightly thicker top coat as your adhesive base, applying it in concentrated sections rather than all at once. Your technician will place larger rhinestones first—typically 3-4mm stones along the center line—then fill gaps with medium-sized stones (2-2.5mm), and finally add tiny 1mm accent stones to complete the design. This layering approach creates visual depth and prevents gaps from showing through. The result is a nail that sparkles comprehensively without feeling chaotic.
How to Style This Statement Design
- Wear minimal rhinestone jewelry to avoid overwhelming your look—let the accent nail be the main sparkle element in your overall aesthetic
- This design pairs exceptionally well with simple, well-fitting clothing in neutral colors; it becomes the visual anchor of your entire outfit
- Photograph this nail in natural light and under indoor lighting to truly appreciate how the rhinestones refract differently in each setting
- When typing or doing detailed hand work, protect this nail slightly more than usual since it has more raised surface area that could snag
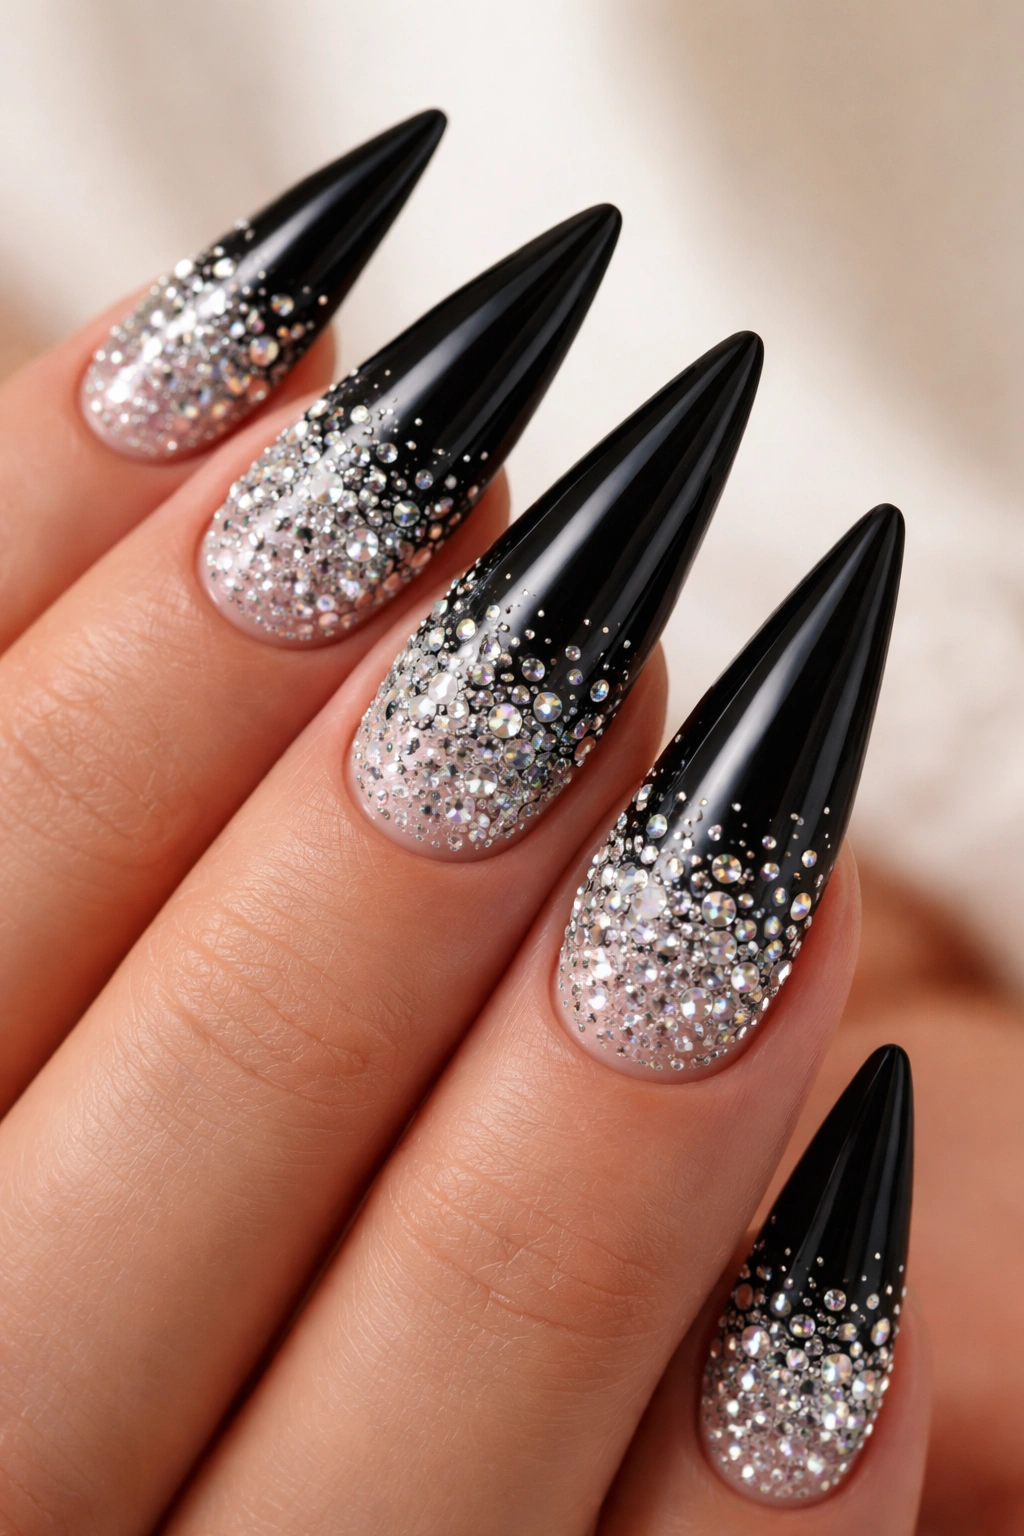
3. Ombre Gradient Rhinestone Effect
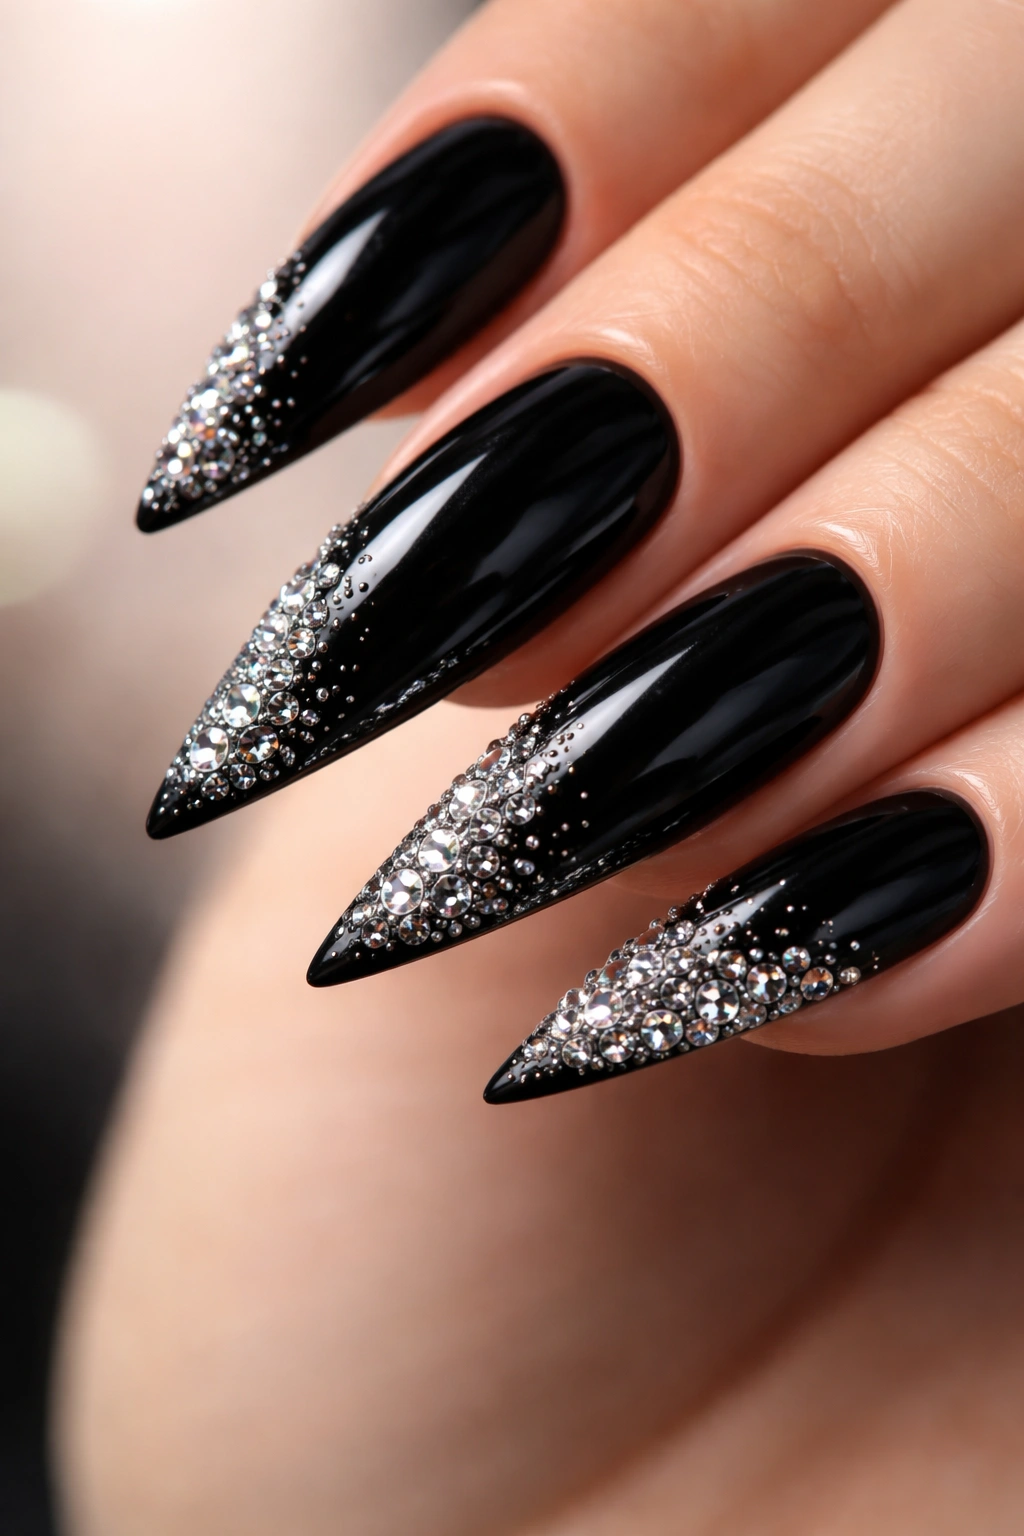
This design uses rhinestones in varying sizes and placement to create a gradient effect—dense rhinestone coverage on one corner or edge gradually fading to sparse coverage or none toward the opposite side. The technical skill required is positioning stones to create a smooth visual transition rather than abrupt change. When executed well, the gradient appears intentional and creates beautiful movement along the nail’s surface.
Creating the Illusion of Gradient
The visual trick here is size progression and density variation working together. Start with your largest stones (3-4mm) on the area where you want maximum sparkle, then transition to 2-2.5mm stones in the middle zone, finishing with 1mm accent stones or no stones at all on the fading edge. The gradient should be subtle enough to feel like a thoughtful design choice rather than a happy accident. Some technicians use varying stone colors—clear graduating to champagne or pink-tinted stones—to enhance the gradient effect even further.
Long-Term Wear Considerations
- The edges of the gradient design (where stones are sparse) experience less stress since there’s less raised surface area to catch on things
- The dense rhinestone areas may require touch-ups slightly sooner than single-stone designs since more adhesion points mean more potential vulnerability
- This design shows dirt and dust more readily than solid black nails, so be prepared for slightly more frequent cleaning and polishing
4. Geometric Pattern with Precise Stone Placement
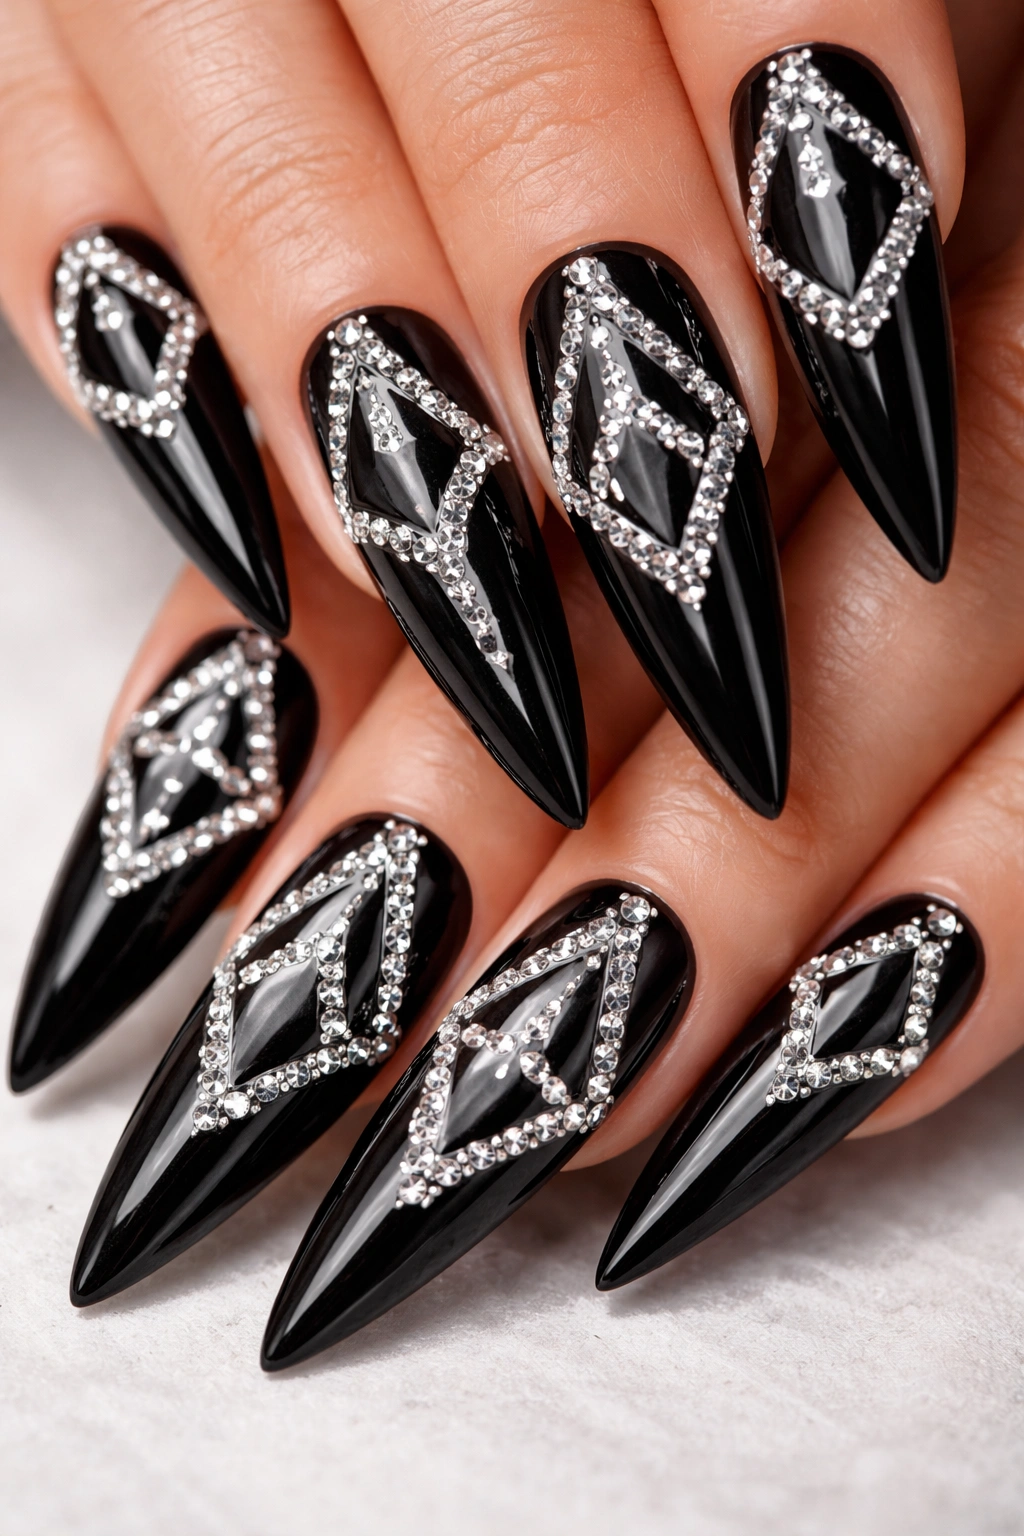
Geometric designs use rhinestones to create defined shapes—triangles, diamonds, hexagons, or abstract angular patterns—across the nail surface. Each stone is deliberately positioned as part of a larger visual design rather than simply scattered for sparkle. This approach requires actual planning and measurement; your nail technician should lightly sketch the pattern before placing stones or have a specific geometric template in mind.
The Precision Required for Geometric Success
Geometric rhinestone designs work best when stones are precisely spaced and aligned. Using rhinestones of uniform size (typically 2-2.5mm) makes the geometry cleaner and more visually satisfying. The pattern repeats across multiple nails for maximum impact—the same triangle or hexagon arrangement on each nail creates rhythm and visual coherence. Asymmetrical geometric designs (where the pattern differs on each nail but maintains the same overall aesthetic) work beautifully too and feel more contemporary.
Styling a Geometric Statement
- Pair geometric rhinestone designs with geometric accessories—angular jewelry, structured handbags, or linear fashion patterns
- This design reads as intentional and artistic, so it pairs well with fashion-forward outfits rather than purely classic styling
- Geometric designs photograph exceptionally well and create strong visual impact in both close-ups and casual photos
- Since the design depends on precise arrangement, any missing stones become immediately visible—make sure your technician uses high-quality rhinestones and strong adhesive
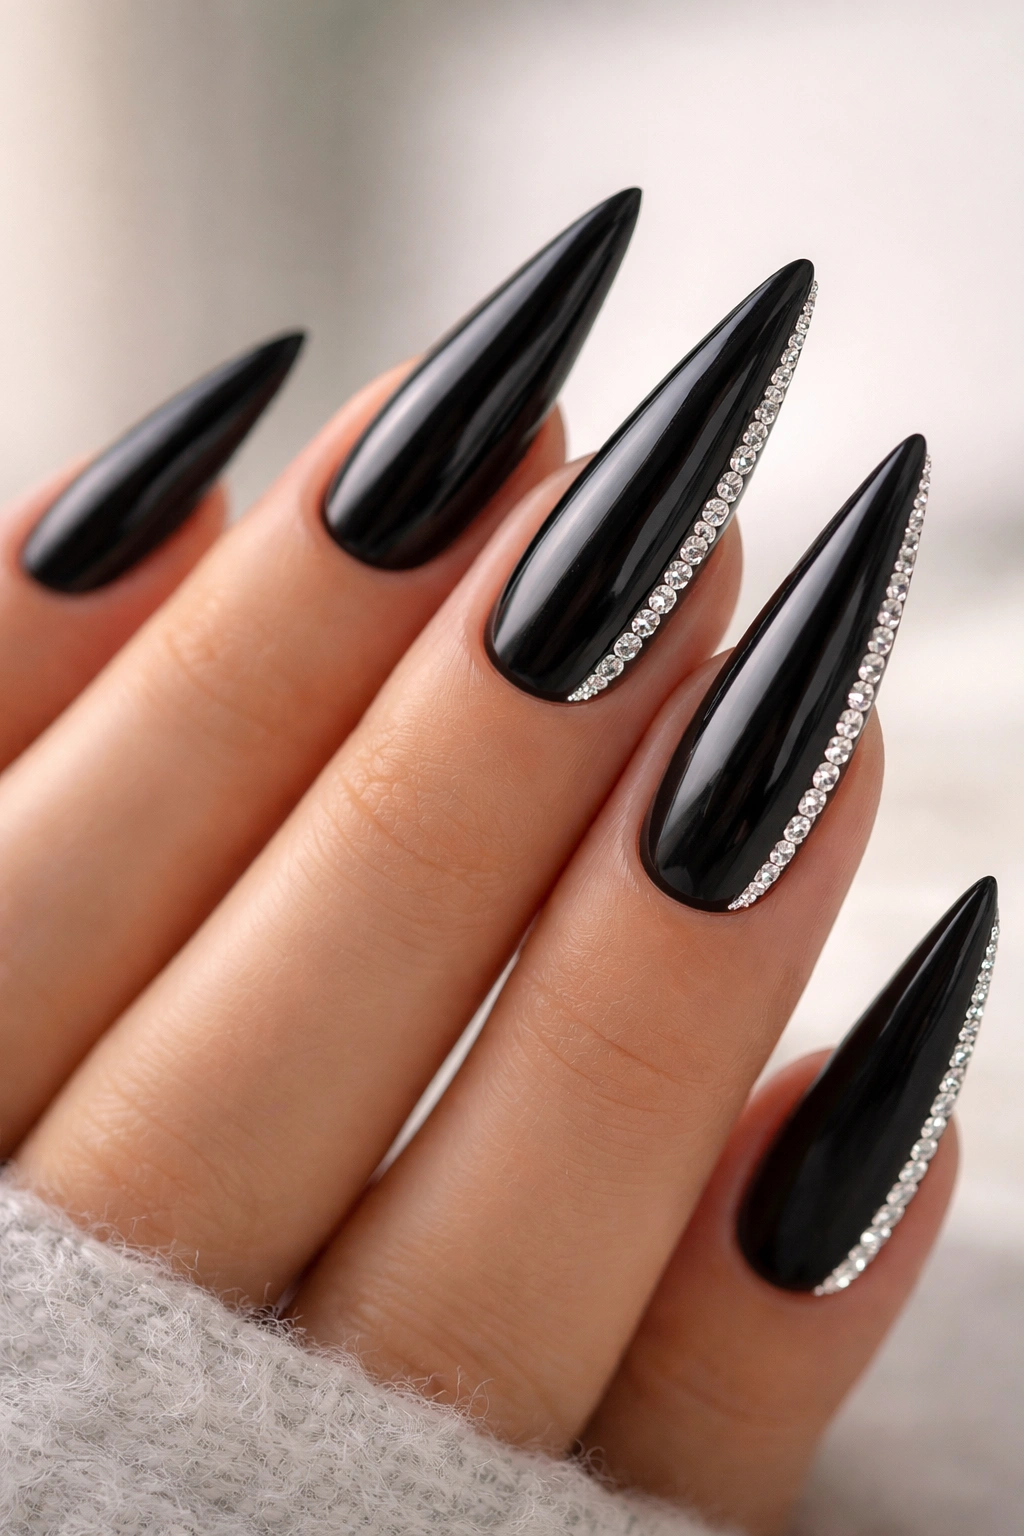
5. French Tip Variation with Rhinestone Edge Detail
This design modifies the classic French manicure by replacing the traditional solid white tip with a line of rhinestones, or by outlining the French tip boundary with a rhinestone edge. The black stiletto becomes a modern take on an iconic design, with black replacing the traditional nude or pale base and rhinestones adding contemporary glamour. This hybrid approach works beautifully because it honors the elegance of the French tip while adding personalized sparkle.
How to Execute the Rhinestone French Edge
The most striking version uses a thin line of tiny rhinestones (1-1.5mm) to mark the exact boundary where black transitions to clear or nude. Your technician applies the rhinestone line while the top coat is still slightly sticky, ensuring the stones sit right at the color transition point. The result is a crisp, defined tip that reads as intentional and elegant. Alternatively, covering the entire tip area with rhinestones creates a different effect—more glamorous and eye-catching, less minimalist.
Why This Design Transcends Trends
French tips feel both timeless and contemporary, making this rhinestone variation work across generations and style preferences. It’s dressy enough for formal events but refined enough for professional settings. The rhinestone edge adds just enough sparkle to feel special without reading as over-the-top—it’s jewelry for your nails rather than costume decoration.
6. Minimalist Single Stone Per Nail
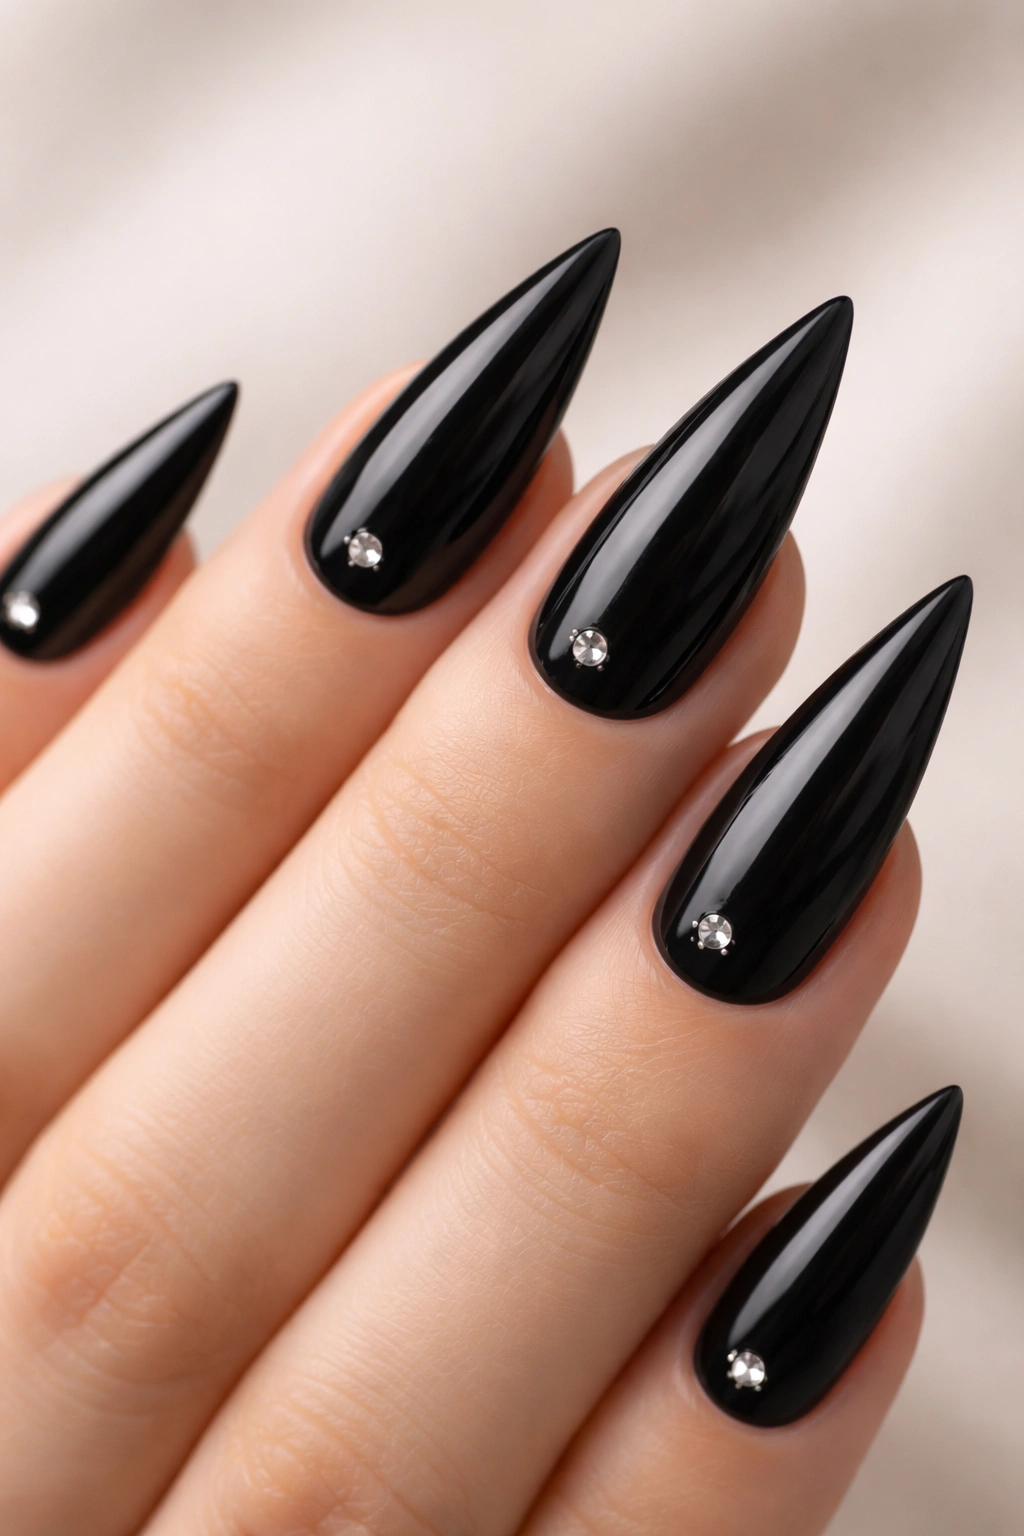
This design places one small rhinestone (1.5-2mm) on each nail, typically in a consistent location like the center of each nail or slightly offset toward one corner. The restraint here is the design’s strength—six to ten tiny sparks of light distributed across your hand creates elegance through repetition and negative space. This approach works beautifully for anyone who wants the luxury of rhinestones without high-impact drama.
The Philosophy Behind Restraint
Minimalist nail design relies on the principle that less is more—one perfectly placed stone is more sophisticated than a dozen mediocre ones. This design works exceptionally well if you do detailed hand work or have professional settings where too much sparkle might read as inappropriate. The single stone per nail approach also means your manicure actually lasts longer since you have fewer adhesion points that might wear or pop.
Styling Minimalist Sparkle
- Pair with any outfit without overthinking it; minimalist nails complement rather than compete
- This design reads well with jewelry, since the nails aren’t attempting to be the main sparkle source
- Minimalist designs photograph beautifully in natural lighting, where small rhinestones create subtle catches of light
- This approach works perfectly for anyone building a manicure habit gradually—start minimal and see how you feel about adding more sparkle over time
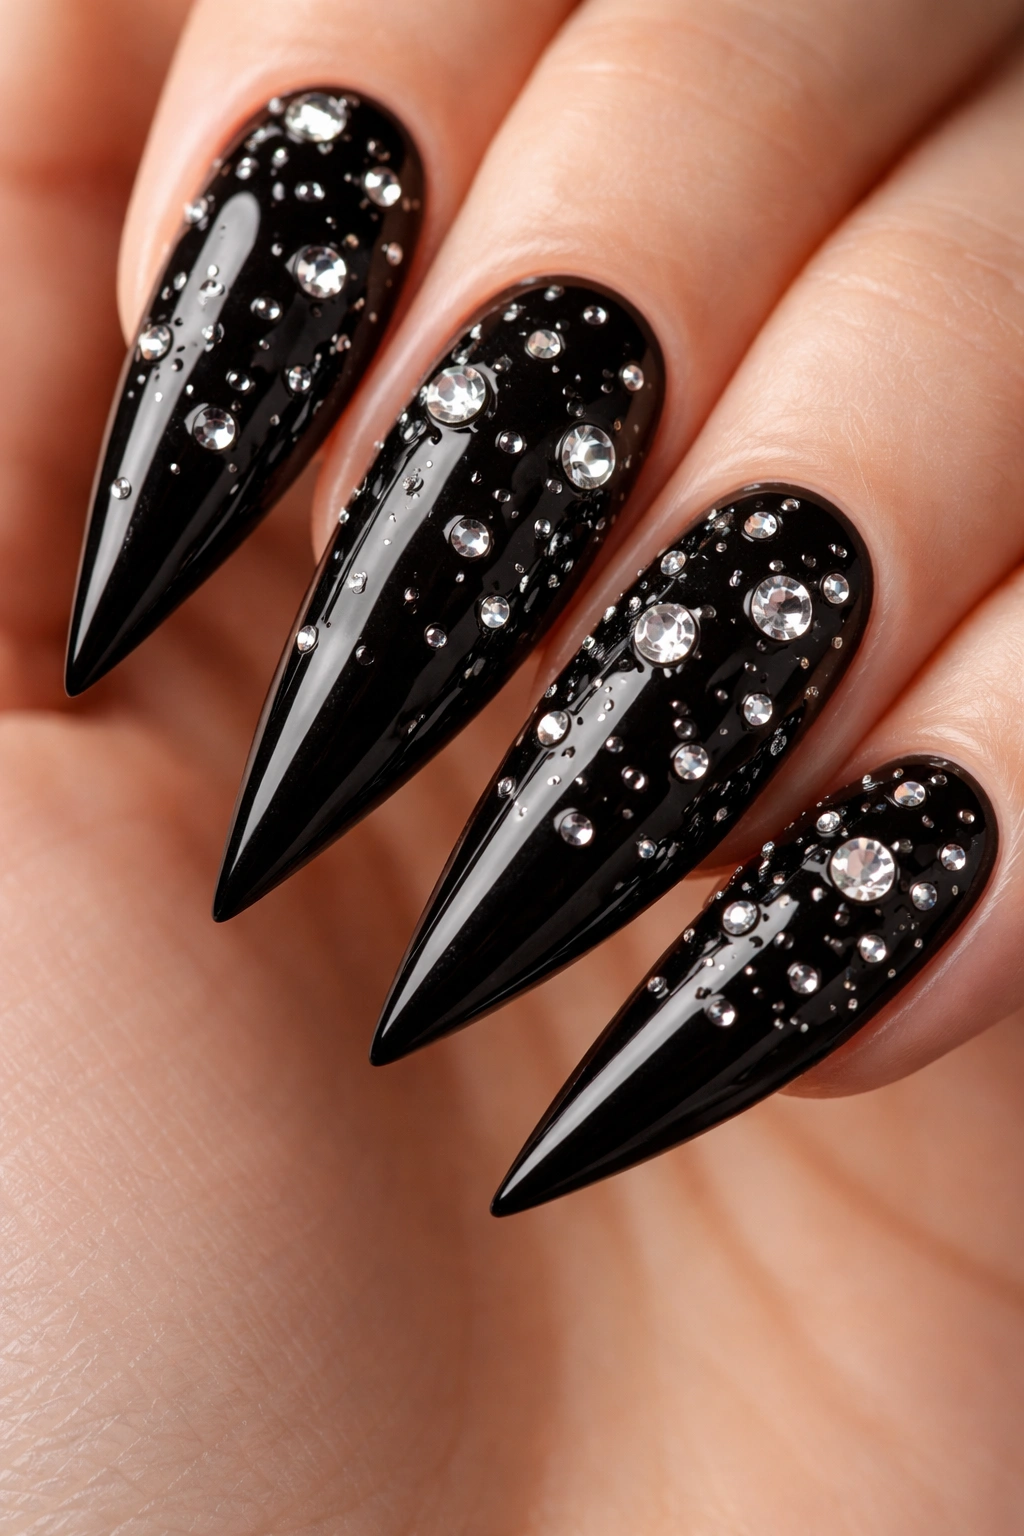
7. Scattered and Seemingly Random Rhinestone Placement
This design embraces apparent randomness—rhinestones are distributed across the nail in no organized pattern, creating a look that feels natural and organic rather than designed. Despite appearing random, successful scattered designs actually follow intuitive spacing rules: stones are evenly distributed without creating obvious gaps or clusters, and the overall visual effect feels intentional even if the exact placement isn’t obviously geometric or patterned.
The Art of Controlled Randomness
True scattered designs require the eye of an artist who understands balance and visual weight distribution. Your technician should step back frequently while applying stones to assess the overall effect rather than working in a systematic predetermined pattern. The goal is variety—mixing stone sizes (1mm up to 3mm), varying how densely they’re placed across different areas of the nail, and ensuring no two stones sit directly adjacent to each other. The result feels organic and effortlessly elegant.
Why Scattered Works in Real Life
This design transitions beautifully as your nails grow—there’s no “correct” spacing that becomes obviously disrupted as new nail growth appears. Scattered designs also feel personal and unique; two people requesting “scattered rhinestones” will end up with distinctly different results based on their technician’s artistic interpretation. This design works beautifully on longer stilettos where there’s more surface area to distribute stones across without overcrowding.
8. Clustered Rhinestone Groupings
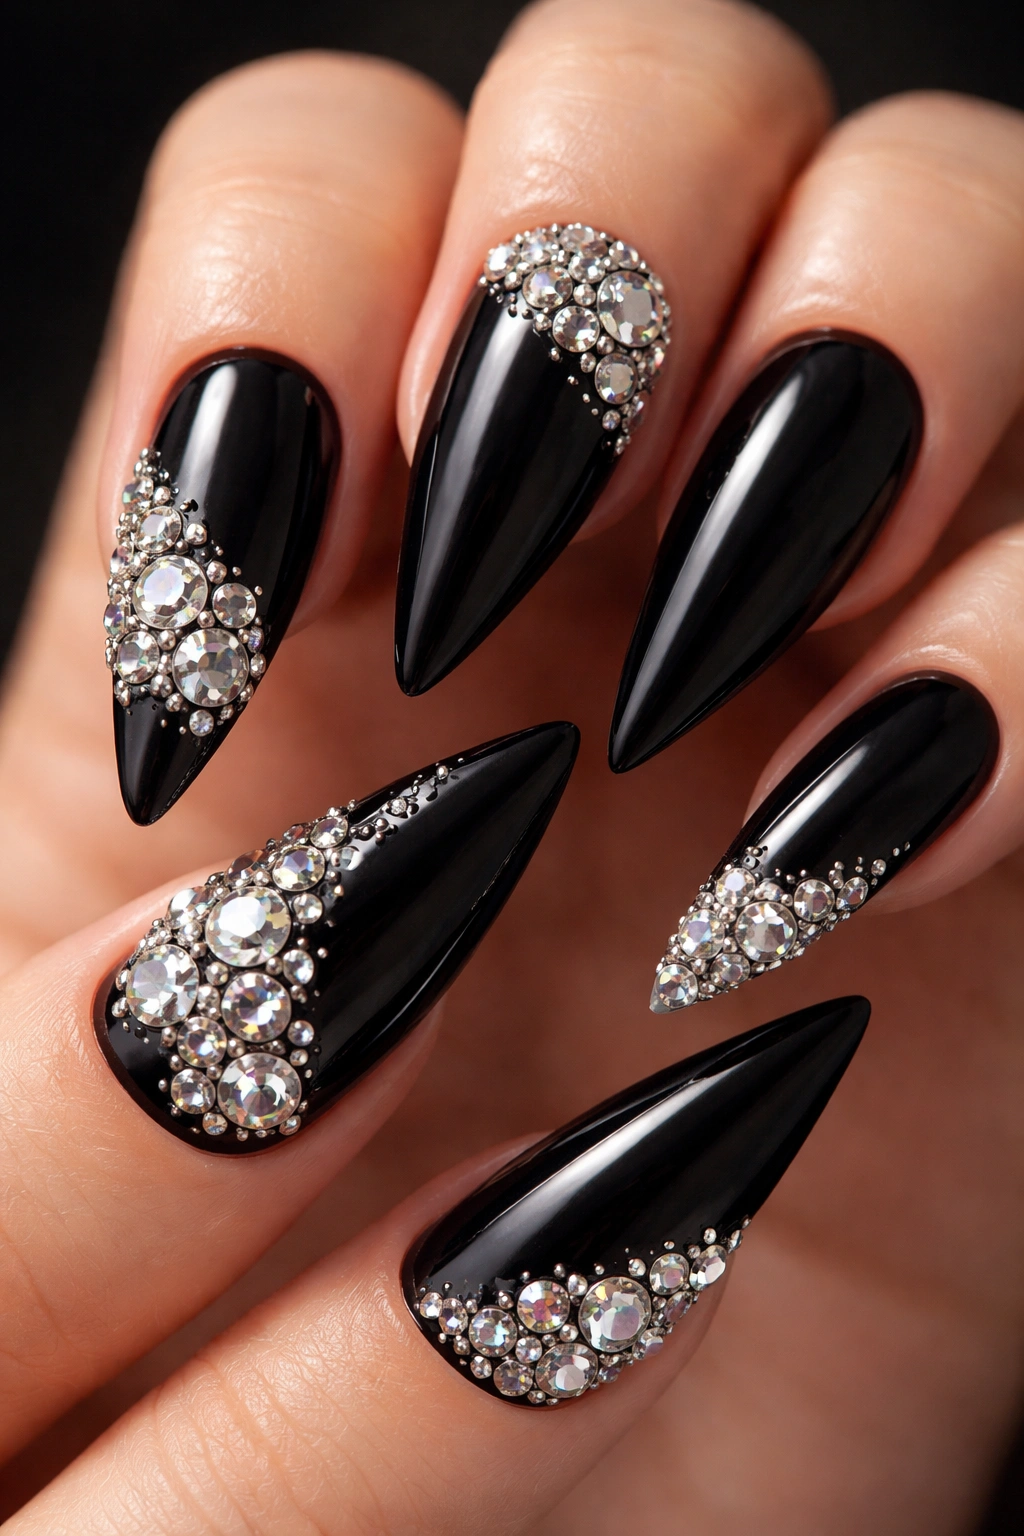
This design groups rhinestones into distinct clusters or pockets across the nail rather than spacing them evenly. You might have one dense cluster at the base of the nail, another near the tip, and empty black space between them. The clustering creates visual interest through contrast—the absence of stones makes the presence of stones more striking. This design works beautifully across multiple nails with clusters positioned differently on each one.
Creating Visual Interest Through Clustering
Effective clusters typically contain 5-12 rhinestones in mixed sizes (1.5-3mm), arranged tightly enough that they create a cohesive visual unit but loosely enough that individual stones remain visible and aren’t crushed together. The negative space between clusters is as important as the clusters themselves—it’s what makes the design feel intentional and balanced rather than incomplete. Your technician should visualize the clusters before placing any stone, ensuring they’re positioned for maximum visual impact without symmetry feeling artificial.
Wearing Clustered Designs
- Clusters at the base of the nail (near the cuticle) create an elegant foundation-building effect
- Clusters at the nail tip create a focal point that draws eyes to your fingertips
- Mixed clustering (some nails with base clusters, others with tip clusters) creates visual movement and interest across your whole hand
- This design shows movement beautifully as you use your hands—clusters catch light and sparkle dynamically
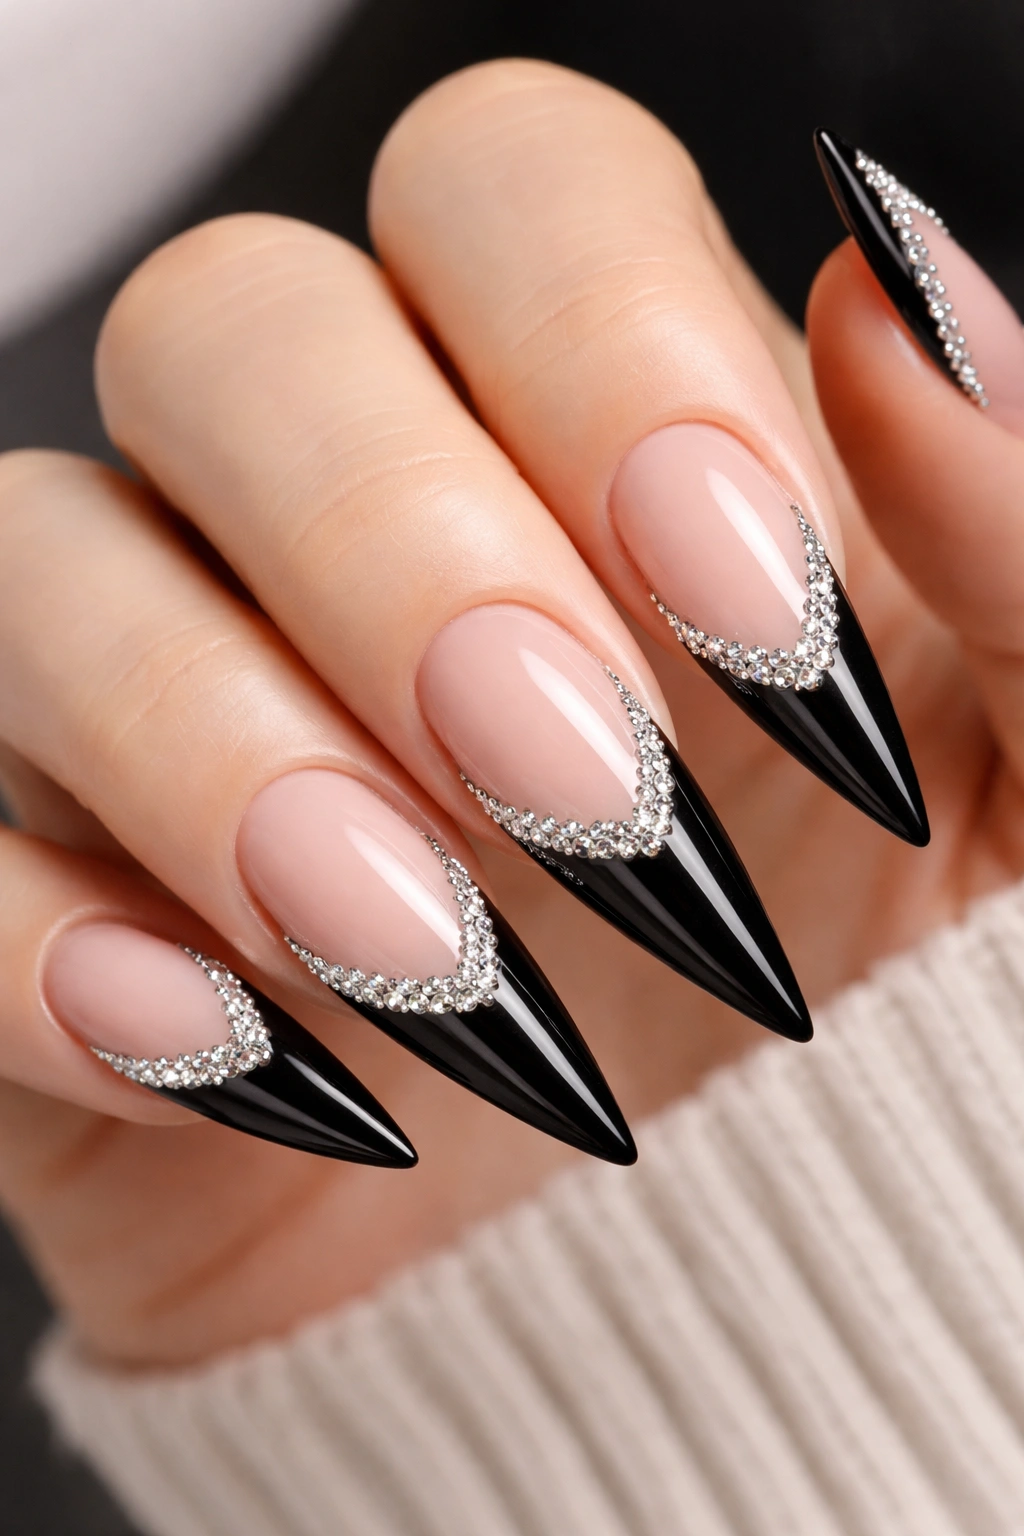
9. Half-Moon Accent with Rhinestone Detail
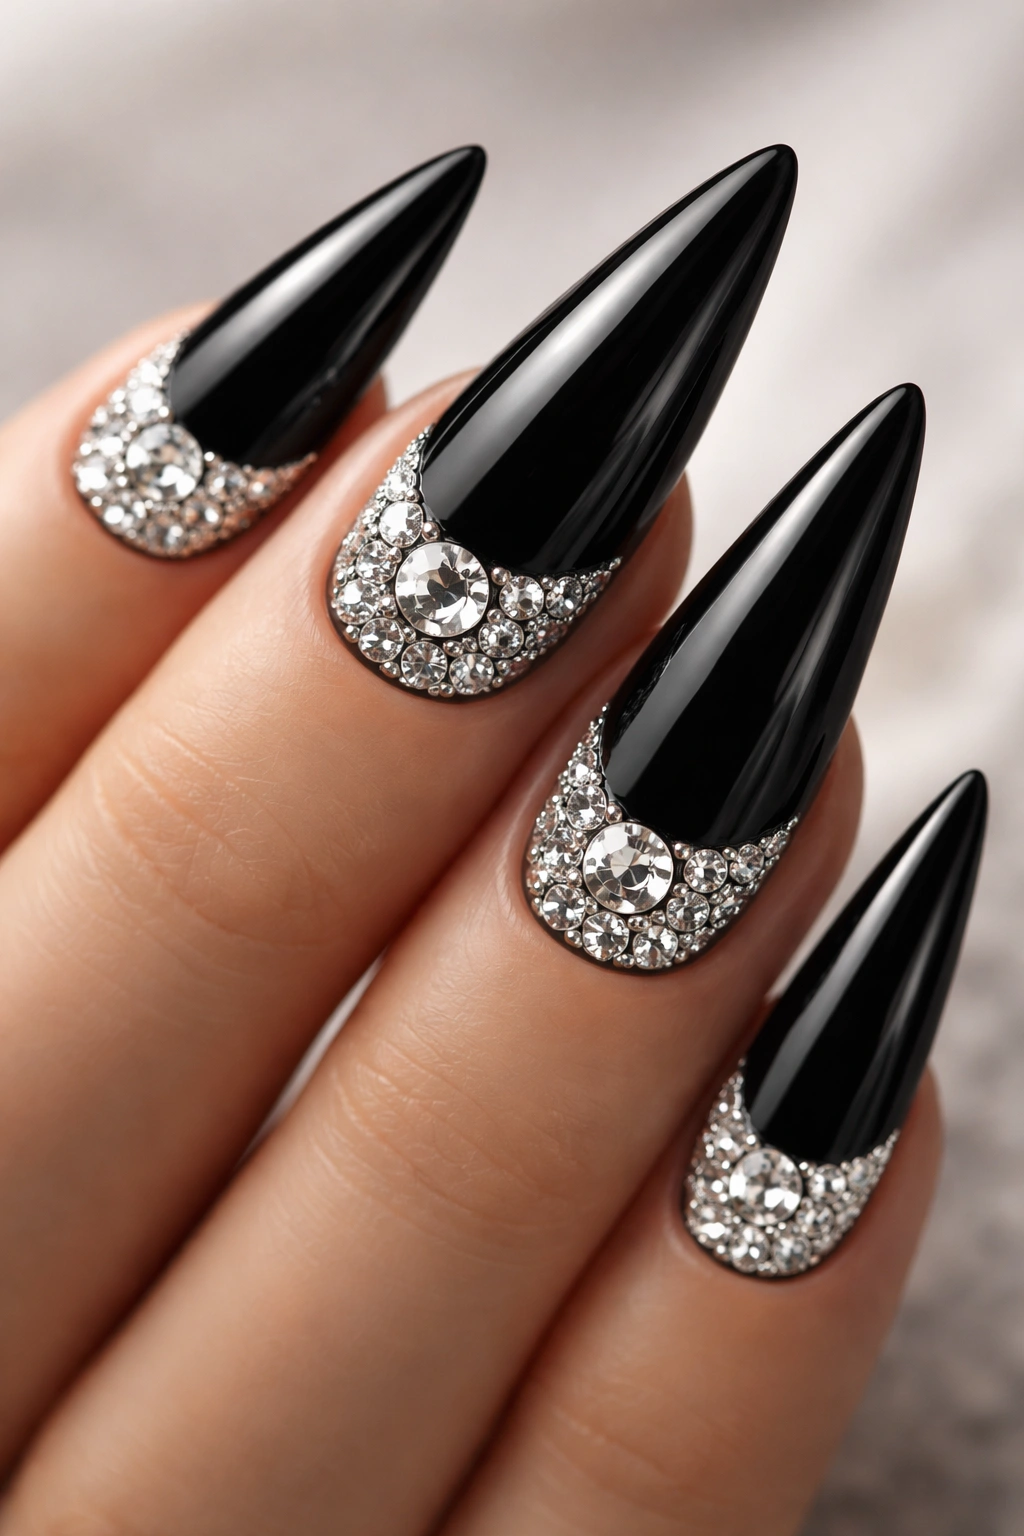
This design incorporates the half-moon shape (a crescent at the base of the nail, traditionally left unpainted) but fills it with rhinestones, creating a sophisticated accent that combines two classic nail art elements. The black stiletto body remains solid, while the half-moon area becomes a showcase for rhinestone placement. This creates natural visual separation and allows the rhinestone work to shine without competing with black polish.
Executing a Clean Half-Moon
The half-moon shape needs to be crisp and defined for this design to work elegantly. Your technician should carefully paint or mask off the half-moon area before applying rhinestones, ensuring the boundary between black and the rhinestone-filled crescent is sharp and intentional. The half-moon can be filled densely with stones or feature a single larger stone surrounded by smaller ones—both approaches work beautifully depending on your preference. The traditional half-moon size works well, but some modern takes use a larger crescent or smaller arc.
Why Half-Moon Designs Feel Elevated
The half-moon detail feels sophisticated because it breaks up the nail visually in an elegant way—rather than covering the entire nail with rhinestones, you’ve created purposeful design zones. This approach also means less rhinestone work overall, making the design more comfortable to wear and less likely to snag on things. The half-moon area naturally accumulates oils and dirt less readily than other parts of the nail, potentially extending the rhinestone appearance.
10. Striped Rhinestone Pattern
This design uses rhinestones to create distinct lines or stripes across the nail surface—either straight lines parallel to the nail edge, diagonal stripes, or wavy lines in rhinestone form. The black polish becomes the canvas, and the rhinestone lines are the art. This approach works beautifully with varying stone sizes and spacing: tight lines create a different visual effect than looser, more spaced lines.
Creating Effective Rhinestone Lines
A successful striped design typically uses consistent sizing within each line (usually 1.5-2mm stones) and evenly spaces the stones along the line for visual coherence. Your technician might use a thin polish or adhesive line as a guide for placement, ensuring the rhinestone line actually follows the intended direction rather than drifting. Diagonal stripes create dynamic visual movement, while horizontal stripes feel more structured and geometric. Mixing stone colors—clear stones and metallic or champagne stones—adds visual interest to the stripe pattern.
Striped Designs in Daily Life
- Straight stripes pair well with linear, geometric fashion choices
- Diagonal stripes create visual movement and work beautifully with dynamic outfits
- Striped designs photograph beautifully and photograph the same way whether your hand is at rest or in motion
- The line structure means missing stones become immediately visible, so ensure your technician uses high-quality adhesive and properly cured polish
11. Corner Concentration with Fading Placement
This design concentrates the majority of rhinestones in one corner or edge of each nail (typically the outer corner or the tip corner), with rhinestones gradually becoming sparser as you move toward the opposite corner. The visual effect is directional and intentional—it creates movement and draws the eye toward that concentrated corner. This design feels sophisticated because the concentration demonstrates purposeful planning rather than random placement.
Why Corner Concentration Works Effectively
Corner-concentrated designs create visual interest through unbalanced but intentional composition. A nail that’s densely rhinestoned on the outer corner but nearly solid black on the inner corner feels dynamic and artistically considered. This design works particularly well on longer stilettos where the extra surface area allows for true spacing and gradation. The concentrated corner becomes your nail’s focal point, and less-covered areas feel intentionally restrained rather than incomplete.
Styling Corner-Concentrated Designs
- These designs work beautifully with any hand position because they create directional visual flow
- Pairing with jewelry that has directional elements (asymmetrical rings or angled bracelets) creates cohesive styling
- Corner concentration naturally photographs well since the focused rhinestone area catches light dramatically
- As your nails grow, maintaining the concentration requires occasional touch-ups in the base area, but the design structure remains visually coherent
12. Mixed Stone Sizes Creating Dimension

This design deliberately mixes rhinestone sizes—combining 1mm accent stones with 2.5-3mm focal stones—to create depth and dimension that makes the nail surface feel three-dimensional rather than flat. The larger stones catch light dramatically while the smaller stones fill gaps and create texture. The mixing is intentional and distributed across the nail rather than segregating sizes to specific areas.
The Science Behind Size Mixing
Larger stones naturally catch and refract light more dramatically, making them feel forward and prominent, while smaller stones add visual texture without demanding attention. The contrast between sizes creates visual interest that a uniform-sized design, however beautiful, cannot match. Your technician should distribute size variation across the nail—avoid clustering all large stones together or all tiny stones together, as this eliminates the dimensional benefit. The goal is visual complexity that feels intentional.
How Mixed Sizes Wear Over Time
- Larger stones are slightly more vulnerable to popping due to their weight and surface area, but they also represent your investment more visibly
- Smaller stones blend into black polish more naturally once a few inevitably pop, so the design remains visually coherent longer than uniform-size designs
- Mixed-size designs require slightly more sophisticated application—your technician needs artistic skill to make the mixing look intentional rather than random
- These designs typically photograph better than uniform-size designs because the size variation creates depth that translates well to images
13. Matte Black Polish with High-Shine Rhinestones
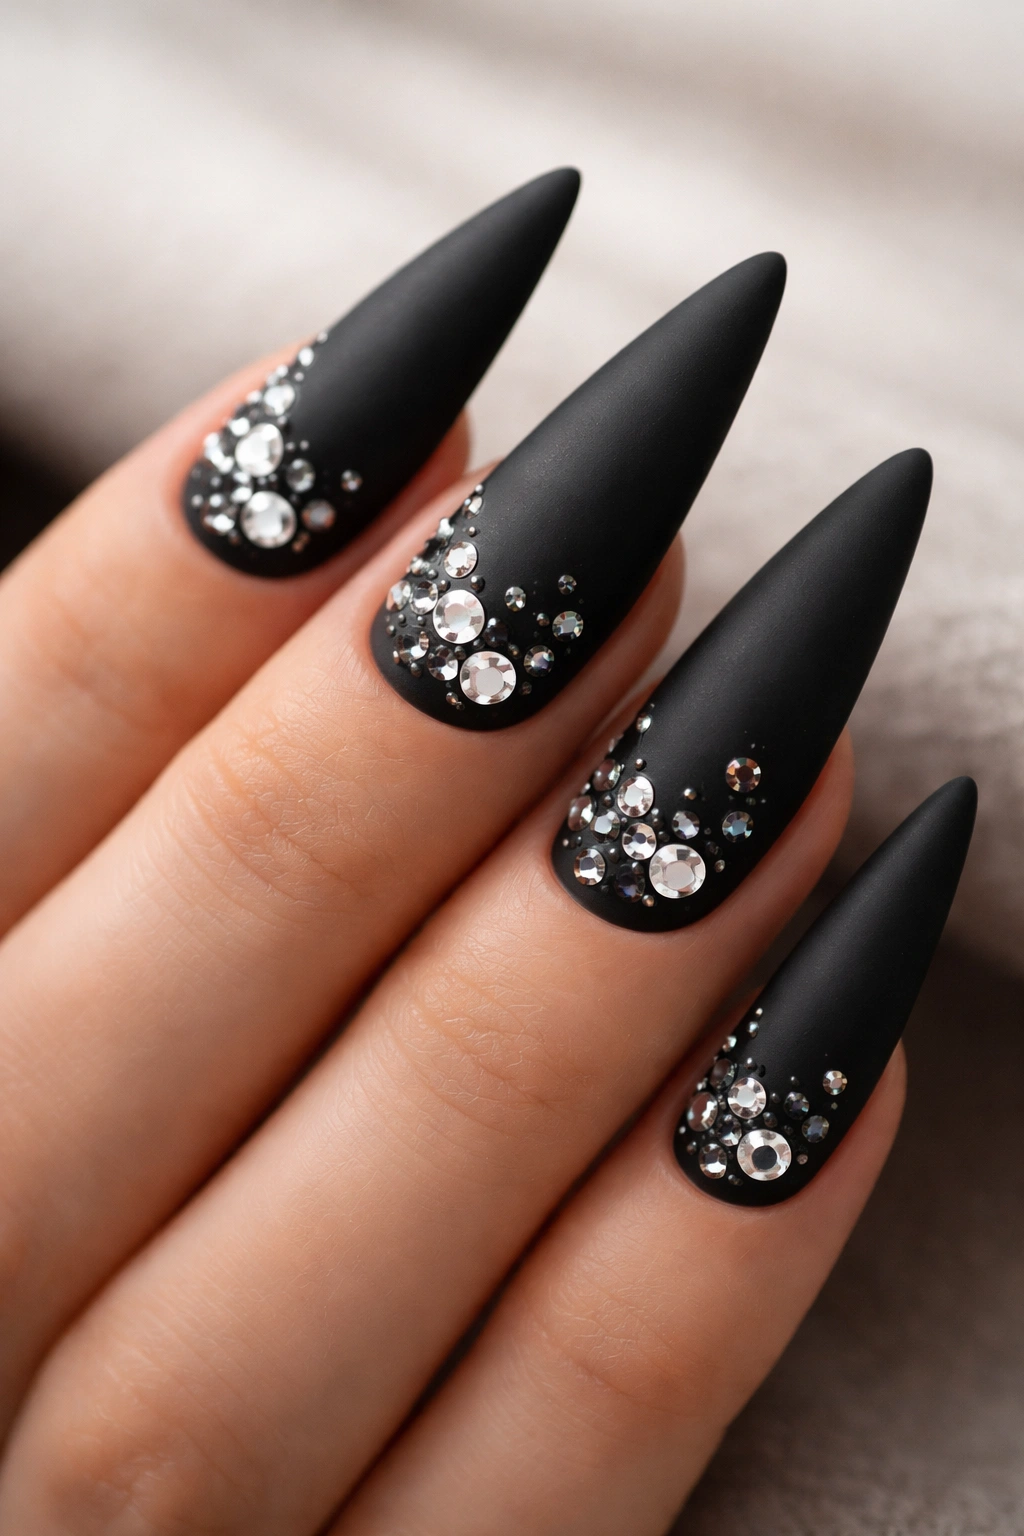
This design uses matte black polish as the base rather than traditional glossy black, creating stark contrast between the flat, velvety nail surface and the brilliant, reflective rhinestones. The matte finish makes the rhinestones pop visually in a way that glossy black cannot—the stones appear to float above the surface due to the contrast. This design choice works beautifully for anyone who loves sophisticated minimalism or modern aesthetic.
The Application Difference for Matte Finishes
Matte and glossy finishes require slightly different application approaches. Your technician will typically use matte top coat over matte polish to ensure uniformity, then apply rhinestones to the cured matte surface. The adhesive needs to be formulated to work with matte finishes, as some traditional rhinestone adhesives work best with glossy surfaces. The result is rhinestones that appear to sit in relief against the matte base rather than blending smoothly into gloss.
Why Matte Changes the Entire Aesthetic
Matte black reads as more modern and editorial than glossy black, making rhinestone designs feel contemporary rather than traditionally elegant. The contrast between matte and shine is visually striking and creates a design that reads differently from every angle. This finish choice also hides fingerprints and smudges better than glossy finishes, keeping your manicure looking fresh longer between polishing. If you prefer understated elegance, matte black with rhinestones delivers that perfectly.
14. High-Gloss Mirror Finish with Maximum Sparkle

This design uses traditional high-shine top coat that creates a mirror-like reflection on the black nail surface, maximizing the contrast between dark polish and the brilliant light-catching rhinestones. The glossy finish makes rhinestones appear even more luminous and creates extra visual depth. This design is unabashedly glamorous and works beautifully for evening wear, special events, or anyone who loves high-impact sparkle.
Creating the Perfect Gloss Canvas
The foundation for a high-gloss rhinestone design starts with excellent black polish coverage and a high-quality glossy top coat applied in thin, even layers. Your technician should cure the top coat fully before applying rhinestones to ensure proper adhesion. Multiple thin top coat layers create a more lustrous finish than a single thick layer, and this professional approach is what makes high-gloss rhinestone designs look expensive and salon-quality. The rhinestones should sink slightly into the gloss rather than sitting perfectly on top.
Styling Maximum Sparkle
- High-gloss rhinestone designs pair beautifully with evening wear, formal dresses, or any outfit designed to make a statement
- These designs read as celebratory and joyful—they work for parties, special occasions, and anywhere glamour is appropriate
- The high shine shows water spots and fingerprints more readily than matte finishes, so be prepared for frequent light cleaning
- High-gloss designs photograph spectacularly under indoor lighting and flash photography, making them perfect for events where photos will be taken
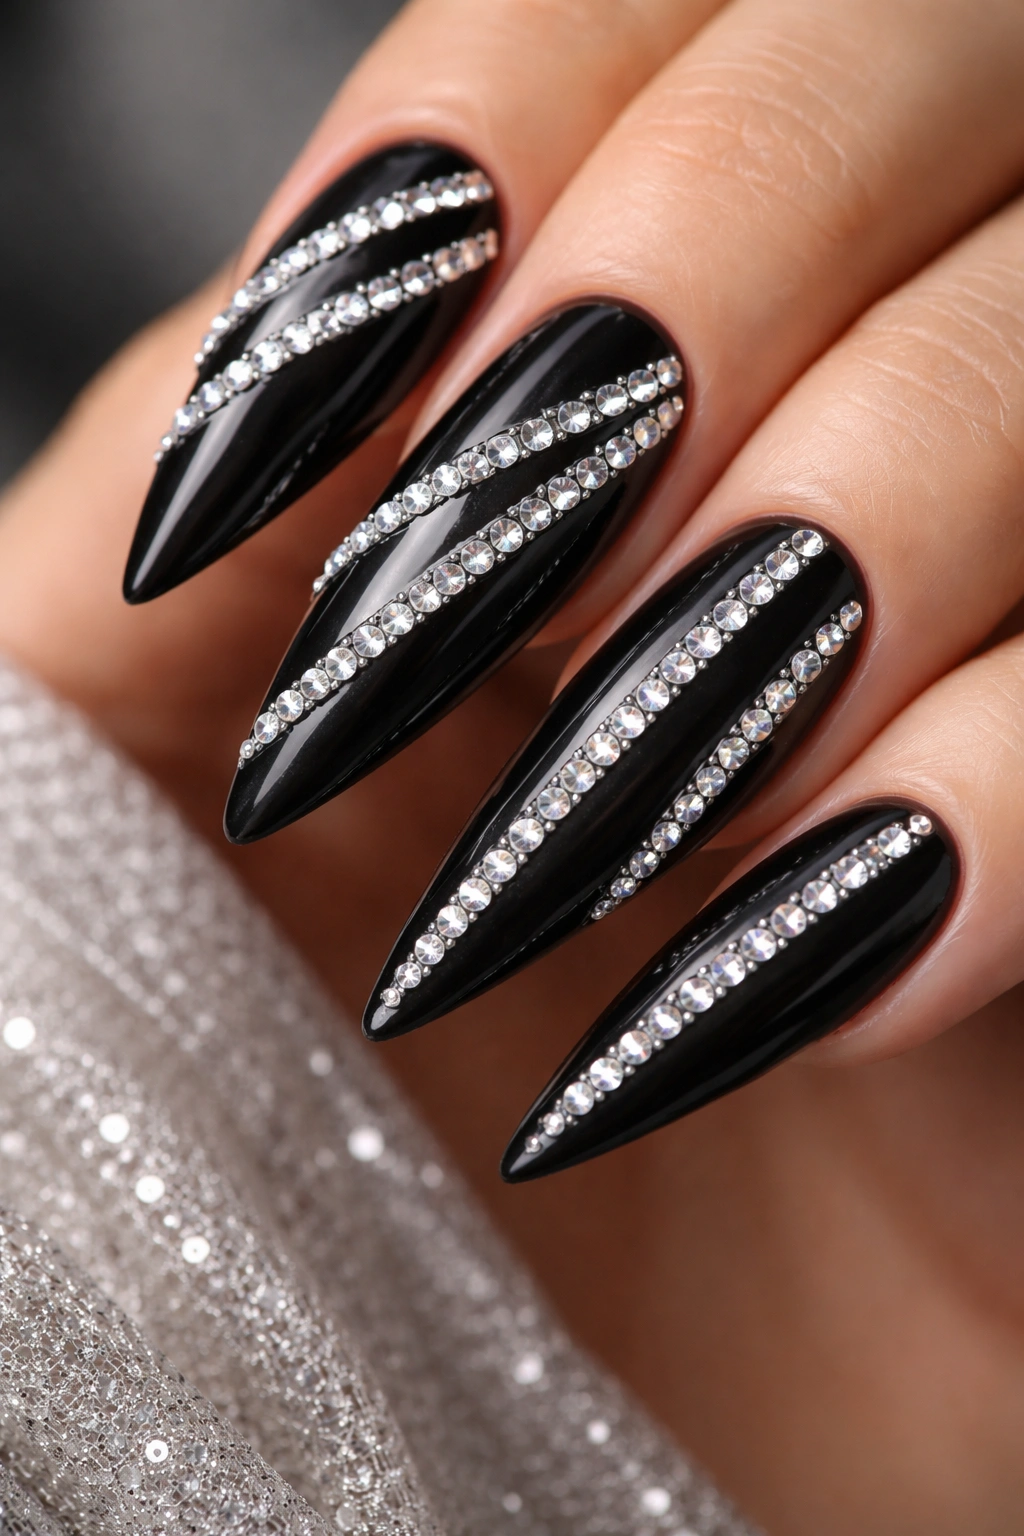
15. Side Stripe Placement with Vertical Rhinestone Line
This design places a vertical line of rhinestones along the outer edge or inner edge of the nail, creating a striping effect that visually elongates the nail and draws the eye upward. The side placement creates asymmetry that feels modern and intentional. This design works beautifully on longer stilettos where the vertical line can truly extend and create its lengthening effect.
Why Vertical Placement Creates Illusion
A vertical stripe naturally draws the eye upward and creates the visual illusion of additional length—perfect for anyone wanting nails to appear even longer and more elegant than they already are. The side placement (rather than center placement) adds sophistication through asymmetry. Your technician should use consistent stone spacing along the side line, ensuring the visual effect is clean and intentional. The line can feature uniform sizing or gradually increase in size from base to tip for added visual interest.
Wearing Vertical Stripe Designs
- These designs pair beautifully with long, flowing sleeves or bracelets that don’t compete with the vertical line
- Side stripes photograph beautifully when your hand is relaxed naturally
- The vertical placement means the rhinestone line experiences less daily friction than center placement, potentially extending longevity
- Vertical designs work across multiple nail styles—they’re equally elegant on all ten nails or featured as accent designs
16. Base Layer Bedazzling with Sparse Upper Polish
This final design places most or all rhinestones in the lower third of the nail (the base area near the cuticle), creating a rhinestone-heavy foundation with gradually less coverage moving toward the tip. The black polish transitions from heavily stone-covered at the base to solid black at the tip, creating a gradient effect through density rather than color change. This design reads as elegant foundation-building—like jewelry layered from the base up.
Creating the Base-Heavy Look
Successful base-layer designs use larger rhinestones (2.5-3mm) at the actual base, gradually transitioning to smaller stones as you move toward the middle of the nail, and finishing with only sparse tiny stones or none at all in the upper third. This approach requires planning and visualization—your technician needs to map out the transition before placing the first stone. The result is a design that feels intentional and architecturally sound rather than simply having more stones at the bottom by chance.
Why Base Designs Feel Polished and Intentional
Base-heavy designs create visual balance by anchoring the nail with concentrated sparkle at the foundation. This approach works beautifully because it doesn’t overwhelm the eye with rhinestones—you get the luxury and sparkle without excessive shine. The design photographs beautifully from most angles and creates distinct visual interest as your nails grow. This is an excellent choice for anyone who loves rhinestones but wants a refined, wearable design that doesn’t feel costume-like or over-decorated.
Final Thoughts
Black stiletto nails with rhinestones represent a category of designs rich with possibility rather than a single monolithic look. Each of these sixteen approaches demonstrates how dramatically the same basic elements—black polish and rhinestones—can transform depending on placement, density, size variation, and finish choices. Your own perfect design exists somewhere in this spectrum of options, whether you’re drawn to minimalist restraint or maximum sparkle, geometric precision or organic randomness.
The key to a rhinestone design that actually lasts and looks beautiful is quality execution from the start. Work with a nail technician who takes time to understand your vision, who uses high-quality rhinestones and professional-grade adhesives, and who pays attention to detail throughout application. A well-executed black stiletto with rhinestones becomes a design you’ll genuinely enjoy wearing for the full duration of the manicure—not something you’re counting down days to remove. The investment in quality upfront pays dividends in longevity and how stunning your nails actually look. Once you’ve experienced one perfect rhinestone design, you’ll understand why this nail art combination remains timelessly popular.
