

Rhinestone ballerina nails can look sharp and expensive, or they can look like a craft-store spill landed on a coffin shape and never recovered. The difference is rarely the amount of bling. It’s the placement, the stone size, the color pairing, and whether the nail shape has enough room to carry that shine without turning clunky.
That’s why the ballerina shape works so well here. The straight sidewalls and tapered tip give rhinestones a clean path to follow, which is something rounder shapes don’t always offer. A tiny crystal cuff at the cuticle, a narrow line down the center, a slanted cluster near one side—on ballerina nails, those details read with more intention because the shape already has structure.
A lot of people miss one small thing: rhinestones don’t need a giant stage to stand out. An ss3 crystal is roughly 1.3 mm. An ss10 is closer to 2.8 mm. Put the wrong size on a short ballerina nail and the whole design loses its proportions. Top-coat over a faceted glass stone, and the shine goes flat. Stack heavy gems at the free edge, and you make the nail feel thick before you even notice the look.
Good bling has restraint. Better bling has direction.
Why Rhinestone Ballerina Nails Work So Well on the Coffin Shape
Ballerina nails give rhinestones a built-in layout. That’s the short version, though the reason goes deeper than shape alone. The sidewalls stay straighter than almond nails, the tip stays softer than a square, and the taper creates a visual lane that makes crystals look placed instead of scattered.
Look at a classic coffin manicure from arm’s length and you’ll notice something subtle: the eye travels downward in a straight line, then lands at the softened tip. Rhinestones love that kind of path. A cuticle arc feels clean. A centerline accent looks balanced. Even a chunky cluster can make sense if it sits near the base and follows the natural apex of the nail.
Shorter lengths can still pull this off, by the way. You do not need extra-long tips for rhinestone ballerina nails. You need good scale. On a shorter set, that might mean micro crystals on two nails and a single 3 mm stone on one accent finger. On a longer set, you’ve got room for mixed sizes, foil, pearls, and metal beads without crowding the design.
And there’s a practical side. Ballerina tips usually give nail techs more flat surface area through the center of the nail than a sharply pointed shape. That matters when you’re trying to anchor stones so they sit flush and do not catch on every knit sleeve you own.
How to Choose Bling for Rhinestone Ballerina Nails
What kind of “bling” actually looks right on this shape?
Start with flat-back glass crystals. They reflect more light, scratch less, and keep their crisp facets longer than cheap plastic stones. Resin gems can work for playful sets, though if you want a cleaner, salon-finish look, glass wins.
Then think about size. Here’s the quick sizing rule I use:
- ss3 to ss5 for cuticle cuffs, French outlines, and fine geometric lines
- ss6 to ss10 for center accents, diagonal trails, and small clusters
- ss12 and up for statement nails only, usually one or two fingers
- 2 mm pearls or caviar beads when you want texture without bulk
Stone color matters more than people think. Clear crystals look crisp on black, white, nude, and chrome. Champagne stones soften warm pinks, taupes, and burgundy shades. AB crystals—the iridescent ones—throw blue, pink, and green flashes, which can be gorgeous on milky ombré sets and a mess on already-busy chrome.
Placement product matters too. For heavier pieces, a gem gel or builder gel holds better than thin nail glue. Most techs flash-cure for about 10 to 15 seconds to freeze the layout, then do a full LED cure for 60 seconds. Good. That tiny pause keeps your stone map from drifting while you work.
One more thing. Do not let anyone drown faceted crystals in top coat. Seal the base around the stone instead. Covering the facets mutes the sparkle, and sparkle is the entire point.
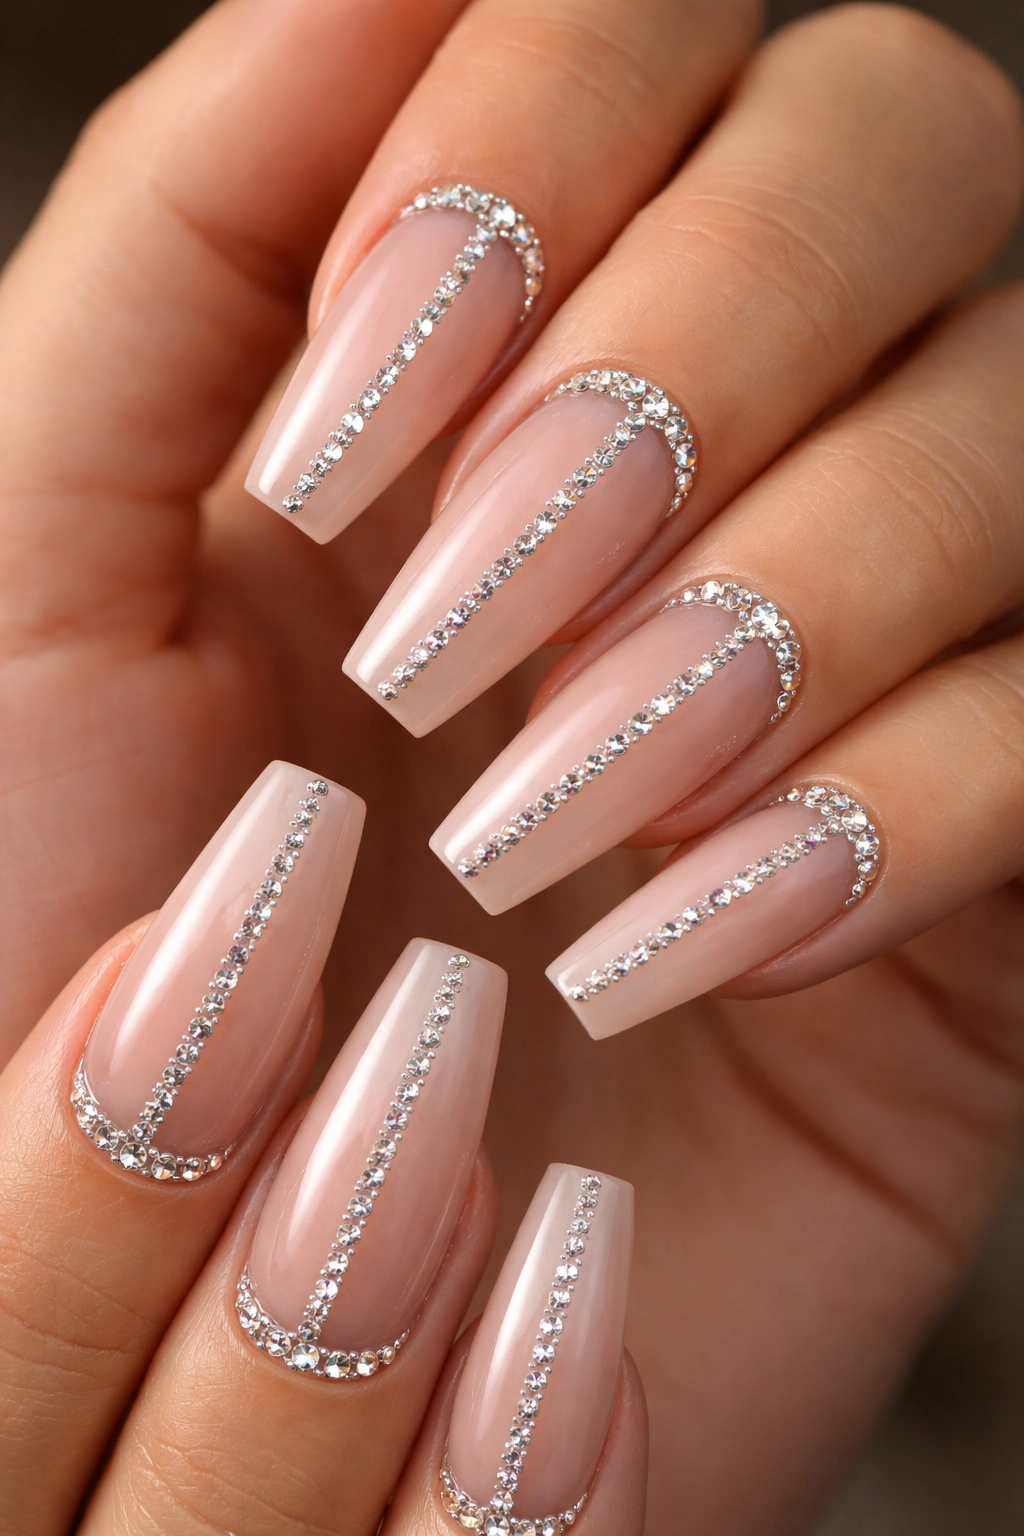
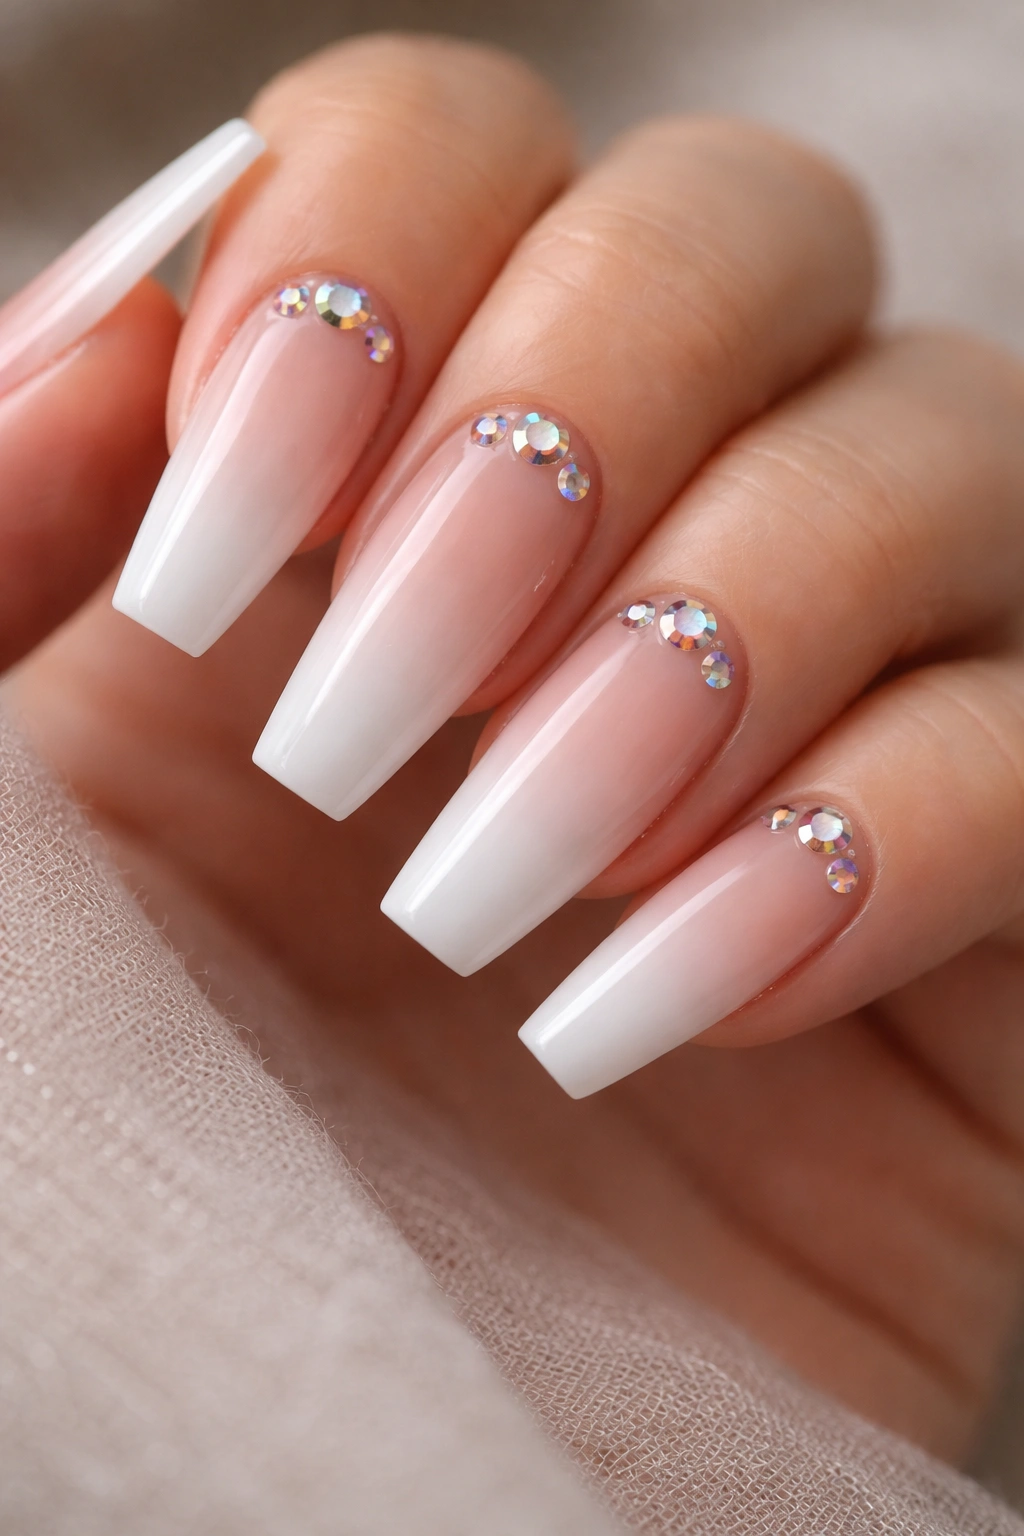
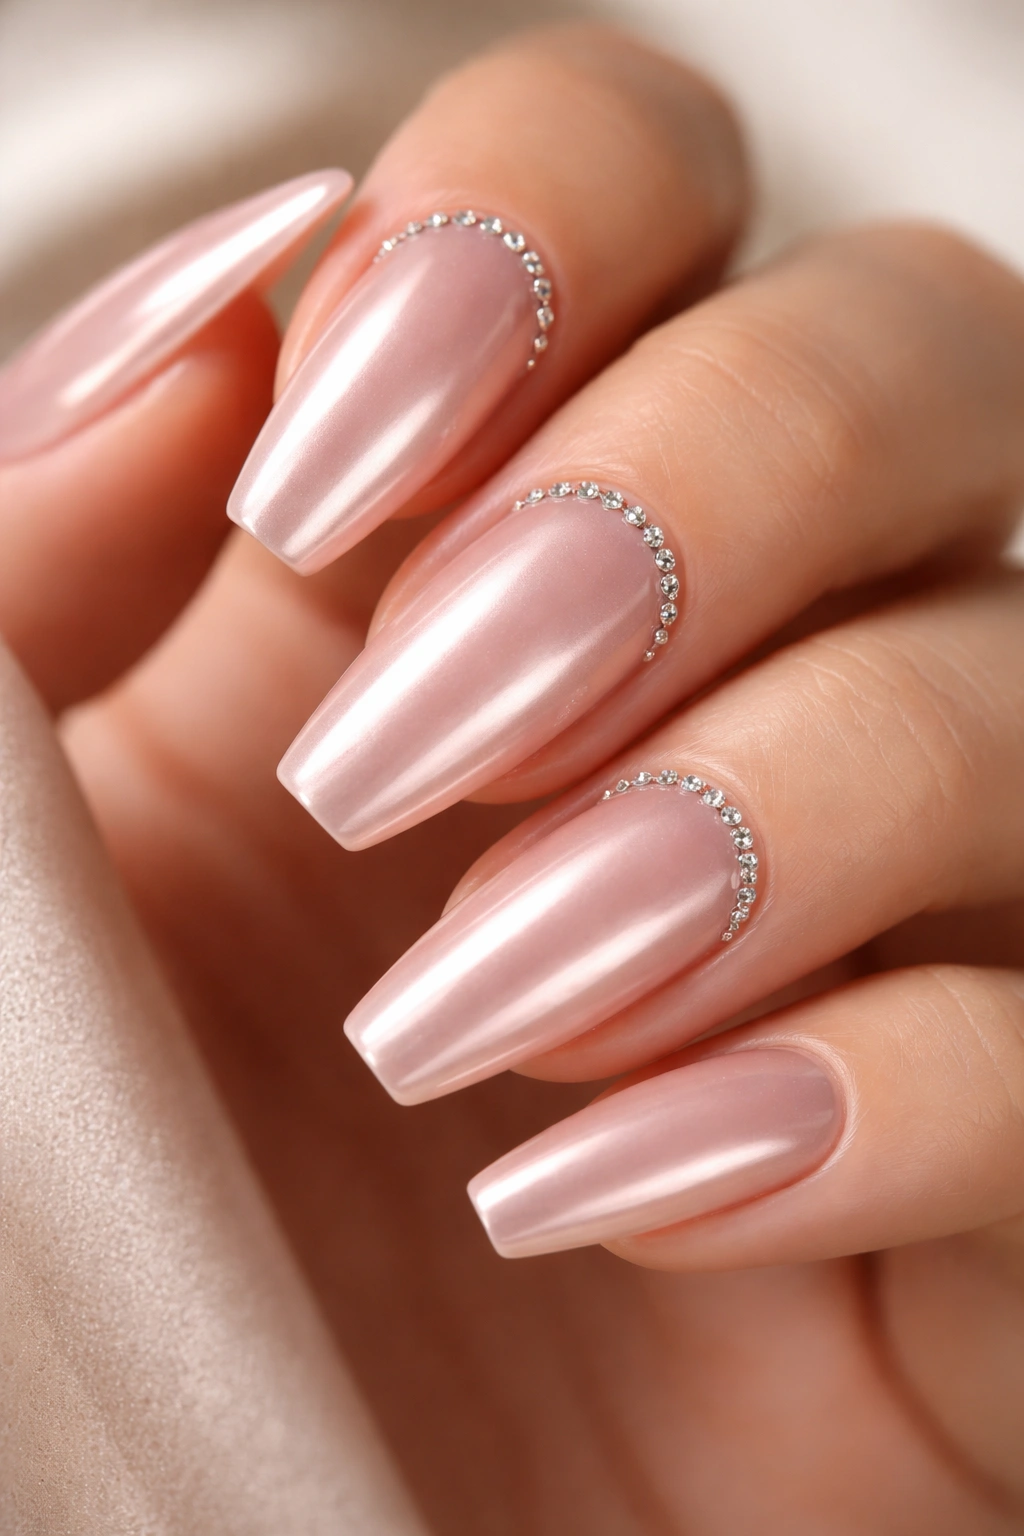
1. Cuticle Crescent Crystal Frame
A sheer blush base with a curved row of tiny crystals at the cuticle is the safest place to start if you want bling without a lot of upkeep. It looks neat, not overloaded, and it lets the ballerina shape stay the main event.
Why the curve works
That crescent mirrors the natural line of the cuticle, so the shine feels anchored. You’re not dropping random stones onto a nude nail and hoping for the best. You’re tracing a shape that already exists, which is why this design reads so clean from a distance.
On medium-length ballerina nails, I like a mix of ss3 and ss5 clear glass stones. The smaller stones sit at the outer edges of the curve, and the slightly larger ones go near the center. That tiny size change keeps the cuff from looking flat.
A clean way to wear it
- Use a milky pink, sheer beige, or soft nude base
- Keep the crystal cuff on two nails or one accent finger if you want easy wear
- Leave about 1 mm of space from the actual cuticle so growth looks tidy longer
- Skip chunky charms here; they fight the sleek shape
Best tip: ask for the arc to follow the cuticle line without dropping too far down the sidewalls. Too wide, and the design starts to look heavy at the base.
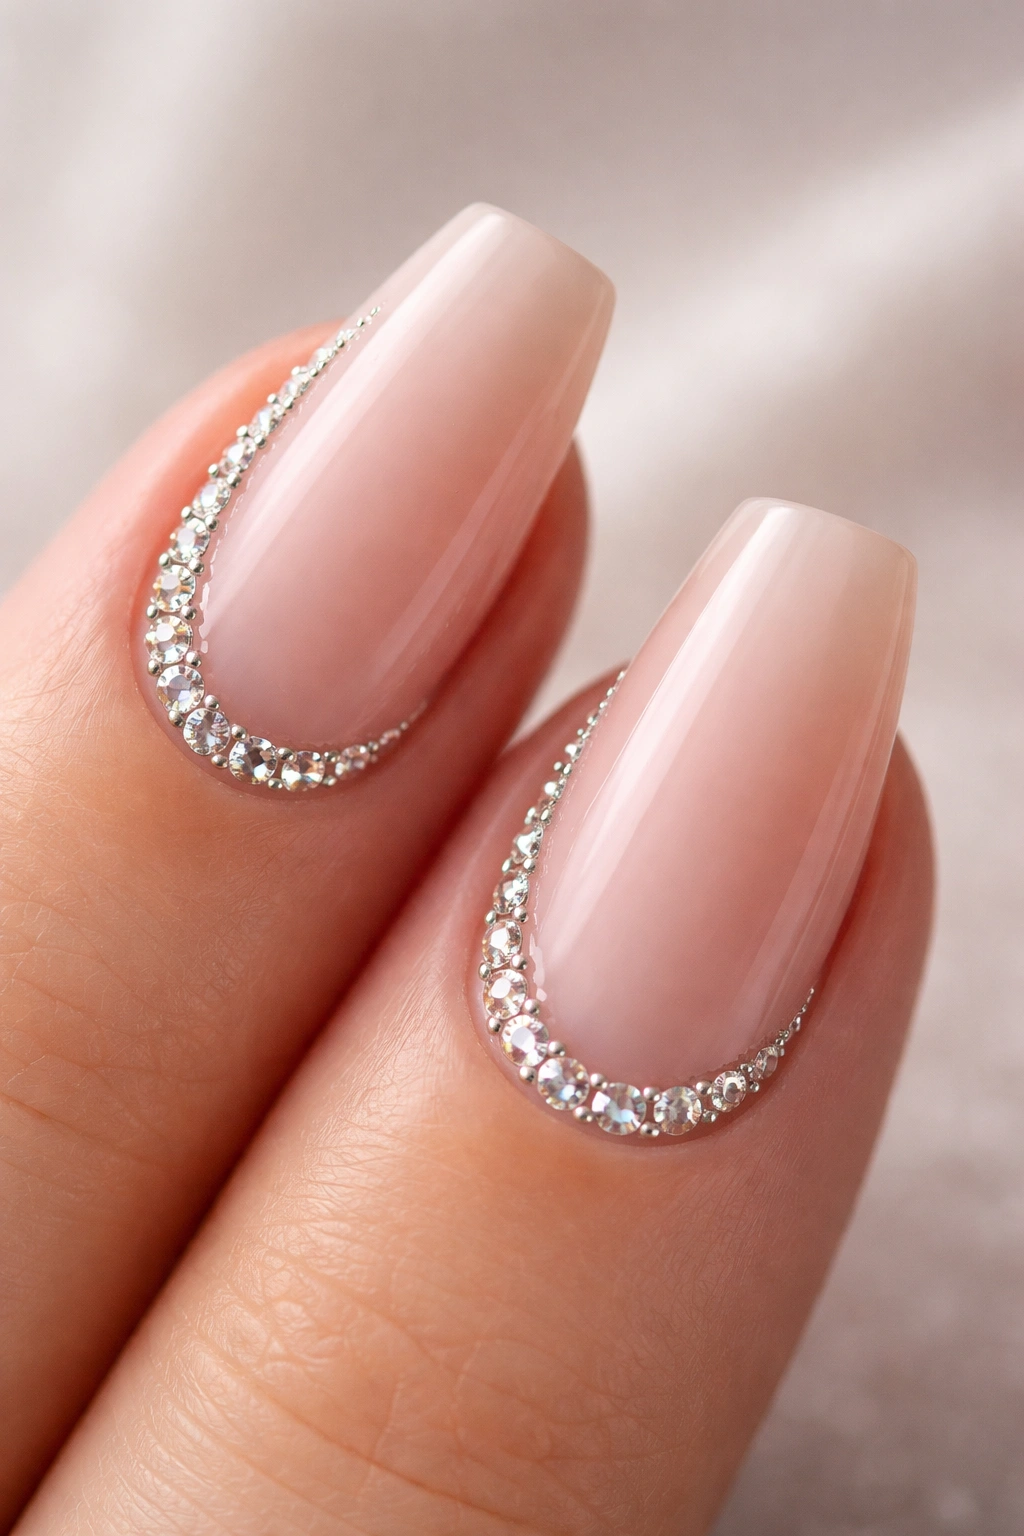
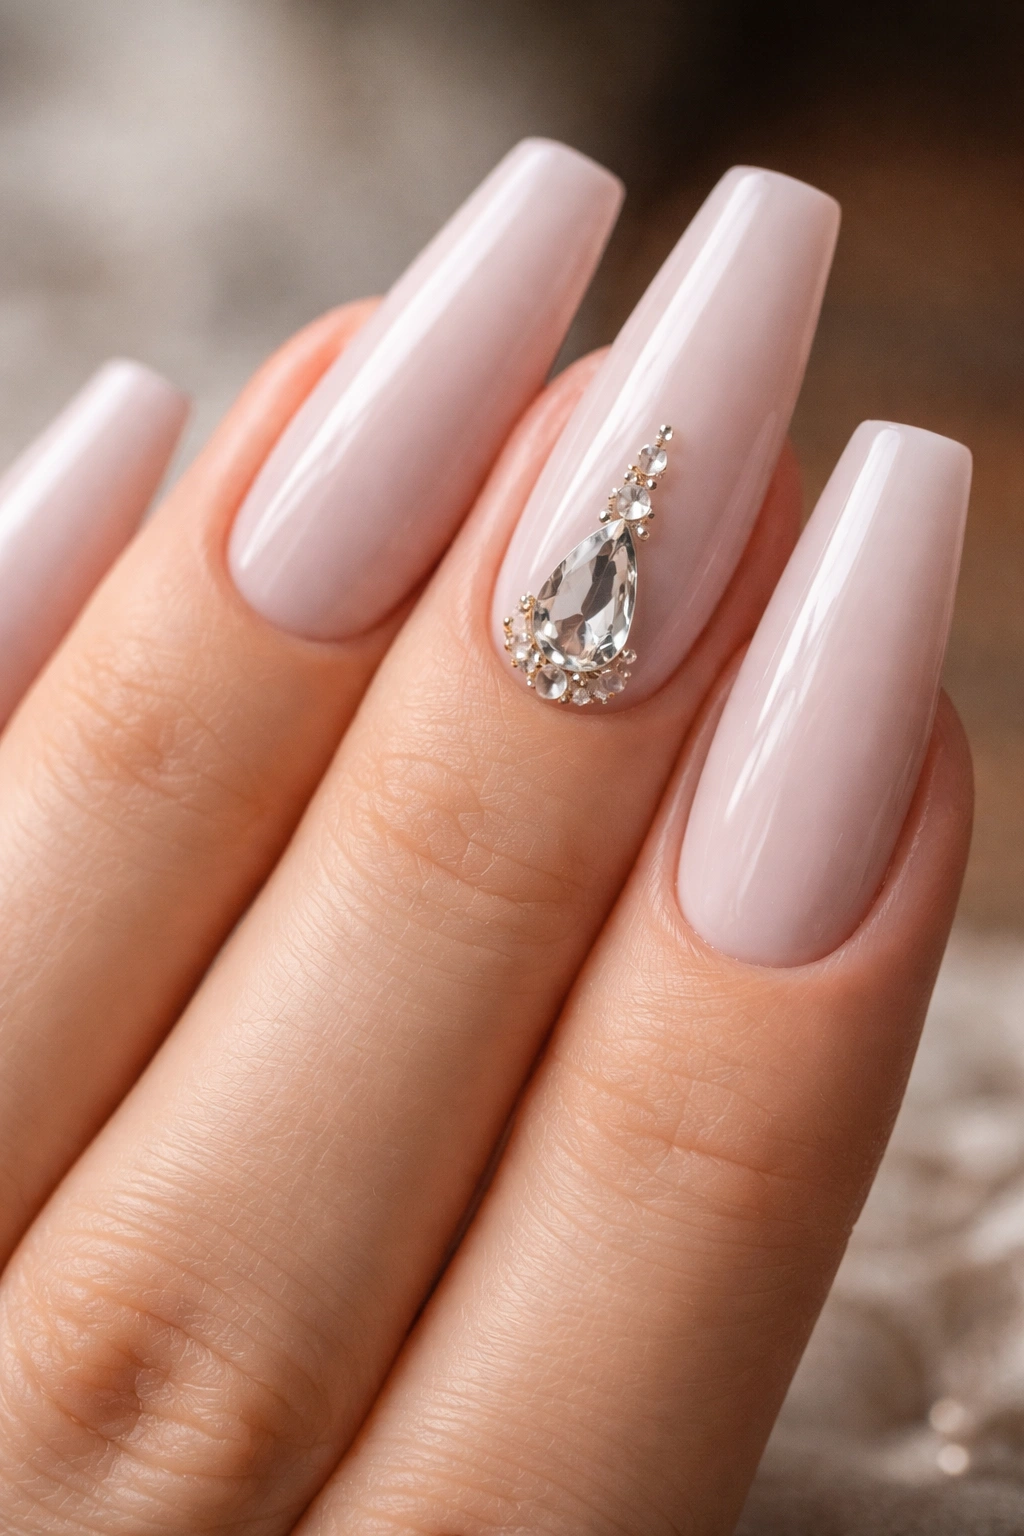
2. Single-Drop Centerline Accent
One stone can do more than ten small ones if you place it in the right spot.
This design uses a nude, beige, pale mauve, or milky pink base and puts one larger crystal—teardrop, oval, or marquise—down the center of the nail, usually on the ring finger. The stone should sit around 3 to 4 mm above the cuticle, not jammed against it. That little bit of breathing room matters. It keeps the design from looking crowded and gives the eye a straight runway down the middle.
A teardrop crystal is my favorite choice here because it echoes the taper of the ballerina shape. Point the narrow end toward the tip, and the nail looks longer. Use a silver rimmed stone on cooler nudes or a champagne-backed stone on peachier bases. Tiny caviar beads around the edge can dress it up, though I’d only do that on one nail per hand.
This is also one of the smarter options for office wear. You still get sparkle. You also get room to type, open cans, button shirts, and go about your life without feeling like you glued costume jewelry to every fingertip.
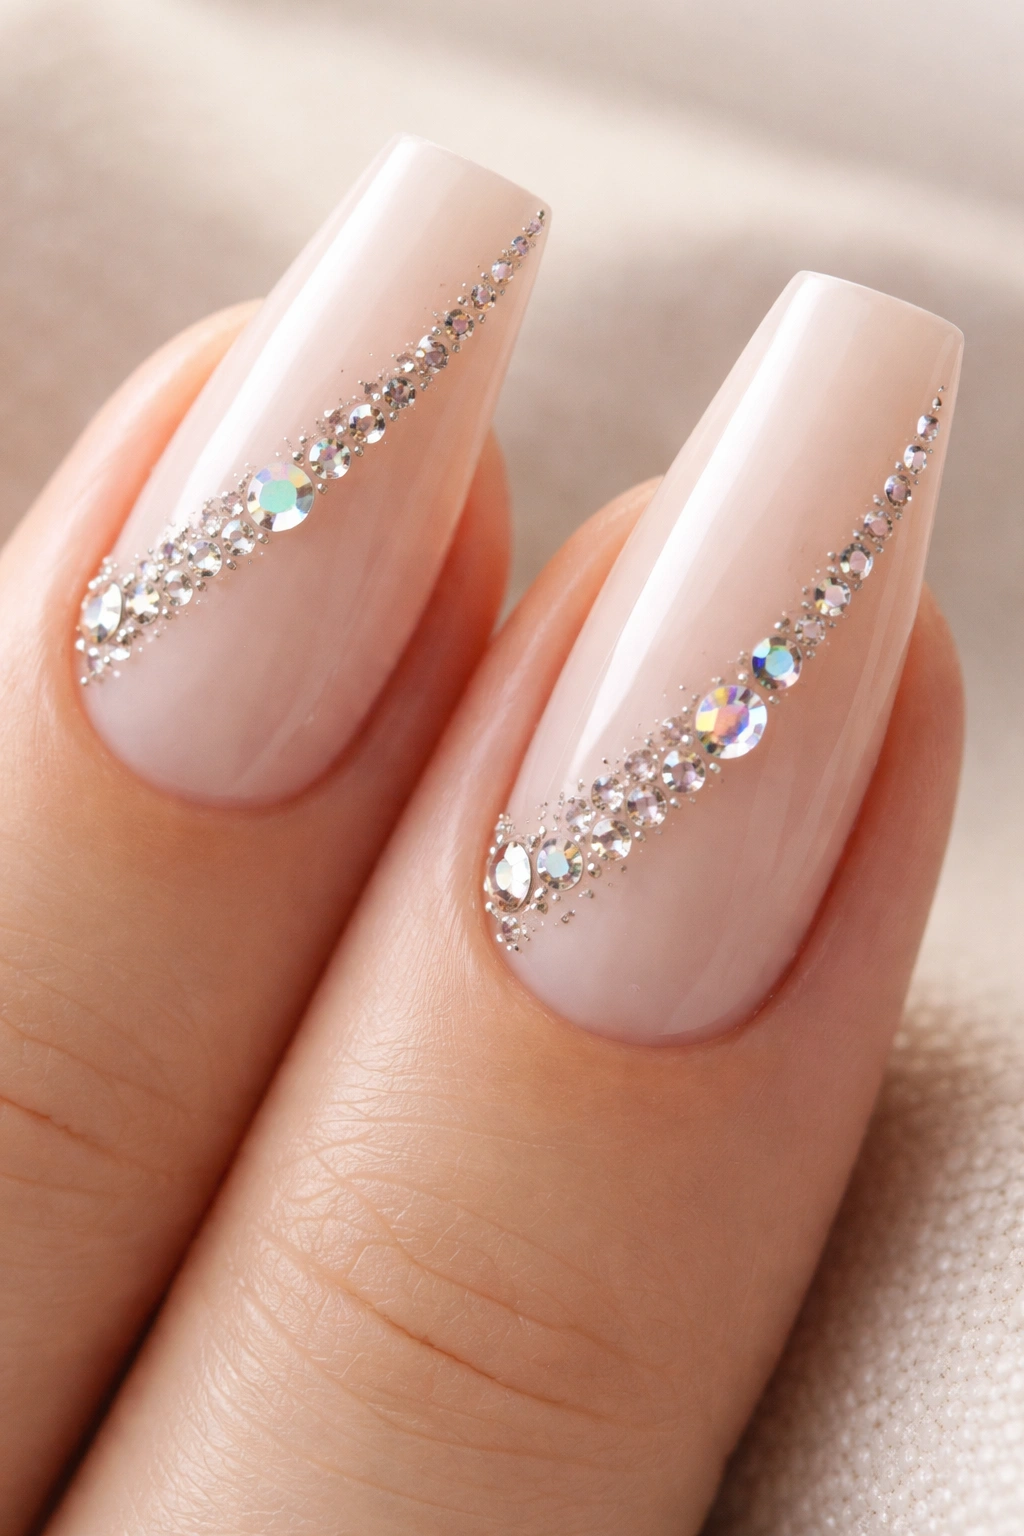
3. Diagonal Side-Swept Crystal Trail
Why does a diagonal crystal trail look so much more modern than a straight row down the center? Because it creates movement without slicing the nail in half.
Start the trail near one side of the cuticle, then angle it toward the opposite sidewall as it travels upward. Not all the way to the tip. Stop around the upper middle of the nail. That stop point keeps the design airy, and it lets the ballerina silhouette stay sharp.
A milky nude base works best because it gives the stones contrast without stealing attention. I like a mixed line of ss3, ss5, and one ss8 accent stone, with the biggest piece sitting near the lower third of the nail. That bottom-weighted layout feels stable. Reverse the weight and put the big stone at the tip, and the design gets awkward fast.
Placement notes that matter
Use this on two or three nails, not the whole set. Keep the other nails glossy and plain, or maybe add a tiny single crystal near the cuticle for continuity. If you want a softer look, swap clear stones for pale rose or champagne.
Short nails can wear this too. Shrink the stone sizes and keep the diagonal tighter. The idea is a whisper of sparkle sliding across the nail, not a rhinestone traffic jam.
4. French Tip Outline With Micro Stones
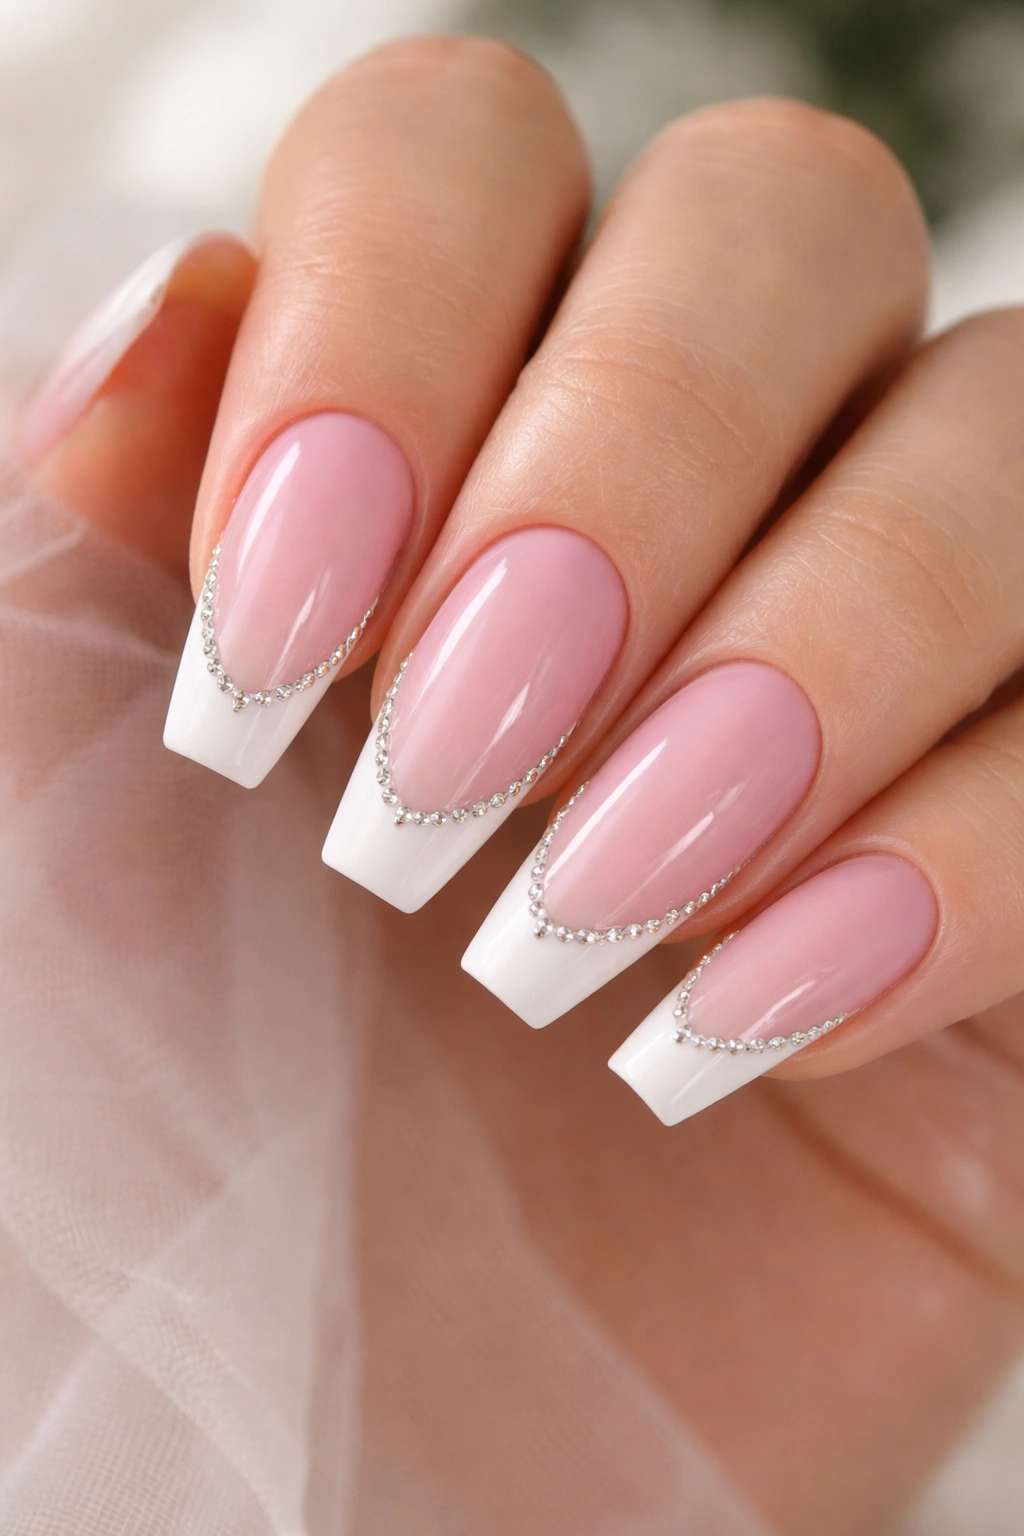
A classic French on ballerina nails already has strong geometry. Add micro stones along the smile line, and the manicure gains a little edge without losing that crisp finish.
I like this look best on milky pink bases with slim white tips. Thick white tips can bully the crystals, especially on medium lengths. A narrow French leaves enough space for the stones to trace the curve instead of compete with it.
There’s a reason this design gets so much salon attention: it photographs with clean lines. More importantly, it still looks good when you’re holding a coffee cup at arm’s length, which matters more than most promo photos admit.
A few specifics make or break it:
- Use ss3 stones only for the outline
- Trace the smile line on one or two nails, not every finger
- Keep the French thin—about 2 to 3 mm deep on medium lengths
- Choose clear or crystal AB stones if the base is cool-toned
Too much stone here ruins the whole point. The French tip should still read first. The bling is there to sharpen the border, not drown it.
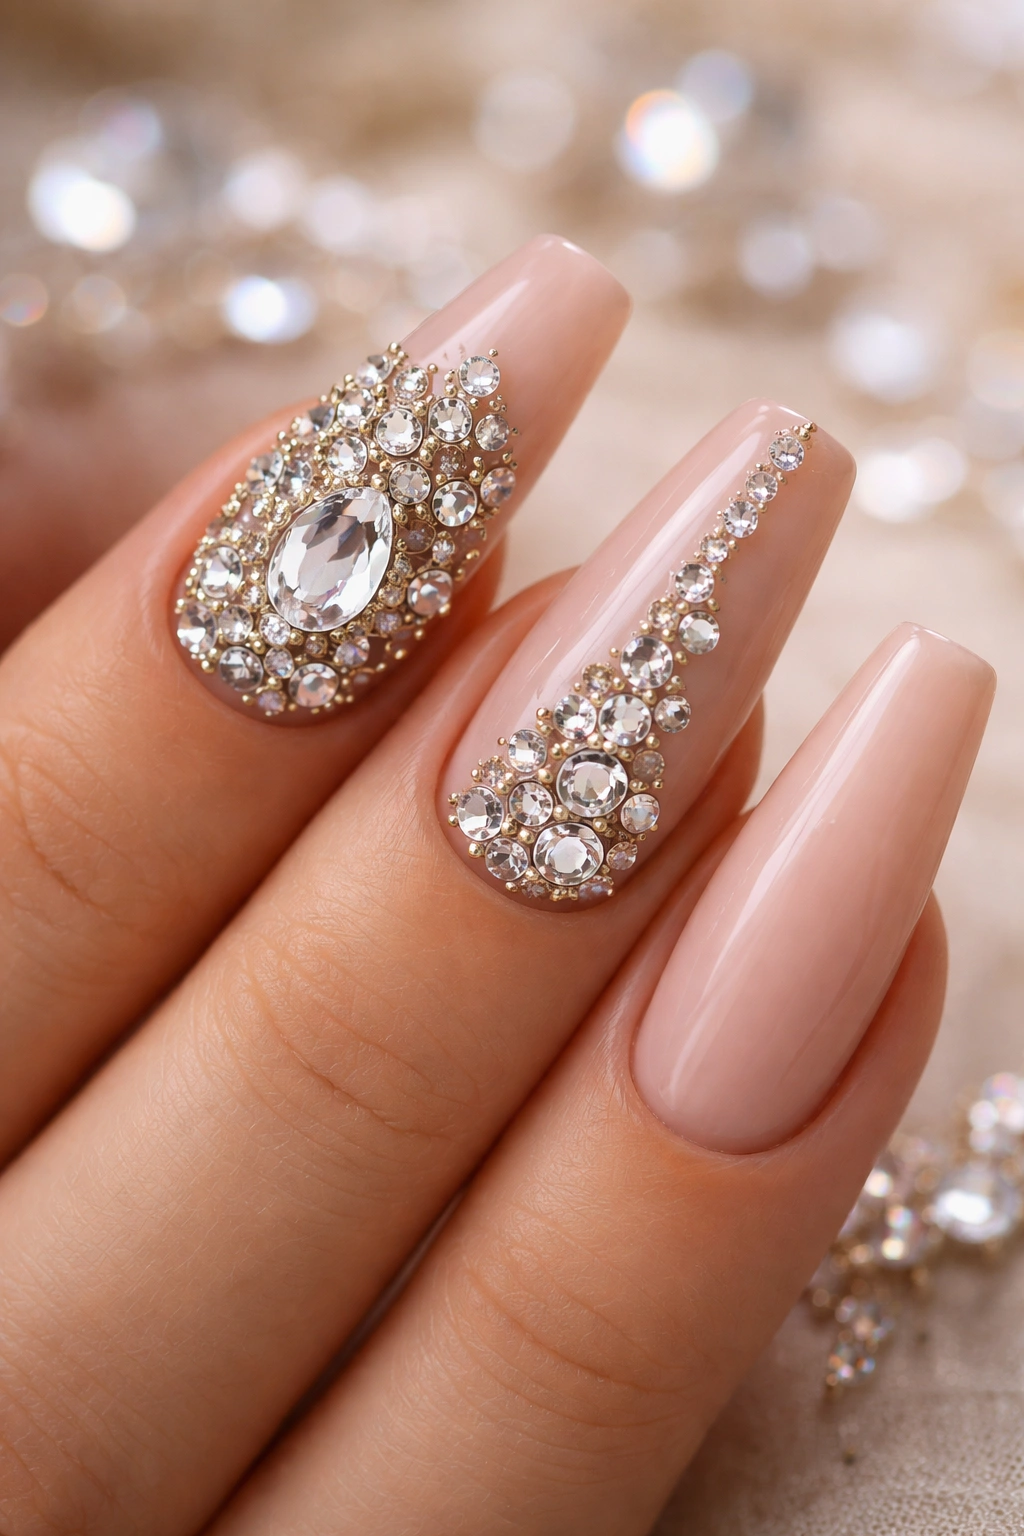
5. Full Crystal Ring-Finger Accent
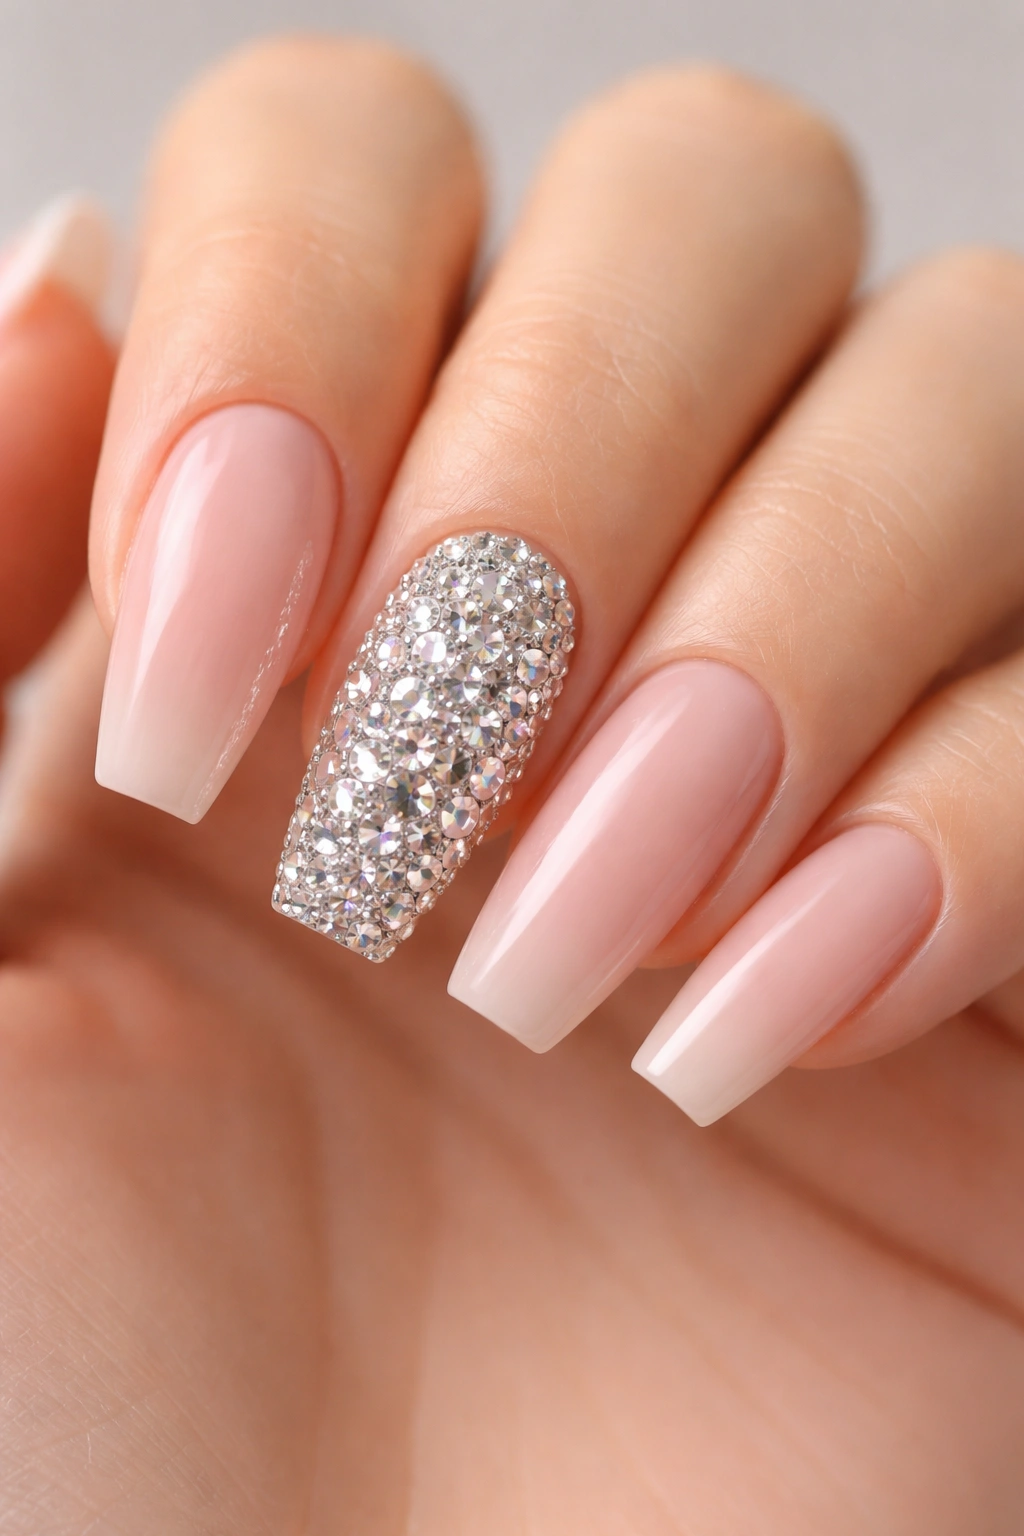
This is the one for people who want a proper statement nail but still want the rest of the set to look controlled. A full crystal ring finger paired with cleaner surrounding nails gives you that balance.
The smart version uses four plain or lightly detailed nails and one fully stoned accent finger on each hand. Nude pink, soft beige, dusty mauve, and glossy latte shades all work. So does a pale ombré. What matters is contrast. If every other nail is busy, the crystal accent stops feeling like a focal point and starts feeling like clutter.
Go mixed-size on the accent. An even scatter of identical stones can look flat, almost pasted on. A blend of ss5, ss7, ss9, and ss12 catches light from more angles and gives the nail texture. Tuck tiny metal beads into the gaps so the surface looks finished rather than patchy.
I wouldn’t put this on the index finger. Ring finger or pinky works better, mostly because those nails take less direct abuse during the day.
And yes, there’s a catch. Full crystal nails are heavier, they snag more, and they need solid product underneath. They look sharp for events, nights out, photos, and special occasions. For everyday wear, I’d keep them to one accent finger and call it done.
6. Matte Pink With a Glossy Stone Trail
Unlike a glossy nude set, a matte pink base dulls the surface so the rhinestones do all the shining. That contrast is what makes this look hit harder.
Choose a muted pink—not bubblegum, not chalky baby pink. Think rose milk, dusty ballet slipper, or a soft cool blush. On top of that matte finish, run a slim trail of clear or pale rose crystals from the cuticle toward the tip. You can keep the trail centered, diagonal, or slightly off to one side depending on how sharp you want the look.
The reason this design works is simple: matte absorbs light. Stones throw it back. Your eye catches the glitter faster because the base is calm. Add a glossy top coat under the stones only, and you get a faint ribbon effect that feels almost hidden until the hand moves.
I’d keep the trail narrow—five to seven micro stones per nail on two fingers is enough. More than that, and you lose the matte-versus-shine tension that makes the set interesting.
This is one of those designs that looks better in person than it does in rushed salon photos. Under indoor light, the base stays velvety. Then the crystals flash when your hand turns. Small move. Big payoff.
7. Nude-to-White Ombré With Scattered AB Crystals
Soft ombré ballerina nails can carry rhinestones without much effort because the fade already gives the nail depth. Add AB crystals in a loose scatter, and you get that icy, airy finish without piling on bulk.
Where the sparkle should sit
Keep the ombré clean first. A cloudy fade makes the stones look random because the background already lacks structure. Once the blend from nude to white looks smooth, place three to five AB crystals on selected nails—usually near the cuticle, off to one side, or drifting through the middle third.
AB stones work here because the white tip catches their color shift. You’ll see flashes of pink, blue, and pale green, though the effect stays softer than it would on a chrome base.
Quick design notes
- Use small AB crystals, usually ss3 to ss5
- Scatter them on two or three nails instead of the whole set
- Pair with milky ombré, not a hard nude-and-white line
- Add one clear stone among the AB pieces if you want more contrast
One warning: heavy AB placement can tip into bridal-pageant territory fast. A light hand keeps it fresh.
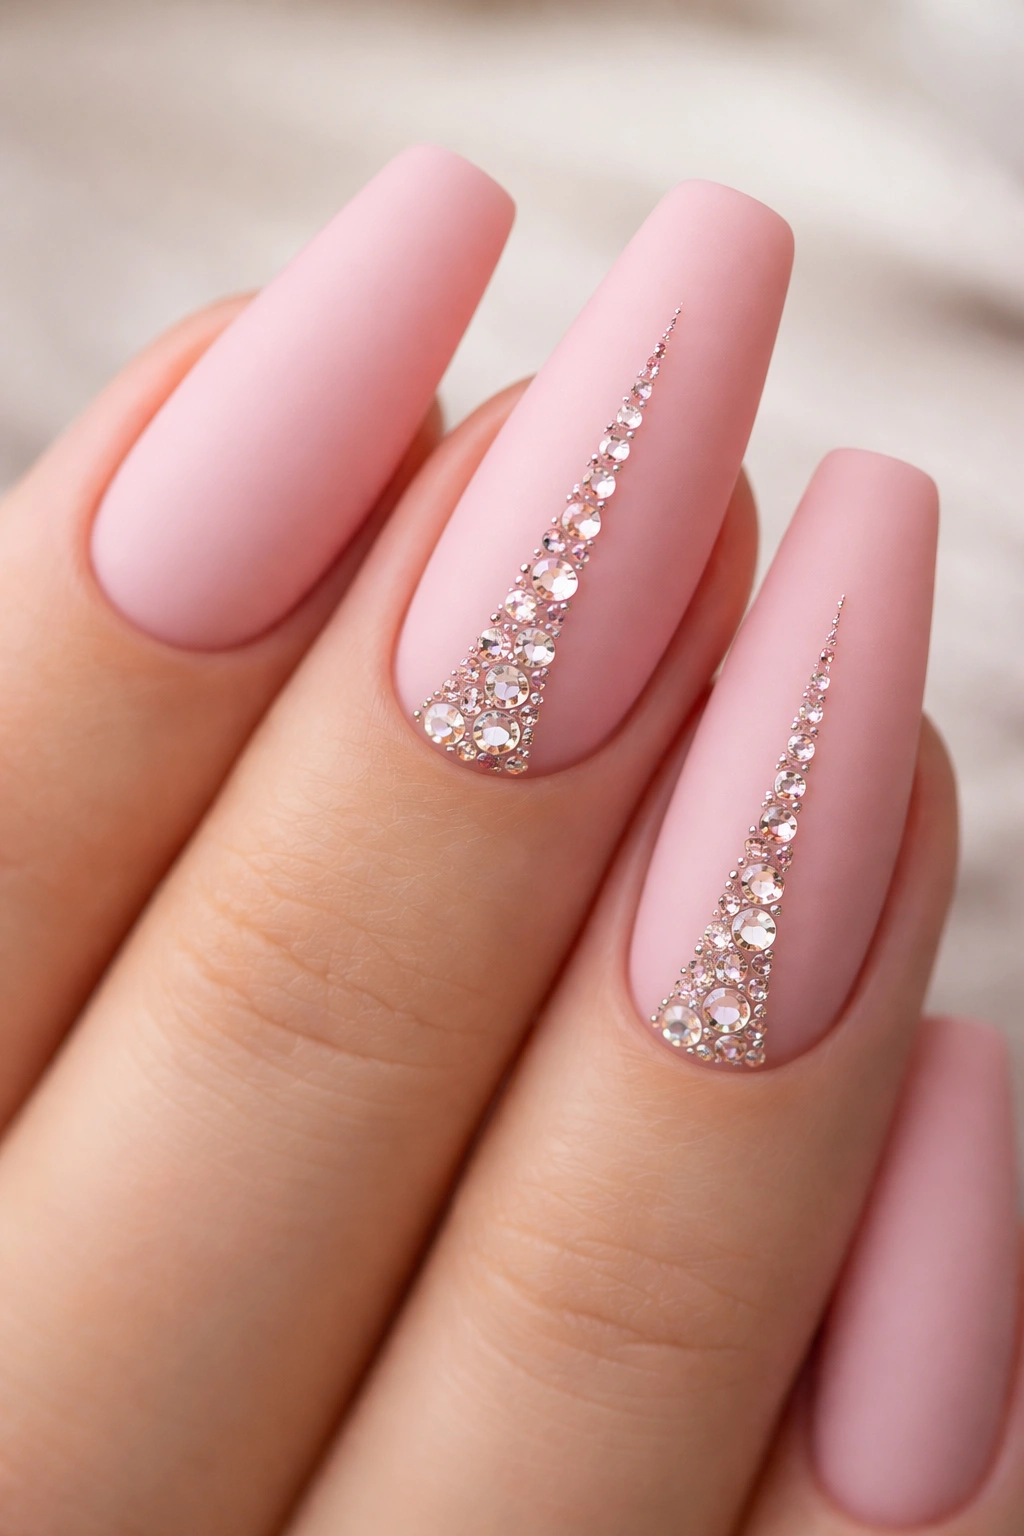
8. V-Cut Smile Line With Tiny Gems
This design takes the French idea and sharpens it. Instead of a curved smile line, you get a narrow V shape at the tip, and tiny gems trace that point so the ballerina nail looks longer and leaner.
It’s a smart pick if your fingers are shorter or your nail beds are on the wider side. That central V pulls the eye inward. Straight across tips can sometimes make the nail look broader. A pointed smile line fixes that without forcing you into a stiletto shape.
Use a nude, pink-beige, or translucent base with a white, silver, or chrome V at the tip. Then line the border with ss3 stones only. Bigger crystals break the sharpness. The whole point is precision.
I like this most on two accent nails, usually ring and middle. Pair the rest of the set with either plain glossy ballerina nails or a single micro crystal at the cuticle. Keep the V shallow on shorter lengths and deeper on longer lengths. Same design, different proportions.
Nope, this is not the one for chunky charms. That would wreck the geometry in about three seconds.
9. Clear Base With Silver Foil and Crystal Clusters
There’s a colder, glassier version of rhinestone ballerina nails that looks almost like jewelry suspended in gel. This is it. A transparent or sheer-clear base with silver foil fragments and small crystal clusters has more texture than a nude set and more edge than a bridal white.
You need editing here. A little foil goes a long way. Tear the foil into tiny irregular pieces, seal them under the clear base, and place one crystal cluster near the cuticle or sidewall on one or two nails. If you spread foil and stones across every finger, the set starts to lose shape.
What kind of cluster works? A small combination of one ss8 stone, two ss5 stones, and a couple of micro beads gives enough detail without turning the nail lumpy. Clear crystals keep the look sharp. AB stones can work too, though I’d use fewer because the foil already gives off plenty of flash.
This style suits medium and long ballerina nails more than short ones. Clear designs need space. Otherwise the foil, the free edge, and the crystal cluster start fighting for room, and your eye doesn’t know where to land.
10. Black Ballerina Nails With Gunmetal Rhinestones
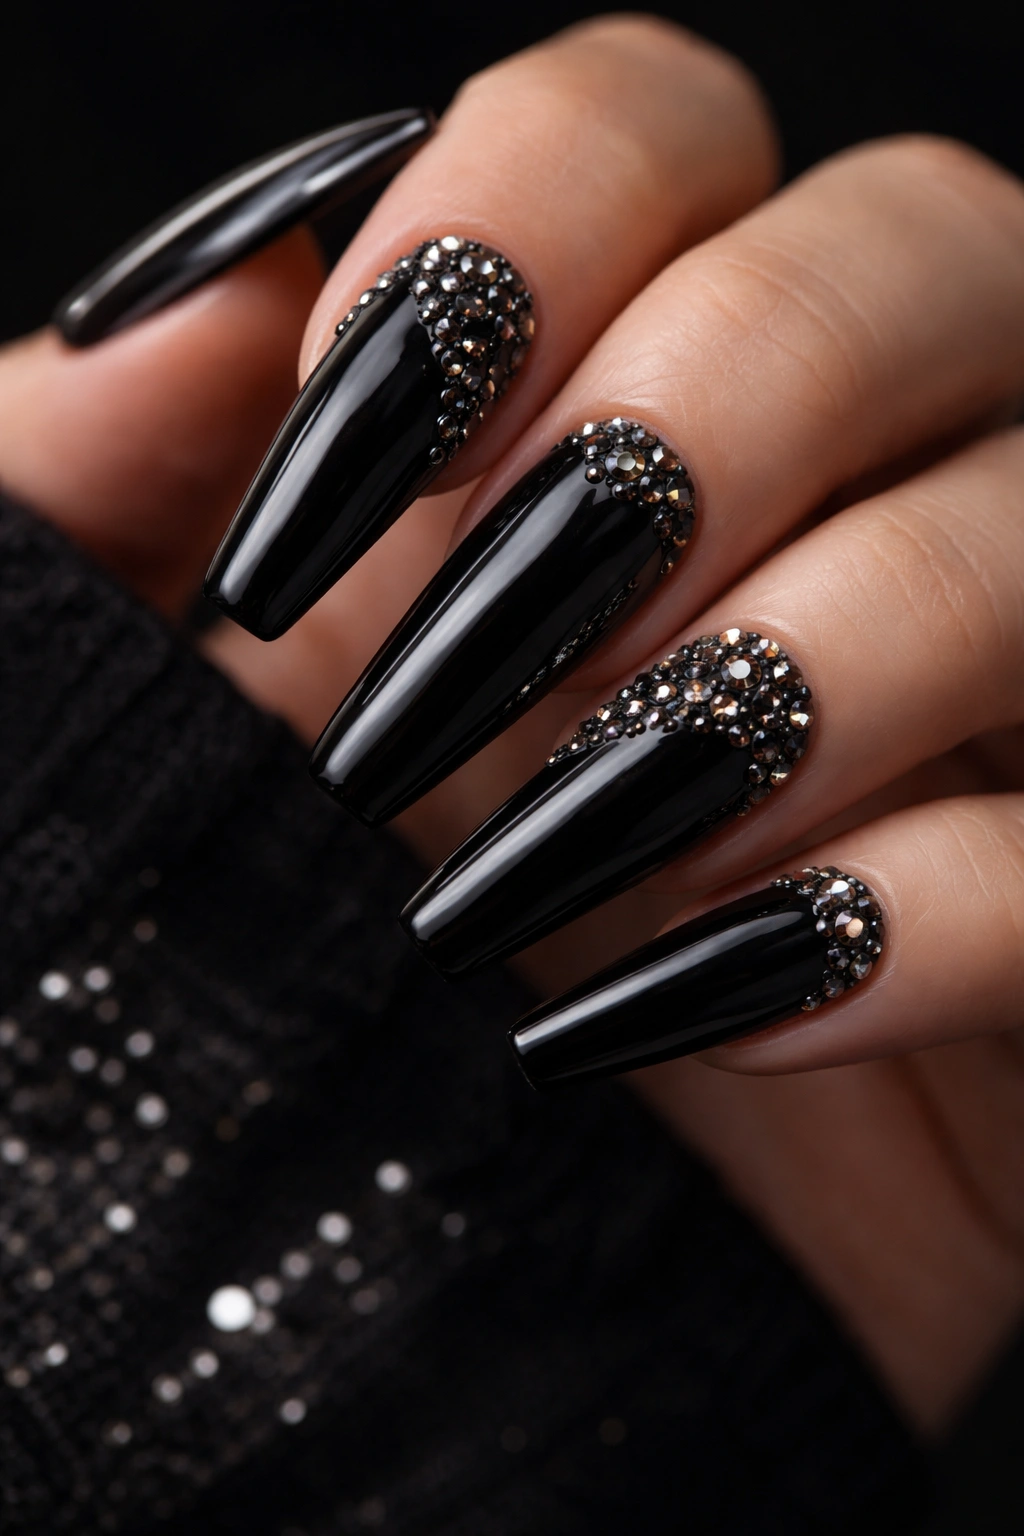
Black polish and bright silver crystals can look harsh if the set isn’t clean. Swap the silver for gunmetal or hematite rhinestones, and the whole manicure turns richer and more deliberate.
The base should be a deep glossy black, not matte. Matte black can flatten the stones too much, while gloss keeps some movement under the surface. Place gunmetal crystals in a cuticle cuff, a diagonal spray, or a slim vertical line. Mixed sizes work best, though I’d keep the largest stone around ss8 or ss10 unless you’re doing one statement nail.
Why the stone color matters
Cool gray-black stones blend with the base instead of shouting over it. You still get shine, though it feels moodier, more metal than glitter. That makes a big difference if you want bling that reads sleek rather than flashy.
Who this style suits
This design has stronger energy than a nude crystal set. It works well for shorter medium lengths, evening wear, dark outfits, leather jackets, silver rings. You can keep it polished with one accent nail, or go bolder with crystal details on three fingers.
I wouldn’t pair black and gunmetal with chunky pearls or pastel gems. Wrong mood. Keep the hardware dark and tight.
11. Soft White Bridal Nails With Pearls and Crystals
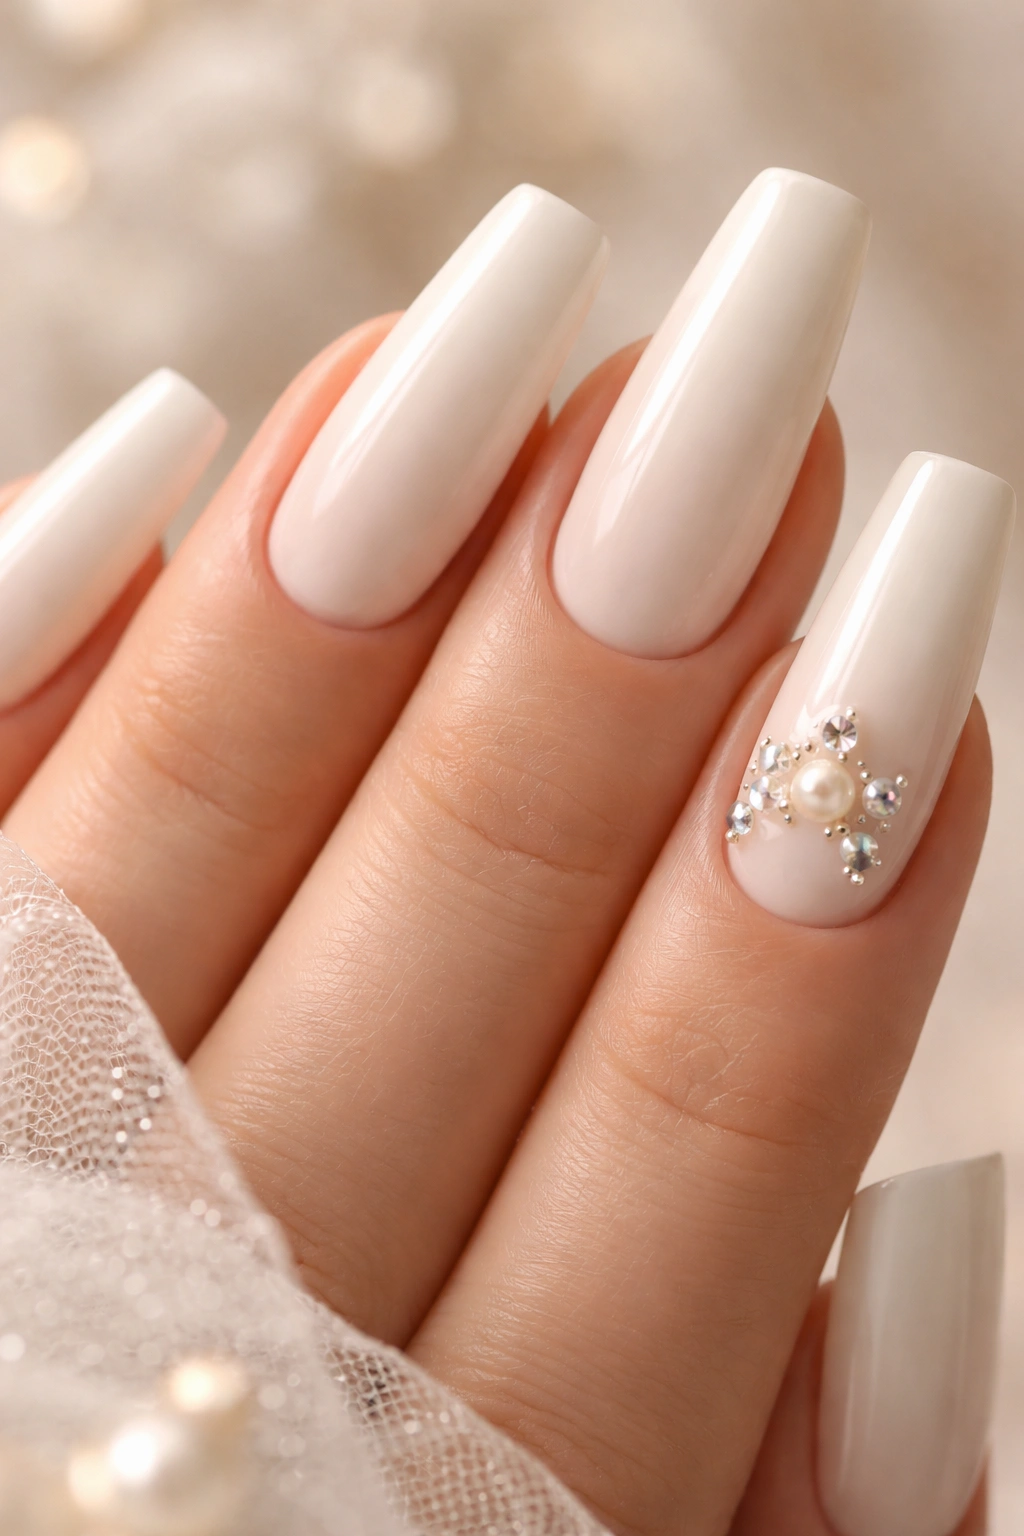
Pearls on ballerina nails can go sideways fast. Use large domed pearls and the set turns bulky. Use too many, and the manicure starts to look costume-y. Small half-pearls mixed with micro crystals solve that problem.
Pick an ivory or soft white base rather than a stark paper white. The warmer tone flatters skin better and gives pearls something to sit against without the whole nail looking flat. Then place 2 mm half-pearls near the cuticle, in a tiny cluster off to one side, or along a single accent nail with ss3 clear crystals tucked around them.
This design shines on wedding sets, formal events, photos, and dressier outfits, though it doesn’t need a gown to make sense. A soft white coffin manicure with one pearl-and-crystal accent nail still feels wearable if the shape is clean and the rest of the set stays quiet.
I keep coming back to one rule here: pearls need breathing room. Leave naked space around them. Let the gloss show. Let the ballerina taper do some of the work. If every square millimeter gets covered, you lose the soft luxury that makes pearls worth using at all.
12. Deep Burgundy Nails With Gold Stone Cuffs
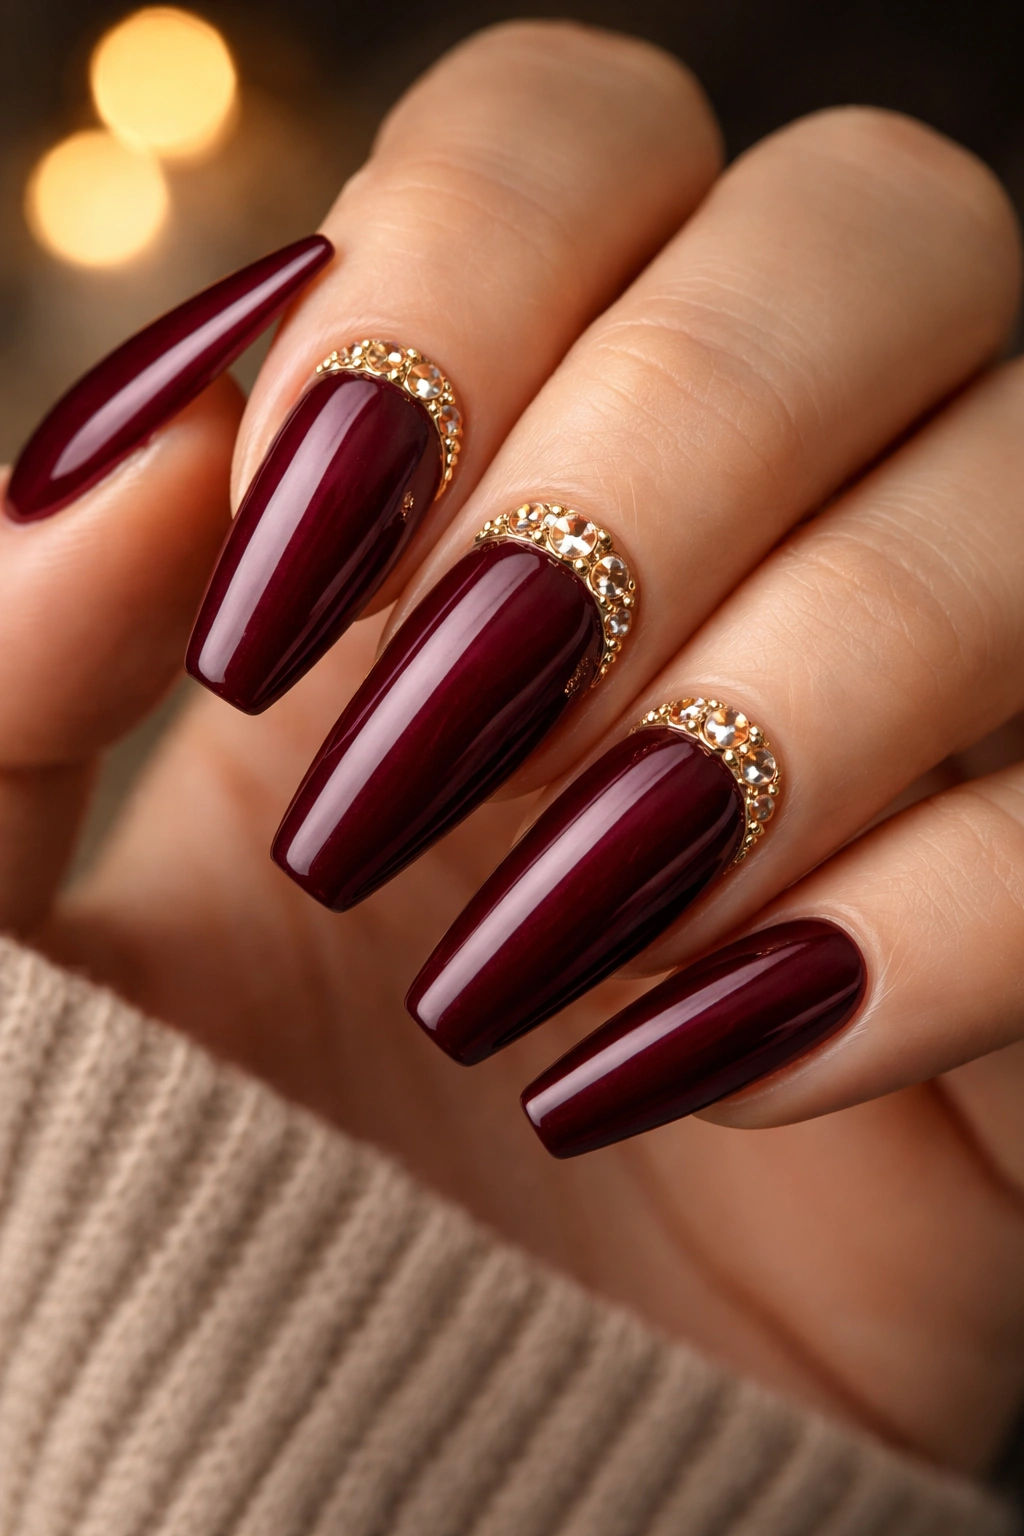
Burgundy ballerina nails already carry weight. They don’t need much help. A gold stone cuff at the cuticle is enough to pull out the warmth in the color and make the whole set feel richer.
This pairing works because burgundy has red-brown depth, and gold sits well against that undertone. Silver can look colder and sharper. Gold makes the shade feel fuller, especially in candlelit rooms or warmer indoor light, where dark reds tend to show more complexity.
A clean version of this look uses glossy burgundy on all nails and a curved cuticle cuff of champagne crystals, tiny gold studs, or gold-rimmed clear stones on two fingers. Ring finger and thumb is an underrated combo here. You see the detail often, though the set still feels edited.
A few useful specifics:
- Keep the cuff slim—one row, maybe two at the center only
- Use warm metallics, not bright yellow novelty gold
- Medium lengths carry this design better than extra-short tips
- Skip matte top coat unless you want a heavier, velvet effect
Dark shades show regrowth less harshly than pale nude bases, which gives this set a bit more life before fill time.
13. Blush Chrome Nails With a Tiny Cuticle Halo
Chrome and rhinestones can compete with each other. That’s the risk. When both are screaming for attention, the manicure loses focus. A tiny cuticle halo keeps the chrome sleek and gives the bling one clear job.
Use a blush, rose-beige, or pale champagne chrome over a smooth ballerina base. Then place a micro crescent of ss3 clear or champagne stones near the cuticle on one or two nails. That’s it. No full crystal finger. No giant center charm. No scattered extras drifting around the set.
The chrome already changes with the light. The halo should act like punctuation, not a second headline.
I like this look most on medium-short ballerina nails because the reflective finish makes the shape look crisp even when the length is modest. Long chrome nails with too much bling can drift into costume territory. Shorter lengths keep them sharp.
And one more practical note—chrome shows every bump underneath. If the builder base is lumpy, the shine magnifies it. Smooth structure first. Stones second.
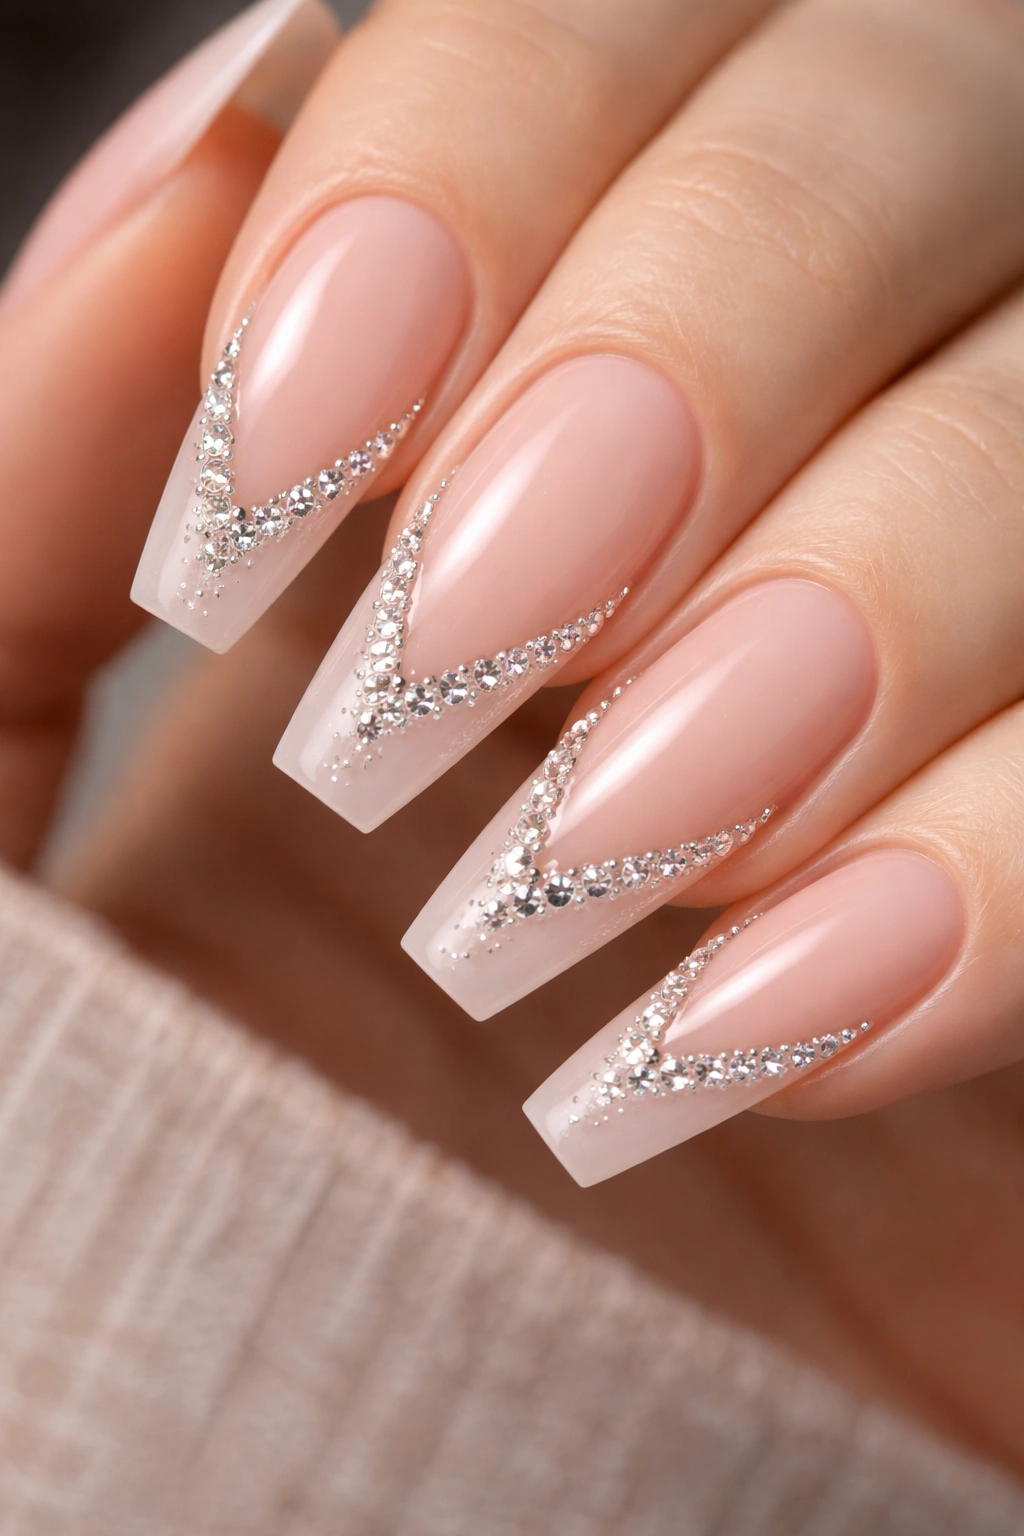
14. Negative Space Panels With Geometric Crystal Lines
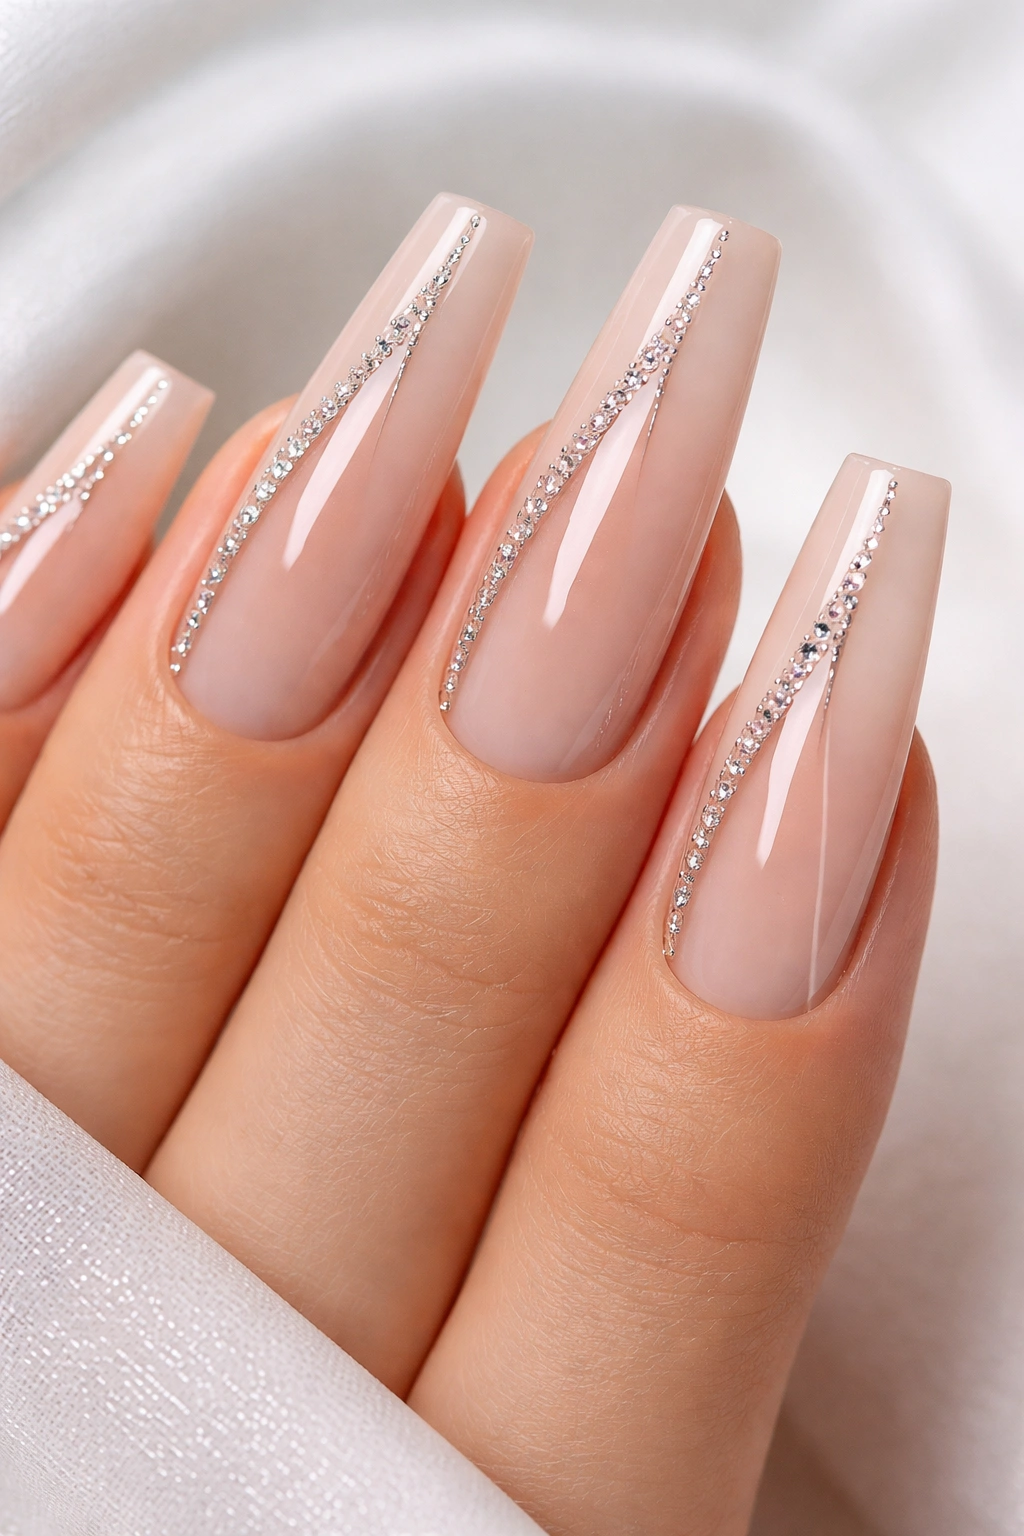
This one has more fashion-editor energy than soft bridal energy. You use negative space sections, sharp panel lines, and straight crystal rows to turn the ballerina nail into something almost architectural.
How the layout should look
Picture a nude or sheer base with one clear panel left exposed near the sidewall or down the center. A strip of micro crystals marks the border of that panel. Because ballerina nails already have straight edges, the geometry looks intentional instead of forced.
The trick is alignment. Crystal lines need to run parallel to the sidewall or cleanly across a panel edge. If the row wobbles, the whole set looks off. There’s no soft fade here to hide small mistakes.
Where this style works best
- Medium to long ballerina lengths
- Nude, beige, taupe, or translucent pink bases
- ss3 crystals with occasional metal studs for structure
- One to three feature nails, with the rest kept plain or lightly glossy
I wouldn’t choose this for a first-time bling set. It needs a steady eye, and it looks strongest when the nail shaping is razor-clean. Still, when the execution is good, few designs feel as sharp as this one.
15. Velvet Taupe Nails With a Mixed-Size Luxe Cluster
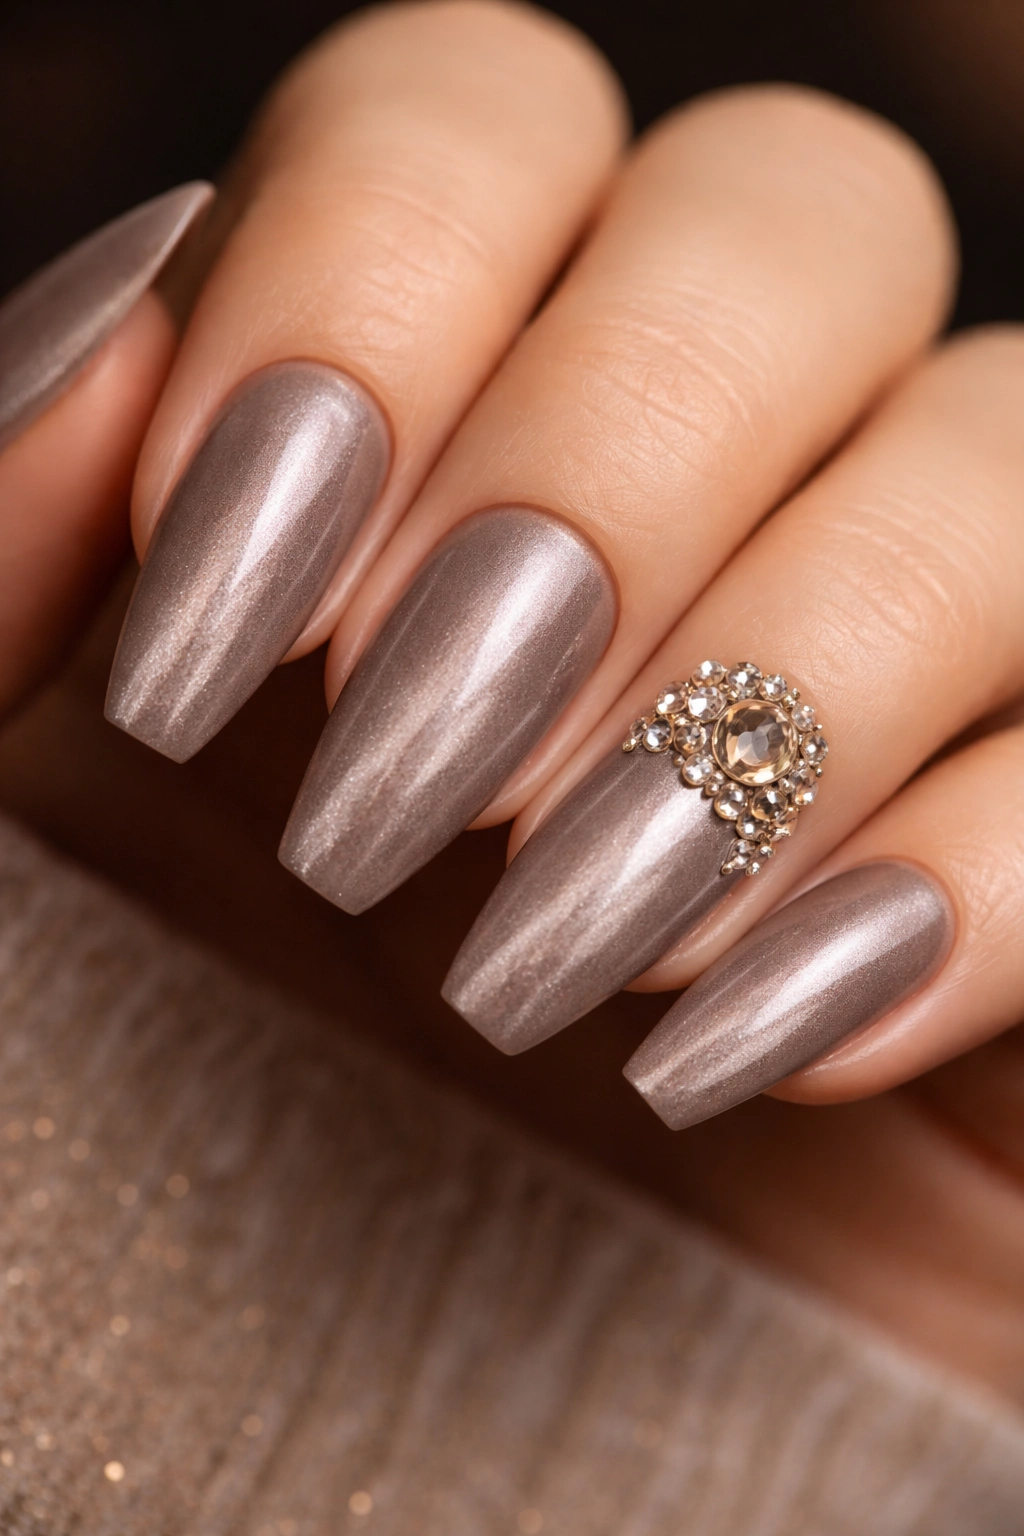
A magnetic velvet top coat in taupe or smoky beige has that soft, moving sheen that shifts as your hand turns. Add one mixed-size crystal cluster near the cuticle sidewall, and the set starts to feel like jewelry instead of polish.
This works because taupe is quiet. It gives stones room to sparkle without that hard contrast you get from black or white. I like using one ss12 focal crystal, two ss8 stones, a few ss5 fillers, and tiny caviar beads to build the cluster. Place it slightly off-center near the cuticle on one or two nails. Side placement keeps the free edge lighter and makes the cluster feel tucked in rather than plopped down.
You can go clear, champagne, or even smoky crystals here. Champagne is my pick because it blends into the warmth of taupe and keeps the look expensive-looking. Bright rainbow AB stones feel too loud against velvet magnetic polish.
This is not a beginner DIY manicure. Magnetic gel already needs timing and clean movement with the magnet. Add cluster placement on top of that, and the margin for error gets narrow. In a salon, though, this design can look outstanding—rich, moody, and still controlled.
How to Keep Rhinestone Ballerina Nails From Losing Stones
The prettiest set falls apart fast if the prep is lazy. Stone retention starts before the first crystal touches the nail.
Prep and placement that actually hold
The nail surface needs to be smooth, dry, and fully cured. Cuticle oil left on the plate, uncured top coat, or dust trapped near the sidewall can all weaken the bond. Heavier pieces should sit over a stable apex area, not hanging off the free edge where they’ll take the most impact.
Use gem gel or thick builder gel for larger stones. Flash-cure each nail once the layout is in place, then do a full cure. After that, seal the edges of the stones with a liner brush and top coat or clear gel—but do not flood over the faceted tops.
Everyday habits that save your manicure
- Wear gloves for dishes and long cleaning sessions
- Avoid using your nails to open cans, scrape labels, or pry lids
- Check snag points on sweaters and towels during the first day
- Press lotion around stones, not under them
- Book fills before the stones start sitting too far from the cuticle
Removal deserves patience. Bigger stones usually need to be lifted or filed down first, then the remaining product can be soaked or filed off depending on the system used. Do not rip them off. That shortcut can take layers of your natural nail with it, and the damage lingers far longer than the manicure did.
Final Thoughts
The best rhinestone ballerina nails are usually the ones with one strong idea: a cuticle cuff, a clean center stone, a sharp French outline, a single luxe cluster. You do not need bling on every nail to make the set feel dressed.
Scale matters more than sparkle count. Small stones on short nails, heavier clusters near the base, clean shaping underneath—those details decide whether a manicure looks intentional or crowded. I’d choose six well-placed crystals over thirty random ones any day.
If you’re saving ideas for your next appointment, save the placement as carefully as the color. Shade gets attention first. Placement is what makes the set hold together.
