

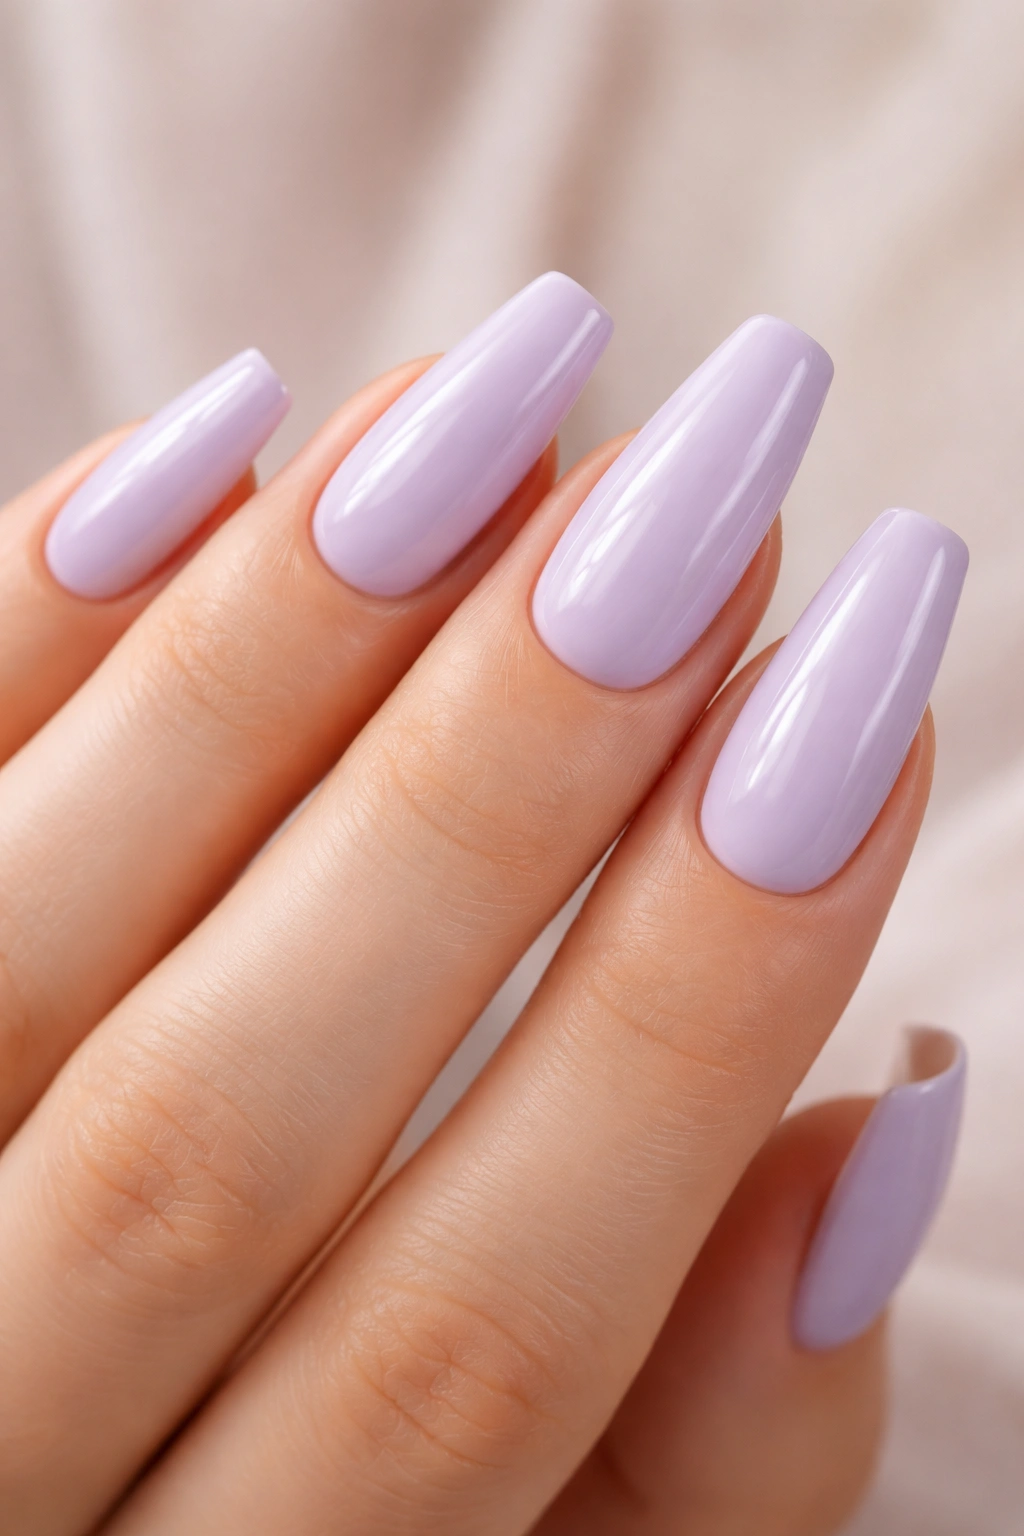
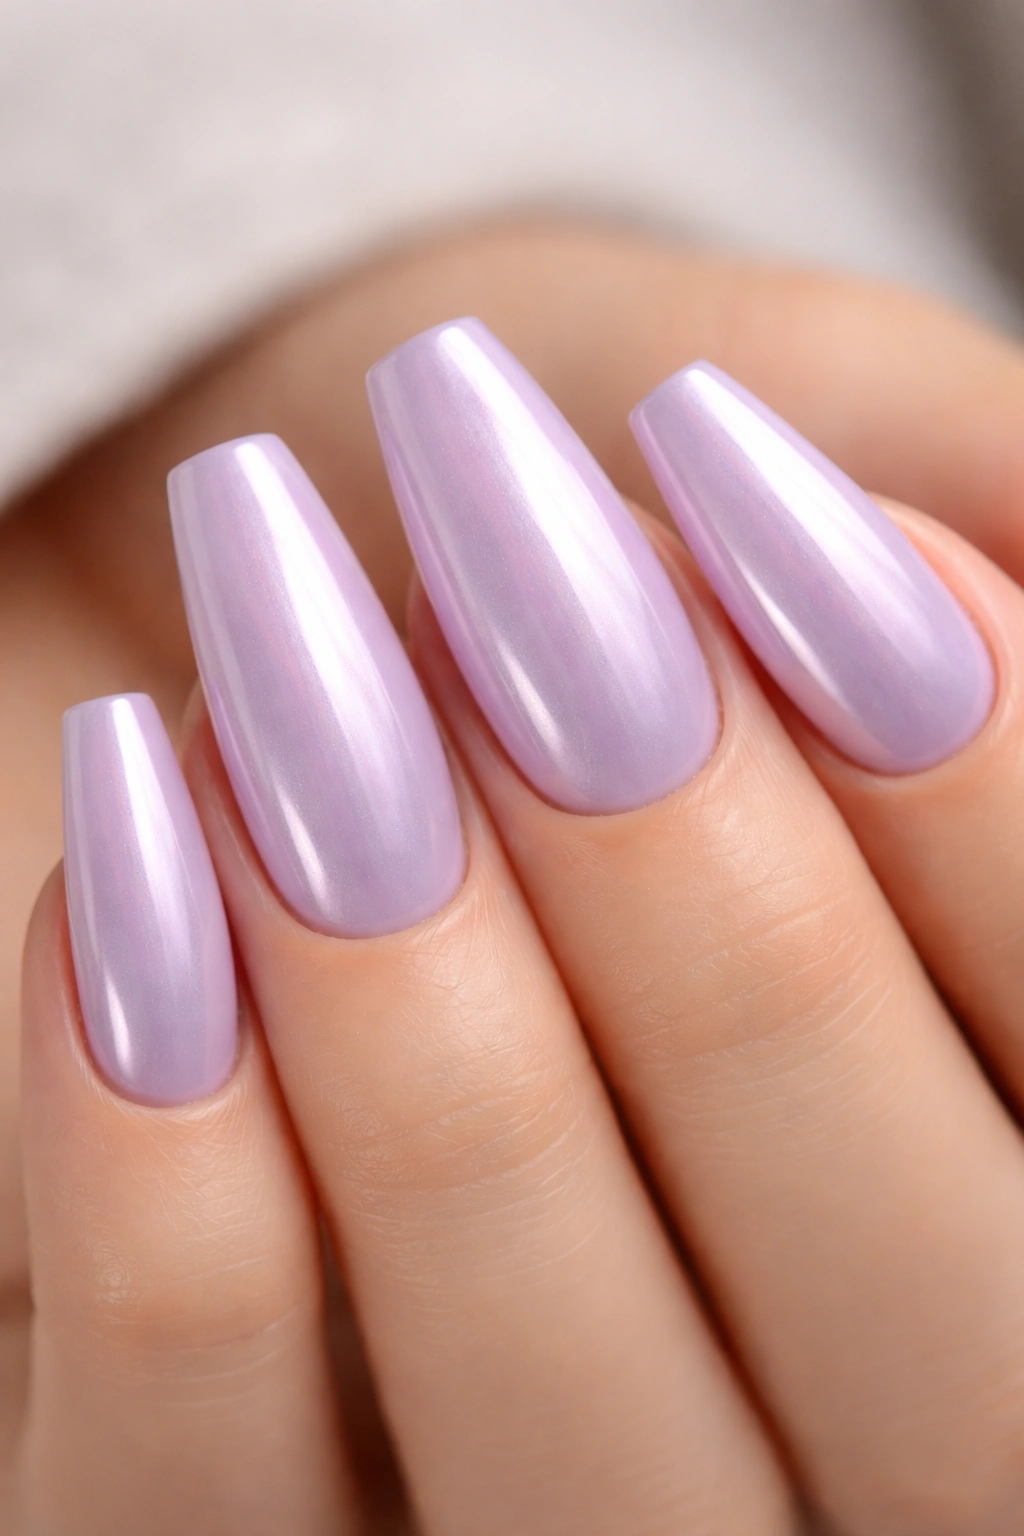
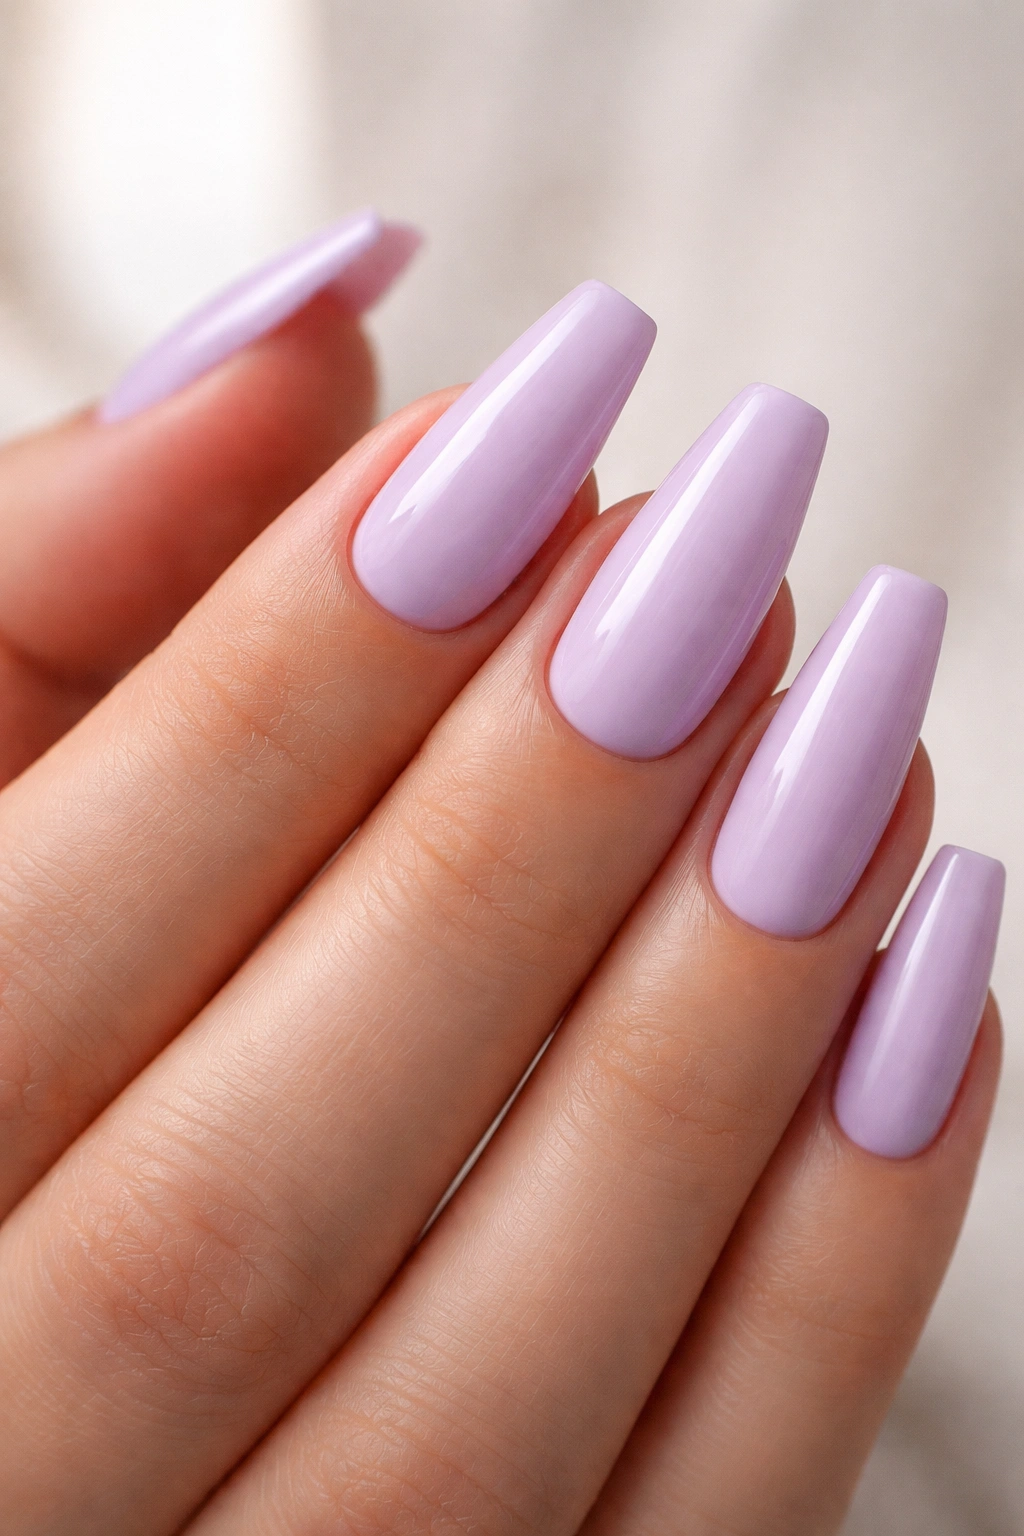
Lilac looks harmless in the bottle, but on a tapered nail it changes the whole hand. Lilac ballerina nails have that odd little magic some shades never manage: they soften the fingers, make rings stand out, and give pastel polish a cleaner frame than round or square tips usually do. The color sits between lavender and pink, so it feels calm rather than sugary.
The shape is doing half the work. Ballerina nails—flat across the tip with slim sidewalls—give pale shades a sharper outline, which matters more than people think. On a short squoval, lilac can read sweet. On a ballerina set, it reads planned.
There is a catch. Light purple shows every ridge, every dent in the builder layer, every sidewall that was filed a touch too far inward. If the apex sits too low or the free edge flares, pastel polish will advertise the mistake from arm’s length.
That’s also why a good lilac set looks so pulled together. Cream finishes, jelly layers, pearly glazes, tiny florals, crisp micro-French tips—some designs flatter the ballerina silhouette far better than others.
Getting the Lilac Base and Ballerina Shape Right
A strong pastel manicure starts before the color goes on. Ballerina nails need straight sidewalls first, taper second, otherwise the tip turns pinched and weak. If you’re building length with hard gel or acrylic, most nail techs aim for a gentle apex around the stress point and a tip that stays flat across the top 2 to 3 millimeters.
Shade choice matters too. Blue-based lilac can make redness in the hands look stronger, while a lilac with a drop of gray or pink tends to look smoother on more skin tones. Milky lilac is the safest place to start if you want the soft pastel look without that chalky, school-supply purple some creams can throw.
Light colors also need a smoother canvas than deep shades do. A ridge-filling base under regular polish, or a carefully leveled builder base under gel, keeps the surface from looking bumpy once the top coat hits. Dermatology guidance from the American Academy of Dermatology makes one point that deserves repeating here: do not peel off gel polish. Pulling it off can take layers of the natural nail plate with it, and pastel colors look rough fast on a thinned-out nail.
A quick salon checklist
- Ask for a softly tapered ballerina shape, not a wide coffin with blunt corners.
- Keep the free edge at least 4 to 6 millimeters past the fingertip if you want the shape to read clearly.
- Choose a milky or dusty lilac if you want the manicure to look softer in daylight.
- Use two thin coats instead of one thick coat. Pastels wrinkle and streak when they go on heavy.
- Cap the tips well. Ballerina edges chip first, especially on light shades.
Now for the fun part.
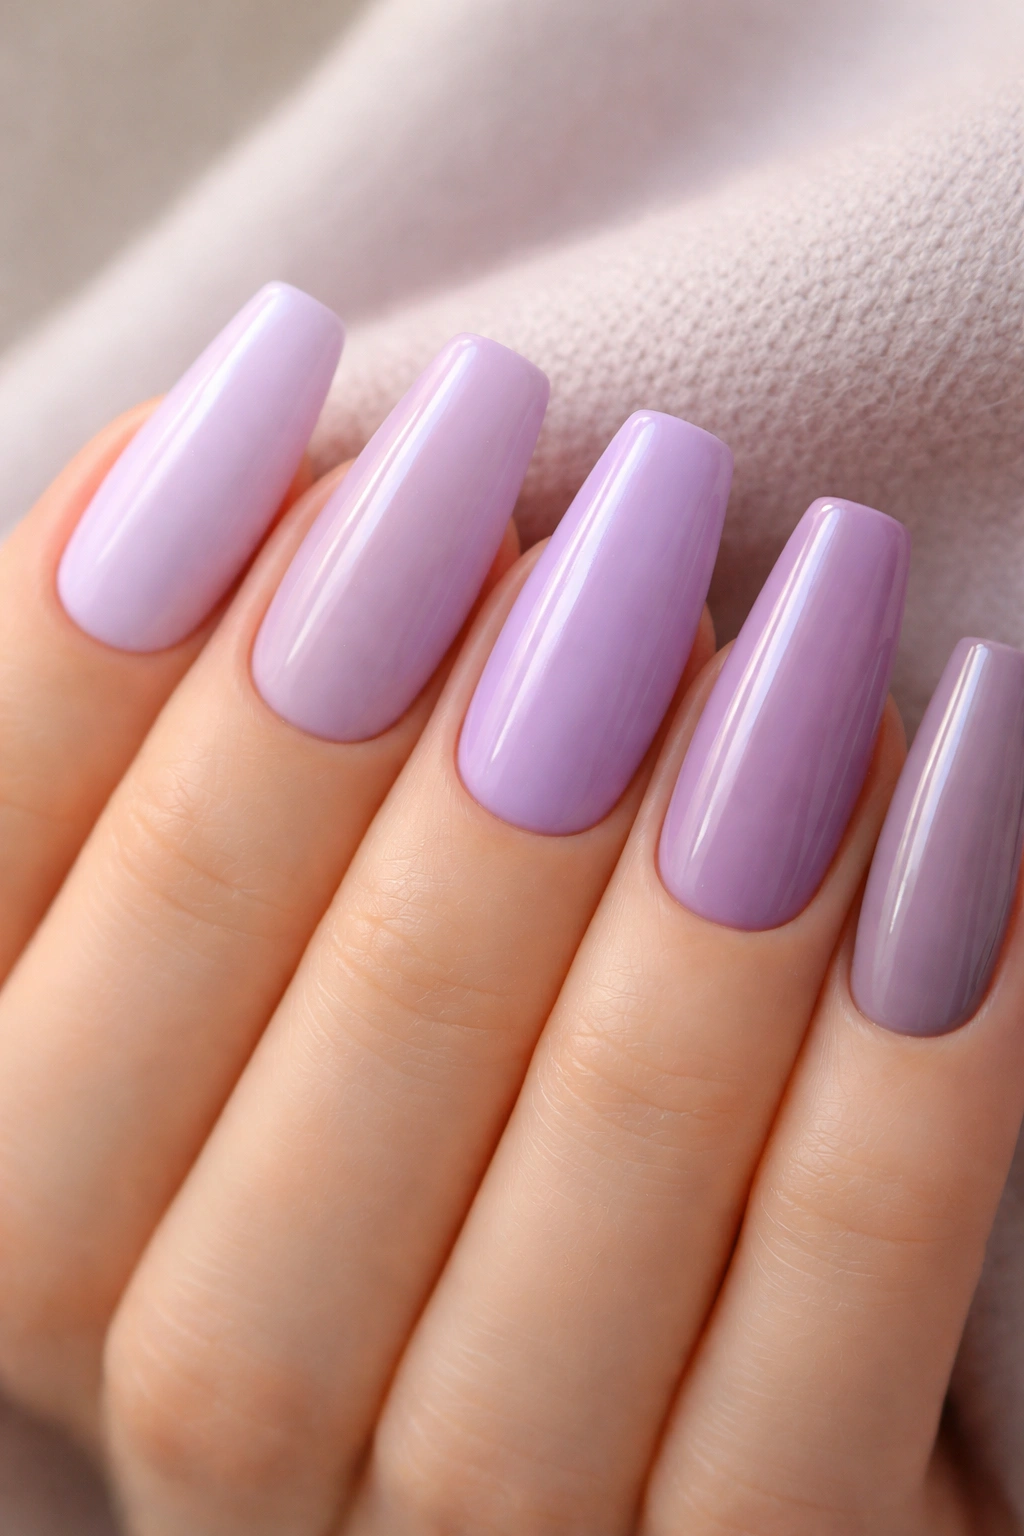
1. Milky Lilac with a Glossy Cream Finish
If you try one lilac set and stop there, make it a milky cream. It’s the cleanest, easiest version of the trend, and it gives you that soft pastel look without asking for glitter, art, chrome powder, or a steady line-painting hand.
The reason it works so well on a ballerina shape is contrast. The nail itself has structure—straight sides, flat tip, visible taper—while the color has a cloudy softness that smooths it out. That push and pull keeps the manicure from feeling sharp or severe. It lands somewhere right in the middle, which is a good place for lilac.
Creamy lilac also hides grow-out better than harsh white or baby pink. When the cuticle area starts to show after 10 to 14 days, the shift is softer, especially if the polish has a semi-sheer milkiness instead of full solid coverage.
What makes this one such a safe bet
- Best length: medium ballerina, with about 6 to 10 millimeters of free edge
- Best finish: high-gloss top coat, not matte
- Best undertone: lilac with a touch of gray if you want it to feel less candy-like
- Best pairing: silver rings, pearl accents, clean cuticles
A small detail makes a big difference here: ask for the color to stop one hairline away from the skin, not flooded into the cuticle. Pastel polish looks sloppy faster than dark polish does.
Tip: if your nail plate has visible ridges, use a blurring base under the lilac. One coat can change the whole result.
2. Sheer Nude Base with Baby Lilac French Tips
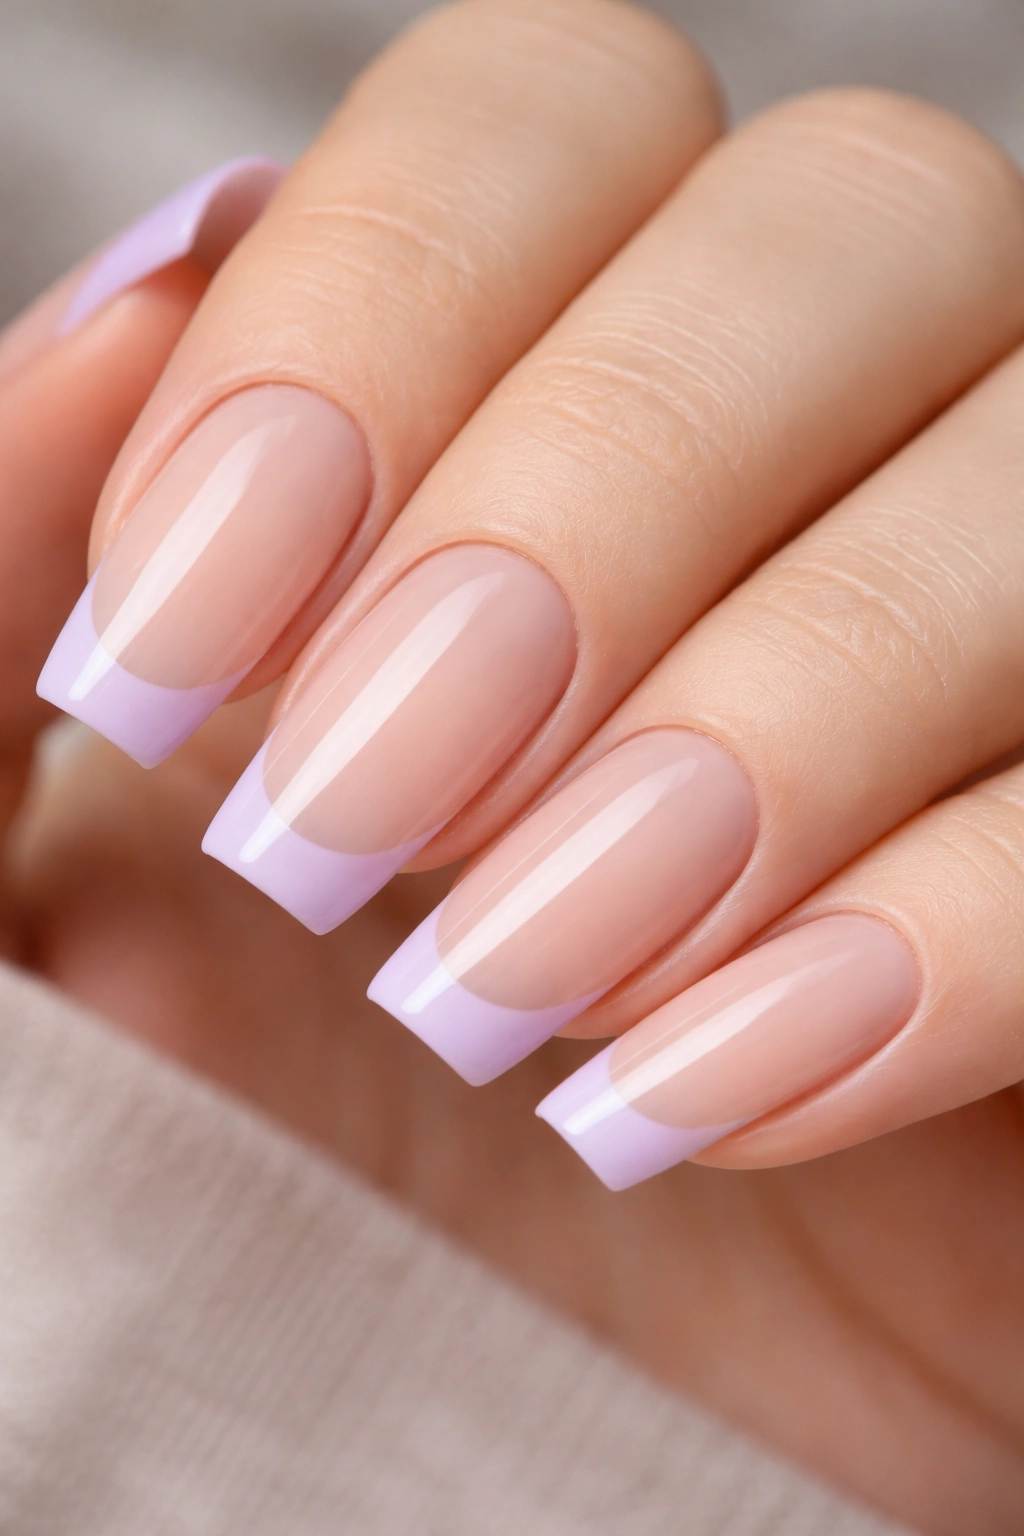
Want the lilac to show up without covering the whole nail? A baby French is where I’d go next. You keep the airy feel of a sheer nude base, then add a 1 to 1.5 millimeter lilac tip that follows the flat ballerina edge.
This design is sharper than a round French, and that is the point. The straight tip line mirrors the shape instead of fighting it, which makes the nail look longer. On shorter ballerina lengths, it can fake more length than a full coat of pastel ever will.
There’s also less room for streaks here. Full pastel coverage can drag, patch, or pool if the polish formula isn’t great. A sheer base plus a small lilac edge avoids that whole problem while still giving you the color story.
I’d keep the nude base neutral or pink-beige, not peach. Peach undertones can muddy cool lilac, especially under warm indoor lighting. If you want the set to feel soft, not sharp, ask for the smile line to stay low and almost straight rather than deeply curved.
No accent nails needed.
3. Blended Lilac-to-White Ombré Ballerina Nails
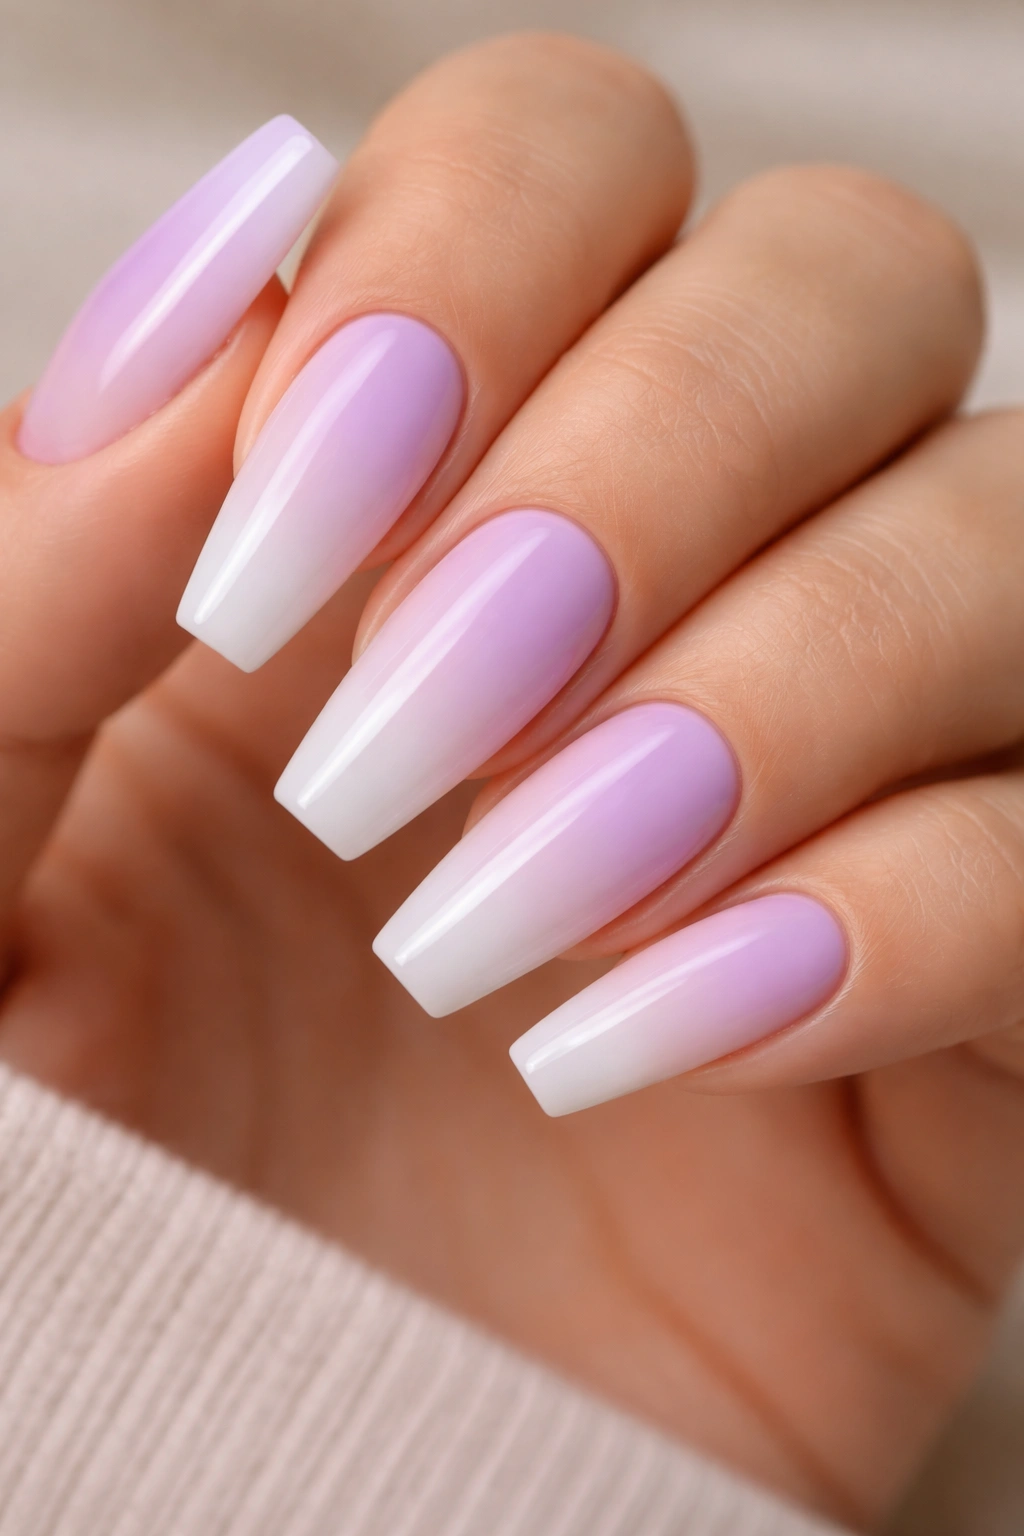
A harsh fade ruins this design.
When the blend is done right, though, lilac-to-white ombré looks like it belongs on the ballerina shape. The flat tip gives the white somewhere to settle, and the taper keeps the fade from turning into a block of color. You get movement from cuticle to edge, which helps pale nails look more interesting without adding stones or foil.
I like this set best when the lilac starts near the cuticle and diffuses into a milk-white tip. It makes the fingers look longer, and it gives the manicure a clean, airy finish that still reads pastel. Airbrushing gives the smoothest fade, but a sponge blend can work if the layers stay thin and the white is softened with a milky top coat.
How to keep the fade soft
- Start with a sheer white, not an opaque paper-white.
- Use a cool milk-lilac instead of a neon lavender.
- Keep the center of the nail slightly translucent so the colors can melt into each other.
- Finish with a gloss top coat, which smooths out any dry sponge texture.
This one does not need extra art. A fade, a clean shape, a bright top coat—that’s enough. Add too many details and the ombré disappears.
4. Matte Lilac with Glossy Micro-French Edges
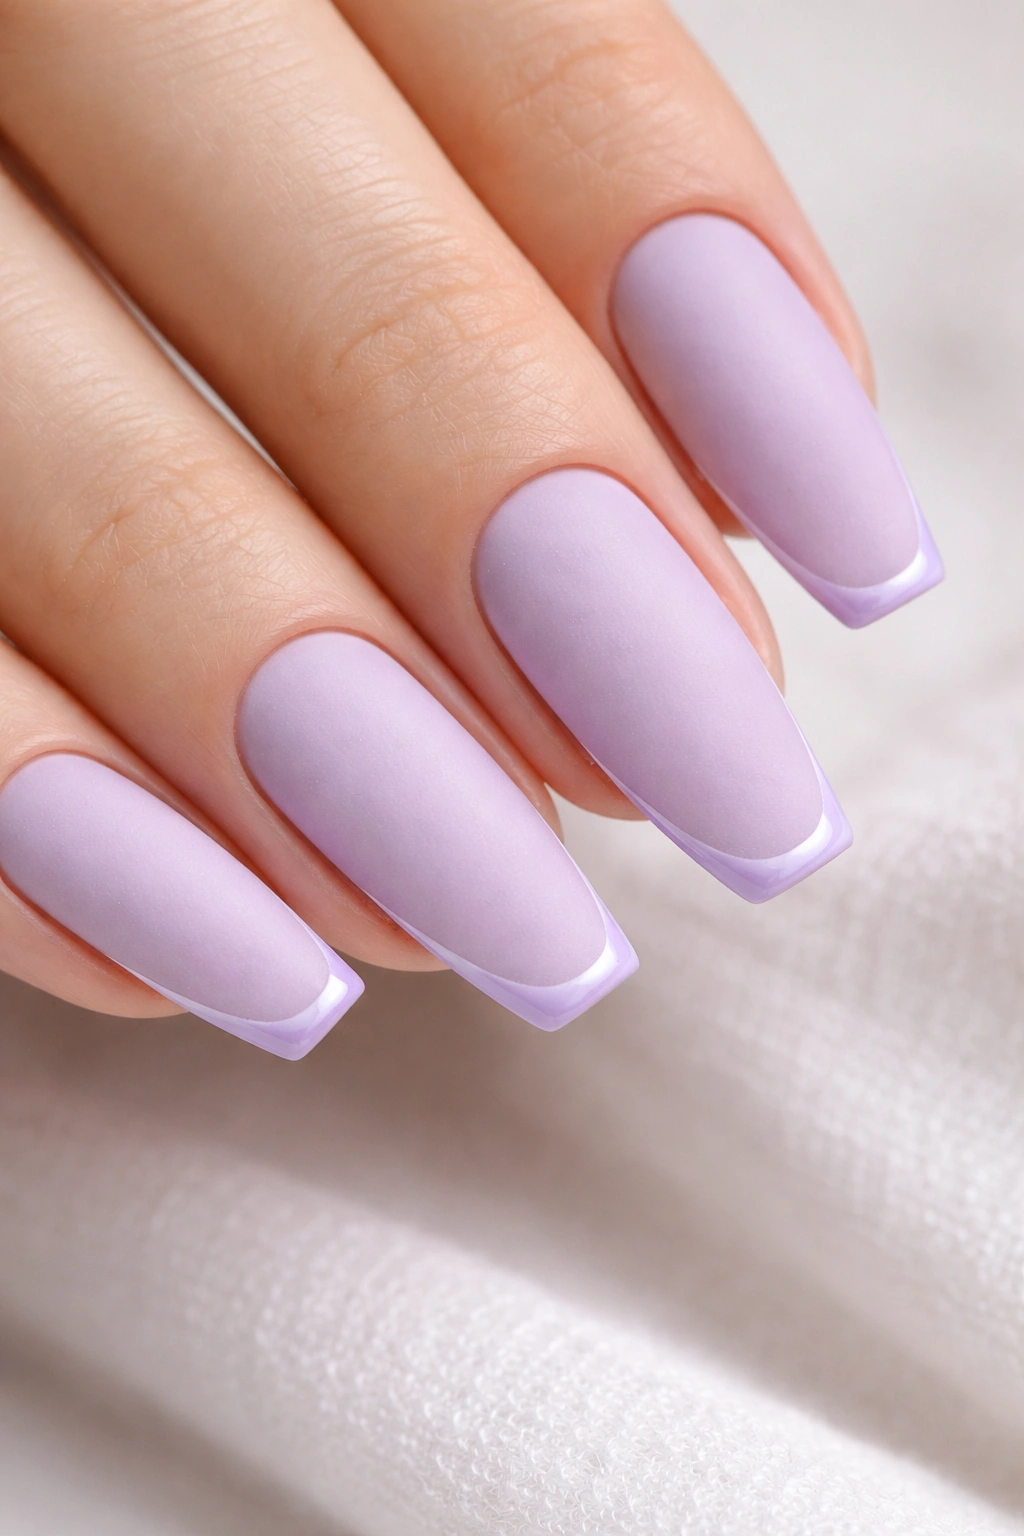
Matte pastel can go chalky fast. A thin glossy edge fixes that.
This design uses one finish to rescue the other. The nail gets coated in matte lilac, then the free edge is traced with a hair-thin glossy French line in the same shade or a close match. It sounds small. On the hand, it changes the whole manicure.
The matte surface makes lilac look velvety and powdery, while the glossy edge puts definition back into the shape. That matters on ballerina nails because the silhouette is the main event. If the outline gets blurry, the shape loses impact.
I like this most on medium to long sets where the tip has enough width for that micro line to register. On a short ballerina, the edge can disappear unless the tech has a steady brush and keeps the line crisp.
A warning, though: matte top coats show lotion marks, makeup smudges, and scratches faster than gloss. If you use hand cream often, reach for this look when you can live with a little maintenance.
- Keep the line around 0.5 to 1 millimeter
- Skip chunky art
- Use cuticle oil at night so the matte finish doesn’t make the skin look dry
5. Pearl-Glazed Lilac Chrome
Under indoor light, this one shifts from cool purple to a soft pink-white sheen. Not glitter. Not mirror chrome. More like a layer of pearl over silk.
That finish works because the base color is already gentle. A pearl glaze over bright purple can look busy. Over lilac, it looks smooth and expensive in the old-school sense—more polished blouse than disco ball. I’m picky about chrome on pastel nails, and this is one of the few versions I keep coming back to.
The best base is a creamy lilac with full, even coverage. Then the pearl powder gets rubbed over a no-wipe top coat and sealed in. If the base underneath is streaky, the glaze will not hide it. It will point right at it.
Short ballerina nails can wear this, but medium length shows the shift better because you get more surface area across that flat tip. The sidewalls catch a cooler shine, and the center tends to glow warmer, which makes the manicure look almost lit from within.
Skip bold gems here. Skip foil too. The glaze already gives movement, and piling on more detail starts to cheapen the finish. If you want an accent, keep it to one tiny pearl or a slim silver line on one nail only.
And ask to see the color in daylight before you commit. Warm salon bulbs can make a cool lilac look grayer than it actually is.
6. Translucent Lilac Jelly Layers
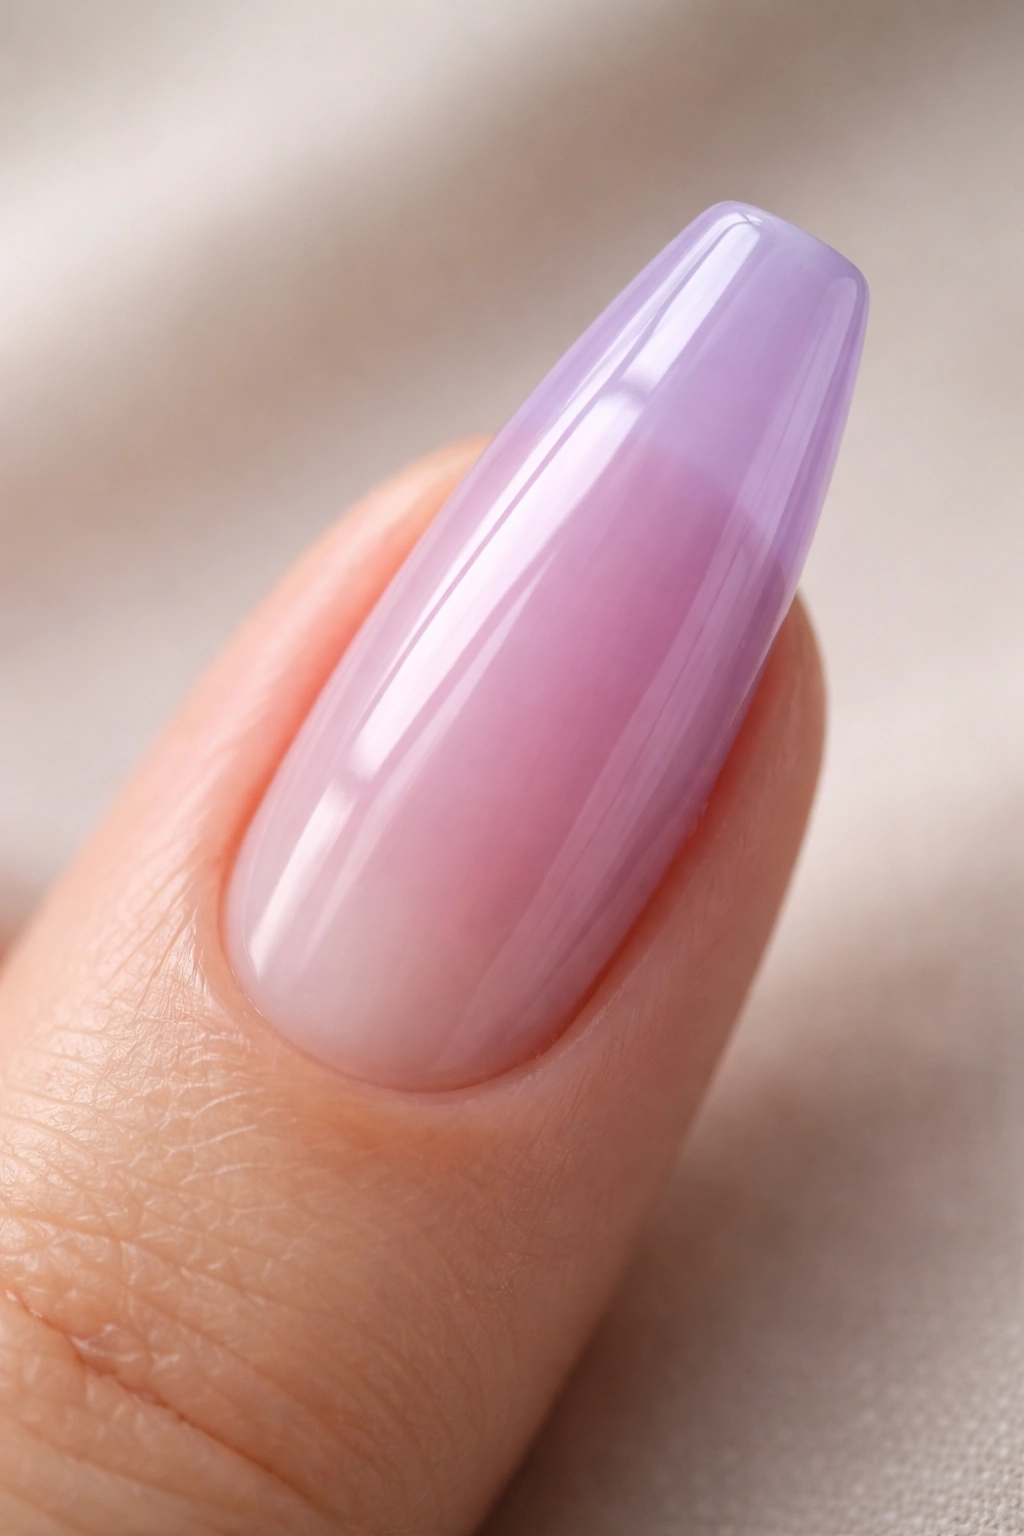
Unlike a solid cream, a jelly finish lets light pass through the color. That alone makes it feel softer on the hand.
Jelly lilac works best when the nail underneath has structure. A builder gel base, a neutral sheer overlay, or a clean natural nail with a smoothing coat gives the color something even to sit on. Then the tech can build the tint with two or three syrup-thin layers until the shade looks glassy rather than patchy.
This look has more edge than people expect. On a ballerina shape, that see-through quality makes the tip look crisp and modern, especially if the free edge stays clean and symmetrical. The nail reads lighter, almost like colored glass.
If you want the soft pastel effect, keep the jelly pale and cool. Push it too deep into grape-purple and it loses that airy quality.
Best uses for a lilac jelly set
- A clean, minimal manicure with no nail art
- A base for encapsulated shimmer or dried flowers
- Spring events, bridal showers, weekend wear—anything where you want color without a heavy finish
One catch: jellies show trapped bubbles and uneven application fast. Thin coats matter more here than in almost any other lilac design.
7. Lilac Marble with White and Gray Veins
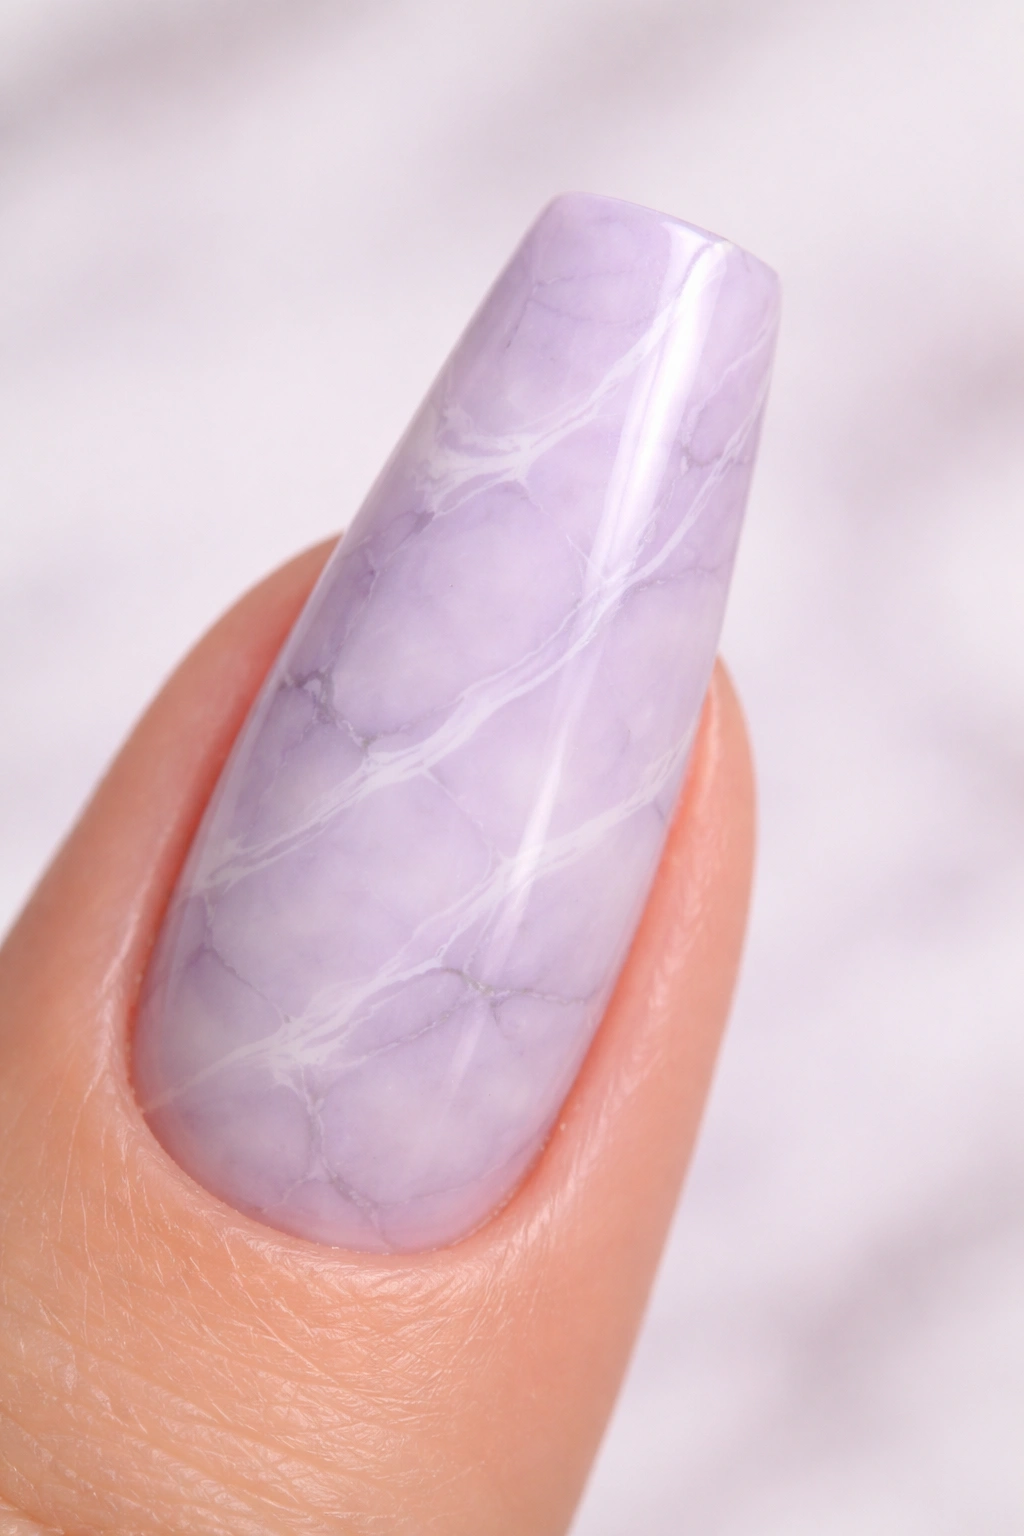
Marble is where pastel manicures often go wrong. The lines get thick, the contrast turns muddy, and the whole nail starts looking crowded.
When it’s handled with restraint, though, lilac marble has a soft stone effect that suits ballerina nails almost better than square or almond shapes. The long sides give the veining room to run, and the flat tip makes the design feel intentional instead of random.
I’d start with a pale lilac base, then drag in hair-thin white and dove-gray veins with a detail brush or blooming gel. Two or three lines per nail is enough. More than that, and the pattern turns stiff. You want negative space between the veins so the base color can breathe.
Here’s the trick most photos do not tell you: marble looks better when not every nail matches. Let one nail have more gray, one lean whiter, another stay almost plain. Real stone isn’t uniform, and a manicure shouldn’t fake it too hard.
- Keep at least 60 percent of each nail calm and open
- Use gray sparingly; too much makes lilac look dirty
- Seal with gloss, not matte, unless you want a chalkier stone finish
This is a strong choice if you like pastel nails but want a little texture without glitter.
8. Tiny White Daisies on a Cream Lilac Base
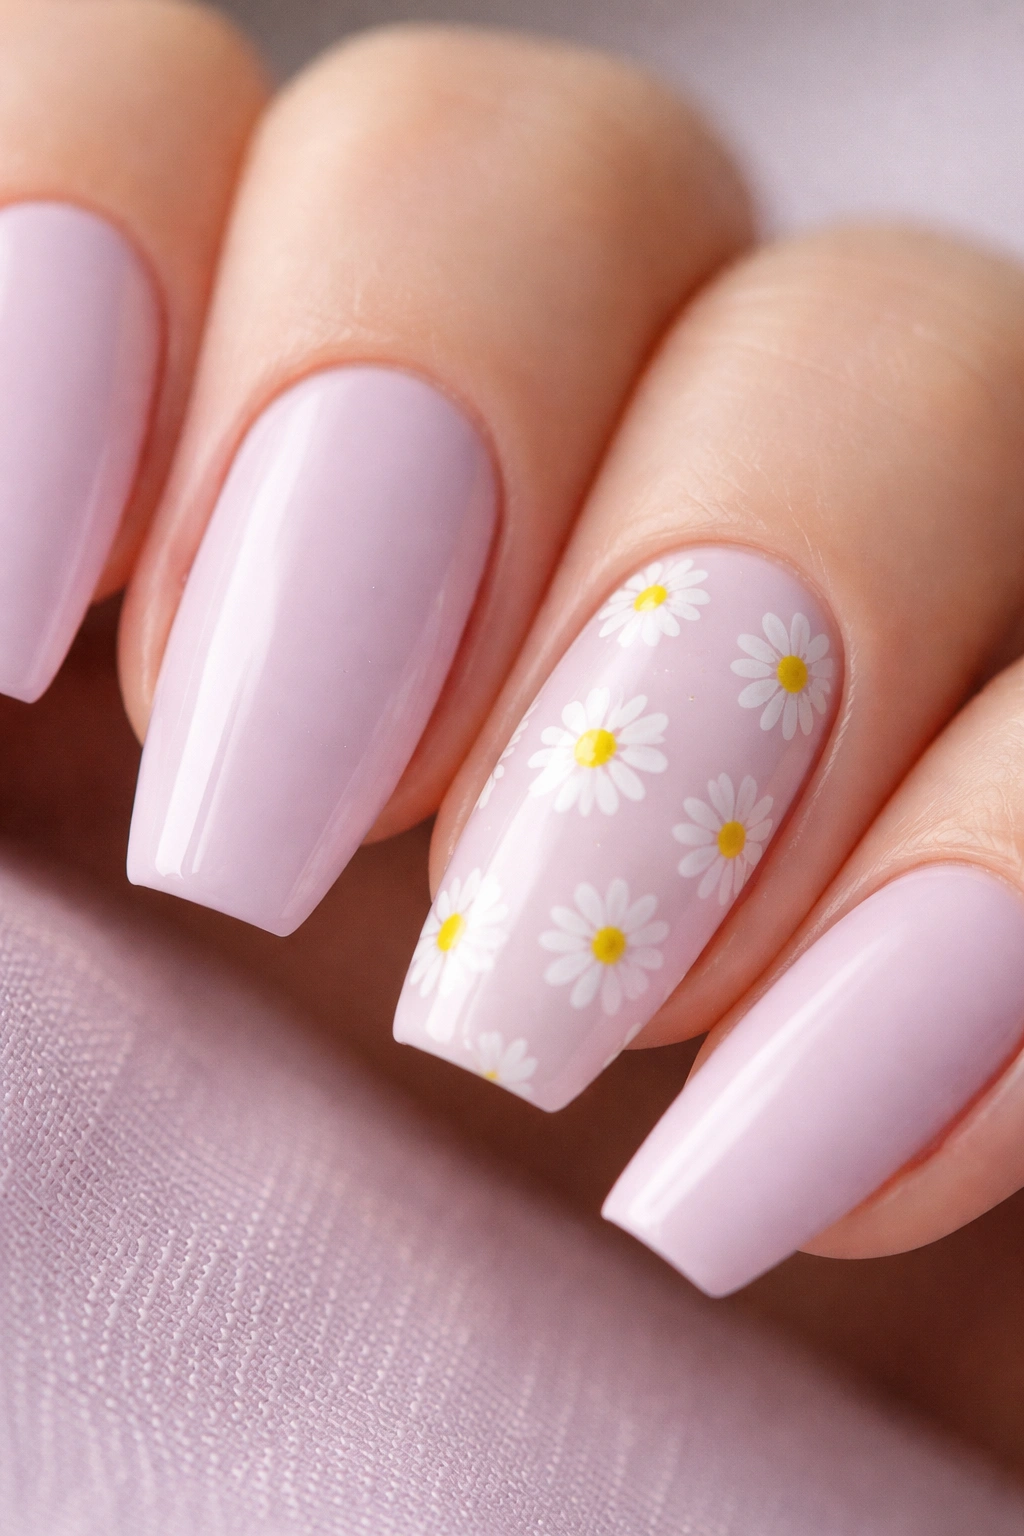
Florals can turn childish fast. Small daisies on lilac only work when the scale stays disciplined.
I’d place them on one to three nails, not all ten. A ring finger accent and a thumb detail are usually enough. The daisy petals should be tiny—five short white strokes or dot petals with a mustard-yellow center no larger than a pinhead. Once the flowers get too large, the ballerina shape starts competing with the art.
Placement matters more than flower count
Scatter the daisies near one corner, along the cuticle edge, or drifting up one side of the nail. Centered flowers on every nail can flatten the shape and make the set feel heavy. Corner placement leaves room for that slim tapered outline to still show.
A creamy lilac base works better than jelly for this design because the white petals stay crisp. If you do want transparency, keep it on accent nails only and use a more opaque lilac behind the daisy art.
This is one of those designs that looks fresh with a short or medium ballerina length. You do not need dramatic length for it to make sense. In fact, shorter often looks cleaner here.
Small flower, small center, lots of open space. That’s the recipe.
9. Lilac Aura Ballerina Nails with a Blurred Center
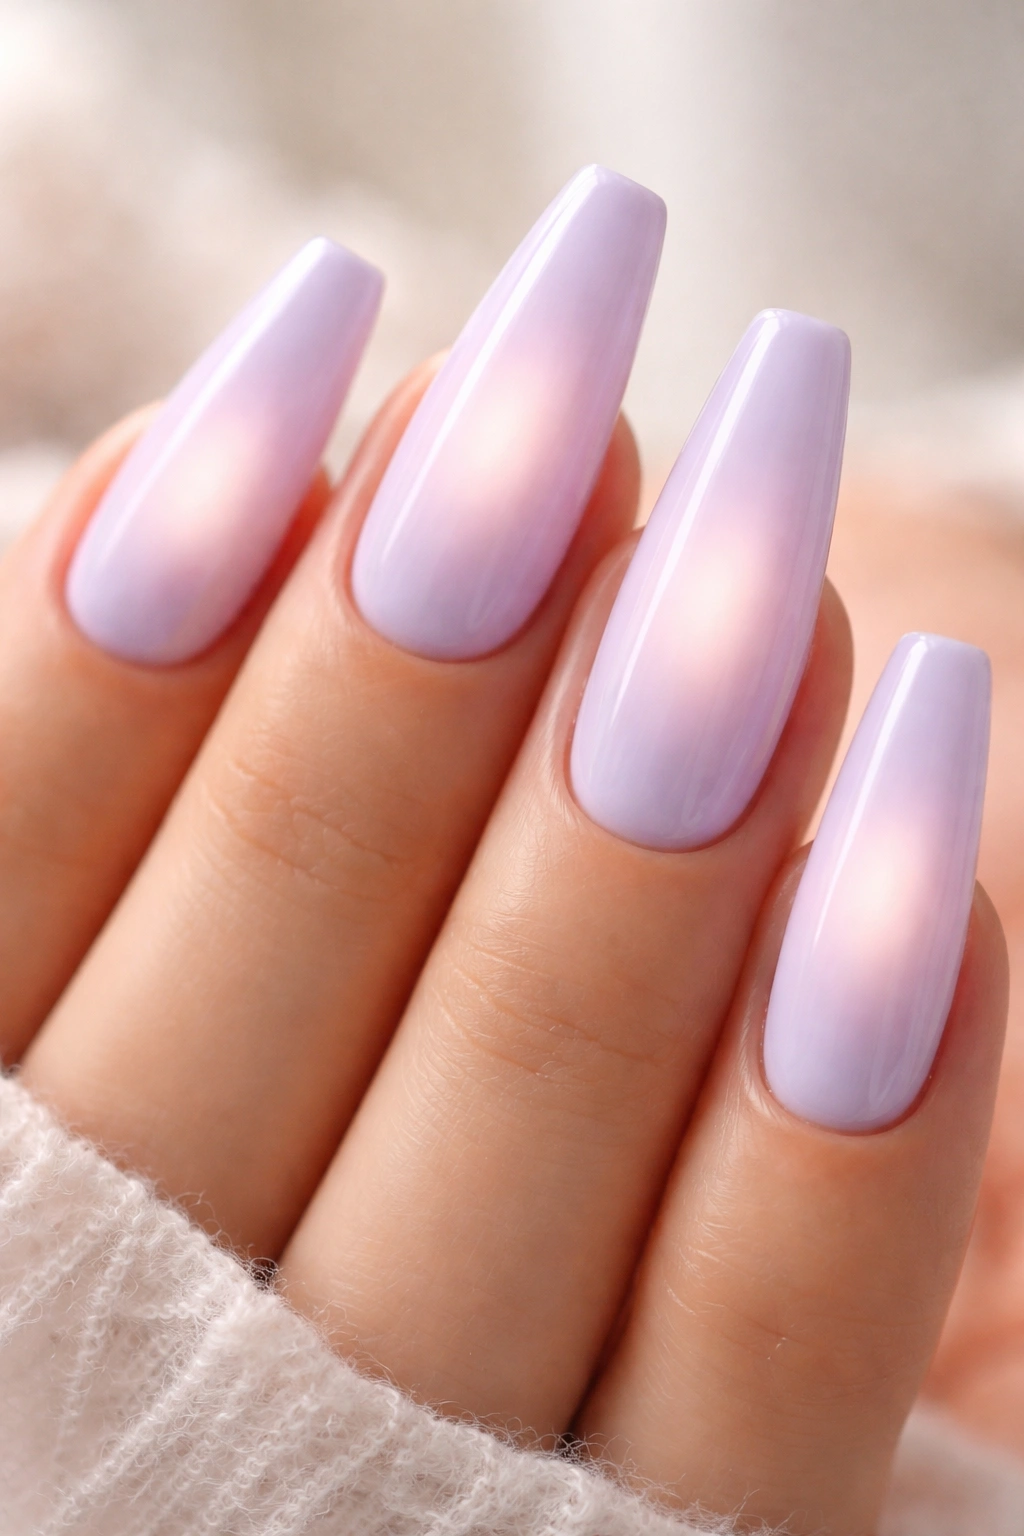
Aura nails do not need neon pigment. A pastel version can be far softer, and lilac is one of the best colors for it.
The prettiest take uses a pale lilac base with a blurred center glow in white, baby pink, or an even lighter lilac. On a ballerina nail, that haze sits nicely inside the tapered frame, almost like a soft-focus filter for the nail. Airbrush gives the smoothest result, though a sponge blend can still look good if the halo stays diffused.
This set benefits from length. A medium or long ballerina gives the glow room to spread before it hits the sidewalls. On a short nail, the aura can look like a round dot placed in the middle with nowhere to go.
I’d skip extra line work here. The whole point is blur. Add French edges, stones, or thick chrome outlines and the softness disappears. If you want detail, try one tiny crystal at the cuticle on each ring finger and stop there.
The color pairing matters. White in the center makes the manicure look cleaner and cooler. Pink warms it up. A slightly darker lilac center gives the moodiest version of the bunch.
10. Side-Swept Lilac French with Negative Space
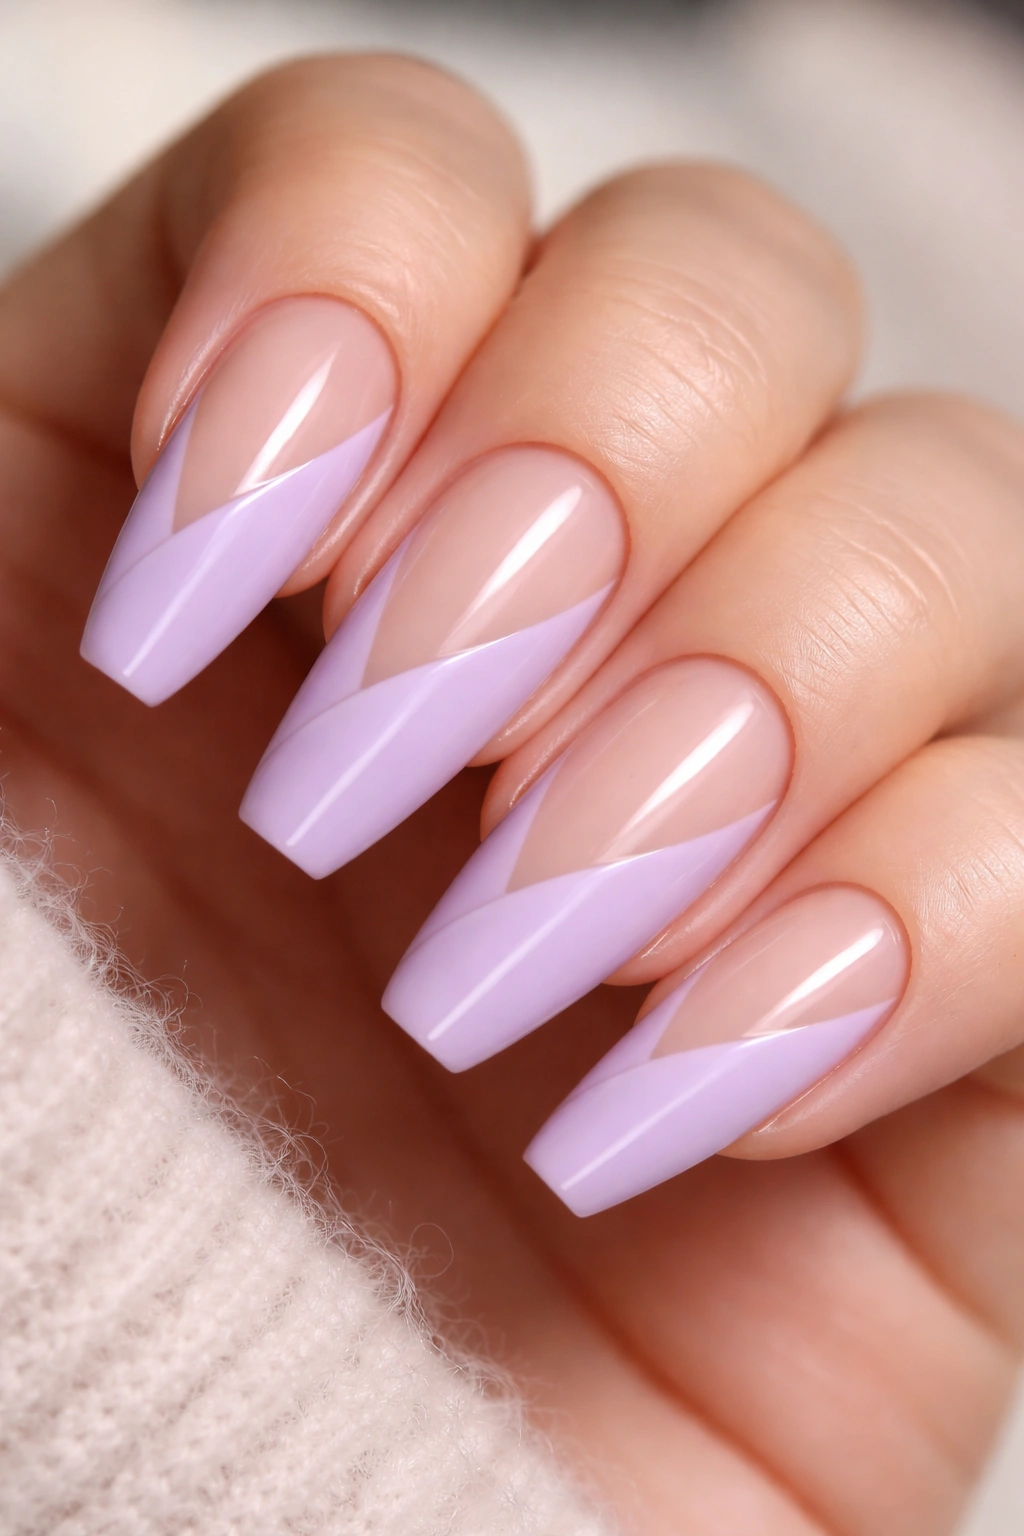
Longer-looking fingers.
That’s what this design does best. Instead of painting the tip straight across, the lilac sweeps diagonally from one sidewall toward the center or opposite corner, leaving part of the nail bare or covered only with sheer nude. Because the line runs on an angle, the eye follows it upward, which makes the nail look leaner.
This style works especially well on ballerina nails because the shape already has built-in direction. You are not fighting the silhouette. You are nudging it. A 35- to 45-degree sweep usually looks cleaner than a dramatic slash, and a soft lilac line keeps the contrast light.
I like a deep side French on the index and middle finger, then a simpler diagonal edge on the thumb and pinky. That slight mismatch gives the set movement without making it feel chaotic.
Negative space also buys you easier grow-out. Since part of the nail stays sheer, the gap near the cuticle does not scream for attention after the first week. If you wear your manicure hard—typing, lifting boxes, digging through bags—this design tends to age more gracefully than a full pastel coat.
One note. Keep the nude base cool. A warm beige can muddy the lilac line in low light.
11. Tonal Lilac Skittle Ballerina Set
Picture five lilac shades lined up from milk-purple to smoky mauve. Same shape, same finish, slightly different color on each nail. When it’s done with restraint, a skittle set gives you variety without wrecking the soft pastel mood.
The trick is undertone control. Do not mix a blue-violet lilac, a pink candy lavender, a gray mauve, a dusty plum, and a bright orchid and call it cohesive. You want neighboring shades, not distant cousins. Keep them within one cool family and let the shift happen in depth, not in temperature.
How to keep a tonal set cohesive
- Choose five shades that sit side by side on a swatch ring
- Keep the finish the same across all nails—gloss or matte, not both
- Arrange the colors from light to deep instead of random placement
- Stop at dusty mauve; once you hit plum, the pastel feel starts fading
This design is smart if you’re indecisive or you want more visual interest without art. It also photographs well in daylight because the tonal changes show up from one finger to the next, even when the manicure itself stays quiet.
I’d start the lightest shade on the pinky and deepen toward the thumb. That placement usually looks balanced when the hand is relaxed.
12. Silver Cuticle Half-Moons over Dusty Lilac
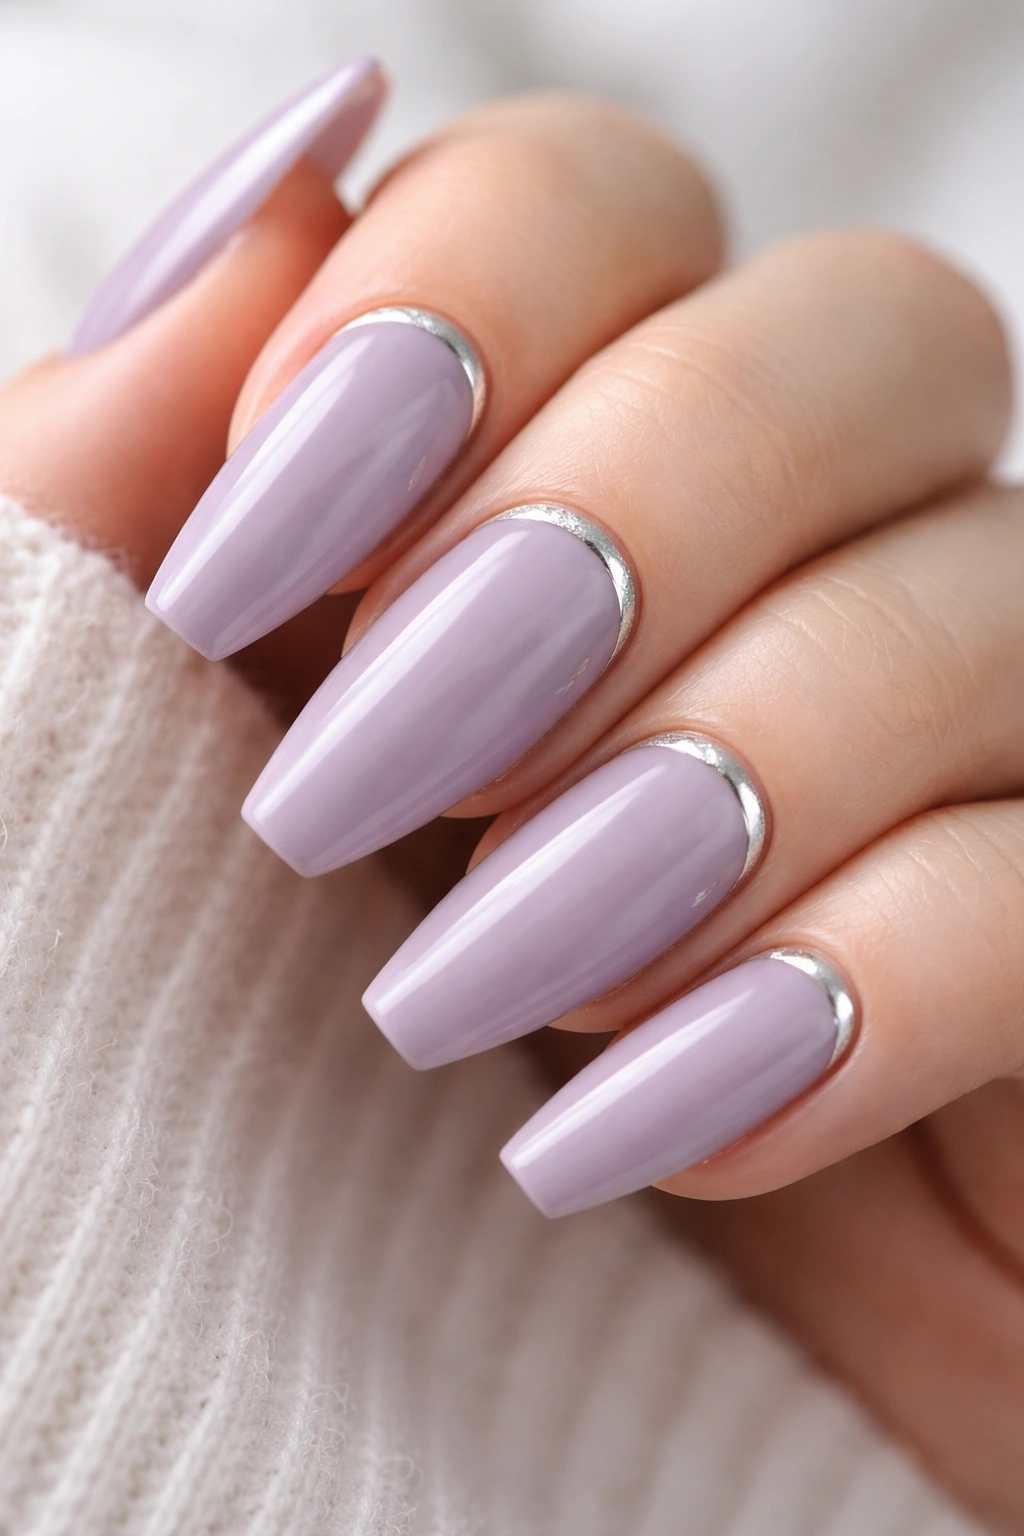
This is the manicure version of jewelry. A thin silver half-moon tucked along the cuticle over dusty lilac gives the nail a dressed-up edge without taking over the color.
Placement is everything. The metallic arc should hug the natural cuticle line and stay narrow—around 1 millimeter is enough. Too thick, and it eats into the nail bed visually. Too bright, and the manicure starts reading holiday instead of pastel.
Silver tends to flatter lilac better than yellow gold because both lean cool. If you wear warmer jewelry, a softer champagne metallic can bridge the gap without looking brassy. I would still keep the lilac dusty rather than bright; a muted base gives the metal room to stand out.
There’s a practical side to this design too. A half-moon near the cuticle can make regrowth look less abrupt because the eye reads the metallic detail first. It’s a small optical trick, but it helps.
No need to put the half-moon on every nail if you want a lighter look. Two accent nails can carry the idea while the rest stay plain lilac cream. That split often feels cleaner than ten matching metallic arcs.
13. Lilac Glitter Fade from Tip to Middle
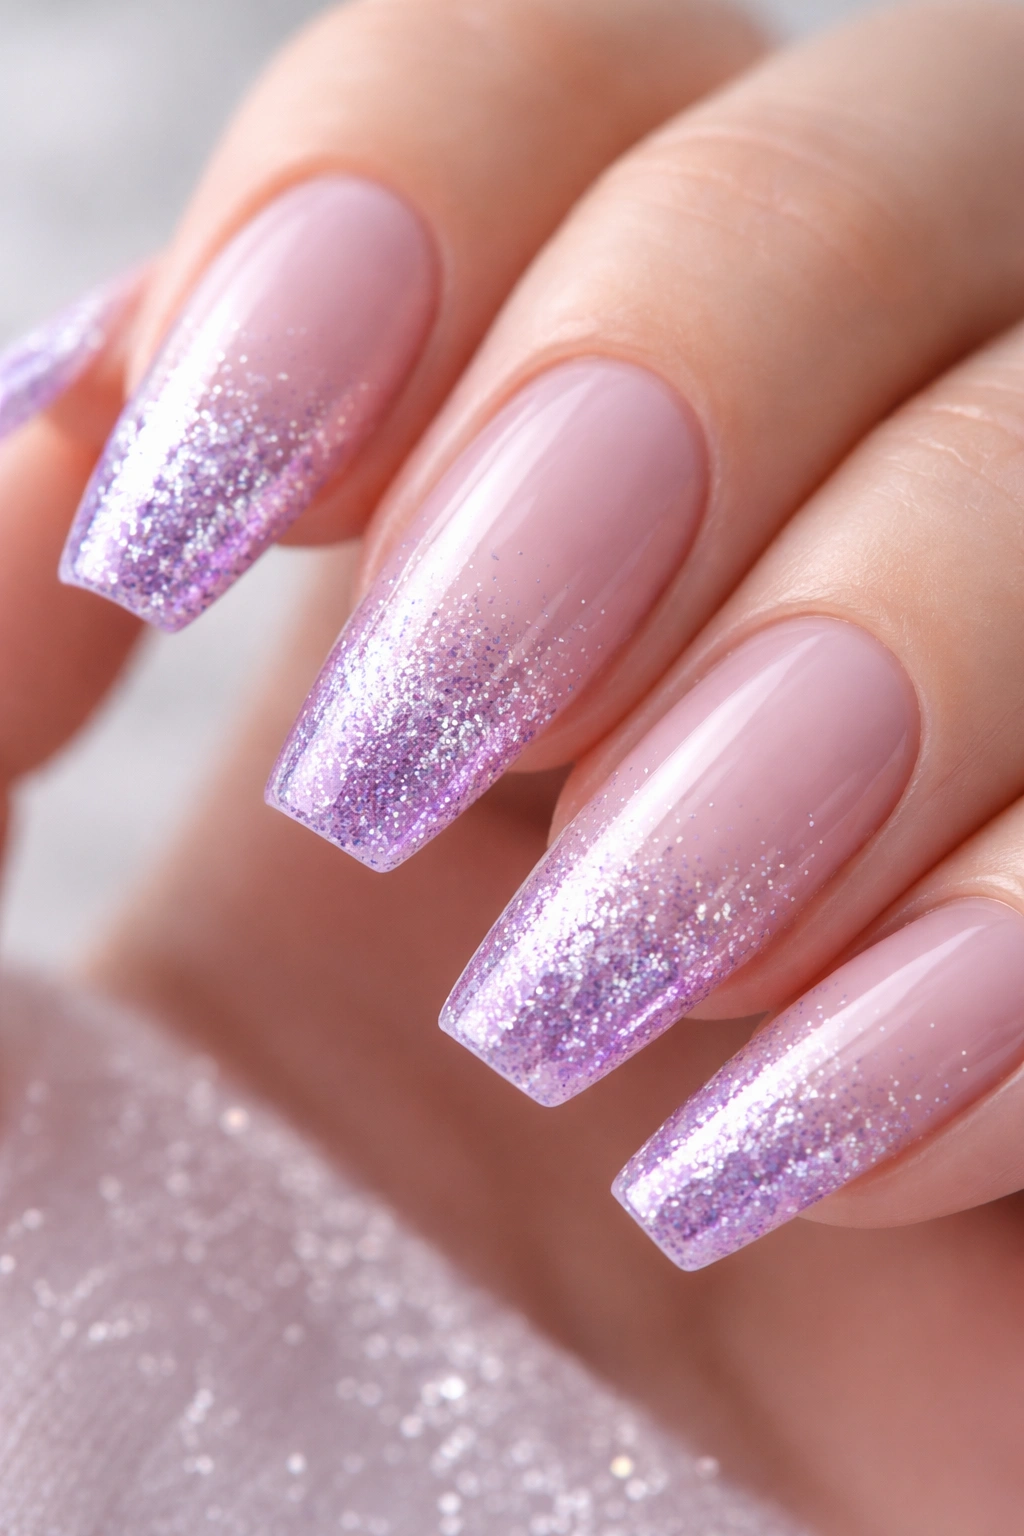
Can glitter stay soft? It can—if the pieces are tiny and the placement stays controlled.
A lilac glitter fade works best when the sparkle starts dense at the tip and thins out toward the center of the nail. On a ballerina shape, the flat edge gives the glitter somewhere crisp to gather before it melts inward. The result feels lighter than an all-over shimmer coat, which can sometimes flatten pastel shades.
Micro-glitter is the move here. Think fine reflective particles or tiny hex pieces under 0.5 millimeter, not chunky festival glitter. Large pieces break the smooth pastel effect and can make the tips look bulky under top coat.
What to ask for
- A sheer or creamy lilac base
- Fine holographic or pearl shimmer, not oversized sequins
- Glitter concentrated on the outer one-third of the nail
- Two layers of top coat if the glitter texture feels rough
I like this look most for people who want one sparkly set without going full chrome. It still reads lilac first, shimmer second, which keeps it wearable beyond a single event.
If you want the manicure to stay airy, leave the ring finger plain or use a lighter fade on it. A little inconsistency helps the whole set look less rigid.
14. Fine White Ribbon Line Art on Lilac
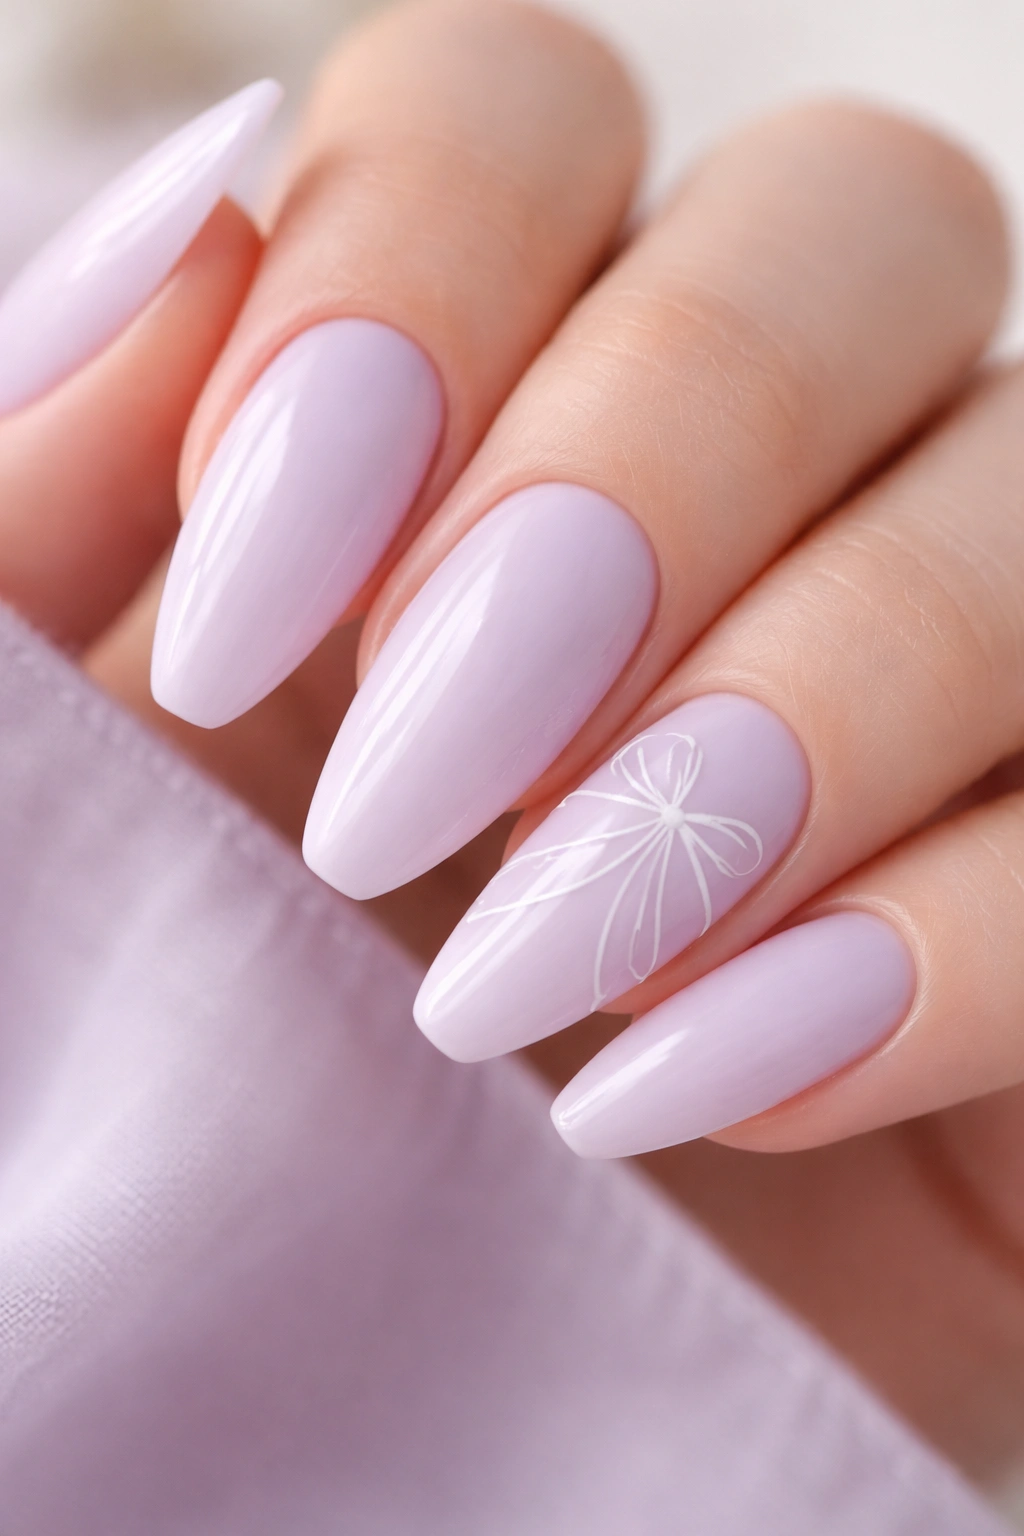
One ribbon on each ring finger is enough.
That sentence saves this design from itself. White ribbon line art—bows, loose loops, soft trailing lines—can look sweet and graphic at the same time on a pale lilac base, but only if you stop before the set gets crowded. The ballerina shape already gives you a long canvas. You do not need to fill all of it.
A milky lilac background works best because the white line stays visible without screaming. The detail brush should be long and fine, and the line needs to stay thin from start to finish. Thick white paint kills the softness fast.
Keeping line art crisp
Use a 7 to 9 millimeter striping brush if you’re painting by hand, and cure one nail at a time if the gel tends to spread. Place the bow or ribbon detail slightly off-center so the nail still has open space on one side. That little shift helps the shape stay visible.
I’d keep the art to two nails, maybe three if the rest are plain. Add a tiny dot at the knot if you want more definition, though I’d skip rhinestones. The line work is the feature here.
This is one of the more feminine lilac looks in the group, though it can still feel clean if the base is quiet and the art stays spare.
15. Lilac Encapsulated Dried Flowers in Clear Gel
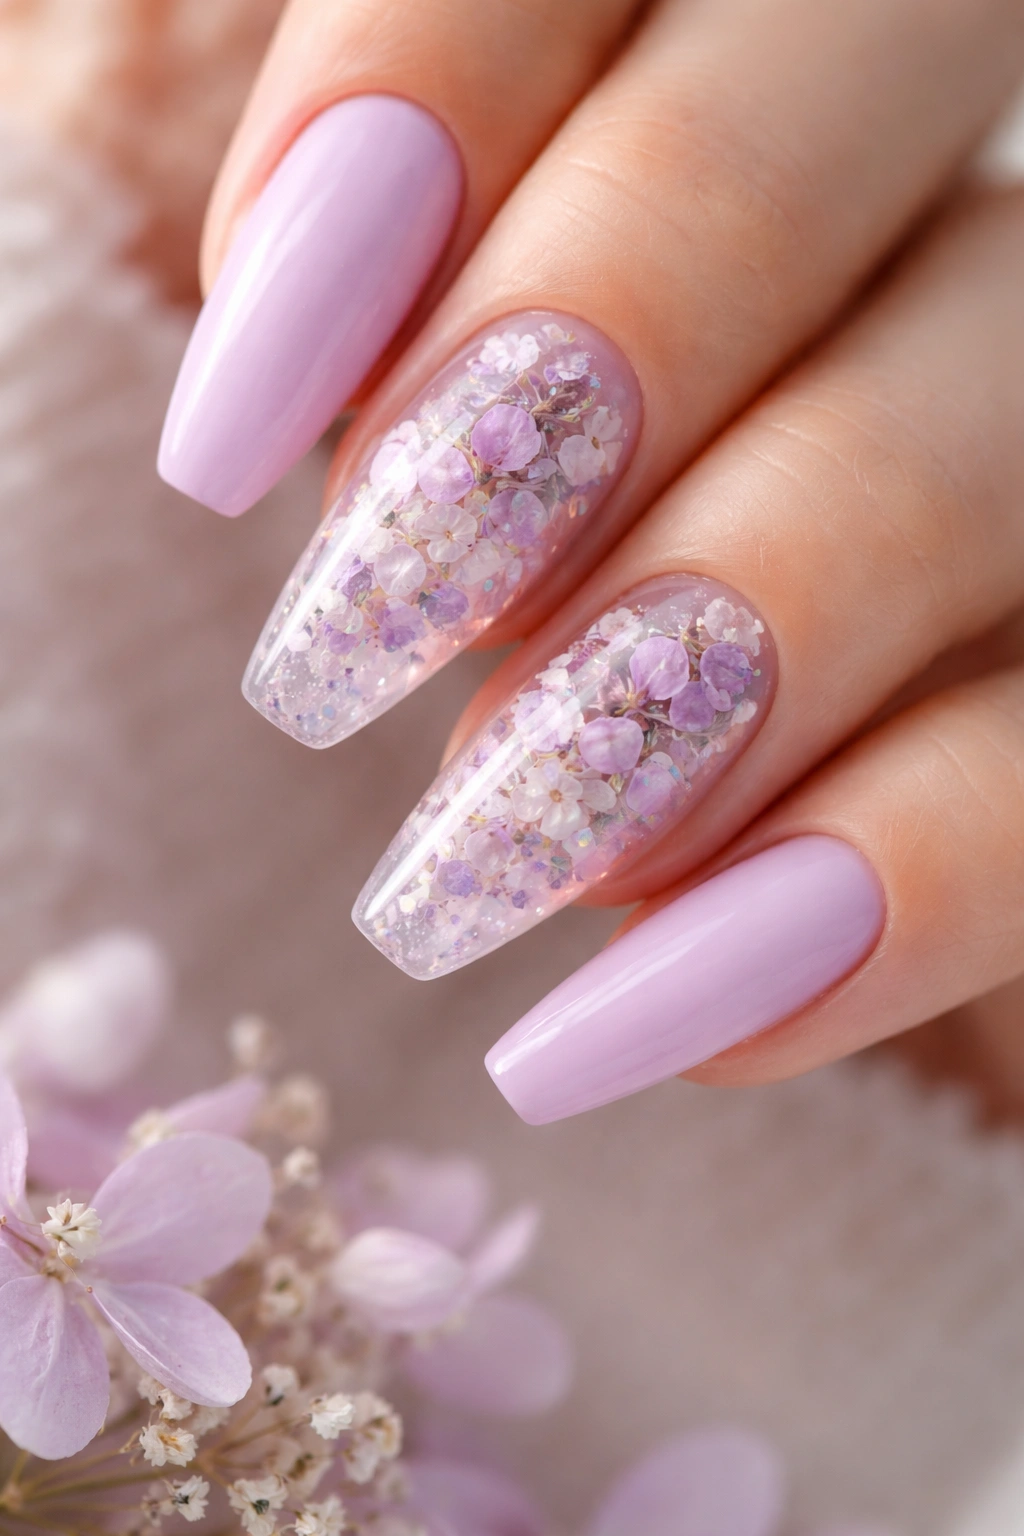
Pressed petals under clear gel look like they were caught in ice. On the right lilac base, the effect is soft, airy, and a little unusual without getting loud.
This is the most technical design here, so I’d save it for a tech who’s comfortable with builder gel encapsulation. The dried flowers need to be trimmed flat, laid into a thin clear layer, and sealed well so no edges stick up. On ballerina nails, I prefer this as an accent design over a translucent lilac base rather than on every finger.
The best petals for the soft pastel look are small and pale: white baby’s breath, tiny lavender flakes, pale violet petals, even miniature fern pieces if they stay delicate. Big flower chunks look clumsy on a tapered nail and can throw off the balance of the set.
You can also split the difference—plain milky lilac on most nails, then encapsulated floral art on the ring fingers and thumbs. That keeps the manicure wearable while still giving you a detail people notice up close.
One caution here: thick encapsulation can bulk up the tip. Ask for the flowers to sit low in the structure, not floating near the top coat, so the flat ballerina edge stays neat.
How to Keep Lilac Ballerina Nails Fresh for Longer
Pastel polish is unforgiving. Chips, dents, dry cuticles, and grown-out sidewalls show faster on lilac than they do on burgundy or black.
A few habits make a real difference:
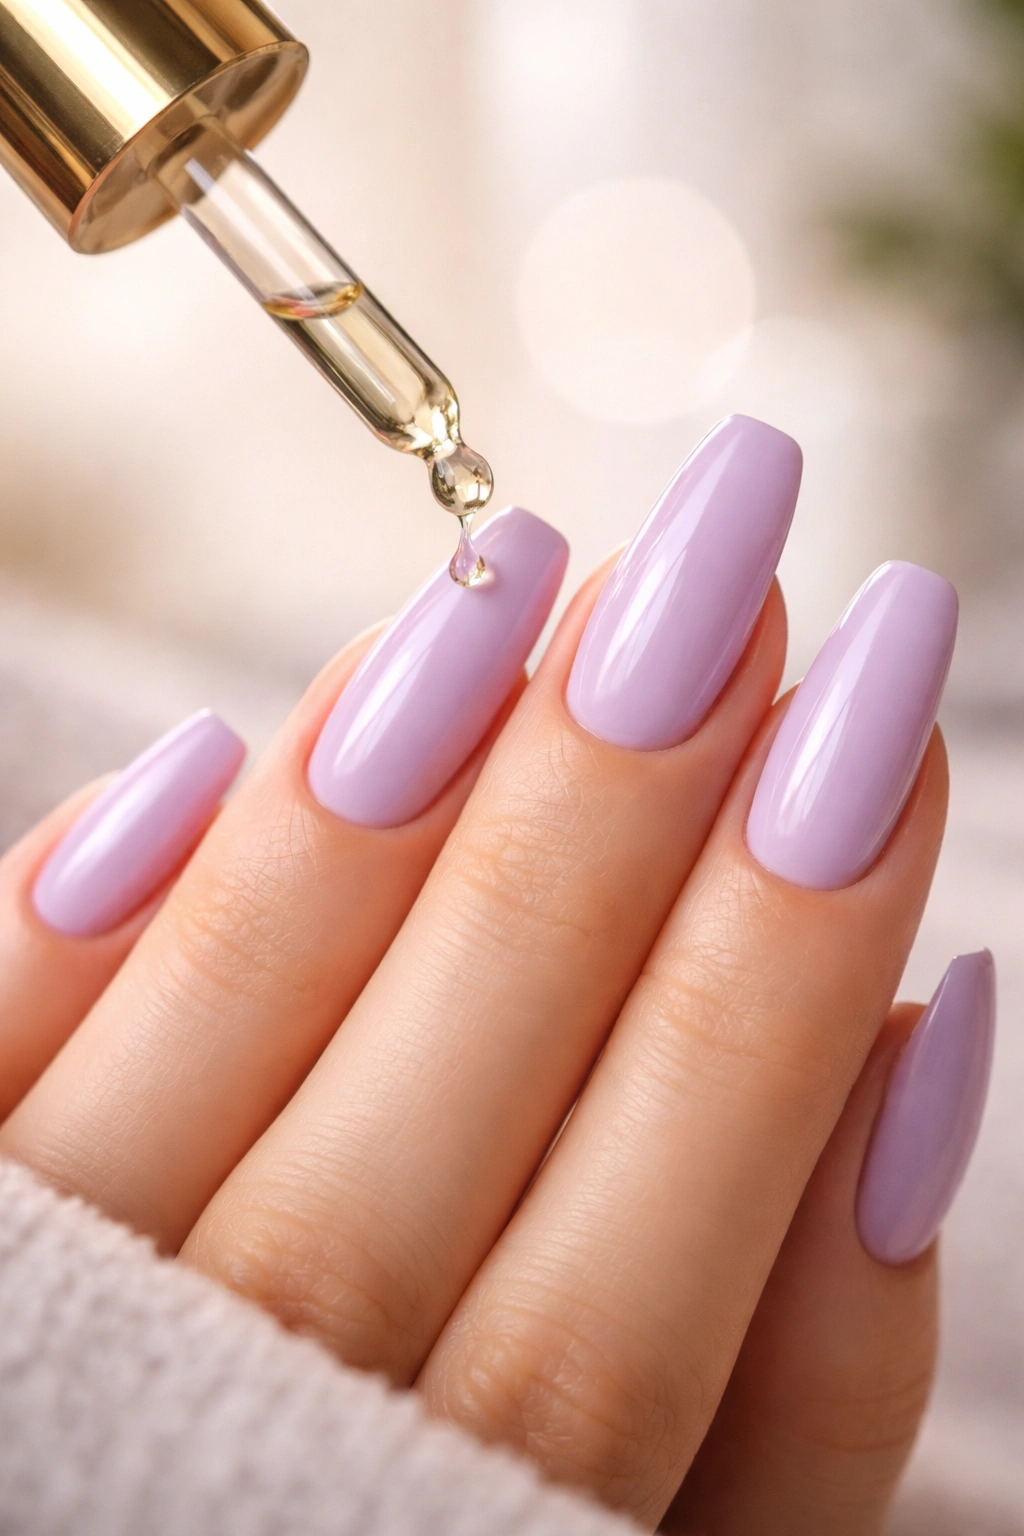
- Massage in cuticle oil twice a day. Dry skin makes pale manicures look rough.
- Wear gloves for dishwashing, bleach, and long hot-water cleaning sessions.
- File snags with a 180-grit file in one direction so the ballerina edge stays crisp.
- Do not use your nails to pop can tabs, scrape labels, pry boxes open, or peel stickers.
- Book a fill around 2 to 3 weeks if you wear medium or long ballerina length.
- If you use regular polish, refresh the shine with a top coat every 3 to 4 days.
Chrome, matte, and encapsulated designs need a little extra respect. Chrome can rub dull if you pick at the edges. Matte shows oils and scratches. Encapsulated art looks messy fast if the top layer gets gouged. None of that means these looks are fragile; it means the details are fine, and fine details ask for better habits.
One more thing. Take a quick photo of your manicure in daylight on day one. If you want to recreate the shade later, that picture will tell the truth more than warm salon lighting ever will.
Final Thoughts
The nicest lilac ballerina nails usually do not rely on big tricks. A clean shape, a smoother base, and the right lilac undertone do more work than heavy crystals or crowded art ever will. When the color has a little milkiness and the sidewalls stay neat, the whole manicure looks calmer.
If you lean minimal, start with the glossy cream, jelly layers, or baby French tips. If you want more detail, the aura blend, silver half-moons, marble, and tiny daisies all keep the pastel mood intact without smothering it.
I’d still put my money on the milky cream or the side-swept French for the longest wear and the cleanest grow-out. Save the encapsulated flowers and ribbon line art for the days when you want your manicure to do a little more talking.
