

Red French tip ballerina nails can land in two very different places. Done well, they look sharp, expensive, and a little dangerous in the best way. Done badly, they look thick, flat, and oddly unfinished, like the nail tech gave up right before the set got good.
That gap comes down to details most people do not think about until they are sitting under the lamp. The red has to be right. The tip width has to match the nail length. The ballerina shape has to stay crisp at the sidewalls, or the whole design loses its edge. And with red, every wobble shows. White French tips can forgive a shaky line. Red will not.
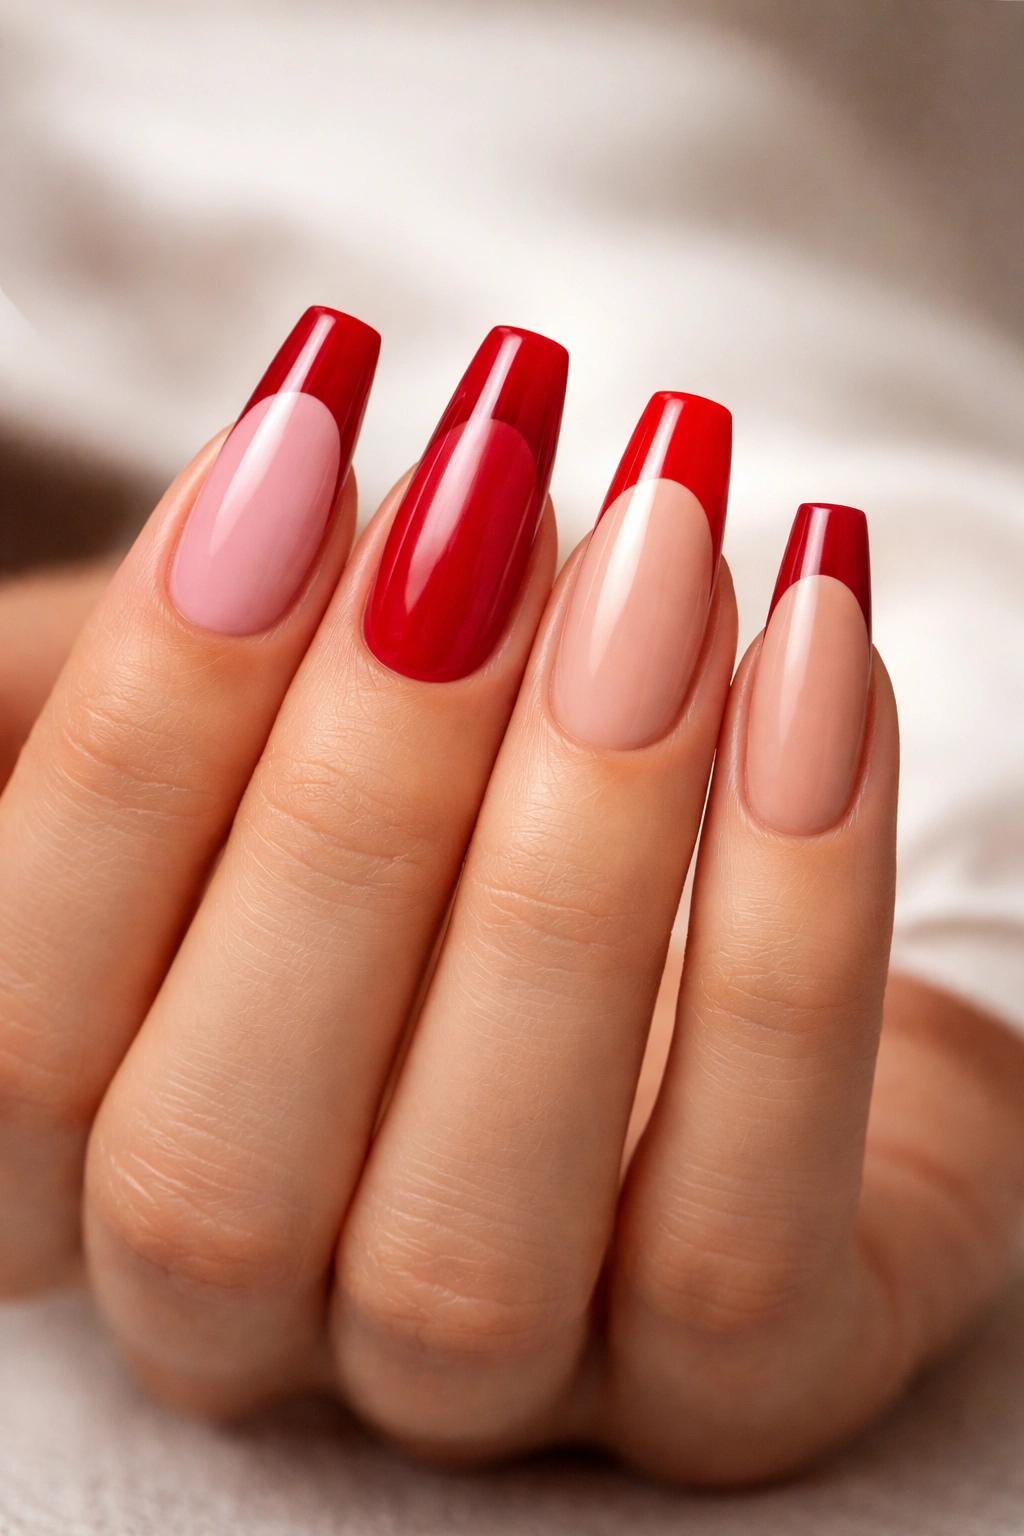
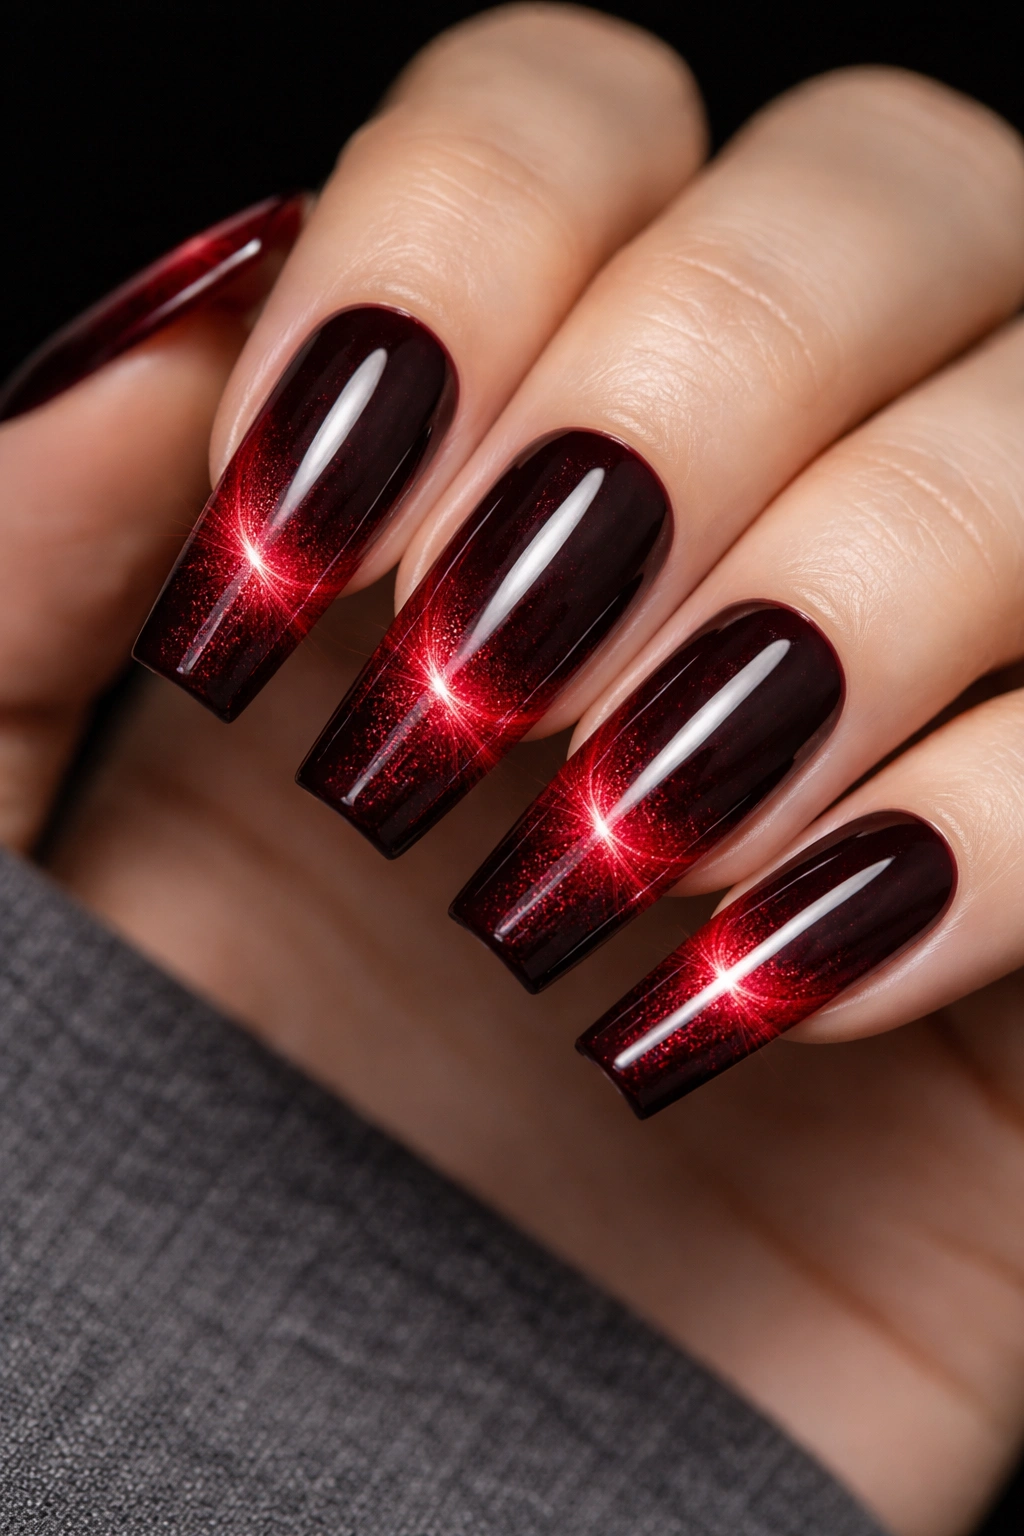
I keep coming back to red French tip ballerina nails because the style does two jobs at once. You get the clean frame of a French manicure, which keeps the set wearable, and you get red, which has more attitude than nude, milk white, or pale pink ever will. Cherry red feels playful. Ruby looks glossy and polished. Oxblood has bite. Same family, totally different mood.
The ballerina shape is what makes the whole thing click. That tapered coffin silhouette gives the tip a straight little stage to sit on, and some designs hit harder on that shape than they ever do on almond, round, or short square nails.
Why Red French Tip Ballerina Nails Look So Good on a Coffin Shape
The flat edge does half the visual work for you. A ballerina nail gives you a narrow taper with a straight free edge, so the red tip looks framed instead of floating. On round nails, red French tips can read softer. On ballerina nails, they read cleaner and more deliberate.
Length matters here.
If the nail extends only 2 or 3 millimeters past the fingertip, the shape can start looking blunt, especially if the tip color is thick. Once you get to 6 to 10 millimeters past the fingertip, the silhouette starts making sense. There is enough room for a proper smile line, a side-swept diagonal, or a micro tip that still looks like a design choice rather than an accident.
The sidewalls are where many sets go wrong. Too much filing on the lower sides makes the nail look pinched. Too little, and you lose that narrow ballerina line that makes red look sleek. The best sets stay fairly straight through most of the nail, then taper in the last third before the squared tip.
Red likes structure. Ballerina nails give it structure.
Choosing the Right Red, Base Tone, and Tip Width Before You Book
A red French manicure is not one red. It is about undertone, opacity, and contrast.
Blue-red shades look cooler and sharper. Orange-red shades feel hotter and brighter. Deep wine and burgundy tones add depth without shouting. Then the base changes everything again. A sheer pink base makes red look cleaner. A beige nude softens it. A milky nude gives the strongest contrast.
A quick match guide helps:
- Fair or cool-toned skin: cherry red, cranberry, blue-red, and ruby shades tend to look crisp without turning harsh.
- Warm or olive-toned skin: tomato red, scarlet, brick red, and warmer ruby shades often sit better against the skin.
- Deep skin tones: true red, burgundy, oxblood, and blue-red shades usually hold their shape and contrast without looking washed out.
- Shorter fingers or wider nail beds: thinner tips, V-cuts, and side-swept French lines can make the hand look longer.
- Long fingers or long nail beds: double French lines, thick micro arcs, chrome, and accent details have more room to breathe.
Tip width makes or breaks the set. On most ballerina nails, 1 to 2 millimeters gives you a clean micro French. 2 to 4 millimeters gives you a more obvious red French look. Go deeper than that, and you are drifting toward color-block nails.
Bring that information to the appointment. You do not need salon jargon. You need clear choices.
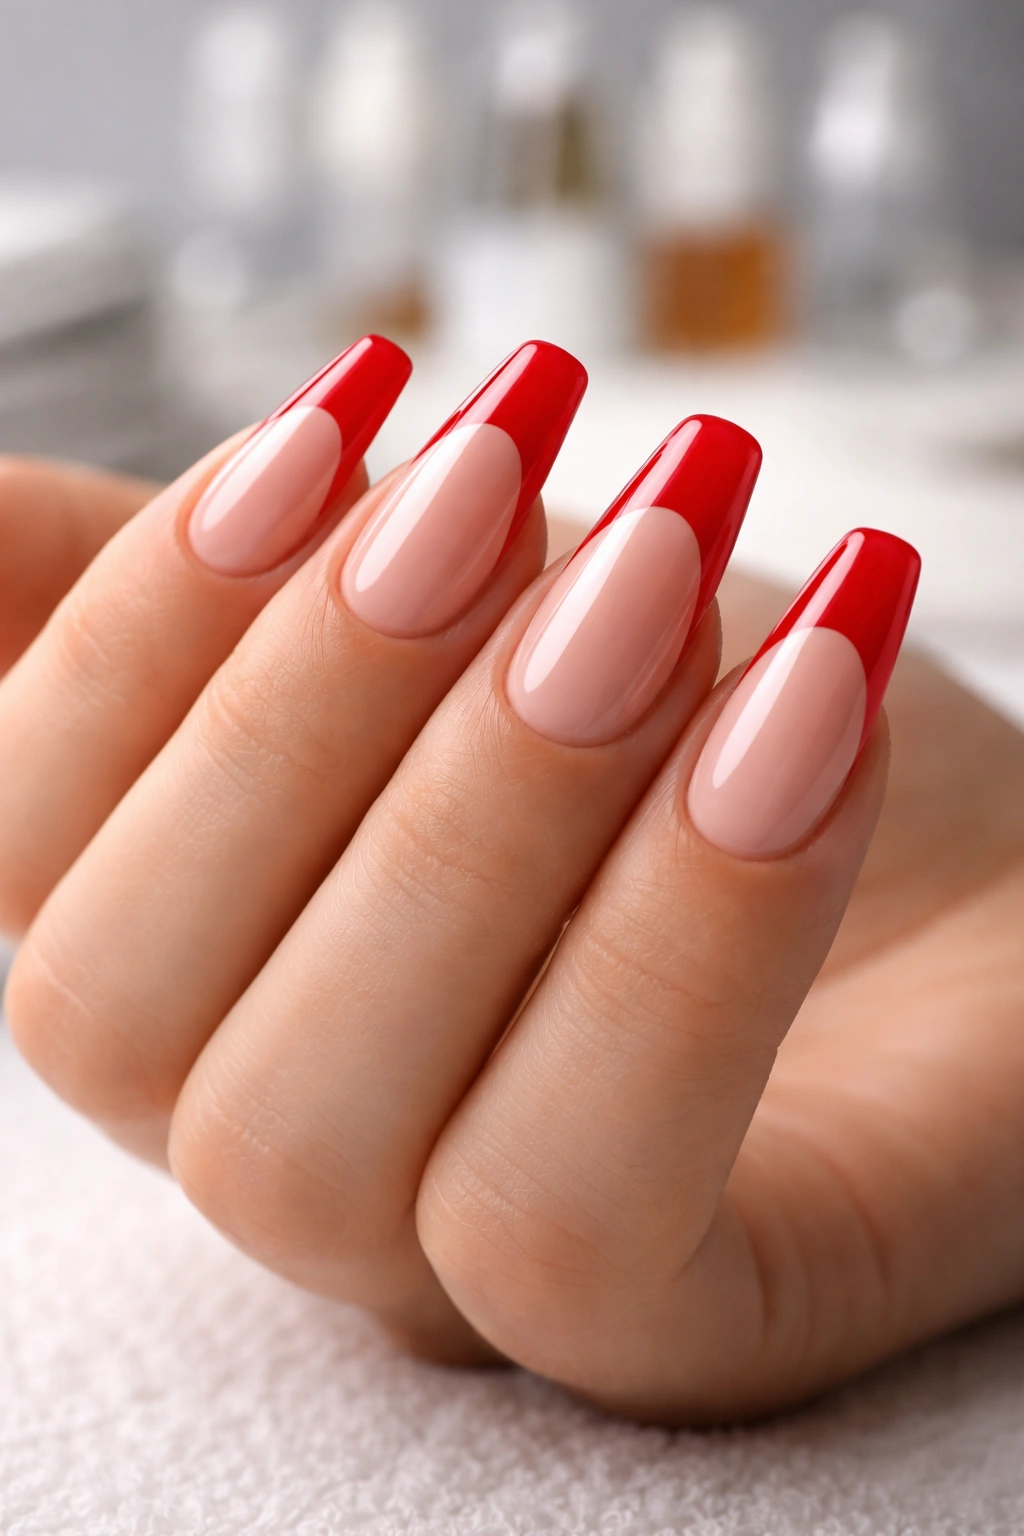
1. Classic Cherry Red Micro Tips on a Sheer Pink Base
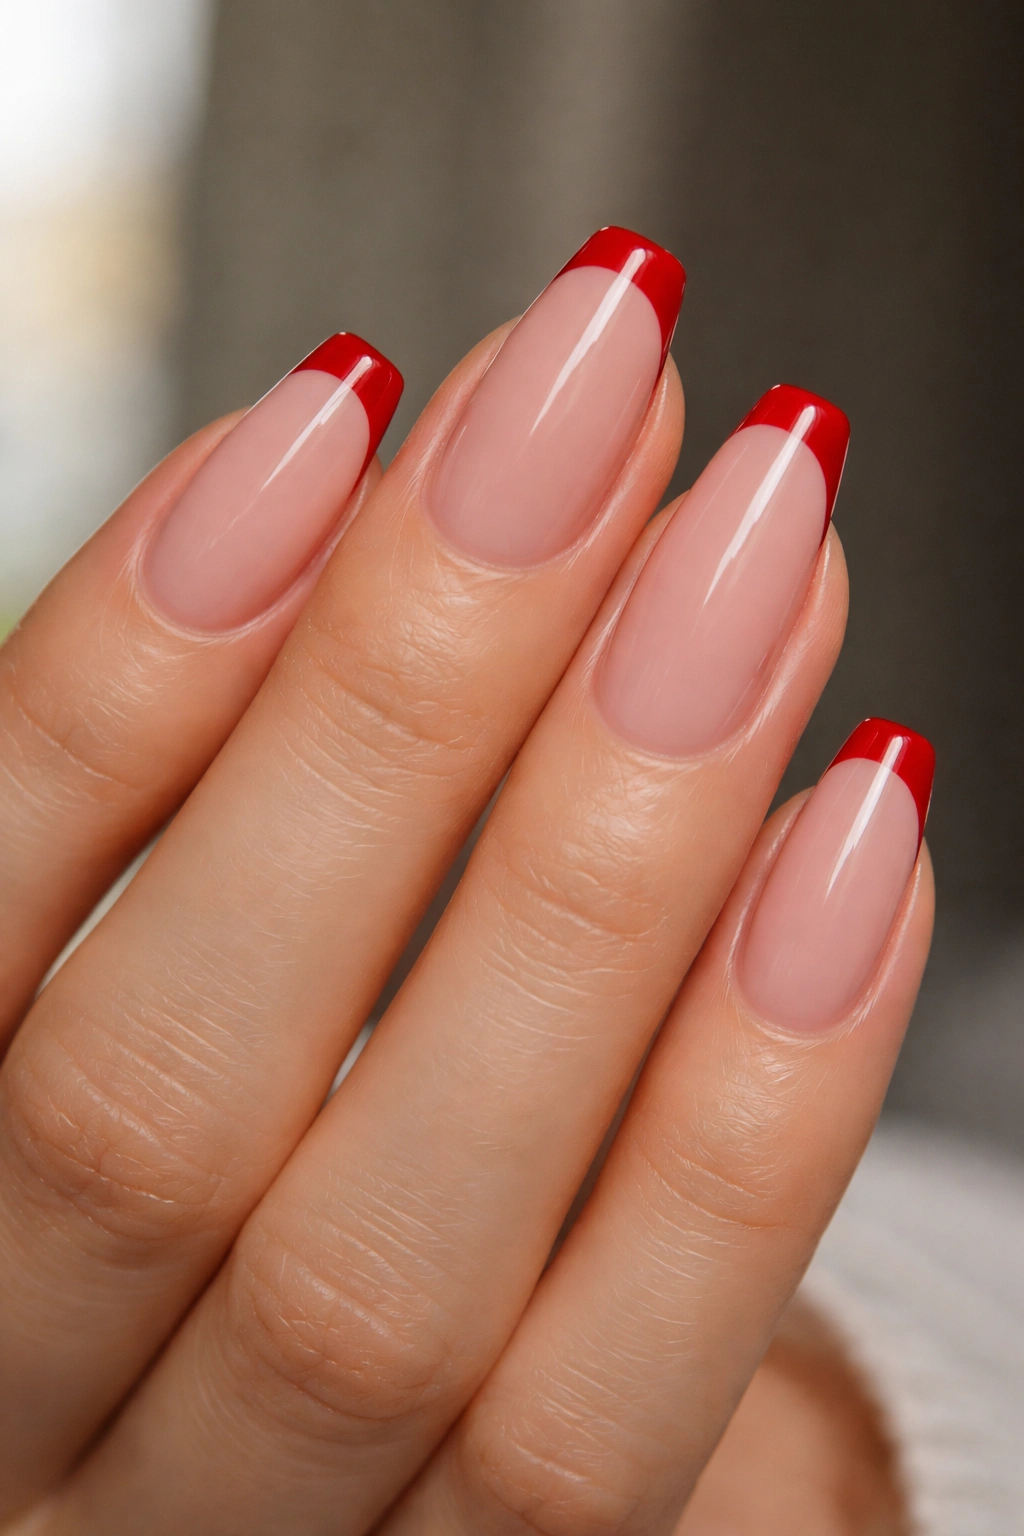
If you want the cleanest version of the look, start small.
A cherry red micro French on a sheer pink base is the set I’d point almost anyone toward first, especially if you love red but do not want your nails doing all the talking. The tip sits right at the edge—usually 1 to 2 millimeters deep—so the color reads sharp instead of heavy. On medium ballerina nails, that thin line looks almost tailored.
Why It Works
The contrast is doing the job here. You have a soft pink or milky blush base, then a crisp hit of cherry right at the tip. Because the line is narrow, the shape still looks long and neat. Nothing feels bulky. Nothing drags the eye downward.
This one also survives outfit changes better than louder nail art. It looks right with denim, black knitwear, a white shirt, a slip dress, gold rings, silver rings—honestly, almost anything.
Quick Design Notes
- Best length: medium ballerina, about 6 to 9 millimeters past the fingertip
- Tip depth: 1 to 2 millimeters
- Base choice: sheer cool pink or milky nude builder gel
- Finish: high-gloss top coat
- Best product: gel polish or hard gel for a thinner edge
Ask your tech to keep the corners soft, not blocky. Sharp outer corners can make a micro French look clunky on a ballerina shape.
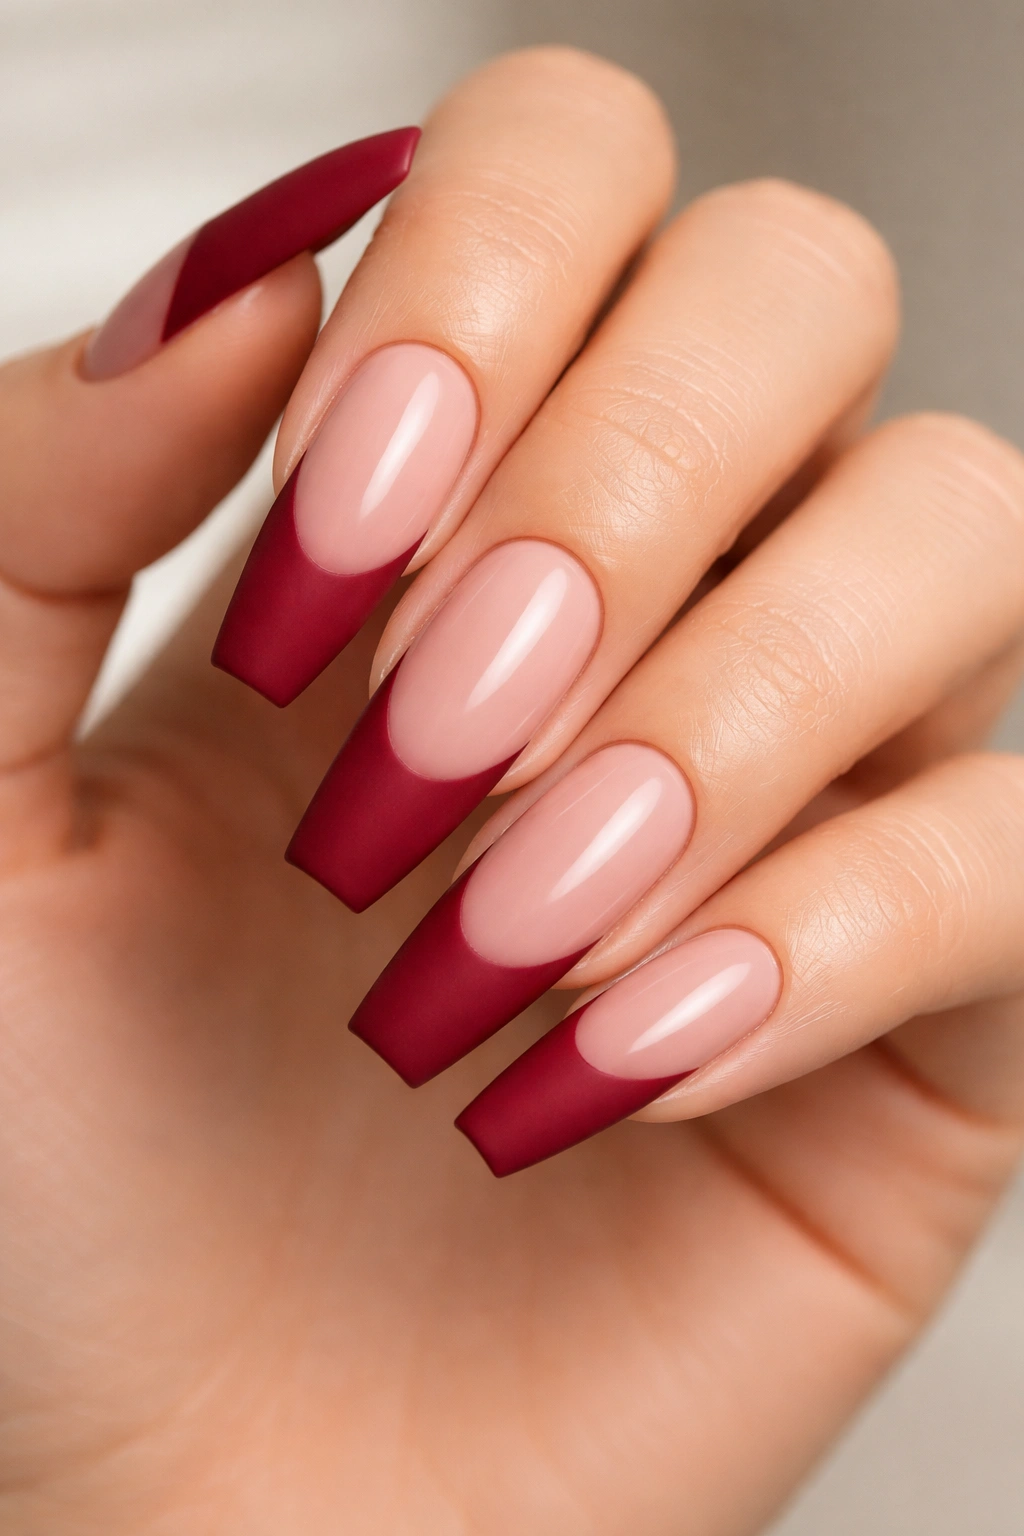
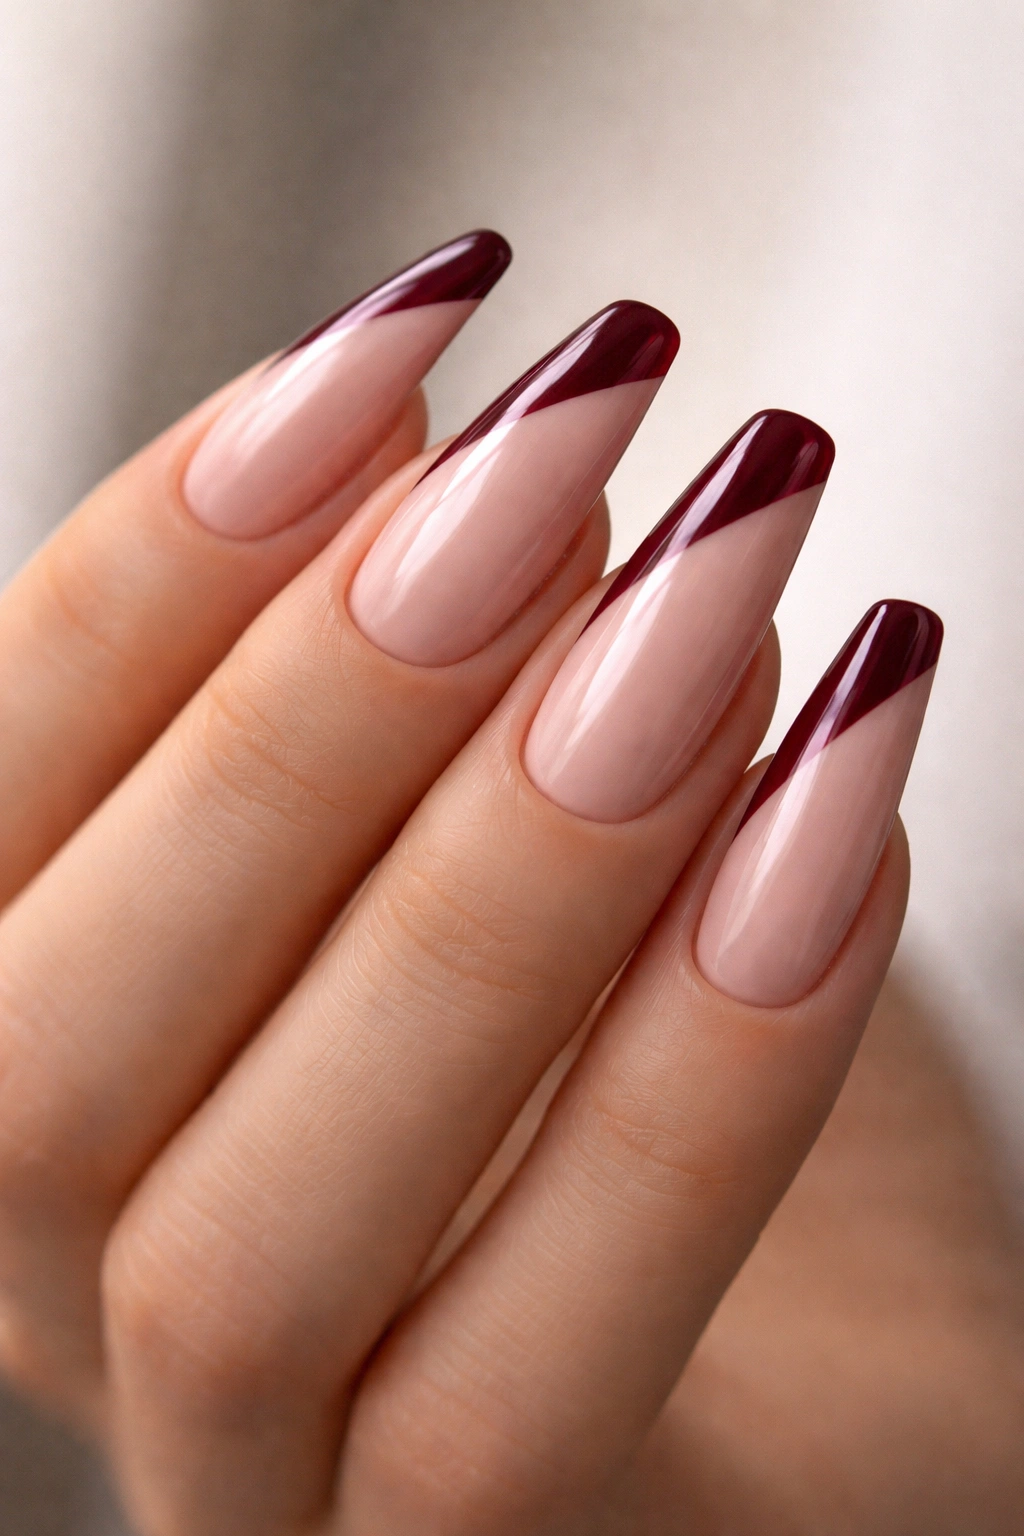
2. Deep Burgundy Swoop Tips on Medium-Length Ballerina Nails
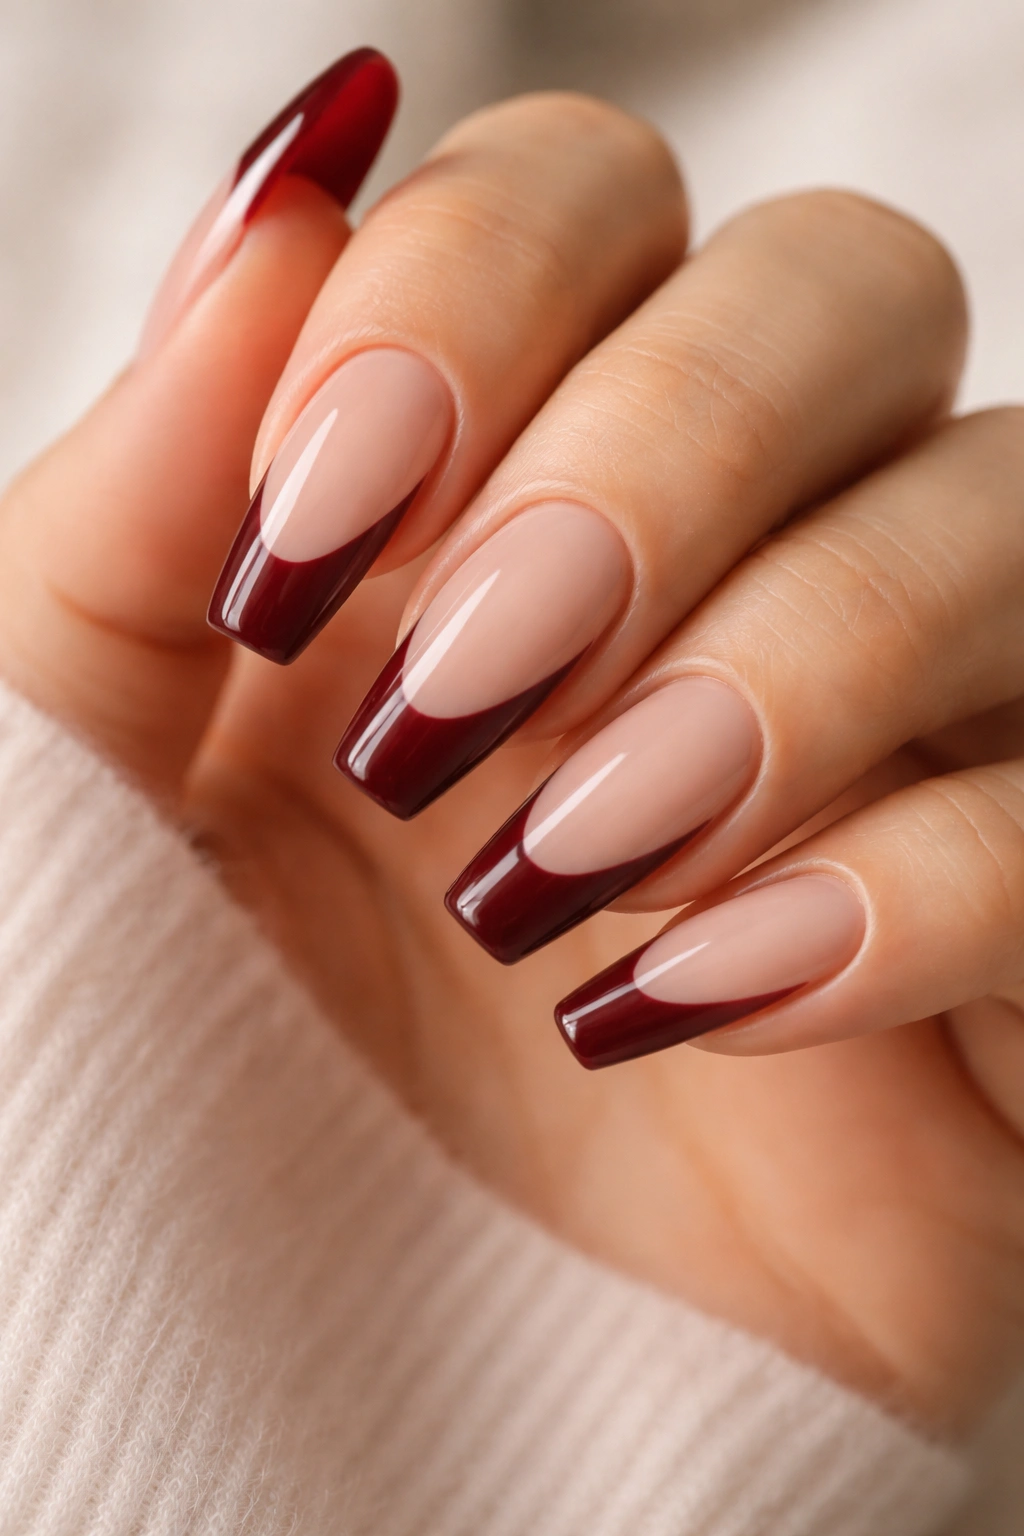
Burgundy does more with less. It gives you the attitude of red, but it carries more depth, which means the manicure can look richer even when the design stays simple.
The swoop tip is the part that keeps this from feeling safe. Instead of a standard curved smile line, the burgundy sweeps slightly higher on one side and dips lower on the other. That uneven motion gives the nail a bit of movement without forcing you into full nail art. It is subtle from a distance. Up close, it has personality.
Medium length is where this design earns its keep. On long ballerina nails, the sweep can get dramatic fast. On a medium set, the asymmetry feels intentional and clean. I like this one on a beige nude base more than a pink base because the warmth balances the depth of the wine shade.
One warning, though. If the burgundy leans too brown, the design can lose its crispness. You want a wine tone with enough red in it to still read red French, not chocolate or plum.
Quiet. Sharp. A little moodier.
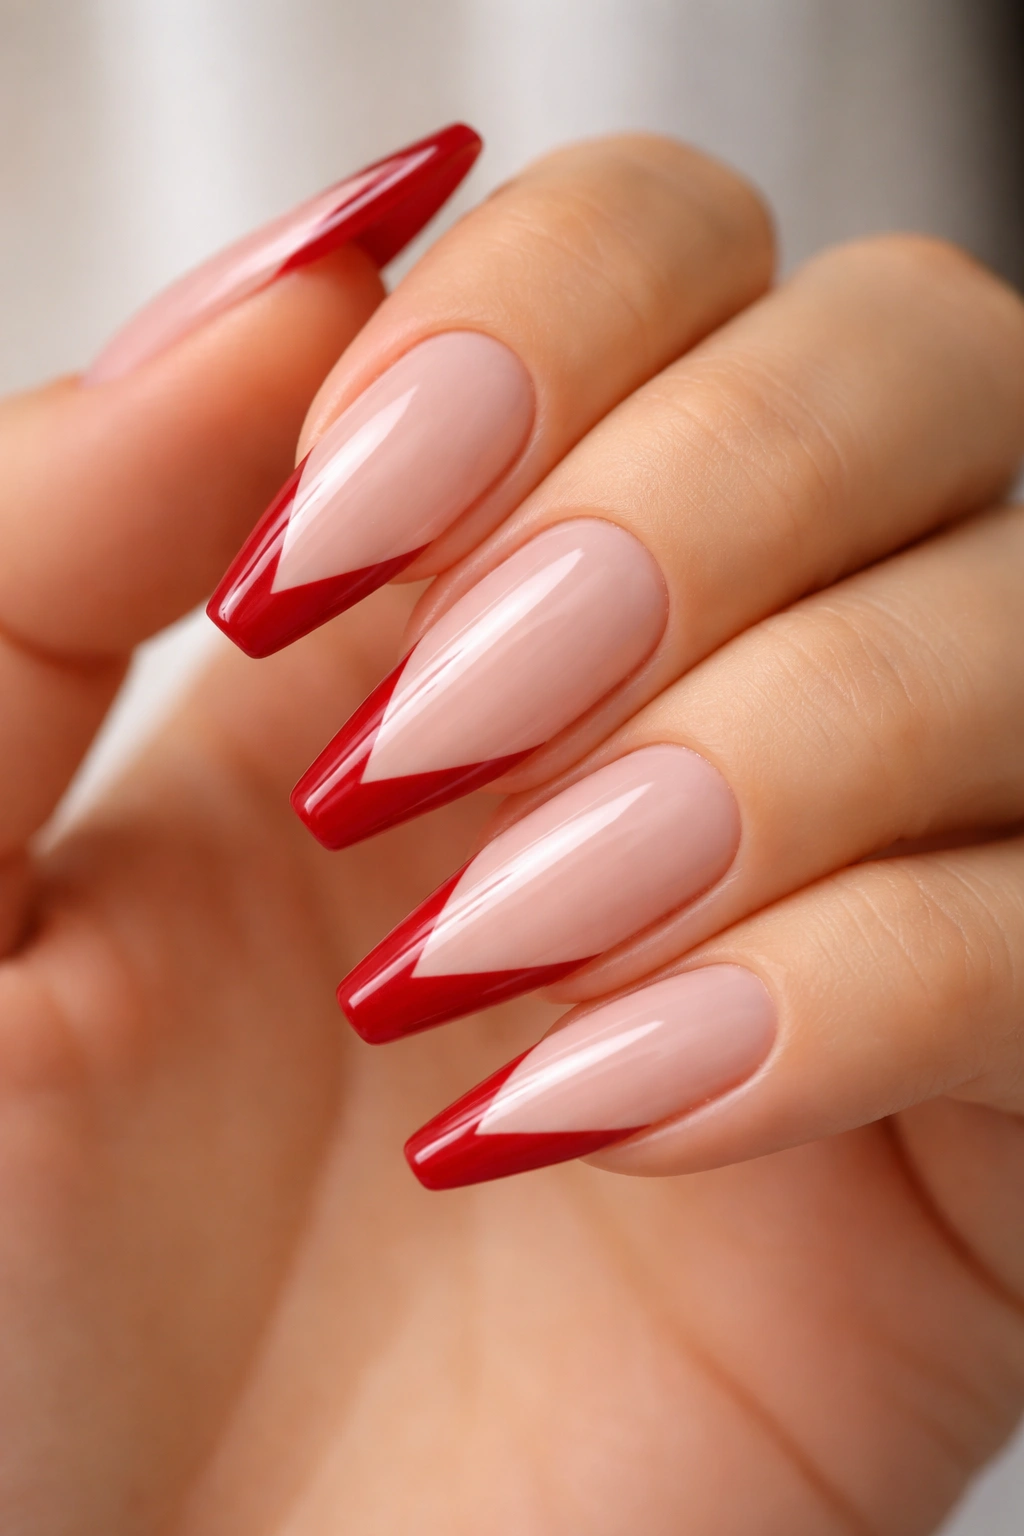
3. Scarlet V-Cut French Tips That Make the Fingers Look Longer
Need a shape trick more than a color trick?
A scarlet V-cut French is one of the smartest choices for anyone who wants the hand to look longer. Instead of following a rounded smile line, the red comes to a soft point in the center of the nail. That pulls the eye inward and downward, which gives the illusion of length even if the actual nail is only medium-long.
The best version is not a dagger point. That is where people overdo it. You want the red to angle down toward the center by about 3 to 5 millimeters, then stop before it turns into a harsh arrowhead. Too deep, and the design starts looking costume-like. Too shallow, and you lose the effect.
How to Keep It Sharp Without Making It Harsh
A milky beige or soft nude base helps. So does keeping the sidewalls clean and slim. If your nail beds are wide, this design can be a small miracle because it breaks up the horizontal width at the free edge. If your fingers are already long, it still looks good—it just reads bolder rather than corrective.
Skip chunky rings with this one if you want the shape to stay the focus. Thin metal bands and a glossy top coat do enough.
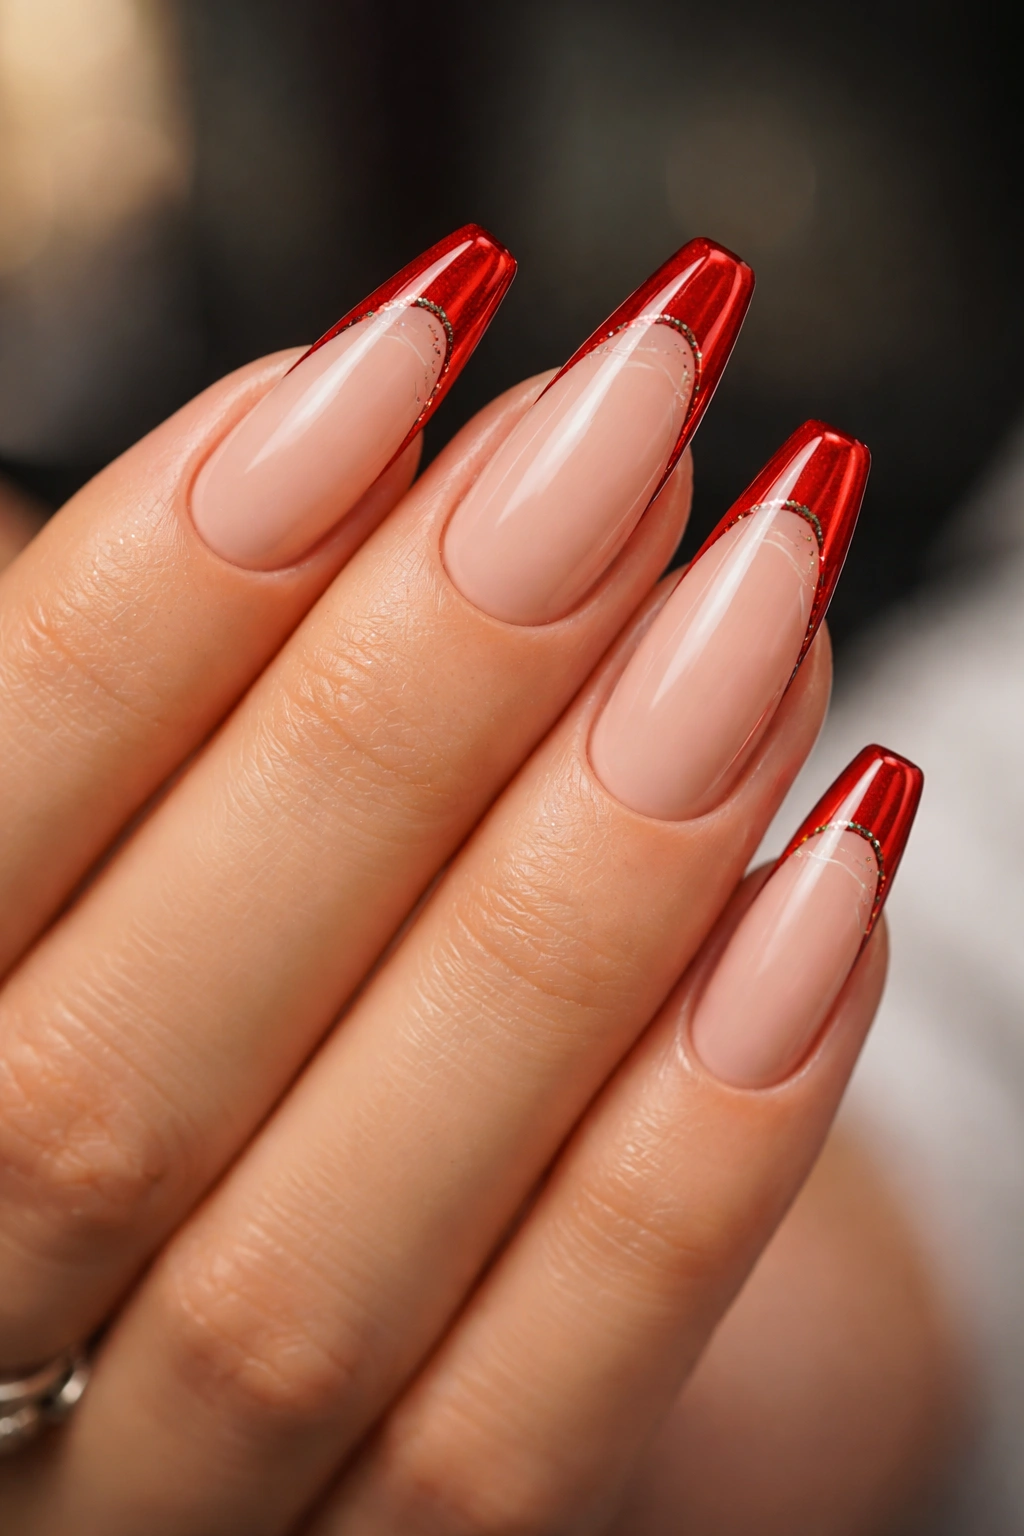
4. Ruby Double French Lines with a Nude Gap
From straight on, this one looks like a standard red French. Then your hand turns, the light hits the nail, and that second line shows up.
A ruby double French uses two thin red lines instead of one thick tip. The first line sits right on the edge. The second floats a little lower, leaving a narrow strip of nude space between them. That negative space keeps the design airy, which matters on ballerina nails where thick color can get heavy in a hurry.
You need precision for this set. If one line is thicker than the other, the whole thing looks off.
Details That Make It Land
- Outer tip line: about 1 millimeter
- Inner floating line: about 1 millimeter
- Gap between lines: 1.5 to 2 millimeters
- Best base: sheer pink, rosy nude, or milky neutral
- Best finish: glossy, never matte
I would not add rhinestones, foil, or a glitter stripe here. The clean geometry is the point. When a nail tech gets the spacing right, this design looks far more expensive than it is.
5. Candy-Apple Red Tips with Tiny Crystal Corners
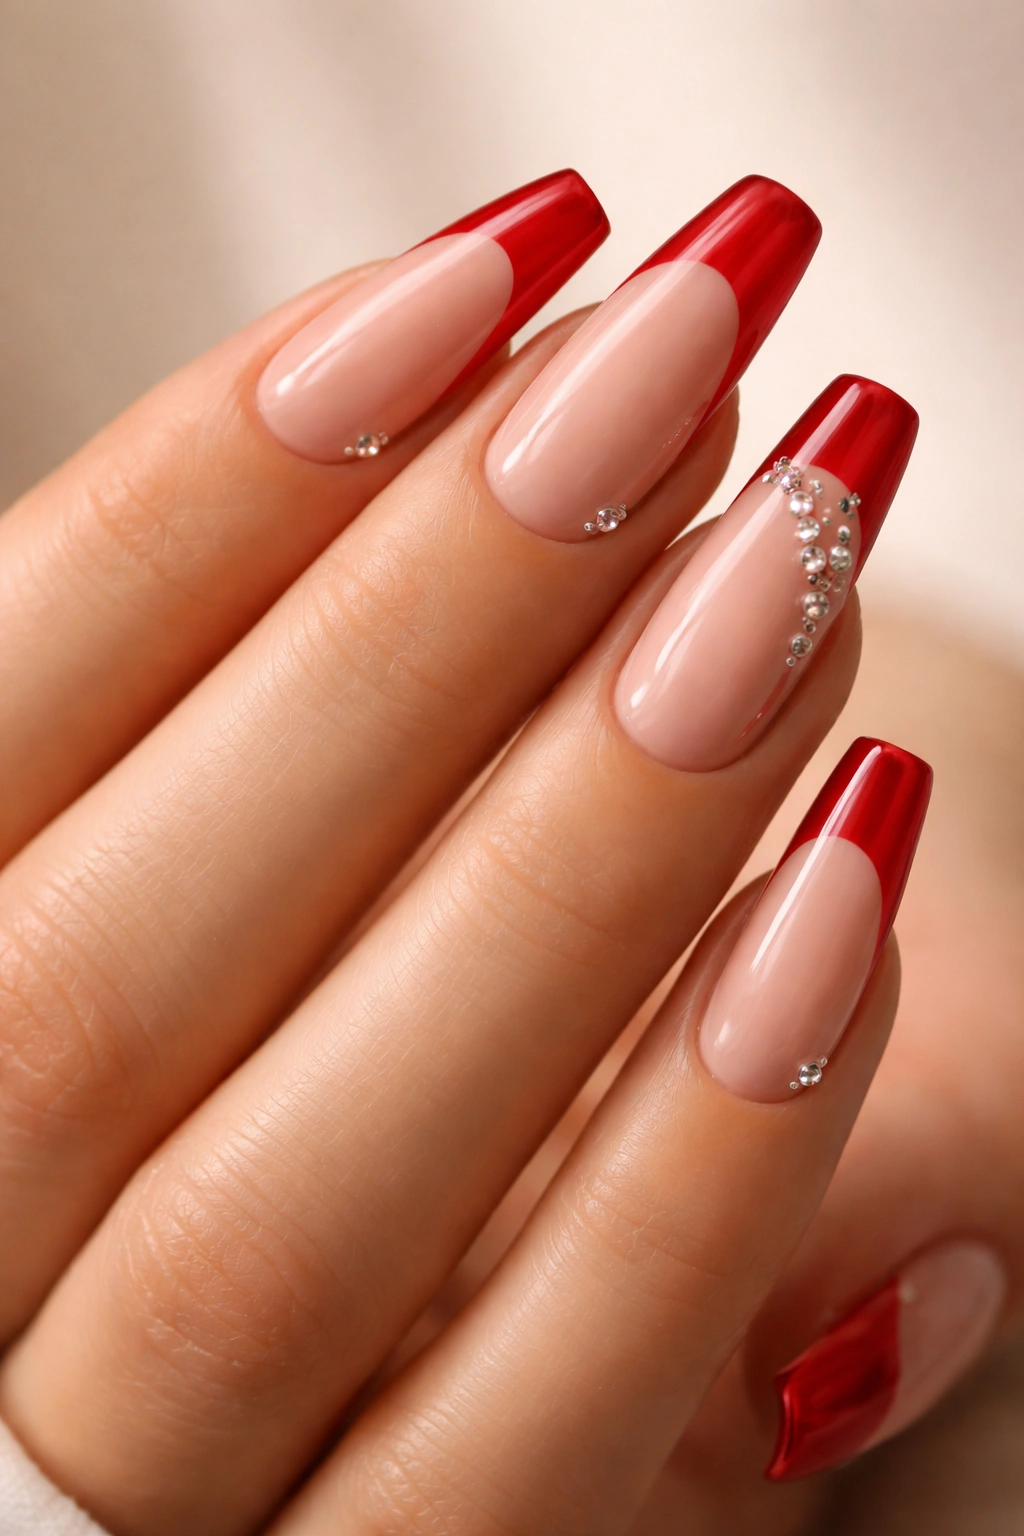
A little sparkle works better at the edges than in the middle. I stand by that.
Candy-apple red tips already have enough shine, so if you want crystals, keep them small and keep them off the center of the nail. The best placement is a tiny flat-back crystal at one outer corner where the red tip meets the nude base. Not on every finger. Two accent nails is enough. Ring finger and pinky can look great. Ring finger and thumb also works.
Use SS3 or SS5 flat-back stones if you want the design to stay neat. Bigger than that, and the crystal starts bossing the whole manicure around. You stop seeing a French tip and start seeing “there are gems on my nails,” which is a different mood.
The red here should lean glossy and bright—true candy-apple, not burgundy. A clear pink or sheer neutral base keeps the crystals from feeling too dressy. That balance matters. The contrast between the simple French line and the tiny bit of hardware is what gives this set its punch.
This is a good event manicure, but I would not save it only for weddings, dinners, or parties. With clean shaping and small stones, it still wears well on an ordinary week.
6. Matte Crimson Tips Over a Glossy Nude Base
Unlike a full matte set, which can turn dull after a few days, this split-finish design keeps the base glossy and skin-like while the crimson tip goes soft and velvety. The contrast is the whole point.
You need two top coats to pull this off well. The nude base gets a standard glossy top coat. The red tip gets matte. That sharp finish change draws the eye straight to the free edge, which is why ballerina nails carry this design so well. The straight tip gives the matte red a clean stop.
Crimson works better than bright tomato red here. Matte removes some of the built-in energy from red, so a deeper tone helps the color hold onto its weight. Think rich red lipstick rather than neon sign.
There is one catch. Matte shows scuffs faster than gloss. If you choose this set, ask your tech to cap the free edge carefully and keep the red portion smooth before top coat goes on. A bumpy matte tip looks dusty, not intentional.
Still, when it is done well, the texture contrast is hard to ignore.
7. Split Black-and-Red French Tips with a Diagonal Cut
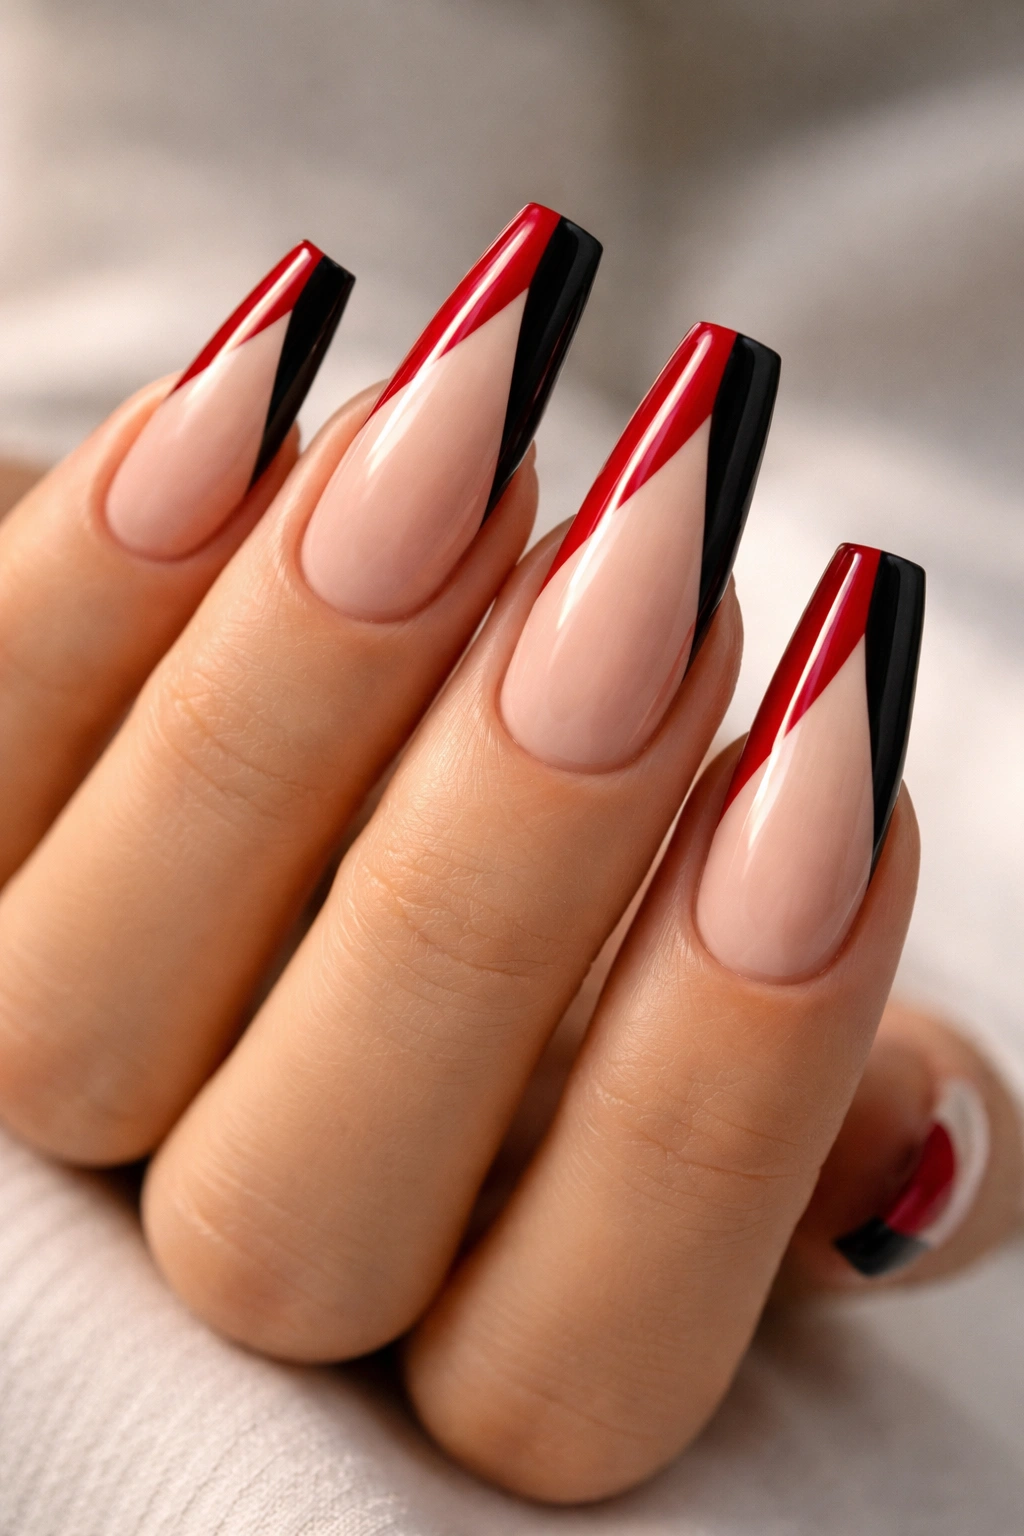
Some nail designs want soft lighting and delicate hand poses. This one looks best wrapped around a coffee cup or a steering wheel.
A split black-and-red French takes the tip and divides it diagonally, usually with red on one side and black on the other. The line can run from the left sidewall to the right corner, or the reverse if you want the angle to mirror across the hands. On ballerina nails, that diagonal cut echoes the taper of the shape, which is why it feels so sharp.
What Makes It Different
The design is graphic. Clean. Slightly aggressive.
That sounds dramatic, but it matters because not every red French set needs to read soft or classic. If your clothes lean toward black, white, charcoal, denim, leather, silver hardware—this one fits right in without feeling too decorated.
Best Setup
- Best length: long ballerina
- Diagonal angle: around 35 to 45 degrees
- Base shade: beige nude or clear pink
- Finish: high gloss
- Accent choice: none, or one thin silver line on a single nail
Keep the split line razor clean. A shaky diagonal ruins the whole effect faster than a messy smile line would.
8. Mirror Red Chrome French Tips on a Milky Nude Base
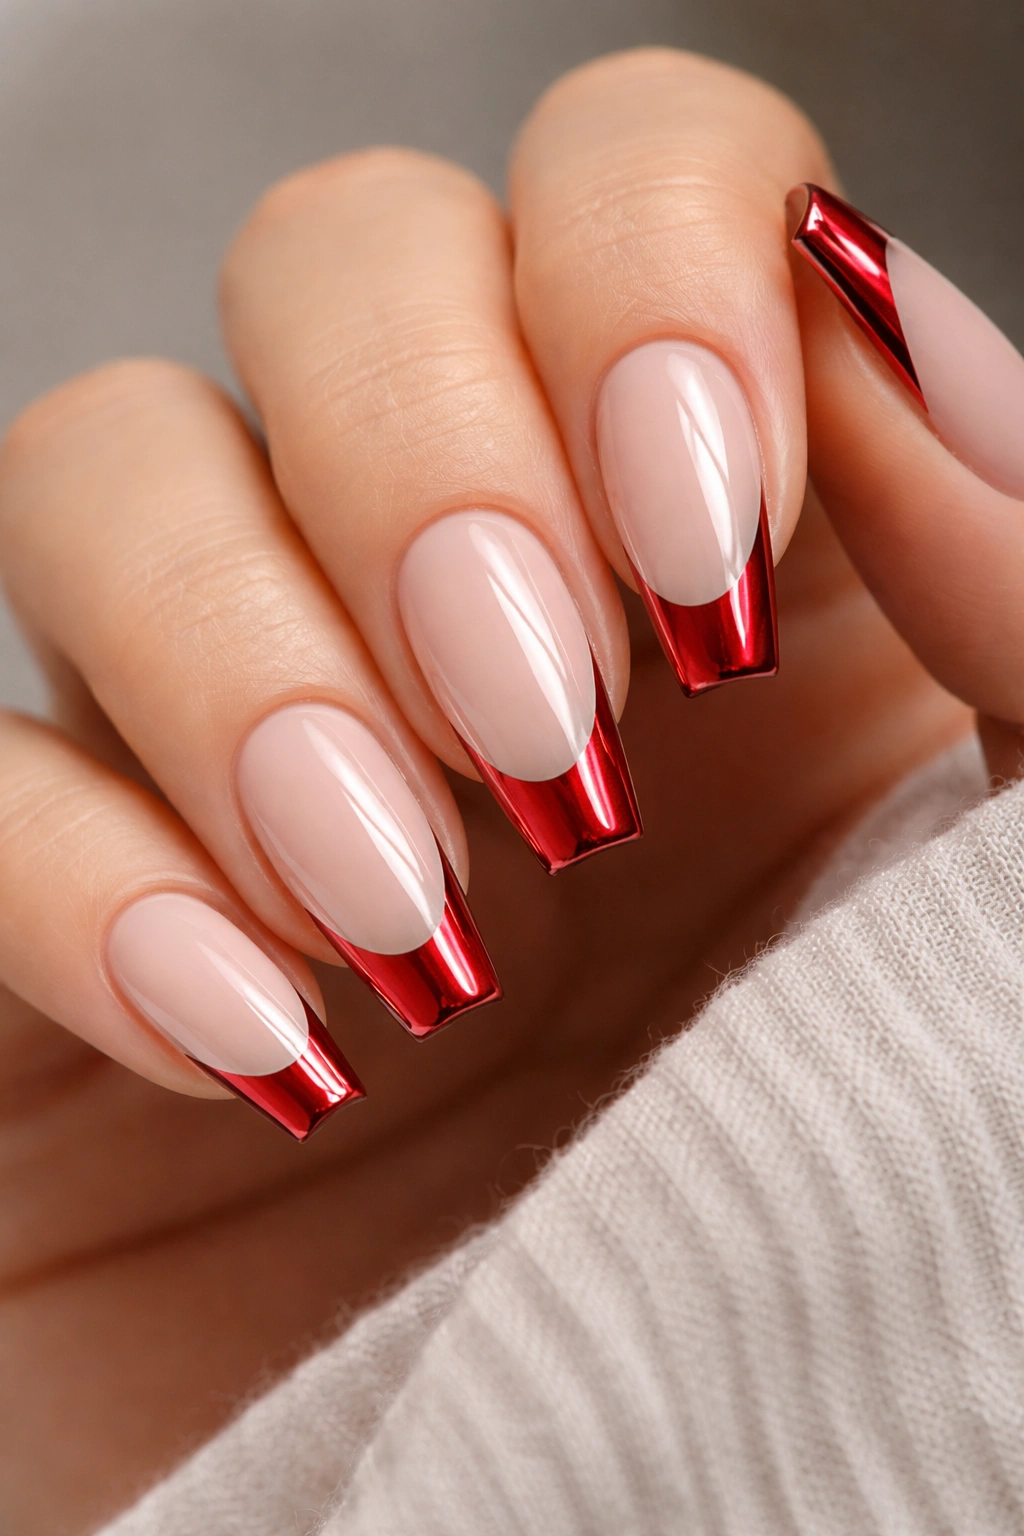
Chrome on the tip is easier to wear than chrome on the whole nail. That is why this set keeps winning people over.
The design starts with a classic red French, then the red portion gets a chrome finish that reflects like polished metal. On a full set, chrome can be loud. On just the tip, it feels focused. The nude base calms it down, while the ballerina shape keeps the shine looking neat rather than bubble-like.
The application matters more than the photo. Red gel goes on first. Then a non-wipe top coat cures over the tip. Then chrome powder gets rubbed into the cured top coat only where the red sits. After that, the edge has to be sealed well, because chrome chips at the free edge faster than plain color if the capping step is lazy.
A milky nude base is my favorite pairing here because it gives the reflective tip more contrast. Sheer pink can work too, though it makes the whole set feel softer. If you want a cleaner, colder finish, ask for a blue-red chrome rather than an orange-red.
The final look has edge without turning into a full metallic manicure.
9. Side-Swept Wine Red French Tips That Break the Usual Smile Line
Bored of the standard curve?
A side-swept French starts at one sidewall and glides across the nail toward the opposite edge, almost like the tip got brushed into place in one movement. On ballerina nails, that diagonal sweep looks longer and leaner than a deep rounded smile line, especially on medium lengths.
Who This One Suits Best
If your nail beds look short or wide, side-swept French tips can help because they interrupt the straight line across the tip. The eye follows the movement instead of measuring the width. Wine red is a smart shade here because the design is already unusual; you do not need the color screaming too.
I also like this one for people who want something fresh but still office-friendly. Yes, I know that word gets thrown around too much, but here it fits. From a few feet away, it still reads like a red French. The twist only shows when someone is close enough to notice.
Keep the sweep clean and slightly lifted. A droopy diagonal makes the nail look tired.
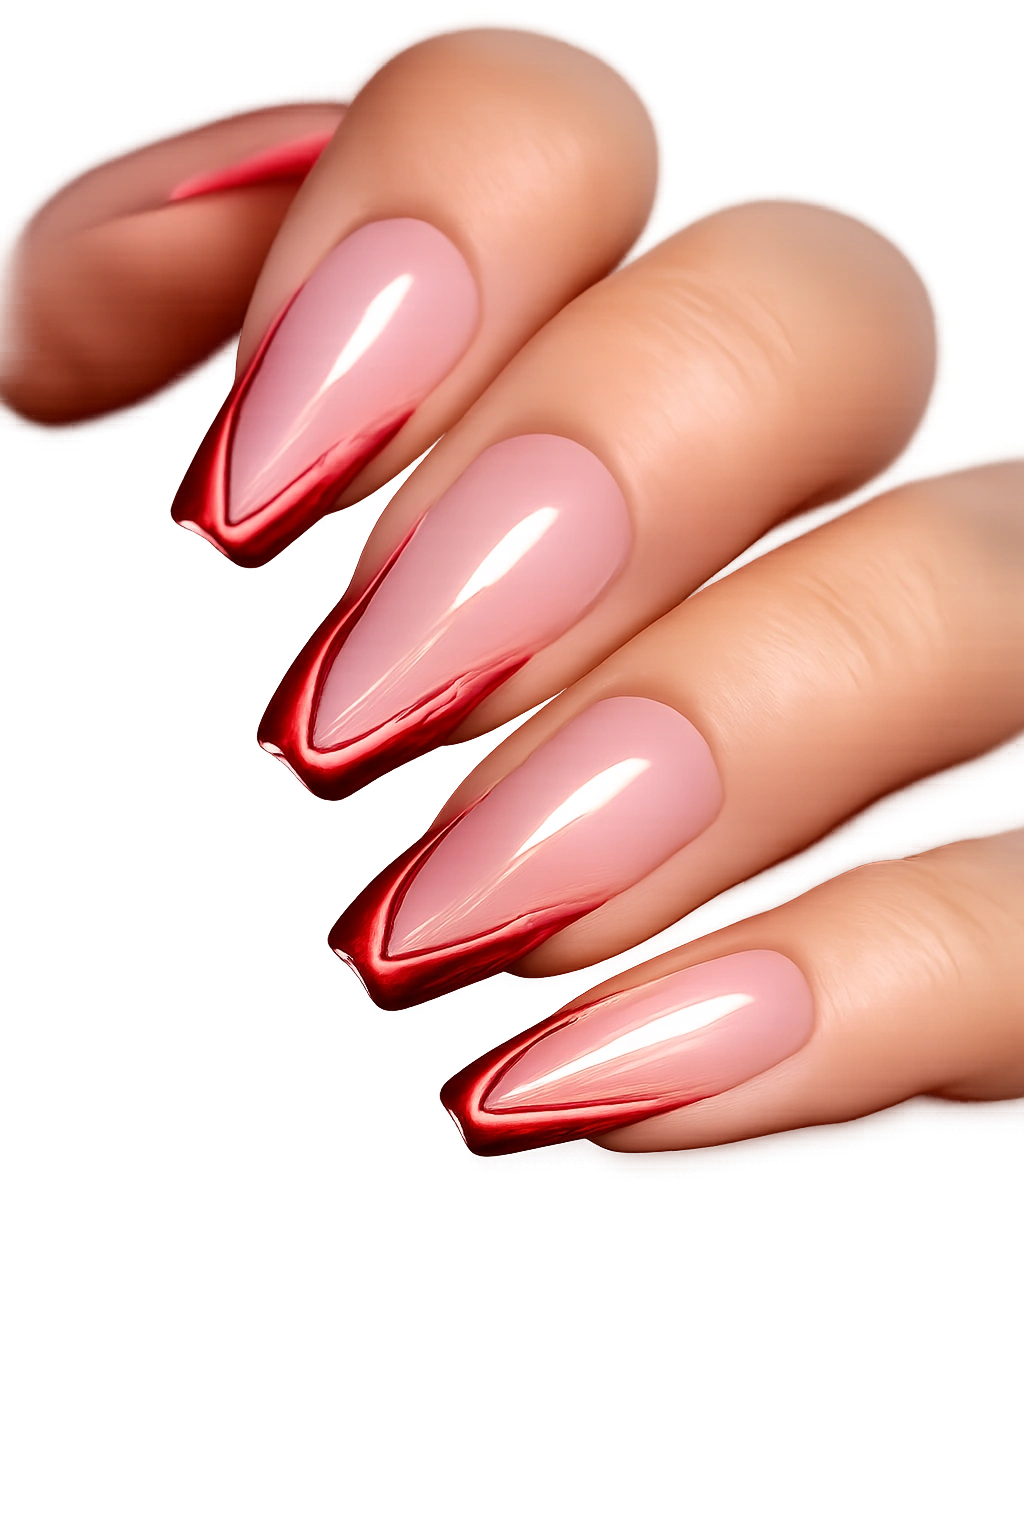
10. Soft Red Ombré French Fade on Long Ballerina Nails
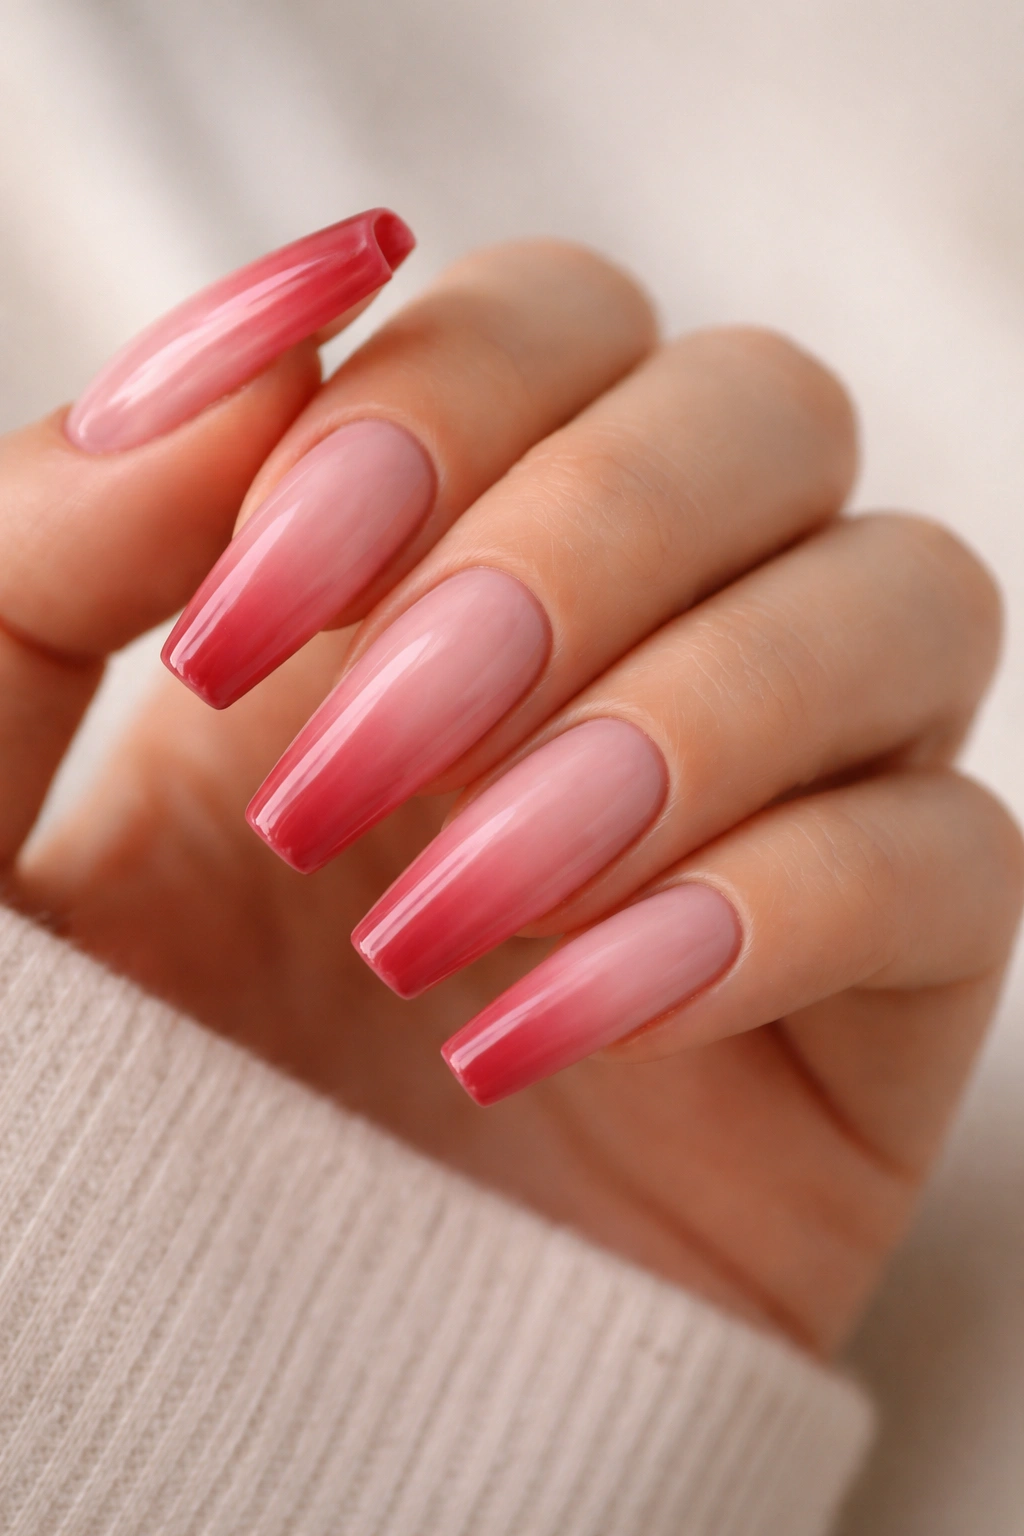
Under direct light, this one looks airbrushed rather than painted.
A red ombré French fade softens the tip so the color dissolves into the nude base instead of stopping with a hard line. If you like the idea of red French nails but do not love a crisp smile line, this is the answer. The fade gives you color at the free edge while keeping the whole set lighter.
It is also one of the more forgiving red designs as the manicure grows out. Because the transition is blurred, you do not have that stark “line at the line” effect that a sharp French can develop over time.
What to Ask For
- Base: milky nude, sheer blush, or soft beige
- Red shade: translucent cherry, ruby, or wine red
- Fade depth: about 4 to 6 millimeters from the tip inward
- Best length: medium-long to long ballerina
- Finish: glossy, with enough top coat to keep the fade smooth
An ombré French can go muddy if too many layers pile up. Thin color, soft blending, and a clean apex matter more here than extra pigment.
11. Burgundy Tips Framed with a Razor-Thin White Outline
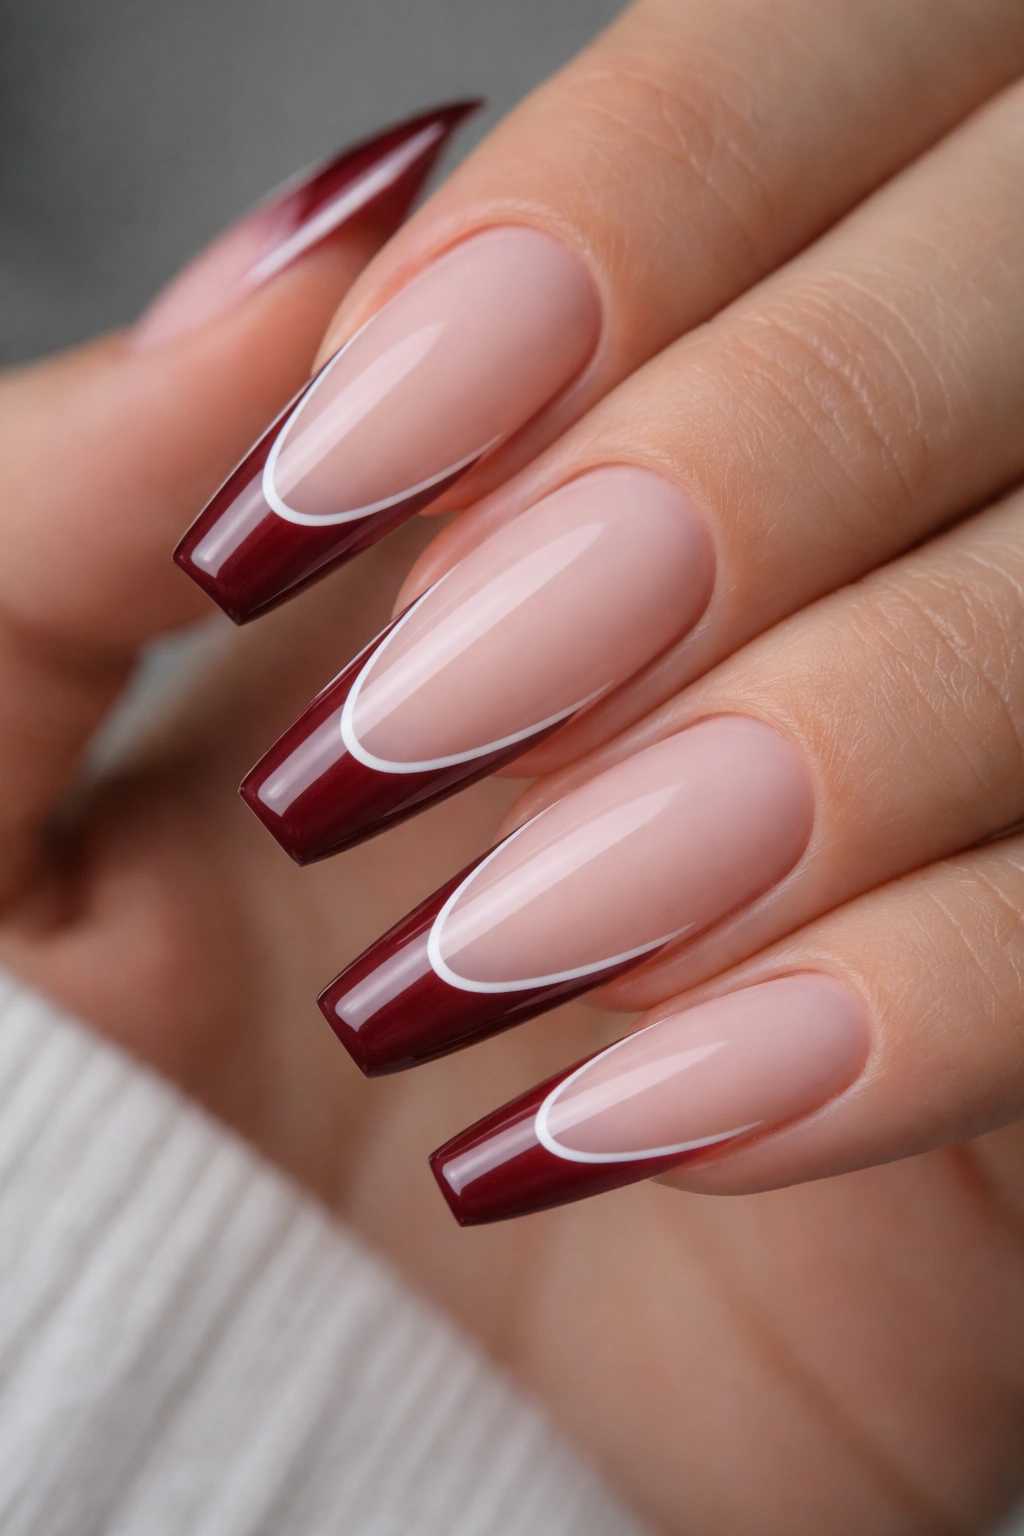
White changes burgundy in a way I never get tired of. It sharpens it.
This design places a slim white line right along the border of the burgundy French tip, either tracing the smile line or skimming just beneath it. The line needs to stay under 1 millimeter. Any thicker, and the set starts reading sporty or cartoonish rather than clean and graphic.
Long ballerina nails carry this best because the outline needs room. On a short set, the white can crowd the red. On a longer set, the contrast looks deliberate and crisp. I like a cool rosy nude or a sheer milky base with this one, not beige. The cooler base keeps the white from looking yellow.
You also need a nail tech with a steady brush hand. There is no hiding a wobbly outline under burgundy. The good news is that when the line is right, the set looks far more detailed than the design actually is.
No crystals. No foil. No extra accent nail.
The outline is enough.
12. Velvet Red Cat-Eye French Tips with a Magnetic Flash
Unlike chrome, cat-eye has movement. Tilt your hand and the light shifts across the tip like silk turning under a lamp.
That moving band is why a velvet red cat-eye French feels richer than plain shimmer polish. The effect comes from magnetic particles in the gel. Your tech paints the red tip, adds the cat-eye layer, then holds a magnet over the nail for about 5 to 8 seconds before curing. Where the particles gather, you get that soft glowing line.
A darker red base under the cat-eye layer helps. Think deep ruby, garnet, or black cherry. If the base is too bright, the magnetic effect can disappear. On a ballerina shape, the straight free edge gives the flash a cleaner lane to travel across, so the design looks more controlled than it can on rounder nails.
I would not crowd this one with heavy art. One accent nail with a tiny crystal can work. A full set of gems, stickers, and swirls cannot. Cat-eye already has motion built in, and it deserves room.
This is one of those manicures that people keep rotating their hands to stare at.
13. Heart-Cut Red French Tips with One Tiny Accent Nail
There is a narrow lane where heart nails feel witty instead of sugary. Stay in that lane, and this design is great.
The trick is using the heart as a cutout, not a sticker explosion. On the ring finger—or one thumb if you want the detail where you can actually see it—leave a tiny negative-space heart in the middle of the red French tip. The rest of the nails stay clean, with standard red French tips and no extra fuss.
Keep the Rest of the Set Quiet
You do not need hearts on every finger. Please do not do that.
A single heart cutout gives the manicure a wink without turning it into theme nails. It looks especially good with a glossy cherry or true red, because the bright color keeps the cutout visible from a normal distance.
Best Specs
- Heart size: small, about 3 to 4 millimeters
- Placement: center of the tip on one accent nail
- Base: sheer pink or milky nude
- Best finish: gloss
- Best length: medium or medium-long ballerina
If the heart gets too big, the tip stops reading French and starts reading costume. Small is the whole point.
14. Fine-Glitter Traced Red French Tips for Night-Out Nails
Chunky glitter can wreck a clean French in about ten seconds.
A traced glitter French is the better move. Instead of packing sparkle into the whole tip, keep the red tip solid and add a fine glitter line right where the red meets the nude base. That line can match the red for a tonal look or go silver for more contrast. Either way, the glitter should be thin, smooth, and almost jewelry-like.
Where the Sparkle Should Sit
The best placement is directly on the smile line, hugging the curve from sidewall to sidewall. Not above it. Not scattered across the nude base. Not stacked in chunky clusters near the cuticle.
A reflective gel liner works better here than loose glitter because the finish stays flatter. Flat matters. Once the line gets textured, the manicure starts collecting lint, catching on hair, and losing that clean French silhouette.
Keep It Controlled
- Use fine reflective glitter, not hex glitter
- Keep the traced line around 0.5 to 1 millimeter
- Pair it with a glossy red tip, not matte
- Choose one accent color for rings and stick with it
This one earns its place when you want a red French that feels dressed up without needing stones.
15. Oxblood French Tips with Broken Gold Foil Half Moons
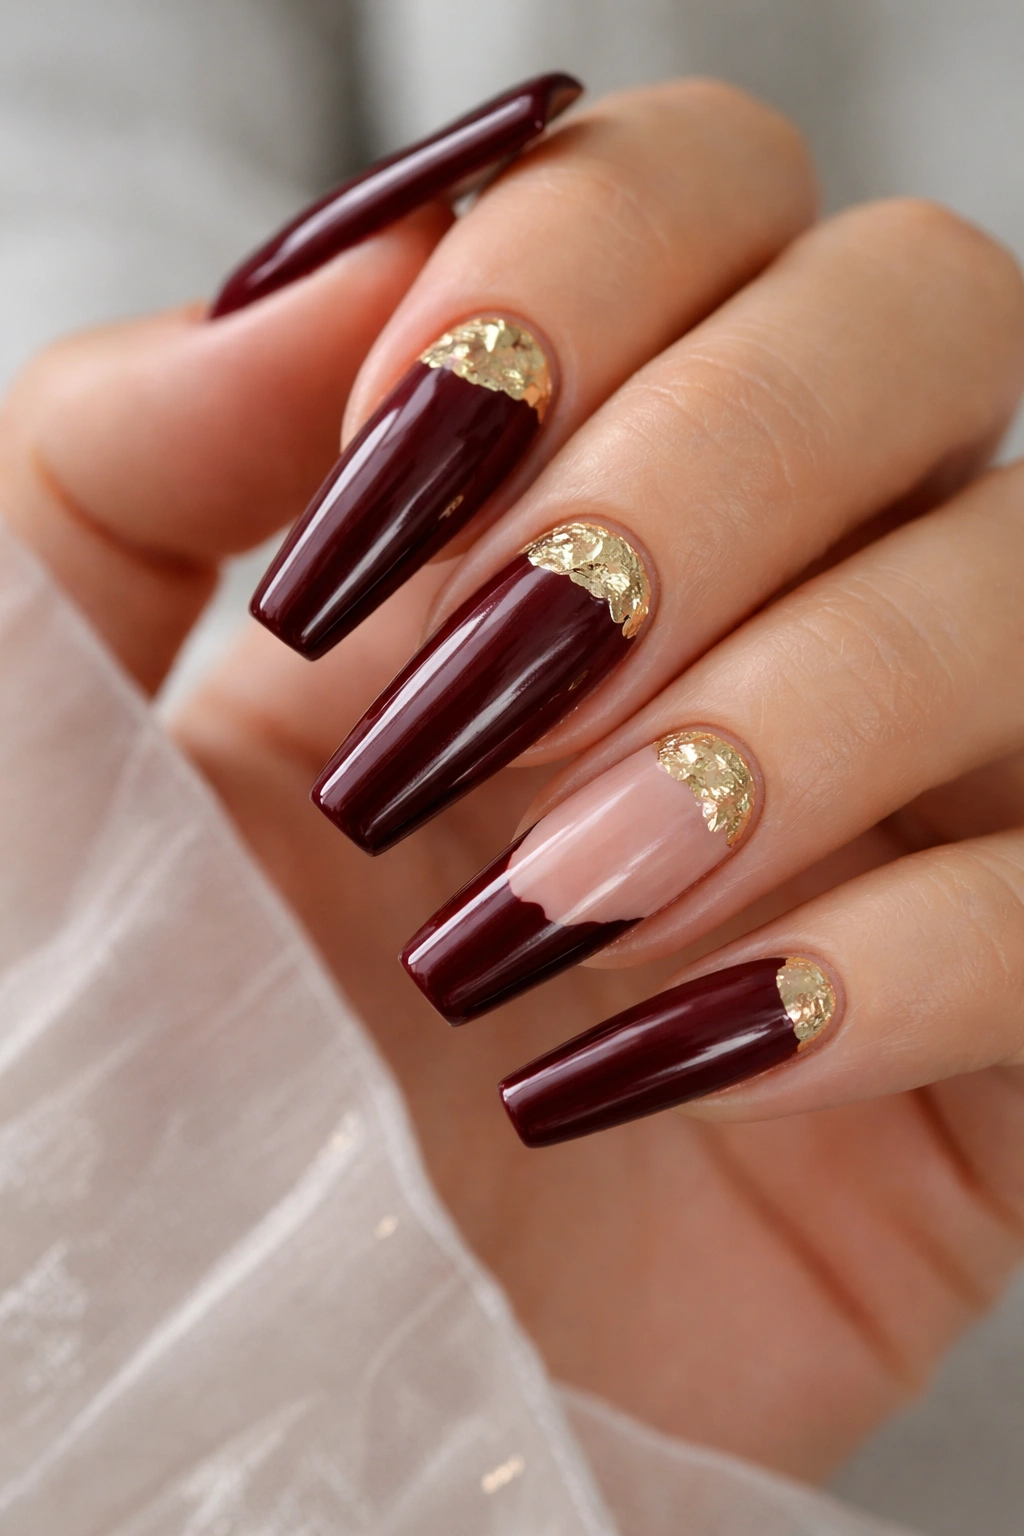
Dark red and gold can turn gaudy fast. Oxblood and broken foil do not—if the foil stays small and irregular.
This design uses a deep oxblood French tip on every nail, then adds tiny flecks of gold foil near the half moon at the base on two or three nails. Not full metallic crescents. Not a cuticle cap. Broken foil pieces, pressed thin so they look more like fragments than hardware.
The reason it works is balance. The heavy color sits at the free edge. The gold catches the eye at the base. Your eye moves the whole length of the nail, which makes ballerina shape look even longer. On a glossy finish, the whole set feels polished without becoming loud.
I like this best on long acrylic or hard gel nails because the design needs space. The oxblood should lean red, not purple. The gold should be warm but muted, not mirror-yellow. Tiny details matter more than extra decoration here.
If your style leans toward dark tailoring, sharp rings, black coats, clean makeup, this set feels right at home.
How to Ask for Red French Tip Ballerina Nails at the Salon

Bring three photos, not one.
One should show the shape from the front. One should show the side profile so the tech can see thickness and apex. One should show the detail you care about most—micro tip width, chrome finish, double line spacing, whatever it is. Clients often bring one flattering angle from social media, then wonder why the finished set feels different in person.
Say what you want in plain terms:
- “I want a medium ballerina shape with straight sidewalls and soft corners.”
- “Keep the red tip thin—about 2 millimeters.”
- “I want a cool cherry red” or “a deep burgundy, not brown.”
- “Use a sheer pink base” or “a milky nude base.”
- “I want the set glossy, except for the red tips, which should be matte.”
- “Keep the nails thin from the side.”
That last one matters.
You should also say what you do not want. No bulky tips. No thick acrylic edge. No deep smile line. No extra gems unless requested. Nail techs are not mind readers, and red French nails show every choice with zero mercy.
How to Keep Red French Tip Ballerina Nails Crisp Between Fills
Red polish tells on you. Small chips, dullness, and lifted edges show faster on red than they do on nude.
Cuticle oil helps more than people think. Use it once in the morning and once at night if you want the set to stay neat. Dry skin makes even a fresh manicure look tired, and red French tips need the whole nail area looking clean to keep their sharpness.
A few habits make a bigger difference than expensive add-ons:
- Wear gloves for dishwashing and heavy cleaning
- Do not use the tip of the nail to open cans, pry labels, or scrape stickers
- File small snags with a fine-grit file instead of picking at them
- Book fills around 2 to 3 weeks if you want the smile line and shape to stay crisp
- Add top coat if your salon offers a gloss refresh between full appointments
If a corner chips, do not peel it. Red gel pulled from the edge can take layers of product with it, and that turns a tiny repair into a full fix. Better to file the rough edge smooth and get it patched properly.
Final Thoughts

The best red French tip ballerina nails do not need ten extras piled on top. Shape first, red second, detail third. That order matters. If the ballerina file work is off, no chrome powder, glitter trace, or crystal accent is going to save the set.
If you are torn between two looks, go a touch cleaner than your first instinct. Red already has enough presence. A thinner line, a sharper sidewall, or one smaller accent usually gives you the stronger manicure.
And if you want the safest bet with the most payoff, I would start with the cherry micro French, the burgundy swoop, or the matte crimson tip. Those three never feel flat when the shape is right.
