

Under salon LEDs, almost any glitter manicure looks good. Step outside, hold your keys in daylight, and half of them fall apart.
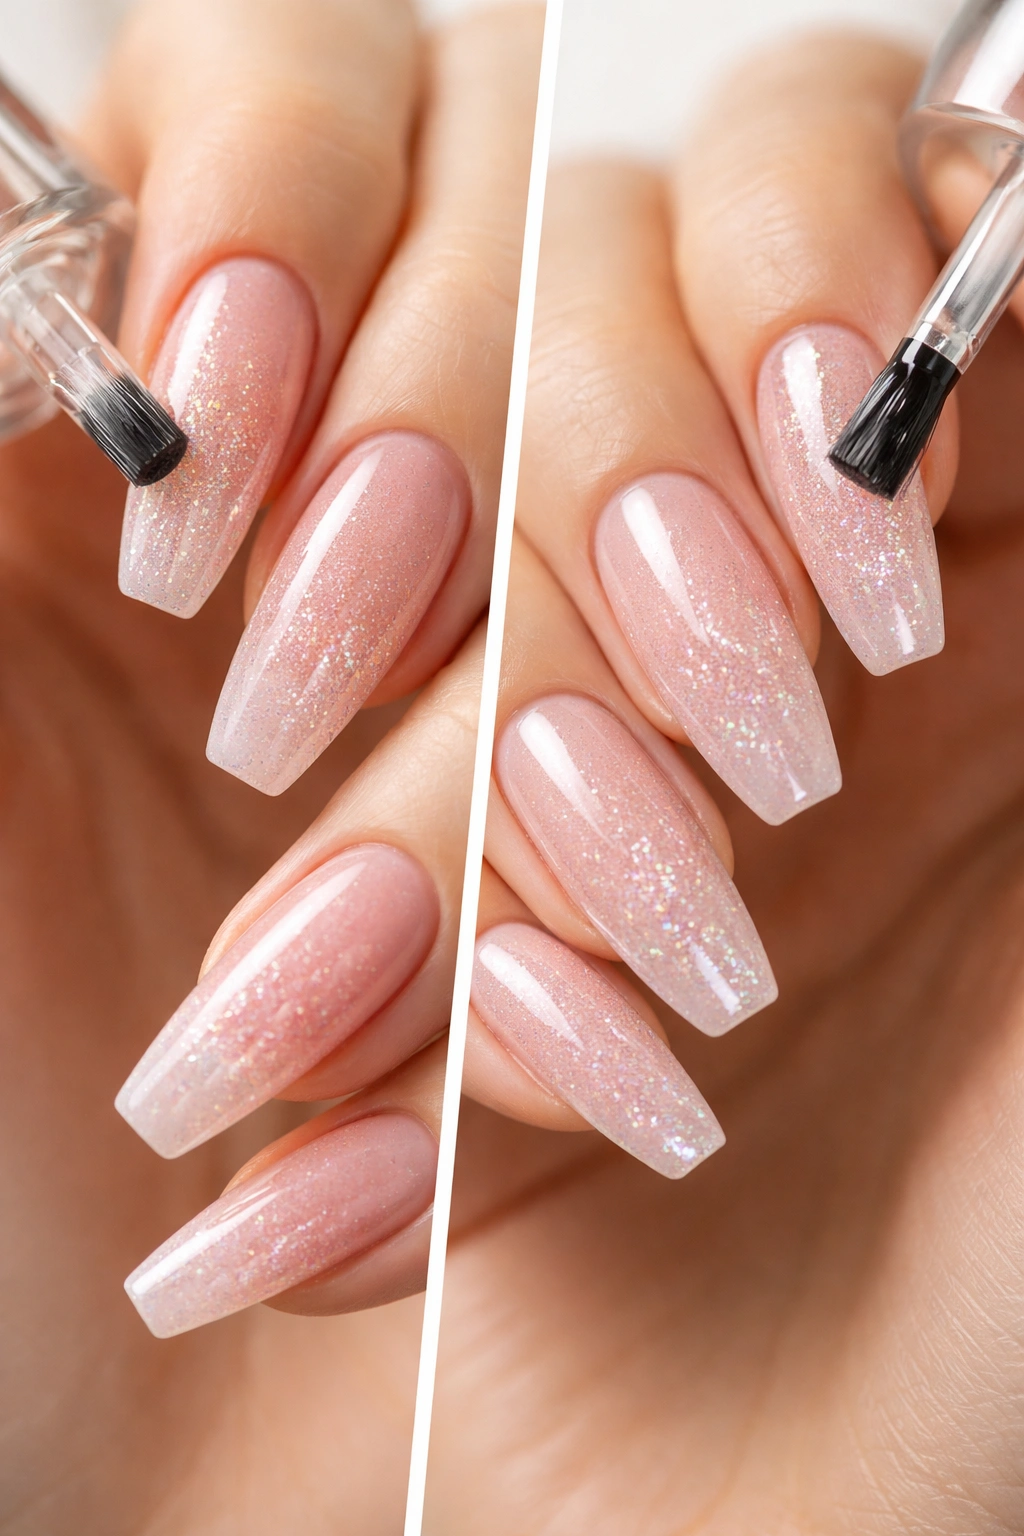
Glitter ballerina nails have a smaller margin for error than round or oval shapes. The long taper, the straight sidewalls, the flat tip—every one of those details makes sparkle placement more visible. Clumps show. Thick top coat shows. A glitter fade that drifts too far down the nail shows even faster.
That sounds harsh. It’s also why the shape can look so good.
When glitter is placed with some restraint, ballerina nails turn it into a frame instead of a distraction. Fine shimmer can make the tip look cleaner. A cuticle accent can look sharper because the nail bed stays calm. Even chunkier sparkle, when it’s boxed into the right area, feels more polished on this shape than on softer silhouettes.
I keep coming back to the same point because it matters: the shape is already dramatic. Your glitter does not need to do all the work.
Why the ballerina shape makes glitter look cleaner
Ballerina nails punish messy glitter. I mean that in the nicest way possible. Their flat free edge and tapered sidewalls pull your eye straight toward the tip, so any uneven glitter placement becomes part of the design whether you meant it to or not.
A square nail spreads sparkle out across a wider, blunter edge. Almond nails soften the finish because the rounded tip blurs where shimmer starts and stops. Ballerina nails sit in the middle: they have enough structure to look crisp, though not so much width that they feel blocky.
Coffin and ballerina are close, though not identical
People use coffin and ballerina like they mean the same thing, and in salon talk they often do. Still, a true ballerina shape usually looks a touch softer at the corners, more like the front of a pointe shoe than a dead-flat coffin tip. That tiny difference matters with glitter, because a softened corner makes fine shimmer look cleaner while large chunky pieces can make the corners look thick.
Flat tips magnify texture
Texture is the part most inspo photos hide. If the glitter sits on top of the nail instead of under a smooth layer of gel or acrylic, the flat tip exaggerates that raised surface. You’ll notice it when you swipe your phone, button a shirt, or run a hand through your hair.
Length matters too. On a ballerina set with about 12 to 18 mm of free edge, glitter gradients have room to breathe. On shorter versions, dense sparkle can shorten the nail fast. That doesn’t mean short ballerina nails cannot wear glitter. It means placement needs more discipline.
Base colors and glitter tones that stay in the same family

Pick the wrong base, and the glitter starts arguing with it.
That’s the fastest way to make a set look noisy. A cool pink base under brassy gold glitter can feel off even if each color looks good on its own. Same story with a warm beige paired with icy blue shimmer that should have stayed in a different jar.
I like glitter ballerina nails most when the base and sparkle share the same temperature. Not identical. Related.
- Cool pink or mauve base + silver or platinum glitter: sharp, icy, and clean under glossy top coat.
- Beige, taupe, or soft tan base + champagne shimmer: warmer than silver, though less yellow than full gold.
- Mocha or chocolate base + bronze foil: rich without a harsh jump in contrast.
- Soft white or pale lavender base + iridescent flakes: lets blue, lilac, and pearl flashes show through.
- Charcoal or black base + gunmetal glitter: dark, moody, and more controlled than rainbow sparkle.
Salon lighting can lie to you. A glitter mix that looks pale gold indoors may flash orange outside, and silver holographic glitter can throw green or blue once it hits daylight. If you do your own nails, swatch one tip and take it near a window before you commit to all ten fingers. If you’re in a salon, ask to see the glitter pot tilted under direct light. Tiny move. Big difference.
Prep steps and top coats that keep sparkle smooth
If a glitter set lifts, chips, or feels bumpy, the problem usually starts before the sparkle goes on.
Ballerina nails need a crisp file shape and a stable apex, because long tapered edges take more daily impact than people expect. You tap tables, grip steering wheels, open cans, zip bags. Glitter cannot hide a weak structure. It highlights it.
Here’s the prep checklist I trust most for this shape:
- File the free edge with a 180-grit file until both sidewalls taper evenly and the tip looks centered from every angle.
- Buff the surface lightly with a 240-grit buffer so the base product grips without leaving deep scratches.
- Clean sidewalls and cuticle area with alcohol and a lint-free wipe after dusting; leftover powder under glitter shows up as dull patches.
- Use builder gel or a structured base if the nail extends more than about 14 mm past the fingertip.
- Encapsulate chunky glitter when possible instead of leaving it exposed under a thin top coat.
- Cap the free edge twice on long sets; glitter tips chip first.
Top coat technique matters almost as much as the glitter itself. Float it. Don’t press the brush down hard, or you’ll drag shimmer out of place and create bald spots. On dense glitter tips, two thin top coats usually wear better than one thick one, and they’re less likely to pool at the sidewalls.
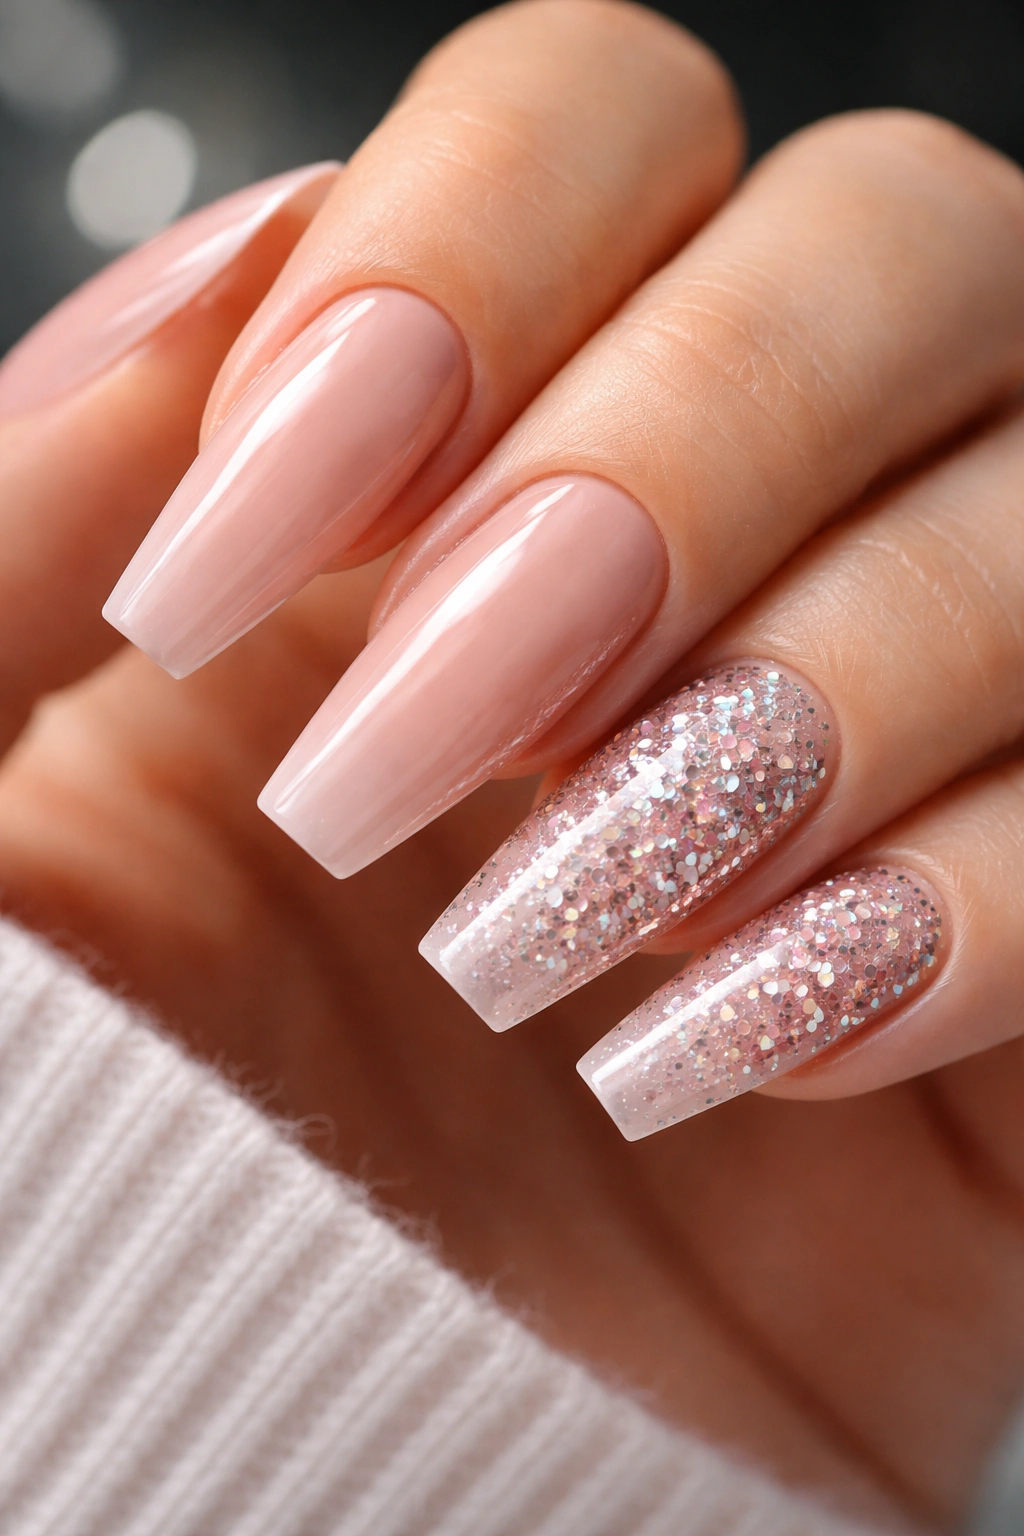
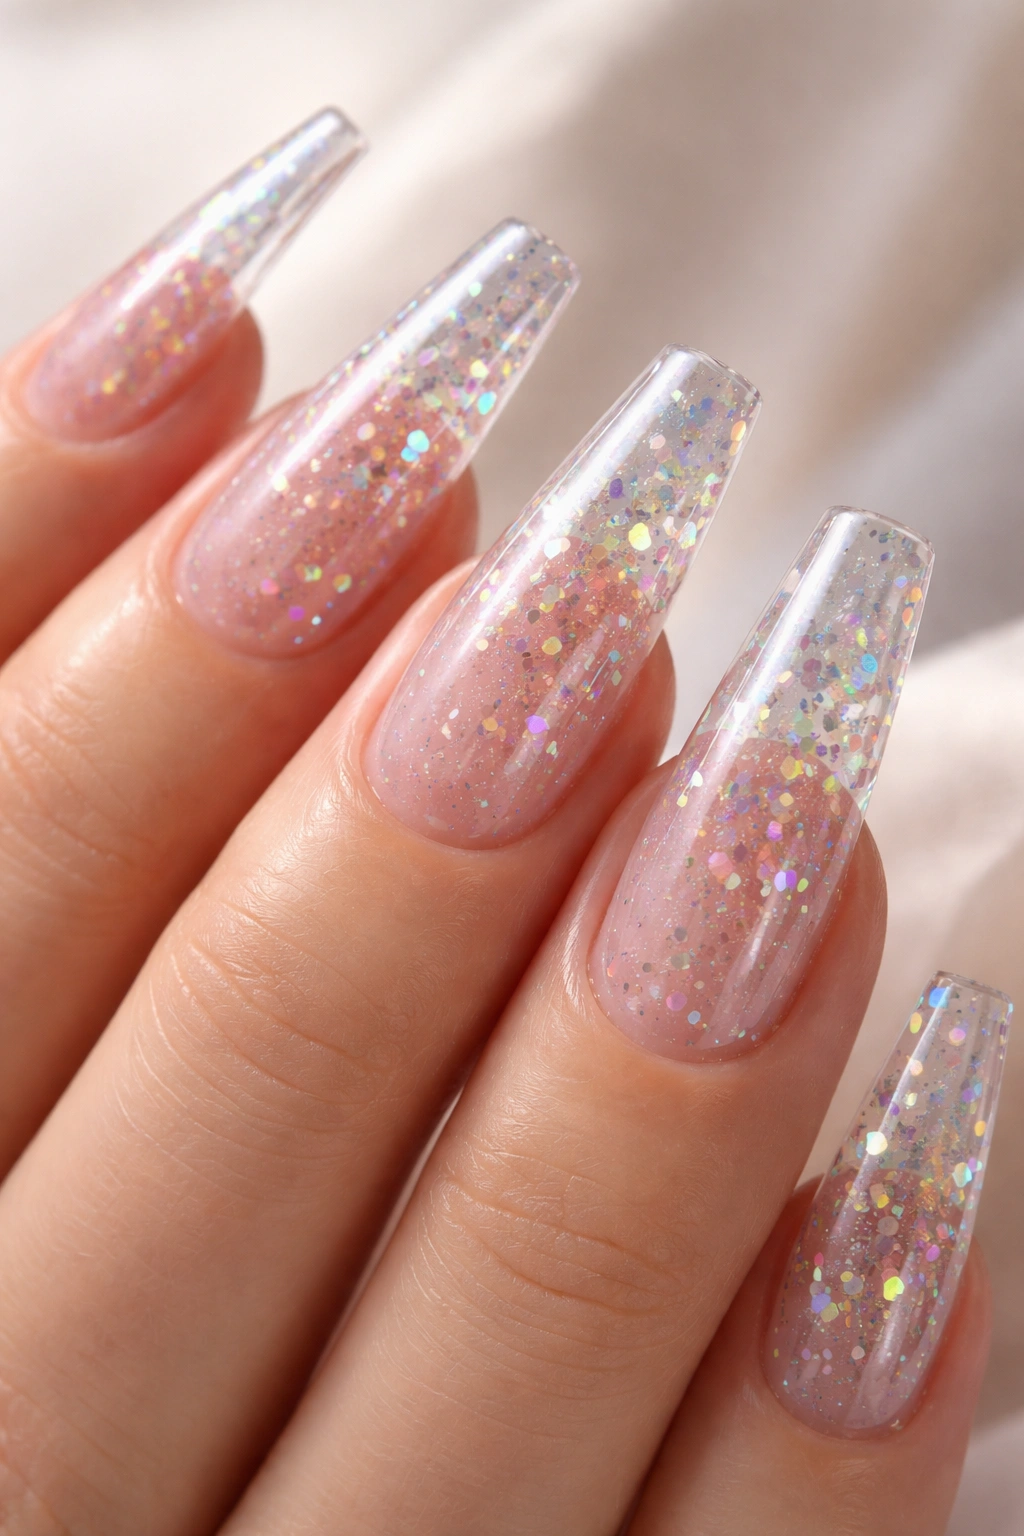
1. Sheer Pink Base With Fine Silver Dust
This is the set I reach for when I want sparkle that reads soft from arm’s length and crisp up close. A sheer pink base with fine silver dust lets the ballerina shape stay front and center, because the glitter looks more like frost than confetti.
The pink should sit close to your natural nail bed tone, though not disappear completely. You still want a little milkiness so the silver has something to glow against. Clear pink can look too bare; opaque pink can kill the airy effect.
Why it stays clean
Ultra-fine silver glitter lies flatter than chunky hex pieces, so the tip stays sleek instead of bulky. On ballerina nails, that matters. The shape already has edges and angles; micro-shimmer supports those lines without making them look heavy.
Quick design notes
- Length: around 12 to 16 mm of free edge shows this look best.
- Glitter size: aim for under 0.2 mm if you want a smooth, glassy surface.
- Placement: keep about 60 percent of the sparkle in the top half of the nail.
- Finish: a glossy top coat gives the silver a cold, clean flash.
Salon note: ask for silver dust suspended in clear gel instead of loose glitter packed on top. The finish lasts longer and feels better on the nail.
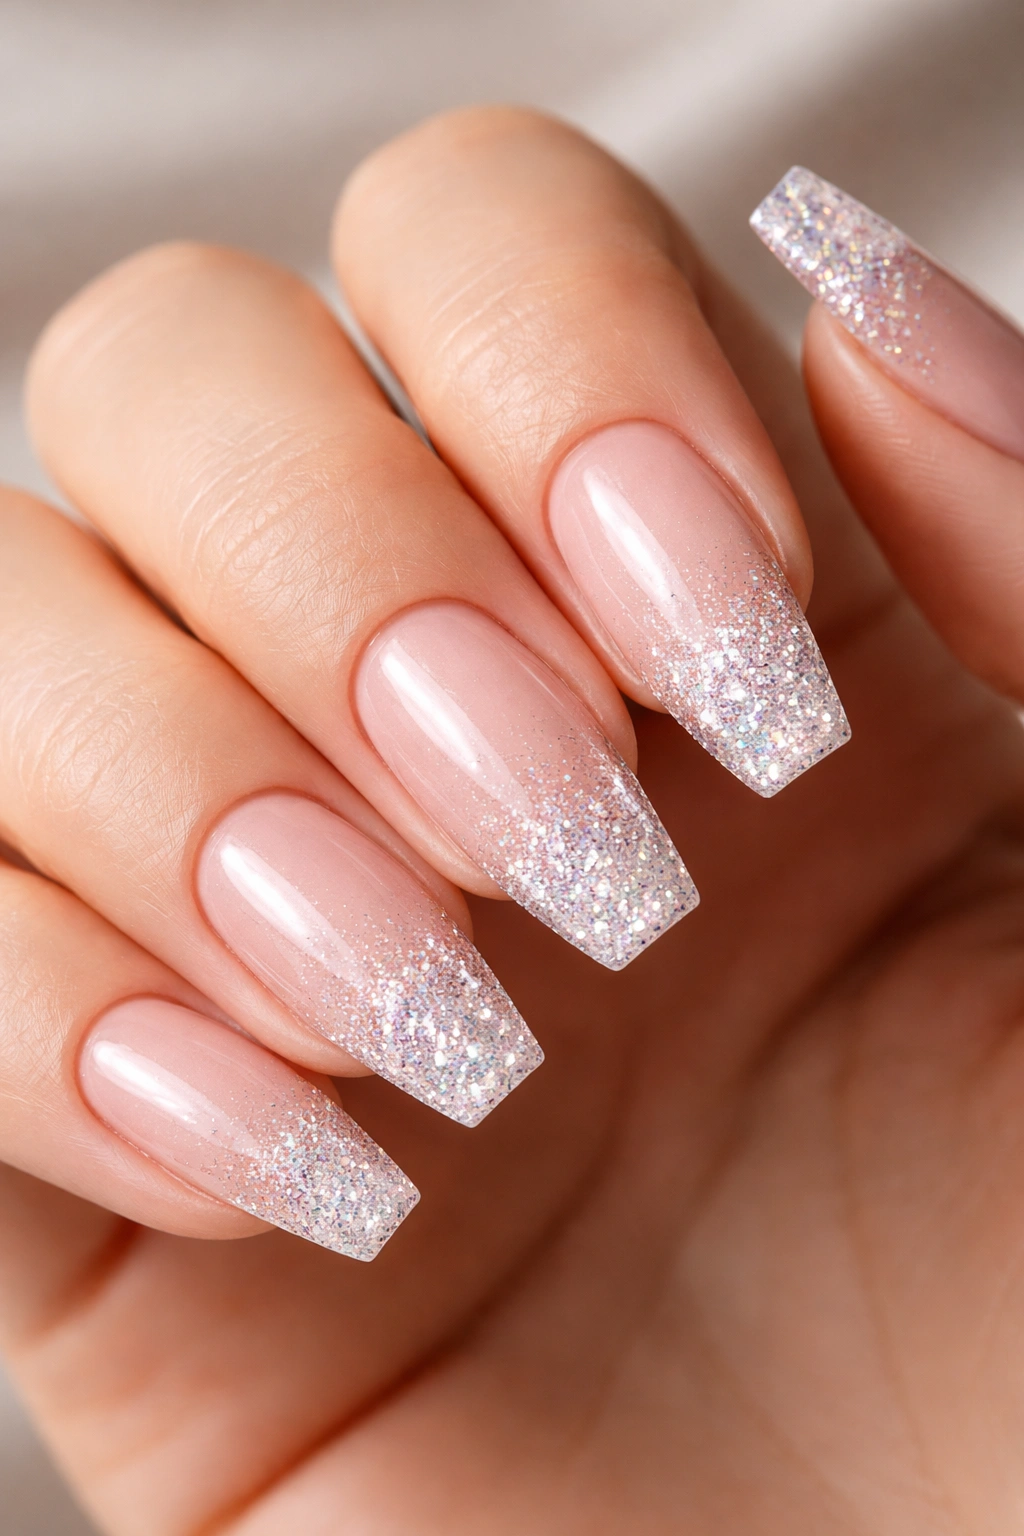
2. Milky Nude Nails With Glitter French Tips
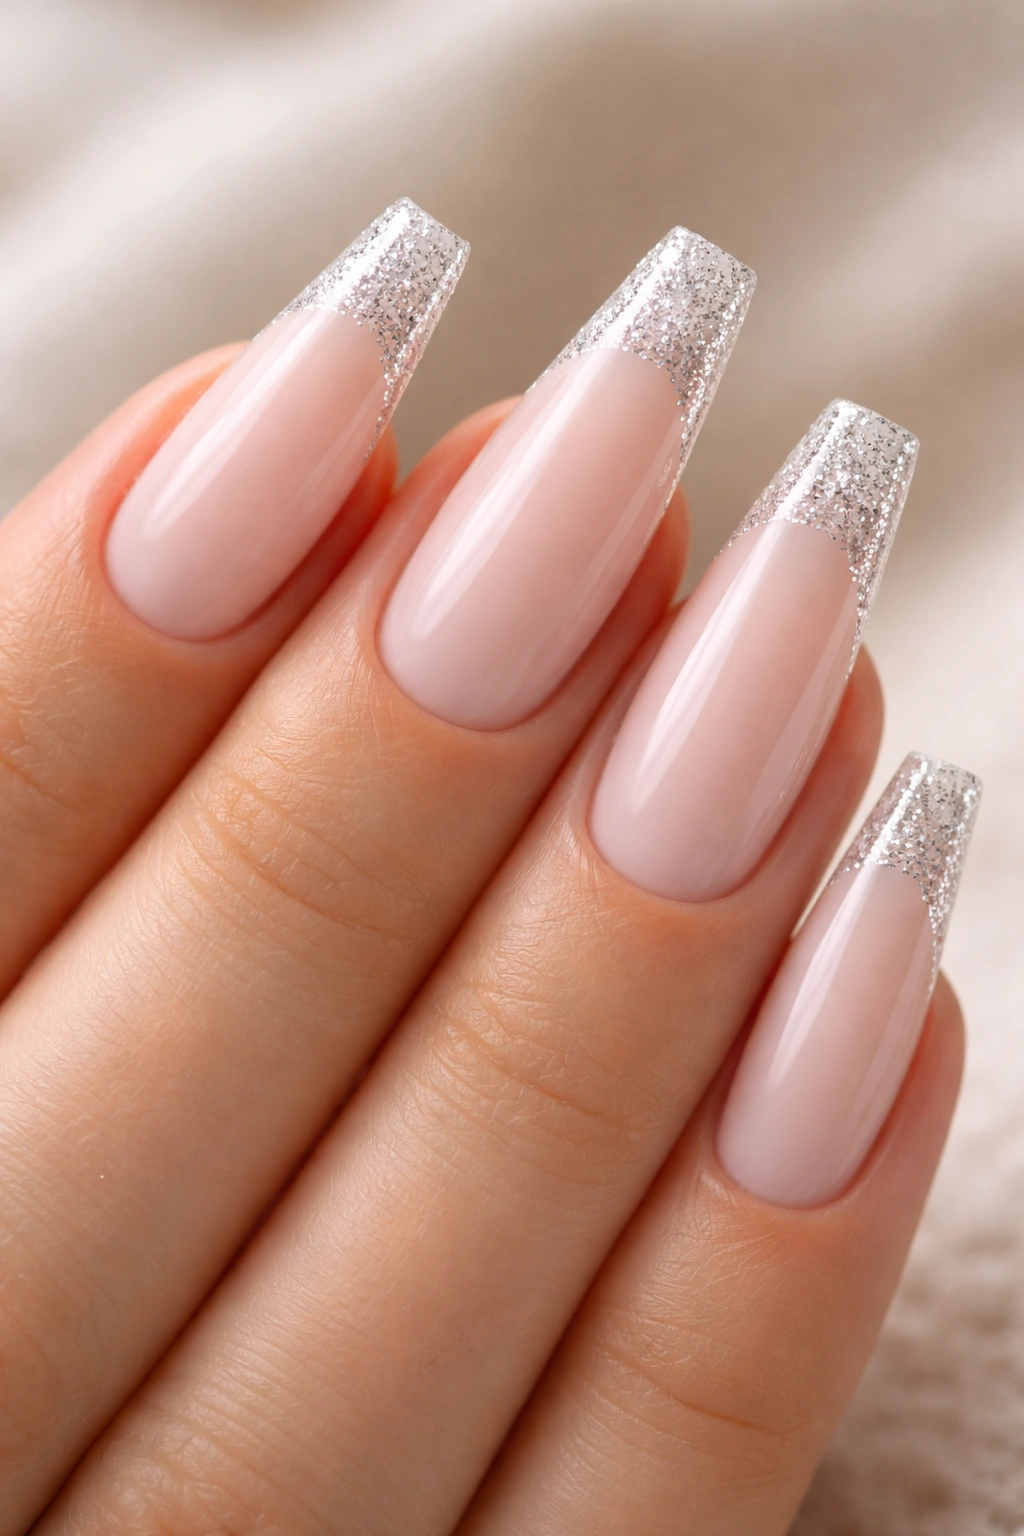
If you like glitter but hate a full sparkle nail, glitter French tips sit in a smart middle lane.
Ballerina nails make this design stronger because the flat edge gives the glitter somewhere to stop. On almond shapes, glitter French tips can drift too deep toward the center and lose their edge. Here, a 2 to 3 mm glitter band across the tip looks sharp and keeps the nude base doing half the work.
The base cannot be flat beige. It needs a little cloudiness. A milky nude blurs the line between the natural nail and the glitter tip, so the transition looks smoother and the grow-out looks less harsh. I lean toward champagne, soft silver, or translucent iridescent glitter here. Rainbow mixes pull the eye away from the shape.
Ask for a straighter French line than you’d wear on a rounded nail. If the smile line curves too far down the center, the ballerina shape starts looking shorter and wider. A second thin top coat over the tip also helps, since the free edge takes the first hit every time you open a drawer or scrape a sticker off something.
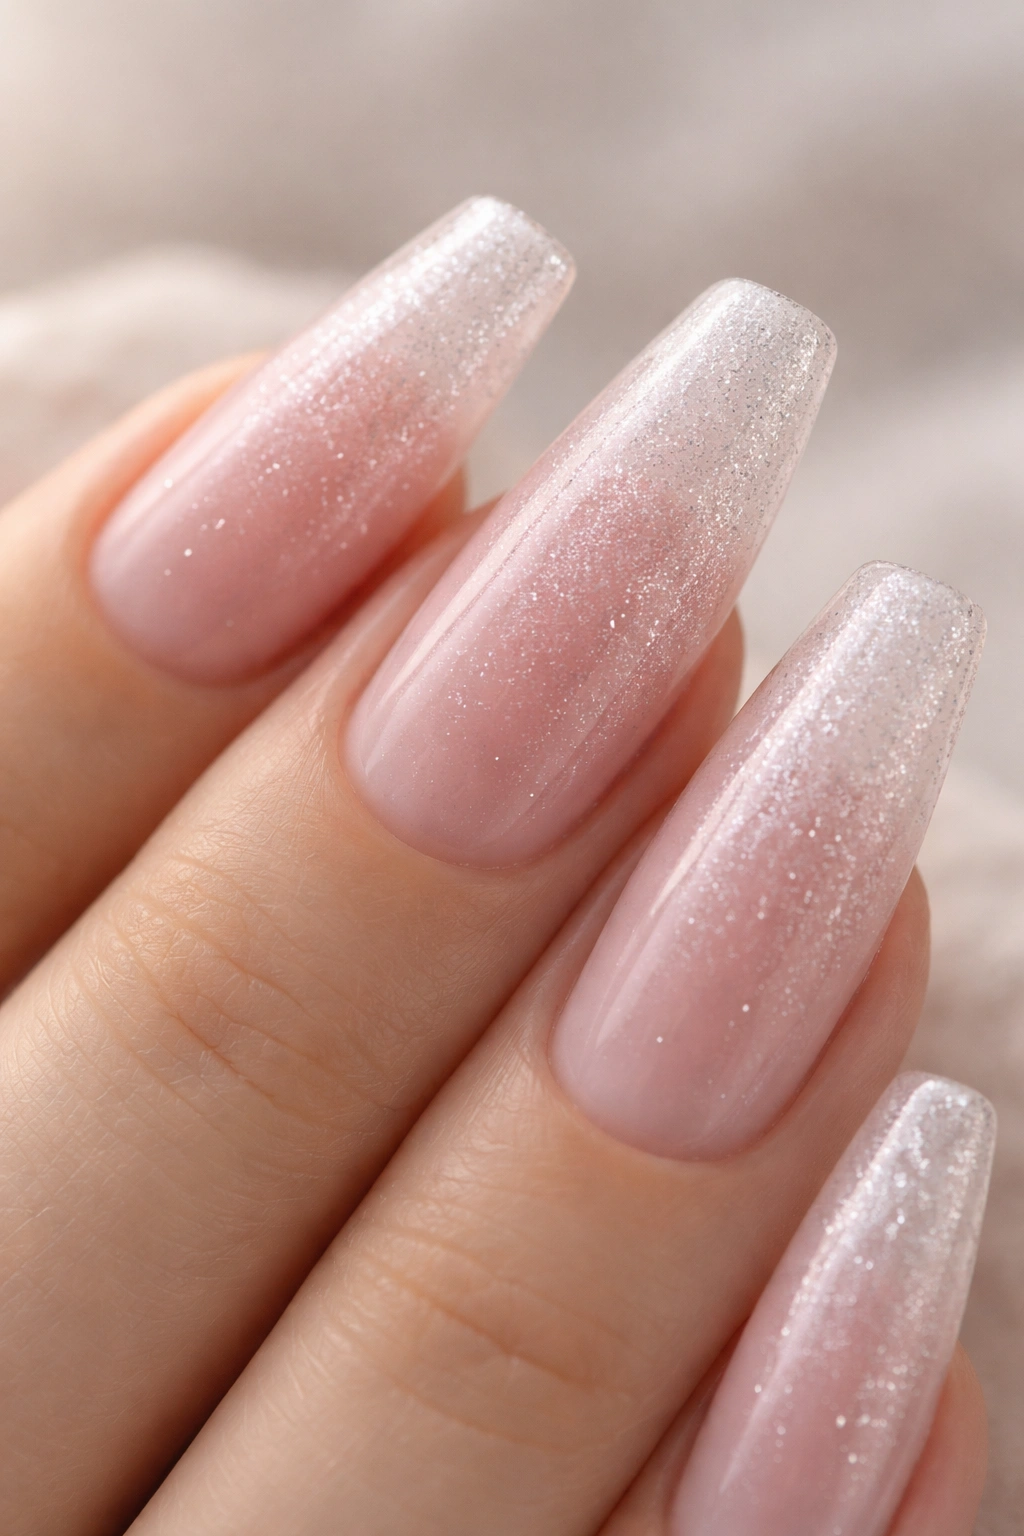
3. Rose Gold Ombre From Cuticle to Tip
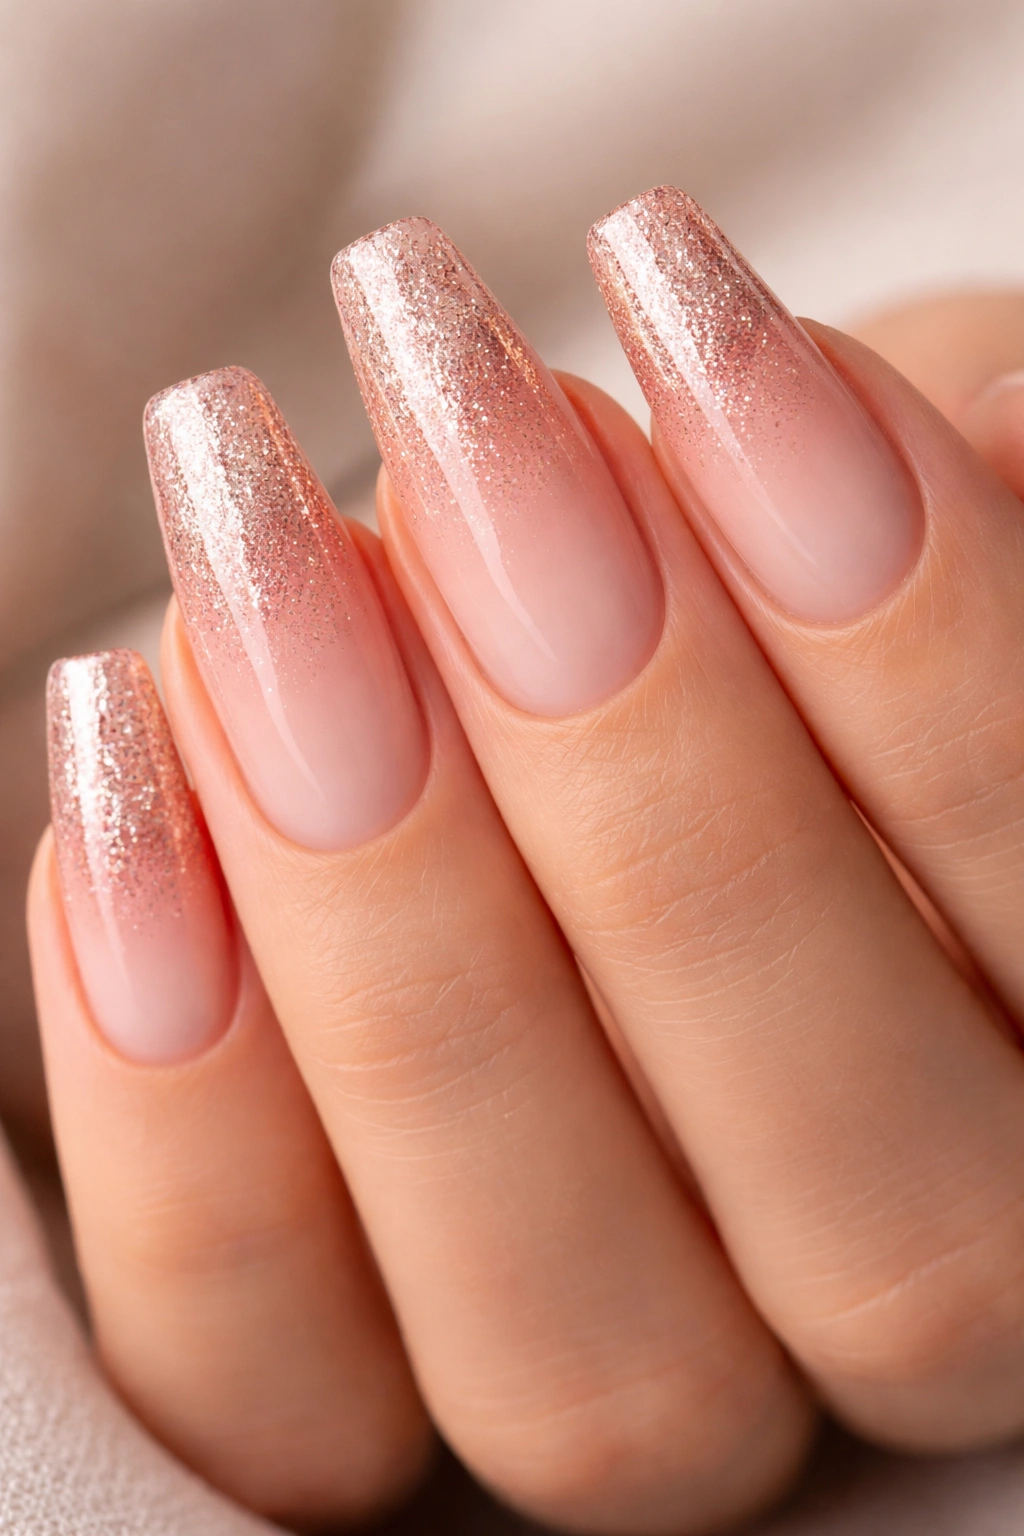
Why does rose gold ombré flatter ballerina nails so often? Because the taper gives the fade a path.
On a shorter square nail, glitter ombré can sit like one block of sparkle. On ballerina nails, the line narrows as it moves toward the tip, so the fade looks stretched and more graceful. You get movement instead of one glitter patch parked in the middle.
Rose gold also solves a color problem that silver and yellow gold sometimes create. Silver can look cold against warm nude bases. Yellow gold can swing orange fast. Rose gold lands in the middle, which makes it easier to pair with blush, beige, soft tan, and mauve-toned bases.
Where the fade should start
Leave about 2 mm of clean space near the cuticle before the first scattered shimmer appears. That tiny gap keeps the cuticle line neat and softens grow-out. From there, build the glitter slowly so the center stays semi-sheer and the last third of the nail carries the densest shine.
If you want this design to hold its shape, do not pack the glitter wall to wall. Let the sidewalls breathe. The ombré should pull the eye forward, not make the nail look thick from edge to edge.
4. Clear Acrylic Ballerina Nails With Encapsulated Holographic Flecks
Pick up a glass of water with this set on, and you’ll see why people keep asking for it. Encapsulated holographic flecks shift with every tiny hand movement, though the nail surface stays smooth because the sparkle sits under clear acrylic or builder gel.
That smoothness is the whole point. Chunky holographic glitter looks fun in the jar, though it can feel rough and look patchy when it’s painted directly on top. Encapsulation fixes both problems. The flecks stay suspended inside the nail instead of sitting on it.
A clear base matters here. Nude can work, though full clarity gives the glitter more space and lets the ballerina silhouette show through. I like a slight jelly tint if you want the look softened, especially on longer sets.
- Use mixed fleck sizes from about 0.5 to 1 mm so the sparkle has depth instead of one flat flash.
- Keep the heaviest concentration around the center and tip, not packed into the cuticle area.
- Leave some open clear space near the sidewalls so the shape still reads narrow.
- Build enough apex to support the length; clear nails show weak structure faster than opaque ones.
If you love chunky glitter and hate snagging, this design earns its place.
5. Taupe Base With Champagne Micro-Glitter
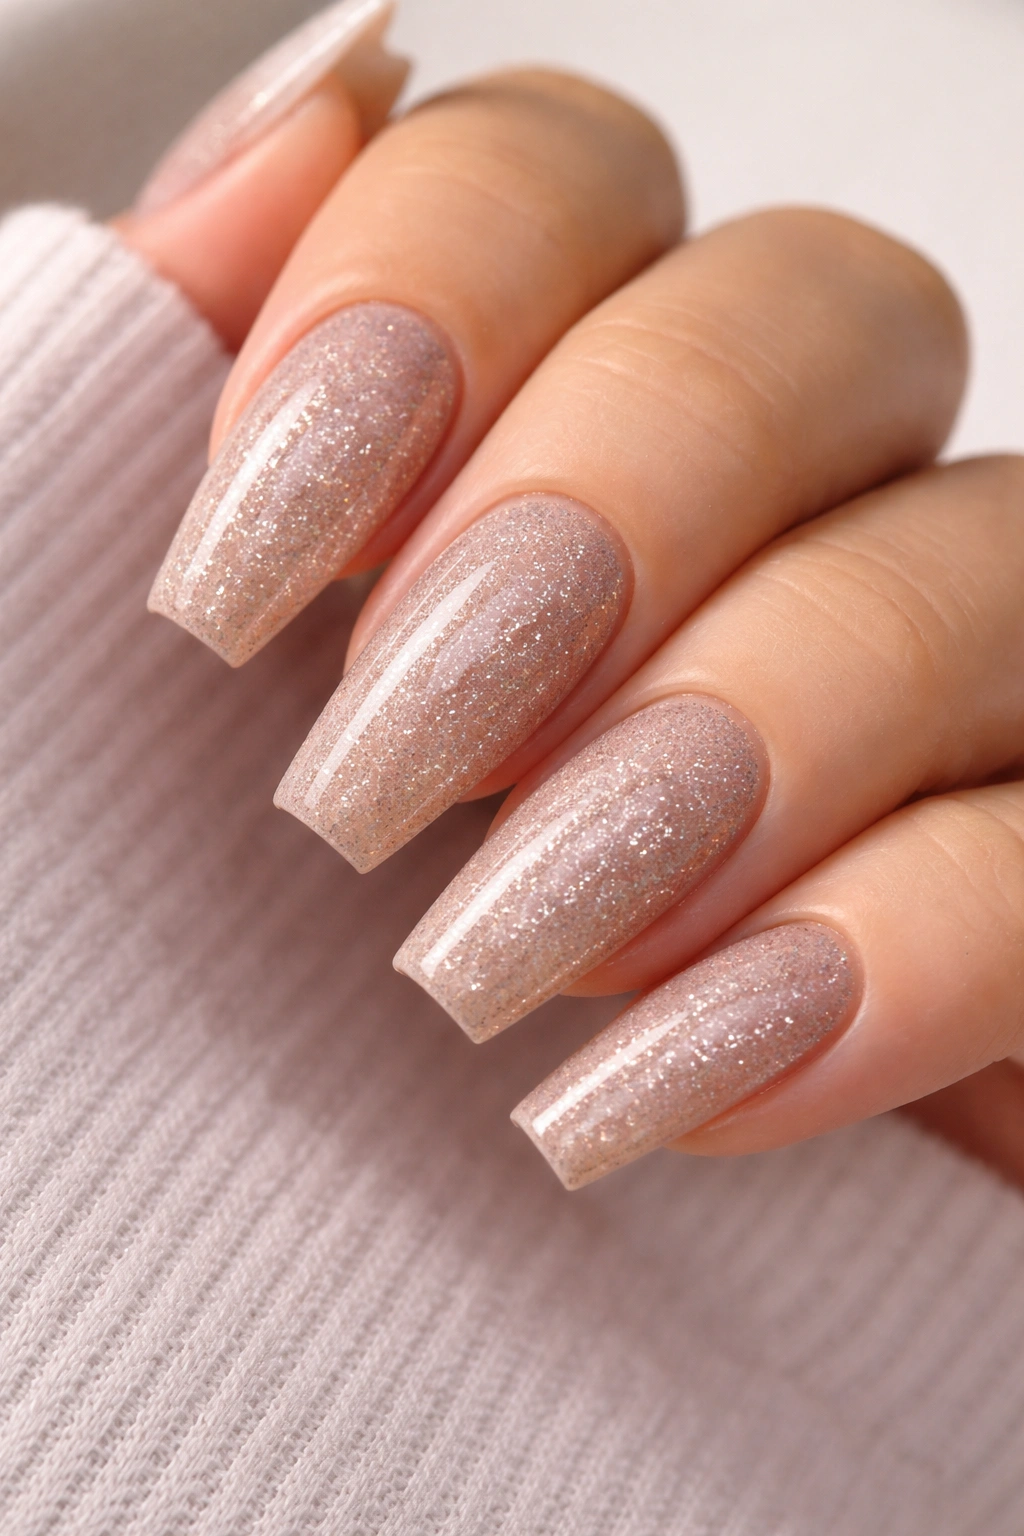
Taupe sounds quiet, and that is exactly why it works.
A taupe base under champagne micro-glitter has a calm, grown-up feel that a lot of gold sets never manage. Gold can lean brassy. Pink glitter can lean sugary. Taupe pulls both of those impulses back and gives the sparkle a cooler, smoother background.
I’m fond of this combination on medium ballerina nails because it doesn’t need much length to look finished. Even with 10 to 13 mm of free edge, taupe still frames the shape well, and fine champagne shimmer at the tip or across the full nail catches enough light to keep the set from looking flat.
Texture matters more than color here. Use micro-glitter, not chunky foil. You want a finish that looks sealed under glass, not textured like craft sparkle. A glossy top coat helps the champagne read creamy instead of yellow.
One more thing. Taupe has to be chosen carefully. If it’s too gray, the manicure can feel dull. If it’s too brown, the champagne starts looking orange. A mushroom-tinted taupe—somewhere between beige and gray—usually gives the cleanest result.
This is one of those sets I’d wear on repeat because it handles both close-up photos and normal weekday life without asking for too much attention.
6. Black Ballerina Nails With a Single Glitter Cuticle Arc
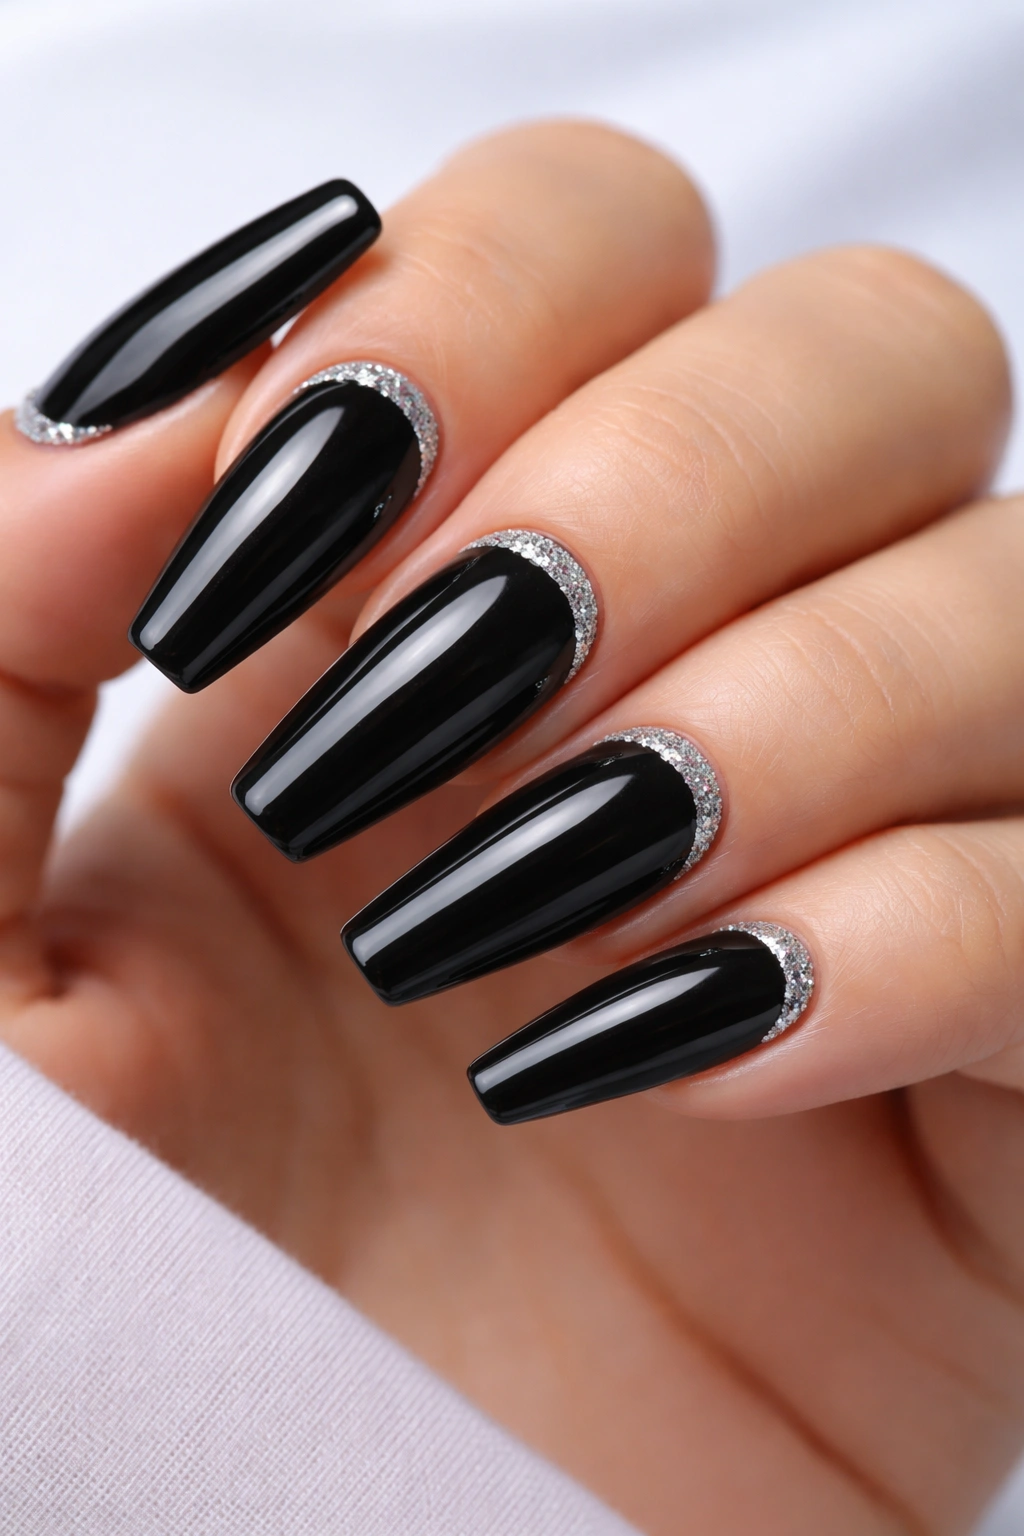
Unlike full-black glitter nails, a glossy black base with one glitter cuticle arc keeps the shine in one controlled place. Your eye reads the dark nail first, then catches the curve when the hand moves. That order makes the whole design feel sharper.
Placement is everything. The crescent should sit about 0.5 mm away from the skin and stay around 1 to 1.5 mm thick. Wider than that, and grow-out starts looking harsh too early. Thicker arcs also fight the sleek line of the ballerina shape.
This design suits anyone who likes dark nails but gets bored with plain crème black after four or five days. Silver glitter gives it a colder edge. Gunmetal makes it moodier. I’d skip multicolor glitter here; it interrupts the clean half-moon effect and can make the arc look less precise.
My preference is medium length—roughly 13 to 17 mm past the fingertip. On extra-long black ballerina nails, the base can get heavy fast, and the cuticle arc has to work harder to break up that block of color. On medium length, the balance lands in a much better place.
7. Soft White Nails With Iridescent Sugar Texture
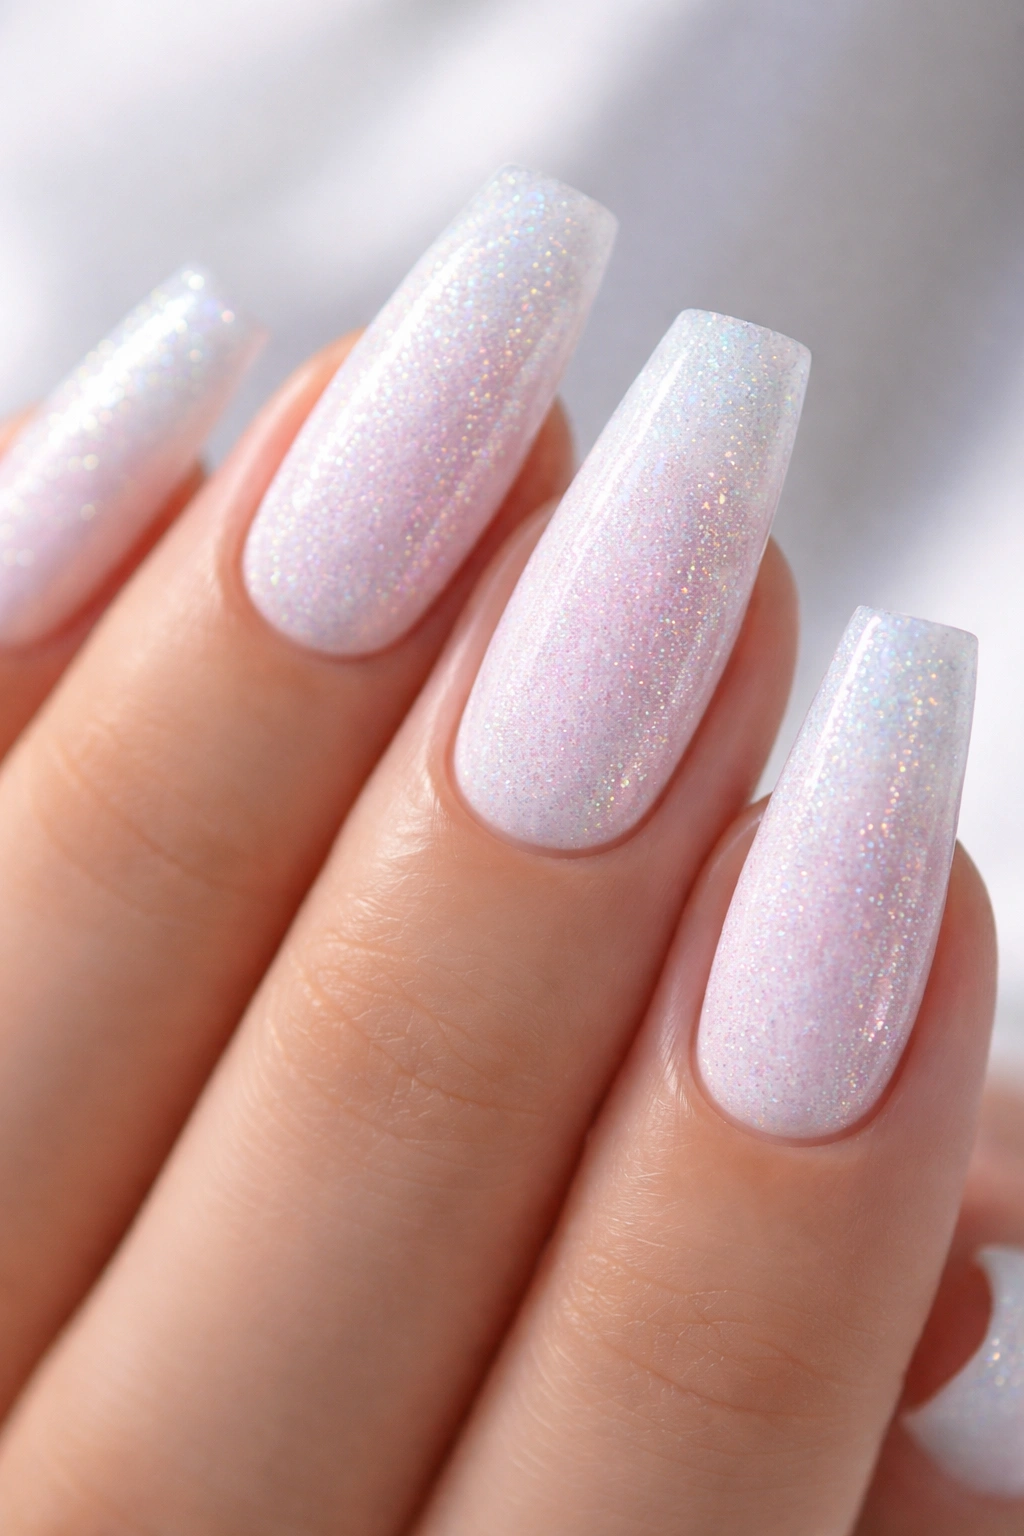
Run a fingertip across this set and you feel the texture before you catch the color shift. Iridescent sugar glitter over soft white has that fine-grain, almost snowy surface that looks delicate from a distance and a little frosty up close.
A soft white base is the move here, not stark paper white. Bright white can make the sugar effect look harsh and chalky. A milkier white gives the iridescent particles room to flash lilac, blue, and pearl without turning the whole nail cold.
What to ask for at the salon
- Choose a milky white base in one or two thin coats.
- Apply the sugar effect over cured color and uncured top gel so the grains grip evenly.
- Use texture on all ten nails only if you’re fine with extra wear marks; two to four accent nails last cleaner.
- Seal the sidewalls under the sugar layer to reduce early lifting.
There’s one downside and I’d rather say it than pretend otherwise. Sugar texture can catch on knit fabrics, and heavy hand sanitizer use dulls the sparkle faster than a glossy sealed glitter set. If that would drive you mad by day three, skip this one and go for encapsulated iridescent shimmer instead.
8. Blush Nude Nails With Chunky Glitter on Two Accent Fingers
Accent nails still earn their place if you stop at two fingers across the full set.
A blush nude base on the rest of the nails keeps the chunky glitter from spreading chaos all over the hand. I like this look most when the accent sits on each ring finger and nowhere else. Once you add more full-glitter nails on the same set, the balance can tip fast on a ballerina shape.
Chunky glitter needs backup. A mix of 1 mm hex pieces with fine shimmer between them fills awkward gaps and keeps the surface from looking patchy. Encapsulation helps a lot here because large glitter near the tip can lift or snag if it’s only trapped under one thin top coat.
Shorter ballerina nails need a little caution with this design. If the free edge is under 10 mm, full coverage chunky glitter can make the accent nail look wider. A better approach is keeping the glitter concentrated from mid-nail to tip so the base still peeks through.
I’m not anti-accent nail at all. I’m anti-accent nail that keeps adding extra ideas because the first idea didn’t feel strong enough.
9. Mocha Brown Base With Bronze Foil Spark
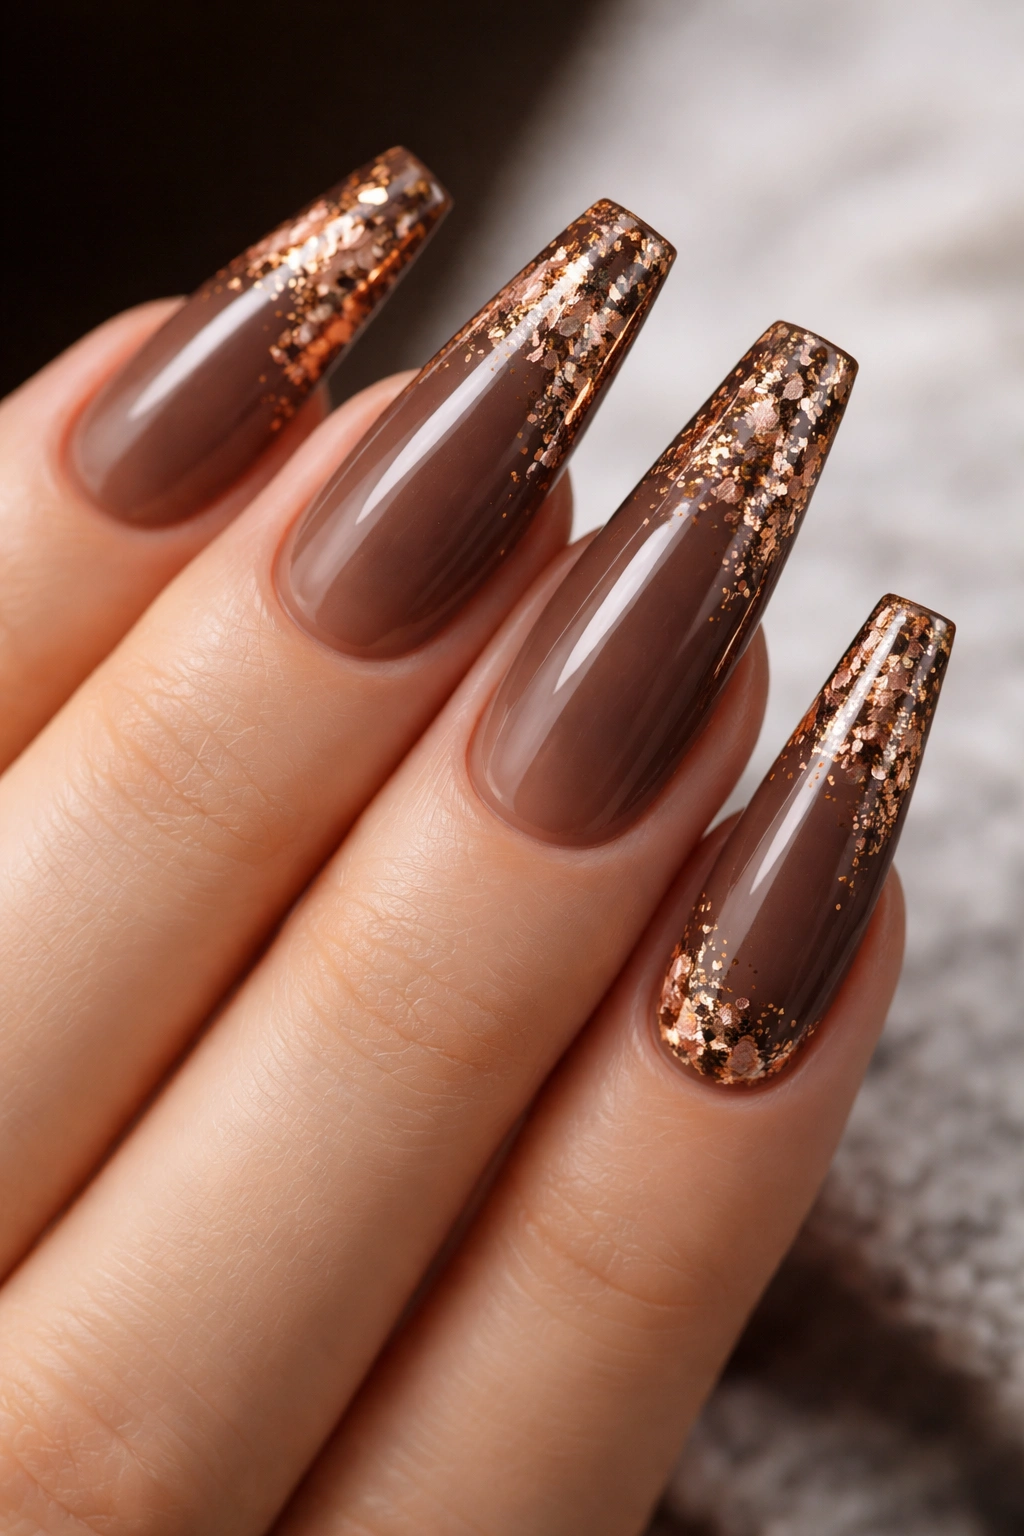
Why does bronze foil look richer on mocha than on pale beige? Because the warmth stays inside one color family.
Pale nude can make bronze foil jump out too hard, almost like the sparkle is sitting on the nail instead of inside the manicure. A mocha base gives the foil something to echo. The result looks deeper, and the broken metallic flashes feel smoother against the ballerina shape.
Foil also gives off a different kind of shine than standard glitter. It doesn’t twinkle in little points. It flashes in torn shards, more like tiny metal leaf caught under glass. On a long tapered nail, that sharper kind of reflection looks right at home.
Placement that keeps the foil clean
Start with torn foil pieces no larger than 3 to 4 mm. Press them into the tacky layer at a diagonal rather than scattering them edge to edge. I like a cluster near one side of the cuticle and another at the opposite corner of the tip. The empty space between those points lets the eye read the shape first.
If the foil covers more than half the nail, the mocha base loses its job and the design gets flatter. Restraint again. I know. Still true.
10. Pale Lavender Nails With Celestial Glitter Placement
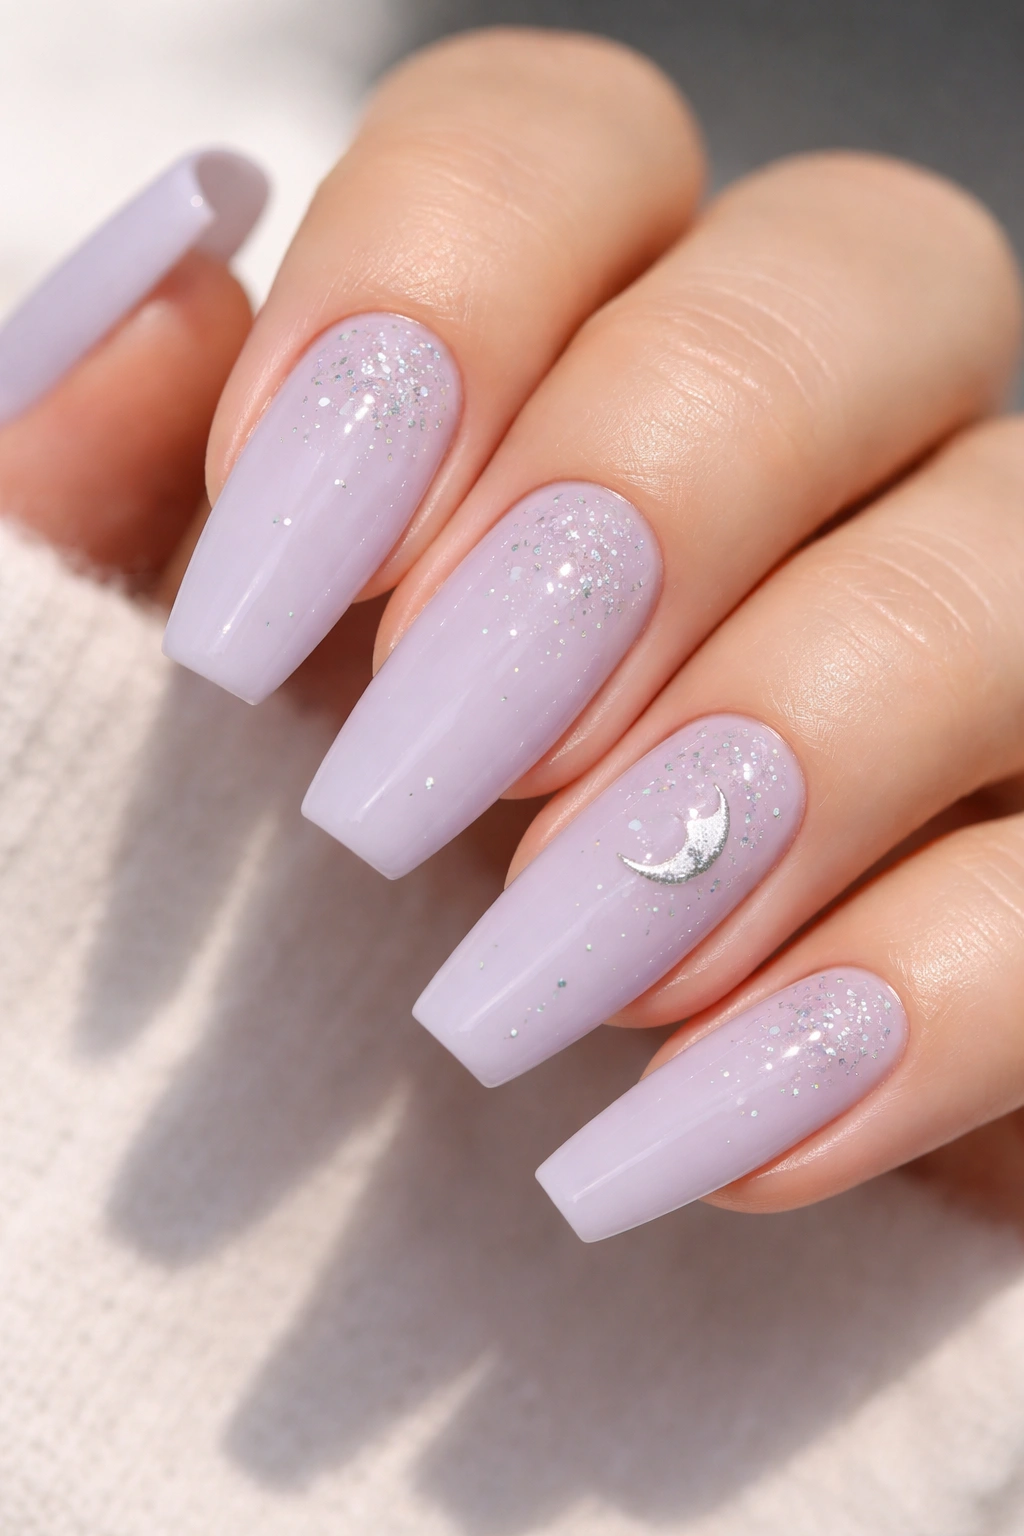
I like celestial nail art less than most inspo boards do. Too many stars, too many moons, too many little white dots trying to do the work of actual design.
Pale lavender ballerina nails with celestial glitter placement fix that by keeping the sky references sparse. Think one crescent on a single nail, a few silver points on another, and tiny scattered sparkle that suggests a night sky instead of spelling it out.
The lavender base matters. Clear nude can make the celestial bits feel random. Lavender gives them context and softens silver glitter without turning the whole manicure sugary.
- Use one moon only on the full set; repeating it on multiple nails gets busy.
- Keep starbursts tiny, around 2 to 3 mm across, with a liner brush instead of thick decals.
- Scatter micro-glitter in groups of 3 to 5 pieces, not in even rows.
- Leave at least half of each nail calm so the placement still feels airy.
This one shines most under a high-gloss top coat. Matte takes away the tiny flash points that make the celestial placement worth the effort.
11. Classic Red Ballerina Nails With Ruby Shimmer
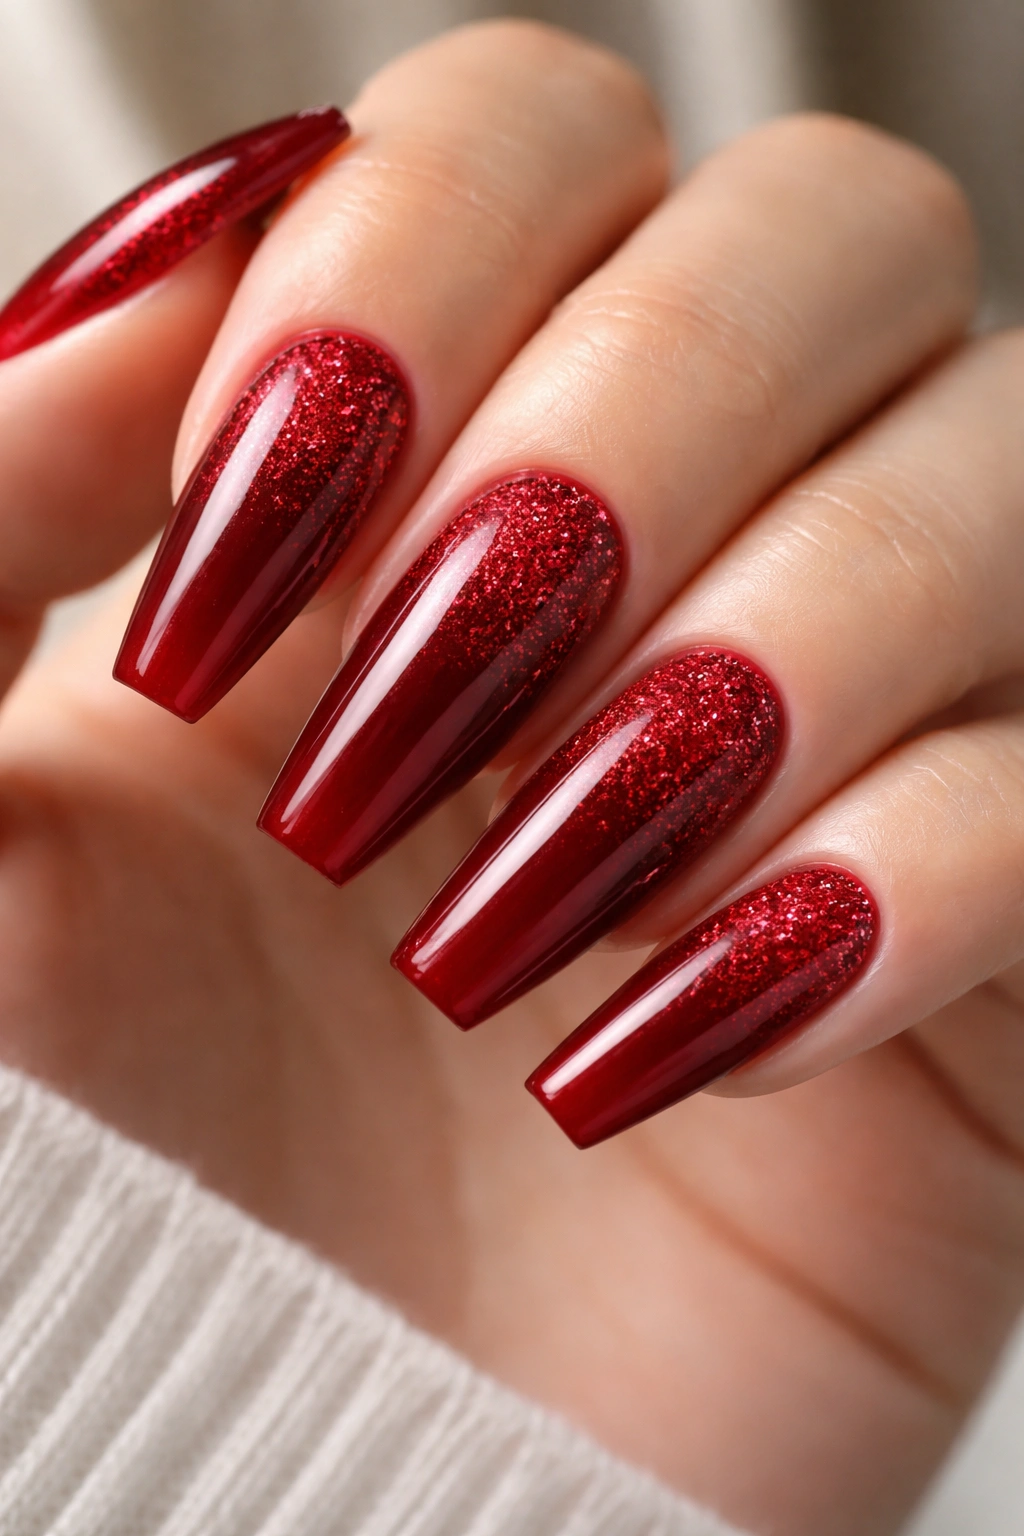
Red shimmer can look plush—or it can look like a holiday ornament in the worst way. The difference usually comes down to undertone.
If your red base leans blue, pair it with ruby or cherry shimmer that sits in the same lane. If the base leans brick or chili, a copper-red micro-shimmer makes more sense. Random silver glitter over classic red can work, though it changes the mood from rich to flashy fast.
Ballerina nails handle red well because the flat tip keeps the color from turning too soft. Add fine ruby shimmer, and the shape gets even more presence without losing that crisp edge. I prefer shimmer suspended through the color or concentrated in the top half rather than dense red glitter packed on every inch of the nail.
There’s also a lighting trick here. In dim restaurants, movie theaters, or evening events, ruby shimmer reads like depth inside the red rather than sparkle sitting on top. That makes it feel heavier, richer, almost velvety to the eye.
If you want red glitter without that costume-jewelry effect, go finer, darker, and more tone-matched than your first instinct tells you.
12. Smoky Gray Base With Gunmetal Glitter Fade
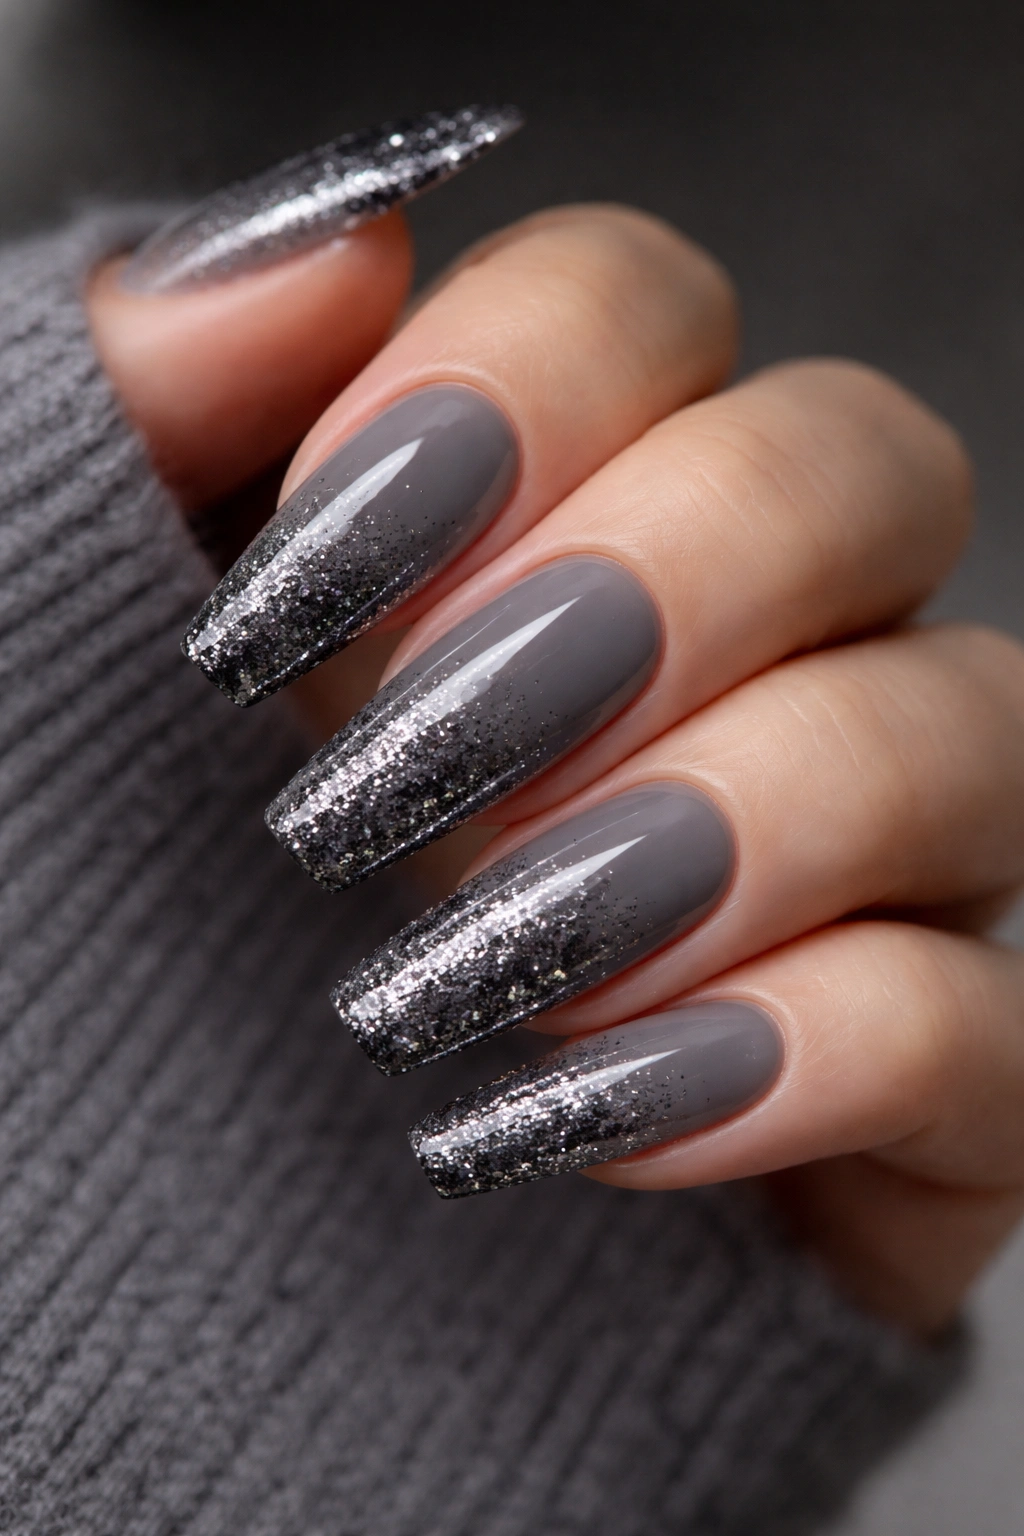
Unlike black, smoky gray gives gunmetal glitter room to show its edges. You still get a dark manicure, though the fade stays visible instead of disappearing into the base.
That matters on ballerina nails. A fade should help the eye travel toward the tip. If the base is too dark and the glitter too similar, the whole design can collapse into one murky block from a few feet away. Smoky gray avoids that problem.
I like the fade strongest when it starts around the midpoint and gets dense at the last third of the nail. Reflective gunmetal on the tip throws off tiny silver flashes in low light, while the gray underneath keeps the manicure from feeling too severe.
Who should wear it? Anyone who wants a dark set with some edge but doesn’t want plain black. My favorite version uses a glossy base and slightly denser reflective glitter at the tip rather than a fully matte background. Matte gray can look dusty if the top coat starts wearing off along the sidewalls.
This one has attitude. It also has better depth than most dark glitter fades I see.
13. Nude Nails Framed With Crystal-Cut Side Glitter
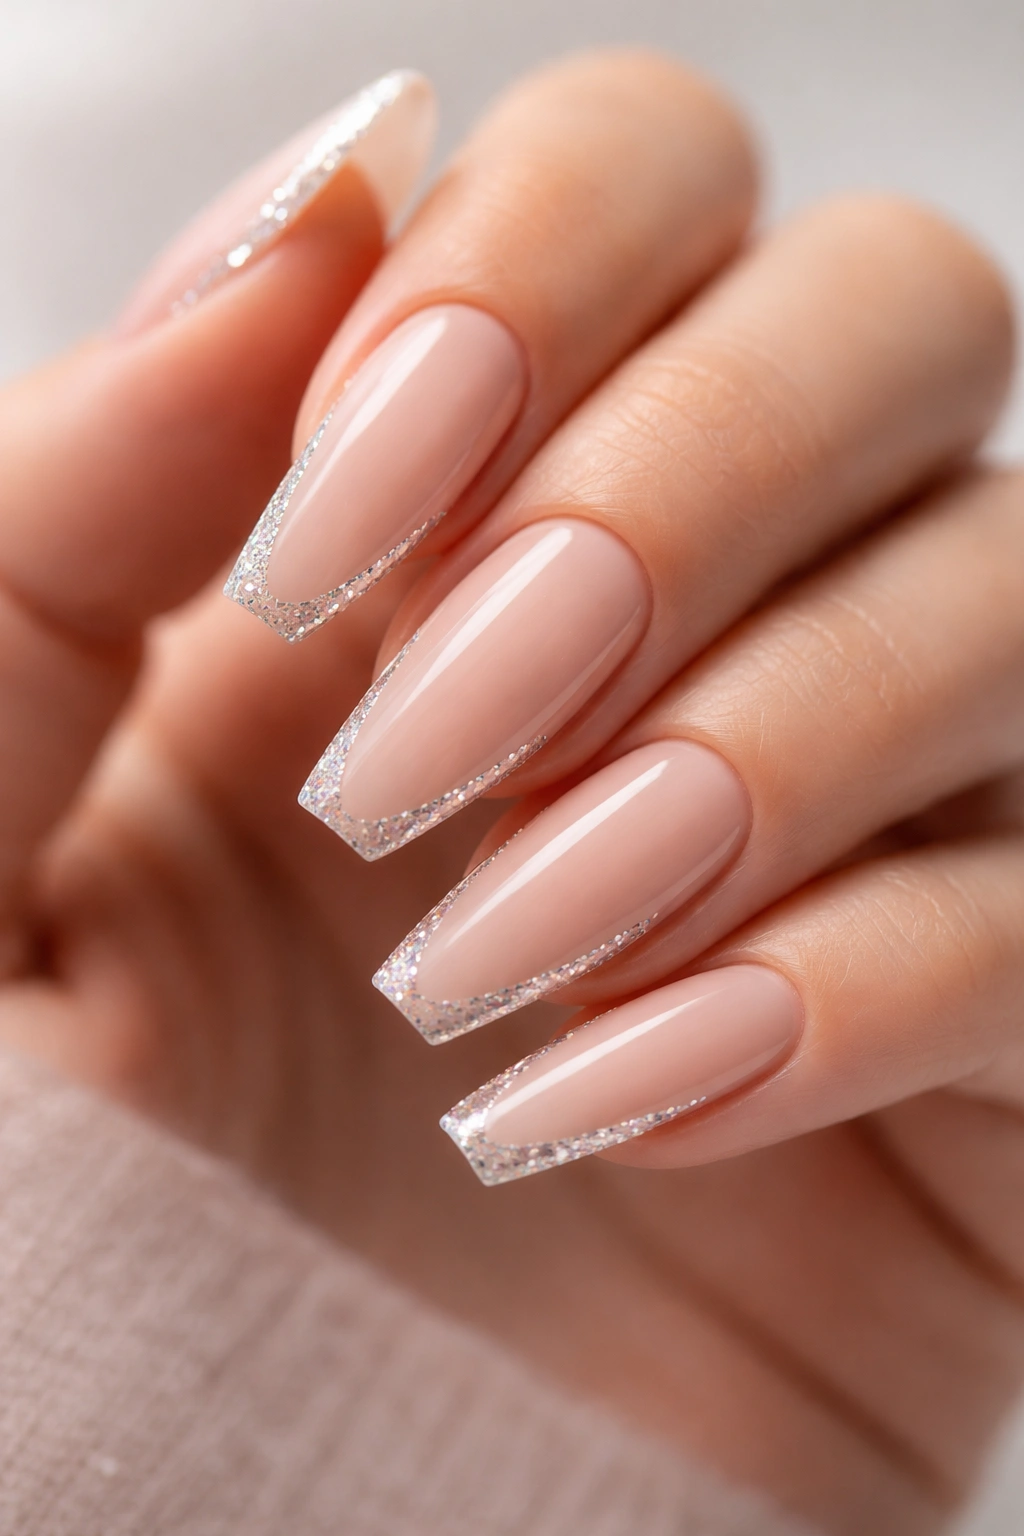
Seen head-on, this set can pass for a plain nude manicure. Turn your hand slightly, and the side sparkle catches first. That little surprise is what makes side-framed glitter ballerina nails worth doing.
The design uses a nude or sheer beige base with a thin glitter line running along one or both sidewalls, sometimes meeting partway near the tip. On a ballerina shape, those lines echo the taper and make the nail look even longer.
How the framing line should sit
- Leave about 1 mm of space from the cuticle so the frame doesn’t crowd the nail bed.
- Keep the glitter line under 1.5 mm thick or it starts looking heavy.
- Stop before sealing off the whole tip unless you want a full outline effect.
- Use fine crystal-cut glitter or tiny foil shards, not chunky hex pieces.
I love this design for people who want glitter in a more architectural way. It feels deliberate, though not loud, and it photographs better in hand poses than straight-on nail close-ups. If your nail tech has a steady liner brush and some patience, this one can look ridiculously sharp.
14. Pearl Beige Nails With Crushed Shell Shine
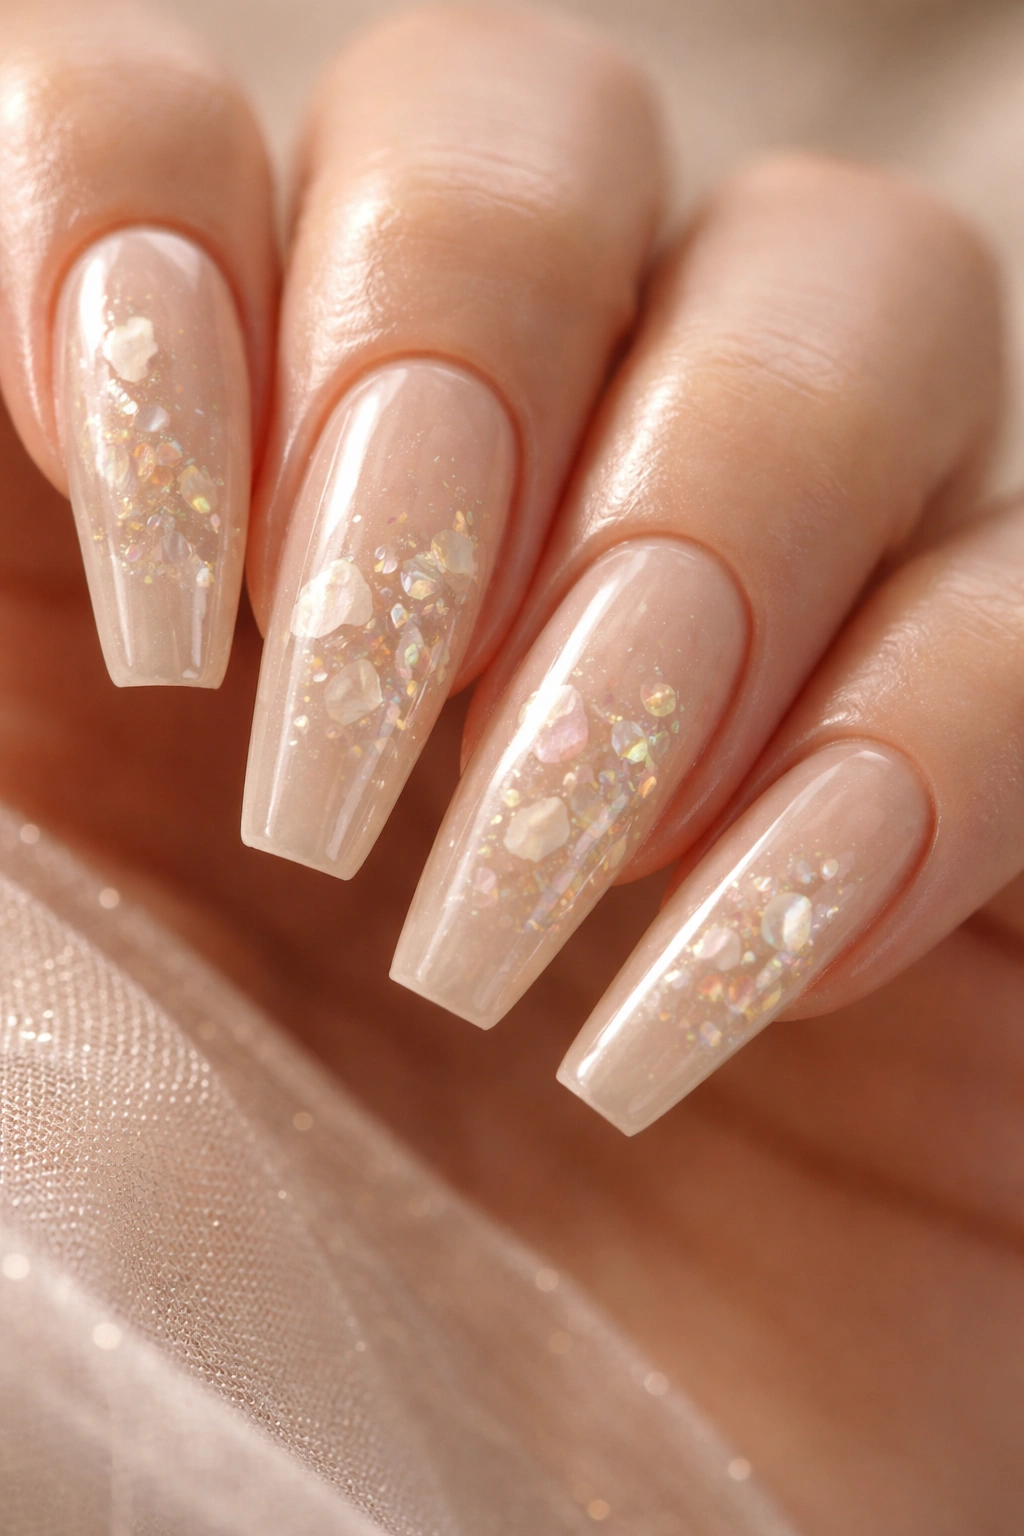
Pearl beige with crushed shell gives off a softer glow than standard glitter, and that difference is the whole appeal.
Shell fragments flash cream, pink, pale green, and soft silver depending on how the light hits them. Set against a pearl beige base, those shifts stay smooth and cloudy rather than sharp. Clear gel alone can make shell look cold. Pearl beige warms it up and makes the manicure feel more cohesive.
I only like this look when the shell is filed thin or encapsulated. Raised shell edges ruin the effect fast. You feel them when you pull on a sweater, smooth your hair, or dig through a makeup bag, and once that texture shows up, it’s hard to ignore anything else.
Gloss is the right finish here. Matte drains too much life from the shell and makes the beige read flat. If you wear gold jewelry most days, ask for warmer shell pieces with cream and peach reflection instead of blue-heavy fragments.
There’s something a little vintage about this set. Not old. More like polished in a way that doesn’t need loud sparkle to get noticed.
15. Clear-to-Nude Jelly Nails With Mixed-Size Glitter Constellations
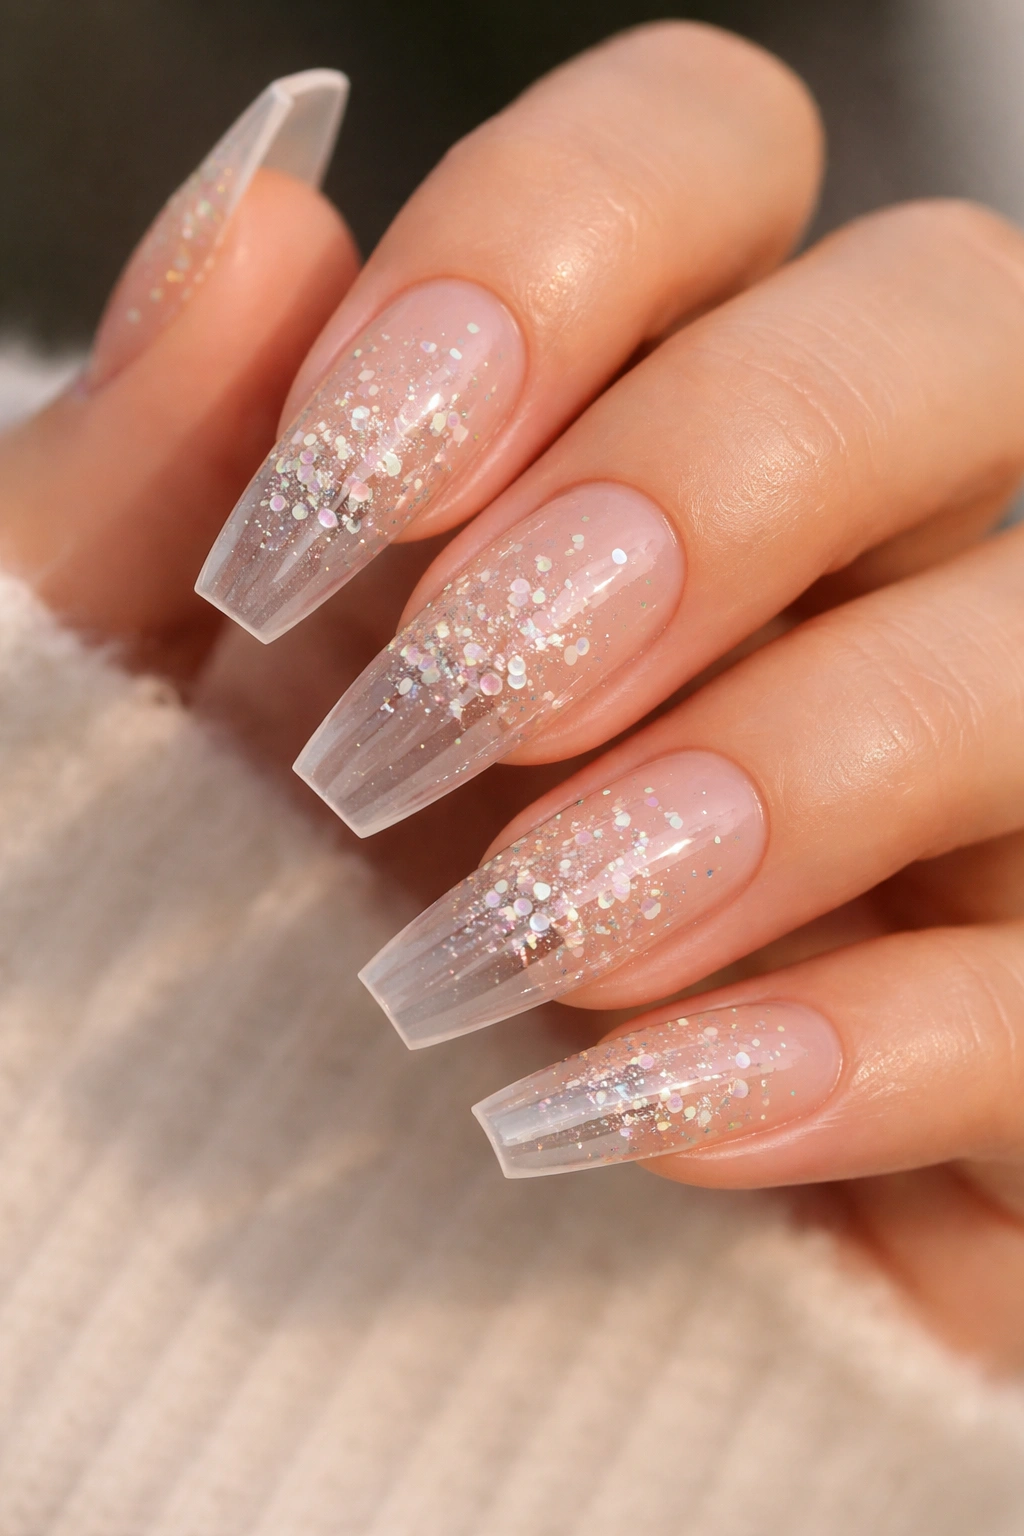
If you want the playful end of glitter ballerina nails, a nude jelly base fading into clear tips with mixed-size glitter constellations earns a long look. The nude near the cuticle keeps the set grounded. The clear space near the tip gives the glitter room to float.
Scale is the trick. Use at least three sizes of sparkle—something around 0.2 mm shimmer, 0.5 mm flecks, and a few 1 mm statement pieces—so the clusters look natural instead of flat. Even spacing kills the effect. Real constellations look scattered, and this design needs that uneven rhythm.
Placement map for a cleaner result
Start each cluster around the middle or upper third of the nail, then let a few stray pieces drift outward. Leave about 30 percent of the nail clear so the jelly finish still reads. If every open space gets filled, you lose the airy, floating look that makes this design special.
You can take the color in different directions. Cool nude with silver and holographic flecks feels icy. Peach jelly with champagne and opal glitter feels warmer. I’d still keep one rule in place no matter what: the clusters should look like they landed there on purpose, though not in a rigid pattern.
Final Thoughts
The best glitter ballerina nails don’t rely on more sparkle. They rely on better placement, smoother structure, and a base color that supports the shine instead of fighting it.
If you’re booking a salon appointment, bring two photos: one close-up and one hand pose. Close-ups show texture. Hand shots show balance. A design can look strong on a macro shot and messy from a normal viewing distance, which is how people will see your nails most of the time.
DIY sets need one extra favor from you—test one nail first. Glitter that looks soft in the pot can look loud once it stretches across a long flat tip in daylight. Catch that on one finger, and the rest of the set gets a lot easier.
