

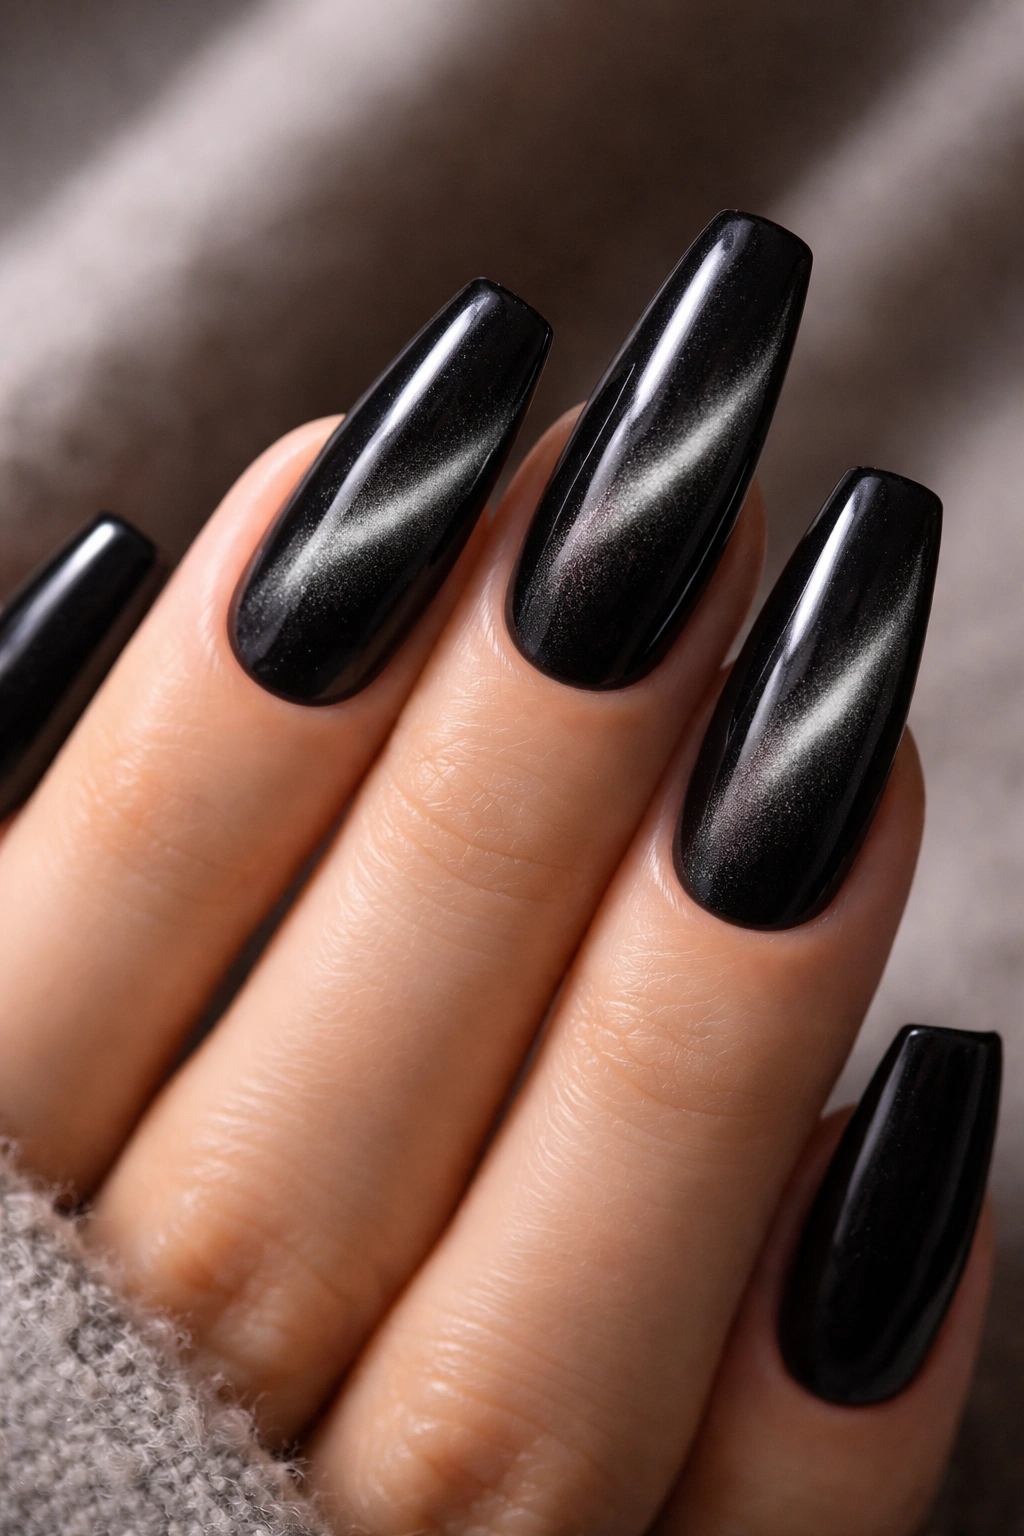
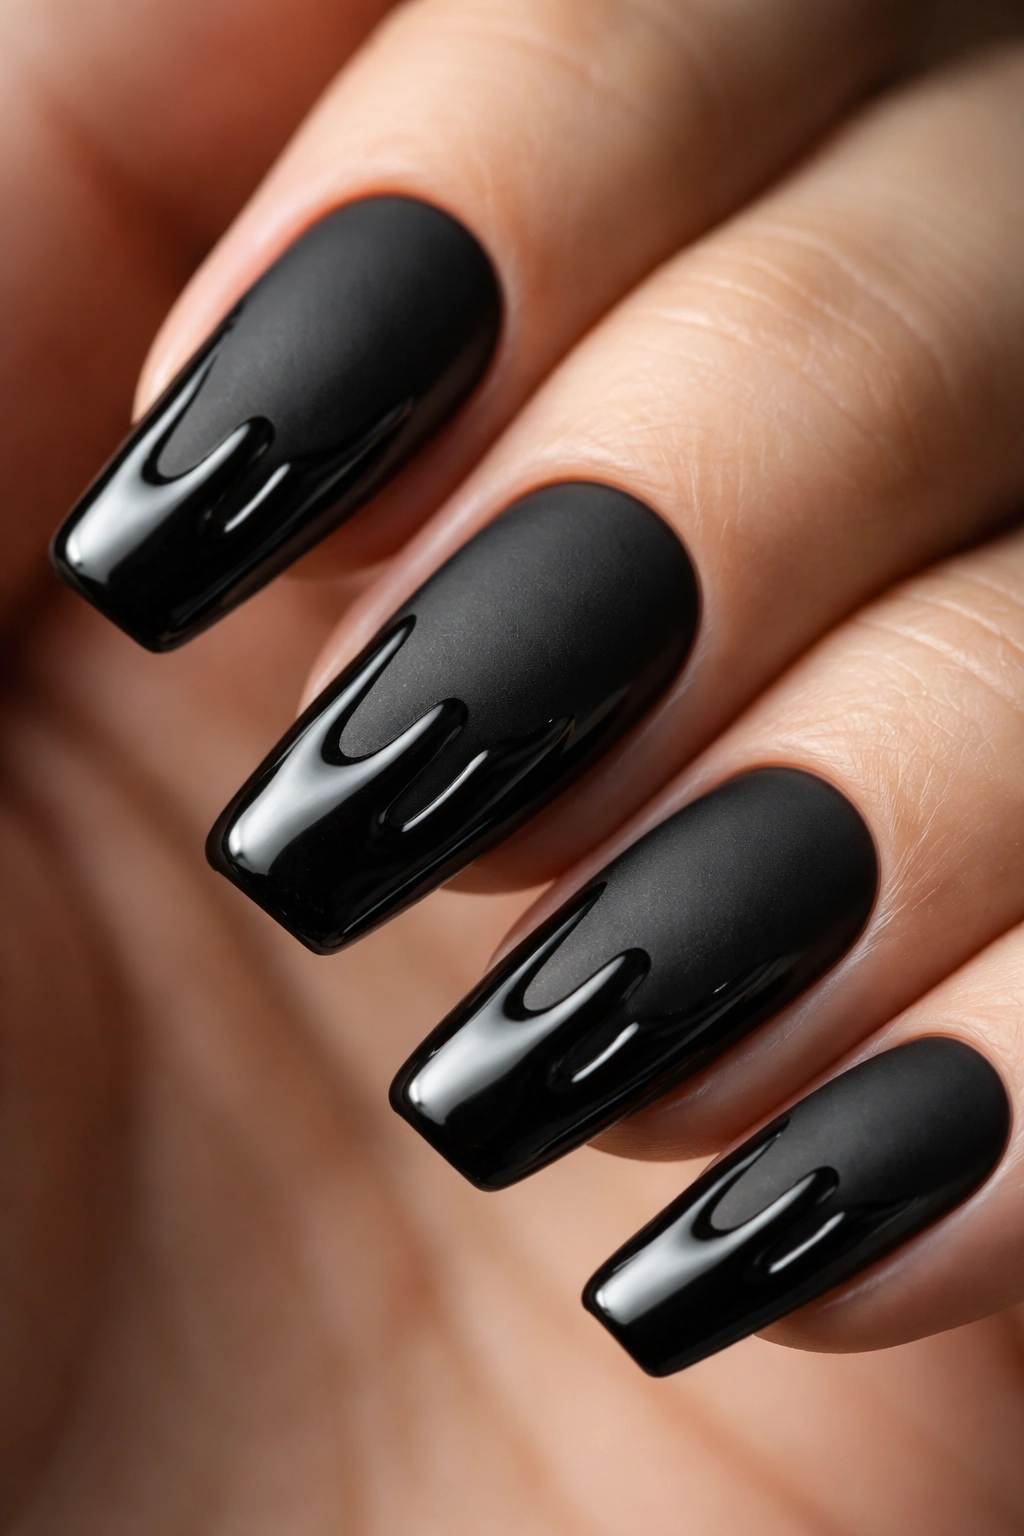
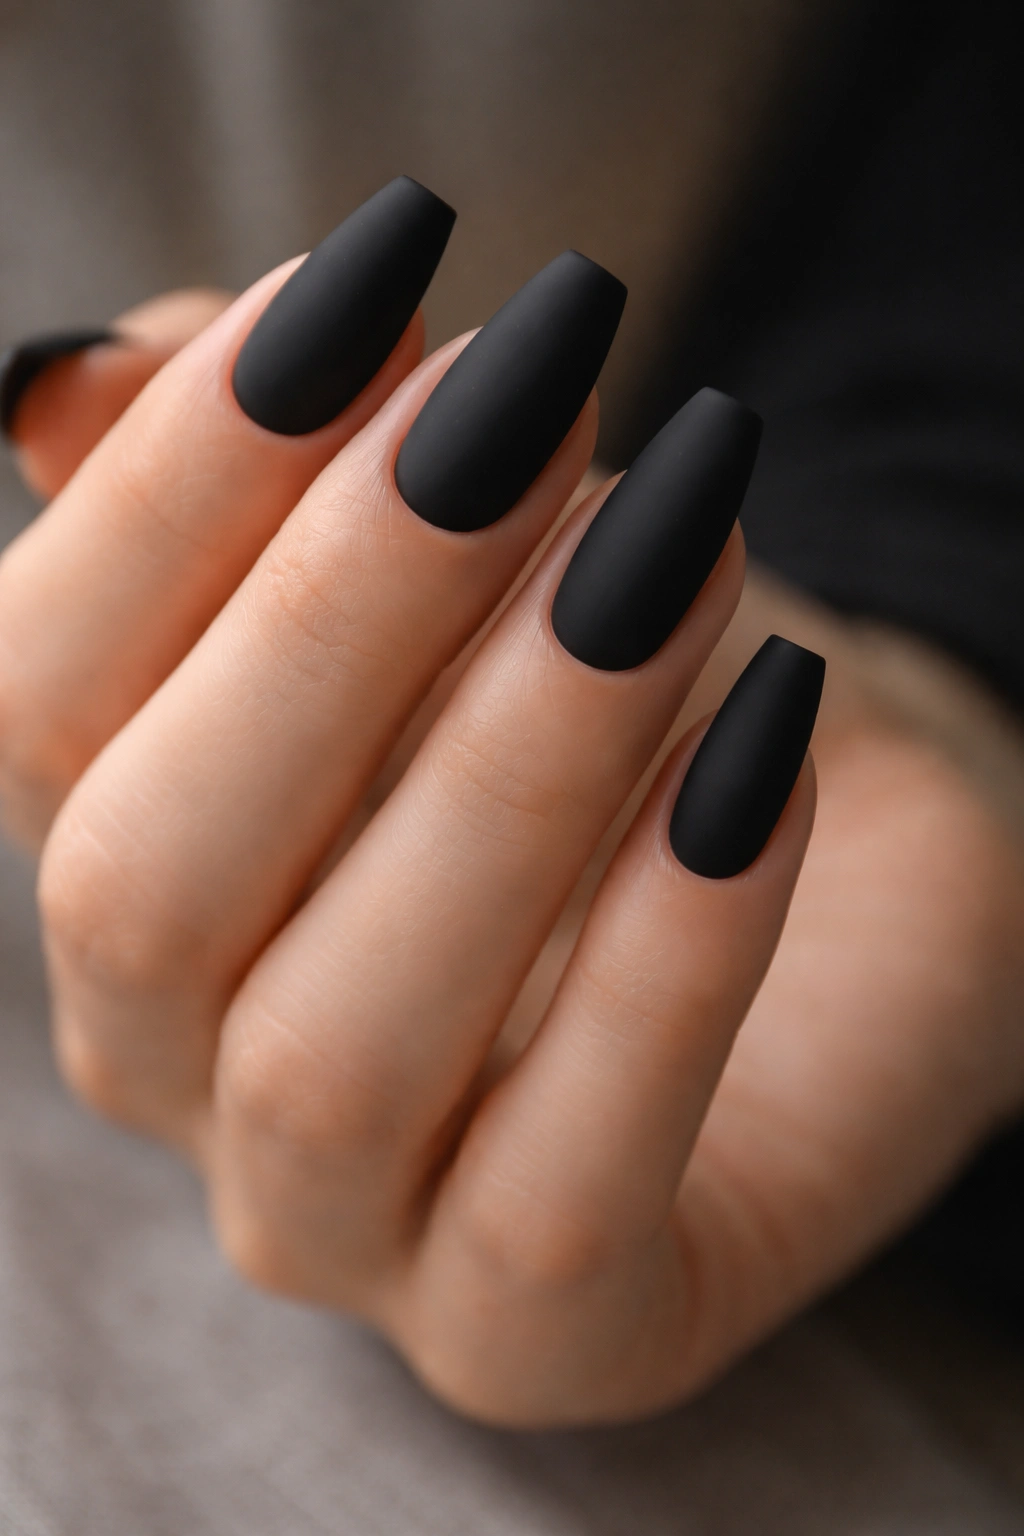
Black ballerina nails do something soft pinks never can: they turn a clean, tapered shape into something with bite. The flat tip keeps the silhouette tidy, but black polish — matte, glossy, smoked, metallic, textured — gives that neat shape an edge that square nails rarely manage. If you want a manicure that looks sharp without sliding all the way into dagger territory, this is usually the sweet spot.
I’ve always thought black works hardest when the shape underneath it has some discipline. On a blunt square nail, black can look heavy. On a long stiletto, it can start reading costume if the length or balance is off by even a little. Ballerina nails, sometimes lumped in with coffin nails, sit in the middle. They’re slim through the sidewalls, gently tapered, and still wearable when you’re typing, texting, opening cans, or digging for keys in a bag.
There’s also a practical reason black ballerina nails have such staying power: dark polish shows every detail. That sounds like a warning because, honestly, it is. A wobbly side line, bulky acrylic near the cuticle, or a tip that’s too wide will show up fast. But when the shape is crisp, black makes the whole set look more intentional, more graphic, and a lot more expensive.
Some designs lean glossy and slick. Others go matte, textured, metallic, or cut with negative space. The ones below aren’t filler ideas with tiny changes from one to the next. Each one gives black ballerina nails a different mood, and some hit a lot harder than others.
Why Black Looks So Strong on the Ballerina Shape
The shape does half the work.
Ballerina nails narrow as they move toward the tip, then stop with a straight edge instead of a point. That last detail matters. You still get the long, lean line people want from coffin nails, but you do not get the stabby feel of a stiletto set. Black polish loves that balance because it turns the whole nail into a clean silhouette instead of a dark block.
Length changes the effect. On a short ballerina nail, black looks crisp and urban — almost minimal. Push the length longer, and the same color starts looking moodier, sharper, and more dramatic. That’s why black ballerina nails can work for someone who likes a plain wardrobe and for someone who wants chrome rings, leather jackets, and a manicure that enters the room first.
Finish matters too. Matte black softens the reflection but hardens the mood. Glossy black does the opposite: it feels slick, wet, and a little dangerous. Add texture, tiny crystals, silver lines, or transparent panels, and suddenly the same base color starts telling a different story.
I’ll say it plainly: black is less forgiving than milky pink. If the structure is off, you’ll see it.
Nail Prep That Keeps Dark Ballerina Sets Looking Clean
Before you pick a design, get the shape right. Black polish will not hide sloppy prep, and neither will good lighting on Instagram.
Ask for straight sidewalls that taper gradually, not sharply. The tip should be flat but not wide — a chunky tip makes a ballerina nail look more like a shovel than a coffin shape. The apex should sit near the stress area, not drift too far back, or the nail can look heavy through the middle. If your nail tech builds too much product near the cuticle, dark polish makes that ridge jump out.
A few details make a big difference:
- Cuticle cleanup needs to be tight because black flooding at the edges ruins the whole set.
- Top coat choice changes the mood fast: soft matte for a velvet-flat look, glassy gloss for patent shine, magnetic top layers for depth.
- Free-edge sealing matters more with black because tip wear shows as a lighter line once the manicure starts breaking down.
- Medium-long length gives most edgy designs enough room for detail without turning daily tasks into a chore.
- Fill timing is shorter when the design is severe. After about 2 to 3 weeks, new growth can make a sharp black set lose its balance.
One more thing. If you love black but hate chips, gel or builder gel is usually the better route. Regular lacquer can look good, though it won’t hold a clean edge as long.
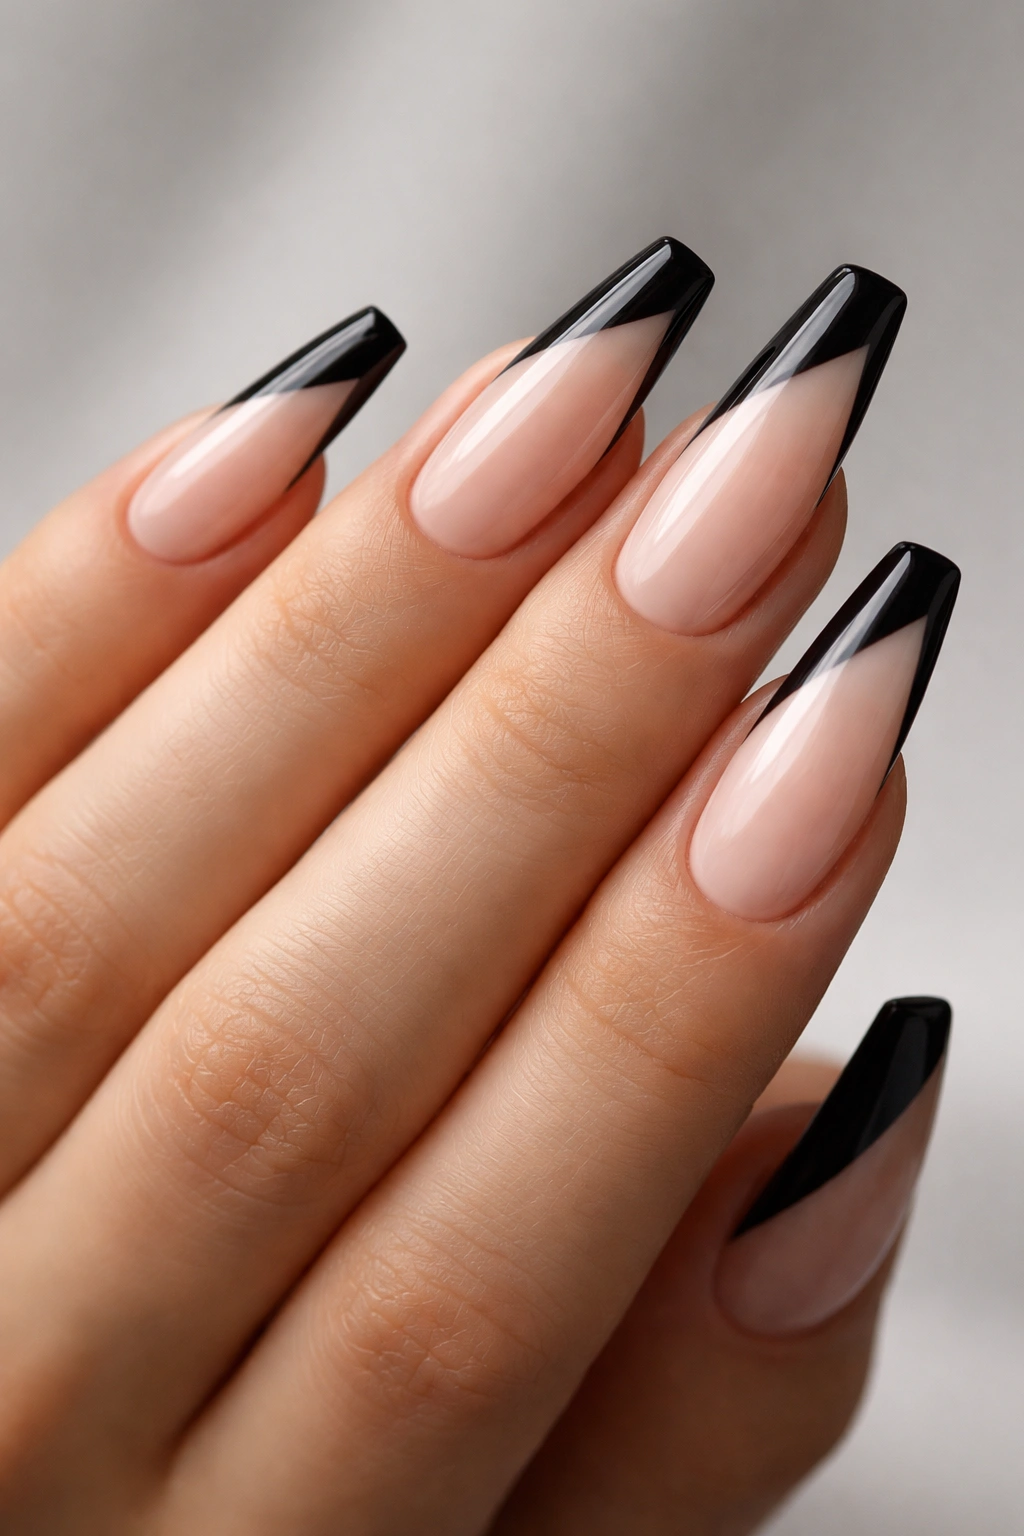
1. Matte Jet Black With Razor-Thin Gloss Tips
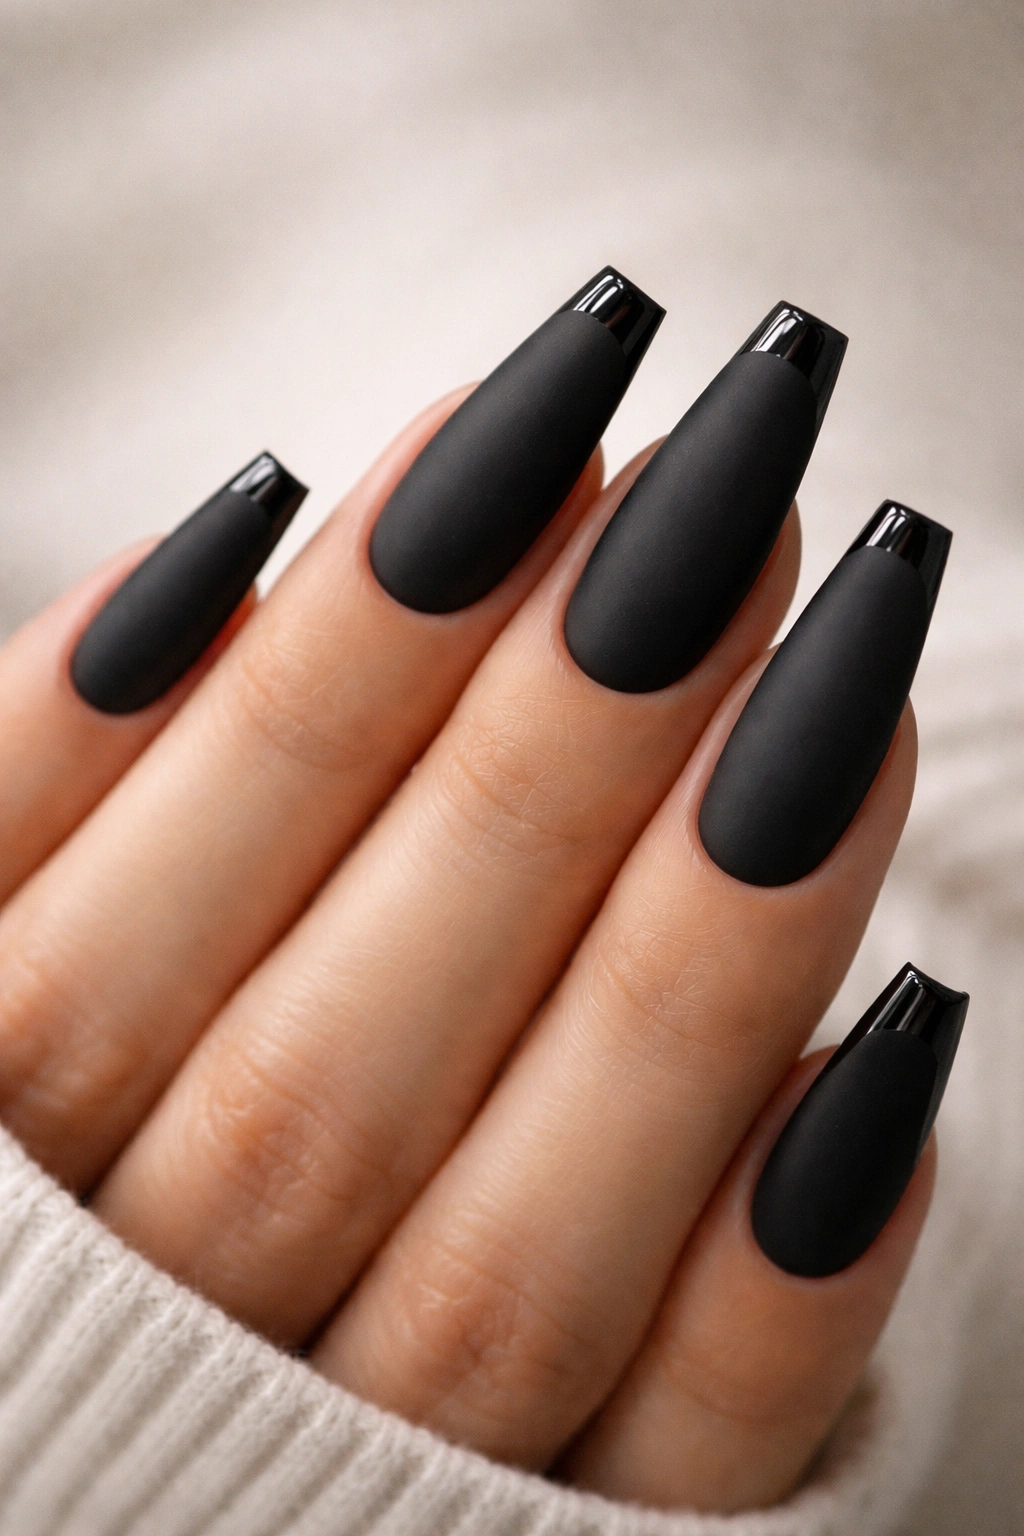
This is one of those black ballerina nail ideas that looks simple until you see it move. At first glance, it’s a matte black set. Then the light hits the tip, and that narrow glossy edge flashes back at you like patent leather.
Why the Contrast Works
The finish contrast is doing the heavy lifting here. Matte black absorbs light, which makes the nail look flatter and more graphic. A 1 to 2 mm gloss French tip puts just enough shine at the edge to define the ballerina shape without adding another color. It feels cleaner than glitter and tougher than a standard French.
This design looks best when the taper is narrow and even. If the tips are too wide, that glossy strip can make the free edge look bulky. Medium to long nails give it the sharpest line.
Ask Your Nail Tech For
- A true jet-black base, not charcoal, so the finish contrast shows up clearly.
- A velvet-matte top coat across the nail bed.
- A thin gloss top coat only at the tip, painted with a liner brush.
- Sidewalls filed straight so the tip line stays sleek.
Wear tip: Pair this set with silver jewelry, not because you have to, but because matte black and cool metal always look like they belong together.
2. Gunmetal Chrome Black Ballerina Nails
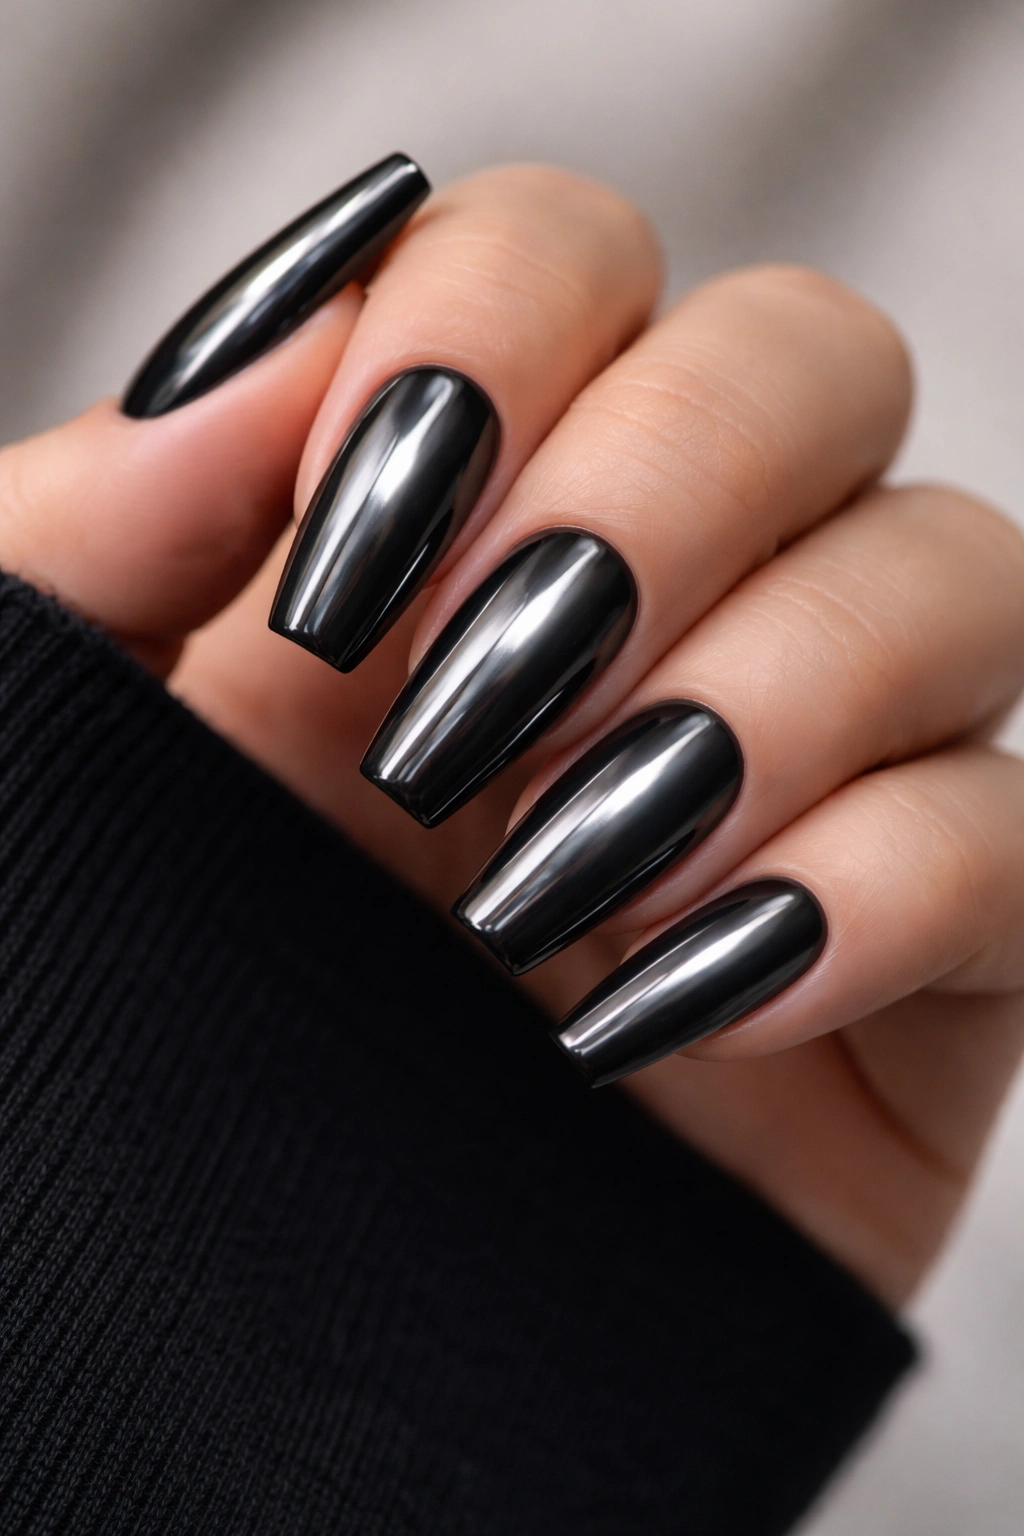
If plain black feels flat to you, chrome fixes that in one pass.
Gunmetal chrome over a black base gives you that liquid-metal look without drifting into mirror-ball territory. It’s darker than silver chrome, moodier than standard metallic polish, and far more dimensional than a plain glossy top coat. On a ballerina shape, the reflected light runs down the center of the nail and makes the fingers look longer.
Chrome can go wrong fast, though. Cheap powder or uneven top coat leaves patchy spots, and those spots are hard to ignore once you notice them. The best version has a smooth, almost smoky reflection — not rainbow, not blue, not oil-slick unless that’s the effect you’re after. Think polished graphite.
I like this style most on medium length. Extra-long chrome can read a little theatrical, which some people want, but medium length keeps it sharper and easier to wear. It also hides everyday dust and lint better than matte black, which is a small thing until you’re staring at your nails under office lights.
One warning: chrome shows surface dents. If you’re rough on your hands, ask for a strong builder layer underneath.
3. Black Ombré Fade Into a Sheer Nude Base
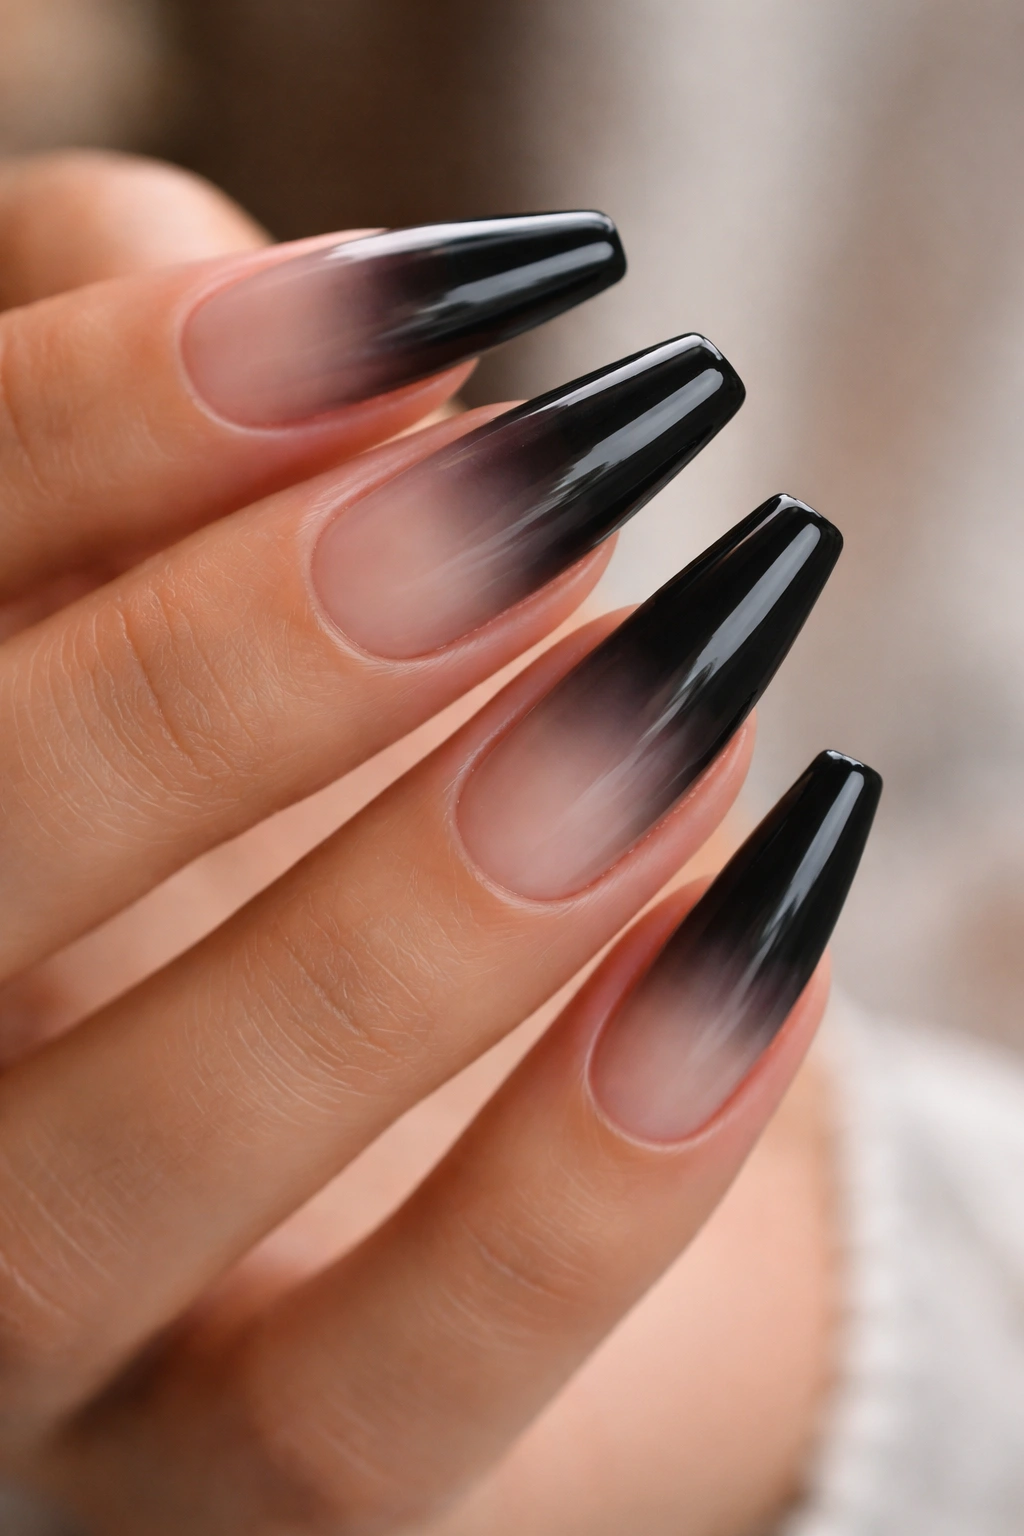
Why does this one look so expensive?
Because the black isn’t sitting like a solid block at the tip. It melts into a sheer nude or pink-toned base, which gives the nail air and keeps the dark color from feeling too heavy. On ballerina nails, that fade follows the taper and makes the whole hand look slimmer.
A clean black ombré needs patience. If the blend line is muddy, the set loses its bite. You want a soft smoke effect through the middle third of the nail, with the darkest pigment held near the tip. Airbrush systems do this beautifully, but a sponge blend can still work if the layers are thin and the pigment is built slowly.
How to Wear It Well
This design is a good choice if you like black ballerina nails but don’t want all ten nails to look dense. It grows out more softly than a full black set, and it pairs well with almond-shaped rings, chain bracelets, and neutral clothes without looking sleepy.
I’d skip chunky crystals here. The fade already has movement. Extra clutter only gets in the way.
4. High-Gloss Black Croc Texture
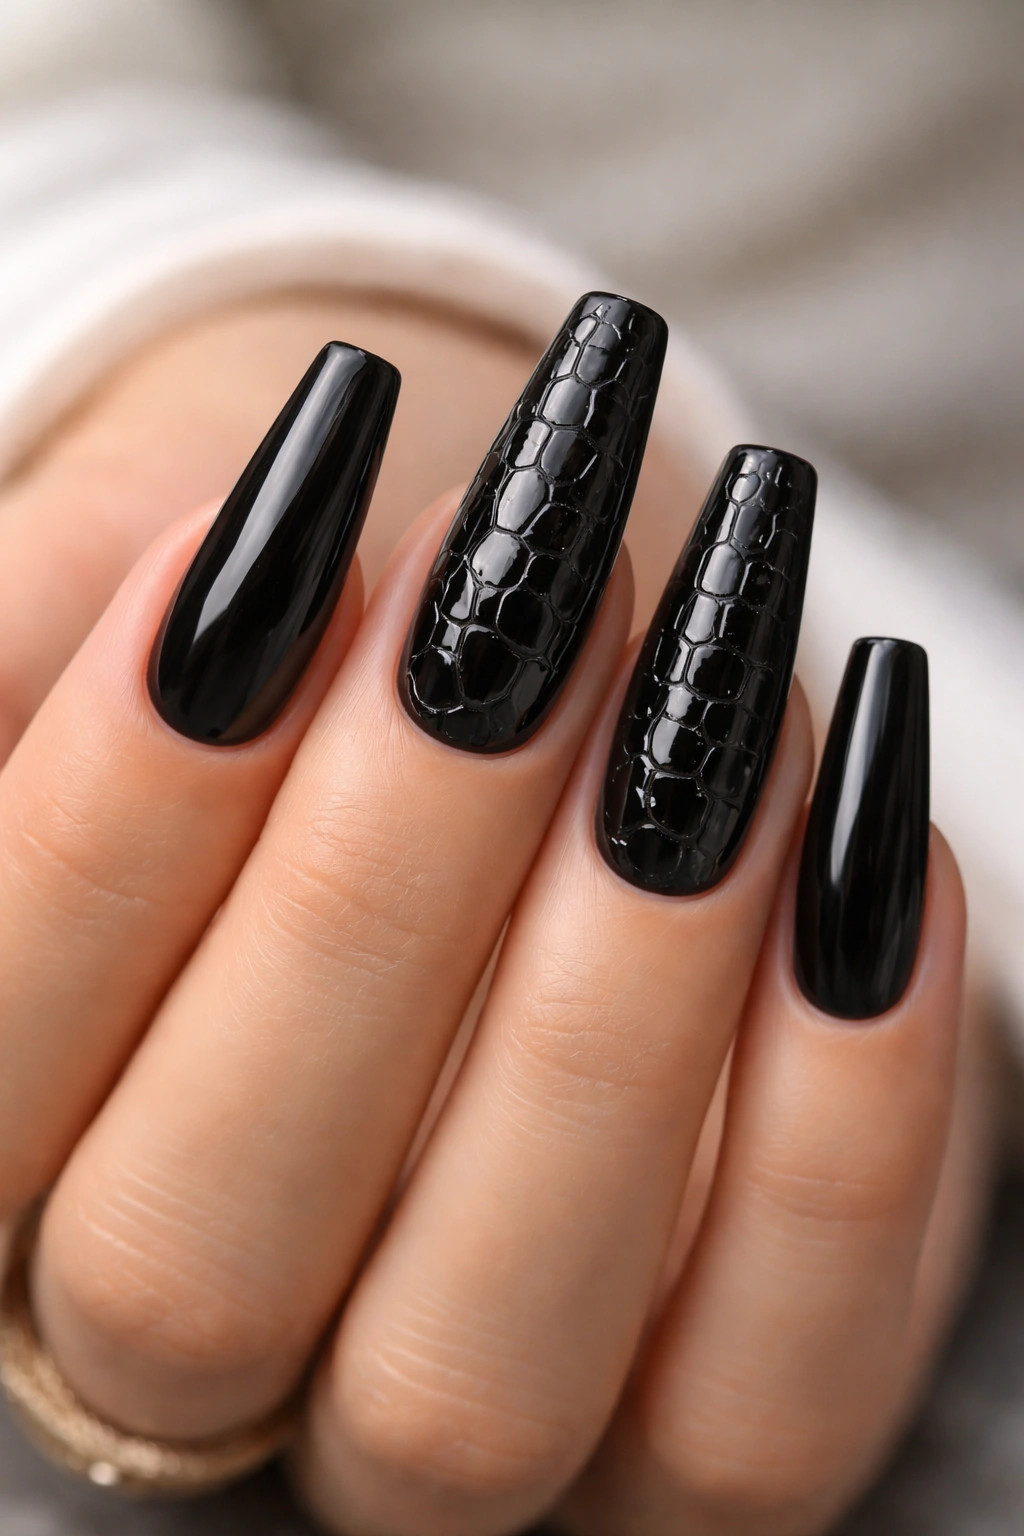
Picture a plain glossy black set from across the room. Nice, clean, a little expected. Then you get closer and notice the surface has a croc pattern pressed into it — still black, still glossy, but textured enough to catch tiny highlights along the raised lines.
That’s why this style works. It gives black ballerina nails edge through texture instead of color contrast.
The croc effect usually comes from blooming gel, stamping, or hand-painted texture sealed under gloss. On ballerina nails, the elongated shape keeps the pattern from looking stubby. Short nails can wear croc too, though the pattern needs to be scaled down or it starts looking crowded.
A few details matter here:
- Gloss is non-negotiable if you want the texture to show.
- The pattern should sit most heavily on 2 to 4 accent nails, not all ten, unless you want a louder set.
- Deep black base gel keeps the texture rich instead of gray.
- Longer nails give the croc print space to stretch and look more like a skin pattern, less like random blobs.
I’d wear this with a plain wardrobe and let the nails do the talking. The texture is enough.
5. Black Nails With a Single Silver Center Line
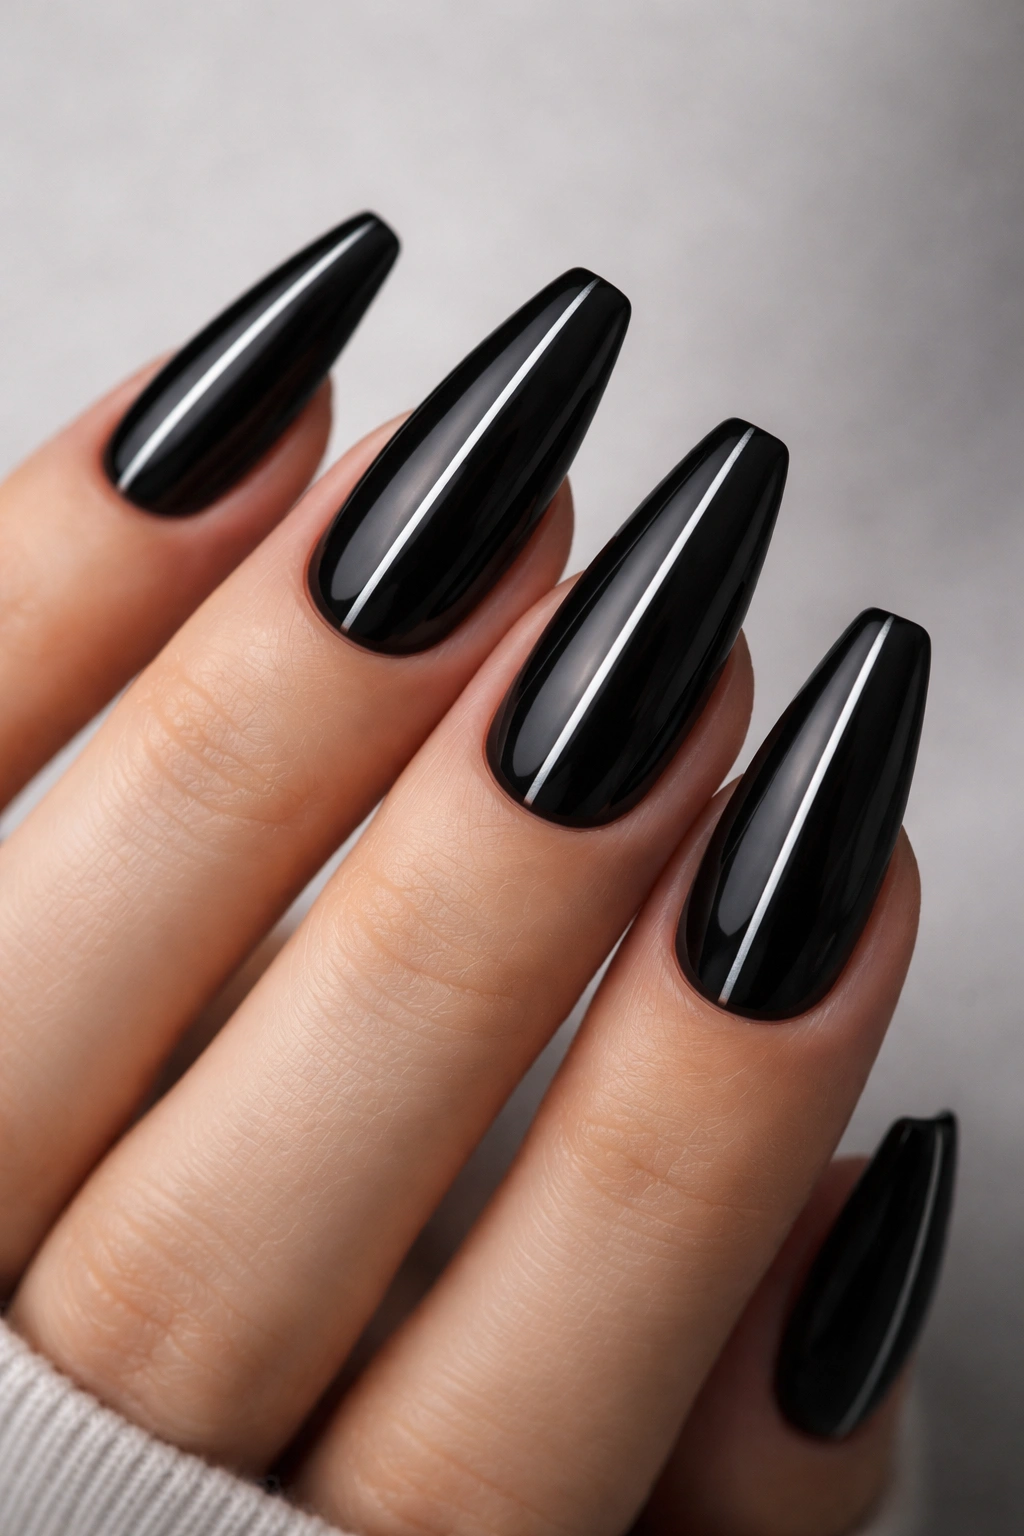
This one is lean, sharp, and a little unforgiving in the best way. A solid black ballerina nail with one thin silver line running straight down the middle sounds minor on paper. On the hand, it changes the whole geometry.
The line draws the eye lengthwise, which makes the nail look slimmer. It also emphasizes how symmetrical the shape is — or isn’t. That’s why I only like this design when the nail structure is clean. If the sidewalls wobble, the silver line turns into a spotlight on the problem.
Placement matters. Dead center creates a strict, graphic look. Shift it slightly off-center and the set feels more fashion-forward, a little less formal. I still prefer the centered version because it hits harder and feels cleaner.
You can do this with chrome striping, foil, painted gel, or a metallic liner. Painted gel usually wears best because there’s less chance of lifting at the edges. Keep the line fine, around 1 mm wide or less. Any thicker and the nail starts reading sporty instead of sharp.
Black and silver is a cold combination. That’s why it works.
6. Smoky Nude Base With Black Flame Tips
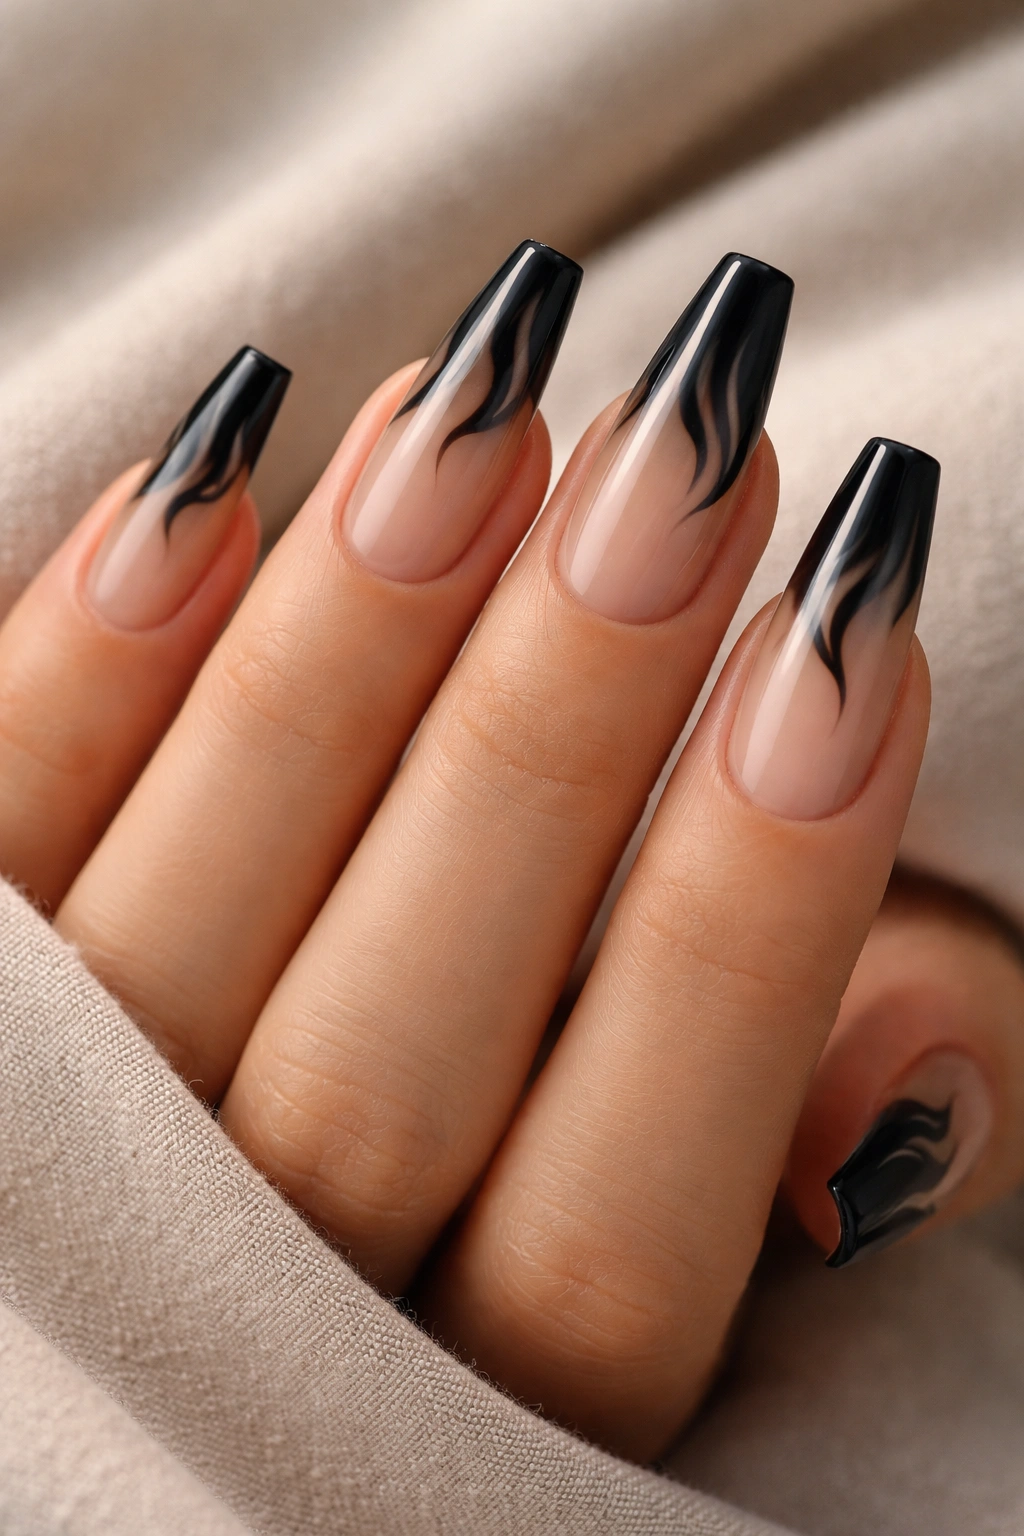
Unlike a full black nail, flame tips leave space for the shape to breathe. You get the drama at the edge, where it belongs, and a softer base that keeps the whole set wearable.
The trick is restraint. Flames that are too chunky or too cartoonish can pull the design into novelty territory, which is not what most people mean when they ask for edgy ballerina nails. The best black flame tips are long, narrow, and slightly uneven, almost like smoke pulled upward by wind.
I’ve seen this done on coffin and stiletto sets, but ballerina nails handle it better because the flat tip gives the flames a stable base. On a pointier nail, the flame art competes with the shape. Here, the shape supports it.
This style also gives you room to play with the base. A sheer taupe, beige-nude, or smoky gray underneath the flames changes the feel. Nude looks cleaner. Gray looks moodier. Milky bases can work too, though I’d avoid anything too white or the black flames start looking harsh.
If you want edge without a heavy-looking full set, start here.
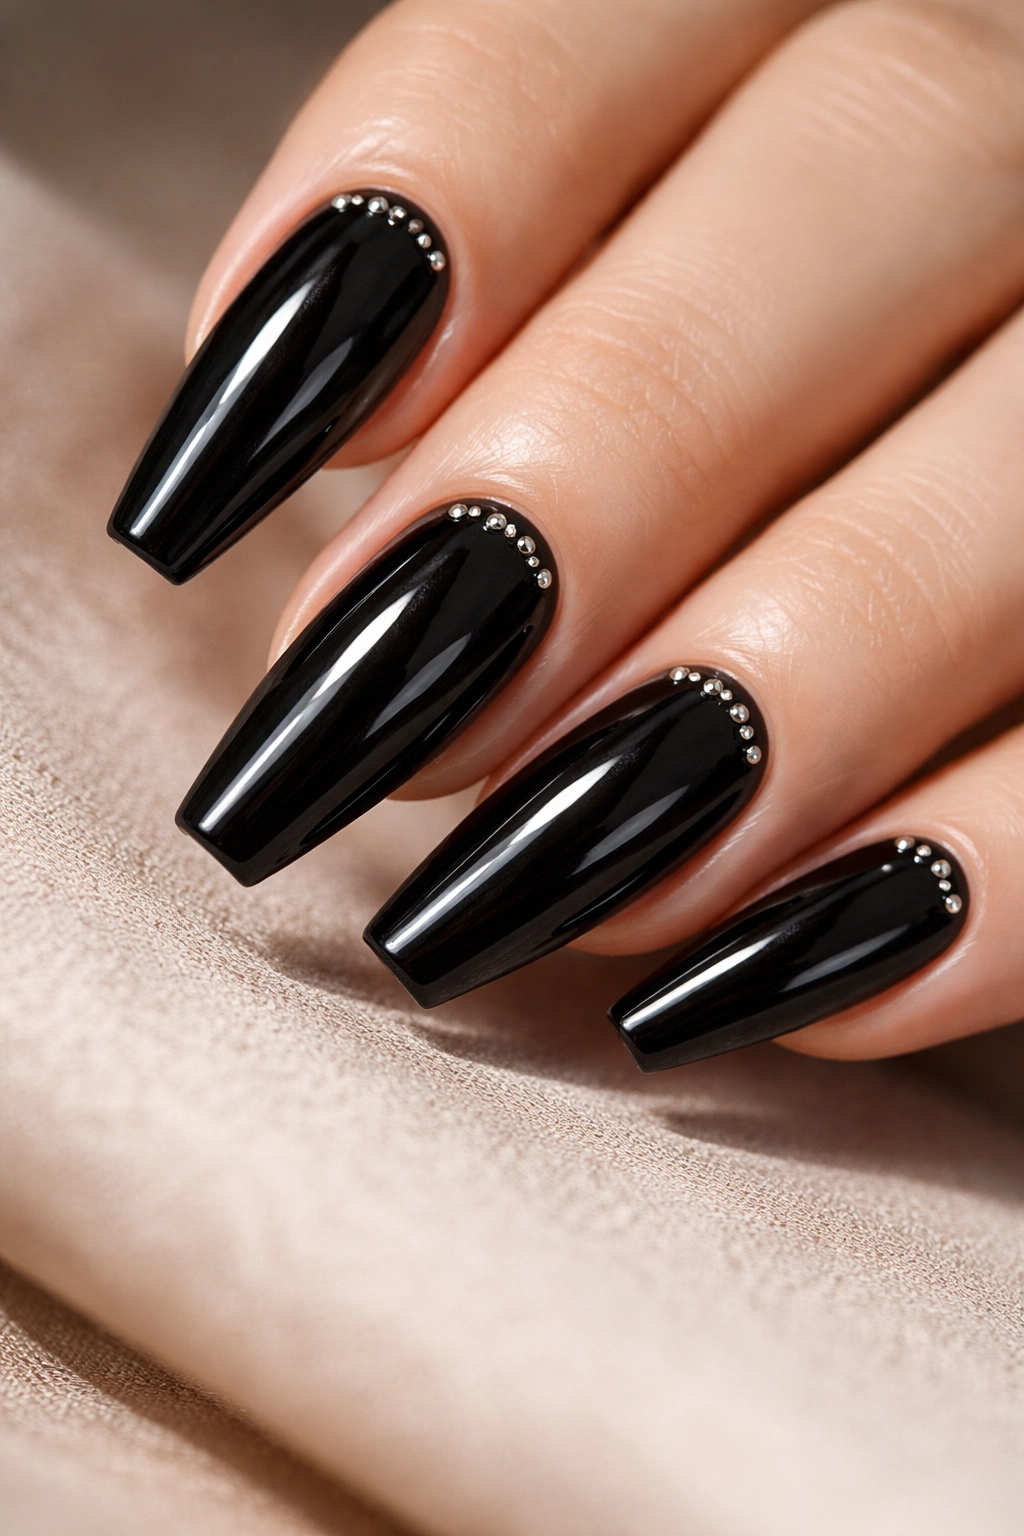
7. Matte Black With Tiny Cuticle Crystals
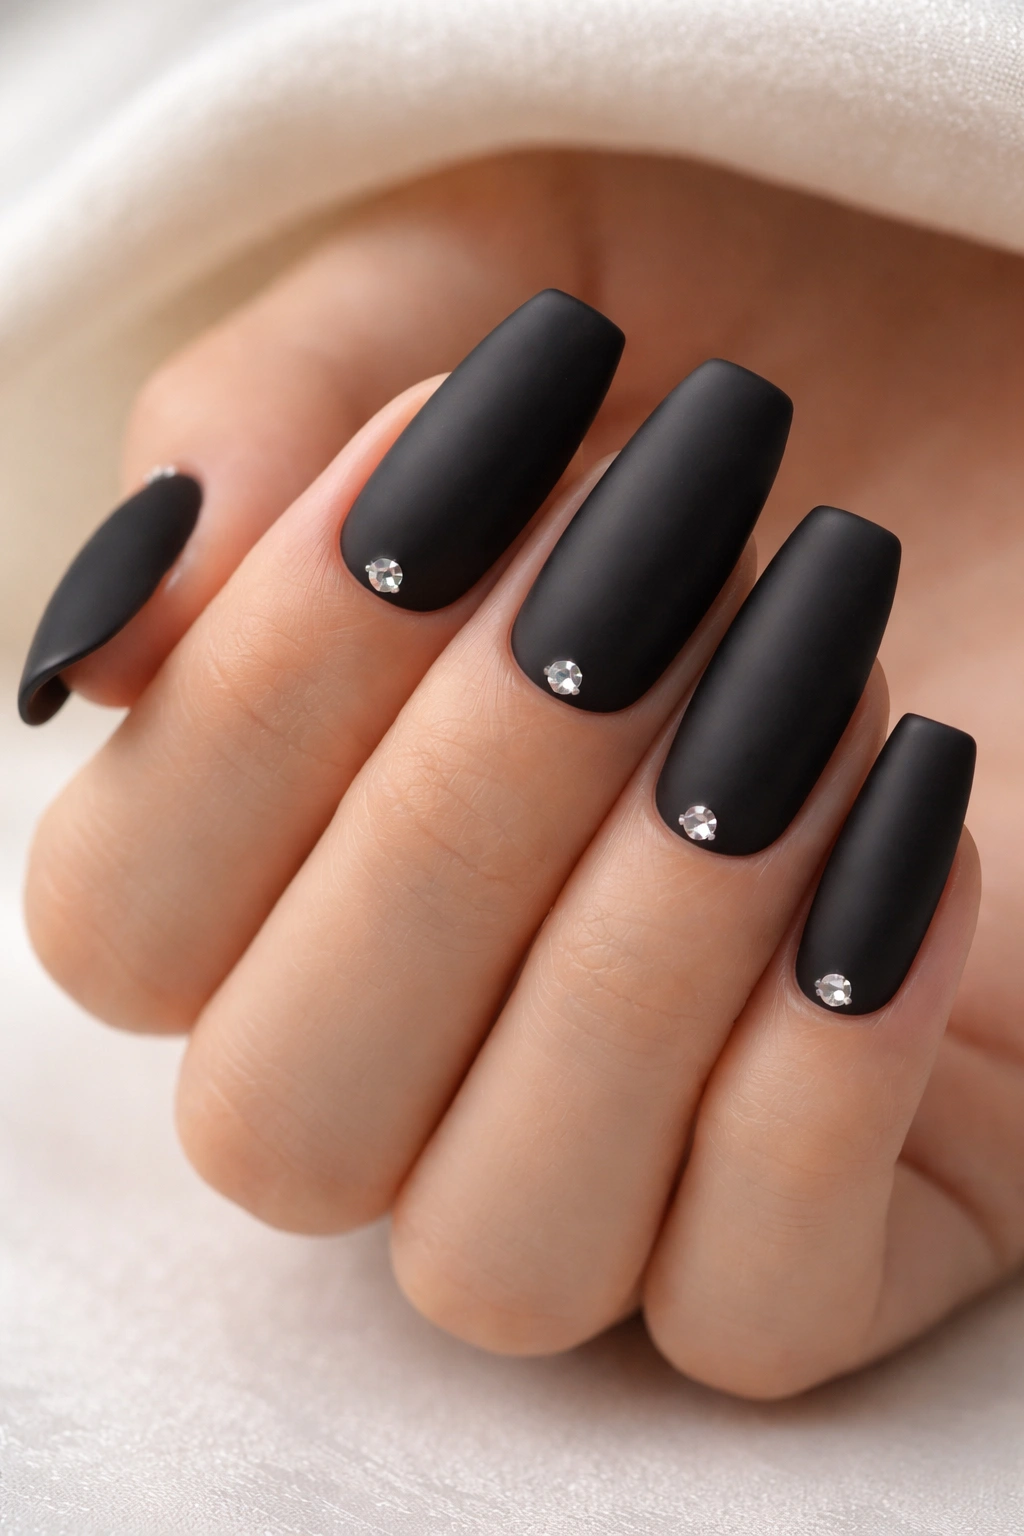
A lot of crystal nail sets get messy fast. Too many stones, wrong size, bad placement, done. This one stays controlled because the sparkle sits at the base of the nail, not all over it.
What Makes the Placement Smart
A single crystal or tiny cluster near the cuticle gives matte black ballerina nails a low, cool shimmer without softening the design too much. Because the rest of the nail stays dark and flat, the stones read more like hardware than decoration. That distinction matters. You want edge, not wedding-guest energy.
This works best with small stones — think SS3 to SS5 size rather than large gems. Silver-backed crystals feel sharper, while jet-black stones disappear into the base and create a subtler flash.
Good Placement Options
- One stone centered at the cuticle on each nail
- A three-stone cluster on the ring finger only
- Tiny diagonal placement on two accent nails
- Mixed sizes kept to the bottom 3 to 4 mm of the nail
My take: if you use crystals here, matte top coat on the nail and gloss around the stones gives the cleanest finish. Too many textures fighting each other can cheapen the look.
8. Black and Clear Split Ballerina Nails
Negative space can make black look meaner, not softer. That’s the funny part.
A split design — half black, half clear or sheer nude, divided by a straight or diagonal line — gives black ballerina nails a colder, more architectural feel. Instead of covering the whole nail, the black becomes a panel. That panel effect makes the manicure look deliberate, almost built rather than painted.
The sharpest version uses a diagonal split that starts near one side of the cuticle and ends toward the opposite corner of the tip. Straight vertical panels work too, though they feel cleaner and less aggressive. If edge is the goal, diagonal usually wins.
You do need a nail tech with a steady hand for this one. The divide line has to be crisp, and the clear section has to stay actually clear, not cloudy with trapped dust or lumpy builder gel. Black next to transparency is ruthless; it shows every flaw.
I like this style on longer ballerina nails because the panel has room to stretch. On shorter sets, use fewer accent nails instead of doing all ten. That keeps the look graphic instead of cramped.
9. Black Velvet Magnetic Nails
Why do magnetic black nails look richer than plain shimmer black? Depth. You’re not looking at glitter sitting on top of the nail; you’re looking into it.
Velvet magnetic polish over a black base gives a soft moving band of light that shifts when you turn your hand. On ballerina nails, that movement runs beautifully down the length of the nail, especially when the magnet is held in a way that creates a cat-eye or all-over velvet effect.
The color matters. You want black with a silver, graphite, or pewter pull — not a bright teal or purple magnetic effect unless you’re after that specific mood. A dark velvet finish keeps the manicure moody and grown-up.
Best Ways to Use It
Go full set if you want a glossy, dimensional black manicure that still feels restrained. Or use velvet magnetic on 2 accent nails and keep the rest plain glossy black for contrast. The mixed-finish approach looks good when you want texture without going full chrome.
One practical note: magnetic polish needs a patient application. If the polish is too thick or the magnet is held too far away, the effect blurs. You want that light band to look clean, not hazy.
10. Patent Black With Micro Stud Accents
The vibe here is less sparkle, more hardware. A high-gloss black base with tiny metallic studs placed near the cuticle, along one sidewall, or in a single line down the nail turns a basic set into something with attitude.
I do not mean big cone studs or oversized rhinestones. Those can work for editorial looks, though for everyday wear they snag hair, catch on knits, and start a small war every time you put on tights. Micro studs are cleaner. They sit lower, wear better, and still give you that metal detail.
This design also benefits from restraint. One stud on each nail is enough. Three on an accent nail can be enough. Once every finger starts carrying a full row, the look gets busy and the ballerina shape stops being the star.
A few smart placements:
- One silver stud centered at the cuticle
- Two gunmetal studs stacked vertically on the ring finger
- A single side-row on the pinky and thumb only
- Tiny black-metal studs over glossy black for a quieter look
Patent shine matters here. Matte eats the hardware effect. Gloss makes the studs feel like part of the nail instead of something glued on after.
11. Black Marble With Fine White Veining
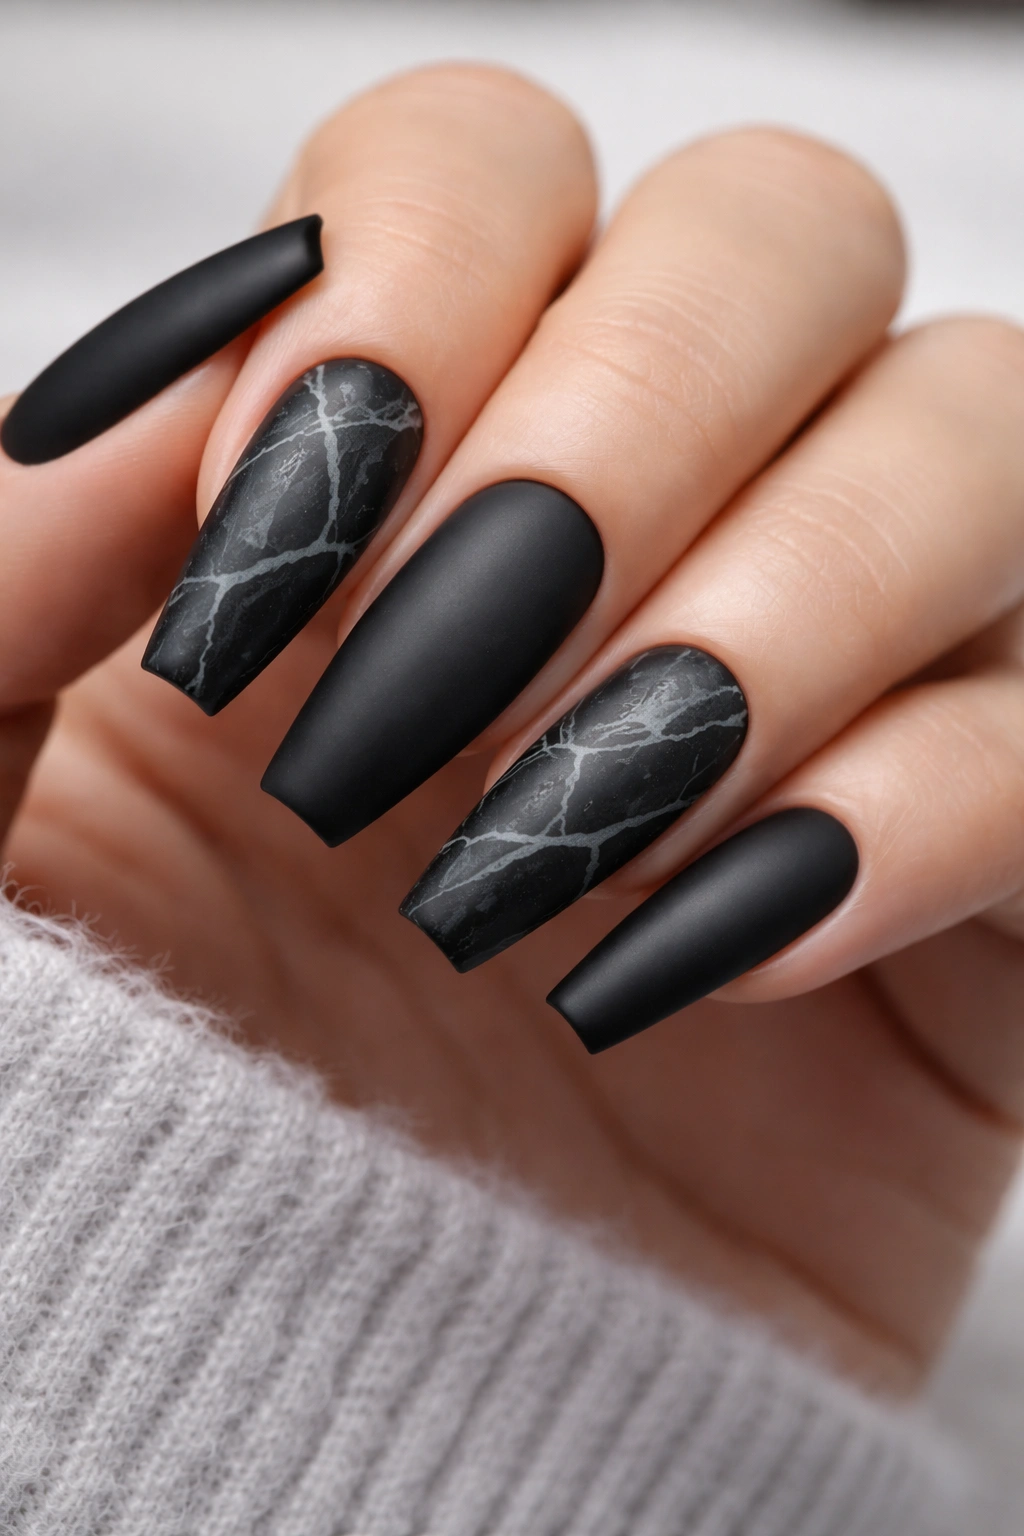
Black marble works because it’s messy in a controlled way. The base is dense and dark, but the white or gray veining cuts through it with thin, irregular lines that feel organic rather than perfectly mapped.
That contrast gives the set tension. Too neat, and it looks printed. Too chaotic, and it turns muddy. The sweet spot is a few hairline veins on each accent nail, maybe with a whisper of smoky gray around them to soften the edges. On ballerina nails, the longer surface lets the veining travel in a natural direction instead of cramming it into a small box.
I wouldn’t put this on all ten nails unless you like a heavier visual. Two or four marble nails paired with solid glossy black usually looks stronger. It also keeps the marble from starting to look like stone countertop samples, which — yes — can happen when the pattern gets overworked.
White is the obvious vein color, though soft gray or silver can look better if you want less contrast. Gold vein lines can be good too, though they warm the set up and shift it away from the colder edgy feel some people want from black ballerina nails.
12. Black Lace Panels Over Sheer Nude
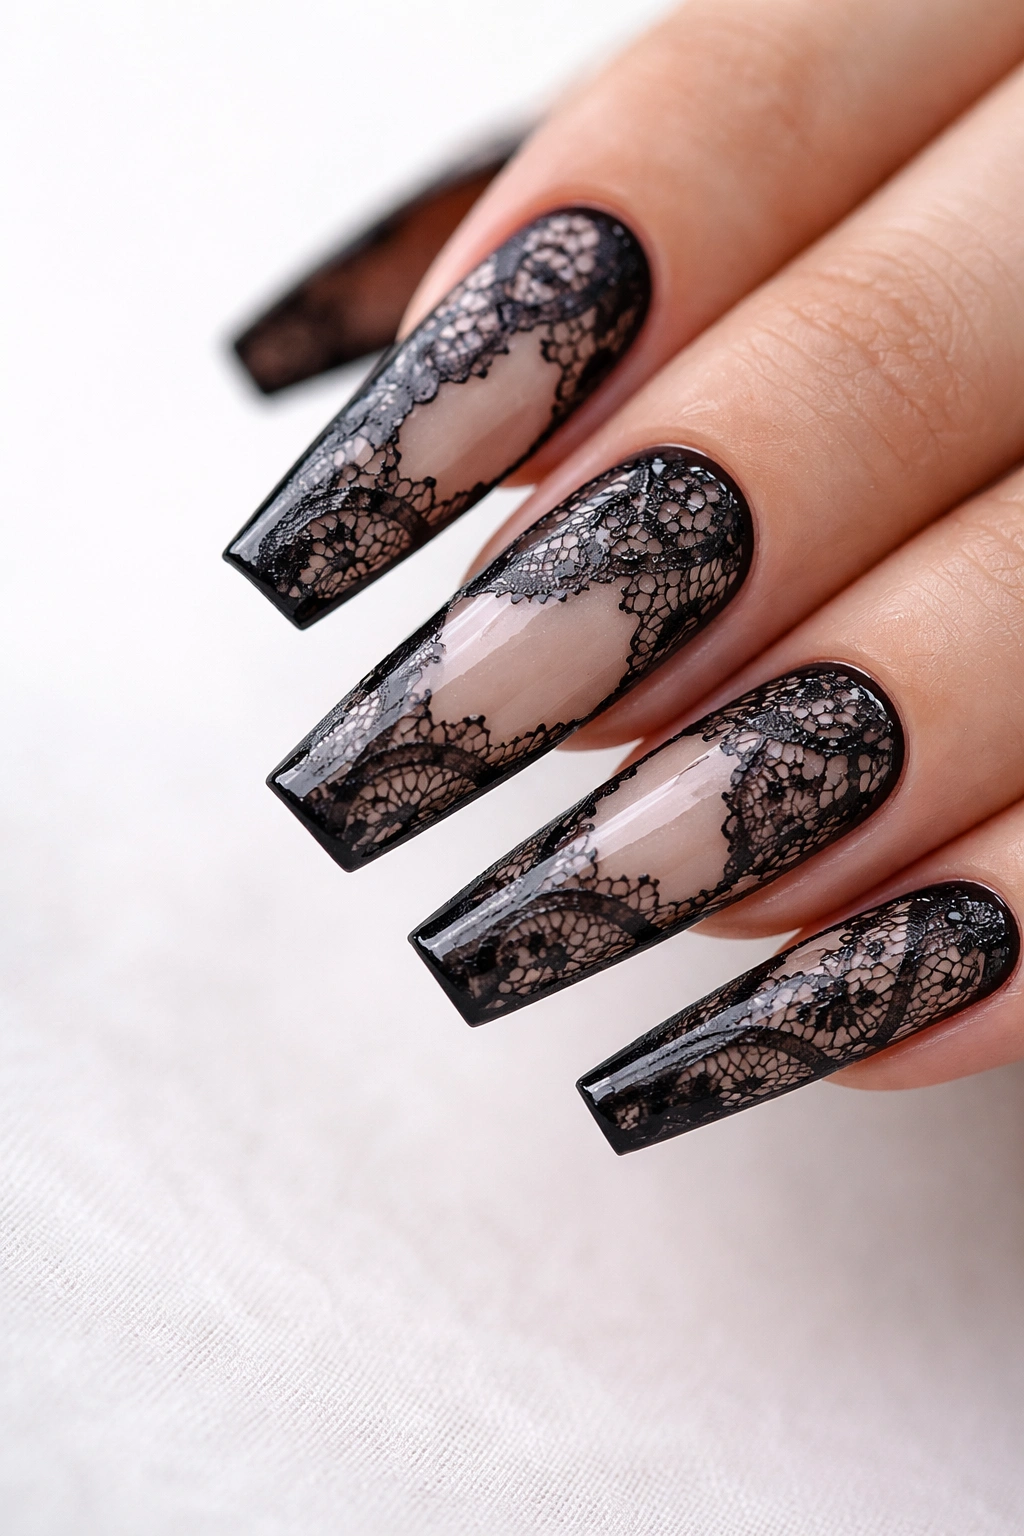
Compared with solid black nails, lace-panel ballerina nails feel lighter, but not softer. That’s an important distinction. The see-through sections create contrast, while the lace or mesh art keeps the manicure looking intentional instead of unfinished.
The cleanest version uses black lace detail over a sheer beige, taupe, or rosy nude panel. You can frame the panel with black at the sides, leave the tip solid, or place lace only through the center. The ballerina shape helps because the long lines keep the sheer section elegant rather than fussy.
This is one of the few designs where I think hand-painted detail beats chunky stamping. Stamping can look good, though large lace motifs often overpower the nail. Smaller mesh or floral-lace patterns sit better on the shape and give the eye somewhere to rest.
If you wear a lot of black clothing, this style ties in nicely without looking flat. It also plays well with rings because the sheer panel leaves visual space around the fingers. Plain glossy black can sometimes make hands look heavier than they are. Lace panels do not have that problem.
13. Matte Black Drip Nails With Glossy Raised Ends
Drip nail art can get silly. Done wrong, it looks like themed Halloween candy. Done well, it looks like wet lacquer sliding over matte black, and the contrast is strong.
Where the Edge Comes From
The raised glossy drips create movement on top of a flat matte base. Because the drips are black on black, the look stays monochrome. You’re not relying on red “blood” or neon slime to make the design readable. The shape of the drip and the shine difference do the work.
On ballerina nails, the flat tip gives the drips somewhere to gather naturally. Start them at the tip and pull them upward in uneven lengths, or invert them from the cuticle for a stranger, less expected look.
What to Ask For
- Matte black base cured fully before detail work
- Clear builder gel mixed with black pigment for raised, domed drips
- Gloss top coat only on the drip pattern
- Drips kept narrow so they don’t eat the whole nail
Worth knowing: this style lasts better on hard gel or acrylic than on thin natural nails. Raised art needs a stable base underneath it.
14. Black Tortoiseshell Windows Framed by Gloss Black
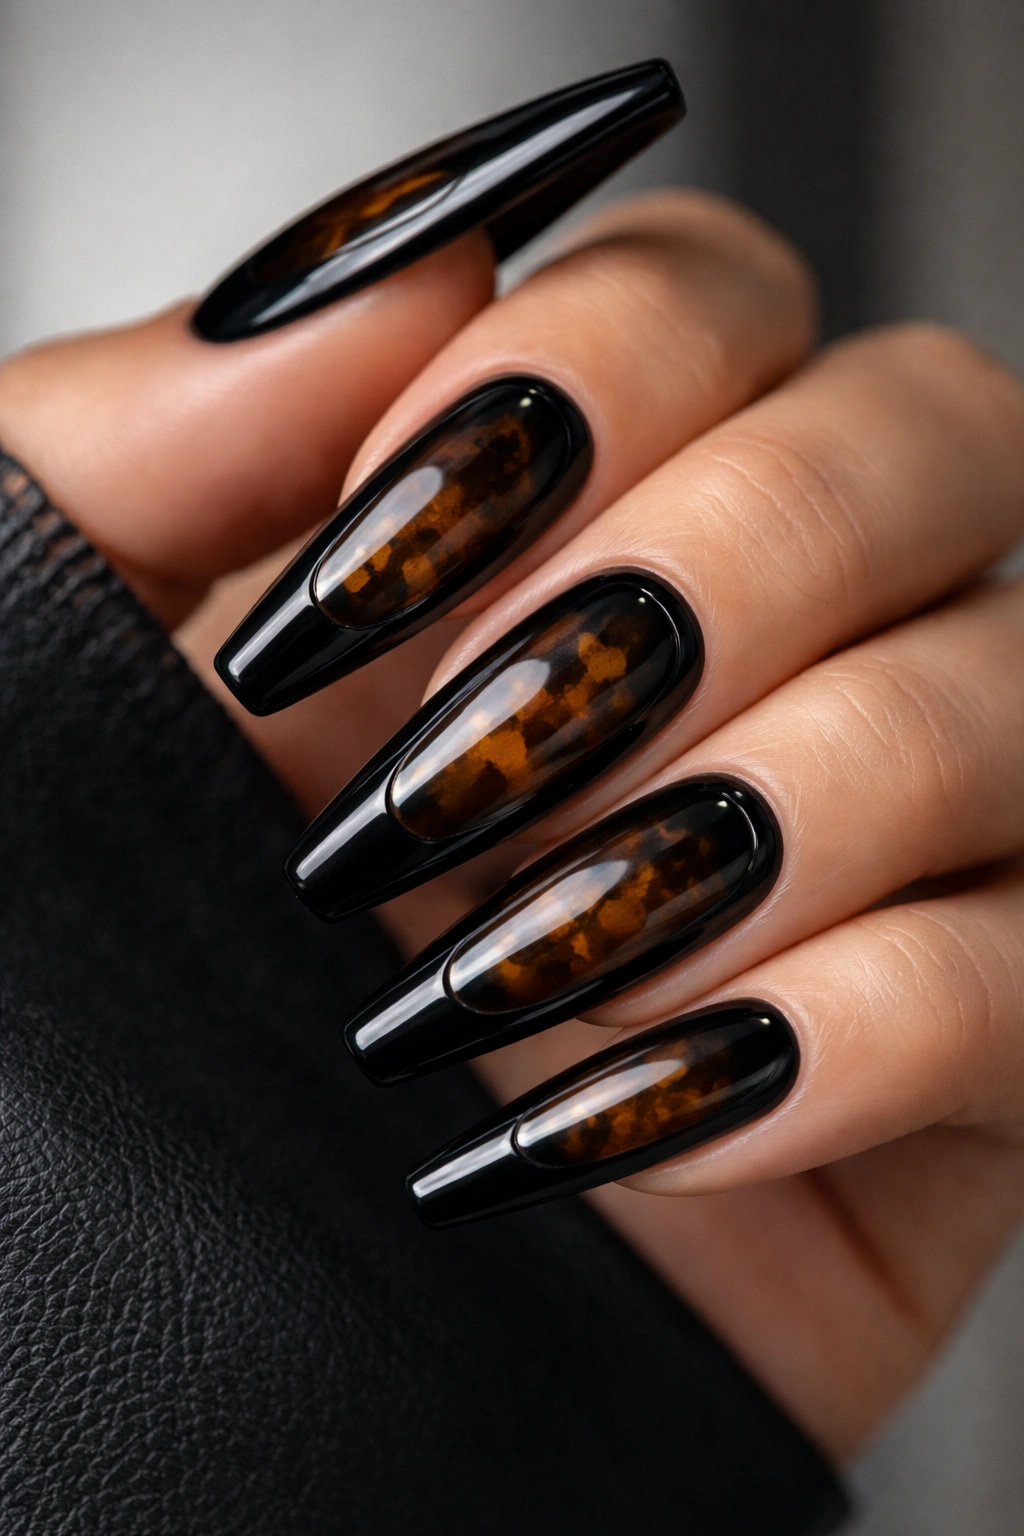
This one is moodier than standard tortoiseshell. Instead of amber and honey tones across the whole nail, you keep most of the nail black and open up one or two “window” sections with a dark tortoiseshell effect.
That black frame changes everything. The warm brown flecks still show up, but they sit inside a stricter design, which keeps the manicure from reading too autumnal or soft. I like this most on ring and middle fingers with the rest left solid black.
Placement matters. A center window looks polished. A side window cut diagonally across the nail feels more fashion-driven and a little weirder, which I mean as a compliment. The jelly tortoiseshell section should stay dark — more espresso than caramel — so it still belongs with the black base.
This is also one of those sets that looks better under gloss. Matte kills the depth of the tortie layers. You want the layered translucent brown, black flecks, and frame to look like they’re suspended under glass. If your nail tech can paint tortoiseshell thinly instead of piling on patches, the result is much cleaner.
15. Black 3D Gel Waves Across a Gloss Base
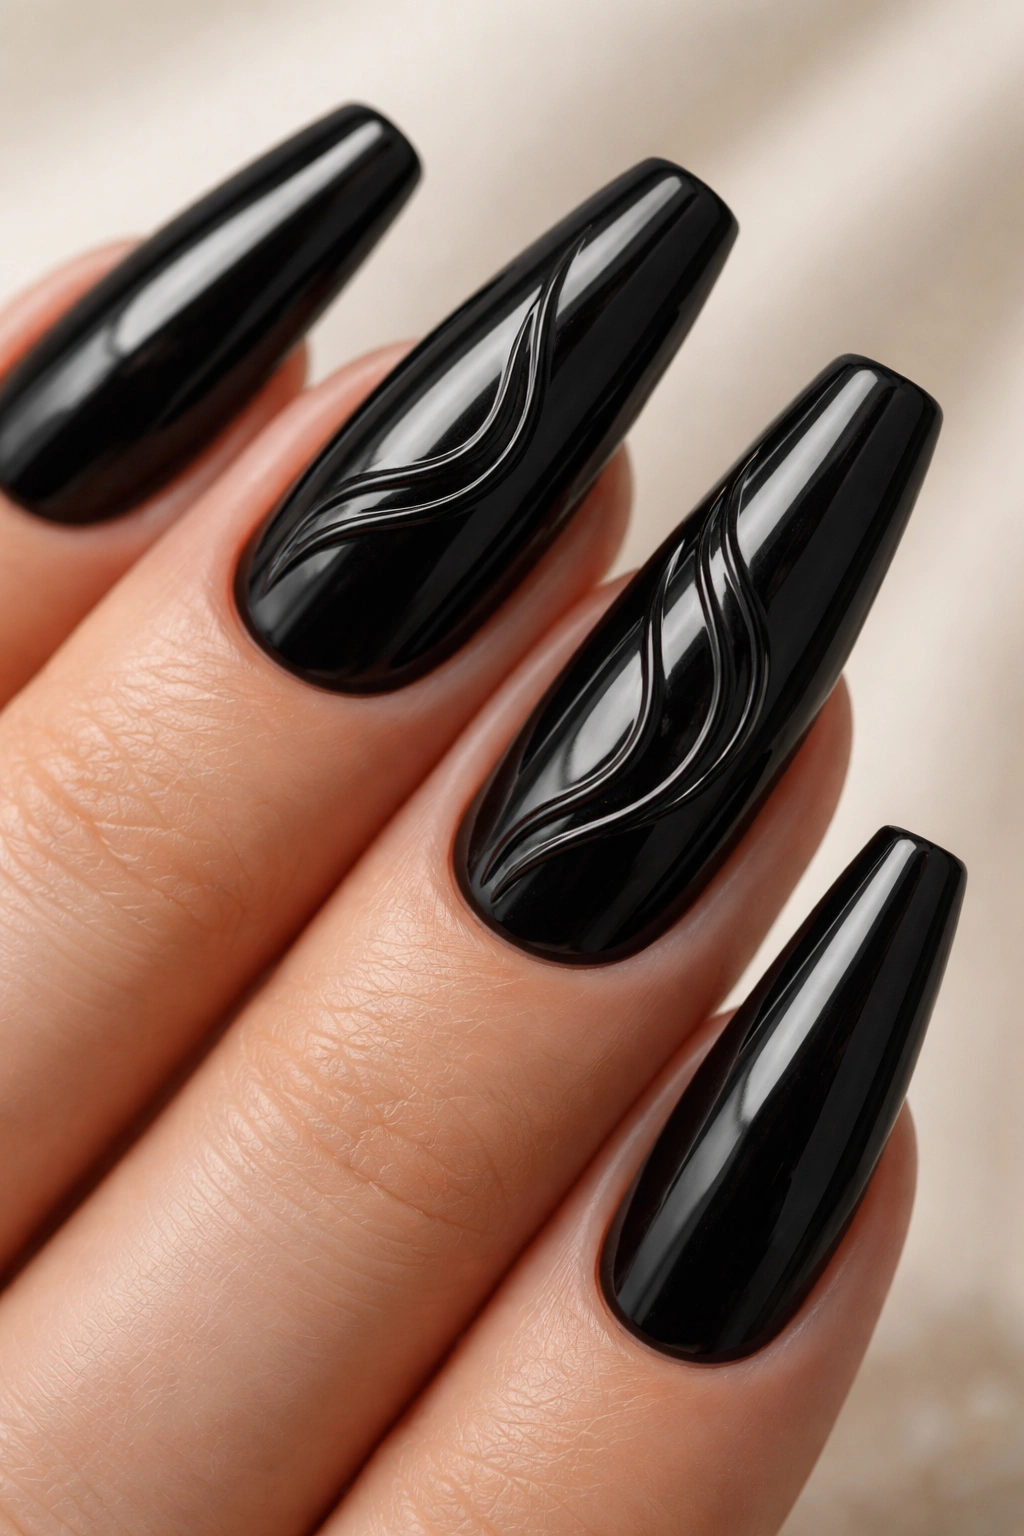
Why bother with 3D black-on-black art when you could just paint a pattern? Because raised gel catches light differently. The effect is subtle up close and stronger once the hand moves.
On a glossy black ballerina nail, thin 3D waves or ribbons laid across the surface create shadow and shine without adding another color. That keeps the set dark and controlled. I like curved wave lines more than random blobs here; they echo the long nail shape and look more intentional.
You do need enough length for this to breathe. Short nails can wear a single raised curve. Long ballerina nails can handle two or three layered lines that cross each other. Any more than that and the surface starts looking crowded.
How to Keep It Clean
Use raised art on 2 to 4 nails, not all ten. Pair it with plain glossy black on the rest of the hand. If every nail has thick 3D gel, the set becomes about texture only, and the shape gets buried.
Also, ask for the raised lines to stay low-profile. High 3D art is more likely to catch lint, makeup, and hair. You want texture, not hassle.
16. Black Glitter Fade From Tip to Mid-Nail
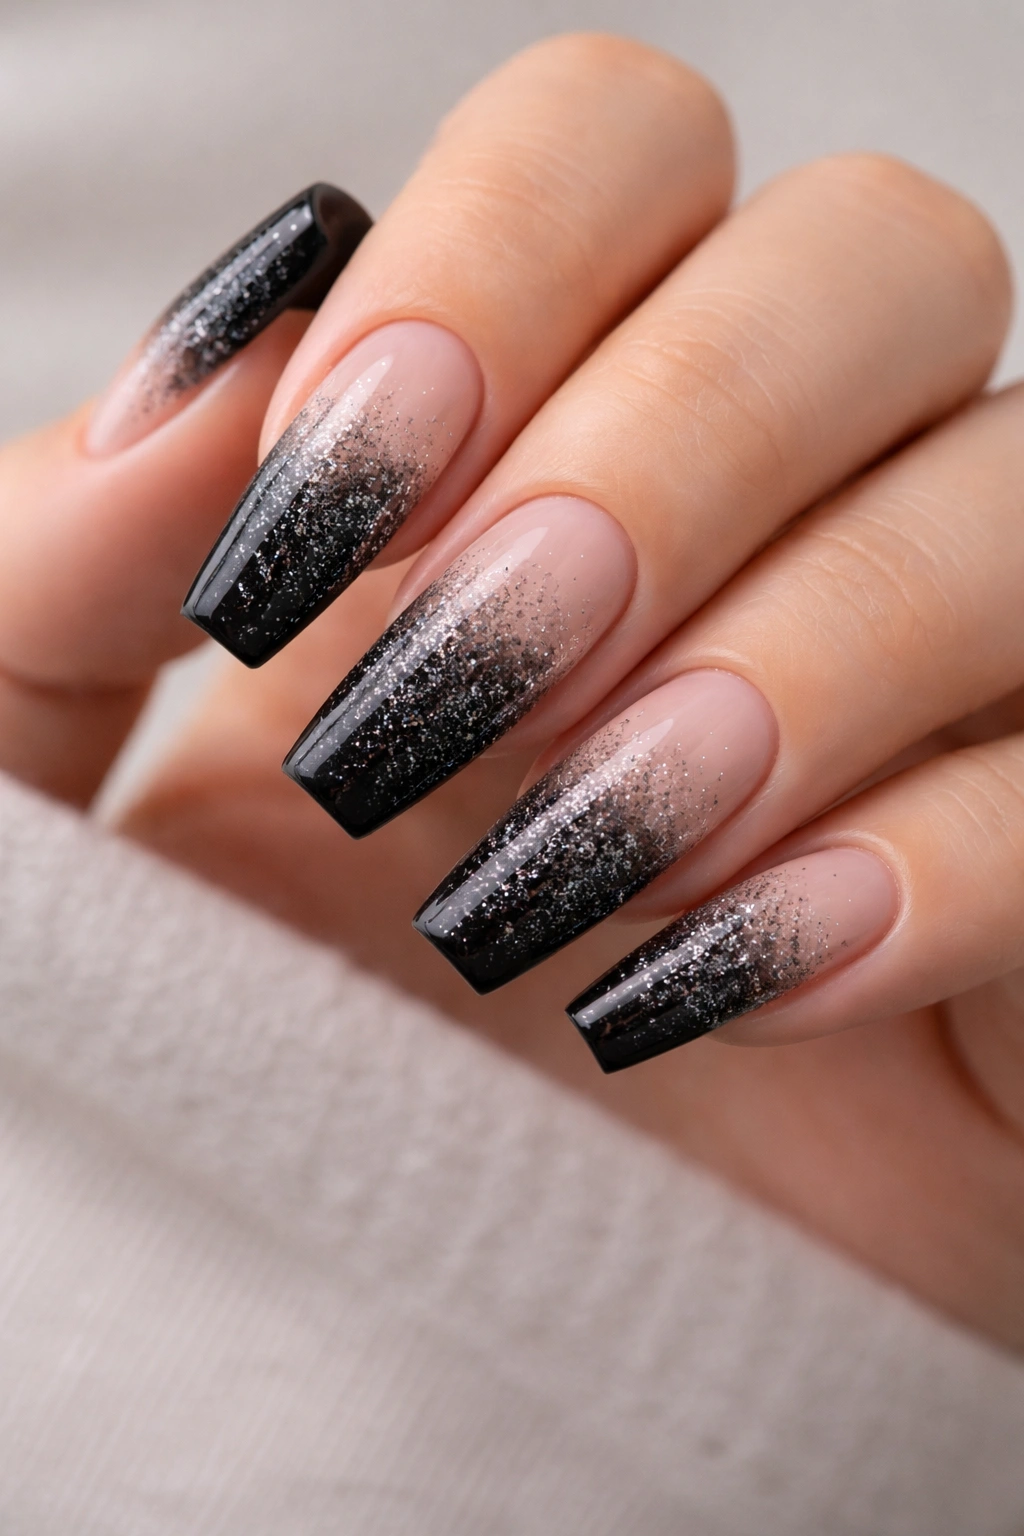
A full glitter black nail can look dense fast. A fade is smarter. Start with solid black at the tip, then feather black micro-glitter or fine reflective glitter down toward the middle of the nail so the sparkle thins out before it reaches the cuticle.
That arrangement suits the ballerina shape because it keeps visual weight at the free edge, where the flat tip can carry it. The rest of the nail stays lighter, which helps the fingers look longer and cleaner. I’d choose fine glitter over chunky hex pieces every single time here. Chunky glitter interrupts the line of the nail.
This design earns its edge from restraint. Reflective black glitter under flash can be bold, though under normal room light it still reads almost plain. That dual personality is part of the appeal. You get a manicure that feels dark and calm in daylight, then turns sharper once stronger light hits it.
If you’re deciding between silver glitter and black glitter, black is usually the better call for an edgy set. Silver pulls the look more festive. Black keeps it cold.
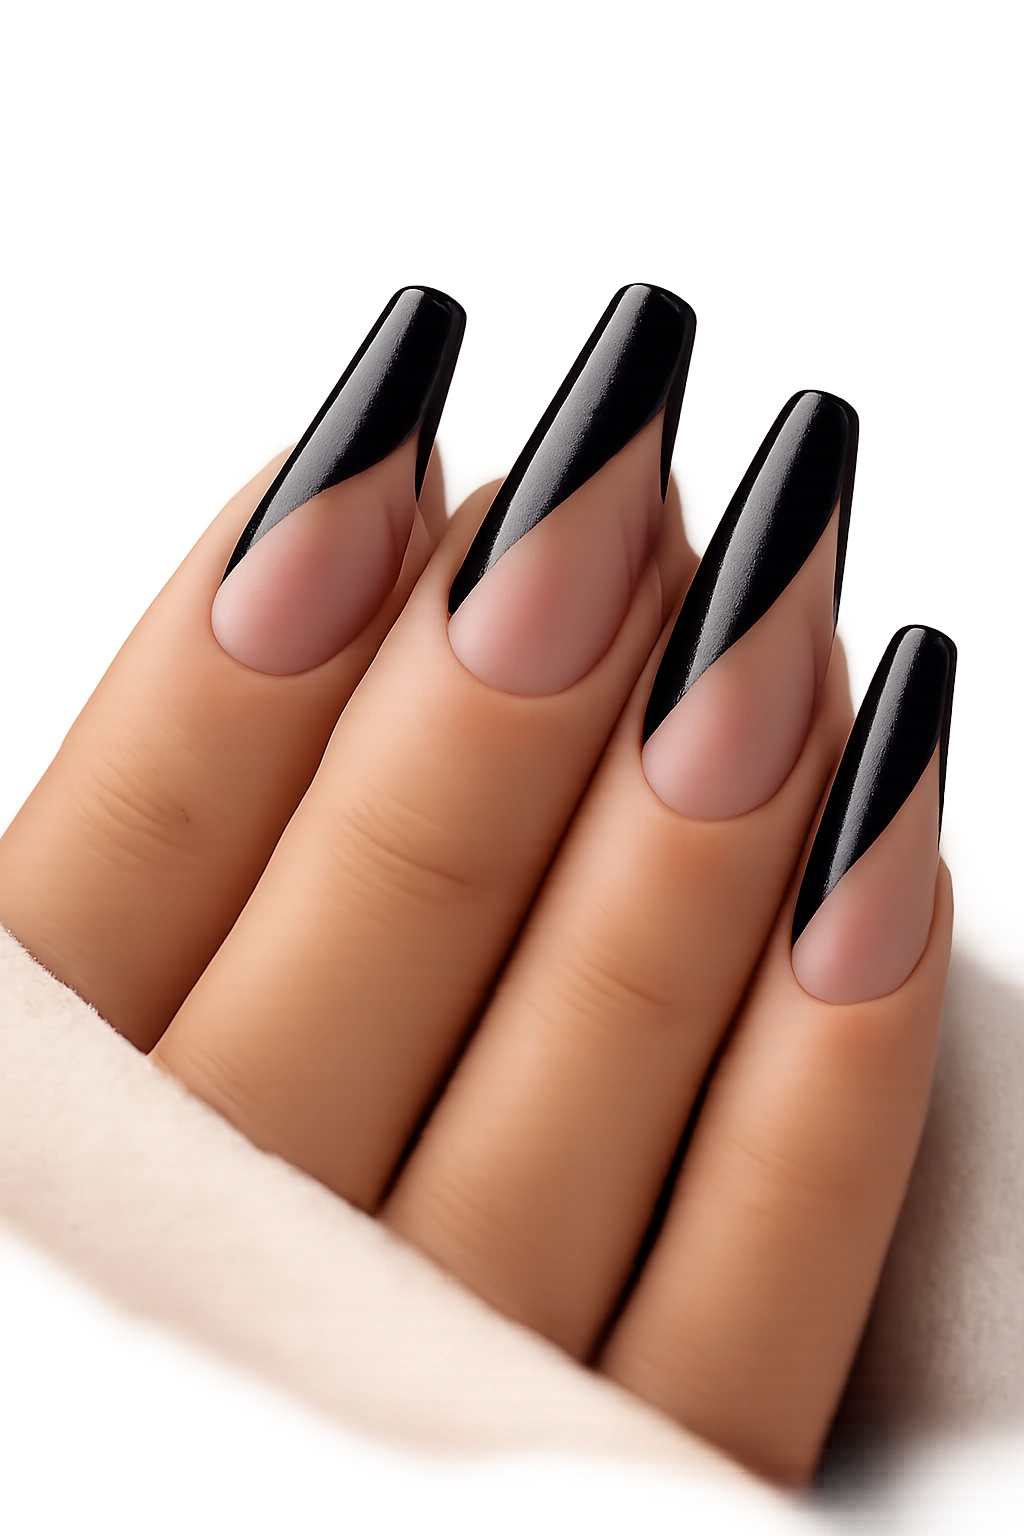
17. Diagonal Black Side-French Ballerina Nails
This is one of my favorite ways to make black ballerina nails look modern without adding stones, foil, or texture. Instead of a classic straight French tip, the black sweeps diagonally across one side of the nail and cuts toward the opposite corner.
The shape creates motion. It also feels sharper than a standard French because the angle breaks the symmetry in a controlled way. On ballerina nails, that diagonal line echoes the taper and makes the whole set look faster, leaner, more graphic.
A sheer nude base works best here. Milky white can feel too stark against black, and solid color underneath can hide the diagonal effect. You want enough transparency for the line itself to stand out.
You can also outline the diagonal edge with a tiny silver strip, though I prefer it plain. Once you start adding extra borders, the design loses some of its confidence. The beauty of this look is that one clean black section does enough. If the line is crisp and the angle matches from nail to nail, it lands hard.
18. Gloss-on-Matte Black Animal Print
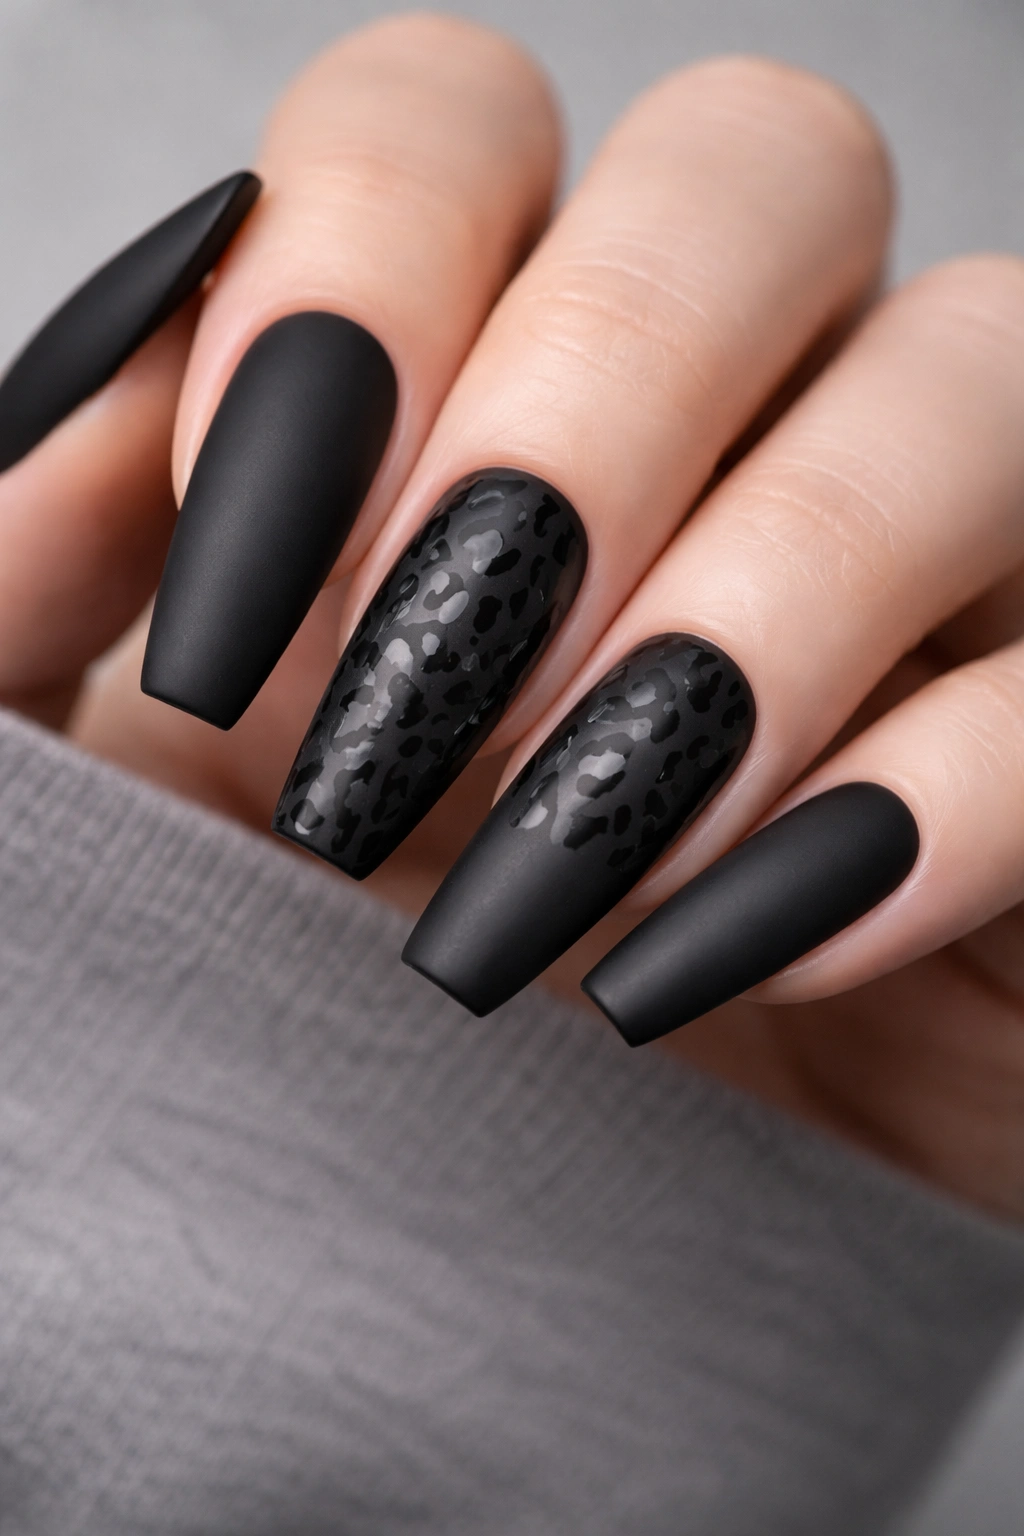
Unlike traditional leopard print with tan and brown spots, black-on-black animal print is all texture and finish. The spots, stripes, or scaled pattern show up because the base and the print reflect light differently, not because the colors change.
That’s why it looks smarter.
Use a matte black base, then paint the print in gloss black so the pattern appears only when the light catches it. Zebra stripes work well on ballerina nails because the long lines match the shape. Leopard can work too, though keep the spots smaller and more spaced out than you’d expect. Dense leopard print turns muddy on a dark base.
This style is good for someone who likes patterned nails but hates loud color. It’s still playful, though in a colder, more controlled way. I’d do print on 2 or 3 nails per hand and keep the rest plain matte black. Ten full animal-print nails can start feeling busy, and the finish contrast loses some of its impact once every surface is patterned.
It’s subtle from far away. Up close, it has teeth.
19. Black Barbed Wire Line Art Over a Smoky Base
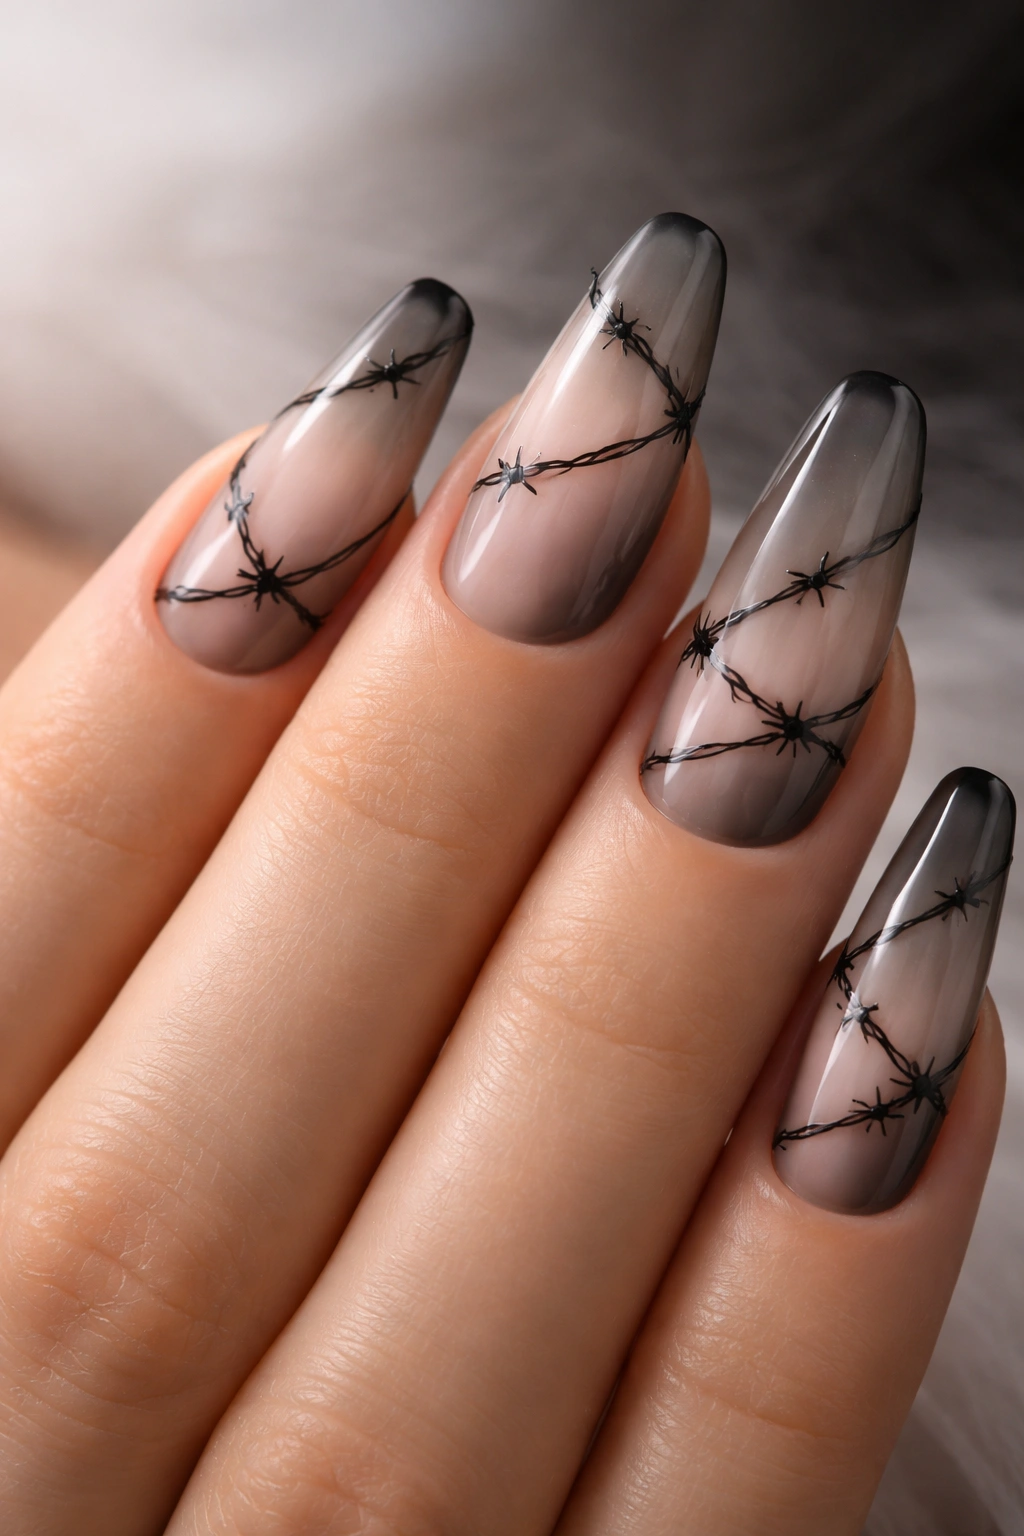
Barbed wire nail art sounds aggressive because it is, a little. That’s the point. On a smoky nude or gray-tinted base, thin black barbed wire lines wrapped diagonally across ballerina nails give a sharp, editorial feel without needing heavy embellishment.
Why It Works Better Than Heavy Graphic Art
Barbed wire is linear. It follows the length of the nail instead of breaking it into chunks. That keeps the manicure sleek. Thick symbols, logos, or full illustrations often make ballerina nails feel crowded. Fine wire lines, done with a liner brush, still read clearly while leaving negative space around them.
The base should stay translucent. A smoked jelly gray or sheer taupe creates contrast without making the black art look pasted on.
Placement Ideas
- One diagonal wrap across each nail
- Full art on 2 accent nails, solid black on the rest
- Double-wire pattern on thumbs only
- A tiny silver dot at one barb point for a hardware feel
Ask for thin lines. Once the barbs get thick, the design loses its tension and starts looking cartoonish.
20. Extra-Long Black Outline French on Narrow Ballerina Tips
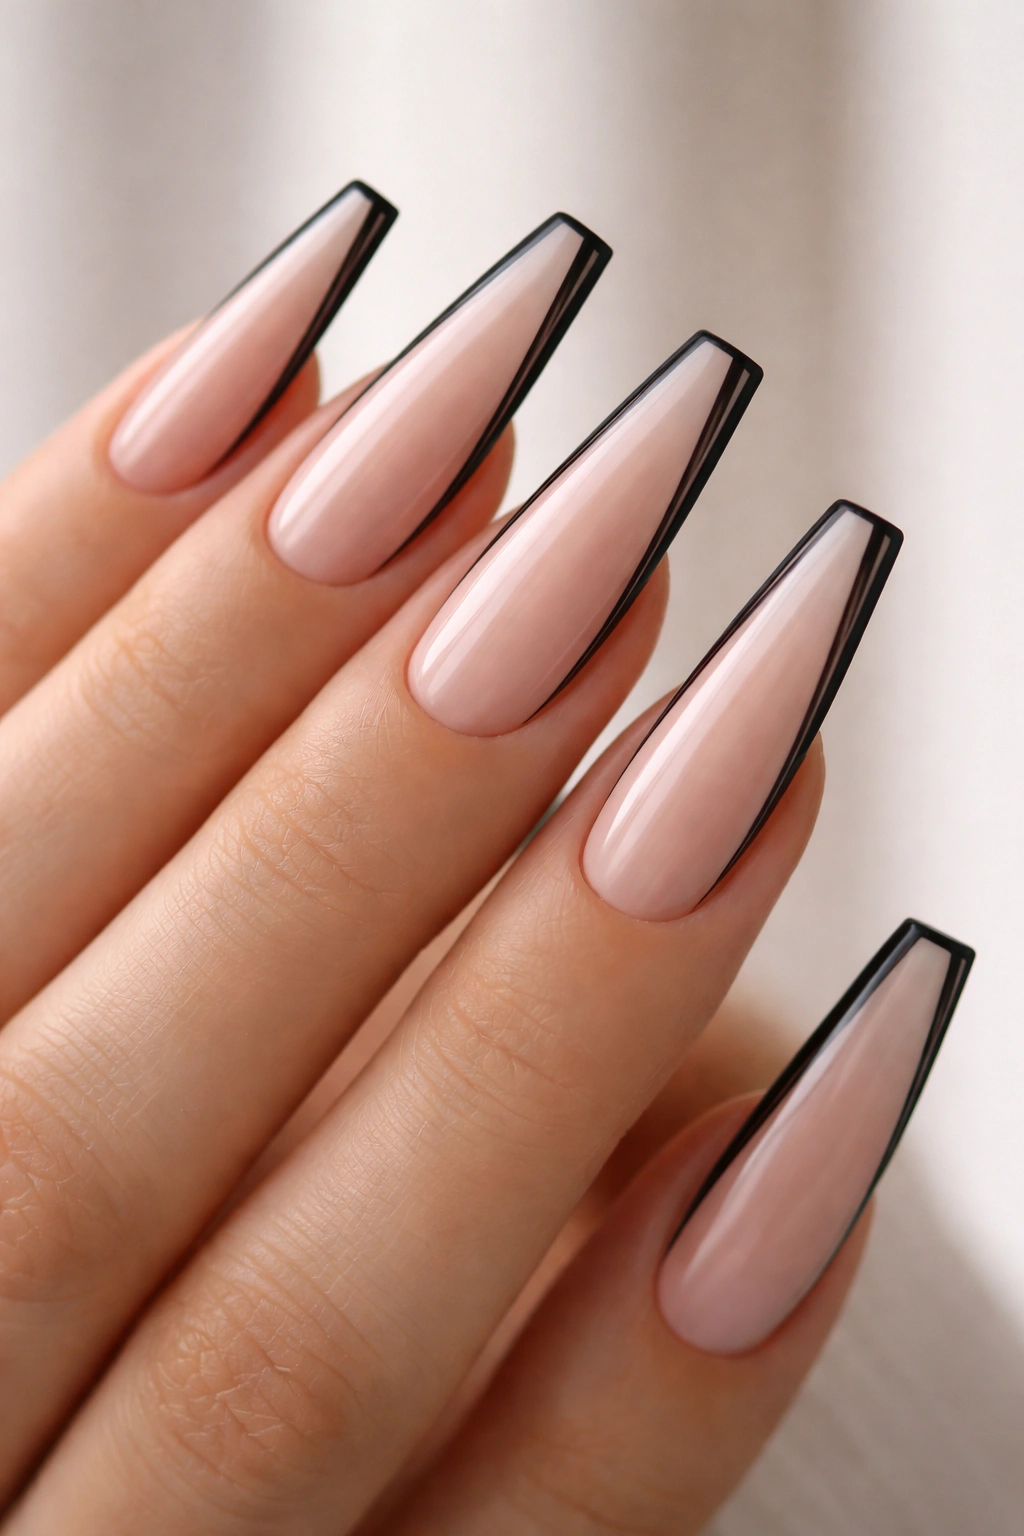
If you want edge without a full black block, this is one of the smartest choices. The nail stays sheer or nude through the center, while the sides and tip are traced with black, almost like the shape has been sketched in ink.
On a long, narrow ballerina nail, that outline makes the silhouette look even sharper. It’s architectural. You see the shape first, then the color. That’s why it works so well for people who love black nails but do not want the hand to look visually heavy.
There are a few ways to do it. You can keep the outline ultra-thin and graphic, maybe 1 mm around the sidewalls and 2 mm at the tip, or thicken the tip slightly for a more obvious French effect. I prefer the thinner version because it feels colder and cleaner.
This design also grows out more gently than a solid black set. The sheer center gives the eye a break, and the regrowth line isn’t as harsh. If your appointments sometimes stretch longer than planned, that’s useful. Not glamorous advice, maybe, but real life always shows up eventually.
Final Thoughts
The black ballerina nails that hit hardest aren’t always the busiest ones. A sharp shape, a controlled finish, and one strong detail usually do more than a pile of charms and five competing ideas. Black rewards precision. It also punishes shortcuts.
If you’re taking one of these ideas to the salon, bring a clear photo and be specific about finish, length, and placement. “Black with chrome” is vague. “Gunmetal chrome over a black base on medium-long ballerina nails” gives your nail tech something solid to work from. Same with “matte black with 1 mm glossy tips” or “smoky nude base with black flame French.”
And if you’re torn between two sets, pick the one that fits how you actually use your hands. Micro studs catch less than large gems. Chrome shows dents. Matte shows lint. Raised gel art looks sharp, though it asks more from the wearer. The right edgy set is the one you’ll still enjoy on day ten, not only under salon lighting on day one.
