

A frosted pink base, a blunt tapered tip, one tiny crystal near the cuticle—early 2000s ballerina nails still work because the bones of those old salon sets were good. The shape gives you drama without the sharp edge of a stiletto, and the era’s best color ideas—baby pink, icy silver, jelly blue, glossy brown—still flatter the hand in a way that feels playful rather than stuck in a costume drawer.
What does not work is throwing every Y2K detail onto one set. Thick acrylic, chunky glitter, airbrushed flames, stickers, heavy white tips, random gems on all ten nails—do all of that together and the manicure stops looking intentional. It starts looking like a dare.
I keep coming back to structure because that’s where most throwback nail looks win or lose. A ballerina nail looks expensive when the sidewalls stay neat, the apex sits a little behind the center of the nail, and the free edge tapers without getting skinny and weak. Even the loud designs below land better when the build is clean.
Some of these looks are soft. A few are unapologetically flashy. One or two flirt with full mall-salon chaos, which, frankly, is part of the fun. But every one of them can still hold up on real hands, with real outfits, and not just in a throwback photo dump.
The Taper, Shine, and Color Balance That Make Early 2000s Ballerina Nails Feel Right

Shape first, art second. If the ballerina shape is off, no amount of chrome powder or rhinestones will save it. For most people, the sweet spot is a free edge of about 8 to 14 millimeters past the fingertip. Shorter than that, and the taper can look stubby. Much longer, and early-2000s design details can start piling up fast.
A lot of old-school sets went wrong on thickness. The tip was chunky, the underside looked bulky, and the white French edge sat on top of the nail like a chalk block. Cleaner sets use a thinner tip, a smoother arch, and a finish that looks glassy or pearly instead of cloudy. That one change does more than any decal ever will.
Color helps too. Y2K nail art loved frost, shimmer, candy pink, silver, lilac, clear blue, and lip-gloss neutrals. All of those still work, but the trick is to let one finish lead. Pick one star: chrome, pearl, jelly, glitter fade, airbrush, or crystals. Not three. Definitely not five.
A few house rules make these looks sharper:
- Keep French lines and striping work around 0.5 to 2 millimeters thick.
- Save full rhinestone clusters for one or two nails, not the whole hand.
- Use a high-gloss top coat or a fine pearl sheen instead of chalky frost.
- If you want decals, use flat stickers or encapsulated art so the surface stays smooth.
- Ask for the sidewalls to be filed with the 180-grit side of the file at the end, which keeps the taper crisp without chewing up the shape.
That’s the frame. Now for the fun part.
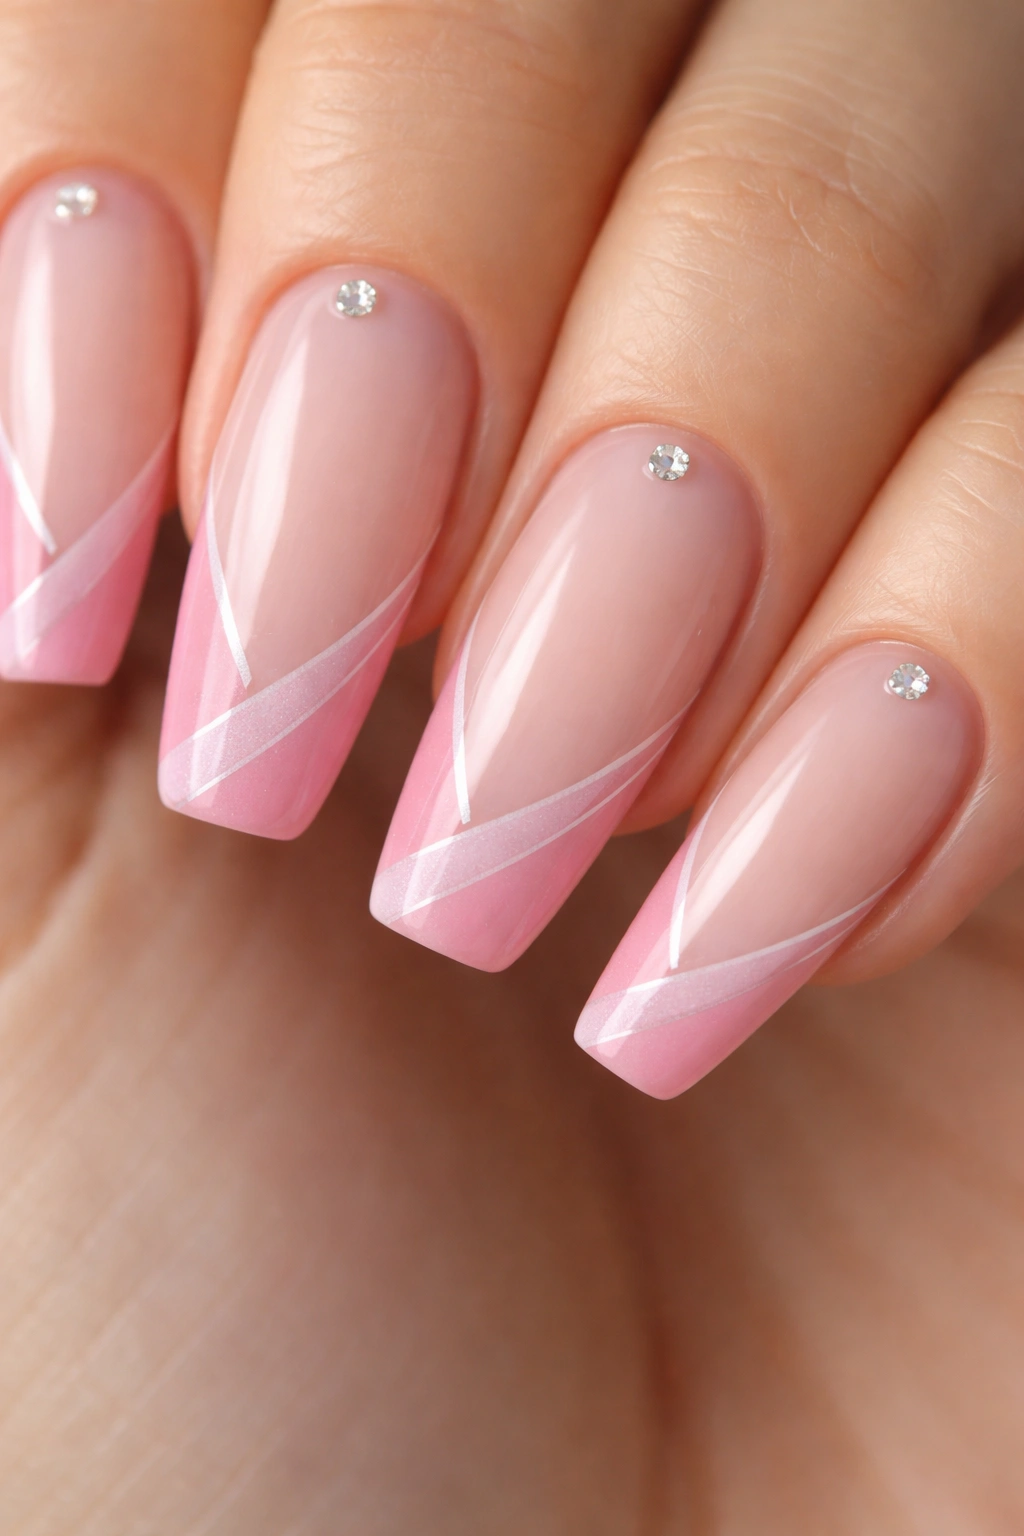
1. Frosted Baby Pink With a Slim White French Tip
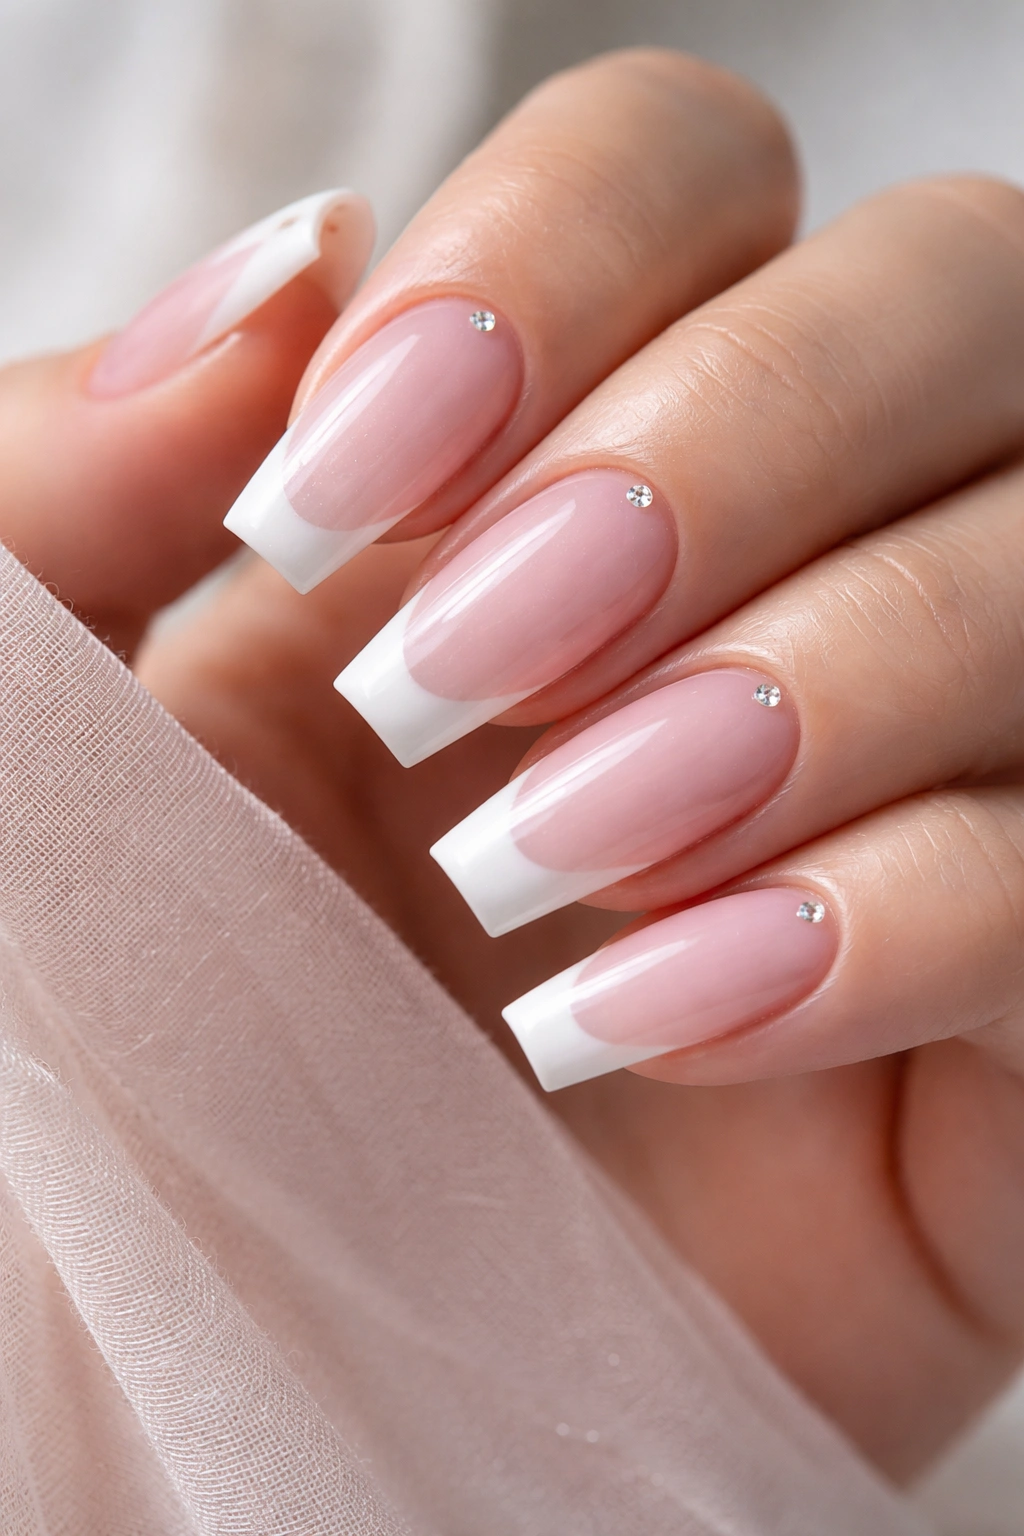
There’s something oddly satisfying about a baby pink frost with a clean white edge. It has that old salon-poster energy, but on a ballerina shape it feels less pageant, more polished. The key is restraint: a sheer pink base, a whisper of pearl, and a French tip that stays narrow.
A lot of people remember the thick white French from the early 2000s, and I’m going to say it plainly—it was usually too wide. On a ballerina nail, a 1.5 to 2 millimeter tip looks better because it keeps the taper visible. You still get the contrast, but the nail looks longer and neater.
Why the frosted finish still works
Frost gets a bad reputation because it can turn chalky fast. The fix is easy: go for a fine pearl finish over a translucent pink, not an opaque icy polish straight from the bottle. Think lip gloss with a little shimmer, not white satin prom shoes.
Skin tone matters a bit here. Cooler pinks flatter fair and rosy skin, while a peach-pink frost usually looks better on olive and deeper tones. You do not need to obsess over undertones, but a small shift in pink can save the whole set.
Quick design notes
- Best length: medium ballerina, around 10 to 13 millimeters of free edge
- Best base: sheer pink builder gel or soft milky pink acrylic
- Best tip shape: flat edge with softened corners, not a harsh square
- Best finish: pearl top coat, not chunky shimmer
Wear note: if the white tip starts creeping past one-third of the nail bed, the whole look gets heavy fast.
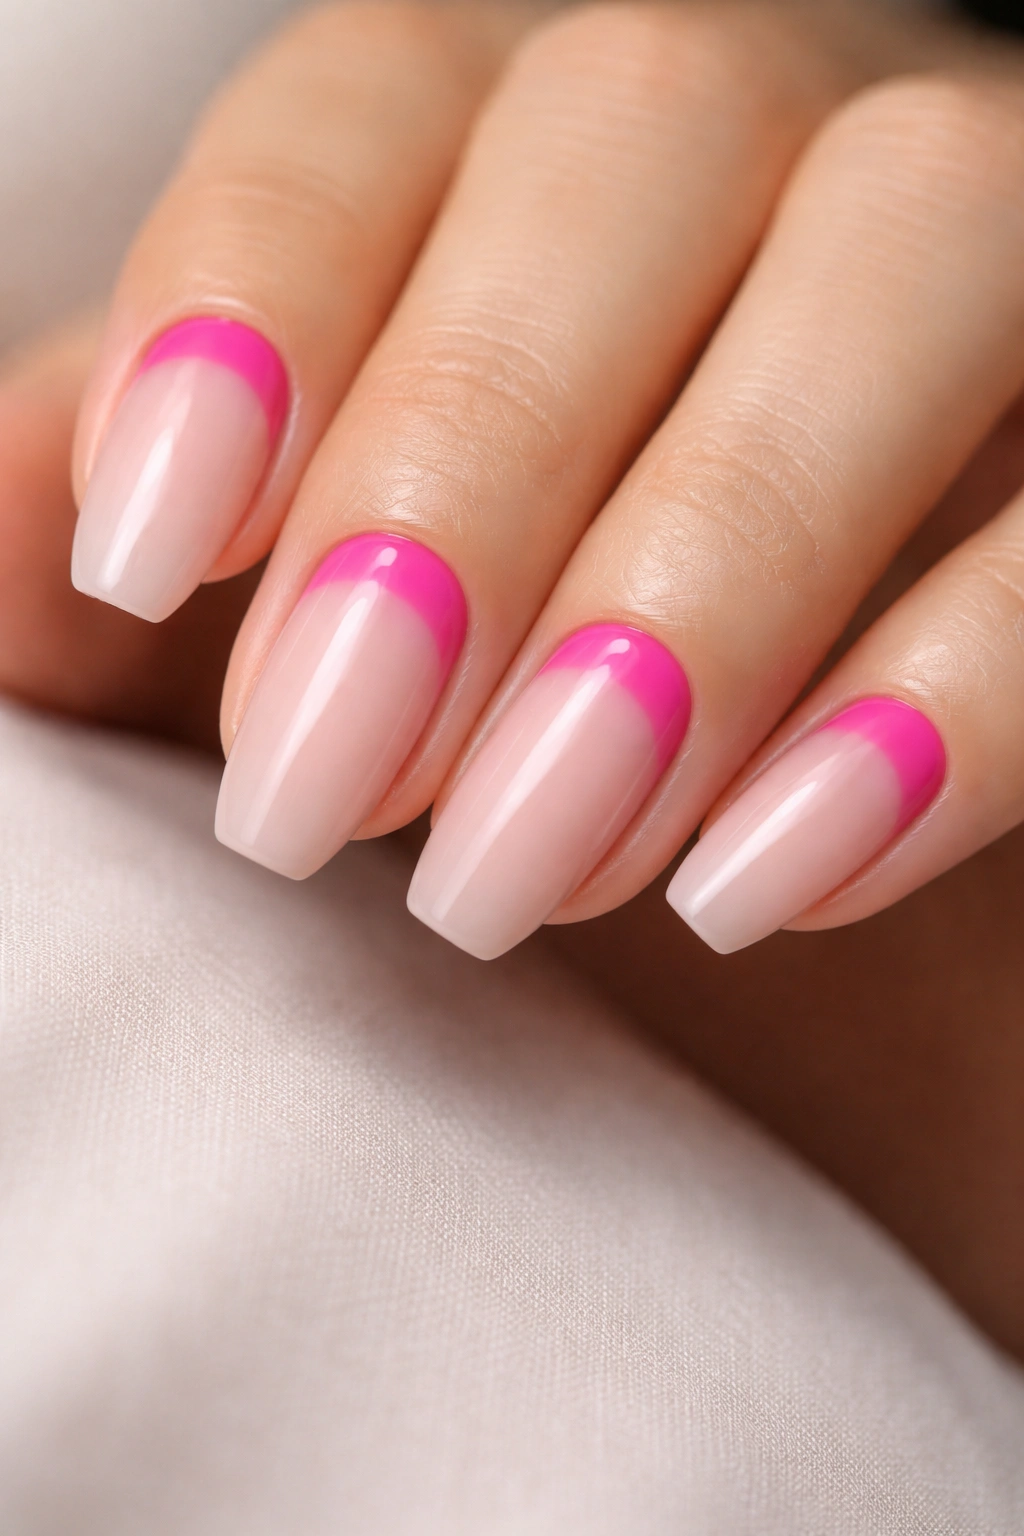
2. Mirror Silver Side-French Tips

A side-French often looks better than a straight-across tip. It pulls the eye diagonally, which makes the fingers look longer and gives silver chrome a job to do besides screaming for attention.
Silver is one of those early-2000s details that still has bite. Flip phones, metallic shoulder bags, silver eyeshadow—it was everywhere, and for good reason. Against a nude or sheer pink base, chrome silver still feels sharp. What saves it on ballerina nails is placement. Sweep the silver from one sidewall toward the center of the tip, keep the line slim, and let the rest of the nail breathe.
The shape matters more here than with a classic French. If the sidewalls are too wide, the diagonal line looks clumsy. When the taper is crisp, the silver slice almost acts like jewelry for the nail. That’s why I like this design on medium length rather than long. You get the sleek angle without wandering into sci-fi costume territory.
Skip a full mirror-chrome base for all ten nails unless you genuinely want drama. A chrome side-French on a translucent nude gives you the metallic Y2K note without the weight of an all-over foil look, and it wears better with denim, black knits, and plain basics.
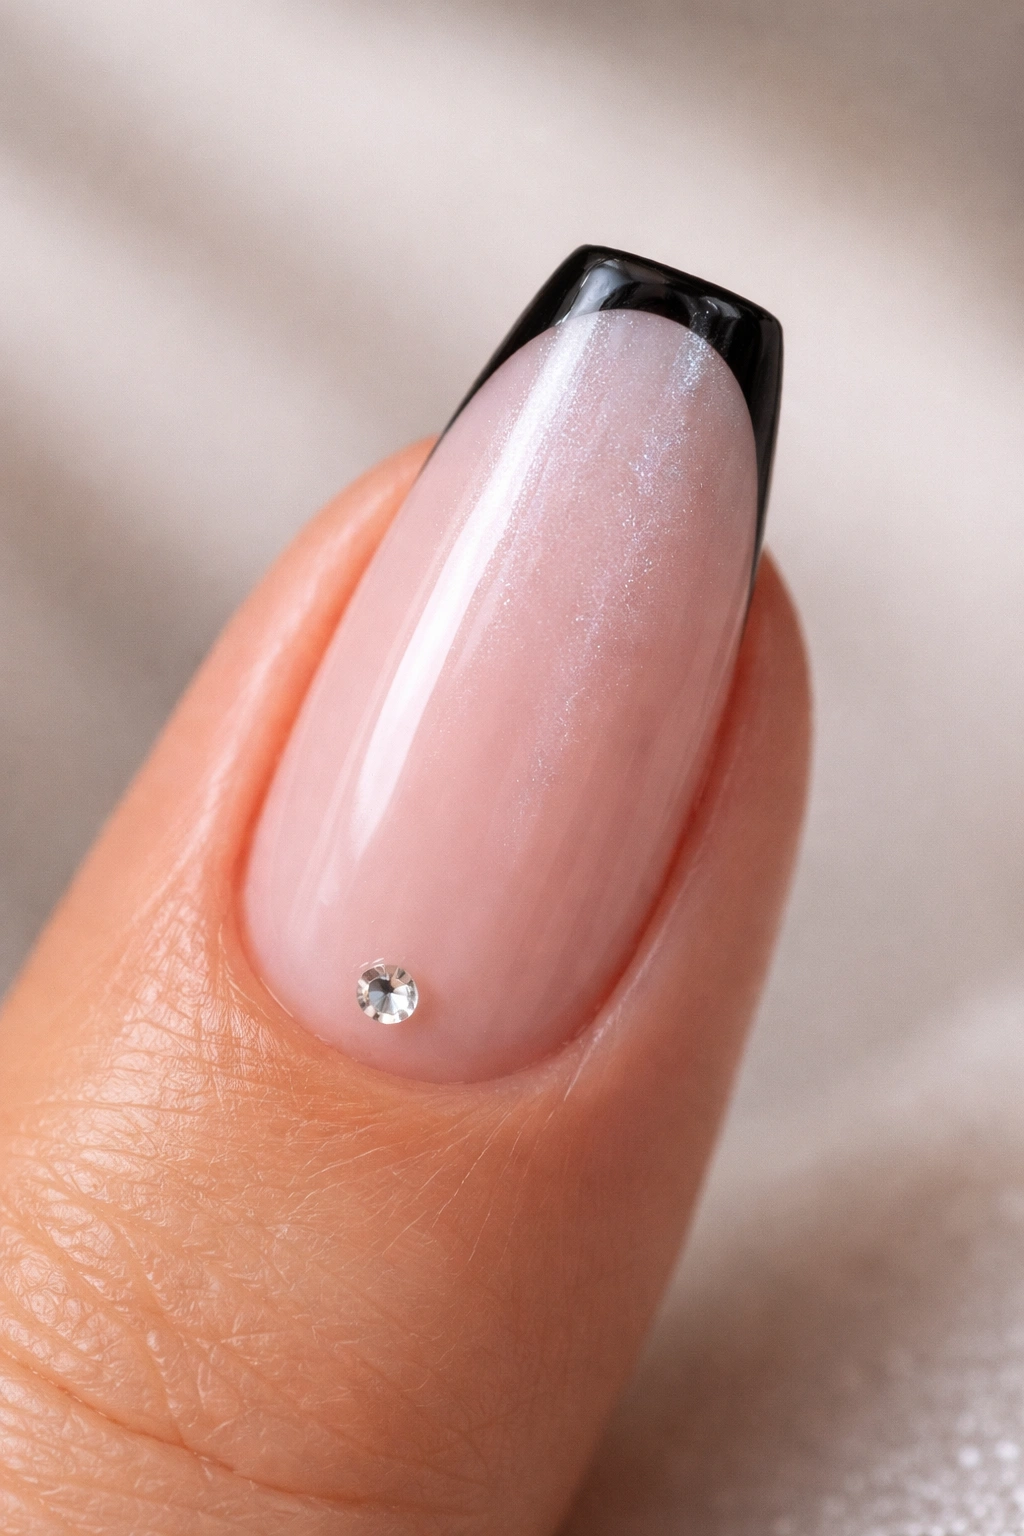
3. Nude Bases With a Tiny Rhinestone Cuticle Arc
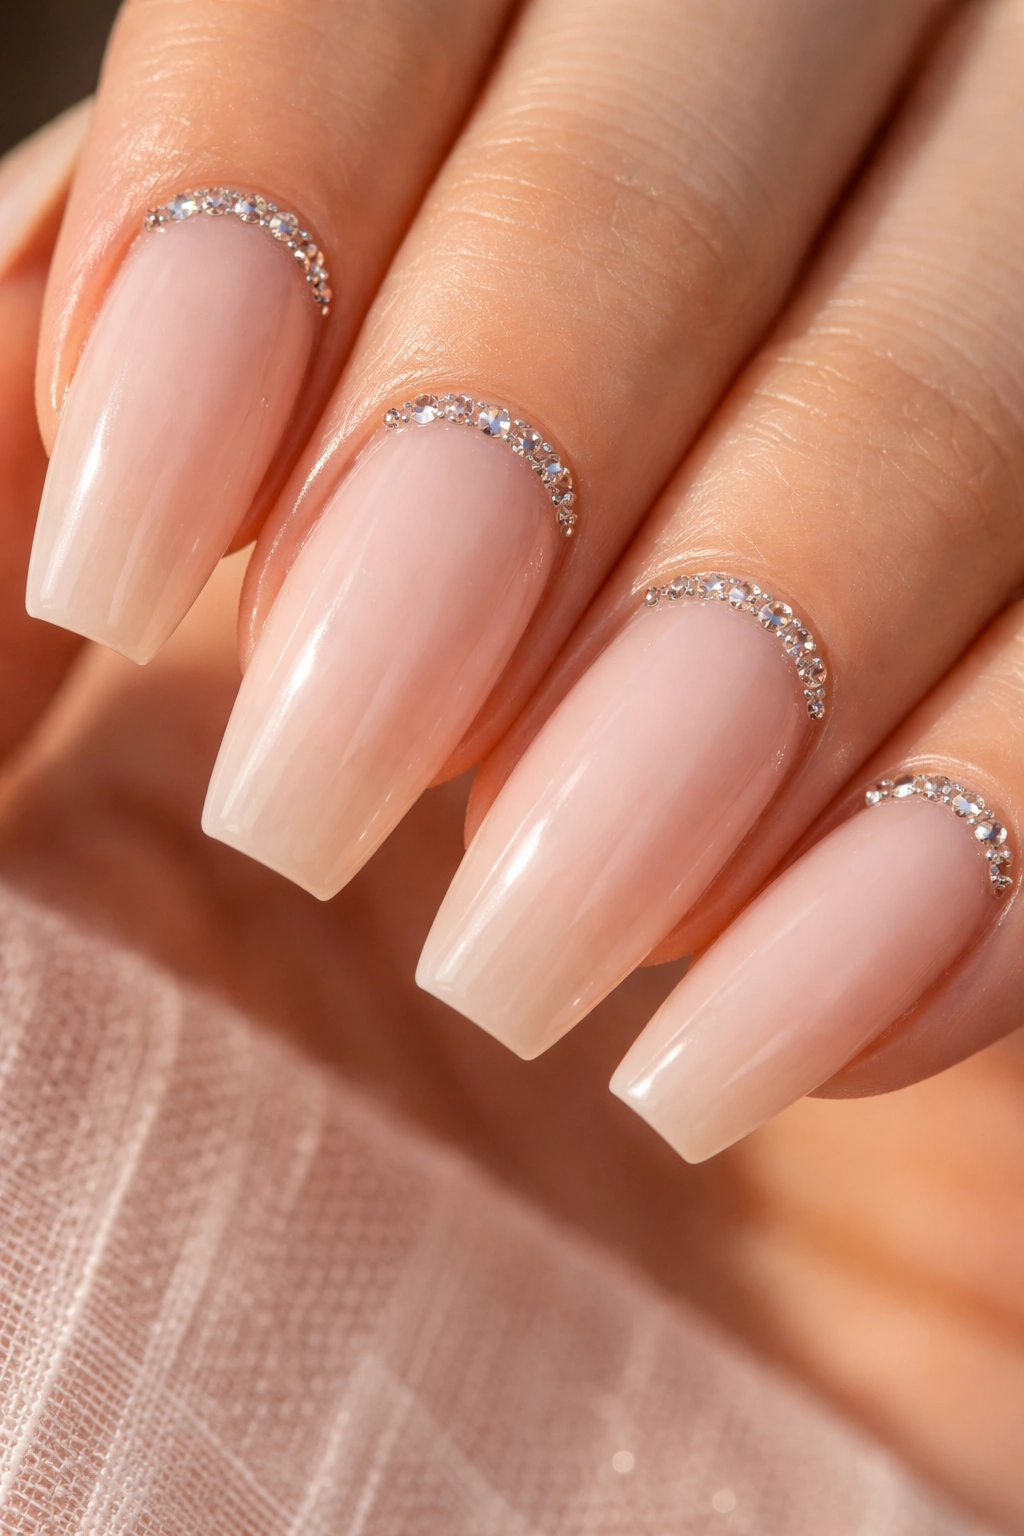
Why does one neat crescent of tiny stones look better than a full rhinestone nail? Because negative space does half the styling for you. The bare or sheer part of the nail keeps the set calm, and the cuticle arc gives that old-school glam hit right where the eye lands first.
Big stones can look clunky on ballerina nails unless the whole set is built around them. Small ones—think SS3 to SS5 crystals—sit lower, snag less, and look cleaner from two feet away. That distance matters. Nail art lives on your hands, not under a macro lens.
You also get more wear from cuticle placement than tip placement. Stones at the free edge take every keyboard tap, every can-opening attempt, every absentminded scrape against your bag zipper. Near the cuticle, they stay put longer.
How to place the sparkle
Use three to five stones in a soft half-moon on one or two nails per hand. More than that, and the set starts to lean bridal in a way that can drown the Y2K mood.
If you’re doing this at a salon, ask for gem gel or a thick resin glue, then a tiny bead of top coat nudged around the base of each stone without flooding over the top. Covering the top dulls the shine and makes flat-back crystals look cloudy.
A milky nude base works best here. Clear pink can work too, but sheer beige or rosy nude gives the rhinestones enough contrast to show up without turning flashy.
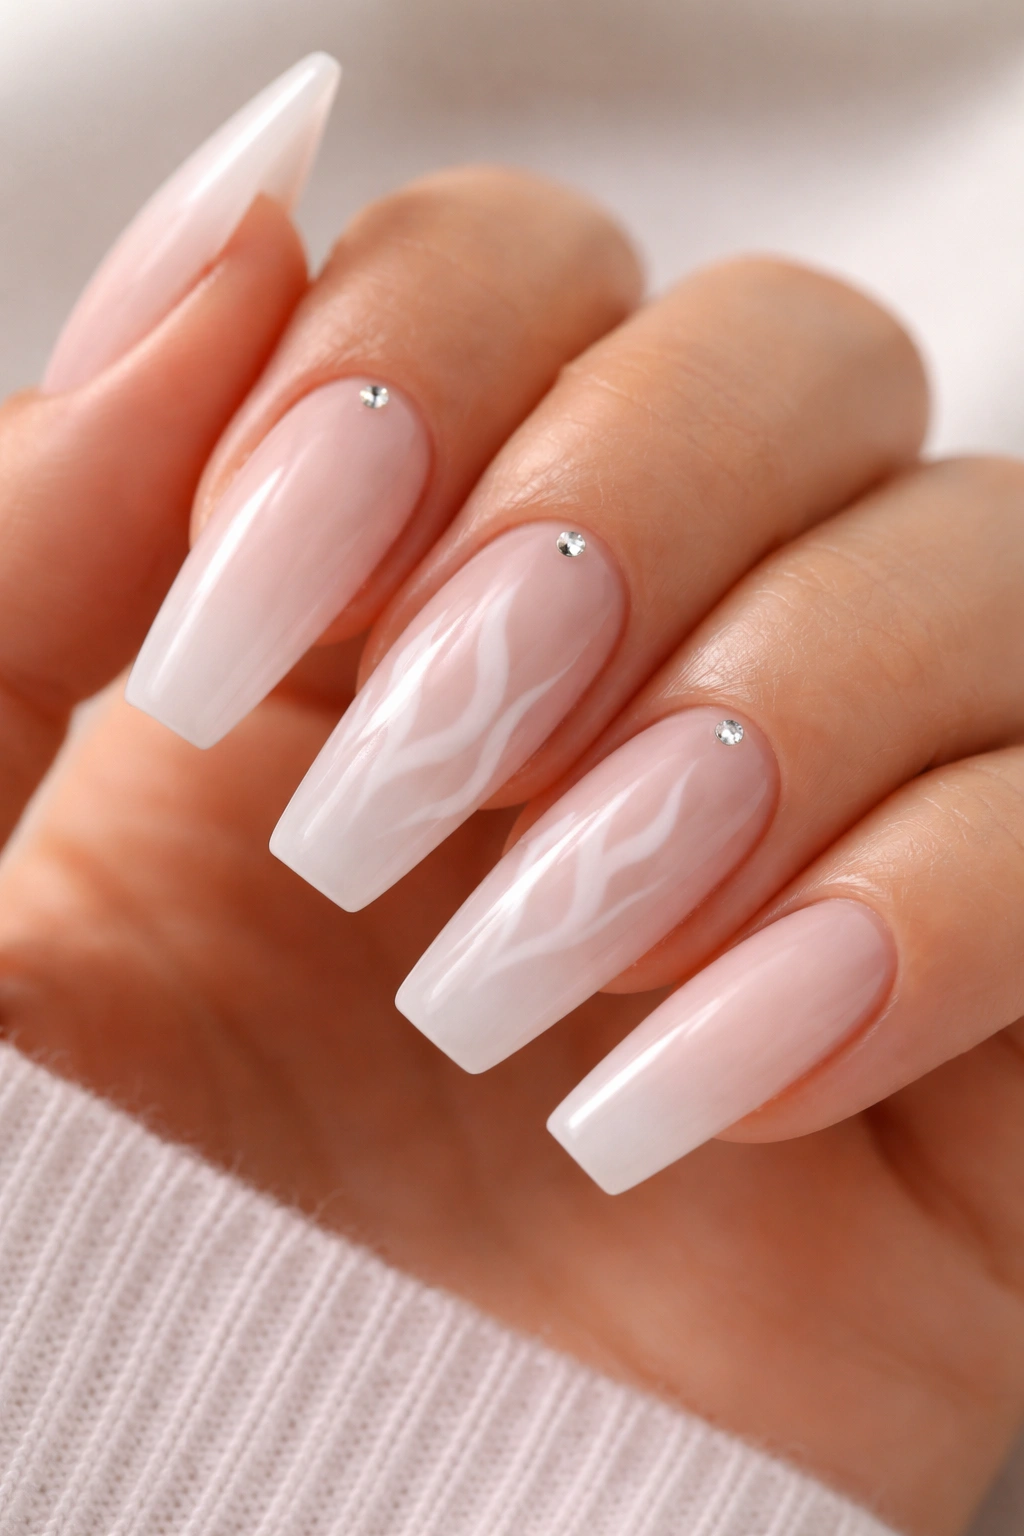
4. White Airbrush Flames Over a Milky Base
I still remember those old sample wheels at mall salons where every third design seemed to involve flames. Red flames, blue flames, silver flames, flames with glitter, flames with more flames. Most of them were too much.
White flames are different.
On a milky nude or sheer pink ballerina nail, thin white airbrush flames look light and graphic instead of loud. The shape helps. Because the ballerina tip narrows slightly, the flame lines already have movement built in. You don’t need much width, and you definitely do not need all ten nails covered.
A few details keep this one from turning cartoonish:
- Use a milky base, not a stark opaque white.
- Keep the flames on two to four nails, then leave the rest plain or lightly glazed.
- Ask for soft-edged airbrush work or hand-painted flame lines with a faint gray shadow.
- Stay with white or white-silver flames; bright red usually pushes it into costume.
- Medium length works better than extra-long because the flames stay lean.
The best version of this look feels almost ghostly—there, but not yelling. That’s why it still works.
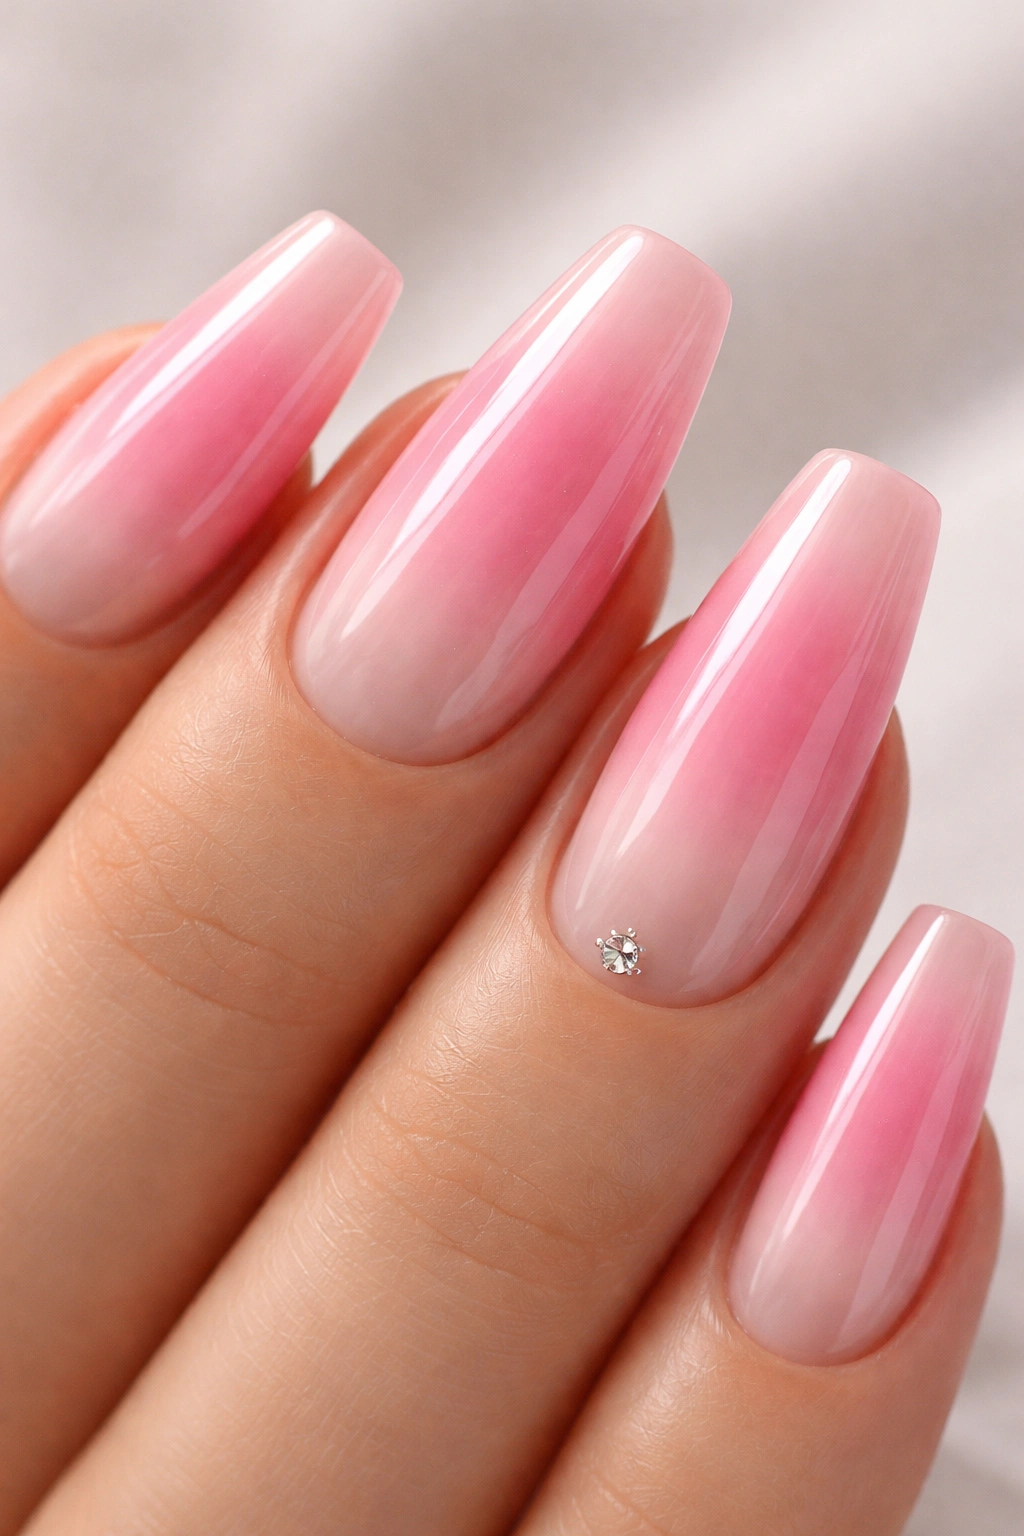
5. Lip-Gloss Pink Ombré With a Glassy Finish
Short answer: yes, ombré can still look fresh.
But the good version is not the dusty sponge fade that used to show up in bad acrylic sets. The one that still earns its place is a lip-gloss pink ombré, where the nail shifts from a sheer rosy base into a slightly brighter pink at the tip, all under a thick, glassy top coat.
What makes this one strong is how little decoration it needs. No stones. No foil. No decals. The shine does the work. On a ballerina shape, that glossy fade makes the nail look longer because the color melts rather than stopping hard at a line.
The pink choice matters. Go too bubblegum and it reads juvenile. Go too beige and the whole effect disappears. The sweet spot is a rosy translucent pink with a cooler edge, almost like the inside of a seashell or a sheer lip gloss from a department-store makeup counter. If that sentence just unlocked a memory, you know the exact shade I mean.
Application matters even more. A smooth airbrushed fade or a well-blended gel gradient beats a sponge texture every time. You want the color to blur, not scatter. The finished surface should look slick enough that a reflection runs along the nail in one clean band.
One more thing. This design looks best when the apex is subtle. Too much height in the middle and the glossy fade starts looking bulbous. Keep the build refined, let the pink do its quiet work, and the whole set looks expensive.
6. Black Micro-French With Icy Pearl Top Coat
Unlike the thick black French tips from old magazine beauty pages, a micro-French in black barely uses any space at all. That’s why it still works. You get the edge and contrast of black without chopping the nail in half.
The pearl top coat is the early-2000s note here. A soft icy sheen over a nude or translucent base gives the set that frosted, late-night-club-bathroom mirror look—yes, I mean that in a good way. Black alone can feel severe. Pearl alone can feel too sweet. Put them together and the set gets balance.
This one suits people who like Y2K style but do not want butterflies, decals, or gems. It’s leaner. Sharper. A little moodier. If you wear silver jewelry, black coats, dark denim, or smoky eye makeup, this design slots right in without asking for a themed outfit.
Ask for the black line to stay around 0.5 to 1 millimeter wide. Wider than that, and the nail starts to look shorter. The pearl should be soft too—a fine rub-on powder or a top coat with a blue-white sheen, not chunky shimmer. Clean edges matter here, because black tells on every wobble.
7. Diagonal Double-Pink Tips With Striping Lines
Picture a French tip that got bored with being symmetrical. One pink sweeps across the nail, a second pink echoes it, and a slim metallic or white striping line separates the two. On a ballerina shape, that diagonal movement looks fast and a little cheeky in the best way.
This design borrows from the old two-tone salon looks that used to show up with hot pink and silver. The update is softer. Keep the base sheer. Use one mid-tone pink and one pale pink instead of two loud colors. Then add a line so thin it looks drawn with a pen.
Where the early-2000s mood shows up
The color layering is what gives it away. Early-2000s nail art loved seeing one shade stacked against another—not blended, not marbled, just blocked cleanly. The diagonal layout also fits the ballerina shape better than a straight horizontal split.
Details worth getting right
- Use a liner brush with long bristles for the dividing line.
- Keep the metallic or white stripe around 0.5 millimeter.
- Let one pink cover about one-quarter of the tip, the second about one-third.
- Leave at least half the nail bed sheer so the design stays light.
My pick: pale rose + cool pink + silver line. It looks throwback without trying too hard.
8. Lavender Glitter Fade on a Clear Ballerina Set
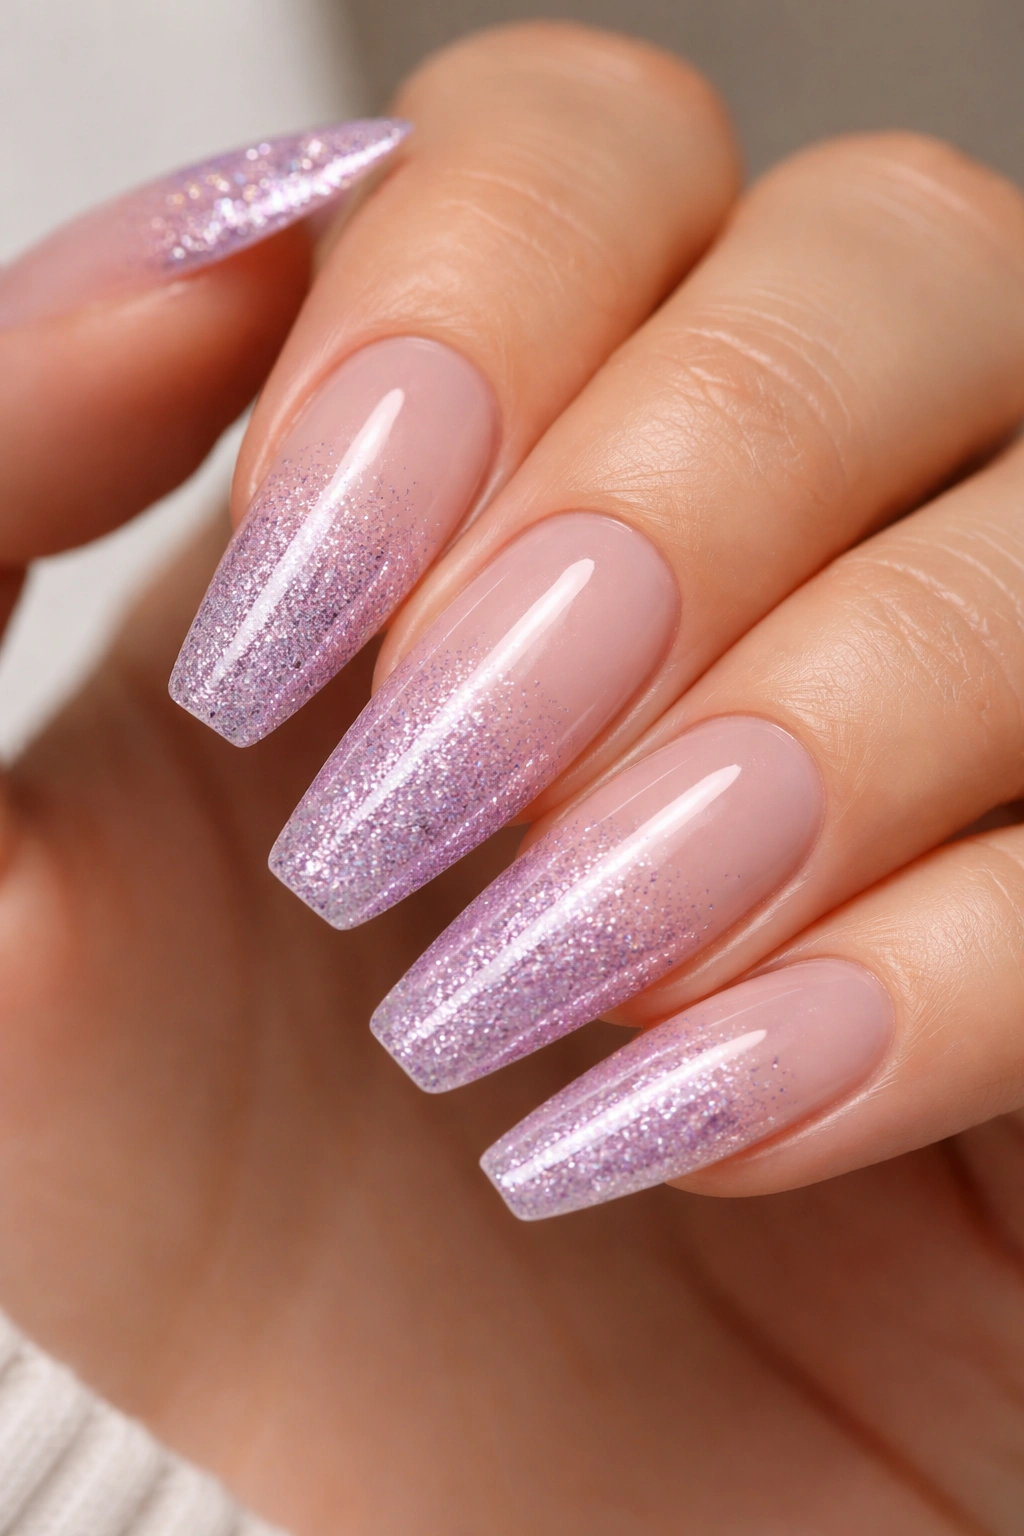
Glitter fades survive because they know when to shut up. The sparkle stays near the tip, the base stays mostly clear, and the hand still looks like a hand instead of a disco ball.
Lavender was one of the softer colors from the era that deserves more love. It sits between pink and blue, so it picks up that candy-coated Y2K mood without feeling sugary. On a clear or jelly nude base, a fine lavender glitter fade looks airy. On a full opaque base, it can get heavy fast.
Chunky hex glitter is where this design often goes wrong. Those big pieces lift sooner, feel rough sooner, and make the finish look older than it needs to. A fine-cut glitter or iridescent dust gives a smoother gradient and keeps the surface sleek under top coat.
You can go full glitter on all ten nails if the fade stays sheer. I still prefer mixing it with two plain nails on each hand. That little pause gives the glitter more impact, and it keeps the set from drifting into prom territory. On medium or long ballerina nails, the fade has enough room to stretch from dense at the tip to nearly invisible by the middle, which is where the design starts to look clean rather than crowded.
9. Jelly Blue Nails With White Star Decals
Can see-through blue nails still look grown-up? They can, if the blue looks like tinted glass and the stars are used with discipline. The problem was never jelly blue itself. The problem was loading it with moons, stars, smiley faces, glitter, clouds, and random dots all at once.
A watery blue jelly has a crisp, cool feel on ballerina nails because the flat tip shows off the transparency. Light moves through it differently than through an opaque polish, so the color looks deeper near the apex and brighter at the edge. That little shift gives the nail depth without any extra work.
White star decals are the right partner because they read clean against the blue. Silver can blur into the shine. Black gets harsh. White stays graphic.
Placement that keeps it from looking juvenile
Use one small star or starburst on three or four nails, then leave the other nails plain. If you want more detail, add a second tiny star near the tip on one accent nail only.
Flat decals are better than raised charms here. Encapsulated stars under builder gel look smoother, last longer, and keep the jelly effect clear. Medium length is enough. Once these get too long, the blue can start looking like novelty plastic.
10. Pearl Nude Nails With a Thin Silver Outline
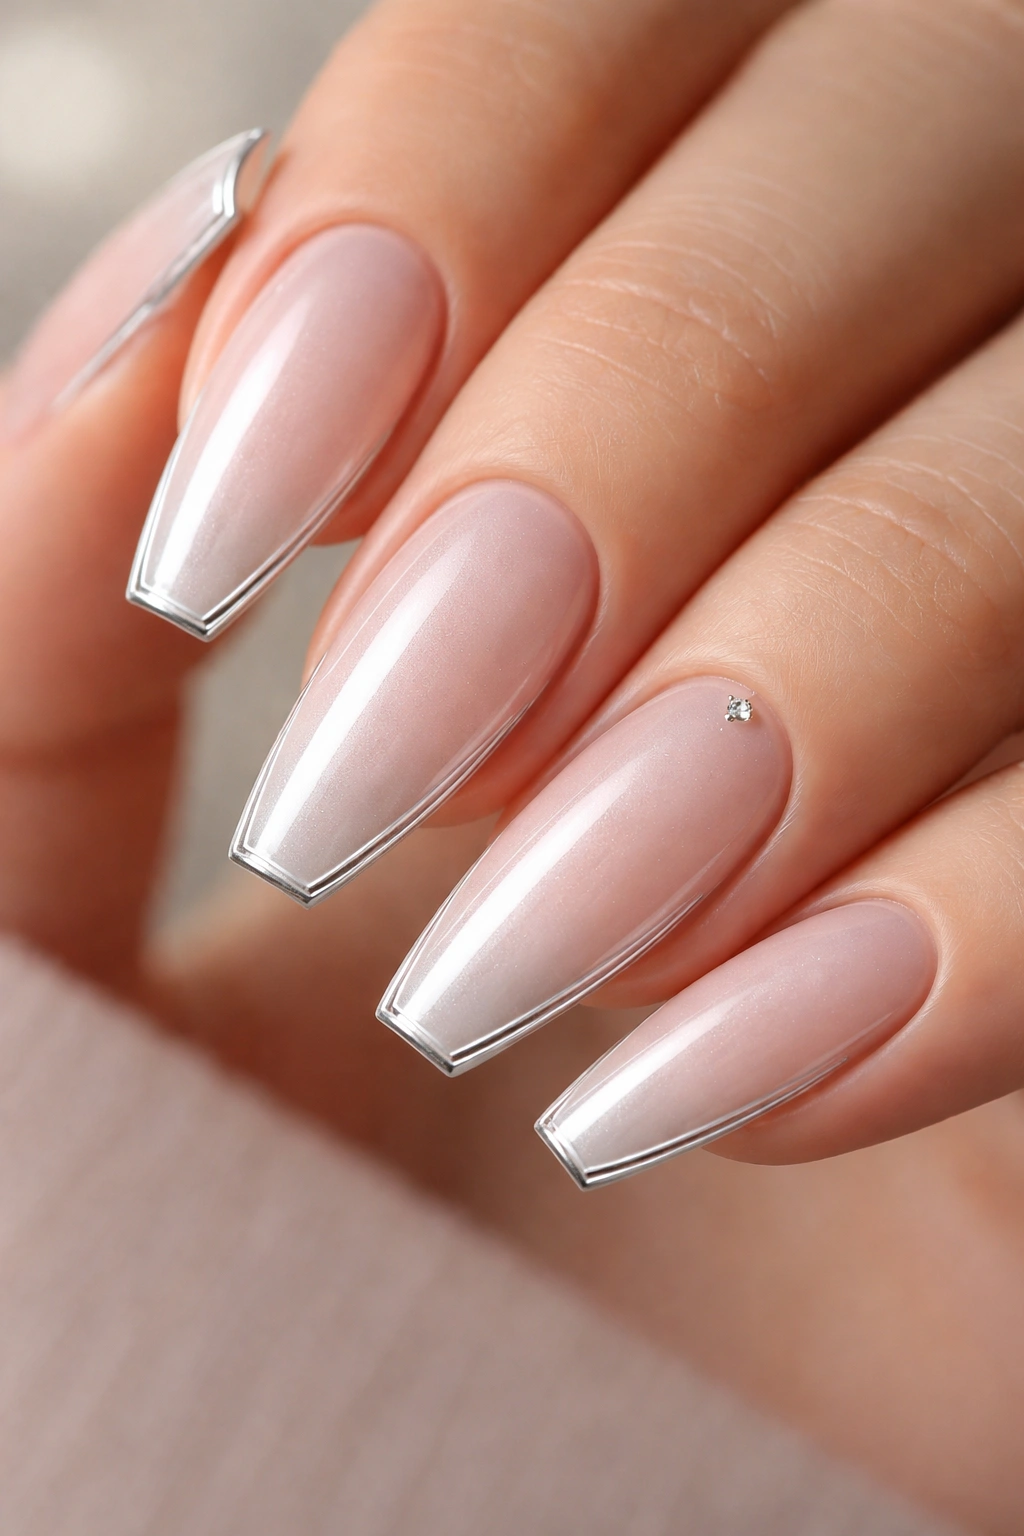
A traced edge sounds fussy on paper. On the nail, though, it can look crisp and expensive—especially on a ballerina shape where the flat tip gives the outline a clean finish.
The base needs to stay soft. Think pearl nude, beige-pink, or sheer taupe with a satin-like sheen. Then comes the silver line, painted around part of the edge rather than the whole perimeter. Outlining the entire nail can look stiff. Tracing the tip and one side keeps the eye moving.
What matters most here is line quality:
- Use a 00 liner brush or the thinnest striping brush your tech trusts.
- Keep the silver line around 0.5 millimeter wide.
- Outline the tip and one sidewall, or create a floating border with a tiny gap.
- Stick to chrome silver or metallic gel paint, not loose foil pieces.
This design feels old-school in a sly way. It nods to metallic accessories and glossy makeup packaging from the era without using an obvious symbol like a butterfly or flame. If you like subtle throwback references, start here.
11. Hot Pink Reverse-French Moons
Most people think of a French manicure as color on the tip. Flip it and put the color at the base, and suddenly the whole nail feels different. A hot pink reverse-French moon has that flirty early-2000s energy, but it also looks cleaner than a full neon nail because most of the surface stays sheer or nude.
The cuticle moon has to be neat. Messy half-circles ruin this design faster than any color choice. On ballerina nails, a crisp moon shape mirrors the arch of the cuticle and gives the hand a dressed-up look without needing stones or stickers.
What I like here is the tension between loud and quiet. Hot pink is loud. The nude body is quiet. The shape is sharp, but the moon itself is curved and soft. That push-pull is what makes the set worth wearing. If it were all pink, it would lose that charm.
Choose a pink with punch—fuchsia, bright rose, even a blue-pink if you like cooler tones. Keep the moon narrow, about 2 to 3 millimeters deep at the center, and leave the rest of the nail glossy and clean. You can wear this on a short ballerina set and it still reads clearly, which is not true of every Y2K design on this list.
12. Neutral Nails With One Monogram Accent
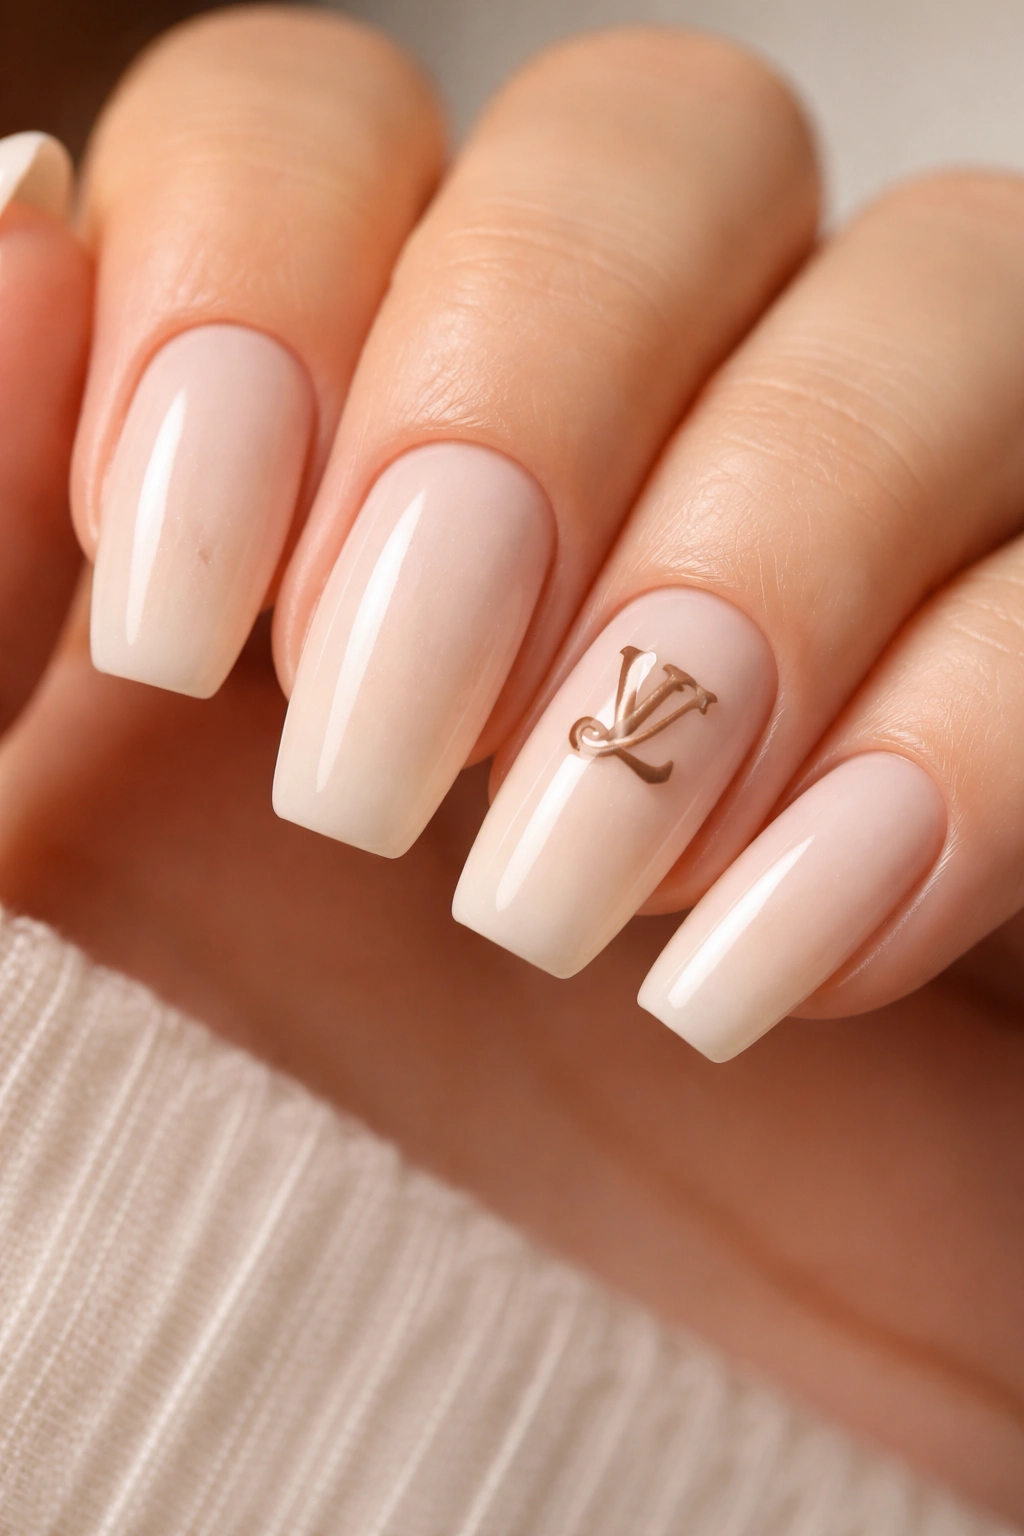
Unlike a full logo set, one monogram-style accent nail feels witty rather than loud. That difference matters. The early 2000s loved branded everything, but on nails, a little goes much further than a full hand of repeating letters.
The best version uses a soft neutral base—cream nude, beige pink, light caramel—then places a small decal or hand-painted letter pattern on one ring finger or one thumb. Tiny brown-and-cream monograms, silver initials, or a repeating symbol can all work. Keep the rest of the nails plain, maybe with a sheer gloss or faint pearl top coat.
This design is best for someone who likes the Y2K mood more than the exact archive look. It gives the reference without asking strangers to decode a full theme. It also wears better. Busy logo art can show grow-out in an ugly way because every line near the cuticle gets distorted as the nail moves down. One accent nail keeps the maintenance lower and the hand cleaner.
My strong opinion here: do not mix monograms with butterflies, flames, and rhinestones on the same set. Pick the monogram and let it stand alone. Otherwise the manicure starts reading like a souvenir kiosk.
13. Soft Peach Ballerina Nails With Small Butterfly Accents
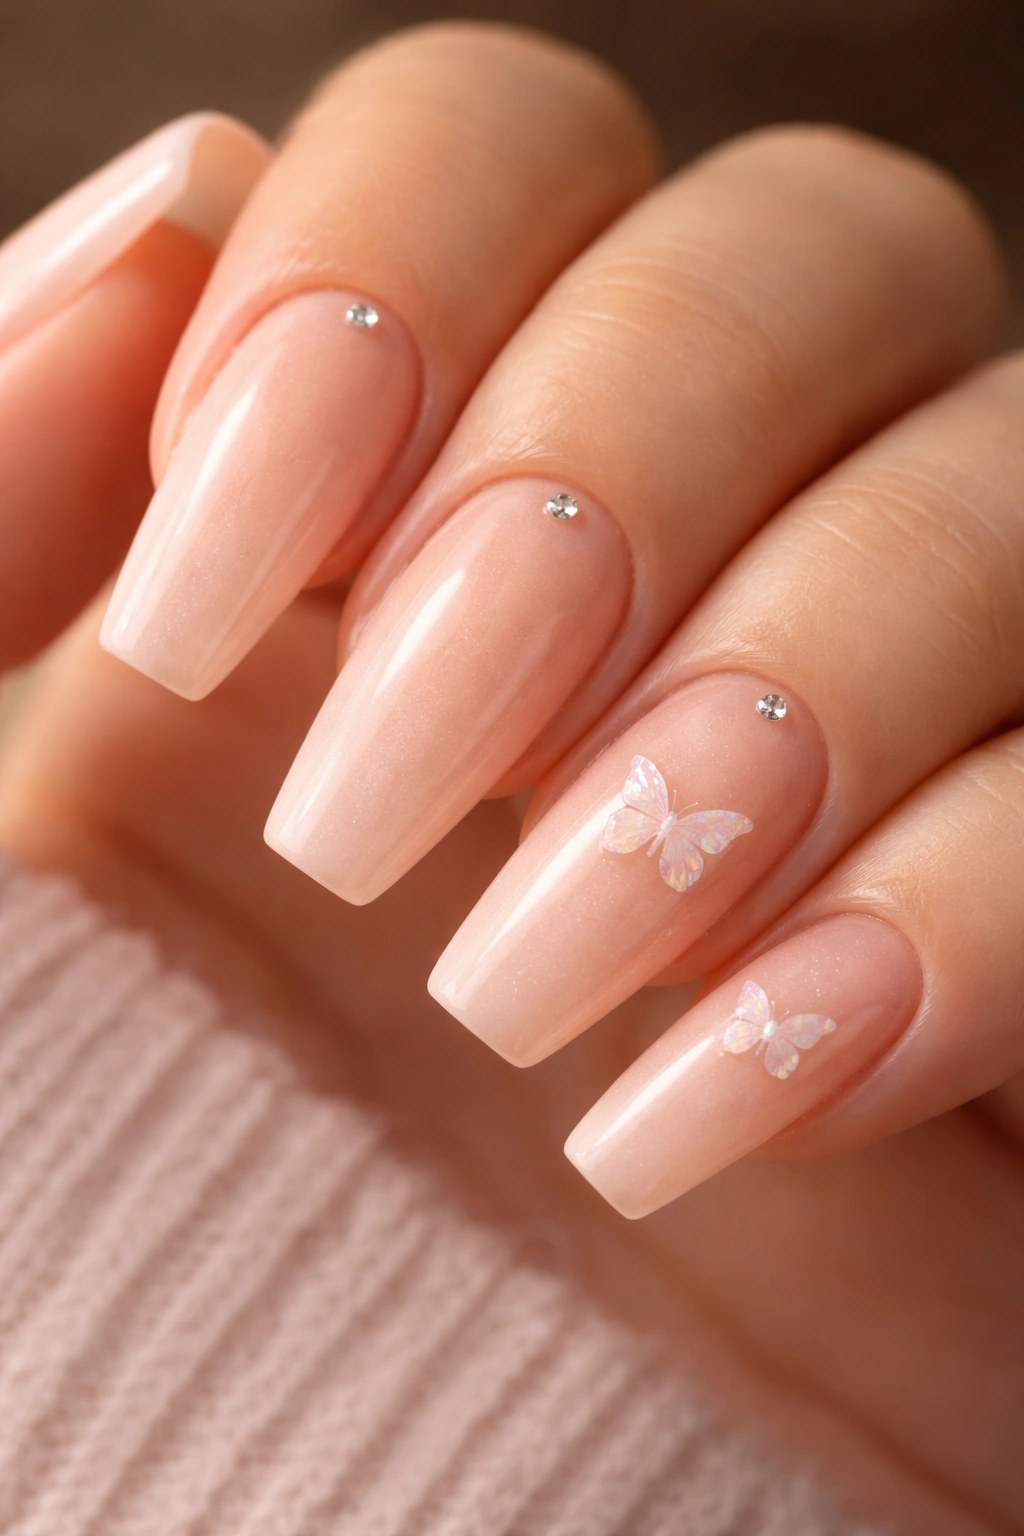
And yes, butterfly nails can still work.
The catch is scale. The old oversized butterfly decals looked cute in tiny photos and clunky in real life. A small translucent butterfly placed off-center on a peachy nude ballerina nail feels lighter, sweeter, and far easier to wear.
Peach is the hero here. Straight pink can make butterfly art feel too sugary. Peach adds a little warmth and keeps the set from reading teenage. It also pairs well with gold jewelry, tan skin, and warm makeup tones if that’s your lane.
Why butterflies still survive
Butterflies belong to that era the way frosted gloss and silver hoops do. The symbol has history. But it works best when it acts like a whisper rather than a billboard.
Keep these details small
- Use one butterfly on two nails, not ten
- Pick decals with soft edges or transparent wings
- Add one tiny crystal in the center only if the rest of the set is plain
- Ask for the art to sit slightly above the middle of the nail, not dead center
Best move: pair soft peach with clear gloss and skip extra glitter. The butterfly already tells the story.
14. Chocolate Brown Gloss With Gold Foil Flecks
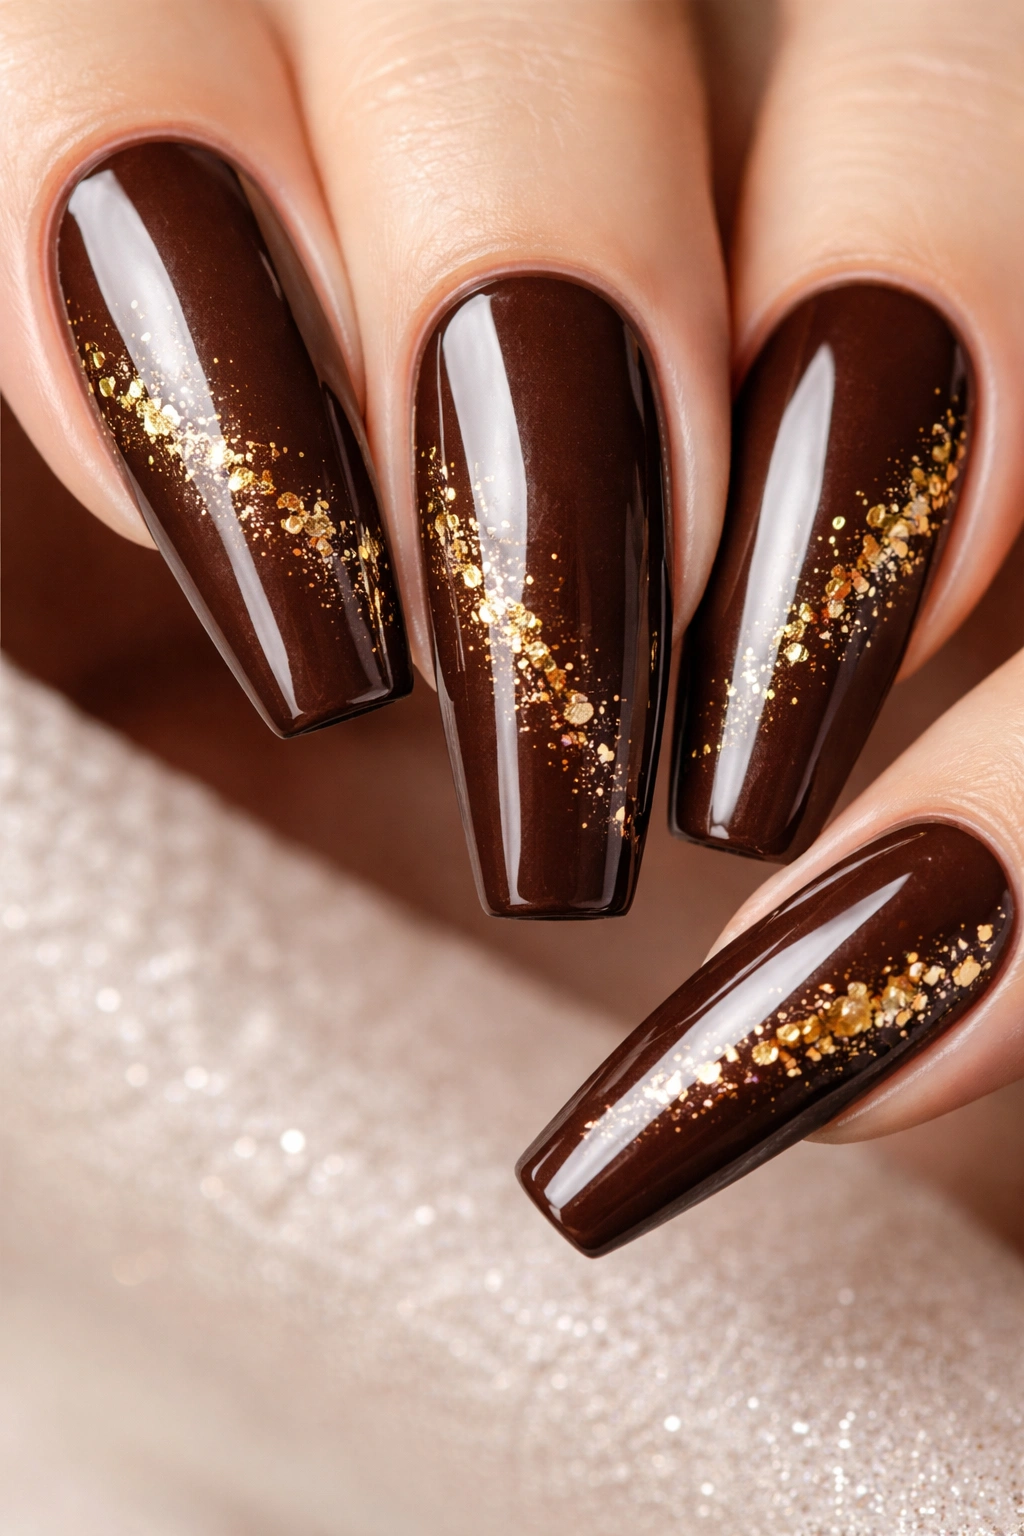
Brown may be the sleeper hit of the whole early-2000s nail archive. Lip-gloss brown, cocoa brown, coffee brown—those shades still look rich on a ballerina shape because they play up the nail’s length without relying on bright contrast.
The finish matters more than the color family. A muddy or flat brown can look dull in a hurry. A deep chocolate gloss with a smooth reflective top coat looks lush and intentional. Add a few torn flecks of gold foil near one side of the tip or along one diagonal line, and suddenly the whole set has that old beauty-counter glamour people keep trying to fake with beige.
Gold foil needs a light hand. One or two tiny pieces on three nails is enough. Bigger chunks can wrinkle under top coat or create a rough surface. I like foil placed a little off-center because it gives the manicure movement without turning it into a full metallic design.
This one is especially good on medium and deeper skin tones, though a cooler espresso brown also looks sharp on fair skin. Pair it with a clean taper, keep the foil sparse, and the result feels grounded, glossy, and a touch dramatic.
15. White-on-White Raised Flower Petals

Raised acrylic flowers sound like a bad idea until you see them done small. Then they make sense.
The problem was never 3D flowers as a concept. The problem was giant petals, huge rhinestone centers, and nails so long they looked like they had their own zip code. On a medium ballerina set, tiny white-on-white flowers can look delicate, textural, and surprisingly wearable.
The best base is milky white or sheer baby pink. Then the flower petals are sculpted in white acrylic or thick 3D gel so they sit low rather than towering off the nail. You want texture you can see, not architecture.
How to keep 3D art wearable
Use 3D flowers on one or two nails only, usually the ring finger and maybe the middle finger. Keep each flower under 6 millimeters across and use small petal clusters instead of one big bloom.
A couple more rules help:
- Flat pearl beads work better as centers than tall crystals
- Keep the surrounding nails plain or with a faint pearl sheen
- Ask your tech to place the flower off to one side so the nail still feels open
- Seal around the base of the petals, not over the top, so the texture stays defined
This is the most bridal-looking option on the list, no question. Still, on the right shape and size, it has that old acrylic-salon romance people remember for a reason.
The Fill Schedule and Top-Coat Habits That Keep These Sets Sharp

A throwback design can still look sloppy by day five if the maintenance is off. Ballerina nails show grow-out fast because the taper pulls the eye toward the center of the nail. Once the cuticle gap gets too wide, the set starts losing its shape even if the art is still intact.
Plan on a fill around 2 to 3 weeks for acrylic or hard-gel sets, a little sooner if your nails grow quickly or you chose a nude base with cuticle art. Waiting too long makes the apex drift down the nail, and that’s when breaks happen. It also changes the silhouette. The set that looked sleek on day two can start looking front-heavy.
Top coat helps more than people think. A fresh layer of clear gloss every 4 to 6 days keeps chrome, pearl, glitter fades, and jelly colors looking alive. If you’re doing this at home, cap the free edge and avoid flooding the sidewalls. Thick top coat along the edges blunts the ballerina shape.
A few habits make a difference fast:
- Rub cuticle oil in twice a day
- Wear gloves for dishwashing and long cleaning sessions
- Use the side of your finger, not the nail tip, to open cans or peel labels
- File tiny snags right away with a 180-grit file, one direction, light pressure
- If a stone lifts, get it fixed early before it catches hair or fabric
One small digression, because it matters: if you know you type hard, choose decals, line work, jellies, or ombré over tall gem clusters and 3D flowers. Pretty is good. Pretty that survives a normal week is better.
Final Thoughts
The best early-2000s ballerina nails are not trying to recreate every salon photo from the era. They’re borrowing the right pieces—frost, gloss, chrome, jelly color, tiny crystals, a little airbrush attitude—and putting them on a cleaner shape with better restraint.
If I had to narrow the whole list down to three easy winners, I’d start with the frosted baby pink French, the lip-gloss pink ombré, and the chocolate brown with gold foil. Those three cover soft, glossy, and moody without asking much from the rest of your style.
Then again, if your heart still wants white flames or tiny butterflies, I wouldn’t fight it. A good throwback manicure should feel fun the second you look down at your hands—and these still do.
