

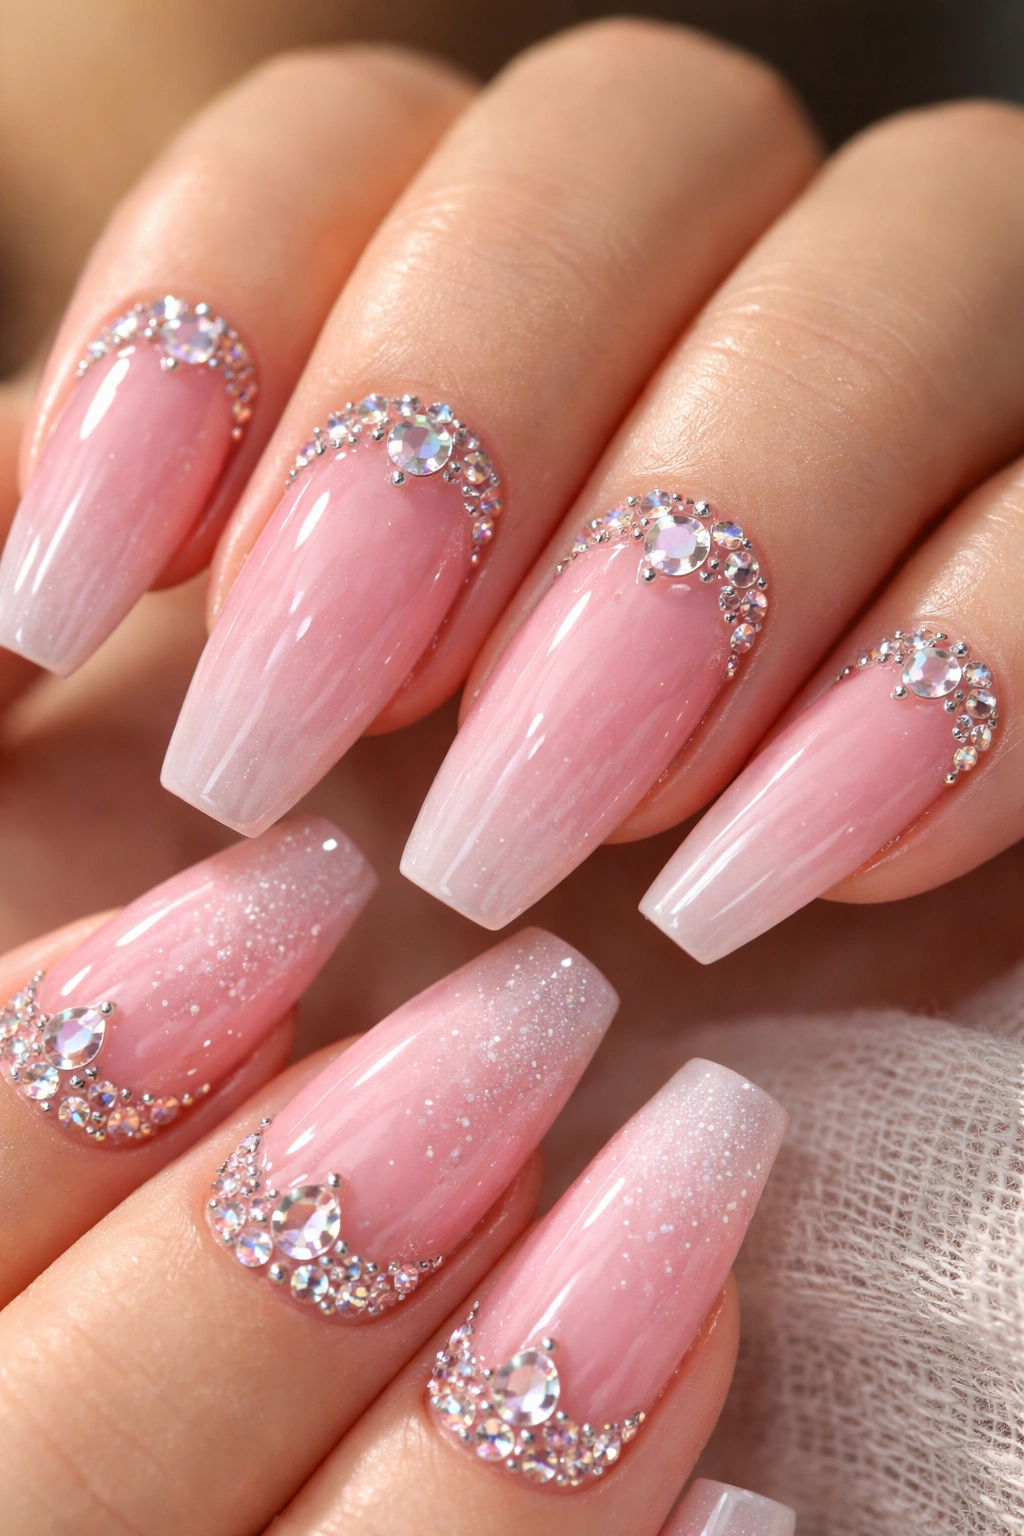
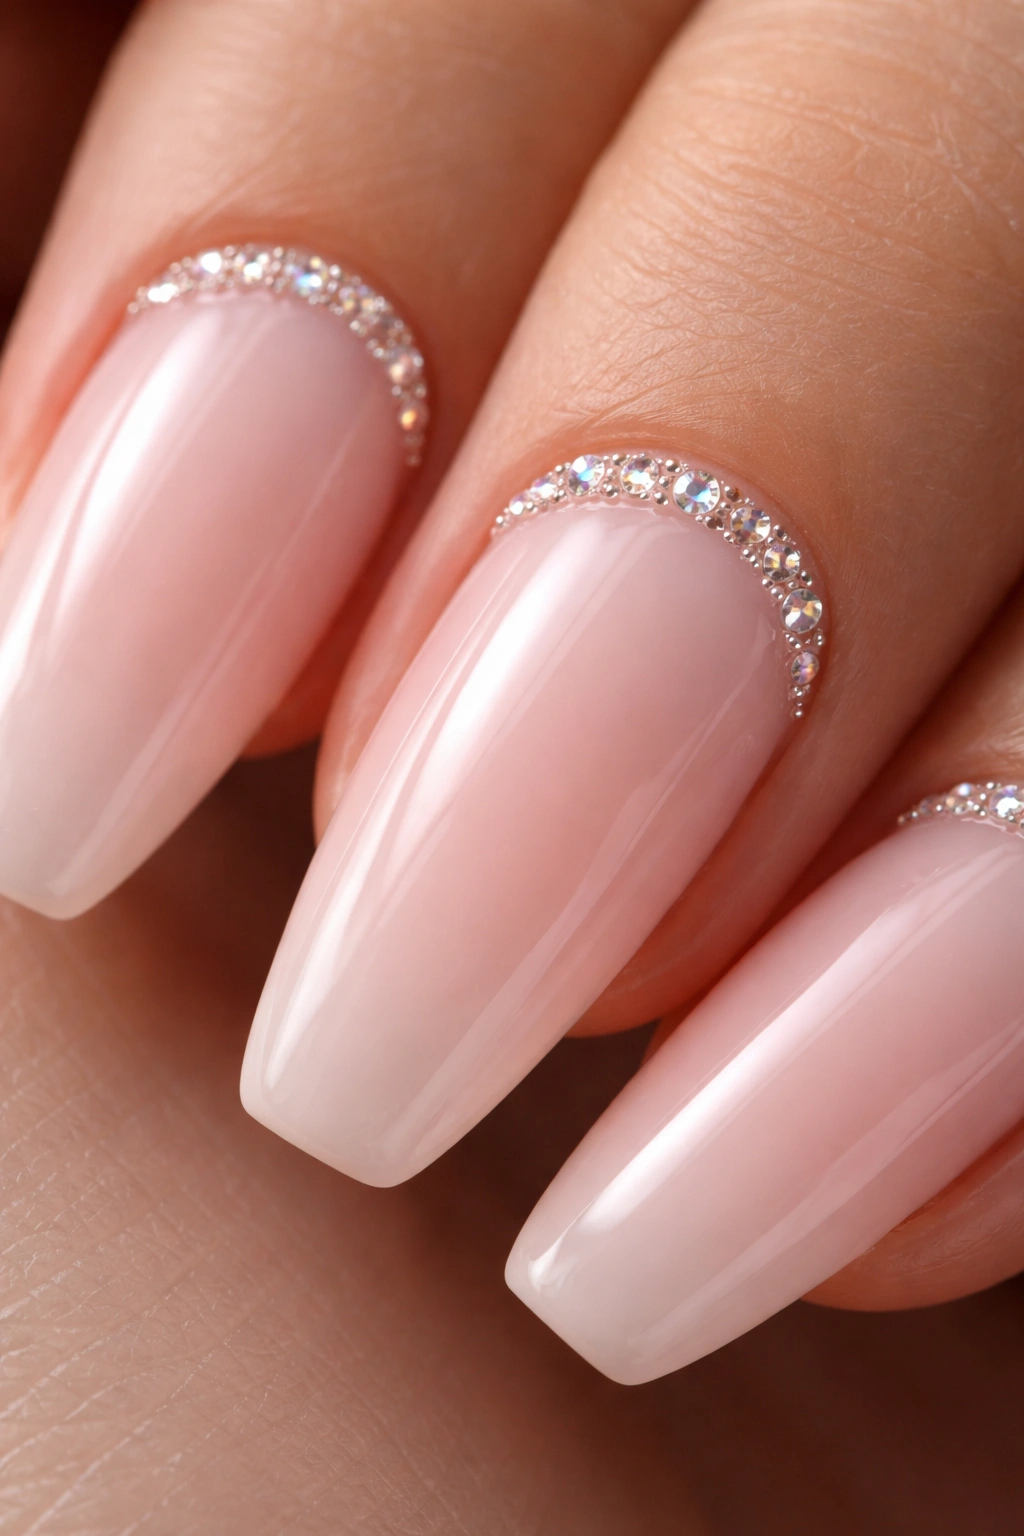
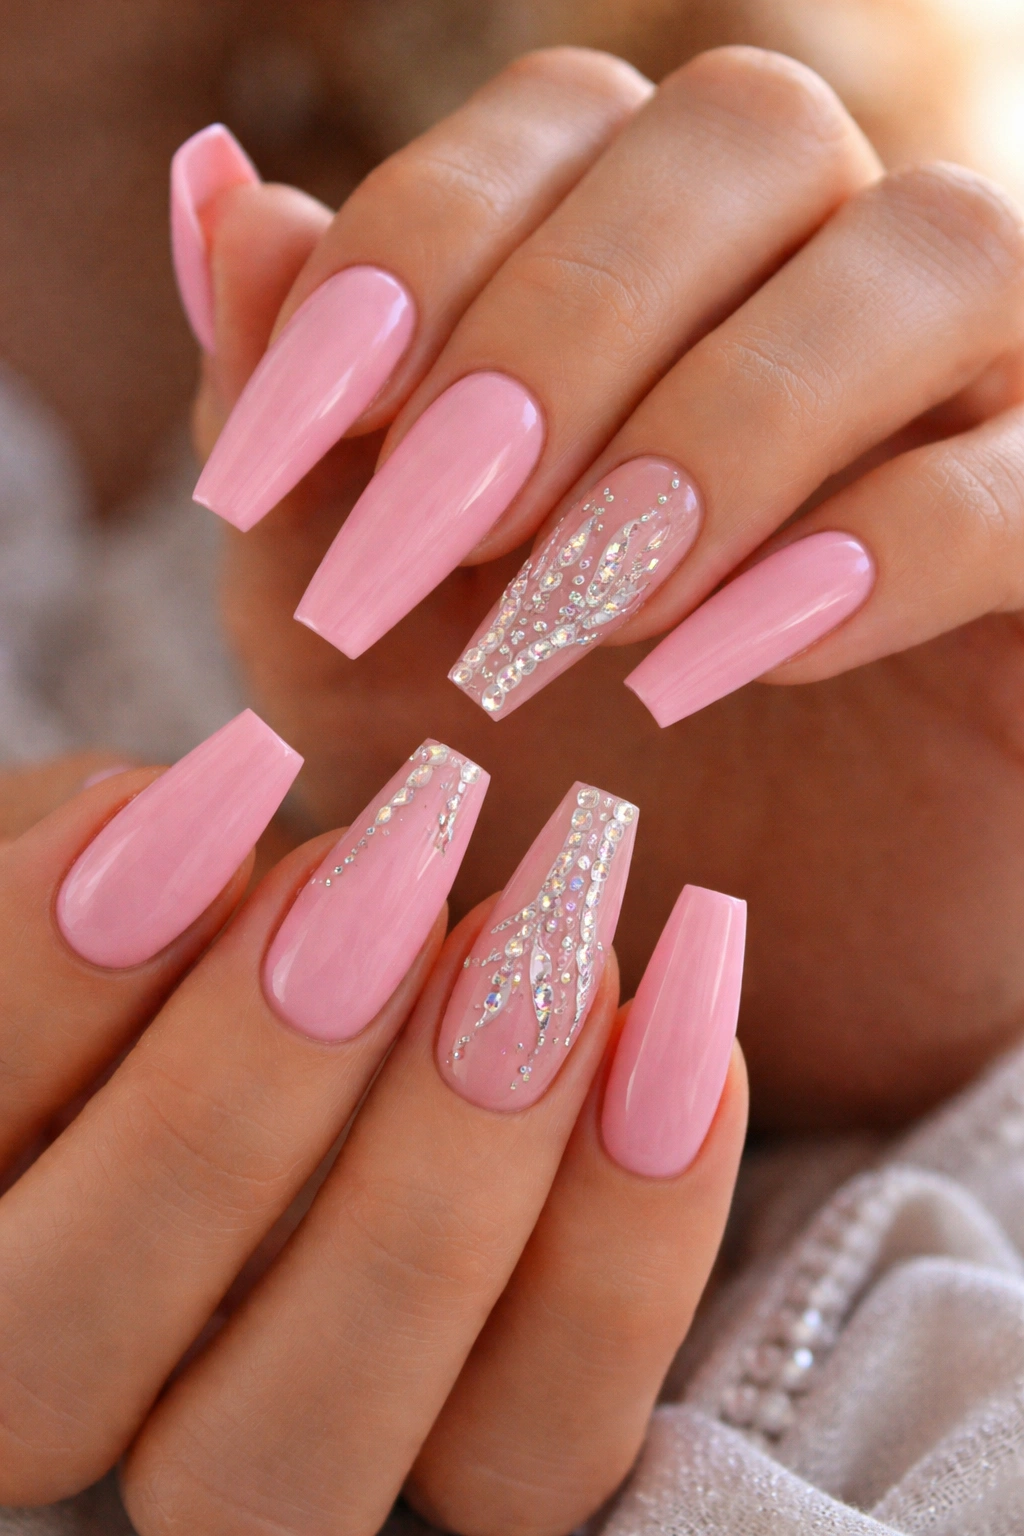
A soft pink manicure can look sweet right up until a row of crystals hits the light and the whole set starts behaving like jewelry. That tension is exactly why pink rhinestone ballerina nails work so well: you get the softness of blush, rose, baby pink, and bubblegum shades, then the tapered shape and sharp sparkle pull everything into a more dressed-up lane.
Most people want the same thing from bling nails, even if they describe it differently. They want sparkle, but not a bulky set that catches on every sweater. They want pink, but not the flat chalky kind that makes the hands look dull. They want ballerina nails that feel sleek—not clumsy, not overloaded, not like ten tiny chandeliers glued to the fingertips.
The details matter more than people think. Flat-back crystals look cleaner than domed craft gems, a 1 mm gap near the cuticle keeps the design from looking crowded, and flooding rhinestones with top coat can kill their shine fast. I also think nail length changes the whole mood of a rhinestone set; a design that looks airy on a long ballerina tip can feel cramped on a short one.
Some sets whisper. Some show off. A few manage both at once.
Why Pink Rhinestone Ballerina Nails Look So Good on This Shape
The ballerina shape gives rhinestones a cleaner stage than almost any other nail shape. You’ve got tapered sidewalls, a flat free edge, and enough surface area to place stones in a line, a cluster, or a cuticle curve without everything collapsing into visual clutter.
Round nails can make crystal layouts feel compressed. Sharp stilettos bring drama, but the point can compete with the stones. Ballerina nails sit in that sweet middle zone. The shape already looks polished, so the bling doesn’t have to do all the work.
Pink helps, too.
A nude or pink base softens the hard shine of rhinestones. Clear crystals, AB stones, rose-toned gems, silver-backed glass pieces—they all pop harder against blush, milky pink, and candy pink than they do against beige or white, at least in my experience. Pink also hides the visual weight of decoration better. A chunky crystal on a black nail looks bold immediately; on a soft pink base, it reads more balanced.
If your nail tech calls this a coffin shape, you’re still in the same family. Some techs use the terms almost interchangeably, though ballerina nails are often filed a little slimmer through the sides. That slightly narrowed shape is a gift when you want a crystal trail, a French line with stones, or a centered gem layout that makes the fingers look longer.
Picking Pink Rhinestone Ballerina Nails for Your Skin Tone and Lifestyle
What trips people up isn’t the rhinestones. It’s the pink.
A pink that looks creamy in the bottle can go gray on the nail, and a crystal layout that looked cute on a photo can feel annoying by day three if you type all day, wear gloves for work, or keep your nails at a shorter ballerina length. Matching the base color and stone size to your real life matters as much as the design itself.
Pink bases that look clean on the hand
Cool pinks—think ballet slipper, rose milk, soft mauve—tend to pair well with silver-backed crystals, clear glass stones, and chrome details. Warm pinks like peach-blush, rosy nude, and strawberry milk look richer with champagne crystals, rose-gold accents, or pearls.
If your skin has golden or olive undertones, a pink with a little beige in it usually sits better than a stark baby pink. If your hands lean cooler, milky pink and dusty rose often look sharper.
Stone sizes that fit the nail instead of fighting it
Here’s a simple way to avoid overload:
- Short ballerina nails: stick with ss3 to ss5 stones, roughly 1.3 mm to 1.8 mm
- Medium length: mix ss3, ss5, and ss8 for tapered clusters
- Long ballerina nails: larger statement stones can work, but keep them to one 3 mm focal crystal per nail, not five
- Busy hands: choose low-profile flat-back stones and keep heavy clusters on one or two nails
- Special-occasion sets: go bigger at the cuticle or on an accent nail, where bulk feels more intentional
Lifestyle counts. If you open boxes, lift weights, braid hair, or spend hours on a keyboard, go for micro bling, side placement, or a cuticle arc instead of chunky raised clusters at the center of every nail.
How to Make Pink Rhinestone Ballerina Nails Last Longer
Loose stones are not a style.
The best pink rhinestone ballerina nails stay pretty because the prep is right, not because the gems were huge or expensive. Good adhesion starts before the first crystal touches the nail, and this is one place where shortcuts show up fast.
A durable set usually comes down to five things:
- Oil-free prep: the nail plate needs proper dehydration and primer before gel, acrylic, or builder base goes on
- A smooth but not slippery surface: crystals grip better on cured gel or top-coated nails that are lightly buffed where the stone will sit
- Builder gel or gem gel placement: a tiny bead is enough; too much floods the edges and makes the stones look gummy
- Flash cure first: hold the layout in place with a 10 to 15 second flash cure, then do a full cure under LED according to the product used
- Seal around the stones, not over them: run top coat around the base of the crystal cluster if needed, but don’t bury the facets
Daily habits count after the appointment. Use cuticle oil around the skin, not sloshed over every crystal. Gloves help when you clean. Picking at one loose gem can lift a whole cluster in less than a minute—I’ve seen people destroy an accent nail in a grocery store parking lot.
One more thing: ask for a stone map that makes sense with regrowth. A tight row of crystals pushed into the cuticle may look packed and rich on day one, then crowded by day six.
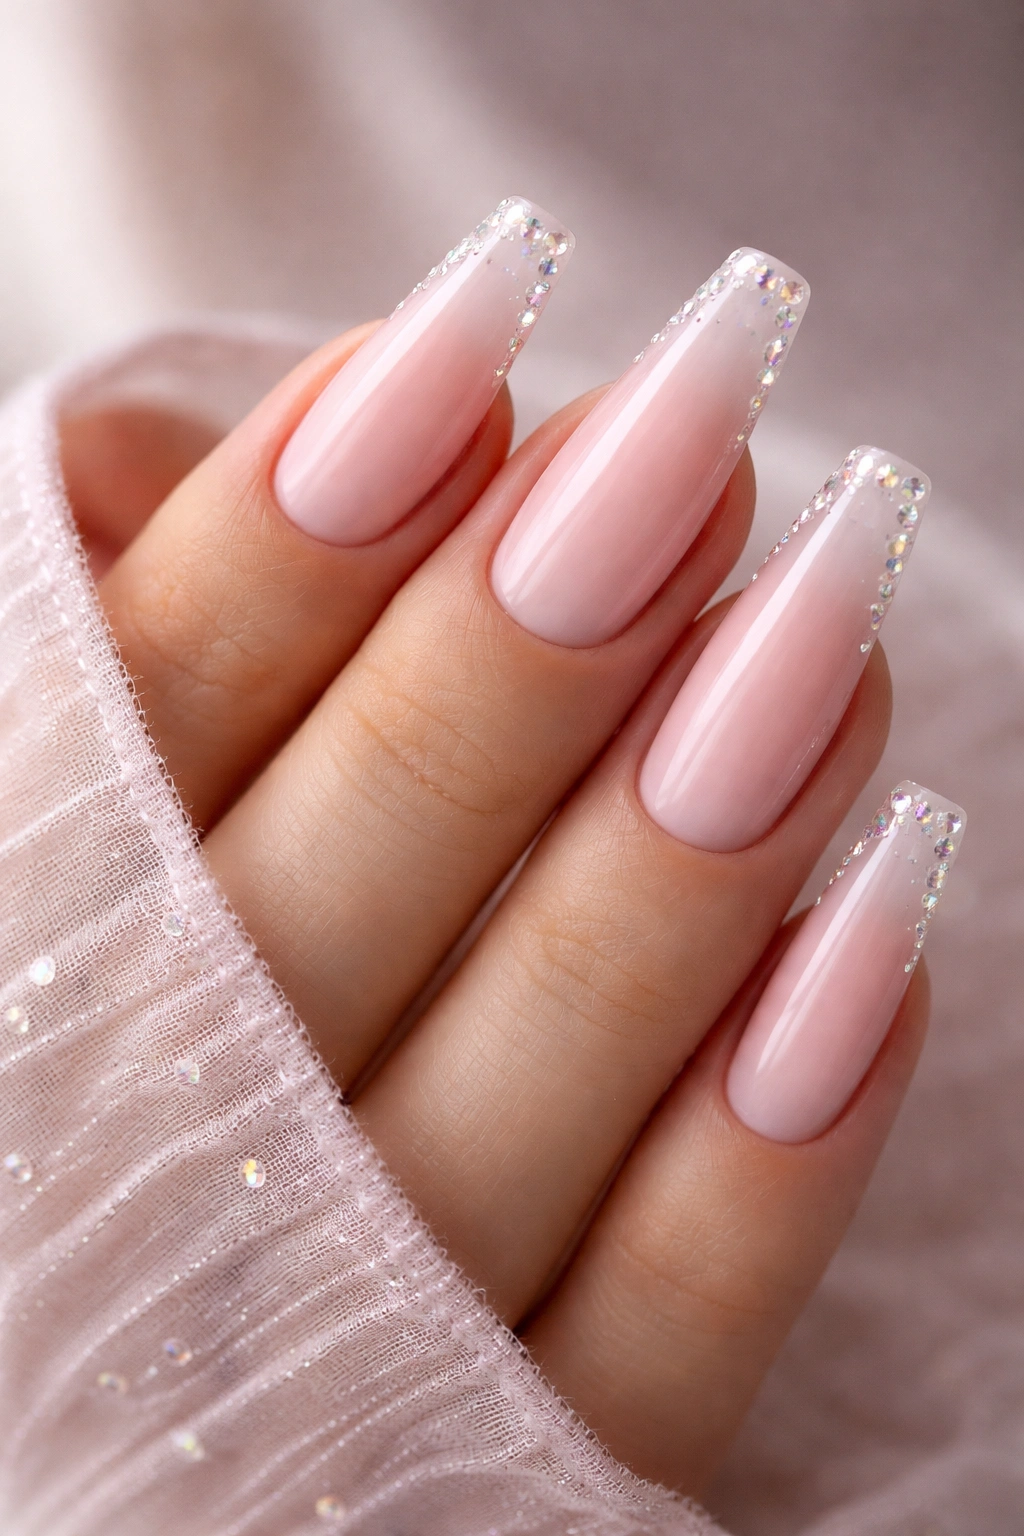
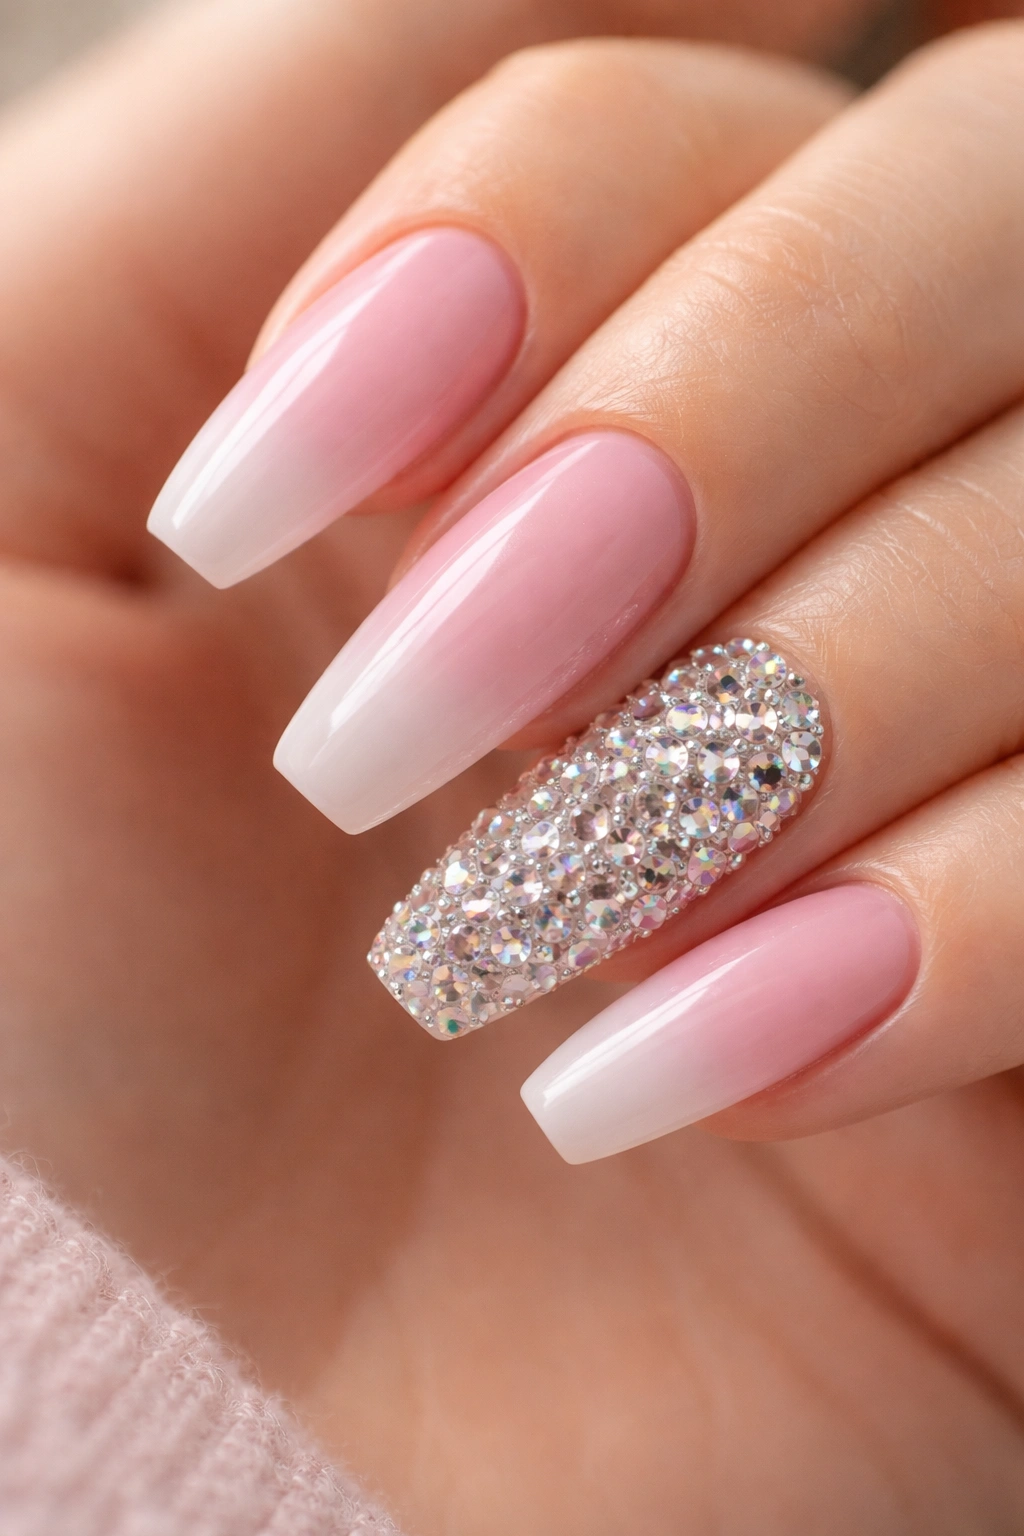
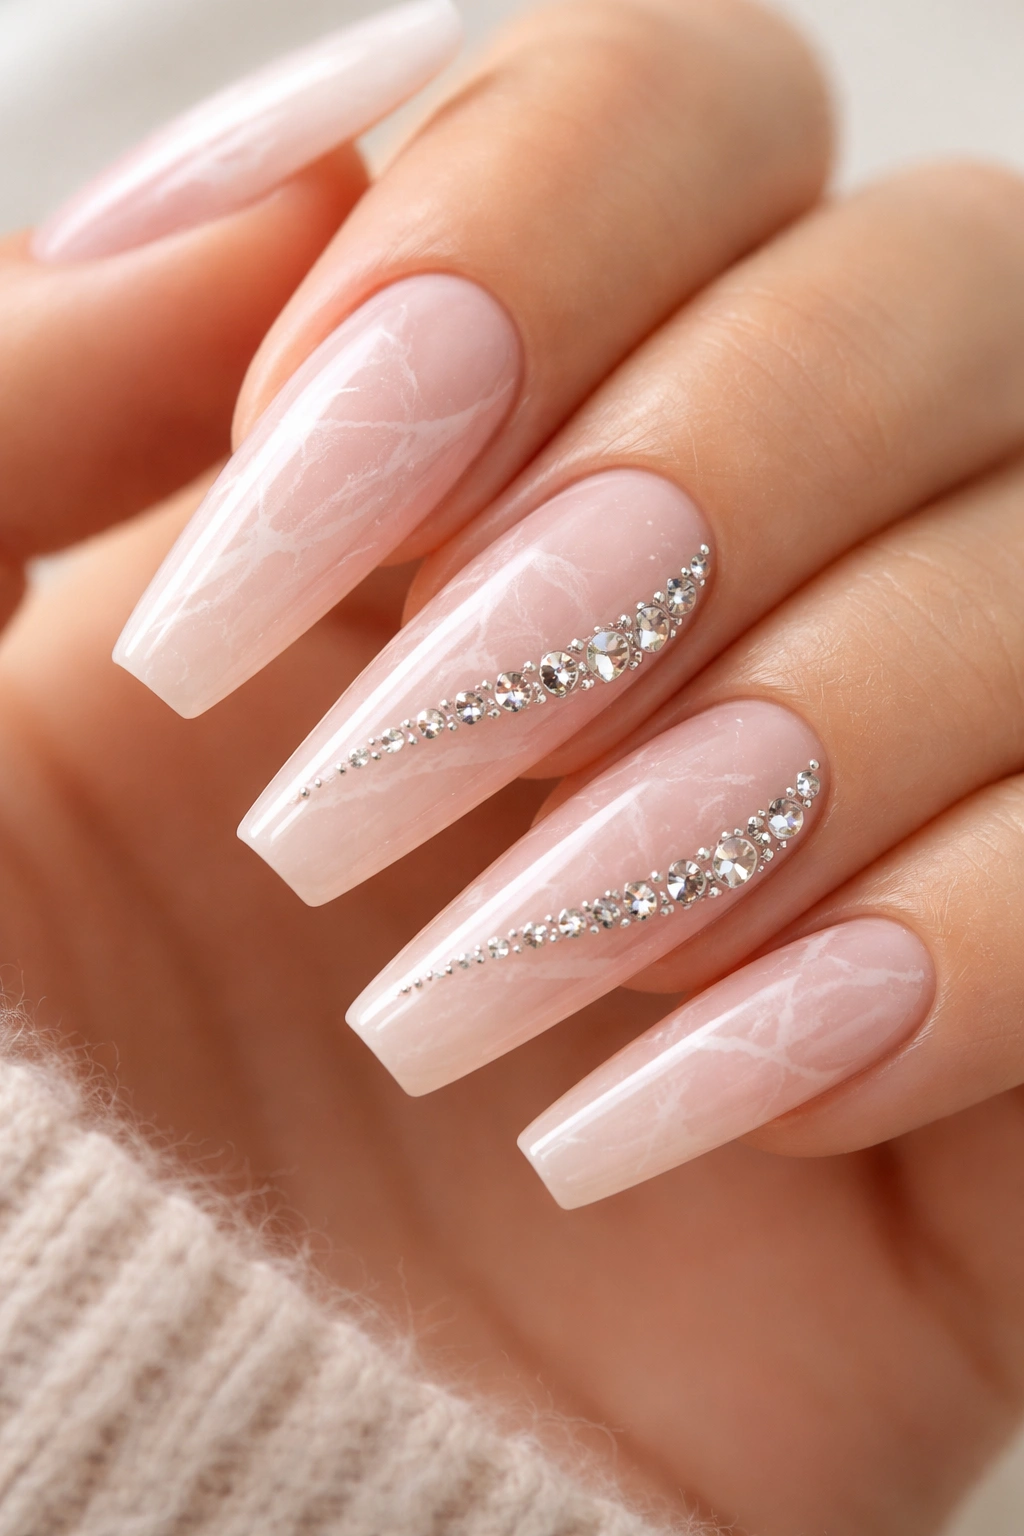
1. Milky Blush Base With a Cuticle Crystal Crescent
If you want a set that looks polished from every angle, start here. A milky blush base with a curved line of small rhinestones hugging the cuticle is one of the cleanest ways to wear bling on ballerina nails.
The color should sit between sheer and opaque—around 70 to 80 percent coverage usually looks best. You still get that soft nail-bed glow, but the pink has enough body to support the sparkle. Then the crystal crescent does the heavy lifting, especially on the ring finger and middle finger.
Why this one looks expensive
The placement mirrors the natural cuticle curve, so the eye reads it as intentional and balanced. You’re not trying to decorate the whole nail. You’re framing the base of it.
A good version usually includes:
- Small flat-back crystals only, usually ss3 to ss5
- A soft glossy finish instead of glitter, so the stones stay the focus
- Crescent placement on 2 to 4 nails, not all ten
- A slight taper in the crystal line, with the smallest stones near the sidewalls
I like this design best on medium ballerina nails. On short lengths, the crescent can eat up too much space. On long lengths, it becomes a nice quiet counterweight if you want the rest of the nail left plain.
Best move: ask your tech to leave about 1 mm of breathing room between the crystal line and the skin so grow-out still looks neat.
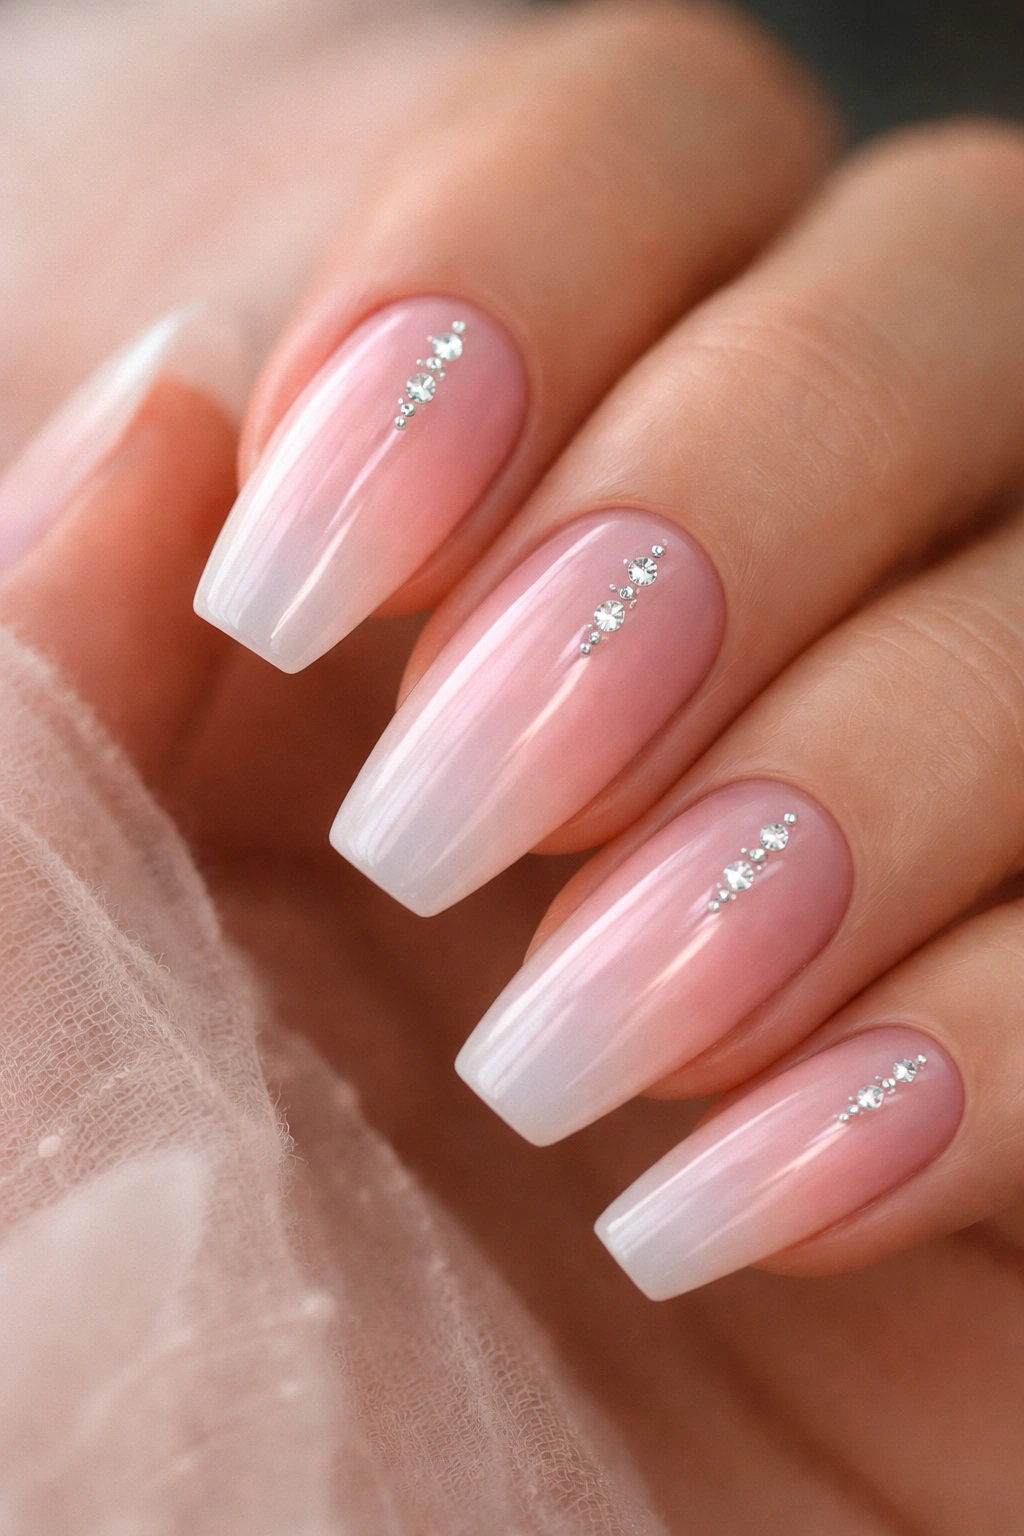
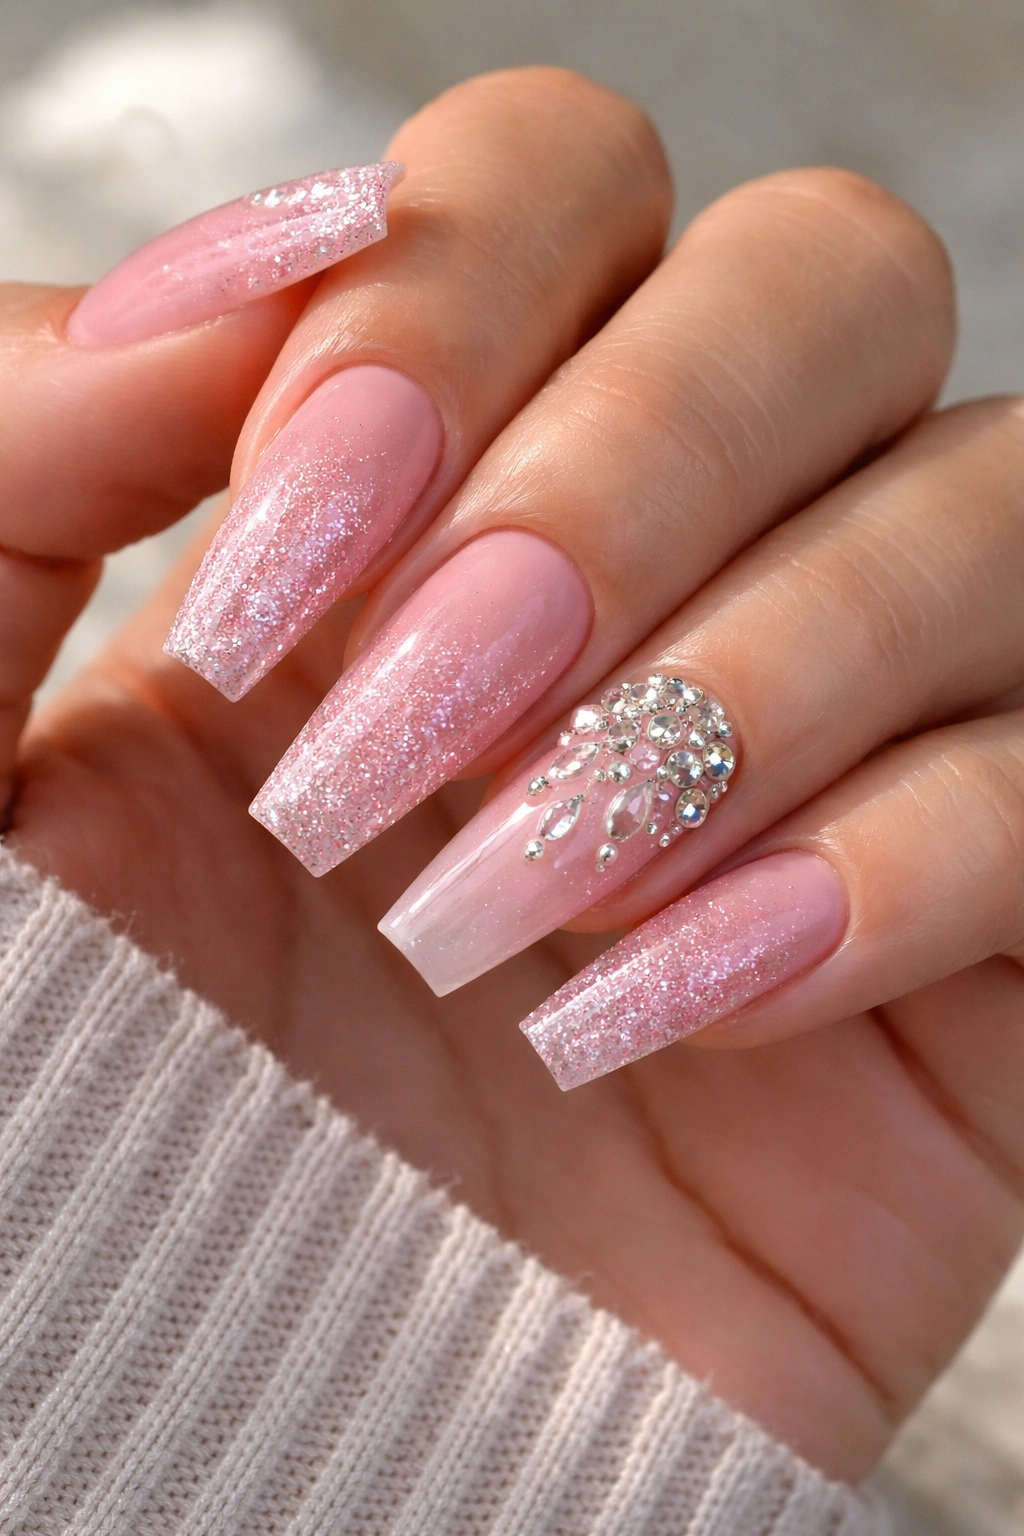
2. Baby Pink Ombré With One Full Crystal Accent Nail
One fully iced accent nail is enough. Maybe more than enough, honestly.
A baby pink ombré set already has softness built in. The fade from nude pink at the base to a milkier or brighter pink at the tip gives the manicure movement, so you do not need ten heavily stoned nails to make it feel dressed up. One accent nail—usually the ring finger—covered in mixed-size crystals gives you that bling payoff without turning the whole set into armor.
This look works because of contrast. The ombré nails feel airy, almost powdery, while the full crystal nail feels dense and bright. That push and pull keeps the set sharp. When every finger is overloaded, the eye stops knowing where to land.
I’d keep the accent nail in a tight palette: clear stones, pale pink stones, maybe one or two silver-backed crystals for flash. Skip too many rainbow finishes unless you want a louder set. On baby pink, AB stones can turn the look from soft glam to pageant fast.
There’s a practical upside, too. One heavy accent nail is easier to wear than four. Less snagging. Less weight. Less repair if a stone pops off. You still get the fun of a fully blinged nail when your hand turns, which is the whole point.
3. Rosy Chrome French Tips With a Rhinestone Smile Line
Why does this design look sharper than a standard pink French? Because the shine sits exactly where the shape changes direction.
A rosy chrome French tip on ballerina nails already plays well with the flat edge. Add a row of rhinestones along the smile line—the curved border where the tip begins—and the whole manicure starts looking sculpted. You’re outlining structure, not sprinkling sparkle at random.
The trick is restraint. Keep the chrome soft and mirror-like, not thick and metallic. Rose chrome powder over a pink gel base gives the tip a reflective finish that still feels wearable. Then place micro stones along the smile line on two nails per hand, not every finger. If the stones run across all ten nails, the design gets busy in a hurry.
How to ask for it at the salon
Tell your tech you want:
- A soft pink or sheer nude base
- A rosy chrome French tip
- A micro-crystal smile line using small stones only
- The crystal line on accent nails, usually middle and ring fingers
One warning: the smile line needs to be clean. If the French edge is chunky or uneven, the stones will highlight the problem instead of hiding it. Done well, though, this set looks sleek in a way plain French tips often don’t.
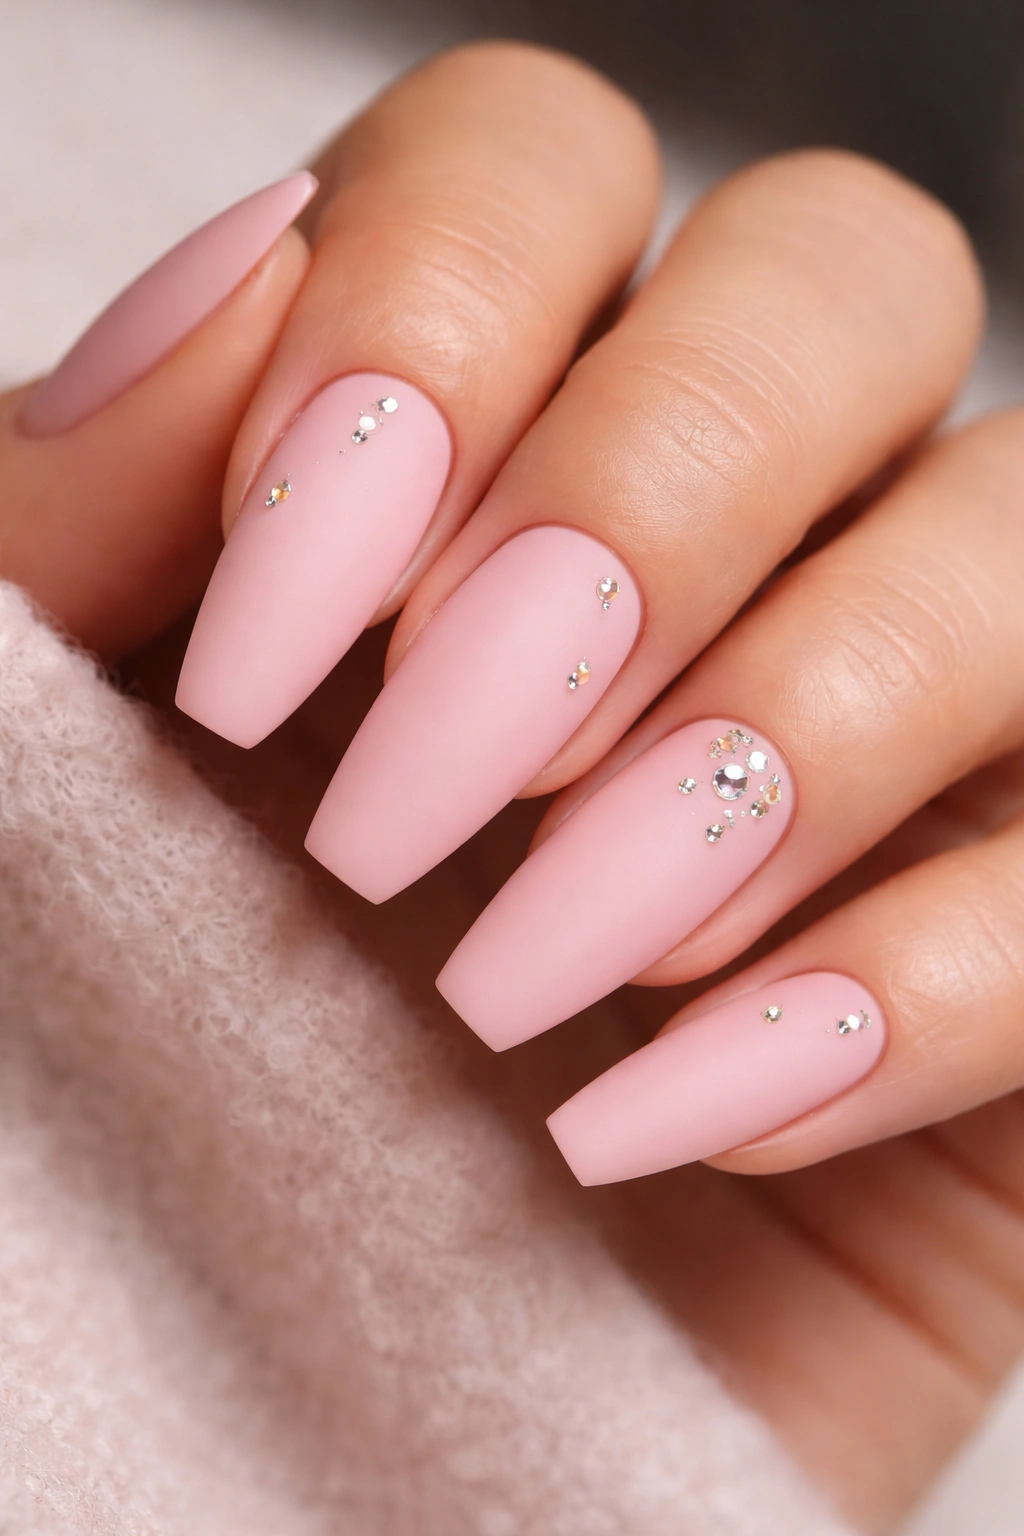
4. Matte Ballet Pink With Scattered Micro Crystals
You pull on a knit sweater, reach into a bag, tap out a message, and almost nothing catches. That’s the appeal here.
A matte ballet pink base with tiny scattered crystals gives you sparkle without the usual bulk that comes with bigger clusters. The matte surface dulls the background shine, so even a handful of micro stones can look crisp and deliberate. It’s one of the better choices for anyone who wants rhinestones but hates feeling them all day.
The placement matters more than the stone count. Scatter the crystals with space between them—one near the sidewall, two near the center, maybe a tiny group near the cuticle on an accent nail. Think constellation, not confetti.
A clean version usually has these details:
- A muted pink base with a velvety matte finish
- ss3 stones only or a mix of ss3 and ss5
- Asymmetrical placement, often on 3 to 5 nails
- No glitter underneath, because matte plus glitter plus stones can turn muddy
The smart way to build it is matte top coat first, then stone placement with gem gel. If you matte top coat around the stones afterward, keep the brush controlled. A cloudy film on the crystal kills the whole reason you chose bling in the first place.
5. Jelly Pink Ballerina Nails With Iridescent Stone Clusters
Translucent pink has a different mood from creamy pink. It feels lighter, a little bolder, and more playful on a ballerina shape because the color lets some light travel through the nail instead of stopping at the surface.
That’s why jelly pink ballerina nails pair so well with iridescent rhinestone clusters. The base has that syrupy, candy-glass look, and the stones pick up extra color from underneath—peach, lilac, icy blue, whatever the light throws at them. On a solid opaque nail, the same crystals can look flatter.
I’d keep the jelly base in the medium-bright lane, not neon. Two thin coats over a clear or milky builder base usually give enough translucency without making the free edge look unfinished. Then place iridescent clusters at the tip corners or along one side of the nail. That off-center placement suits the ballerina shape better than a heavy blob in the middle.
This is one of those designs that can get tacky fast if the stones are too large. Smaller AB crystals grouped in threes and fives look cleaner than one oversized gem dropped on every finger. You want shimmer, not costume jewelry glued to plastic.
Longer nails help here. The jelly finish looks richer when there’s enough length to show the color depth, and the tapered tip gives the crystal cluster room to breathe.
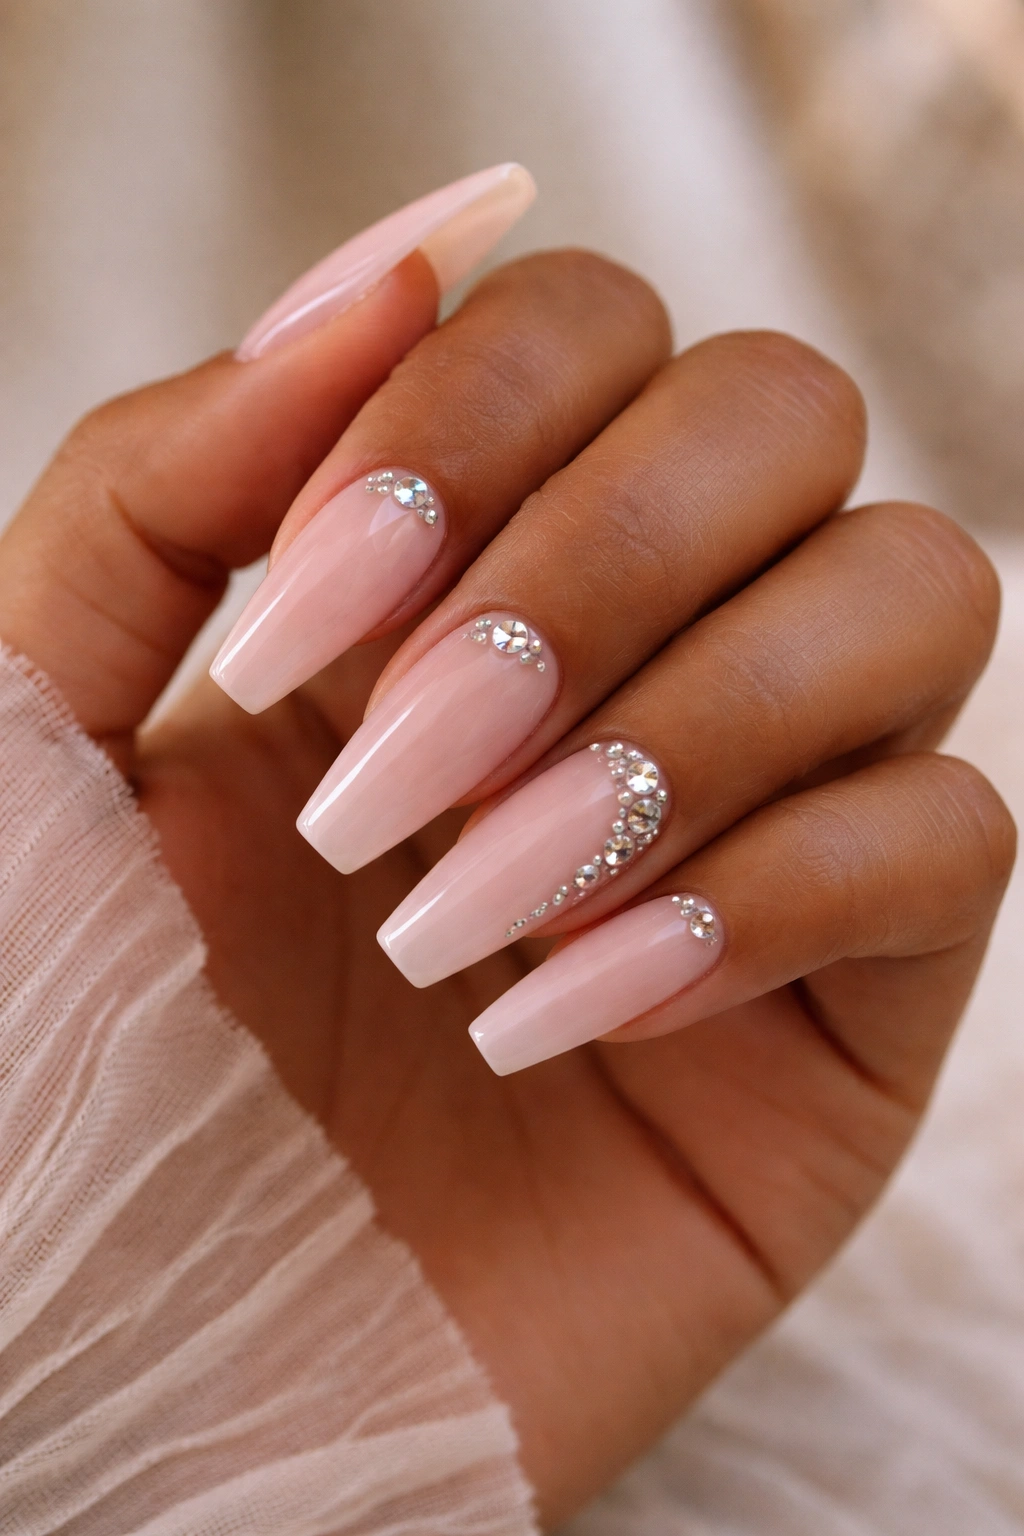
6. Nude-Pink Marble Nails With a Diagonal Crystal Sweep
Unlike a solid pink set, nude-pink marble has built-in movement. That helps in two ways: it disguises fill growth a bit better, and it gives the rhinestones something to follow.
A diagonal crystal sweep—running from one lower sidewall toward the opposite upper tip—looks especially good on ballerina nails because it echoes the taper. The eye travels across the nail, which makes the fingers look longer. It’s a small trick, but it works.
The marble itself should stay fine and airy. Thin white veining, a wash of pink nude, maybe a whisper of translucent milky gel through the center. Heavy marbling can fight the stones. Light marbling gives them a path.
I’d choose this set for medium to long nails and keep the diagonal sweep on two or three nails, with the others carrying a simpler marble finish or a glossy blush overlay. A little rose-gold foil can work in the marbling if the crystals are clear or champagne toned, though I would not stack foil, glitter, and large bling together. One flashy material is enough. Two can still work. Three is where the manicure starts arguing with itself.
Strong recommendation: keep the crystal line narrow at the base and slightly fuller near the tip so the sweep feels intentional, not like a random slash.
7. Hot Pink Ballerina Nails With Silver Crystal Framing
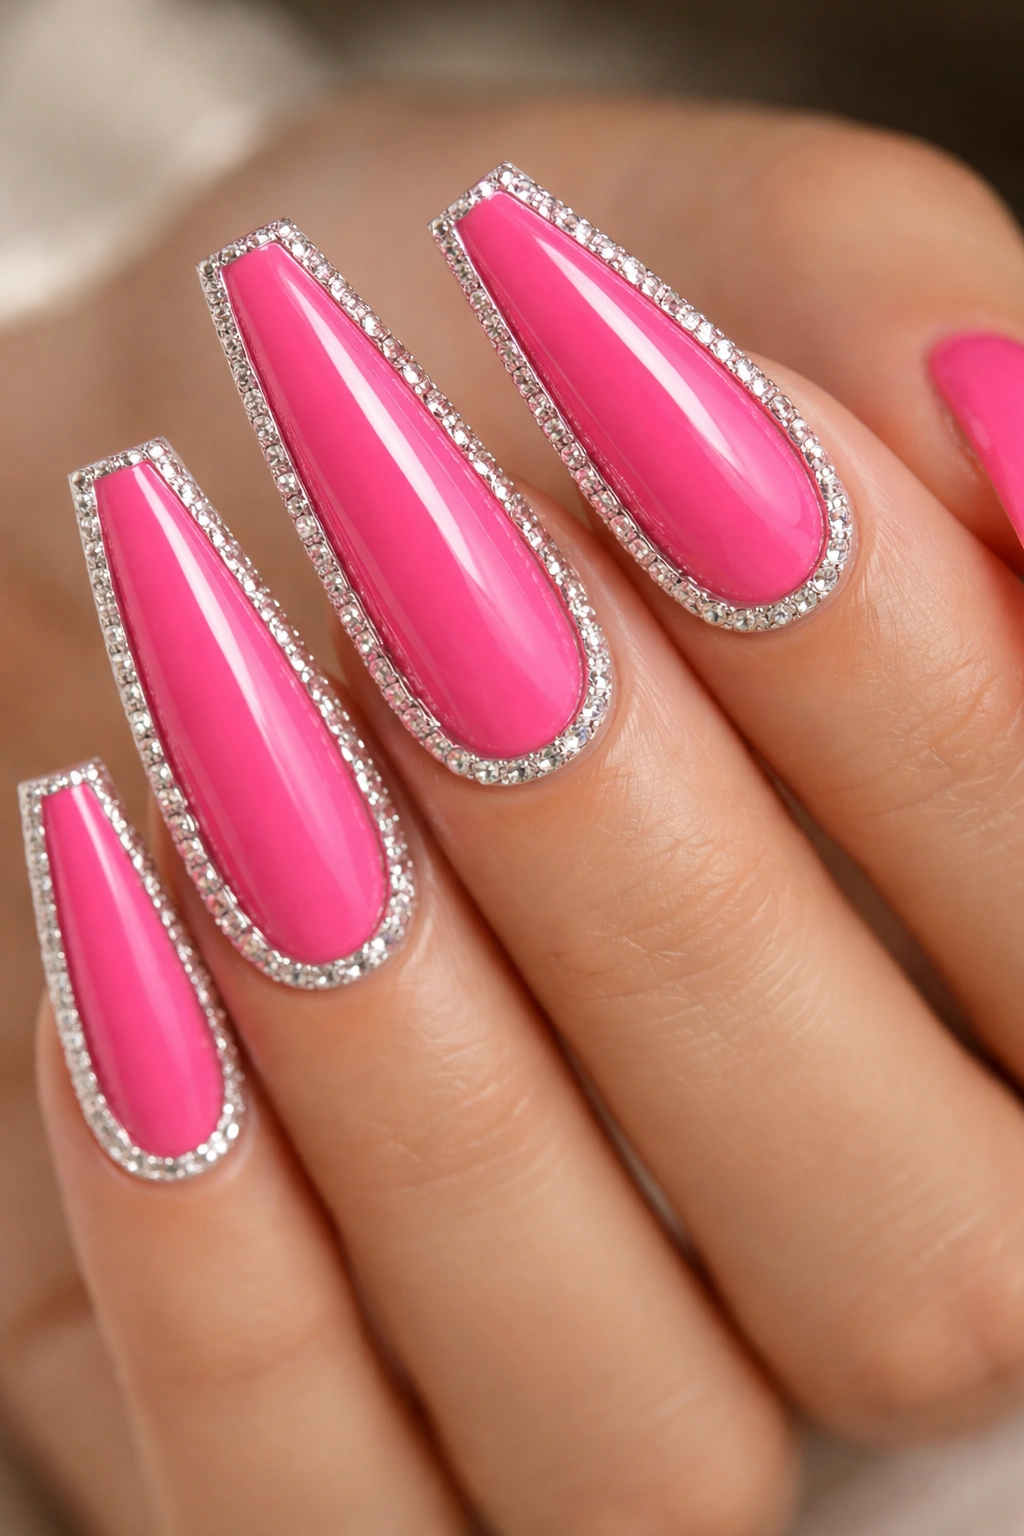
Hot pink can look cheap fast if the layout gets messy. Framing fixes that.
With this design, the bold pink carries the energy, while silver crystal framing gives the set structure. Instead of covering the whole nail, you trace part of the outline—one sidewall, the tip edge, or a partial border on accent nails. On ballerina shapes, that frame makes the flat tip look sharper and the taper more deliberate.
Where the frame should go
The cleanest versions usually use framing in one of these ways:
- A half-frame from one sidewall to the tip
- A tip frame only on the ring finger and thumb
- A double-side frame on one accent nail, with plain hot pink on the rest
- Small crystals spaced evenly rather than packed edge to edge
I prefer a glossy hot pink base here, not glitter pink. Glitter under a crystal frame can blur the outline, and the whole appeal of this set is the crisp border.
There’s a practical reason to avoid a full perimeter frame, too. Crystals placed right at the edge of the free tip can take more knocks from daily use. Leaving about half a millimeter from the edge gives the design a cleaner line and helps the stones last longer.
If you want bling with attitude, this one earns its place.
8. Sheer Pink Aura Nails With Centerline Gems
A soft aura center gives the nail a glow that looks almost airbrushed, and that hazy center makes a vertical row of gems look cleaner than it would on a flat solid base. The design has depth before the rhinestones even show up.
Start with a sheer pink base, then build a slightly deeper rosy halo in the middle of the nail using airbrush, sponge work, or a diffused gel blend. You’re not aiming for a harsh circle. You want a blurred cloud of color that sits a touch brighter at the center and fades toward the edges.
Then place three small gems in a straight centerline—usually one near the cuticle area, one mid-nail, one a little above center—or keep it even more minimal with a single larger focal stone and two tiny companions. Because the aura effect already draws the eye inward, the gems do not need to be huge.
I like this design on medium-length ballerina nails because the shape gives that vertical gem line enough runway. It also works well if you want sparkle but hate the side-snatching problem that comes with broader crystal clusters.
One caution: ask for a soft aura, not a dark bullseye. If the center shade is too harsh, the manicure starts looking bruised instead of glowy.
9. Dusty Rose Velvet Nails With Side-Stone Accents
Velvet gel has its own little magic trick. Tilt your hand, and the light moves across the nail like fabric nap shifting under your fingers.
That’s why dusty rose velvet nails pair well with side-stone accents instead of center clusters. A magnetic velvet finish already creates a bright focal path. Put a chunky rhinestone in the middle, and it can stomp on that effect. Slide the stones off to one side, though, and the velvet still gets room to move.
Magnet placement matters here
For the nicest pull, ask for the magnetic shimmer to sit slightly diagonal or centered lengthwise instead of scattered. A clean cat-eye magnet line gives the rhinestones something to balance against.
What I’d watch for:
- A dusty rose or mauve-pink magnetic gel, not a muddy brown-pink
- One side cluster near the cuticle or a slim side trail of micro stones
- Minimal decoration on 2 or 3 nails
- No thick top coat over the magnetic effect, which can soften the sharpness of the pull
This set feels richer in person than in photos. The soft pink base keeps it grounded, while the magnetic glow adds movement every time the hand turns. If you want bling that feels a little moodier and less sugary, this is a smart pick.
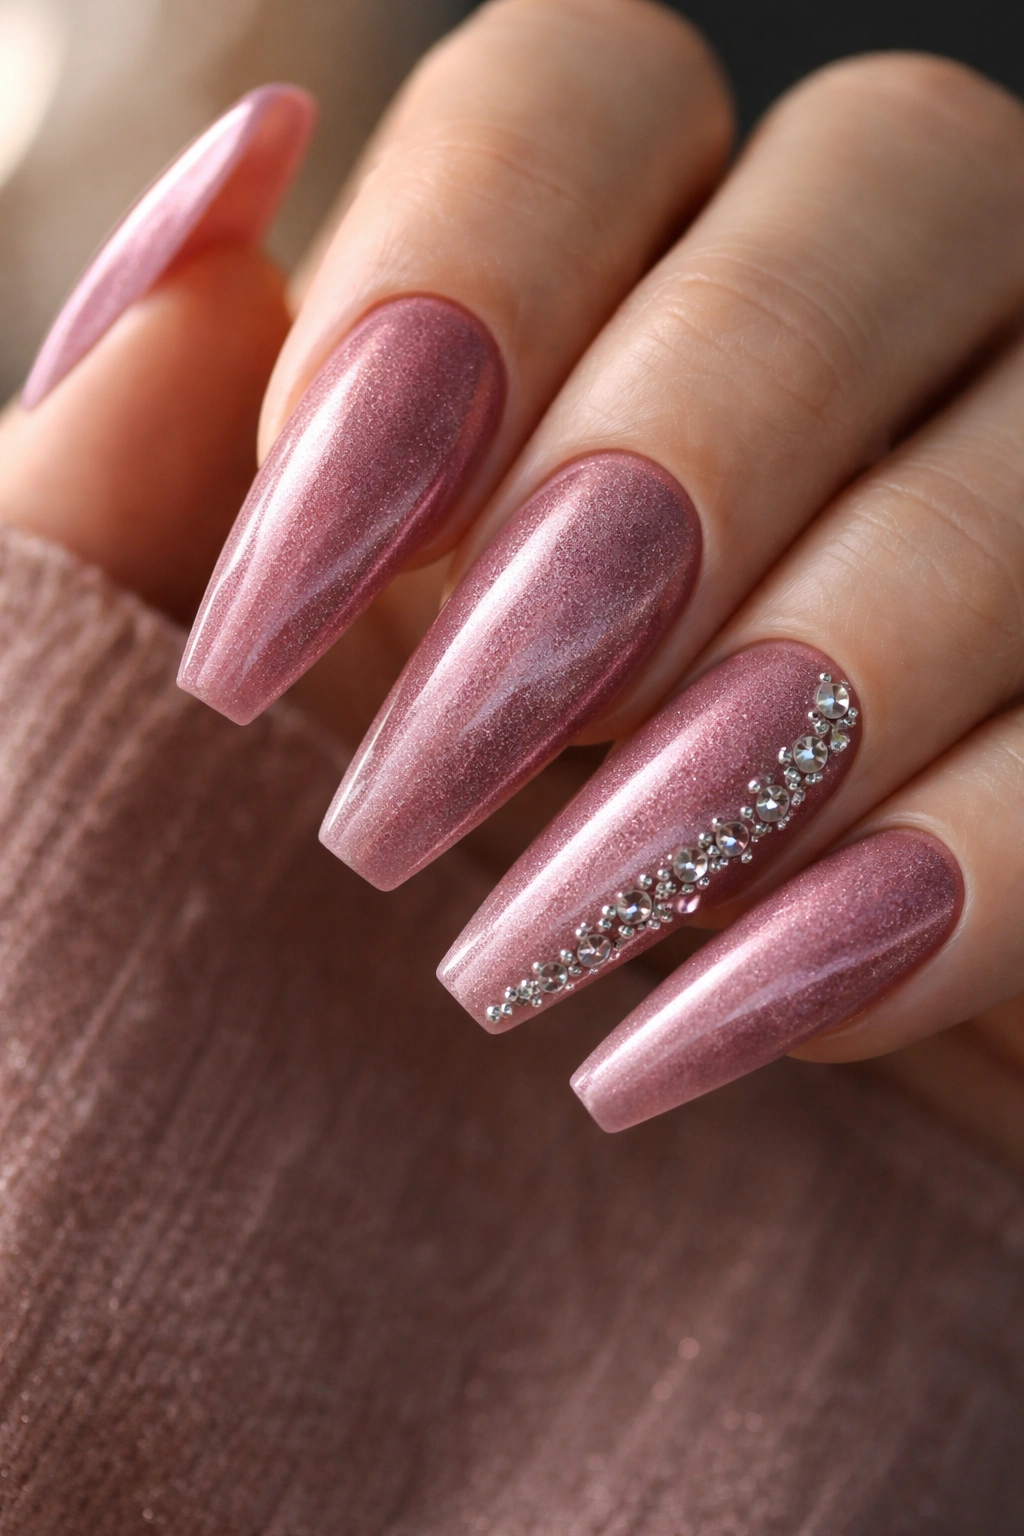
10. Pink Cat-Eye Nails With a Starburst Crystal Accent
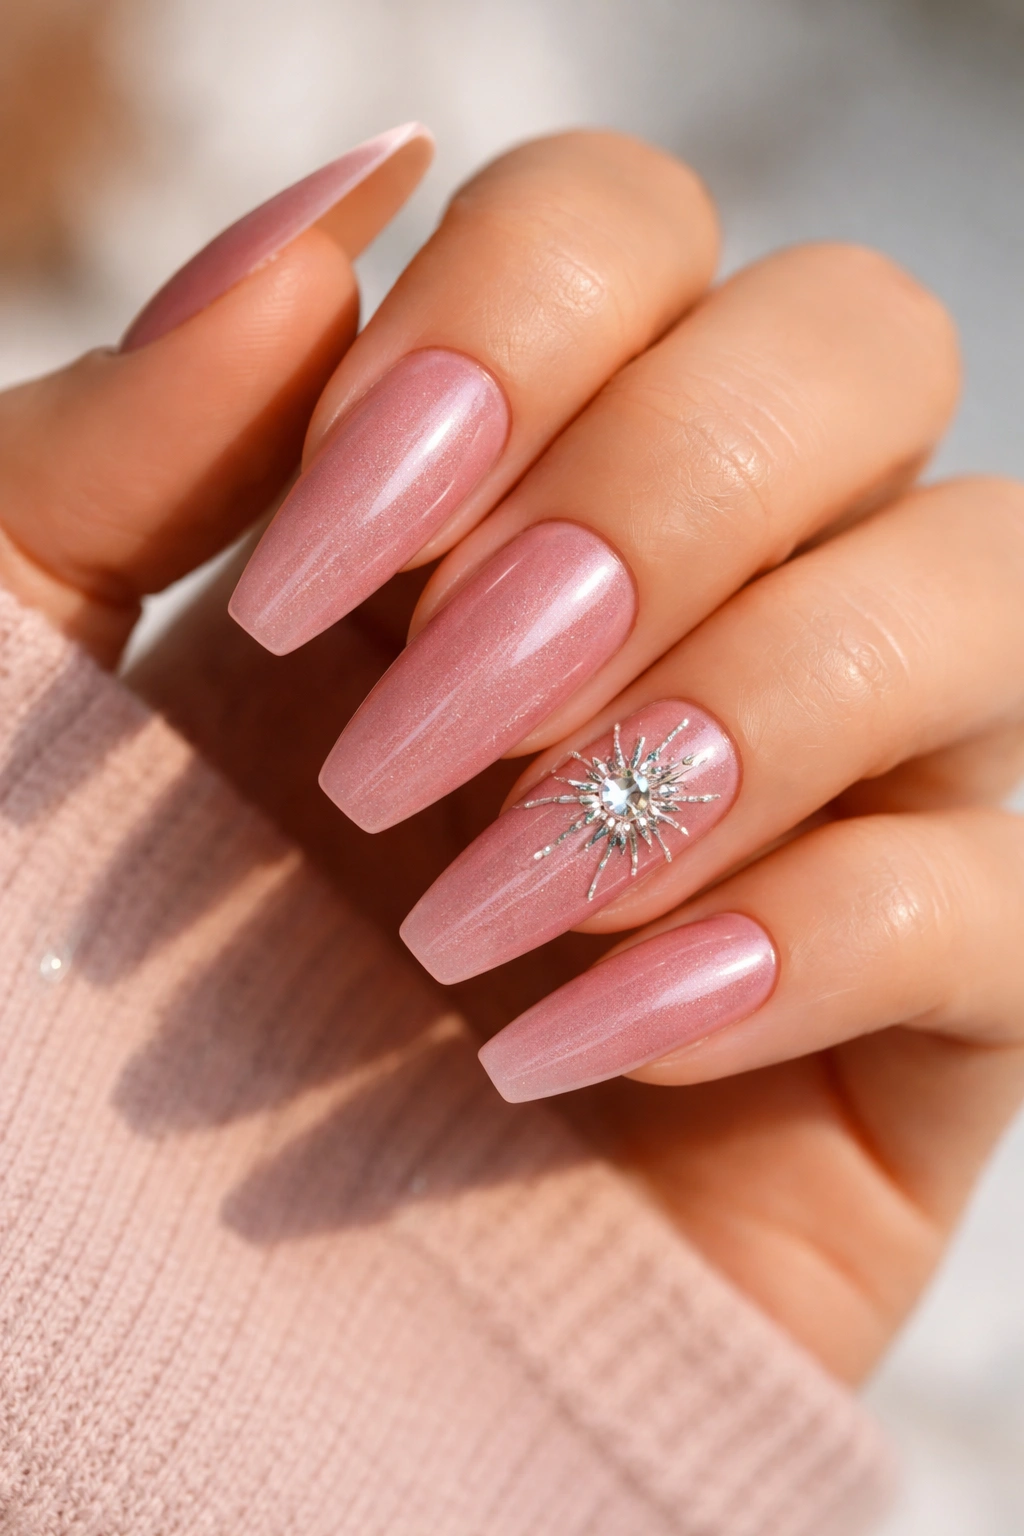
Drama.
A pink cat-eye ballerina set already has a moving strip of light built into it, so the crystal work needs to be placed with a little discipline. The prettiest version uses one starburst accent nail—usually ring finger or thumb—with a center stone and tiny crystals radiating out like short little beams.
The base color can lean from rosy nude to brighter pink, though I think medium rose works best. Too pale, and the magnetic line disappears. Too dark, and the manicure stops reading pink first. You want that shifting cat-eye flash to stay visible while the rhinestones still pop.
The starburst itself should stay compact. One focal crystal around 3 mm, surrounded by micro stones or short metallic gel lines, gives you the effect without turning the whole nail into a brooch. Keep the other nails simpler: cat-eye finish, maybe one cuticle stone, maybe nothing else.
I would not choose this set if you want a low-maintenance manicure. The starburst accent is decorative in a noticeable way, and it reads dressier than a plain crystal line. But if you like a little old-Hollywood energy mixed with pink shimmer, it’s hard not to love this one.
11. French Fade Ballerina Nails With a 3D Bow and Stone Details
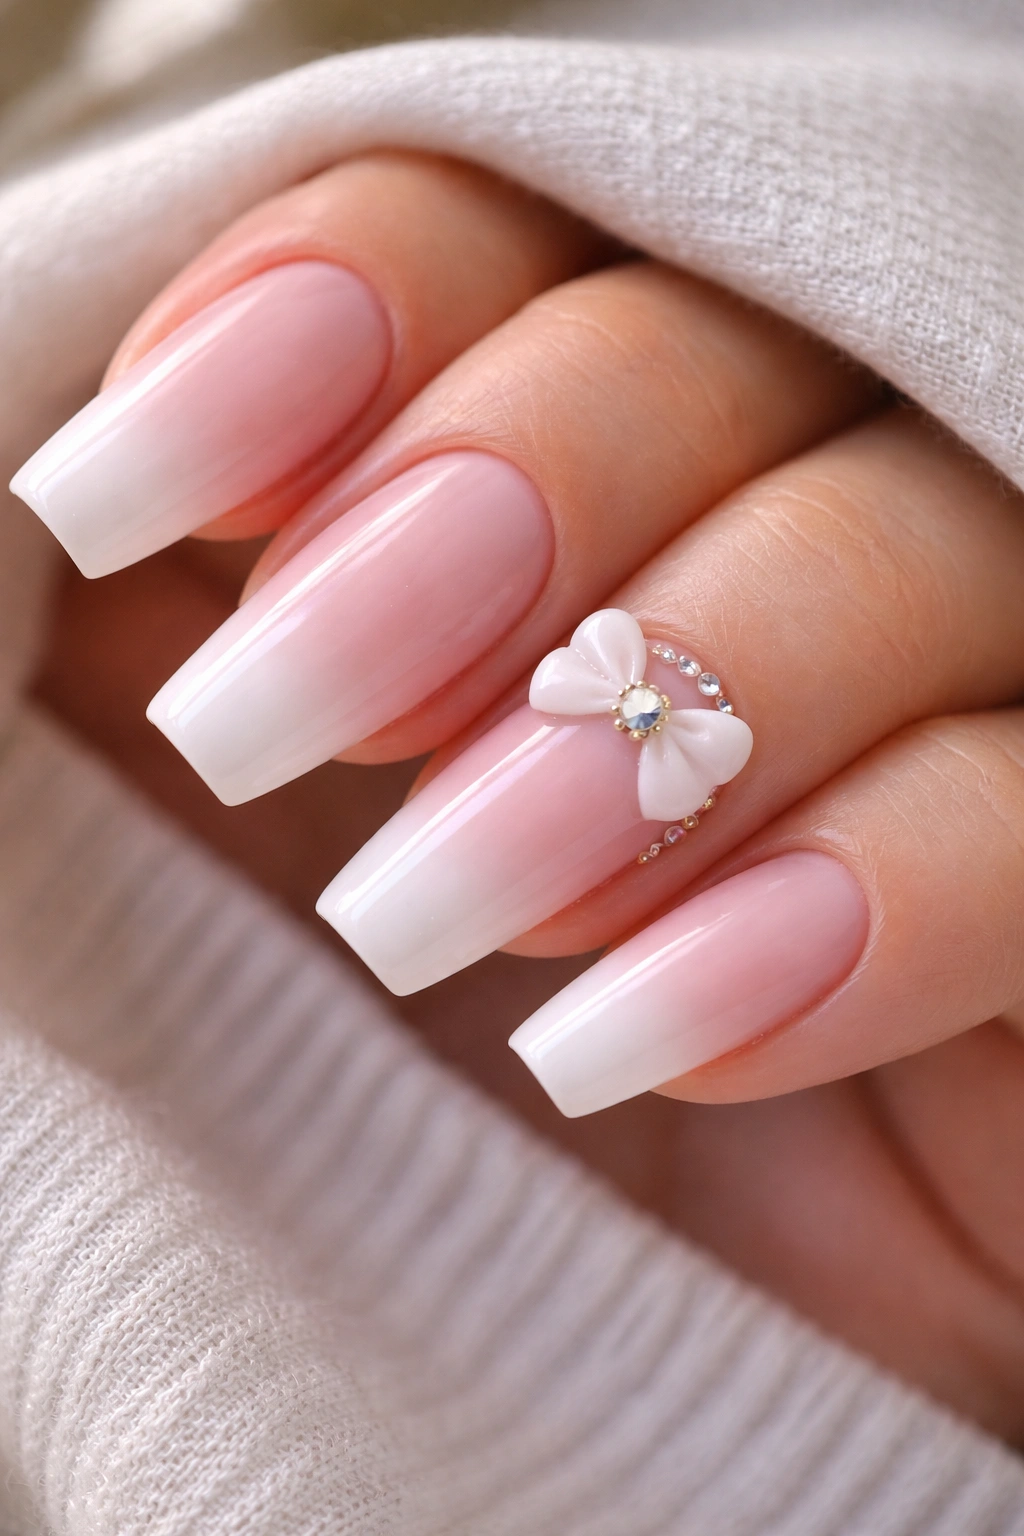
Not every bow set needs to look sugary. On a French fade ballerina base, a single 3D bow can look soft, polished, and grown-up—especially when the pink base is milky and the stone accents stay small.
A French fade, or baby boomer blend, gives you that smooth transition from pink nail bed to a softer white or pale blush tip. Because there isn’t a hard line, the bow becomes the focal point without competing against a strong French border. Add a crystal center to the bow and a few micro stones near the cuticle on one or two nails, and you’ve got a set that feels decorative without looking overloaded.
Practical note
Keep the bow to one nail per hand, maybe the ring finger only if you type a lot or wear gloves often. A raised bow on three or four nails stops being cute after the second time it hits a pocket seam.
I also think the bow should sit a little lower on the nail, not jammed right against the free edge. That placement looks more balanced on ballerina shapes and cuts down on accidental bumps. This design works especially well for bridal looks, engagement photos, and dressier events, though I’d wear it anytime if the bow stays neat and small.
12. Pink Glitter Ombré Nails With Crystal Drip Tips
At arm’s length, the tips look sugared. Up close, the crystals read almost like tiny drops hanging from the edge.
That’s the trick with pink glitter ombré and crystal drip tips. You fade fine pink glitter from the free edge upward, then use crystal placement to create short drip shapes at the tips of one or two nails. On ballerina nails, the flat edge gives those drips a clean starting point.
A solid version usually includes:
- Fine glitter, not chunky hex glitter
- A fade that stops around one-third to halfway up the nail
- Crystal drips on 1 or 2 accent nails
- Small to medium stones that taper downward rather than big gems stuck in a row
The reason this one works is contrast. The glitter feels misty and soft. The crystal drips feel sharp and cold. Put together, they land somewhere between party manicure and winter jewelry.
Use caution with this design if your nails are short. Drip tips need room. On a short ballerina shape, they can make the tip look heavy and cut the nail shorter. Medium and long lengths carry the idea much better.
13. Rose Quartz Ballerina Nails With Mixed-Size Bling
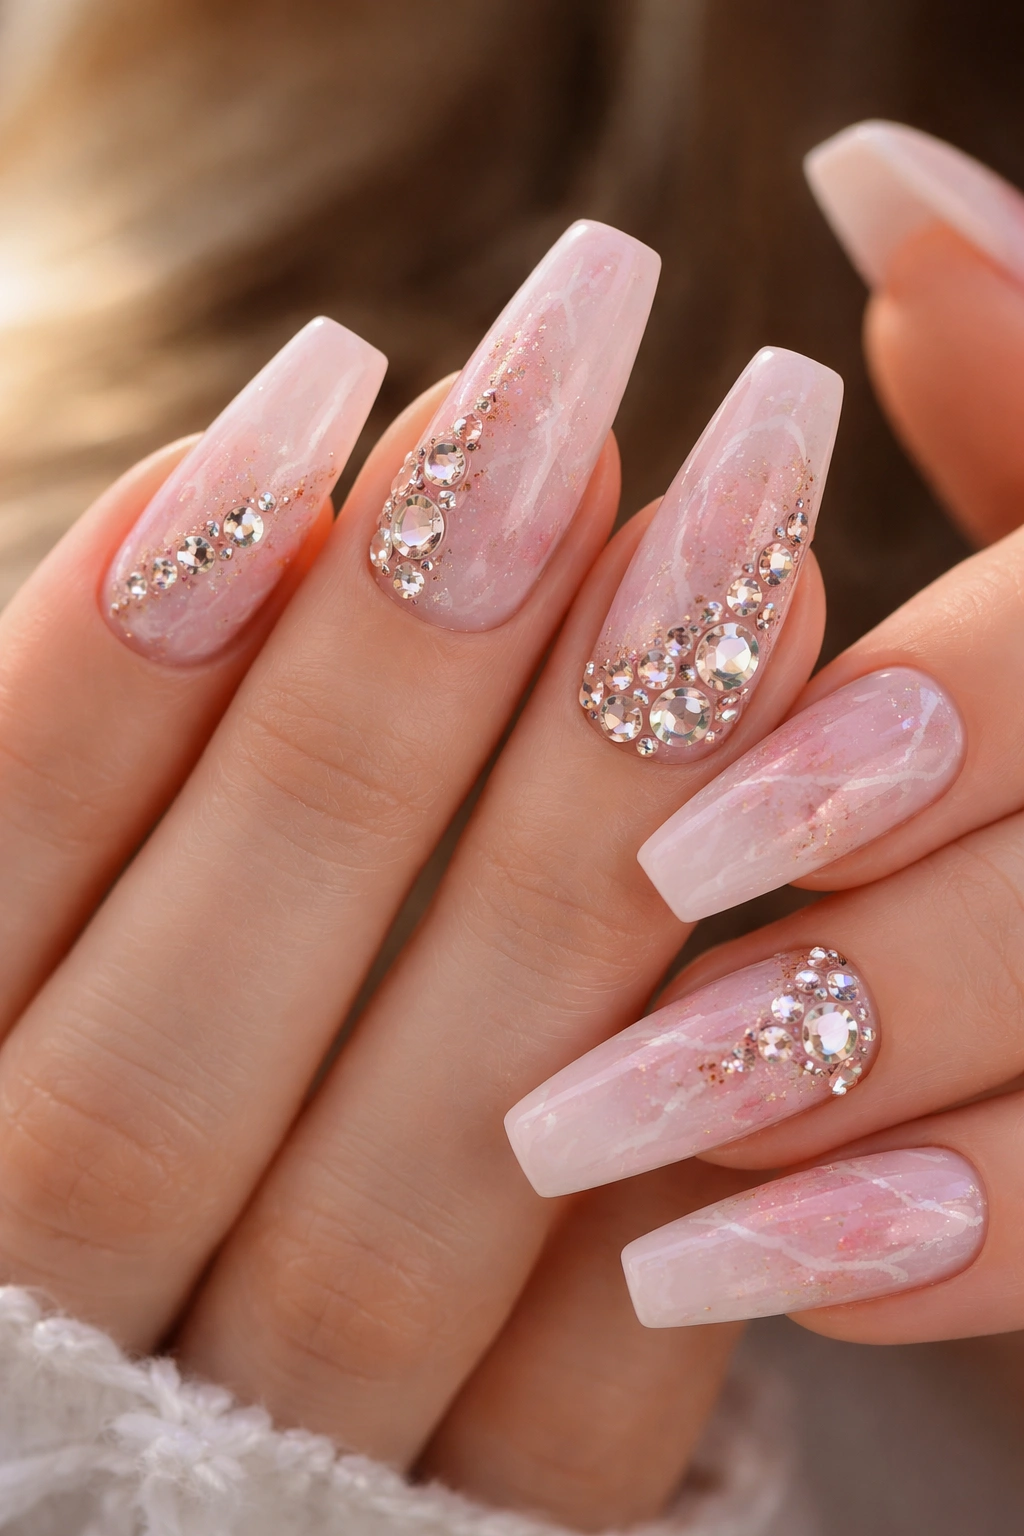
Rose quartz nail art can go muddy if the marbling gets too thick or the crystals are dropped on top with no plan. When it’s done well, though, it has a soft mineral look that feels richer than plain pink.
Start with a semi-sheer pink base. Layer in cloudy white veining, a touch of translucent blush, and maybe a faint crack of silver or rose foil if you want more definition. The goal is not to paint literal stone slices. You want that blurred, layered look you get when light passes through real rose quartz.
Why the mixed-size bling works
This is one of the few designs where different crystal sizes make the layout better instead of busier. Tiny stones can follow the marble veins, while a couple of medium crystals act like focal points where the “stone” appears to catch light.
A balanced layout often uses:
- ss3 and ss5 stones along the veins
- One or two medium crystals near the cuticle or side edge
- Clear, pale pink, or champagne stones instead of bold rainbow finishes
- Crystal placement on 2 to 4 nails, leaving the rest as rose quartz art
I love this one on glossy finishes. Matte kills too much of the depth in the marble. And because the base already has movement, you can keep the bling focused and still end up with a set that feels rich.
14. Bubblegum Pink Ballerina Nails With Crystal Flame Tips
Pink does not have to behave.
A bubblegum pink base with crystal flame tips pushes ballerina nails into a sharper, more graphic direction. The flame shape works because the ballerina tip is flat enough to anchor the design, while the tapered sides help the flames stretch upward in a way that looks lean instead of chunky.
You can build the flames in two ways. One is a solid pink nail with silver or clear crystal flames rising from the tip on accent nails. The other—which I like better—is a glossy bubblegum pink base with negative-space or translucent flame outlines traced in stones and fine gel line work. That second version feels lighter.
The mistake here is making every flame thick. Keep them narrow and pointed, with enough empty space between each tongue of the flame so the nail still reads as a nail, not a bedazzled sticker. Two flame nails per hand is usually plenty. More than that and the design loses shape.
This set has attitude. It’s not the one I’d suggest for someone asking for “soft pink with a little sparkle.” It belongs to the person who wants pink but refuses to make it sweet.
15. Soft Pink Bridal Ballerina Nails With Pearls and Micro Crystals
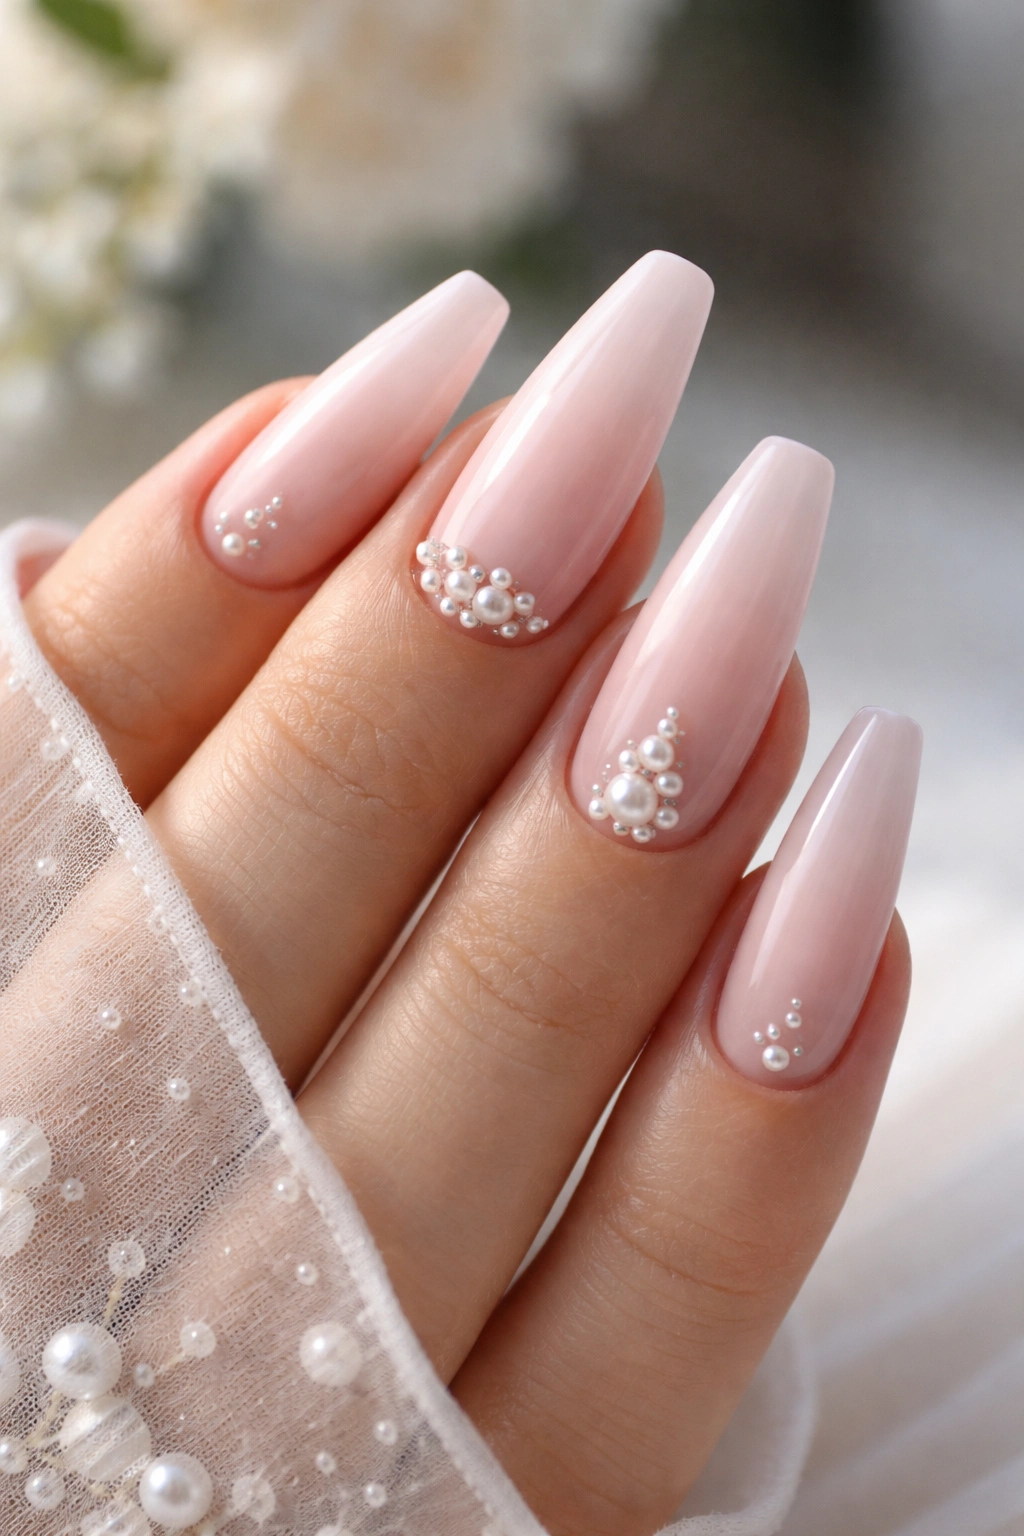
If I had to pick one set that balances soft romance and visible bling, I’d land here. A soft pink bridal ballerina manicure with pearls and micro crystals has enough detail to feel dressed up, yet it still reads clean in person.
The base should stay muted: milky pink, pale rose nude, or a sheer blush builder base with a glossy top coat. Then the decoration comes in small touches—tiny half pearls, clear micro crystals, maybe a cuticle arc on one nail and a small clustered accent on another. Pearls bring softness. Crystals bring light. Together they stop each other from becoming too flat or too flashy.
Where this one works best
I’d place pearls sparingly:
- One small pearl cluster on the ring finger
- A pearl-and-crystal cuticle detail on the middle finger
- Micro crystals scattered lightly on the thumb
- The rest kept glossy and clean
There is one downside, and it’s worth saying plainly: pearls can catch more than flat crystals if they are placed too high. Keep them low-profile and limited. Done that way, the set feels elegant, not fussy. It also suits more than weddings. Any dressy occasion with soft fabrics, pale tones, or classic jewelry pairs well with this look.
Final Thoughts
The best pink bling sets are not the ones with the most stones. They’re the ones where the shape, pink tone, and crystal placement all agree with each other. A milky blush cuticle crescent looks clean because it respects the nail’s natural lines. A hot pink frame works because it controls a loud color. A starburst accent lands because it knows when to stop.
If you’re choosing between these looks, start with two questions: How much texture can you tolerate day to day, and how long are your ballerina nails going to be? Those two answers narrow the field fast. Shorter nails usually look better with micro bling, cuticle arcs, and side accents. Longer sets can carry marble sweeps, drip tips, flames, and bow details with less effort.
And if you’re sitting in the salon chair torn between “soft” and “extra,” pick a pink base you love, then put the drama on one or two nails. That mix rarely disappoints.
