

Pink and white nail designs have been a cornerstone of modern nail art for years, and stiletto nails take this classic combination to an entirely new level of sophistication and drama. The elongated, pointed shape elongates your fingertips and creates a genuinely striking canvas for showcasing creative designs—and when you combine that with the timeless elegance of pink and white, you’ve got something that works for almost any occasion. Whether you’re heading to a wedding, a professional meeting, or just want to feel extra polished on a Tuesday, these two colors together deliver polish and personality without ever feeling overdone.
What makes pink and white stilettos so universally flattering is their flexibility. The neutral base of white pairs beautifully with every shade of pink—from soft, barely-there blush to deep, saturated magenta—so you can completely customize the intensity and vibe of your look. You’re not limited to a single design idea, either. From delicate geometric patterns to full-coverage ombre effects, from minimalist French tips to glittery glamour, there’s a pink and white stiletto aesthetic for every mood and personal style.
The key to getting a design that actually feels like you is understanding how different techniques and patterns play out on the elongated shape of a stiletto. A design that looks perfect on a short, square nail might feel overwhelmed on a longer pointed tip—and vice versa. That’s why I’ve gathered 14 distinctly different approaches below, each with specific inspiration and practical guidance on how to ask your technician for exactly what you want.
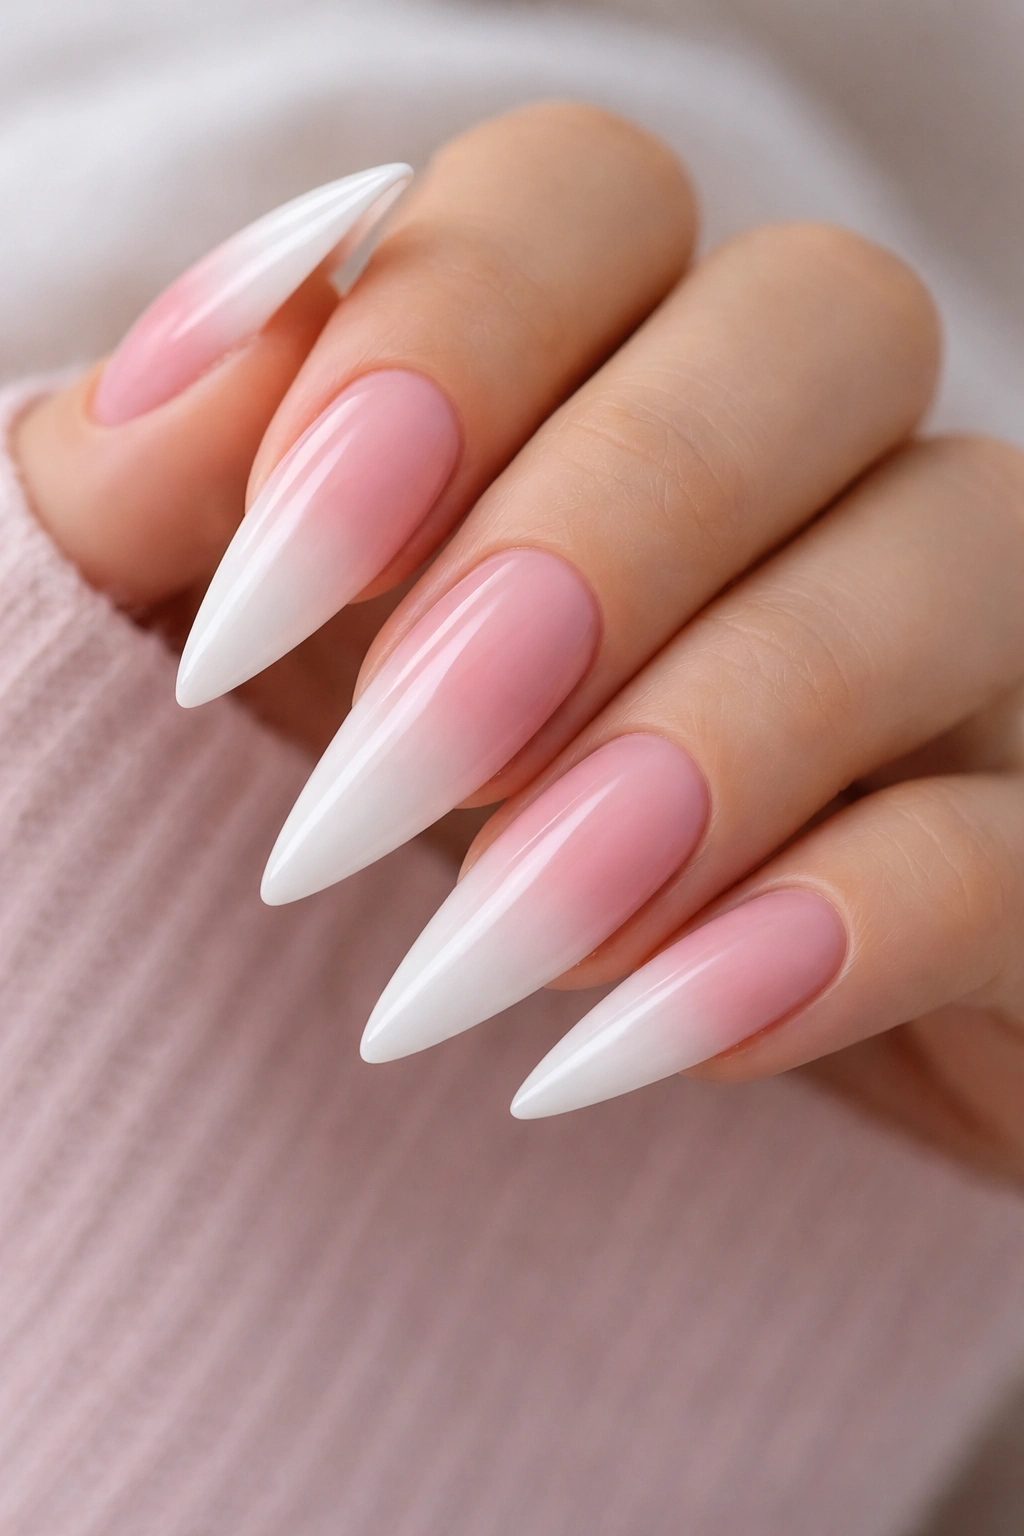
1. Soft Ombre Gradient with Peachy Pink Transition
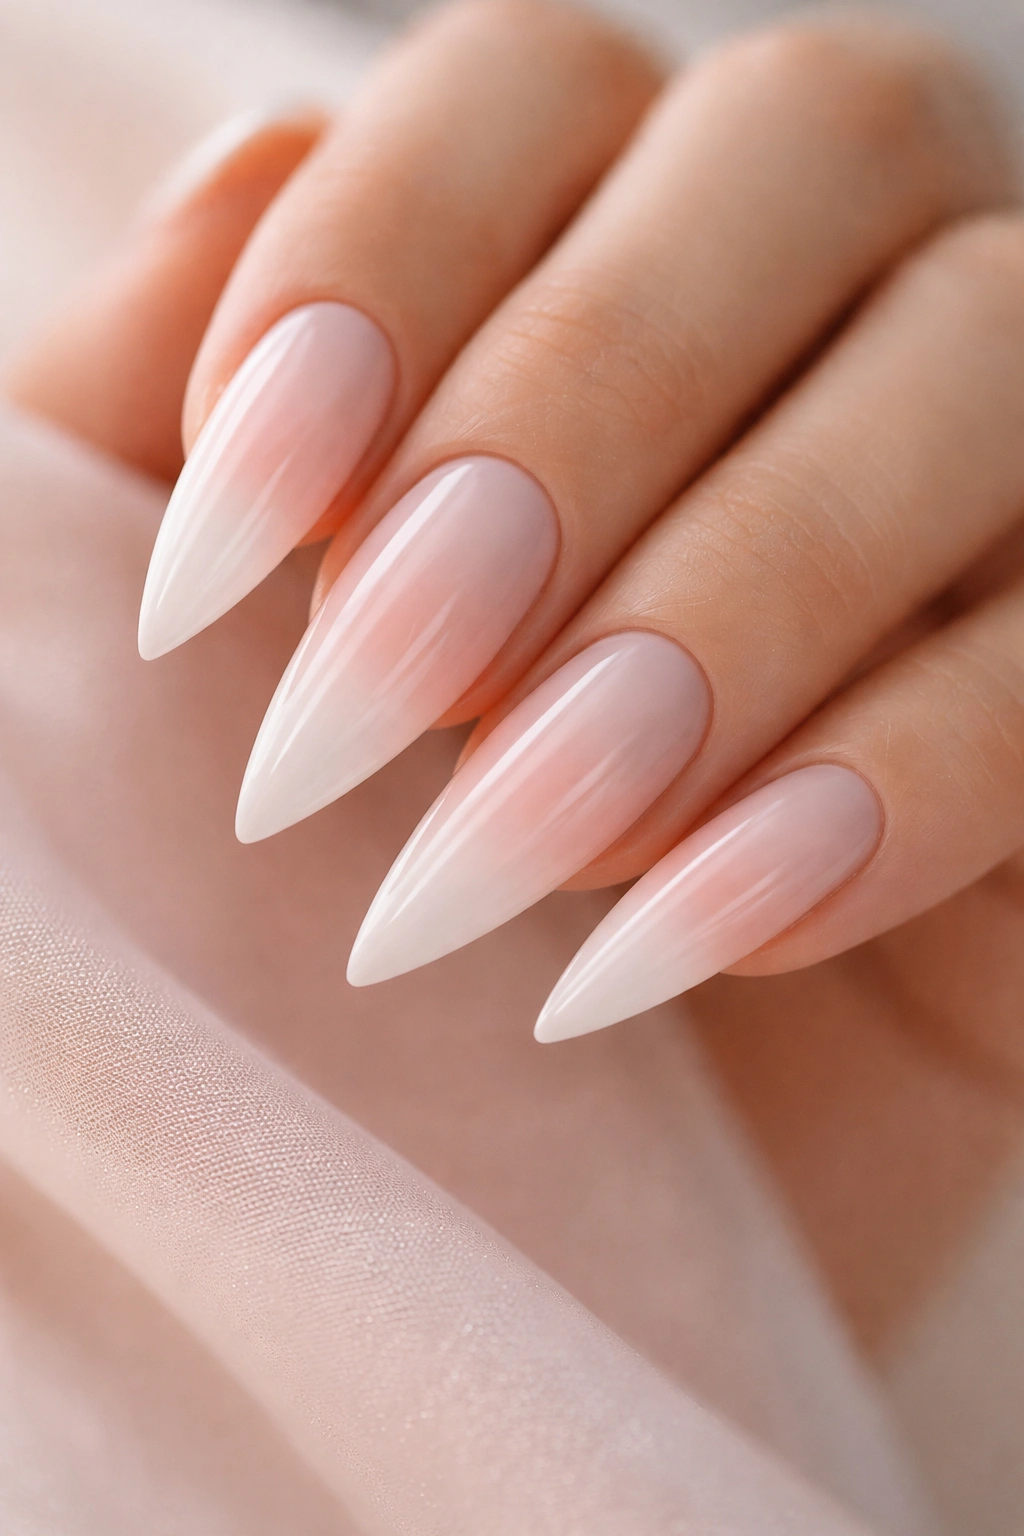
This design creates a seamless transition from white at the base to a soft peachy-pink at the tip, giving your nails an ethereal, almost airbrushed quality. The ombre technique works especially well on stilettos because the length gives the gradient room to develop and shift gradually—it’s not cramped or rushed. Rather than a harsh line between colors, the two shades blend together so smoothly that it almost looks like a single color with depth.
Why This Design Works on Stilettos
The elongated shape of a stiletto naturally draws the eye downward from tip to base, so a gradient that moves from light to dark (or vice versa) actually flatters the nail shape itself. The peachy undertones create warmth without being overly saturated, so it reads as sophisticated rather than party-ready. This works for professional environments while still being visibly special.
How to Request It and Maintain It
- Ask your technician for a “watercolor ombre” or “gradient fade” effect specifically—some techs call this a “fade” rather than ombre, so knowing both terms helps
- Specify the peachy tone so you don’t end up with something too coral or too rosy
- This design hides minor growth well, meaning you can stretch your appointments to 3-4 weeks
- Bring a reference photo showing stiletto nails, not rounded tips—the shape matters for how the gradient appears
2. Classic White French Stiletto with Rhinestone Accent
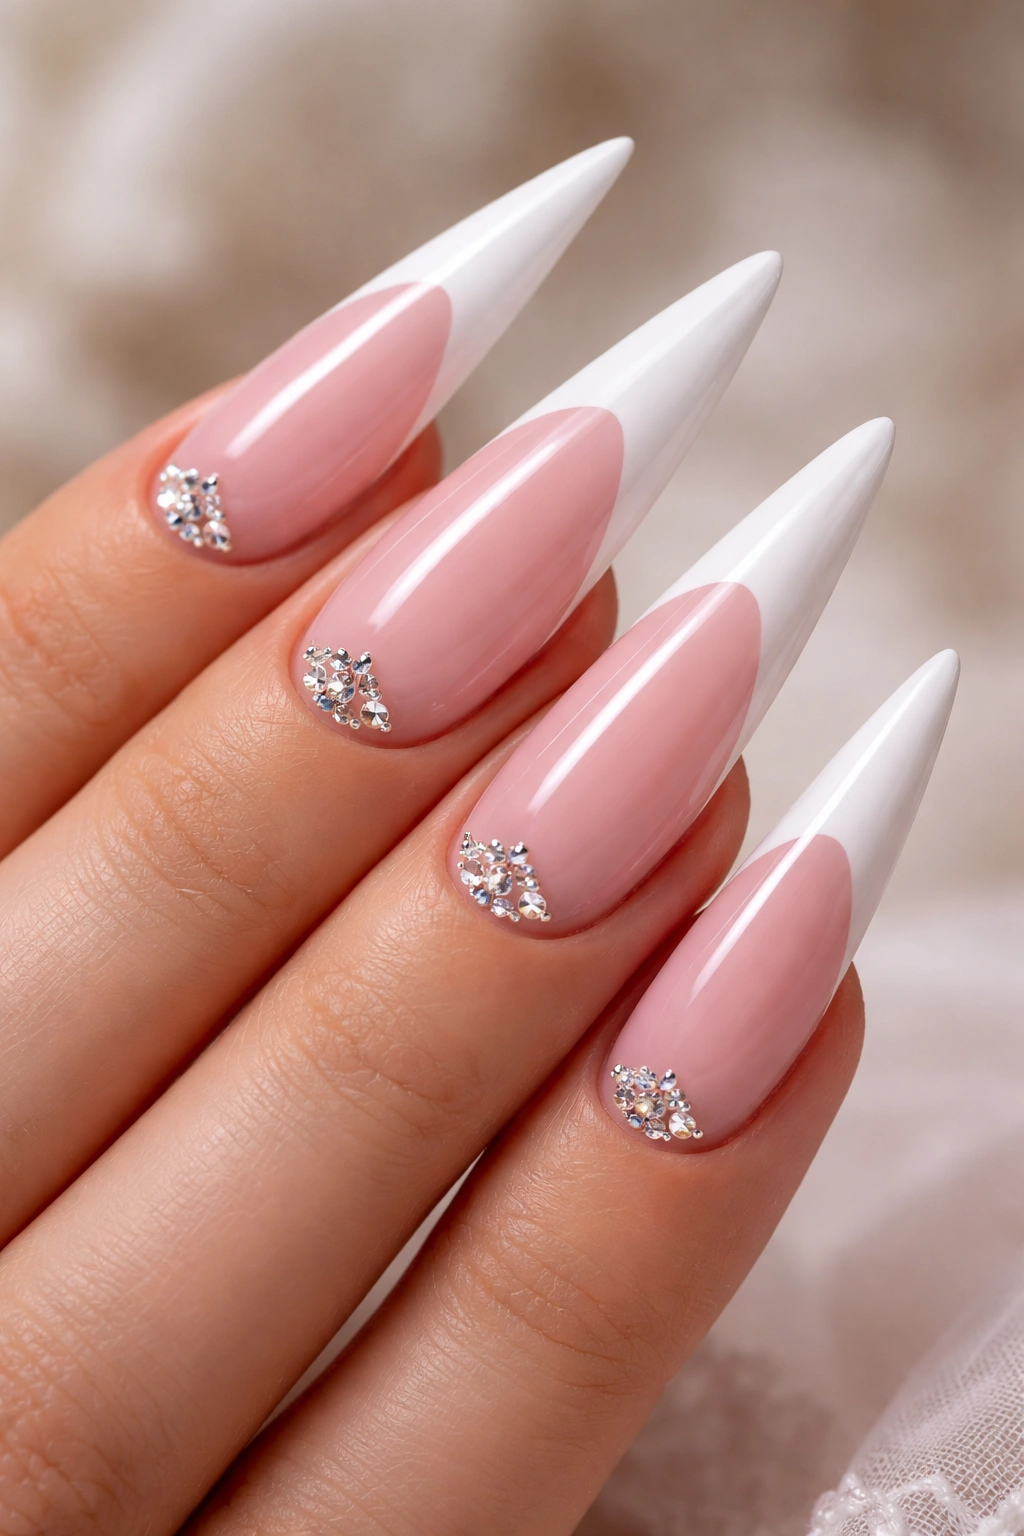
The white French tip is the original, the gold standard, the design that never actually goes out of style. For stilettos, the elongated white tip becomes an extended canvas for a single statement—whether that’s a row of rhinestones, a delicate floral accent, or a tiny geometric detail. Pink makes up the base of the nail, providing the necessary contrast that makes white pop without looking washed out.
The Styling Edge That Makes This Timeless
A plain French tip in white and pink can read as basic if executed without intention, but when your technician takes time to create a precise, slightly thicker white tip and places even a small cluster of crystals right at the apex of the point, suddenly it becomes a signature look. The rhinestones catch light as you move your hands, drawing attention to the manicure without screaming for attention.
Application and Longevity Tips
- Request Swarovski crystals specifically (they’re worth the extra cost)—cheaper alternatives can look cloudy or fall off after a week
- Ask for placement at the very tip point, not spread across the entire white section
- This design typically holds up beautifully for 3-4 weeks before the crystals need refreshing
- Avoid prolonged water exposure immediately after application—give the adhesive 24 hours to fully cure
3. Pink Ombre with White Glitter Tips
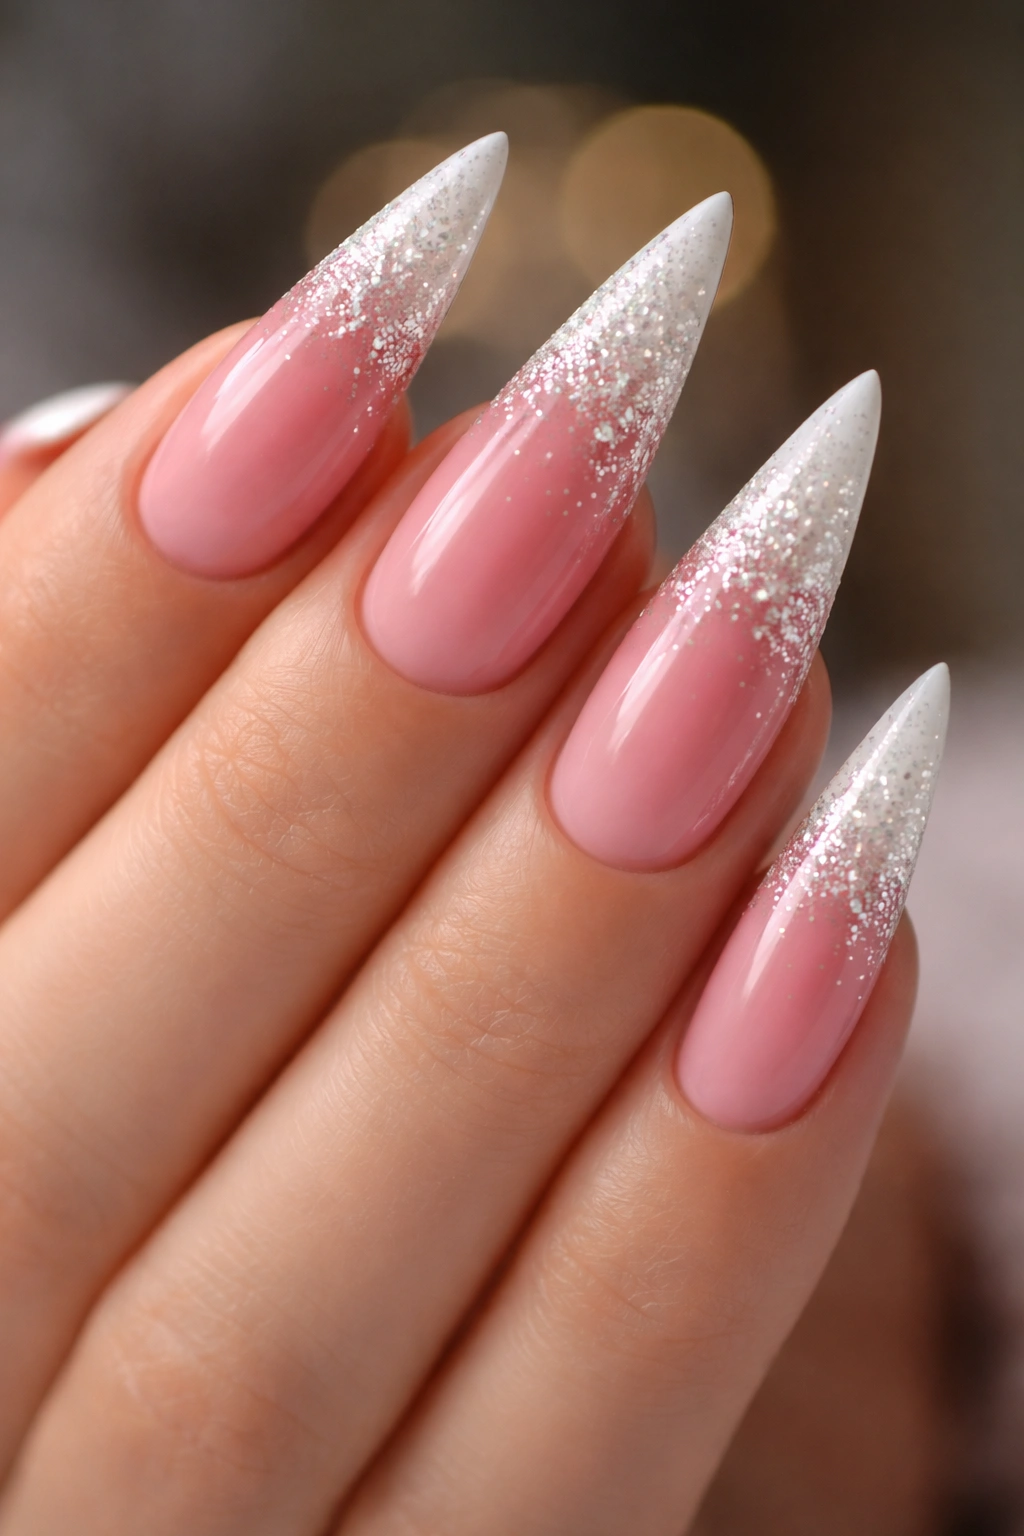
This inverts the typical gradient by starting with deep pink at the base and fading to white at the tip, with the transition packed with chunky glitter that creates a sparkly, gradient effect. It’s bolder than a soft ombre and more dramatic, making it ideal for night out energy or anyone who actually likes drawing attention to their hands.
Why Chunky Glitter Elevates the Look
Chunky, multi-colored glitter (mixing silver, rose gold, and pearl) creates visual texture and dimensionality that fine shimmer can’t achieve. On a stiletto, the length and pointed shape mean glitter gets room to really shine—literally. The effect reads as intentional and polished rather than accidental sparkle.
Technical Details for Best Results
- This design works best when applied over a semi-matte pink base for contrast with the glitter and white
- Ask for dense glitter packing in the transition zone (roughly the middle third to tip of the nail)
- Expect this to be a slightly higher-maintenance manicure—brush your nails gently in the shower to prevent glitter loss
- Reapplication or refreshing is typically needed every 2-3 weeks before obvious gaps appear
4. Geometric Half-Moon with Negative Space
A geometric half-moon design uses the natural curve of your nail bed to create a sharp line separating white from pink, with intentional negative space (the natural nail showing through) creating additional visual interest. The pointed stiletto shape actually enhances the geometry because the clean angles of the tip emphasize the clean lines of the design.
The Visual Impact of Negative Space
Negative space—showing the actual nail beneath the polish—has become increasingly popular in modern nail art because it feels intentional and design-forward rather than like an accident. On a stiletto, a half-moon design with an open window of natural nail visible at the very tip creates a contemporary, editorial quality that photographs beautifully.
Execution and Care
- This design requires extremely precise line work—ask to see your technician’s geometric portfolio before committing
- The exposed natural nail visible in the negative space area will eventually show growth, so plan for fills every 2-3 weeks
- This is one of the few designs that actually looks better with a bit of growth visible, as it creates intentional banding
- Avoid this design if you typically bite your nails or if your nail beds are uneven—the negative space will highlight imperfections
5. Romantic Pink and White Marble Effect
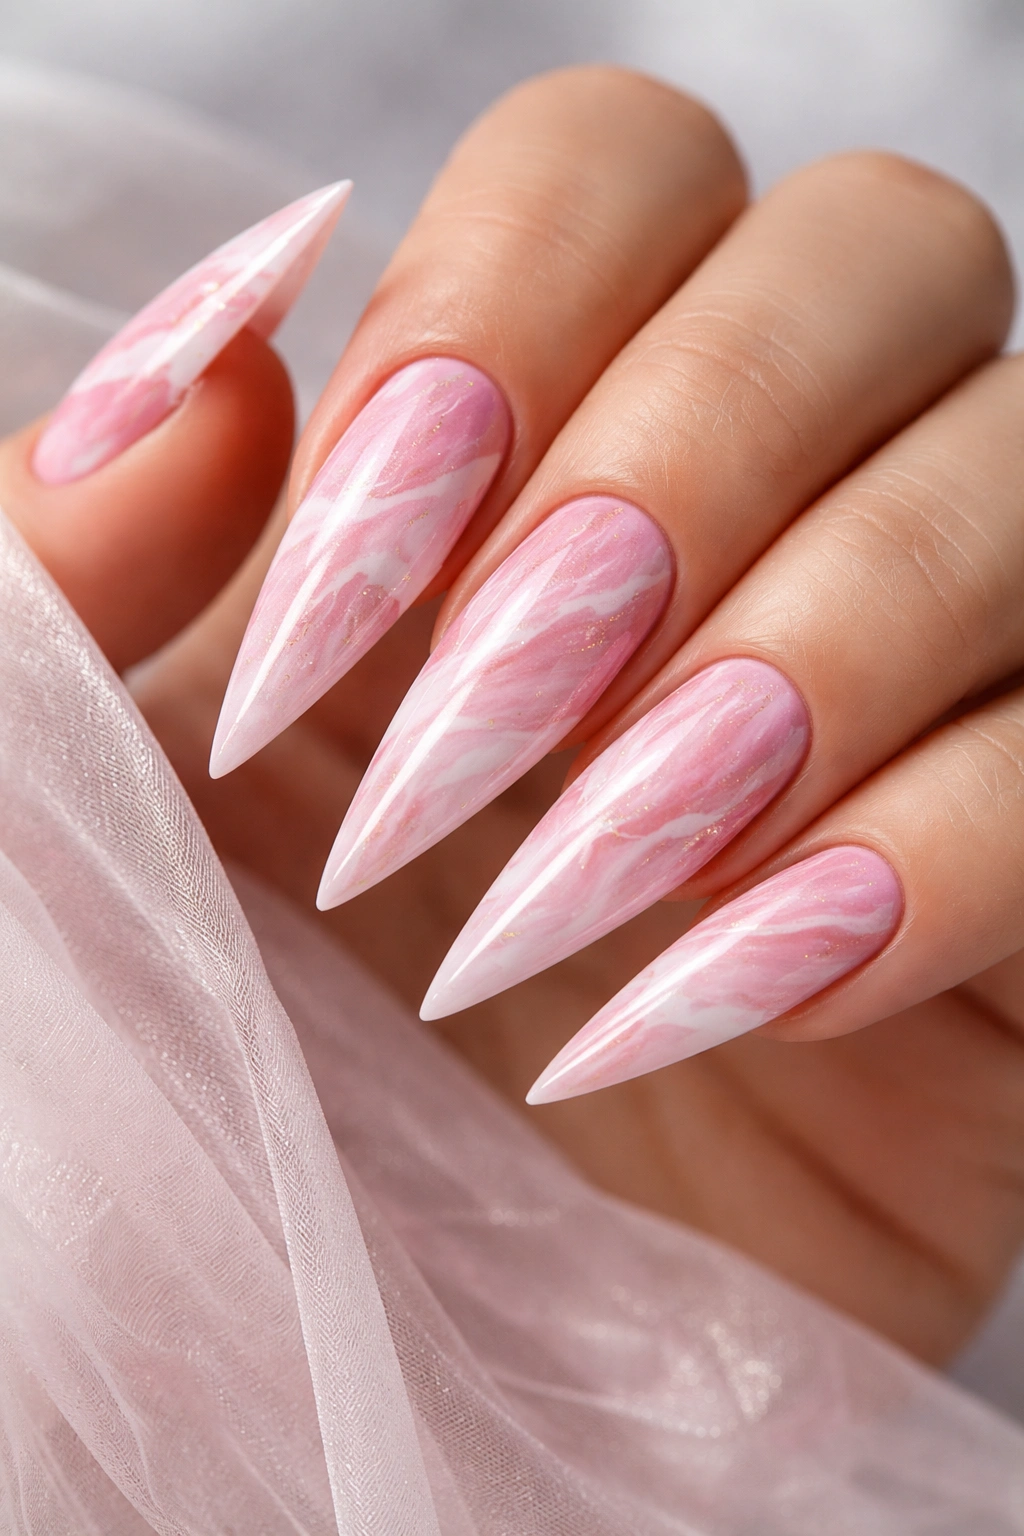
Marble nails create the illusion of swirled stone by blending pink and white together in an organic, non-linear pattern across the entire nail surface. Each nail will have a uniquely different pattern, even from the same application, which creates a perfectly imperfect, artisanal quality.
How Marble Translates to Stilettos
The elongated shape of a stiletto means your marble pattern has more real estate to develop, so the design feels luxurious and intentional rather than cramped. Marble also hides minor imperfections and variation better than solid colors, making it more forgiving between appointments.
Getting the Effect You Actually Want
- Request watermarble technique or hand-painted marble—they produce slightly different effects, so specify which appeals to you
- Bring a reference photo (stiletto-shaped if possible) showing the color intensity and pattern density you prefer
- This design typically lasts 3-4 weeks without significant maintenance
- Topcoat is critical for marble nails—ask that your technician apply at least two coats of glossy topcoat to seal the design and prevent chipping
6. Pink Base with White Accent Nail Featuring 3D Embellishments
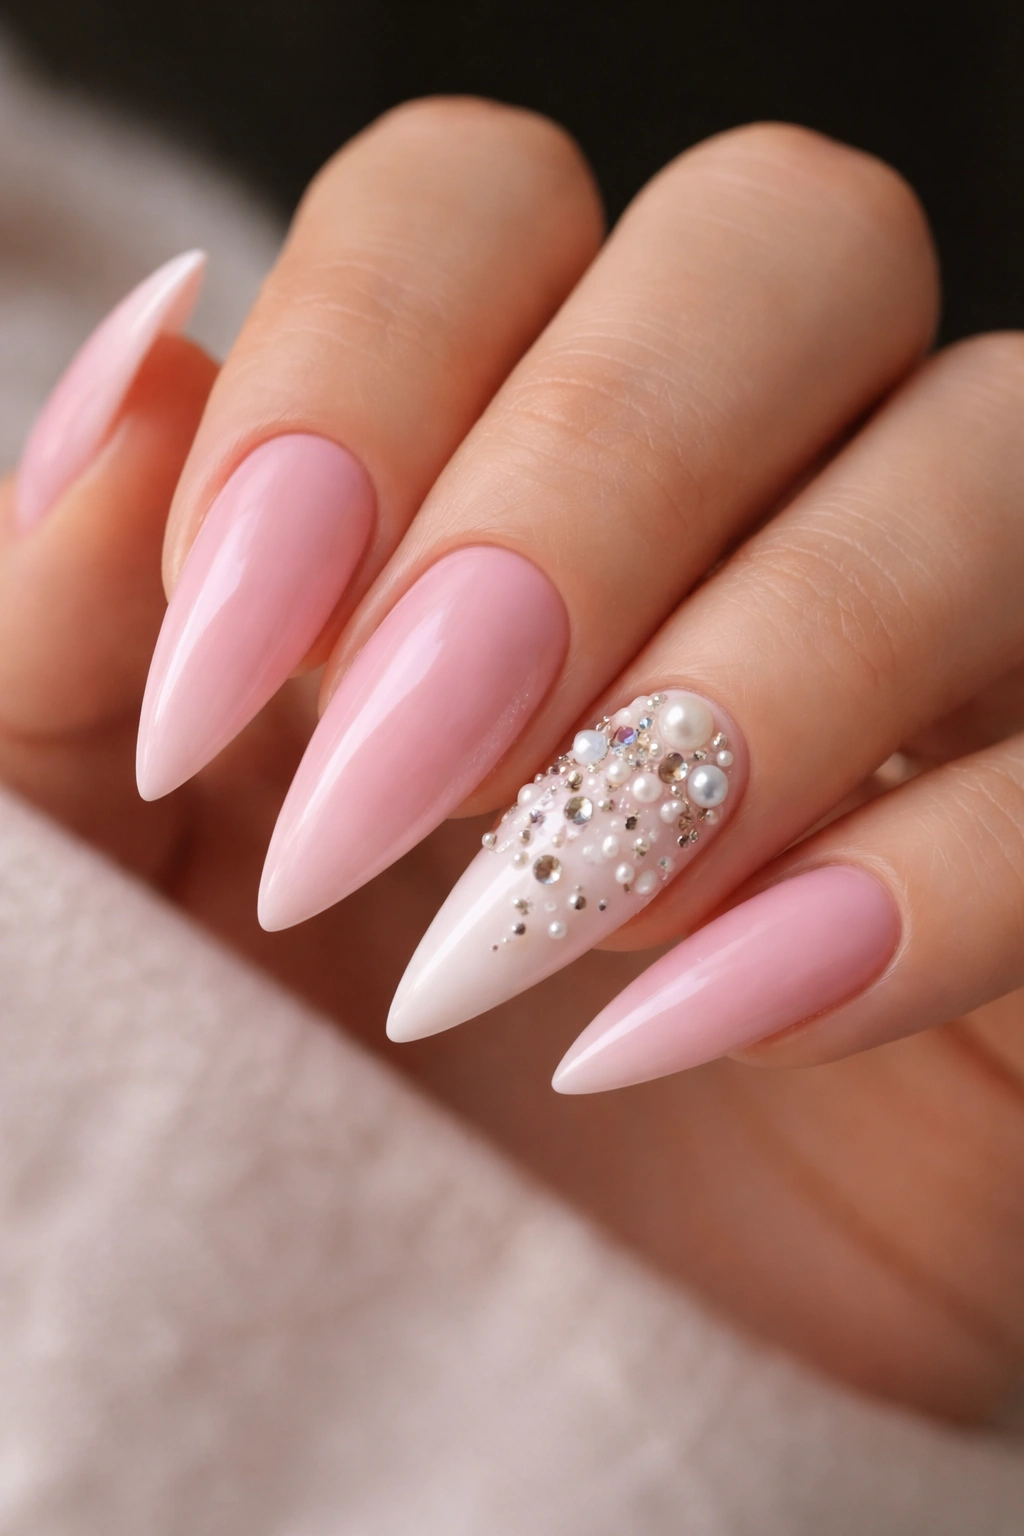
This design keeps most nails a solid pink with one or two accent nails (typically the ring finger or middle finger) featuring white as the dominant color, plus dimensional elements like studs, rhinestones, or micro-beads creating actual texture you can feel. The 3D element transforms what could be a basic design into something memorable and sculptural.
Why Accent Nails Work Better Than All-Over Glam
An accent nail draws the eye without overwhelming. On a stiletto where you already have dramatic length and point, an all-over glittery or heavily embellished design can read as too much, whereas a single accent nail channels all that drama into one focal point. The 3D quality makes it feel like intentional art rather than trying too hard.
Material Choices and Durability
- Gold or silver studs tend to be more durable than rhinestones for 3D elements because they’re mechanically set rather than glued
- If you choose beads or micro-pearls, confirm your technician is using UV-bonded materials specifically designed for nail art (not just glued beads that will pop off)
- Expect accent nails with significant 3D elements to need refreshing every 2-3 weeks
- Be intentional about when you wear this design—it’s gorgeous but not ideal for typing-heavy work or activities where catching your nails is a risk
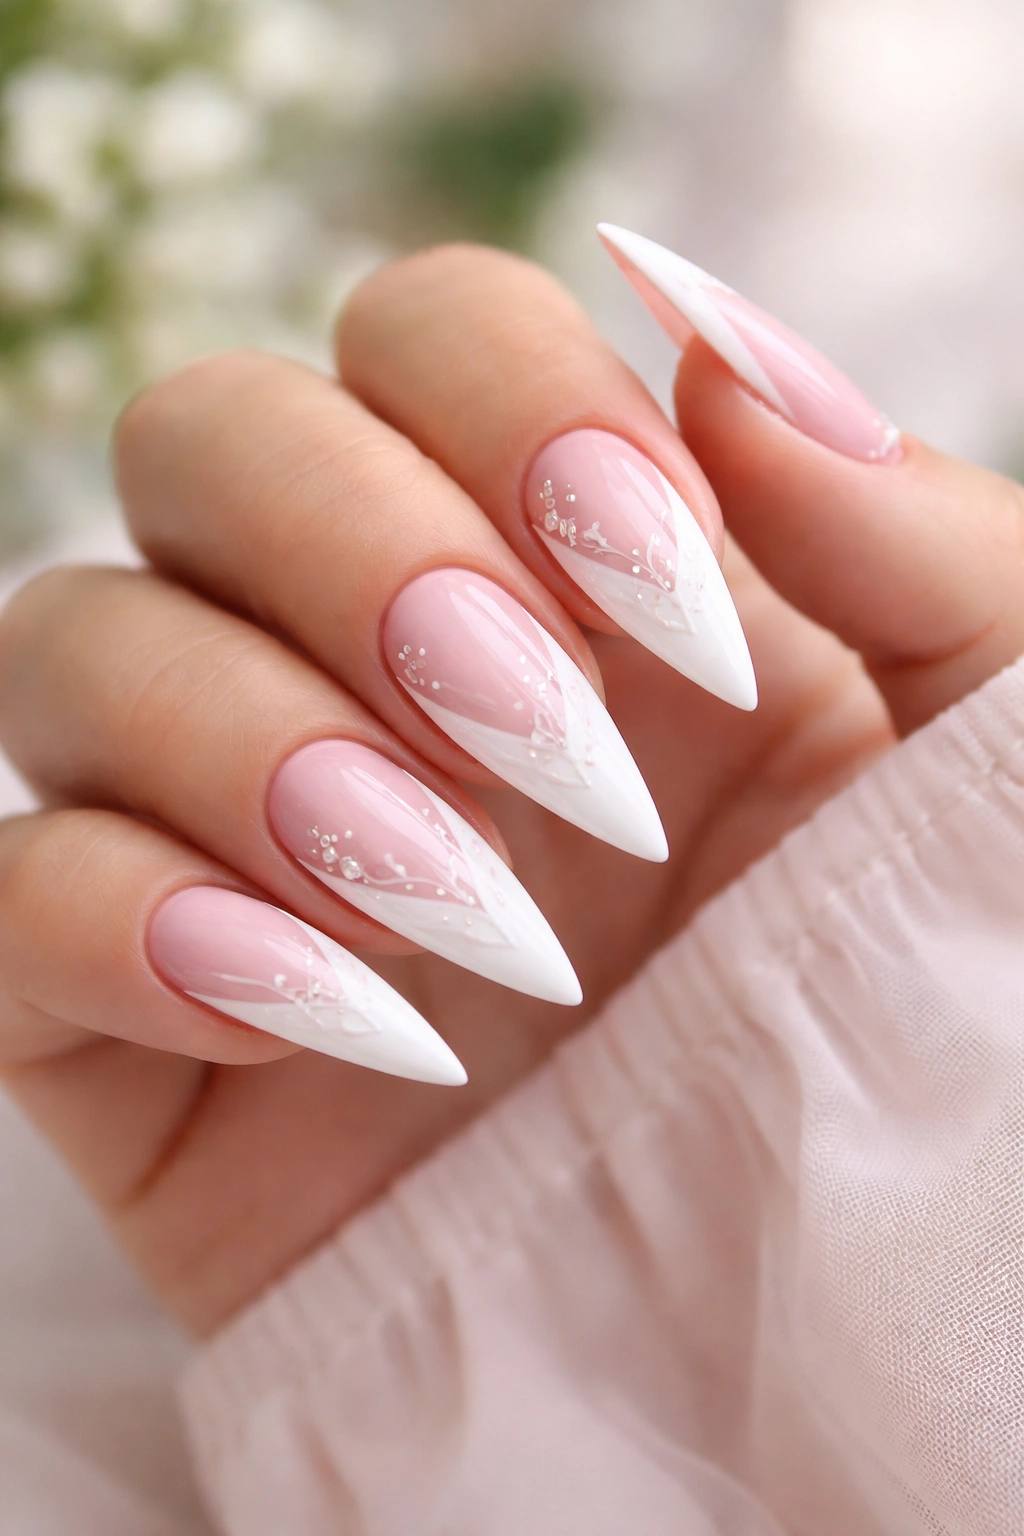
7. Soft Pink with Delicate White Line Art Details
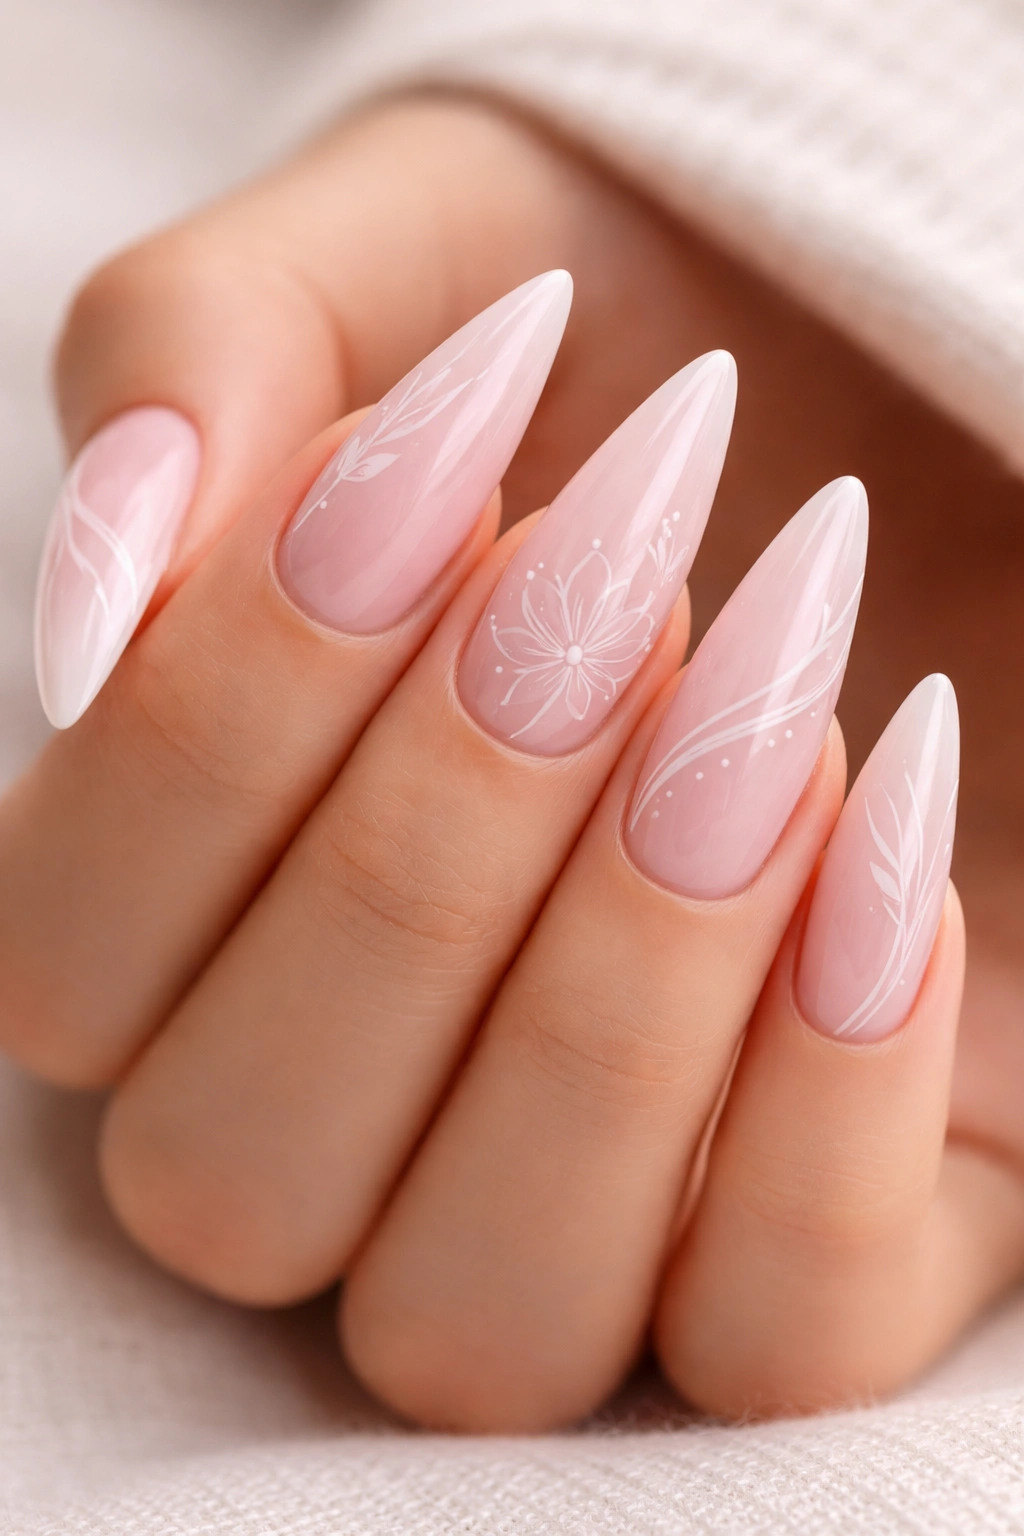
Line art on nails has become incredibly popular, and when executed with a steady hand, creates a boutique, almost illustration-like quality that feels artistic and sophisticated. Think thin white lines creating minimalist florals, geometric patterns, or abstract designs across a soft pink base. The key is restraint—the lines should feel like an accent, not a cluttered pattern.
The Technical Skill Required
This design demands a technician with actual drawing ability. Not every nail tech can execute clean, precise line work, so if you’re considering this design, ask specifically about hand-painting skills and request to see a portfolio of previous line art work. Poor execution reads immediately as amateur, so getting the right technician matters more with this design than with most.
Making It Last and Look Fresh
- Line art looks best when applied with gel-based acrylic or builder gel that allows fine detail without drag
- Glossy topcoat enhances the appearance of delicate lines, making them pop against the pink base
- Expect this design to last a clean 3-4 weeks with minimal chipping if your technician uses quality materials
- This design shows your natural nail growth more prominently than glitter or ombre, so schedule fills accordingly
8. High-Shine White Tips with Pink Metallic Base
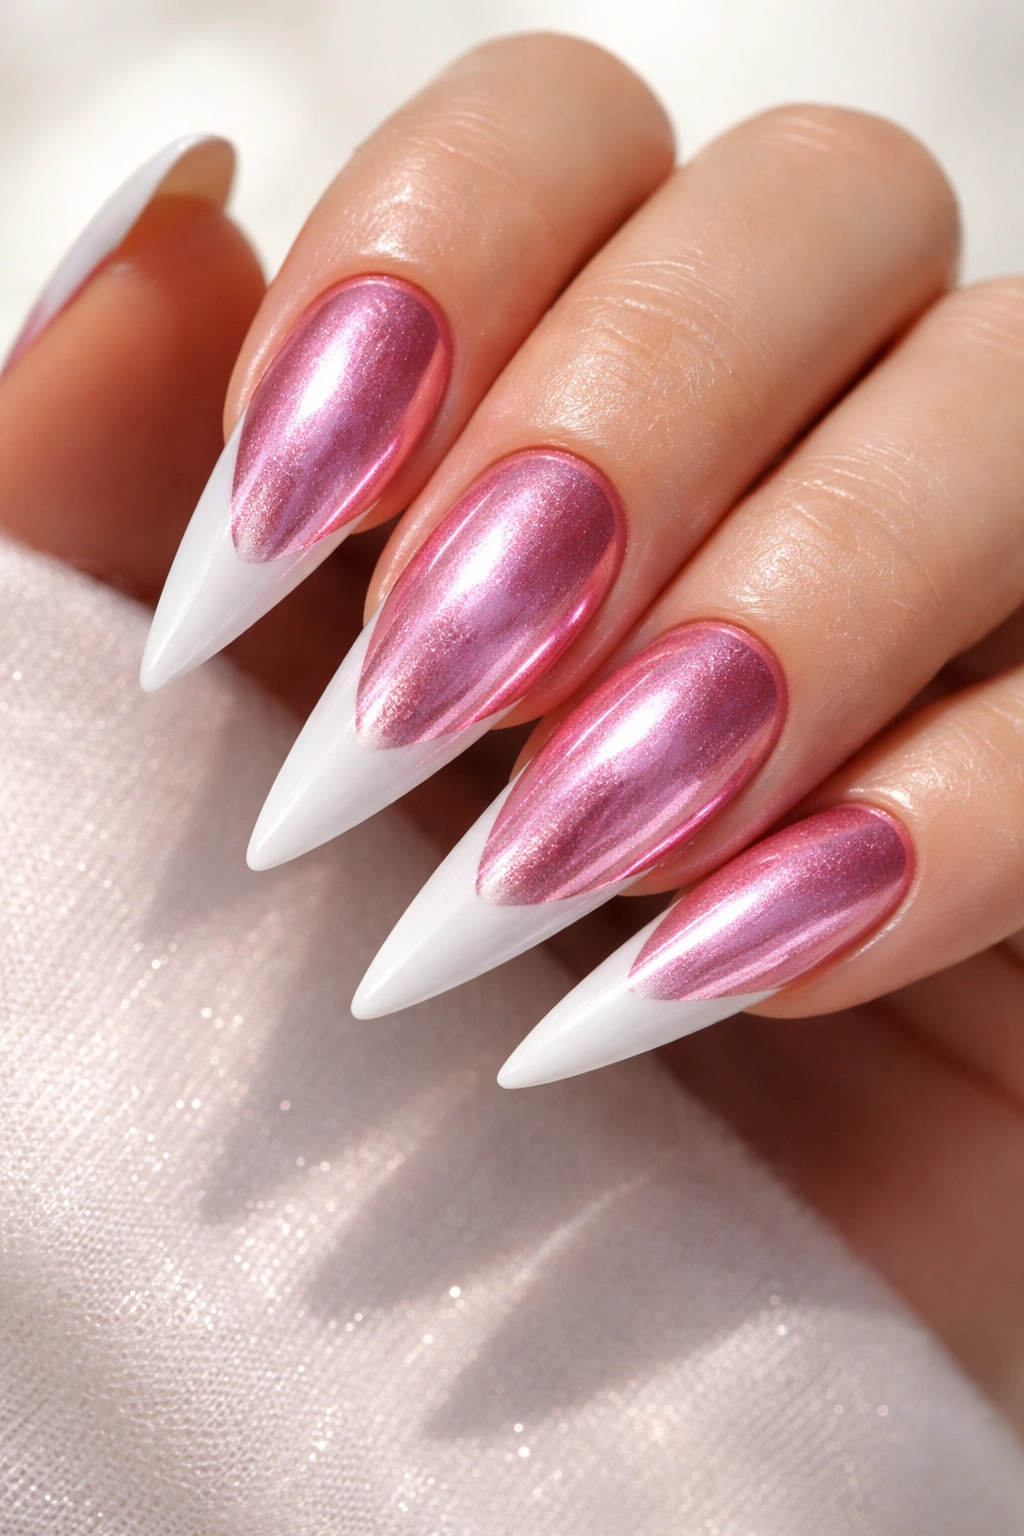
A bright, glossy white tip paired with a pink base that has metallic shimmer creates effortless glamour. The white tip is bold and bright (not soft or muted) while the pink provides richness and depth. The metallic component in the pink adds light-catching dimension that makes the manicure feel expensive and intentional even though it’s relatively simple to execute.
Why Metallics Matter More Than They Sound
A flat, matte pink reads as basic—add a metallic shimmer and suddenly the same design feels luxurious and expensive. The shine catches light at different angles throughout your day, so your nails appear subtly different in different lighting, which keeps the design visually interesting. On stilettos, the length means the metallic shimmer has more surface area to shine.
Application and Refresh Schedule
- Request rose gold or champagne metallic for pink bases (avoid pure gold, which can read as brassy)
- Ask that your technician apply the white tip with slightly thicker coverage than a standard French tip—this makes it brighter and more striking
- This design holds beautifully for 3-4 weeks, though the shine does gradually dull (normal wear and tear)
- A glossy top coat refresh (without a full fill) can restore shine between appointments
9. Pink Stilettos with White Reverse French and Nail Art
A reverse French (also called an inverse French) flips the traditional design—instead of a white tip with a pink base, you have a white base with a thin pink line at the base of the nail where it meets the skin, and then white becomes the dominant color again at the tip. Add delicate nail art (flowers, gems, or designs) in the white zone for extra interest.
Why Reverse French Feels Modern and Fresh
The reverse French was actually an art deco design that’s been revived in contemporary nail art. It feels fashion-forward because it’s less expected than a traditional French tip, and when executed well, it’s genuinely striking. The contrast created by the thin pink line at the base acts as an anchor that grounds the design and prevents it from feeling washed out.
Achieving Clean Execution
- This design absolutely requires precise line work and a steady hand—poor execution looks messy rather than intentional
- The thin pink line at the base should be roughly 1-2 mm thick, not thicker
- White should be bright and opaque, not translucent or yellowed
- Ask your technician to photograph similar designs they’ve completed so you can verify their skill level before committing
10. Soft Pink with Gradient Glitter Fade to Clear Tips
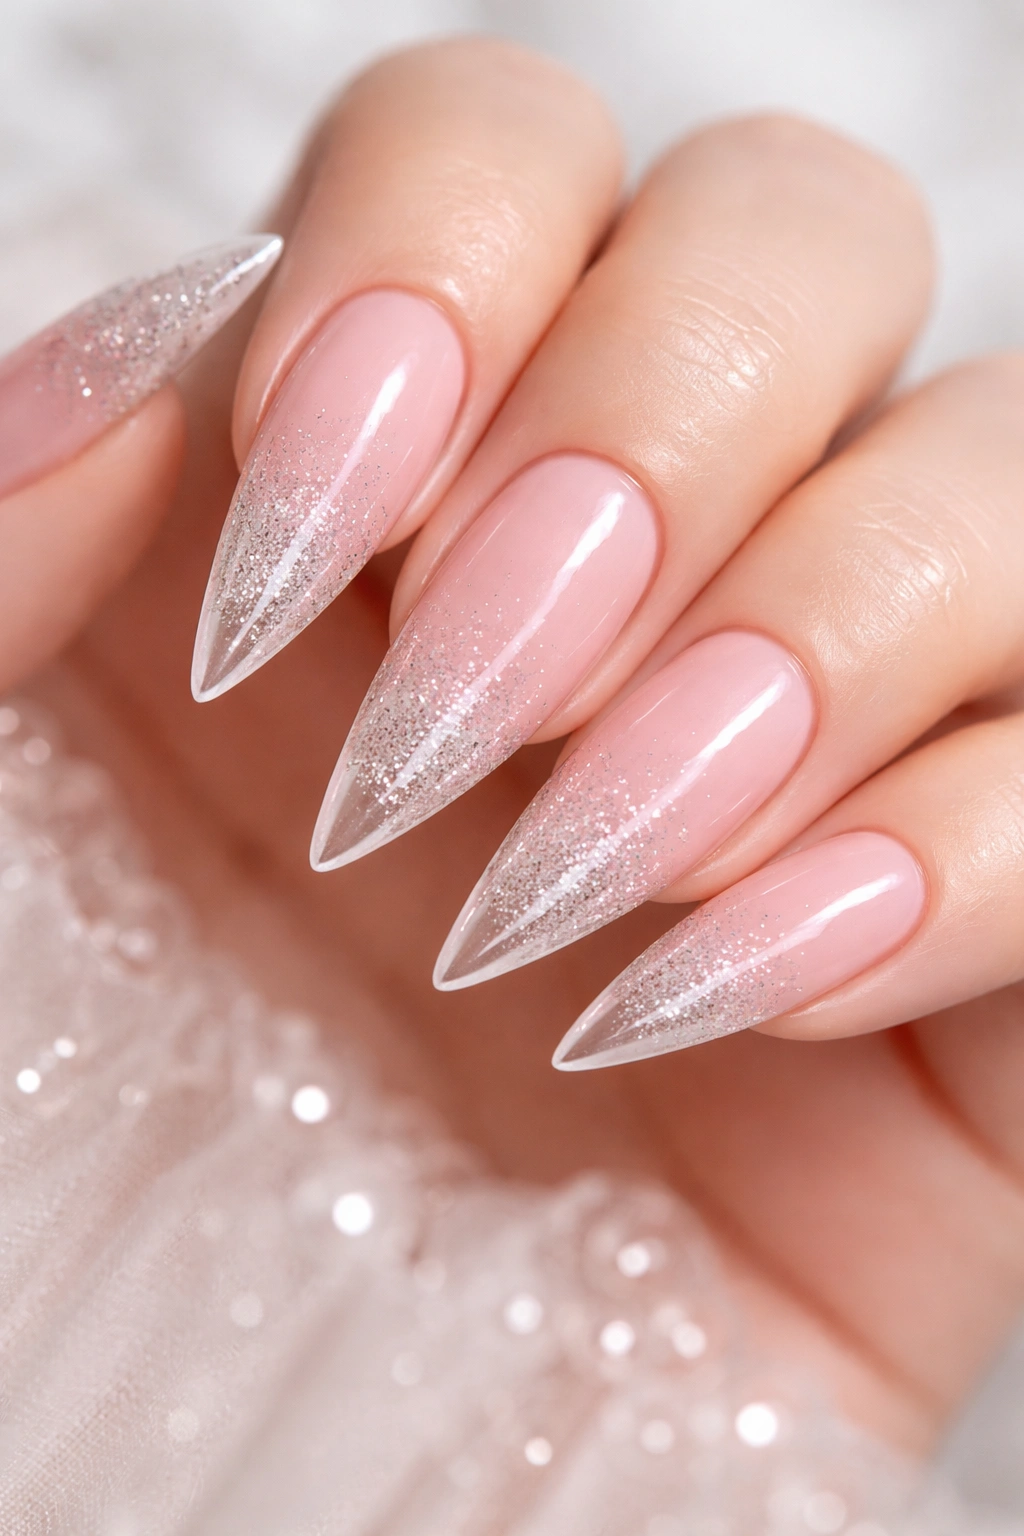
This design uses a pink base with glitter that gradually becomes sparser toward the tip, eventually fading to clear polish on the very point of the nail. The effect is sophisticated rather than over-the-top because the gradient makes it feel intentional and artistic rather than like you simply didn’t finish applying glitter.
The Subtle Elegance of Fading Glitter
Glitter fade works beautifully on stilettos because the gradual transition from densely packed sparkle to completely clear creates movement and dimension along the length of the nail. It reads as intentional design rather than an incomplete manicure, and it’s far more interesting visually than either solid glitter or no glitter at all.
Material Selection and Application
- Request fine or medium-sized glitter, not chunky (chunky glitter fades unevenly and can look patchy)
- Multi-colored glitter (mixing silver, pink, and holographic) fades more smoothly than single-color
- Ask your technician to compress glitter into a clear or translucent topcoat for durability—loose glitter will shed quickly
- This design typically lasts 3 weeks before visible glitter loss along the tip (normal wear)
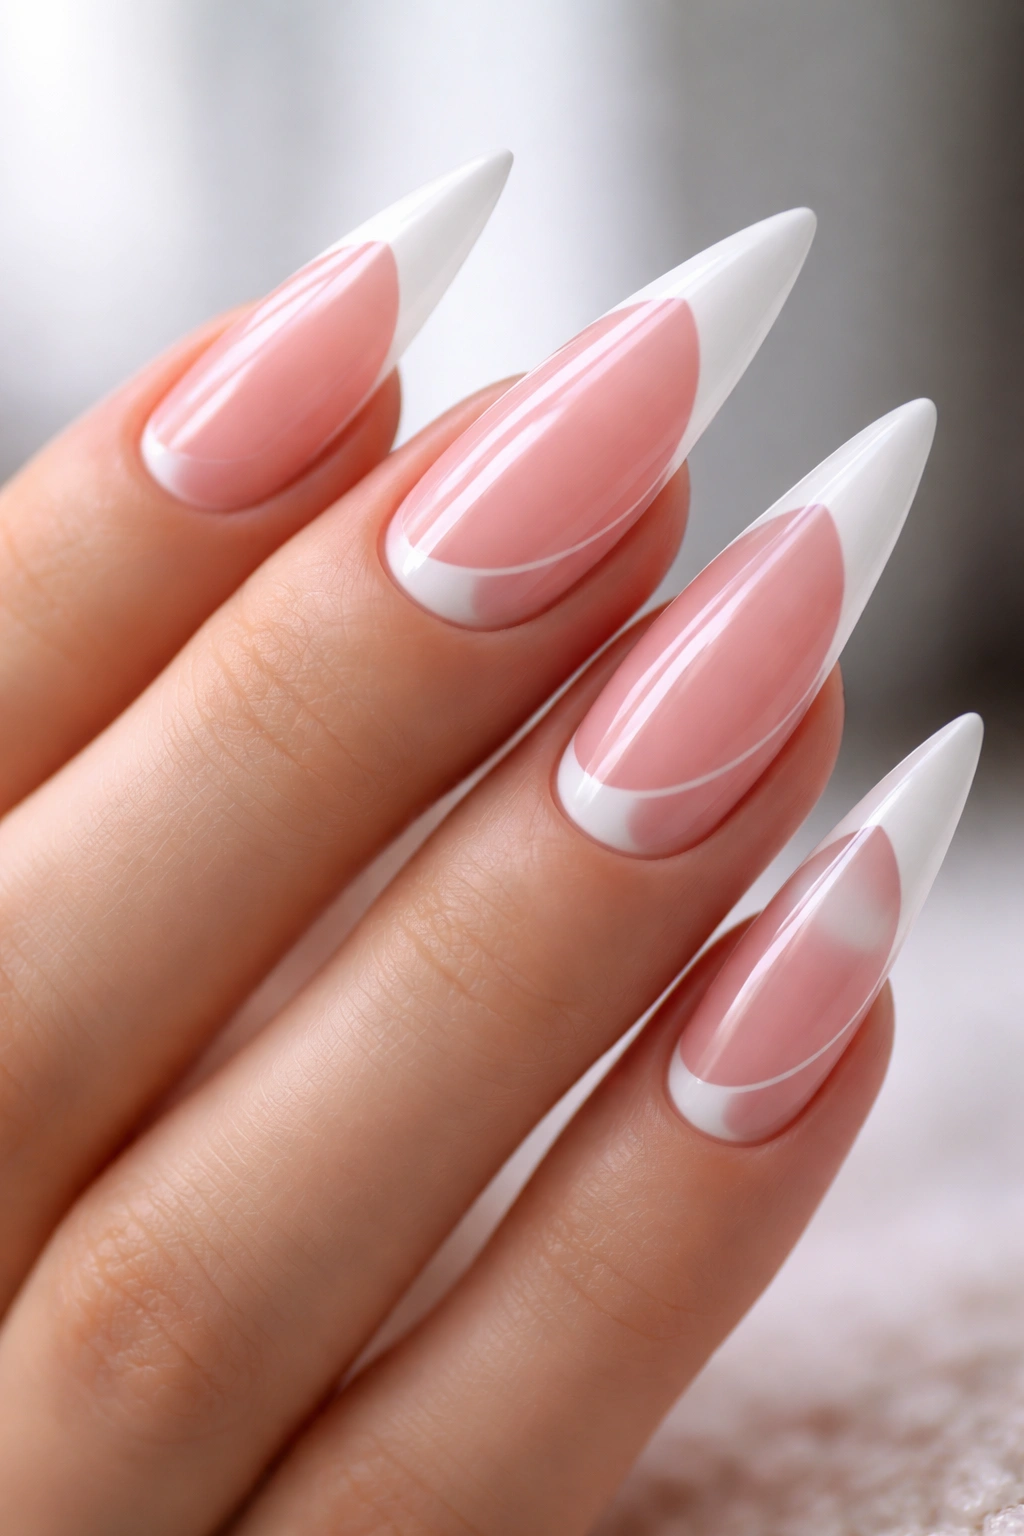
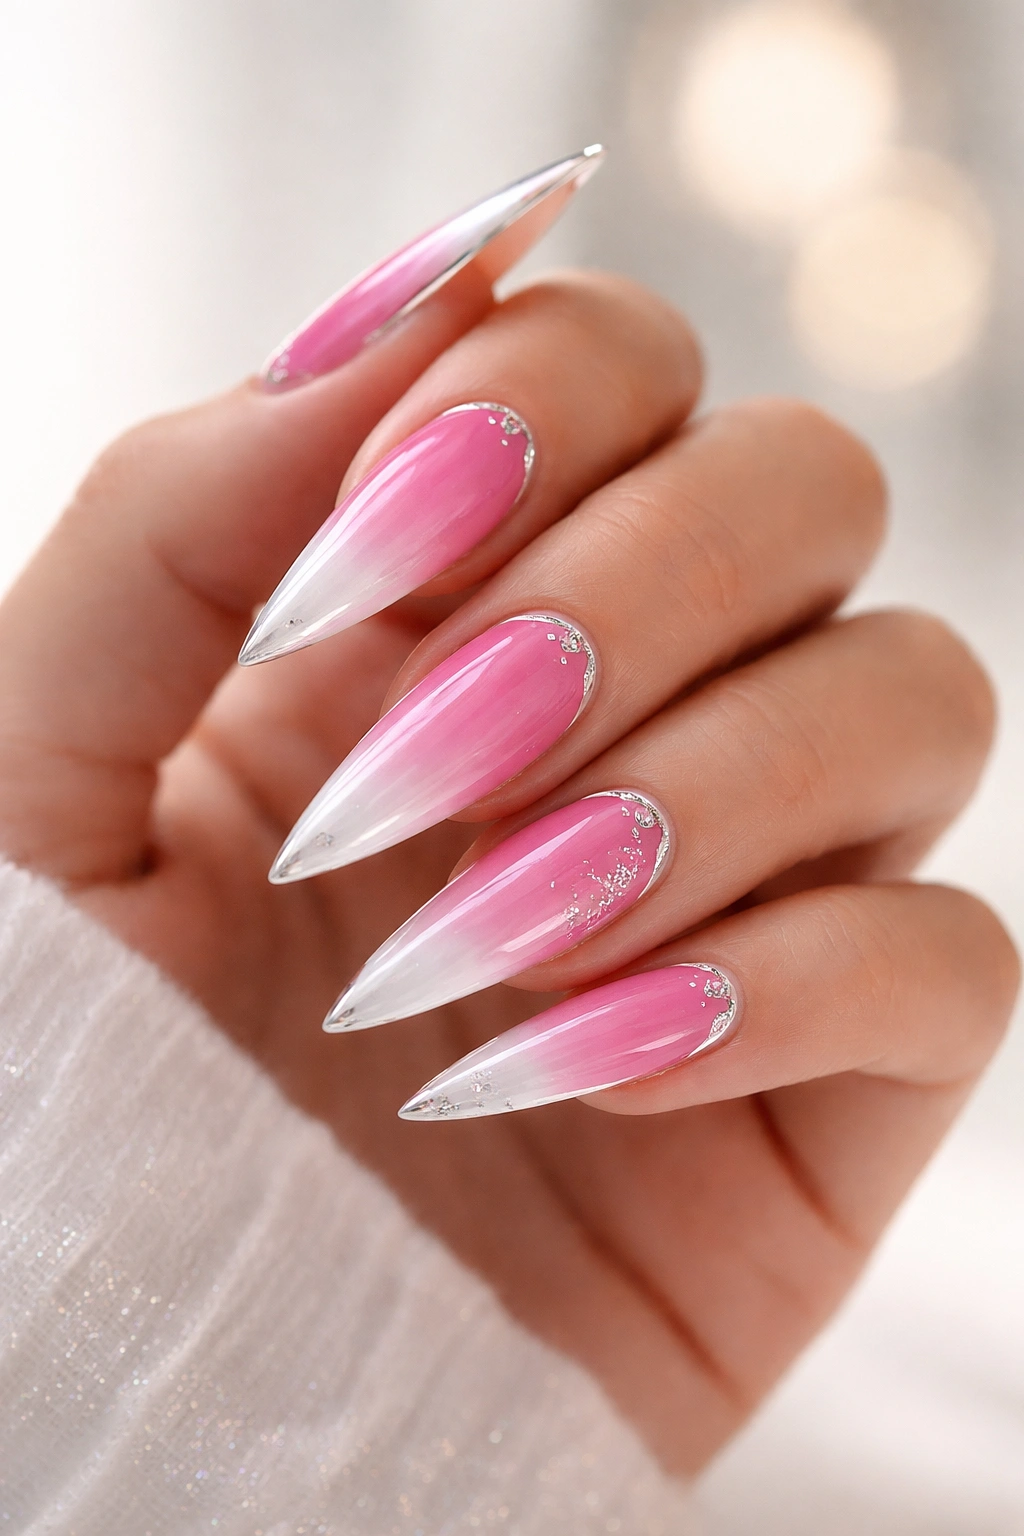
11. French Ombre with Pink to White Gradient Tips
Combining two trendy techniques—French tips and ombre—creates a design that’s both classic and modern. A white base transitions into pink at the very tip, so the tip itself becomes a gradient of white-to-pink rather than solid white. The effect is like a softer, more artistic version of the traditional French manicure.
Why Combining Techniques Feels Intentional
When two popular nail techniques are combined thoughtfully, the result feels editorial and design-forward rather than just trend-stacking. The pink-to-white gradient in the tip area creates a focal point that draws the eye, while the overall effect remains elegant enough for professional settings.
Getting the Color Gradient Right
- The gradient in the tip should be subtle, not a harsh line—ask your technician for blending rather than a stripe
- Start with white closest to the tip line and let pink gradually increase toward the very point
- The pink tone should match a pink you’ve requested elsewhere (or specified as your preference)—avoid having your technician guess
- This design holds beautifully for 3-4 weeks, though the gradient line becomes more obvious with growth (which is actually visually interesting)
12. Bold Pink Nails with Negative Space White Geometric Cutouts
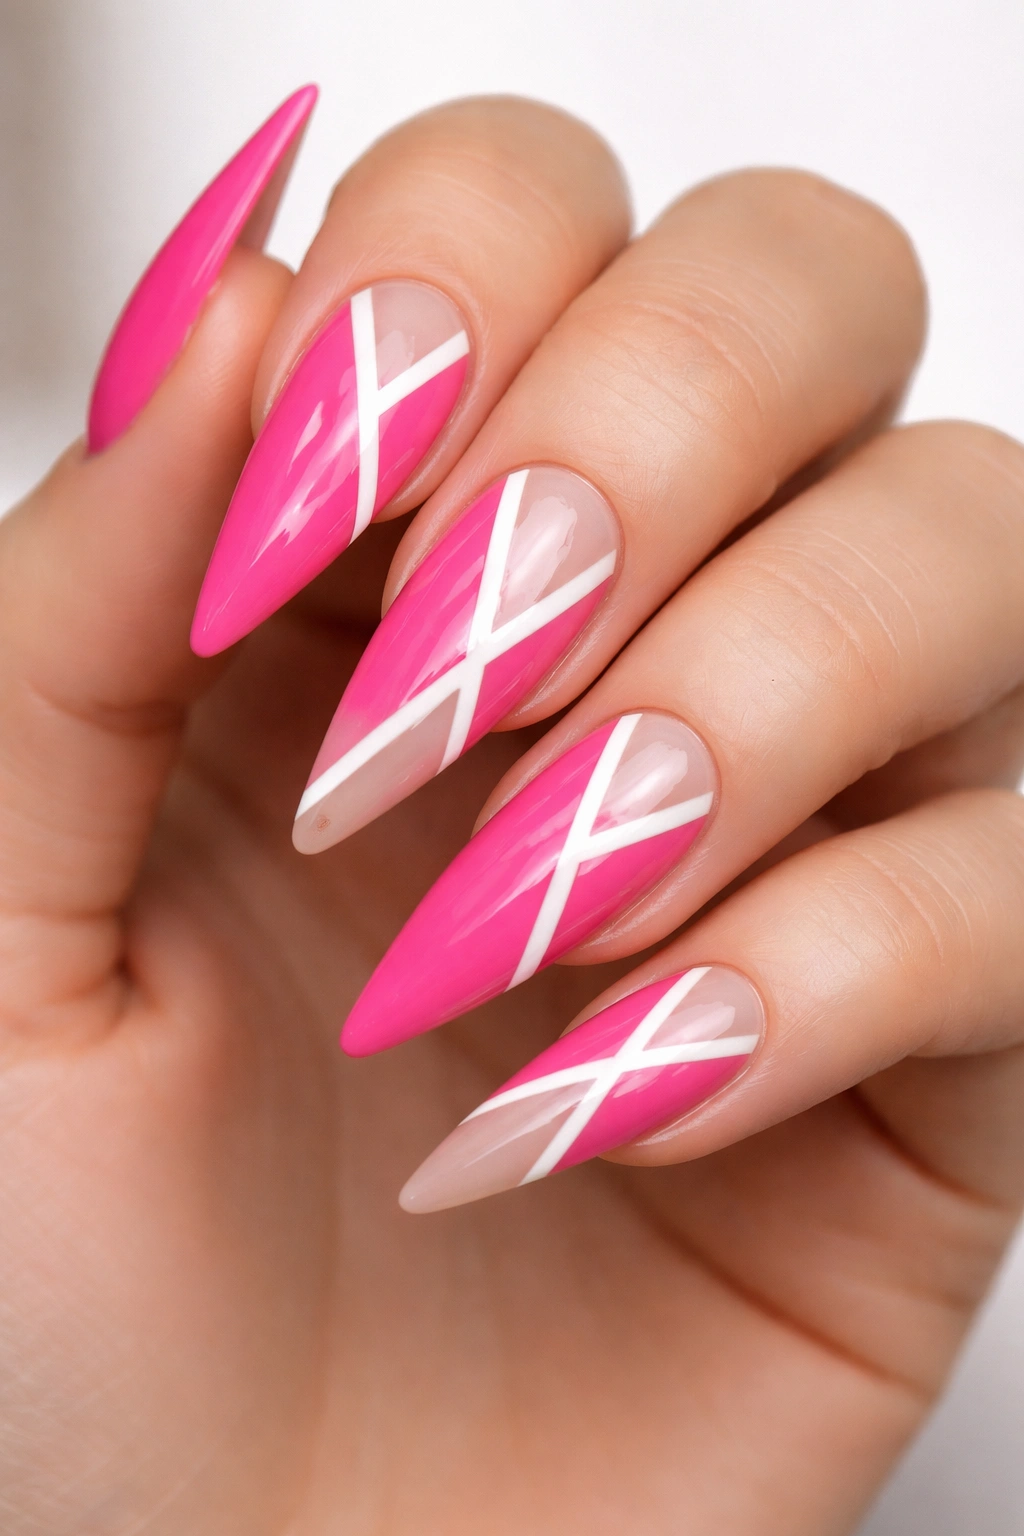
Instead of applying white polish, this design uses negative space (bare nail) to create geometric shapes—triangles, stripes, or abstract patterns—across a bold pink base. The natural nail showing through creates contrast without adding extra polish, and the geometric precision makes it feel intentional and modern.
The Bold Aesthetic of Negative Space Geometry
Geometric negative space on stilettos creates an almost architectural quality. The pointed tip of the stiletto can become the apex of a triangle cutout, or the negative space can be organized as vertical stripes running the length of the nail. Either way, the clean lines and contrast between pink and natural nail read as sophisticated and bold without being gaudy.
Technical Execution Matters Hugely
- This design requires expert line work and precise tape placement to achieve clean edges
- The natural nail showing through will reveal any unevenness in your nail bed, so this isn’t ideal if you have ridged or uneven nails
- Growth becomes visible quickly with this design (roughly 2-3 weeks), so plan for regular fills if you love this look
- Topcoat over the pink is essential (the exposed nail stays bare), so ensure your technician applies a quality glossy topcoat
13. Blush Pink with Subtle White Pearls and Matte Finish
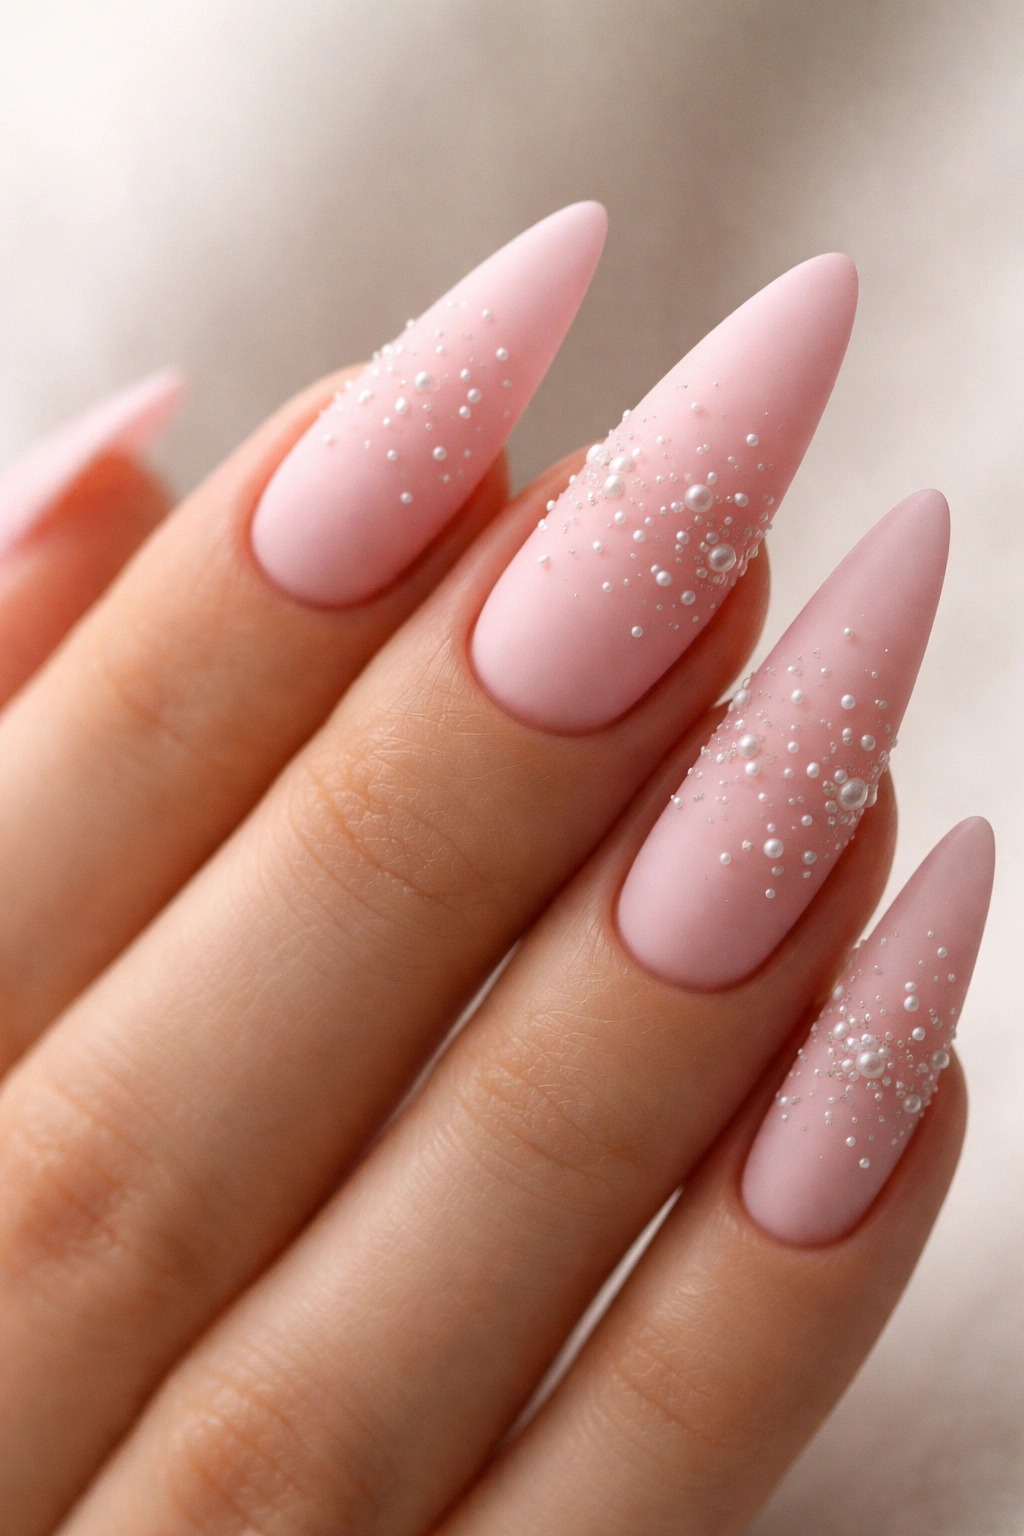
A matte topcoat on a blush pink base creates a velvety, sophisticated aesthetic, and tiny white pearls scattered across (typically denser toward the tip) add just enough dimension to keep the design from feeling completely flat. The matte finish is having a major moment in nail art because it reads as fashion-forward and intentional.
Why Matte Finishes Elevate Delicate Designs
A glossy topcoat on a soft, muted design can make it feel washed-out or boring, whereas a matte topcoat adds sophistication and texture. Matte nails catch light differently than glossy ones, creating subtle variation in tone that’s visually interesting. The white pearls pop more dramatically against matte than they would against glossy.
Care and Maintenance of Matte Nails
- Matte topcoats are slightly more prone to chipping than glossy, so expect this design to remain pristine for about 2-3 weeks before touch-ups are needed
- Avoid harsh soaps and cleaning products while your manicure is fresh—matte topcoats set more slowly than glossy
- Moisturize your cuticles regularly with matte nails because the matte texture can draw attention to dry skin
- If you want to refresh just the topcoat (keeping the design underneath), ask your technician if they can reapply matte topcoat alone—saves you a full reapplication
14. Gradient Pink to White Ombre with Chrome Accent Details
This design blends a full ombre (starting deep pink at the base, fading to white at the tip) with chrome accents—typically a thin chrome line at the cuticle or small chrome details scattered throughout the gradient. Chrome creates a metallic, almost liquid mercury effect that catches light in extraordinary ways.
Why Chrome Creates Visual Drama
Chrome is the most light-reflective nail finish available. It creates an almost three-dimensional effect that’s impossible to achieve with regular shimmer or glitter. On a stiletto with an ombre base, chrome accents add luxury and edge without overwhelming the delicate gradient underneath.
The Chrome Application and What to Know
- Chrome powder requires careful application and specific technique—not all nail techs are experienced with it, so verify your technician’s skill level
- Chrome looks best applied to gel or acrylic (not on natural nails), and it requires a very smooth, sealed base underneath
- Ask for chrome accents to be placed strategically (perhaps a thin line at the cuticle or small details) rather than covering the entire nail—this balances the delicate ombre underneath
- Expect this design to last 3-4 weeks, though chrome can gradually dull with heavy wear (normal, and easily refreshed with a new application)
Final Thoughts

Pink and white stiletto nails offer nearly unlimited design possibilities because the combination is inherently flattering and the elongated shape gives you actual canvas space to work with. Whether you’re drawn to soft, romantic aesthetics or bold, graphic designs, there’s a pink and white stiletto idea that matches your personal style and the occasions you need it for.
The most successful manicure is one where you actually love seeing your hands throughout the day. That means choosing a design that feels authentically like you—not just what’s trending—and finding a technician whose skill level matches your design ambitions. Take time to review their portfolio, communicate your vision clearly with reference photos, and don’t hesitate to speak up during the appointment if something isn’t looking like you imagined. Your hands deserve to feel as polished and intentional as the designs on your nails.
