

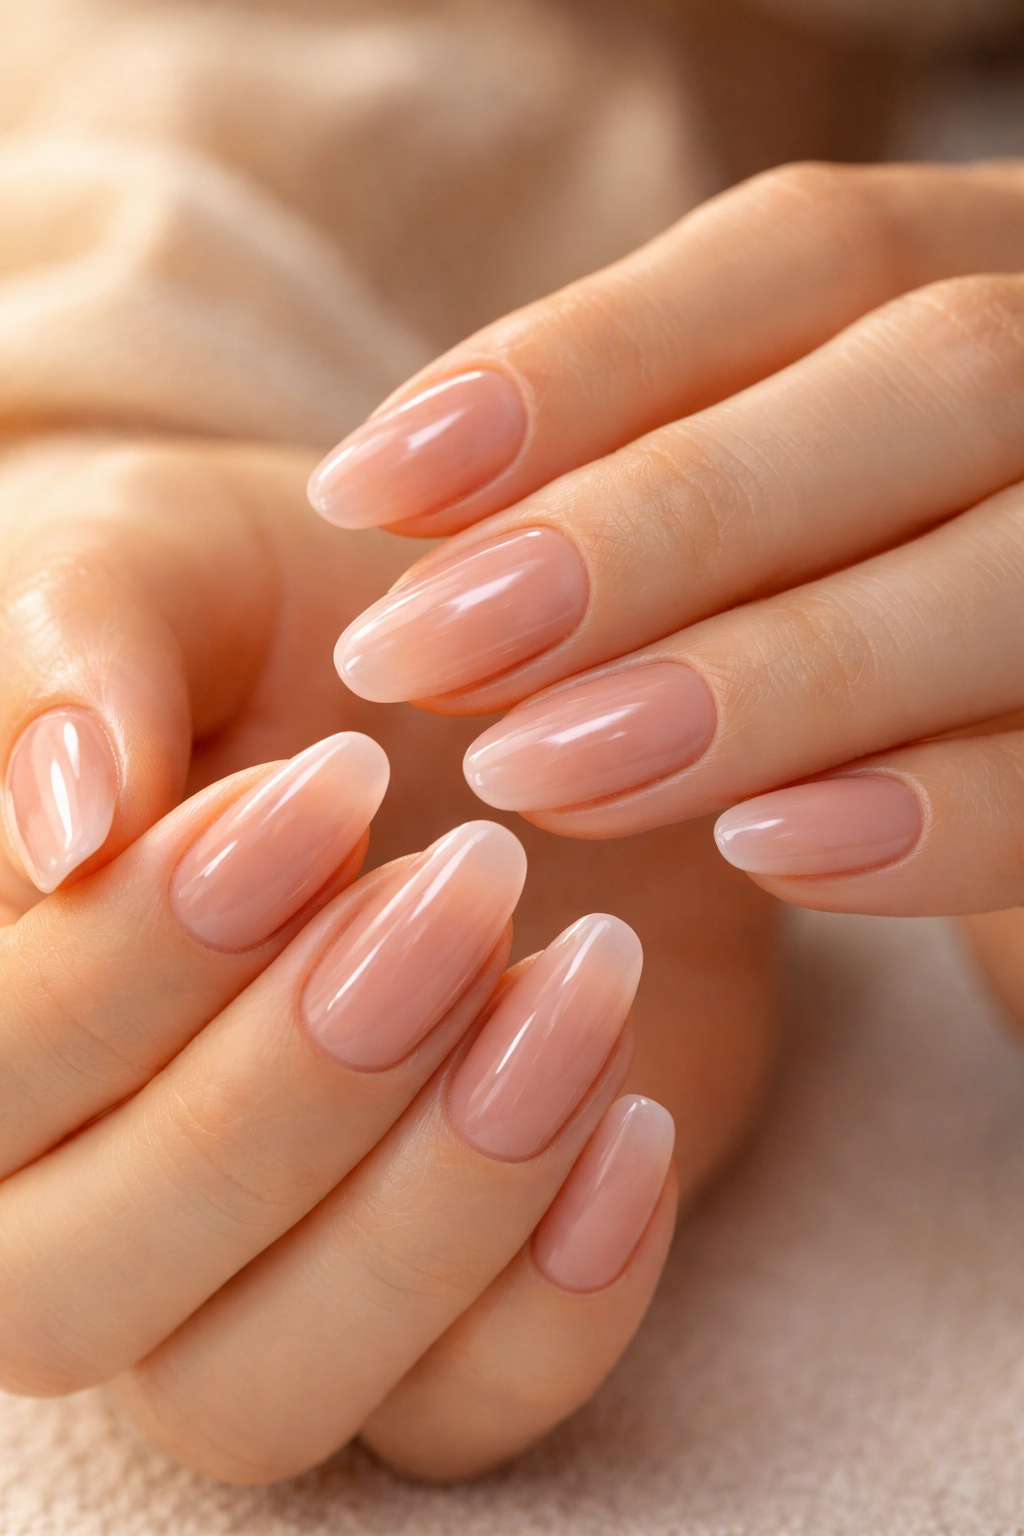
Press-on nails have seriously leveled up from the chunky plastic sets you might remember from the ’90s. These days, they’re sleek, customizable, and when applied correctly, can rival a salon manicure for a fraction of the price. But here’s the catch—getting them to stick around for more than a few days requires more than just peeling and pressing.
You’ve probably experienced the frustration of having a perfectly good press-on pop off mid-coffee or during an important meeting. Maybe you’ve even lost one while reaching into your purse, never to be seen again. The good news? With the right prep, application technique, and aftercare, you can make your press-ons last anywhere from one to two weeks—sometimes even longer.
The secret isn’t just about buying expensive nails or premium glue (though quality matters). It’s about understanding how adhesive actually bonds to your natural nails and what you can do to maximize that connection. Think of it like painting a wall—you wouldn’t skip the primer and expect the paint to stick perfectly, right? Same concept applies here.
Why Nail Prep Is Non-Negotiable
Most people rush through prep because they’re excited to see the finished look. That’s exactly why their nails don’t last. Proper preparation creates the foundation for everything else, and skipping even one step can cut your wear time in half.
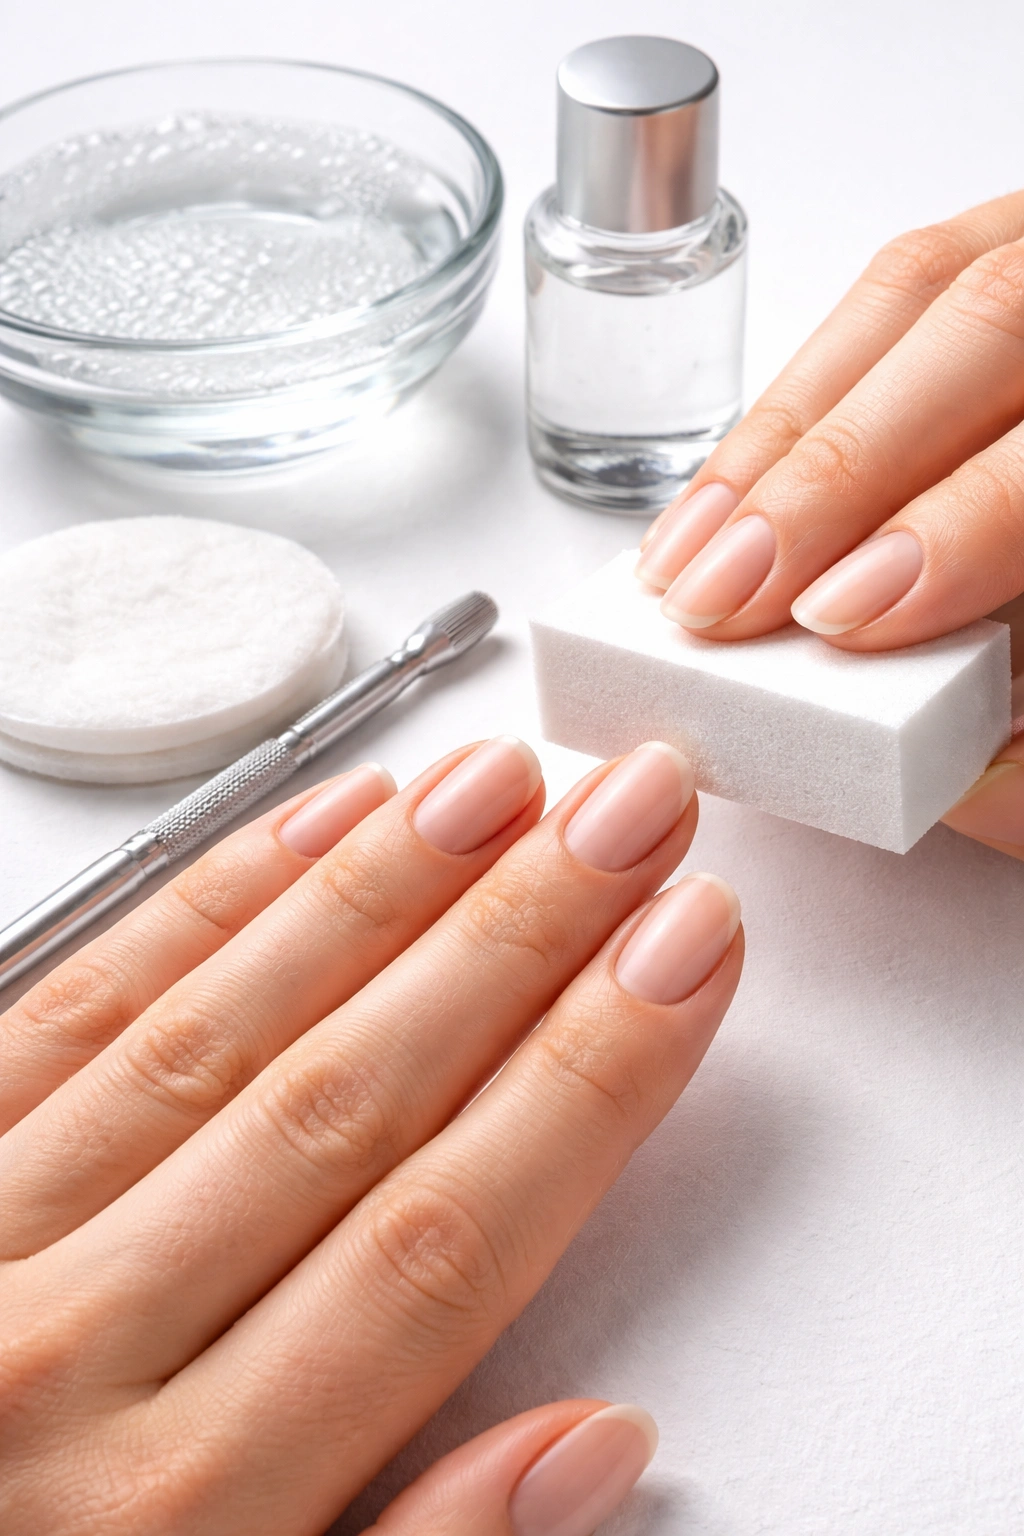
Start by removing any existing polish with acetone-based nail polish remover—not the gentle, acetone-free kind. You need the strong stuff because it strips away oils that naturally sit on your nail surface. These oils are your press-ons’ worst enemy. Even if your nails look clean, there’s likely a thin layer of natural oil that’ll prevent the glue from forming a solid bond.
Next, wash your hands thoroughly with soap and water. Get underneath your nails too. Any dirt, lotion residue, or hand cream will compromise adhesion. Dry your hands completely before moving forward—moisture is another adhesion killer.
Buffing Creates Texture
Here’s where things get interesting. Your natural nails have a smooth, shiny surface that glue actually has trouble gripping. You need to create some texture. Grab a nail buffer (the foam block kind works great) and gently buff the entire surface of each nail until the shine disappears.
You’re not trying to thin out your nails or make them rough. Just create a slightly matte finish that gives the glue something to grab onto. Think of it like lightly sanding wood before staining it—same principle.
After buffing, there’ll be nail dust everywhere. Wipe each nail with rubbing alcohol or an alcohol prep pad. This removes the dust and further dehydrates the nail surface. Some press-on kits include these pads, but if yours doesn’t, pick up a box from any drugstore. This step makes a noticeable difference.
Don’t Skip Cuticle Prep
Push back your cuticles using a wooden cuticle stick or a metal pusher. When your cuticles are covering part of your nail bed, the press-on can’t sit flush against your nail. That creates gaps where water and air can get in, leading to lifting.
Soak your fingertips in warm water for a few minutes first if your cuticles are stubborn. This softens them and makes pushing them back way easier. Just make sure you dry your nails completely afterward and wipe them down with alcohol again.
Trim your natural nails short. You don’t want much of your natural nail extending beyond your fingertip. When there’s too much length underneath the press-on, it creates pressure points that can cause the fake nail to pop off unexpectedly.
Choosing Press-Ons That Actually Fit
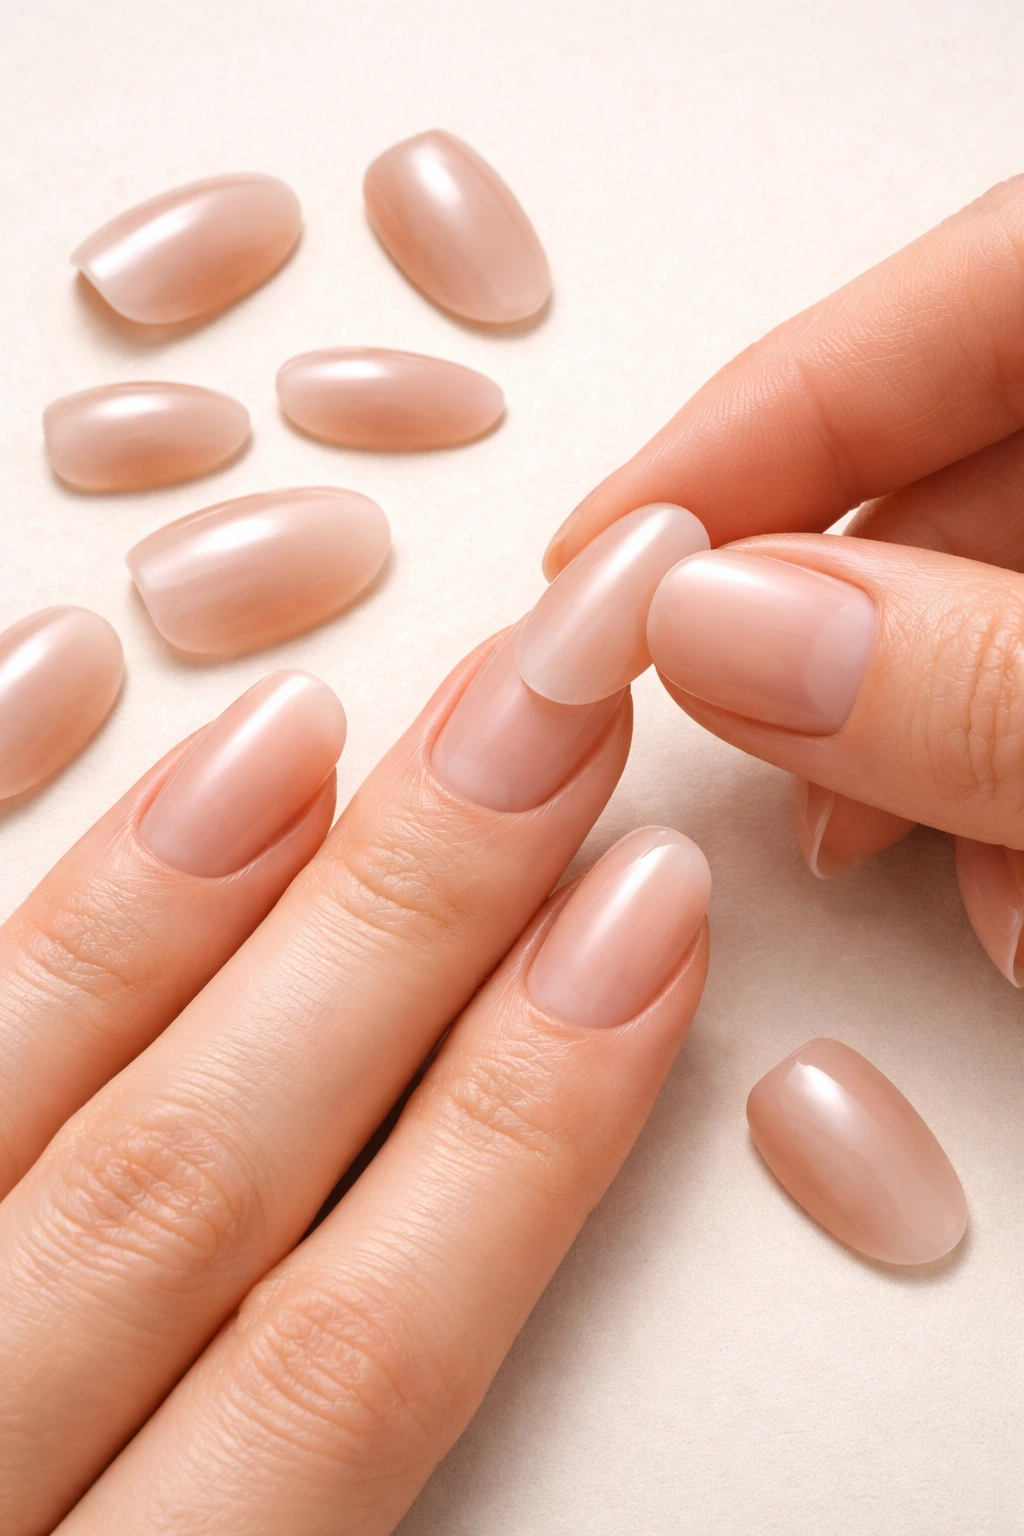
Size matters more than you might think. A press-on that’s even slightly too big or too small will lift prematurely. Most kits come with multiple sizes—usually around 24 nails in various widths so you can find the perfect match for each finger.
Hold each press-on over your natural nail to check the fit. The press-on should cover your nail completely from sidewall to sidewall without overlapping onto your skin. If it’s too wide, the edges will lift when you bend your fingers. Too narrow, and you’ll have visible gaps on the sides that look unnatural and allow water in.
Pay attention to the curve of the nail too. Your natural nails have what’s called a C-curve—the arch from one side of the nail to the other. Press-ons have this curve too, and it needs to match yours. If you try to force a deeply curved press-on onto a flatter nail bed, it’ll pop up in the middle. When the curve matches, the nail will lay flat without much pressure.
When Size Isn’t Perfect
Sometimes you’ll find yourself between sizes. Go with the slightly larger option and file it down. Use a nail file to gently shape the sidewalls of the press-on until it fits your nail bed perfectly. Take your time with this—a good fit is worth the extra few minutes.
File the bottom edge too if needed. The press-on should sit right up against your cuticle without actually touching or overlapping onto it. If there’s a gap, your manicure will look grown out immediately. If it’s pressing into your cuticle, it’ll be uncomfortable and won’t adhere properly.
Lay out all your nails in order before you start gluing. Place them thumb to pinky for both hands so you’re not scrambling to find the right size with wet glue on your fingers. This simple step makes application so much smoother.
The Double Glue Method Changes Everything
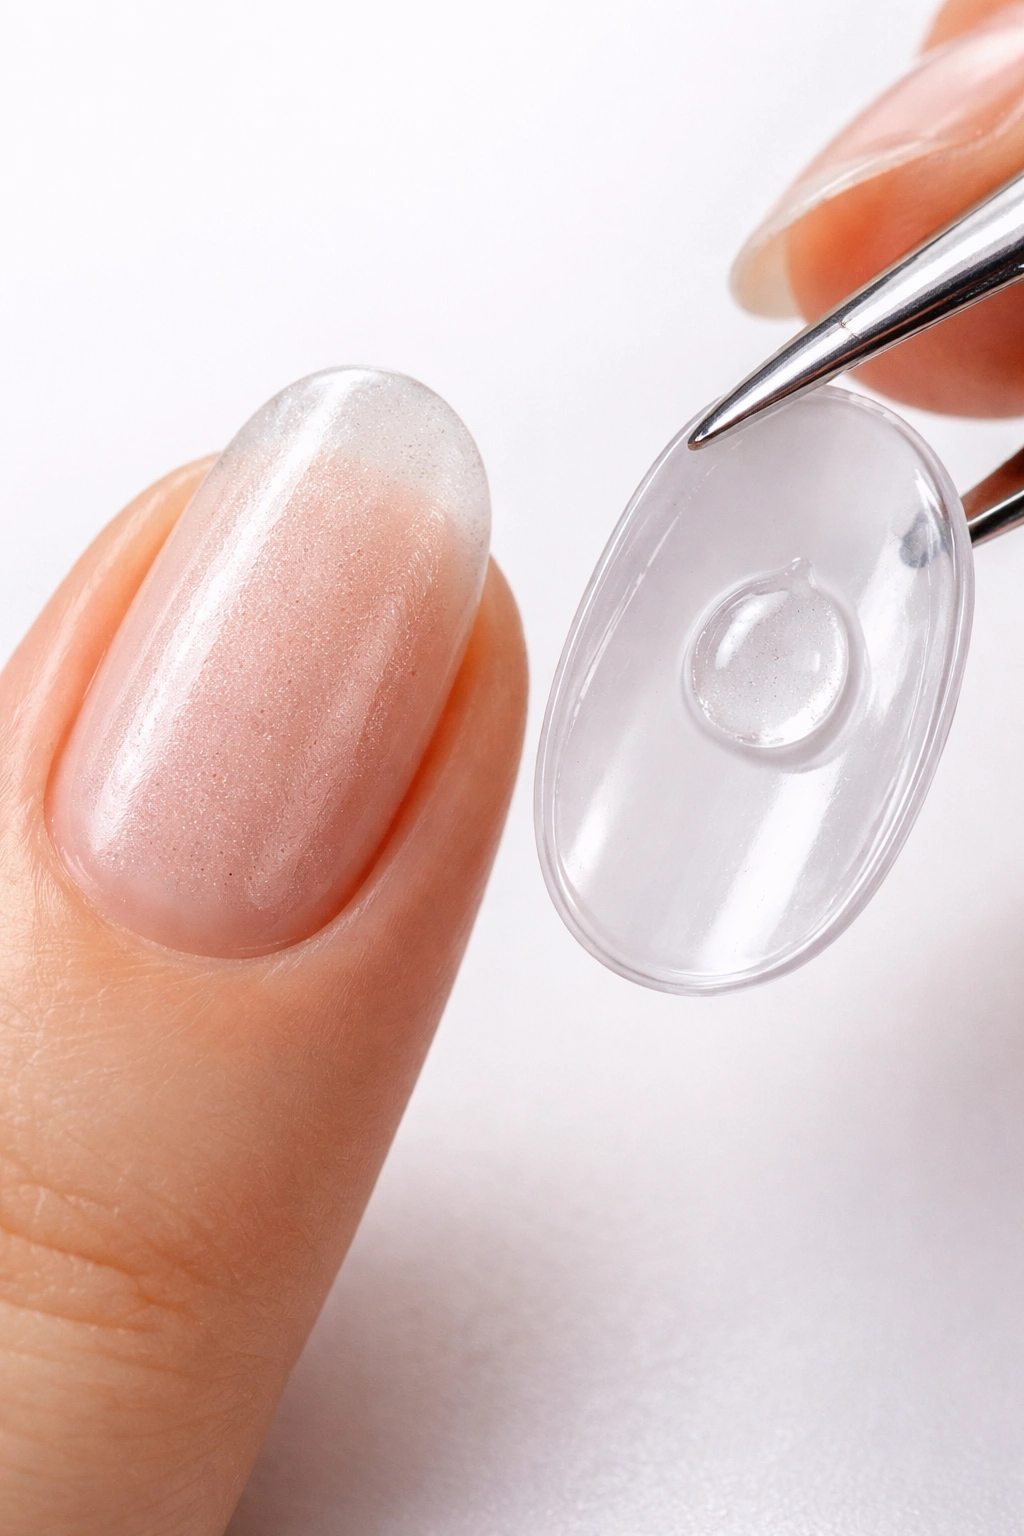
Most people apply glue to either the press-on or their natural nail—not both. That’s mistake number one. The double glue technique creates a much stronger bond and can easily double your wear time.
Here’s how it works: Apply a thin, even layer of nail glue to your entire natural nail surface. Don’t skimp, but don’t go overboard either—you want complete coverage without pools of glue. Then, add another drop of glue to the center of the press-on nail’s underside.
The glue on your natural nail should cover from cuticle to free edge and sidewall to sidewall. When you press the fake nail down, these two layers of glue will sandwich together, creating an incredibly strong bond. Any excess that squeezes out from the sides is normal—you can clean that up before it dries.
Quality Glue Makes a Difference
Not all nail glues are created equal. The tiny bottles that come with budget press-on kits often aren’t strong enough for extended wear. Investing in a high-quality nail glue with a brush applicator makes application easier and results more reliable.
Look for glues specifically designed for press-on nails or nail tips. These formulas dry quickly and create flexible bonds that move with your nails instead of becoming brittle and cracking. Some popular options include professional nail glues from beauty supply stores.
The applicator matters too. Brush-on glues give you more control than squeeze bottles, especially when you’re working on your non-dominant hand. You can apply a thin, even layer without the glue running everywhere or creating thick spots that take forever to dry.
Application Technique That Actually Works
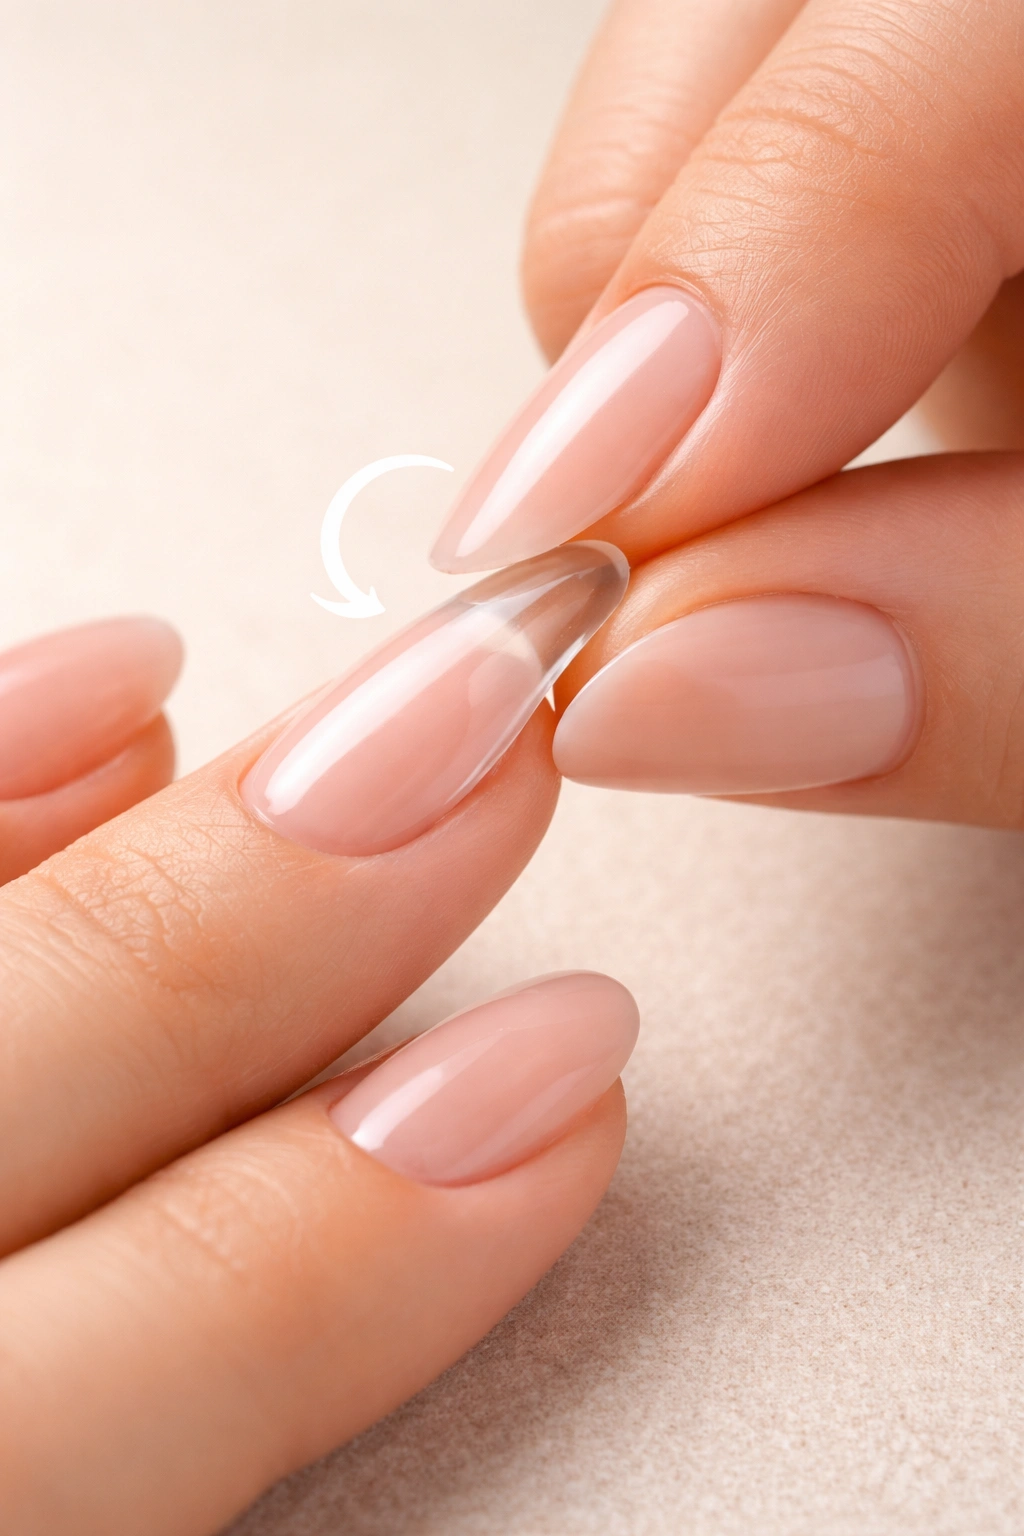
When you’re ready to apply each nail, work one at a time. Don’t try to rush through and do multiple nails before the glue sets. Place the press-on at a 45-degree angle against your cuticle line, then press down and roll it onto your nail bed toward the tip.
This rolling motion helps push out air bubbles, which are a major cause of premature lifting. Air bubbles create weak spots in the adhesive bond. When you press the nail straight down, you’re more likely to trap air underneath.
Once the nail is in position, press down firmly across the entire surface. Use your thumb to apply pressure, holding for at least 30 to 60 seconds. Don’t rush this part. The longer you hold, the better the initial bond. Some people hold each nail for a full minute to ensure maximum adhesion.
Pay Extra Attention to the Edges
The edges and tip of the press-on are where lifting usually starts. After pressing the entire nail, go back and apply extra pressure around the perimeter. Press down along each sidewall and across the free edge with focused pressure for another 10 to 15 seconds.
If you see any glue oozing out from the sides, wipe it away immediately with a cotton swab or paper towel dampened with a tiny bit of acetone. Once nail glue dries on your skin, it’s a pain to remove and can pull at your cuticles.
Pull your fingertip pad back slightly while the glue is drying. Sometimes the skin on your fingertip can accidentally get glued to the underside of the press-on nail. This is uncomfortable and can cause the nail to lift when you let go.
The First 24 Hours: Your Critical Window
The hour immediately after application is crucial. Keep your hands completely dry during this time. That means no hand washing, no showering, and definitely no swimming. Water can seep into the glue before it’s fully cured, weakening the bond right from the start.
Even after that first hour, take it easy for the rest of the day. Avoid submerging your hands in water as much as possible for the first 24 hours. This gives the adhesive time to fully cure and reach maximum strength. Think of it like letting concrete set—it needs time to harden properly.
Apply your press-ons at night before bed if you can. This gives them several hours to cure while you’re sleeping and not using your hands. By morning, the bond will be significantly stronger than if you’d applied them in the afternoon and immediately started texting, typing, or doing dishes.
Top Coat for Extra Protection
Once your press-ons have been on for an hour or two, apply a layer of clear top coat. This seals the edges where the press-on meets your natural nail and adds an extra layer of protection against water and wear. It also makes the whole manicure look more cohesive and polished.
Reapply top coat every few days to maintain that fresh-from-the-salon shine and reinforce the seal around the edges. This simple step can add several days to your wear time. Use a quick-dry top coat to avoid smudging or denting the finish.
Daily Habits That Make or Break Your Mani
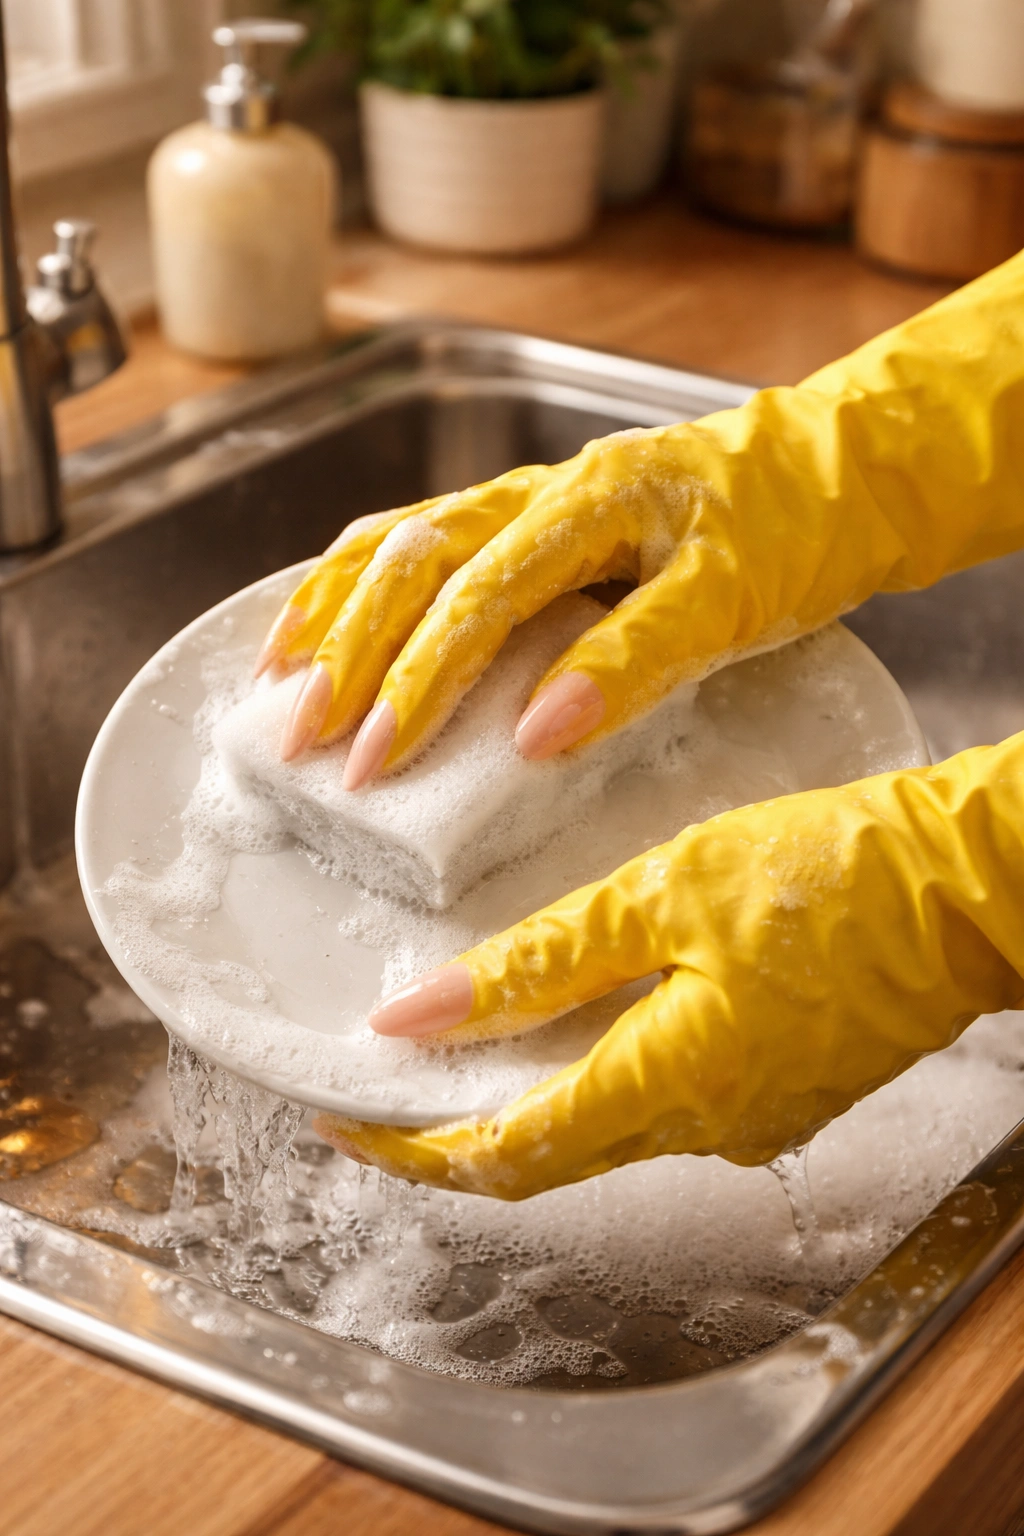
Wearing gloves isn’t just for your grandma. When you’re washing dishes, cleaning, or doing anything that involves prolonged water exposure, rubber gloves are essential. Water is the number one enemy of press-on nails because it softens the glue and seeps underneath the nail, causing it to lift.
Hot water is even worse than cold. The heat makes the glue more pliable, and when combined with moisture, it’s basically a recipe for nails popping off. Keep a pair of dishwashing gloves under your sink and actually use them. Your manicure will thank you.
Swimming presents a unique challenge because you’re submerging your hands for extended periods. If you know you’ll be swimming, maybe plan your press-on application for after your beach day or pool party. If that’s not an option, apply an extra thick layer of top coat around the edges before swimming and reapply afterward.
Your Nails Aren’t Tools
Opening soda cans, peeling off stickers, scratching off labels—these everyday actions put serious stress on press-on nails. Use the pads of your fingers instead of your nail tips. Grab a coin for opening cans, use scissors for stickers, and find an actual tool for anything that requires prying or scraping.
When you use your nails as tools, you’re applying pressure in ways they’re not designed to handle. This can break the glue seal, cause the press-on to crack, or snap the nail off completely. Being mindful of how you use your hands is one of the easiest ways to extend wear time.
Typing can also be tough on press-ons, especially if you have longer nails. Learn to type with the pads of your fingers instead of letting your nails hit the keys directly. It takes a day or two to adjust, but it makes a huge difference in how long your nails last.
Moisturize Smartly
Keep your hands moisturized, but be strategic about it. Apply hand cream to the backs of your hands and your fingers, but avoid getting lotion on your actual press-on nails. Oil and lotion can seep underneath the edges and gradually loosen the adhesive.
Use cuticle oil daily, but apply it carefully around the cuticle area without letting it run under the nail. Healthy, moisturized cuticles make your whole manicure look better and prevent the dry, peeling skin that can catch on your nails and cause lifting.
Common Mistakes You’re Probably Making
Rushing the prep is mistake number one. When you skip buffing or don’t clean your nails properly, the glue simply can’t form a strong bond. It’s like trying to tape something to a greasy surface—it might stick initially, but it won’t last.
Using adhesive tabs for long-term wear is another common error. Those sticky tabs work great for special occasions when you only need your nails to last a few hours or maybe a day. For anything longer, you need actual nail glue. The tabs just don’t have the staying power.
Picking at lifted nails is incredibly tempting but absolutely ruins your chances of salvaging the manicure. Once one nail starts lifting, the instinct is to pull it off. Resist this urge. Instead, clean under the lifted portion, apply a drop of fresh glue, and press it back down.
Size Really Does Matter
Forcing press-ons that don’t fit properly is setting yourself up for failure. A nail that’s too big will never lay flat, no matter how much glue you use. The edges will catch on everything and peel up within days. A nail that’s too small looks obviously fake and doesn’t protect your natural nail underneath.
Take the time to find the right size for each finger. Your nail beds aren’t identical—your dominant hand might have slightly different sizes than your non-dominant hand. What works for your index finger definitely won’t fit your pinky. This matching process seems tedious but makes all the difference.
Curing press-on nails under a UV lamp is a viral trend that nail experts actually advise against. Unless you’re using press-ons specifically designed to be cured (like Gel-X extensions), standard press-ons aren’t compatible with UV gel. The light can’t penetrate opaque press-ons, which means the gel underneath won’t cure properly and can cause skin sensitivities or allergic reactions.
When Things Go Wrong: Quick Fixes
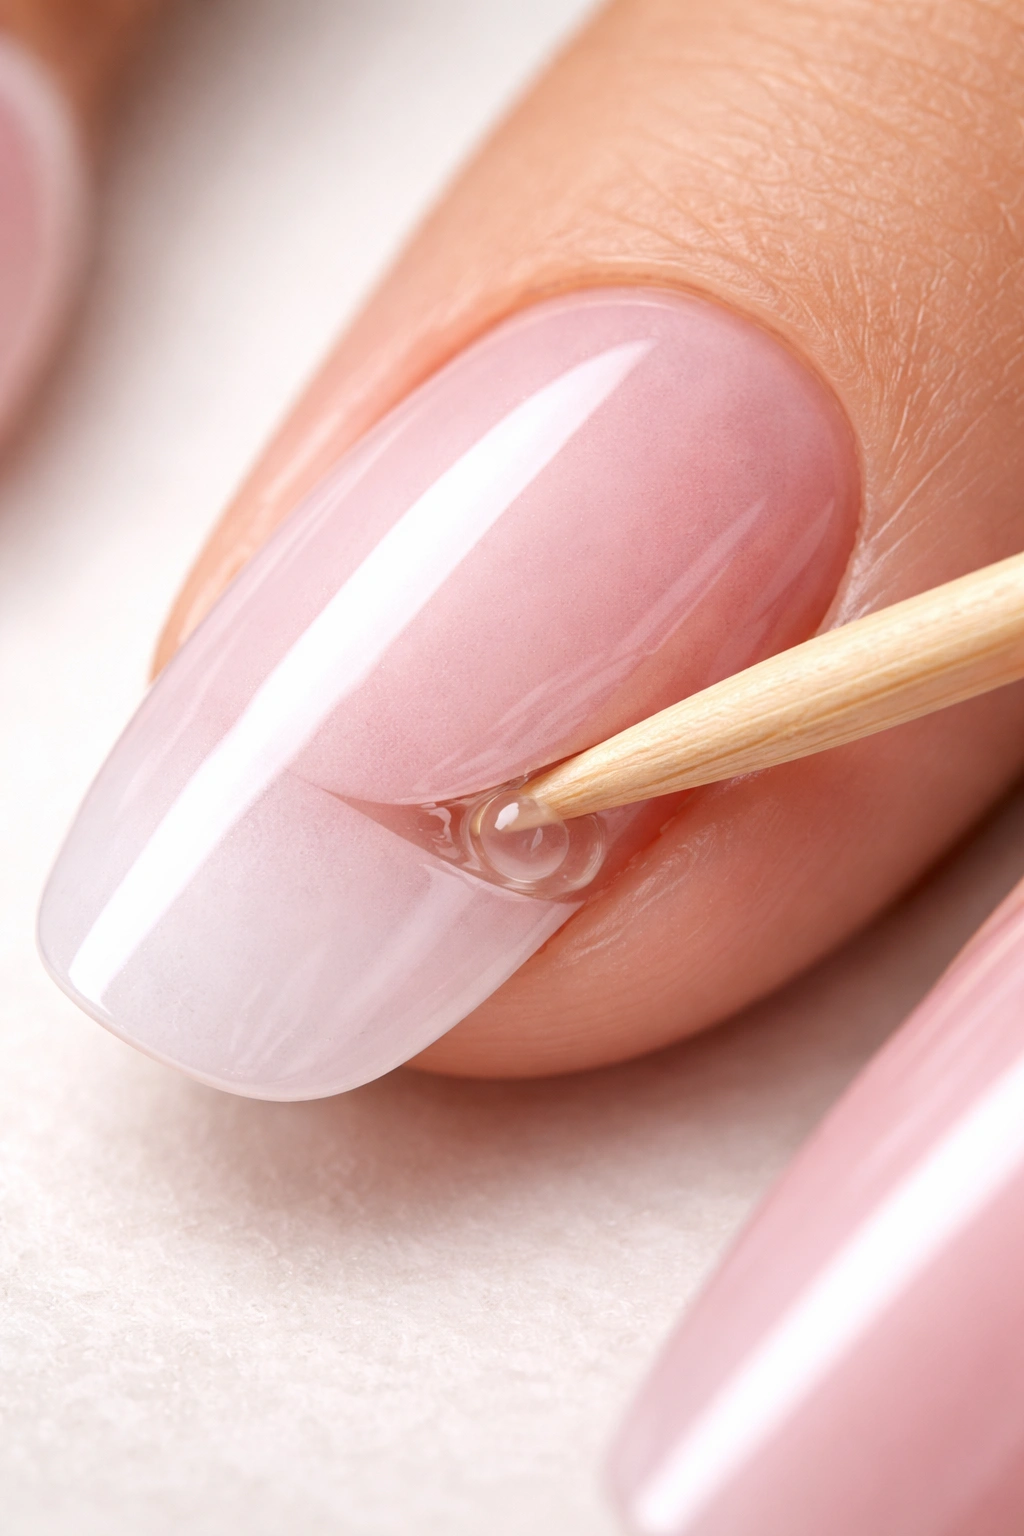
If a nail starts lifting at the edge, don’t panic. Catch it early and you can save it. Gently lift the loose portion just enough to get a toothpick or small brush underneath. Apply a tiny drop of fresh nail glue, then press the nail back down firmly for 30 seconds.
Wipe away any excess glue that squeezes out immediately. You might need to file the edge of the press-on slightly if it’s gotten bent or damaged. A quick swipe with a nail file can smooth things out and prevent further catching.
Carry a mini nail kit in your bag with backup press-ons, a small bottle of nail glue, and a nail file. If a nail pops off completely, you can reapply it on the spot instead of walking around with nine nails and one bare finger. Clean the back of the press-on and your natural nail with a tissue or alcohol wipe if you have one, then reglue.
Signs It’s Time to Remove Them
Press-ons shouldn’t stay on indefinitely. Most experts recommend removing them after 10 to 14 days, even if they’re still holding strong. Beyond that, you risk damaging your natural nails underneath and preventing proper nail health maintenance.
If you notice significant lifting around multiple nails, moisture trapped underneath, or any discoloration, remove them immediately. These are signs that bacteria or moisture has gotten between the press-on and your natural nail, which can lead to infections or nail damage if left unchecked.
Your natural nails also need to breathe occasionally. Giving them a break between press-on applications helps maintain their strength and health. Use this time to apply a nail strengthening treatment and cuticle oil to prep for your next set.
How to Remove Press-Ons Without Destroying Your Nails
Never, ever rip or peel off press-on nails. This is the fastest way to damage your natural nails. When you forcefully pull off a press-on, you’re taking layers of your natural nail plate with it. Those keratin layers are what keep your nails strong and healthy.
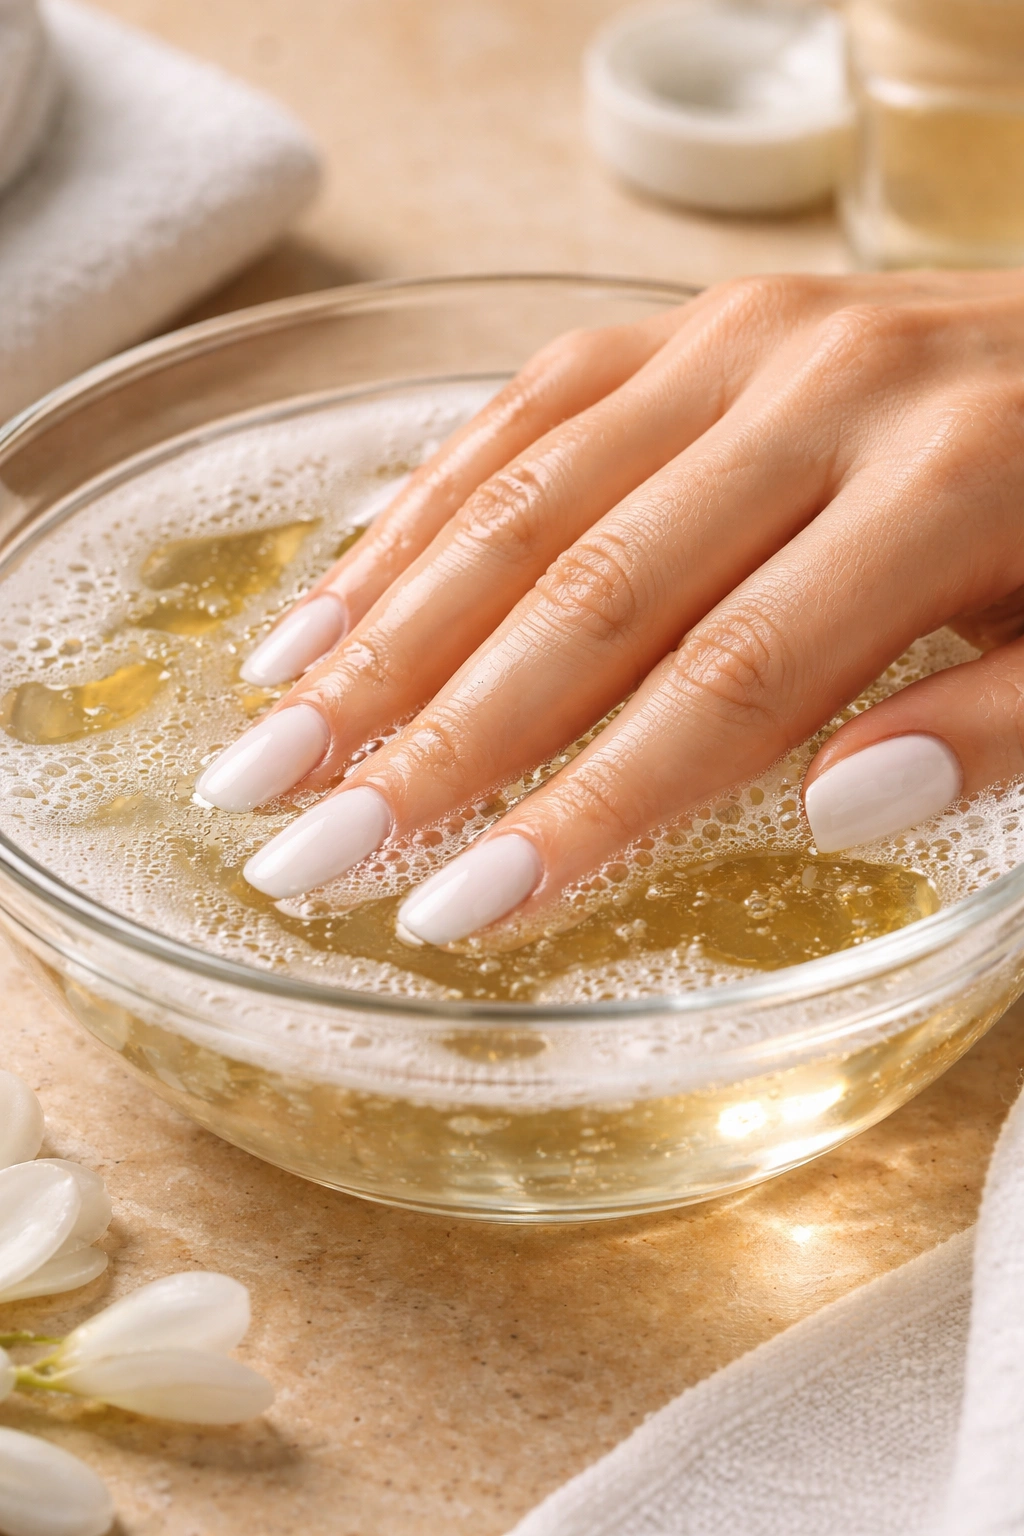
The proper removal method requires patience. Fill a bowl with warm water and add a squirt of dish soap and a bit of oil (olive oil or cuticle oil works great). Soak your nails for 15 to 20 minutes. The combination of warm water, soap, and oil breaks down the glue’s bond.
After soaking, the press-ons should lift easily from the edges. Gently work a wooden cuticle stick under the lifted portion and slowly pry the nail up. If you encounter resistance, soak for another five minutes rather than forcing it.
Clean Up After Removal
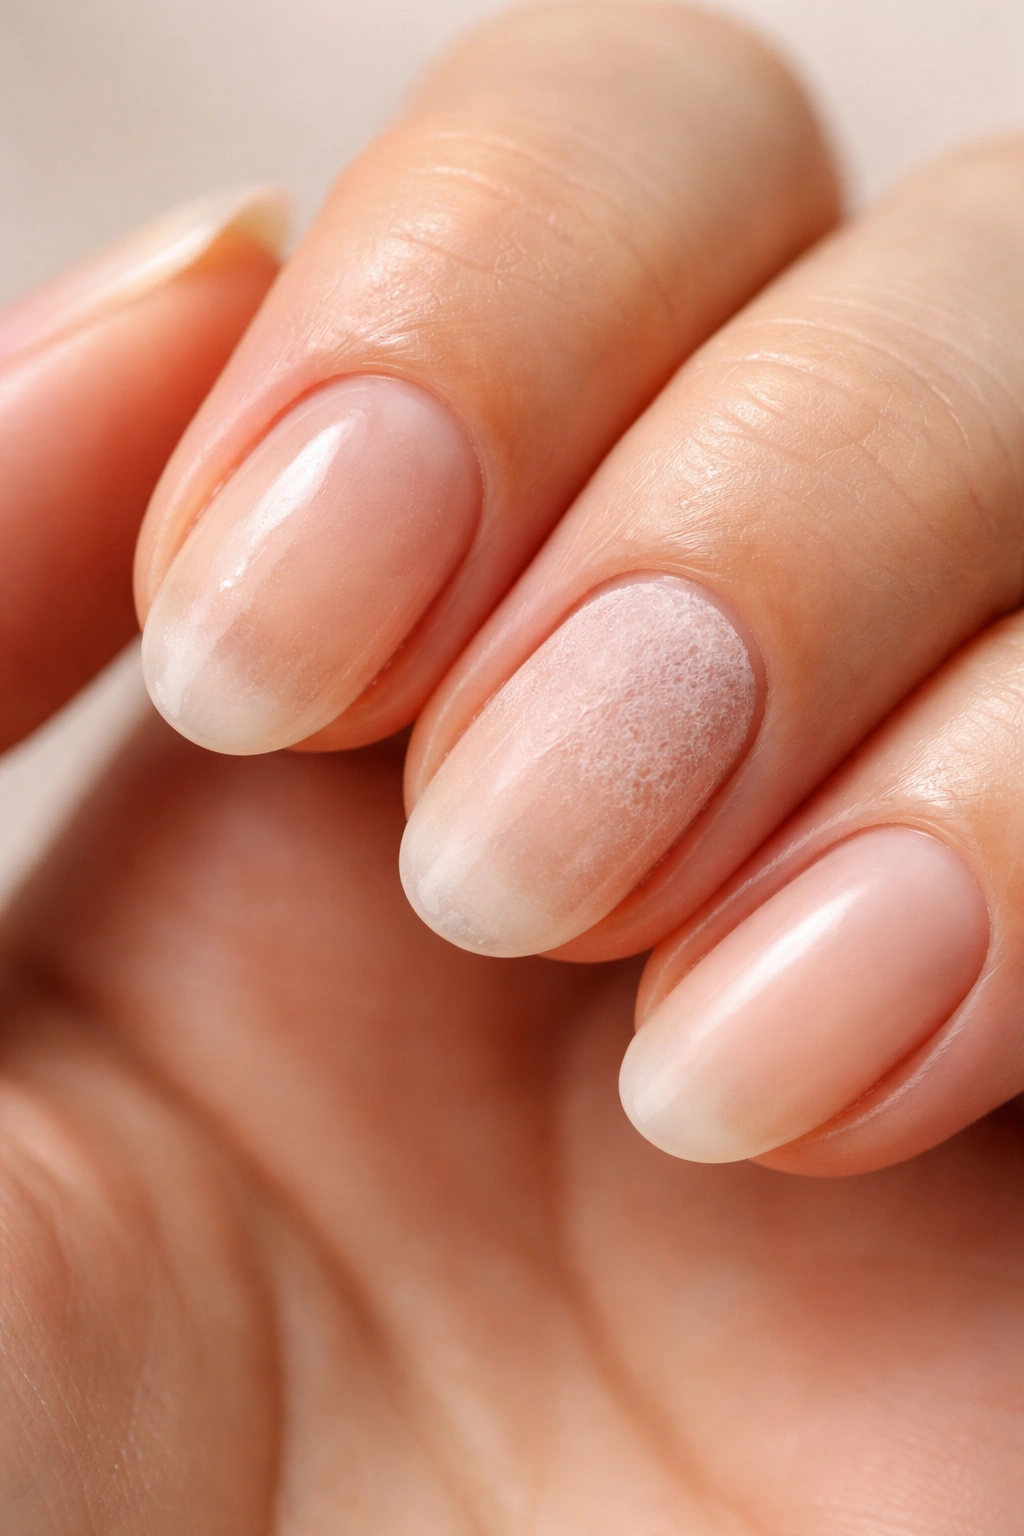
Once the press-ons are off, you’ll have dried glue residue on your natural nails. Gently file this away with a nail file or buffing block. Use a back-and-forth motion with light pressure. You’re just removing the glue, not filing down your actual nails.
Wash your hands thoroughly and assess your natural nails. They might look a bit dull or feel slightly thin—this is normal. Apply a nail strengthening treatment or a coat of nail hardener to start rebuilding their strength. OPI Nail Envy is a popular option that many people swear by.
Moisturize like crazy for the next few days. Use cuticle oil multiple times a day and apply hand cream regularly. This helps restore moisture to your nails and surrounding skin after the drying effects of glue and removal.
Choosing Quality Press-Ons Makes a Difference
Not all press-on nails are created equal. Budget options from the drugstore can work well if you apply them correctly, but investing in higher-quality press-ons often means better fit, more durable materials, and longer wear.
Look for press-ons made from durable materials like acrylic or ABS plastic. These hold up better to daily wear than flimsy plastic. The nails should feel substantial in your hand, not bendable or thin. Check the thickness—thicker nails are generally more durable but can look less natural if you prefer a subtle look.
Some popular high-quality brands include Static Nails, which are reusable and come with excellent adhesive, and Olive & June, known for their natural-looking shapes and reliable wear. Kiss and Impress are drugstore options that offer good quality at accessible price points, with extensive color and design selections.
Custom vs. Pre-Packaged
Custom press-ons from Etsy or specialty brands often fit better because they’re designed for specific nail shapes and sizes. Some sellers even create custom-sized sets based on measurements you provide. The investment is higher, but the fit is usually superior to standard drugstore kits.
Pre-packaged sets are perfectly fine for most people, especially once you learn which brands and styles work best for your nail shape. The key is finding a brand with enough size variety that you can achieve a good fit on all ten fingers.
Final Thoughts on Long-Lasting Press-Ons
Making press-on nails last comes down to three things: thorough prep, proper application, and smart aftercare. Skip any one of these, and you’re looking at a few days of wear instead of one to two weeks. But when you nail all three (pun intended), press-ons can be just as durable and beautiful as a professional manicure.
The beauty of press-ons is their flexibility. Wear them for a weekend event and take them off Sunday night. Or commit to a full two-week manicure that costs less than $15 instead of $60 at the salon. You can switch up your style weekly without damaging your natural nails the way repeated gel or acrylic applications do.
With a little practice, you’ll figure out which brands work best with your nail shape, which glues hold strongest for your lifestyle, and how to apply them quickly and efficiently. Keep backup supplies in your bathroom and maybe a mini emergency kit in your bag. Once you’ve mastered the technique, you might find yourself ditching salon manicures altogether.
Your nails deserve to look good without breaking the bank or taking hours out of your day. Press-ons deliver exactly that—when you know how to make them stick around.
