

Your feet carry you through life, so they deserve just as much attention and care as any other part of your body. Yet for many people, pedicures become an afterthought—something that only happens when you finally can’t avoid looking down at your neglected toenails anymore. The good news? You don’t need a professional salon or hours of free time to achieve gorgeous, well-maintained feet. With the right tools, technique, and a little patience, you can give yourself a spa-quality pedicure at home that rivals what any professional technician could do.
The truth is, an at-home pedicure isn’t just about the final polish color—though that’s certainly the fun part. It’s a complete foot care ritual that involves soaking, scrubbing, trimming, filing, exfoliating, and moisturizing. When you do all these steps properly, you’re not just making your feet look beautiful; you’re also preventing painful problems like ingrown toenails, cracked heels, and calluses. Regular pedicures promote circulation, maintain foot hygiene, and give you an excuse to slow down and practice genuine self-care. Best of all, once you master the process, you’ll save money and always have beautiful toes ready for sandals or that special event.
This guide walks you through every single step of the pedicure process, exactly as professionals do it, with tips and tricks you might not find elsewhere. Whether you’ve never done your own pedicure before or you’re looking to refine your technique, you’ll find everything you need here to transform your feet into something you’re genuinely proud of.
Gather Your Supplies and Prepare Your Space
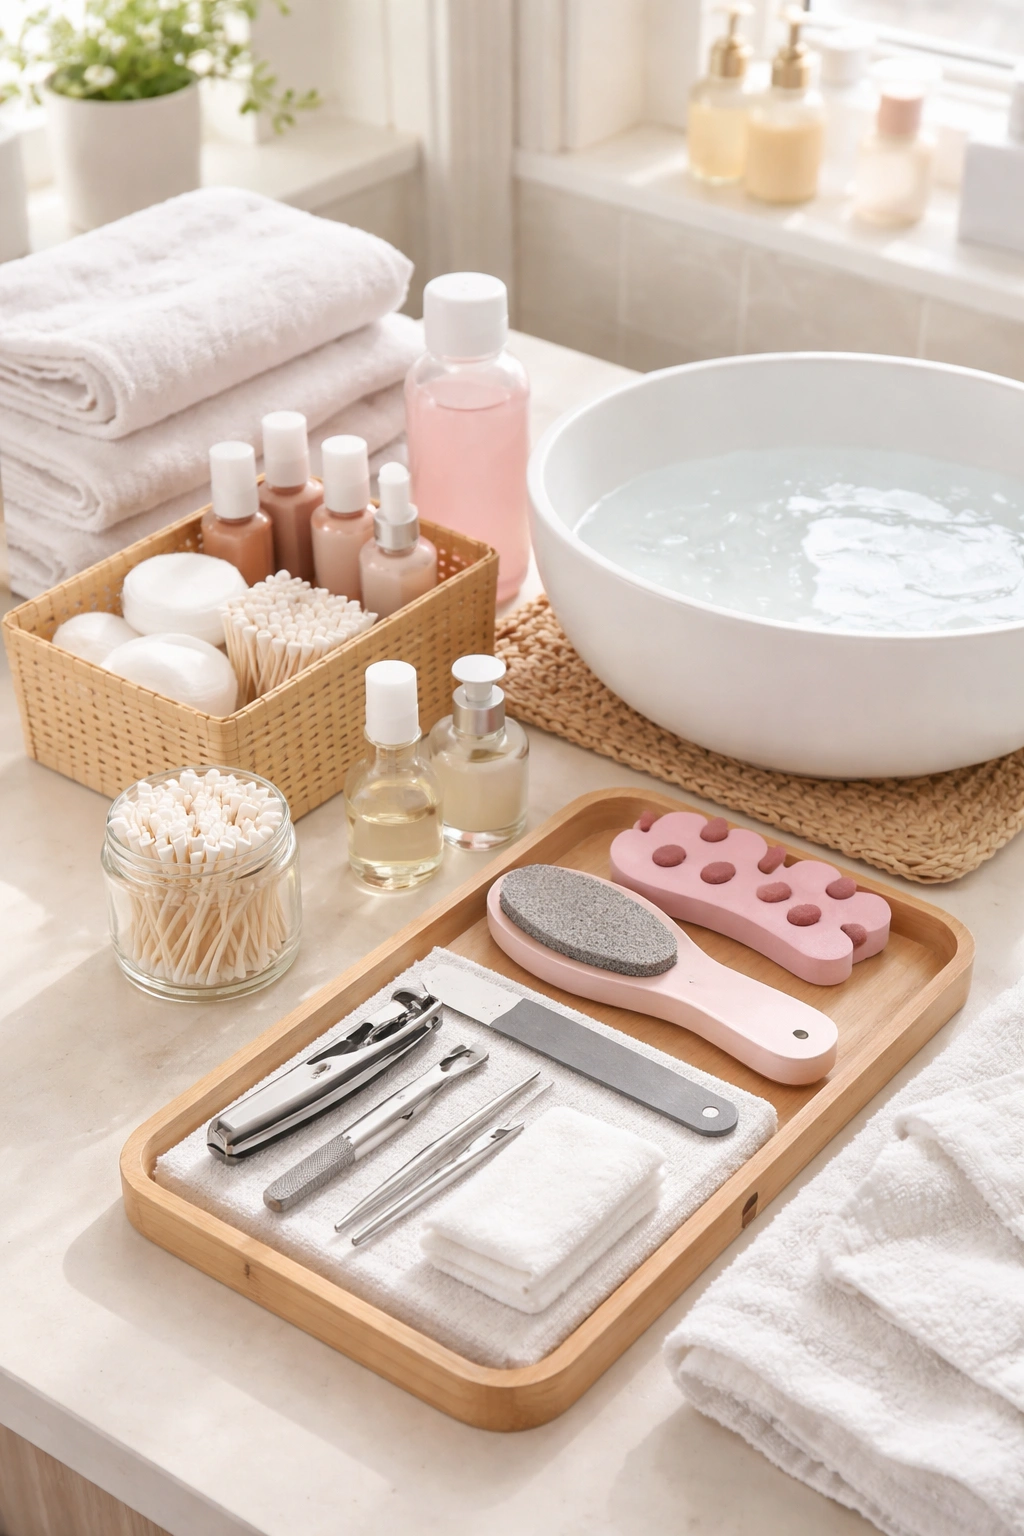
The difference between a mediocre at-home pedicure and a genuinely good one often comes down to preparation. Professional nail technicians don’t just dive in—they set up their entire workspace first, making sure everything is within reach and organized. This approach matters because once you start the pedicure process, your hands and feet will be wet or busy, and hunting around for a missing file or nail polish is the opposite of relaxing.
Start by choosing a comfortable spot where you won’t be disturbed. The best location has good lighting, a comfortable chair or place to sit, and a flat surface where you can set down supplies and rest your feet. Your bathroom works well, but so does a bedroom or living room corner. Many people like to sit with their feet propped up on a low stool or ottoman—this position lets gravity help, and it’s easier on your back than bending over constantly.
Now gather every tool and product you’ll need for the entire pedicure before you start. Here’s the complete list:
- Nail polish remover (preferably acetone-free to protect your nails)
- Cotton pads or cotton wool (lint-free ones are worth the investment because they won’t leave fuzz on your nails)
- Toenail clippers (regular nail clippers work, but clippers designed specifically for toenails give you better control)
- Nail file (an emery board or dual-grit file with both coarse and fine sides)
- Nail buffer (for smoothing and bringing shine to the nail surface)
- Foot file or pumice stone (to remove calluses and dead skin)
- Foot soak or basin (anything large enough to hold water and submerge your feet)
- Cuticle oil or cuticle softener (essential for healthy cuticles)
- Cuticle pusher or orange stick (for pushing back cuticles safely)
- Exfoliating foot scrub (with ingredients like sugar, salt, or crushed nuts)
- Foot moisturizer or body lotion (preferably something thicker and richer than regular hand lotion)
- Base coat nail polish (this protects your nails from staining)
- Nail polish in your chosen color (or multiple colors if you’re feeling adventurous)
- Top coat nail polish (to seal and protect your color)
- Rubbing alcohol or nail dehydrator (to remove oil residue before polishing)
- Toe separators (optional, but helpful for keeping toes apart while polish dries)
- Clean towels (several—they’ll get wet)
Set everything out on a table or tray next to where you’ll be working. Arrange items in the order you’ll use them so you can move through the pedicure smoothly. This setup makes the whole experience feel more intentional and luxurious, and it keeps you in a relaxed mindset rather than scrambling for supplies.
Remove Any Existing Nail Polish
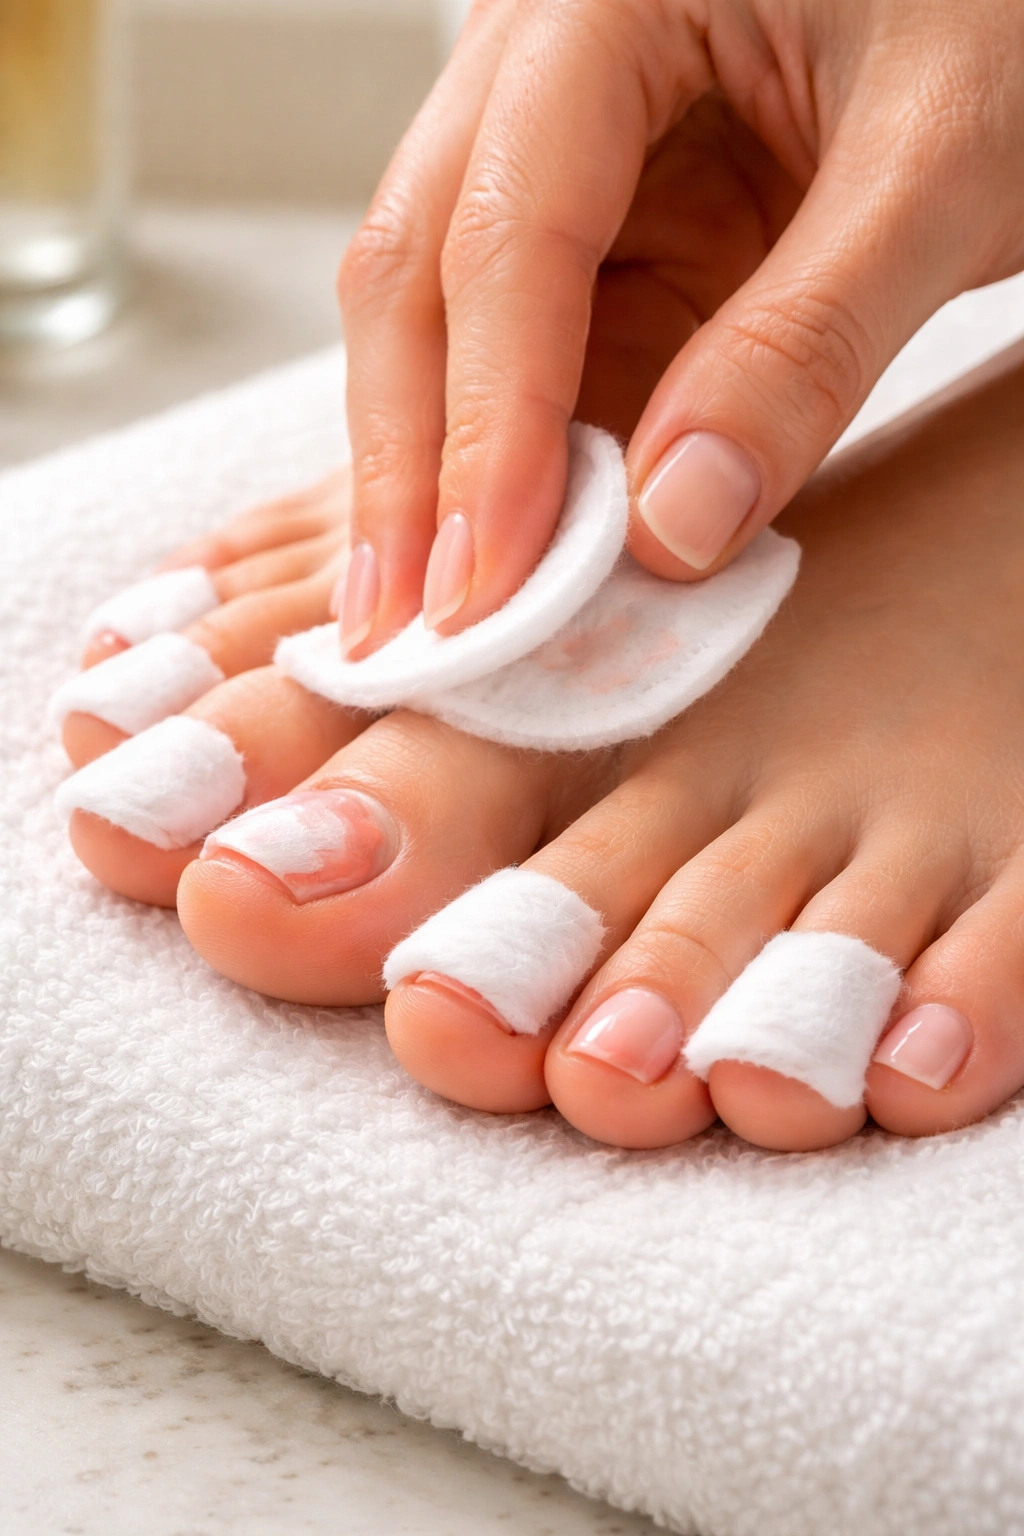
Before you can give your feet fresh attention, you need to clear away whatever’s already there. Old nail polish, whether it’s perfectly intact or chipped and peeling, needs to go completely. Even if you’re just maintaining a pedicure you did a week or two ago, always start with a clean slate rather than adding new polish over old.
Soak a lint-free cotton pad generously with nail polish remover. Press the saturated pad firmly onto each toenail and hold it there for 10-15 seconds. This gives the remover time to break down the polish rather than forcing you to scrub aggressively, which can damage your nail surface. After those seconds pass, gently rub the polish away with a downward motion. If any polish resists, reapply remover and let it sit a bit longer instead of scrubbing harder.
For particularly stubborn polish—especially dark colors or formulas that seem to cling—don’t fight it. Let the remover do the work. Wrap a wet cotton pad around each nail and secure it loosely with a small piece of aluminum foil or just hold it there for a full minute. This gives the remover time to penetrate even dried, thick polish. When you unwrap and wipe, most of the color should come away easily.
If you notice your nails or the skin around them has taken on a slight tint from a previous dark polish color, that’s completely normal. Soaking your nails in warm water during the next step will help lighten that staining. Some people use lemon juice on a cotton pad to help remove stubborn discoloration—it’s gentle and actually works surprisingly well. Just dab it on and let it sit for a few minutes before wiping away.
Soak Your Feet to Soften Skin and Nails
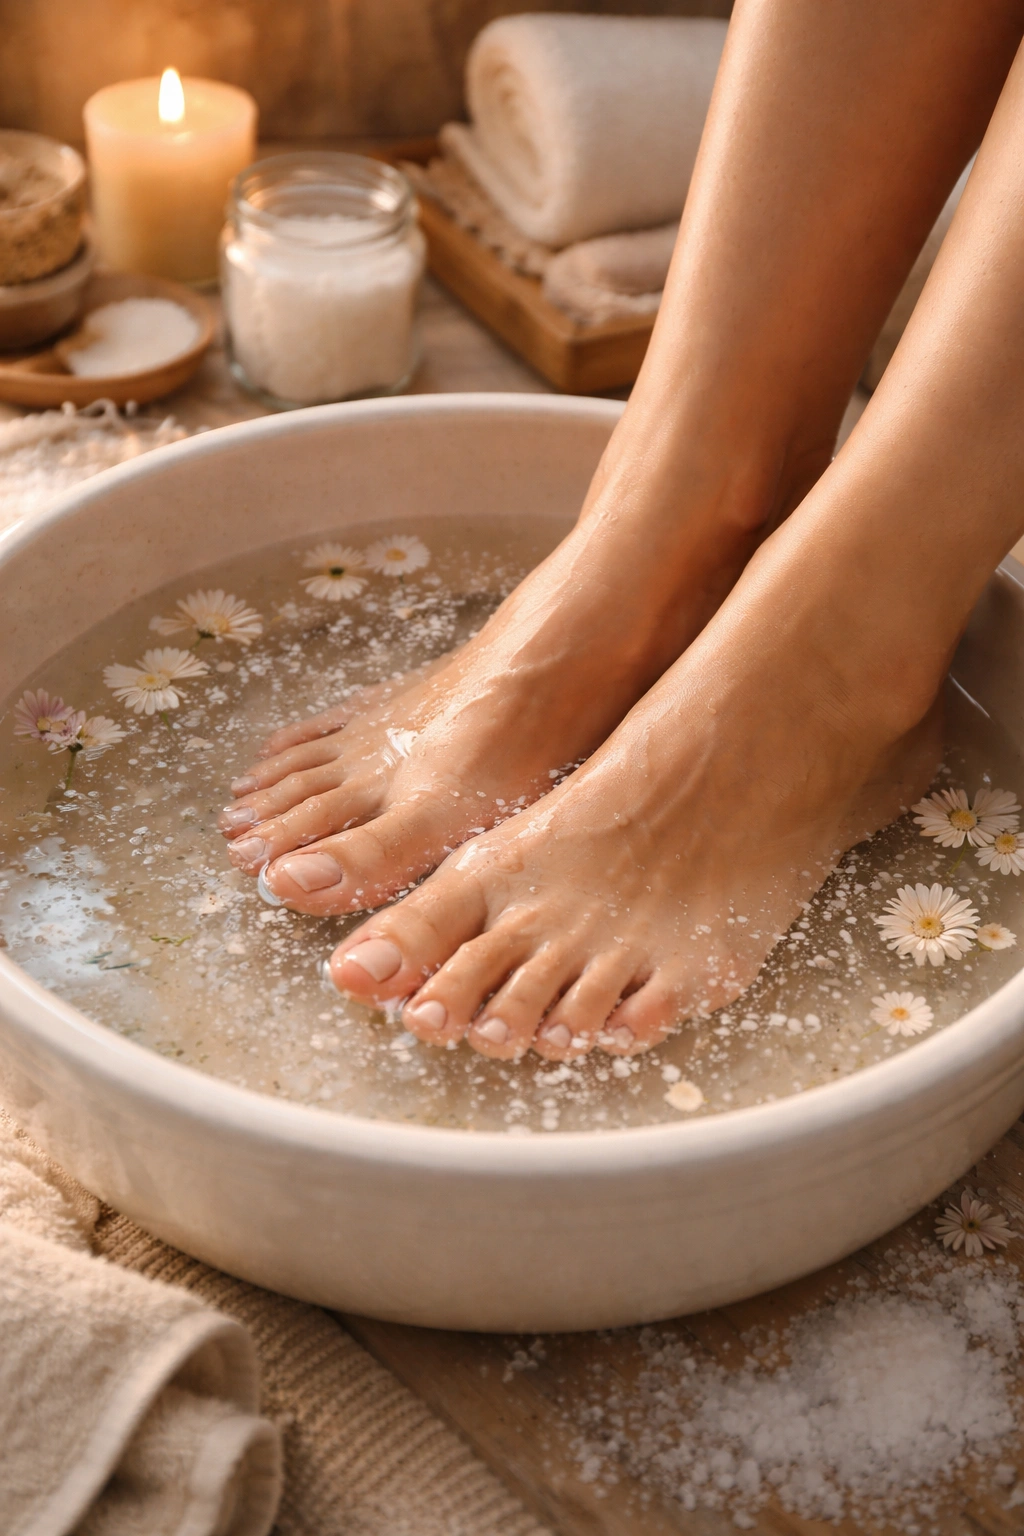
Soaking is the pedicure step that transforms the entire experience. Warm water opens your pores, softens hardened skin, and makes your toenails much easier to trim and shape. It’s also deeply relaxing, which is part of why salons insist on this step. The warm water doesn’t just prepare your feet physically; it signals to your brain and body that it’s time to relax.
Fill your foot basin, bucket, or bathtub with enough warm water to cover your feet up to the ankle. Test the temperature with your hand first—it should feel pleasantly warm but never so hot that you’d yelp when you sit your feet in. Around 90-95°F (32-35°C) is ideal; warm enough to be soothing without risking any damage to delicate skin.
For the most spa-like experience, add about half a cup of Epsom salt to the water. Epsom salt does real work here—it reduces inflammation, eases muscle tension, and draws out impurities. If you don’t have Epsom salt on hand, baking soda works well too, or you can simply use a few drops of your favorite liquid soap or bath wash. Some people swear by adding essential oils: a few drops of lavender for relaxation, peppermint for invigoration, or tea tree oil for its mild antimicrobial properties.
For an extra touch of luxury, toss in fresh lemon slices or dried herbs like chamomile or mint. These add a gentle fragrance and make the soak feel special. You’re not going for complicated ingredients here—you want a soak that feels indulgent without requiring a trip to a specialty store.
Lower your feet into the warm water slowly, letting them adjust to the temperature. Settle in for 10-20 minutes. This is the time to put on your favorite music, light a candle, read something you enjoy, or simply sit quietly with no screens. The longer you soak (up to about 20 minutes), the more softened your skin becomes, making the next steps easier and more effective. Your nails will soften too, so they trim cleanly rather than cracking or splintering.
Trim Your Toenails Straight and Even
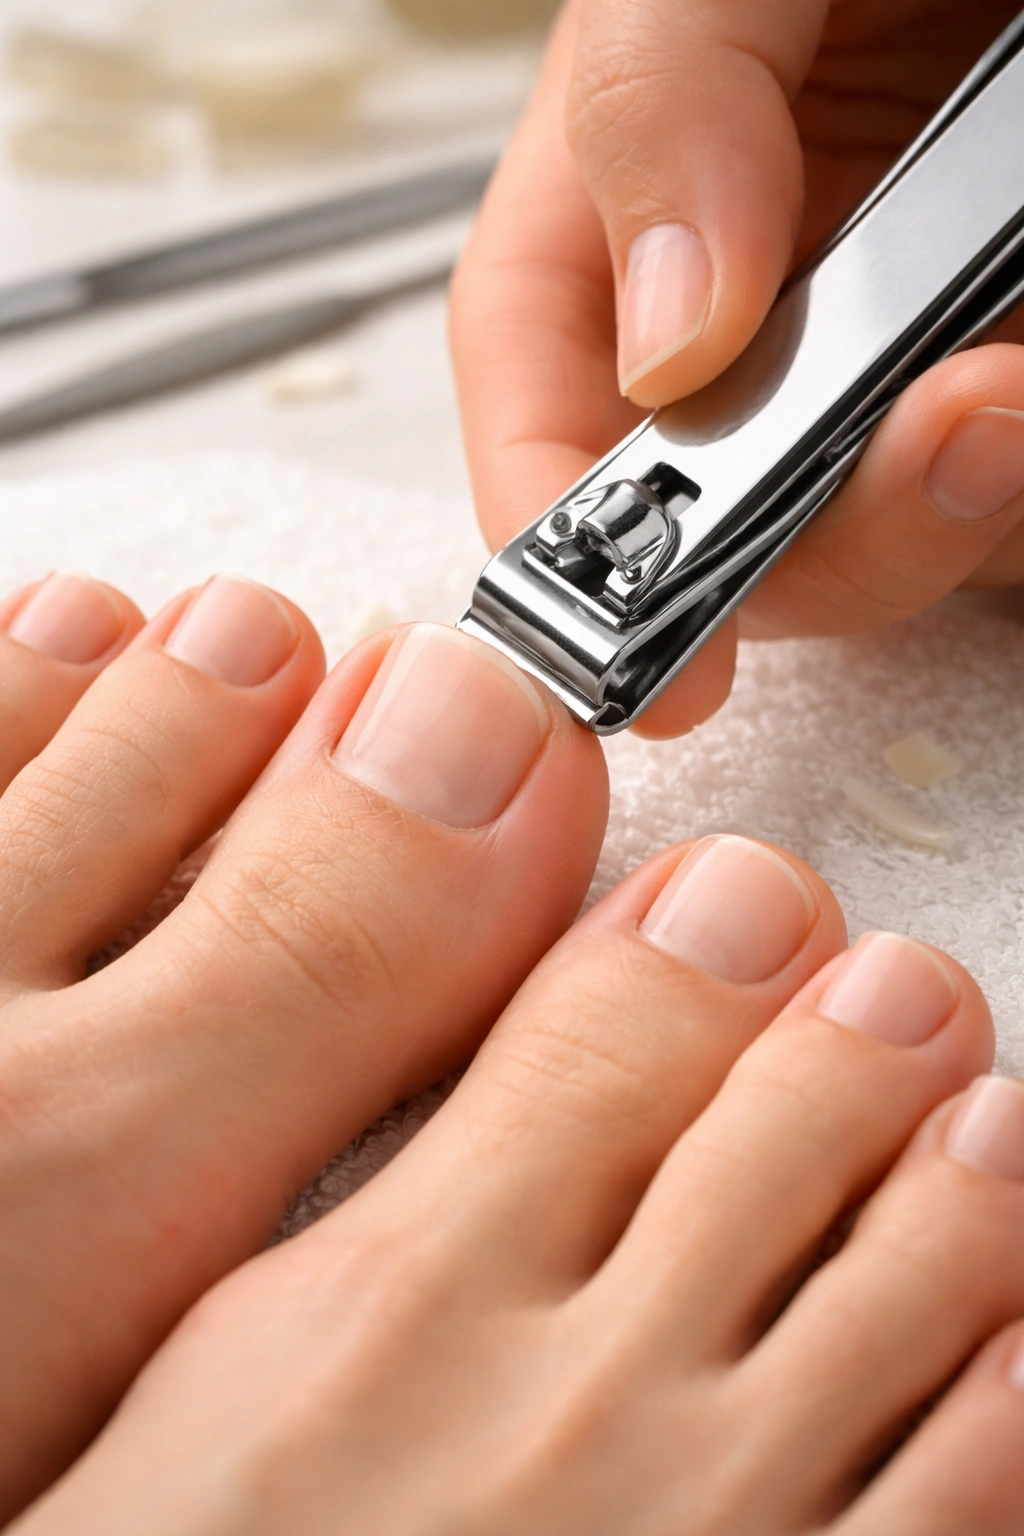
Once your feet have soaked and your nails have softened, it’s time to trim. This is actually the perfect moment to do it because wet nails are soft enough to cut cleanly without cracking, whereas dry nails can splinter or tear unevenly. Dry your feet with a towel before trimming—you want them dry enough that you can see and work with the nails clearly, but the softness from soaking remains.
Use toenail clippers specifically designed for toenails rather than fingernail clippers. Toenail clippers have stronger handles and a wider cutting surface, giving you much better control. Position the clippers so you’re cutting straight across the nail from one side to the other. This is genuinely important: cut your nails straight across, never angling in at the corners. Angling the corners inward is the primary cause of ingrown toenails, which are painful and can become infected.
Trim your nails to a length where you can still see just a tiny bit of white beyond the edge of your toe. This isn’t cutting them as short as possible—it’s cutting them to a practical length that’s less likely to catch on socks or shoes and cause damage. Don’t cut them so short that the pink nail bed is exposed all the way to the edge. Aim for about 2-3 millimeters of white visible at the tip.
Cut each nail with one deliberate motion of the clippers rather than making multiple small cuts. Multiple cutting motions cause jagged edges and are more likely to cause splits. If your nails are very thick or hard despite the soak, don’t force it—let them soak a bit longer before cutting. Forcing thick nails through clippers can cause them to split unevenly.
After you’ve trimmed all ten toenails, look at them from the side and from straight on. They should be relatively even in length and all cut straight across. You’ll fine-tune the shape in the next step with your file, but trimming establishes the basic length and prevents the nails from being too long to file properly.
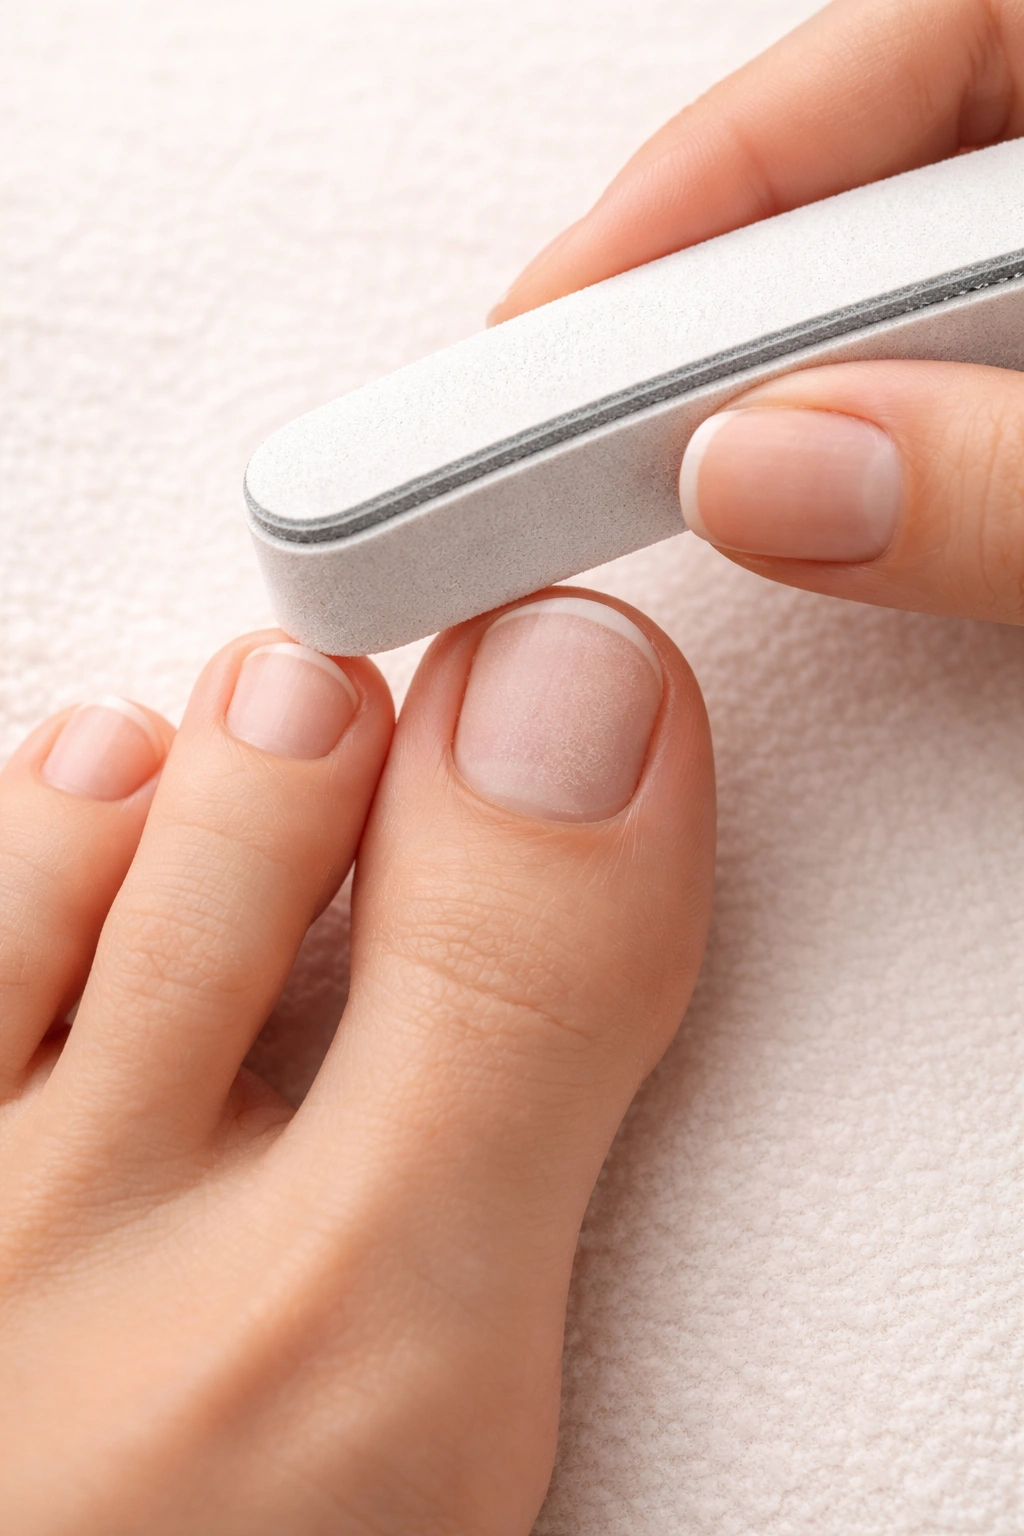
File and Shape Your Nails to Perfection
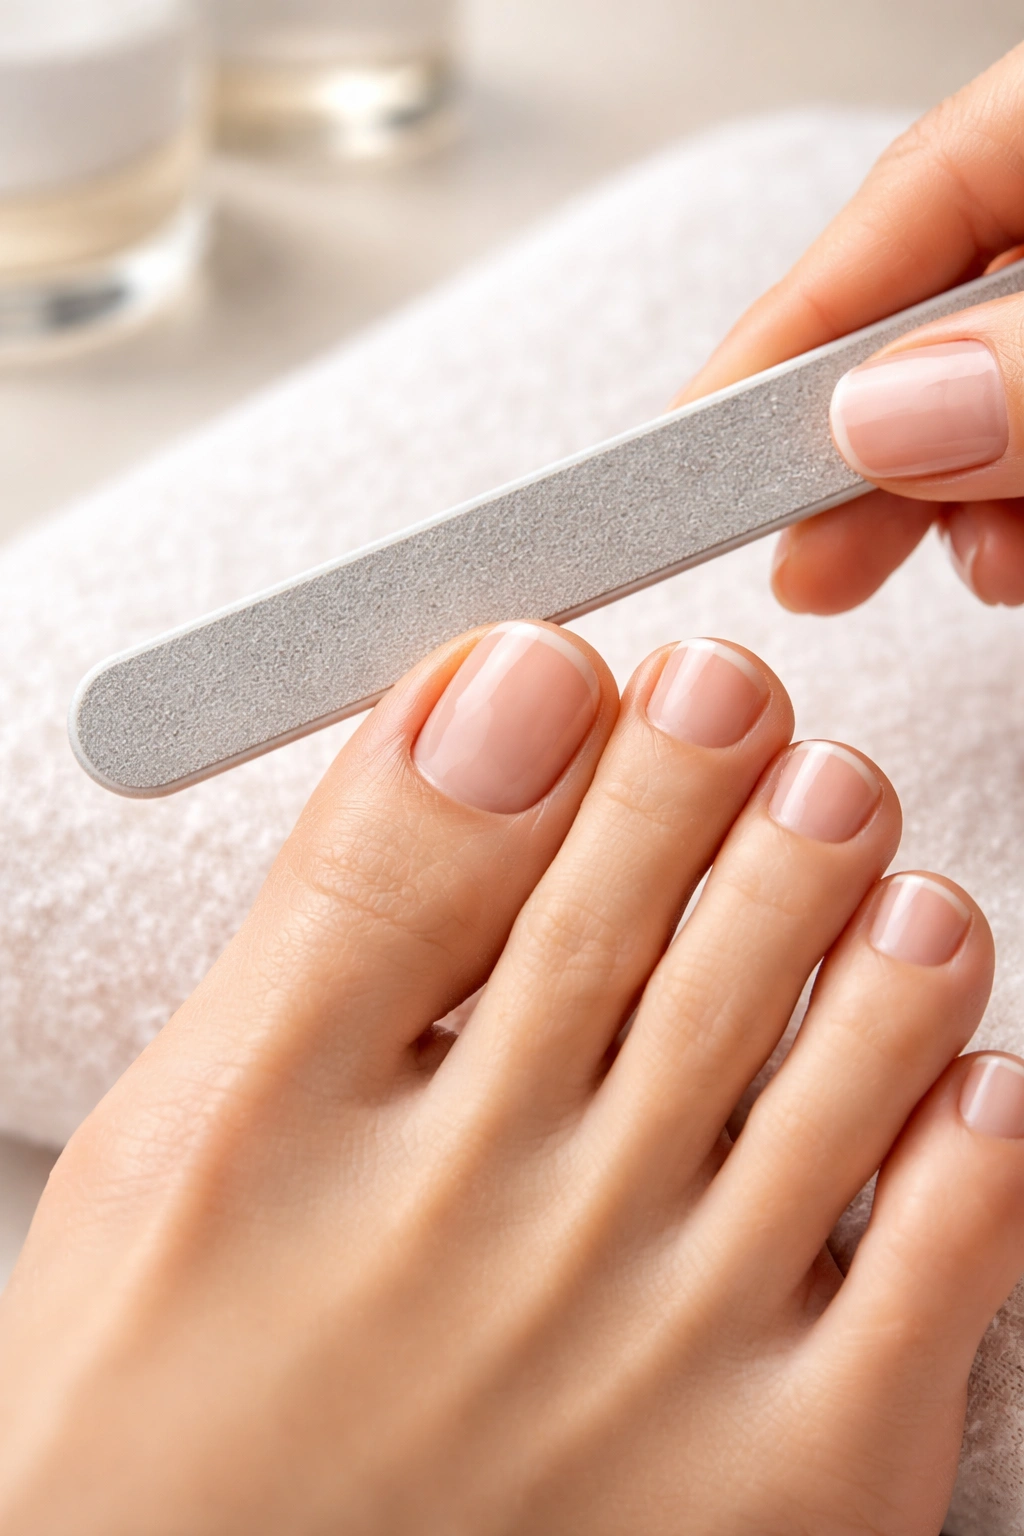
Now that your nails are trimmed to roughly the same length, filing gives them a smooth edge and lets you customize the shape to your preference. This step is where your pedicure goes from functional to polished-looking. A nail file is also your chance to correct any uneven trimming—if one nail ended up slightly longer or shorter than the others, the file brings them into harmony.
Use a nail file with a fine grit, not the coarse side if you have a dual-grit file. Coarse files are better for shortening length, but since you’ve already done that with clippers, the fine side will give you a smooth, even edge. Some people prefer glass nail files because they seal the keratin at the edge of the nail, preventing peeling and splitting. Ceramic or emery board files work well too—the key is using a fine grit and consistent motion.
File in one direction only. This is important: don’t saw the file back and forth across the edge of the nail. Filing in one direction, from the outer edge toward the center, creates a smooth edge. Sawing back and forth can create tiny cracks and peeling at the edge of the nail, especially on toenails which are already more delicate than fingernails. Start at one corner of the nail and file across toward the center, then do the other side.
The shape of your nails is entirely up to you and should match your lifestyle and aesthetic preferences. A rounded or slightly oval shape is timeless and looks good on most people—plus, it’s less likely to catch on things or break. A square shape looks modern and clean. A very pointed shape looks dramatic but tends to be less practical because pointed nails break more easily. Whatever shape you choose, file consistently around the entire edge so the nail looks intentional rather than accidental.
Once you’ve shaped all ten nails, take a moment to look at them. Run your finger along the edges—they should feel completely smooth with no rough spots or catches. If you feel any roughness, gently file that area again with your fine-grit file.
Exfoliate Dead Skin with Pumice Stone or Foot File
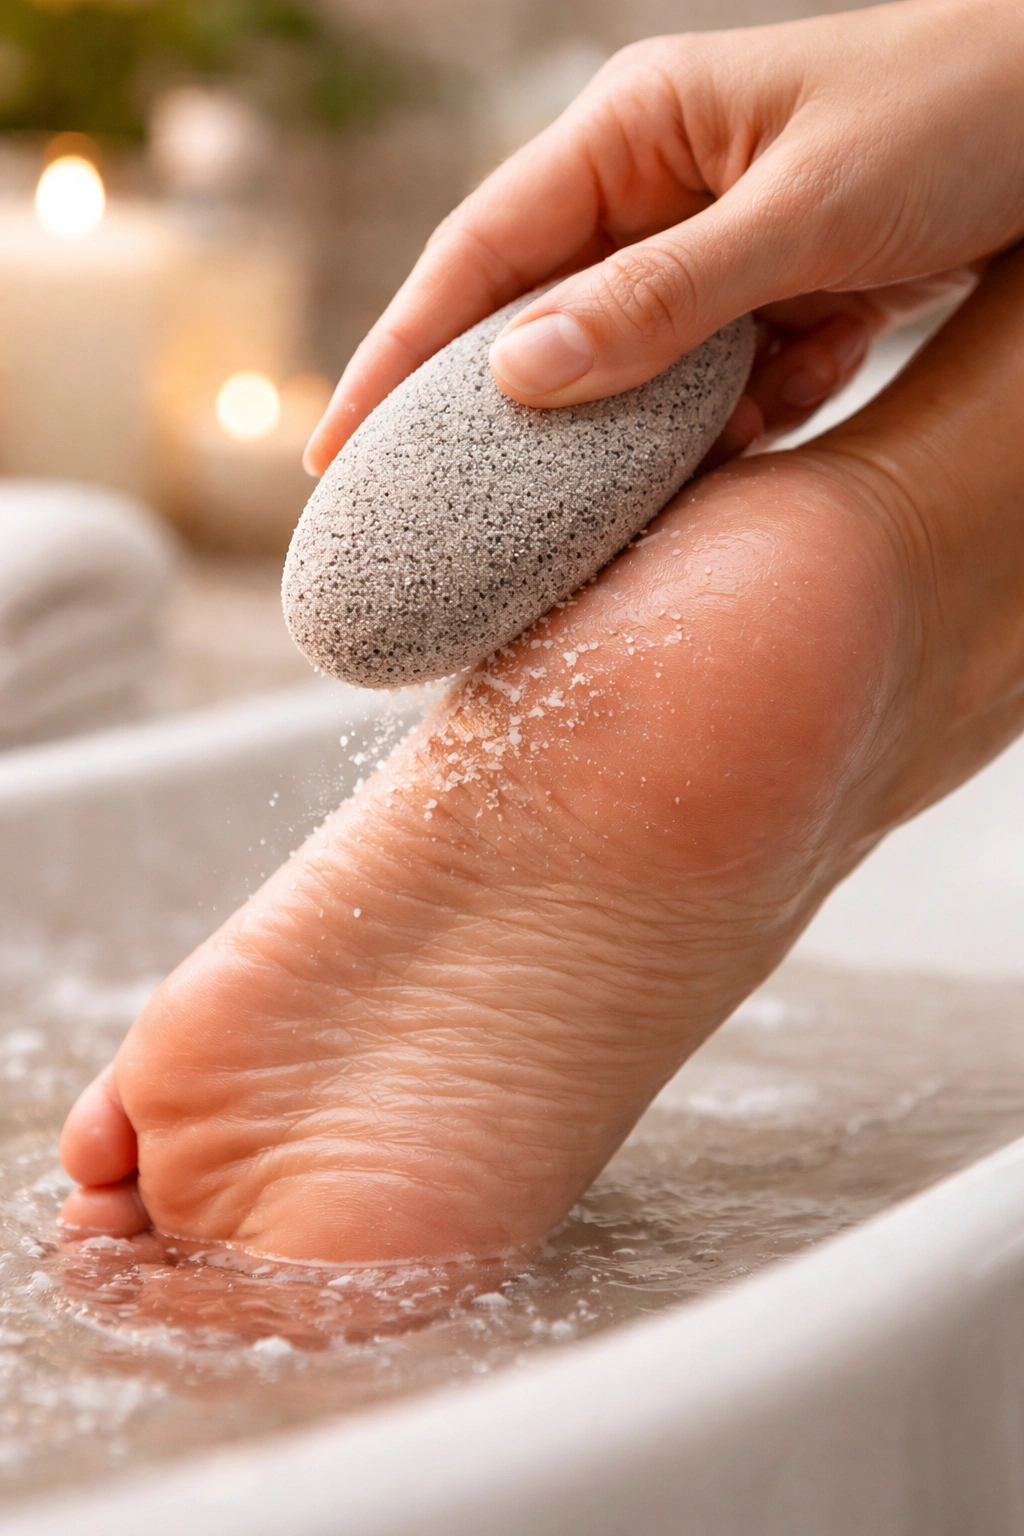
Your feet have now been softened by soaking for several minutes, which means they’re at the perfect stage for exfoliation. Dead skin cells accumulate on our feet because they bear constant weight and friction from shoes, and we don’t typically moisturize them as well as we do other body parts. A pumice stone or foot file removes these dead cells, revealing the softer, healthier skin underneath.
A pumice stone is a light, porous volcanic rock that’s been used for foot care for centuries. You can also use a ceramic foot file or a metal foot file—all work similarly. Wet your pumice stone (or file) with warm water and gently rub it across the soles of your feet using circular or back-and-forth motions. Pay special attention to your heels, the balls of your feet, and the outer edges of your feet where calluses tend to build up.
Use steady, moderate pressure. You’re not trying to sand your feet down to raw skin—you’re gently removing the buildup of dead cells. It should feel pleasant, like a massage, not painful or intense. If something hurts, lighten your pressure immediately. Never use a blade or razor to remove calluses or dead skin. This is a common mistake and a dangerous one: using blades increases the risk of infection, and calluses always regrow harder when removed this way.
Work methodically across both feet, spending extra time on problem areas. Most people need to focus more attention on their heels because they tend to get the driest and thickest calluses. You might need to rewet your pumice stone a couple times during this step to keep it working effectively. After a few minutes of this work, your feet will feel noticeably smoother and softer.
If you have diabetes or any condition that affects sensation in your feet, consult with your doctor before using a pumice stone. For people with these conditions, gentle exfoliation with a foot scrub (done in the next step) is often safer than mechanical tools.
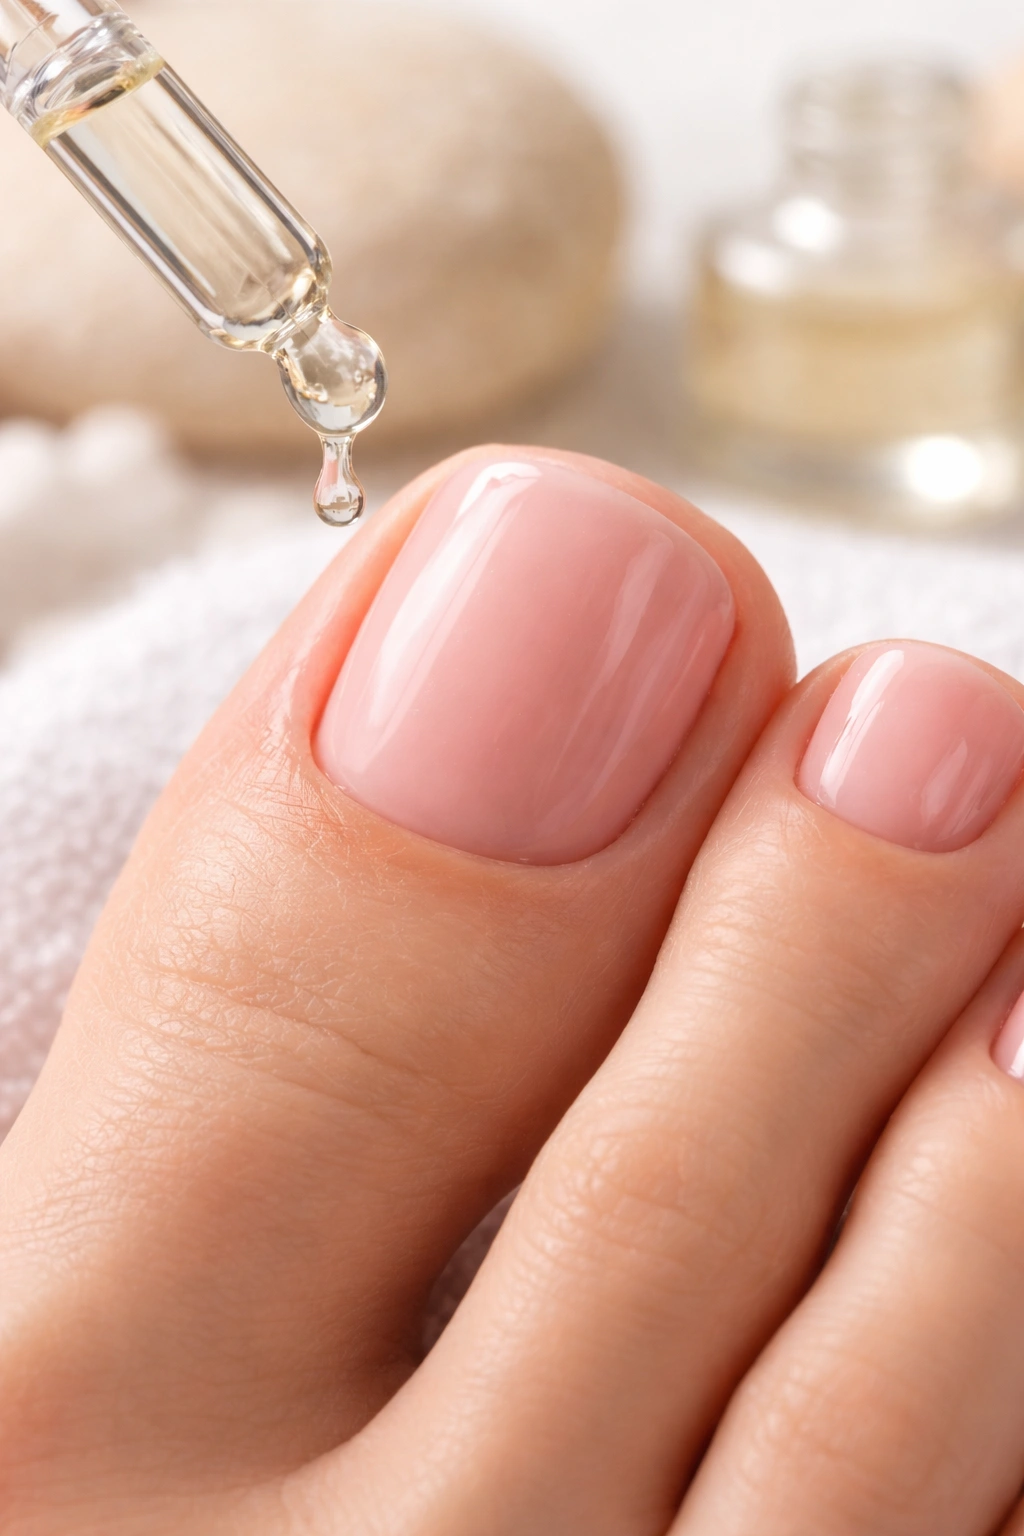
Care for Your Cuticles Properly
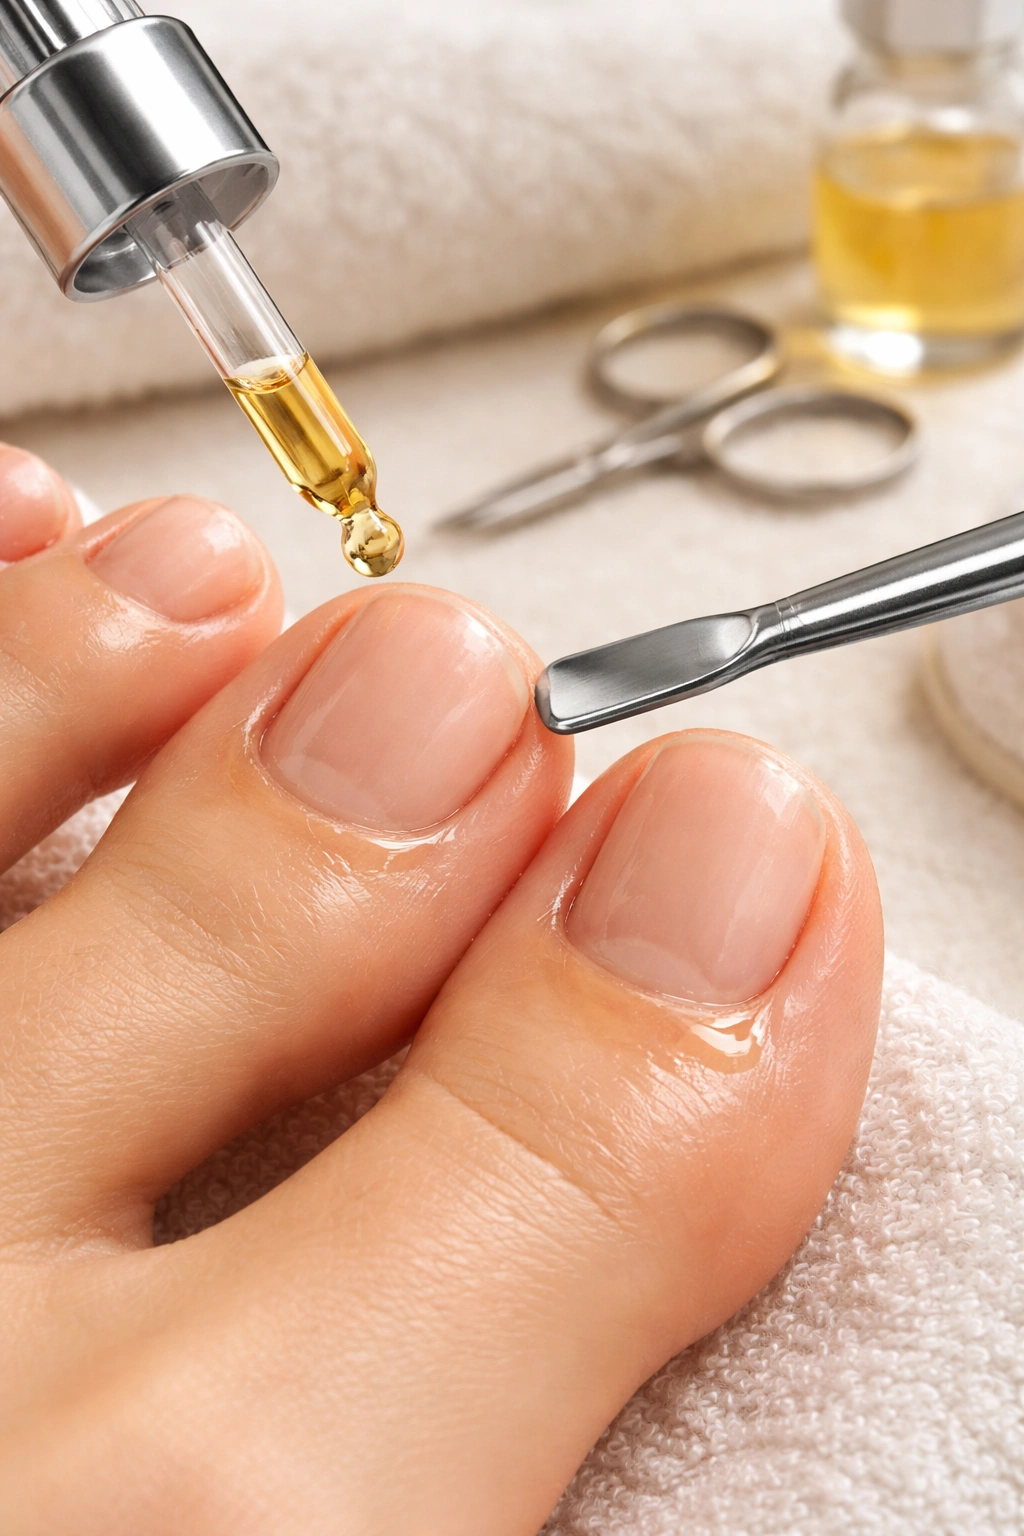
Cuticles protect the delicate skin at the base of your nails. They’re not something to cut away aggressively—they’re a natural barrier that keeps bacteria and fungus out. However, they do need attention and care to stay healthy. Pushing them back gently and keeping them moisturized prevents them from becoming dry, thick, and unsightly.
Apply cuticle oil or a dedicated cuticle softener around the base of each toenail. This product softens the cuticle, making it easier to push back without forcing it. Let the oil sit for a minute or two to do its work. Then use a cuticle pusher or a wooden orange stick to gently push back the cuticles. A cuticle pusher is a small, flat metal or plastic tool designed specifically for this—it’s not expensive and makes this step much easier.
Hold your pusher at a gentle angle and slowly push the cuticle back toward the base of the nail. You’re not trying to force it far back—just push it back enough that it’s no longer covering the base of the nail. The goal is to create a visible margin between the cuticle line and where the nail color will start. This makes your pedicure look more polished and intentional.
If you notice any cuticle skin that’s already separated from the nail or hanging loose, you can gently trim just that loose piece with a small nail scissors or cuticle trimmer. Never cut the main cuticle tissue itself. The cuticle serves a purpose, and cutting it can lead to infection. Only trim loose pieces that are already separated.
After pushing back your cuticles, wipe away the excess oil with a tissue. The cuticles should look neat and pushed back, but your nails shouldn’t be slippery with oil for the next steps. You can reapply cuticle oil after you paint your nails if you’d like extra hydration.
Apply an Exfoliating Scrub for Smooth Feet
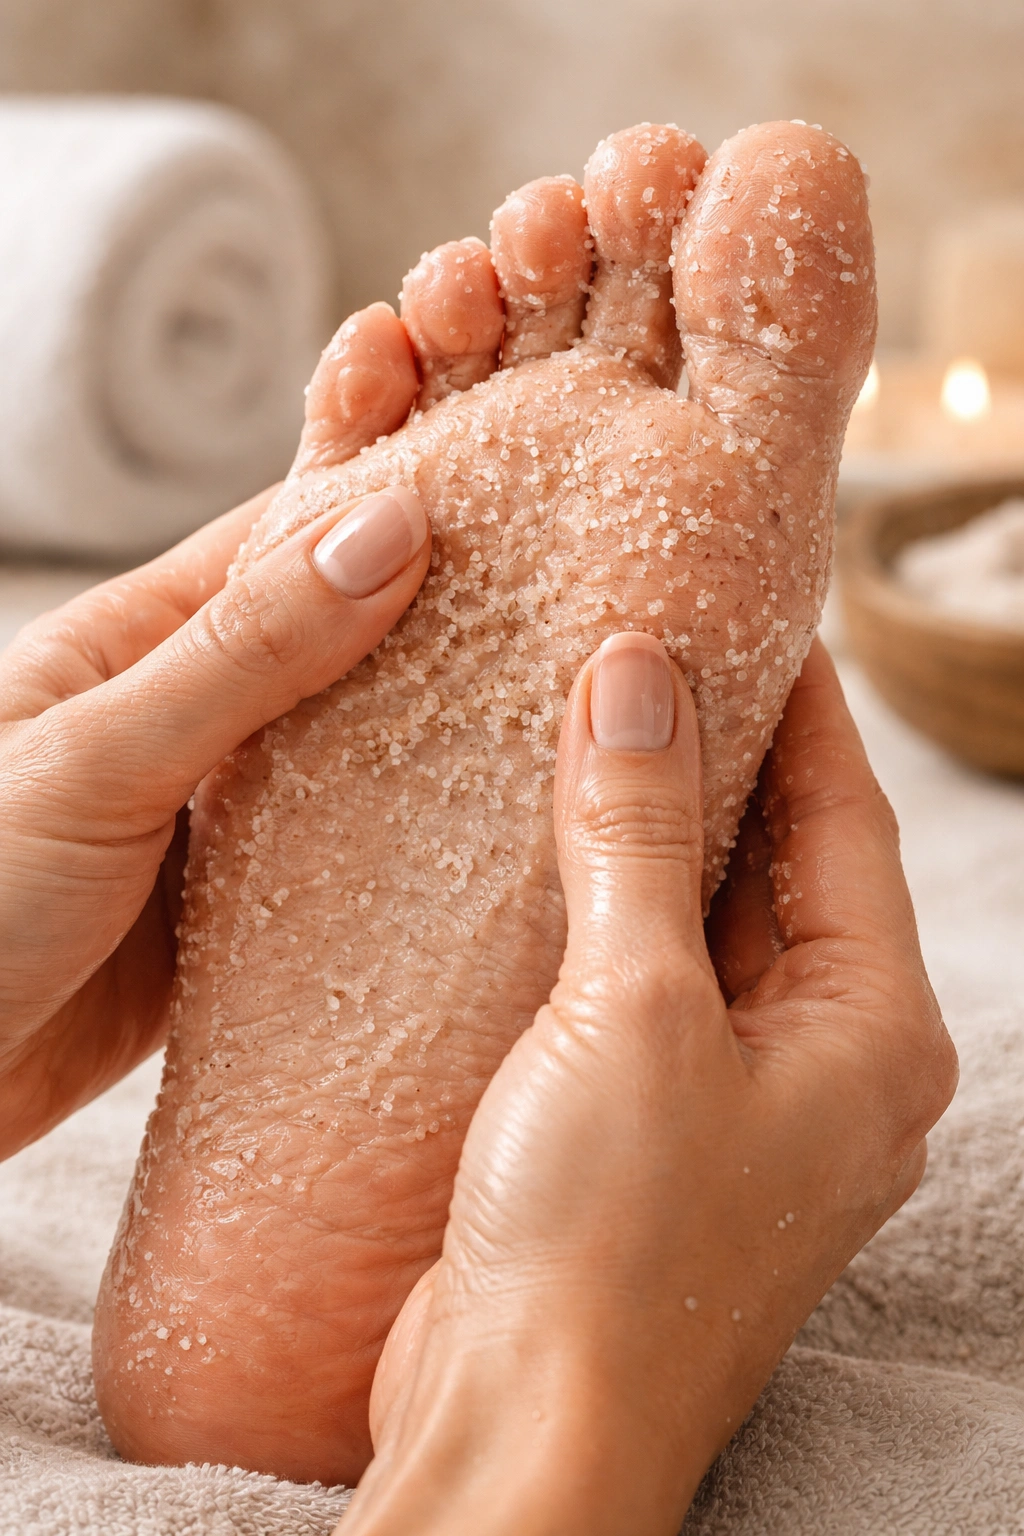
You’ve already used a pumice stone on your feet to remove heavy calluses, but now it’s time for a gentler, more luxurious exfoliation with a foot scrub. A good exfoliating scrub not only removes the last of the dead skin but also feels wonderful and often contains nourishing oils that start the moisturizing process.
Choose a foot scrub with gentle exfoliating particles—sugar, finely ground salt, crushed nuts, or coffee grounds are common ingredients. Squeeze about a quarter-sized amount into your palm and rub it between your hands to distribute it. Then massage it all over your feet: the tops, soles, heels, ankles, and anywhere else that needs attention. Use small, circular motions and moderate pressure. This feels incredibly relaxing and is genuinely good for your feet.
The scrub removes any remaining dead skin cells and polishes your skin to smoothness. As a bonus, the massage motion improves circulation in your feet, which is actually beneficial for foot health. Many scrubs also contain moisturizing ingredients like shea butter, coconut oil, or botanical extracts that start conditioning your skin. After a few minutes of scrubbing, your feet will feel noticeably smoother and softer than they did even after the pumice stone.
Rinse the scrub off completely with warm water and dry your feet thoroughly with a towel. At this point, your feet should feel absolutely silky smooth. If you still feel any rough spots, you can do another quick pass with your pumice stone, but most people find their feet are perfectly smooth by now. This is the transformation moment where you suddenly love how your feet feel and look—reward yourself for the work you’ve done.
Massage and Moisturize Your Feet Thoroughly
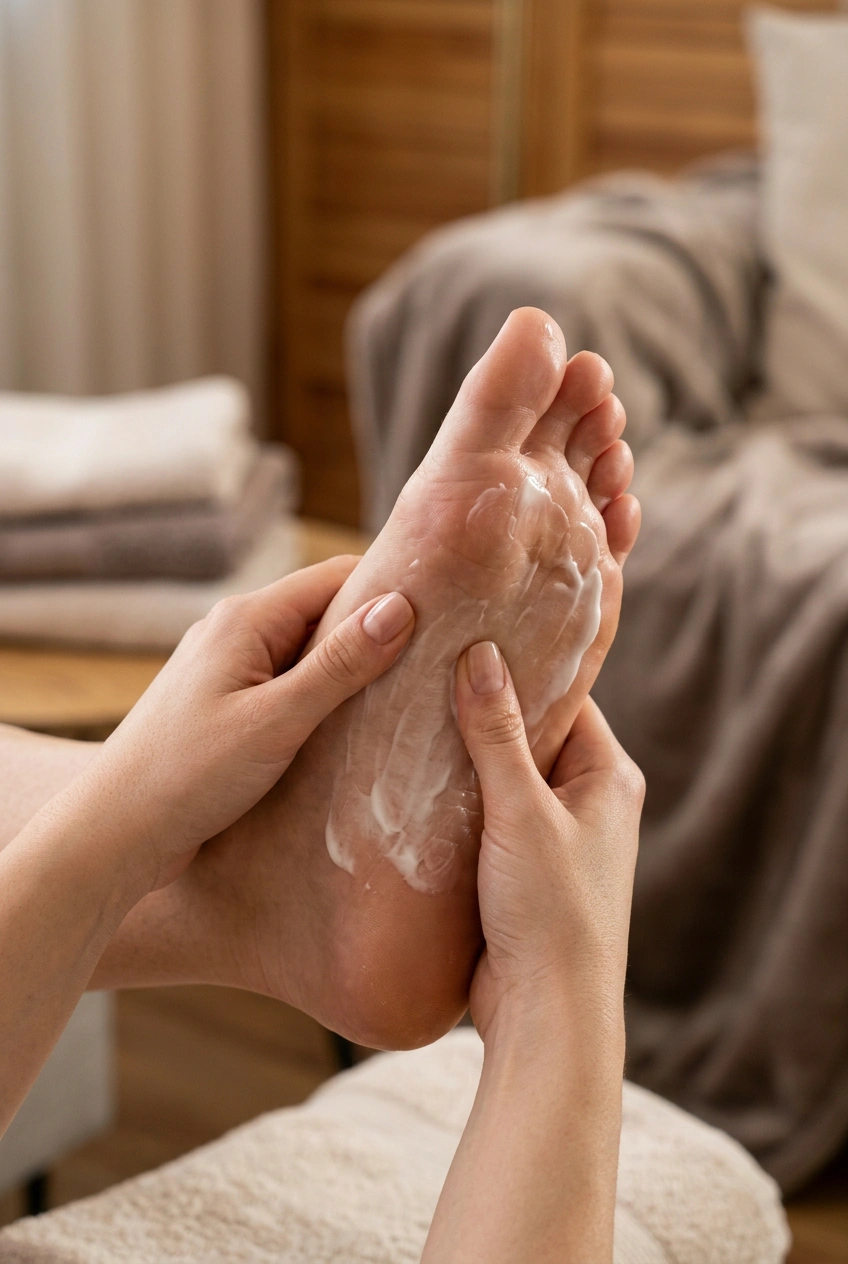
Now that your feet are clean, exfoliated, and smooth, it’s time for intensive moisturization. Our feet have fewer oil glands than the rest of our body, which is why they tend toward dryness and cracking. After all the soaking and scrubbing you’ve just done, your skin is actually primed to absorb moisture deeply, so this is the perfect time to apply a rich foot cream or moisturizer.
Choose a cream or lotion that’s thicker and richer than regular hand lotion—foot-specific creams are ideal, but a thick body butter works beautifully too. Look for ingredients like shea butter, cocoa butter, glycerin, or nourishing oils. Squeeze a generous amount—you want enough to really coat your feet, not just a thin slick.
Warm the cream slightly by rubbing it between your hands, then apply it all over both feet, starting with your soles and working up to your ankles and tops of feet. Don’t forget the sides of your feet and between your toes. Now comes the wonderful part: give yourself a foot massage. Use your thumbs to apply moderate pressure in circular motions, working from your heels up toward your toes.
Foot massage is more than just luxurious—it’s genuinely therapeutic. Massaging your feet improves circulation, eases muscle tension from hours of walking and standing, and helps your feet feel refreshed and energized. Spend at least a few minutes massaging. Many people find that foot massage helps them relax their entire body. Apply extra attention to any areas that feel tense or tired.
Once you’ve massaged your feet thoroughly, you can wipe away any excess cream with a tissue so your feet aren’t slippery. However, many people prefer to wrap their feet in plastic wrap or socks immediately after applying cream to lock in maximum moisture. This creates an intense treatment—wrap your feet and leave them wrapped for 10-30 minutes (or even overnight for an extra-intensive treatment). The moisture gets trapped against your skin instead of evaporating, and your feet absorb it deeply. When you unwrap, your feet will feel incredibly soft.
Prepare Your Nails for Polish
At this point, your feet are beautifully prepared, but your nails need one final prep step before polish goes on. Any residual oil, lotion, or moisture left on your nails will prevent polish from adhering properly, causing it to chip sooner. You need a clean, slightly dry surface for polish to grip.
Use a nail buffer or a very fine nail file to gently buff the surface of each toenail. You’re not trying to thin out your nails or remove significant nail material—just create a slightly textured surface that helps polish stick better. Buff in one direction using light pressure. You should see the nails become slightly duller as the surface texture improves. This step takes just a minute or two but makes a noticeable difference in how long your pedicure lasts.
Next, take a cotton pad or swab and dip it in rubbing alcohol or a commercial nail dehydrator. Wipe this over each nail to remove any remaining oil, lotion, or dust. You might be surprised at how much residue comes off—this step is genuinely important even though it seems simple. A completely clean nail surface means your base coat will apply smoothly and your color will stick properly.
At this point, your nails are clean, buffed, and ready for polish. Your feet look and feel amazing, and you’re just a few steps away from finishing your pedicure. If you’re using toe separators to keep your toes apart while the polish dries, this is the time to put them in place.
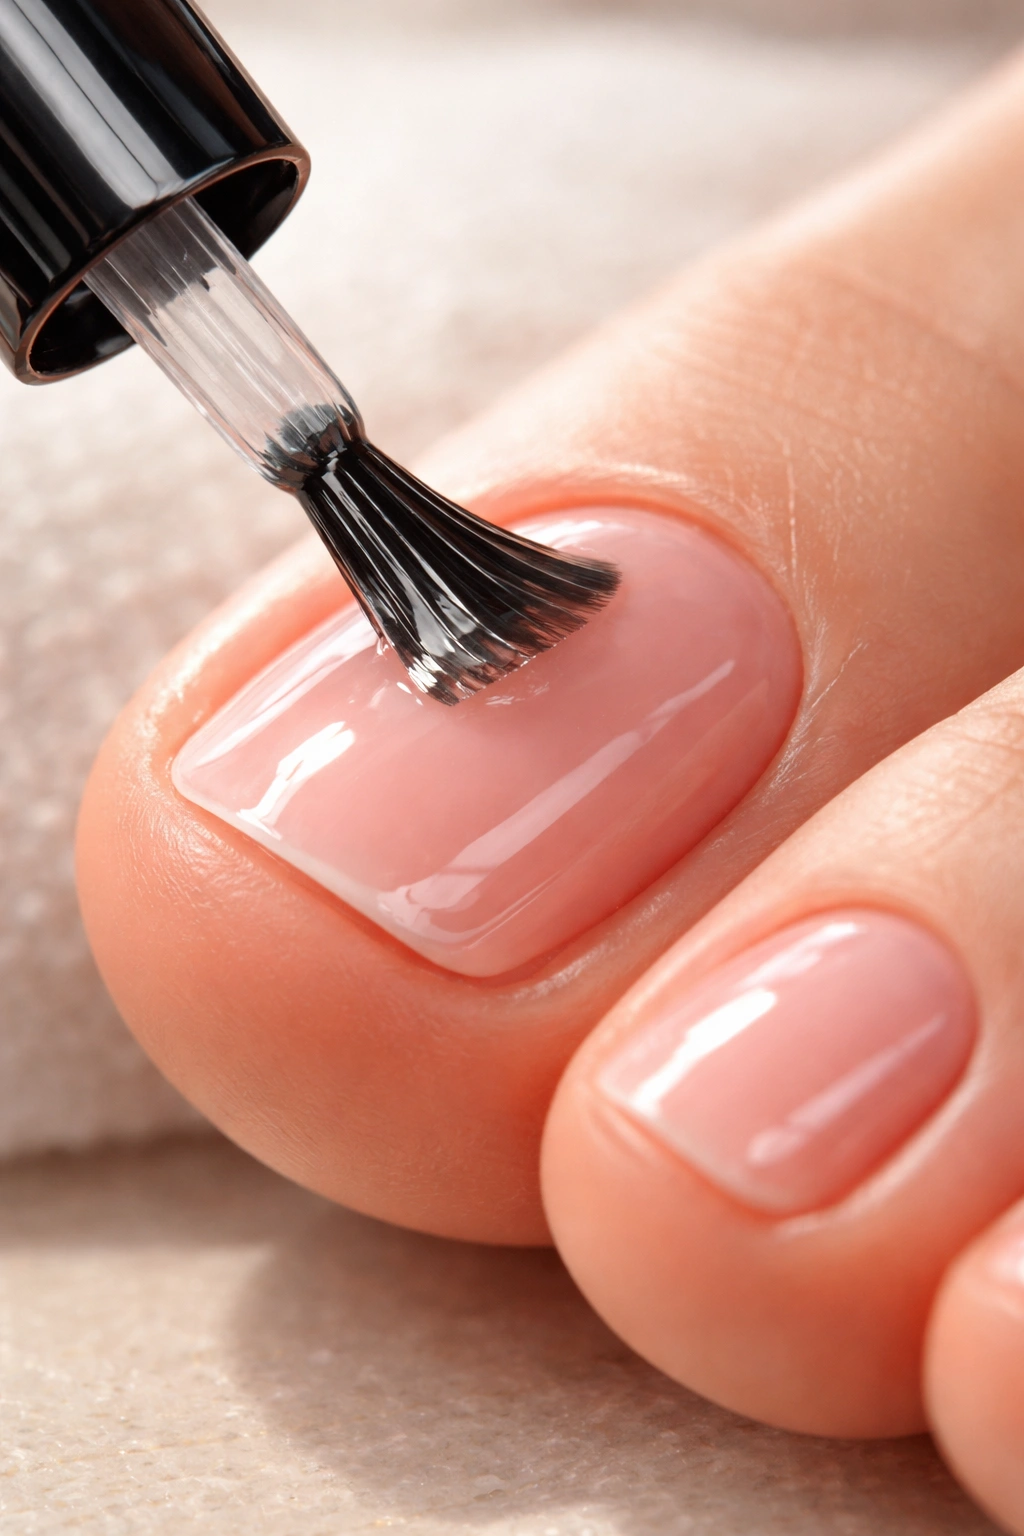
Apply Base Coat for Protection
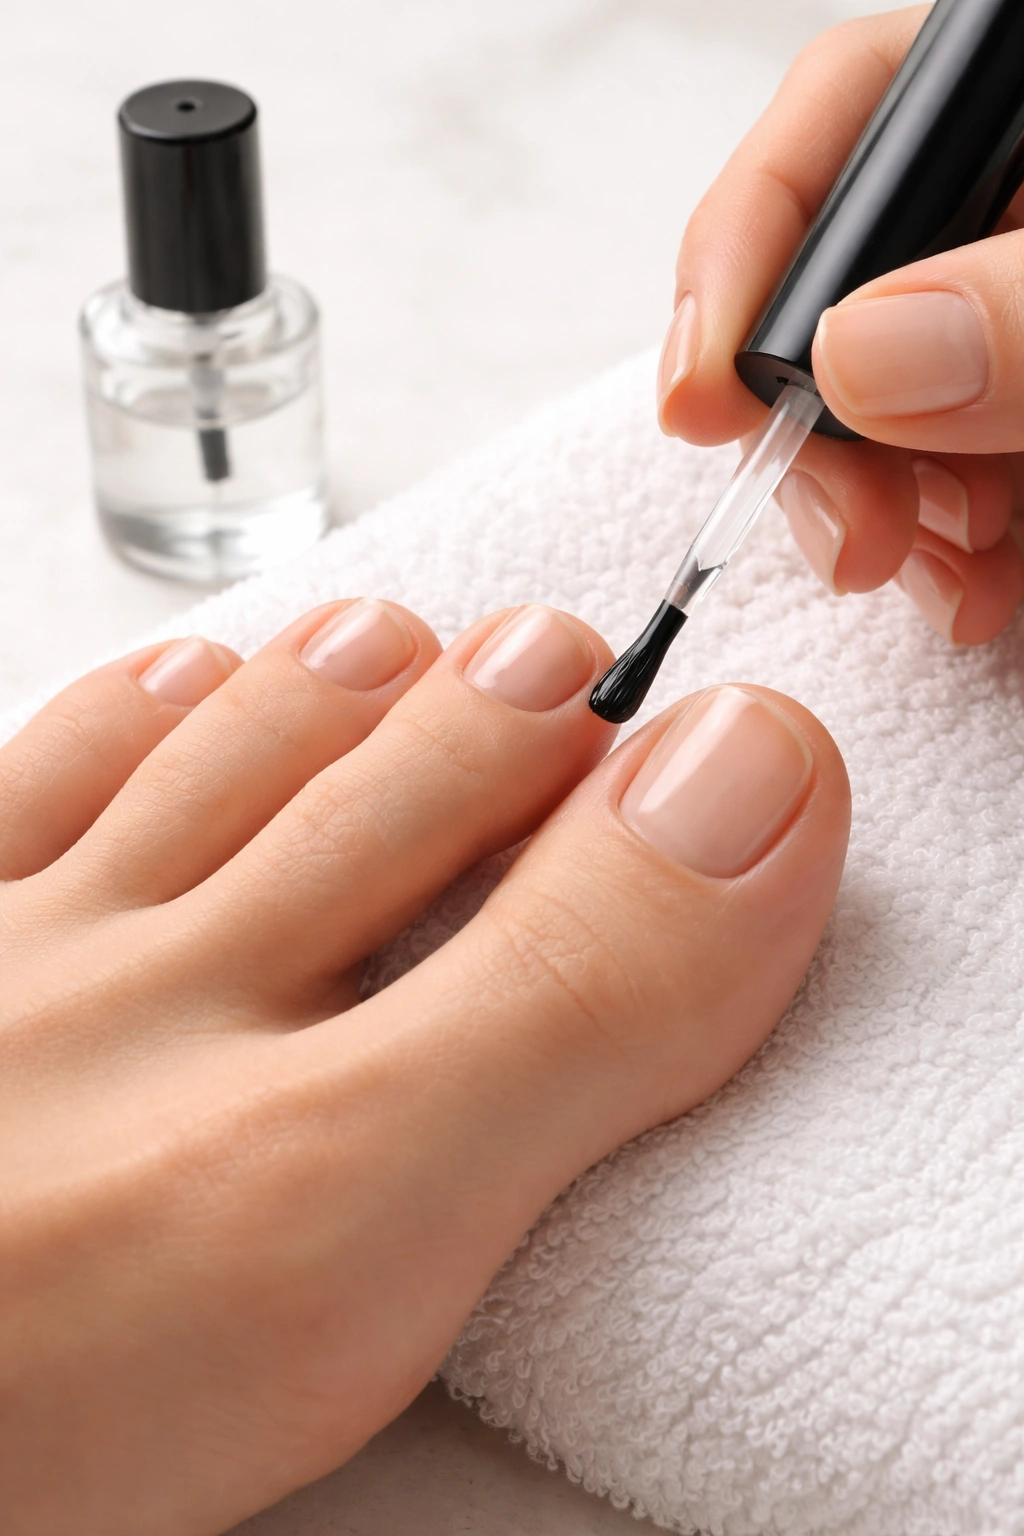
Never skip the base coat, even if you’re in a hurry. A base coat protects your nails from staining (which can happen with particularly pigmented polish colors), provides a smooth surface for your color to adhere to, and often contains strengthening ingredients that keep your nails healthy. Quality base coats can actually be quite nourishing.
Pour a small amount of base coat into the bottle cap to keep the bottle clean, and use the brush to apply a thin, even coat to each toenail. Start at the cuticle and paint toward the tip of the nail using three strokes: one down the center and one along each side. Keep the coat thin—thick base coats take forever to dry and don’t adhere as well.
Allow the base coat to dry completely before moving to the next step. This typically takes 1-2 minutes, though drying times vary by product. You can tell it’s dry when it no longer feels tacky to the touch. Some people use a quick-dry spray or fan to speed up drying, which is helpful if you’re trying to finish quickly.
A properly applied base coat should look nearly invisible on your nails—just a very slight sheen or color change. It’s not meant to be visible once you apply your color coat, but it’s doing essential work underneath. This invisible layer of protection is worth the minute it takes to apply.
Paint Your Nails with Color
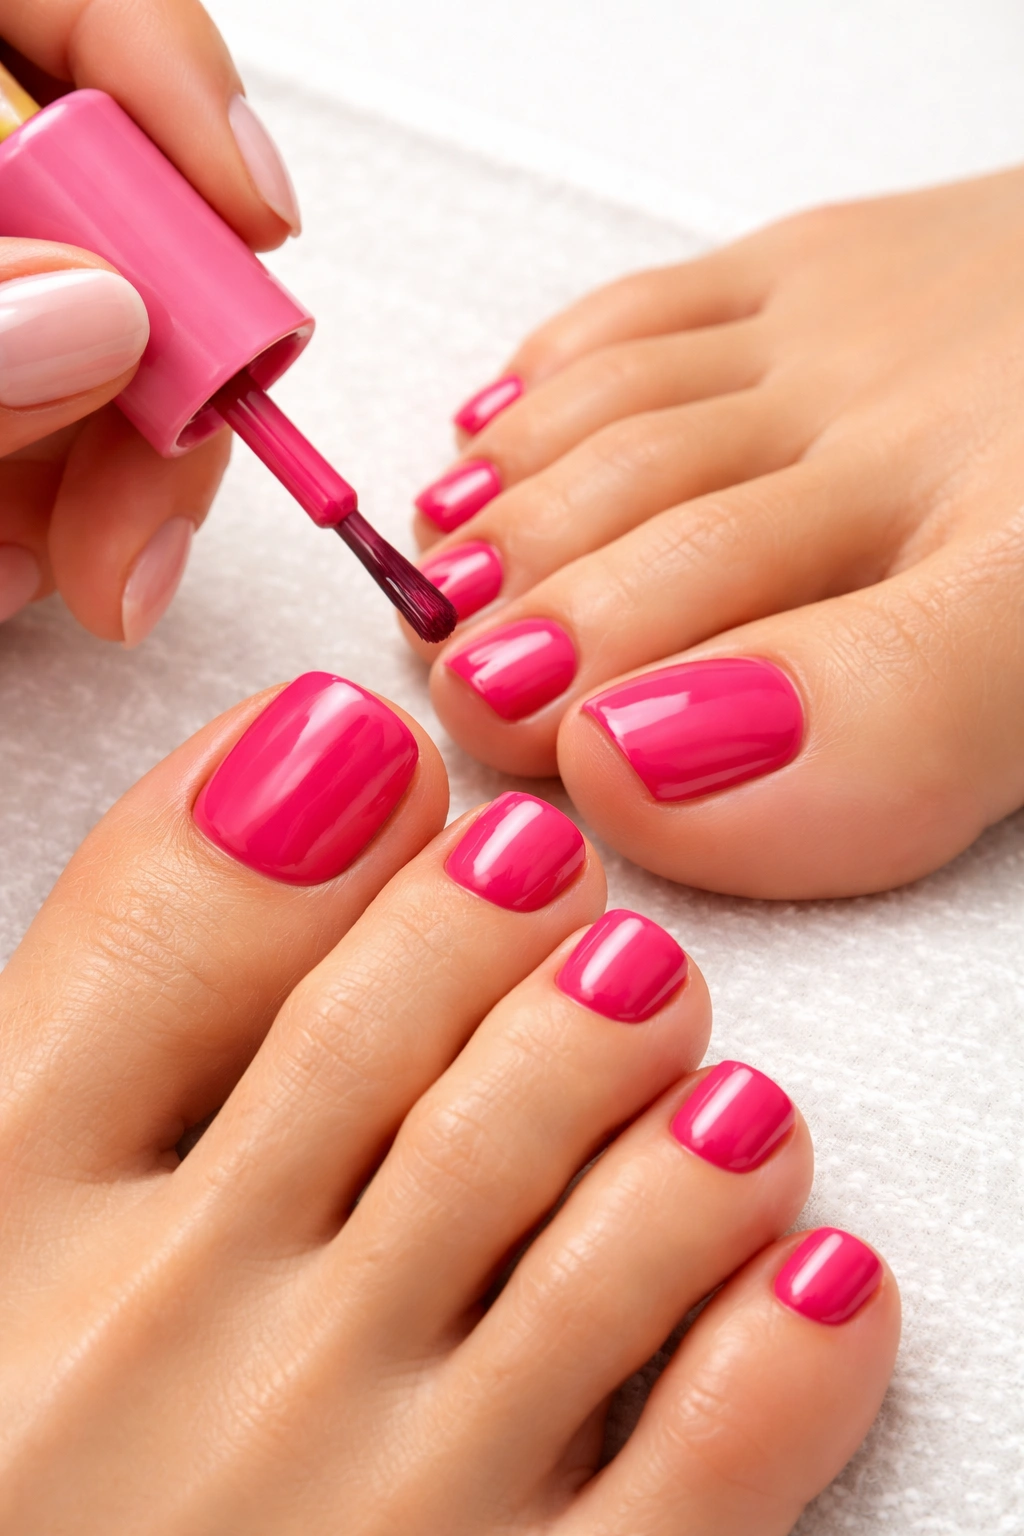
This is the part most people look forward to—choosing and applying your polish color. Before opening your bottle, roll it gently between your hands for about 30 seconds. This ensures the pigment and formula are perfectly mixed. Shaking the bottle introduces air bubbles that make the polish harder to apply smoothly.
Apply your chosen color in thin coats rather than one thick coat. A thin coat dries faster, looks more even, and is less likely to streak or clump. Using three strokes (center and both sides), paint each toenail with your first coat, working from base to tip. Wait 15-30 seconds for the polish to dry to the touch, then inspect for any thin spots or uneven coverage before applying your second coat.
Most colors need two coats for even, opaque coverage. A second coat ensures rich, vibrant color that looks intentional rather than translucent. Apply the second coat using the same technique as the first—thin, even strokes with the brush. Allow this coat to dry completely, which takes 30 minutes to an hour depending on the polish formula.
While waiting for polish to dry, keep your feet elevated and as still as possible. Watch a show, read, or simply relax. Resist the urge to walk around or do chores—wet polish is vulnerable, and even slight friction can cause smudging or dimpling. If you need to move around, go very slowly and carefully.
If you make a mistake and paint polish outside the nail line, don’t panic. Once the polish is dry, you can use a cotton swab dipped in nail polish remover to carefully clean up the edges. The thin line of remover dissolves just the stray polish without affecting the polish on your nail itself.
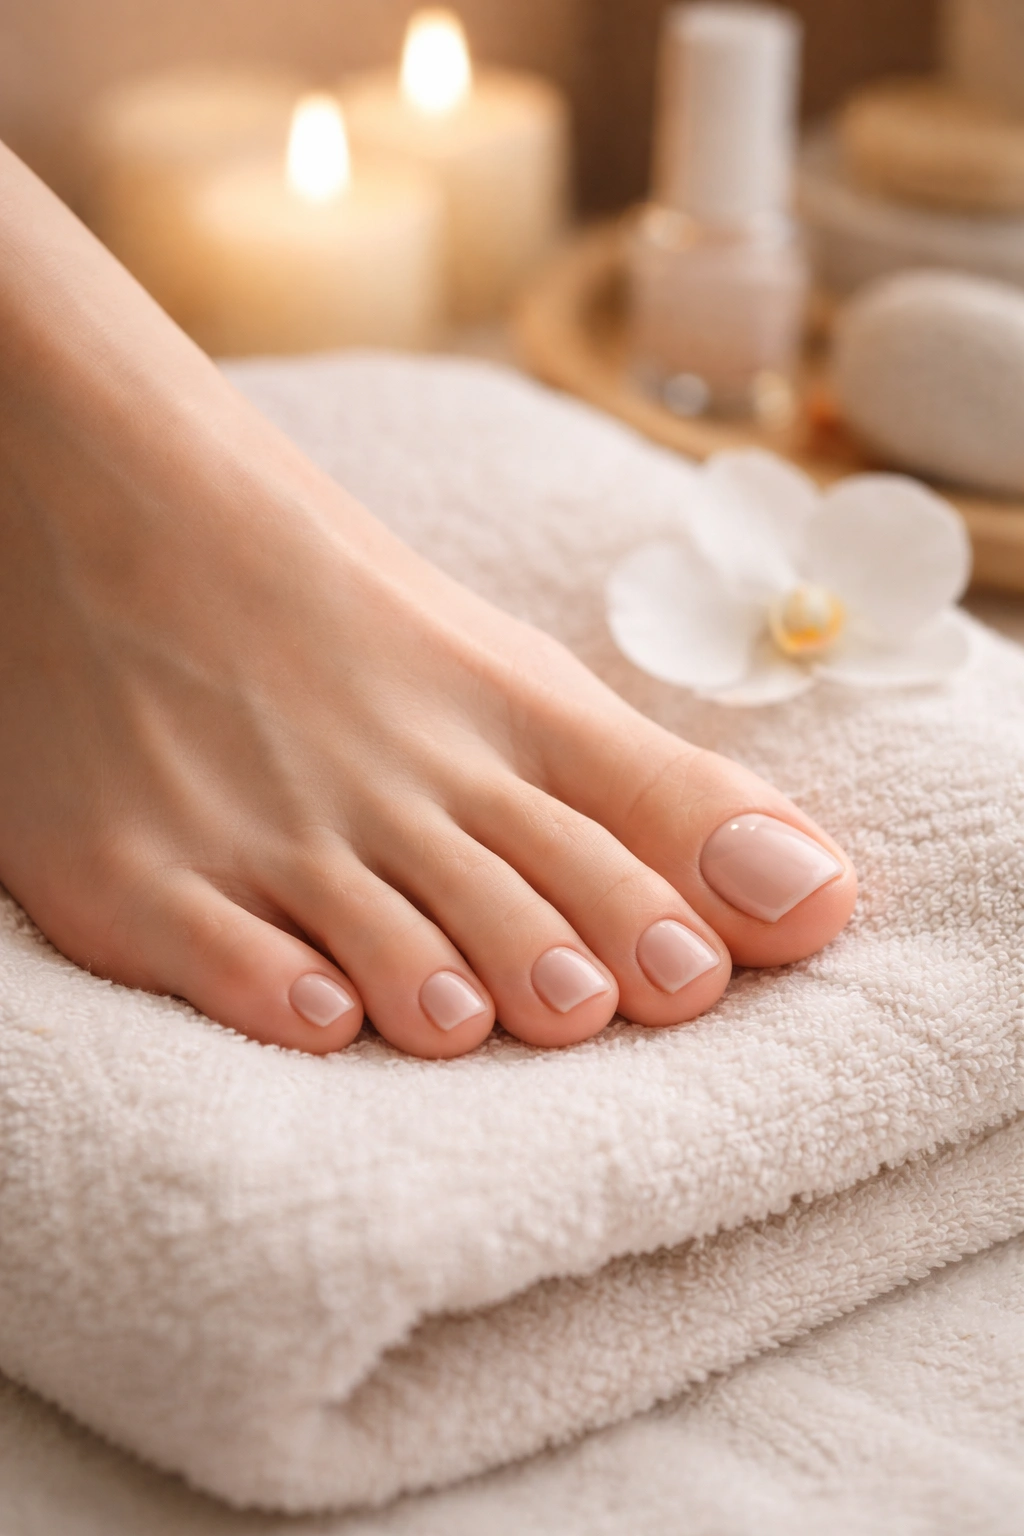
Finish with Top Coat for Shine and Durability
Top coat is what takes a pedicure from looking good to looking like you just left a professional salon. It adds gloss and shine, protects your color from chipping, and extends the life of your pedicure significantly. Always finish with a top coat, even if your nail polish already has a built-in shine.
Apply your top coat once the color is completely dry. Using the same three-stroke technique, apply a slightly thicker layer of top coat than you did with your base coat and color. The top coat should fully seal the color coat, creating a glossy, protective layer. This is the layer that takes the wear and tear—your color stays protected underneath.
Allow the top coat to dry completely before doing anything with your feet. This can take longer than the color coat because the top coat needs to fully harden to provide protection. Many top coats are “quick-dry” formulas that set in 5-10 minutes, but it’s worth waiting a full 30 minutes before walking around if possible. You’ll know it’s completely dry when it feels completely hard and slick to the touch with zero tackiness remaining.
Some people like to apply additional top coat every few days to extend the life of their pedicure. This refreshes the protective layer and keeps the shine looking fresh longer. If your pedicure starts to chip around the edges after a week or two, a fresh coat of top coat can often extend its life by several more days.
Maintain Your Pedicure Long-Term
Your pedicure is finished and looks beautiful, but you can extend its life significantly with smart maintenance. Once the polish is completely dry, avoid exposing your feet to water for at least an hour. Don’t shower, wash your feet, or go swimming until the polish has fully hardened.
After that initial hour, you can use your feet normally, but be mindful that wet nail polish is more delicate than fully cured polish. Try to keep polish-on feet out of water for the first 24 hours if possible. Activities like swimming, long baths, or being out in the rain will soften fresh polish and are more likely to cause chipping.
Wear open, comfortable shoes for the rest of the day if you can. Tight shoes can cause polish to chip or smudge, and having your feet confined in warm, moist shoes isn’t ideal right after a pedicure. Sandals or slip-on shoes are perfect. At night, wear clean socks if you’re going to bed with polish still slightly soft.
For several days after your pedicure, keep your feet moisturized with cuticle oil or foot cream, especially your cuticles. Hydrated cuticles and skin look better and help your polish application look more intentional and professional. Reapply cuticle oil daily to maintain the appearance.
After about a week, you might notice tiny chips appearing at the edges or tips of your nails. Instead of removing all the polish and starting over, simply apply a fresh top coat. This refreshes the shine and often seals up those micro-chips, extending the life of your pedicure by another week or more. You can do this top coat refresh every few days if you want to keep your pedicure looking fresh for an extended period.
Your pedicure will eventually reach the point where it needs a full refresh rather than just a top coat refresh. This typically happens after 2-3 weeks, depending on how active you are, what kind of shoes you wear, and how well you’ve maintained it. At that point, you’ll go through the entire process again—removing old polish, soaking, trimming, filing, exfoliating, and applying fresh polish.
Final Thoughts
A professional-quality pedicure at home is entirely achievable once you understand the steps and invest in the right tools. The process takes longer than a quick salon visit—plan for 45-90 minutes depending on how much attention you give each step—but you have complete control, you’re relaxing at home, and you save significant money over time.
The secret to a pedicure that lasts and looks great is never rushing the preparation steps. Soaking, exfoliating, and moisturizing take time, but they’re what separate a mediocre pedicure from a genuinely beautiful one. Your nails will be stronger, your feet will feel softer, and your polish will adhere better and last longer.
Practice makes improvement too. Your first few at-home pedicures might not be perfect—your polish application might be a little uneven, you might struggle with the filing or buffing. That’s completely normal and expected. By your third or fourth pedicure, you’ll have developed a rhythm, you’ll understand which products you prefer, and the entire process will feel much easier and more natural.
Treat your at-home pedicure as a genuine self-care ritual rather than a chore. Light candles, play music you love, make yourself a drink, and fully embrace the relaxation aspect of the experience. Your feet carry you everywhere—they deserve this attention and pampering, and you deserve the stress relief and self-care that comes with taking time to care for them properly.
