

Short nails get a bad rap in the nail art world, but here’s the truth: they’re actually an incredible canvas for creative designs. If you’ve been holding back from attempting nail art because you thought you needed long extensions to make it work, you’re missing out on one of the easiest, most rewarding ways to express your style right from your own home. Short nails offer real advantages—they’re practical, they heal faster if something goes wrong, and honestly, some of the most stunning designs look even better on a shorter nail bed. The key is understanding how to work with your nail length rather than against it, using techniques and color choices that actually enhance what you’ve got.
The beautiful part about doing nail art on short nails at home is that you don’t need an expensive setup or advanced artistic skills. You probably have most of the tools you need already—a toothpick works as well as any dotting tool, and careful brushwork with regular polish can create effects that rival what you’d pay a nail technician to do. Over the years, nail artists have developed countless beginner-friendly techniques that are specifically suited to shorter nail beds, which means you’re not starting from scratch. Whether you’re a complete beginner or someone who’s tried nail art before and wants to get better, this guide will walk you through everything from prep to polish application to the specific designs that absolutely shine on short nails.
The main reason short nails work so well for nail art is surface area—or rather, working with less of it. Simpler designs don’t need to compete with tons of empty space, so minimalist styles, geometric patterns, and solid colors with accent details create stronger visual impact. You’re not trying to fill a huge canvas, which actually takes the pressure off. What matters more is precision, color choice, and understanding which designs photograph well and look intentional rather than accidental on a smaller scale. Let’s dive into how to master this skill at home.
Understanding Why Short Nails Are Perfect for Nail Art
Short nails might seem limiting, but they actually eliminate some of the biggest challenges that longer nails present. Long nails demand intricate details to avoid looking sparse, they’re prone to breaking while you’re working on designs, and they require special care to keep polish from chipping at the edges. Short nails, on the other hand, are forgiving and practical while still offering plenty of room for creativity.
The durability factor matters more than you’d think. When your nails are short, the polish sits closer to the cuticle and grows out more naturally without those harsh lines that appear on longer nails. This means your manicure actually looks intentional for longer, and when it does eventually chip, it’s less noticeable because the free edge is minimal. You’re also less likely to accidentally smudge designs while they’re drying or catch them on something while going about your day.
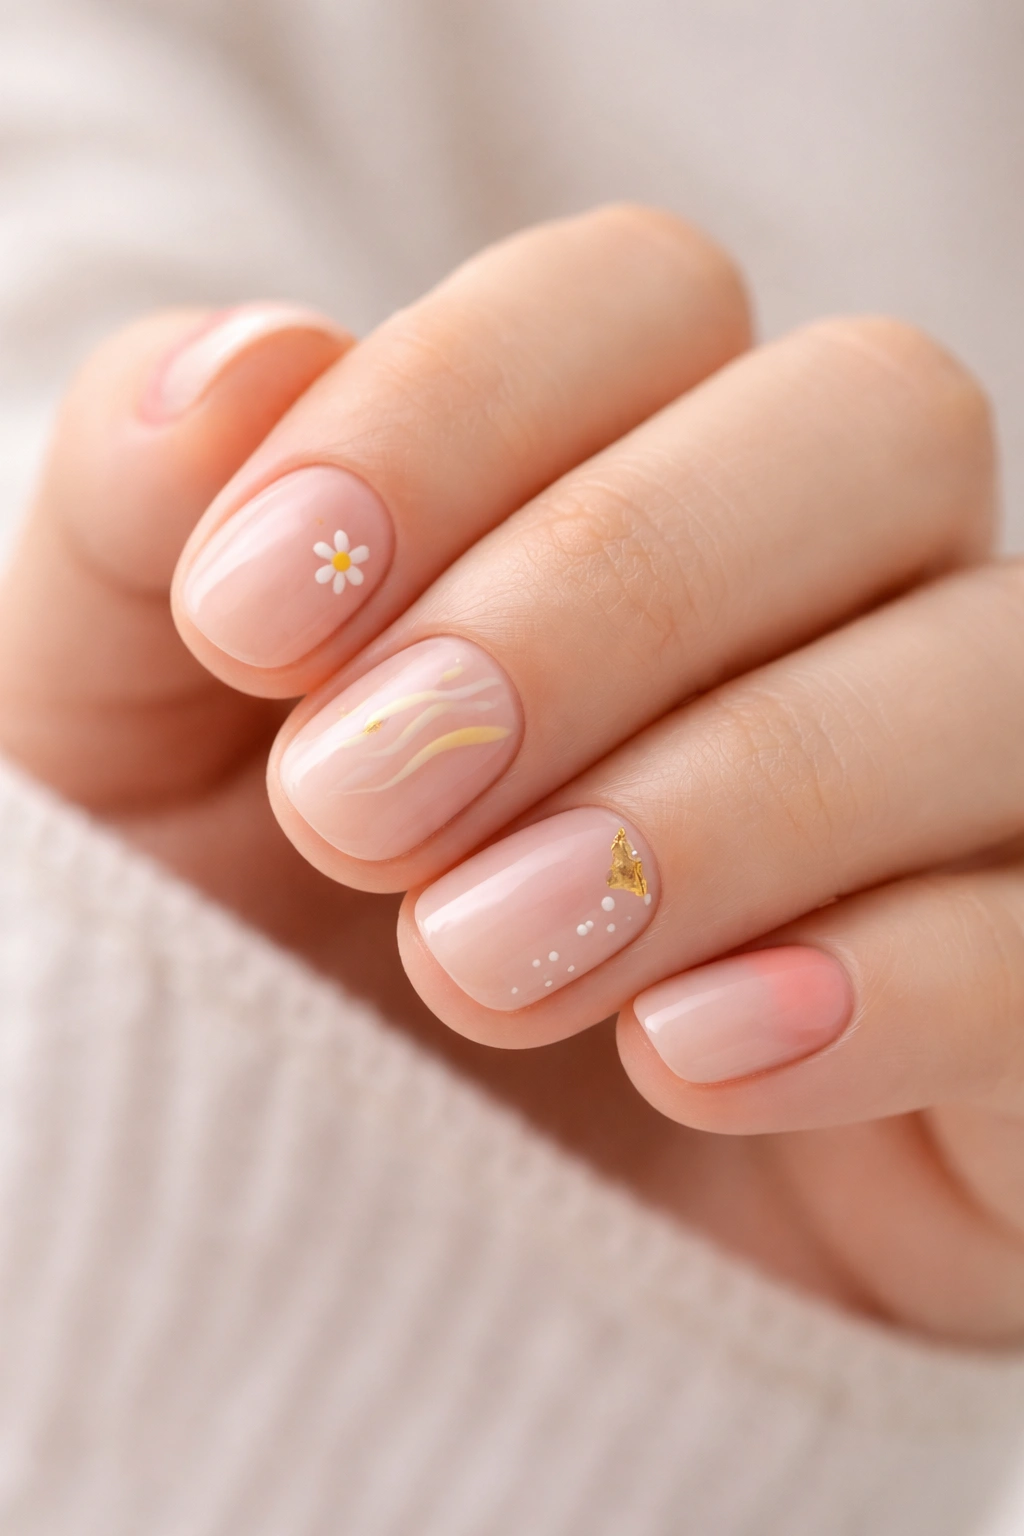
The design advantage is equally important. Negative space designs—where you leave parts of the nail unpainted or bare—look incredibly chic on short nails because there’s less area to fill. A simple line, a few dots, or a small geometric shape creates maximum impact without looking busy or cluttered. Professional nail artists actually prefer designing for shorter nails because it forces them to be intentional with every element rather than filling space for the sake of it.
Short nails also level the playing field for beginners. You’re not trying to execute a tiny, intricate design across a massive surface area. Your hand positioning is more stable because your fingertips are closer to your other hand. Mistakes are less visible because there’s less space for them to dominate. This psychological advantage—knowing that imperfection is harder to spot—helps you relax and actually do better work.
Assembling the Essential Tools and Supplies
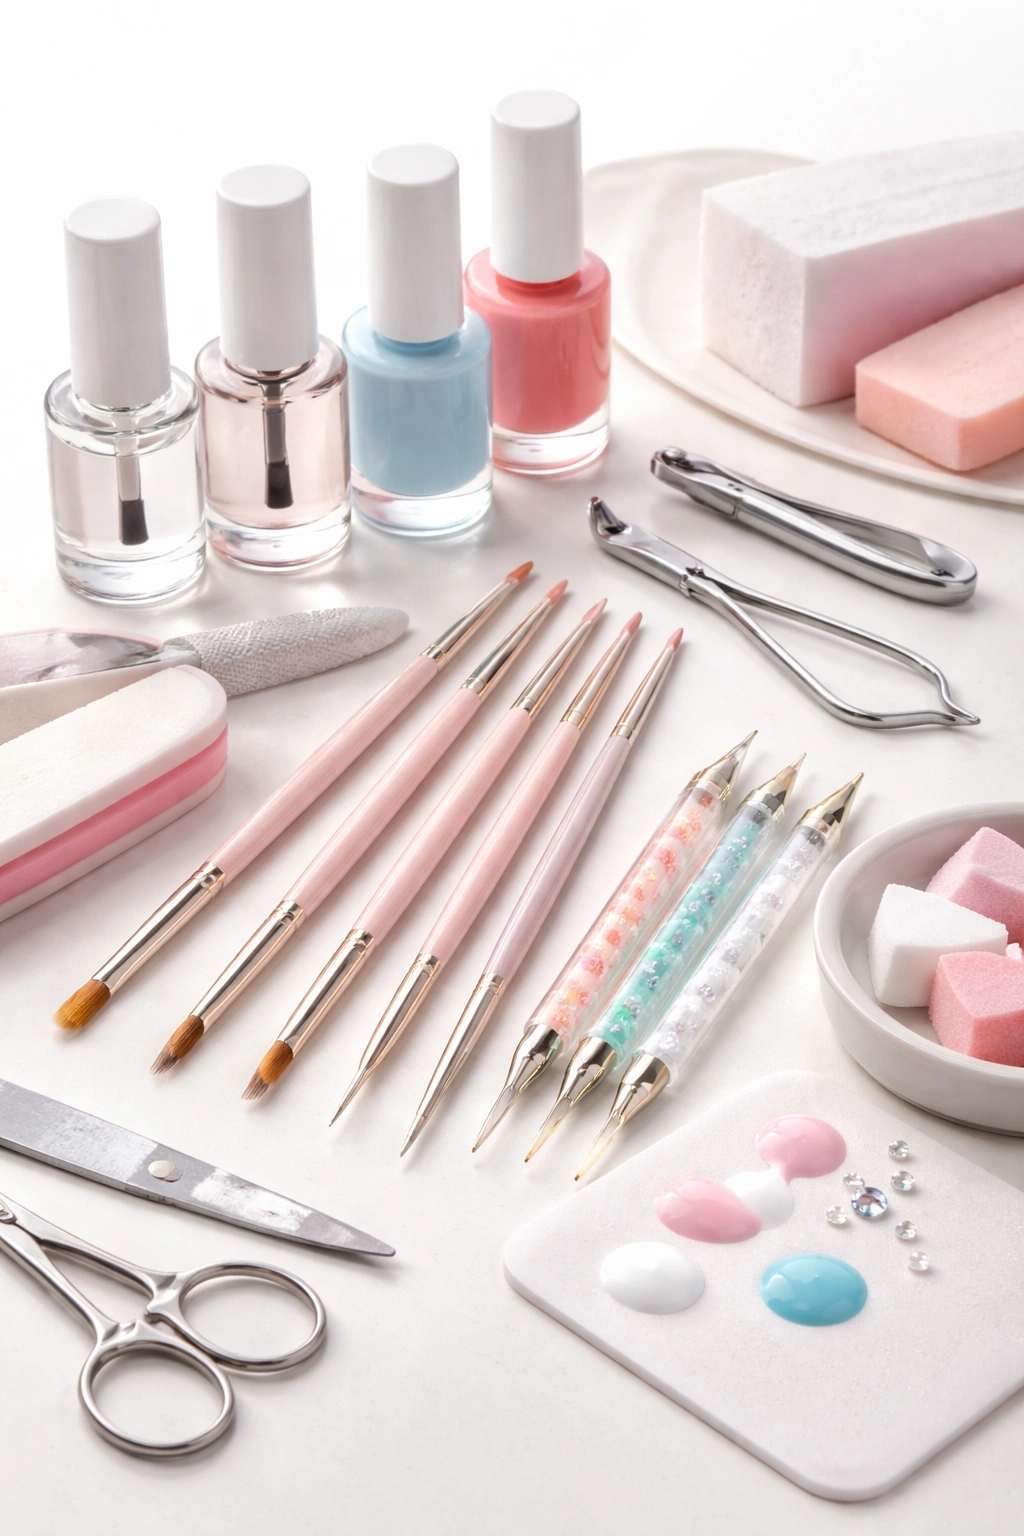
You don’t need a professional-grade nail kit to create salon-quality designs at home. In fact, starting simple is actually smarter because it teaches you fundamental skills before adding complexity. Here’s the genuine baseline you need: nail polish in 2-3 colors, a base coat, a top coat, a regular nail polish brush (the one that comes with the bottle works fine), and something thin for detail work.
The detail work tool is where people overthink things. Yes, you can buy a fancy dotting tool, but a toothpick, a bobby pin with a rounded end, or even the pointy end of a nail file works identically for creating dots and small details. If you want to draw thin lines, an old eyeliner brush or a fine paintbrush from a craft store costs a dollar and works perfectly. The brush that comes with your nail polish works for most applications—only invest in specialty brushes once you’ve figured out what you actually need.
A makeup sponge is genuinely useful, not just a luxury. You’ll use this for gradient effects and ombre techniques by dabbing multiple polish colors onto the sponge and stamping them onto your nail. Plain cheap sponges from the drugstore are actually better than fancy ones because the texture is more uniform. Keep a few around because you’ll go through them quickly.
Tape is surprisingly valuable for creating clean lines and geometric patterns. Regular painter’s tape from the hardware store, medical tape, or even scotch tape all work—the key is making sure it’s stuck down firmly so polish doesn’t seep underneath. Nail-specific stencil stickers are nice to have but entirely optional if you’re comfortable cutting tape into shapes.
For cleanup, you’ll need nail polish remover (acetone works faster but can be drying; non-acetone is gentler), cotton pads or swabs, and a small brush or old eyeliner brush for precise removal around the edges. Petroleum jelly around your cuticles before you start designing saves massive cleanup time because polish won’t stick to it—this is a professional hack that genuinely changes the game.
Preparing Your Nails for the Best Results
Preparation determines everything about how your final manicure looks and how long it lasts. Start with clean nails that have been washed and completely dried. Any oils, lotions, or moisture on your nail surface will cause polish to stick unevenly and chip faster. If you’ve used hand cream recently, wash your hands with regular soap and let them air dry completely.
File your nails into a consistent shape, even though they’re short. A gentle rounded shape works beautifully on short nails and is much easier to file than sharp corners. File in one direction rather than sawing back and forth—this prevents splitting and peeling at the edge. You don’t need to file much; just enough to even out any uneven growth and create a smooth edge where you’ll eventually apply polish.
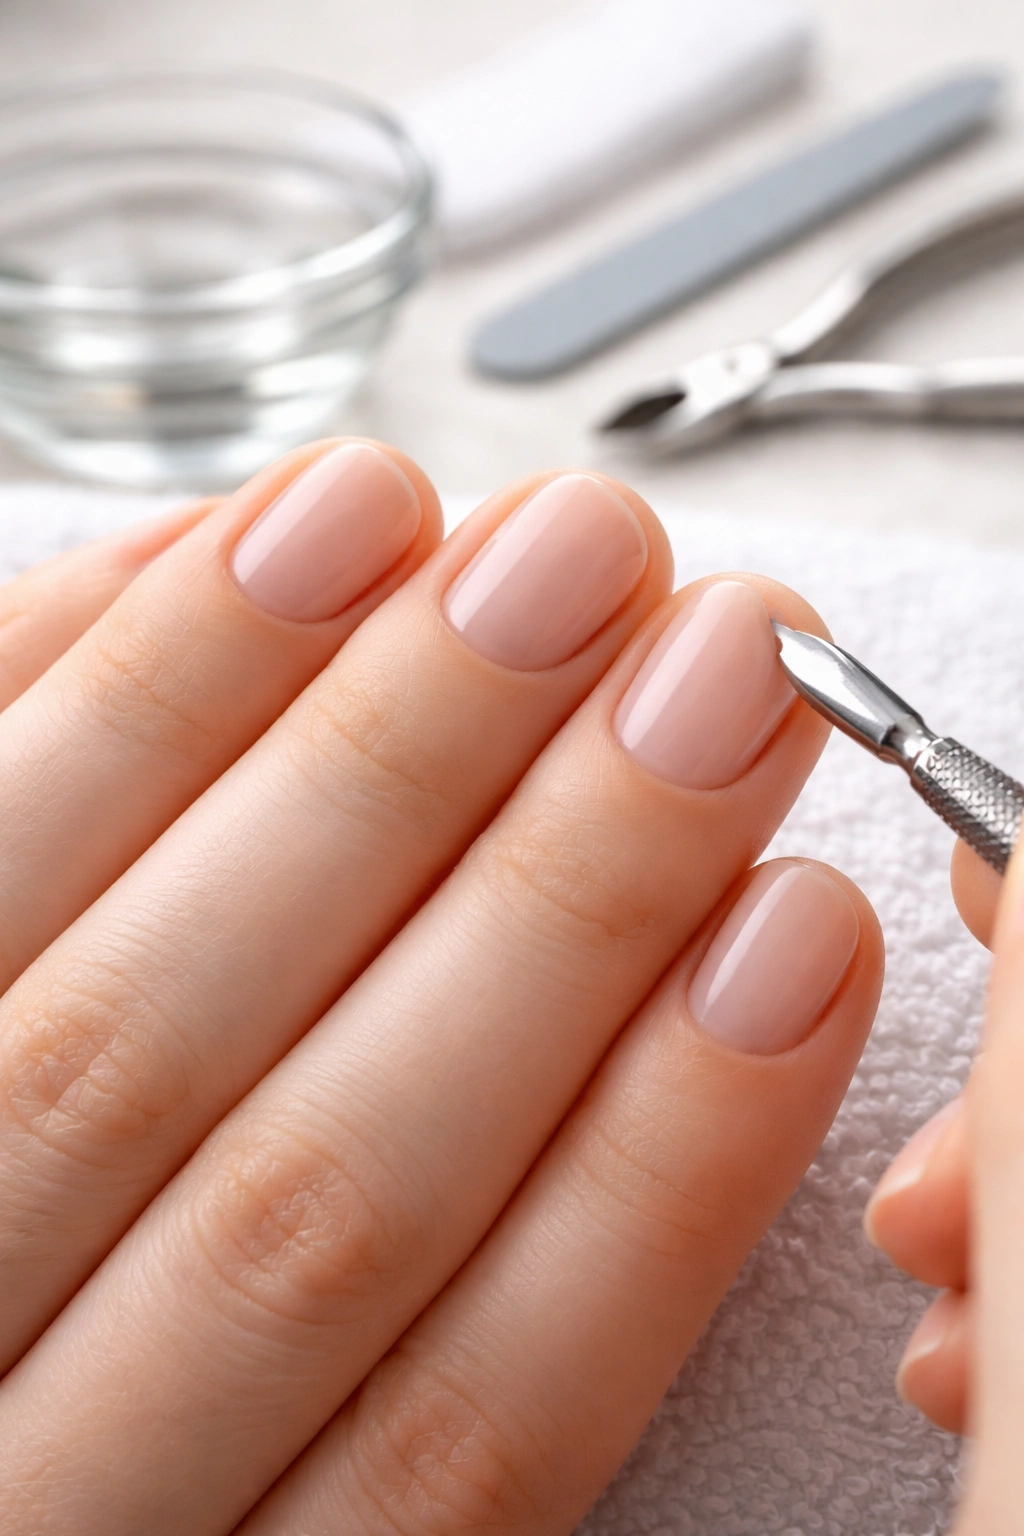
Push back your cuticles using a cuticle stick or an old credit card. This is the step that makes the biggest visual difference on short nails because it actually makes them appear longer and creates a neater base for polish. Never cut your cuticles—they protect your nails from infection—just gently push them back. If your cuticles are particularly dry or overgrown, soak your hands in warm water for three to five minutes before pushing them back; they’ll move more easily.
Buff the surface of your nails lightly with a nail buffer, moving in one direction. This creates a slightly textured surface that helps polish adhere better and last longer. You’re not trying to sand your nails down; just a light buffing to remove shine. This step is what professionals do consistently, and it’s the reason salon manicures last significantly longer than rushed at-home ones.
A layer of petroleum jelly or cuticle oil around the edges of your nails before you start painting is the secret weapon for easy cleanup. Apply it in a thin ring around your cuticle line, extending down the sides. When you inevitably get polish on your skin while painting, it won’t stick, and you’ll wipe it away effortlessly with a cotton pad. This one step eliminates the tedious scrubbing that usually comes after doing nail art.
Selecting Colors That Enhance Short Nails
Color choice impacts how nails look far more than most people realize. If your goal is to make short nails appear longer, nude and pale colors are your best friends. Choose a nude shade that’s one to two shades lighter than your actual skin tone. This creates an optical illusion of length because the color doesn’t provide a defined stopping point at the tip. The effect is subtle but genuinely works, and the pale tone also makes your fingers look more elegant and elongated.
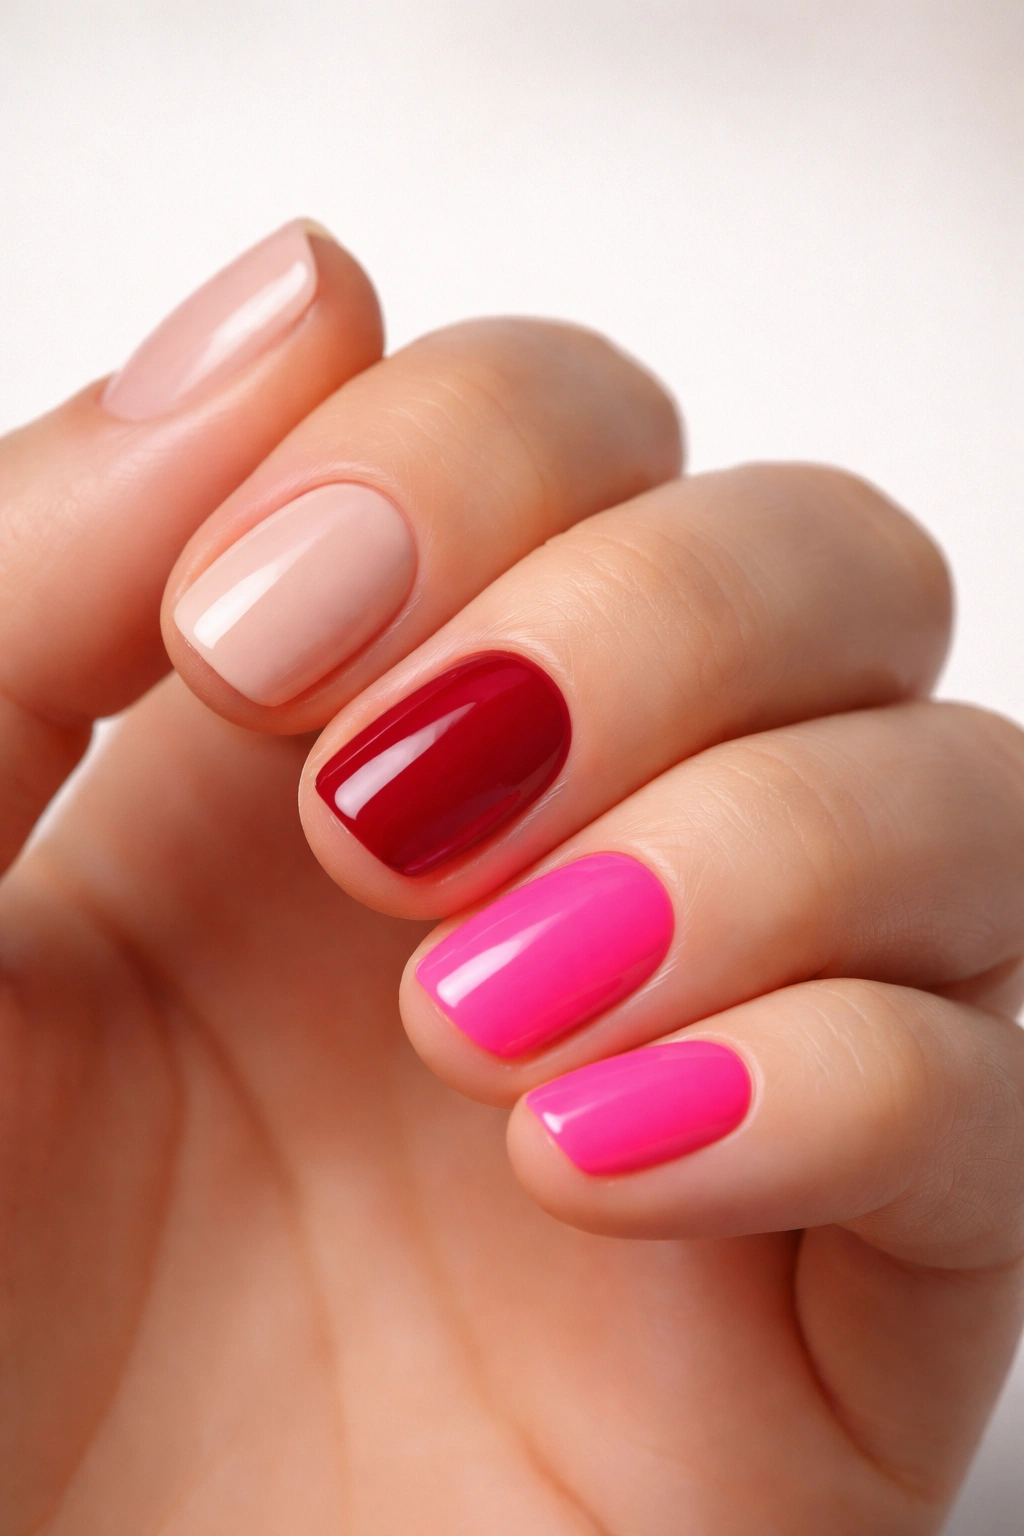
Dark, saturated colors—deep reds, blacks, dark purples, rich teals—work beautifully on short nails when you’re not worried about length and just want to look bold. These colors create strong contrast and actually look more intentional on shorter nails because they’re not trying to stretch down a long nail bed. A classic dark red on short nails is sophisticated and timeless, while that same color might look harsh or overwhelming stretched down a long nail.
Bright colors deserve special consideration on short nails. Neon pinks, electric blues, vibrant oranges—these pop against short nails because there’s less space between the base color and the tip for the eye to travel. The saturation and brightness read as intentional design choices rather than just trying to fill space. If you have fair skin, jewel tones and darker brights work especially well; darker skin tones glow with warm brights like coral, golden yellows, and warm reds.
Metallics and chromes are absolute game-changers for short nails. A shimmery silver or gold appears luxurious and catches light in ways that draw attention to your manicure without requiring any additional design work. Chrome powders, in particular, look like liquid metal and create a high-end effect with zero effort beyond application. These are perfect when you want impact without complexity.
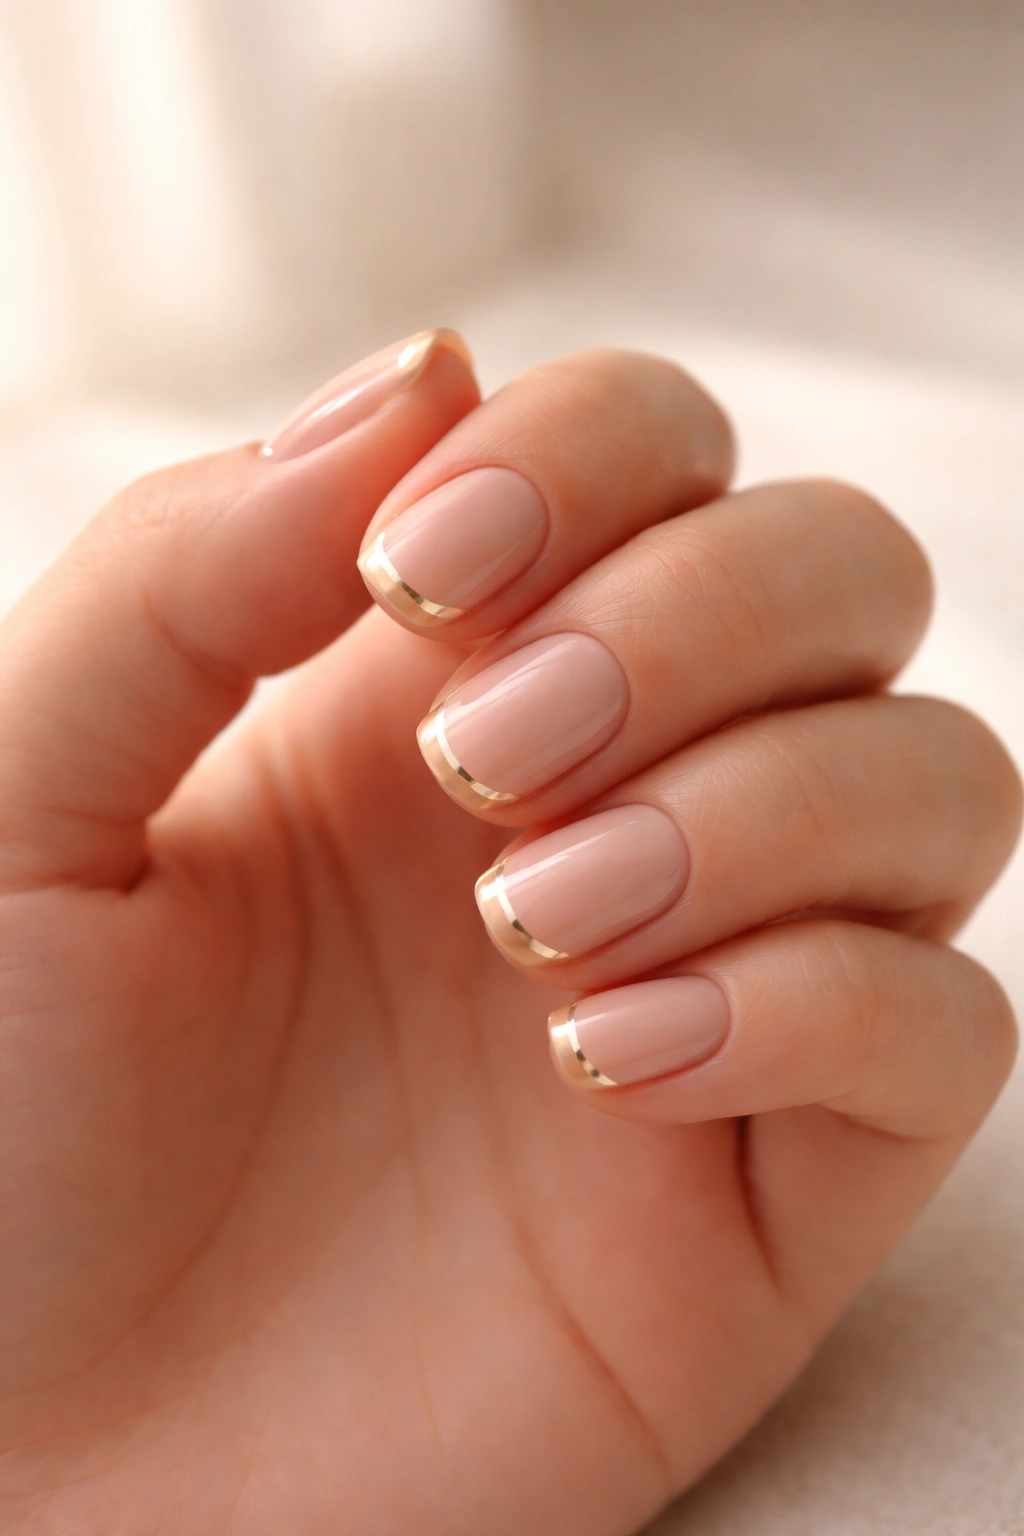
White and nude French tips actually make more of a statement on short nails than on longer ones because the proportion is different. A traditional French tip has a thicker white line on longer nails and needs to be proportionally smaller on short nails to look balanced—which is exactly why “micro French tips” have become so popular. The thinner line reads as more elegant and intentional.
Applying Base Coat Like a Professional
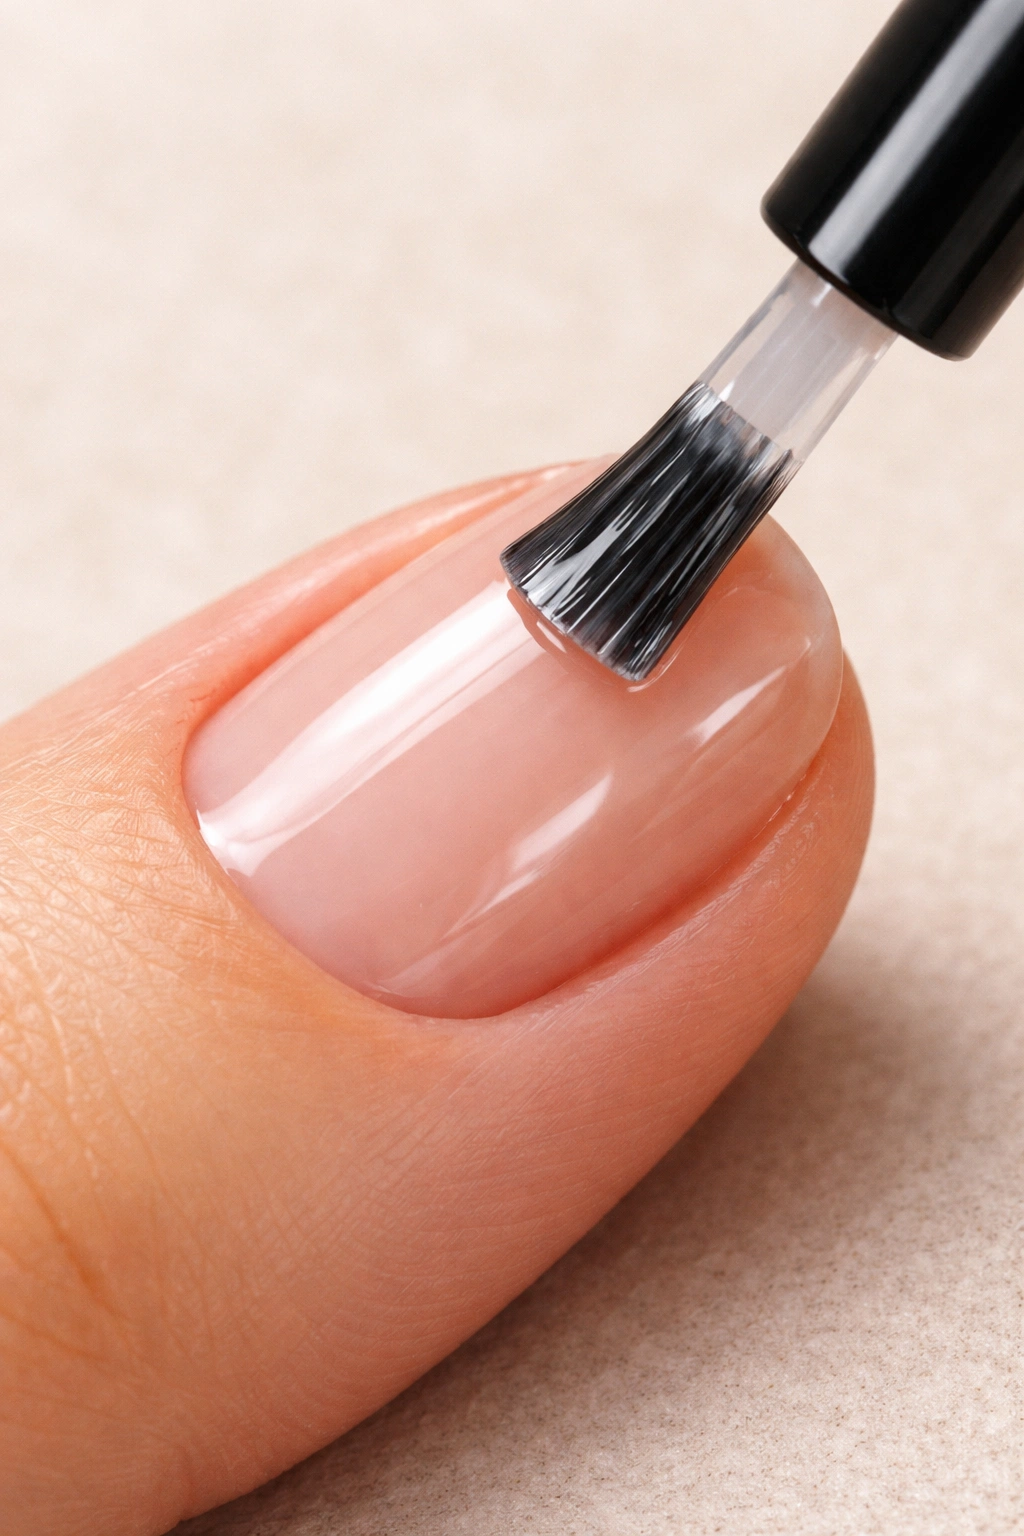
This is the step that separates manicures lasting one week from those lasting three. Base coat creates a protective barrier between your nails and colored polish, preventing staining and ensuring better adhesion. Even if you think you’re in a hurry, skipping base coat is a false economy because you’ll spend twice as long trying to get your color to look even and last.
Choose a base coat based on your nail needs. If your nails are weak or brittle, a strengthening base coat with nylon fibers will reinforce them. If your nails are stained from previous polish, a brightening base coat will neutralize discoloration. For most people, a simple clear base coat works fine. Apply a thin, even coat across the entire nail surface, and let it dry completely—don’t rush this step.
The application technique matters. Use the brush that comes with the base coat, load it with a modest amount of product, and apply with smooth strokes from base to tip. Don’t overload the brush; too much product causes streaking and uneven coverage. A light touch with thin layers beats heavy coverage that takes forever to dry and looks thick and goopy. Let the base coat dry fully before moving to color—usually two to three minutes for regular polish, though gel base coats have different timing.
One insider trick: if your base coat is a bit streaky or uneven, that’s fine. The colored polish over top will correct it, and the important thing is having that protective layer. Don’t obsess over perfection at this stage; you’re setting up for success with the colored polish, which is where your design actually happens.
Mastering Dots and Minimalist Designs
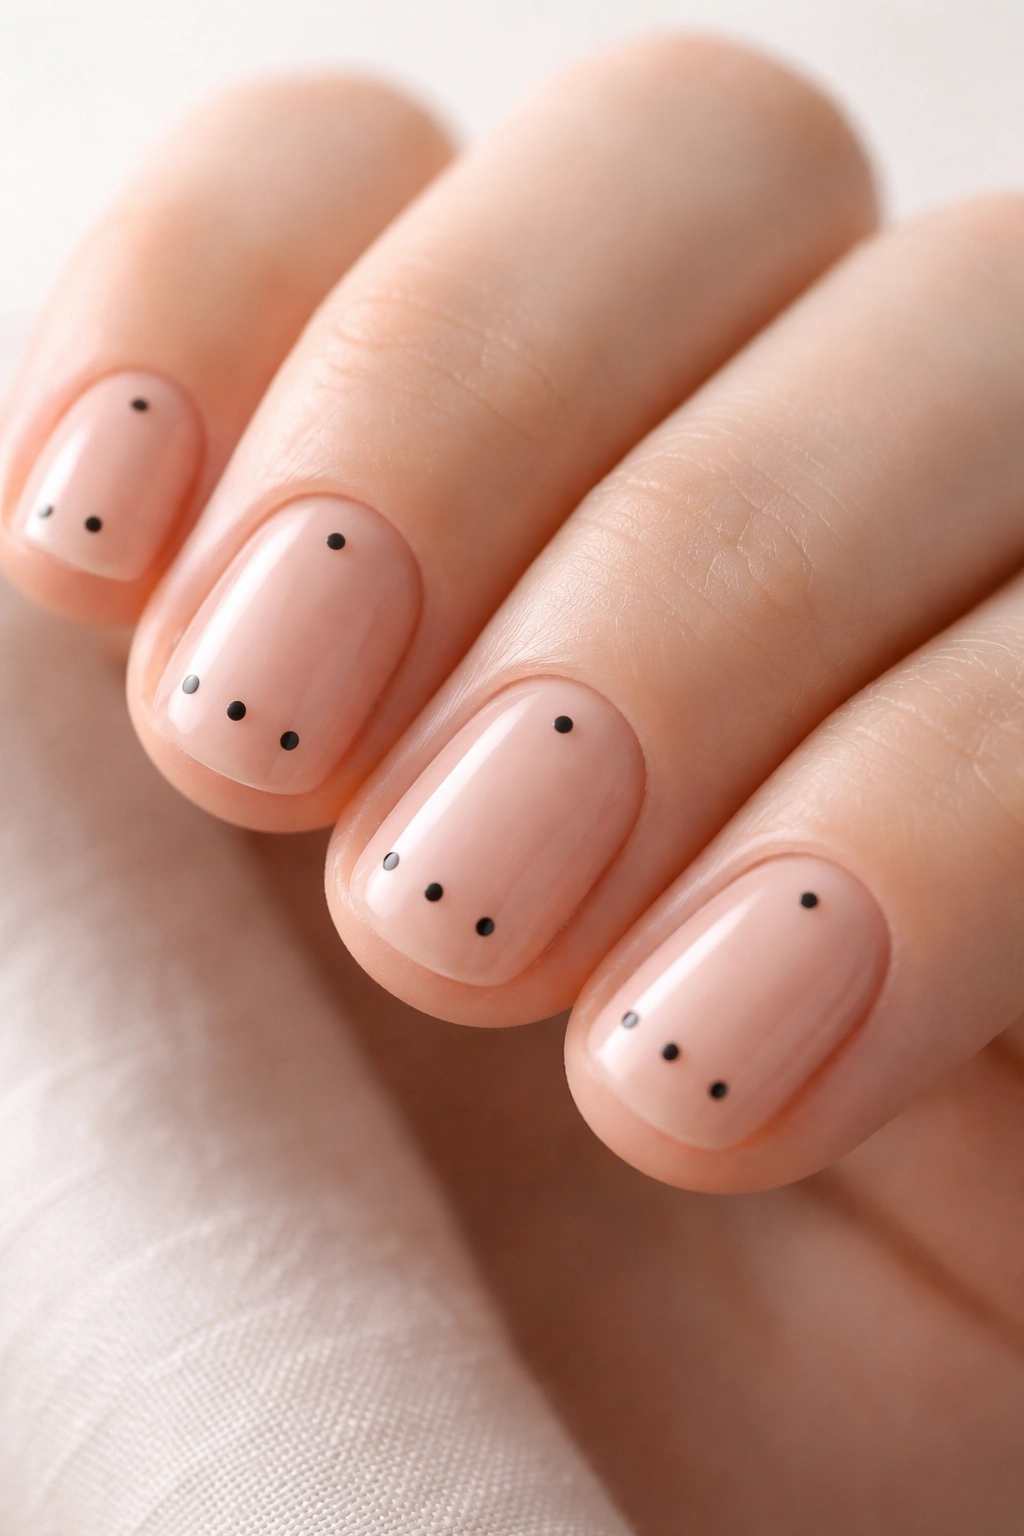
Dots are genuinely the easiest nail art technique you can learn, yet they look intentional and polished. All you’re doing is creating small circles on your nail using a tool dipped in polish. A dotting tool, toothpick, bobby pin end, or even the eraser end of a pencil all work. The only difference between professional-looking dots and amateurish ones is consistency—keeping them roughly the same size and spacing them intentionally rather than randomly.
Dip your tool very lightly into polish—you want just enough to create a dot when you press it against your nail. If you load too much, the dot spreads into a blob. Practice on a piece of paper or scrap first to get a feel for how much pressure and how much product you need. A single dip usually creates one to three dots depending on how many times you press, so you’ll reload frequently. This is actually good because it prevents buildup that causes imperfect shapes.
Create dots in intentional patterns: a line down the center of each nail, scattered randomly for a playful look, or grouped in circles to resemble flowers. On short nails, less is more—three to five dots per nail looks considered and elegant, while dots covering the entire nail can look busy. Leave white space or negative space around your design; this is what makes minimalist designs so visually powerful on shorter nails.
Monochromatic dot designs are underrated. Paint all your nails one color, then add dots in a slightly different shade of the same color family—pale pink nails with slightly deeper pink dots, for example. This creates definition and interest without looking like a completely different design. It’s the easiest way to transition from solid color to nail art.
One-color-plus-white dots is the ultimate beginner design. Paint your nails any color you want, let it dry completely, then add white dots in any pattern. White pops against every color and makes even irregular dots look intentional. This combination is fresh, clean, and virtually foolproof.
Creating Lines and Geometric Patterns
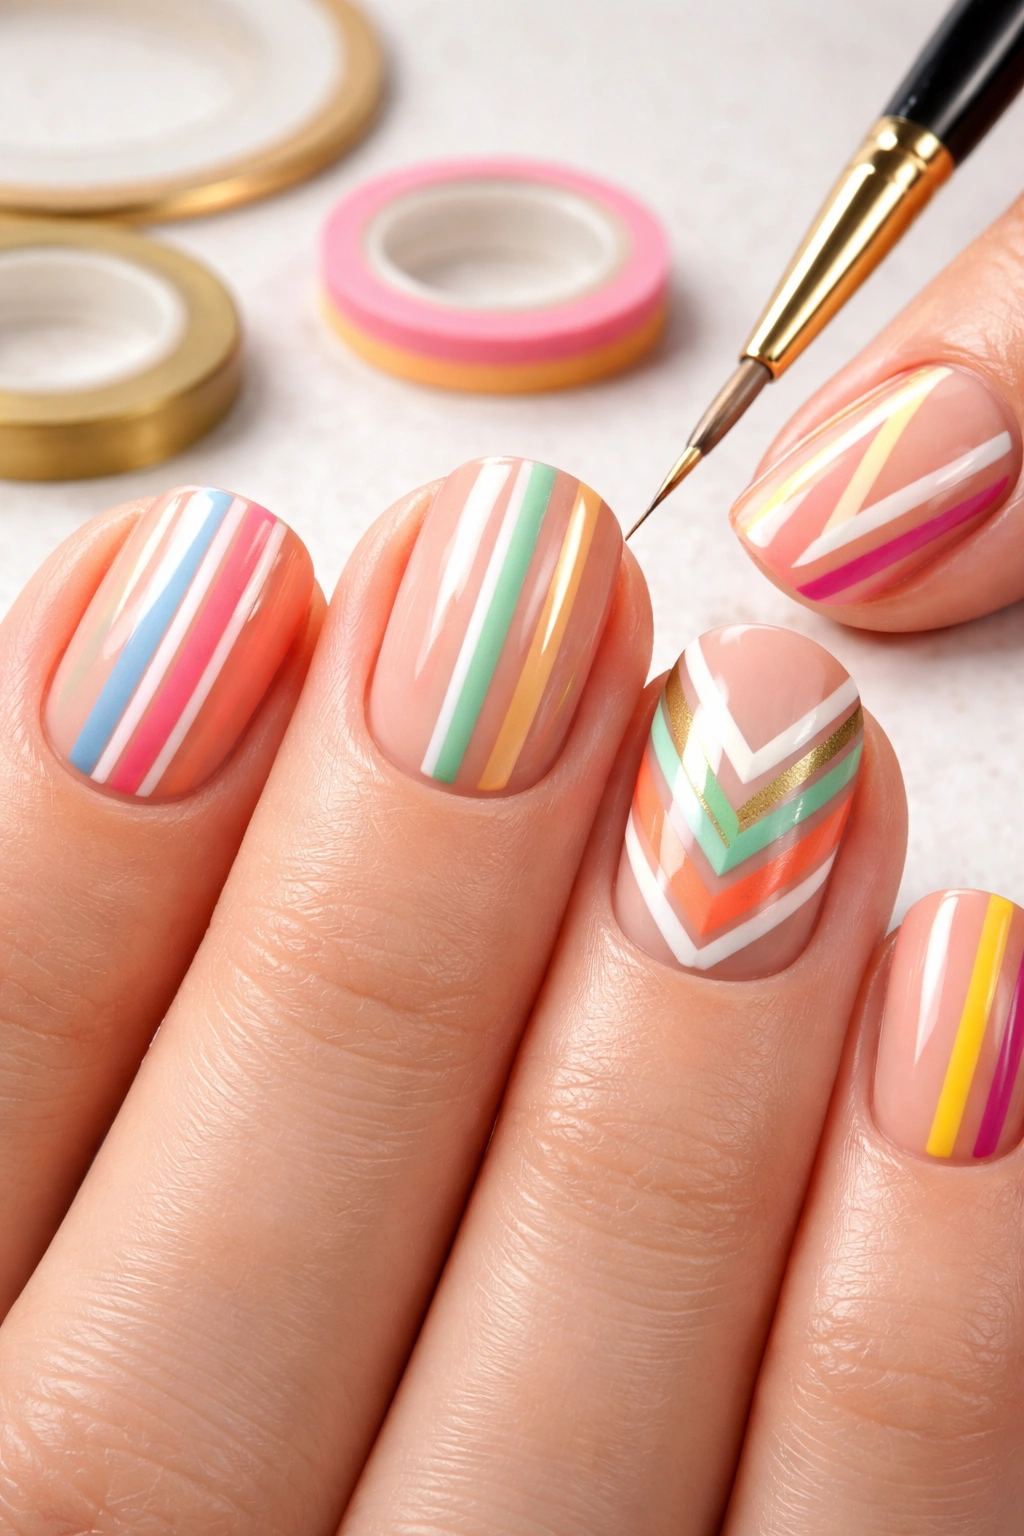
Lines are the building block of countless designs, from simple stripes to complex geometric patterns. The key to straight lines is using a thin brush, moving your hand slowly and deliberately, and ideally using tape as a guide when you’re starting out. Painters’ tape or nail-specific stencil tape lets you create perfectly clean lines without needing a surgeon’s hand-eye coordination.
To use tape for geometric designs, plan your pattern first. A vertical stripe down the center of each nail is the easiest starting point—apply painter’s tape on either side of where you want the stripe, paint your chosen color down the middle, let it dry slightly, then carefully remove the tape. Wait for the paint to be mostly dry before peeling tape because completely wet polish will smudge when you pull it away.
Chevron patterns—V-shaped lines pointing down—look modern and work beautifully on short nails. Create them by applying tape in a V shape, painting over it, removing the tape, and repeating with different colors. The geometric precision makes even imperfect execution look intentional, which is a huge advantage when you’re learning.
Thin hand-painted lines work once you understand the technique. Use the thinnest brush you have or even a toothpick loaded minimally with polish. Rest your hand on the table, steady your painting hand with your other hand supporting your wrist, and move slowly. It’s better to go slowly and get a straight line than to rush and create a wobbly one. Practice on paper first, holding your hand exactly as you would while painting your nails.
Abstract line designs are forgiving because lines don’t have to be perfect to look intentional. Thin, wavy lines creating an organic pattern, or scattered lines at different angles, all read as contemporary and artistic. The beauty of abstract designs is that imperfection actually enhances them—your unique imperfections make it look handmade rather than stamped.
Designing French Tips That Suit Short Nails
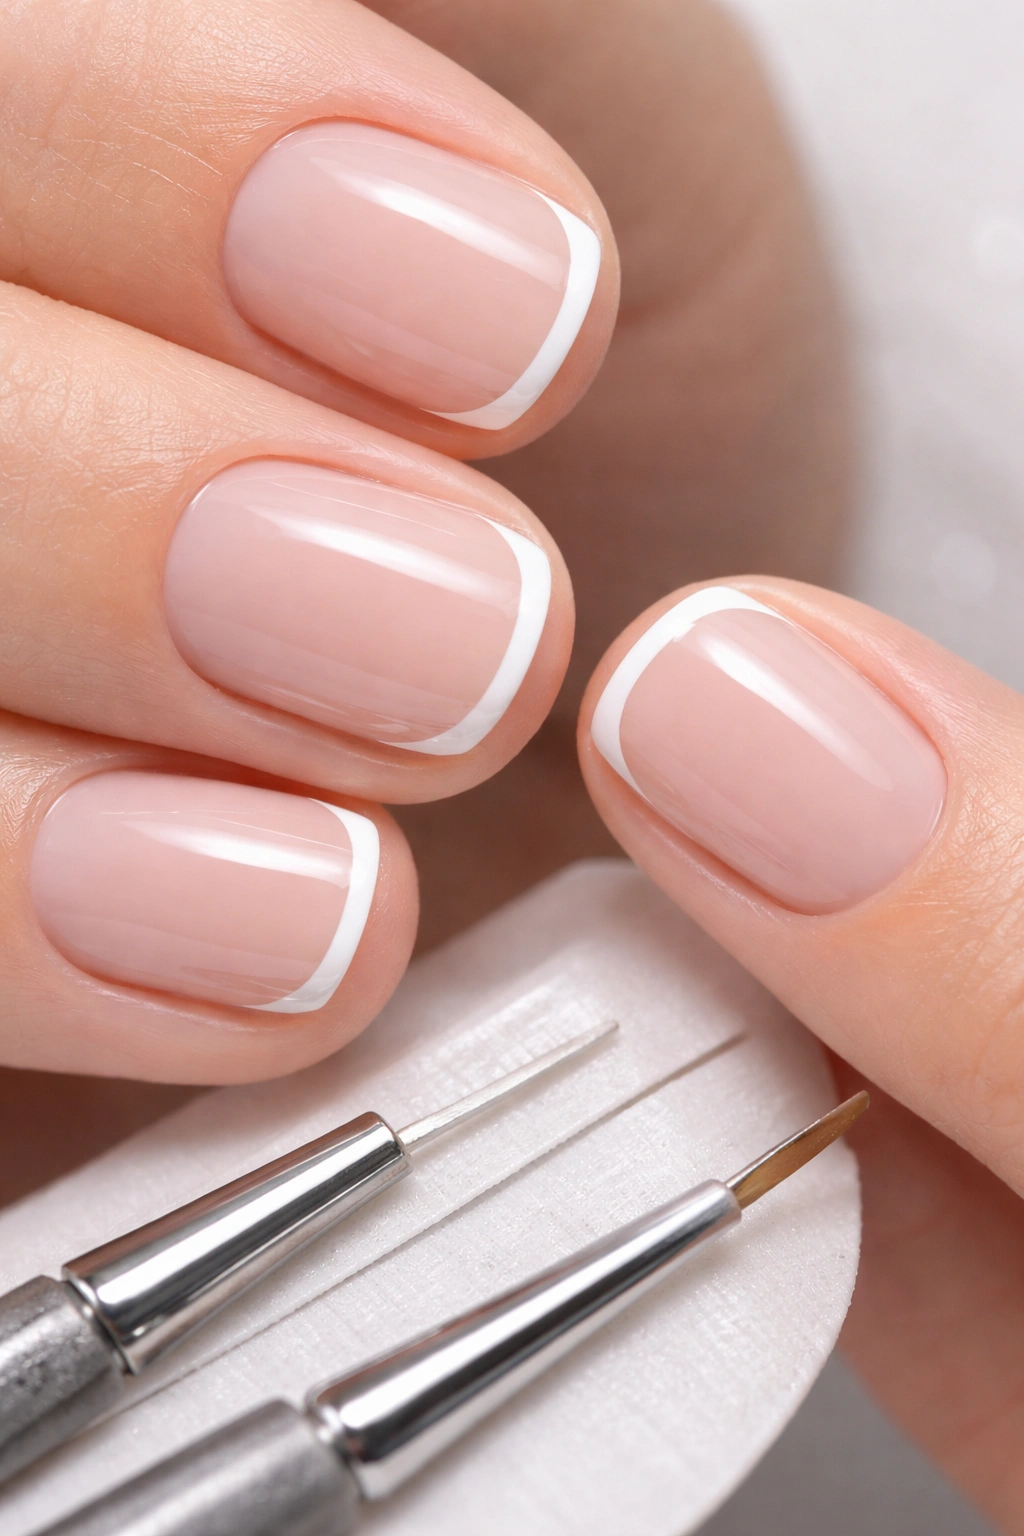
The traditional French tip translates beautifully to short nails, but the execution requires understanding proportions. On short nails, your white tip line needs to be significantly thinner than on longer nails—this is why “micro French” became a trend. A line that’s roughly one to two millimeters thick looks elegant on short nails, while a thicker line can overwhelm the smaller surface area.
Achieving a clean French tip line by hand requires a steady hand and practice, or you can use a French tip guide—a sticky stencil that you apply to your nail to create a perfectly straight line. These cost a few dollars and eliminate the guesswork. Apply the guide to your nail with the line positioned where you want it, paint your white or accent color across the exposed tip, let it dry slightly, and remove the guide. The result is a crisp, professional line.
Without a guide, you’ll use a very thin brush and the slow, steady technique mentioned above. Load your brush minimally, position it at the edge where you want your line to start, and make one smooth stroke across. If it’s not perfect, let it dry and do another thin coat to even it out. Thin layers are more forgiving than trying to get perfect coverage in one stroke.
Micro French tips with a colored line instead of white are having a major moment. A thin line of black, navy, burgundy, or even neon creates a modern update to the classic look. This is actually easier to execute than white French tips because a colored line blends better if it’s slightly imperfect, while white shows every wavering edge.
Gold or silver metallic French tips add luxury without complexity. Use a metallic polish to create your thin tip line, and the shimmer catches light in a way that makes the design look intentional and high-end. This works especially well on nude or pale pink base colors, creating a sophisticated, expensive-looking manicure.
Reverse French tips—where you paint the base of the nail instead of the tip—are surprisingly flattering on short nails. A thin line of color at the cuticle, with bare or neutral nails below, draws the eye upward and somehow makes nails appear longer. It’s a geometric design that feels modern and intentional.
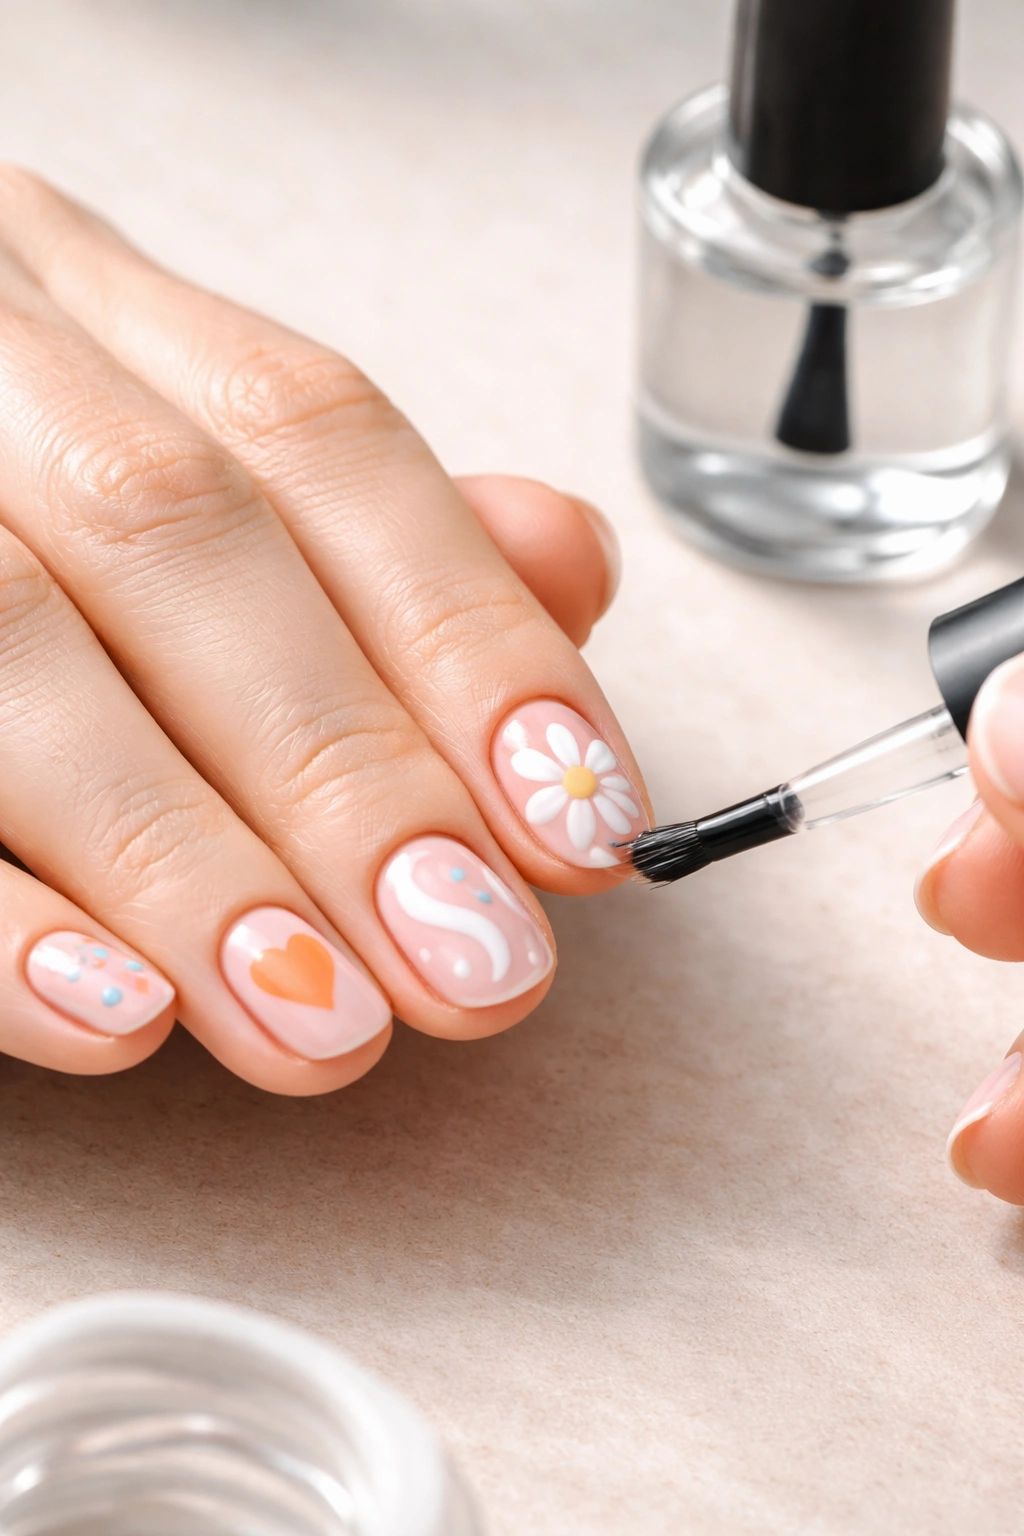
Painting Simple Floral Designs

Flowers seem complicated until you realize that every flower is just a dot surrounded by smaller dots or petals. Start with the simplest flower: five dots arranged in a circle, with a sixth dot in the middle for the flower center. Use your dotting tool to create each petal, spacing them evenly around an imaginary center point. A yellow or gold dot in the middle completes the flower in seconds.
Make petals slightly larger than you think necessary—what looks large enough when you’re painting often looks small once the polish dries and you step back. Multiple thin layers build color better than one thick layer, so don’t try to create the perfect flower in one application.
Daisies are especially suited to short nails because their simple petal structure isn’t overwhelming on a smaller surface. White petals with a yellow center, or pale pink petals with a gold center, both look charming. Scatter two or three small daisies across your nails rather than covering every nail—this creates a delicate, intentional look rather than a busy pattern.
Rose designs are actually easier than they look. Paint a small spiral shape in your chosen color, working from the center outward in a loose spiral. The spiral automatically creates the layered petal effect that roses have. Once you understand the basic spiral, you can make roses larger or smaller, tighter or looser, in any color.
Tiny flower clusters work beautifully on short nails. Paint a small branch line using a thin brush, then add small clusters of dots along the branch as flowers. This creates an organic, nature-inspired design that’s forgiving because nothing needs to be perfectly realistic. Small green leaf shapes made with a thin brush add dimension without complexity.
Creating Gradient and Ombre Effects

Gradients appear complicated but are actually among the easiest intermediate techniques. You need a makeup sponge, two or more colors of polish, and the willingness to do a little dabbing. The sponge texture naturally creates the blended effect that would take forever to create with a brush.
Load your sponge by dabbing different colored polishes onto it in a line, letting them slightly overlap. Gently press the sponge onto your nail, rolling or dabbing rather than dragging. The sponge instantly blends the colors into a gradient from one shade to another. One press rarely gives perfect coverage, so you’ll repeat the process once or twice until the gradient looks even.
The key is letting each color slightly overlap the next color on the sponge. This overlap zone is where the blending happens. If your colors are too separated on the sponge, you’ll get distinct blocks instead of a gradient. Practice on a piece of paper first so you understand how much overlap you need.
Vertical gradients—colors blending from base to tip—work differently than horizontal gradients. Load your sponge vertically with colors in the order they should appear (lightest at the base, darkest at the tip, for example), then press and roll down your nail in one smooth motion. The motion helps blend as it applies.
Ombré is just another word for gradient, but the term usually implies a specific aesthetic—multiple shades of the same color family blending smoothly from light to dark. This creates an incredibly elegant, sophisticated effect that works beautifully on short nails because the gradient guides the eye and creates visual length.
Monochromatic gradients are the easiest to execute. Use three shades of the same color—pale pink, medium pink, and deep rose, for example—and gradient from light to dark as you move down the nail. Because they’re similar colors, minor imperfections in the blending are invisible; the effect is elegant regardless.
Adding Glitter and Sparkle Elements
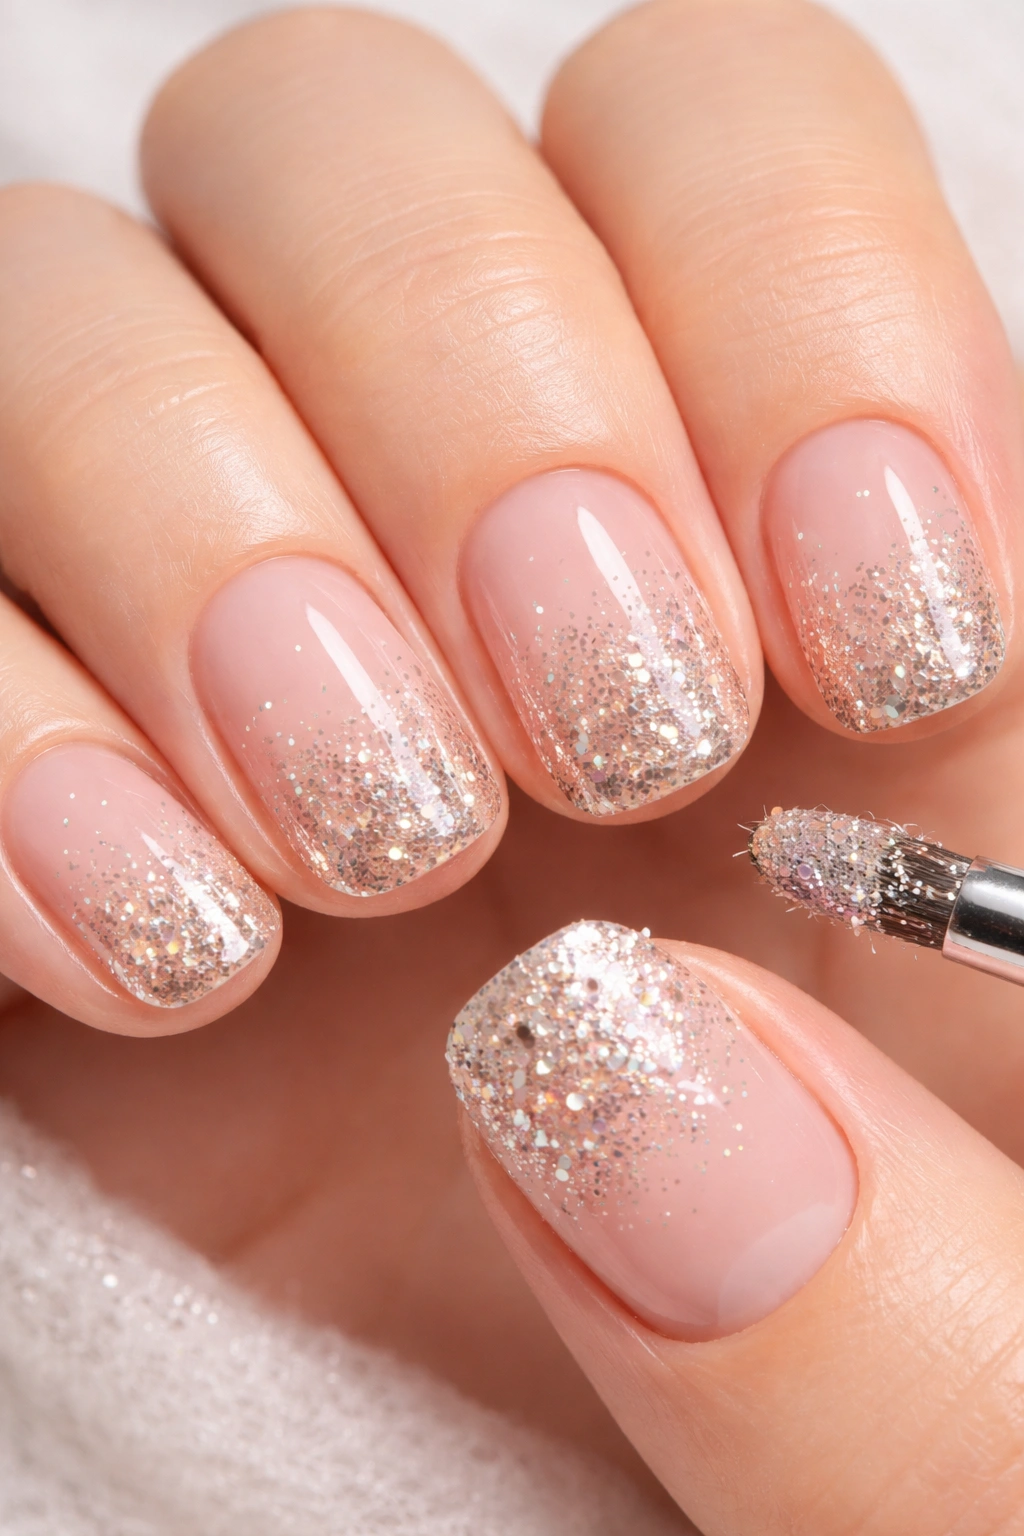
Glitter transforms even simple designs into something special. The easiest approach is a solid color base with glitter applied only to the tips—this works on short nails without looking overdone. Paint your nails your chosen color, let them dry completely, then use a separate brush to apply glitter polish to just the top third of each nail.
Layering glitter for dimension is a pro technique that’s actually simple. Apply a fine glitter first in one color, let it dry, then apply a chunkier glitter in a complementary color over the top. The fine glitter underneath shows through, creating depth and visual interest that reads as intentional and professional.
Mixing glitter polish with regular polish creates a more subtle sparkle. Mix a small amount of glitter polish with your regular color on a palette (a small dish or even a piece of foil works), then apply the mixture. This gives you sparkle without it being overwhelming—great for creating a festive manicure that’s still work-appropriate.
Full glitter nails on short nails actually look cleaner and more intentional than on longer nails. Because there’s less surface area, the glitter reads as a cohesive design rather than excessive. Opt for fine glitter rather than chunky glitter for a more polished aesthetic, though chunky glitter can work for playful, intentional designs.
Glitter tips work similarly to French tips but with more impact. Apply glitter polish to just the tip area (with or without a guide), creating a concentrated sparkly zone that draws attention. This works particularly well with neutral base colors and metallic or iridescent glitters.
Experimenting with Color-Blocking and Abstract Designs
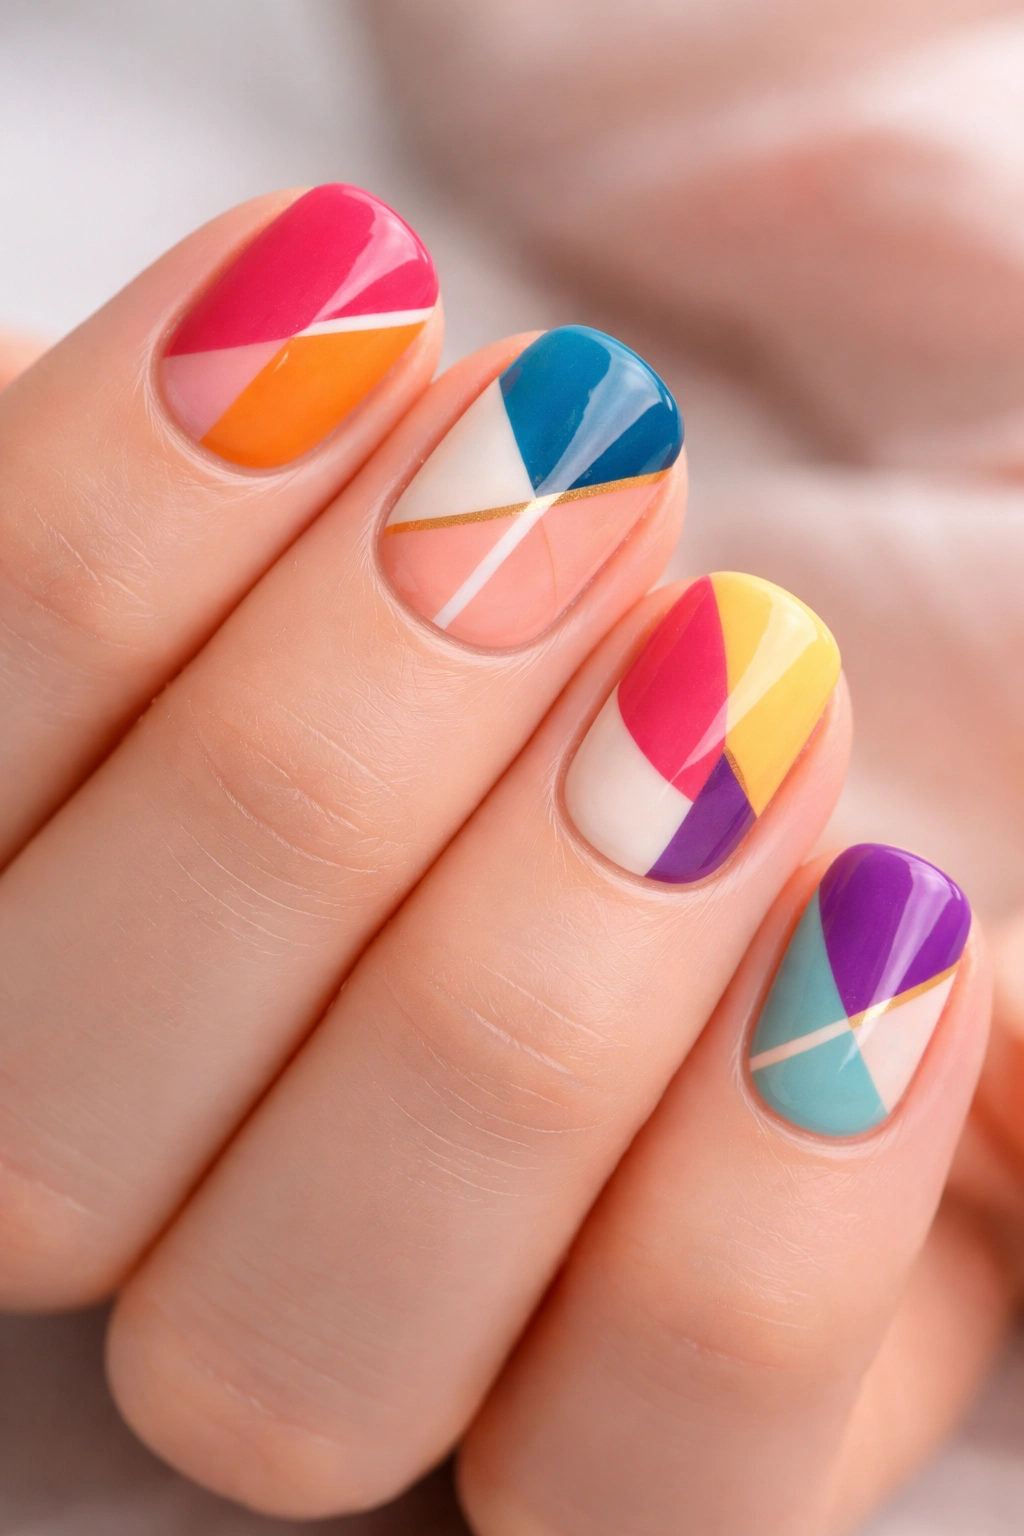
Color-blocking is incredibly forgiving on short nails because geometric shapes don’t need to be perfect to look intentional. The simplest version is two-toned tips: paint half your nails one color and half another. A diagonal line down the middle of each nail creates a split color effect—paint one side in one color, the other side in another, letting them meet in the middle.
Horizontal color-blocking divides the nail into zones: maybe cream on the bottom half and gray on the top, or white at the base and pink at the tip. Use tape to create clean lines between colors, or let colors meet slightly imperfectly for a more artistic, hand-made aesthetic.
Abstract designs are genuinely the easiest way to look artsy without technical skill. Wavy lines, organic shapes, scattered marks—none of these need to be perfect, and their imperfection is part of their charm. Paint freely without worrying about precision, and the result looks intentional and contemporary.
Splatter designs bridge the gap between easy and impressive-looking. Load a stiff paintbrush with polish, then flick it toward your nail so paint splatters across the surface. Practice on paper first to figure out how much force you need, but the beautiful part is that splatters inherently look artistic and random—there’s no “wrong” way to do it.
Geometric color combinations create visual interest without requiring drawing ability. Paint alternating nails in two colors, or create a pattern where each nail is a different color. On short nails, bold color combinations look intentional and fashion-forward rather than chaotic.
Preventing Common Mistakes and Cleanup

The most common beginner mistake is moving on to the next step before polish is actually dry. Regular polish needs at least two to three minutes between coats, and most people underestimate how long this actually is. While you’re waiting, do something else—grab your phone, sip water, anything that stops you from immediately applying the next coat. Waiting feels long but results in better polish adhesion and fewer smudges.
Overloading your brush is the second most common error. A tiny amount of product goes a long way; if your brush is dripping, you have too much. Light strokes with minimal product beat heavy, goopy strokes every time. Your nails should look like they have a smooth coat, not like you painted them with a marker.
Shaky hands aren’t your fault—they’re normal. Everyone’s hands shake slightly, especially when concentrating. Stabilize your hand by resting it on the table and supporting your painting hand’s wrist with your other hand. This dramatically improves control and steadiness. It’s not cheating; it’s how professionals do it.
Cleanup is exponential easier if you applied petroleum jelly around your cuticles before starting. Use a cotton swab barely dipped in nail polish remover to gently swipe away any polish on your skin. If you forgot the petroleum jelly step, more aggressive cleanup with acetone-based remover becomes necessary, which is why the preventative approach is genius.
For stubborn polish on skin, soak your nails in warm water for a minute to soften the dried polish, then gently scrape it away with a cuticle stick. Never scrub aggressively at skin; patience and gentle pressure work better and won’t irritate your skin.
A nail polish remover pen—a retractable device with a small brush applicator—is worth the few dollars it costs. It lets you be incredibly precise with cleanup around the edges of your nails without soaking cotton swabs in remover and getting your hands wet.
Making Your Manicure Last Longer
The top coat is genuinely where the longevity game is won or lost. A good top coat seals everything and prevents chips and peeling. Apply top coat in a thin, even layer, and importantly, swipe it along the free edge (the tip of your nail) to seal the edge and prevent peeling from that vulnerable spot. This one habit extends manicure life by days.
Reapply top coat every few days as a maintenance step. You don’t need to redo your entire manicure—just paint a fresh top coat over the existing design. This refreshes the shine, reseals everything, and prevents the early chipping that happens as top coat wears down. A fresh top coat makes a day-five manicure look like day-one.
Avoid prolonged water exposure in the first hour after painting. Wet polish is soft and vulnerable; submerging your hands in water or running them under a faucet right after finishing softens it and can cause smudging or peeling. If you must wash your hands, use cool water and pat dry gently rather than rubbing.
Wear gloves when cleaning, doing dishes, or gardening. Water and chemicals are the primary culprits behind chipped polish. A pair of cheap latex or nitrile gloves creates a barrier and extends your manicure’s lifespan significantly. This seems like a small thing but it genuinely makes a huge difference.
Keep your hands moisturized with cuticle oil. Dry nails and skin around the cuticles cause polish to peel more easily. A quick application of cuticle oil each evening nourishes your nails and keeps the area around your manicure healthy, which indirectly helps your design last longer.
Troubleshooting When Things Don’t Go Perfectly

Streaky base coat is fixable. If your base or first color coat looks streaky, don’t panic. Apply a second thin coat and it’ll even out. Streaks usually happen because you’re using too little product or not letting the first coat dry long enough. More coats in thinner layers is the key.
Bubble in polish happen when you shake your nail polish bottle instead of rolling it between your hands. The shaking action introduces air into the formula. If bubbles happen, let the polish dry completely and apply a fresh coat. Going forward, roll the bottle gently between your palms instead of shaking to mix it.
Smudged designs after you thought they were dry probably means they weren’t actually dry yet. Drying times vary based on polish brand, thickness of application, and room temperature. If you’re impatient, use a quick-dry top coat which genuinely speeds up drying. Or simply accept that you’ll wait longer next time, because patience beats rework.
Uneven color coverage usually means you’re using too much product or applying it too thickly. Thin layers that show the base slightly are better than one thick layer. Apply two thin coats and you’ll get better coverage and faster drying than one heavy coat.
Shaky hands causing wobbly lines aren’t a design failure—they’re an execution issue. Steady your hand better, use tape to guide straight lines, or embrace the imperfection as part of your aesthetic. Some of the most charming designs come from slight imperfections because they look genuinely handmade.
Working With Seasonal and Occasion-Based Designs
Certain color combinations and designs naturally suit specific seasons without requiring any complex design work. For warmer months, bright colors, pastels, and tropical designs with simple palm trees or geometric patterns in summery hues work beautifully. White nails with bright accent colors, or pale colors with bold geometric lines, capture that light, open feeling.
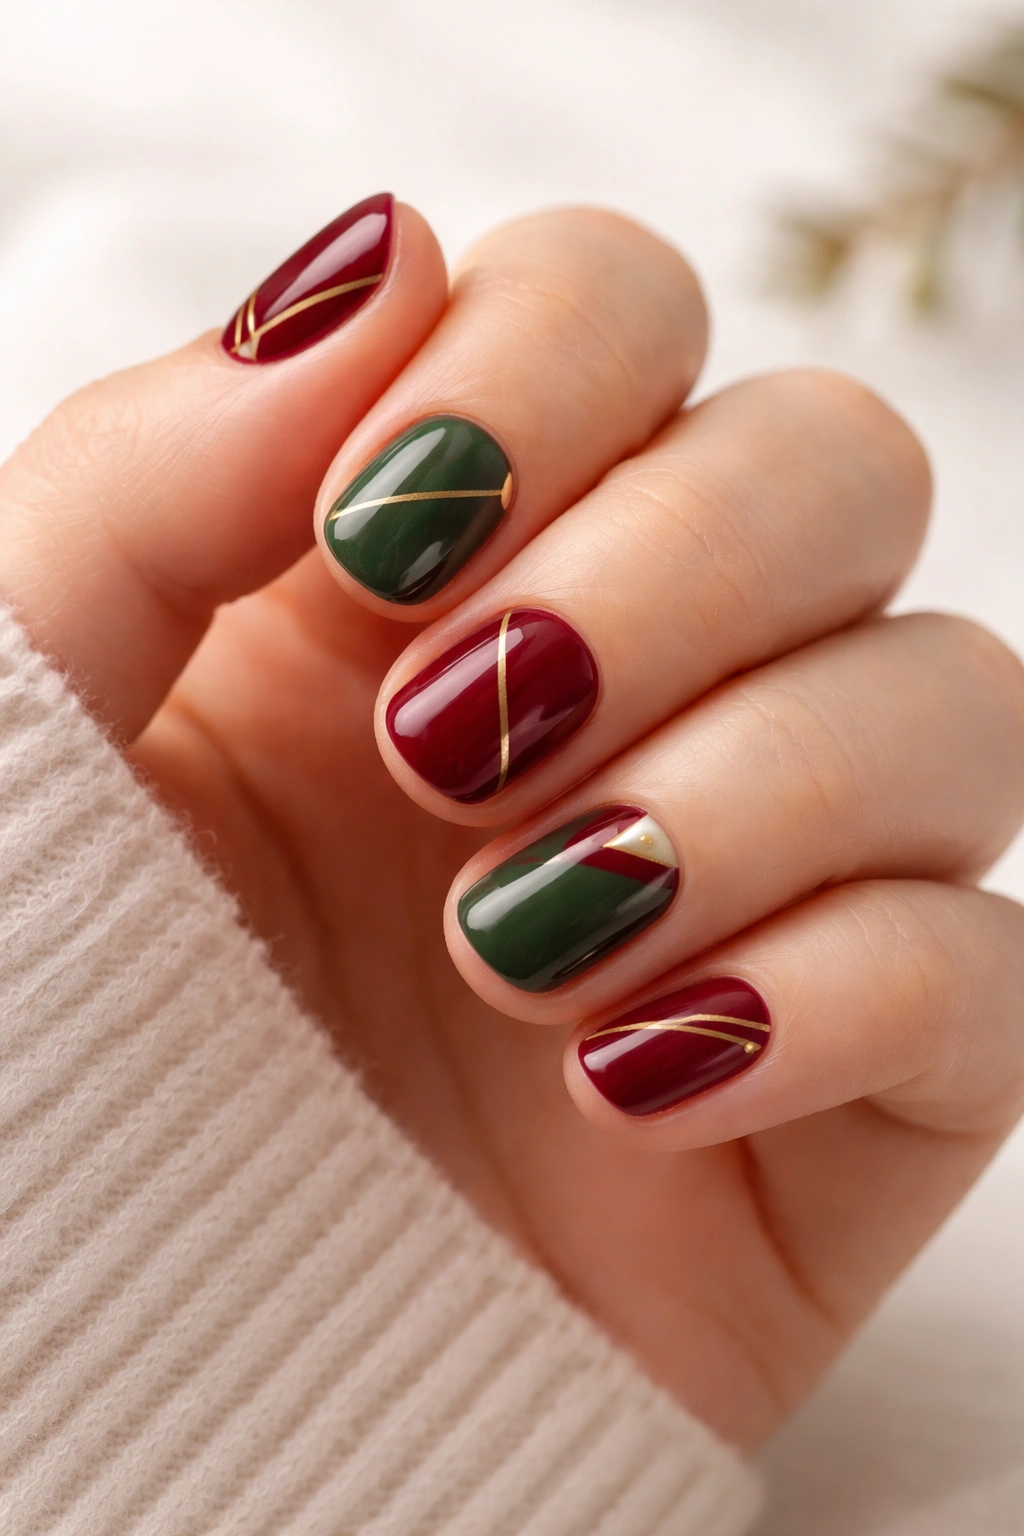
During cooler months, burgundy, deep berry tones, forest green, and charcoal all feel seasonally appropriate. Geometric designs in these colors, or simple monochromatic gradients, look naturally wintery without needing snowflakes or explicit winter imagery. Metallic accents in these seasons feel luxurious and intentional.
Holiday designs on short nails benefit from keeping things minimal. Gold and silver on short nails reads as festive without looking costume-like. Red and green with white accents, kept to geometric patterns or simple color-blocking, looks intentional and elegant rather than cutesy. The key is letting the colors do the work instead of trying to paint detailed holiday imagery.
Valentine’s designs are easy: hearts in any size, pink and red color combinations, or sparkly finishes all communicate the occasion without requiring artistic ability. A simple pink base with small red dots or a heart silhouette on one accent nail looks considered rather than over-the-top.
Professional or minimalist occasions call for clean designs: French tips in classic white or a thin metallic line, solid colors in neutral or jewel tones, or very subtle sparkle that catches light without being obvious. The goal is sophistication rather than statement.
Final Thoughts
Short nails aren’t a limitation for nail art—they’re actually an advantage once you understand how to work with their specific qualities. The designs that work best are often the simplest ones: solid colors with strategic sparkle, minimalist dots and lines, elegant French tips with intentionally thin proportions, and subtle gradients. None of these require professional-level artistry or expensive equipment. What they require is understanding your nail’s actual surface area and making intentional choices about every element you add.
The real secret to successful short-nail art at home is preparation and patience. Spend time on nail prep, let polish dry fully between coats, and use tape or guides when you’re uncertain about creating clean lines. These foundational skills matter more than fancy brushes or rare colors. A simple nude base coat with a thin gold French tip looks expensive and professional because it’s executed well, not because it’s complicated.
Your short nails are a canvas worth exploring, and every design you create teaches you something about what works and what doesn’t. Start simple—dots, French tips, simple lines—and build your confidence from there. You already have everything you need to create beautiful designs at home, and the skills you’re building are genuinely transferable to longer nails if you ever decide to go that route. Short nails are underrated, and once you start experimenting, you’ll understand why so many people choose to keep them that way.
