

Nail art doesn’t require a steady hand, years of practice, or a professional salon appointment to look amazing. The truth that most people don’t realize is that some of the most stunning nail designs are actually the easiest to create, especially when you’re just starting out. If you’ve ever scrolled through Instagram and felt intimidated by intricate designs, or thought you’d need dozens of specialized tools to achieve anything impressive, this guide is going to change your perspective entirely.
The beauty of beginner nail art is that it celebrates imperfection. Slightly wobbly lines? That’s part of the charm. A dot that’s not perfectly round? Nobody notices but you. The secret is choosing designs that either embrace a casual aesthetic by nature, or rely on simple tools and techniques that don’t require freehand artistic skill. You probably already have most of what you need at home—a toothpick works just as well as a professional dotting tool, and painter’s tape creates crisp lines without any special talent required.
What we’re going to cover in this guide are ten nail art designs that genuinely work for beginners, along with the exact steps to create them, the minimal tools you’ll need, and insider tips from nail professionals to help you succeed on your very first try. By the end, you’ll have a collection of go-to designs that look polished and intentional, yet require just minutes of your time and a relaxed approach to application. Whether you’re doing this for yourself or want to impress friends at your next gathering, these designs prove that beautiful nails don’t have to be complicated.
1. Micro Dots Near the Cuticle
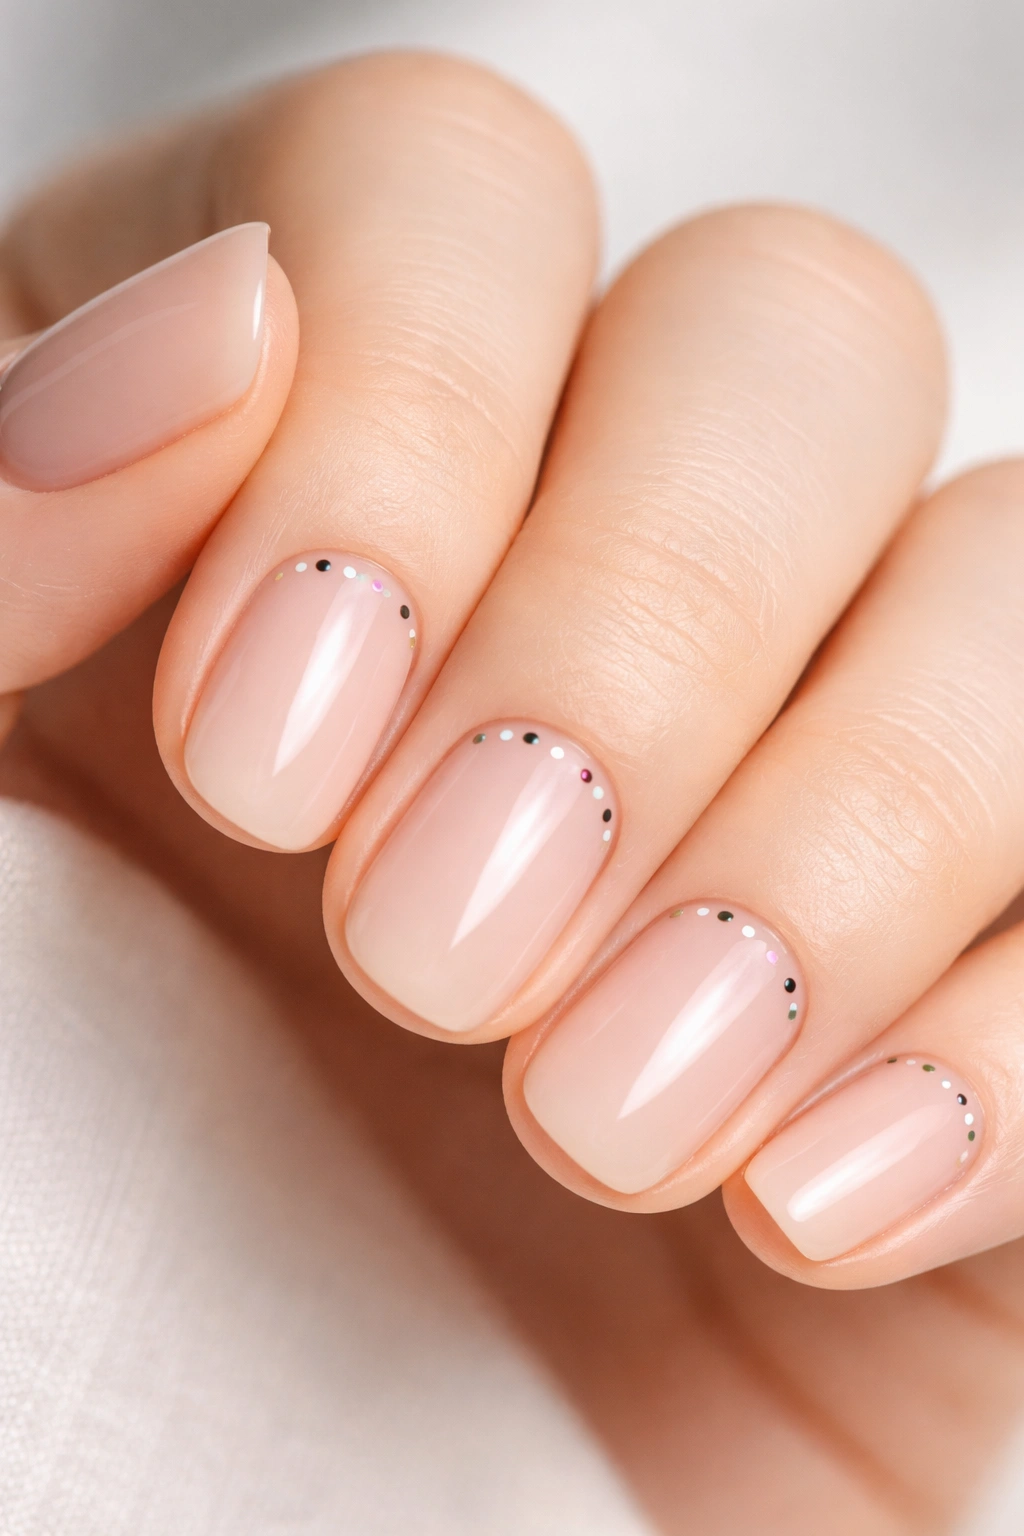
This is hands-down the easiest design to start with, yet it looks surprisingly sophisticated and intentional. The concept is beautifully simple: you’re placing tiny dots near the cuticle area in a contrasting color, which creates a delicate accent without requiring you to cover the entire nail. Because the dots are small and you’re only placing them on a limited portion of the nail, there’s virtually no room for anything to look “wrong.”
Why This Design Works for Beginners
The magic of micro dots is that their small size makes imperfection invisible. If a dot isn’t perfectly circular, it’s so tiny that the eye blends it into the overall design rather than focusing on any individual flaw. The cuticle area also provides a natural stopping point, so you’re not trying to fill an entire nail canvas. This gives you a psychological advantage—less area to cover means less pressure. Additionally, because the design is minimalist by nature, it reads as intentional and chic rather than unfinished. Professionals love this design because it’s universally flattering on any nail shape or length, and it works with virtually any color combination.
How to Create Micro Dots
Start by applying a base coat and allowing it to cure completely if you’re using gel polish, or dry fully for regular polish. Once dry, select a contrasting color—if your base is light, go darker, and vice versa. You’ll need either a dotting tool, a bobby pin, or even a toothpick. Dip your chosen tool into the polish (just the tip), and gently press it onto the nail near the cuticle in the center of the nail. The key is a light touch—you’re resting the tool against the nail, not pressing hard. Redip your tool after each dot to maintain consistent sizing. Create 3-5 dots per nail, spacing them evenly, then cure or allow to dry. Seal everything with a glossy top coat for a polished finish.
Pro Tips for Perfect Micro Dots
The most common beginner mistake is using too much product on the dotting tool. A tiny amount is all you need—so little that you might think it won’t be enough. It will be. If your dot comes out too large, that’s actually okay because the small size is forgiving, but if you want more control, try barely dipping the tool rather than fully inserting it into the bottle. For extra precision, you can even place a small dot of polish on a piece of aluminum foil or a ceramic tile first, then dip your tool into that instead of the bottle directly. This gives you more control over the amount. If you make a mistake, use a thin brush dipped in acetone to gently clean it up before it fully sets.
2. Glitter Gradient with Sponge Application
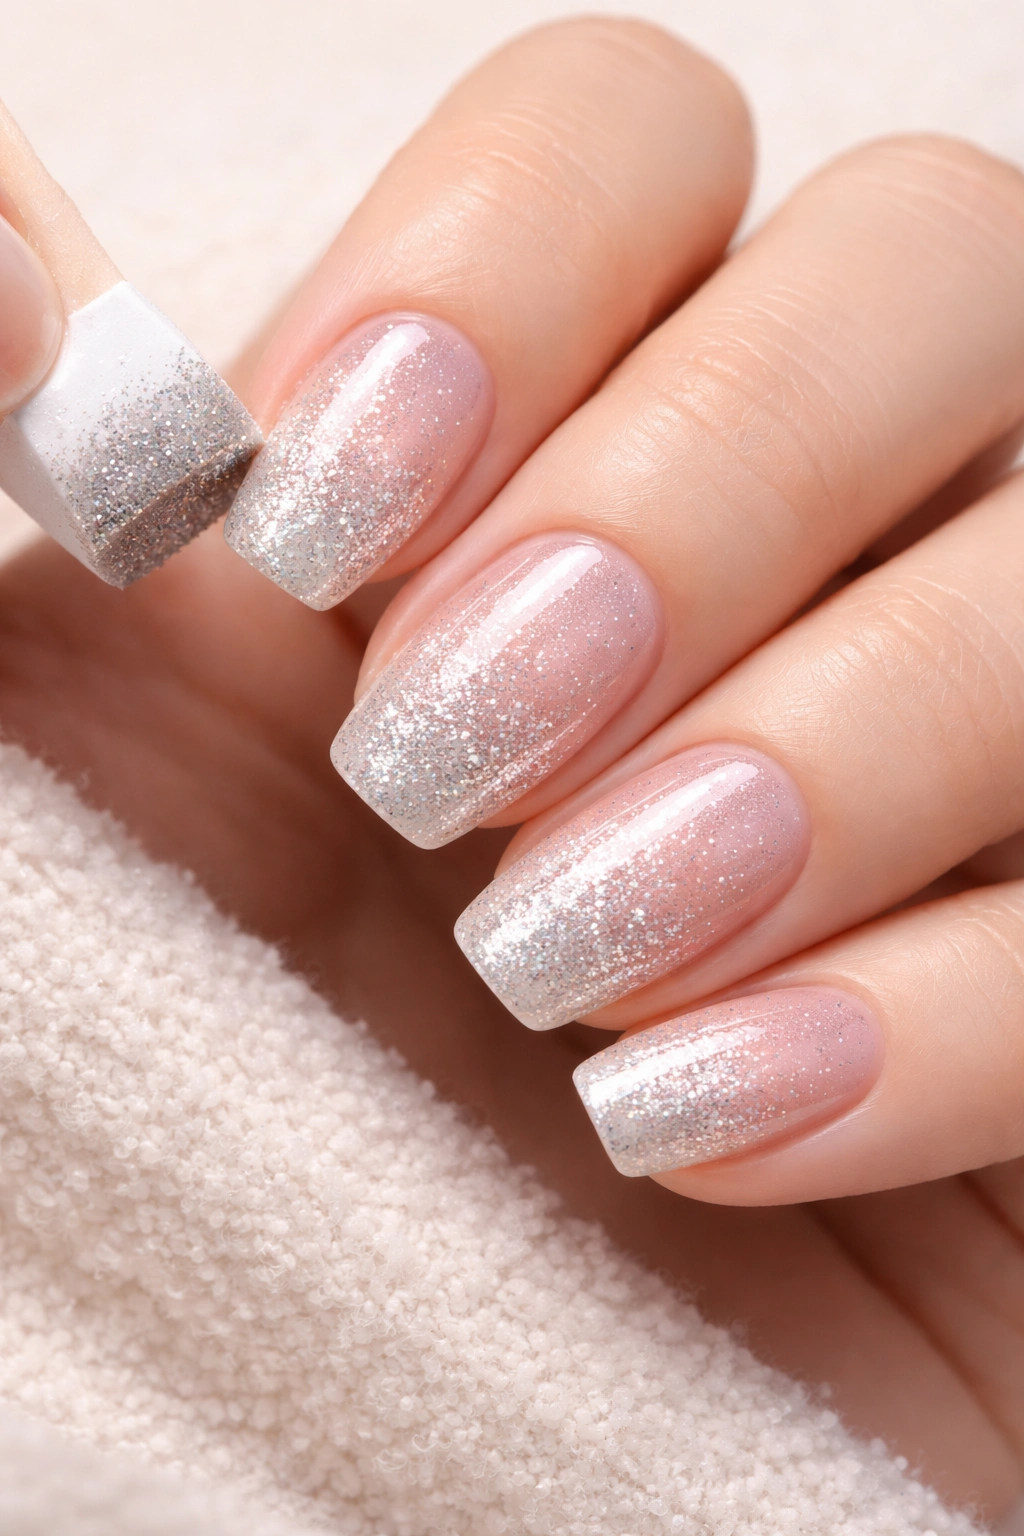
A glitter gradient is the perfect design for anyone who wants to add sparkle and dimension without needing any brush skills whatsoever. This technique uses a makeup sponge to apply glitter polish in a gradient effect—starting concentrated at the tips and fading toward the cuticle. The beauty here is that sponging is actually more forgiving than traditional brush application because you’re not trying to create precise lines; you’re creating a soft, intentional fade.
Understanding Glitter Gradients and Why They’re Beginner-Friendly
Glitter gradients work because the irregular nature of glitter itself hides any imperfection in your application. Unlike solid color gradients where every brushstroke shows, a glitter gradient actually looks better when it’s slightly uneven because that unevenness creates a more organic, blended appearance. The sponge method eliminates the need for any brush control—you’re literally just dabbing the sponge against the nail. Plus, if you apply too much product or the coverage looks uneven, you can simply dab more on top to build it up. There’s no such thing as “too much” with glitter; you either have coverage or you don’t.
Step-by-Step Glitter Gradient Instructions
Begin with a base coat and allow it to dry completely. Apply 1-2 coats of a solid color that complements your glitter shade—this acts as the foundation and affects how the glitter shows up. Once your base color is fully set, prepare a small disposable makeup sponge by cutting it into a smaller piece if needed (you want something manageable). Apply your glitter gel or glitter polish directly onto the sponge, concentrating the product more heavily on one side. Starting at the tips of your nails, lightly dab the sponge against your nail, then pull it upward toward the cuticle with a dabbing motion, gradually using lighter pressure as you move up. This creates the gradient effect—concentrated glitter at the tip fading to less at the base. Cure if using gel, or allow to dry if using regular polish. Seal with a top coat.
Making the Most of Your Glitter Gradient
One professional trick is to use a matte top coat instead of a glossy one for glitter gradients—the matte finish actually makes the glitter pop more because it reduces shine competition. If you’re using regular nail polish instead of gel, work quickly because the glitter polish dries fast and you want the sponge application to be seamless before it sets. For a more dramatic gradient, use a completely contrasting glitter color to your base coat—for example, gold glitter over a deep navy base creates stunning depth. If you find your gradient looks too sparse, you can cure or dry completely and then repeat the sponge application with the same color to build up the coverage and make it more opaque.
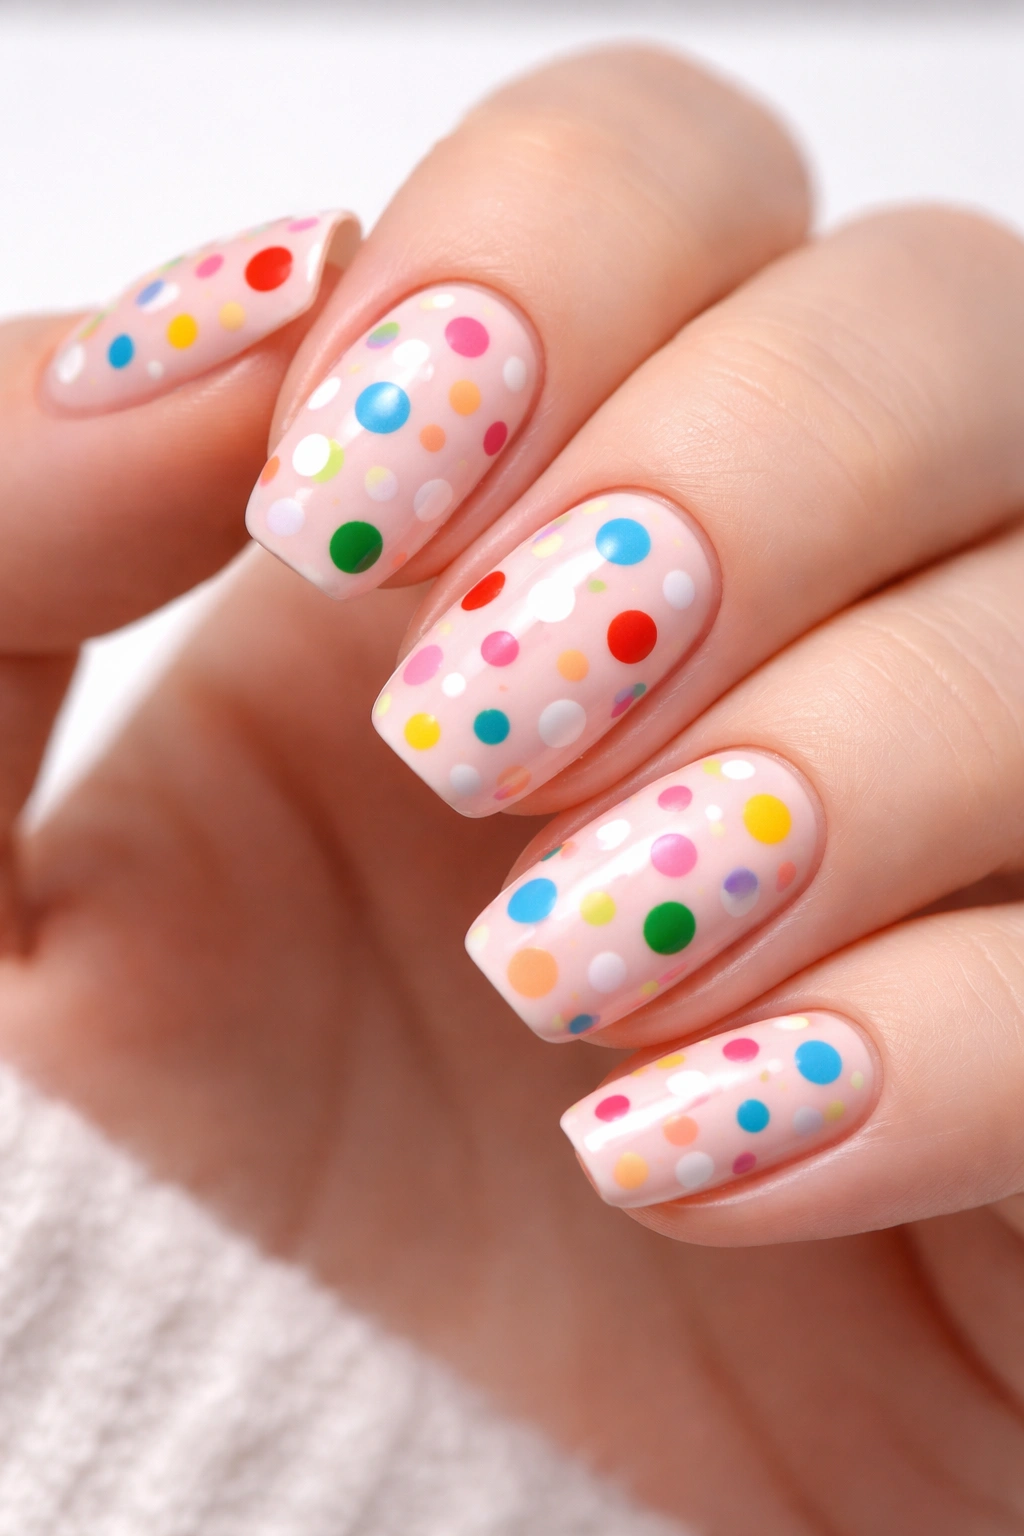
3. Confetti Nails with Scattered Dots
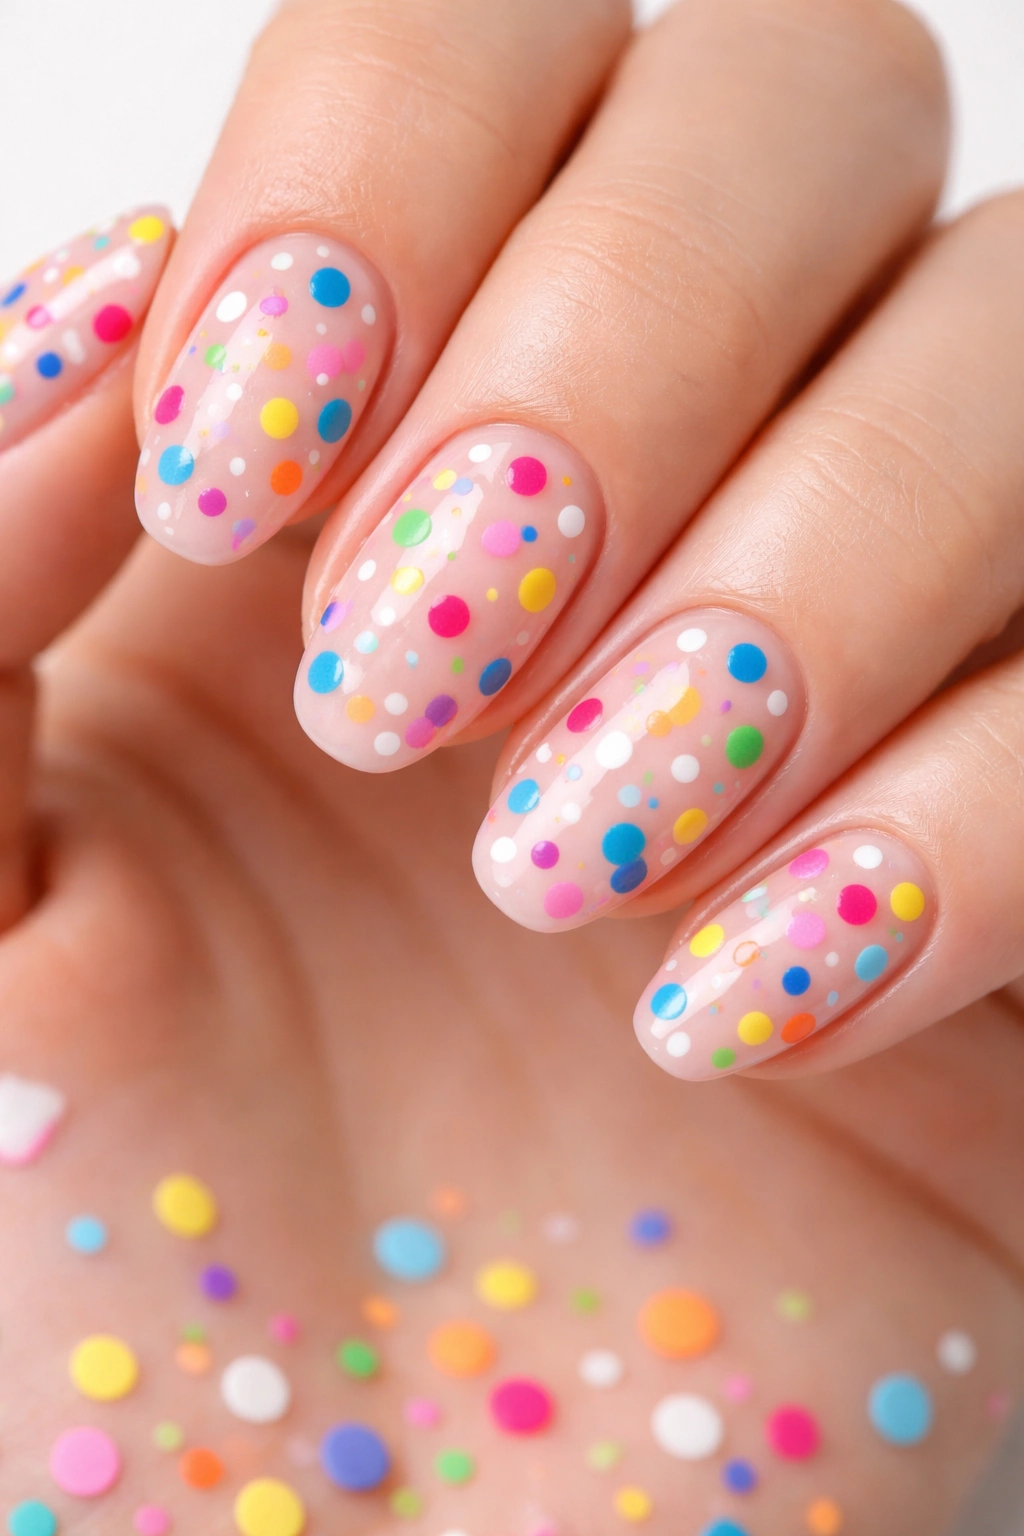
Confetti nails are literally just dots scattered randomly across the entire nail surface, and because they’re intentionally chaotic, they’re practically impossible to get wrong. There’s no pattern to follow, no spacing requirements, and no precision needed—you’re essentially creating controlled randomness, which is exactly what confetti nails are all about. This design is incredibly forgiving for beginners because you can use multiple colors, vary dot sizes, and embrace the imperfection completely.
Why Confetti Nails Are Nearly Foolproof
The fundamental appeal of confetti nails is that they celebrate messiness while still looking intentional and designed. You could spend 30 seconds or 5 minutes on a single nail, and either version would look equally valid because the design’s entire premise is that it should look spontaneous. Unlike some designs where symmetry or precision matters, confetti nails actually improve if your dots are slightly irregular because that contributes to the authentic confetti aesthetic. You can use 2 colors, 5 colors, or even 10 colors—there’s no wrong approach. This gives you complete creative freedom without any performance pressure.
How to Execute Perfect Confetti Nails
Apply a base coat and choose your base nail color, then let it dry completely. Select 2-4 colors that either complement each other or create an intentionally eclectic mix—both approaches work beautifully. Using a dotting tool, toothpick, or bobby pin, start placing dots randomly across the nail surface. Don’t overthink placement; just dab dots in various areas. Vary the size slightly by using different amounts of pressure or different parts of your tool. If you want to use multiple colors, apply different color dots in no particular pattern. The key is to avoid creating any discernible rows or symmetrical arrangement—keep it truly random. Once you’ve achieved your desired density of dots (some people like sparse confetti, others prefer densely packed coverage), allow everything to dry or cure, then seal with a top coat.
Insider Tips for Confetti Nail Success
Here’s something professionals know: if you want your confetti to look intentional rather than accidental, vary both the size and spacing of your dots as much as possible. Large dot, small dot, medium dot, spacing that’s close together in one area and spread out in another—this variety actually makes confetti look more authentically designed. Another trick is to use a gel top coat (even if you used regular polish for the base) because the thickness and shine of gel topcoat makes confetti nails look more like professional nail art. If you accidentally create a hole or bald spot that bothers you, just add more confetti dots in that area to balance it out.
4. Abstract Swirls and Organic Lines
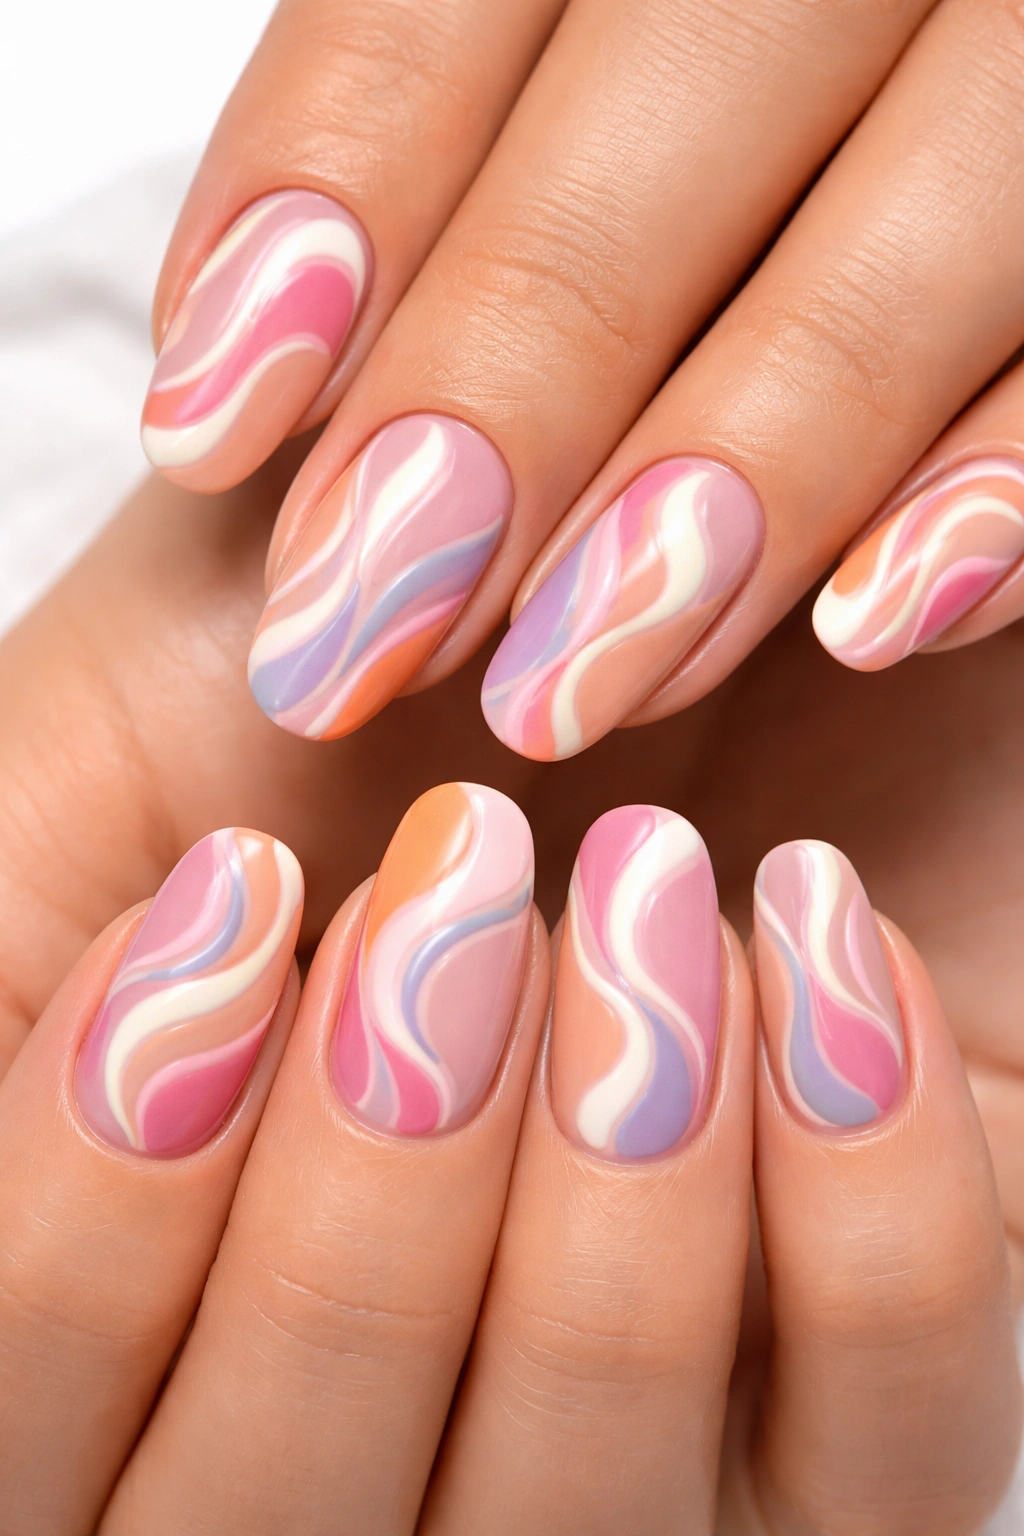
Abstract swirls represent a massive shift in confidence for beginners because they completely eliminate the pressure of perfection. A wobbly line? That’s not a mistake—that’s an intentional organic swirl. A line that doesn’t go where you planned? Perfect. The entire aesthetic of abstract swirl nails is built on the premise that imperfect, organic marks are the goal. You’re not trying to create anything specific; you’re creating the vibe of movement and artistic expression.
The Psychology Behind Why Swirls Work So Well
Abstract nail art removes the performance aspect that makes beginners anxious. You’re not trying to create recognizable objects like flowers or hearts, which have “correct” versions that you might fall short of. You’re creating something purely expressive and personal. Because of this, there’s literally no way to fail—any line you put down is automatically “right” because you decided to put it there. This psychological shift is enormously powerful. It transforms nail art from a test you could pass or fail into a creative act where all outcomes are valid. Professionals use this approach specifically when they want designs that feel fresh, modern, and intentional rather than fussy or overdone.
Creating Your Own Abstract Swirl Design
Begin with a base coat and a solid nail color as your foundation. Once dry, select a contrasting color—or even two contrasting colors if you want to layer swirls. Using a thin detail brush or even a regular nail polish brush, start creating swirls and lines across the nail surface. There are no rules here: you can create loops, curves, zigzags, spirals, or freeform waves. The only guidance is to vary the size and thickness of your lines—this creates more visual interest than uniform lines would. Some people like to create one or two large swooping lines per nail, while others prefer filling the entire nail with smaller squiggles. Work at your own pace; there’s no rush since you’re not trying to achieve anything specific. Once you’re happy with your design, let everything dry or cure completely, then seal with a top coat.
Making Abstract Swirls Look Professional
The secret to making casual swirls look intentional rather than accidental is color choice. If you use two complementary colors or a bold contrast (like white on navy, or gold on deep purple), your swirls automatically look more designed. The color combination tells the eye that this is intentional art rather than a mistake. Another professional trick is to seal abstract swirls with a matte top coat instead of gloss—the matte finish makes the design read as more sophisticated and artistic. If you want to up the ante, you can add tiny dots or small geometric shapes between your swirls to create additional visual interest and make the design feel even more layered and intentional.
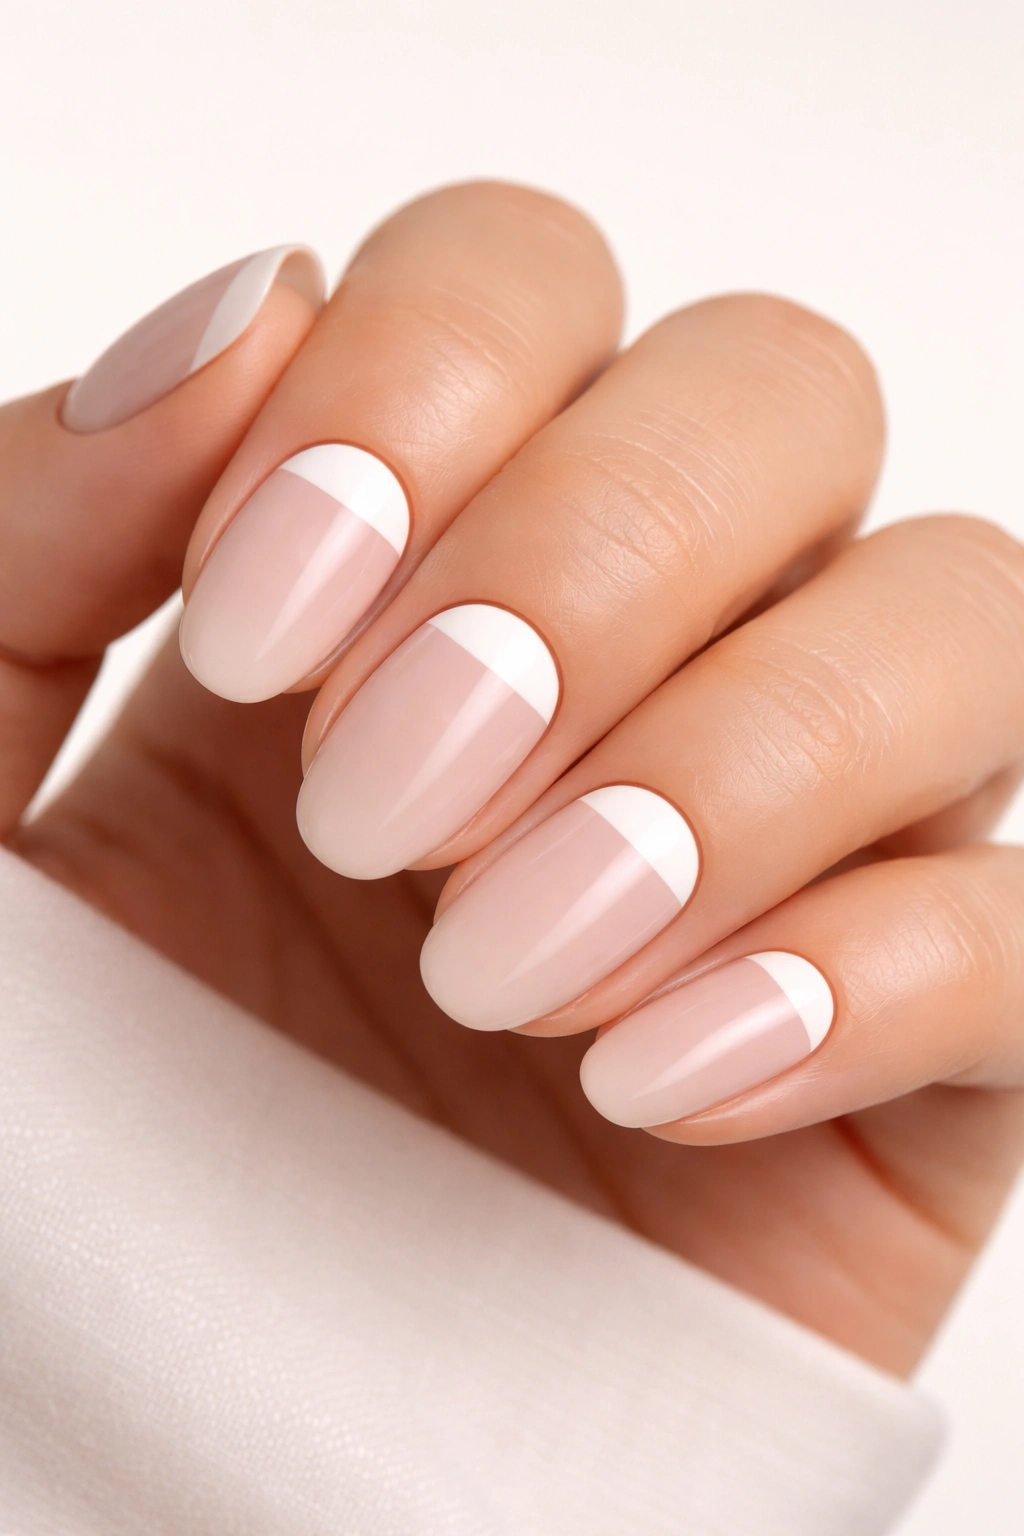
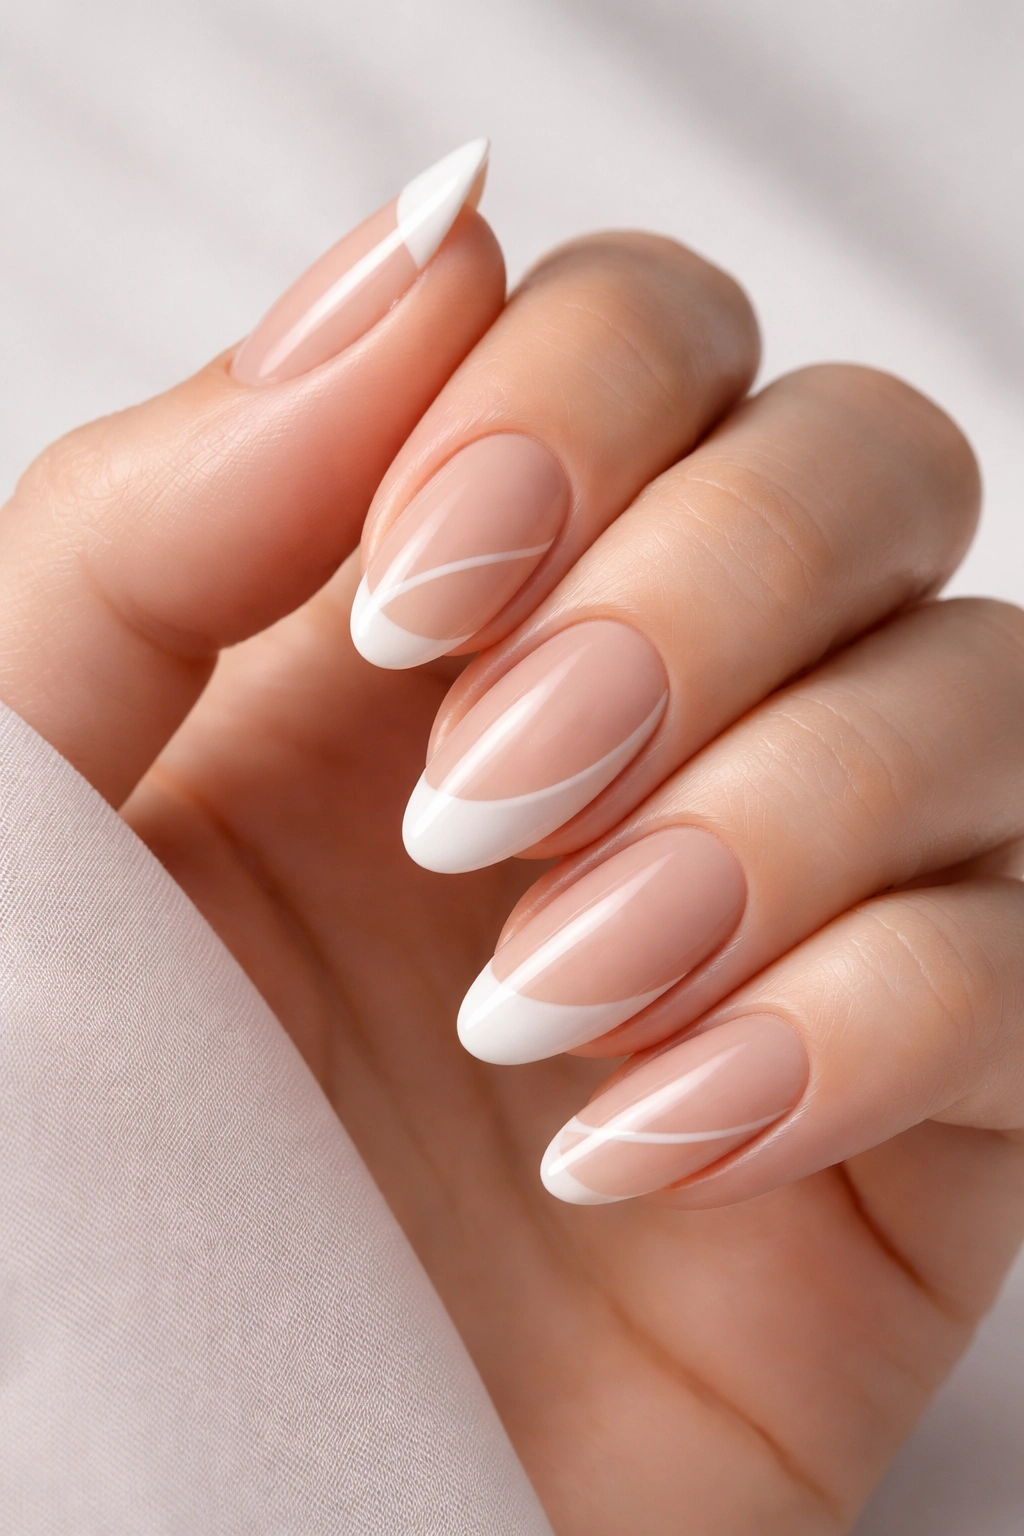
5. French Tips with Geometric Twists
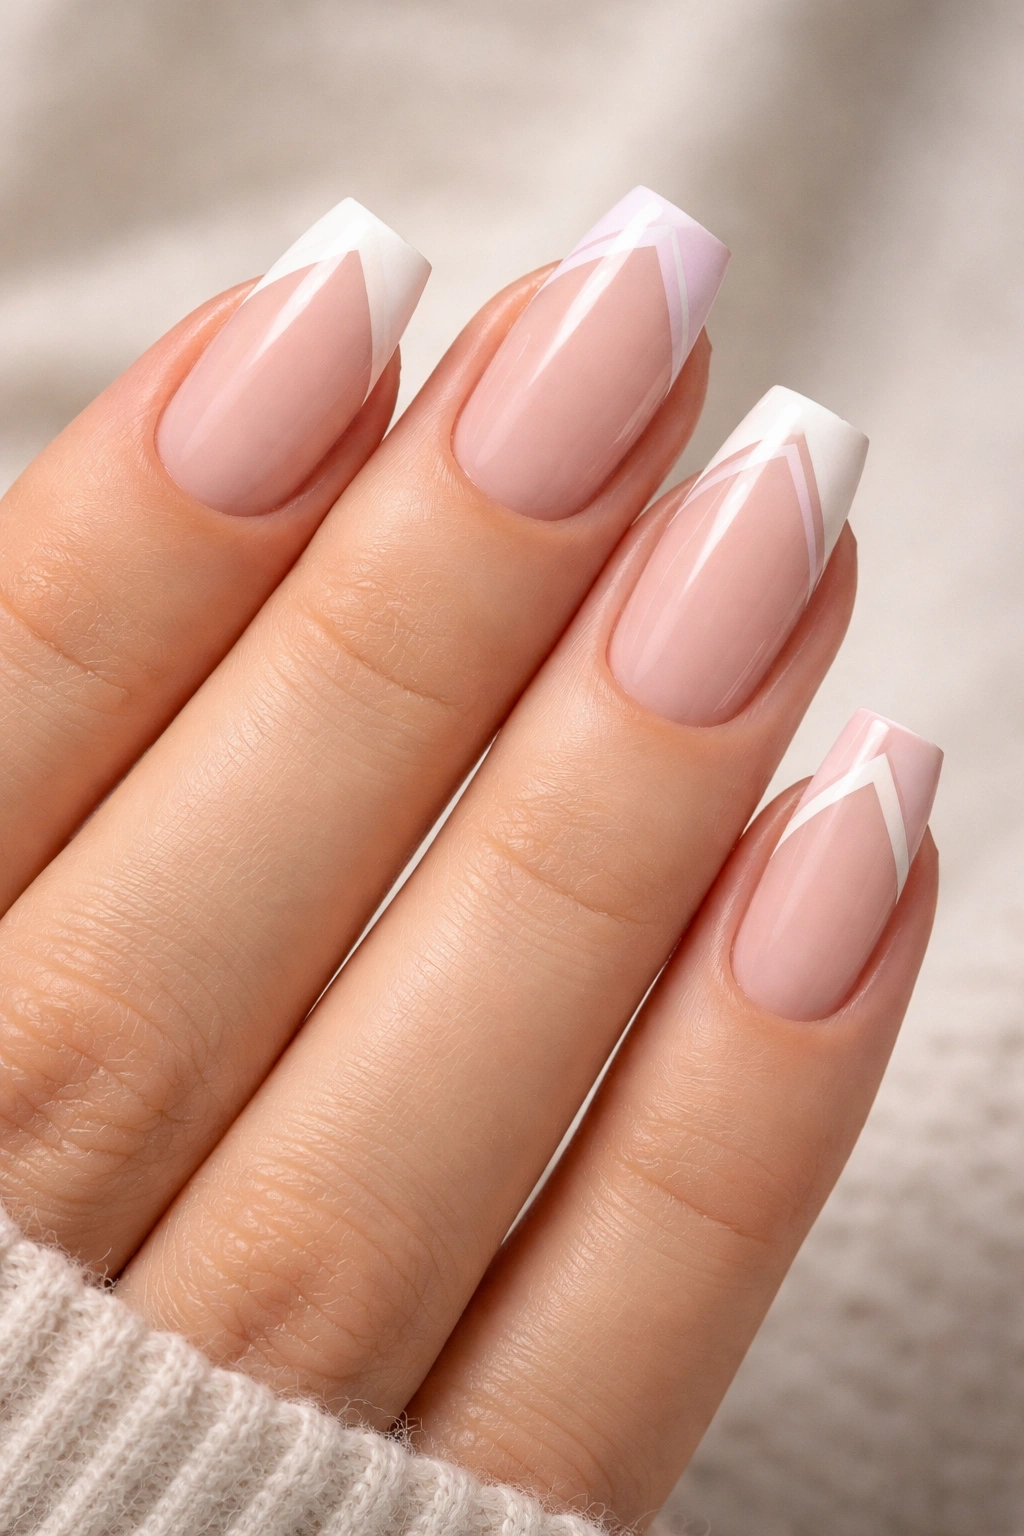
The French manicure is timeless, but beginners often feel intimidated by the precision required to create clean, curved tips. The solution? Geometric French tips. Instead of trying to create a perfect curved white line at the tip, you’re creating geometric shapes like triangles, chevrons, or simple straight lines. This completely removes the precision requirement while maintaining the sophistication of a French-inspired design.
Why Geometric French Tips Are More Beginner-Friendly
Traditional French tips require you to paint a curved line that follows the contour of your nail, which demands both precision and a steady hand. Geometric variations eliminate this challenge entirely. A straight line doesn’t require any curved motion—you can use painter’s tape to ensure a crisp edge, or you can freehand a line that’s intentionally loose and organic, and it still works beautifully. Triangular tips don’t require curves either; you can create simple diagonal lines. Chevron tips (V-shaped tips) involve just two diagonal lines meeting at a point. All of these geometric approaches give you the sophisticated, elevated look of a French manicure without the technique barrier.
How to Create a Geometric French Tip
Start with a base coat and paint your entire nail in a nude, pink, or natural shade. Allow this to dry completely. Now comes the geometric part: decide what shape you want at the tip. For straight-line French tips, use a striping brush or thin liner brush to paint a horizontal line about ⅛ inch from the tip edge—using painter’s tape makes this much easier because you can tape off the area and simply paint over the tape, then remove it for a perfect line. For chevron tips, paint two diagonal lines that meet in a V-shape at the center of the tip. For triangular tips, paint a solid triangle at each corner of the tip and one in the center. Use a contrasting color (typically white, nude in a different shade, or a metallic) for your geometric element. Cure or dry completely, then seal with a top coat.
Pro Techniques for Clean Geometric French Tips
If you’re nervous about freehand lines, painter’s tape is genuinely a game-changer—it’s inexpensive, foolproof, and creates edges so clean that they look professional. Apply the tape in the shape you want (horizontal for straight tips, diagonal for chevrons), paint your contrasting color over top, then carefully remove the tape while the polish is still slightly wet. The slight tackiness helps the tape pull away cleanly without dragging. If you’re going freehand, thin is your friend—use a striping brush rather than a regular polish brush, and know that imperfect lines actually read as more artistic and intentional. For extra visual impact, use a metallic or shimmer color for your geometric tip rather than solid white.
6. Half-Moon Cuticle Design
Half-moon nails (also called half-moon manicure or reverse French) feature a curved or circular shape painted around the cuticle area in a contrasting color, leaving the rest of the nail in another shade. It’s a sophisticated, retro-inspired design that actually looks more complicated than it is. The curved shape appears difficult to achieve freehand, but there’s a surprisingly simple method that makes it foolproof.
Why Half-Moons Are Easier Than They Appear
The visual complexity of half-moon nails is actually an advantage for beginners because it makes a simple technique look impressive. You’re essentially creating a curved or circular shape, and because it’s at the cuticle where your nail curves naturally, you’re working with the nail’s existing shape rather than against it. The most genius hack professionals use is tape or stickers—you can use painter’s tape shaped into a curved line, or you can purchase pre-made half-moon stickers that you simply apply and paint over. Even the freehand version is more forgiving than it sounds because the shape is close to the cuticle where your nail’s natural curve helps guide you.
Creating a Half-Moon Cuticle Design
Apply a base coat and paint your entire nail with your primary color (this will be the main nail color). Let it dry completely. Now you have two options: tape method or freehand. For tape, use painter’s tape and create or cut a curved line that represents where your half-moon will begin—position it about ¼ inch from the cuticle. Paint your contrasting color above the tape (toward the cuticle), building up 2-3 coats if needed for opacity. Once dry, carefully remove the tape. For the freehand method, use a thin brush and carefully paint a curved or semi-circular shape starting at the cuticle. The shape should follow the curve of your nail’s base. You don’t need pixel-perfect precision; in fact, slightly organic curves look more intentional and artistic. Seal everything with a top coat.
Making Your Half-Moon Design Shine
The color combination makes all the difference with this design—jewel tones over pastels, metallics over soft neutrals, or deep colors over light bases all create stunning contrast. Professionals often use a matte top coat over shiny base polish (or vice versa) to create additional visual interest and dimension. Another advanced technique is creating multiple half-moons of different colors on the same nail, stacked toward the tip in a gradient effect. This transforms the design from simple to truly artistic while maintaining the beginner-friendly execution.
7. Minimalist Lines and Stripes
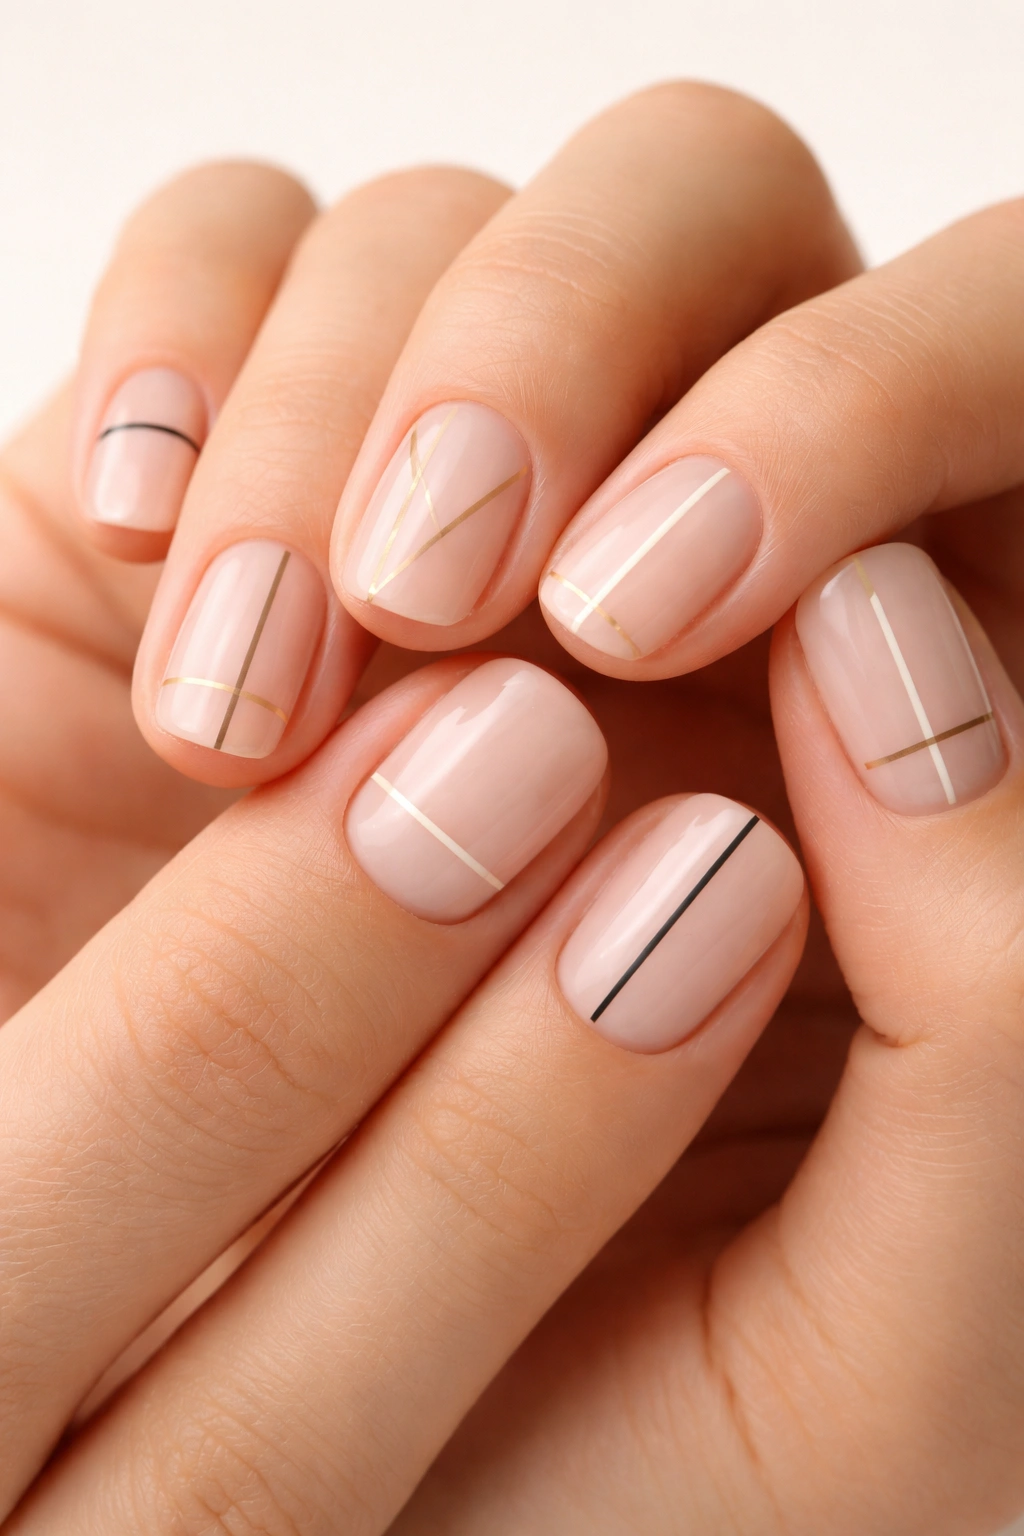
Minimalist line work involves painting simple, straight (or intentionally imperfect) lines across your nails, either horizontally, vertically, or diagonally. This design celebrates simplicity and modern aesthetics while remaining accessible for beginners. The best part? If your lines are slightly wobbly, that actually contributes to the design’s casual, artistic vibe rather than detracting from it.
The Appeal of Minimalist Line Designs
In a world of elaborate nail art, minimalist lines stand out precisely because they’re understated and intentional. They communicate sophistication and artistic restraint rather than trying to impress through complexity. For beginners, this is ideal because the entire aesthetic supports your skill level—a beginner creating simple lines actually looks more intentional and professional than a beginner struggling to create complicated art. The design also works with virtually any color combination, any nail length, and any nail shape, making it infinitely adaptable to your personal style.
How to Paint Minimalist Lines
Start with a clean base coat and a solid nail color as your foundation. Once dry, select a contrasting color for your lines. Using a striping brush or thin detail brush, paint your chosen pattern: horizontal lines across the nail, vertical lines down the nail, or diagonal lines creating a sophisticated angle. You can create one line per nail or multiple lines, widely spaced or close together. Some people prefer perfectly straight lines painted freehand (which is easier than you’d think because you can use a single continuous motion), while others prefer the super-controlled look that painter’s tape creates. Both approaches work beautifully. Create your lines, allow them to dry completely, then seal with a top coat.
Elevating Minimalist Line Work
Varying the thickness of your lines creates more visual interest—paint one thick line and one thin line on the same nail. Using metallic or shimmer colors for your lines against matte bases creates dimension and catches light beautifully. Combining multiple colors in your line work (for example, alternating gold and silver lines, or white and nude lines) adds complexity while maintaining the minimalist aesthetic. Some professionals use a matte top coat on minimalist line work to enhance the sophisticated, artistic feel.
8. Aura Nails with Makeup Sponge
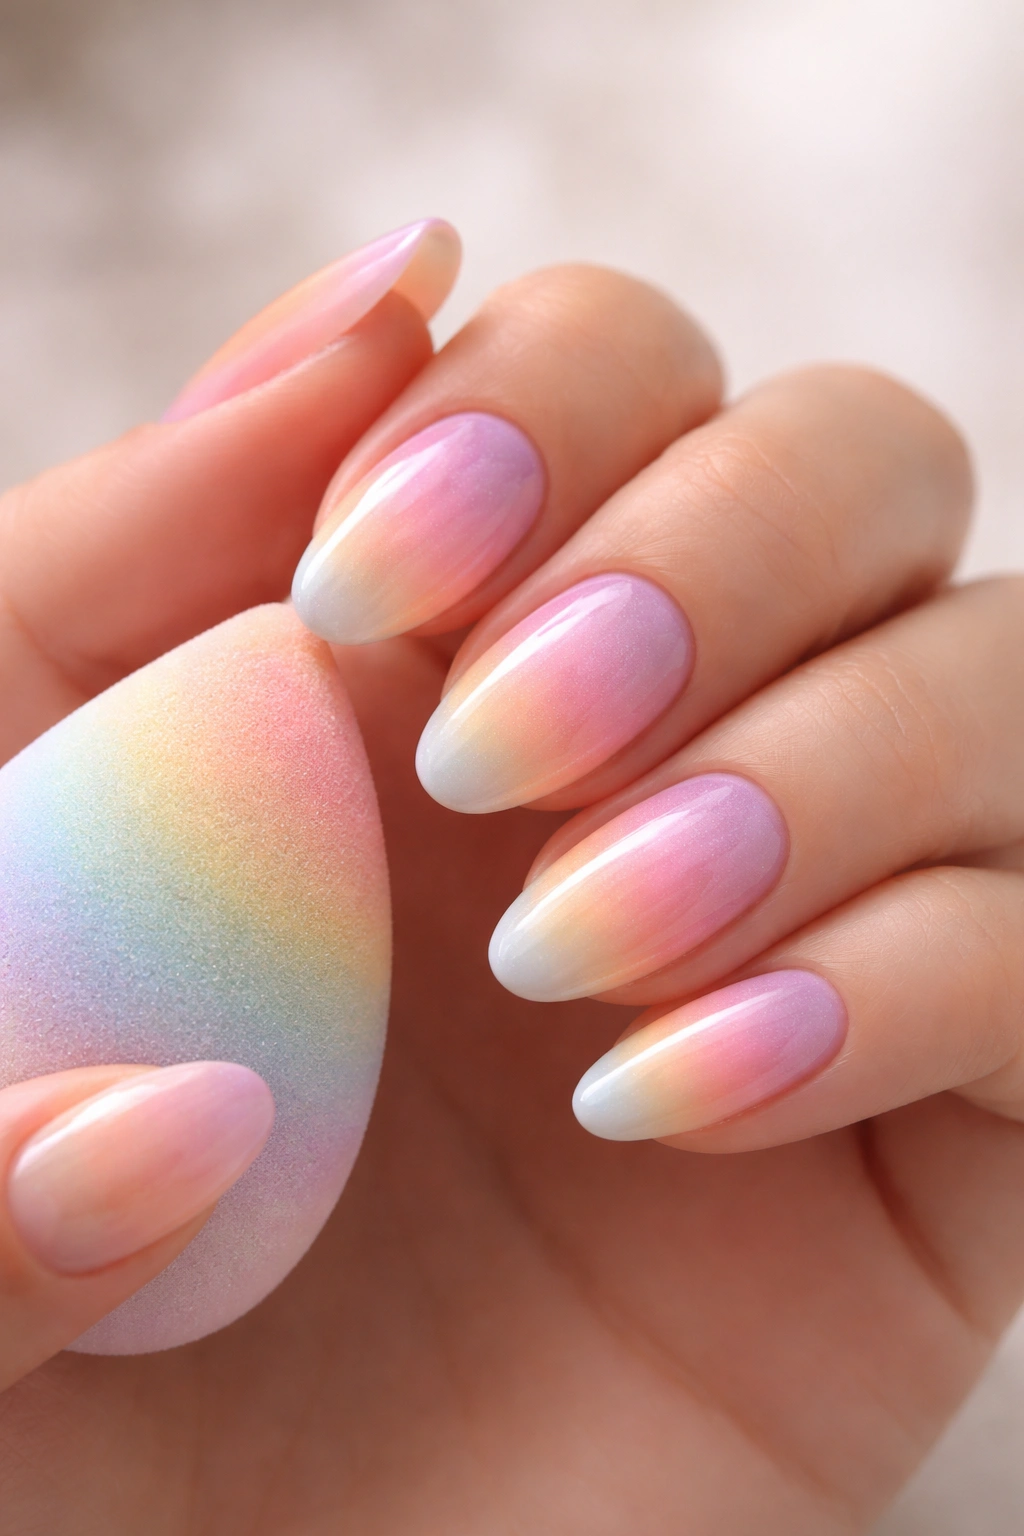
Aura nails feature a soft, blended color effect that looks like a subtle glow around the center or edges of the nail. This is one of the most forgiving gradient techniques because the entire point is for it to look soft and slightly blended rather than perfectly precise. The makeup sponge application method makes this accessible for complete beginners.
Why Aura Nails Are Beginner-Perfect
The entire aesthetic of aura nails is built around soft, imperfect blending. Unlike some gradient techniques where you’re trying to create sharp transitions between colors, aura nails want that soft, slightly blended, almost watercolor-like appearance. This means that any imperfection in your application actually contributes to the design rather than detracting from it. If your aura is slightly uneven, that’s not a flaw—that’s authenticity. If your colors blend together more than you expected, that’s actually the goal. This fundamental alignment between what beginners naturally create and what the design is supposed to look like makes aura nails nearly impossible to mess up.
Creating Aura Nails Step by Step
Apply a base coat and paint your nails with a light, neutral, or milky color as your foundation—this acts as the canvas for your aura. Let it dry completely. Select a contrasting color or complementary shade for your aura effect (soft pastels, jewel tones, or even subtle metallics all work beautifully). Dip a small makeup sponge (or a cut piece of a regular makeup sponge) into your aura color, then gently dab it onto the center of your nail or around the edges, depending on which effect you prefer. Use a light touch and build up the color gradually with multiple dabs rather than applying heavy coverage all at once. The goal is to create a soft transition rather than a defined line. If the blending looks too harsh, you can gently dab a clean, slightly damp sponge over the area to soften it further. Cure or dry completely, then seal with a top coat.
Professional Aura Nail Variations
For a more pronounced aura, apply the color, cure, then apply another layer of aura color in the same or a different shade to build up the effect. This creates more depth and dimension. For a color-shifting aura, use two different colors applied separately to different areas of the nail, allowing them to blend where they meet. Using a matte top coat creates a softer, more diffused aura effect, while a glossy top coat makes it more defined.
9. Polka Dots in Various Sizes
Classic polka dots are truly beginner-proof because of their inherent forgiving nature. Dots don’t require precision or steady hands—they’re small enough that imperfections are invisible, varied enough that you can use multiple sizes (which actually adds visual interest rather than detracting), and simple enough that you can complete a whole set in minutes.
The Universal Appeal of Polka Dot Nails
Polka dots work on any nail shape, with any color combination, in any density (sparse dots or densely packed), and at any scale. You could do large polka dots for a bold look or tiny ones for subtle elegance. You could use matching dots or multi-colored confetti-style dots. The design is so fundamentally versatile that it adapts to your skill level and aesthetic preferences. For beginners, this versatility means you can’t really go wrong—whatever dots you create automatically look intentional because polka dots are such an established, respected nail design.
Painting Perfect Polka Dots
Apply a base coat and paint your entire nail with your base color, then let it dry. Select your dot color (or colors). Using a dotting tool, toothpick, bobby pin, or even the back of a thin brush handle, dip into your chosen color and press gently against the nail to create a dot. Redip after each dot for consistent sizing, or vary the pressure and tool for intentional size variation. Space your dots however feels right to you—scattered randomly across the nail, arranged in loose rows, or clustered in certain areas. Use one color for uniform elegance or multiple colors for fun variation. Once your dots are set, seal with a top coat.
Polka Dot Pro Tips
For extra visual impact, use high contrast colors—white dots on deep navy, gold dots on burgundy, or black dots on pale pink all create stunning effects. Varying dot sizes intentionally (large dot, small dot, medium dot, repeat) creates more visual interest than uniform dots. Using a gel top coat even with regular polish base makes polka dots look more salon-professional. Some professionals use a matte top coat on polka dots to create a more artistic, less “crafty” appearance.
10. Negative Space Accent Nails
Negative space nails feature intentionally unpainted areas that create part of the design—for example, leaving the center of your nail bare while painting the edges, or painting just the tips while leaving the nail bed bare. This approach is incredibly beginner-friendly because you’re not covering the entire nail, and the negative space (unpainted nail) is actually part of the design rather than something you need to hide.
Why Negative Space Eliminates Beginner Anxiety
Traditional nail art requires you to cover and decorate the entire nail surface, which can feel overwhelming. Negative space designs flip this expectation—you’re intentionally leaving areas bare, which means you have less surface to cover, less product to apply, and fewer opportunities for things to look “wrong.” The unpainted areas actually become a design feature rather than a flaw. This psychological shift is powerful for beginners because it transforms a challenge into an advantage. You could literally paint just the tips of your nails and consider it a complete design—and you’d be right.
Creating Negative Space Designs
Apply a base coat. Now decide on your negative space design—will you paint just the tips, leaving the nail bed bare? Paint the outer edges, leaving the center unpainted? Create a half-and-half design with one side painted and one side bare? Once you’ve decided, apply painter’s tape to define the areas you want to keep unpainted, or simply freehand your design. Paint your chosen color(s) in the areas you want covered, building up opacity as needed. Remove any tape carefully, clean up edges with a brush dipped in acetone if needed, and seal with a top coat. The beauty here is that imperfect edges in negative space often look more artistic and intentional than perfect ones.
Making Negative Space Nails Shine
Use contrasting colors—nude with black, white with metallics, or pastel with bold accents. Combining negative space with other techniques (like adding a simple line or dot in the bare area, or using a pattern in the painted area) creates more visual complexity while maintaining the simple execution. The negative space principle also works beautifully with chrome, glitter, or metallic finishes in the painted areas while keeping bare nail as your contrast.
Final Thoughts

The transformation from feeling intimidated by nail art to confidently creating designs at home is closer than you think. The secret that nail professionals know is that the easiest designs often look the most impressive because they’re intentional, confident, and unapologetically simple. Your first micro dot design might take you three minutes, but someone will ask where you got your nails done because it looks polished and thought-out.
Start with whichever design speaks to you—there’s no hierarchy here, no “beginner” level you need to graduate from. You could do micro dots exclusively and have an eternally elegant manicure, or you could cycle through all ten designs and keep your nails fresh and interesting. The tools you need are minimal, the techniques are genuinely accessible, and the most important ingredient—confidence—grows with every single nail you paint.
Your hands don’t need to be steady. Your lines don’t need to be perfect. Your colors don’t need to match an Instagram aesthetic. What matters is that you’re creating something with intention and having fun in the process. That’s what makes nails look beautiful, and that’s well within your reach right now.
