

Nail polish is supposed to make you feel fabulous, not trap you in a cycle of damage. The moment you start thinking about removing your manicure, you’re probably dreading the harsh chemical smell of acetone and the way it leaves your nails feeling paper-thin and parched. Here’s the thing: you don’t have to resign yourself to that experience. There’s a whole world of gentler, more nail-friendly removal methods waiting in your bathroom cabinet, kitchen pantry, and medicine chest right now.
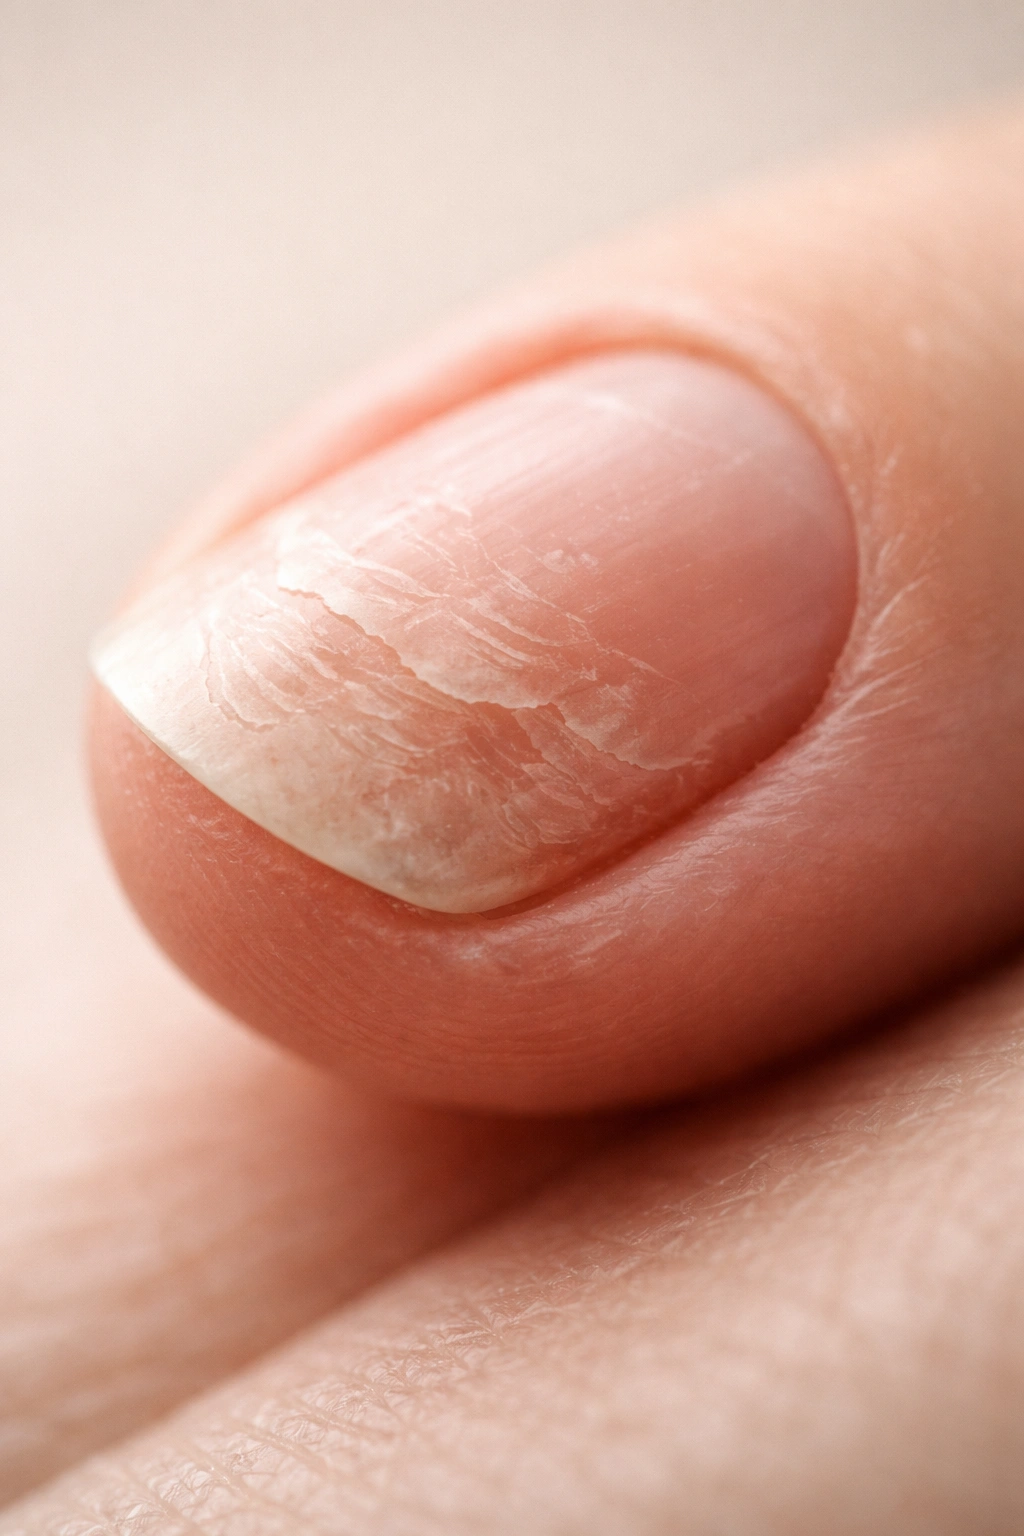
If you’ve ever noticed your nails becoming brittle, developing white streaks, or peeling in thin layers after regular polish removal, acetone is likely the culprit. This powerful solvent doesn’t just dissolve your nail polish—it also strips away the natural oils that protect your nail plate, leaving behind weakened, dehydrated nails that can take months to fully recover. The damage compounds with every removal, especially if you’re switching colors frequently.
The good news? You can ditch acetone completely and still remove every trace of polish from your nails. The methods are easier than you’d think, often require ingredients you already own, and they’re genuinely better for your nail health in the long run. Some work faster than others, and some are better suited to specific situations, but they all prioritize keeping your nails intact and nourished.
Let’s walk through each option so you can choose the approach that fits your situation, your timeline, and your nails’ current condition.
Why Acetone Damages Your Nails

Understanding exactly what acetone does to your nails is the first step toward breaking free from it. Acetone is a harsh solvent that professionals use because it’s brutally effective at breaking down the resins and pigments in nail polish. But that same power that makes it work so well is precisely what makes it so damaging.
When acetone touches your nail plate, it doesn’t discriminate between the polish and your nail’s protective lipid layer. It strips away both. Your nails depend on a delicate coating of natural oils to stay flexible, hydrated, and strong. Acetone removes that barrier in minutes, leaving the nail cells underneath dehydrated and vulnerable. This is why your nails often feel softer and more fragile immediately after acetone removal.
The damage doesn’t stop at the nail bed. Your cuticles—which serve as a protective seal for the nail matrix where new growth happens—also take a hit. When cuticles become damaged and dry from acetone exposure, they can’t do their job effectively. This leads to a cascade of problems: slower growth, brittleness, peeling, splitting, and even infection in severe cases.
Many people notice whitening or white spots appearing on their nails after repeated acetone use, which is actually a visible sign of dehydration and damage. Some nails develop a yellowish tint over time, another telltale marker of acetone exposure. These changes aren’t cosmetic concerns—they’re red flags that your nails are struggling.
If you’ve been using acetone regularly and your nails have started showing these signs, switching to gentler removal methods now can prevent long-term damage. Your nails take about three to six months to fully grow out, so the sooner you make the switch, the sooner you’ll notice healthier, stronger nails growing in.
Understanding How Acetone Harms Your Nails
The damage from acetone is cumulative, which means the more often you remove polish with it, the worse the effects become. This is particularly important to understand if you’re someone who loves changing your polish color frequently. Each removal strips away more protective layers, making your nails progressively more vulnerable to breakage and damage.
Your nail plate is actually made up of several layers of keratin—the same protein found in your hair and skin. Acetone essentially dissolves the “glue” that holds these layers together, causing them to separate and weaken. When layers start separating, you get peeling and flaking that can take weeks to grow out. In severe cases, acetone can cause nails to become so thin they’re almost translucent, and they’ll bend or break at the slightest pressure.
The drying effect is particularly concerning for anyone with naturally weak, thin, or brittle nails, or for people with existing skin conditions like eczema or dermatitis. For these individuals, acetone can trigger intense irritation, redness, and even chemical burns on the delicate skin around the nails. Some people develop a sensitivity to acetone over time, meaning the reaction gets worse with each exposure.
Beyond the physical damage, acetone exposure also harms your cuticles specifically. The cuticle is living tissue that protects your nail matrix—the area under your skin where new nail cells are generated. When acetone dries out and damages your cuticles, you’re potentially compromising the health and quality of every new nail cell your body produces for months to come.
Rubbing Alcohol and Hand Sanitizer Method
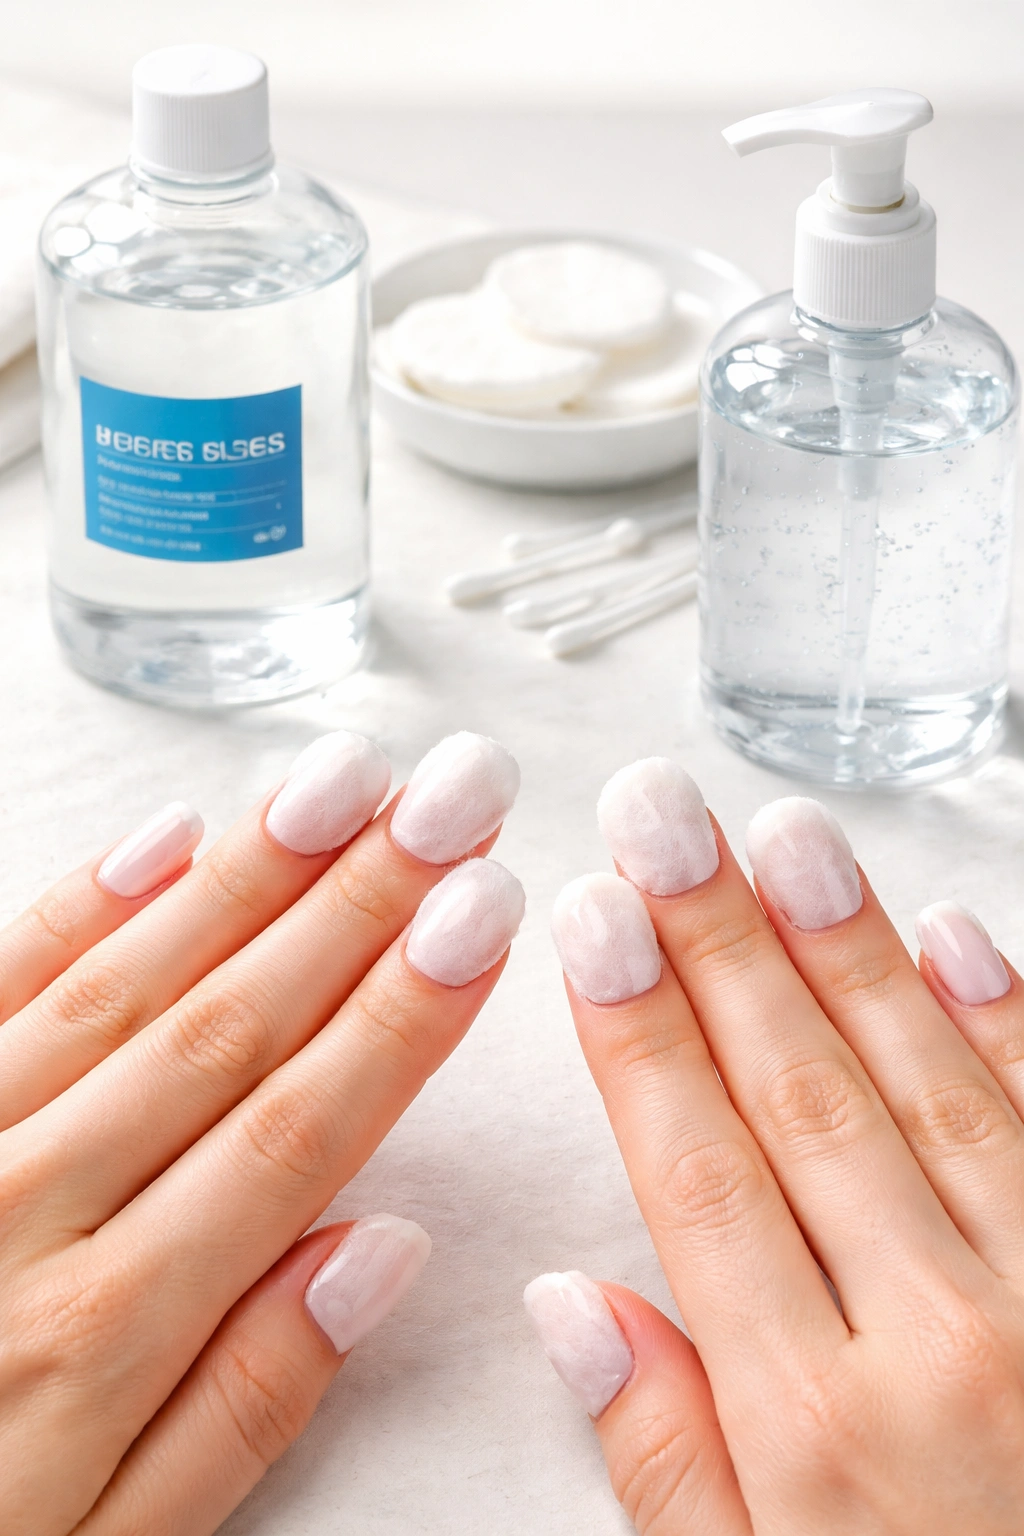
If you need a quick solution and acetone isn’t an option, you likely already have rubbing alcohol or hand sanitizer sitting in your home right now. Both contain high concentrations of alcohol, which acts as a solvent capable of breaking down nail polish. While neither is quite as potent as acetone, they absolutely work—they just require a little more patience and elbow grease.
Hand sanitizer typically contains 60% to 80% alcohol, making it surprisingly effective at removing polish, even stubborn glitter formulas. The method is straightforward: saturate a cotton ball or pad with your chosen product, place it directly on the nail, and let it sit for about 10 to 15 seconds. Then gently rub the polish away. You may need to repeat this process a few times for thick or dark colors, but it does work.
Rubbing alcohol works on the same principle. Apply it the same way you would hand sanitizer—soak a cotton ball and hold it against each nail. Because rubbing alcohol often has a stronger concentration, you might see results slightly faster than with hand sanitizer. The tradeoff is that it’s more drying, so aftercare is non-negotiable with this method.
Important consideration: Both alcohol-based products can be quite drying to your skin and nails. After using either method, you absolutely must follow up with cuticle oil and hand moisturizer. Some people find the smell of rubbing alcohol overwhelming, so hand sanitizer might be the better choice if scent is an issue. Perfume that contains alcohol can also work in a pinch, though the fragrance might be intense.
The Vinegar and Orange Juice Solution
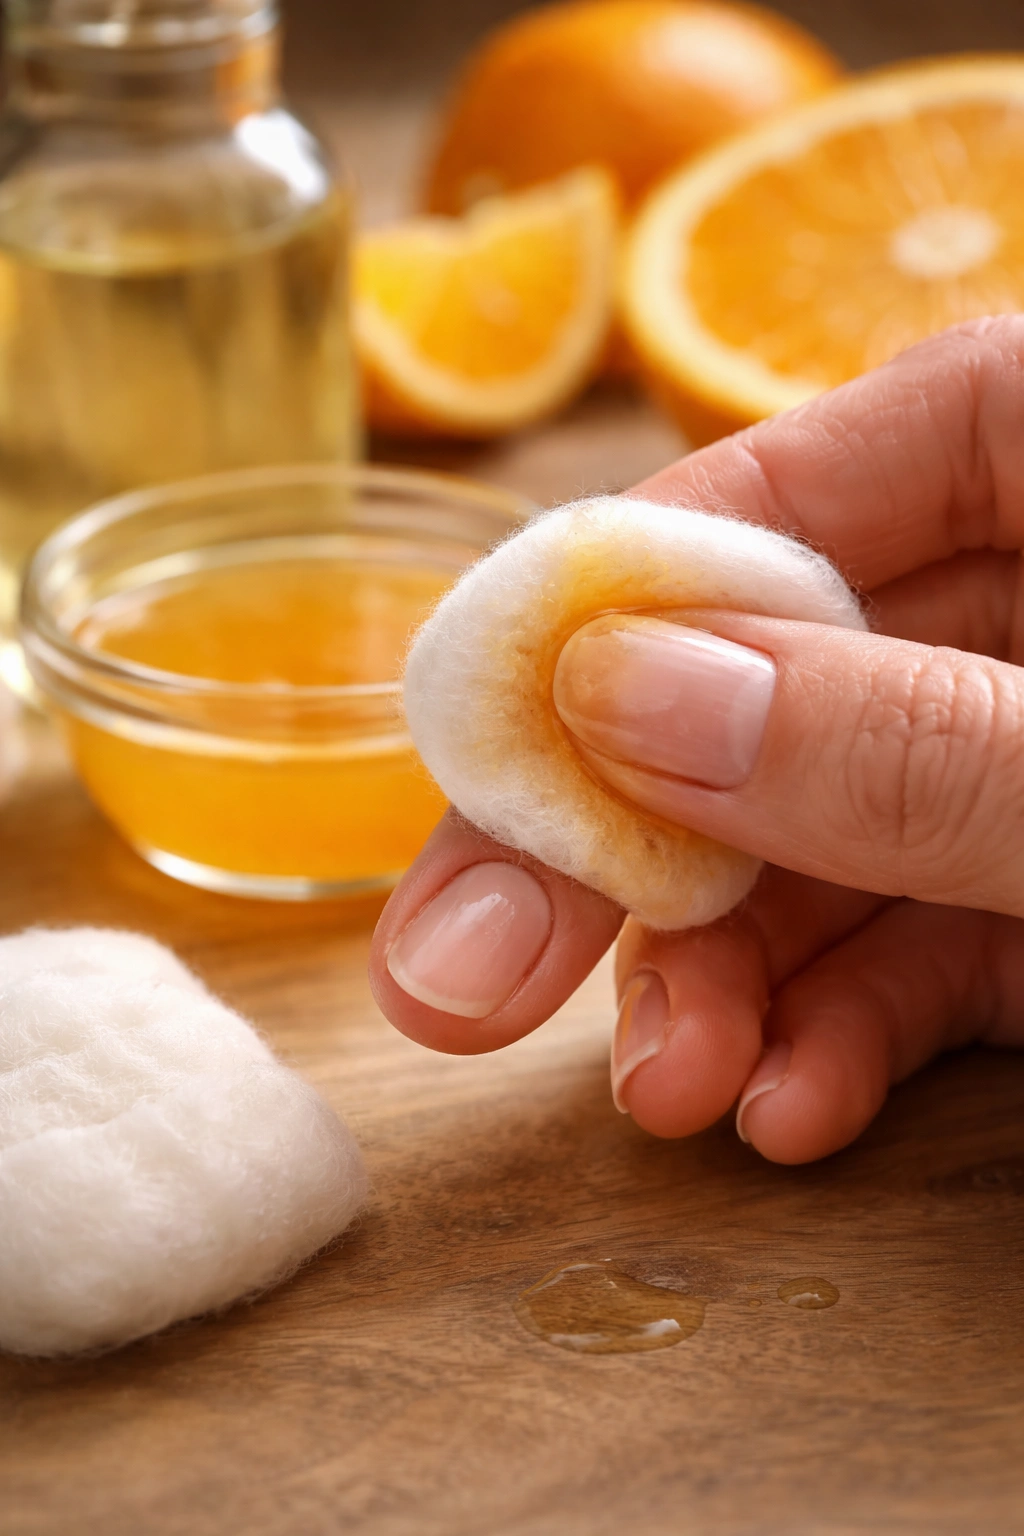
This combination sounds like a margarita ingredient, but it’s actually one of the most effective natural polish removers available. The secret lies in the acidity of both ingredients—citric acid from the orange juice and acetic acid from the vinegar work together to break down nail polish resins and pigments without the harshness of acetone.
Mix equal parts white vinegar and fresh orange juice in a small bowl. The fresher the juice, the better—store-bought juice works fine, but freshly squeezed is ideal because it has higher acid content. Once you’ve combined them, soak a cotton ball in the mixture and press it firmly against each nail for about 10 to 15 seconds, holding it in place while the solution starts softening the polish.
After the initial soak, use the same cotton ball (or a fresh one) to gently wipe and rub away the loosened polish. You may need to repeat this process several times, especially on the first coat or with darker colors. The polish will soften gradually, so patience is key. Unlike acetone, this method won’t work instantly, but the results are solid once the polish begins to lift.
One significant advantage of this method is that the oils in orange juice actually nourish your nails while removing polish, rather than stripping them. Your skin and cuticles benefit too, getting hydration rather than damage. This makes it an excellent choice if your nails are already dry or damaged from previous acetone use.
The only real drawback? If you have any cuts, cracks, or open wounds on your hands or cuticles, the acid will sting. Avoid this method if you’ve recently trimmed your cuticles or if you have sensitive, irritated skin around your nails.
Lemon Juice for Natural Polish Removal
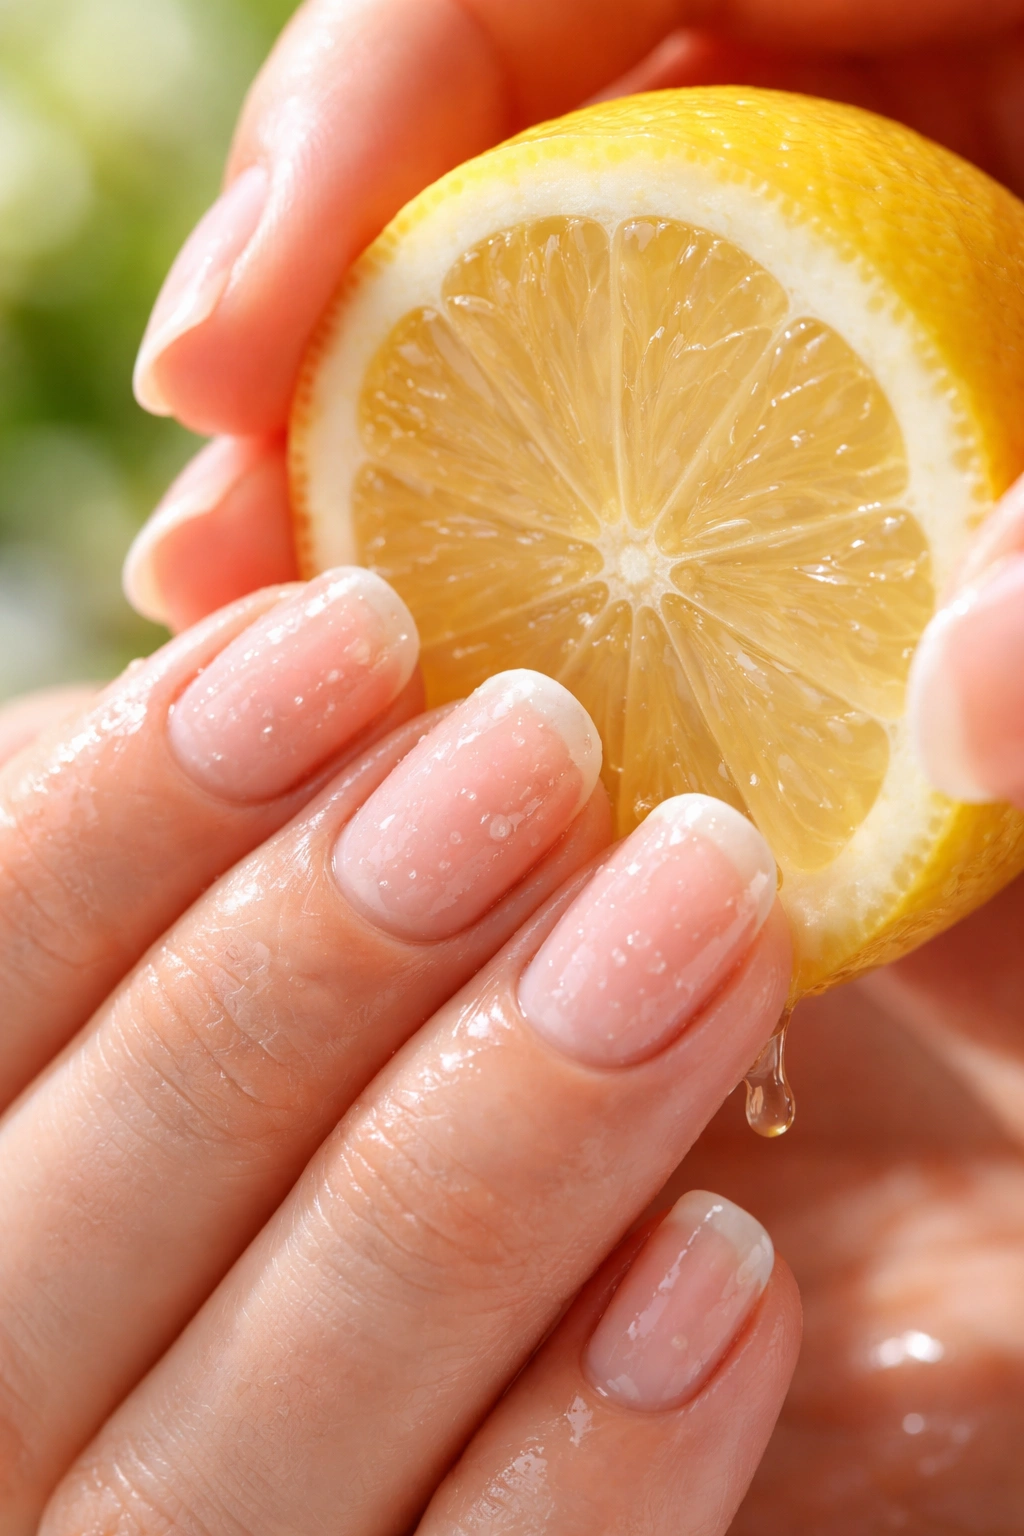
Lemon is one of nature’s most versatile cleaning agents, and it works beautifully for removing nail polish. The citric acid in lemon juice has dissolving properties that break down polish pigments, making it an ideal acetone-free option. You can use either fresh lemon juice or a slice of fresh lemon directly on your nails.
If you’re using a fresh lemon, simply cut it in half and rub the wet part directly over the polish for about one minute. Apply gentle, circular pressure to the nail surface. Once you’ve done this, use a Q-tip, paper towel, or cotton pad to firmly rub the polish away using an upward motion, working from the cuticle toward the tip of the nail. This upward motion is important because it helps lift the polish away without pushing it into your skin.
Alternatively, squeeze fresh lemon juice onto a cotton ball, saturate it fully, and hold the cotton against your nail until the polish softens enough to rub away easily. This method takes a bit longer than the direct-lemon approach, but many people find it more comfortable because you’re not actively scrubbing.
Be cautious if you have any hand injuries or irritated skin. The citric acid will sting if it comes into contact with cuts, so take your time and be careful around the cuticle area. If you feel any burning sensation, rinse your hands immediately and switch to a gentler method.
One nice bonus: lemon juice won’t leave your nails feeling as parched as acetone does. In fact, if you’re removing particularly stubborn polish, you can add a nourishing oil like olive, almond, or coconut oil to your lemon juice for extra conditioning benefits while you work.
The Warm Water Soak Technique
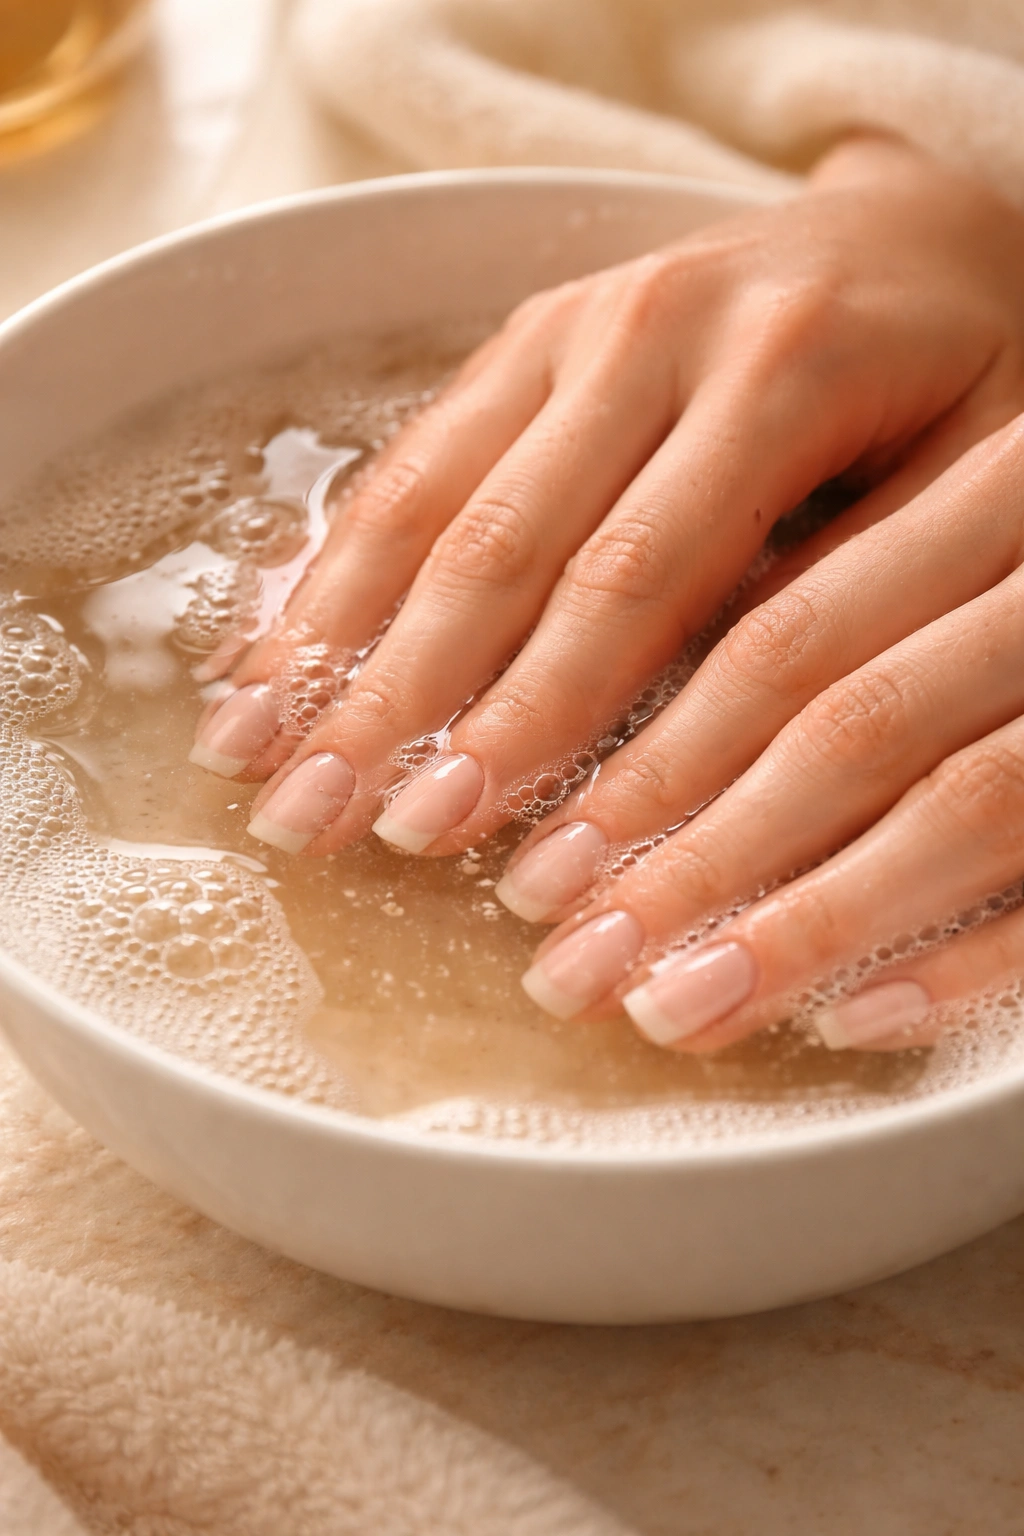
This is the gentlest method available, and it’s perfect if your polish is already starting to chip or lift naturally. It requires patience and time—typically 15 to 20 minutes—but it’s so mild that it’s ideal for anyone with sensitive nails or skin.
Fill a bowl with warm (not hot) water and add a few drops of dish soap or hand soap. The soap helps break down the polish slightly and makes the whole process more effective. Soak your nails completely in the bowl, making sure they’re fully submerged. The warmth of the water helps soften the polish while the soap gently works to loosen its grip on your nail.
Every few minutes, gently try lifting an edge of the polish with an orange stick or cuticle pusher. Don’t force it—if it’s not ready to come off, just soak longer. Once the polish starts to lift on its own, you can slowly and carefully peel it away. If it resists, place your nails back in the water for another few minutes.
This method works best if your polish is already partially lifted, which is why it’s great for manicures that are a couple of weeks old. If you’re trying to remove freshly applied polish, you might need to soak for 20 to 30 minutes or longer. Some people even add a splash of white vinegar to the water to boost the polish-breaking power.
The beauty of the warm water soak is that it’s moisturizing rather than drying. Your nails and cuticles actually come out of this process feeling softer and more hydrated than they did before. There’s virtually zero risk of damage or irritation, making it the safest choice for anyone with compromised or sensitive nails.
Using Cuticle Oil for Gentle Removal
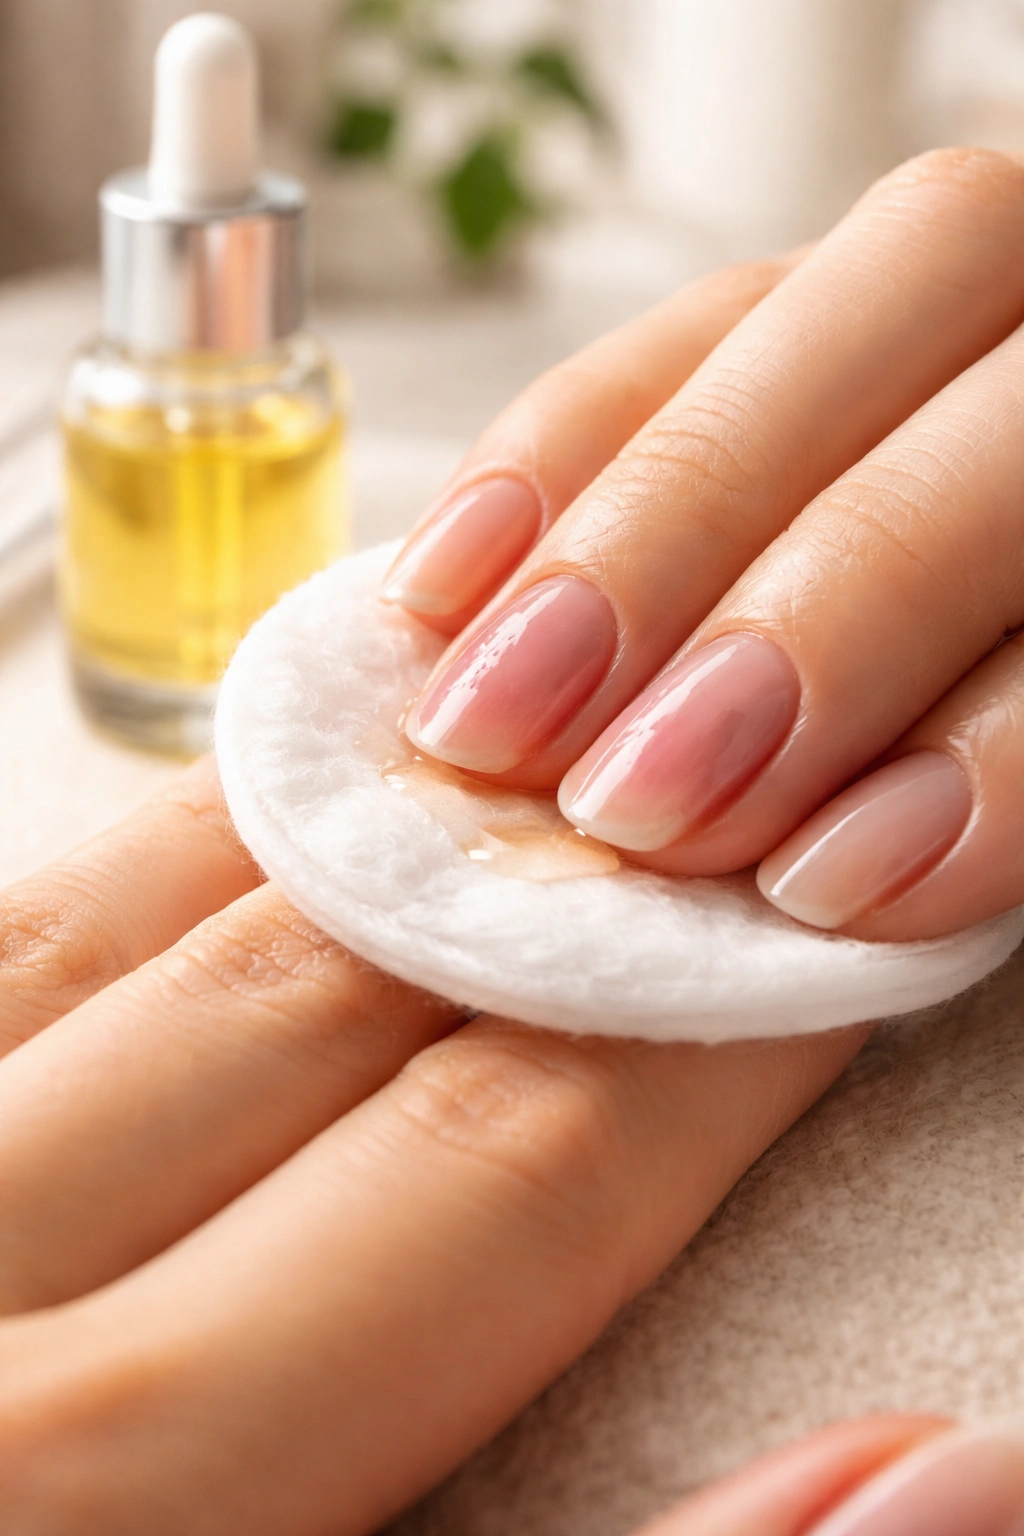
Cuticle oil is a secret weapon for removing acrylics, gel polish, and regular polish without any harsh chemicals. This method works particularly well if your polish is already starting to lift or chip at the edges, and it’s one of the most nourishing approaches available. You’re literally removing polish while conditioning your nails at the same time.
Soak a cotton ball or Q-tip generously with cuticle oil—it needs to be fully saturated. Hold the oil-soaked cotton directly against each nail for about five minutes, focusing on areas where the polish has already started to separate from your natural nail. The oil slowly penetrates underneath the polish, breaking the bond between the artificial or traditional polish layer and your real nail.
Once the polish has softened, gently use an orange stick or cuticle pusher to carefully lift it away. Take your time with this step—you’re not scraping or forcing, just gently coaxing the polish to release. If it’s not ready, apply more oil and wait a bit longer.
Any cuticle oil will work, but options enriched with nourishing ingredients like vitamin E, sweet almond oil, or argan oil offer additional conditioning benefits. If you don’t have dedicated cuticle oil, you can use regular coconut oil, olive oil, or even avocado oil. The key is using something that will nourish your nails while doing the work of removal.
This method is slower than acetone-based removal—expect it to take 15 to 30 minutes depending on how well-adhered your polish is. But the trade-off is worth it: your nails and cuticles come out significantly softer and more hydrated, and you’ve actually given your nails a mini conditioning treatment while removing the old color.
Toothpaste and Baking Soda Method
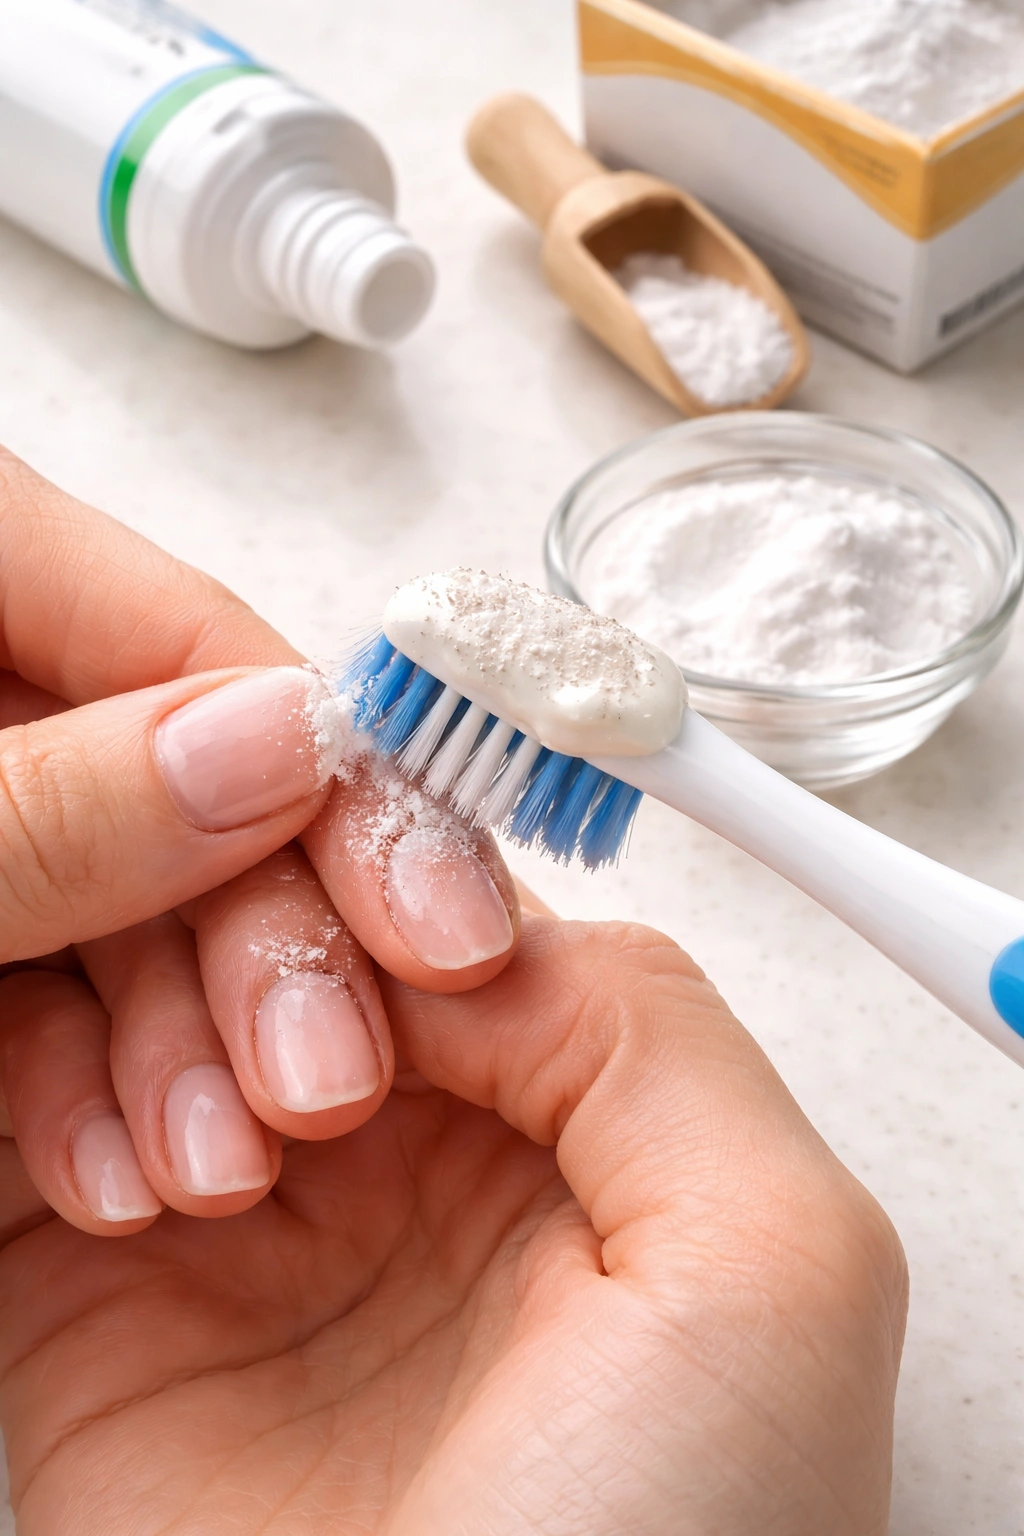
Your toothpaste contains ethyl acetate, which is found in many traditional nail polish removers but is gentler than pure acetone. When combined with baking soda’s mild abrasive properties, toothpaste becomes an effective polish remover that’s safe enough to use on even the most delicate nails.
Use a basic white toothpaste—the cheaper, the better, actually. Fancy whitening or gel toothpastes don’t work as well. Squeeze a pea-sized amount onto an old toothbrush (one you don’t plan to use on your teeth anymore). Gently scrub the toothpaste onto each nail, working it into the polish with circular motions.
Sprinkle a tiny bit of baking soda onto the wet toothpaste, which boosts the abrasive action and helps lift the polish more effectively. Continue scrubbing gently for about 10 to 15 seconds per nail. The combination of the ethyl acetate and the gentle abrasion works to break down and lift the polish away. Rinse with warm water and pat dry.
This method works best on light or medium polish colors. Dark polish and especially glitter require more scrubbing and patience. If toothpaste with baking soda is your only option, know that you might need to repeat the process a few times. It’s not the fastest method, but it’s safe, effective, and you probably already have both ingredients at home.
Some people find the scrubbing motion a bit harsh on sensitive nails, so if your nails are already feeling weak or damaged, stick with soaking methods instead. But for regular nail health maintenance, the toothpaste-and-baking-soda approach is a reliable, budget-friendly choice.
Household Oils: Olive, Coconut, and Cuticle Oil
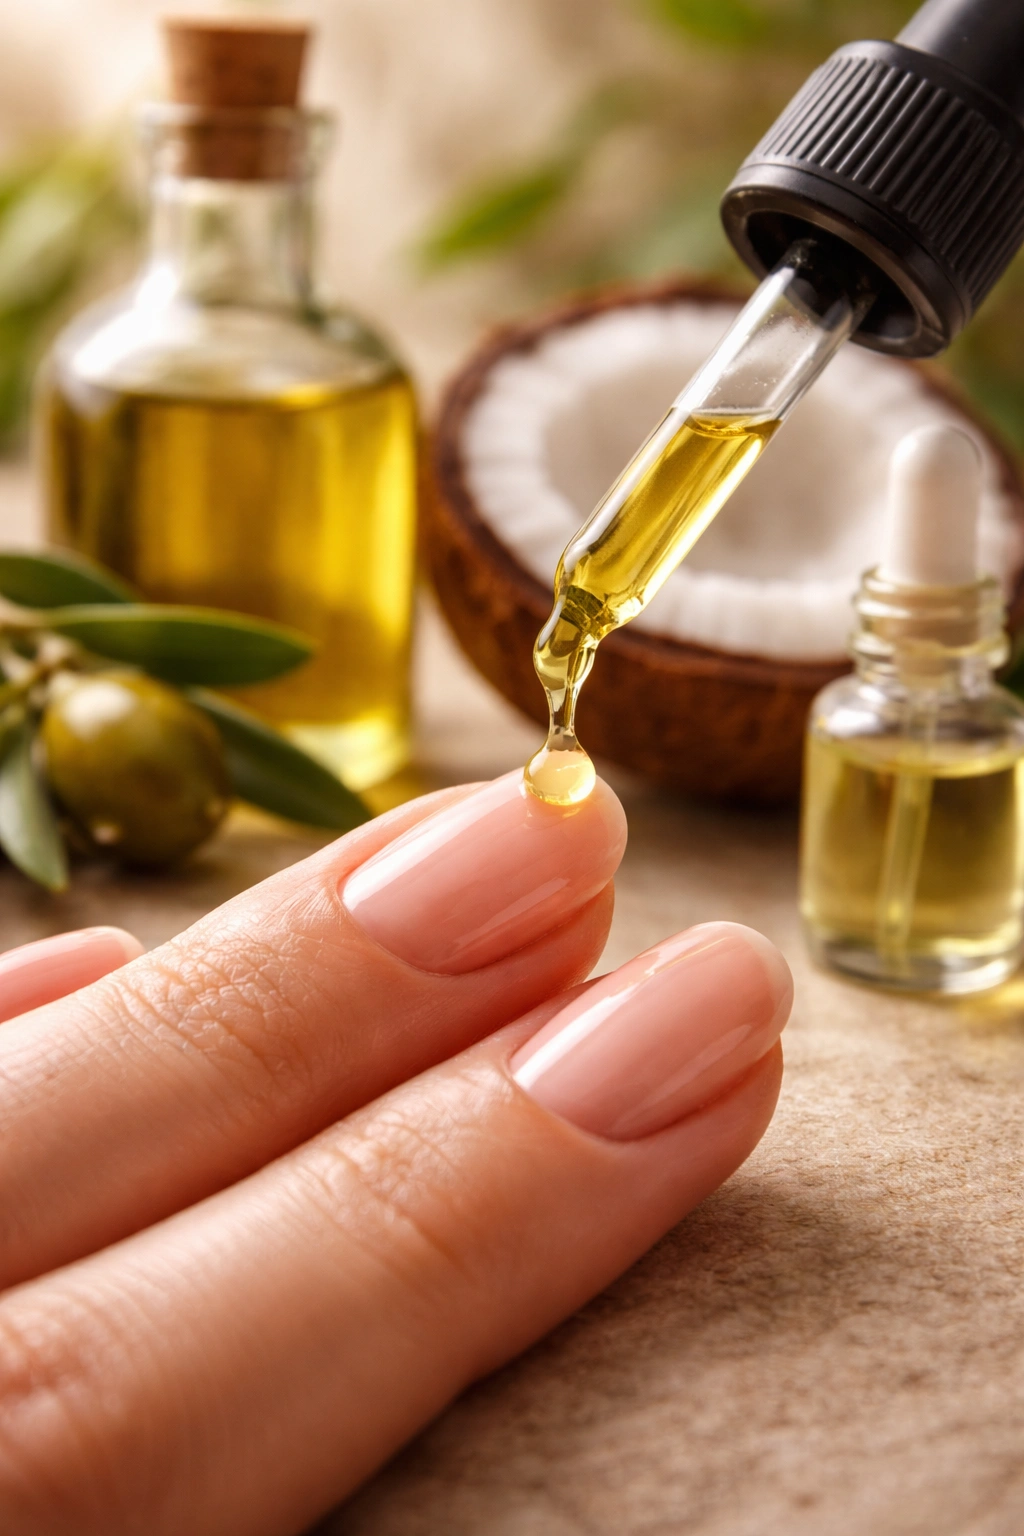
Oils work by penetrating underneath the polish and weakening the bond between the color and your nail plate. The best part is that they condition your nails simultaneously, making them especially valuable if you’ve been using harsh removers and your nails are crying out for hydration. Multiple oils work well—it’s really about what you have available.
Apply a generous amount of your chosen oil directly onto each nail. Massage it into the polish, working it around the edges and under any areas where the polish is already lifting. Let the oil sit for about 15 to 20 minutes. For better results, you can wrap your fingertips loosely with plastic wrap or aluminum foil to create a warming effect that helps the oil penetrate more deeply.
After the oil has had time to work, use an orange stick or cuticle pusher to gently lift the softened polish. You may need to apply more oil and repeat the process if you’re dealing with thick or heavily pigmented polish. Olive oil tends to be the most effective because of its higher viscosity and nourishing compounds, but coconut oil and cuticle oil work beautifully too.
This is a deeply nourishing method that leaves your nails and cuticles feeling softer and more flexible than other removal techniques. It’s particularly good to use after you’ve exposed your nails to acetone for an extended period, since the oils actively reverse some of the drying damage.
Salt and Soap Soak Removal
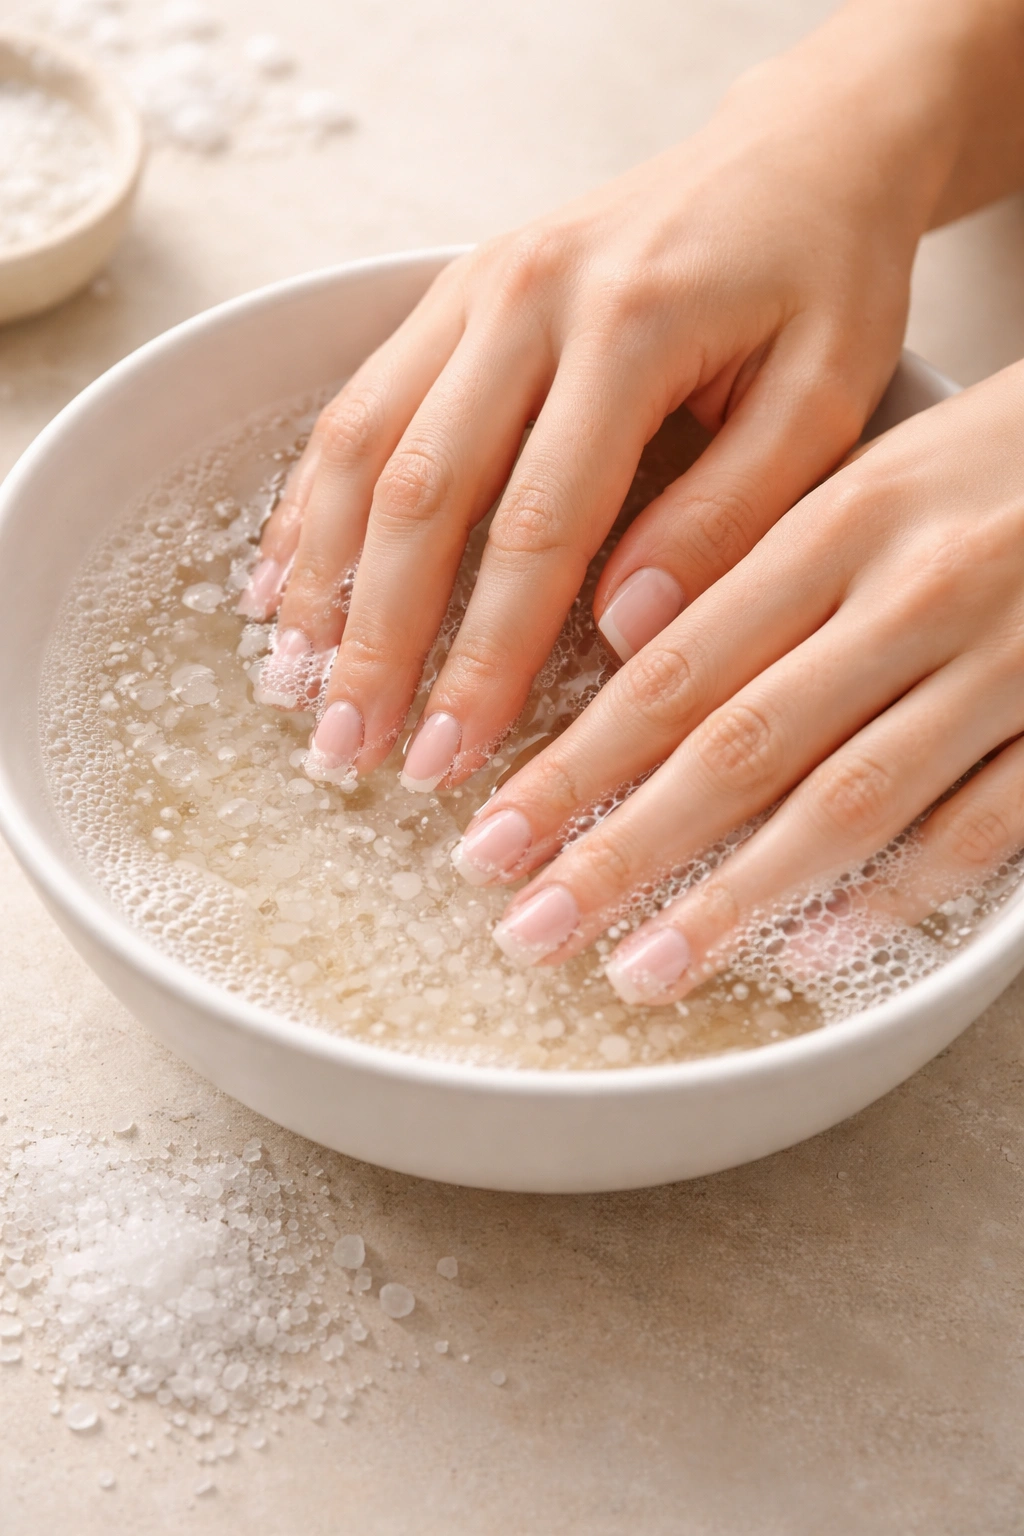
This DIY soak combines warm water, salt, and dish soap into a simple yet effective polish-removal solution. The salt helps break down the polish while the warmth and soap work together to loosen its grip on your nail. It’s gentle enough for regular use yet effective enough to tackle stubborn polish.
Fill a bowl with warm water and add a teaspoon of salt along with a few drops of dish soap. Stir well and soak your nails for 15 to 20 minutes, keeping them fully submerged. As you soak, you’ll notice the polish beginning to soften or even bubble slightly around the edges—that’s the mixture doing its job.
After soaking, use a cotton pad or cuticle pusher to gently lift and rub away the loosened polish. You may need to soak again if you’re dealing with thick polish or multiple coats. Some people find that adding a tablespoon of sugar instead of salt works equally well and feels slightly gentler on their skin.
This method is excellent for manicures that are already slightly lifted or chipped. Fresh, well-adhered polish might take longer to respond, but given enough time, the salt solution will work its way through. The soap adds a conditioning element that pure-salt soaks lack, making it a good middle ground between aggressive and ultra-gentle removal methods.
Hairspray and Perfume Techniques
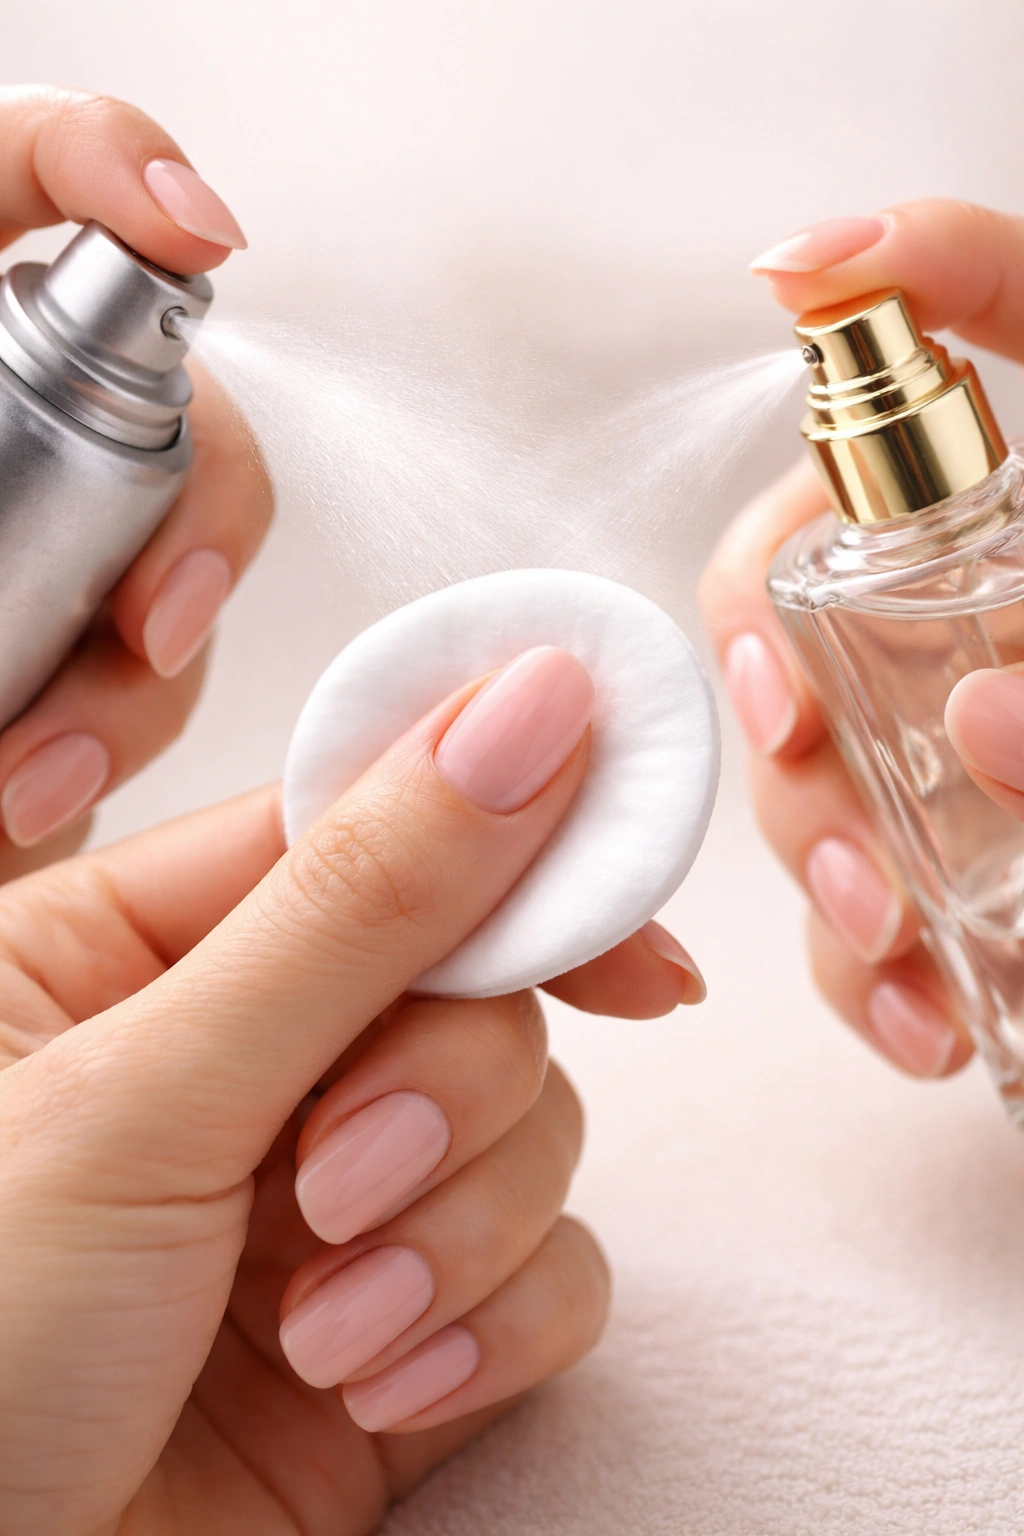
Both hairspray and perfume contain alcohol in high concentrations—typically 25% to 50% for hairspray and varying amounts for perfume depending on the formulation. This makes them capable of dissolving nail polish when you need a quick solution and have nothing else available.
For hairspray, you need aerosol-based products, not pump spray, since aerosol delivers higher alcohol concentration. Saturate a cotton ball or pad completely with hairspray by spraying directly onto it. Immediately place the saturated cotton onto your nail and hold it there for 10 to 20 seconds while the alcohol breaks down the polish. Gently rub away the softened color with the same cotton ball.
Perfume works similarly—pour some onto a cotton pad and rub it across your nails. The polish should begin lifting within a few minutes. The downside is that the scent can be quite strong and overwhelming, especially if you’re working on all ten nails at once. Make sure you’re in a well-ventilated area and take breaks if the fragrance becomes too intense.
Neither of these methods is ideal for regular use because they’re drying and the strong fragrance can be unpleasant. But they’re genuinely useful when you’re in a pinch and don’t have proper removal supplies. They work faster than water-based methods but gentler than acetone.
The Filing Method: When and How to Do It Safely
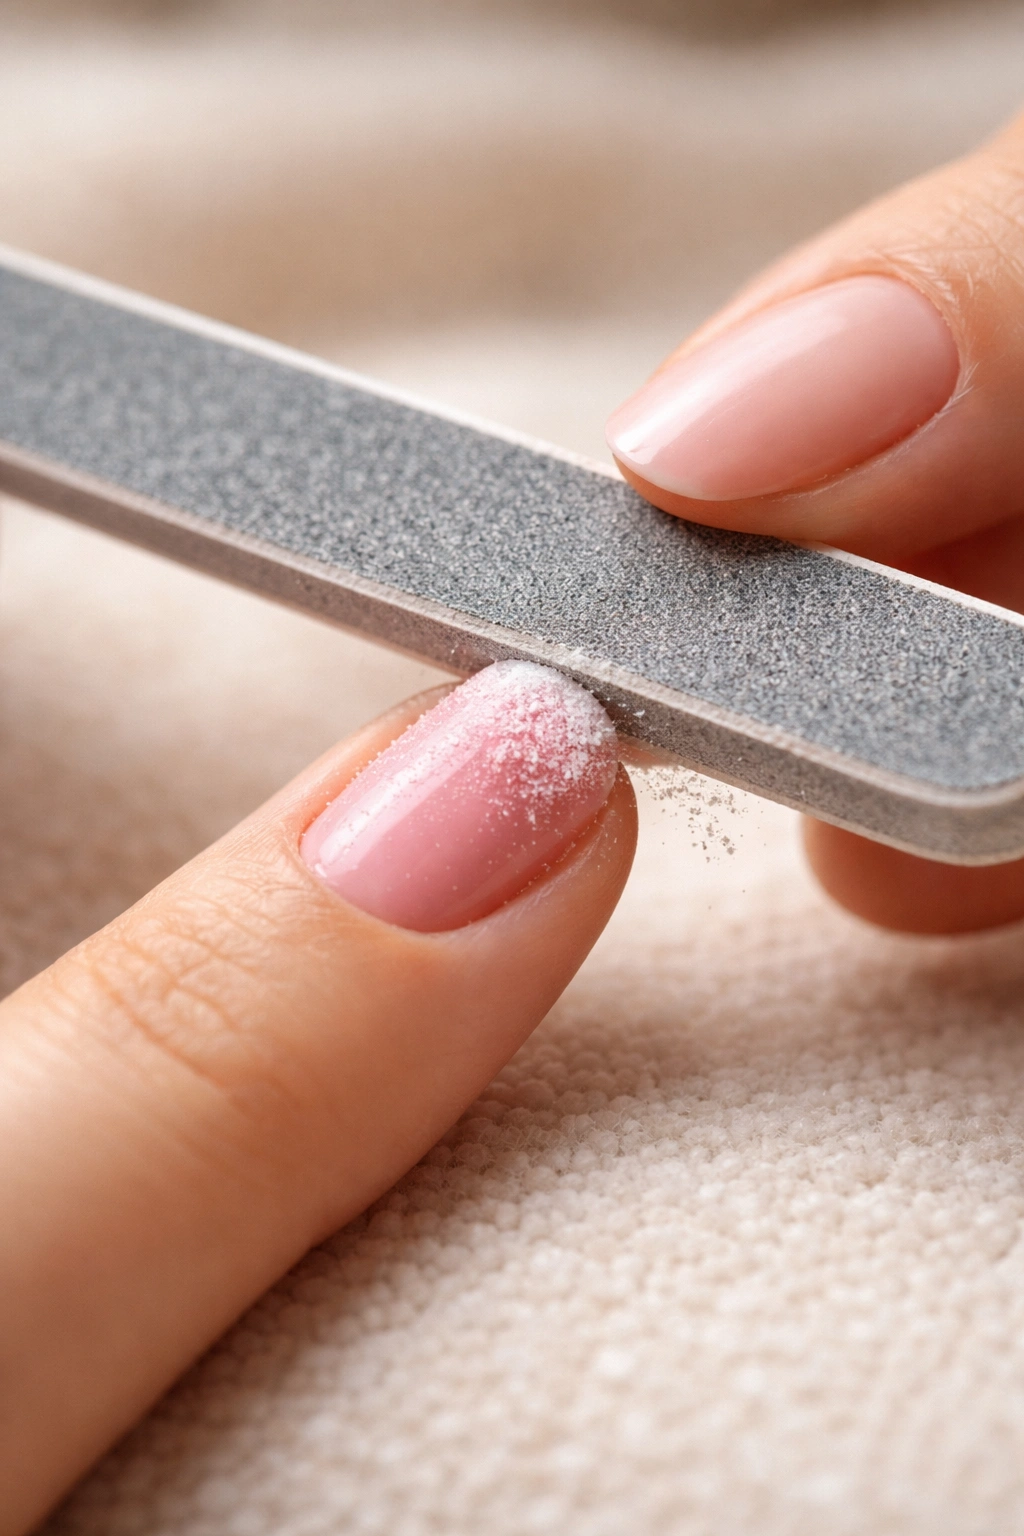
Filing is a last-resort removal method that should only be used if polish is already lifted or if you’re willing to invest significant time and patience. It’s not the gentlest option, but it can work if done carefully and with the right tools. The key is understanding that you’re filing away the polish, not your nails.
Start by trimming your nails as short as possible without causing pain or damage. Shorter nails give you more control and reduce the risk of filing into your natural nail plate. Use a medium-grit nail file (around 180 to 240 grit) and gently file the top surface of the polish in different directions—not just one direction, which can create weak points in the nail.
Work slowly and deliberately, checking your progress frequently. As you file, you’ll see the polish gradually disappear and your natural nail color beginning to show through. Switch to a fine-grit file or buffer once most of the polish is gone, using only gentle pressure to smooth the surface.
Stop immediately if you reach the nail plate and feel any pain. Over-filing is a common mistake that creates surface damage, white spots, and ridges that take weeks to grow out. If your polish is firmly adhered, filing isn’t going to work well no matter how much effort you put in—you’ll just damage your nails. In this case, choose a soaking method instead.
This technique works best if your polish is already naturally peeling or lifting from your nails. Fresh, well-applied polish is extremely difficult to file away without damaging your nail plate, so don’t attempt it unless you have a very gentle touch and plenty of time.
Essential Aftercare for Healthy Nails
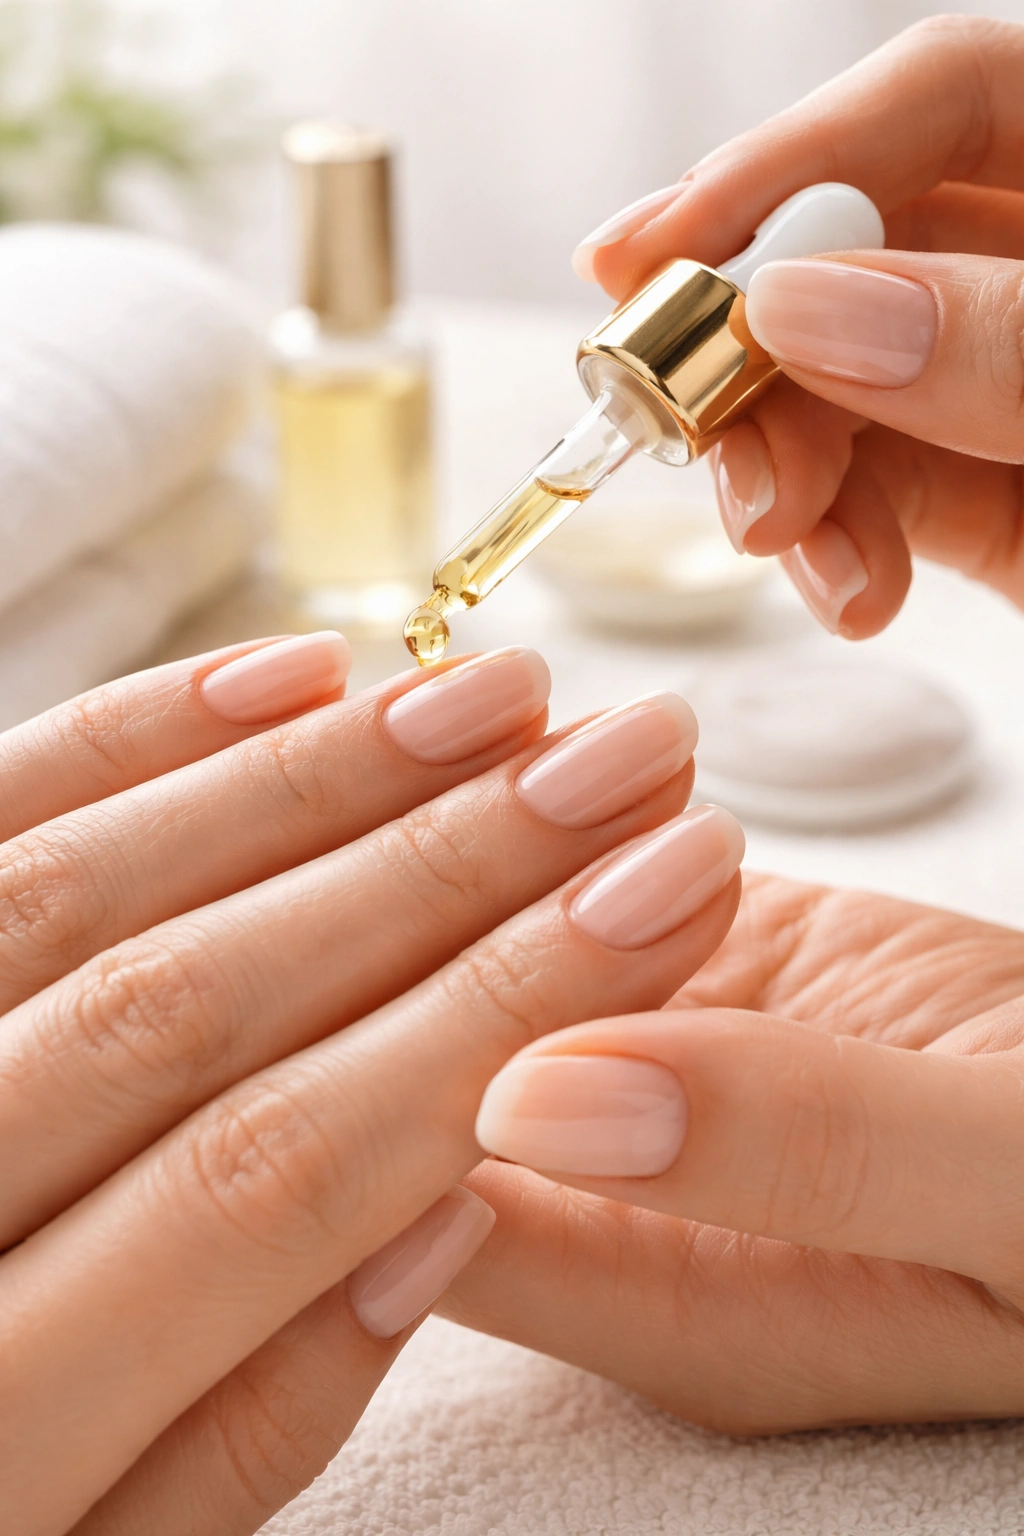
No matter which removal method you choose, aftercare is non-negotiable if you want your nails to stay strong and healthy. Even the gentlest methods have some drying effect, and most methods leave your cuticles feeling parched. Proper aftercare reverses that damage and prepares your nails for the next manicure.
Moisturize immediately and generously. Within minutes of removing your polish, apply cuticle oil to your nails and surrounding skin. Don’t just dab it on—massage it in thoroughly, working it into the cuticle area where your nail matrix lives. Use a rich hand cream or hand balm on the rest of your hands. Vitamin E-enriched creams or vaseline-based products are particularly good at repairing acetone damage.
Continue this daily moisturizing routine for at least a week after removal, preferably longer. Your nails and cuticles experienced stress during the removal process, even if the method was gentle, and they need consistent hydration to recover fully. Make cuticle oil your new best friend—apply it every single day if possible, and definitely before bed.
Stay hydrated internally as well. Your nail health depends partially on overall body hydration, so drink plenty of water. While you’re focusing on external moisture, make sure your body has the hydration it needs to generate healthy new nail cells.
Give your nails a break before applying new polish. Wait at least 24 to 48 hours, preferably longer, before painting your nails again. If you’ve used acetone or alcohol-based methods, give your nails a full week if possible. This gives them time to recover and rebalance their moisture levels. If you notice visible damage—peeling, white spots, or brittleness—extend the break to two weeks or until your nails look healthier.
Consider using a strengthening treatment or nourishing base coat during your break period. Products containing keratin, calcium, or biotin can help reinforce your nail plate. Some people use gentle color treatments during recovery instead of regular polish—these are more breathable and less likely to stress already-damaged nails.
When to Seek Professional Help
Sometimes your nails need professional intervention. If you’ve been struggling with removal at home or if your nails show signs of serious damage, a nail technician can remove polish safely while protecting your natural nails. They have tools and experience that allow them to work without damaging the nail plate.
Visit a salon if you have extremely thick polish, gel extensions, or builder gel that won’t lift. Trying to force removal at home can cause serious damage. Professionals have specialized tools and techniques designed specifically for these products, and the investment is worth protecting your nails.
If you notice signs of infection—redness, swelling, pus, or persistent pain—see a dermatologist or your regular doctor. Acetone exposure and aggressive removal can sometimes lead to infections if the nail plate has been compromised. Professional medical assessment ensures you get proper treatment quickly.
Similarly, if your nails show severe damage like peeling that goes deeply into the nail plate, white spots that won’t grow out, or extreme brittleness, consult a dermatologist. They can assess whether the damage is permanent or if your nails will recover with proper care and time.
Final Thoughts

Breaking up with acetone doesn’t mean accepting a tedious removal process or compromising your nail health. You have multiple effective, gentler alternatives that work beautifully when you give them a chance. Whether you choose the vinegar-and-orange-juice solution, a nourishing oil soak, or the toothpaste-and-baking-soda method depends on your situation, timeline, and which ingredients you have on hand.
The most important thing is this: your nails are worth the extra few minutes of patience. Yes, acetone works faster. But it damages the very thing you’re trying to keep beautiful. Switching to gentler removal methods means your nails will gradually become stronger, more flexible, and more resilient. You’ll stop noticing white streaks, peeling, and brittleness. Over time, you’ll grow nails that are genuinely healthy—not just temporarily polished.
Start with whichever method appeals to you most, but commit to proper aftercare every single time. Use cuticle oil religiously, give your nails breaks between manicures, and notice how different your nails feel after just a few weeks of gentler treatment. Once you experience the difference, you’ll never want to go back to acetone again.
