

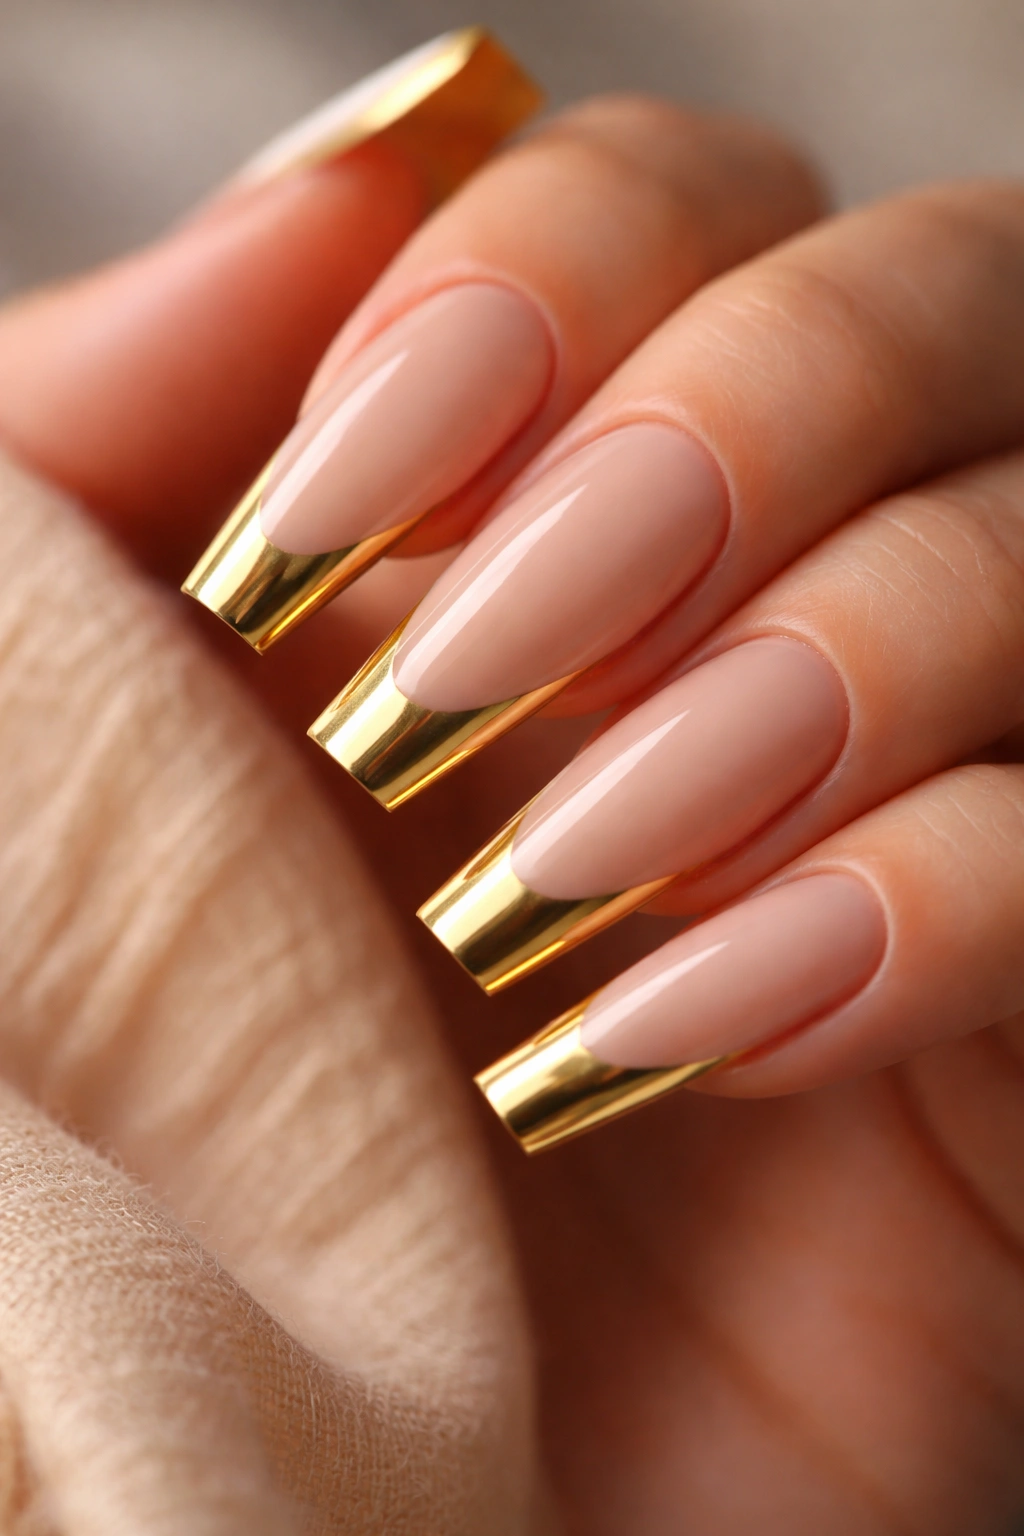
Warm-toned coffin nails have become a signature look that flatters virtually every skin tone while commanding attention with understated elegance. If you’ve been scrolling through nail inspiration and wondering how to achieve that perfectly polished aesthetic that photographs beautifully and lasts for weeks, you’re in the right place. Coffin nails—elongated with a squared-off, tapered tip—create the ideal canvas for warm color palettes, and when you work with rich bronzes, sophisticated taupes, cozy terracottas, and glowing golds, you’re tapping into one of the most versatile and sophisticated nail trends available.
The magic of warm-toned coffin nails lies in how they bridge the gap between dramatic and wearable. These aren’t nails that disappear into the background; they’re statement pieces that feel intentional and carefully considered. Whether you’re heading into the office, celebrating a special occasion, or simply want to feel more put-together on a random Tuesday, warm tones have a way of making you feel instantly more polished. Long coffin nails elongate the finger visually and create negative space that makes even solid colors feel more interesting than they would on shorter nail beds.
What makes warm tones particularly powerful is their undertone. Unlike cool colors that can sometimes feel clinical or stark, warm hues—those with orange, red, brown, or golden undertones—create a sense of richness and depth. They complement both warm and cool skin tones beautifully, which is why you see them repeatedly across luxury beauty and high-end nail design. The coffin shape amplifies this effect by creating a sophisticated silhouette that feels both modern and timeless.
Understanding Warm Tones and Why They Work for Coffin Nails
Warm tones aren’t just about color preference—they’re about how light reflects off your nails and interacts with your skin. Warm undertones contain more red, orange, yellow, or brown pigment, which creates a naturally harmonious relationship with human skin regardless of whether your undertones are warm, cool, or neutral. This is why warm-toned nails feel universally flattering in a way that some color families don’t quite achieve.
The coffin shape specifically benefits from warm tones because of how the silhouette catches light. The tapered sides and squared-off tip create subtle shadow lines that make depth appear more pronounced. When those shadows play against a warm-toned base, the dimensional effect is amplified. A dusty rose might look flat on a rounded nail, but the same shade on a coffin nail develops complexity—the tip glows, the sides create subtle contour, and the overall effect feels expensive and intentional.
Warm tones also photograph exceptionally well. If you’re someone who documents your nails, warm palettes read more richly in photos than cool tones. The light-to-dark variations within warm color families translate beautifully to camera, which is why warm-toned nails dominate luxury nail accounts. There’s a quality of permanence about them—they feel like they won’t trend out next season because they’re rooted in warm metallics and natural pigments that humans have valued for centuries.
The Coffin Nail Shape: Why Length Matters
The coffin shape requires length to work properly. Short coffin nails can feel stubby because the defining characteristic of the style—that dramatic taper—doesn’t have enough distance to create its signature visual impact. Long coffin nails, generally ranging from one to two inches beyond your fingertip, allow the shape to breathe and create the elegant silhouette the style is known for.
Length also changes how color reads on the nail. A warm terracotta on a very long coffin nail takes on a different presence than the same shade on a shorter nail. The extra surface area allows you to appreciate the color’s depth and richness without it feeling overwhelming. This is especially important with warmer tones, which can read as bold or statement-making on shorter nails but feel sophisticated and refined at length.
The commitment to length is real, though. Long coffin nails require consistent maintenance, careful activity modification, and an honest assessment of your lifestyle. If you’re someone who uses your hands constantly—typing, playing instruments, doing physical work—extremely long nails might not be practical. But if you can accommodate them, the payoff in terms of visual impact and design possibilities is substantial. Warm tones at length create an aura of intentionality that shorter nails struggle to achieve, no matter how stunning the color.
Choosing Warm Tones Based on Your Skin Undertone
While warm tones work across all skin undertones, certain specific shades will make your nails feel even more like an extension of your natural coloring. If you have warm undertones in your skin—golden, peachy, or olive—you’ll find that warm-toned nails with more orange or golden pigment feel most harmonious. These create a cohesive, unified appearance where your hands look like they naturally belong to your face.
Cool or neutral undertones actually benefit from a slightly different approach. Instead of leaning heavily into golden or orange-based warm tones, try cooler warm tones—think dusty rose, mauve, brownish-taupe, or muted bronze. These have warm undertones without the intensity of pure gold or orange, creating a sophisticated balance that feels refined rather than matchy.
The undertone conversation matters because it’s the difference between nails that feel like they enhance your natural coloring and nails that feel like they’re fighting against it. A true golden yellow might be technically a warm tone, but if your skin has cool undertones, that same shade might read as slightly wrong in a way you can’t quite articulate. By understanding your own undertone and then selecting warm shades that harmonize with it, you’re creating nails that feel like the best possible version of yourself.
Application Techniques for Long Coffin Nails
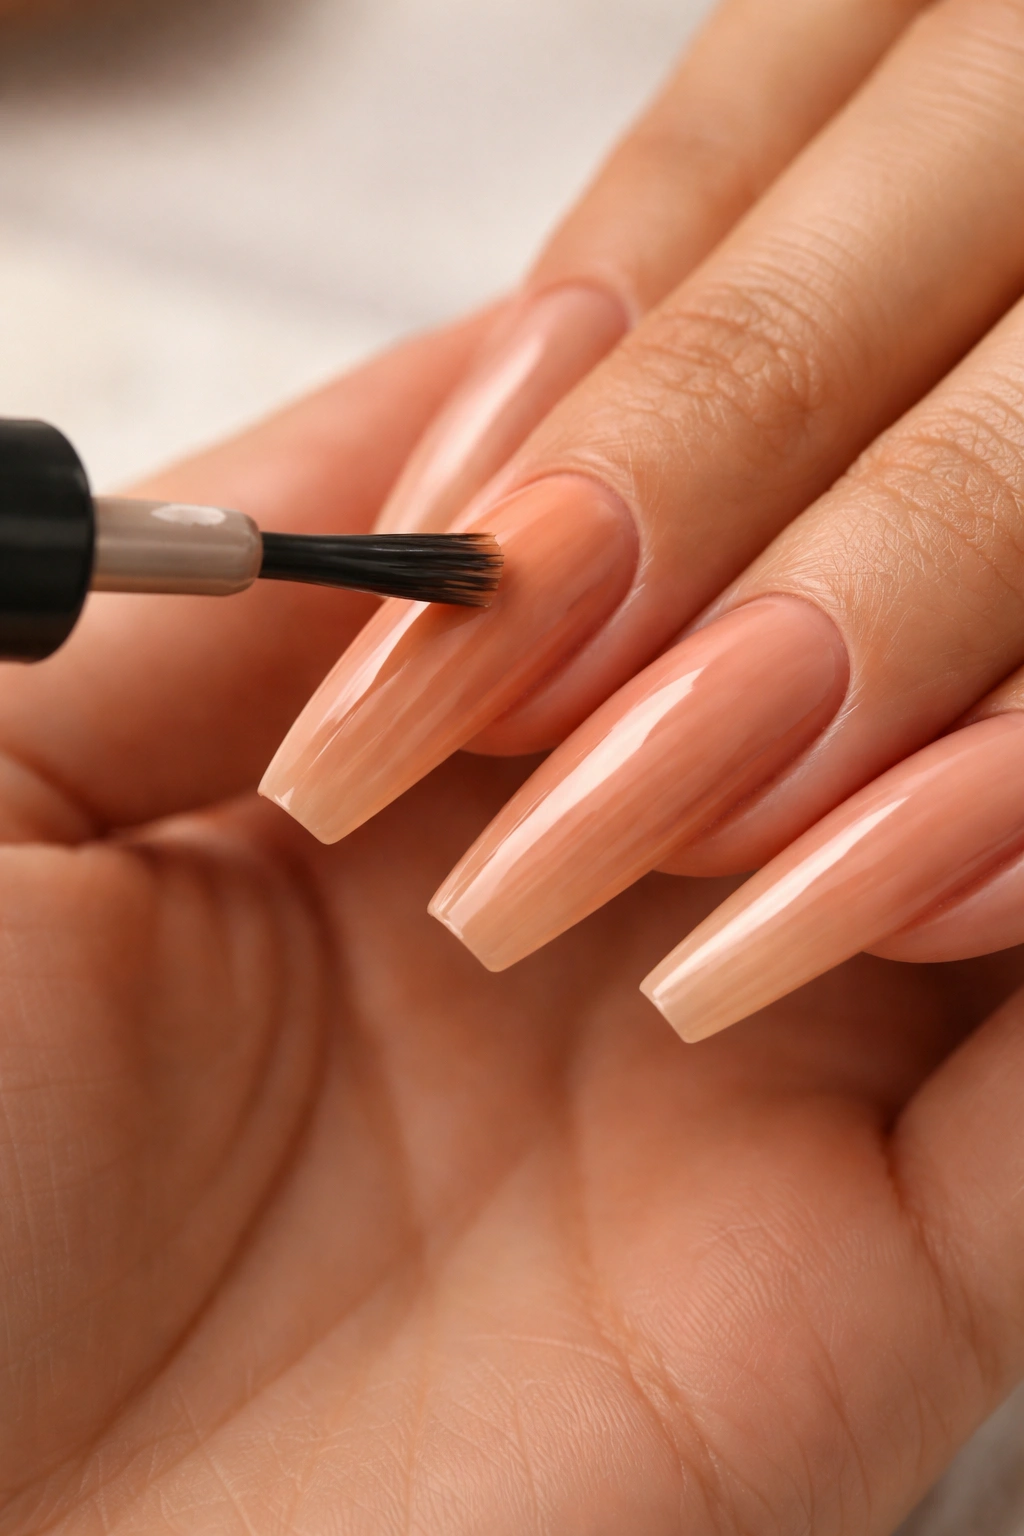
Getting warm-toned coffin nails to look salon-quality at home requires understanding the specific challenges of longer nail beds. The first consideration is structural integrity. Long nails require a solid base to prevent cracking or breaking, which means starting with a strengthening base coat and ensuring each subsequent layer is thin enough to cure properly but thick enough to provide coverage.
For solid warm tones, the key is applying thin coats rather than one thick coat. This prevents bubbling, ensures even color, and reduces the likelihood of polish cracking or peeling around the edges. Most warm tones—particularly the deeper, richer shades—benefit from two thin coats rather than one heavy application. Allow complete drying time between coats, even if the bottle says it’s quick-dry. Rushing this step is the primary reason at-home manicures look less polished than salon versions.
The brush technique matters significantly with longer nails. Your hand position needs to be stable, which often means bracing your working hand against something steady. Work from the center of the nail outward toward the edges, using the brush to create a thin, even stripe down the middle first, then filling in the sides. For coffin nails specifically, pay attention to the tip—it’s where the shape becomes most pronounced, and uneven polish application here is more visually obvious than on other nail shapes. The squared-off tip should have a clean line where the nail ends, with no polish extending onto your skin.
Color Dimensions and Finishes That Elevate Warm Tones
Warm tones don’t have to mean flat, matte color. The finish you choose dramatically changes how the color reads and how sophisticated your nails feel. A matte warm tone creates a velvety, soft appearance that feels modern and slightly edgy. The same shade in a cream finish (glossy but opaque) reads more traditional and polished. A shimmer or metallic finish in warm tones creates sparkle and movement that catches light throughout the day.
Jelly finishes—semi-transparent warm tones—have become incredibly popular because they create dimension without requiring multiple colors. A jelly terracotta over a nude base looks different than a solid terracotta, with a glowing quality that feels fresh and contemporary. For long coffin nails, jelly finishes are particularly effective because the length allows the transparency to create depth that might be lost on shorter nails.
Chrome and metallic finishes in warm tones create maximum impact. A warm bronze chrome on a long coffin nail is undeniably eye-catching. These finishes require special powder or a chrome application technique, so they’re typically salon applications, but the result is nails that look sculptural and architectural. If you’re opting for a more dramatic warm-toned statement, metallics are your answer.
1. Burnt Sienna with Copper Leaf Accent
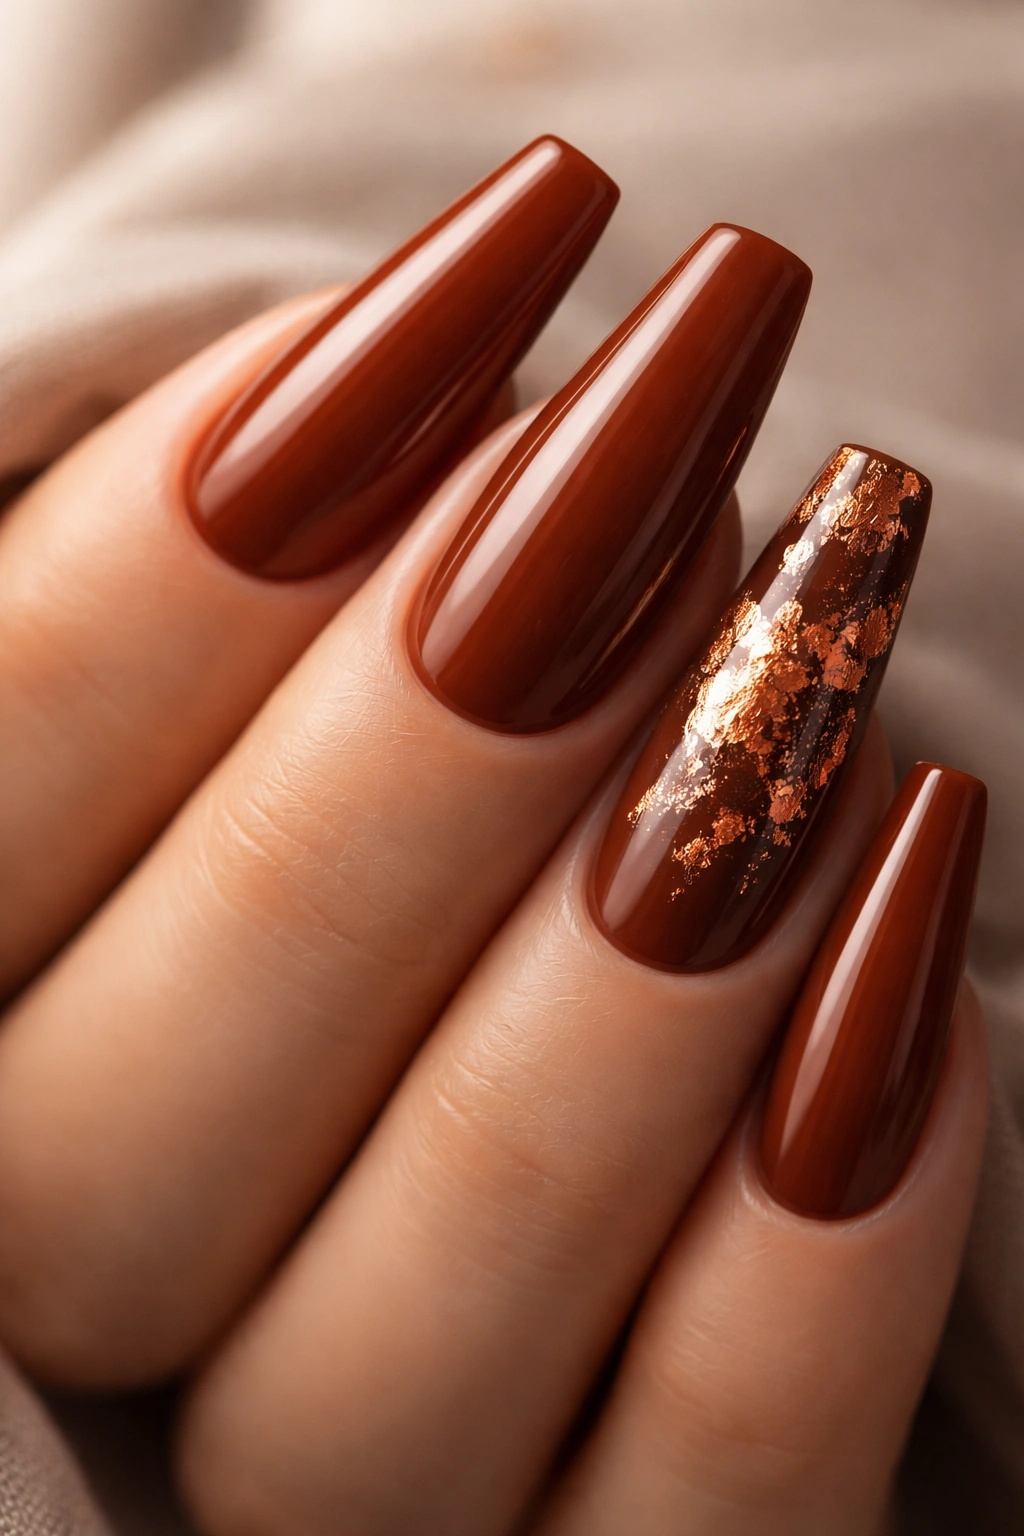
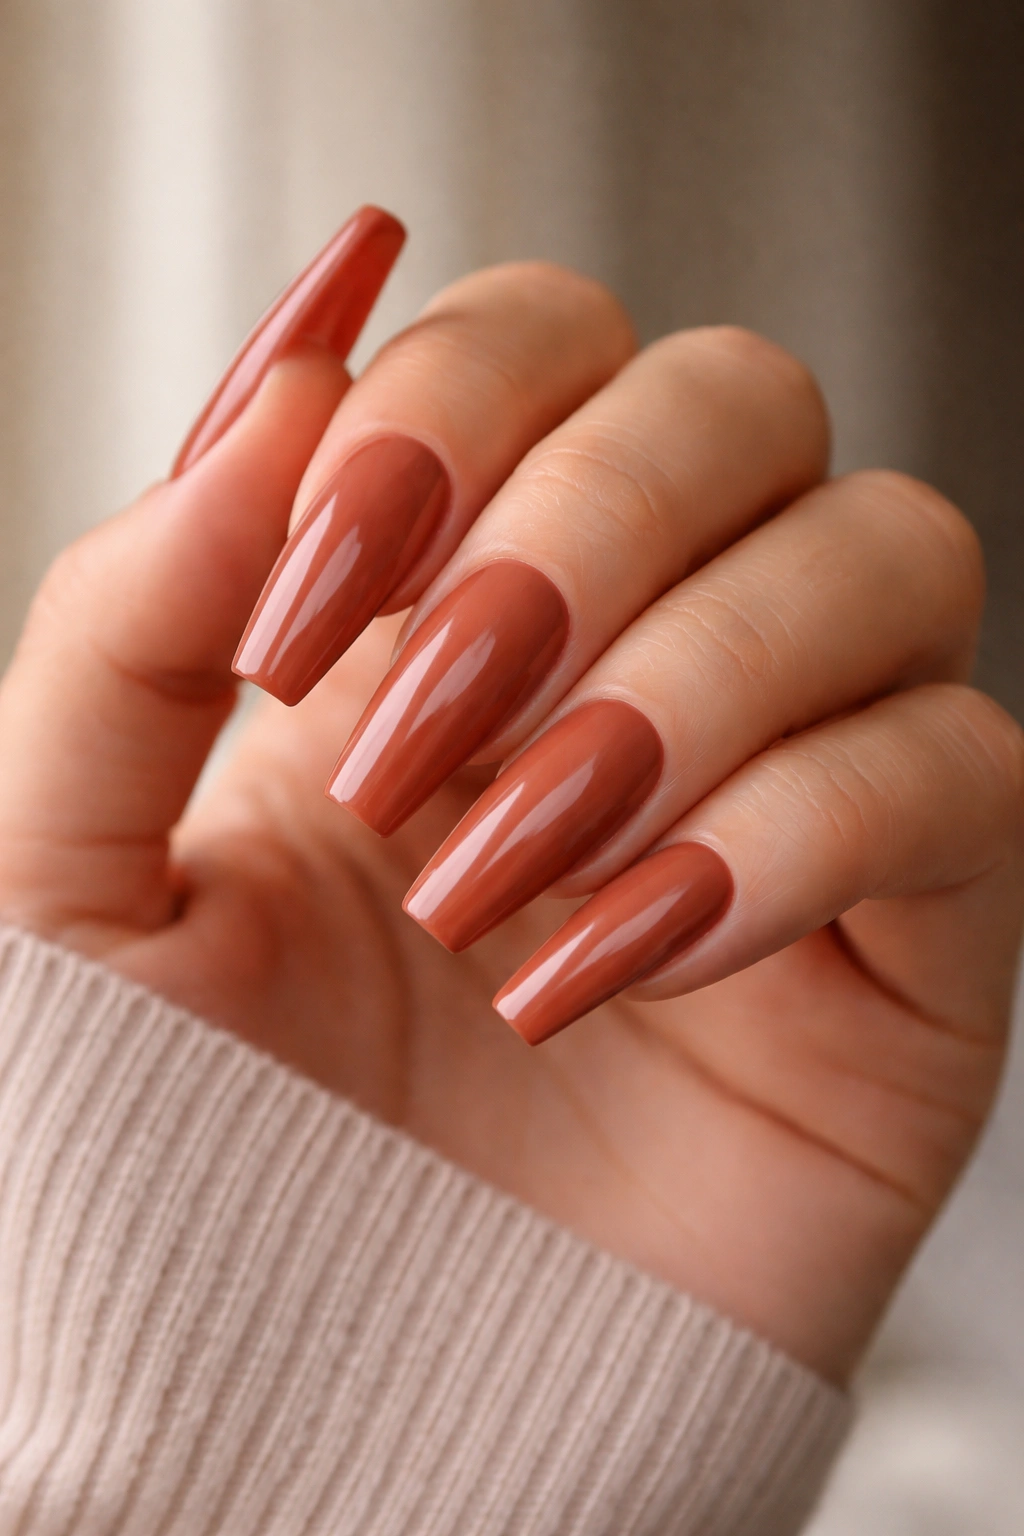
Burnt sienna coffin nails capture the essence of autumn and warm earth tones without feeling seasonal or gimmicky. This deep, rusty-brown shade sits at the intersection of red and orange, creating a naturally sophisticated appearance that complements warm skin undertones beautifully while remaining universally flattering. The depth of burnt sienna is what makes it work on longer nails—it’s dark enough to feel intentional and refined without reading as heavy or severe.
Why This Shade Commands Attention
Burnt sienna has historical weight behind it as a pigment. It’s been used in fine art for centuries, which gives it an inherent sense of sophistication that more modern color inventions don’t quite achieve. When you wear burnt sienna nails, you’re tapping into something timeless. On long coffin nails, this becomes even more pronounced—the length allows the color’s depth to fully register, and the tapered shape creates subtle shadow lines that make the color feel dimensional rather than flat.
Application and Enhancement Details
- A true burnt sienna should have minimal shimmer in the base color—this keeps it feeling earthy and refined
- Copper leaf accents placed on one or two accent nails add visual interest without overwhelming the design
- The leaf placement works best on the middle finger or pinky, creating an intentional accent rather than appearing scattered
- Two thin coats of burnt sienna creates the ideal opacity; three coats can make it look slightly muddy
- The copper leaf catches light throughout the day, creating movement that plain color can’t achieve
Pro tip: Seal your copper leaf accents with a glossy top coat rather than matte, even if your base is matte—this allows the metallic to pop while maintaining the matte aesthetic on the rest of the nail.
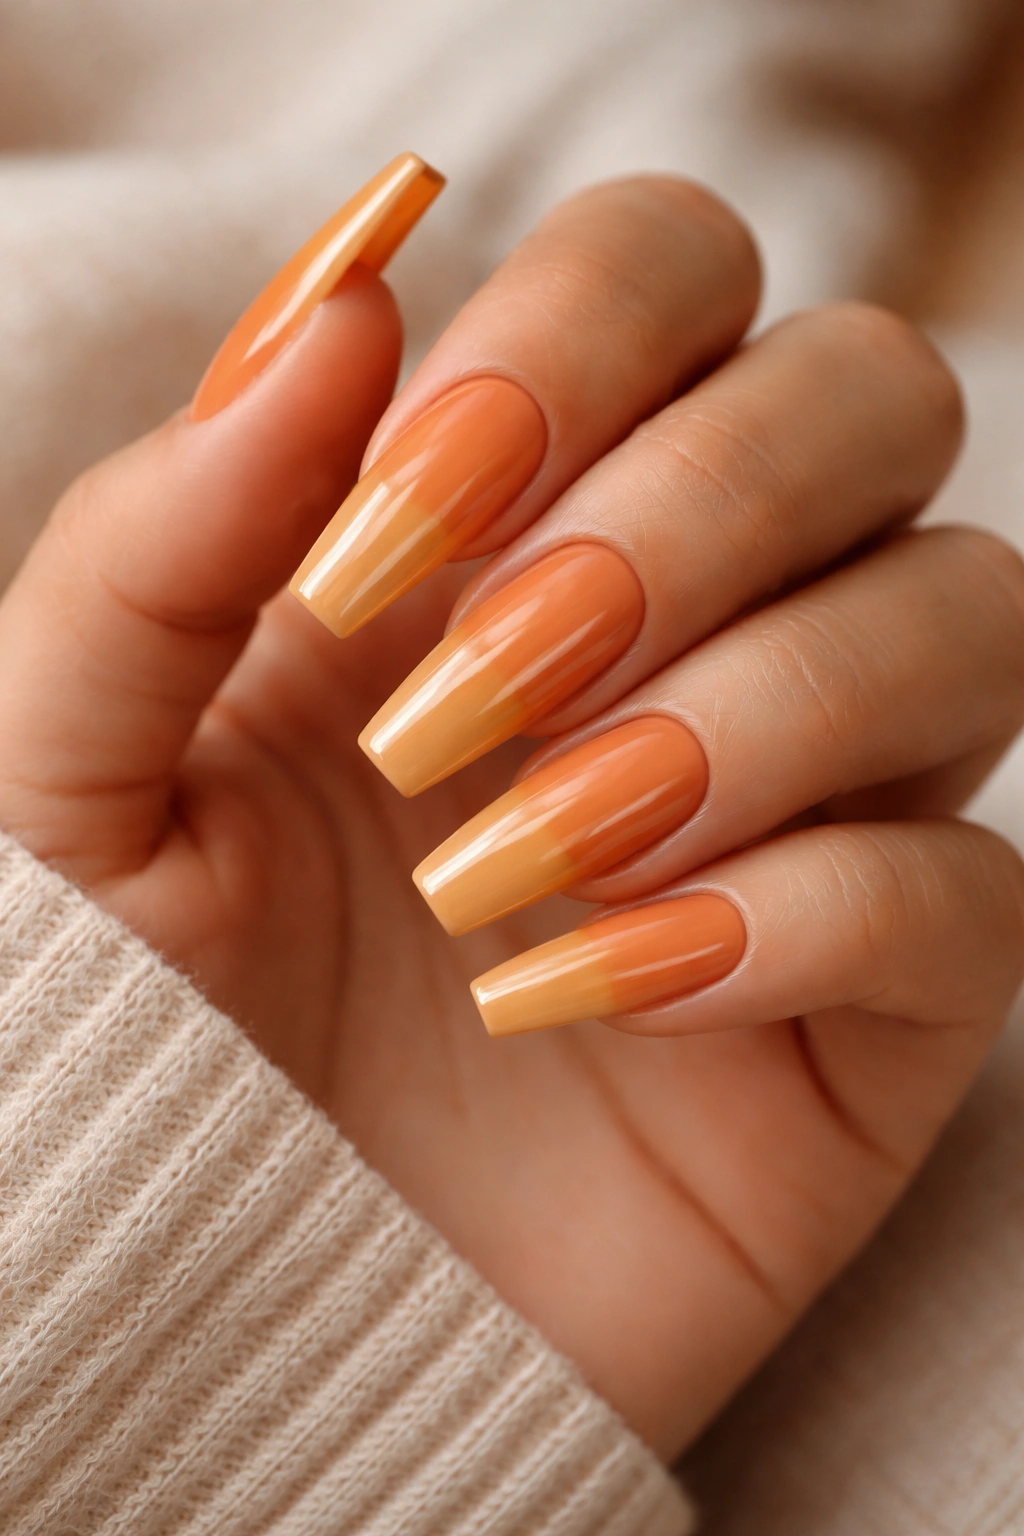
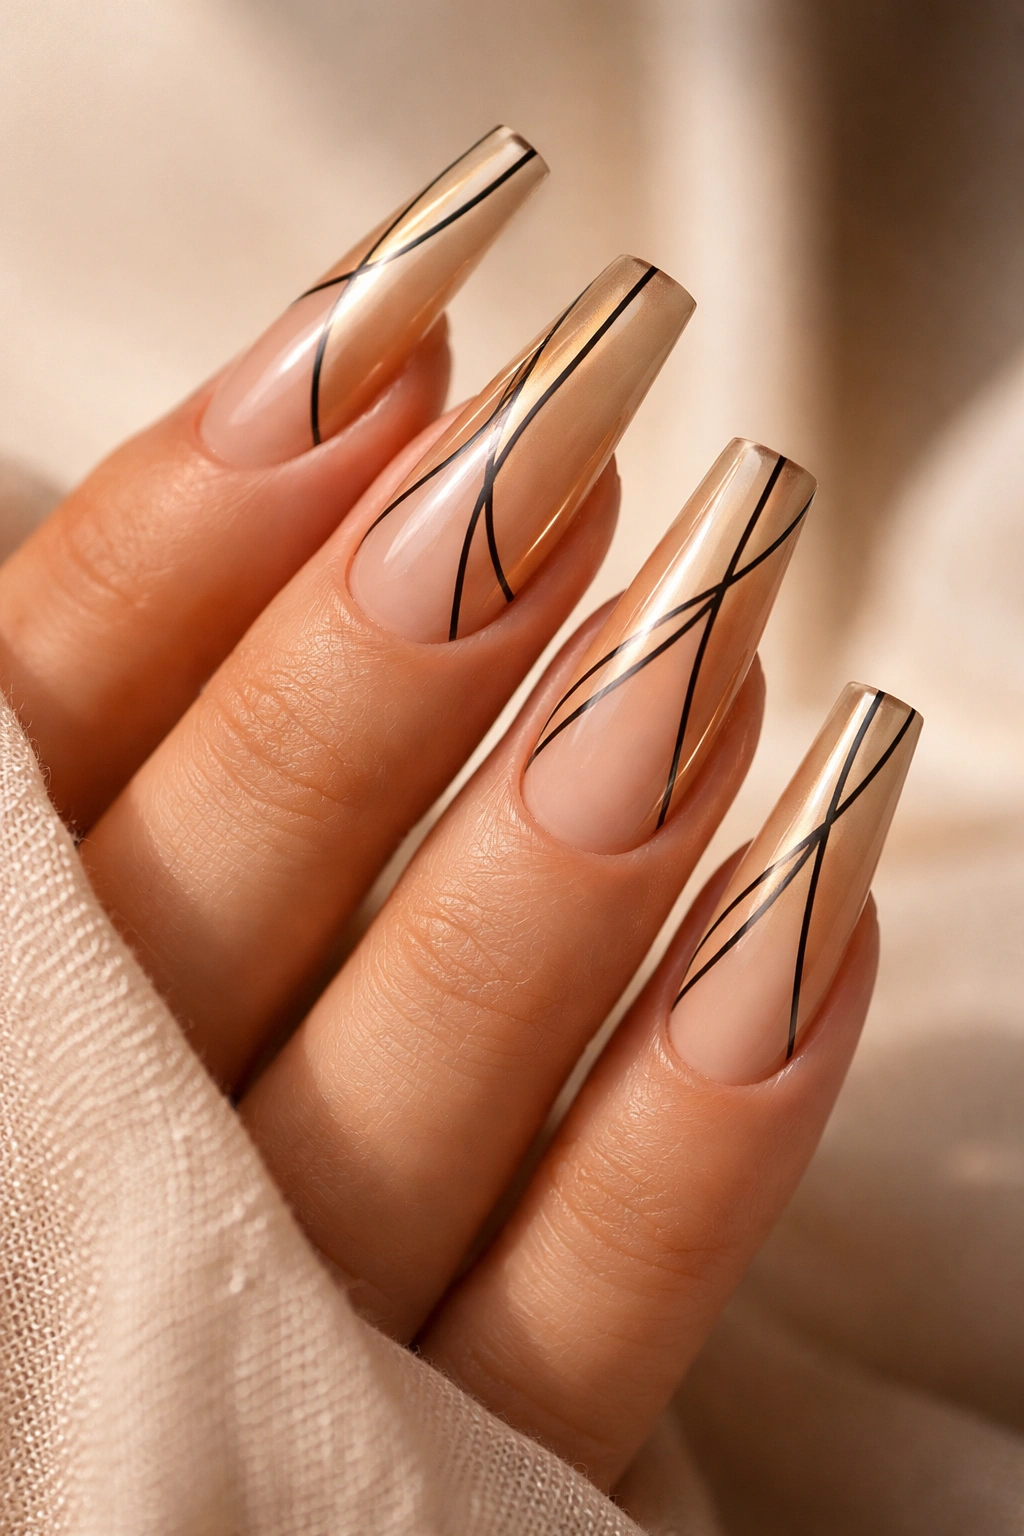
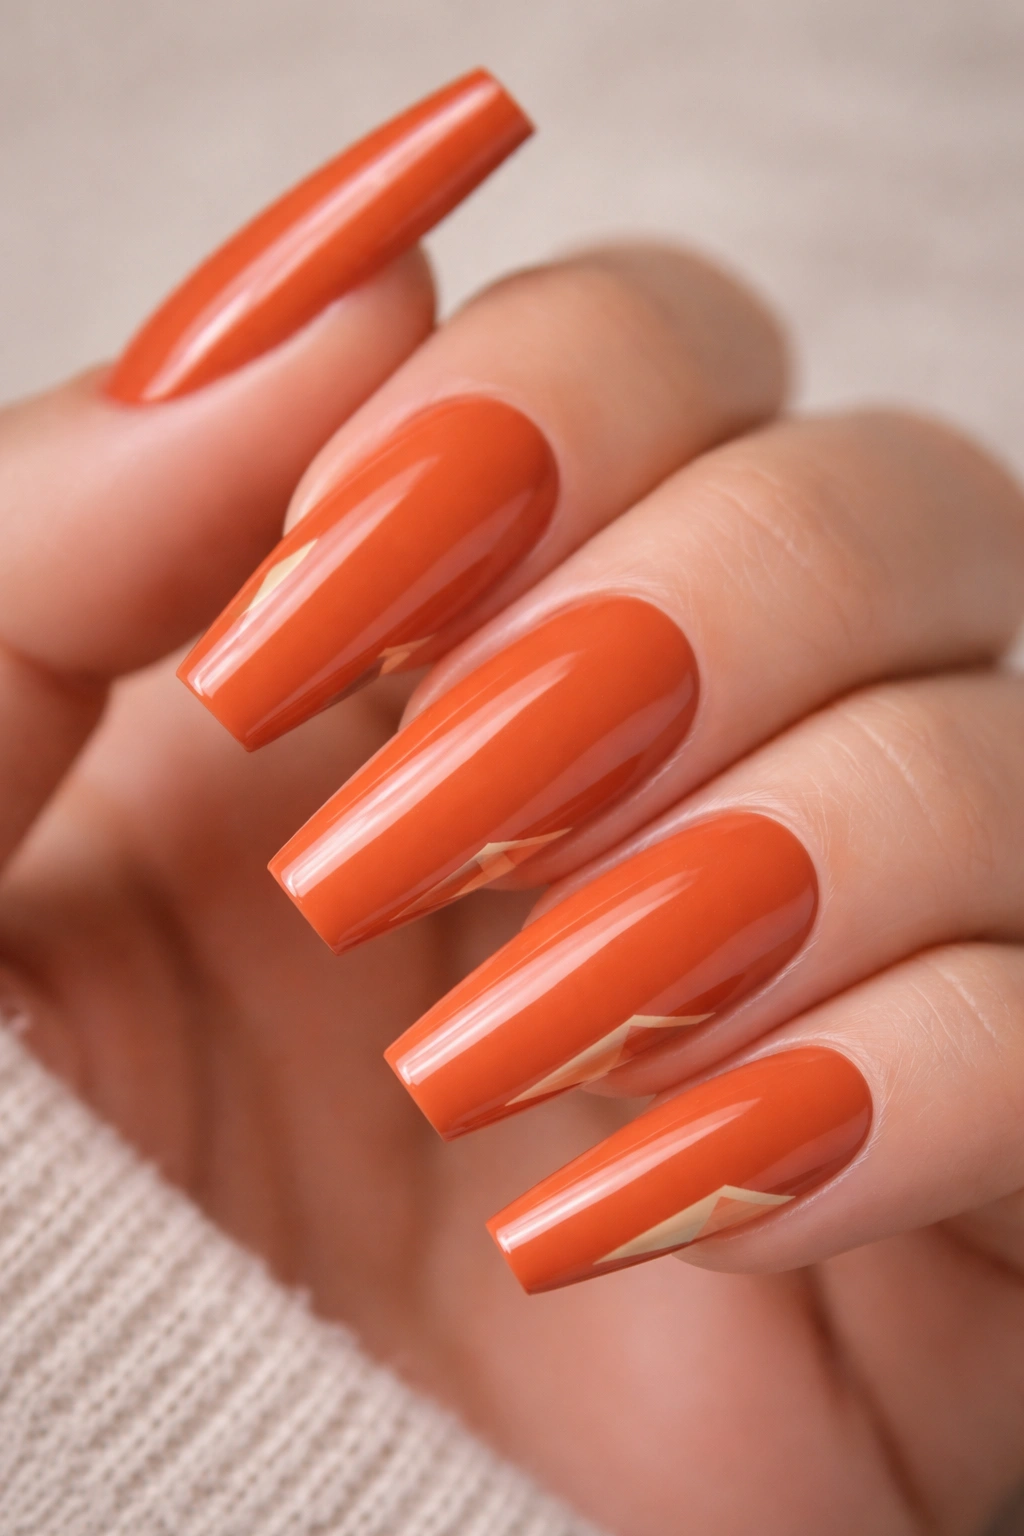
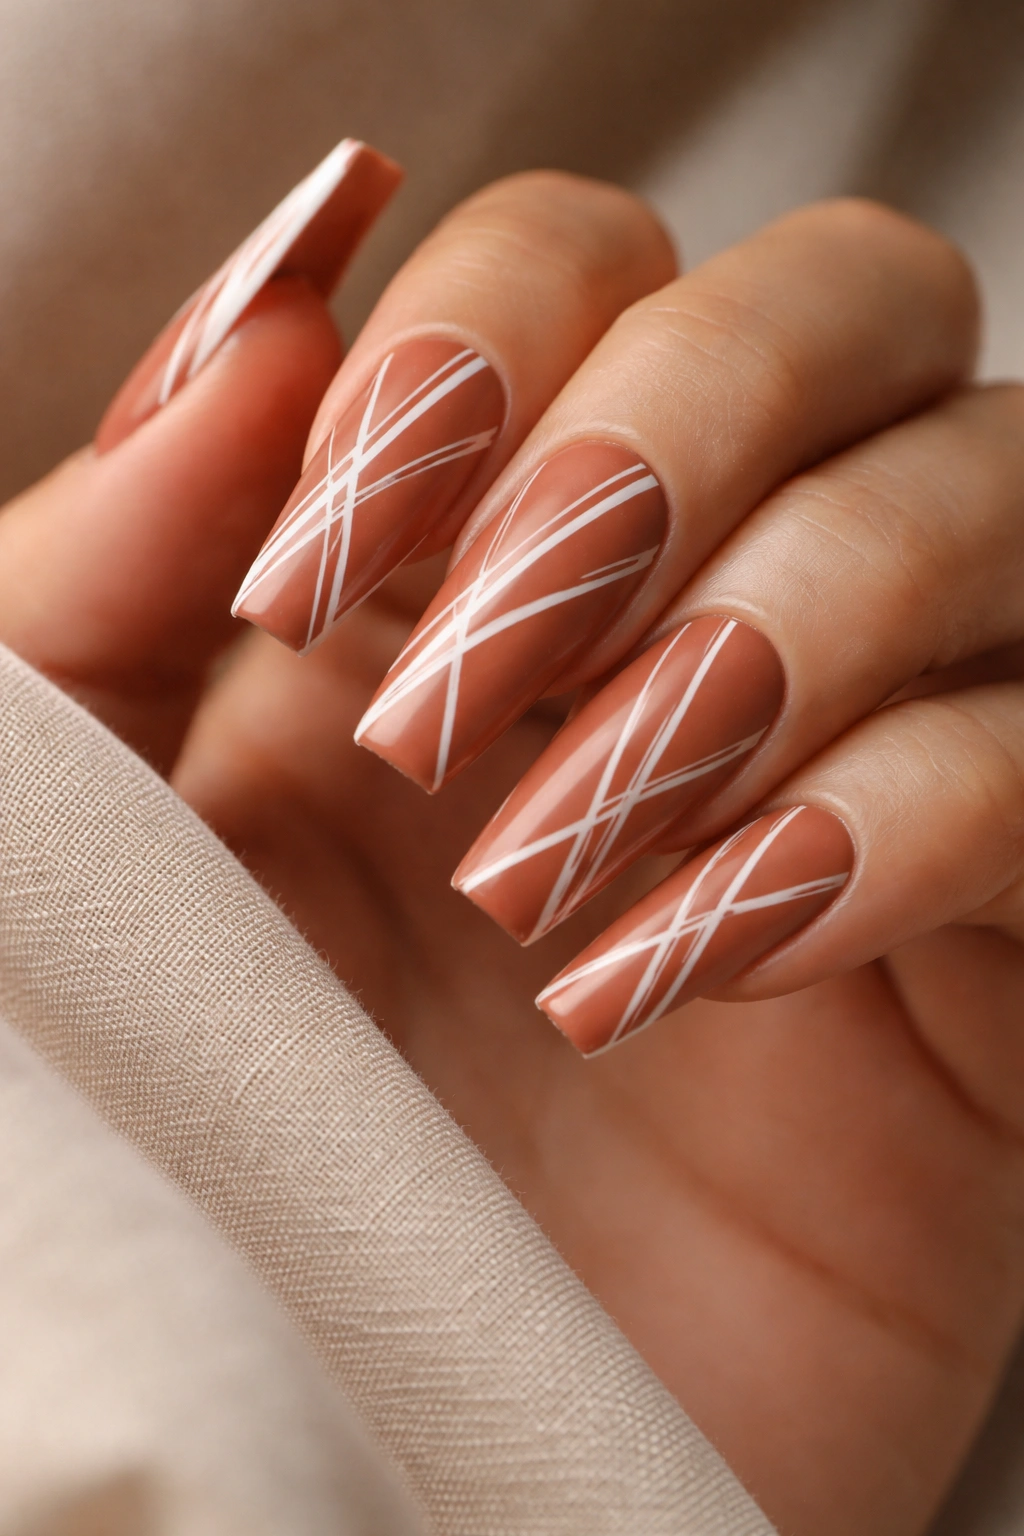
2. Terracotta Orange with Gold Geometric Lines
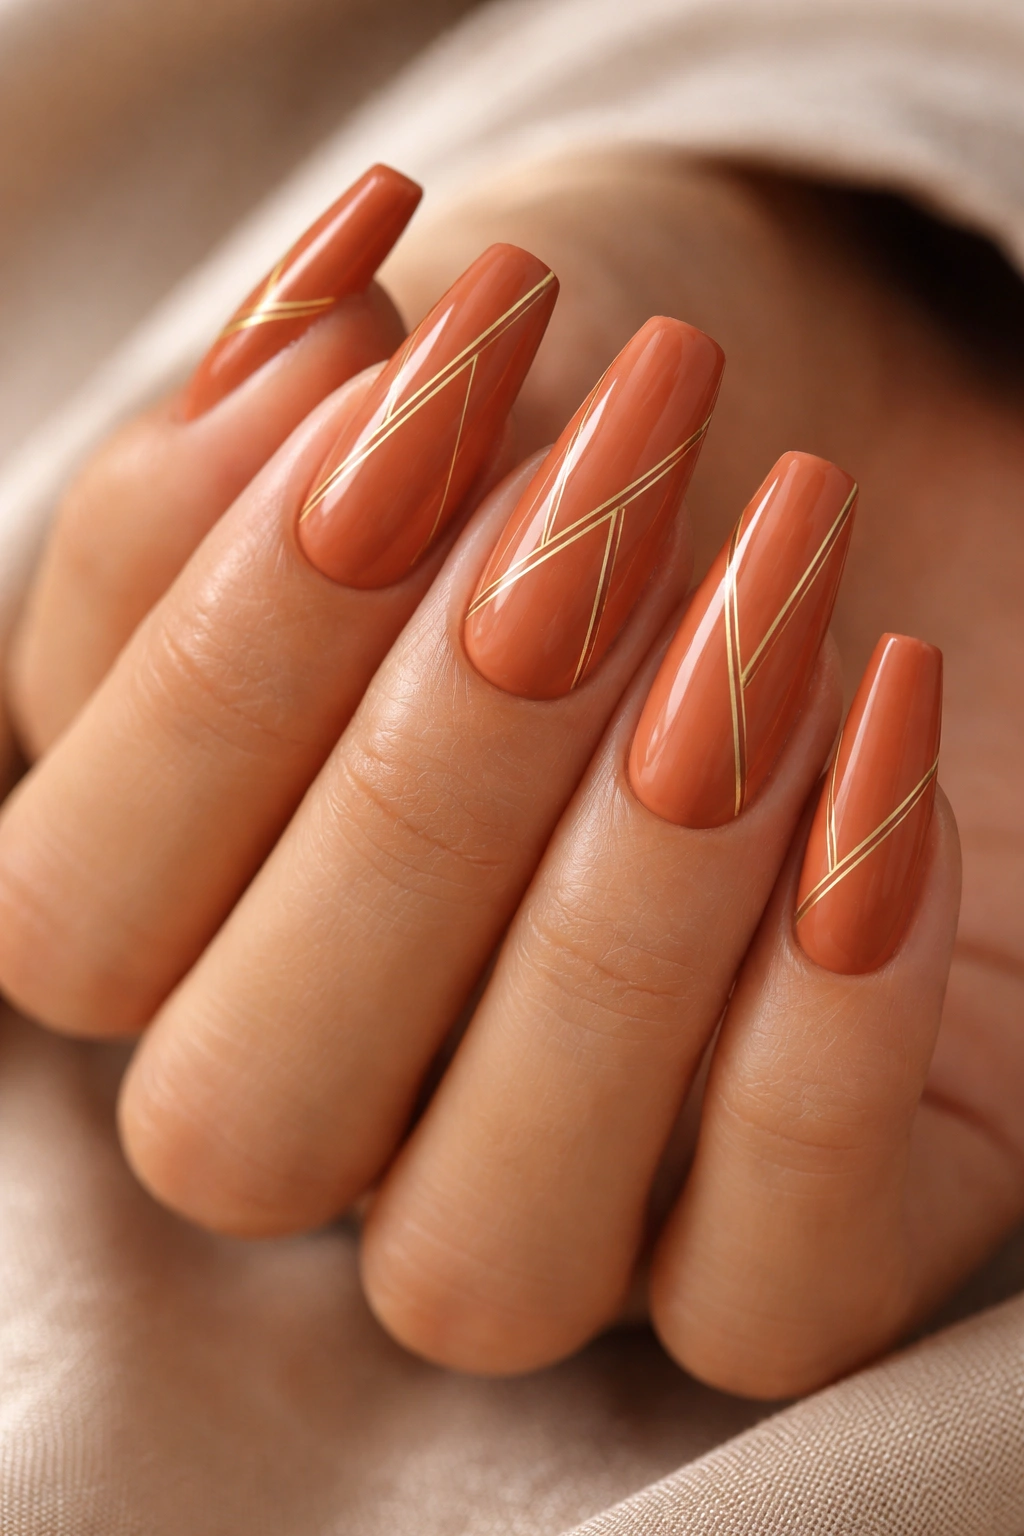
Terracotta is warm without being bright, making it one of the most wearable warm tones for everyday use. This clay-inspired orange-brown creates an earthy, intentional appearance that feels current without trending. On long coffin nails, terracotta reads as sophisticated rather than loud because the length gives the color space to breathe and the warm undertone naturally harmonizes with skin.
The Power of Geometric Accents on Length
Gold geometric lines on terracotta create structured sophistication. The lines work best when they’re thin and intentional—a single gold line down the center of the nail, parallel lines on either side, or angular lines that follow the coffin shape’s natural architecture. Geometric designs leverage the coffin nail’s clean lines and structured silhouette, creating a cohesive visual story where the polish and the shape work together.
Detailed Design Specifications
- Terracotta base requires a cream finish (glossy opaque) to allow gold lines to stand out clearly
- Gold geometric lines are easiest to execute with a thin nail art brush or a striping brush with steady hand support
- Single-accent nails (applying geometry to just the ring finger, for example) create polish without looking overdone
- The contrast between terracotta and gold is strong enough that imperfect lines still read as intentional rather than sloppy
- Matte top coats over geometric designs can make the lines appear less sharp; use glossy to maintain definition
Worth knowing: If you’re not confident with freehand line work, nail art tape can help you create perfectly straight lines while maintaining a hand-painted aesthetic.
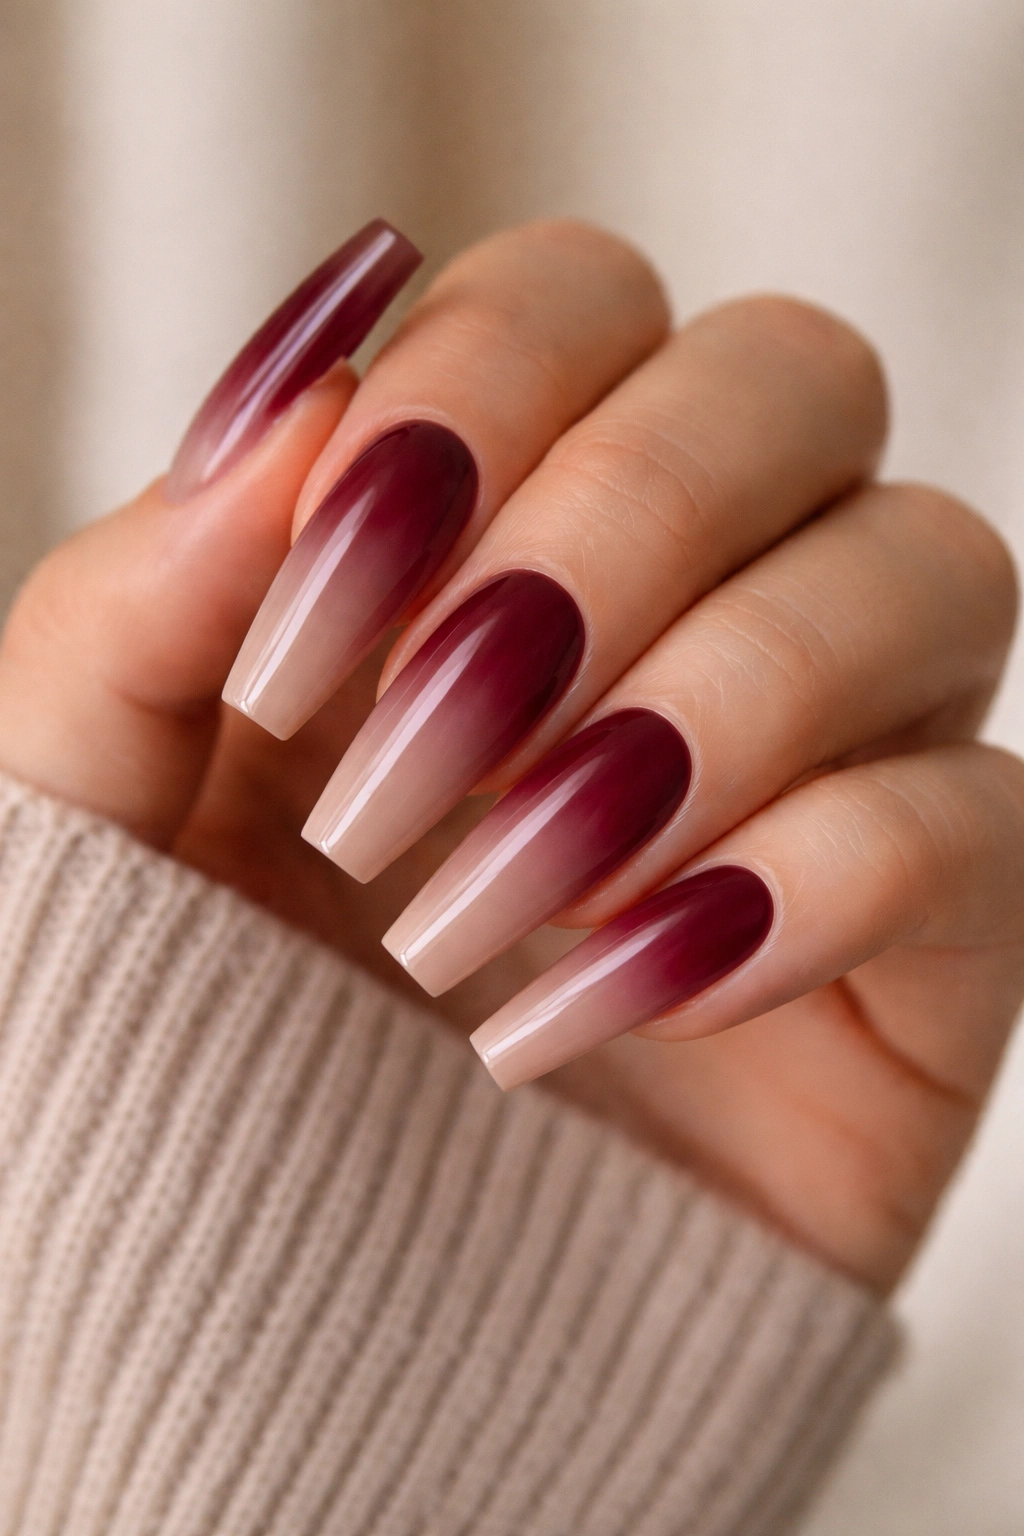
3. Warm Taupe with Burgundy Ombre Gradient
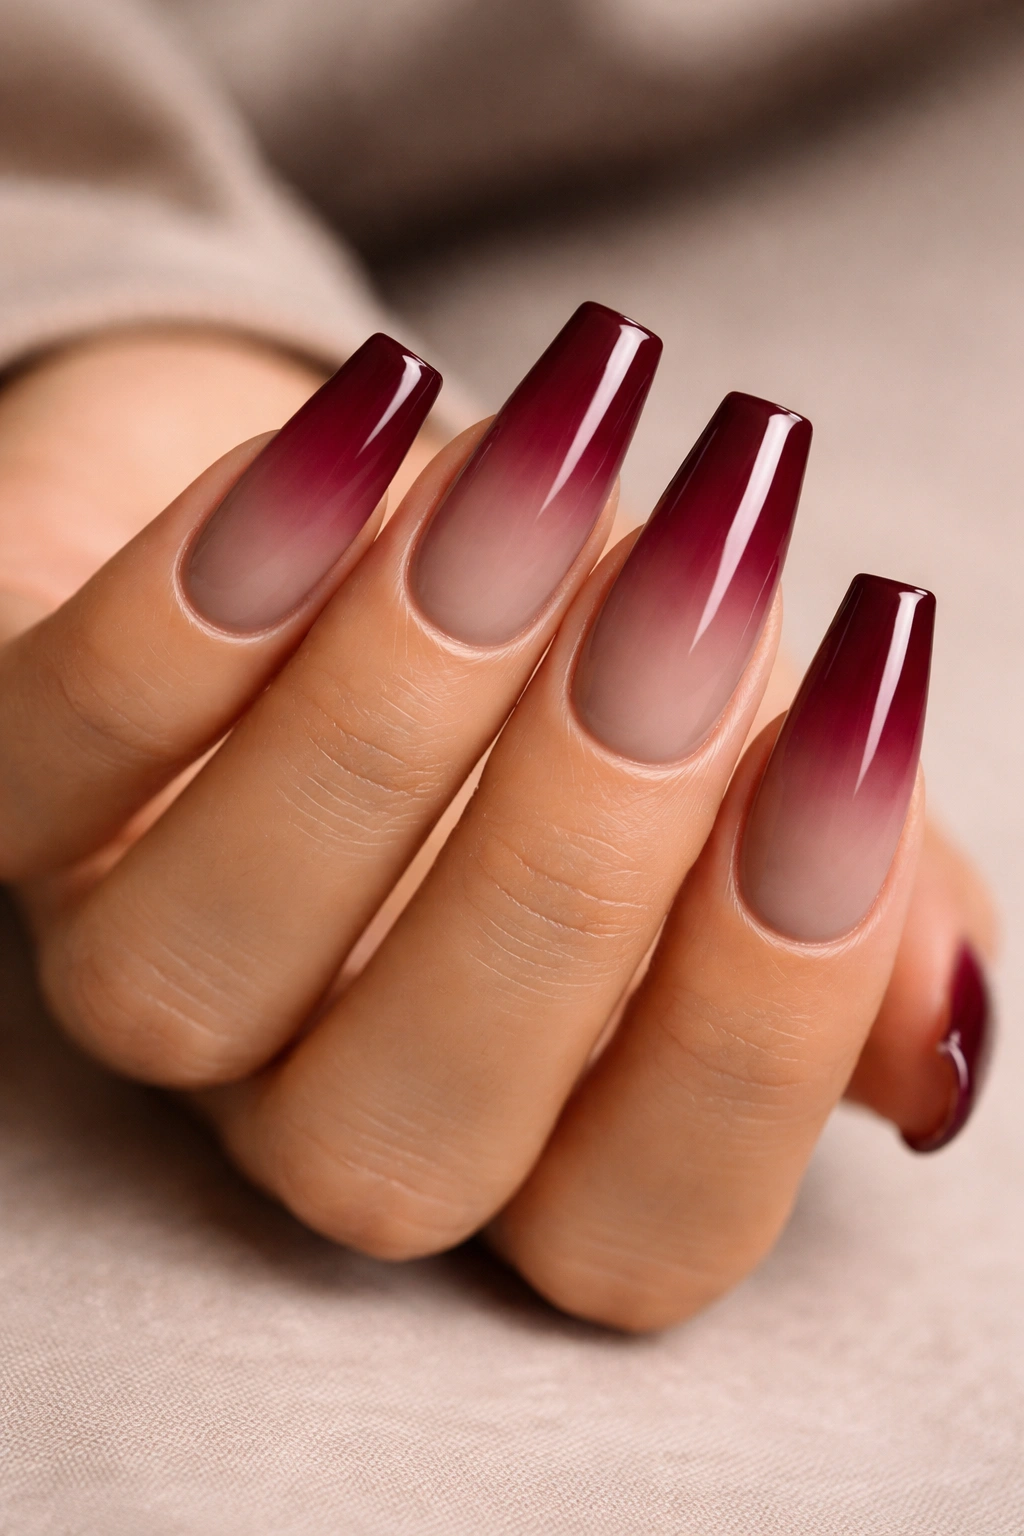
Taupe walks a fascinating line—it’s warm but muted, sophisticated but not assertive. Warm taupe (with brown and golden undertones rather than gray undertones) on long coffin nails creates an elegantly neutral base. Introducing a burgundy ombre gradient that deepens from the cuticle to the tip transforms simple taupe into something with movement and dimension.
Why Gradient Design Works on Coffin Nails
The tapered shape of coffin nails creates natural pathways for gradient effects. The color transition appears more intentional on a shape with defined edges than it would on rounded nails, where the gradient might feel amorphous. The ombre technique—where one color gradually transitions to another—capitalizes on the coffin shape’s architectural quality.
Execution and Finish Considerations
- Start with warm taupe as your base color, requiring two coats for full coverage
- Create the ombre using a sponge or stippling technique with burgundy on the tip area
- The gradient zone should span roughly the last third to half of the nail, creating a clear transition rather than a harsh line
- Seal with a glossy top coat to allow the colors to read their truest—matte finishes can make gradients appear less vibrant
- This design works beautifully with natural light and photographs exceptionally well
Quick fact: Gradient designs actually hide imperfections better than solid colors because the color transition creates visual distraction, making slight unevenness less noticeable.
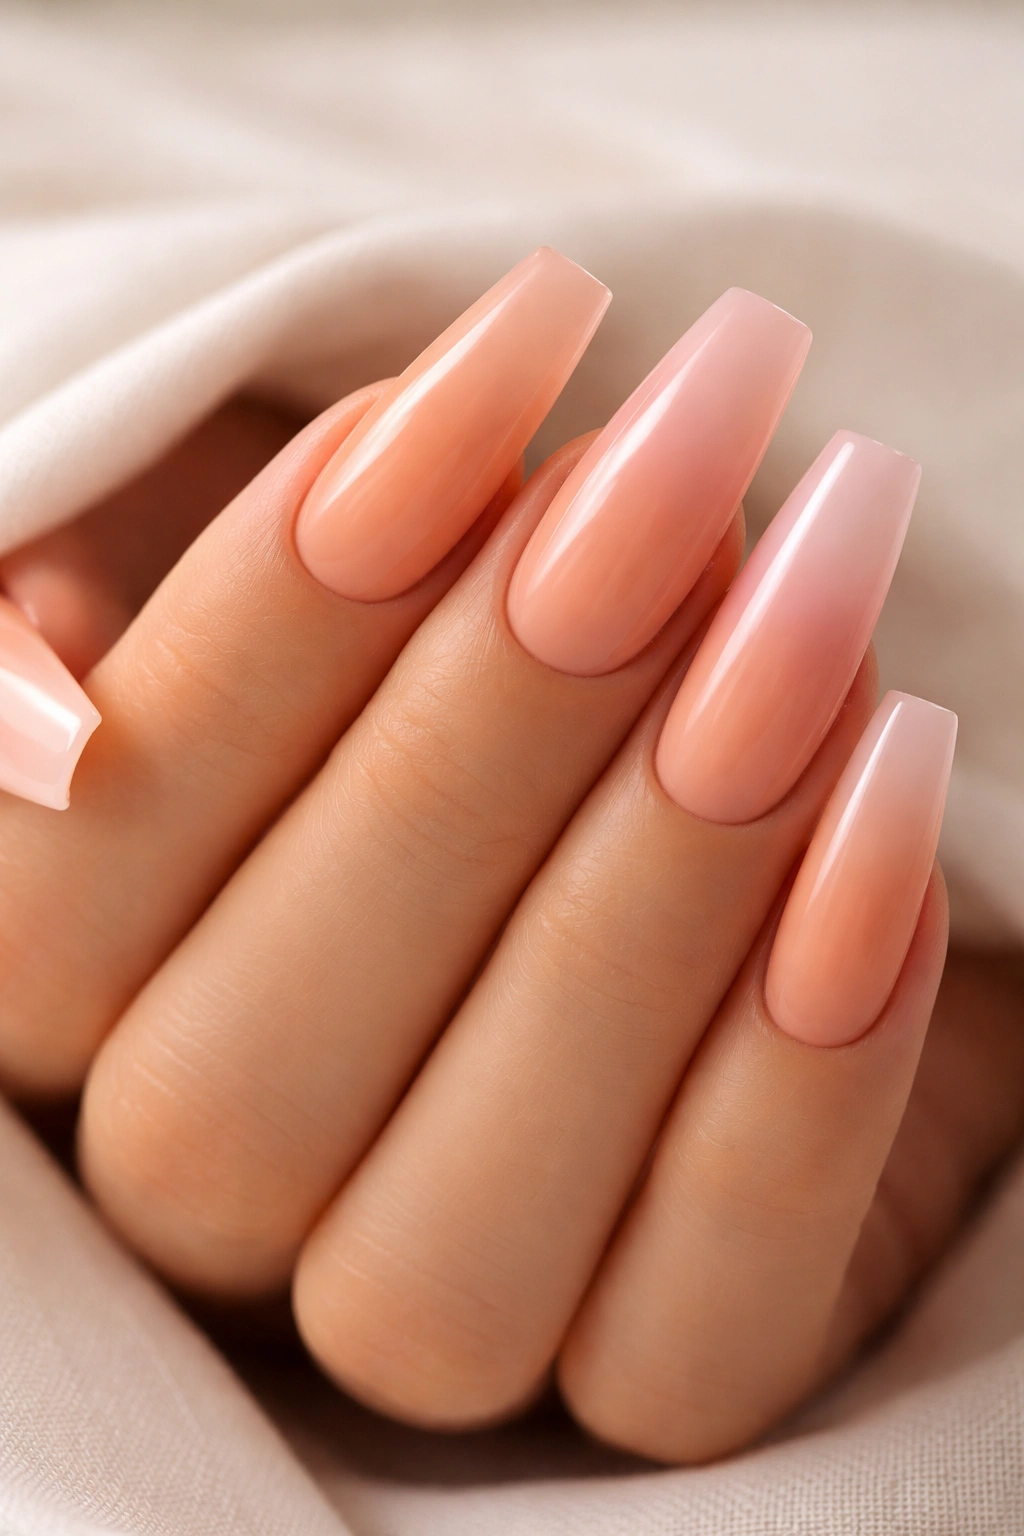
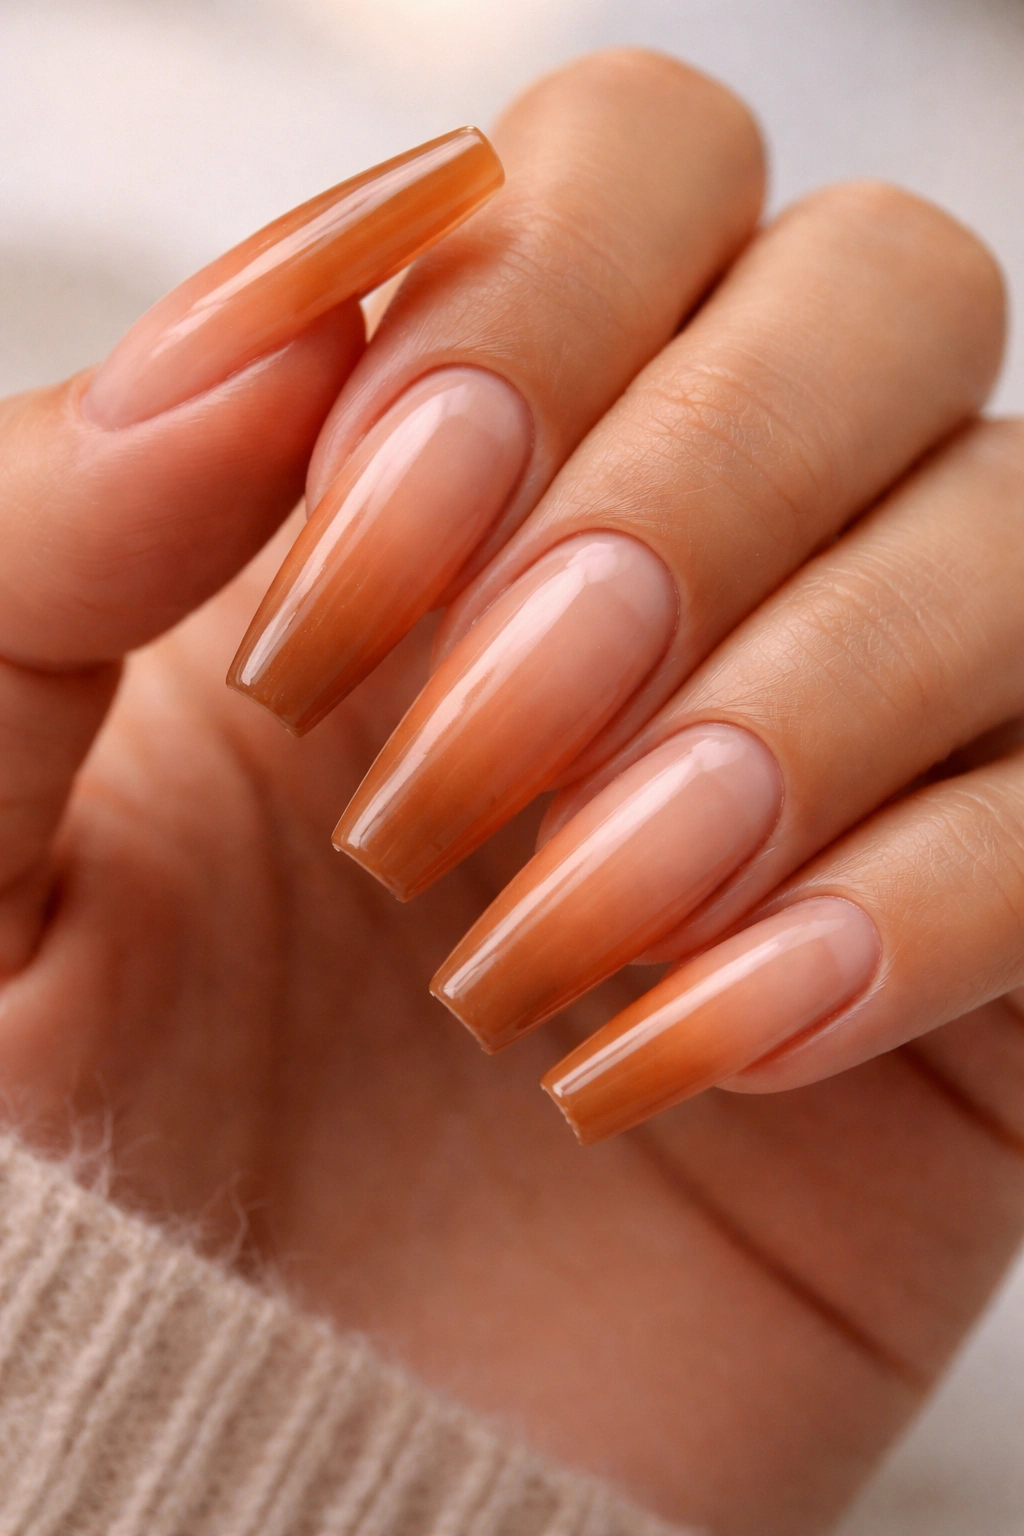
4. Peachy Nude with Rose Gold Foil Flecks
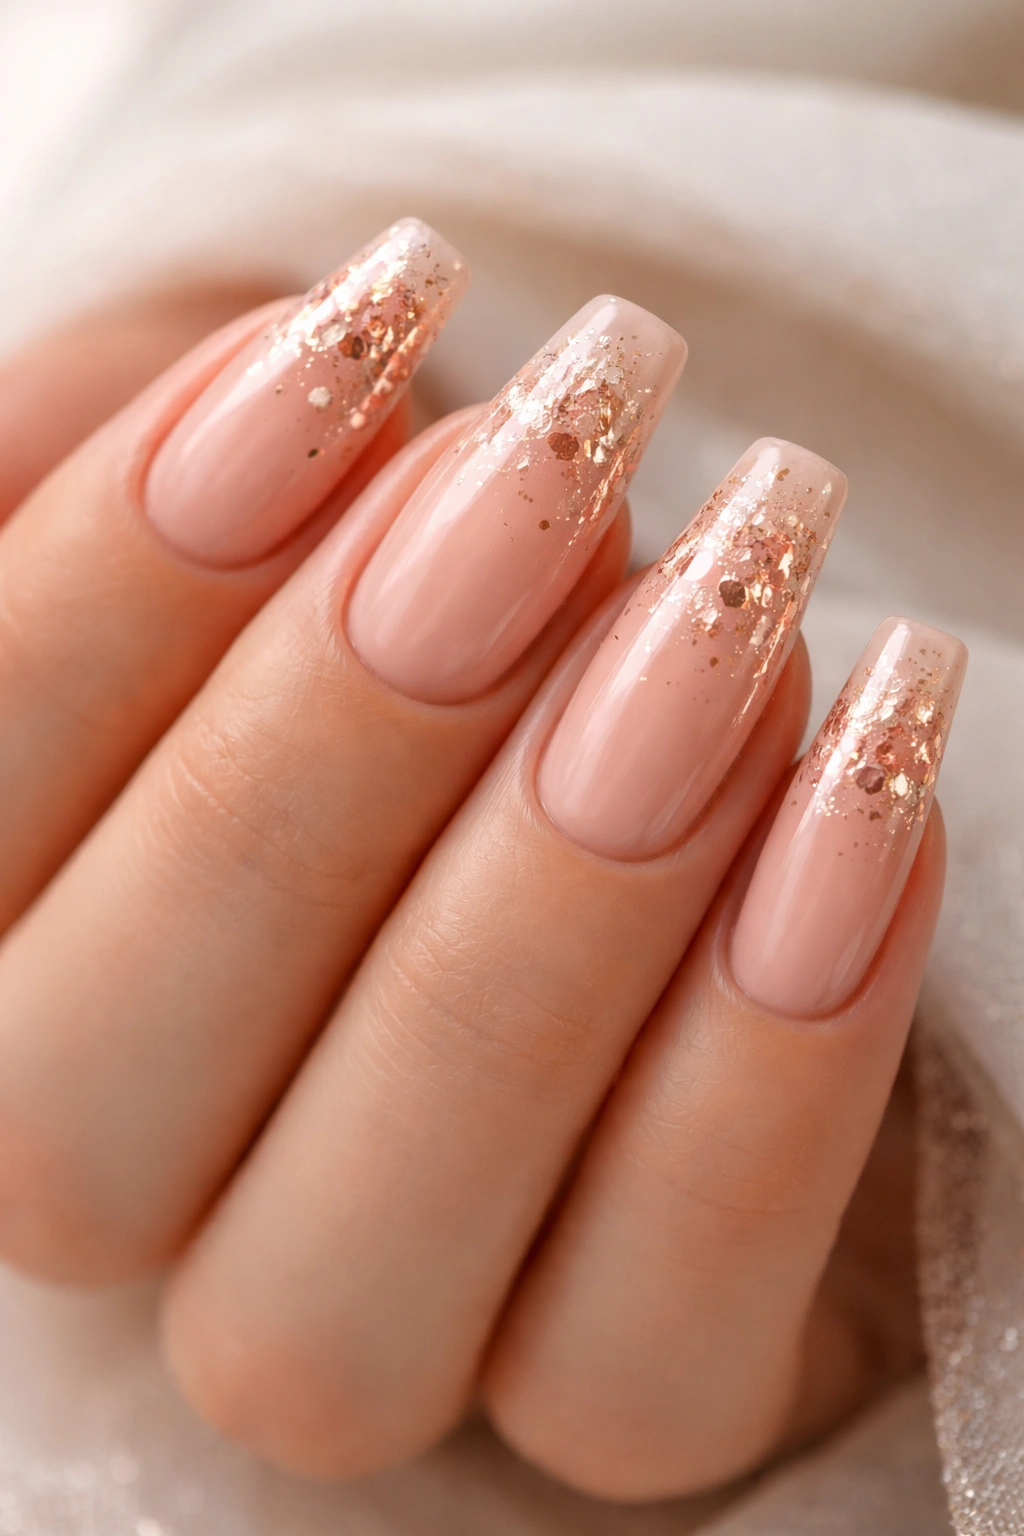
Peachy nude occupies the sweet spot between nude and warm color—it’s barely-there while still reading as intentional. On long coffin nails, peachy nude creates an elongating effect because it doesn’t create harsh contrast with your skin. Scattered rose gold foil flecks add just enough visual interest to prevent the design from feeling empty while maintaining the sophisticated minimalism that makes peachy nude so popular.
The Art of Subtle Sophistication
Foil flecks work because they’re not required—they’re enhancements. This distinction is important psychologically. A nail without foil still reads as complete; the foil merely elevates the design. This means your nails look equally polished whether someone notices the foil or not, creating a layered sophistication where more observant viewers see additional depth.
Application Technique for Foil Effects
- Apply two coats of peachy nude for smooth, even coverage
- Mix a small amount of clear builder gel or sticky top coat with rose gold foil flecks to create an adhesive
- Apply this mixture to random spots on the nail surface, pressing gently to ensure foil adheres
- Seal with a standard top coat to lock everything in place
- The randomness is intentional—uniformly placed foil reads as overly calculated
Pro tip: Apply foil flecks while your base color is still slightly tacky but not wet. If the base is fully dry, foil won’t adhere properly; if it’s too wet, the foil will slide around before you can position it.
5. Warm Cognac Brown with Darker Tortoiseshell Overlay
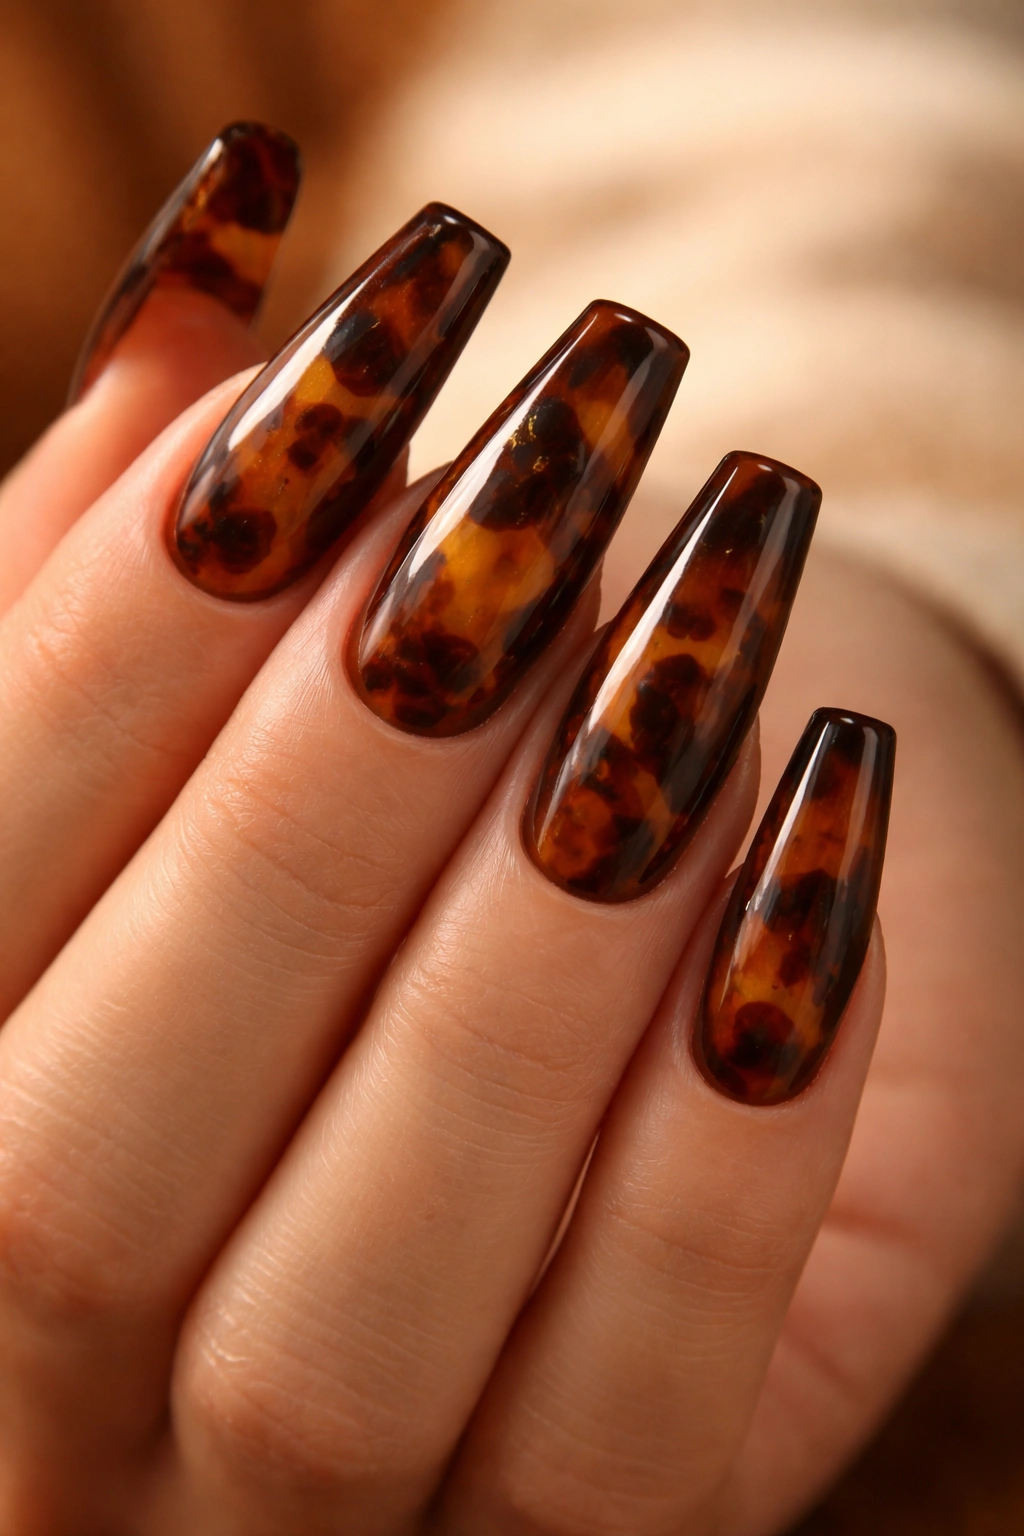
Cognac brown evokes the rich warmth of the liquor it’s named after—deep, sophisticated, and genuinely luxurious. This particular warm brown has golden and red undertones that make it feel expensive without requiring premium products or complex application. A tortoiseshell overlay pattern in darker browns creates texture and visual complexity that turns a solid color into something far more interesting.
Tortoiseshell Technique Explained
Tortoiseshell patterns aren’t as difficult as they appear. The technique involves creating organic, irregular shapes using multiple warm brown shades, then adding intentional lines that create the characteristic look. On cognac brown, this works because tortoiseshell typically uses browns of varying depths, and cognac provides a perfect foundation that reads as expensive and intentional.
Step-by-Step Layering for Tortoiseshell
- Begin with cognac brown as your full-coverage base color
- Use a slightly darker brown shade to create organic patches and shapes across the nail surface
- Add even darker brown in select areas to create depth and shadow
- Use a thin striping brush with dark brown to draw thin, irregular lines that create the characteristic tortoiseshell pattern
- Seal with a glossy top coat that emphasizes the layered colors
Worth knowing: Tortoiseshell patterns are forgiving by nature because slight irregularities actually enhance the authentic appearance—the technique celebrates imperfection, which is liberating for at-home nail artists.
6. Golden Honey with Thin Black Lines and Negative Space
Golden honey brings sunshine to your fingertips without reading as yellow or overly bright. This warm, luminous tone sits between gold and amber, creating a color that’s genuinely unique. On long coffin nails, golden honey glows with a warmth that feels slightly edgy when paired with intentional black line work and strategic negative space.
Negative Space Design Theory
Negative space—the areas of the nail left unpolished, showing your actual nail—has become a hallmark of contemporary nail design. This technique works beautifully with golden honey because the contrast between the warm color and the pale natural nail creates visual interest without requiring multiple colors. The black lines add structure and prevent the design from feeling too minimal.
Design Layout and Execution
- Golden honey requires three thin coats for a luminous, glowing finish (two coats may appear translucent)
- Create negative space by carefully polishing around geometric shapes—typically lines or triangles on the sides or tip
- Use black gel or acrylic to create thin lines that define the negative space and add architectural interest
- The lines don’t need to be perfectly straight—slightly imperfect lines read as intentionally hand-drawn
- Seal with glossy top coat to emphasize the contrast between matte/natural nail and polished areas
Quick fact: Golden honey with black lines has roots in contemporary jewelry design, where this color combination is used to create bold, minimalist pieces.
7. Cinnamon Spice with Cream Swirl Details
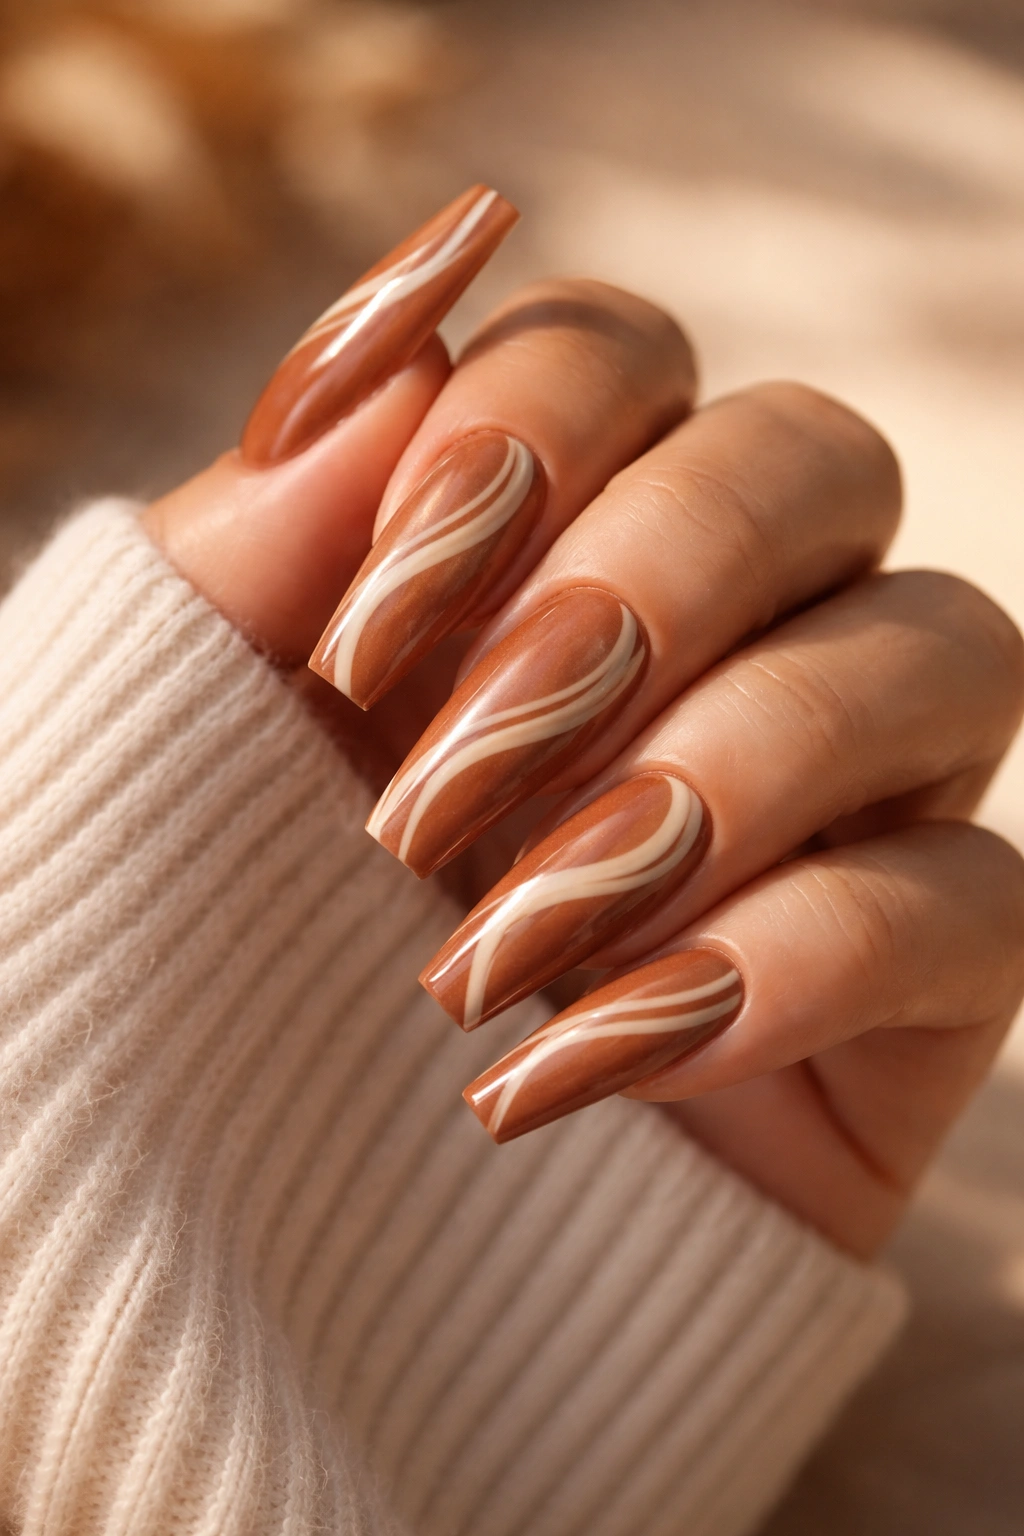
Cinnamon spice captures the warm, slightly dusty richness of the actual spice—it’s brown with prominent warm undertones and a slightly muted quality that makes it feel refined rather than bold. When you add cream-colored swirl details, you’re creating a design that feels both artistic and wearable, sophisticated and slightly playful.
Creating Elegant Swirls Without Artistic Training
Swirl patterns might sound complex, but the beauty of swirls is that their organic nature means perfection isn’t the goal—authenticity is. A swirl created by dragging a thin brush through cream polish on a cinnamon base will read as intentional and artistic even if it’s slightly wobbly. The movement created by the swirl draws the eye across the nail, creating visual interest that solid color can’t achieve.
Swirl Application Process
- Apply two coats of cinnamon spice for full coverage and that signature warm depth
- While the base is still slightly sticky (not fully dry), use a thin brush with cream polish to create curved, organic lines across the nail
- Swirls work best when they flow across the nail rather than staying in one area—imagine a gentle S-curve or spiral
- Create swirls on all nails or just on accent nails (typically ring and middle finger) depending on your preference for drama
- Seal with glossy top coat to create shine and definition
Pro tip: If your swirls don’t turn out perfectly on your first attempt, allow them to fully dry and paint over that nail with fresh cinnamon spice to try again—the practice compounds and you’ll improve quickly.
8. Warm Rust with Deep Burgundy Tips Ombré
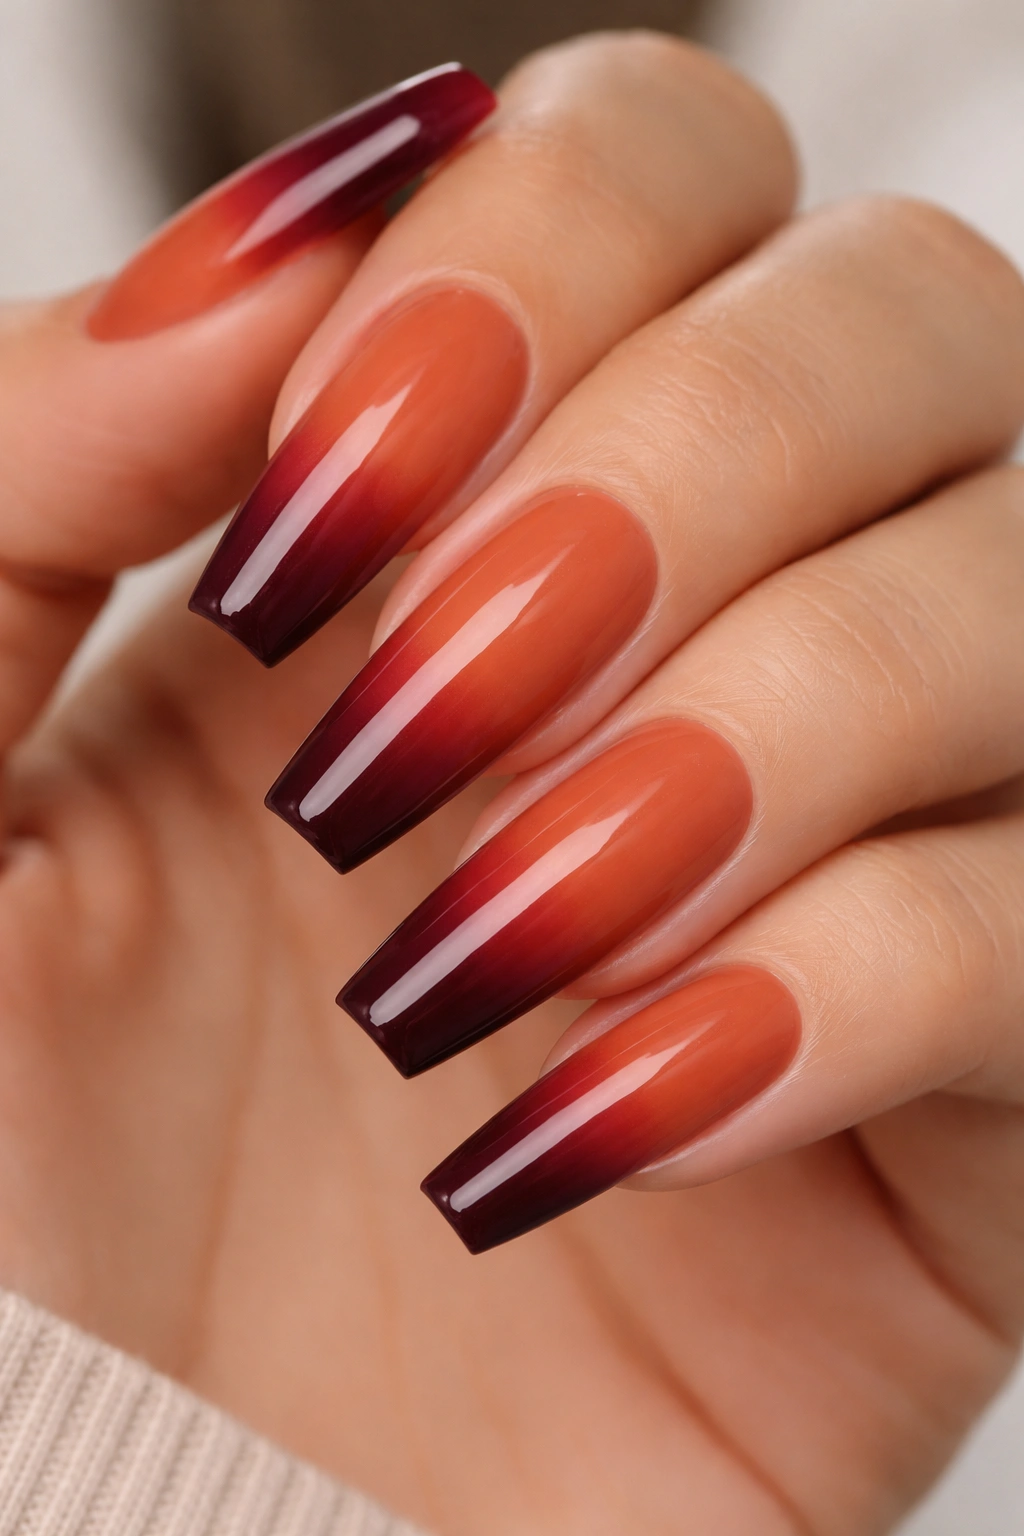
Rust is warm without being orange, deep without being brown—it exists in its own sophisticated category. When you transition rust into deep burgundy at the tips through an ombre technique, you’re creating movement that takes advantage of the coffin nail’s length and defined tip.
Why This Color Combination Feels Luxe
Rust and burgundy together create what color theorists call color harmony—they’re neighboring warm tones on the color wheel, so they naturally complement each other. Neither color overpowers the other; instead, they create a gradual, beautiful transition that feels intentional and expensive.
Ombre Execution on Long Coffin Tips
- Apply two coats of rust throughout the entire nail for your base color
- Using a makeup sponge or stippling technique, begin applying deep burgundy to the tip area
- Work the color about halfway up the nail, creating a gradient where rust gradually becomes burgundy
- Blend the transition zone by stippling back and forth between the two colors—this softens hard lines
- Allow each application to dry slightly before adding more color to ensure proper blending
- Seal with glossy top coat to create depth and dimension
Worth knowing: Ombre gradients appear most sophisticated when the transition zone is gradual—rough transitions read as amateurish, while smooth gradients appear salon-executed.
9. Warm Bronze with Nude Marble Veining
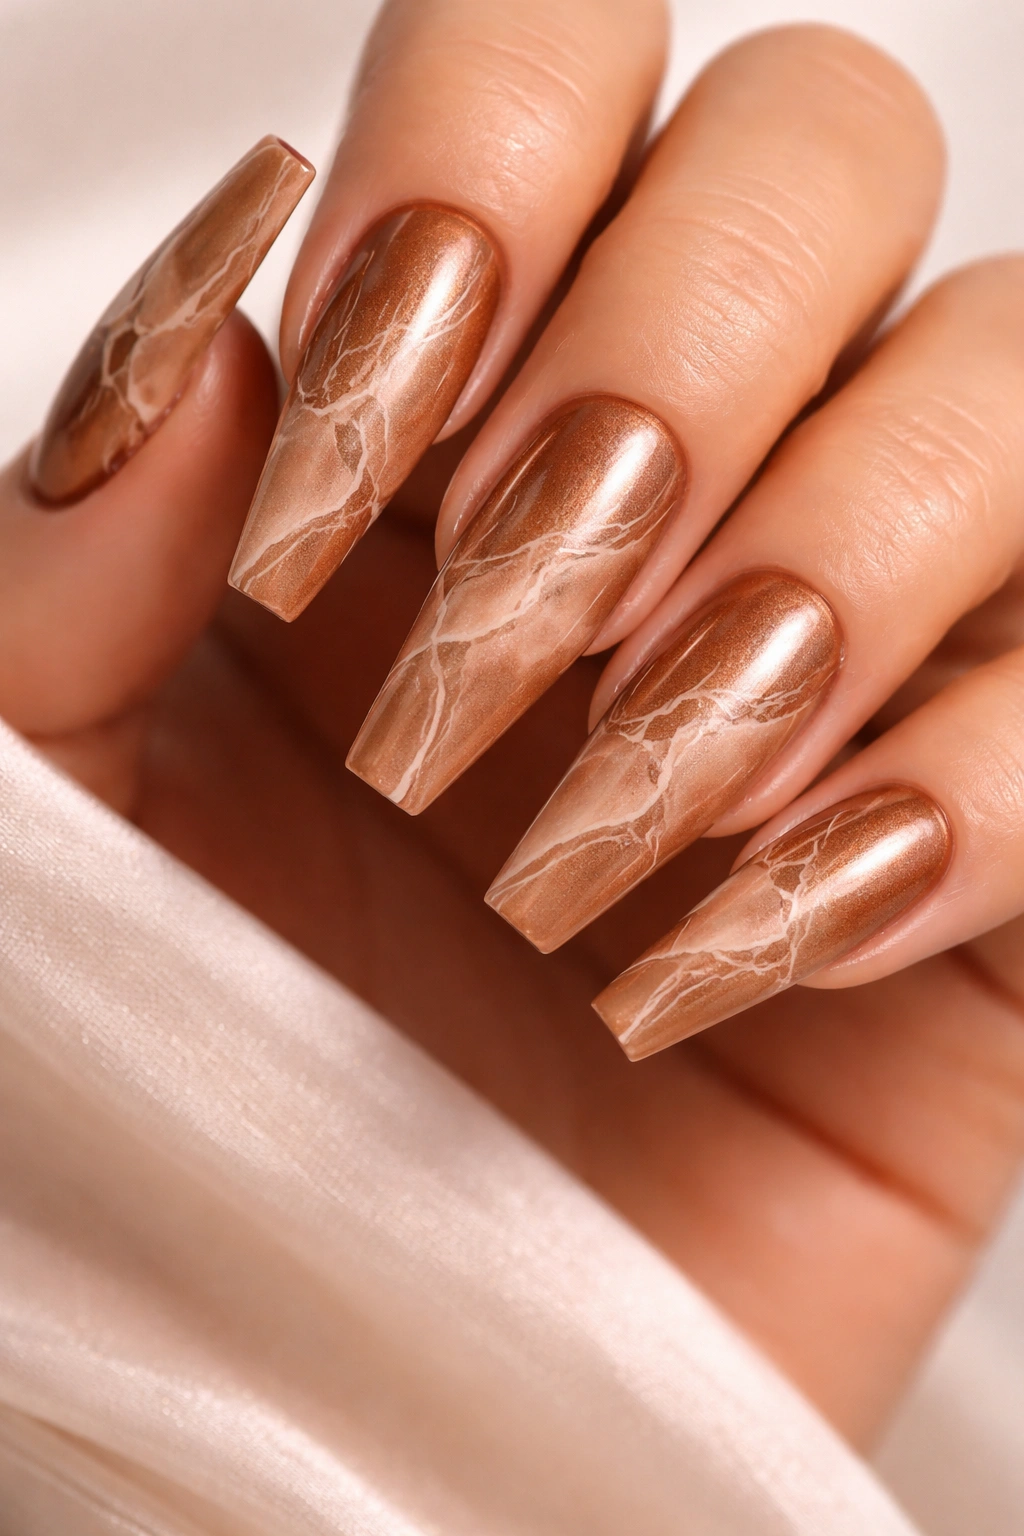
Bronze occupies a fascinating space in the warm color spectrum—it’s metallic without being shiny, rich without being opaque. When you add nude marble veining on top of bronze, you’re creating a design that mimics natural stone, lending an inherent sense of luxury and permanence.
Marble Effect Creation
Marble patterns are created using thin lines and organic shapes that mimic the natural veining found in marble stone. The beauty of marble designs is that they don’t need to be anatomically accurate—they just need to create an impression of natural stone veining. This makes them relatively forgiving for home application.
Executing Marble Veining on Bronze
- Apply two coats of warm bronze to create your foundation
- While the final coat is still slightly tacky, use a thin brush with nude or cream polish to create irregular, branching lines
- Marble veining should look organic and slightly unpredictable—straight lines won’t work
- Vary the thickness of your lines slightly, using sometimes thicker and sometimes thinner strokes
- Consider adding a second accent color (optional)—a thin gray line can create additional dimension
- Seal with glossy top coat that will enhance the stone-like quality
Quick fact: Real marble has layers of depth, which is why glossy finishes work so well with marble-inspired nail art—the shine mimics how light reflects off actual stone.
10. Burnt Orange with Minimalist Geometric Corner Design
Burnt orange sits between orange and brown, delivering warmth that feels energizing without being juvenile or overly bright. Long coffin nails in burnt orange read as bold and artistic. A minimalist geometric design in the corner (typically the lower inside corner of the nail) adds intentional visual interest without overwhelming the space.
Minimalist Design Philosophy
Minimalism in nail art means less is more—each design element has purpose, and nothing is included simply for decoration. A single geometric shape in a corner creates a focal point that guides the eye without dominating the nail. This approach keeps burnt orange from feeling too dramatic while still creating a clearly intentional design.
Corner Geometry Technique
- Apply two coats of burnt orange to all nails
- Select one or two accent nails (ring finger and pinky work well for corner designs)
- Using a thin brush or nail art pen, create a geometric shape in the corner—a triangle, small square, or angular line arrangement
- The shape should be small enough that it feels like an accent rather than the main feature
- Keep the geometry in that corner rather than scattered elsewhere—this creates intentional composition
- Seal with glossy top coat
Pro tip: Corner designs are particularly effective on coffin nails because the tapered corners naturally draw the eye—you’re working with the shape’s architecture rather than against it.
11. Warm Mahogany with Rose Gold Gradient
Mahogany evokes luxury wood—rich, warm, and sophisticated. This deep reddish-brown has golden undertones that make it feel glamorous without being ostentatious. A rose gold gradient that deepens slightly toward the tip creates movement while staying within a warm color family, creating cohesion.
Rose Gold Gradient on Deep Mahogany
Rose gold gradients on deep mahogany create an effect similar to light hitting polished wood—the lighter rose gold acts as a highlight on the deeper mahogany, creating dimension and visual interest. This works particularly well on long nails where there’s sufficient space for the gradient to develop.
Building the Mahogany-to-Rose Gold Transition
- Start with two coats of warm mahogany as your full base
- Using a sponge or stippling technique, apply rose gold polish to the tip area
- The rose gold should be concentrated at the very tip and gradually become less intense
- Blend the transition zone by lightly stippling over it with a nearly-clean sponge to soften the gradient
- The goal is a smooth transition where you can see both colors but they flow into each other
- Seal with glossy top coat that will enhance the warm glow
Worth knowing: Rose gold gradients appear most luxurious when the transition is subtle—too much contrast between base and gradient can look unintentional rather than sophisticated.
12. Caramel Swirl with Dark Chocolate Accent Stripes
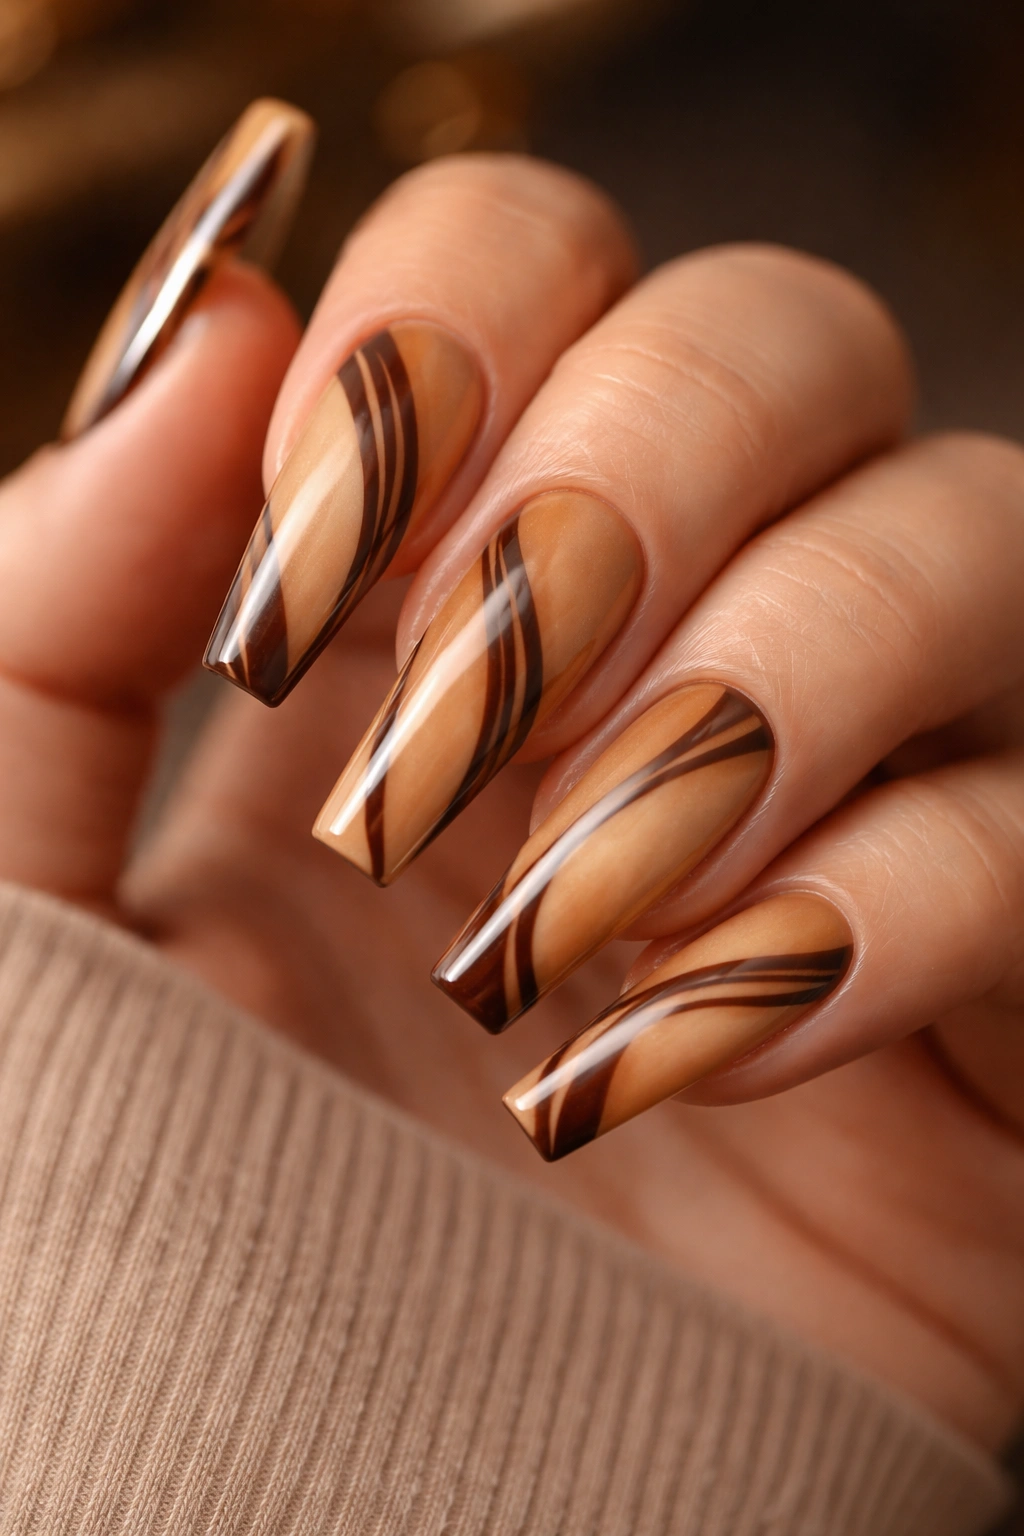
Caramel brings sweetness and warmth in a sophisticated package. This warm, slightly creamy brown-gold creates an inviting appearance that feels approachable while remaining refined. Dark chocolate accent stripes add structure and prevent caramel from feeling too soft or simple.
The Caramel-Chocolate Combination
Caramel and chocolate work together because they’re both warm, rich, and associated with luxury products. The combination reads as almost edible—nails that look like they’re made from delicious confections. This pairing works beautifully on longer nails because the length allows each color to occupy sufficient space.
Stripe Application on Caramel Base
- Apply two coats of caramel as your base for full, creamy coverage
- Using a striping brush, create thin dark chocolate lines—placement options include: vertical lines down the center and sides, horizontal lines across the nail, or diagonal lines
- Vertical lines are most slimming and work beautifully on longer nails
- Create lines on all nails or just accent nails, depending on how dramatic you want the design
- Ensure lines are thin enough that they complement rather than dominate the caramel base
- Seal with glossy top coat
Quick fact: Caramel and chocolate are complementary colors on the warm palette—they’re close enough in temperature to feel cohesive while being different enough to create visual contrast.
13. Warm Sand Beige with Metallic Gold Tips
Warm sand beige is barely-there color that feels luxurious in its minimalism. This nude-adjacent tone with warm undertones creates elongation and sophistication on long coffin nails. Metallic gold tips transform the minimalist base into something with subtle drama—a design that looks expensive and intentional from every angle.
Gold Tips as a Luxury Accent
Gold tips create what’s sometimes called the “luxury manicure” effect—they feel like something you’d see in high-end salons or luxury nail imagery. The metallics catch light and draw attention to your hands in a way that solid color can’t match, but the gold tips remain subtle enough that the design doesn’t read as over-decorated.
Applying Metallic Gold Tips
- Apply two coats of warm sand beige throughout the entire nail
- Using metallic gold polish or chrome powder, create an ombre effect at the tips
- The gold should cover roughly the last quarter to third of the nail
- The transition from beige to gold can be slightly blurred (for a softer gradient) or more defined (for a cleaner look)
- Either approach works beautifully on coffin nails, depending on your aesthetic preference
- Seal with glossy top coat that will make the gold glow
Pro tip: If using chrome powder for maximum impact, apply a tacky base coat to the tip area first, then press the powder into the wet surface and seal—this creates more dramatic, reflective results than standard metallic polish.
14. Warm Terracotta with White Geometric Line Art
Geometric line art on terracotta creates a design that feels both artistic and architectural. Clean white lines on warm terracotta produce strong contrast while maintaining warmth—the white doesn’t read as cool against the warm orange-brown base. The geometric approach lends structure and intentionality to the design.
White Line Art Composition
White lines on terracotta work best when they follow or complement the coffin nail shape. Lines that mirror the tapered sides create cohesion, while lines that create geometric shapes (triangles, hexagons, irregular angles) add artistic interest. The key is making lines feel purposeful rather than random.
Line Art Execution
- Apply two coats of terracotta for smooth, even base coverage
- Plan your design beforehand (sketching on paper helps)—where will your lines go? What shapes will they create?
- Use a thin brush or nail art pen with white polish to create your geometric lines
- Lines can be perfectly straight (using nail art tape) or slightly hand-drawn (which often reads as more intentional)
- Multiple thin white lines grouped together create stronger visual impact than single scattered lines
- Seal with glossy top coat that will make white lines appear crisp and clean
Worth knowing: White lines appear boldest when applied to fully dry terracotta base—attempting white lines on wet base can cause the colors to blend, muting the design.
15. Warm Apricot with Nude Pink Ombre Blend
Apricot brings joy and warmth without feeling juvenile—it’s a sophisticated fruit tone that works beautifully on long nails. Blending apricot into nude pink creates a transition between warm and cooler-warm tones, resulting in a gradient that feels contemporary and refined.
Color Blending Across Warm Tones
Apricot to nude pink is a journey within the warm family—apricot is more orange-warm while nude pink is red-warm. The blend between them creates dimension because the undertones are slightly different, but they remain cohesive because both are undeniably warm. This makes the transition feel intentional and sophisticated.
Creating the Apricot-to-Pink Ombre
- Apply two coats of apricot as your base color
- Create the ombre by introducing nude pink at the tip area using a sponge or stippling technique
- Blend by working back and forth between apricot and nude pink, softening the transition zone
- The blending process takes longer than simple gradients but creates more professional-looking results
- Multiple light applications of each color work better than heavy, thick coats
- Seal with glossy top coat to create depth and allow colors to appear their truest
Quick fact: Ombre designs between similar warm tones create more subtle, refined effects than ombres between contrasting colors—perfect for those who prefer understated elegance.
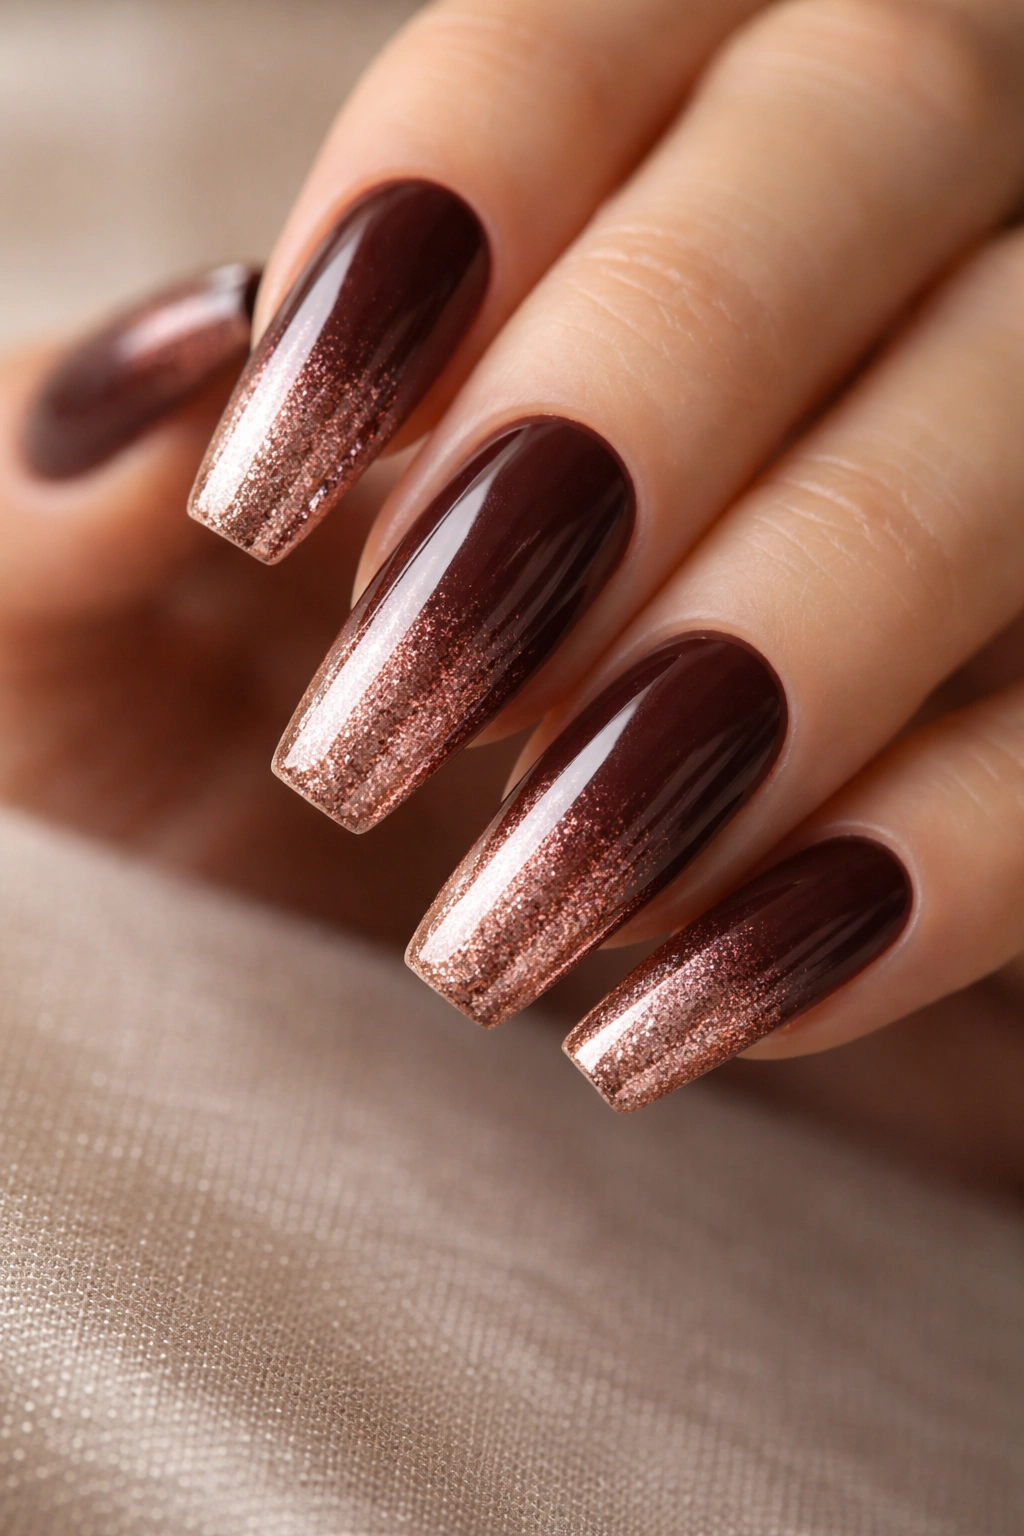
16. Deep Copper with Champagne Foil Dust Sparkle
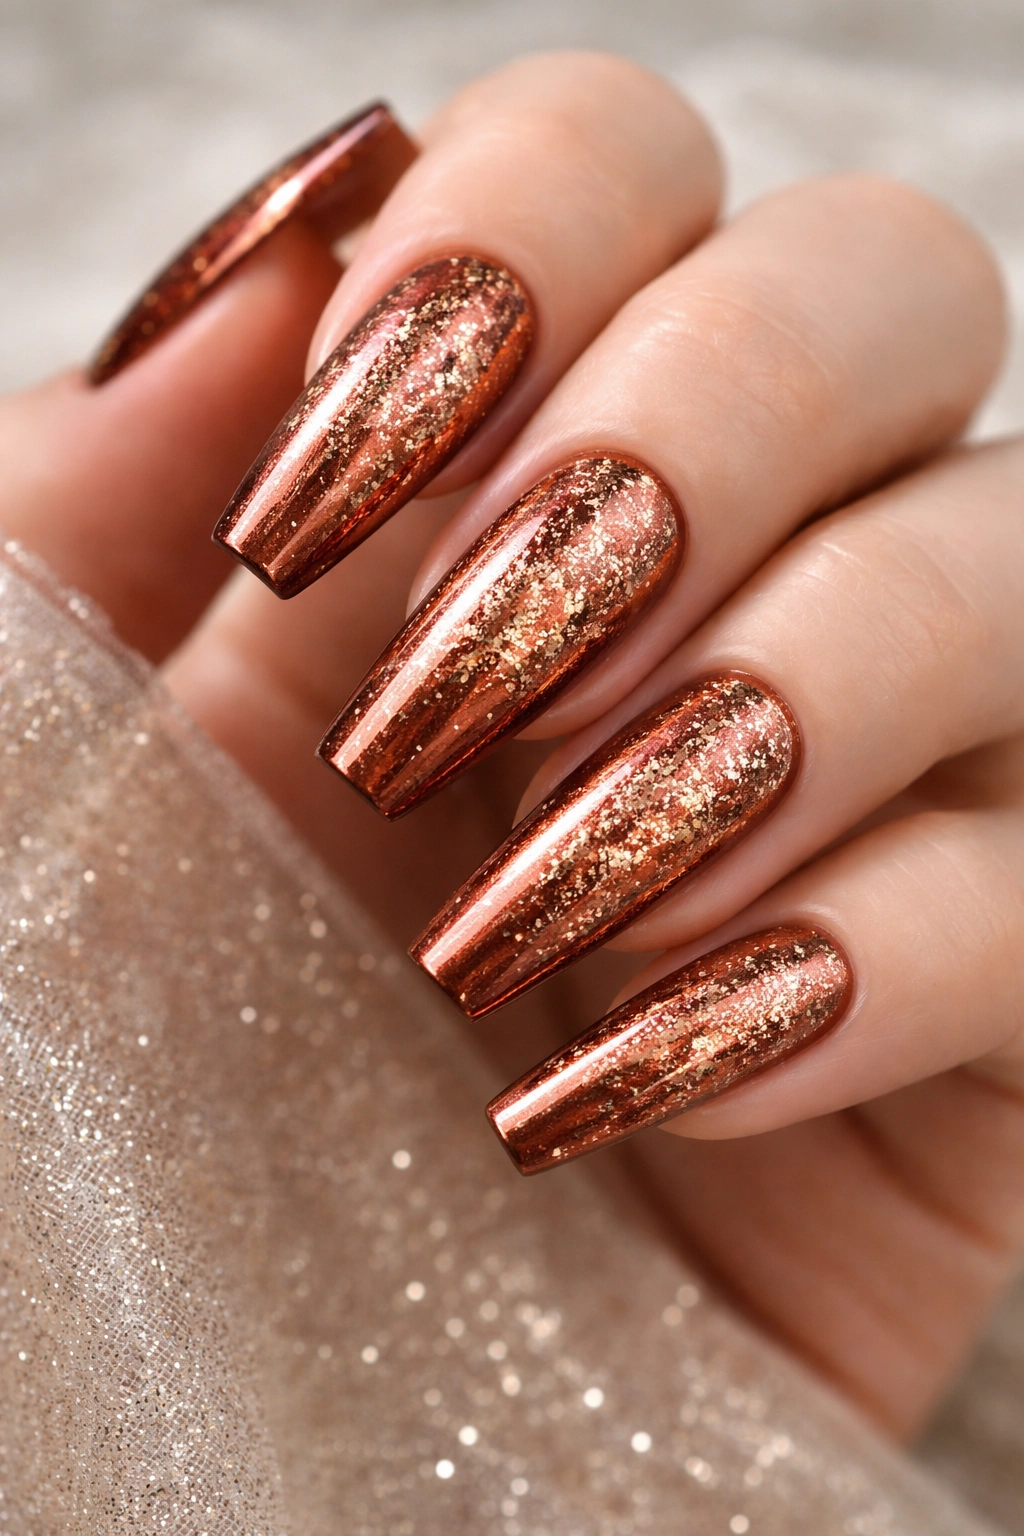
Deep copper is warm, metallic, and inherently luxurious. This rich, glowing brown-gold tone feels upscale on its own, but adding champagne foil dust creates subtle sparkle that catches light beautifully throughout the day. The result is nails that shimmer without being glittery—sophisticated sparkle.
Foil Dust Application for Sparkle Effect
Foil dust differs from flecks because it’s finely ground, creating an overall shimmer rather than distinct sparkly pieces. When applied to deep copper, the champagne foil dust creates a subtle glow that makes the copper appear to emanate light. This technique works particularly well on longer nails where the sparkle has space to be appreciated.
Applying Foil Dust Finish
- Apply two coats of deep copper for your complete base color
- Create a mix of clear builder gel or sticky top coat with champagne foil dust
- Apply this mixture with a brush to create an all-over sparkly finish
- The champagne dust should be visible but not overwhelming—aim for “subtle glow” rather than “disco ball”
- Allow the foil mixture to fully cure (if using builder gel, cure under UV light; if using polish, allow to dry completely)
- Seal with standard top coat
- This design works best in natural light where the sparkle reads most authentically
Pro tip: Less is more with foil dust—a light coating appears more luxurious than heavy application, which can look muddy.
17. Warm Taupe with Burgundy Reverse Gradient
Reverse gradients (where the darkest color is at the base rather than the tip) create an unexpected twist on traditional gradient designs. Starting with warm taupe at the tips and transitioning to deep burgundy at the base creates movement that draws the eye upward—a visually lengthening effect on coffin nails.
Why Reverse Gradients Create Visual Impact
Reverse gradients are less common than traditional tip gradients, making them feel contemporary and intentional. The movement direction—from light at tips to dark at base—creates an upward visual flow that actually makes nails appear longer. On coffin nails, this effect is particularly pronounced because the shape already creates vertical lines.
Building a Reverse Gradient
- Start with burgundy at the cuticle area using a sponge or stippling technique
- Gradually blend into warm taupe as you move toward the tips
- The transition should be smooth and gradual—multiple light applications work better than thick coats
- Blend the transition zone thoroughly to avoid harsh lines
- Allow the design to fully dry before sealing
- Seal with glossy top coat
Worth knowing: Reverse gradients require careful planning regarding application order—start with your darkest color at the base and gradually introduce lighter color as you move toward the tips.
18. Warm Cocoa Brown with Bronze Metallic Accent Nail
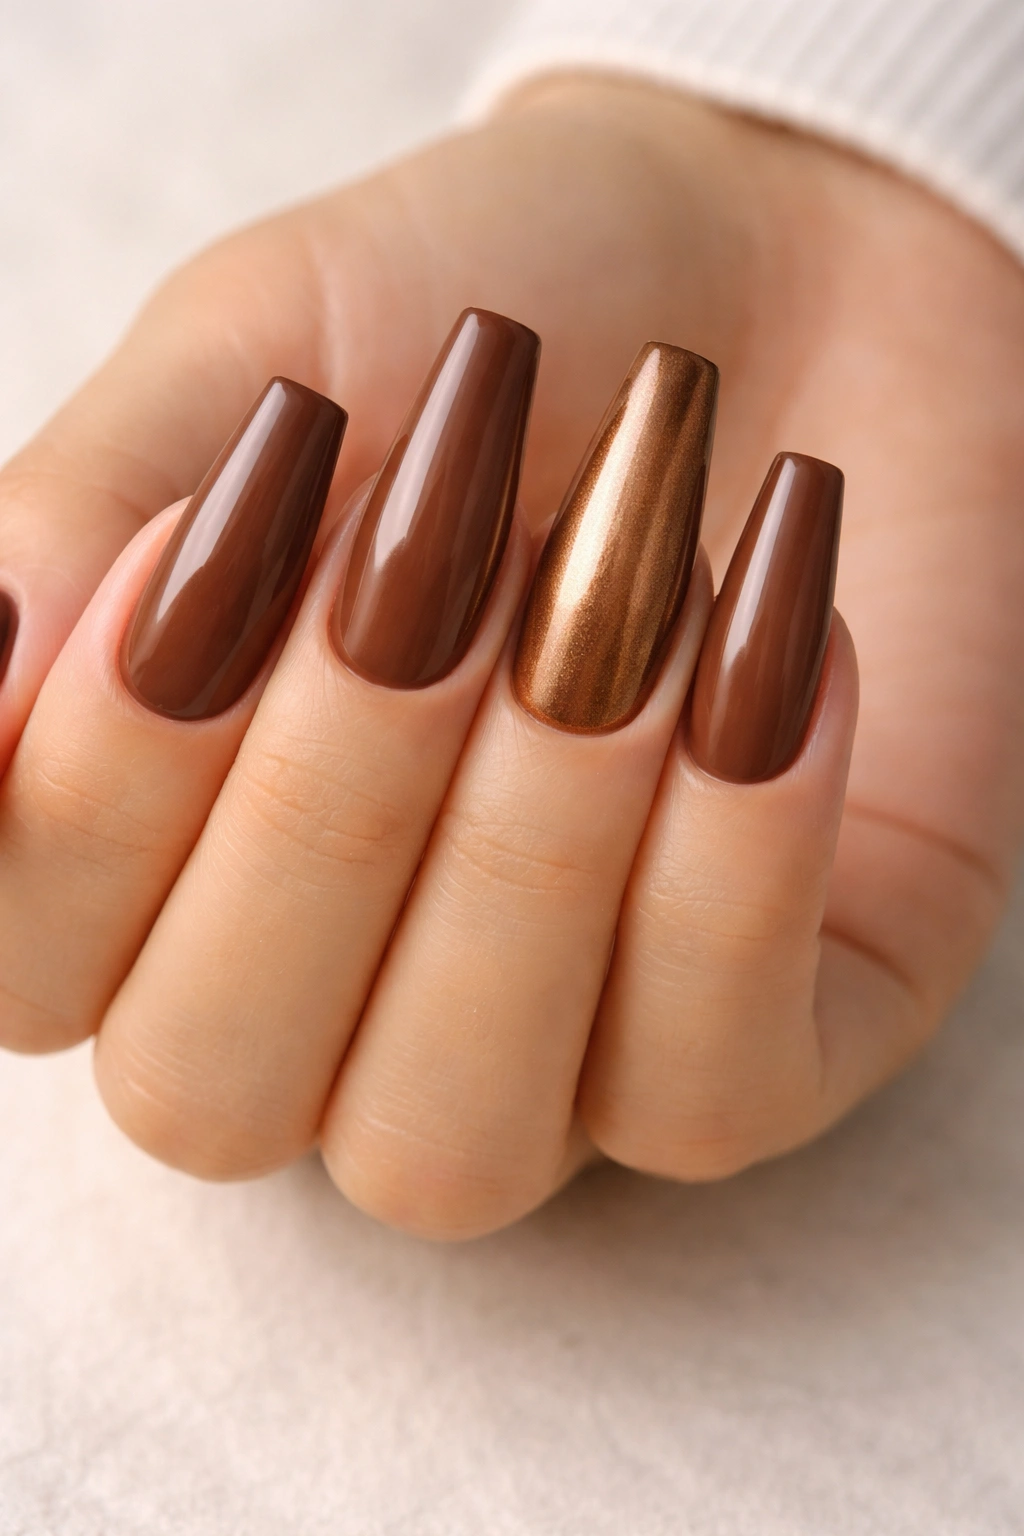
Warm cocoa brown is cozy, sophisticated, and endlessly wearable. This rich brown with warm undertones works on all skin tones and reads as intentional without being dramatic. Creating a bronze metallic accent nail on one finger adds interest and luxury without overwhelming the design’s cohesion.
The Accent Nail Approach
Accent nails allow you to introduce more dramatic color or finish while keeping the overall design wearable. By limiting the metallic to just one nail, you’re creating a focal point that draws the eye while the surrounding solid-color nails maintain the design’s elegance.
Accent Nail Application
- Apply two coats of warm cocoa brown to all nails
- On your accent nail (typically the ring finger), apply bronze metallic polish or chrome powder for maximum impact
- If using metallic polish, two coats create the optimal opaque, glowing finish
- If using chrome powder, apply a tacky base coat, press the powder into the wet surface, and seal—this creates more dramatic metallics
- The contrast between matte cocoa and shiny bronze creates visual hierarchy
- Seal all nails with top coat
Quick fact: Accent nails that use metallics appear more intentional and designed than accent nails using darker colors, which can read as an error or chipped polish.
19. Peachy Brown with Delicate Rose Gold Swirls

Peachy brown exists in that sweet spot between warm and neutral—it’s beige with a peachy undertone, creating a color that feels approachable and refined simultaneously. Delicate rose gold swirls add artistic interest without overwhelming the design. The swirls feel intentional and sophisticated, elevating peachy brown from basic to intentionally designed.
Creating Delicate Rose Gold Details
Delicate swirls require a light touch and a thin brush. The key is creating organic, flowing lines that feel artistic without looking chaotic. On peachy brown, rose gold swirls read as luxe accents—they catch light and create visual interest while remaining understated.
Swirl Application Technique
- Apply two coats of peachy brown for your base color
- Using a thin brush and rose gold polish, create delicate, curved lines across the nail
- Swirls should flow across the nail surface in organic, S-like patterns
- Create full swirl coverage (all nails) or limit to accent nails (middle and ring fingers)
- The goal is to create movement and visual interest without covering the base color
- Seal with glossy top coat that will make the rose gold appear luminous
Pro tip: Practice your swirls on a practice nail or paper first—this builds confidence and muscle memory, resulting in smoother actual execution.
20. Rich Russet with Gold Dust Gradient to Burgundy Tips
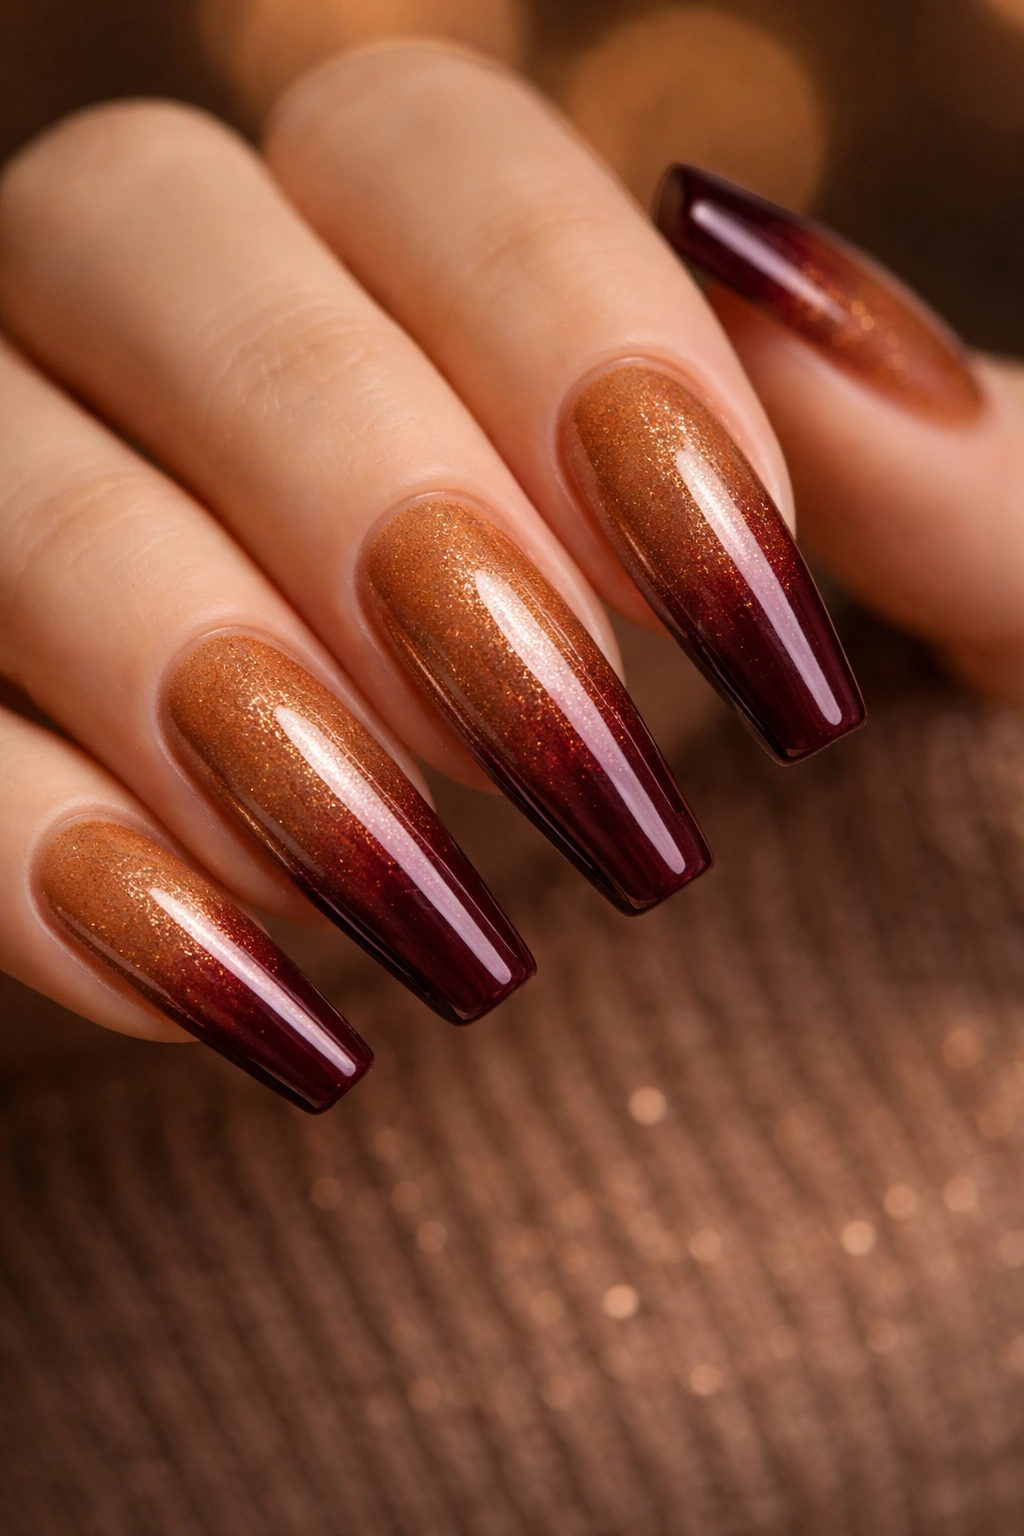
Russet is the ultimate warm tone—deep, rich, and absolutely luxurious. This red-brown with golden undertones represents the height of warm-tone sophistication. Introducing gold dust that transitions into deep burgundy tips creates a gradient that moves within the warm family, creating dimension and movement.
The Grand Finale: Russet’s Complexity
Russet is reserved for those ready to make a statement. This is nail color for special occasions, for when you want to feel absolutely put-together, for when you’re ready to let your nails command attention. On long coffin nails, russet with gradient tips represents the fullest expression of sophisticated warm-tone nail design.
Building the Russet-to-Burgundy Gradient with Gold Dust
- Apply two coats of rich russet as your complete base color
- Using a sponge or stippling technique, begin adding gold dust mixture (clear gel or sticky top coat mixed with gold foil powder) starting at mid-nail
- Continue working toward the tip, concentrating the gold dust there
- Begin introducing deep burgundy at the very tips, blending where it meets the gold dust
- The effect should show all three elements: russet base, gold dust in the middle, burgundy tips
- Allow ample dry time between applications
- Seal with glossy top coat that will emphasize all the layers and create depth
Worth knowing: This complex gradient design photographs beautifully and looks different depending on lighting—natural light reveals different depths than artificial light, which is part of what makes it so sophisticated.
Maintenance and Longevity for Long Warm-Toned Coffin Nails
Maintaining long coffin nails requires consistent care and realistic expectations about the time investment involved. Warm-toned nails, particularly darker shades and complex designs, show chips and growth more visibly than lighter neutrals, which means touch-ups become necessary around the two-to-three-week mark. This isn’t a flaw of warm tones specifically—it’s the reality of maintaining longer nails with any design.
Cuticle care becomes essential when you’re wearing long nails. Push back cuticles gently every few days, keeping the nail bed nourished with cuticle oil. The longer your nails, the more strain they’re experiencing at the base, and healthy cuticles directly support nail strength. A quick cuticle oil application takes literally thirty seconds but extends the time between manicure appointments noticeably.
Storage of warm-toned polish matters more than you might think. These colors can oxidize or separate if exposed to extreme temperatures or sunlight. Store your warm-toned polishes in a cool, dark place—a bathroom cabinet or dresser drawer works far better than a windowsill. Properly stored polish maintains its color accuracy and consistency better than polish exposed to light and heat, meaning your application will look more professional and last longer.
Color Psychology: Why Warm Tones Make You Feel Confident
There’s scientific basis for the fact that warm-toned nails feel psychologically powerful. Warm colors are associated with energy, confidence, and approachability—wearing them creates a subtle shift in how you carry yourself. When you look down at rich terracotta or luxe mahogany nails, there’s an automatic confidence boost because you know those nails look intentional and expensive.
Psychologically, warm tones also create a sense of closeness and connection. Unlike cool tones, which can feel distant or clinical, warm tones feel intimate and inviting. This translates to how others perceive you—warm-toned nails create an impression of warmth and approachability in addition to style and sophistication.
The length amplifies this psychological effect. Long coffin nails feel inherently confident because they require commitment and intentionality. You can’t wear extremely long nails accidentally—they’re a choice you’ve made, which communicates intention and self-assurance. Pairing that length with rich warm tones creates an exponential confidence boost that goes beyond aesthetics into actual psychology.
Final Thoughts
Warm-toned coffin nails represent the intersection of personal style, professional polish, and genuine artistry. Whether you choose solid shades like burnt sienna and cognac brown or more complex designs like marble veining and gradient effects, you’re working with a color family that’s simultaneously timeless and contemporary, sophisticated and approachable.
The beauty of warm tones is their universality—they genuinely work across all skin undertones, all age ranges, and all occasions. A warm terracotta coffin nail reads beautifully in a business meeting and equally stunning at a celebration. The designs and shades you choose can range from barely-there peachy nude to statement-making deep copper, giving you complete creative freedom within a cohesive color family.
Long coffin nails amplify everything you choose to do with them. That rich mahogany base becomes luminous at length; that subtle gold dust sparkle catches light in ways impossible on shorter nails; that geometric line art reads as intentional artwork rather than decoration. The combination of warm tone plus coffin shape plus length creates a nail aesthetic that earns attention not through loudness but through evident intention and care.
Take time to consider which warm tones genuinely appeal to you and which designs speak to your personal style. Your nails are an extension of your identity and aesthetic vision—they deserve that thoughtful consideration. Whether you’re channeling autumn earth tones with burnt sienna or embracing tropical warmth with peachy gold, your warm-toned coffin nails are worth the commitment to maintain them beautifully.
