

Green is having a major moment in nail design, and coffin nails — with their elongated, tapered silhouette — are the perfect canvas for showcasing rich, sophisticated green shades. From deep forest tones to vibrant lime and everything in between, green coffin nails offer endless creative possibilities that feel both modern and timeless. Whether you’re drawn to minimalist elegance or bold, eye-catching designs, there’s a green coffin nail style waiting for you.
The beauty of coffin nails lies in their generous surface area, which allows complex designs to really shine without feeling cramped. Long coffin nails elongate your fingers and command attention, making them ideal for statement-making manicures that turn heads. The tapered sides and flat top create a surprisingly balanced proportion that flatters most hand shapes and works equally well for professional settings or special occasions when executed with intention.
This guide explores 20 distinct green coffin nail ideas — each one offering a different vibe, technique, and level of complexity. Some designs are achievable at home with patience and basic tools; others are best left to experienced nail technicians. The key is finding the style that resonates with your personal aesthetic and commitment level.
1. Classic Sage Green with Gold Leaf Accents
A muted sage green base creates the perfect backdrop for delicate gold leaf detailing that catches light beautifully. This design balances sophistication with a hint of luxe without veering into costume territory. The soft green feels calming and wearable, making it suitable for everyday wear while the gold accents elevate it into “special occasion” territory.
Why This Works for Long Coffin Nails
Sage green is one of the most universally flattering green shades — it complements a wide range of skin tones without looking harsh or overly trendy. The muted undertones prevent the nails from feeling too bold, while the gold leaf provides just enough visual interest to make the design feel intentional and curated. On longer coffin nails, the gold accents can be strategically placed (around the cuticle area, scattered across the nail, or concentrated on an accent nail) for maximum impact without overwhelming the design.
How to Achieve This Look
- Paint two coats of sage green polish over a white or cream base coat for optimal color payoff
- Tear small, irregular pieces of loose gold leaf and apply them using a tweezers while the base is still slightly tacky
- Seal everything with a glossy top coat to lock the leaf in place and create a seamless finish
- For a more refined look, apply gold leaf only to the accent nail (typically the ring finger)
- If loose leaf feels too delicate, substitute with thin gold striping tape for easier application
Pro tip: Apply the top coat in thin layers rather than one thick coat — multiple thin layers prevent the leaf from shifting and wrinkling.
2. Emerald Green with White Geometric Lines

Emerald green delivers rich, jewel-toned sophistication, and white geometric lines create architectural contrast that feels fresh and modern. Clean lines running vertically, horizontally, or in angular patterns transform a solid green base into something gallery-worthy. The high-contrast pairing reads as intentional and artistic rather than random.
The Power of Geometric Design on Coffin Nails
Geometric patterns take full advantage of the elongated coffin nail shape — vertical lines emphasize length, while horizontal elements create balance and width. The negative space created by white lines against deep emerald makes each line feel deliberate and striking. This design works because it’s simple enough to execute cleanly but complex enough to feel design-forward.
Application Tips
- Start with two coats of deep emerald green base (allow full drying time between coats)
- Use a thin striping brush or toothpick dipped in white gel polish to draw lines freehand, or apply striping tape for perfectly straight edges
- Create patterns like: vertical center line with three horizontal cross-lines, angled lines creating a geometric grid, or a single bold stripe running the length of each nail
- Seal with top coat and remove any excess white polish from the brush before it dries
- Practice the line pattern on a nail wheel or practice tip first if you’re not confident with freehand application
Worth knowing: White gel polish shows every mistake, so if precision isn’t your strength, consider using white striping tape instead for perfectly sharp lines every time.
3. Olive Green Ombre Fade to Nude
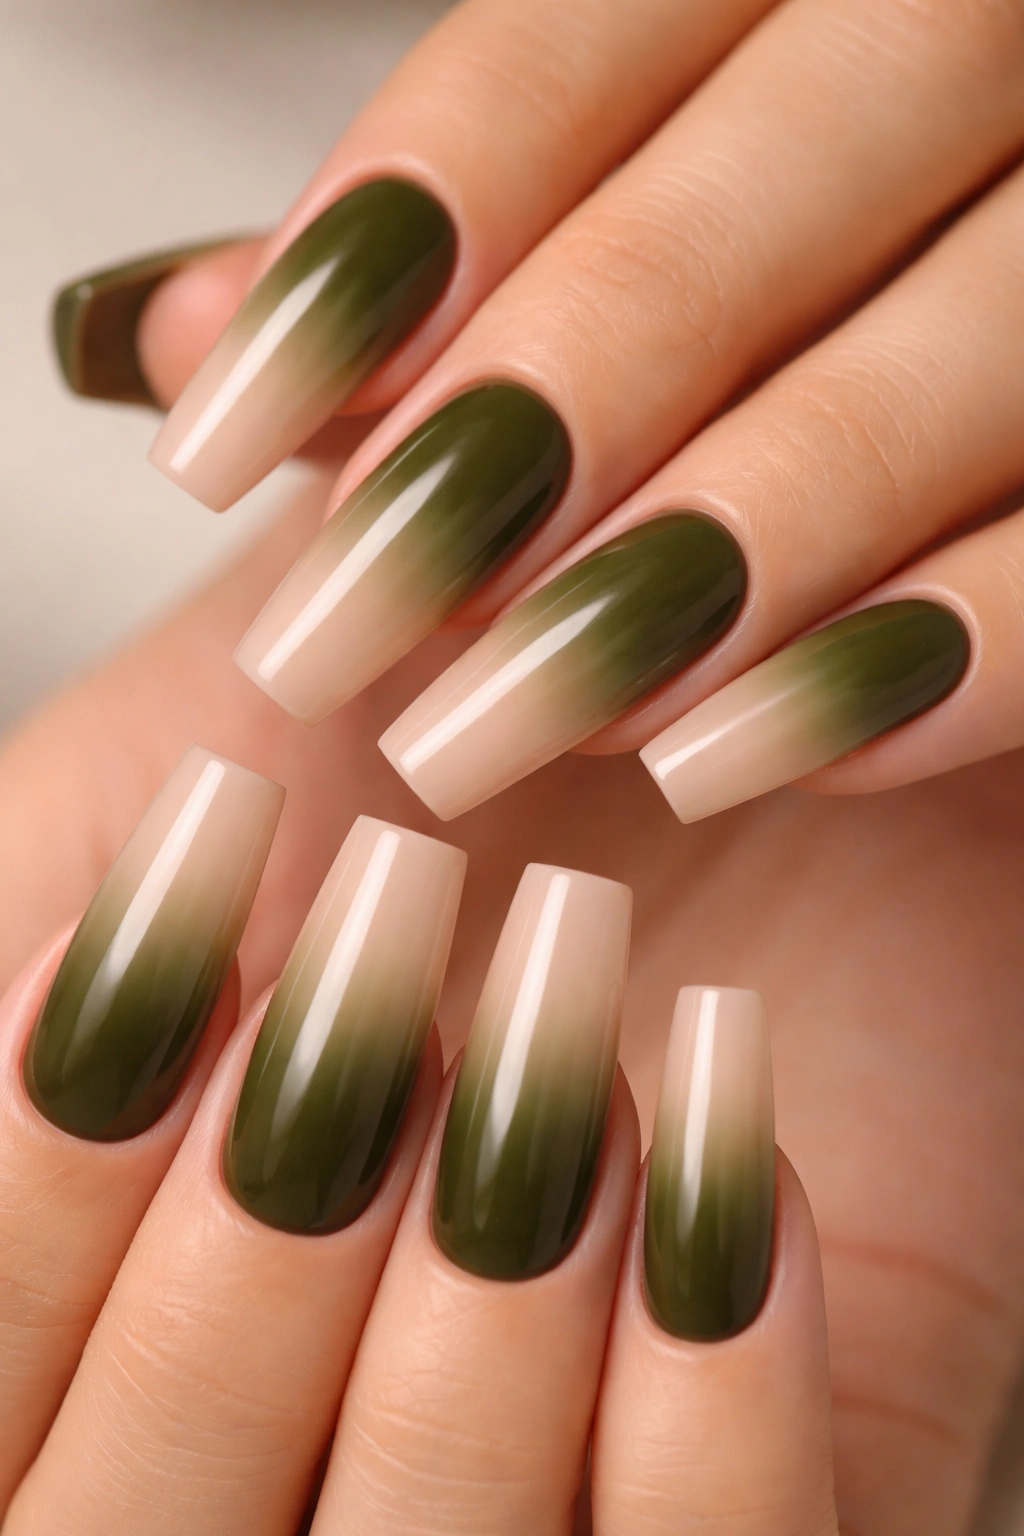
An ombre effect moving from rich olive green at the base through muted midtones to creamy nude at the tip creates gradient elegance that feels effortless and expensive-looking. This design works because it uses warm, earthy tones that blend naturally without harsh demarcation lines. The effect is subtle enough for professional settings but artistic enough to showcase technique.
Why Ombre Complements Coffin Nail Length
The longer surface area of coffin nails makes ombre transitions more visible and impactful than on shorter nails. You have room to create gradual, smooth transitions instead of abrupt color changes. The tapered shape of coffin nails means the ombre gradient naturally follows the contours of the nail, with the narrowest point (tip) showing the lightest shade for perfect visual balance.
Creating a Seamless Ombre
- Paint a solid base of olive green on all nails
- Mix olive and nude on a makeup sponge (cut a small piece to fit the nail width) in overlapping sections
- Dab the sponge gently onto the nail in a blotting motion (don’t drag, which creates streaks)
- Apply multiple light layers rather than one heavy application — this creates smoother transitions
- Blend harsh lines by applying a tiny bit of the middle shade along the transition zone
- Finish with glossy top coat to seal and smooth out any texture from the sponge application
Insider note: Warming your bottle of nude polish slightly under warm water makes it thinner and blends more smoothly with the olive shade.
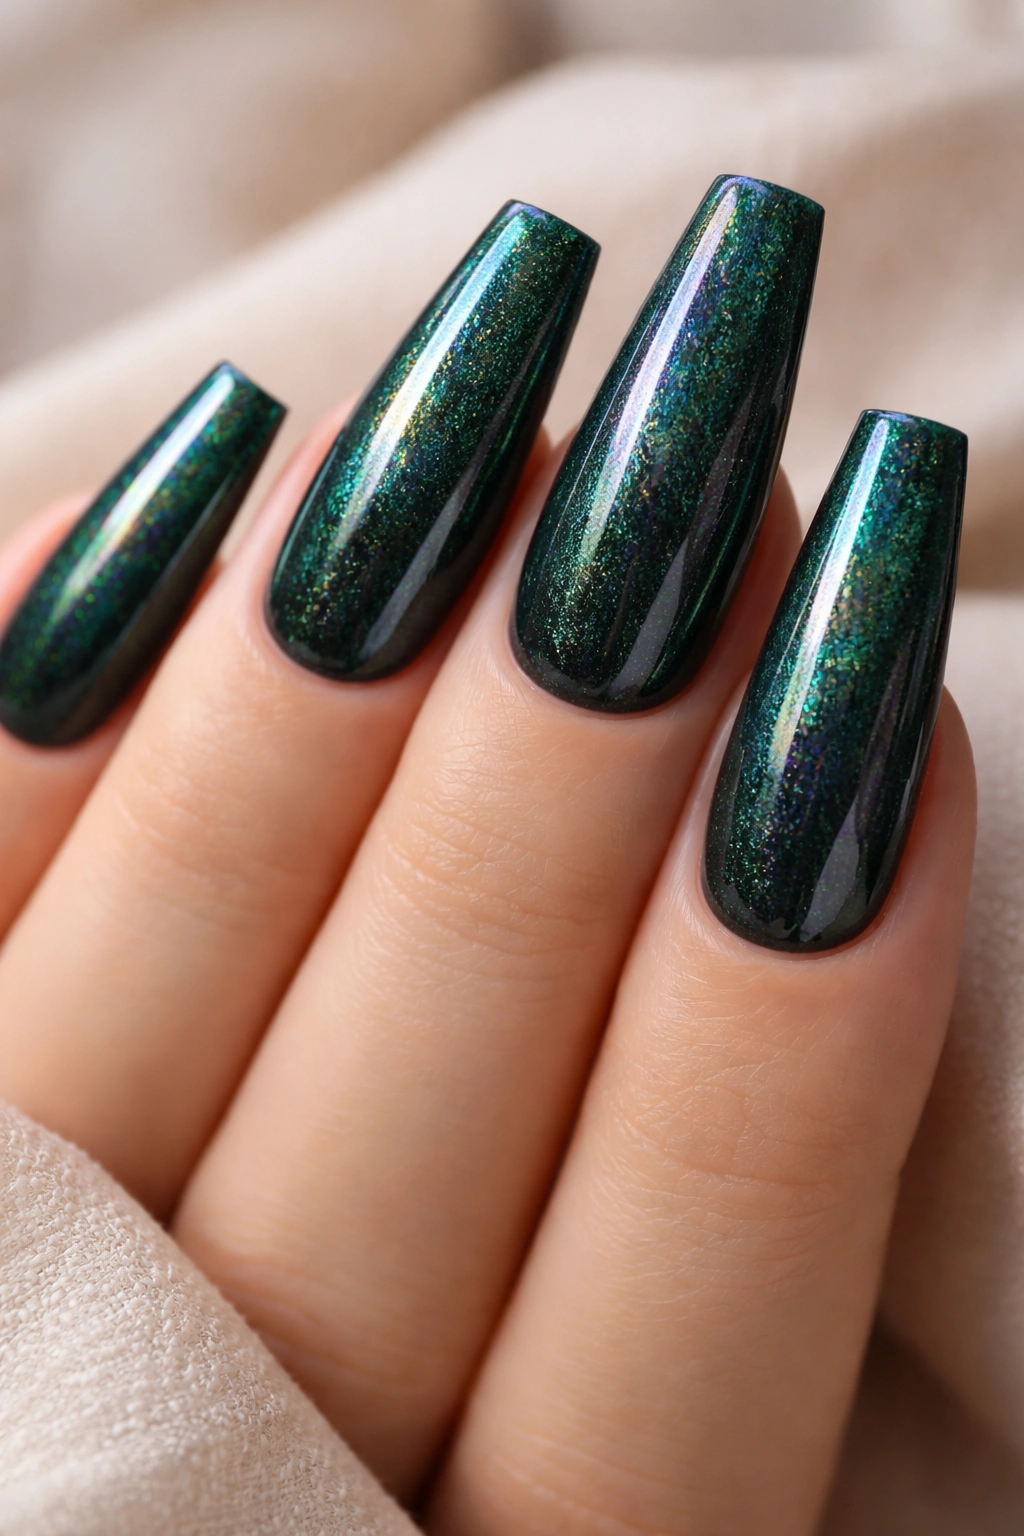
4. Forest Green with Silver Foil Shimmer
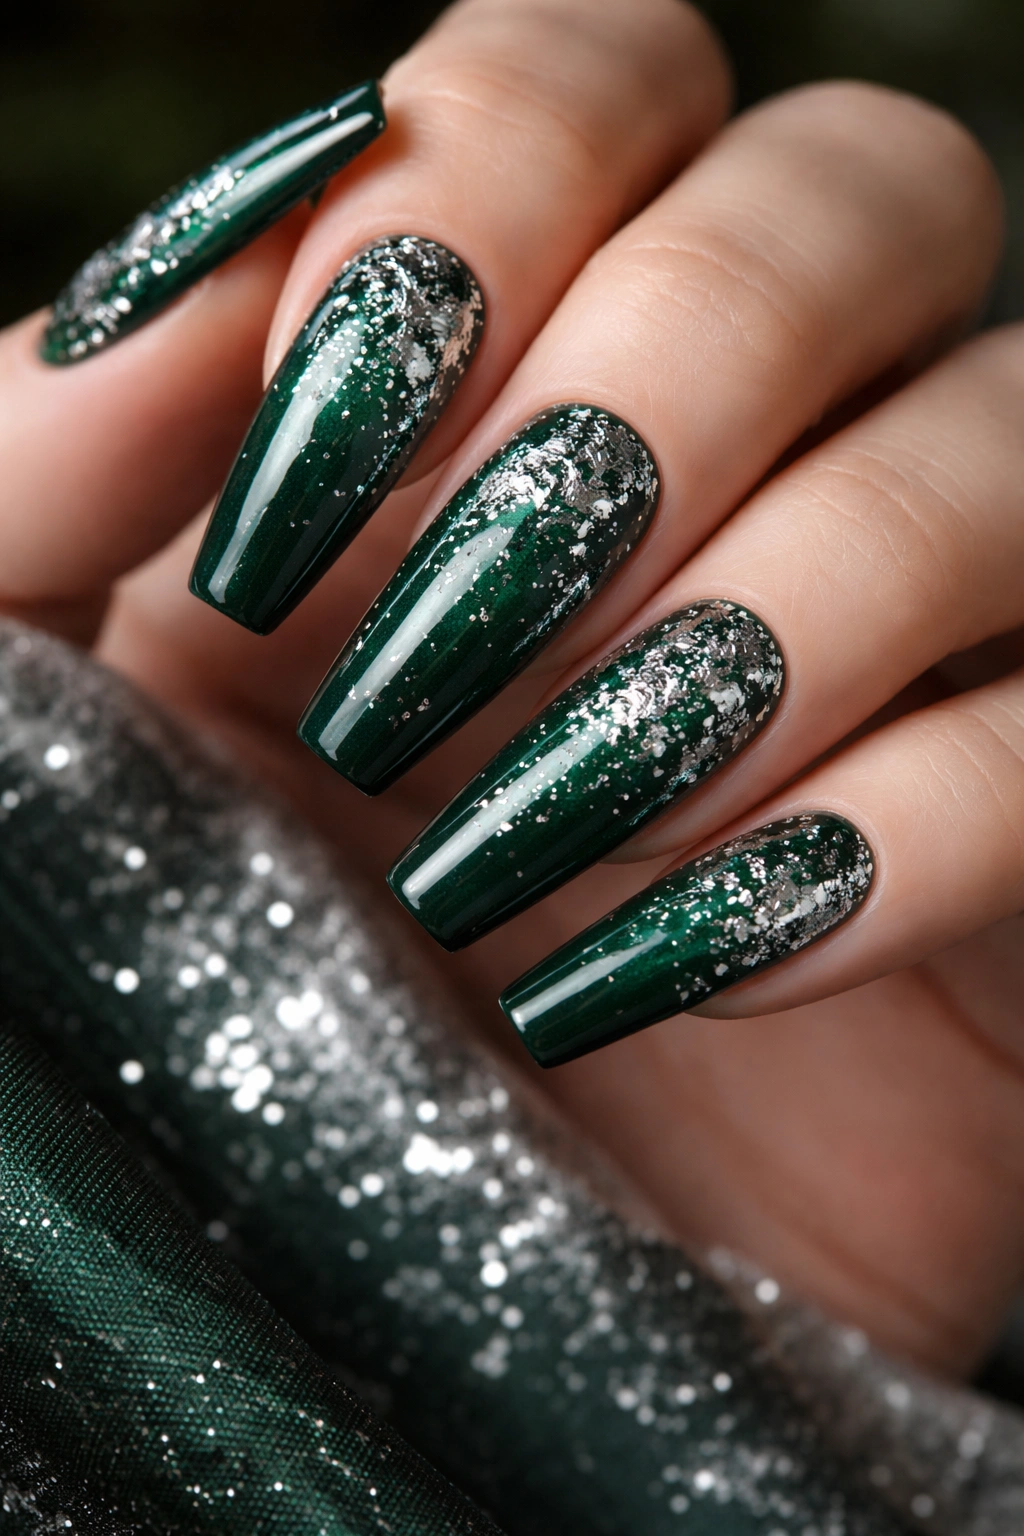
Deep forest green combined with silver foil creates an effect that’s part evening glam, part nature-inspired. The foil catches light from every angle, making your nails shimmer subtly in indoor light and sparkle in sunlight. Unlike glitter, foil creates a smooth, refined texture that feels polished rather than party-ready.
The Magic of Foil on Green Nails
Silver foil against deep green reads as elegant and intentional rather than flashy. The cool tones of silver complement the cool undertones in forest green, creating harmony rather than visual competition. On long coffin nails, foil sparkle is visible from multiple angles, which means your manicure looks purposeful whether people are viewing your hands straight-on or from the side.
Foil Application for Long Nails
- Apply two coats of forest green base polish and let cure fully
- Paint a thin layer of sticky gel top coat (or foil adhesive) over the entire nail surface
- Cut pieces of silver foil slightly larger than your nail and press firmly into place, rubbing gently
- Peel away the foil transfer sheet slowly — the foil pattern will remain on the nail
- Seal with non-sticky top coat to smooth the texture and protect the foil
- If foil coverage feels patchy, repeat the adhesive and foil process on problem areas
Pro tip: Foil works best on fully cured gel bases — regular polish doesn’t provide enough grip for the foil to adhere properly.
5. Seafoam Green with Pearl Dust Finish
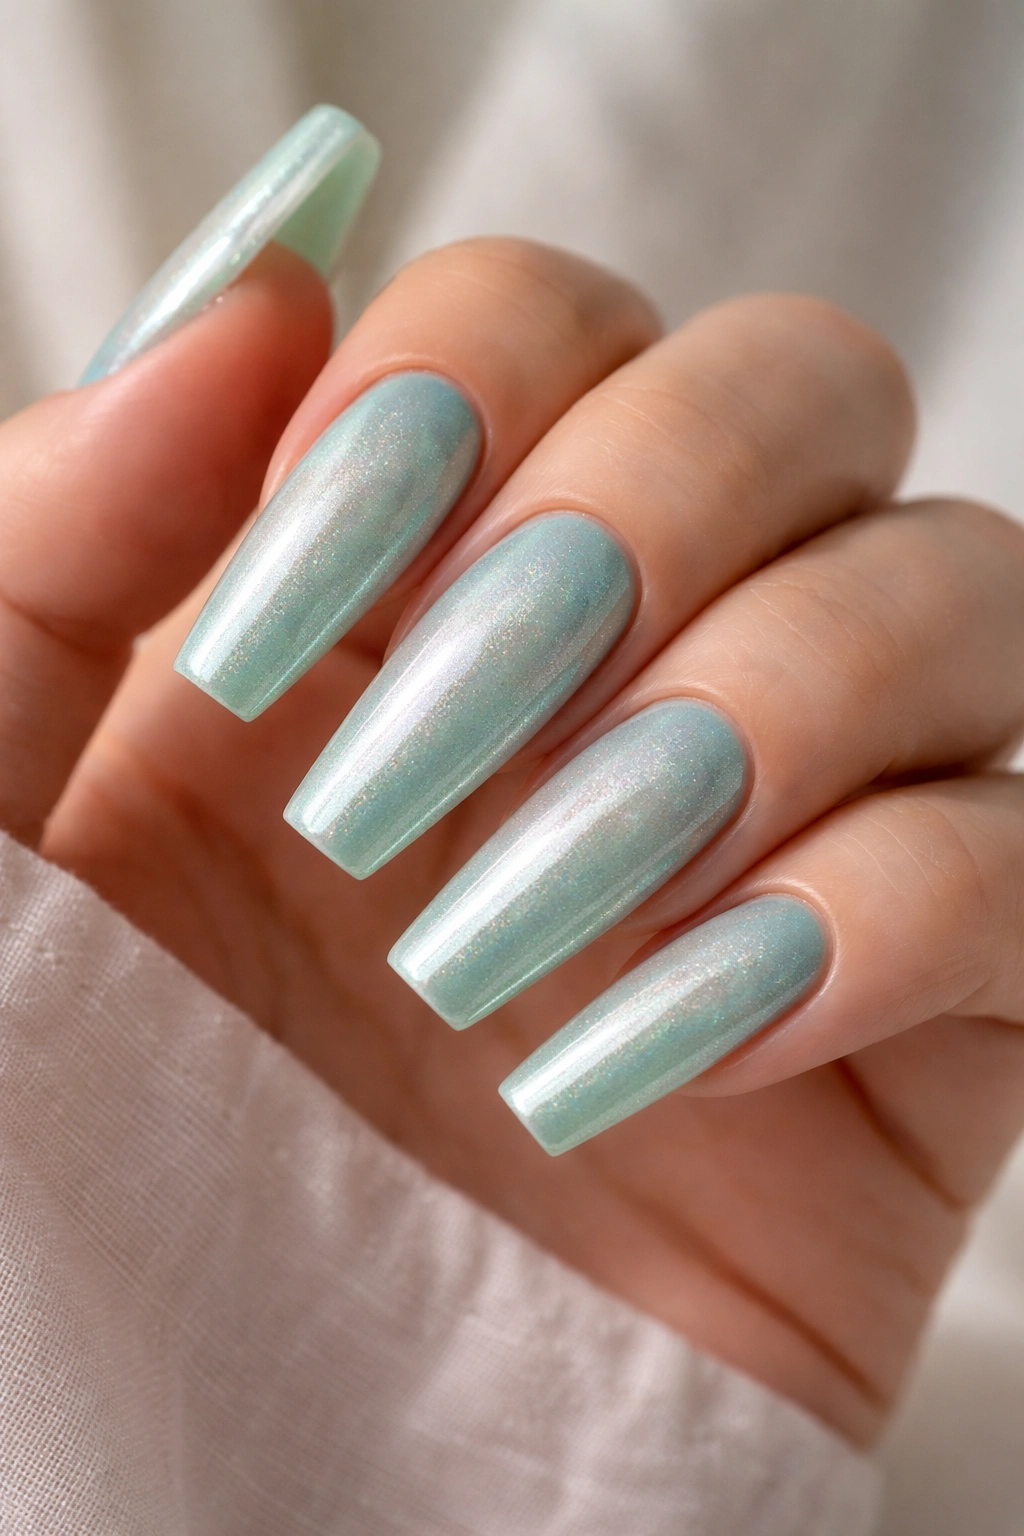
Seafoam green mixed with pearl dust creates a luminous, ethereal effect that shimmers delicately in natural light. This is the nail equivalent of catching the light off calm ocean water — the color shifts subtly depending on the angle and lighting. The finish feels organic and dreamy without being overly glittery or costume-like.
Why Pearl Dust Works on Seafoam
Pearl dust is finer than traditional glitter, creating a smooth texture that feels luxurious rather than grainy. Mixed directly into the polish or sprinkled into a tacky layer, pearl dust transforms a flat green into something with dimension and movement. On coffin nails, the larger surface area means the pearl effect is more visible and impactful.
Creating the Pearl Dust Effect
- Mix pearl dust directly into seafoam green polish before applying, or apply seafoam base and sprinkle dust into a tacky layer
- Apply the mixture in thin, even layers — thick applications look clumpy rather than luminous
- Let the base layer become slightly tacky before applying additional coats (about 1-2 minutes for gel, or wait fully if using regular polish)
- Seal with a clear top coat to encapsulate the pearl dust and create a smooth surface
- For an ombre effect, concentrate pearl dust more heavily near the cuticle and less toward the tip
- Test the ratio of dust to polish on a practice nail first — a little dust goes a long way
Worth knowing: Pearl dust settles at the bottom of bottles, so shake the mix thoroughly before each application to maintain consistent coverage.
6. Lime Green with Black Line Art
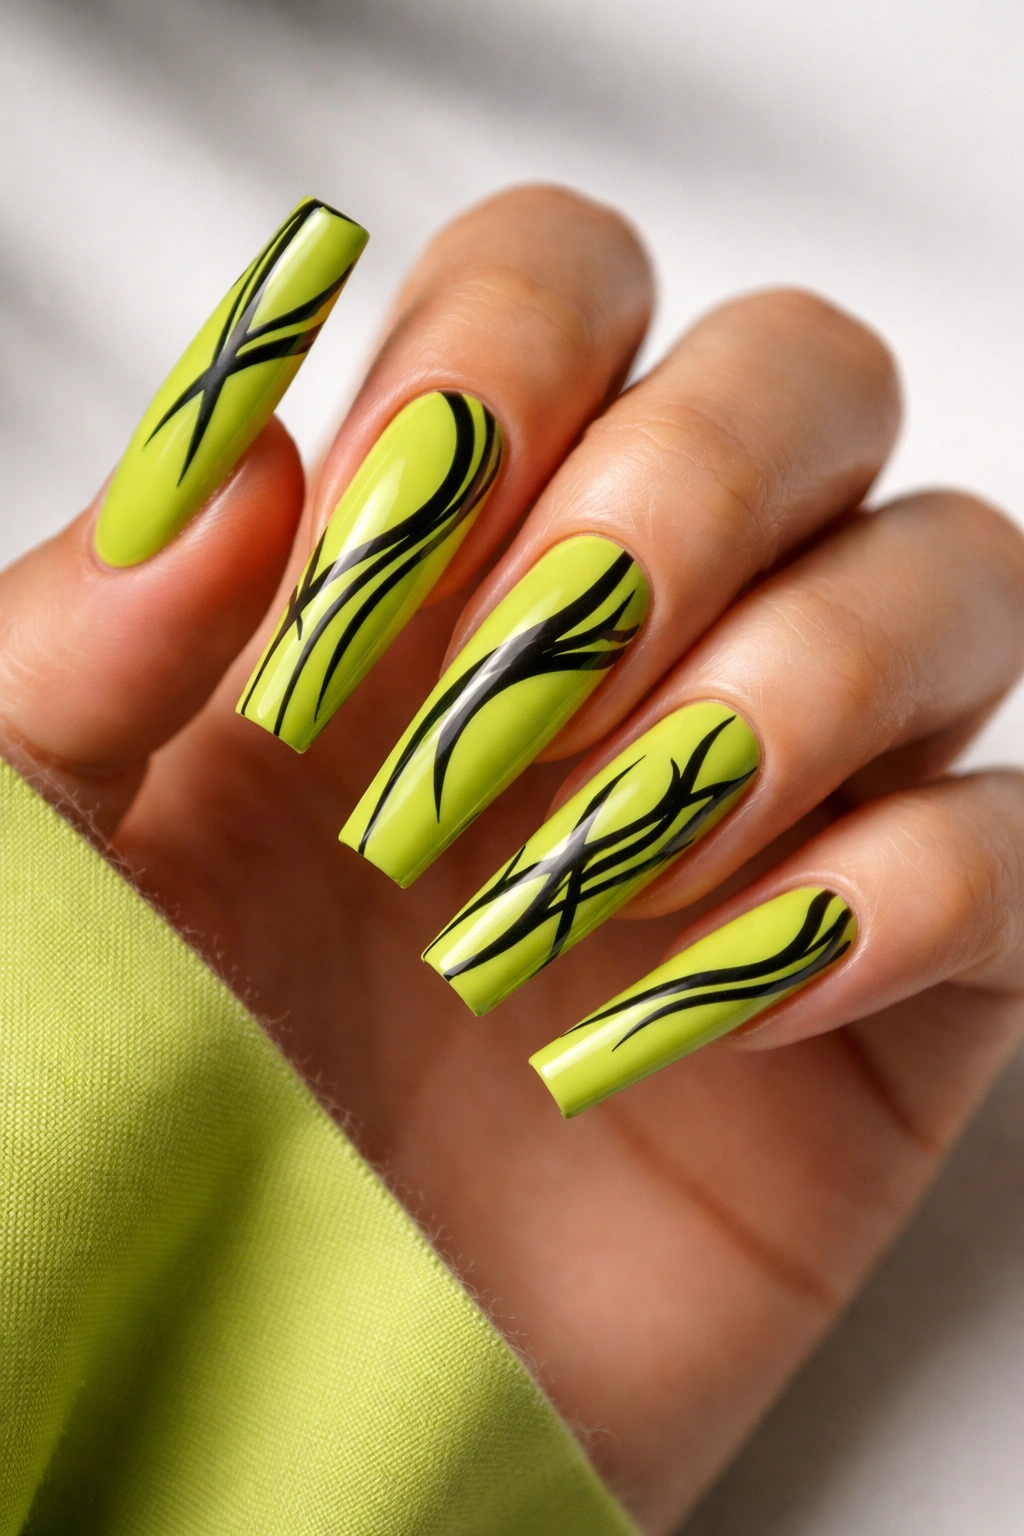
Bright lime green serves as a bold backdrop for intricate black line art that feels editorial and fashion-forward. Think botanical illustrations, geometric patterns, or abstract line designs in striking black ink. The high contrast between neon lime and true black reads as intentional and artistic rather than chaotic.
Line Art on Lime Green Demands Confidence
This design works because both colors are unapologetic — there’s no middle ground or subtle blending. The lime green announces itself immediately, and the black line work transforms it from bright-and-simple into an art piece. On long coffin nails, you have enough surface area to create detailed line work without the design feeling cramped or illegible.
Executing Black Line Art
- Apply two coats of bright lime green base and let cure fully
- Use a thin detail brush and pure black gel or polish to draw your chosen design
- Sketch the design lightly first using a toothpick or thin brush with water to see how it fits
- Common patterns: abstract leaves, geometric grids, scattered line patterns, or a central focal image on one accent nail
- Let black fully cure before applying top coat, or the black may bleed or smudge
- Seal with glossy or matte top coat depending on the vibe you want
Pro tip: If freehand art feels intimidating, search for nail art stickers or decals in black that coordinate with lime green, and apply them under a layer of gel.
7. Hunter Green with Burgundy Ombre Tips
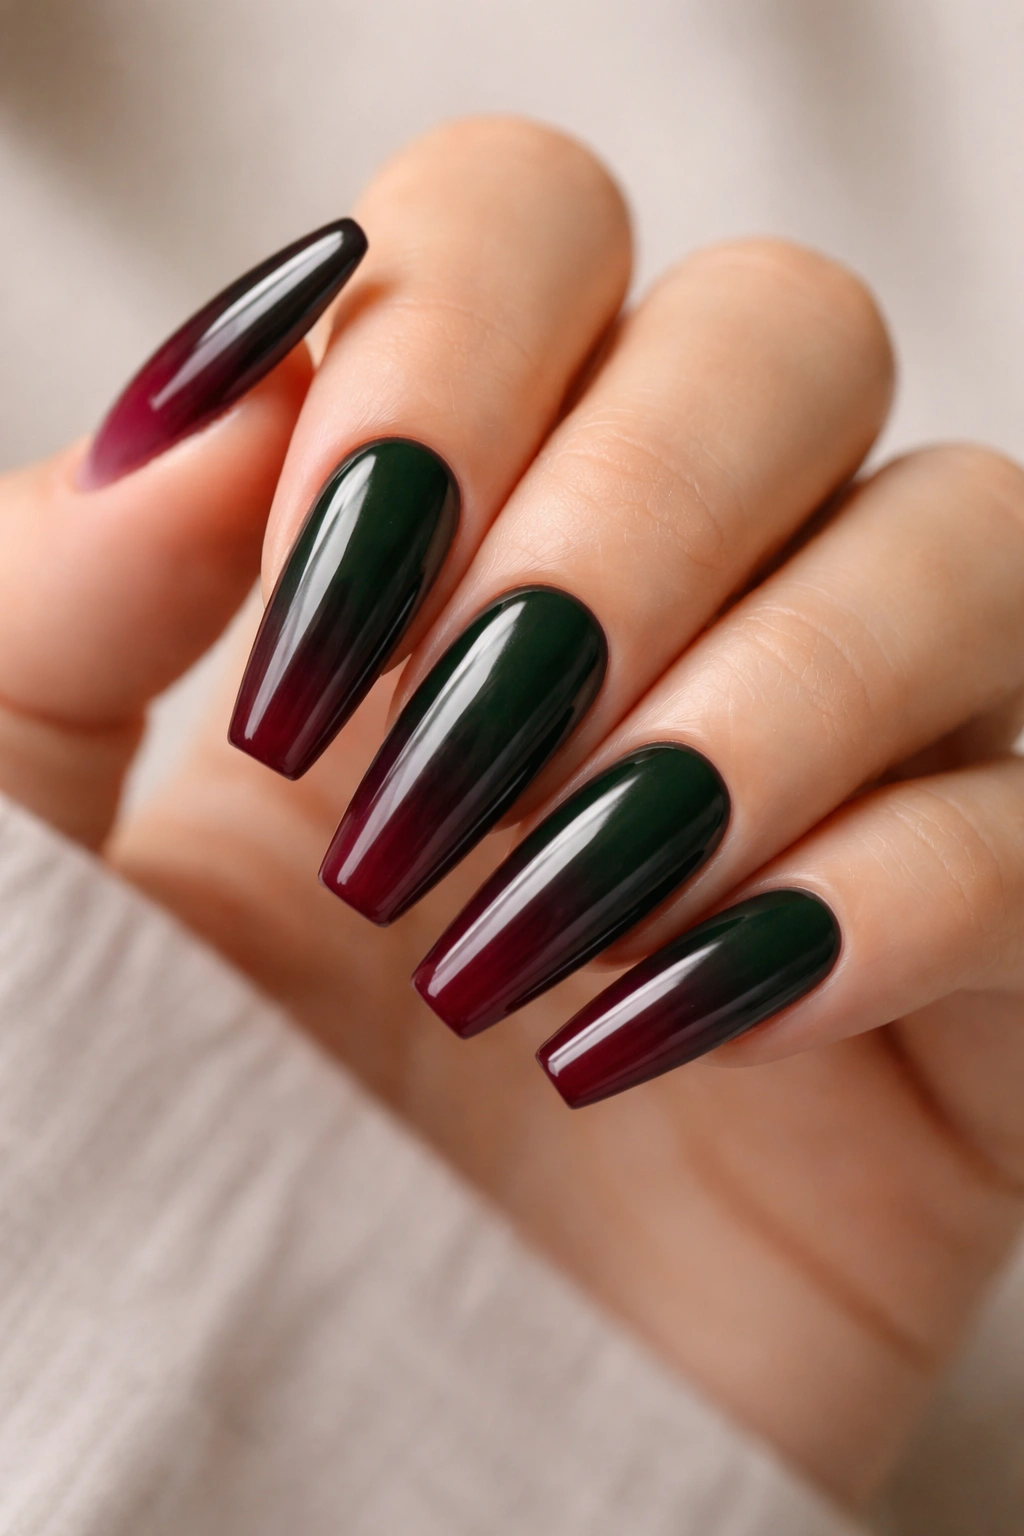
Hunter green transitioning to deep burgundy creates a sophisticated color story that feels luxe and intentional. The two colors share burgundy’s cool undertones, so they blend naturally instead of clashing. This design works year-round but feels particularly appropriate during cooler months when earth tones dominate fashion.
Color Harmony in Ombre Design
Hunter green and burgundy work together because they’re analogous colors on the color wheel — they sit next to each other, making their pairing feel natural rather than random. On coffin nails, this ombre creates a gradient that guides the eye from the base (calm and grounded) to the tip (dramatic and glamorous). The effect is more refined than a sudden color change would be.
Creating Hunter-to-Burgundy Ombre
- Paint hunter green base and let cure completely
- Create an ombre by sponging burgundy polish onto the tip half of the nail, then blending upward
- Mix a small amount of hunter green with burgundy to create a transitional shade for the middle zone
- Apply this blended shade across the transition area to soften the color shift
- Build up opacity gradually with multiple light layers rather than one heavy application
- Seal with top coat and buff out any visible sponge texture
Insider note: Burgundy polish is often thick — thin it slightly with gel top coat or a drop of polish thinner so it blends smoothly rather than applying in streaks.
8. Mint Green with Rose Gold Accents and Rhinestones
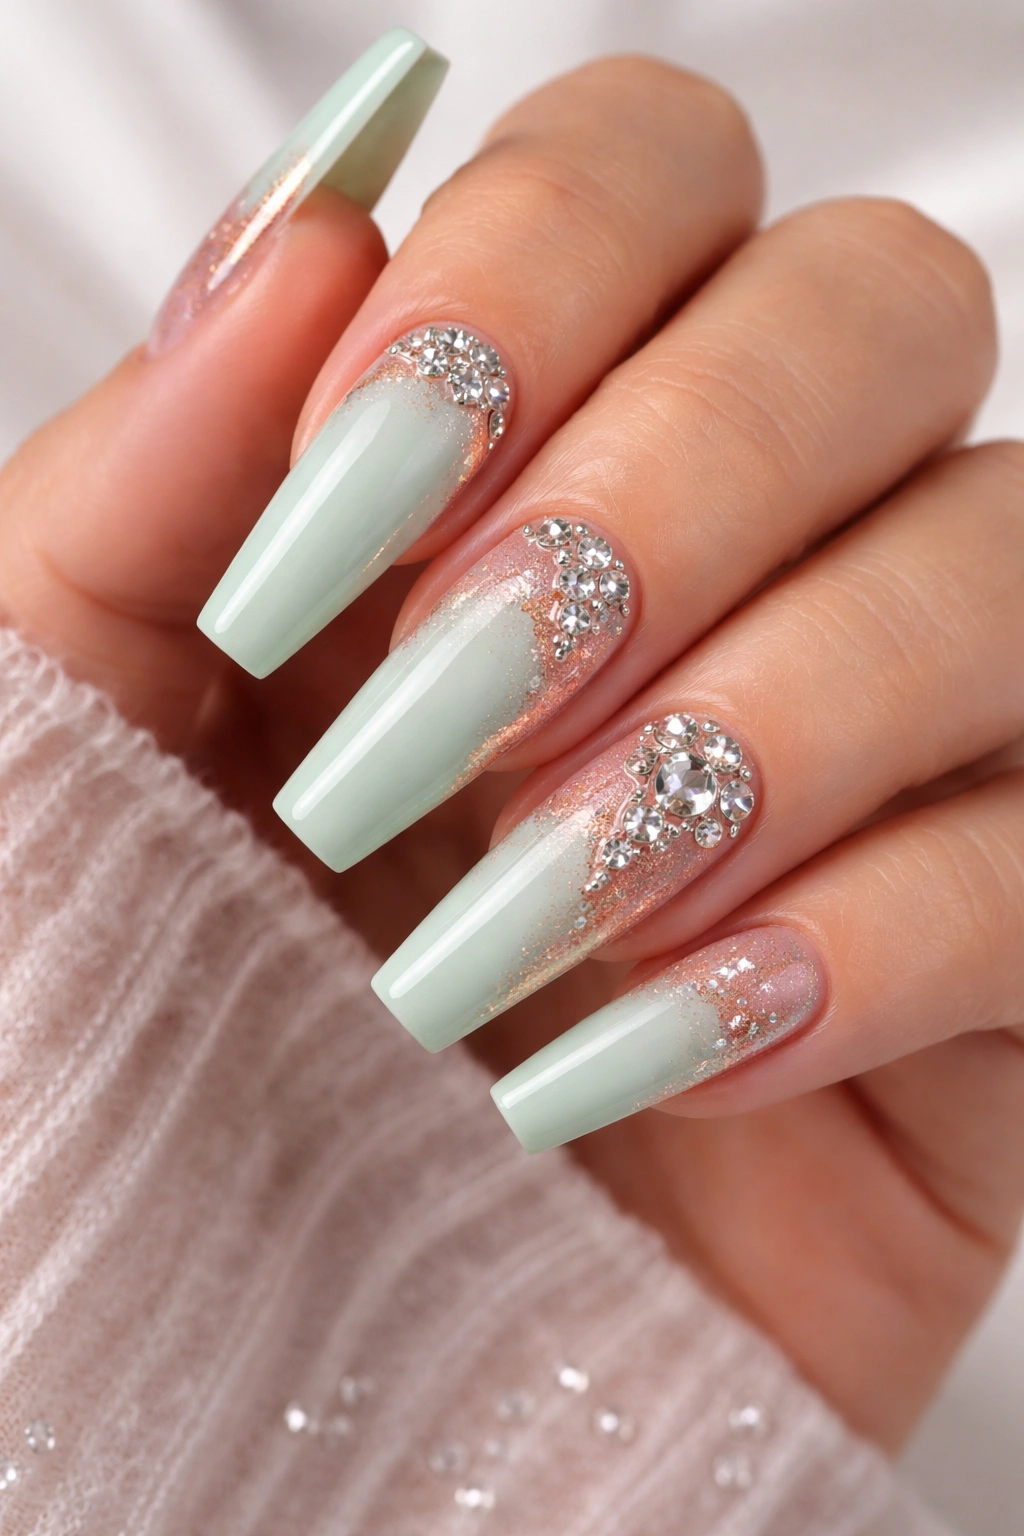
Soft mint green pairs beautifully with rose gold foil and strategically placed rhinestones for a design that feels romantic and celebratory. The cool mint allows rose gold to shine without overwhelming the nail, and rhinestones add dimension and catch light in unexpected ways. This design works for engagements, weddings, or any occasion calling for understated glamour.
Balancing Sparkle on Longer Nails
Long coffin nails provide enough space to distribute rhinestones without the design feeling overdone or costume-like. Strategic placement (perhaps a diagonal line of stones, a scattered pattern, or concentrated on the accent nail) makes rhinestones feel intentional. Rose gold foil bridges the gap between cool mint and warm sparkle, creating visual coherence.
Building the Mint-Rose Gold-Rhinestone Design
- Apply two coats of mint green base and cure fully
- Paint a thin layer of rose gold foil using foil adhesive, or apply rose gold striping tape for accents
- Place rhinestones using a dab of sticky gel or jewel glue on a detail brush — position each stone carefully
- Allow adhesive to set before applying top coat
- Seal with top coat carefully around stones to avoid disturbing their placement
- Alternatively, place rhinestones after fully sealing to ensure they don’t shift during cure
Pro tip: Use flat-back rhinestones in varying sizes (a mix of 2mm and 3mm creates more interest than uniform sizes) and anchor them with builder gel rather than regular top coat for maximum durability.
9. Pistachio Green with White Striping and Negative Space
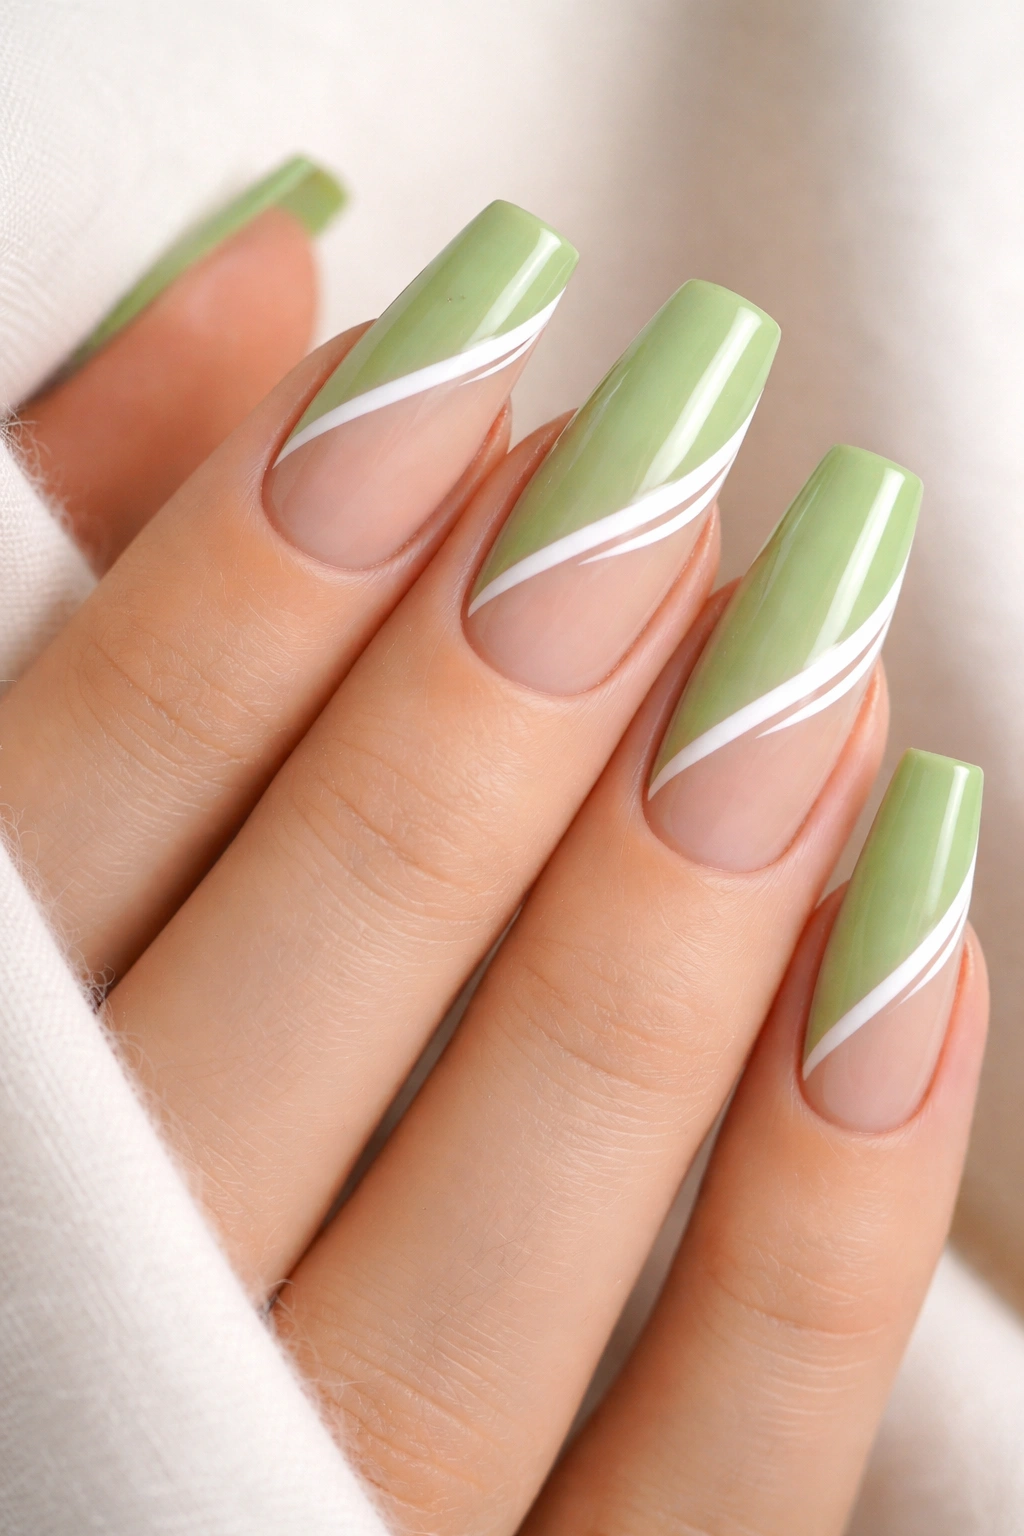
Pistachio green — a soft, warm-toned green — pairs with white striping and intentional negative space (bare nail) to create a design that feels Scandinavian-modern and refined. The stripes create movement while negative space keeps the design from feeling busy. This is an approachable design that looks intentional without requiring advanced skill.
Negative Space as Design Element
Negative space isn’t a mistake — it’s a deliberate design choice that creates visual rest and sophistication. On coffin nails, leaving portions of the nail bare (showing the natural nail or a neutral base) alongside pistachio green creates balance and prevents the design from feeling overwhelming. It’s a trick professional nail artists use to make designs feel refined rather than cluttered.
Creating Pistachio-White-Negative Space
- Paint the entire nail a warm, creamy base (nude or soft pink) as your negative space
- Apply pistachio green to specific areas: maybe the sides of the nail and a stripe down the center, or half the nail with white and pistachio in alternating patterns
- Use striping tape or a thin brush to create clean lines between colors
- Leave portions of the base color intentionally visible — this is what creates the negative space effect
- Seal everything with top coat for a cohesive finish
- This design is extremely customizable — adapt the stripe pattern to suit your vision
Worth knowing: Creating clean lines with regular polish is tricky — consider using gel polish for this design so you can cure between color applications and maintain sharp demarcations.
10. Teal Green with Gradient Glitter Fade
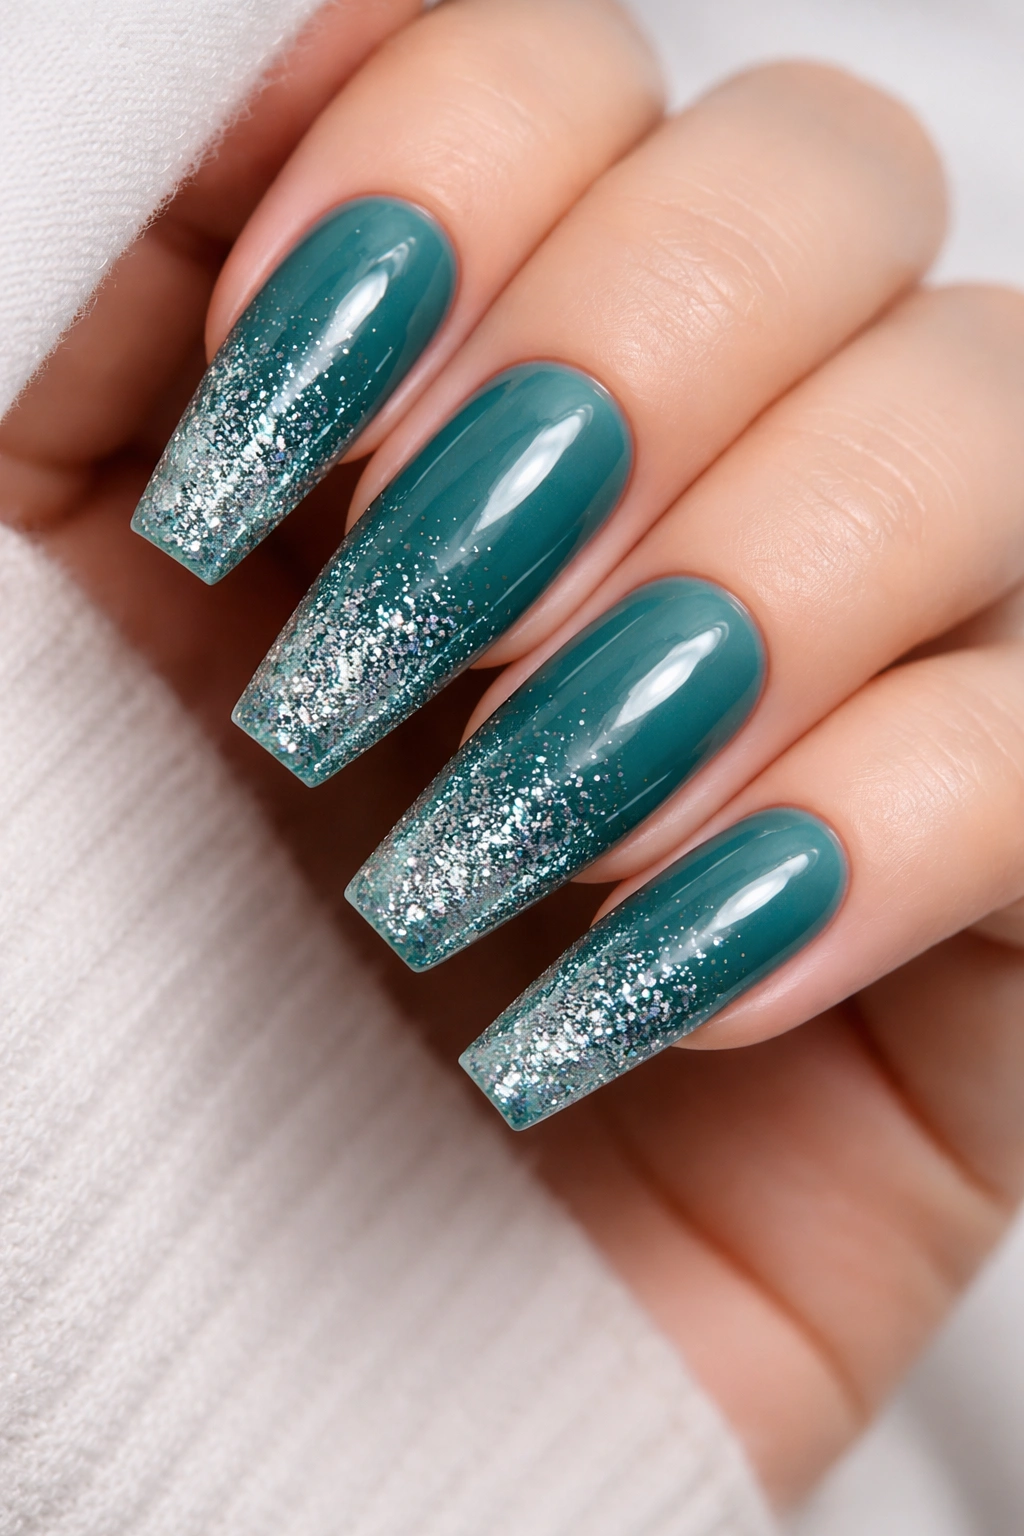
Teal green — a blue-green hybrid — creates the perfect base for a glitter fade that intensifies toward the tips. Fine glitter in silver, gold, or holographic creates a sparkling gradient that feels both wearable and celebratory. The teal base grounds the glitter in nature-inspired sophistication rather than party-ready excess.
Why Glitter Fades Work on Coffin Nails
A glitter fade creates visual depth and movement on longer nails. Concentrating glitter more heavily toward the tips makes nails appear even longer while creating a sense of downward motion. The teal base prevents the glitter from feeling costume-like, and the taper of coffin nails naturally guides where glitter concentration feels balanced.
Building a Teal-to-Glitter Fade
- Apply two coats of teal green base and cure fully
- Mix fine glitter with clear gel or glitter suspension formula in a small dish
- Apply the glitter mixture to the bottom third of the nail using a brush, concentrating most glitter toward the tip
- Apply a second layer of glitter to the bottom quarter, building opacity only at the very tip
- Apply a layer of clear builder gel over the entire nail to encapsulate glitter and create a smooth surface
- Seal with top coat for a glossy, finished appearance
Pro tip: Mix glitter directly into builder gel rather than clear gel — builder gel is thicker and holds glitter in place better without requiring multiple encapsulation layers.
11. Kelly Green with Chrome Finish Tips
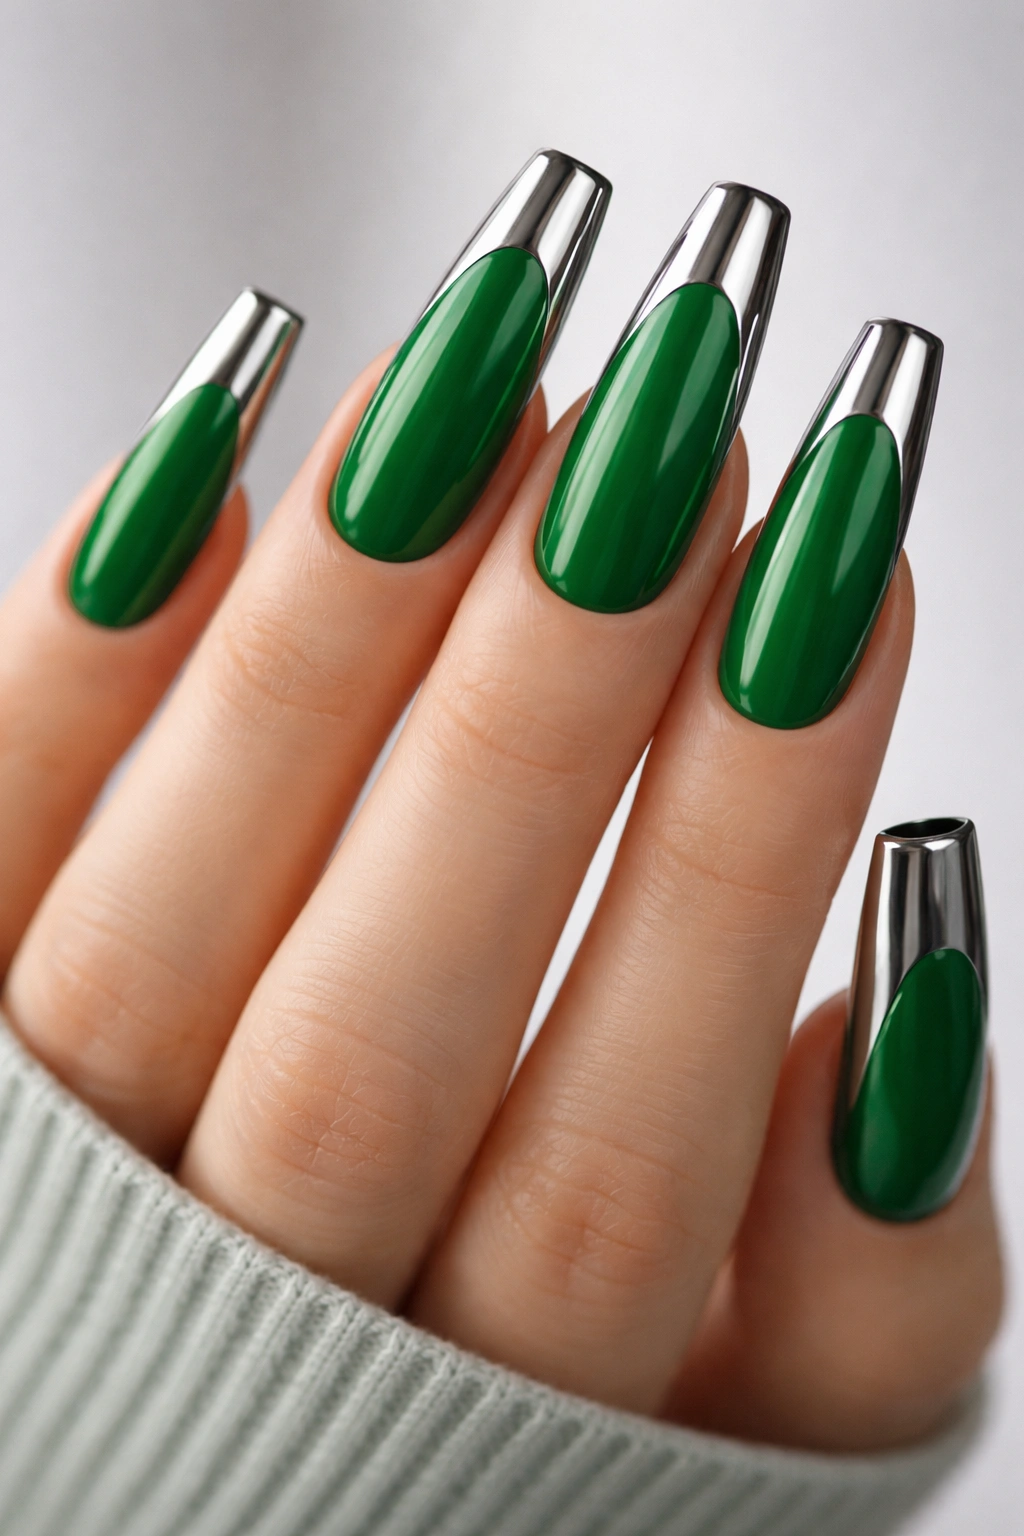
Deep kelly green topped with chrome — that futuristic, mirror-like metallic finish — creates a design that feels editorial and avant-garde. The chrome tips catch light intensely, creating an almost holographic effect that’s impossible to ignore. This is the design for someone unafraid of bold nail statements.
Chrome’s Power on Green Nails
Chrome is undeniably eye-catching, which is why pairing it with a strong base color like kelly green (rather than nude or pink) works so well. The combination reads as intentional high fashion rather than accidental. On coffin nails, chrome tips create a naturally lengthening effect because the metallic finish draws focus to the nail’s extremities.
Applying Chrome to Kelly Green
- Paint kelly green base coat and cure fully
- Apply a thin layer of chrome adhesive or sticky builder gel to the tip half of each nail
- Press chrome powder onto the adhesive using a velvet applicator pad, rubbing gently in one direction for smooth, even coverage
- Apply a second layer of adhesive and chrome to build opacity if needed
- Seal the entire nail with a layer of builder gel, then top coat
- Alternatively, apply chrome powder over a chrome gel base for easier application
- If chrome powder applies unevenly, a light buffing with a fine-grit buffer can help smooth the surface
Worth knowing: Chrome powder requires a specific adhesive base to work properly — don’t attempt to apply it directly over regular polish, as it won’t adhere.
12. Moss Green with Botanical Nail Art
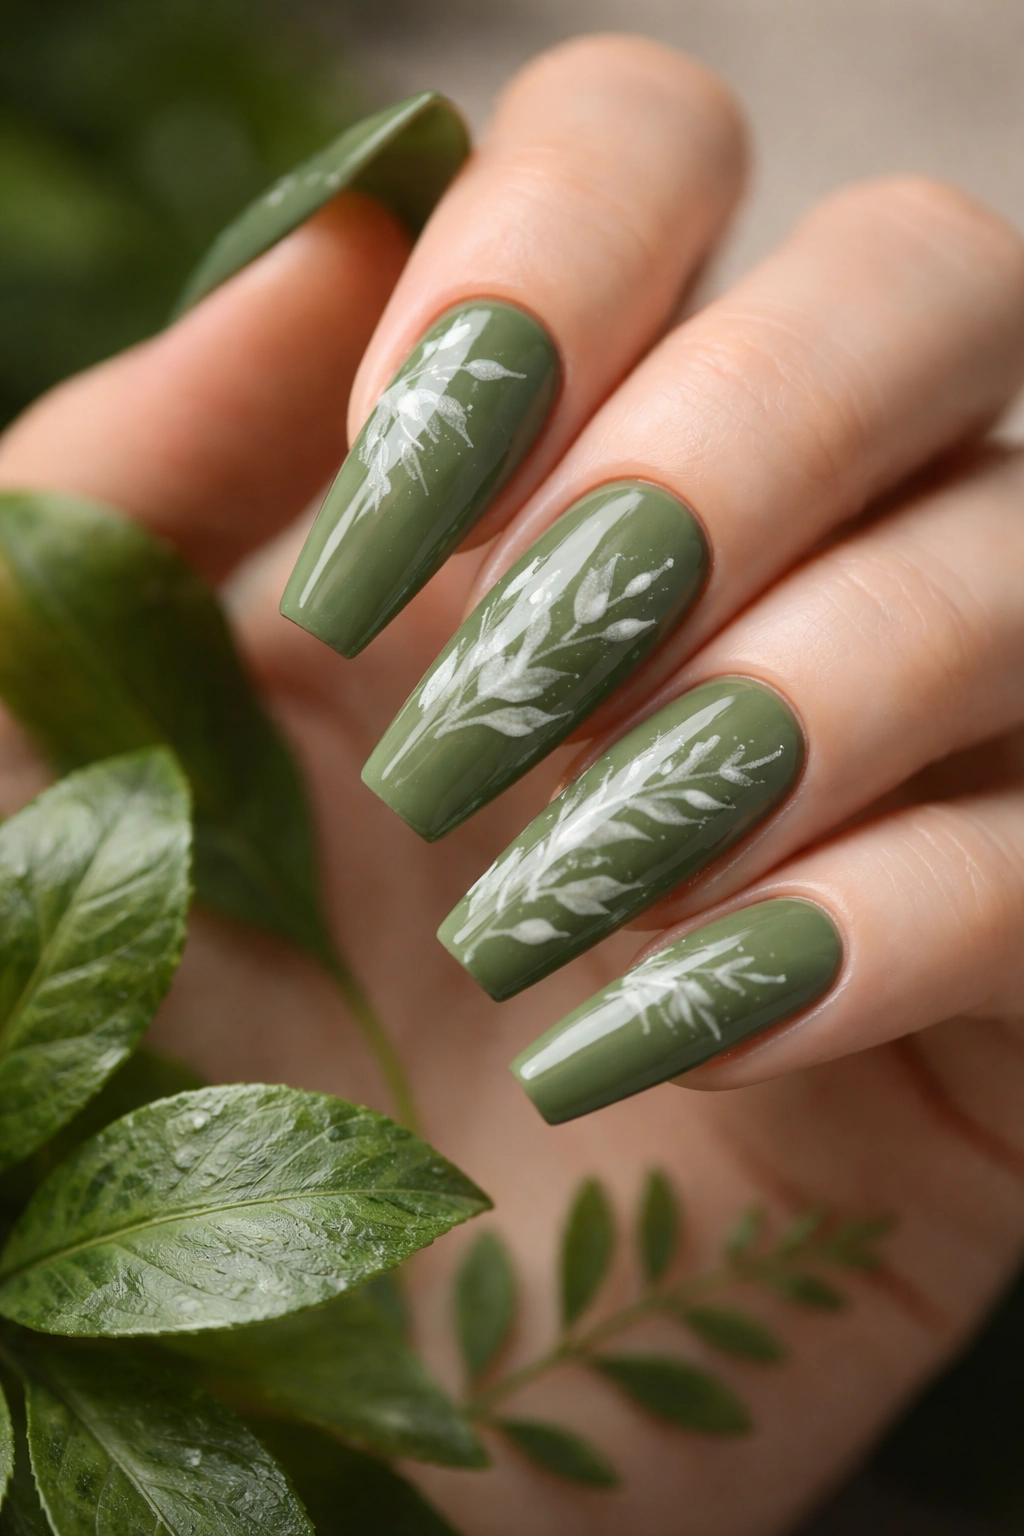
Moss green serves as a naturalistic backdrop for delicate botanical illustrations — leaves, ferns, wildflowers, or vines in whites, creams, and complementary green shades. This design celebrates the nail as a canvas for miniature art and feels artistic without being overdone. It’s perfect for nature lovers and anyone who appreciates detail.
Why Botanical Art Complements Moss Green
Moss green is literally inspired by nature, so adding botanical imagery feels cohesive rather than random. The muted, earthy tone of moss green allows detailed artwork to shine without visual competition. On long coffin nails, botanical designs have room to breathe and showcase the detail without cramping the composition.
Creating Botanical Designs
- Apply two coats of moss green base and cure fully
- Use a very thin detail brush and white or cream gel to paint botanical elements
- Common designs: single fern frond running down the center of the nail, scattered small leaves, delicate vine wrapping around the nail’s edge
- For more intricate work, sketch the design lightly first using a water-based pencil, then paint over it
- Consider painting the same design on all nails for cohesion, or concentrate it on accent nails only
- Seal with glossy top coat to protect the artwork and create a smooth surface
Pro tip: If freehand botanical painting feels beyond your skill level, use a thin striping brush and focus on simple shapes (small ovals for leaves, thin lines for stems) rather than detailed realistic illustrations.
13. Celadon Green with Gold Geometric Patterns
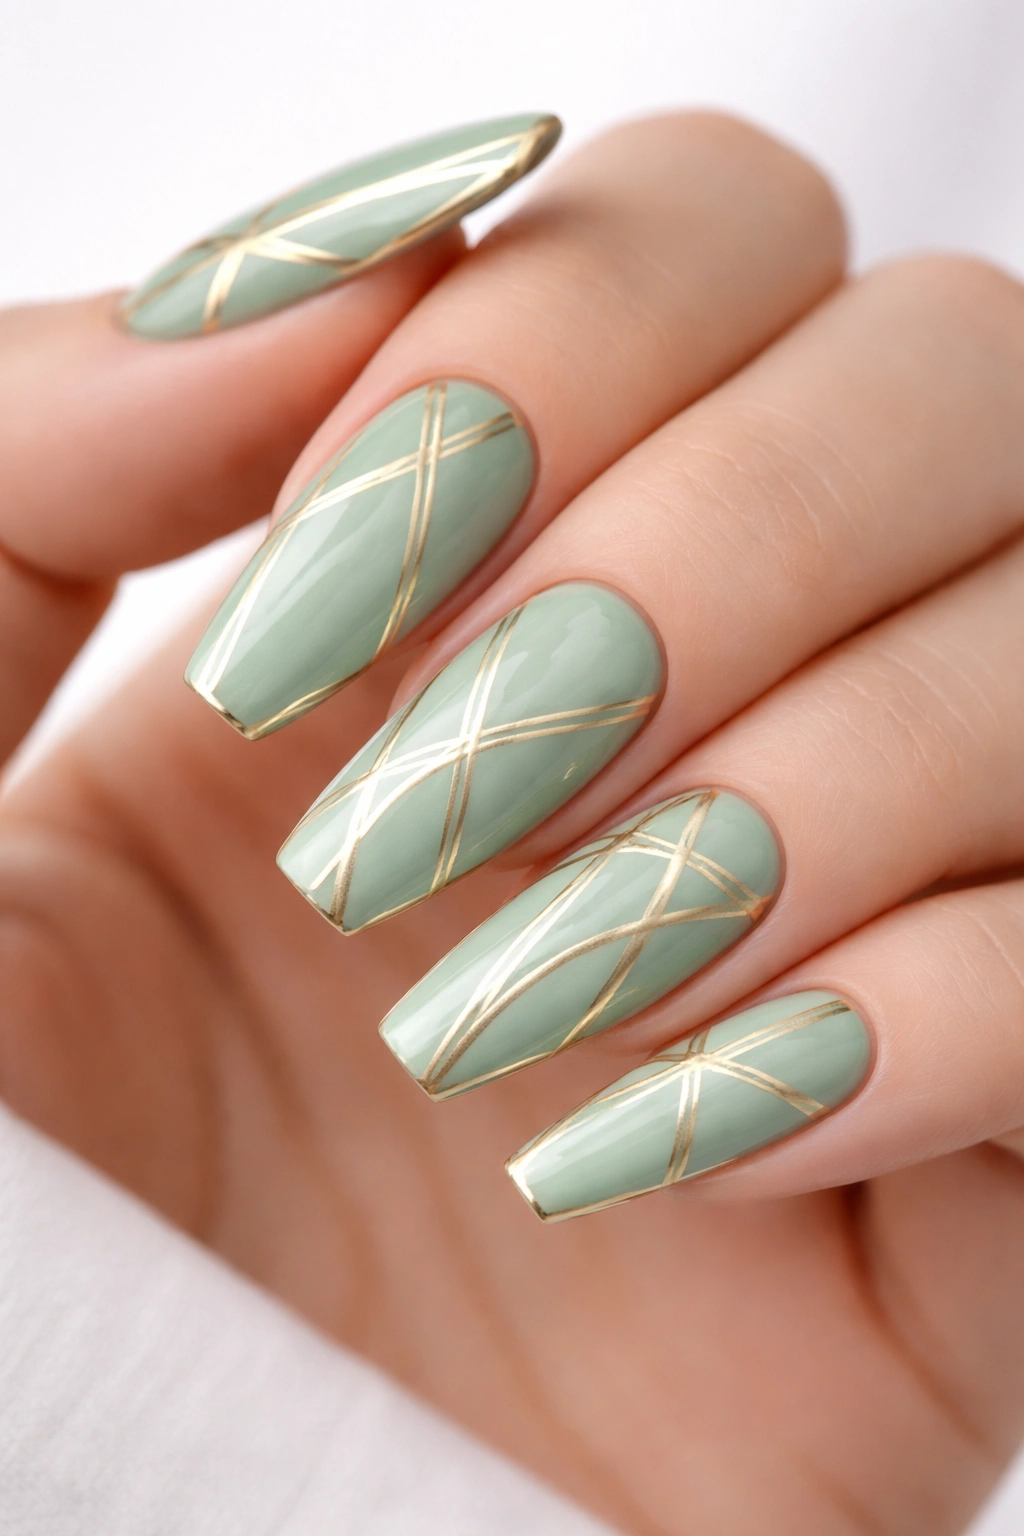
Celadon — a soft, pale green with gray undertones — paired with gold geometric patterns creates a design that feels sophisticated and gallery-quality. The minimalism of geometric patterns combined with the elegance of celadon reads as intentional and curated. This design works for professional settings while still feeling special and thoughtfully executed.
The Sophistication of Pale Green Plus Gold
Celadon is often overlooked in favor of bolder greens, but its muted elegance makes it the perfect companion for metallic accents. Gold against celadon reads as refined rather than flashy because the base color is understated. On coffin nails, the gentle green allows geometric gold work to be the focal point without overwhelming the design.
Creating Celadon-and-Gold Geometric Patterns
- Apply two coats of celadon green base and cure fully
- Use gold striping tape to create geometric patterns: triangles, hexagons, angular grids, or abstract lines
- Press tape firmly to ensure clean edges, then cure or dry
- Remove tape carefully by peeling at a 45-degree angle
- Alternatively, paint gold patterns freehand using a thin brush and gold gel
- Consider creating different geometric patterns on each nail for visual interest while maintaining cohesion
- Seal with top coat for a polished, professional appearance
Insider note: Striping tape creates cleaner lines than freehand painting, making it ideal if precision matters more than artistic spontaneity.
14. Olive Green with Nude Base and Gradient Tip
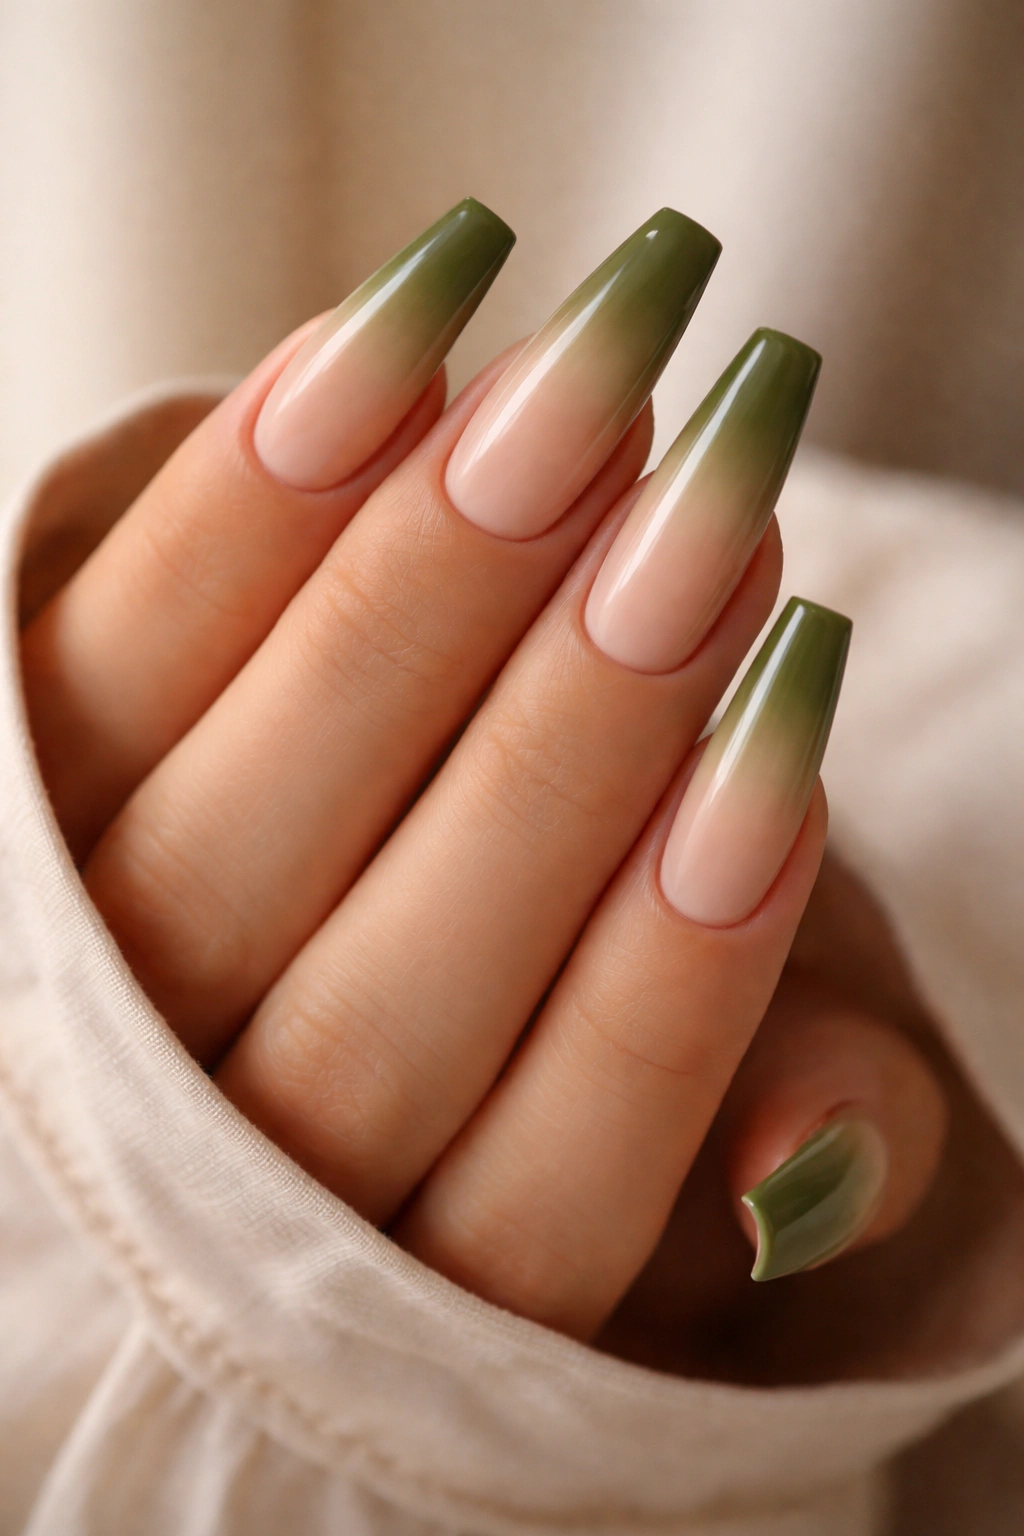
Olive green concentrated on the tips with a nude or cream base creates an elegant French manicure variation that feels modern and wearable. The color flows from neutral base to earthy green tip, creating a sophisticated look that suits both casual and professional settings. The gradient keeps the transition soft and refined.
Modern Interpretations of Classic Designs
French manicures feel timeless because they’re balanced — the light base elongates fingers while the tip color adds depth. Adding olive green instead of the traditional white updates the classic while maintaining its elegant simplicity. On long coffin nails, this gradient variation is even more striking because the base-to-tip progression is visible along the full nail length.
Executing Olive Green Tips
- Paint the entire nail a creamy nude or soft pink base and cure fully
- Apply olive green to the tip half of each nail
- Create a soft blend where the two colors meet by sponging a tiny amount of olive into the nude base at the transition zone
- Alternatively, use a gradient tool or soft brush to feather where colors meet
- Apply multiple thin layers for smooth blending rather than one thick application
- Seal with top coat and add a glossy finish for polish and cohesion
Pro tip: This design looks best when the color transition is gradual rather than abrupt — spend time blending the line where colors meet.
15. Dark Green with Holographic Shimmer
Deep, dark green combined with holographic shimmer creates a magical effect that shifts colors depending on light and angle. Holographic elements catch every color of the spectrum, creating a prism-like effect that’s subtle in shade and dramatic in movement. This design appeals to anyone who loves otherworldly, multidimensional nail art.
Holographic Effects on Long Nails
Holographic elements are most visible on longer nails because there’s more surface area for light to interact with the particles. Dark green provides a neutral canvas that allows holographic sparkle to show clearly without competing for attention. On coffin nails, holographic shine is visible from any angle, making your nails shimmer beautifully whether you’re scrolling on your phone or reaching for a cup of coffee.
Applying Holographic Elements
- Paint two coats of dark green base and cure fully
- Mix holographic pigment into clear builder gel — you can buy pre-made holographic gel, or add loose holographic powder to clear gel
- Apply the holographic mixture in patterns: full coverage for maximum shimmer, or concentrated on tips or selected nails for subtle effect
- Build opacity gradually with multiple thin layers if using loose pigment
- Seal with clear top coat, but avoid thick top coats that cloud the holographic effect
- Alternatively, apply holographic foil using foil adhesive for a different texture and light-catching effect
Worth knowing: Holographic elements show more dramatically in bright light and sunlight than in indoor lighting — consider this when deciding how much shimmer you want.
16. Sage Green with Minimal Gold Line Details
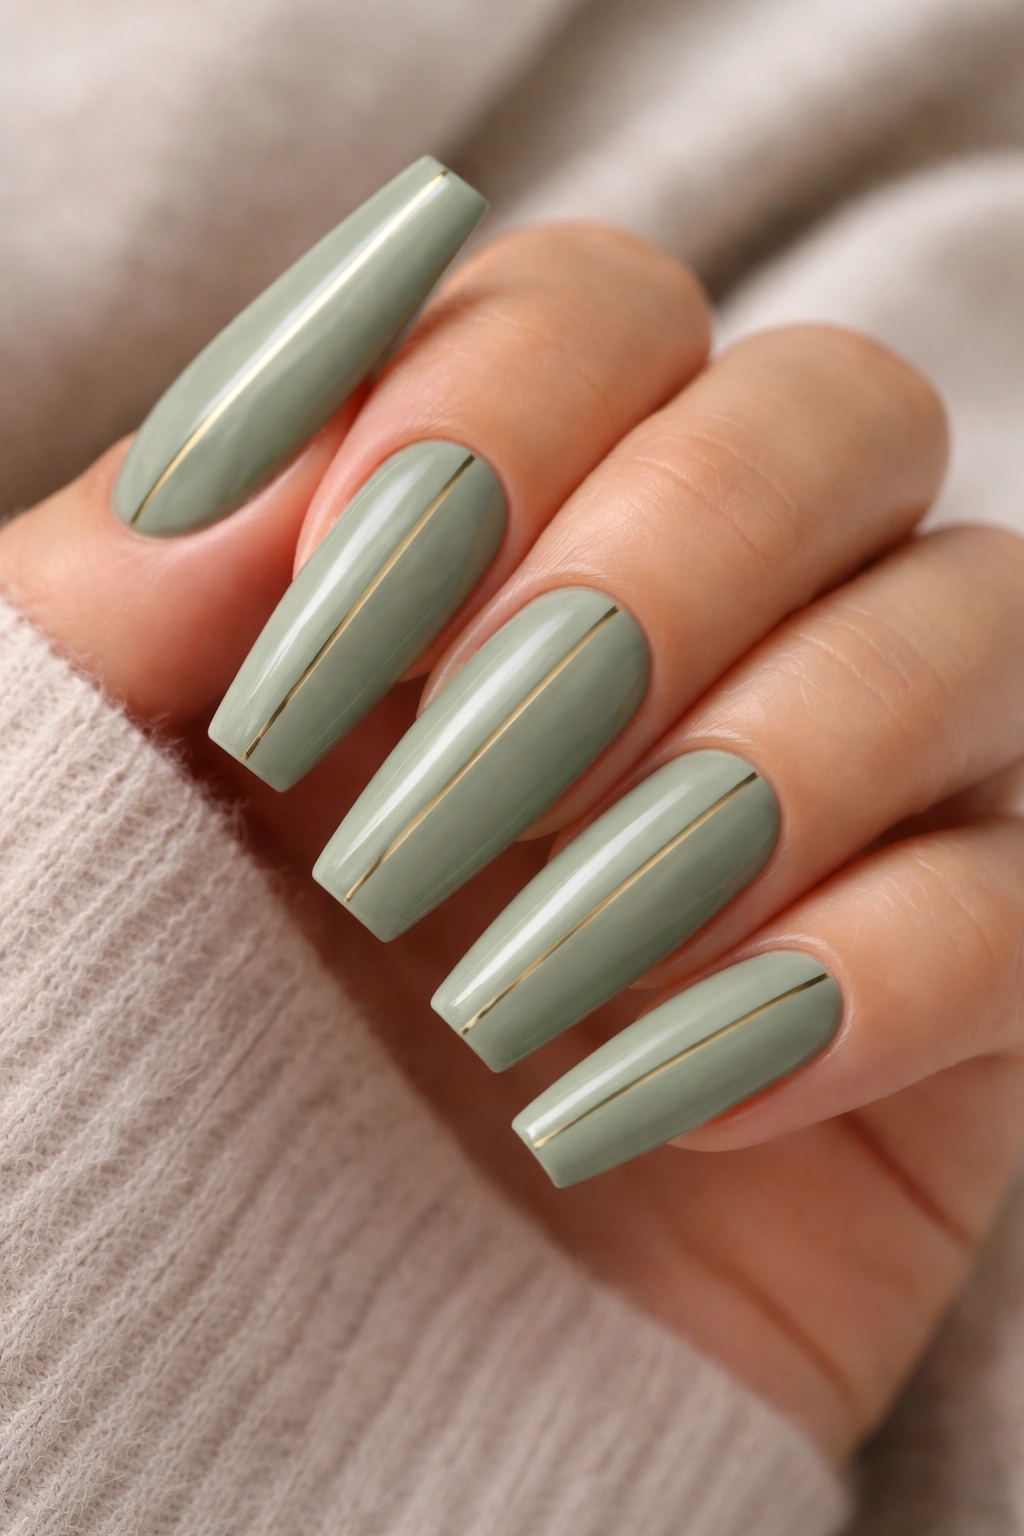
Sage green painted with minimal gold line details creates a zen-like, meditative aesthetic that feels modern and calm. A single gold line, perhaps along the cuticle or running vertically through the center of the nail, provides just enough visual interest without disrupting the serene vibe. This design proves that less is often more.
The Power of Minimalism on Nails
Minimalist nail designs feel intentional and sophisticated because every element serves a purpose. There’s no visual noise, no competing elements — just a beautiful color and one carefully considered accent. On long coffin nails, minimalism reads as confidence and editorial sensibility rather than laziness.
Creating Minimal Gold Details
- Apply two or three coats of sage green and cure fully — ensure coverage is even and saturated
- Using a very thin striping brush or gold striping tape, create a single line accent: vertical down the center, horizontal along the cuticle, or a thin frame around the edge
- If painting freehand, use steady, deliberate strokes — a slightly imperfect hand-painted line feels intentional and artisanal
- Cure or dry the accent line completely before applying top coat
- Seal with glossy top coat for a polished finish
- This design works best when the gold line is truly minimal — resist the urge to add additional details
Pro tip: A single accent nail (usually the ring finger) with gold detail while keeping other nails solid sage green creates visual interest while maintaining minimalism.
17. Lime Green with White Marble Swirls
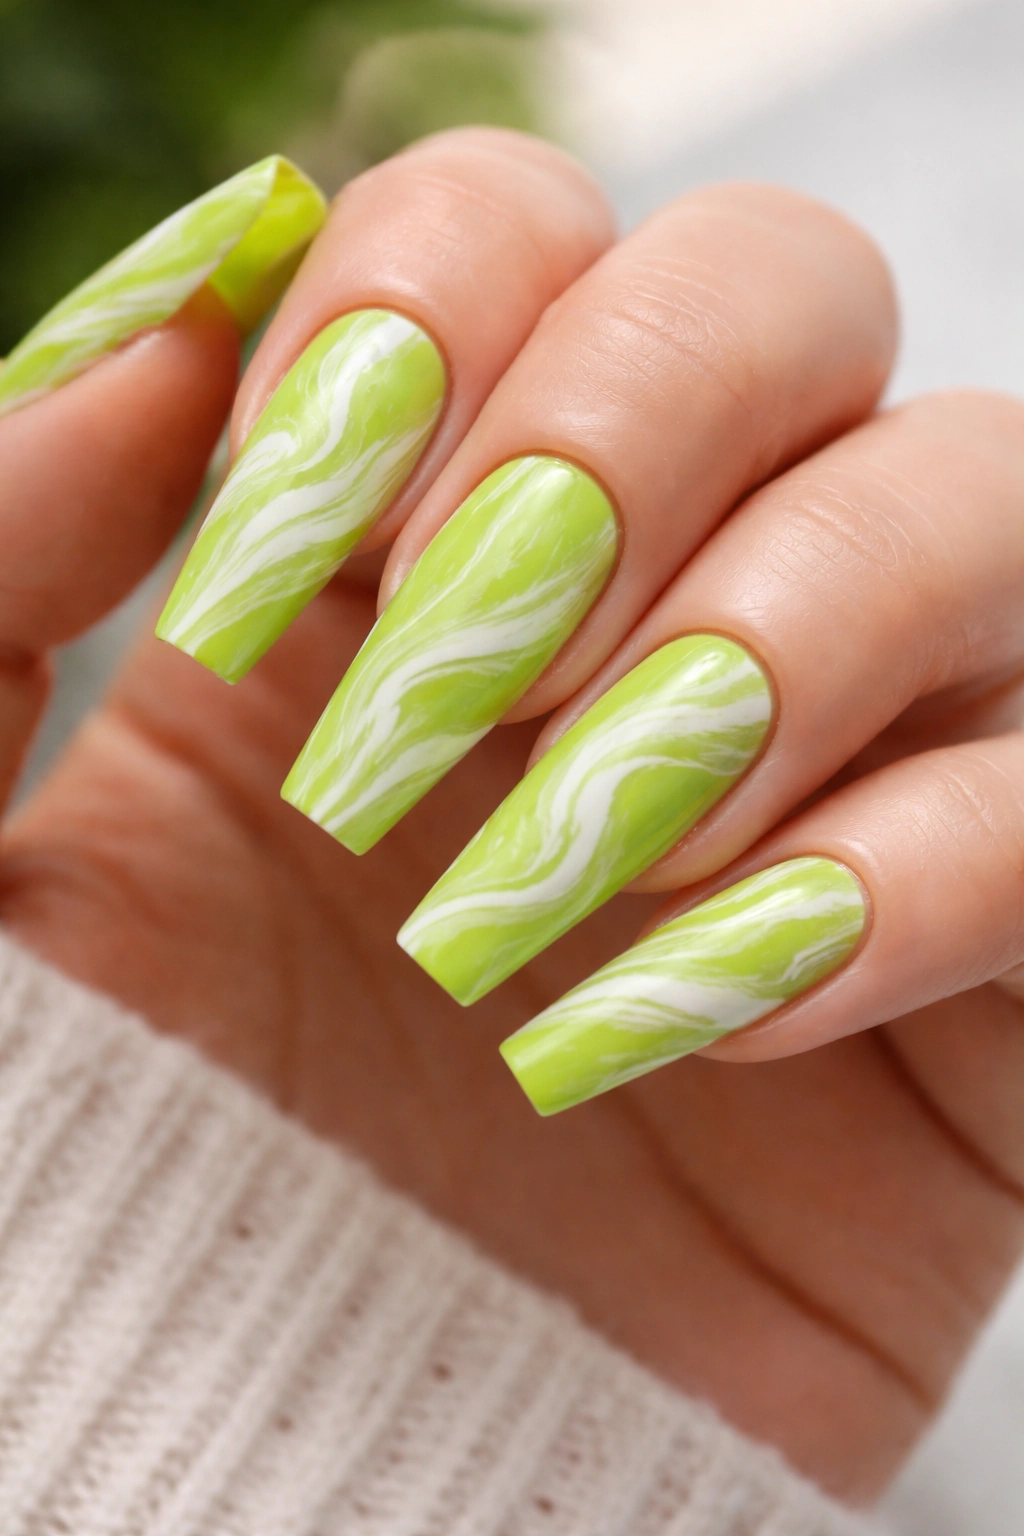
Bright lime green serves as a bold base for delicate white marble swirls that create organic, flowing patterns reminiscent of natural stone. The combination is unexpected — lime green feels fresh and modern while marble patterns feel sophisticated and timeless. Together, they create a design that’s both artistic and wearable.
Creating Marble Effects on Nail Canvas
Marble designs work because they’re organic and slightly unpredictable — no two marbled nails look exactly alike, which feels artisanal and intentional. On long coffin nails, marble swirls have room to flow naturally from cuticle to tip without feeling cramped. The white against lime green creates contrast that makes the marble pattern pop.
Marble Swirl Technique
- Apply two coats of bright lime green base and cure fully
- In a small dish, mix white gel with a touch of translucent gel for workability
- Using a thin detail brush, create flowing, organic swirls across the nail surface — think veining in stone
- Work quickly before the gel sets, making swirls as you go
- Create some swirls that connect across multiple nails for visual cohesion
- Don’t aim for perfect symmetry — the organic, slightly imperfect quality is what makes marble beautiful
- Seal the entire nail with top coat to smooth and protect the marble work
Insider note: A toothpick or thin brush can help feather and blend white into the lime green if your swirls look too harsh.
18. Malachite Green with Onyx Black Accents

Deep malachite green — a rich, saturated shade with cooling undertones — paired with pure onyx black creates a dramatic, powerful design. Bands of black wrapped around malachite, or black accents on malachite with clean geometric division, create a high-contrast look that reads as bold and fashion-forward. This design suits anyone unafraid of color and statement.
High-Contrast Color Blocking
Malachite and onyx work as a pairing because both are saturated, unapologetic colors that respect each other’s presence. There’s no subtle blending or soft transitions — instead, there’s clean division and confident color. On long coffin nails, this color blocking creates strong geometric lines that emphasize the nail’s elongated shape.
Creating Malachite-and-Black Sections
- Paint the nail in sections: perhaps malachite base with black tips, or alternating vertical stripes of each color
- Use striping tape for perfectly straight demarcation lines, or freehand for a slightly artisanal feel
- Apply malachite and black in layers, ensuring clean edges where colors meet
- Cure between color applications if using gel to keep colors from mixing
- Seal with top coat — a matte finish intensifies the drama of this pairing, while glossy feels more refined
- Consider adding a thin metallic stripe (silver or gold) between the green and black for a touch of sophistication
Pro tip: This design is more forgiving with freehand application than delicate designs — slight imperfections in line placement add to the bold, confident vibe.
19. Seafoam Green with Soft Nude Ombre
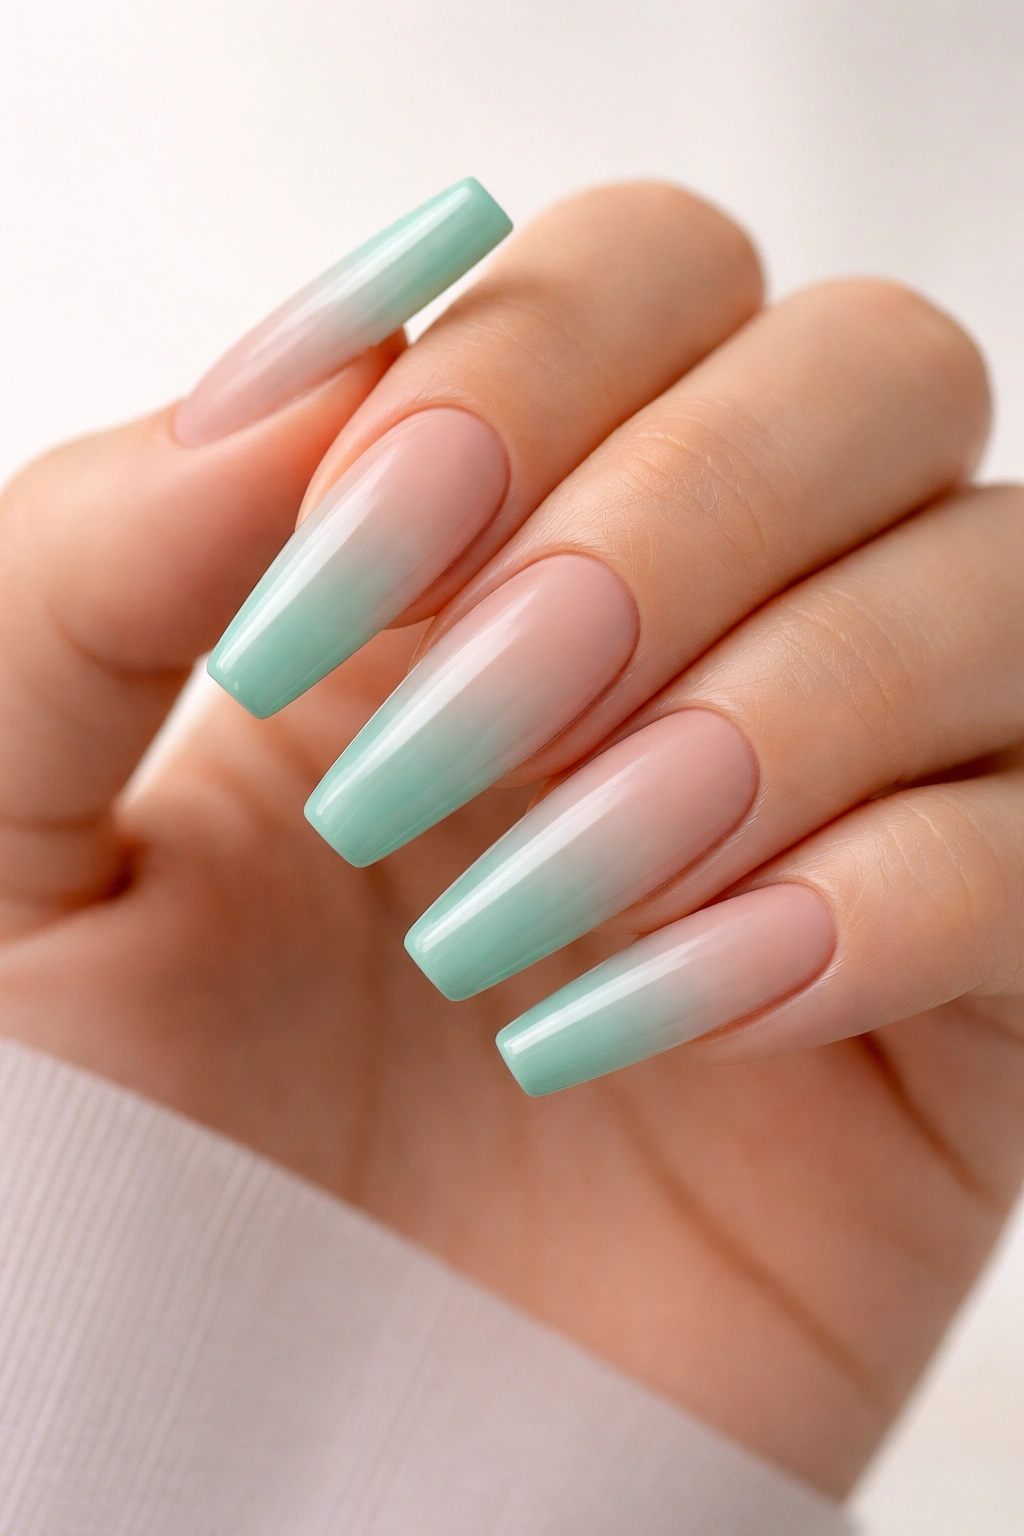
Seafoam green transitioning softly to a nude or peachy tone creates an ombre that feels both summery and sophisticated. The colors are analogous on the color wheel (they sit near each other), so the transition feels natural rather than jarring. This design works year-round and appeals to anyone who loves subtle gradient effects.
Analogous Color Ombre
Ombre designs feel most refined when the colors are analogous (adjacent on the color wheel) because they transition smoothly without harsh color clashing. Seafoam to nude is inherently harmonious — seafoam’s blue-green undertones bridge beautifully to nude’s warm, skin-toned undertones. On long coffin nails, this gradient has plenty of space to showcase a smooth, seamless transition.
Creating Seafoam-to-Nude Ombre
- Paint a solid seafoam green base and cure fully
- Create an intermediate shade by mixing seafoam and nude in equal parts
- Using a makeup sponge, apply nude polish to the tip third of the nail, intermediate shade to the center third, and keep seafoam at the base
- Dab gently with the sponge in overlapping motions — don’t drag or swipe, which creates harsh lines
- Build up opacity gradually with multiple light applications
- Smooth out any sponge texture by gently dabbing with a barely-damp sponge
- Seal with top coat and allow full cure time before removing sticky residue
Worth knowing: Warmer nude shades transition more smoothly into seafoam than cool-toned nudes — test your color pairing on a practice nail first.
20. Forest Green with Constellation Star Map
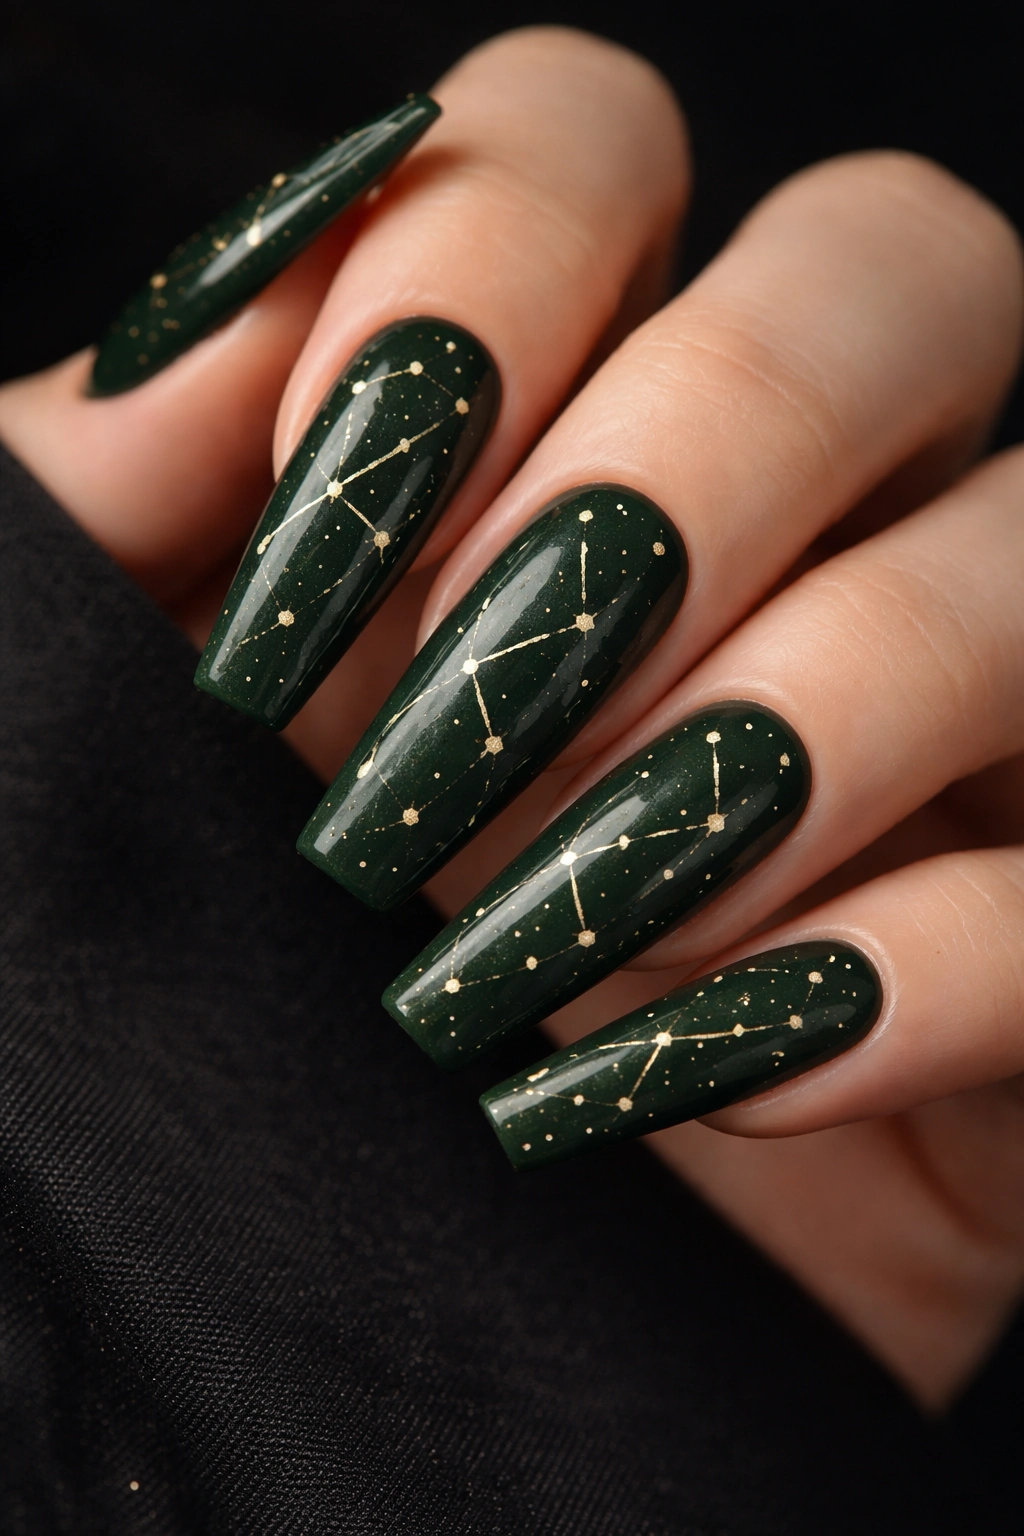
Deep forest green serves as a night sky for delicate gold constellations and stars, creating a design that’s romantic, celestial, and utterly dreamy. Tiny gold stars scattered across the green nail with connecting lines forming recognizable constellations create a design that feels personal and artistic. This is perfect for anyone who loves astronomy, stargazing, or celestial imagery.
Celestial Themes on Nail Canvas
Constellation designs work on nails because they’re simple enough to be legible despite the small scale, but intricate enough to showcase artistry. Gold against deep forest green reads as elegant starlight against a night sky. On long coffin nails, constellation patterns have room to spread across multiple nails, telling a complete celestial story.
Creating Constellation Designs
- Apply two or three coats of deep forest green base and cure fully
- Using a thin brush and gold gel, place tiny dots across the nail to represent stars — vary sizes slightly for visual interest
- Connect certain stars with delicate lines to form recognizable constellations (Big Dipper, Orion, Cassiopeia are easily recognizable)
- Concentrate denser star clusters on one or two accent nails, with sparser scattered stars on other nails
- Leave some areas of the nail sparse and dark for that “night sky” feeling — not every inch needs stars
- Seal with glossy top coat to enhance the luminous quality of the gold stars
- Consider adding tiny dots of silver for additional sparkle and dimension
Pro tip: Research actual constellation maps online and use them as reference so your constellation designs are recognizable rather than random star patterns.
Final Thoughts

Green coffin nails offer remarkable versatility — whether you gravitate toward deep, jewel-toned emeralds or light, airy seafoam shades, there’s a green that suits your skin tone and personal style. The coffin shape’s elongated silhouette and spacious surface area make it the perfect nail shape for showcasing detailed designs, bold colors, and creative techniques that might feel cramped on shorter nails.
The designs featured here range from achievable-at-home-with-patience to definitely-book-a-nail-technician-for-this, which means you can adapt these ideas based on your comfort level and skill. If you’re drawn to botanical art but lack painting confidence, use nail decals. If chrome seems intimidating, try chrome powder over a gel base for easier application. If ombre transitions are tricky, use striping tape to create geometric sections instead.
Most importantly, choose a design that genuinely excites you — the best manicure is the one that makes you smile when you look at your hands. Green is having a well-deserved moment in nail design, and your long coffin nails are the perfect vehicle for celebrating it.
