

Coffin nails have become the ultimate canvas for expressing sophistication and personality. Whether you’re drawn to minimalist elegance, bold statement designs, or timeless classics, the elongated coffin shape offers plenty of room to experiment with styles that feel both polished and distinctly you. The beauty of coffin nails lies in how they elongate the fingers while maintaining a flattering proportion — sharp enough to feel confident, yet graceful enough for any occasion.
Finding nail designs that work with your lifestyle and aesthetic can feel overwhelming, especially when you want something that feels genuinely classy rather than just trendy. That’s where having a curated collection of proven ideas becomes invaluable. These designs range from subtle and understated to bold and striking, but they all share one thing in common: they elevate your entire look.
The coffin nail shape is particularly forgiving because it balances length with wearability. The flat top and tapered sides create a sophisticated silhouette that works whether you’re going for French elegance, moody drama, or refined minimalism. What makes these designs genuinely classy is the restraint and intentionality behind them — every element serves a purpose, and the overall effect feels curated rather than chaotic.
Let’s explore eighteen stunning coffin nail ideas that showcase just how versatile this shape can be.
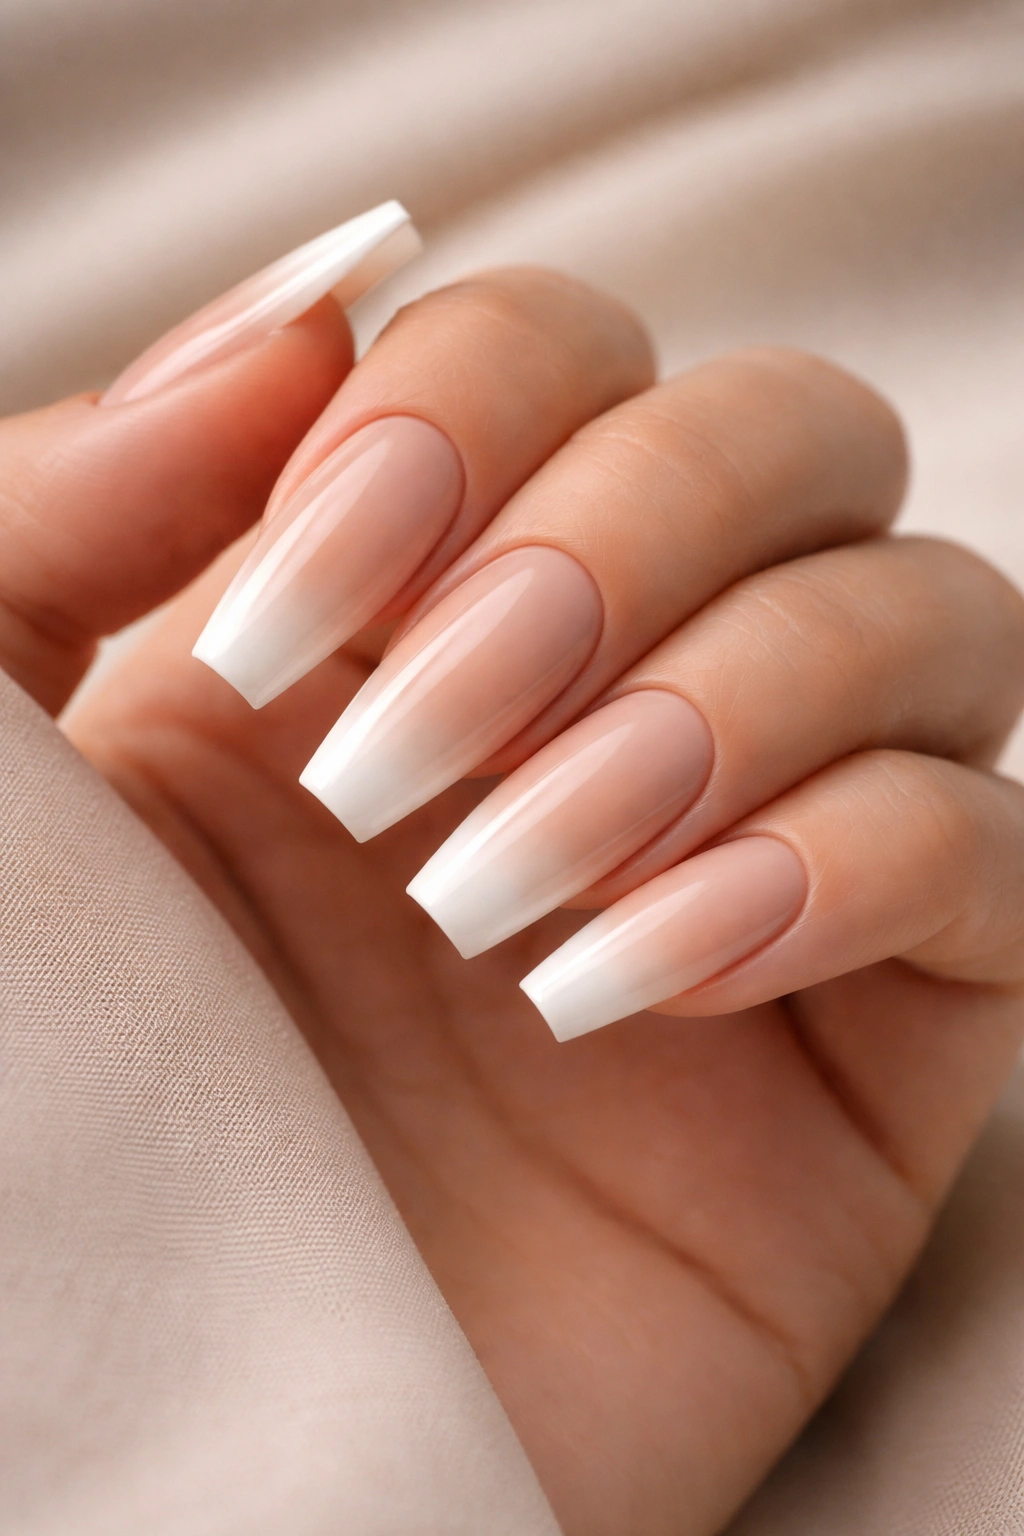
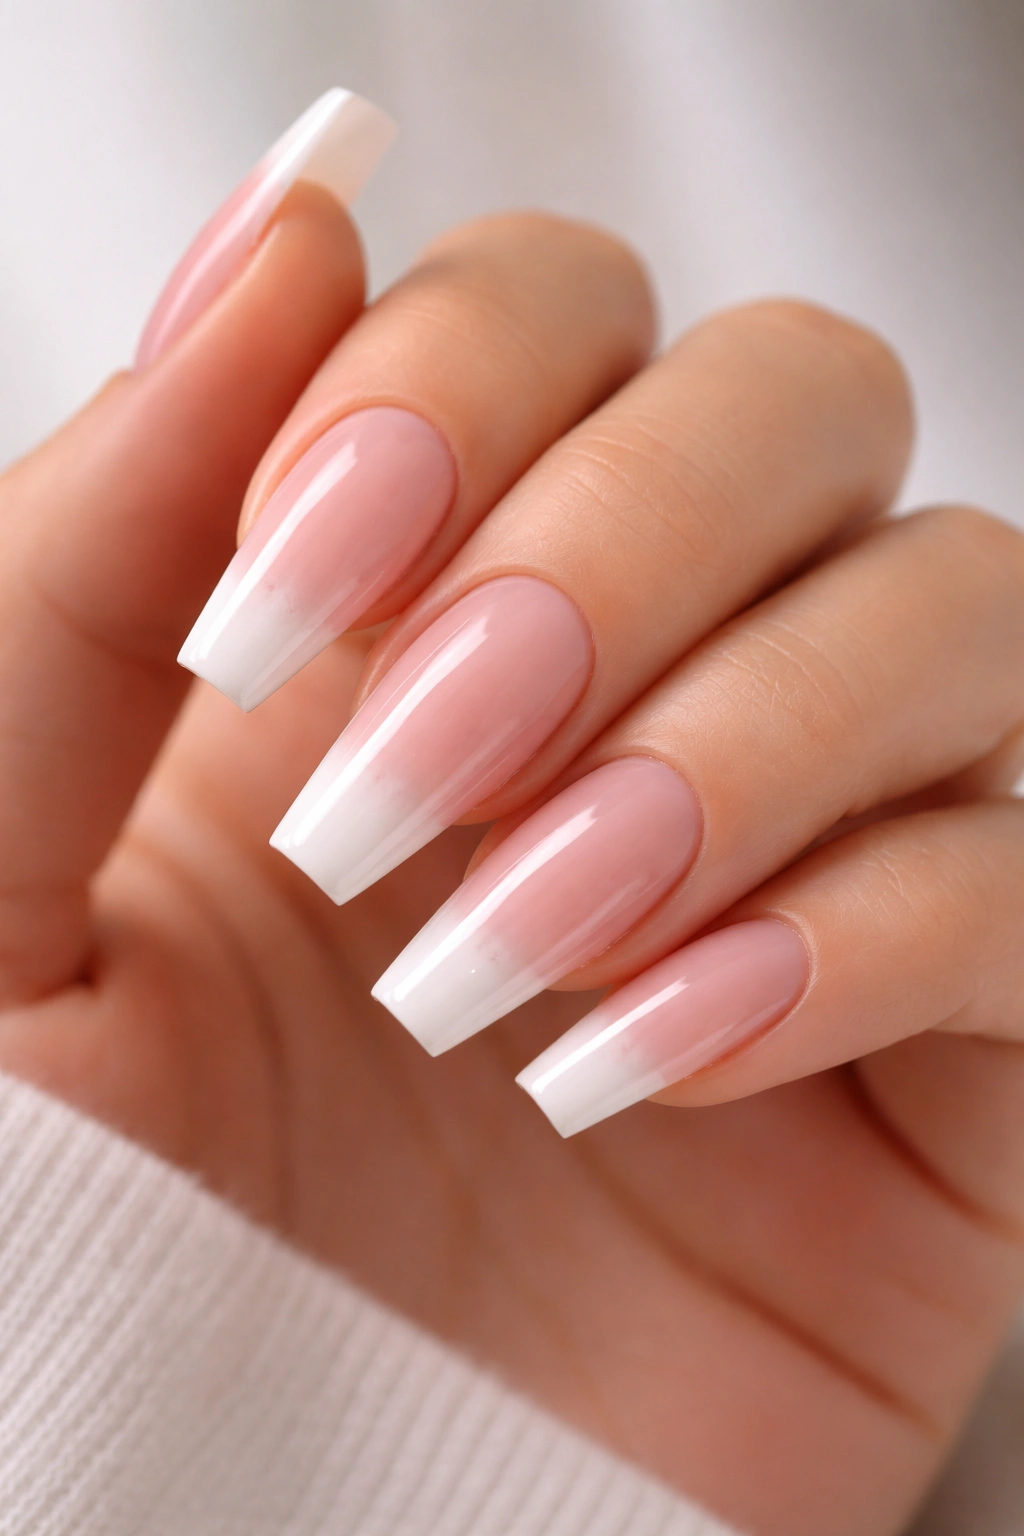
1. Classic White French Tips with Soft Gradient
The French manicure stands as the gold standard of elegant nail design, and when executed on coffin nails, it becomes even more refined. This version softens the traditional stark white line with a gradient that blends seamlessly into the pale pink base, creating an almost ethereal quality that catches light beautifully.
Why It Never Goes Out of Style
A gradient French tip works because it honors the traditional French manicure’s timeless appeal while adding contemporary softness. The color transition draws the eye toward your fingertips, making hands look longer and more graceful. This design pairs seamlessly with any outfit, from casual to formal, making it genuinely versatile rather than just safe.
How to Make It Work for You
- Use a nude or soft pink base that matches your skin tone for maximum lengthening effect
- Apply white polish to the tip and feather it outward with a soft brush to create the gradient effect
- Seal everything with a glossy top coat that amplifies the sophisticated shimmer
- This design works especially well during warmer months when you want something fresh without feeling bare
Pro tip: If your natural nails are still short, this design actually looks more flattering than harsh whites, making it perfect for growing out your nail bed.
2. Deep Burgundy with Gold Leaf Accents
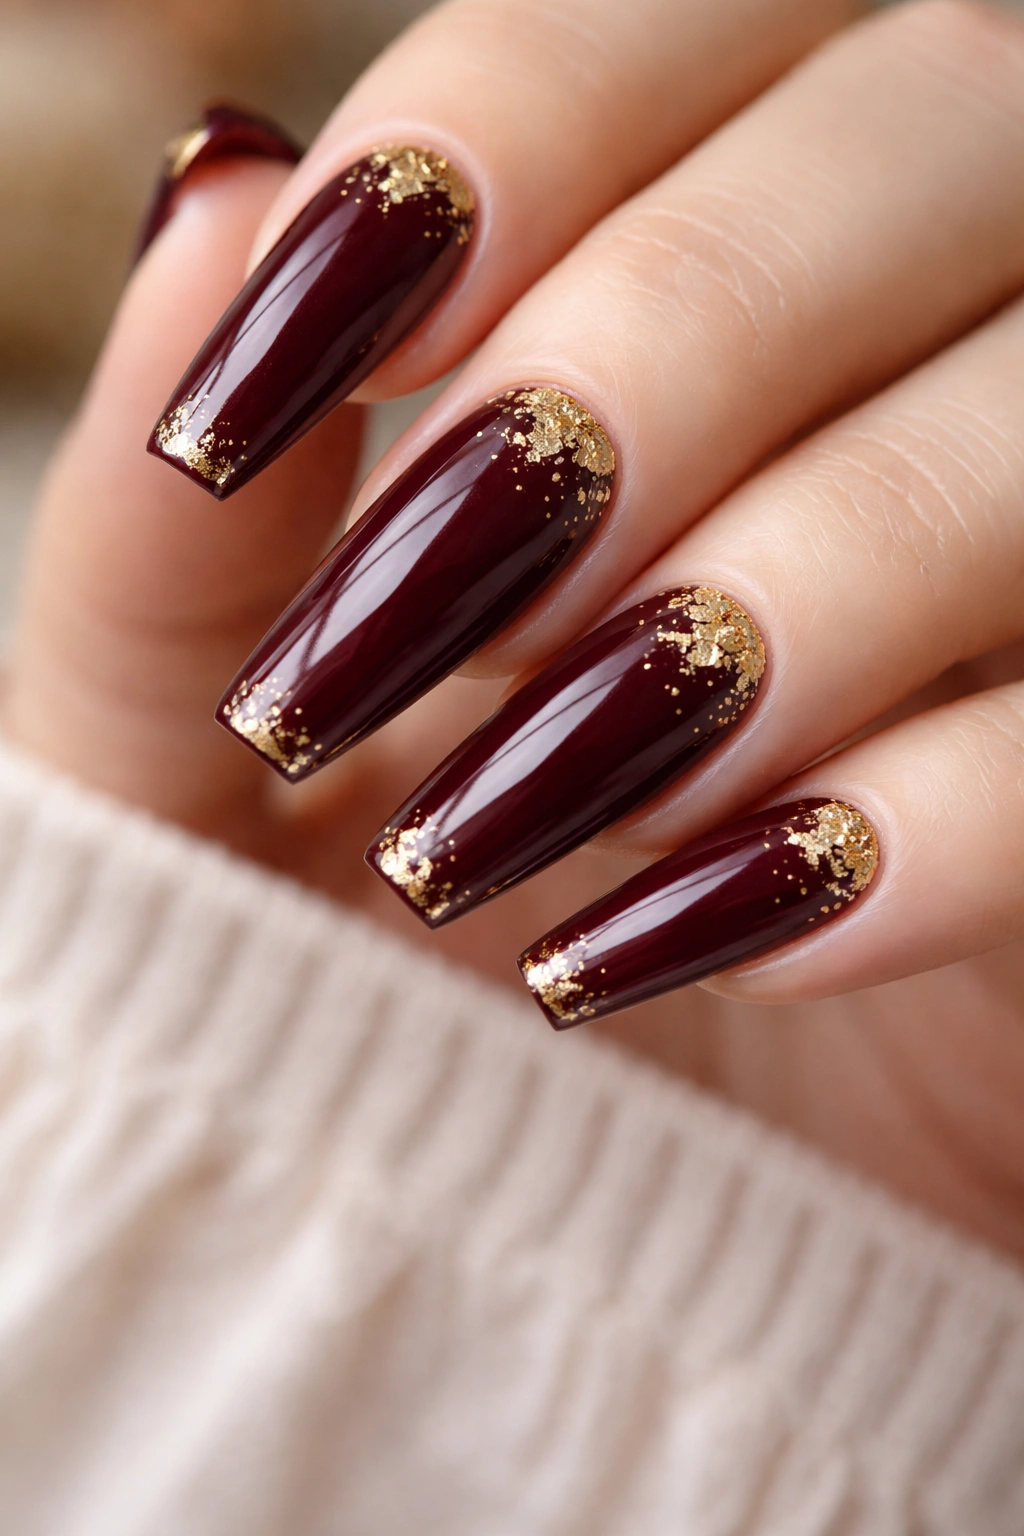
Burgundy on coffin nails has a quietly luxurious quality that feels both sophisticated and slightly mysterious. When paired with delicate gold leaf details, it becomes a design that commands attention without being loud.
The Power of Deep Jewel Tones
Burgundy works beautifully on coffin nails because the elongated shape gives the dark color somewhere to go visually. The richness of the tone feels refined rather than heavy, especially when you break it up with strategic gold placement. This combination signals elegance and intention — it’s a design that says you know exactly what you’re doing.
Application and Styling
- Start with two coats of deep burgundy to ensure rich, even coverage
- Apply delicate gold leaf pieces along the side of the nail or in small corners for subtle glamour
- Use a thin gold stripe down the center of a few nails for understated detail
- This design transitions beautifully from day to evening with a simple change of outfit
- Pair it with metallics, blacks, or jewel tones for maximum impact
Worth knowing: Gold leaf can be temperamental, so seal it immediately with a thick layer of clear gel or top coat to prevent shifting.
3. Soft Nude with Minimalist Black Line Art
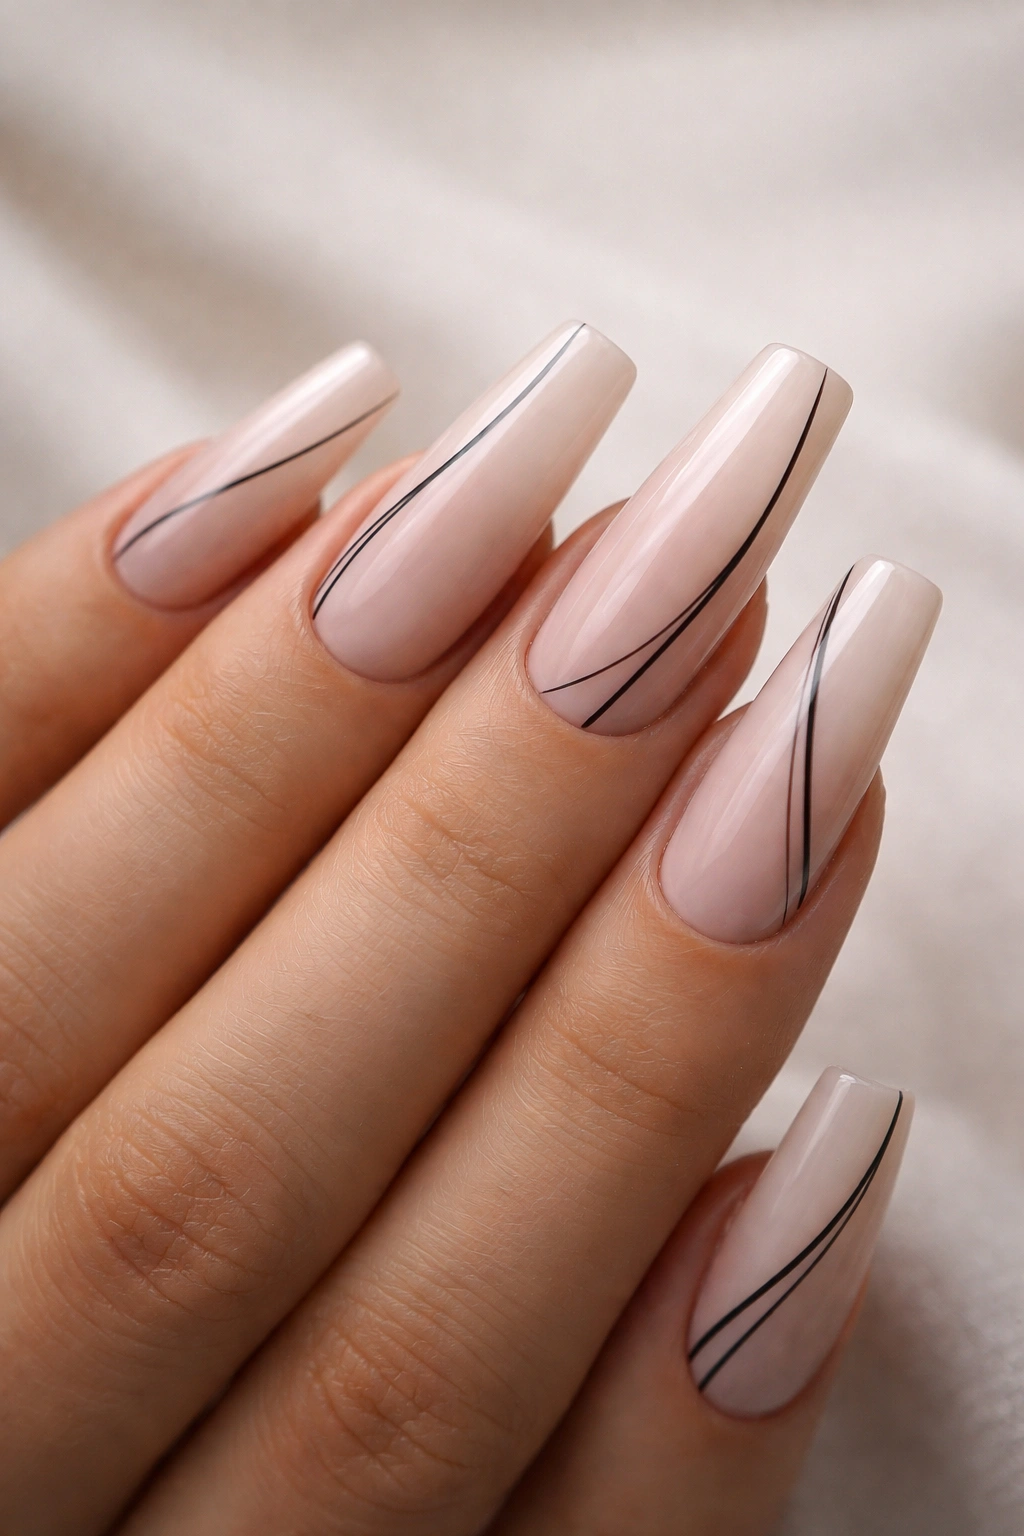
Minimalism done well is harder than maximalism, which is exactly why this design radiates sophistication. A clean nude base paired with one or two delicate black lines creates an editorial quality that feels intentionally refined.
Why Less Is More Here
Minimalist designs on coffin nails work because they give the nail shape room to breathe. The elongated silhouette itself becomes the statement piece, with the fine line art acting as a subtle accent rather than a distraction. This approach appeals to people who want their nails to enhance their overall aesthetic without overshadowing it.
Creating the Perfect Minimalist Design
- Choose a nude that’s one shade lighter or darker than your natural skin tone
- Use a very thin liner brush or nail art pen to create precise lines — wobbly lines read as unintentional rather than artistic
- Try a diagonal line across the tip, a geometric shape on the ring finger, or a simple frame around the edge
- Keep designs on just one or two nails per hand for maximum impact through restraint
- The negative space (bare nail showing through) is just as important as the design itself
Insider note: This design actually looks more expensive and high-end than heavily decorated nails, which is why it’s a favorite among people who want quiet confidence.
4. Nude Ombre with Rose Gold Tips
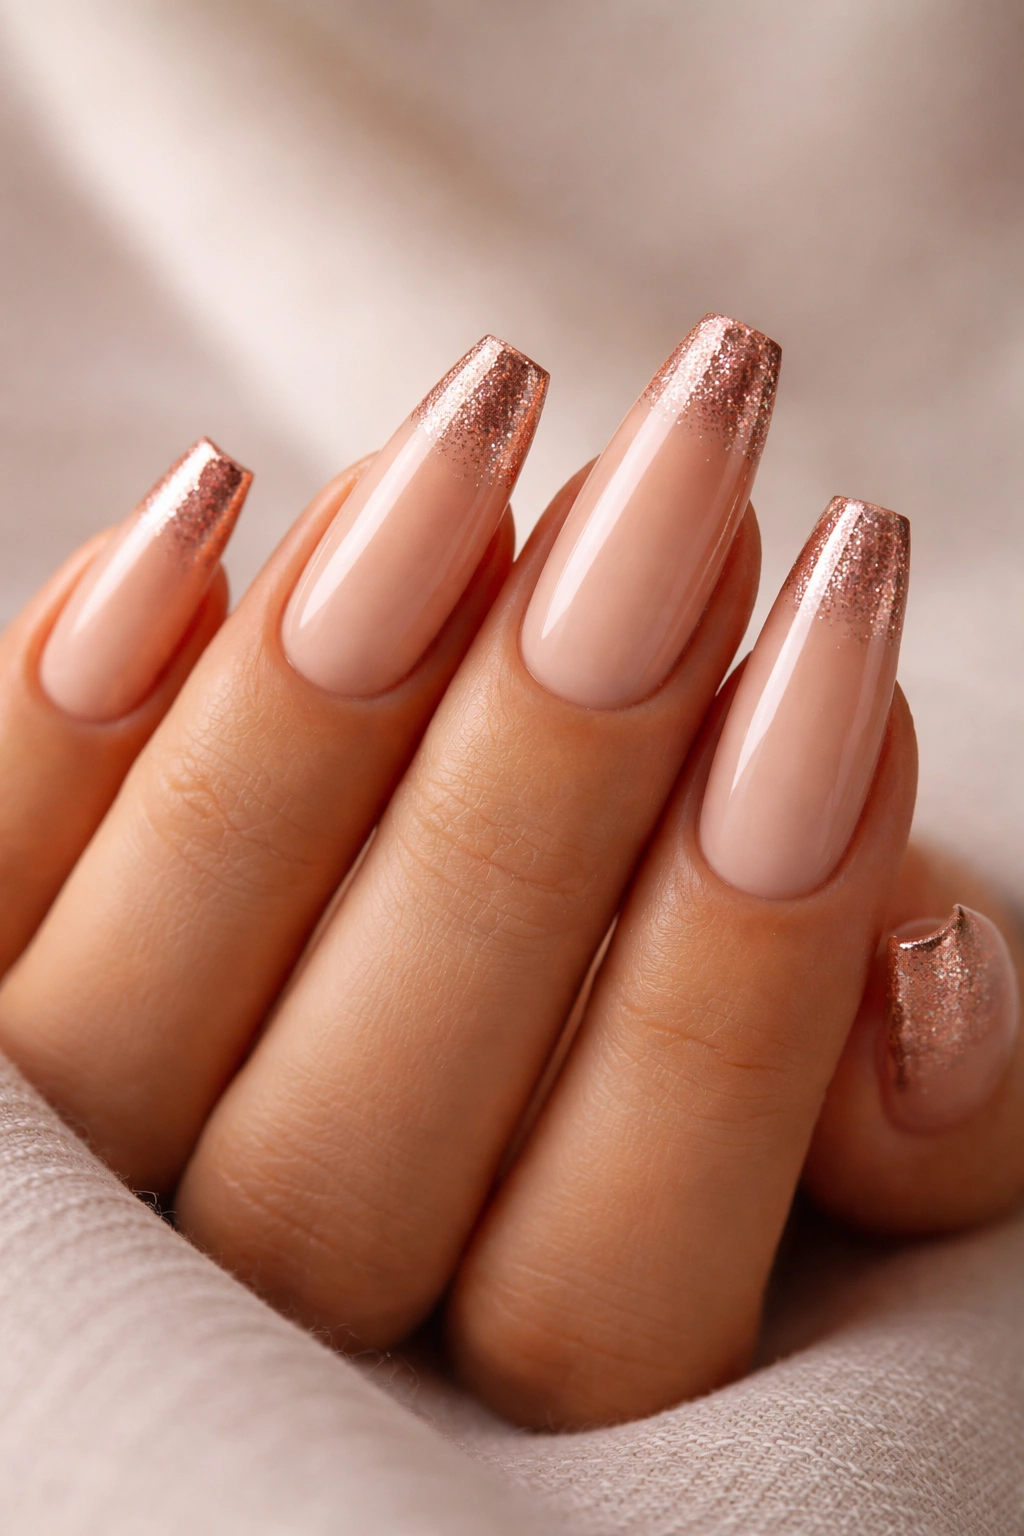
This design sits in the sweet spot between understated and eye-catching. The gradient shifts from a warm nude base through subtle peachy tones to rose gold at the tips, creating dimension without pattern.
The Ombre Advantage
Ombre works exceptionally well on coffin nails because the shape naturally follows the color graduation. Your fingers look longer, more refined, and somehow more delicate despite the dramatic color shift. The rise of rose gold as an alternative to yellow or white gold gives this a contemporary feel while maintaining classical proportions.
Achieving the Right Blend
- Choose a nude base that sits warm on your skin tone — cooler nudes can look washed out with rose gold
- Blend through peachy and taupe tones before reaching the rose gold at the tip
- Use a sponge to dab on each color layer, blending as you go for that seamless gradient
- Top coat is essential here — it creates the polished, unified look that makes this design sing
- This design actually photographs incredibly well, which makes it perfect for social occasions
Quick facts about this design:
- Works for any season or occasion
- Requires one solid manicure appointment (no touch-ups needed for several weeks)
- Complements both warm and cool undertones when executed properly
- Creates an illusion of longer, more elegant nail beds
5. Black Glossy with Thin Gold Geometric Frames
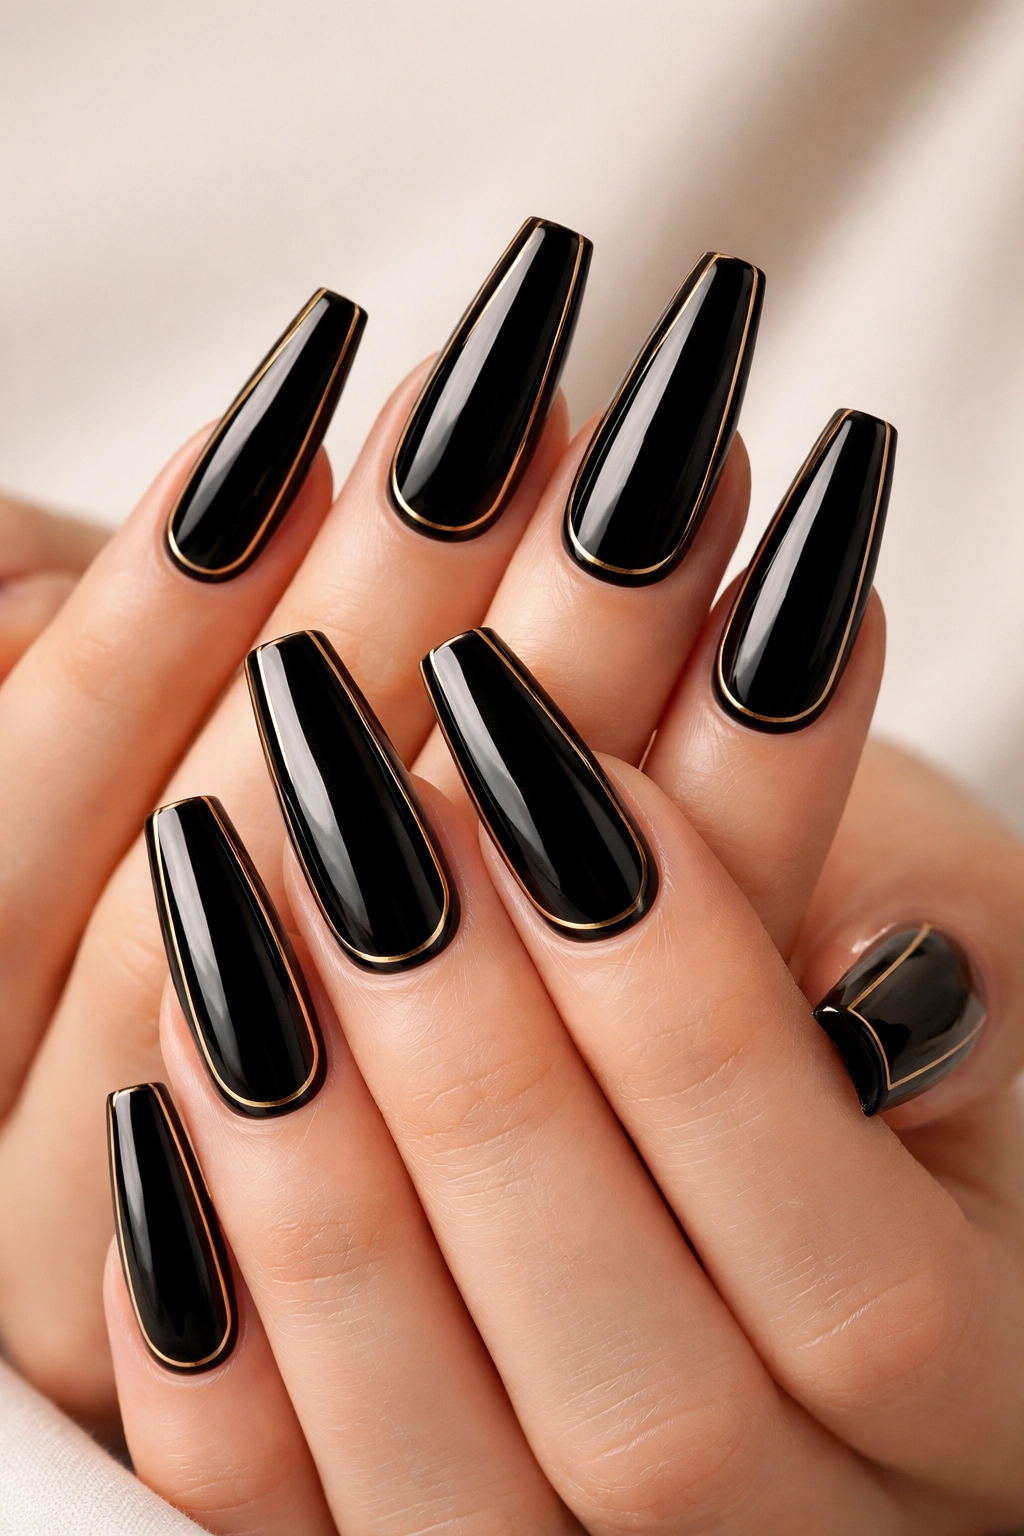
Black coffin nails make a statement, but when framed with precision gold geometry, they become editorial rather than edgy. This design walks the line between bold and sophisticated with grace.
Why This Design Commands Respect
Glossy black reads as powerful and put-together on elongated nails. The geometric gold frames create visual interest without pattern or clutter — they simply highlight the shape you’ve already chosen. This is the kind of design that works equally well at a corporate meeting or a night out, which is the hallmark of genuine class.
Executing Precision Gold Lines
- Use high-quality black gel or polish — drugstore black often has blue or green undertones that look flat
- Once the black is fully set, use a very thin gold liner to create geometric frames
- Try a simple rectangular frame in the upper corner, a small triangle at the cuticle, or interconnected squares
- Keep the gold lines perfectly symmetrical and precisely placed — this isn’t a freehand design
- Seal with a glossy top coat that amplifies the shine
Real talk: This design requires a steady hand or nail art tools, but the result looks so intentional that it’s absolutely worth the effort.
6. Soft Pink with Delicate White Marble Veining
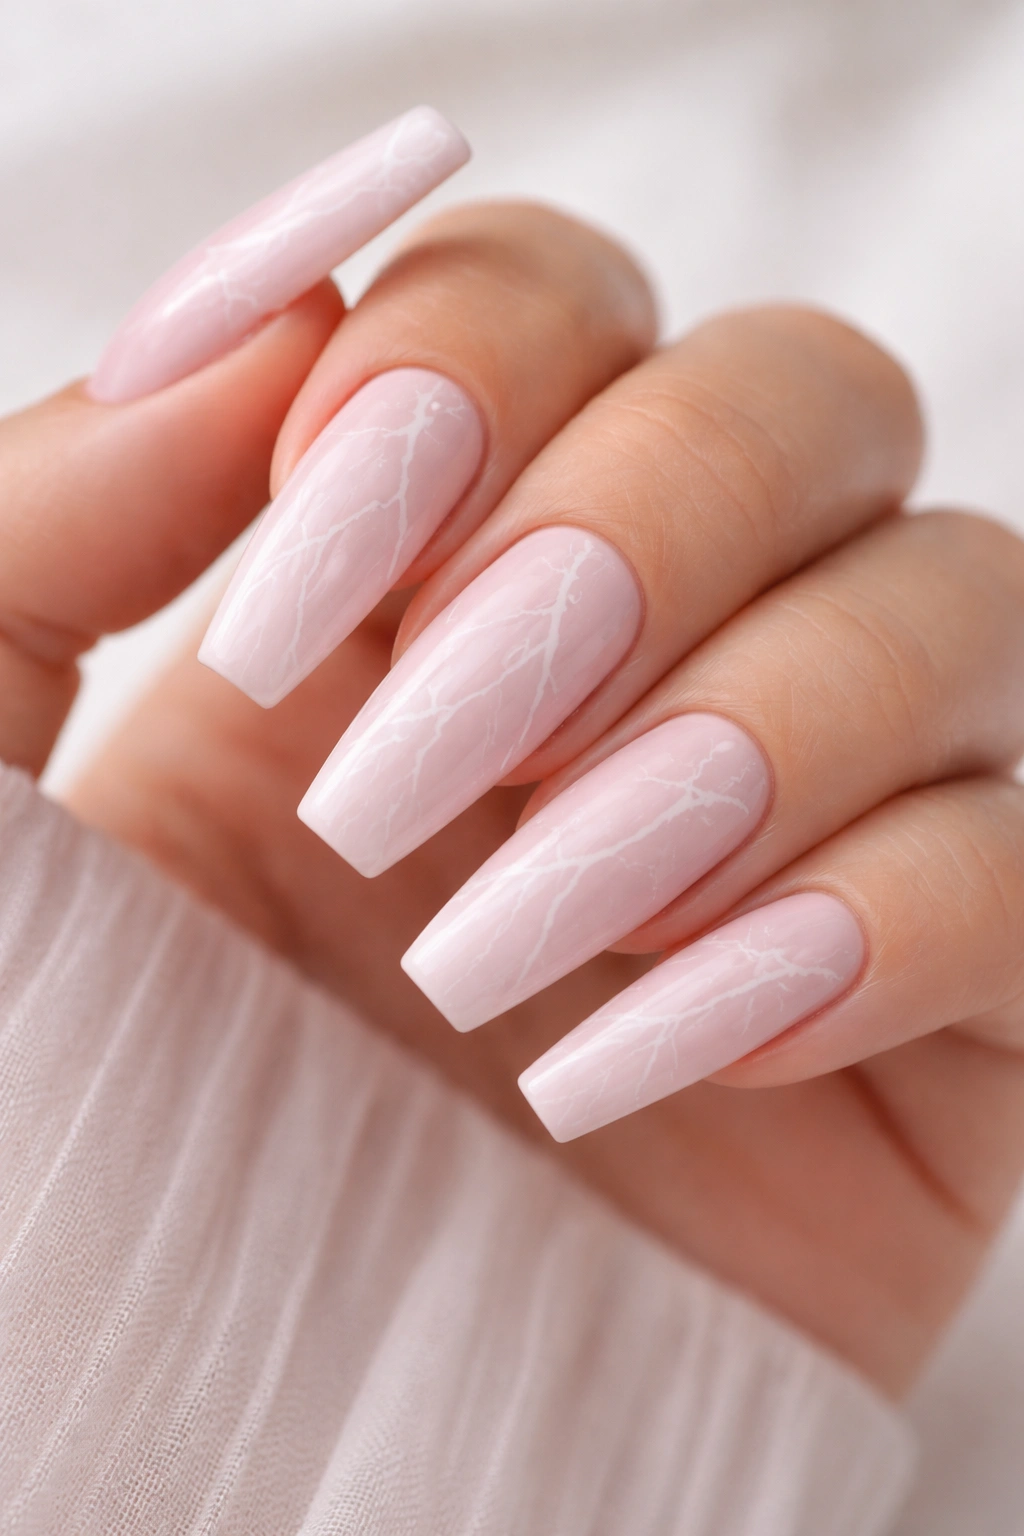
Marble is having a permanent moment in nail design because it works at every skill level and looks genuinely upscale. On soft pink coffin nails, subtle white marble veining creates an almost stone-like elegance.
The Marble Effect
Marble mimics natural stone — which inherently feels luxurious and expensive. When applied as veining rather than a full marbled base, it becomes refined rather than trendy. The soft pink provides a gentle base that lets the white veining shine without overwhelming the nail shape.
Creating Natural-Looking Marble
- Start with two coats of soft, milky pink for an even foundation
- Once fully dry, use a very thin brush and white polish or gel to create irregular, organic lines
- Don’t aim for perfect symmetry — real marble is imperfect, and that’s what makes it beautiful
- Layer lines at different angles, allowing some to thin out and fade naturally
- Seal with a glossy or semi-glossy top coat to enhance the stone-like appearance
Insider knowledge: The key to believable marble is variation — some lines should be thick, some thin, some broken. Perfection reads as artificial.
7. Nude Base with Subtle Silver Glitter Gradient at Tips
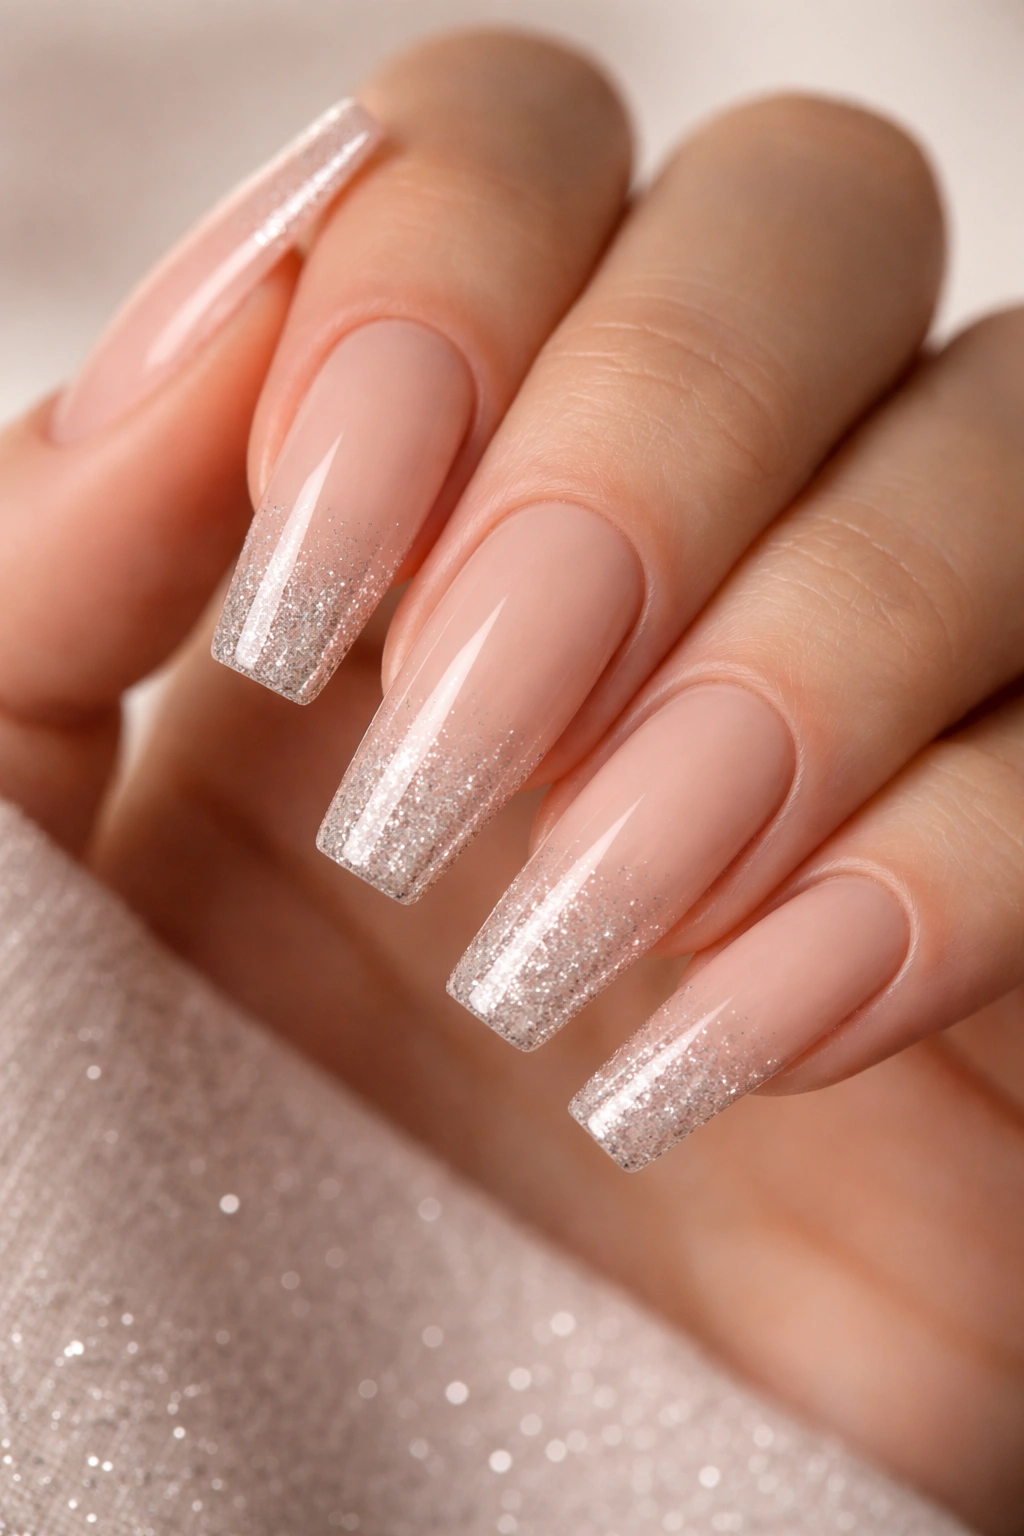
Glitter needs to be handled carefully to feel classy rather than costume-like. The secret is using it sparingly and strategically, which this design does perfectly.
Making Glitter Feel Sophisticated
Glitter at the tips creates a subtle catch-the-light effect without the full-on sparkle of an all-over glitter manicure. On coffin nails, this gradual glitter fade maintains elegance while adding just enough dimension to feel special. The nude base keeps the focus on the refined shape while the glitter adds celebration.
Gradient Glitter Application
- Paint a clean nude base that matches your skin tone for maximum length illusion
- Once dry, apply clear gel to the nail tips (the outer third of the nail)
- Sprinkle ultra-fine silver glitter into the wet gel, concentrating more at the very edge and less as you move toward the center
- Use a brush to feather the glitter particles outward, creating a natural fade
- Seal with a thick layer of clear top coat to lock everything in place and create a smooth surface
- This design looks especially striking under natural light and in photos
Worth noting: The finer the glitter particles, the more sophisticated the effect — chunky glitter tends to read as less refined.
8. Matte Burgundy with Glossy Gold Accents
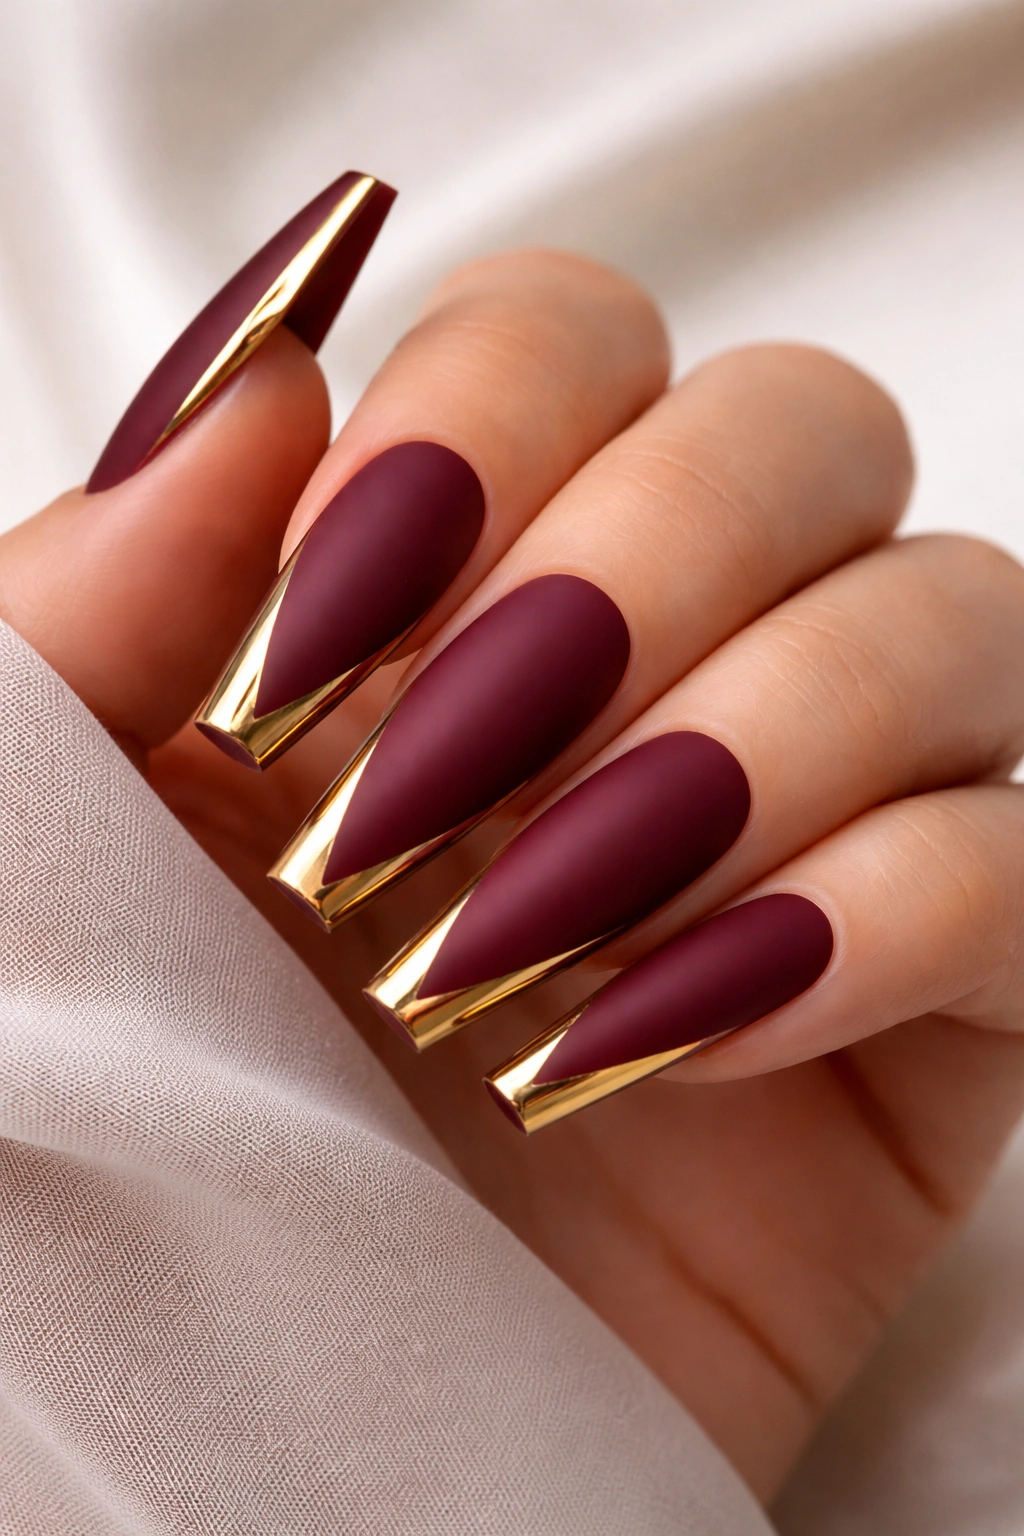
Mixing matte and glossy finishes creates visual interest that makes the nail shape itself more prominent. Burgundy matte paired with glossy gold is inherently sophisticated.
Playing with Finish Contrasts
The texture contrast between matte burgundy and glossy gold creates dimension without color clash. Your eyes move between the different finishes, making the nails feel more dynamic. Coffin nails are the perfect shape for this interplay because the larger surface area gives the finishes room to interact visually.
Achieving the Matte-Glossy Combination
- Apply two coats of burgundy gel and cure, then apply a matte top coat rather than glossy
- Once the matte coat is cured, carefully apply glossy gold polish or gel to accent areas — try the tips, the sides, or small geometric shapes
- The contrast between the two finishes becomes the actual design element, so placement matters
- Keep the glossy accents strategic and purposeful rather than scattered
- Test the durability of your chosen top coats together before committing to a full manicure
Helpful observation: This design is particularly striking in indoor lighting where the matte and glossy finishes create visible texture differences.
9. Cool Nude Tone with Pressed Flower Details
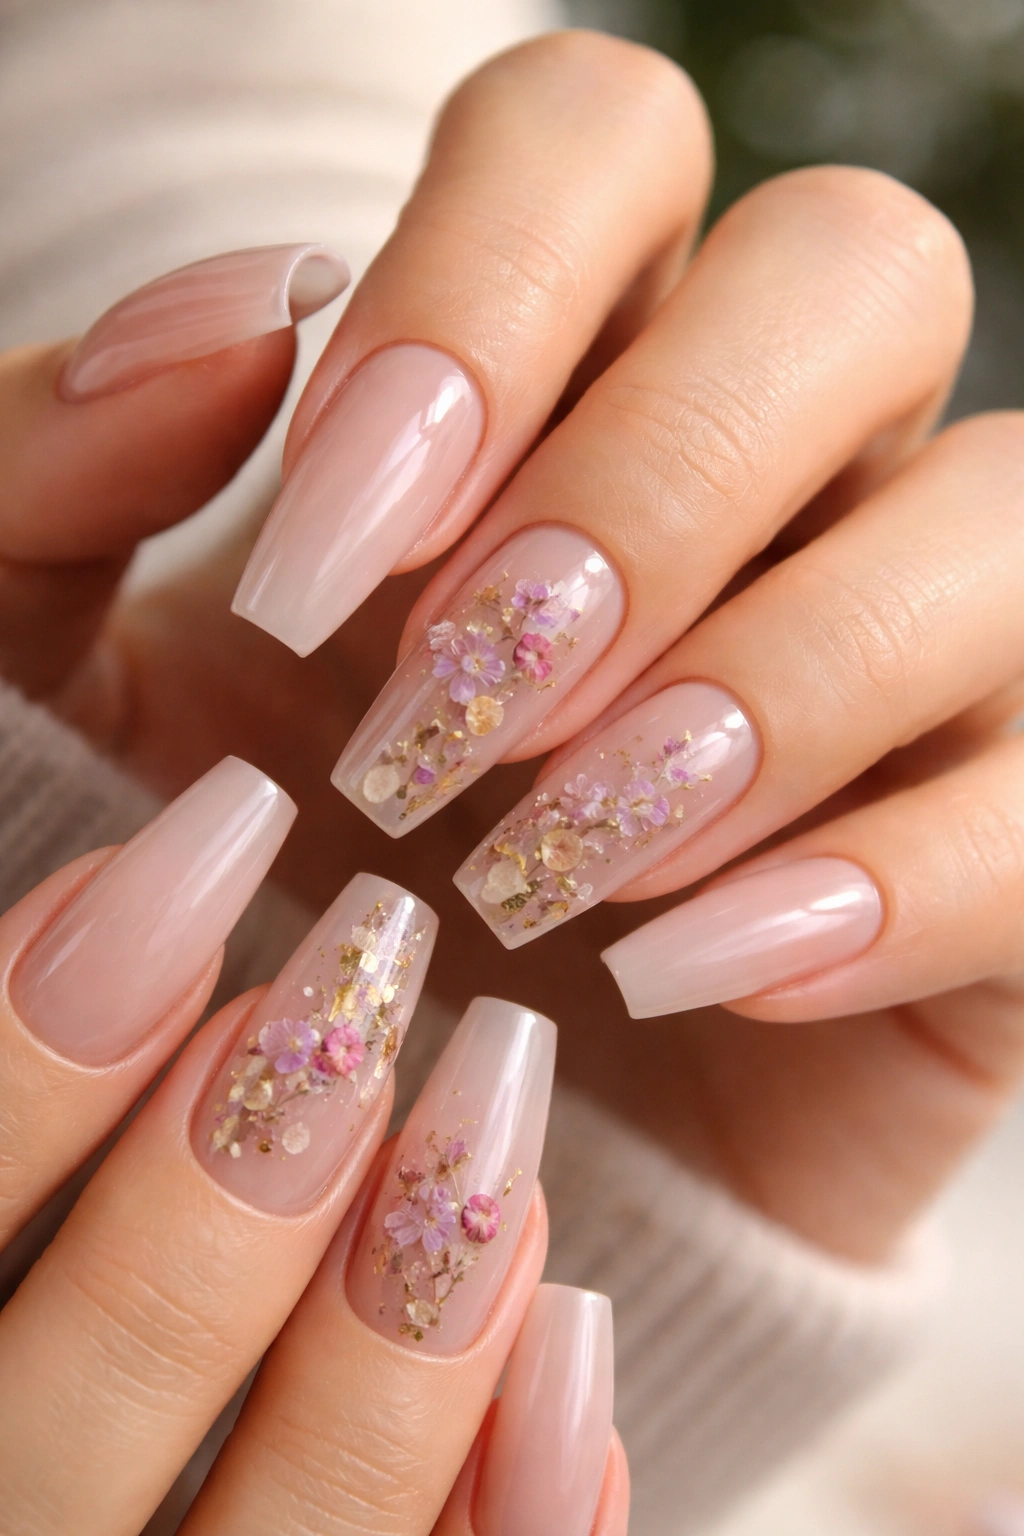
Pressed flowers bring organic elegance to coffin nails in a way that feels timeless rather than fleeting. This design bridges natural and refined perfectly.
The Appeal of Botanical Details
Pressed flowers work beautifully on coffin nails because they’re small enough not to overwhelm the shape, yet detailed enough to create genuine visual interest. Real flowers add an artisanal quality that makes nails feel custom and personal. The cool nude base keeps the aesthetic sophisticated rather than whimsical.
Using Real Pressed Flowers
- Prepare thin, completely dry pressed flowers from a craft store or by pressing your own
- Paint a cool nude base on all nails and seal with a clear coat
- Apply a thin layer of clear gel to the area where you want the flower
- Carefully place the pressed flower and press gently to ensure contact
- Seal with multiple layers of clear gel or top coat — this protects the delicate flower from damage
- The flower should be completely encased by the time you’re done
Important detail: Pressed flowers under gel last much longer than under regular polish. If you’re using regular polish, expect the flowers to fade or deteriorate more quickly.
10. Deep Navy with Subtle Shimmer and White Negative Space Design
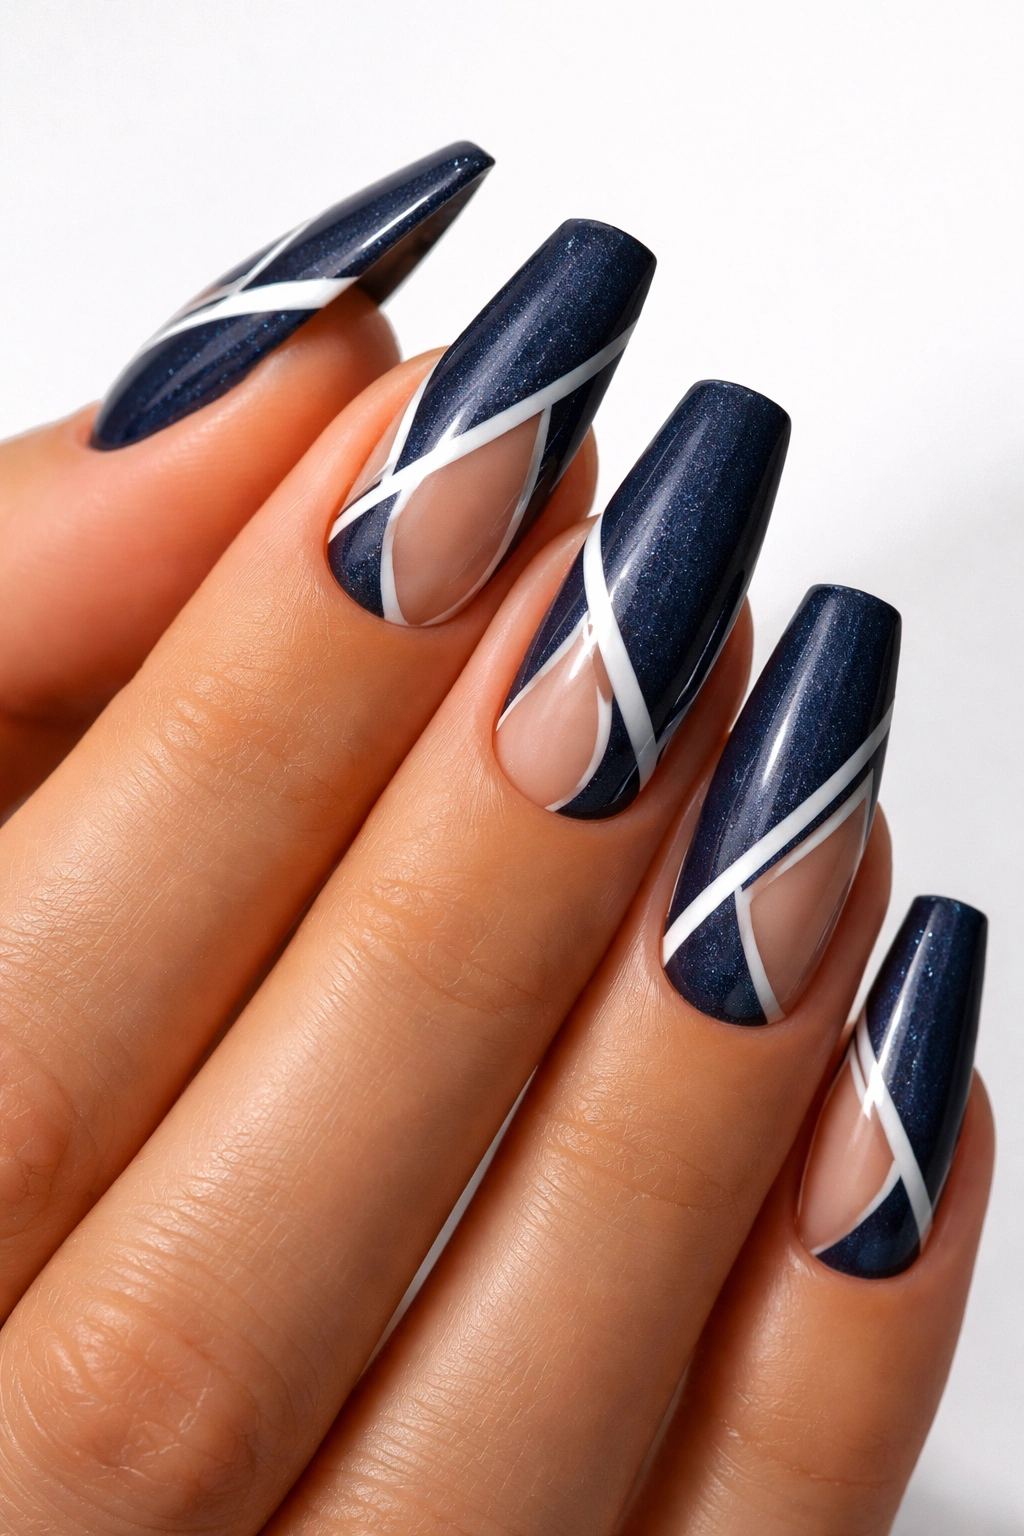
Navy feels more refined than pure black while still projecting sophistication. When combined with white negative space design, it creates contrast that makes the coffin shape especially prominent.
Why Navy Over Black
Navy has warmth that black lacks, making it feel less severe and more approachable. The shimmer adds dimension without reading as glittery. The white negative space design (where you leave the actual nail bare in geometric patterns) creates a modern, high-design feel.
Creating Negative Space Design
- Paint the entire nail with navy shimmer polish, allowing the subtle sparkle to catch light
- Once completely dry, use a thin brush to carefully paint white polish in geometric patterns, leaving navy and bare nail visible
- Try a diagonal line creating a triangle of bare nail, rectangular frames, or abstract asymmetrical shapes
- The negative space (bare nail showing through) is as important as the colors you apply
- Seal with a glossy coat that unifies all the elements
Design idea: Place the negative space design on just the ring and pinky fingers for an asymmetrical, editorial feel.
11. Pale Pink with Barely-There Glitter and Pearl Accents
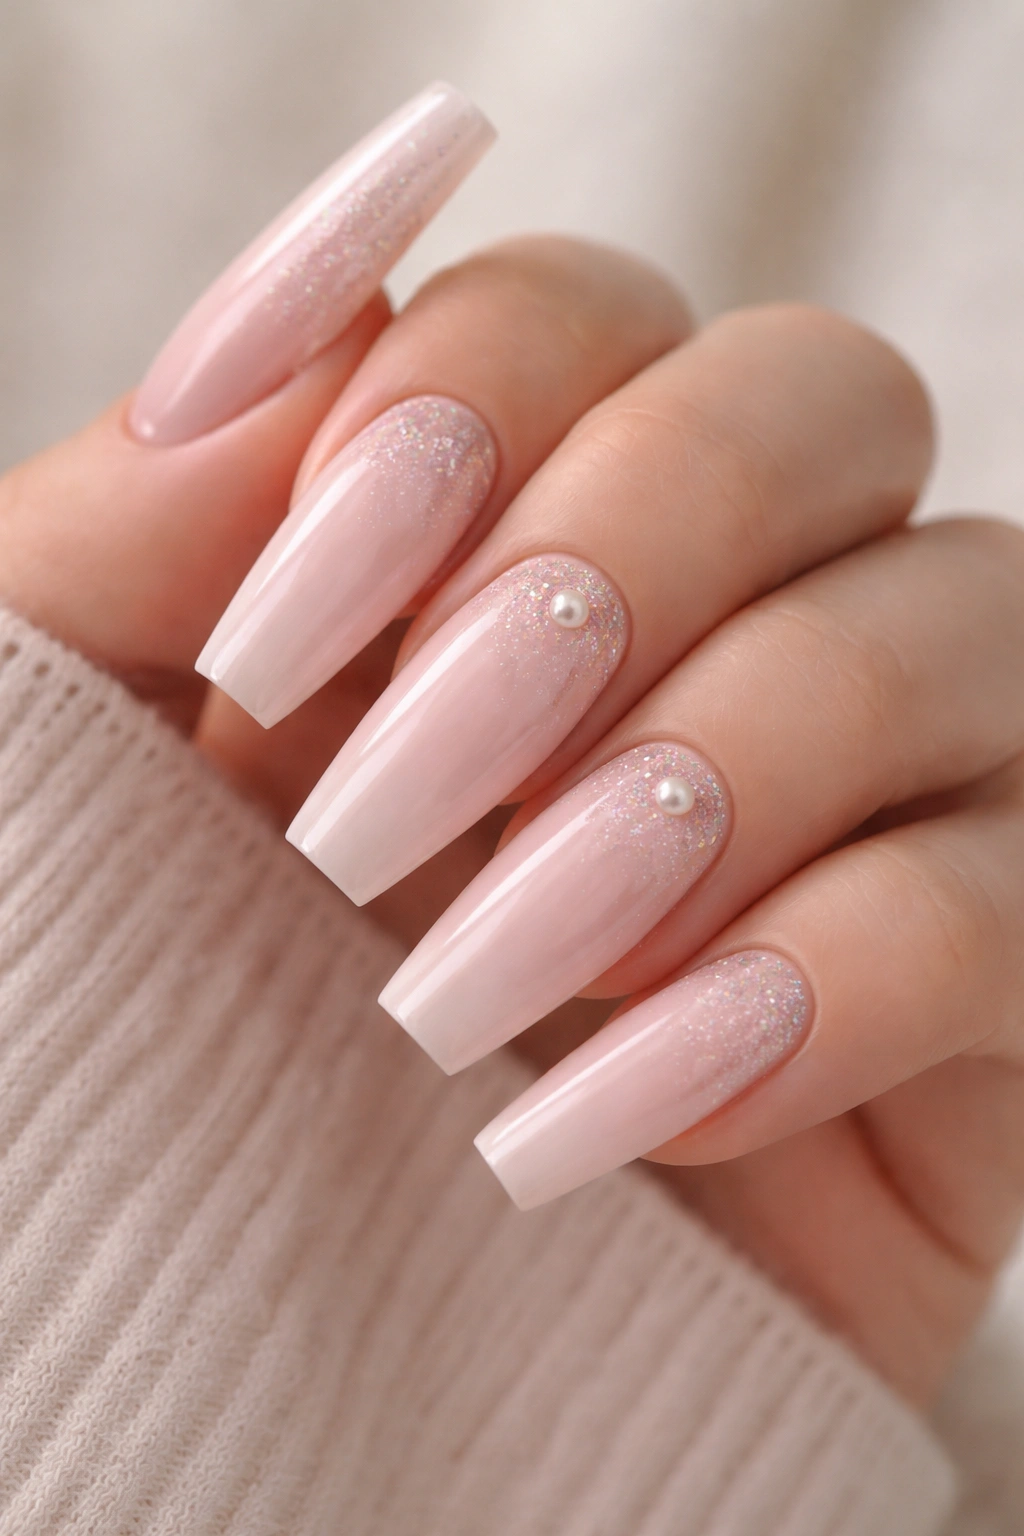
This design leans into femininity without feeling saccharine — think sophisticated romance rather than cutesy romance.
The Power of Subtle Sparkle
Pale pink coffin nails already feel refined, and minimal glitter plus pearl accents elevate them further. The key is restraint — one pearl per nail, barely visible glitter, allows the elegant base color to remain the star. This design works equally well for everyday wear and special occasions because it never tips into overdone territory.
Applying Pearls and Minimal Glitter
- Create a smooth pale pink base with two coats of quality polish
- Once dry, apply a very light sprinkle of ultra-fine glitter across just the top third of a few nails
- Place a single small pearl or pearl accent at the cuticle or centered on the nail
- Use a clear top coat to secure the pearls and seal everything
- The overall effect should read as polished, not embellished
Quick observation: This design actually looks better with less rather than more — resist the urge to add more pearls or glitter.
12. Warm Tan with Thin Rose Gold Stripe Down the Center
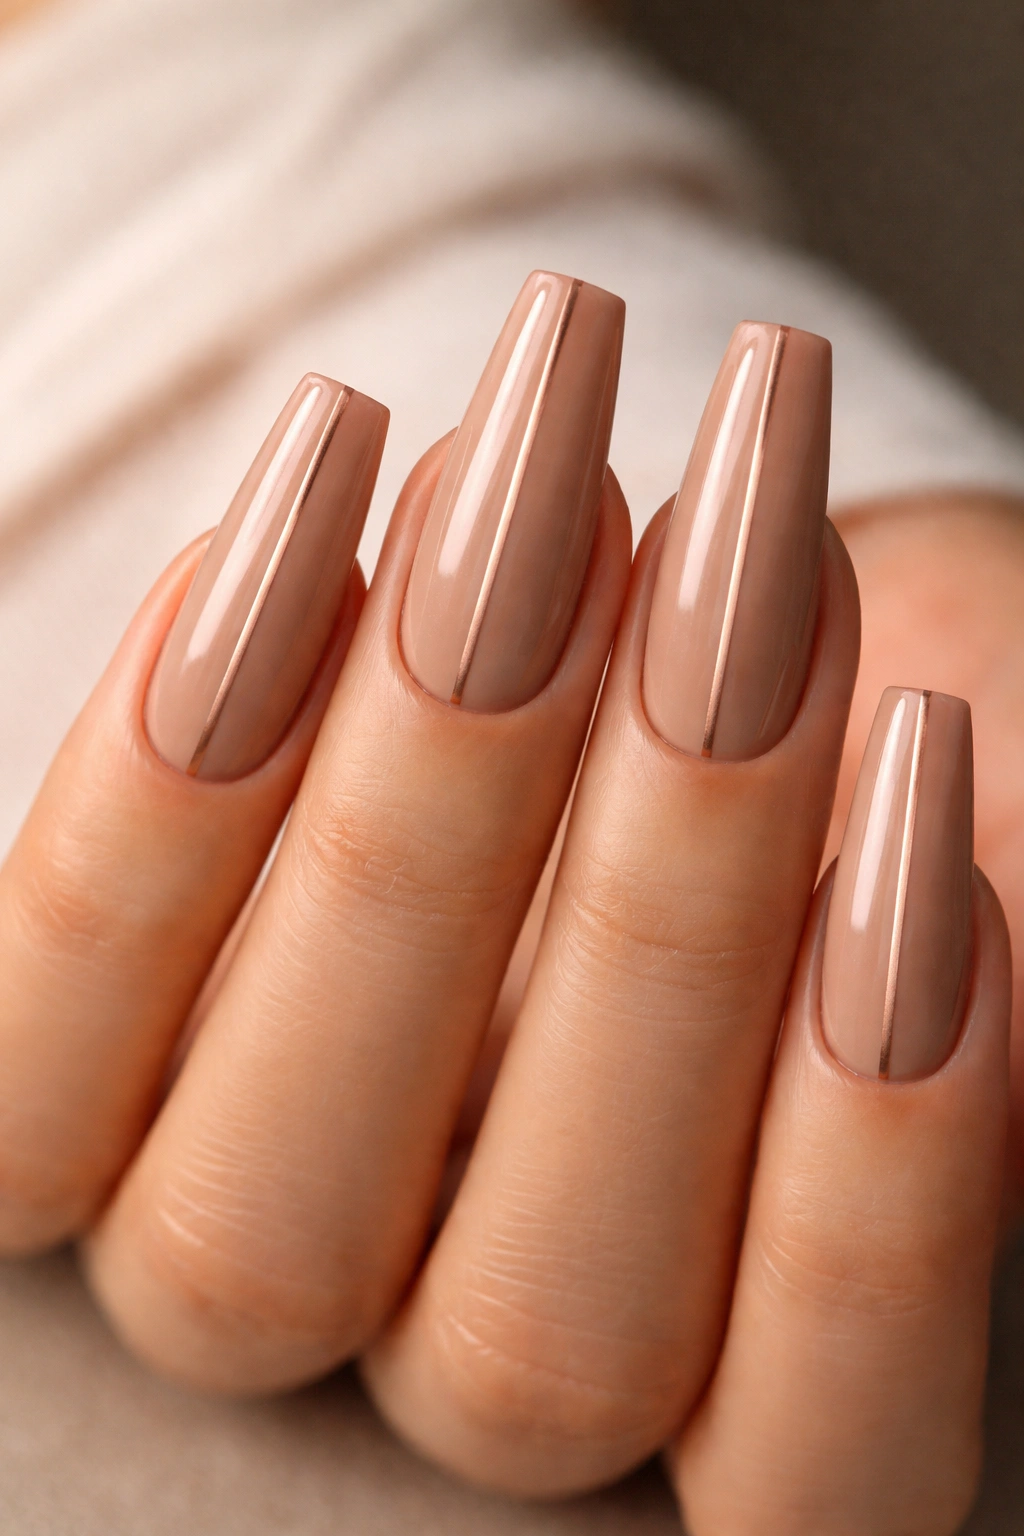
Simplicity executed perfectly becomes elegance. This design proves that you don’t need complexity to create something genuinely stunning.
Elegance Through Restraint
A single centered stripe transforms a simple tan base into something intentional and refined. The rose gold complements warm skin tones beautifully, and the thin application keeps it feeling sophisticated. Coffin nails are ideal for this design because the centered stripe emphasizes the elongated shape.
Executing the Perfect Center Stripe
- Choose a warm tan that complements your natural skin tone — yellowy tans work best
- Paint two even coats and allow to fully dry
- Use a thin nail art brush or striping pen to paint a perfectly centered rose gold line from cuticle to tip
- The line should be perfectly straight and consistent in width
- Seal with a glossy coat that makes the stripe glow against the tan base
Pro tip: If your hand shakes, use painter’s tape on either side of where the stripe should go, then remove it carefully before sealing.
13. Rich Plum with Thin Silver Lightning Bolt Design
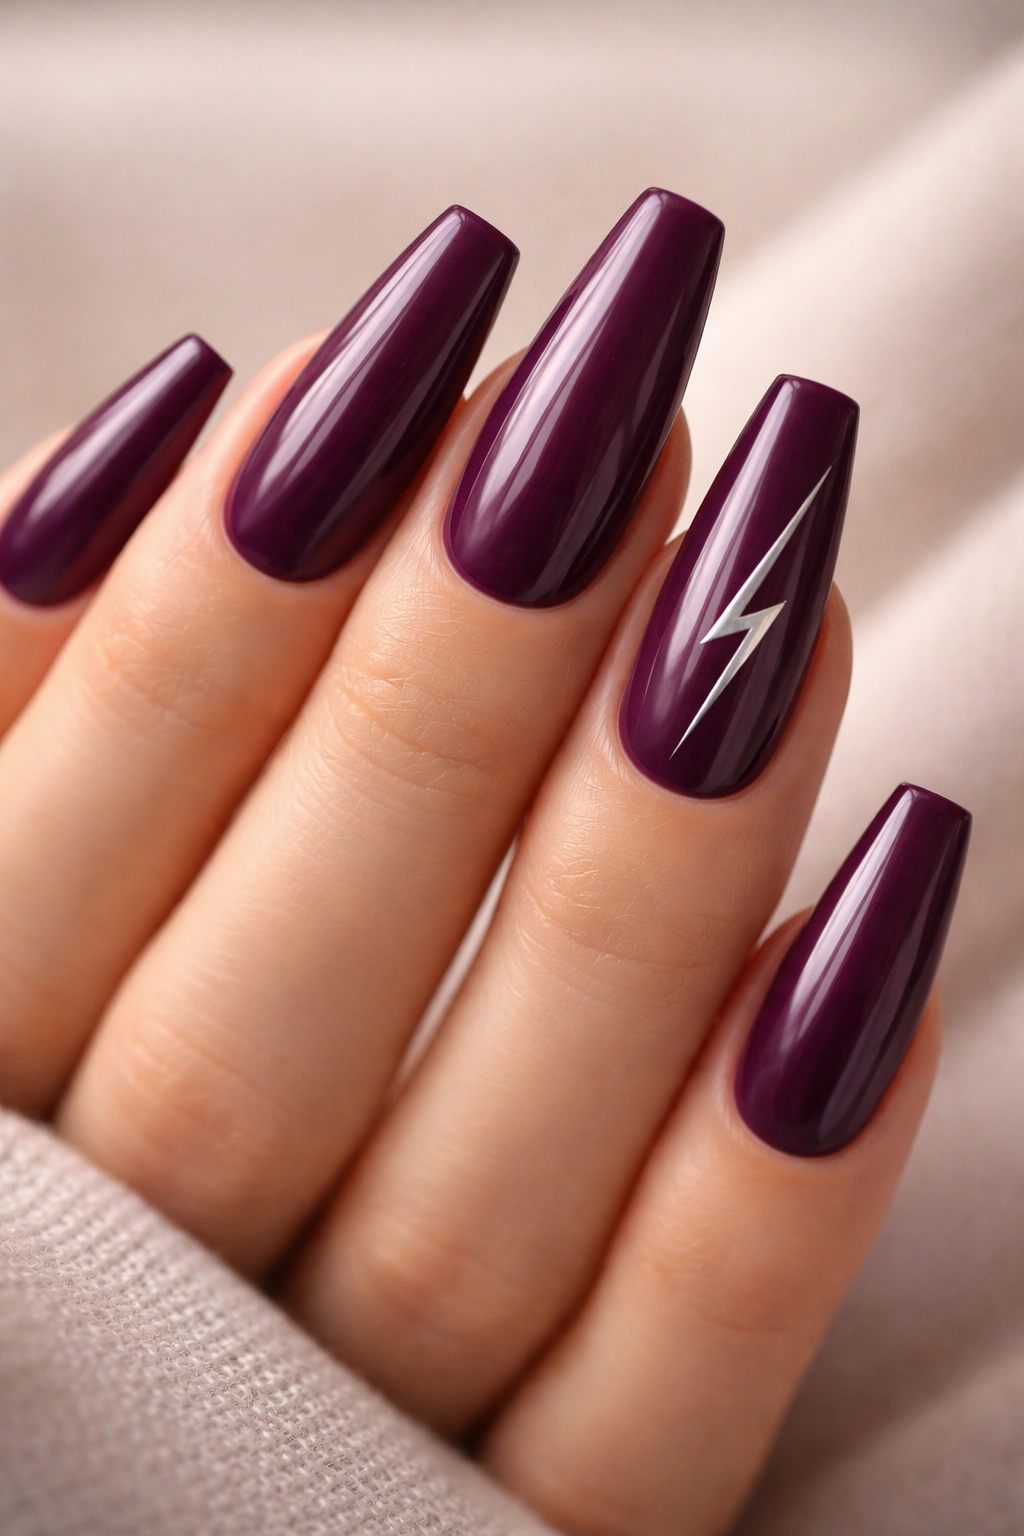
Plum coffin nails feel moody and sophisticated, and a subtle lightning bolt design adds just enough edge to prevent them from feeling heavy.
Balancing Drama and Refinement
Plum is darker than burgundy but warmer than black, making it feel luxurious without being severe. A lightning bolt design — crisp, geometric, intentional — prevents the dark color from feeling flat or boring. The silver keeps the design bright enough to prevent the overall effect from feeling gothic.
Creating Precise Lightning Bolt Details
- Apply two coats of rich plum for even, opaque coverage
- Use a thin brush or striping pen with silver polish to create a lightning bolt design
- Try placing it down the center of one nail, along the side of another, or in the upper corner for asymmetrical interest
- Keep the lines sharp and the angles consistent — precision is what makes this feel like a design rather than a mistake
- Seal with glossy top coat that emphasizes the silver shine
Design consideration: This works beautifully on just one or two nails per hand rather than all ten.
14. Soft Beige with Minimalist Tan Gradient and White Tips
Monochromatic gradients feel incredibly sophisticated because they work with the coffin shape rather than against it.
Monochromatic Elegance
A soft beige base transitioning through tan to white tips creates the illusion of even longer nails while staying perfectly cohesive. Because there’s no color contrast, all the visual interest comes from the shape and the gradient itself. This design works for literally any occasion and never feels out of place.
Creating a Smooth Monochromatic Gradient
- Start with a soft beige base and allow to dry completely
- Using a sponge, apply thin layers of progressively darker or lighter tones, blending as you go
- Move through the monochromatic range (beige → tan → cream → white) with each layer
- Use a sponge rather than a brush for blending — the sponge creates the seamless transition that makes this special
- Seal with a glossy coat that unifies all the tones
Real observation: Monochromatic designs actually look more expensive because they require precision and skill to execute smoothly.
15. Charcoal Gray with Rose Gold Geometric Inlay
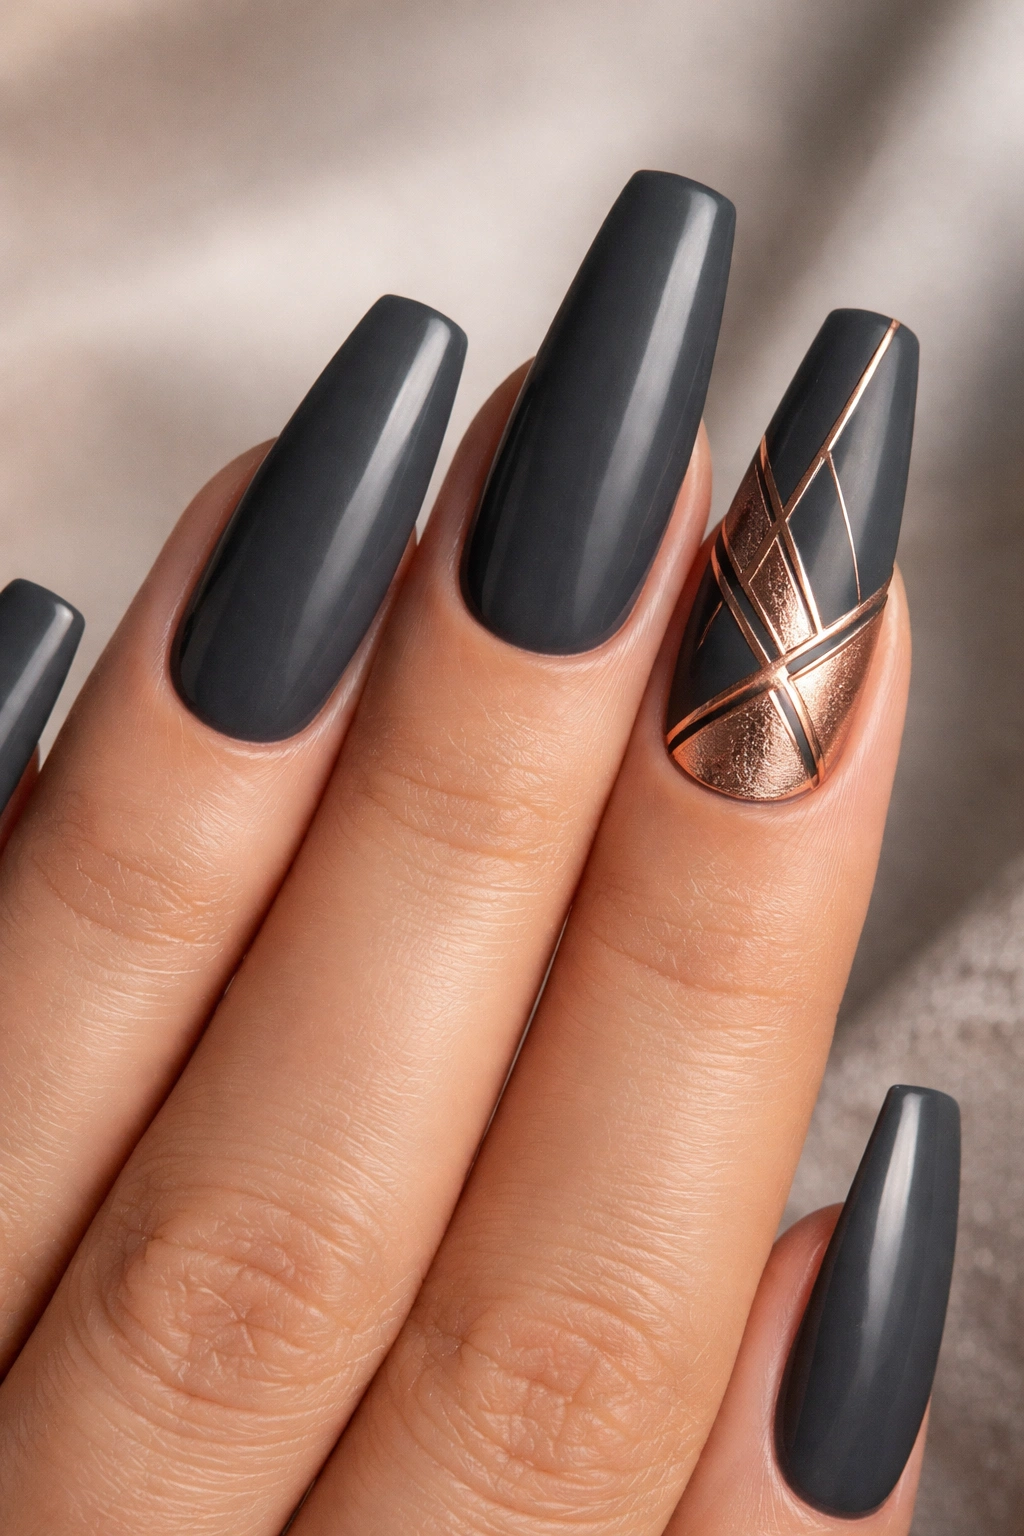
Gray coffin nails feel contemporary and sophisticated, especially when paired with rose gold geometric details that feel modern without being trendy.
The Contemporary Appeal of Gray
Charcoal gray sits between black and silver, making it feel both powerful and refined. It works with virtually any skin tone, and it provides the perfect backdrop for geometric details. The coffin shape pairs beautifully with geometric precision — they speak the same visual language.
Geometric Inlay Technique
- Paint charcoal gray as your base — use two coats for full opacity
- Once dry, plan your geometric design (try interlocking triangles, nested rectangles, or hexagons)
- Use a thin brush to carefully apply rose gold polish in these geometric shapes
- The precision matters here — slightly wobbly lines read as unpolished
- Seal with a glossy top coat that emphasizes the shine difference between the matte gray and glossy gold
Design angle: Keep the geometric shapes on just one nail per hand for a contemporary, editorial feel.
16. Ivory with Barely Visible Gold Flecks and Glossy Finish
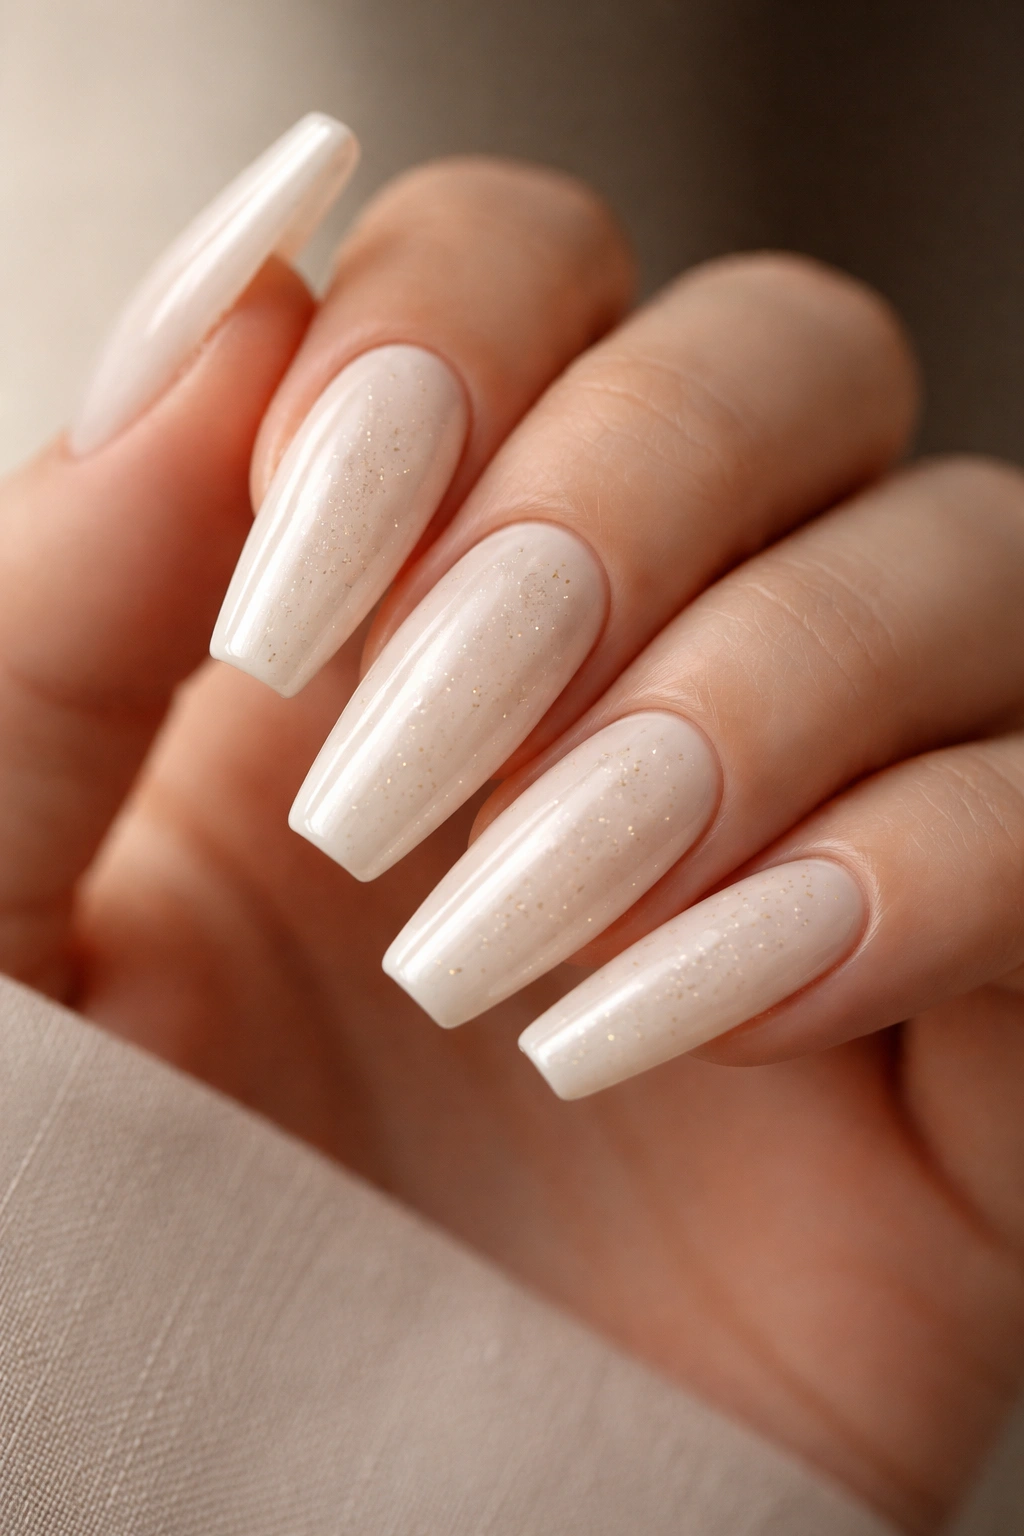
Sometimes the most sophisticated designs are the ones that look like they’re barely there. This design proves that whitespace is powerful.
The Power of Quiet Luxury
Ivory coffin nails feel sophisticated by default — they’re elongated, pristine, and inherently classy. Adding barely-there gold flecks keeps the look from feeling plain while maintaining its refined quality. The glossy finish means light bounces off the nails constantly, creating movement without decoration.
Applying Minimal Gold Flecks
- Paint with ivory (not stark white, but creamy ivory) for two coats to ensure opacity
- Once completely dry, use a fine brush to apply tiny specs of gold glitter or gold polish
- The flecks should be so subtle that someone notices something is off without immediately seeing what it is
- Scatter them randomly rather than in a pattern — randomness reads as more sophisticated than order
- Seal with a ultra-glossy top coat that makes everything gleam
Worth noting: This design actually benefits from fresh manicures every two to three weeks because the subtle gold flecks fade beautifully.
17. Dusty Rose with Delicate White Dot Pattern
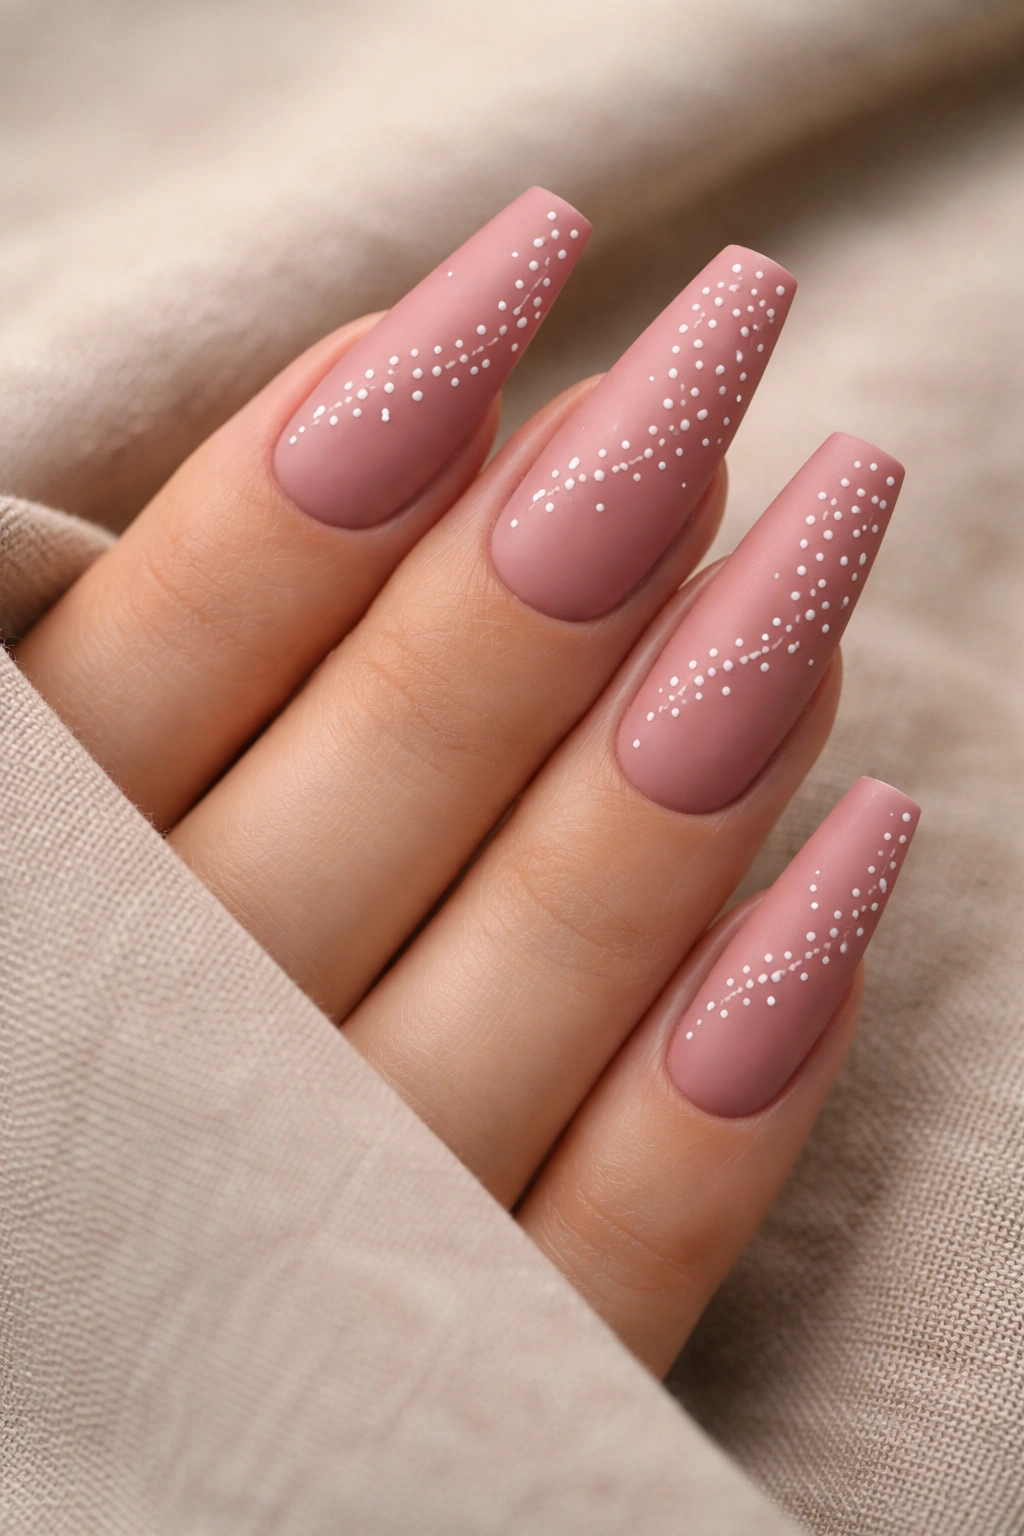
Dusty rose sits in the sweet spot between blush pink and mauve — it feels soft without being babyish, elegant without being formal.
The Versatility of Dusty Rose
Dusty rose works for virtually any season and any occasion. It complements most skin tones, and white dot patterns add visual interest without reading as juvenile when executed with proper spacing. Coffin nails showcase this color beautifully because the elongated shape gives the soft tone room to shine.
Creating Precise Dot Patterns
- Paint dusty rose base with two coats for full, even coverage
- Once completely dry, use a dotting tool (or the end of a bobby pin) to create small white dots
- Space the dots deliberately rather than randomly — try a column down the center, clusters in the corners, or asymmetrical groupings
- Each dot should be perfectly round and the same size
- Seal with a glossy or semi-glossy top coat depending on whether you want additional shine
Practical tip: Smaller dots look more sophisticated than larger ones — aim for dots that are smaller than the head of a pin.
18. Classic Red with Subtle Black French Tip Definition
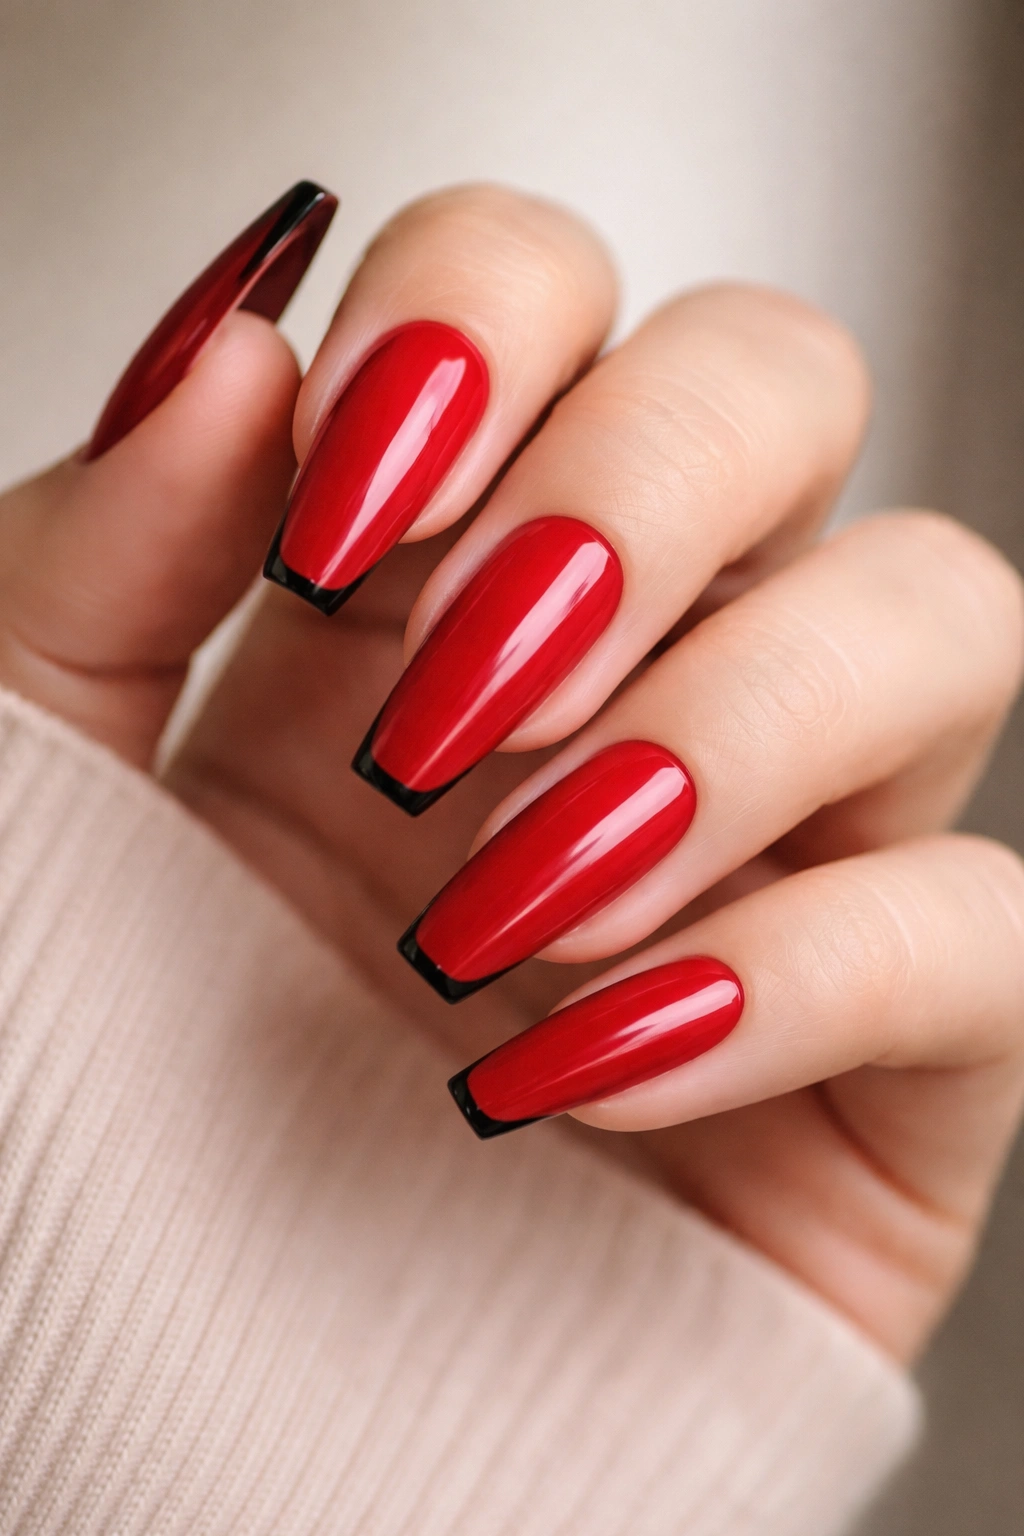
A red and black combination feels bold, but when executed as a subtle French tip variation, it reads as sophisticated rather than costume-like.
Elevating the Bold Combination
Classic red coffin nails already feel confident and polished. Adding a thin black definition at the tips creates visual interest without the harshness of a traditional French tip. The black frames the red, making the color feel even more luxurious and intentional.
Creating Subtle Black Definition
- Paint two coats of true red (not orange-red, but a clear, true red) across the entire nail
- Once dry, use a thin brush to paint a very fine black line just along the actual tip edge
- This is meant to be definition, not a thick stripe — the line should be barely thicker than the edge itself
- On a few nails, extend this black line slightly down the sides for subtle asymmetry
- Seal with a glossy coat that makes the red glow and the black definition crisp
Final observation: This design works because the coffin shape has a defined tip — the black simply emphasizes what’s already there structurally.
Wrapping Up
The beauty of coffin nails lies in their versatility — they’re elegant enough for formal occasions, interesting enough to express personality, and elongated enough to make practically any design look intentional and refined. Whether you gravitate toward minimalist simplicity, jewel-tone richness, or subtle shimmer, these eighteen designs offer plenty of starting points for creating looks that feel genuinely classy.
The common thread running through all of these designs is intentionality. Classy nail designs don’t happen by accident — they’re the result of thoughtful color choices, precise execution, and knowing when restraint actually creates more impact than abundance. A single perfect stripe carries more weight than scattered glitter. Monochromatic elegance speaks louder than busy patterns.
The best design is ultimately the one that makes you feel confident and comfortable. Some of these ideas will resonate immediately, while others might feel like they need tweaking to match your aesthetic. That’s exactly as it should be — the most sophisticated manicure is one that feels authentically yours rather than a complete copy of someone else’s vision. Use these designs as inspiration, adapt the ones that call to you, and don’t hesitate to combine elements from different designs to create something that’s entirely your own.
