

Black and gold nails have an undeniable appeal—that perfect balance between bold and sophisticated, edgy and elegant. The two-tone combination works across every season and occasion, whether you’re heading to a night out, a formal event, or just want to elevate your everyday look. When you pair these stunning colors with the coffin nail shape, you get a manicure that’s instantly more striking and fashion-forward than standard shapes.
Medium-length nails hit a sweet spot that many people prefer. They’re long enough to showcase intricate designs and geometric patterns, but short enough to remain practical for daily life. You won’t struggle with breakage, typing, or handling everyday tasks—yet you still get that elongated silhouette that coffin nails are famous for. This makes medium coffin nails the ideal canvas for black and gold nail art, letting you experiment with different design styles without overcommitting to ultra-long lengths.
The beauty of black and gold combinations is their versatility. You can go minimalist with subtle accents, or fully embrace maximalist designs with intricate patterns, rhinestones, and metallic details. Whether you’re drawn to sleek geometric lines, glamorous glitter gradients, marble effects, or detailed nail art, black and gold delivers sophistication every single time. Let’s explore 14 stunning designs that work beautifully on medium coffin nails.
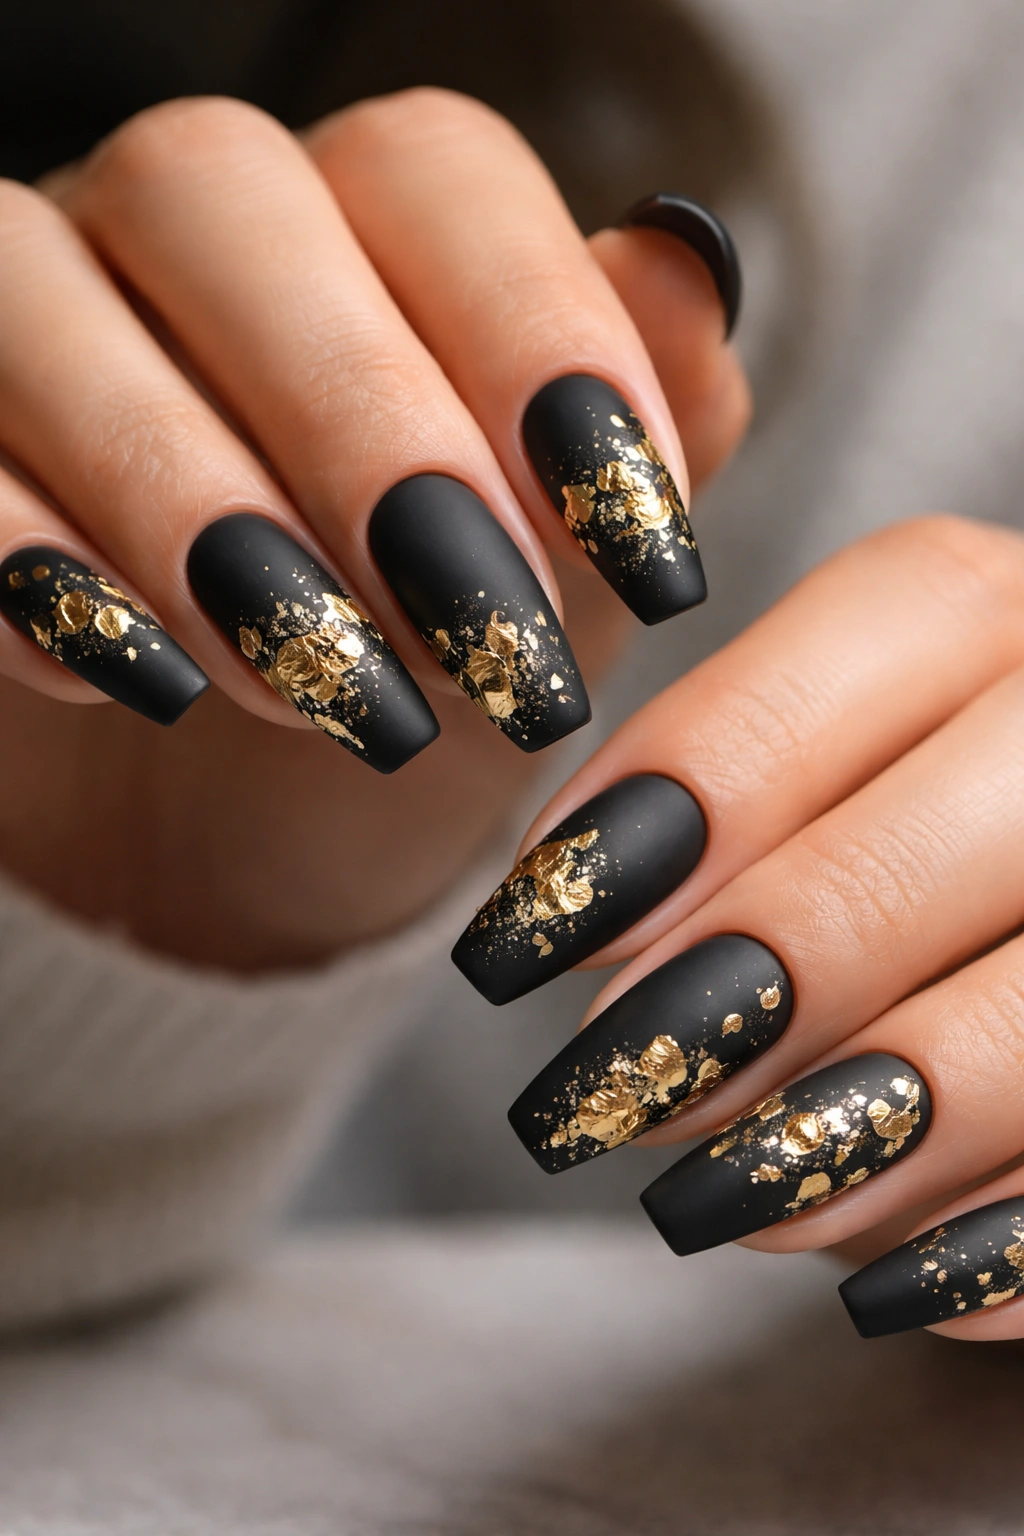
1. Classic Gold Leaf Accents on Matte Black
Matte black acts as the perfect neutral canvas, and gold leaf details transform it into something truly luxurious. This design combines a soft, velvety matte finish with delicate pieces of genuine or faux gold leaf scattered across the nail surface, creating an organic, artisanal appearance that catches light beautifully.
Why This Design Stands Out
The contrast between matte and metallic finishes creates visual interest without overwhelming the nail. Matte black feels modern and understated, while the gold leaf adds just enough glamour to make the look feel special. This combination works for both casual settings and upscale events—it’s sophisticated without trying too hard. The randomness of the leaf placement means every nail is slightly different, giving the look an intentional, hand-crafted quality that’s far more interesting than a rigid pattern.
How to Create It Perfectly
- Start with a smooth base of matte black polish (two coats for full coverage)
- Allow the polish to dry completely before adding any embellishments
- Tear small, irregular pieces of gold leaf or purchase pre-cut leaf pieces from a nail supply store
- Use a thin brush or tweezers to apply the pieces with a clear gel or top coat as adhesive
- Press gently and smooth out any air bubbles with a soft brush
- Seal everything with a glossy top coat to protect the design and create contrast with the matte base
Pro tip: If you find applying individual leaf pieces tedious, look for pre-made metallic leaf nail stickers—they give the same luxe effect with zero fuss and are surprisingly high-quality.
2. Half-and-Half Black and Gold Split Design
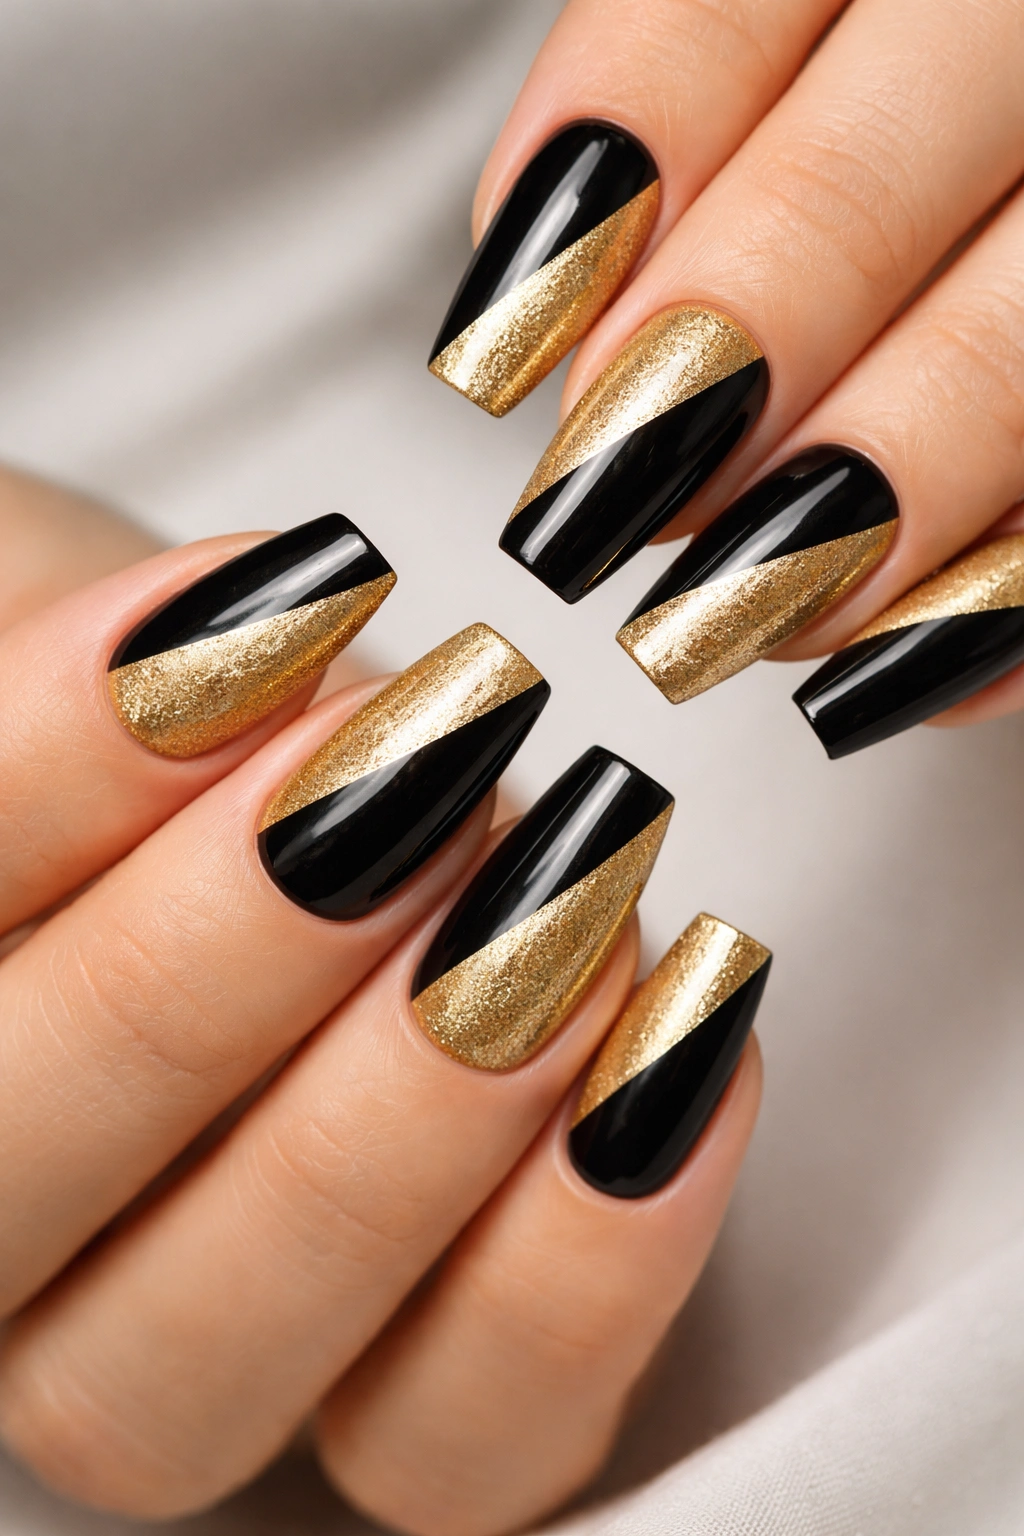
This geometric approach divides the nail diagonally, with one half in glossy black and the other in shimmering gold. It’s bold, modern, and instantly eye-catching while remaining clean and organized. The simplicity makes it surprisingly easy to achieve at home with steady hands and painter’s tape.
The Graphic Impact
Half-and-half designs appeal to people who love clear, decisive aesthetics. There’s no ambiguity here—just two complementary colors in perfect balance. On medium coffin nails, the split design emphasizes the nail’s natural shape and creates dynamic visual movement. The geometry adds contemporary edge that feels current without being trendy or temporary. Plus, the clean division means you can easily swap colors or patterns down the line—it’s a design template you can reinvent endlessly.
Application Tips for Sharp Lines
- Paint your entire nail with a base color (let’s say black on one half, gold on the other)
- Once dry, apply painter’s tape diagonally from corner to corner
- Paint the contrasting color on the exposed area with 2-3 thin coats
- Remove the tape slowly and carefully while the polish is still slightly tacky for the cleanest edge
- Use a thin cleanup brush and nail-safe acetone if you need to refine the line
- Finish with a strong top coat that extends slightly past the edge for durability
Worth knowing: The angle of your diagonal matters. A 45-degree angle creates maximum visual drama, while a shallower angle feels more subtle. Experiment with angling the division toward different corners for variety.
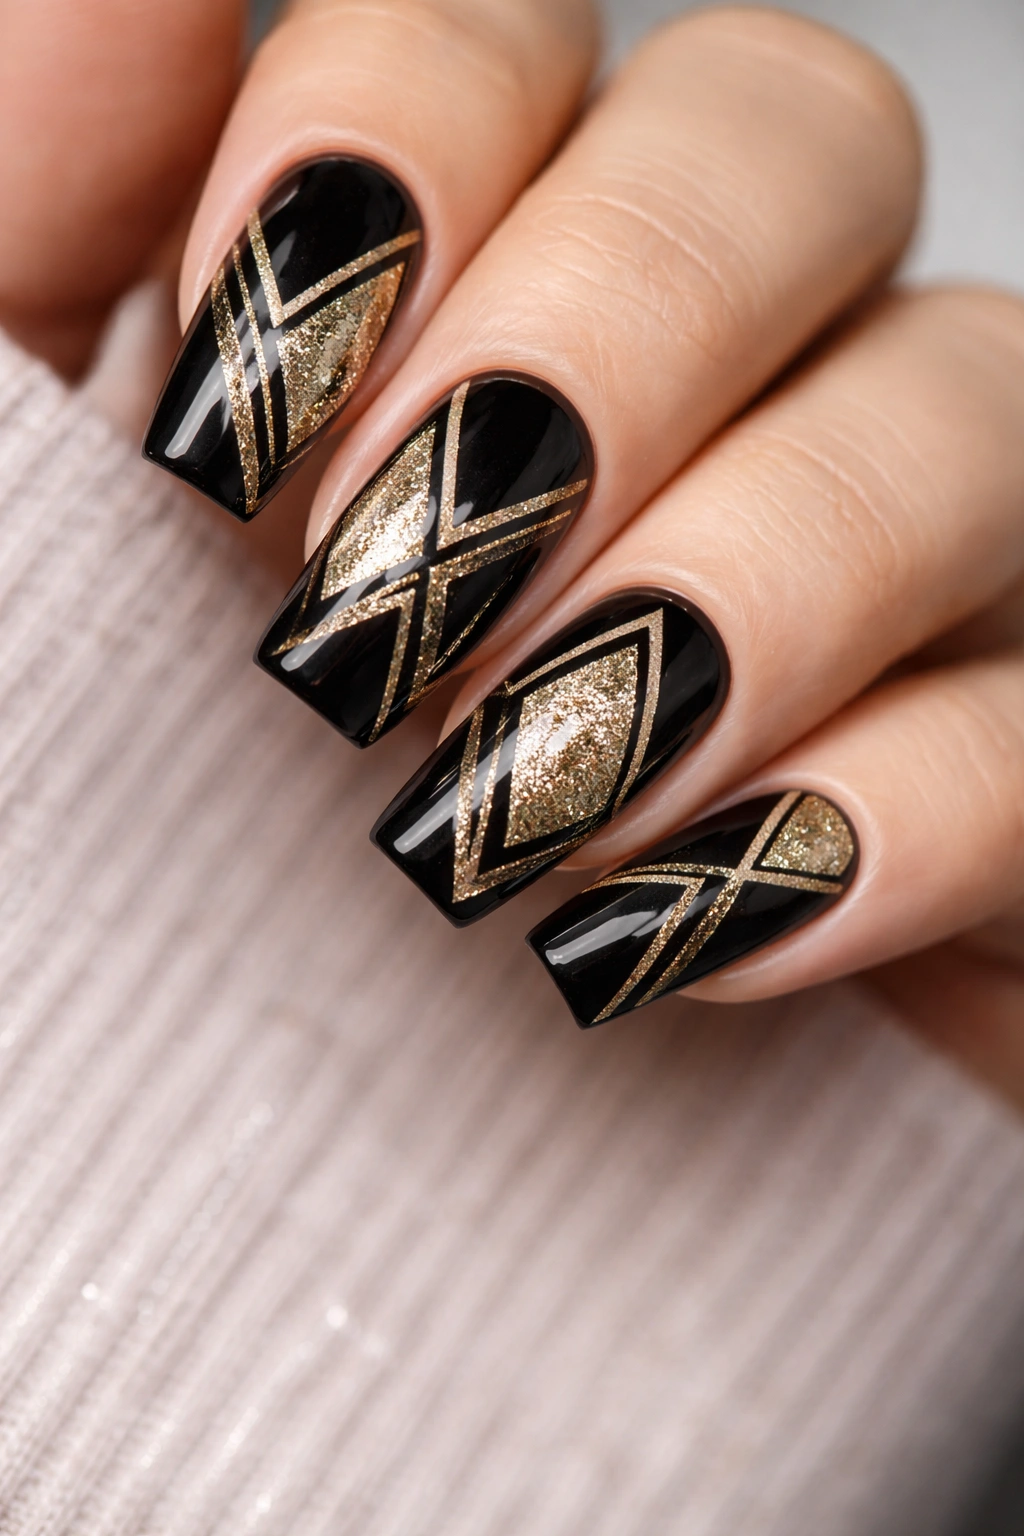
3. Gold Geometric Patterns on Matte Black Base
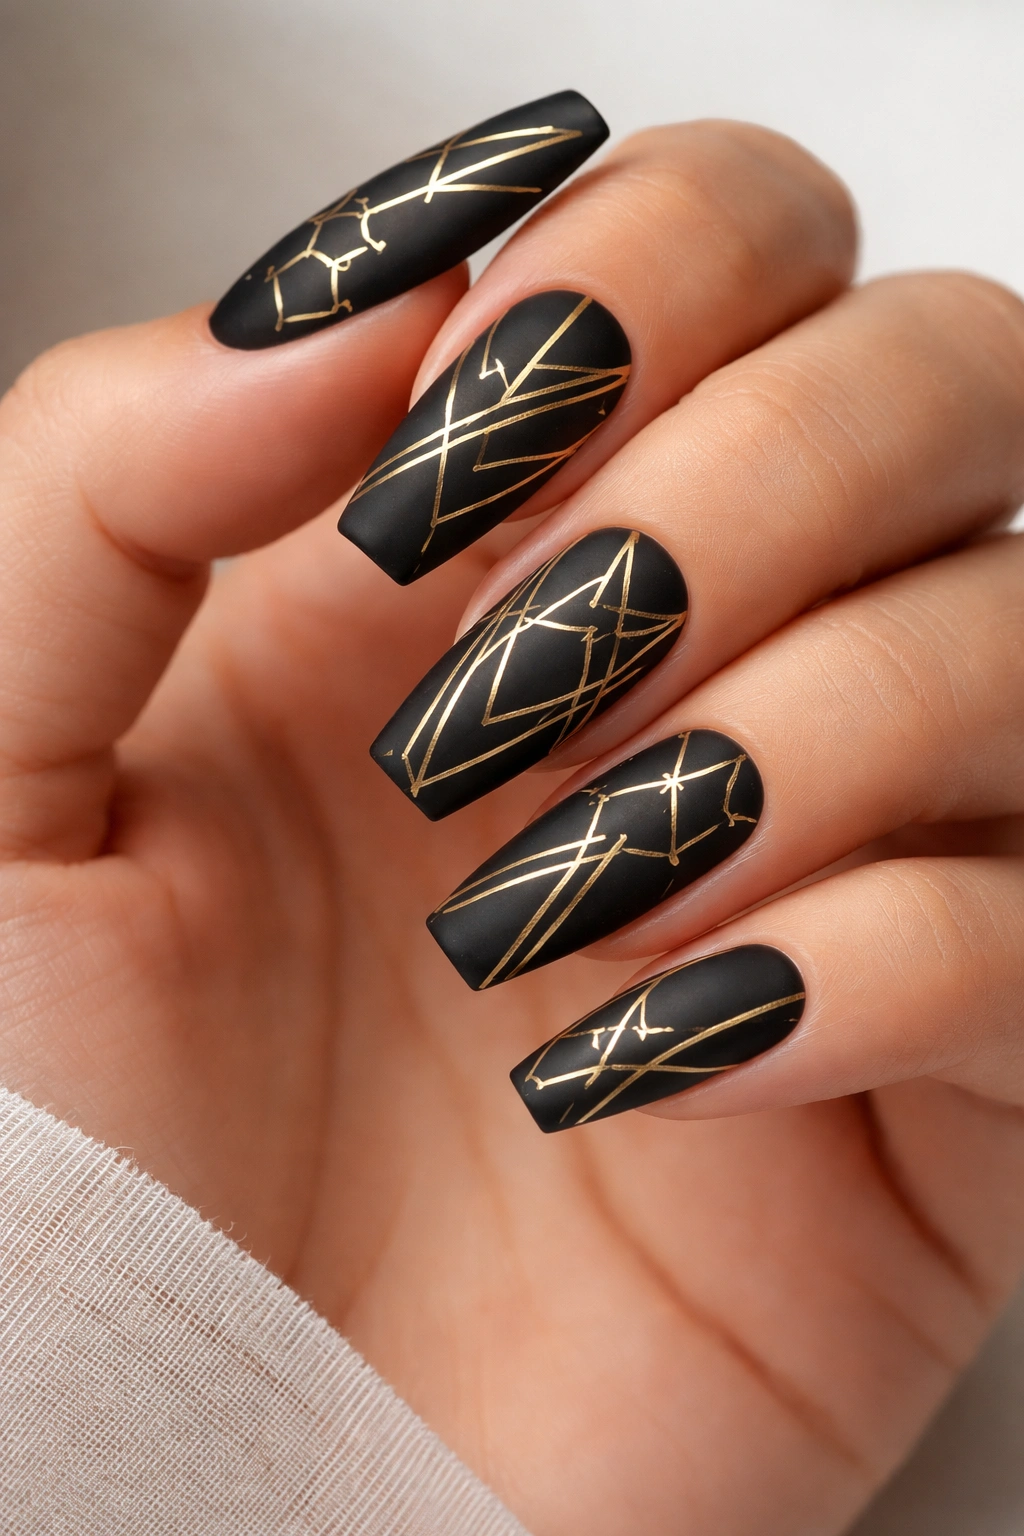
Geometric designs feel contemporary and artistic without requiring expert-level skill. Think triangles, hexagons, parallel lines, or chevron patterns painted in metallic gold over a matte black base. This design works because geometry is forgiving—minor imperfections actually enhance the hand-drawn aesthetic.
Why Geometry Works on Coffin Nails
The elongated shape of coffin nails naturally lends itself to linear patterns and geometric shapes. Horizontal lines emphasize width, while vertical patterns draw the eye upward and elongate the nail further. Geometric designs scale beautifully—you can fill the entire nail with a pattern or use it just as accents near the cuticle or tips. The style remains effortlessly modern and works across age groups and style preferences, making it endlessly wearable.
Creating Clean Geometric Lines
- Use a thin striping brush or detail pen for precision
- Start with a matte black base and allow it to dry completely
- Sketch your design lightly in pencil on the nail (yes, this works) before committing with polish
- Use metallic gold or champagne polish for the geometric elements
- Thin polish slightly with gel medium if you’re struggling with application—this improves flow without weakening color
- One solid coat of geometric shapes often provides better coverage than two thin coats
- Seal with a glossy top coat for contrast and protection
Pro tip: If hand-drawing feels intimidating, nail stencils designed for geometric patterns are inexpensive and yield professional results even for beginners.
4. Gold Ombre Gradient Into Black
A gradient that transitions smoothly from gold on the tips to black near the cuticle creates an elegant ombré effect that’s simultaneously sophisticated and eye-catching. This design works beautifully on medium nails because there’s enough surface area to show the color transition clearly.
The Appeal of Gradient Design
Ombré nails feel upscale and gallery-like—they photograph beautifully and catch compliments frequently. The gradient requires no detailed artistry, just careful blending, which makes it more achievable for home application than intricate designs. On coffin nails, the longer length allows the gradient to develop gradually rather than cramming multiple colors into a tight space. The effect is mesmerizing and creates depth that solid colors can’t achieve.
Perfecting Your Gradient Technique
- Apply a base coat and let it dry
- Paint a gold polish on the nail tips and blend it about halfway up the nail
- Paint black polish starting from the cuticle area and blend it toward the gold
- Use a damp makeup sponge to blend the colors where they meet by dabbing gently
- Build the gradient with multiple thin layers rather than applying too much polish at once
- The key is patience—rushing the blend creates muddy, uneven transitions
- Seal with a quality top coat designed for color protection to prevent the colors from separating over time
Insider note: Keep a damp cotton ball nearby to clean up your cuticle and nail edges. Ombré designs can get messy, but cleanup takes just seconds and makes the final look exponentially more polished.
5. Black with Fine Gold Striping Detail
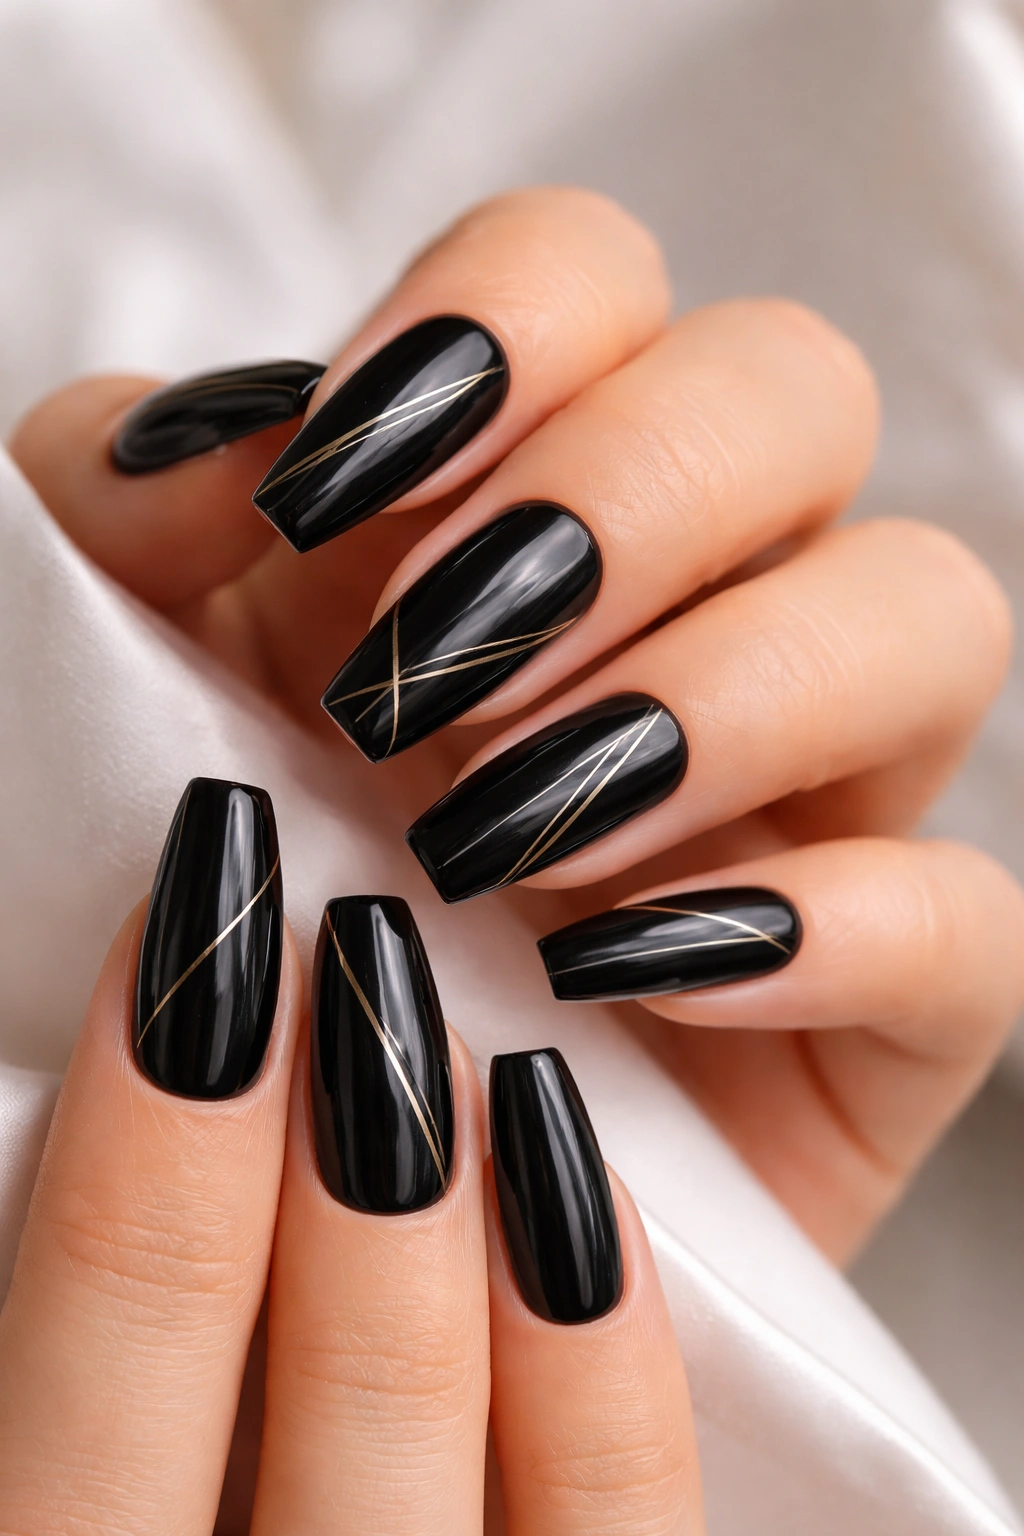
Elegant and minimalist, this design features a solid black base with delicate thin gold lines—either vertical stripes, diagonal lines, or a combination—creating interest through restraint. The thinness of the lines means they read as sophisticated rather than busy, even though they require steady hands to execute.
Minimalism as Sophistication
Sometimes less really is more. Fine line designs appeal to people with refined taste who prefer subtlety over statement. On medium coffin nails, thin striping works because it doesn’t overwhelm the nail’s surface but still provides visual interest. Gold lines against black have timeless elegance—this design works whether you’re 25 or 65, and it pairs with any outfit. It’s the kind of manicure that makes people notice your hands look polished without being able to pinpoint exactly why.
Executing Thin, Even Lines
- Begin with two smooth coats of black base polish
- Use a thin striping brush or a detail pen with metallic gold polish
- Decide on your pattern: vertical lines spaced evenly, diagonal stripes, or thin lines framing the nail edge
- For vertical lines, start at the cuticle and draw straight to the tip with one confident stroke
- For diagonal lines, establish an angle and maintain consistency across all nails
- Thin your gold polish slightly if it’s dragging or skipping
- One coat of gold striping is usually sufficient for opacity
- Finish with a glossy top coat
Fun fact: Nail artists often use a tiny ruler or tape guide to mark spacing before applying striping polish, ensuring perfect alignment even without freehand skill.
6. Gold Foil Splatter Effect Over Black
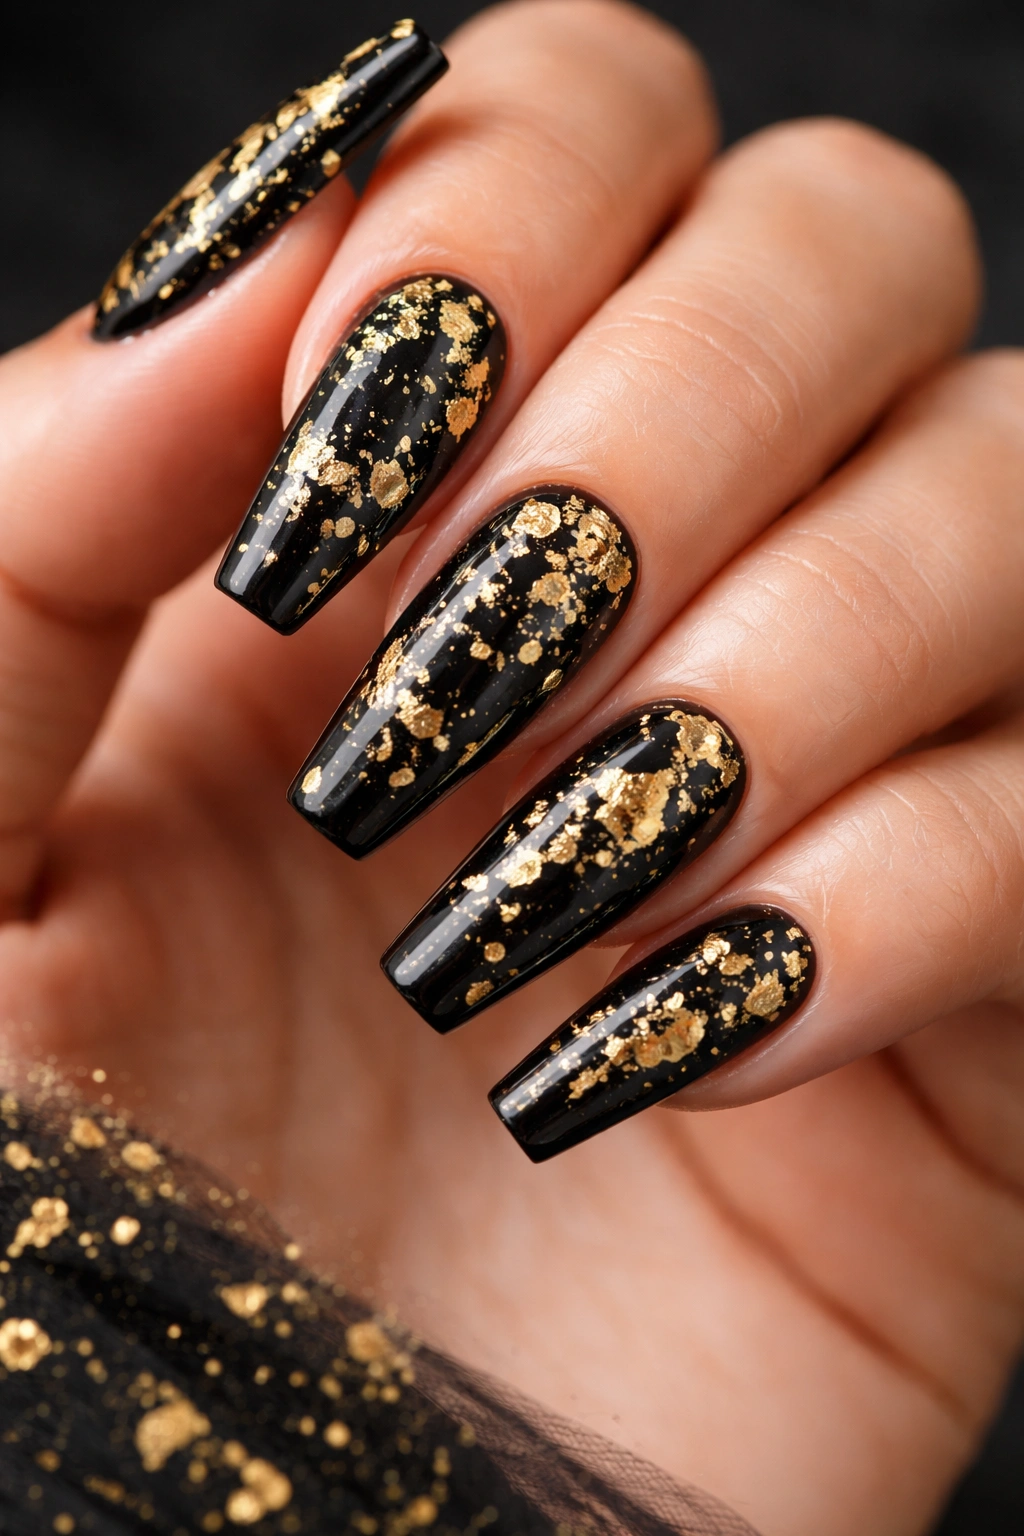
For a more artistic, abstract look, gold foil shatters into irregular shards and is applied to a black base, creating a fractured, edgy aesthetic. This design looks complex but is surprisingly forgiving—the randomness of the splatter is actually the point, so perfection is impossible.
Why Splatter Designs Feel Modern
Abstract splatter effects appeal to creative, artistic personalities. There’s no “right way” to do it, which makes it freeing and fun. On medium nails, the splatter pattern has enough room to develop visually without feeling cramped. The design reads as contemporary and artistic rather than dainty or sweet. It’s perfect for people who want their nails to reflect a more edgy, unconventional aesthetic while still maintaining enough black for sophistication.
Creating the Splatter Effect
- Paint a smooth base of black polish (two coats for opacity)
- Allow it to dry completely—this is important for clean results
- Tear gold foil into tiny, irregular pieces of varying sizes
- Mix a clear gel or tacky top coat in a small dish
- Dip pieces of foil into the gel and press them onto the nail in random patterns
- Don’t overthink placement—the randomness is what makes it work
- Press gently and smooth with a fine brush
- Layer different sizes of foil pieces to create depth
- Seal with a protective top coat
Pro tip: You can buy pre-shattered metallic foil packs at any nail supply store, which saves the step of tearing it yourself and gives more consistent-sized pieces.
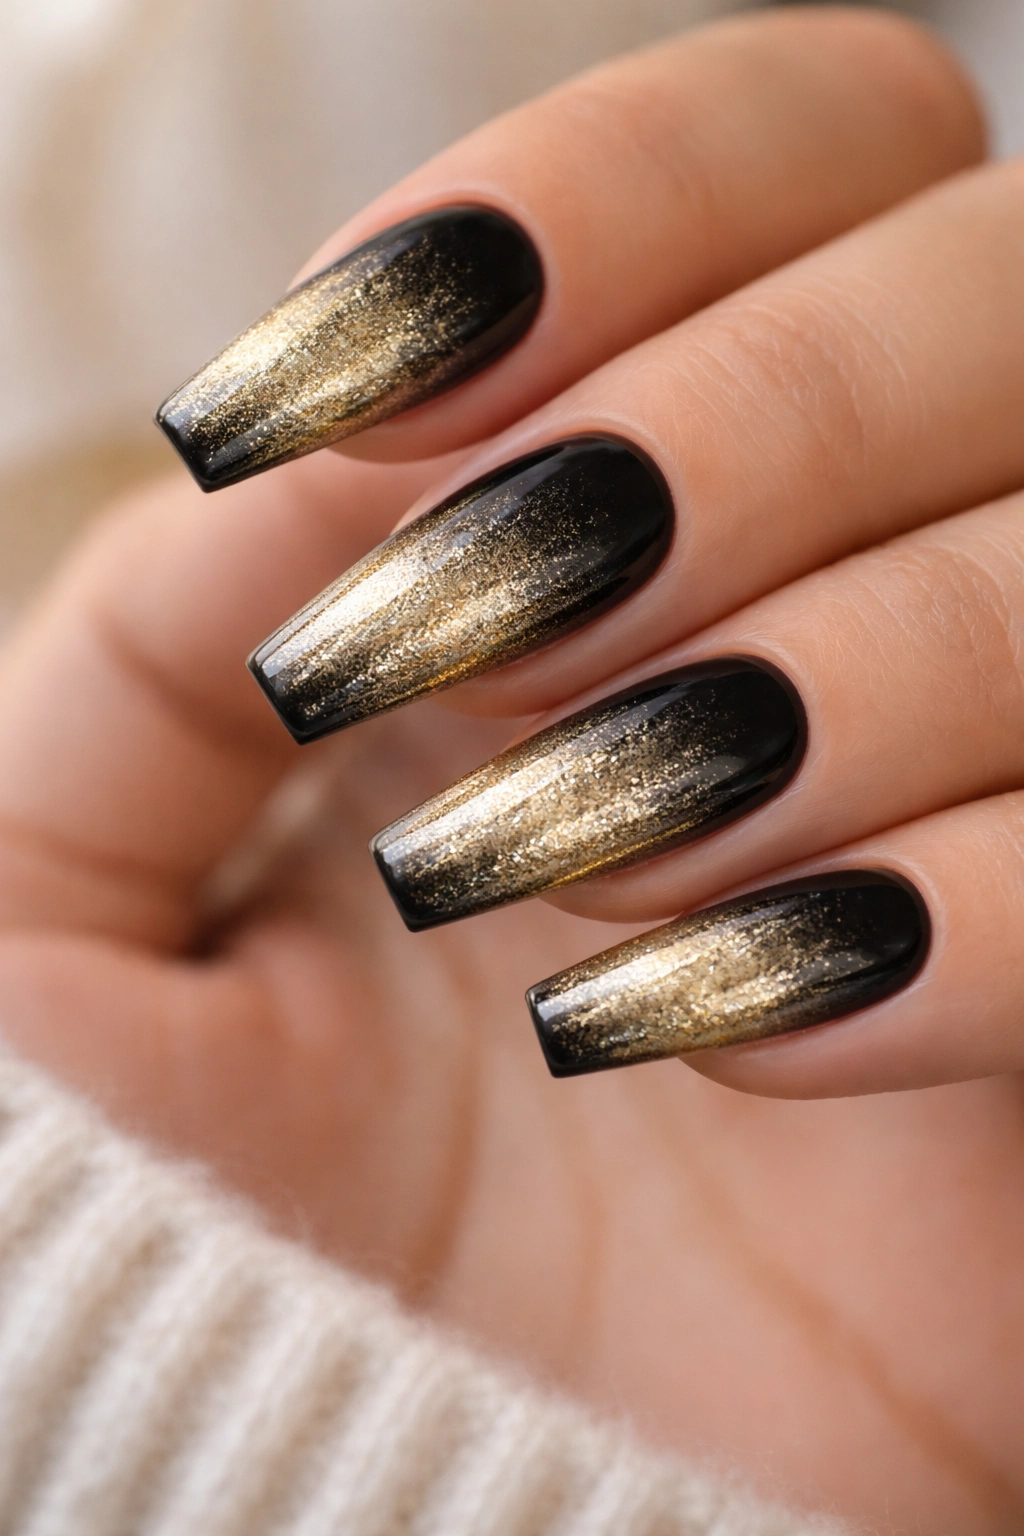
7. Black Coffin Nails with Gold Glitter Gradient Tips
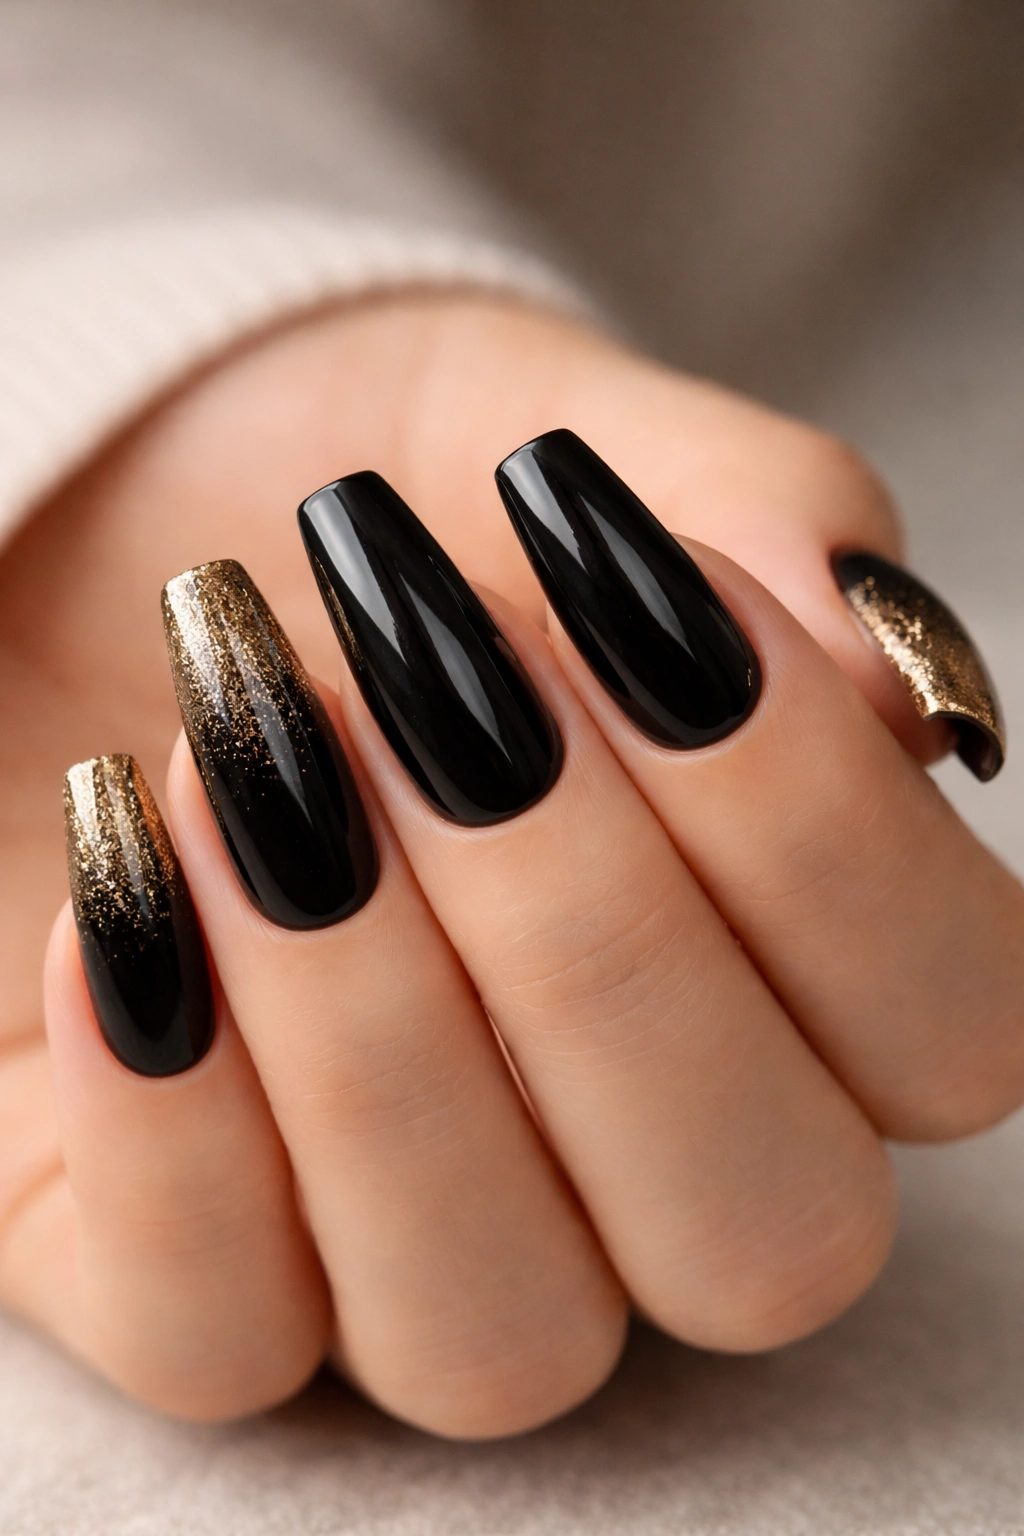
A subtle glitter gradient that starts sparse at the base and becomes dense with glitter at the tips creates movement and draws attention downward toward the nail edge. This design combines sophistication (solid black) with a touch of glam (concentrated glitter), offering the best of both worlds.
The Allure of Glitter Concentration
Glitter placed only on the tips avoids the “overdone” feeling that happens when an entire nail is covered in sparkle. The gradient creates subtle depth and makes the glitter feel intentional rather than accidental. On medium coffin nails, tip glitter draws the eye to the nail’s pointed edge, which is the shape’s most distinctive feature. This design works for everyday wear and special occasions alike—it’s polished enough for professional settings but glittery enough to feel celebratory.
Application for a Perfect Glitter Fade
- Paint the entire nail with black gel or regular polish (two coats for full opacity)
- Once dry, create a clear base or tacky layer on the tips
- Mix fine metallic gold glitter with clear gel in a small dish
- Apply this mixture to just the bottom third of the nail, working upward
- Add progressively more glitter-saturated mixture as you move toward the tip
- The transition should look gradual, not abrupt—build it with layers
- Each layer should be slightly more glitter-dense than the last
- Seal with a glossy, durable top coat rated for chip resistance
Worth knowing: The size and cut of your glitter matters. Fine glitter (also called dust or micro glitter) creates a subtle effect, while larger flakes are more dramatic and sparkly.
8. Negative Space Design with Gold Accents
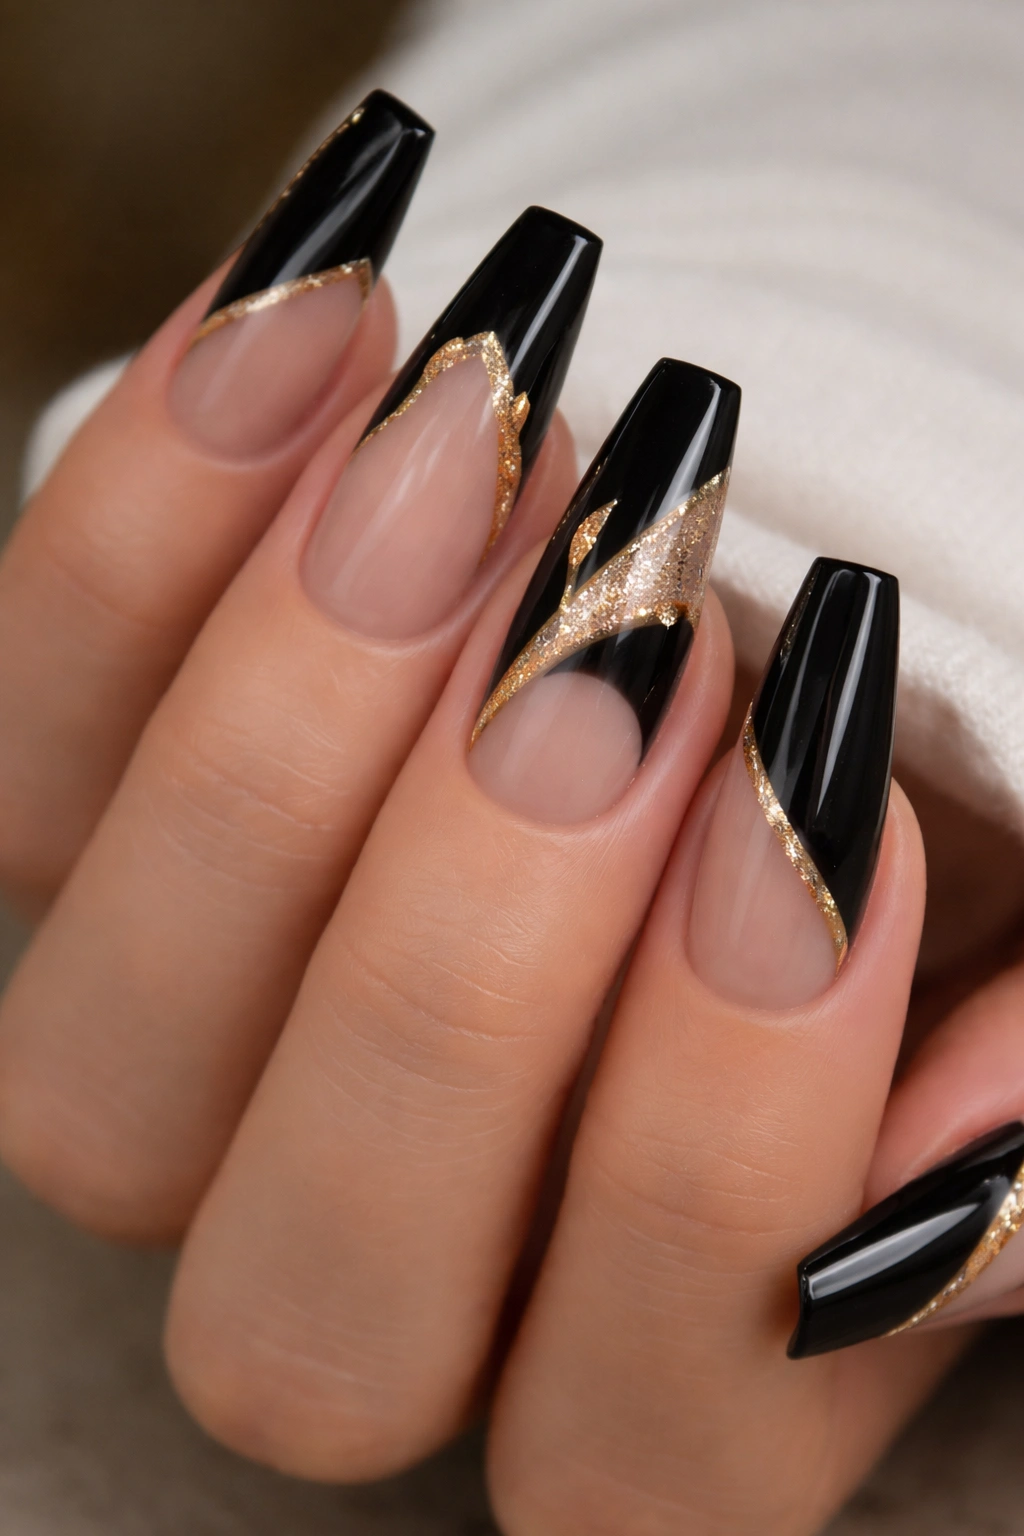
Negative space designs leave portions of the natural nail visible, creating an artistic, minimalist look. Combine black on some sections with gold accents and exposed nail in others for a design that feels modern and deliberately incomplete—in the best way.
The Power of Negative Space
Negative space automatically feels contemporary and thoughtfully designed. It’s the opposite of “covering every inch,” which appeals to people with modern sensibilities. The exposed nail area breaks up color saturation and prevents the design from feeling heavy or overdone. On medium coffin nails, negative space means you can create complex, visually interesting designs without requiring intense detail work. The design works because the negative space does half the work for you—your eye is drawn to both the painted and unpainted areas.
Creating Intentional Negative Space
- Start with a clear base coat on clean, prepped nails
- Plan your design: where will you paint black, where will you add gold, and where will you leave bare nail visible
- Use painter’s tape to section off areas and protect them while you paint
- Paint black sections first (allowing them to dry)
- Add gold accents, details, or small design elements in the remaining taped-off areas
- Remove tape slowly while polish is still slightly tacky for the cleanest lines
- The negative space should look intentional—not like you forgot to paint part of the nail
- Finish with a strong top coat that protects all edges
Insider note: This design works best when negative space makes up at least 20-30% of the nail. Too little empty space and it reads as accidental rather than intentional.
9. Black Base with Gold Foil Accent Nail
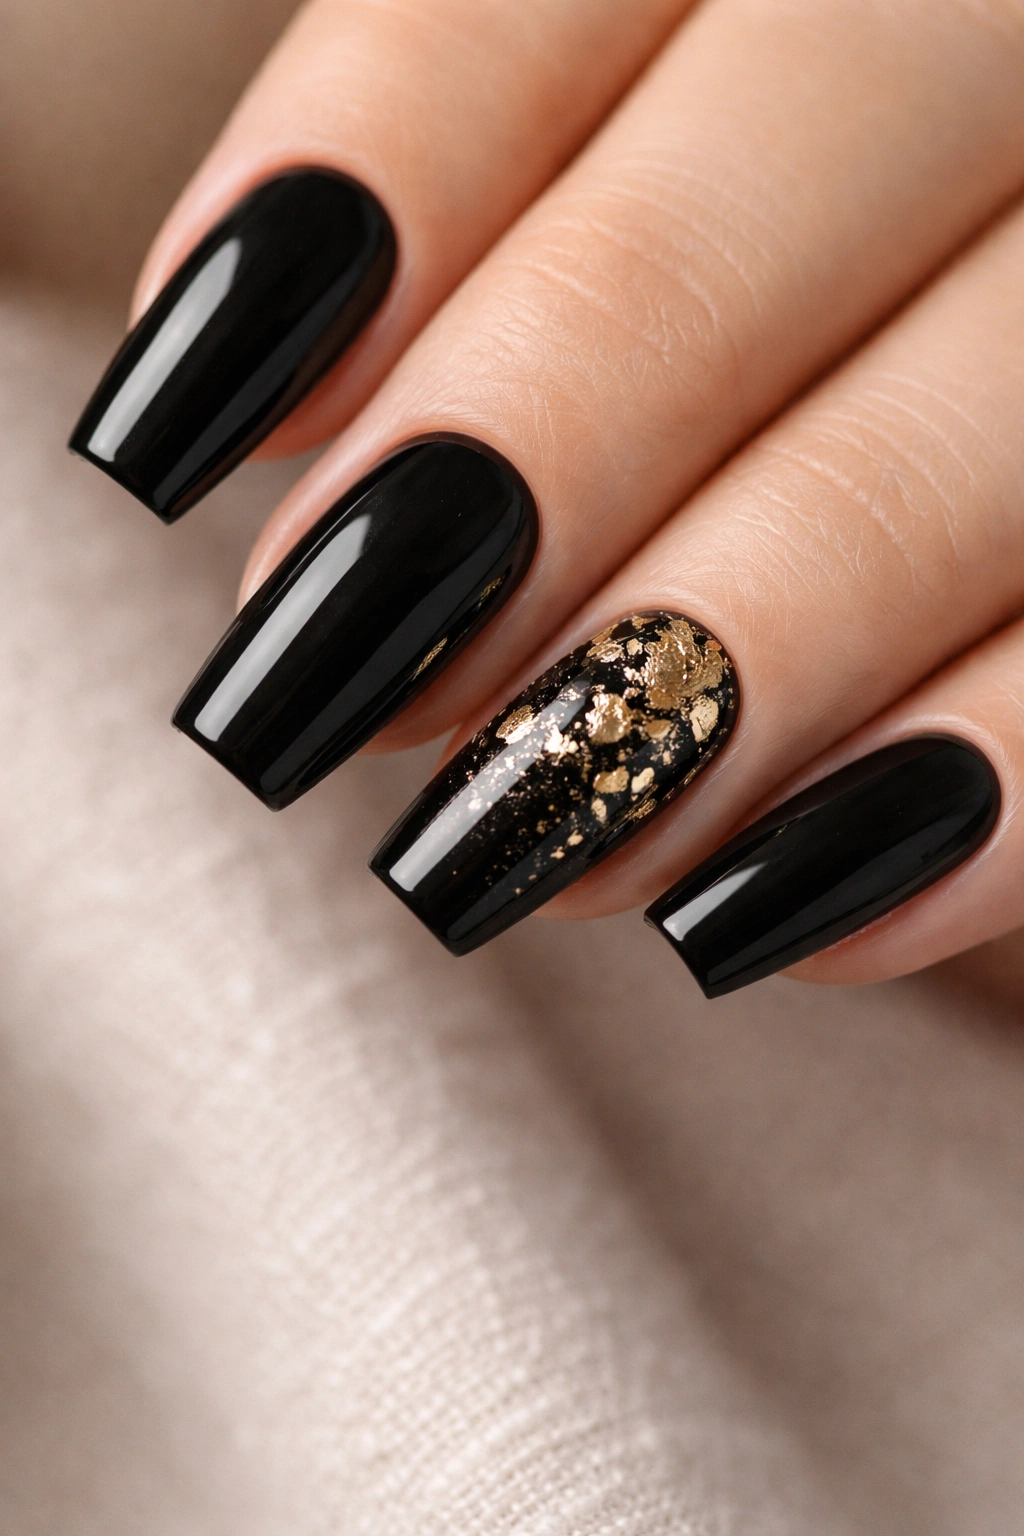
The accent nail approach features 9 nails in solid black and one statement nail (usually the ring finger) covered in gold foil or decorated with a bold black-and-gold design. This creates visual impact while maintaining balance and restraint overall.
Why Accent Nails Work
Accent nails break up monotony while keeping the overall look cohesive and not overwhelming. By concentrating visual interest on just one nail, you create a focal point that draws the eye. This technique works beautifully on medium coffin nails because one decorated nail stands out against a clean black base. Accent nails are also forgiving for DIY application—you only need to nail one complex design instead of repeating it ten times. They work for everyday wear and special events, and they make a manicure feel intentionally designed rather than randomly assembled.
Building Your Accent Nail
- Paint all nails with two coats of black polish
- Once dry, decide which nail will be your accent (usually ring or middle finger)
- Apply clear gel or base coat to the accent nail
- Create your accent design: this could be gold foil, geometric patterns, glitter, rhinestones, or detailed nail art
- Popular accent options include a full gold foil shatter, a glitter ombre, or an intricate black-and-gold pattern
- Keep the accent nail visually compatible with the solid black nails—it should feel intentional, not mismatched
- Seal everything with a protective top coat
Pro tip: If you’re nervous about hand-painting an intricate accent nail, use a pre-designed nail decal or sticker in black and gold. Professional-quality decals exist for virtually every design you can imagine.
10. Marble Effect in Black and Gold
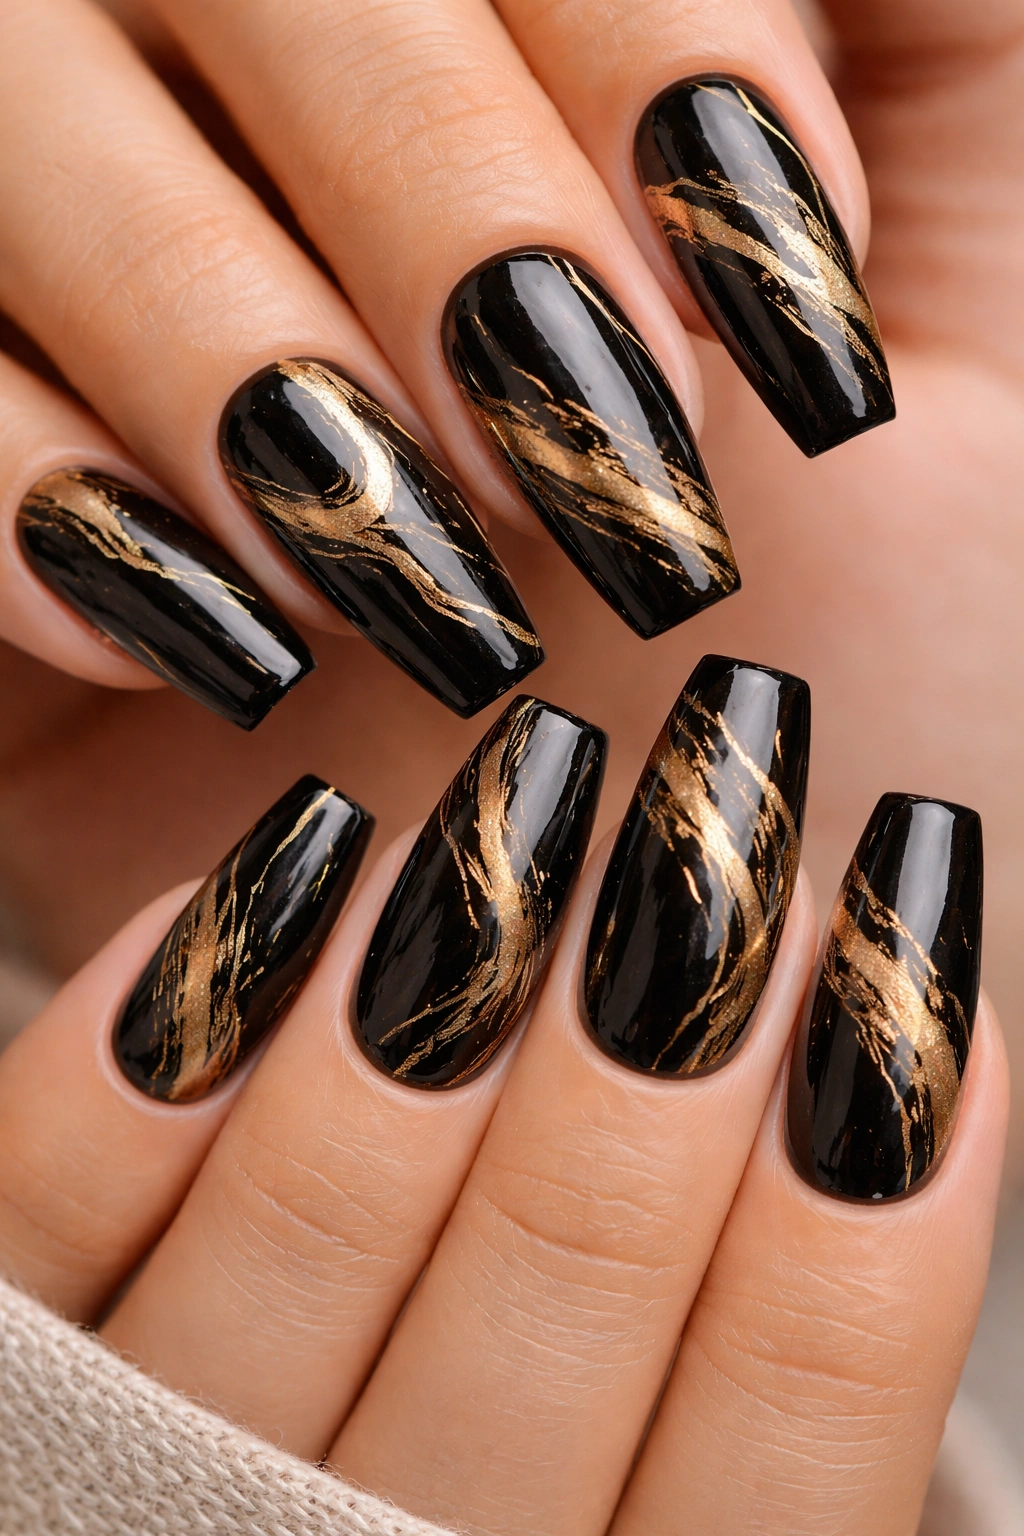
Swirled marble patterns combining black and metallic gold create a luxurious, organic look that’s both artistic and elegant. Unlike traditional marble designs that can look dated, a black-and-gold marble feels current and sophisticated.
The Timeless Appeal of Marble
Marble patterns evoke luxury—think marble countertops, marble floors, marble sculptures. That inherent association with elegance transfers to nail art. True marble effect features natural-looking swirls and veining that appear organic rather than geometric. On medium coffin nails, marble has enough surface area to show the pattern complexity clearly without looking busy or crowded. The pattern is forgiving because marble in nature is never perfectly uniform—variations actually enhance the authenticity of the design.
Creating Authentic Marble Effect
- Paint a white or cream base coat to make the marble pattern visible (two coats)
- Mix black and metallic gold polish together in a shallow dish with a clear gel top coat
- Create the swirl pattern by dropping small amounts of black and gold onto the base, using a thin brush to swirl them together
- The key is not overworking the swirls—gentle, decisive movements create better veining than obsessive blending
- Each nail should have a slightly different pattern—just like real marble
- Once you’re satisfied with the pattern, seal everything with a glossy top coat
- The top coat will slightly blur the pattern, creating a more authentic marble appearance
Worth knowing: Water marbling is another technique where you drop polish into water, swirl it, then dip your nail into it. While more dramatic, it requires more practice than simple brush-swirled marble.
11. Gold Geometric Frame Around Black Nail
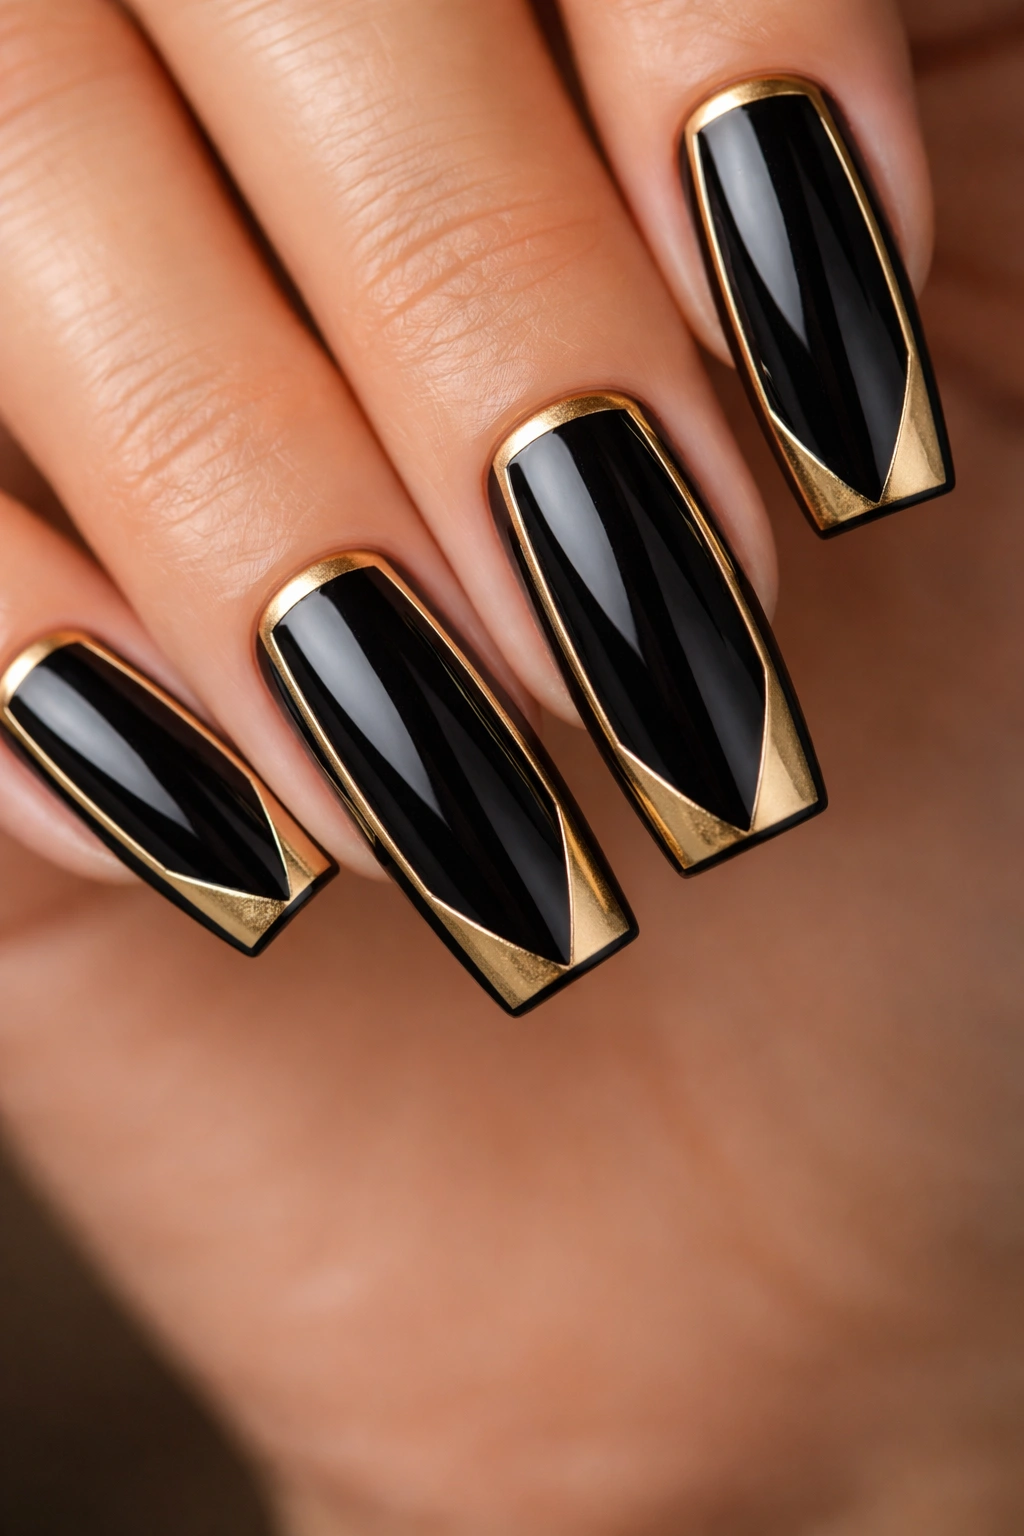
Create an outlined geometric shape—perhaps a triangle, trapezoid, or abstract frame—in metallic gold that borders a solid black center. The frame draws attention to the nail’s edges and creates a layered, three-dimensional appearance through color alone.
Geometric Framing for Visual Interest
Frames create the illusion of depth and sophistication. By concentrating color on the edges and leaving the center solid, you create contrast and visual dynamism. This design feels intentional and artfully composed rather than random. On medium coffin nails, geometric frames emphasize the nail’s elongated shape—vertical frames draw the eye upward, while diagonal frames create movement and energy. The design is more interesting than a solid color but more minimalist than busy patterns.
Executing Geometric Frames
- Apply a black base coat to your entire nail (two coats)
- Using a thin brush and metallic gold polish, outline a geometric shape: try a triangle starting near the cuticle, a trapezoid following the nail’s coffin shape, or an abstract frame along the edges
- Make the outline approximately 2-3mm thick for visibility without overwhelming the design
- Keep the center solid black for contrast and simplicity
- Use steady, careful brushstrokes—this design relies on clean lines
- If hand-drawing feels uncertain, use painter’s tape to create boundaries before filling in the frame
- Finish with a glossy top coat
Pro tip: The thicker and more deliberate your frame outline, the more forgiving small imperfections become. A 3mm outline reads as intentional; a 1mm line shows every wobble.
12. Black and Gold Striped French Manicure Twist
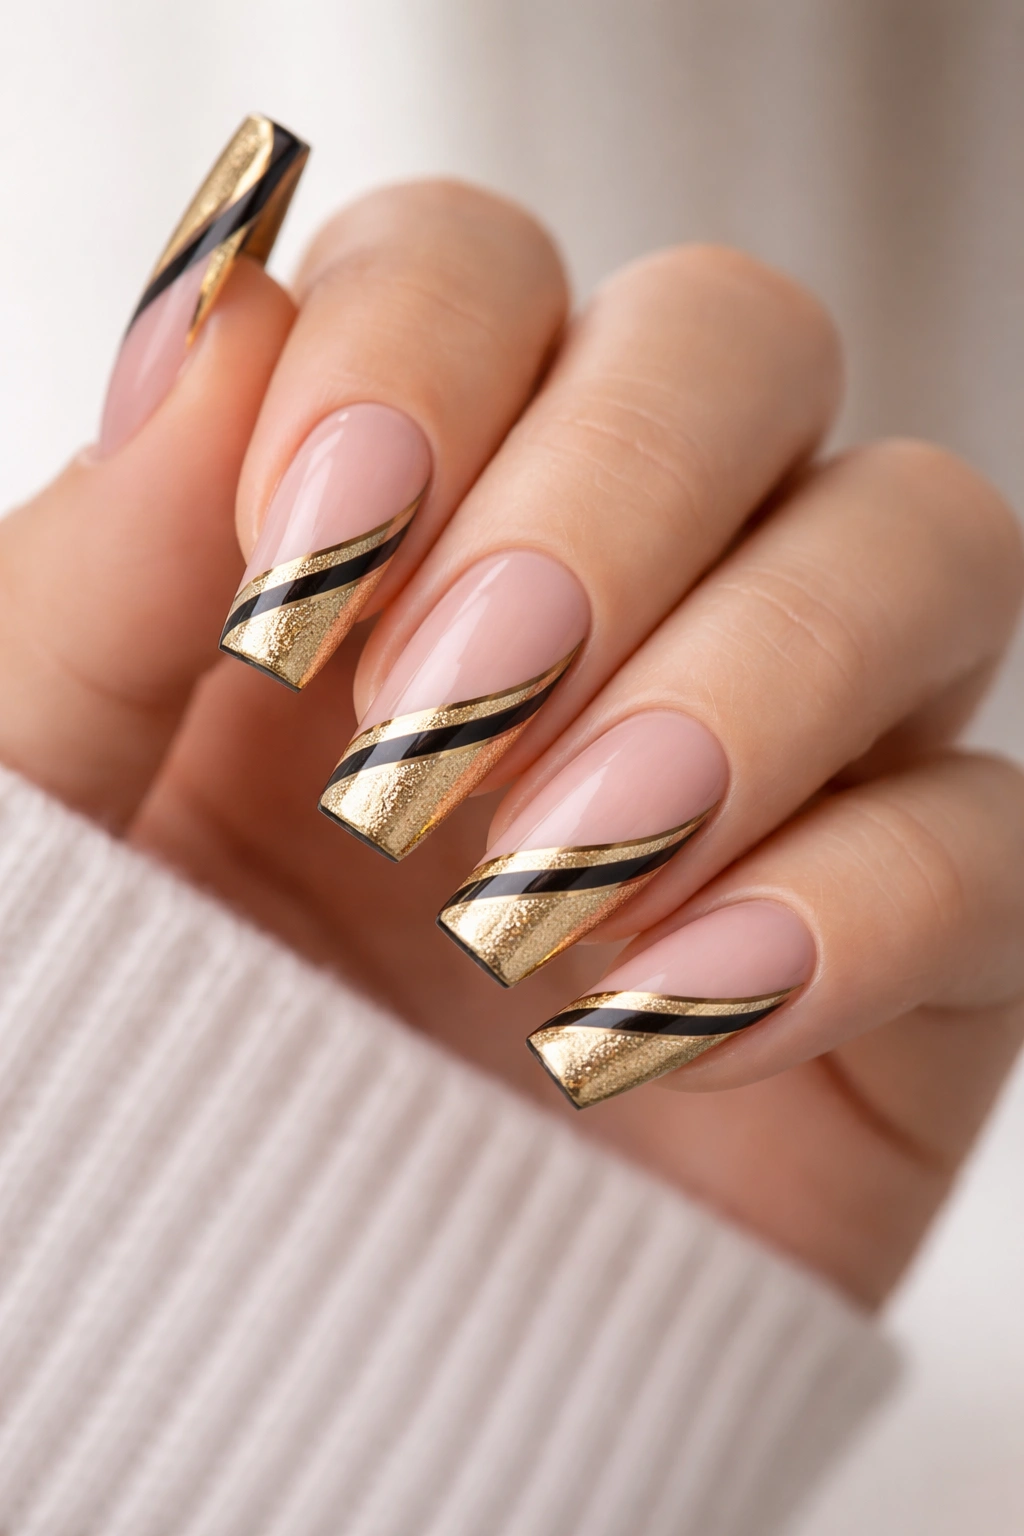
Take the classic French manicure concept but replace the traditional white tip with metallic gold and add thin black stripes throughout. This hybrid design feels both traditional and modern, offering elegance with an edgy twist.
Modernizing the French Manicure
The traditional French manicure is timeless but can feel dated or too safe. By swapping gold for white and adding black striping, you create immediate visual interest while maintaining the sophisticated structure of a French design. The gold tip catches light beautifully, especially on medium coffin nails where the tip has enough length to display the color richly. The added striping prevents the design from feeling too minimal while keeping it clean and polished.
Creating This Hybrid Design
- Start with a pale pink or nude base coat to mimic a traditional French manicure (or use a clear base for more modern edge)
- Paint the tips with metallic gold polish, creating a graduated or blunt tip—your preference determines the look
- Once the gold tip is dry, add thin black stripes running vertically or diagonally across the entire nail
- Space the stripes evenly (usually about 3-5mm apart) for a cohesive look
- The stripes should cross over both the base and the gold tip areas
- Keep stripe thickness consistent throughout
- Finish with a glossy top coat
Insider note: The traditional French manicure French curve happens naturally on medium coffin nails without extra work—the nail’s shape creates the gradient for you.
13. Gold Constellation or Star Pattern on Black
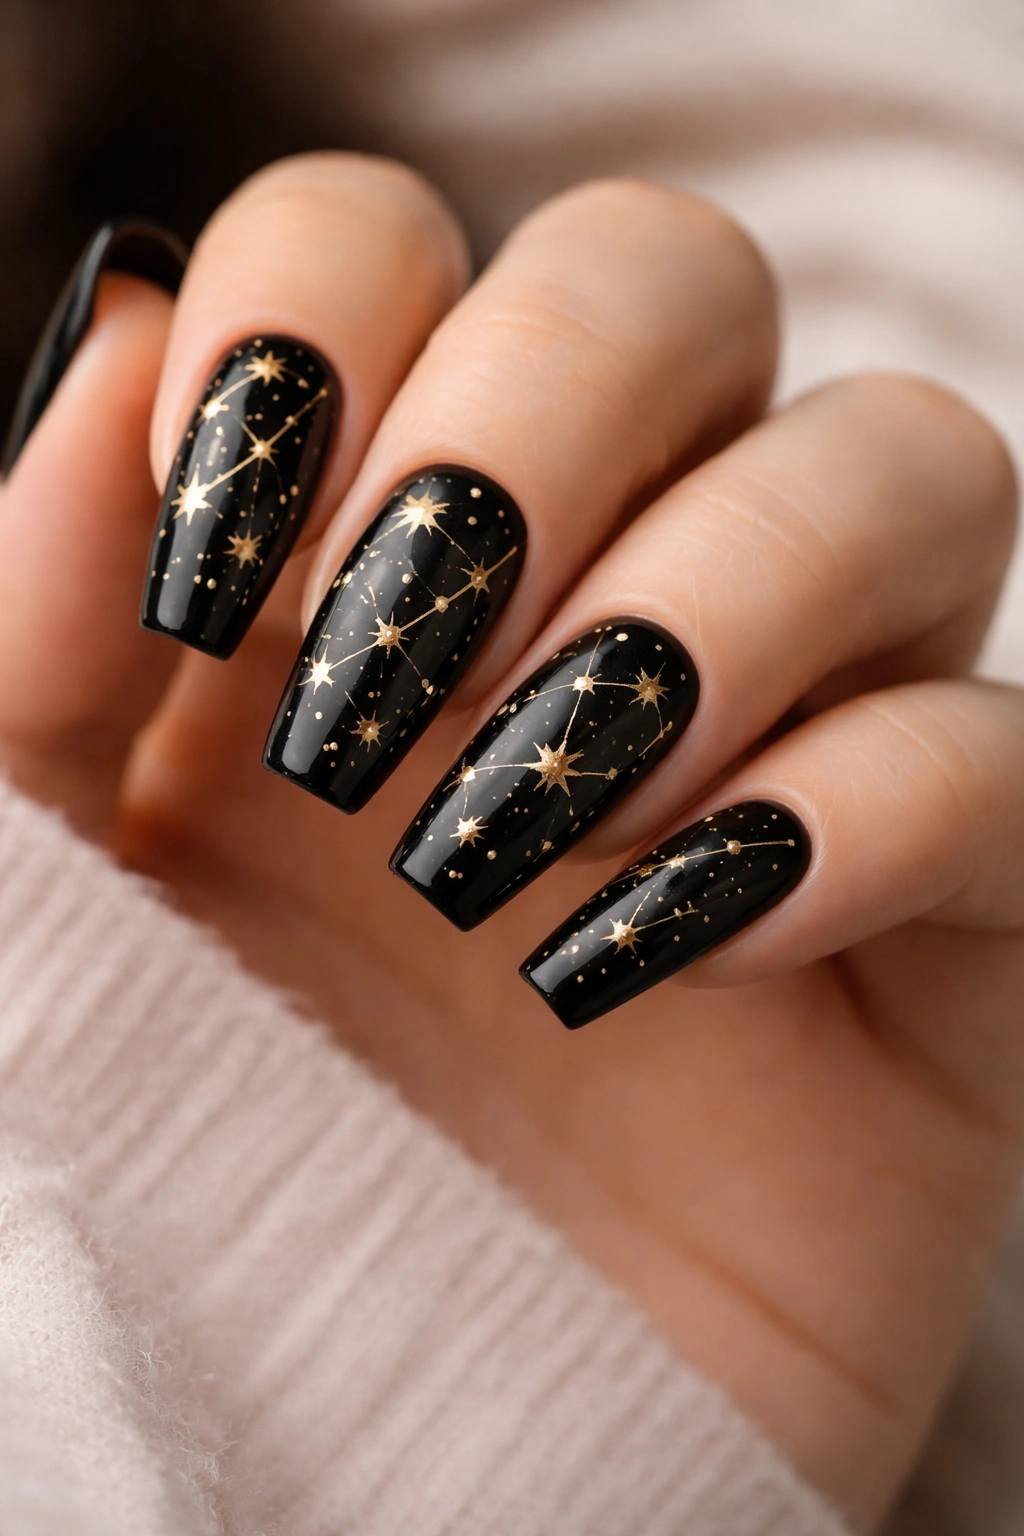
Create a celestial design by hand-painting tiny gold stars, dots, and abstract constellation lines across a black base. The night sky theme is romantic, whimsical, and still sophisticated—perfect for people who like subtly artistic details.
Why Celestial Designs Feel Special
Stars and constellations evoke wonder, dreams, and romance. These designs appeal to imaginative personalities without being childish. Small details scattered across the nail create visual interest from a distance while revealing complexity up close. On medium coffin nails, there’s enough space to include several stars and connecting constellation lines without crowding. The design reads as intentionally artistic rather than random doodling, elevating the look to something gallery-like.
Painting Your Starry Design
- Paint a black base coat and let it dry completely
- Use a thin brush and metallic gold polish to paint small stars scattered across the nail
- Stars can be simple dots, four-pointed shapes, or tiny star shapes drawn with a few strokes
- After placing stars, connect some of them with thin lines to create constellation patterns
- Keep the overall design balanced—don’t cluster all stars on one corner
- The lines should be delicate and thin, not bold
- Space your stars purposefully rather than randomly covering every inch
- Finish with a glossy top coat that emphasizes the metallic shimmer
Pro tip: If hand-painting tiny precise stars feels daunting, use a dotting tool (a simple pointed metal tool) to create perfect dots, then add tiny lines between them with a striping brush.
14. Black with Glitter-Filled Geometric Shapes
Combine solid black with geometric shapes (circles, triangles, hexagons) filled in with metallic gold glitter. This design merges clean geometry with sparkly texture, creating dimension and interest that solid shapes can’t achieve alone.
Texture Adds Dimension
Glitter creates tactile interest and catches light in ways solid polish can’t. By confining it to specific geometric shapes, you maintain sophistication while incorporating sparkle. The geometric structure prevents the glitter from feeling random or overdone—every sparkly element has a clear purpose. On medium coffin nails, geometric shapes are large enough to showcase glitter texture while remaining visually organized and intentional.
Creating Glitter-Filled Shapes
- Paint two coats of black base polish and let it dry completely
- Use painter’s tape to outline geometric shapes (circles, triangles, hexagons) on the nail surface
- Fill these shapes with clear gel or tacky top coat
- Mix fine to medium metallic gold glitter with the gel adhesive
- Fill the outlined shapes with the glitter mixture, keeping it contained within the geometry
- Press and smooth with a gentle brush to ensure glitter bonds properly
- Remove the tape carefully while the adhesive is still slightly tacky
- Add a second layer of protective top coat to seal the glitter securely
Worth knowing: Glitter often sheds slightly during wear. Using a strong UV or gel top coat rated specifically for glitter protection prevents this. Regular nail polish top coats don’t seal glitter as effectively.
Final Thoughts
Black and gold coffin nails on medium lengths offer endless design possibilities, each more stunning than the last. What makes these designs so effective is their balance—black provides sophistication and edge, while gold adds glamour and warmth. Medium coffin nails give you the perfect canvas to showcase these combinations without requiring maintenance levels that would drive you crazy.
The designs above range from minimalist and elegant to artistic and bold, meaning there’s genuinely something for every taste and occasion. Whether you prefer the understated elegance of fine gold striping, the artistic flair of splatter and marble effects, or the sparkly impact of glitter gradients, black and gold delivers every time.
The best part about all these designs is that most are achievable at home with basic tools and a bit of patience. If DIY nail art feels intimidating, these designs are also perfect to take to a professional—show them this article, and they’ll understand exactly what you want. Either way, you’re guaranteed a manicure that feels intentional, sophisticated, and absolutely stunning on medium coffin nails.
