

Hot pink is the color that commands attention, and when you pair it with the bold, elongated elegance of coffin nails, you’ve got a design statement that works for virtually any occasion. The beauty of hot pink coffin nails on medium-length nails is that you get all the drama and sophistication of the coffin shape without the fragility that can come with extra-long lengths. Medium coffin nails strike the perfect balance—they’re striking enough to make a real visual impact, but practical enough for daily life. Whether you’re after minimalist sophistication, playful patterns, or glamorous embellishment, hot pink is the foundation that ties everything together.
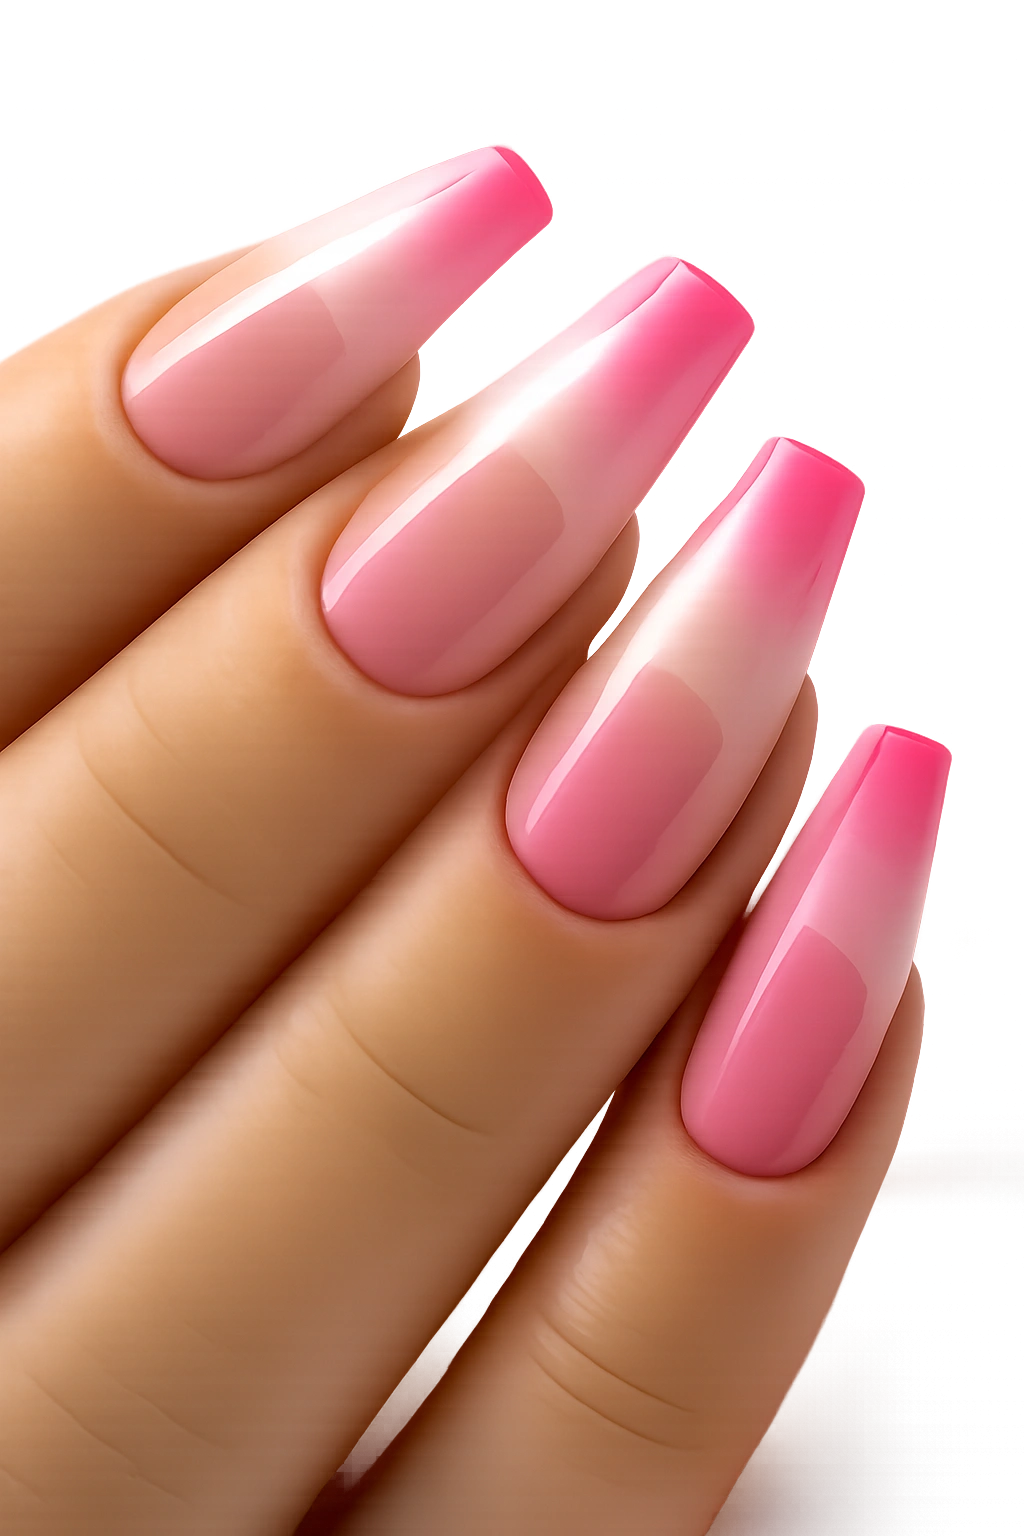
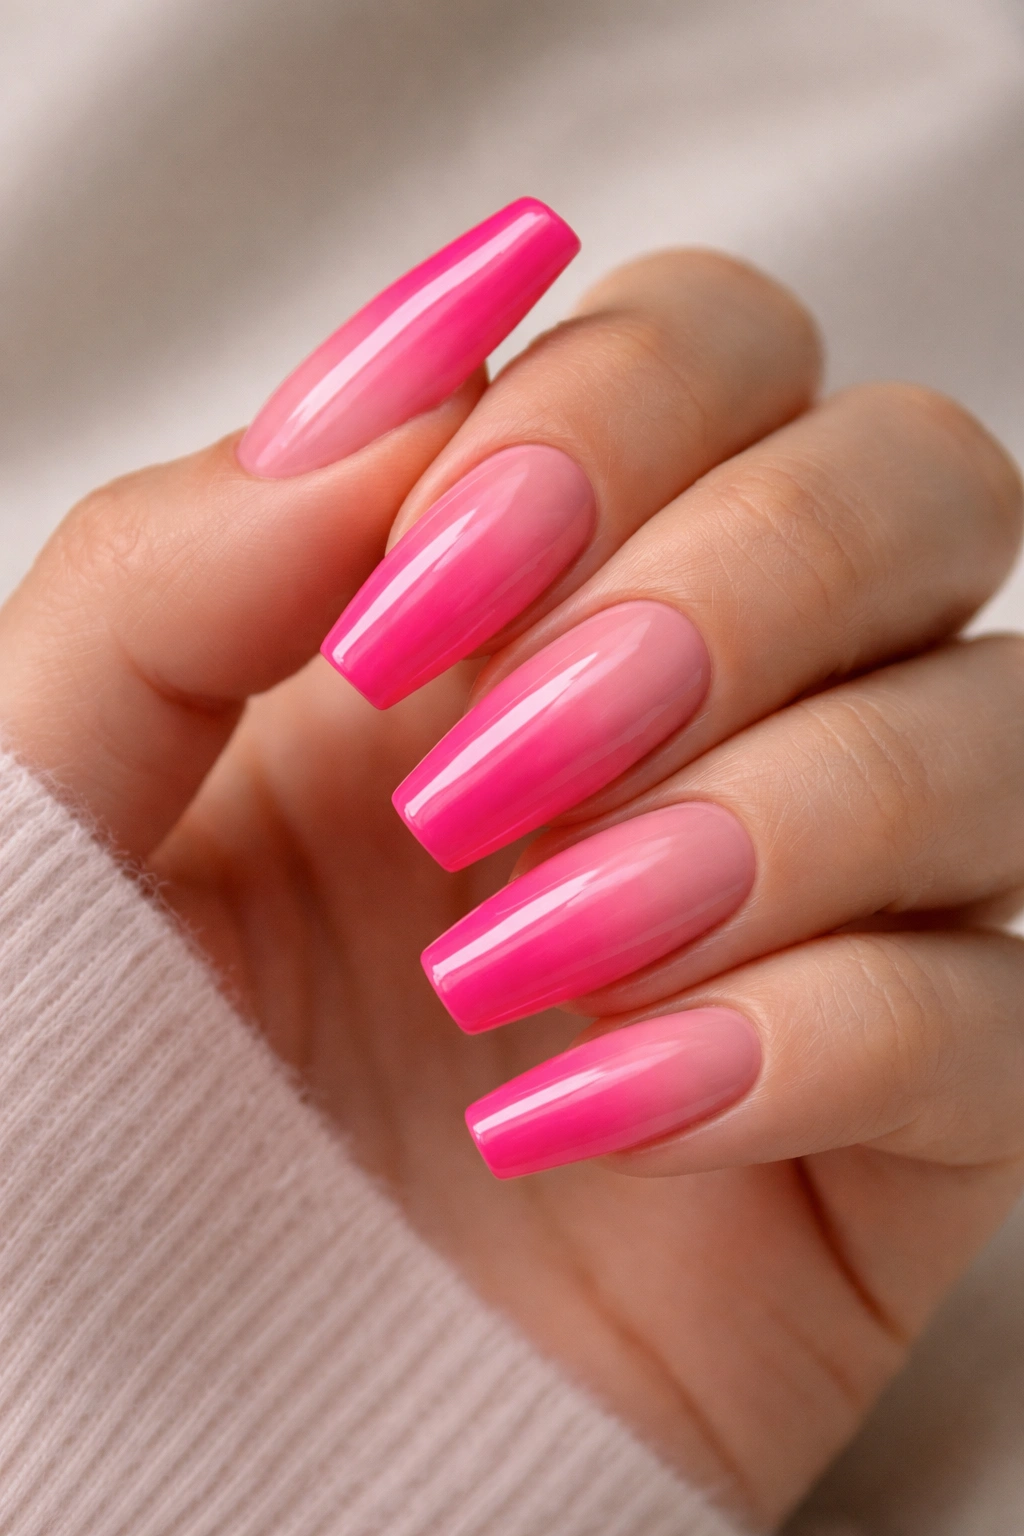
1. Glossy Hot Pink Ombré Fade
A glossy hot pink base that gradually fades to a softer, nearly nude tone at the tips creates an effortlessly chic gradient effect that feels modern and refined. This design works because it combines boldness with subtlety—the hot pink keeps things vibrant while the fade prevents the look from feeling overwhelming. The ombré technique on coffin nails naturally draws the eye along the length of the nail, elongating your fingers even when you’re working with medium length.
Why This Design Stands Out
The ombré fade is one of those designs that looks complicated but actually photographs beautifully and feels surprisingly wearable day after day. The transition from hot pink to neutral means you can pair these nails with almost any outfit without worrying about clashing. The glossy finish reflects light in a way that makes the gradient effect even more noticeable.
How to Nail This Look
- Use a quality base coat to prevent staining from the hot pink pigment
- Apply your hot pink polish on the full nail, then use a makeup sponge to dab a lighter nude or champagne shade onto the tips
- Blend the colors where they meet using a slightly dampened sponge
- Seal everything with a high-shine top coat for that luminous finish
- The key is patience—you may need 2-3 blending passes to get a smooth transition
Pro tip: If you’re not confident with the sponge-blending method, ask your nail tech about an airbrush ombré—it creates an impossibly smooth fade that sponging can’t quite match.
2. Hot Pink with Delicate Gold Foil Accents
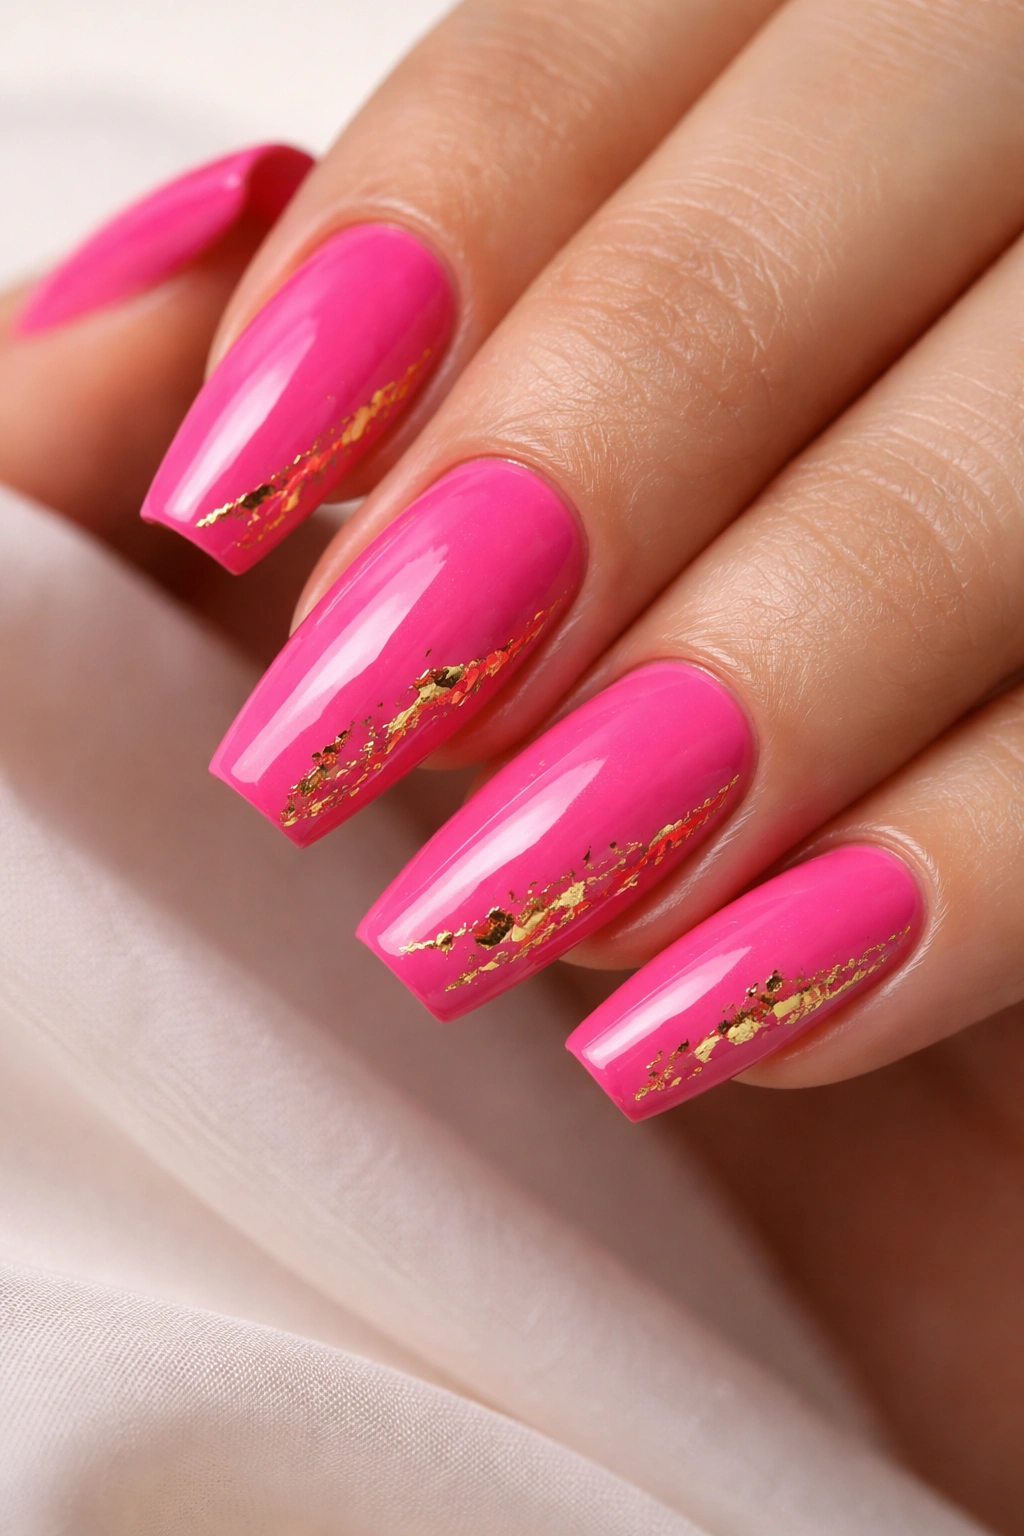
Thin strips of gold foil placed strategically across a hot pink coffin nail add instant luxury without overwhelming the design. Gold foil catches light beautifully and creates a sophisticated contrast that elevates hot pink from playful to polished. On medium coffin nails, just one or two foil accents per nail is all you need—too many starts to feel cluttered.
The Luxury Factor
Foil accents signal refinement because they’re often associated with high-end nail art and jewelry. Pairing them with hot pink creates an interesting tension—you’ve got a fun, bold color elevated by a precious-metal finish. This is the design you wear when you want people to notice your nails and assume you invested real money in them.
Application Tips
- Start with a smooth, opaque hot pink base (2-3 coats)
- Use a thin nail art brush to apply a thin line of clear gel or tacky top coat where you want the foil
- Press the gold foil into the wet product, hold for 5-10 seconds, then carefully peel away
- Seal with a final coat of top coat to keep the foil from catching on things
- You can place foils along one edge, down the center, or in abstract scattered placements
Worth knowing: Not all foils are created equal—invest in professional-grade foils from a reputable nail supply brand rather than craft foils, which look cheap and peel immediately.
3. Hot Pink Coffin Nails with Negative Space Geometric Patterns

Negative space designs let the natural nail or a contrasting base peek through strategic cutouts, creating geometric patterns that feel contemporary and architectural. Think triangles, lines, or asymmetrical shapes left unpainted against your hot pink coffin nails. This design is incredibly striking because your eye gets confused in the best way—it’s not sure whether to focus on the hot pink or the empty space.
Why Negative Space Works on Medium Nails
Negative space designs actually make medium coffin nails look longer because the geometric patterns create an illusion of extended length. The eye follows the lines and shapes, which naturally draws upward along the nail. Plus, negative space keeps things from feeling too heavy—hot pink is already bold, so the breathing room created by negative space balances it perfectly.
Creating Clean Negative Space
- Start with your hot pink base and let it dry completely
- Use tape (painter’s tape works great) to mark out the geometric shapes you want to leave unpainted
- Apply a glossy top coat to the painted areas only, avoiding the taped sections
- Carefully remove the tape—the key is to pull slowly and at a 45-degree angle to avoid peeling your polish
- Seal the entire nail with a final clear top coat to even everything out
Insider note: If taping feels fussy, ask your nail artist about hand-painted negative space—a skilled tech can freehand geometric shapes that look cleaner than tape ever could.
4. Hot Pink with White Ombre and Glitter Tips
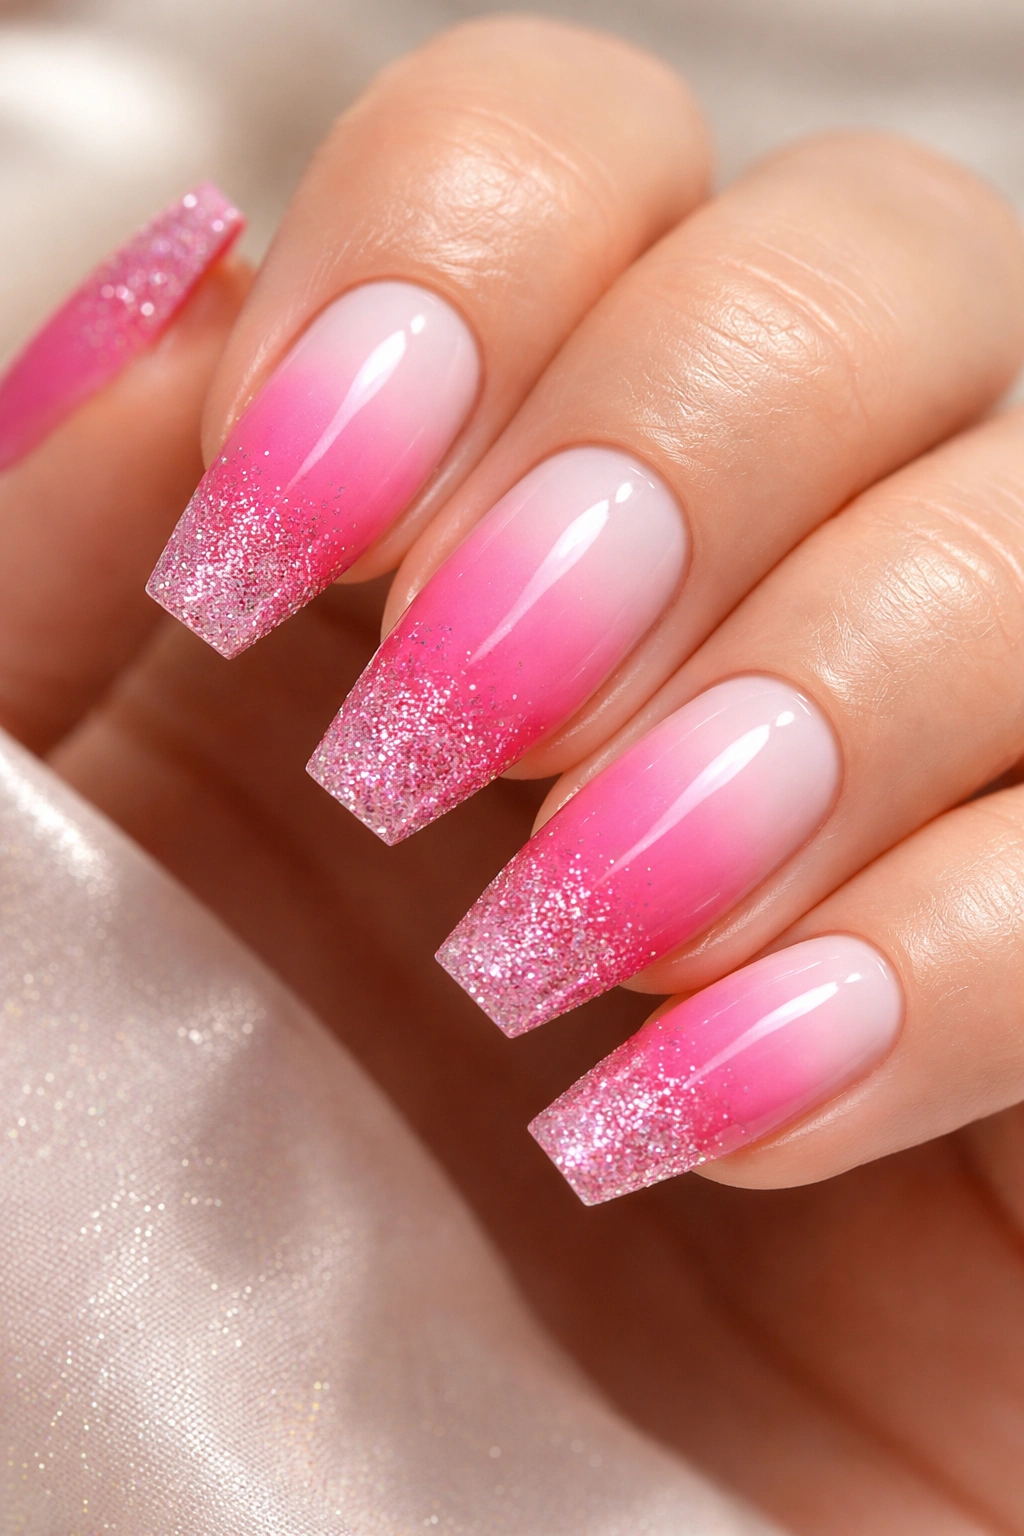
A white-to-hot-pink ombre that transitions into a glitter-packed tip creates a fun, almost celebration-worthy vibe that works for parties, nights out, or just when you want your nails to feel special. The glitter catches every light source in the room, making your hands sparkle subtly without looking costume-y. On medium coffin nails, this design reads as playful sophistication—fun but intentional.
The Psychology of This Color Combo
White softens hot pink and makes it feel more wearable in professional settings, while the glitter tips add just enough edge to prevent the design from feeling too sweet. This is the design that makes people say “oh, I love your nails” rather than looking a little nervous about the boldness.
Step-by-Step Application
- Apply a white base coat to each nail
- Using a makeup sponge, dab hot pink onto the tips in a gradient pattern, blending where the colors meet
- Once the ombre is completely dry, apply a thin clear gel to the tip area only
- Press fine or medium-sized glitter into the wet gel, focusing on the very edge of each nail
- Seal everything with a top coat and wipe away any stray glitter particles with a lint-free wipe
Pro tip: Use glitter in shades that echo your hot pink—rose gold, pink sparkle, or even clear glitter with pink undertones—rather than contrasting colors that can make the design feel chaotic.
5. Matte Hot Pink with Metallic Edge Details
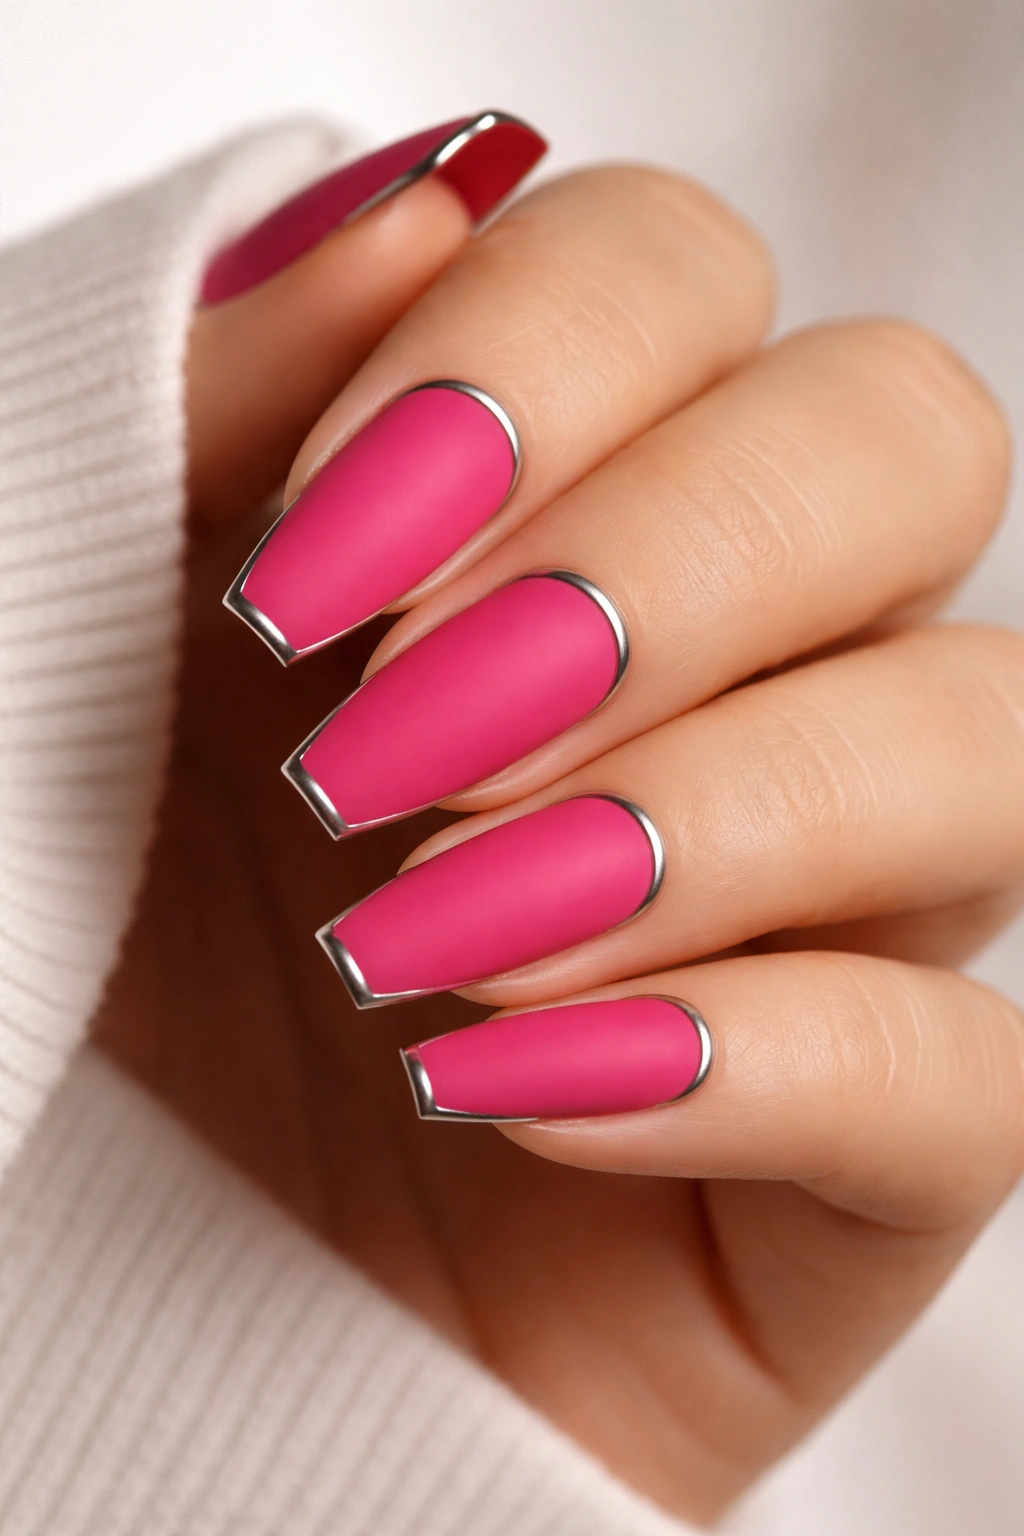
A velvety matte hot pink base topped with thin metallic lines along the cuticle and tip creates a design that feels incredibly high-fashion and modern. The matte finish feels more sophisticated than glossy, and the metallic details add just enough shine to prevent the design from looking flat. On medium coffin nails, this is the design that looks effortlessly expensive.
Why Matte Finishes Photograph Better
Glossy nails can sometimes look washed out in certain lighting, but matte finishes have a depth and richness that reads beautifully in photos and in person. Pair that with metallic accents and you’ve created a design that has serious visual complexity despite being relatively simple to execute.
Creating the Metallic Details
- Apply 2-3 coats of matte hot pink to build full opacity
- Using a thin brush and metallic gel or polish, paint precise lines along the cuticle edge and along the tip
- You can do a full tip line or create a geometric edge detail—thin lines work better than thick ones
- Skip the top coat initially, or use a matte top coat to maintain the velvety finish
- If you want just a tiny bit of shine to make the metallics pop, use a glossy top coat only on the metallic areas
Worth knowing: Matte polish can feel a bit sticky, so handle your nails carefully for the first 24 hours and use a cuticle oil regularly to keep your skin from drying out around the nail bed.
6. Hot Pink Coffin Nails with Micro-Rhinestone Accents
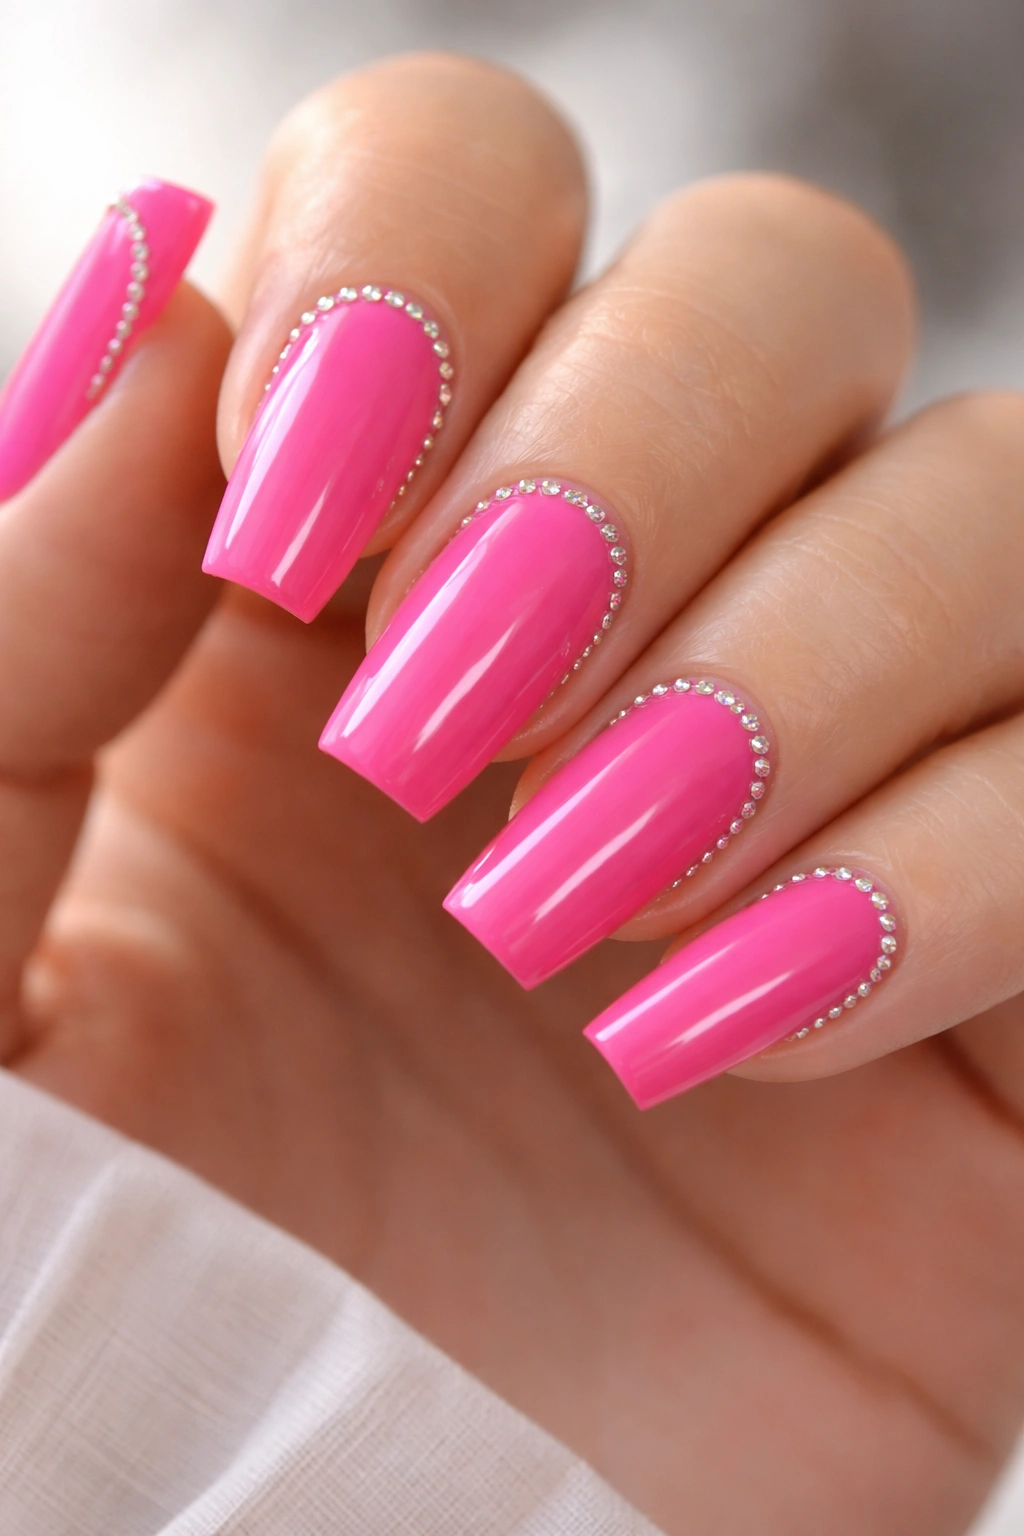
Tiny rhinestones placed in strategic patterns—along one edge, scattered across the nail, or clustered at the cuticle—create an ultra-glamorous look that feels special without being over-the-top. Micro-rhinestones are smaller than traditional nail gems, which makes them feel more modern and elegant. On medium coffin nails, they add the perfect amount of sparkle and dimension.
The Strategic Placement Matters
Where you place rhinestones changes the entire vibe of your design. A line of rhinestones up the center of each nail feels formal and elegant. Scattered randomly across the nail feels playful. Clustered at the cuticle line feels luxurious. Think about the occasion and your personal style when deciding on placement.
Applying Rhinestones Like a Pro
- Use a rhinestone or crystal adhesive (never regular nail glue—it won’t hold)
- Apply your hot pink base and let it dry completely
- Using a dotting tool or the applicator that comes with quality adhesives, place a tiny dot of adhesive exactly where you want each rhinestone
- Press the rhinestone into the adhesive and hold for 2-3 seconds
- Let the adhesive cure fully (usually 24 hours) before applying top coat
- Seal with a thick top coat that fully covers the rhinestones to keep them secure
Pro tip: Keep rhinestones away from areas that take the most contact—avoid placing them on your thumb or index finger if you use your hands heavily throughout the day.
7. Hot Pink with Transparent White Overlay and Negative Gradient
A sheer white overlay creates a frosted, almost icy effect over your hot pink base, with strategic unpainted sections creating a gradient fade. This design feels modern and editorial—it’s the kind of thing you’d see on a fashion runway. The transparency of the white over the hot pink creates a color-mixing effect that’s visually interesting.
The Visual Illusion
When you layer transparent white over hot pink, it creates a lighter, almost mauve-toned version of your base color. By leaving certain areas uncovered, you create a gradient effect without using an ombré technique. It’s a trick that makes your nails look more sophisticated and intentional.
How to Execute This Design
- Apply 2-3 coats of hot pink for a solid base
- Using a thin brush, apply semi-transparent white polish to create your overlay effect
- Leave the tip or certain sections unpainted to show the pure hot pink underneath
- You can create horizontal stripes, vertical sections, or abstract shapes—whatever feels right
- Seal with a glossy top coat for dimensional shine
Insider note: Semi-transparent whites often need to be applied in very thin layers to avoid looking chalky—thin layers that build up create that beautiful frosted effect much better than one thick layer.
8. Gradient Hot Pink to Coral with Gloss Finish

A gradual fade from deep hot pink to a warmer coral creates a design that feels sunset-inspired and incredibly wearable. This gradient works because both colors sit in the same warm family—there’s no jarring contrast, just a beautiful color evolution. On medium coffin nails, the gradient draws the eye upward, making your fingers appear longer.
Why Warm Color Gradients Work Year-Round
While ombré designs might feel trendy, warm color gradients have real staying power because they feel natural and effortless. Coral and hot pink together create an energy that works in summer, spring, and honestly any time of year. The gradient suggests movement and sophistication.
Creating a Smooth Gradient
- Apply your hot pink base and let it dry completely
- Using a makeup sponge, dab coral color onto the tips
- Blend back and forth with a damp sponge until the transition is smooth
- Keep blending until you don’t see a hard line between colors—this step takes patience
- Apply a glossy top coat to seal and add shine
- The glossiness makes the gradient appear even more seamless
Pro tip: Warm colors like hot pink and coral can stain lighter skin tones—always use a base coat and check that your polish is stain-resistant before committing to this design long-term.
9. Hot Pink with Negative Space French Tips and Diamond Details
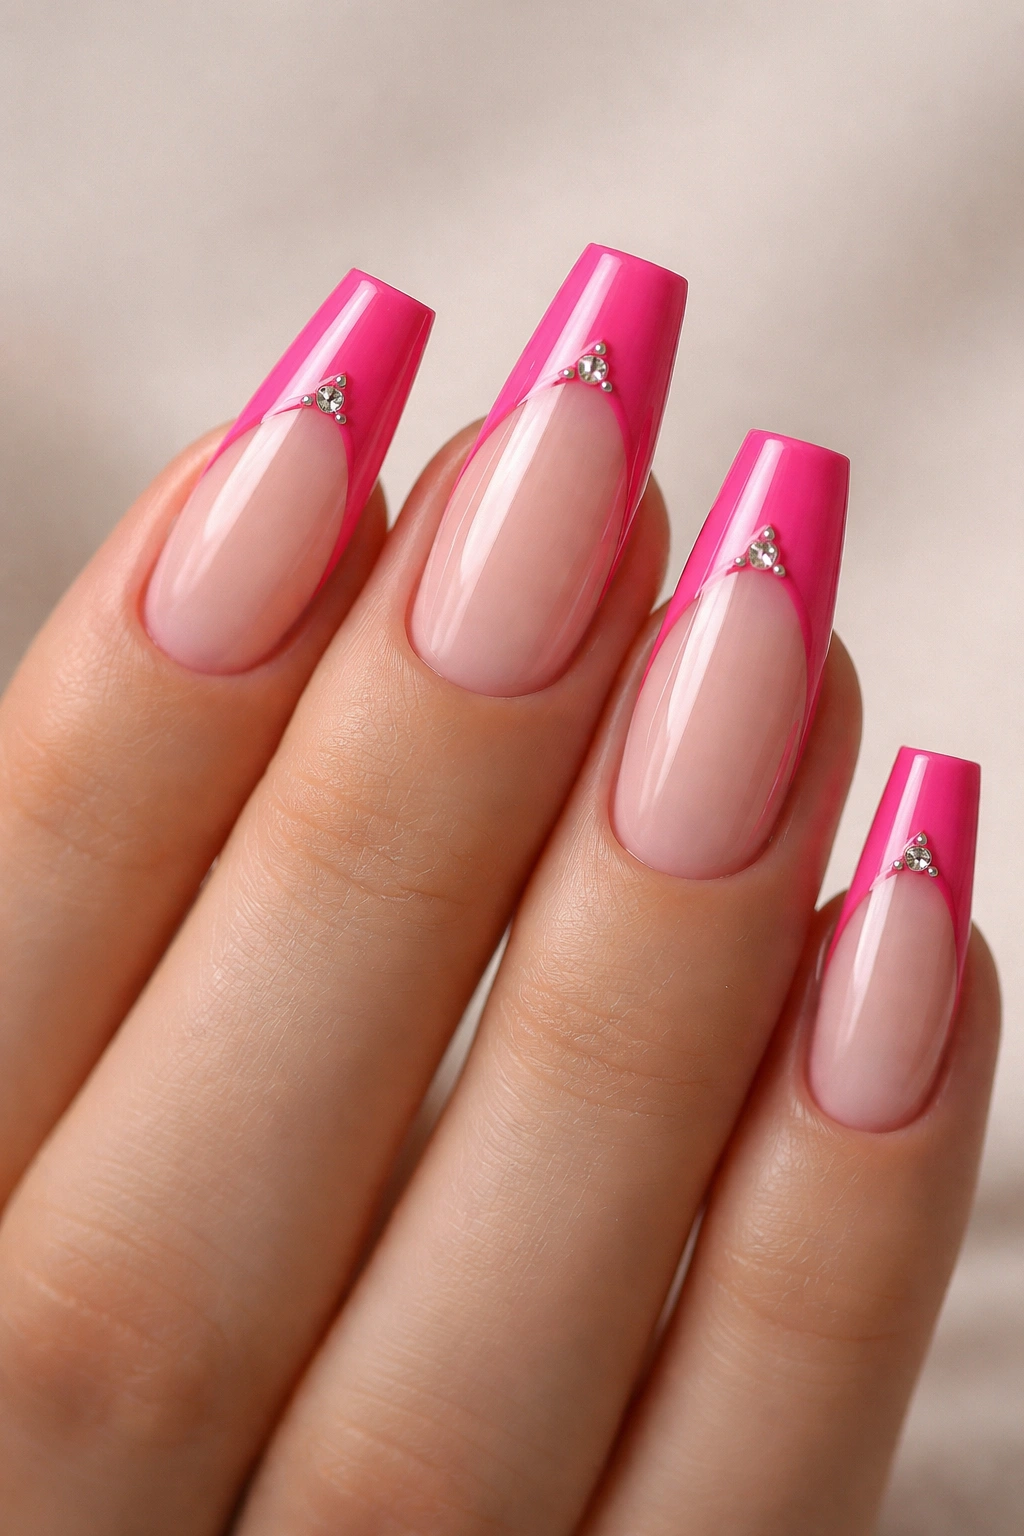
A hot pink base with the classic French tip shape left unpainted creates a modern twist on the traditional manicure, elevated with tiny diamond or geometric details at the apex of the nail. This design feels fresh because it subverts expectations—you expect hot pink to be maximalist, but instead it becomes the base for a more refined look.
The Modern French Twist
The French tip is classic, but doing it in negative space on a bold color feels contemporary and intentional. Adding small diamond or shape details elevates it from simple to editorial. On medium coffin nails, this creates a design that reads as both playful and polished.
Creating the Negative Space French
- Paint your entire nail with hot pink—2-3 coats for full opacity
- Once completely dry, use painter’s tape to mark out your French tip shape
- Leave the tip area unpainted by carefully removing the tape
- Using a thin brush, add small geometric details or diamond shapes near where the tip meets the painted area
- Seal with a top coat for protection
Worth knowing: The key to a clean French tip is patience—let your base color dry completely before taping, and remove the tape slowly and at an angle to avoid peeling your polish.
10. Hot Pink Nails with Pearl and Shimmer Accent Details
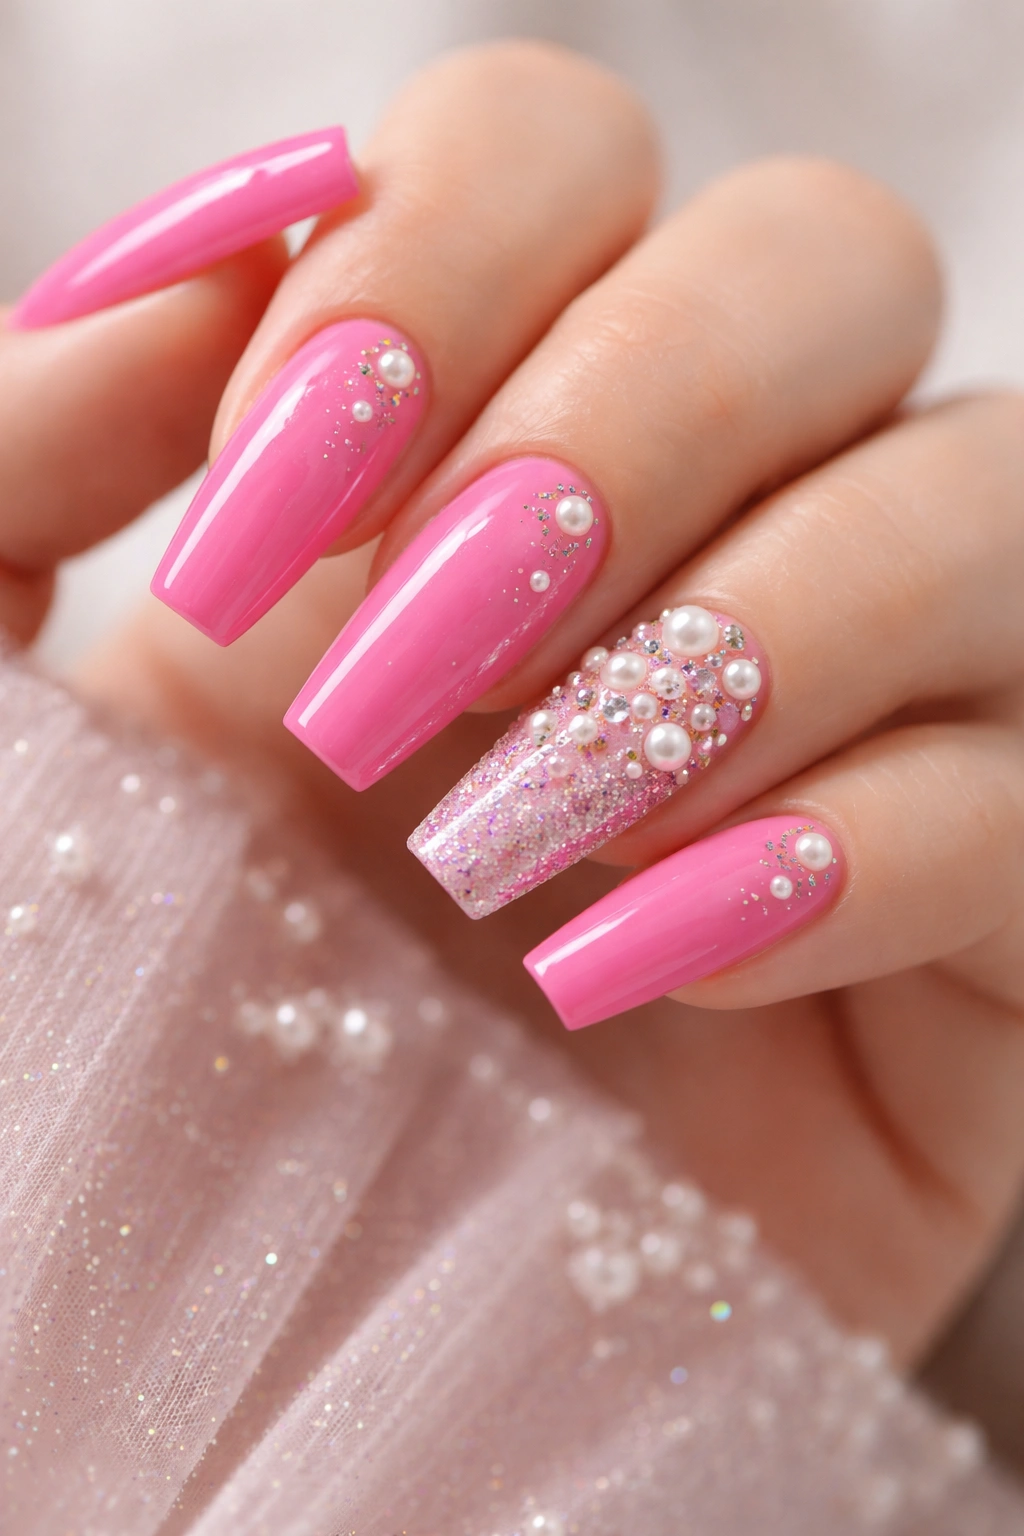
A creamy hot pink base combined with iridescent pearl or shimmer details creates depth and sophistication that reads beautifully in all lighting conditions. The shimmer catches light without being overtly glittery—it’s refined sparkle. On medium coffin nails, this combination feels luxurious and intentional.
Why Pearl Works with Hot Pink
Pearl finishes have a subtle, multidimensional quality that complements bold colors. While a hot pink that’s too flat can feel simple, adding pearl or shimmer details instantly elevates it into luxury territory. The colors interact with each other in interesting ways depending on the light.
Incorporating Pearl and Shimmer
- Apply 2-3 coats of your hot pink base for full coverage
- Using a thin brush, apply pearl or shimmer polish to accent areas—one nail entirely, or details on each nail
- You can create stripes, geometric shapes, or just do one feature nail in pearl while keeping the others solid hot pink
- Seal with a glossy top coat that will amplify the shimmer effect
- The glossiness makes the pearl appear even more luminous
Pro tip: Pearl finishes look most impressive under natural light and in photos—if you spend most of your time under artificial light, you might want to go with a more pronounced shimmer instead.
11. Hot Pink Coffin Nails with Minimalist Line Art and Symbols
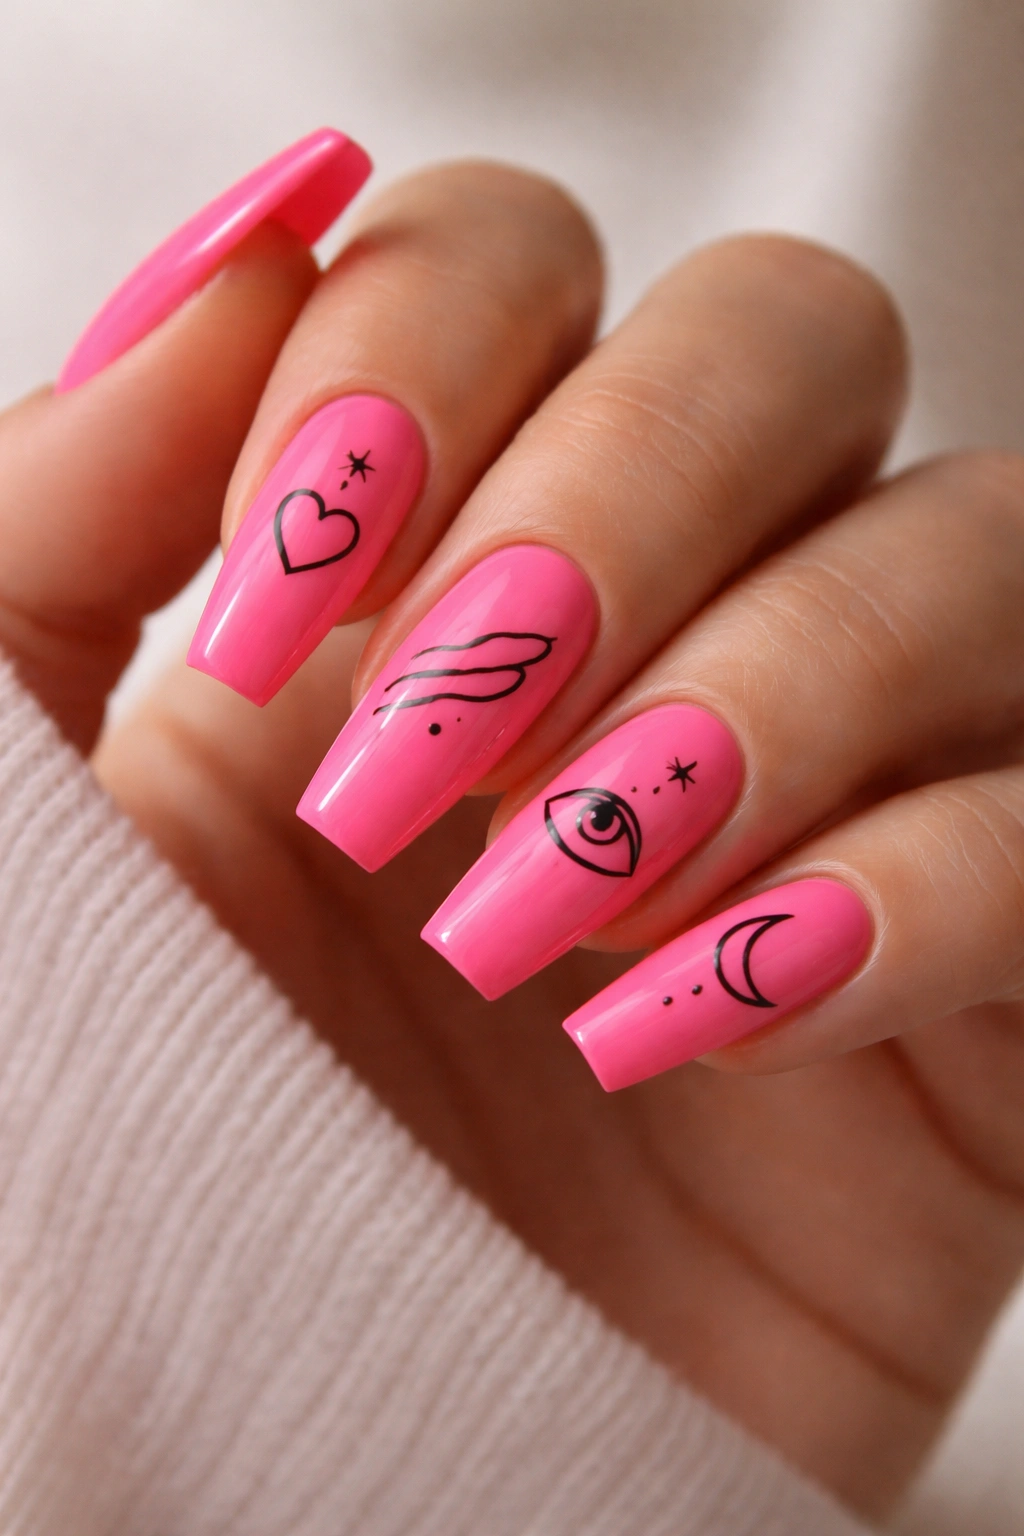
Thin black or dark lines creating simple symbols, geometric shapes, or abstract art over a hot pink base create a design that feels artistic and intentional without being complicated. A single thin line up the center of each nail, small geometric shapes, or minimalist line-drawn symbols create visual interest while keeping the overall look clean. This design works beautifully on medium coffin nails because the nail bed gives you enough space to make the line art visible.
The Power of Minimalist Line Art
Minimalist designs feel sophisticated because they rely on precision and intentionality rather than busy embellishment. When paired with a bold color like hot pink, line art creates contrast and visual complexity. The simplicity of the lines keeps the design from feeling chaotic.
Creating Precise Line Art
- Start with your hot pink base—2-3 coats for full opacity
- Let dry completely, then apply a glossy top coat to create a smooth surface for your line work
- Using a thin detailing brush and black or dark polish, carefully draw your chosen design
- Go slowly—shaky lines are visible, so take your time even if it means multiple sessions to complete all ten nails
- Seal with a final clear top coat once the line art is completely dry
Insider note: If freehand line art feels intimidating, nail transfer foils with geometric or symbolic designs can give you the minimalist line art look without requiring the steady hand.
12. Hot Pink with Holographic Chrome and Fade Effect
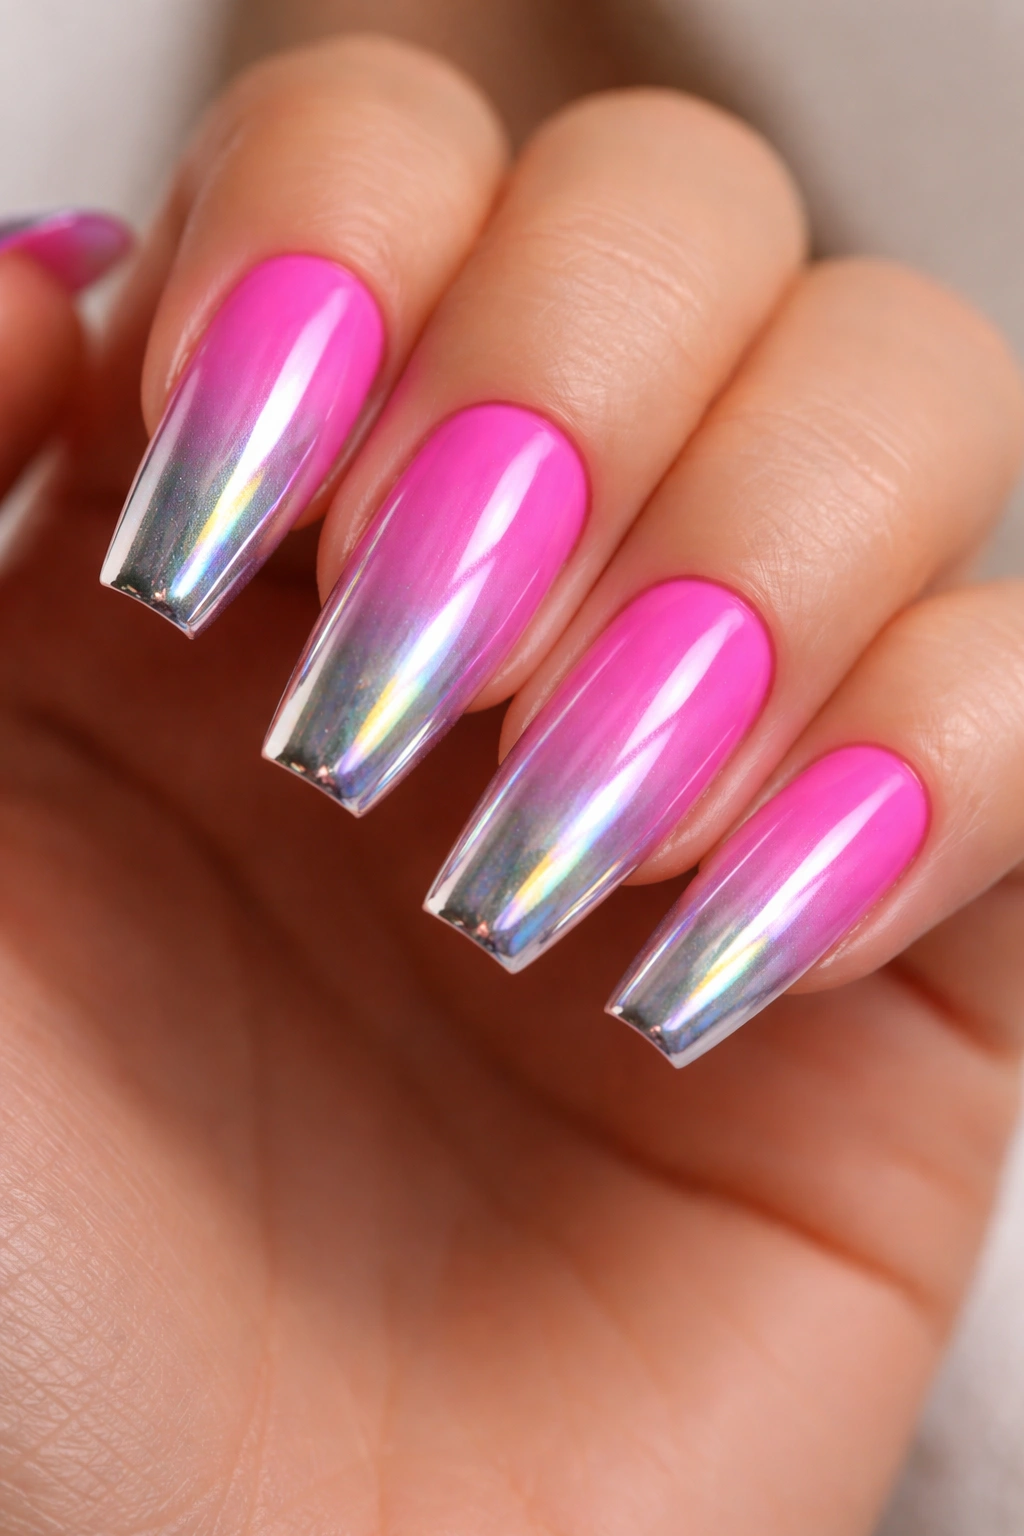
A hot pink base that transitions into a full holographic chrome finish creates a futuristic, almost iridescent effect that’s absolutely show-stopping. The chrome sits on top of the hot pink in a gradient pattern, so you see both colors working together. On medium coffin nails, this design is dramatic enough to be the focal point of your whole look.
Why Chrome Works as an Accent Rather Than a Base
Full chrome nails can sometimes feel costume-y or overwhelming, but using chrome as an accent or fade effect keeps things wearable while maintaining serious visual impact. Layering it over hot pink creates a color-mixing effect that’s complex and beautiful.
Creating the Chrome Fade
- Apply 2-3 coats of hot pink base polish
- Once dry, apply a chrome or holographic polish to the tips, fading it into the hot pink base using a sponge
- Blend carefully so you see a smooth transition from pink to full chrome effect
- Use a top coat that’s specifically designed for chrome (regular top coat can dull the effect)
- Avoid touching the chrome before it’s fully set—it can be delicate and fingerprints show easily
Pro tip: Holographic and chrome polishes tend to be stickier than regular polish, so they dry slightly slower—give yourself extra drying time before applying top coat to avoid smudging.
Final Thoughts
Hot pink coffin nails on medium-length nails give you the best of both worlds—the drama and elegance of the coffin shape without sacrificing practicality or wearability. Whether you choose a simple glossy hot pink with delicate accents, a complex gradient design, or a bold statement with chrome or glitter, hot pink works for virtually any mood, occasion, or personal style. The key is choosing a design that reflects what you love about hot pink in the first place—that confidence, that boldness, that refusal to blend in.
The designs outlined here range from minimalist and refined to sparkly and celebratory, which means you can rotate through different styles depending on your mood or what’s happening in your life. Medium coffin nails give you enough canvas to make these designs really shine without the maintenance hassle of longer lengths. Take your time with application, invest in quality products, and don’t be afraid to ask your nail artist questions about techniques you’re not sure how to execute yourself. Hot pink nails should make you feel good every single time you look at your hands.
