

Coffin nails have become a staple in modern nail art, and pairing them with rich gold tones creates an instantly luxe aesthetic that works for everything from everyday wear to special occasions. The elongated, tapered shape of coffin nails provides the perfect canvas for gold designs—whether you’re going for subtle elegance, bold statement-making, or intricate detail work that demands attention. Long nails amplify the impact even further, giving you more surface area to play with geometric patterns, metallic finishes, gradient effects, and decorative elements that would be cramped on shorter nail beds.
Gold coffin nails strike that rare balance between appearing polished and high-maintenance while actually being surprisingly versatile with different outfits, skin tones, and personal styles. Whether you prefer minimalist sophistication, maximalist glamour, or anything in between, there’s a gold coffin nail design ready to elevate your look. The beauty of working with gold is its warmth—it complements warm undertones beautifully while also creating striking contrast against cool-toned skin. Add length, and you’ve got a genuinely showstopping nail aesthetic that photographs well and feels confidence-boosting in real life.
Let’s explore twenty distinct gold coffin nail designs that showcase different techniques, color combinations, and artistic approaches. Each one offers enough specific detail that you can either recreate it yourself or describe it clearly to your nail technician.
1. Solid Gold Mirror Finish with Matte Base
This design layers two finishes to create visual drama with minimal complexity. Start with a rich matte gold base that covers the entire nail, then apply a mirror or chrome powder to just the tips of the nails, creating a gradient effect that shifts from matte to ultra-reflective. The contrast between the soft, velvety matte surface and the high-shine metallic tips creates depth and dimension that reads as more sophisticated than a single finish alone.
Why This Design Stands Out
The interplay between matte and mirror finishes draws the eye across the entire nail length, making even the longest coffin nails look intentional rather than just grown out. The matte section feels modern and subtle, while the mirrored tips catch light dramatically. This design works equally well for professional environments and evening events because it balances restraint with impact.
Application Tips and Real-World Results
- Apply two thin coats of matte gold base and allow complete drying before adding mirror powder
- Use a velvet or flocking pad to press mirror powder into the matte topcoat while still tacky
- Seal everything with a non-wipe topcoat to prevent the mirror powder from shifting
- The matte finish will show minor imperfections, so take your time with application
- This design lasts 3-4 weeks without chipping if sealed properly
Pro tip: If you’re applying this at home, invest in a quality matte topcoat—cheap versions can feel gritty and look chalky rather than velvety.
2. Gold Geometric Shapes with Black Negative Space
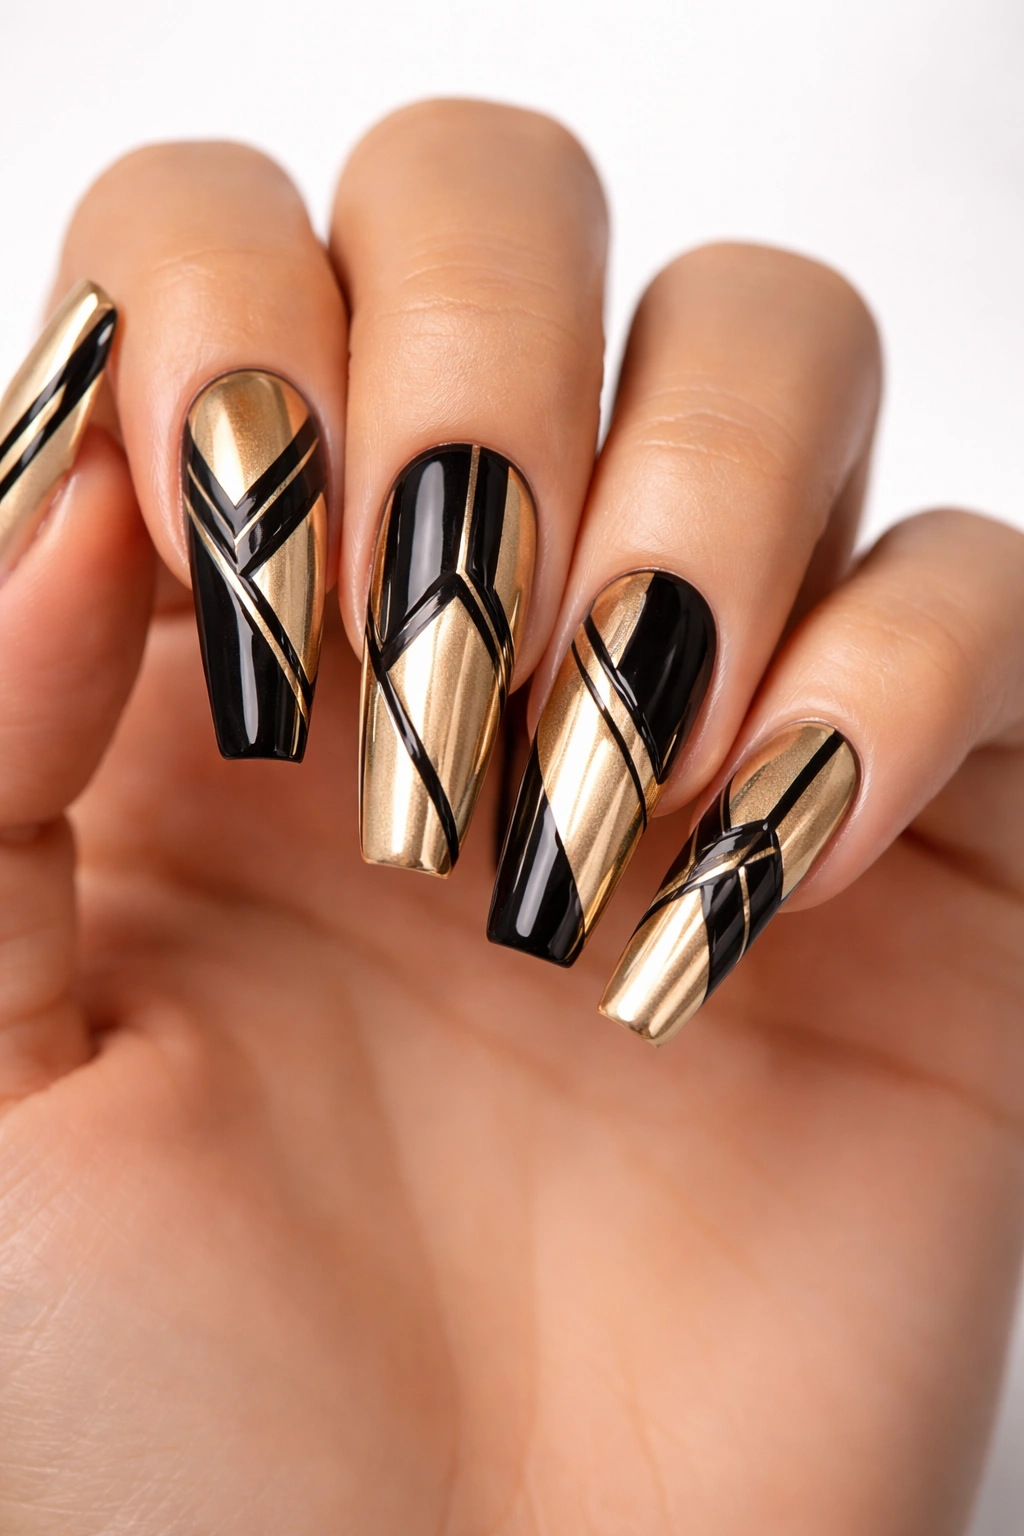
Geometric designs thrive on long coffin nails because the extended surface gives you room to create bold shapes without overcrowding. Paint a gold base, then use a fine liner or thin nail art brush to create geometric patterns—triangles, hexagons, diamonds, or lines—using black polish or black gel. Leave portions of the nail unpainted (negative space) so the nude or natural nail color shows through, creating visual breathing room that keeps the design from feeling overwhelming.
What Makes It Different
Black and gold is a timeless color pairing that feels inherently elegant and modern simultaneously. The negative space prevents the design from feeling cluttered while the geometric shapes provide structure and intentionality. This approach works beautifully on longer nails because the extended length gives you canvas space to experiment with asymmetrical placement or to run geometric elements down the nail length at varied angles.
How to Execute It Cleanly
- Start with a smooth, opaque gold base coat—opacity matters so the nude nail underneath doesn’t muddy the gold
- Use a thin-tipped nail art brush or nail pen for precise geometric lines
- Black polish dries quickly, which makes it easy to layer additional shapes on top without waiting between coats
- Seal with topcoat, but avoid excessive application over black areas as it can cause streaking
- Practice your geometry on paper first if you’re not confident freehanding
Worth knowing: Geometric designs actually look more forgiving than they sound because imperfect lines still read as intentional when they’re part of a structured pattern.
3. Gold Ombre with Glitter Gradient
This design creates movement and sophistication by blending multiple shades of gold polish from light to deep, then adding a glitter gradient that intensifies from the base toward the tips. Start with a pale champagne or light gold at the base, transition to a medium gold in the center, then deepen to a rich bronze or warm brown at the tip. Layer fine gold glitter over the entire design, concentrating heavier glitter placement toward the tips where the color is darkest.
Why It’s a Top Pick
Ombre designs are inherently flattering because the gradual color transition elongates the nail visually. Gold ombré specifically creates a warm, luxurious effect that feels special without being costume-like. The glitter adds sparkle and texture that catches light differently depending on how you position your hand, making the nails look dynamic and alive.
Application Breakdown
- Apply light gold base and let dry completely
- Use a makeup sponge or specialized nail ombre sponge to dab medium gold over the center
- Dab deep bronze over the tip section, blending edges slightly with the sponge
- Seal with a thick layer of topcoat to smooth everything
- Drop fine glitter onto wet topcoat over the tip section, then seal with another topcoat layer
- Build additional glitter layers if you want a more dramatic effect
Insider note: Using a makeup sponge creates softer ombré blends than trying to paint gradients with a brush—the dabbing motion naturally feathers colors into each other.
4. Pressed Gold Foil with Clear Nail Base
Foil designs create instant luxury without requiring steady-hand precision because you’re not painting fine details. Apply a tacky base coat, then press adhesive-backed gold foil sheets (or hand-tear gold foil into custom shapes) directly onto the nail. You can cover the entire nail with foil for maximum shine, or apply foil pieces to specific areas like the tip or create geometric foil patterns across a clear base.
What Makes It Different
Foil has a captured, almost 3D quality that regular gold polish can’t replicate. The foil catches light completely differently, creating a metallic effect that’s almost wet-looking and distinctly more dramatic than any painted finish. On coffin nails, foil designs photograph beautifully and feel immediately luxe in person.
How to Get Professional Results
- Use a sticky base coat specifically designed for foil application—regular base doesn’t hold foil well
- Cut or tear foil into the shapes you want before application to avoid fumbling once it’s tacky
- Press foil gently but firmly onto the wet sticky base, holding for 2-3 seconds
- Seal immediately with topcoat to prevent foil from peeling
- Avoid soaking hands in water for at least 24 hours after application
- This design lasts 2-3 weeks depending on daily hand exposure and activity level
Pro tip: Gold foil pieces can be layered—apply one foil piece, seal it, then apply another foil piece on top for dimensional, nested patterns.
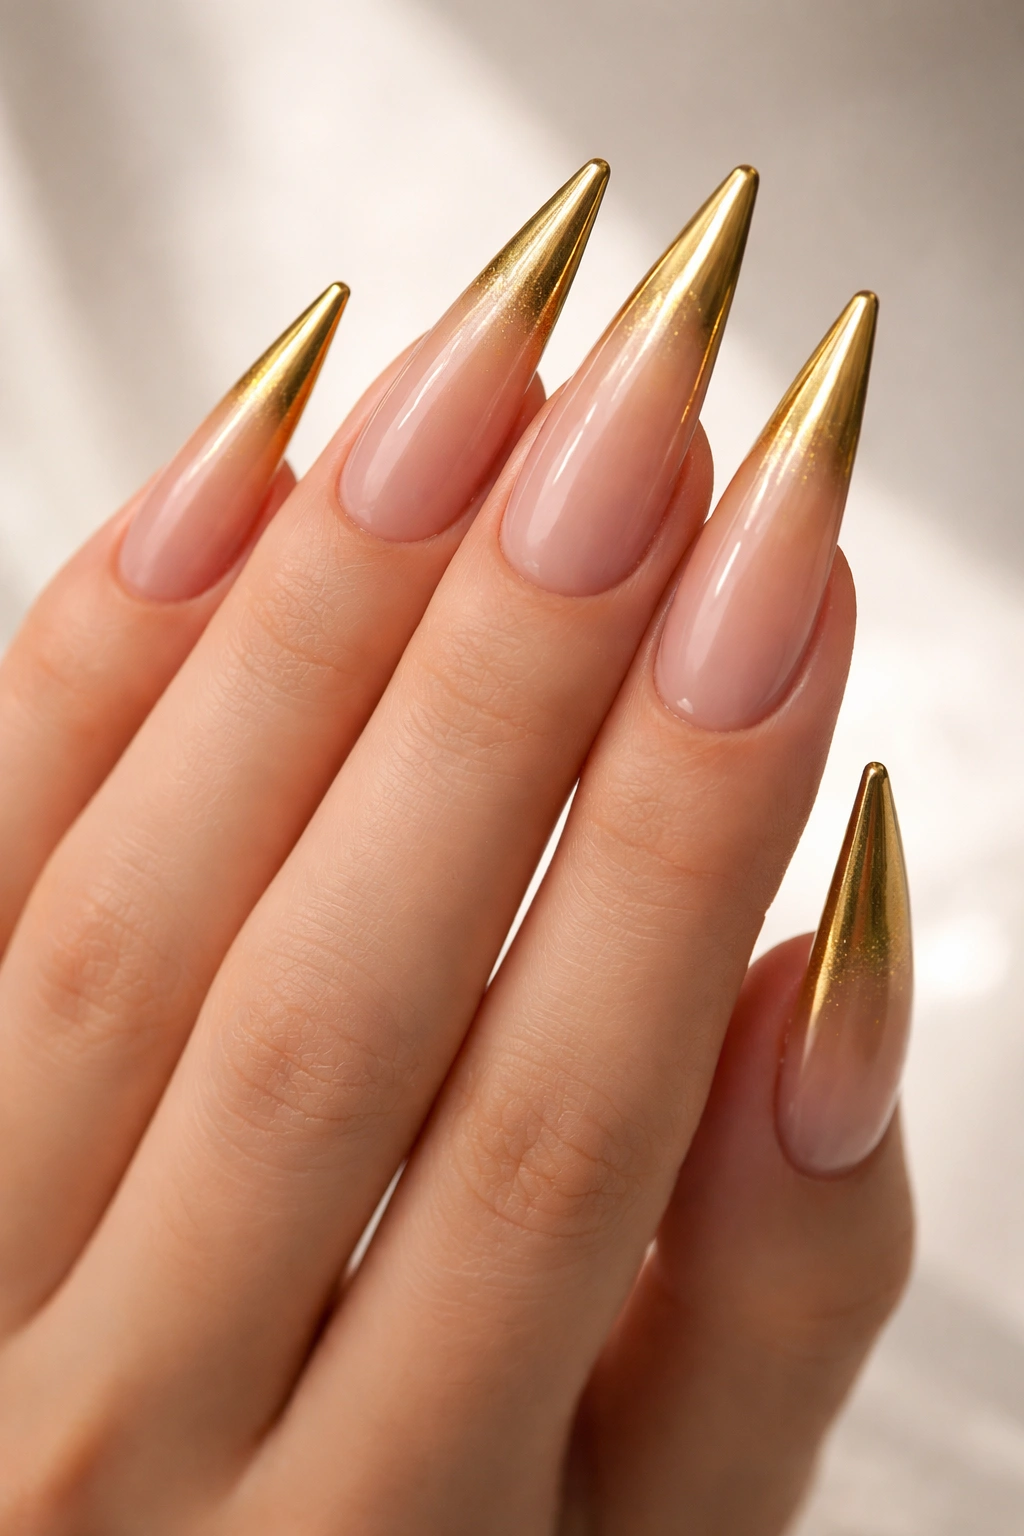
5. Gold French Tips with Nude Base
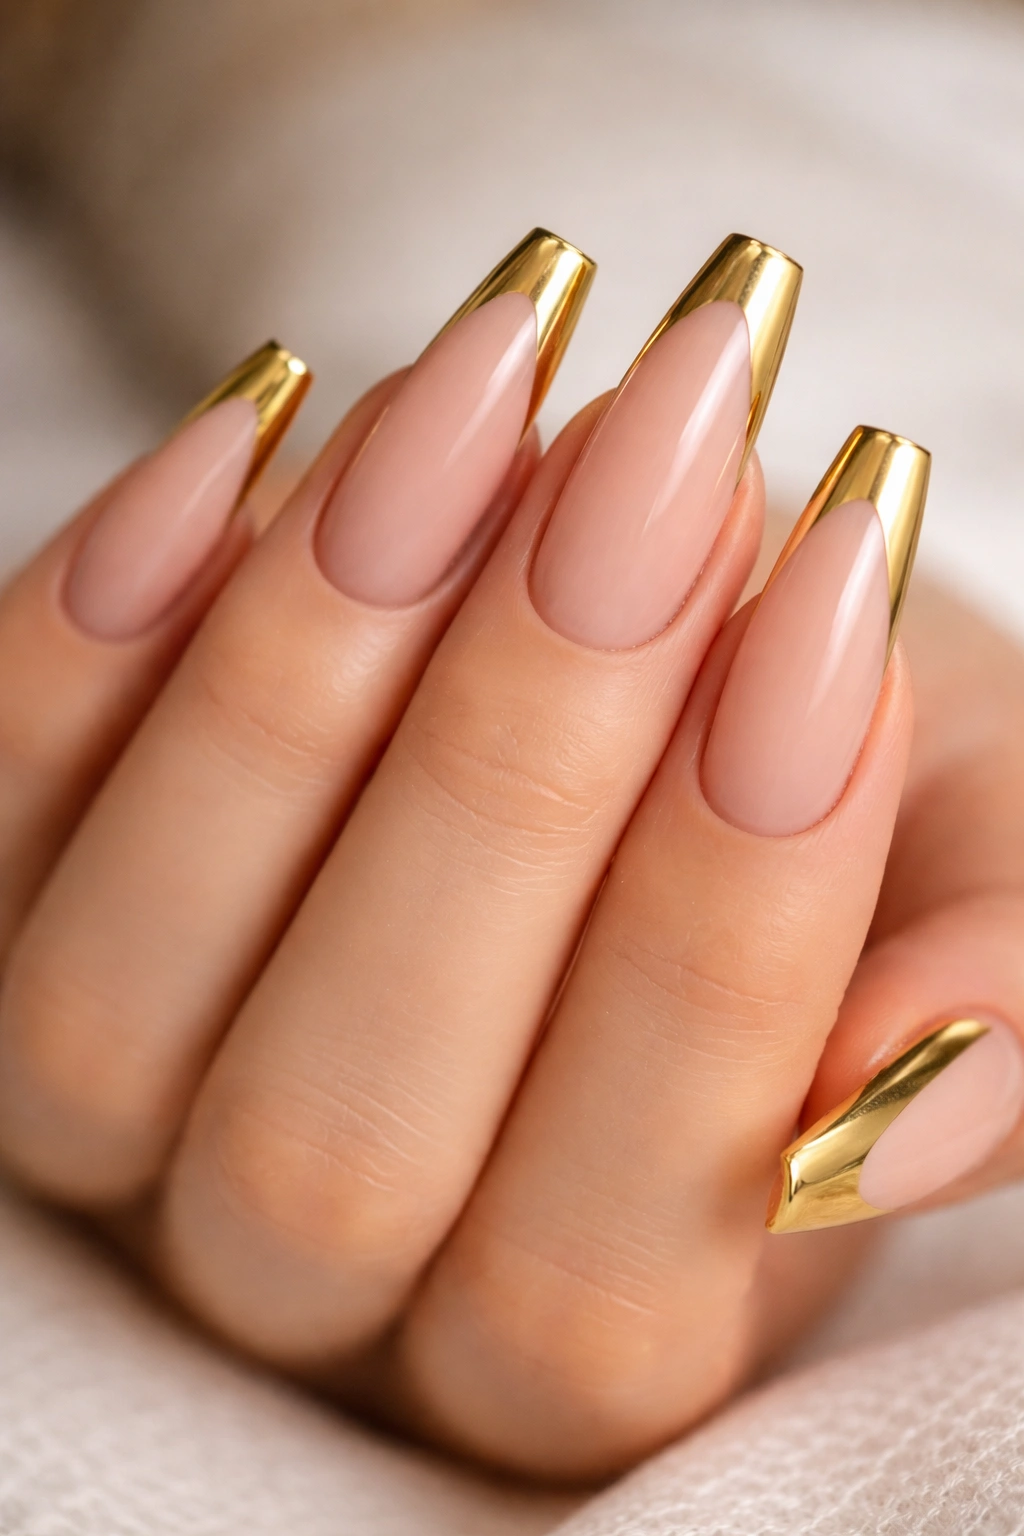
The French manicure is elegant on any nail length, but coffin-shaped nails elevate it to something distinctly more modern than traditional square-tipped French nails. Paint the entire nail in a creamy nude, peachy, or warm beige base, then paint the tip section (roughly the top third) in a rich gold that contrasts with the base. The angled shape of coffin nail tips means the gold section follows the nail’s natural diagonal line, creating an inherently flattering frame for the fingertip.
Why It’s Timeless and Versatile
French tips are universally flattering, appropriate for any occasion, and work with virtually every skin tone. Gold tips specifically add warmth and luxury without appearing overstated. The nude base keeps things sophisticated and wearable, while the gold tip provides just enough color to feel intentional and special. This design suits long nails particularly well because the extended length gives the gold section more visual presence.
Application Tips
- Choose a nude base that matches your skin undertone—if you have warm undertones, go for a warmer beige; cool undertones suit pinker nudes
- Use a thin angled brush or nail tip guide to create a clean gold line where the tip begins
- Two coats of gold creates better opacity than one coat and looks more polished
- Seal with a shiny topcoat to enhance the contrast between matte nude and glossy gold
- This design typically lasts 4-5 weeks because the tip section wears less than other design elements
Worth knowing: If your natural nail shape isn’t perfectly uniform, this design actually helps because the gold section draws the eye and creates visual consistency even if nail widths vary slightly.
6. Gold Marble Effect with Black Lines

Marble designs feel intricate but are surprisingly achievable, especially on longer nails where you have more surface area to work with. Create the marble effect by swirling multiple shades of gold, champagne, and bronze together on wet topcoat using a thin brush or toothpick, then let it dry partially. Add thin black lines across the entire design using a nail art pen, creating veins that make the marble pattern read as more intentional and structured.
What Makes It Stand Out
Marble gives an organic, natural-looking aesthetic despite being completely created by hand. The black lines add contemporary edge and prevent the design from feeling too soft or feminine. Gold marble specifically walks the line between glamorous and sophisticated in a way that other marble colors don’t quite achieve.
How to Create Clean Marble
- Apply a clear base so the marble colors show their true shade
- Drop gold, champagne, and bronze colors onto wet topcoat in random spots
- Use a thin brush or toothpick to gently swirl colors together—don’t over-blend or colors become muddy
- Let the topcoat dry slightly so it has surface tension to hold the pattern
- Add black veining lines once everything is stable but before final topcoat seal
- The entire process requires patience and a steady hand, but imperfections actually enhance the natural marble aesthetic
Pro tip: Practice your marble technique on a test nail or nail wheel first—once you understand how the colors interact, the actual nail application is much easier.
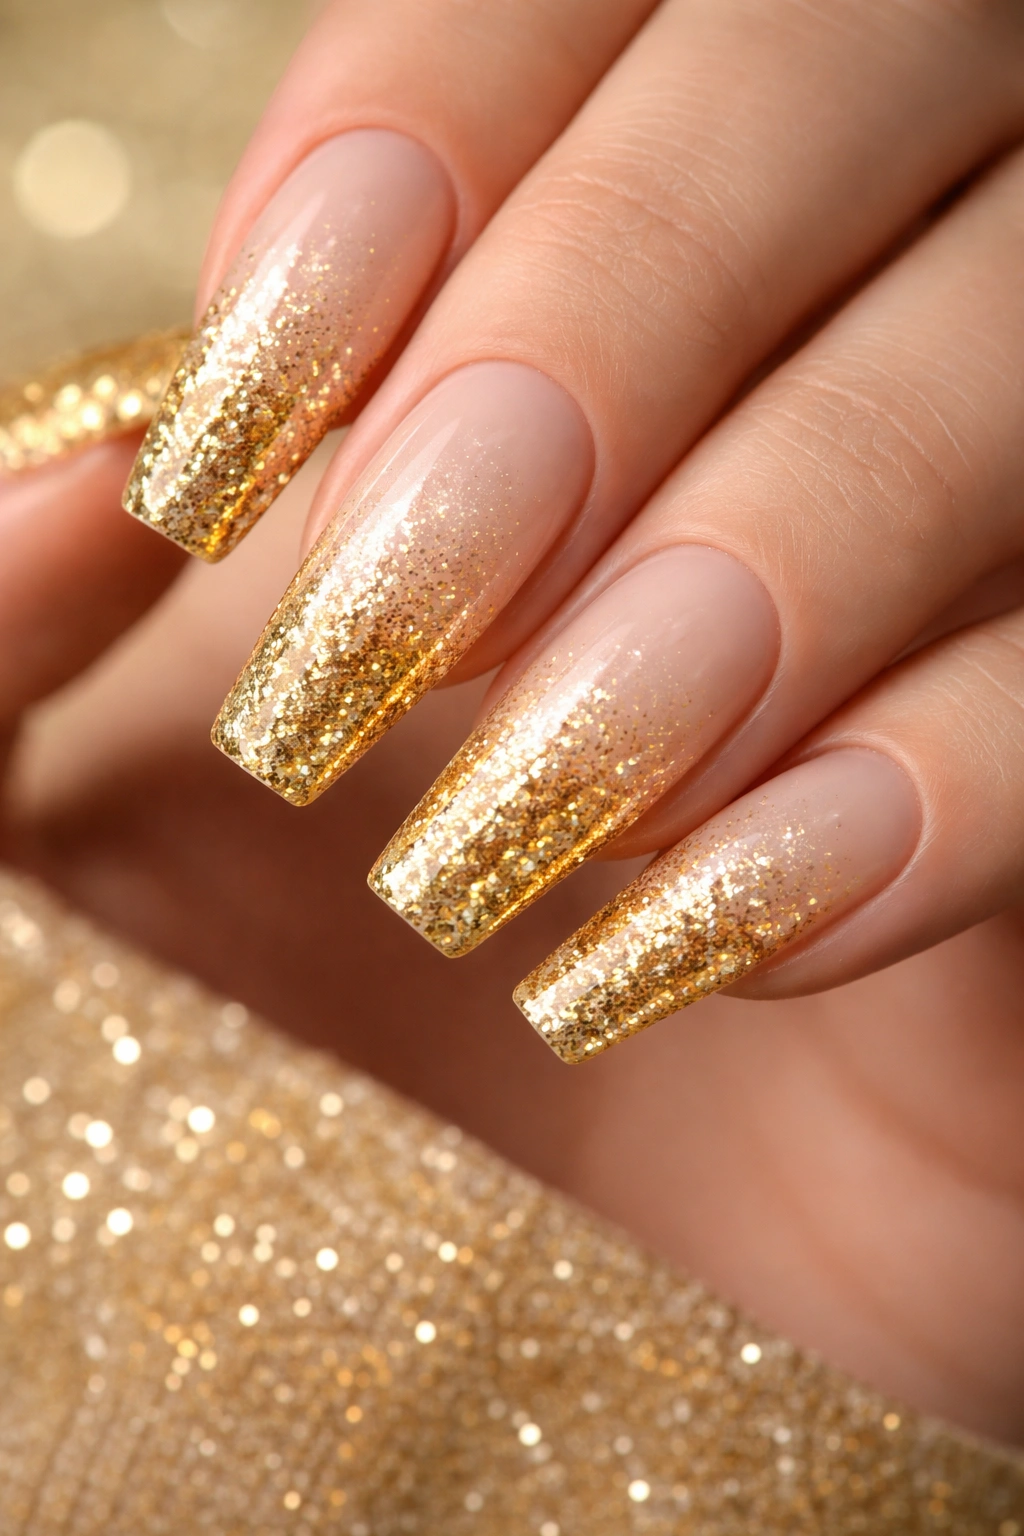
7. Gold Glitter Bomb with Ombre Fade
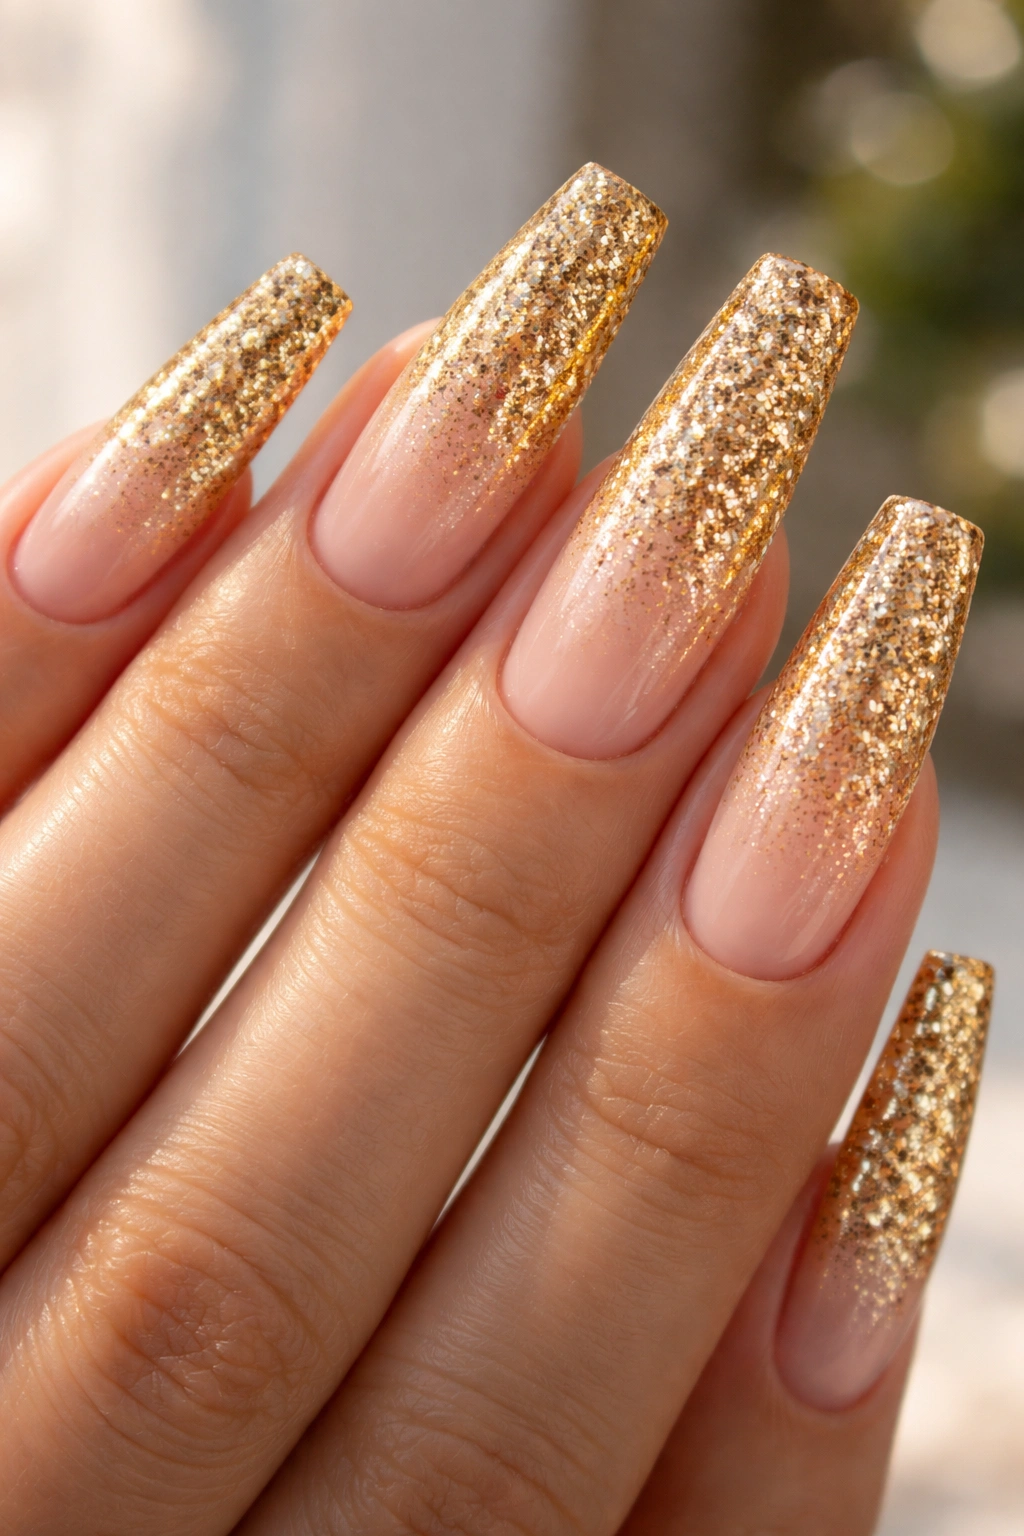
This design maximizes sparkle and shine by layering dense glitter over a gradient base. Start with a light nude or champagne base, apply a rich gold ombré (progressively darkening toward the tip), then layer fine and chunky gold glitter over the entire nail, concentrating more glitter toward the tips where the color is deepest. The result is nails that literally sparkle from every angle while maintaining a cohesive color story.
Why It Works for Long Nails
Glitter designs can look overwhelming on short nails, but the extended length of coffin nails gives glitter room to breathe. The ombré base prevents the glitter from reading as too young or playful—instead it feels elegant and intentional. This design is perfect for celebrations, night outs, or anyone who loves maximum shimmer without maximum pattern complexity.
Building the Glitter Effect
- Start with a sticky base coat designed to hold glitter
- Apply nude base and let dry completely
- Layer gold ombré using the sponge technique described earlier
- Seal the ombré with a thick layer of sticky topcoat
- Apply fine glitter first, seal, then apply chunky glitter on top for dimensional sparkle
- Finish with at least two layers of topcoat to smooth everything and prevent glitter migration
Insider note: Using both fine and chunky glitter creates more visual interest than using just one size—the different sizes catch light differently and create depth.
8. Gold Striping with Minimalist Lines
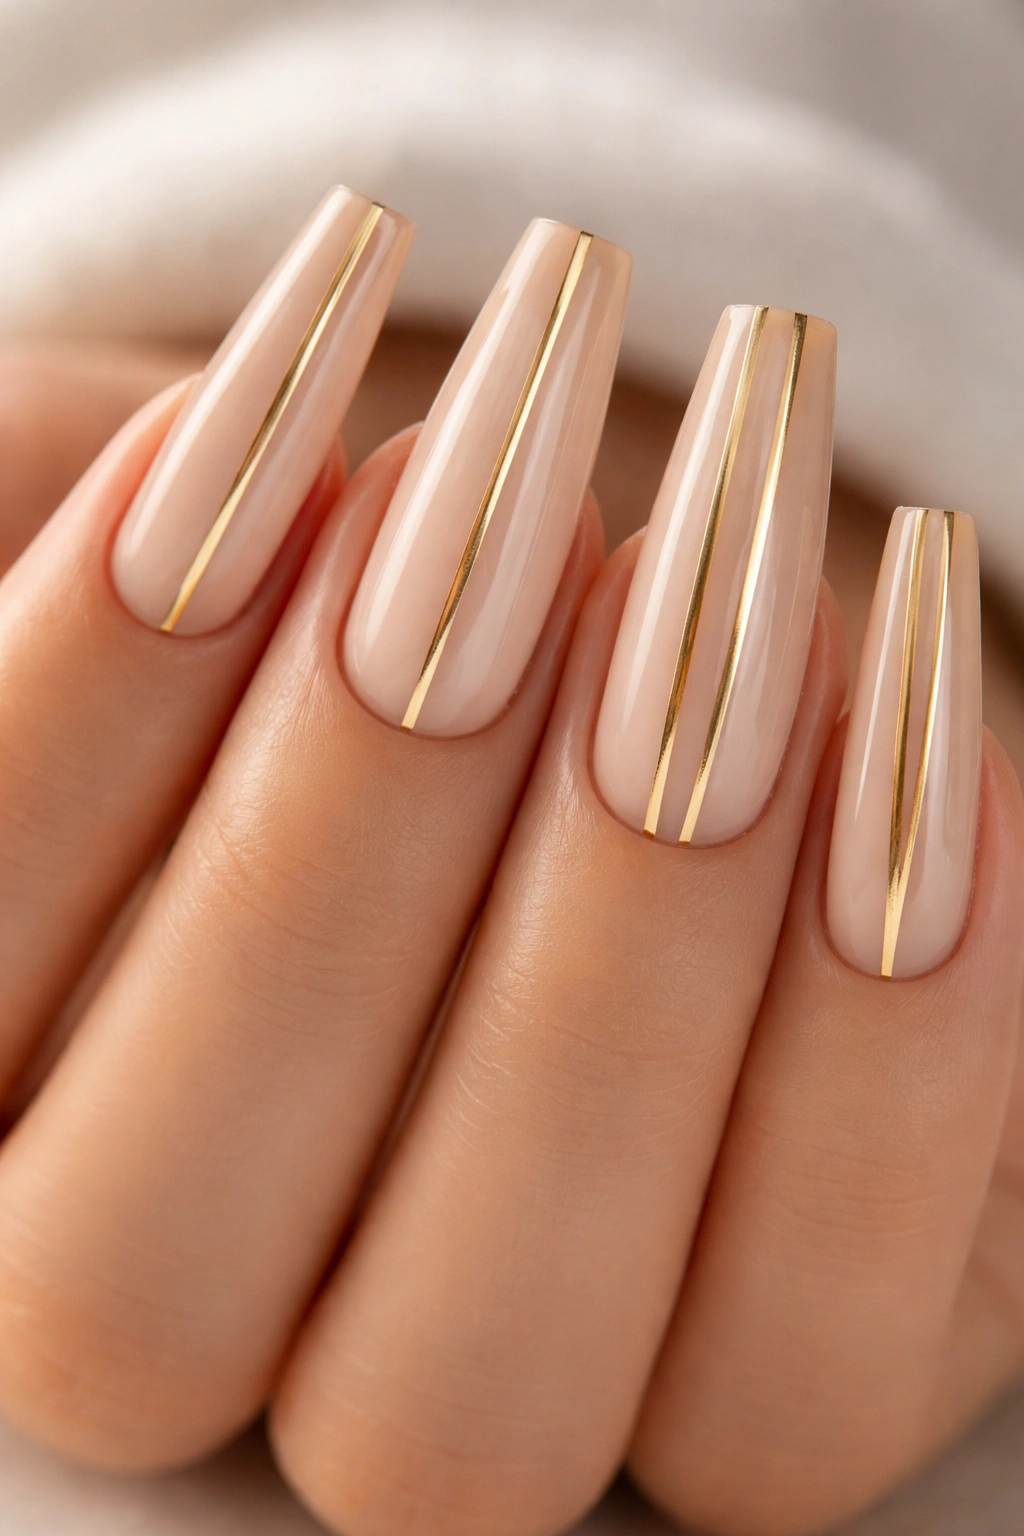
Striping requires a steady hand but creates a distinctly modern, almost architectural aesthetic that’s perfect for long coffin nails. Use a nail art pen or thin striping brush to paint straight gold lines down the length of each nail—aim for 2-4 lines per nail spaced evenly. You can stripe in the same direction across all nails for uniformity, or alternate stripe direction between nails for visual interest. Keep the base either nude, white, or very pale gold so the stripes create clear contrast.
What Makes It Different
Striping is one of the few designs that feels equally at home in minimalist, modern settings or bold fashion contexts. The clean lines create visual structure and elongate the finger, which is particularly flattering on already-long coffin nails. This design never looks dated because clean lines are permanently in style.
Executing Perfect Stripes
- Use a thin striping brush and gold gel or polish meant for detailed work
- Support your painting hand with your non-painting hand for maximum stability
- Paint stripes in one smooth motion rather than shaky back-and-forth movements
- Space stripes by eye or use thin tape as guides if you’re still building confidence
- Two coats of gold creates better visibility than one coat
- Seal with topcoat and let completely cure before touching anything
Pro tip: If your stripes aren’t perfectly straight, they still look intentional if you commit to the design—the human eye won’t notice minor imperfections from normal viewing distance.
9. Gold Chrome Tips with Blush Pink Base
Chrome and metallic finishes are having a moment in nail design, and pairing them with a soft blush pink base creates an incredibly flattering, wearable combination that reads as far more sophisticated than basic nail art. Paint the entire nail in a soft, warm blush or mauve tone, then apply chrome or mirror powder to just the tip section. The pink base makes the chrome tips feel less cold and more integrated with the overall design while maintaining the wow-factor shine.
Why This Combination Works
Pink and gold are complementary in nail design because pink is inherently flattering to most skin tones, and gold is universally warming. Together they create a design that’s eye-catching without being bold, elegant without being boring. The chrome tips add that luxury element that elevates what might otherwise read as a basic pink manicure.
Application for Best Results
- Start with a quality blush or mauve base—this is the foundation so choose a shade you love
- Allow the base to dry completely before applying chrome
- Use a chrome powder applicator (usually included with the product) to gently press powder into the tip section
- Work quickly once you apply the sticky topcoat before the chrome dries and becomes difficult to set
- Seal everything with a non-wipe topcoat to lock the chrome in place
- This design wears beautifully for 3-4 weeks with proper care
Worth knowing: Not all chrome powders are created equal—invest in quality chrome if this is a design you’ll recreate, because cheap versions can look dull or patchy.
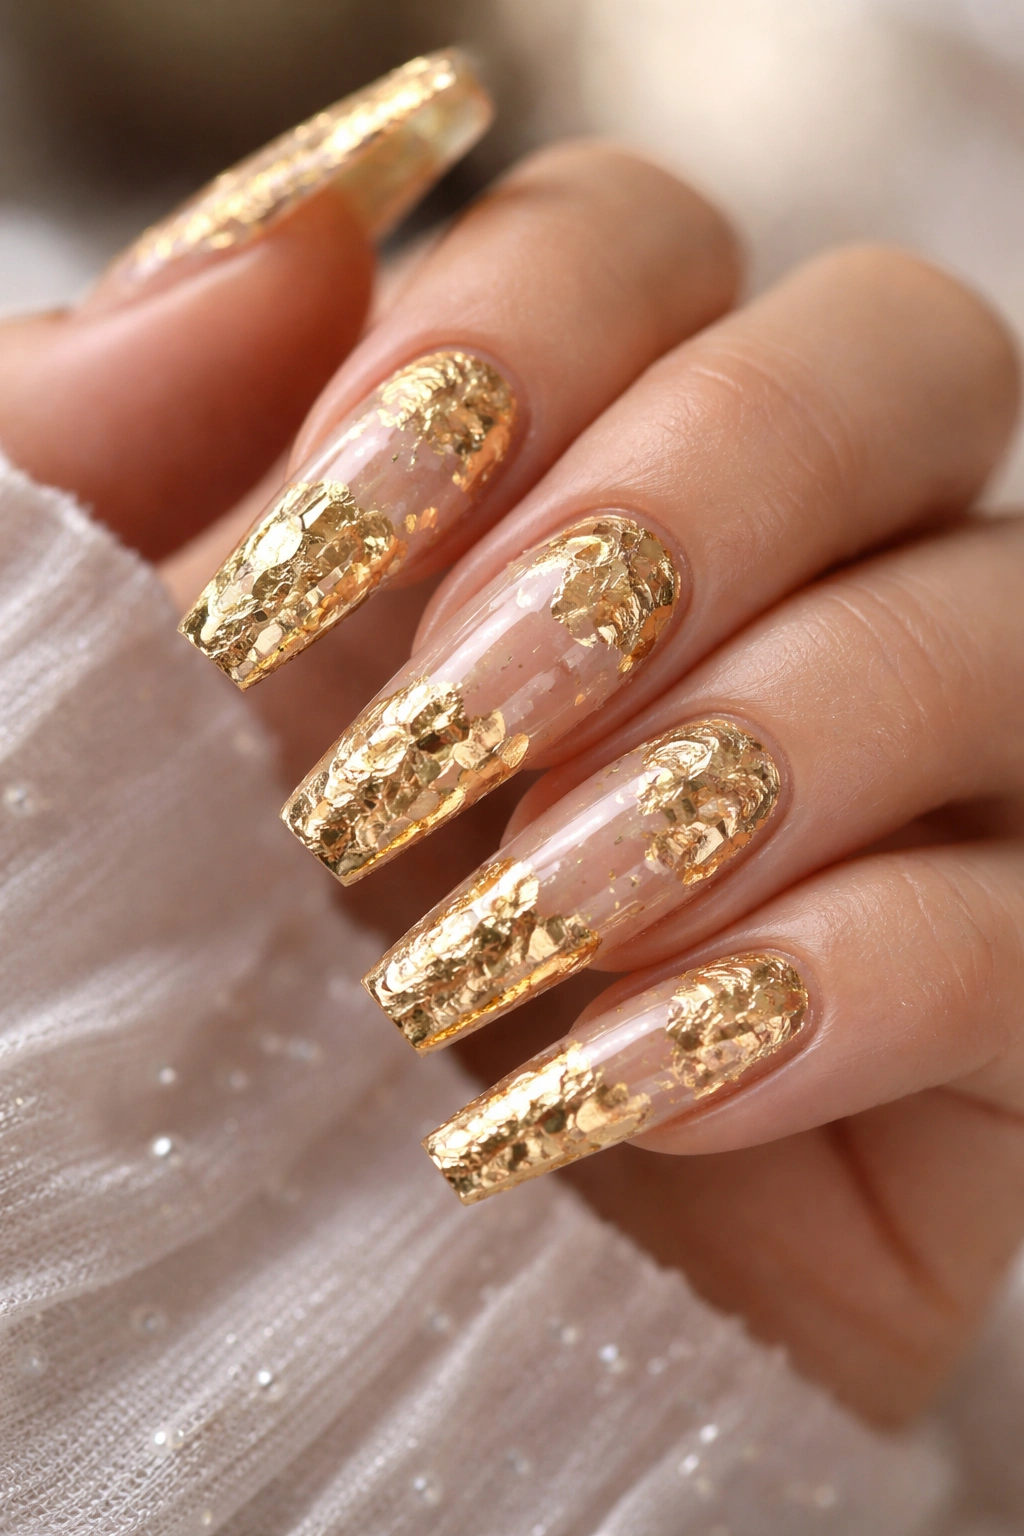
10. Gold Leaf Accents with Botanical Elements

Gold leaf creates texture and dimension that flat nail polish simply can’t replicate, especially when combined with painted botanical elements like leaves, flowers, or branches. Paint a pale nude or white base, then use thin brushes to paint delicate botanical line art in black or dark green. Position gold leaf pieces strategically—perhaps wrapping around flowers, creating leaf shapes, or following the line of branches. The combination of drawn botanicals and applied gold leaf creates an organic, nature-inspired design with unexpected luxury.
What Makes It Stand Out
Gold leaf adds a tactile quality to nail designs that even glitter can’t match because you can actually feel the dimension. The botanical elements prevent the design from feeling too showy while the gold leaf ensures it’s still special enough for occasions where you want to stand out. This design appeals to people who appreciate nature, art, and understated luxury simultaneously.
Creating Botanical Gold Leaf Designs
- Start with a clean, well-prepped base
- Paint your botanical elements first using thin brushes and gel or nail polish
- Allow botanical paintings to dry completely
- Apply a sticky topcoat over the areas where you want to apply gold leaf
- Tear or cut gold leaf into small pieces and carefully apply to the sticky topcoat
- Press gently and seal with a final topcoat layer
- The gold leaf should feel smooth and integrated, not sharp or peeling
Pro tip: Use tweezers to apply tiny gold leaf pieces—your fingers are too large to position delicate pieces precisely.
11. Gold Gradient Ombré with Rhinestone Border
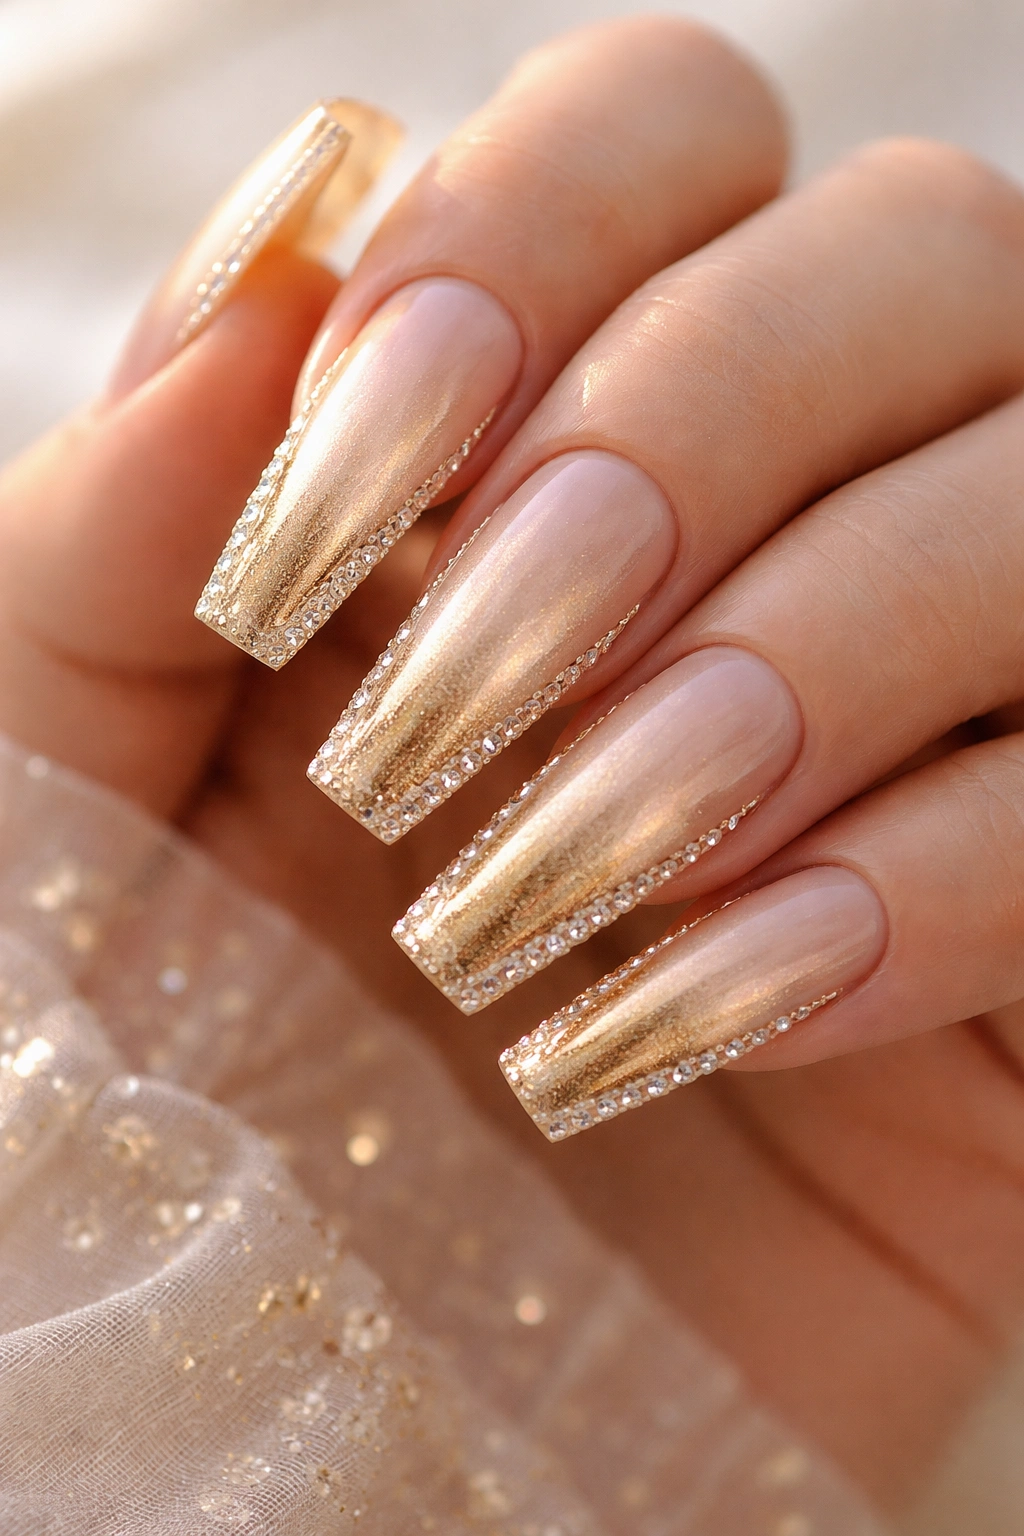
This design combines smooth color gradient with crystal embellishment for maximum sophistication. Create a gentle gold ombré from pale champagne at the cuticle to deep bronze at the tip, then use a nail glue designed for rhinestones to create a delicate line of small crystals or rhinestones along the edge between the gold and the clear tip section. The rhinestones catch light differently than the polish, creating visual contrast and drawing attention to the center line of the nail.
Why It’s Perfect for Long Nails
The extended length of coffin nails gives you a large surface area for the ombré gradient to display its beauty, and a clear space at the tip for rhinestone placement. This creates multiple focal points on each nail that keep the eye moving and engaged. The design feels special enough for events but wearable enough for regular occasions.
Application for Lasting Results
- Create your ombré gradient using the sponge technique for soft, blended color transitions
- Seal the ombré with a thick layer of topcoat and let cure completely
- Apply a fresh layer of sticky topcoat where you want to place rhinestones
- Use rhinestone-specific glue or tweezers to place individual rhinestones in a precise line
- Press each rhinestone gently but firmly to ensure adhesion
- Seal everything with a final topcoat layer, being careful not to dislodge rhinestones
- This design lasts 2-3 weeks depending on hand activity
Worth knowing: Rhinestones are more durable than you might expect, but they can catch on hair or clothing—be mindful if you have long hair or wear fitted sleeves.
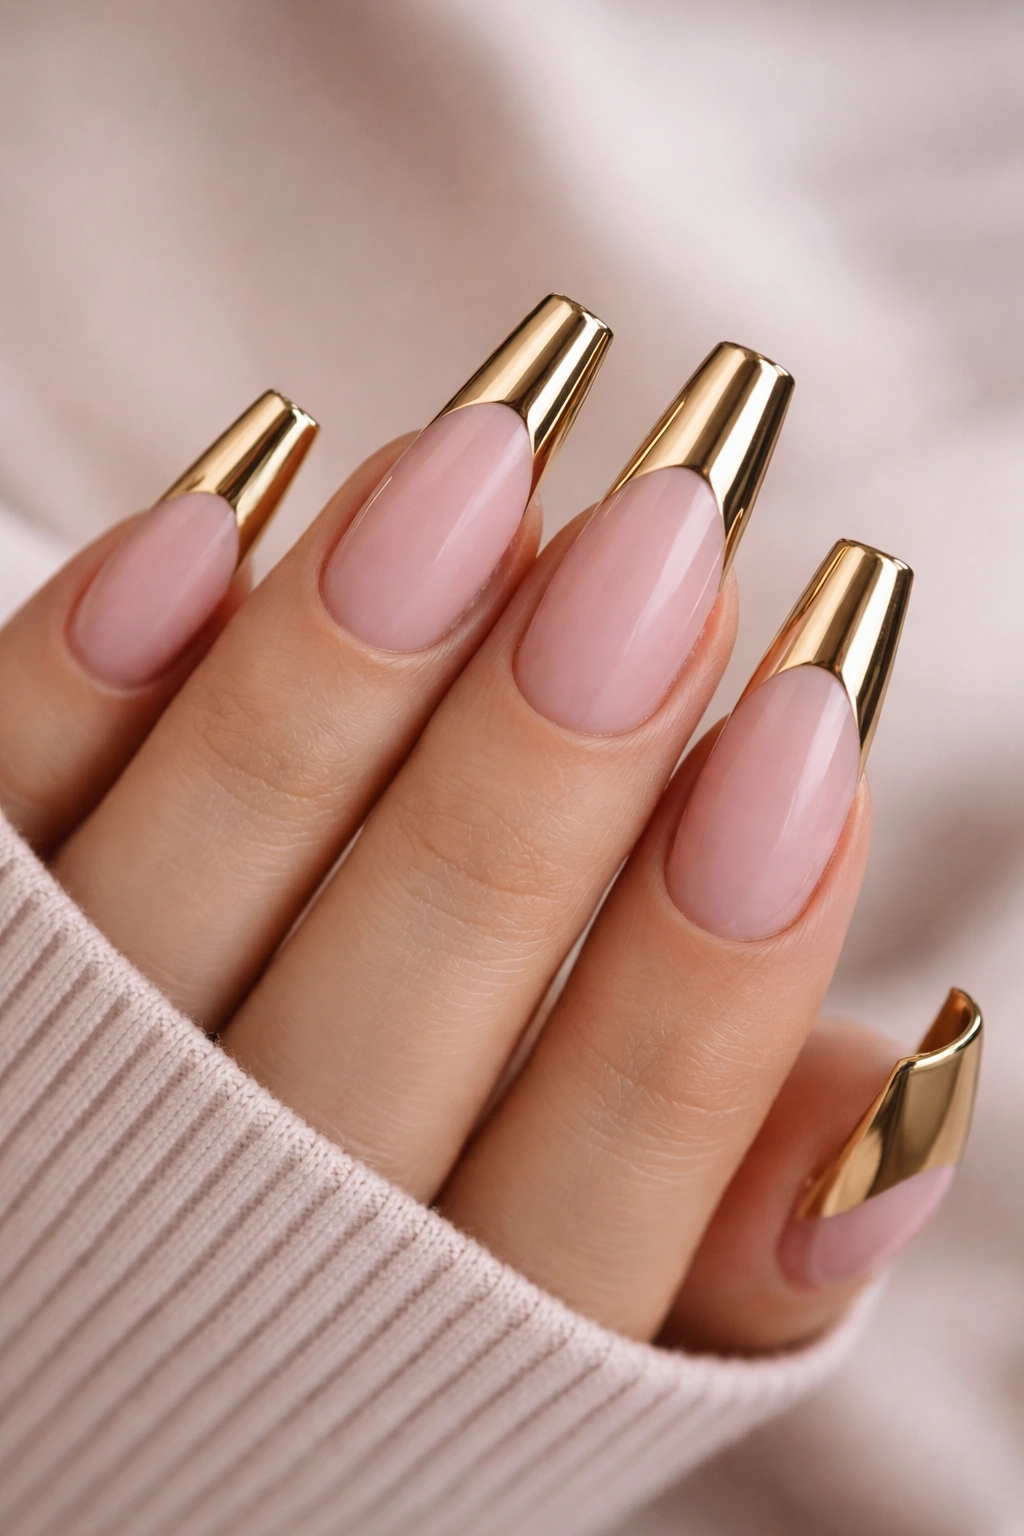
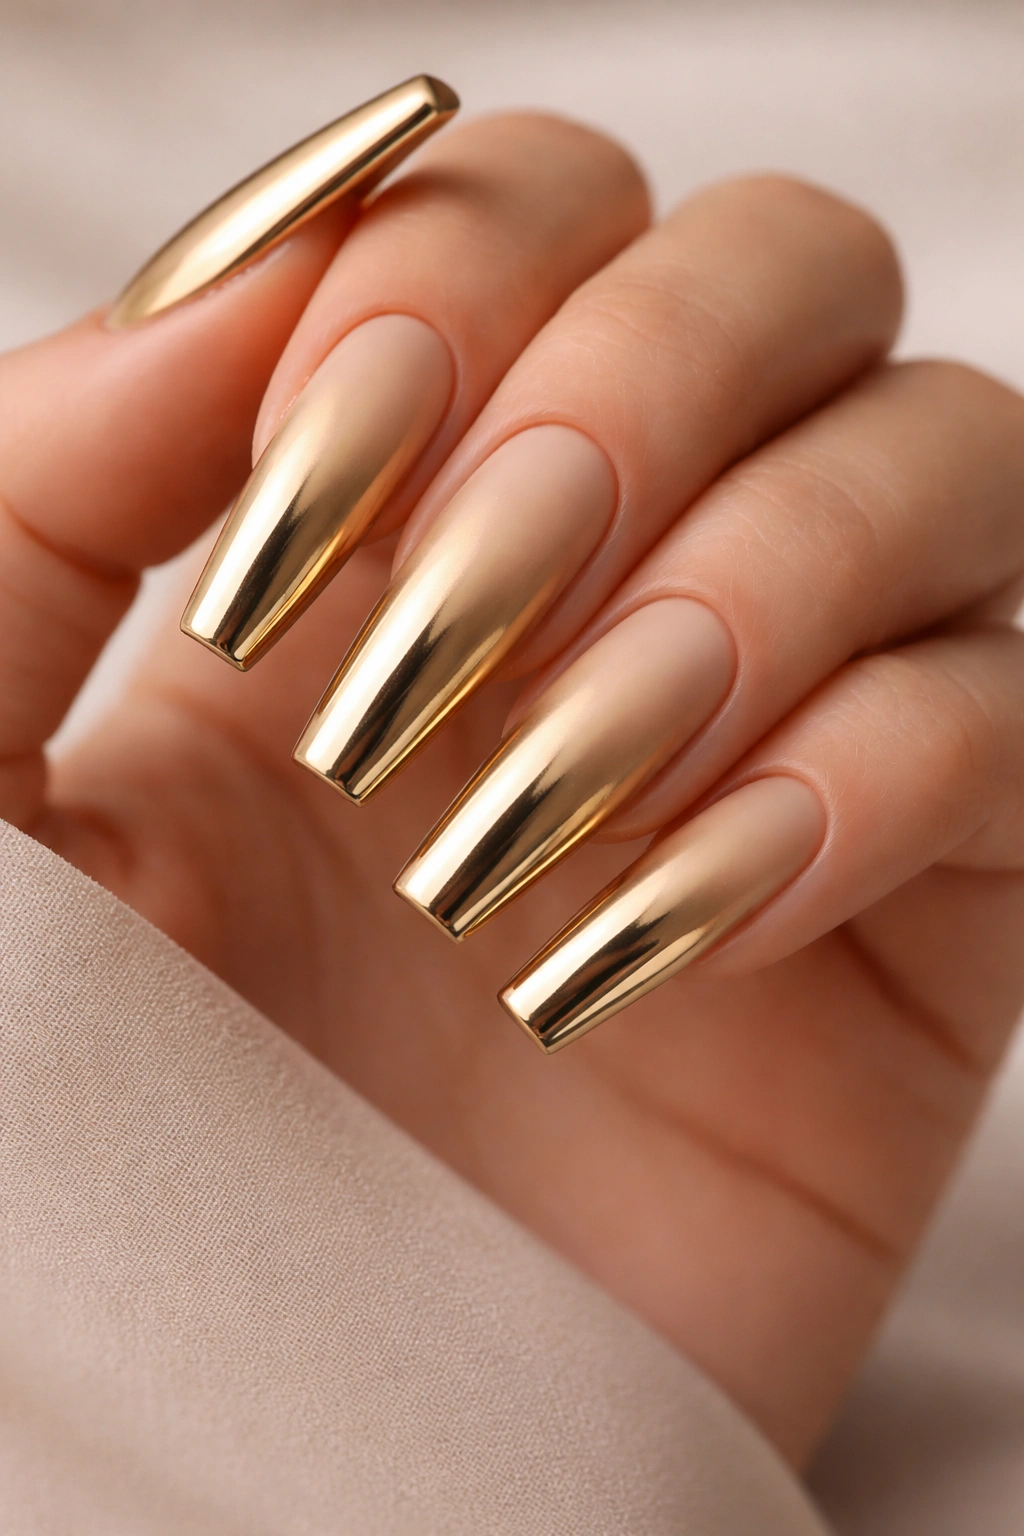
12. Solid 24K Gold Nail with Dimensional Edge
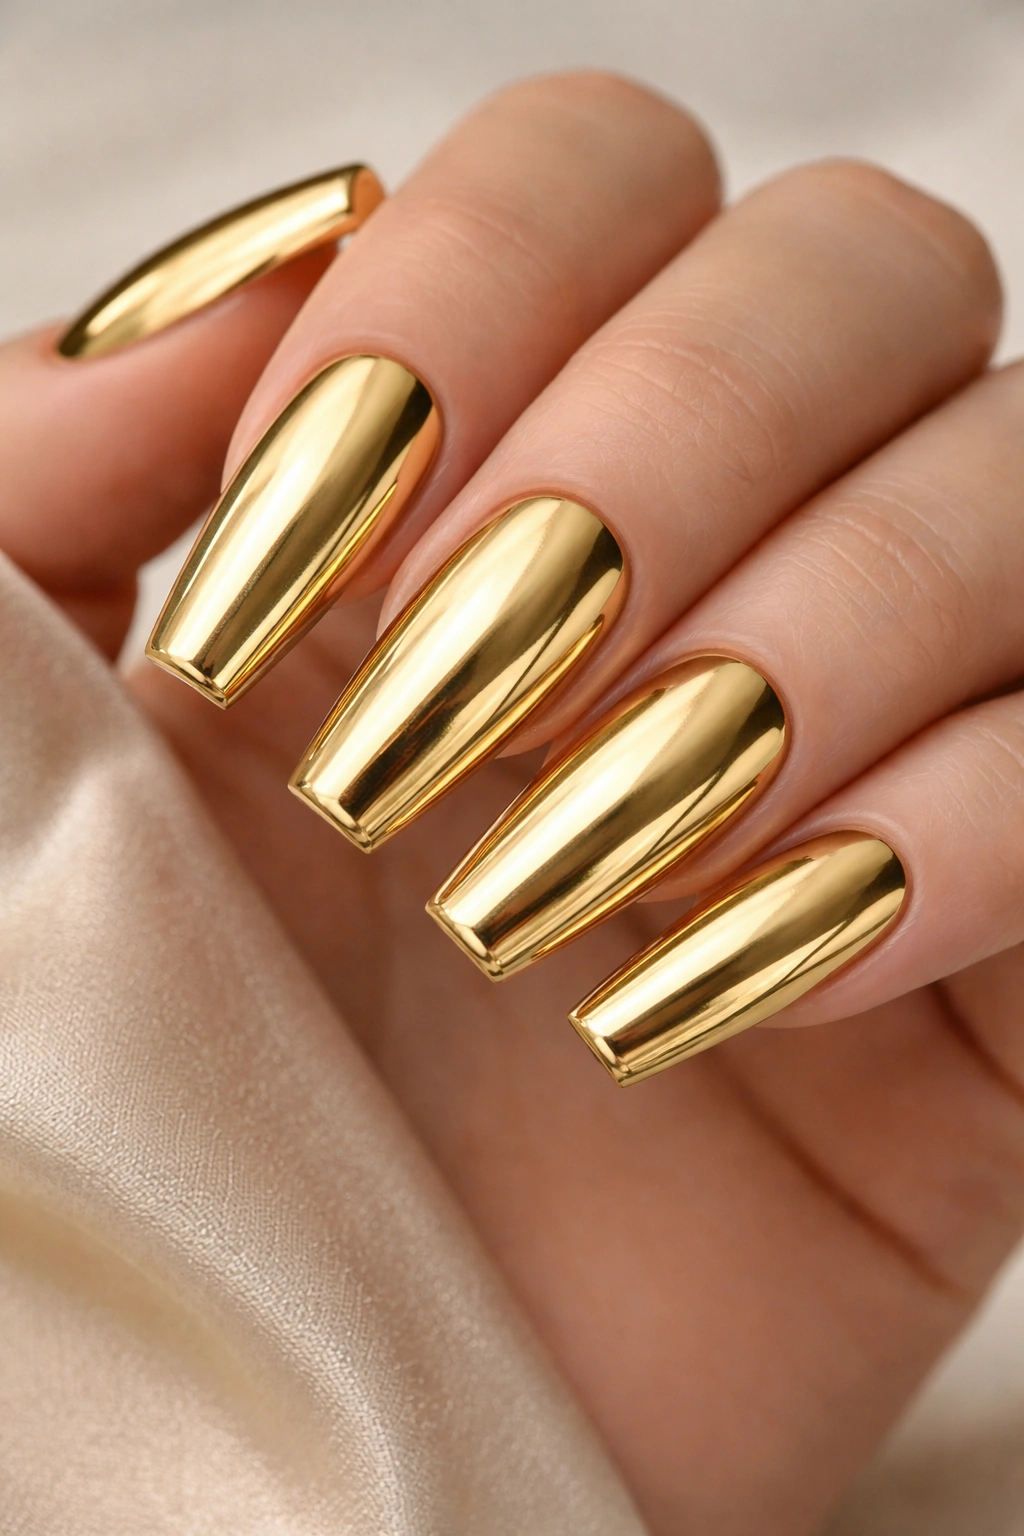
Sometimes the most luxe designs are the simplest. Cover the entire nail in a rich, opaque gold polish that catches light beautifully from every angle. The coffin shape means the natural edge is already dimensional and interesting. For extra dimension, apply a metallic or mirror powder to just the very tip edge (maybe the last 2-3mm) so the edge has a slightly different finish than the main nail surface. This creates subtle dimension without pattern or complexity.
Why Simplicity Reads as Luxury
Solid color designs are timeless because they let the quality of the polish shine (literally). A rich gold nail with perfect application, smooth finish, and no imperfections reads as far more luxe than a complicated design with uneven application. Long coffin nails showcase a solid color beautifully because there are no distracting patterns to compete with the nail shape’s elegance.
Achieving Flawless Solid Color Application
- Prep your nails thoroughly—any texture or imperfection shows on solid colors
- Use a quality gold polish with good opacity—apply two coats minimum
- Apply thin coats rather than one thick coat to avoid bubbles and lumps
- Use a steady hand or nail guides to create clean, even edges
- Seal with a glossy topcoat to enhance shine and protect the polish
- This design lasts 4-5 weeks because solid colors wear more slowly than patterned designs
Pro tip: If you notice any imperfections after application, wait until everything is dry, then gently file the surface with a fine nail file and reapply topcoat—this works better than trying to fix wet polish.
13. Gold Reverse Stamping with Geometric Patterns
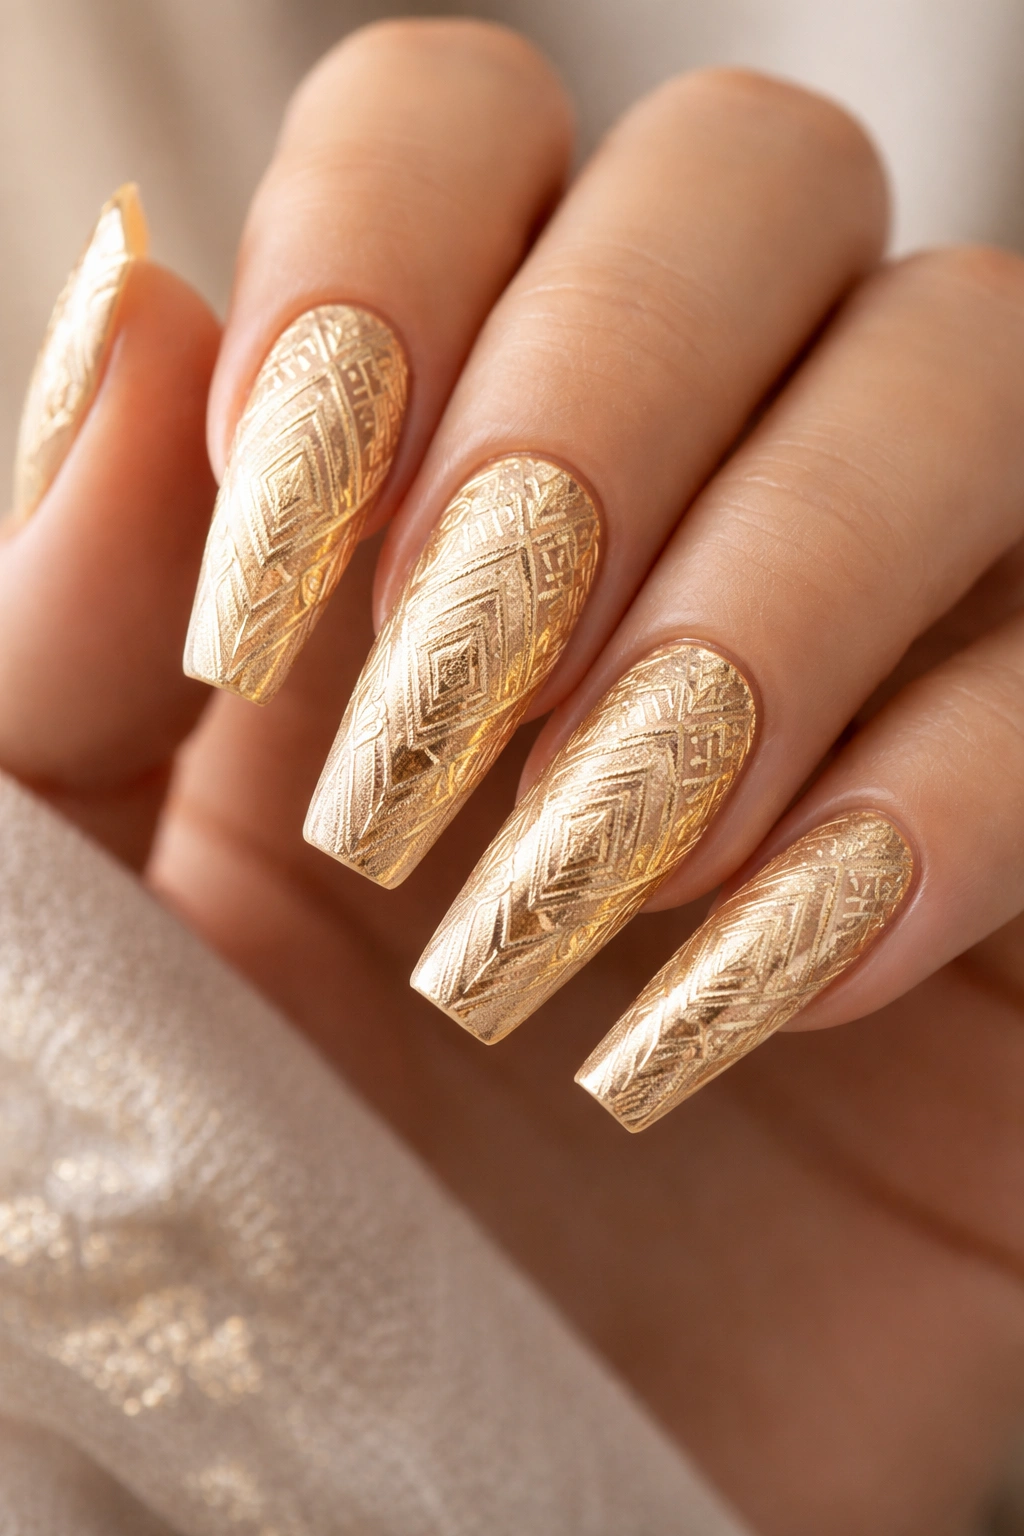
Stamping is a game-changer for anyone who loves intricate patterns but isn’t confident with detailed freehand work. Use stamping plates with geometric patterns in gold or black on a clear or nude base. Reverse stamping (transferring the pattern to a clear layer before applying to the nail) creates even more precision and dimensional effects. The geometric patterns available in stamping plates range from simple grids to complex mandalas, offering endless possibilities.
What Makes It Different
Stamping creates perfectly uniform patterns that would be nearly impossible to paint by hand, making this technique ideal for designs that need geometric precision. The geometric patterns available in quality stamping plates are often more intricate than what most people can freehand successfully.
Perfecting Your Stamping Technique
- Invest in a quality stamper and scraper—cheap ones are nearly impossible to work with
- Use a stamping polish with good viscosity so patterns transfer clearly
- Scrape the stamping plate with a firm, smooth motion to remove excess polish
- Stamp quickly in one decisive motion rather than rocking or wiggling
- Practice stamping on a nail wheel before attempting on your actual nails
- Reverse stamping requires a clear layer (like a silicone mat) to transfer the pattern—learn this technique by watching detailed tutorials first
- Allow stamped designs to dry completely before topcoat to prevent smudging
Worth knowing: Stamping plates get clogged easily—clean yours thoroughly after each use with rubbing alcohol or specialized stamping plate cleaner to ensure clear pattern transfer every time.
14. Gold Metallic Smoke Effect with Gradient
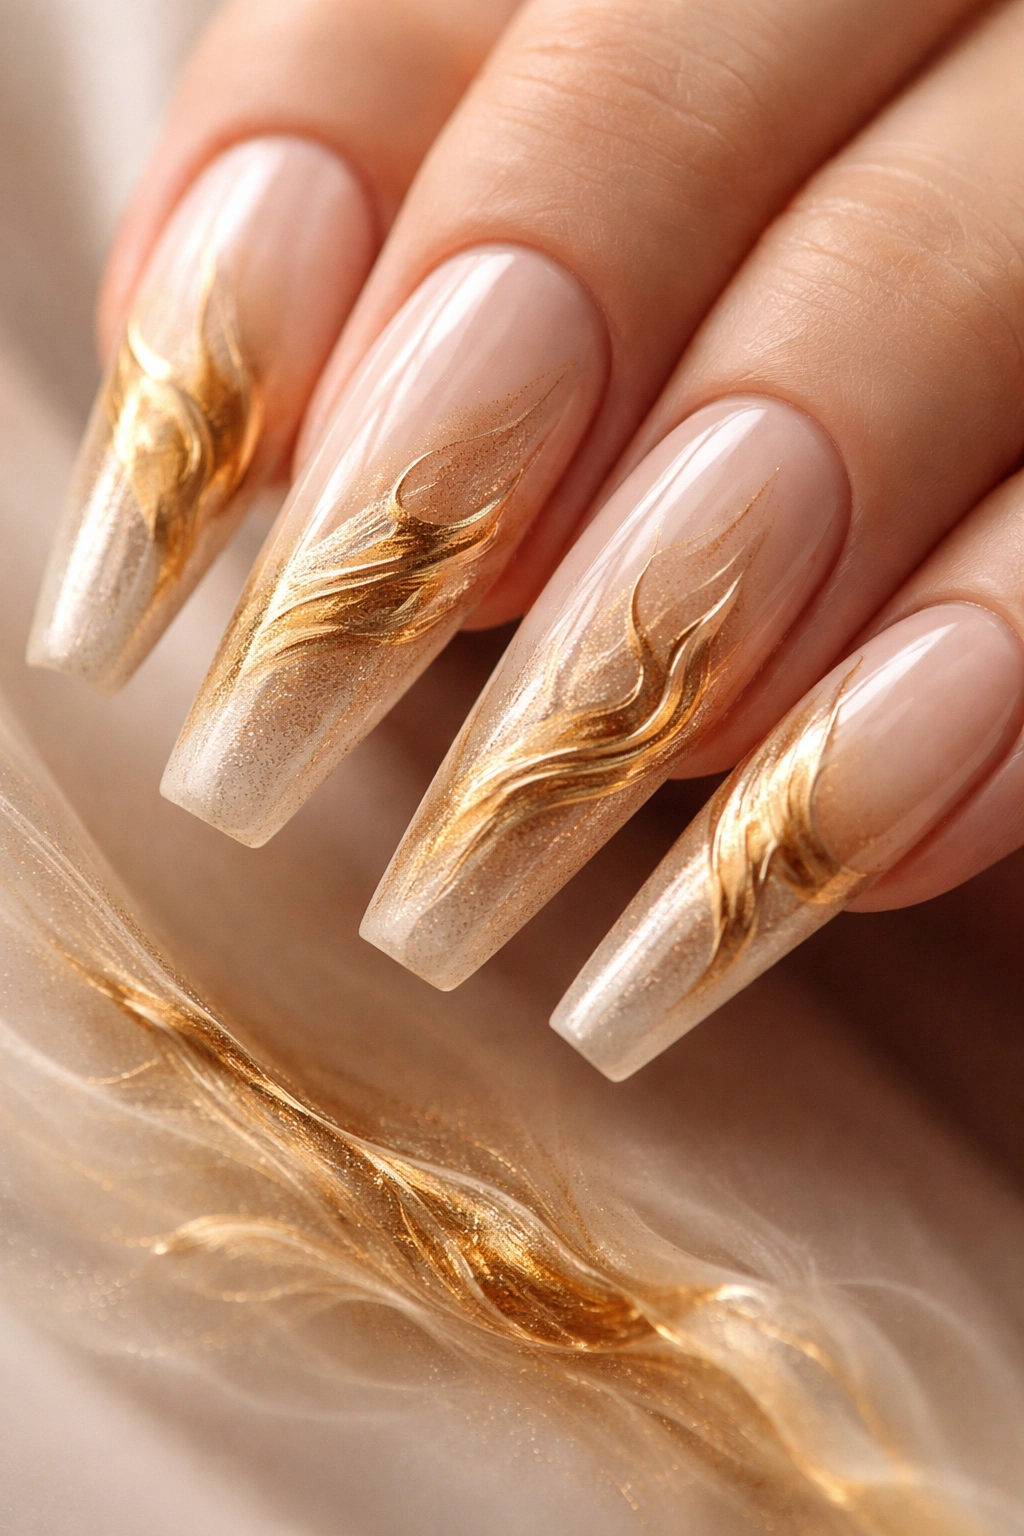
Smoke effects create an ethereal, almost watercolor aesthetic that feels artistic and high-end. Start with a pale nude or white base, then use a thin brush or stippling technique to create wispy, smoky gold streaks that fade from concentrated to barely-there as they move across the nail. Layer darker gold or bronze smoke over lighter areas for depth. The effect should feel organic and flowing, like actual smoke drifting across the nail.
Why It Stands Out
Smoke effects feel special and custom in a way that regular gradient designs don’t quite achieve. The organic, cloud-like quality prevents the design from reading as too geometric or structured—instead it feels natural and artistic. Long coffin nails provide the perfect canvas for this design because the extended length allows the smoke effect to flow dramatically across the surface.
Creating Realistic Smoke Effects
- Start with a base coat that’s lighter than your smoke colors so the smoke reads clearly
- Use a stippling brush or thin brush with minimal product to dab and drift gold colors onto the nail
- Work with thin layers—you can always add more, but removing excess creates muddy colors
- Blend the edges of smoke concentrations using a clean, damp brush
- Let each layer dry before adding the next to maintain clarity and definition
- This technique requires practice and patience—don’t expect perfection on your first attempt
Pro tip: Study actual smoke and clouds before attempting this design—observe how smoke concentrates in some areas and disperses in others to create more realistic-looking effects.
15. Gold Floral Design with Hand-Painted Details
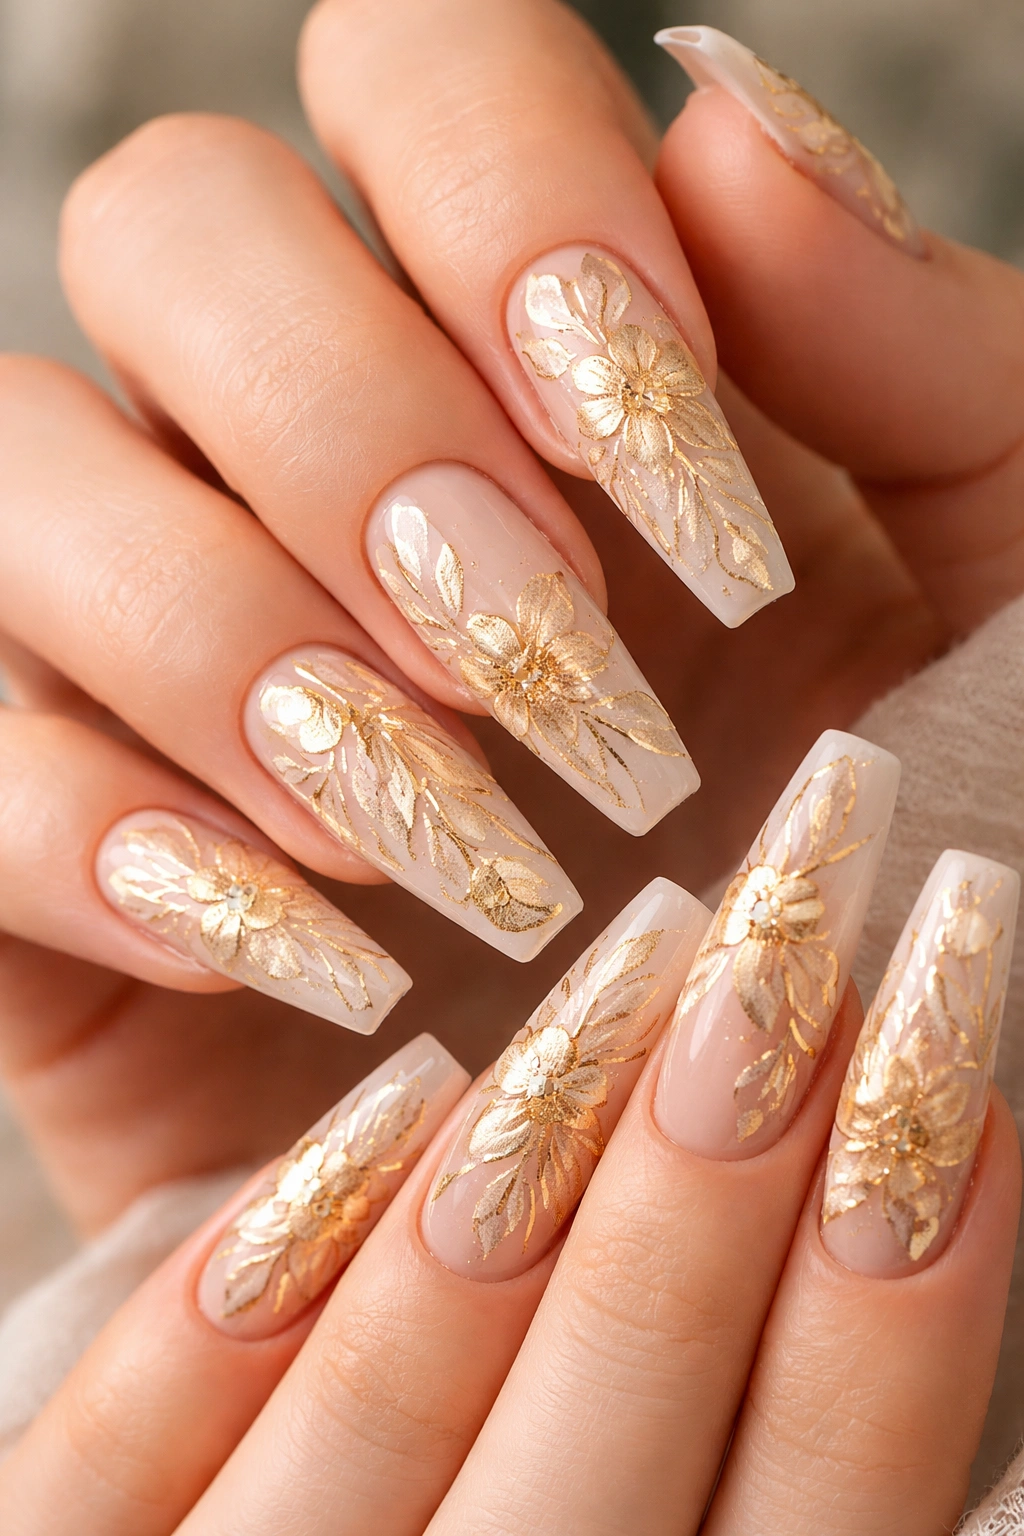
Hand-painted florals immediately elevate nail art from basic to artistic, and pairing them with gold creates a specifically luxurious aesthetic. Paint a nude, blush, or cream base, then use thin brushes to paint delicate flowers in gold, white, or metallic accent colors. Add green stems and leaves using complementary green shades. The flowers can be realistic botanical illustrations or more abstract, stylized blooms depending on your artistic comfort level.
What Makes It Different
Hand-painted florals are inherently unique because each set of nails will have slightly different flowers—no two designs are exactly identical. Gold flowers specifically feel opulent and special, perfect for celebrations, weddings, or anyone who wants nails that double as wearable art.
Painting Delicate Florals
- Choose one or two focal flowers to paint prominently on each nail
- Use thin brushes (00 or 000 size) for detailed work
- Paint flowers in stages—base petals first, then details and shadowing
- Add stems and leaves as the connecting element that ties flowers across all nails
- Gold florets (small flower accents) painted around larger flowers create fullness without overcrowding
- Allow each layer to dry completely before adding shadows or details on top
- Seal with topcoat and let cure fully before touching anything
Worth knowing: If you’re not confident painting on nails, start with simple floral shapes like circles for flowers and lines for stems—advanced details like shading come with practice.
16. Gold Holographic Effect with Shift Colors
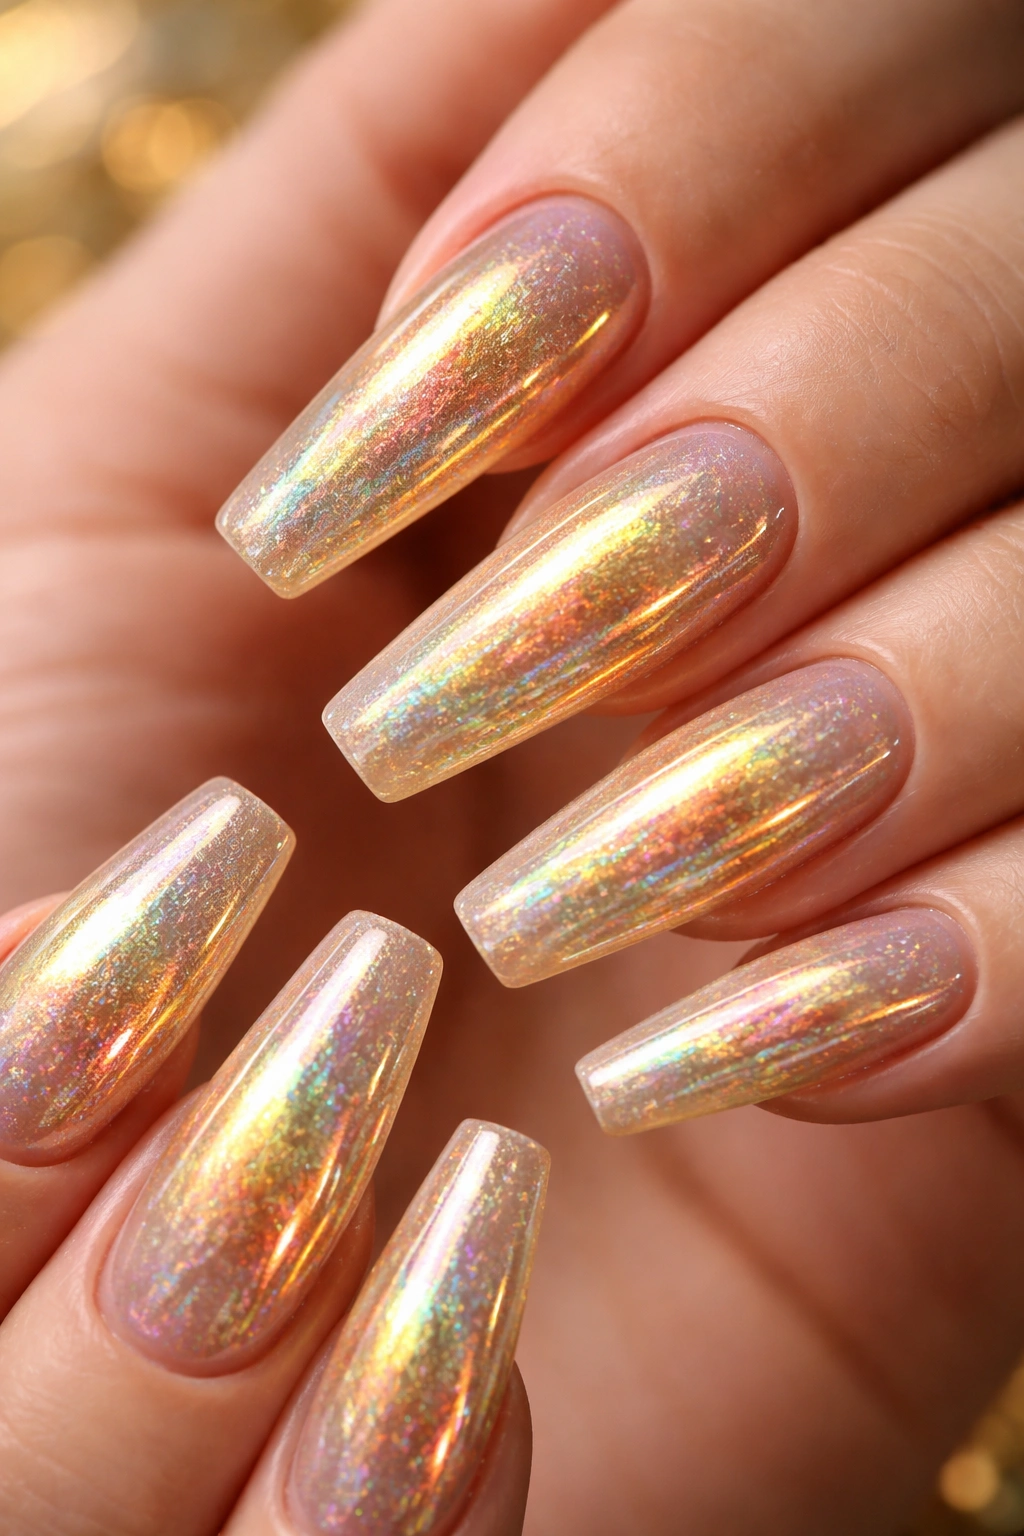
Holographic nails create a rainbow effect that seems to shift depending on viewing angle, and combining this with gold creates something almost ethereal. Apply a holographic base that’s gold-centered (meaning it shifts to rainbow colors but maintains gold as the primary tone), then apply a sheer holographic topcoat to intensify the effect. The nails should shimmer with color-shifting properties while remaining predominantly gold when viewed straight-on.
Why This Design Works for Long Nails
The extended length of coffin nails means the color-shifting effect has more surface area to display itself. Every hand movement creates different light interactions, making the nails feel alive and dynamic. This design works beautifully in indoor lighting, natural sunlight, and artificial evening light—it looks intentional in all conditions.
Achieving Holographic Effect
- Choose a quality holographic polish—cheaper versions may not shift convincingly
- Apply two coats of holographic base to build up pigment and shift intensity
- Layer a holographic topcoat over the entire design for amplified effect
- The effect is most visible in natural sunlight—artificial indoor lighting may not show the full shift
- This design typically lasts 4 weeks because holographic polishes are usually quite durable
- Avoid excessive topcoat layers that can obscure the holographic effect
Pro tip: Holographic effects show best when nails are clean and well-maintained—any dust or debris interferes with light refraction and diminishes the shift effect.
17. Gold Stiletto Tips with Nude Ombre Base
While technically we’re discussing coffin nails, this design bridges the gap by creating a subtle stiletto effect within the coffin shape through color and placement. Create a warm nude ombré from the cuticle to the middle of the nail, then transition to a deep gold that intensifies all the way to the very tip. The coffin shape’s natural point is emphasized by the concentrated gold at the tip, creating a visual point even though the actual nail shape remains coffin.
What Makes It Stand Out
This design combines two nail shapes’ best qualities—the stability and wearability of coffin nails with the visual drama of stiletto-pointed tips. The warm ombré creates movement and visual interest while the deep gold tip ensures the design feels special and intentional.
Building the Gradient
- Start with a light nude base at the cuticle
- Use the sponge ombré technique to gradually deepen the color toward the center
- Transition to rich gold at the center point and deepen further toward the tip
- The transition should feel smooth and gradient rather than having distinct color stops
- Seal with a glossy topcoat to enhance the color gradation
- This design lasts 3-4 weeks and shows wear first at the tip section
Worth knowing: This design photographs beautifully because the gradient creates visual movement and the deep gold tip creates a focal point that photographs as dramatic.
18. Gold Geometric Art Deco Design
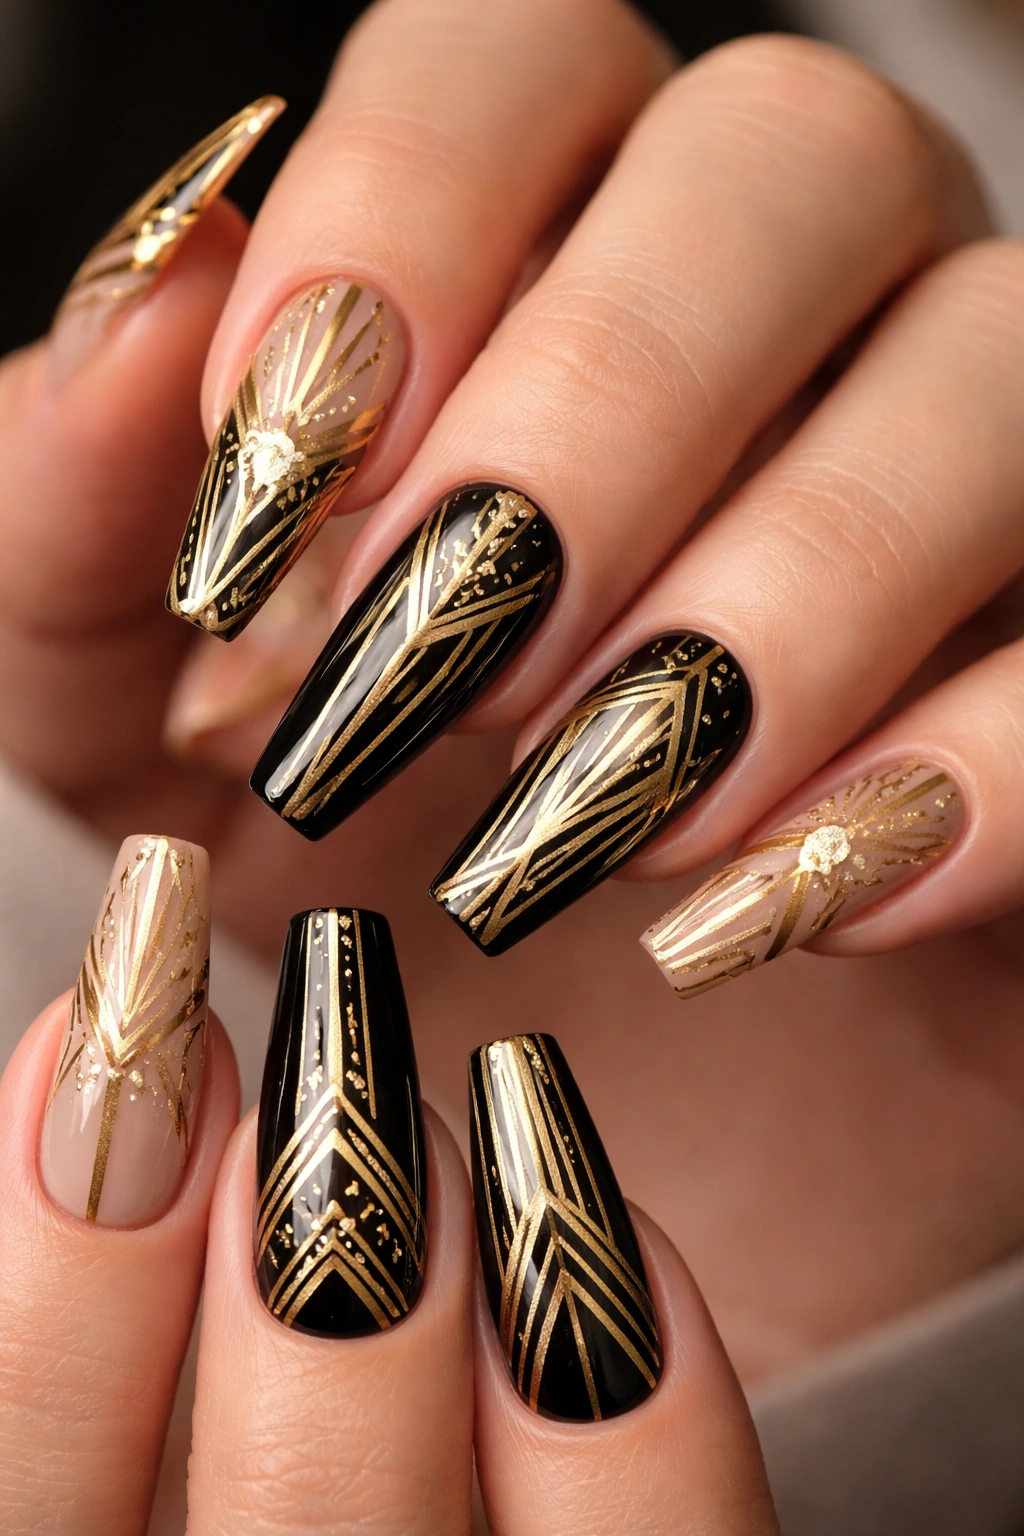
Art Deco styling features bold geometric shapes, clean lines, and symmetrical patterns that feel immediately sophisticated and vintage-inspired. Create a nude or black base, then use a thin brush or gold geometric stamping plate to apply triangles, sunburst patterns, or symmetrical geometric designs. Gold on a contrasting background (like black) creates maximum visual impact while maintaining the Art Deco aesthetic.
Why It’s Perfect for Long Nails
Art Deco designs scale beautifully to longer nail lengths because the geometric elements can expand and repeat across more surface area. Symmetry is inherently pleasing to the eye, and Art Deco patterns are fundamentally symmetrical, making even large designs read as balanced and intentional.
Creating Clean Art Deco Patterns
- Sketch your Art Deco pattern on paper first to ensure symmetry
- Use nail guides or tape to create crisp geometric lines
- Gold on black has the highest contrast and reads most cleanly
- Use a thin brush for precise lines and angle control
- Quality stamping plates with Art Deco designs are available if freehand feels intimidating
- Allow each color to dry completely before adding overlapping elements
- This design typically lasts 4+ weeks because solid colors and geometric designs wear slowly
Pro tip: Art Deco patterns are forgiving because geometric imperfection still reads as intentional—the human eye expects perfect geometry but accepts slight variations within patterned designs.
19. Gold Sunburst Design with Rays
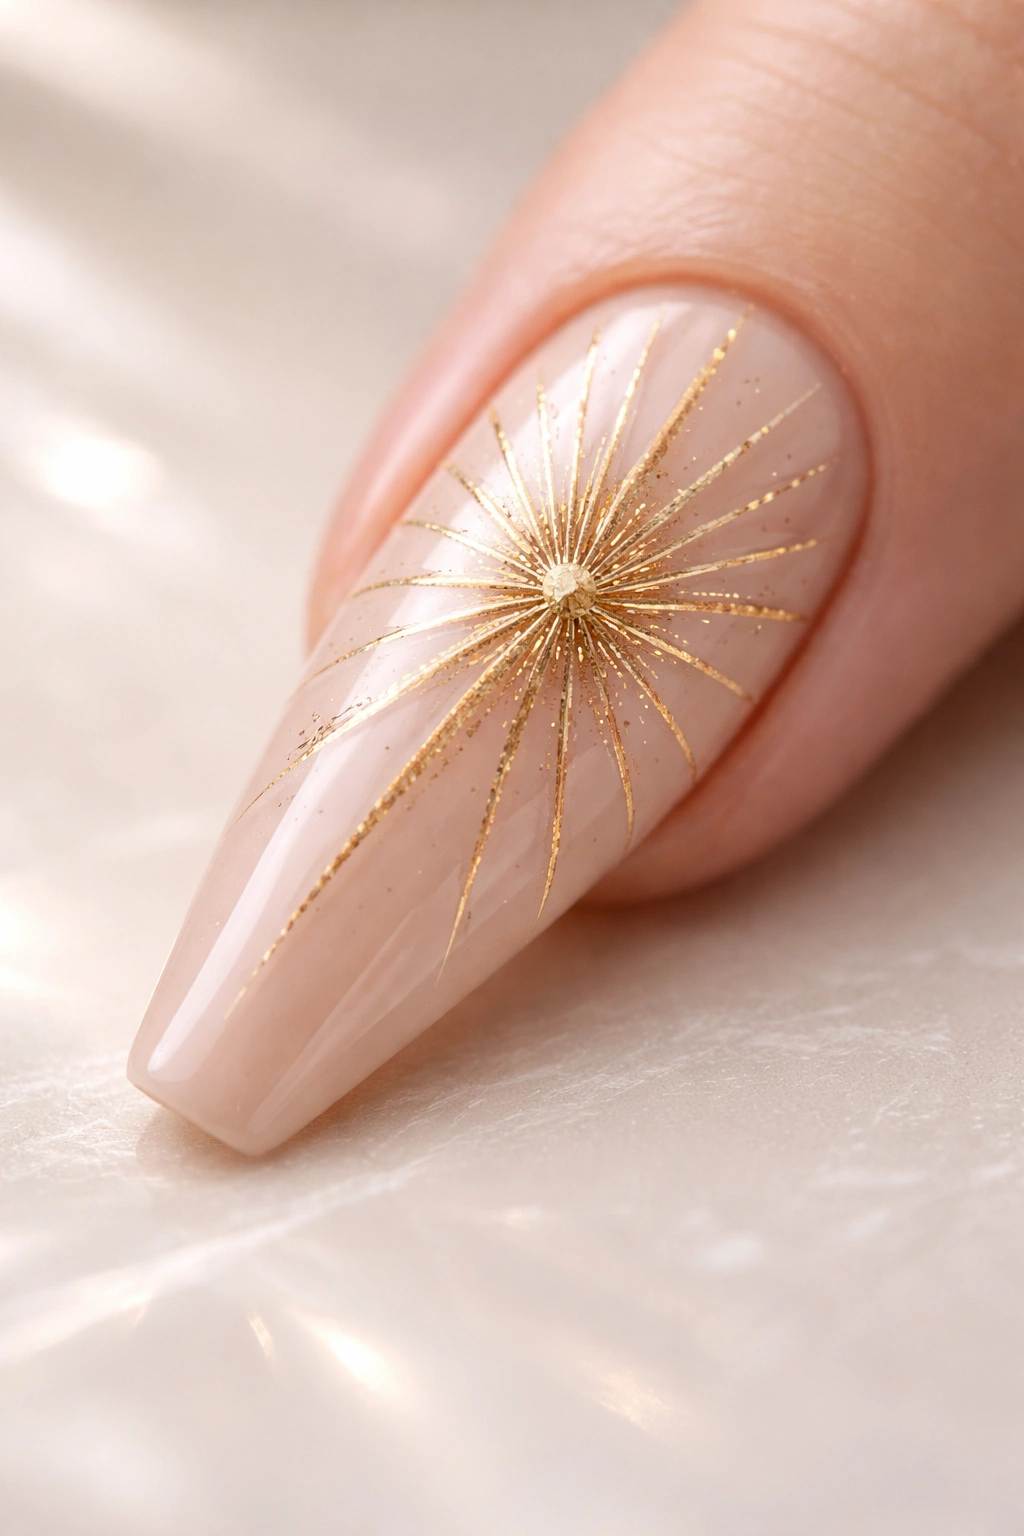
Sunburst designs create a sense of movement and drama by using radiating lines that seem to emanate from a central point. Paint a nude or pale base, then use a thin brush or nail pen to paint delicate gold lines radiating outward from a point (usually the center or slightly off-center on the nail). Vary the line length and spacing to create organic movement rather than rigid geometry. Add a small gold circle or dot at the central point where all rays originate.
What Makes It Different
Sunburst designs feel contemporary and artistic without being overly complicated. The radiating lines create visual movement that makes nails feel dynamic and alive. Gold rays on a neutral base maintain elegance while providing clear visual interest.
Painting Perfect Sunburst Rays
- Lightly mark your center point with a pencil or light-colored polish
- Paint rays extending outward from this point in varying lengths
- Space rays evenly around the center point for balanced appearance
- Vary ray thickness slightly—some thin and delicate, some slightly thicker for interest
- Add small decorative circles or dots at ray endpoints for finishing detail
- Paint your central point circle last to anchor everything and hide any imperfections
- Allow completely to dry before topcoat
- This design lasts 3-4 weeks with normal wear
Worth knowing: Imperfect rays actually enhance the design’s organic aesthetic—perfectly rigid geometry can feel manufactured, while slightly imperfect rays feel hand-drawn and artistic.
20. Gold Metallic Ombre with Glitter Accent Line
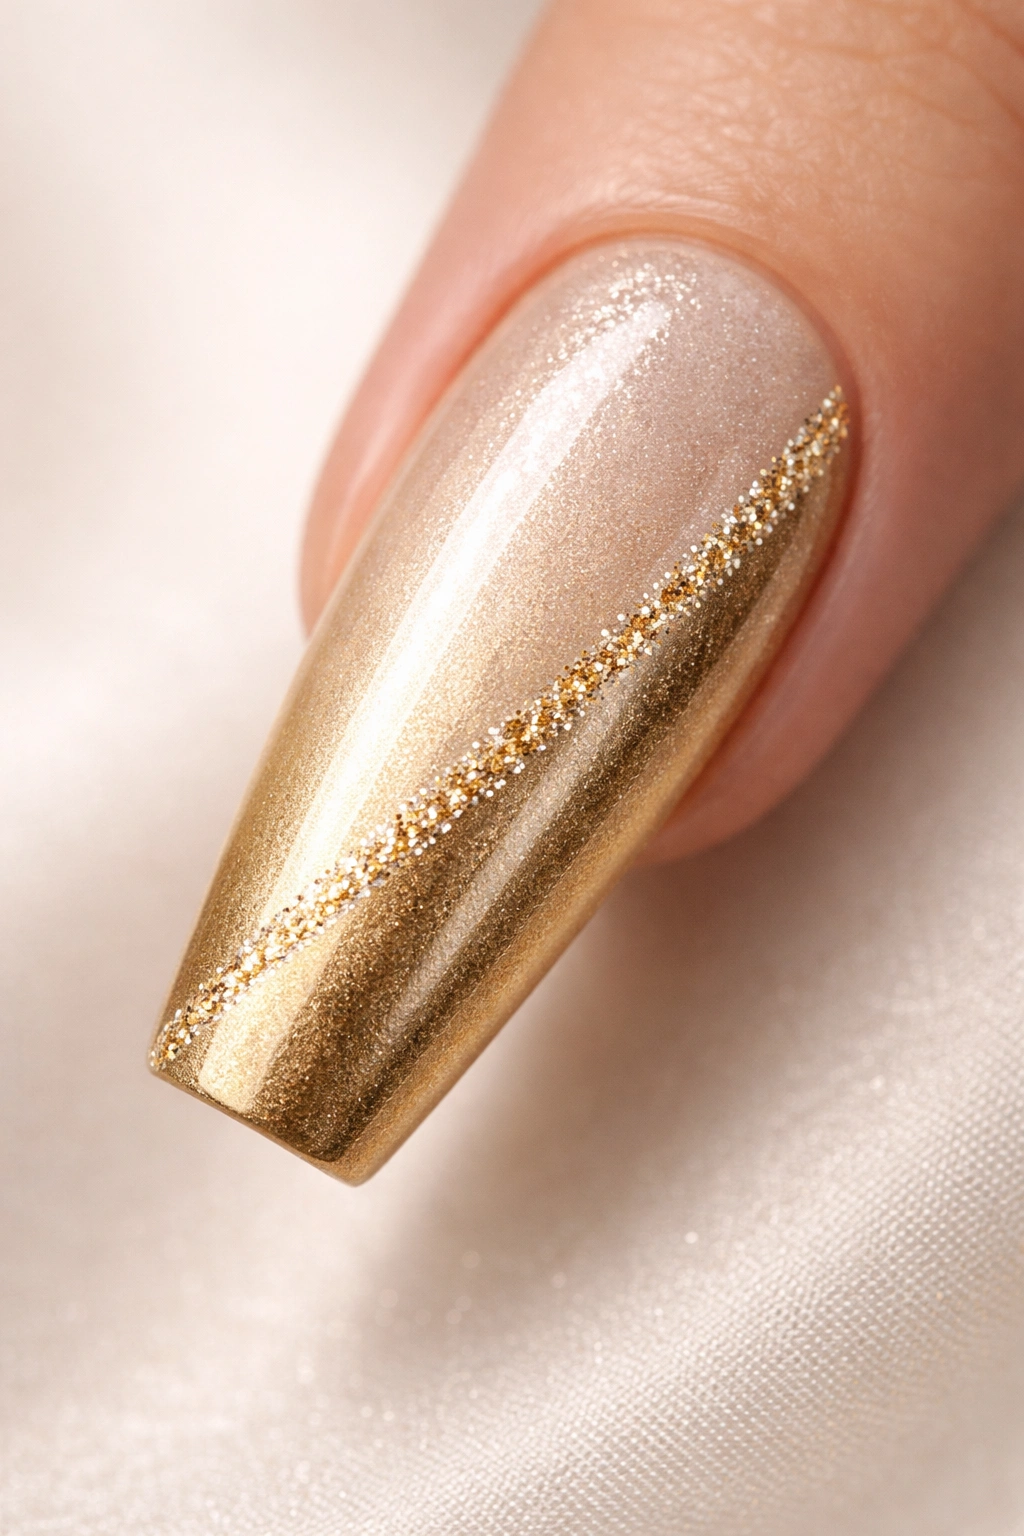
This design maximizes sophistication by combining smooth gradient with strategic sparkle placement. Create a champagne-to-deep-gold ombré across the entire nail using the sponge technique, then once completely dry, apply a thin line of fine gold glitter along the edge where your ombré colors transition most dramatically (usually the center line of the nail). The glitter line acts as an accent that highlights the ombré gradient while adding sparkle without overwhelming the design.
Why This Finishing Touch Works
The glitter accent line draws attention to the ombré gradient’s color transition, essentially highlighting the design’s best feature. The placement ensures sparkle without glitter overwhelming the composition. This design feels elevated and thoughtful rather than random or thrown-together.
Perfecting the Glitter Accent
- Create your ombré gradient first and seal it completely with topcoat
- Allow topcoat to cure fully before adding glitter to prevent colors from mixing
- Apply a fresh thin line of sticky topcoat exactly where you want your glitter accent
- Use a fine brush to apply the glitter line with precision
- Seal immediately with topcoat to lock the glitter in place
- Additional topcoat layers keep the glitter secure without creating bulk
- This design lasts 3-4 weeks with the glitter line potentially showing wear first at edges
Pro tip: Use tweezers and a magnifying mirror for glitter line application if you want maximum precision—the glitter should read as a distinct line rather than scattered sparkle.
Final Thoughts
Gold coffin nail designs offer an incredible range of possibilities from minimalist elegance to maximum glamour, and the extended length of coffin nails means every design has room to truly shine. Whether you’re drawn to solid colors that highlight your polish quality, intricate patterns that showcase your artistic side, or sparkly finishes that catch light from every angle, there’s a gold coffin nail design that matches your style.
The beauty of these designs is their versatility—most of them work equally well for everyday wear and special occasions, adapting based on context and how you style them. A solid gold nail might feel boardroom-appropriate on Monday and celebrations-worthy on Saturday simply through how you position your hands and what you wear. Gold itself carries luxury connotations, so even the simplest gold design automatically reads as more elevated than similar designs in other colors.
If you’re planning to recreate these designs yourself, invest in quality materials because polish application, topcoat quality, and pigment richness make a dramatic difference in final results. If you’re bringing these ideas to a professional nail technician, describe them using specific details from these designs—mention color transitions, accent placement, and finish types so your technician understands your vision completely. Long nails require maintenance regardless of design, but they’re absolutely worth the upkeep when they’re this beautiful.
