

If you’ve been scrolling through nail inspiration and keep landing on teal, you’re onto something. This jewel-tone shade sits at the perfect intersection of sophisticated and bold — it’s regal without being stuffy, and it plays beautifully across every skin tone. Pair teal with the elongated elegance of coffin nails (those stunning ballerina-shaped tips that taper to a broader, squared-off edge), and you’ve got a canvas for truly striking nail art.
The thing about coffin nails is that their proportions are forgiving. That slightly wider square tips mean you’ve got real estate to work with — enough space for detailed nail art, geometric patterns, and texture without the design feeling cramped or overwhelming. And teal? It’s the unsung hero of nail colors. It’s complex enough to feel upscale, versatile enough to pair with nearly any accent technique, and dramatic enough to turn heads.
We’ve rounded up 16 genuinely different teal coffin nail designs that go beyond basic solid color. Each one shows you exactly what makes it work, what you’ll need to achieve it, and how to pull off the look whether you’re a seasoned nail artist or someone who just loves beautiful nails. These designs range from minimalist and modern to ornate and glamorous — there’s something here for every mood, every occasion, and every level of nail confidence.
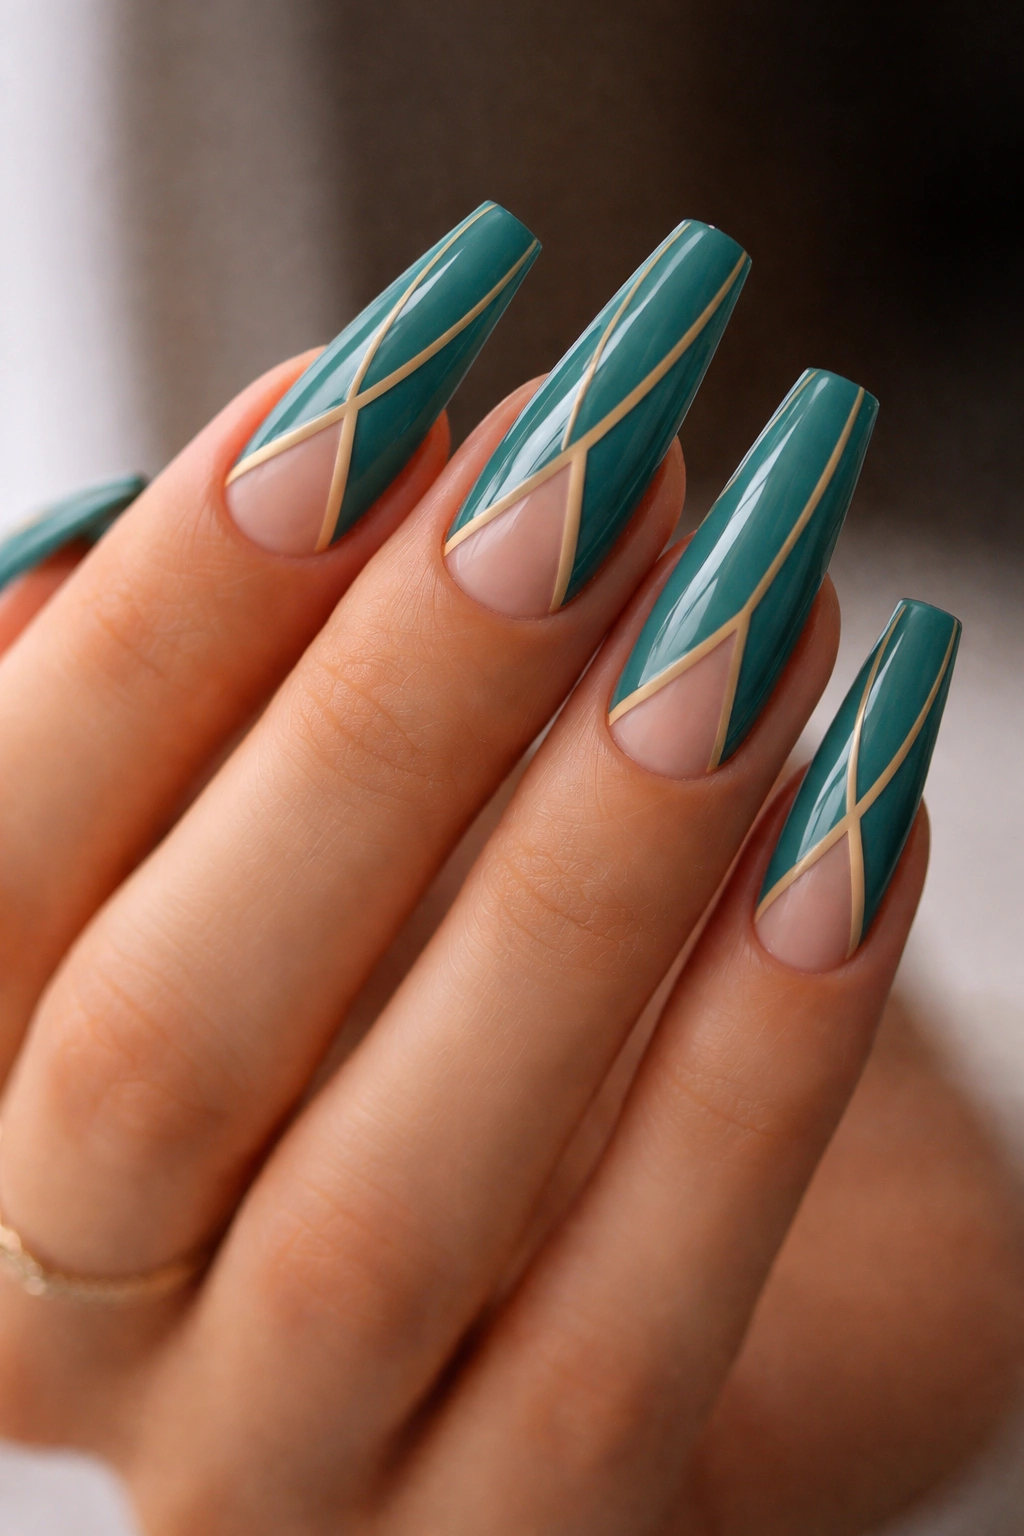
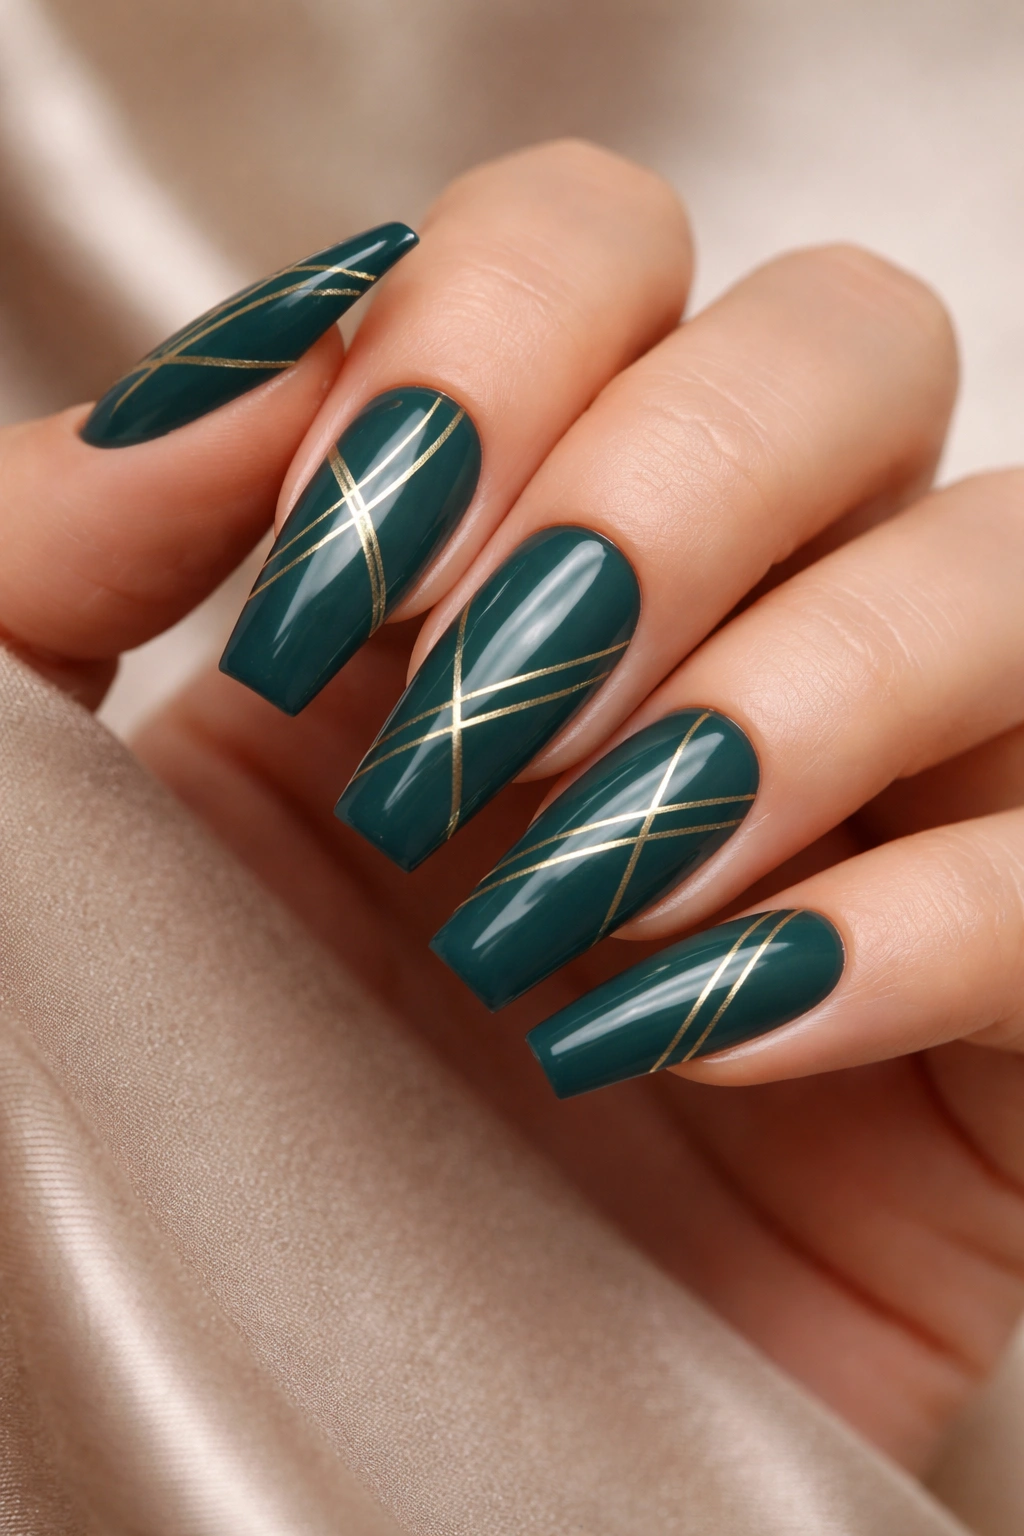
1. Classic Teal with Gold Geometric Accents
This design is the definition of understated elegance. You’re starting with a smooth, creamy teal base — think a rich jewel tone that’s not quite navy but definitely in that deeper range — and adding thin gold lines that create geometric patterns across the nail surface.
The beauty of this design lies in its restraint. The gold lines aren’t wild or chaotic. Instead, they form clean, deliberate shapes: triangles pointing inward from the corners, thin lines creating a border effect, or subtle linear designs that frame the nail. The coffin shape naturally complements these geometric elements because the proportions of the nail give the patterns room to breathe without looking scattered.
What Makes This Design Stand Out
The contrast between matte or satin teal and the reflective quality of metallic gold creates instant visual interest without requiring complicated techniques. This is the kind of design that photographs beautifully and reads as intentional and curated, even though the execution is surprisingly straightforward. It works equally well for professional settings and evening occasions because it’s polished without being over-the-top.
How to Achieve It
- Paint your teal base in a formula with good pigmentation — you likely won’t need more than two coats
- Let the base cure completely if using gel, or dry fully if using regular polish
- Using a thin gold striping brush or a detail brush dipped in gold metallic polish, sketch your geometric pattern
- Keep the lines crisp and even by moving slowly and letting your hand find the edge of the nail naturally
- Seal everything with a glossy topcoat to make the gold pop against the matte teal
Pro tip: If freehand lines feel intimidating, use thin striping tape as a guide. Place it on your nail to mark where your gold lines should go, paint over it, then remove the tape to reveal perfectly clean edges.
2. Matte Teal Base with Gloss Pearl Finishes

Here’s a design that plays with finishes in a way that feels completely modern and sophisticated. Your entire coffin nail is coated in a velvety matte teal polish, which creates this soft, sophisticated appearance. Then you add accent nails or specific nail areas in a glossy pearl finish — think a luminous, slightly iridescent pearl rather than a bright white.
The contrast between the matte and gloss finishes is what makes this design sing. Matte tones absorb light and feel grounded, while gloss reflects light and draws the eye. By combining them on the same nail, you’re creating a visual hierarchy that makes the pearled areas feel almost three-dimensional. It’s a subtle play of textures that reads as intentional and considered.
Why This Design Works
Matte finishes are having a major moment because they feel modern and velvety soft to the touch (even though your nails are still hard underneath). The pearl glossy accents break up the matte in a way that adds visual interest without introducing a competing color. This keeps the design cohesive while still delivering visual variety. The coffin shape elongates these texture contrasts, so they’re more dramatic and noticeable than they’d be on a shorter nail.
Design Application Ideas
- Paint the main body of the nail in matte teal, then add a gloss pearl stripe down the center
- Create a half-moon design where the base of the nail is matte teal and the tip is glossy pearl
- Add glossy pearl accent lines, dots, or a small geometric shape on specific nails (like an accent nail on every other finger)
- Try a gloss pearl band across the middle of the matte teal base
Insider note: Matte topcoats can sometimes feel gritty or uneven. Choose a quality matte sealer designed specifically for nails, and apply it evenly in thin layers rather than one thick coat.
3. Ombre Teal to White Gradient
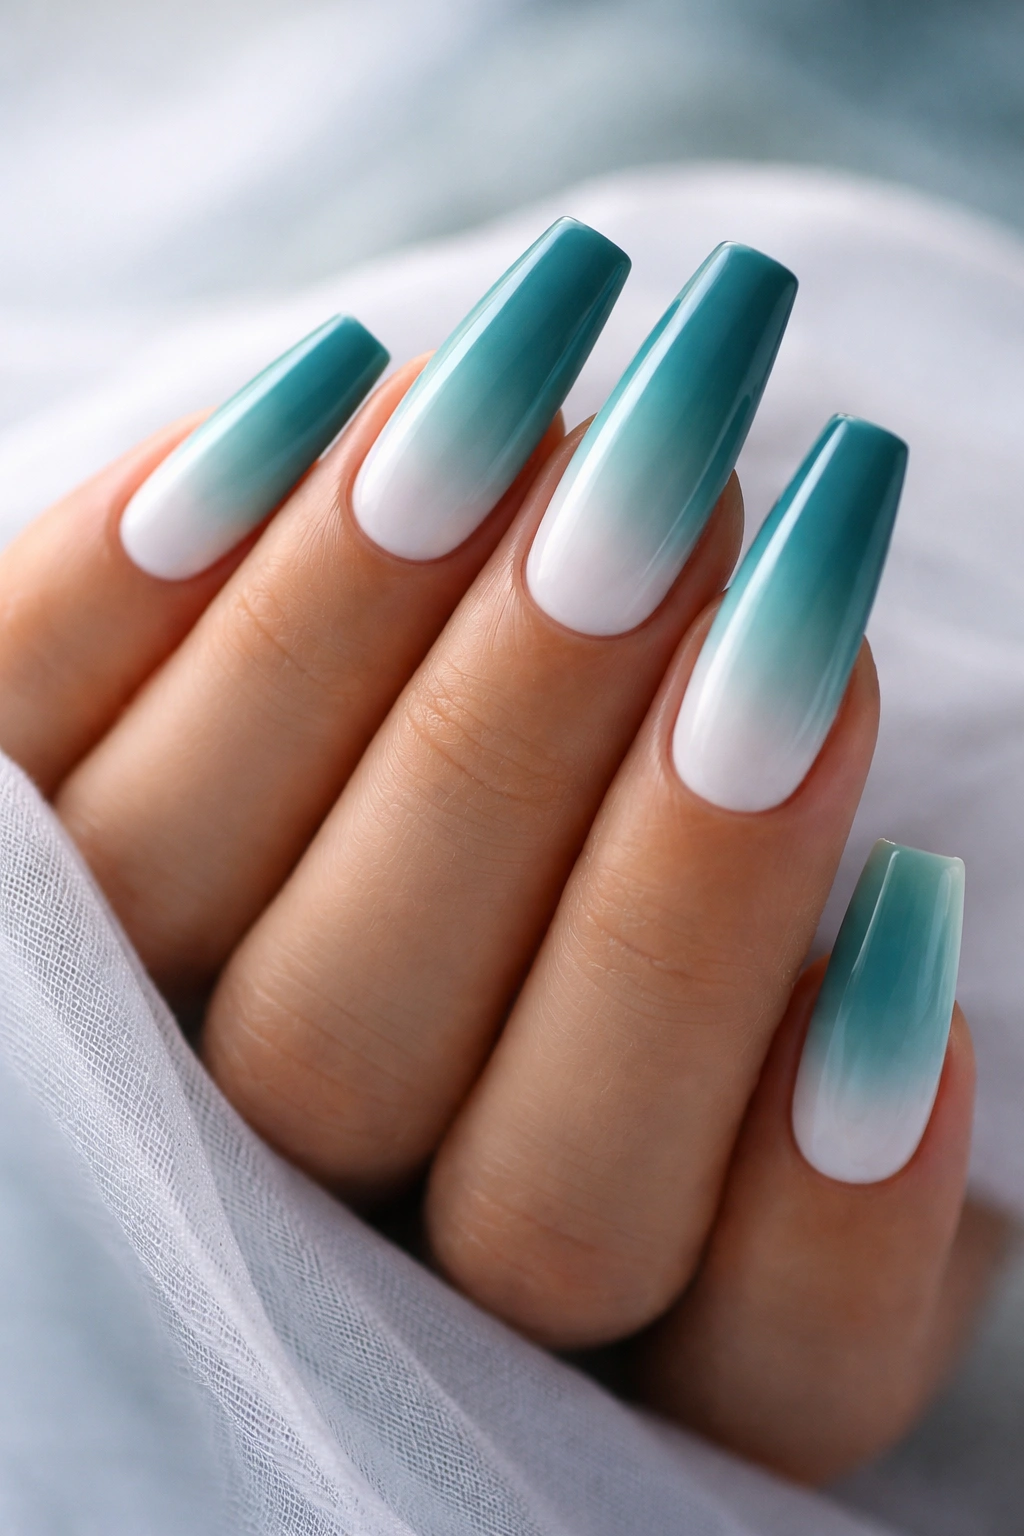
This design is all about the gradient — a smooth, seamless transition from deep teal at the base of the coffin nail to pure white at the tip. The effect is calming and contemporary, with an almost ombré sunset quality, except you’re working with cool jewel tones instead of warm ones.
The magic of an ombre on coffin nails is that the shape itself creates natural anchor points for the gradient. The taper of the coffin design draws the eye from the darker base toward the lighter tips, so the gradient looks intentional and purposeful rather than accidental. It’s a design that works whether your nails are fresh and angular or slightly grown out with softer edges.
Creating the Ombre Effect
You have two main approaches here. The sponge method involves dabbing a makeup sponge (or nail sponge) that’s been loaded with multiple polish colors onto the nail surface, creating a blended transition. The brush method uses a soft, fluffy brush to feather the colors together where they meet. Both work beautifully on coffin nails, though the sponge method tends to feel slightly less refined, and the brush method offers more control.
Color Layering Breakdown
- Base coat and one generous coat of deep teal (this will be your darkest shade)
- Let this dry completely
- Apply white polish to a palette (or directly onto your sponge or brush)
- Load your sponge with teal on one side and white on the other, then press and dab onto the nail
- Build the gradient gradually — multiple light applications are better than trying to do it all at once
- Seal with a glossy topcoat to blend everything into a polished, cohesive look
Worth knowing: The gradient looks most professional when there’s a clear transition zone in the middle where the two colors blend, rather than a hard line. Don’t worry if your first application feels patchy — each layer will smooth it out.
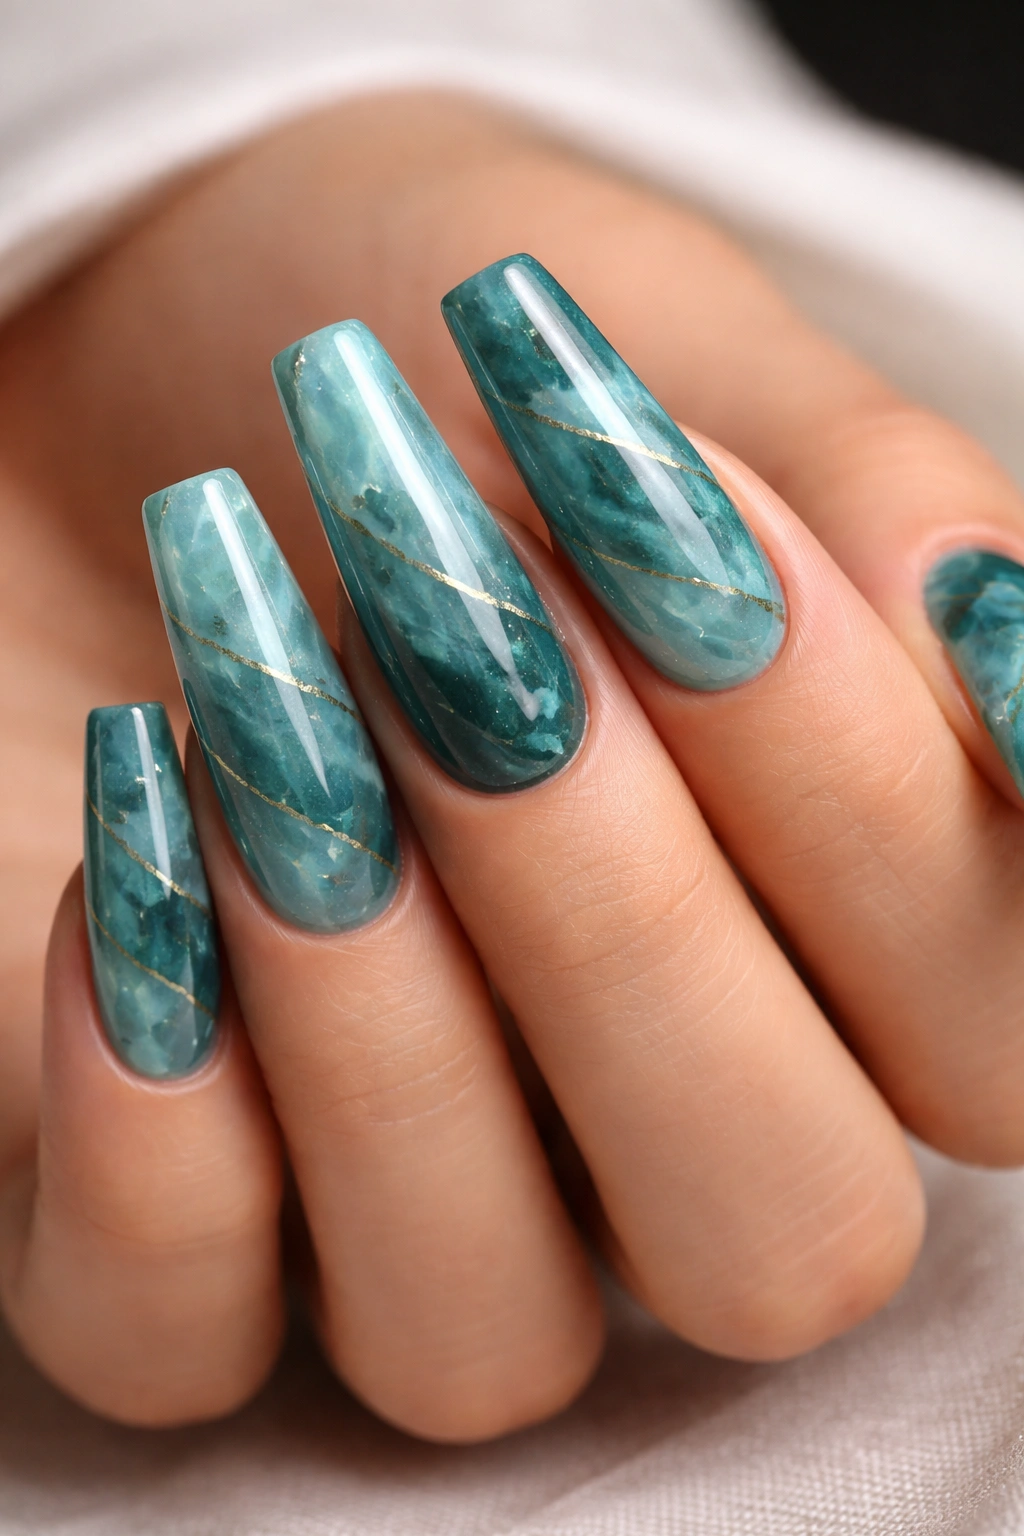
4. Teal Marble with Gold Foil Inlays
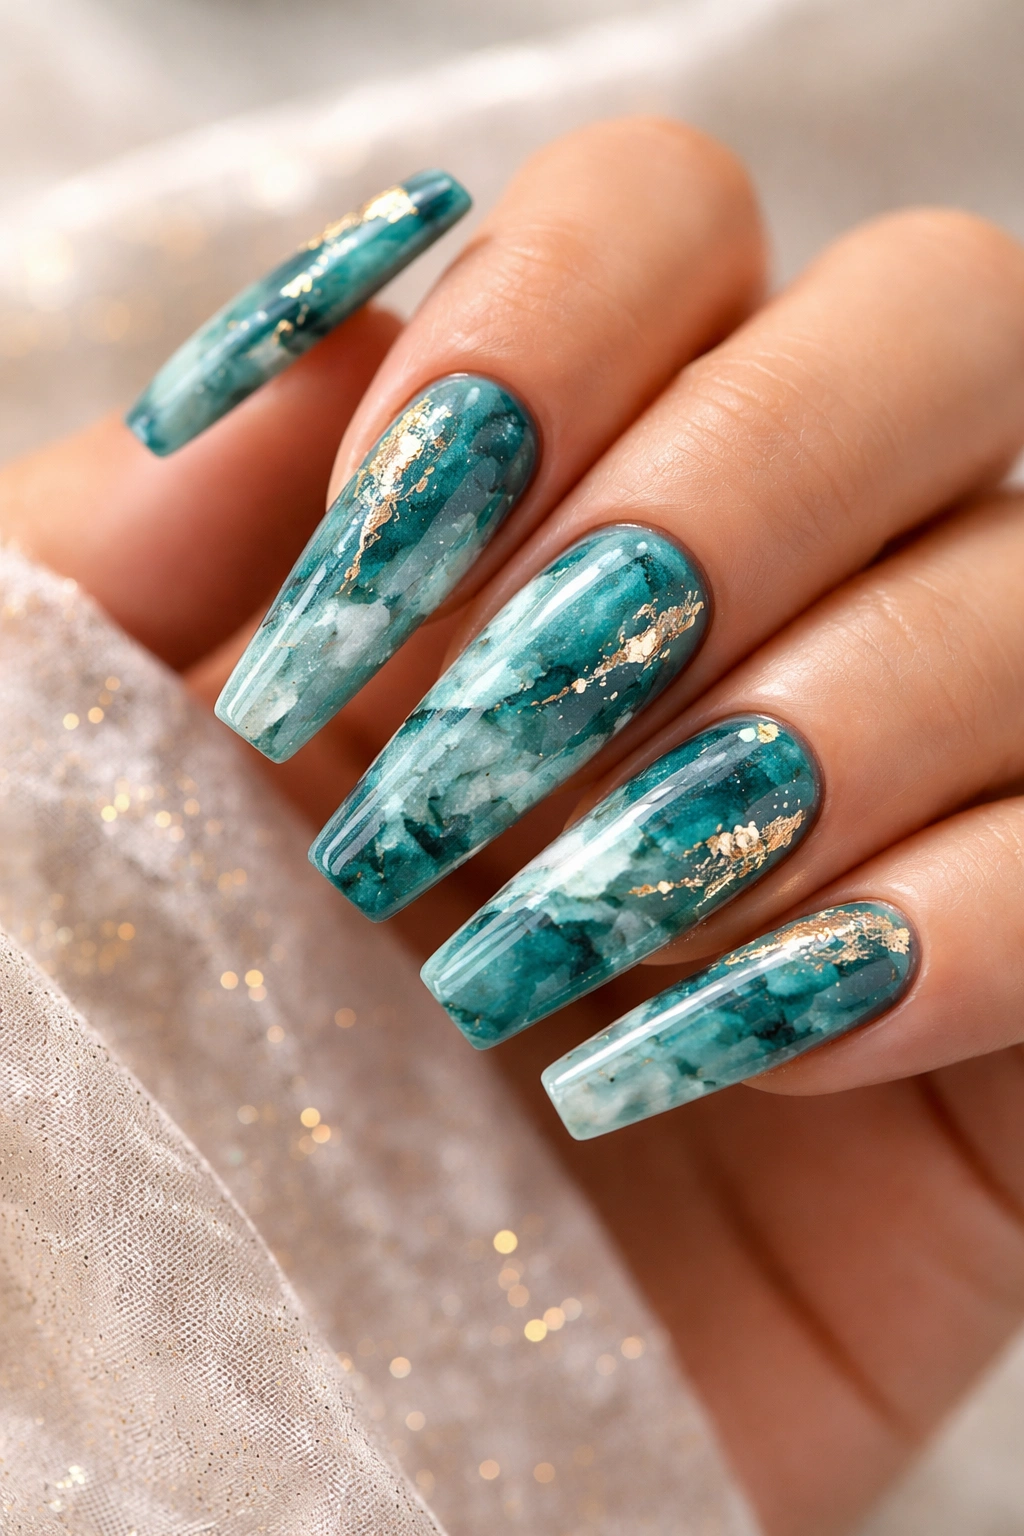
Marble nail art on coffin nails hits differently. The irregular, flowing lines of a marble design follow the natural contours of the elongated shape, creating an effect that feels both organic and luxurious. Now add thin pieces of actual gold foil pressed into the marble pattern, and you’ve got something that looks like nail art you paid premium prices for.
Marble designs work because they don’t require perfect symmetry or geometric precision. The whole point of marble is that it’s naturally imperfect, with veining and color variations that make each nail unique. The gold foil accents catch light and add a glamorous finishing touch that elevates the entire design from pretty to statement-worthy.
Creating the Marble Effect
- Apply your teal base coat and let it dry completely
- Using a thin detail brush or striping brush, draw irregular, flowing lines in a contrasting color like white, black, or darker teal across the nail
- While the veining lines are still wet, gently drag a dry, clean brush (or even a thin toothpick) through the lines to create that characteristic feathered, marble-like appearance
- Allow this to dry
- Press small pieces of gold foil onto specific areas of the marble pattern where you want accent points (the foil will adhere to the glossy polish)
- Seal everything with a topcoat
Foil Application Tips
- Use foil specifically designed for nails, not regular craft foil
- Make sure your polish is still slightly tacky when you apply the foil, so it adheres properly
- Press the foil gently and hold it in place for a few seconds
- You don’t need to cover the entire nail with foil — strategic placement is more elegant than a totally covered surface
Pro tip: If foil feels too fussy, you can achieve a similar effect using thin metallic striping brushes to paint gold lines into the marble pattern. The result is slightly less dramatic but equally beautiful and much easier to control.
5. Deep Teal with Rhinestone Border
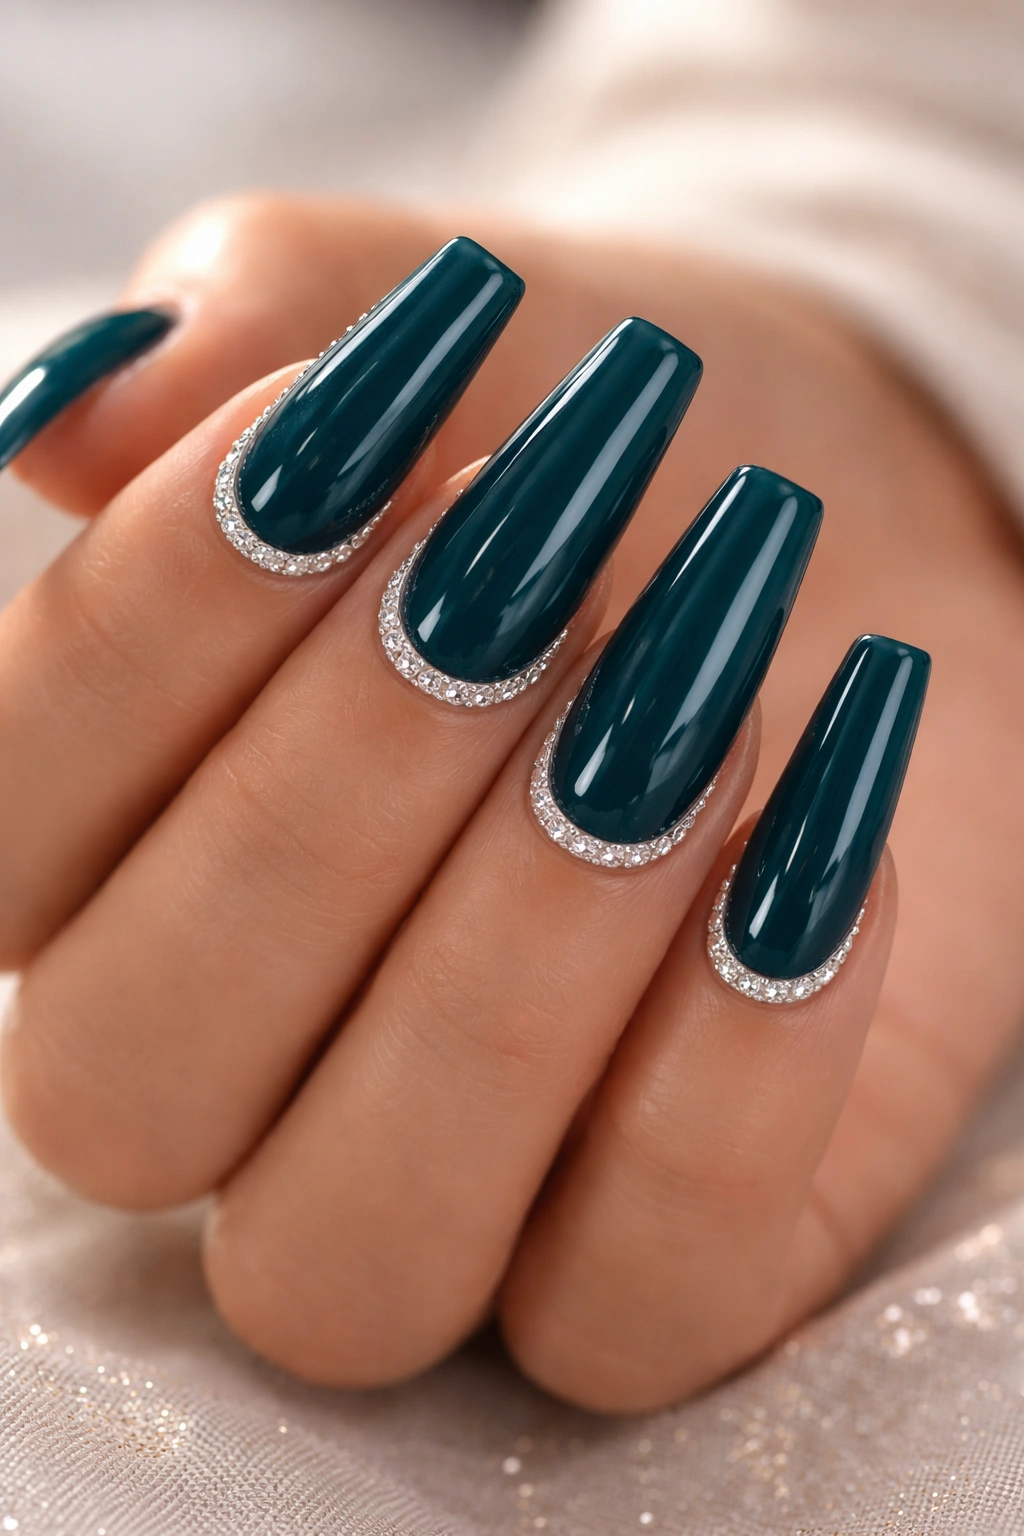
Rhinestones are the nail art equivalent of jewelry, and a carefully placed rhinestone border transforms a simple teal coffin nail into something that genuinely sparkles. The key is using high-quality rhinestones — cheap ones look tacky, but genuine crystal rhinestones catch light beautifully and feel substantial.
A rhinestone border typically runs along the cuticle area or the edges of the nail, creating a frame effect. On coffin nails, a border along the sides or a curved line of rhinestones across the middle creates visual interest without overwhelming the nail. The deep teal provides the perfect background — dark enough that the rhinestones really pop, but jewel-toned enough that both elements feel cohesive rather than clashing.
Placement Strategies
- Cuticle border: A line of rhinestones across the base of the nail, like you’re wearing a delicate bracelet on your fingertip
- Accent nail approach: Place rhinestones on just one or two nails per hand (usually the ring finger or middle finger)
- Curved detail: A curved line of rhinestones sweeping across the center of the nail
- Corner accents: Single large rhinestones or small clusters at the corners of the coffin shape
- Tip embellishment: A strip of rhinestones along the very tip of the nail, like a glittering French manicure
Securing Rhinestones
- Apply your teal base and topcoat first, letting everything cure completely
- Use a nail-safe rhinestone glue or a drop of clear topcoat to create a sticky base
- Pick up each rhinestone using a rhinestone picker (a small tool with a sticky tip) and place it exactly where you want it
- Let the glue or topcoat dry completely before using your hands
- Consider sealing the rhinestones with a final topcoat layer, though this can sometimes dull their sparkle
Real talk: Rhinestones can occasionally catch on things and pop off if you’re not careful. This design is most practical if you’re not doing heavy physical work with your hands. If you need something more durable, consider using nail foil or metallic polish to create a similar sparkly effect.
6. Pastel Teal French Ombre
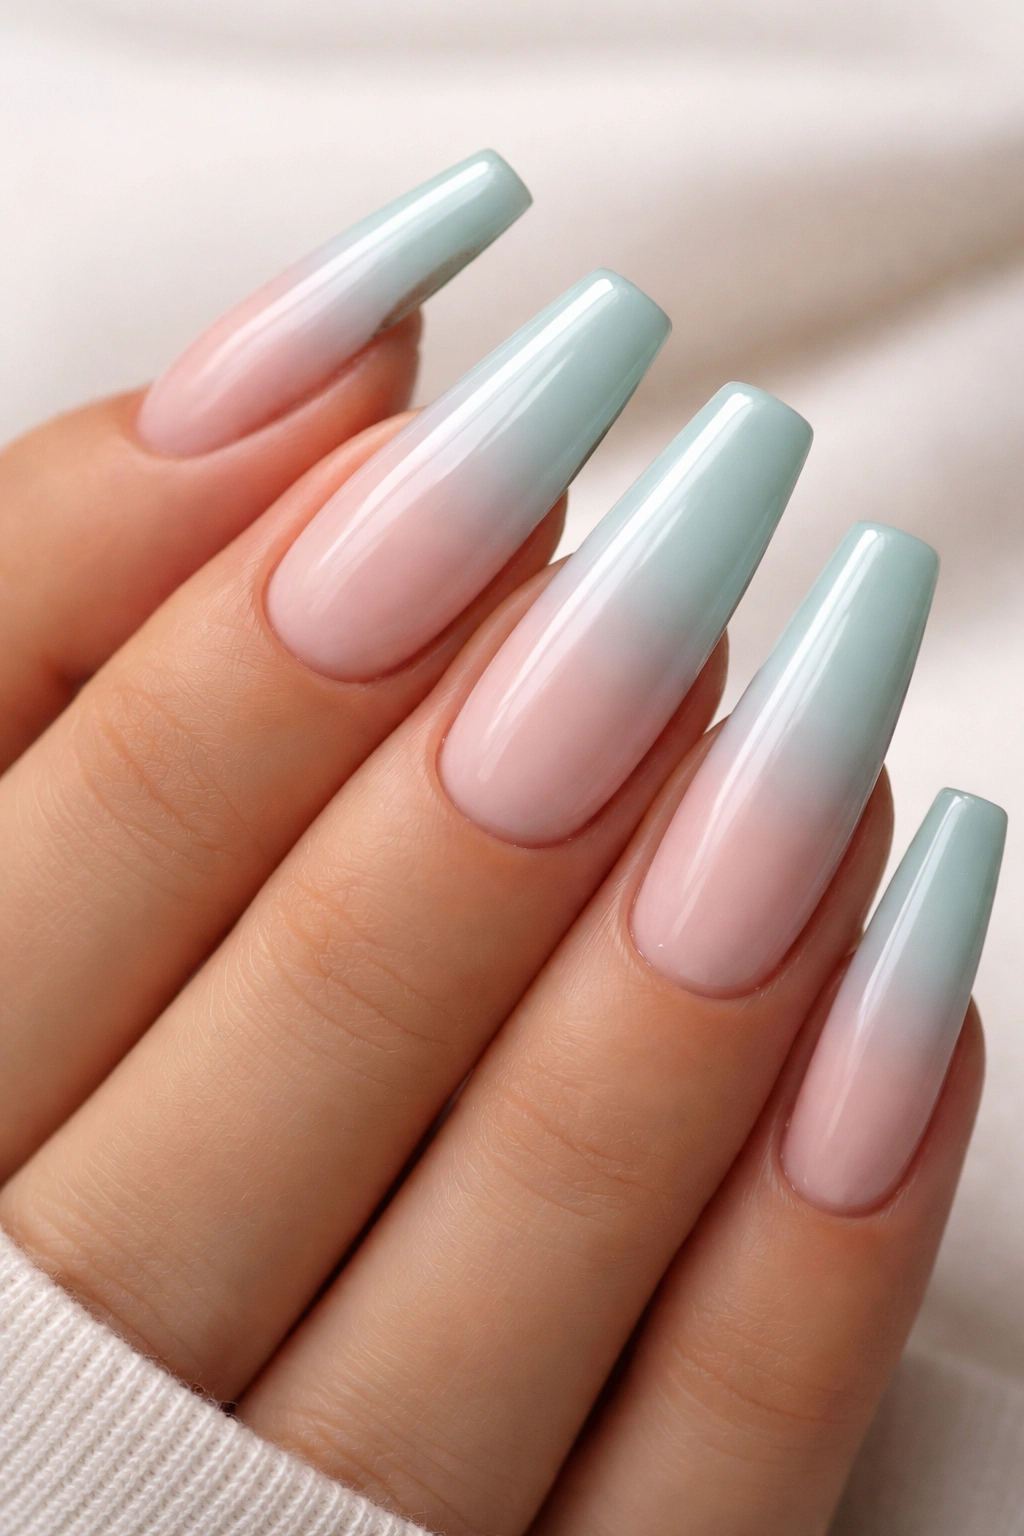
A French ombre takes the classic French manicure concept and softens it with a gradient approach. Instead of a crisp white tip, you’re creating a subtle, blended transition from pastel teal at the base to white or cream at the very tip. This design feels more modern and romantic than a traditional French manicure, while still maintaining that elegant, universally flattering aesthetic.
Pastel teal is lighter and airier than the deeper jewel tones — think seafoam or aquamarine rather than peacock teal. This softer shade makes the design feel fresh and appropriate for everyday wear, while still being distinctly not a nude or neutral nail. The coffin shape elongates the gradient, so the ombre effect is more pronounced and visually interesting than it would be on a shorter nail format.
Achieving the Pastel Teal French Ombre
- Apply a sheer or opaque pastel teal base — if your pastel polish is sheer, you may need two coats to get even color
- While this is still slightly tacky (if using gel) or after it dries (if using regular polish), begin introducing white polish in the tip area
- Use a sponge or brush to blend the two colors where they meet, creating a gradient rather than a defined line
- Build the gradient gradually with multiple thin layers, letting each one dry before adding the next
- The transition should be visible but smooth — you should see a clear color shift, but no harsh lines
Color Combinations That Work
- Pastel seafoam teal fading to white (the classic soft French)
- Pale aquamarine blending into ivory or cream
- Baby blue-teal transitioning to champagne
- Soft teal ombré to soft pink (for a two-tone gradient effect)
Pro tip: If creating a perfect gradient with a sponge feels overwhelming, try using a super-soft brush instead. Load it with pastel teal and white, then lightly feather where the colors meet. It takes practice, but the brush method gives you more control than a sponge.
7. Teal with Hand-Painted Floral Details
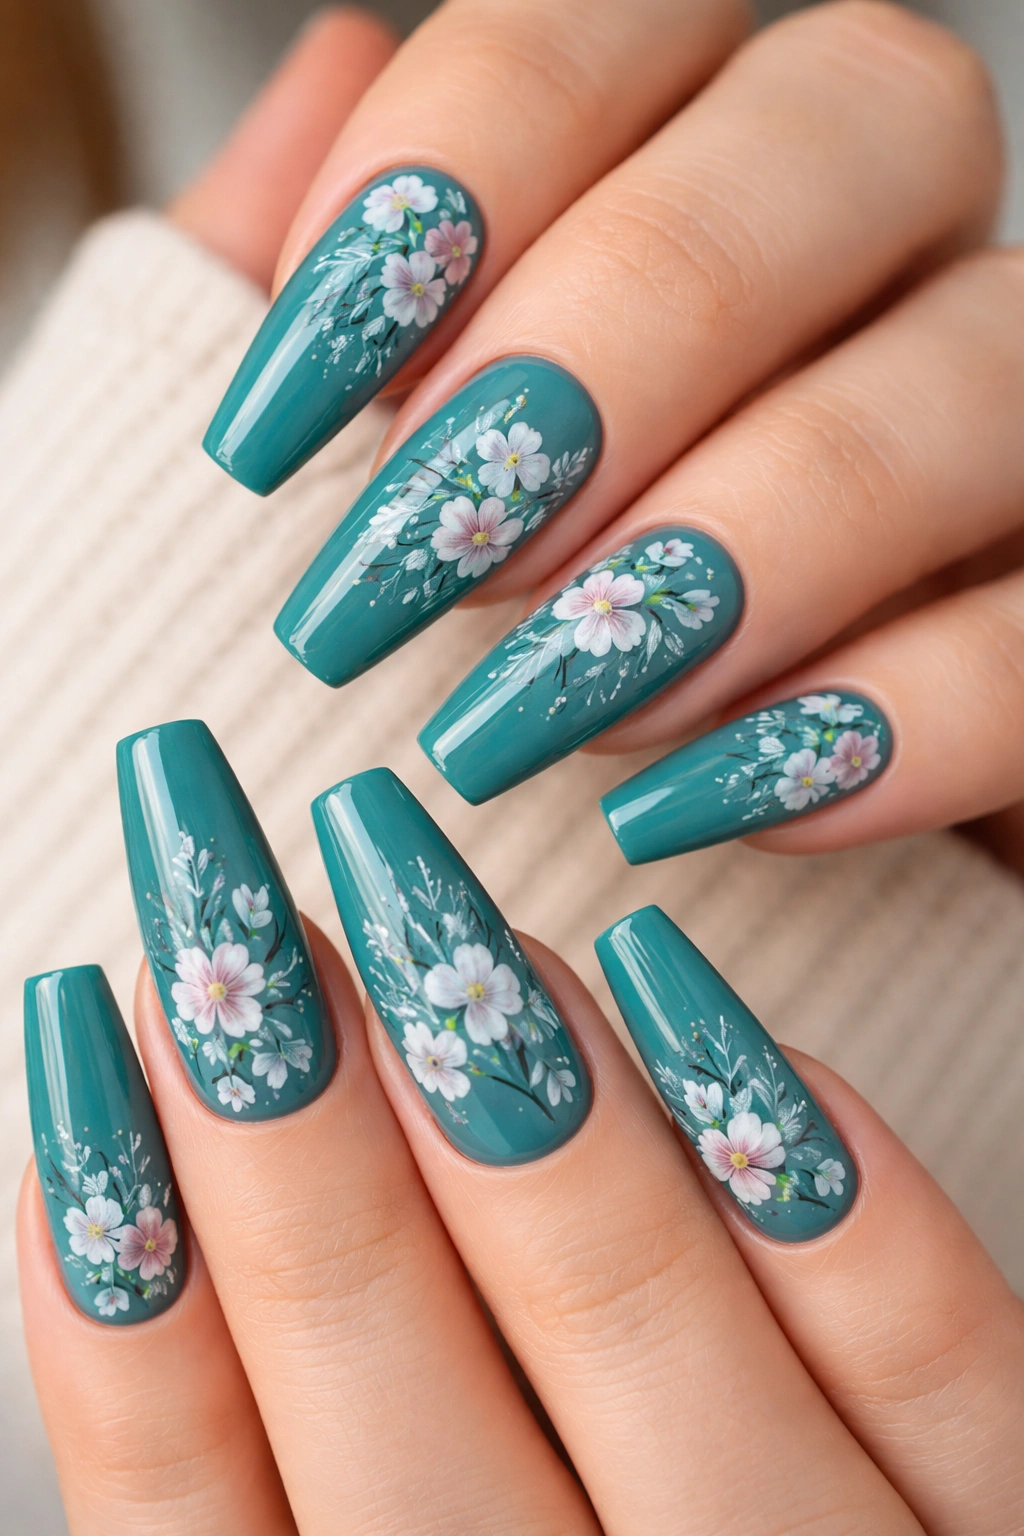
Here’s where coffin nails become a genuine canvas for art. A teal base provides the perfect backdrop for delicate hand-painted florals — imagine tiny watercolor flowers, botanical line drawings, or small illustrated blooms scattered across the nail surface. This design feels personal, artistic, and significantly more impressive than most nail art, even though the actual skill requirement depends on how detailed you want to get.
Florals on teal are inherently elegant because teal is a nature-inspired color. Whether you’re painting tiny roses, dainty daisies, leaf sprigs, or abstract floral shapes, the color pairing feels cohesive. The coffin shape gives you enough surface area to include multiple small flowers or one slightly larger focal flower without the design feeling cramped.
Simple Floral Techniques for Beginners
If you’re not a practiced nail artist, start with simplified florals that don’t require perfect detail:
- Dot flowers: Use a dotting tool to create small circles in contrasting colors, then add a tiny center dot. Five dots arranged in a circle makes a simple flower. Scatter three or four of these across the nail.
- Leaf strokes: Using a thin brush and contrasting polish, paint simple leaf shapes — just angled strokes with a pointed tip. Group these in small clusters.
- Line flowers: Create flowers using only thin curved lines in a contrasting color. Think minimalist line drawings rather than realistic blooms.
- Watercolor effect: Apply thin layers of contrasting polish and let the colors blend slightly where they overlap for a soft, watercolor appearance.
Color Choices for Floral Details
- White or cream florals on deep teal (maximum contrast, most visible)
- Gold or metallic florals on teal (romantic and luxurious)
- Pastel pink or lavender florals on lighter teal (soft and cohesive)
- Darker teal or navy florals on pastel teal (subtle and sophisticated)
Insider note: Hand-painted nails are beautiful, but they’re not always practical for people who use their hands heavily. The detailed design can wear away with regular friction. If you’re getting these done professionally, ask the artist to apply an extra-strong topcoat and consider refreshing them every two weeks.
8. Mirror Chrome Teal Coffin Nails
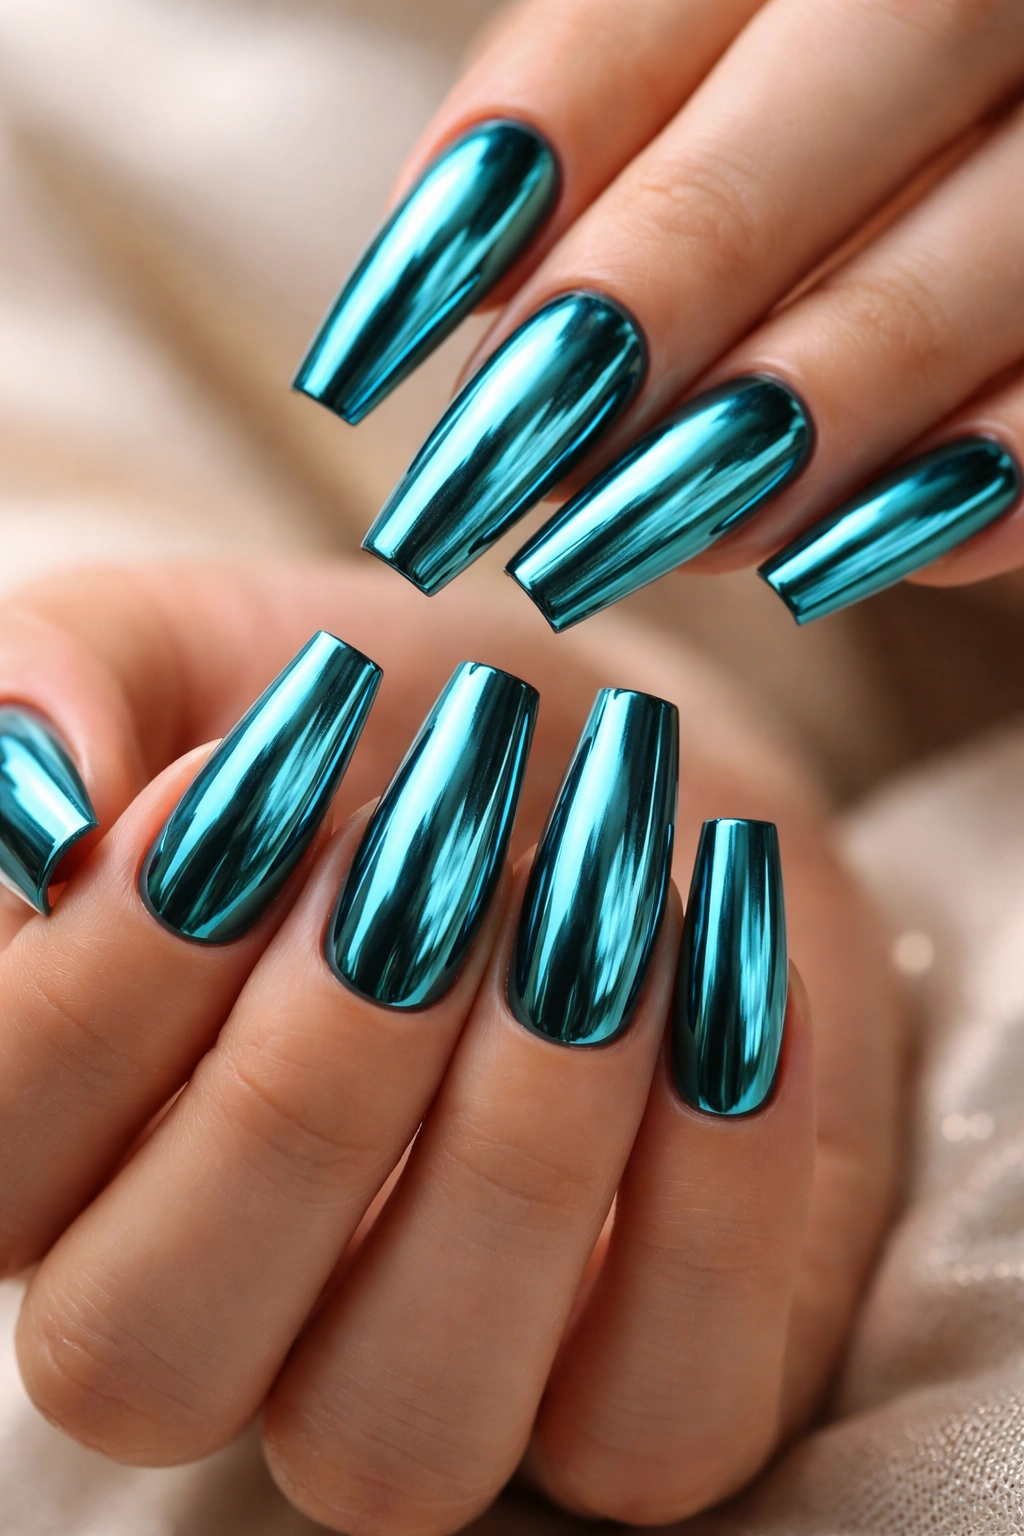
Chrome nail polish creates a reflective, almost metallic mirror effect that looks like liquid metal on your nails. Teal chrome is particularly striking because the reflective quality intensifies the jewel-tone color, making it look almost iridescent. This design is bold, modern, and completely show-stopping without requiring any additional art or details — the finish itself is the statement.
The chrome effect works beautifully on coffin nails because the elongated shape gives the reflective finish room to display itself. Every angle of your hand catches the light differently, so the nails literally look different depending on how you move and position your hands. It’s that quality that makes chrome feel so luxurious and expensive-looking.
Application Process for Chrome Polish
Chrome polish requires a specific application technique to achieve that mirror effect:
- Apply a quality base coat to protect your nails
- Apply the chrome polish according to the brand’s instructions (usually one thick coat, though some formulas require two thin coats)
- Use the specific buffing tool or applicator that comes with your chrome polish — this is not optional. Chrome polish needs to be buffed to activate the mirror effect
- Buff with steady, directional strokes until the reflective finish appears
- Some formulas require a topcoat to seal, while others don’t — follow your polish brand’s instructions
Chrome Polish Notes
- Chrome polish is typically gel-based and requires UV or LED lamp curing
- The fumes can be intense, so work in a well-ventilated space
- Once the mirror effect activates, you cannot undo it — make sure you’ve buffed evenly across the entire nail
- Chrome polish wears differently than regular polish and may show fingerprints more readily
Worth knowing: If DIY chrome feels too tricky, professional nail technicians have specific experience with chrome application and can get a perfect mirror finish that’s difficult to replicate at home. This is one design where professional application might be worth the investment.
9. Matte Teal with Metallic Linear Designs
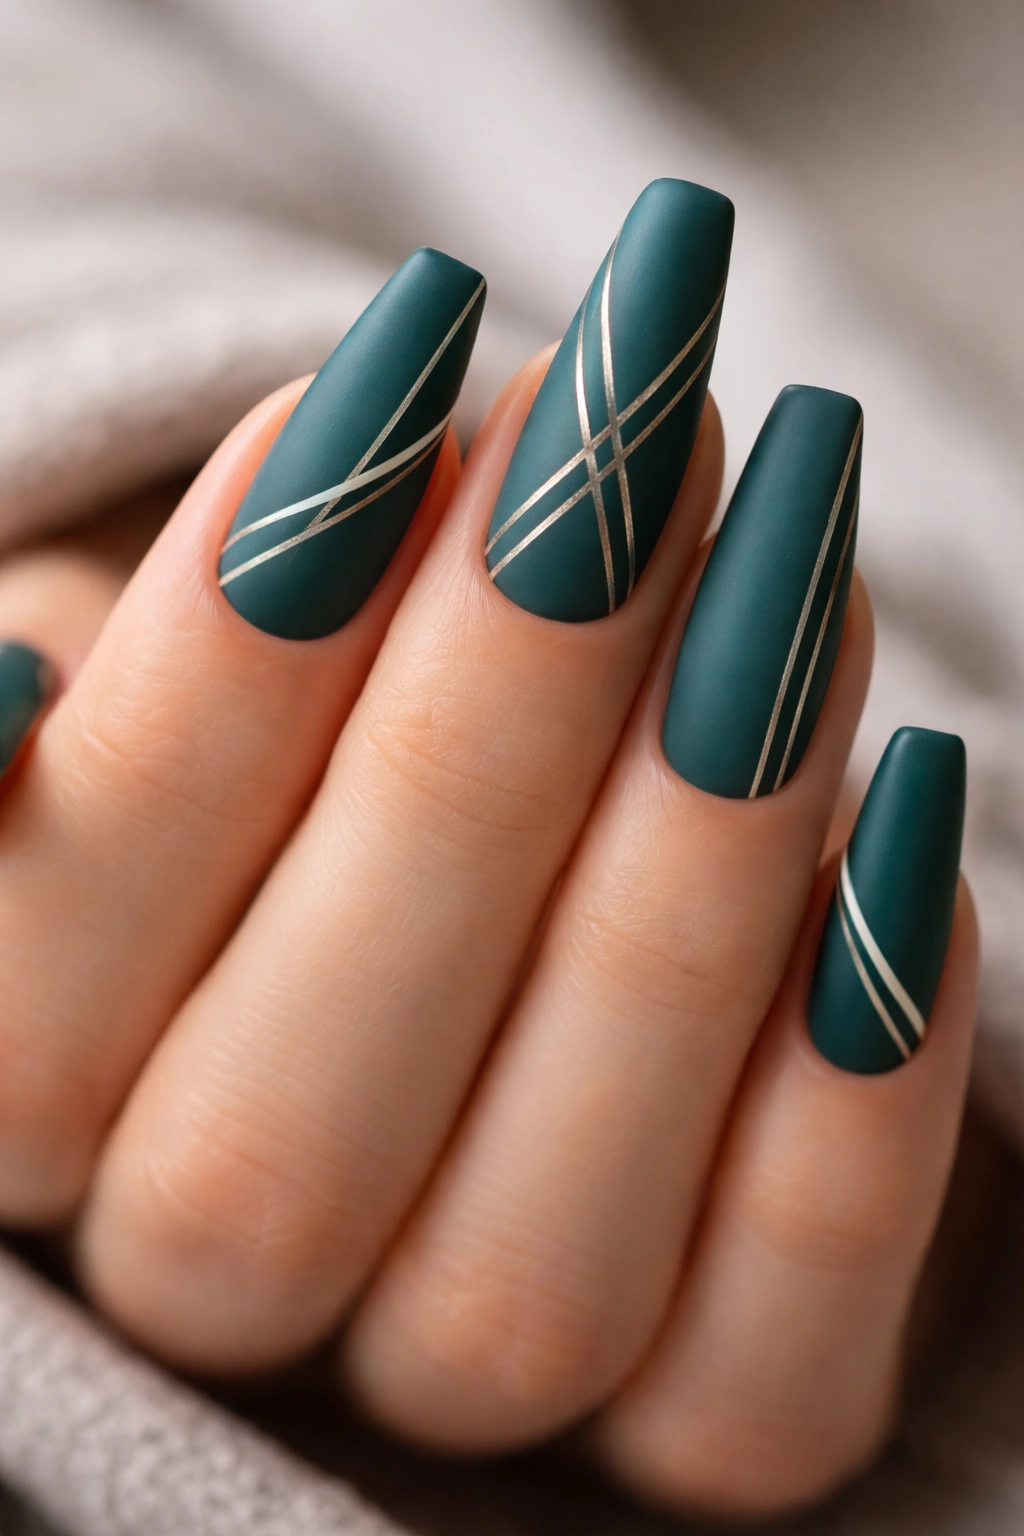
This design combines the softness of matte teal with crisp, geometric metallic lines that create visual structure and movement across the nail. The lines might be straight and parallel, creating a striped effect, or they might be angular, forming geometric shapes like chevrons, triangles, or abstract patterns.
The magic here is the textural contrast. Matte creates a soft, velvety appearance that absorbs light, while metallic finishes — usually gold, silver, or rose gold — reflect light aggressively. That interplay between matte and shiny creates a design that’s simultaneously calming and visually interesting. The coffin shape works beautifully with linear designs because the elongation naturally draws the eye along the lines.
Linear Design Ideas
- Vertical stripes: Thin metallic lines running from cuticle to tip, evenly spaced across the nail
- Chevron pattern: V-shaped metallic lines creating a wave-like visual effect across the nail
- Diagonal cross-hatch: Metallic lines crossing at angles to create a lattice effect
- Curved metallic lines: Soft, flowing lines that follow the contours of the coffin shape
- Geometric frames: Metallic lines creating a rectangular or diamond-shaped frame within the teal base
- Accent lines: Metallic lines only on specific nails (like just the accent nail on each hand)
Application Method
- Paint your matte teal base and apply matte topcoat, letting everything cure and dry completely
- Using a thin striping brush or metallic polish pen, draw your metallic lines slowly and deliberately
- Keep a steady hand by resting your brush hand on your non-dominant hand for stability
- If freehand feels uncertain, use thin striping tape as a guide for straight lines
- You don’t need a topcoat after metallic lines if you’re going for maximum texture contrast, but a light glossy seal will protect the design
Pro tip: Metallic polish can sometimes look streaky or uneven on matte bases. Use a metallic polish specifically formulated for thin application, and apply multiple thin lines rather than trying to get full opacity in one stroke.
10. Gradient Teal to Pink Ombré
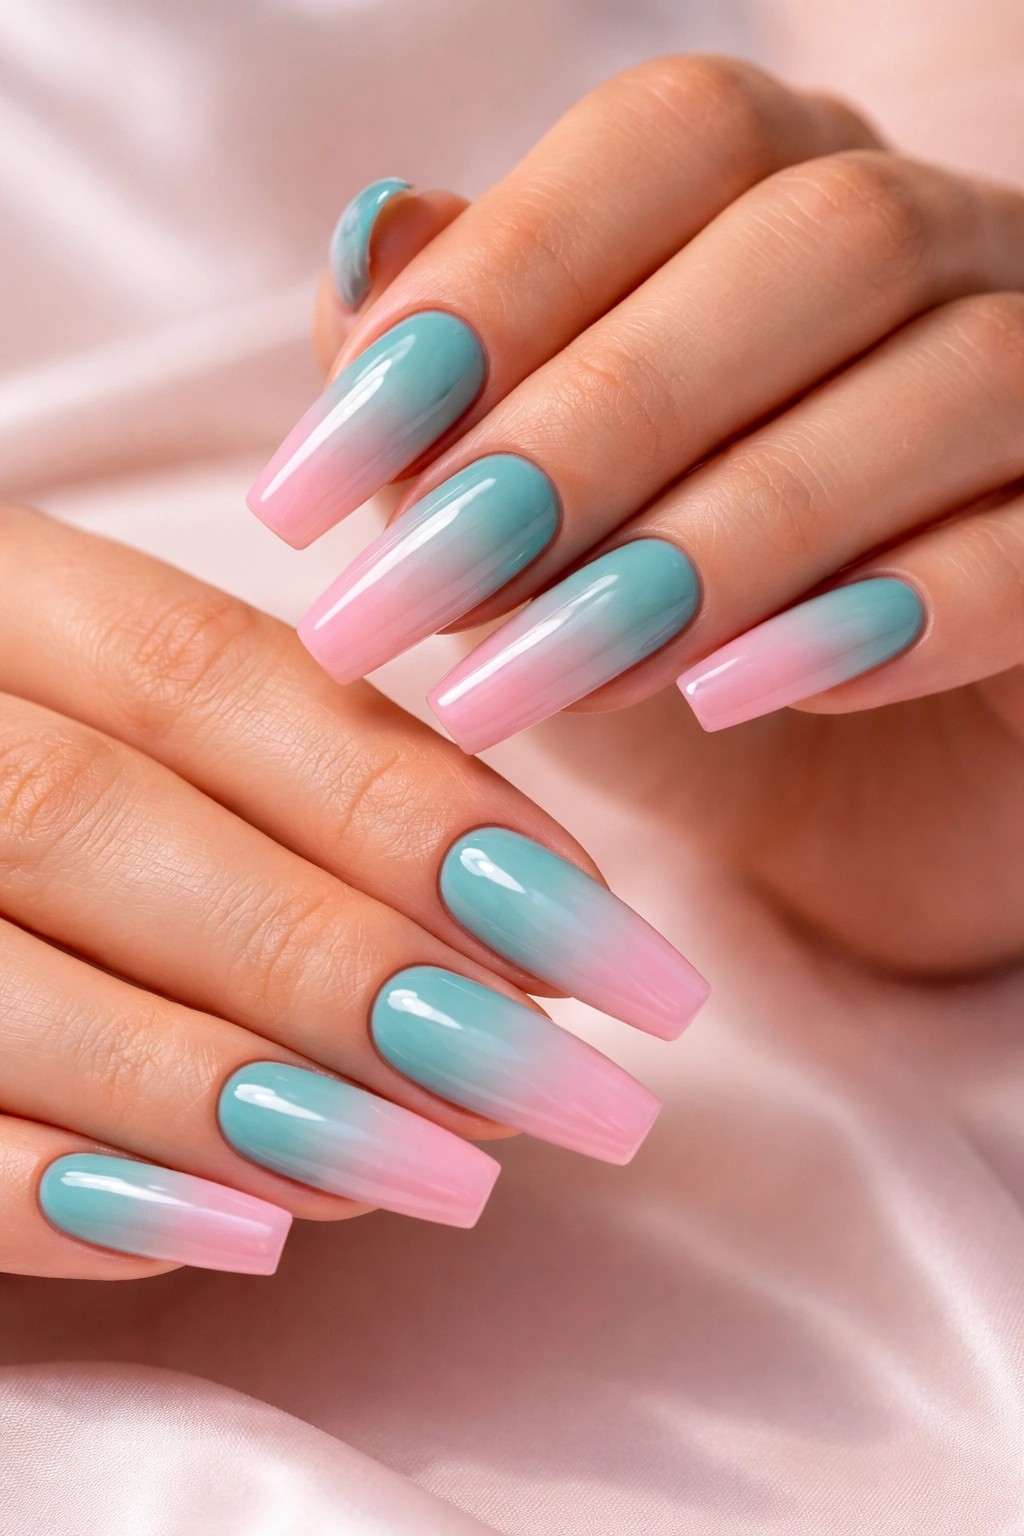
This dual-tone gradient takes things in a warm direction. You’re starting with teal at the base and transitioning through the middle tones to a soft pink or peachy pink at the tips. The effect is a two-color ombré that feels dynamic and colorful while maintaining sophistication because both colors sit in the jewel-tone or pastel family.
The coffin nail shape is ideal for this gradient because the natural taper of the design creates a built-in guide for where colors should shift. The gradient looks intentional and purposeful rather than accidental. The teal-to-pink combination is particularly striking because the two colors are different enough to create visual interest, but complementary enough to feel cohesive rather than chaotic.
Creating the Teal-to-Pink Gradient
- Paint your entire nail in teal and let it cure or dry completely
- This base color creates a fallback if your gradient doesn’t blend perfectly
- Load a sponge or soft brush with teal polish on one side and pink polish on the other
- Press or dab onto the nail, slightly overlapping the two colors where they meet
- The overlap zone is where the blending happens — that’s where you’ll see the gradient shift from teal to pink
- Build the gradient gradually with light applications, allowing each layer to dry between coats
- Multiple thin layers create a smoother, more blended result than one heavy application
Color Intensity Options
- Bright to bright: Deep teal transitioning to hot pink (bold and playful)
- Deep to soft: Deep teal fading to pale blush pink (elegant and romantic)
- Saturated to muted: Vibrant teal transitioning to mauve or dusty rose (artistic and modern)
- Cool to warm: Teal gradually warming toward peachy pink (a gentle color shift)
Insider note: The gradient looks most professional when there’s a visible middle zone where colors blend, rather than a sharp line separating them. If your gradient looks too stark, apply another layer of sponged color in a blended tone between your two main colors.
11. Teal Base with Negative Space Lines
Negative space nail art uses the natural nail color (or a contrasting base) underneath thin lines or designs. On teal coffin nails, this means painting the teal base, then using thin lines to reveal your natural nail or a contrasting color underneath, creating a sophisticated line-art effect.
This design feels contemporary and architectural. Instead of adding details on top of the teal, you’re subtly removing them, which creates a more minimalist, refined appearance. The technique works beautifully on coffin nails because the clean lines emphasized by the negative space look intentional and elegant against the elongated shape.
Negative Space Design Ideas
- Vertical negative lines: Thin vertical lines running from tip to cuticle, showing the natural nail underneath
- Geometric frames: A square or rectangle outlined in negative space in the center of the nail
- Half-nail design: One half of the nail in solid teal, one half left bare with a thin line dividing them
- Curved negative elements: Flowing lines that follow the contours of the coffin shape
- Accent nail approach: Full negative space design on one or two nails, solid teal on the others
Creating Negative Space
This technique requires planning and precision:
- Paint your teal base as usual
- Using a thin, precise striping brush and a white or light-colored polish, paint thin lines where you want the negative space
- The white lines essentially cover and protect the teal, keeping it from showing through
- Once the white lines are dry, gently file away the teal between the white lines, revealing your natural nail underneath
- Seal everything with a clear topcoat
Alternatively:
- Paint your teal base with tiny gaps or lines intentionally left unpainted, revealing the natural nail beneath from the start
- This requires extreme precision but eliminates the filing step
Pro tip: Start with simple designs — a few clean vertical lines are easier to execute than complicated geometric shapes. As you get comfortable with the technique, you can try more intricate patterns.
12. Glitter Teal with Sparkle Tips
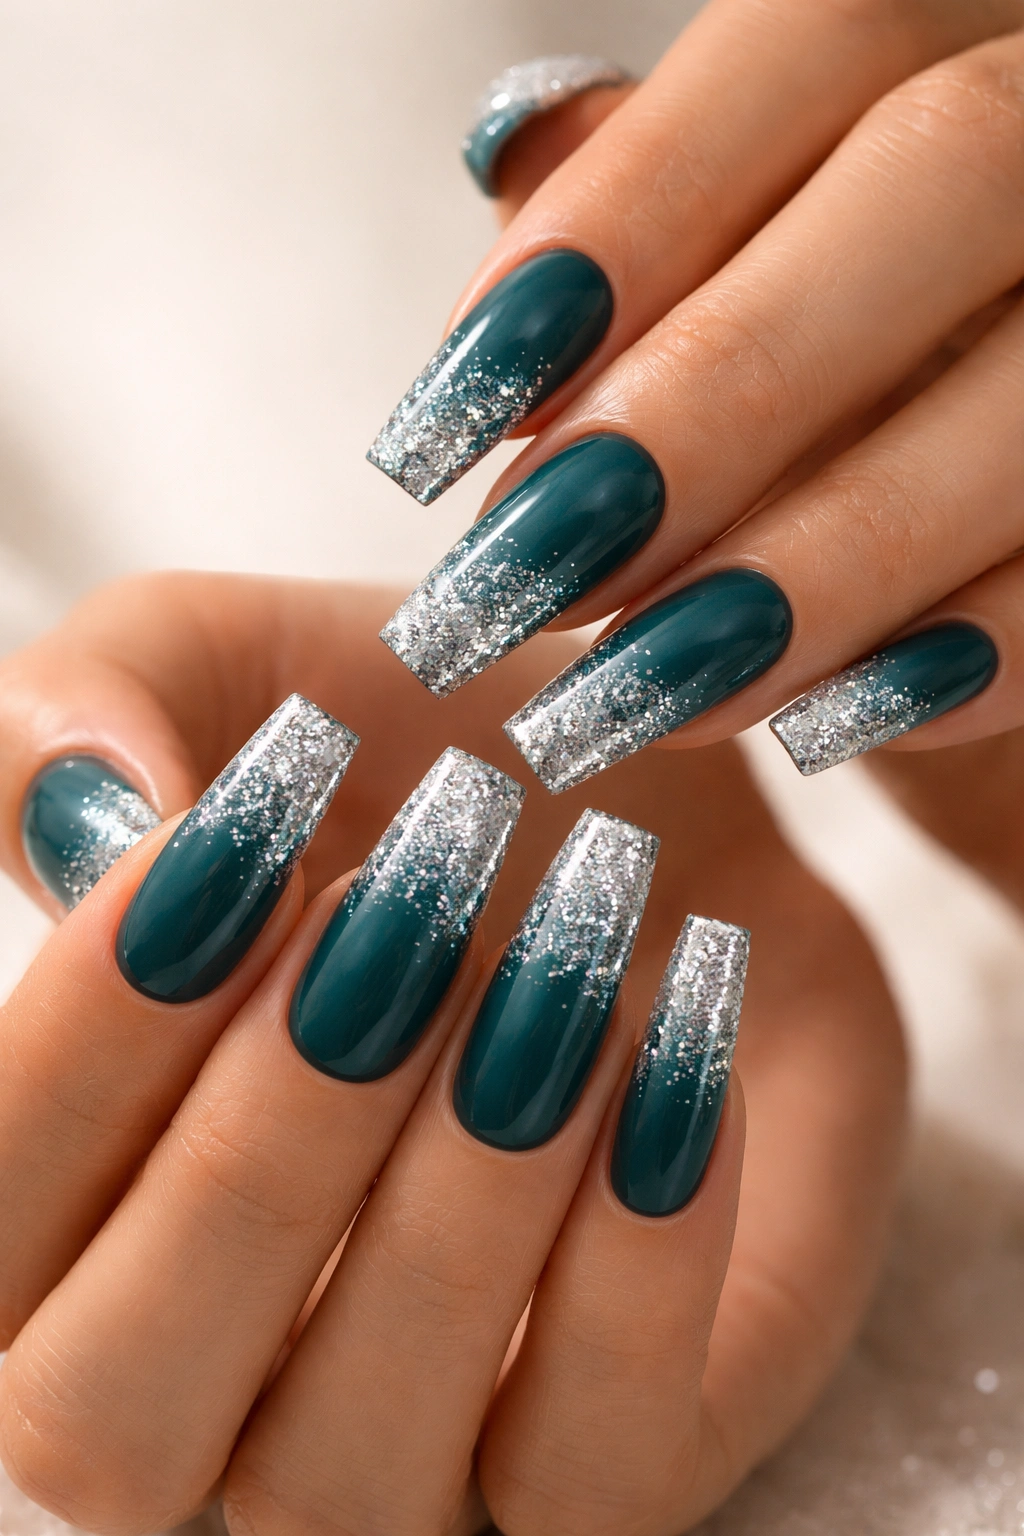
Sometimes elegance is just teal with glitter, and there’s no shame in that. This design takes your teal base and adds dimension through a glitter gradient concentrated at the tips. The effect is glamorous, festive, and still sophisticated because the glitter concentration is focused rather than scattered chaotically across the entire nail.
The glitter-tipped coffin nail is particularly striking because the shape naturally directs focus toward the tips, which is exactly where your glitter is concentrated. The effect feels intentional and well-executed, not like glitter got stuck on your nails by accident.
Glitter Application Methods
Fine glitter: Use ultra-fine glitter (much smaller particles than standard craft glitter) mixed into a clear topcoat. Apply this glitter-infused topcoat only to the tips of your nails, gradually feathering it back toward the center to create a gradient.
Glitter polish: Use a commercial glitter nail polish that has the right suspension — good glitter polish applies evenly without requiring the brush to be super-loaded. Paint just the tip area with this glitter polish.
Chunky glitter: If you prefer larger glitter particles, use a tweezers or tiny brush to place individual pieces onto a tacky base (like a wet topcoat) exactly where you want them.
Glitter Gradient Techniques
- Apply your teal base and let it dry completely
- Using a sponge or brush, apply glitter polish (or topcoat with glitter mixed in) heavily at the very tip
- Gradually reduce the amount of glitter as you move toward the center of the nail, creating a fading effect
- The gradient should transition from heavy glitter at the tips to solid teal in the middle
- Seal with a glossy topcoat to hold everything in place
Worth knowing: Regular craft glitter doesn’t adhere well to nails and can be painful to remove. Always use cosmetic-grade glitter or commercial glitter polish designed for nails — the particles are specifically sized and formulated to stay put and come off cleanly.
13. Teal Nail Art with Jade Stone Effect
This design mimics the look of polished jade stone on your nails. You create a teal base with translucent layers, soft color variations, and subtle tonal shifts that evoke the natural veining and depth of real jade. The effect is organic, natural-looking, and absolutely luxurious.
Creating a jade effect involves layering slightly different teal shades and allowing them to blend subtly, rather than creating obvious patterns. It’s more about creating depth and dimension within the same color family. On coffin nails, this approach creates a sophisticated, dimensional look that changes as light hits it from different angles.
Layering Technique for Jade Effect
- Start with your main teal shade as your base coat
- Mix a slightly lighter version of teal (add a touch of white or a contrasting lighter shade to your original polish)
- Using a sponge, apply this lighter teal unevenly across the nail, creating areas of variation
- Allow this to dry, then mix an even lighter tint of teal
- Sponge this lightest shade onto specific areas, building up the depth gradually
- The key is irregular application — you’re not creating a uniform gradient, but rather organic variation that mimics natural stone
- Seal everything with a glossy topcoat to add that polished stone appearance
Translucency Matters
The jade effect looks best with at least some translucency. Use sheer or semi-opaque polishes if possible, so light passes through the layers slightly, creating depth rather than flat color. If your teal polish is very opaque, thin it slightly with a nail polish thinner to increase transparency.
Pro tip: If you’re not confident in your sponging skills, you can achieve a similar effect using dry-brush techniques. Load a soft brush with slightly lighter teal and drag it across the nail with a light touch, letting the bristles create streaky, uneven color variation.
14. Holographic Teal Coffin Design
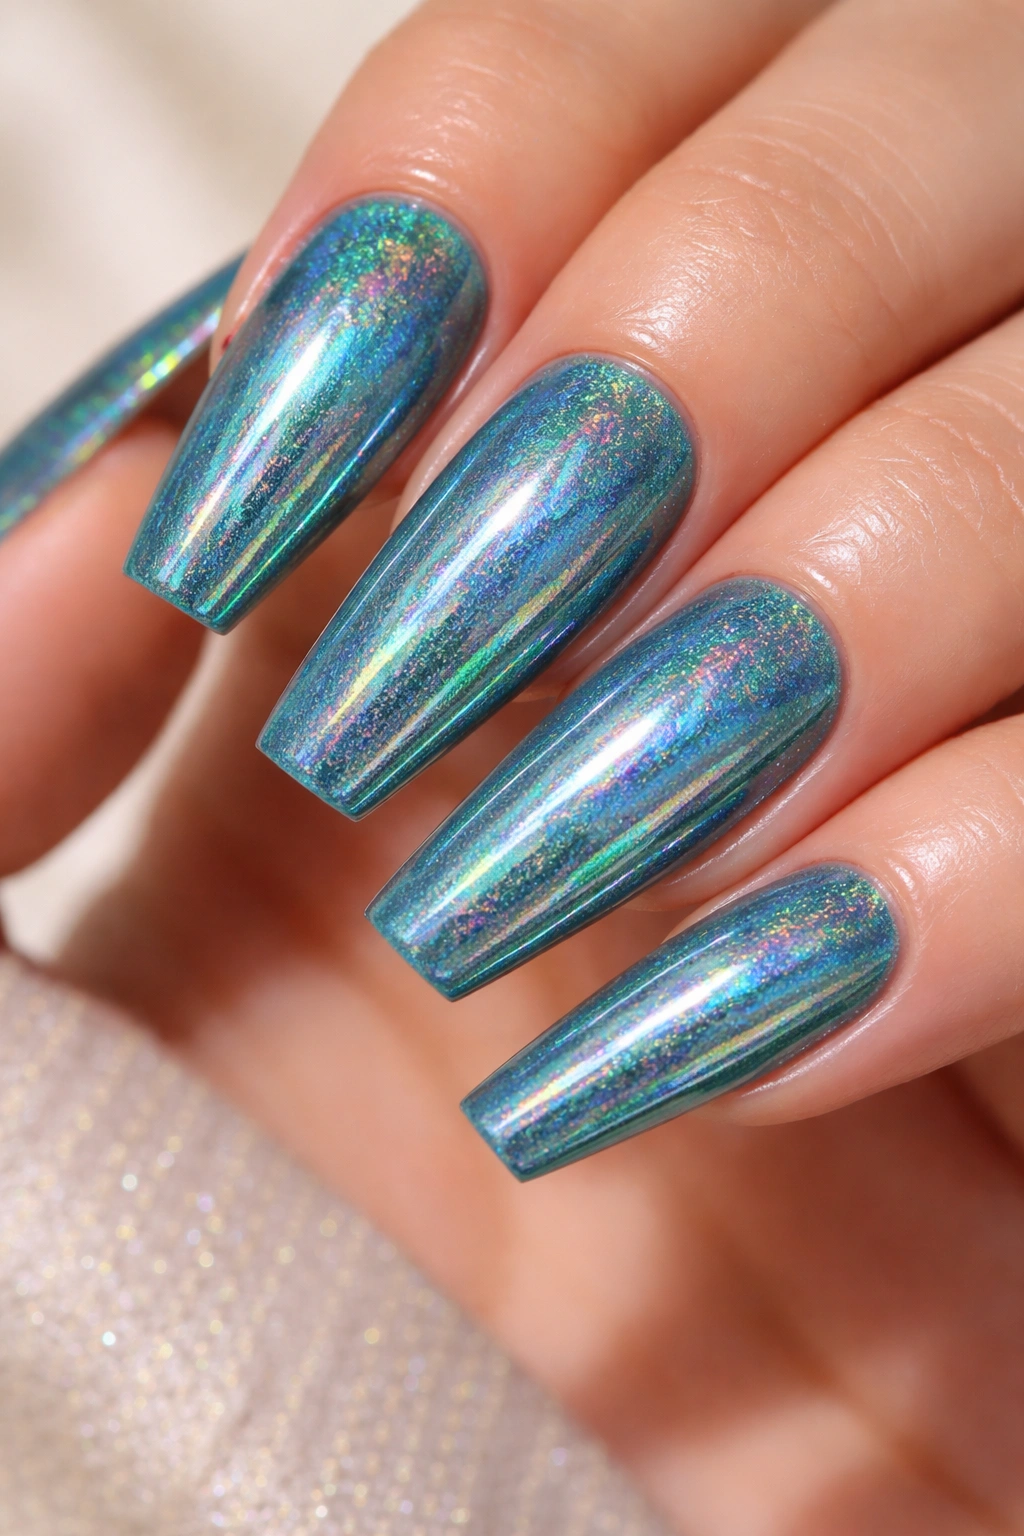
Holographic nail polish is the technical version of sparkle. Unlike glitter, which sits on top of the nail, holographic polish creates a spectrum-shifting effect built into the polish formula itself. When light hits holographic teal nails, you see rainbow reflections dancing across the surface — it’s like wearing tiny disco balls on your fingertips.
Holographic teal is interesting because it’s a unicorn of a product — it’s fundamentally sparkly and eye-catching, but the teal base keeps it from feeling juvenile or over-the-top. The rainbow refraction actually complements the cool, sophisticated teal tone. The coffin nail shape gives the holographic effect space to really show itself without looking cramped.
Holographic Polish Application
Holographic polish requires careful application to show off the effect properly:
- Apply a quality base coat (a white base coat can actually intensify holographic effects)
- Apply your holographic teal polish in thin, even coats — you typically need two or three coats for full effect
- Don’t shake the bottle aggressively; this distributes the holographic particles unevenly
- Instead, gently roll the bottle between your palms to mix
- Apply the polish with smooth, even strokes
- Cure or dry completely between coats
- The holographic effect should be visible even on the first coat, but becomes more dramatic with multiple layers
- Use a glossy topcoat to seal and protect
Understanding Holographic Effect
The holographic particles in the polish are what create the rainbow effect. Different brands formulate their holographics differently — some create a fine, subtle shimmer, while others create obvious, dramatic rainbow flashes. The quality of the holographic particles directly affects the effect, so investing in a good brand is worth it.
Worth knowing: Holographic polish can sometimes look darker or muddy if you apply too many thick coats. Stick to two or three thin coats for the best effect. If your holographic teal looks opaque and flat instead of sparkly, you may have applied it too heavily.
15. Matte Teal with Embossed Texture Details

This design takes texture to the next level by creating actual raised details on the nail surface. Using textured nail powders or building techniques, you create embossed effects — think tiny dots, lines, geometric shapes, or patterns that literally rise above the nail surface. The matte teal base provides the perfect backdrop for showing off these dimensional details.
Embossed nail art feels incredibly luxurious and expensive because it’s genuinely three-dimensional. The texture catches light differently than flat polish, creating subtle shadows and dimension. On coffin nails, these raised details are visible enough to be noticed from a distance, making the nail art feel significant.
Creating Embossed Texture
Using textured powder: Some nail systems come with textured powders that adhere to sticky gel polish. Apply your matte teal gel base, lightly cure it so it’s tacky, then sprinkle or brush the textured powder over specific areas. Cure again to set.
Building with gel: Using clear or matching-colored gel, create small dots, lines, or shapes on top of your teal base. Each layer of gel adds height and dimension. Cure between layers to build the 3D effect.
Using acrylic: Acrylic powder mixed with liquid creates a moldable substance that you can shape directly on the nail. Once cured, it sets in whatever texture you’ve created.
Texture Design Ideas
- Dotted pattern: Small raised dots scattered across the nail
- Linear texture: Raised lines creating geometric patterns
- Studded look: Small raised studs or nugget shapes arranged in patterns
- Metallic texture: Combine matte teal with textured metallic (gold or silver) details
- Accent texture: Full matte teal with textured details only on one or two nails
Insider note: Textured nails can catch on fabric and hair slightly more readily than smooth nails. Be mindful when pulling on clothing or running fingers through hair, or consider applying a topcoat that smooths the texture slightly for durability.
16. Teal Dual-Color Design with Diagonal Split
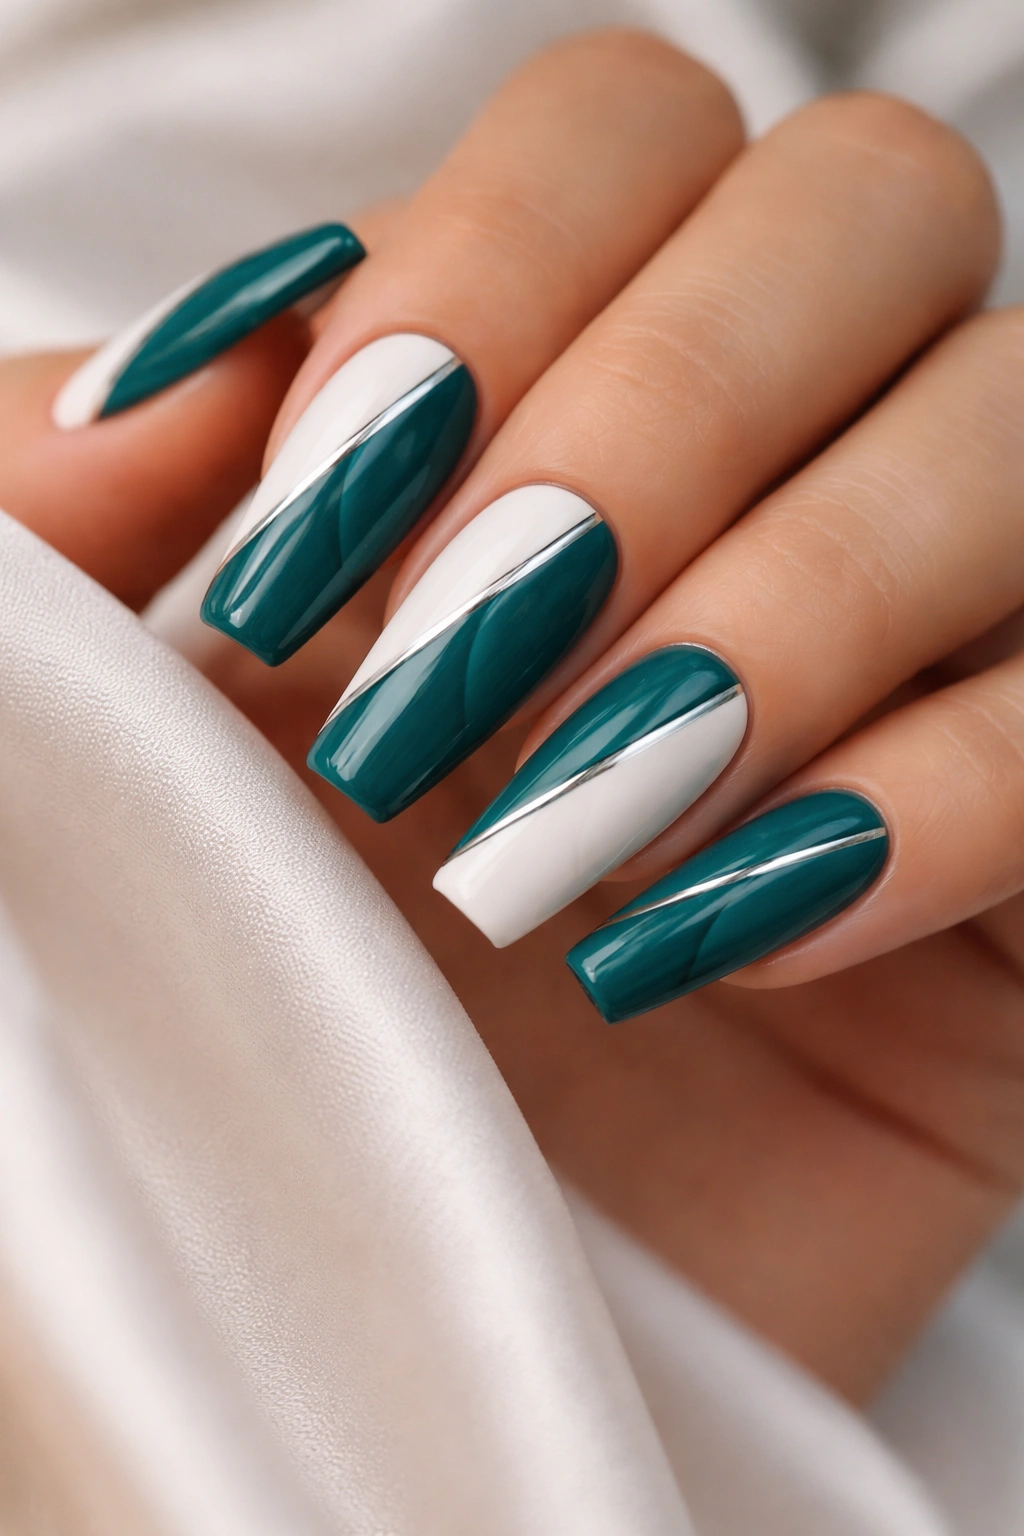
This final design is all about color blocking — splitting each coffin nail down the middle (or at a diagonal angle) and filling each section with a different shade or finish. You might split teal with white, teal with navy, or matte teal with glossy teal. The geometric division creates a clean, modern, intentional look.
The diagonal split version is slightly more dynamic than a straight vertical or horizontal split because it creates movement. Instead of the nail feeling divided into two static halves, the diagonal line creates a sense of direction. The coffin nail shape emphasizes this directional effect beautifully.
Color Combination Options
- Matte teal with glossy white: One side matte, one side gloss, creating a finish contrast
- Light teal with dark teal: Two different tonal intensities of the same color family
- Teal with navy: Similar colors at different depths for a subtle but sophisticated effect
- Teal with cream: A slightly warmer contrast
- Metallic teal with matte teal: One side reflective, one side flat
Application Process
- Paint your dominant color (usually the larger section) and let it dry completely
- Using painter’s tape, create a diagonal line across the nail where your two colors will meet
- The tape should run from one corner of the coffin tip to the opposite corner at the base, or at whatever angle feels right
- Paint your second color over the taped area, covering it completely
- Once dry, gently remove the tape, revealing a clean line between the two colors
- Seal with topcoat
Alternative Method (Tape-Free)
If painter’s tape leaves sticky residue on your nails:
- Paint your first color and let it dry completely
- Using a thin striping brush and steady hand, paint your dividing line in the second color
- Then fill in one side of that line with your second color
- This requires more precision but avoids any tape residue
Pro tip: The cleaner and more precise your line between the two colors, the more expensive and intentional the design looks. Take time with this step — it’s the detail that makes or breaks the overall effect.
Final Thoughts
Teal coffin nails offer something special. The color is jewel-toned enough to feel upscale without being overly trendy, and the elongated coffin shape gives you real canvas space to work with. Whether you’re drawn to minimalist geometric designs, sparkly embellishments, or artistic hand-painted details, teal provides the perfect neutral-but-not-boring backdrop.
The designs above range from beginner-friendly (solid teal with gold accents, simple French ombré) to more advanced (hand-painted florals, complex jade layering, embossed texture work). The beauty is that you don’t need to be a nail artist to achieve professional-looking results — many of these designs rely more on quality products and careful technique than artistic ability.
When you’re choosing which design to try, think about your lifestyle and how much maintenance you’re willing to embrace. Minimalist line designs and solid colors wear more gracefully over a few weeks than intricate nail art. Rhinestones and embossed textures are genuinely beautiful but require some care. And remember that even if your first attempt doesn’t look perfect, the fact that you’re experimenting with nail art is what matters. Each attempt teaches you something about what works, what doesn’t, and what you prefer.
