

There’s something undeniably striking about red and black coffin nails. This color combination pulls from gothic elegance, bold fashion statements, and timeless sophistication all at once. Whether you’re drawn to the drama of a deep crimson against matte black, the intrigue of geometric patterns mixing both shades, or the artistry of ombre gradients flowing from one color to the other, red and black coffin nails offer endless creative territory. The elongated coffin shape—wider at the base, tapered at the edges, with a squared-off tip—amplifies whatever design you choose, giving you an extended canvas that celebrates both color and detail.
Coffin nails have become a cornerstone of modern nail aesthetics, and the red-black pairing is particularly versatile. You can make it edgy and alternative, glamorous and refined, or playfully artistic depending on finish choices, embellishments, and design elements. The length factor matters too—long coffin nails command attention and let intricate designs truly breathe. Your nail shape becomes architecture, and the colors become the story you’re telling.
What makes this pairing so compelling is how naturally complementary these colors are. Red symbolizes confidence and passion, while black adds mystery and restraint. Together, they create tension that’s visually interesting without clashing. Whether you’re prepping for a special event, looking to switch up your everyday look, or seeking inspiration for your next nail appointment, these twenty designs showcase the range of what’s possible with red and black on coffin nails.
1. Classic Half-Moon Red and Black
This design splits your nail directly down the middle—one half rendered in a rich red, the other in pure black. The division is clean and geometric, creating a yin-yang quality that feels balanced yet bold. The half-moon approach works beautifully on coffin nails because the width of the nail accommodates both colors without either feeling cramped.
Why This Design Works So Well
The split-color aesthetic draws from retro nail art and modern minimalism simultaneously. It’s striking enough to make a statement but simple enough that you won’t tire of it after a few weeks. The coffin shape’s wider base means each color has room to develop its own presence, and the tapered tip creates a natural focal point where the colors meet.
Application Tips and Techniques
- Use painter’s tape applied vertically down the center of each nail for a clean line
- Apply red to one side and let it cure fully under the UV lamp before removing tape
- Repeat the process with black on the opposite side
- Seal everything with a glossy topcoat to make both colors pop equally
- If you want a softer transition, apply both colors without tape and use a thin detail brush to blend the edges slightly
How to Style This Look
This design pairs exceptionally well with monochromatic outfits—wear all black with red accents, or reverse it with all red and black details. It’s office-appropriate if your workplace allows bold nail color, and it’s striking enough for evening wear without feeling costume-like.
2. Ombre Gradient From Deep Red to Black
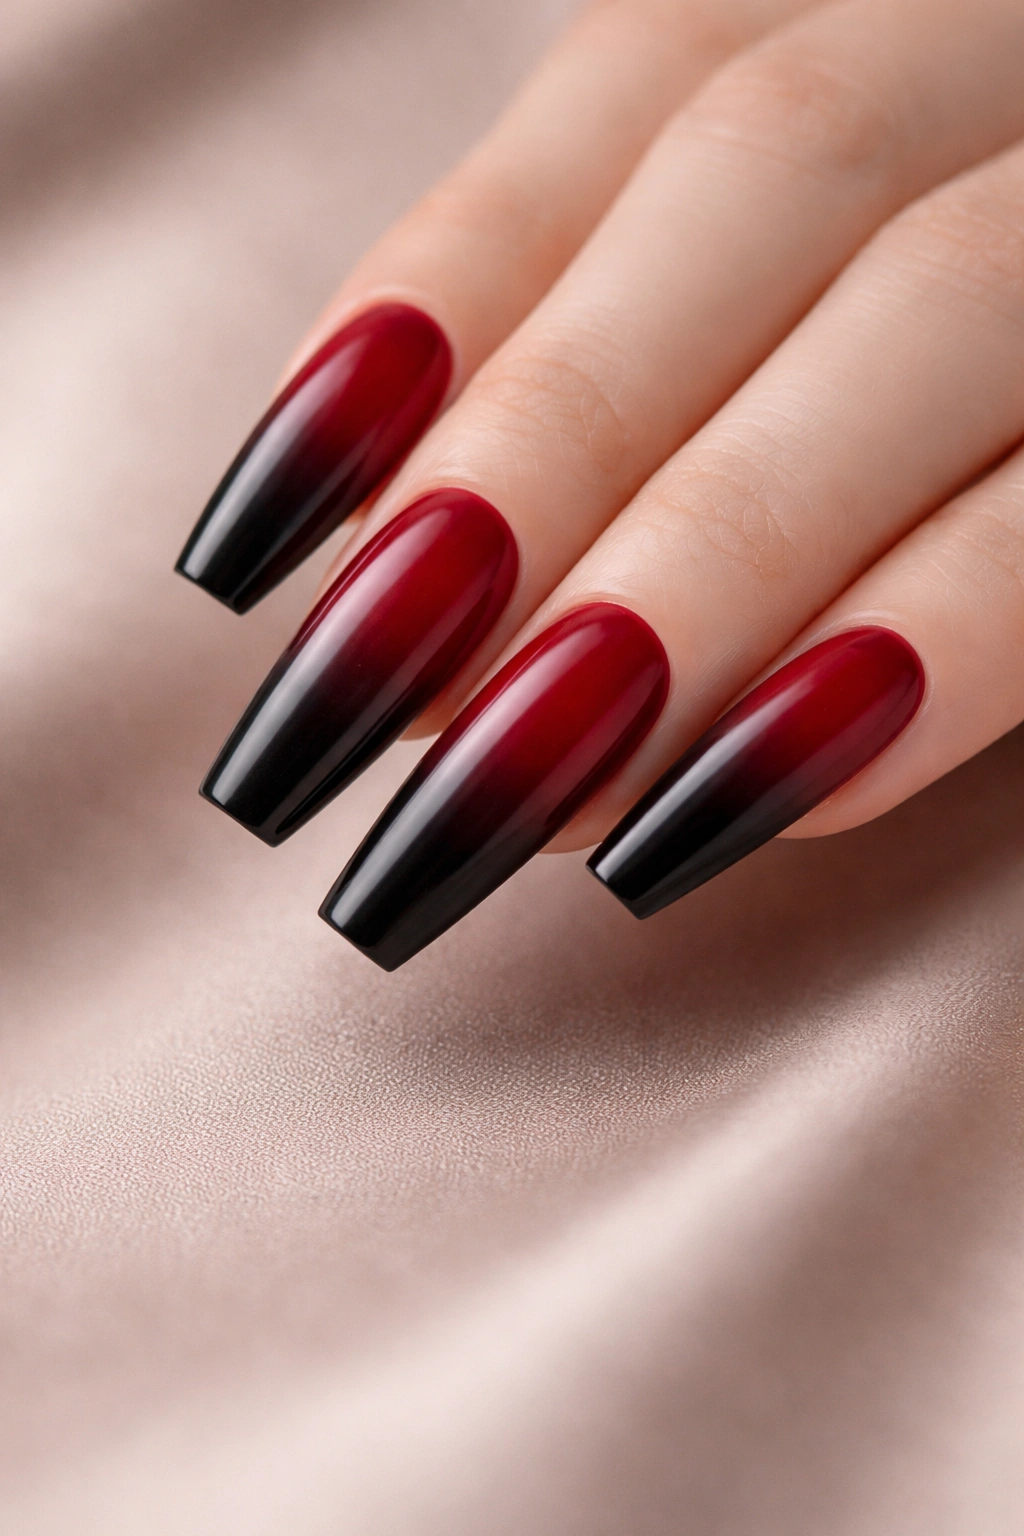
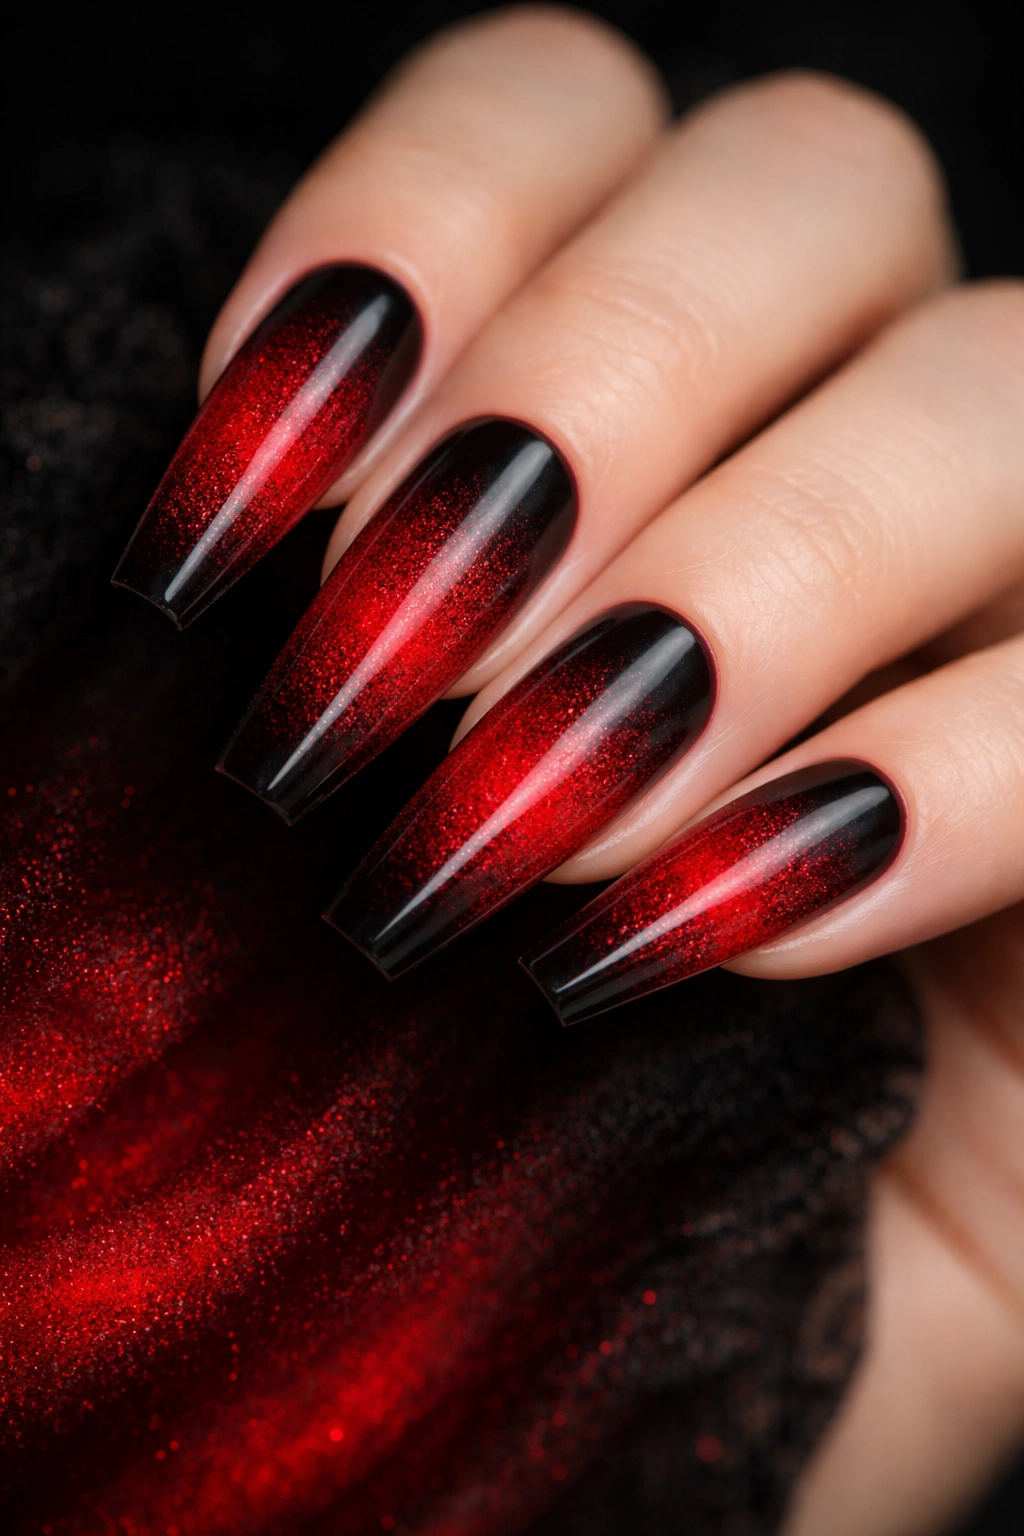
An ombre nail creates a smooth color transition from a warm, deep red at the cuticle area, flowing through burgundy and maroon, and finally landing in black at the tip. The gradient should feel organic, not starchy—like colors naturally bleeding into one another. On a coffin nail, this ombre journey becomes more pronounced because of the nail’s length.
Why Ombre Transforms Red and Black
Ombre takes two potentially harsh colors and softens the transition between them. Instead of abrupt contrast, you get a story told in pigment. The effect is more sophisticated than a stark split and feels contemporary without being trendy in a way that dates quickly. Deep red-to-black ombre especially suits the coffin shape’s extended surface.
Creating a Flawless Ombre Gradient
- Start with a base coat of your deepest red shade on the entire nail
- Apply black to the tips and use a dense makeup sponge or a dedicated ombre sponge, lightly bounced rather than rubbed, to blend the colors
- Use a thin detail brush with a middle shade (burgundy or maroon) to smooth any harsh lines
- Work in thin layers rather than trying to blend perfectly on the first attempt
- Seal with a glossy topcoat that will enhance the gradient effect
Finish Variations That Elevate This Design
A glossy ombre reads as glamorous and polished. A matte ombre feels edgy and modern. A combination finish—matte in the mid-tones with gloss on the tips—adds visual depth that’s really striking on coffin nails.
3. Geometric Stripes and Angles
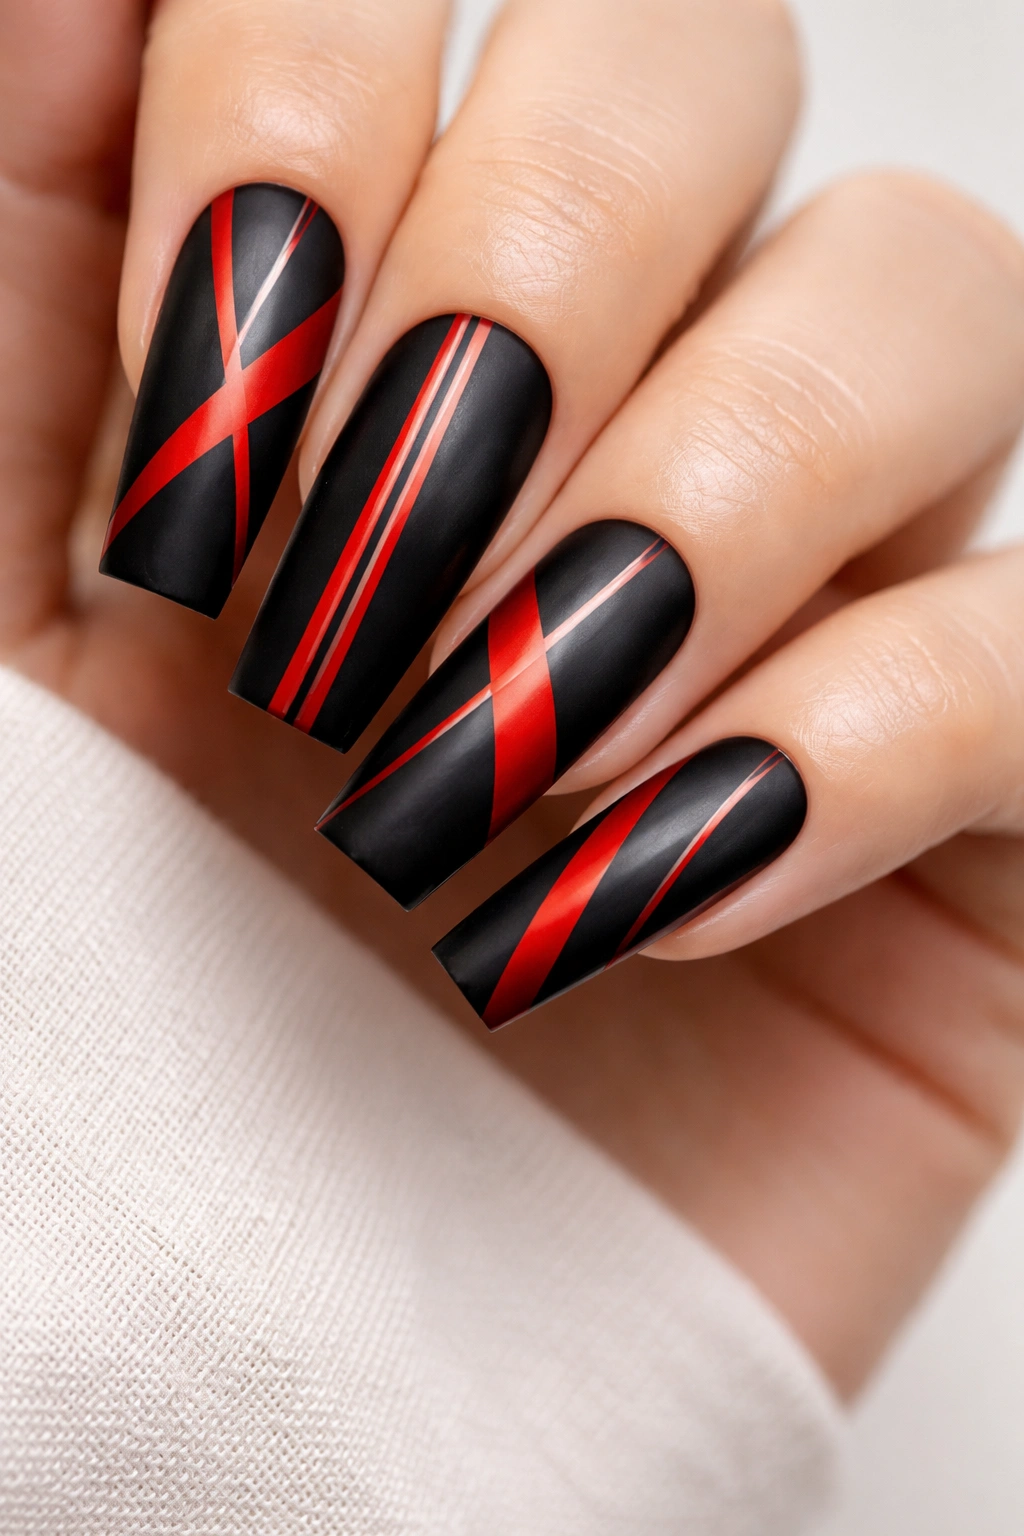
Paint your base black, then add red stripes—thick and thin, diagonal and vertical, overlapping and separate. Geometric patterns on coffin nails become almost architectural. You might paint white-thin red lines contrasting against black, or bold red stripes that cover half the nail’s width. Angles work particularly well because they play into the coffin shape’s natural lines.
The Geometry of Bold Design
Geometric patterns do something psychological—they feel organized and controlled, which paradoxically makes them feel modern rather than chaotic. Red lines against black create contrast that’s crisp without being jarring. The coffin shape’s length means your stripes or angles have room to develop, creating patterns that feel intentional rather than cramped.
Executing Geometric Patterns With Precision
- Use painter’s tape to create perfectly straight lines
- Apply your base color (black) and let it dry completely
- Position thin strips of tape in your desired angle or pattern
- Paint red over everything, then remove tape carefully to reveal clean lines
- Alternatively, use a thin detailing brush and a steady hand for more organic lines
- Seal with a topcoat—glossy will make geometric patterns look sharp, while matte softens them slightly
Pattern Ideas to Explore
Try chevrons pointing toward the tip, parallel stripes running the nail’s length, angular blocks that create a sense of movement, or even a grid pattern overlaid across both colors.
4. Black Base With Red Accent Nails
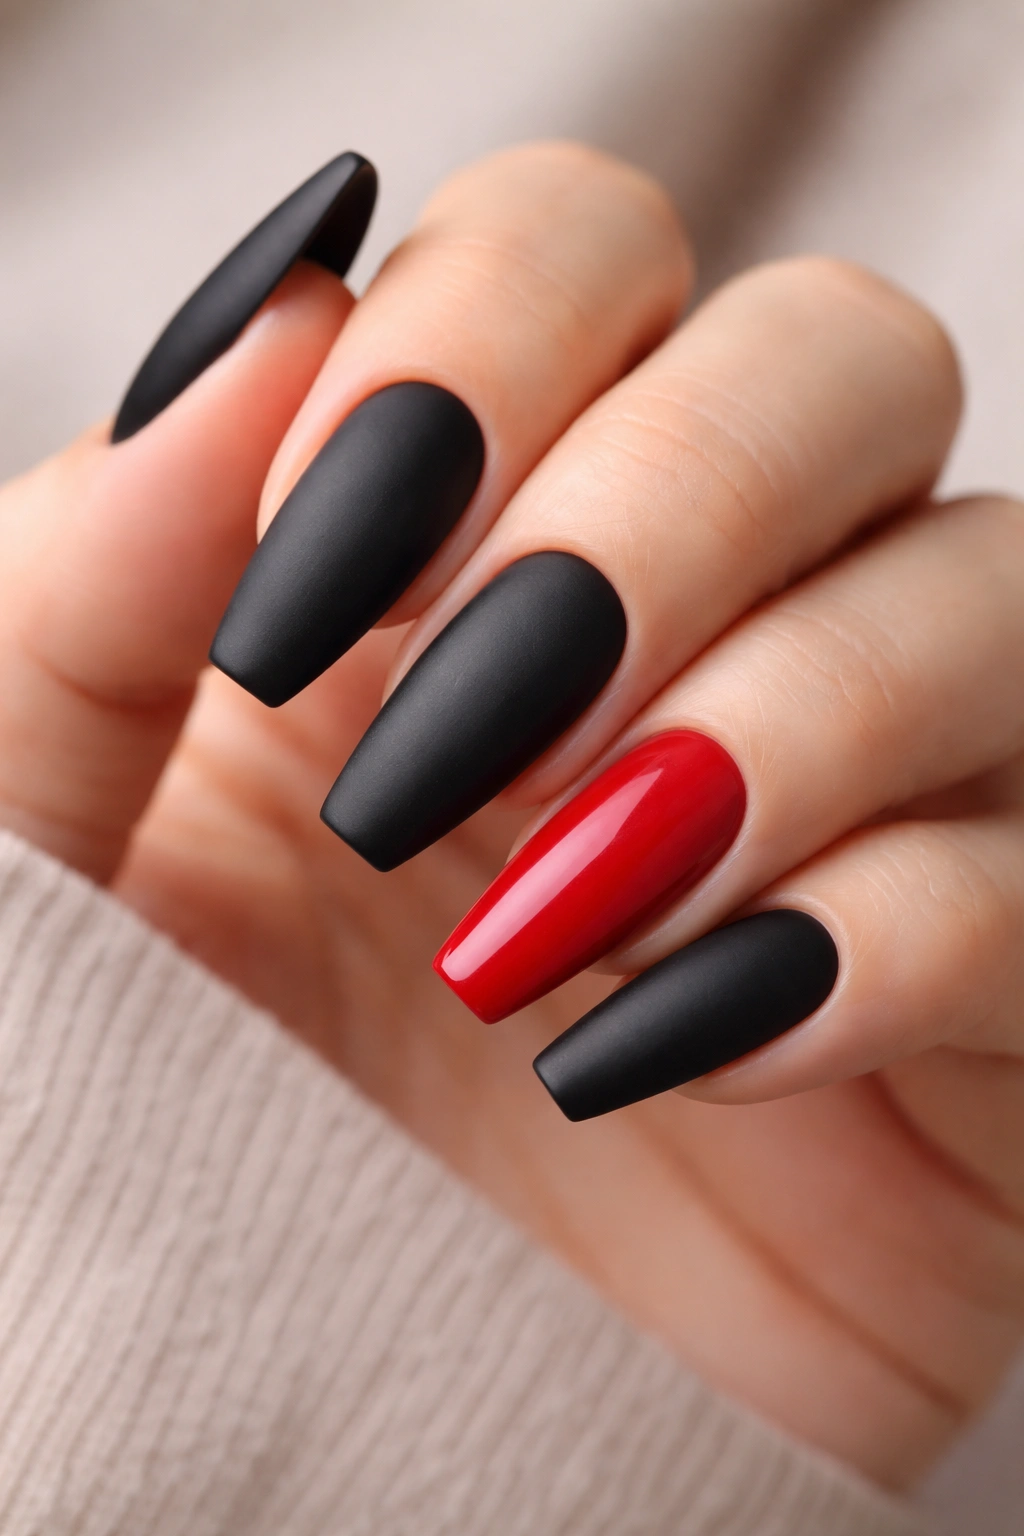
Paint four nails on each hand in a sleek matte black, then choose one or two “accent” nails to showcase in solid red or a red design. The accent nail—typically the ring finger or middle finger—becomes your statement, while the black nails provide sophisticated framing. This design respects balance; it’s not asking every nail to work equally hard.
Why Accent Nails Are Smart Design
Accent nails let you include a bold color without committing your entire hand to drama. This approach is particularly clever if you want red-and-black aesthetics but need something professional or understated overall. The black background makes whatever design you choose on your accent nails feel more prominent and intentional.
Choosing Which Nails Get the Accent Treatment
- The traditional accent is your ring finger on one or both hands
- For maximum impact, choose your middle fingers for that bold centerpiece effect
- Some people do one accent nail per hand; others do both ring and pinky for a scattered, less predictable look
- Symmetry feels more formal; asymmetry feels more artistic
Red Designs for Your Accent Nails
You could paint them solid red with a matte or glossy finish, create a red ombre with black tips, add red geometric patterns to the black base, or paint a detailed red design like glitter, marble, or a gradient that justifies its special status.
5. Marble Effect Red Swirled Into Black

Marble nails create an organic, stone-like effect with colors swirling into each other like natural veining. For red and black marble, you’re painting black as your primary base and swirling warm red throughout it. The effect is luxurious and feels handcrafted even though it’s a specific technique. On coffin nails, the extra length means your marble patterns can be more elaborate and less crowded.
Creating Authentic-Looking Marble Patterns
- Paint your entire nail black as your base
- While the black is still slightly tacky, use a thin detail brush or toothpick dipped in red to create veining patterns
- Don’t think in straight lines—think in organic, flowing movements like actual stone
- You want some areas dense with red and other areas minimal, creating variation
- Seal everything with a glossy topcoat that enhances the luxurious, stone-like effect
Marble Effect Variations
Paint some nails with heavy red veining and others with sparse red details for visual interest across your hand. You can also add a touch of white or gold into the mix to create even more depth—these metallic highlights enhance the marble’s sophistication without overwhelming the red-black foundation.
6. Glossy Red With Matte Black Tips
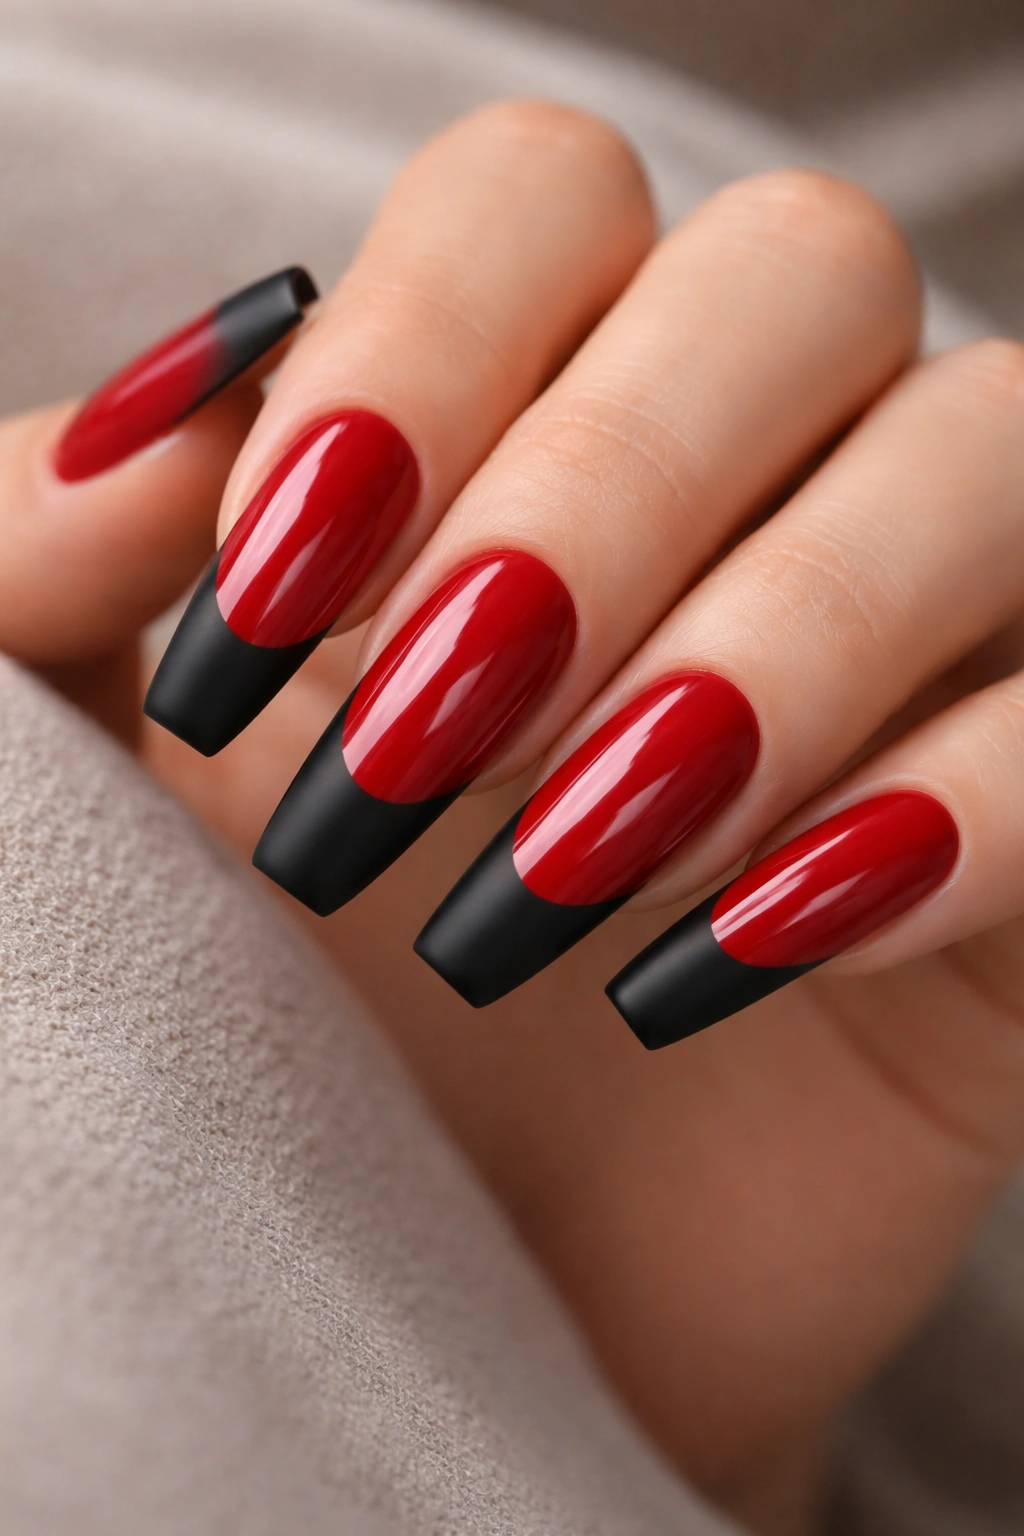
This design combines finishes in a striking way: paint your coffin nails glossy red across the entire nail, then paint the final third or half (starting at the tip) in matte black. The glossy-matte contrast is visually interesting even though the colors are just two. The reflection of gloss against the darkness of matte creates depth that feels more complex than the actual color palette.
How Finish Contrast Elevates Simple Designs
Most nail designs focus on color, but finish is equally important. Glossy finishes reflect light and feel glamorous and polished. Matte finishes absorb light and feel modern and slightly edgy. When you combine them on the same nail, you’re adding texture and visual complexity without additional colors or patterns. This is smart design—maximum impact from minimal components.
Application Strategy for Finish Contrast
- Paint your entire nail with glossy red base coat and polish
- Cure it completely under the UV lamp
- Use painter’s tape to mark where your matte black will begin (usually starting about halfway down the nail)
- Paint the exposed area with black matte polish
- Remove the tape while the polish is still slightly wet for the cleanest line
- Seal the entire nail with a matte topcoat to preserve the matte finish on the black portion
- You can apply glossy topcoat over just the red portion if you prefer maximum shine contrast
7. Delicate Red Lace Pattern Over Black
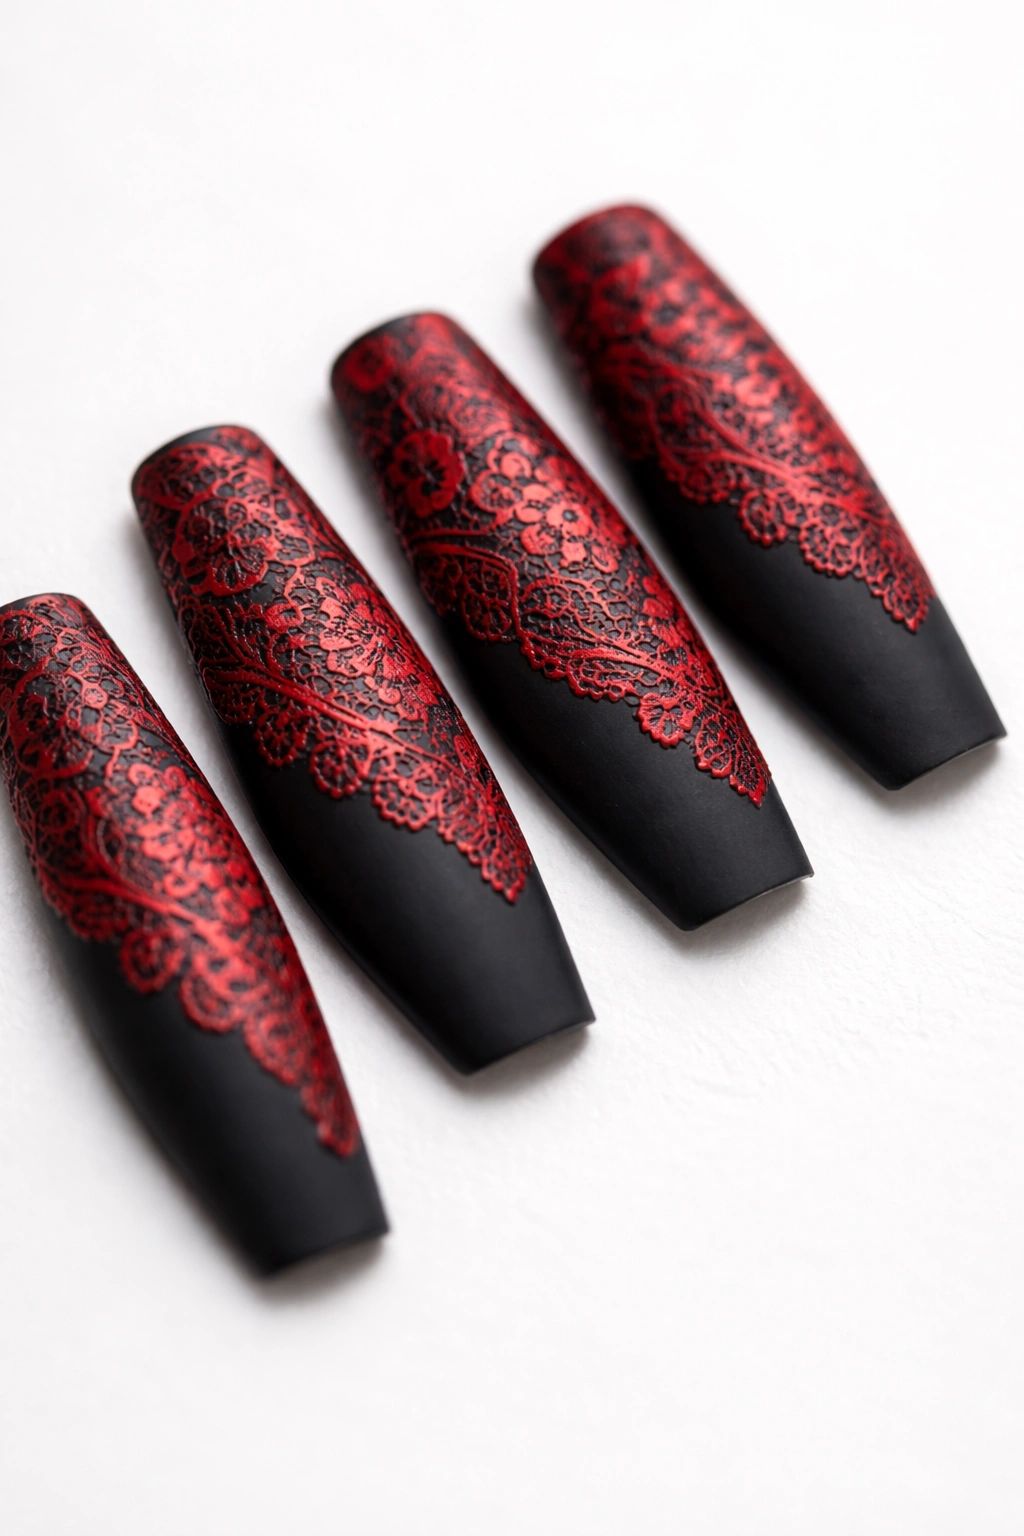
Imagine intricate lacework in red painted over a black base. This is detailed nail art that requires a steady hand or a very fine detail brush. The lace pattern—think delicate flourishes, tiny loops, interconnected geometric designs reminiscent of actual lace—feels romantic and slightly gothic, which suits the red-black pairing perfectly. The coffin shape’s length gives lace patterns room to develop and look intentional rather than cramped.
Designing Lace Patterns That Translate to Nails
- Start by choosing a lace aesthetic: vintage Victorian lace, geometric modern lace, or nature-inspired lace
- Sketch your pattern on the black base using a white pencil or water-soluble marker
- Use a very fine detail brush (size 000 or smaller) with red polish to trace your design
- Work slowly and steadily; lace is about precision and delicacy
- If you make mistakes, you can carefully remove them with a small brush dipped in acetone
- Seal with a glossy topcoat to make the red lace details pop against the black
Lace Design Inspiration Sources
Look at actual lace patterns in fashion (lingerie, wedding dresses, vintage doilies) and adapt them to the rectangular canvas of your nail. You can also find lace nail stickers online if freehand painting feels too daunting, though hand-painted always feels more personal.
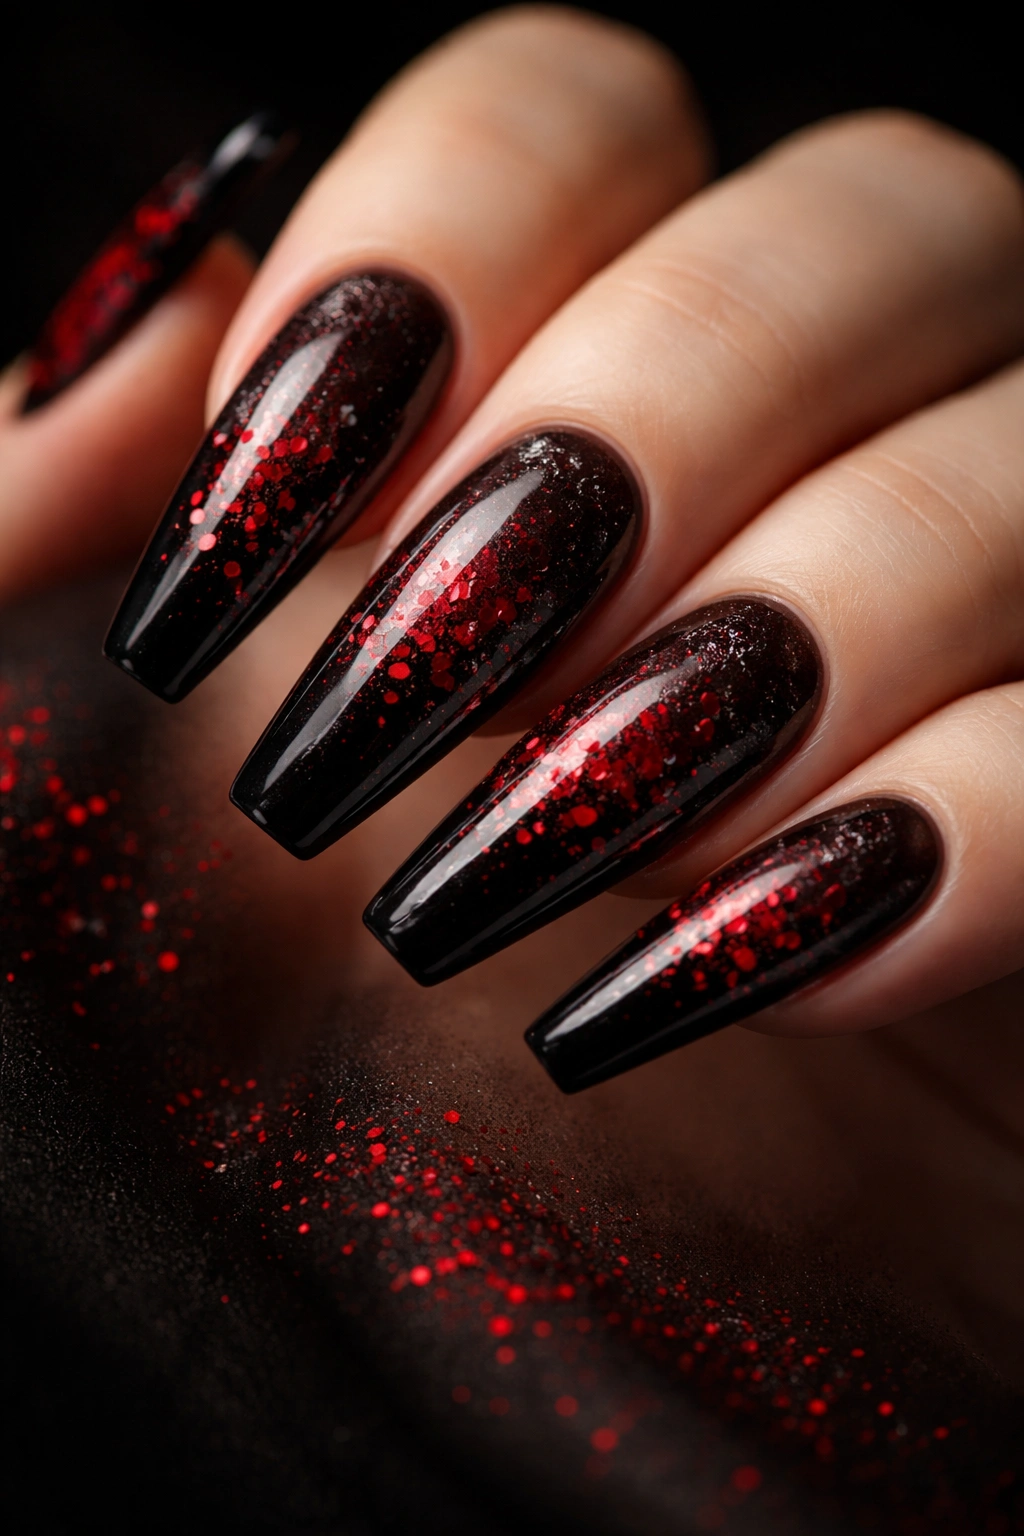
8. Red Glitter Gradient Fading to Black
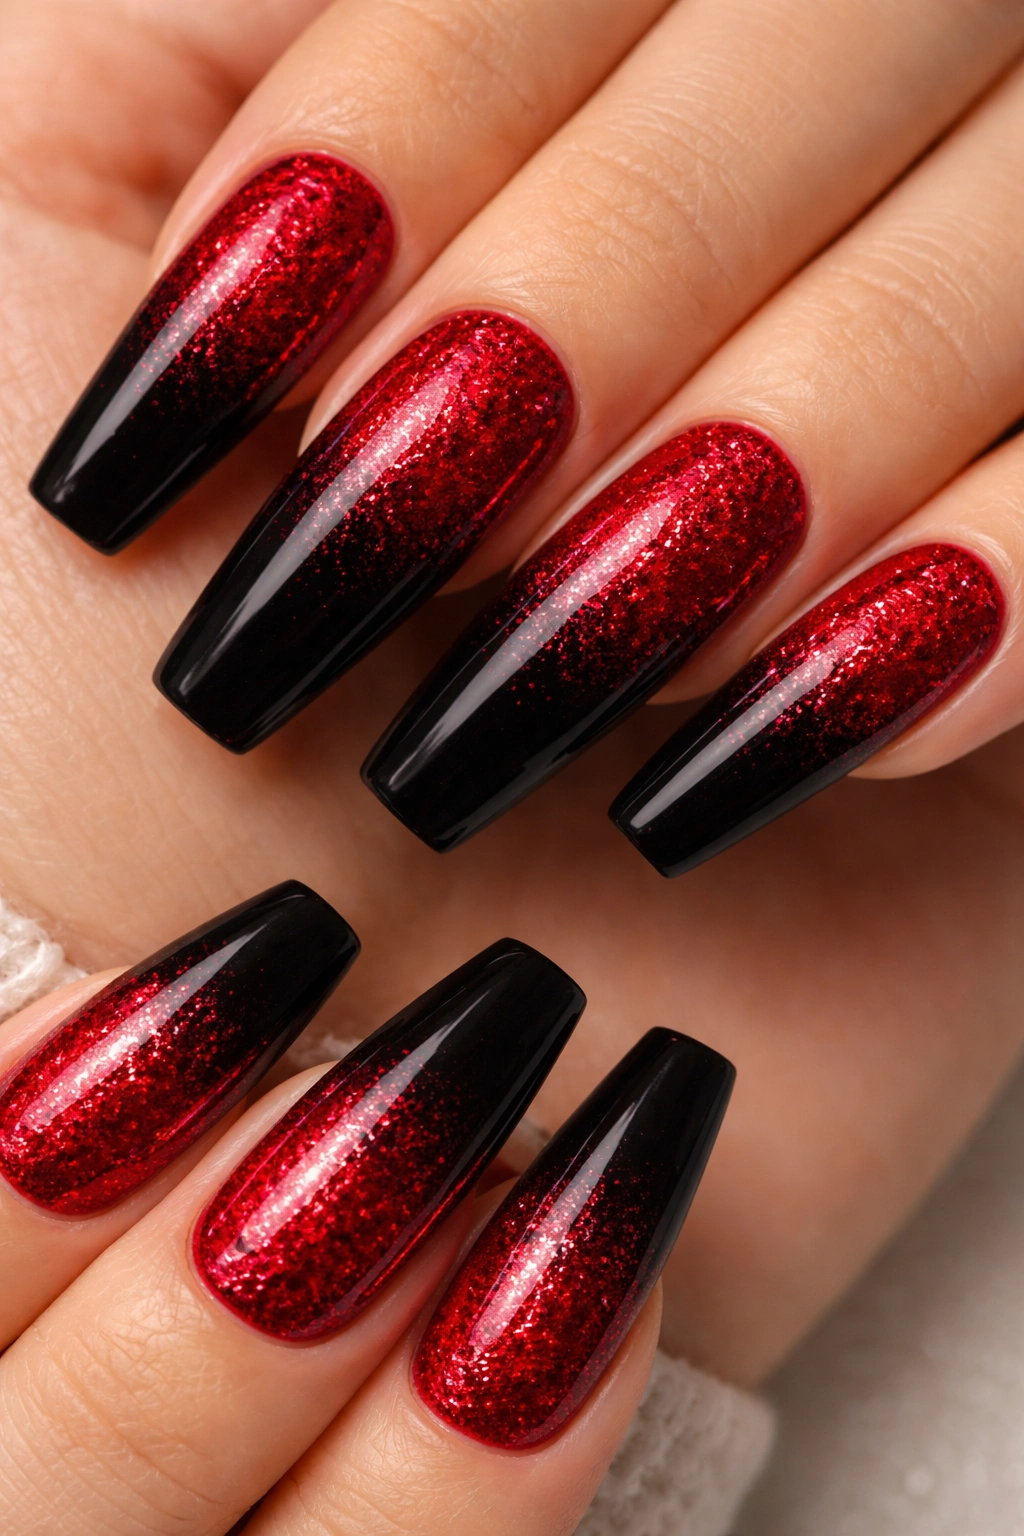
Start with solid red at the cuticle and gradually introduce fine glitter (in matching red, contrasting black, or neutral gold) as you move toward the tip, eventually reaching a pure black with glitter mixed throughout. This design combines sparkle with depth. The glitter adds dimension and catches light in ways solid color alone can’t. On coffin nails, the gradient transition from sparkle to solid has room to develop elegantly.
Applying Glitter Gradients Without Clumping
- Paint your red base and cure it
- Mix your chosen glitter polish with a small amount of clear gel base to create a lighter glitter “transition” shade
- Using a dense sponge, apply this transition shade to the mid-section of your nail
- Use pure glitter polish closer to the tip
- Blend everything using a makeup sponge bouncing technique rather than rubbing
- Paint pure black at the very tip
- Cure between each layer for clean transitions
- Seal with a topcoat—glossy will emphasize the sparkle, matte will tone it down
Glitter Color Combinations Worth Trying
Red glitter fading to black glitter creates a monochromatic sparkly effect. Red glitter fading through gold or champagne glitter to black feels more luxe and dimensional. Red glitter fading to pure black (no glitter) creates a more graphic contrast between sparkle and solid.
9. French Manicure Flipped: Red Tips and Black Nails
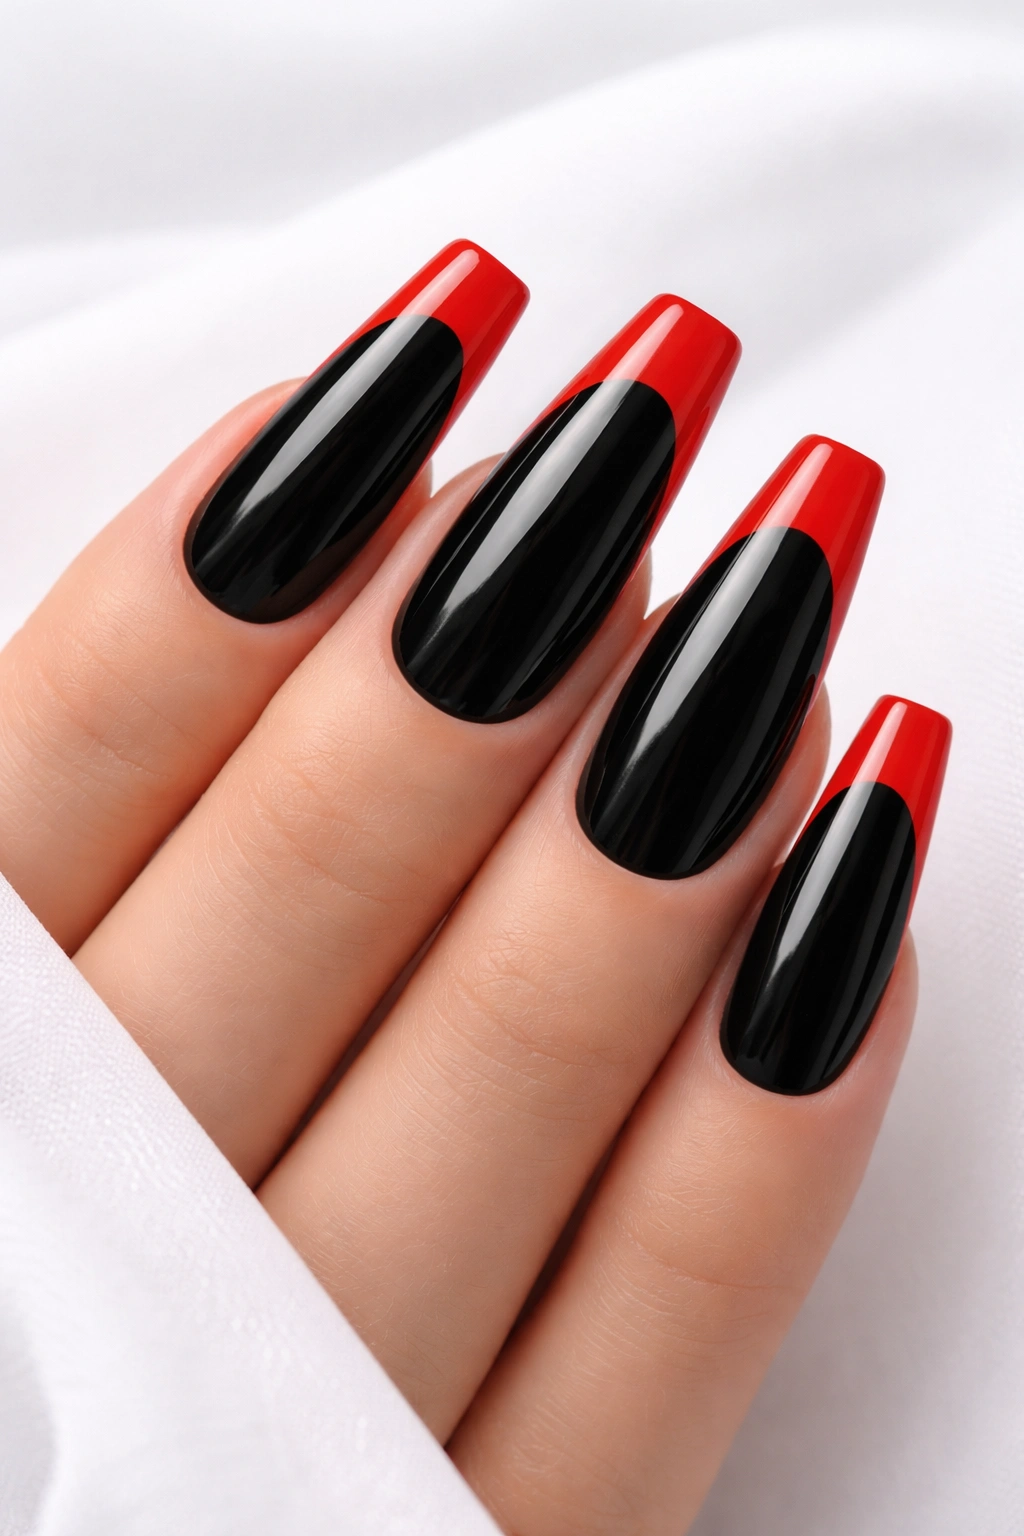
Reverse the traditional white-tipped French manicure—paint your coffin nails black as the base and create red tips instead. The “smile line” (the tip demarcation) becomes your design element, typically a clean arc about a quarter-inch thick. This inverted French manicure feels contemporary and edgy while maintaining some of the timeless elegance that makes French manicures enduring. The coffin shape’s tapered tip is perfect for showcasing a bold red smile line.
Making Your Red Smile Line Pop
- Paint black as your entire base and cure it
- Use a thin French manicure brush or a detail brush to paint a precise red arc at the tip
- Some people prefer a thick, bold smile line; others choose a delicate, thin one
- The curve should follow your natural nail tip line for the most polished look
- Seal everything with a glossy topcoat
- If your line isn’t perfectly precise, you can clean up the edges with a small brush dipped in acetone or black polish
Variations on the Flipped French
Add a thin gold or white line between your black base and red tip for Art Deco vibes. Make the red smile line very thick, covering almost half the nail length. Create a double smile line with red and another color like gold or white sandwiched in between. Each variation feels different while maintaining the elegance of the original concept.
10. Splatter Effect With Red Paint on Black Base
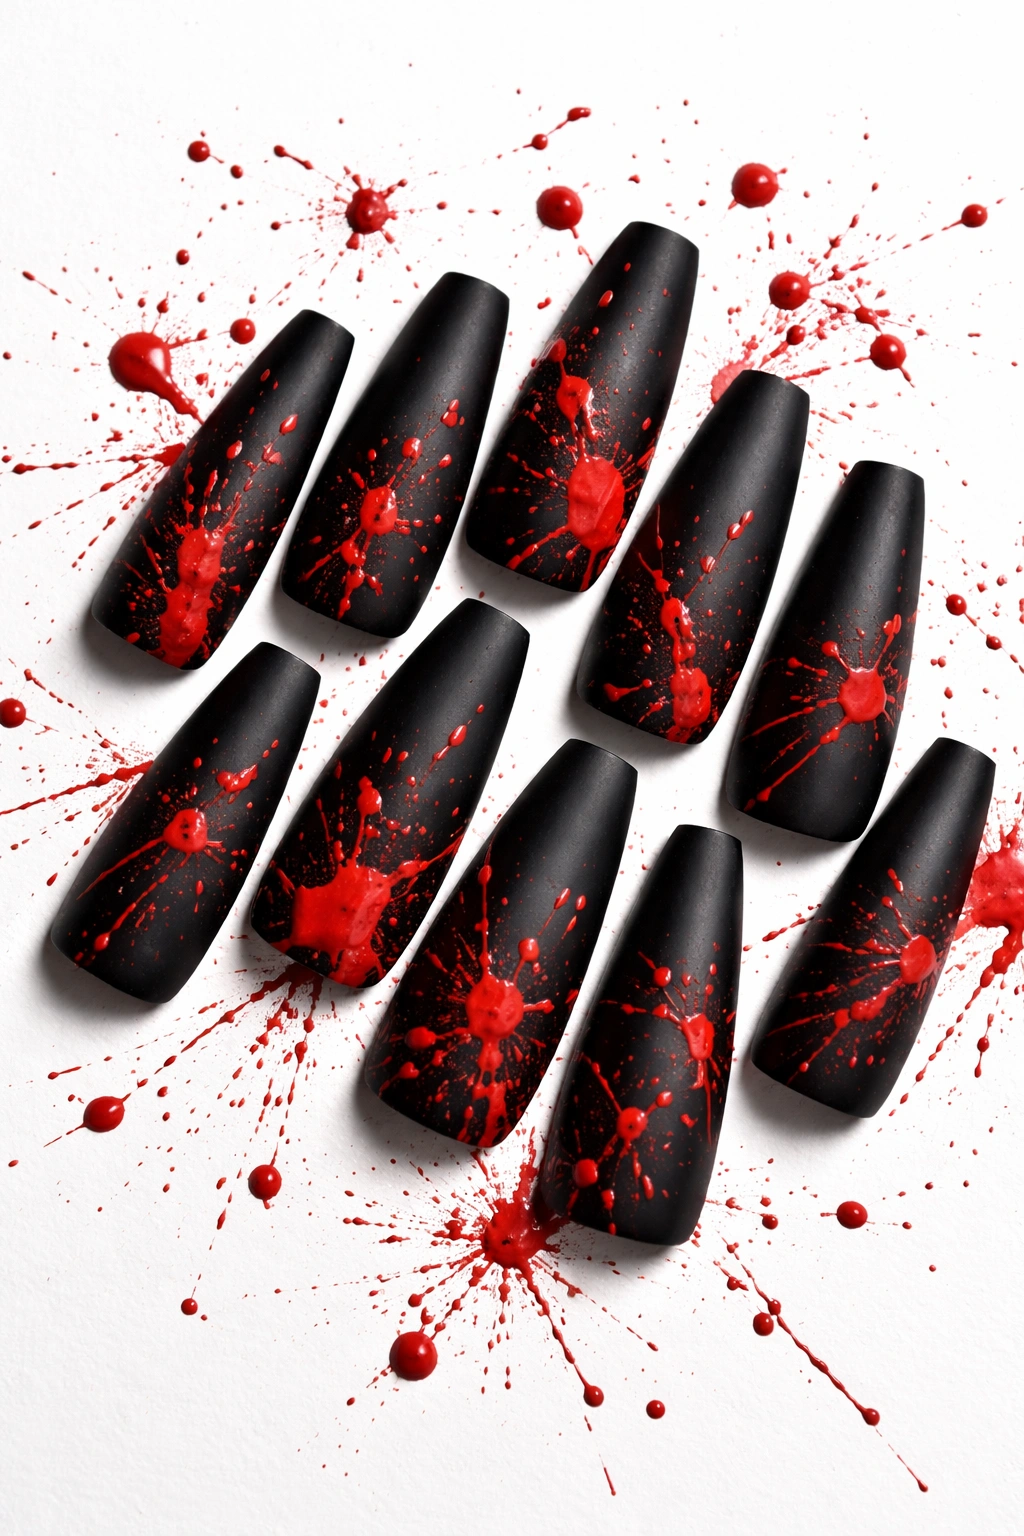
Splatter nail art involves flicking or spattering paint onto your base to create an energetic, abstract effect. Start with a matte black base and splatter red paint across it—use a thin detail brush flicked across the nail, or dip a toothpick in red and drag it across the surface to create lines that break into droplets. The result is edgy, artistic, and feels less formal than most of the designs on this list. Splatter art embraces imperfection, which paradoxically makes it feel deliberate and cool.
Creating Splatter Effects That Look Intentional
- Paint your black base and let it dry completely
- Dip a thin brush into red gel polish
- Flick it across your nail from above, aiming for a scattering of droplets rather than dripping continuously
- Work over multiple flicks to build up the pattern gradually
- Alternatively, use a straw to blow red polish across the nail for less control but more chaotic energy
- Cure under the lamp
- Seal with a topcoat—glossy will make the splatters shine, matte will make them feel more integrated
Controlling Chaos in Splatter Art
The paradox of splatter nails is that they feel random but should still look intentional. Aim for coverage across the entire nail rather than clumping all splatters in one area. Keep some black showing through so it doesn’t become a confusing mess. If splatter feels too chaotic, just practice on a few nails before committing your whole hand to the effect.
11. Black Cat Eye Effect With Red Accents
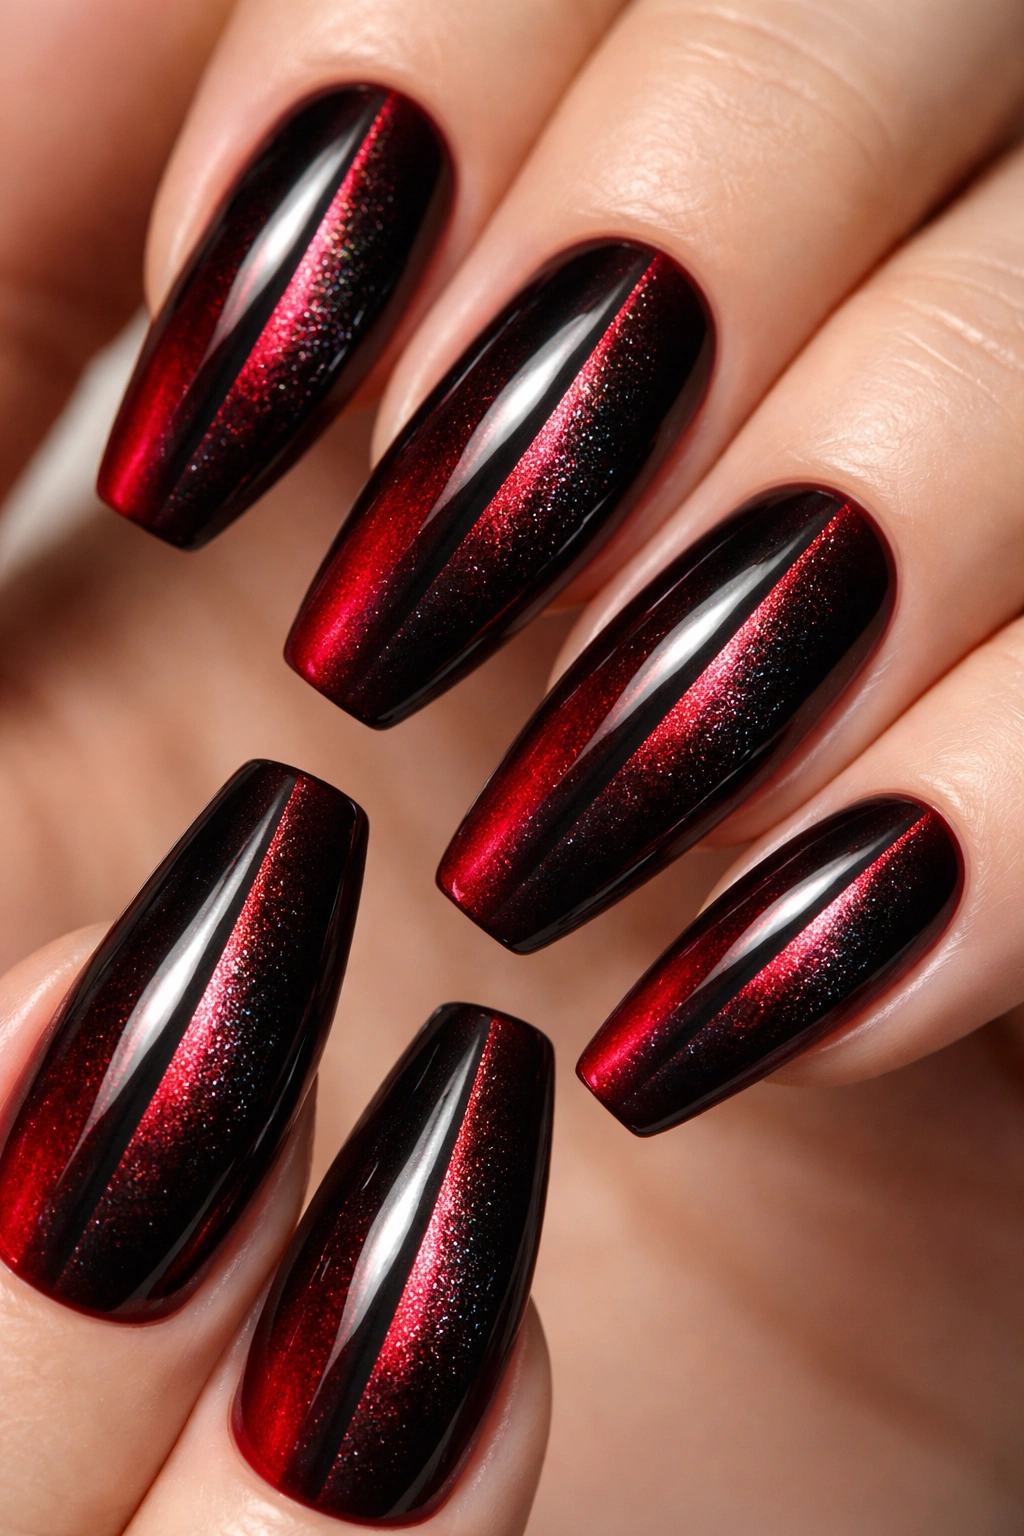
Cat eye manicures create a shimmering vertical line that moves across the nail as you tilt your hand, achieved using special magnetic nail polish. Paint your base red, then add a black cat eye line running vertically down the center. The “eye” shifts and changes as light hits it, creating an almost supernatural effect. The moving shimmer is especially striking against red. Add thin black outlines around the eye for definition and a slightly mystical aesthetic.
How Cat Eye Magnetic Polishes Work
- Cat eye polishes contain iron particles that respond to a magnet held near the wet polish
- As the magnet passes over wet polish, the particles align, creating a visible line or pattern
- Different magnet shapes and movements create different effects—a straight vertical line, a wave, or horizontal stripes
- Always use your magnetic wand on freshly applied polish before it cures
Creating a Coffin-Shaped Cat Eye Design
- Paint your red base and cure it
- Apply black cat eye magnetic polish over top
- Hold a straight-edged magnet about one-quarter inch above the nail, running it vertically from cuticle to tip
- This should create a distinct vertical line of shimmer
- You can make the eye thicker or thinner depending on how long you hold the magnet in place
- Once you’ve created your line, immediately cure the polish
- Optional: outline the eye with a thin black line using a detail brush to emphasize the effect
Wearing Cat Eye Nails Confidently
Cat eye nails are statement-making, almost mystical-looking, which suits the red-black combination perfectly. They’re artistic enough for special occasions but interesting enough to wear casually if you love the look.
12. Negative Space Design With Red and Black
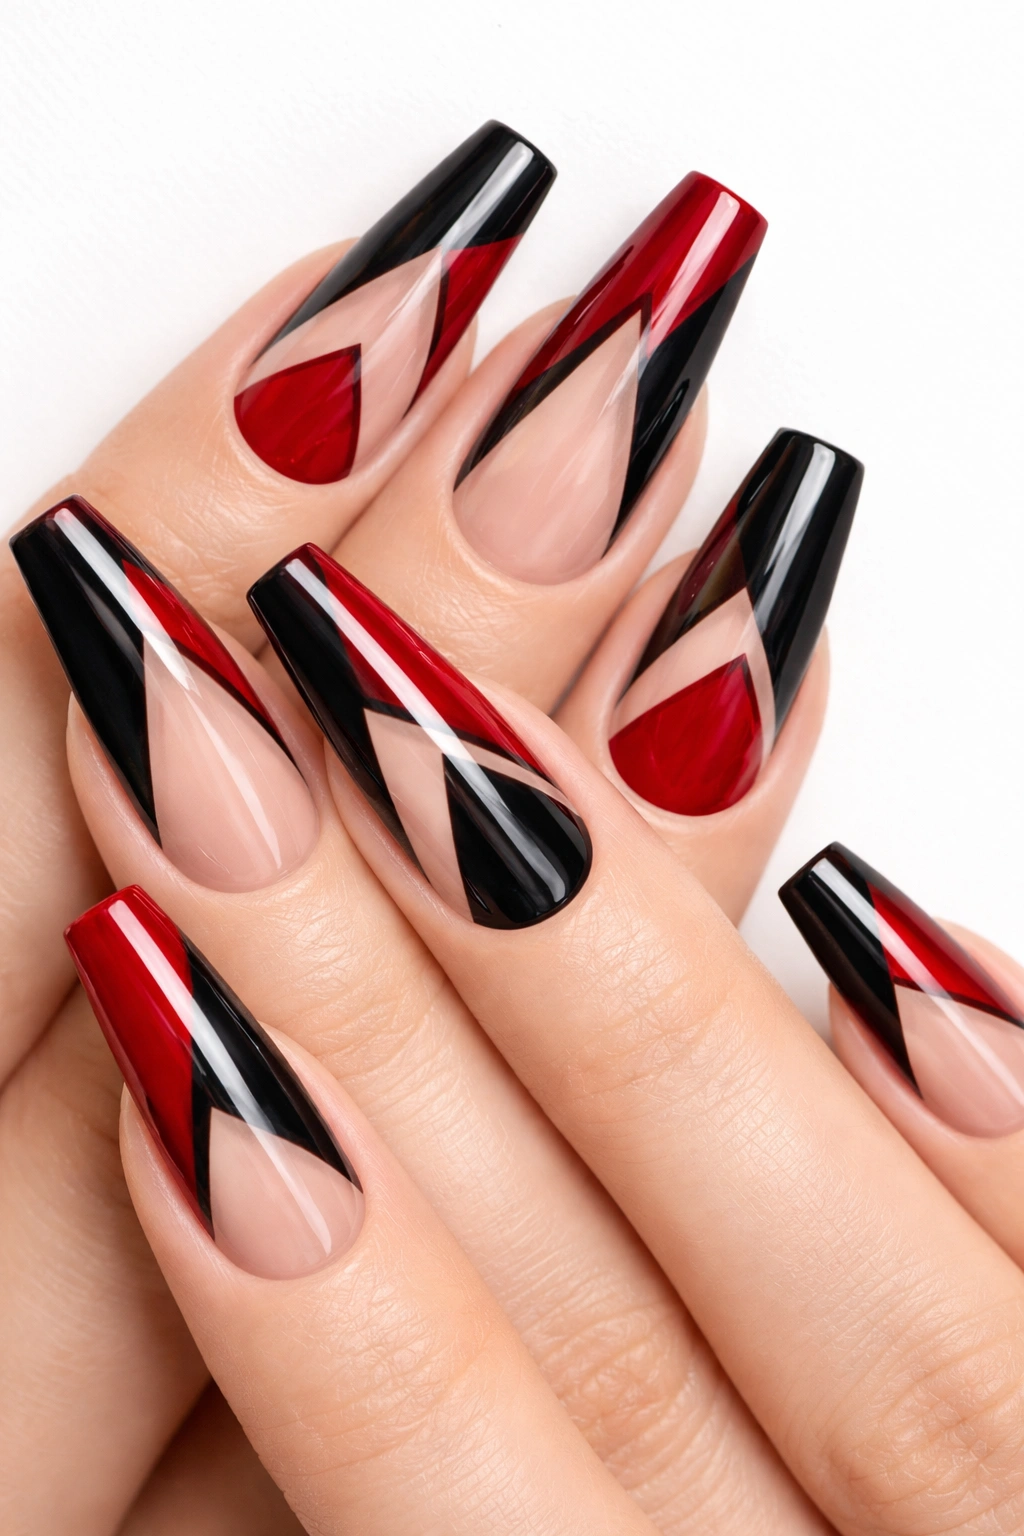
Negative space nails intentionally leave areas of your natural nail bare, using that exposed nail as part of the design. Paint black on some portions and red on others, leaving geometric areas completely unpainted. This approach is clever because the natural nail tone becomes a third color, creating visual interest from minimal coverage. On coffin nails, negative space designs can be particularly striking because the large surface area accommodates complex patterns.
Creating Clean Negative Space Designs
- Plan your pattern first—perhaps a diagonal stripe of black, a diagonal stripe of red, with the remaining space left bare
- Use painter’s tape to mask off the areas you want to leave unpainted
- Apply your first color within the tape boundaries
- Cure and remove the tape
- Reposition tape for your second color
- Apply the second color and cure
- Leave everything else bare as negative space
- Seal with a clear topcoat to protect the natural nail exposed in the negative space
Negative Space Pattern Ideas
Create a geometric pattern where black and red form puzzle-like pieces with bare nail creating additional visual lines. Try a corner block of black or red positioned at the tip, leaving the rest bare. Paint two diagonal stripes of each color crossing each other with negative space in the corners.
13. Red Ombre Reverse Nails: Dark at Cuticle, Bright at Tip
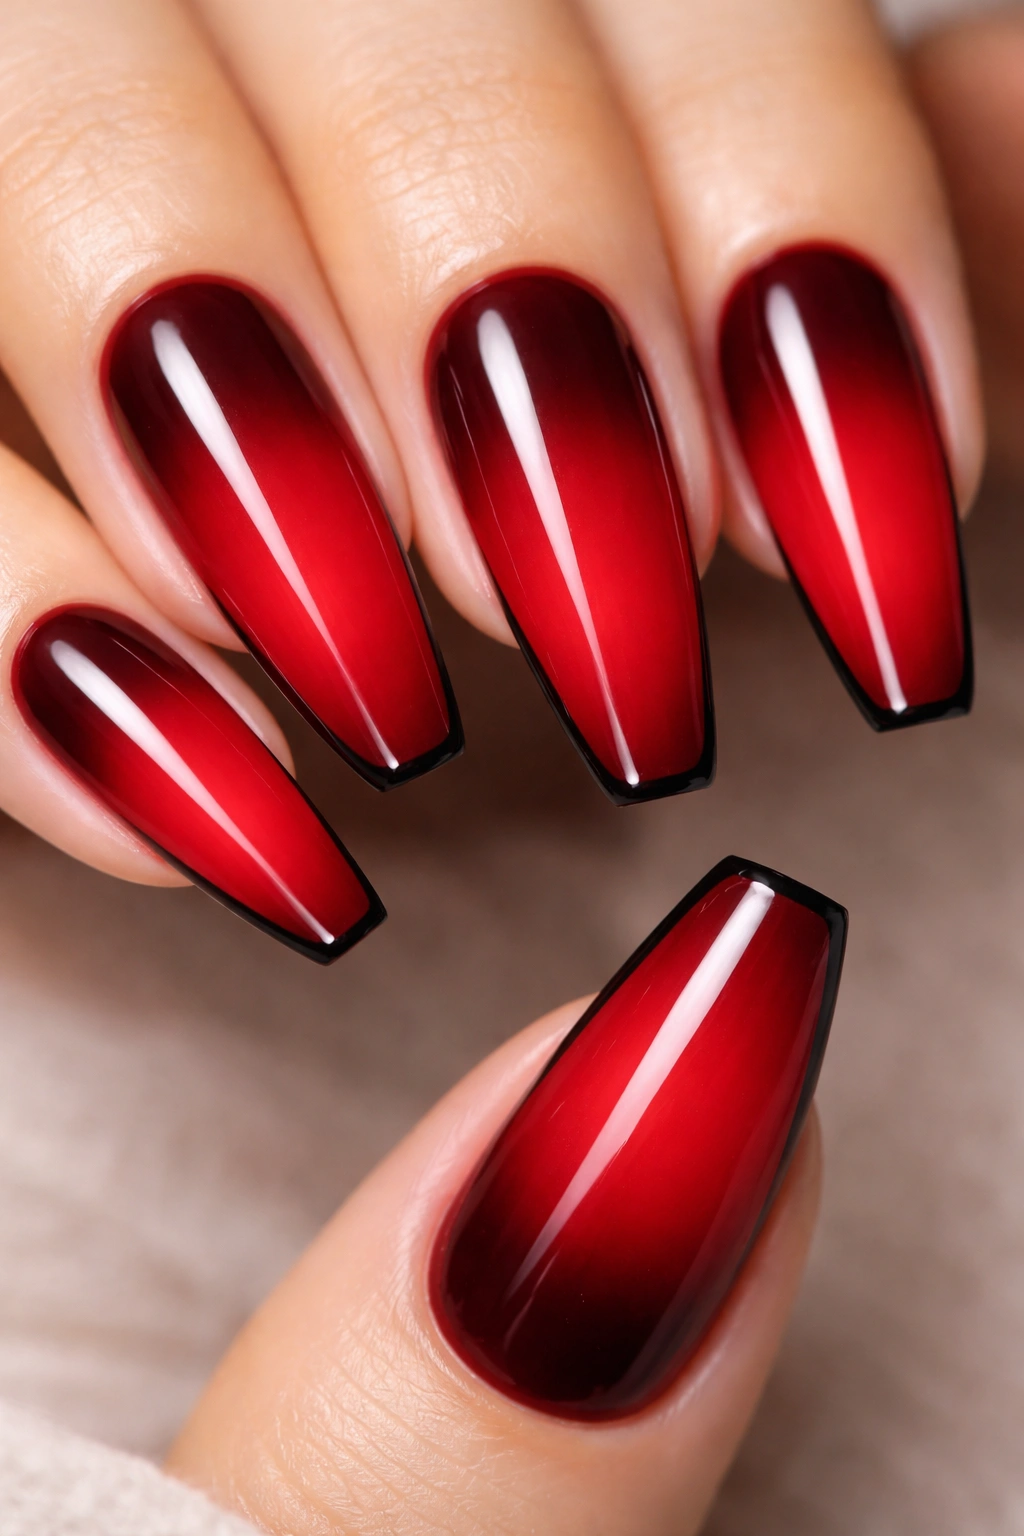
Flip the traditional ombre orientation—start with a deep crimson at the cuticle and fade to a bright, almost cherry-red at the tip, then transition to a thin black line at the very edge. This design creates an unexpected light-to-bright journey, which feels more dynamic than the expected dark-to-light gradient. The reverse ombre challenges color expectations and feels artistic. Adding the black tip acts as an anchor that grounds the brightness of the red.
Executing a Reverse Color Gradient
- Paint your deepest red at the cuticle area
- Apply a mid-tone red across the middle, feathering it into the deep red
- Apply your brightest red near the tip
- Use a makeup sponge and bouncing technique to blend all the reds seamlessly
- Paint a thin black line at the very edge as a finishing touch
- Cure between layers to prevent muddying
- Seal with a glossy topcoat to enhance the gradient’s visual flow
Color Psychology of Reverse Ombre
Bright colors at the tips draw the eye toward the end of the nail, which creates a sense of movement and dynamism. This works psychologically to make your nails feel longer and more dramatic. Combined with the coffin shape’s natural length, a reverse ombre feels especially elongating.
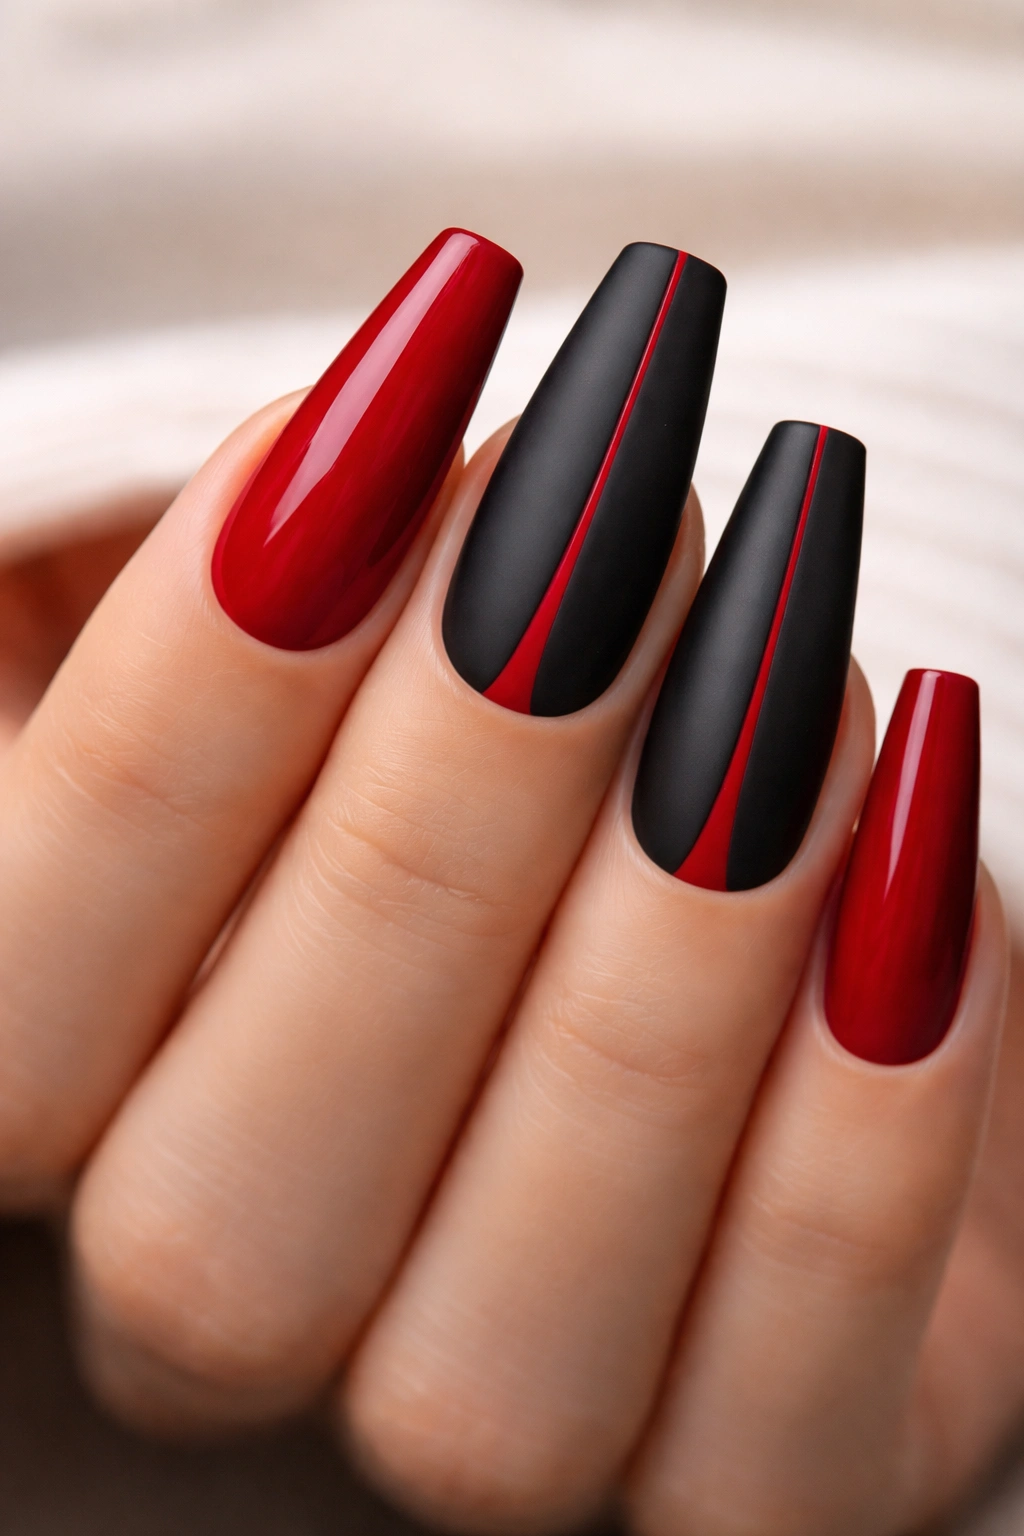
14. Minimal Line Art: Red Lines on Black Background
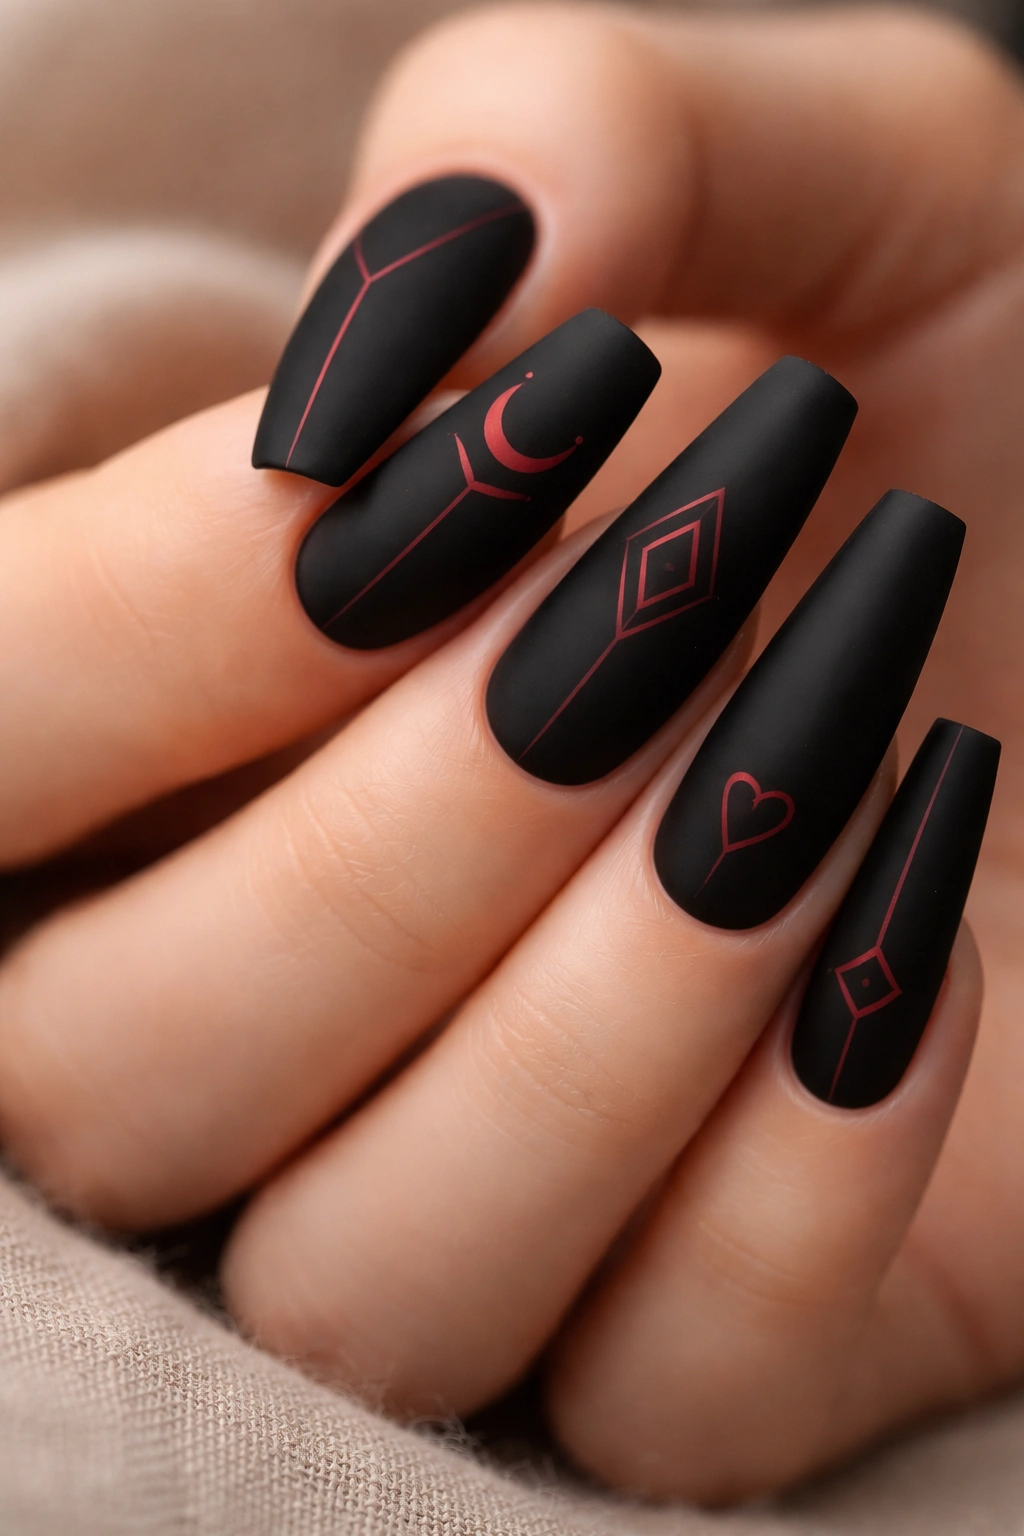
Paint a black base on all nails, then use a very fine detail brush to paint minimal red line art. This might be abstract lines forming shapes, geometric patterns, or even tiny representations of objects—hearts, arrows, symbols, waves. Keep it minimal and precise. Each line should be intentional. This design celebrates simplicity and looks sophisticated rather than childish because of the color choice and matte black backdrop. On coffin nails, you have enough surface area to include meaningful detail without the design feeling crowded.
Developing Your Minimalist Line Art Style
- Start by deciding on your line art subject: abstract, geometric, or representational
- Use a white pencil to sketch guidelines on your black base
- Switch to your red line art polish and a very fine brush
- Work slowly and steadily; the appeal of minimalist line art is its precision
- Clean up any mistakes with a detail brush dipped in acetone
- Seal with a matte or glossy topcoat depending on the mood you want—matte feels more modern, glossy feels more romantic
Minimalist Design Ideas
Paint tiny red arrows pointing downward across your nails, thin red geometric shapes (triangles, circles, squares), abstract line patterns that suggest movement, or scattered red dots connected by lines to create constellation-like patterns.
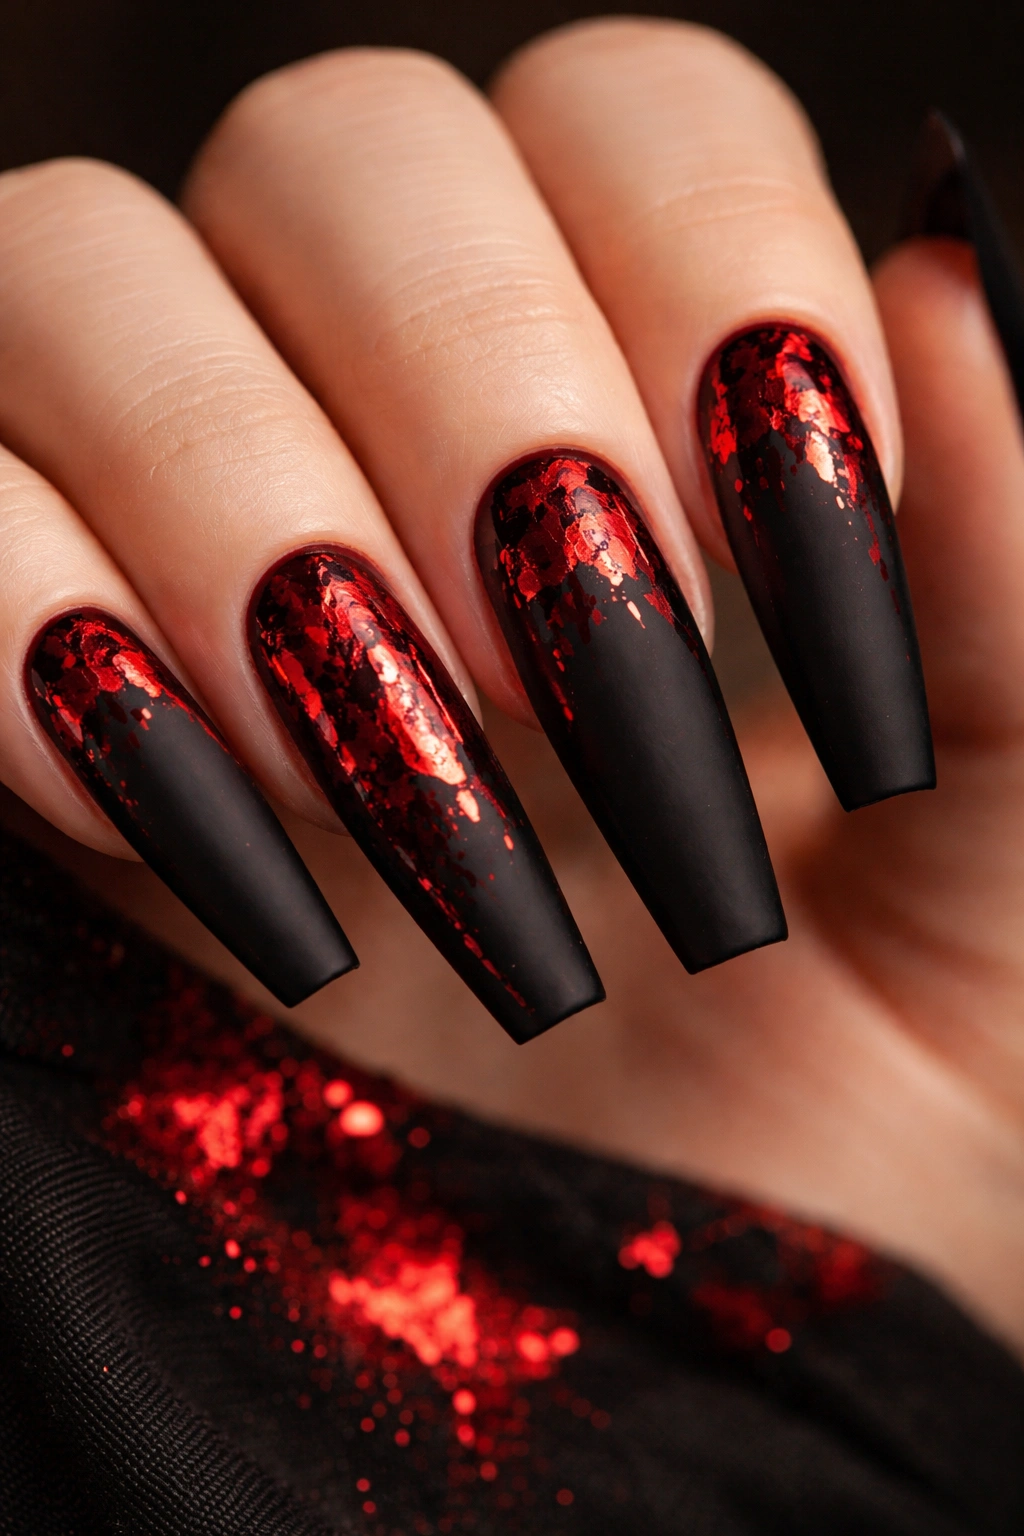
15. Black Gradient With Red Flakes and Texture
Paint a gradient of black—darker at the tip, lighter (charcoal) at the cuticle—then add red flakes or crushed glass scattered throughout for texture. The flakes catch light and create a dimensional, almost glittery effect without being traditionally glittery. The contrast between matte black gradient and shiny red flakes is visually dynamic. This design is tactile and interesting to look at from multiple angles. The coffin nail’s surface gives texture room to develop without feeling chaotic.
Adding Texture to Gradient Nails
- Paint your black gradient base using the ombre sponging technique
- Cure the gradient
- Paint a layer of thick clear builder gel or clear polish over the entire nail
- While still wet, sprinkle or press red flakes or crushed texture into the wet layer
- Cure and seal with a topcoat to protect the texture
Finding the Right Flake Materials
Red mica flakes specifically designed for nail art distribute evenly and catch light beautifully. Crushed red glass or even finely chopped red foil can work. Alternatively, use red holographic flakes for extra light-catching shimmer against the dark base.
16. Red and Black Checkered Pattern
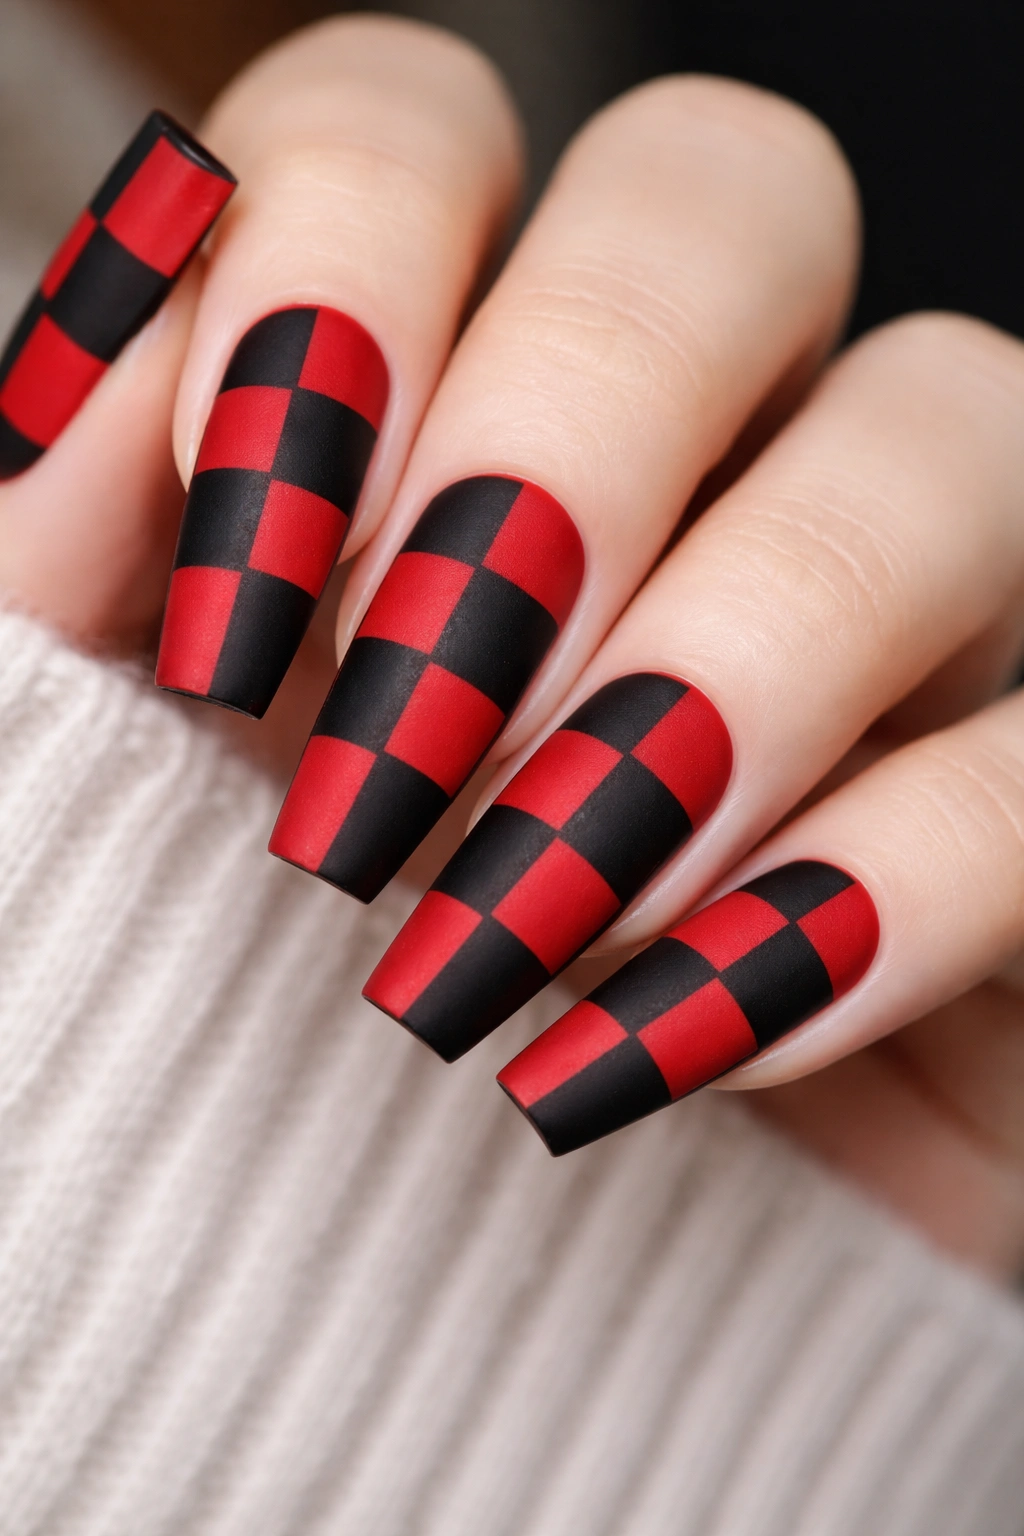
A checkered or gingham pattern in red and black is graphic, bold, and undeniably striking. Paint your base with alternating red and black squares—they can be large and bold or small and delicate depending on the mood you want. Checkered patterns feel playful and retro simultaneously, especially in this classic color combination. The coffin nail’s width accommodates checkered patterns beautifully; the pattern doesn’t feel cramped or oversized.
Creating Precise Checkered Patterns
- Paint a base color (let’s say red) across all nails and cure it
- Use painter’s tape to create a grid pattern—if you want one-inch squares, mark and tape accordingly
- Paint black in alternating squares where tape isn’t protecting your base
- Remove tape carefully while polish is still slightly wet for clean edges
- For smaller checkered patterns, a thin brush and steady hand work better than tape
- Seal everything with a topcoat
Checkered Variations
Large bold checks feel more statement-making and playful. Tiny checks feel more intricate and sophisticated. You can also create diagonal checkered patterns by angling your tape or freehand approach, which feels less traditional and more artistic.
17. Red Ombre Dust Effect Over Black Base
Ombre dust nail art uses a powder or super-fine glitter dusted over gel polish while it’s wet, creating an airbrushed effect. Start with a black base, then apply clear gel over top and dust red ombre powder or crushed pigment onto the wet gel, building color intensity from sheer at the cuticle to opaque at the tip. The result is an ethereal, almost smoky transition from black to red. This technique feels more advanced but creates results that look professionally airbrushed. On coffin nails, the dust effect covers enough surface area to really showcase the technique’s elegance.
Using Ombre Dust Successfully
- Apply black base and cure
- Apply a layer of clear gel or builder gel over the entire nail
- While still wet, use a soft brush or sponge to dust red ombre powder onto the wet gel
- Build up the color gradually, starting with less product at the cuticle and more near the tip
- Cure the entire nail
- Seal with a topcoat to lock in the dust effect
- Apply a second topcoat if you want extra dimension and protection
Sourcing Ombre Dust Products
Ombre dust specifically designed for nail art is available from most nail supply retailers. It’s finer than typical glitter and creates a more polished, airbrushed appearance. You can also use ultra-fine crushed pigments, though the effect won’t be quite as refined.
18. Striped Nails With Alternating Red and Black Bands
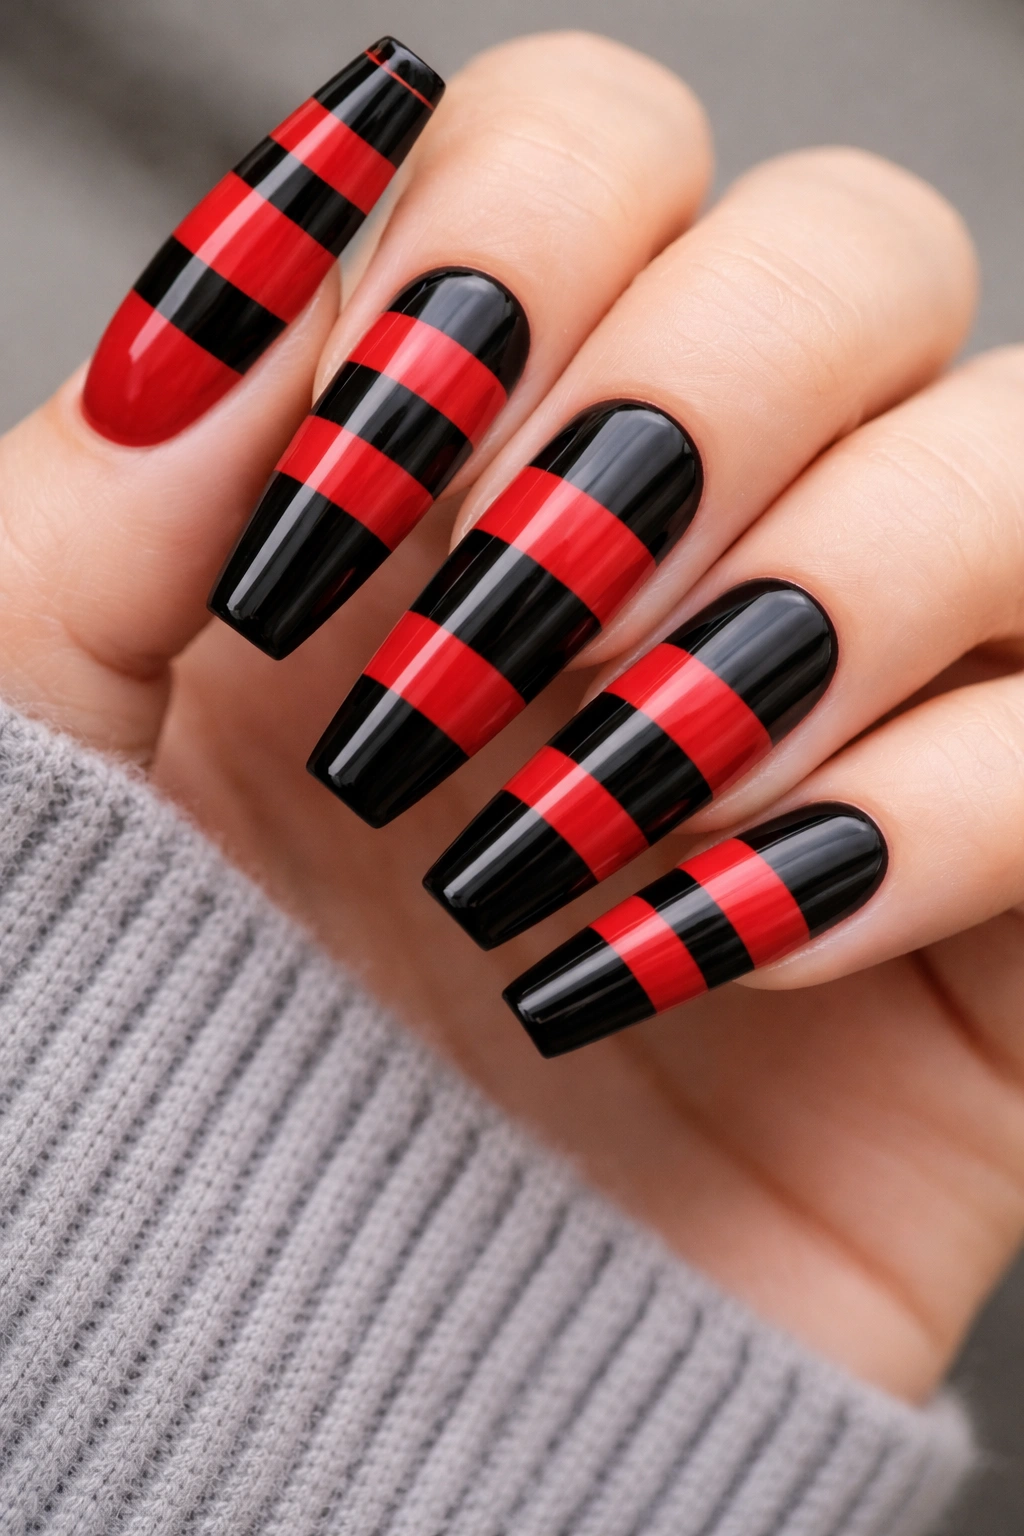
Paint your entire nail with thin horizontal stripes alternating between red and black—thick stripes, thin stripes, thick stripes, thin stripes. The striped pattern creates visual rhythm and feels bold without being chaotic. The stripes emphasize the coffin shape’s length, drawing the eye along the nail toward the tip. This is a simple design that looks more complex and artistic than it actually is to create. Use thick stripes for a bolder look or thin stripes for more visual interest and a less obvious pattern.
Painting Perfect Horizontal Stripes
- Paint your base color (let’s say red) and cure
- Use painter’s tape to mask off horizontal sections where you want your black stripes
- Paint black in the exposed areas
- Remove tape while polish is slightly wet
- Repeat the process if you want multiple stripes of each color
- Seal with a topcoat
Stripe Width Variations That Change the Feel
Wide stripes (approximately one-quarter inch) feel graphic and modern. Thin stripes (approximately one-eighth inch or thinner) feel more intricate and sophisticated. Alternating between different stripe widths creates visual interest—perhaps thick red, thin black, thick red, thin black.
19. Black Base With Red Foil or Metallic Accents
Paint your black base, and while it’s still slightly sticky after curing, press pieces of red foil or metallic red material onto it, or paint metallic red accents that shimmer dramatically against the matte black. The foil catches light and creates unexpected glimmers of shine. This combines matte sophistication with sparkly surprise. You can apply foil to the entire nail for maximum impact, create foil accents at the tips, or scatter foil flakes randomly for an artistic effect. On coffin nails, foil accents catch light beautifully and add dimension to an otherwise simple design.
Applying Foil to Nail Polish Correctly
- Paint your black base and cure it
- Apply a thin layer of foil adhesive (or use a sticky topcoat) over the entire nail
- Wait a few seconds for the adhesive to become tacky but not wet
- Cut your red foil into pieces and press onto the tacky surface
- You can tear foil into organic shapes or cut precise geometric pieces
- Once foil is in place, seal everything with a regular topcoat
- The foil should be completely secure and not lift off with normal use
Red Foil and Metallic Combinations
Rose gold foil over black is luxe and sophisticated. Pure red foil creates a bolder statement. Chrome red foil is ultra-modern. You can mix different metallic finishes on different nails for visual variety while maintaining color cohesion.
20. Yin-Yang Symbol in Red and Black
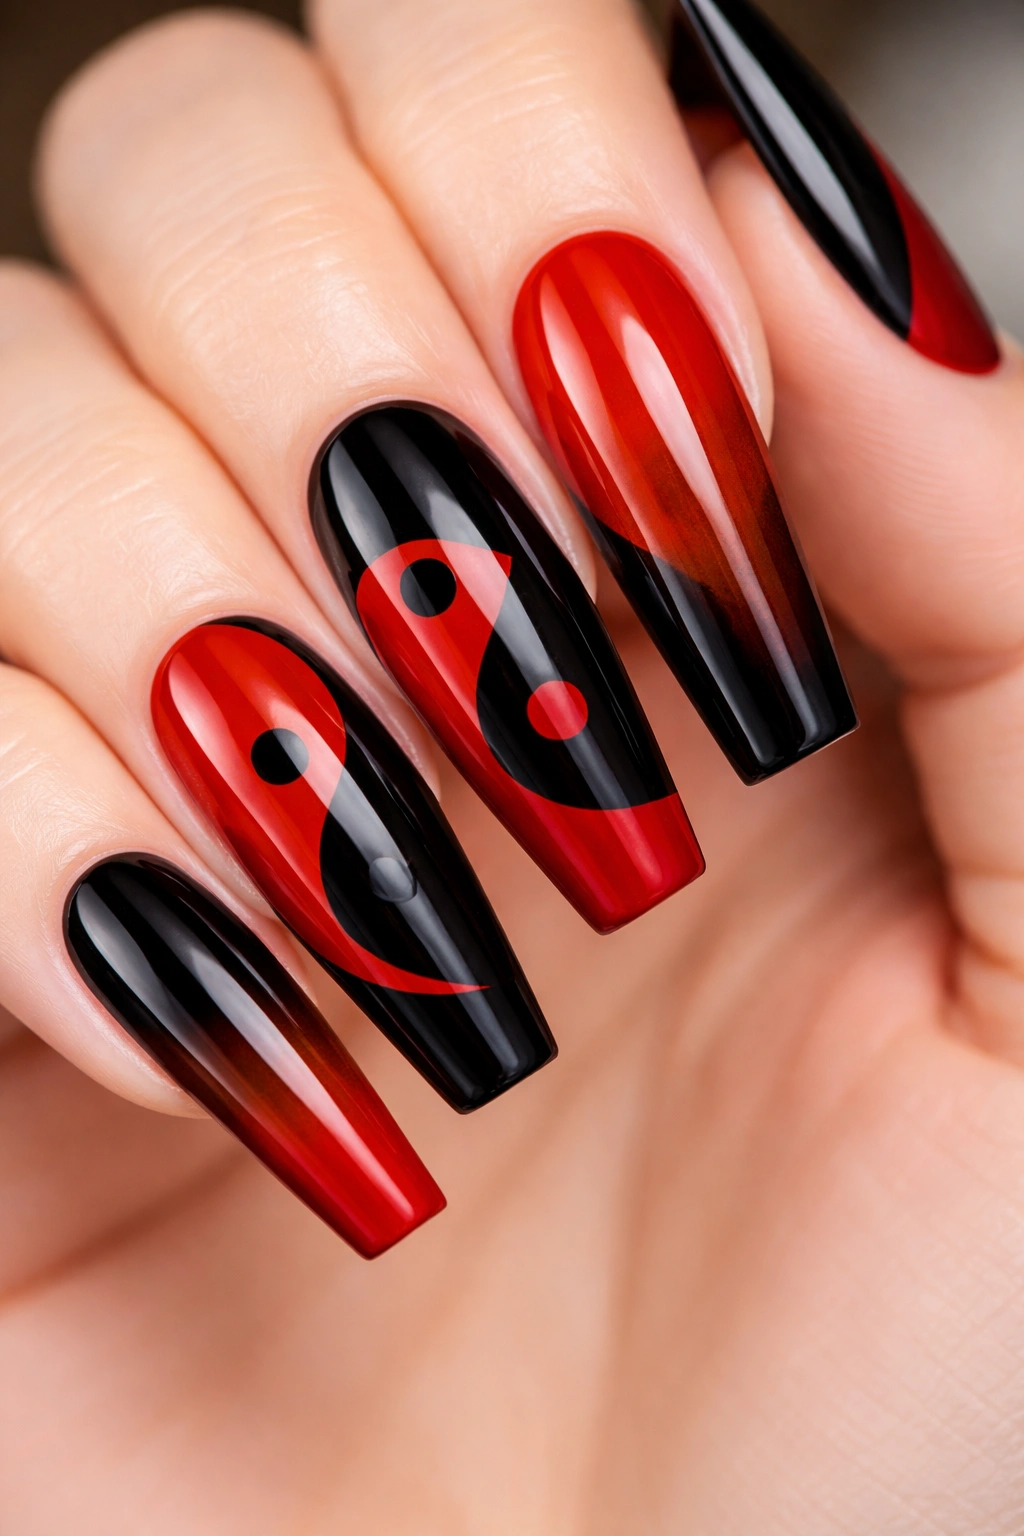
Create the classic yin-yang symbol—one half black with a red dot, one half red with a black dot—spanning across your nail. This design is symbolic, visually balanced, and feels more purposeful than just painting two colors. The yin-yang represents balance between opposing forces, making it philosophically interesting. It’s also simply beautiful to look at. On coffin nails, the yin-yang symbol has enough space to be rendered clearly and meaningfully. This design works on single accent nails or across your entire hand for maximum impact.
Painting a Precise Yin-Yang Symbol
- Paint half your nail red and half black, creating a straight vertical line down the center
- Use a thin detail brush or a dotting tool to paint the contrasting color’s dot in the center of each half (a red dot in the black half, a black dot in the red half)
- Make the dots proportional to your nail size—too tiny and they disappear, too large and they overwhelm the design
- For a softer yin-yang, create the curve between black and red using a thin curved line rather than a straight division
- Seal with a glossy topcoat to make the symbol pop
Variations on the Yin-Yang Theme
Create the traditional yin-yang symbol with a perfectly curved S-line dividing the colors. Make the curve more dramatic or more subtle depending on your aesthetic. Paint the dots slightly offset from center for a less perfectly balanced but more artistic feel. Add thin gold outlines around the dots for extra definition.
Final Thoughts
Red and black coffin nails work because they’re inherently dramatic—the colors command attention and the shape amplifies their presence. Whether you choose a simple split, an intricate ombre, minimalist line art, or a bold patterned design, you’re working with colors that have history, meaning, and undeniable presence. The coffin shape’s extended length lets each design breathe and develop fully, which is why this pairing is so much more striking on longer nails than shorter ones.
The beauty of these twenty approaches is that they span a range of complexity, skill level, and aesthetic—from ultra-simple (the half-moon division) to intricate (the lace pattern). You can recreate any of these at home if you have steady hands and patience, or bring these ideas to your nail technician who can execute them with professional precision. Either way, you’re choosing nails that reflect confidence, artistry, and an appreciation for color and design working together intentionally.
As you explore these options, remember that the best design is the one that resonates with you personally. Some people love maximum sparkle and shimmer; others prefer clean, minimal lines. Some love intricate patterns; others prefer bold simplicity. The range of designs here ensures you’ll find something that fits your aesthetic, your lifestyle, and the image you want to project. Red and black coffin nails are a statement—the question is just what statement you want to make.
