

Blue is one of those universally flattering nail colors that somehow works for every season, every skin tone, and every occasion. The moment you pair it with the elongated sophistication of coffin nails—those tapered, squared-off tips that elongate your fingers and command attention—you’ve got a manicure that’s equal parts elegant and edgy. The thing is, blue doesn’t have to be boring or predictable. There are so many ways to interpret it: cool navy depths that feel almost black, soft periwinkle whispers that read as nearly neutral, jewel-toned sapphires that catch the light like gemstones, and everything in between. Long coffin nails give you the perfect canvas to play with depth, texture, gradients, metallic finishes, and intricate nail art that shorter nails can’t quite pull off with the same impact.
If you’re thinking about refreshing your mani but feel stuck between “too safe” and “too much,” this guide explores 14 distinct blue coffin nail ideas that each bring something different to the table. Some lean minimalist and sophisticated. Others embrace maximalist glamour. A few play with unexpected color combinations or textural contrasts. Whether you’re heading to the office, getting ready for a night out, or just want nails that make you feel confident walking into a room, there’s an idea here that’ll speak to you. Let’s dive into designs that prove blue isn’t just a color—it’s a mood, a statement, and an absolute game-changer for long nails.
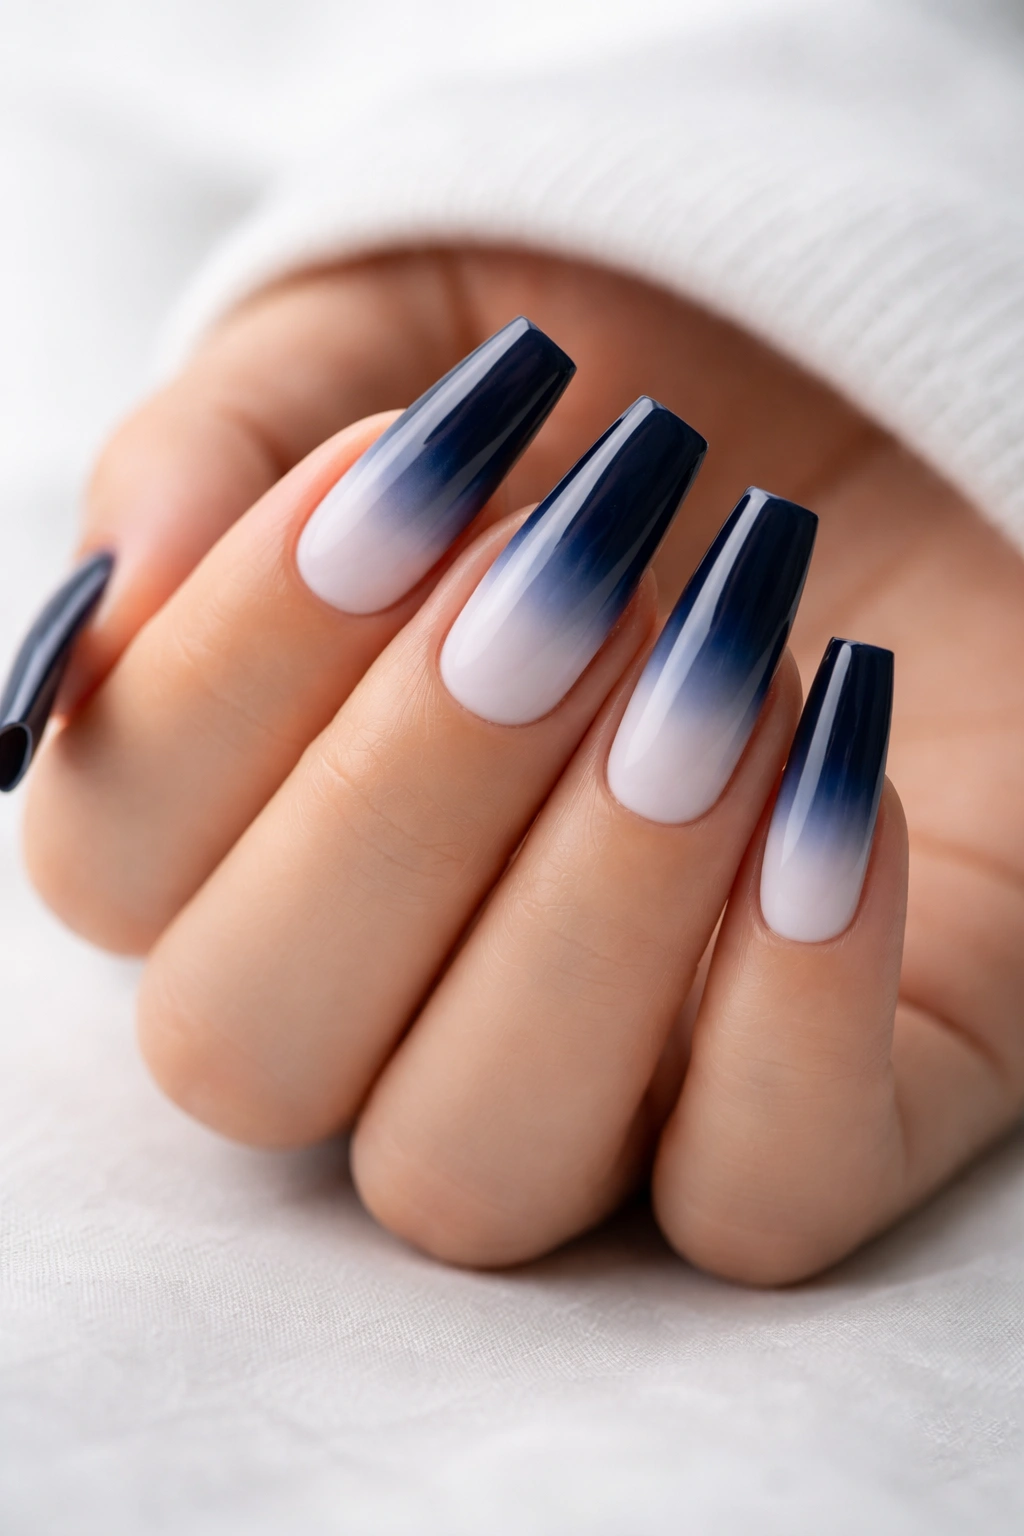
1. Classic Navy Ombre with White Fade
Navy ombre on coffin nails creates an ultra-refined look that transitions from deep, almost-black blue at the base to a crisp white at the tips. This design works because it feels formal enough for a business presentation yet modern and interesting enough to stand out. The gradient isn’t harsh—it’s a smooth, deliberate fade that creates dimension and draws the eye along the length of your nails, making them appear even longer than they are.
Why This Design Commands Attention
The navy-to-white ombre works as a contemporary take on the French manicure, but with so much more personality. Navy is sophisticated without being stuffy, and the white tips give you that clean, polished finish while avoiding the potential stuffiness of an all-navy look. The gradient itself becomes the focal point rather than any additional embellishments—it’s all about the color play and technique.
How to Execute This Look
- Apply a base coat and let it dry completely
- Paint the entire nail white as your base color
- Using a makeup sponge, gently dab navy blue onto the sponge and apply it to the base of the nail in a dabbing motion, allowing the color to fade toward the white tips
- Repeat this process 2-3 times, building depth and creating a smoother gradient with each application
- Seal everything with a glossy top coat for a polished finish
Pro tip: If your sponging technique feels uneven at first, use a small fluffy brush with a touch of white or a very light blue to blend the transition line and soften any harsh edges.
2. Sapphire Blue with Delicate Gold Leaf Accents
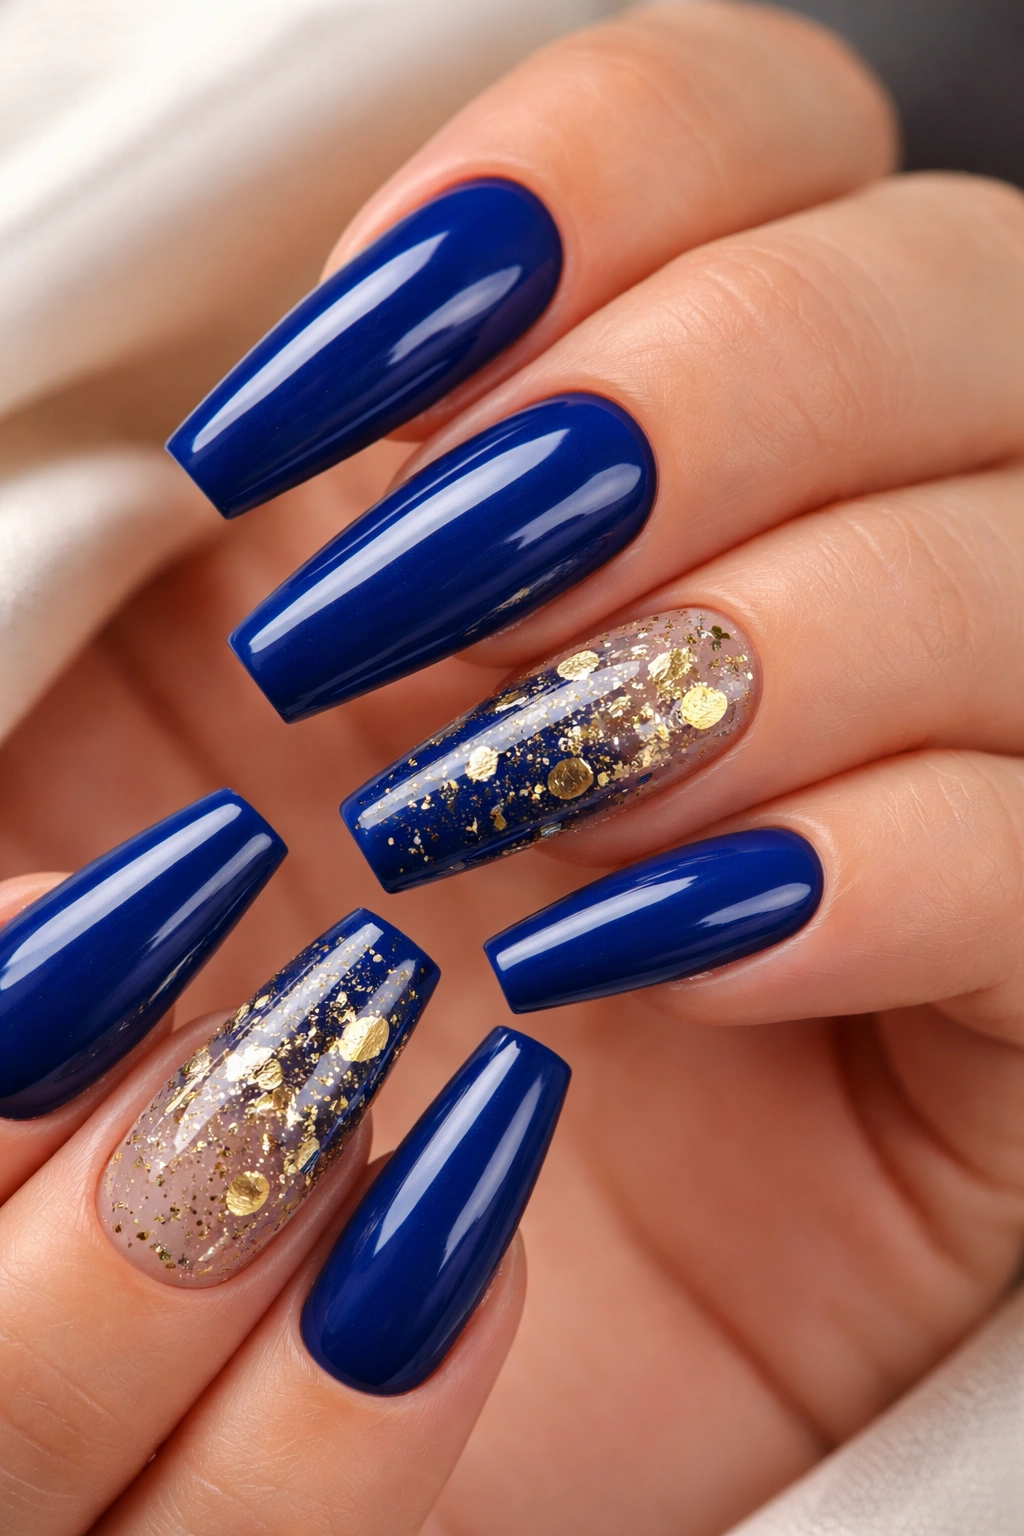
When you layer rich sapphire blue with thin gold leaf scattered across one or two accent nails, you’re creating something that feels genuinely luxurious. The warmth of the gold against the cool depth of sapphire creates a sophisticated contrast that catches light and draws attention. On coffin nails, this combination feels almost jewelry-like—the geometric shape of the nail bed becomes the perfect frame for minimalist gold detailing.
What Makes This Combination Work
Gold and sapphire blue have been paired together for centuries in everything from royal regalia to fine jewelry. On nails, this pairing brings that same sense of understated luxury. The gold doesn’t overwhelm—it enhances and adds dimension to what’s already a stunning base color. This is the kind of manicure that makes people compliment your hands without being able to pinpoint exactly why they’re so drawn to them.
Building This Design Layer by Layer
- Apply two coats of a deep, rich sapphire blue polish, allowing each to dry fully
- On your accent nails (typically your ring finger and pinky, or just your ring finger), apply a very thin layer of clear gel or regular top coat
- While still tacky, gently place small pieces of gold leaf or use a gold foil applicator, pressing gently to adhere
- Seal the entire design with a glossy or matte top coat depending on your preference
Worth knowing: Real gold leaf can be delicate and shift easily, so seal it with a thick, high-quality top coat to keep it in place throughout the week.
3. Midnight Blue Marble with Black Swirls
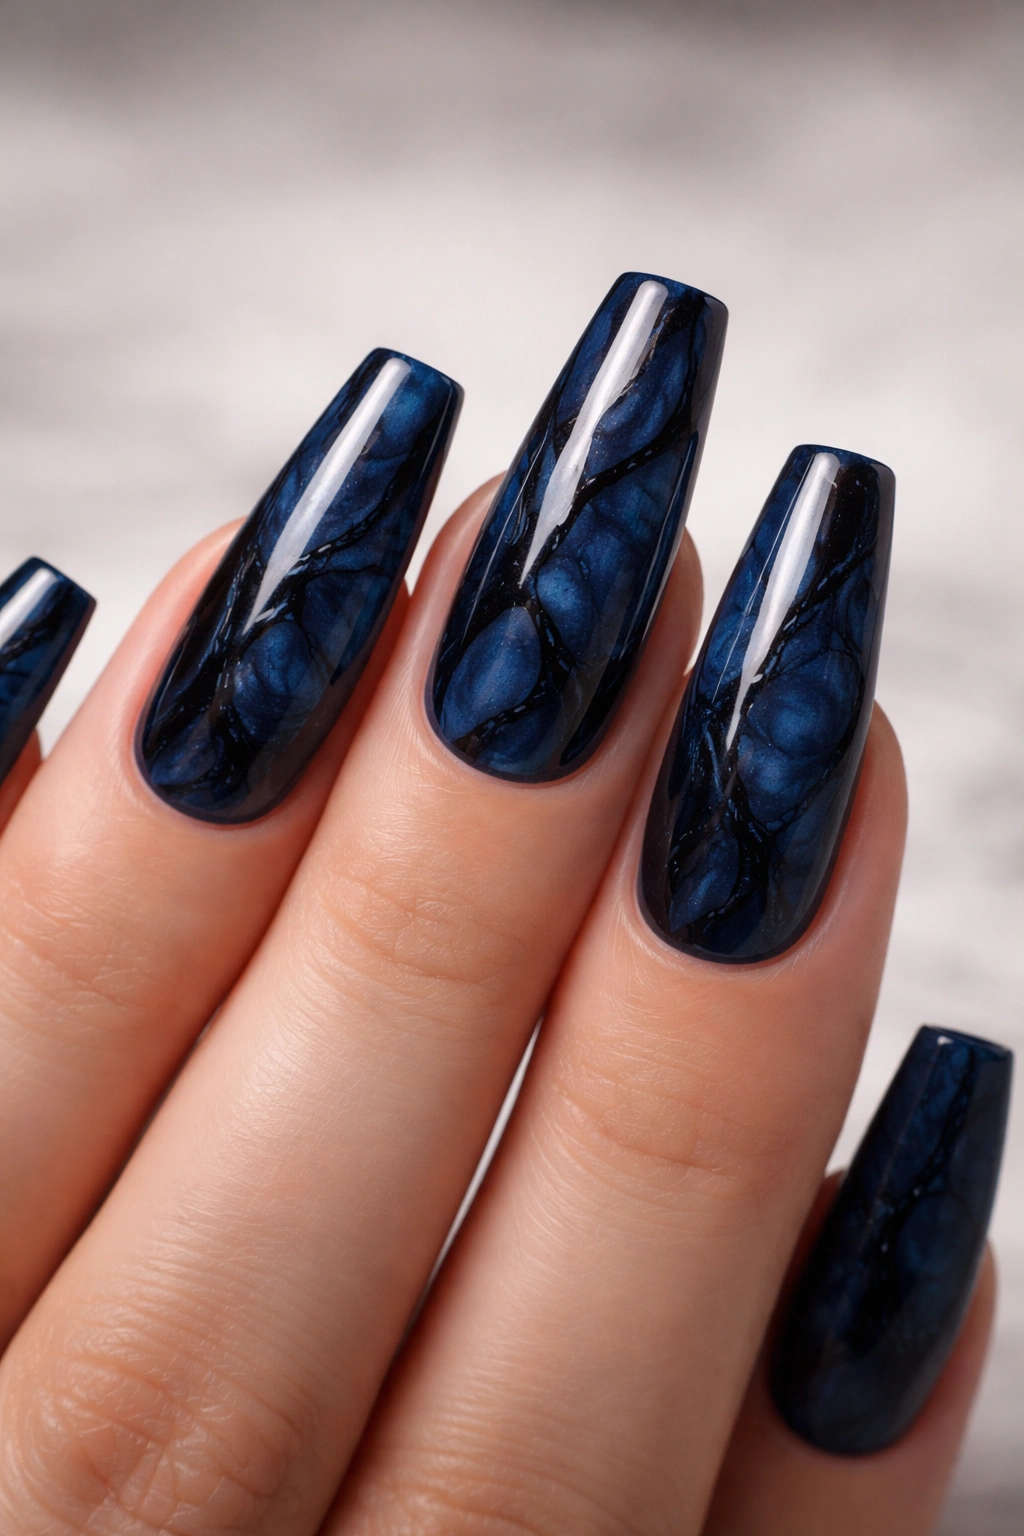
Marble nail art on long coffin nails is pure drama. A base of midnight blue (so dark it’s almost black) combined with black marble swirls and veining creates an effect that mimics natural stone—like you’ve got actual polished marble or lapis lazuli on your fingertips. This design reads as artistic and intentional, and it’s a lot easier to achieve than it looks.
Why Marble Works on Elongated Nails
The length of coffin nails gives you more surface area to work with, so the marble veining can be more intricate and detailed without feeling cramped. The geometric shape of the nail also frames the marble pattern beautifully—there’s something about the squared-off edge that makes the organic, flowing marble design pop even more by contrast.
Creating the Marble Effect
- Paint the entire nail midnight blue and let it dry completely
- Using a thin nail art brush or toothpick, create irregular lines and veins across the nail surface with black gel or polish
- Work freehand with organic, wandering lines—they don’t need to be perfect or symmetrical
- For a more complex look, add very thin white or gray lines alongside the black for additional depth
- Seal with a glossy top coat
Insider note: If you mess up a line, you can wipe it away with a damp brush or cotton swab before it fully dries, so don’t stress about perfection—marble is meant to look natural and slightly imperfect anyway.
4. Baby Blue with Delicate White Tips
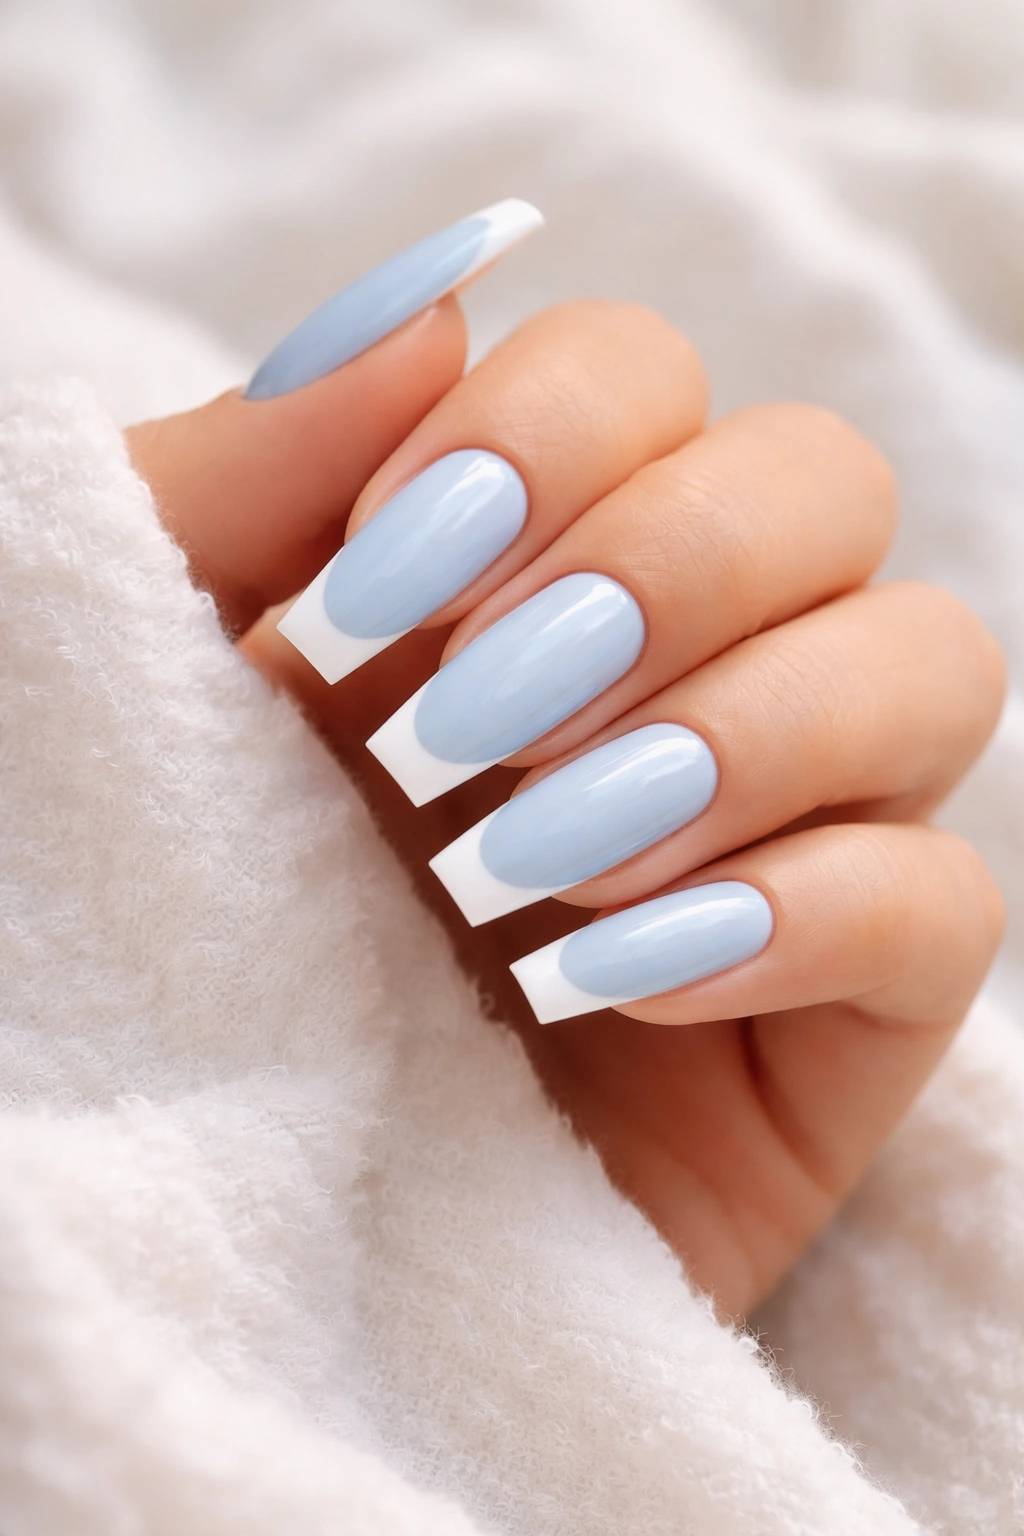
A soft, pale blue paired with crisp white tips is the dreamy, romantic counterpoint to darker blue designs. This feel-good manicure balances sweetness with the inherent sophistication of the coffin shape. Baby blue is calming and versatile—it works for someone heading to the beach, someone attending a summer wedding, or someone who just wants nails that make them smile every time they look at their hands.
Why This Pairing Feels So Fresh
Baby blue sits in this interesting space where it’s neither quite neutral nor boldly saturated. It has enough presence to be a statement, but not so much presence that it demands intense attention. Pairing it with white tips gives you the classic French mani appeal while keeping the overall look light, airy, and seasonless. The combo is elegant without trying too hard.
Step-by-Step Application
- Apply a base coat and one thin coat of baby blue polish
- Once dry, use a thin nail art brush or angled brush to paint white tips that are slightly thicker than a traditional French manicure line
- You can go for a straight, sharp line or a slightly curved, softer line depending on your aesthetic preference
- Add a second coat of baby blue if you feel the color needs more opacity
- Finish with a glossy top coat
Pro tip: If your white line looks wobbly, don’t panic—you can use a white correction pen or touch-up pen to clean up the edge and create a crisper definition between blue and white.
5. Teal Holographic with Scattered Iridescent Glitter
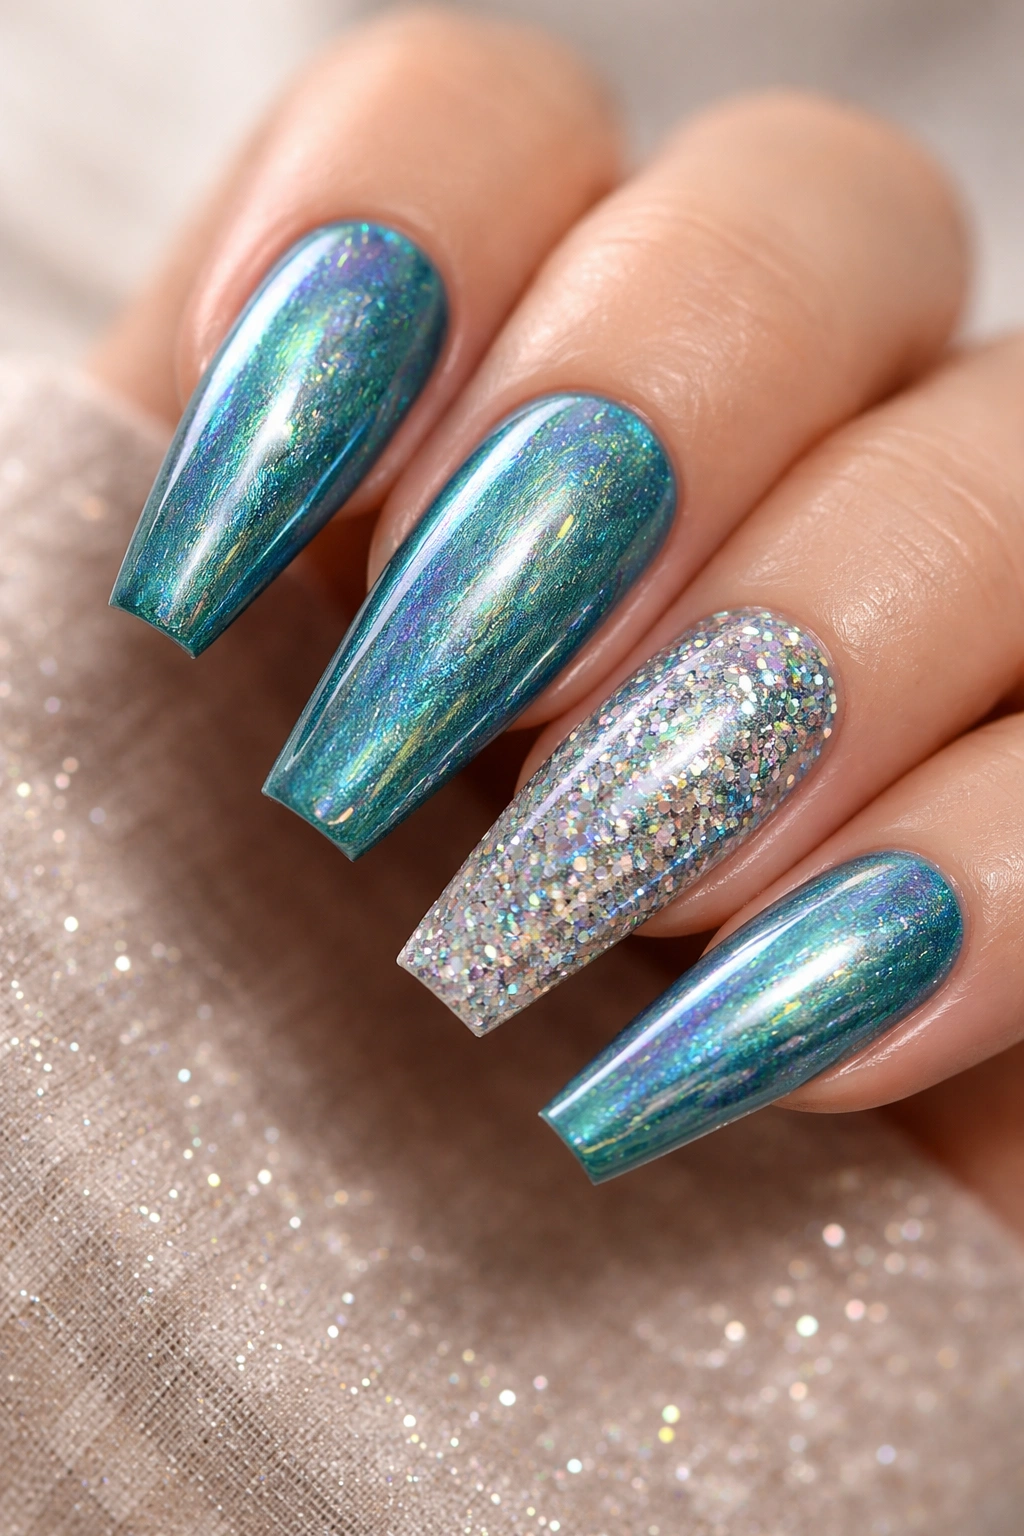
Teal holographic polish is a game-changer for long nails because it shifts and shimmers with every angle and light source. Add scattered iridescent glitter on an accent nail or two, and suddenly you have nails that literally change color depending on how you move your hand. This is the manicure equivalent of that feeling you get wearing something that catches the light in unexpected ways.
The Appeal of Color-Shifting Finishes
Holographic polishes contain special pigments that bend light in multiple directions, creating that rainbow-shifting effect that feels almost magical. On coffin nails, where you have more surface area to appreciate the shimmer, the effect is especially striking. The scattered glitter adds another layer of dimension and catches light independently of the holographic base.
Applying Holographic Color for Maximum Impact
- Paint 2-3 coats of teal holographic polish, building up the color for full opacity and shimmer
- Allow each coat to dry completely before applying the next
- On your accent nails, while the top coat is still slightly tacky, apply scattered iridescent glitter pieces using a small picking tool or tweezers, placing them in a random but intentional pattern
- Once the glitter is positioned, apply a glossy or crystal-clear top coat to seal everything and protect the glitter from snagging
Worth knowing: Holographic polish can sometimes look thin or streaky in indoor lighting, so make sure you’re applying thin, even coats rather than one thick glob. Two to three thin coats will give you better shimmer and color payoff than one heavy coat.
6. Ocean Wave Design with Gradient Blue Tones
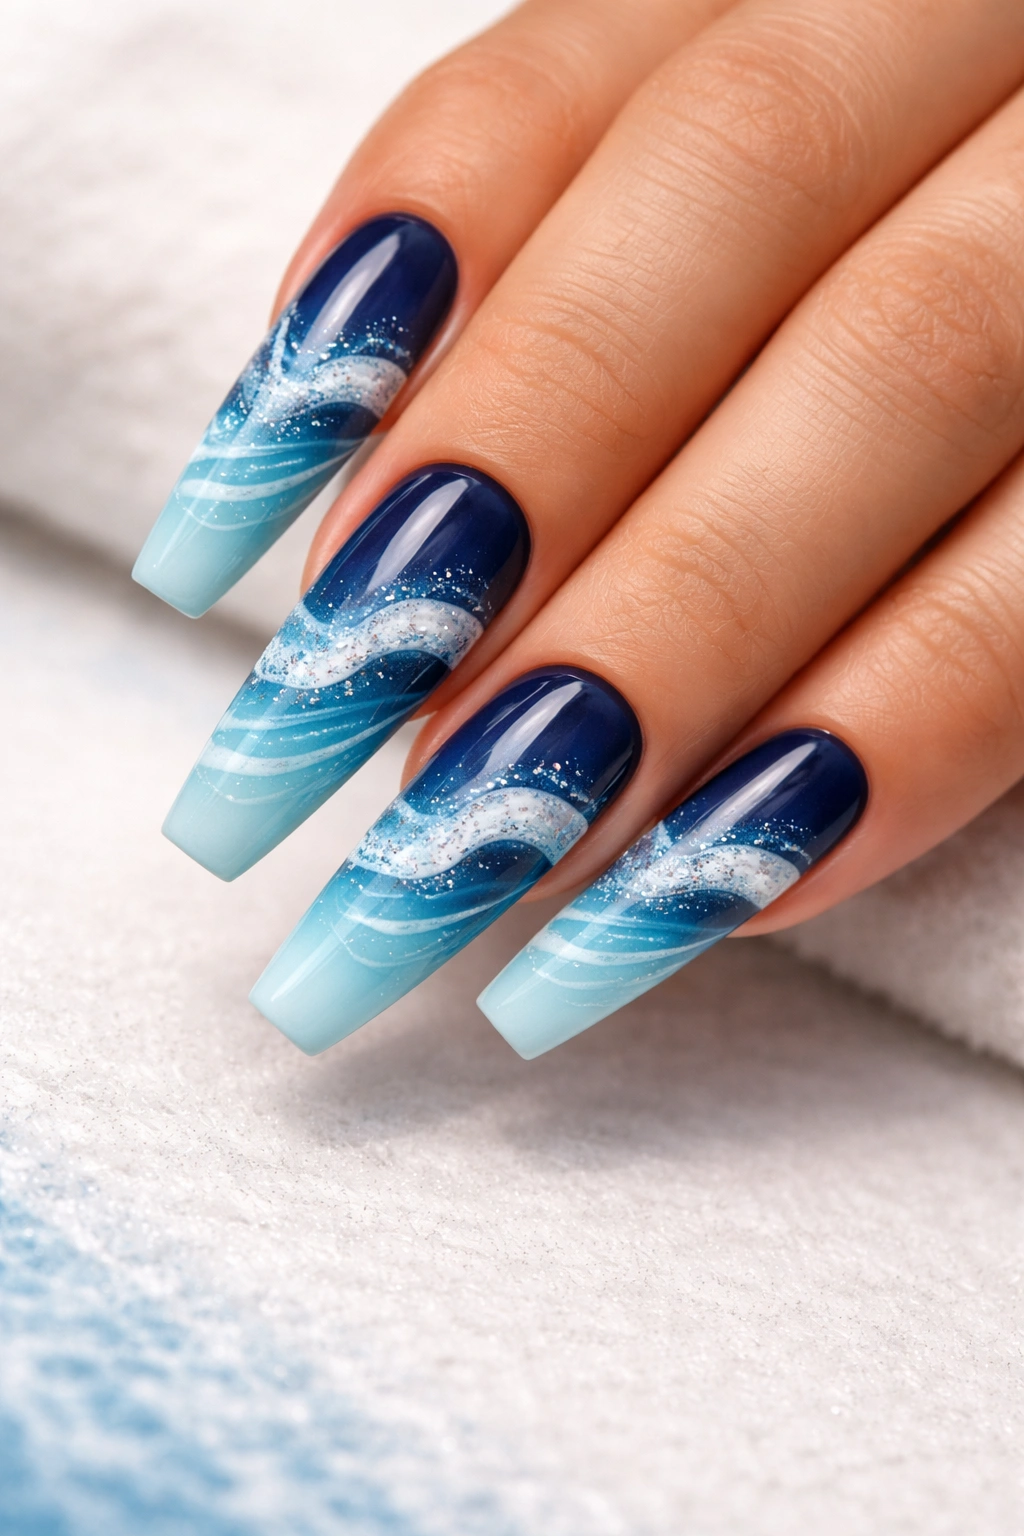
Creating a literal ocean wave design on your nails transforms them into tiny seascapes. Using gradient blues from navy to turquoise, combined with white wave tips and subtle details, you can create a design that feels like you’re carrying a piece of the ocean on your hands. On coffin nails, the length and shape give you enough room to really develop this design with detail and depth.
Why Nail Art Designs Shine on Longer Nails
Shorter nails require simplified, minimalist designs to look proportional. Longer coffin nails, by contrast, can handle more complex nail art without feeling overwhelming. An ocean wave design on coffin nails actually looks more refined than it would on shorter nails because the proportions work better and there’s more canvas to show the detail.
Painting the Ocean Wave Design
- Start with a pale turquoise base coat on all nails
- Using a gradient technique (sponging or a gradient polish), transition from turquoise at the nail tips to a deeper navy blue partway up the nail bed
- With a small detail brush, paint white curved lines along the middle of the nail to represent waves
- Add tiny white dots or dashes along the wave lines to create movement and texture
- Optional: add a touch of glitter or shimmer to the white wave areas for an extra shimmer effect
- Seal with glossy or matte top coat depending on preference
Pro tip: Use a sponging technique for the blue gradient rather than trying to blend by hand—it creates a much smoother, more natural transition that mimics the way sky meets water.
7. Royal Blue Velvet Matte Finish
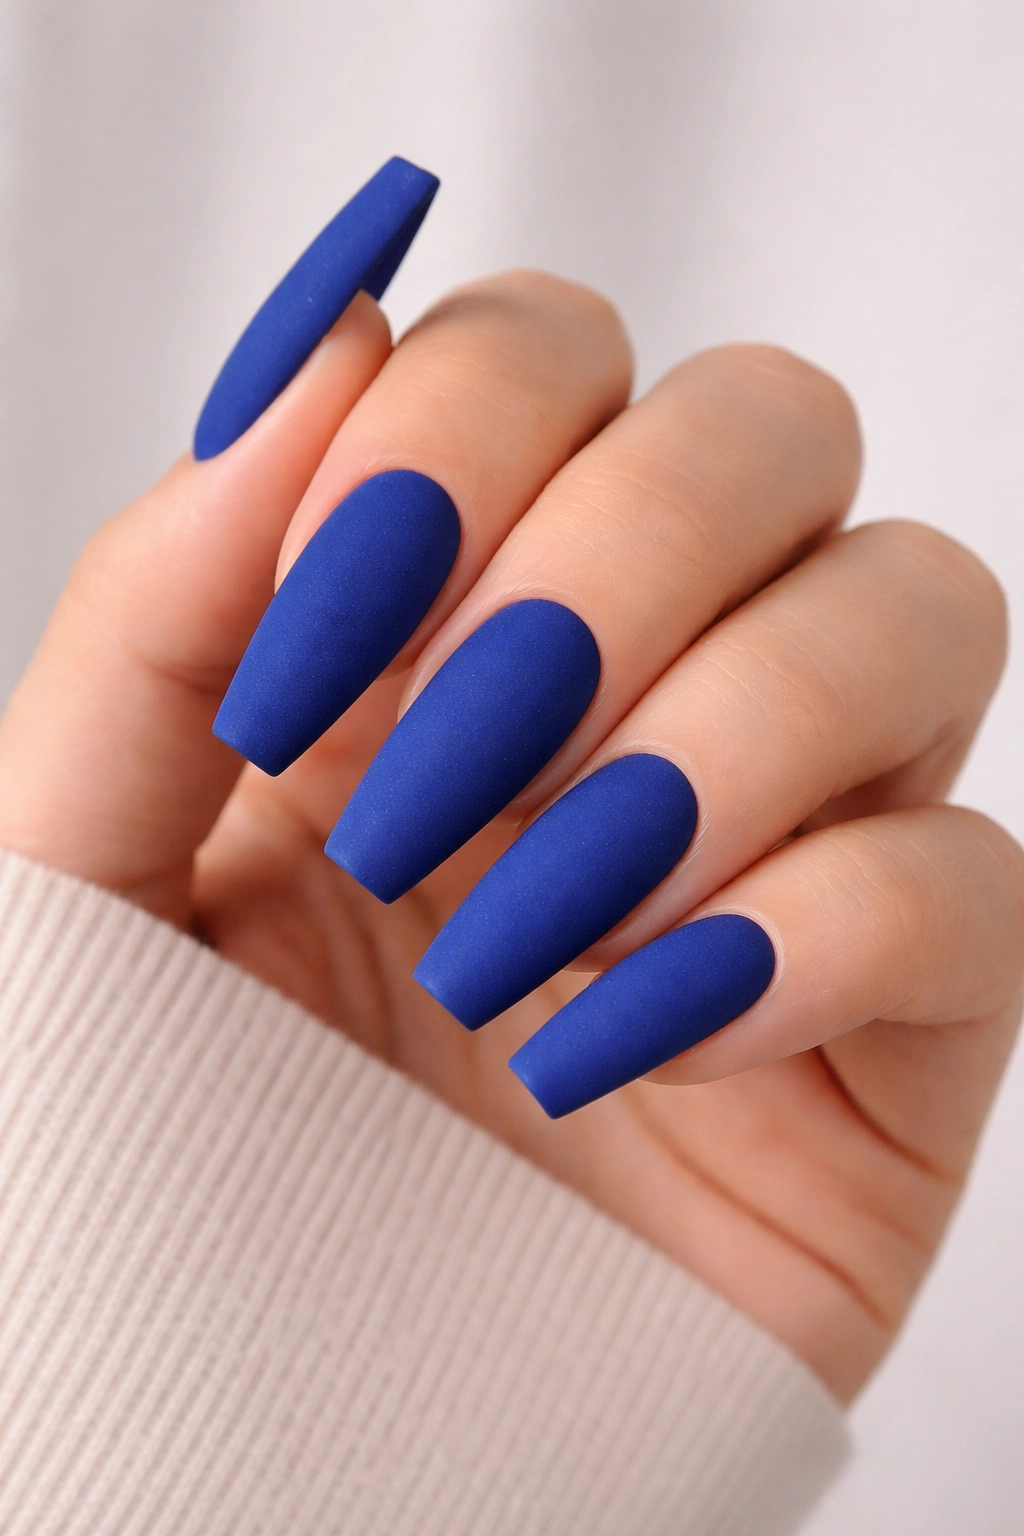
Matte finishes are an underrated manicure choice, and they’re especially striking on rich, saturated colors like royal blue. A velvety matte blue on coffin nails creates an incredibly sophisticated, almost luxurious look. The texture of the matte finish is tactile and interesting—it’s a design that looks as good as it feels to touch.
The Psychology of Matte vs Glossy
Matte finishes read as more modern, artistic, and intentional than glossy ones. They have a calming, less-is-more aesthetic that appeals to minimalists. On a bold color like royal blue, matte actually makes the color feel less aggressive and more contemplative. It’s a color statement without shouting.
Achieving the Perfect Matte Finish
- Apply your chosen royal blue polish in 2-3 coats, allowing each to dry fully
- Instead of using a glossy top coat, use a matte top coat designed specifically for creating that velvety finish
- Apply the matte coat in thin, even layers for consistent texture
- If you want to add a glossy accent (just the tips or just one nail), you can apply glossy top coat to specific nails after the matte layer dries, creating a matte-and-shine combination
Worth knowing: Matte finishes require a bit more maintenance than glossy ones—they can show fingerprints and dust more easily, so you might need to touch up or refresh the matte coat more frequently as your manicure grows out.
8. Periwinkle with 3D Rhinestone Embellishments
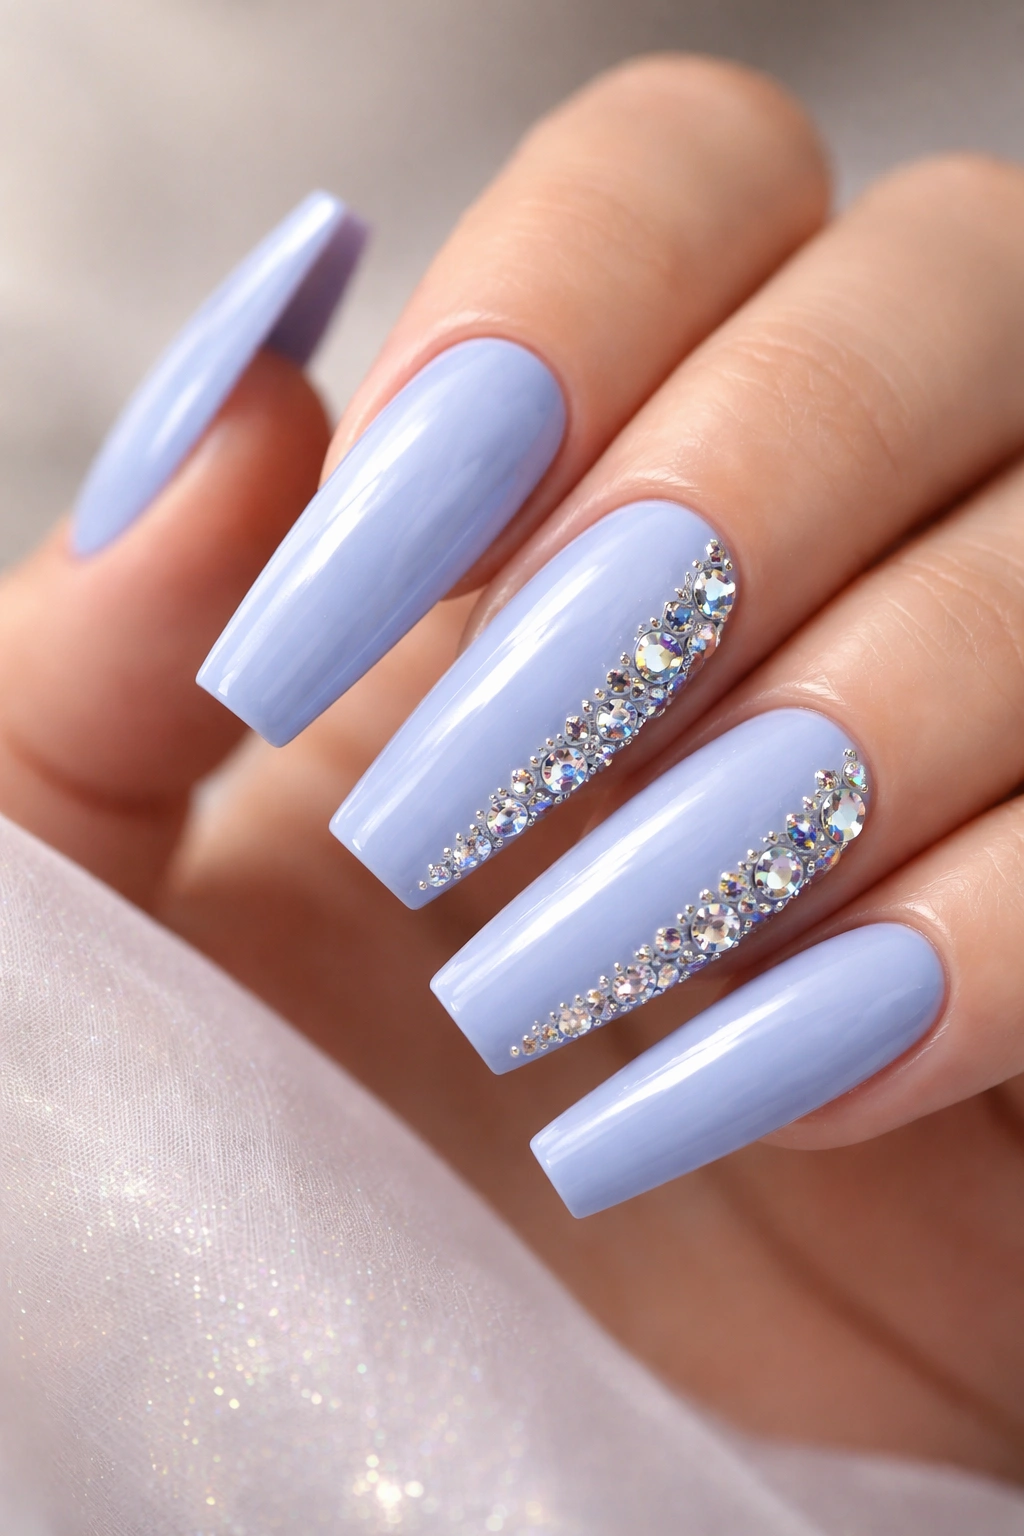
Periwinkle is that perfect in-between blue—not quite purple, not quite true blue, but sophisticated and slightly unexpected. When you add 3D rhinestones (particularly in clear, white, or AB finishes), you create nails that absolutely catch the light and draw attention. This is the design you choose when you want your nails to be a focal point.
The Art of Rhinestone Placement
Rhinestones on nails aren’t about covering every millimeter—they’re about strategic placement that creates visual interest. Placing them along one side of the nail, in a scattered pattern on the accent nails, or creating a gradient that concentrates them at the tips all create different effects. On coffin nails, asymmetrical placement tends to look more modern and intentional than perfectly symmetrical patterns.
Setting Rhinestones for Longevity
- Apply your periwinkle base in 2-3 coats until fully opaque
- While the top coat is still slightly tacky (or use a sticky gel polish specifically designed for rhinestone adhesion), use a picking tool or tweezers to place each rhinestone individually
- Press down gently but firmly to ensure good adhesion
- Once all rhinestones are placed, apply a final top coat carefully to seal them in place without moving them
Pro tip: Use a rhinestone picker tool (a tiny stick with a slightly sticky end) rather than tweezers—it gives you much more precise control and is less likely to accidentally knock stones out of place.
9. Cobalt Blue with Metallic Chrome Tips
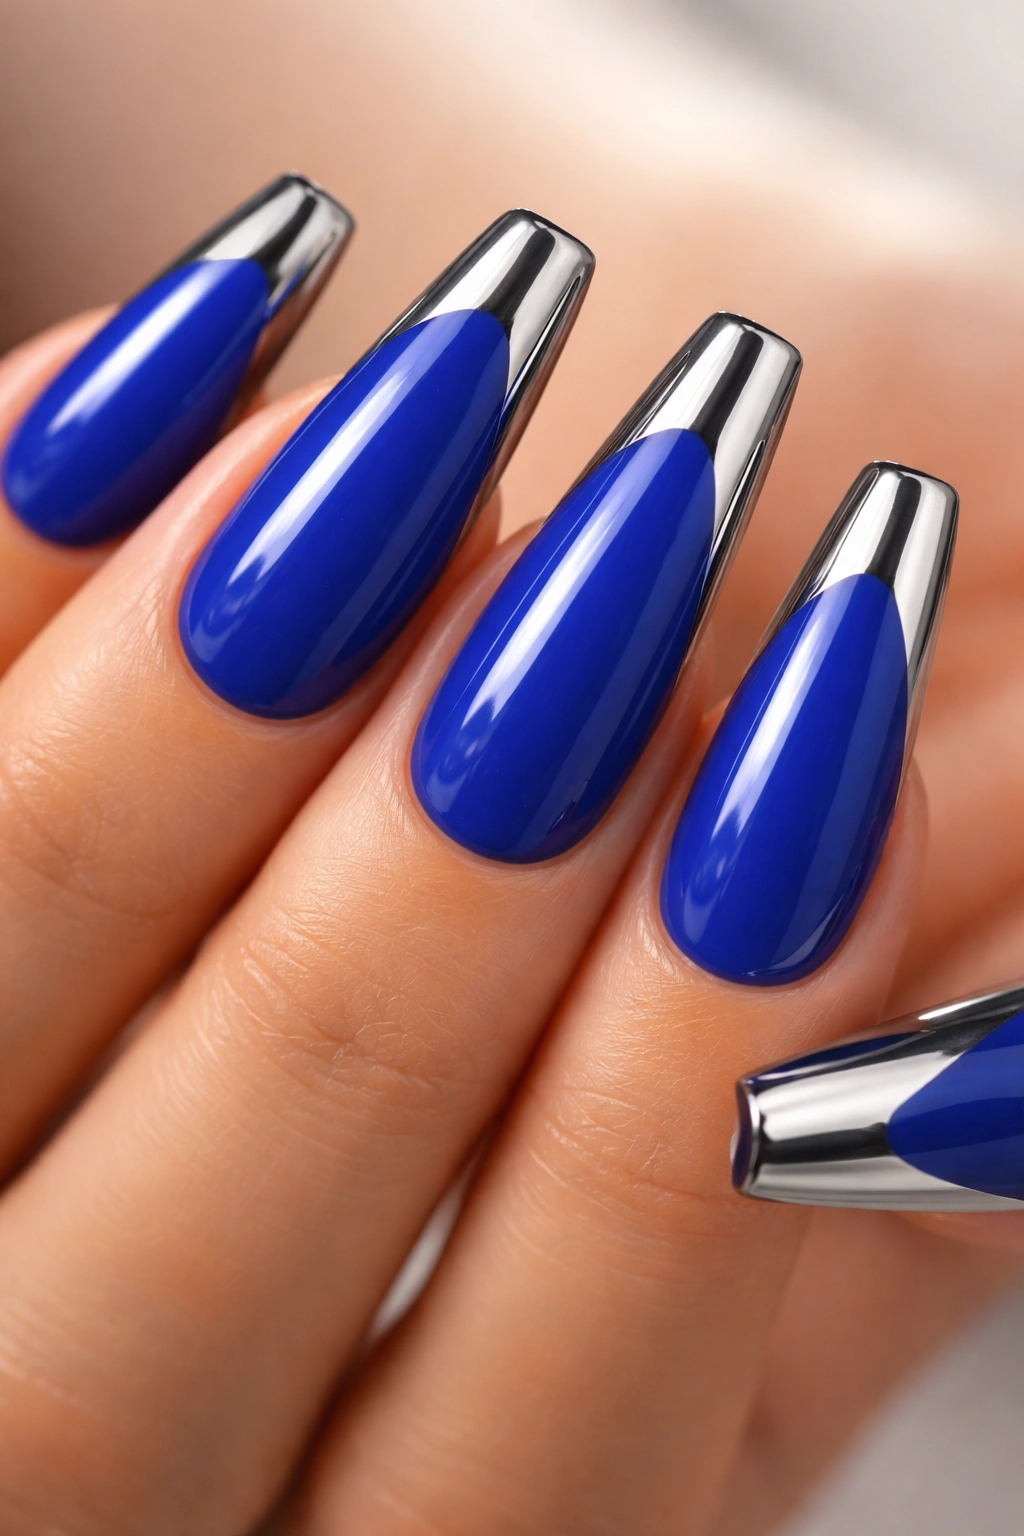
Cobalt blue is a bold, confident blue that reads as almost electric in intensity. Pairing it with metallic chrome tips creates a futuristic, high-fashion look. Chrome finishes have that liquid metal appearance that looks absolutely cutting-edge, and on coffin nails, the geometric tip shape frames the chrome effect beautifully.
Why Chrome Finishes Feel So Modern
Chrome finishes use special powder that creates a mirror-like, reflective effect. Unlike regular metallic polishes, which have sparkle and dimension, chrome is smooth and reflective like actual metal. On nail tips, this creates a striking contrast with the cobalt blue base. It’s a look that feels very “now” and very intentional.
Creating the Chrome Tip Effect
- Paint the entire nail in 2-3 coats of cobalt blue, allowing it to dry completely
- Apply a clear gel or chrome base product to just the tip area (the outer ¼ to ⅓ of the nail)
- While the base is still slightly wet, use a chrome powder applicator or a small fluffy brush to press chrome powder onto the wet base
- Work in gentle buffing motions to evenly distribute the chrome powder
- Seal everything with a top coat designed to work with chrome finishes (not all top coats work well with chrome products)
Worth knowing: Chrome powder can be tricky—it requires the right base product and application technique. If you’re new to chrome, consider getting this done at a professional salon first to see how it’s done, then you can decide whether to attempt it at home.
10. Navy Blue with White Negative Space Design
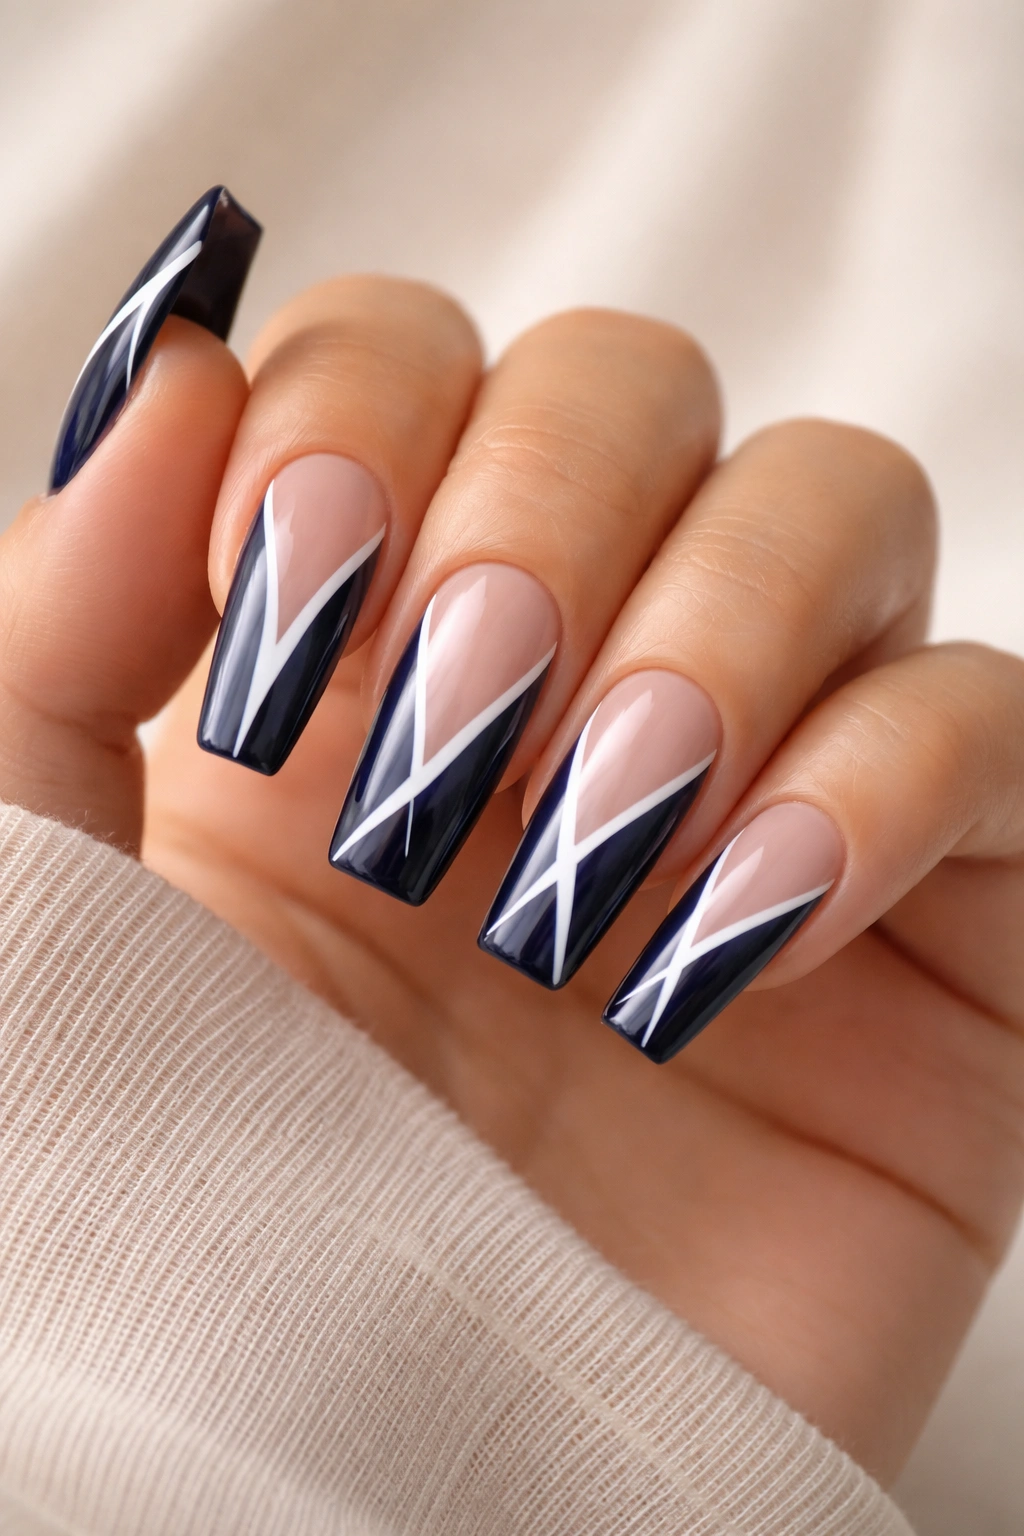
Negative space designs let the natural nail or base color show through as part of the design. On coffin nails with navy blue polish and carefully carved-out white negative space sections, you create a design that’s graphic, modern, and surprisingly minimalist. This is art-gallery-level nail design that makes a statement through what you remove as much as what you apply.
The Power of Negative Space in Nail Art
Negative space designs feel intentional and thoughtful. They’re not about being ornate or covered—they’re about creating interesting visual rhythm through the interplay of color and bare space. On long nails, this approach can feel very fashion-forward and editorial.
Creating Sharp Negative Space
- Apply 2-3 coats of navy blue polish to all nails
- Once completely dry, use a thin nail art brush and a base coat or clear polish to paint the areas where you want negative space to show through
- Common negative space patterns include diagonal lines, geometric shapes, half-moons, or abstract shapes—choose what speaks to you
- Paint these “negative space areas” with clear or nude polish to mark them, then carefully use a thin brush with acetone or pure nail dehydrator to clean away the navy polish from within these marked areas
- Alternatively, use nail striping tape to create clean lines, apply the navy polish, remove the tape, and seal with top coat
Pro tip: This technique requires a steady hand or the use of striping tape to work well. If you’re not confident in your freehand precision, tape is your friend—it creates perfect clean lines every time.
11. Electric Blue with Ombre Glitter Gradient
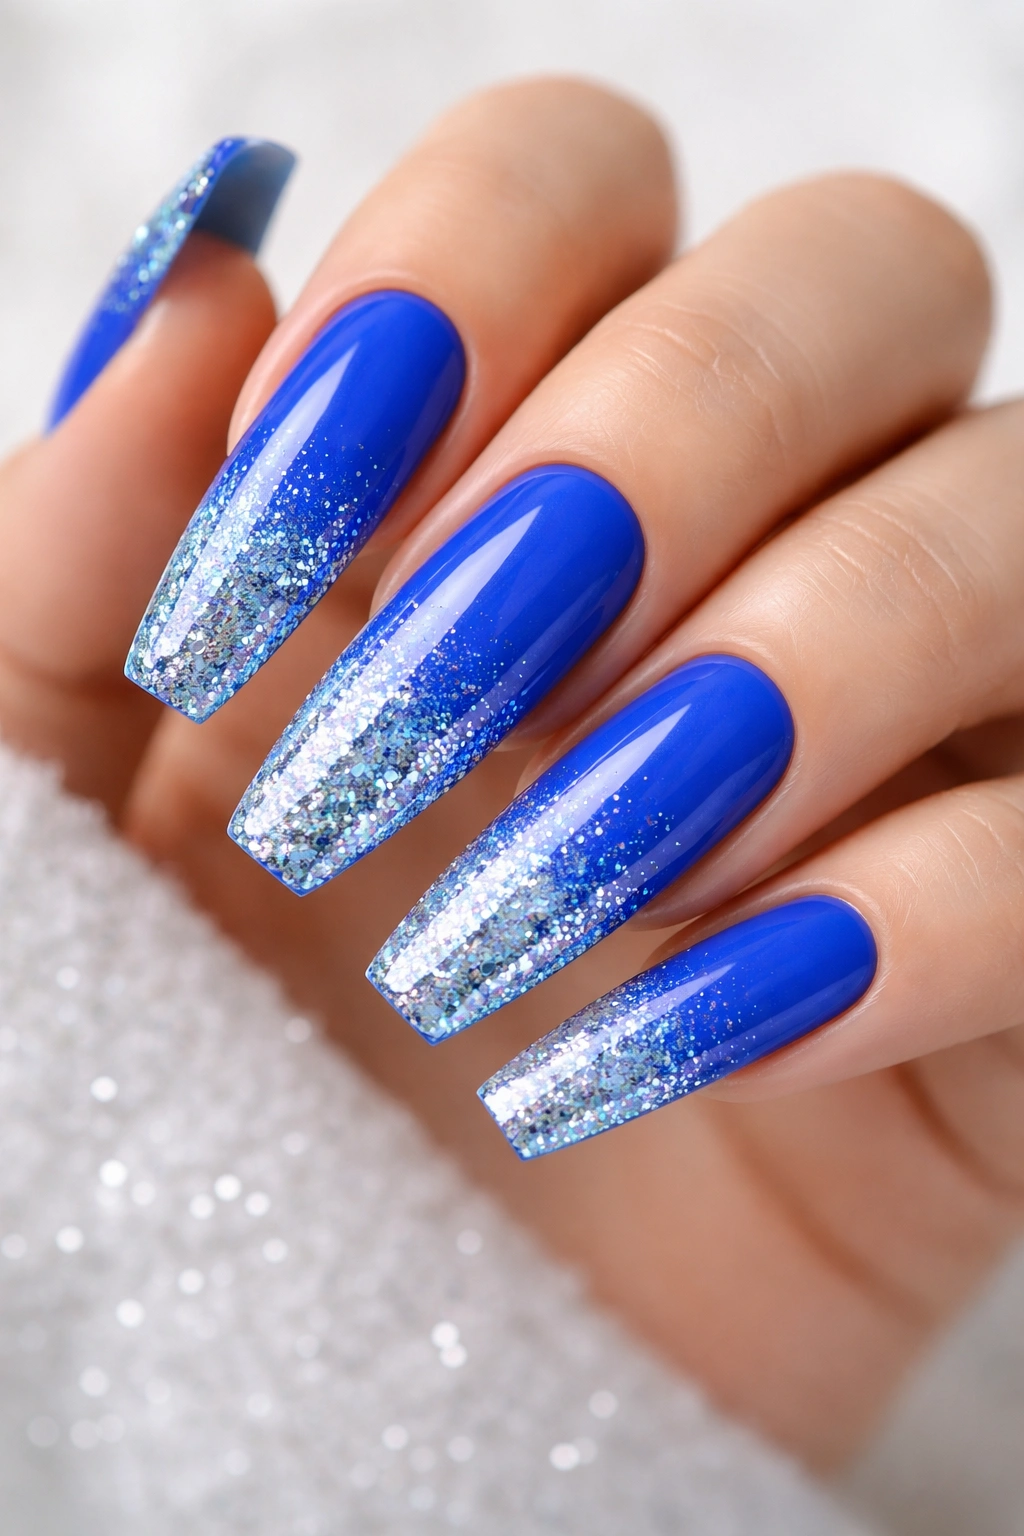
Electric blue alone is striking—add a gradient of glitter that transitions from heavy concentration at the tips to nothing at the base, and you’ve created something that feels both playful and polished. This design catches light from multiple angles and has movement and dimension that keeps changing depending on how you position your hands.
The Technique Behind Glitter Gradients
A glitter gradient isn’t about sprinkling glitter everywhere—it’s about intentional placement that creates a visual flow. Starting with larger or more densely-packed glitter at the tips and gradually spacing it out as you move toward the base creates the illusion of the glitter “fading” even though you’re using the same glitter throughout.
Building the Glitter Gradient
- Apply 2-3 coats of electric blue polish, allowing it to dry completely
- Apply a layer of clear gel or sticky top coat to the entire nail
- Using a small detail brush or picking tool, apply your chosen glitter pieces densely to the tip area (outer ⅓ of the nail)
- As you move toward the middle of the nail, gradually space the glitter pieces further apart
- The base ⅓ of the nail should have either very sparse glitter or no glitter at all
- Seal everything with a glossy top coat
Worth knowing: Fine glitter can sometimes look dusty or cheap, so invest in higher-quality glitter pieces if possible—the difference in how they catch light and look on the nail is noticeable.
12. Powder Blue with Soft Ombré to Nude
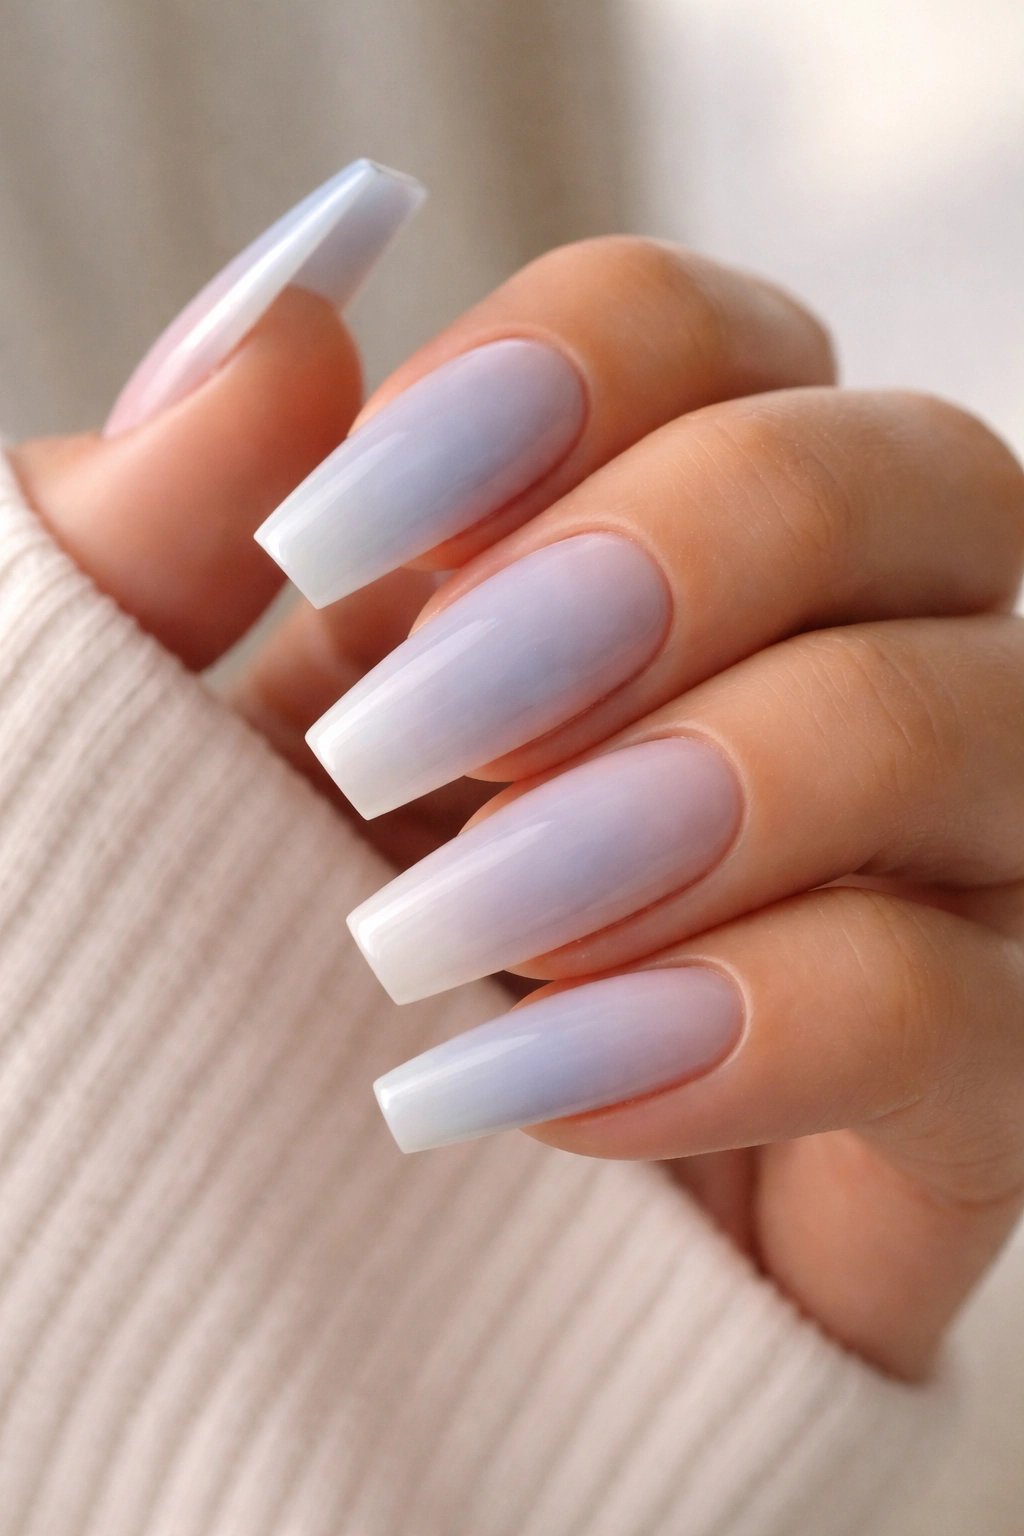
This design is all about subtlety and sophistication. Starting with a soft powder blue at the base and gradually transitioning to a nude or beige tone at the tips creates a look that’s elegant, wearable, and works for virtually any occasion. The ombré transition is smooth and intentional, not harsh or overly dramatic.
When Soft Colors Work Best
Soft color transitions tend to work beautifully on longer nails because you have enough surface area to make the transition feel natural and gradual. The coffin shape also complements soft, subtle designs—there’s something about the geometric cleanness of the shape that makes understated designs feel even more refined.
Creating a Flawless Ombré Transition
- Apply a base coat and allow it to dry
- Paint the entire nail with powder blue and let it dry completely
- Using a makeup sponge, apply a small amount of nude or beige polish to the sponge
- Gently dab this color onto the tip area of the nail, creating the beginning of your gradient
- Continue this sponging process, gradually moving your application point toward the base and building up the color as you reach the tips
- The result should be a smooth, gradual transition with no harsh lines
- Seal with a glossy or matte top coat
Pro tip: The key to a smooth ombré is patience and multiple light layers rather than trying to create the gradient in one thick application. Build gradually, and you’ll get a much more professional-looking result.
13. Midnight Blue with Gold Geometric Line Design
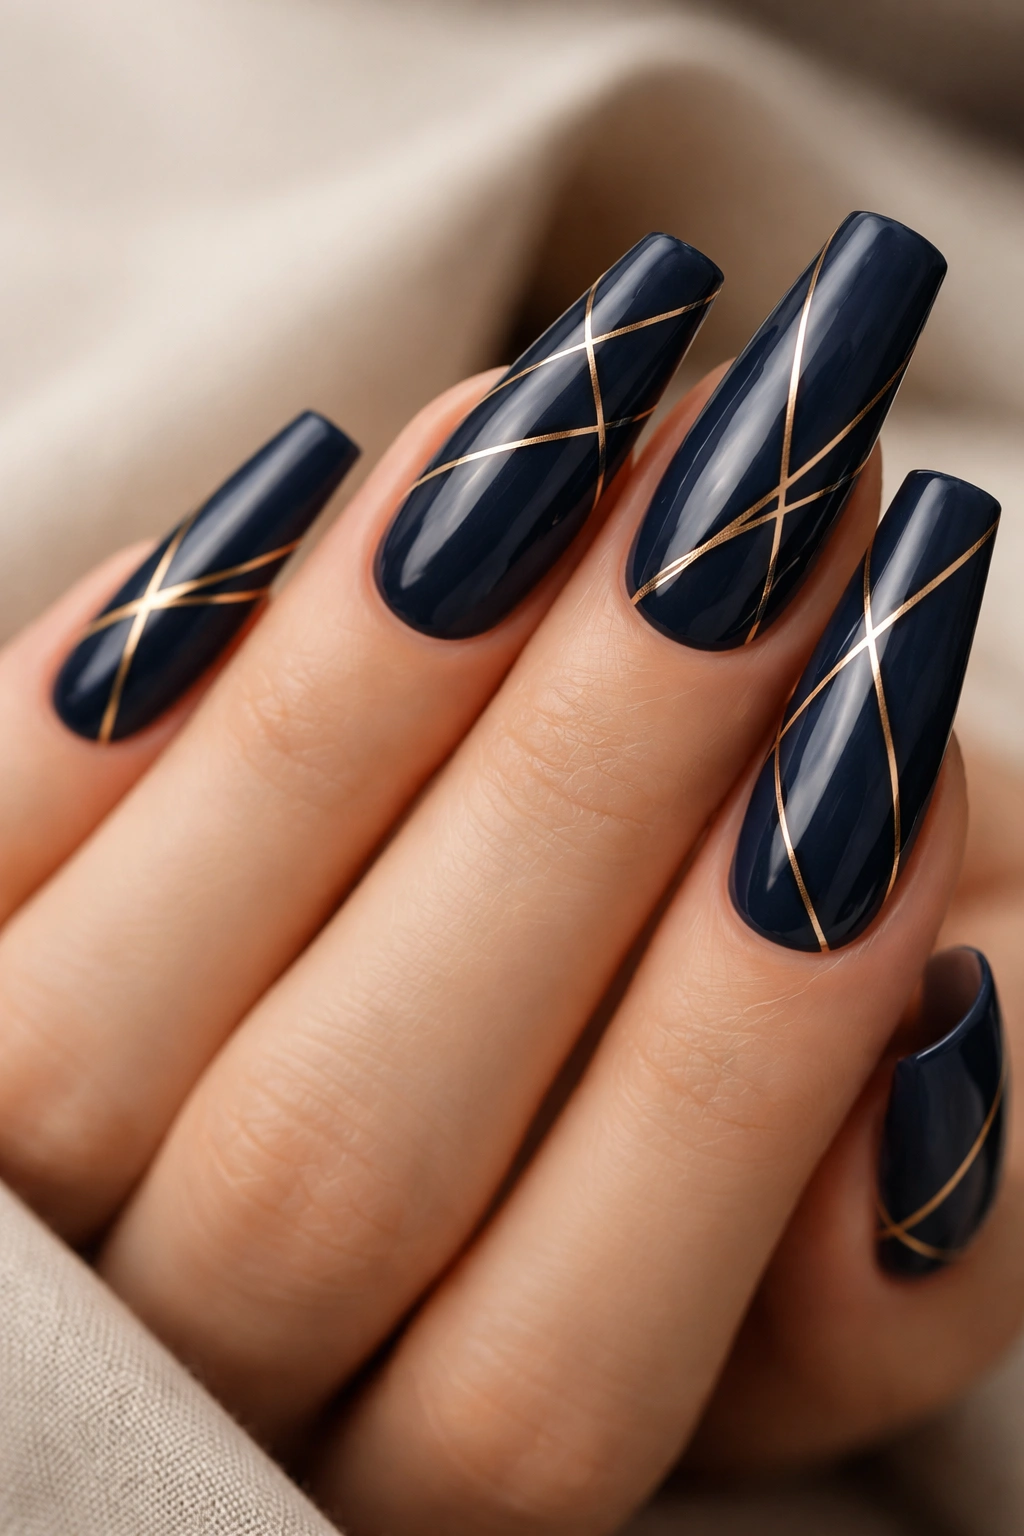
Midnight blue coffin nails become a canvas for geometric gold line work that feels almost architectural. Thin gold lines creating triangles, hexagons, or abstract shapes across the nail surface add visual interest and sophistication without overwhelming the base color. This is the manicure equivalent of minimalist jewelry.
The Appeal of Geometric Nail Art
Geometric designs feel intentional, modern, and artistic. They work on any skill level because “imperfect” lines actually feel more artistic than perfectly precise ones. On midnight blue, which is already a dark, dramatic color, gold geometry creates just enough visual interest without feeling overcomplicated.
Painting Geometric Designs Precisely
- Apply 2-3 coats of midnight blue polish and let it dry completely
- Using a thin nail art brush or a gold metallic gel, paint thin lines across the nail creating your chosen geometric pattern
- Work slowly and deliberately—if your hand shakes, take it slow
- If a line isn’t quite right, you can gently wipe it away with a cotton swab before it dries
- Continue until you’ve created your desired pattern across the nail or accent nails
- Seal with a glossy or matte top coat
Worth knowing: Gold gel polishes or metallic gel liners work better for this technique than regular polish because they have better control and adhere more reliably. If you’re using regular polish, make sure your brush is very fine and your lines are deliberate.
14. Iridescent Blue with Opalescent Finish
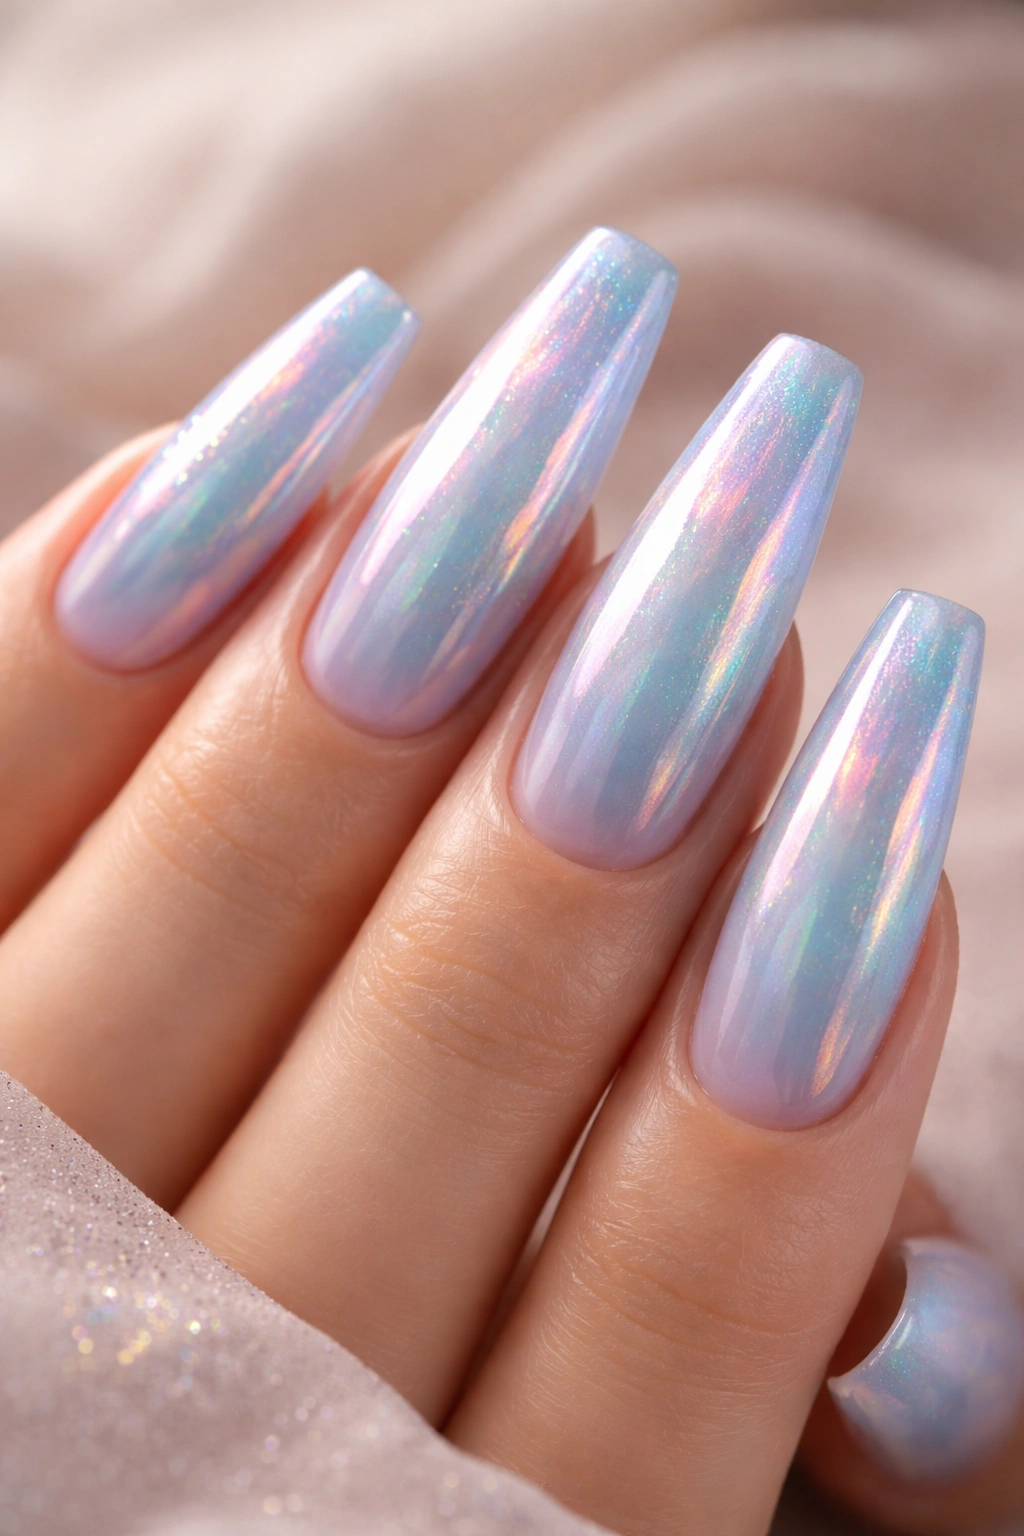
Iridescent finishes are like the color-shifting cousin of holographic polishes. They create a subtle rainbow shimmer that looks different depending on the angle and light. An iridescent blue base with an opalescent top coat creates a finish that’s simultaneously soft and shimmery, sophisticated and eye-catching. On long coffin nails, the shimmer is visible from multiple angles as you move your hands.
Understanding Iridescent vs Holographic Finishes
Iridescent finishes tend to be more subtle than holographic ones—the color shift is present but refined, creating an almost jewel-like quality. Opalescent finishes are slightly opaque with a cloudy shimmer. Together, they create a finish that feels expensive and carefully considered. This is the kind of manicure that makes people ask, “What is that color? It’s beautiful.”
Creating the Iridescent-Opalescent Combo
- Apply 2-3 thin coats of iridescent blue polish, building opacity with each coat
- Instead of a regular top coat, finish with an opalescent or pearl top coat that has its own subtle shimmer
- The combination of these two shimmery finishes creates depth and dimension that a single shimmer product can’t achieve alone
- Make sure you’re using high-quality products—cheaper shimmer polishes can look chalky rather than luminous
Pro tip: Test your iridescent polish in natural daylight, indoor lighting, and under UV light before committing to the full manicure. The way it looks can vary dramatically depending on light source, and you want to make sure you love it in all conditions.
Final Thoughts
Blue coffin nails are a commitment to sophistication that doesn’t require compromise. Whether you’re drawn to the minimalist elegance of a navy ombré, the artistic expression of marble or geometric design, the glamour of rhinestone accents, or the cutting-edge modernity of chrome and holographic finishes, there’s a blue coffin nail design that matches your aesthetic and skill level. The coffin shape itself—that perfect blend of length and structure—elevates whatever design you choose, making even simple color application feel intentional and fashion-forward.
The beauty of blue is that it’s versatile enough to work year-round and adaptable enough to suit any mood or occasion. A midnight blue marble design reads completely differently than a baby blue French tip, even though they’re both technically blue nails. Pay attention to which designs genuinely excite you when you imagine wearing them, and don’t feel pressured to choose something just because it’s trendy or because someone else loves it. The best manicure is one that makes you feel confident and like yourself every single time you look at your hands.
If you’re planning to try any of these designs, remember that practice matters—your first attempt might not be gallery-perfect, and that’s completely okay. Nail art is a skill that improves with repetition. Start with designs that match your comfort level, and gradually work your way toward more complex techniques as your confidence grows. And if you reach a point where you’d rather have a professional handle something intricate, there’s absolutely no shame in that either. The goal is nails that make you happy.
