

There’s something undeniably glamorous about coffin nails—that elongated, tapered silhouette that commands attention from across a room. Pair that striking shape with rich, sophisticated purple hues, and you’ve got a nail design that works for everything from everyday elegance to formal events. Purple isn’t just one color either. It spans from soft lavender pastels that whisper sophistication to deep, moody eggplant shades that feel almost mysterious. The coffin nail shape is actually the perfect canvas for purple because its lengthened profile gives you serious real estate to play with intricate designs, gradients, and embellishments that might feel cramped on shorter nails.
If you’re drawn to purple but weren’t sure how to style it on long coffin nails, you’re about to have plenty of inspiration. These 16 designs range from minimalist and chic to bold and statement-making, with techniques and color combinations that suit different vibes, skill levels, and occasions. Whether you’re a fan of glossy finishes, matte drama, sparkling accents, or intricate nail art, there’s a purple coffin design here that will make you feel confident and beautiful.
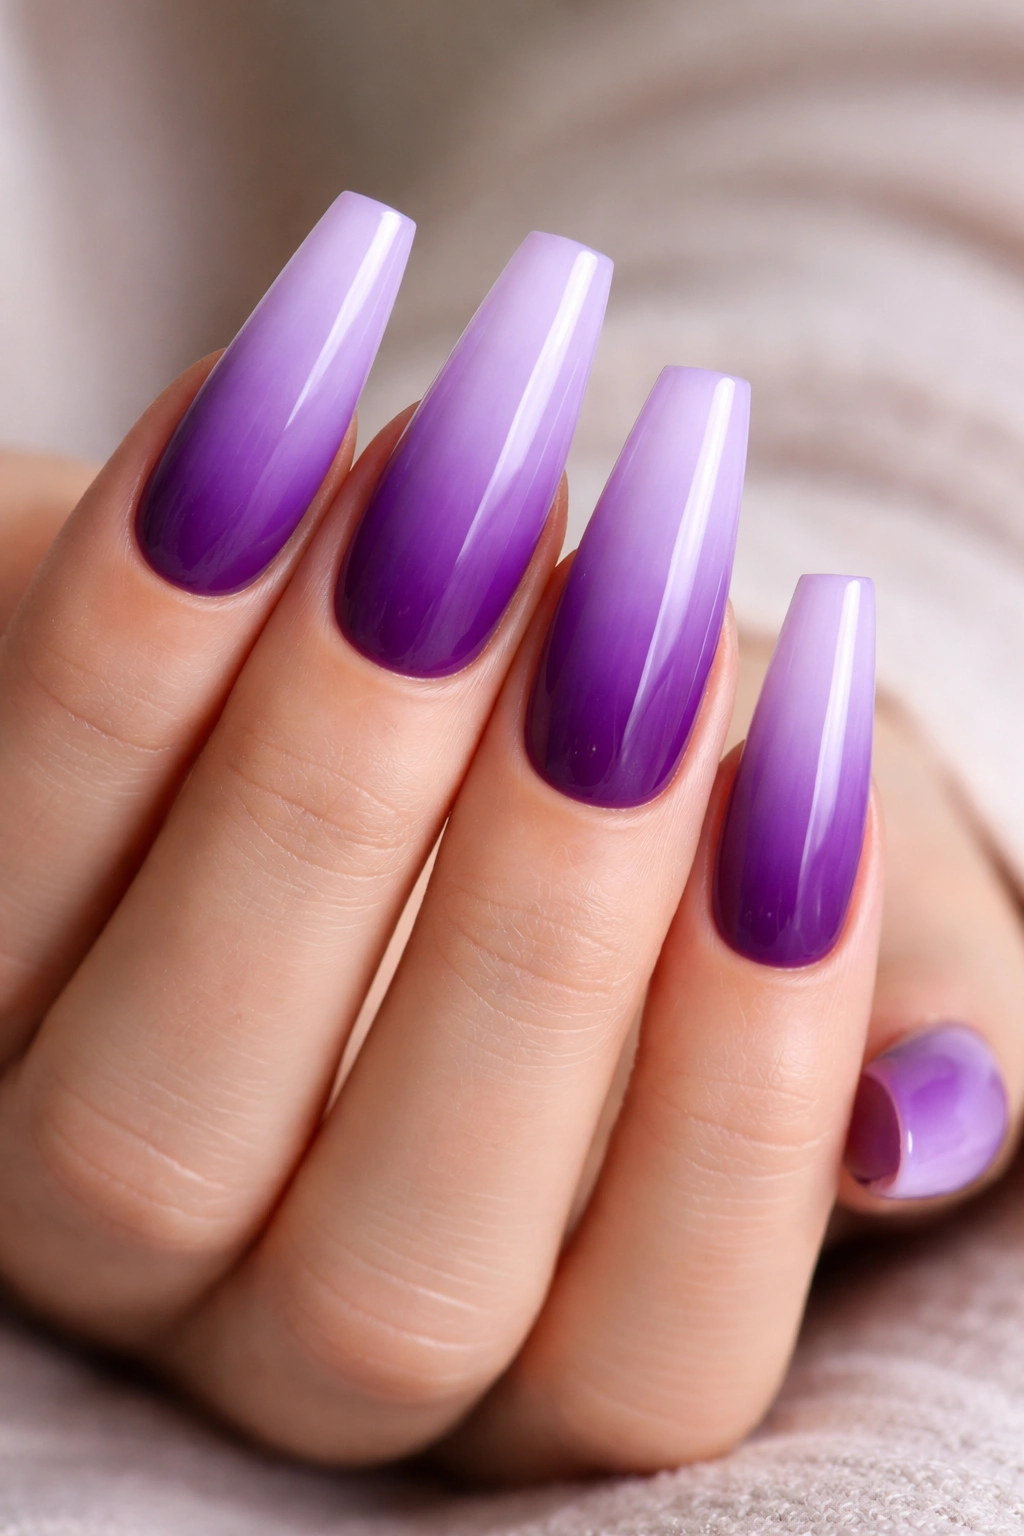
1. Ombre Purple Gradient
An ombre purple gradient is one of the most flattering techniques for coffin nails because it lets the elongated shape do the visual work. The gradient transitions from a pale, almost white-based lavender at the tip to a rich, deeper purple at the base, creating an illusion of even more length and elegance.
Why This Design Stands Out
This design works because it’s sophisticated without being over-the-top, and it photographs beautifully in both natural and artificial lighting. The gradient technique is forgiving—minor imperfections actually add to the soft, blended aesthetic rather than looking like mistakes. The coffin shape gives the gradient plenty of room to create smooth color transitions that would look cramped on shorter nails.
How to Achieve This Look
- Start with a glossy base coat and let it cure completely
- Use a makeup sponge to dab two contrasting purple shades onto the sponge, leaving a gap between them
- Press and bounce the sponge onto the nail multiple times to blend the colors gradually
- Seal with a glossy top coat for a smooth, refined finish
- Add a single accent nail with a thin gold line or small rhinestone if you want subtle sparkle
Pro tip: Let each sponge application dry for 10-15 seconds before applying the next layer—this prevents the colors from muddying together.
2. Purple with Gold Glitter and Foil Accents
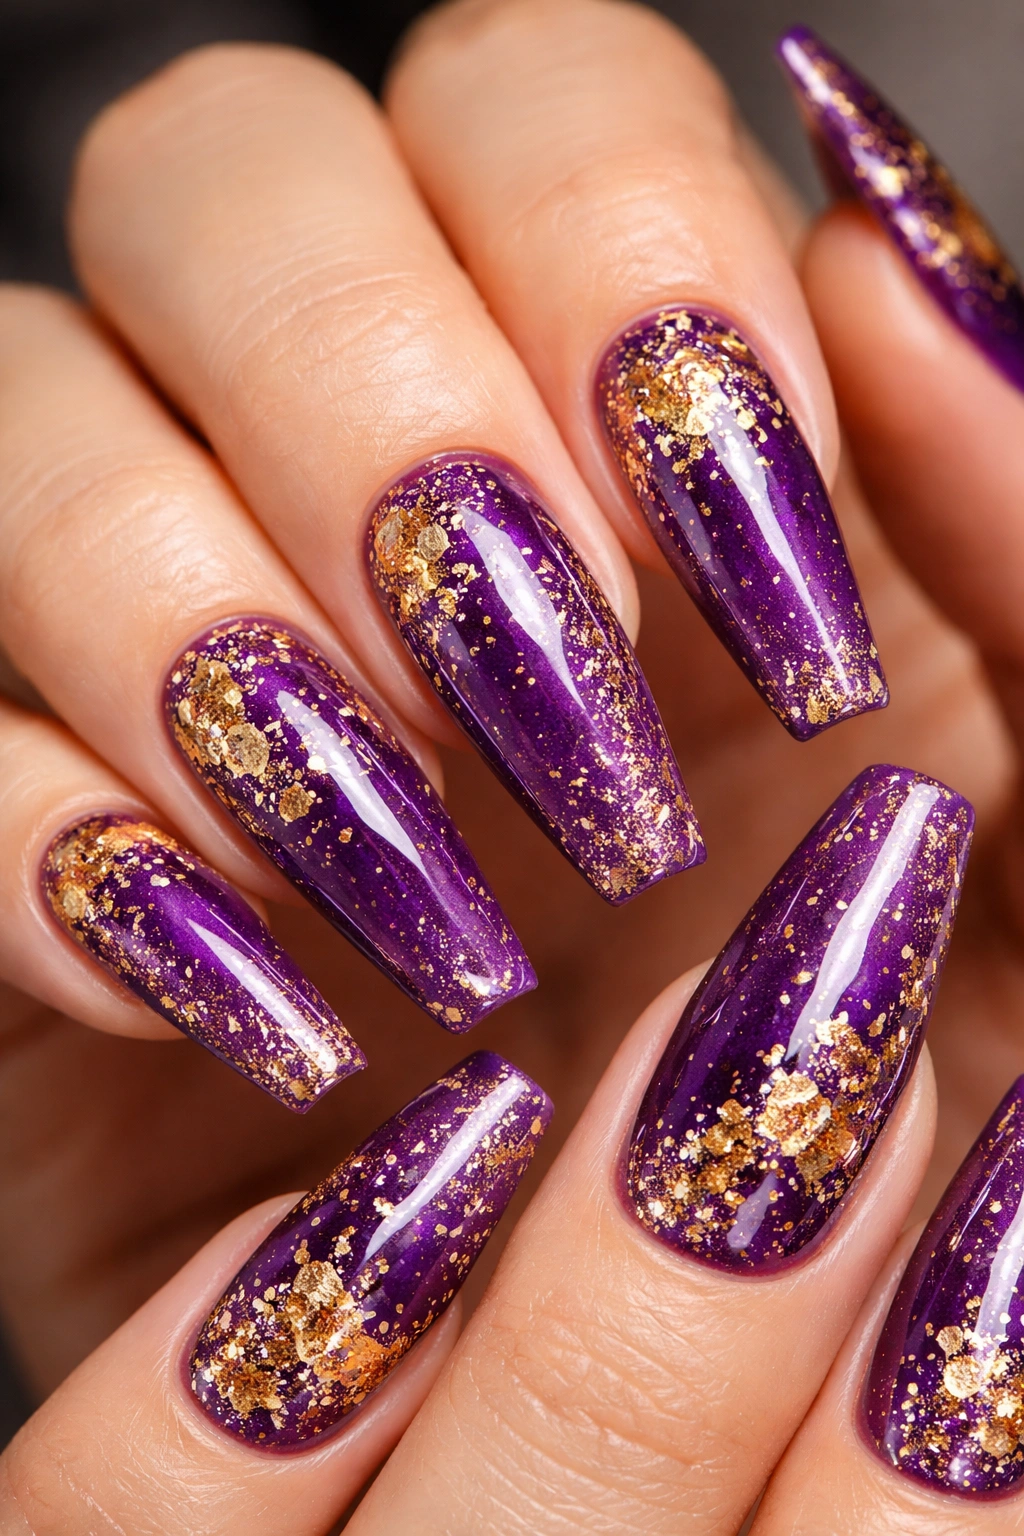
This design combines rich purple base color with strategic placements of gold glitter and metallic foil that catch light and create dimension. The glitter typically sits on a few accent nails or concentrated near the tips, while the foil adds geometric or organic shapes across the nail surface.
What Makes This Combination Sing
Gold and purple are a naturally luxurious pairing—gold brings warmth to the cooler purple tones and adds glamour without overwhelming the base color. On coffin nails, this combination reads as intentional and high-impact because there’s enough surface area for both the solid color and the accent elements to shine independently.
Design Application Ideas
- Apply solid purple base, then layer gold glitter polish in the center or tip area
- Use gold foil transfer stickers to create geometric lines, triangles, or abstract shapes
- Create a half-and-half design with solid purple on one side and gold glitter on the other
- Add gold foil accents just along the side edges for a subtle frame effect
- Scatter small flecks of holographic or true gold glitter for texture variation
Worth knowing: Foil accents require a tacky base layer underneath—either a gummy top coat or sticky base coat—so they adhere properly and last through daily wear without peeling.
3. Deep Purple Velvet Matte Finish

A velvet matte finish in deep, jewel-toned purple creates an almost tactile elegance. The matte surface diffuses light instead of reflecting it, which makes the color appear richer and more dimensional than the same shade in a glossy finish would be.
Why Matte Purple Looks So Sophisticated
Matte finishes bring a modern, fashion-forward vibe that feels less traditional than glossy nails. On coffin nails, the matte surface actually makes the shape appear even more defined because the lack of shine emphasizes the geometric lines and silhouette. Deep purple in matte form reads as intentionally moody and artistic rather than playful or casual.
How to Get the Look Right
- Use a deep eggplant or dark plum purple base—not a bright purple, which can look murky when matte
- Apply a quality matte top coat that doesn’t leave a grainy or stippled texture
- Ensure even, thick application so the matte effect looks intentional and finished rather than like the polish is drying out
- Keep nails perfectly shaped and filed smoothly so the clean lines are the star of the design
- Optional: add a single glossy accent nail in the same purple for subtle contrast
Insider note: Matte finishes can feel dry to touch—seal them with a matte gloss coat rather than a regular top coat so they last longer without chipping.
4. Purple Marble Effect with Black Swirls
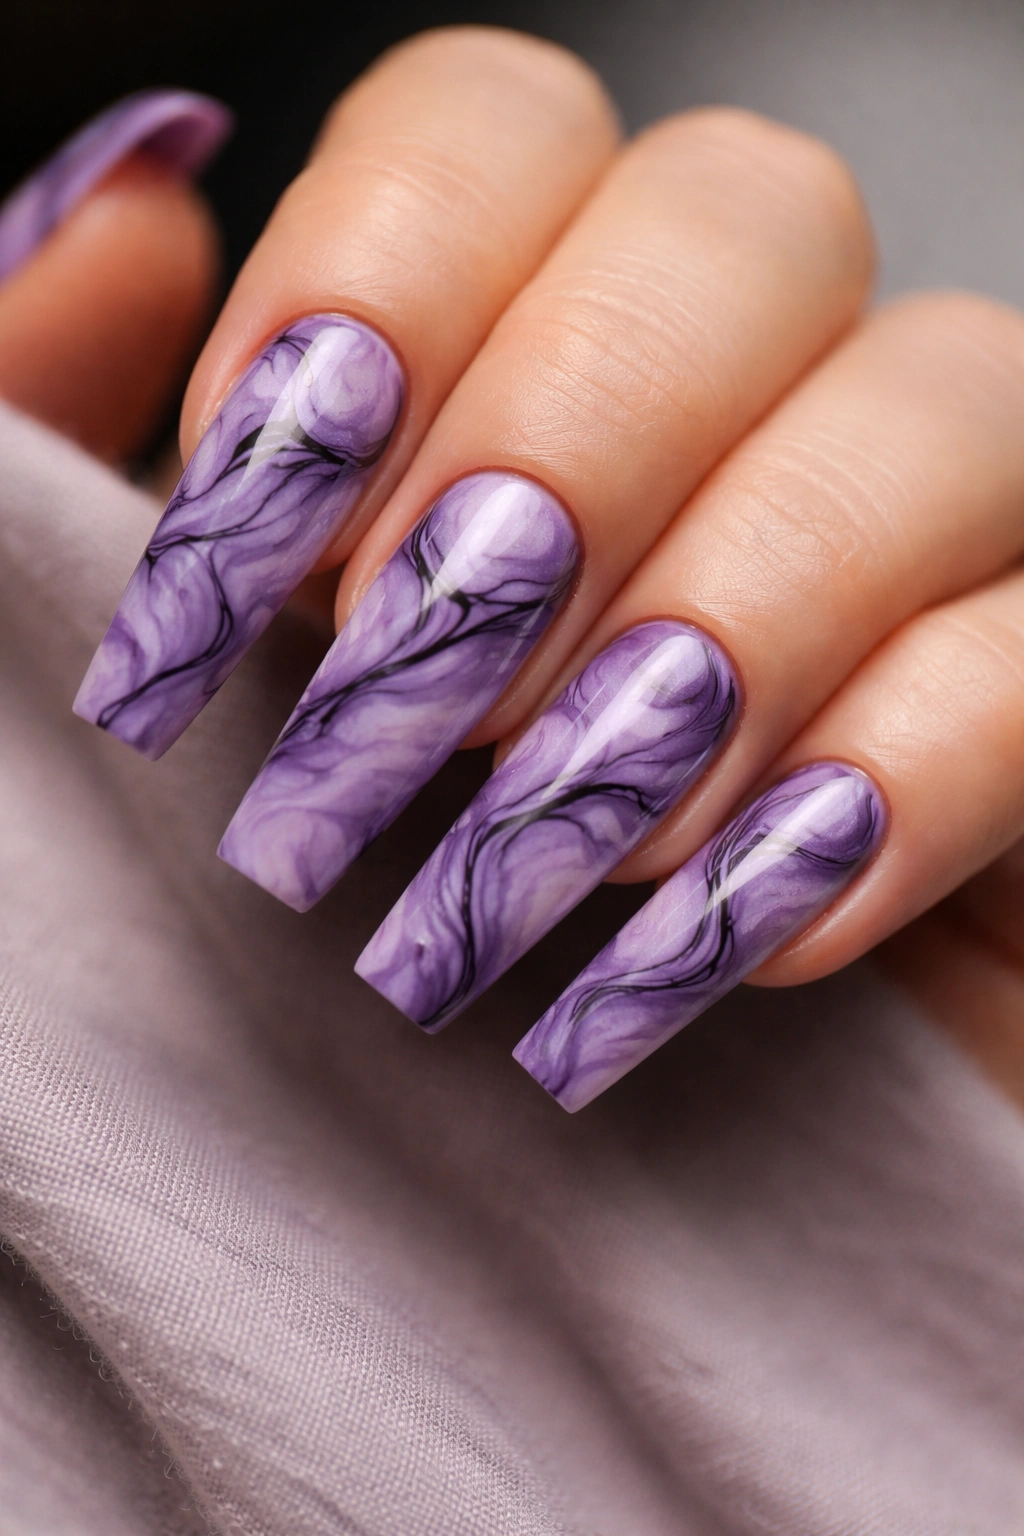
Marble nail designs mimic the natural veining and color variation of marble stone. Purple marble typically uses two to three shades of purple plus black or charcoal to create organic, branching patterns that look intricate but are surprisingly approachable to create.
The Appeal of Marble on Coffin Nails
Marble designs benefit from length—the swirling black lines have room to flow and create a cohesive look rather than feeling cramped. Each nail can have a unique marble pattern, which makes the overall design feel personalized and artistic even though you’re using the same technique on all ten fingers.
Creating Your Marble Design
- Apply a light lavender or pale purple base coat
- Mix black and a deeper purple shade with a bit of water on a ceramic palette
- Use a thin detailing brush to create random swirling lines and branches across the nail
- Let some lines connect and others stand alone for organic variation
- Seal with a glossy top coat that makes the veining pop
Pro tip: Practice the swirling motion on a test strip or a practice wheel before committing to your actual nails—the key is loose, confident strokes rather than trying to be perfectly precise.
5. Purple Ombré Gradient with Rhinestone Detail
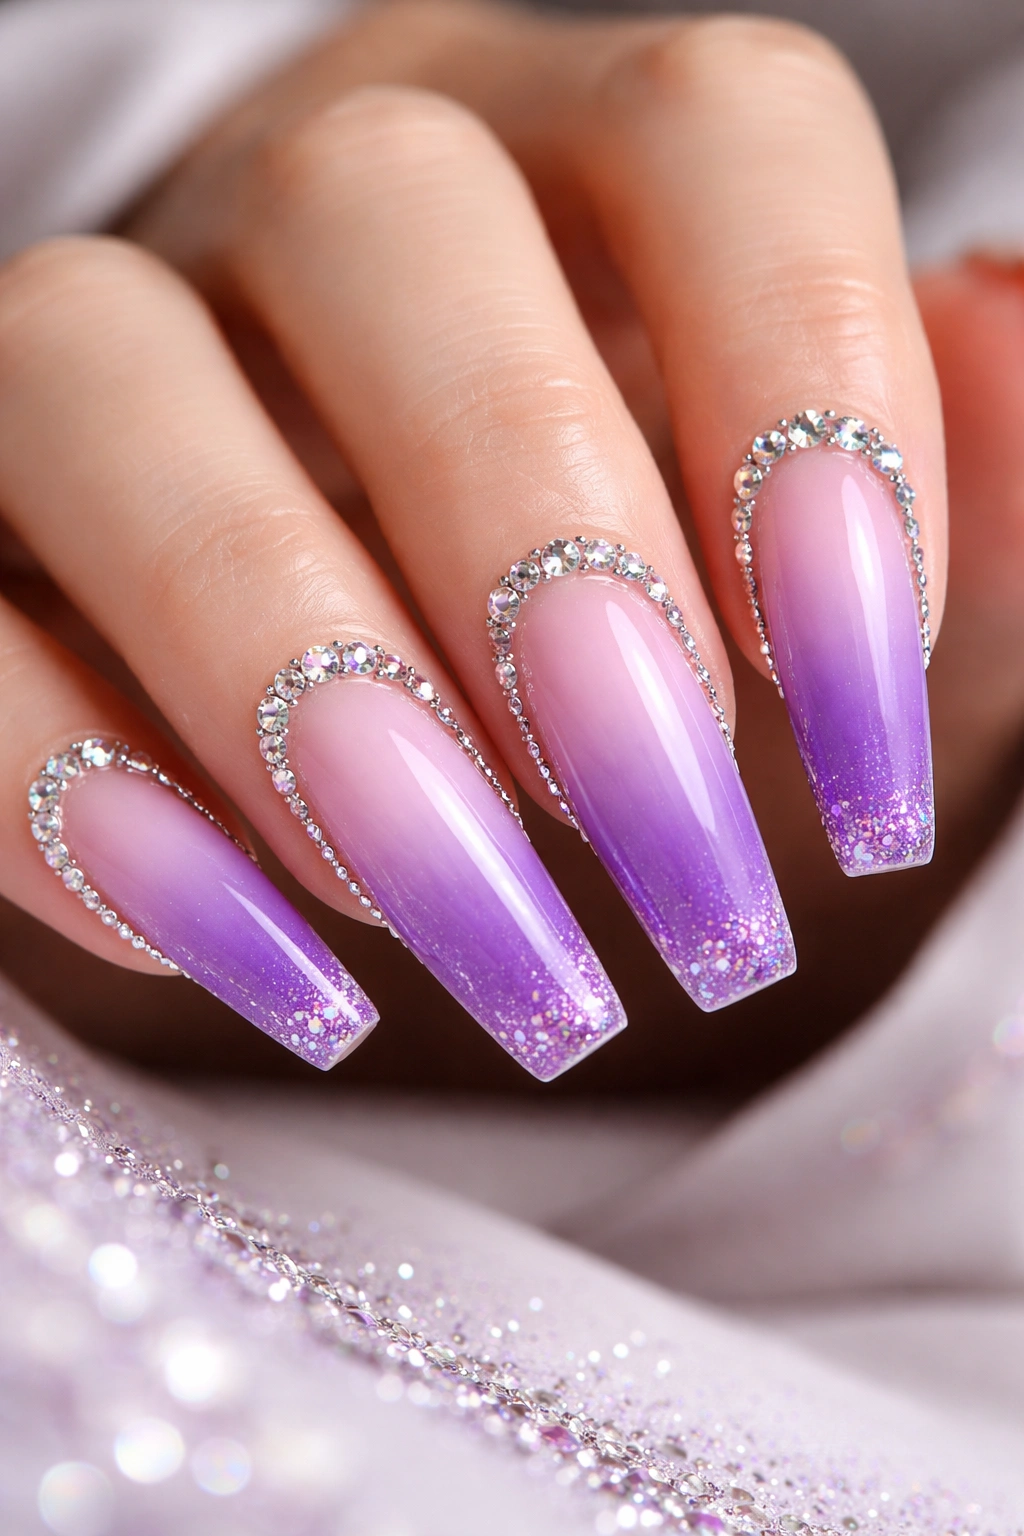
This design combines a smooth color gradient in purple tones with strategic rhinestone placement that catches light and adds visual interest. Rhinestones typically cluster along the sides, create a frame around the nail edge, or scatter in a gradient pattern matching the color transition.
Why Rhinestones Elevate This Design
Rhinestones add a luxury factor that transforms a gradient from pretty to statement-making. On coffin nails, you have enough surface area to play with rhinestone placement intentionally—they can create frames, patterns, or focal points without overwhelming the design. The combination of smooth gradient and sparkle creates beautiful dimension when the light hits your nails.
Placement and Application Tips
- Create your purple ombré gradient first and let it cure completely
- Use a rhinestone picker or double-sided sticky tool to place stones precisely
- Create a vertical line of rhinestones down the center, or frame the outer edges
- Concentrate rhinestones toward the tip for a more dramatic effect
- Use clear or purple rhinestones to echo the gradient effect
- Seal with a thick gloss coat to secure the rhinestones and create a glass-like finish
Worth knowing: Rhinestones stay put best when applied over a thick, sticky base coat before the final top coat seals them in place. Budget extra drying time for this step.
6. Dark Purple with Silver Foil Geometric Lines
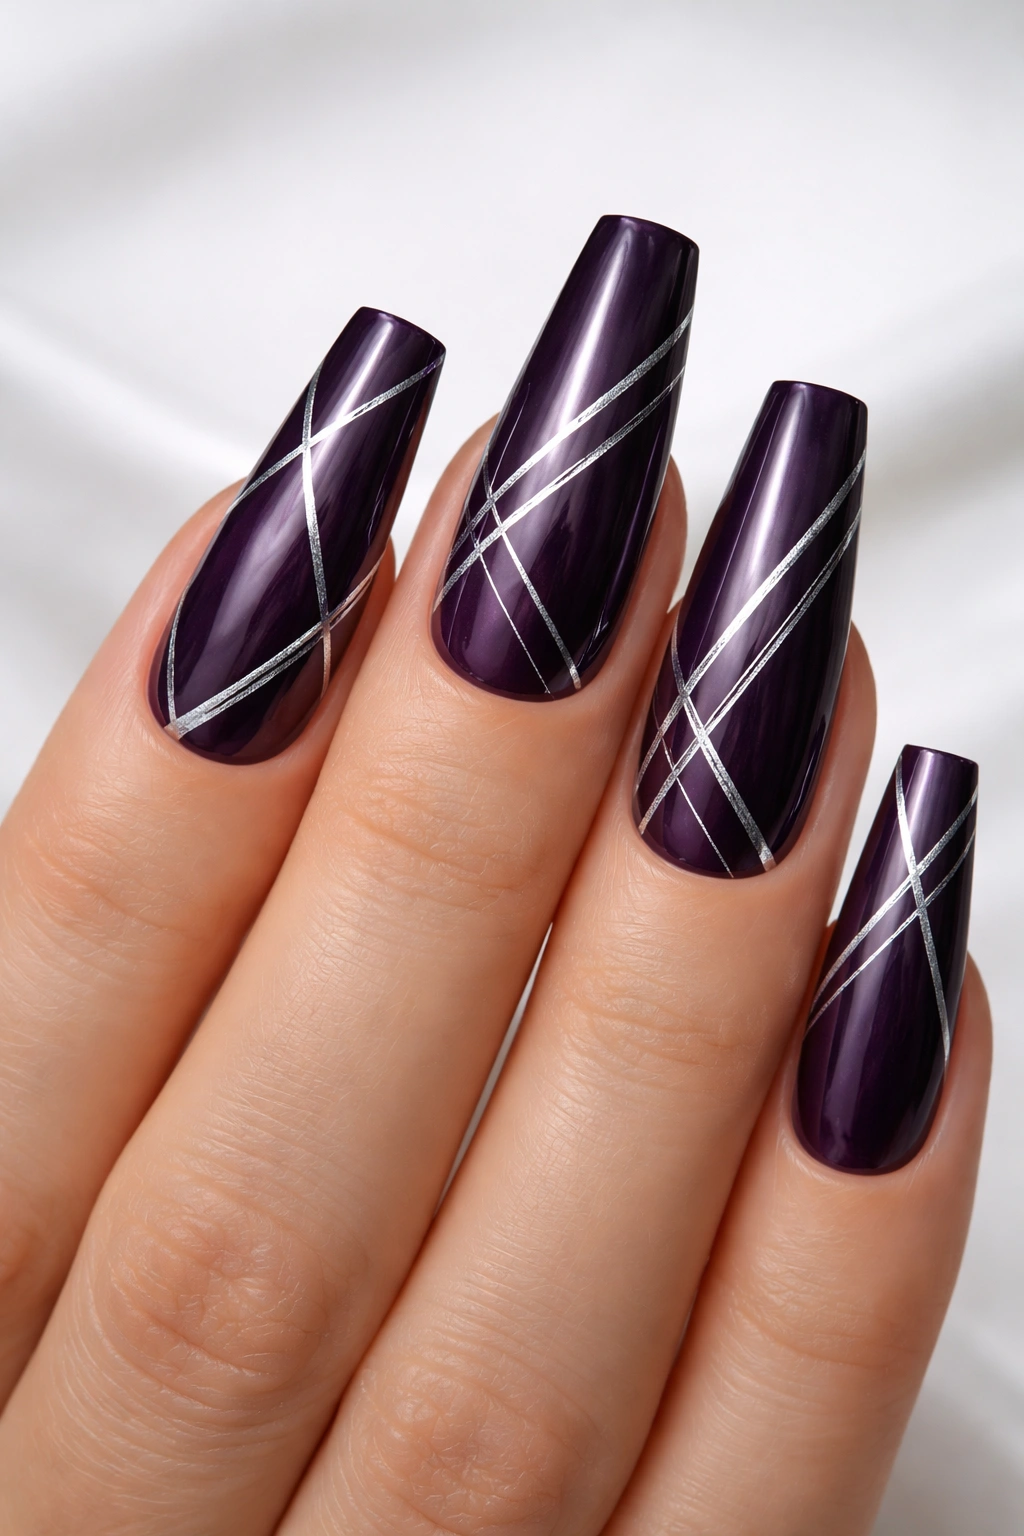
This design combines a dark, rich purple base with precise silver foil accents in geometric patterns. Think straight lines, triangles, chevrons, or abstract shapes created with thin metallic foil that creates sharp, clean edges and bright reflectivity.
The Modern Appeal of Geometric Foil
Geometric designs on coffin nails feel architectural and intentional—the straight lines echo the tapered shape of the nail itself, creating a unified, cohesive look. Silver foil against dark purple creates striking contrast that reads as modern and editorial rather than delicate or sweet.
How to Execute Geometric Foil Accents
- Paint a solid dark purple base and let it dry completely
- Use thin foil transfer stickers to create geometric shapes—you can find sheets with pre-cut designs or use a craft knife to create custom shapes
- Apply foil stickers to a sticky base or gummy layer and press firmly to adhere
- Alternatively, use metallic nail pens to draw precise lines in silver across the purple base
- Seal everything with a glossy top coat for a seamless, finished look
- Keep negative space (unpainted areas) clear so the design feels intentional and not busy
Pro tip: If using foil stickers, press them down for at least 15 seconds to ensure they adhere fully, then seal immediately with top coat.
7. Lavender with Crisp White Tips

A lavender base with white coffin tips is a fresh take on the classic French manicure. The elongated coffin shape makes the white tip area more pronounced and dramatic than it would be on shorter nails, creating a striking color-blocking effect.
Why This Variation Feels Modern
While traditional French manicure tips are subtle, this lavender-and-white version feels intentional and contemporary because of the coffin shape. The clean white tip against softer lavender creates visual separation and makes nails look even longer. This design reads as polished and elegant without feeling stiff or overly formal.
Creating This Design
- Apply lavender base coat to the entire nail
- Once dry, use a thin brush or straight-edge guide to paint crisp white tips—aim for about 2-3mm of white at the very tip of the coffin
- Make sure the white-lavender line is as clean as possible for a professional appearance
- Add a single glossy top coat to blend and seal
- Optional: add a micro-thin gold line at the white-lavender transition for extra sophistication
Insider note: Angled straight-edge nail guides or stencils make creating perfectly clean tips much easier—they’re inexpensive and take the pressure off steady hands.
8. Purple Galaxy Nails with Stars and Sparkle
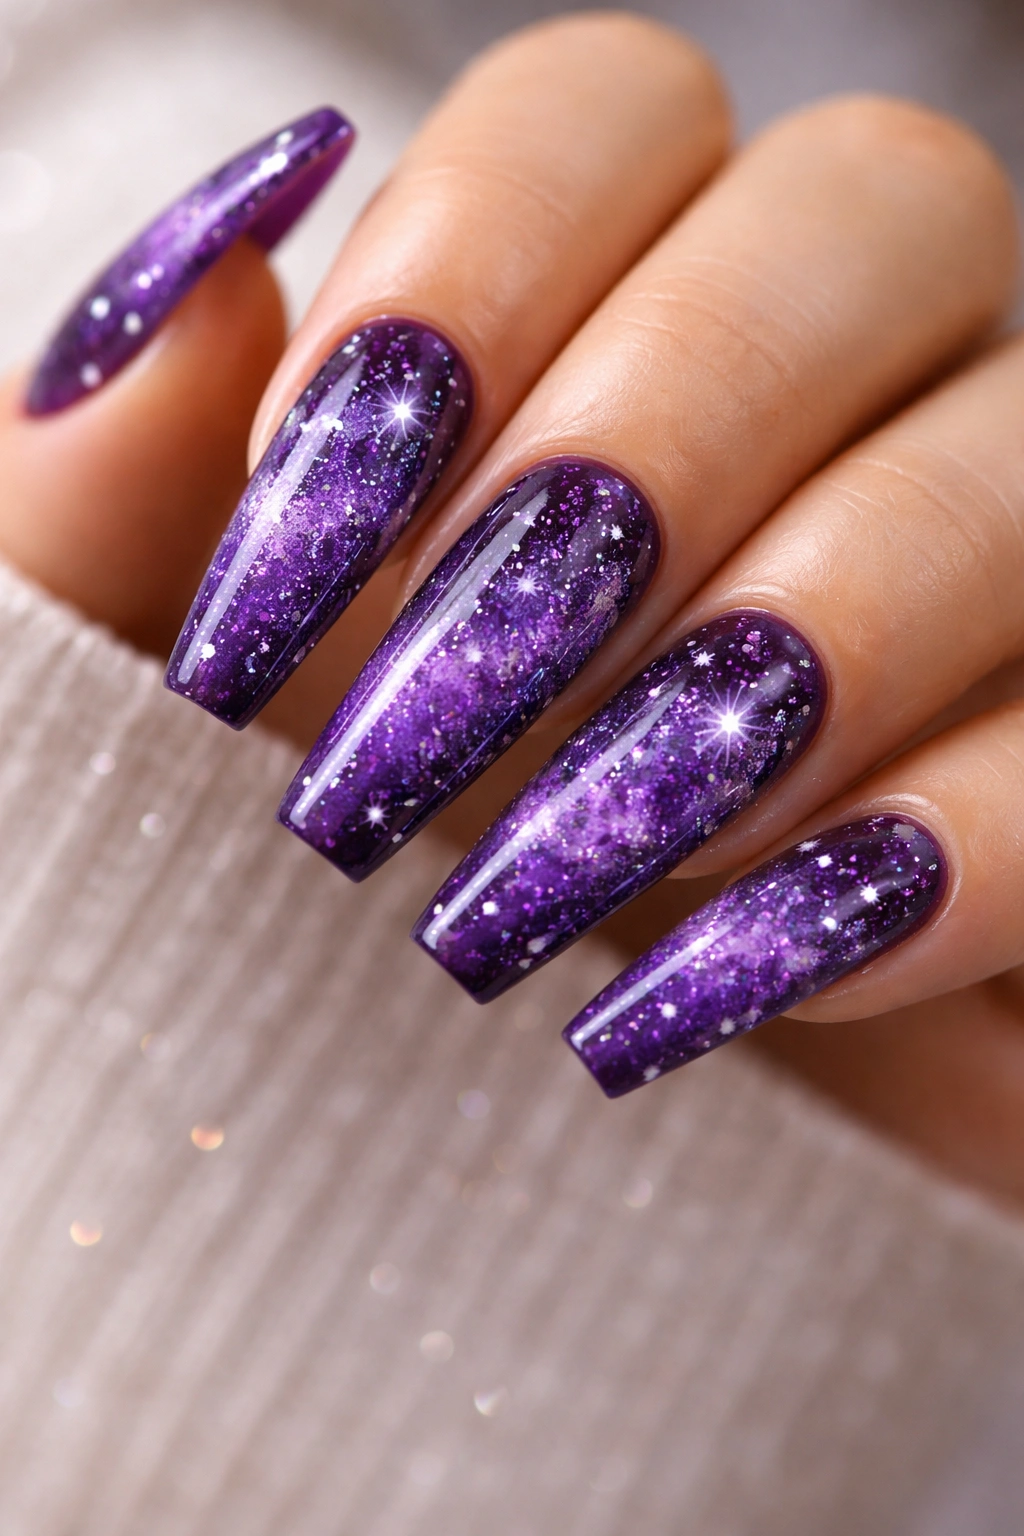
Galaxy nails feature a deep purple base (sometimes with black, navy, or indigo mixed in) with white or light purple “stars” scattered across and iridescent or holographic glitter that mimics the depth and mystery of outer space. It’s a design that feels both dreamy and edgy.
The Magic of Galaxy Design on Long Nails
Galaxy designs benefit from the larger surface area of coffin nails—you have room to create layers of depth, scatter stars across multiple areas of the nail, and build dimension that would feel cramped on shorter lengths. The design feels cosmic and artistic without being childish or overly cute.
Creating Your Galaxy Manicure
- Apply a deep purple, navy, or black base coat—this is your space background
- Dab black and dark purple polish onto a sponge and bounce it over the base to create depth and variation
- Use a thin brush or toothpick to dot small white or light purple circles across the nail (these are your stars)
- Scatter iridescent or holographic glitter across the nails using a makeup sponge or your brush
- Add swirls of lighter purple or blue to suggest nebulas or dust clouds
- Seal with a clear glossy top coat to secure everything and create a smooth finish
Worth knowing: Let each layer dry before adding the next to prevent colors from muddying together. The layering is what creates galaxy depth.
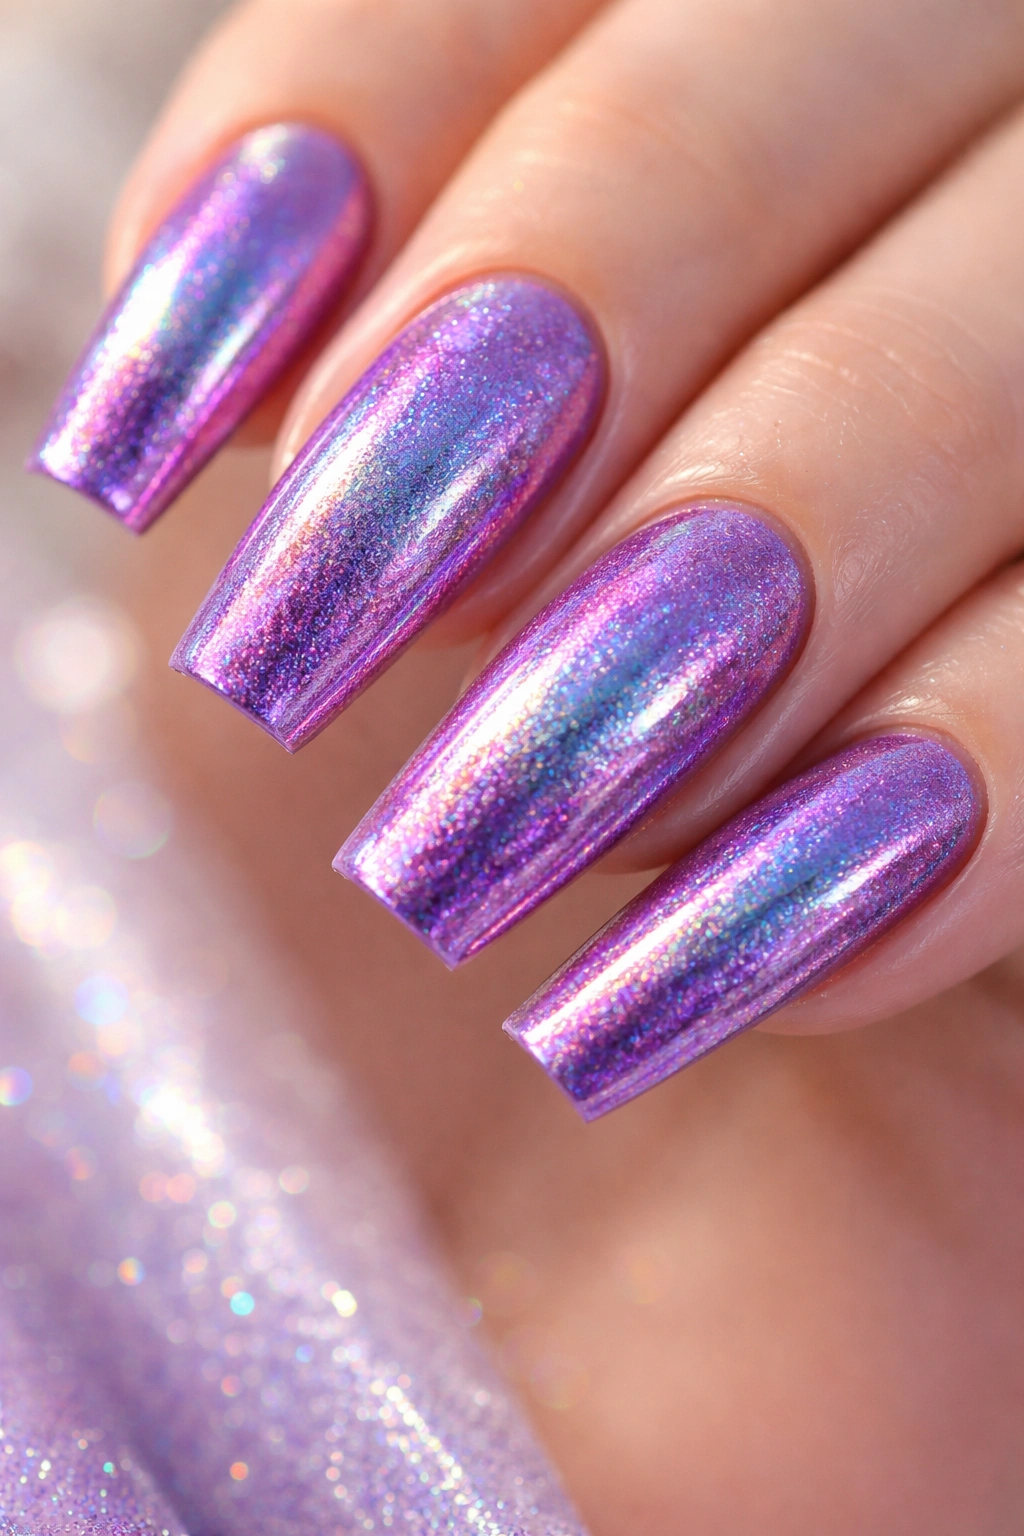
9. Purple Metallic Chrome Nails
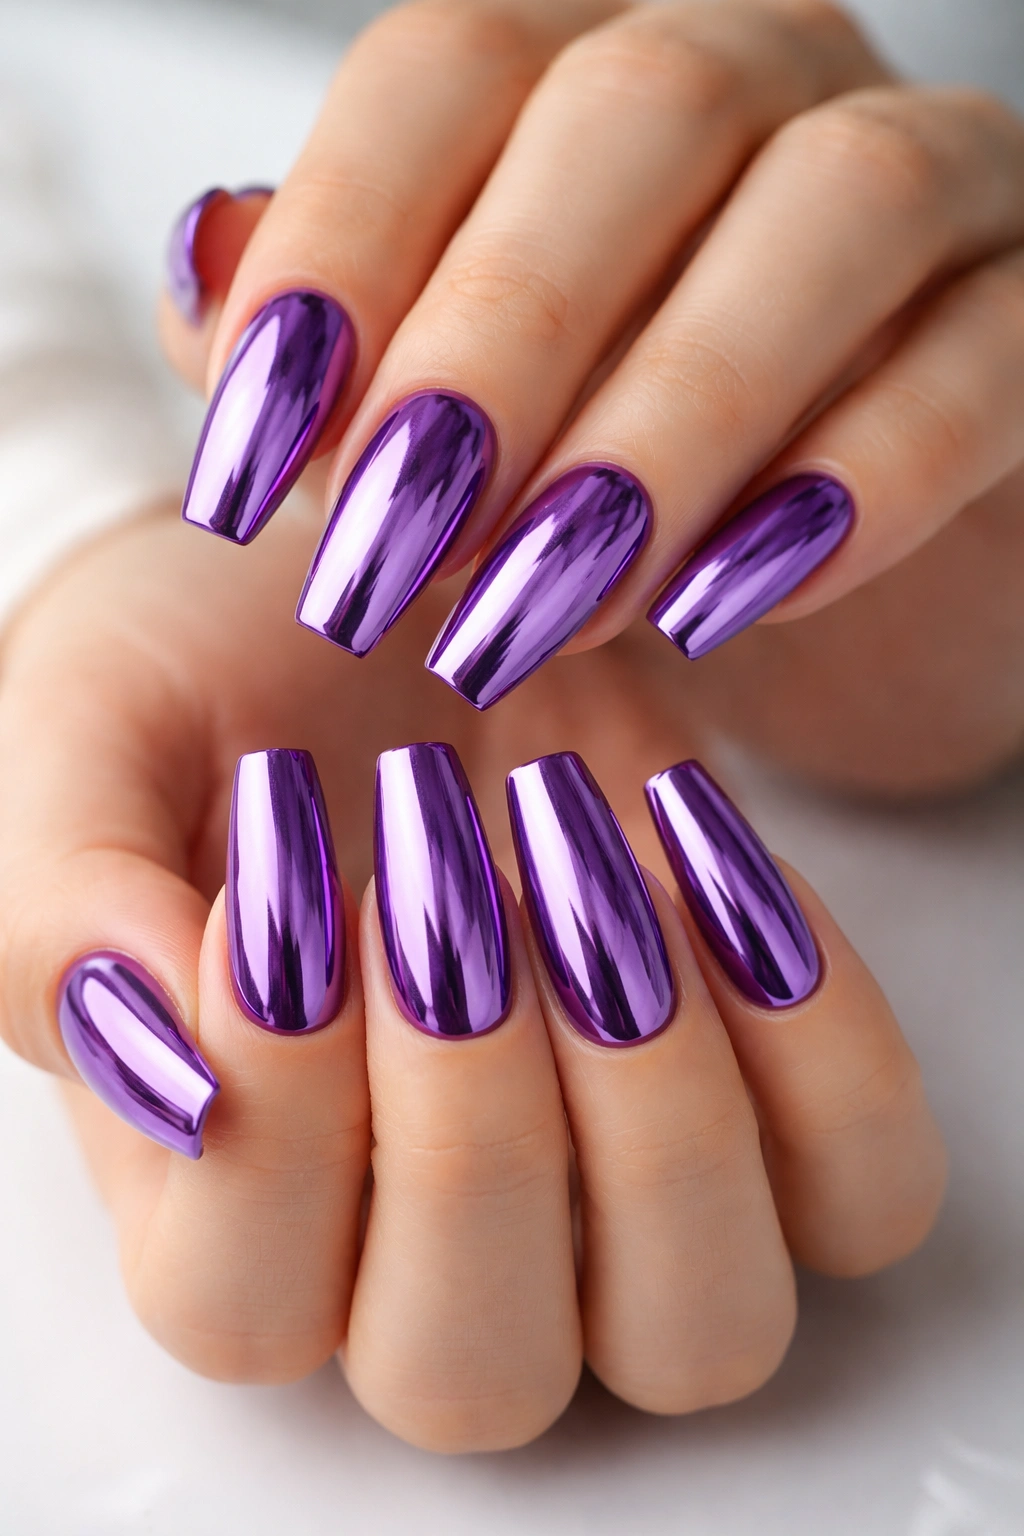
Metallic chrome nails in purple create a mirror-like, futuristic effect. Chrome polish reflects light so intensely that it almost looks 3D or holographic, giving coffin nails a high-fashion, runway-ready appearance.
The Ultra-Modern Appeal of Chrome
Chrome finishes are bold and unapologetically trendy-looking. On coffin nails, the reflective surface emphasizes the shape and creates an almost liquid appearance as light bounces across the nail. Purple chrome is less common than traditional chrome shades, which makes it feel edgy and distinctive.
Achieving Chrome Perfection
- Apply a high-quality chrome powder-based polish or chrome top coat over a purple base
- Chrome polishes often require specific application techniques—follow the manufacturer’s instructions carefully
- Use a velvet or applicator pad to distribute the chrome powder evenly and buff it to a mirror finish
- Some chrome formulas work better over a sticky base coat; check your specific product
- Seal with a glossy top coat designed for chrome (some regular top coats can dull the chrome effect)
- Avoid touching or buffing the nails once chrome is applied, as this affects the mirror finish
Pro tip: Chrome nails are stunning in photos but require careful maintenance because any smudges or fingerprints show prominently on the reflective surface.
10. Purple Nude Ombré Blend
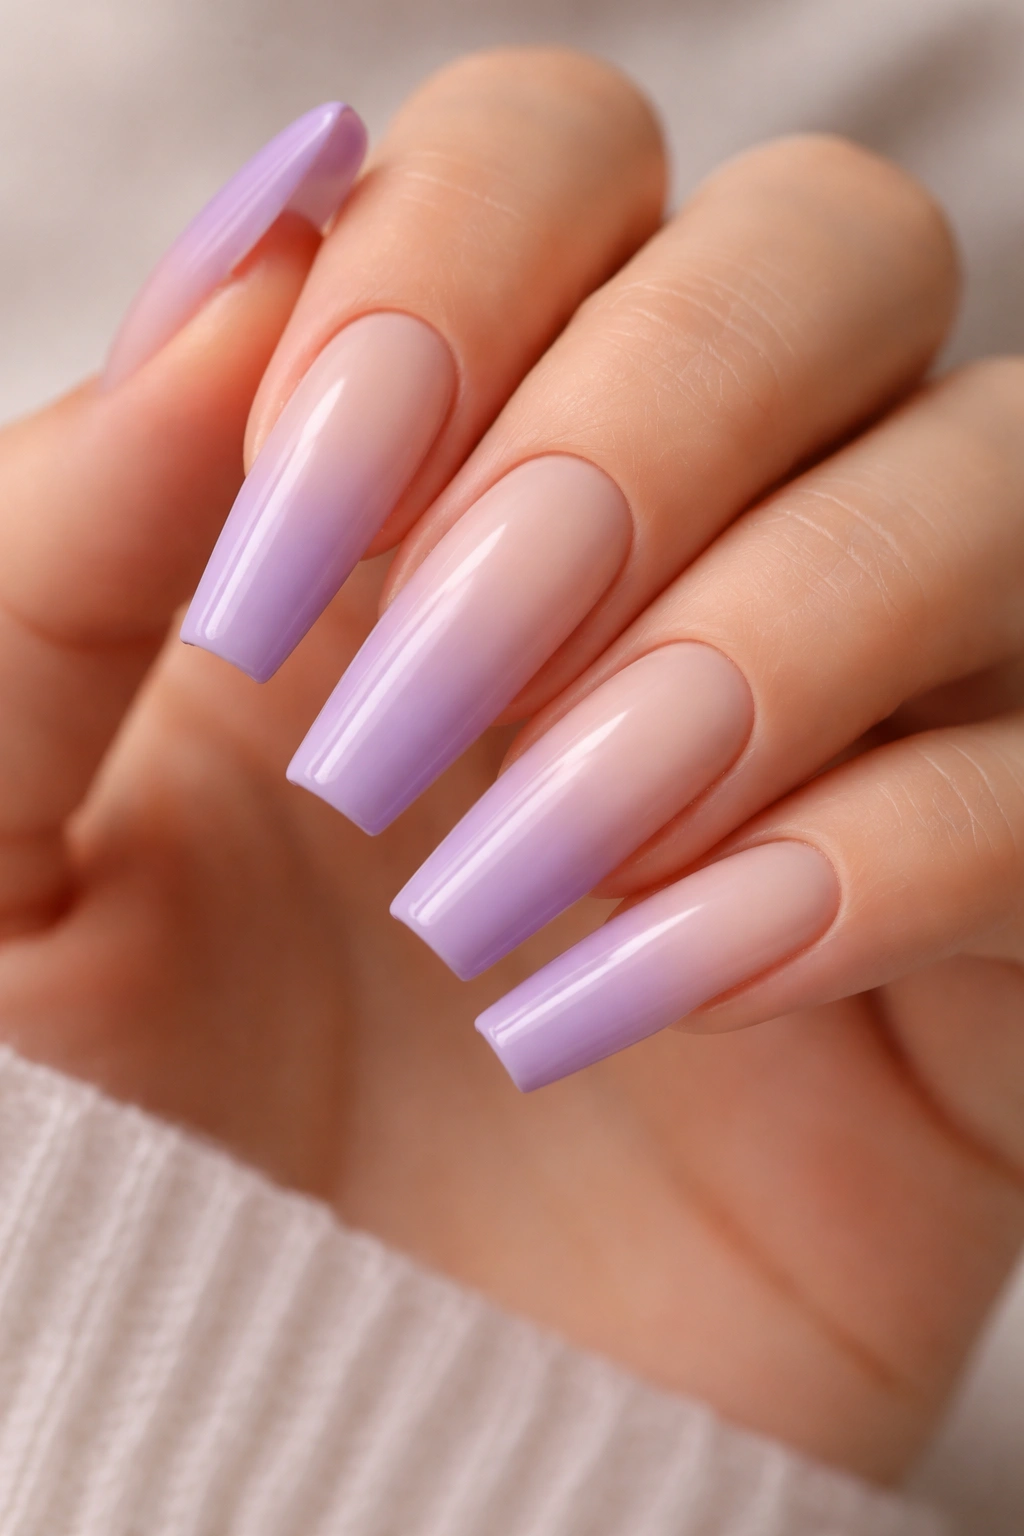
This sophisticated design blends soft purple with nude, beige, or soft pink tones to create an ombré effect that’s subtle and wearable while still incorporating purple. It’s perfect if you want purple without it being the dominant color.
Why Blended Ombré Reads as Elegant
Blending purple with nude or soft pink creates a sophisticated, slightly unexpected color combination that feels expensive and curated. The softness of the blend makes it appropriate for professional settings while still being visually interesting and special.
Executing a Purple-Nude Blend
- Choose two colors: a soft purple (think mauve or dusty lavender) and a nude or soft pink shade
- Apply the nude shade to the entire nail as a base
- Use a makeup sponge to gradually blend the purple into the nude, starting from the cuticle or nail base
- Create a soft transition zone where the colors meet and merge
- Add a glossy top coat to smooth and unify the blend
- Optional: add a thin pearl shimmer across the entire nail for subtle dimension
Worth knowing: The slower you move the sponge and the more times you dab, the smoother your blend will be—rushing creates harsh color lines instead of seamless transitions.
11. Royal Purple with Black Geometric Line Art
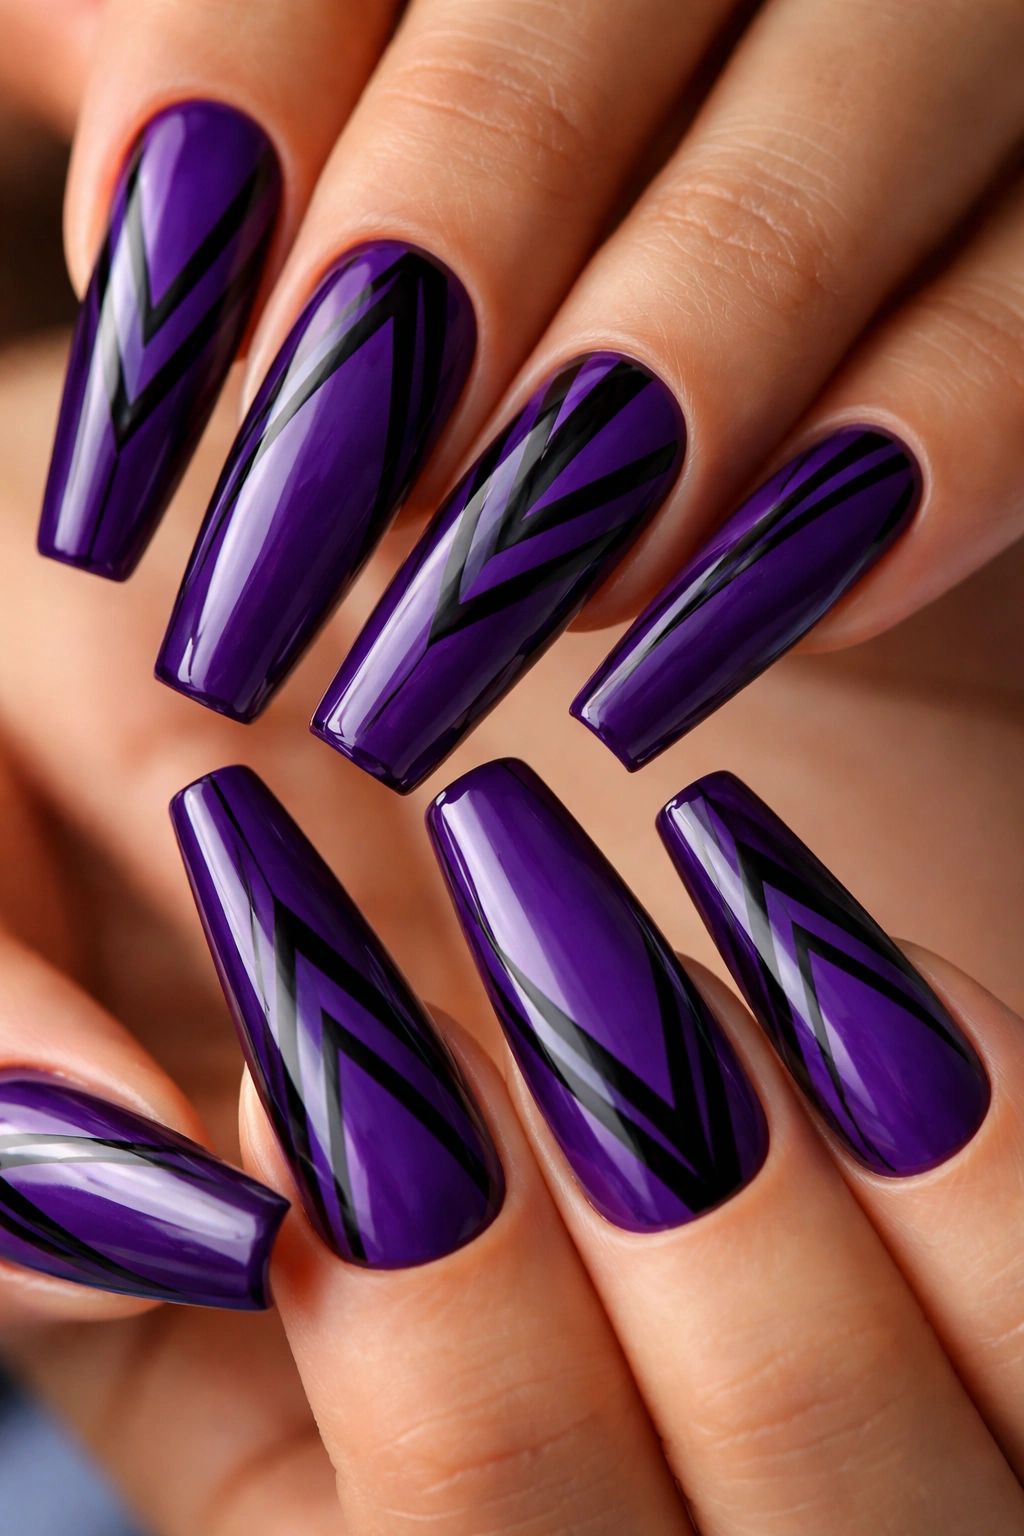
This striking design features a saturated royal purple base with bold black lines creating geometric shapes—think triangles, chevrons, half-moons, or abstract patterns. The high contrast between the vibrant purple and crisp black creates a fashion-forward, editorial look.
The Impact of Geometric Line Art
Black lines on purple create sharp visual interest and a modern aesthetic. On coffin nails, geometric patterns echo the nail’s natural shape and proportions, making the design feel intentional rather than random. This is a design that photographs beautifully and translates well to different lighting conditions.
Creating Geometric Patterns
- Apply royal purple base and let it cure completely
- Use a thin black nail art brush or liner to draw precise geometric shapes
- Create full lines across the nail, or use negative space (leaving some areas blank) to make the design feel less busy
- Try patterns like chevrons radiating from the center, triangles at the tips, or angular lines down the sides
- Keep some nails solid purple to balance the patterned ones
- Seal with a glossy top coat to make the black lines pop
Pro tip: Use a ruler or straight-edge guide to keep your black lines perfectly straight and geometric—freehand lines will feel less polished even if they’re close.
12. Purple Holographic Nail Polish
Holographic polish creates a rainbow effect across the nail surface, shifting colors as light changes and the nail moves. Purple holographic combines the sophistication of purple with the playful, eye-catching quality of rainbow light-play.
Why Holographic Polish Feels Special
Holographic finishes have an almost magical quality—they change color depending on lighting and angle, which makes nails feel dynamic and alive. On coffin nails, this effect is especially noticeable because the larger surface area captures and reflects light across more area, creating a bigger rainbow effect.
Applying Holographic Polish
- Start with a clean base coat—some holographic polishes work best over a slightly sticky base
- Apply holographic polish in thin, even coats—thick applications can muddy the rainbow effect
- Most holographic polishes require 2-3 thin layers to achieve full color-shifting effect
- Cure between layers if using gel or UV-cured polish
- Seal with a glossy top coat to lock in the shine and protect the holographic finish
- Avoid matte top coats, which will dull the holographic effect completely
Worth knowing: Holographic polish is often delicate and shows fingerprints and dust easily, so handle your nails carefully and store the polish bottle away from direct light.
13. Purple with Pearl and Iridescent Accents
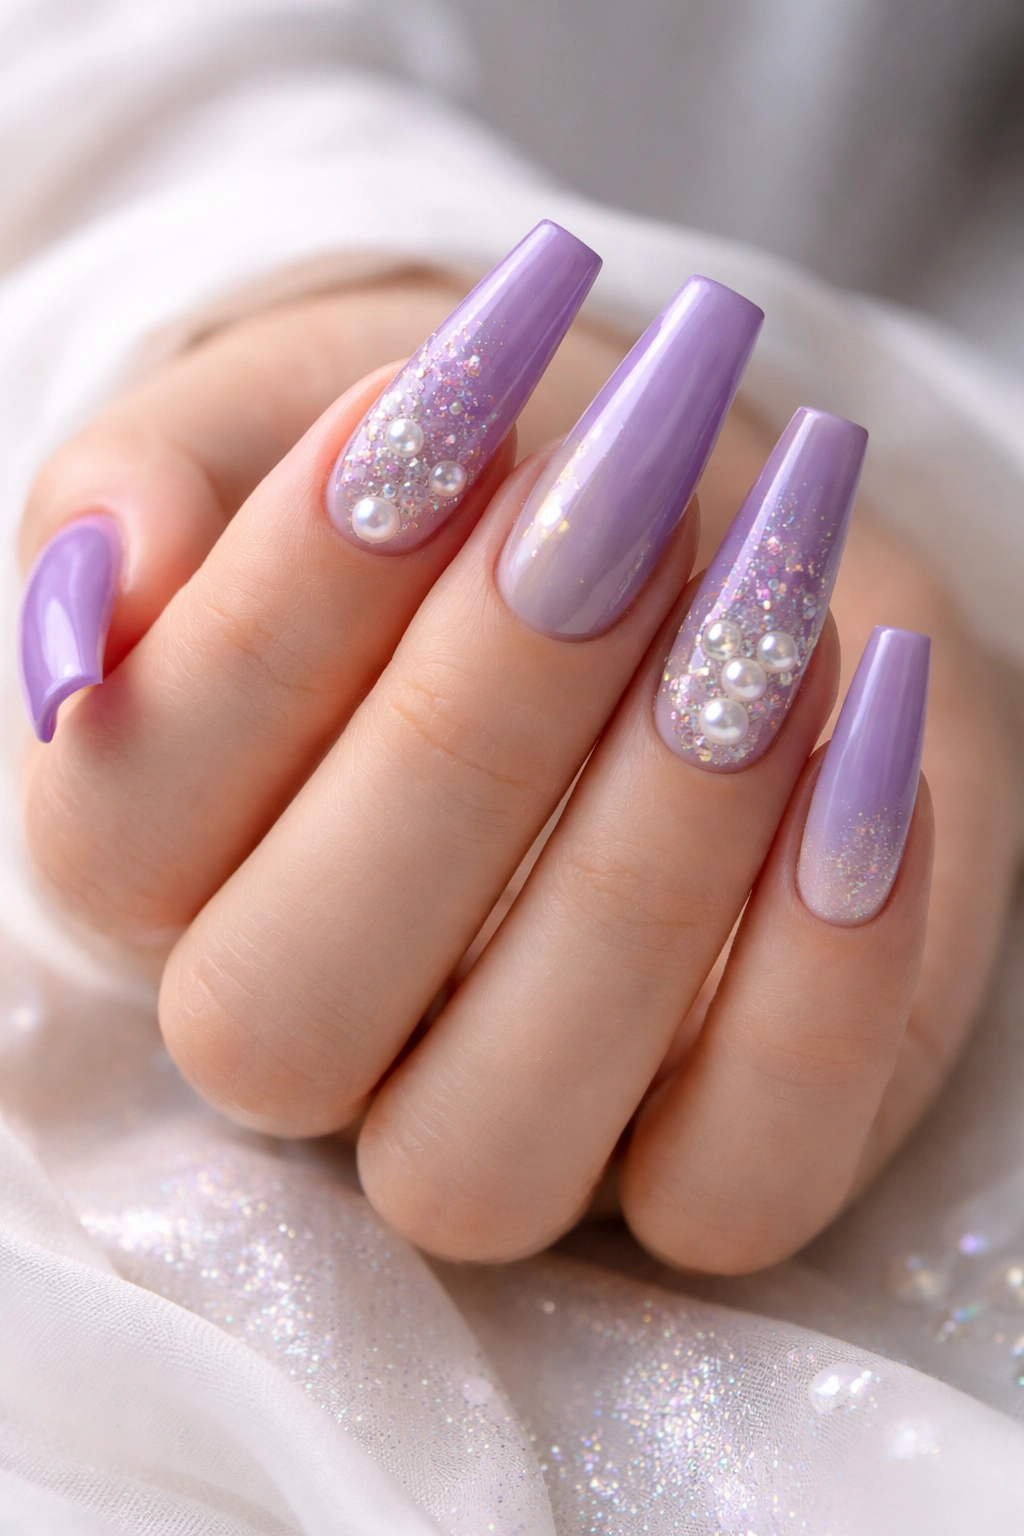
This subtle design features a solid purple base with pearl or iridescent elements layered on top. Pearls add a luminous, slightly dimensional quality, while iridescence creates color-shifting shimmer that makes the purple feel more complex and refined.
The Luxury of Pearl and Iridescence
Pearl and iridescent accents add sophisticated dimension without looking loud or over-the-top. They catch light in understated ways, which makes the overall design feel elevated and expensive. This is a great option if you want to incorporate purple but need a look that’s still appropriate for professional or formal settings.
Layering Pearl and Iridescent Effects
- Apply purple base coat and let it cure fully
- Add a pearl topcoat or dust with pearl powder for a soft, luminous finish across the entire nail
- Optional: layer iridescent flakes or flitters on top for color-shifting shimmer
- Use a fine brush to apply pearl or iridescent polish in specific areas—cuticle line, tips, or along the sides
- Seal with a thick glossy top coat that holds all the delicate elements in place
- The goal is subtle shine, not heavy glitter, so restrain your hand and build layers
Pro tip: Less is more with pearl and iridescence—multiple thin layers create more sophisticated dimension than one thick application.
14. Deep Eggplant with Micro Glitter Scatter
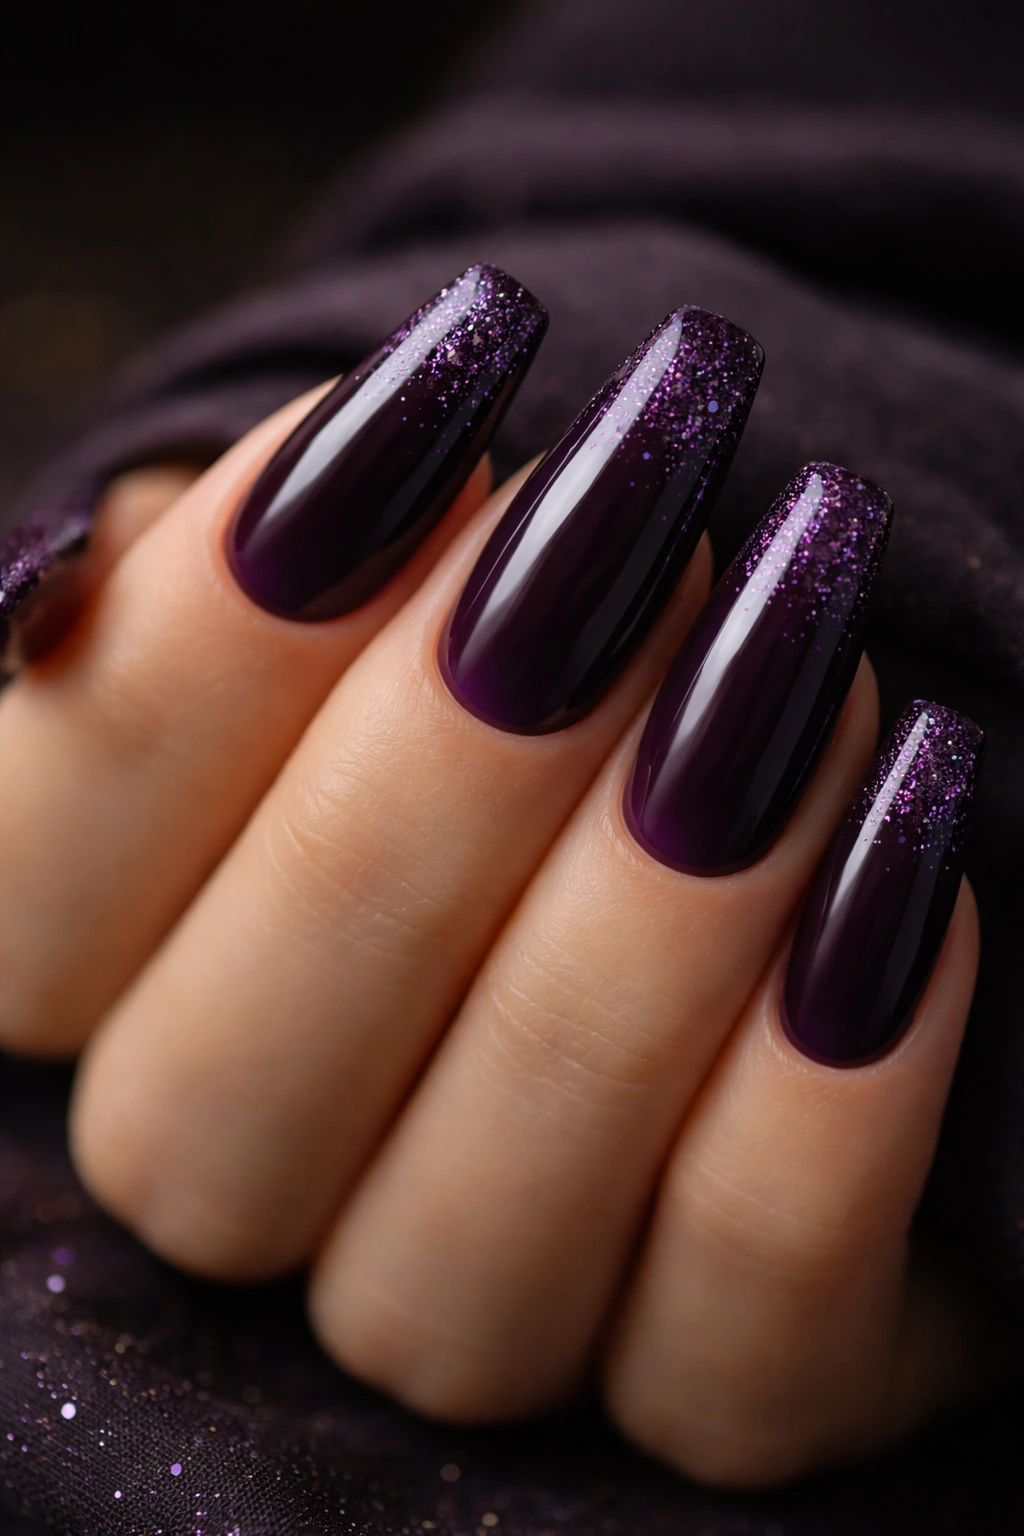
Deep eggplant is a rich, almost burgundy-tinged purple that feels moody and sophisticated. Scattered micro glitter (tiny, fine sparkles rather than chunky glitter pieces) adds just enough texture and light-catching without overwhelming the dark base color.
Why Micro Glitter Works on Dark Shades
Micro glitter on dark eggplant creates a subtle sparkle effect that catches light without looking costume-like. The fine glitter particles sit on the dark purple surface and twinkle rather than reflecting light in large, obvious ways. This creates a refined, wearable sparkly manicure perfect for evening wear or when you want a hint of glamour.
Applying Micro Glitter Effectively
- Apply deep eggplant base coat—a gel base holds glitter particularly well
- Mix micro glitter into a clear or slightly sticky top coat, or use a glitter-embedded top coat
- Apply the glitter layer in specific areas: the tips, the cuticle area, or scattered randomly for a more artistic look
- Alternatively, apply glitter using a makeup sponge for concentrated sparkle in certain zones
- Seal everything with a thick glossy top coat to smooth the glitter and create an even finish
- Buff gently if the surface feels bumpy, using a nail buffer to create a smooth topography
Worth knowing: Removing glitter nails requires patience—soak in acetone rather than trying to peel the polish off, as pulling glitter nails damages the nail bed.
15. Pastel Lavender with 3D Floral Nail Art
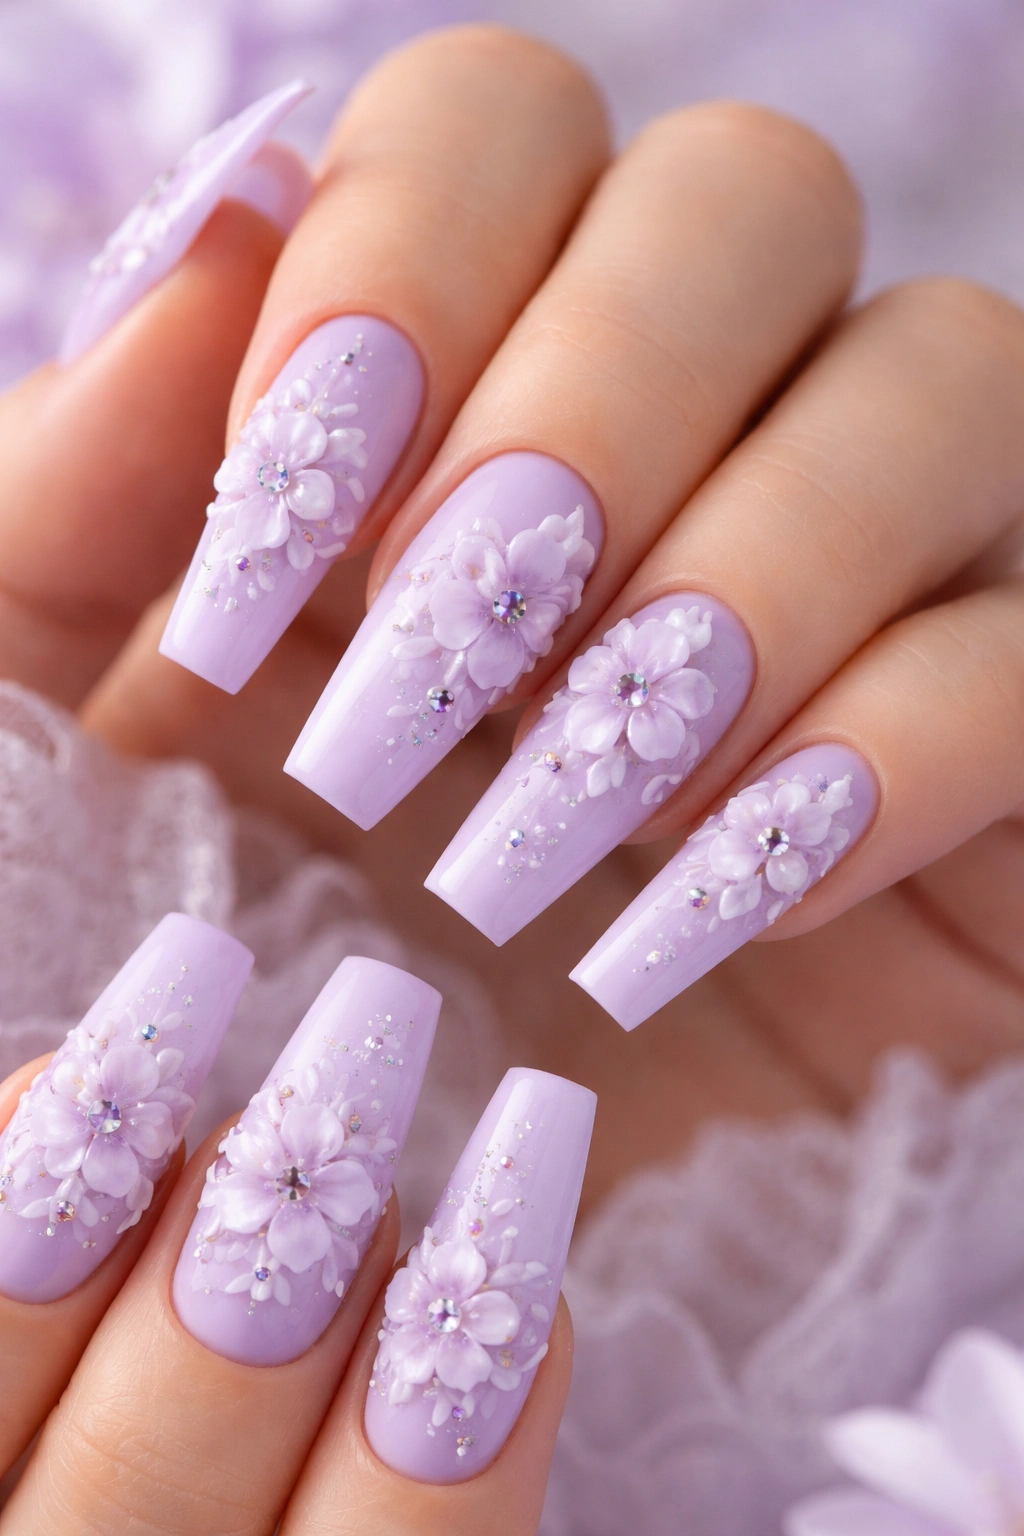
This softer, more romantic design features a pale lavender base with raised floral elements—think tiny 3D flowers, embellishments, or dimensional nail art pieces. The 3D aspect creates actual height and texture on the nail surface, making this a standout design.
The Charm of 3D Florals
3D nail art is tactile and visually interesting in ways that flat designs can’t be. On coffin nails, dimensional florals add luxury and specialty quality—this feels like a manicure you’d pay premium prices for at a salon. The combination of soft lavender and delicate florals creates a romantic, wedding-appropriate aesthetic.
Creating 3D Floral Details
- Apply pale lavender base and let it cure completely
- Use a thick, putty-like builder gel or acrylic to sculpt small 3D flower shapes directly on the nail
- Alternatively, apply pre-made resin flowers or nail art charms using strong adhesive
- Paint the 3D elements with gel polish in coordinating or contrasting colors (whites, deeper purples, pinks)
- Seal everything with a thick builder gel or top coat that encapsulates the 3D elements smoothly
- Add rhinestones around the flowers for extra sparkle if desired
- Cure thoroughly, and reinforce with additional top coat layers
Pro tip: If sculpting 3D elements feels intimidating, purchase pre-made resin flowers from nail art suppliers—they adhere easily and look professional without requiring sculpting skills.
16. Purple Teal Ombré Fusion
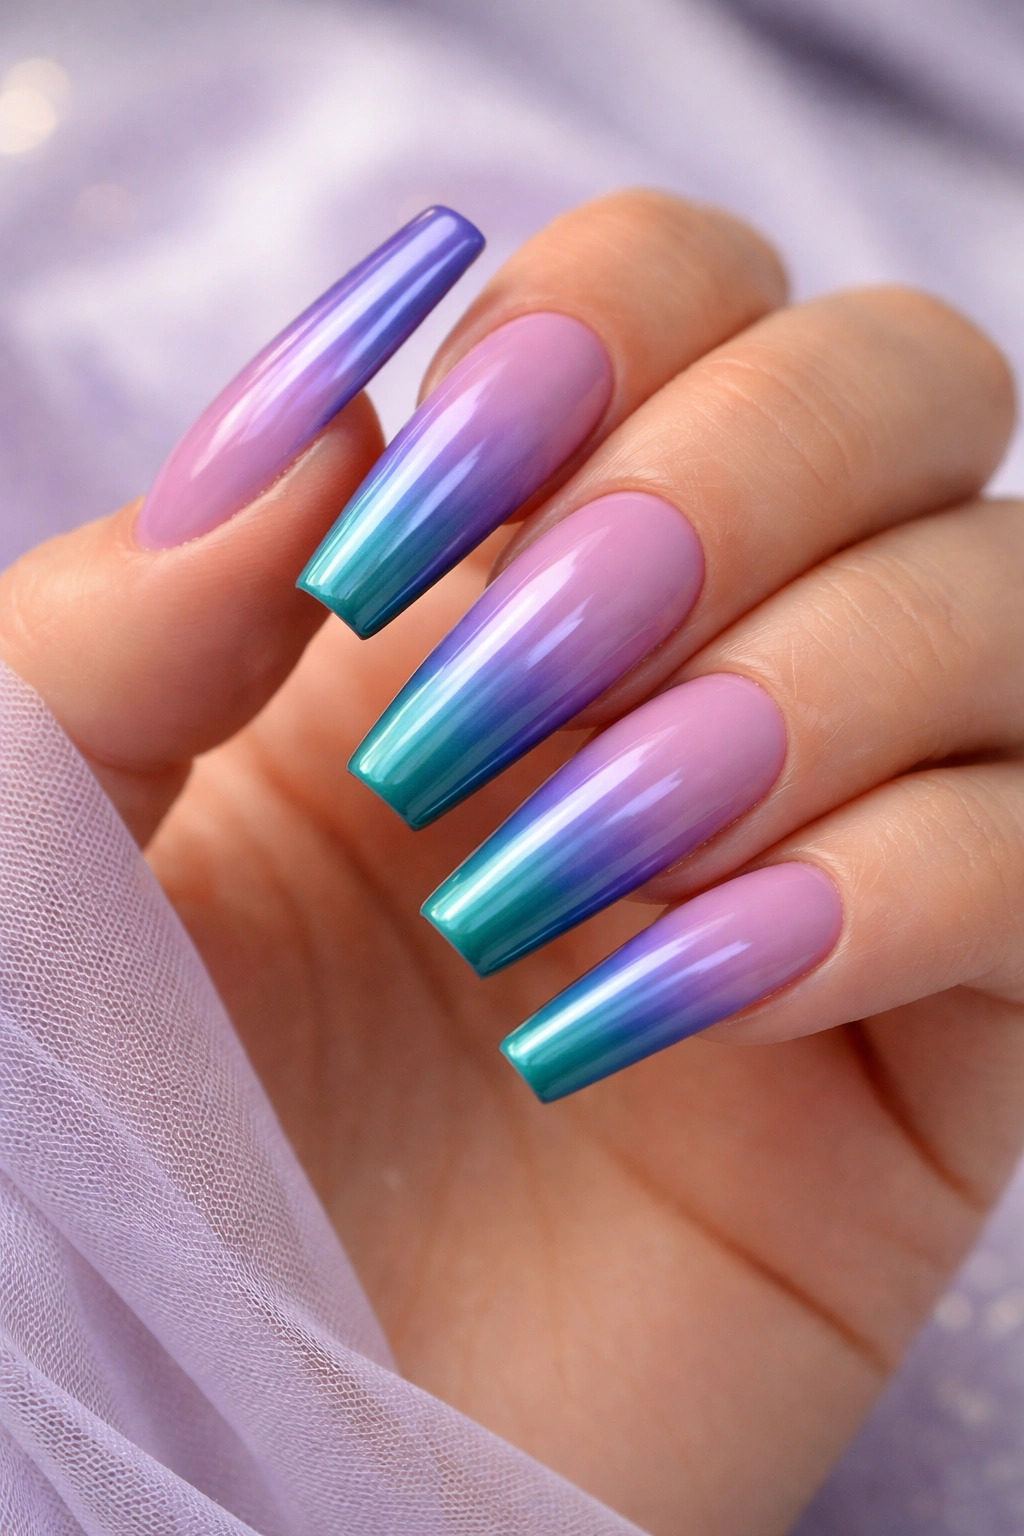
This trendy design blends purple and teal (blue-green) in an ombré gradient, creating a color-shifting effect that moves from cool blue-purple into warm teal. The fusion of these two jewel tones feels contemporary and unexpected.
The Modern Appeal of Purple-Teal Blending
Purple and teal together create a sophisticated, slightly unexpected color story that feels editorial and fashion-forward. The ombré transition between them creates movement and visual interest across the nail. On coffin nails, this gradient has room to develop smoothly and creates an almost watercolor effect.
Creating the Purple-Teal Ombré
- Choose a true purple and a jewel-toned teal (not bright aqua—something richer and more sophisticated)
- Apply the purple to the base and teal toward the tips
- Use a makeup sponge to blend the colors together in the middle transition zone
- Dab and bounce the sponge gently to create a smooth gradient rather than a harsh line
- Add a glossy top coat to seal and smooth the blend
- Optional: layer a holographic or iridescent top coat over the gradient for added dimension
- Consider adding gold or silver accents to unify the jewel-toned palette
Insider note: This ombré works beautifully whether you blend the colors on the same nail or create the gradient across all ten nails in varying intensities.
Final Thoughts
Purple on coffin nails is genuinely versatile. Whether you’re drawn to deep, moody eggplant, soft romantic lavender, or jewel-toned richness, there’s a purple coffin nail design that matches your style and the occasion. The elongated coffin shape gives you plenty of canvas to experiment with techniques like ombré gradients, geometric patterns, glitter placement, and dimensional art—options that would feel cramped on shorter nails.
The beauty of these designs is that many of them are approachable even if you’ve never done nail art before. An ombre gradient, a simple white-tip lavender manicure, or a solid purple with strategically placed rhinestones are all achievable at home with patience and the right tools. Other designs, like chrome finishes and 3D florals, might benefit from a professional manicurist’s expertise, but the payoff in glamour is absolutely worth it.
Start with a design that speaks to you, gather your supplies, and don’t hesitate to adapt these ideas to match your personal taste. Purple is forgiving—it works with gold, silver, black, white, pearls, glitter, and nearly every embellishment you can think of. Your coffin nails are the perfect stage for whatever purple design makes you feel confident and beautiful.
