

Coffin nails have become the go-to choice for anyone wanting an elegant yet edgy manicure that photographs beautifully and feels appropriately fancy for special occasions. The tapered, squared-off shape is forgiving on medium-length nails — long enough to show off intricate designs without requiring the commitment of ultra-long acrylics, and short enough that they won’t interfere with daily life. Birthday celebrations deserve nails that feel intentional and celebratory, and the coffin shape is the perfect canvas for incorporating glitter, shimmer, dimension, and color in ways that feel more sophisticated than basic designs while still capturing that festive energy. Whether you’re going for understated elegance or over-the-top sparkle, coffin nails let you express personality without sacrificing wearability.
The real advantage of choosing coffin-shaped nails for a birthday manicure is the balance they strike. The wider nail bed gives you plenty of room for detailed artwork, multi-color gradients, or strategic placement of rhinestones and embellishments, while the tapered sides create visual elongation that makes medium-length nails appear more dramatic and intentional. Birthday nails can afford to be bolder than everyday wear — this is your moment to commit to the shimmer, the dimension, and the designs you might normally hesitate over. Medium-length coffins give you the confidence to go for something statement-making without worrying about practicality or longevity concerns.
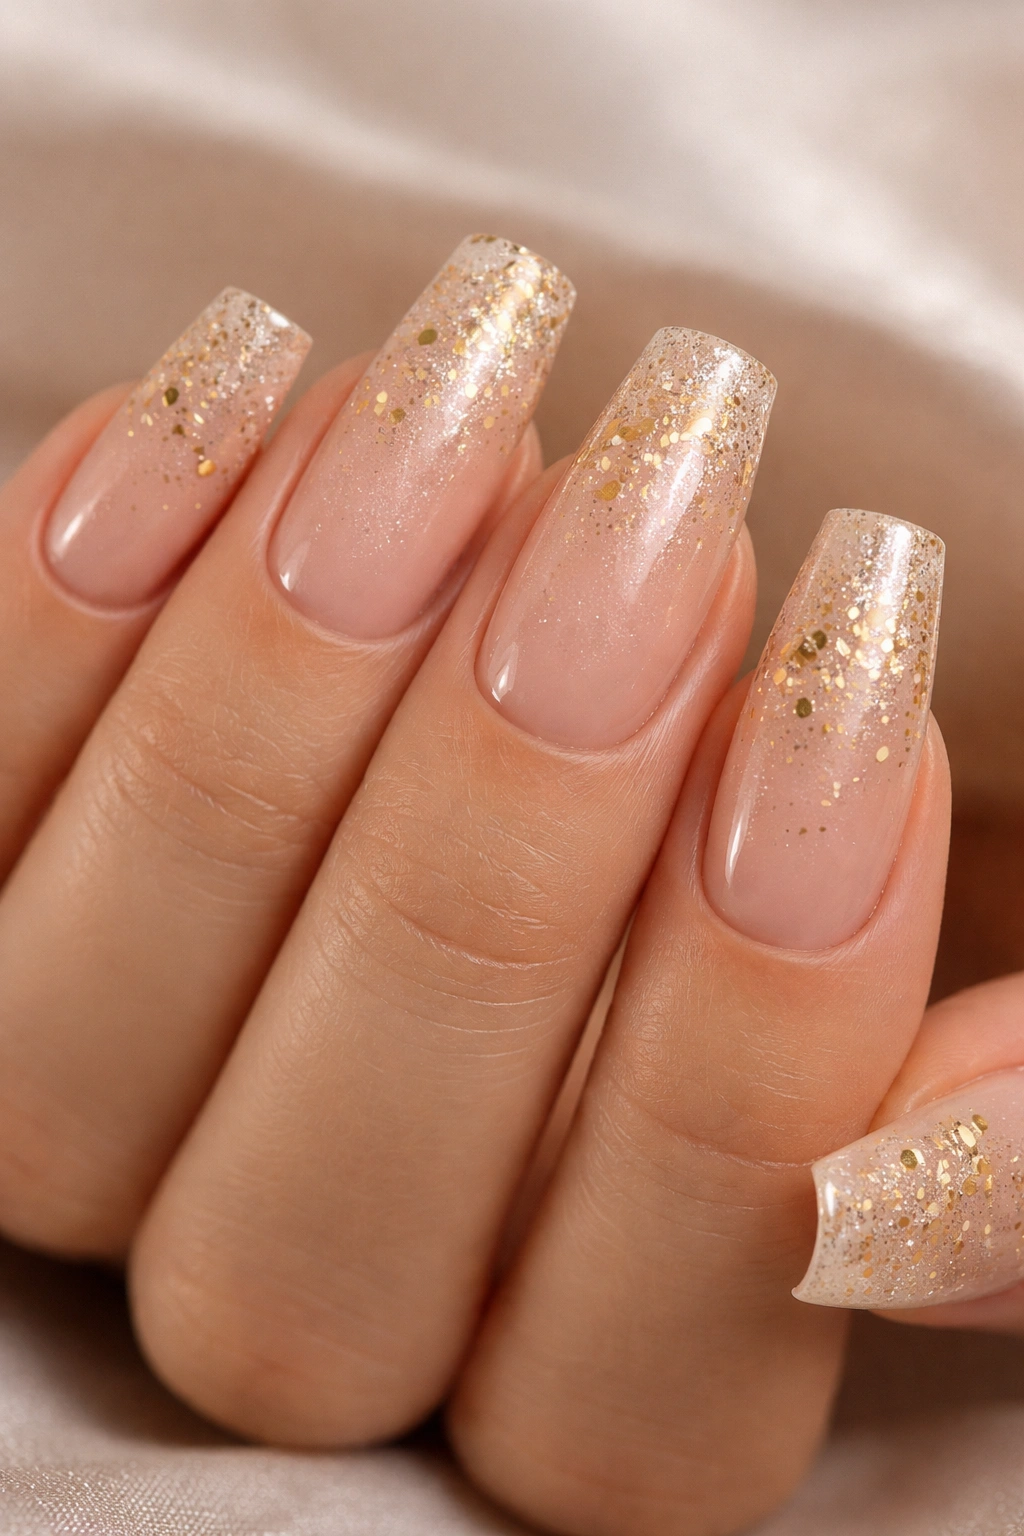
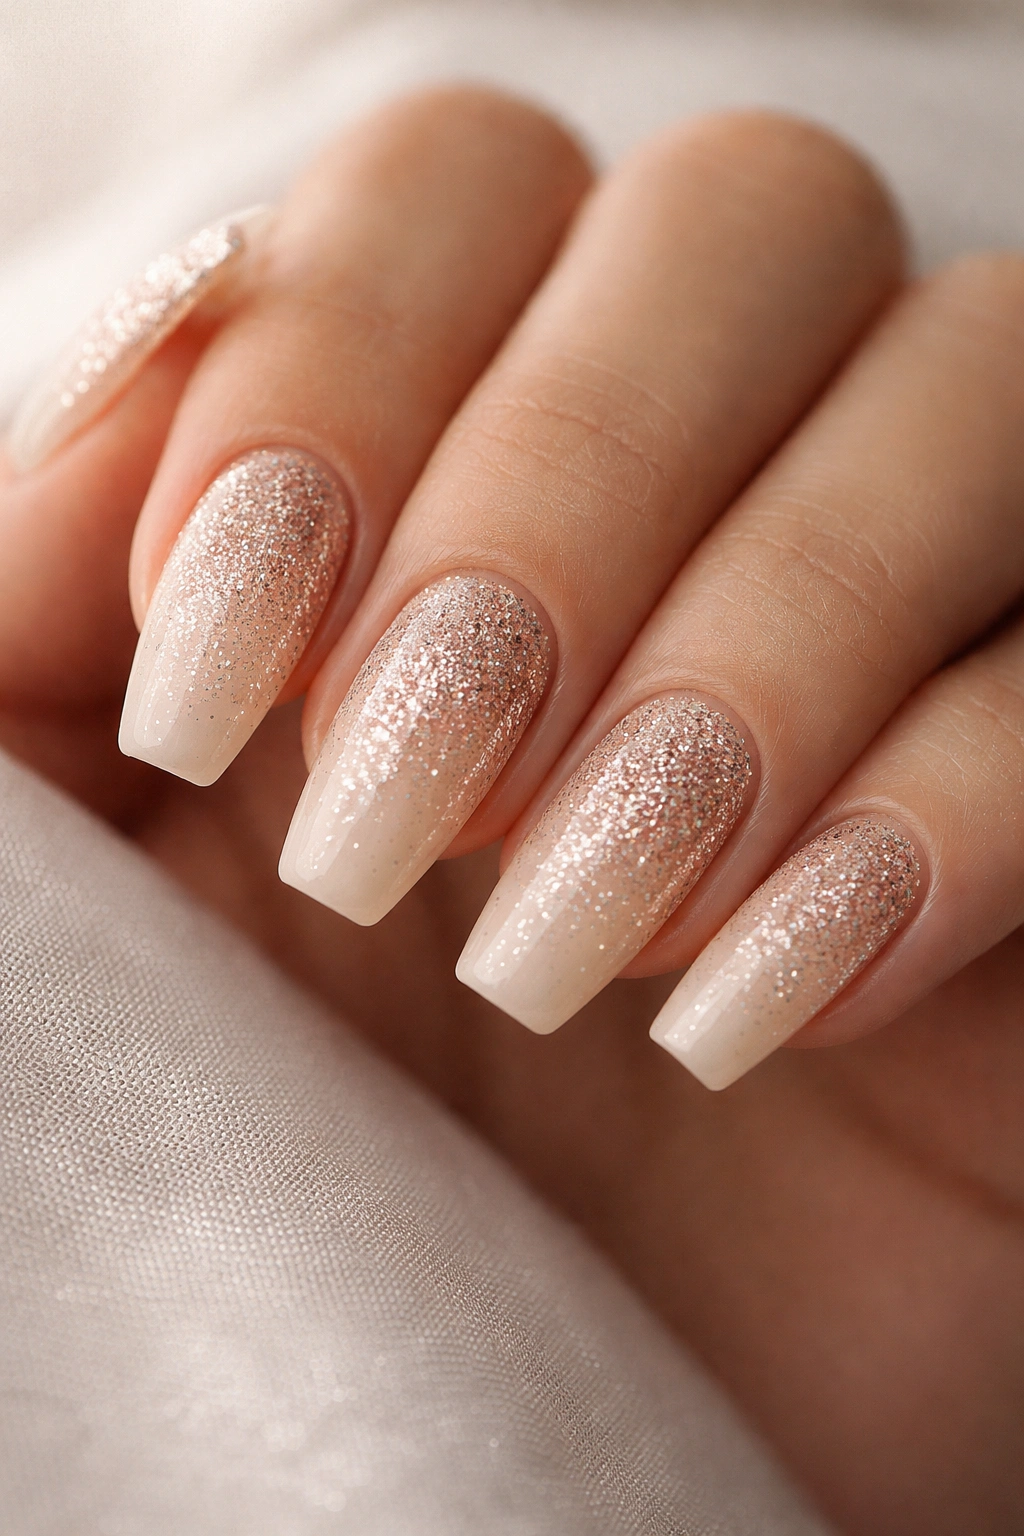
1. Ombre Glitter Gradient with Champagne Base
This design combines the sophistication of a soft champagne or nude base with a progressive buildup of glitter that intensifies from the nail base to the tips. It’s the perfect balance of understated elegance and subtle sparkle — the kind of design that looks expensive without screaming for attention.
Why This Works for Medium Coffin Nails
The ombre effect naturally follows the tapered shape of coffin nails, creating an optical illusion of even greater length and refinement. Champagne tones are universally flattering against all skin tones and photograph exceptionally well under flash photography, which is essential for a birthday manicure destined for countless photos. The gradient draws the eye down the length of the nail, and the coffin shape amplifies this elongating effect. Glitter gradually increases in density rather than appearing as chunky confetti, which feels more elegant for someone who wants sparkle without the party-favor vibe.
Application Secrets for Flawless Results
- Start with a creamy champagne or pale nude base coat — apply two thin coats rather than one thick coat to prevent bubbling and ensure a smooth surface for the gradient
- Use a makeup sponge to dab increasingly larger amounts of fine glitter along the lower third, middle, and upper portions of the nail, working from nail bed toward the tip
- Layer different sizes of glitter: start with ultra-fine champagne micro-glitter, then add slightly larger gold shimmer particles as you move toward the tip
- Seal everything with a thick topcoat and allow it to cure fully between layers if using gel polish
- The coffin shape’s side taper naturally frames the glitter gradient — the effect appears more deliberate and artistic than it would on a square or round nail
Quick Design Facts
- Best suited for all skin tones and hand sizes
- Works with both gel and traditional polish formulas
- Glitter particles tend to migrate, so apply topcoat generously and cure thoroughly if using UV
- Pairs beautifully with champagne, rose gold, or pale pink bases
- The gradient effect hides minor imperfections in application better than solid designs
Pro tip: Use a light hand with the sponge initially, then build glitter density gradually — it’s much easier to add more than to remove it, and the subtle ombre effect is what makes this design feel sophisticated rather than overdone.
2. Holographic Birthday Sparkle with Color Shift
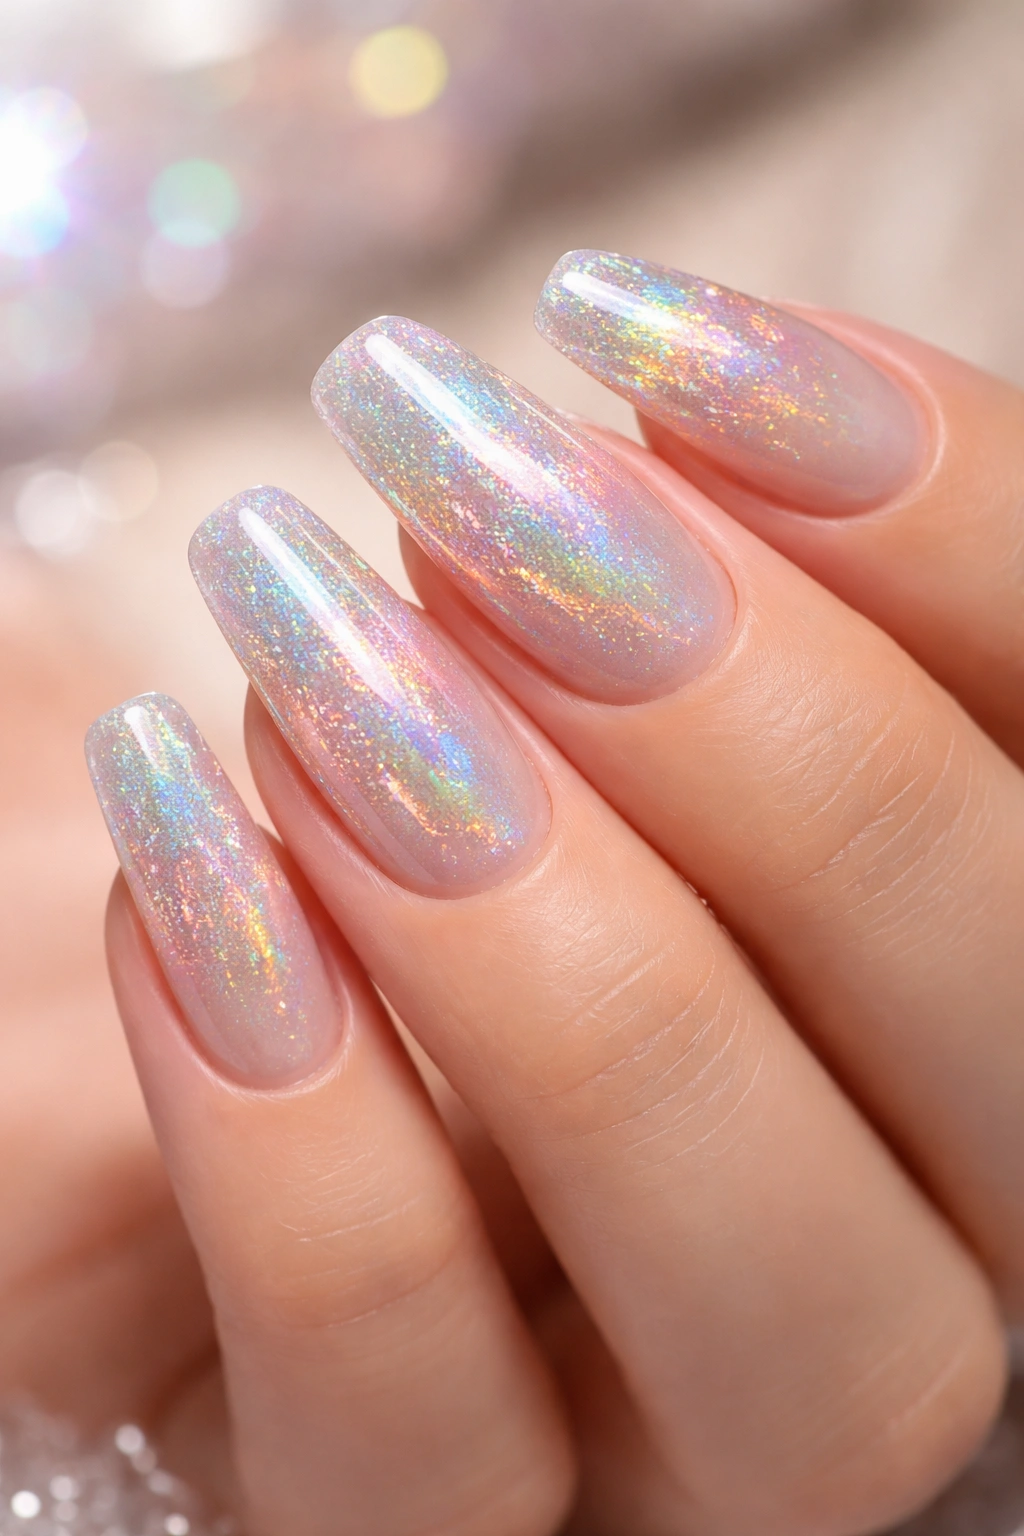
Holographic polishes have revolutionized nail art with their ability to shift colors depending on the angle and lighting. A birthday manicure featuring holographic elements captures light beautifully and creates an eye-catching sparkle that feels genuinely celebratory without relying on chunky embellishments.
What Makes This Design Stand Out
Holographic pigments refract light across the entire visible spectrum, meaning the nails will appear different in daylight, under flash photography, and in indoor lighting. This multifaceted quality feels inherently festive and special — the nail literally changes color as you move your hands. Medium-length coffin nails provide enough surface area for the holographic effect to fully display itself without getting lost. The clean lines of the coffin shape frame the sparkle effect elegantly, letting the shimmer do all the talking without needing additional decorative elements.
How to Get Maximum Holographic Impact
- Apply a white or pale nude base — holographic polishes show their full spectrum best over a neutral or light base
- Use a holographic polish formulated specifically as a full-coverage shade rather than a topper (toppers tend to look thin and streaky)
- Apply holographic polish in thin, even coats — holographic particles need proper distribution, and thick applications trap the pigment rather than displaying it
- Use a UV or LED lamp to cure gel formulas completely; holographic particles are light-reactive and sometimes require slightly longer cure times
- Finish with a non-wipe topcoat so you can see the full shimmer effect without sticky residue dulling the shine
- Consider a nude or white coffin shape as the statement, or opt for holographic on just the ring finger or middle finger for a subtle accent manicure
Quick Design Facts
- Holographic polishes work best in brighter lighting conditions
- The effect is more noticeable in flash photography than in person (perfect for birthday photos)
- Colors available include blues, pinks, purples, greens, and multi-spectrum rainbow effects
- Holographic nails stand out best when the rest of the nails are relatively simple
- This design requires minimal application skill — the polish does the work
Worth knowing: Some holographic polishes can appear dull if applied too thickly or if cured under weak UV lamps. Invest in a quality holographic formula and ensure proper curing for the most dramatic effect.
3. Geometric Confetti Design with Negative Space
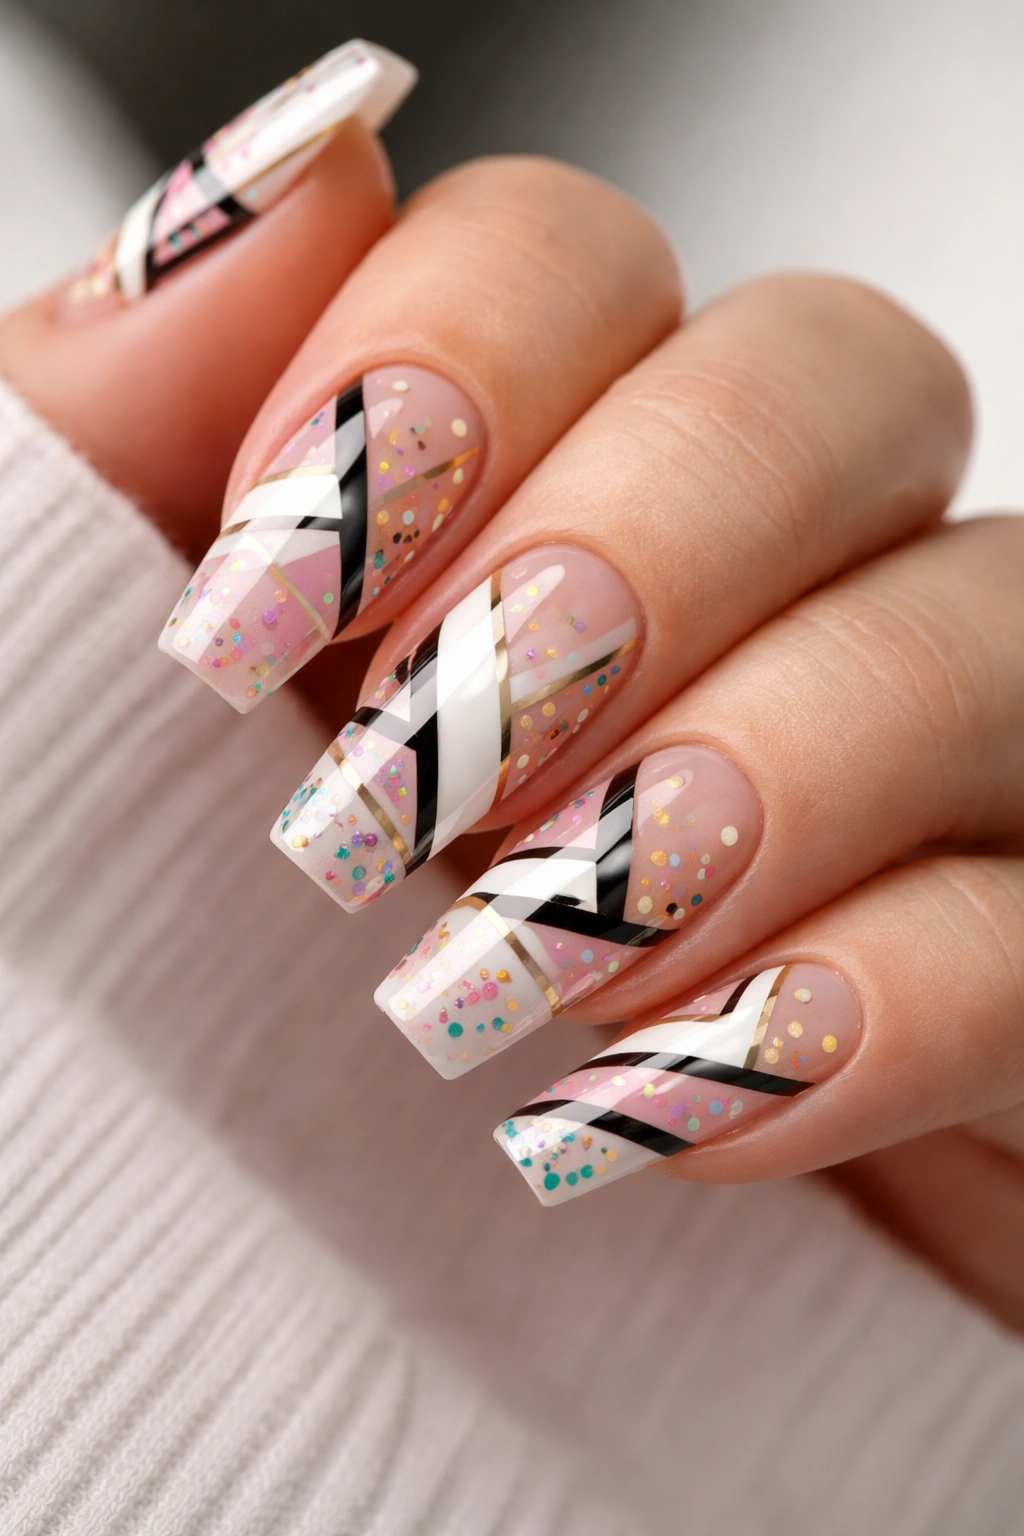
This design plays with the coffin shape by using negative space (the natural nail showing through) to create geometric patterns — triangles, stripes, and angular shapes — combined with strategic placement of confetti elements. It’s modern, playful, and infinitely customizable.
Why Geometric Patterns Suit Coffin Nails Perfectly
The coffin shape’s naturally sharp, angular lines echo geometric design language, making geometric patterns feel intentional rather than randomly placed. The taper of the coffin shape actually enhances angular patterns because the lines naturally follow the contour of the nail. Negative space designs are inherently flattering to medium-length nails because they make the nails appear longer and more refined than solid designs. The interplay between the natural nail, colored areas, and geometric negative space creates visual complexity that looks far more sophisticated than simple solid designs require.
Creating Geometric Confetti on Coffin Nails
- Start by mapping out your geometry: draw light pencil lines on the nail or use tape to define where patterns will sit
- Use nail tape to create clean geometric lines — burnish the edges firmly so polish doesn’t seep underneath
- Create patterns that respect the coffin shape: vertical stripes that follow the taper, triangles pointing toward the nail tip, or diagonal lines that enhance the shape’s natural flow
- Combine one or two solid geometric patterns with negative space, then add confetti elements (small dots, flecks, micro-glitter) in the negative space
- Choose confetti colors that complement rather than clash with your geometric sections — if you have navy geometric shapes, add silver or white confetti to the bare nail areas
- Coffin nails allow geometric patterns to span the full width of the nail without appearing cluttered because the sides taper naturally
Quick Design Facts
- Geometric designs hide minor imperfections and growth lines better than solid designs
- Negative space makes medium nails appear longer than solid designs would
- Works beautifully with any color combination
- Requires a steady hand or nail tape for clean lines
- Geometric confetti feels modern and edgy, perfect for younger birthday celebrants or those with bolder personal style
Pro tip: Use different sizes of confetti elements (micro-glitter, small metallic dots, scattered rhinestones) in the negative space areas to create depth and visual interest without the design feeling chaotic.
4. Chrome Mirror Finish Nails with Gradient
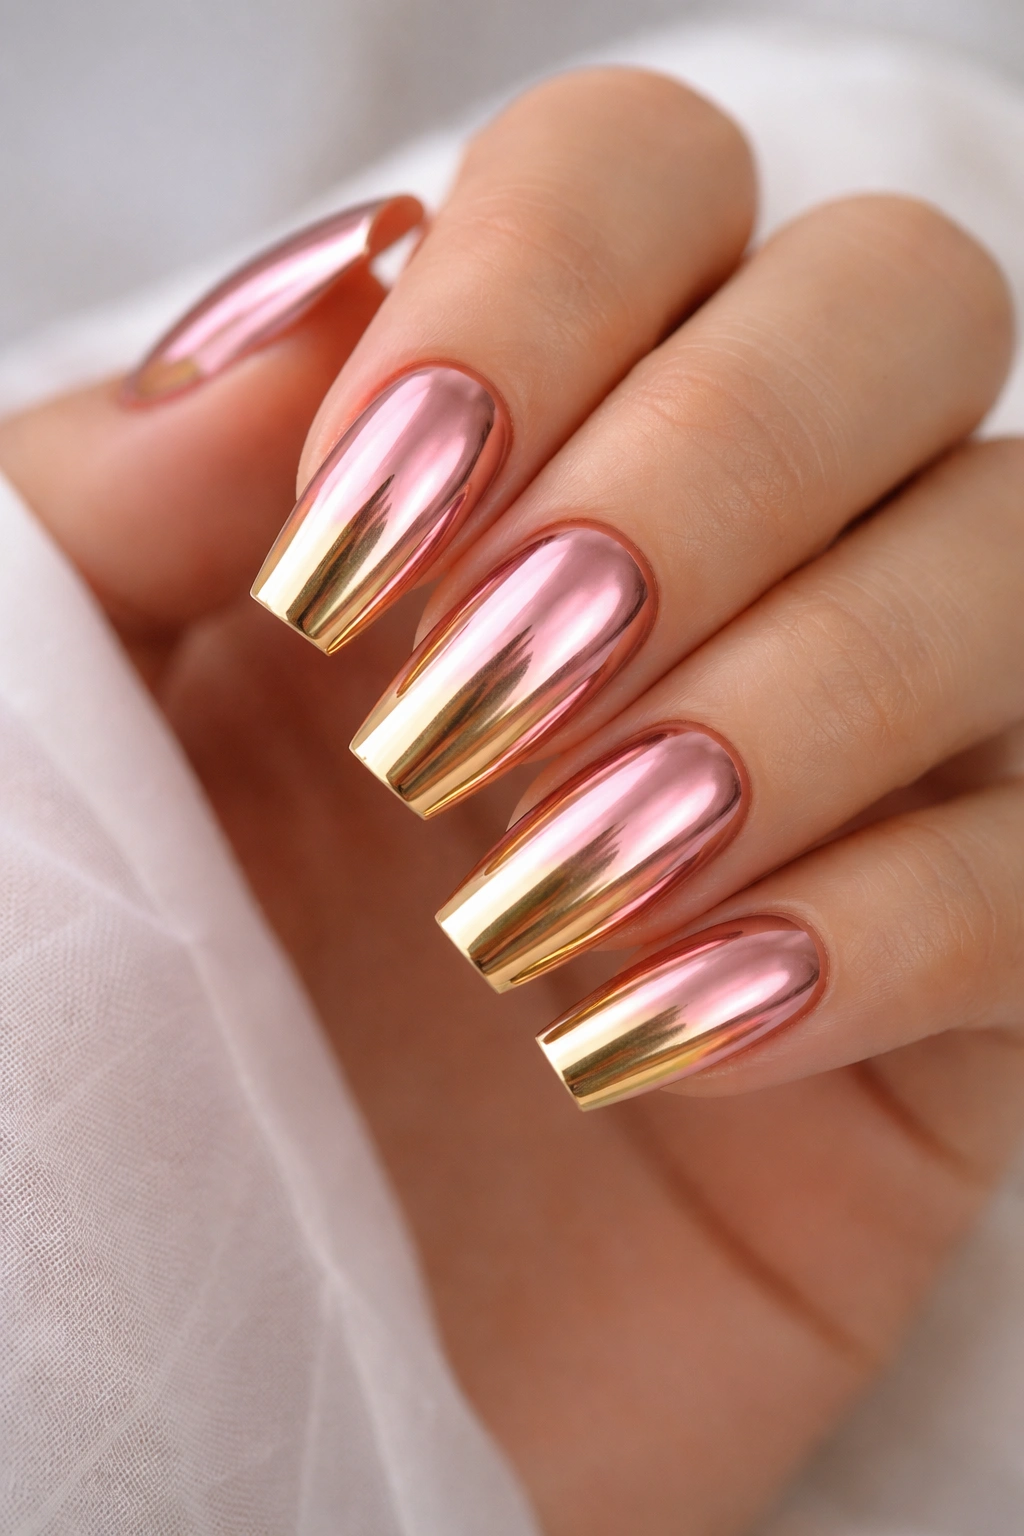
Chrome and mirror polishes create an impossibly shiny, reflective surface that looks like polished metal. Combining chrome with a gradient effect (one chrome color transitioning to another) creates an almost liquid, futuristic effect that’s stunning on coffin nails.
What Makes Chrome Work on Medium Coffins
Chrome polishes have a reflective quality that catches light dramatically, making medium-length nails appear glossier and more luxurious than longer nails with traditional polish. The coffin shape’s width allows you to see the full reflection effect — the curve and taper of the nail create natural light-catching surfaces that enhance the chrome shine. A gradient from one chrome tone to another (rose chrome to gold chrome, for example) creates dimension and movement without needing additional embellishments. The result feels futuristic and celebratory without the potential fragility of heavy rhinestone work.
Applying Chrome Polish for Maximum Shine
- Chrome polishes require a completely smooth surface — buff nails gently with a soft buffer first
- Apply a nude or clear base coat to ensure chrome particles have optimal adhesion
- Apply chrome polish in one even, thin coat (chrome particles suspend in the polish, and thick coats trap the pigment)
- Use a specialized chrome powder applicator or fold a microfiber cloth into a small bundle, dip it in the chrome powder, and swipe it across the wet polish in one direction
- Seal with a thick, non-wipe topcoat — the topcoat actually enhances the chrome reflection by creating a super-smooth protective surface
- For gradient effects, apply one chrome shade to the entire nail, then apply a second chrome shade to just the tips and blend the transition with a soft brush or the edge of the applicator
- Work quickly — chrome polishes can dry faster than traditional polishes, and you need the surface slightly wet to apply chrome powder effectively
Quick Design Facts
- Chrome finishes are most dramatic in bright lighting or daylight
- The reflection effect can appear muted indoors or in low light
- Chrome polishes work best on coffin and almond shapes; they look slightly less dramatic on round nails
- Gradient chrome combinations: rose to gold, silver to champagne, blue to purple
- This design requires Chrome powder and a quality applicator for the best results
Insider note: Some nail technicians use a lint-free wipe with a tiny amount of isopropyl alcohol to gently buff the chrome surface after sealing with topcoat — this creates an almost mirror-like reflection that’s impossible to achieve otherwise.
5. Floral Garden Party with Pressed Flowers
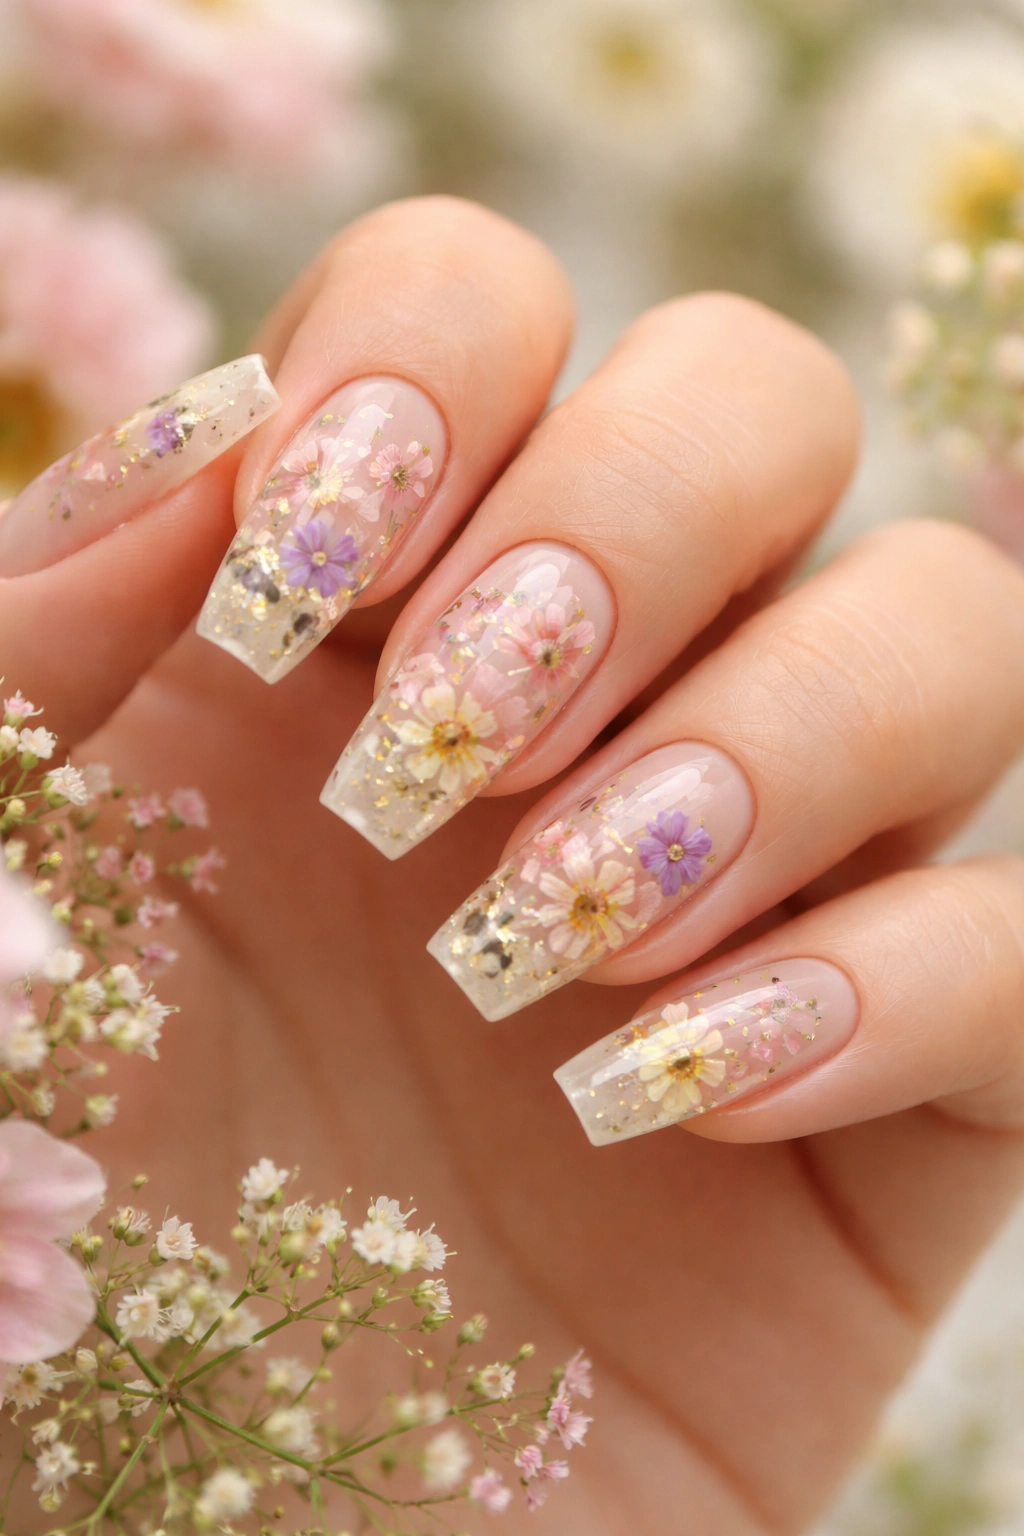
This design incorporates actual dried pressed flowers or realistic floral nail art beneath a clear or nude topcoat. It evokes a botanical garden aesthetic and feels romantic, delicate, and distinctly celebratory without being overtly glittery.
Why Pressed Flowers Suit Birthday Celebrations
Flowers are inherently celebratory and associated with special occasions — they signal that something worth commemorating is happening. The coffin shape provides a perfect frame for floral designs; the elongated shape gives pressed flowers or painted florals enough space to display without feeling cramped. Medium-length nails are ideal for pressed flower designs because they’re long enough to show multiple florals or a larger design, but short enough that the flowers won’t snag or break easily. The pressed flower aesthetic feels handcrafted and personal in a way that mass-produced design stamps don’t quite achieve.
Creating Floral Designs on Coffin Nails
- For pressed flowers: use actual dried flower petals (available from specialty craft stores), apply a small amount of clear gel to the nail surface, place flowers carefully with tweezers, then seal completely with thick topcoat
- For hand-painted flowers: use a fine brush and acrylic paint or thin gel polish to create wildflowers, daisies, or roses — even simple silhouettes feel elegant
- Create a gradient background (pale pink, lavender, or soft peach) on the nail first, then place flowers on top for visual interest
- Coffin nail width means you can fit 2-3 smaller flowers or one larger focal flower per nail
- Consider a botanical theme: floral designs on the full set, or just on the ring finger and middle finger as statement nails with solid color on the rest
- Pressed flowers require careful sealing to prevent them from shifting or coming loose — apply generous topcoat in thin layers rather than one thick layer
Quick Design Facts
- Pressed flowers are delicate and can shift during application if not sealed immediately
- Real flowers create a botanical, cottagecore aesthetic
- Painted florals offer more control and longevity than pressed flowers
- Works beautifully with soft, muted color bases
- Floral designs feel romantic and feminine but still work for sophisticated celebrations
Worth knowing: If using real pressed flowers, source them from beauty supply vendors rather than craft stores — beauty-grade flowers are dried specifically for nail application and won’t deteriorate as quickly as craft flowers.
6. Champagne Bubble Nails with Pearl Accents
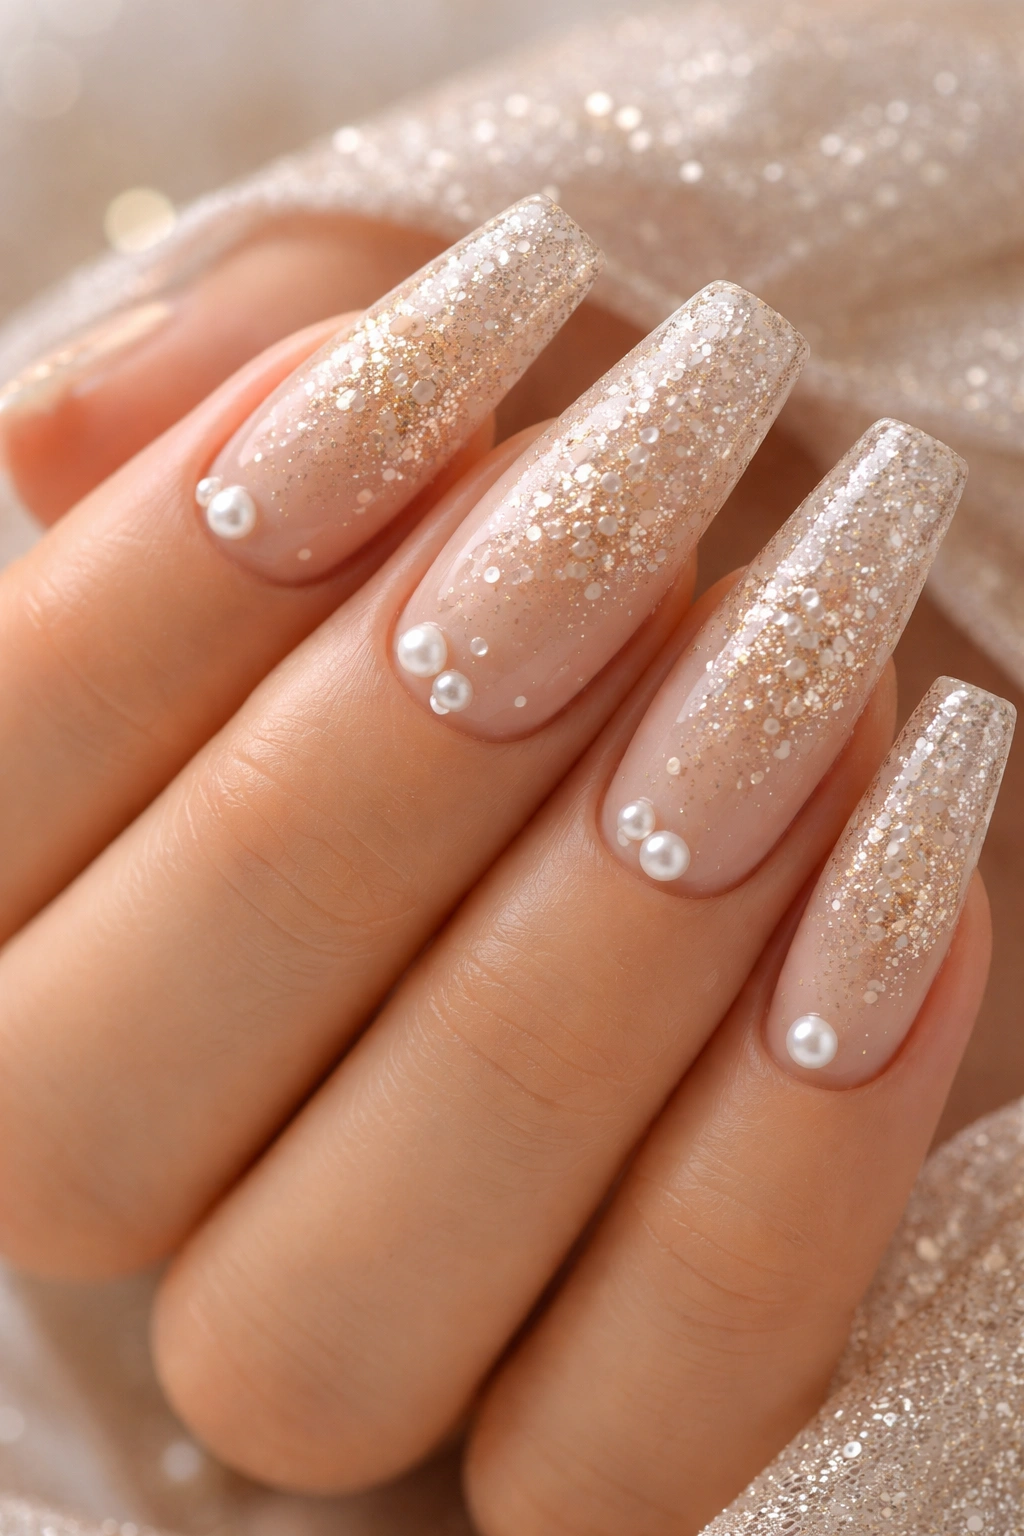
Bubble nails feature textured areas created with bubble nail polish — a specialized formula that creates air pockets and a raised, bubbly surface texture. Combined with champagne tones and pearl accents, this creates a tactile, luxurious design that photographs beautifully.
What Makes Bubble Nails Feel Celebratory
Bubble polish creates dimension and texture that catches light in unique ways — the raised surface feels celebratory and playful, unlike smooth gel nails. The coffin shape’s width allows the bubble texture to display fully without appearing overdone or chaotic. Champagne bubble polish has an inherent elegance, and the addition of pearl accents (pearl pigments or pearl rhinestones) elevates the design to formal-occasion level. The combination feels both playful and sophisticated — perfect for someone who wants to feel special on their birthday without going full glitter-bomb.
Application Technique for Bubble Polish
- Apply a smooth champagne or pale nude base coat first — this provides a neutral foundation
- Apply bubble polish directly over the base in thin coats; bubble polish formulas are designed to create texture automatically without requiring additional steps
- Allow bubble polish to air dry completely or cure if it’s gel-based — the bubbles form as the polish dries
- Once the bubble layer is set, add pearl accents: use pearl pigment mixed into a clear topcoat and drip or sponge it onto specific areas, or apply individual pearl rhinestones with a topcoat adhesive
- Create a focal accent nail: bubble all ten nails with champagne, but add extra pearl accents to just the ring finger or middle finger
- The coffin shape means you can place pearls strategically along the sides or at the tips where they’ll catch light beautifully
Quick Design Facts
- Bubble polish is more delicate than traditional gel — it can be prone to peeling if nails aren’t properly prepped
- The bubbles can flatten slightly with excessive topcoat, so seal gently and sparingly
- Pearl accents work best applied sparsely rather than densely covered
- Bubble nails feel best as a full-manicure design rather than just one accent nail
- The textured finish makes these nails feel premium without requiring elaborate application
Pro tip: Bubble polish and sparkle polishes don’t always mix well — if you want to combine bubble texture with some shimmer, apply bubble as the base and add sparkle as a topcoat layer rather than mixing them together.
7. Neon Ombre Rainbow with Coffin Taper
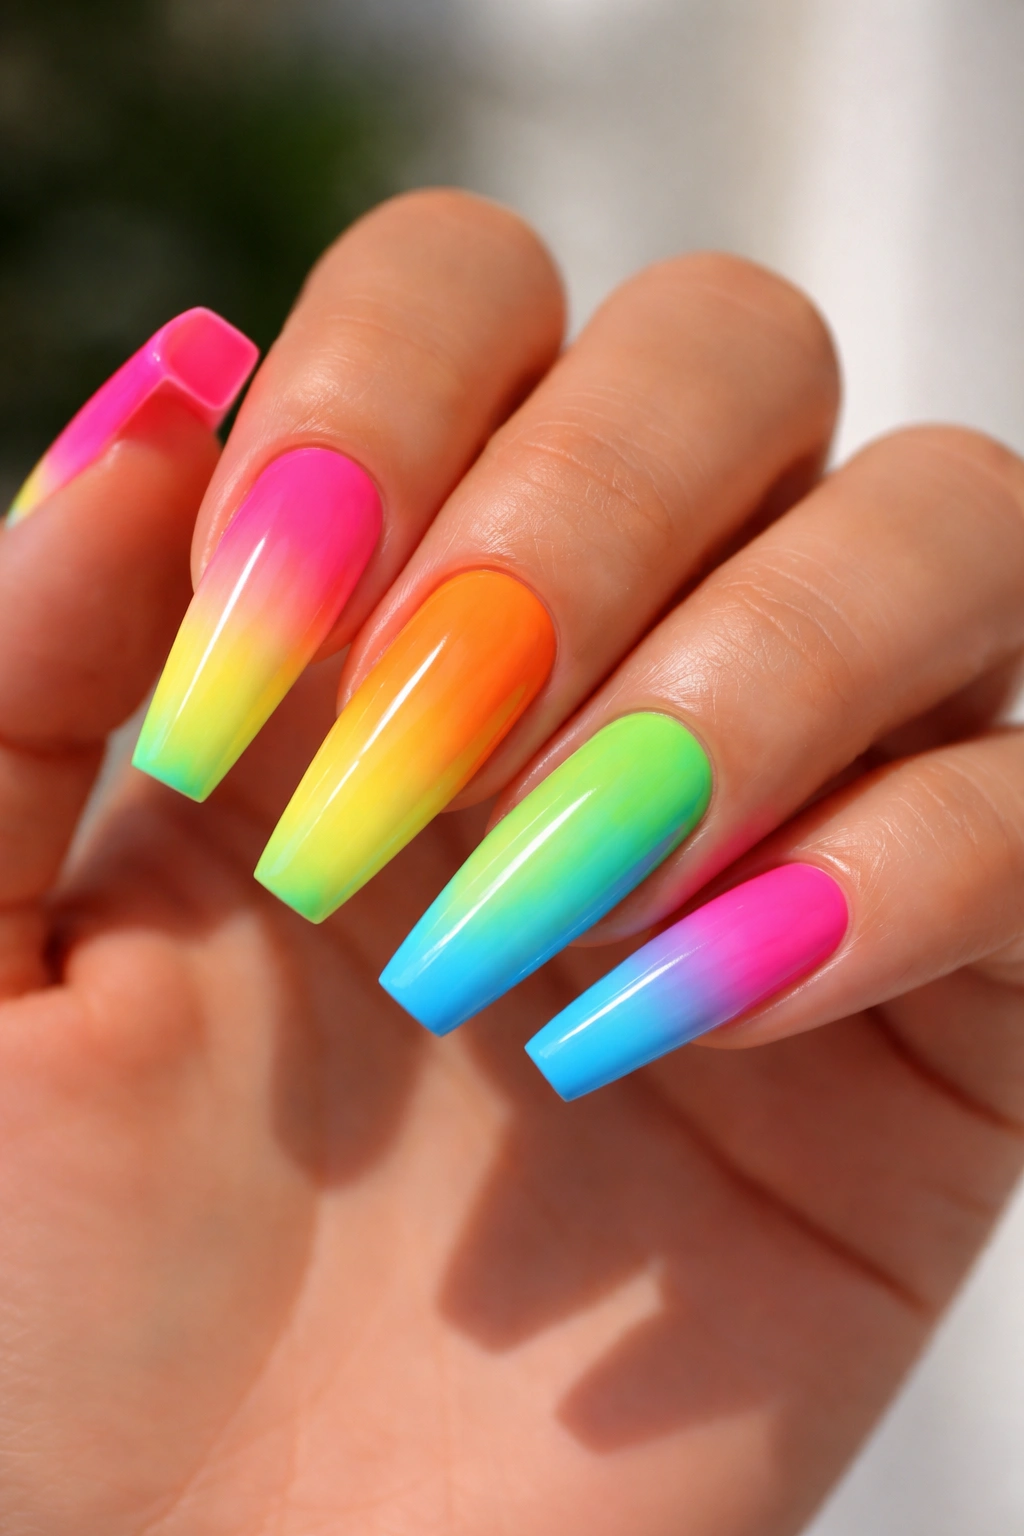
This design transitions through multiple neon colors — electric pink, neon yellow, hot orange, bright lime, and electric blue — creating a rainbow effect across the nail. The coffin shape’s taper enhances the rainbow’s visual impact.
Why Rainbow Works on Coffin Nails
Rainbow designs on standard shapes can feel chaotic or overly busy, but coffin nails’ natural taper creates a visual framework that organizes the multiple colors. The tapered sides guide the eye through the color transition, making the rainbow feel intentional rather than random. Neon tones are inherently celebratory and birthday-appropriate, and coffin nails provide enough surface area for the full spectrum without the design feeling cramped or overwhelming. The elongation of the coffin shape makes the color gradient appear even more sophisticated and directional.
Creating Neon Ombre on Coffin Nails
- Use neon gel polishes rather than traditional acrylics — neon colors appear more vibrant in gel formulas
- Apply the first neon color to the entire nail as a base
- Create a gradient by applying the next neon shade to the lower half, then the next shade to the lower third, continuing this process with each new color
- Use a sponge or brush to blend the color transitions — neon colors can look stark if the transitions are too abrupt
- The tapered sides of the coffin nail naturally create softer color transitions because there’s less surface area at the edges
- Consider whether you want a smooth gradient or a more segmented approach (distinct color blocks that transition rather than blend)
- Seal with a quality topcoat — neon colors can fade with UV exposure, and a protective topcoat extends wear time
Quick Design Facts
- Neon ombre requires at least 4-5 different color polishes for a full spectrum effect
- Neon colors appear most vibrant in daylight or bright indoor lighting
- The design works best as a full-manicure style rather than just one accent nail
- Neon requires quality polishes — cheaper brands may not have true neon pigmentation
- This design appeals to people celebrating with a bolder, more colorful personal style
Insider note: The order of your colors matters for visual impact. Starting with pink at the base and moving to blue at the tips creates an energetic, uplifting feel, while reversing that (blue to pink) feels calmer and more sophisticated.
8. Glitter Bomb with Rhinestone and Crystal Accents
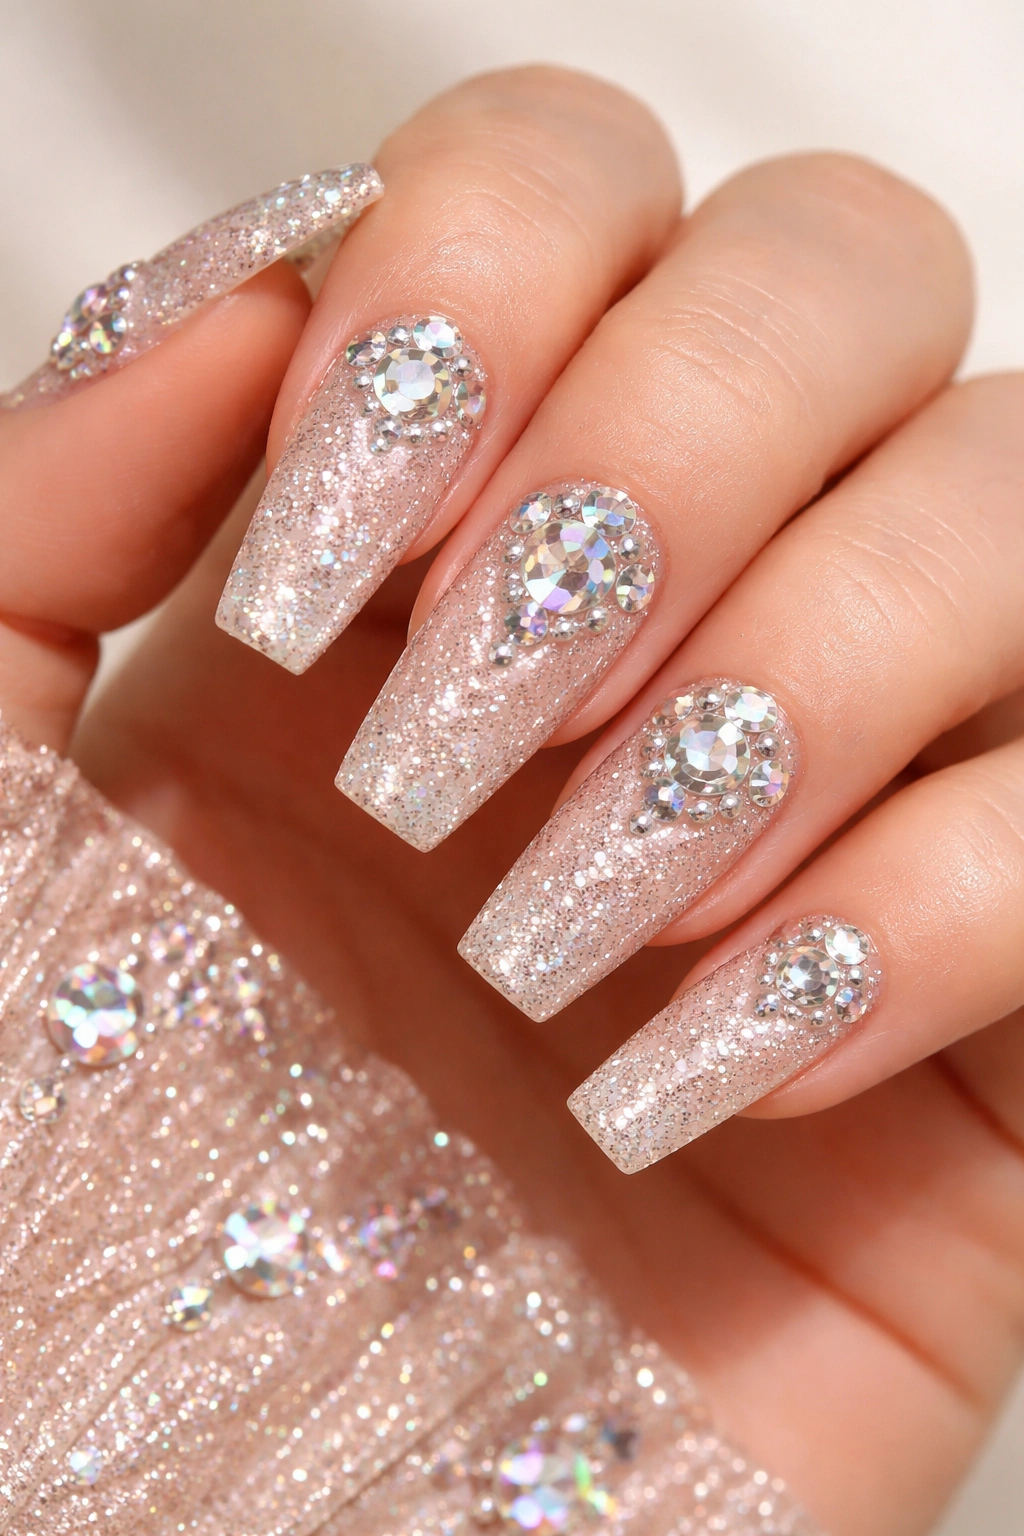
This is the maximalist birthday design — a glitter-laden base (usually nude, champagne, or a soft pink) combined with strategically placed rhinestones, crystals, and dimensional embellishments. It’s bold, it’s celebratory, and it screams special occasion.
Why Glitter Bombs Suit Birthday Celebrations
There’s no time more appropriate for maximum sparkle and shine than a birthday manicure. The coffin shape gives you plenty of real estate for rhinestones and crystals without making the nails appear overstuffed or chaotic. Medium-length coffin nails can carry significant embellishment weight because the shape is structurally strong at the attachment point. The wider nail bed of medium coffins means rhinestones won’t overwhelm the nail the way they might on shorter or narrower shapes. A glitter bomb manicure says “I’m celebrating myself” in the loudest, most unapologetic way possible.
Building Your Glitter Bomb Manicure
- Start with a adhesive gel or traditional polish base — either a nude, champagne, soft pink, or even a light metallic shade
- Layer glitter: start with fine micro-glitter embedded in the base coat, then add chunkier glitter particles on top using either a sponge or a brush
- Use loose glitter rather than glitter suspended in polish — loose glitter allows you to control placement and density
- Seal glitter with a thick topcoat, making sure to seal edges completely so glitter doesn’t snag on clothing or hair
- Add rhinestone accents: use a topcoat with adhesive properties or a specialized gem glue to place rhinestones in patterns (a line down the center of each nail, clustered at the tips, or scattered across the surface)
- Vary rhinestone sizes and finishes: combine large crystals with smaller rhinestones and tiny diamond chips for visual interest and depth
- Consider which nails get the most embellishment: coffin nails look balanced with heavier embellishment on the ring finger and middle finger and lighter coverage on the others
Quick Design Facts
- Glitter bomb manicures require careful sealing to ensure longevity — loose glitter will shed if not properly sealed
- Rhinestones add weight to nails, which can increase the stress on the nail bed — make sure your medium-length nails are healthy and strong
- This design has the highest snag potential of any manicure style, so be mindful when washing hands or reaching into bags
- Removal can be time-consuming because sealed glitter requires soaking and careful picking
- The visual impact is maximum — glitter bomb nails are impossible to miss in photos
Pro tip: Create a hierarchy of sparkle rather than applying glitter uniformly across all nails. Have some nails with dense glitter and heavy rhinestone coverage, some with moderate coverage, and one or two with minimal sparkle. This approach feels more curated and sophisticated than uniform density across all nails.
9. Marble Luxe Look with Gold Swirls
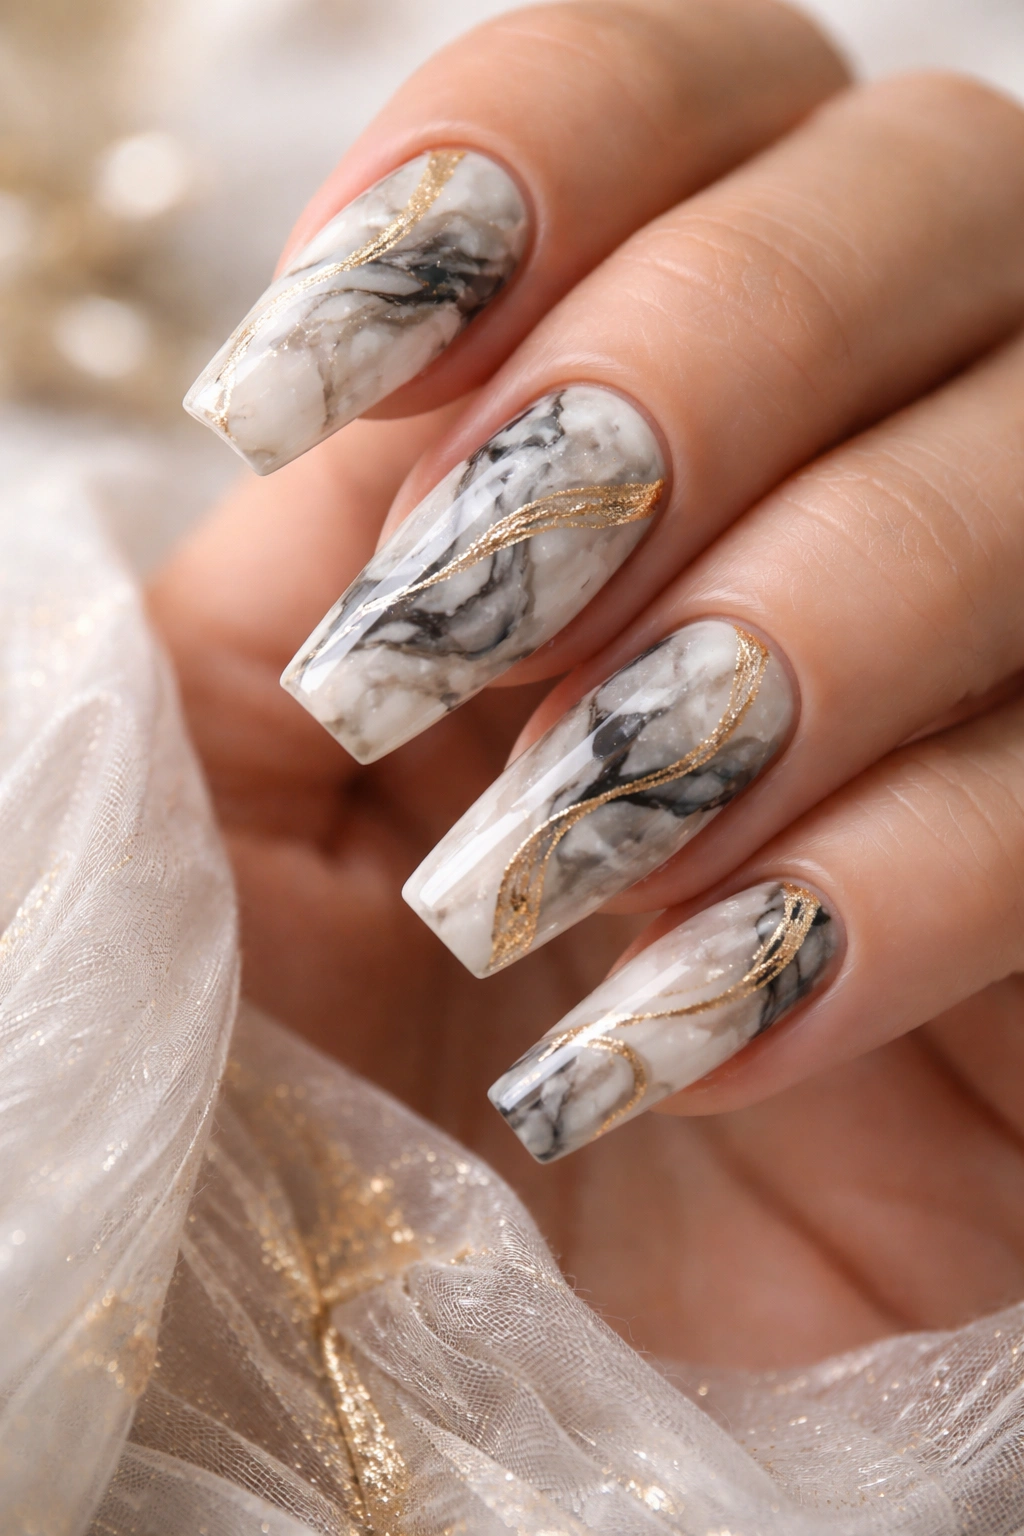
Marble designs feature organic, flowing patterns created with nail polish (usually in black, grey, or dark colors) swirled across a lighter base, reminiscent of natural marble stone. Adding gold accents or swirls elevates the design to luxury-manicure status.
What Makes Marble Feel Sophisticated Yet Celebratory
Marble designs evoke luxury and high-end aesthetics — they instantly make a manicure feel more refined and intentional than solid colors. The organic, artistic quality of marble patterns means each nail is slightly unique, giving the manicure a handcrafted feel. Coffin nails are the ideal shape for marble because the elongated surface gives the swirled patterns space to display without appearing crowded. Gold accents on marble feel inherently celebratory without being over-the-top — it’s sophisticated sparkle rather than party-sparkle.
Creating Marble Patterns on Medium Coffins
- Start with a pale nude, white, or light grey base coat
- Use thin nail polish (in black, dark grey, dark green, or even navy) applied in thin lines or drops across the nail
- Before the polish dries, use a toothpick or fine brush to create swirling, marbled patterns — guide the lines through the drops to create organic-looking movement
- Work quickly because the polish dries fast and dried lines won’t swirl
- Seal with a clear topcoat
- Add gold accents: thin gold lines drawn over the marble pattern, or gold leaf applied at the tips or along the edges
- The coffin shape means your marble pattern naturally frames the nail — the tapered sides don’t require coverage, simplifying the design
- Consider whether you want full marble coverage on all nails or just a few accent nails with marble and solid color on the others
Quick Design Facts
- Marble designs are highly forgiving because they’re meant to look organic and slightly imperfect
- Thin polish works better than thick polish for creating swirled patterns
- Black-and-white marble is classic; navy-and-grey is modern; green-and-white is nature-inspired
- Gold accents elevate marble from everyday to celebratory
- Marble designs work beautifully as either a full manicure or with marble on just 2-3 nails
Worth knowing: Traditional marble designs require quick hands and good timing. If you prefer a less technical approach, many nail polish brands now offer pre-formulated marble polishes that create the effect with single application.
10. Galaxy Birthday Theme with Planets and Stars
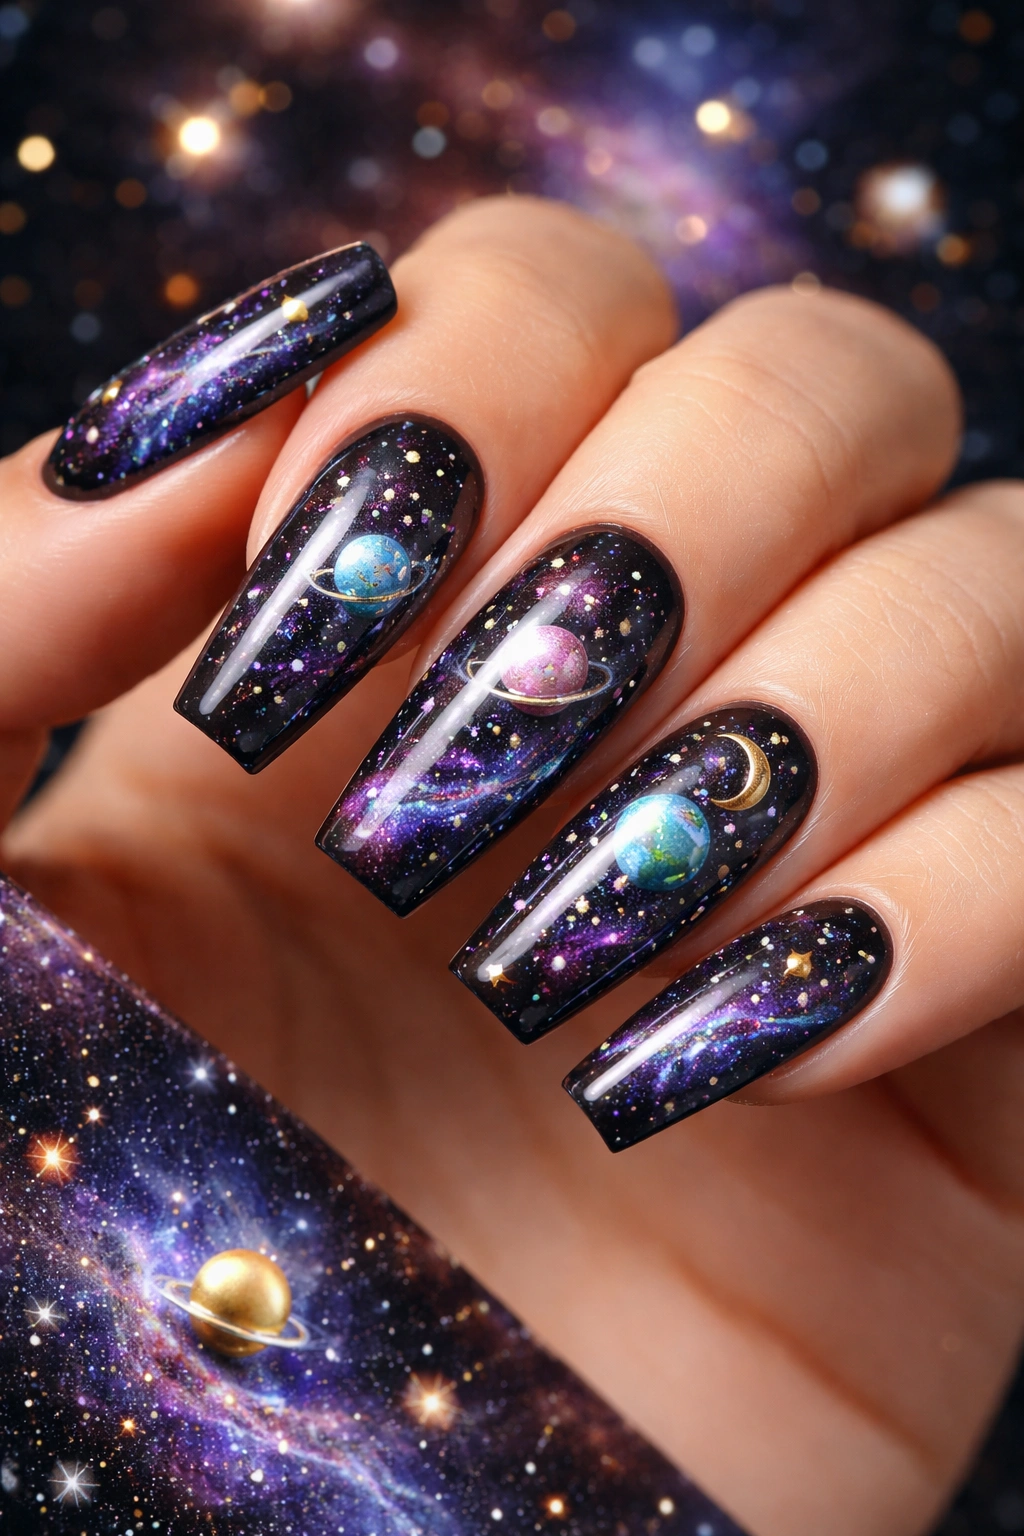
This design takes inspiration from outer space — a dark base (usually black, very dark blue, or deep purple) with swirled metallic colors, tiny stars created with white or gold polish, and occasionally small planets or celestial elements. It’s imaginative, visually stunning, and distinctly celebratory.
Why Galaxy Nails Feel Special
Galaxy designs immediately conjure a sense of wonder and celebration — they’re inherently more interesting and artistic than solid colors. The coffin shape’s width allows you to create a full galaxy scene on each nail without elements appearing crowded or overlapping awkwardly. Stars, planets, and cosmic swirls are easier to execute on coffin nails than on smaller shapes. The dark base combined with bright metallics and stars creates dramatic contrast that photographs beautifully. Galaxy designs work across all ages and personal styles — whether you’re 8 or 80, there’s something universally appealing about cosmic-themed nails.
Painting Galaxy Scenes on Coffin Nails
- Apply a very dark base (black or navy gel) to all nails — this is your cosmic foundation
- Use sponging technique to add metallic colors: dab gold, silver, and iridescent pigments onto a makeup sponge and sponge them across the nail surface in wispy, directional strokes
- Create swirled effects by using a thin brush to blend and drag the metallic colors together before they cure
- Add stars: use a white or gold gel and a dotting tool to create clusters of stars in varying sizes across the nail
- Add planet details: using a fine brush and appropriate colors (orange for Mars, blue for Saturn, cream for Jupiter), paint small circular planets with rings or atmospheric details
- Seal with topcoat
- Consider a focal nail: full galaxy scene with multiple planets and star clusters on the ring finger, simpler galaxy with just stars on the others
Quick Design Facts
- Galaxy designs require steady hands and patience — each nail takes 10-15 minutes to complete properly
- The sponging technique is key to creating the wispy, cosmic look
- Metallic pigments show up best over dark bases
- This design looks particularly stunning in flash photography
- Galaxy nails work as a full-manicure theme or as a few accent nails with complementary solid colors
Pro tip: Layer metallic colors rather than applying just one — use gold, silver, and an iridescent finish in the same galaxy. The overlapping creates depth and movement that a single metallic color can’t achieve.
11. Sunset Ombre Gradient from Orange to Pink to Purple
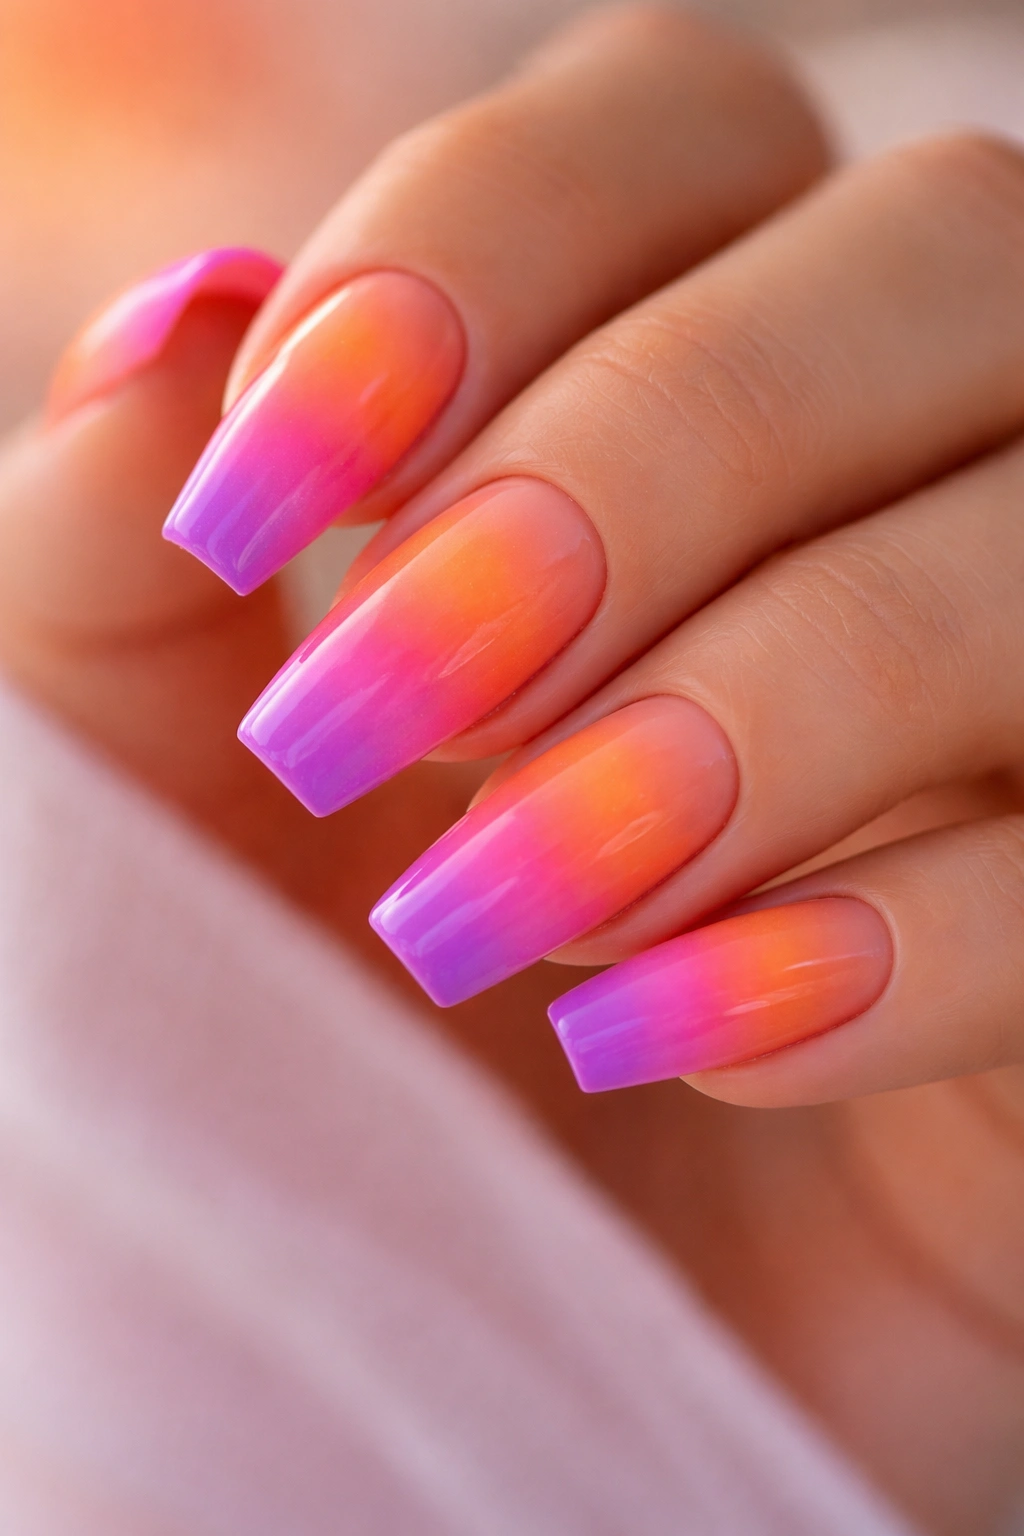
This design mimics a sunset by transitioning from warm orange tones at the nail base, through peachy and pink shades in the middle, to purple or deep mauve at the tips. It’s warm, romantic, and inherently celebratory.
What Makes Sunset Ombre Timelessly Celebratory
Sunsets are universally associated with beauty, reflection, and special moments — wearing a sunset on your nails creates an emotional connection to that imagery. The color transition (warm to cool) is flattering to all skin tones and creates visual movement that makes medium-length nails appear longer. The coffin shape’s taper naturally mirrors the way a sunset extends across a horizon — the shape itself echoes the imagery. Unlike neon rainbows or glitter bombs, sunset ombre feels sophisticated enough for formal celebrations while remaining warm and celebratory for casual birthday gatherings.
Achieving Smooth Sunset Ombre on Coffin Nails
- Apply an orange or coral base coat as your foundation color
- Use a makeup sponge to create the gradient: apply peachy-pink polish to the lower portion of the sponge, pink in the middle, and purple at the upper portion
- Dab the sponge onto the nail in a pressing motion, rotating to blend the colors together
- You’re aiming for soft transitions rather than distinct color blocks
- Layer the gradient multiple times if needed for better color saturation
- Use a topcoat to seal and create shine
- The coffin shape means the sides taper, which naturally softens the color transitions without requiring additional blending work
Quick Design Facts
- Ombre designs hide growth lines and minor imperfections beautifully
- Sunset colors are complementary to warm skin tones especially
- The gradient effect works best when the base color (orange) is saturated and the final color (purple) is also fully opaque
- Sunset ombre works as a full-manicure design or on select nails with complementary solid colors
- This design feels both romantic and empowering
Insider note: If your gradient blending looks harsh, apply a thin layer of topcoat over the unbuffed gradient and it will soften the color transitions while providing a smoother surface for the final seal coat.
12. Velvet Matte Finish with Metallic Accents
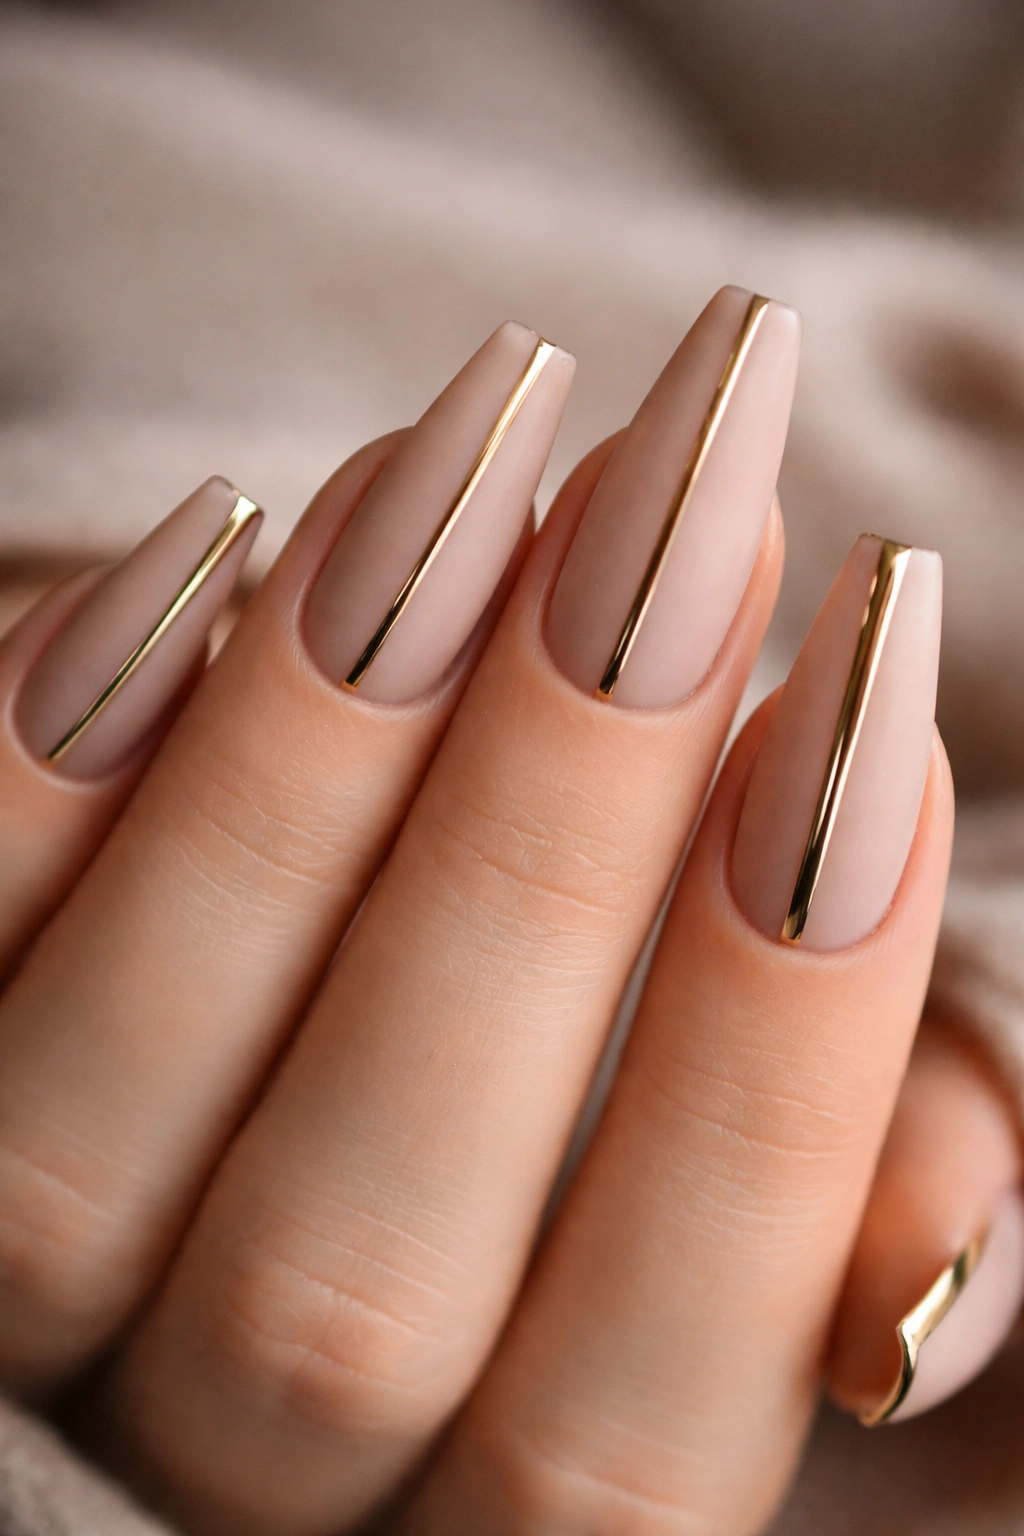
Velvet matte finishes create a soft, fuzzy texture completely different from glossy gel nails. Combined with metallic accents or stripes, matte velvet provides sophisticated elegance with visual interest and movement.
Why Matte Velvet Feels Like a Birthday Upgrade
Matte finishes are having a major moment in sophisticated nail design — they feel modern, high-fashion, and distinctly intentional. The velvety texture creates tactile interest that glossy nails can’t replicate. Adding metallic accents to matte creates contrast and ensures the design photographs well (pure matte can sometimes look flat in photos). Coffin nails with a matte finish feel elongated and refined, and the coffin shape’s clean lines pair beautifully with matte aesthetics. This design is perfect for someone who wants to feel special without resorting to obvious glitter or rhinestones.
Creating Matte Velvet Nails on Medium Coffins
- Apply a matte topcoat over your chosen base color (nude, soft grey, blush pink, or dusty rose work beautifully)
- Allow the matte topcoat to cure completely — matte finishes require full curing
- Add metallic accents: either a thin metallic stripe down the center of the nail, metallic outlines at the tips, or scattered metallic dots
- Metallic accents can be achieved with metallic gel polish applied with a fine brush, metallic foil applied with a sticky topcoat layer, or metallic nail tape for clean lines
- Contrast is key — the metallic accent should be noticeably shiny against the matte background
- Consider which nails get metallic accents: all ten for a cohesive look, or just accent nails for variety
- The matte finish can feel vulnerable to chipping, so make sure your top sealing layer is thick and protective
Quick Design Facts
- Matte finishes are more delicate than glossy finishes and require careful topcoat application
- Metallic accents are essential for ensuring matte designs photograph well
- Matte nails feel best in natural light — indoor lighting can make them appear duller
- The velvety texture is not actually fuzzy despite the appearance
- Matte velvet designs feel fashion-forward and sophisticated rather than traditionally feminine
Pro tip: If you’re worried about the longevity of matte finishes, apply a thin shine topcoat over everything after the matte has cured. This protects the matte while still preserving the velvety appearance.
13. Nude Base with Gold Confetti and Champagne Shimmer
This is the understated elegance option — a nude or pale pink base that matches skin tone, combined with delicate gold confetti placement and a champagne shimmer that catches light subtly. It’s sophisticated, timeless, and appropriate for any celebration context.
Why Nude with Sparkle Suits Every Birthday
Nude nails are universally flattering and elongating — they create a clean, elegant canvas. Adding strategic sparkle transforms nude from everyday to celebratory without the design becoming overdone or costume-like. Coffin nails in nude with sparkle accents feel both refined and intentional. This design works whether you’re attending a formal dinner, casual celebration, or work event — the sparkle keeps it festive without the design being inappropriate for professional settings. It’s a design that says “I’m celebrating” without shouting it.
Combining Nude Base with Gold Accents
- Apply a nude or pale pink base that closely matches your skin tone — this creates visual elongation
- Add champagne or light gold shimmer: either mix shimmer into your topcoat or layer a shimmery topcoat over the nude base
- Add gold confetti: place small amounts of fine gold glitter or gold foil pieces strategically across the nail (a line down the center, clustered at the tips, or scattered sparsely)
- Keep confetti placement controlled rather than dense — the power of this design is in its restraint
- Seal thoroughly with topcoat, ensuring confetti is completely protected
- Consider making one or two nails more sparkly (ring finger and middle finger) and keeping others with just the shimmer base for a balanced look
- The coffin shape means even sparse confetti placement is visible and impactful
Quick Design Facts
- Nude shimmer works beautifully on all skin tones (choose a shimmer shade that matches your specific undertone)
- Confetti placement is more forgiving than intricate designs — you can’t really make mistakes
- This design is appropriate for both casual and formal celebrations
- The elongating effect of nude nails is enhanced by the coffin shape
- Gold accents are more universally flattering than silver or rainbow colors
Worth knowing: The key to making this design feel intentional rather than accidental is using quality champagne shimmer and controlling confetti placement. A random sprinkle of cheap glitter looks accidental; strategic placement of high-quality sparkle looks designed.
14. Pink Ombre Confetti Mix with Rainbow Accents
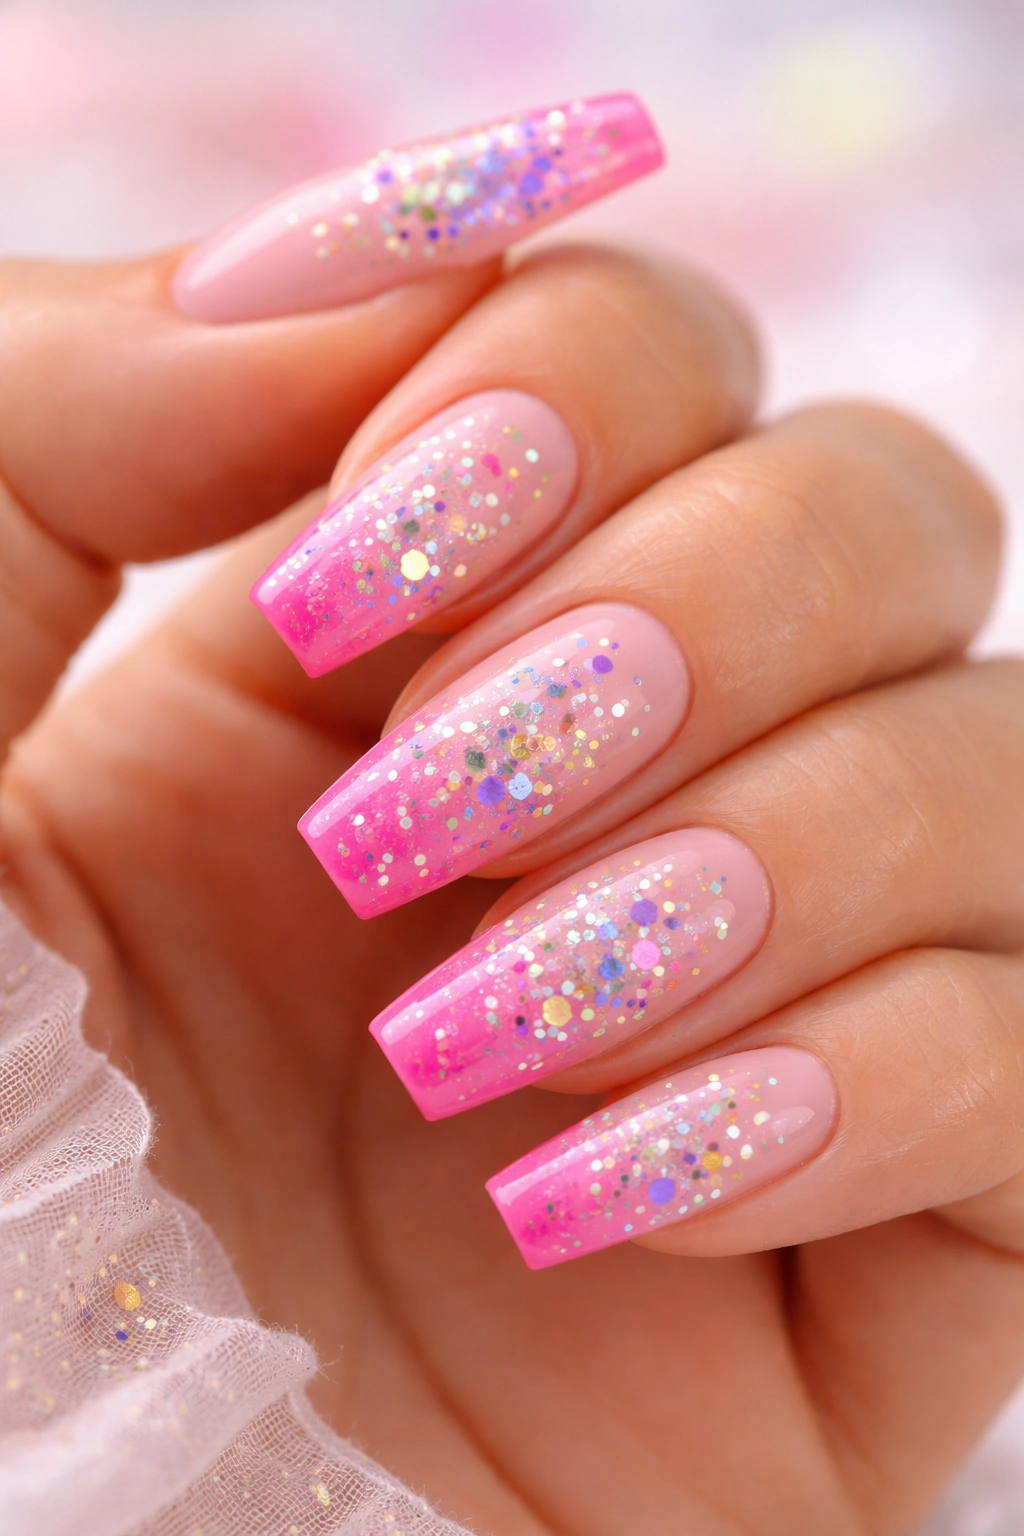
This design combines a soft pink to hot pink ombre gradient with scattered confetti elements in multiple colors — creating a playful, colorful birthday manicure that feels energetic without being neon or overly busy.
Why Pink Ombre with Rainbow Confetti Works
Pink ombre provides a cohesive color foundation while the scattered rainbow confetti adds personality and visual interest. The combination is celebratory without feeling costume-y or immature. Coffin nails’ wider surface area allows confetti to be visible without making the nail appear cluttered. The pink ombre creates a romantic foundation, while the rainbow confetti provides the celebratory energy — together they create balance. This design appeals across ages and styles: it’s sophisticated enough for adult celebrations while feeling playful and birthday-appropriate.
Layering Pink Ombre with Rainbow Confetti
- Create a pink ombre: apply light pink to the entire nail as a base, then layer hot pink or magenta on the lower third and middle portion of the nail, blending with a sponge for smooth transitions
- Once the ombre is set, add confetti: use tiny scattered pieces of multicolor glitter, rainbow micro-glitter, or small metallic confetti bits
- Placement strategy: keep confetti denser toward the tips and sparser toward the base, or create a confetti cloud concentrated on one or two nails while keeping others with just ombre
- Seal thoroughly with topcoat, ensuring all confetti particles are protected
- Consider a focal nail approach: one or two nails with heavy confetti and full ombre, the rest with just the ombre gradient
- Coffin nails’ tapered sides naturally frame confetti placement, making even scattered confetti look intentional
Quick Design Facts
- Pink ombre works on all skin tones (adjust pink shade from cool to warm depending on your undertone)
- Rainbow confetti prevents the design from feeling overly feminine despite the pink base
- Confetti can migrate during topcoat application, so seal gently and allow proper cure time
- This design works beautifully as a full-manicure style
- The balance of ombre sophistication and confetti playfulness appeals to people who want pretty without being too precious
Pro tip: Use different sizes and finishes of confetti — mix fine glitter, metallic dust, and slightly larger glitter pieces. The variation in texture creates depth and visual interest that uniform confetti size can’t achieve.
15. 3D Embellished Party Nails with Layered Texture
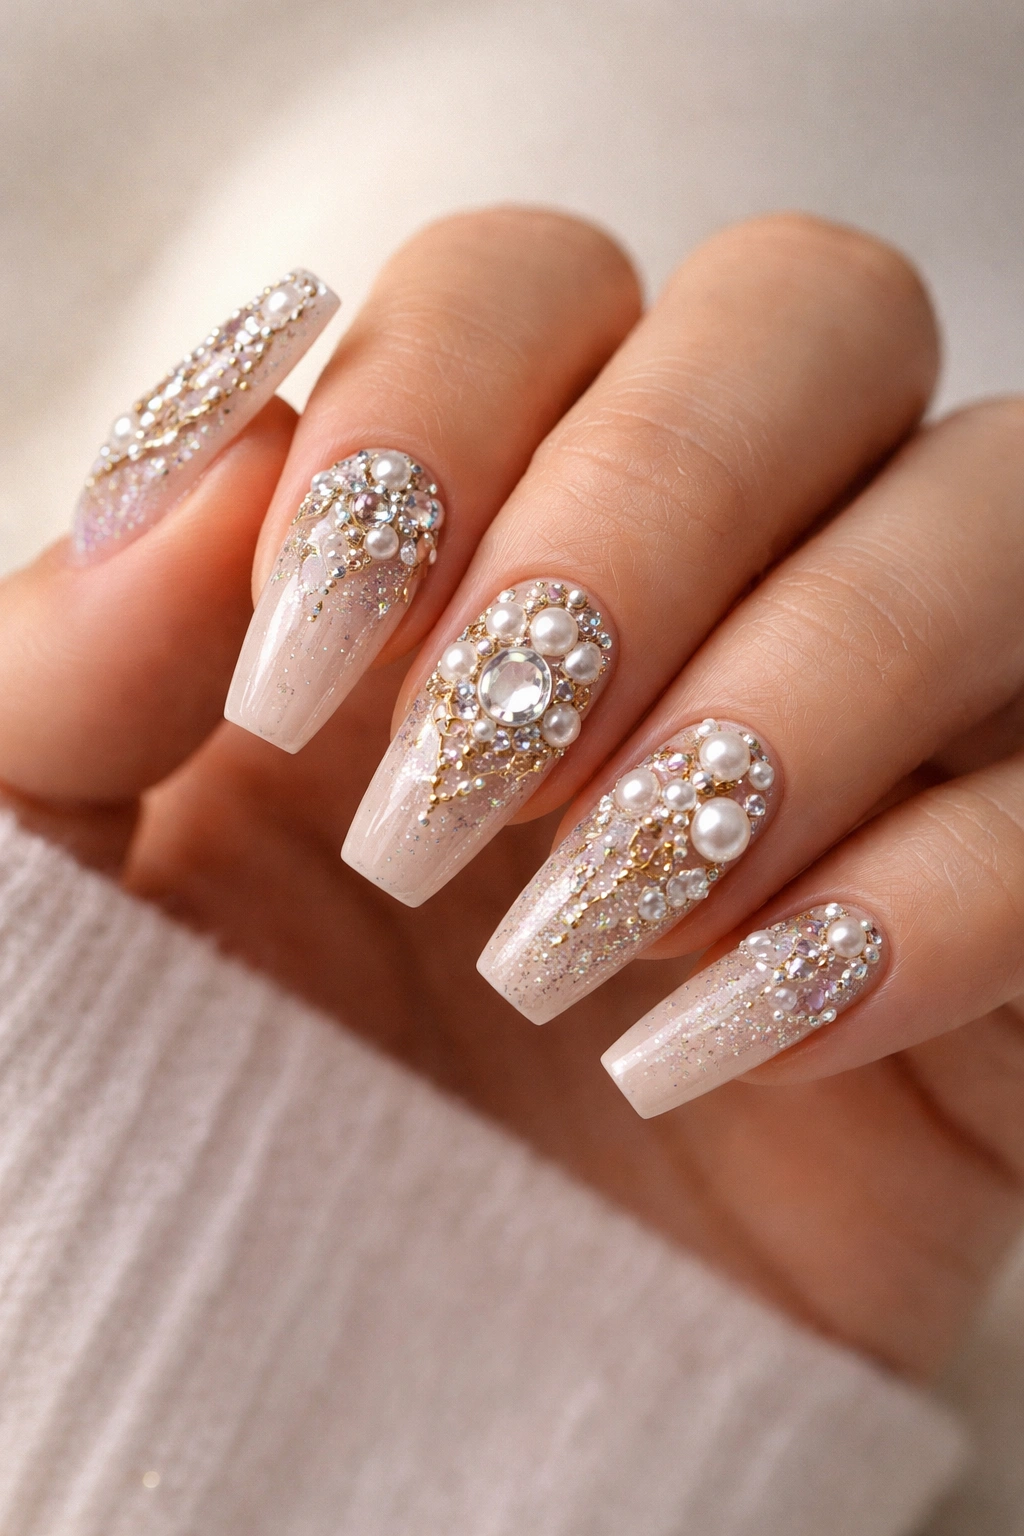
This is the ultimate birthday statement: a sophisticated base color combined with 3D elements like rhinestone clusters, metal studs, pearl accents, and textured components that add genuine dimension and tactile interest. These nails are art pieces designed specifically to be noticed and admired.
What Makes 3D Embellished Nails Feel Like a Celebration
Three-dimensional embellishment transforms nails from a fashion statement into wearable jewelry. The tactile quality (you can actually feel the texture) creates a sensory element that flat designs can’t replicate. Coffin nails are structurally the best shape for 3D embellishment because the wider nail bed can support the weight distribution of clustered rhinestones and studs without appearing overwhelming or off-balance. Medium-length coffin nails provide enough foundation that embellishments don’t look precarious. These nails are impossible to ignore in person or in photos — they’re the definition of a birthday manicure meant to celebrate yourself boldly.
Building 3D Embellished Nail Art
- Start with a secure base: a nude, neutral, or metallic base color applied in gel formula for maximum durability
- Map out embellishment placement: decide which nails get the most embellishment (typically ring finger and middle finger) and where embellishments will sit on each nail
- Layer your elements: start with larger focal pieces (a cluster of mixed-size rhinestones, a large pearl accent), then add smaller supporting pieces around them
- Combine different embellishment types: rhinestones, pearls, metal studs, glitter, and metallic accents together create more visual interest than one embellishment type alone
- Use a strong topcoat with adhesive properties or specialized gem glue to ensure embellishments stay secure
- Consider creating a gradient of embellishment density: one nail very densely covered, the next less so, creating visual variety
- Seal everything with thick topcoat in multiple layers — embellished nails require extra protection because the embellishments add stress points
- Your coffin nails should have the embellishments positioned to complement the shape: heavier at the tips and sides, lighter at the base
Quick Design Facts
- 3D embellished nails are structurally heavy and require strong, healthy nails underneath
- Embellished nails have higher snag potential than any other style — be mindful when reaching into bags or washing hands
- Removal can be time-consuming because individual embellishments must be removed before polish can be soaked off
- These nails are statement pieces and are inappropriate for low-key celebrations but perfect for formal events or photo-heavy gatherings
- The visual impact of 3D embellishment is maximum — photographs will show every detail of your nail art
Insider note: Not all embellishments adhere equally well. Spend a bit more on rhinestones and gems specifically designed for nail application — cheap craft rhinestones often look dull and lose their sparkle quickly, and they don’t adhere as securely as beauty-grade alternatives.
Final Thoughts
Birthday coffin nails are about celebrating yourself in a way that feels intentional and special. Whether you choose subtle elegance like nude base with gold confetti, maximalist drama like a glitter bomb with rhinestones, or anything in between, the coffin shape’s inherent sophistication and visual impact work beautifully across every design style. Medium-length coffin nails give you the perfect balance — long enough to showcase intricate details without requiring the ongoing commitment of ultra-long acrylics.
The designs that work best are the ones that genuinely reflect your personal style and celebration vibe. If you love sparkle and drama, lean into it fully with glitter bombs and rhinestone clusters. If you prefer understated elegance, nude bases with strategic shimmer and confetti deliver that luxury feeling without overwhelming your hands. The variety of coffin nail designs means there’s genuinely something for everyone — whether you’re celebrating solo or with others, whether your birthday calls for bold statement-making or quiet sophistication.
Consider your lifestyle, work environment, and personal comfort level when choosing your design. A design that feels amazing in photos might not feel comfortable if you’re worried about snagging embellishments, or it might be inappropriate for your work context. The best birthday manicure is one that makes you feel confident and celebrated — if that’s maximalist 3D embellishment, fantastic. If that’s understated marble with gold accents, equally fantastic. What matters is that you feel like your nails are reflecting your celebration mood and personal style. Treat your birthday nails as an extension of how you want to feel and move through the world on your special day.
