

Blue is one of those versatile nail colors that somehow works for every season, every mood, and every occasion — yet most people stick to the same safe shades they’ve worn a hundred times before. If you’re ready to go beyond basic blue and embrace the elegance of coffin-shaped nails, you’re tapping into one of the most flattering nail shapes that exists. Coffin nails (also called ballerina nails) have that perfect balance between dramatic length and wearable sophistication, and they’re especially stunning when you work with blue’s incredible range — from icy pastels to rich navy depths to electric jewel tones.
The beauty of blue coffin nails on medium length is that you get enough surface area to make a real design statement without the impracticality of super-long extensions. Medium coffin nails feel elegant rather than theatrical, polished rather than costume-like. They’re the sweet spot where you can do intricate nail art, play with multiple shades, add texture, and still have nails that work for real life — whether that’s typing at a desk, cooking dinner, or scrolling through your phone without worrying about breakage.
What makes blue such a winner for coffin nails is its psychological impact combined with its visual versatility. Blue reads as calm and professional, yet it’s bold enough to feel intentional and special. You can go moody and sophisticated, soft and dreamy, or bright and playful — all within the same color family. The coffin shape elongates your fingers and brings an instant sense of refinement, and when you pair that with thoughtful blue nail design, you’ve got something that looks expensive and expertly done, whether you created it at home or had it professionally applied.
1. Solid Deep Navy With Gold Leaf Accents
Deep navy is the chameleon of the blue spectrum — it’s professional enough for boardrooms, rich enough to feel luxurious, and dark enough that it doesn’t show every speck of dust. But here’s what transforms a basic navy manicure into something memorable: thin strokes of gold leaf scattered across the nail surface or clustered along the tip. The gold catches light as you move your hand, creating an almost jewelry-like effect that feels expensive without being over-the-top.
Why It Stands Out
Navy plus gold is a classic pairing that instantly elevates any look, and on coffin nails, the extended surface area gives you room to play with placement. The contrast between the deep, matte navy and the reflective warmth of gold creates visual interest that reads as intentional and sophisticated. This combination works year-round and pairs beautifully with everything from casual weekend outfits to evening wear.
How to Achieve It
- Start with 2-3 coats of a rich, pigmented navy base polish to ensure full coverage and depth
- Allow each coat to dry completely — rushing this step results in streaking that shows through
- Once fully dry, use a thin brush or nail art pen with gold leaf polish or metallic gold gel to create small, organic strokes
- Random placement looks more natural than perfect symmetry; concentrate more gold on the upper nail and along the free edge
- Seal with a glossy top coat to protect the gold and add shine
Pro tip: If you’re nervous about freehand gold work, try pressing actual gold foil onto tacky gel base coat for a foolproof, professional-looking result that’s actually easier to control than painting.
2. Ombre From Sky Blue to White Gradient
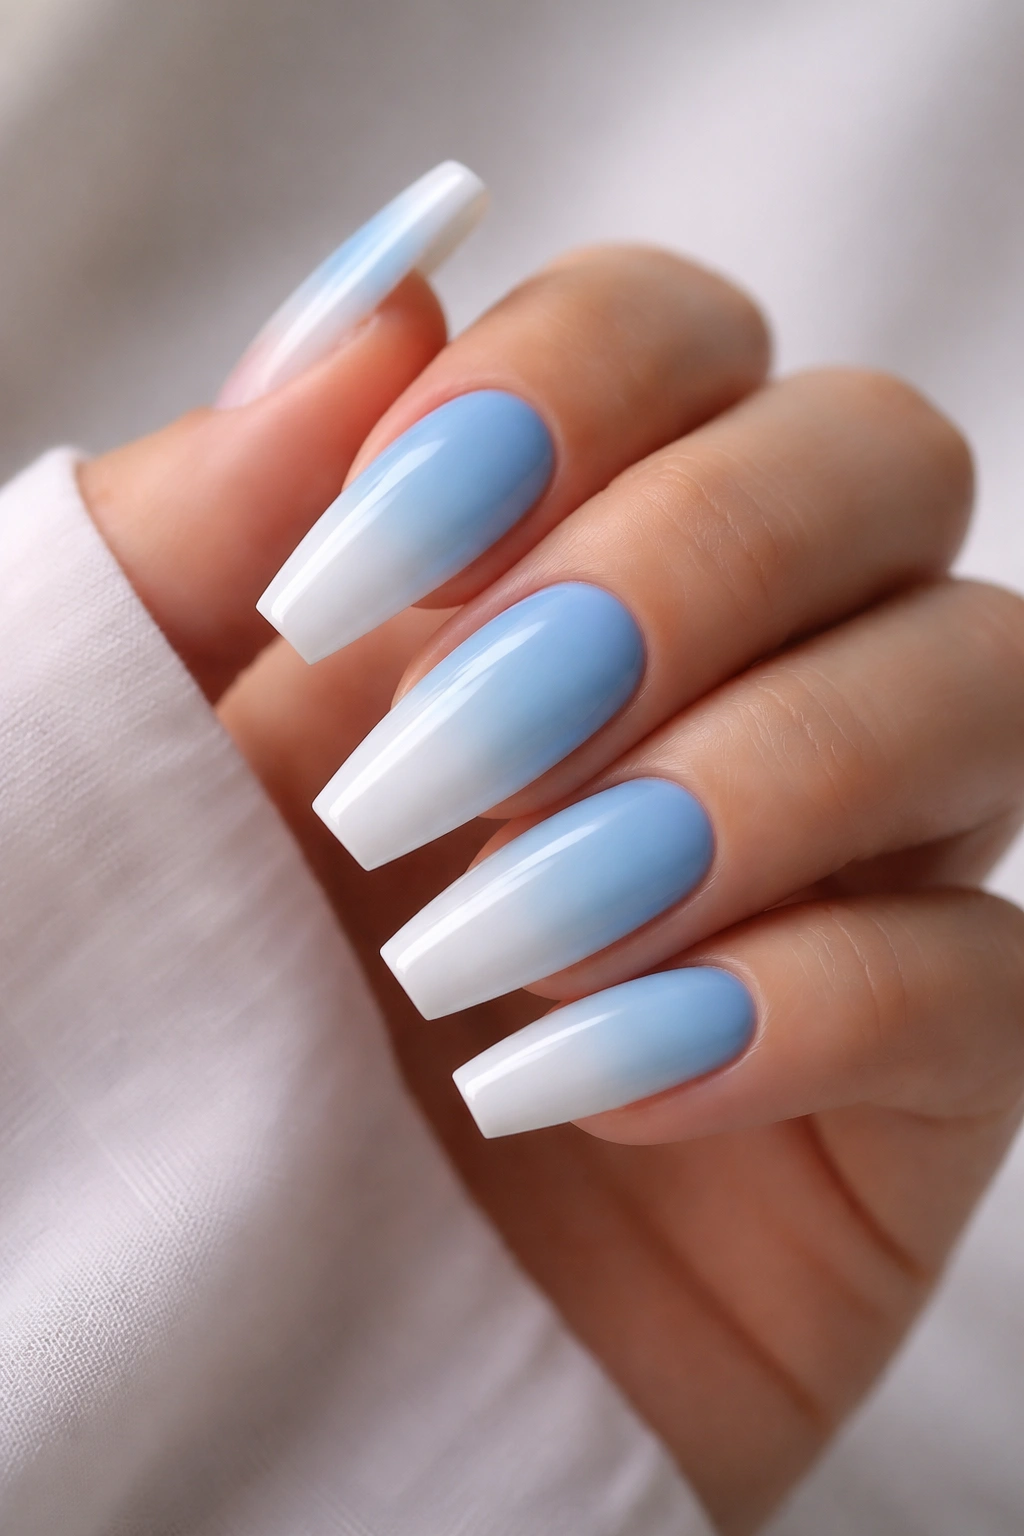
An ombre gradient that melts from crisp sky blue at the base to pure white at the tip creates an optical illusion of length and lightness. This design plays beautifully with the coffin shape — the gradient follows the natural contour of your finger, and the white tip elongates the nail visually. It’s ethereal without being impractical, and the soft transition between colors gives your manicure an almost watercolor quality.
What Makes It Different
Unlike solid color, an ombre design adds dimension and movement to your nails. Sky blue to white is specifically calming and elegant — it reads as peaceful rather than edgy, which is why this particular gradient works across so many contexts. The coffin shape frames the gradient perfectly, with the widest part of the nail showcasing the full transition.
What You Need to Know
- Sponging is the most effective technique for smooth gradients; a regular cosmetic beauty sponge works perfectly
- You’ll need both colors on a palette (a ceramic dish or even a clean glass surface), and you’ll be dabbing the sponge between the colors to blend them on the sponge itself before applying to the nail
- This technique works best with gel polish, as water-based polish dries too quickly to blend smoothly
- The transition zone needs at least 3-4 gentle dabs of the sponge to look seamless rather than striped
Worth knowing: If you have a shaky hand or struggle with the sponging method, a gradient nail vinyls or guides can help you achieve clean lines between zones.
3. Matte Navy With Metallic Silver Geometric Lines
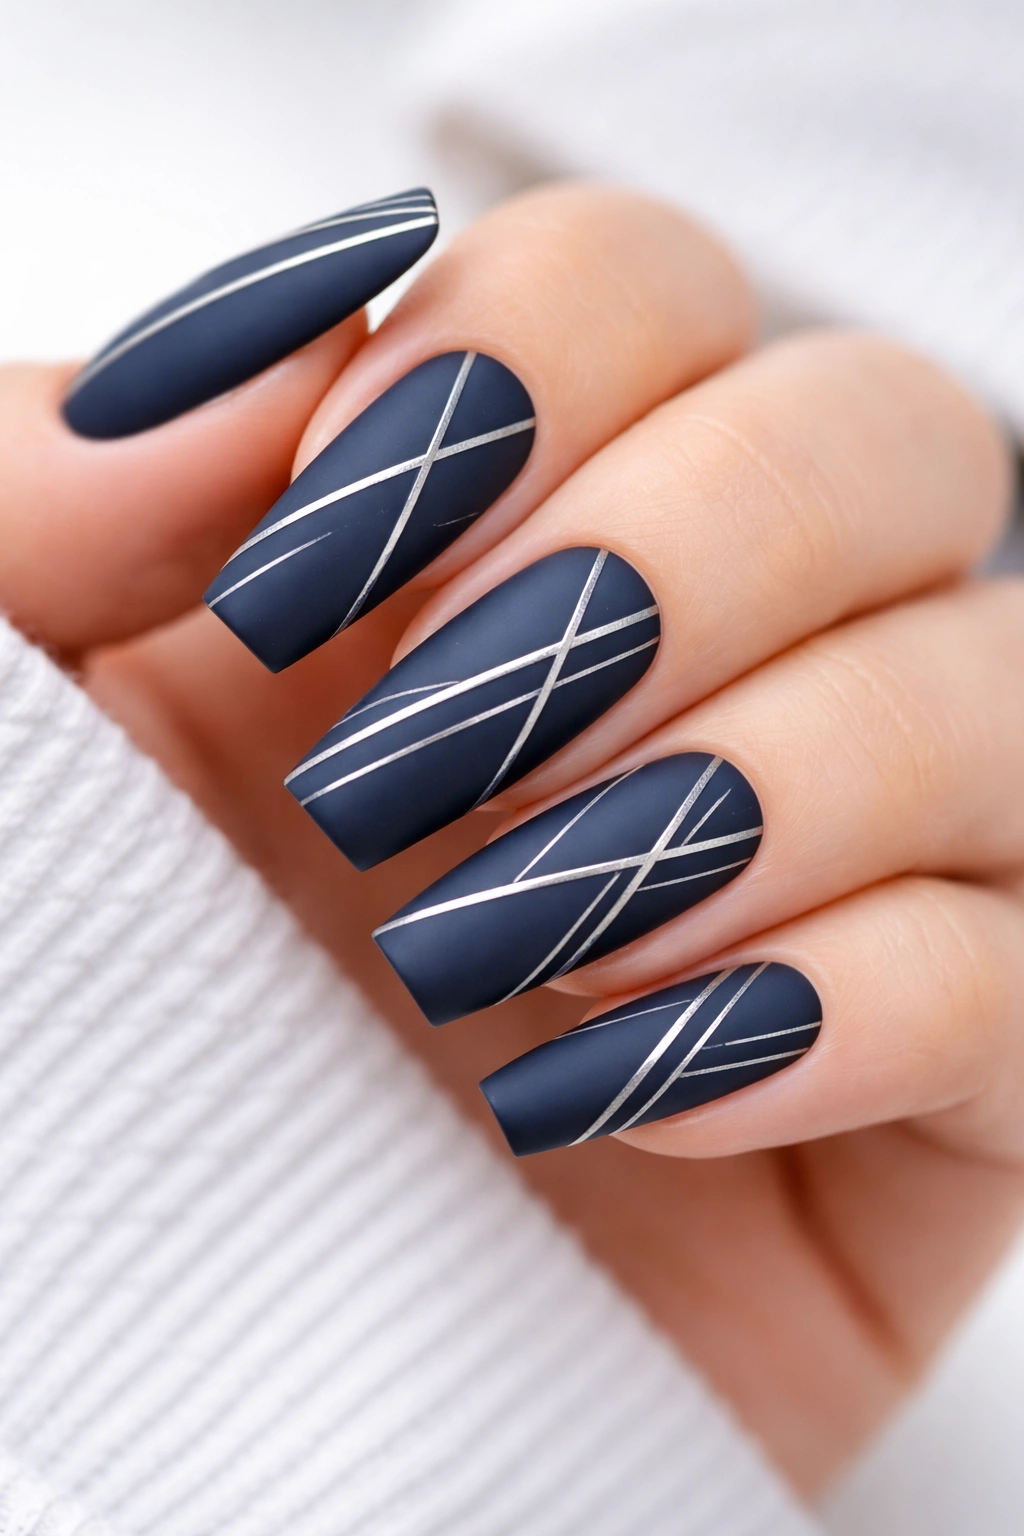
Matte polish creates a velvety, sophisticated surface that feels modern and refined — completely different in texture from glossy nails. Pair a matte navy base with sharp metallic silver geometric lines (think thin stripes, angular shapes, or abstract linear designs), and you’ve got a nail look that feels both artistic and wearable. The geometric element keeps the matte navy from feeling too heavy or monochromatic.
How to Achieve It
- Apply 2-3 coats of matte navy gel or regular polish — matte finishes often need more coats than glossy to look polished
- Once fully cured (if using gel) or dry, use a thin liner brush or metallic gel pen to create your geometric design
- Straight lines are easiest: try vertical stripes, a single diagonal across the nail, or a frame around the edges
- For more complex geometry, use nail tape as a guide to ensure crisp, clean lines
- Skip the top coat if you want to maintain the matte finish, or use a matte top coat to seal the design while keeping the velvety texture
Insider note: Metallic silver pops most dramatically against matte navy when you make your lines intentionally thin and precise — thicker lines tend to look busy rather than chic.
4. Peacock Blue With Iridescent Flakes
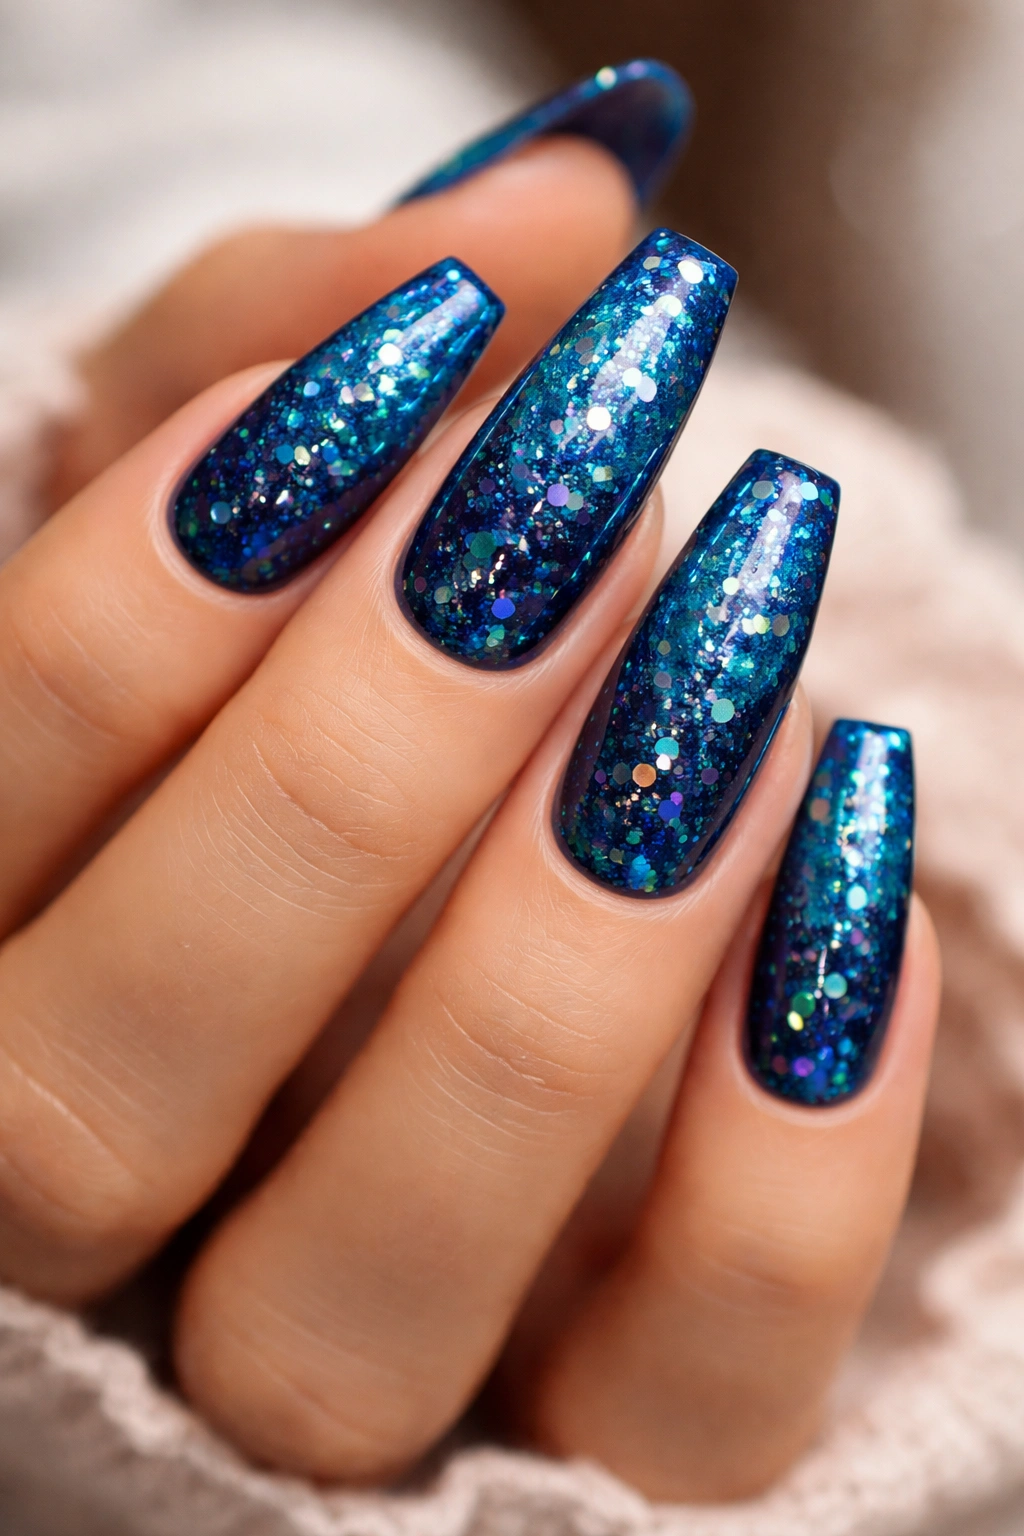
Peacock blue sits right between true blue and teal, carrying notes of turquoise while staying grounded in the blue family. When you layer iridescent flakes or chrome powder over this base, the nail surface becomes almost alive — shifting colors as light hits it from different angles. The effect is mesmerizing and feels luxe, but the flakes are what elevate a simple blue to something really special.
Why It Works So Well
The iridescent elements catch light and create movement, which is exactly what you want on coffin-shaped nails. The extended length means more surface area for the flakes to sparkle, and the coffin shape’s elegant silhouette frames the shimmer beautifully. This design reads as intentional and well-executed, even though it’s straightforward to apply.
What to Watch For
- Quality matters here — cheap iridescent flakes look dusty and muted, while good ones are brilliant and multichromatic
- You’ll need a gel base (regular polish won’t hold flakes effectively), and the base should be slightly tacky before you apply flakes
- Press flakes gently into the sticky base rather than trying to paint them on — this ensures they stay put and the finish looks smooth
- A glossy top coat sealed over the flakes creates a glass-like finish that makes them look embedded rather than sitting on top
Pro tip: Layer the iridescent flakes more heavily at the tip and gradually taper them toward the base — it creates a more intentional, directional look than covering the entire nail uniformly.
5. Soft Periwinkle With Delicate White Nail Art Flowers
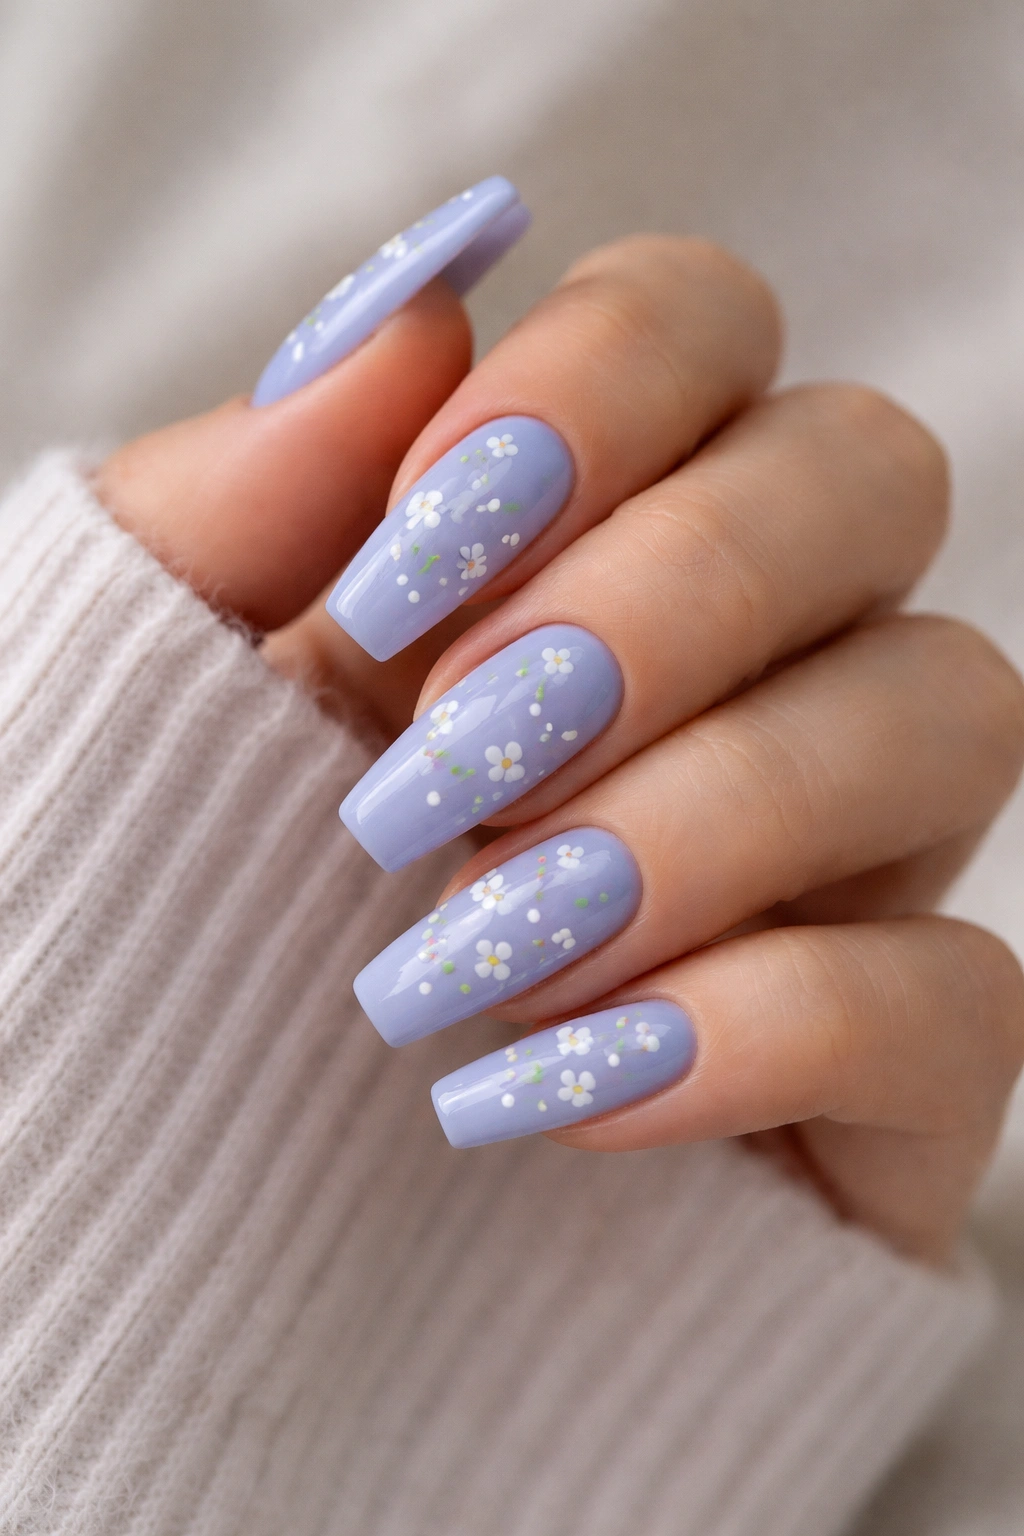
Periwinkle is blue’s softer, dreamier cousin — it has just enough purple undertone to feel romantic without being overtly feminine. Combine this gentle blue with delicate white flowers (tiny roses, simple daisies, or abstract floral shapes) and you’ve got a design that feels both whimsical and sophisticated. The coffin shape gives you plenty of room for flower placement, and the elongated silhouette makes even small floral details feel intentional.
How to Achieve It
- Start with 2-3 coats of periwinkle gel or regular polish for a solid, creamy base
- Let the base fully cure if using gel, or dry completely if using regular polish
- Use a fine detail brush or nail art pen with white polish to paint tiny flowers — five petals in a simple circle is the easiest starting point
- Vary the size of flowers from the base to the tip to create visual interest and movement
- Add tiny white dots or stamens in the flower centers for extra detail and dimension
Worth knowing: If freehand florals feel intimidating, nail stamping plates with floral designs let you achieve the same look with a stamper and scraper instead of a brush.
6. Electric Cobalt With Black Line Details

Electric cobalt — that bright, almost neon blue — commands attention and reads as confident and bold. But here’s what keeps it from feeling cartoonish: clean black line work that brings structure and sophistication. Think thin black lines framing the edges, creating a border effect, or simple linear patterns that divide the nail into zones. The coffin shape’s clean lines complement geometric black details beautifully.
What Makes It Different
Most people either go full bright color or add glitter to cobalt blue, but line work is more sophisticated and modern. The black creates contrast that makes the electric blue even more vibrant, and the linear design feels intentional and artistic rather than decorative. This works especially well on medium coffin nails because the lines have room to breathe without feeling cramped.
Quick Facts
- Electric blue can be tricky to apply evenly because it’s so pigmented — use thin coats and let each one dry completely
- Black line work shows every tremor in your hand, so invest in a liner brush with a very fine tip or use a gel pen for straighter lines
- Negative space (leaving parts of the nail bare or using the black lines to frame empty areas) keeps this design from feeling heavy
- A glossy top coat over the finished design makes both the cobalt and the black pop
Pro tip: Create an ombré effect by making your black lines thicker and more prominent at the tip, gradually becoming thinner toward the base — it adds movement and visual flow.
7. Dusty Blue With Marble Effect
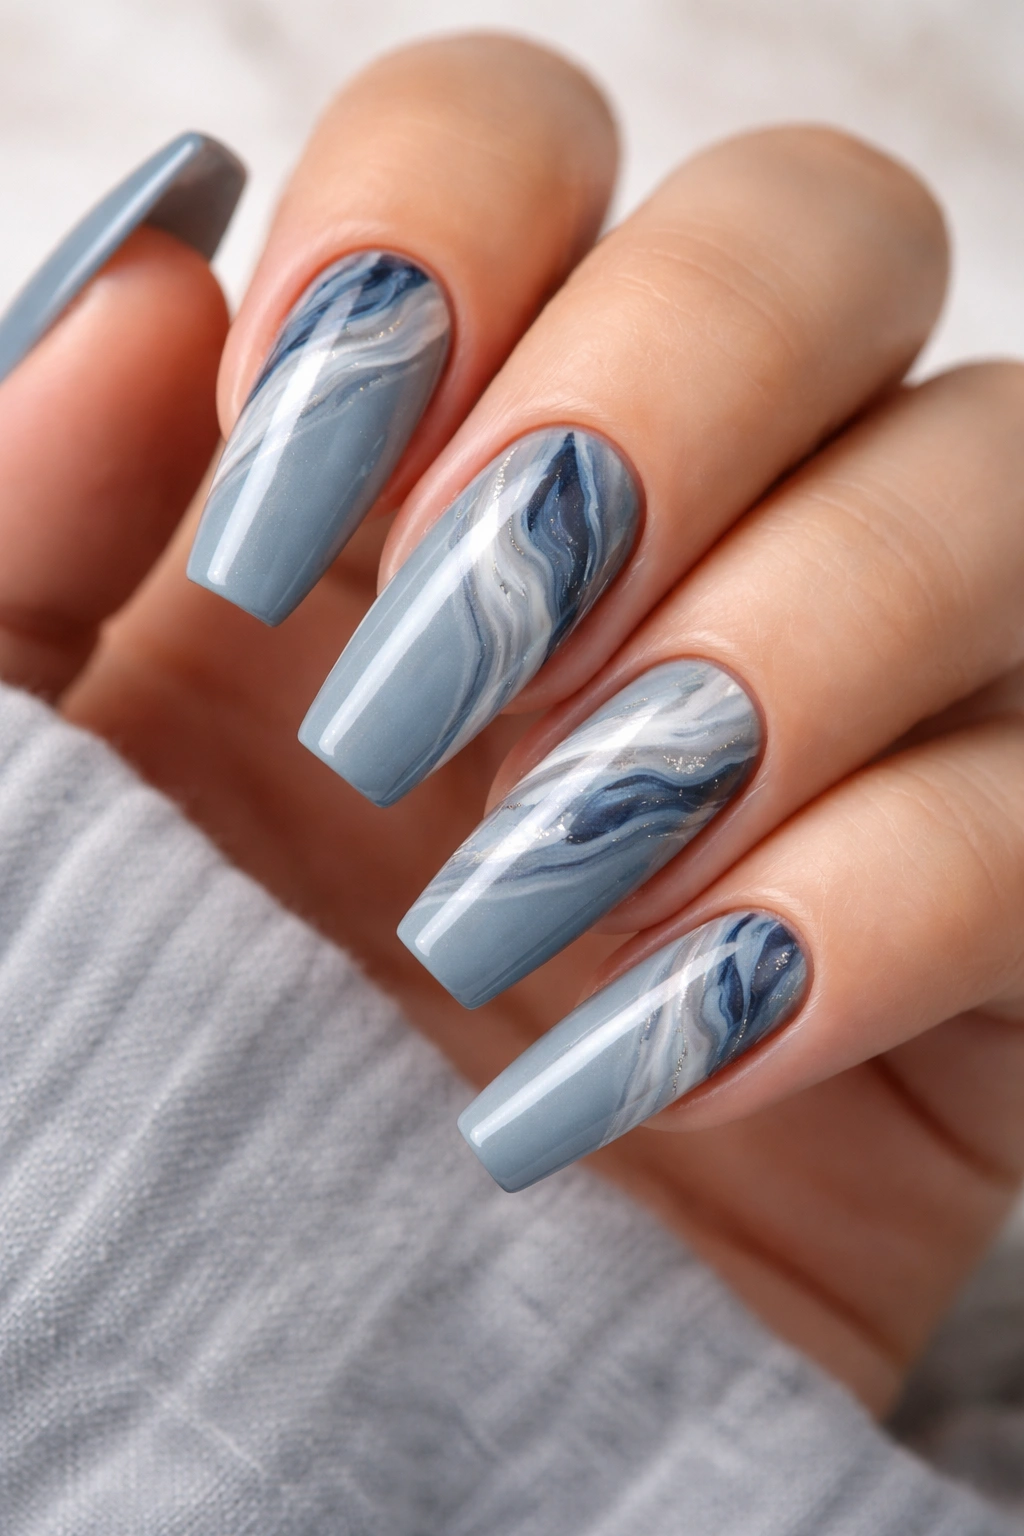
Dusty blue is muted and calming — the kind of blue that feels like a soft sweater or a quiet room. When you add a marble effect (created by dripping multiple colors into a wet base and swirling them together), even a muted blue becomes visually interesting. The marble effect mimics natural stone, giving your nails a sophisticated, almost geological elegance. On coffin nails, the extended surface area lets the marble pattern develop fully.
How to Achieve It
- Apply a base of dusty blue gel or regular polish and leave it slightly tacky (for gel) or partially wet (for regular polish)
- Drop tiny amounts of white, gray, or navy into the wet base using a thin brush or detail pen
- Drag a toothpick or thin brush through the dropped colors to create the marble swirling effect
- Work quickly before the base dries — marble effects are all about moving fast and letting gravity and wet polish do the blending
- Seal with a glossy top coat to smooth the surface and add shine
Worth knowing: You can also create marble effects using a water marbling technique (dripping polish into water and transferring the pattern to your nail), but the gel swirl method tends to give more consistent results for beginners.
8. Royal Blue With Gold Glitter Gradient
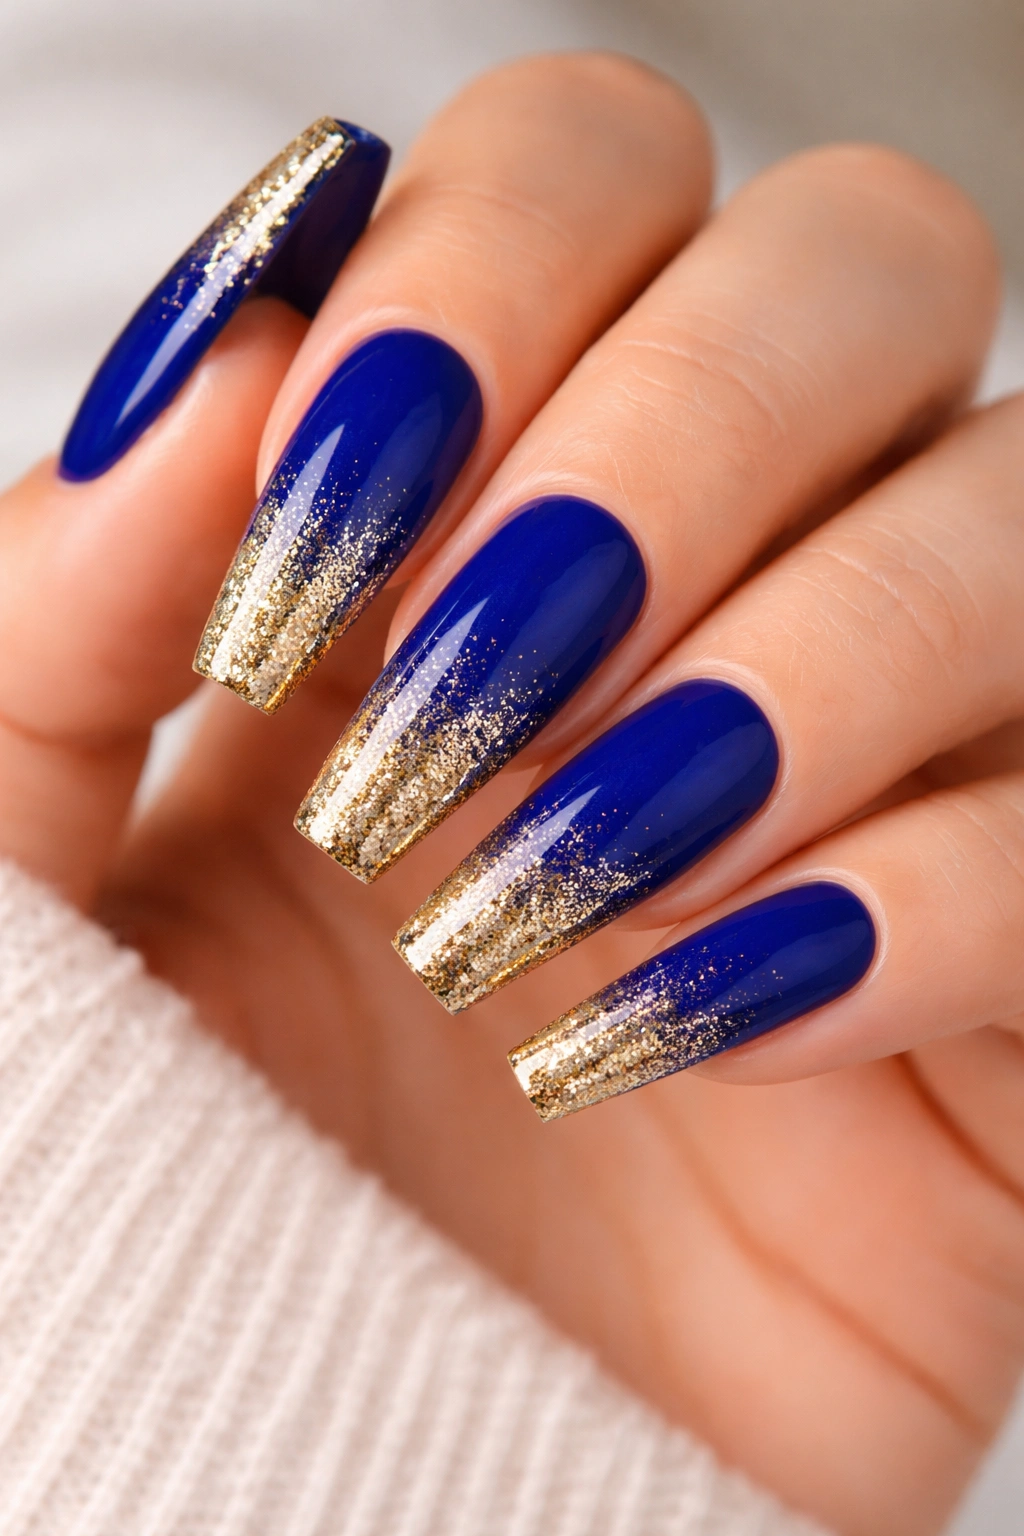
Royal blue is bold without being neon — it’s the blue of velvet, jewels, and luxury. Layering a gold glitter gradient (concentrated at the tip and fading toward the base) creates the illusion that light is hitting your nails and scattering gold. This design is especially stunning on coffin nails because the glitter gradient follows the shape’s natural flow, making the effect look more like artistic intention than accident.
Why It Stands Out
The combination of royal blue and gold has been associated with luxury and prestige for centuries, and when you apply it with a gradient rather than solid coverage, you get sophistication instead of costume. The coffin shape elongates the gradient, giving you a longer canvas to work with and making the transition from solid color to glitter-heavy more gradual and elegant.
How to Apply It
- Paint 2-3 coats of rich royal blue gel or polish as your base
- Once dry or cured, create the glitter gradient using a sponge method: apply glitter polish to a cosmetic sponge (or use a loose glitter with sticky gel base), then dab onto the nail starting at the tip
- Dab heavily at the free edge, medium density in the middle, and just a touch near the base
- The sponge creates a more textured gradient than brushing would — this texture actually adds to the jeweled effect
- Seal with glossy top coat to smooth everything and lock the glitter in place
Pro tip: Loose fine glitter gives you more control over density and creates a more refined look than pre-mixed glitter polish, but it requires a slightly tackier gel base to stay put.
9. Navy Blue With Reverse French Tip in Holographic White
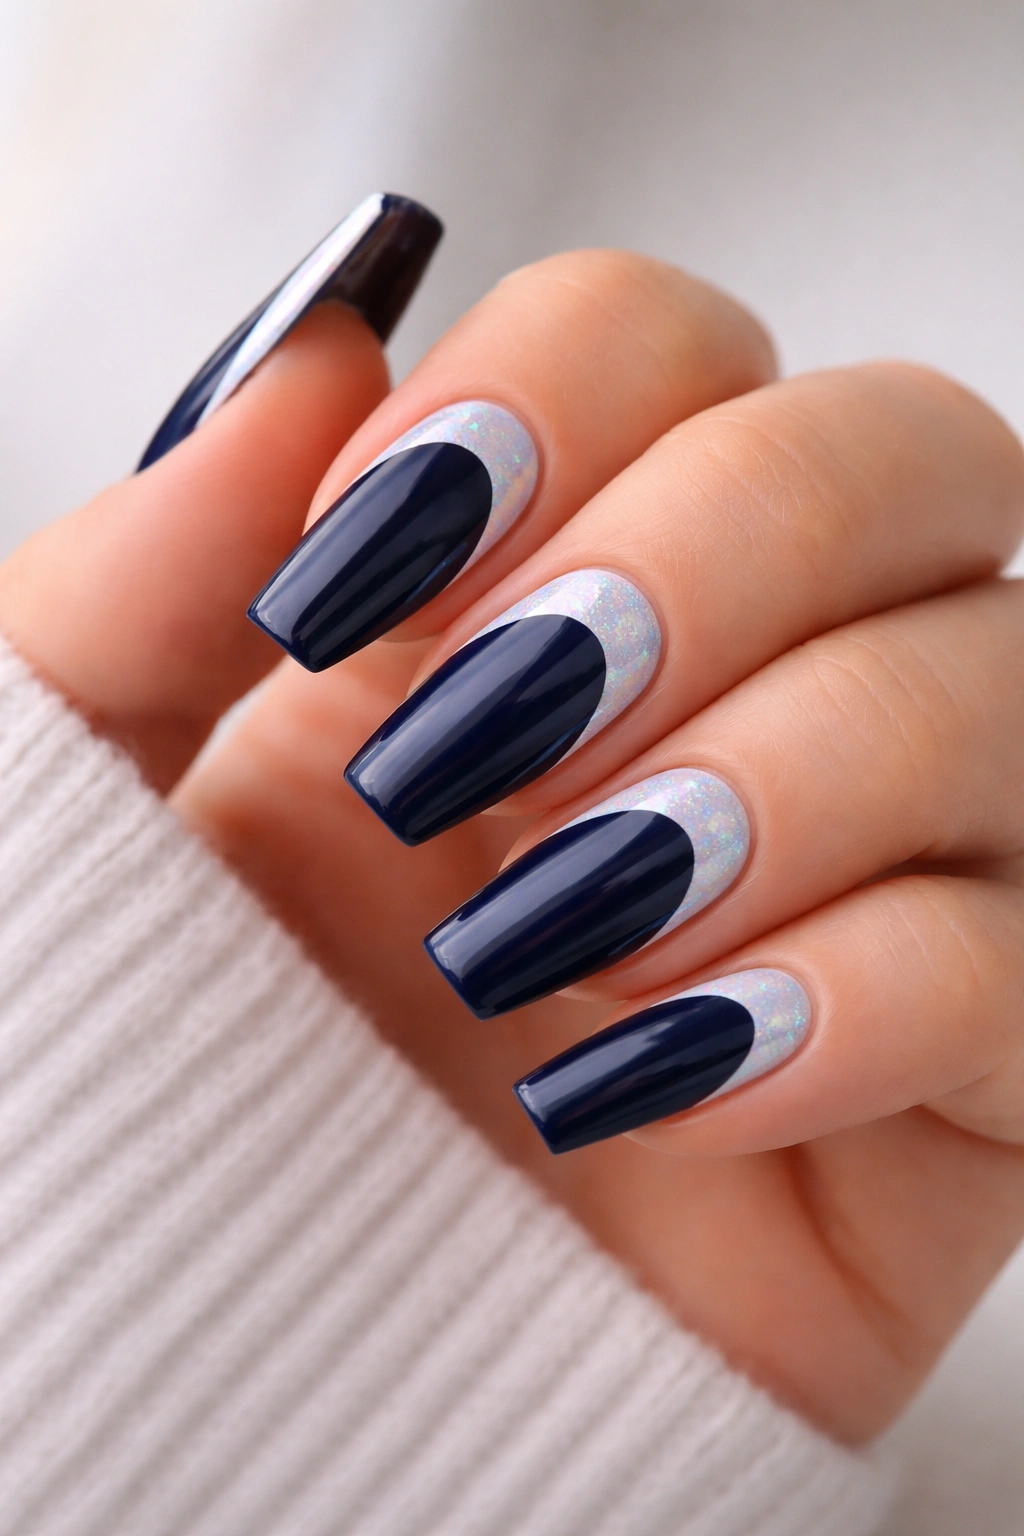
The reverse French tip (color on the base, contrasting shade on the tip) is having a real moment, and for good reason — it’s modern and unexpected. A navy base with a holographic white tip creates a striking visual pop while still reading as sophisticated. The holographic element (which shifts colors slightly as it catches light) adds just enough sparkle without being glittery or casual. On coffin nails, the reverse French tip is perfectly framed by the shape’s clean lines.
What Makes It Different
Traditional French tips put the accent at the very end of the nail; reverse tips do the opposite, creating a completely different visual effect. The holographic white reads as icy and modern rather than warm and classic, which pairs beautifully with navy’s depth. This design is professional enough for conservative settings yet distinctive enough to be memorable.
Quick Facts
- Reverse French tips work best with a distinct line between colors — use nail tape or a guide to ensure crisp edges
- Holographic white typically needs 3+ coats to reach full opacity and that signature rainbow shift
- Position the reverse tip to start at approximately where your nail naturally bends (usually about one-third from the base) for the most flattering proportion
- A matte top coat over the navy and glossy over the white creates interesting textural contrast, or go fully glossy for maximum shine
Worth knowing: If holographic white is hard to find, try iridescent white or pearl white as alternatives — they create a similar effect with slightly different light-catching properties.
10. Cornflower Blue With Negative Space Geometric Designs
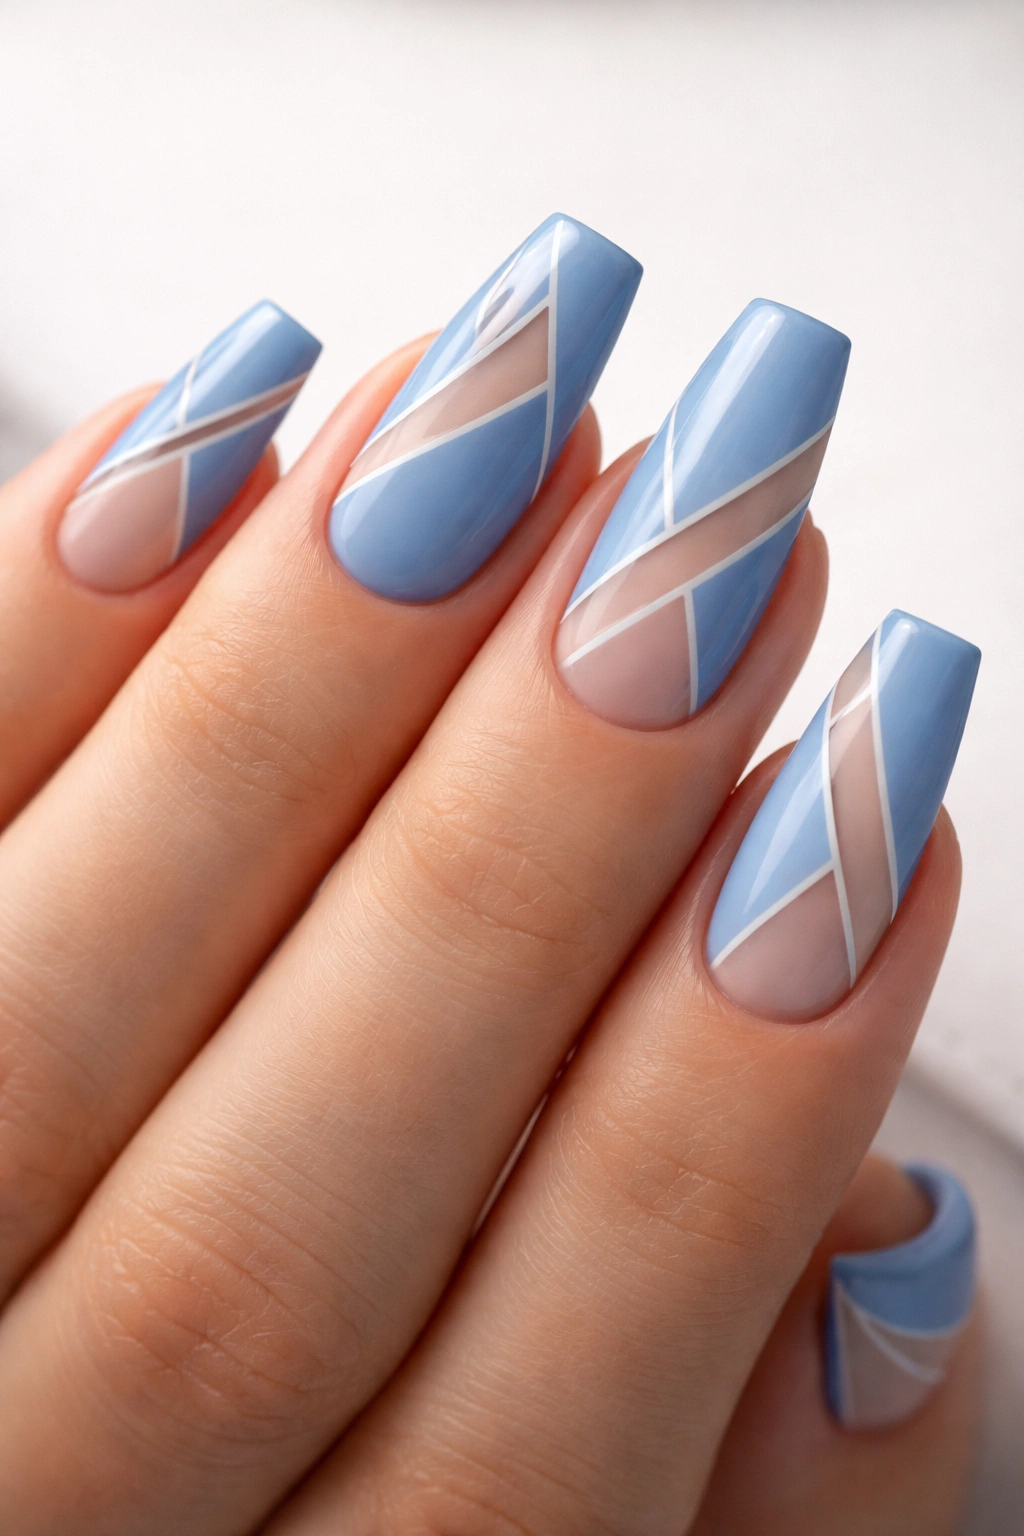
Cornflower blue is cheerful and bright without being neon — it’s the blue of clear skies and reliable days. Negative space designs (where you leave parts of the nail bare to show your actual nail or a nude base coat) create modern, artistic patterns. Think angular shapes, geometric zones, or linear divisions that break the blue into interesting sections. The negative space makes the design feel more contemporary and less “decorated.”
How to Achieve It
- Apply a thin base coat of nude or natural nail color to even out nail texture
- Decide on your geometric pattern before applying color — sketch it on paper first if you want to visualize it
- Use nail tape or vinyl stickers to create crisp edges where the cornflower blue meets the negative space
- Paint the cornflower blue carefully within your guides, then remove the tape while the polish is still slightly tacky
- For best results, let the blue fully dry before removing tape — this prevents the edge from peeling
- Seal with a single glossy coat to protect the design
Pro tip: Asymmetrical negative space (where the pattern is different on each nail) reads as more intentional and artistic than perfectly mirrored designs.
11. Slate Blue With Constellation Star Pattern
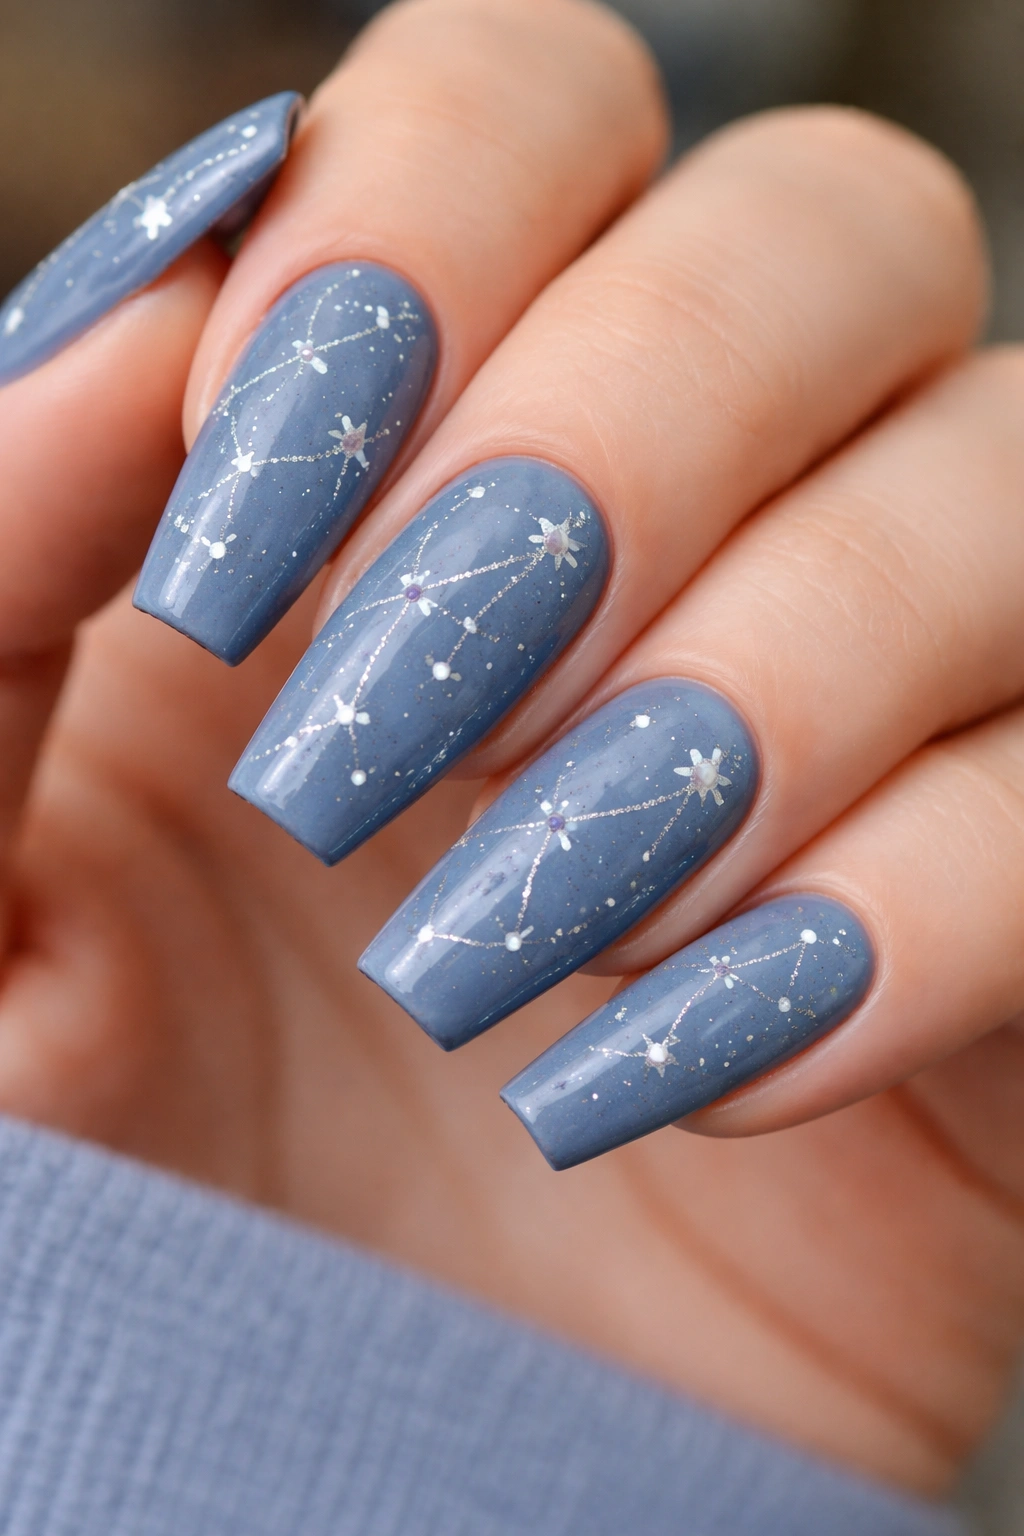
Slate blue is a sophisticated gray-blue that feels calm and professional. Add delicate constellation-inspired star patterns (random placement of small stars or connected stars like an actual constellation map), and your nails become a personal artwork. Stars are relatively easy to create with a detail brush — just five small points radiating from a center point — and even imperfectly executed stars feel intentional on coffin nails.
Why It Works So Well
The slate blue provides a sophisticated, understated base that lets delicate line work shine. Stars feel whimsical without being childish, and their random distribution across the nail creates movement and visual interest. The coffin shape’s length gives you plenty of space to scatter stars at varying sizes, creating depth and intentionality.
How to Create It
- Apply 2-3 coats of slate blue gel or polish to build rich color
- Once fully cured or dry, use white gel or fine-tipped nail art pen to create small stars across the nail surface
- Vary the size of your stars — a few larger ones, several medium, and a handful of tiny ones creates more visual interest than uniform sizing
- Create a few “connected” stars that look like actual constellation patterns if you want extra detail and meaning
- Seal with a glossy top coat that will smooth the paint slightly while keeping the stars visible and protected
Worth knowing: If you’re worried about hand-painting stars, star-shaped nail stamps (available at any beauty supply store) let you achieve this look quickly and uniformly.
12. Teal Blue With Rose Gold Accents and Geometric Shapes
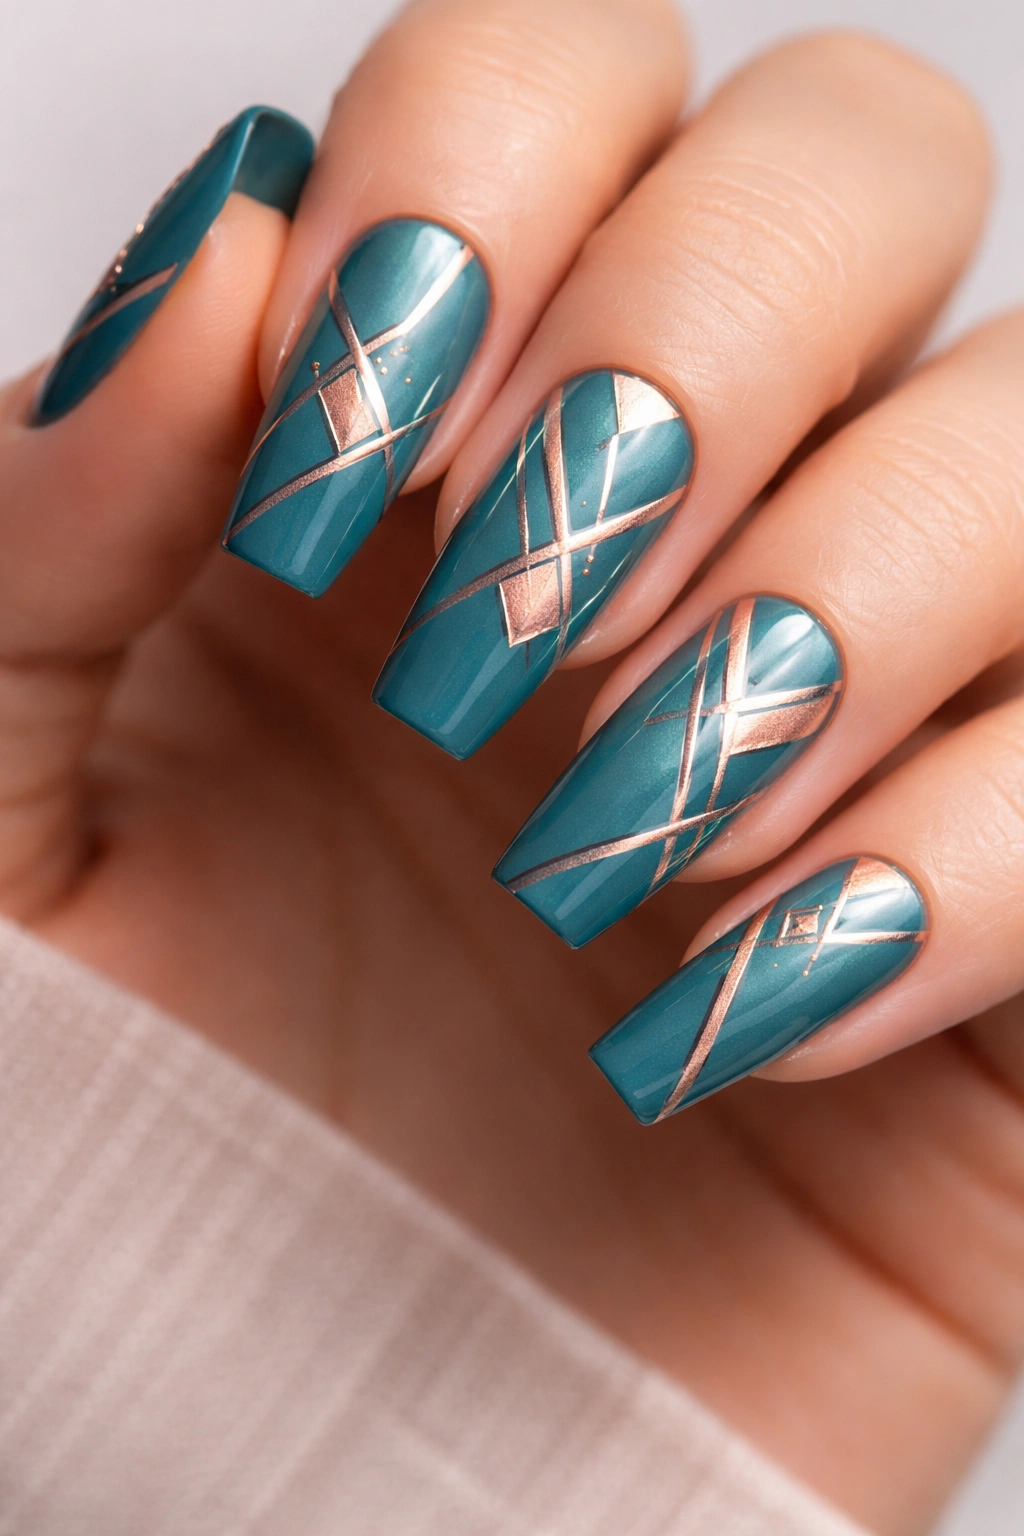
Teal — that blue-green hybrid that sits at the intersection of blue and cyan — has become increasingly popular, and for good reason. It’s modern without being trendy, bold without being loud. Pair teal with rose gold geometric accents (small squares, triangles, or lines) and you’ve got a design that feels both luxurious and artistic. The rose gold warms the coolness of teal, creating an appealing color temperature balance.
What Makes It Different
Teal is naturally more playful than navy or royal blue, yet rose gold elevates it to luxury status. Geometric shapes add structure and modernity, while the combination of colors feels curated and intentional. This design works especially well on medium coffin nails where the geometric shapes have room to develop without feeling crowded.
How to Apply It
- Start with 2-3 coats of teal base color — rich, pigmented teal requires good coverage
- Once fully dry or cured, use a thin brush or nail art pen with rose gold metallic polish to create your geometric shapes
- Keep shapes clean and crisp: small perfect squares, perfect triangles, or straight lines look more polished than wobbly shapes
- Position shapes asymmetrically across the nails for a more modern, gallery-like feel
- Seal with glossy top coat to make both the teal and rose gold pop with shine
Pro tip: Create a focal point by concentrating geometric shapes on your accent nail (usually your ring finger) and keeping other nails with just teal, building visual hierarchy across your manicure.
13. Powder Blue With White Lace Details
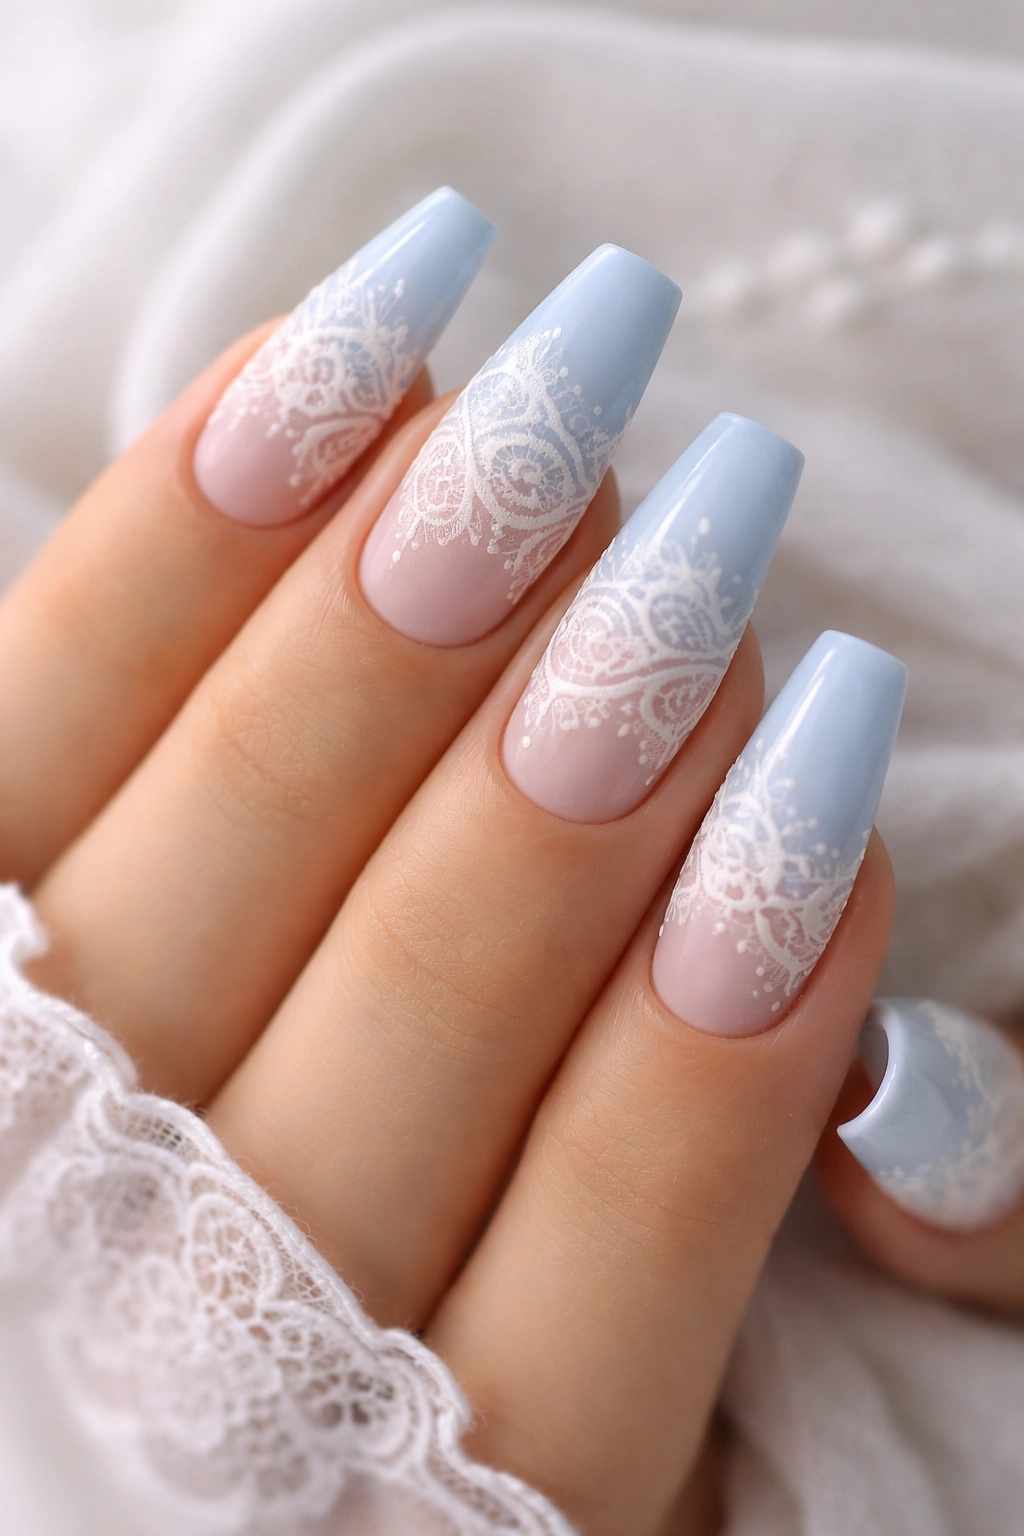
Powder blue is soft, romantic, and instantly calming — it’s the blue of peaceful mornings and quiet confidence. Layering white lace details (created using lace nail decals or painted freehand with a detail brush) adds delicate femininity without being over-the-top. The negative space created by lace patterns keeps the overall design from feeling heavy, and on coffin nails, the extended canvas makes even intricate lace details visible and beautiful.
Why It Stands Out
Lace is inherently elegant and sophisticated, and powder blue is one of the few nail colors that lets lace details shine without creating visual competition. The combination feels bridal or special-occasion appropriate while still being wearable for everyday wear. The coffin shape frames lace details beautifully because the shape itself is already elegant.
How to Achieve It
- Apply 2-3 coats of powder blue as your base — lighter blues need good coverage to look polished
- Once fully dry, you have two options: apply lace decals (soak-off stickers available at beauty suppliers) or paint lace details freehand
- For decals: apply to tacky gel base, press down gently, and seal with top coat
- For freehand: use a detail brush and white gel or polish to create delicate linear patterns that mimic lace — interconnected lines, small loops, and organic curves
- Seal everything with glossy top coat for a smooth, professional finish
Worth knowing: If you can’t find nail-specific lace decals, regular craft lace can be carefully applied using nail glue, though the edges may need trimming with tiny scissors.
14. Cobalt With Metallic Blue Ombre and Sparkle Fade
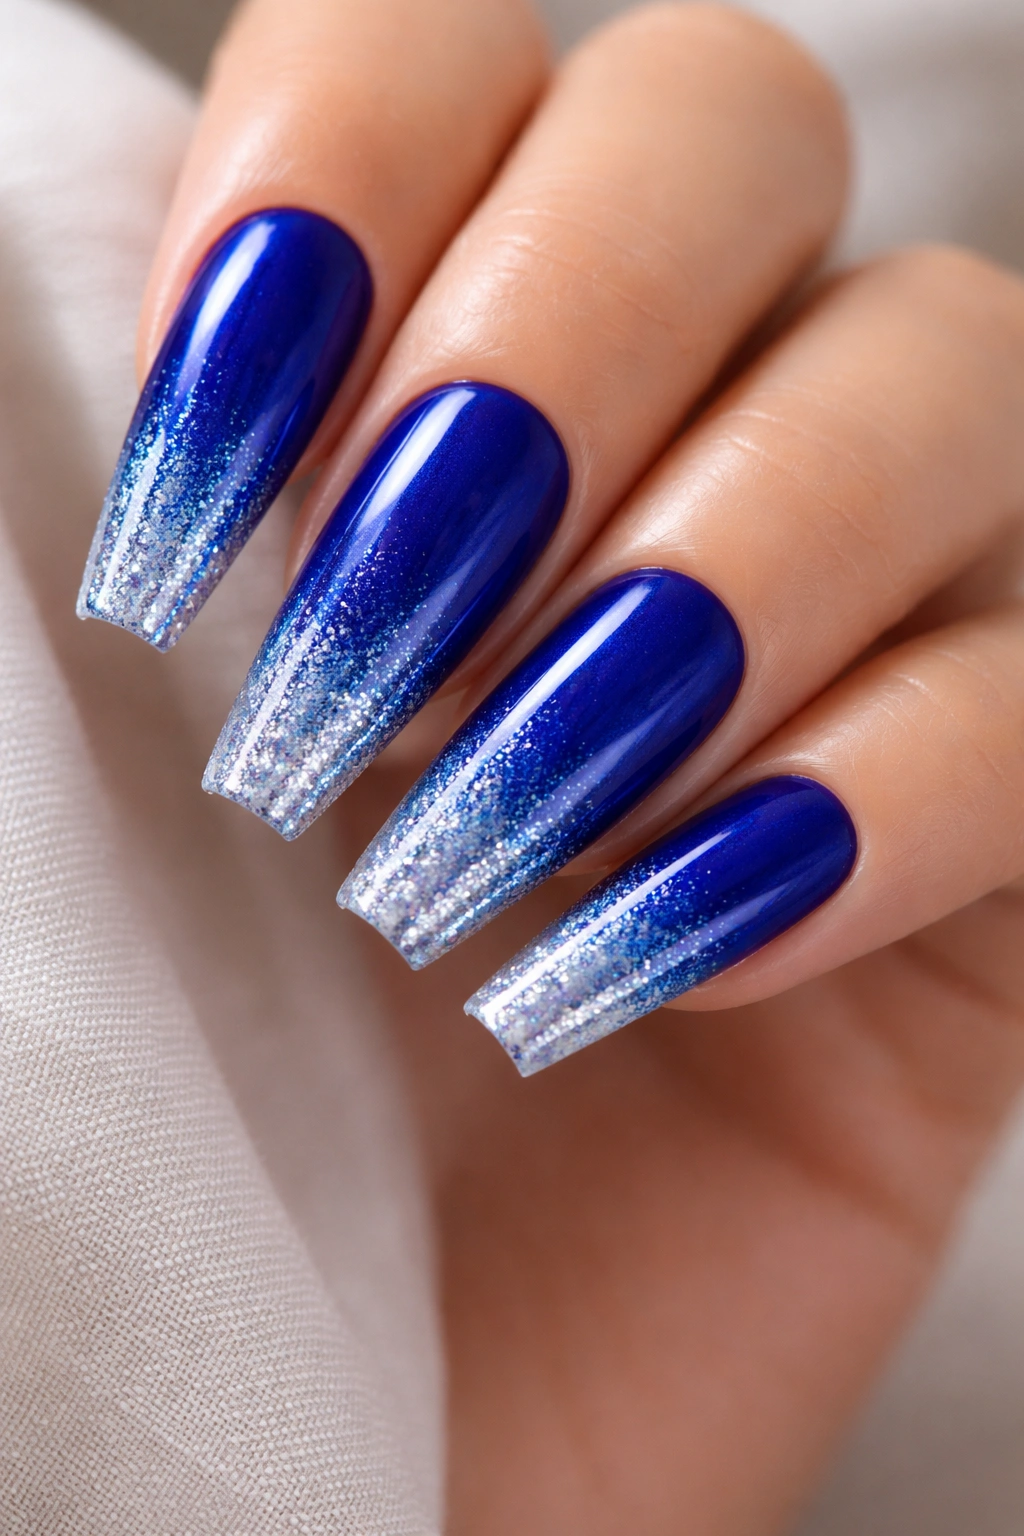
This final design layers multiple shades of blue — starting with cobalt at the base, transitioning to a lighter, more metallic blue in the middle, and finishing with sparkle or shimmer at the tip. It’s technically complex but absolutely worth the effort because the result is a nail that looks professional, multi-dimensional, and intentional. The coffin shape lets each color zone develop fully, and the sparkle fade creates an eye-catching finish without being tacky.
How to Achieve It
- Apply 2-3 coats of rich cobalt blue as your base color
- Create the ombre transition using either sponge method or a gradient brush, transitioning to metallic blue (which often has shimmer already built in)
- Allow the transition zone to dry completely — this is crucial for maintaining distinct color zones
- Apply sparkling or glitter polish to just the tip of the nail, blending slightly into the metallic zone where they meet
- Use the sponge method to fade the sparkle, making it heaviest at the very tip and gradually lighter as you move back toward the base
Pro tip: If you want maximum impact, use a contrasting sparkle color — gold, silver, or even a lighter blue shimmer creates more visual separation between zones than using the same blue family for all three layers.
Final Thoughts

Medium-length coffin nails in blue give you the best of both worlds — enough length to make a real design statement and enough practicality that you’re not fighting your nails throughout the day. The designs above range from minimalist and elegant to detailed and artistic, so whether you’re drawn to clean geometry, soft florals, sparkle and shine, or moody sophistication, there’s a blue coffin nail idea here that speaks to your aesthetic.
The real beauty of working with blue is how forgiving it is across different skin tones, undertones, and personal styles. A muted dusty blue reads completely differently than an electric cobalt, and navy paired with gold feels entirely different from teal with rose gold accents. That means you don’t have to choose just one blue nail look — you can rotate through several depending on your mood, outfit, or the season.
Before you head to the salon or start your at-home manicure, think about the vibe you want to project: are you going for polished professional, creative and artistic, romantic and dreamy, or bold and confident? That intention will guide which design and which shade of blue will feel most like you. The coffin shape is doing the heavy lifting in terms of elegance, so the real fun is playing with color, texture, and detail to create something that feels genuinely personal.
