

Coffin nails have become synonymous with edgy sophistication and dramatic flair, and when you combine that distinctive almond-shaped silhouette with dark, moody color palettes, you’ve got a look that commands serious attention. Medium-length coffin nails strike the perfect balance—they’re long enough to showcase nail art details and color depth without the daily-life complications of ultra-long extensions. The darker the shade, the more mysterious and polished the overall aesthetic becomes, which is why moody tones like deep burgundy, charcoal, forest green, and midnight blue have become go-to choices for anyone wanting to elevate their nail game.
What makes dark and moody coffin nails so versatile is how they work across seasons, skin tones, and personal styles. A rich chocolate brown reads differently on fair skin than it does on deeper complexions, and a deep plum shifts from edgy to elegant depending on what you pair it with. The coffin shape itself—that perfect blend of pointed and squared—gives these dark designs maximum visual impact. Medium length is genuinely the sweet spot for most people because it’s wearable for everyday life while still feeling intentional and styled.
The beauty of going dark and moody is that you get to play with textures, finishes, and subtle design elements that might get lost in lighter shades. A matte black coffin nail reads completely different from a glossy jet black or one with a holographic shimmer. Add in topographic lines, metallic accents, or minimal geometric designs, and suddenly you’ve got something that feels distinctly yours. Whether you’re drawn to the vampire-romance aesthetic, the sophisticated minimalist vibe, or the witchy-bohemian energy, there’s a dark and moody coffin nail design for that mood.
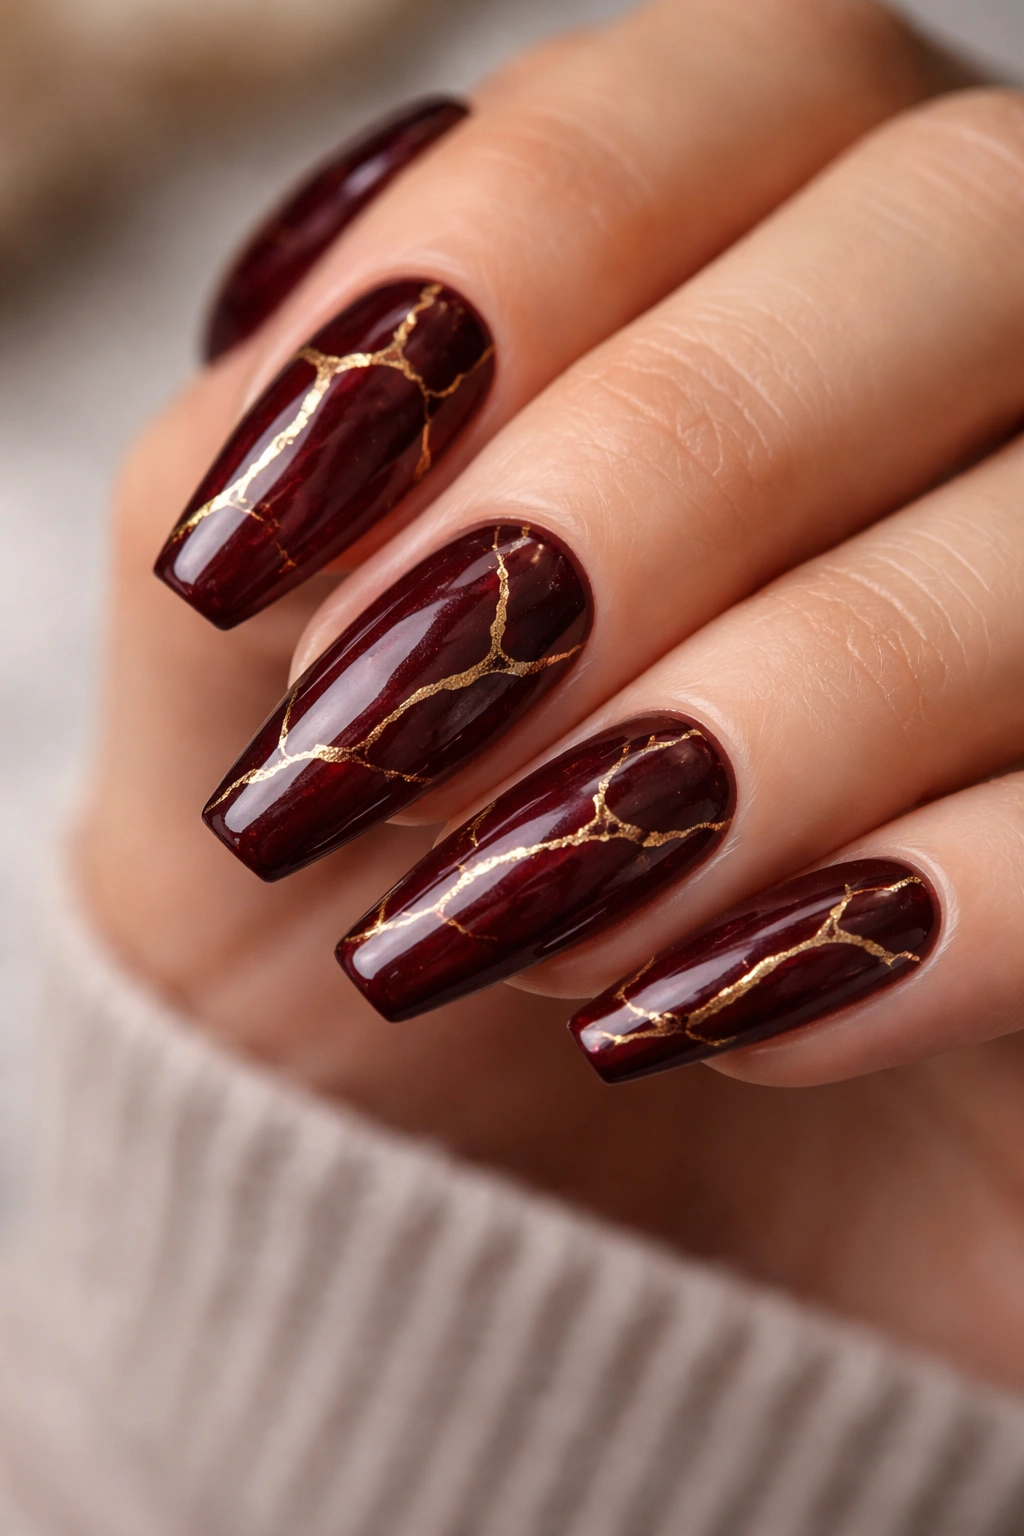
1. Deep Burgundy with Gold Veining
Deep burgundy is essentially the perfect dark shade that doesn’t feel quite as intense as pure black, which makes it ideal if you want something moody without going full noir. Think of the color of a good red wine held up to the light—rich, complex, and undeniably elegant. On medium coffin nails, burgundy creates an almost jewel-like appearance that catches light in unexpected ways.
Why This Design Works for Medium Coffin Nails
The coffin shape elongates your fingers naturally, and when you pair that with a deep burgundy base, you’re creating a visual line that reads as both dramatic and refined. Burgundy has this unique quality where it can look either romantic or rebellious depending on how you style it. Gold veining running through the polish adds an element of luxury that feels intentional without being over-the-top. This combination works beautifully for people who want something that works in both professional and creative settings.
How to Execute This Look
- Use a high-quality burgundy base—two coats minimum for full opacity and depth
- While the base coat is still slightly tacky, apply thin gold lines using a detail brush or thin striping brush
- Let those gold lines follow natural patterns (don’t overthink the placement—organic looks better than rigid)
- Seal with a glossy or matte topcoat depending on your preference (matte softens the drama slightly)
- If you mess up a line, gently wipe it away with a thin brush dipped in acetone before it fully sets
Pro tip: Add a single gold accent nail (solid gold or with a burgundy reverse design) to break up the pattern and add dimension.
2. Charcoal Gray Matte with Silver Studs
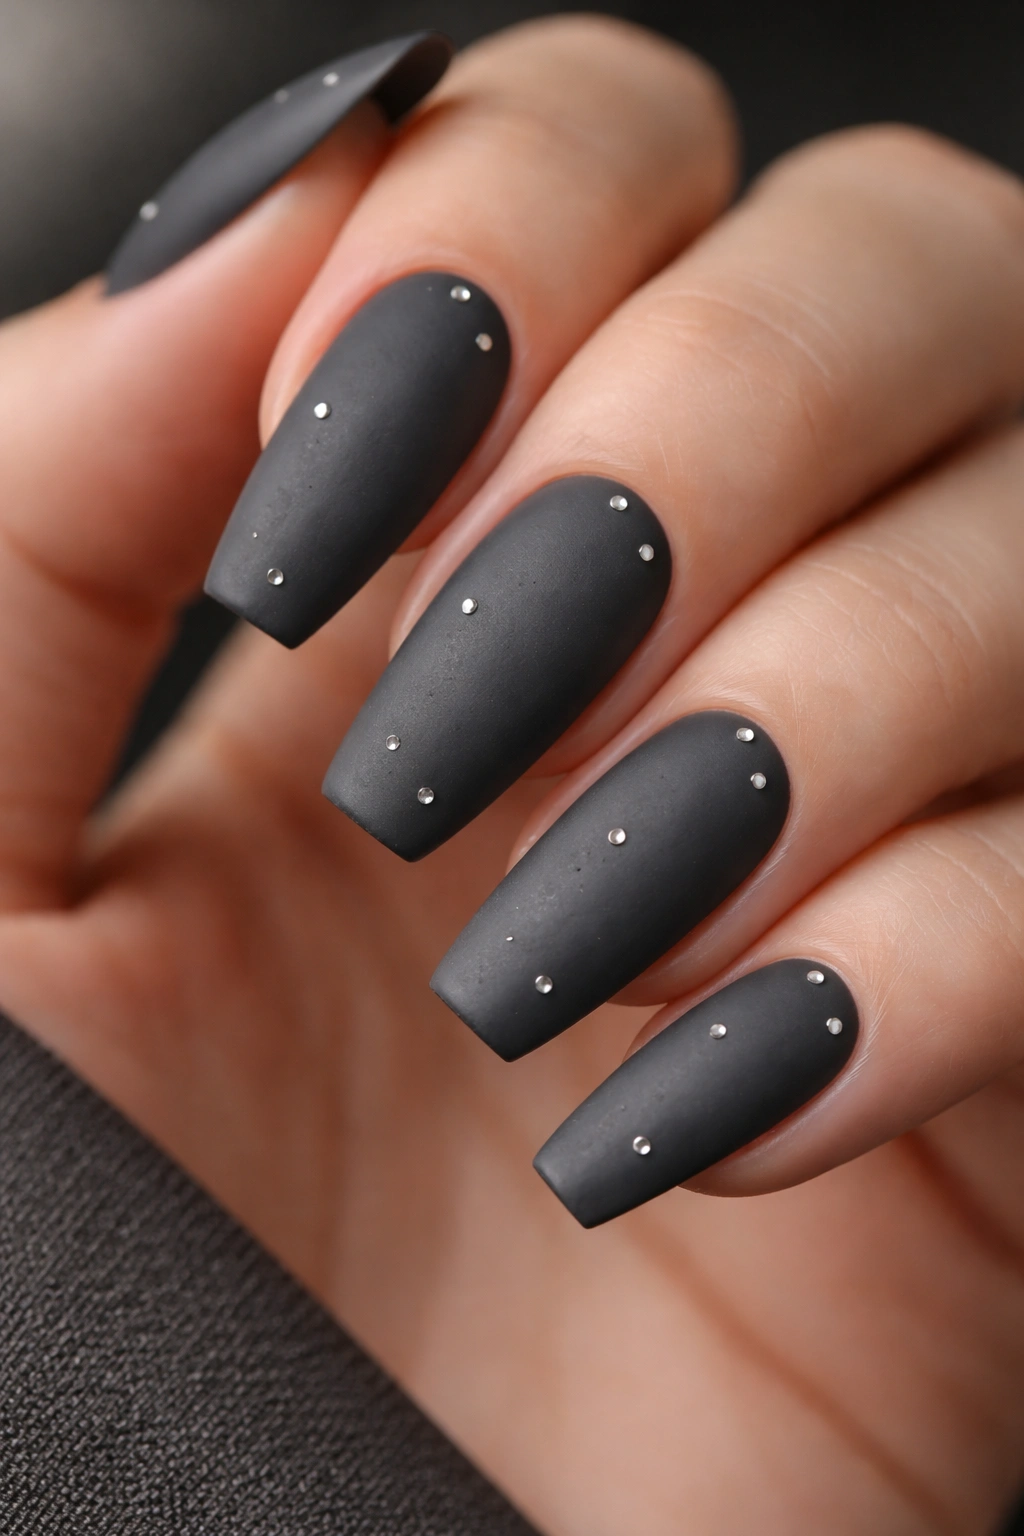
Charcoal gray is the cooler, more subtle cousin of black, and it absolutely dominates on medium coffin nails because it feels modern and intentional rather than stark. When finished with a matte topcoat, charcoal gray has this velvety, almost fabric-like quality that’s deeply satisfying visually. Add a scattering of small silver studs, and suddenly you’ve got an edge without feeling costume-like.
The Psychology of Charcoal Gray
Gray has an underrated power in nail design—it’s sophisticated, it’s wearable, and it doesn’t feel as heavy as black while still delivering that moody punch. Studies on color psychology consistently show that gray is associated with balance, calm, and sophistication, which is why it works across so many contexts. On medium coffin nails specifically, charcoal gray allows your natural nail shape to be the star while the color and texture do the supporting work.
Creating the Perfect Matte Finish with Studs
- Apply charcoal gray in two thin coats, allowing each to dry fully
- Once dry, apply a matte topcoat to all five nails
- While the matte topcoat is still slightly wet, place small silver studs strategically (try a diagonal line, or cluster them near the cuticle area)
- Seal with another layer of matte topcoat to secure the studs
- The studs will sit slightly on top of the matte finish, creating subtle light-catching dimension
Worth knowing: Metal studs work best on matte finishes because the contrast between the light-reflecting stud and the light-absorbing matte surface is what creates visual pop.
3. Midnight Black with Holographic Flakes
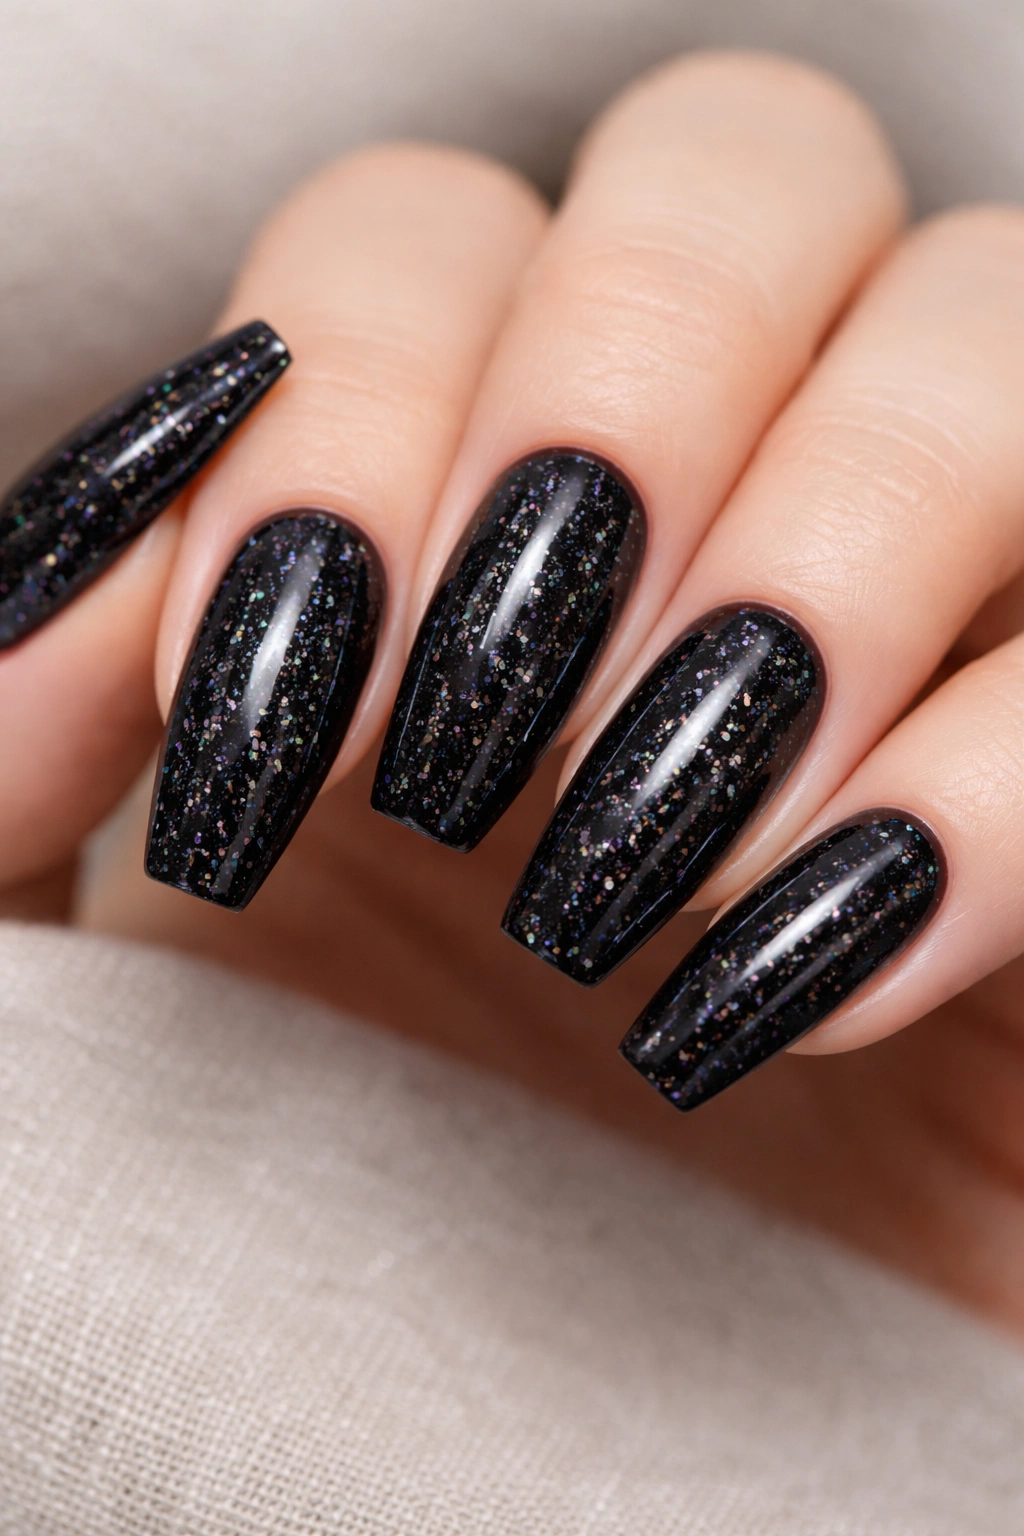
Pure midnight black is the ultimate dark and moody base, and it’s even more striking when you add holographic flakes that create a subtle rainbow effect visible only at certain angles. This design gives you the sophistication of solid black while adding an element of surprise and playfulness that prevents it from feeling too severe.
Why Holographic Accents Elevate Black
Black can read as very stark if it’s completely solid, especially on longer nails like coffins. Holographic flakes solve this by adding movement and light-play that keeps the eye engaged. These flakes are microscopic fragments of holographic material that create rainbow shifts without being glittery or sparkly in an obvious way. When finished with a glossy topcoat, they catch the light subtly as your nails move, creating this mesmerizing depth.
Application Technique for Maximum Effect
- Apply two coats of true black—midnight black is your target, not charcoal gray
- While the second coat is still slightly wet, sprinkle holographic flakes onto the nail
- Use a detail brush or toothpick to distribute them evenly, pressing gently so they adhere
- Allow to dry fully, then apply a glossy topcoat to seal and magnify the holographic effect
- The topcoat acts as a lens, amplifying the rainbow shifts in the holographic flakes
Insider note: Holographic flakes show up best on glossy surfaces and in natural or bright indoor lighting—they’re subtle enough that fluorescent lighting in some spaces barely shows them.
4. Forest Green with Matte Finish and Thin Gold Outline
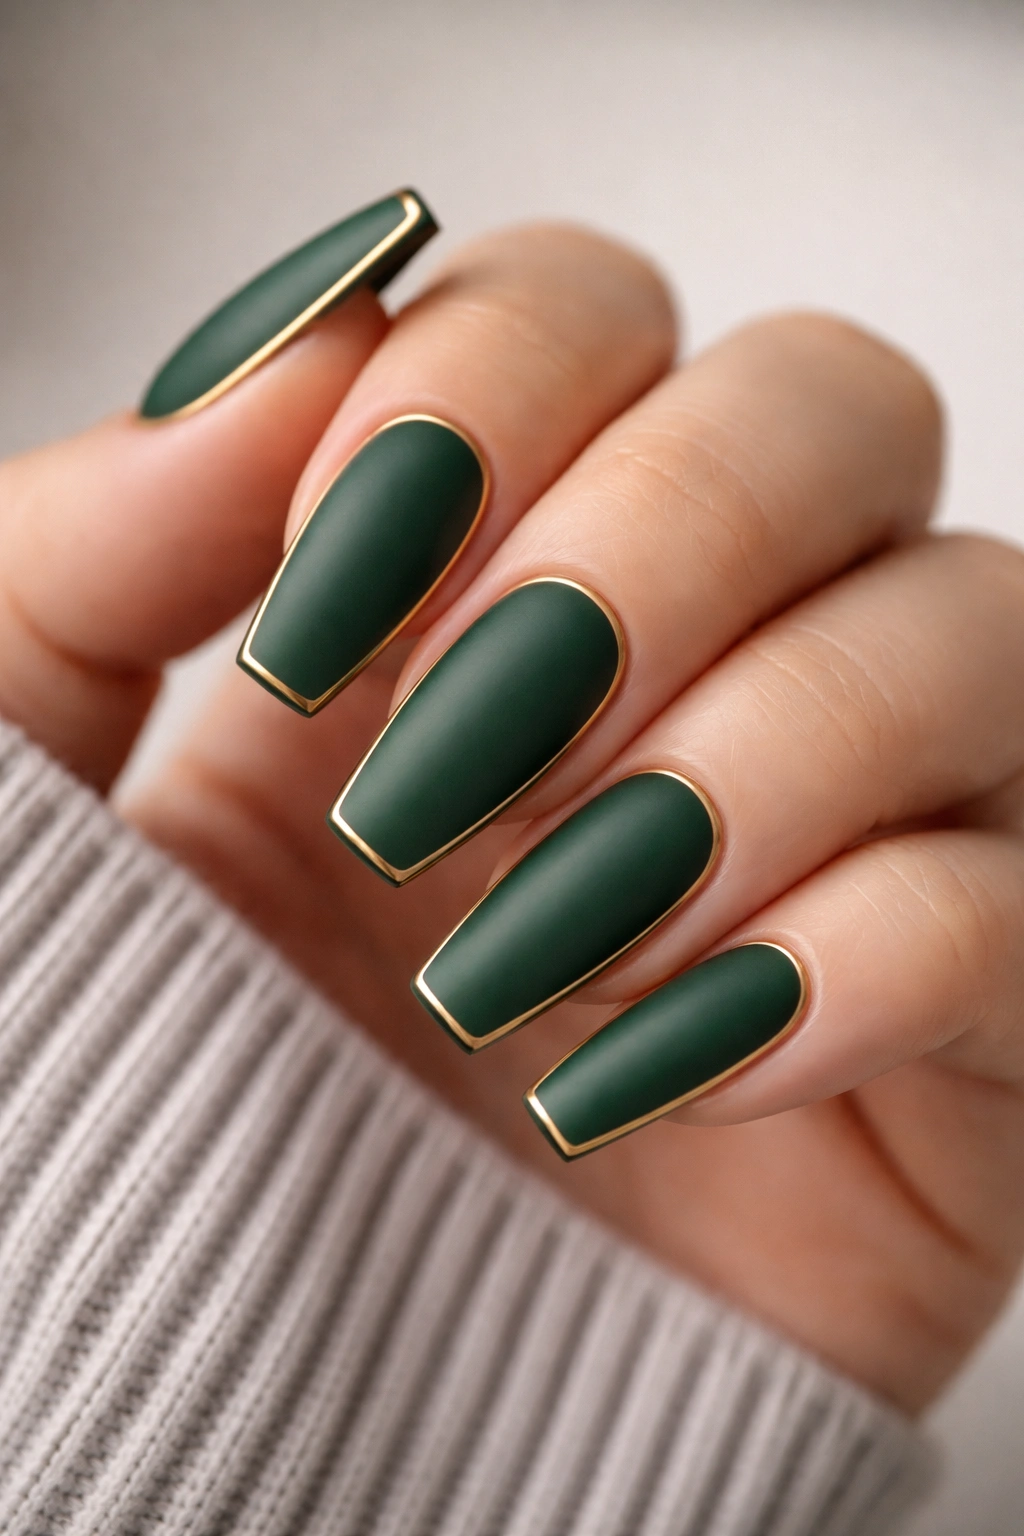
Forest green is the dark moody shade that bridges the gap between neutral and bold. On medium coffin nails, it feels sophisticated and witchy simultaneously, especially when you finish it matte and add a delicate gold outline around the edge of each nail.
The Versatility of Forest Green
Dark green has roots in luxury and nature—think forest canopies, vintage velvet, and emerald gemstones. Unlike black, which reads as a color choice, forest green reads as an aesthetic. It’s moody without feeling gothic, bold without feeling aggressive. The coffin shape naturally emphasizes the nail edge, which is exactly where you want that thin gold outline to draw attention. On medium nails, this design is professional enough for most workplaces while still feeling intentional.
Creating Clean Gold Outlines on Matte Polish
- Apply two coats of forest green and allow to dry completely
- Once fully set, apply a matte topcoat to all five nails
- Using a thin striping brush or angled liner brush, trace gold polish around the very edge of each nail (just the perimeter where the nail meets the air)
- This outline should be thin—one-eighth inch at most—to avoid looking too graphic
- Seal with a glossy topcoat just to the outline area, or leave it matte for a more understated look
Pro tip: Thin gold outlines look most effective on the free edge (the part of the nail extending past your fingertip) and along the top edge near the cuticle—these are the areas people see most clearly.
5. Deep Plum with Sparkle Gradient
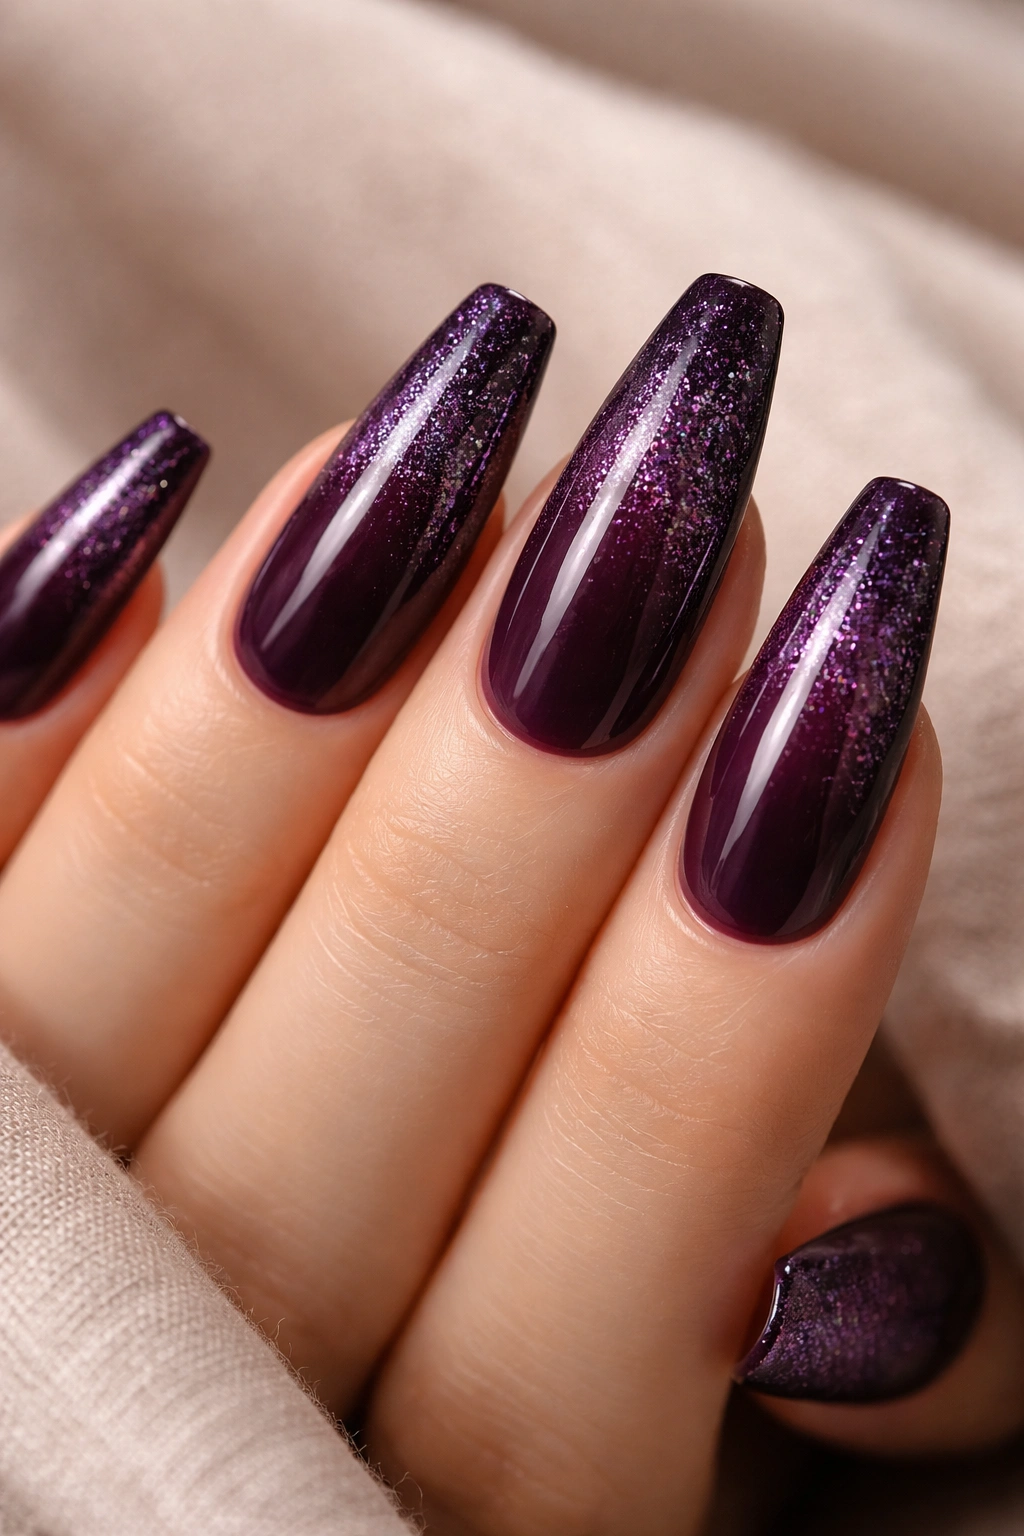
Deep plum is that sophisticated color that reads differently depending on lighting—it can look almost black indoors and reveal its purple undertones in natural daylight. When you add a sparkle gradient that gets denser toward the tips, you create dimension and movement while maintaining that moody aesthetic.
Why Plum Works Across All Undertones
Purple and plum shades are genuinely universal because they contain both warm and cool undertones. A plum with more red undertones suits warmer skin tones, while plum with more blue undertones works beautifully on cooler complexions. On medium coffin nails, plum creates an interesting optical illusion where the nails appear slightly longer than they actually are, because the eye follows the depth created by the color and the gradient effect.
Building a Sparkle Gradient on Plum
- Apply two solid coats of deep plum as your base
- Once dry, apply a glossy topcoat to the entire nail
- On a separate brush or sponge, apply the sparkle polish (glitter or micro-shimmer formula)
- Dab the sparkle polish onto the tips of your nails, allowing it to fade organically toward the center
- The gradient shouldn’t be perfectly geometric—a natural fade looks more intentional
- Seal with a final topcoat to blend the gradient slightly and create cohesion
Worth knowing: Sparkle gradients look best with a slight ombré effect where the opacity increases toward the tip—solid sparkle at the base and gradient at the tip creates the most flattering effect.
6. Charcoal with Minimalist Line Art
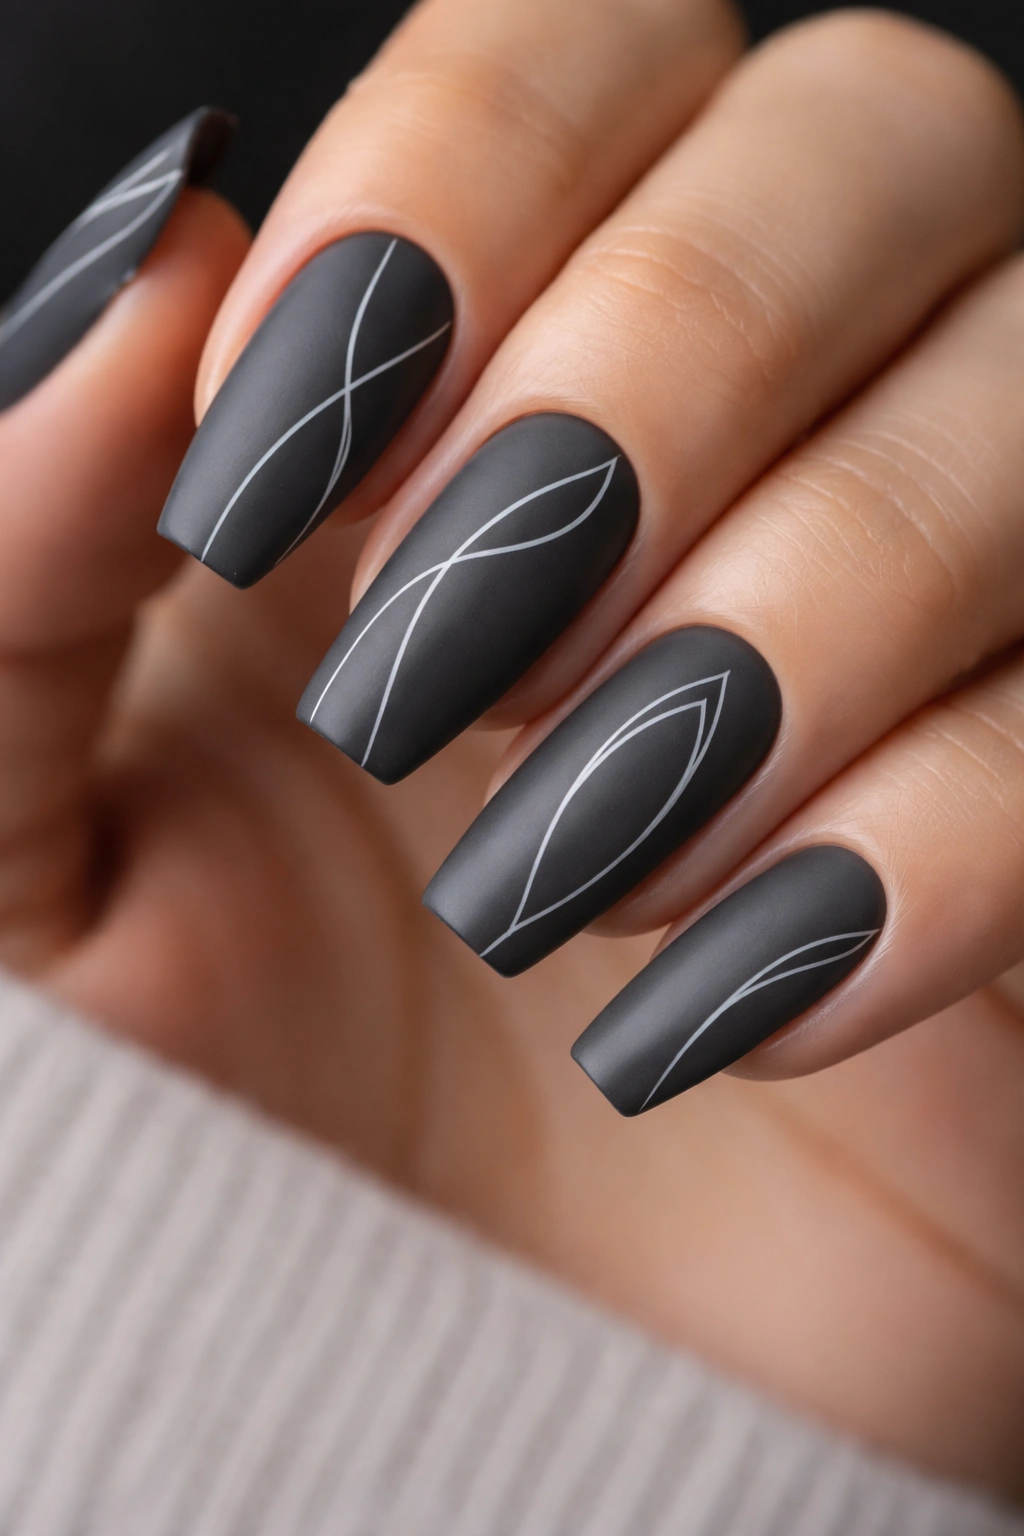
Minimalist line art on dark backgrounds is having a moment, and for good reason—those thin, delicate lines read beautifully against charcoal on medium coffin nails. Think single flowing lines, geometric shapes, or abstract designs that take up less than half the nail.
The Appeal of Minimalist Design on Medium Nails
Medium coffin nails give you enough space to see detail without so much space that your design gets lost. Minimalist line art works because it creates visual interest through simplicity and precision rather than complexity or color. A single curved line near the cuticle, or a geometric triangle near the free edge, creates impact through intentionality. This design approach reads as modern, artistic, and intentional—the opposite of chaotic or overwhelming.
Executing Clean, Precise Line Work
- Apply two coats of charcoal and seal with a topcoat
- Once completely dry, use a very thin detail brush (size 000 or smaller) or thin striping brush
- Apply white, gold, or a contrasting color in your chosen design
- Thin lines require steady hands—rest your brush hand on a table or your non-dominant hand for stability
- Allow line work to dry fully before applying a final topcoat
- A matte topcoat after the design actually makes lines more visible by reducing shine on the base
Pro tip: If you’re nervous about hand-painting lines, thin nail stickers or nail stencils designed for line work can help you achieve this look with more confidence.
7. Navy Blue Metallic with Geometric Patterns
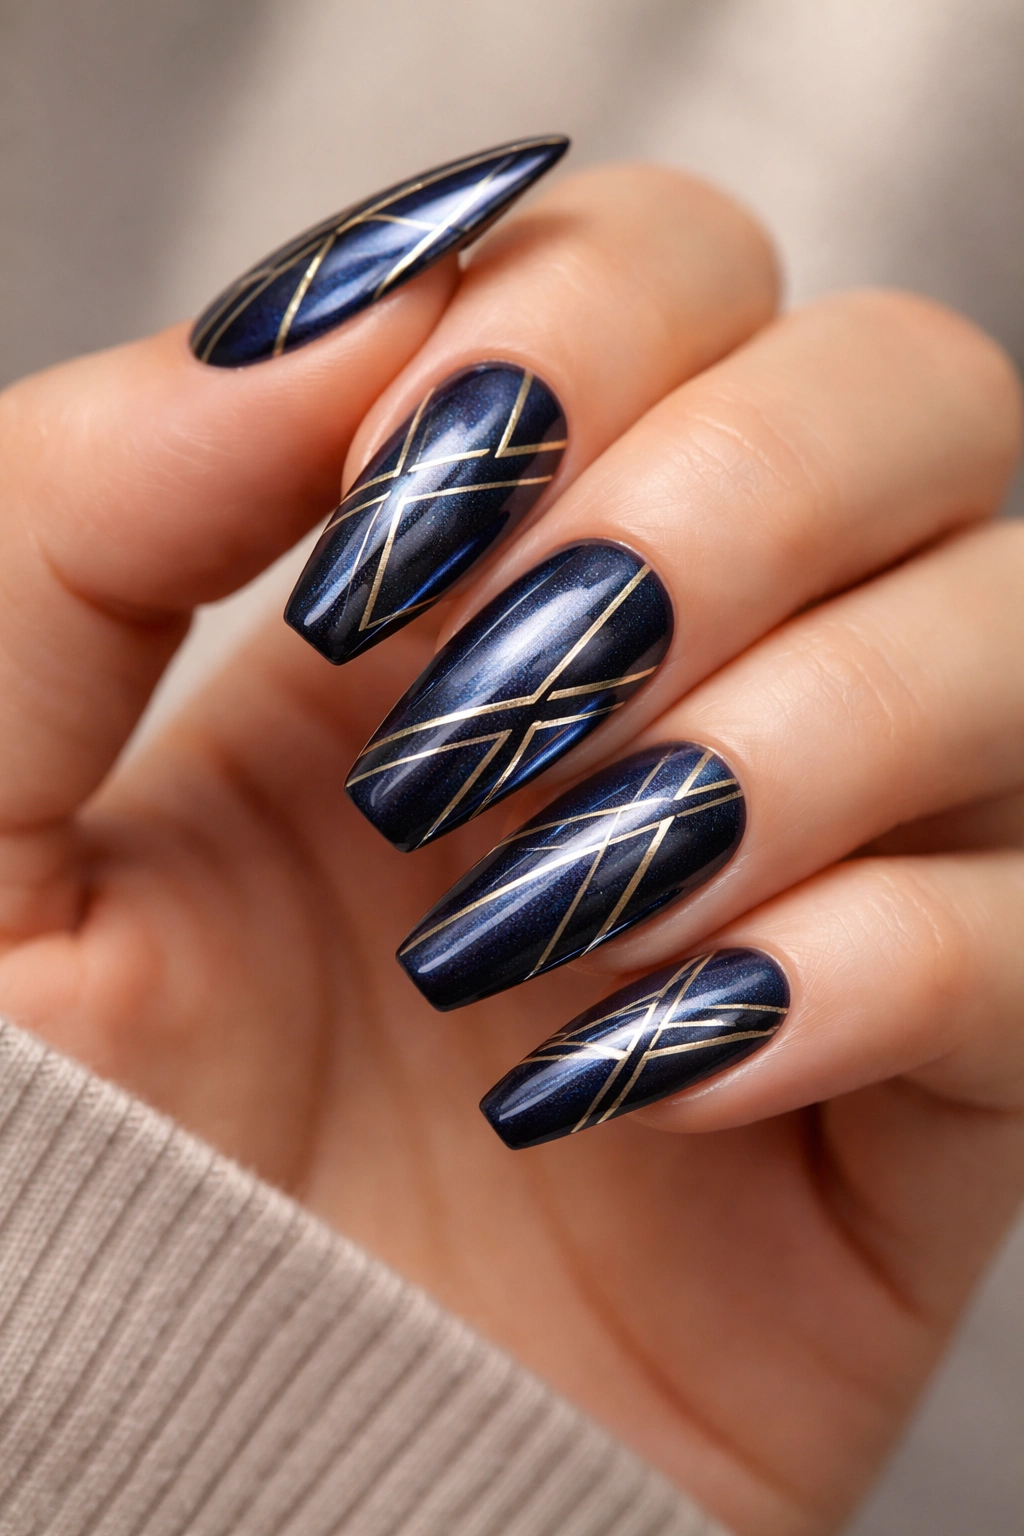
Navy blue is the dark moody shade that feels slightly more wearable than black for some people, especially in professional settings. When you choose a metallic finish and add geometric patterns in contrasting colors, you create something that feels modern and deliberately artistic.
Why Navy Feels Different Than Black
Navy blue has warmth that pure black doesn’t—it’s sophisticated and professional while still delivering that dark moody vibe. The metallic finish gives navy an interesting sheen that makes the color feel dimensional and rich. On medium coffin nails, navy metallic catches light beautifully without feeling overly shiny or plastic-like if you choose a high-quality polish with true metallic pigments.
Adding Geometric Patterns to Metallic Navy
- Apply two coats of navy metallic base and allow to dry
- Use a detail brush or thin striping brush to add geometric patterns in white, gold, or a lighter contrasting shade
- Geometric patterns work best when they’re strategic (one pattern per nail, or a cohesive design across all five nails)
- Try: triangles near the cuticle, squares along the side edge, or a combination of lines creating an abstract pattern
- Seal with a glossy topcoat to enhance the metallic sheen and lock in your design
- The topcoat will make the geometric patterns slightly blend into the base, creating a dimensional effect
Insider note: The reflection quality of metallic polishes means your geometric patterns will be more visible to you up close than to people viewing your nails from a distance—this actually makes it feel like a secret aesthetic detail.
8. Oxblood Red with Glossy Finish and Nude Accent Nail
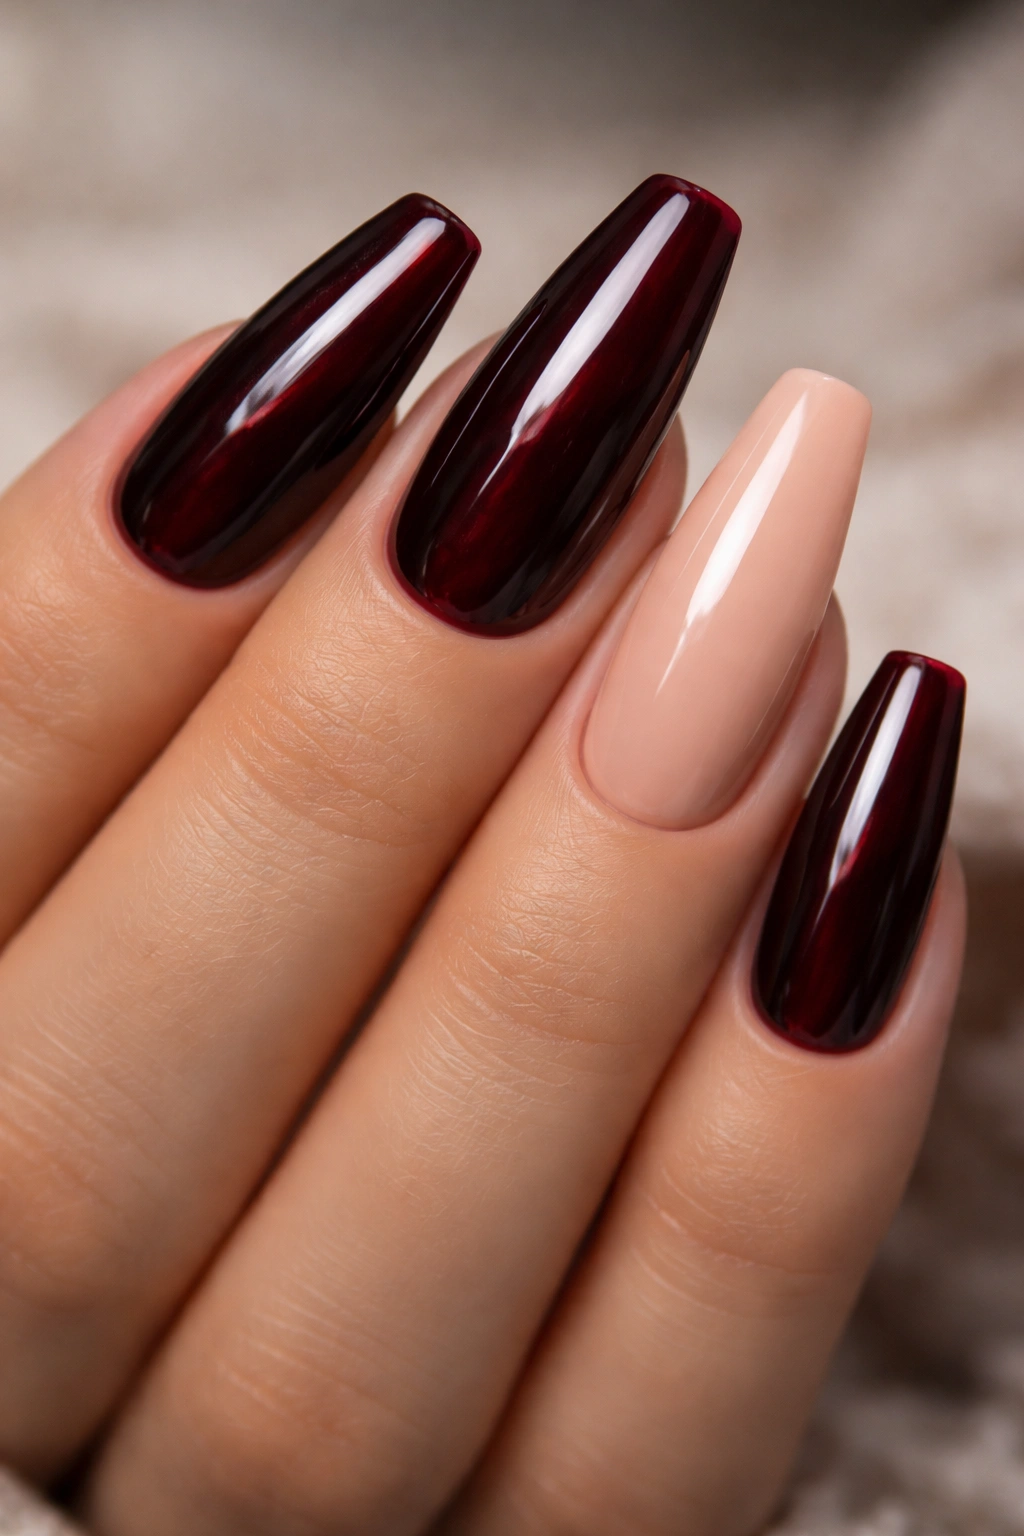
Oxblood red is the dark burgundy shade that looks black in low light but reveals deep red undertones in natural daylight. It’s moody, it’s dramatic, and it’s undeniably elegant on medium coffin nails. Pairing it with a single nude accent nail breaks up the intensity while maintaining visual cohesion.
The Sophistication of Oxblood Red
Oxblood gets its name from the exact color of, well, actual blood—it’s a deeply moody shade that has been associated with luxury and refinement for centuries. On medium coffin nails, oxblood red reads as intentional and artistic rather than costume-like. The coffin shape elongates your fingers, which makes oxblood red even more striking because the color travels a greater visual distance.
Creating Cohesion with a Nude Accent Nail
- Apply two coats of oxblood red to four nails
- On your accent nail (typically your ring finger or middle finger), apply a nude shade that matches your skin tone
- The nude nail should be the exact shade where your skin and nail naturally blend—this creates a visual break that softens the drama
- All five nails should have the same finish (glossy, matte, or sparkle)—consistency in finish matters more than consistency in color
- Consider adding a thin gold or silver stripe across the nude accent nail to connect it visually to the oxblood nails
Pro tip: The accent nail should be positioned where it breaks up the visual line of color—if you’re right-handed, a left accent nail works better visually; vice versa for lefties.
9. Slate Gray with Negative Space Design
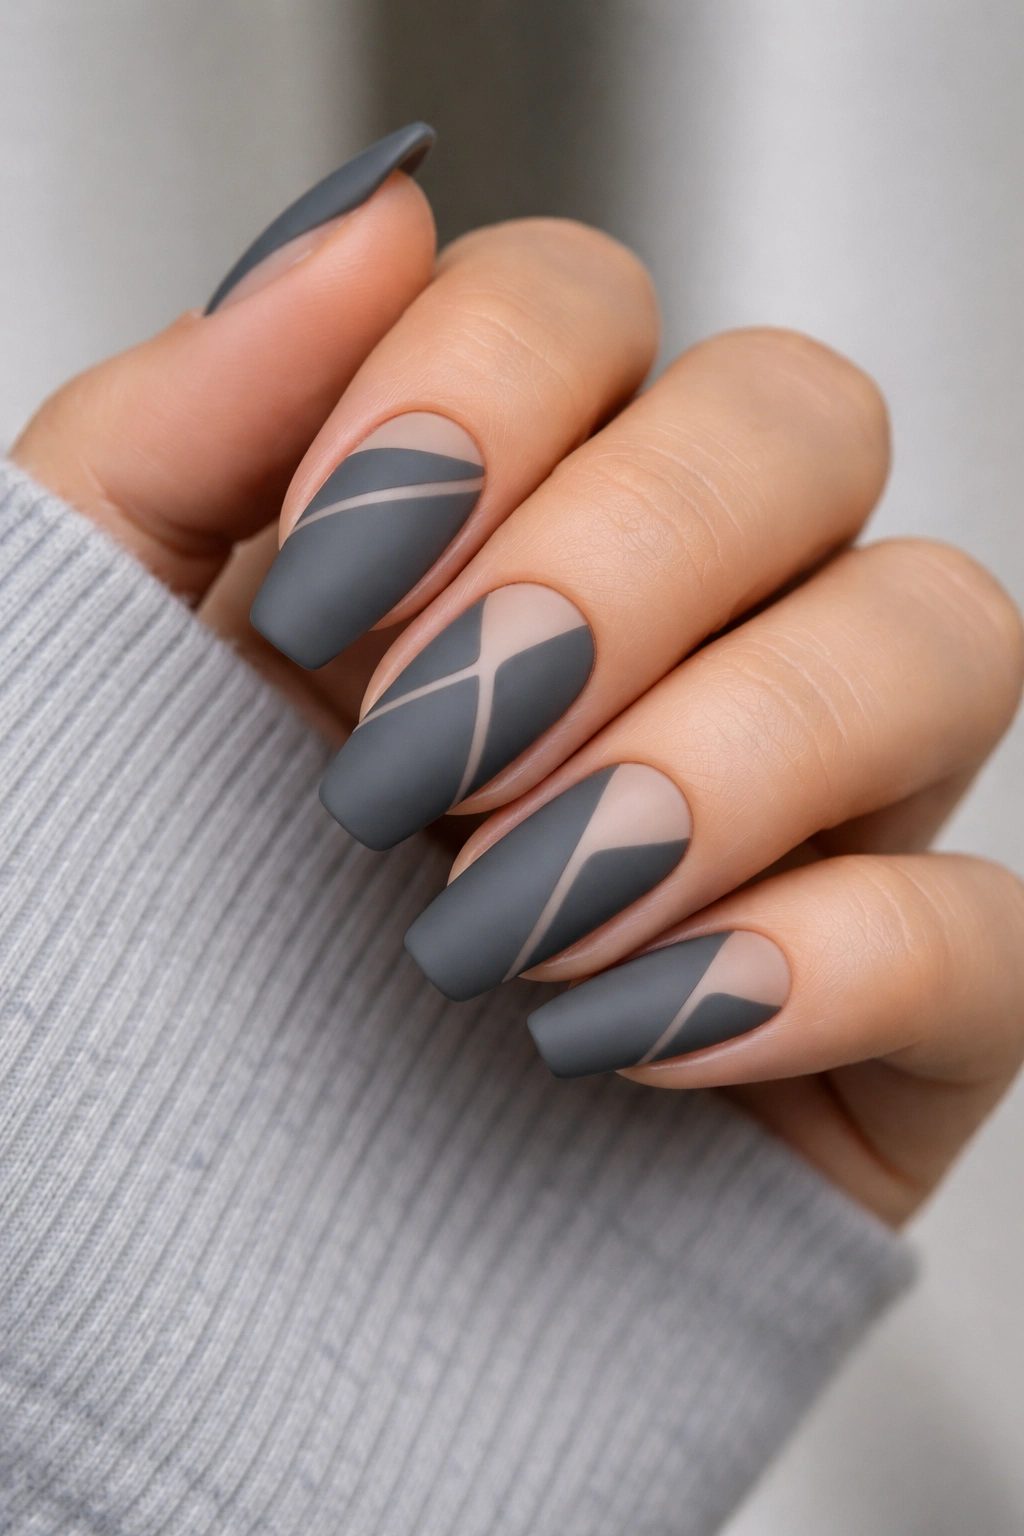
Negative space design means leaving areas of your actual nail (or a base color) visible, creating a design through the absence of polish rather than the presence of it. On slate gray medium coffin nails, negative space designs read as modern, sophisticated, and intentionally artistic.
Why Negative Space Feels So Current
Negative space design requires planning and precision, which automatically reads as intentional rather than accidental. When people see negative space nail art, they understand that the design required actual forethought and skill. On medium coffin nails, negative space works beautifully because you have enough nail surface to create a recognizable pattern without it feeling cramped or confusing.
Creating Negative Space on Slate Gray
- Apply a light-colored base (white, nude, or pale pink) to all five nails
- Once dry, apply slate gray over most of the nail, leaving strategic areas uncovered
- You can do this by: painting around certain areas, using tape as a stencil and painting around it, or applying the gray and then carefully removing sections with a thin brush dipped in acetone
- The unpainted areas become your “negative space”—they’ll be the light color of your base
- Try creating: a geometric shape (triangle, square, or irregular polygon) at the cuticle or free edge
- Seal with a clear topcoat
Worth knowing: Negative space designs show up best when there’s strong color contrast between the base and the colored layer—slate gray over white or nude creates obvious contrast.
10. Espresso Brown with Subtle Dimension and Glossy Topcoat
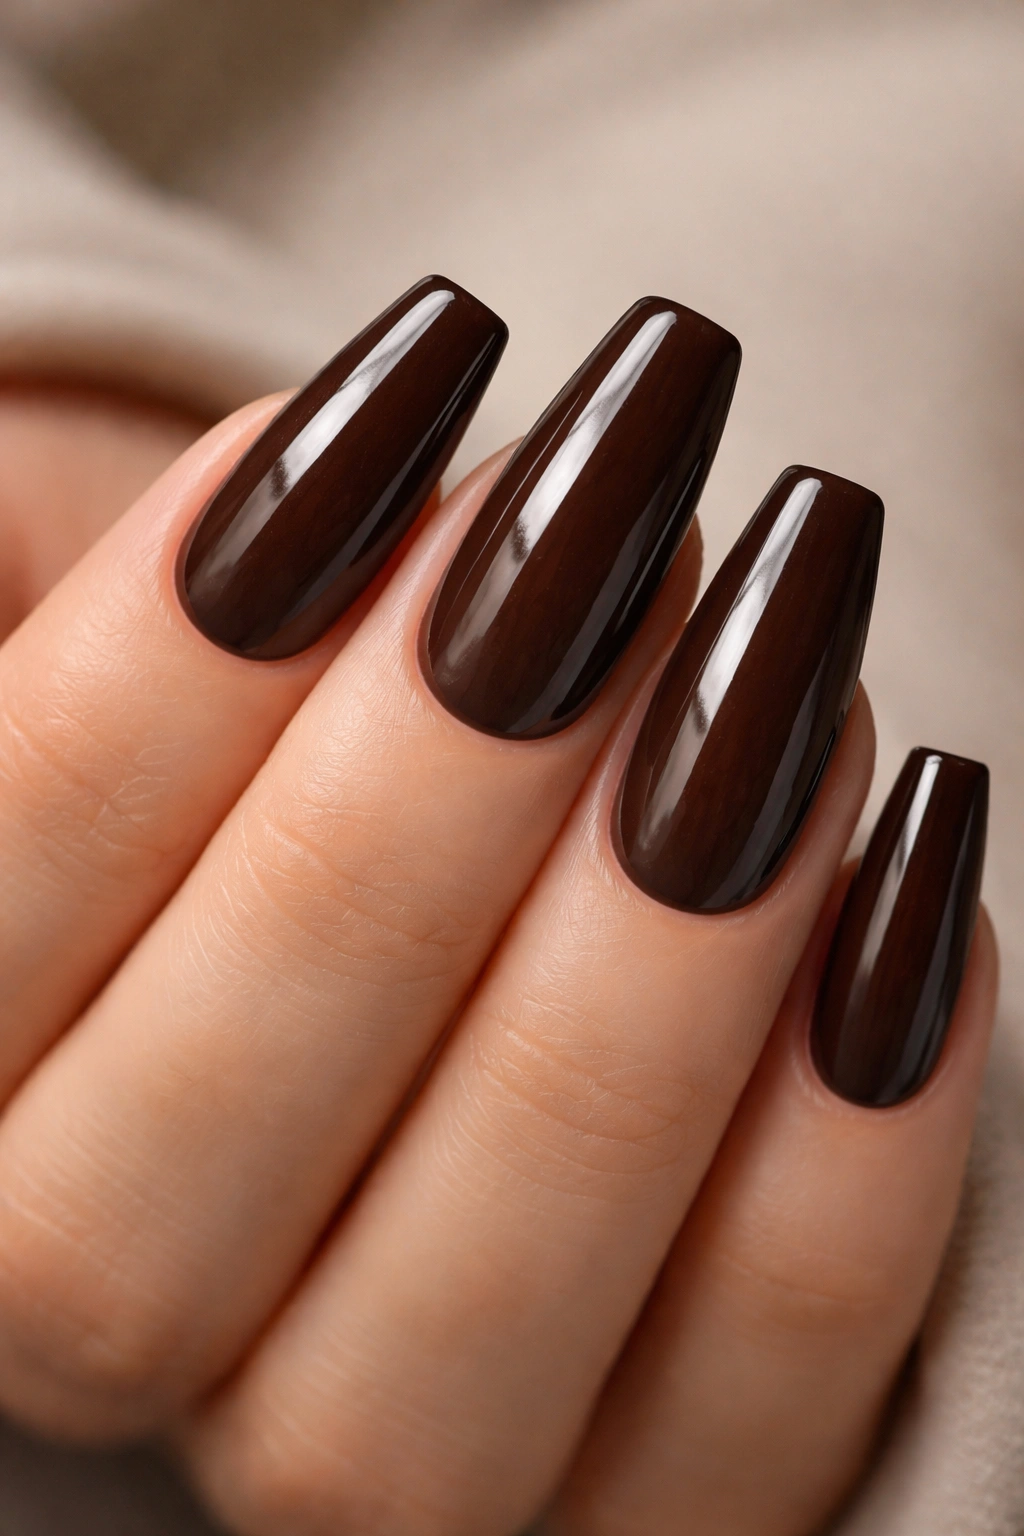
Espresso brown is that incredibly wearable dark shade that reads as moody without feeling heavy or severe. It’s sophisticated, it’s warm, and it’s genuinely flattering on every skin tone. On medium coffin nails with a high-gloss finish, espresso brown becomes almost liquid-looking, creating dimension through shine rather than pattern.
The Underrated Appeal of Brown on Coffin Nails
Brown has fallen out of fashion in recent years, which means choosing espresso brown feels slightly edgy and trend-resistant. It’s a color that reads as intentional rather than default. The warmth of brown makes it feel more approachable than black while still delivering that dark moody aesthetic. On medium coffin nails, espresso brown is professional enough for most workplaces while still feeling deliberately styled.
Achieving that Liquid-Like Dimension with Gloss
- Apply one thin coat of espresso brown and allow to dry
- Apply a second coat, and while it’s still slightly wet, apply a premium glossy topcoat
- This technique creates dimensional depth because the topcoat magnifies the brown slightly and creates a light-reflection that makes the nails appear to have dimensional depth
- Buff your nails very gently with a soft nail buffer before polishing to create a slightly textured surface—this helps topcoat adhere and creates subtle dimension
- Reapply glossy topcoat every 3-4 days as it naturally wears away; this is how you maintain that liquid appearance
Pro tip: Espresso brown photographs beautifully in natural light, which makes it the perfect choice if you love sharing photos of your nails.
11. Charcoal with White Marble Effect
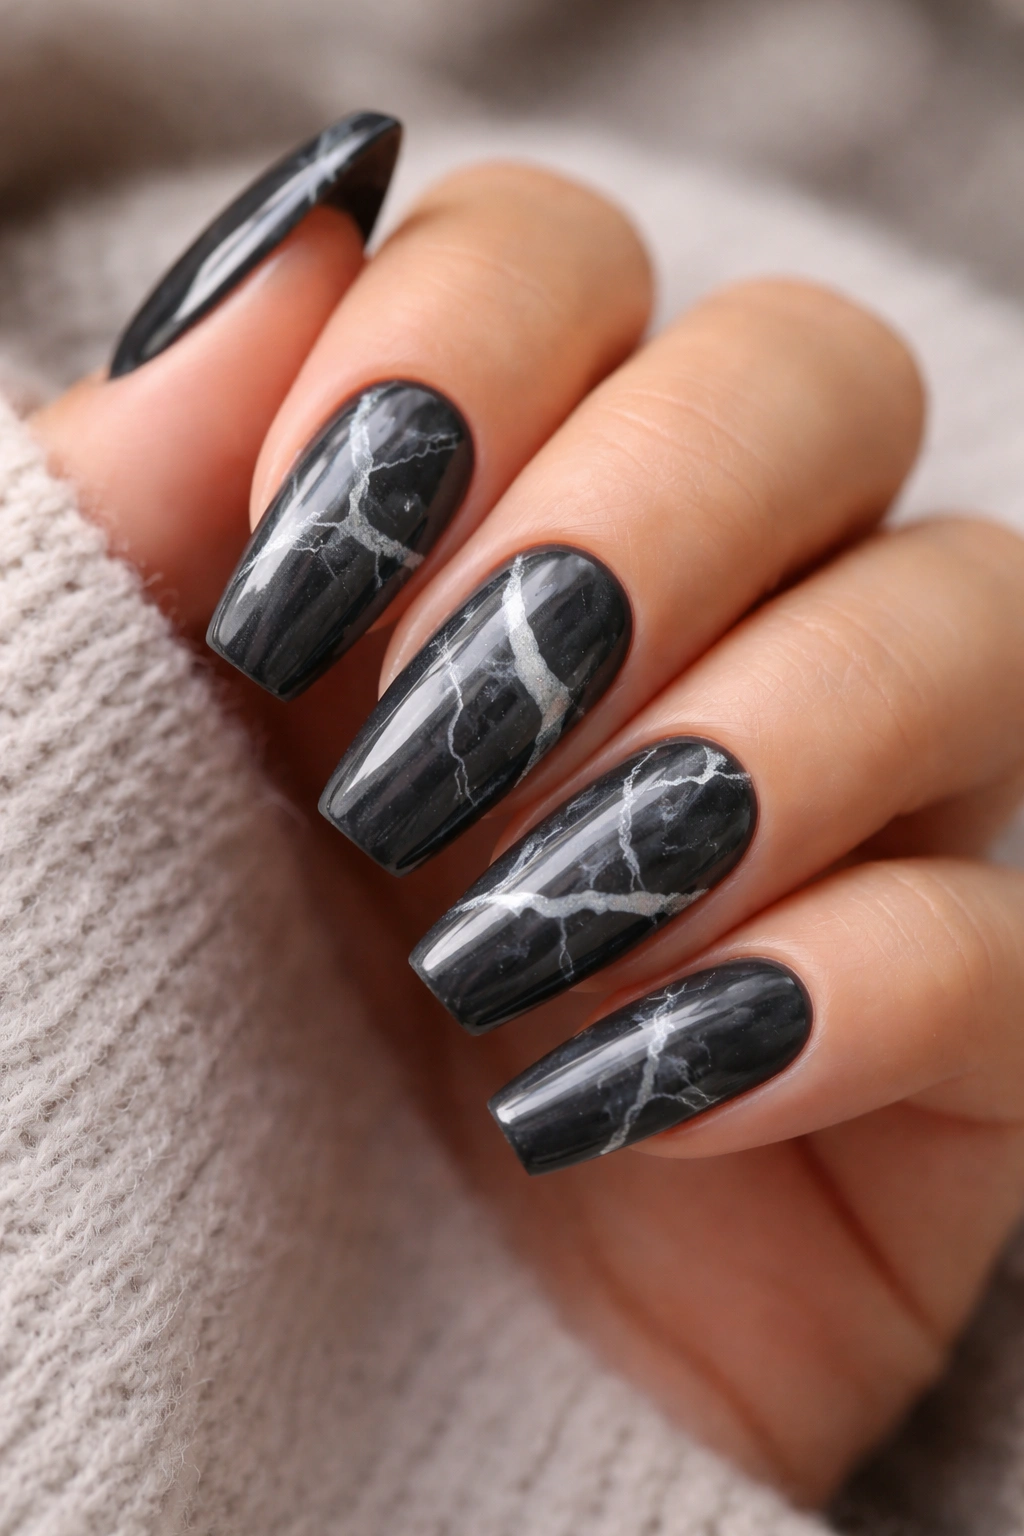
White marble effect on charcoal is the sophisticated counterpart to black marble designs. The white veining reads more delicate and intentional against charcoal than it does against black, and it creates an agate or mineral quality that feels luxurious on medium coffin nails.
Creating the Marble Effect Authentically
True marble effect isn’t random—it follows patterns inspired by actual stone veining. When you’re creating this on charcoal, you’re essentially painting white lines that vaguely resemble mineral deposits or natural stone cracks. On medium coffin nails, you don’t need overly complex marble work—even simple veining creates visual interest.
Step-by-Step Marble Application
- Apply two coats of charcoal gray and allow to dry completely
- Using a thin detail brush or striping brush, apply white polish in irregular, vein-like patterns
- These lines should be organic—curved, slightly branching, not perfectly symmetrical
- Vary the width of your white lines—some thick, some thin—to create natural-looking variation
- You can create the marble on all five nails or just select nails for visual interest
- Seal with a topcoat; glossy will enhance the marble effect, while matte softens it
Insider note: The marble effect looks more authentic if you allow your white lines to fade in places—start with white and then add a thinner line of the original charcoal on top in some areas to create depth and dimension.
12. Deep Teal with Matte Finish and Subtle Sparkle at Tips
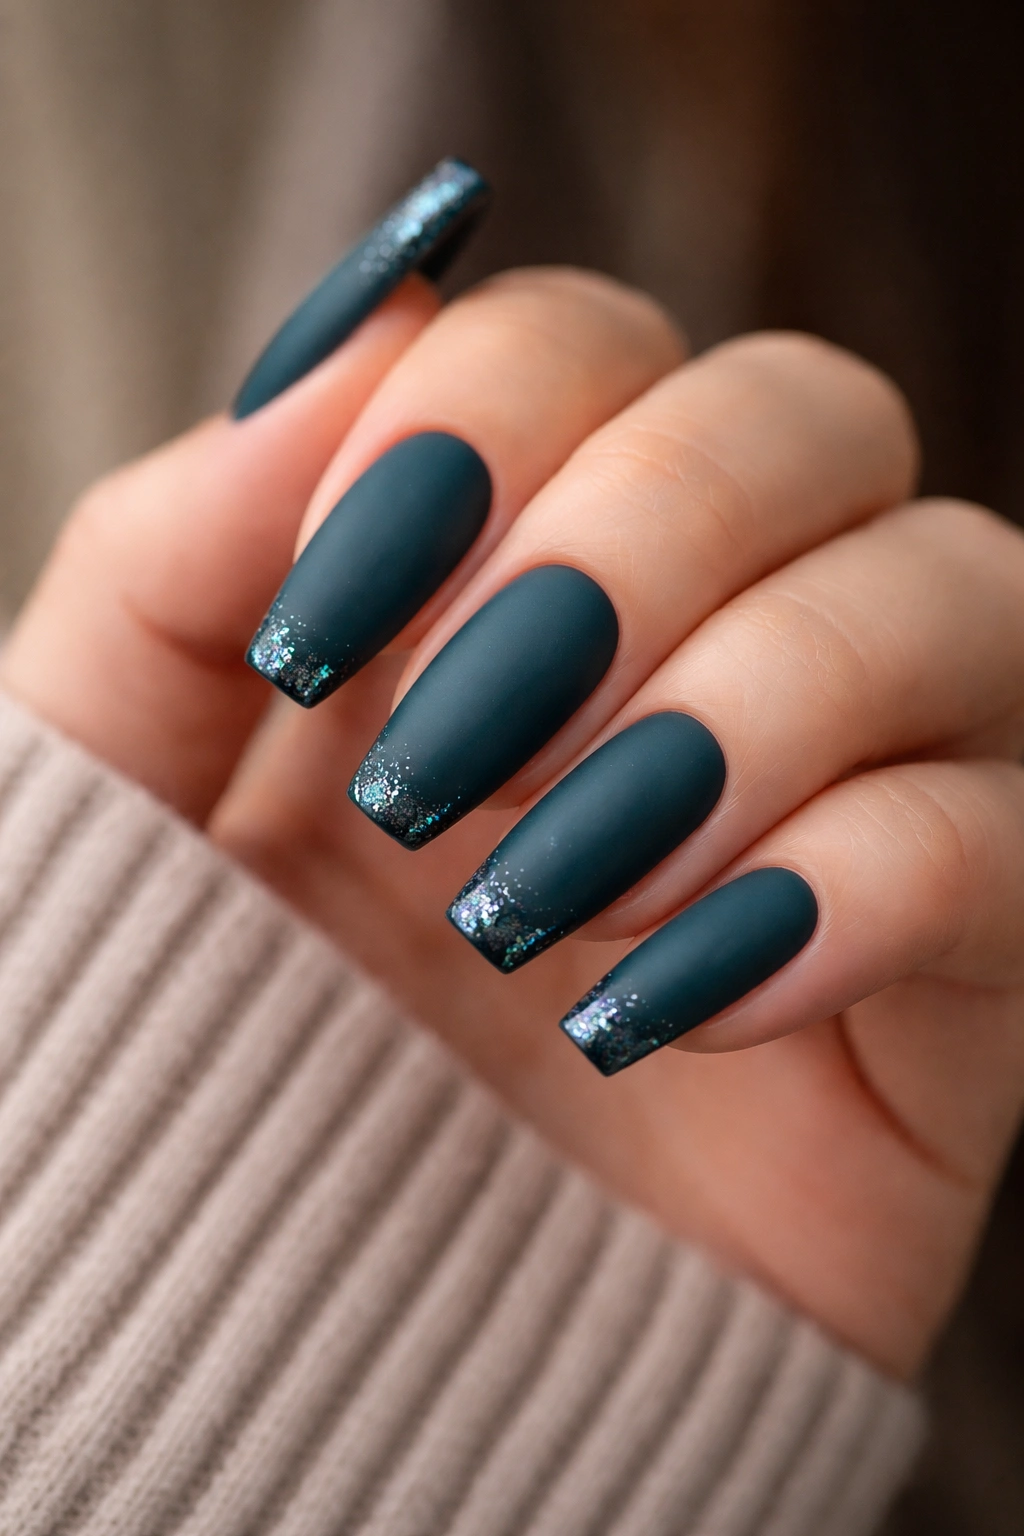
Deep teal is that moody blue-green shade that feels both natural and dramatic simultaneously. It’s darker than typical teal, which makes it genuinely moody rather than cheerful. When you finish it matte and add subtle sparkle just at the tips, you create a design that reads as wearable and artistic without feeling overdone.
Why Teal Is the Underrated Dark Moody Color
Teal has been pigeonholed as a bright, cheerful color, but deep teal is something entirely different. It evokes images of deep ocean water, precious gemstones, and midnight forests. On medium coffin nails, deep teal reads as sophisticated and intentional. The matte finish makes it feel more serious and less playful, which is exactly what makes this combination work as a dark moody design.
Applying Sparkle at the Tips Over Matte
- Apply two coats of deep teal to all nails
- Apply a matte topcoat to the entire nail
- Once completely dry, apply glossy topcoat only to the tips (the free edge area)
- While that glossy topcoat on the tips is still slightly wet, sprinkle fine sparkle or glitter
- The sparkle adheres better to glossy topcoat than matte, which is why you’re applying it in two separate coats
- Allow to dry, then consider a final seal of matte topcoat over the entire nail for cohesion, or leave the glossy tips for contrast
Pro tip: The sparkle at the tips works best if you can see it when looking at your hands in a relaxed position—this means positioning it in the outer third of the nail where it’s most visible.
13. Jet Black with Negative Space Moon Design
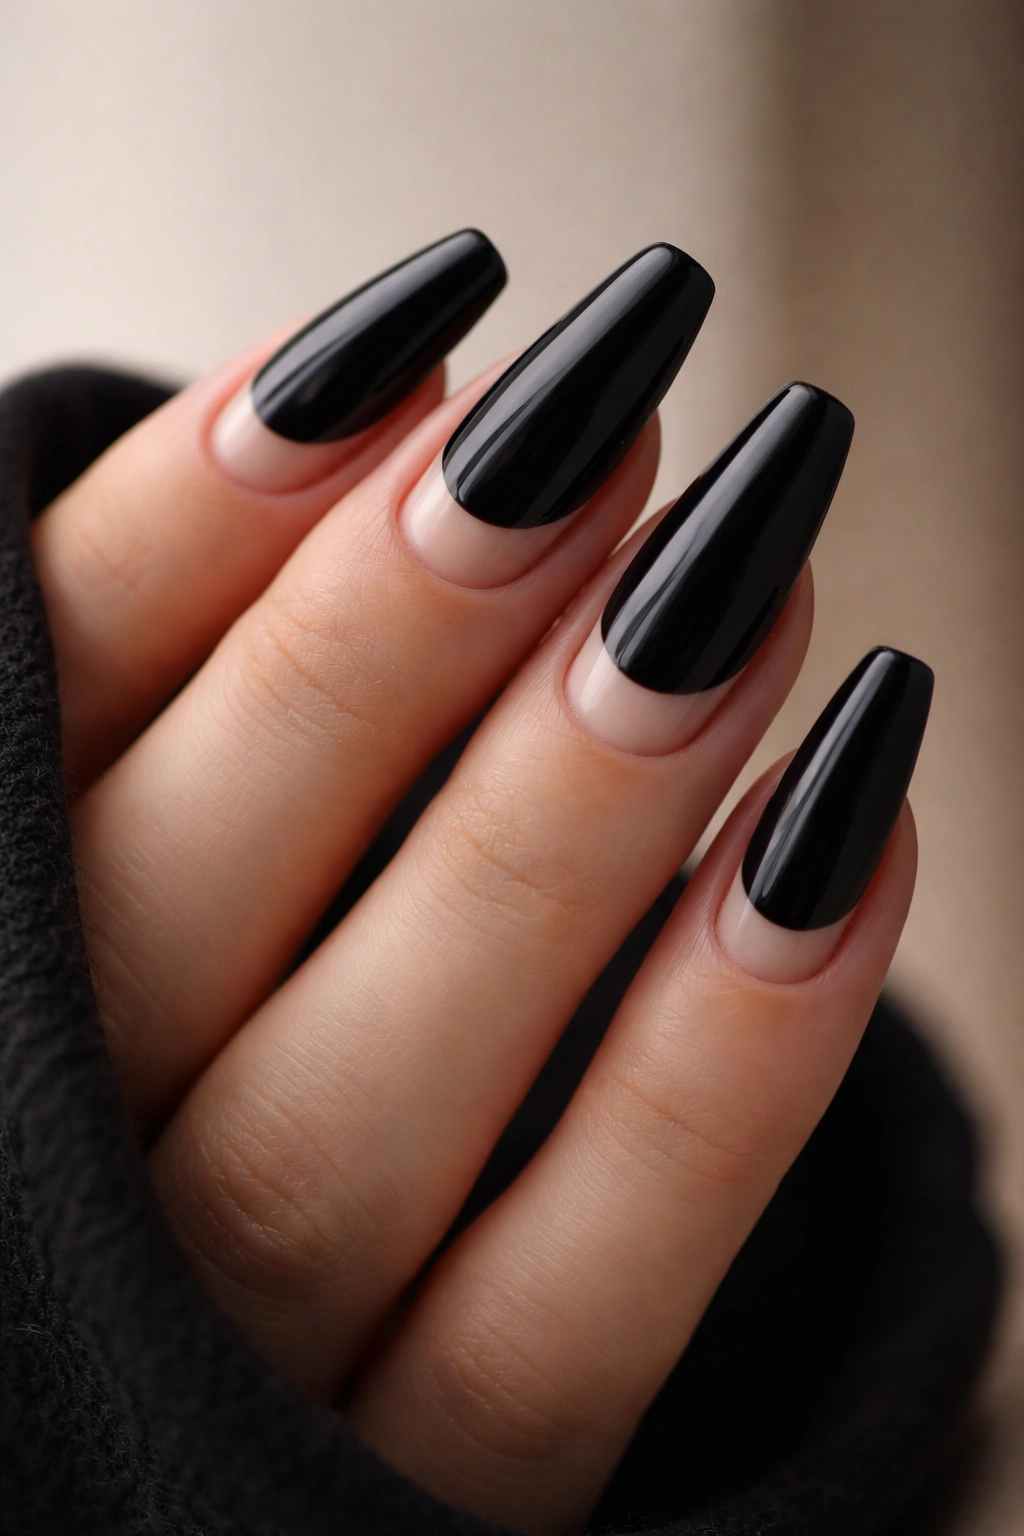
Jet black is pure, intense darkness, and it becomes even more dramatic when you add negative space in the shape of crescent moons. This design is slightly witchy, definitely artistic, and utterly stunning on medium coffin nails where the shape of the nail actually mirrors the crescent moon shape.
The Meaning Behind Moon Symbolism in Nail Design
Crescent moons have become symbolic of the dark moody aesthetic—they reference moon phases, night energy, and witchy aesthetics. On medium coffin nails specifically, the natural curve of the nail’s shape mirrors the crescent moon, which makes this design feel intentional rather than random. The contrast between jet black and the natural nail color (or a light base) creates dramatic visual impact.
Executing the Crescent Moon Negative Space Design
- If you want the moon to show your natural nail: apply jet black over most of the nail, leaving a crescent-shaped area unpainted
- If you want the moon in a specific color: apply a light base to all nails, then apply jet black around a painted crescent moon
- The crescent should be positioned at the cuticle area for a classic look, or at the tips for a reverse moon effect
- You can do this freehand with careful brush work, or use tape as a stencil to create clean edges
- Seal with a glossy or matte topcoat—glossy will make the contrast more dramatic, matte will make it more subtle
Worth knowing: This design looks especially striking if you paint the crescent moon in a metallic gold or silver rather than leaving it as negative space—the shine of the metallic against the matte black creates interesting visual pop.
14. Blackened Plum with Fine Gold Dust and Glossy Topcoat

Blackened plum is the absolute epitome of dark and moody—it’s plum so dark it appears almost black until light hits it and reveals its deep purple undertones. When you add fine gold dust and seal everything with a premium glossy topcoat, you create a nail design that feels genuinely luxurious and expensive-looking.
The Luxury of Blackened Plum
Blackened plum sits at the exact intersection of dark and moody while remaining visually rich and complex. It reads as a color choice rather than a default, which automatically feels intentional and curated. The depth of this shade means that when you add metallic elements like gold dust, they don’t overwhelm the base color—they add subtle dimension and light-catching properties.
Creating That Luxury Finish with Gold Dust
- Apply two coats of blackened plum and allow to dry completely
- Apply a glossy topcoat to the entire nail
- While the topcoat is still slightly wet (about 30 seconds after application), apply fine gold dust by tapping it gently onto the nail with a detail brush
- The wet topcoat acts as adhesive, so the gold dust stays in place without requiring additional sealing
- Allow to dry fully—the topcoat will cure around the gold dust and lock it in permanently
- Apply one more thin layer of glossy topcoat over the entire nail to create a smooth, professional finish
- The final topcoat should be premium quality (gel or high-shine formula) for maximum luminosity
Pro tip: Gold dust reads best when applied with a light hand—you want to see the plum base through the dust, not create a dense metallic coating. The dust should create the impression of light-catching rather than covering the color.
Final Thoughts
Dark and moody coffin nails represent something beyond just a color choice—they’re a complete aesthetic statement that says you’re intentional about your appearance, you understand visual design, and you’re confident enough to go bold. Medium length is genuinely the sweet spot for this style because it gives you enough surface area to showcase whatever design or finish you choose without the maintenance demands of ultra-long nails.
The variety within dark and moody palettes is honestly surprising. You can go pure black for maximum drama, burgundy for romantic sophistication, navy for professional edge, or forest green for witchy elegance. Each shade reads differently on different skin tones, and each one pairs beautifully with different design elements—metallics enhance warmth, sparkle adds playfulness, negative space creates modern art, and matte finishes deepen the mood even further.
What makes these designs work across so many different personal styles and occasions is their inherent sophistication. There’s something about committing to a dark and moody palette that signals intentionality and care. You’re not choosing these designs casually—you’re making a deliberate aesthetic choice that reflects how you see yourself. Whether you’re drawn to the gothic romance of deep burgundy, the minimalist perfection of charcoal with line work, the mysterious depth of blackened plum, or the natural sophistication of espresso brown, there’s a dark and moody coffin nail design that aligns perfectly with your personal aesthetic.
