

Black coffin nails expose every shortcut. File the sidewalls a touch too wide, leave a ridge near the cuticle, or flood polish into the skin, and the dark color will point it out from across the room. When the shape is crisp, though, nothing looks sharper.
That’s why black coffin nails never feel like a throwaway manicure to me. The shape already has attitude—the tapered sides, the squared-off tip, the way it makes fingers look longer—and black pushes that further. Matte black feels dry and strict. Gloss black looks like patent leather. A sheer black jelly finish lands somewhere in the middle, moodier and a little lighter on the hand.
Tiny details matter more with dark polish than people expect. Matte top coat can grab lint if the nail isn’t sealed cleanly. High-shine black shows ripples unless there’s a smoothing base or builder gel under it. And on long coffin nails, the apex placement has to sit in the right spot—usually around the stress area, not too far back—or the whole set starts to look droopy after a week of typing, texting, and opening cans.
Some black nail designs stay stripped down and clean. Others go straight into chrome, chains, foil, texture, and weird little art details that look far better in person than they do in salon sample books. The smart move is picking the one that matches how much drama—and upkeep—you actually want.
1. Matte Jet Black Coffin Nails
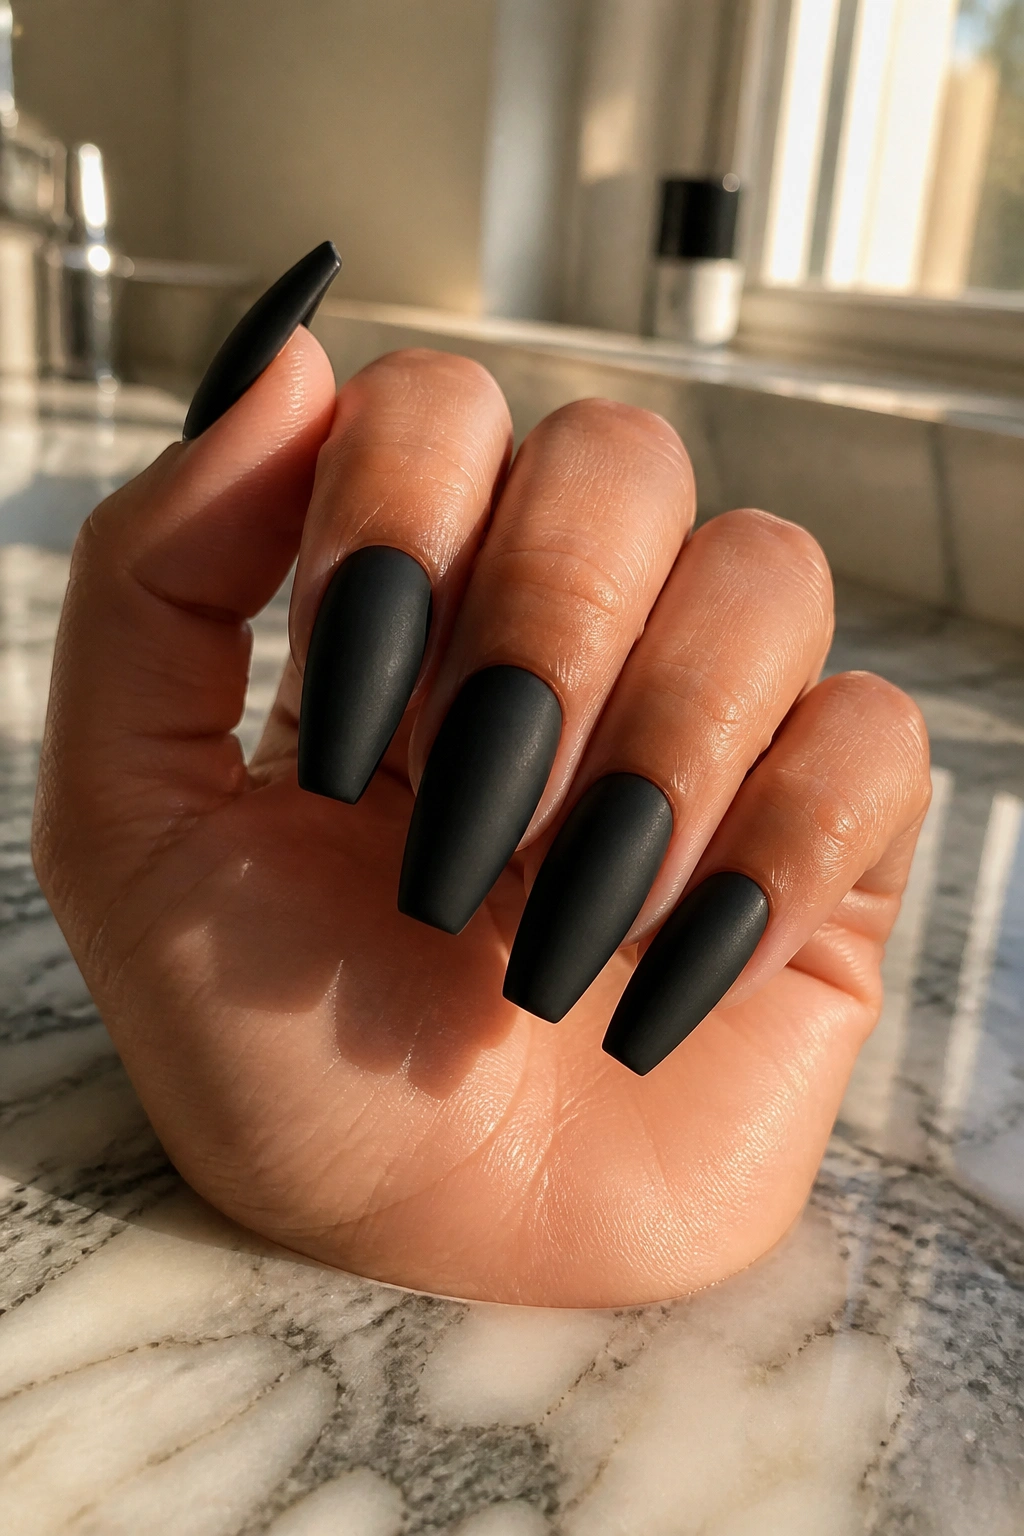
Matte black on a coffin shape is unforgiving—in the best way. It turns the nail into a clean slab of color, so the shape does the work. If the taper is balanced and the tip is filed straight, this look has edge even with zero art.
I like this most on medium coffin nails, somewhere around 6 to 10 millimeters past the fingertip. Go much longer and matte can start to look heavy unless the nail bed is extended neatly with builder gel or acrylic. Medium length keeps it sharp and wearable.
Why matte hits harder than gloss
Gloss throws back light, which softens tiny flaws. Matte does the opposite. It flattens the surface, makes the black look denser, and gives the set a dry, almost velvety finish that feels more severe than shiny black.
That’s also why prep matters more here. Any cuticle flooding, tiny dent, or uneven sidewall stands out.
Quick care notes
- Ask for a soft coffin shape if you want the taper visible but not knife-like.
- Use a lint-free wipe and alcohol before the final matte top coat.
- Cap the free edge with color and top coat, or the tips can fade to charcoal after a few days.
- Keep hand cream off the nails for about 10 minutes after application if you want the finish to stay clean.
My take: if you only wear one black manicure, make it this one.
2. Patent Gloss Black Coffin Nails
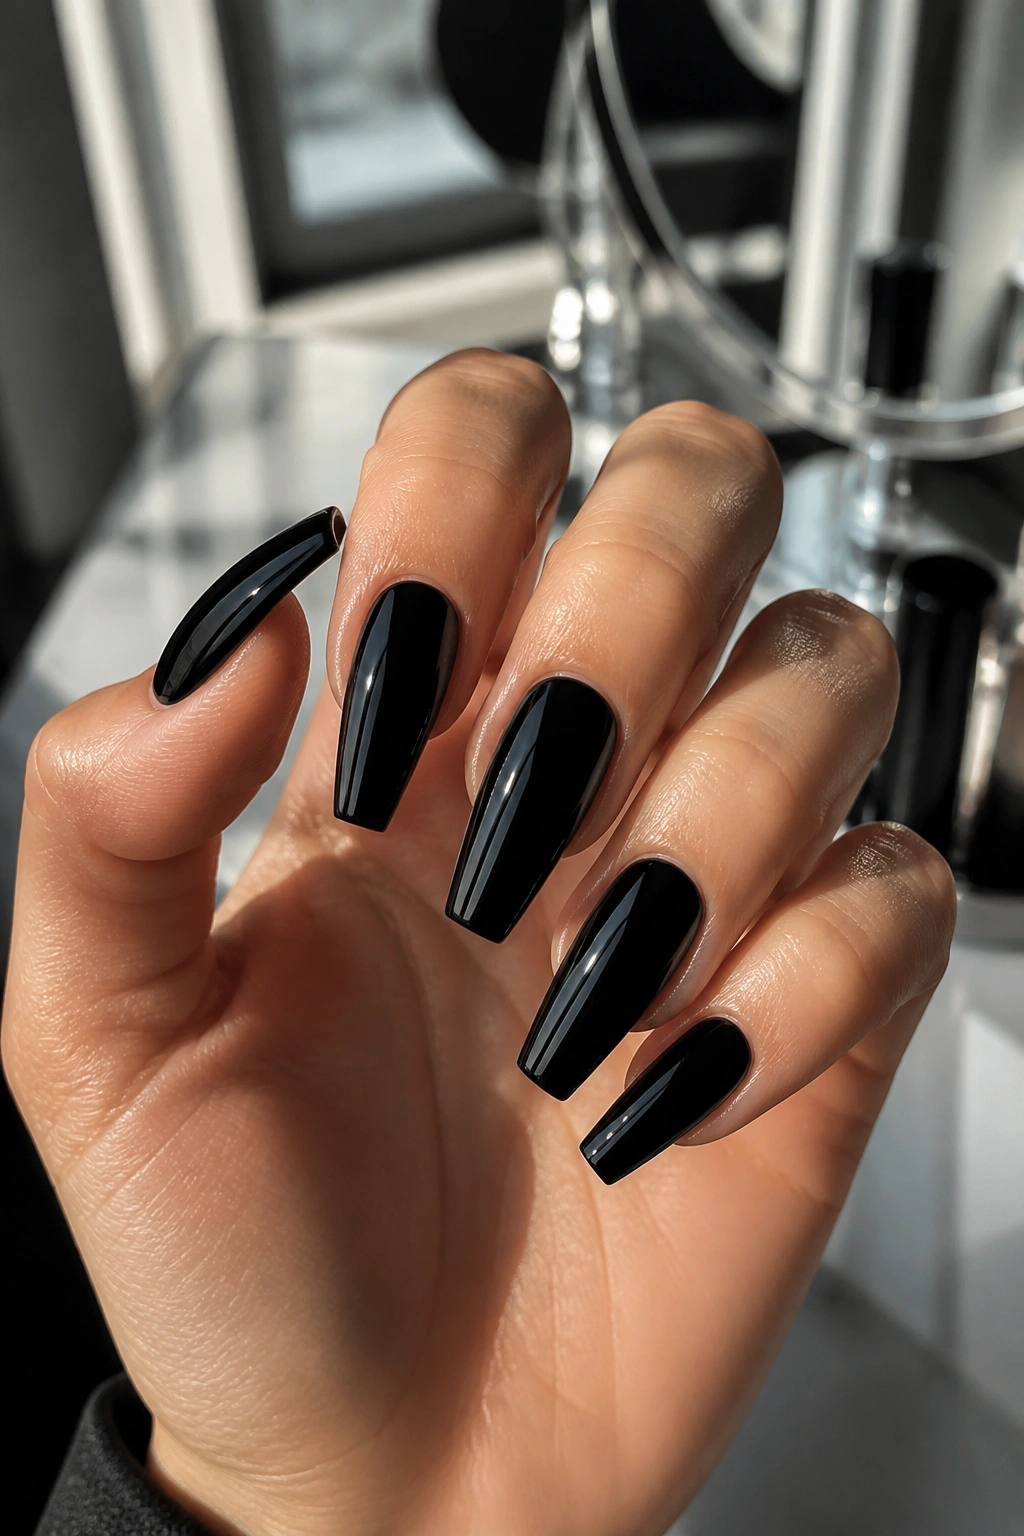
Want black nails that look like vinyl, polished leather, or a fresh piano finish? Go glossy. A patent-black coffin set has a cleaner, sleeker vibe than matte, and it reads less gothic than people assume.
The shine is the whole point. On a well-built nail, a glossy black surface gives you that long light reflection from cuticle to tip, and that reflection makes the coffin shape look even straighter. When I see a black manicure that looks expensive, this is usually what’s happening: the surface is smooth, the apex is placed well, and the top coat has been floated on in one even layer instead of scrubbed around with the brush.
Shorter coffin lengths work well here too—say 4 to 7 millimeters past the fingertip. Gloss makes a shorter set feel deliberate rather than plain, which is handy if you like black nails but need something easier to type with. Natural nails can pull this off if they’re reinforced with rubber base gel. Acrylic or Gel-X gives you a crisper line, though, and black polish loves crisp lines.
One catch. Gloss black shows surface scratches faster than matte. If you clean, garden, lift weights, or dig around in tote bags, a fresh layer of top coat at the fill makes a big difference.
3. Black Coffin Nails With Gunmetal Chrome
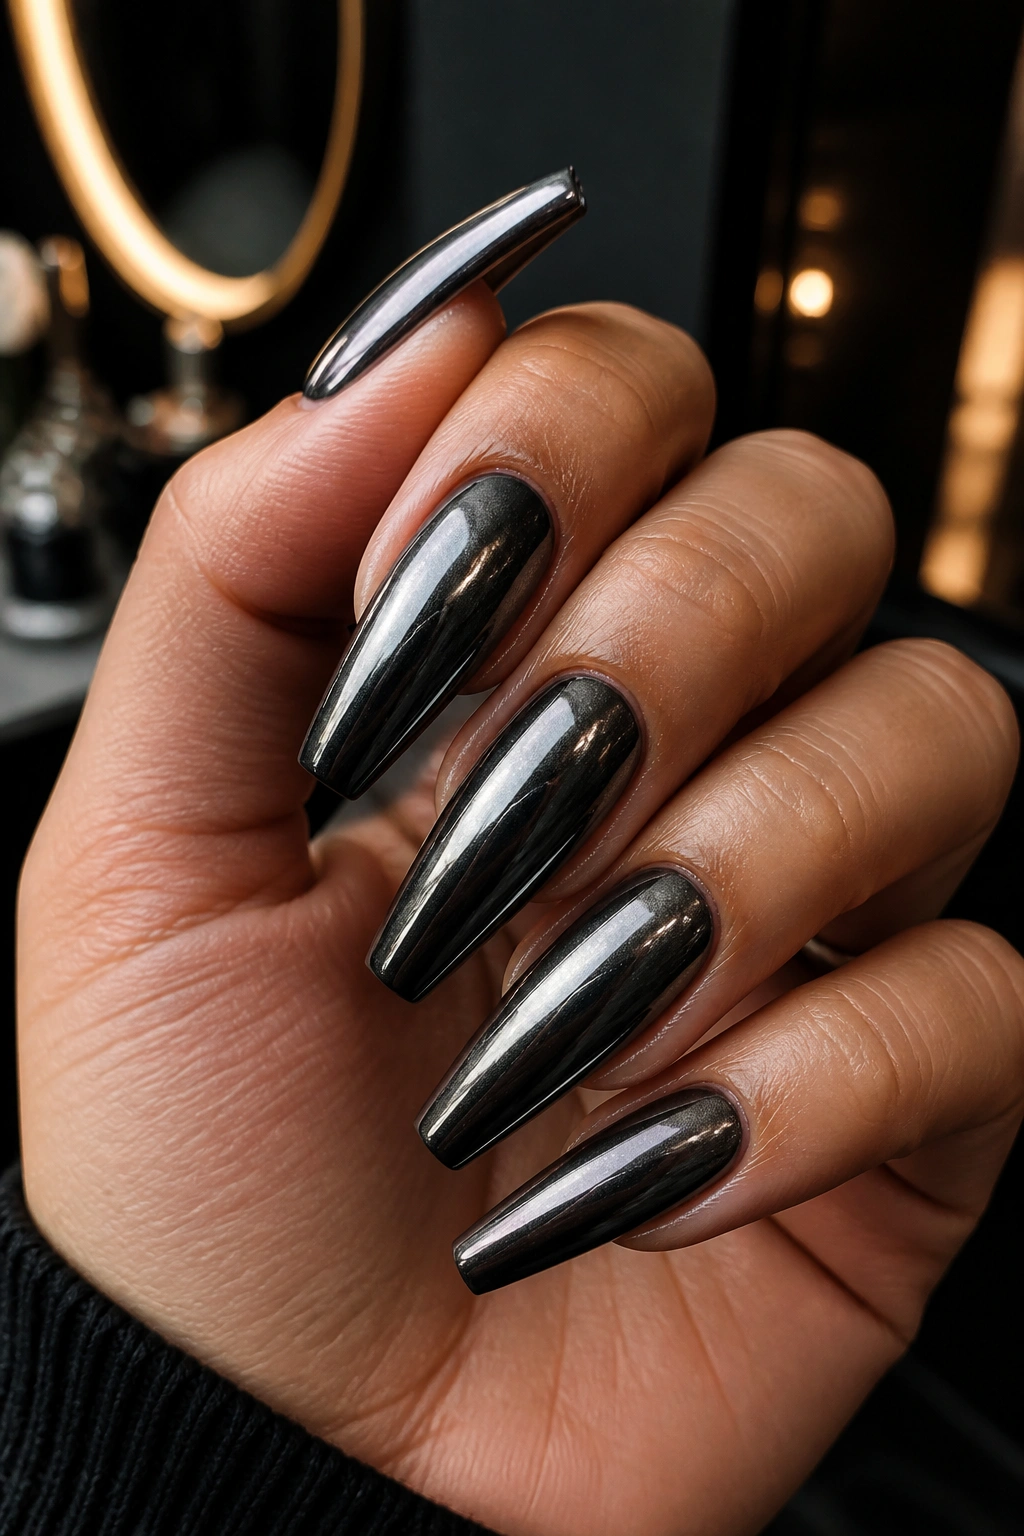
Under dim light, gunmetal chrome does something flat black cannot. It flashes steel, charcoal, and near-silver at once, but it still keeps that dark mood that makes black coffin nails feel sharp.
Mirror silver chrome can be fun, though it often pulls the manicure into costume territory. Gunmetal stays darker. You still get that metallic shift, yet the base reads black first, metal second. That balance matters if you want edge without looking like you glued spoons to your hands.
The finish comes from a black gel base plus chrome powder rubbed into a no-wipe gel top coat after a short cure—usually around 30 seconds under LED, depending on the product. Too much cure time and the powder won’t grip well. Too little and the surface smears. When it’s done right, the surface feels smooth, glassy, and oddly dense.
Who this suits best
If you wear silver jewelry most days, gunmetal chrome makes sense fast. It echoes the metal without shouting over it. I also like it on longer coffin shapes because the extra length gives the color shift room to show.
Press-ons work for this design, by the way. Chrome often looks cleaner on press-ons because the nails can be buffed and painted flat on a stand before they ever touch your hand. That little bit of control helps.
4. Black Coffin Nails With Nude Side Cutouts
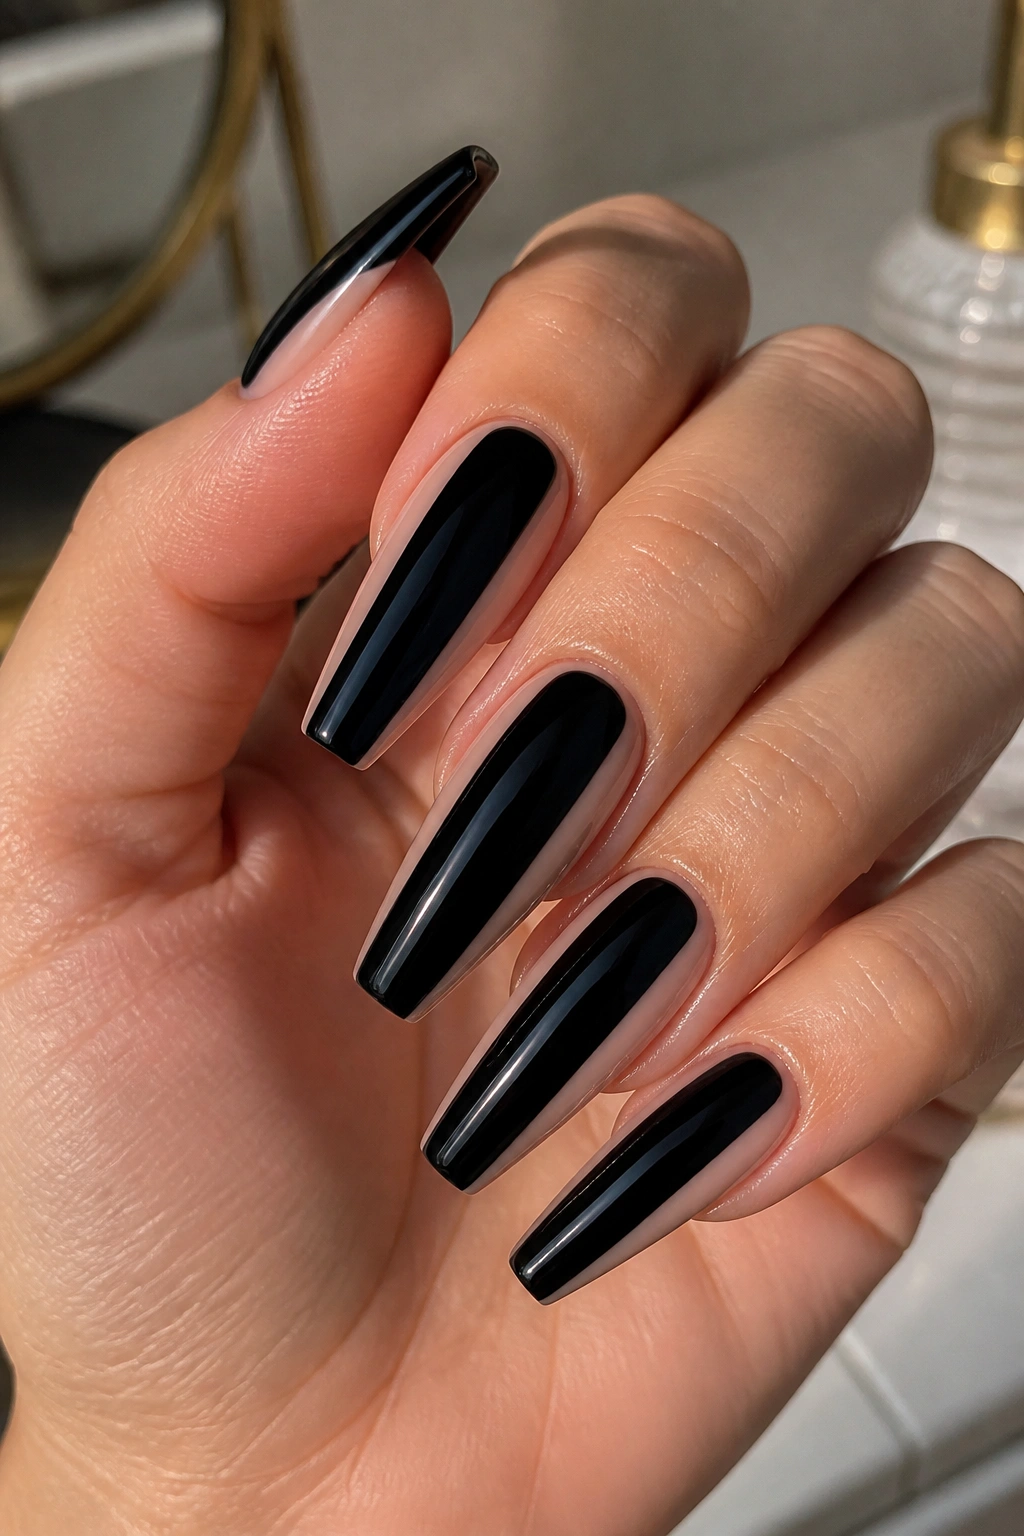
If full black feels too heavy on your hands, cut some of it away. Nude side cutouts give you the same dark mood, but they slim the nail and let more skin tone show through, which keeps the set from looking blocky.
A smart version uses black down the center of the nail with sheer nude panels along one or both sides. Another option is a diagonal cutout near the cuticle or sidewall. Both work, though the side-panel version flatters shorter fingers more because it pulls the eye straight down the nail.
This is one of the few black designs that looks good a little grown out. Since the cuticle area doesn’t sit under a full cap of opaque black, the regrowth line blends better after ten days or so. If you hate hard fill lines, pay attention to that.
Details that make or break it
- Use a nude gel close to your skin tone, not a chalky beige that turns gray.
- Keep the black section centered. A crooked center panel makes the whole nail look bent.
- Thin striping tape helps with guide lines, though a steady hand and liner brush usually look cleaner.
- Medium length is enough. This design does not need extra-long tips.
Negative space can go wrong fast if the black sections are too thick. Keep them lean.
5. Black Coffin Nails With Smoky Marble Swirls
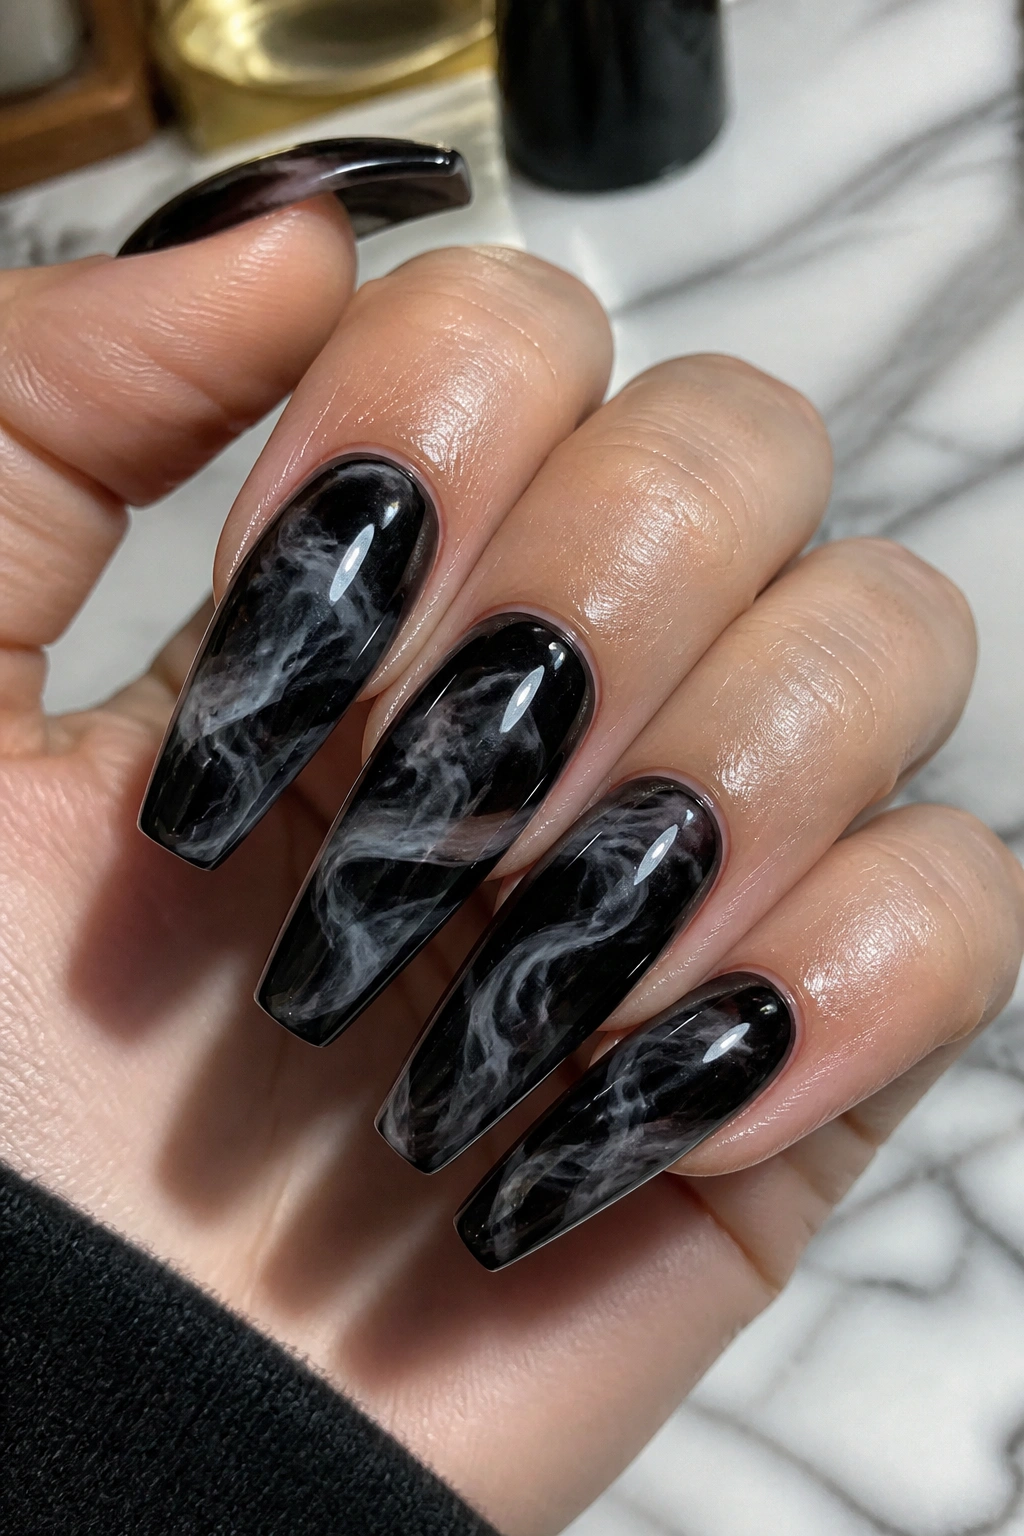
Smoky marble black nails look like ink dropped into water. The effect is softer than a hard geometric design, though it still has bite because the color stays dark and the movement feels a little wild.
I prefer this style on two or four accent nails, not all ten. A full marble set can start to blur together, especially on long coffin tips where each nail already carries plenty of visual weight. A few smoky nails mixed with solid black gives your eye somewhere to rest.
The best versions use blooming gel, a fine liner brush, or a drag-marble technique to pull gray, white, and diluted black through one another. You want wisps, veins, and cloudy edges. Thick stripes kill the effect. If the swirl looks painted on top instead of melted into the layer under it, it loses that smoke-like depth.
There’s also a texture question here. High gloss makes the swirls look wetter and deeper. Matte turns the design softer, almost ash-like. I lean gloss for marble because the layers show more.
Tiny point, but it matters: each nail should have a different swirl path. Matching the exact same pattern on every finger makes it look stamped, and this design is at its best when it feels a little unpredictable.
6. Black Coffin Nails With Silver Foil Cracks
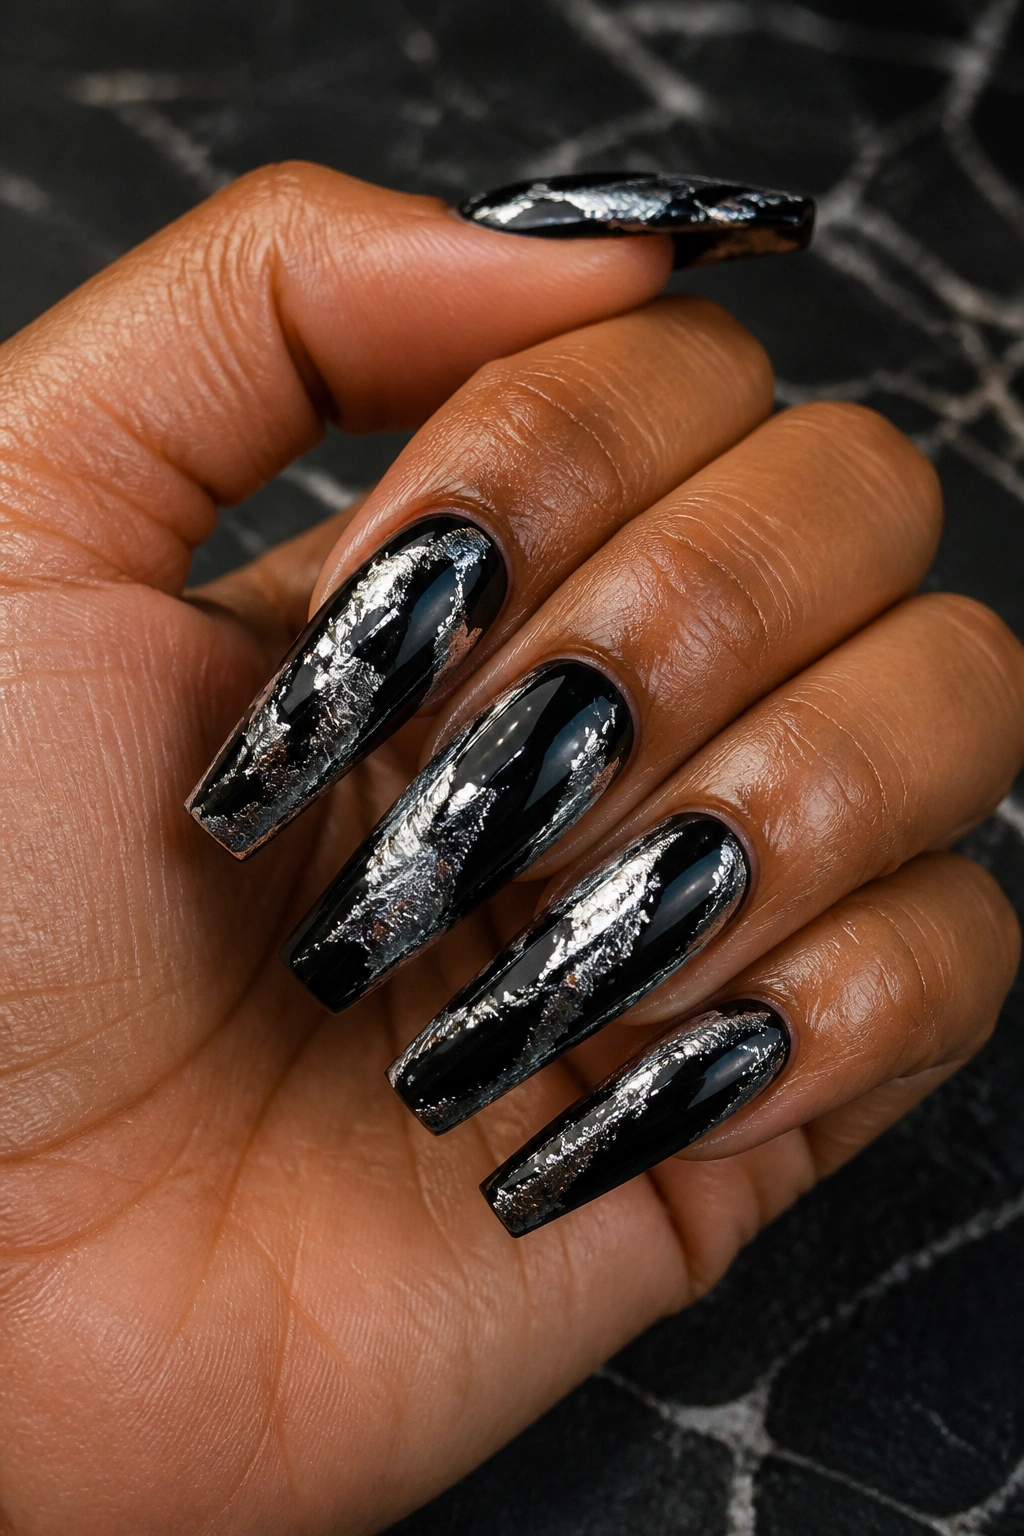
Foil gets dismissed as glitter’s louder cousin, which misses the point. On black coffin nails, torn silver foil looks less sparkly and more like cracked metal, chipped paint, or a broken mirror laid over polish.
That roughness is why it works.
Unlike glitter, foil reflects in sharp little sheets rather than scattered specks. You press torn bits into a tacky layer of gel, flatten them with a silicone tool, then seal them twice so the edges do not snag. If your nail tech skips the extra sealing layer, you’ll feel the foil lift near the sidewalls within a day or two.
Where foil looks best
I like foil placed near the tip, trailing up one side, or split across the nail in jagged sections. Centered chunks can look clumsy. On a coffin shape, diagonal placement usually suits the taper better.
A few practical notes
- Keep foil to 2 to 4 nails unless you want a full metallic look.
- Small torn pieces lay flatter than one giant shard.
- A black base with cool silver foil looks colder and sharper than black with gold.
- Press-ons are a good match for this art because sealing foil is easier off the hand.
This one has a punk feel without needing studs, chains, or rhinestones.
7. Black Flame Art on Coffin Nails
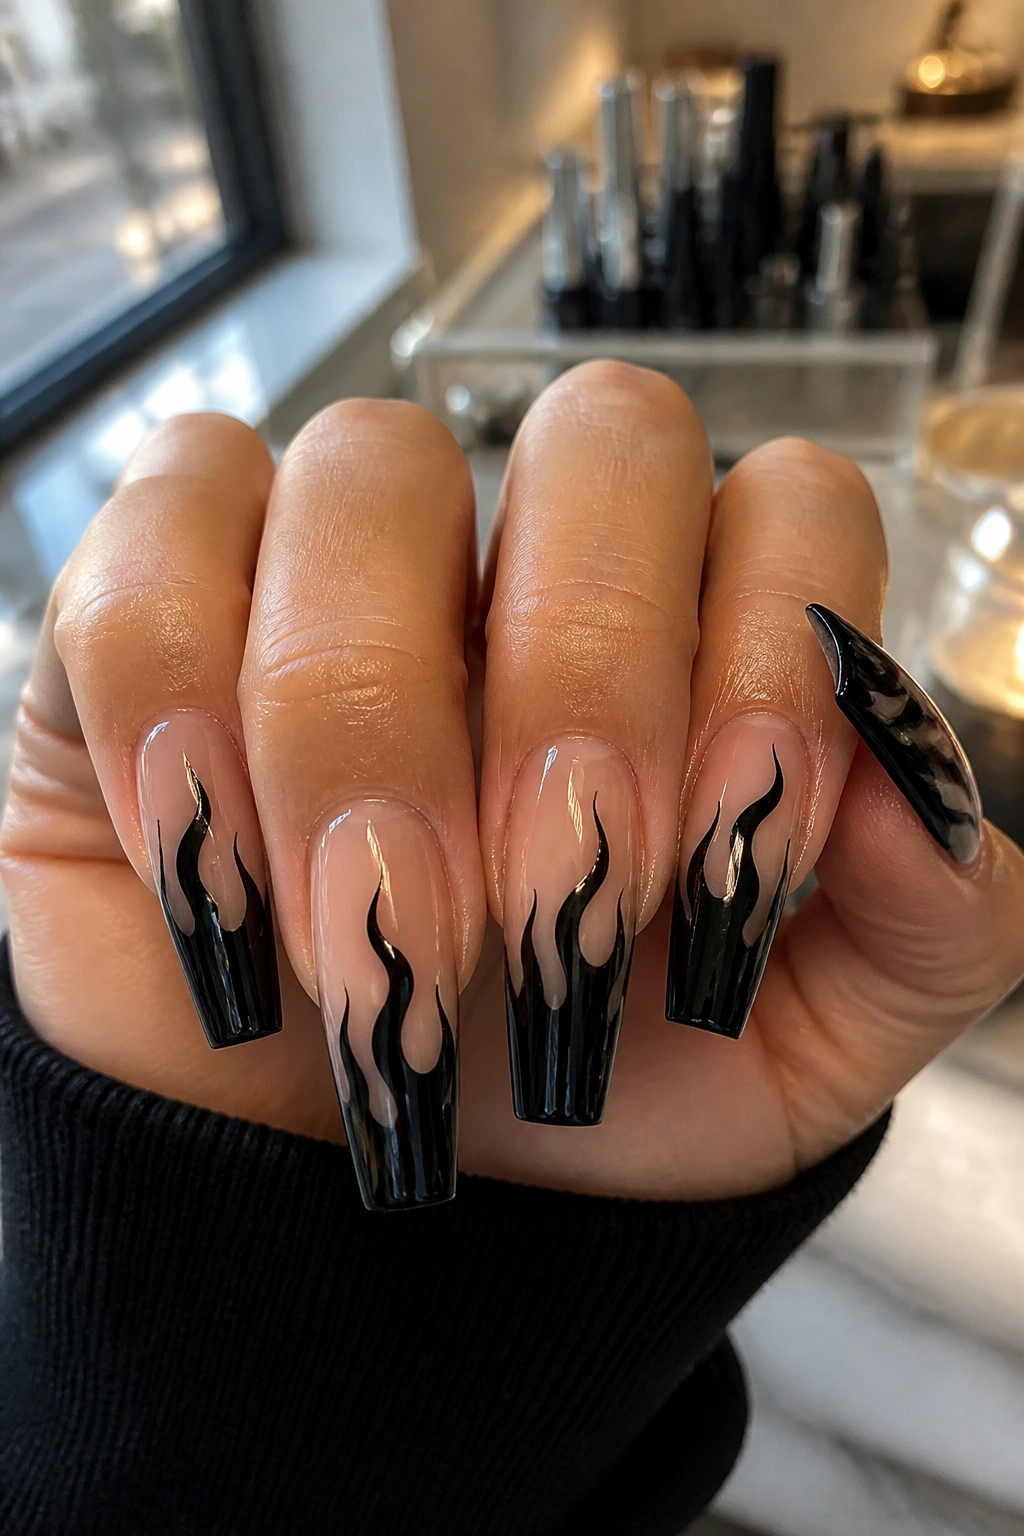
Flames. Still hard to beat on a coffin shape.
The trick is not treating them like a novelty sticker from the corner shop. Good black flame nails use shape and scale well. The flames should stretch upward with narrow points and uneven curves, not sit as three little blobs at the tip.
My favorite version starts with a sheer nude or milky base, then layers glossy black flames over it. That contrast keeps the art readable and lets the coffin outline show through. If you put black flames over a black base, the look can get muddy unless you change the finish—matte base, gloss flames, or the other way around.
Placement matters here
A long coffin nail can handle flames on every finger. A shorter set looks cleaner with flames on four to six nails, paired with solid black accents. Keep the flame base low on the nail, close to the free edge or sidewall, so the art has room to climb.
Curved liner brushes help, though a fine detail brush and patience work too. The best flame art has a little wobble to it. Too neat, and it loses its heat.
This design skews younger, louder, and more playful than matte black or negative space. That’s part of the charm.
8. Black Coffin Nails With a Rhinestone Spine
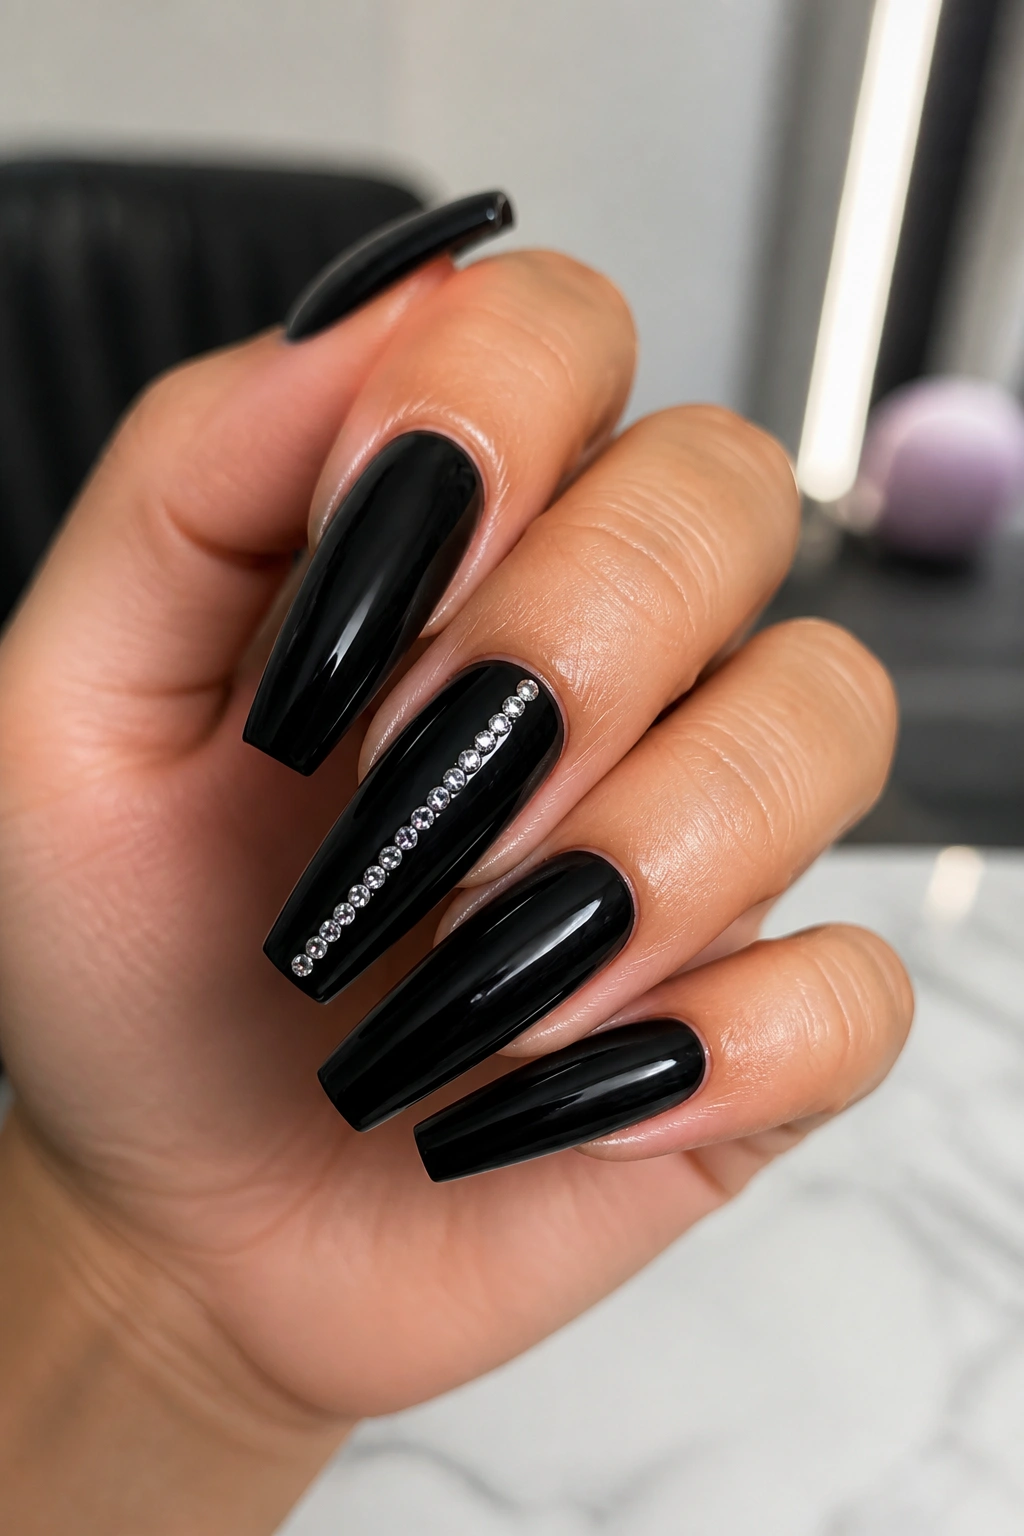
One straight line of stones can do more than a full glitter nail. On black coffin nails, a rhinestone spine—running down the center of one accent nail or stacked near the cuticle—looks sharp because the dark base makes every crystal edge stand out.
Scattershot gems rarely work on black. They start to feel random. A controlled placement, though, gives the set structure. I like SS5 to SS8 flat-back stones for this. Large crystals can overwhelm the taper unless the nails are long enough to carry them.
You do not need ten gem-covered nails. Two is enough. Maybe three if the rest of the set is plain black.
What keeps it clean
- Use small stones in a single line, not mixed sizes all over the place.
- Seat the stones into builder gel, then frame the edges with a liner brush and top coat.
- Leave a hairline gap from the sidewalls so the design stays crisp.
- Pick silver-backed or black-diamond stones; warm gold can fight with pure black.
Best version: glossy black nails, one matte accent, and one rhinestone spine. That mix gives you shine, texture, and structure without turning the manicure into jewelry storage.
9. Sheer Black Jelly Coffin Nails
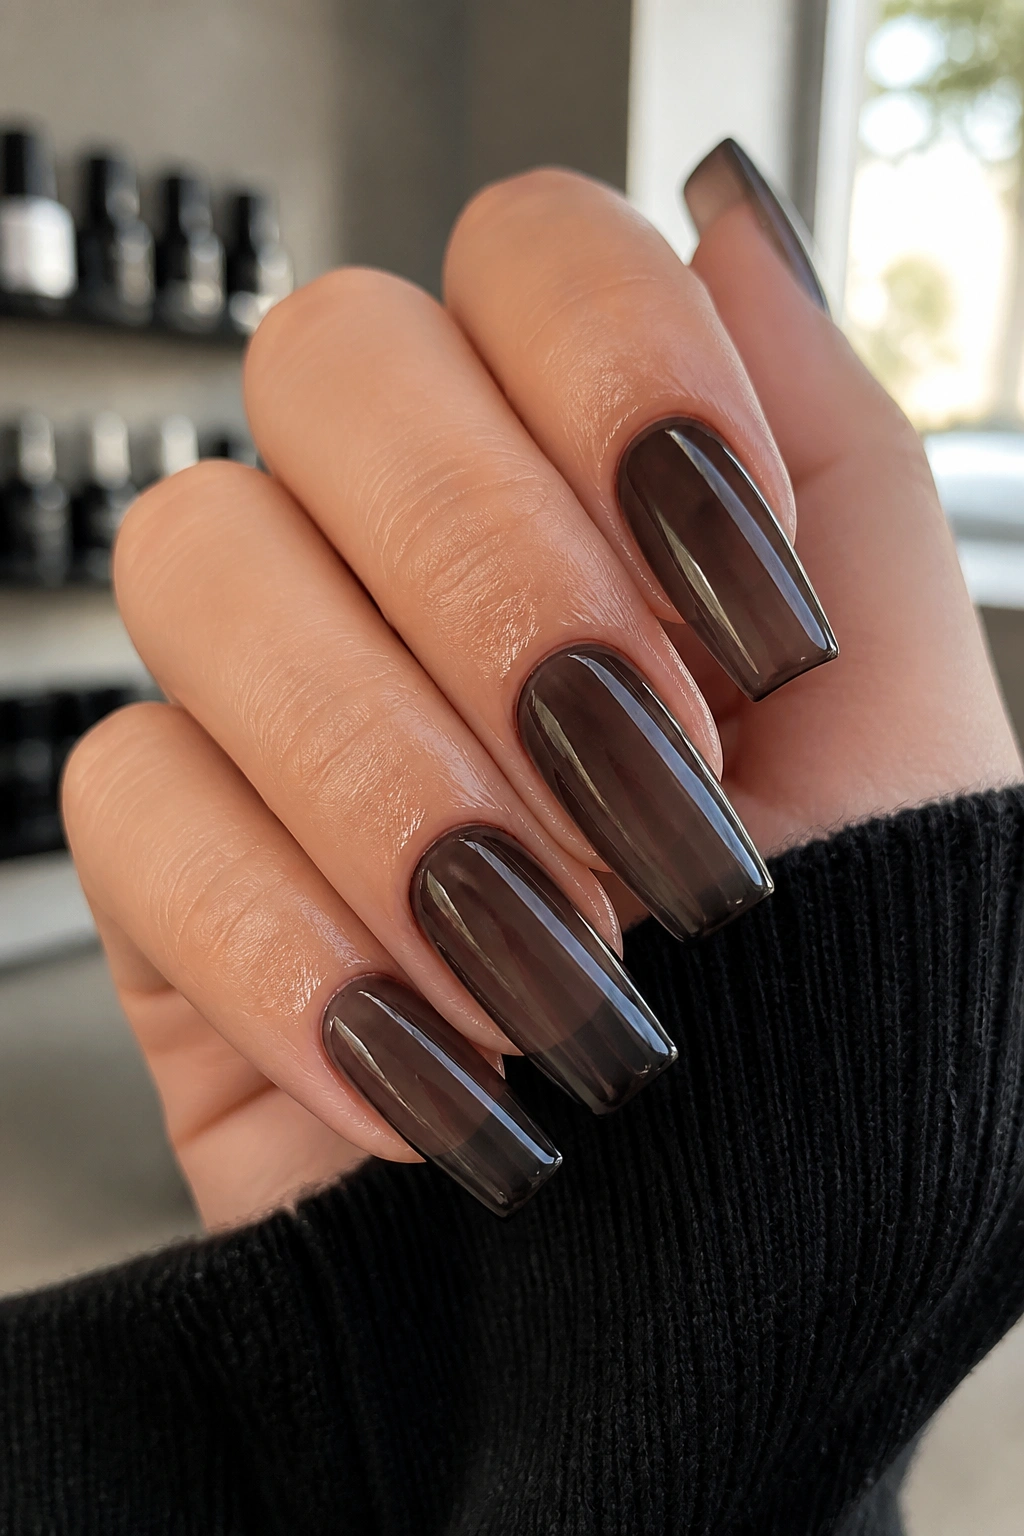
Can black nails feel softer and still look cool? Yes. Make them translucent.
A black jelly manicure looks like smoked glass. You still get the depth of black, though the light comes through the layers enough to keep the set from feeling dense. On shorter coffin nails, that’s a huge advantage. Full opaque black can make a short tip look wider; jelly black keeps it lighter.
Two coats usually give you a charcoal smoke effect. Three coats push it closer to near-opaque black. I like stopping at two on natural nails and going to three on Gel-X or acrylic, where the shape is sharper and the structure underneath is cleaner.
This style also hides regrowth better than a hard, solid black. Since the color has some transparency, the cuticle line does not hit as harshly after a week or two. If you want black without that heavy band of grow-out, jelly polish is a smart route.
No extra art needed. The finish is the design. Add one tiny silver star or a single chrome detail if you want, though I’d stop there. Jelly black gets muddy fast when you pile too much on top of it.
10. Black Coffin Nails With a Red Underside
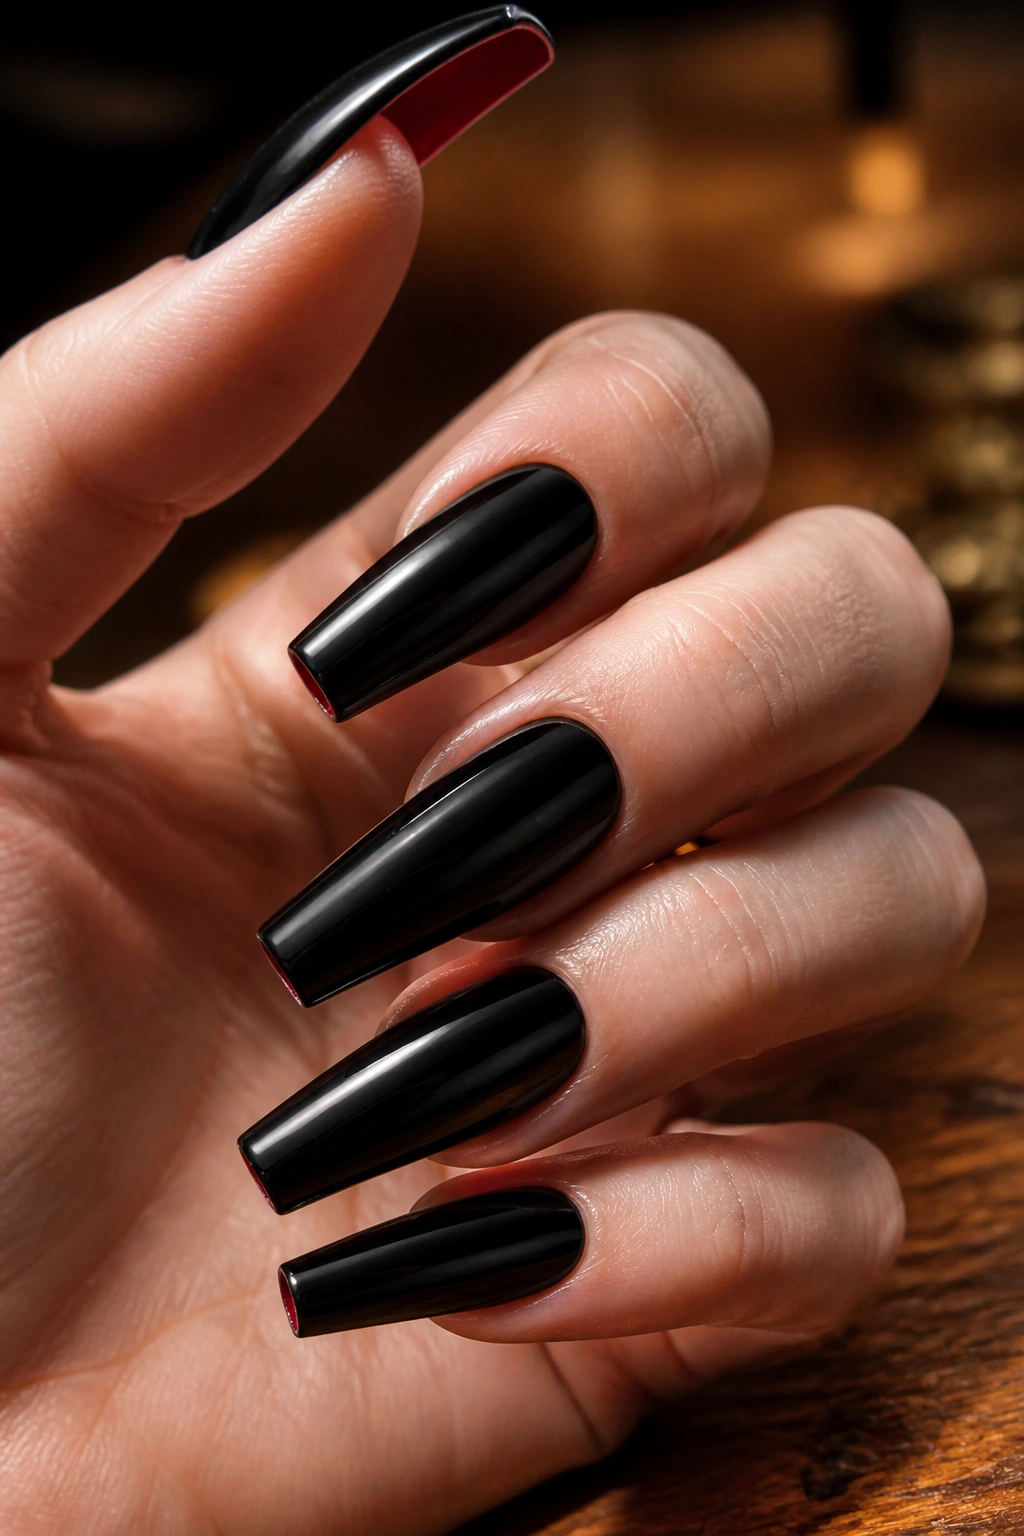
I love this one because the red stays hidden until your hand moves. From above, the nails look clean and black. Turn your fingers sideways, reach for a glass, tap on a table, and that flash of deep red appears under the free edge.
It only works on nails with enough length. You need an underside worth painting, which means medium-long to long coffin tips. Short nails do not give the contrast enough room. Sculpted acrylic and Gel-X usually carry this style better than natural nails for that reason.
The red should be rich—think oxblood, dark cherry, or lacquered crimson—not bright tomato. A darker red keeps the set moody. Pair it with a glossy black top and the whole thing feels tight, deliberate, almost a little dangerous.
Painting the underside cleanly takes patience. The tech needs a fine brush, a steady angle, and enough cure time so the red does not smear onto the top edge when the nail flips back over. Top-coating the underside helps keep the color from rubbing dull.
This design is a good reminder that nail art does not always belong on top of the nail.
11. Black Coffin Nails With Tiny Studs and Chains

Chains are either sharp or messy, and the gap between those two outcomes is tiny. When they work, though, they give black coffin nails a hardware-heavy look that no flat painted design can fake.
Keep the scale small. Micro studs, tiny bars, and short lengths of chain look better than chunky charms on most hands. Coffin nails already have length and edge; piling huge metal pieces on top can make the set feel clumsy and hard to wear.
There are two placements I like. One is a short chain draped across a single accent nail, anchored at both sides with gel and framed by two small studs. The other is a line of tiny silver studs running near one sidewall or at the cuticle edge. Both feel cleaner than covering half the nail in hardware.
Skip this one if…
- You wear contact lenses every day.
- You knit, sew, or handle delicate fabrics often.
- You need a manicure that slides easily into gloves.
- You hate the feeling of raised texture on the nail.
This is the most high-maintenance design on the list. Worth it for the right person. A headache for the wrong one.
12. Black Croc-Texture Coffin Nails
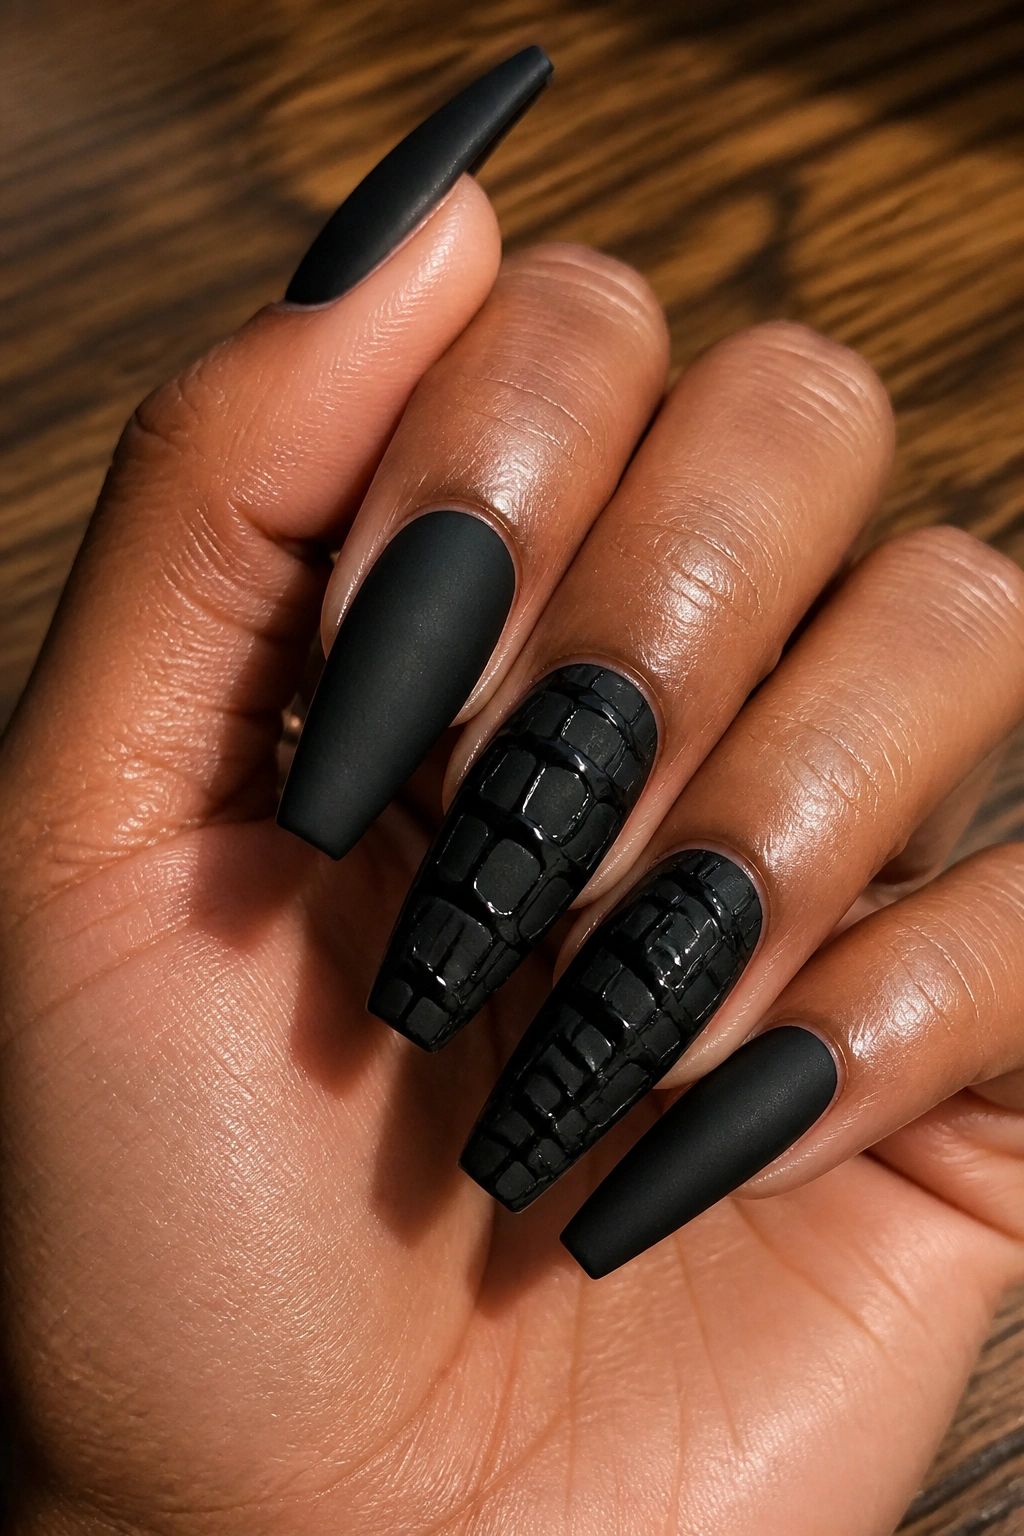
Run your fingertip over a croc-texture nail and you’ll get the appeal right away. The raised pattern gives black polish a physical bite, and on a coffin shape that texture feels tougher than any flat swirl or outline.
The best version uses a matte black base with glossy croc cells on top. That finish contrast matters. If everything is glossy, the texture can blur. If everything is matte, the pattern can disappear from arm’s length. Matte underneath, shine on top—that’s the sweet spot.
How the texture is built
Some techs use blooming gel to spread glossy black into rounded cells over a matte base. Others use a textured gel or top coat placed in uneven clusters, then cure it so the surface stays raised. Either method can work. What matters is scale. The cells should vary a little, with tighter texture near the sidewalls and larger shapes through the center.
Long coffin nails suit this style best because the pattern needs room. On a short set, croc print can turn into random bubbles. Keep the accent nails limited if you’re unsure—two textured nails, the rest solid black, maybe one chrome detail if you want to push it.
Texture like this looks better in person than in phone photos. No shame in picking a design for the real world.
13. Black Coffin Nails With Constellation Details
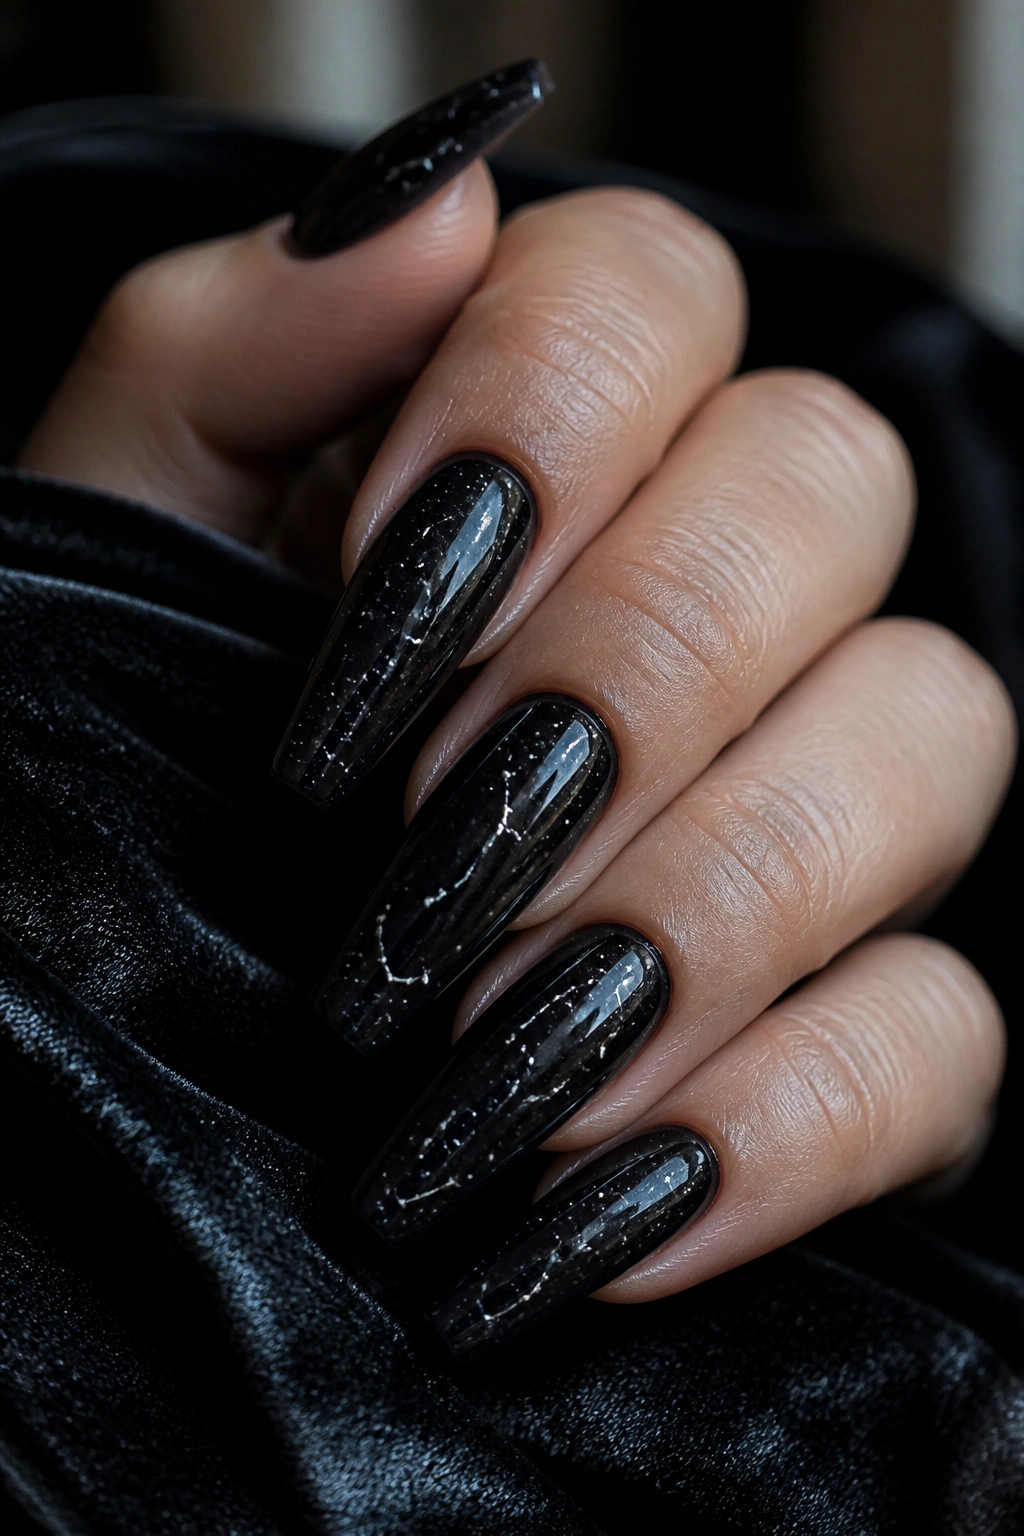
Tiny silver dots on black can look like a night sky if they’re placed with restraint. Go too big or too busy, and the design slips into costume fast. Keep the marks small, sharp, and sparse, and it holds onto that cool, dark feel.
I like a soft black or jelly-black base for this more than a dense opaque black. The slight transparency gives the background more depth, almost like there’s space under the surface instead of color sitting flat on top. Then you add fine silver or white details: dotted star clusters, one thin orbit line, maybe a tiny crescent on a single nail.
This is where a dotting tool earns its keep. A liner brush draws the connecting lines, though the lines should stay thin and broken in places. You’re sketching a star map, not drawing a cartoon moon.
A little asymmetry helps. Put the heavier detail on one hand’s ring finger and the other hand’s index finger, not the exact same nails both times. That small mismatch makes the set feel more like art and less like a stamp.
If you like black nails but want something with a softer mood, this is a smart place to land.
14. Black Coffin Nails With White Graffiti Lines
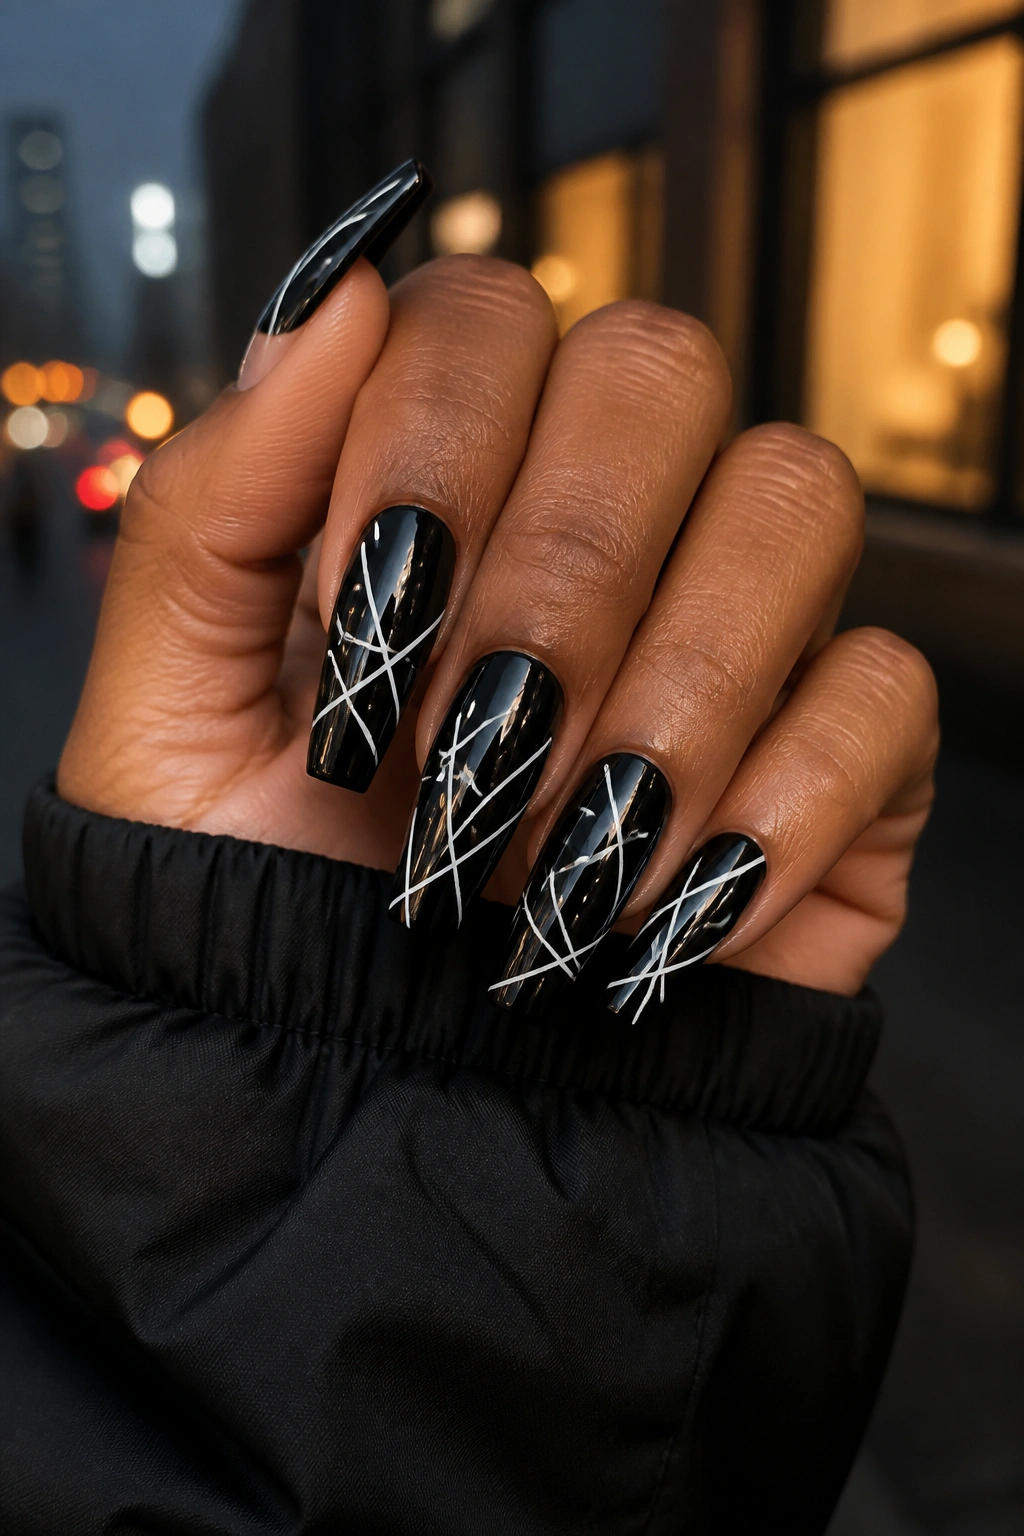
Messy line work is harder than clean geometry. Anyone can drag a brush around and call it abstract. Getting white graffiti lines over black to look raw rather than sloppy takes control.
The best versions use contrast well: glossy black base, bright white gel paint, maybe one silver slash or tiny stencil mark if you want a bit more. Think scribbles, layered loops, rough crosshatching, partial letters, drips that stop short. You want motion, not a crowded notebook page.
Why this one works on coffin nails
The long taper gives the line work direction. A round or square nail can make abstract marks feel trapped. Coffin nails give the strokes somewhere to travel, especially if the lines start near one sidewall and break across the center.
This design is also one of the easiest to test on press-ons. Paint the black base, top coat it, then add white art over the cured surface so you can wipe away bad lines before sealing. That saves a lot of frustration.
Wear this one with short silver rings and black clothing, and it feels sharp. Wear it with soft knits and bare makeup, and it still works because the nail art carries enough edge on its own.
15. Black Coffin Nails With a Nude-to-Black Ombre
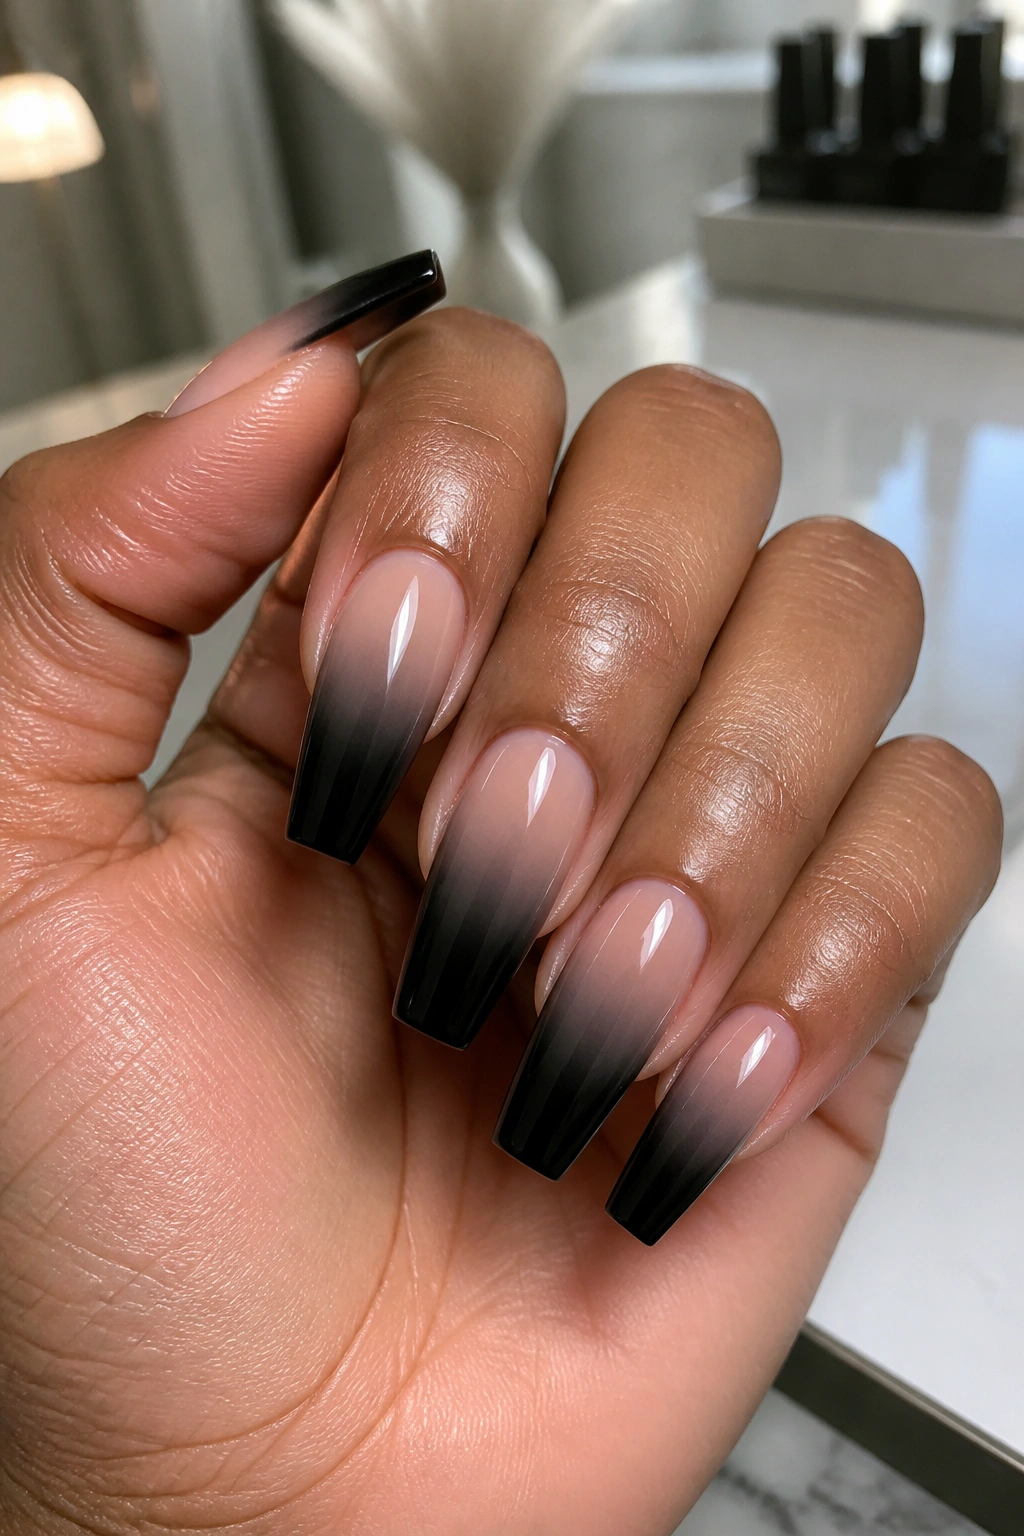
If solid black feels too blunt, fade it. A nude-to-black ombre keeps the attitude of black coffin nails, though it softens the start of the color near the cuticle and gives the whole set more depth.
This design earns its place because it solves a practical problem. Regrowth is less harsh when the cuticle area stays sheer nude or rosy beige. Two weeks in, the manicure still looks intentional instead of abruptly outgrown. That alone makes it one of the easiest black sets to live with.
There are a few ways to build it: airbrush, sponge blending, or a gel ombre brush. Airbrush gives the smoothest fade. Sponge blending works, though it can leave a grainy surface unless the top coat is floated on thick enough to even it out. I like the fade strongest through the middle third of the nail, with black concentrated at the tips. That placement suits the coffin shape and keeps the nail looking long.
Smart color pairing matters
- Use a cool nude if you want the black to read sharper.
- Use a pink-beige nude if you want the set to look a touch softer.
- Keep the black dense at the very tip, or the fade can look muddy.
- Matte ombre feels moodier; gloss ombre shows the blend better.
This one is easy to wear, hard to get bored with, and kinder to grow-out than most dark manicures.
Final Thoughts
Black coffin nails work best when the shape is handled with care. That sounds obvious, though it’s the part people skip. Dark polish does not hide weak filing, bulky cuticle work, or a crooked taper. It puts a spotlight on all of it.
Pick your finish first. Matte gives you structure. Gloss gives you polish and shine. Jelly, chrome, foil, and texture each push the mood in a different direction, and that mood should match your tolerance for upkeep as much as your taste.
If you’re stuck, start with matte black, patent gloss, or the nude-to-black ombre. Those three cover the clean, sharp, and wearable end of the spectrum. Once you know how much edge you like on your own hands, the chains, flames, croc texture, and red undersides start making a lot more sense.
