

Coffin nails have become the go-to shape for anyone who wants drama, elegance, and an unmistakable presence. But here’s the thing—add rhinestones into the mix, and you’ve got designs that absolutely stop people in their tracks. Whether you’re scrolling through inspiration on a lazy afternoon or preparing for a special occasion, rhinestone-adorned coffin nails offer endless possibilities for expressing your personal style. The combination of the elongated, tapered coffin shape with the sparkle and dimension of rhinestones creates nail art that feels both luxurious and wearable.
The appeal goes beyond just looking gorgeous, too. Long coffin nails with rhinestones work for virtually any occasion—from everyday glam to red-carpet-worthy statements. They photograph beautifully, catch light in unexpected ways, and give your hands an instant sense of polish and put-togetherness. What makes this particular nail style so versatile is the sheer range of design approaches you can take. You can go minimal with a single strategic rhinestone accent, go full-on bedazzled with clusters and cascades, or lean into elegant negative space designs that let the nail color do some of the talking while rhinestones frame or highlight specific areas.
The best part? You don’t need to be a professional nail artist to wear these looks. Many of these designs are entirely achievable at home with the right tools, a bit of patience, and some quality rhinestones. Whether you’re drawn to classic minimalism, bold geometric patterns, romantic ombré effects, or eye-catching maximalist drama, there’s a rhinestone coffin nail design here that will make you feel confident and beautiful every single time you look at your hands.
1. Classic Diamond Cluster Center
This timeless design places the focus squarely in the center of each nail with a precise arrangement of high-quality rhinestones in a cluster formation. The beauty of this approach is its elegance through simplicity—a solid base color (typically nude, soft pink, or classic red) lets the sparkling centerpiece be the star.
Why This Design Works So Well
The centered diamond cluster immediately draws the eye to the nail’s focal point without overwhelming the space. This design strikes the perfect balance between statement-making and everyday-wearable. The cluster effect creates depth and dimension on a relatively small canvas, making your nails look more intricate than they actually are. It’s sophisticated enough for boardroom meetings yet festive enough for celebrations.
How to Create It
- Choose rhinestones in graduating sizes, with the largest in the very center and progressively smaller stones radiating outward
- Use a quality nail glue or gel base to secure each stone individually
- Space the stones closely enough to create a cohesive cluster, but not so tightly that they overlap uncomfortably
- Seal everything with a glossy topcoat to protect the rhinestones and add extra shine
- Keep the rest of the nail a clean, neutral color to maximize contrast
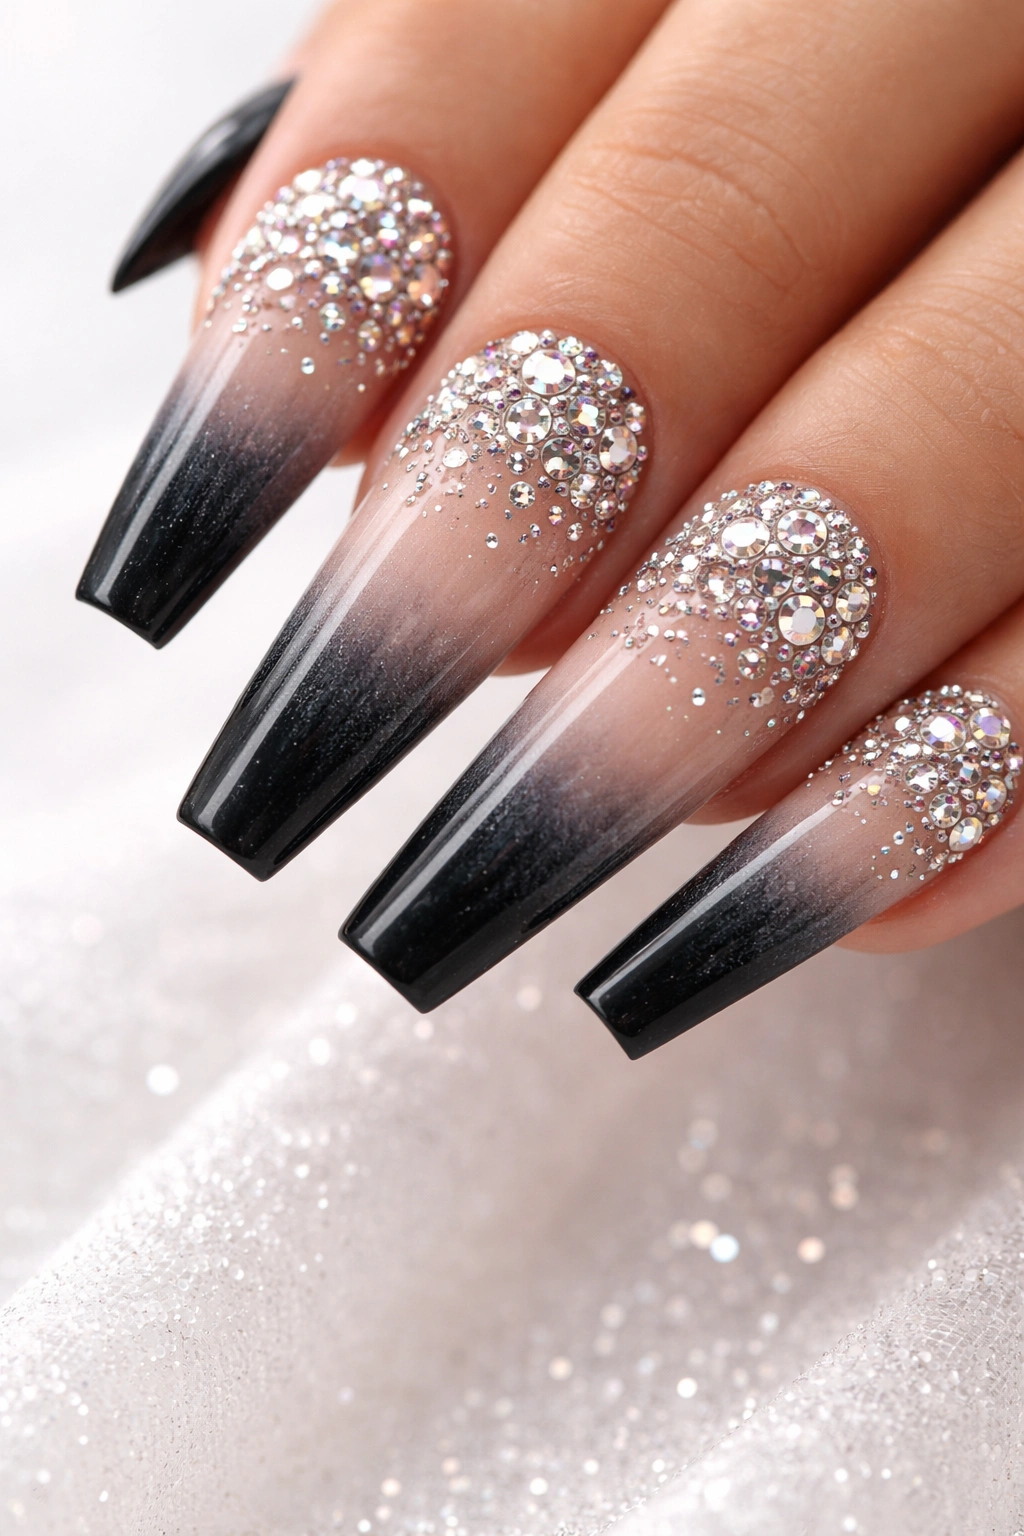
2. Gradient Ombré with Scattered Gems

This design layers a beautiful color gradient across the nail while strategically scattering rhinestones throughout, creating an effect that feels both artistic and refined. The gradient typically flows from a darker shade at the base to a lighter shade at the tip, with rhinestones placed to complement the color transition.
Why This Design Works So Well
The ombré effect adds sophistication and visual interest even before you add the sparkle. The scattered rhinestones create focal points across the nail rather than clustering them in one spot, which makes the design feel more dynamic and modern. This approach works particularly well on longer coffin nails because you have plenty of canvas to play with color movement and stone placement.
Quick Design Ideas
- Soft pink to white gradient with clear or pale pink rhinestones for a romantic, bride-inspired look
- Deep burgundy to champagne gradient with rose gold rhinestones for autumn elegance
- Icy blue to silver gradient with crystal rhinestones for a winter-ready statement
- Peachy nude to nude gradient with warm-toned rhinestones for an understated luxury feel
- Black to nude gradient with black and clear rhinestones for modern drama
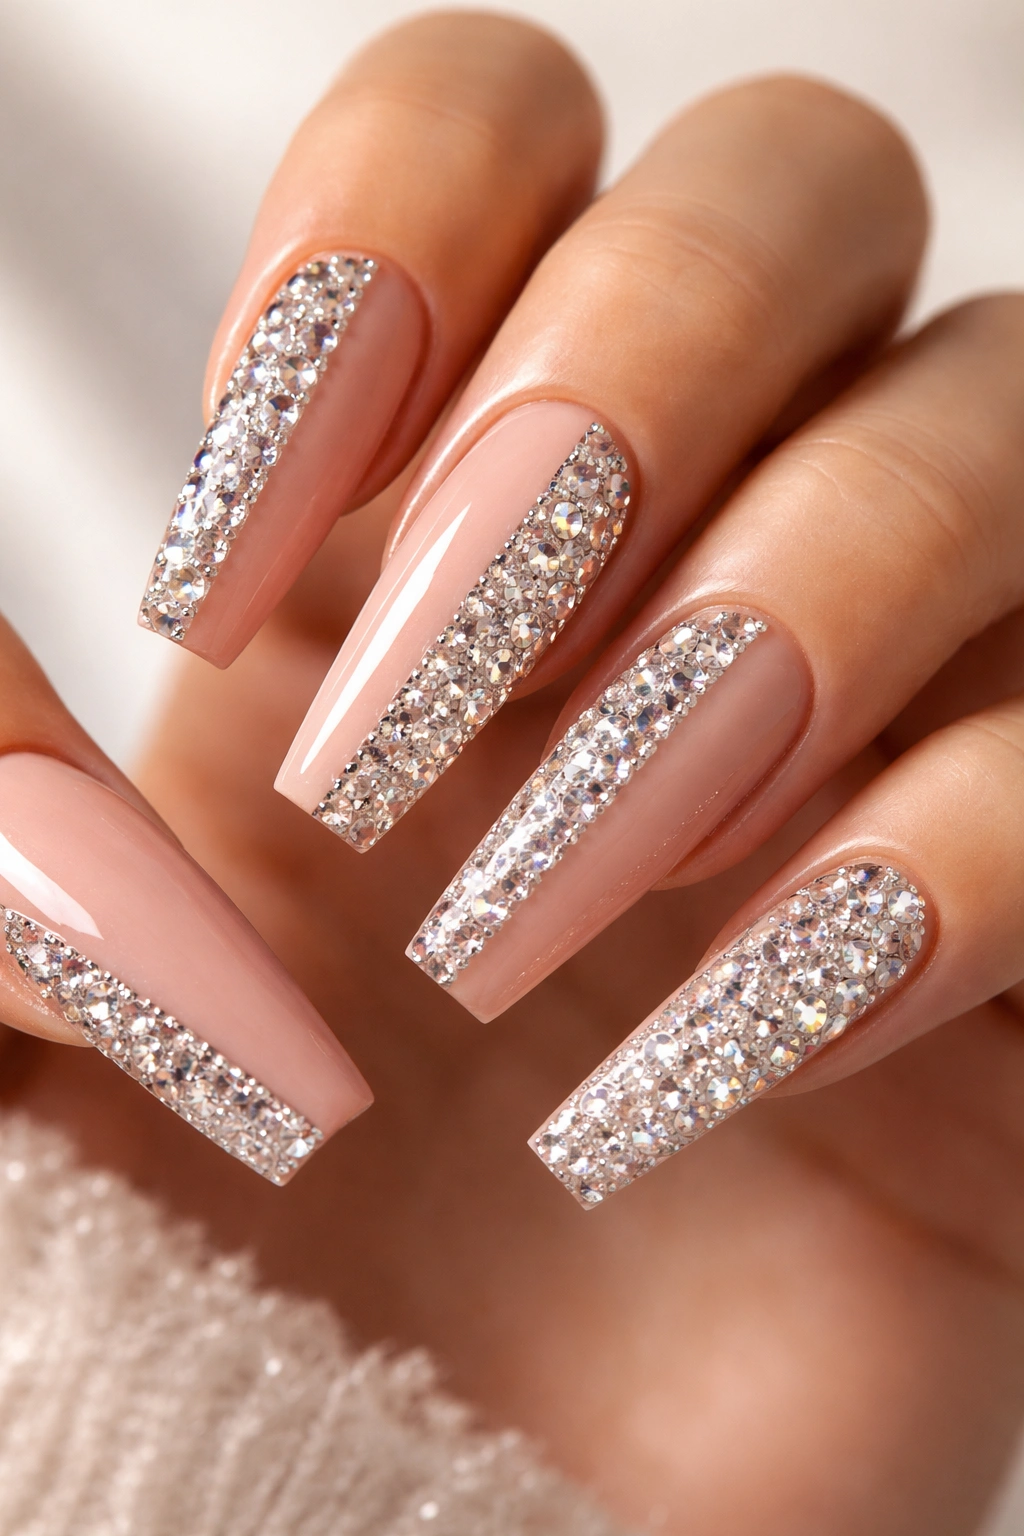
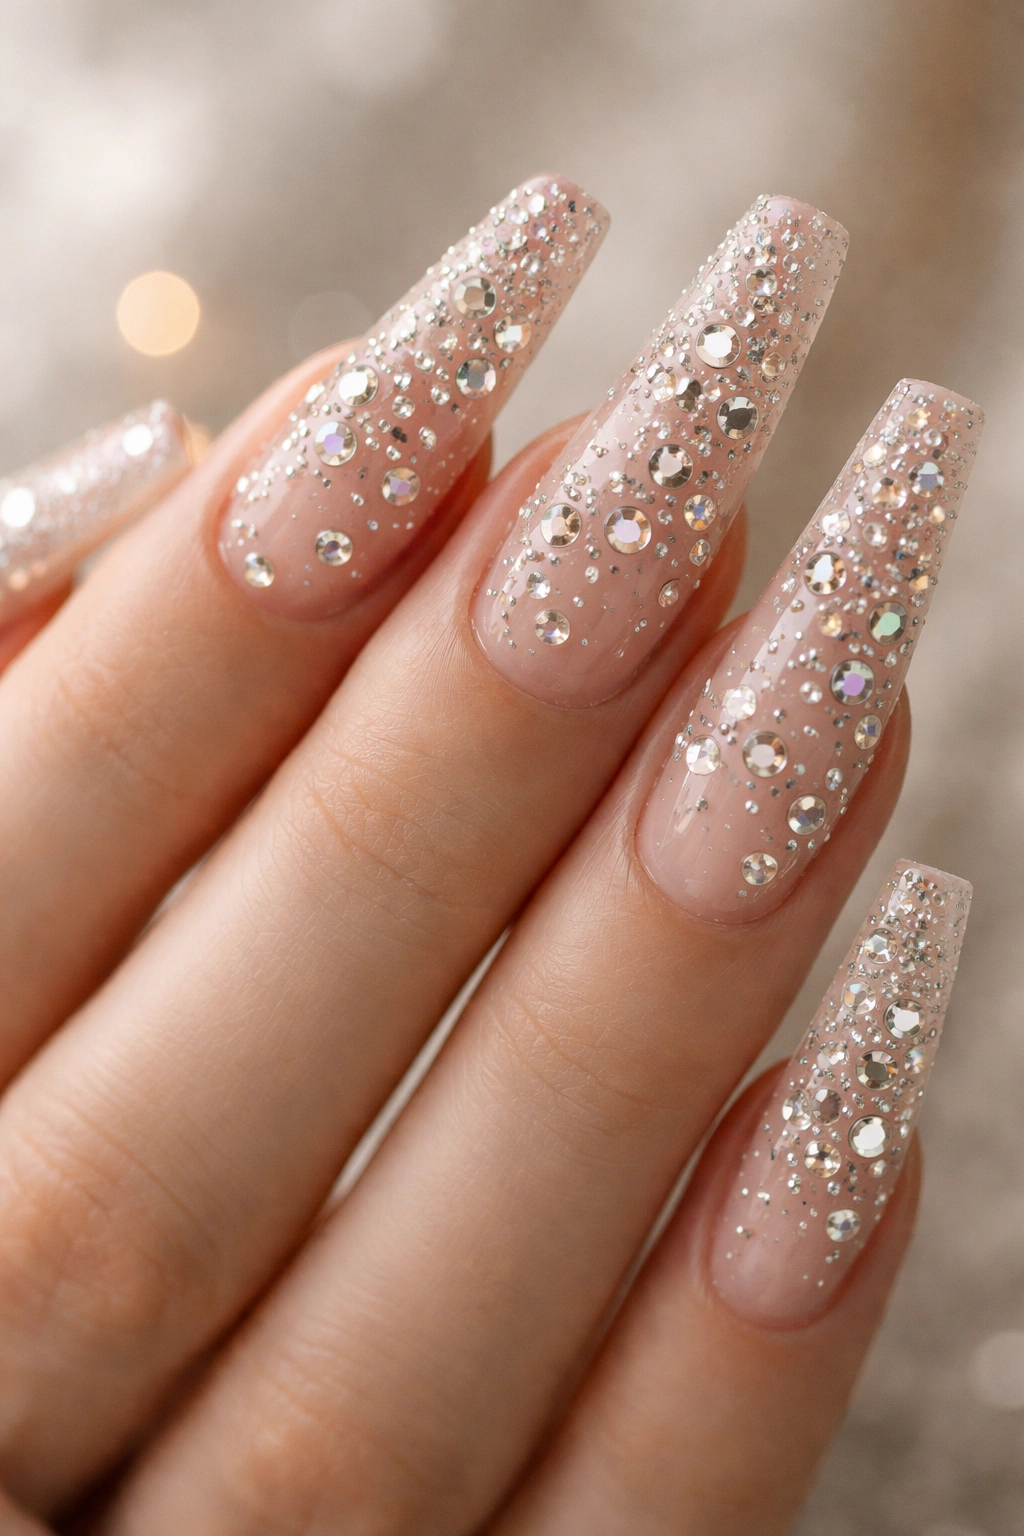
3. Full-Coverage Rhinestone Bedazzle
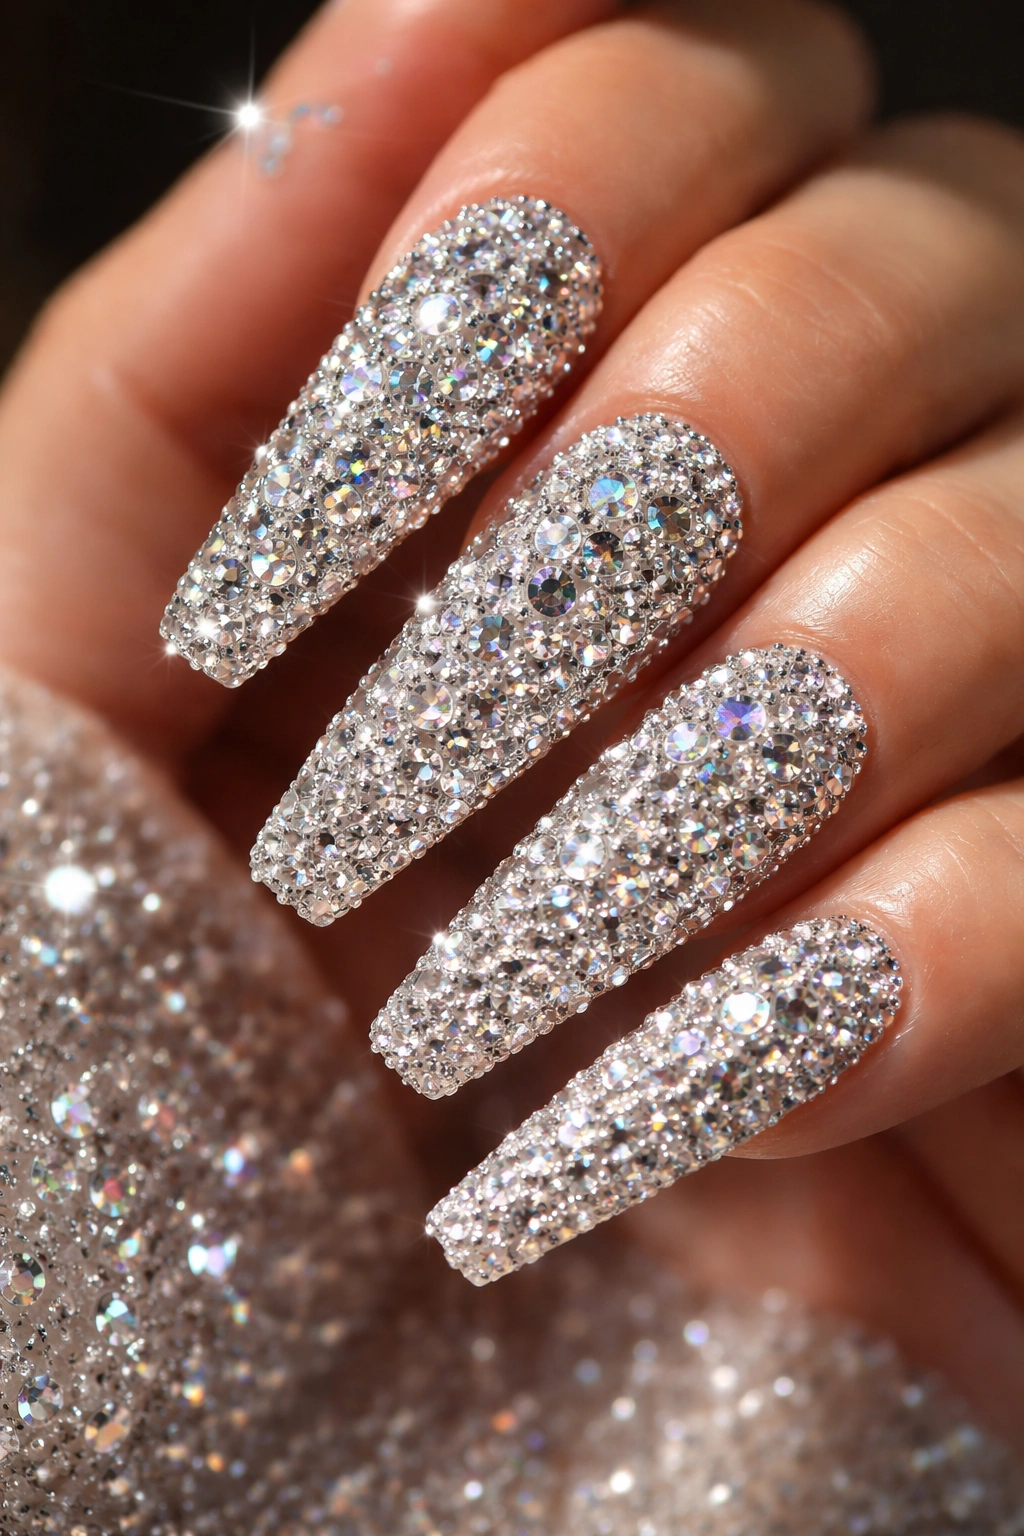
This is the ultimate maximalist approach—nearly the entire nail surface is covered with rhinestones of varying sizes and finishes, creating an almost mosaic-like effect. It’s bold, it’s shimmering, and it absolutely commands attention.
Why This Design Works So Well
There’s something undeniably glamorous about a fully bedazzled nail. This design works beautifully for special events, formal occasions, or any time you want to feel genuinely special. The full coverage creates a cohesive, high-impact look that photographs spectacularly under both natural and artificial light. The varied stone sizes prevent it from looking flat or one-dimensional.
Pro Tips for Success
- Mix rhinestone sizes and finishes (crystal clear, milky white, iridescent, metallic) for depth and visual interest
- Leave just a hair-thin line of color visible around the edges for definition and a finished look
- Use a high-quality gel base that will grip the stones securely—this design has weight and needs rock-solid adhesion
- Consider using tweezers with a flat edge for precise placement of smaller stones
- Build the design in sections rather than trying to cover the whole nail at once
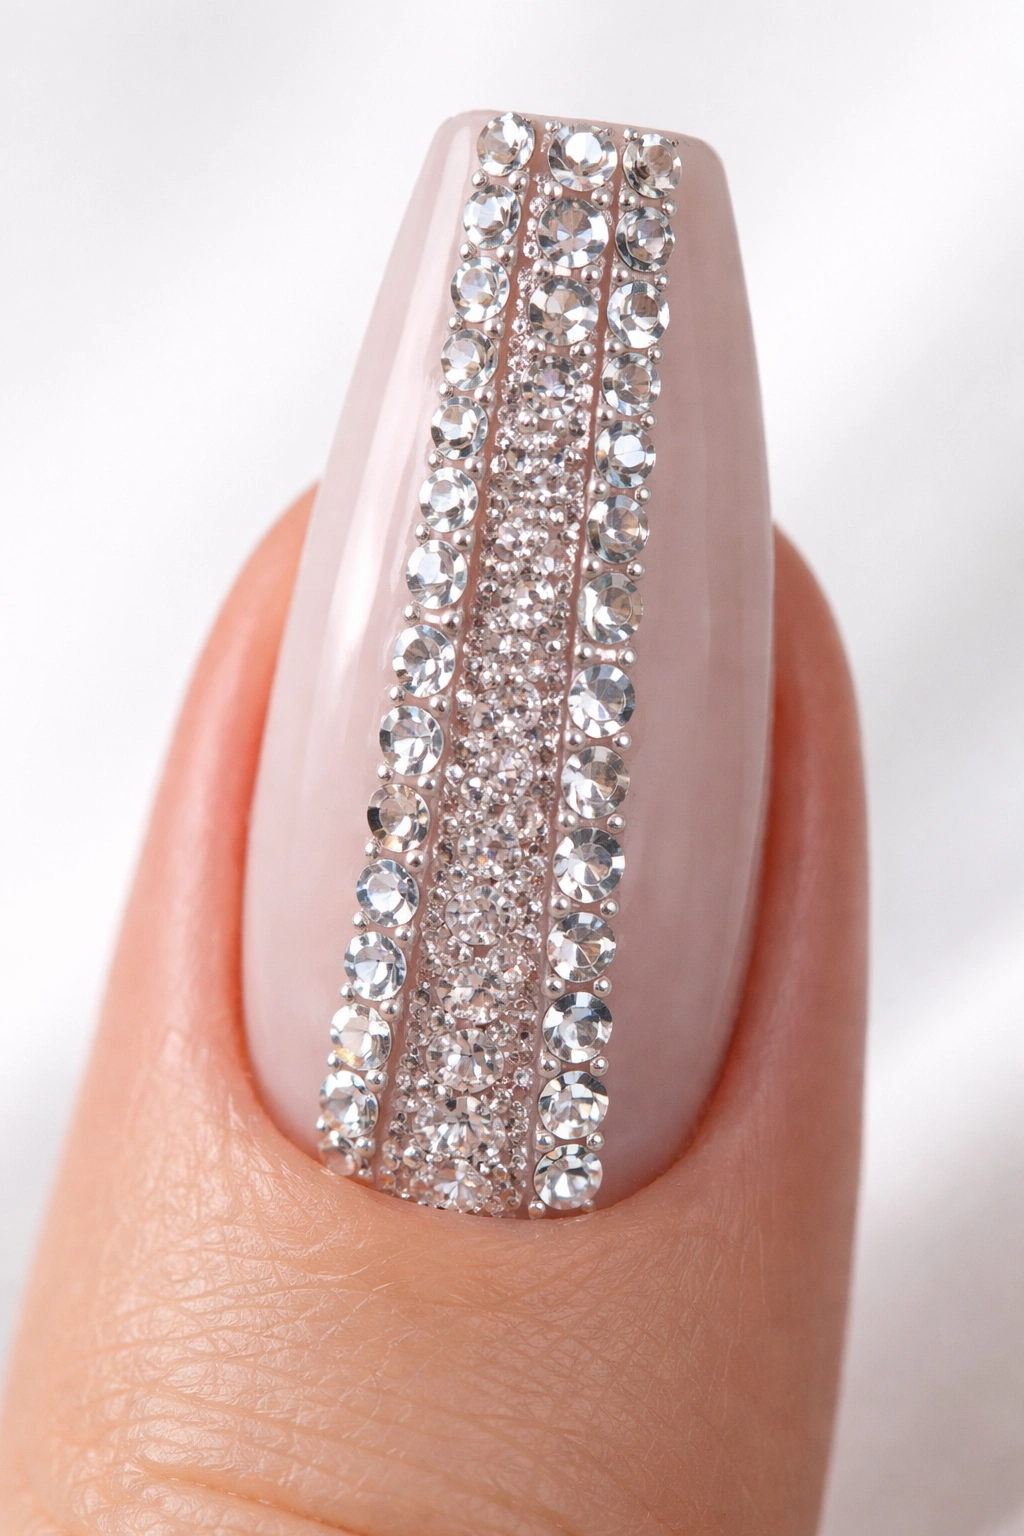
4. Linear Vertical Lines of Gems
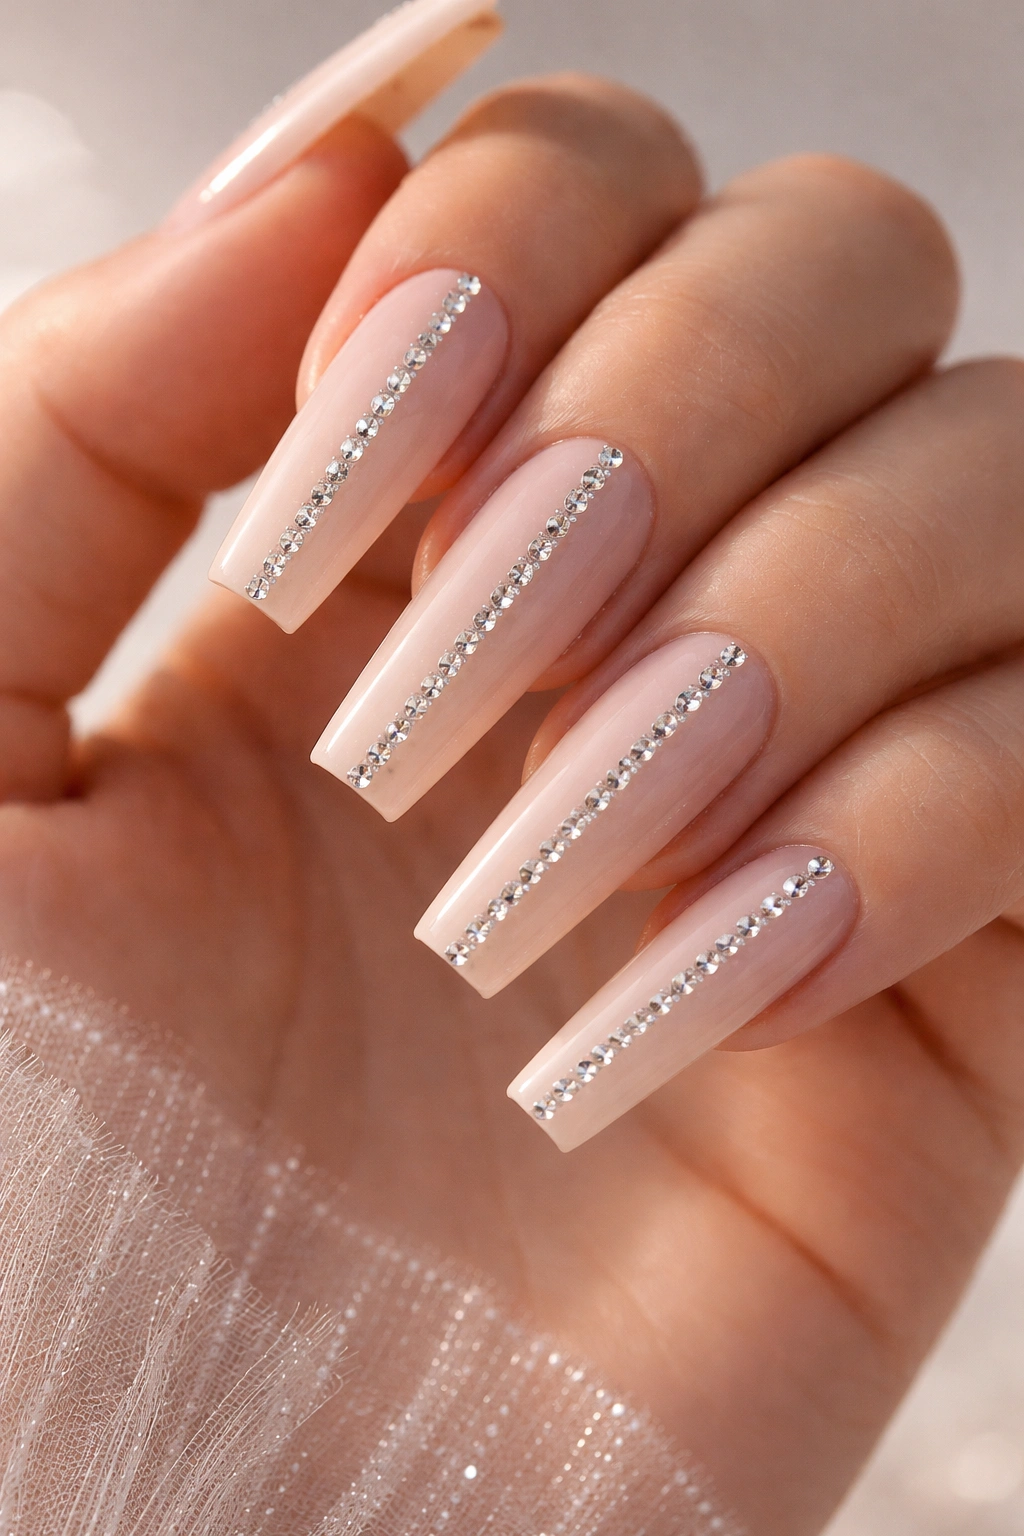
This geometric approach features perfectly straight vertical lines of rhinestones running from the cuticle area toward the tip. The lines can be evenly spaced or vary in thickness and density, but the effect is always striking and modern.
Why This Design Works So Well
Vertical lines create an elongating illusion that makes your nails appear even longer and more elegant. The geometric precision feels very intentional and high-fashion. This design bridges the gap between minimalism and glamour—it’s not sparse, but it’s not completely covered either, giving it a refined, curated feeling.
Design Variations to Try
- Three evenly spaced vertical lines in matching crystal rhinestones for classic clean geometry
- Center line in larger stones with thinner lines of smaller stones on either side for a pyramid effect
- Alternating lines of clear and colored rhinestones that complement your base color
- Lines that start thick at the base and taper toward the tip, following the coffin shape
- Curved vertical lines rather than perfectly straight ones for a slightly softer, more organic geometry
5. Reverse Ombré with Border Accents
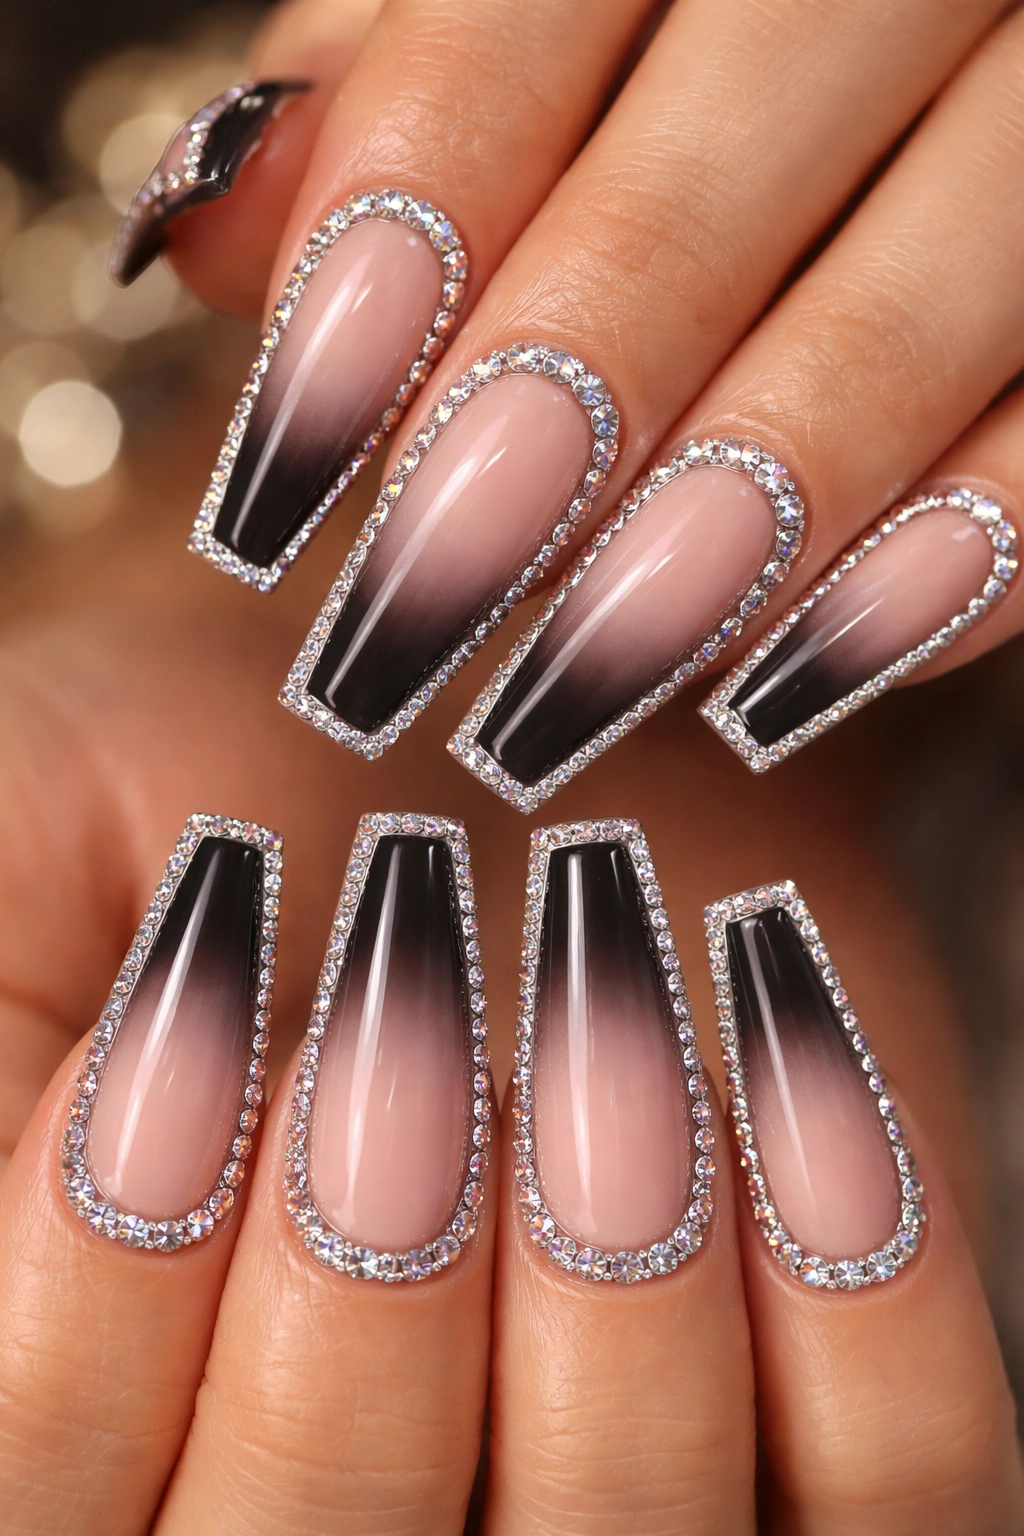
Instead of a traditional gradient, this design reverses the typical light-to-dark flow and combines it with a decorative border of rhinestones around the nail’s perimeter. The result feels both modern and carefully constructed.
Why This Design Works So Well
The border of rhinestones frames the nail beautifully and adds an extra dimension of sparkle. A reverse ombré—going from light at the base to dark at the tip—feels unexpected and contemporary. This combination creates a design that’s visually complex without looking chaotic.
Execution Details
- Start with a dark shade at the cuticle and graduate to a lighter shade toward the free edge
- Apply a thin, continuous border of rhinestones around the entire perimeter of the nail
- Keep rhinestones evenly sized around the border for a polished, intentional appearance
- The contrast between the color gradient interior and the sparkling border creates a jewelry-like quality
- Works beautifully in jewel tones (emerald, sapphire, amethyst) paired with crystal rhinestones
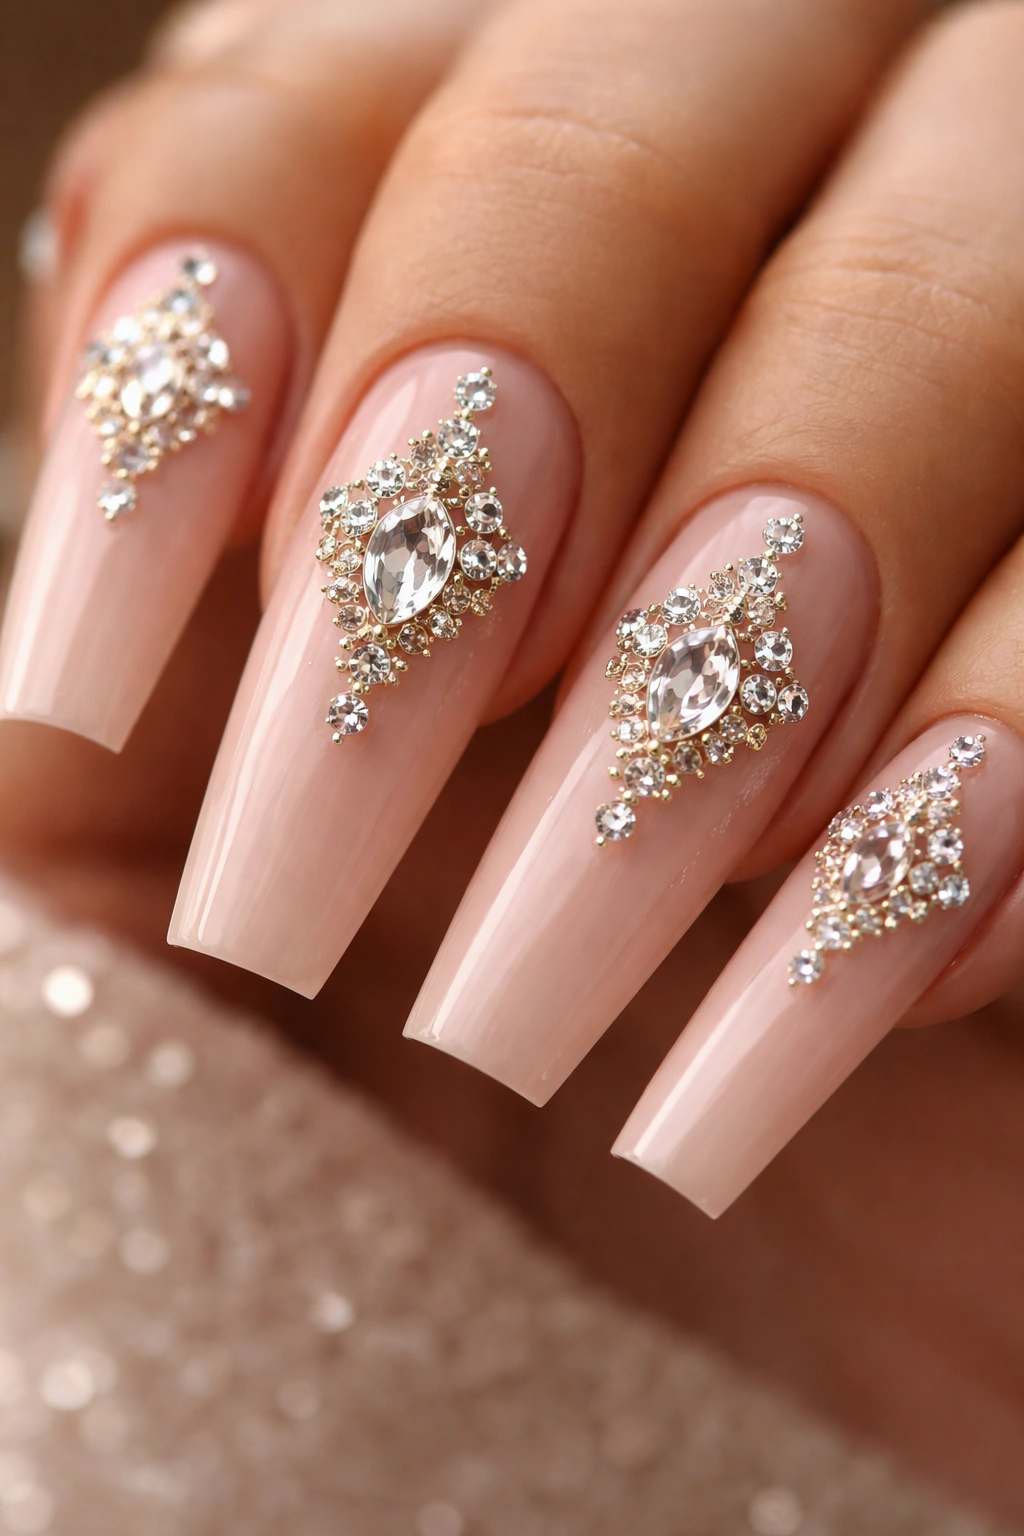
6. Single Statement Stone Per Nail
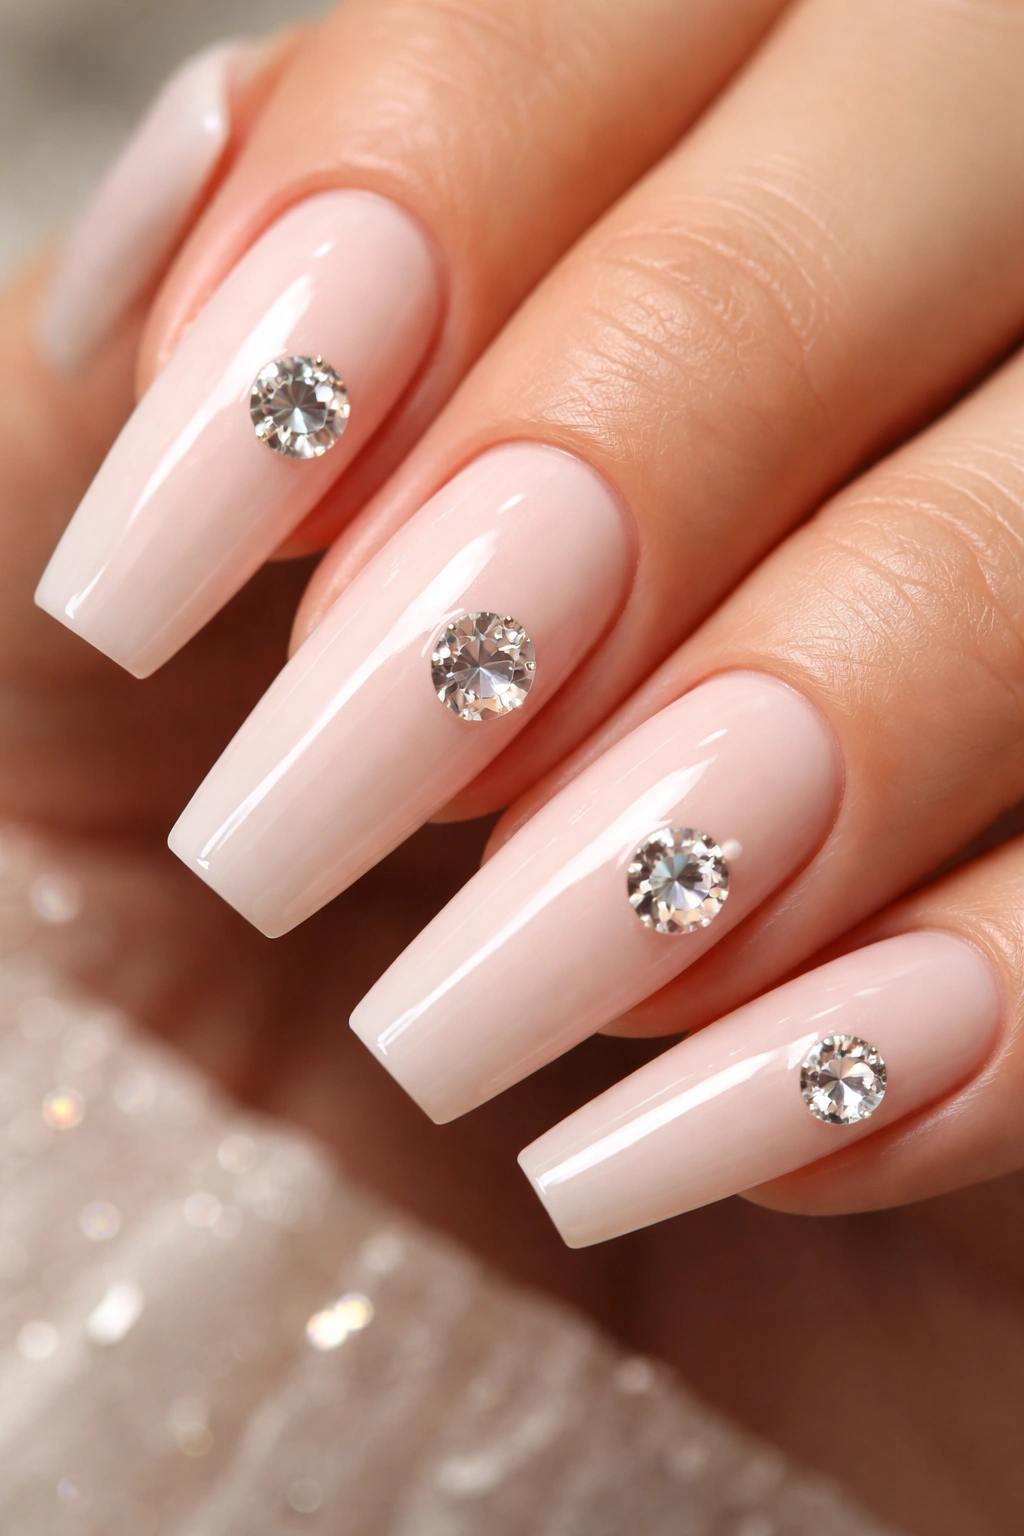
Sometimes less truly is more. This minimalist approach features just one large, show-stopping rhinestone per nail, typically positioned slightly off-center or at the tip for maximum impact. The rest of the nail remains clean and unadorned.
Why This Design Works So Well
This design epitomizes understated luxury. It’s perfect for those who prefer subtlety but still want that touch of glamour. The single stone approach also means better comfort—there’s less bulk on your fingertips, making this option more practical for daily wear. It’s the kind of design that looks more expensive and intentional than designs with more elements.
Stone Selection Matters
- Choose one premium-quality rhinestone per nail rather than multiple lesser-quality stones
- Consider mixing stone sizes across different nails for a cohesive yet varied look
- Larger clear stones or AB (aurora borealis) stones create the most dramatic single-stone effect
- Position the stone off-center slightly rather than dead center for a more sophisticated placement
- Works beautifully on nude, blush, or very pale pink bases where the stone truly stands out
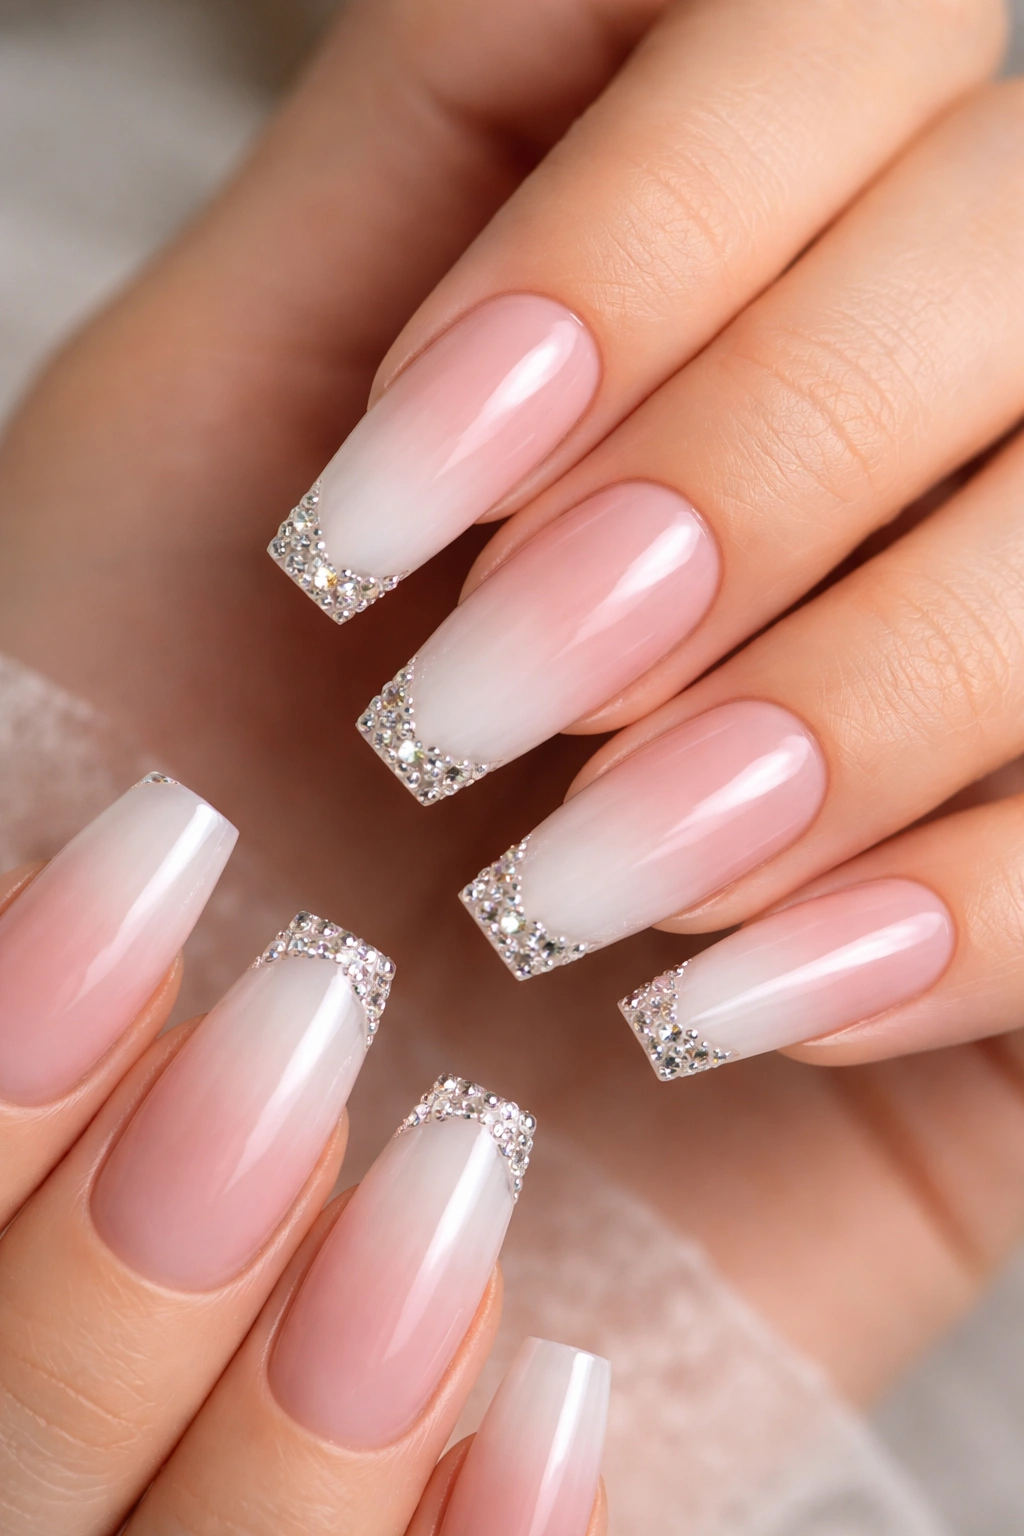
7. French Tip with Rhinestone Accent
This classic nail design gets an upgrade by placing rhinestones along the French tip line or scattered across the white tip area. It combines timeless elegance with contemporary sparkle.
Why This Design Works So Well
The French tip is universally flattering and professional-looking on its own, but adding rhinestones elevates it instantly. This design works for virtually any setting—professional environments, casual outings, formal events. The rhinestone placement maintains the clean lines of the traditional French tip while adding glamour that catches light.
Styling Options
- Rhinestones placed in a continuous line following the curved edge of the French tip
- Small clusters of stones at the outer corners of the white tip for a subtle accent
- Graduated rhinestones along the tip line, larger in the center and smaller toward the sides
- Scattered stones across the white tip area in a random constellation pattern
- Colored rhinestones (rose gold, champagne) for a warmer, less traditional take on the classic French
8. Geometric Half-and-Half Split
This bold design divides each nail vertically or diagonally into two distinct halves—one side solid color and one side densely packed with rhinestones. The sharp division creates an ultra-modern, artistic effect.
Why This Design Works So Well
The geometric split feels very fashion-forward and creates instant visual impact. It’s a design that photographs beautifully and generates genuine conversation. The division also means you can use two complementary colors or finishes, creating more visual interest than a monochrome design.
Execution Variations
- Vertical division down the center with rhinestones on one side and solid color on the other
- Diagonal split from corner to corner for a more dynamic, unexpected composition
- Left half in rhinestones, right half in matching metallic finish for shimmer on both sides
- Contrasting base colors on each half with rhinestones only on the darker side for maximum contrast
- Graduated transition where the rhinestone coverage gradually decreases from one side to the other
9. Starburst or Explosion Pattern
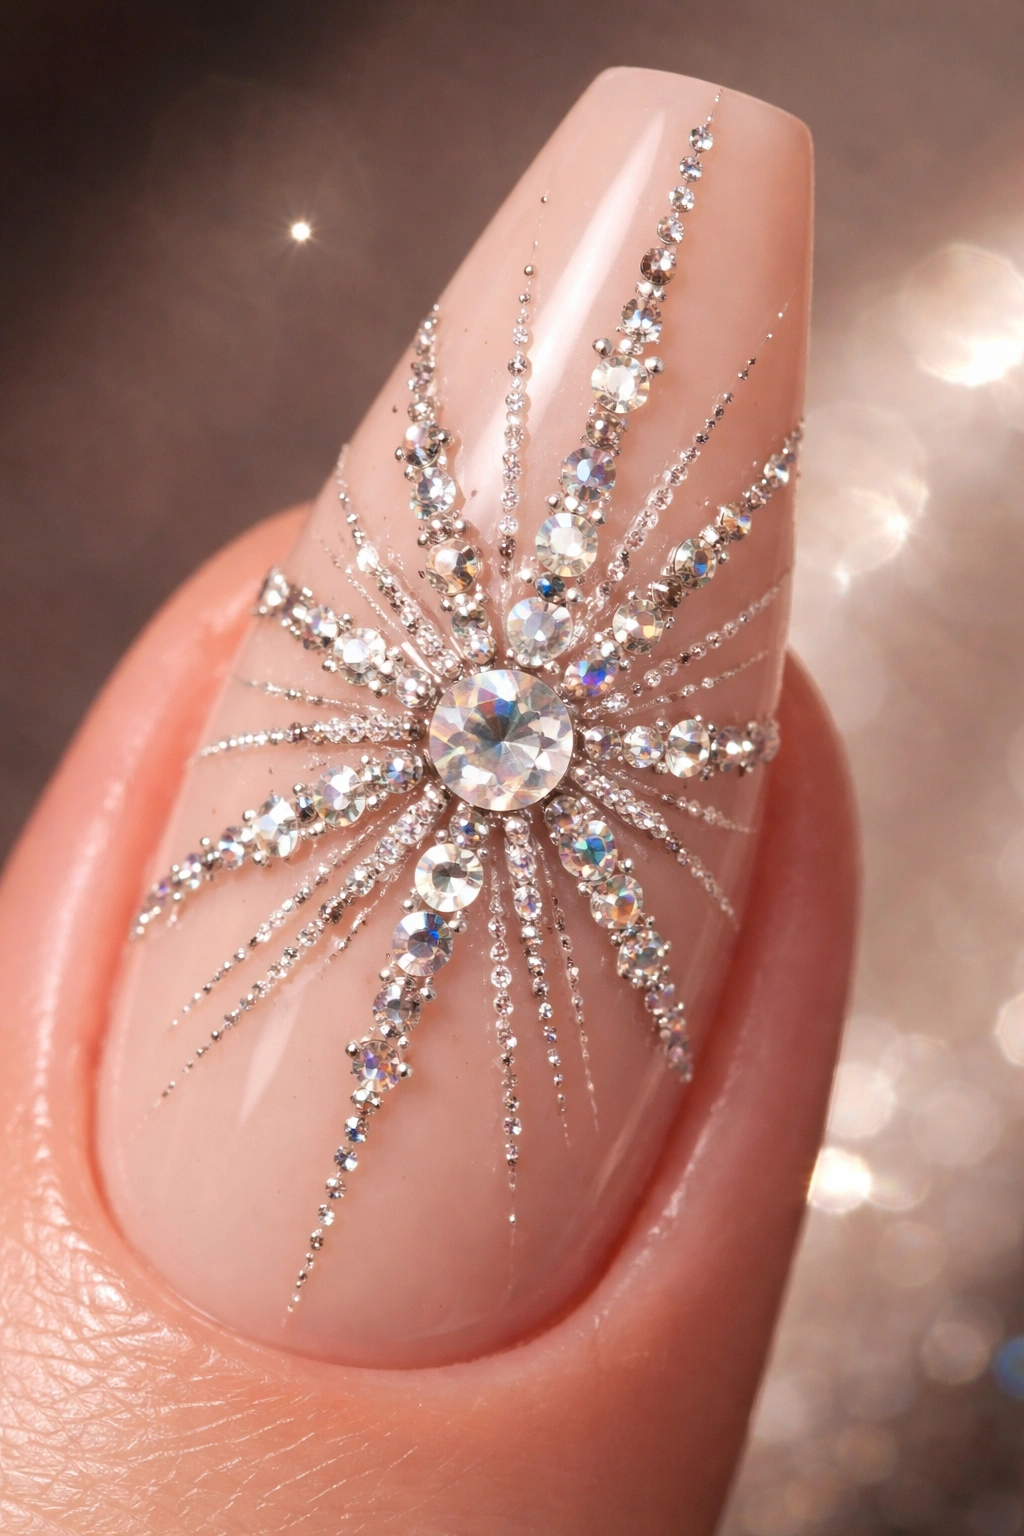
This design radiates rhinestones outward from a central point, creating the illusion of light rays or a starburst explosion across the nail. The stones become progressively more spaced apart as they move toward the edges.
Why This Design Works So Well
The starburst immediately draws the eye and creates a sense of movement and energy. This design is particularly flattering on longer coffin nails because you have room for the rays to fully develop and spread. It’s dramatic without being overwhelming, and it works beautifully in both bright and subtle stone colors.
How to Create It
- Start with a larger stone or cluster in the exact center of the nail
- Build lines of progressively smaller stones radiating outward like sun rays
- Keep the rays evenly spaced around the center point for visual balance
- Space stones farther apart as they reach the edges for a sense of dispersal
- This design works exceptionally well on nude, pale pink, or champagne bases where contrast makes the rays pop
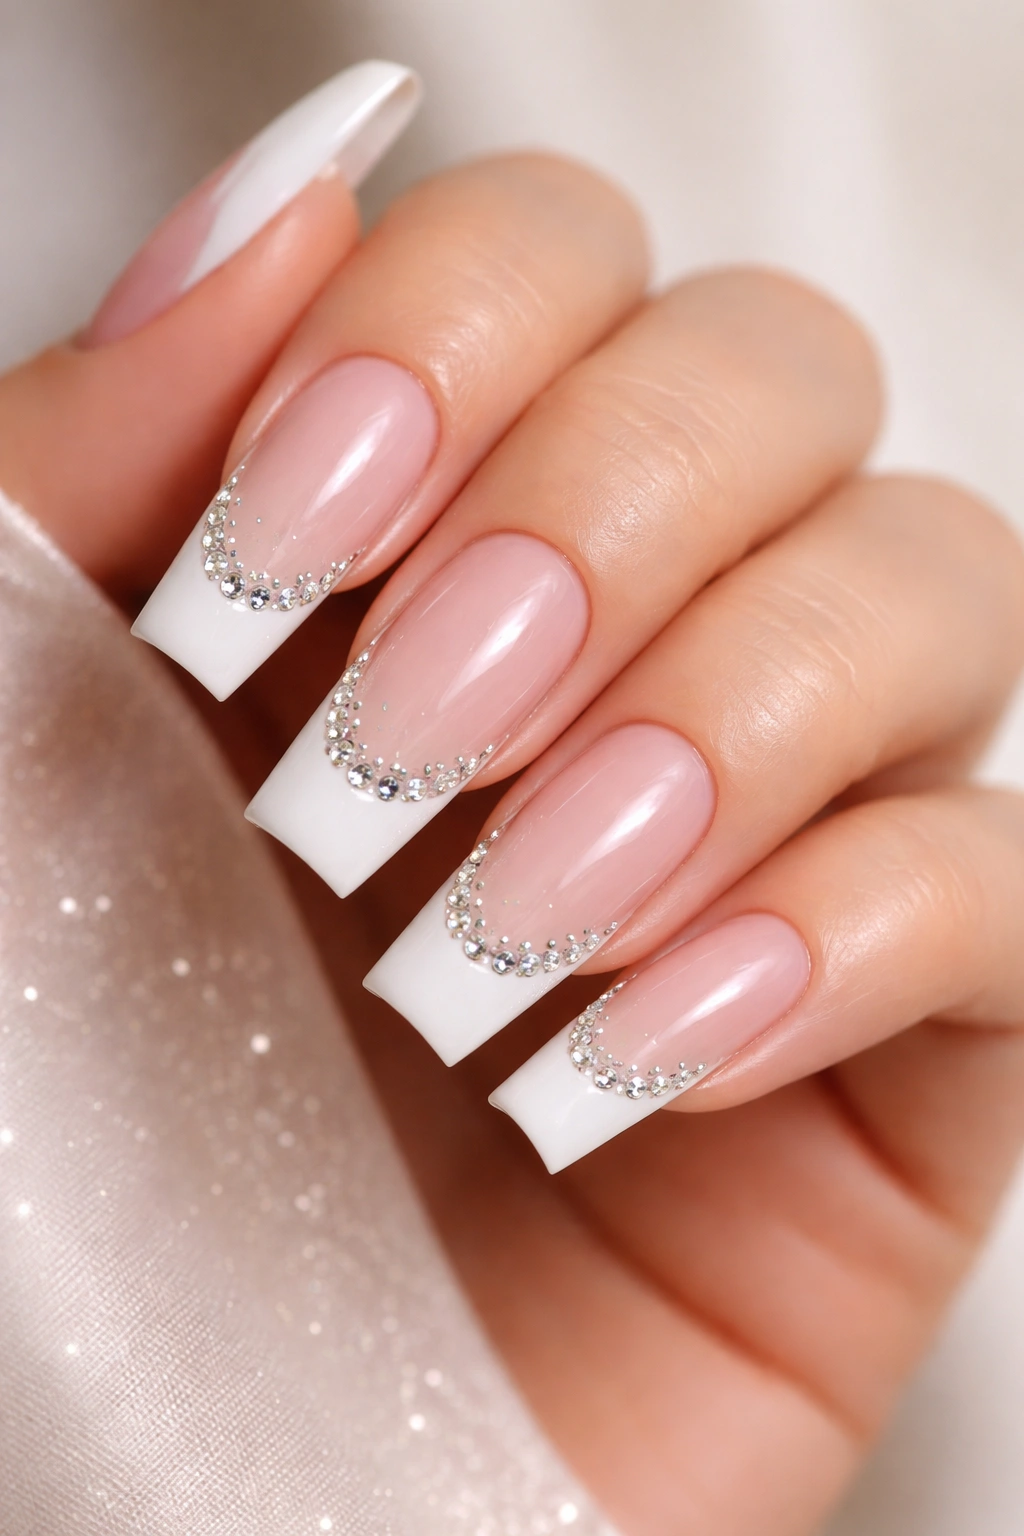
10. Negative Space with Corner Accents
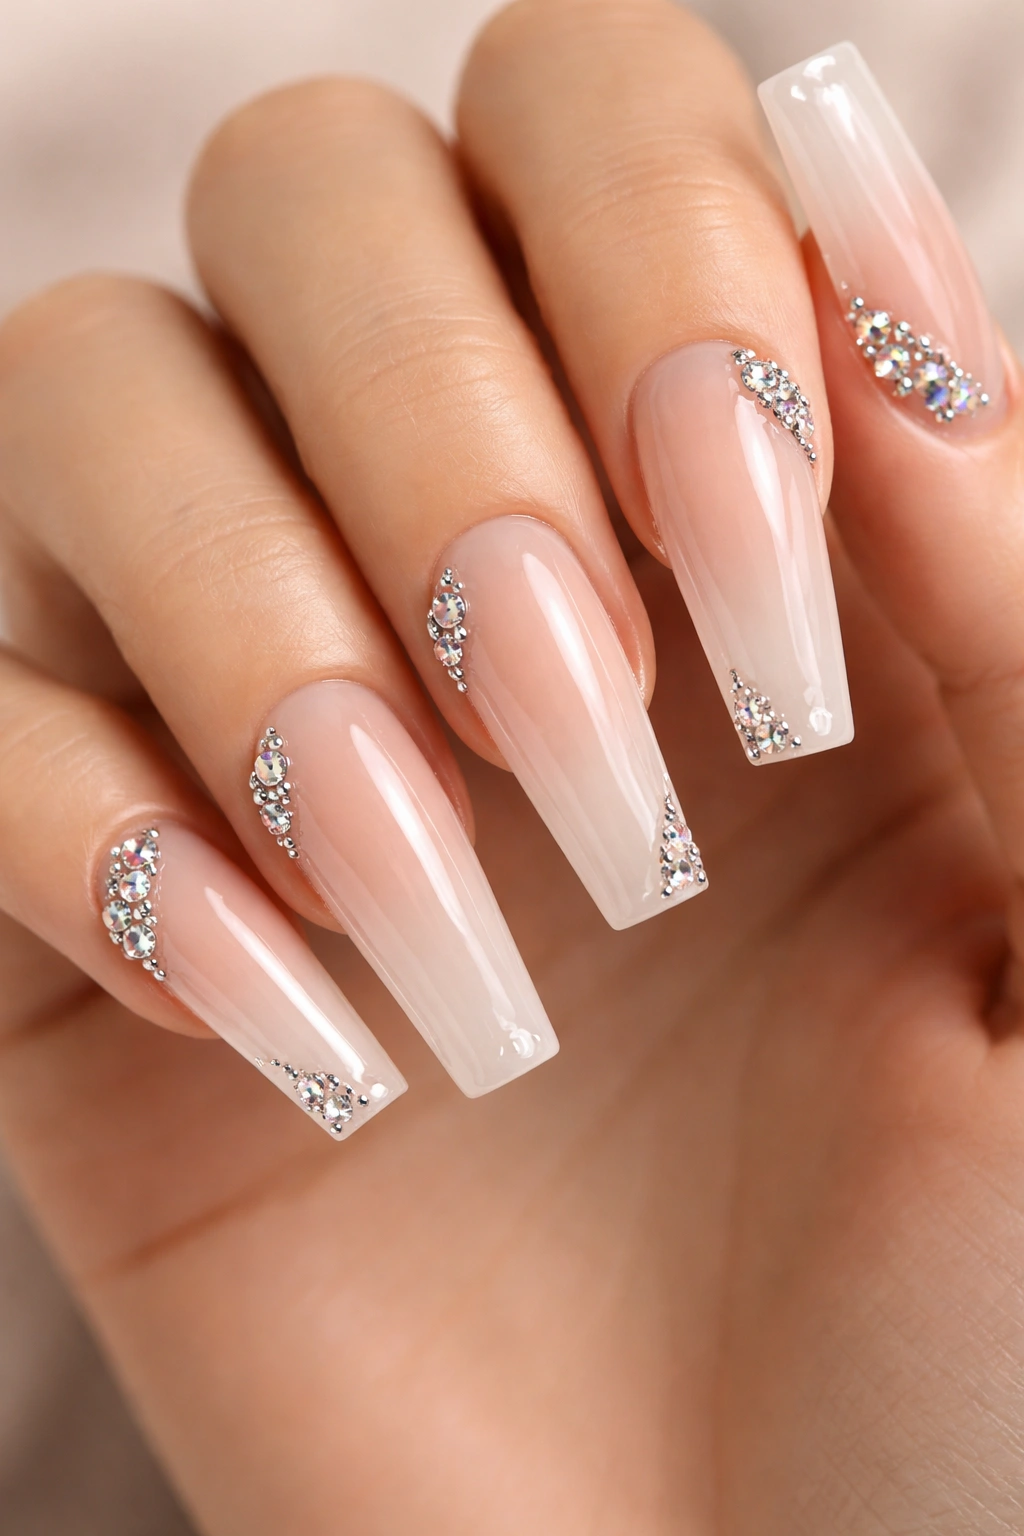
This sophisticated design embraces negative space—leaving much of the nail bare—while placing carefully positioned rhinestone accents at the corners or edges. It’s minimal, elegant, and surprisingly striking.
Why This Design Works So Well
Negative space creates an elegant, contemporary aesthetic that feels intentional and high-fashion. By strategically placing stones at the corners or edges, you create a frame around the emptiness, which paradoxically makes the design feel complete and finished. It’s perfect for anyone who loves sparkle but also values simplicity.
Design Approaches
- Crystal rhinestones at all four corners creating a subtle frame
- Larger stone at one corner with smaller accent stones trailing toward the center
- Stones placed only along the top edge or along one side of the nail
- Curved arrangement of stones that echoes the coffin shape’s natural lines
- Paired with a very subtle background color (almost nude, almost white) so the emptiness feels intentional
11. Ombre Gradient with Rhinestone Tip Line
This design combines a soft ombre gradient across the nail with a distinct line of rhinestones along the free edge, creating a defined tip that looks jewelry-like. The line essentially becomes a decorative border for the gradient.
Why This Design Works So Well
The rhinestone tip line adds definition and creates a clean, finished appearance to the ombre. The contrast between the smooth gradient and the sparkly border adds visual interest and dimension. This design feels both artistic and polished—like something a professional would create.
Stone and Color Pairing Ideas
- Soft pink to white gradient with clear crystal rhinestones for a delicate, romantic effect
- Nude to champagne gradient with rose gold rhinestones for warm, luxurious vibes
- Soft gray to pale blue gradient with AB rhinestones for a cool, contemporary look
- Pale peach to coral gradient with warm-toned rhinestones for a sunset-inspired design
- White to silver gradient with icy blue or clear rhinestones for a winter aesthetic
12. Asymmetrical Scattered Gems
This playful approach places rhinestones randomly across the nail surface with no particular pattern or order. Some nails have more stones, others have fewer, creating an intentionally asymmetrical, free-spirited look.
Why This Design Works So Well
The asymmetrical placement feels modern, artistic, and less formal than perfectly organized designs. It gives off an effortlessly cool, creative energy. Despite the randomness, it somehow feels more sophisticated than it has any right to be, especially when you use high-quality stones and maintain good spacing.
Making It Work
- Think of it as a constellation rather than random placement—aim for a generally balanced distribution even if it’s not symmetrical
- Mix stone sizes and finishes for added depth
- Leave enough negative space so stones don’t feel cramped or chaotic
- Works beautifully on darker nail colors where each stone stands out distinctly
- The more you vary the placement, the less formal the overall impression becomes
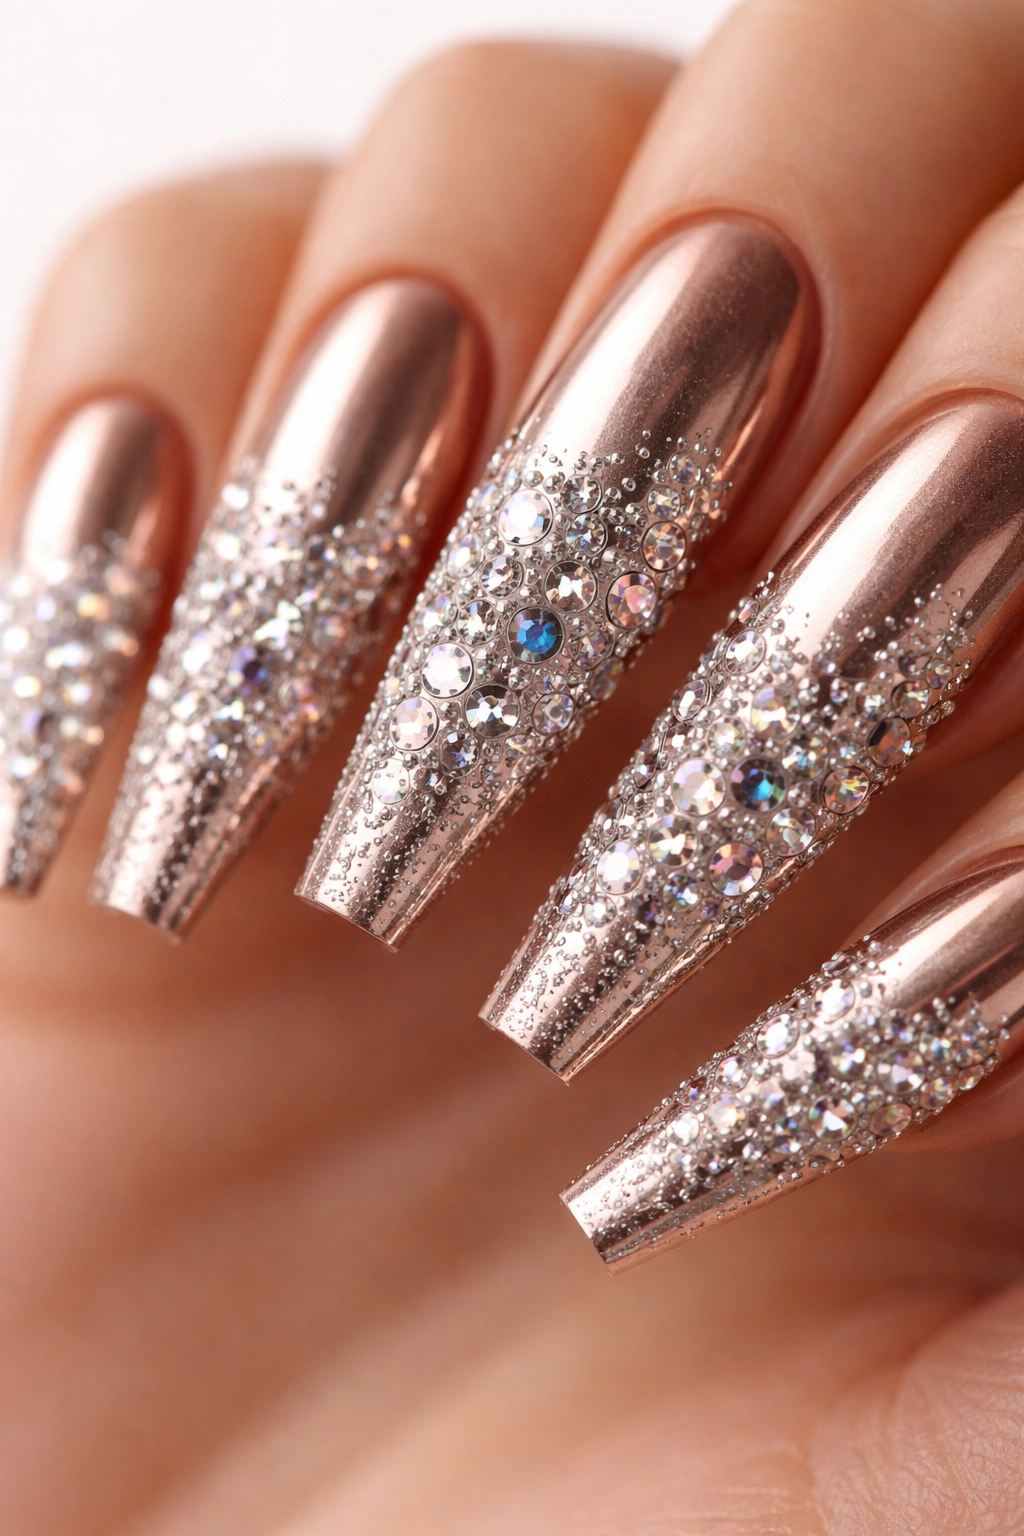
13. Gradient Halo Around the Tip

This elegant design creates a concentrated halo of rhinestones around the very tip of the nail, with the stones becoming denser toward the edge and graduating to nothing near the cuticle. It’s like wearing a sparkling crown at your fingertips.
Why This Design Works So Well
The concentrated halo around the tip creates a beautiful point of focus that draws attention to the nail’s shape. The graduation from dense to sparse feels purposeful and elegant rather than accidental. This design shows off the elongated coffin shape beautifully while adding just the right amount of glamour.
Styling Variations
- Dense rhinstone concentration directly at the tip edge with a gradient thinning toward the middle of the nail
- Halo that concentrates more on the center-tip area, leaving the corners slightly less covered
- Mix of larger stones at the very edge with progressively smaller stones as you move back
- Colored rhinestones in the densest area graduating to clear stones as coverage thins
- Paired with a subtle glitter or shimmer base to enhance the luminous quality
14. Double-Line Design with Central Fill
This geometric design features two parallel lines of rhinestones running down the center of the nail with the space between them filled with additional stones or a contrasting color. It creates a striped effect with beautiful symmetry.
Why This Design Works So Well
The double-line creates visual balance and a sense of intentional design that feels very put-together. The symmetry is inherently satisfying to the eye, and the filled center creates a cohesive design block. This works particularly well on longer nails where you have room to develop the full effect.
Execution Details
- Create two parallel lines using consistently sized rhinestones
- Fill the space between with smaller stones, or leave it as a colored stripe
- Keep spacing between the two lines proportional—typically about one-third to one-half the nail width
- The double-line acts as a frame for whatever you choose to do in the center space
- Works beautifully paired with glitter or a metallic finish in the center area
15. Scattered Rhinestone Fade-Out
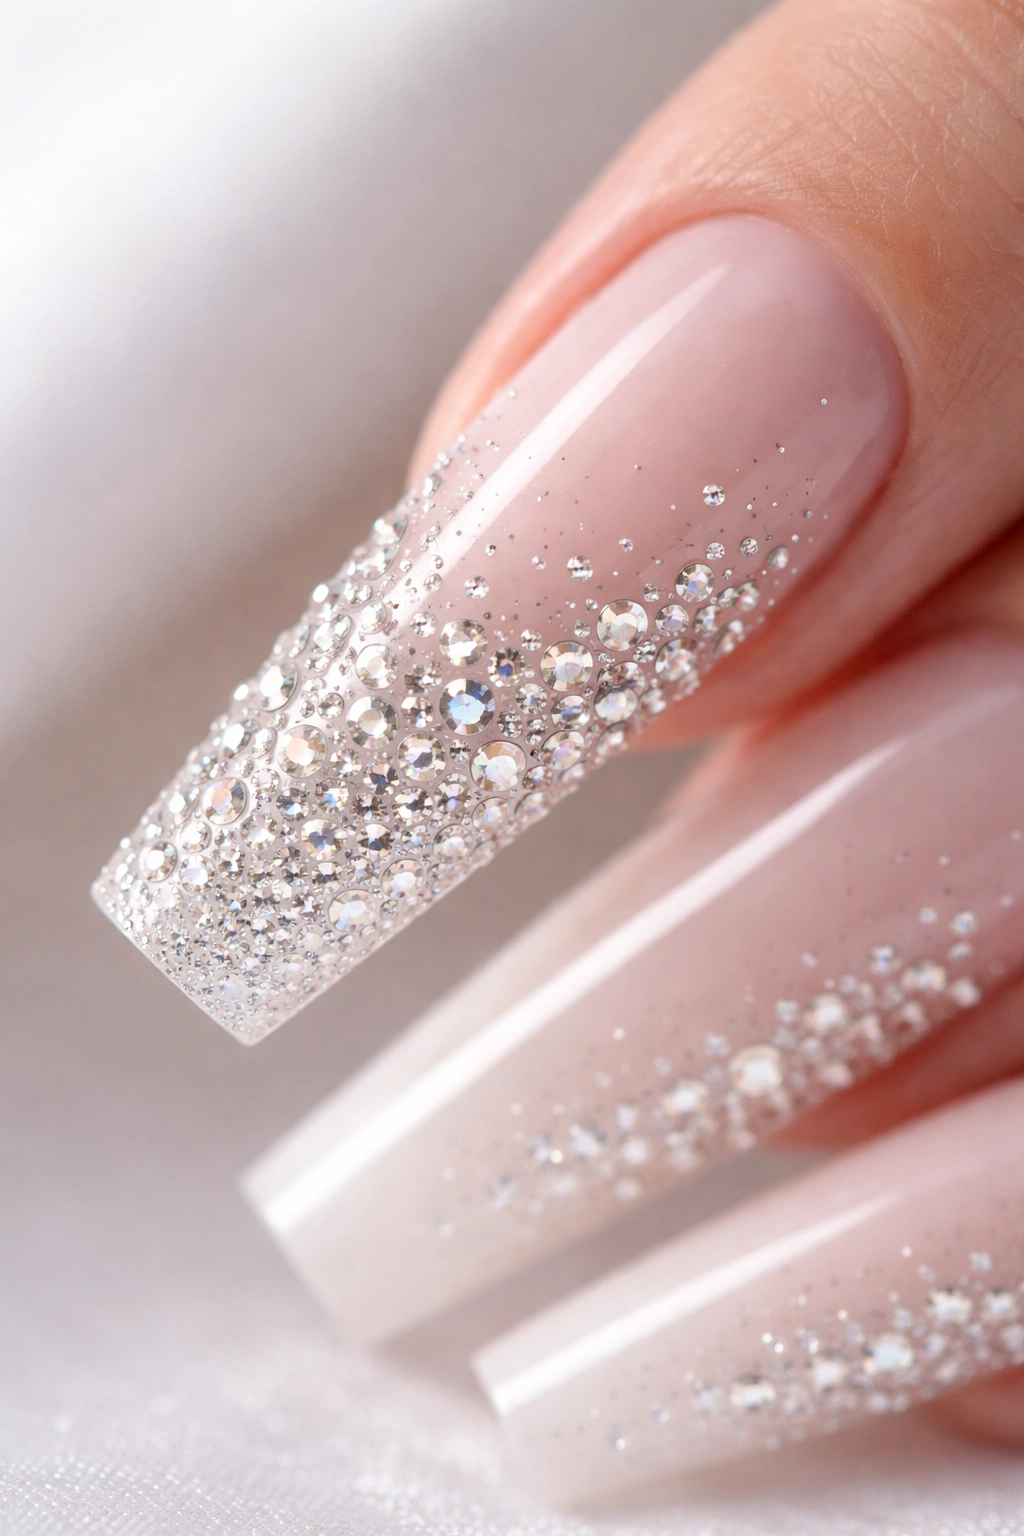
This design places rhinestones densely at one end of the nail and gradually decreases coverage toward the other end, creating a fade-out effect. Typically stones are concentrated near the tip and barely present near the cuticle, creating directional movement.
Why This Design Works So Well
The fade-out creates a sense of movement and direction that feels dynamic and modern. The gradual transition prevents the design from feeling too heavy while still delivering significant sparkle. This approach is particularly flattering on longer coffin nails because the fade has room to develop fully.
Design Execution
- Start with dense rhinestone coverage near the free edge
- Gradually space stones farther apart as you move toward the center of the nail
- By the time you reach the cuticle area, stones should be completely absent or nearly so
- Use consistently sized stones for a clean, intentional appearance
- The fade creates the illusion of light and shimmer concentrated at the nail tip
16. Accent Band with Rhinestone Detailing

This design features a colored accent band running horizontally across the nail at the midpoint or tip area, with rhinestones placed strategically along or within this band. It’s a design that combines color blocking with sparkle.
Why This Design Works So Well
The accent band divides the nail into distinct zones, and the rhinestones within it add luxury and detail without covering the entire nail. This creates a very intentional, designed appearance. The band itself becomes a frame for the sparkle, making the stones feel like deliberate embellishment rather than decoration.
Band Placement Ideas
- Horizontal band at the tip with rhinestones outlining both edges of the band
- Mid-nail band that’s wider on one side, creating a dynamic, asymmetrical frame
- Band that follows a curved or diagonal path rather than a straight horizontal line
- Metallic band with rhinestones placed at intervals along its length
- Contrasting-colored band with matching rhinestones for a coordinated, high-fashion look
17. Rhinestone Gradient with Metallic Base
This sophisticated design pairs a metallic or shimmer base color with a rhinestone concentration that gradually increases toward the tip. The metallic base catches light independently from the stones, creating a multi-dimensional effect.
Why This Design Works So Well
The combination of metallic shimmer and rhinestone sparkle creates incredible depth and light-play. The gradient of stone concentration adds another layer of visual interest. This design is particularly striking under different lighting conditions—indoors, outdoors, and in photos, it looks different and beautiful every time.
Stone and Base Pairings
- Rose gold metallic base with rose gold and clear rhinestones in an increasing gradient
- Silver metallic base with iridescent AB rhinestones concentrating toward the tip
- Champagne shimmer base with warm-toned rhinestones creating a cohesive, warm aesthetic
- Gunmetal metallic base with cool-toned or clear rhinestones for modern contrast
- Gold metallic base with yellow-tinted or warm rhinestones for a luxurious, coordinated effect
18. Reverse Gradient with Top-Heavy Rhinestones
This final design concept places the color gradient in reverse (dark to light) while loading the concentration of rhinestones heavily in the top portion of the nail, creating an inverse relationship between color and sparkle. It’s unexpected and visually intriguing.
Why This Design Works So Well
The combination of reverse gradient and top-heavy rhinestone placement creates an almost architectural design that feels very deliberate and designer-created. The concentration of stones at the top creates visual weight that’s unusual and eye-catching. This is a design for someone who loves unexpected combinations and isn’t afraid to be bold.
Achievement Tips
- Gradient from deep color at the tip to pale or nude at the cuticle
- Rhinestone concentration is heaviest near the cuticle and base area, lightest at the tip
- This creates an inverse relationship that feels fresh and contemporary
- Mix stone finishes and sizes in the concentrated area for maximum visual interest
- The pale area at the tip has minimal or no stones, letting the color graduation shine
- Works exceptionally well on deep jewel tones paired with crystal or metallic stones
Final Thoughts
Long coffin nails with rhinestones offer an incredible range of styling possibilities, from subtle and understated to completely over-the-top glamorous. The key to finding a design that works for you is understanding your personal style, how much daily sparkle you actually want on your hands, and what occasions you’re dressing your nails for most often. A design that feels perfect for a night out might feel overwhelming for everyday wear, and that’s completely okay—there’s genuinely something for everyone in this collection.
The technical aspect of creating these designs has also become more accessible than ever. With quality rhinestones readily available online, better adhesives designed specifically for nail art, and countless tutorials, you can absolutely achieve these looks at home. That said, if you prefer professional application or want the extra assurance that your design will last through your busy week without stones loosening, a skilled nail technician can bring these ideas to life with excellent results.
Whatever design you choose, remember that the most important thing is how they make you feel when you look at your hands. Rhinestone coffin nails are a form of self-expression and creative play. They catch light, they catch compliments, and they absolutely catch your own eye throughout the day—which is exactly the point.
