

Coffin nails have become the go-to shape for anyone craving that perfect balance between dramatic and wearable. The tapered sides with the flat, squared-off tip create an inherently sophisticated silhouette that photographs beautifully and feels surprisingly practical for everyday life — unlike stiletto nails that catch on everything, coffin nails give you edge without the constant frustration.
Medium-length coffin nails are where the magic happens. They’re long enough to show real design work and make a statement, but short enough that you can actually text, type, and live your life without constantly worrying about breakage. This sweet spot is exactly where ombre nail art truly shines. The gradient effect — that smooth color transition from one shade to another — looks more dramatic on the elongated canvas of coffin nails, and medium length keeps the whole look sophisticated rather than over-the-top.
An ombre manicure is more than just a pretty gradient. It’s a technique that requires understanding color theory, blending methods, and how pigment intensity affects the final visual impact. When you get it right, an ombre design transforms the entire hand, making the nails look more elongated, the fingers appear more graceful, and the whole presentation feel intentional and elevated. The best part? A well-executed ombre works for literally any occasion — you can do a soft, romantic gradient for a wedding, a bold jewel-tone transition for a night out, or an earthy blend for everyday confidence.
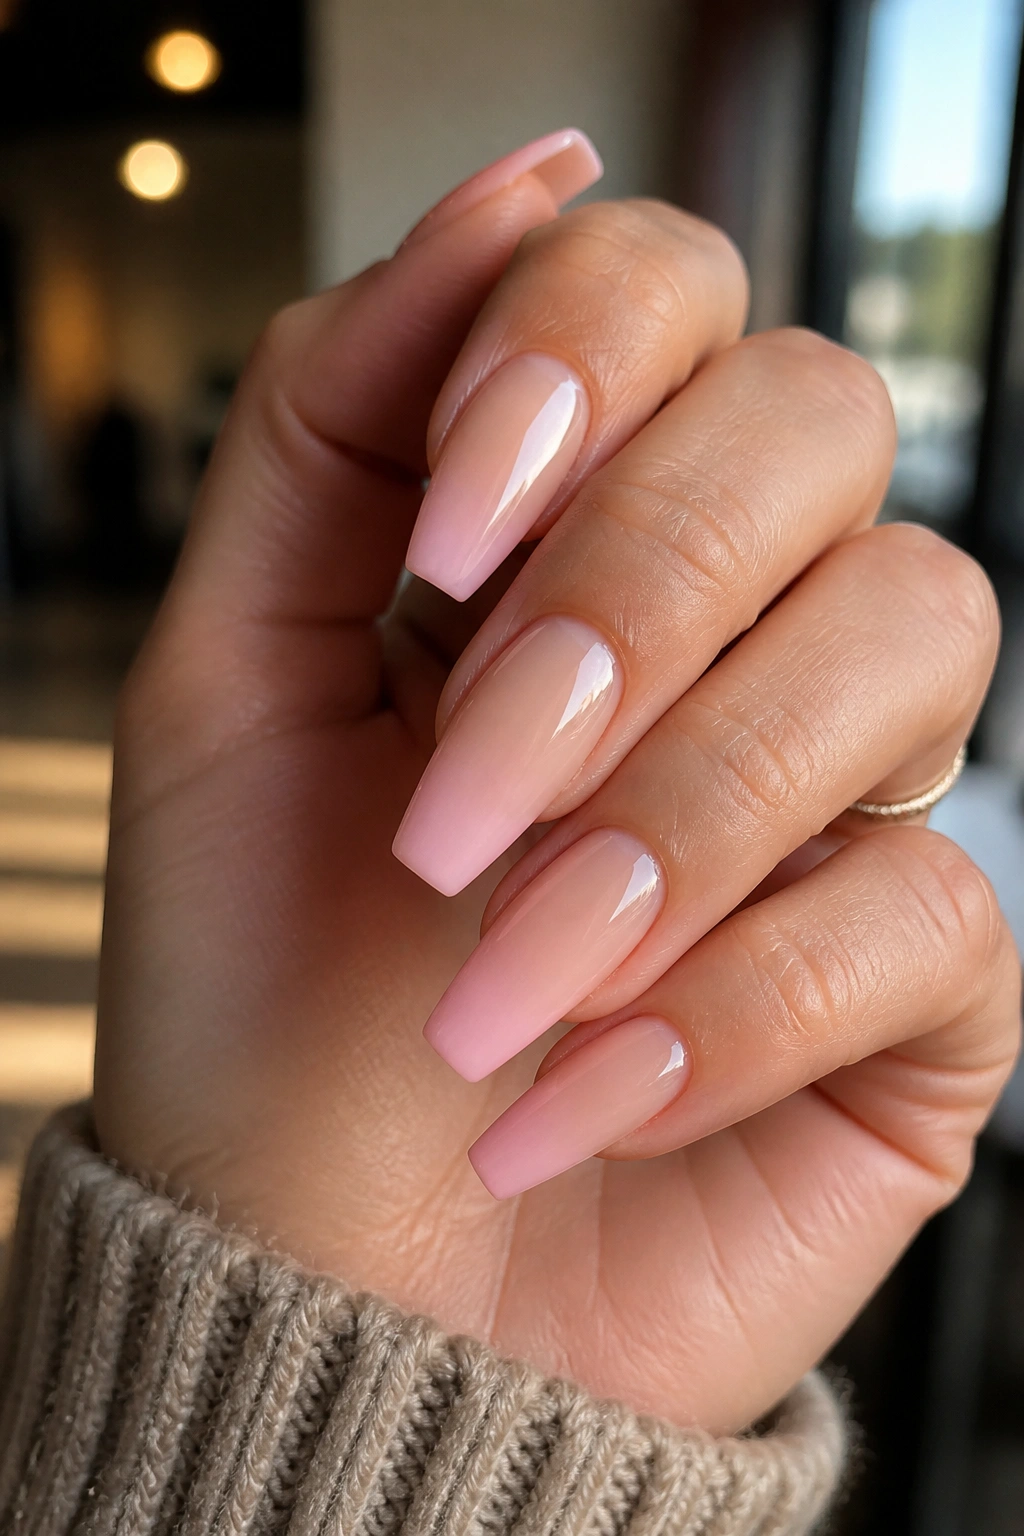
1. Soft Blush to Nude Ombre
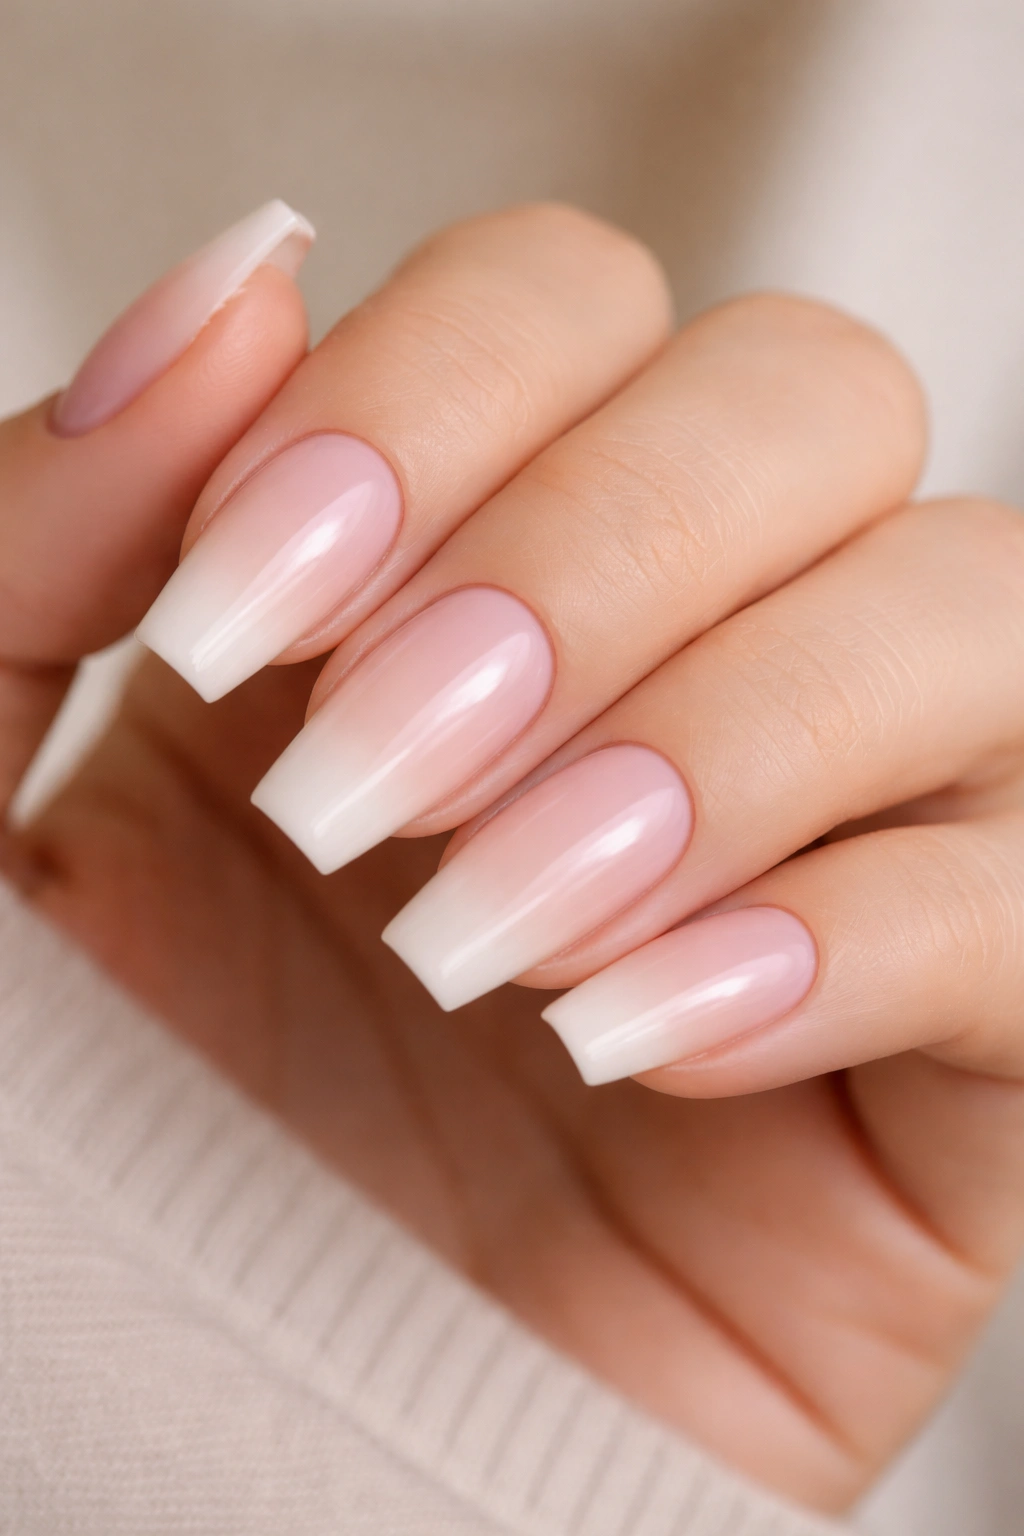
This is the classic ombre that never goes out of style, and for good reason. The transition starts with a delicate blush pink that sits right at the edge of being a true color, then gradually fades into warm, creamy nude tones as you move toward the tip. On medium coffin nails, this creates the perfect “my nails but better” effect that makes your hands look naturally polished without announcing the manicure loudly.
Why This Combination Works So Well
The beauty of blush-to-nude is that it mimics the natural gradient of a perfectly healthy nail bed. The peachy undertones in blush pink create harmony with most skin tones, and because the color is so soft, the gradient can be subtle or more pronounced depending on your preference. The nude tip ensures that your nails always look fresh — there’s no obvious growth line like there would be with a darker shade.
Application Tips for Success
- Start with a high-quality pink base that has enough pigment to show up clearly but stays in the “dusty” family rather than hot pink territory
- Use a makeup sponge or a soft blending brush to create the gradient rather than trying to blend on the nail directly — this gives you far more control
- Seal everything with a thick layer of glossy top coat, which will blur any harsh lines and create that seamless, professional finish
- If you’re a beginner, this gradient is actually forgiving because the color shift is subtle — imperfect blending won’t be as obvious
Pro tip: Apply this ombre when you’re not in a rush. The sponge-dabbing method takes patience, and rushing through it is what creates visible stripes instead of smooth transitions.
2. Deep Burgundy to Gold Ombre
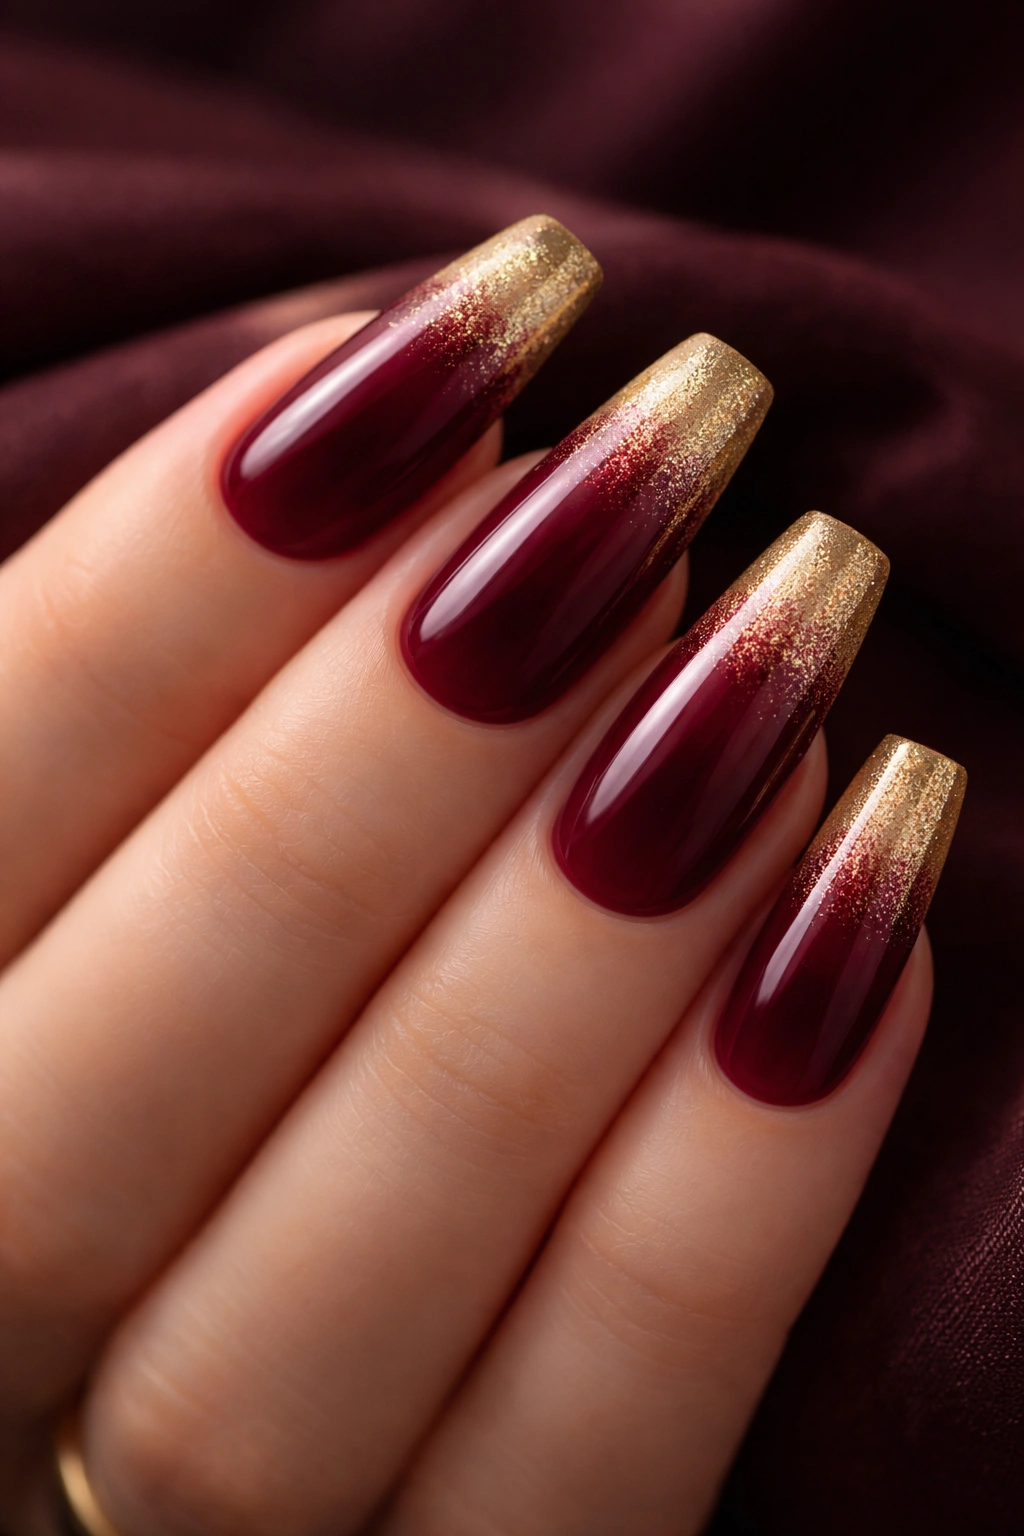
Now we’re stepping into territory that photographs like a dream. Deep burgundy — think wine-stained velvet — as the base color, bleeding into shimmery gold at the tips creates an ombre that’s equal parts cozy and glamorous. On medium coffin nails, this gradient looks rich and sophisticated, perfect for evening occasions or anyone who loves moody, jewel-toned aesthetics.
The Psychology of Wine and Gold Together
Burgundy is inherently warm and luxurious, while gold adds shimmer and catches light beautifully. Together, they create visual interest without clashing. The burgundy grounds the look in something substantial and elegant, while the gold prevents it from feeling too dark or heavy. This is the ombre choice for someone who wants to command attention without trying too hard.
How to Achieve This Look at Home
- Use a deep burgundy gel or regular polish as your base color — make sure it’s fully opaque so the color reads richly
- Create your gold section using a shimmery or metallic gold polish; you can use a sponge to blend the transition zone or use a soft, dry brush to feather the edge where colors meet
- If the burgundy-to-gold shift feels too abrupt, add a transitional shade — a muted bronze or burnt orange in the middle creates a smoother visual flow
- Don’t skip the top coat; it brings all the shine together and makes the gradient look intentional rather than patchy
Worth knowing: This ombre actually improves with slightly imperfect blending. A few visible color bands in the transition can look like intentional striping, which reads as intentional design rather than a blending error.
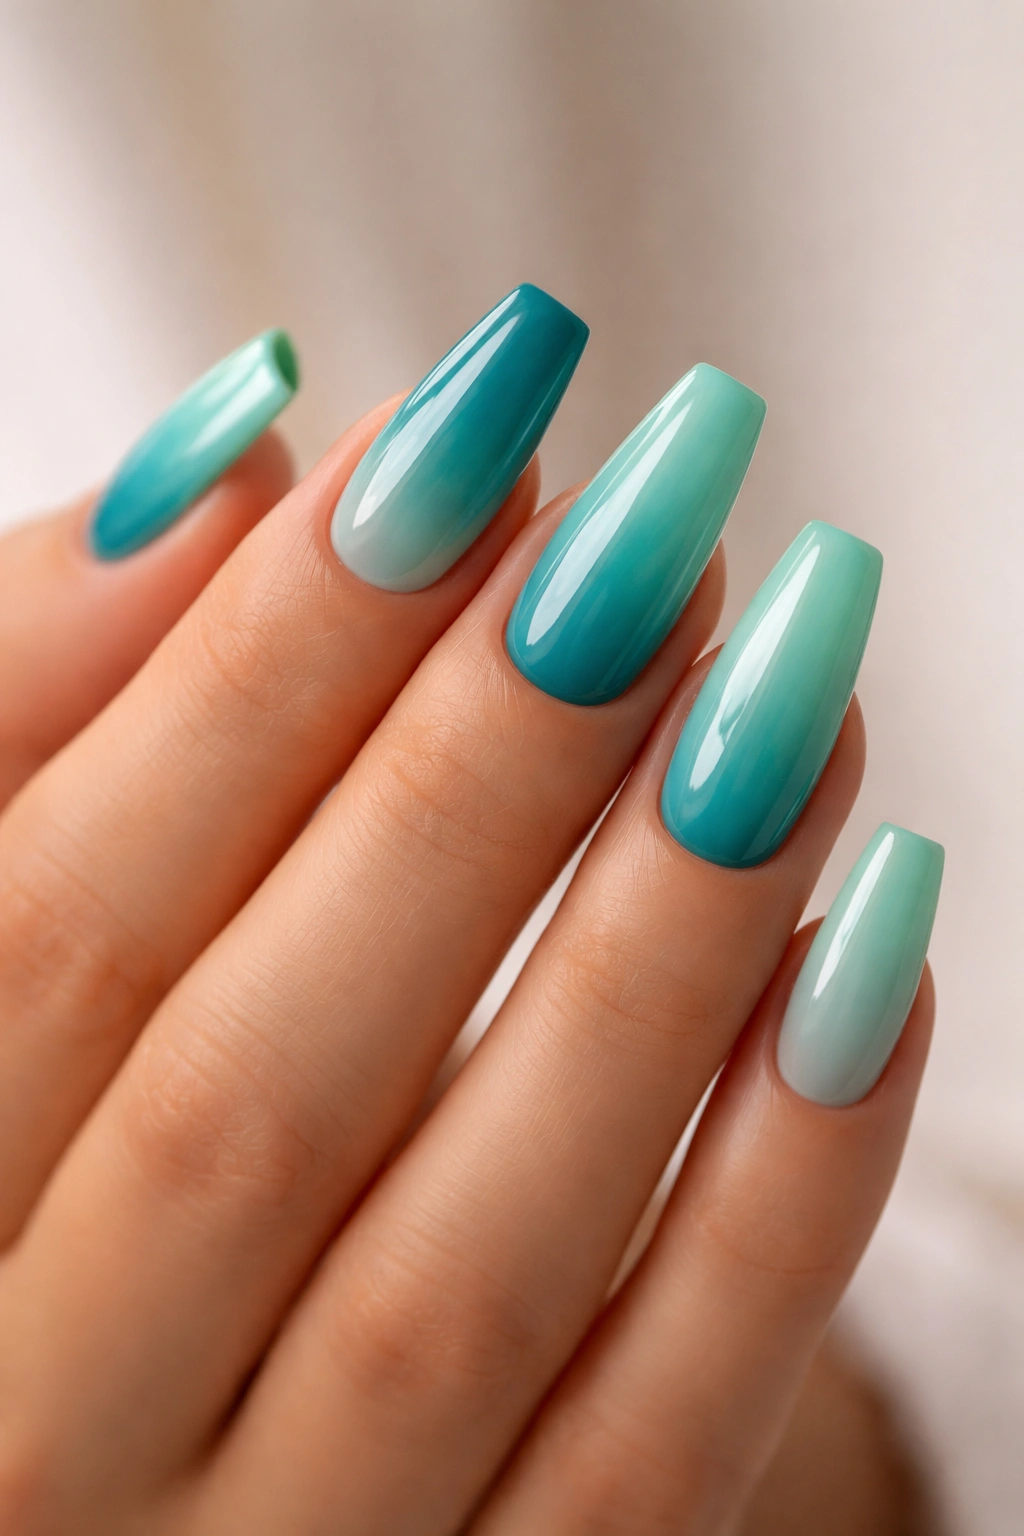
3. Midnight Blue to Turquoise Gradient
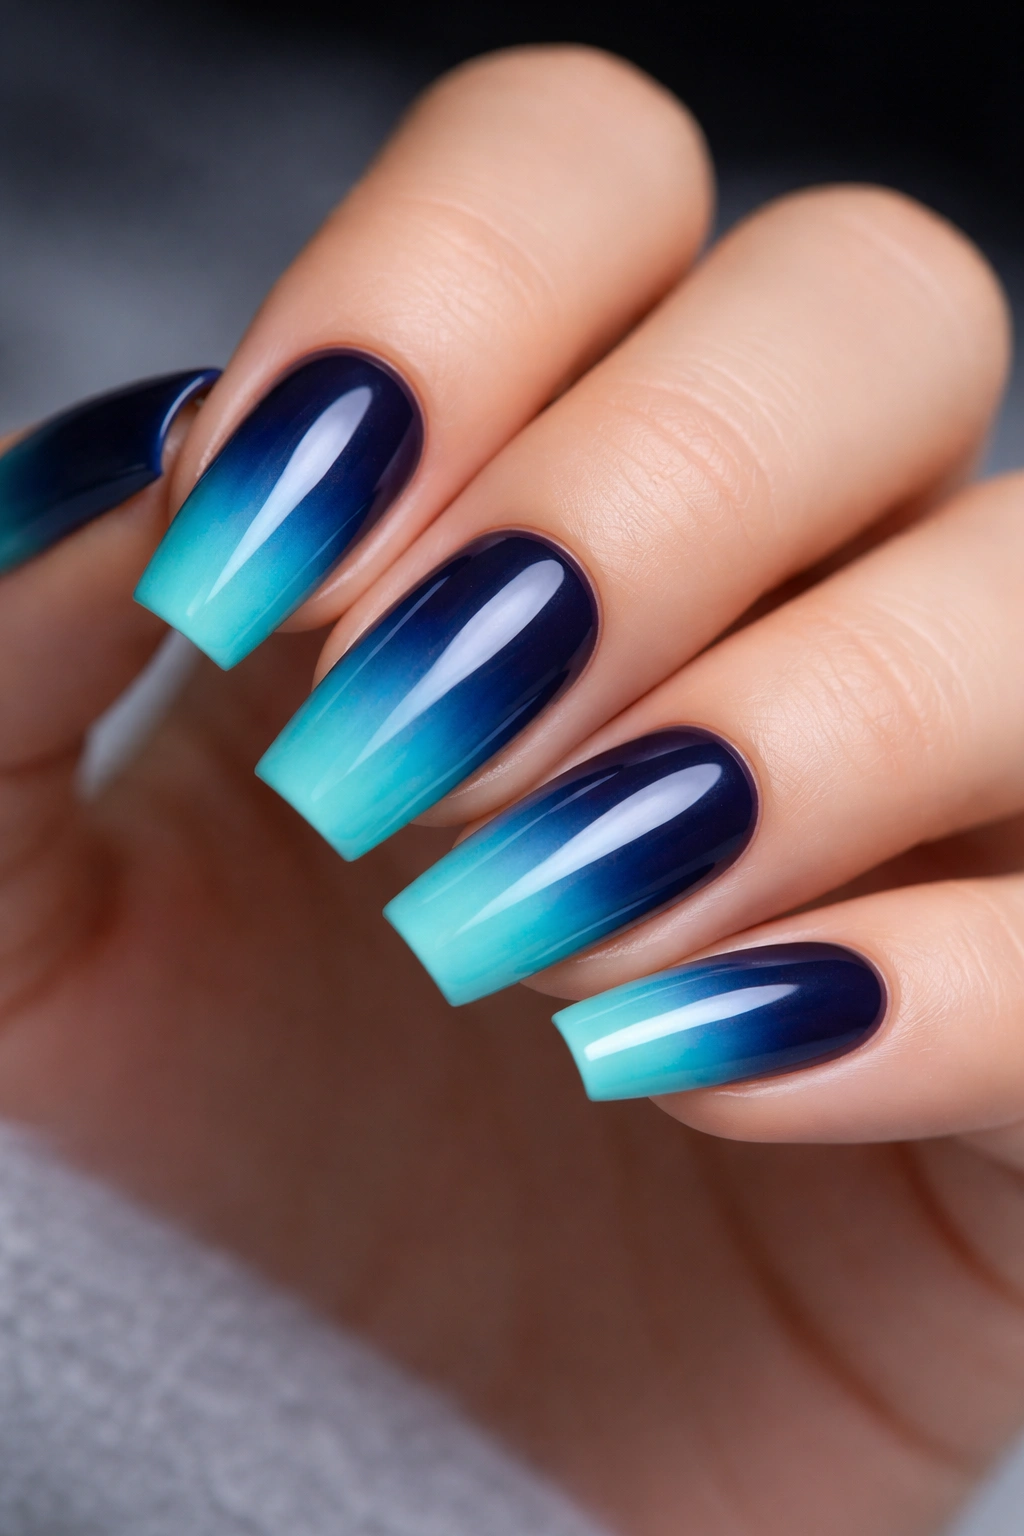
This ombre takes the entire color story underwater. The base is a deep, almost black-blue — midnight blue that’s just dark enough to feel mysterious — and it gradually lightens into vibrant turquoise at the nail tips. On medium coffin nails, this creates a statement ombre that feels modern, cool-toned, and endlessly wearable.
Why Cool Tones Work on Coffin Nails
The elongated shape of coffin nails naturally creates a visual flow from base to tip, which pairs perfectly with directional gradients like blue-to-turquoise. Cool tones like blue and teal are associated with calm and confidence, so even though this is a bold ombre, it doesn’t read as aggressive. It’s sophisticated instead.
Nailing the Technique
- Start with midnight blue as a full base — you want the color to be completely opaque and rich
- Create turquoise by mixing a bright teal base with a touch of cyan or bright blue if your turquoise reads too green
- Use a damp blending brush (not a sponge) to create soft, feathered edges where the two colors meet — this method gives you more precision than sponge-dabbing
- The transition zone should be roughly in the middle of your nail, creating a balanced visual split
Quick facts:
- This color combination works on all skin tones, though it reads slightly different: warmer skin tones make the gradient look more vibrant, while cooler skin tones create a more harmonious blend
- The shimmer in some turquoise polishes can actually help disguise blending imperfections
- This ombre pairs beautifully with silver or white nail art accents if you want to add extra visual interest
4. Rose Pink to Peach Ombre
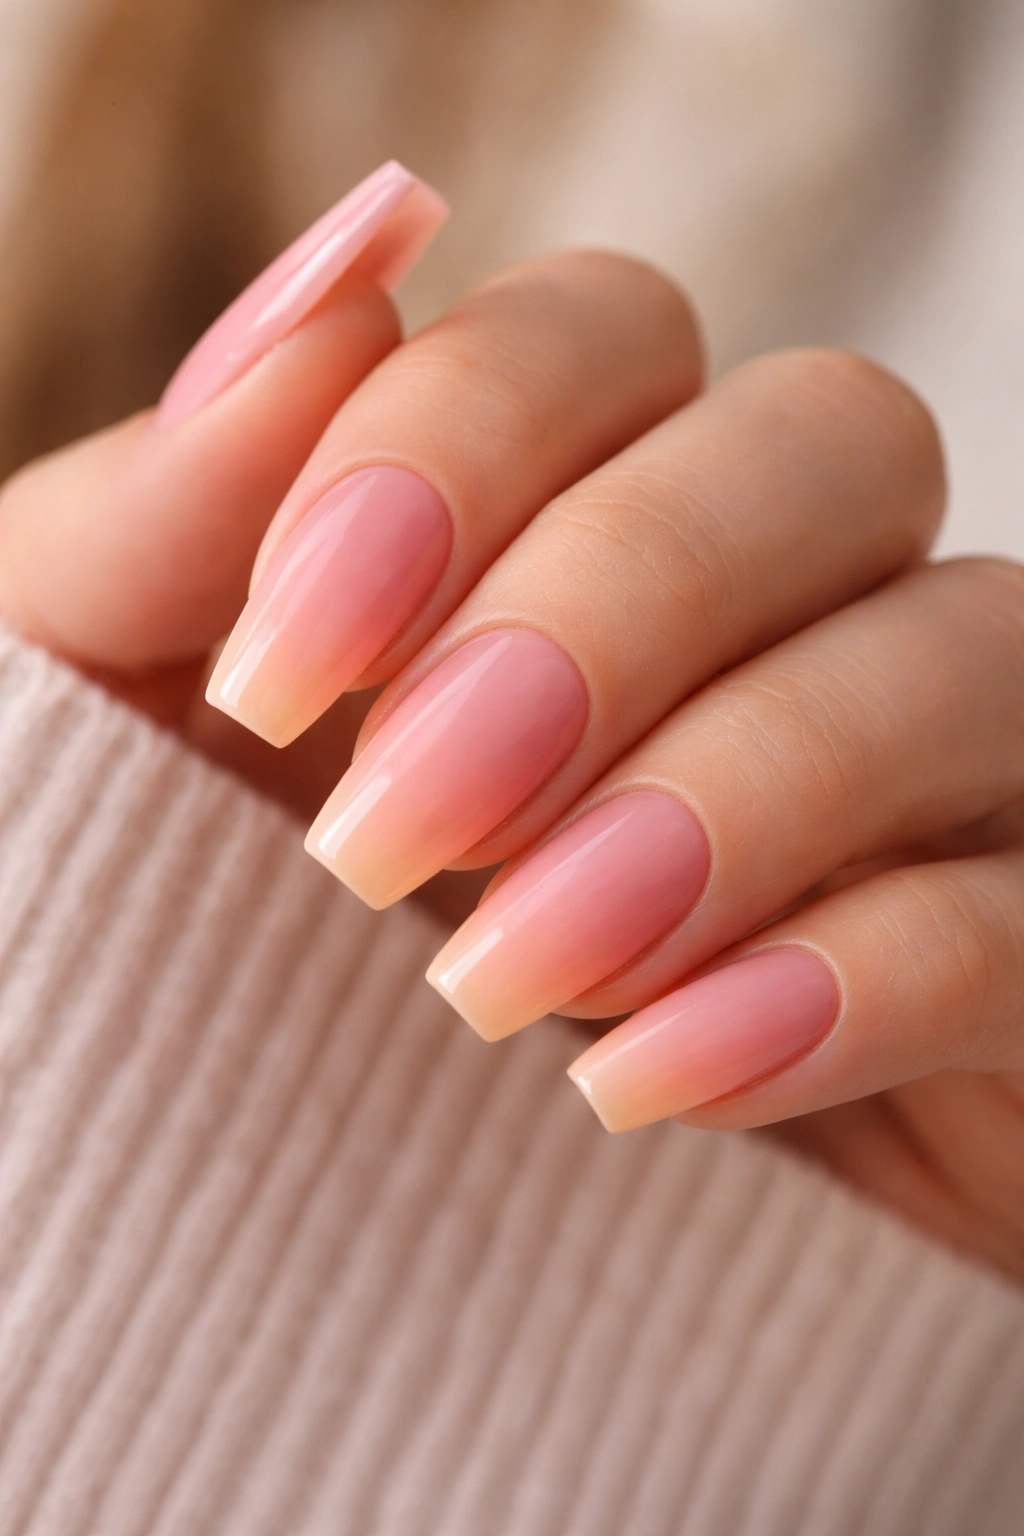
Warm, feminine, and absolutely wearable, the rose pink to peach gradient is the ombre for anyone who loves peachy, romantic tones. This one starts with a true rose pink — not too fuchsia, not too mauve — and transitions into soft, warm peach at the tips. On medium coffin nails, it creates a look that’s polished enough for professional settings but fun enough for everyday wear.
The Warmth Factor
The reason rose-to-peach works so beautifully is that both colors sit in the same warm color family, so the transition feels natural rather than jarring. There’s no harsh temperature shift — just a gradual lightening and shift in undertone. This is why the ombre looks effortless, even though executing it requires precision.
Step-by-Step Execution
- Begin with a rose pink base. This should be a true pink, not coral and not mauve — if you’re unsure, lean slightly toward the mauve side rather than the coral side
- Mix your peach tone carefully. Pure peach can read as too orange; add a touch of pink to your peach so it stays warm but retains peachy undertones
- Apply the rose base completely, then use a makeup sponge to dab the peach into the tip area
- Create a blend zone in the middle where the two colors meet by repeatedly dabbing with a nearly-clean sponge until the line softens
- Finish with a smooth, thick top coat
Pro tip: Rose and peach can sometimes look muddy if the top coat isn’t high-quality. Invest in a premium top coat for this one — it makes the difference between a sloppy blend and a professional gradient.
5. Chocolate Brown to Caramel Ombre

This ombre is pure warmth in gradient form. Starting with rich, creamy chocolate brown at the base and melting into buttery caramel at the tips, this color combination feels organic, cozy, and sophisticated all at once. On medium coffin nails, it creates a look that’s perfect for anyone with warm or golden undertones in their skin.
Why Browns Make Excellent Ombre Bases
Brown is the most underrated color in nail art. It’s incredibly flattering, rarely looks harsh, and creates a perfect backdrop for any lifestyle. A chocolate-to-caramel ombre specifically works because both colors are warm and share similar undertones, so the gradient feels intentional and cohesive rather than accidental.
Creating the Perfect Chocolate-to-Caramel Blend
- Use a true chocolate brown as your base — avoid browns with red undertones, which can look muddy
- Your caramel should be creamy and warm, not orange or tan
- Apply the chocolate base first, making sure it’s fully opaque
- Use a sponge to apply caramel to the tip area, then blend the middle zone by repeatedly dabbing with a clean or nearly-clean sponge
- This particular ombre benefits from a matte top coat option if you want a more sophisticated look, but a glossy finish also works beautifully
Quick facts:
- Chocolate brown actually elongates the appearance of medium coffin nails because it creates depth and visual interest
- This ombre is nearly impossible to mess up because the color family is so forgiving — uneven blending actually looks intentional
- Caramel polish can be tricky to find in the exact right shade; if you can’t locate true caramel, mix a touch of gold into light brown
6. Purple Plum to Lavender Ombre
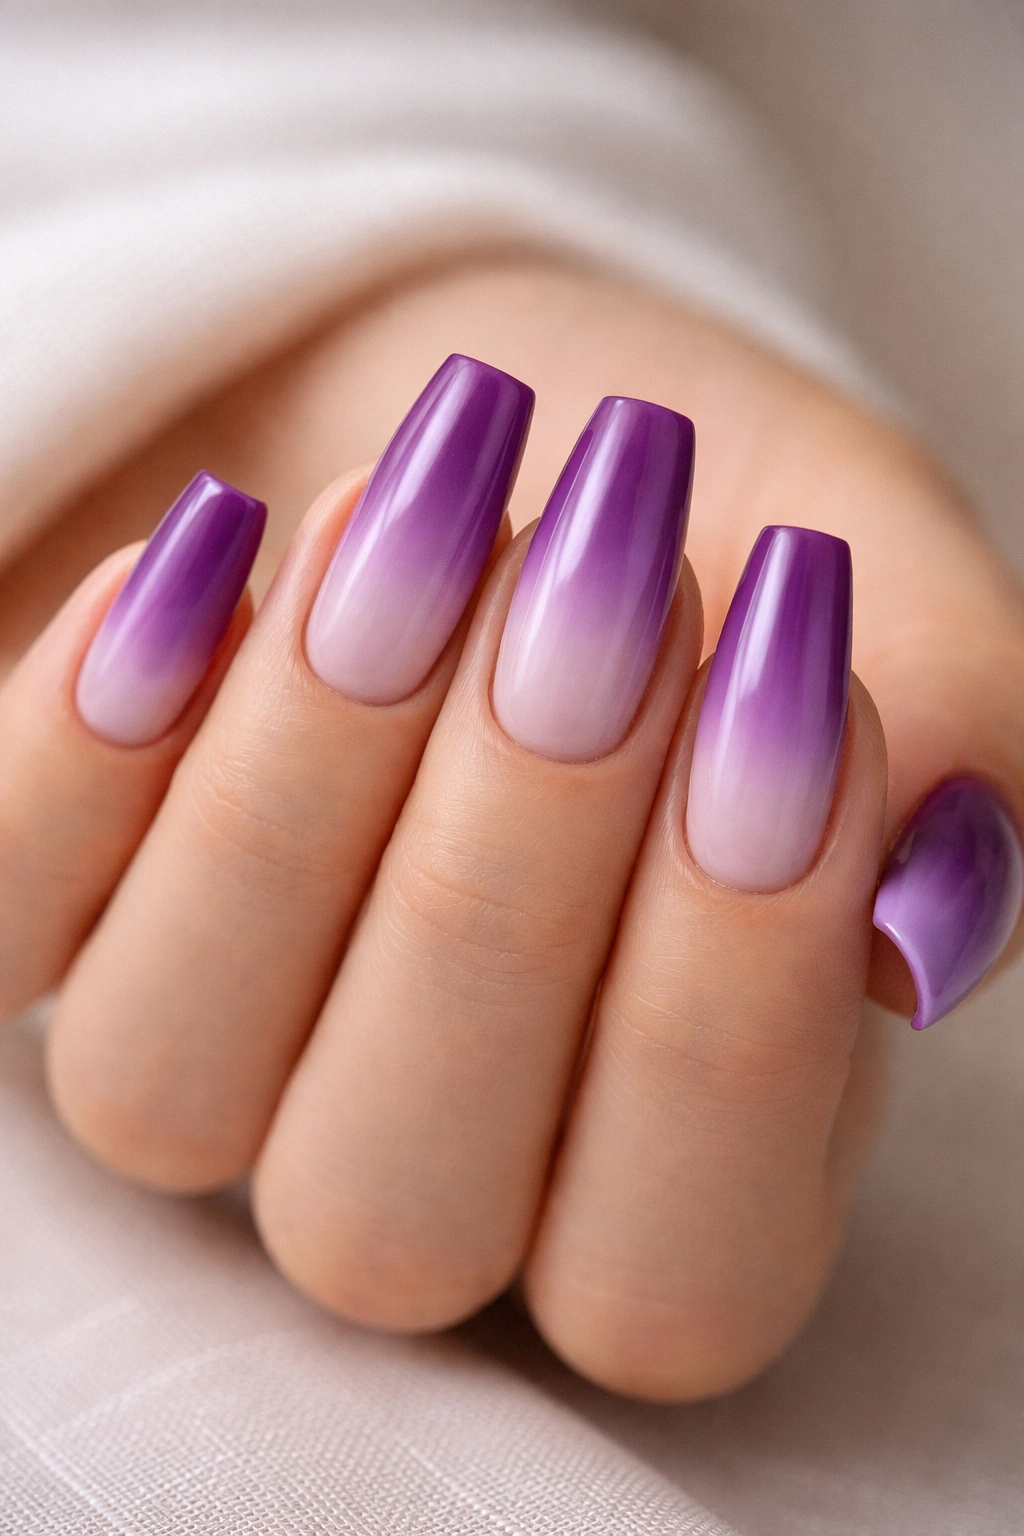
For anyone who loves purple, this ombre is the sweet spot between drama and elegance. Deep plum purple at the base gradually transitions into soft, dreamy lavender at the tips. On medium coffin nails, this creates an ombre that feels romantic, artistic, and absolutely stunning in natural light.
The Magic of Purple Gradients
Purple is a color that demands attention while remaining fundamentally elegant. A plum-to-lavender gradient specifically works because plum is deep and anchoring while lavender is airy and light — together, they create balance. The visual journey from dark to light feels intentional and beautiful.
Achieving This Ombre Perfectly
- Select a plum purple that leans slightly toward burgundy rather than blue — this keeps the entire ombre in the warm-purple family
- Your lavender should be soft and muted, not overly bright or neon
- Apply plum as your complete base color
- Using a makeup sponge, carefully apply lavender to the tip area, blending the middle zone with a clean or nearly-clean sponge
- This gradient actually benefits from a satin or semi-gloss finish, which can make the plum look richer and the lavender more ethereal
Worth knowing: Purple can stain nails temporarily, so use a strong base coat under your plum shade to prevent discoloration that might peek through your design.
7. Emerald Green to Mint Ombre
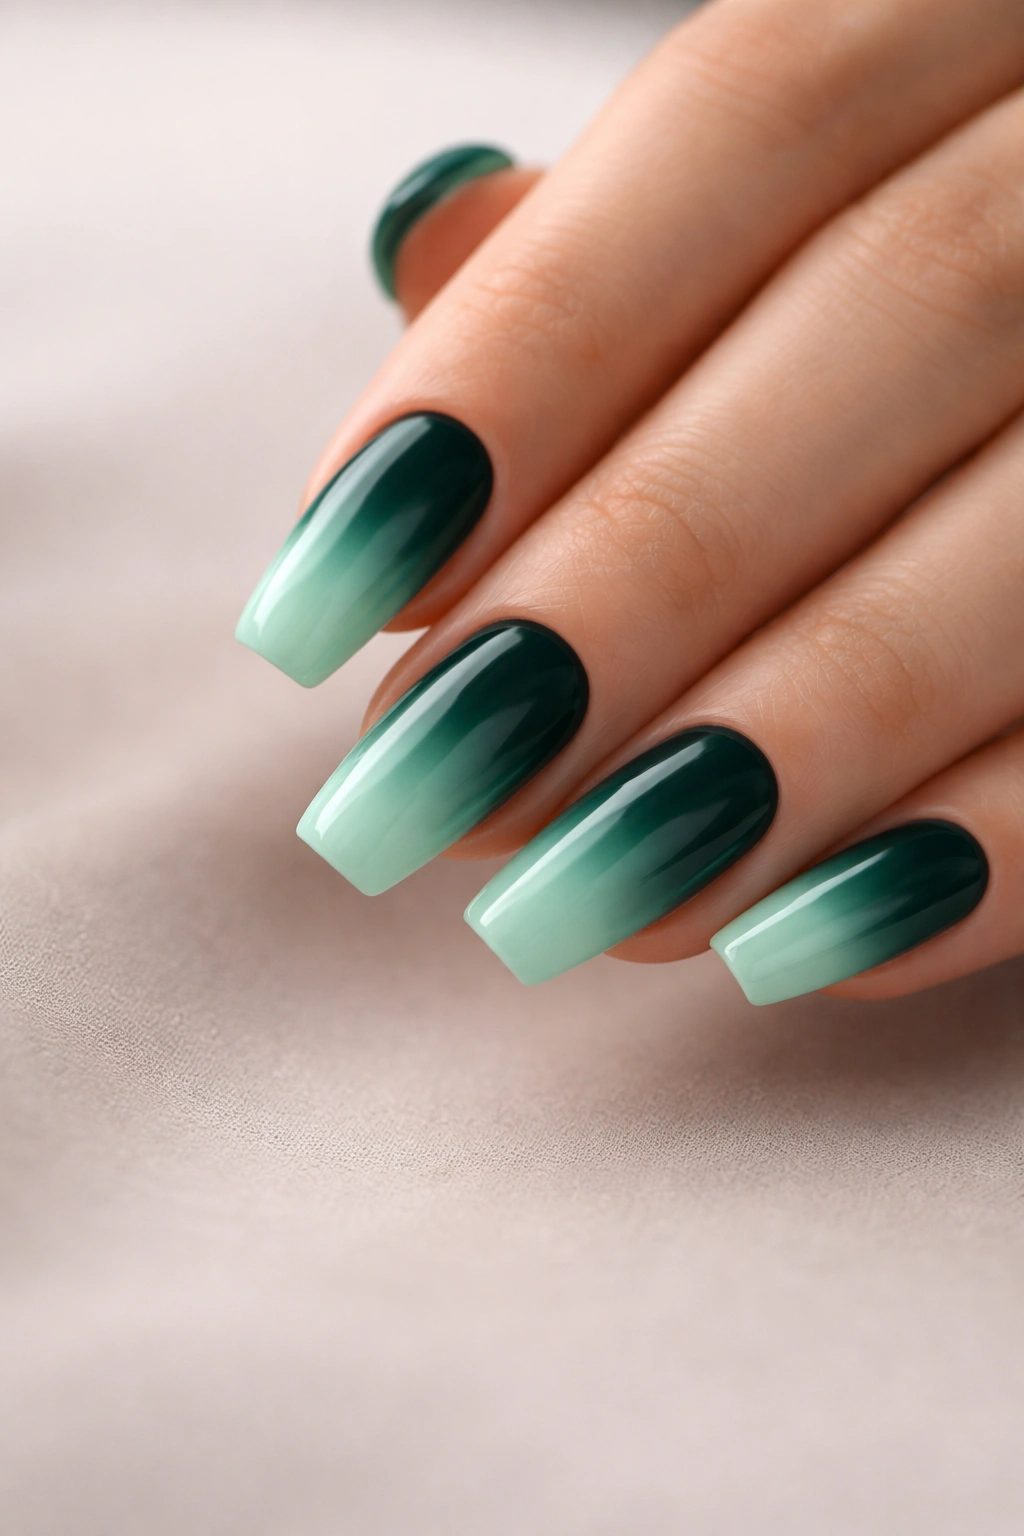
This is the ombre for bold confidence. Rich, jewel-toned emerald green at the base gives way to bright, fresh mint at the tips. On medium coffin nails, this creates a gradient that’s eye-catching without feeling costume-y — it’s luxurious and modern simultaneously.
Working with Green Gradients
Green is a color that either absolutely sings or falls flat, depending on undertone matching. Emerald is a blue-toned green, and mint is a blue-toned light green, so keeping both in that cool-blue family ensures harmony. The contrast between deep jewel and fresh light is what makes this ombre visually striking.
The Right Technique for Green
- Start with a high-quality emerald green as your base — this color needs to be rich and opaque, so don’t skimp on the formula
- Your mint should be cool-toned and bright, not yellow-green
- After applying the emerald base, use a sponge to apply mint to the tip, then blend the transition zone carefully
- Green can sometimes look streaky with uneven application, so consider doing two thin base coats of emerald rather than one thick coat
- Finish with a glossy top coat to make the jewel tones really pop
Pro tip: If you’re worried about the green-to-mint transition feeling too abrupt, add a transitional shade — a muted teal or blue-green in between. It creates a smoother flow.
8. Black to Silver Ombre
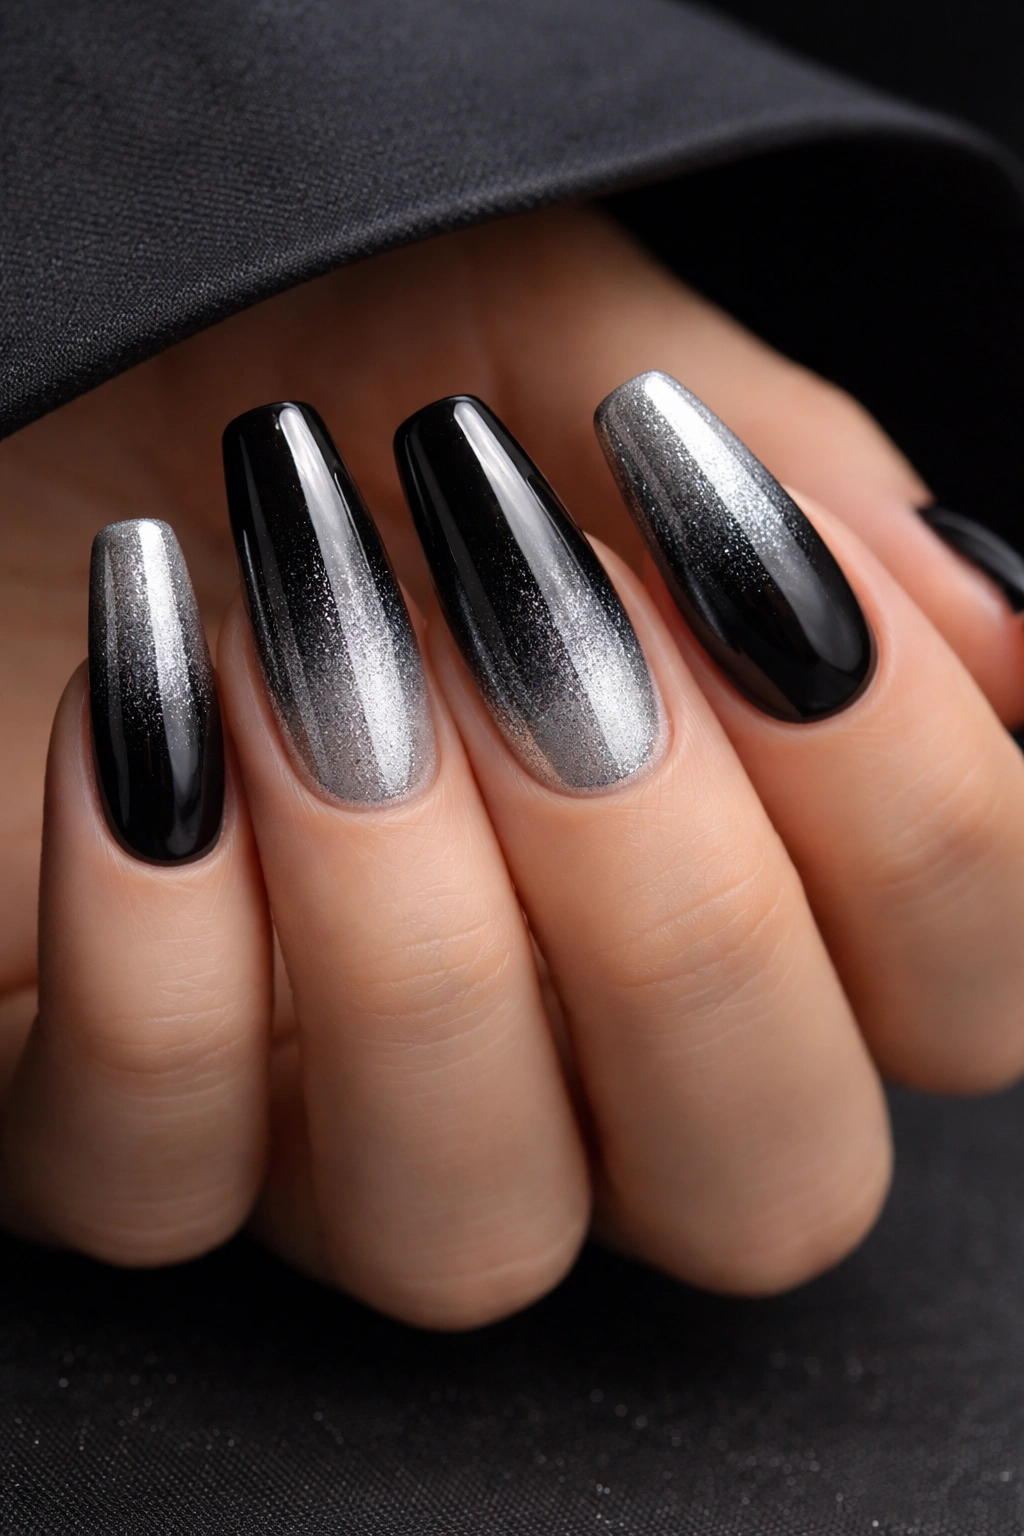
This is the sophisticated, edgy choice. Deep black at the base transitions into shimmery silver at the tips, creating an ombre that’s simultaneously moody and glamorous. On medium coffin nails, this creates a look that’s perfect for evening occasions, creative professionals, or anyone who loves a high-contrast aesthetic.
The Power of Black-to-Silver
Black provides the ultimate grounding color — it’s serious, elegant, and flattering. Silver adds shimmer and light-catching properties that prevent the whole look from feeling too dark or heavy. Together, they create contrast that’s visually interesting without clashing.
Executing Black-to-Silver
- Use a true jet black as your base — avoid blacks with brown or blue undertones
- Your silver should be metallic or holographic, not pale gray
- Apply black as a complete base, ensuring full opacity
- Use a sponge to apply silver to the tip area, creating a transition zone in the middle
- Because black and silver are so different in tone, this ombre benefits from a slightly thicker transition zone — work the blend area carefully to avoid a harsh line
- A super glossy top coat is essential here; it makes the silver shimmer and creates a polished, intentional look
Quick facts:
- This ombre is particularly striking under neon or artificial light, where the shimmer really stands out
- Black can stain lighter nail beds temporarily, so use a protective base coat
- If your silver polish streaks, try a sponge-dabbing method rather than brush application for more even coverage
9. Coral to Peachy Orange Ombre
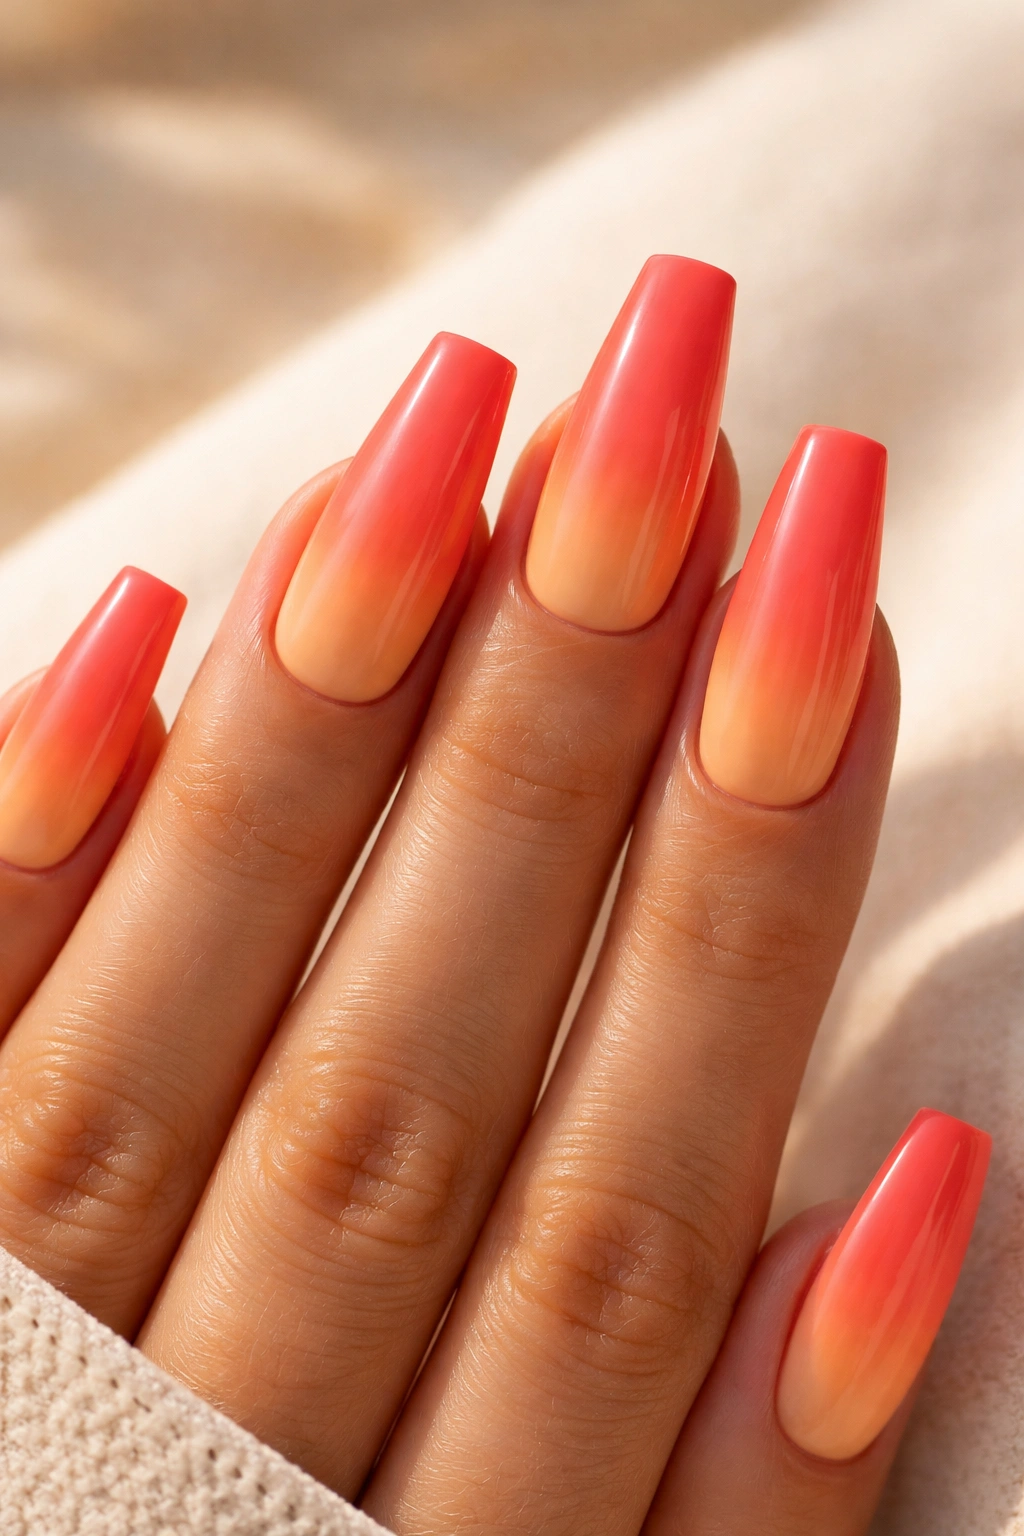
Warm, inviting, and perpetually summery, the coral-to-peachy orange ombre is pure joy on medium coffin nails. The gradient starts with a vibrant coral that catches light beautifully and eases into a softer, more muted peachy orange at the tips. This is the ombre for anyone who loves warm tones and wants something that feels energetic without being chaotic.
The Warmth and Energy of Coral
Coral is a color that makes people smile. It’s associated with happiness, creativity, and sunshine. When you pair it with peachy orange, you’re creating an ombre that feels cohesive and intentional rather than like two random colors mashed together. Both colors sit in the warm family, so the transition feels natural.
Building the Perfect Coral-to-Orange Blend
- Start with a coral base that’s bright but not neon — you want vibrancy without garishness
- Your peachy orange should be warm and slightly muted, not as bright as the coral
- Apply the coral base color completely, ensuring even coverage
- Use a makeup sponge to apply peachy orange to the tip area, then blend the transition zone with a clean or nearly-clean sponge
- This particular gradient can sometimes look slightly separated rather than blended, so take extra time with the middle zone
- Finish with a glossy top coat that enhances the warmth of both colors
Pro tip: This ombre is more forgiving on medium coffin nails than on shorter nails because the gradient has more space to develop. You can create a softer, more gradual color shift.
10. Navy to Powder Blue Ombre
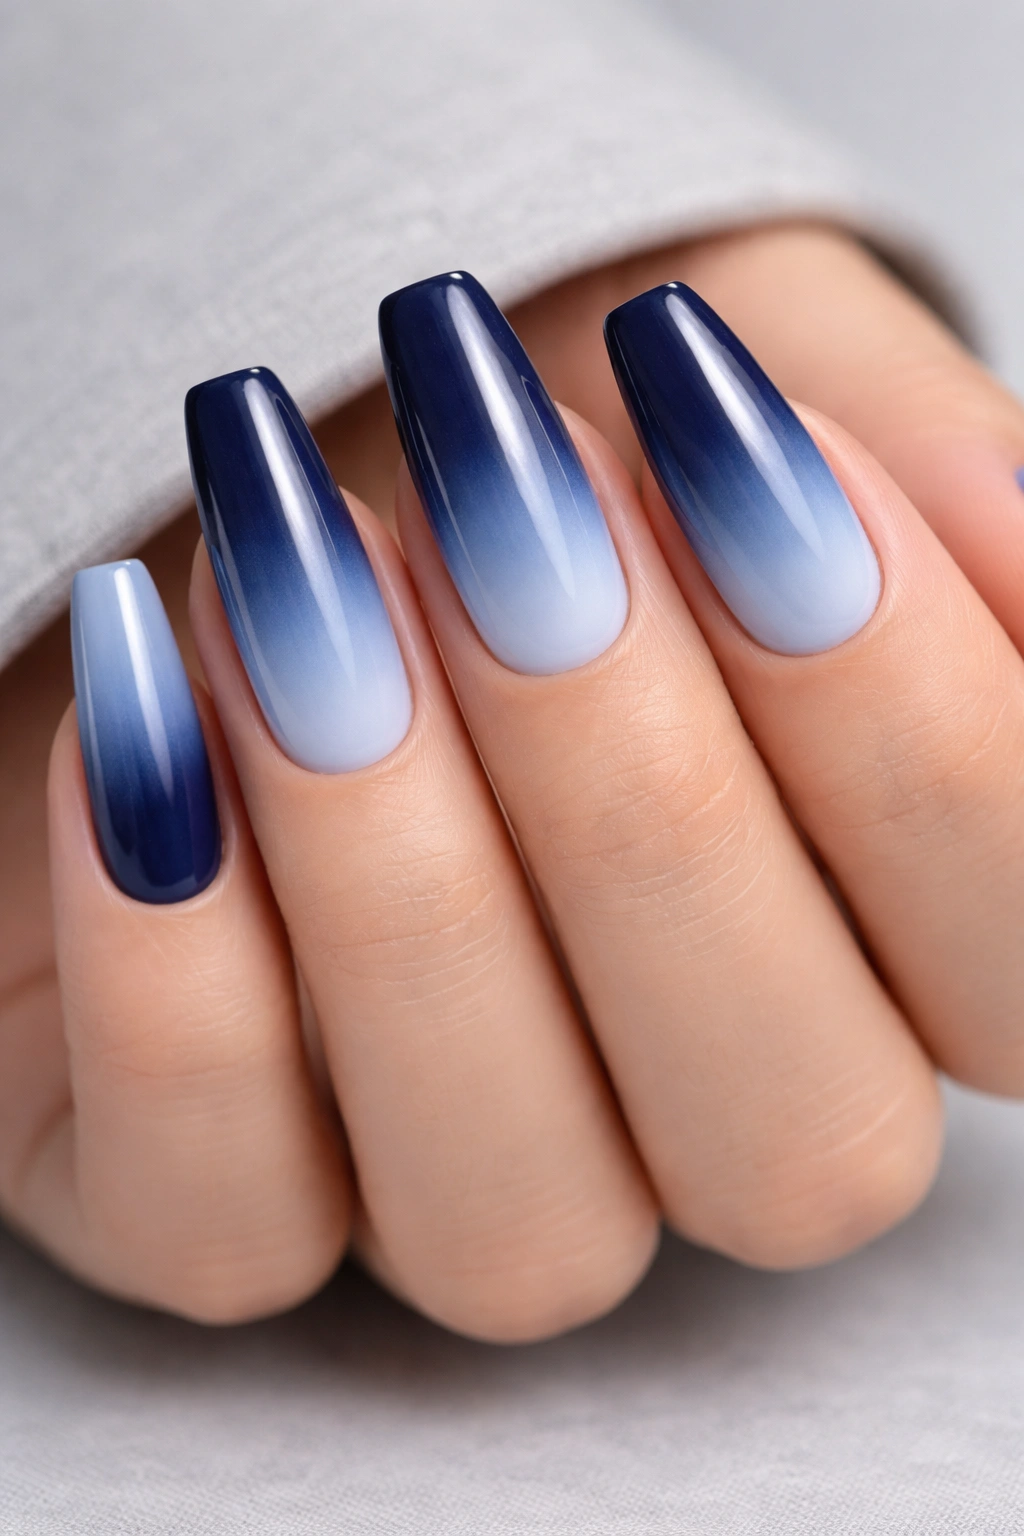
Cool, calming, and endlessly sophisticated, the navy-to-powder blue ombre is the choice for someone who appreciates subtle elegance. The gradient starts with deep, rich navy at the base and transitions into soft, almost pastel powder blue at the tips. On medium coffin nails, this creates a look that’s striking without being loud.
Why Navy and Powder Blue Belong Together
Both colors sit in the blue family, so the transition between them feels inherently harmonious. Navy is grounding and professional, while powder blue is airy and light — together, they create a beautiful contrast that’s visually interesting but not jarring. This ombre works in literally any setting.
Mastering the Navy-to-Powder Transition
- Begin with a navy base that’s rich and opaque — true navy, not purple-blue or royal blue
- Your powder blue should be very light and soft, almost pastel
- Apply navy completely, then use a sponge to carefully introduce powder blue into the tip area
- The transition zone should be gradual; because there’s significant tonal difference between navy and powder, take time with the blending step
- A glossy finish looks best here, as it enhances the depth of the navy while making the powder blue look almost ethereal
Worth knowing: If your navy polish is particularly thick or pigmented, use slightly thinner coats on the base to prevent staining the nail bed in a way that shows through your powder blue tip.
11. Wine Red to Dusty Rose Ombre
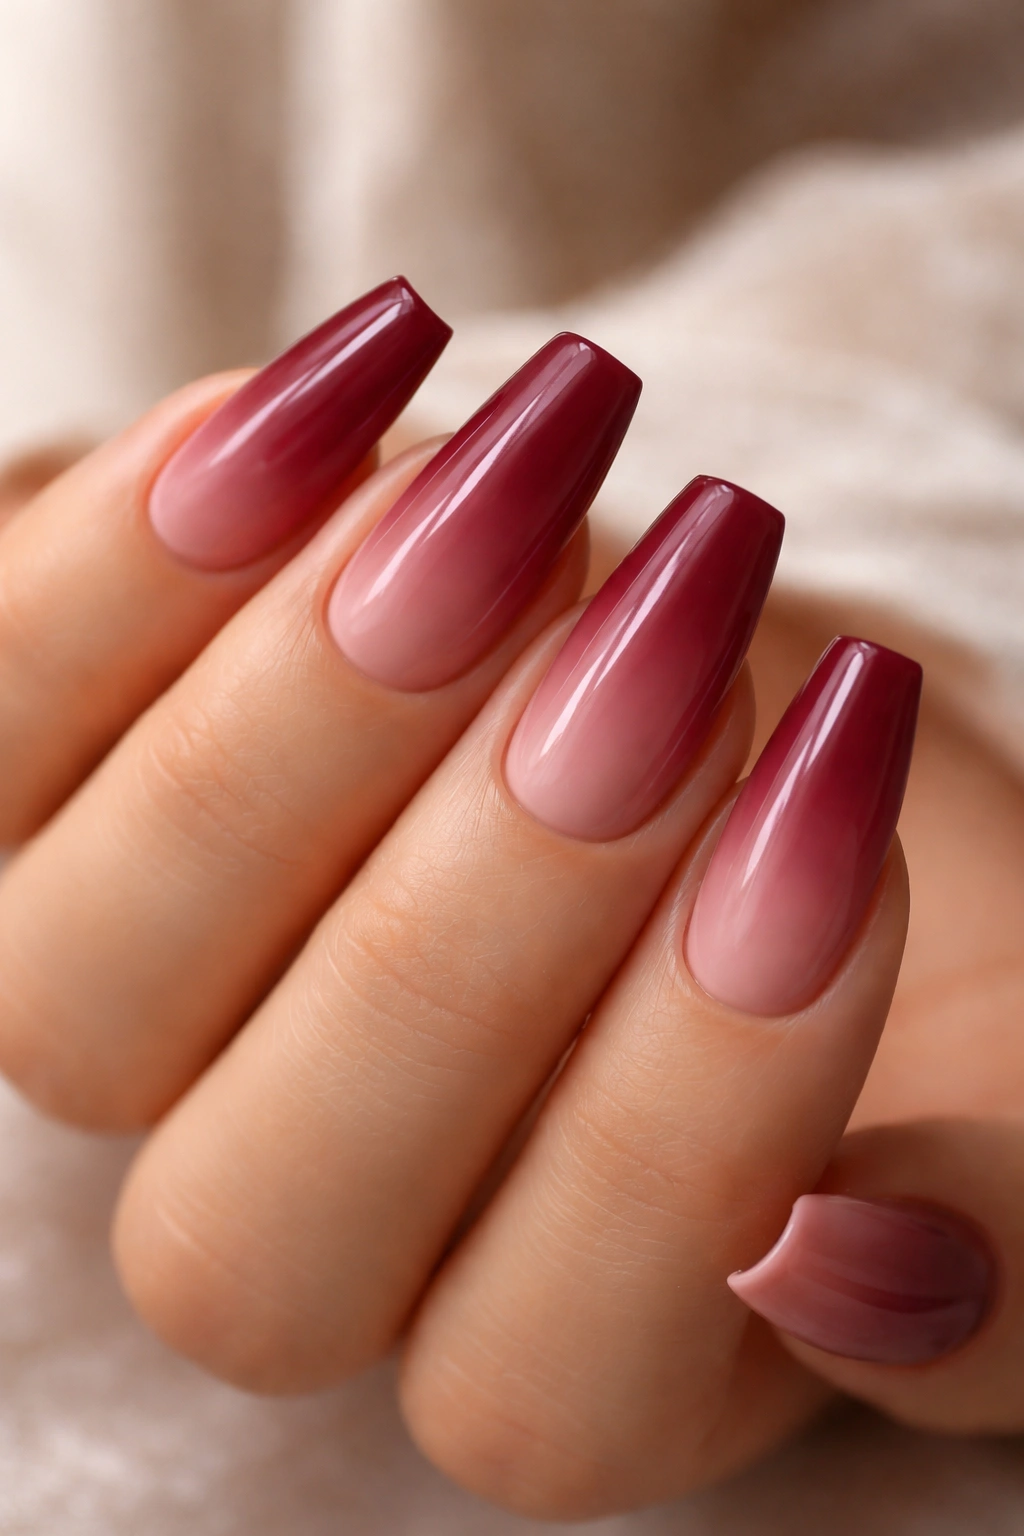
This ombre is romance and sophistication in gradient form. Deep wine red at the base creates a luxurious foundation, while dusty rose at the tips adds a softness and femininity to the overall look. On medium coffin nails, this creates an ombre that’s appropriate for formal occasions while still feeling wearable for everyday elegance.
The Luxury of Wine and Mauve
Wine red has inherent sophistication — it’s the color of fine dining and evening wear. Dusty rose is traditionally feminine and romantic. Pairing them creates an ombre that appeals to anyone who loves classic elegance with modern edge. The transition from deep to light feels natural and intentional.
Creating the Wine-to-Dusty Rose Blend
- Start with a true wine red as your base — make sure it has burgundy undertones rather than blue undertones
- Your dusty rose should be mauve-leaning and muted, not bright pink
- Apply wine red as a complete base coat, ensuring full opacity
- Use a makeup sponge to apply dusty rose to the tip area, blending the middle zone multiple times with a clean sponge
- This gradient benefits from a slightly thicker transition zone because of the tonal difference, so don’t rush the blending step
- Finish with a glossy or satin top coat — either looks beautiful with this color combination
Quick facts:
- Wine red can temporarily stain lighter nail beds, so use a protective base coat
- This ombre photographs beautifully in both natural and artificial light
- The dusty rose tip ensures this ombre never looks too heavy or gothic, keeping it perpetually elegant
12. Sage Green to Cream Ombre
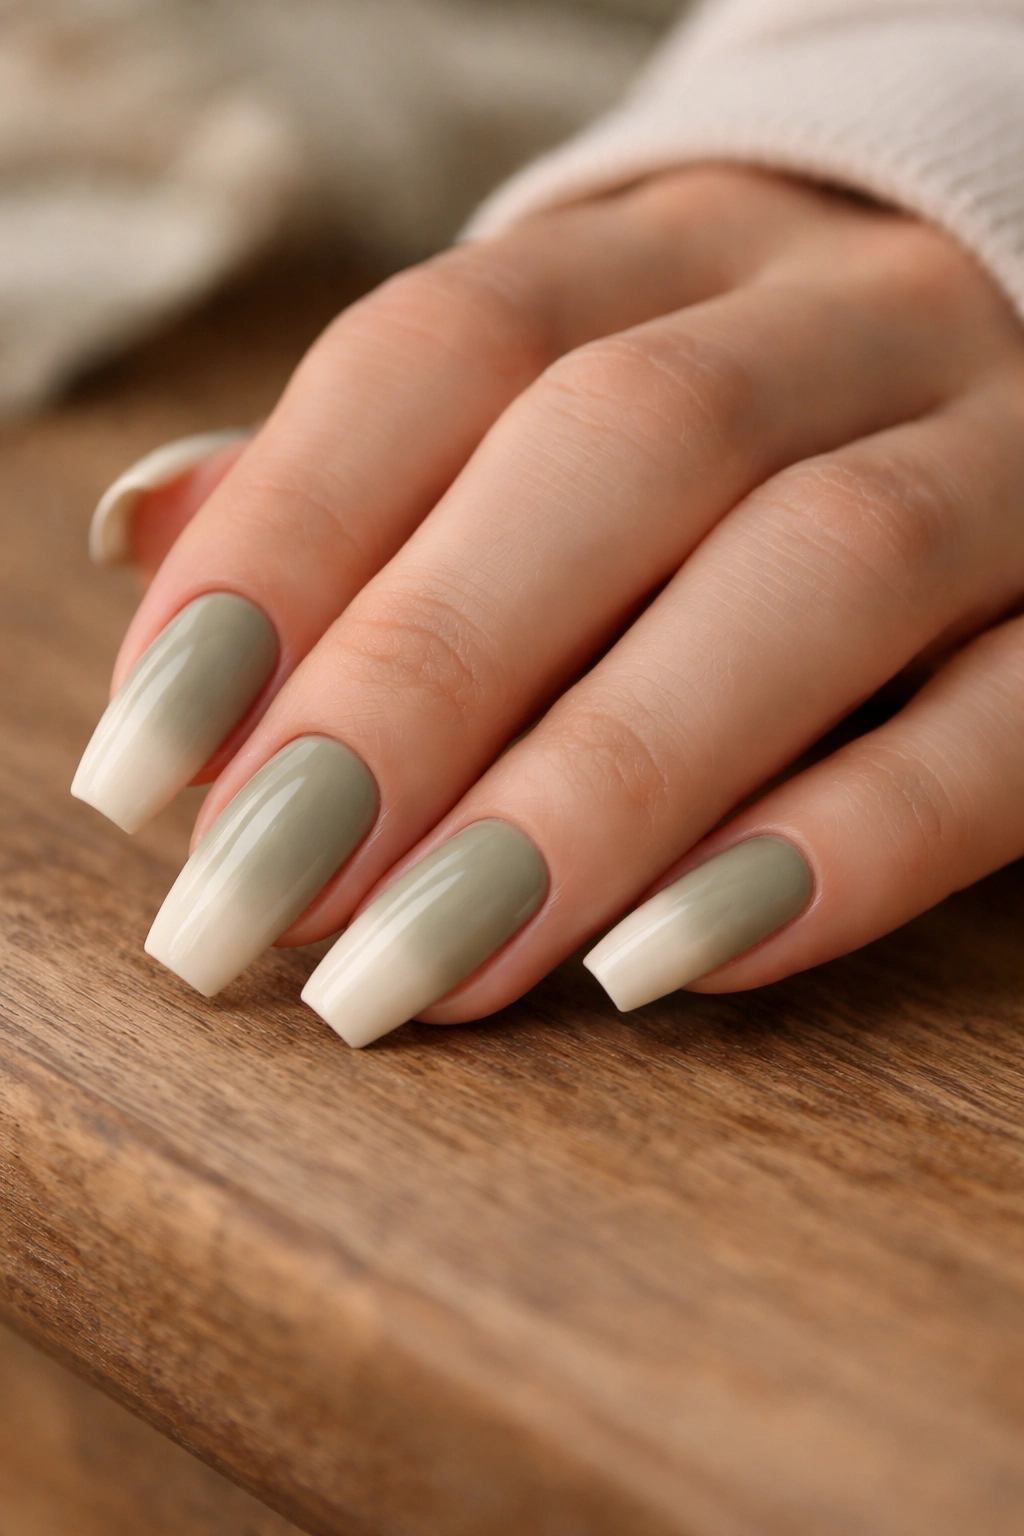
Calming, understated, and infinitely wearable, the sage green to cream ombre is for anyone who loves earthy, muted tones. The gradient begins with soft, grayed-green sage at the base and transitions into warm cream at the tips. On medium coffin nails, this creates a look that’s sophisticated and natural-looking without being boring.
The Serenity of Sage and Cream
Sage is a color that feels inherently calm and grounding. It has enough color to be interesting but enough gray to keep it muted and wearable. Cream adds warmth and softness without being stark white. Together, they create an ombre that feels like wearing something completely natural and effortless.
Executing Sage-to-Cream Perfectly
- Choose a true sage green — not too blue, not too yellow — that has a slightly grayed, muted quality
- Your cream should be warm and slightly off-white, not pure white or pale yellow
- Apply sage as your complete base color, ensuring even coverage
- Use a makeup sponge to apply cream to the tip area, creating a blend zone in the middle
- This particular gradient is very forgiving because both colors are muted, so even imperfect blending looks intentional and artistic
- A satin or matte finish actually looks gorgeous with this combination, though glossy works too
Pro tip: Sage green can read as washed-out on some nail polish formulas, so test your shade before committing to a full manicure. Look for a sage that has depth and richness, not one that looks pale or transparent.
13. Charcoal to Rose Gold Ombre
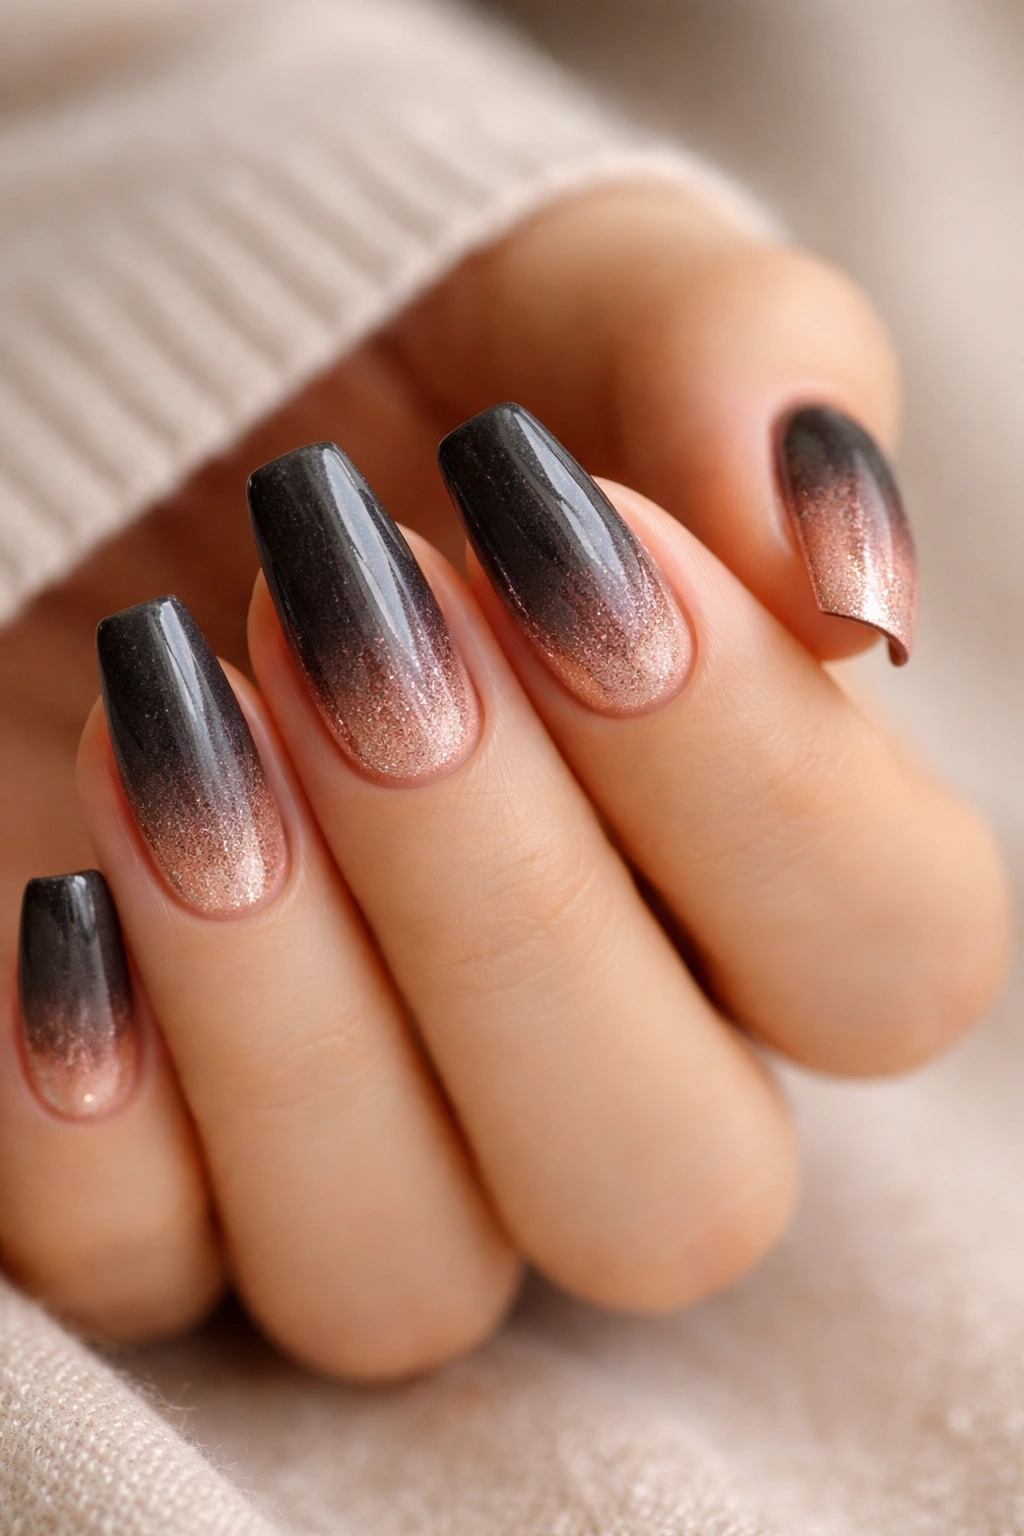
This ombre bridges the gap between edgy and romantic. Deep charcoal gray at the base gradually transitions into warm, shimmery rose gold at the tips. On medium coffin nails, this creates a look that feels modern, unexpected, and absolutely stunning in any lighting situation.
The Appeal of Charcoal-to-Rose Gold
Charcoal is sophisticated and contemporary without being as heavy as black. Rose gold adds warmth, sparkle, and a hint of glamour. Together, they create an ombre that feels editorial and intentional — like you’ve put genuine thought into your nail design. This combo works for anyone who appreciates both strength and femininity.
Building the Charcoal-to-Rose Gold Gradient
- Start with a charcoal gray base that’s dark but not black — you want it to read as gray with depth
- Your rose gold should be warm and shimmery, with genuine sparkle or shimmer
- Apply charcoal as your base, making sure it’s completely opaque
- Use a sponge to apply rose gold to the tip area, blending the transition zone carefully
- Because charcoal and rose gold have different undertones, create a moderately thick transition zone to allow the colors to blend smoothly
- A glossy top coat is essential here; it makes the rose gold shimmer intensify and creates a polished, intentional finish
Worth knowing: This ombre looks particularly striking with rose gold nail art accents — think delicate lines or geometric shapes in the same rose gold shade as the ombre tips.
14. Teal to Seafoam Ombre
Finishing strong with a gradient that’s pure coastal vibes. Teal at the base creates a vibrant, jewel-toned anchor, while seafoam at the tips brings lightness and a breezy, beachy quality. On medium coffin nails, this creates an ombre that’s eye-catching, modern, and absolutely refreshing.
Why Teal-to-Seafoam Works
Both colors sit in the blue-green family, so the transition between them feels harmonious. Teal is bold and confident, while seafoam is light and airy. This ombre specifically works because it feels like a natural color progression — from deeper water to shallow, lighter water. It’s intuitive and visually satisfying.
Perfecting the Teal-to-Seafoam Blend
- Select a true teal as your base — not turquoise, not blue-green, but actual teal with equal parts blue and green
- Your seafoam should be light and slightly muted, not overly bright
- Apply teal as a complete base, ensuring full opacity and even coverage
- Use a makeup sponge to apply seafoam to the tip area, then blend the middle zone with a clean or nearly-clean sponge
- This gradient benefits from a glossy finish that makes both colors pop and creates a cohesive, high-shine look
- If the transition feels too abrupt, add a transitional shade — a muted turquoise or blue-green in the middle
Quick facts:
- This ombre reads beautifully on all skin tones, though the visual impact varies slightly depending on undertone
- Teal can sometimes look slightly blue or slightly green depending on lighting, which is actually a feature of this ombre — it shifts subtly and stays interesting
- This gradient pairs beautifully with white nail art accents or matte finishes on the tips if you want to add extra dimension
Final Thoughts
An ombre manicure on medium coffin nails is the kind of decision that elevates your entire look without requiring you to sacrifice practicality or wearability. The shape itself is forgiving enough to accommodate various skill levels, and the medium length keeps everything feeling grounded and intentional rather than over-the-top or impractical.
The key to nailing any ombre is patience with the blending process. Whether you’re using a makeup sponge, a blending brush, or a combination of techniques, the transition zone is where the magic happens. Rushing through the blend step is what separates a DIY manicure from a salon-quality result. Give yourself permission to spend extra time there — repeated gentle dabbing or feathering creates smoother, more seamless gradients than aggressive blending.
Color choice matters just as much as technique. The most successful ombre designs are the ones where the two colors sit in the same temperature family — both warm, both cool, or naturally complementary. When you choose colors that work together rather than fight for dominance, the gradient itself becomes the art, and even technically imperfect blending reads as intentional rather than accidental.
Your medium coffin nails are the perfect canvas for any of these ombre ideas. Whether you’re drawn to soft, romantic gradients or bold, jewel-toned transitions, you now have a complete roadmap for creating a manicure that feels personal, polished, and absolutely beautiful.
