

Coffin nails have become a beloved choice for people who want an elegant, edgy aesthetic without committing to the dramatic length that acrylic extensions require. The coffin shape—defined by a squared-off tip with tapered sides that create a sharp, sophisticated silhouette—looks stunning on medium-length natural nails, offering the best of both worlds: enough length to showcase intricate designs while remaining practical for daily life. Medium coffin nails provide the perfect canvas for creative nail art, from minimalist designs to bold, statement-making looks.
The beauty of this nail shape lies in its versatility. A medium coffin nail gives you enough surface area to play with colors, patterns, and textures, yet it’s short enough to remain functional for work, exercise, and everyday tasks. Whether you prefer classic elegance, playful patterns, or daring color combinations, there’s a coffin nail design that matches your personal style and fits your lifestyle.
What makes medium coffin nails particularly appealing is that they’re achievable with just nail polish and a bit of patience—you don’t necessarily need extensions or professional acrylics to rock this look. The following designs showcase what’s possible with this versatile shape, offering inspiration for your next manicure and practical guidance on how to execute each look at home or bring reference photos to your nail technician.
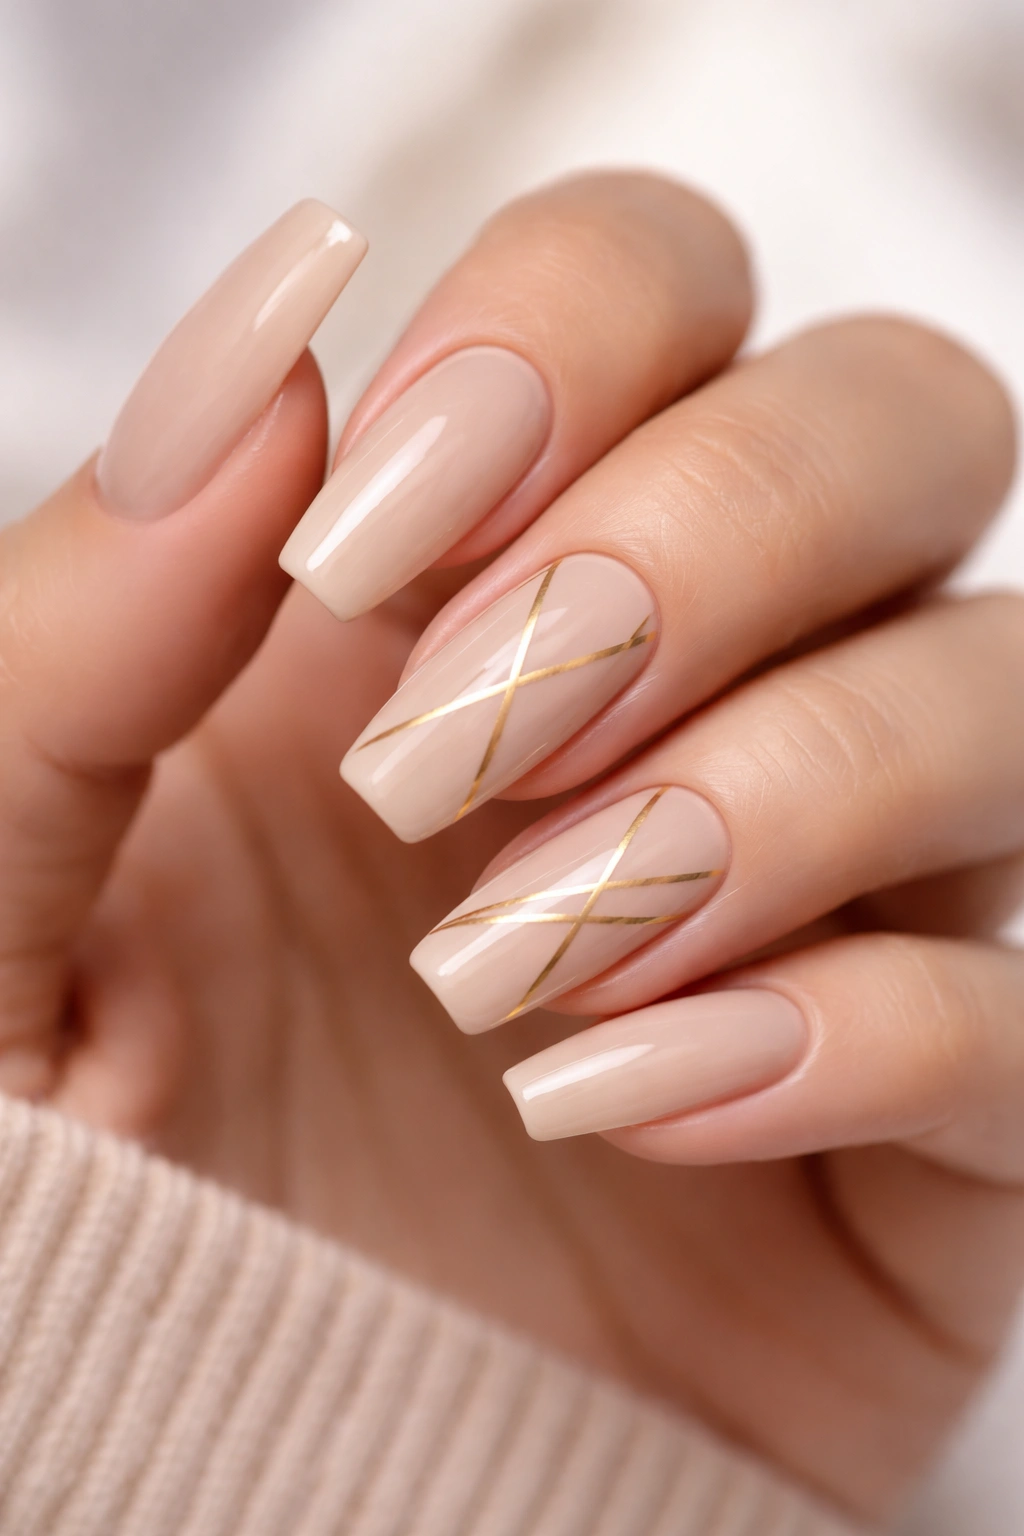
1. Classic Nude with Gold Geometric Accents
A nude base creates an understated, sophisticated foundation that works for virtually any occasion. Pair a soft beige or warm taupe with thin gold lines that form geometric shapes on one or two accent nails, such as a triangle, starburst, or diagonal grid pattern. This design bridges the gap between professional and artistic, making it perfect for office settings while still feeling intentional and polished.
How to Achieve This Look
Start with a base coat, then apply two coats of your chosen nude polish for even coverage. Once the polish is completely dry, use a thin nail art brush or a striping brush with gold gel polish or metallic paint to create your geometric design. Gold metallic finishes work best when applied over nude tones because of the contrast—the warm metallics pop beautifully against cooler or neutral bases.
Quick Tips for Success
- Choose a nude shade that matches your undertone (cooler undertones pair well with champagne gold; warmer undertones suit deeper golds)
- Thin, clean lines require a steady hand and a quality brush with fine bristles
- Apply gold accents on just the accent nails (usually the ring finger and pinky) for maximum visual impact without overwhelming the design
- Seal everything with a top coat to protect the geometric details
- If your hand isn’t steady enough for freehand lines, use thin striping tape as a guide
Pro tip: Gold doesn’t have to be perfectly symmetrical or complex to look expensive—sometimes the most elegant designs are the simplest ones, executed cleanly and precisely.
2. Deep Emerald with Marble Texture
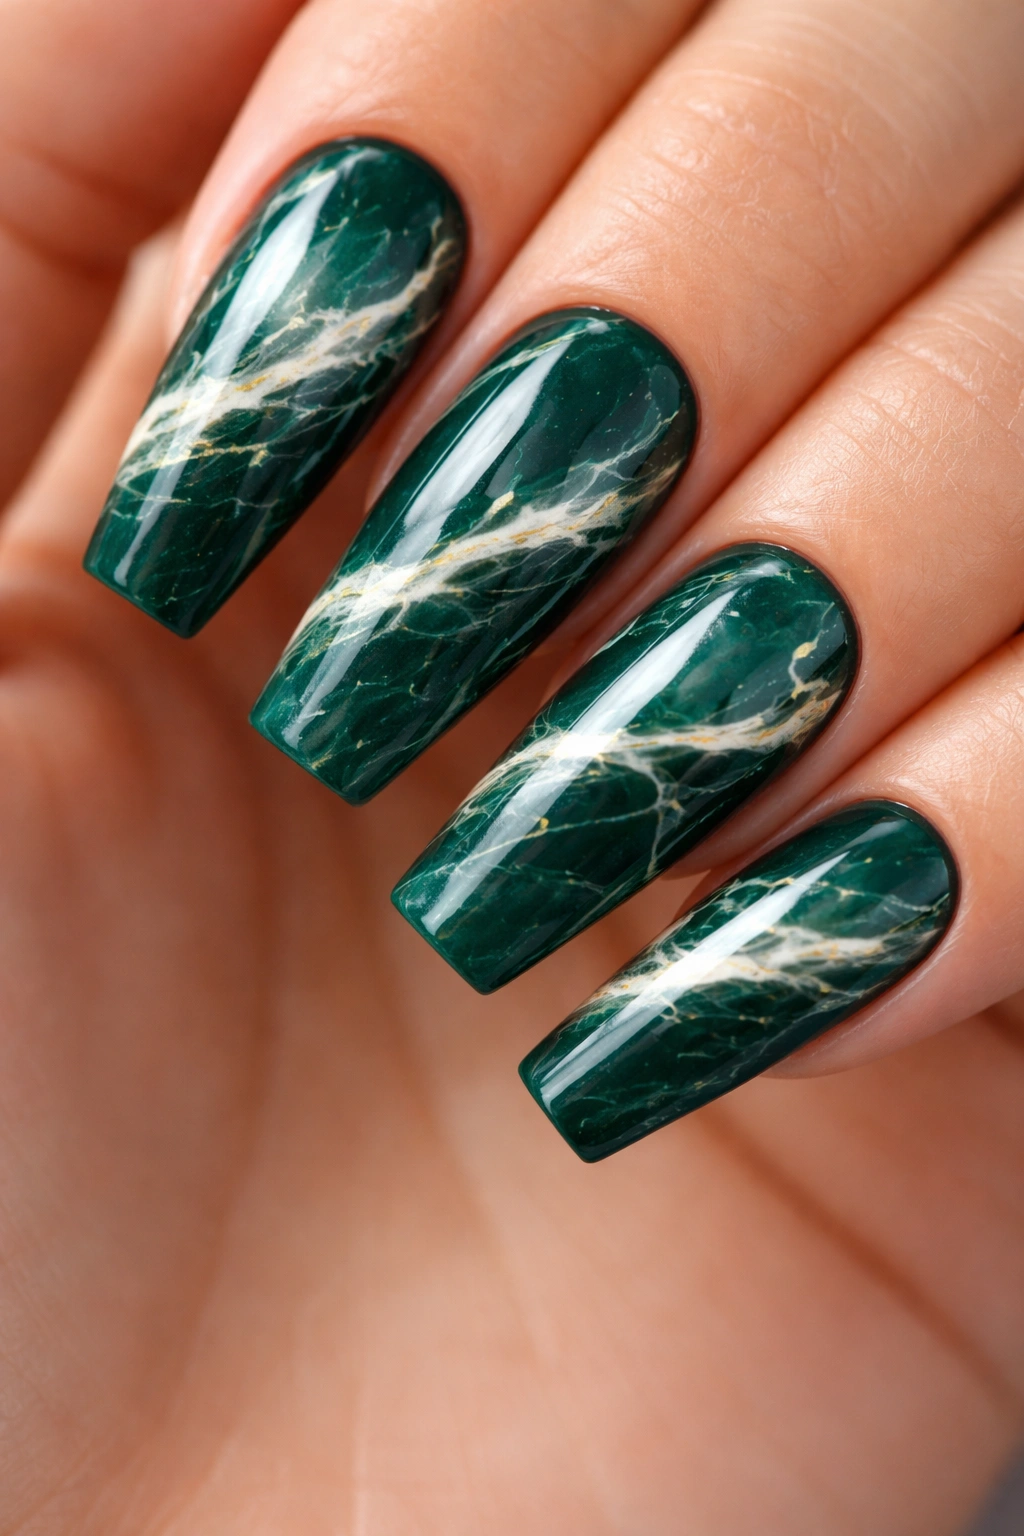
Emerald green is a luxurious, jewel-tone color that feels instantly sophisticated on coffin nails. Create a marble effect by dripping small amounts of white and cream polish onto the emerald base while it’s still slightly wet, then swirling with a toothpick or thin brush to create organic, vein-like patterns. The result is a design that looks like real stone while maintaining a cohesive color story.
Creating the Marble Effect
Apply your emerald base coat and allow it to dry completely—this is important because you’ll be layering additional polish on top. Drop small dots of white and cream polish onto the nail and immediately use a toothpick to swirl them before the polish sets. Work quickly but not frantically; the goal is organic movement, not perfect veining. Seal with a glossy top coat to enhance the stone-like appearance.
Maintenance and Durability
- Marble effects show water spots easily, so a high-quality top coat is essential
- This design works beautifully as a full set or on just accent nails (two emerald marble nails with solid emerald on the rest)
- The marble technique works with virtually any base color—try navy, burgundy, or even black for different moods
- If your first attempt doesn’t look perfect, remember that real marble is naturally imperfect, so organic variations actually add authenticity
Worth knowing: Emerald pairs beautifully with gold hardware, so if you wear rings or bracelets with gold accents, this color will complement them perfectly.
3. Soft Pink Ombre Gradient
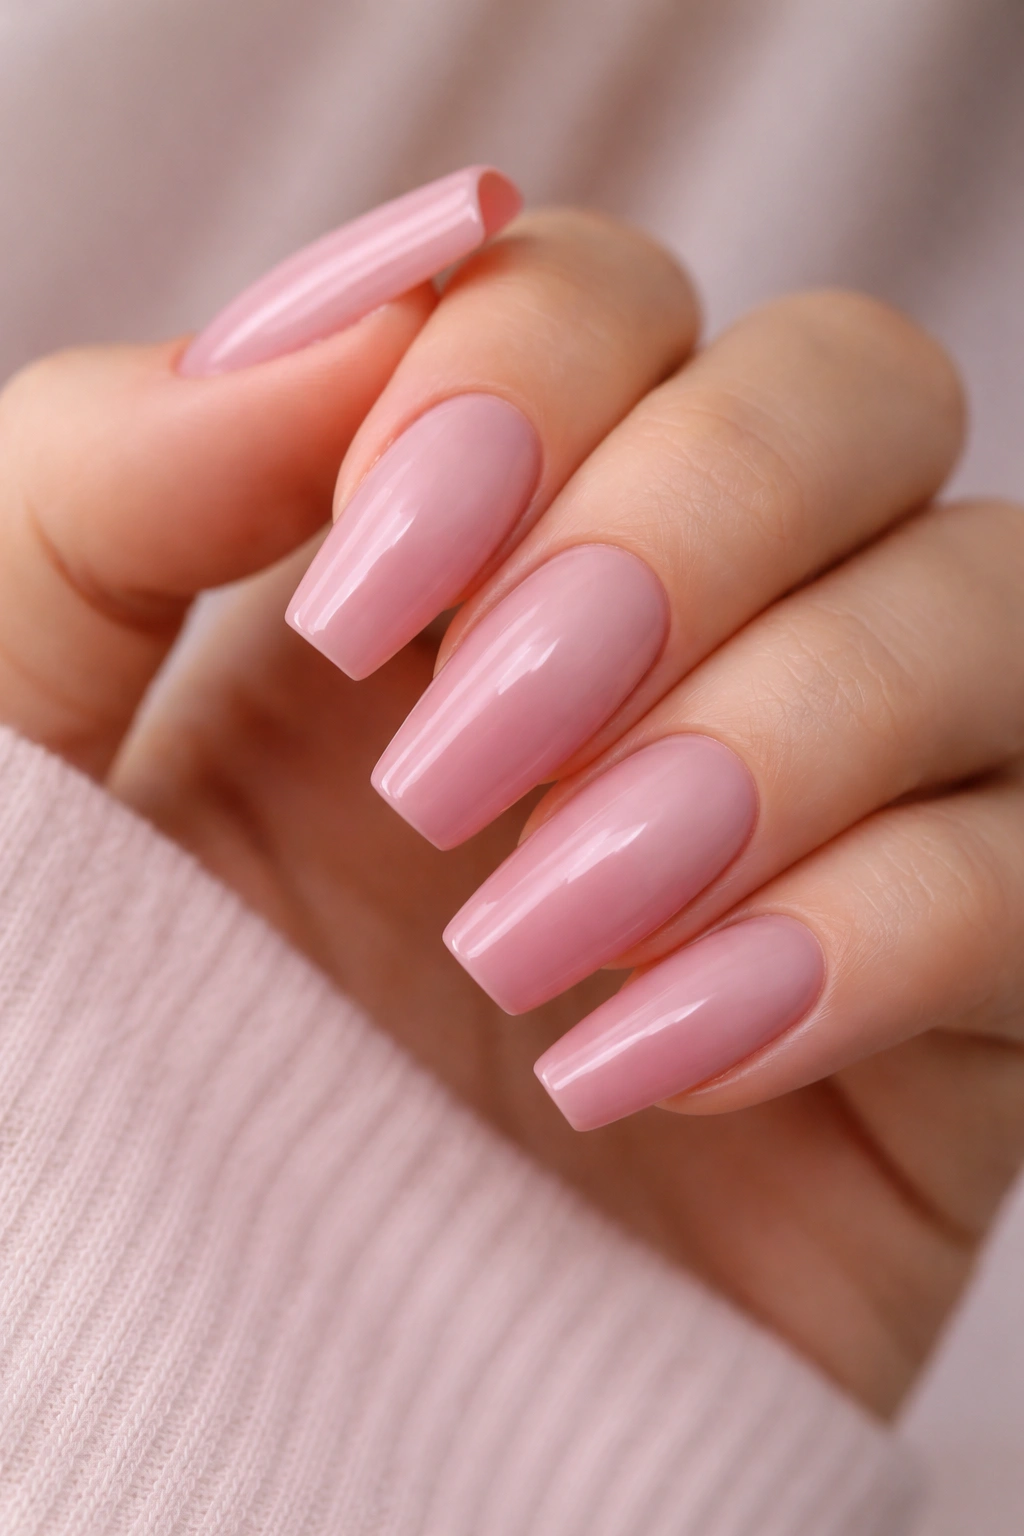
An ombre effect moves from one color to another across the nail, creating depth and dimension. Start with a light blush pink at the base and gradually transition to a deeper rose or mauve at the tip. This design is romantic without being overly girly, and it works for any season or occasion. The gradient technique requires patience but produces professional-looking results.
Blending the Perfect Ombre
Use a makeup sponge (or the sponge from a eyeshadow palette) to blend two or three shades of pink polish together. Dab small amounts of each shade onto the sponge in a row, then gently press the sponge onto your nail and rock it slightly to blend the colors. Repeat this process 2-3 times to build opacity and smooth out the transition. Clean up the edges with nail polish remover on a small brush.
Color Selection Strategy
- Light pink to dusty rose creates a subtle, elegant transition
- Blush pink to mauve adds a modern twist with cooler undertones
- Ballet pink to burgundy delivers more drama while staying sophisticated
- Apply the ombre on all ten nails for maximum impact, or use it as accent nails with a solid pink on the rest
- Finish with a shiny top coat to enhance the gradient and create a polished appearance
Quick fact: Ombre designs actually look better with a slight variation in shade intensity—perfect blending can sometimes look flat, while a little texture makes the gradient feel more intentional.
4. White Base with Black Line Art
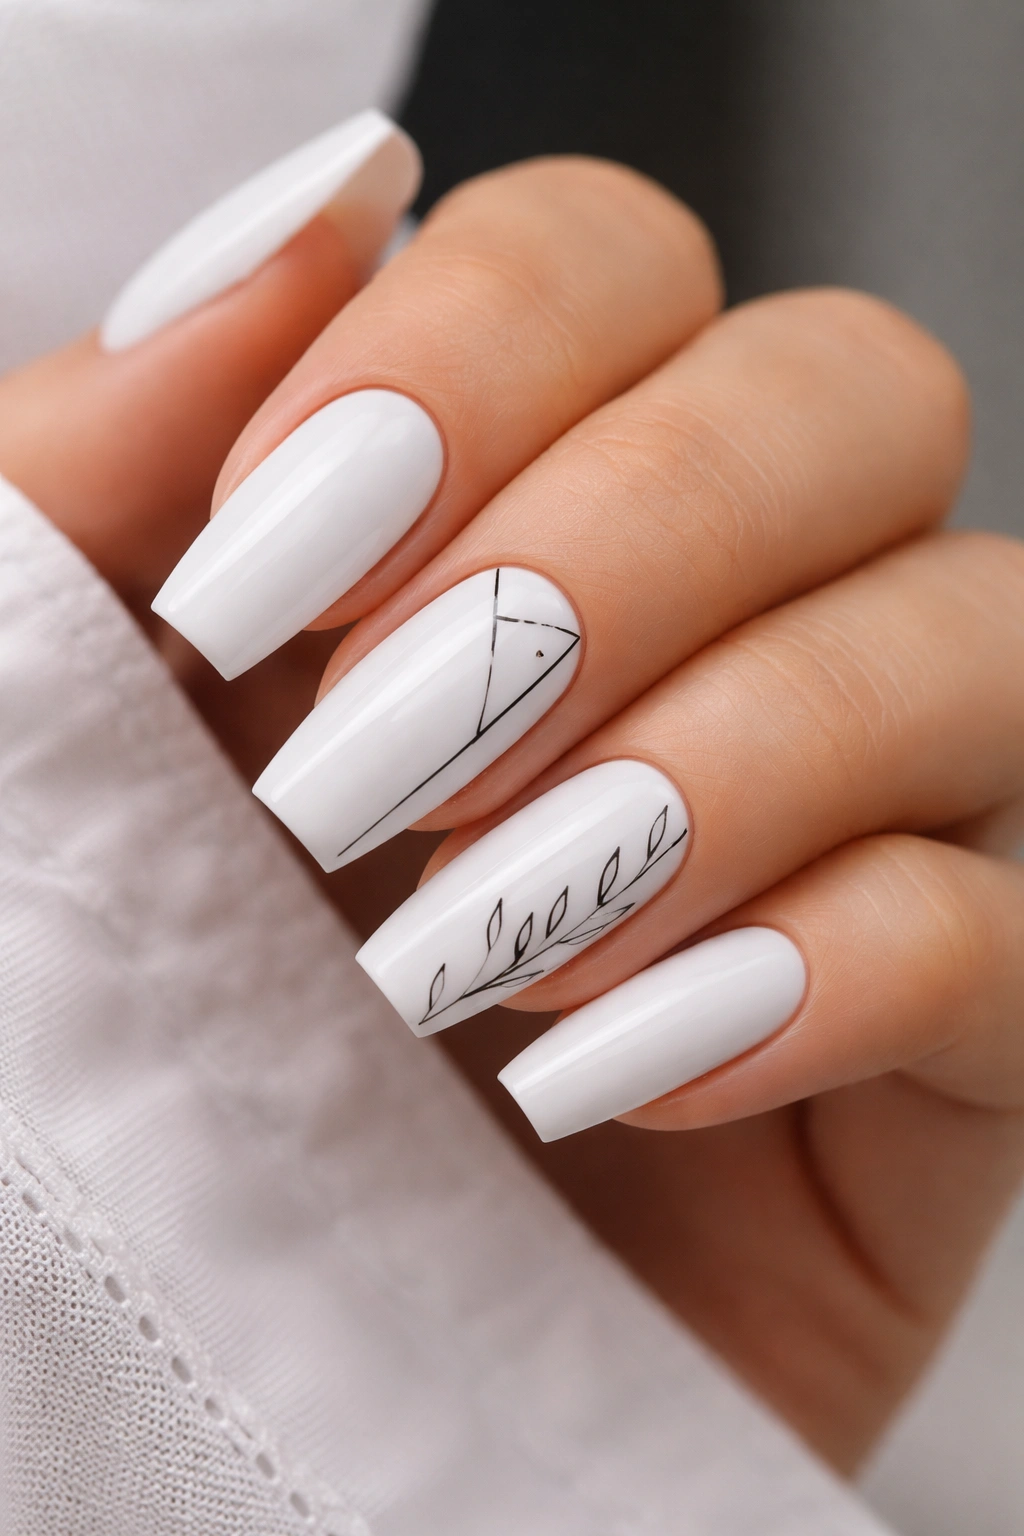
Minimalist line art has become increasingly popular for its clean, modern aesthetic. Start with a crisp white base and add delicate black line drawings—thin branches, geometric shapes, abstract faces, or small celestial designs. The high contrast between white and black creates visual impact while the thin lines maintain an air of sophistication and simplicity.
Executing Precise Line Work
A white base must be completely opaque and dry before you add any line work. Use a thin nail art brush with black polish or black gel to draw your design. If you’re not confident in freehand drawing, practice the design on a piece of paper first, or look for nail art stencils that can guide your lines. Black line art requires precision, so take your time and don’t rush.
Design Ideas That Translate Well
- Fine botanical drawings (leaves, stems, flowers) wrap around the nail edge
- Abstract geometric patterns (triangles, hexagons, intersecting lines) cover the full nail
- Tiny illustrated faces or profiles on accent nails with solid white on others
- Celestial motifs like moons, stars, and constellations across the nail set
- Delicate script lettering (initials, meaningful words) on one or two nails
Pro tip: If a line goes crooked, let it dry and use a thin brush with white polish to correct it—this cleanup technique works better than trying to remove and restart.
5. Burgundy with Gold Foil Details
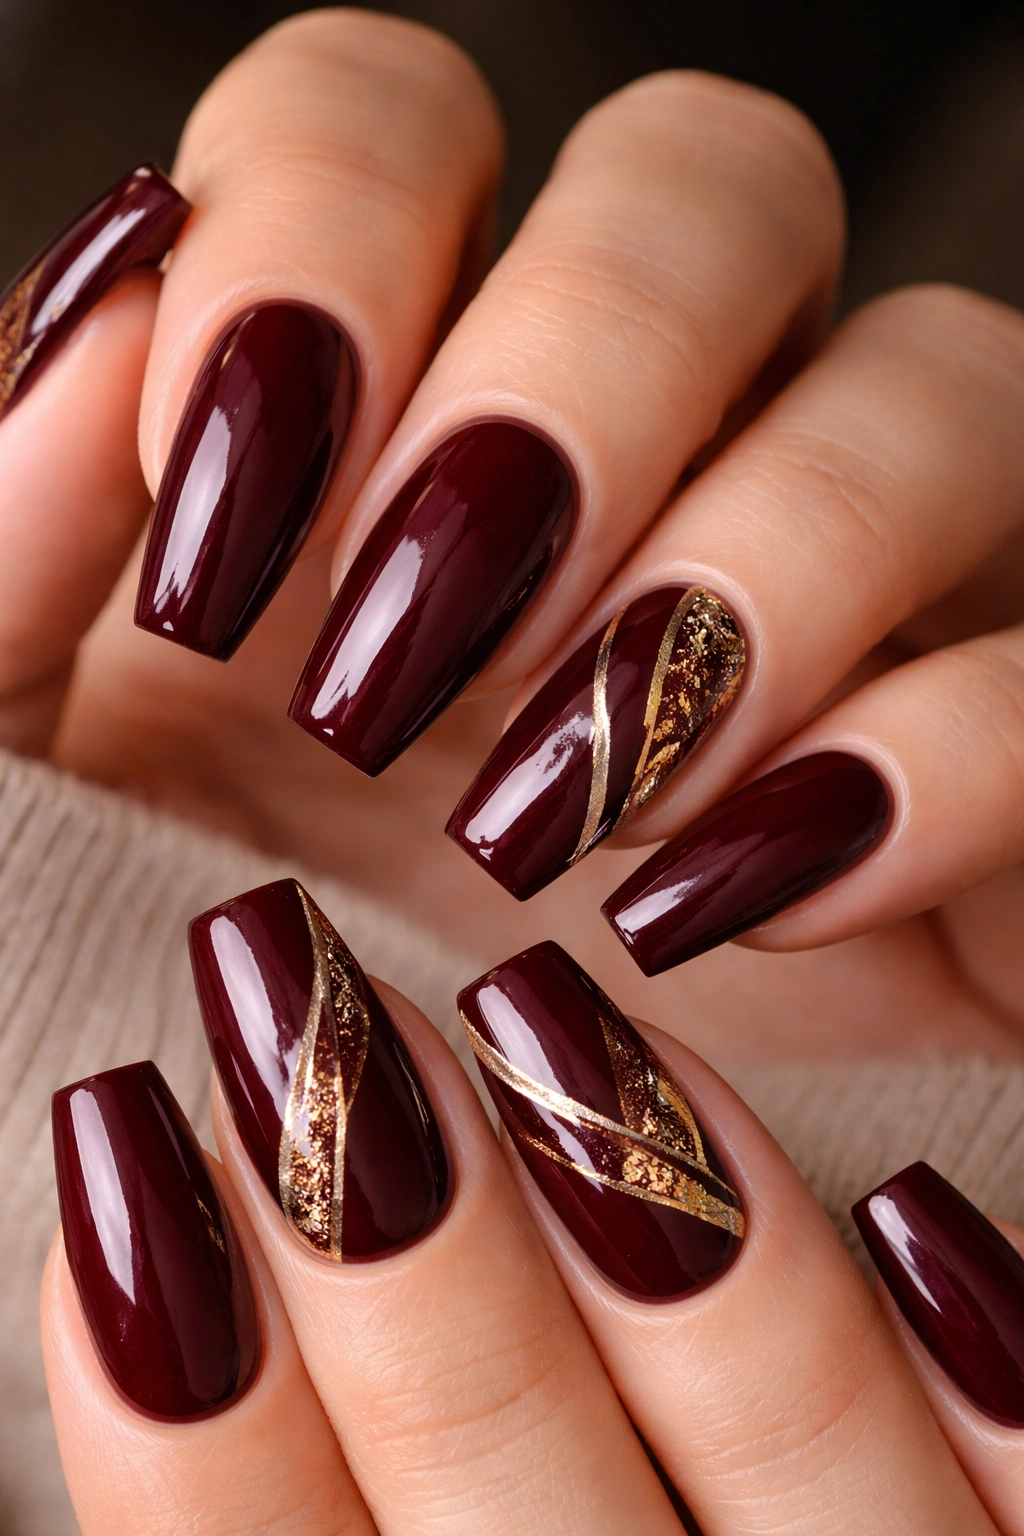
Burgundy is a rich, wine-like shade that feels luxurious and works especially well during cooler months (though it’s beautiful year-round). Layer thin strips or geometric shapes of gold foil over the burgundy base to create a high-impact design. The combination of deep color and metallic shine feels both glamorous and wearable.
Applying Foil to Nail Polish
Burgundy must be completely dry before foil application. Purchase foil specifically designed for nails (not craft foil). Apply a thin layer of foil adhesive to the areas where you want foil, wait 30-60 seconds until it becomes tacky, then carefully press the foil onto the adhesive. Use a soft brush to gently press it down, then seal with a top coat. The foil will adhere permanently once sealed.
Design Placement Options
- Run thin vertical or diagonal foil strips across each nail
- Create geometric shapes (triangles, rectangles, hexagons) using foil on accent nails only
- Frame the cuticle area with a thin foil line
- Use foil to create a half-moon or ombré effect from one corner of the nail
- Apply small foil accents (dots, dashes) scattered across the nail for a subtle sparkle
Worth knowing: Foil shows every imperfection on the burgundy base, so your base coat needs to be smooth and evenly applied. Take extra time with the foundation for the best results.
6. Coral with Delicate Floral Design
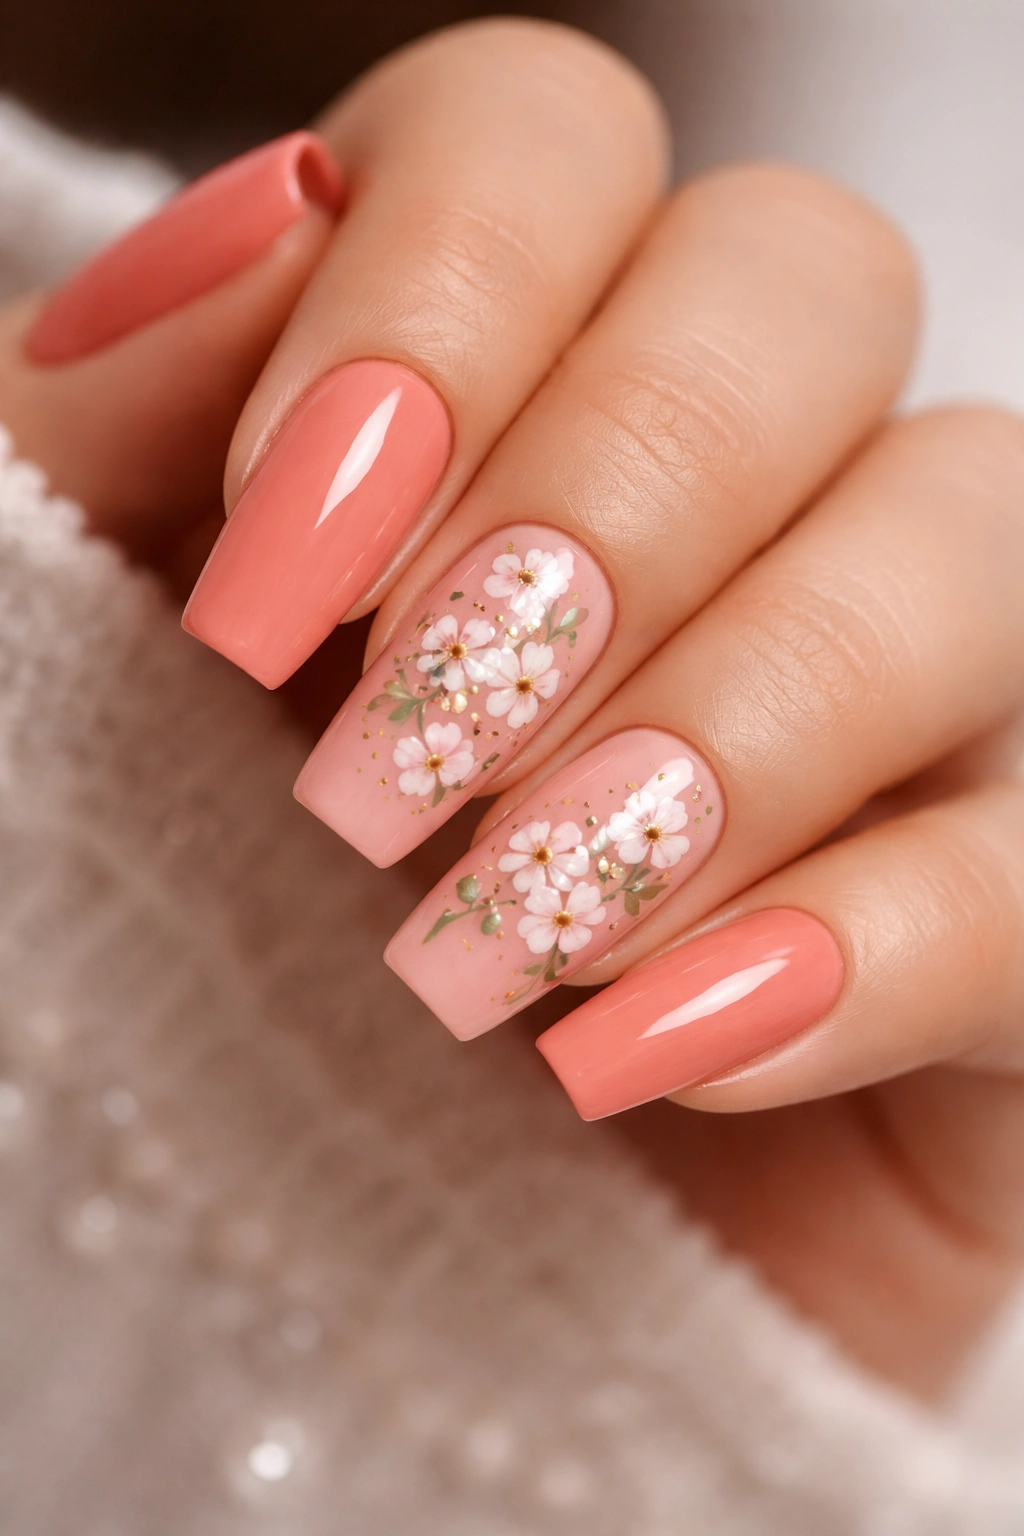
Coral is a warm, energizing color that brings joy and vitality to any manicure. Create a delicate floral design using thin brushwork—small flowers scattered across the nail, a botanical branch, or a bouquet-style arrangement on accent nails. Coral pairs beautifully with white, pink, and sage green florals, making this design both cheerful and sophisticated.
Painting Miniature Flowers
Start with your coral base coat, completely dry. Using a very thin nail art brush and white or light pink polish, paint tiny five-petal flowers by making small dots in a circle, then adding a tinier dot in the center. Add small green leaves using a similar technique. If your hand isn’t steady, dotting tools (small ball-end tools) can help create perfectly round petals. Practice on paper first to build confidence.
Color Combinations for Florals
- Coral base with white flowers and sage green leaves creates a modern botanical look
- Coral with pale pink flowers and deeper coral leaves feels cohesive and romantic
- Coral with yellow centers and green leaves brings a cheerful, summery vibe
- Use the floral design on accent nails only (ring finger and pinky) for a sophisticated balance
- All-over floral design (flowers on every nail) works beautifully for a bolder statement
Pro tip: Leave adequate space between flowers—crowded designs tend to look busy. A few well-placed flowers will always look more intentional than a nail covered edge-to-edge.
7. Black Matte Finish with Glossy Red Accent Nails
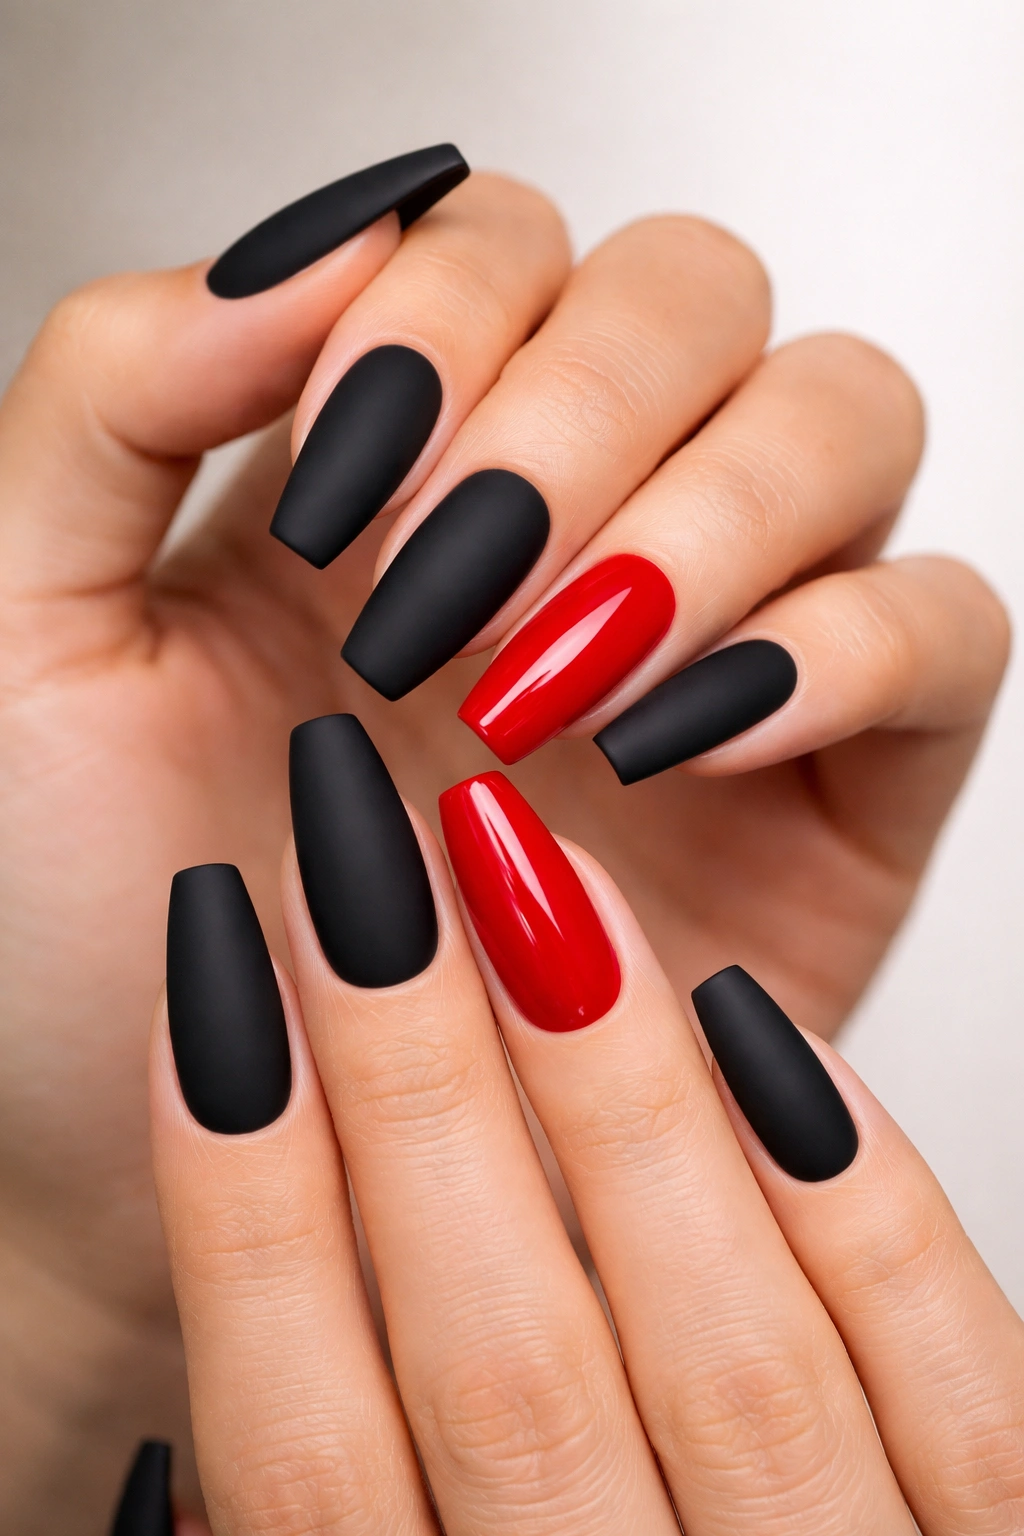
Matte black creates a bold, edgy aesthetic that’s instantly striking. Paint most of your nails in a matte black finish, then choose one or two accent nails (typically the ring finger or the pinky) in a glossy, bright red. The contrast between matte and glossy finishes, combined with the bold color difference, creates a design that’s modern, confident, and undeniably eye-catching.
Achieving True Matte Finish
A matte finish requires a specialized matte top coat applied over your black polish. Alternatively, some black polishes come in matte formulas. Avoid mixing matte and glossy finishes on the same nail—the transition will look unintentional. Once your matte finish is completely dry, paint your accent nails with a glossy red (bright red, cherry red, or burgundy all work beautifully) and seal with a glossy top coat.
Styling Considerations
- This design works best when you have confident personal style—matte and glossy combination requires owning the boldness
- Pair with minimalist jewelry to let your nails be the statement piece
- The red accent draws eyes to your hands, so make sure your nail shape is neat and your cuticles are well-groomed
- This design reads as contemporary and artistic, perfect for creative professions or confident personal style
- Matte finishes can feel less polished than glossy, so impeccable application is essential
Quick fact: Matte black can feel harsh on some skin tones. If it doesn’t feel right on you, try charcoal gray or deep navy with a matte finish instead—the effect is similar but slightly warmer.
8. Lavender Base with Butterfly Nail Art
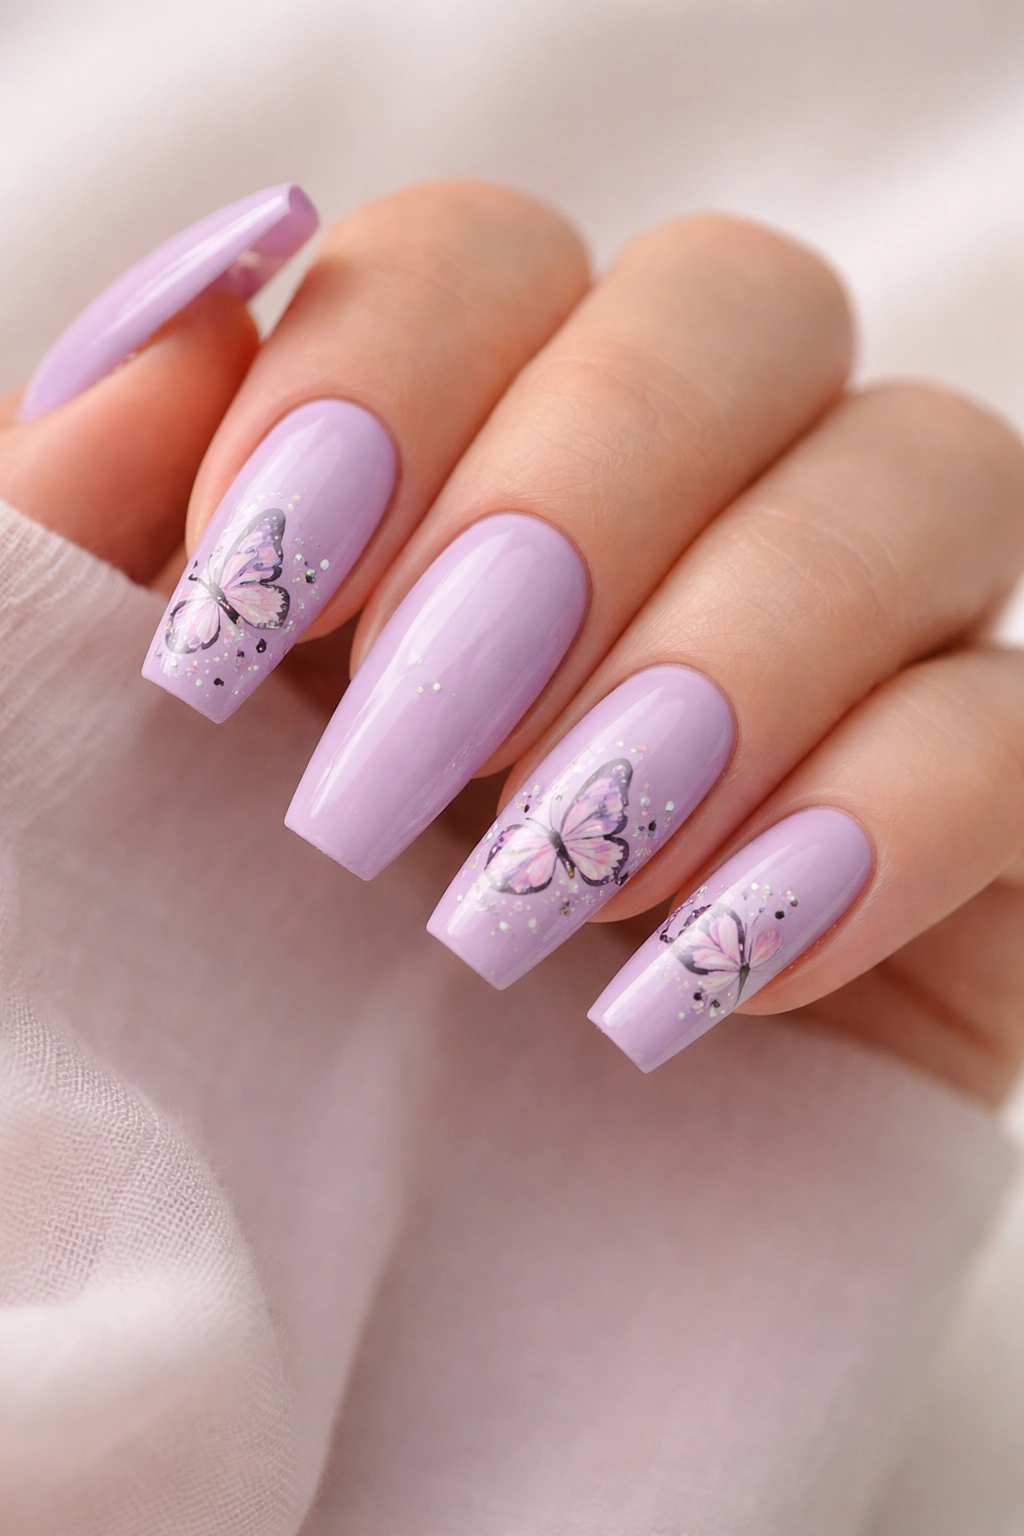
Lavender is a gentle, calming color that feels soft and romantic. Add delicate butterfly designs using thin brush work or nail decals—butterflies with translucent wings, solid color butterflies, or detailed butterfly illustrations. Butterflies on coffin nails create a whimsical, feminine design that’s still sophisticated enough for any setting.
Painting Butterfly Wings
Create butterfly wings by painting two teardrop shapes on either side of a small body. Using a thin brush and contrasting colors (white, pink, or darker lavender), add patterns to the wings. Simple dot patterns or thin stripe patterns look beautiful without requiring advanced art skills. Alternatively, purchase butterfly nail decals and apply them to your lavender base for a foolproof option.
Butterfly Design Variations
- Small butterflies scattered across nails in complementary colors (white, blush pink, sage green)
- One large butterfly design spanning accent nails with solid lavender on remaining nails
- Ombré lavender background with butterflies positioned to look like they’re flying across the nail
- Delicate winged patterns with thin gold or silver detailing on the wings
- Multiple tiny butterflies in graduated sizes creating movement and dimension
Worth knowing: Butterfly designs work beautifully at any scale—tiny delicate butterflies look elegant, while larger butterflies feel more playful and bold. Choose the size based on the overall feeling you want to project.
9. Nude with Negative Space Geometric Pattern
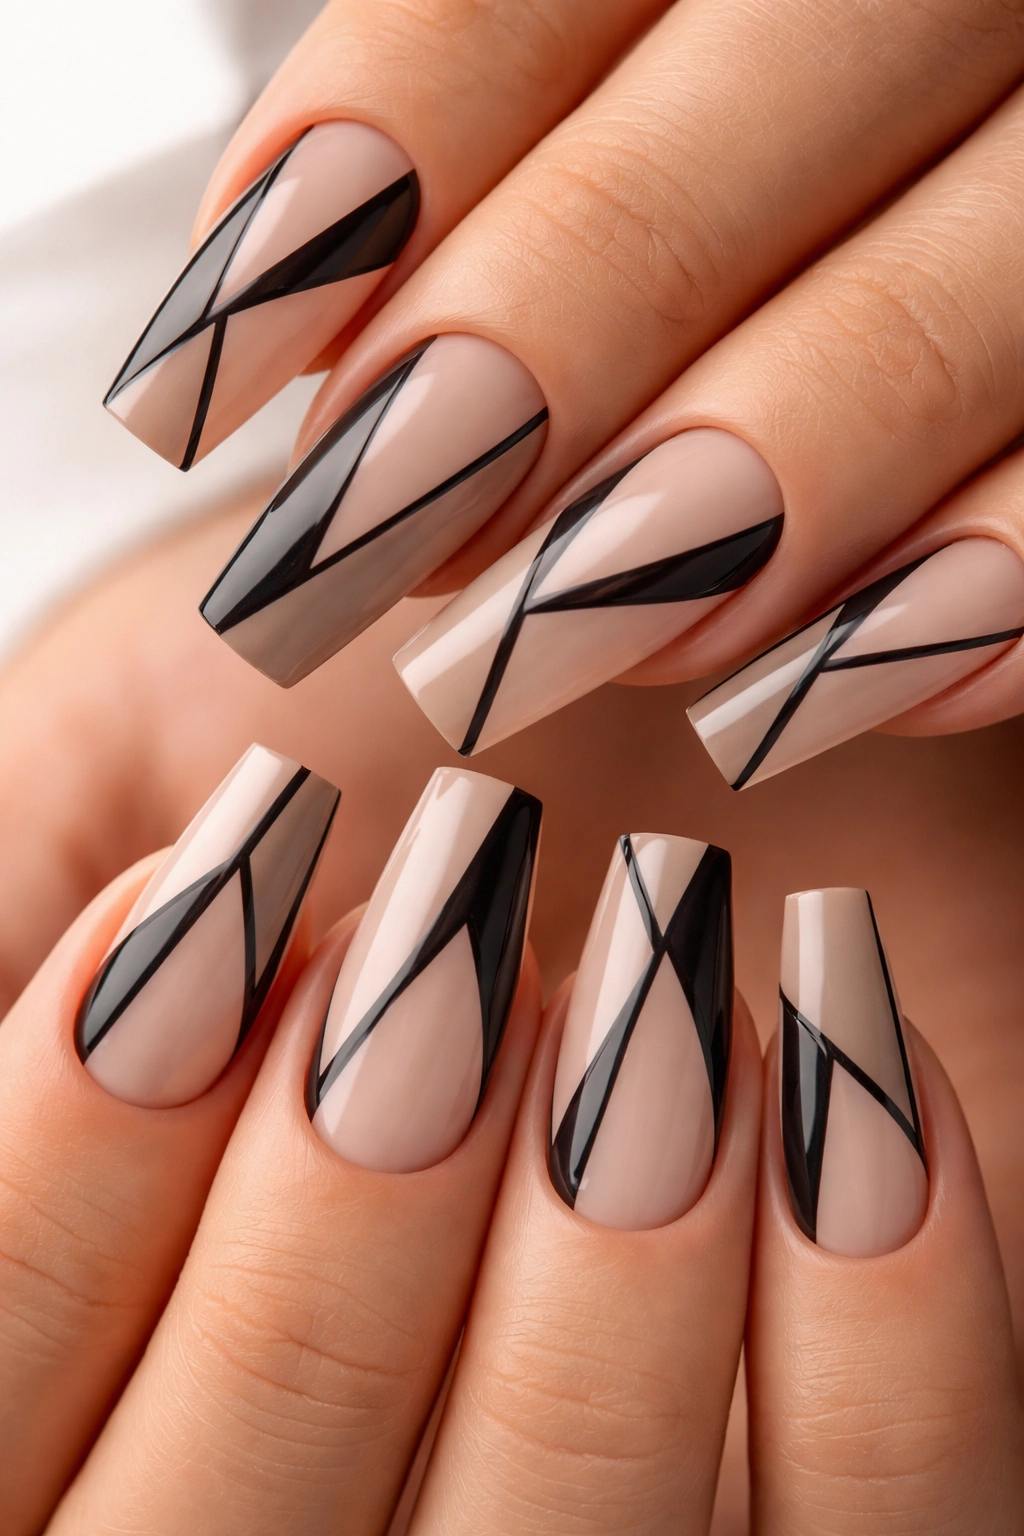
Negative space designs (where you intentionally leave bare nail visible) create artistic, modern looks that feel contemporary and intentional. Start with a nude base and paint geometric shapes that interlock or create patterns while deliberately leaving gaps of bare nail visible. This technique requires a steady hand but produces stunning, architectural results.
Creating Clean Negative Space
Nude creates the perfect neutral base for geometric negative space designs. Paint your geometric shapes (triangles, hexagons, lines, or abstract shapes) with a contrasting color—black, white, or a deep jewel tone. Leave small areas of bare nail visible between shapes, which creates the “negative space” that makes the design feel modern and intentional. The key is making these gaps look deliberate rather than accidental.
Geometric Pattern Ideas
- Interconnected triangles creating a geometric diamond pattern
- Thin black lines forming hexagons or honeycomb structures
- Abstract angular shapes that look like modern art
- Half-moons and crescents positioned to create movement
- Asymmetrical line work that appears spontaneous but is actually carefully planned
Pro tip: This design sounds more complicated than it is—sketch the pattern on the nail with a pencil first, then fill in with polish. Having a guide makes execution far easier and more accurate.
10. Blush Pink with Pearl and Glitter Accents
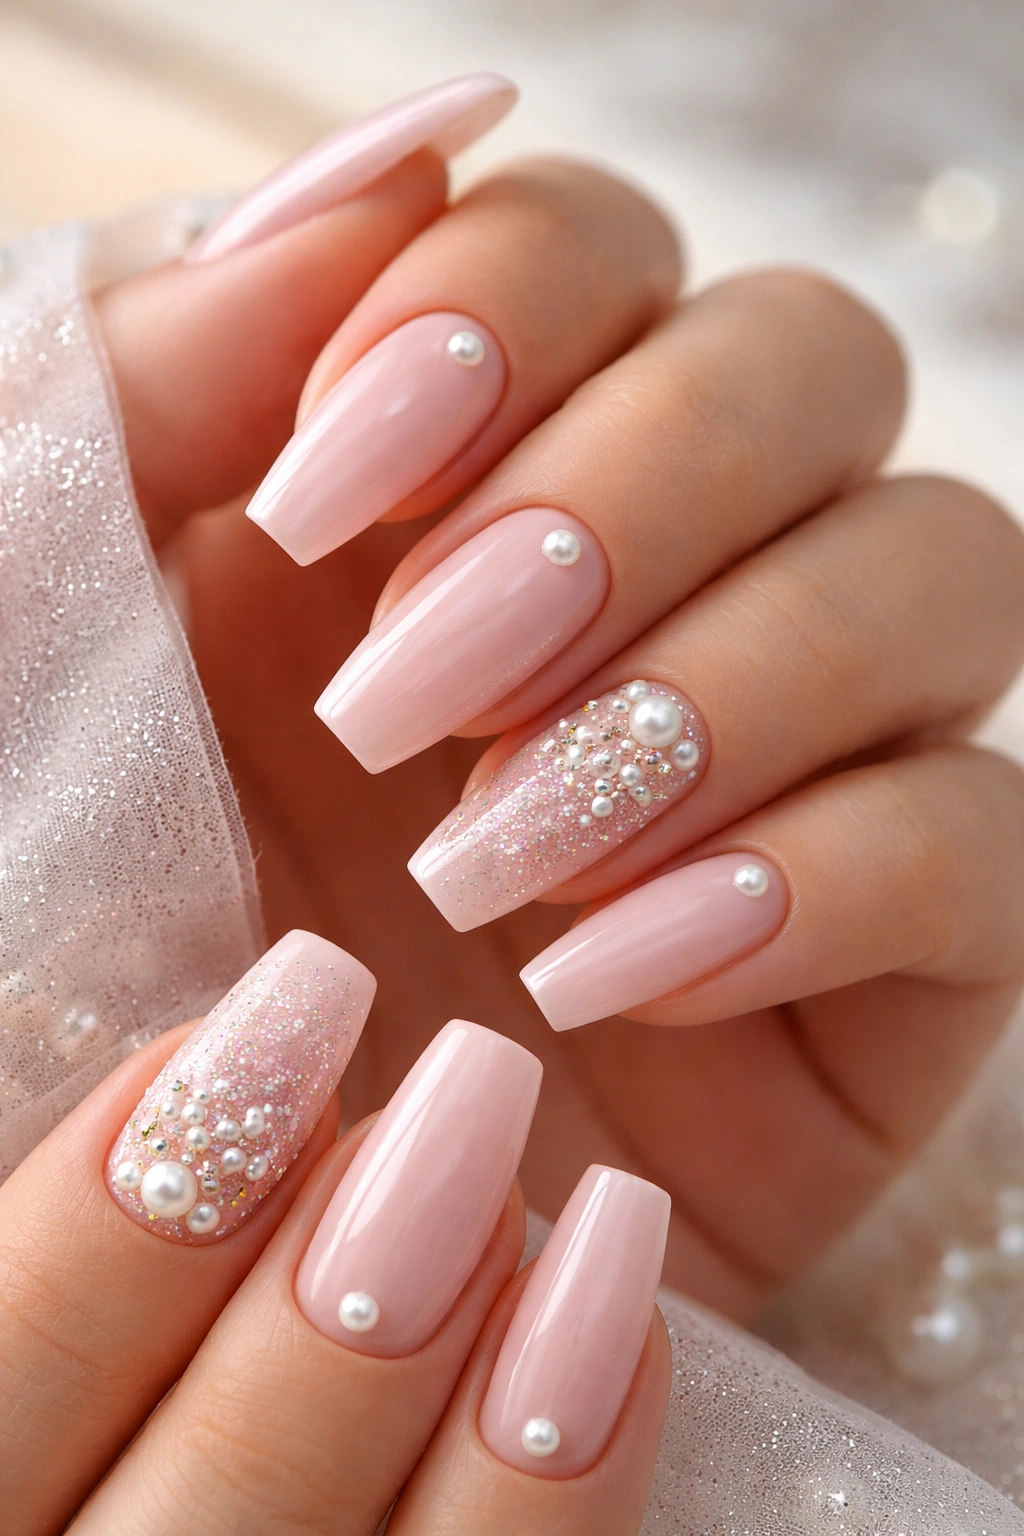
Blush pink is a universally flattering, sophisticated shade that works on any skin tone. Elevate it by adding pearl effects and subtle glitter—perhaps a thin band of pearls around the nail edge or glitter concentrated at the tips. This design feels elegant and celebratory without being over the top, making it suitable for both everyday wear and special occasions.
Adding Pearls and Glitter Strategically
Start with your blush pink base, completely dry. Pearl finishes can be applied as a full nail or as an accent stripe—apply pearl polish in a thin horizontal band for a modern look. Glitter works best when layered—add a thin layer of glitter polish to the very tip of the nail or to one accent nail for sparkle without overwhelming the design. Seal everything with a glossy top coat to blend layers and create a unified, polished appearance.
Sparkle Placement Options
- Thin pearl line around the nail perimeter with glitter at the tip
- Full pearl nail on two accent nails with solid blush pink on others
- Glitter concentrated only at the very tip (last 1/4 inch of the nail) for a subtle gradient effect
- Pearl and glitter combination—pearls near the cuticle, glitter at the tip, blush pink in between
- Scattered glitter dots across the nail for a confetti-like effect
Quick fact: Pearl finishes look best over pink and nude bases. Over darker colors, they can appear flat or muddy. Choose lighter base colors to let the pearl effect truly shine.
11. Sage Green Base with Thin White Wavy Lines
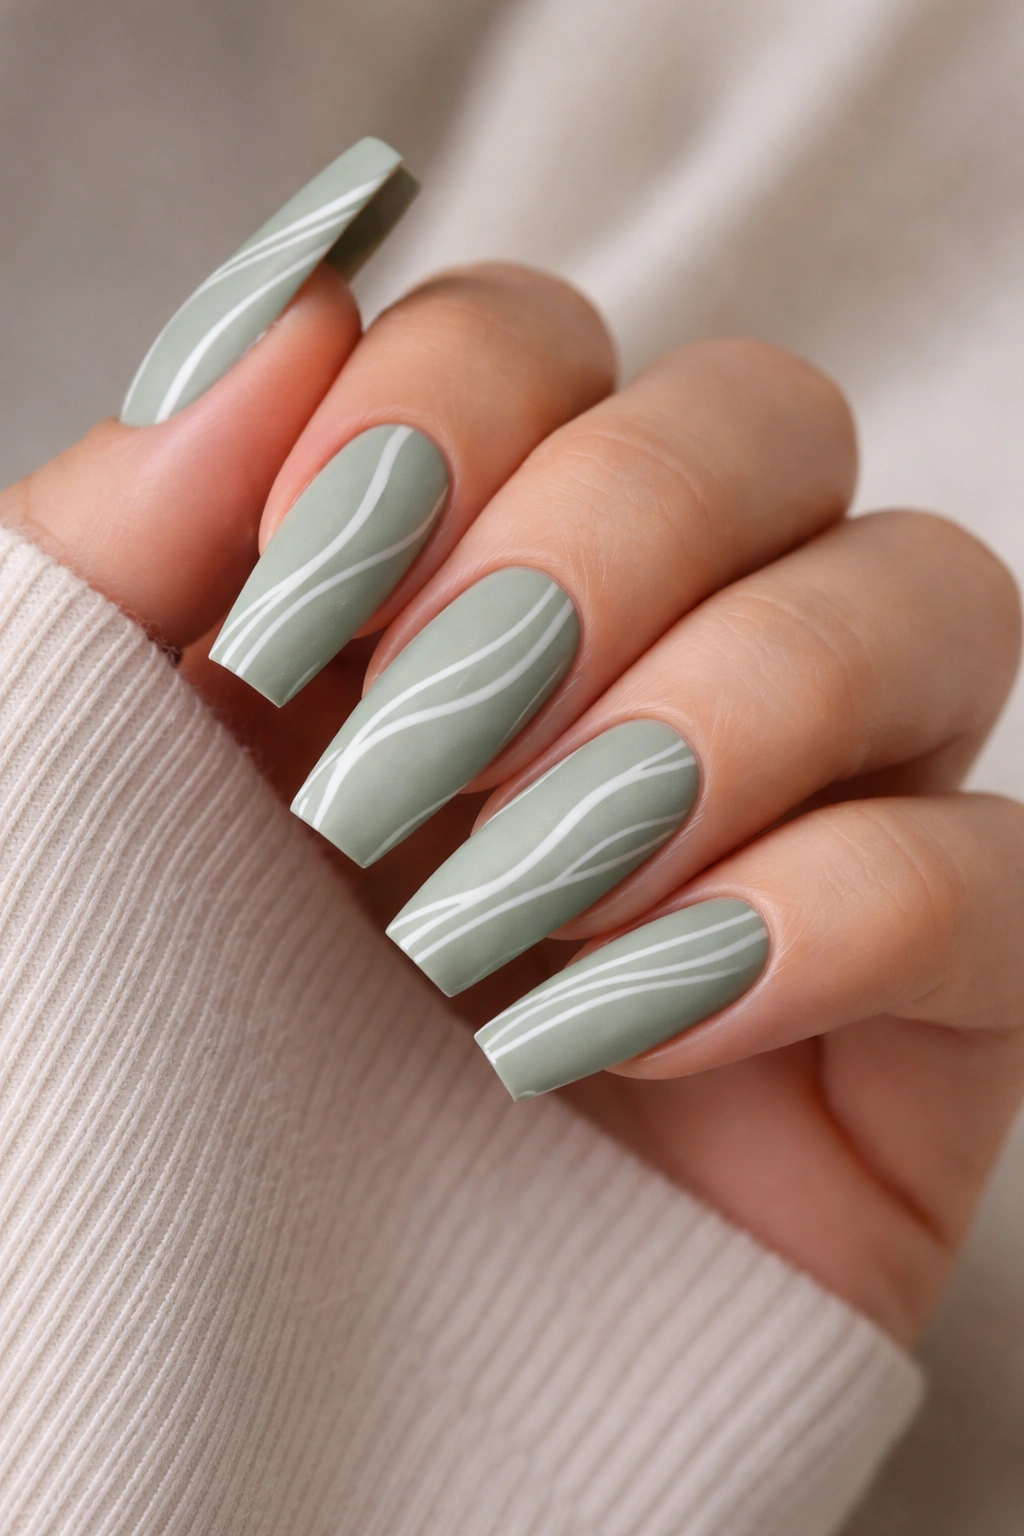
Sage green is a muted, sophisticated shade that feels trendy yet timeless. Add thin white wavy lines that move organically across the nail, creating a flowing, water-like effect. This design feels calm, artistic, and contemporary—perfect for people who appreciate understated elegance with an artistic edge.
Creating Flowing Wavy Patterns
Use a thin nail art brush with white polish to paint gentle, curved lines across your sage green base. Let the lines flow naturally without overthinking the pattern—wavy lines should feel organic and slightly irregular. Practice the motion a few times on paper to develop a feel for the rhythm. Apply the wavy lines once your sage green base is completely dry, then seal with a matte or glossy top coat depending on your preference.
Pattern Variations
- Three to five thin wavy lines flowing horizontally across each nail creates a water-like effect
- Diagonal wavy lines that move from cuticle to tip
- One prominent wavy line on each accent nail with solid sage green on others
- Multiple thin lines creating a ripple or wave pool effect
- Combination of wavy lines and small dots scattered throughout for added texture
Worth knowing: This design looks equally beautiful with a matte or glossy finish. Matte gives it a more modern, subdued feel, while glossy adds shine and polish. Choose based on your personal preference and lifestyle.
12. Burgundy Ombré with Silver Sparkle
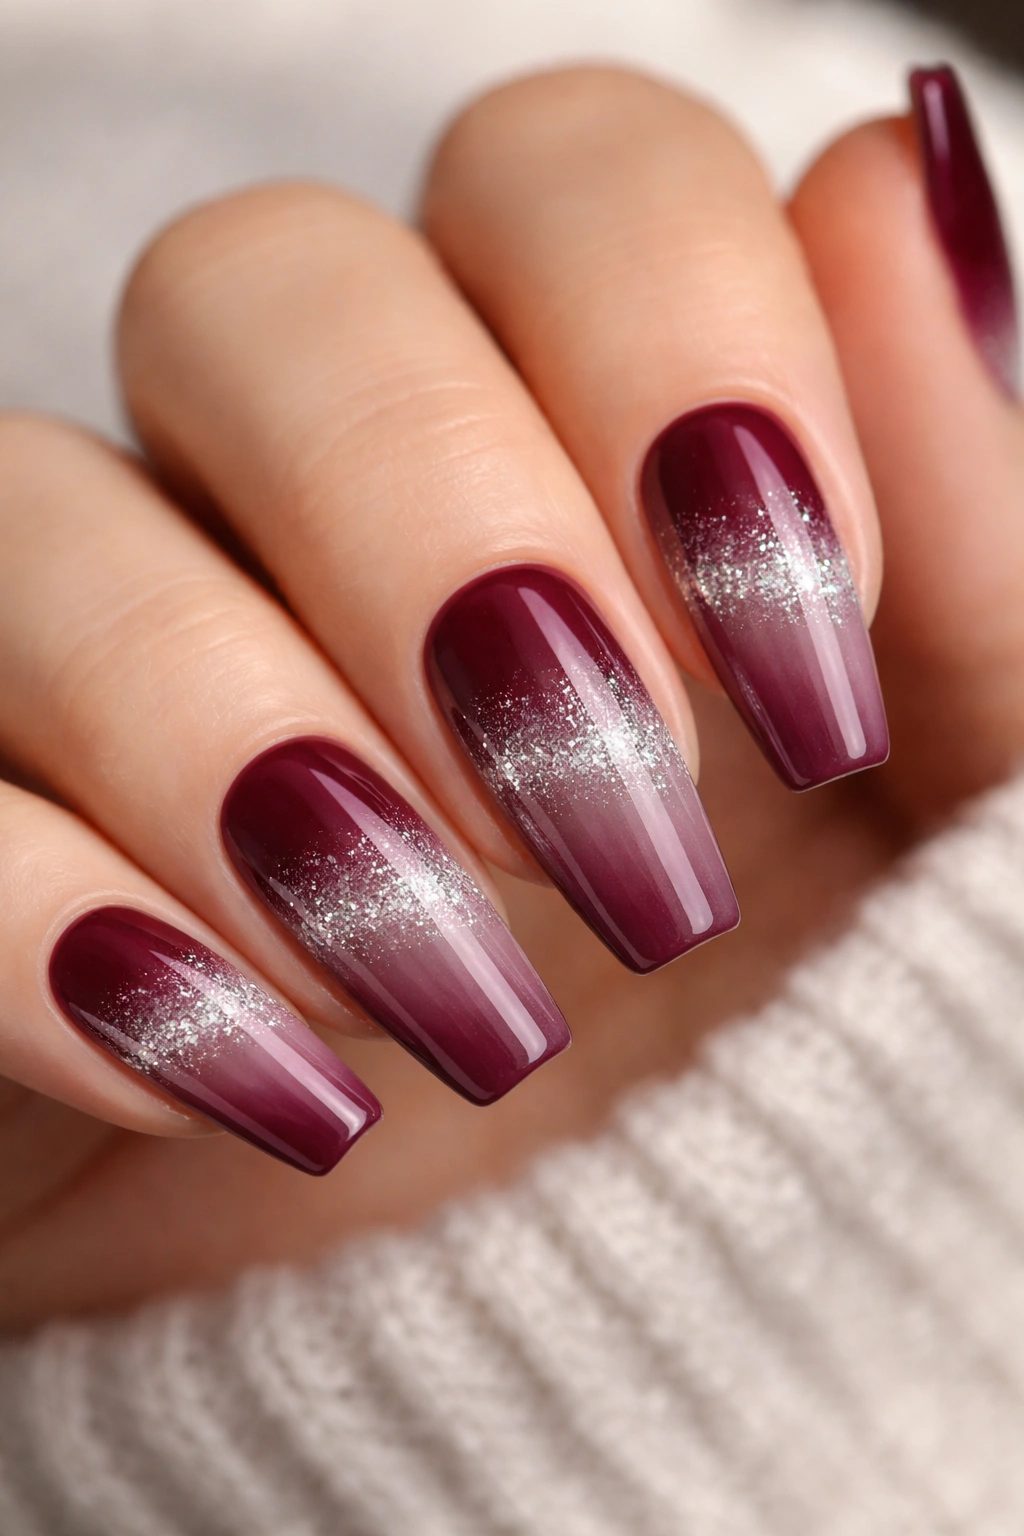
Burgundy ombré, moving from a darker burgundy at the base to a lighter mauve at the tip, becomes even more luxurious with the addition of silver sparkle. Add fine silver glitter concentrated around the middle section of the ombre gradient, creating a dimensional, sparkly effect that catches light beautifully.
Building the Ombré with Sparkle
Create your burgundy-to-mauve ombré using the sponge technique described in an earlier section. Once the ombre is set and dry, apply a thin layer of silver glitter polish to the middle section of the nail (approximately the middle third). The glitter will blend beautifully with both the darker and lighter ombre shades, creating a seamless sparkly transition. Seal with a glossy top coat to set everything in place.
Sparkle Effect Options
- Concentrated glitter only in the center band of the ombre for a dimensional effect
- Scattered glitter across the entire nail, more concentrated in the middle
- Fine silver glitter that catches light subtly rather than bold, chunky sparkle
- Gradient of glitter intensity—more sparse near the base and tip, denser in the middle
- Combine this design with a clear top coat for a wet-look effect that enhances the sparkle
Pro tip: Silver sparkle works beautifully with cool burgundy tones. If your burgundy has warm undertones, rose gold or copper sparkle will complement it better.
13. Nude with Thin Black Striped Accent
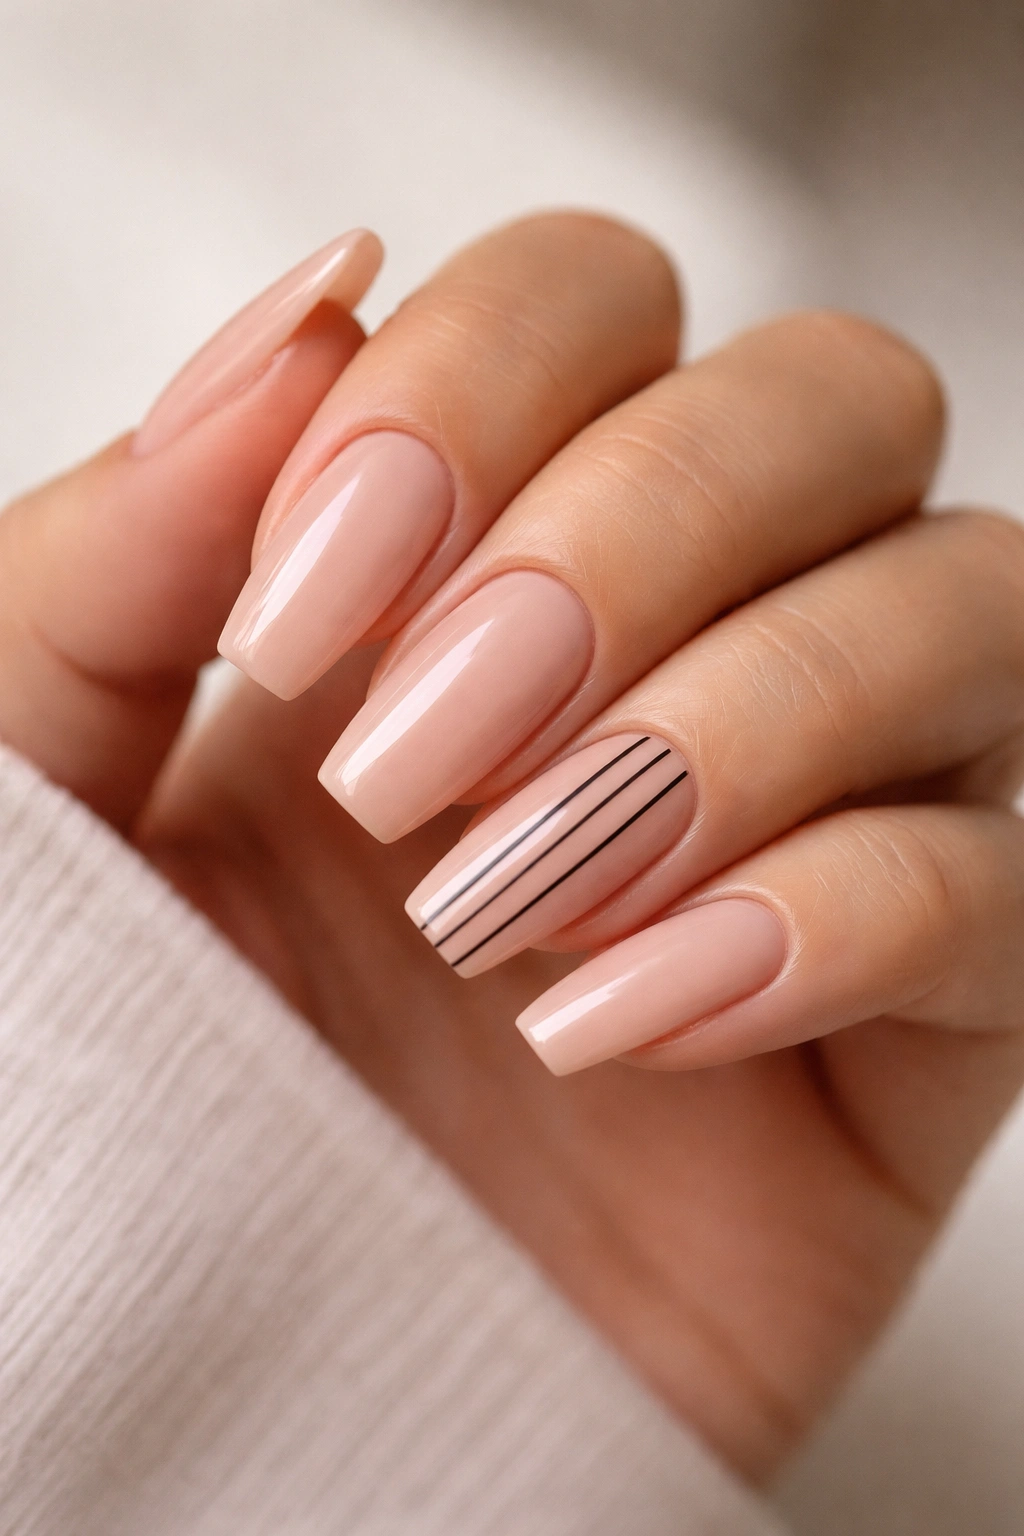
Simple striping creates a modern, design-forward look that remains wearable and sophisticated. Paint most nails in a warm nude shade, then create thin, evenly spaced black stripes on one or two accent nails. The high contrast between nude and black makes the striped nails pop, while the simplicity keeps the overall design refined.
Achieving Perfectly Straight Stripes
Nude base must be completely dry before stripe application. Use striping tape (thin adhesive tape designed for nail art) as a guide for perfectly straight lines. Apply tape to your nail in the desired stripe pattern, paint over it with black polish, and remove the tape before the polish dries. This technique ensures clean, crisp lines without requiring freehand precision.
Stripe Pattern Ideas
- Thin vertical stripes running from cuticle to tip on accent nails
- Thin horizontal stripes for a different visual effect
- Diagonal stripes at a 45-degree angle for movement and sophistication
- Asymmetrical stripe placement—stripes on only half of the accent nail
- Combination of thin and slightly thicker stripes for visual rhythm
Quick fact: Black stripes on nude look more contemporary than black stripes on any other color. The nude base allows the stripes to feel intentional rather than decorative.
14. Soft Pink with Minimalist Gold Dots
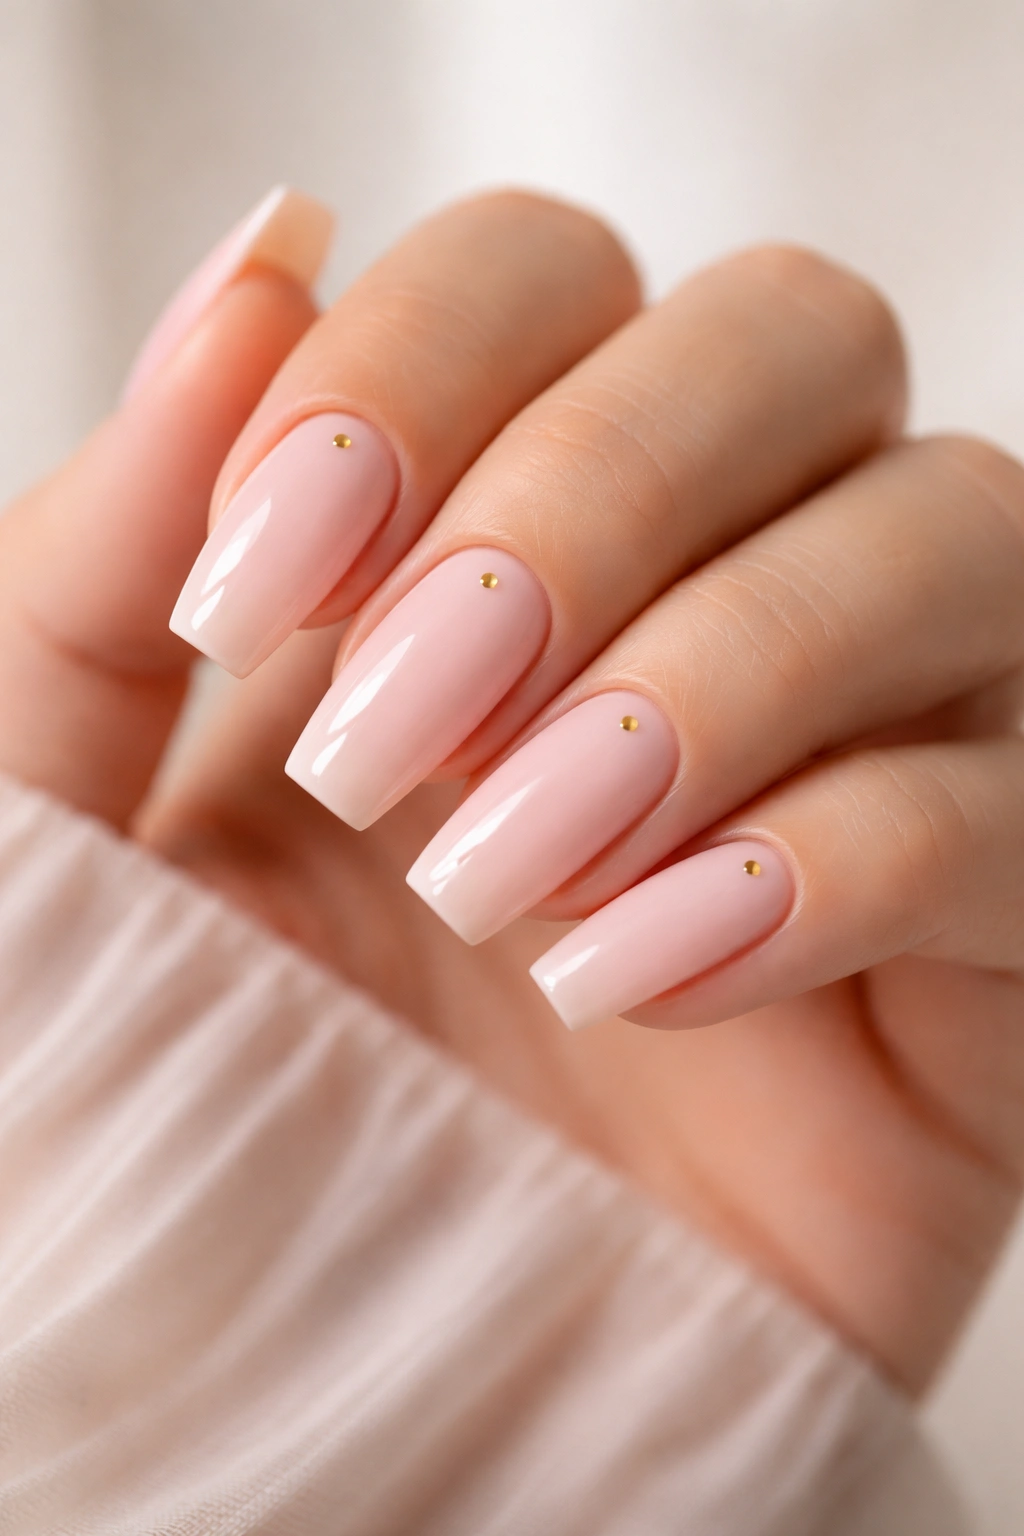
End with the ultimate minimalist design—a soft pink base with tiny gold dots strategically placed. This design requires virtually no artistic skill yet looks intentional, sophisticated, and effortlessly elegant. Gold dots on pink create a feminine, understated design that works beautifully for any occasion.
Applying Perfect Tiny Dots
Soft pink base should be dry before dot application. Use a dotting tool (a small ball-end tool) dipped in gold polish to create perfect circles. Start with one dot, dip the tool in polish again for each new dot—this prevents dots from looking smudged or inconsistent. Space dots intentionally: some near the cuticle, some near the tip, some scattered across the nail. Three to five dots per nail is typically the sweet spot for balanced visual interest.
Dot Placement Strategies
- One or two dots per nail scattered randomly across the entire set
- Concentrated dots on just accent nails with solid pink on others
- Diagonal line of dots running from cuticle to tip
- Dots forming a loose geometric pattern rather than pure randomness
- Larger gold dots (using the end of a bobby pin) combined with smaller dots for variation
Worth knowing: The beauty of this design is its simplicity. Resist the urge to add more elements—the minimalist approach is what makes it feel intentional and sophisticated. Fewer, well-placed dots look more expensive than a nail covered with embellishments.
Final Thoughts
Medium coffin nails offer the perfect balance between fashion-forward style and practical wearability. Whether you choose a bold, statement-making design like black matte with red accents or a subtle, minimalist approach like nude with gold dots, the shape itself conveys confidence and intentionality. These nail designs work beautifully as full sets or as combinations where most nails remain solid while one or two accent nails showcase intricate art.
The key to pulling off any of these designs is precision in your base coat application and quality products. A smooth, even foundation transforms any nail art from amateur-looking to polished and professional. Take your time with each step, and remember that nail art improves with practice—your first attempt at line work or ombre blending might not be perfect, but each manicure teaches you something that makes the next one better.
Ultimately, the best coffin nail design is the one that resonates with your personal style and makes you feel confident. These ideas provide a starting point, but don’t hesitate to adapt them, combine elements, or use them as inspiration for your own unique creations. Your nails are a canvas for self-expression—choose designs that genuinely reflect who you are and what makes you feel beautiful.
