

Coffin nails have become the go-to shape for anyone wanting a sophisticated, elongated manicure that feels modern without being overly dramatic. The tapered silhouette—wider at the base, narrowed toward the squared-off tip—flatters almost every hand shape and works beautifully with designs ranging from minimalist to ornate. If you’ve been scrolling through nail inspiration and feeling overwhelmed by the endless options, you’re in the right place. These sixteen designs showcase the versatility of coffin nails while keeping the application within reach of most skill levels, whether you’re doing this at a salon or attempting it at home.
What makes coffin nails so special isn’t just the shape—it’s that they provide a generous canvas for nail art while maintaining an elegant, professional appearance. The length and angle of the coffin shape actually make certain designs look better than they would on other nail shapes. Unlike stiletto nails, which can feel extreme, or square acrylics, which read differently with certain colors, coffin nails hit that sweet spot of being bold without looking unmanageable. Each design below works with the natural geometry of the shape, using it to enhance visual interest rather than fight against it.
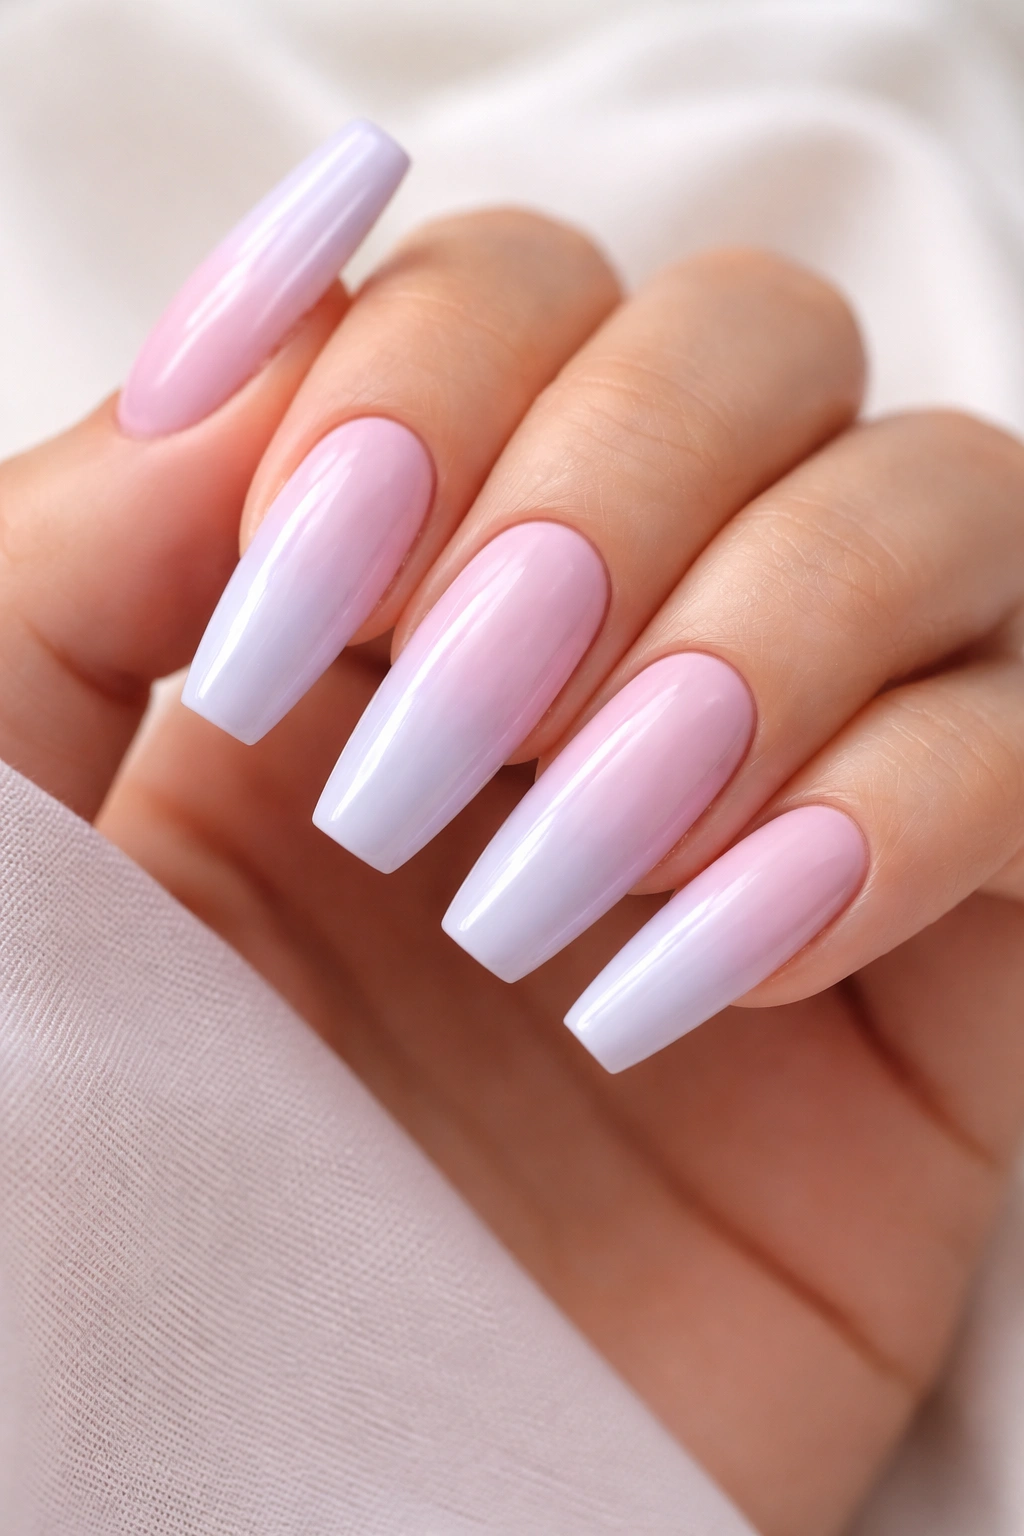
1. Classic French Ombre
The French ombre on coffin nails takes the traditional French manicure and softens it into a gradient that flows from neutral beige at the base to crisp white at the tip. What makes this version special is how the coffin shape naturally elongates the ombre effect, creating an elegant line that draws the eye down the nail. This design works for every occasion and never looks dated because it’s rooted in timeless nail technique.
Why This Design Works for Coffin Nails
The tapered shape of coffin nails actually makes the ombre gradient appear smoother and more intentional than on other nail shapes. The wider base gives you space to start your color transition, while the narrowed tip emphasizes the white tip perfectly. You’re working with a shape that’s already flattering, so even a slight gradient looks polished.
What You’ll Need to Recreate It
- A neutral nude or beige base polish (match it to your skin tone for maximum elegance)
- Bright white polish for the tip
- A soft fluffy brush or sponge for blending
- Optional: a makeup sponge for a softer gradient effect
- Top coat for sealing and smoothness
Pro tip: The key to a seamless ombre isn’t blending the colors perfectly on the nail—it’s sponging back and forth between the two colors multiple times with a nearly-dry sponge. Each pass softens the line more, giving you control over exactly where you want the transition to happen.
2. Glitter Gradient
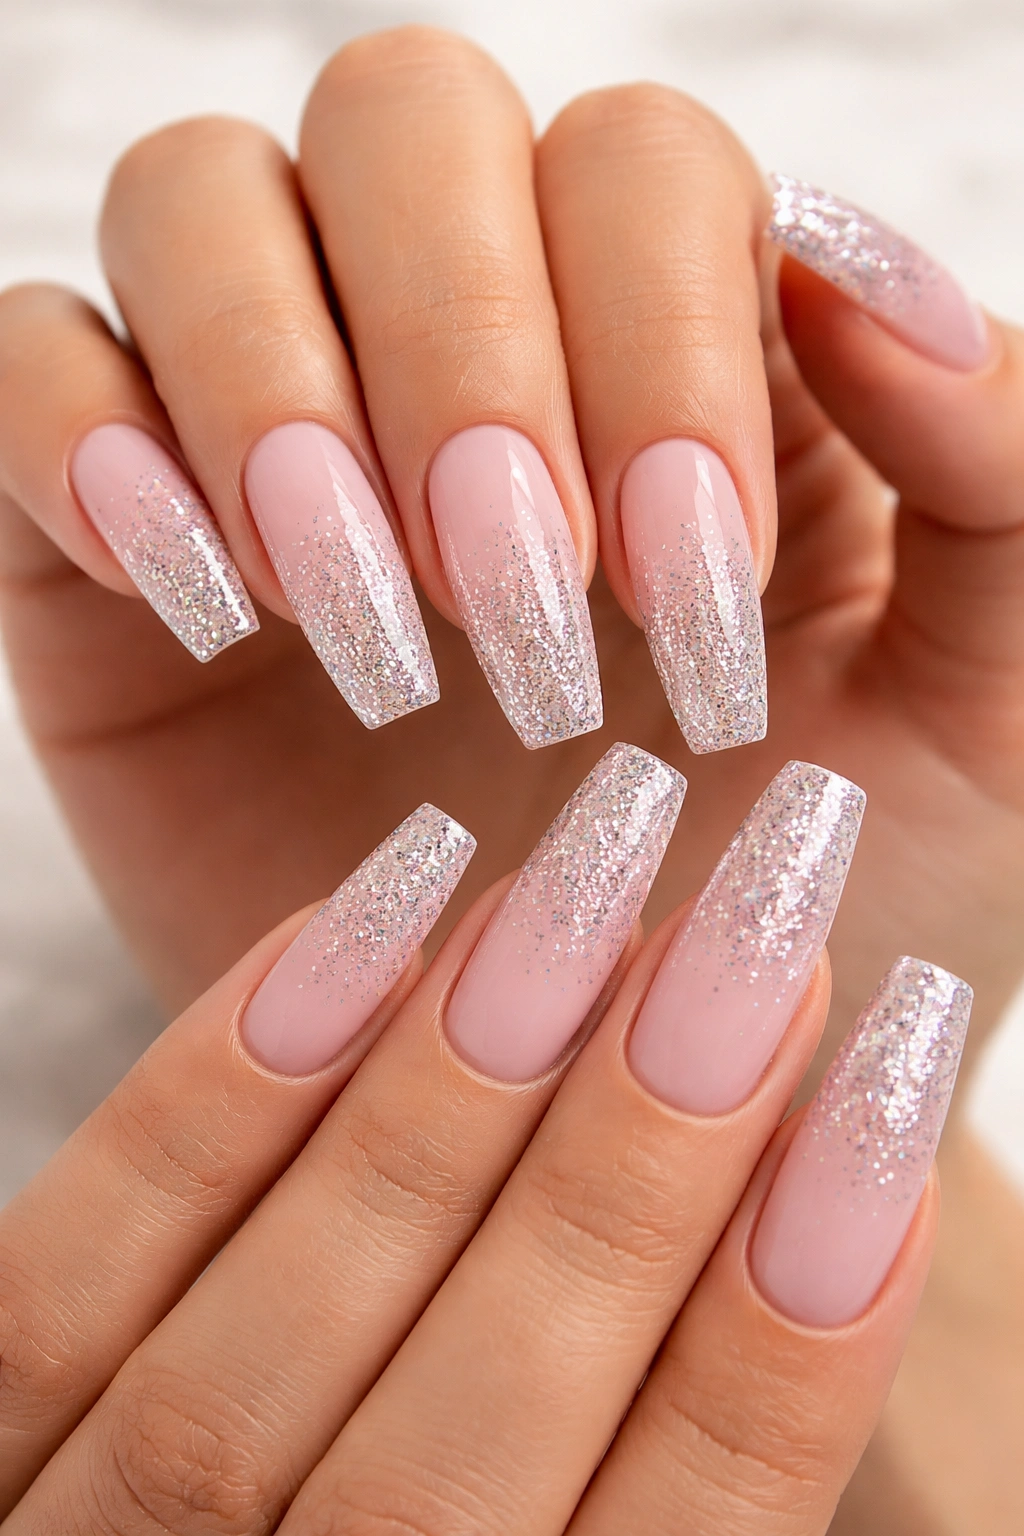
A glitter gradient transitions from a solid color base into increasing densities of sparkle, creating depth and movement across the nail. On coffin nails, this effect is particularly striking because the shape allows the glitter to cascade down the length of the nail in a way that feels intentional and editorial. The gradient can go from subtle to completely dazzling depending on how much glitter you layer.
Building the Perfect Glitter Gradient
Start with a solid base color—champagne, nude, soft pink, or even a deeper jewel tone works beautifully. Once that’s dry, apply a layer of clear gel or top coat to a small section near the tip, then press fine glitter into it. Apply another layer of base color mixed with loose glitter to the middle section for a medium sparkle density, then finish with a nude or very light color on the base with minimal glitter. This creates the illusion that the glitter is graduating smoothly from less to more.
Design Variations to Explore
- Rose gold glitter fading into a blush pink base
- Silver holographic glitter on a nude foundation
- Gold glitter densely packed at the tip, fading to none at the base
- Rainbow glitter that shifts as you move your hand in the light
- White or clear glitter on a champagne base for a subtle, sophisticated look
Insider note: Using a mix of different glitter sizes—combining fine micro glitter with slightly larger holographic flakes—creates visual depth that catches light in multiple ways as you move your hand.
3. Marble Swirl
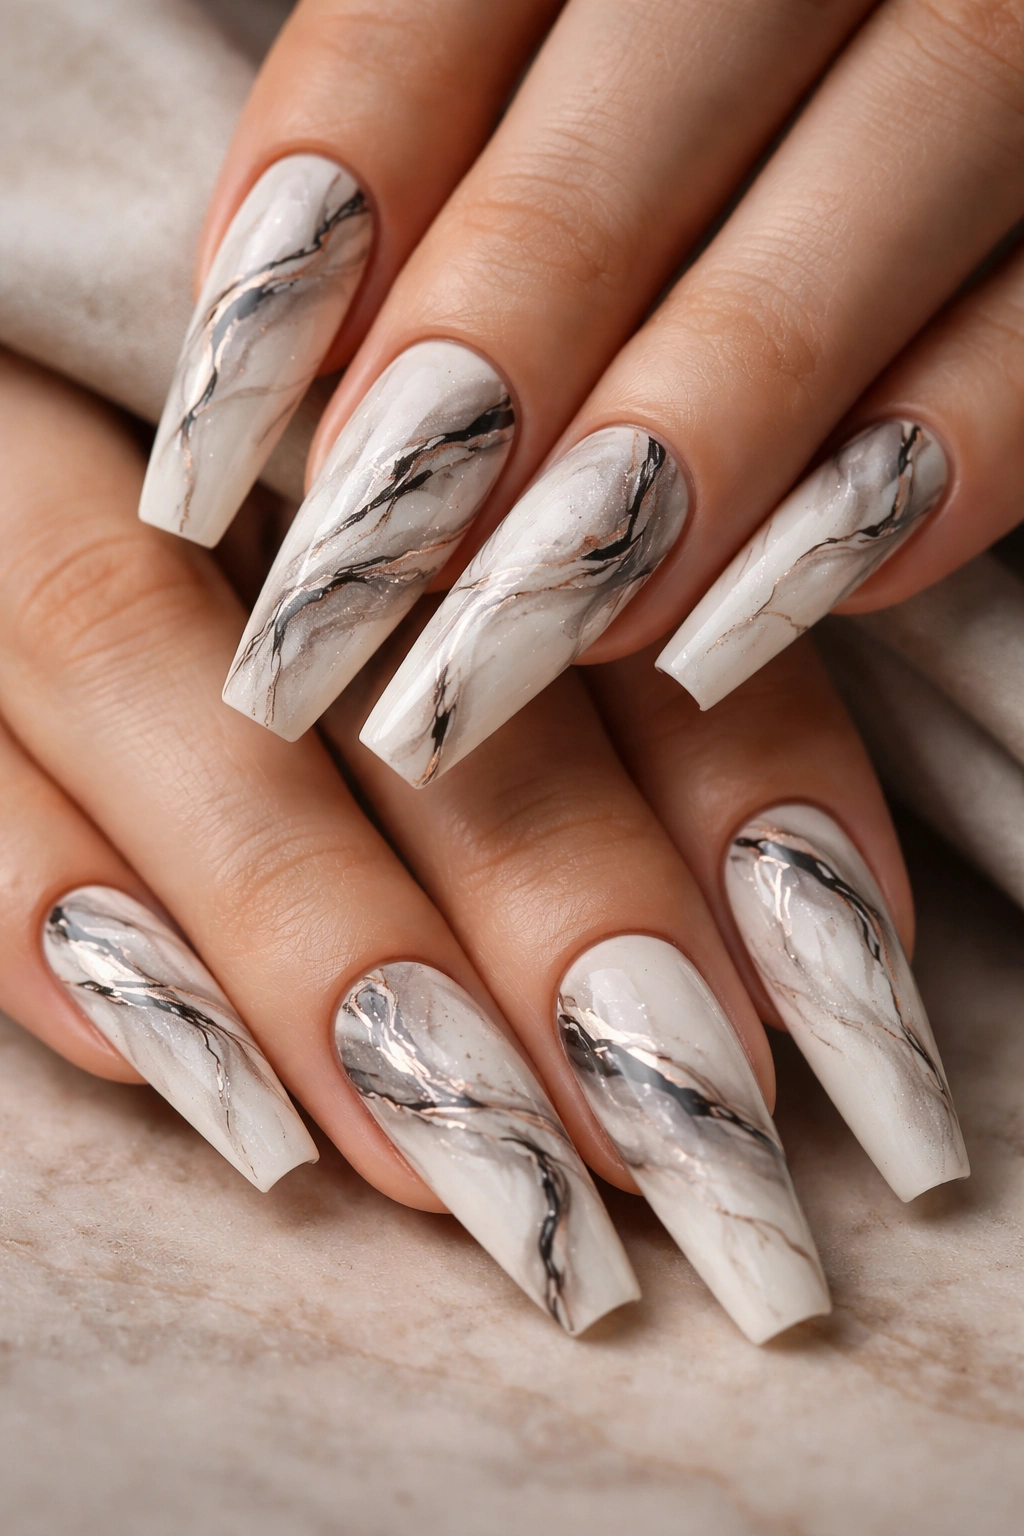
Marble nails feature organic, flowing patterns that mimic the veining in natural stone. On coffin nails, marble designs feel luxurious and high-fashion because the elongated shape gives the swirls room to flow. The pattern naturally follows the length of the nail, creating an almost liquid effect. Each nail ends up slightly different, which is part of what makes this design feel artistic and intentional rather than mass-produced.
Creating Marbled Patterns
The traditional marble technique involves applying two or three colors to the nail, then using a thin brush or toothpick to drag the colors into swirling patterns. For coffin nails, apply your base color first—white, pale gray, or cream provides the best backdrop for seeing the marble patterns clearly. While still wet, drop on your accent colors (typically black, gray, and rose gold work beautifully together). Then use a thin brush or even a toothpick to drag the colors through each other in loose, organic strokes. The beauty is that perfection isn’t the goal; the swirls should look natural and slightly unpredictable.
Color Combinations That Look Expensive
- Black and white with rose gold accents
- Deep gray with white and metallic gold veining
- Black with champagne and nude marble effect
- Navy blue with white and silver marble
- Burgundy with cream and rose gold swirls
Worth knowing: The longer you wait between applying color and creating the marble effect, the less the colors will blend. If you want crisp, defined swirls, work quickly. If you want softer, more blended patterns, wait a few seconds between steps.
4. Matte Black
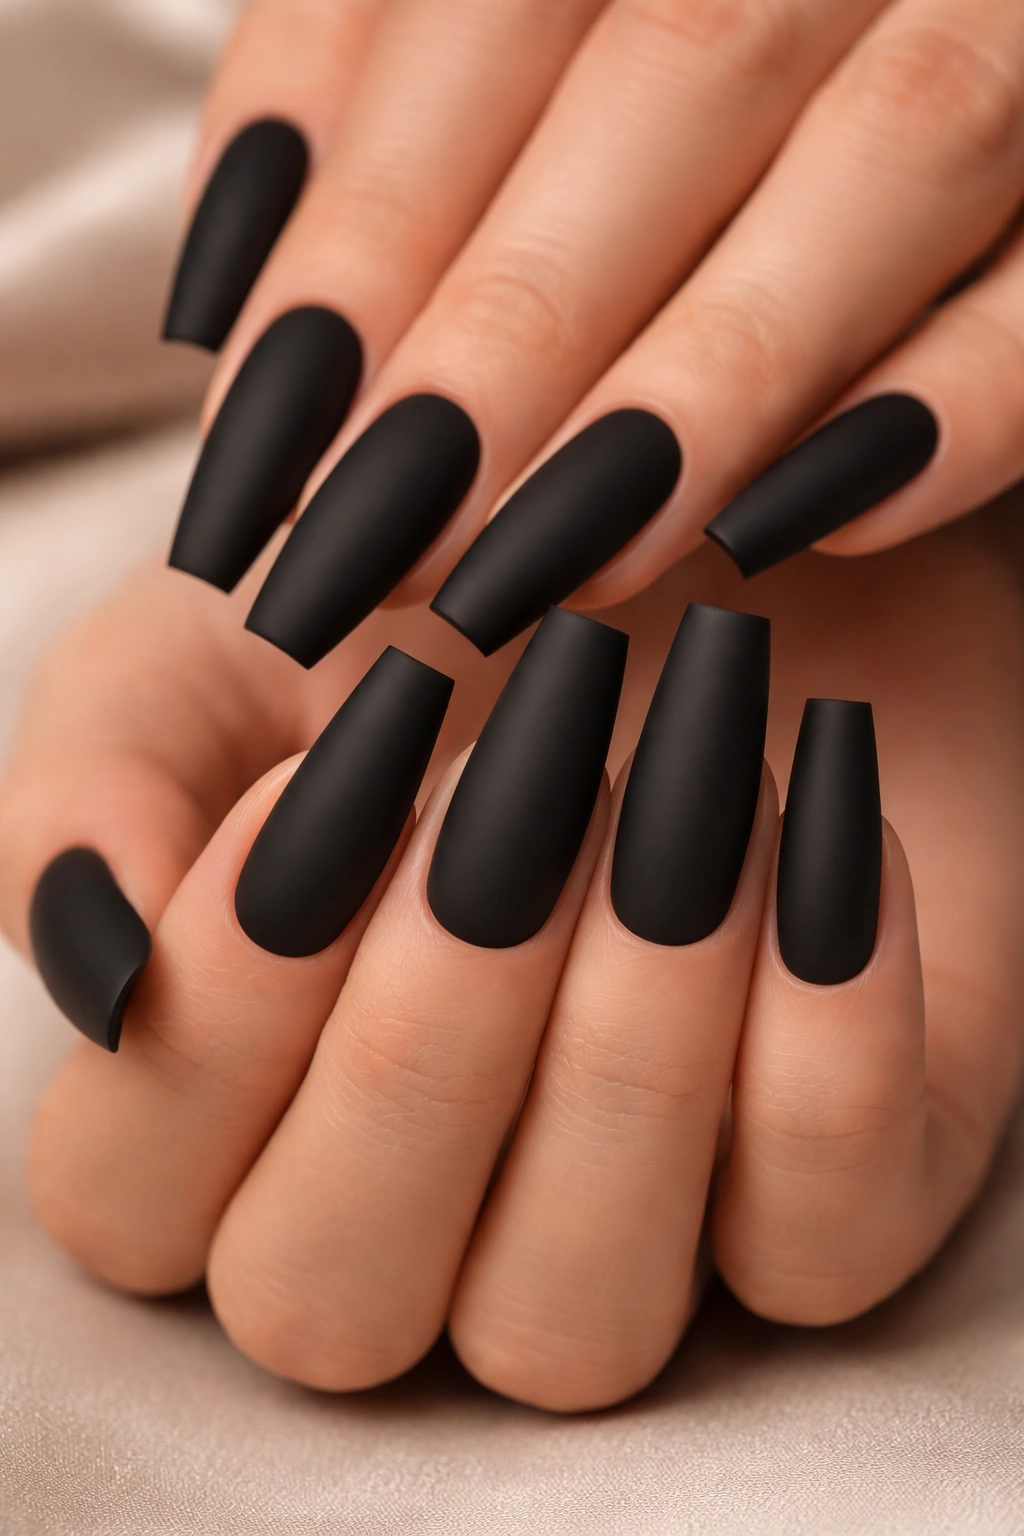
Matte black on coffin nails is the epitome of understated sophistication. There’s something striking about the combination of a deep, flat black finish and the elongated coffin shape—it feels edgy and elegant simultaneously. This is a design that requires zero embellishment because the shape and finish do all the heavy lifting. Matte black works from the boardroom to evening events and never looks out of place.
Why Matte Finishes Elevate Simple Colors
A matte topcoat removes shine, which actually makes the color read darker and more dramatic than the glossy version of the same polish. Black becomes almost velvety and absorbs light rather than reflecting it, which creates a sophisticated, toned-down luxury feel. On the coffin shape, this matte finish emphasizes the clean lines and geometric precision of the nail edge, making it look intentional and carefully considered.
Making Matte Black Feel Fresh
- Add a single thin stripe of metallic gold or rose gold down the center of each nail
- Create a negative space design where the matte black frames a small nude or white accent at the tip
- Apply matte black to most nails, then do one or two accent nails in glossy black for subtle contrast
- Add tiny gemstones at the base where the nail meets the cuticle for hidden luxury
- Paint matte black on the tips and transition to a glossy nude toward the base
Pro tip: Matte topcoats can sometimes make nails feel dull or chalky. Choose a high-quality matte coat that still has a slight sheen to it, and make sure your base color is pristine—any streaks or imperfections will show more on a flat finish.
5. Rose Gold Metallic
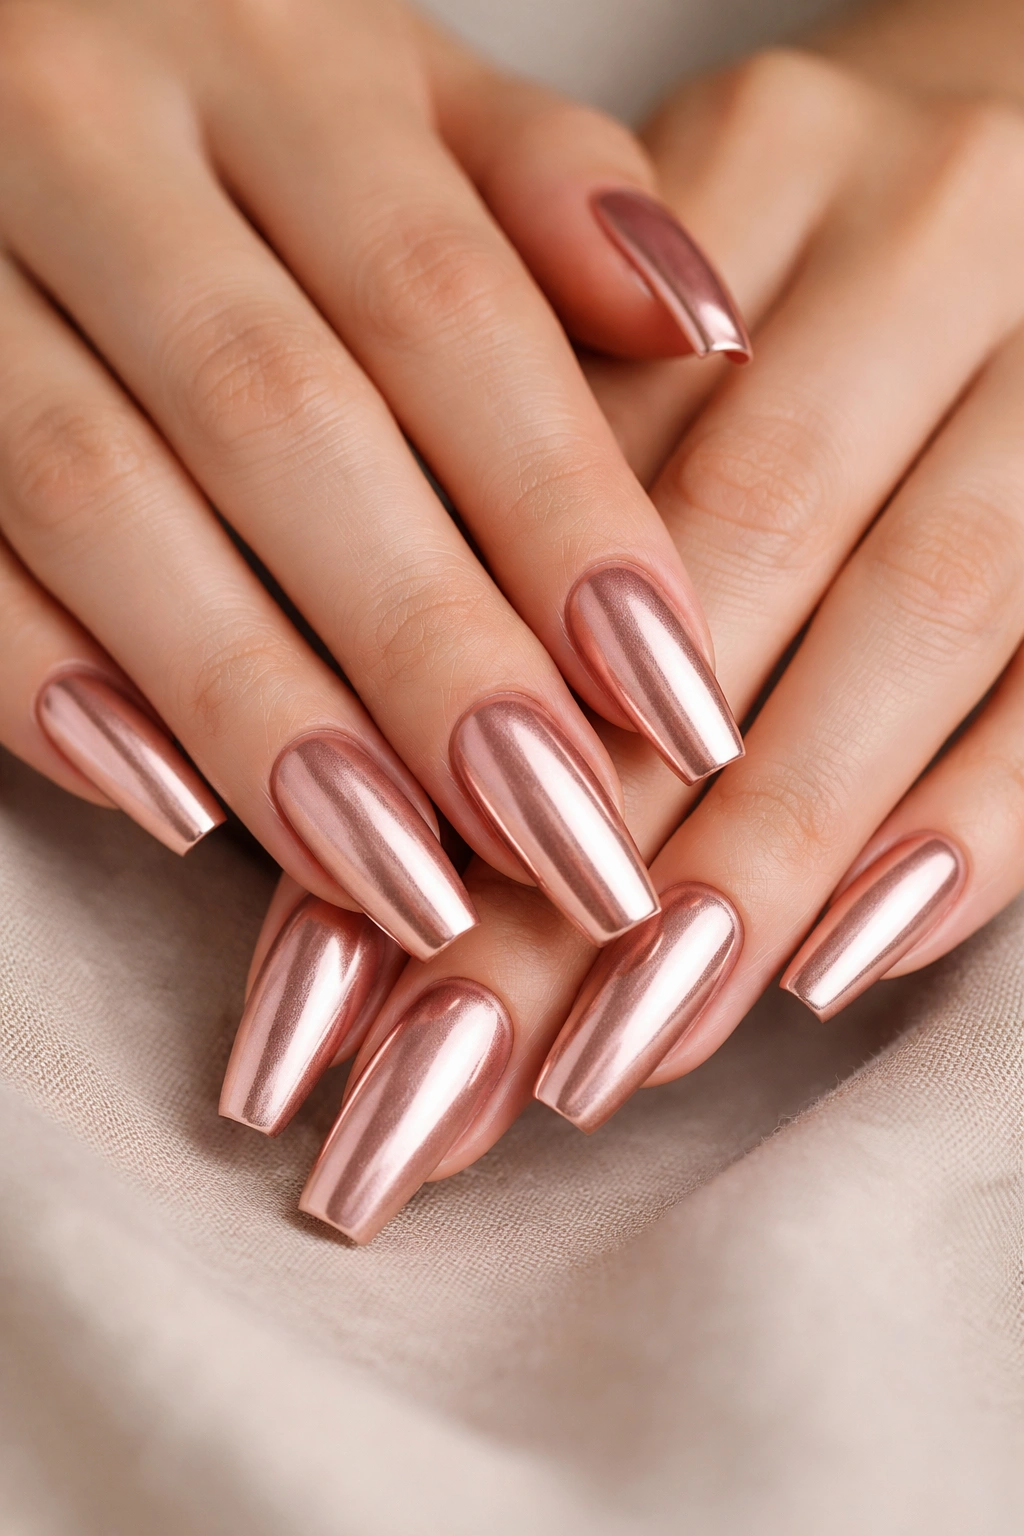
Rose gold metallic polish creates a warm, shimmering finish that complements virtually every skin tone and works with everything from casual to formal styling. On coffin nails, the metallic shimmer catches light beautifully along the length and tapered edges of the nail. Rose gold feels contemporary without looking trendy—it’s become a classic neutral metallic that never goes out of style.
Application Secrets for Maximum Shine
Metallic polishes work best with thin, even coats. Apply the first coat and let it dry completely, then apply a second coat for full opacity and maximum shimmer. If you use a metallic that’s slightly sheer (which many rose gold polishes are), you might need three thin coats rather than two thick ones. The key is patience—rushing the coats leads to streaking and uneven color. A quality topcoat over metallic polish enhances the shine and prevents the metallic particles from dulling over time.
Design Combinations Using Rose Gold
- Rose gold base with a glossy nude tip for a modern take on the French manicure
- Rose gold with holographic accents for extra sparkle
- Rose gold metallic over a matte nude base layer for an ombré metallic effect
- Rose gold with delicate line art or minimalist designs on top
- Half rose gold, half matte nude for a two-tone geometric look
Worth knowing: Rose gold looks warmest on nails when applied over a slightly peachy or nude undertone rather than pure white. If your base polish has a warm undertone, the metallic will pop even more beautifully.
6. Nude with Gold Accents
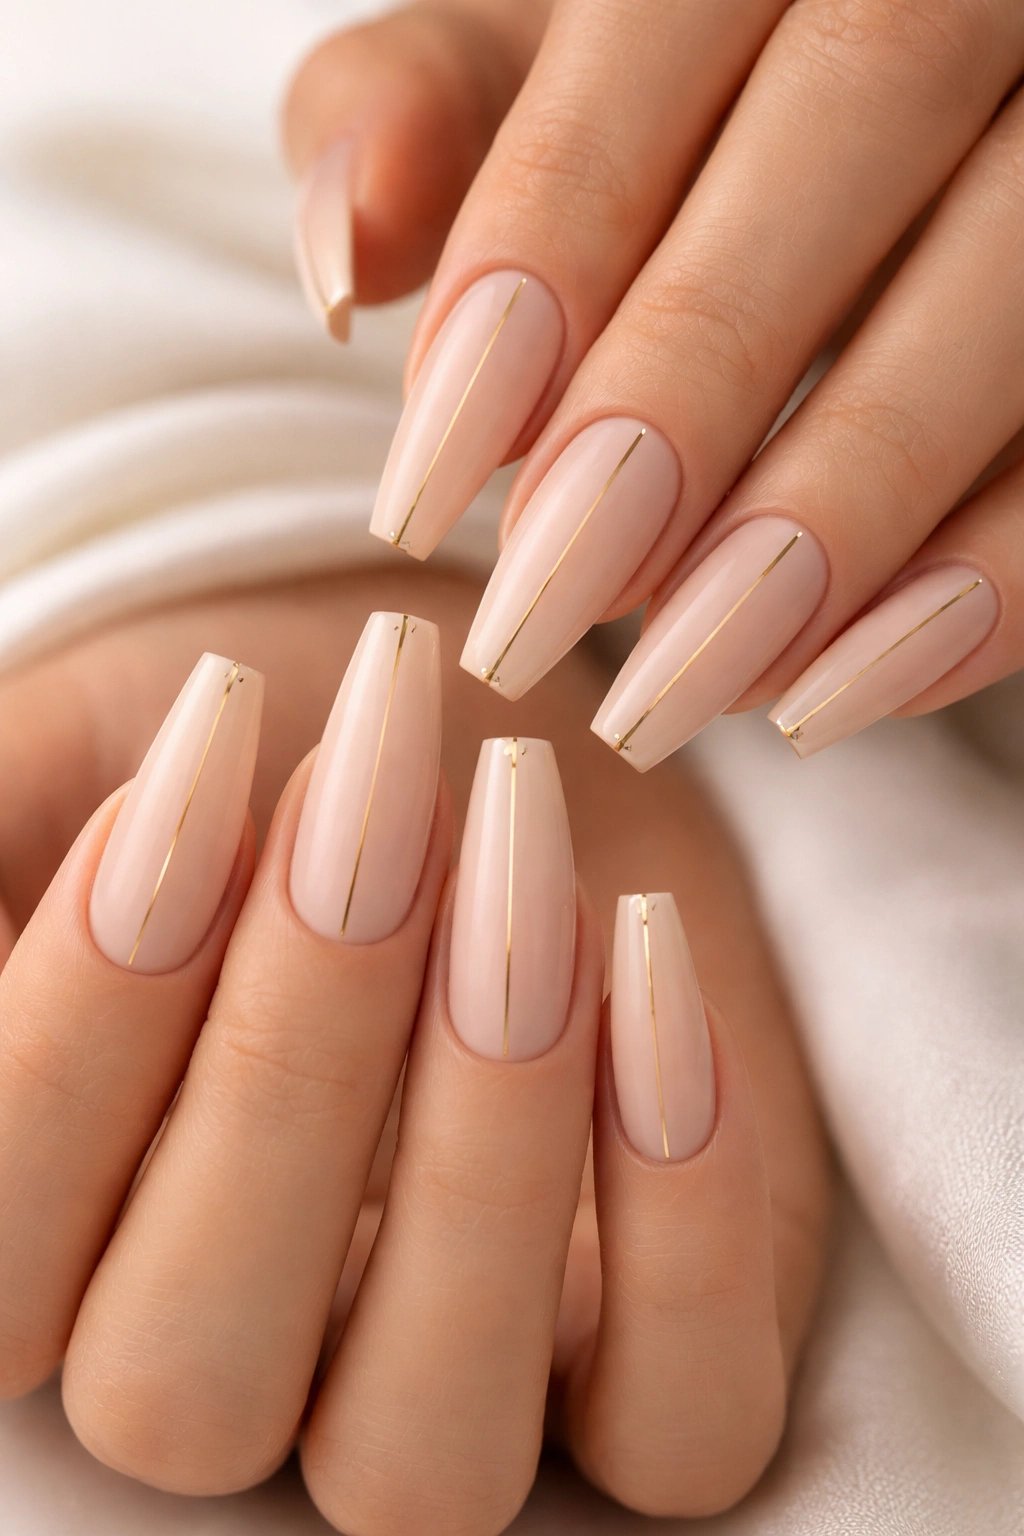
Nude nails with gold accents represent the intersection of minimalist and luxury—the overall look is clean and understated, but small, strategic touches of metallic gold elevate it into something special. On coffin nails, this combination feels refined and works for professional settings while still feeling intentional and designed. The nude elongates the appearance of your fingers while the gold adds just enough visual interest to keep the design from feeling plain.
Where to Place Gold Accents for Maximum Impact
Strategic placement is everything with this design. Thin vertical gold lines down the center of each nail create an elegant, elongating effect. A small gold accent at the very tip of the nail (like a tiny metallic French tip) modernizes the look. Geometric gold shapes—triangles, lines, or a single small rectangle—positioned at the cuticle area add sophistication. You could also frame the nail with a delicate gold border or add a single gold line along the side edge of the coffin shape.
Application Techniques
- Use gold metallic gel or a thin-tipped brush with gold acrylic paint for precise placement
- Apply gold accents after your nude base is completely dry and sealed with a base topcoat
- Keep lines clean and deliberate—wobbly gold lines look accidental rather than intentional
- Use a toothpick or thin liner brush for fine details
Insider note: Matte nude paired with glossy gold accents creates more visual contrast than glossy nude with gold. If you want the design to feel more prominent, consider a matte nude base.
7. Holographic Rainbow
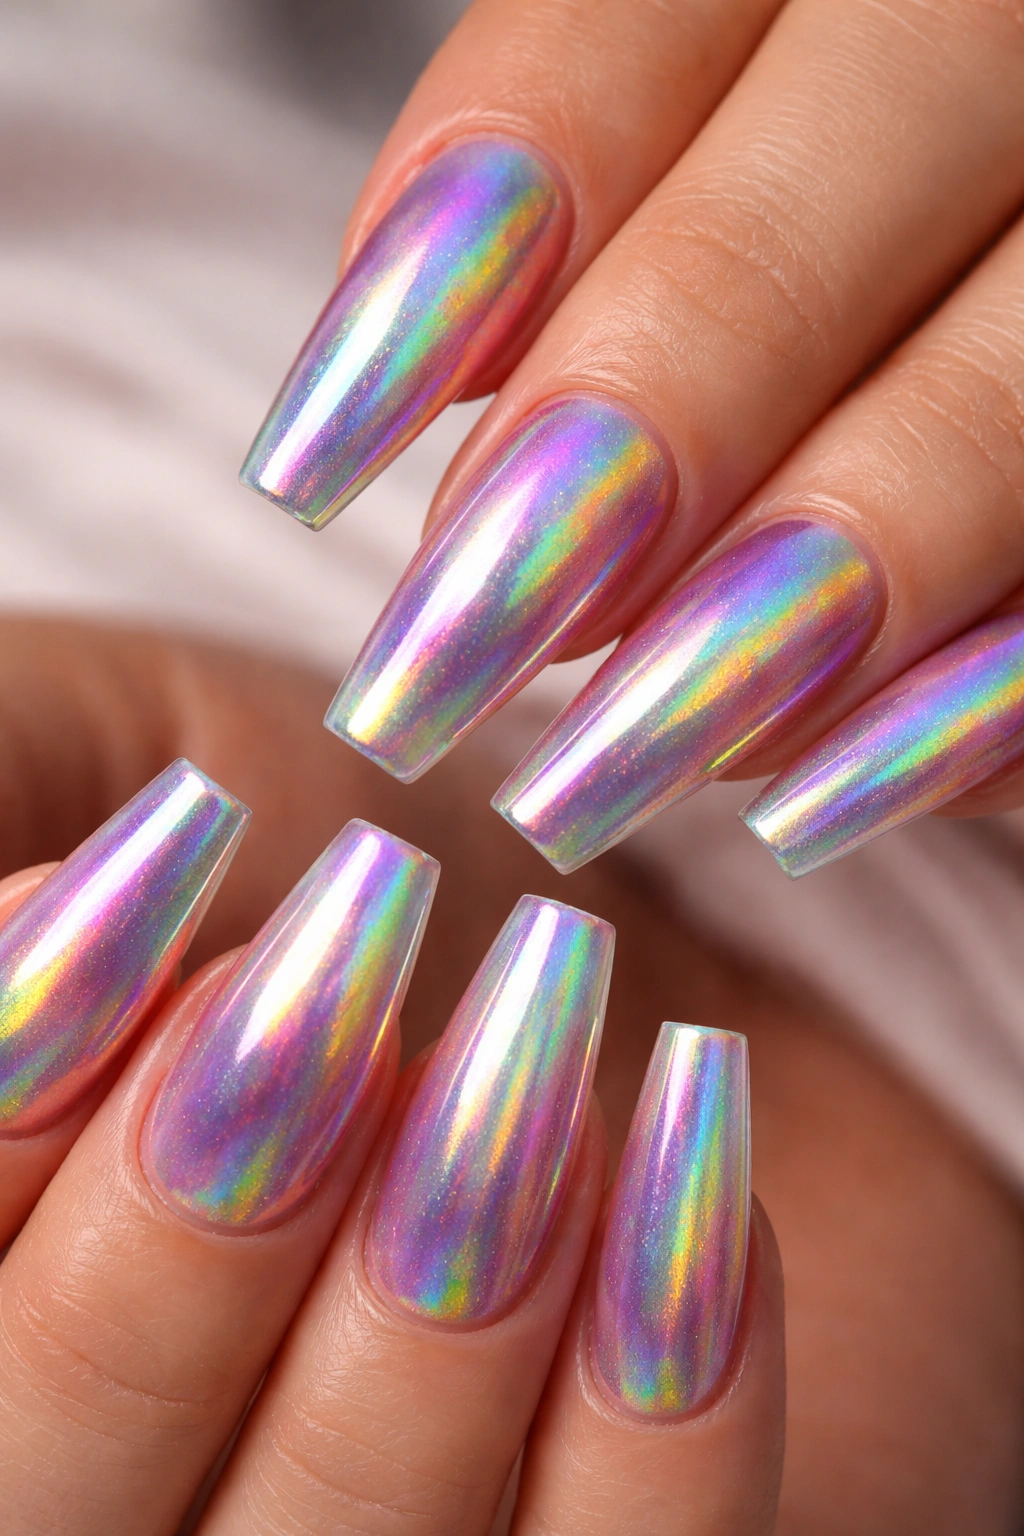
Holographic polish creates a rainbow light-play effect that shifts as your hand moves, catching different colors in different lighting. On coffin nails, this effect is particularly mesmerizing because the elongated shape and multiple angles of the nail catch and reflect light differently. A full holographic manicure is bold and eye-catching, making it perfect for anyone who loves color and isn’t afraid to stand out.
Achieving True Holographic Shine
Quality matters enormously with holographic polish. Cheap versions often look murky or streaky rather than creating that clean rainbow effect. Apply holographic polish in thin, even coats—it’s more opaque than it might appear after the first coat, so you can get away with two coats for full coverage. Some holographic polishes work best in sunlight or bright light, where the rainbow effect really shows. Indoors under artificial light, they may read as more silver or white.
Styling Holographic Designs
- Full holographic manicure on all ten nails for maximum impact
- Holographic on just two or three accent nails with a coordinating nude or white on the rest
- Holographic base with matte black tips for a modern ombré twist
- Holographic with black line art or geometric patterns on top
- Holographic nails with tiny gemstones for added sparkle and dimension
Pro tip: Holographic polishes are delicate and can look dull if your topcoat is too thick or if you apply too much product. Use a thin, glossy topcoat specifically designed for shimmer polishes to preserve the rainbow effect.
8. Nude with Line Art
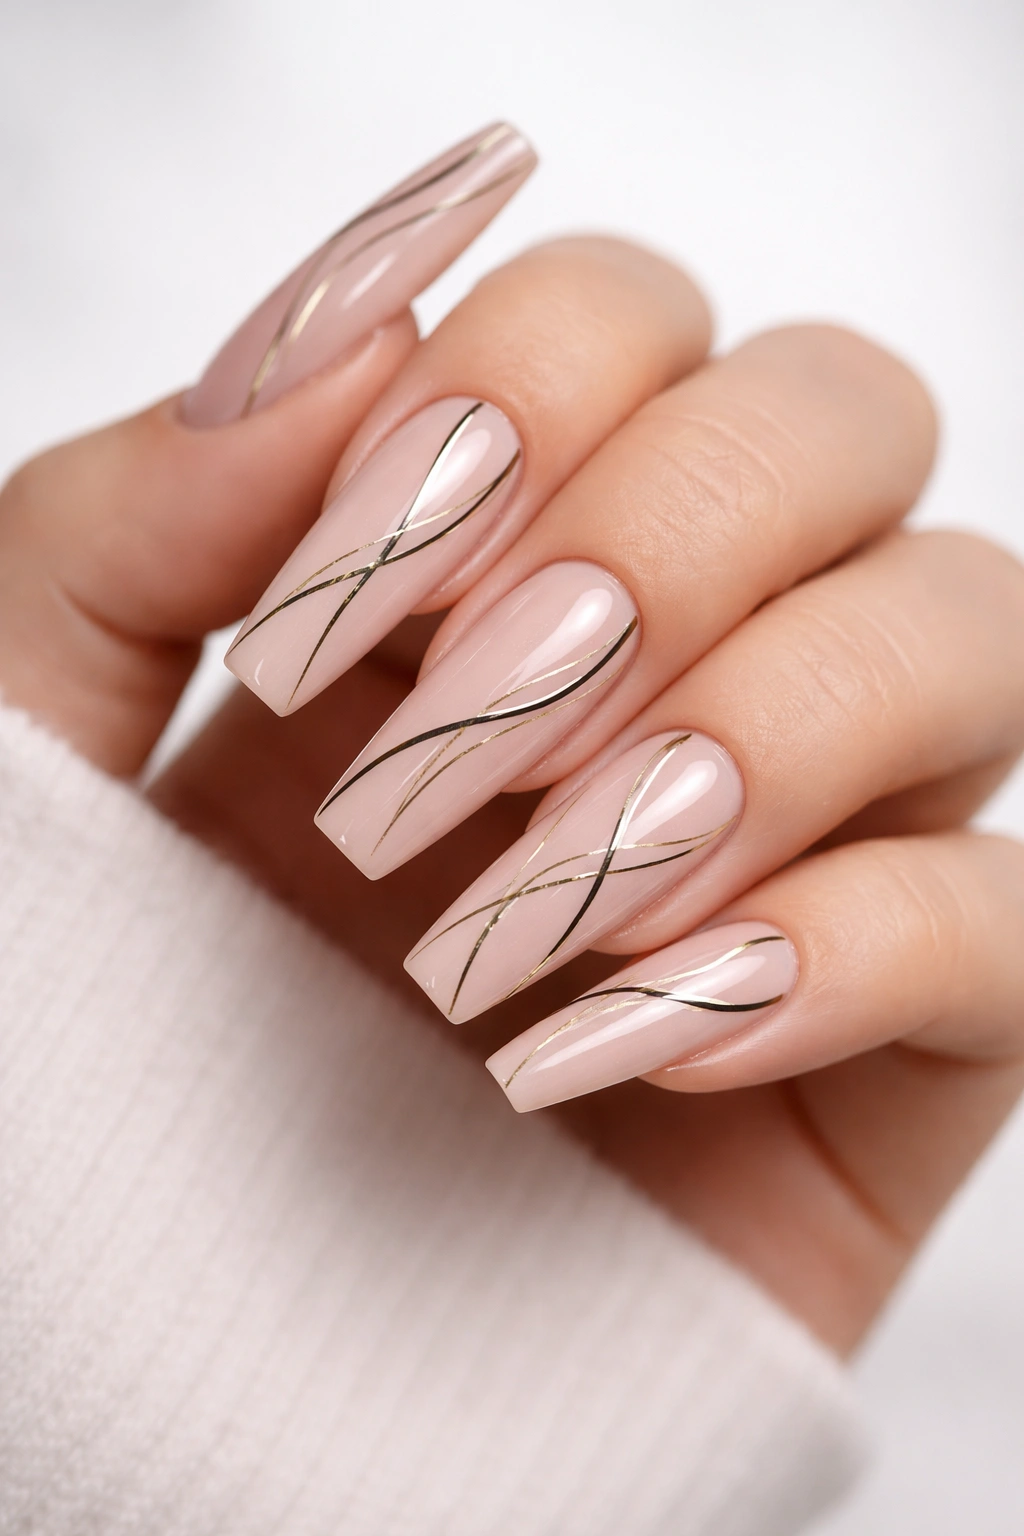
Line art on coffin nails—thin black or metallic lines creating abstract patterns, botanical designs, or geometric shapes—turns a simple nude base into something artistic and intentional. The canvas of a coffin nail is perfect for line art because the length gives you room to create flowing designs without the nails feeling cluttered. A single continuous line, delicate geometric patterns, or minimalist botanical illustrations all look striking against a nude background.
Designing Line Art for Your Nails
The key to successful line art is using a very thin brush or a fine-tipped nail art pen. Black offers high contrast and dramatic effect, while metallic gold or rose gold creates a more subtle, luxurious look. Consider the direction of your lines—vertical lines that follow the length of the coffin shape are elongating and elegant, while horizontal lines create a modern, geometric feel. You don’t need to draw the same design on every nail; varying the patterns across your hand creates an intentional, curated look.
Line Art Ideas Perfect for Coffin Nails
- Minimalist botanical designs (a single leaf, a tiny branch, delicate florals)
- Geometric patterns (triangles, hexagons, abstract angular shapes)
- Continuous flowing lines that move across multiple nails
- Abstract portrait or face line drawing on an accent nail
- Constellation or celestial designs with connected dots and lines
Worth knowing: Line art looks cleaner and more intentional when your base coat is completely smooth and sealed. If your nude base has ridges or texture, the lines will appear uneven even if your hand is steady.
9. Deep Burgundy
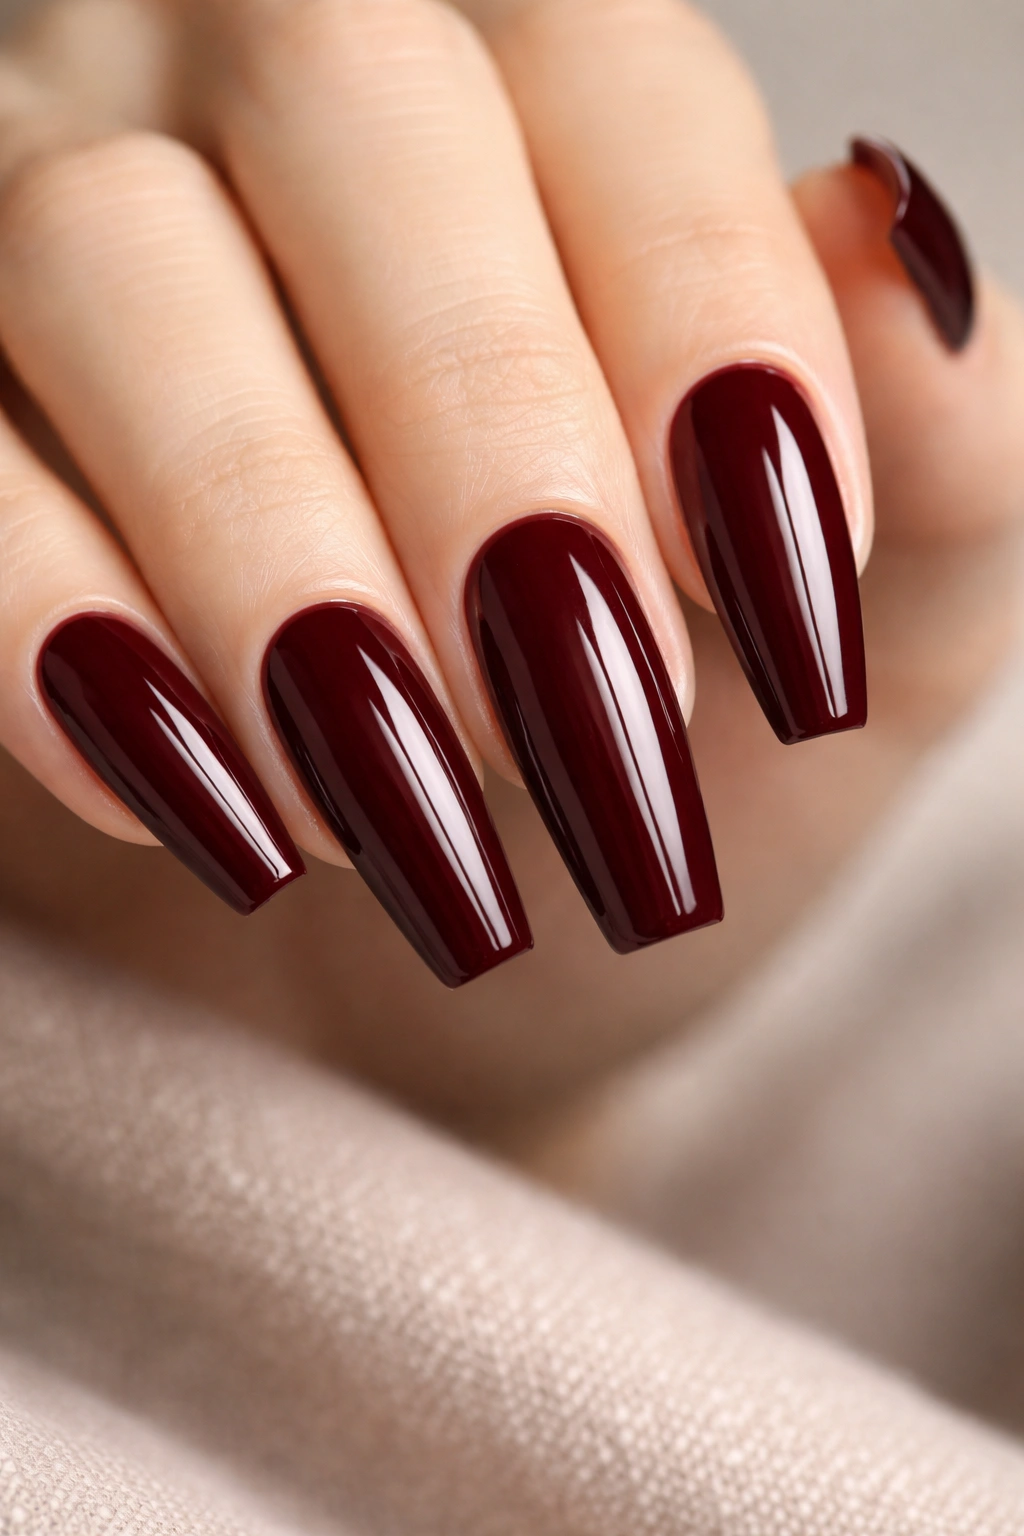
Deep burgundy on coffin nails is the definition of sophisticated elegance. This rich, warm color reads as expensive and intentional, whether you’re wearing it during the cooler months or year-round. The burgundy sits somewhere between red and brown, which means it complements warm skin tones beautifully while still looking chic on cool undertones. On the coffin shape, burgundy creates a polished, put-together appearance that feels both classic and contemporary.
Making Burgundy Look Its Best
Burgundy polish works best with a glossy topcoat that adds shine and depth to the color. The glossy finish emphasizes the richness of the shade and makes it look more luxurious. Apply thin, even coats to avoid streaking—burgundy can sometimes be slightly sheer, so you might need three coats for complete opacity. The coffin shape actually helps here because the tapered edges naturally showcase the color beautifully, even if there’s slight color variation from base to tip.
Styling Deep Burgundy
- Solid glossy burgundy on all nails for maximum impact
- Burgundy with subtle glitter at the tips for a touch of sparkle
- Matte burgundy base with a glossy burgundy tip for dimensional contrast
- Burgundy with delicate gold line work or geometric patterns
- Burgundy on most nails with one or two nude accent nails
Pro tip: Burgundy can sometimes stain lighter skin tones if the polish isn’t sealed properly. Make sure you have a good base coat preventing direct contact between the polish and your nail bed, and remove the polish promptly when you’re ready for a new design.
10. White Negative Space
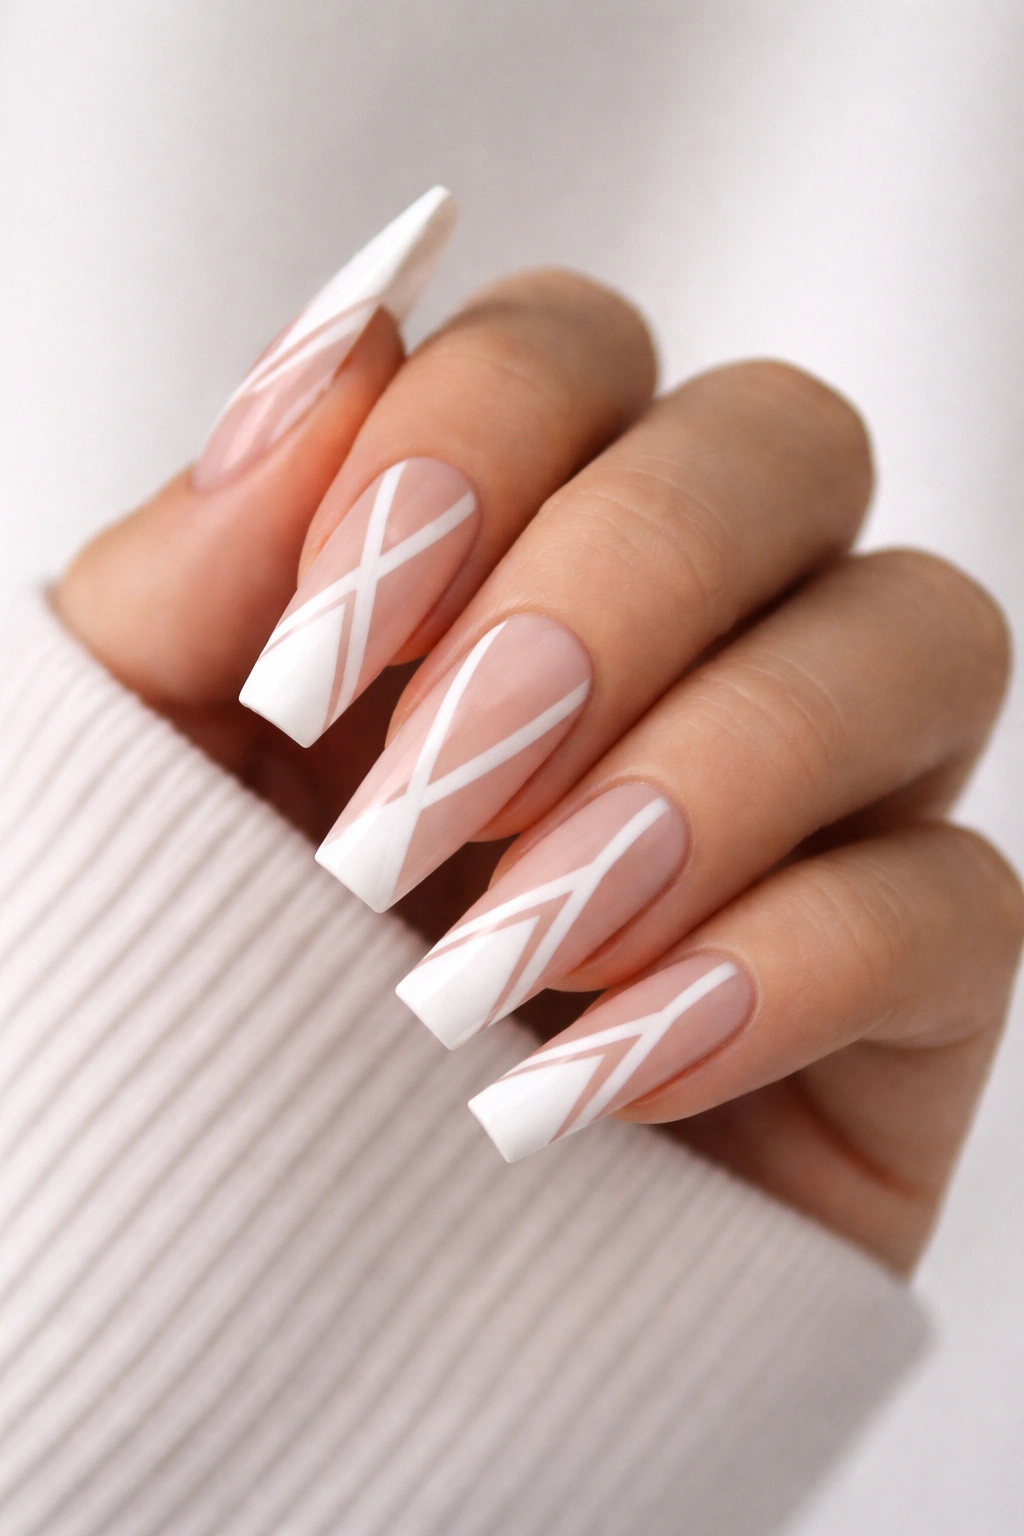
Negative space designs deliberately leave portions of the nail bare (showing the nail underneath) or use white space as part of the design. On coffin nails, negative space creates striking geometric effects because you’re working with a distinctive shape. The coffin’s tapered sides and squared tip naturally lend themselves to negative space design—you might paint just the sides black while leaving the center white, or create geometric cutouts that follow the nail’s contours.
Creating Negative Space on Coffin Nails
Plan your design before you start painting. The coffin shape has natural visual lines: the two tapered sides, the squared tip, and the center. You could paint everything except the center (leaving a vertical white line) for a striking effect, or paint the tips while leaving the sides bare. Negative space designs require precision—clean lines matter more than perfect freehand skills. Use painter’s tape to mark out your design areas if you’re not confident in your freehand lines.
Negative Space Design Ideas
- White vertical stripe down the center with black on both sides
- Black painted tips with a gradient fade into white negative space
- Geometric shapes (triangles, rectangles, hexagons) left unpainted against a colored background
- Alternating black and white sections that create a striped or checkered effect
- One white negative space accent nail paired with solid colored nails
Insider note: The “bare nail” in negative space designs doesn’t have to be completely bare. You can apply a very light nude or white to create the appearance of negative space while still protecting the nail underneath.
11. Emerald Green

Emerald green is a jewel tone that feels luxurious and sophisticated on coffin nails. This deep, rich green works beautifully with both warm and cool skin tones and reads as more refined than bright greens. The coffin shape emphasizes the saturation of emerald, making it look like you’re wearing tiny pieces of actual emerald. This is a color that feels intentional and special—perfect for elevating your everyday manicure or celebrating a special occasion.
Achieving the Perfect Emerald Shade
Not all emerald polishes are created equal. Some read as too bright or neon, while others lean too blue or gray. The ideal emerald has warmth and depth—it should look like gemstone rather than artificial. When applying emerald, the glossy topcoat is crucial. Emerald polish can sometimes look flat or muted without shine, so a high-gloss topcoat amplifies the richness of the color and makes it truly pop.
Styling Emerald Green Designs
- Solid glossy emerald on all nails for maximum impact
- Emerald with gold accents (metallic stripe, geometric shapes, or tiny gemstones)
- Matte emerald for a softer, more understated look
- Emerald tips with nude or white base (a gemstone French manicure)
- Emerald with delicate line art or minimalist designs on top
Worth knowing: Emerald can sometimes appear different depending on lighting. What looks beautiful in natural daylight might appear darker or more muted under artificial light, and vice versa. This is part of what makes emerald special—it shifts subtly and creates depth.
12. Ombre Pink to White

An ombre that transitions from soft pink at the base to crisp white at the tip creates a romantic, gradient effect that feels both modern and timeless. On coffin nails, this ombre is particularly striking because the tapered shape allows the gradient to flow naturally from deeper color at the wider base to lighter color at the narrower tip. This design works for weddings, special occasions, or anyone who loves a soft, feminine aesthetic.
Mastering the Pink-to-White Ombre
The technique is similar to the French ombre, but the color story is different. Start with a pale pink base color applied to the entire nail. Once dry, apply a thin layer of clear topcoat to the tip area (roughly the outer third of the nail). While the topcoat is still tacky, press white polish into it using a sponge, working from the white area back toward the pink. Use a dry sponge to blend the colors together with light dabbing motions. Each pass softens the line further, so you have control over the gradient’s intensity.
Pink Ombre Variations
- Ballet pink fading to white for a classic bridal look
- Dusty rose fading to white for a more muted, sophisticated version
- Blush pink to white with subtle gold flecks in the gradient zone
- Hot pink to white for a bolder, more dramatic effect
- Peach fading to white for a warm, summery version
Pro tip: The most seamless ombres happen when the base color and the accent color are far enough apart in tone. A very pale pink fading to white will create a subtle gradient, while a deeper dusty rose to white creates more visual contrast and is easier to see.
13. Geometric Patterns
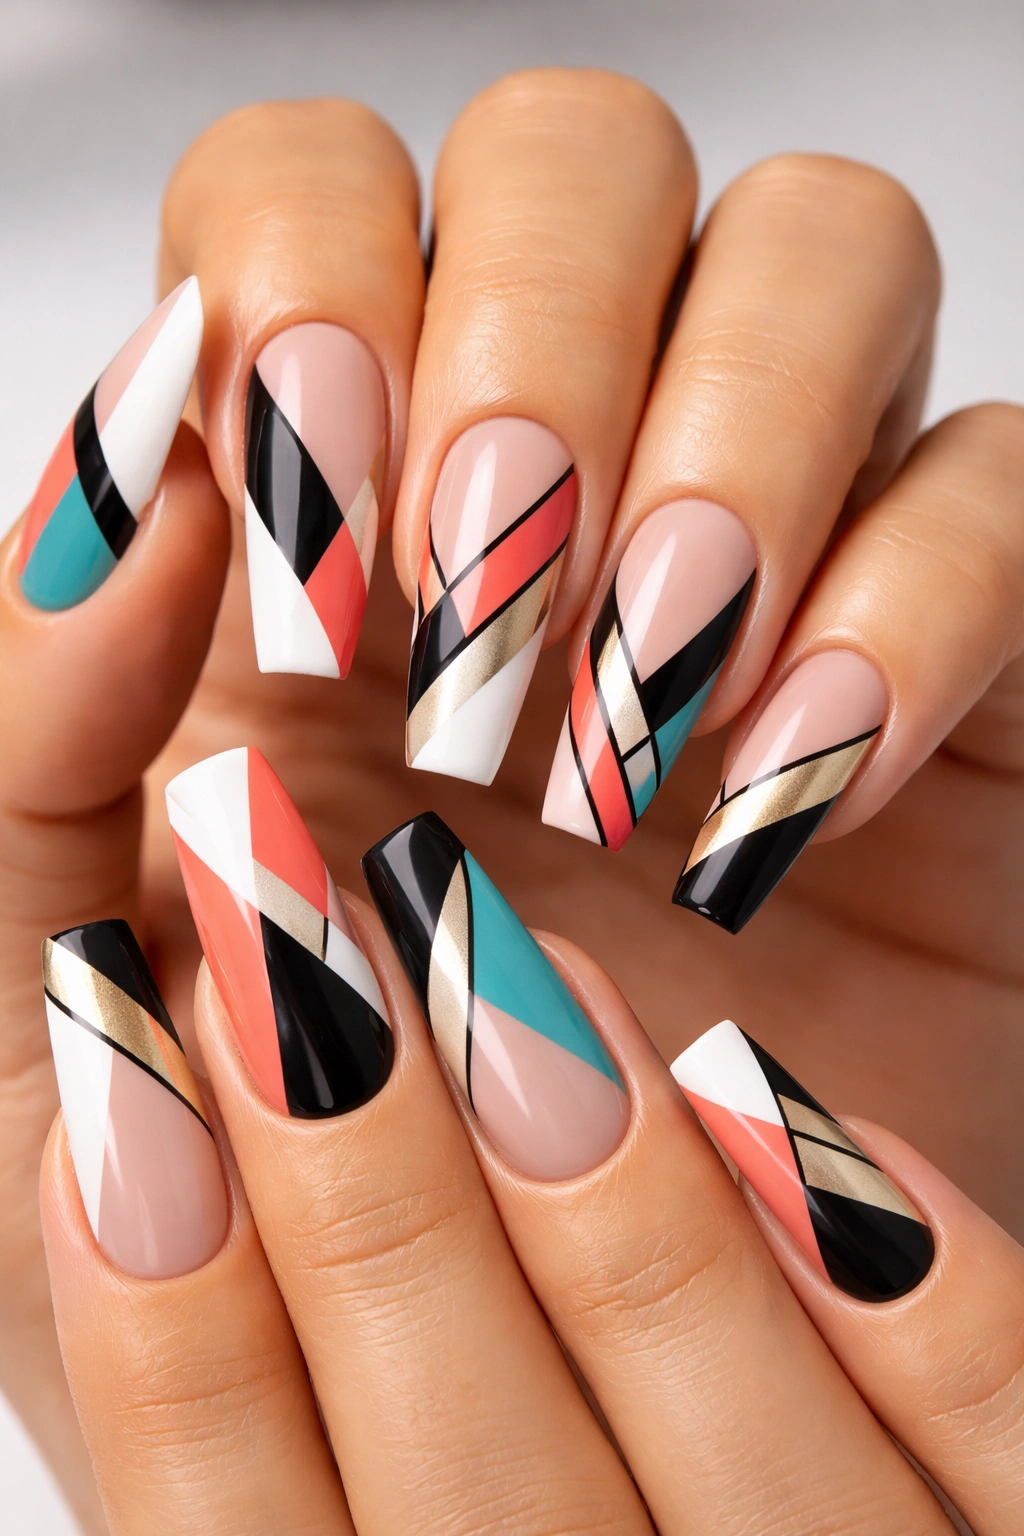
Geometric patterns—clean lines, shapes, and angles—create a modern, artistic manicure that feels intentional and designed. Coffin nails are ideal for geometric patterns because the shape itself is geometric; adding geometric art on top creates a cohesive, sophisticated look. These designs can be bold and colorful or minimal and monochromatic, depending on your preference. What makes geometric patterns special is that they don’t require artistic skill—they just require steady hands and possibly a guide.
Creating Geometric Designs on Coffin Nails
Precision is everything with geometric patterns. Use painter’s tape to mark out areas before painting, or use a thin nail art brush and a steady hand. Color combinations matter—high-contrast colors (black and white, navy and gold, burgundy and cream) read as more striking, while analogous colors (soft pink and nude, navy and teal) create a more cohesive, understated look. You can create patterns that cover the entire nail or designs that occupy just a portion of the surface.
Geometric Pattern Ideas
- Diagonal color blocks with sharp lines dividing them
- Triangular or chevron patterns across the nail
- Concentric circles or rings in varying colors
- Grid patterns or checkerboard designs
- Angular shapes (diamonds, hexagons) as accent elements
- Striped patterns with varying widths and colors
Worth knowing: Painter’s tape is your friend if you want clean geometric lines. Apply it, paint over it, and remove it while the polish is still slightly wet for the cleanest edges possible.
14. Nude with Rhinestones
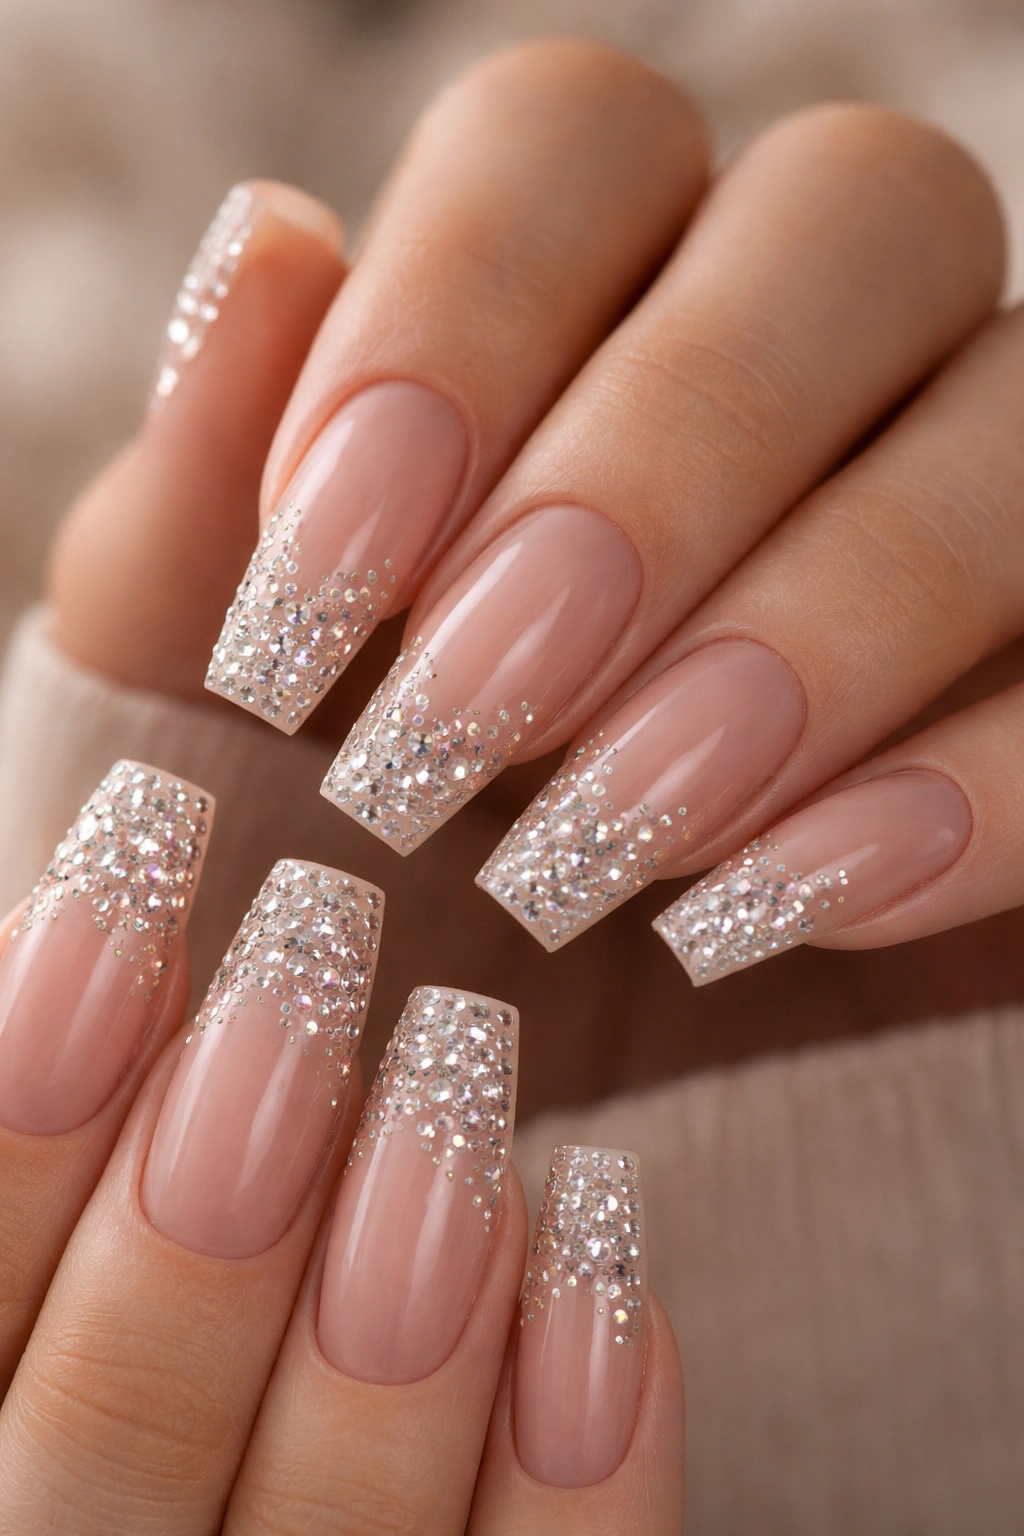
Rhinestones add sparkle, luxury, and dimension to even the simplest base color. On a nude nail, rhinestones create a jeweled, special-occasion aesthetic that reads as expensive and intentional. The coffin shape provides plenty of surface area for creative rhinestone placement—you could create a scattered pattern, a concentrated design at the tips, or a gradient of increasing rhinestone density. Rhinestones catch light beautifully and add three-dimensional texture that flat polish alone cannot achieve.
Applying Rhinestones That Stay Put
Quality rhinestones and appropriate adhesive are essential. Cheap rhinestones don’t sparkle the same way and can fall off more easily. Use a rhinestone-specific adhesive or a thick gel base to secure stones. Apply a tiny dot of adhesive to the back of the rhinestone, then press it onto the nail in your desired location. Let the adhesive cure fully before applying topcoat. A final layer of topcoat over the rhinestones (without submerging them) locks them in place and adds shine.
Rhinestone Placement Ideas
- A single large rhinestone at the center of each nail
- Multiple rhinestones creating a diagonal line from cuticle to tip
- Concentrated rhinestone cluster at the tips only
- Scattered rhinestones across the nail in a random pattern
- One rhinestone accent nail with solid nude on the others
Pro tip: Mix rhinestone sizes and shapes for added visual interest. Combining larger statement stones with tiny accent stones creates depth and luxury without looking overdone.
15. Chrome Mirror Finish
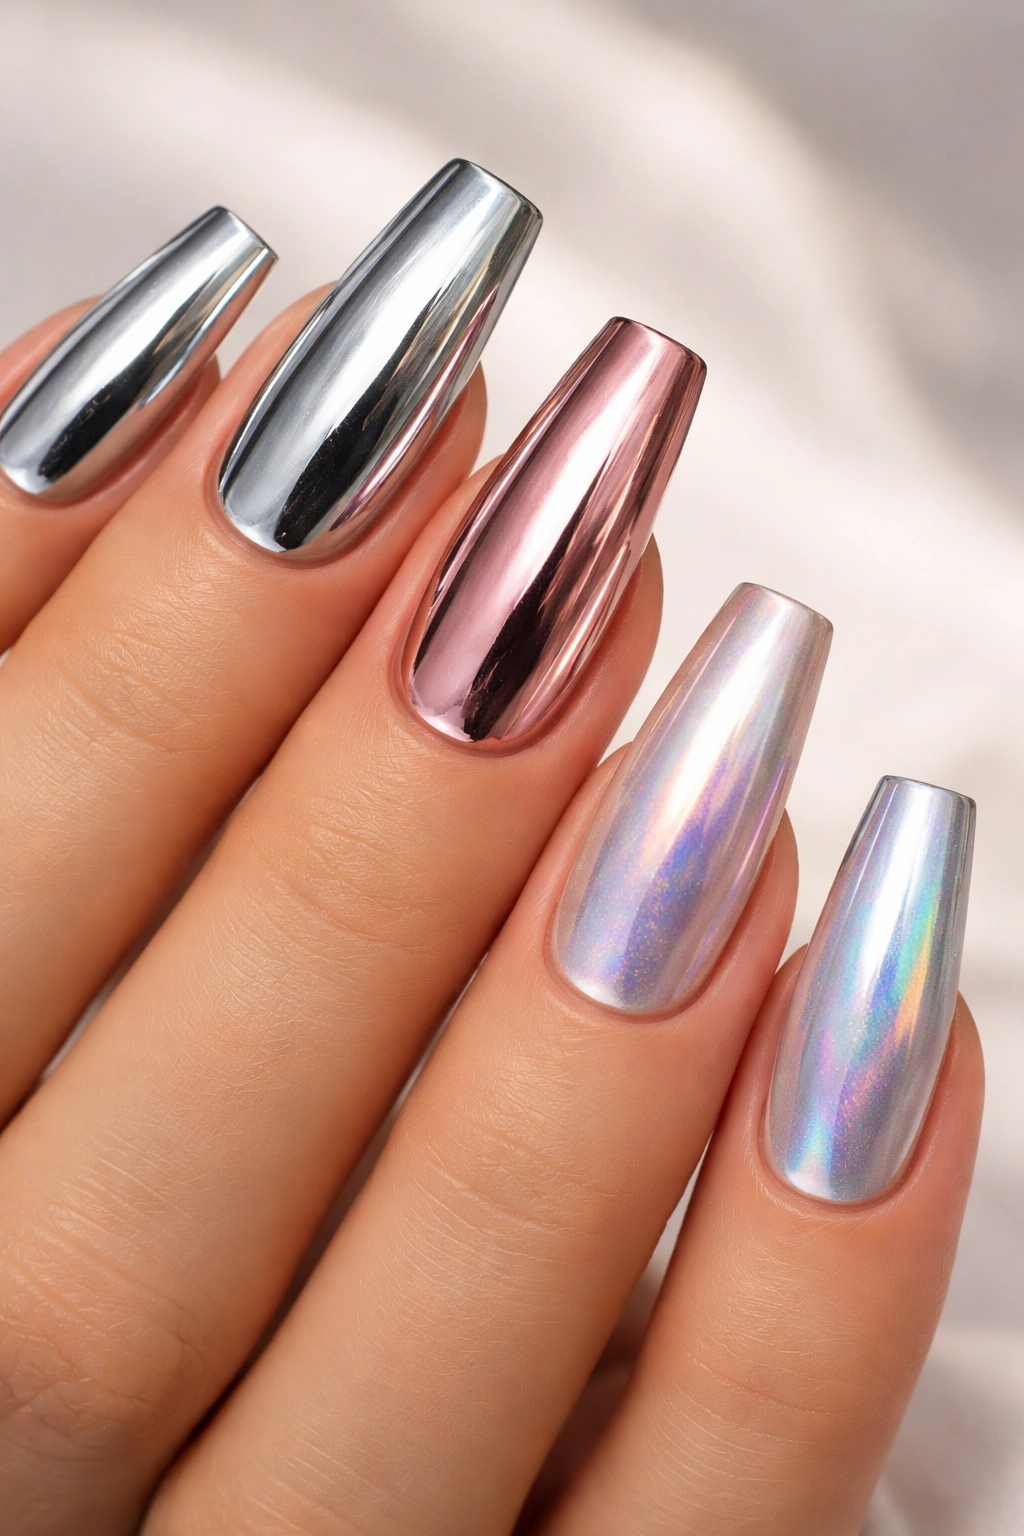
Chrome mirror polish creates a reflective, nearly-metallic finish that looks like polished steel or liquid metal. On coffin nails, chrome creates an ultra-modern, futuristic aesthetic that’s impossible to ignore. This finish is bold and dramatic—it’s not subtle, but it’s undeniably eye-catching. Chrome comes in silver, rose gold, copper, and even holographic versions, offering options for different moods and occasions.
Achieving a Flawless Chrome Finish
Chrome polish requires a specific technique. Apply a colored base coat if you want a tinted chrome, or a clear base if you want pure reflective silver. Once the base is completely dry, apply the chrome polish using the buffing technique described on the polish bottle—this usually involves rubbing the polish on with a slightly damp applicator or specific tool rather than brushing it on traditionally. The buffing motion activates the chrome effect and creates that mirror-like finish.
Chrome Design Variations
- Pure silver chrome on all nails for maximum impact
- Rose gold or copper chrome for a warmer metallic tone
- Chrome on accent nails with nude or matte on the others
- Holographic chrome that shifts colors as you move
- Chrome tips with a matte or solid color base
Worth knowing: Chrome finishes can sometimes look streaky or uneven if the base coat isn’t perfectly smooth. A sealed base coat with a glossy topcoat underneath helps create an even surface for the chrome polish to bond to.
16. Pastel Ombre
A soft pastel ombre creates a dreamy, gentle gradient that feels both romantic and contemporary. Pastels on coffin nails feel elegant and sophisticated rather than childish—the elongated shape and mature aesthetic keep the design from feeling too sweet. A pastel ombre might transition from lavender to white, soft peach to cream, or pale blue to pale pink. The gradient is subtle and soothing, creating visual interest without feeling bold or dramatic.
Building a Pastel Ombre
Select two pastel shades that complement each other—ideally one slightly deeper than the other, or two different hues in the same pastel family. Apply the deeper shade to the entire nail, then create an ombre by sponging the lighter shade into the tip area and blending with a dry sponge. Because pastels are soft colors, the blending can be more visible than with contrasting colors, which actually adds to the gentle, watercolor-like effect. Multiple passes with a dry sponge create a seamless transition.
Pastel Ombre Color Combinations
- Soft lavender fading to white for a calming, spa-like aesthetic
- Peachy pink transitioning to cream for a warm, romantic look
- Pale blue to white for a cool, serene vibe
- Mint green fading to white for a fresh, botanical feel
- Rose quartz pink to soft purple for a dual-tone pastel effect
Insider note: Pastels can sometimes look washed out under certain lighting. A quality glossy topcoat adds subtle shine that prevents pastels from looking flat or muted and helps them photograph more vibrantly.
Final Thoughts

Coffin nails are the perfect shape for experimenting with nail art because they’re versatile enough to handle virtually any design while maintaining an elegant, intentional aesthetic. Whether you gravitate toward the understated sophistication of solid colors, the artistic expression of line art and geometric patterns, or the sparkle of metallics and rhinestones, there’s a coffin nail design that matches your style and skill level.
The beauty of this nail shape is that it works across all occasions and settings—you can go to the office with a matte burgundy or nude with gold accents, to an evening event with emerald green and rhinestones, or to a casual gathering with an ombre or holographic design. Start with designs that feel achievable for your current skill level and invest in good-quality polish and tools. Clean application, smooth basecoats, and quality topcoats matter far more than intricate technique when you’re building your nail art confidence.
Whether you’re maintaining these designs at a salon or creating them at home, remember that practice improves precision. Save these designs as inspiration and take your time with each step. The designs that look effortlessly elegant are often the result of patience and attention to detail rather than advanced artistic skill. You’ve got this.
