

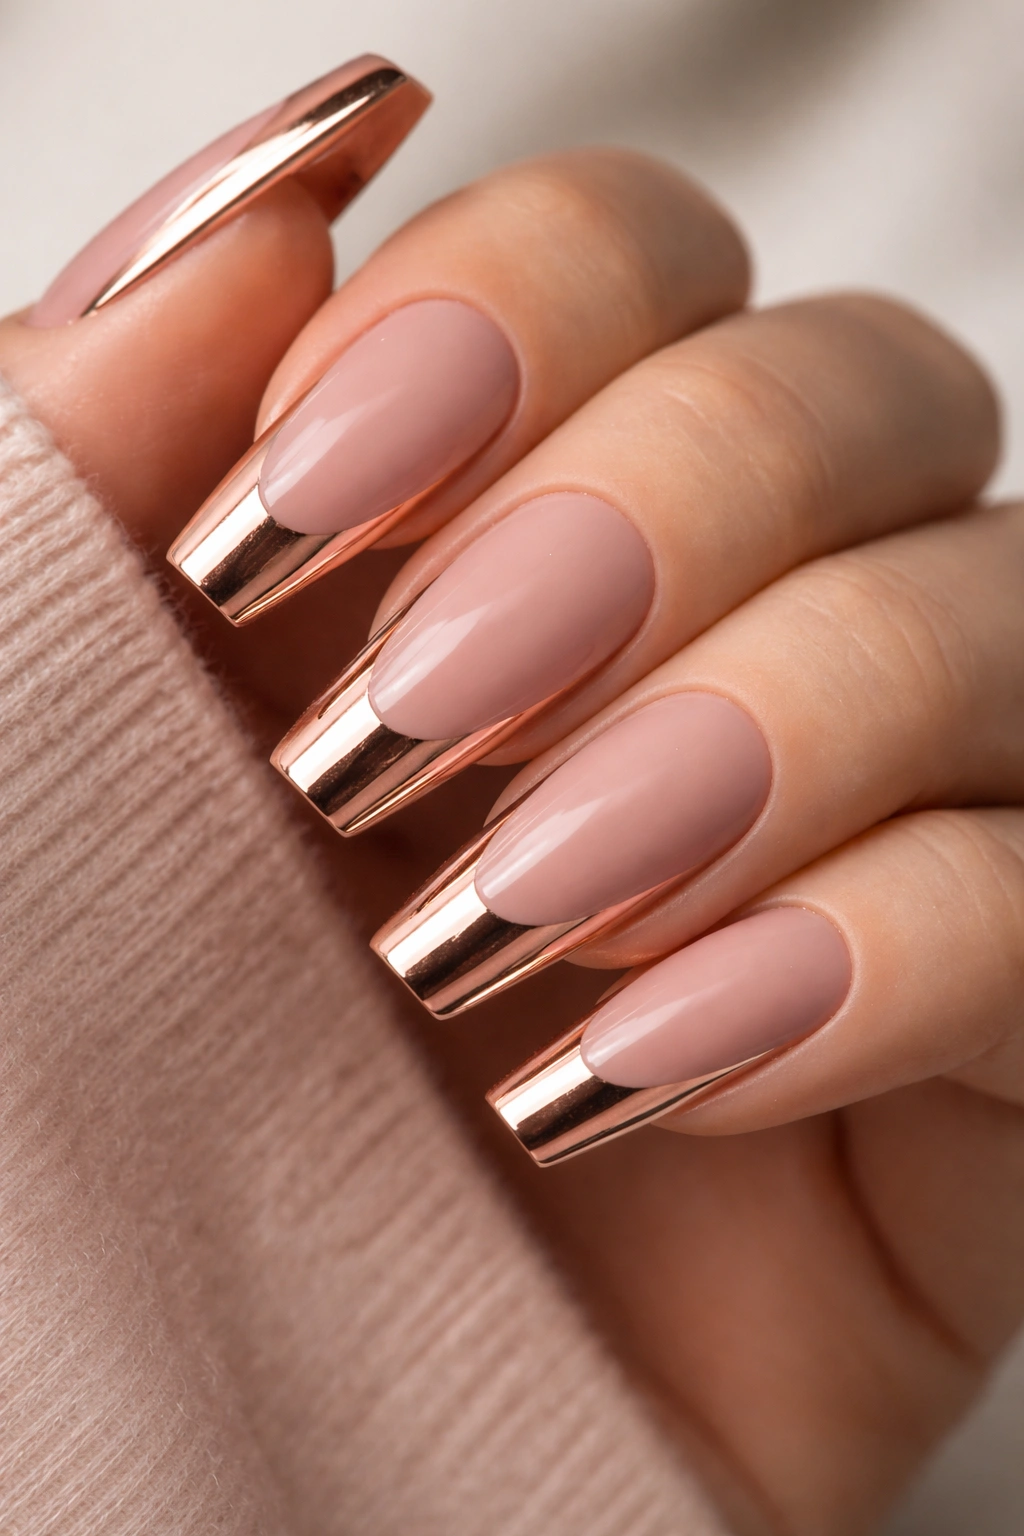
Coffin nails strike that perfect balance between edgy and elegant—they’re elongated and dramatic without being impractical, and they suit almost every hand shape and skin tone. The flat, squared-off tip is more comfortable to live with than stilettos but way more striking than a standard round or almond shape. Medium-length coffin nails are especially forgiving because they give you plenty of canvas for intricate designs while remaining genuinely wearable for work, hobbies, and everyday life. The coffin silhouette is flattering on medium nails because it elongates your fingers without the fragility of extra-long extensions, and it photographs beautifully whether you’re scrolling through social media or working in professional settings.
The real magic happens when you choose a design that elevates the coffin shape itself. A thoughtful color choice, an unexpected texture, or a precise nail art technique transforms medium coffin nails from simple to sophisticated. Whether you prefer minimal and understated or bold and colorful, there’s a coffin nail design waiting that fits your style. The designs that follow aren’t just pretty—they’re practical, achievable with or without professional help, and genuinely timeless rather than trendy. Each one proves that medium coffin nails deserve just as much attention as their longer counterparts.
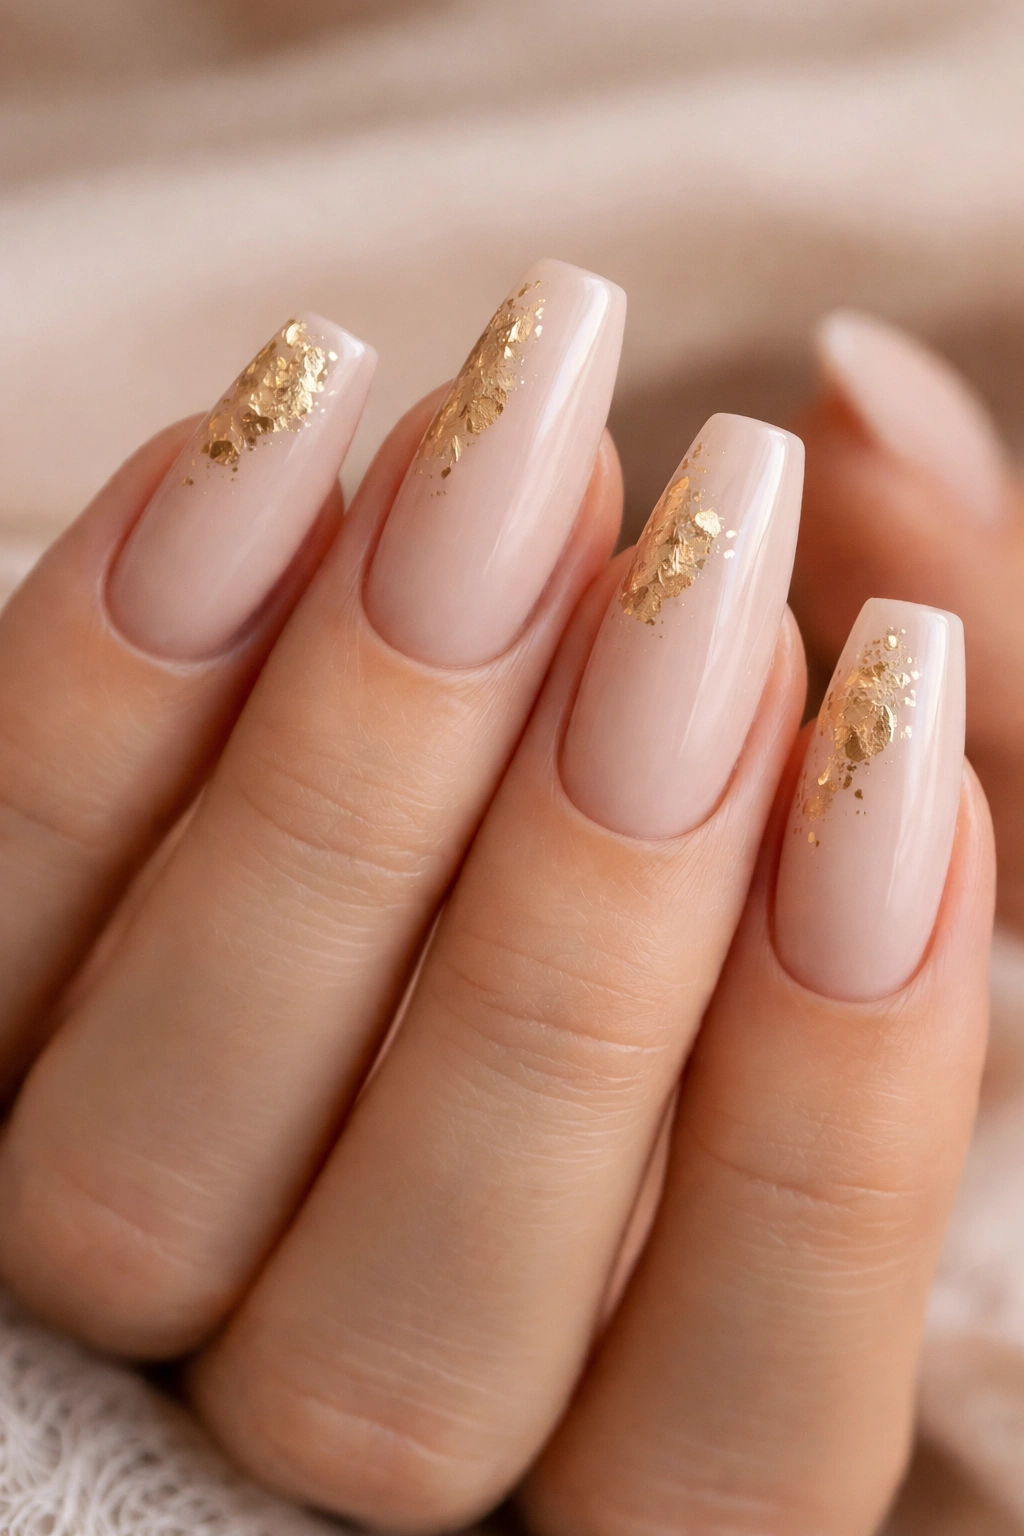
1. Soft Nude with Gold Leaf Accents
A creamy, warm nude base is the foundation for understated luxury on coffin nails. This design works beautifully on medium length because nude elongates the finger without relying on length alone. The soft, neutral tone creates a canvas for real artistry—delicate gold leaf fragments embedded into the polish, scattered across the nail as if by chance but actually quite intentional. The effect is sophisticated enough for boardroom meetings and polished enough for evening events, yet casual enough for weekend wear.
Why This Design Works on Medium Nails
The magic of nude with gold leaf is that it reads as effortlessly elegant rather than maximalist. You’re not screaming for attention; you’re radiating quiet confidence. On medium coffin nails, the gold leaf feels proportional—not overwhelming—and the nude base prevents the overall look from feeling heavy or cluttered. The warmth of the gold complements most skin tones, making this a universally flattering choice.
How to Achieve This Look
- Apply two thin coats of a warm, creamy nude base (think sandy beige or soft caramel, not pure white)
- While the second coat is still slightly tacky, use tweezers to carefully place tiny gold leaf pieces across the nail surface
- Seal everything with a glossy topcoat to lock the leaf in place and create dimension
- Add a single thin line of gold near the cuticle on a couple of nails for subtle detail
- Consider a matte topcoat instead for a softer, more understated finish if you prefer
Pro tip: Warm nudes photograph better and age more gracefully than cool pinks or bright whites—you’ll get a solid two weeks of gorgeous nails without chipping showing.
2. Deep Burgundy Matte Finish

Matte burgundy on coffin nails is the adult equivalent of a red lipstick statement. This deep wine shade is forgiving (it hides day-to-day wear better than bright reds) while still reading as intentional and put-together. The matte finish adds texture and sophistication—it catches light differently than glossy polish and feels more modern and intentional. On medium coffin nails, burgundy reads as moody and elegant rather than aggressive.
The Power of Matte Over Glossy
Glossy burgundy can feel one-dimensional, but matte burgundy has actual depth. The velvety finish makes the color appear richer and more complex. A matte finish also visually softens the nail shape, making coffin nails feel less angular and more refined. Matte burgundy works across seasons—it’s equally beautiful paired with sweaters in winter or with summer dresses, making it a genuine year-round workhorse.
Choosing the Right Burgundy Shade
- Too brown and it reads dull and tired
- Too bright and it loses the sophistication
- You want a shade that has actual depth—rich and complex rather than flat
- Swatch multiple brands because the exact undertone shifts dramatically between polish makers
- Pair with a quality matte topcoat for a finish that lasts and maintains its velvety texture
Worth knowing: Matte topcoats sometimes look chalky or dusty if you apply them too thick—use a thin, even coat and resist the urge to double-coat.
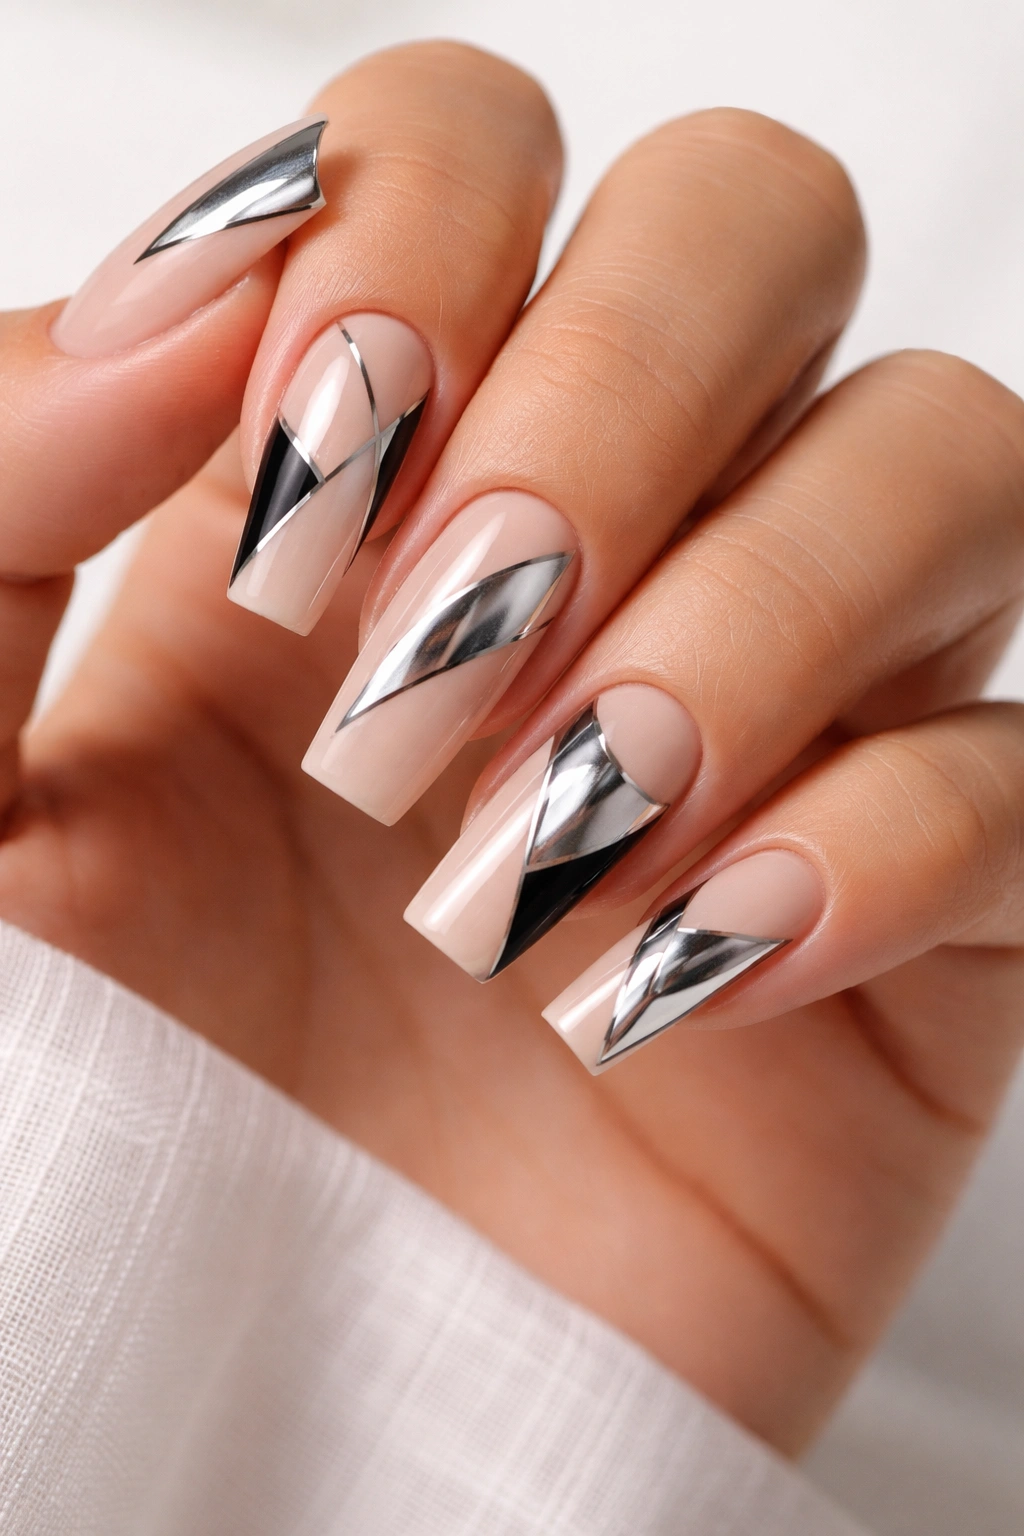
3. Chrome Silver with Geometric Cutouts
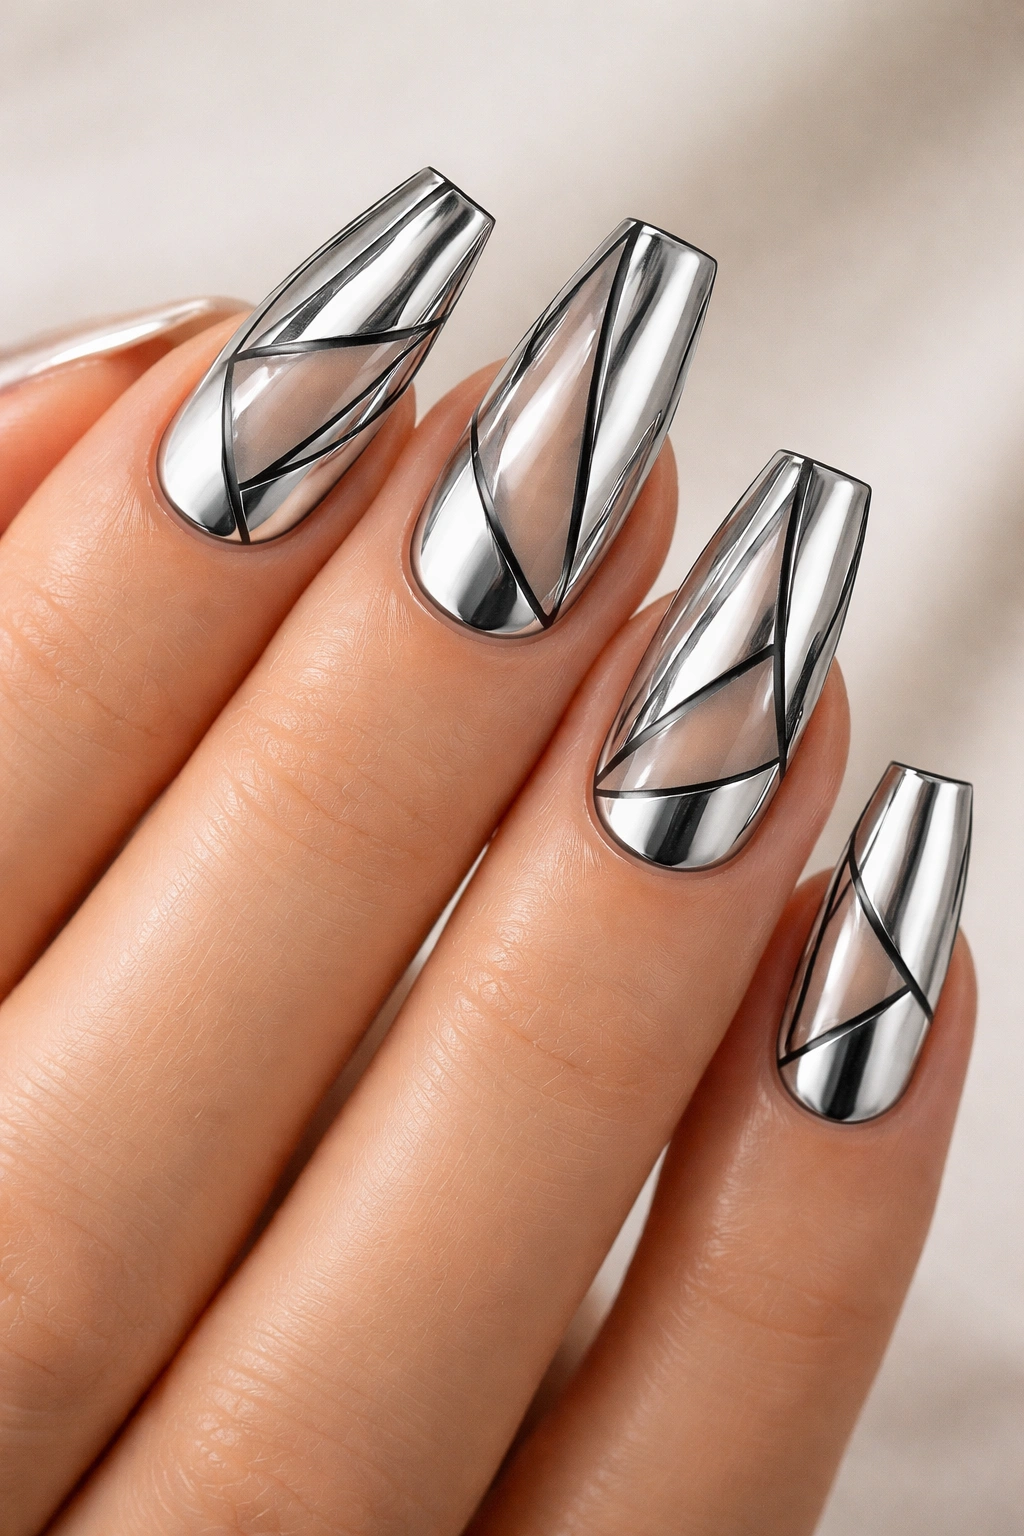
This design is where medium coffin nails truly shine because the geometric shapes (thin triangles, angular lines, or small cutout sections) are proportional to the nail size and actually visible. A high-shine chrome silver base creates mirror-like reflection, and thin black or dark outline cutouts create graphic contrast. It’s modern, artistic, and absolutely eye-catching without feeling costume-y. The geometric element prevents the chrome from feeling flat or one-dimensional.
Creating Precision Geometric Details
Geometric designs on nails require steady hands or nail art tape and thin liner brushes. Start with the silver chrome base (use a quality chrome powder applied over sticky gel base for that mirror effect), then use thin black gel or acrylic liner to paint clean geometric shapes. Nail tape helps create perfectly straight lines and sharp angles. The negative space—the cutout shapes—actually draws more focus than you’d expect and creates visual drama.
Design Ideas Within This Category
- Thin parallel lines running vertically down the nail
- Small triangles at the nail tips
- Angular striped patterns in alternating chrome and black
- Thin geometric frames around the edges
- Abstract line work that looks more art installation than nail art
Insider note: Chrome powder alone can look plasticky—add strategic black geometric detail to give the design context and sophistication.
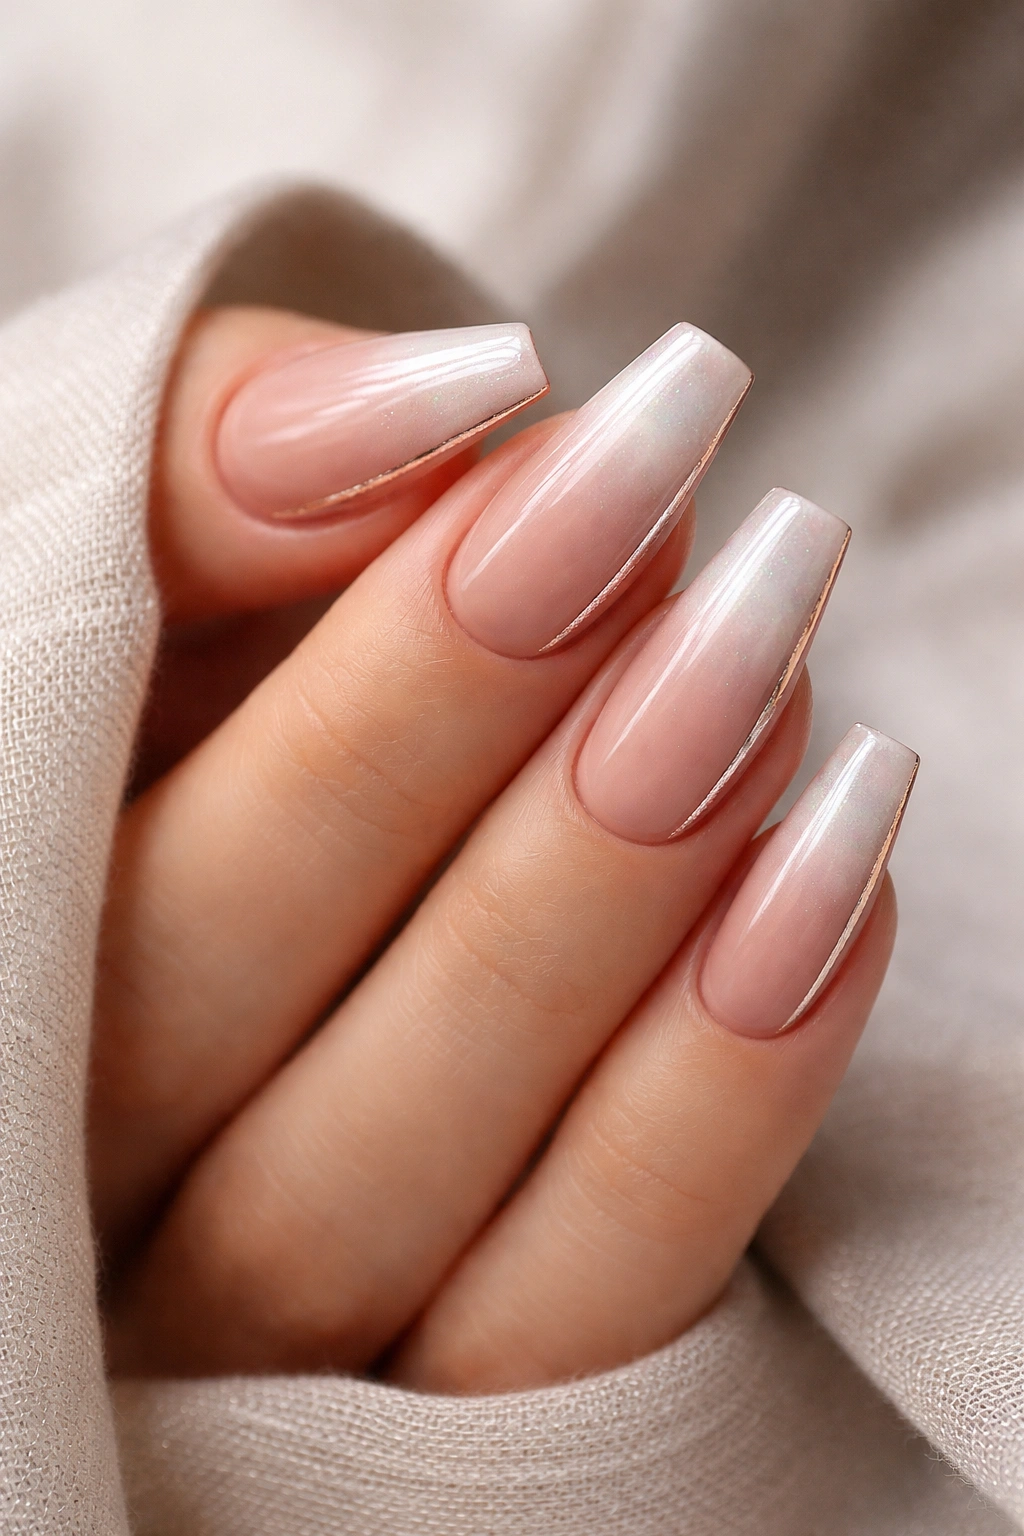
4. Gradient Blush Pink to White Ombré
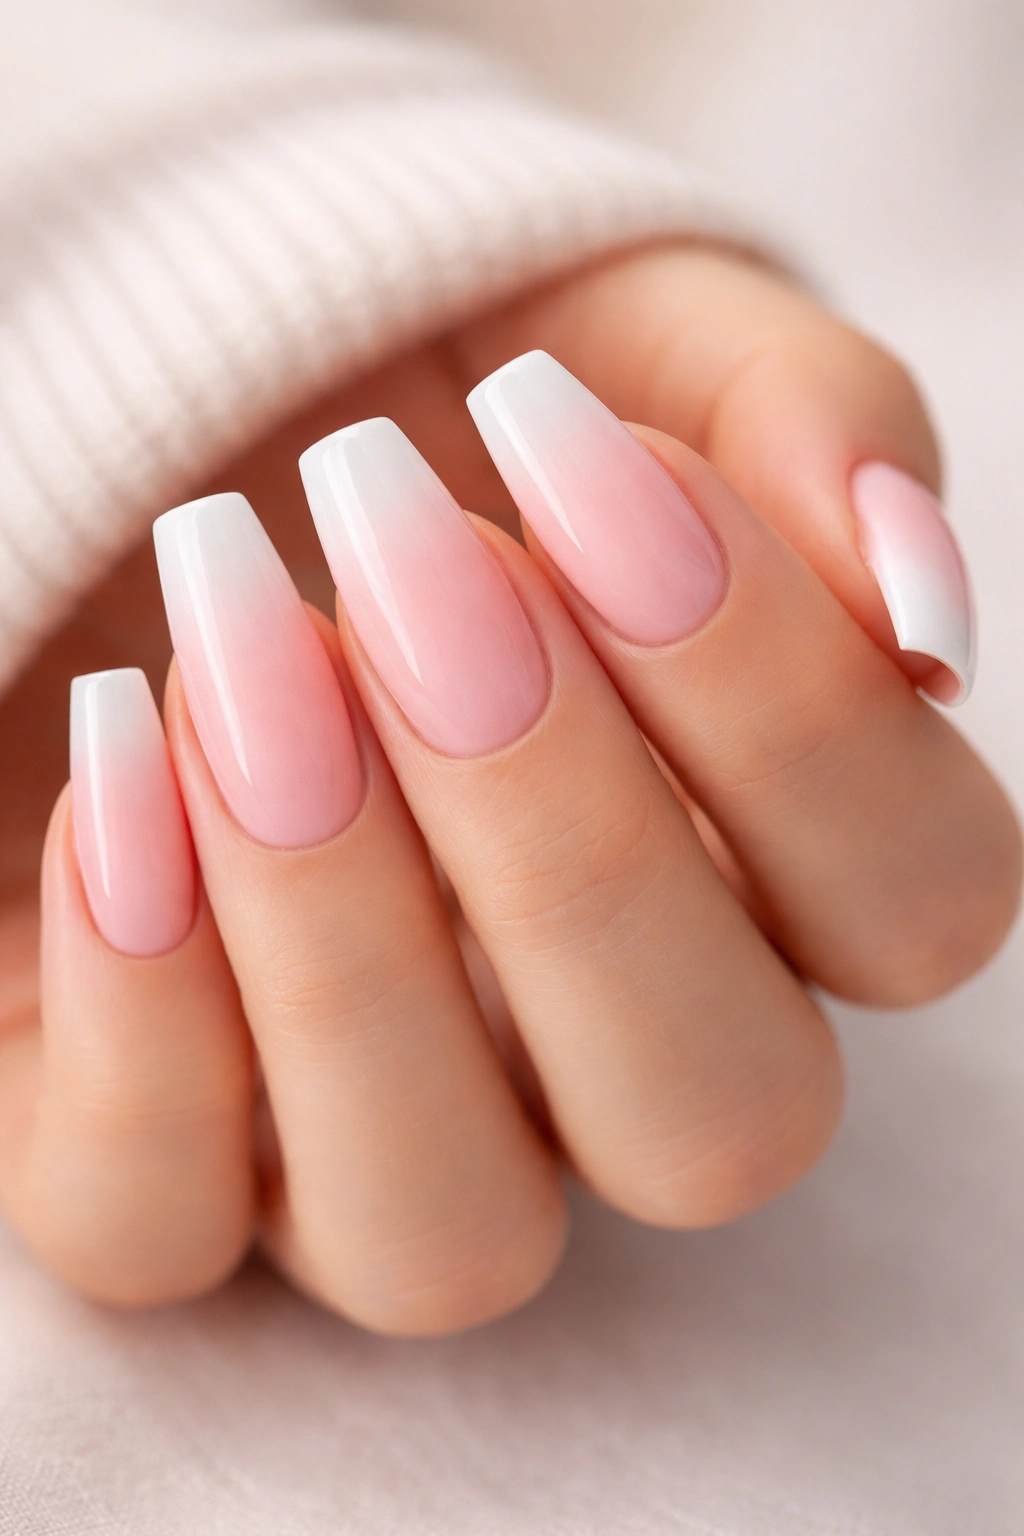
An ombré gradient from soft blush pink at the base to crisp white at the tips is romantic without being precious, modern without being stark. The gradient should be seamless on medium coffin nails, fading gradually from one color to the next across the length of the nail. This creates an elegant elongation effect and feels lighter and airier than solid colors. The blush-to-white transition is subtle enough for professional settings yet pretty enough for special occasions.
The Technique Behind Flawless Gradients
Ombré is a skill that separates average manicures from professional-level work. You need a sponge (not a brush), two colors mixed subtly together, and multiple light layers rather than one heavy-handed attempt. The key is blending, blending, and more blending—the transition between blush and white should take up the middle half of the nail. Too abrupt a line and it looks like two separate colors; properly blended and it reads as a sophisticated gradient.
Perfecting Your Ombré
- Use a cosmetic sponge wedge for the application—brushes don’t create that ethereal blend
- Tap lightly rather than dragging; let the sponge do the blending work
- Apply 3-4 light sponge applications rather than trying to get it perfect on the first pass
- Seal with glossy topcoat for maximum luminosity and a polished finish
- The softest, most subtle blends look the most expensive
Pro tip: If your first attempt looks streaky, don’t panic—another light sponge application of a color between your two shades will smooth the transition instantly.
5. Jewel-Tone Emerald with Silver Confetti
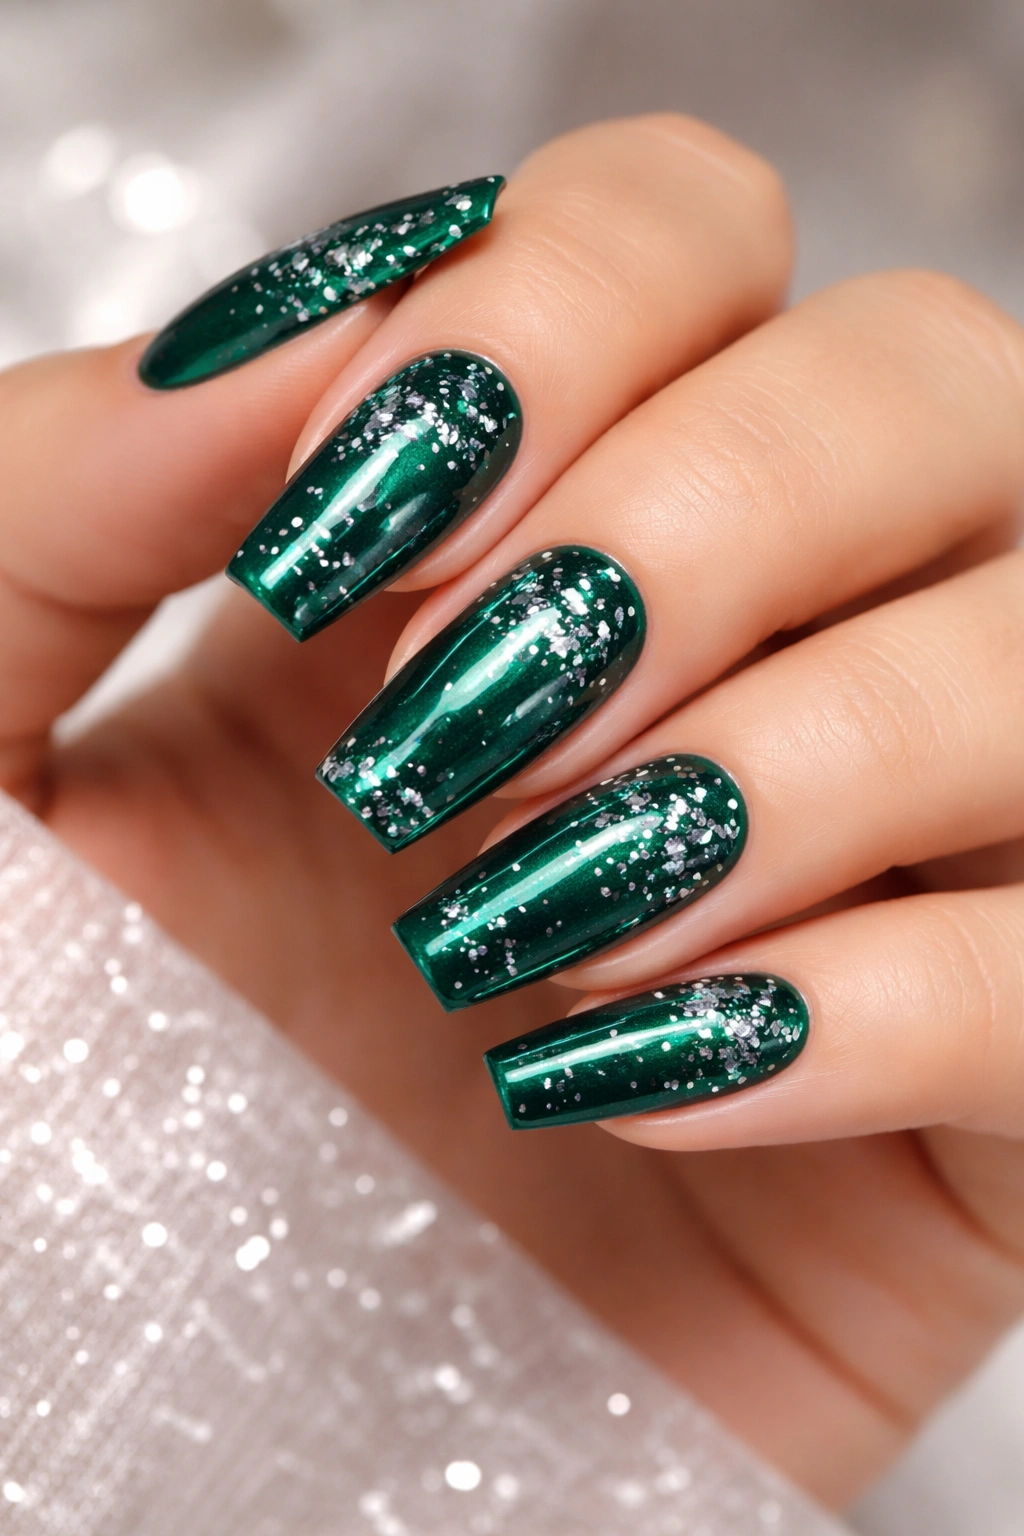
Deep emerald green is one of the most flattering colors for coffin nails because it’s dramatic without being harsh. Pair emerald with scattered silver confetti throughout—tiny silver dots, fragments, or foil pieces embedded into the polish—and you have a design that looks genuinely precious. The confetti catches light as you move your hands, creating movement and dimension. This design feels fancy enough for celebrations but wearable enough for someone who loves bold color.
Why Emerald Works So Well on Medium Nails
Emerald is inherently elegant because of its jewel-tone depth. It’s not a bright, neon green but a rich, sophisticated shade that evokes luxury and nature simultaneously. On medium coffin nails, emerald doesn’t feel childish or costume-like—it reads as intentional and high-fashion. The silver confetti prevents the emerald from feeling too heavy or moody.
Executing Emerald With Confetti
- Start with two coats of quality emerald polish for opacity and depth
- While the second coat is still slightly wet, use a thin brush to apply tiny dots of silver gel or foil flakes
- Alternatively, sprinkle silver confetti glitter across the wet topcoat and seal with another clear topcoat
- Space the confetti randomly but thoughtfully—too sparse and you lose the effect, too dense and it reads cluttered
- Finish with a glossy topcoat for high shine and to lock everything in place
Worth knowing: Real metal foil creates a more refined effect than glitter, but glitter is more forgiving if you’re applying this yourself without professional tools.
6. Minimalist Black Line Work on Nude
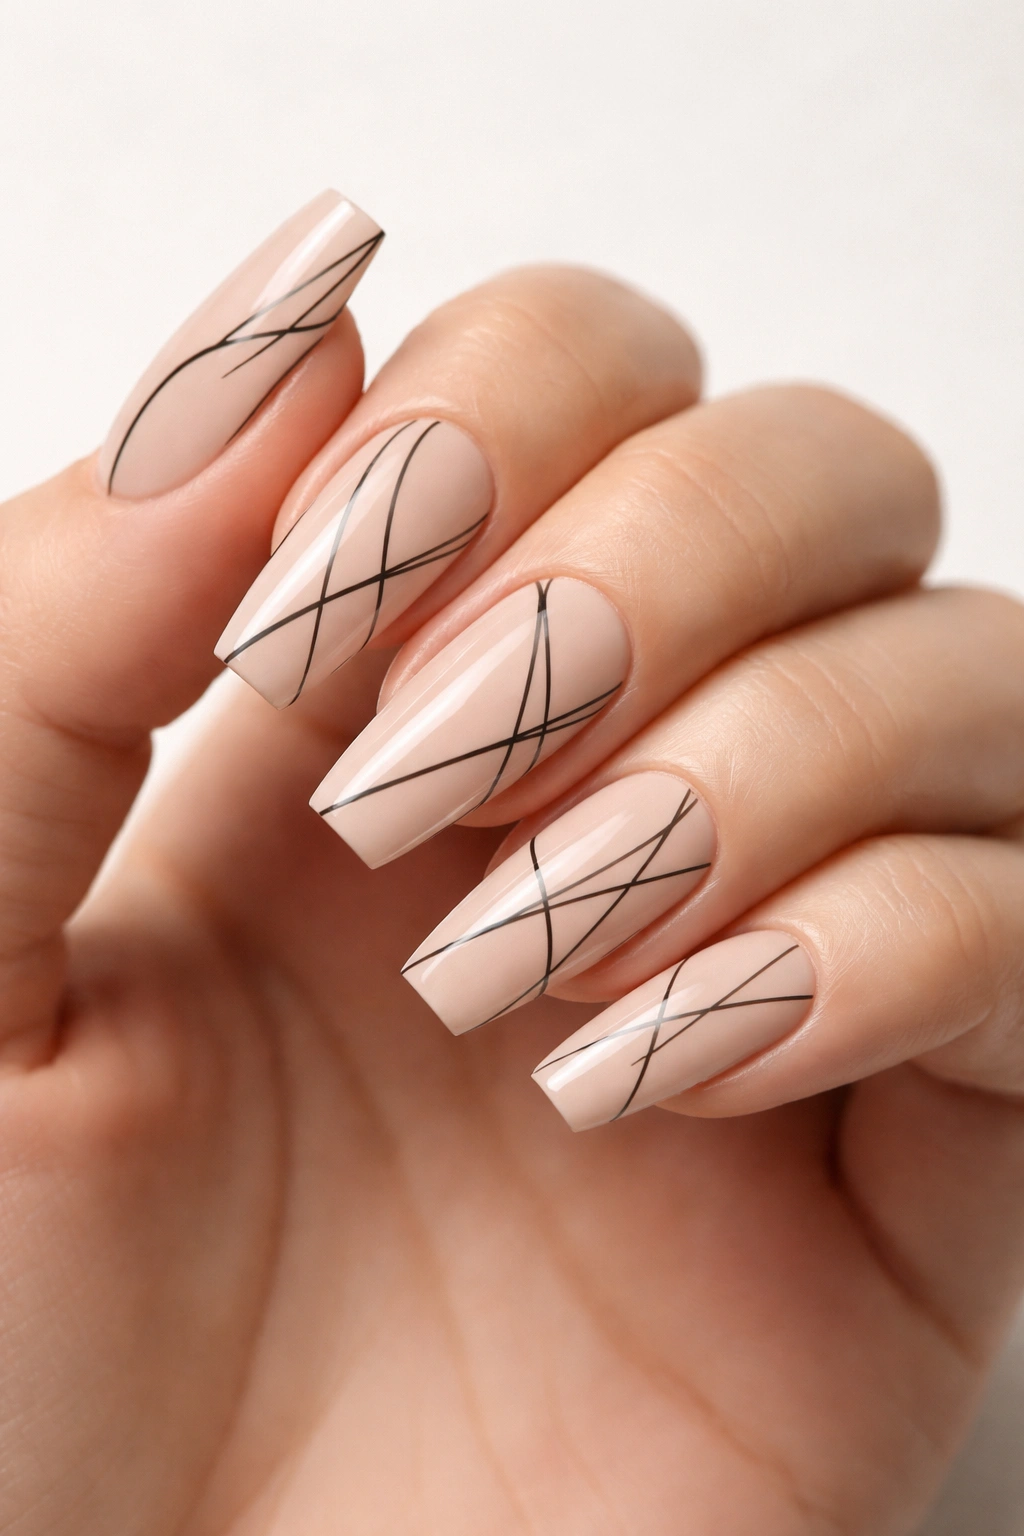
This design is deceptively simple: a nude base with thin, deliberate black lines creating abstract geometric or organic patterns. Think Mondrian meets manicure—stark black lines on a soft background create sophisticated contrast without any color competition. On medium coffin nails, thin line work feels precise and intentional rather than cluttered. The nude base elongates, and the black lines add graphic interest and personality.
The Appeal of Minimalist Design
Minimalism is about intention—every element serves a purpose. Thin black lines on nude look expensive because they’re so restrained. This design works equally well with one line per nail or an interconnected pattern across all five nails. The coffin shape actually enhances line work because the straight sides and flat tip create natural edges for geometric designs to follow.
Creating Sharp, Precise Lines
- Use a thin gel liner brush or a nail art striping brush (not a regular polish brush)
- Gel works better than regular polish for crisp, non-fuzzy lines
- Plan your design lightly with a thin pencil or dry brush first to ensure symmetry
- Apply thin lines in a single, confident stroke rather than multiple passes
- A steady hand matters, but nail art tape can help create perfectly straight lines if you need support
Insider note: One perfectly executed line is more impactful than three wobbly ones—embrace simplicity and refine your technique rather than overcomplicating the design.
7. Rose Gold with Matte and Gloss Mix
Combining matte and glossy finishes on the same nail creates textural interest and visual dimension. A rose gold base with a matte finish is soft and modern, then strategically glossy sections (perhaps the tip or a stripe down the center) create contrast and catch light. This texture mixing feels intentional and elevated—it’s the kind of detail that makes people ask “how did you get it to look like that?” On medium coffin nails, the matte-gloss combination feels textured and sophisticated without being busy.
Playing With Finish Contrasts
Most people think nails must be either all matte or all glossy, but mixing finishes is where real artistry happens. Matte creates a sophisticated, velvety base while glossy sections shimmer and reflect light. The contrast between the two draws focus and adds dimension. This technique works especially well on rose gold because the warm, metallic undertones complement both finishes beautifully.
How to Create This Effect
- Apply two coats of rose gold polish and seal with a matte topcoat
- Using a thin brush and glossy topcoat, paint the tip of the nail (or a vertical stripe) in glossy finish
- The contrast between matte and glossy will be immediately visible
- Alternatively, use a glossy rose gold and selectively apply matte topcoat to certain sections
- This works on all nail shapes but feels especially sophisticated on coffin nails
Pro tip: The thinner your glossy stripe or section, the more refined it looks—wide glossy bands on a matte base feel less intentional than precise, thin details.
8. Classic French Tips with a Twist
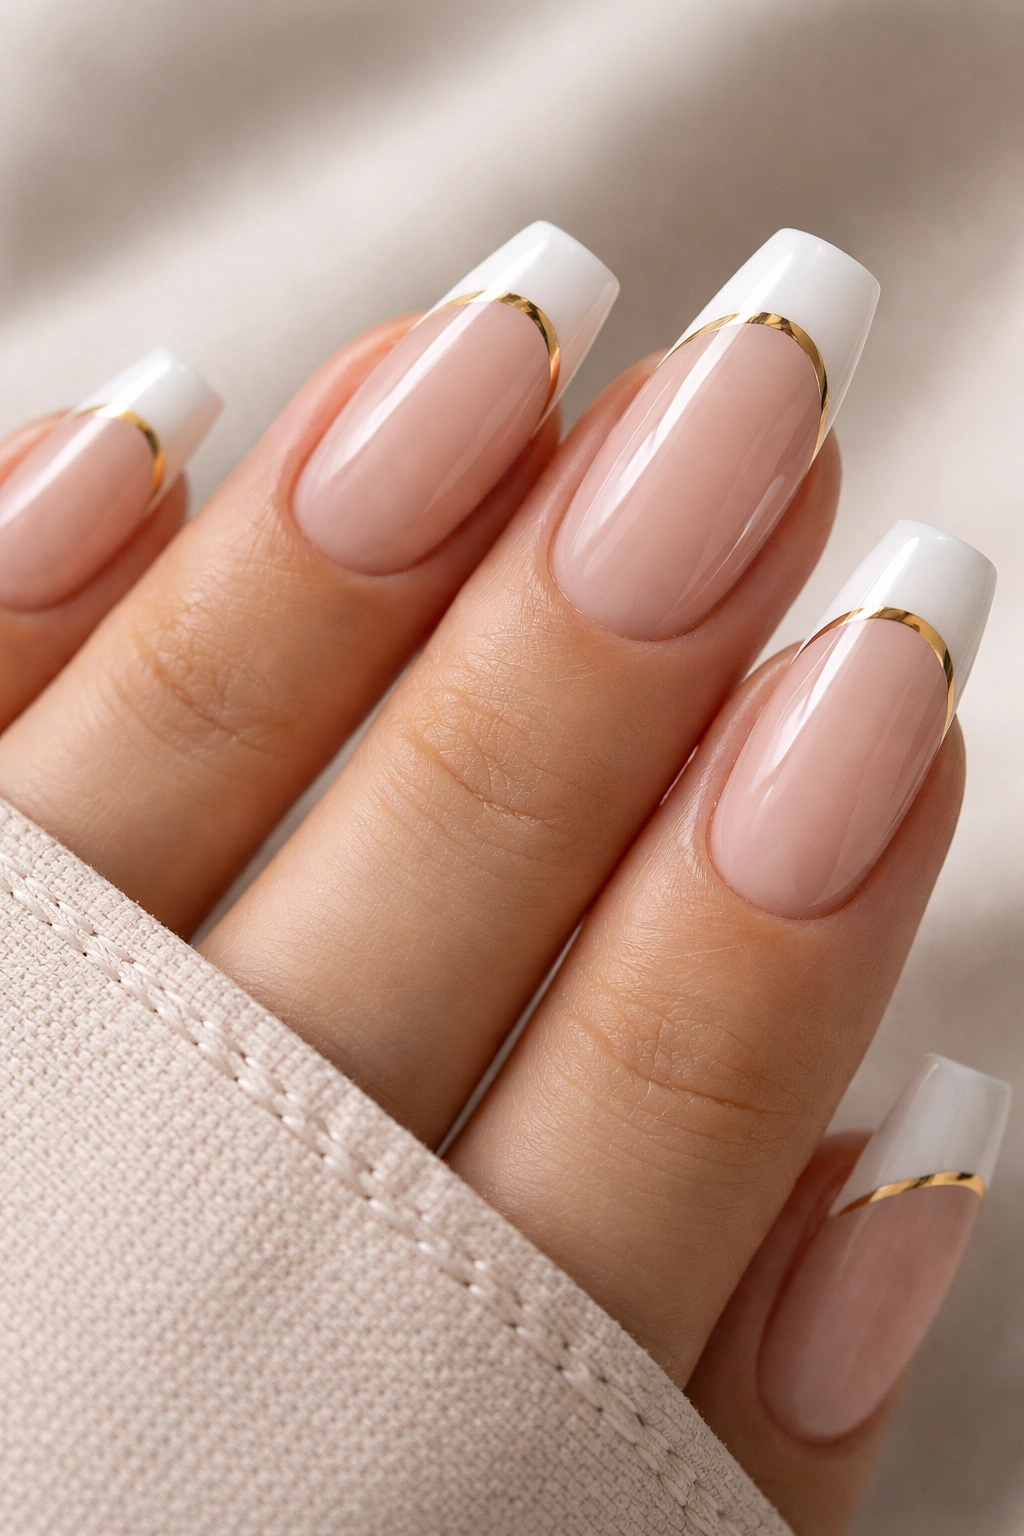
You know the standard French tip—crisp white tips with nude or clear base. Now imagine the white tips are slightly thicker, the line slightly thicker, and perhaps there’s a delicate gold or black pinstripe separating the tip from the base. This is French tips grown up. On medium coffin nails, a French tip is timeless and lengthening, but that small twist—that pinstripe, that slightly modified angle, that barely-there detail—transforms it from basic to intentional. It’s the difference between a standard manicure and a salon-quality design.
Elevating the Timeless French
A standard French tip can feel boring or safe, especially on someone with a strong sense of style. But a French tip with intention—a perfectly executed pinstripe, a slightly curved line instead of straight, a touch of shimmer in the white tip—reads as sophisticated and thoughtful. The coffin shape actually enhances French tips because the flat tip provides the perfect canvas for precise white polish application.
Modern French Tip Variations
- Gold pinstripe between the tip and base (thin, precise line)
- Ombre white tips that fade from white into the nude base
- Angled or curved tip line instead of straight
- Nude base with white tips and matching nude pinstripe
- Pearl or shimmer embedded into the white tip for subtle shine
Worth knowing: The French tip line matters more than anything—a clean, sharp line separates a polished manicure from a sloppy one. Use nail tape or a thin striping brush for precision.
9. Moody Navy with Constellation Details
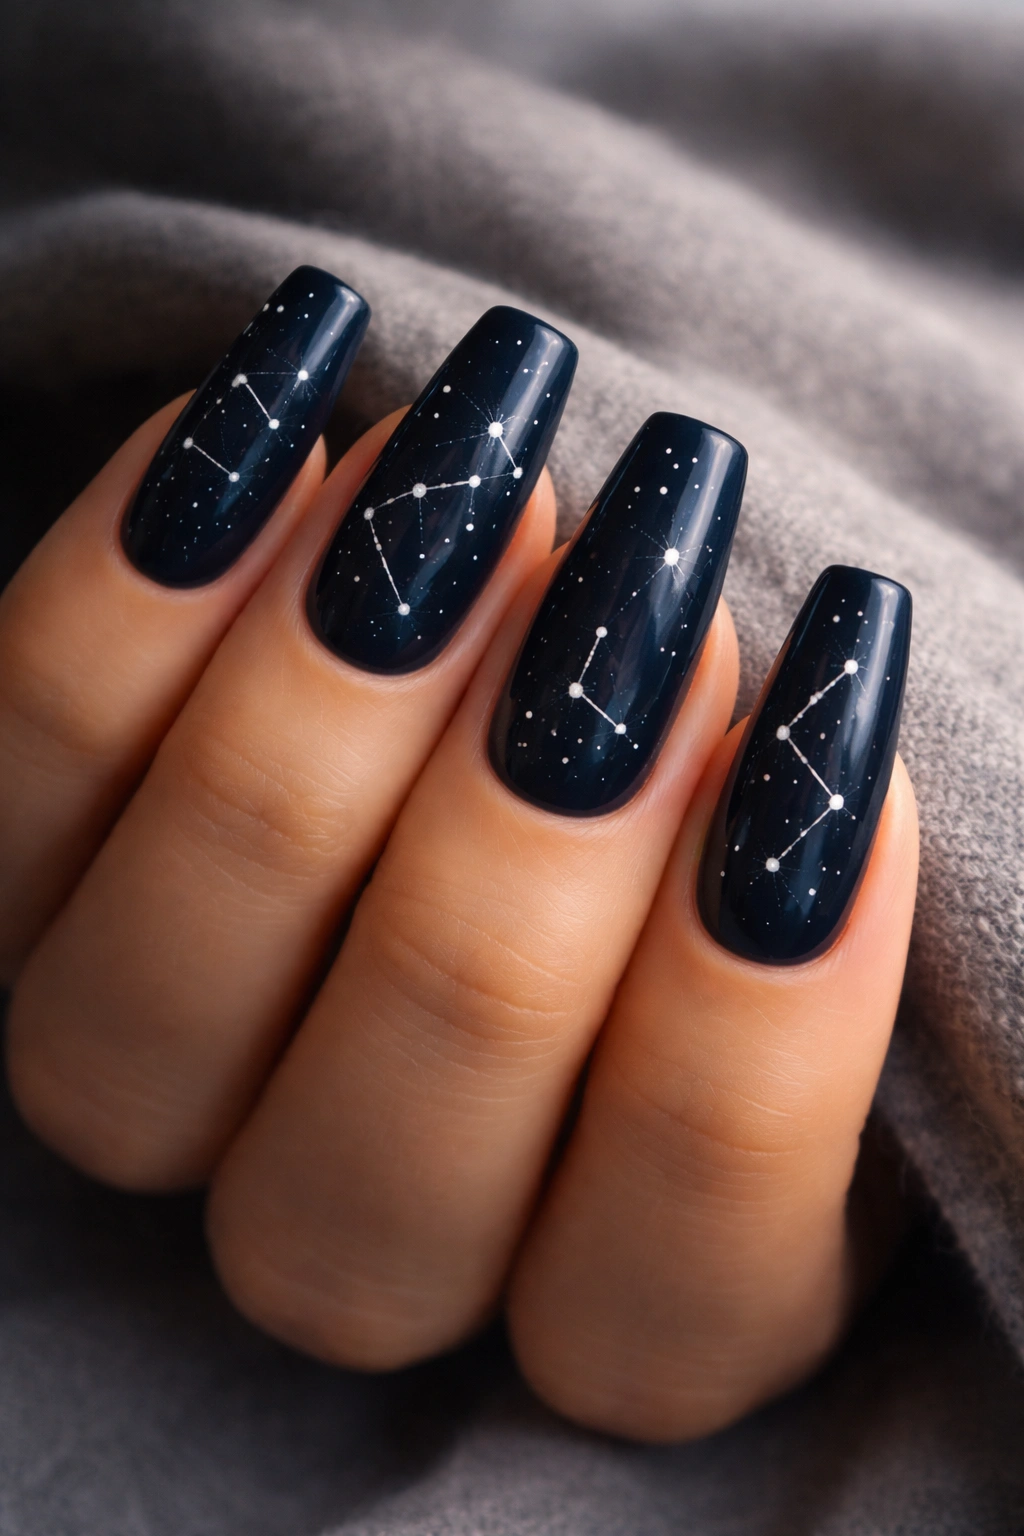
Navy blue feels sophisticated and understated while still being a genuine color statement. Add tiny white dots scattered across the nail like constellations—perhaps with thin white lines connecting them—and you transform navy from safe choice into thoughtful design. The constellation detail tells a story and feels personal. On medium coffin nails, navy with constellation details reads as artistic without being over the top, elegant without being formal.
The Storytelling Aspect of Constellation Design
People respond emotionally to constellation designs because they feel personal and meaningful. You can use actual constellation patterns (the Big Dipper, Orion, your zodiac sign) or create your own abstract pattern of connected dots. The meaning matters less than the intention and execution—this design works because the white dots create contrast against the navy and the nail becomes a tiny work of art.
Executing Constellation Details
- Apply two coats of navy blue base (a rich, true navy, not too dark)
- Using white gel or a thin brush with white polish, apply tiny dots randomly or in constellation patterns
- Connect some dots with thin lines using the same white
- Space the dots thoughtfully—clusters are more interesting than uniform spacing
- Seal with glossy topcoat for shine and longevity
Insider note: You can purchase constellation nail stickers for foolproof application, or hand-paint for a more organic, unique result—both approaches work beautifully.
10. Soft Blush with Pressed Flowers
Pressed flowers sealed into clear polish create an ethereal, garden-inspired look that’s romantic without being childish. Start with a soft blush or translucent base, then layer in tiny pressed flowers (real or synthetic) before sealing with clear topcoat. The flowers appear to float within the polish, creating dimension and a botanical art installation effect. On medium coffin nails, this design feels delicate and intentional—it’s wearable art.
The Beauty of Botanical Details
Pressed flower designs appeal because they’re natural, pretty, and feel handmade. Unlike abstract nail art, flowers are immediately recognizable and evoke nature and growth. The translucent or pale base allows the flowers to stand out while maintaining an overall soft, romantic aesthetic. This design works especially well on coffin nails because the larger surface area gives the flowers room to be appreciated.
Creating Pressed Flower Designs
- Start with a clear or very pale blush base
- Carefully place tiny pressed flowers (available from craft suppliers) onto the sticky layer before topcoat
- Seal with a clear, protective topcoat to lock the flowers in place
- The topcoat should be thick enough to create a smooth surface and protect the flowers
- Alternatively, use flower nail decals or stickers for easier application and more precision
Pro tip: Real pressed flowers can be fragile—synthetic or dried flowers designed for nails are more durable and longer-lasting for actual wear.
11. Deep Plum with Holographic Shimmer
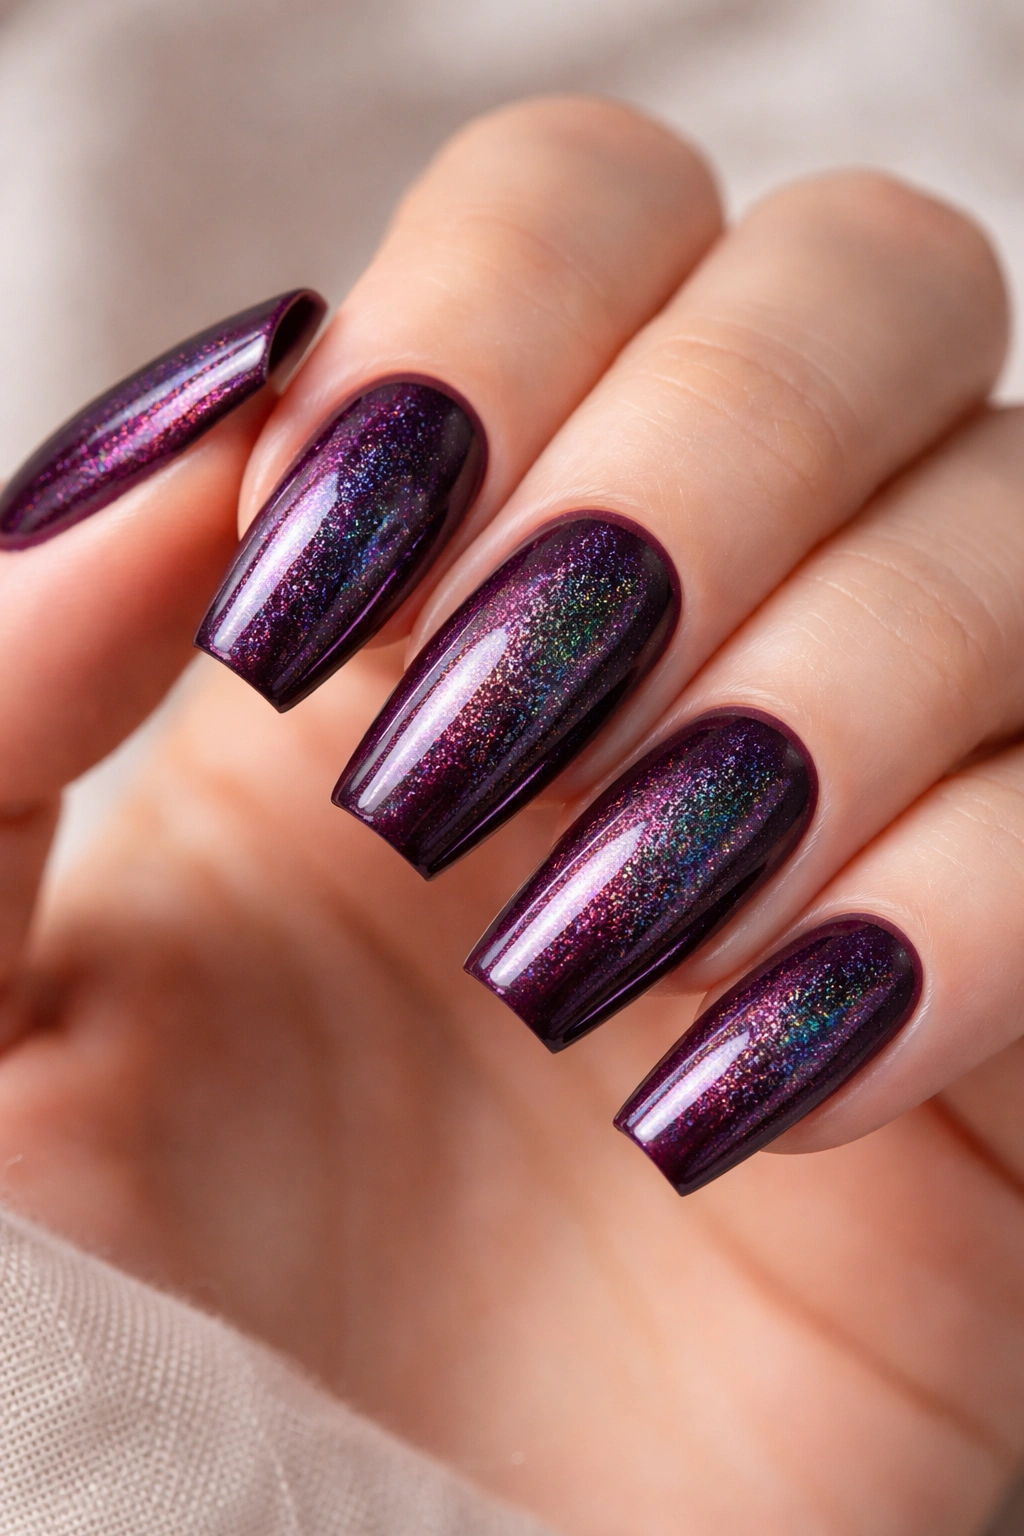
Plum is a sophisticated color that sits between purple and burgundy—it’s moody and elegant simultaneously. Add holographic shimmer that shifts colors slightly as light hits it, and you have a design with genuine depth and dimension. The holographic effect prevents plum from feeling flat or one-dimensional; instead, it appears to shift and move. On medium coffin nails, holographic plum feels luxurious and modern—it’s the kind of design that catches light as you gesture or move your hands.
Why Holographic Finishes Feel Luxe
Holographic polish contains tiny prismatic particles that refract light and create rainbow flashes. It’s not glitter (which feels separate and chunky) but an integrated shimmer throughout the entire polish. Holographic plum, especially, benefits from this treatment because the depth of the base color combined with the shifting shine creates genuine visual complexity. It reads as expensive and intentional, not overdone.
Applying Holographic Polish Effectively
- Use a quality holographic polish from a reputable nail brand (cheap holographic can look muddy)
- Apply in thin, even coats—holographic shows brush strokes more than solid colors
- Build color with 2-3 thin coats rather than one thick coat
- The holographic effect intensifies in sunlight, so your nails will look different indoors vs. outside
- Seal with a non-cloudy topcoat designed for holographic polish (regular topcoat can dull the effect)
Worth knowing: Holographic polish can be harder to remove than standard polish because the particles can cling to the nail surface—use quality remover and patience.
12. Negative Space Design with Geometric Shapes
Negative space nail art means leaving parts of your nail bare (showing your natural nail or base color) as part of the design. Create geometric shapes—triangles, circles, stripes—where the negative space is intentional and part of the overall composition. On a nude or neutral base, paint specific areas with chrome, glitter, or color while leaving geometric sections bare. On medium coffin nails, negative space feels modern and artistic—it requires precision but reads as gallery-quality when executed well.
The Art and Intention of Negative Space
Negative space designs work because they’re unexpected—most people assume nails are fully covered with color, so leaving intentional bare sections reads as deliberate and artistic. This technique can be minimalist (just one geometric cutout per nail) or complex (interconnected patterns across all five nails). The key is that every bare section must feel purposeful, not like the design is incomplete.
Creating Geometric Negative Space
- Start with a neutral or nude base
- Using nail tape or stencils, create geometric shapes that will remain bare or be filled with a contrasting color
- Tape off sections carefully to ensure clean, sharp edges
- Paint surrounding areas with your chosen design color or chrome
- Remove tape while polish is still slightly tacky for crisp edges
- Seal everything with glossy topcoat
Pro tip: Simple negative space designs (one clear triangle at the tip, one circle at the center) are more striking than overly complex patterns—let the empty space do the visual work.
13. Caramel Brown with Gold Foil Veining
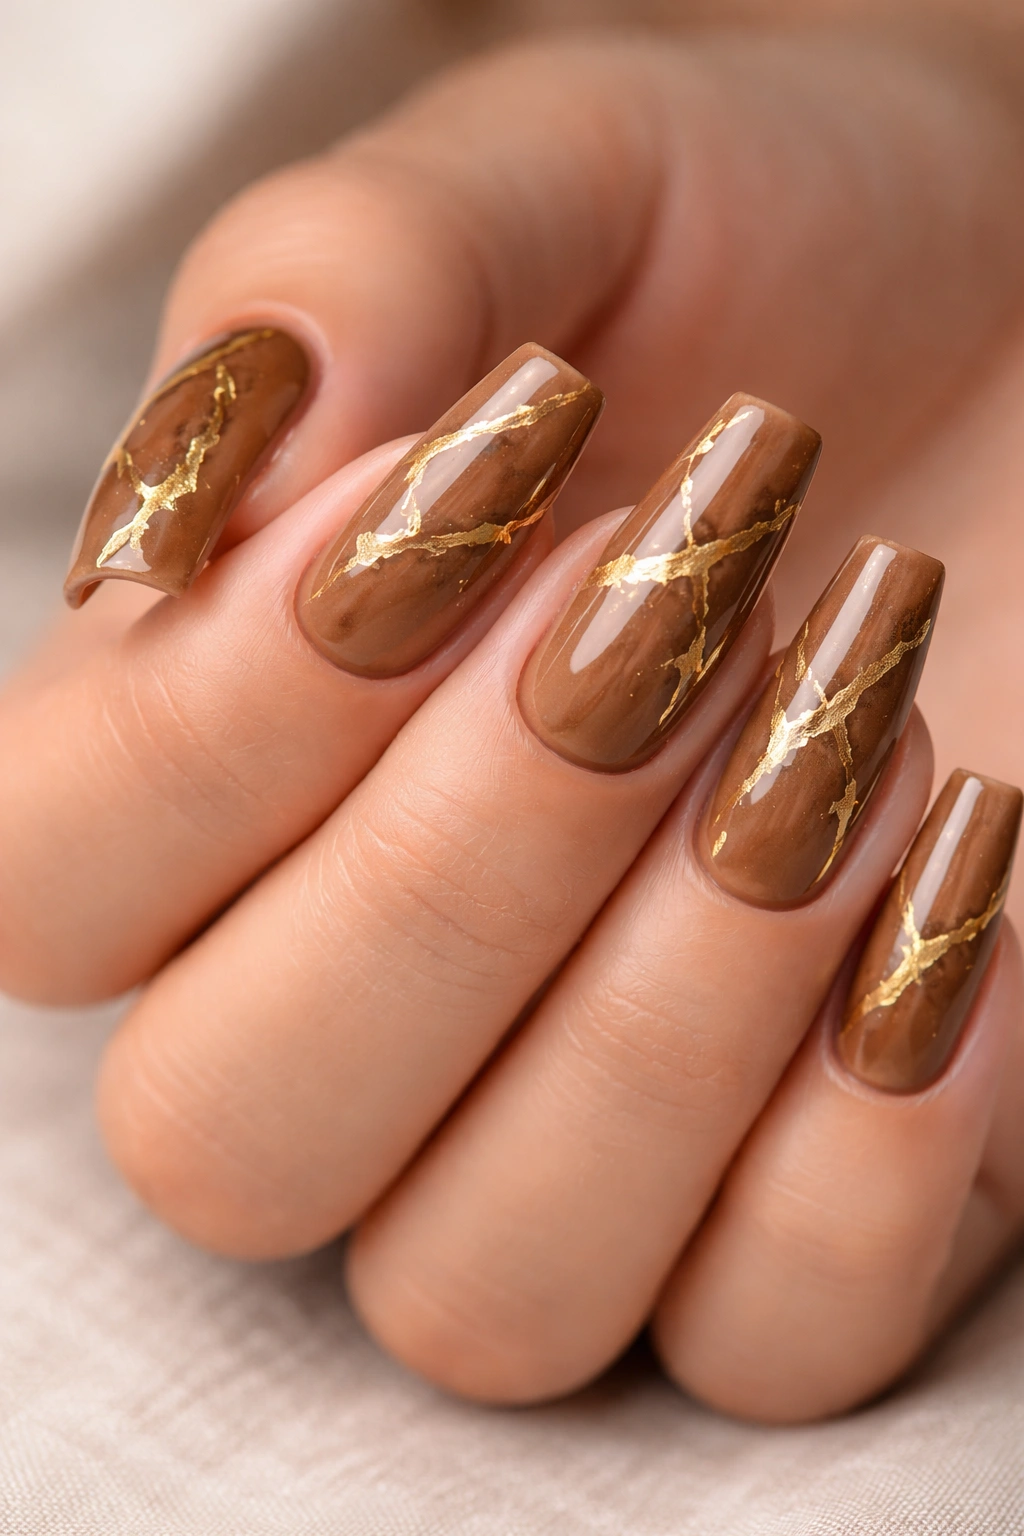
Caramel brown is a warm, approachable color that feels sophisticated and earthy. Add delicate gold foil veining that runs across the nail like geological striations, and you have a design that’s both natural and luxurious. The veining shouldn’t be uniform or too neat—it should look organic, like you’re capturing a piece of agate or marble. On medium coffin nails, caramel brown with gold veining feels grounded and elevated simultaneously, earthy and glamorous.
The Balance of Earthy and Luxury
Caramel brown grounds the design—it’s approachable and wearable. The gold foil elevates it—it’s luxury and shimmer. Together, they create balance. This is the kind of design that works across contexts: professional environments, casual settings, special events. The coffin shape enhances the stone-like, geological quality of the design.
Achieving Gold Foil Veining
- Apply two coats of caramel brown base for opacity
- While the second coat is still tacky, use thin gold foil pieces or leaf
- Crumple or tear the foil into irregular pieces to create organic veining rather than structured patterns
- Use tweezers to place pieces strategically across the nail
- Seal with clear topcoat, applying gently to avoid disturbing the foil placement
- The veins should look natural, not perfectly symmetrical
Insider note: Crushed foil (slightly crumpled before application) creates more natural veining than perfectly intact leaf—the texture and irregularity add authenticity.
14. Soft Sage Green with Fine White Details
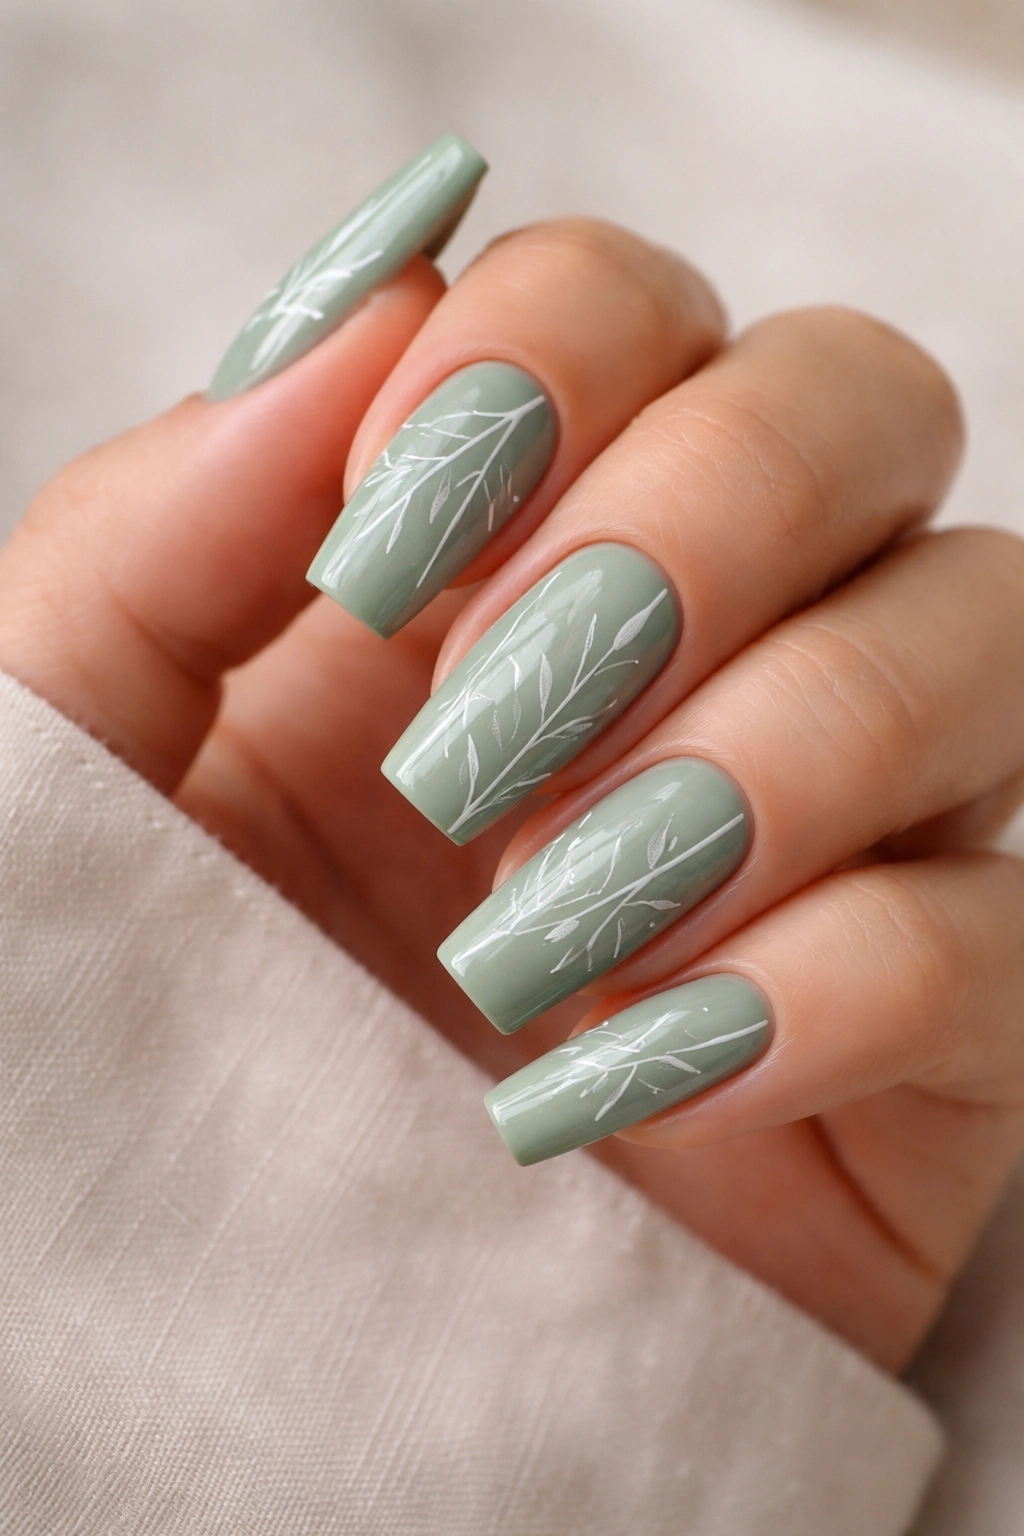
Sage green is having a moment because it’s sophisticated, natural, and genuinely calming to look at. It’s not neon or bright but a muted, earthy green that appeals to people who love nature and understated style. Add fine white details—delicate line work, tiny dots, or thin botanical lines—and you transform sage from plain to purposeful. On medium coffin nails, sage green with white details feels like wearing tiny pieces of nature with intentional artistry.
Why Sage Green Feels Universally Flattering
Sage is a universally flattering color because it’s neutral enough to feel approachable but distinctive enough to feel special. It complements most skin tones and works across seasons. Unlike trendy pastels, sage green feels timeless. It’s the color of Instagram-worthy home decor and wellness brands, so it carries subtle connotations of health, peace, and thoughtfulness.
Creating White Detail Work on Sage
- Start with two coats of quality sage green (too bright and it’s not sage; too muted and it disappears)
- Using a thin brush with white gel or polish, apply delicate details—thin lines, tiny botanical shapes, dots in a pattern
- Keep details refined and minimal—sage is already a strong color, so details should enhance rather than compete
- Consider a matte topcoat for a softer, more natural finish that emphasizes the earthy quality
- Alternatively, glossy topcoat creates more shine and modern feel
Pro tip: Pair sage nails with neutral everything else—let the color speak without competing patterns or bold jewelry.
15. Pearl Gradient with Metallic Accent
A pearl gradient uses shimmery, light-catching polish in a subtle gradient—perhaps from nude pearl at the base to white pearl at the tips, creating an iridescent effect. Add a metallic accent—a thin line or small detail in rose gold or silver—and you have understated luxury. Pearl polish contains mica that catches light beautifully, and the gradient elongates the finger. On medium coffin nails, pearl gradient with metallic accent feels polished, refined, and thoroughly modern. It’s the manicure people assume cost significant money because it looks professionally executed and thoughtfully designed.
The Sophistication of Pearl Finishes
Pearl polish is inherently elegant because it mimics the luminosity of actual pearls—it shifts and glows rather than sitting flat. A gradient of pearl shades from light to lighter creates dimension without relying on stark color contrast. The metallic accent adds just enough detail to feel intentional without overwhelming the subtle sophistication. This design reads as expensive because it requires technique and restraint.
Building Your Pearl Gradient
- Use two shades of pearl polish—perhaps a warmer nude pearl and a cooler white pearl
- Sponge the gradient using the same technique as blush-to-white ombré (light tapping, multiple thin applications)
- Focus on seamless blending rather than dramatic color shift
- While the gradient topcoat is still slightly tacky, apply a thin metallic line or accent (rose gold or silver work beautifully)
- Seal with glossy topcoat for maximum luminosity and polish
Worth knowing: Pearl polish requires good lighting to truly shine—indoor light might make it look too subtle, but natural light brings out the iridescence beautifully.
Final Thoughts
Medium coffin nails sit in that perfect sweet spot—they’re long enough to showcase intricate designs but short enough to actually be practical for life. Whether you choose something as simple as a single-color matte finish or as intricate as constellation details and holographic shimmer, the key is that each design feels intentional and considered. Your nails become a tiny canvas for self-expression, and the coffin shape enhances almost every design choice you make.
The designs that look most expensive and professional aren’t necessarily the most complicated—they’re the ones executed with precision and restraint. A perfect nude with thin gold foil beats a cluttered rainbow design every single time. Start with a clean base (properly shaped and buffed), invest in quality polish, and take your time with application. Your medium coffin nails will look salon-quality, and you’ll actually want to show them off. The best nail design is the one that makes you feel confident and gorgeous every single time you look at your hands.
