

Medium coffin nails are the sweet spot for creating impact without sacrificing practicality, and they’re absolutely perfect for channeling that baddie energy that makes heads turn. The coffin shape—with its tapered sides and broad, squared-off or subtly pointed tip—naturally commands attention and photographs beautifully on social media. Unlike super-long stilettos, medium coffin nails give you the strength to actually live your life while still making a bold statement, and they’re forgiving enough for at-home maintenance if you’re DIY-ing your designs.
The baddie aesthetic is all about confidence, edge, and intentional boldness. It’s not about following trends—it’s about owning a look so completely that trends follow you instead. When you pair that attitude with thoughtfully designed medium coffin nails, you’re creating an accessory that signals you know exactly who you are and what you want. Whether you’re drawn to dark, moody palettes, unexpected finishes, or designs that blend minimalism with attitude, there’s a baddie coffin nail look waiting to become your signature.
The best part? Medium length is incredibly versatile. It works for professional settings without looking out of place, handles everyday activities without constantly breaking or snagging, and provides enough real estate for intricate nail art that actually shows up. You can go minimalist and let a single unexpected element do all the work, or go full-design with multiple techniques layered together. Here are fifteen baddie coffin nail ideas that’ll have you obsessed with your own hands.
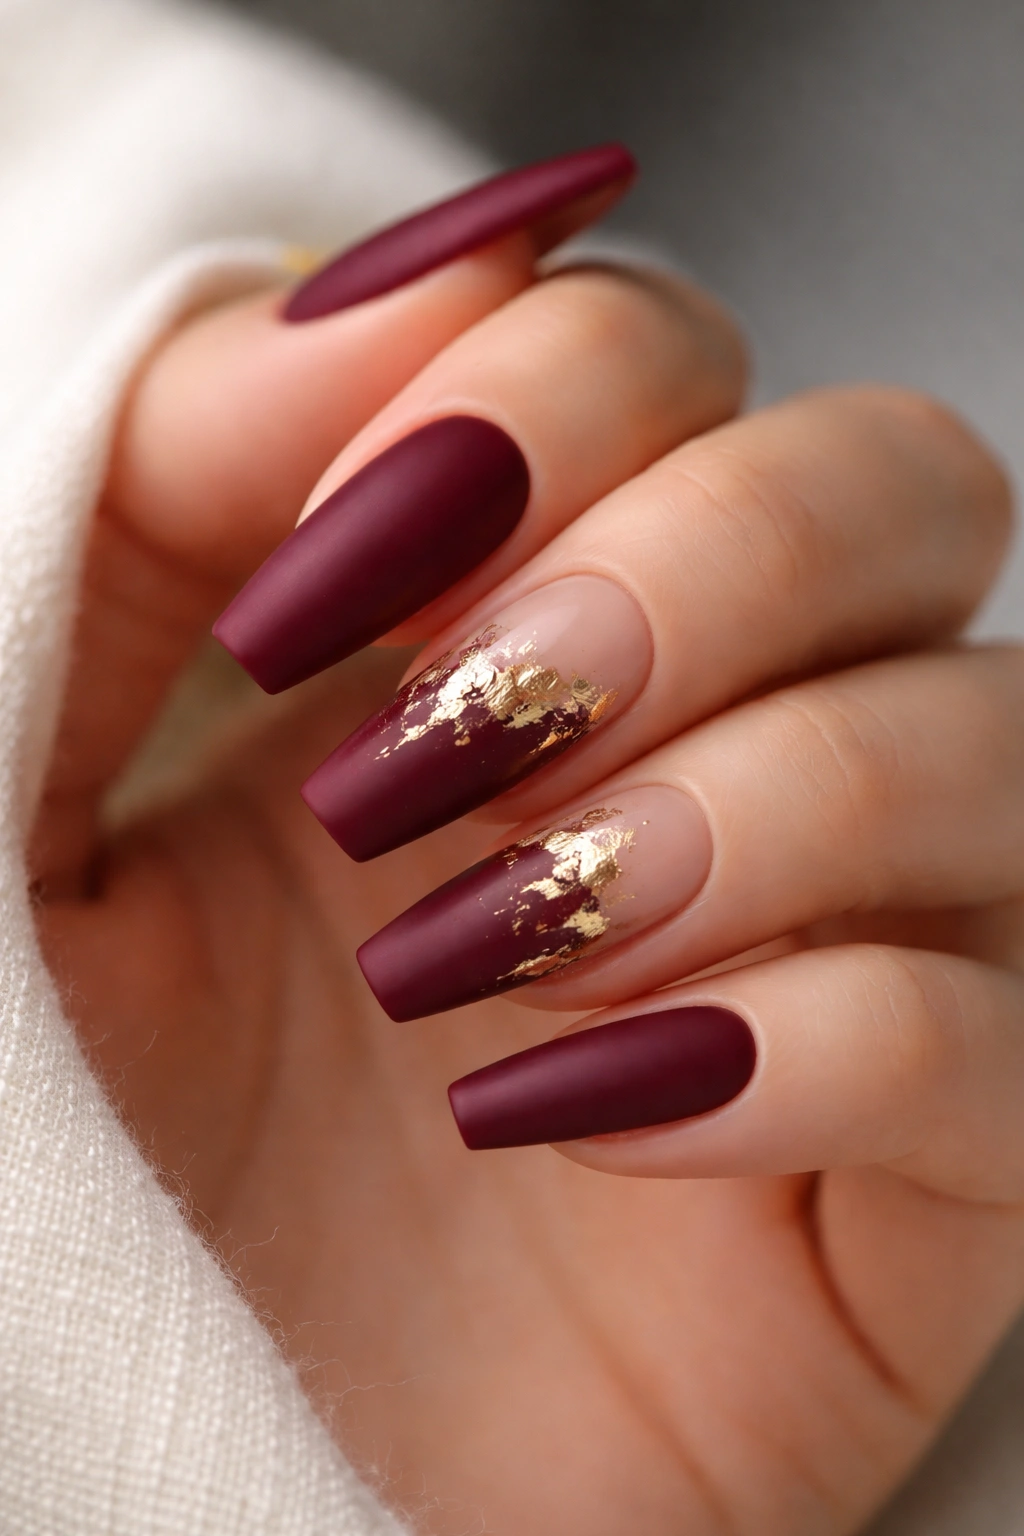
1. Deep Burgundy with Gold Foil Accents
Burgundy walks the line between sophisticated and moody in a way few colors can manage, and it’s the ultimate confidence color for anyone wanting to feel like the main character. This shade reads as both understated luxury and undeniable edge, depending on how you own it. Medium coffin nails in deep burgundy give you enough space to work with negative space, allowing skin to peek through strategically, which instantly elevates the whole look.
Why This Design Works for Medium Coffins
Gold foil accents catch light without overwhelming the base color, creating movement and dimension that keeps the design from feeling flat. The contrast between matte or satin burgundy and reflective gold creates a visual tension that’s inherently baddie—it’s polished but not precious, bold but not screaming. Gold actually complements warmer and cooler burgundies depending on which undertones you choose, giving you flexibility.
How to Execute This Look
- Apply a deep burgundy base coat in your preferred finish (matte, glossy, or satin all work beautifully)
- Cut small pieces of adhesive gold foil and press them onto one or two accent nails—typically the ring finger and pinky work best for balance
- Seal everything with a glossy top coat to protect the foil and create contrast against a matte base
- For a more subtle version, use a thin gold striping brush to paint delicate lines across the nail instead
Pro tip: This design absolutely works as a French tip variation too—keep the deep burgundy on the tip portion and transition to a nude or very pale pink on the nail bed. The gold foil sits right at the tip-to-base transition line and becomes the focal point.
2. Matte Black with Metallic Silver Geometry
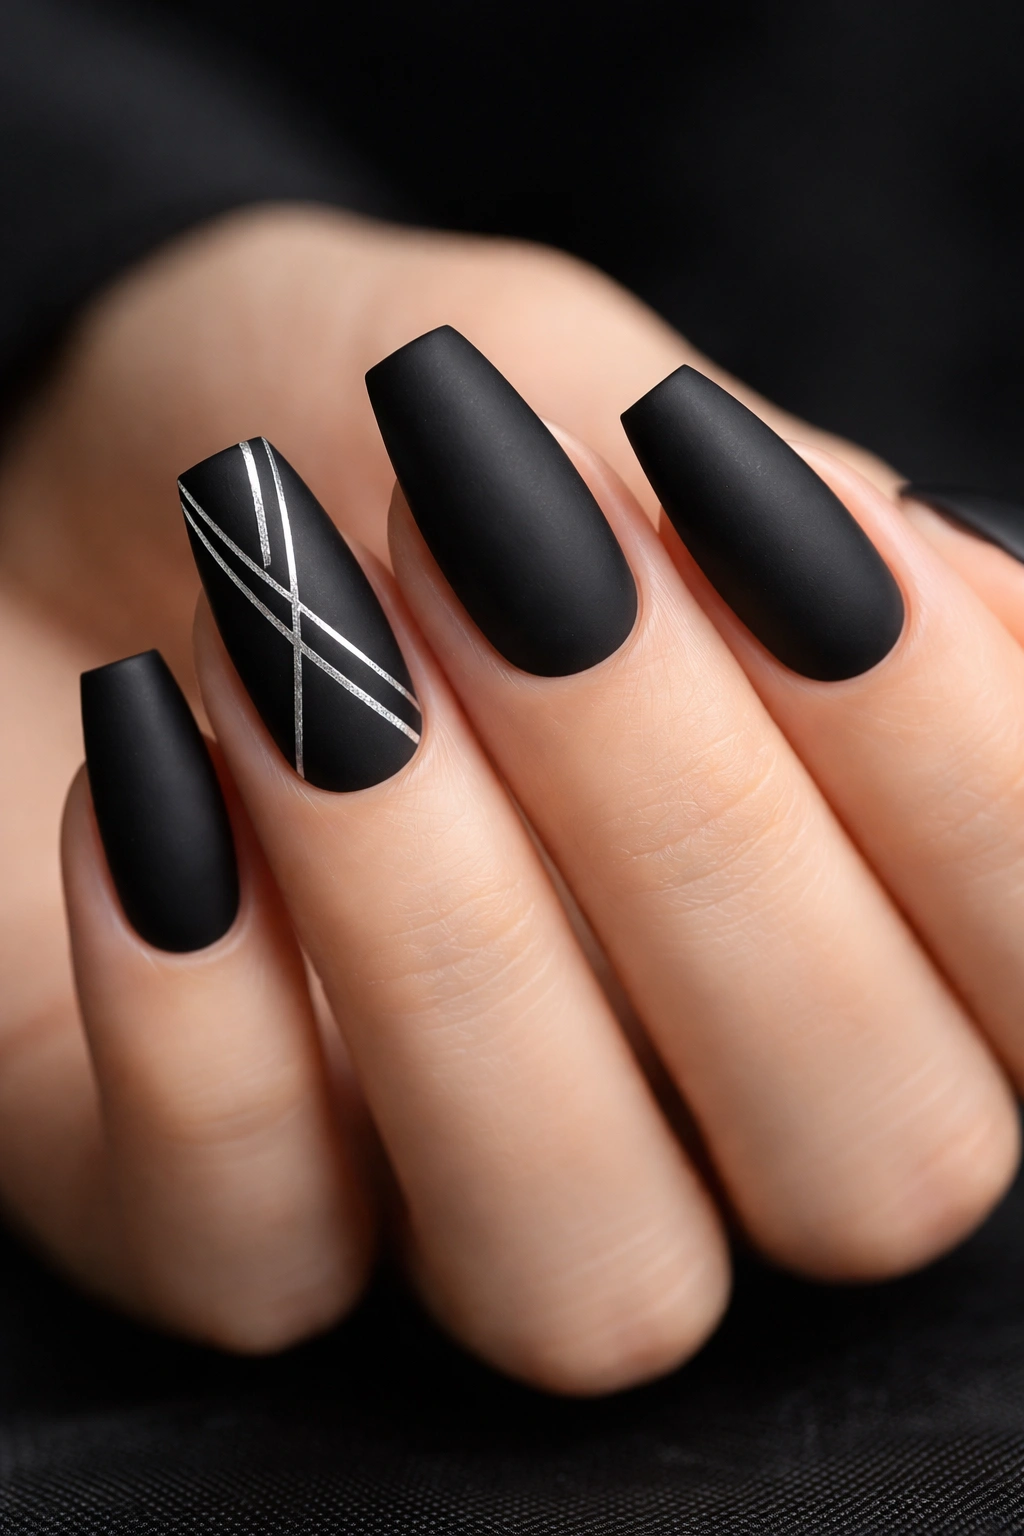
Black matte is the foundation of baddie culture because it says what needs saying without adding a single unnecessary word. It’s uncompromising, professional when it needs to be, and cool in every context. Layering geometric silver accents on top creates an unexpected detail that transforms matte black from basic to architectural.
The Psychology Behind This Pairing
Geometry speaks a language of intention and control. Paired with matte black on medium coffin nails, it reads as someone who knows exactly what she wants and has the precision to execute it. The silver lines can be perfectly sharp or slightly hand-drawn—both approaches work, but hand-drawn adds personal movement to the design. This isn’t about perfection; it’s about intention.
Execution Tips for Maximum Impact
- Start with a quality black gel or polish base in matte finish—sheer black looks washed out, so go fully opaque
- Use a thin metallic silver gel or a striping brush with metallic polish to create your geometric pattern: thin lines, triangles, or abstract shapes work equally well
- Keep the silver contained to one nail per hand for maximum baddie energy, or spread it across two if you prefer more balance
- Seal with a glossy top coat to create contrast between the matte black and shiny silver lines
Insider note: If you mess up the geometry slightly, you can actually lean into it—imperfect lines read as artistic and deliberate rather than mistaken.
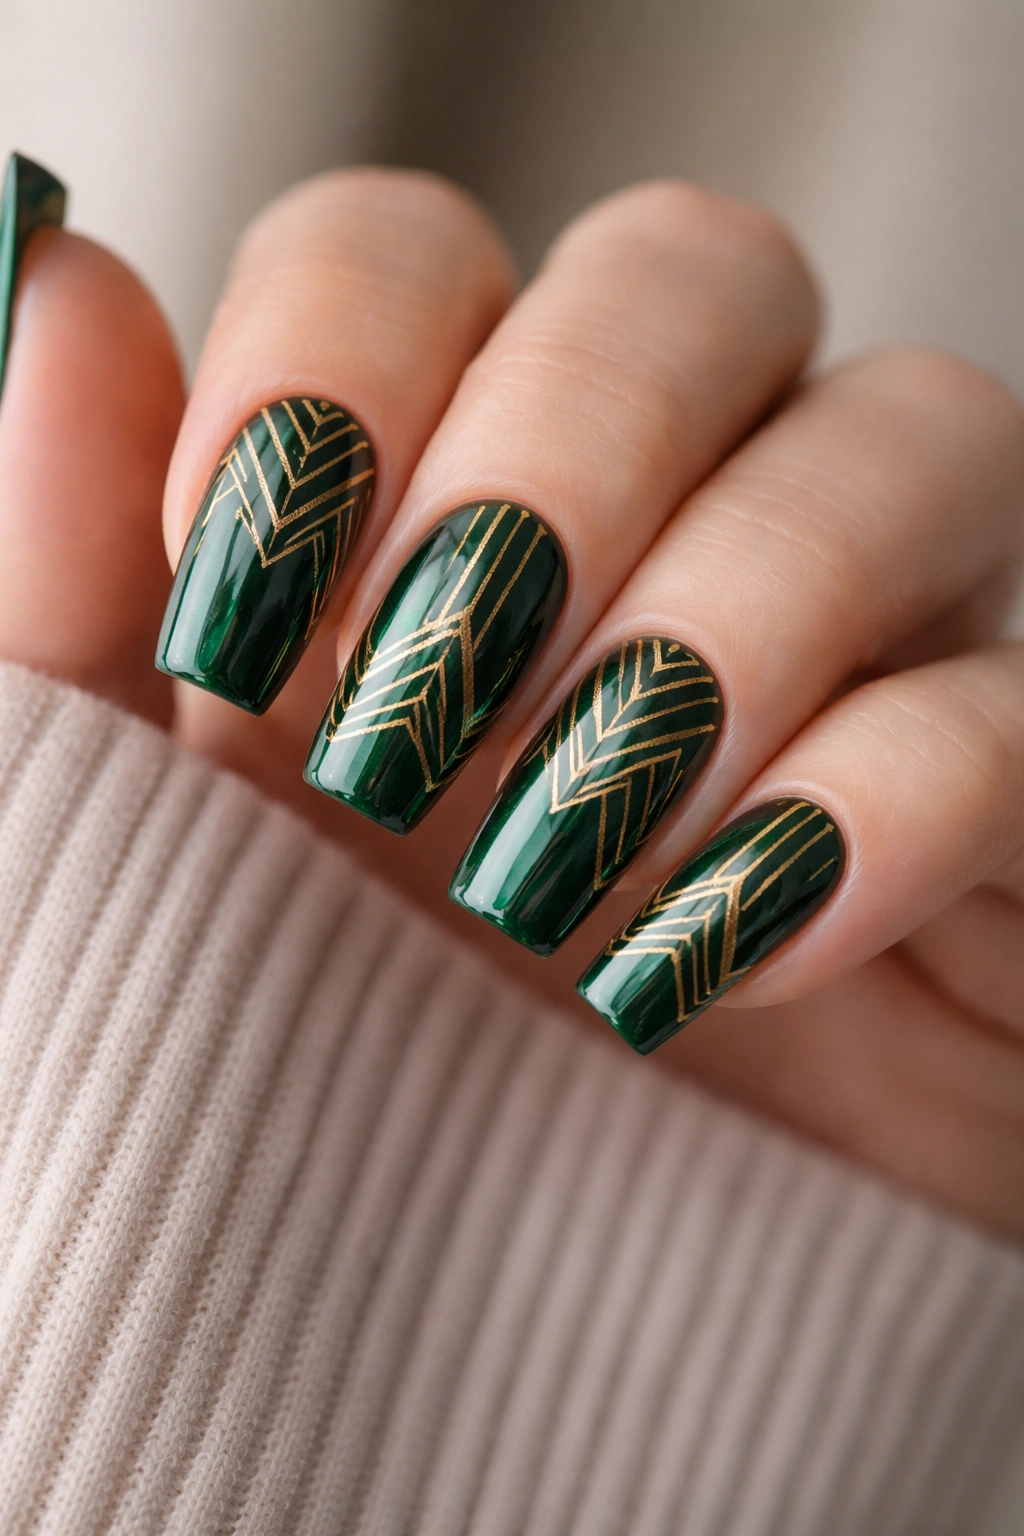
3. Dark Forest Green with Emerald Glitter Gradient
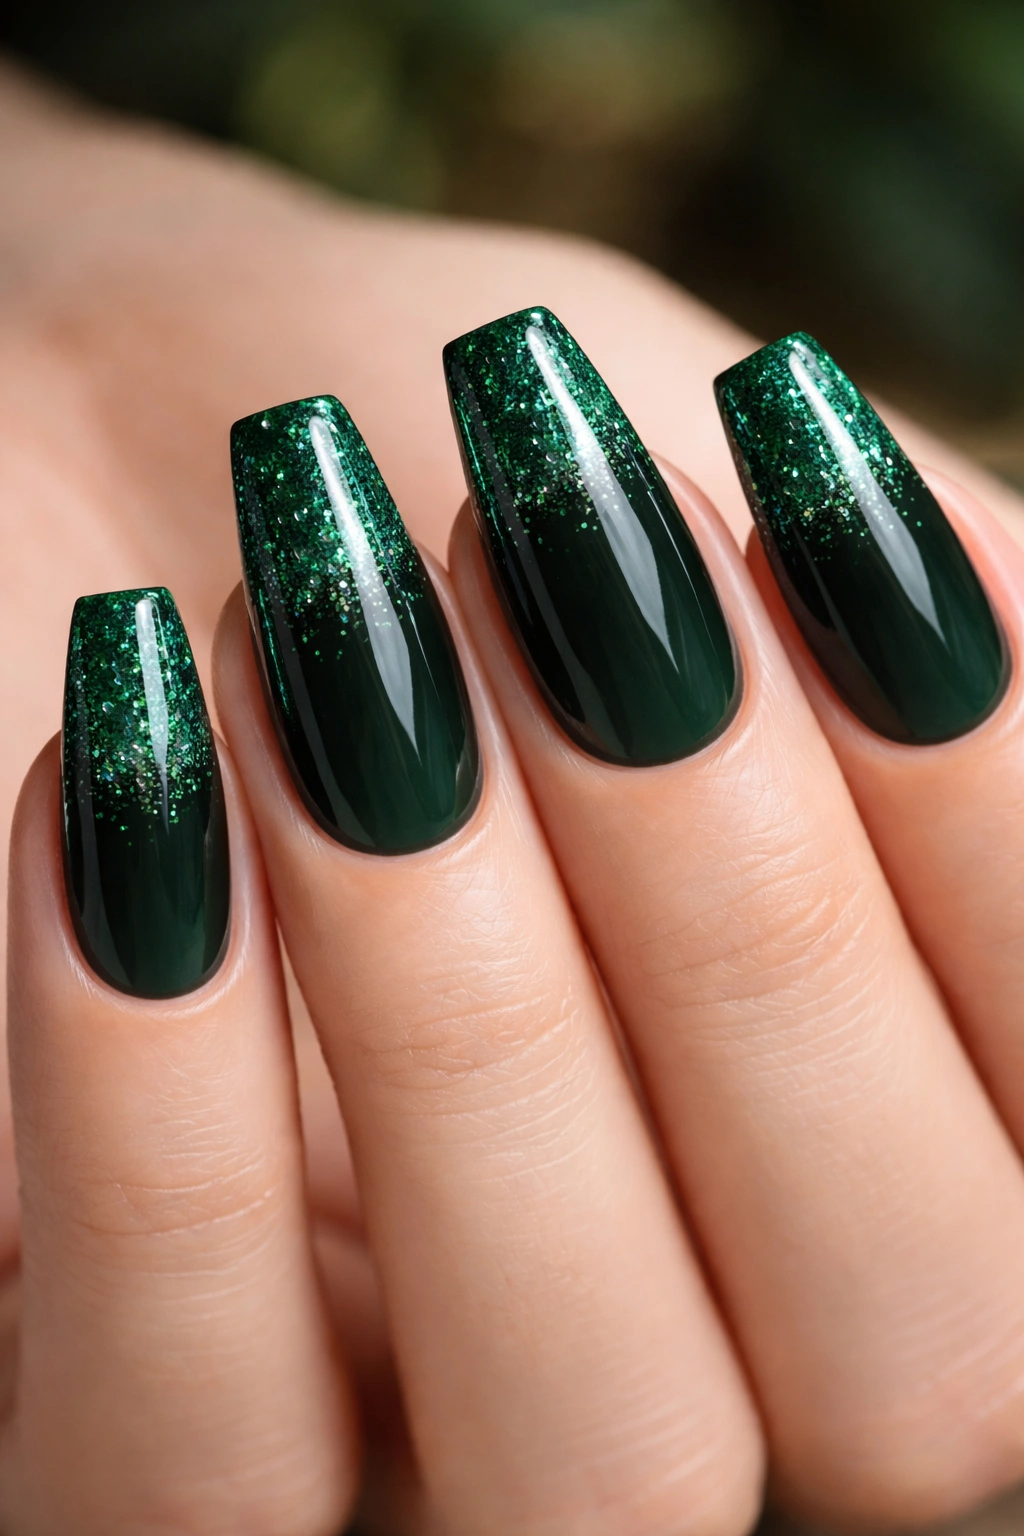
Deep forest green is having a serious moment because it hits the intersection of nature-inspired and mysterious—you’re giving off earthy, grounded vibes while maintaining an air of intrigue. Medium coffin nails in this shade feel special without being loud, and emerald glitter adds just enough sparkle to prevent the look from feeling flat.
Why Green Is Secretly the Ultimate Baddie Color
Green says you’re comfortable outside conventional color choices. It’s a statement without being a statement. You’re not going for the obvious red or pink; you’re choosing something more interesting, which is quintessentially baddie. The glitter gradient—concentrated near the tip and fading toward the base—adds dimension and keeps your nails from looking one-note.
Application Method for Flawless Results
- Apply two coats of dark forest green as your base, ensuring full opacity
- Mix a small amount of emerald or matching-tone glitter with clear gel or topcoat to create a gradient mixture
- Using a makeup sponge, dab the glitter mixture onto the tip portion of the nail, letting it fade toward the middle
- Build layers gradually—it’s easier to add more glitter than to remove it—until you achieve your desired density
- Seal with a glossy top coat for a professional finish
Worth knowing: Different glitter sizes create different vibes. Fine glitter reads as refined; chunky glitter reads as playful and bold.
4. Nude Ombre with Subtle Chrome Dust
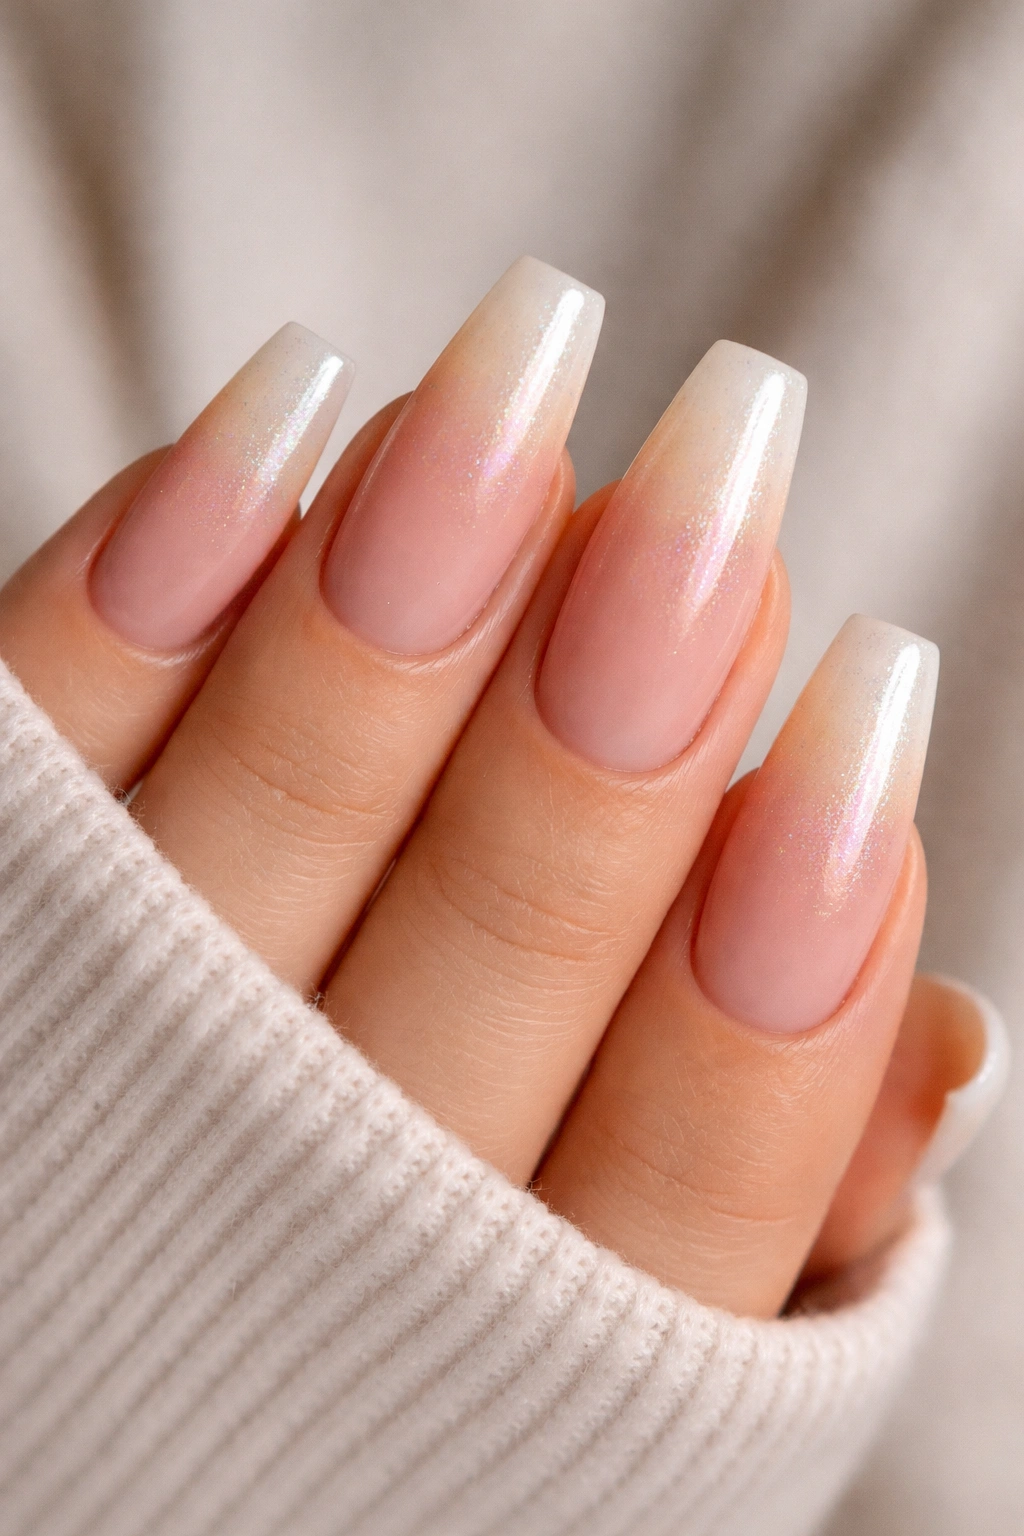
Nude ombre is elegant without trying, and it’s the perfect canvas for someone who wants their nails to enhance their natural beauty rather than override it. Adding chrome dust—the fine metallic powder that creates an almost-holographic finish—elevates nude from basic to extraordinarily sophisticated.
The Subtle Strength of This Design
This is peak quiet luxury baddie energy. You’re not announcing yourself loudly; you’re letting people notice your attention to detail. The ombre gradient (typically transitioning from a pinky-nude at the base to a slightly warmer or deeper tone at the tip) creates visual movement, while chrome dust catches light from every angle. Medium coffin nails provide enough surface area for the ombre to be visible without feeling overdone.
Step-by-Step Application
- Select two coordinating nude shades—one lighter, one slightly warmer or deeper
- Apply the lighter shade as your full base coat
- Create an ombre by blending the deeper shade onto the tip third of each nail using a sponge and gentle dabbing motions
- Once the gradient is set and dry, apply a very thin layer of chrome dust using a dedicated brush, pressing it gently into the nail surface
- Seal everything with a matte or glossy top coat depending on whether you want the chrome to be subtle or highly reflective
Pro tip: Chrome dust shows up better over slightly darker nudes, so don’t go too pale with your base shade.
5. Black Base with Negative Space Line Art
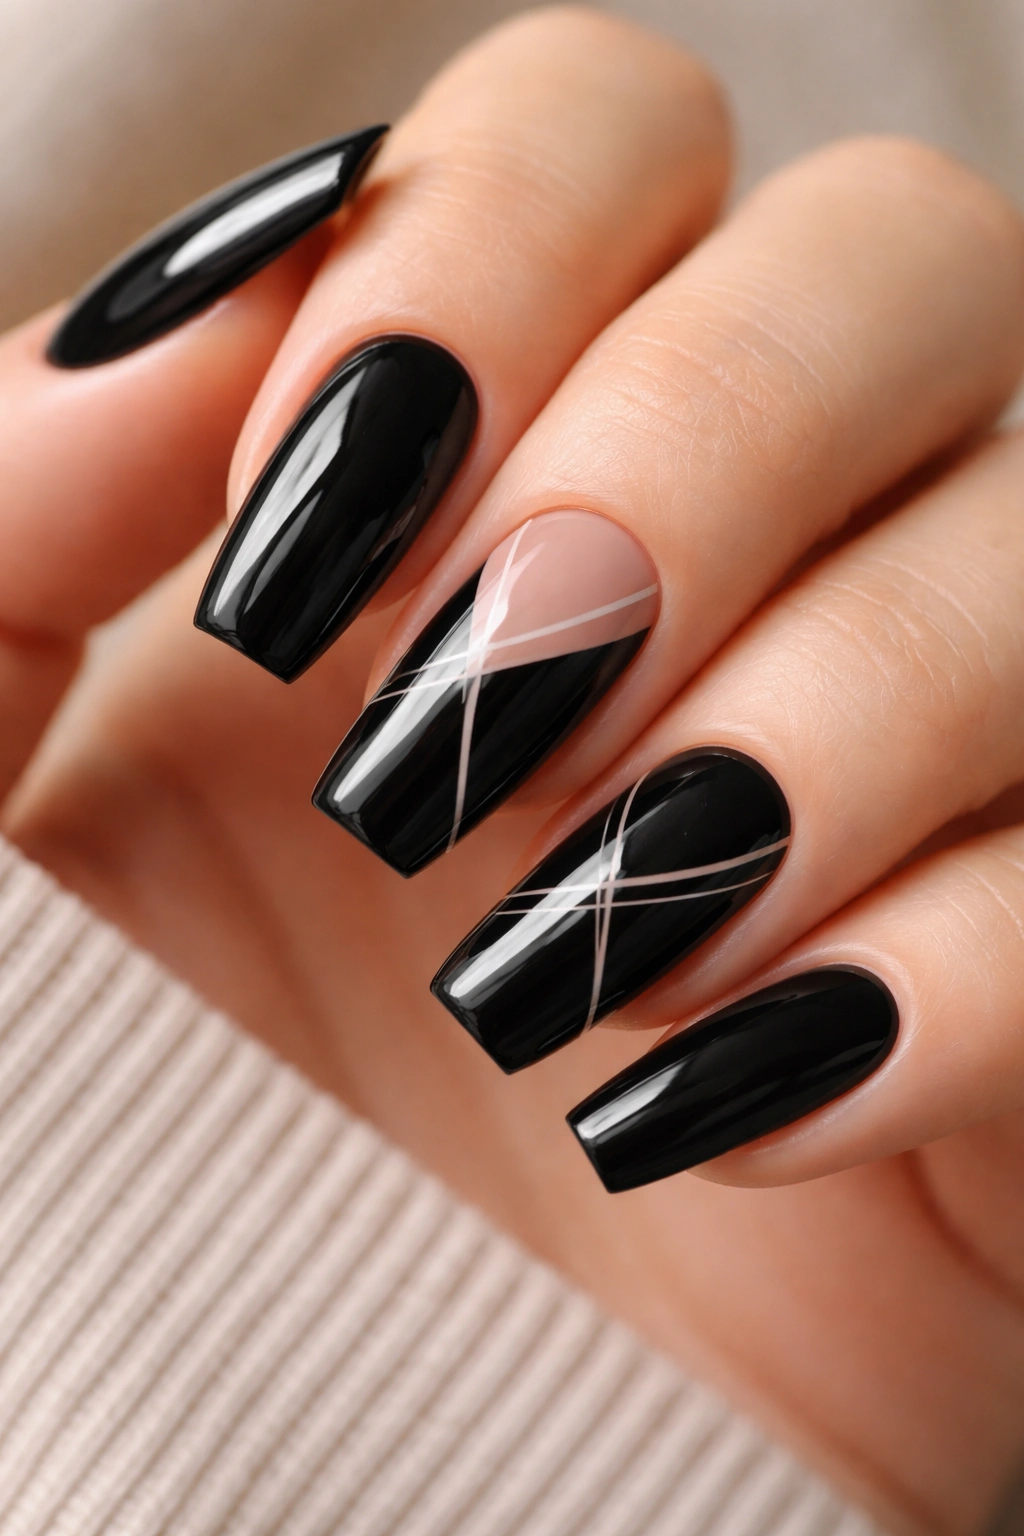
Negative space designs are the thinking person’s baddie nail. You’re not filling every available inch; you’re strategically using the space you have, which reads as confident and intentional. Black paired with skin showing through creates contrast that’s impossible to ignore on medium-length coffin nails.
Why Negative Space Reads as Sophistication
Negative space demands restraint and intention. It’s the opposite of “more is more”—it’s “less is strategic.” Fine white or nude lines drawn across a black base in minimal, abstract patterns (thin geometric shapes, single continuous lines, or scattered dots) create an unexpected focal point. The eye moves around the nail instead of resting on a solid block of color.
Creating This Design at Home
- Apply black as your base coat in whatever finish appeals to you (glossy, matte, or satin all work)
- Use a white gel pen or very fine striping brush with white or nude polish to draw your line work—practice first on a sticky note to get comfortable with your design
- Draw minimalist patterns: a few thin lines, small geometric shapes, or abstract marks
- Keep the design limited to one or two nails per hand so it reads as intentional rather than busy
- Seal with appropriate top coat
Insider note: If you’re nervous about hand-drawing, use nail guides or thin striping tape to create perfectly straight lines, then remove the tape before sealing.
6. Chrome or Mirror Finish Everything
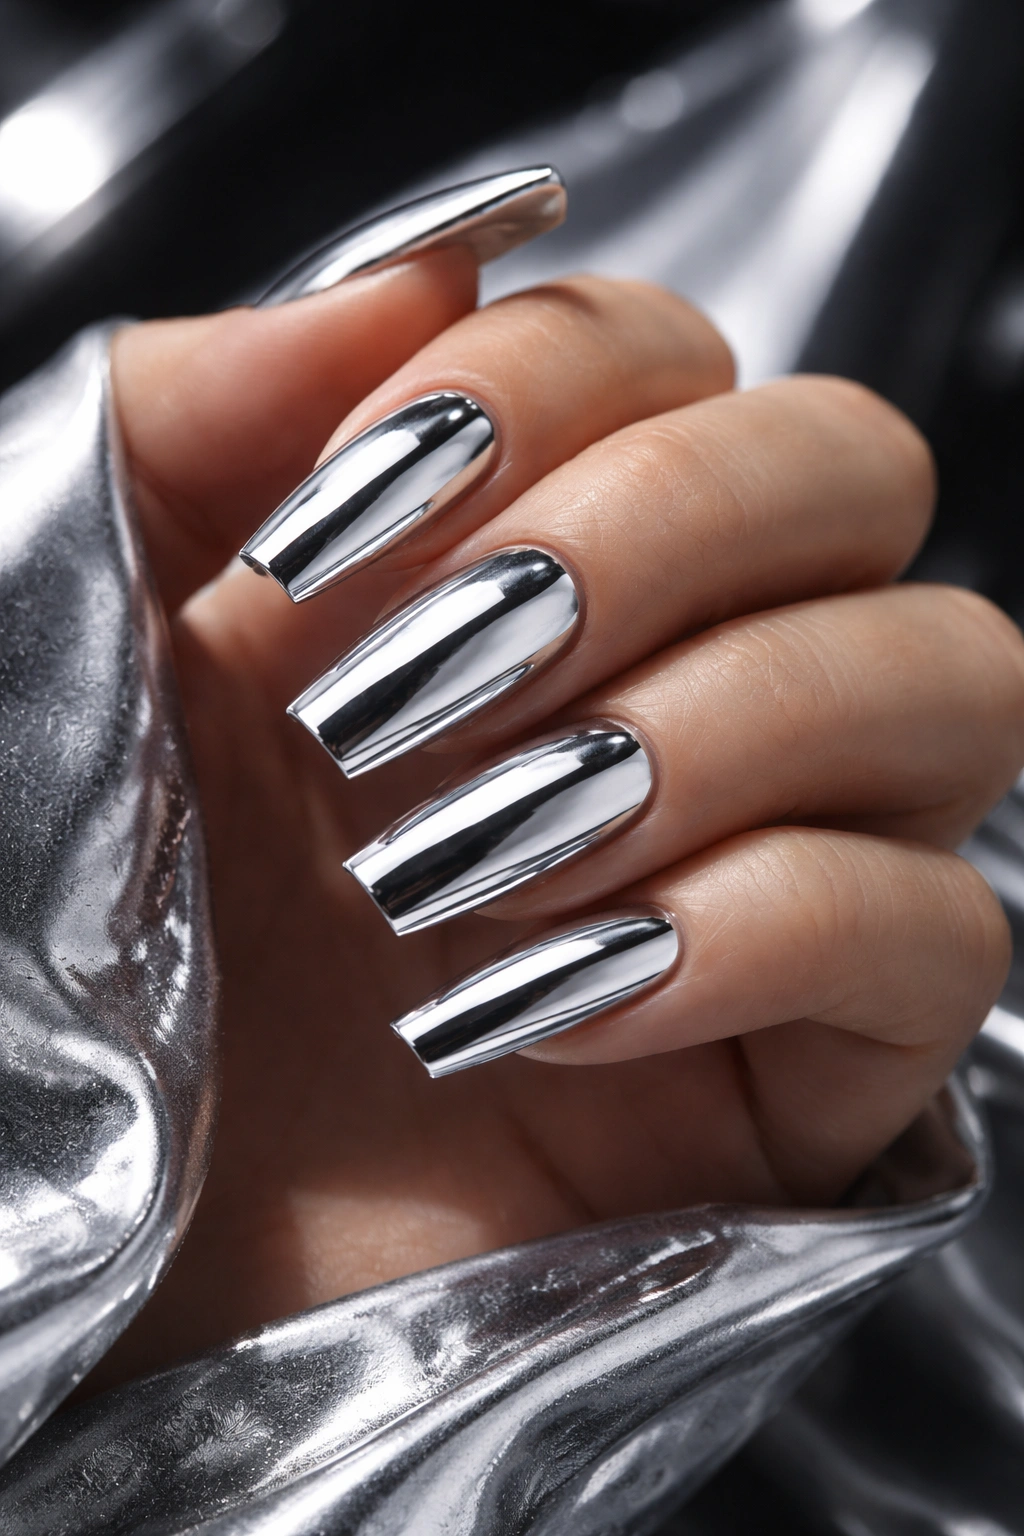
Chrome nails are peak baddie because they literally reflect the world around you. There’s something inherently confident about a nail so shiny it’s almost unreal—you’re not asking for attention, you’re commanding it through pure optical presence. On medium coffins, chrome finishes catch light beautifully and photograph like a dream.
The Technical Reality of Chrome Nails
True chrome requires either professional-grade chrome powder (applied over a sticky gel base) or specialty chrome gel polishes. The powder method works better for the most reflective, almost-mirror finish. You apply a base coat, use a makeup sponge to apply the sticky powder, and seal it—the result is almost liquid-like in its reflectivity. Chrome gel polishes are more forgiving for at-home application and still deliver serious shine.
Color Options for Maximum Impact
- Silver chrome: classic, versatile, works with any skin tone
- Rose gold chrome: warmer, slightly softer while still being bold
- Holographic chrome: shifts between colors as light hits it, creating an almost liquid effect
- Black chrome: exists in that space between chrome shine and gothic edge
- Rainbow chrome: creates an oil-slick effect with multiple shifting colors
Pro tip: Chrome shows every fingerprint and smudge immediately, so keep a microfiber cloth handy and expect to polish these regularly for that show-stopping shine.
7. Burgundy and Black Color Block
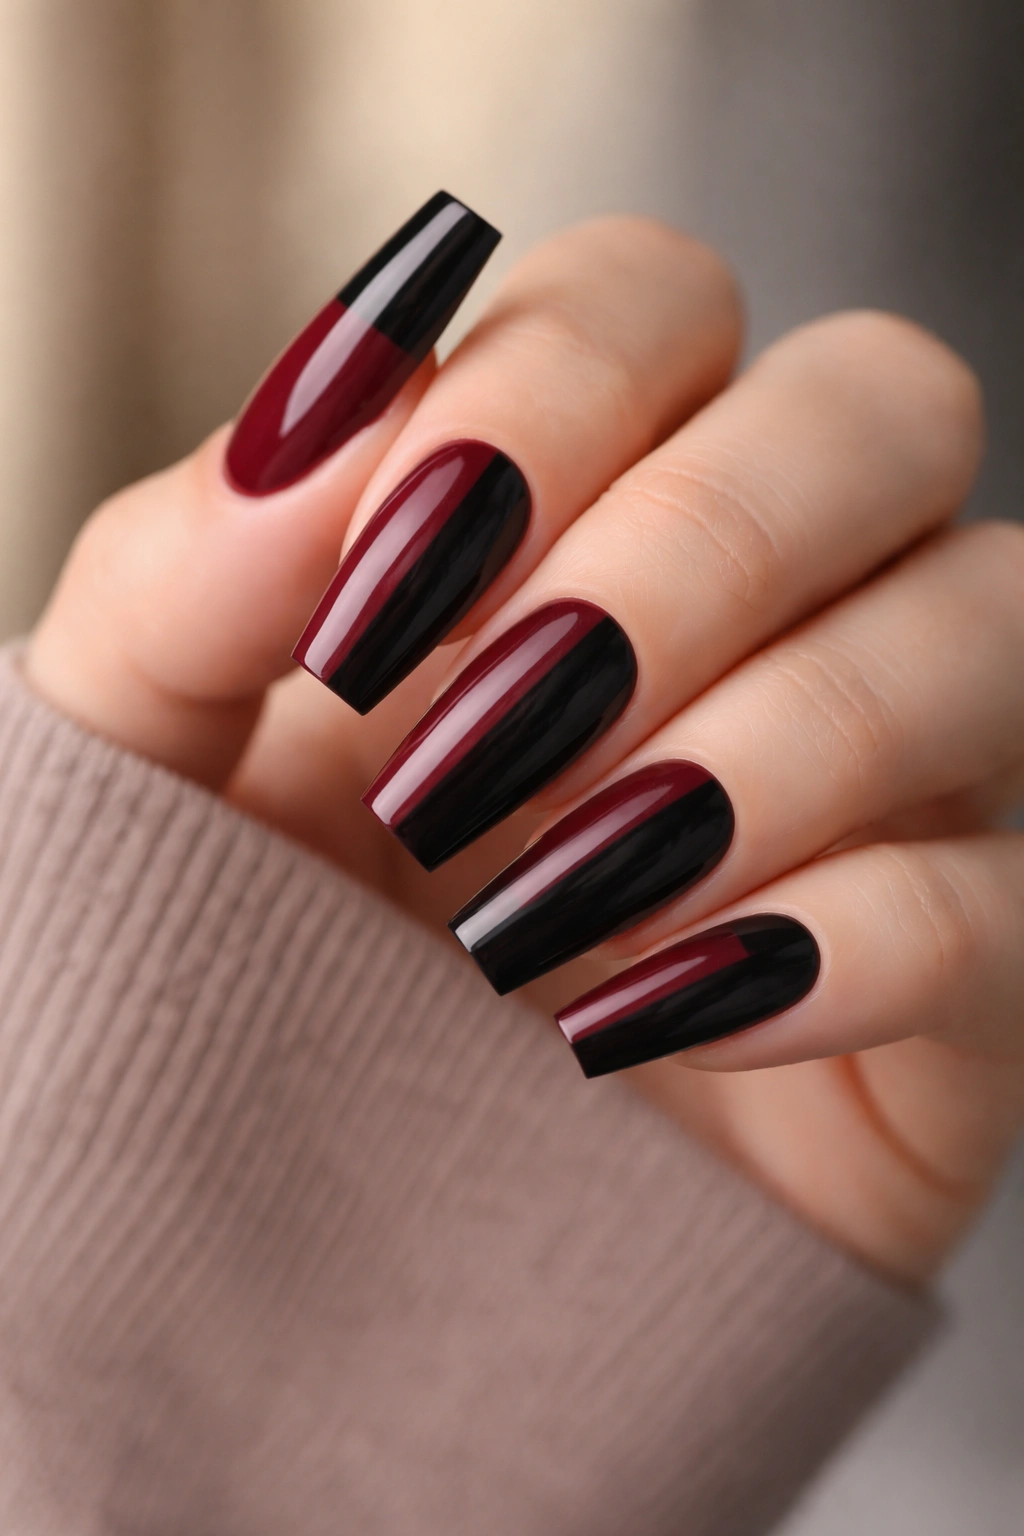
Color blocking—where two colors occupy distinct sections of the nail—is an architectural approach to nail design that’s inherently baddie. Burgundy and black together create maximum contrast and visual interest without relying on embellishments. Medium coffin nails give you enough space for the color blocks to be clearly visible and balanced.
Design Placement That Actually Works
The most flattering placement divides the nail vertically (left half burgundy, right half black), horizontally (tip burgundy, base black, or vice versa), or diagonally (a diagonal line creates more movement). Vertical splits read as the most balanced on coffin shapes. The sharp line between colors becomes the focal point—keep it perfectly straight for maximum baddie precision.
Achieving Clean Lines
- Apply your first color as a full base coat
- Use painter’s tape or specialized nail guides to create your dividing line
- Apply your second color carefully up to the tape line
- Remove the tape gently while the polish is still slightly wet for the cleanest edge
- Seal with top coat
Worth knowing: Slight imperfections in your line actually read as hand-made rather than cheap, which can elevate the design.
8. Glossy French Tips with Unexpected Accent Color
French tips are classic, but classic doesn’t mean boring when you make unexpected choices. Keeping the traditional white tip but switching the base from nude to a bold jewel tone, metallic, or even sheer black creates instant modernity. Medium coffin nails make French tips look elongated and elegant without the high-maintenance nightmare of extremely long nails.
Why This Update Works
French tips read as put-together and intentional, which is baddie at its core. The white tip remains recognizable, but the unexpected base color signals you’re not following the rulebook. The geometric simplicity of the design means your nails look polished even during busy weeks when you might not have time for intricate nail art.
Variations That Deliver
- Deep jewel-tone base (emerald, sapphire, amethyst) with white tip
- Sheer black or nude base that lets skin show through, with white tip
- Metallic or chrome base with white tip for maximum contrast
- Glossy base with matte white tip for textural interest
- Ombre base fading from deep color to nude, with white tip
Pro tip: Use a nail guide for perfectly straight French tips every single time—even the slight irregularity of hand-drawn tips can look intentional if you own it, but a guide removes the guesswork entirely.
9. Deep Plum with 3D Metallic Studs
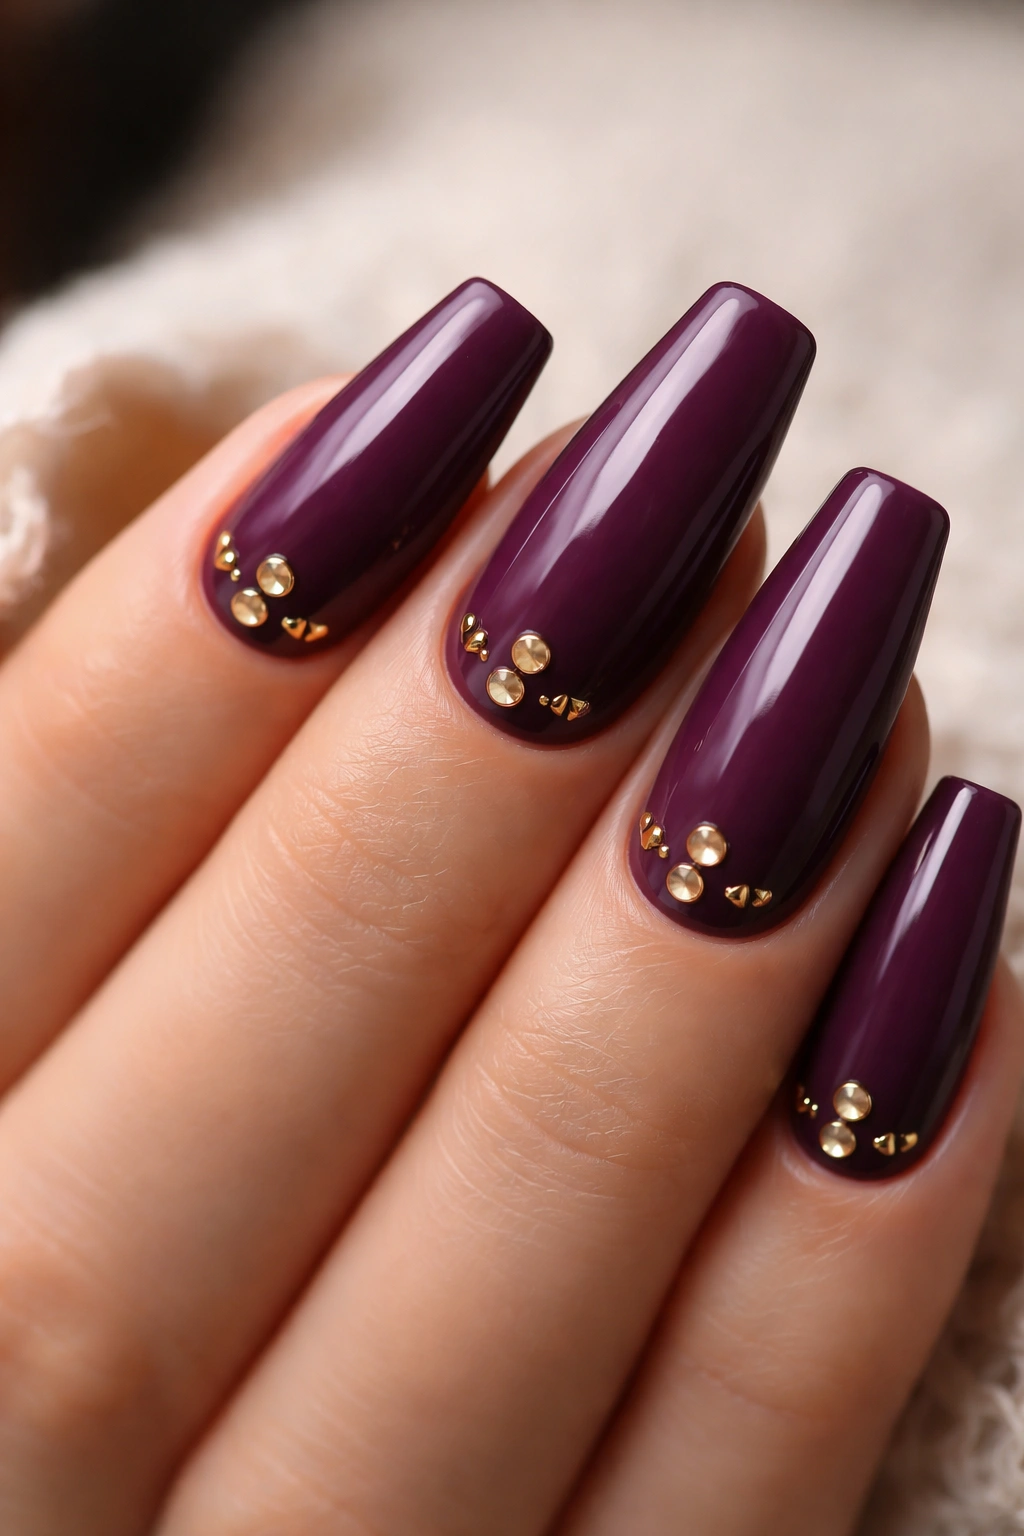
Three-dimensional elements on nails add tactile interest that flat designs simply can’t match. Tiny metallic studs in gold or silver on a deep plum base create a luxe, jewelry-adjacent vibe that reads as expensive and intentional. On medium coffin nails, 3D elements should be strategic and balanced rather than overwhelming.
Placement Strategy for 3D Elements
The most baddie approach is restraint. Instead of covering the nail with studs, place them in a specific pattern: a few clustered at the cuticle area, a diagonal line across the nail, or a single statement stud on the accent nail. This creates focal points that draw the eye rather than creating visual chaos.
Application and Durability
- Apply your plum base coat and seal it completely before adding studs
- Use tweezers to pick up pre-glued studs (they come with adhesive already on them)
- Place studs intentionally on the sealed base
- Once all studs are placed, apply a thick layer of gel or thick top coat to seal them securely
- Note: studs can snag on clothing or hair, so sizing matters—tiny studs pose less snagging risk than large ones
Insider note: Studs look best when they have contrast against your base color, so match metallics to complement your polish rather than match it exactly.
10. Minimalist Nude with Thin Black Line Art
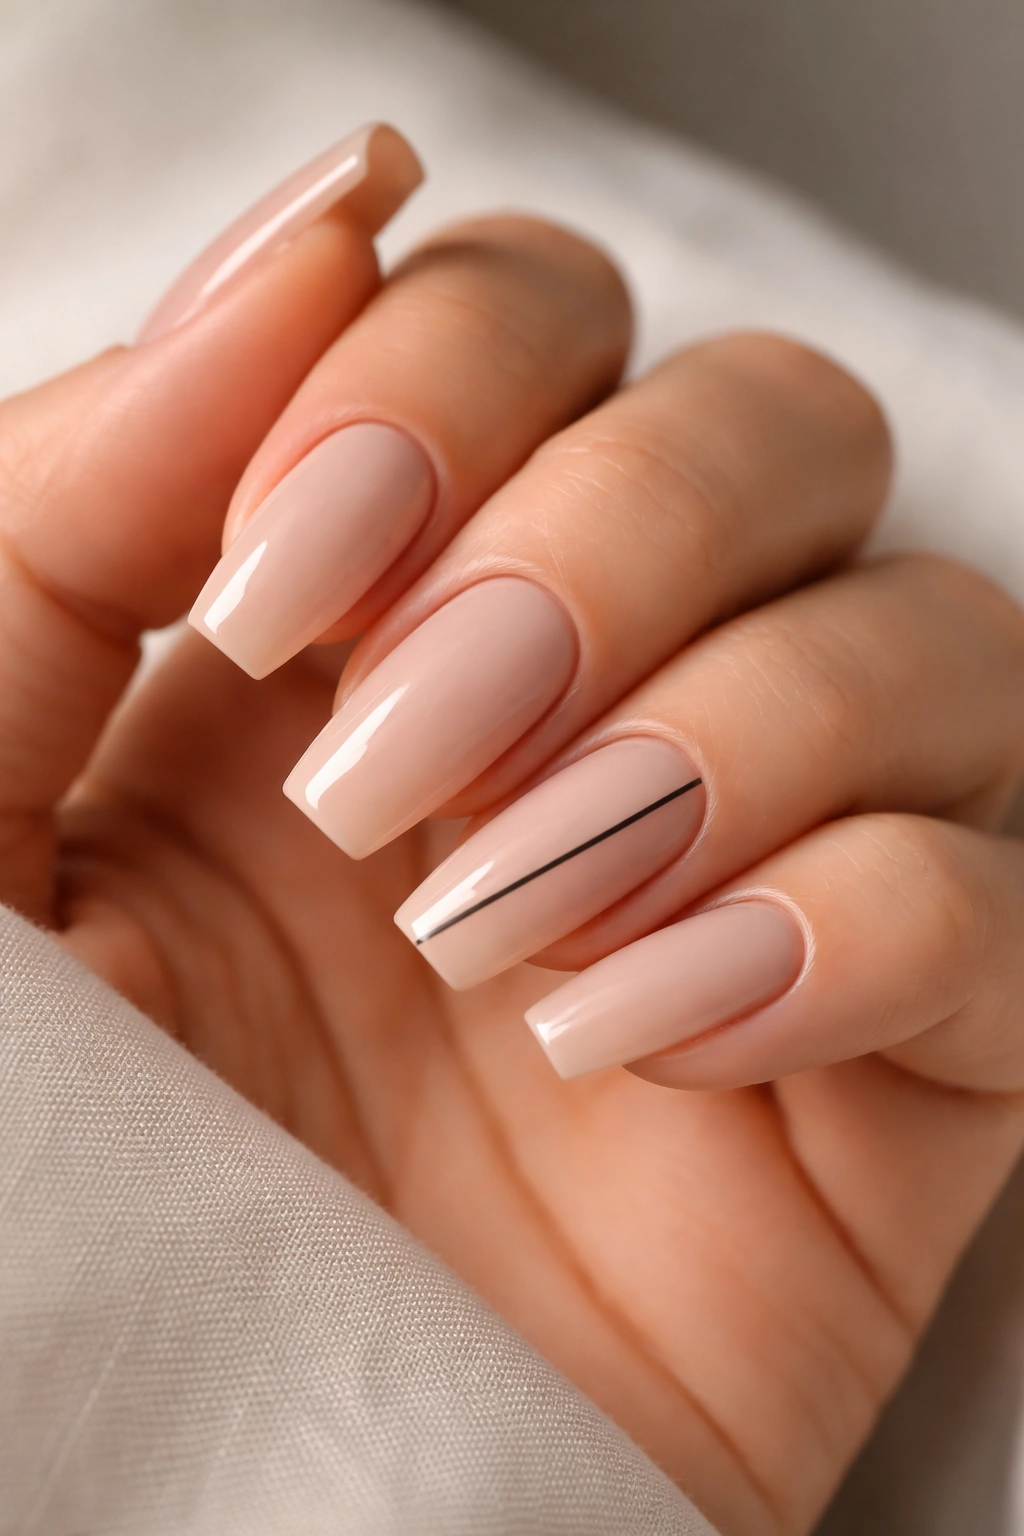
Sometimes baddie energy is about doing less, not more. Nude nails with a single element—a thin black line creating a simple geometric shape, abstract design, or symbolic mark—demonstrates the confidence of someone who doesn’t need to prove anything. The simplicity itself becomes the statement.
Why Minimalism Is Maximally Baddie
A single line drawn with intention and precision reads as artistic rather than unfinished. You’re showing technical skill through restraint. On medium coffin nails, a thin black line (perhaps a diagonal slash, a small rectangle, or an abstract shape) creates movement and interest without overwhelming the nail or your hands.
Execution for Flawless Results
- Choose a warm, medium, or cool-toned nude that flatters your skin tone
- Apply two coats for full opacity
- Using an extremely fine striping brush or nail pen, draw your design on one or two accent nails only
- Keep lines thin and intentional—practice on paper first if you’re nervous
- Seal with glossy top coat to protect your line work
Pro tip: A single thin line on your dominant hand’s ring finger draws attention exactly where you want it—to your hands when you gesture.
11. Forest Green with Glossy Top and Matte Base
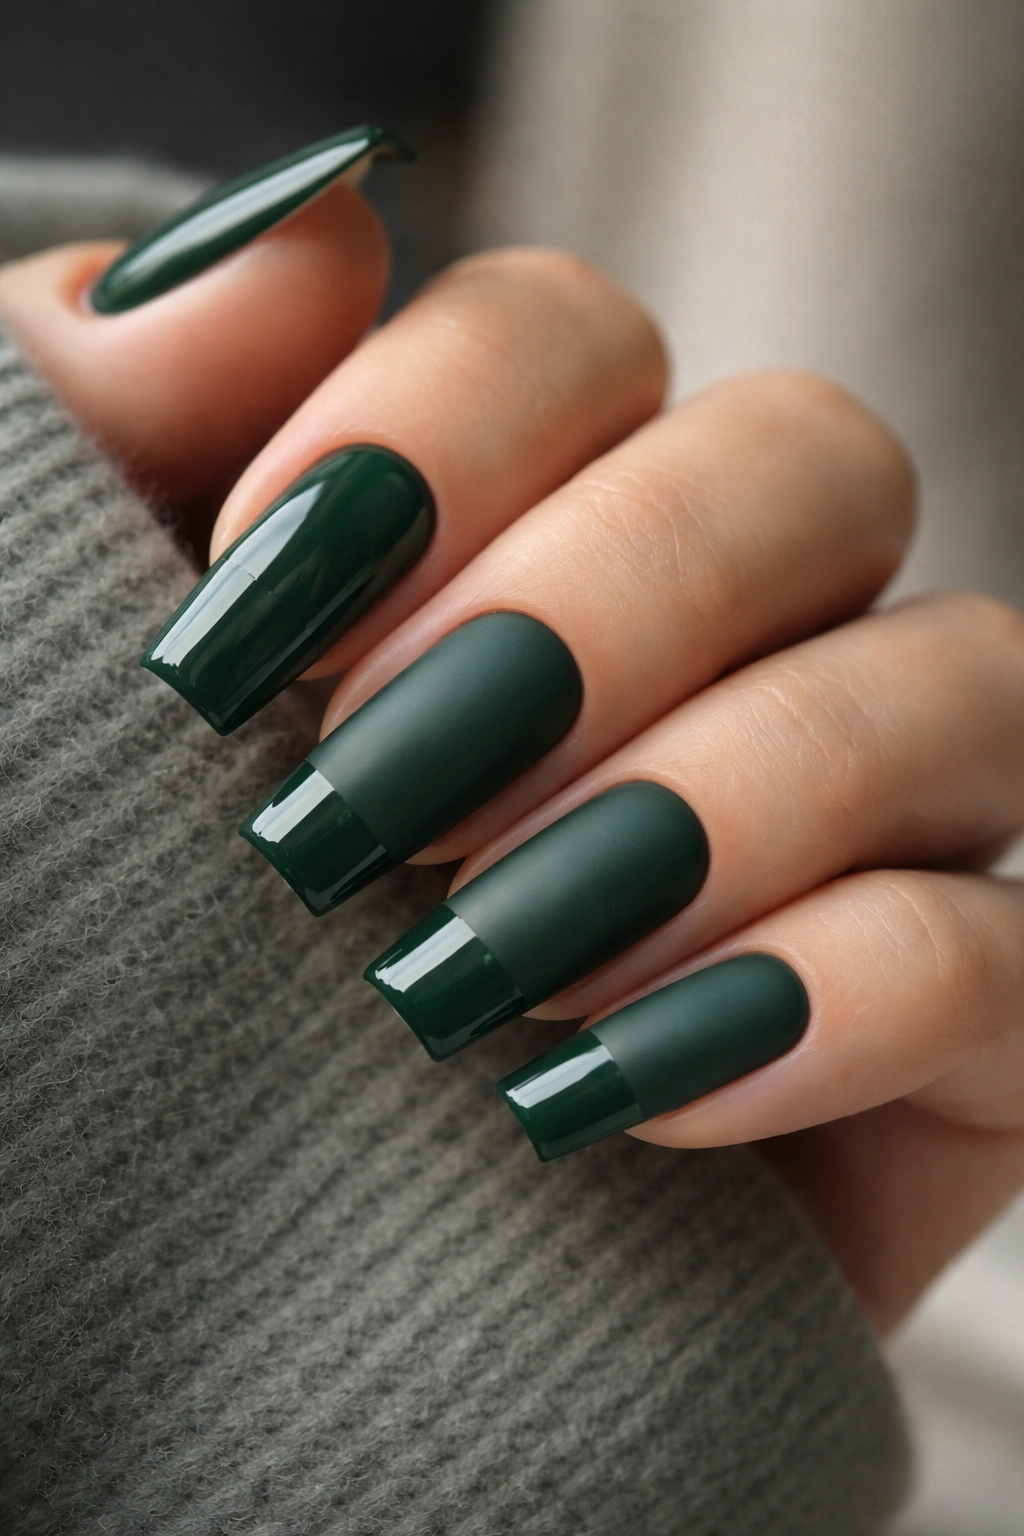
Playing with finishes—glossy on matte, or vice versa—creates textural interest without adding color complexity. A forest green base in matte finish with a glossy top coat creates an unexpected hybrid finish where glossy sections gleam while the rest stays matte. This can be applied to just the tip or in specific sections for dramatic effect.
The Textural Baddie Approach
Finishes create dimension on their own. You can achieve this by applying matte topcoat over glossy base and then using a glossy topcoat over just the tip section, or by using specialized matte and gloss gels. The visual effect is that certain parts of your nail catch light while others remain soft and muted—it’s subtle but undeniably sophisticated.
Two Methods for Different Effects
Method 1 (Tip Gloss): Apply matte forest green to entire nail, then seal with matte topcoat. Once dry, apply glossy topcoat only to the tip portion, creating a glossy-matte split.
Method 2 (Geometric Sections): Divide your nail into sections using tape. Apply matte finish to one section and glossy to another for a color-block effect with textural variation.
Insider note: The transition between matte and glossy is where the magic happens—keep it clean and purposeful.
12. Gradient Ombre from Burgundy to Gold
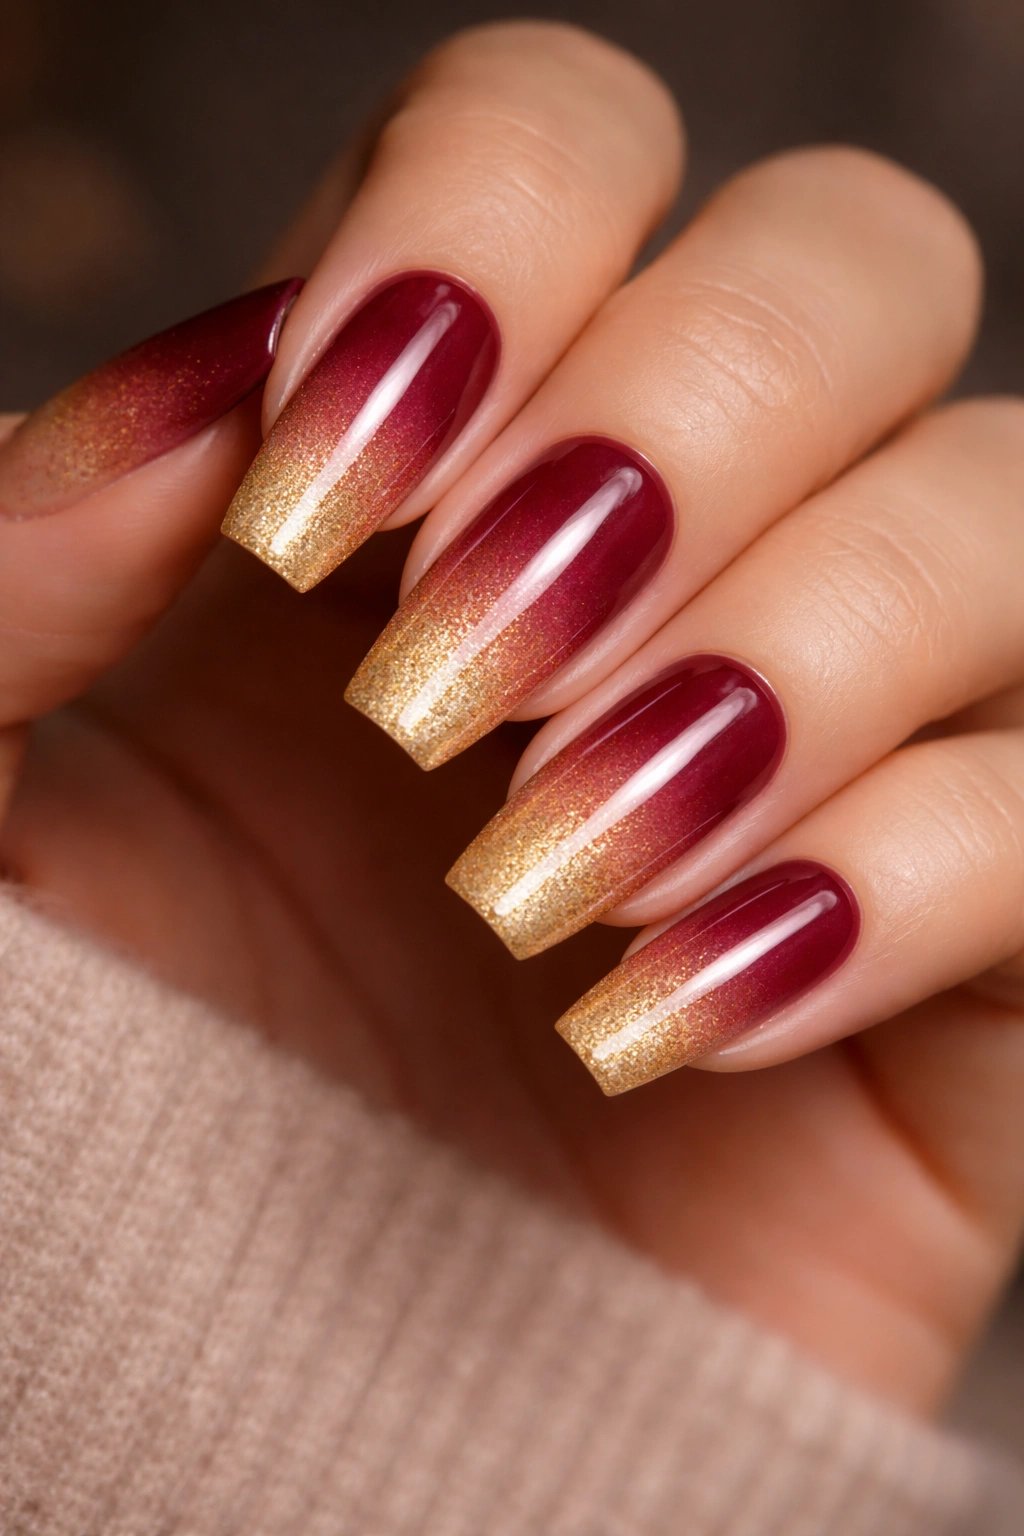
An ombre that transitions from a deep burgundy at the base to warm gold at the tip creates movement and warmth that reads as sophisticated and intentional. Unlike simple color blocking, an ombre suggests blending and careful color selection, which signals expertise. Medium coffin nails show off gradients beautifully because of the nail’s shape.
Why Ombre Works on Coffin Shape
Coffin nails have a naturally tapered shape that guides the eye from base to tip, making ombre gradients feel naturally directional. A burgundy-to-gold ombre follows that natural movement, creating a cohesive design rather than a random color choice. The warm undertones in both colors make them read as intentional companions rather than clashing choices.
Creating a Flawless Gradient
- Apply burgundy as your full base coat
- Create a mixture of gold and the burgundy shade to create a middle transition color
- Use a makeup sponge to apply the transition color to the middle third of the nail
- Apply pure gold to the tip section with your sponge, blending slightly into the transition zone
- Build depth gradually with multiple sponge applications
- Seal with glossy topcoat for a polished, blended appearance
Pro tip: Soak your sponge in alcohol between applications to prevent colors from getting muddy—it removes excess polish and keeps your blending clean.
13. Black Nails with Pearl or Iridescent Accents
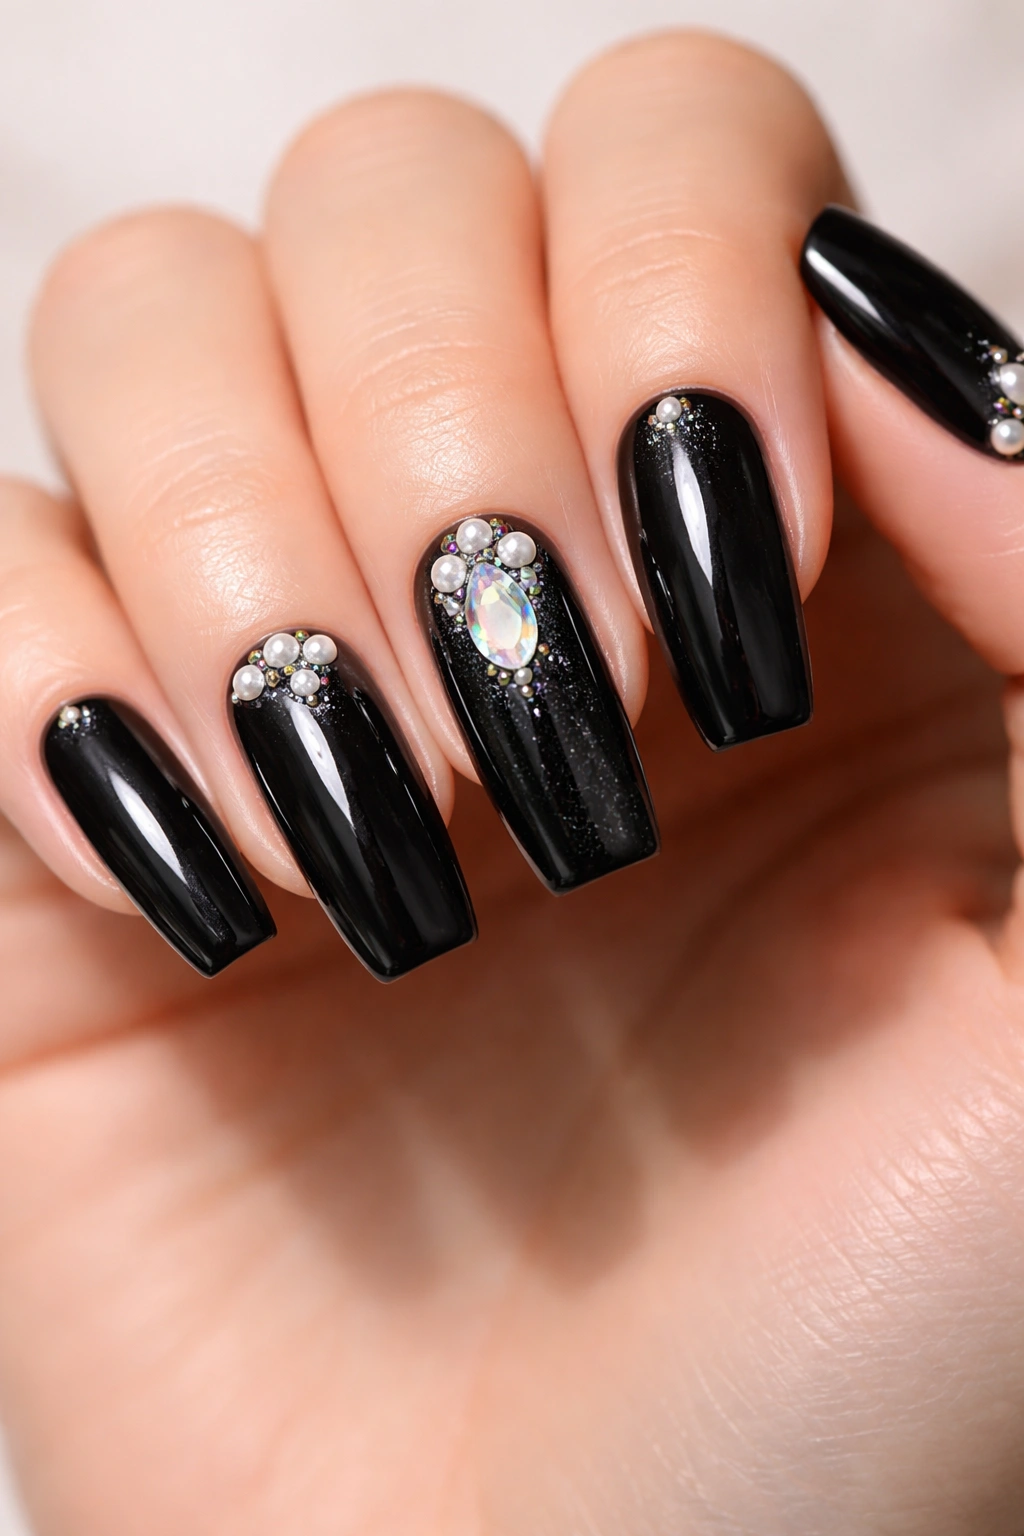
Black provides the perfect canvas for iridescent or pearl finishes, which shimmer differently depending on light and angle. These finishes read as expensive and intentional—they’re not glitter, they’re something more subtle and sophisticated. On medium coffins, they add visual interest without overwhelming the design.
Understanding Pearl and Iridescent Finishes
Pearl finish has a soft, almost-metallic quality that’s less reflective than chrome but more dimensional than solid color. Iridescent finishes shift color slightly as light hits them. Both work beautifully over black because the contrast makes them pop. You can apply them to entire nails or use them as an accent on one or two fingers.
Application Variations
- Full nail coverage: Apply pearl or iridescent topcoat over your entire black base for a cohesive, sophisticated look
- Accent nails: Apply pearl or iridescent topcoat to just your ring finger and pinky for balanced visual interest
- Tip accent: Apply pearl or iridescent topcoat only to the tip section, creating a two-tone effect
- Powder method: Use specialty pearl or iridescent powder pressed into a sticky topcoat for maximum shimmer
Worth knowing: Pearl finishes read more sophisticated and subtle, while iridescent finishes read more playful and colorful—choose based on the mood you want.
14. Emerald Green with Gold Geometric Nail Wraps
Nail wraps (thin adhesive designs that cover the entire nail) in emerald green with gold geometric patterns offer maximum design impact with minimal skill requirement. They come pre-made, so you’re not hand-drawing anything, but they read as custom and intentional. Medium coffin nails showcase wraps beautifully because of their broad nail bed.
Why Wraps Work for Medium Coffins
Nail wraps come in hundreds of designs, and coffin-shaped wraps are specifically made to fit your nail shape perfectly. You’re getting a professionally designed pattern applied to custom-shaped nails, which automatically reads as high-effort even though application is straightforward. Emerald and gold combinations are consistently popular because they feel both jewel-toned and luxe.
Application for Flawless Results
- Prep nails thoroughly—file into coffin shape, push back cuticles, buff the nail surface slightly for better adhesion
- Clean nails with rubbing alcohol to remove oils
- Select your wrap size carefully—too large and you have excess to trim, too small and you’re left with exposed nail
- Apply the wrap, smoothing from center outward to avoid air bubbles
- Trim excess wrap at the free edge and file smooth
- Seal with topcoat for durability
Pro tip: Nail wraps last longer when sealed with topcoat, and they’re easier to remove later with the protective barrier.
15. Matte Black Everything with Subtle Holographic Dusting
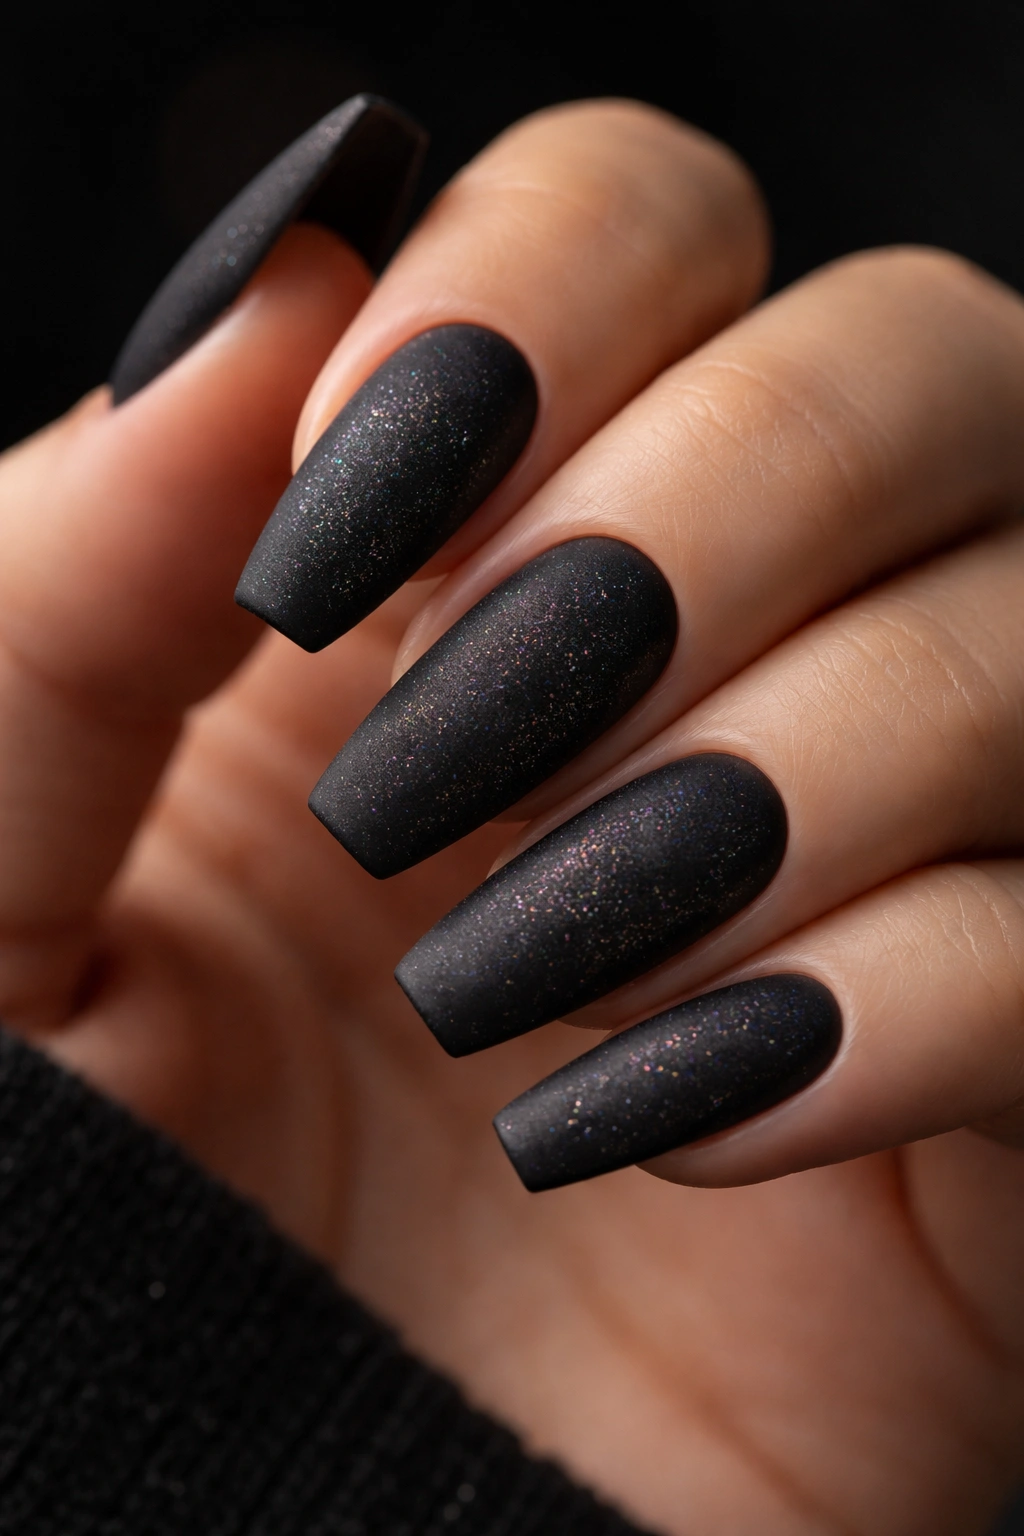
The ultimate baddie move is taking something already bold (matte black) and adding another unexpected layer (holographic dusting). This is confidence in visual form—you’re not compromising on darkness or boldness, but you’re adding secret sparkle that only appears at certain angles. It’s like having an inside joke with everyone looking at your nails.
The Psychology of Hidden Dimension
Holographic dust is best appreciated up close or in certain lighting—it’s not screaming for attention, but it’s absolutely there if you look carefully. This is the definition of baddie energy: you’re doing something bold for yourself, not for external validation. Medium coffin nails show off this effect beautifully because the broad nail bed catches light from multiple angles.
Creating the Perfect Finish
- Apply matte black as your base in whatever formula you prefer (gel or regular polish both work)
- Once fully set, lightly brush an ultra-fine holographic dust over the entire nail surface using a dedicated soft brush
- The dust will cling to the matte surface, creating an almost imperceptible shimmer
- Seal with matte topcoat to keep the holographic dust from smudging while maintaining the matte finish
- Alternatively, use a glossy topcoat if you want the holographic effect to be more visible
Insider note: Holographic dust is extremely fine and can be messy, so apply it in a dust-catching container or over a paper towel. The investment in proper application pays off because the effect is stunning and unexpected.
Final Thoughts
Medium coffin nails are the perfect length for bringing baddie energy into real life because they deliver on the promise of boldness without requiring you to compromise on practicality. You’re not limited to one aesthetic—you can go full minimalist one week, switch to 3D elements the next, and land on a simple gradient the week after. The shape flatters every hand, photographs beautifully, and feels confident without being aggressive.
The real secret to baddie nails is choosing designs that feel authentically you, not just copying what you see online. Whether that’s deep jewel tones, unexpected finishes, strategic minimalism, or layered techniques, the confidence comes from knowing why you chose what you chose. That intentionality is what transforms a manicure from pretty into absolutely unforgettable.
Your nails are with you constantly—they’re the first thing you notice when you’re thinking, typing, or gesturing. Investing in a design that makes you feel powerful, creative, and utterly yourself isn’t superficial. It’s a daily reminder that you’re someone who pays attention to details, makes intentional choices, and knows exactly what she wants. That’s the true definition of baddie energy.
