

Coffin nails are the ultimate canvas for gel designs—their elongated shape and tapered sides create natural geometry that makes every pattern, color, and finish look exponentially more sophisticated than it would on any other nail shape. The length gives you room to play with gradients without them looking cramped, while the width at the base supports intricate details that would get lost on shorter nails. Whether you’re drawn to minimalist elegance, bold statement designs, or anything in between, gel polish is the perfect medium because it locks in color intensity, creates flawless finishes, and actually makes intricate art easier to execute with precision.
The challenge isn’t whether coffin nails look good—they almost always do. The challenge is choosing which design direction to take when possibilities feel endless. That’s why we’ve pulled together twenty of the most striking, wearable, and technically achievable long coffin nail gel ideas that work for everything from everyday wear to special occasions. Each one is specific enough to inspire your next appointment but flexible enough that your nail artist can personalize it to match your skin tone, style, and preferences. Let’s dive in.
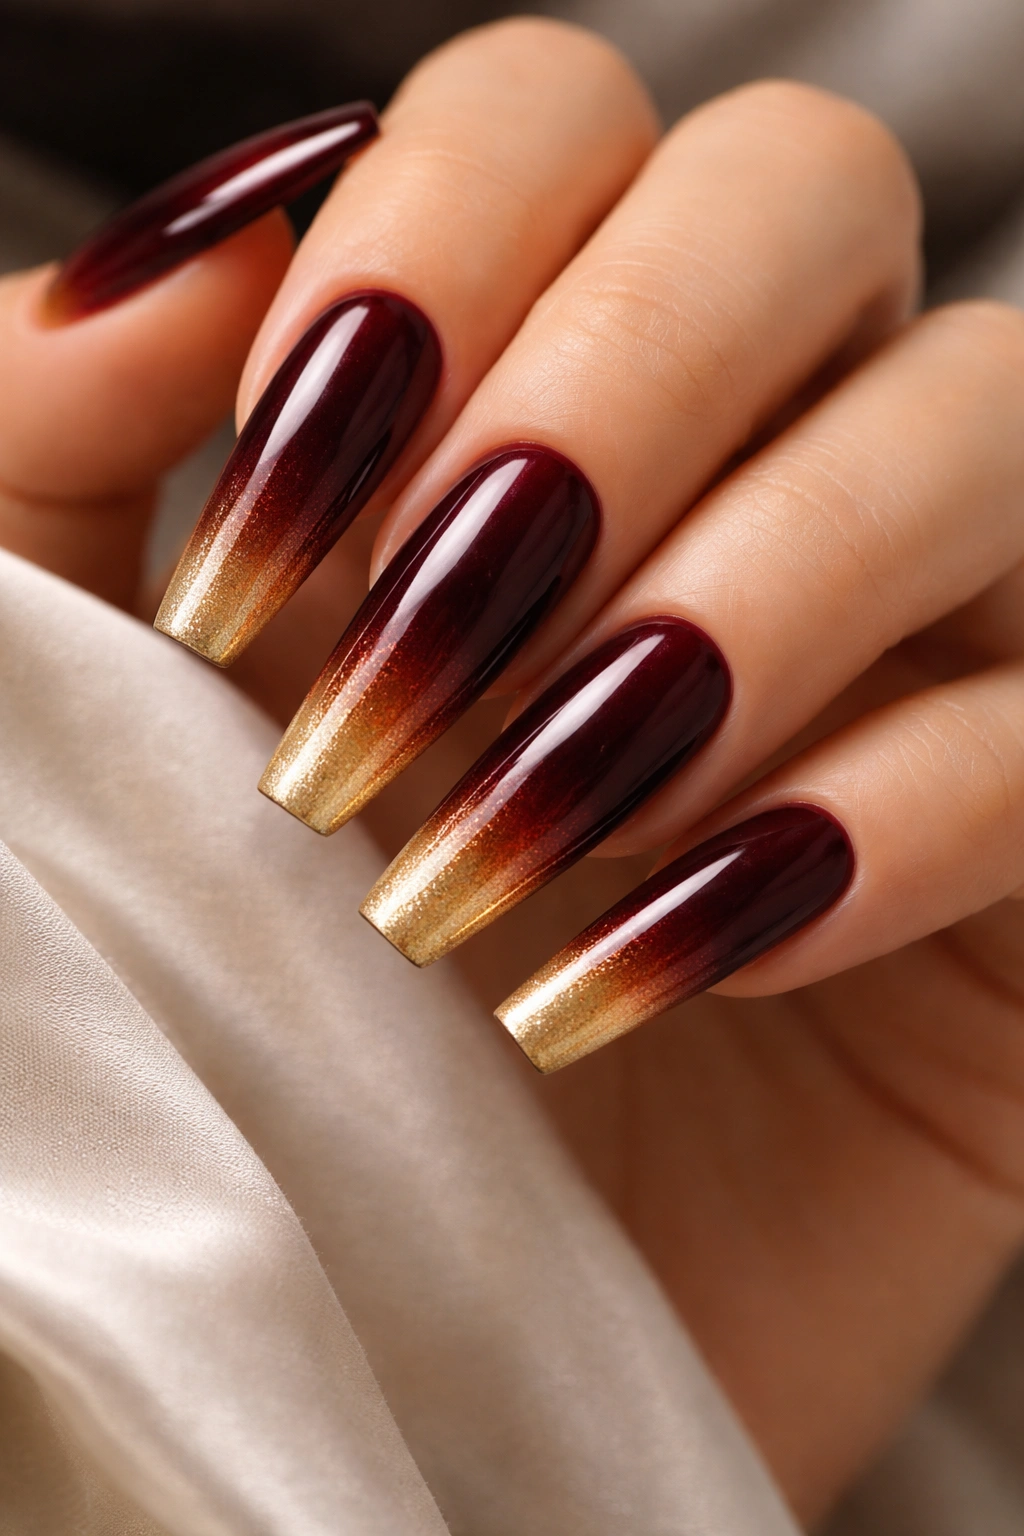
1. Deep Burgundy with Gold Ombre Fade
A rich burgundy that transitions to warm gold across the nail creates a design that feels both moody and luxurious at once. This works beautifully on coffin nails because the gradient has plenty of space to fade smoothly without looking rushed or unbalanced. The burgundy grounds the design with sophistication, while the gold fade catches light and adds dimension that makes your hands look expensive and intentional.
Why This Design Works on Coffin Nails
The tapered coffin shape naturally follows the direction of the ombre fade, guiding the eye from the darker burgundy at the nail bed to the golden tips. This creates visual movement that makes the design feel dynamic rather than static. The color combination reads as autumn-forward or elegant depending on how you style it, which gives you flexibility to wear it across seasons.
Pro Tips for Flawless Results
- Ask your technician to use a sponging technique (dabbing rather than brushing) to create a softer, more blended transition between burgundy and gold
- Apply a glossy top coat to enhance the shine and make the ombre effect more pronounced
- Keep the edges clean and crisp—coffin nails already command attention, so sharp lines make the design feel intentional
- This design pairs beautifully with warm-toned skin and jewelry featuring rose gold or yellow gold
Worth knowing: The burgundy-to-gold combination actually photographs beautifully in natural light and artificial lighting, which makes it ideal if you’re someone who spends time on camera.
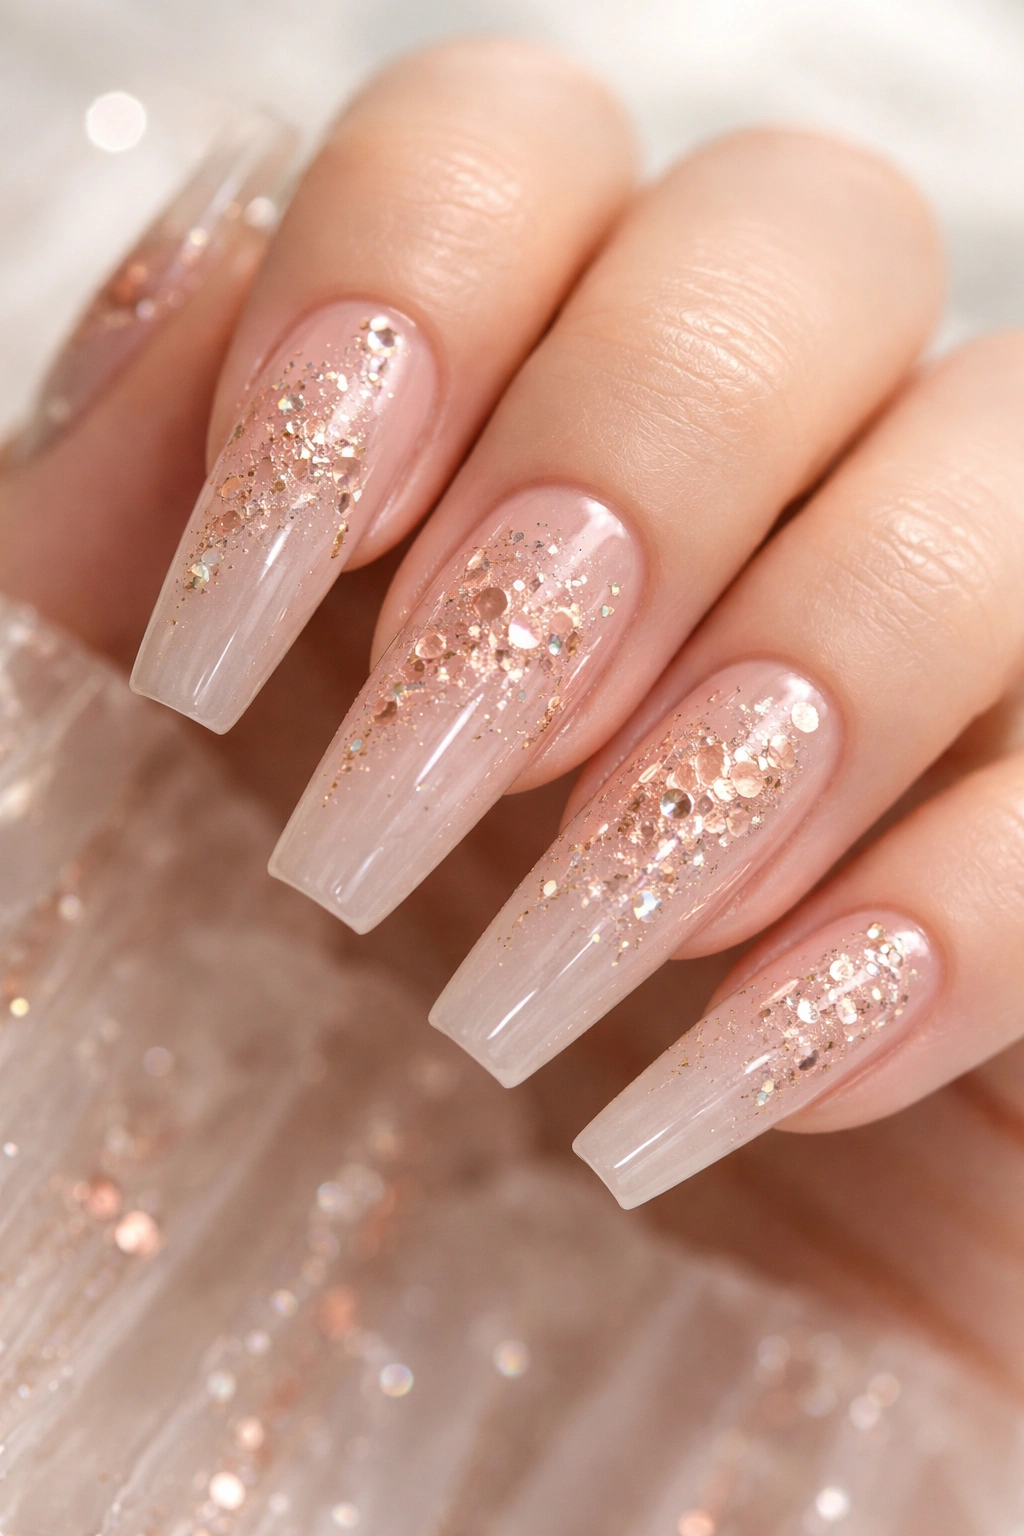
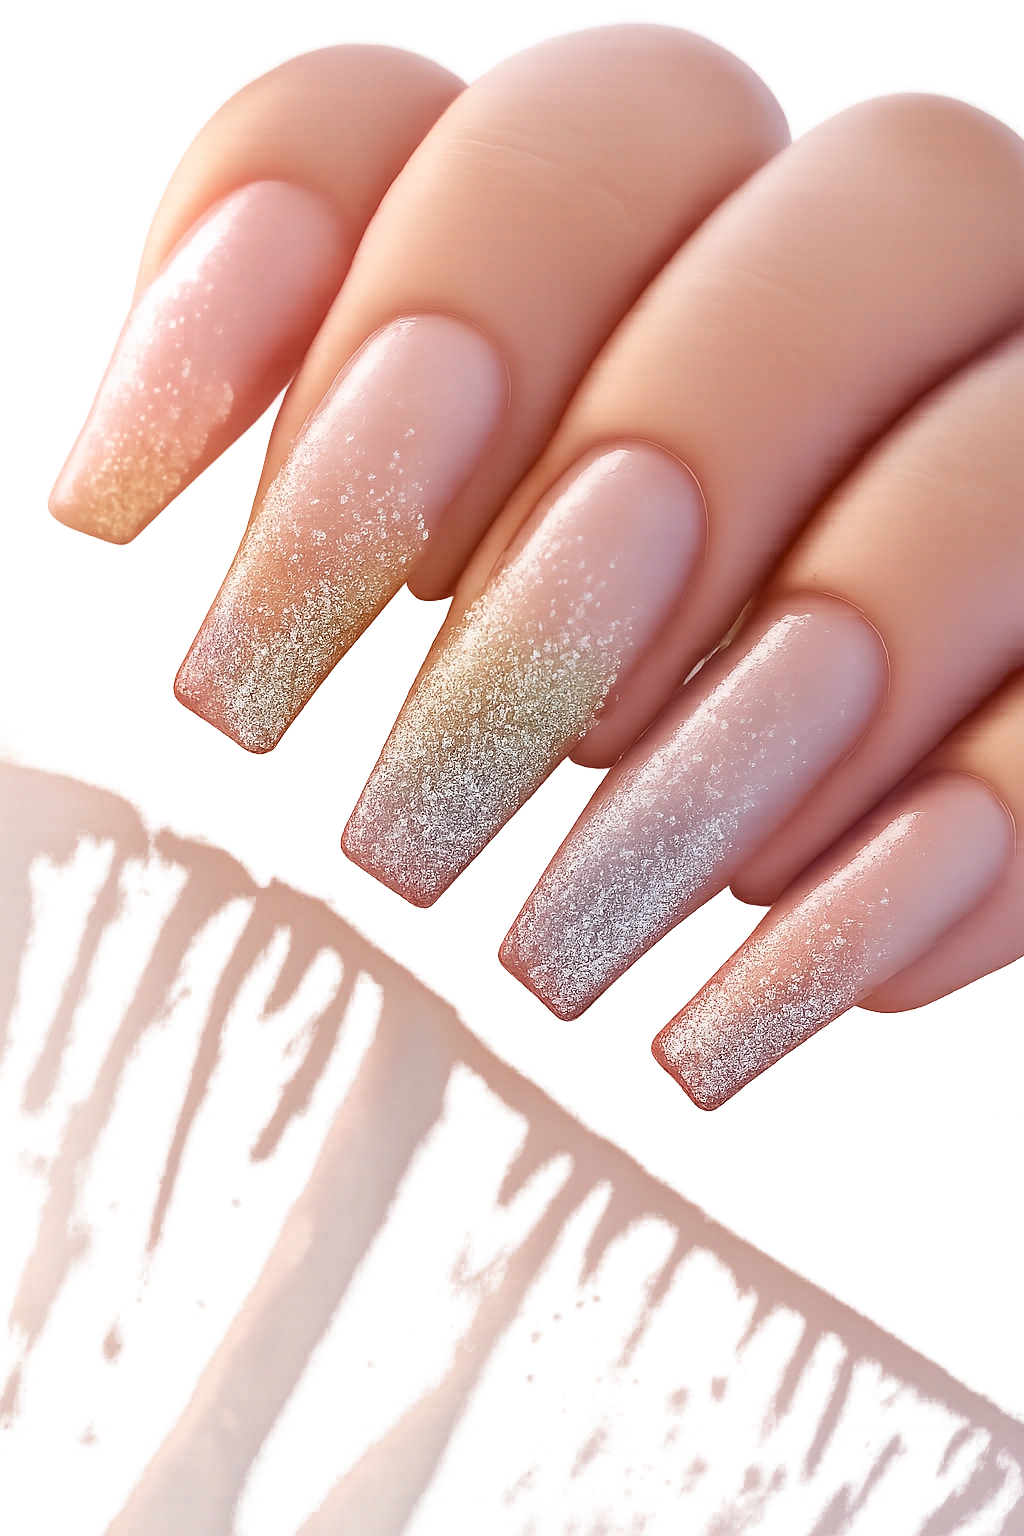
2. Holographic Glitter Gradient on Nude
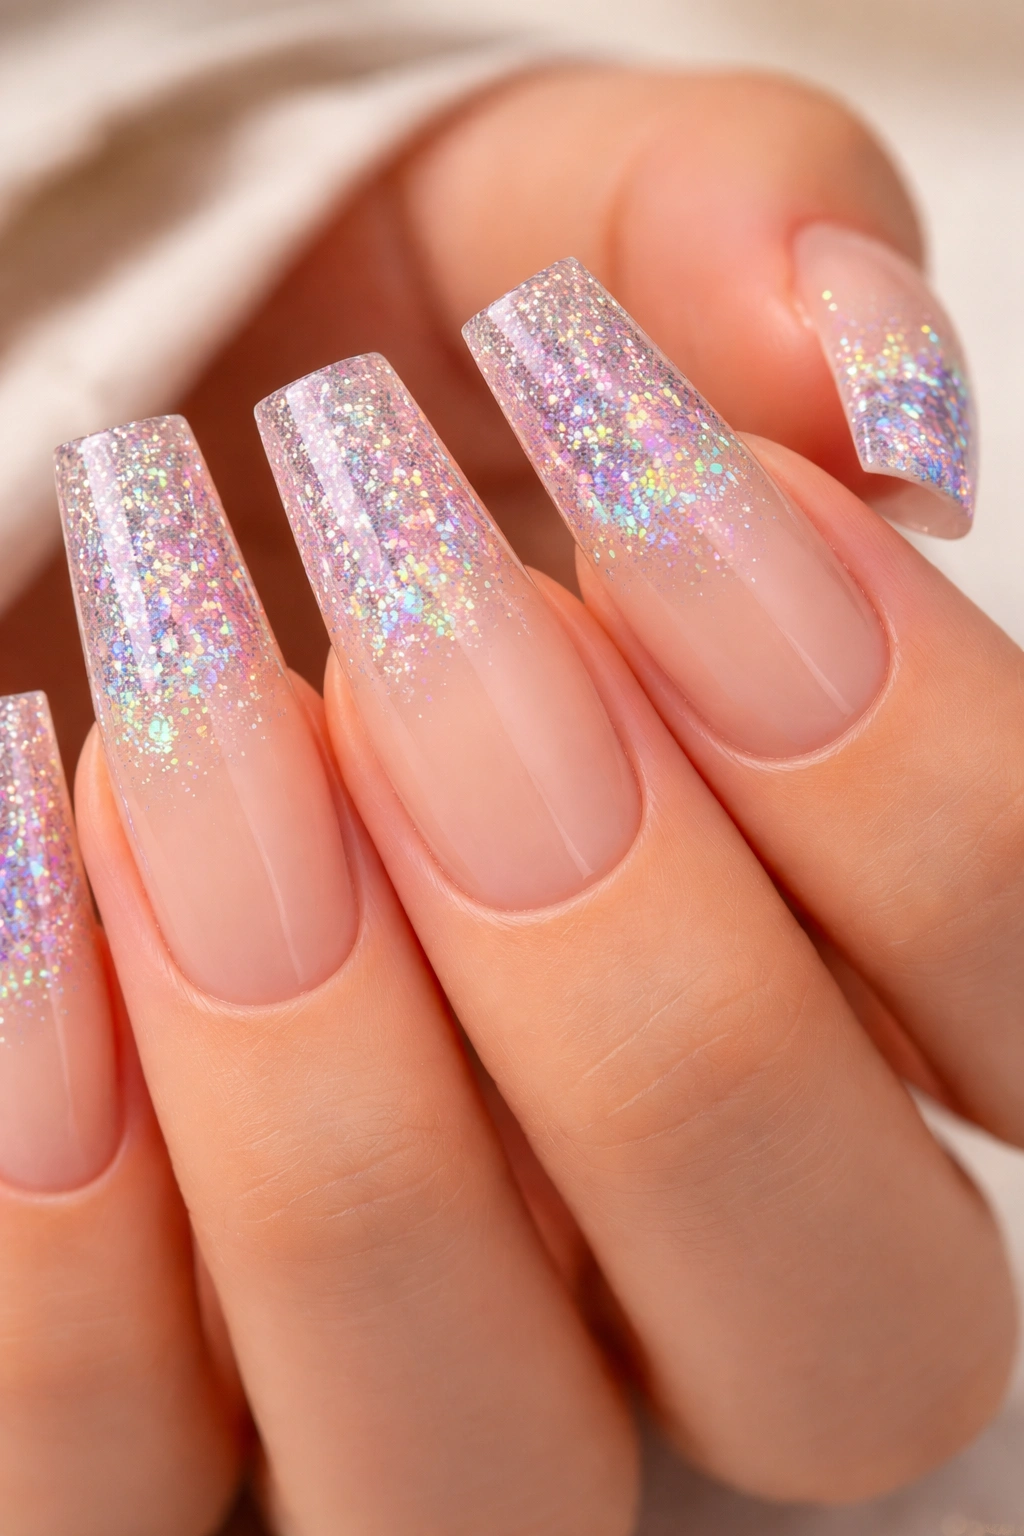
A soft nude base with progressively denser holographic glitter concentrating toward the tips creates an effect that’s subtle at the base and show-stopping at the tips. This design captures light in multiple colors—pink, green, blue, and purple all shift and shimmer as you move your hands. On coffin nails, the gradient has room to develop gradually, so it never looks like you just dumped glitter on the nails without intention.
The Technical Magic
Holographic glitter reflects light at different wavelengths depending on the angle, which means this design literally changes colors as you move. The nude base keeps the overall look wearable for work environments, while the glitter-forward tips give you that special-occasion sparkle without committing your entire nail to glitter (which can feel heavy and look dusty).
Execution Details to Discuss With Your Technician
- Request a gradient that concentrates glitter most densely in the last third of the nail (toward the tip)
- Use a top coat formulated for glitter to seal everything smoothly—cheaper top coats can feel gritty
- Apply a thin base layer of nude gel first, then layer glitter gradually using a wet brush (allowing the gel to stay slightly tacky helps glitter adhere evenly)
- Consider matte top coat on the nude portion and glossy on the glitter section for visual contrast
The coffin shape gives you enough nail real estate that you can see the full glitter gradient develop across the length, which makes this design particularly stunning.
3. Marble Effect in Black and White
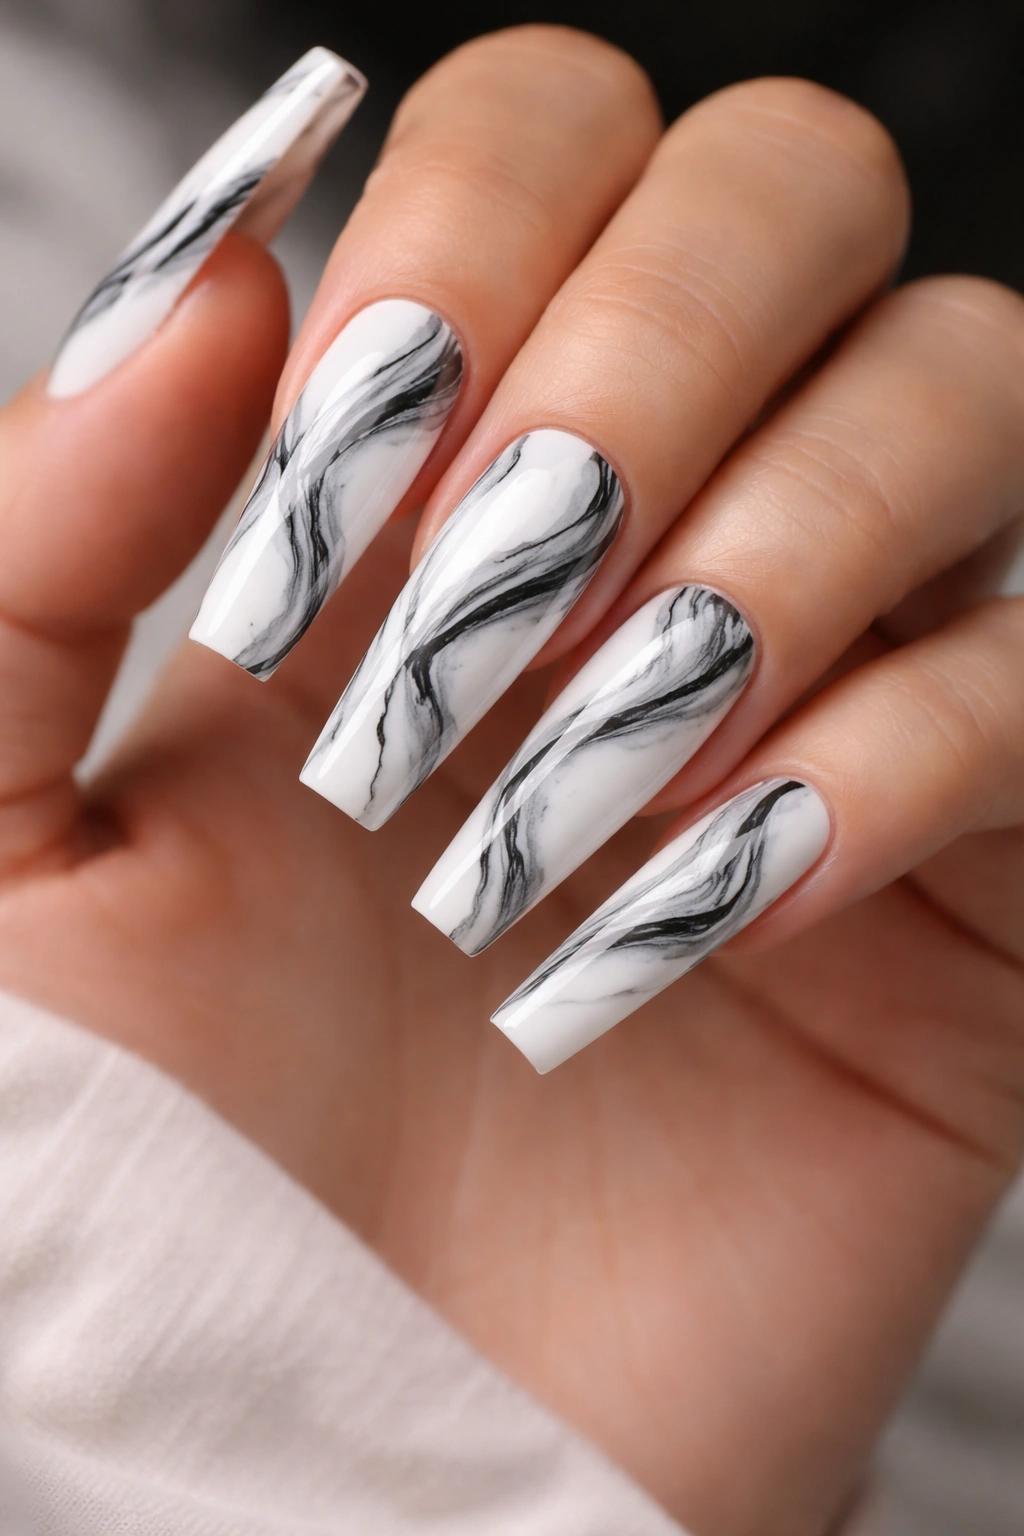
Swirled black and white marble creates an organic, artistic design that never looks the same twice—even if your technician recreates it, the pattern will have subtle variations that make it feel handcrafted and unique. The monochrome palette keeps the design elegant enough for professional settings while the marble technique adds visual interest and movement.
Why Marble Works on Coffin Nails
The coffin shape’s width gives marble patterns room to sprawl without looking compressed or chaotic. Each nail becomes a small piece of art, and because the shape is symmetrical, the marble effect reads as intentional rather than accidental. The elongated surface also means you can incorporate larger swirls and veining that would get lost on shorter nails.
How to Create or Request Marble Nails
- Your technician will apply white gel base, then drop thin lines of black gel across the wet white surface and use a thin brush or dotting tool to drag the black through the white in marble-like patterns
- The technique requires a steady hand and practice, so if you love this design, stick with a technician you trust
- Seal with high-shine top coat so the white pops and the black reads as intentionally dramatic rather than smudged
- Each nail should have a unique marble pattern—this is where the design truly shines
The black and white palette actually ages better than other marble color combinations because it’s timeless and won’t feel dated in six months.
4. Chrome Mirror Effect with Geometric Tips
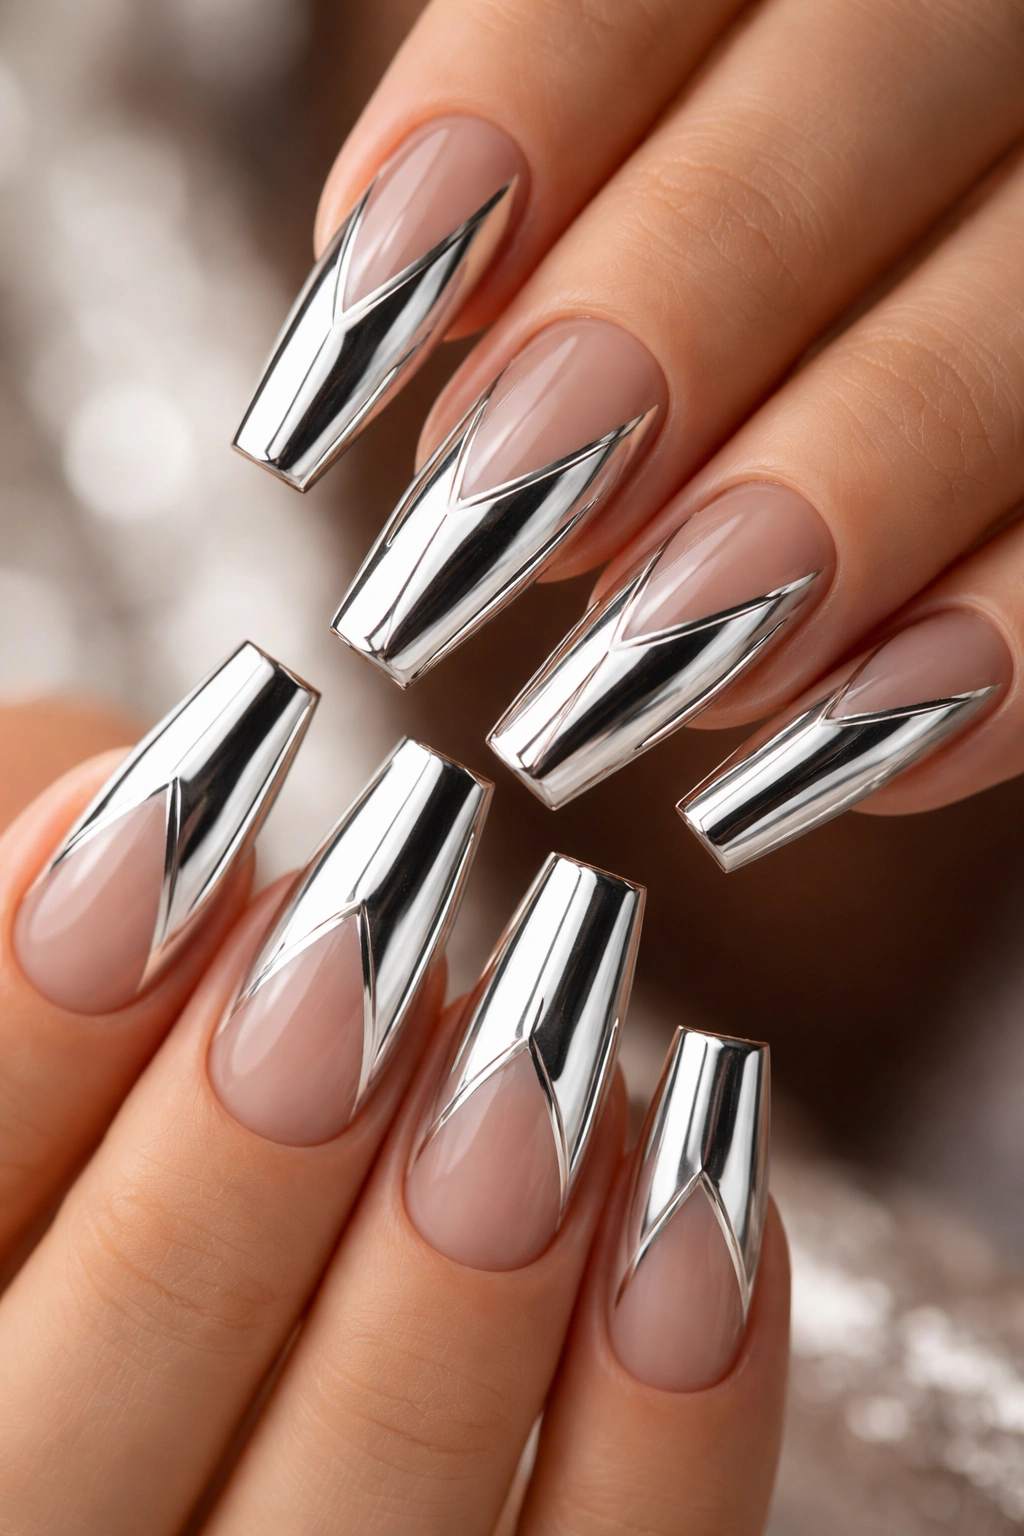
Mirror powder creates a liquid metal effect that shifts between silver, rose gold, and copper depending on the angle and light. Pairing this with geometric shapes—negative space triangles, sharp lines dividing the nail into sections—creates a high-fashion design that reads as editorial and intentional. Coffin nails are wide enough to showcase geometric shapes without them becoming a visual jumble.
The Chrome Technique Explained
Mirror powder (also called chrome powder or chrome effect powder) requires a specific application process: you apply a sticky base gel, press the finely milled powder onto the wet gel surface, then brush away excess powder and seal with top coat. The result is a reflective, almost holographic finish that looks nothing like regular nail polish. It’s genuinely striking in person, though photos often don’t capture just how dimensional it looks.
Design Combinations That Shine
- Try nude or soft pink base with chrome tips and a sharp geometric line dividing them
- Negative space (the natural nail showing through) creates high-contrast against chrome, making shapes pop
- Keep geometric patterns simple—one or two key lines rather than an overly complex design—because the chrome effect already commands visual attention
- Consider matte top coat on non-chrome sections to make the chrome sections even more reflective by comparison
The coffin nail length means you have room to incorporate multiple geometric elements without the design feeling cramped.
5. Blush Pink Ombre with Delicate White Florals

A gradient from pale blush at the tips to deeper mauve-pink at the base creates a soft, romantic foundation for tiny white florals—small flowers, stems, and leaves painted across the mid-nail area. This design reads as feminine and intentional without being overly cutesy, which makes it wearable for a wide range of occasions.
Why This Combination Works
The ombre creates color depth and interest on its own, while the florals add an artistic element that transforms it from simple gradient to designed piece. The white florals pop against the pink tones, and the delicate scale keeps the design feeling sophisticated rather than heavy. On coffin nails, you have enough surface area that the flowers don’t feel cramped.
Creating Florals That Look Professional
- Ask your technician to use a fine brush or toothpick for flowers, keeping each one small (roughly the size of a lentil)
- White works beautifully, but consider nude-pink or peach florals if you want them to blend more subtly
- Not every nail needs flowers—consider putting detailed flowers on just the ring and middle fingers, with florals hinted at on other nails
- The florals should look hand-painted, not stamped—there’s something about the slight imperfection that reads as intentional artistry
This design pairs beautifully with minimal jewelry and works across seasons because blush and mauve are universally flattering.
6. Deep Emerald Green with Gold Foil Accents
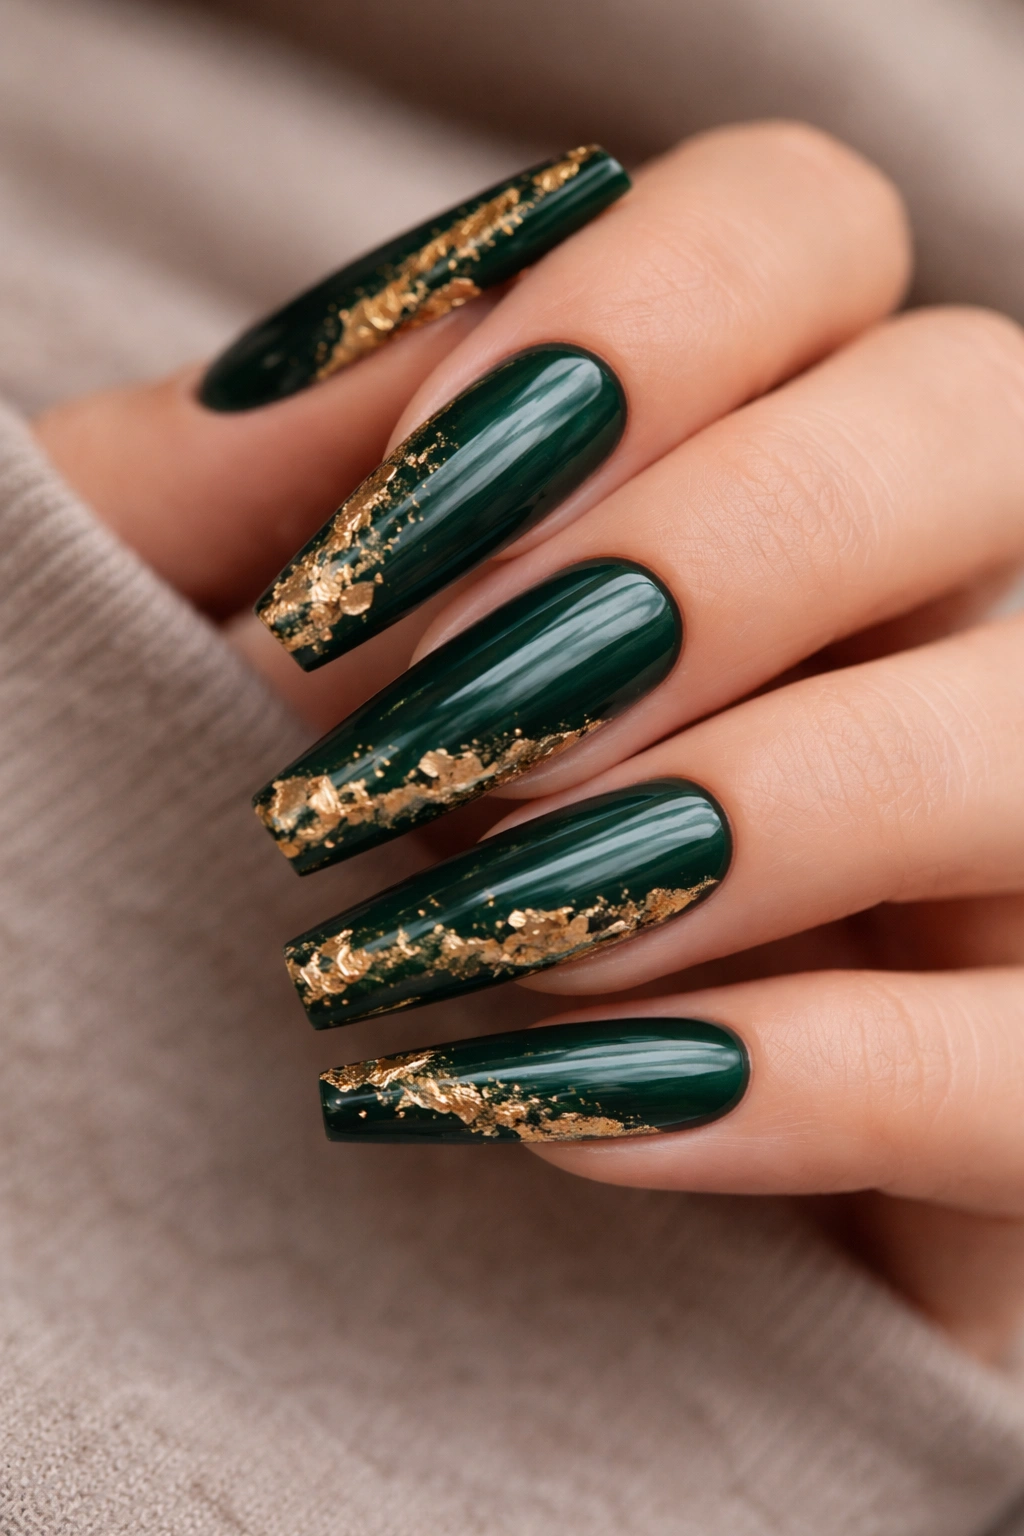
A rich, saturated emerald green base with actual gold foil pressed into the gel creates a design that feels jewel-toned and precious. Gold foil catches light and creates highlights that make the emerald appear even richer and more dimensional. This is a design for someone who isn’t afraid of color but wants it executed with sophistication.
The Gold Foil Application
Gold foil (also called leaf foil) is applied by pressing sheets of metallic foil onto slightly tacky gel before sealing with top coat. The foil adheres to the gel and creates a solid metallic finish that’s more refined than glitter. On coffin nails, you can use foil as a border, scattered accent, or concentrated on specific areas like tips or nail beds.
Design Placement Ideas
- Try foil running along the tip edge of each nail, creating a gold frame for the emerald
- Consider foil concentrated on just one or two accent nails (like ring and middle finger)
- Matte top coat on the emerald with glossy top coat on foil sections creates striking contrast
- This color combination reads as intentionally luxury without feeling costume-y
Emerald is a color that actually looks better on longer nails because the depth of the color fully develops across the surface. On short nails, it can read as too dark; on long coffin nails, it reads as sophisticated.
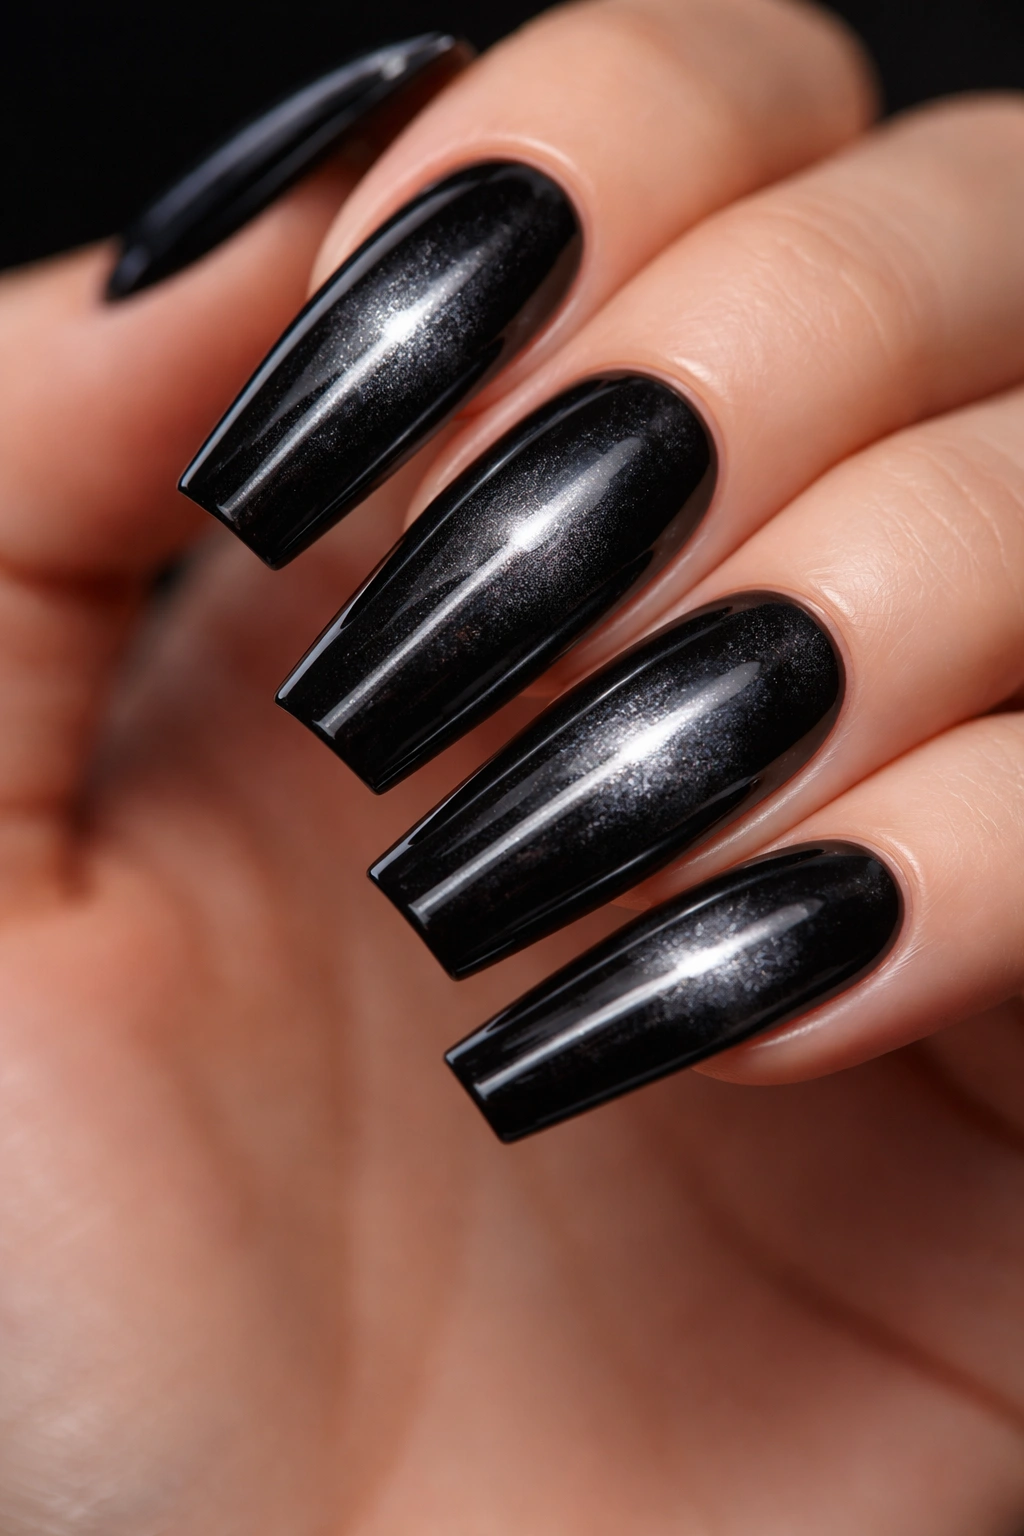
7. Matte Black with Scattered Rhinestones
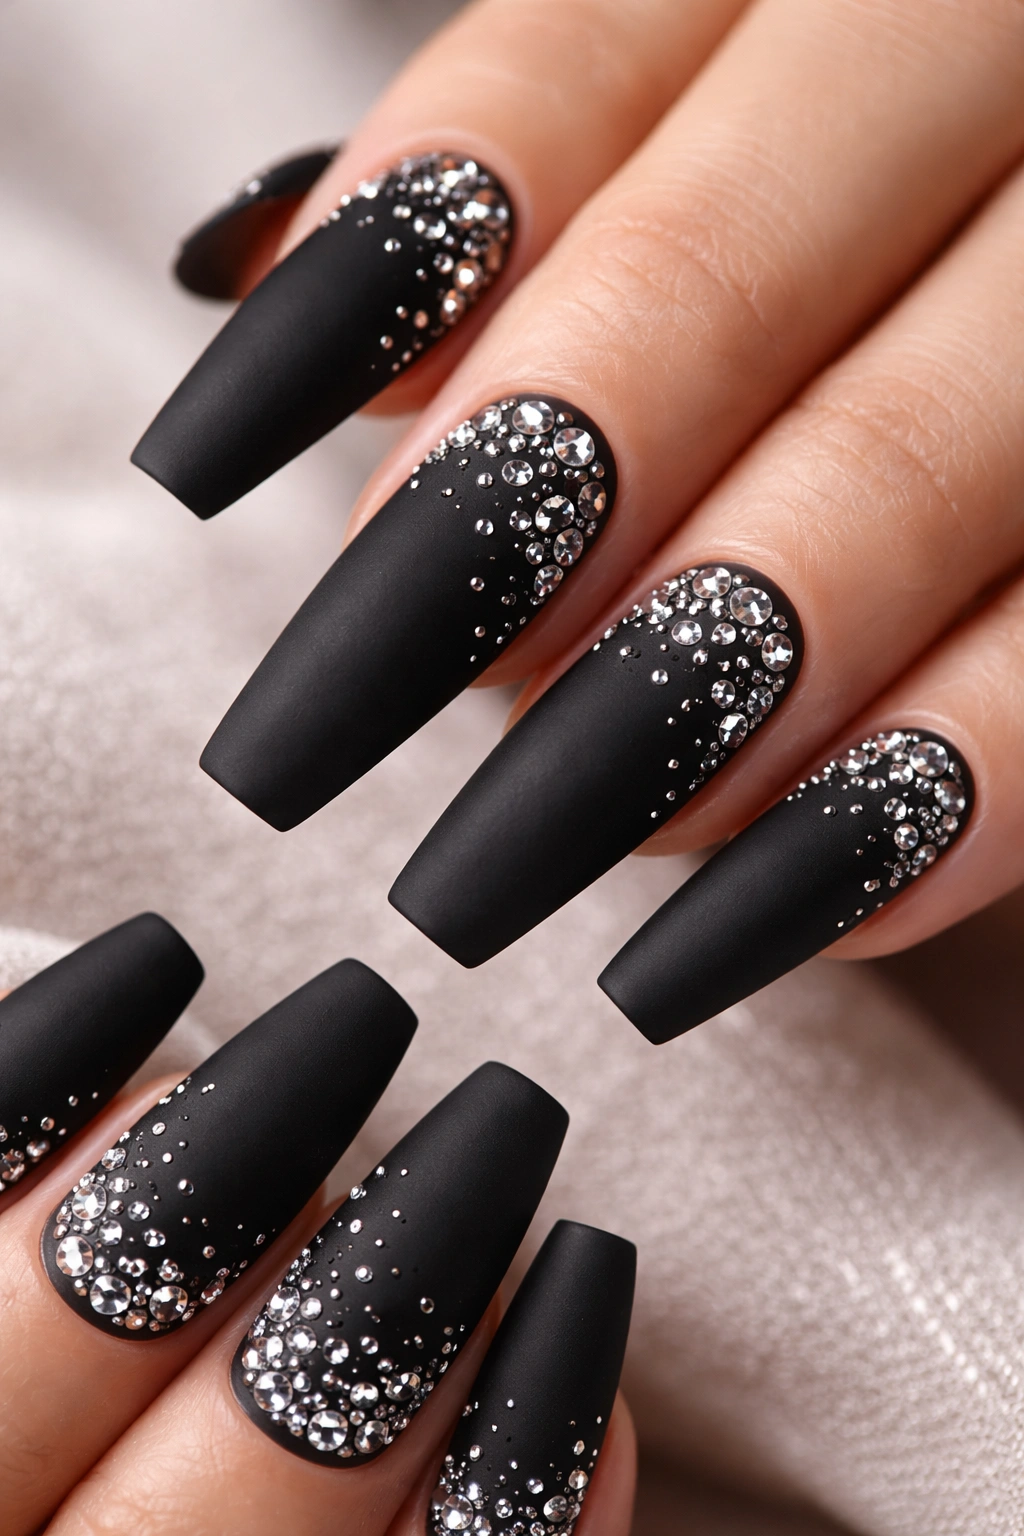
A velvety matte black base with rhinestones scattered across the nails—concentrated at the tips, dispersed along the nail bed, or clustered into specific patterns—creates glamorous drama. The matte finish makes the sparkle pop even more, because there’s no competing shine from a glossy top coat. This design works for night events, special occasions, or whenever you want to make a statement.
Rhinestone Application Technique
High-quality rhinestones (Swarovski crystals look exponentially better than cheap alternatives) are applied with a dedicated rhinestone picker tool or a toothpick dipped in a tiny drop of gel. Each stone is pressed onto the tacky matte gel surface, then sealed with a thick top coat. The top coat seals around each stone, preventing them from catching on clothing or falling off during daily wear.
Design Variations Worth Considering
- Try a gradient of rhinestones—densely clustered at tips, scattered down the nail bed
- Consider graduating rhinestone sizes, with larger stones at the tips and tiny stones sprinkled at the base
- You don’t need rhinestones on every nail—even two or three fully bedazzled accent nails surrounded by plain matte black creates impact
- The matte finish means this design doesn’t photograph with glare, making it perfect if you take a lot of photos
Black is one of the few colors where rhinestones truly pop, because there’s zero color competition. The contrast is stark and stunning.
8. Rose Gold Shimmer with Geometric Lines
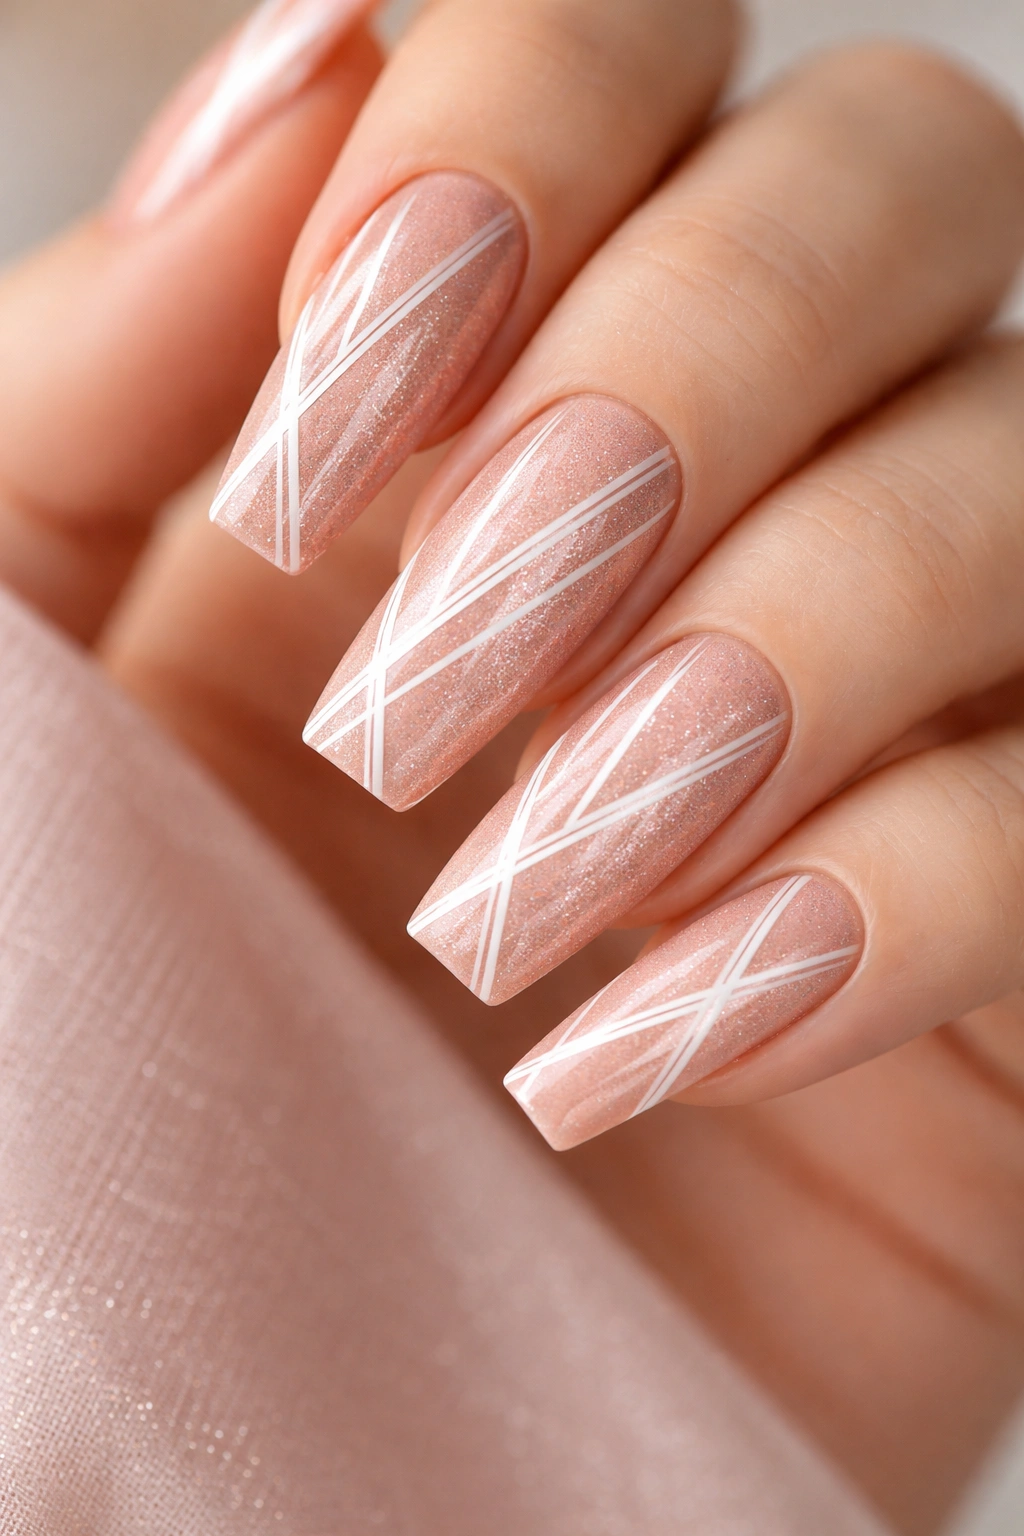
A warm, peachy rose gold base with fine geometric lines in white or nude create a design that’s modern and wearable. The shimmer in the base gives the design texture and movement without making it feel overly complex. Geometric lines—sharp angles, clean divisions, simple triangles or rectangles—keep the design feeling structured and intentional.
Why This Works as an Everyday Design
Rose gold is flattering on virtually every skin tone, and the shimmer reads as polished without being over-the-top. The geometric elements add interest without being busy, which makes this design perfect for workplaces where you want to look put-together but not like you’re trying too hard. On coffin nails, the geometric lines have plenty of room to develop without feeling cramped.
Geometric Pattern Ideas
- Try negative space triangles (where part of the nail is left as the natural nail or clear base, creating a triangle shape)
- Simple lines dividing each nail into clean sections
- Gradient of geometric shapes (triangles getting progressively smaller as you move down the nail)
- Keep lines clean and sharp—use tape to create perfectly straight edges if needed
Rose gold shimmer finishes actually hold up beautifully over time without looking dull or chipped as frequently as matte finishes.
9. Translucent Nude with Embedded Gold Leaf
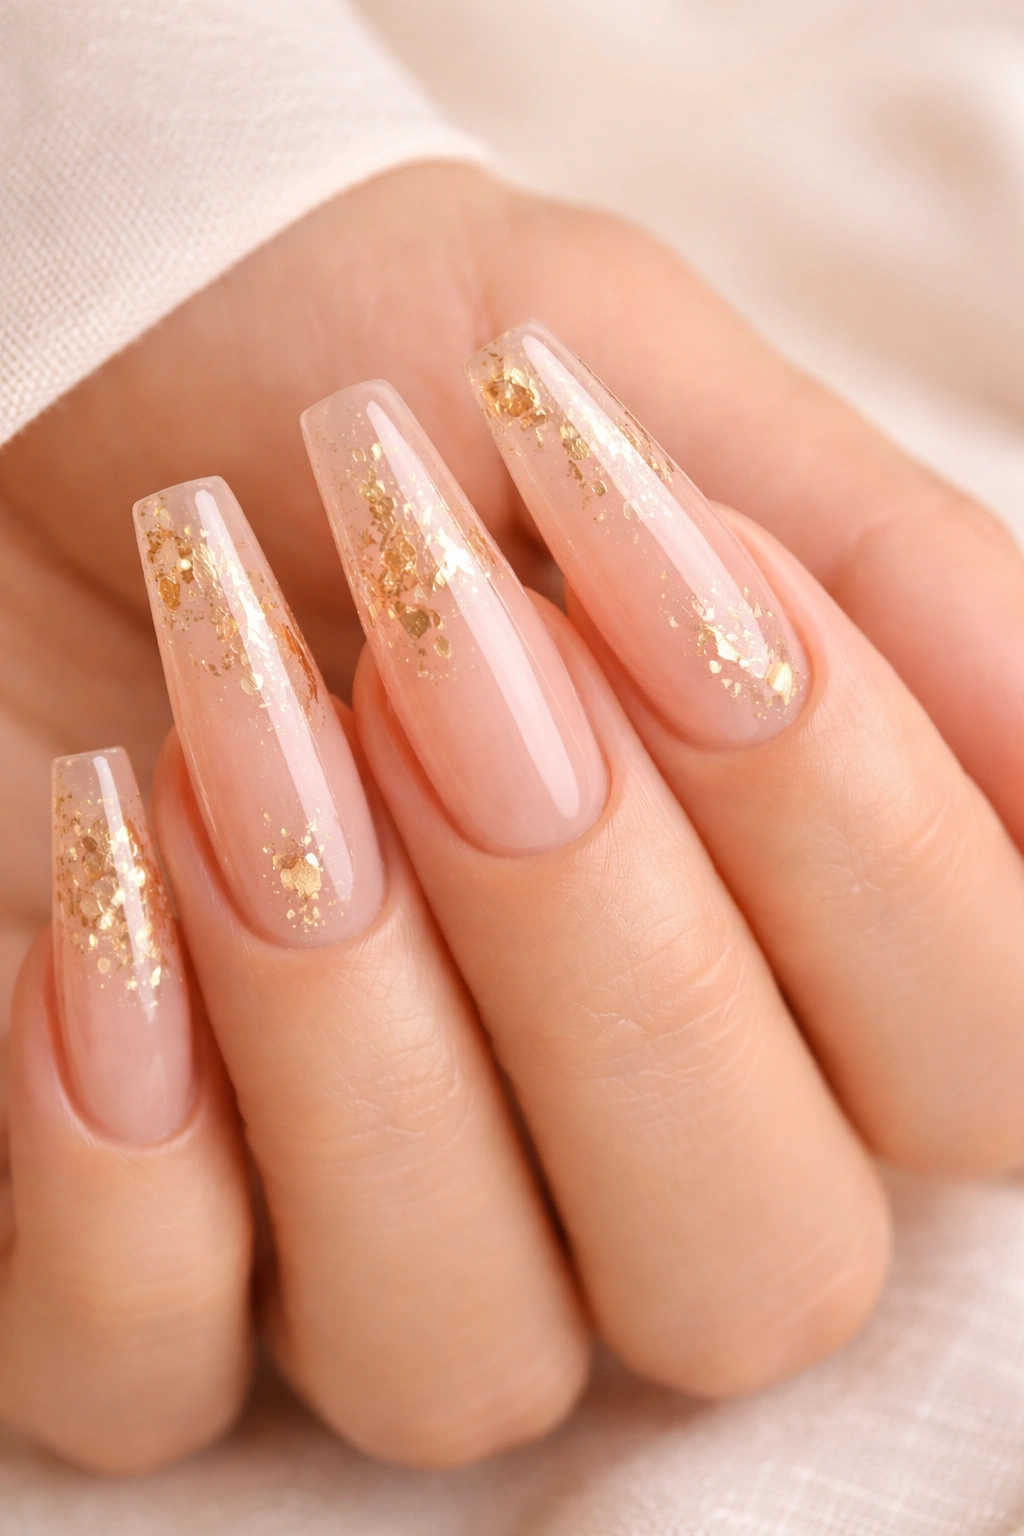
A sheer, translucent pink-nude base that lets your natural nail show through creates an ultra-delicate foundation for pressed gold leaf scattered throughout the design. The translucency creates sophistication—your nails still look like nails, just enhanced—while the gold leaf adds luxury and shimmer. This is elegance masquerading as simplicity.
The Translucent Technique
Translucent gel allows light to pass through it, so your natural nail color shows through the gel. This creates a “your skin but better” effect that feels natural and wearable. Gold leaf is then pressed onto the tacky translucent gel in sections or scattered throughout, creating dimension and luxury without being obviously bedazzled.
Application and Customization
- Work with a technician who understands translucent finishes—application temperature and top coat choice matter significantly
- Consider where to place leaf: concentrated at tips for an ombré effect, scattered naturally, or clustered into specific patterns
- The translucency means this design works beautifully even on longer nails without looking artificial
- This design actually works year-round because the effect is subtle rather than seasonal
Translucent nails age beautifully because as they grow out, the effect naturally fades without looking obviously grown-out. The gold leaf remains as an accent throughout.
10. Peachy Nude Ombre with Glitter Tips
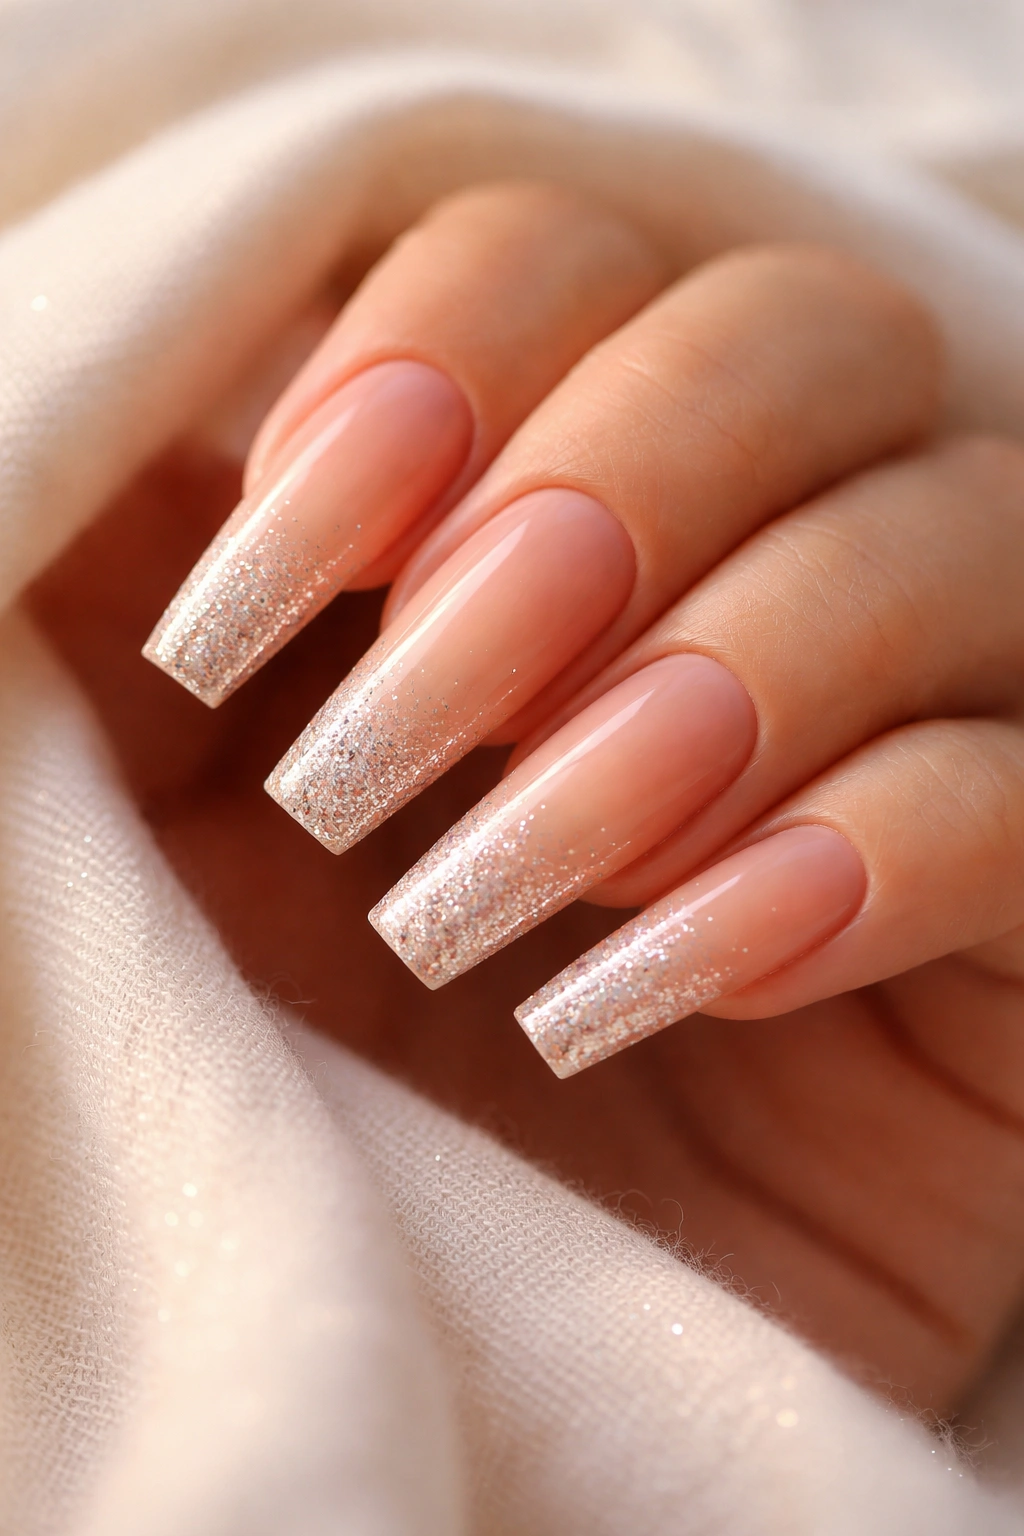
A gradient from peachy nude at the base to nude-pink at the middle, with progressively denser glitter concentrating at the tips, creates a design that’s romantic and sparkly without being overwhelming. The peachy tone is universally flattering, and the gradual transition to glitter feels intentional rather than abrupt. This works for everyday wear with just enough special-occasion shimmer to feel celebratory.
The Ombre-to-Glitter Transition
Your technician will apply peachy nude at the base, create an ombre transition through the middle nail, then layer increasingly dense glitter across the last third of the nail. The gradient itself does the visual heavy lifting, while the glitter becomes the exclamation point at the tips. This structure means you’re never overwhelmed by glitter.
Executing This Design Beautifully
- Request a gradual, blended ombre rather than a sharp color transition—you want it to feel soft and intentional
- Use fine glitter or a specialized nail glitter formula that doesn’t feel gritty when you run your fingers across the nails
- Consider nude-toned glitter for a cohesive look, or bright glitter for more contrast
- A glossy top coat intensifies both the ombre gradient and the glitter sparkle
The coffin nail length means the ombre transition has room to develop gradually, which is what makes this design feel sophisticated rather than rushed.
11. Navy Blue with White Ombré Tips
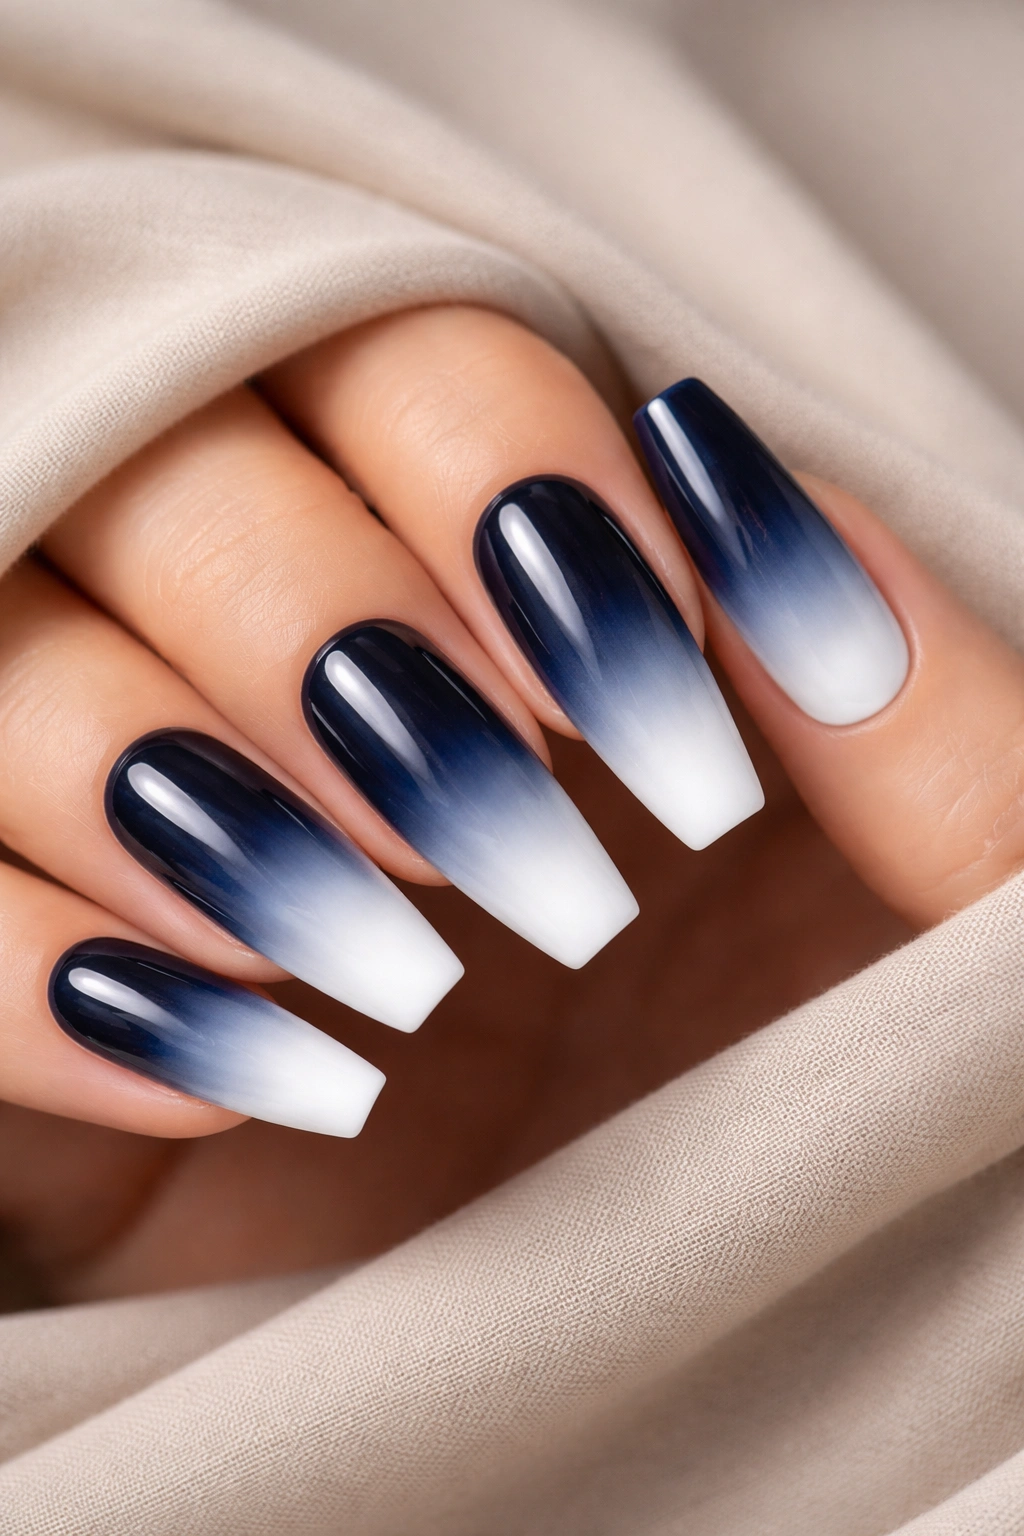
Deep navy blue at the base transitioning to white at the tips creates a sophisticated color gradient that reads as modern and intentional. The navy-to-white transition is striking without being trendy, which means this design will photograph beautifully and never feel dated. On coffin nails, the gradient has room to develop with a smooth, blended transition.
Why Navy-to-White Works Year-Round
Navy is universally flattering and sophisticated—it works with virtually every style and occasion. The white tips create sharpness and definition, making your nails look crisp and intentional. This color combination reads as both professional and polished without feeling like you’re trying too hard.
Technical Considerations
- A sponging technique creates the smoothest gradient, so work with a technician skilled in sponge application
- Keep the white at the tips clean and defined—sharp lines between navy and white create higher impact
- Consider a matte top coat for an ultra-modern finish, or glossy for more traditional shine
- This design photographs beautifully in both natural and artificial light
The coffin shape naturally leads the eye down from navy to white, following the shape of your nail, which makes the design feel structured and intentional.
12. Blush Pink with Fine Gold Striping
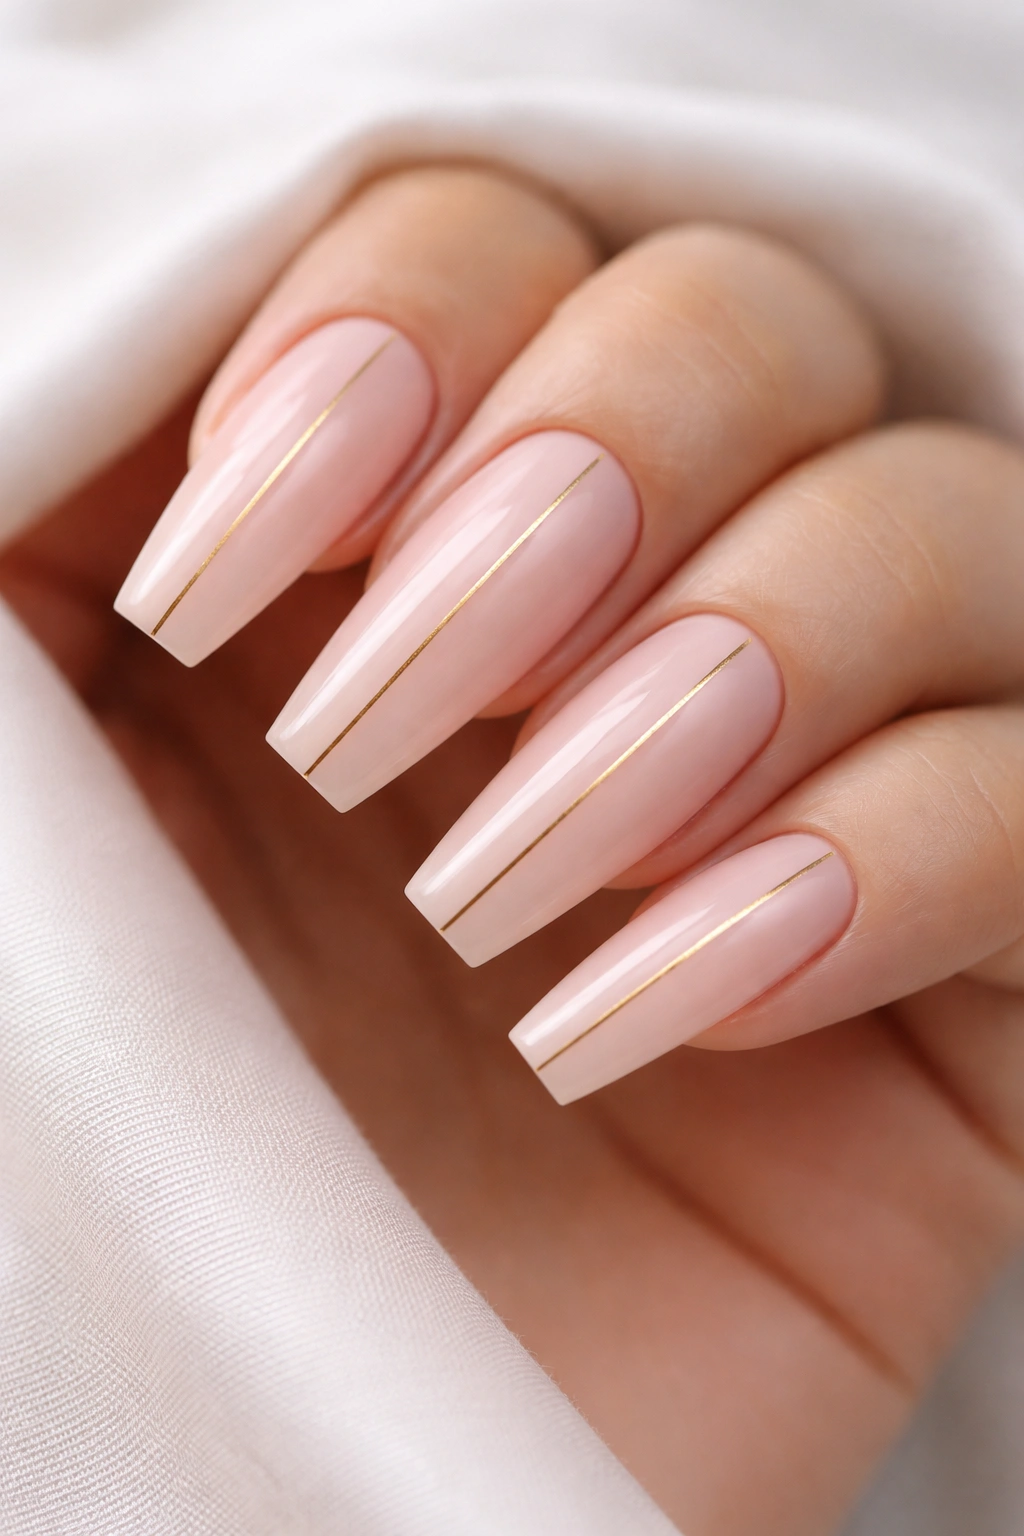
Soft, milky blush pink base with delicate gold lines running vertically down each nail (or across in horizontal sections) creates a design that’s minimalist but polished. The gold striping is intentional enough to be interesting but subtle enough that the design reads as elegant rather than bold. This works beautifully for everyday wear or special occasions.
Creating Fine Striping Details
Your technician will use a very fine brush and steady hand to paint thin gold lines—or they might use gold striping tape (adhesive-backed metallic tape) applied to the sticky base gel before sealing. The tape method creates perfectly straight, even lines with minimal skill variation. Either way, the lines should be thin enough to feel delicate but visible enough to read clearly.
Design Variation Ideas
- Vertical stripes running the length of each nail for an elongating effect
- Horizontal stripes creating sections across the nail
- Diagonal stripes for a more playful, dynamic feel
- One or two accent nails fully striped, others with just a single stripe at the tip
The blush pink palette is soft and romantic, while the gold striping adds just enough sophistication to prevent the design from feeling overly girly. This combination is genuinely versatile.
13. Deep Wine Red with Metallic Gold Geometric
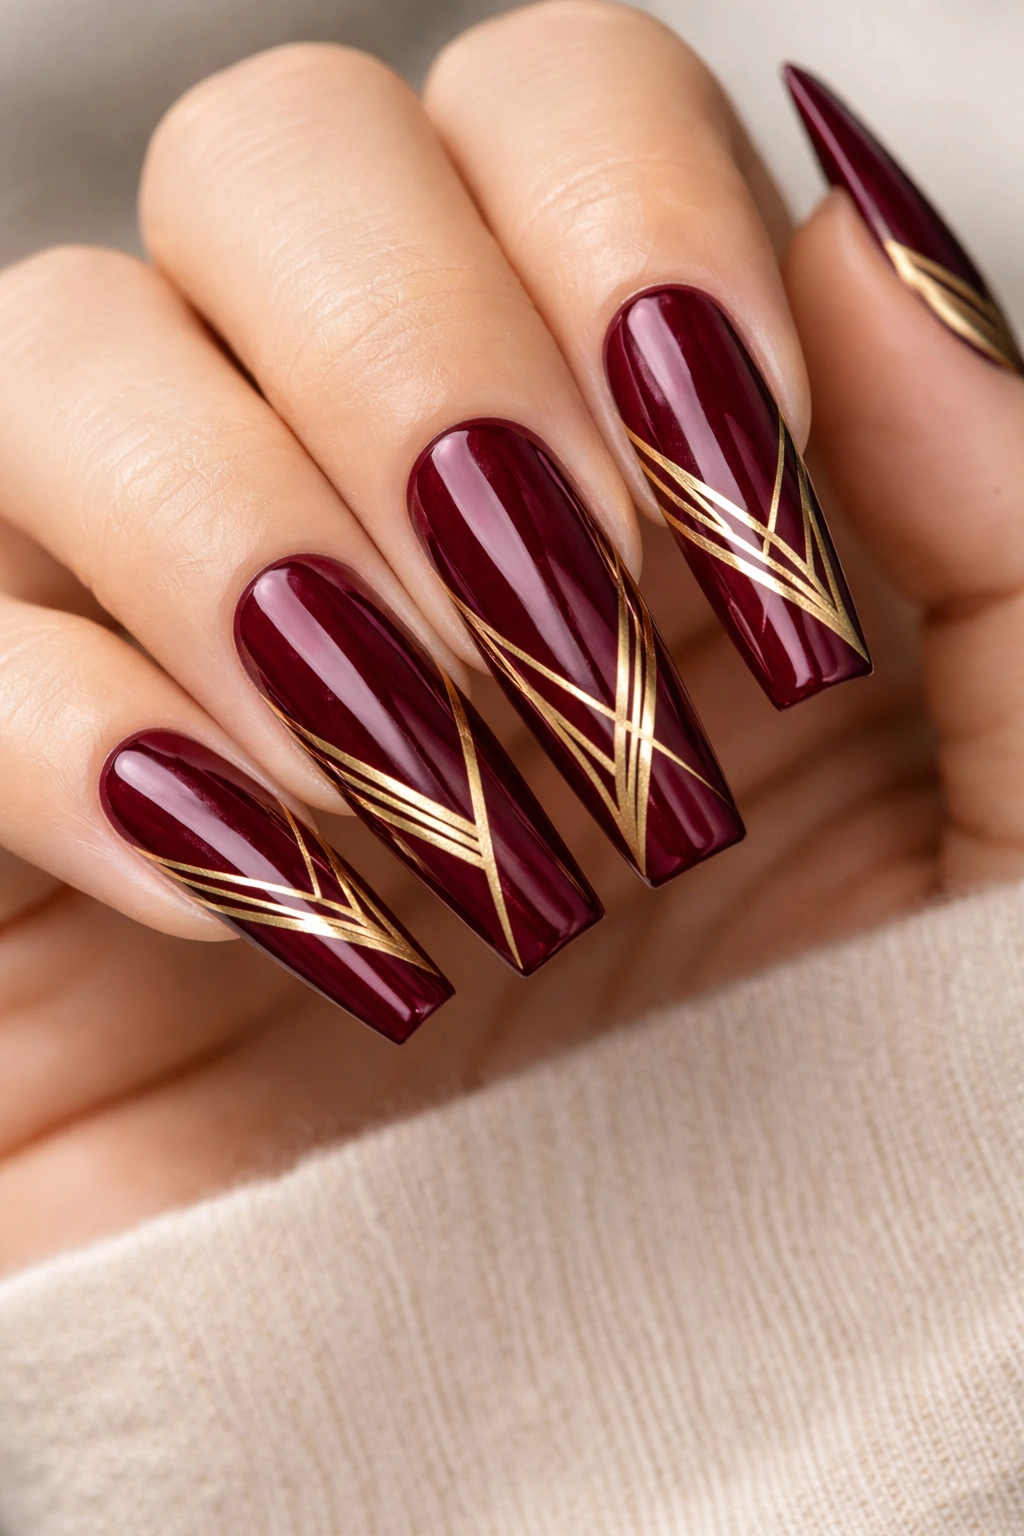
A luxurious, deep wine red base with sharp metallic gold geometric shapes—think triangles, chevrons, or angular lines—creates a design that’s bold and intentional. The wine red is rich and moody, while the metallic gold feels celebratory, making this perfect for evenings or special occasions. The geometry keeps the design modern rather than classic.
The Metallic Geometric Technique
Gold metallic finishes can be applied using striping tape, hand-painted with a fine brush, or stamped using a nail stamping plate. Each method creates slightly different results: tape gives perfectly straight lines, hand-painting offers artistic variation, and stamping allows for complex patterns. The coffin nail width supports all three techniques beautifully.
Why Wine and Gold Work Together
Wine red is one of the few colors that actually looks better with gold than with silver—the warmth in both colors creates harmony. The combination reads as intentionally luxe without feeling costume-y. This color pairing also works across seasons and never feels dated or trendy.
Placement Ideas for Geometric Elements
- Geometric pattern concentrated at the tips, with plain wine red at the base
- Gold geometric frame outlining each nail
- Scattered geometric shapes throughout the nail bed
- Accent nails (one or two) fully patterned, others with subtle geometric hints
The depth of wine red means the metallic gold absolutely sings against it, creating high contrast and visual impact.
14. Nude with Delicate Hand-Painted Florals
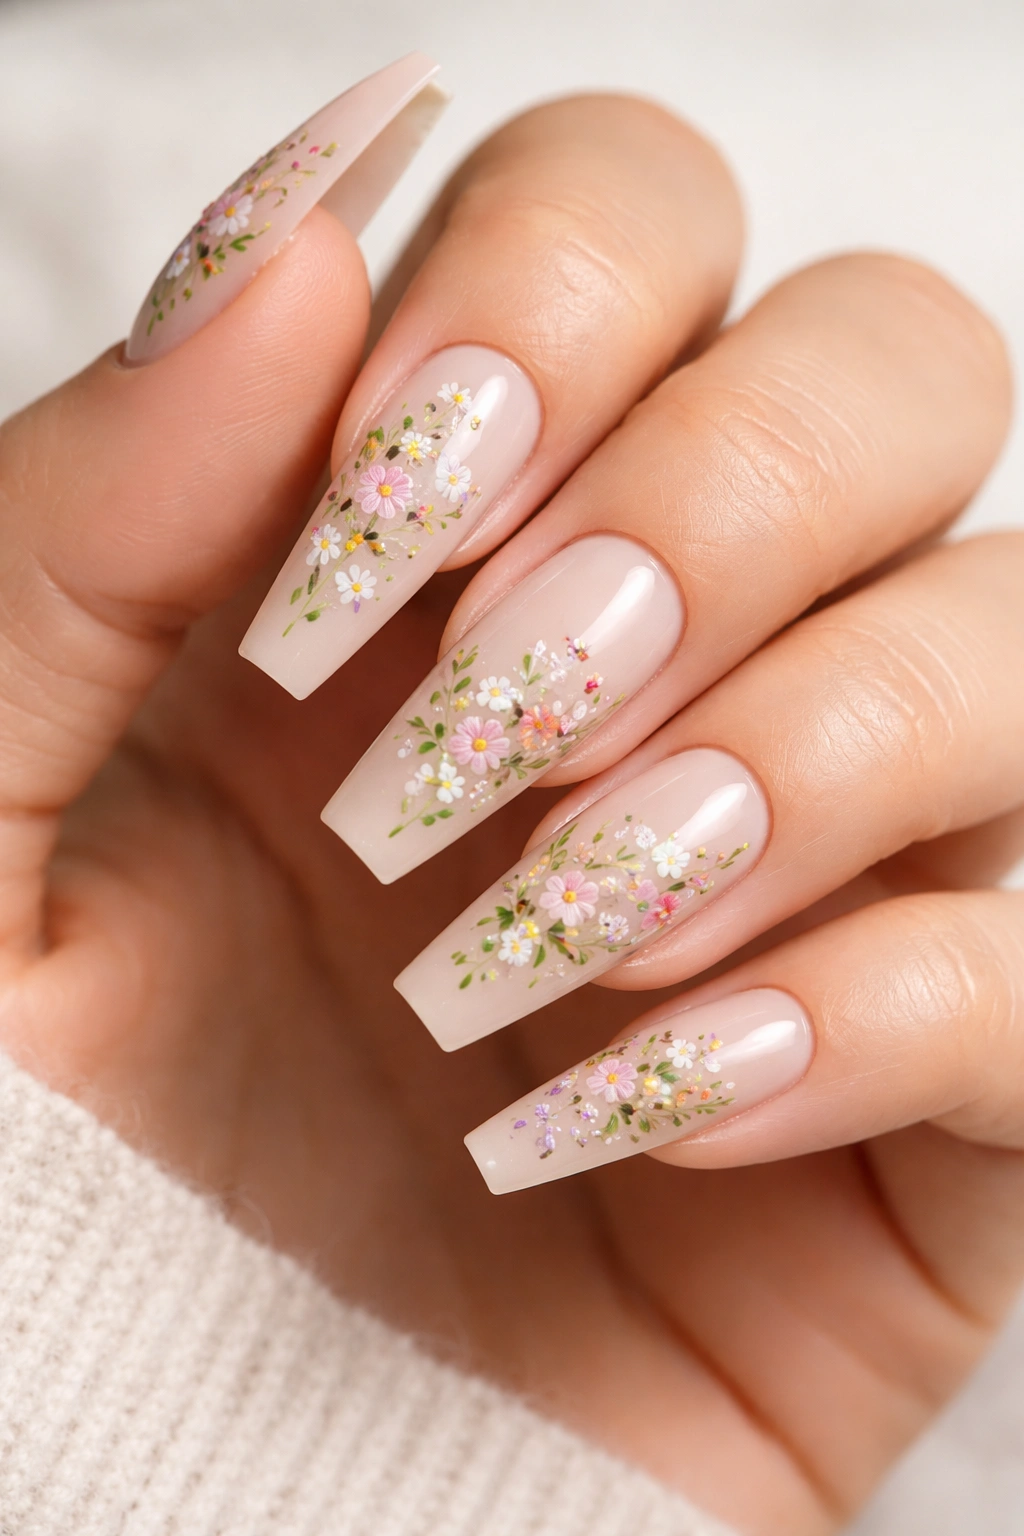
A neutral nude base with tiny hand-painted flowers, leaves, and botanical elements scattered across the nails creates an artistic, personalized design that reads as intentional and creative. The nude base keeps everything wearable, while the florals add charm and uniqueness. Since each hand-painted flower is one-of-a-kind, your nails will be genuinely unique.
The Hand-Painting Process
Your nail artist will use a very fine brush to paint delicate floral elements—small flowers, stems, leaves, branches—directly onto the nude base. This requires artistic skill and a steady hand, so finding a technician whose hand-painted work you love is essential. The beauty is in the imperfection; these nails aren’t meant to look stamped or mechanical.
Botanical Element Ideas
- Small wildflowers scattered across the nail
- Delicate vines or branch patterns running the length of the nail
- Minimalist line-drawn flowers
- Seasonal florals (cherry blossoms in spring, sunflowers in summer, leaves in fall)
The coffin nail length provides enough surface area that hand-painted florals remain visible and don’t look cramped. Each nail becomes a small canvas.
Sealing Your Artwork
A glossy top coat protects the hand-painted design and makes colors pop. Your technician should apply it carefully to avoid disrupting the delicate brushwork. This design lasts beautifully if sealed properly.
15. Black with Cat Eye Magnetic Effect
A sleek black base with magnetic gel creates a moving “eye” effect that shifts and changes as the nail moves under light. The magnetic effect looks like a reflective line moving across the nail surface, creating an optical illusion that’s genuinely stunning. This is a conversation-starting design that feels futuristic and modern.
Understanding Magnetic Gel
Magnetic gel contains metallic particles that respond to a magnetic field. Your technician applies the gel, then holds a magnet near the nail surface, causing the particles to align and create patterns. The most common effect is a vertical line that appears to move as you tilt the nail. The effect is subtle until you see it move, then it’s impossible to look away.
Customizing the Magnetic Effect
- Classic cat eye creates a single vertical line that looks like an eye opening and closing
- Multi-line effects create more complex patterns
- Different colors underneath the magnetic layer create different visual effects (black provides the most contrast, but nude or metallic bases create subtler effects)
- The effect only activates in certain light angles, which is part of the magic—it’s not always “on,” which makes it feel special
The coffin nail length means the magnetic effect has room to develop fully. The movement is visible across the entire nail surface.
16. Translucent Blush with Scattered Rose Gold Leaf and Rhinestones
A sheer blush base that lets your natural nail show through, scattered with rose gold leaf and tiny rhinestones throughout, creates a design that’s delicate and luxurious simultaneously. The translucency keeps it wearable, while the rose gold and rhinestones add shimmer and dimension. This feels like understated luxury—beautiful but not screaming for attention.
Combining Multiple Textures
The key to making this design work is layering techniques: translucent gel base, scattered rose gold leaf pressed onto tacky gel, rhinestones applied selectively, then sealed with top coat. Each layer adds depth without overwhelming the design. The translucency prevents the design from feeling heavy, even with multiple elements.
Placement Strategy
- Concentrate rhinestones at the tips and along the sides of the nail, leaving the center somewhat clear
- Scatter leaf throughout, creating a natural, organic pattern rather than precise placement
- Not every nail needs the same density—some nails can be more heavily embellished while others are subtler
This design actually improves as your nails grow because the effect naturally fades without looking obviously grown-out.
17. Champagne with Pearl Finish and Nude Ombré
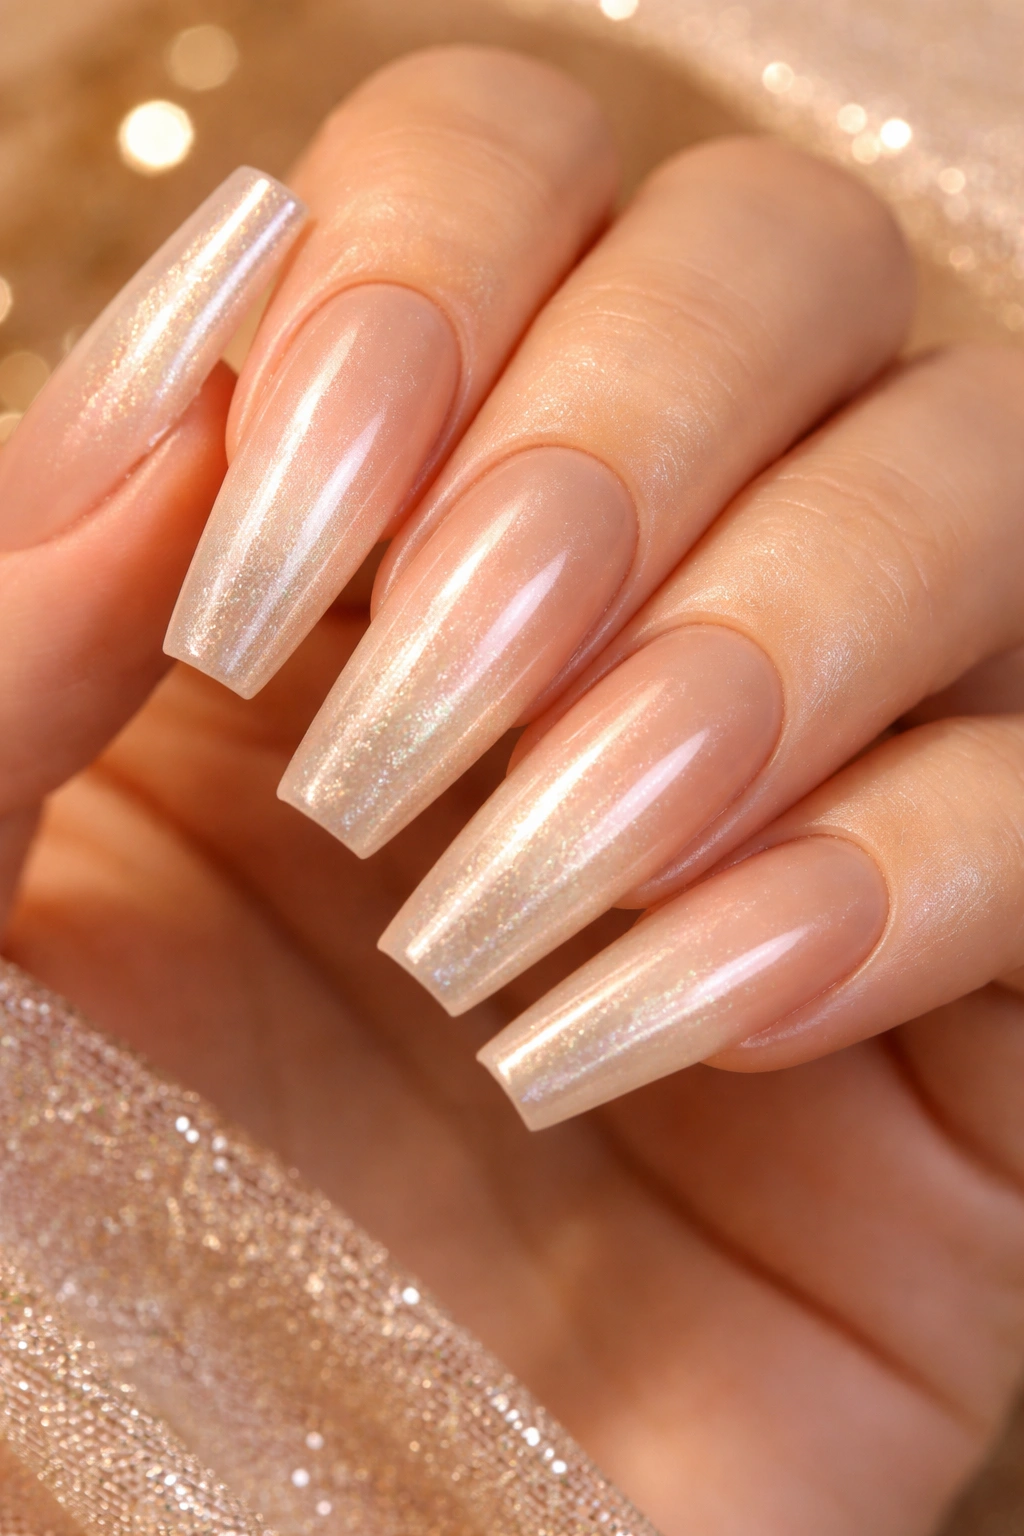
A champagne shimmer base transitioning into a subtle ombré of warm nudes, finished with a pearl coating that creates an iridescent, multidimensional effect. This design is sophisticated, wearable, and genuinely captures light beautifully—it’s the kind of design that looks different and flattering in every lighting situation.
The Pearl Finish Explained
Pearl top coats contain pearlescent particles that create an iridescent, multidimensional effect. Unlike regular shimmer, pearl creates subtle rainbow reflections that shift depending on light angle. The effect is more sophisticated than glitter and feels luxe without being obviously sparkly.
Building the Ombré
Your technician will apply champagne base, then blend in progressively warmer nude tones toward the tips. The pearl top coat goes over everything, creating cohesion while adding dimension. The coffin nail width means the ombré transition has room to be gradual and smooth.
Why This Works as an Everyday Design
Champagne and nude are universally flattering and professional. The pearl finish adds polish without being bold. This design reads as intentionally put-together rather than trying too hard—perfect for workplaces, events, or everyday wear where you want to look elevated.
The subtle multidimensional effect means this design never feels boring, even weeks into wearing it.
18. Deep Plum with Gold Metallic Splatter

A rich, deep plum base with gold metallic splatter creating artistic, organic patterns across the nails combines elegance with artistic expression. The splatter feels intentional rather than accidental, creating a design that’s modern and creative. This works beautifully for someone who wants color and personality in their nail design.
Creating the Splatter Effect
Gold metallic splatter is created by flicking or spattering gold polish (or gel) across the plum base using a brush or sponge. Some technicians use a splatter brush technique, while others create the effect by carefully removing polish with a brush to reveal the color underneath. Either way, the goal is creating seemingly random but actually intentional gold splatters.
Splatter Density Variations
- Heavy splatter concentrated at tips, with lighter splatter toward the base
- Scattered throughout the entire nail evenly
- One or two accent nails fully spattered, others with minimal splatter
- The unpredictable nature of splatter means each nail is unique
Deep plum is a color that actually looks more luxurious with gold splatter than without—the artistic element elevates what would otherwise be a standard color.
Long-Term Wear
This design wears beautifully because the splatter pattern prevents visible growth lines from being obvious. Even as your nails grow out, the irregular pattern masks the demarcation between old and new growth.
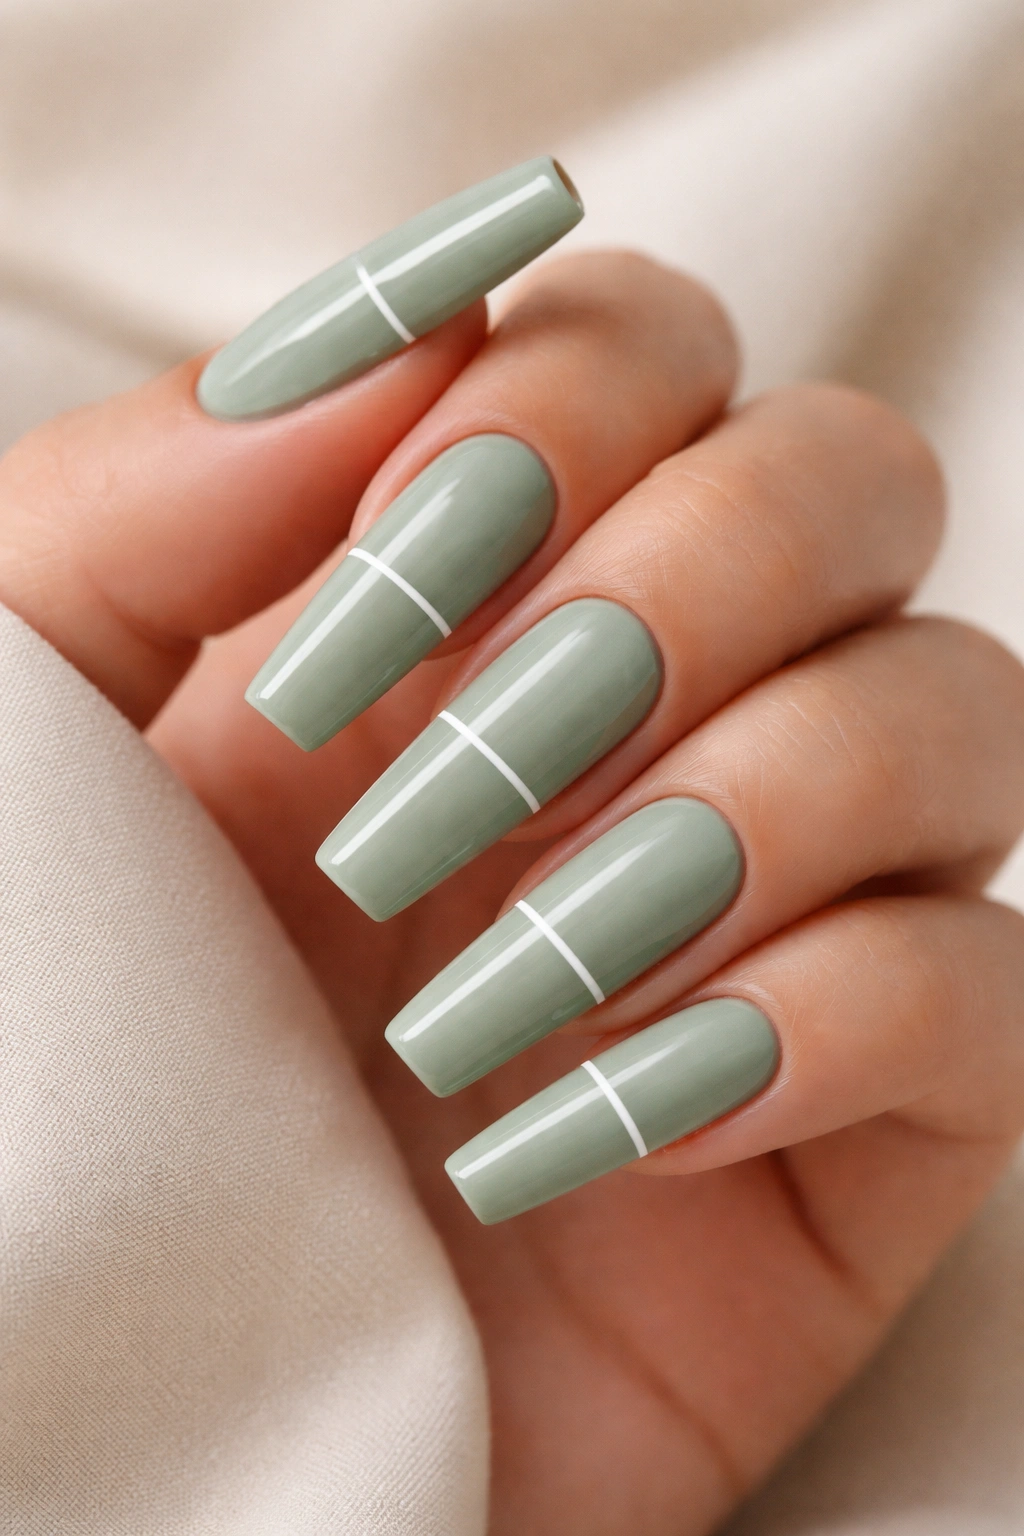
19. Sage Green with Minimal White Line Detail
A soft, muted sage green base with a single thin white line running horizontally across each nail (or diagonally for a more playful effect) creates a minimalist design that’s surprisingly impactful. The sage green is earthy and wearable, while the white line adds just enough interest to prevent the design from feeling one-note. This works beautifully as an everyday design that still feels intentional.
Why Minimalist Design Works on Long Nails
Longer nails can actually pull off minimalist designs better than shorter nails because the simplicity reads as intentional rather than unfinished. The coffin shape’s elegance is enough visual interest on its own; a single line detail complements that elegance without competing with it.
White Line Placement Options
- Horizontal line across the mid-nail
- Diagonal line from one corner to the opposite corner
- Thin white tips with a line detail at the base
- Multiple thin white lines for a more geometric feel
Sage green is one of the most versatile colors in nail design—it works with virtually any skin tone and any style aesthetic.
Application Tip
Use a striping brush or thin brush to create the white line, or apply thin metallic striping tape for perfectly straight, even lines. The coffin nail width is wide enough that thin lines remain visible and impactful.
This design actually complements minimalist fashion, jewelry, and overall aesthetic beautifully—it’s the perfect nail design for someone with refined taste.
20. Transparent with Rainbow Glitter Ombré
A clear or barely-tinted transparent base with rainbow glitter concentrating from sparse at the base to dense at the tips creates a design that’s playful, colorful, and absolutely eye-catching. The transparency lets your natural nail show through, keeping the design wearable, while the rainbow glitter adds personality and fun. This works beautifully for someone who loves color and isn’t afraid to let their nails make a statement.
Rainbow Glitter Application
Fine rainbow glitter or multicolored glitter is applied to the sticky transparent gel base, layering progressively more glitter as you move toward the tips. The transparency prevents the glitter from feeling heavy or opaque. The gradual transition from minimal glitter to maximum glitter at the tips creates visual movement.
Why This Design Works on Coffin Nails
The coffin nail length gives the ombré transition room to develop gradually, which means the glitter effect doesn’t feel abrupt or jarring. The width of coffin nails means you can see the full spectrum of colors in the rainbow glitter, which maximizes the visual impact.
Glitter Density Variations
- Barely any glitter at the nail base, progressively increasing toward tips
- Even scatter throughout with slightly heavier concentration at tips
- Different glitter types: ultra-fine for a subtle effect, or chunky glitter for maximum impact
- Consider fine rainbow glitter for everyday wear, or chunky glitter for special occasions
The transparent base with rainbow glitter reads as youthful and fun without being childish—the coffin nail shape elevates the playful design into sophisticated territory.
Longevity Tip
Fine glitter tends to outlast chunky glitter in gel applications, so if you want this design to hold up through several weeks of daily wear, opt for finer glitter particles.
Final Takeaway
Long coffin nails are genuinely one of the most flattering nail shapes available—they elongate your hands, create natural geometry that frames your fingers beautifully, and provide enough surface area for virtually any design you can imagine. Gel polish amplifies all of those benefits by maintaining flawless color, creating professional finishes, and making intricate details actually achievable.
The twenty designs above represent just a fraction of what’s possible with coffin nails and gel polish, but they’re a solid starting point for inspiration. Whether you’re drawn to minimalist elegance, bold color, sparkle and shimmer, or artistic hand-painted details, coffin nails provide the perfect foundation. When you’re ready to book your appointment, bring photos of whichever designs speak to you, but also be open to your technician’s suggestions—they often spot combinations and techniques that photographs don’t fully capture.
The most stunning nails come from a collaboration between you and your technician: you bring the inspiration and vision, they bring technical expertise and creative perspective. The best outcome happens when both parties are excited about the design. So choose something that genuinely excites you, communicate clearly with your technician about what you’re imagining, and trust that with coffin nails and gel polish, almost everything looks incredible.
