

Coffin nails have become one of the most sought-after nail shapes in recent years, and for good reason. The elongated, tapered silhouette with a squared-off tip creates a sophisticated and edgy look that flatters nearly every hand shape and skin tone. If you’ve ever scrolled through nail inspiration galleries and felt drawn to that distinctive coffin or ballerina-like profile, you’re definitely not alone — this shape offers the perfect balance between dramatic length and wearable elegance.
The beauty of coffin nails is their incredible versatility. They provide an expansive canvas for nail art while still maintaining an air of refinement, even when bare or minimally decorated. Whether you’re drawn to minimalist designs, bold statement looks, glittery accents, or intricate patterns, coffin nails can handle it all with style. Long coffin nails in particular give you enough real estate to really showcase your personality and creativity, and they tend to photograph beautifully, making them a favorite among nail enthusiasts and social media devotees.
If you’re considering growing out your natural nails or booking an appointment for acrylics or gel extensions in the coffin shape, you’ll want some solid design inspiration to bring to your nail technician. The designs below range from subtle and understated to bold and intricate, but they all share the same quality: they look absolutely stunning on long coffin nails. Let’s explore 15 gorgeous options that’ll have you excited about your next manicure.
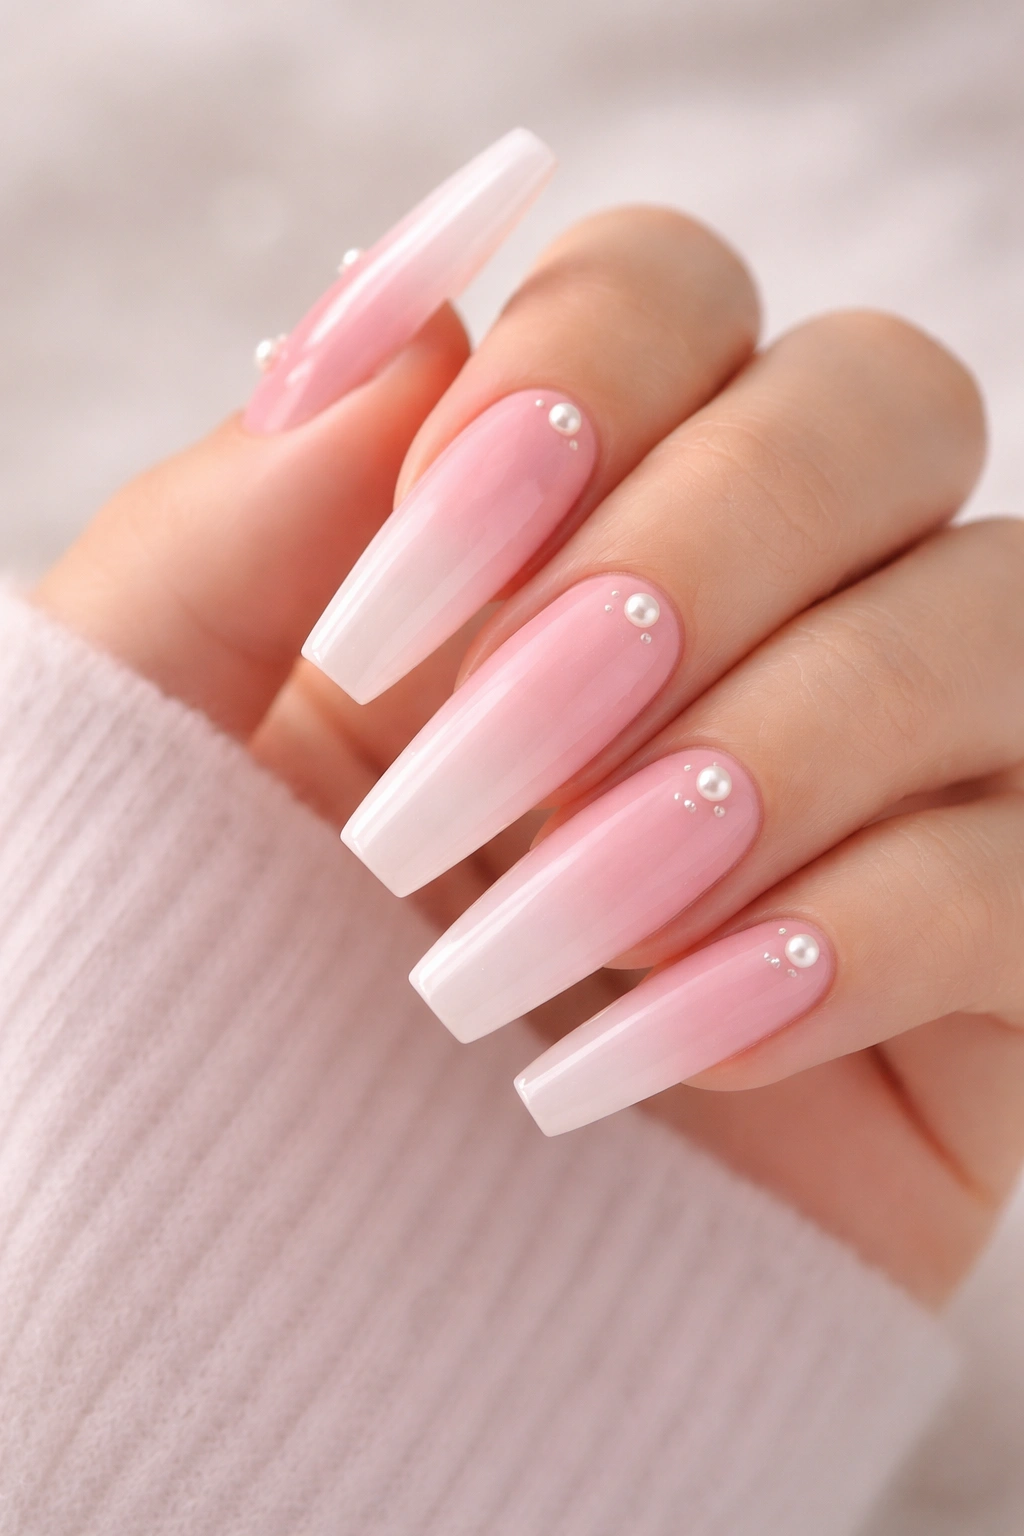
1. Soft Pink Ombré with Pearl Accents
Soft pink ombré is a timeless choice that feels both romantic and modern, making it perfect for anyone who wants elegance without edge. This design features a gradient that transitions from a pale blush at the base to a slightly deeper rosy tone toward the tips, creating subtle dimension and depth. The pearl accents — whether scattered across the nail or clustered near the tip — catch the light beautifully and add just enough sparkle to elevate the look from simple to sophisticated.
Why This Design Works on Coffin Nails
The longer canvas of coffin nails allows the ombré gradient to really breathe and show off its color transition. You’ll have enough space for the pearls to be properly spaced and visible rather than crowded, and the squared-off tip of the coffin shape actually frames the sparkle perfectly. The soft pink color palette feels especially flattering against the geometric precision of the coffin silhouette, creating a nice contrast between soft color and structured shape.
Application Tips and Tricks
- Use a makeup sponge to gently dab the pink shades into each other for a seamless blend
- Apply the ombré on all nails or just the accent nails for a more subtle effect
- Pearl accents look best when applied with a dotting tool or thin brush for clean placement
- Seal everything with a glossy top coat to make the ombré blend look even more polished
Pro tip: This design works especially well for formal events, work environments, or any situation where you want to look put-together and refined without anything too bold or attention-grabbing.
2. Deep Burgundy with Gold Foil Details
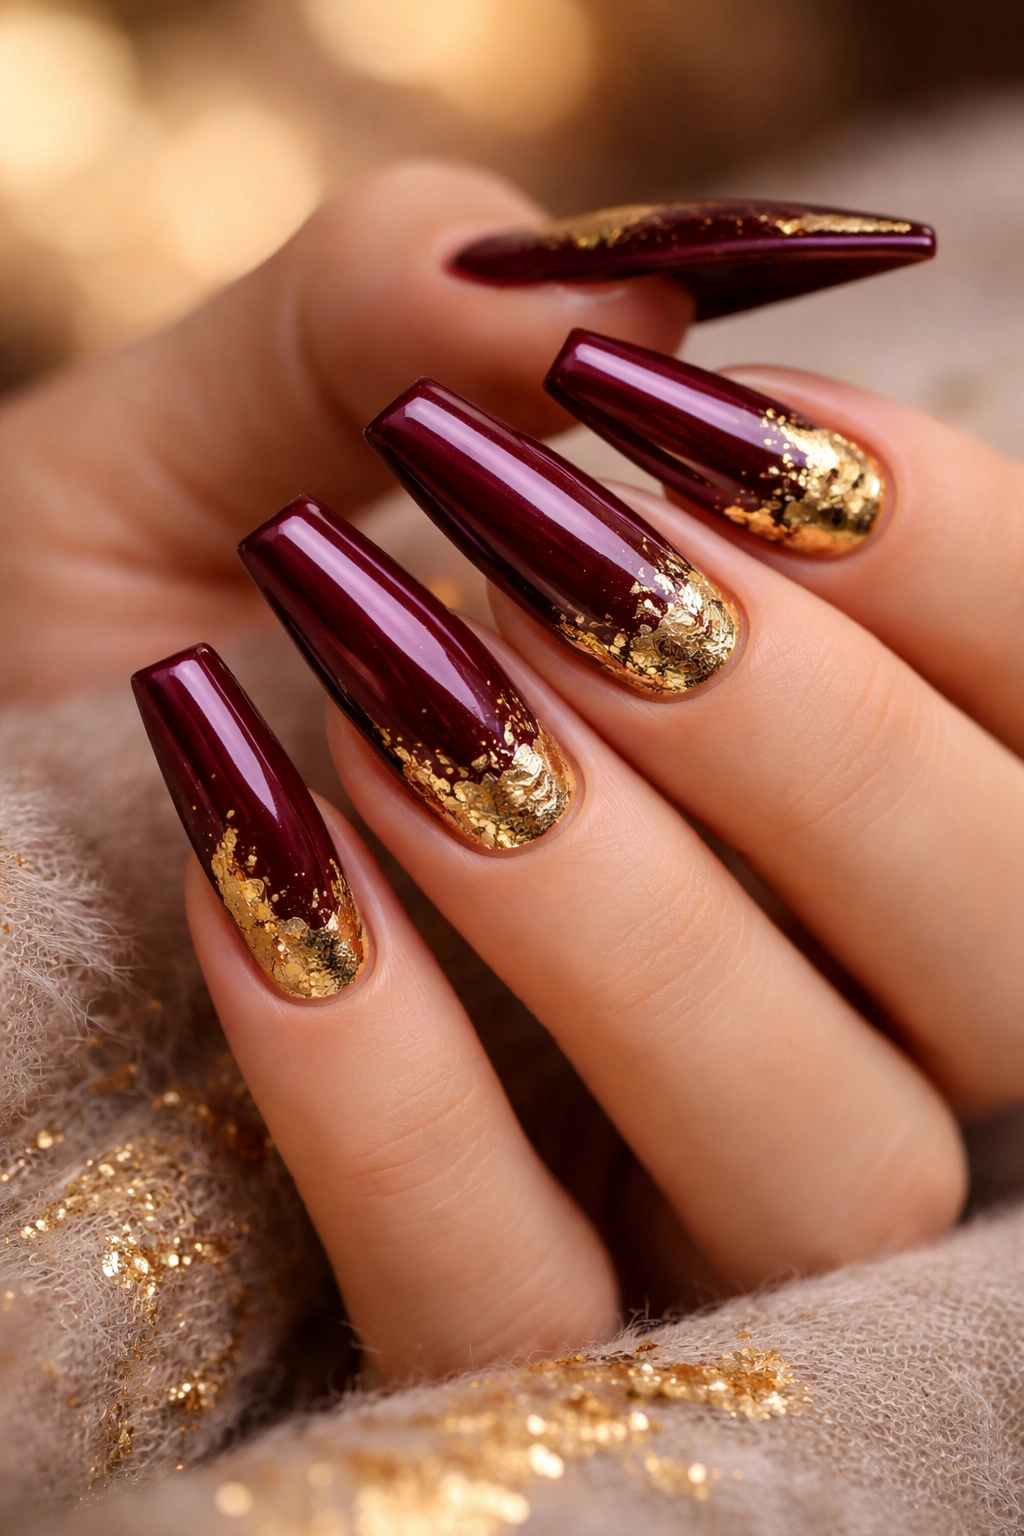
Deep burgundy is having a major moment, and when paired with gold foil accents, it becomes an absolutely luxe design that screams sophistication. This look combines a rich, wine-colored base with strategically placed gold foil that catches light and adds glamorous detail. The contrast between the deep jewel tone and the warm metallic creates instant visual interest without feeling overly complicated.
The Appeal of Burgundy and Gold
There’s something undeniably elegant about this color combination — it feels both moody and celebratory at the same time. The burgundy works beautifully on coffin nails because it’s dramatic enough to make a statement without looking overwhelming on longer nails. Gold foil adds richness and luxury, making even a simple application feel high-end and intentional.
Design Variations to Consider
- Foil scattered across the entire nail for a speckled effect
- Foil concentrated along the tips for a glittery ombré transition
- Thin foil stripes running vertically down each nail
- Foil accents only on your accent nail or pinky nail for a hint of shine
Worth knowing: This design pairs incredibly well with fall wardrobes and winter styling, but the timeless color combination actually works year-round. It’s especially stunning for evening events, date nights, or whenever you want to feel extra confident and polished.
3. Nude Base with Intricate Black Line Art
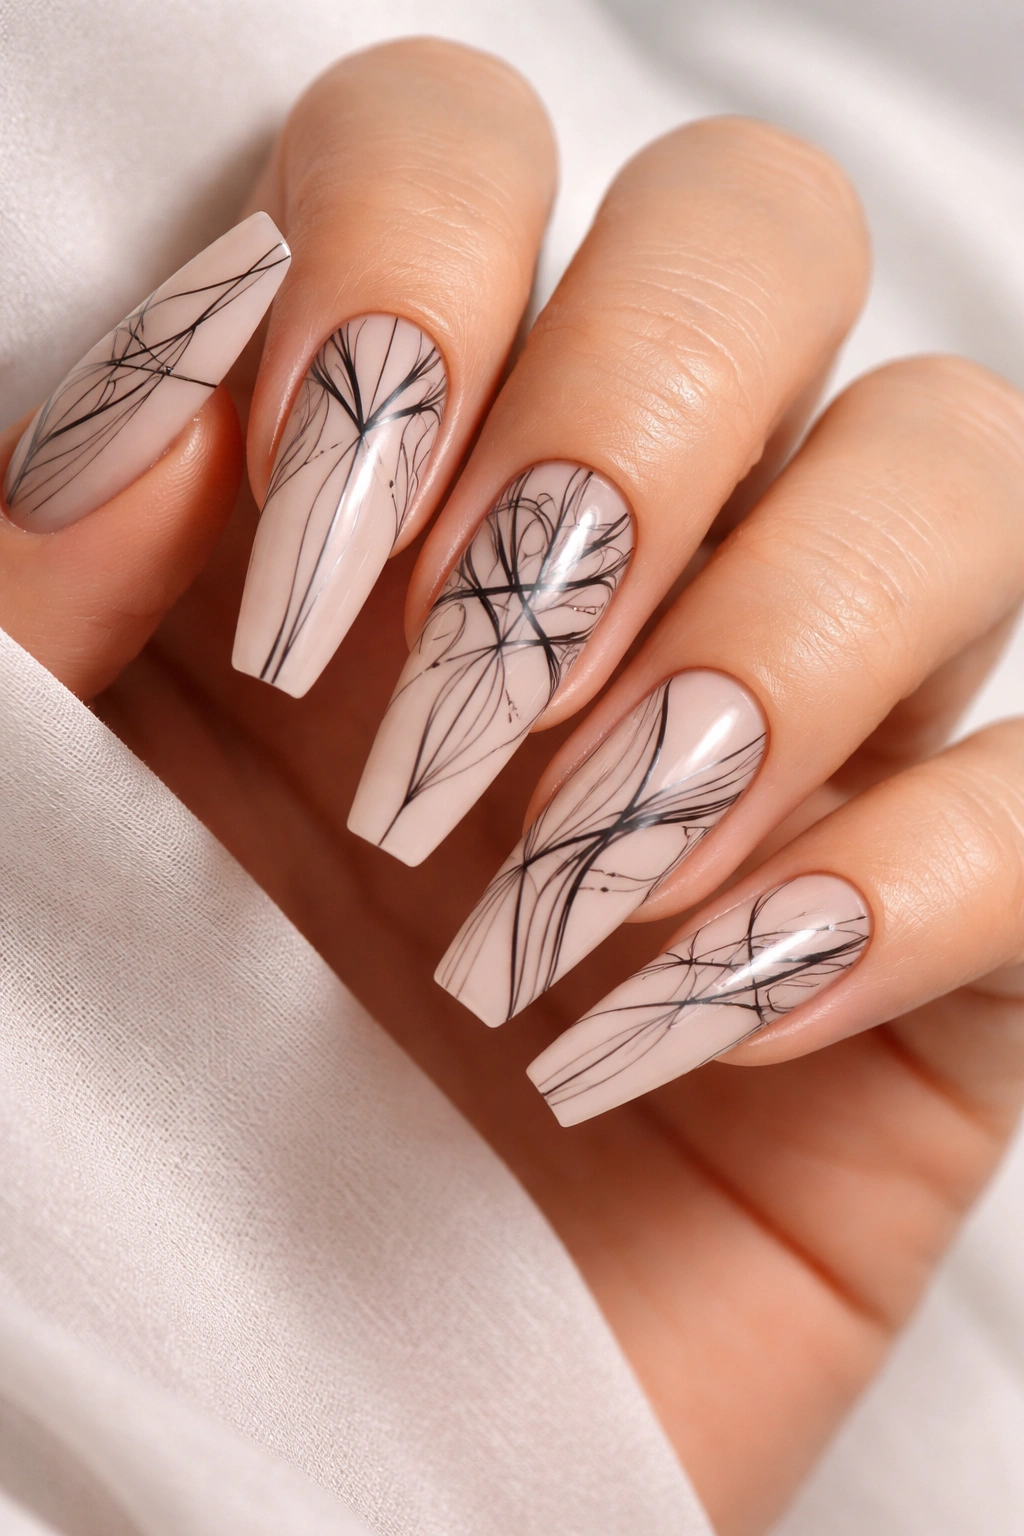
Line art on nails has evolved into a true art form, and when executed on long coffin nails with a neutral nude base, it’s absolutely stunning. This design features delicate black lines creating geometric patterns, abstract designs, or even miniature illustrations against a creamy nude background. The contrast is clean and striking without being harsh, and the detail level can range from simple geometric shapes to incredibly intricate artwork.
Why Nude Plus Line Art Is So Effective
A nude base gives the black lines maximum visual impact — there’s no color competition, so every line is crisp and clear. Coffin nails provide enough surface area that you can actually see fine detail work without everything feeling cramped. The neutral backdrop means this design coordinates with virtually any outfit, making it a genuinely versatile choice for daily wear or special occasions alike.
Line Art Ideas Worth Exploring
- Minimalist geometric shapes like triangles, rectangles, or hexagons
- Abstract continuous line drawings (like a single-line face or landscape)
- Tiny botanical elements like leaves, branches, or wildflowers
- Architectural or mandala-inspired patterns radiating from the center
Insider note: If you’re having line art done by a technician, bringing a reference image or a detailed description helps ensure you get exactly what you’re envisioning. Black line work is unforgiving — there’s nowhere for imperfections to hide — so it’s worth investing in a technician who specializes in detailed nail art.
4. Marble Effect with Emerald Green and White
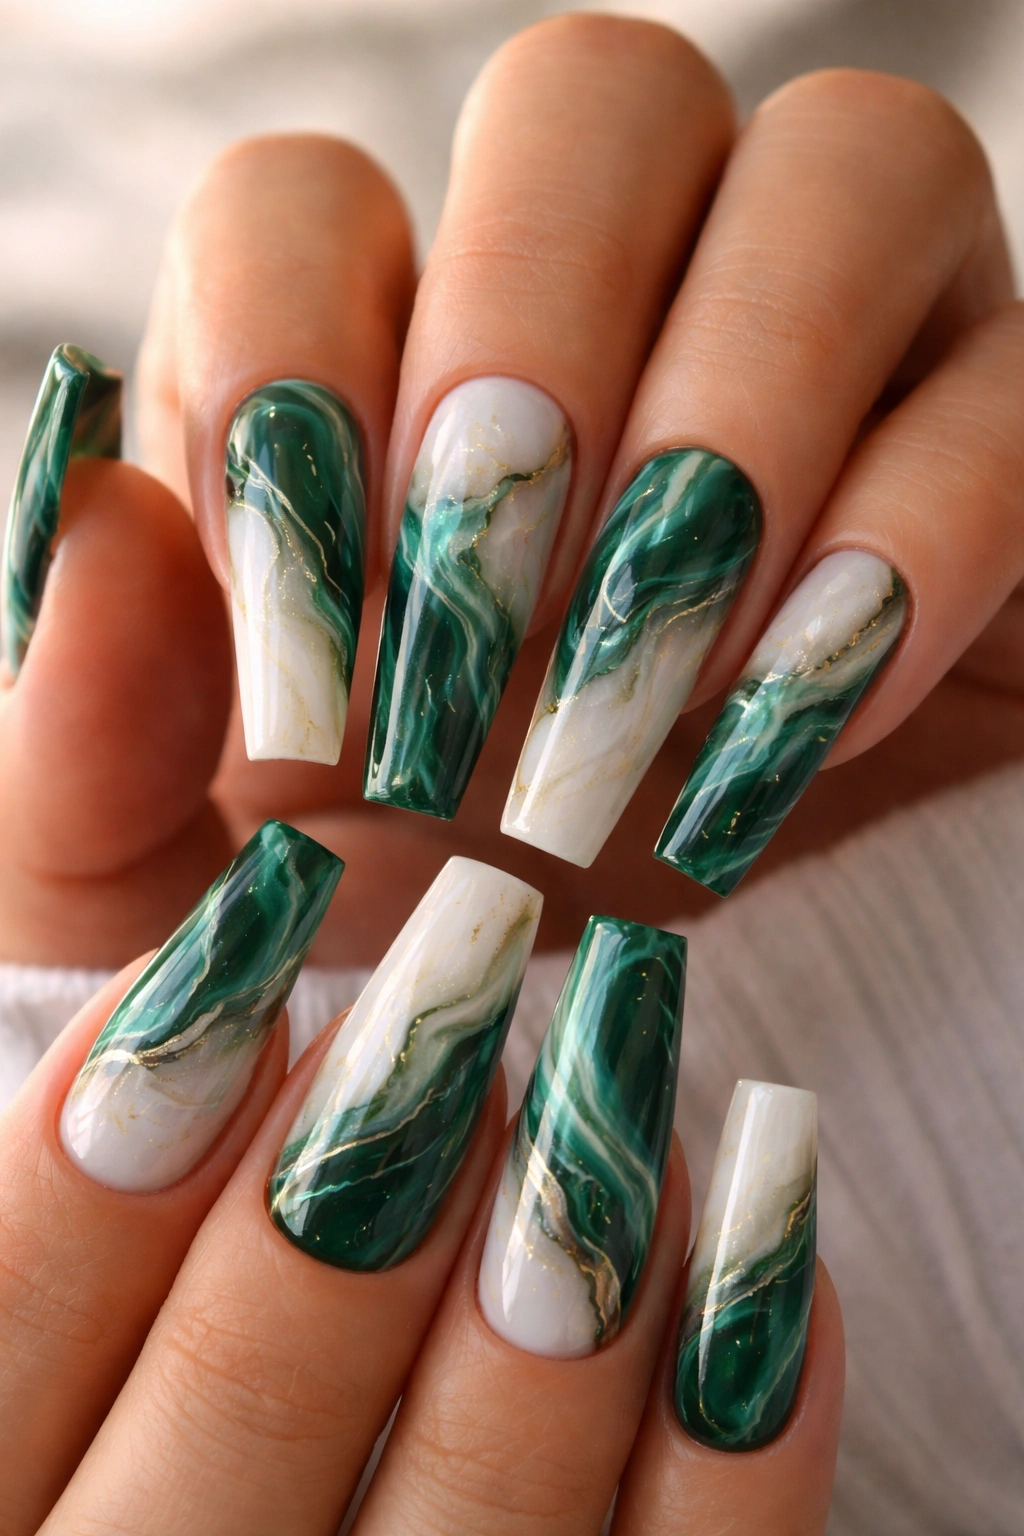
Marble nails create an organic, natural look that feels expensive and thoughtfully designed. This particular variation uses emerald green and white to create a stone-like pattern that’s both sophisticated and interesting. The swirled, veined effect mimics real marble while the jewel tone of emerald makes it feel decidedly modern and luxe. It’s a design that works as a statement without requiring any additional embellishments.
The Technique Behind Marble Nails
Marble effects are typically created using a water droplet technique or by hand-painting swirled patterns directly onto the nail. When done well, the result looks organic and natural rather than artificial or overly designed. On coffin nails, the longer length allows the marble pattern to flow and create interesting visual movement, and the squared tip gives the organic pattern a neat frame.
Color Combinations That Work Beautifully
- Emerald green and white (jewel-toned and glamorous)
- Black and white (timeless and high-contrast)
- Blush pink and cream (soft and romantic)
- Navy blue and gold (rich and sophisticated)
- Sage green and white (calm and contemporary)
Pro tip: If you’re attempting marble nails at home, practice on a few nails before committing to all ten. It takes some experimentation to get the pattern distribution balanced and prevent the effect from looking muddy or unclear.
5. Glossy French Ombre with Glitter Gradient
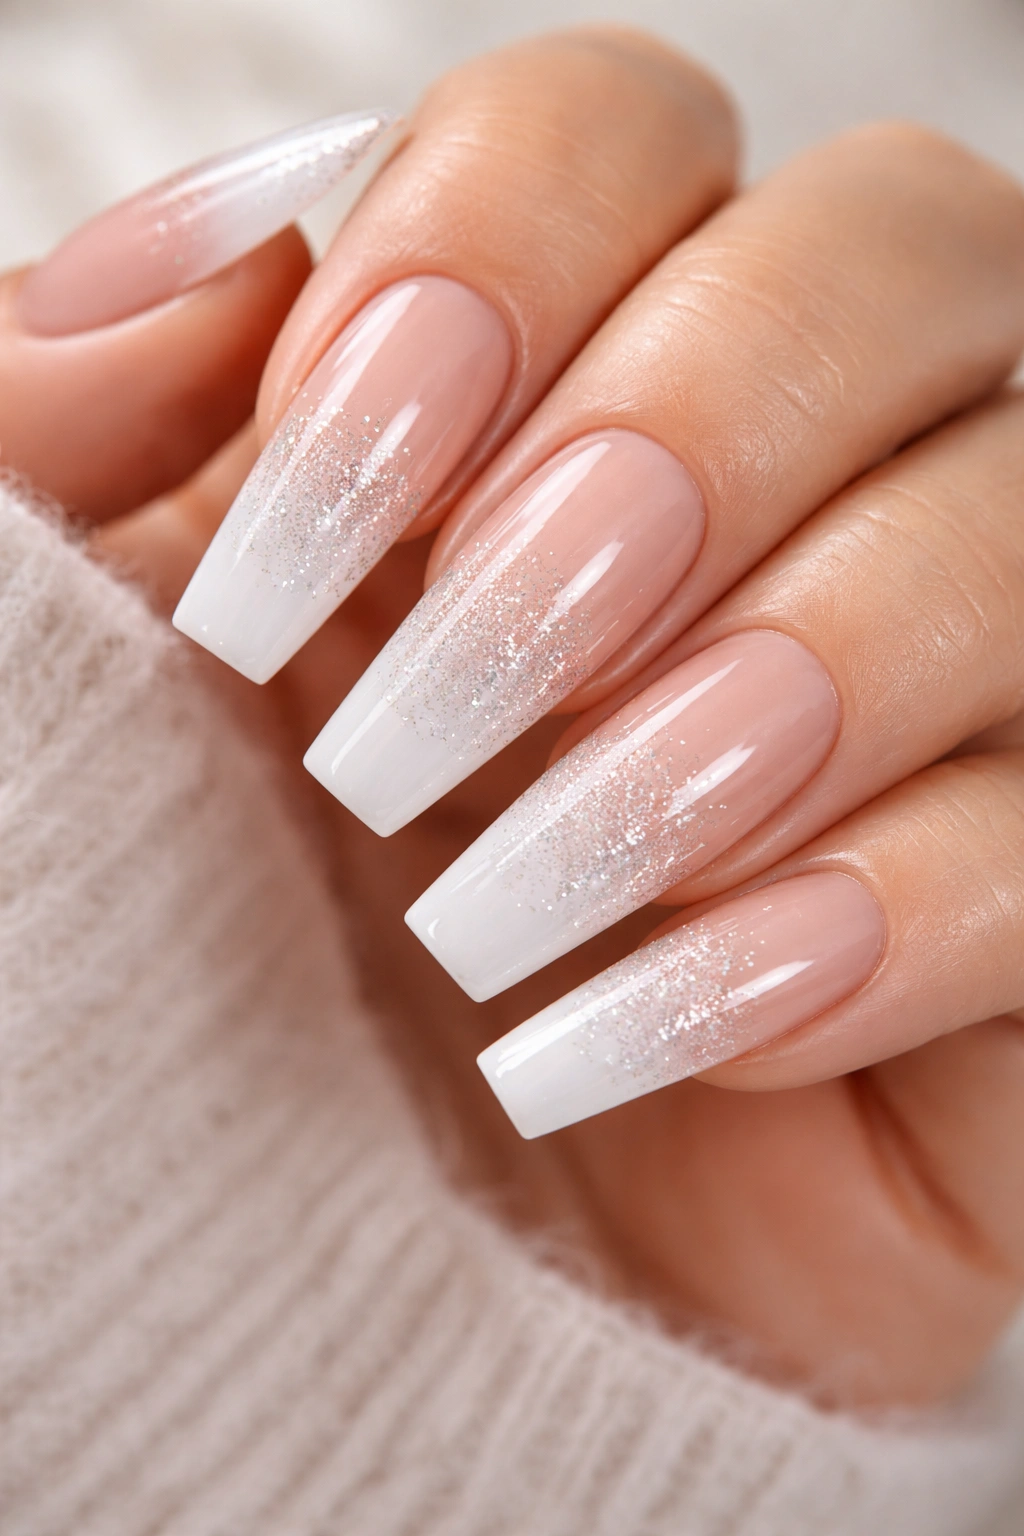
A modern twist on the classic French manicure, this design features a gradient that flows from a bare or pale pink base through a glitter transition into a sparkly white or nude tip. It’s the perfect mashup of timeless elegance and contemporary sparkle. The glossy finish makes everything shine, and the gradual transition from solid to glitter to solid again creates a refined, polished look that’s still playful.
Why French Ombré Works on Coffin Nails
Coffin nails are long enough that the gradient transition across the nail has space to be truly visible and beautiful. The squared-off tip is the perfect showcase for the white or nude glitter concentration, and the overall silhouette — paired with a glossy finish — looks incredibly chic and modern. This design reads as sophisticated enough for work or formal settings, but still has that fun sparkle element.
Building the Gradient Properly
- Start with a base color that’s either nude, pale pink, or completely clear
- Use a makeup sponge to apply the glitter over the middle section, building intensity toward the tip
- The glitter should be concentrated most heavily at the very tip, creating a natural ombré effect
- Seal with a super glossy top coat for maximum shine and to blend all the elements together
Worth knowing: Glitter gradients look most polished when you use fine, small glitter particles rather than chunky craft glitter. The smaller particles blend more seamlessly and create a more refined, professional appearance.
6. Pastel Rainbow with Matte Finish
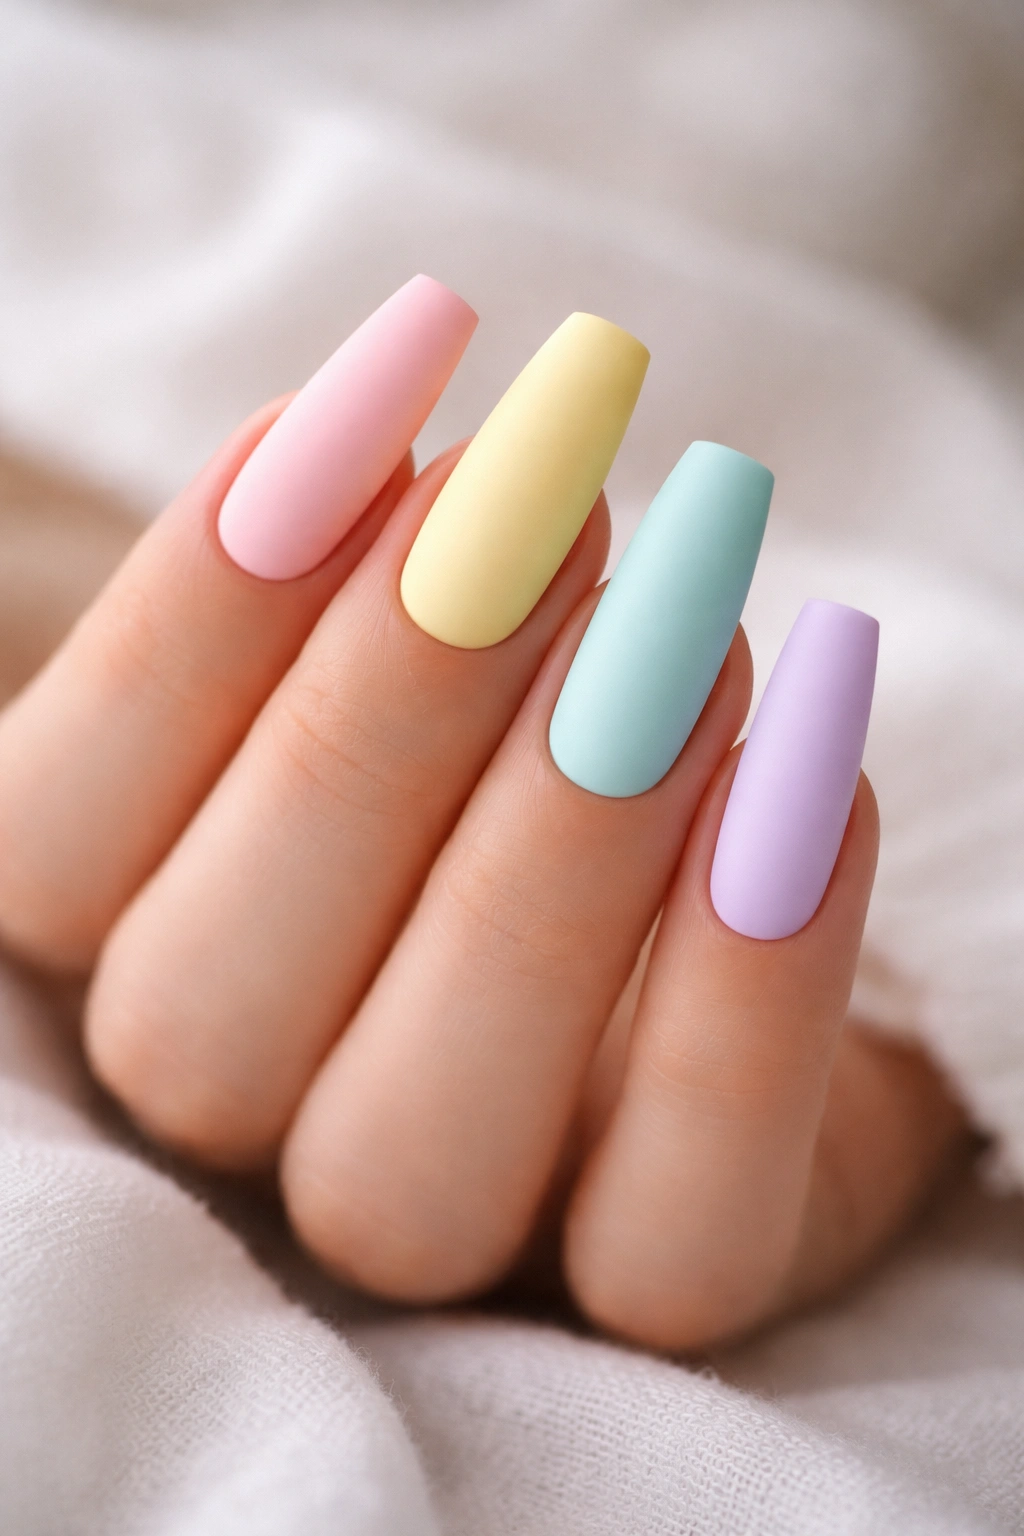
This design brings joy and whimsy to long coffin nails while maintaining an elegant, contemporary feel. Each nail features a different soft pastel color — think pale lavender, soft mint, peachy blush, baby blue, and light yellow — all with a matte finish that feels modern and sophisticated. The lack of shine gives the pastels an unexpected coolness that makes them feel less cutesy and more genuinely stylish. It’s a design that celebrates color without feeling childish.
The Power of Matte Texture
A matte finish transforms how we perceive color. The same pastel shades would feel sweet and bubbly with a glossy finish, but with matte, they feel artistic and intentional. The matte texture also makes coffin nails look even more sculpted and defined, emphasizing the shape’s architectural qualities. This design works particularly well if you want color without sparkle or embellishment.
Choosing Your Pastel Palette
- Soft and cohesive: lavender, mint, pale pink, baby blue, champagne
- Warm pastels: peach, pale yellow, cream, blush, light coral
- Cool pastels: lavender, mint, pale blue, periwinkle, soft gray
- Mixed tones: choose five pastels that feel harmonious when displayed together
Pro tip: Apply a matte top coat over your base colors rather than using matte polish throughout — this ensures better color payoff and durability while still giving you that sophisticated matte finish.
7. Black Cat Eye with Gold Geometric Shapes
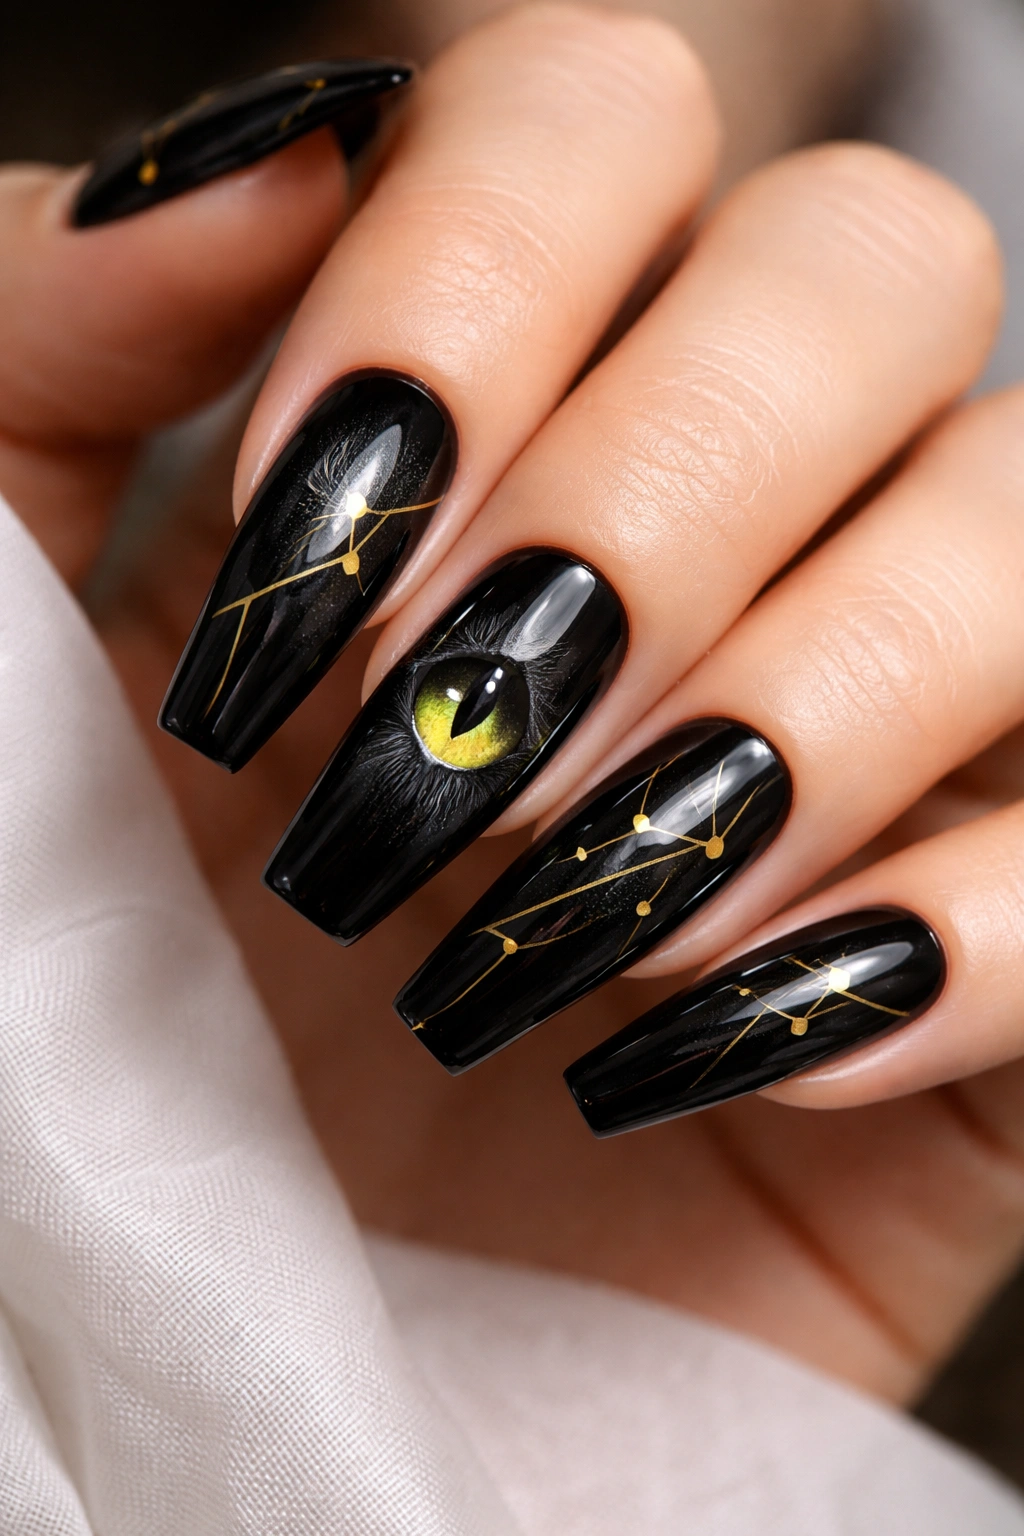
Cat eye designs are bold and playful, and when executed on coffin nails with sophisticated gold geometric shapes, they become a genuinely chic statement. This design features a classic black cat eye (or just the eye itself) on one nail, with complementary gold geometric shapes scattered across the other nails. It’s quirky without being silly, artistic without being chaotic, and bold without overwhelming the hand.
Making Cat Eye Art Wearable
The key to pulling off a cat eye design on the nail is ensuring clean lines and proportional sizing. On a coffin nail, you have enough room to create a detailed eye that actually reads as intentional rather than smudged. Pairing it with gold geometric shapes on the other nails creates cohesion and prevents the look from feeling too focused or novelty-based.
Gold Geometric Complements
- Thin gold lines creating triangular shapes
- Gold hexagons or circles distributed across nails
- Gold striping in a minimalist pattern
- Gold accent nail with geometric shapes paired with solid nails
Insider note: If you’re not confident in your hand-painting skills, this is an excellent design to have done professionally. The cat eye especially benefits from a technician’s precision and artistic expertise.
8. Nude with Delicate Floral Watercolor Art
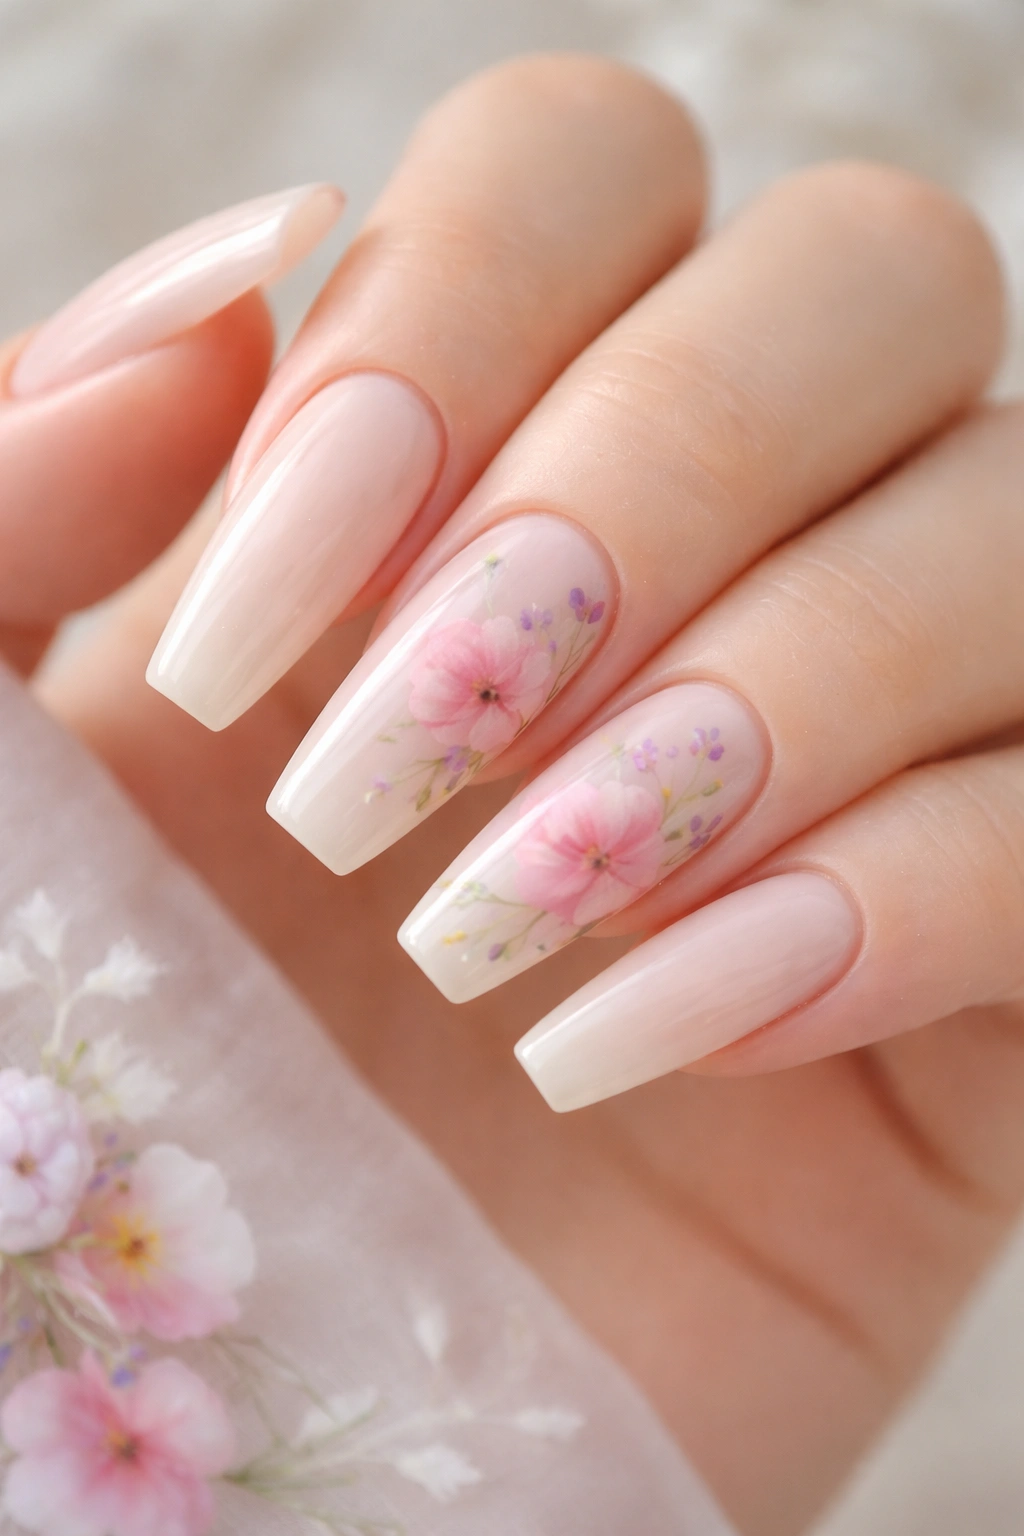
Watercolor florals bring an artistic, painterly quality to nails that feels genuinely special and thoughtfully designed. This design uses soft florals — think peonies, cherry blossoms, or wildflowers — painted in watercolor technique against a nude or cream base. The translucent quality of watercolor painting, where colors blend and merge softly, translates beautifully to nails and creates an ethereal, romantic aesthetic.
Why Watercolor Works on Long Nails
The soft, blended nature of watercolor art benefits immensely from the larger surface area of coffin nails. There’s enough room for the florals to be detailed and visible without feeling cramped or overly busy. The squared-off tip becomes a natural frame for the artwork, and the overall effect is both sophisticated and distinctly artistic.
Achieving Watercolor Effects
- Thin the polish with a clear base or nail thinning liquid to create transparency
- Layer translucent colors, allowing them to blend and merge on the nail
- Use thin brushes or even makeup sponges to create soft, feathered edges
- Focus florals on certain nails and leave others nude for balance
Worth knowing: Watercolor finishes are typically less durable than standard polish applications, so plan on either refreshing them more frequently or having them sealed carefully with top coat to extend wear time.
9. White Base with 3D Rhinestone Nail Art

Three-dimensional rhinestone designs take coffin nails from pretty to absolutely show-stopping. This design starts with a clean white base and builds up carefully placed rhinestones in a design of your choosing — whether that’s a geometric pattern, a floral arrangement, or an abstract cluster. The dimension created by the raised rhinestones catches light from multiple angles and creates serious visual impact.
Applying Rhinestones Successfully
Rhinestones adhere best to a sticky or tacky base — many nail technicians use a builder gel or clear gel base that’s specifically designed to hold embellishments. The white base creates maximum contrast and makes the sparkle really pop. On coffin nails, even a moderately sized rhinestone arrangement can look stunning without overwhelming the nail shape.
Design Ideas for Rhinestone Placement
- Clustered design across the center of accent nails
- Diagonal line of rhinestones running from base to tip
- Frame design with rhinestones creating a border around the nail edges
- Scattered arrangement that feels organic and artistic
- Concentrated rhinestone design just near the tip for a gradient effect
Pro tip: If you’re having rhinestones applied, ask your technician about the adhesive they’re using — quality matters significantly in terms of how long the stones stay put. Professional-grade adhesives are worth the extra investment.
10. Sage Green with Minimalist Gold Line
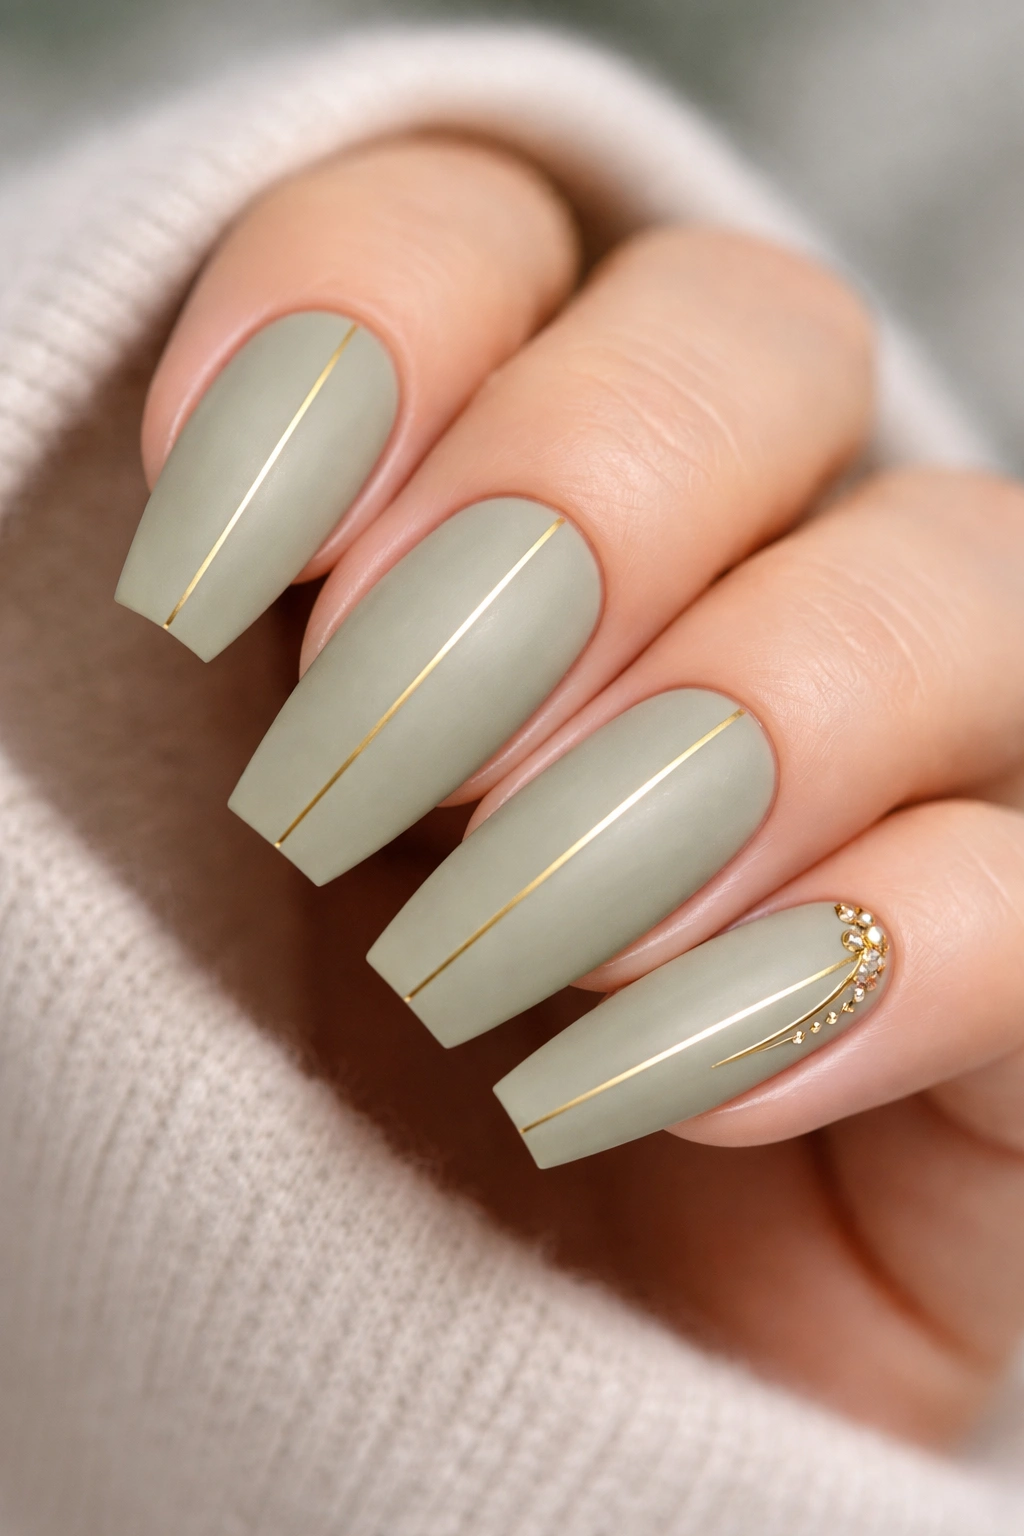
Sometimes less is more, and this design proves it perfectly. A soft, muted sage green base paired with a single, delicate gold line running down the center of the nail creates an understated elegance that’s sophisticated without being flashy. The gold line can be perfectly straight and geometric or slightly curved and organic — either way, it’s a design that makes a quiet statement about having refined taste.
The Beauty of Minimalist Design
Minimalist nail designs read as intentional and thoughtful rather than plain or boring. The sage green is calming and contemporary, while the gold line adds just enough visual interest to prevent the design from feeling too simple. This look coordinates beautifully with any aesthetic — casual, professional, artistic, preppy — making it genuinely versatile.
Variations on the Single-Line Concept
- Straight gold line down the center
- Curved gold line that follows the natural contour of the nail
- Multiple thin parallel lines for a slightly bolder effect
- Gold line only on accent nails with solid sage green on others
- Two-tone variation with gold on one side, sage on the other
Insider note: If you’re doing this design yourself at home, use a thin striping brush or a toothpick dipped in gold polish to create the line. Steady hands help, but even slightly imperfect lines have charm in a minimalist design.
11. Burgundy Velvet with Clear Crystal Accent
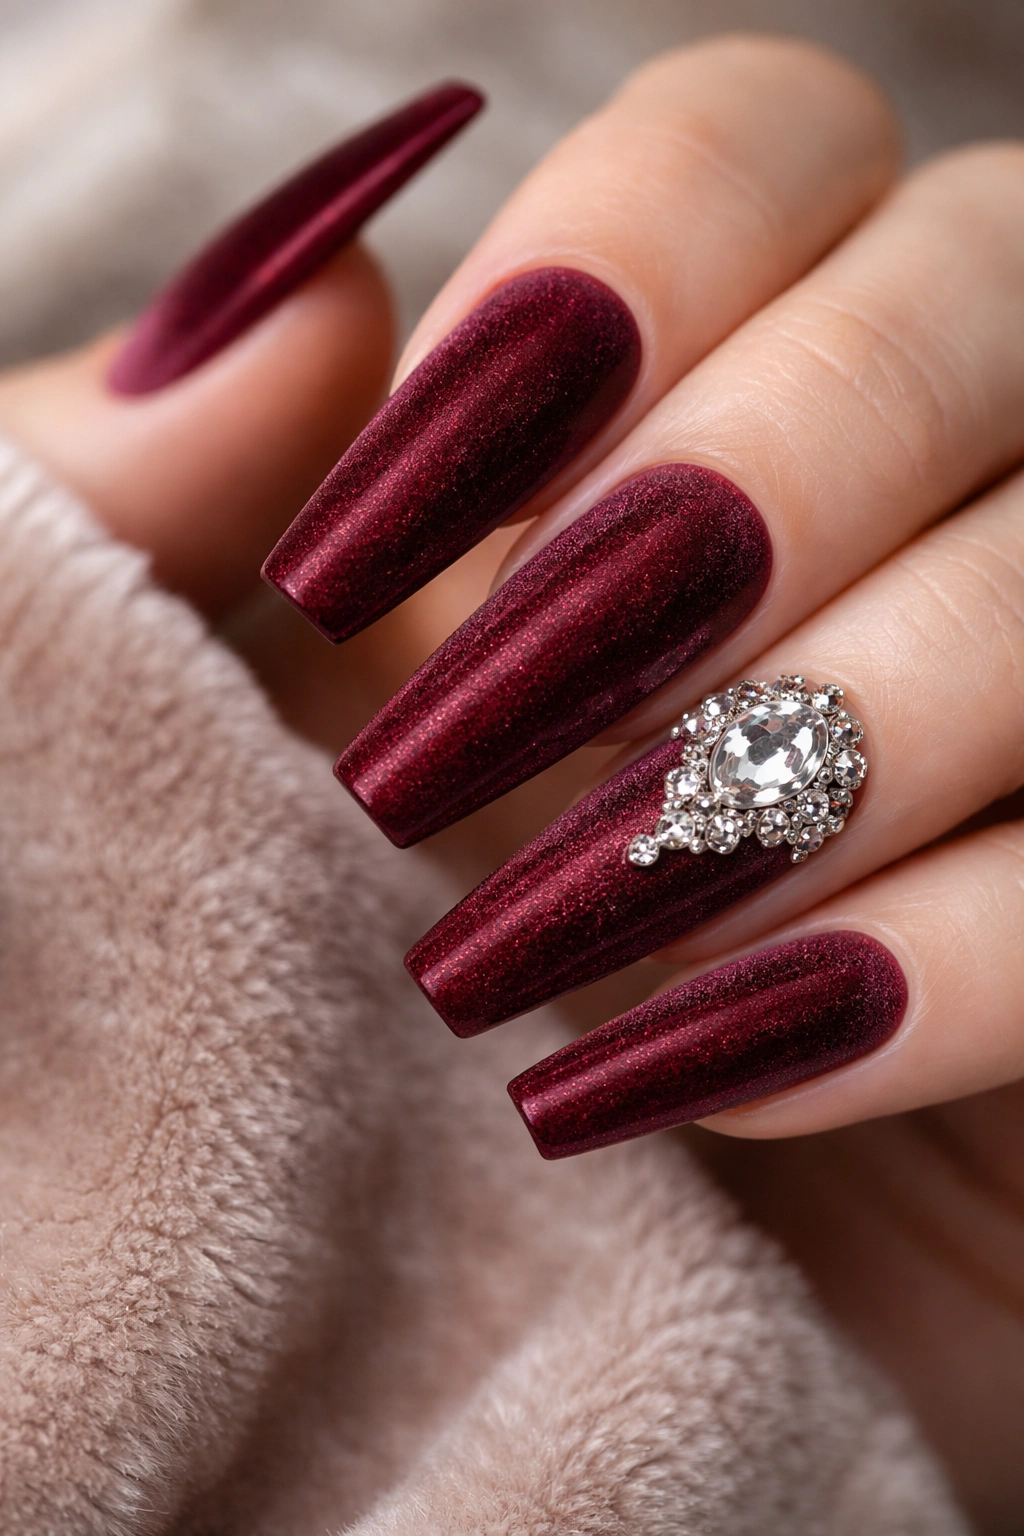
Velvet finishes on nails have a velvety, almost suede-like texture that feels incredibly luxurious and tactile. Pair a burgundy velvet finish with a strategic clear crystal or large rhinestone accent, and you’ve got a design that’s textured, dimensional, and absolutely stunning. The matte velvet contrasts beautifully with the sparkle of the crystal, creating visual interest without the design feeling busy.
Creating a Velvet Finish
Velvet finishes are typically created using velvet powder applied to a sticky base, and they require professional application (or very careful home application). The powdery texture is distinctive and immediately eye-catching. On coffin nails, the velvety finish emphasizes the shape’s architectural qualities and makes even a simple color feel extra luxurious.
Crystal Placement Options
- Single large crystal or rhinestone at the center of one accent nail
- Small clusters of crystals near the tip on select nails
- One crystal per accent nail, placed strategically for balance
- Crystal positioned to follow the natural nail line or curve
Pro tip: Velvet finishes can be delicate and may require extra care to maintain. Avoid excessive water exposure immediately after application, and be gentle when touching your nails for the first 24 hours.
12. Soft Pink with Reverse Stamped Design
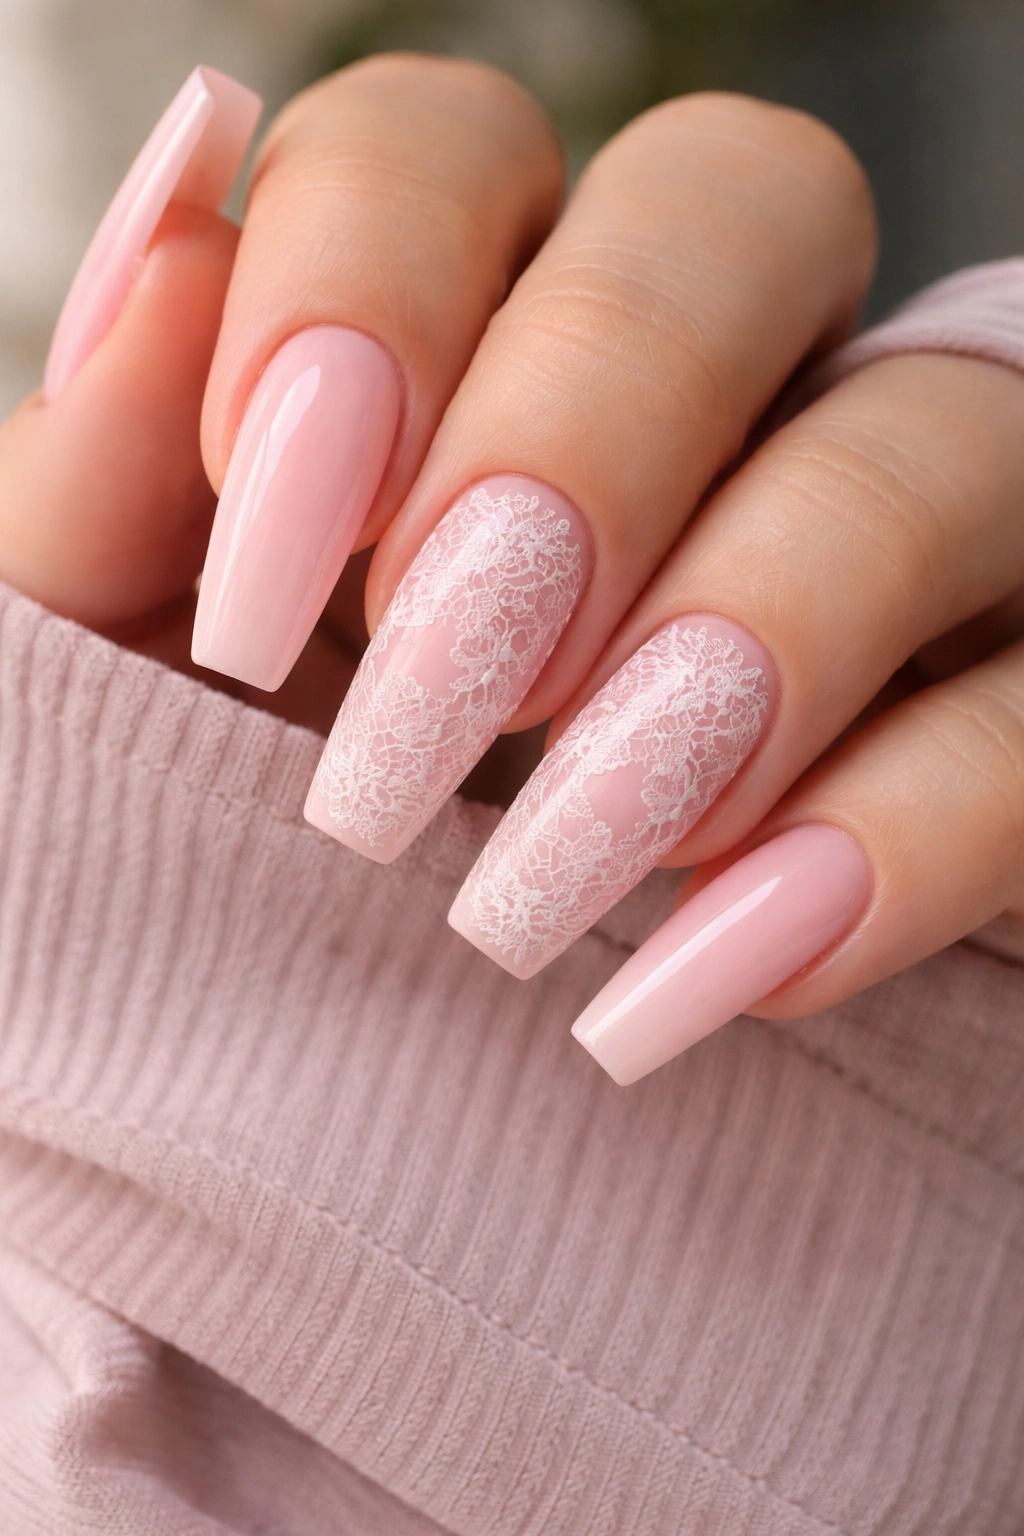
Reverse stamping (stamping on a clear surface, then transferring it to the nail) allows for incredibly detailed, intricate designs that would be nearly impossible to hand-paint. This design uses soft pink as the base with delicate reverse-stamped designs — perhaps tiny florals, lace patterns, or geometric designs — creating an artistic, precisely detailed look. The technique requires specific tools but delivers professional results.
Why Reverse Stamping Delivers Excellence
Reverse stamping eliminates the limitations of hand-painting and allows for intricate detail that genuinely impresses. On coffin nails, detailed stamp designs have plenty of room to shine and truly showcase their intricacy. The soft pink base keeps the overall aesthetic romantic and wearable while the stamped details add sophistication and artistry.
Common Reverse Stamped Designs
- Delicate lace patterns
- Tiny floral arrangements
- Geometric or mandala-inspired designs
- Detailed botanical elements
- Intricate border patterns
Worth knowing: If you’re interested in reverse stamping but don’t have the supplies or experience, many nail technicians offer this service. Bringing a reference image or design inspiration helps ensure you get exactly what you’re envisioning.
13. Nude Ombre with Subtle Holographic Shimmer
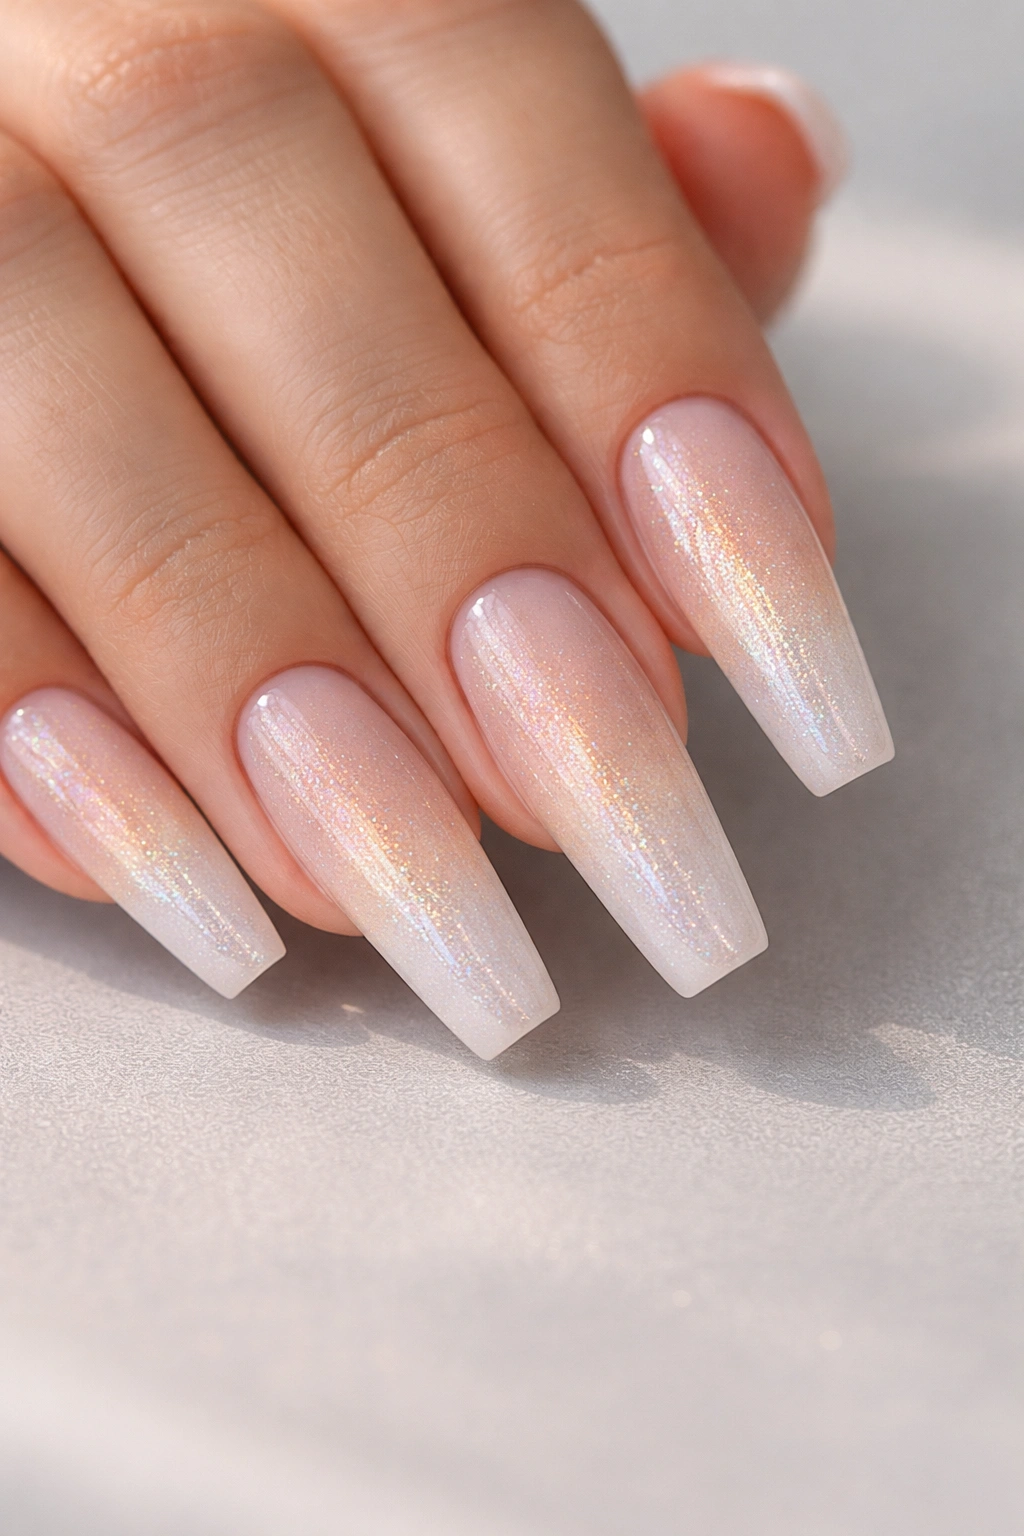
This design takes a classic nude ombre and elevates it with a subtle holographic shimmer that shifts through rainbow colors as light hits the nail at different angles. The holographic effect is understated rather than obvious, creating dimension and visual interest without the design feeling loud or overwrought. It’s sophisticated, contemporary, and absolutely beautiful in different lighting conditions.
The Holographic Effect Explained
Holographic products create color shifts due to light refraction — as you move your hand and the light angle changes, the colors shift and move. A subtle holographic shimmer on a nude ombre background creates a refined, expensive-looking design that works for any occasion. The shifting colors make the nails endlessly interesting to look at.
Achieving the Ombre Holographic Look
- Create a nude-to-slightly-darker-nude ombre gradient first
- Layer holographic shimmer or flakes over the ombre for the color-shift effect
- The shimmer should feel like a delicate accent rather than the main event
- Seal with a glossy top coat to make the holographic effect really pop
Pro tip: Holographic products photograph beautifully, especially in natural light or sunlight. If you love social media-worthy nails, this design delivers.
14. Transparent with Dried Flowers Embedded
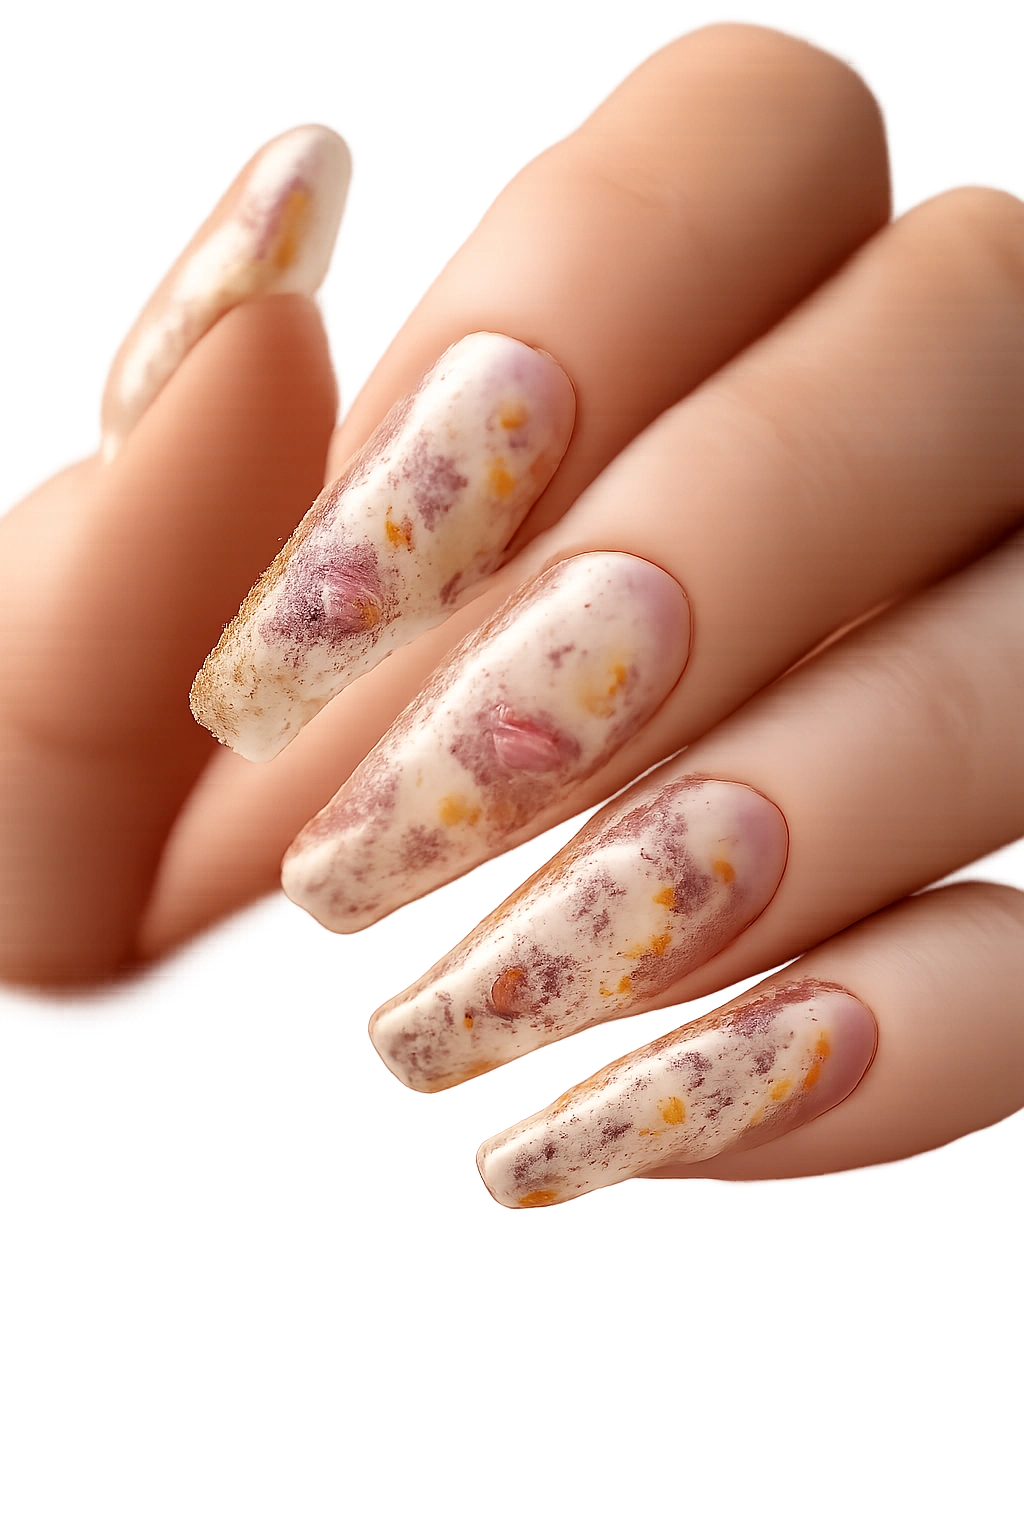
Transparent or clear nails with dried flowers embedded between the polish layers create a botanical, artistic look that feels completely unique. This design involves applying a clear base, carefully placing tiny dried flowers or botanicals, then sealing them in with additional clear polish. The result is essentially pressed flowers on your nails — delicate, natural, and absolutely one-of-a-kind.
Creating Embedded Flower Designs
- Use ultra-thin dried flowers or botanicals (baby’s breath, tiny roses, forget-me-nots work beautifully)
- Apply a clear base, then carefully place the flower with tweezers or a dotting tool
- Seal immediately with clear builder gel or polish to secure the flower in place
- Add additional clear layers to ensure the flower is fully encased and protected
Choosing Your Botanicals
- Baby’s breath for a delicate, romantic look
- Tiny dried rose petals for subtle color and fragrance
- Forget-me-nots or other tiny flowers for an artisan aesthetic
- Herbs like lavender or rosemary for a botanical feel
- Leaves or greenery for a nature-inspired design
Insider note: This design is most successfully done with gel polish and cured under a UV lamp, as the flower needs to be fully encased quickly and the final seal needs to be rock-solid to protect the delicate botanical.
15. Chrome Coffin Nails with Geometric Black Accent

Chrome finishes create an ultra-modern, futuristic look that’s absolutely head-turning on coffin nails. This design uses a metallic chrome finish (typically silver or rose gold) as the base with bold geometric black shapes creating contrast and visual interest. The combination feels contemporary, artistic, and genuinely striking without being overly complicated.
Mastering the Chrome Finish
Chrome finishes require specialty products and powder — they’re not your typical polish application. The result is a mirror-like, metallic surface that’s incredibly reflective and eye-catching. On coffin nails, the chrome finish emphasizes the shape’s sharp lines and creates a modern, architectural aesthetic.
Geometric Accent Patterns
- Bold black triangles at the tips of one or more nails
- Geometric shapes arranged in a balanced pattern across the nail
- Clean black lines creating angles and asymmetry
- Abstract geometric design covering a portion of the nail
- Negative space design with chrome showing through geometric black cutouts
Worth knowing: Chrome finishes do require maintenance and can show fingerprints and smudges more readily than standard finishes. Regular buffing and polishing keeps them looking pristine and prevents dulling.
Final Thoughts
Coffin nails truly are the perfect canvas for expressing your style, whether you lean toward minimalist elegance, artistic detail, or full-on glamour. The shape’s length and structure create natural visual interest, meaning that even simple designs look sophisticated and intentional. The designs above represent just a fraction of what’s possible with this stunning nail shape — each one can be customized with your own color preferences, embellishments, or artistic tweaks.
The key to loving your coffin nail design is choosing something that genuinely speaks to you rather than just following trends. Whether you’re drawn to the soft romance of pastels and florals, the bold impact of deep jewel tones and metallics, or the artistic appeal of detailed nail art, there’s a coffin nail design that’s perfect for your personal style. And remember that even the simplest designs look elevated on long, well-shaped coffin nails, so don’t feel pressured to choose something overly complicated if that’s not your aesthetic.
Consider booking an appointment with a technician who has solid experience with coffin nail shapes — they’ll understand how to achieve the perfect proportion and can help guide you toward designs that’ll complement your hand shape and lifestyle. Bring reference photos, describe what you’re drawn to aesthetically, and trust their expertise. Your coffin nails are about to look absolutely stunning.
